

Page 1
Accelerating the World of Cooking
TM
Service Manual
FOR THE TURBOCHEF 3240 HIGH H CONVEYOR O VEN
Page 2

Page 3

For further information, call
800.90TURBO
or
+1 214.379.6000
Page 4

The information contained in this manual is important for the proper installation, use, maintenance, and repair of this oven. Follow these procedures and instructions to help ensure satisfactory
baking results and years of trouble-free service.
Errors – descriptive, typographic, or pictorial – are subject to correction. Specifications are subject
to change without notice.
PLEASE CAREFULLY READ THIS MANUAL AND RETAIN IT FOR FUTURE REFERENCE.
Page 5

TABLE OF CONTENTS
Table of Contents
Safety Instructions
Important Safety Information - Please Read First i
General Safety Information i
Preventing Oven Damage i
Reducing Fire Risk ii
Grounding Instructions ii
Power Cord Replacement ii
Specifications and Startup
Oven Overview 1
Certifications 2
Dimensions 2
Oven Construction 2
Theory of Operation 2
Power Specifications 2
Ventilation Requirements 2
Gas Derating 2
Gas Setup 3
Reading the Incoming Gas Pressure (Static) 3
Reading the Gas Pressure at 100% Flame 3
Reading the Gas Pressure at Minimum Flame 4
Reading the Operating Gas Pressure 4
Confirming Proper Closure of all Taps 4
Cleaning
Cleaning the Oven 5
Supplies and Equipment 5
Daily Cleaning Procedures 5
Deep Cleaning Procedures 6-8
Standard Oven Operation
Oven Controls 9
Cooking a Product 10
Editing a Cooking Profile 12
Changing a Cooking Profile’s Name 12
Adjusting the Belt Speed 13
Adjusting the Temperature 13
Adjusting the Top and Bottom Air 13
Page 6

TABLE OF CONTENTS
Oven Modes
Config Mode 15
Smart Card Screen 15
Updating the Firmware 15
Accessing the Fault Count Screen 16
Accessing the Setup Mode 16
Accessing the Test Mode 16
Setup Mode 16
Changing the Display Temperature 16
Edit Option Screen 16
Changing the Display Language 17
Info Screen 17
Test Mode 17
Accessing the Burner Control Screen 18
Manipulating the Top and Bottom Blowers 18
Viewing the Status Indicators 18
Entering a New Serial Number 19
Initiating a Burn-In Test 20
Erasing all Oven Settings 20
Clearing the Fault Counts 20
Viewing the Serial Number 20
Oven Systems
The Control System 21
Control Board 21
Display 21
EMI Filter 21
Fuses 21
High-Limit Thermostat 21
Idle Button 21
Keypad 21
Power Supply - 24VDC (Domestic) 21
Power Supply - 24VDC (International) 22
K3 Relay - Gas 22
K4 Relay - Ignition 22
RTD 23
Smart Card Reader 23
Speaker 23
Thermostat - 120F (Close on Rise) 23
Wire Harness 23
The Conveyor System 23
Gear Drive (Conveyor Motor) 23
Gear Drive (Conveyor Motor) Speed Controller (CMSC) 24
Page 7

TABLE OF CONTENTS
The Blower System 25
Blower Motor 25
Blower Motor Speed Controller (BMSC) 25
The Burner System 26
Air Pressure Switch 26
Burner Transformer 26
Combustion Blower 27
Modulating Gas Valve 27
Ignition Module 27
Troubleshooting
Overview of Troubleshooting 29
Fault Code Descriptions 29
Fault Code Troubleshooting 31
F1: Blower Fault 31
F2: Low Cook Temp 32
F3: No Flame 34
F5: CC Over Temp 36
F6: EC Over Temp 37
F7: RTD Fault 38
F8: High Limit Tripped 38
F9: Belt Fault 39
F10: Air Pressure Switch Fault 40
Non-Fault Code Troubleshooting 41
Cooling System Issue 41
Food Not Cooking Properly 42
No Display 43
No Keypad Input 43
Schematics
Schematic 45
Pin-out 46
Controller Codes 47
Appendix A - Replacing Oven Components
Comprehensive Part List A-1 - A-4
Replacing Items - No Panel Removal Required A-6
Replacing Items - Right End Bell A-8
Replacing Items - Left End Bell A-12
Replacing Items - Burner Compartment Cover A-14
Page 8

i SAFET Y INSTRUCTIONS
Important Safety Information – Please Read First
Improper installation, adjustment, alteration, service, or maintenance of this equipment can cause property
damage, injury, or death. Thoroughly read the installation, operating, and maintenance instructions before
installing or servicing this equipment. Strictly adhere to the following safety information to reduce the
risk of:
- Damage to the oven
- Damage to property near the oven
- Personal injury
- Burns
- Fire
- Electric shock
General Safety Information
a
Use this appliance only for its intended uses as described in this manual.
a
Only qualified service personnel should service this appliance. Contact the nearest authorized service
facility for examination, repair, or adjustment.
a
Always ensure the oven is disconnected from the power supply before servicing, repairing, or adjusting any components or parts.
X
DO NOT place the cord near heated surfaces.
X
DO NOT store or use flammable vapors or liquids (e.g., gasoline) in the vicinity of this appliance.
X
DO NOT allow children to use this appliance.
X
DO NOT place corrosive chemicals or vapors in this appliance. It is not designed for industrial or
laboratory use.
X
DO NOT operate this appliance if it:
-Has a damaged cord, plug, or gas hose
-Is not working properly
-Has been damaged or dropped
X
DO NOT cover or block any openings on this appliance.
X
DO NOT store this appliance outdoors.
X
DO NOT use this appliance near water.
X
DO NOT immerse this appliance or any of its components (e.g., cord, plug, etc.) in water.
X
DO NOT let the cord hang over the edge of a table or counter.
X
DO NOT work near the appliance with long hair, loose clothing, or dangling jewelry.
Preventing Oven Damage
a
When servicing this appliance, do not tear insulation to get to components. Rather, find the edge of
the insulation and remove the tape that holds it in place.
a
Clean the oven daily (page 5).
a
Clean the oven only with TurboChef approved cleaner.
X
DO NOT clean with a water jet.
X
DO NOT slam or mishandle the oven window.
X
DO NOT frequently open and close the window to check the cook status of the food.
X
DO NOT allow cleaning solution or water to remain in the cook cavity longer than necessary.
Page 9

SAFET Y INSTRUCTIONS
ii
Reducing Fire Risk
If materials inside the oven ignite or if smoke is observed,
1.Keep the oven window closed.
2.Turn off the oven.
3.Disconnect the power cord or shut off power at the fuse/circuit breaker panel.
a
Carefully attend the oven if paper, plastic, or other combustible materials are placed inside the oven
to facilitate cooking.
X
DO NOT leave items in the cook cavity when the oven is not in use.
X
DO NOT cook items wrapped in cling wrap or plastic film.
X
DO NOT overcook food.
X
DO NOT store (or use) gasoline or any other flammable vapors or liquids near this appliance.
If a gas leak is noticed,
X
DO NOT attempt to light or operate any appliance.
X
DO NOT operate any electronic device.
a
Immediately use an exterior phone to contact your gas supplier.
a
If you cannot contact your gas supplier, contact your local fire department.
Grounding Instructions
WARNING: Improper grounding increases the risk of electric shock.
This appliance must be grounded. The cord is equipped with a grounding wire and plug, which in the
event of an electrical short circuit, reduce the risk of electric shock by providing an escape wire for the
electric current. The wire must be plugged into an outlet that is properly installed and grounded.
Consult a qualified electrician or serviceman to determine whether or not the appliance is properly
grounded.
X
DO NOT use an extension cord. If the power supply cord is too short, request a qualified electrician
or serviceman to install an outlet near the appliance.
Power Cord Replacement
To avoid potential hazards, only the manufacturer, its service agent, or a similarly-qualified person should
replace a damaged power cord.
Page 10

iii SAFET Y INSTRUCTIONS
This page intentionally
left blank.
Page 11

Specifications and Startup
Page 12

Page 13

SPECIFICATIONS AND STARTUP
1
Overview
Figures 1 and 2. For part numbers, see the
appendix.
1. Air filter, 11.75” x 7.5” (298 mm x
190 mm)
2. Idle button (page 21)
3. Left end bell (page A-12)
4. Right end bell (page A-8)
5. VFD display and keypad (page 21 and A-8)
6. Chain guard
7. Conveyor belt
8. Window (optional feature)
9. Hi-limit reset switch
10. Burner compartment cover
11. Cooling fan tube
12. Air filter, 9” x 3.25” (228 mm x 83 mm)
13. Cooling fan tube access thumb screw
14. Burner compartment cover access screws
15. Power cord and plug (page ii)
16. Rating plate
3
1
4
5
6
7
8
2
9
10
11
12
15
16
13
14
Figure 1: Oven Overview, Front
Figure 2: Oven Overview, Rear
Page 14
2
Certifications
cULus GAS FIRED LISTED, UL EPH, FCC
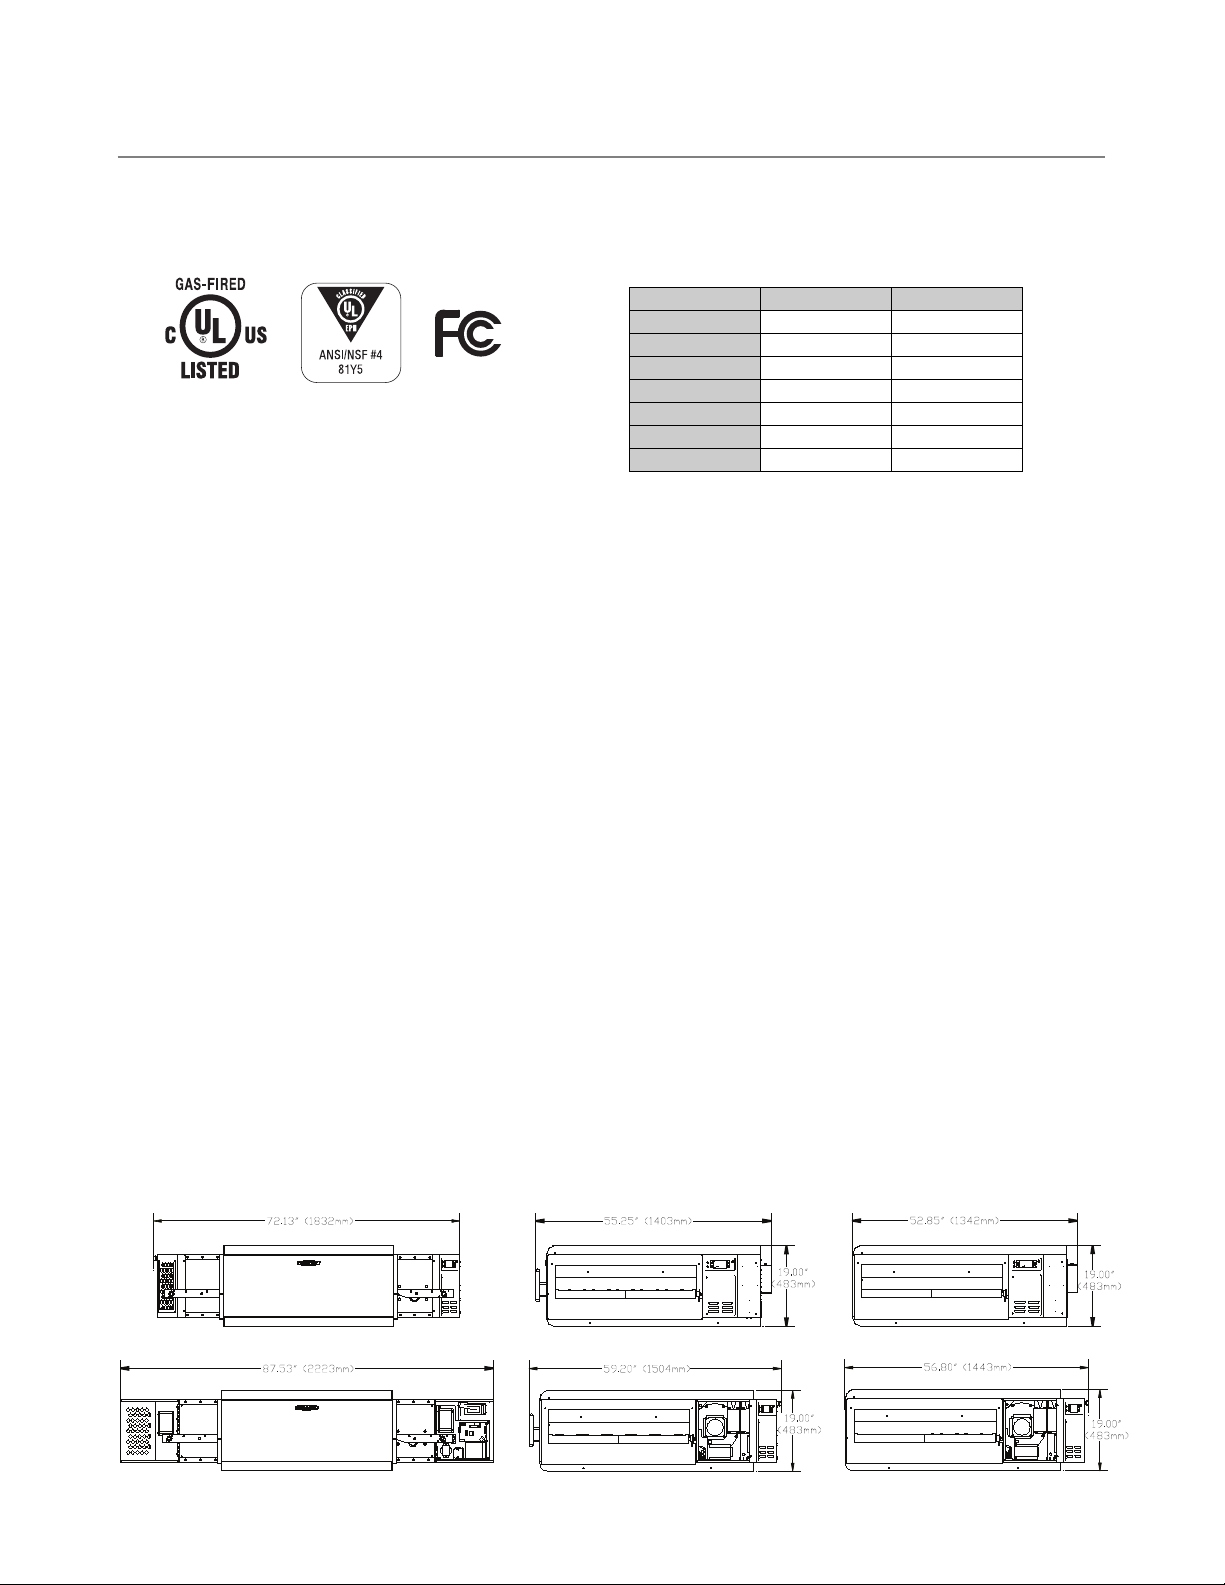
Dimensions
With End Bells Closed
- Width: 72.13” (1832 mm)
- Depth: w/ window: 55.25” (1403 mm)
- Depth: w/o window: 52.85” (1342 mm)
- Height: 19.00” (483 mm)
With End Bells Open
- Width: 87.53” (2223 mm)
- Depth: w/ window: 59.20” (1504 mm)
- Depth: w/o window: 56.80” (1443 mm)
- Height: 19.00” (483 mm)
Oven Construction
- 430 stainless steel exterior
- 304 stainless steel interior
- Powder coated steel legs
Theory of Operation
The HhC3240 conveyor oven uses two
independently-controlled blower motors to
precisely distribute impinged air into the cook
cavity from the top and bottom, creating a
highly-customizable cooking environment and
more throughput than any other oven its size.
Power Specifications
Electrical
Gas
-Volume: Maximum input per cavity
85k BTU (25kW [Gross])
-Min. Pressure (Nat, LP, I2H, I2E, I
2E+
, I2L, and I3P):
6” W.C. (152.4 mm H2O / 14.94 mb)
-Max. Pressure (Nat, LP, I2H, I2E, I
2E+
, I2L, and I3P):
14” W.C. (350.6 mm H2O / 34.87 mb)
-Burner Pressure (Nat, LP, I2H, I2E, I
2E+
, and I3P):
3.5” W.C. (88.9 mm H2O / 8.71 mb)
-Burner Pressure (I2L):
4.0” W.C. (101.6 mm H2O / 9.96 mb)
Ventilation Requirements
The TurboChef model HhC3240 conveyor oven
must be operated underneath a Type I or II hood.
Always adhere to local building and gas codes.
Local code is the prevailing authority for determining hood size and CFM.
Gas Derating
Contact TurboChef with questions regarding elevations and necessary adjustments.
SPECIFICATIONS AND STARTUP
19.00”
(483mm)
19.00”
(483mm)
Figure 3: Dimensions
North America EU / Asia
Phase
1 Phase 1 Phase
Voltage
208/240 VAC 220-240 VAC
Frequency
50/60 Hz 50/60 Hz
Current Draw
8 Amp 8 Amp
Supply
3 Wire (L+L+G) 3 Wire (L+L+G)
Breakers
20 amp 16 amp
Plug
NEMA L620 IEC, 309 3 PIN
Page 15
SPECIFICATIONS AND STARTUP
3
Gas Setup
A digital manometer that will read 0.10” WC
(2.54 mmH2O, 0.249 mb) must be used to
properly set all pressures. If the minimum
pressure is not set correctly, the oven temperature
will slowly rise in stand-by mode and eventually
cause cooking issues as well as trip the high limit
temperature switch. Digital manometers (HHC-
3001) are available through TurboChef; call
800.90
TURBO (+1 214-379-6000) for pricing and
availability.
For information on accessing the
burner control, see page 18.
Reading the Incoming Gas Pressure
(Static)
1. Ensure the oven and all the equipment in the
piping system are off (pilot lights are
acceptable).
2. Remove the burner compartment cover and
cooling fan tube (refer to page 1).
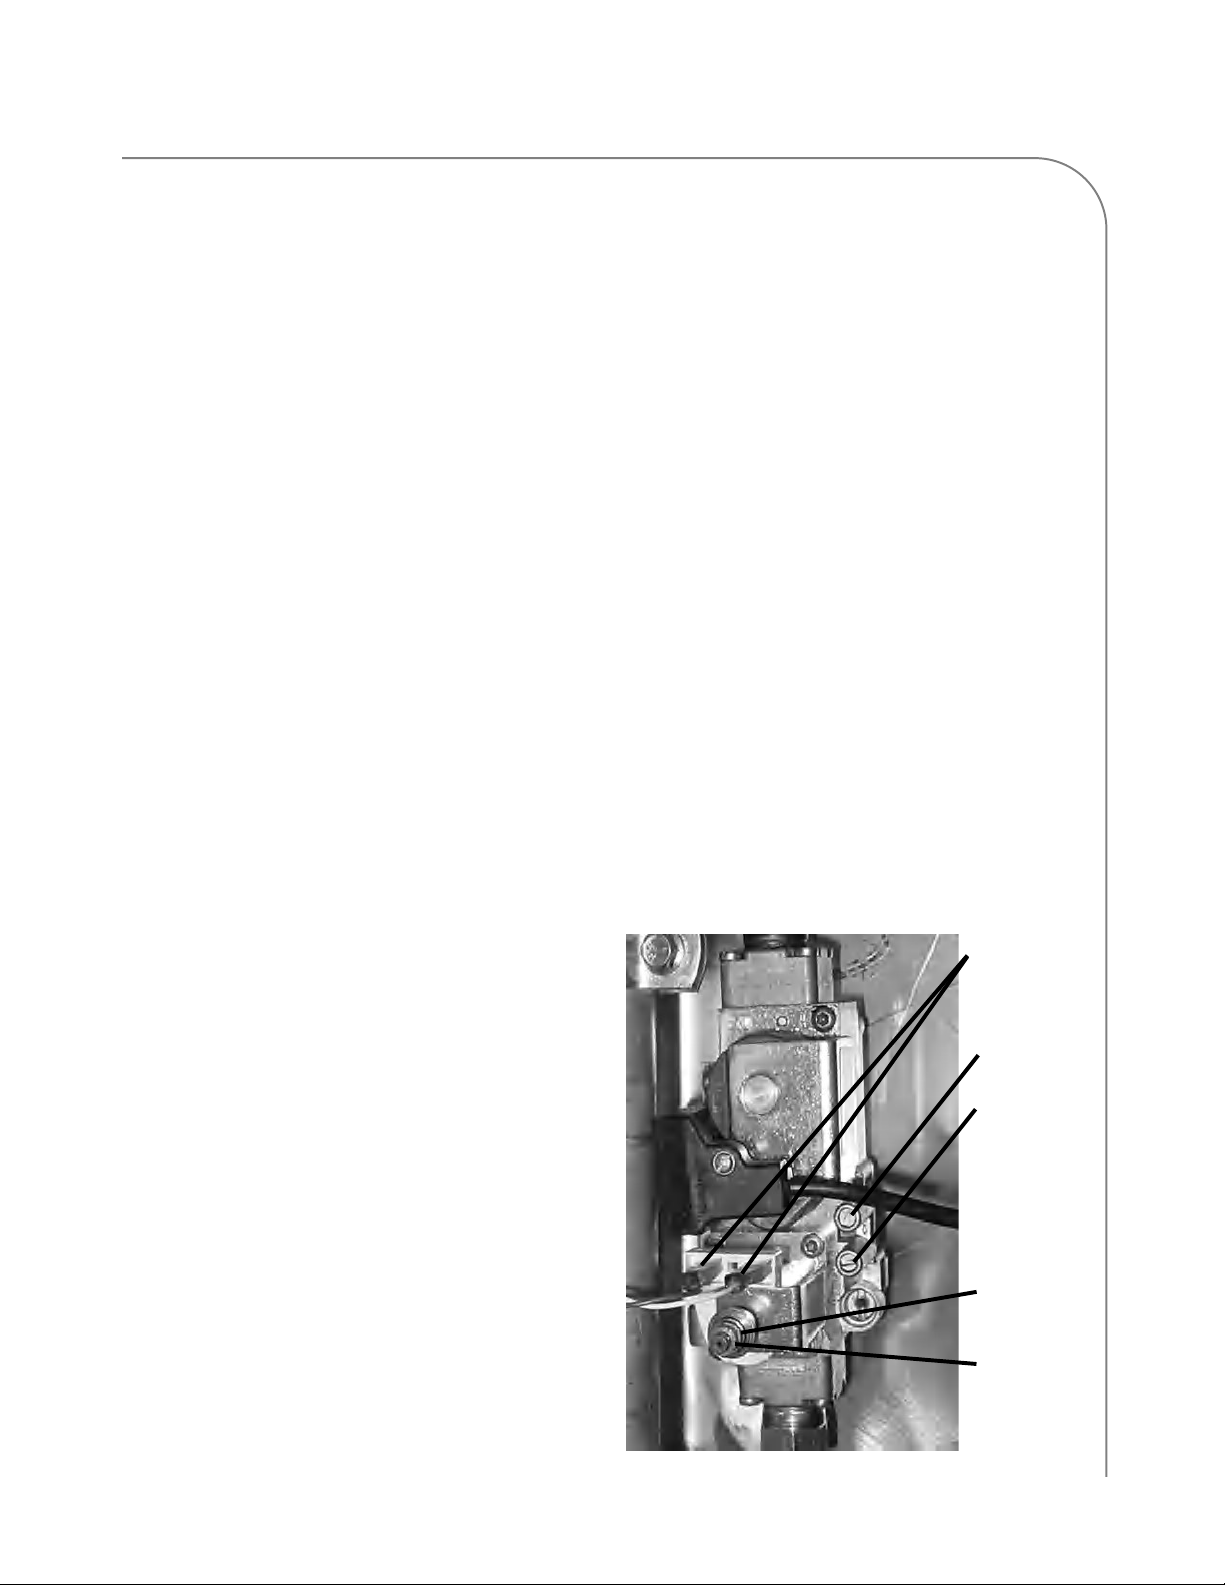
3. Remove the screw from the upper tap of the
gas valve.
4. Attach the digital manometer to the upper
tap of the gas valve (Figure 4). This tap will
show the incoming pressure before the
internal regulator of the gas valve.
5. The pressures must be no less than 6” W.C.
(152.4 mmH
2
O, 14.94 mb) and no more
than 14” W.C. (350.6 mmH2O, 34.87 mb).
Otherwise, severe damage to the equipment
can occur.
6. Reattach the screw to the upper tap of the
gas valve.
Reading the Gas Pressure at 100%
Flame
1. Ensure the oven is on.
2. Select a cooking profile.
3. Remove the screw from the lower tap of the
gas valve.
4. During warmup (both fan speeds are at 65%
and the oven is at 100% flame), attach the
manometer to the lower tap of the gas valve
(Figure 4).
5. Verify that the maximum operating pressure is
3.5” W.C. (88.9 mmH
2
O, 8.71 mb)
, unless
operating I2Lgas.
NOTE: I
2L
gas requires a pressure of 4” W.C.
(101.6 mmH2O, 9.96 mb).
6. If not, use an 8mm nut driver to adjust the
8mm nut (Figure 4) until the manometer
reads 3.5” W.C. (88.9 mmH
2
O, 8.71 mb)
,
unless operating I2Lgas, as noted above (turn
clockwise to increase the pressure, counterclockwise to decrease the pressure).
7. Reattach the screw to the lower tap of the
gas valve.
Figure 4: Gas Valve
Red/White
Wires
Upper Tap
Lower Tap
8mm nut
5mm nut
Page 16

4 SPECIFICATIONS AND STARTUP
Reading the Gas Pressure at Minimum
Flame
1. Remove either the red or white wire
(Figure 4).
2. Attach the electric manometer to the lower
tap of the gas valve (Figure 4).
3. Verify that the minimum operating pressure is
0.10” W.C. (2.54 mmH2O, 0.249 mb).
4. If not, use a 5mm nut driver to adjust the
5mm nut until the electric manometer reads
0.10” W.C. (2.54 mmH2O, 0.249 mb) (turn
clockwise to increase the pressure, counterclockwise to decrease the pressure).
5. Reconnect the wire you removed.
6. If adjustments were made, re-check 100%
flame pressure (see adjacent procedure).
Reading the Operating Gas Pressure
1. Ensure the oven is on.
2. Select a cooking profile (page 10).
3. Remove the screw from the upper tap of the
gas valve.
4. During warmup (both fan speeds are at 65%
and the oven is at 100% flame), attach the
manometer to the upper tap of the gas valve
(Figure 4).
5. Ensure that the pressure is no less than 6”
W.C. (152.4 mmH2O, 14.94 mb)and no
more than 14” W.C. (350.6 mmH2O,
34.87 mb).
6. Reattach the screw to the upper tap of the
gas valve.
Confirming Proper Closure of all Taps
Additional testing may be required - always
adhere to local gas codes and required methods of
leakage testing in the immediate location (refer to
the regulations in force in the country in which
the appliance is being installed). The prevailing
authority is the local code (or regulations).
1. Turn on the gas supply.
2. Spray all gas connections with a soap
solution.
-If growing soap bubbles are observed, a leak
-is present. Immediately shut off the gas
-supply.
-If no growth occurs, the connections are
-intact. Turn off the gas supply.
Page 17

Cleaning
Page 18

Page 19
CLEANING
5
Cleaning the Oven
Follow the steps below daily to help maintain
your HhC oven.
Daily Cleaning Procedures
Supplies and Equipment
TurboChef-approved oven cleaner, nylon scrub
pad, cleaning towels, disposable gloves
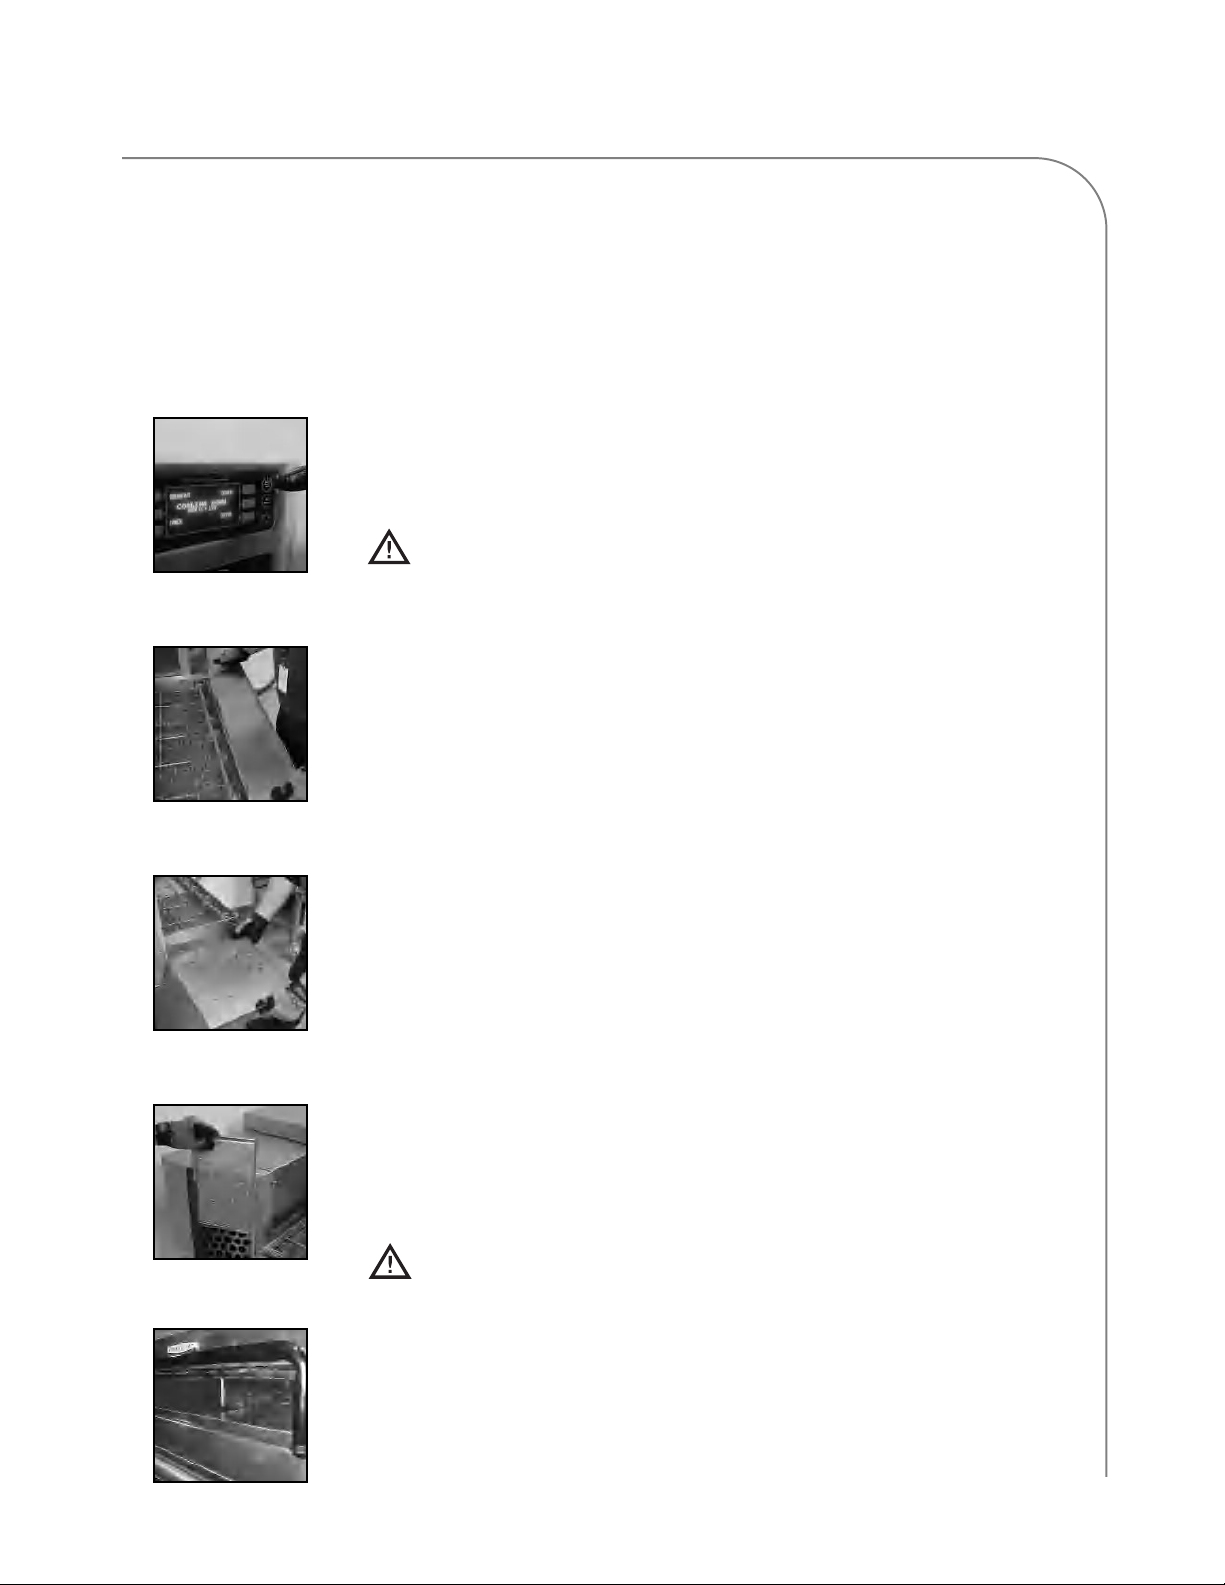
Step 1: Prepare the Oven
-Press the back/off key (page 9) to turn the oven off.
-Ensure cooling down has completed.
CAUTION: Injury can occur if oven is not allowed to cool properly
before cleaning. DO NOT attempt to clean until the “cooling down”
message has disappeared.
Step 2: Remove and Clean the End Trays
-Remove both end trays.
-Wash and rinse both end trays, then dry them with a clean towel.
-Reinstall the end trays.
Step 3: Remove and Clean the Crumb Trays
-Slide out and remove both crumb trays.
-Wash and rinse both crumb trays, then dry them with a clean towel.
-Reinstall the crumb trays.
Step 4: Remove and Clean the Filters
-Remove the filters, both of which are located on the left side of the oven.
-Wash and rinse both filters, then dry them with a clean towel.
+ If a filter is torn or damaged, replace with a new filter (page A-2 for
part number).
CAUTION: DO NOT operate the oven without the filters in place.
Step 5: Clean the Oven Exterior
-Wipe the oven exterior and window with a clean, damp towel.
-The oven is ready to turn on.
Step 1
Step 2
Step 3
Step 4
Step 5
Page 20
6 CLEANING
Deep Cleaning Procedures
TurboChef recommends deep cleaning the oven once a month (or more frequently depending on
use) to ensure optimal performance. Use only TurboChef-approved cleaner. Using any other
cleaning product can damage critical parts and may void the oven’s warranty.
Step 1: Prepare the Oven
-Press the back/off key (page 9) to turn the oven off.
-Ensure cooling down has completed.
CAUTION: Injury can occur if oven is not allowed to cool properly
before cleaning. DO NOT attempt to clean until the “cooling down”
message has disappeared.
Step 2: Remove and Clean the End Trays
-Remove both end trays.
-Wash and rinse the end trays, then dry them with a clean towel.
Step 3: Remove and Clean the Crumb Trays
-Slide out and remove both crumb trays.
-Wash and rinse both crumb trays, then dry them with a clean towel.
Step 4: Remove and Clean the Filters
-Remove the filters, both of which are located on the left side of the oven.
-Wash and rinse both filters, then dry them with a clean towel.
+ If a filter is torn or damaged, replace with a new filter (page A-2 for
part number).
CAUTION: DO NOT operate the oven without the filters in place.
Step 5: Remove and Clean the Chain Guard
-Remove the guard that covers the conveyor drive chain.
-Wash and rinse the chain guard, then dry it with a clean towel.
Step 6: Remove and Clean the Upper End Panels
-Remove both upper end panels from each end of the oven.
-Wash and rinse the upper end panels, then dry them with a clean towel.
WARNING: Lock all four casters before removing the conveyor, lower
plenum assembly, and upper nozzle plate. Physical injury or damage to
equipment can occur if the casters are not locked.
Step 1
Step 2
Step 3
Step 4
Step 5
Step 6
Page 21
CLEANING
7
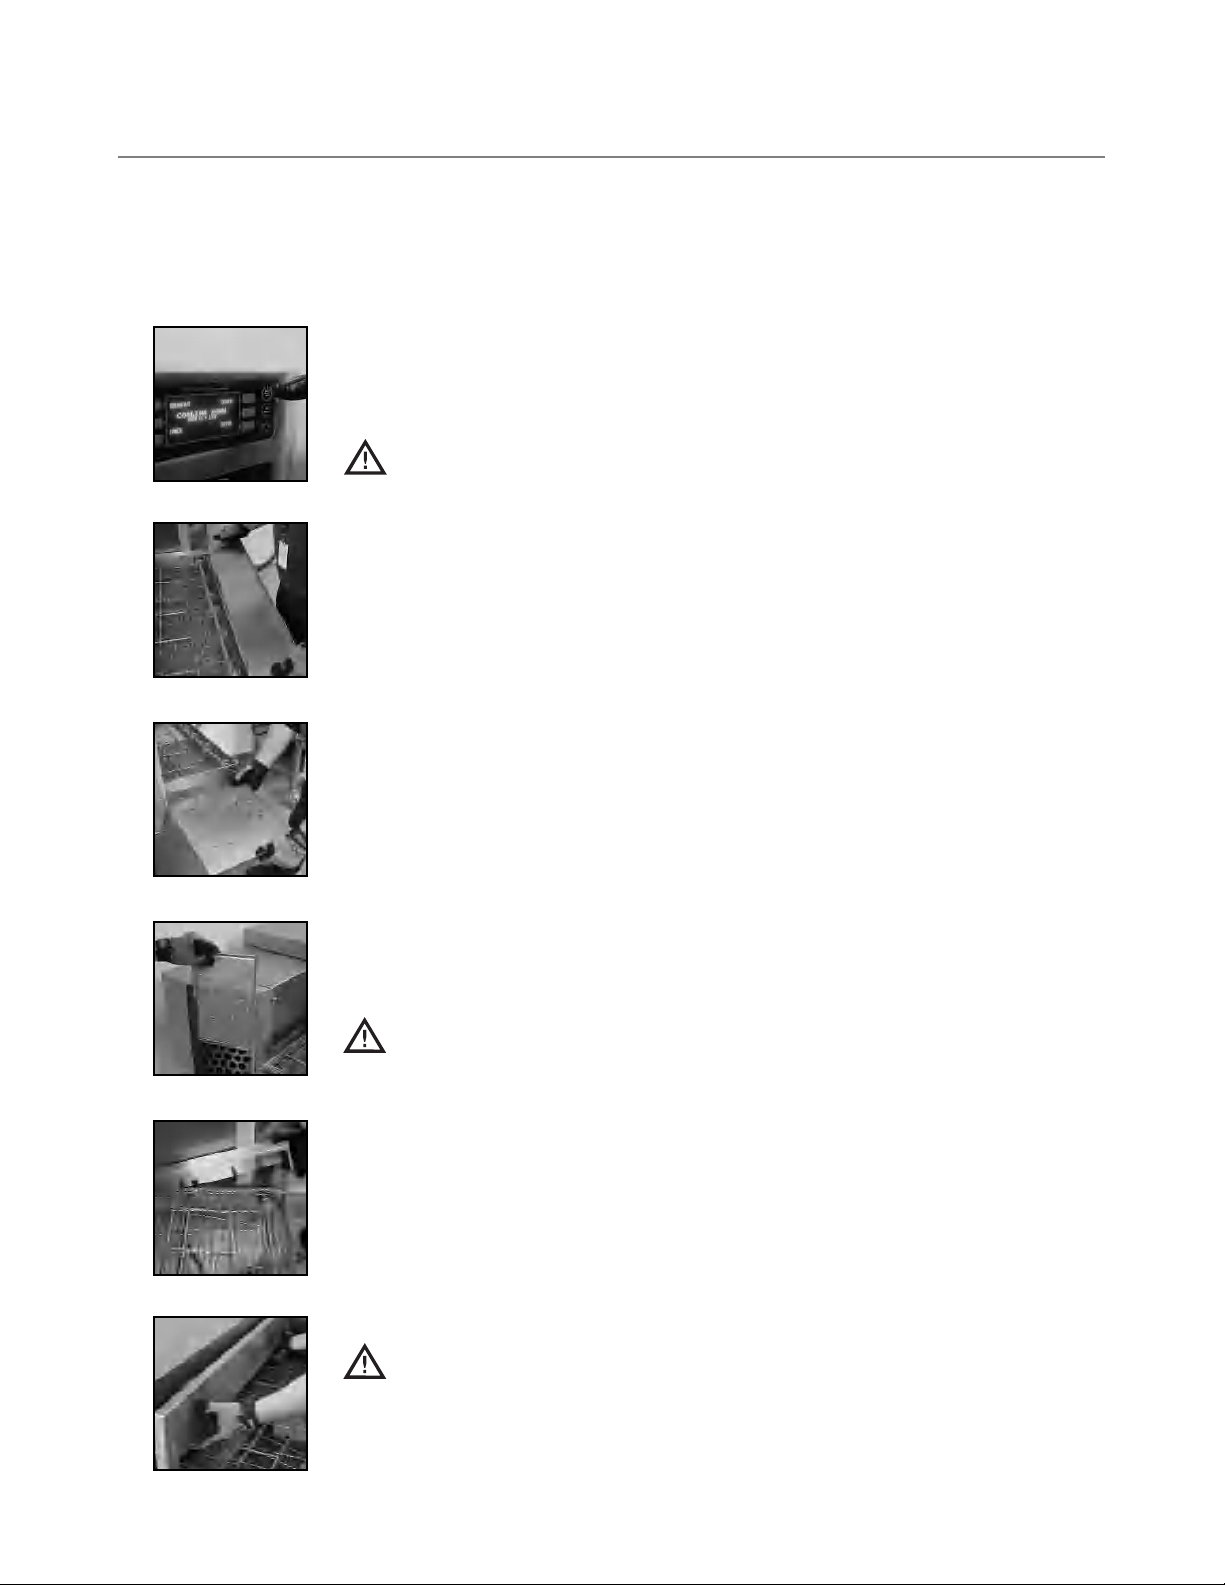
Step 7: Remove and Clean the Conveyor (requires TWO people)
-Position one person at each end of the conveyor.
-Lift the conveyor assembly up and then towards the left side of the oven until
the conveyor drive chain has enough slack for removal.
-Remove the conveyor drive chain.
WARNING: Never attempt to remove the conveyor with fewer than 2 people.
-Lift the conveyor and push it through the right side of the oven for removal.
-Wash, rinse, and dry the conveyor with a clean towel.
Step 8: Remove and Clean the Lower End Panels
-Remove both lower end panels from each end of the oven.
-Wash and rinse the lower end panels, then dry them with a clean towel.
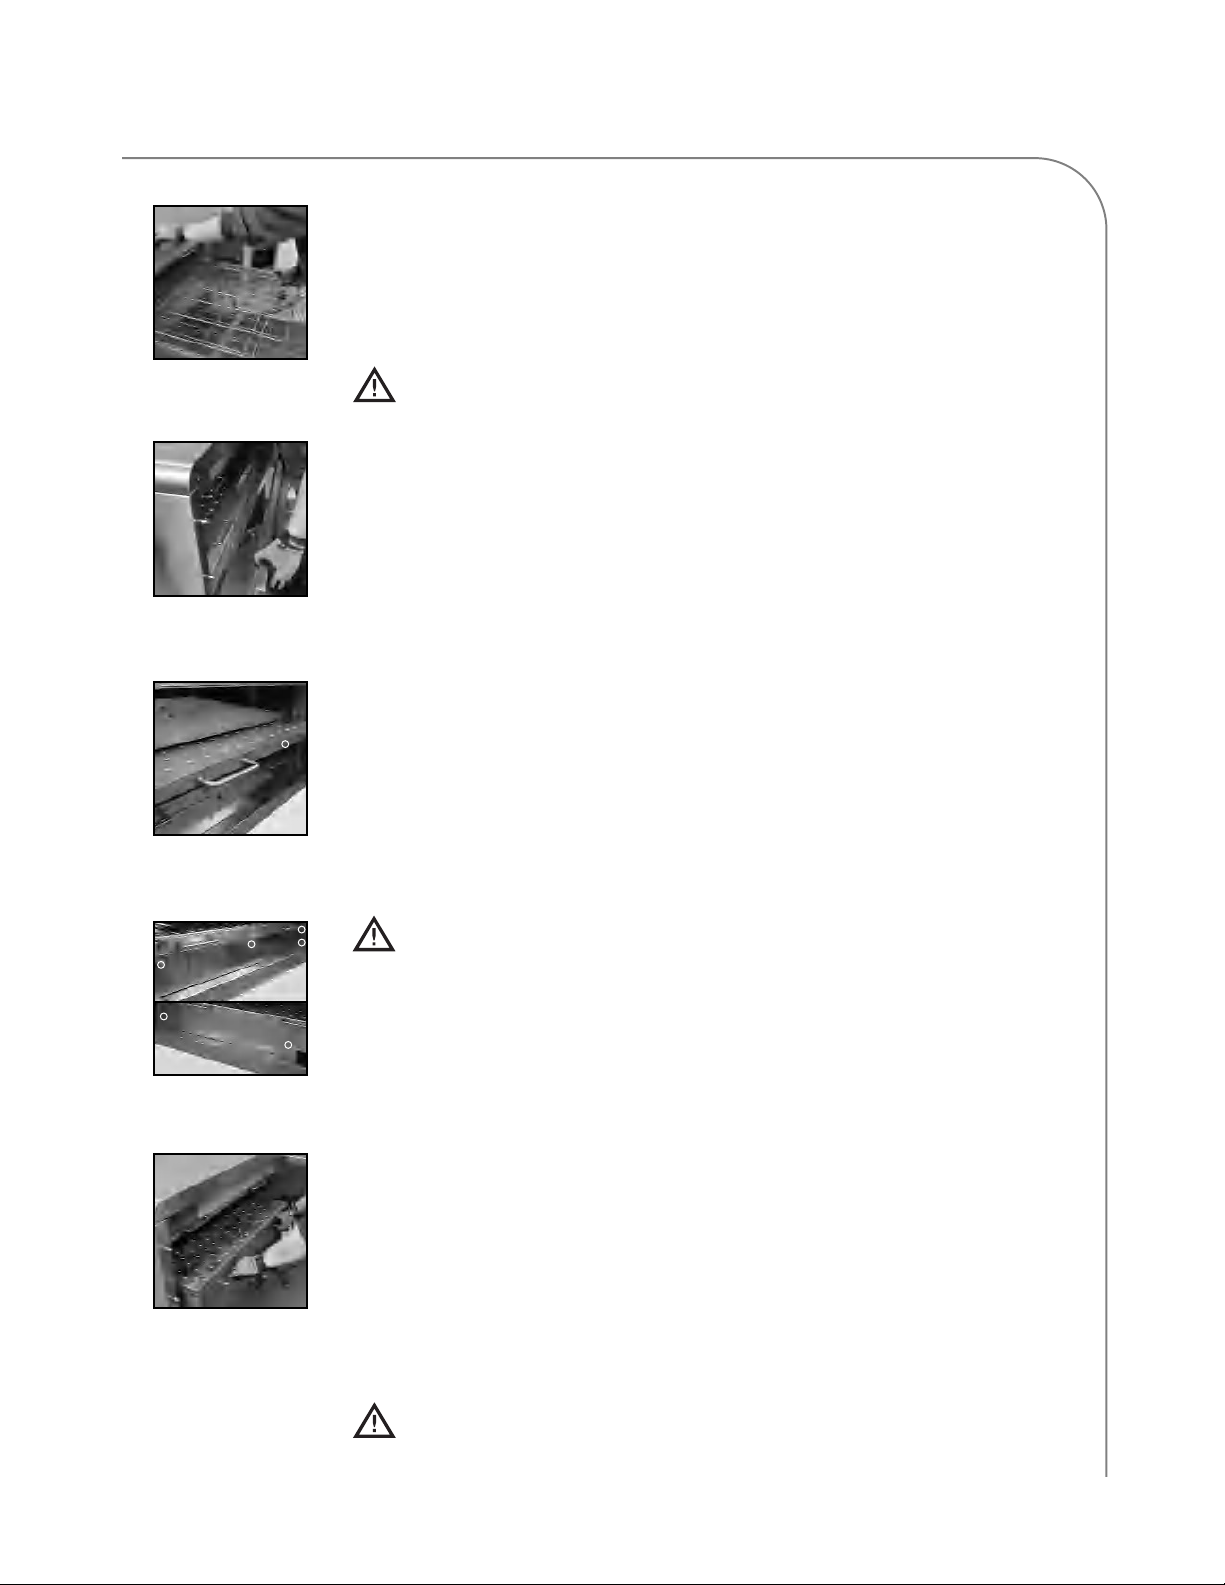
Step 9: Remove and Clean the Upper Nozzle Plate
-Remove the thumbscrew holding the upper nozzle plate in place on the right side
-of the oven (located between the two handles). If the right side upper air diverter is
-incorrectly positioned in front of the lip of the upper nozzle plate, remove the right
-side upper air diverter.
-Spray the upper nozzle plate with TurboChef Oven Cleaner to break apart any
-heavy stains. Allow cleaner to penetrate stains for five minutes.
-Scrub the upper nozzle plate with a nylon scrub pad.
-Rinse the upper nozzle plate with water and wipe it with a clean, damp towel.
WARNING: Be sure to THOROUGHLY remove all cleaner residue.
Step 10: Remove and Clean the Right and Left Lower Air Diverters
-Remove the four thumbscrews from the right side lower air diverter.
-Remove the right side lower air diverter.
-Remove the two thumbscrews from the left side lower air diverter.
-Remove the left side lower air diverter.
-Wash and rinse the lower air diverters, then dry them with a clean towel.
Step 11: Remove and Clean the Lower Plenum Assembly
-Remove the lower plenum assembly from the right side of the oven.
-Spray the lower plenum assembly with TurboChef Oven Cleaner to break
-apart any heavy stains. Allow cleaner to penetrate stains for five minutes.
-Scrub the lower plenum assembly with a nylon scrub pad.
-Rinse the lower plenum assembly with water and wipe it with a clean, damp towel.
WARNING: Be sure to THOROUGHLY remove all cleaner residue.
Step 7
Step 8
Step 9
Step 10
Step 11
Right
Left
Page 22
8 CLEANING
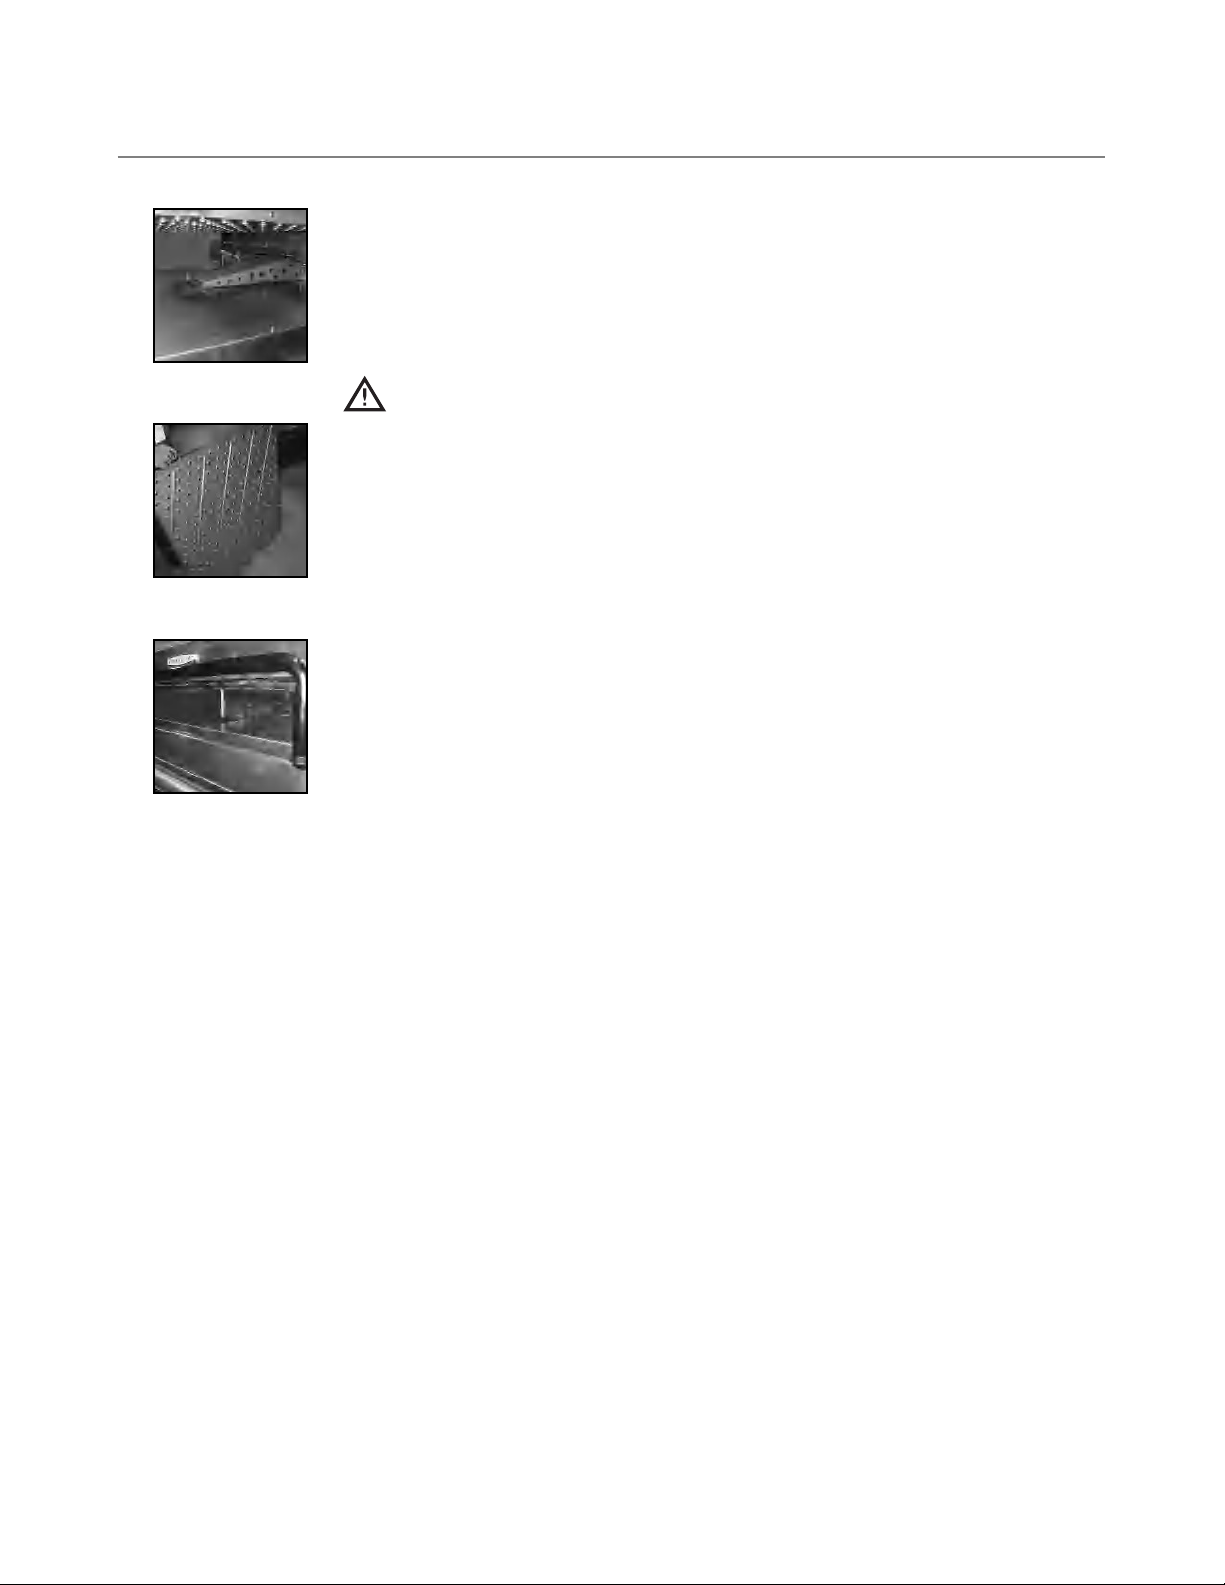
Step 12: Clean the Oven Interior
-Spray the bottom and sides of the oven interior with TurboChef Oven Cleaner to
break apart any heavy stains. Allow cleaner to penetrate stains for five minutes.
-Scrub the oven interior with a nylon scrub pad.
-Wipe the oven interior with a clean, damp towel.
WARNING: Be sure to THOROUGHLY remove all cleaner residue.
Step 13: Reinstall the Oven Components
-Reinstall the lower plenum assembly (if upper nozzle plate was cleaned,
-reinstall now).
-Reinstall the lower end panels.
-Reinstall the conveyor and chain.
-Reinstall the upper end panels.
-Reinstall the chain guard, filters, and crumb trays.
Step 14: Clean the Oven Exterior
-Wipe the oven exterior and window with a clean, damp towel.
-The oven is ready to turn on.
Step 13
Step 14
Step 12
Page 23

Standard Oven Operation
Page 24

Page 25
9
STANDARD OVEN OPERATION
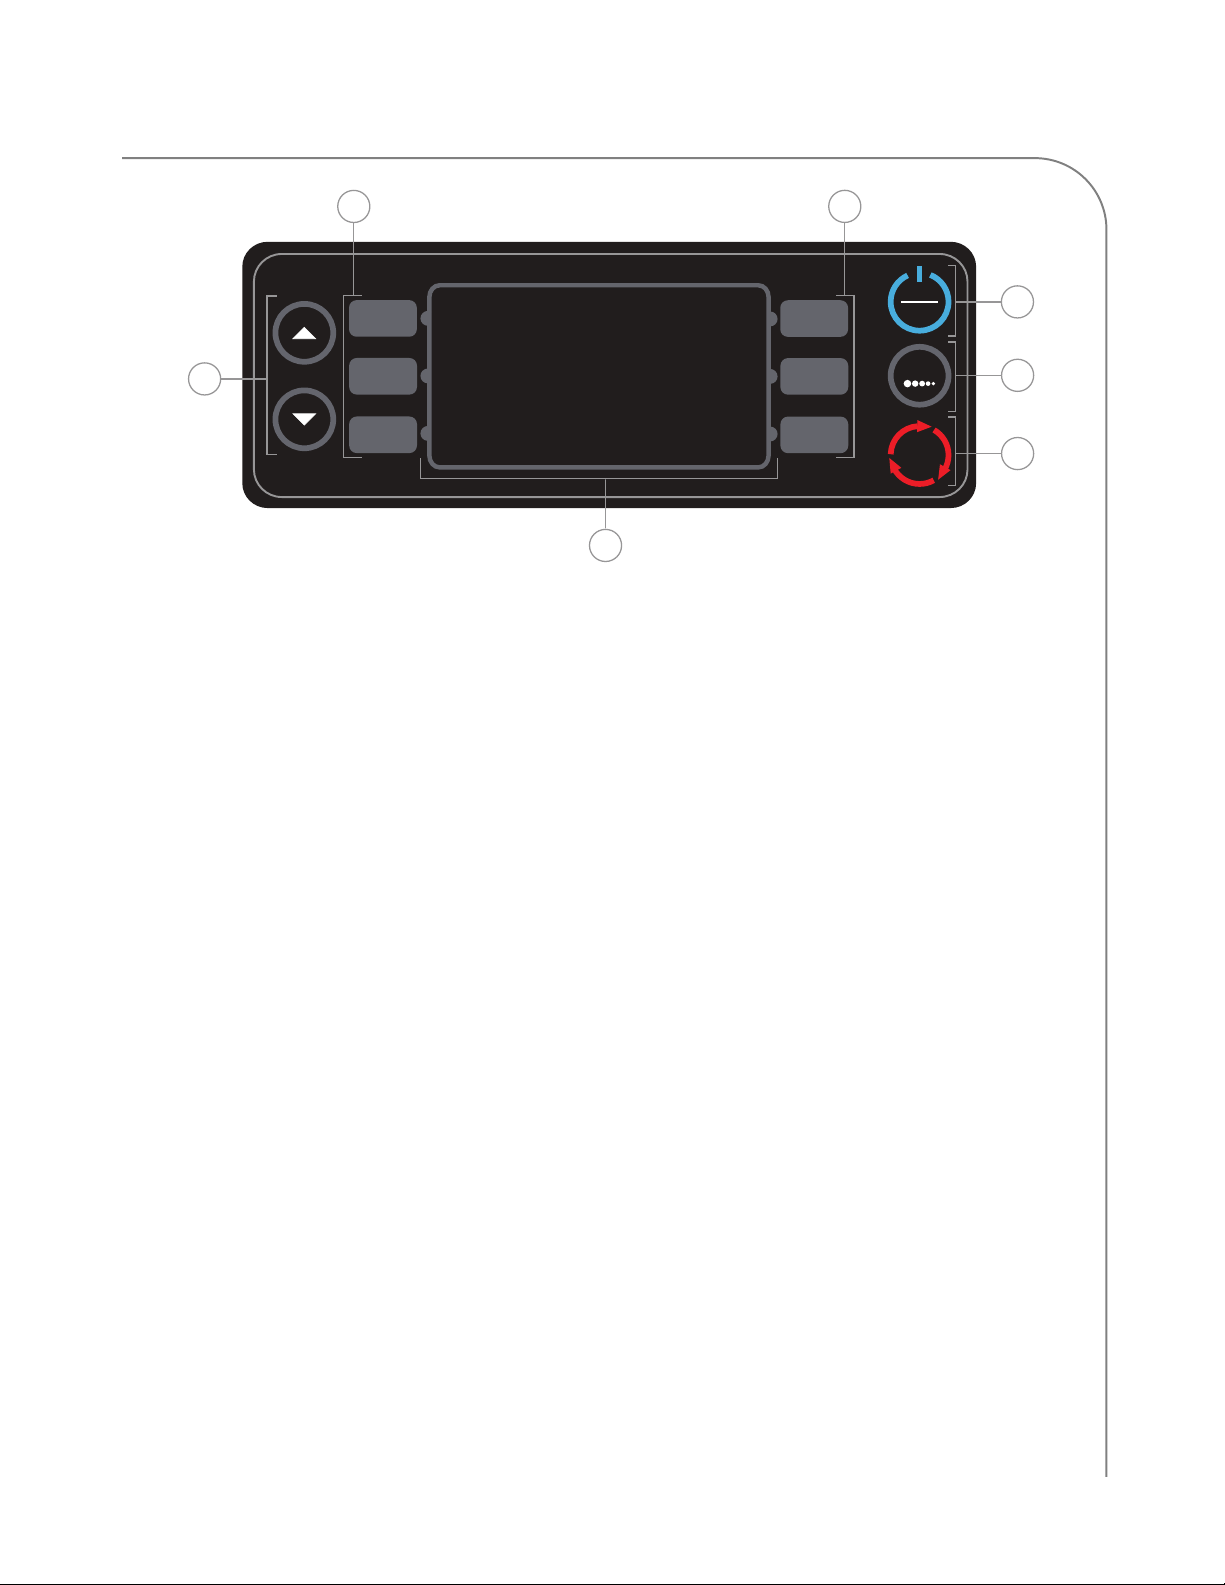
Oven Controls
Figure 5
1. Display
The display shows current oven operation
and/or user programming information.
2. Soft Keys
Six soft keys are on the oven controls, three on
the left (L1, L2, L3, where L1 = top) and three
on the right (R1, R2, R3, where R1 = top).
Press a soft key to select the option/command
that is adjacent to it on the screen.
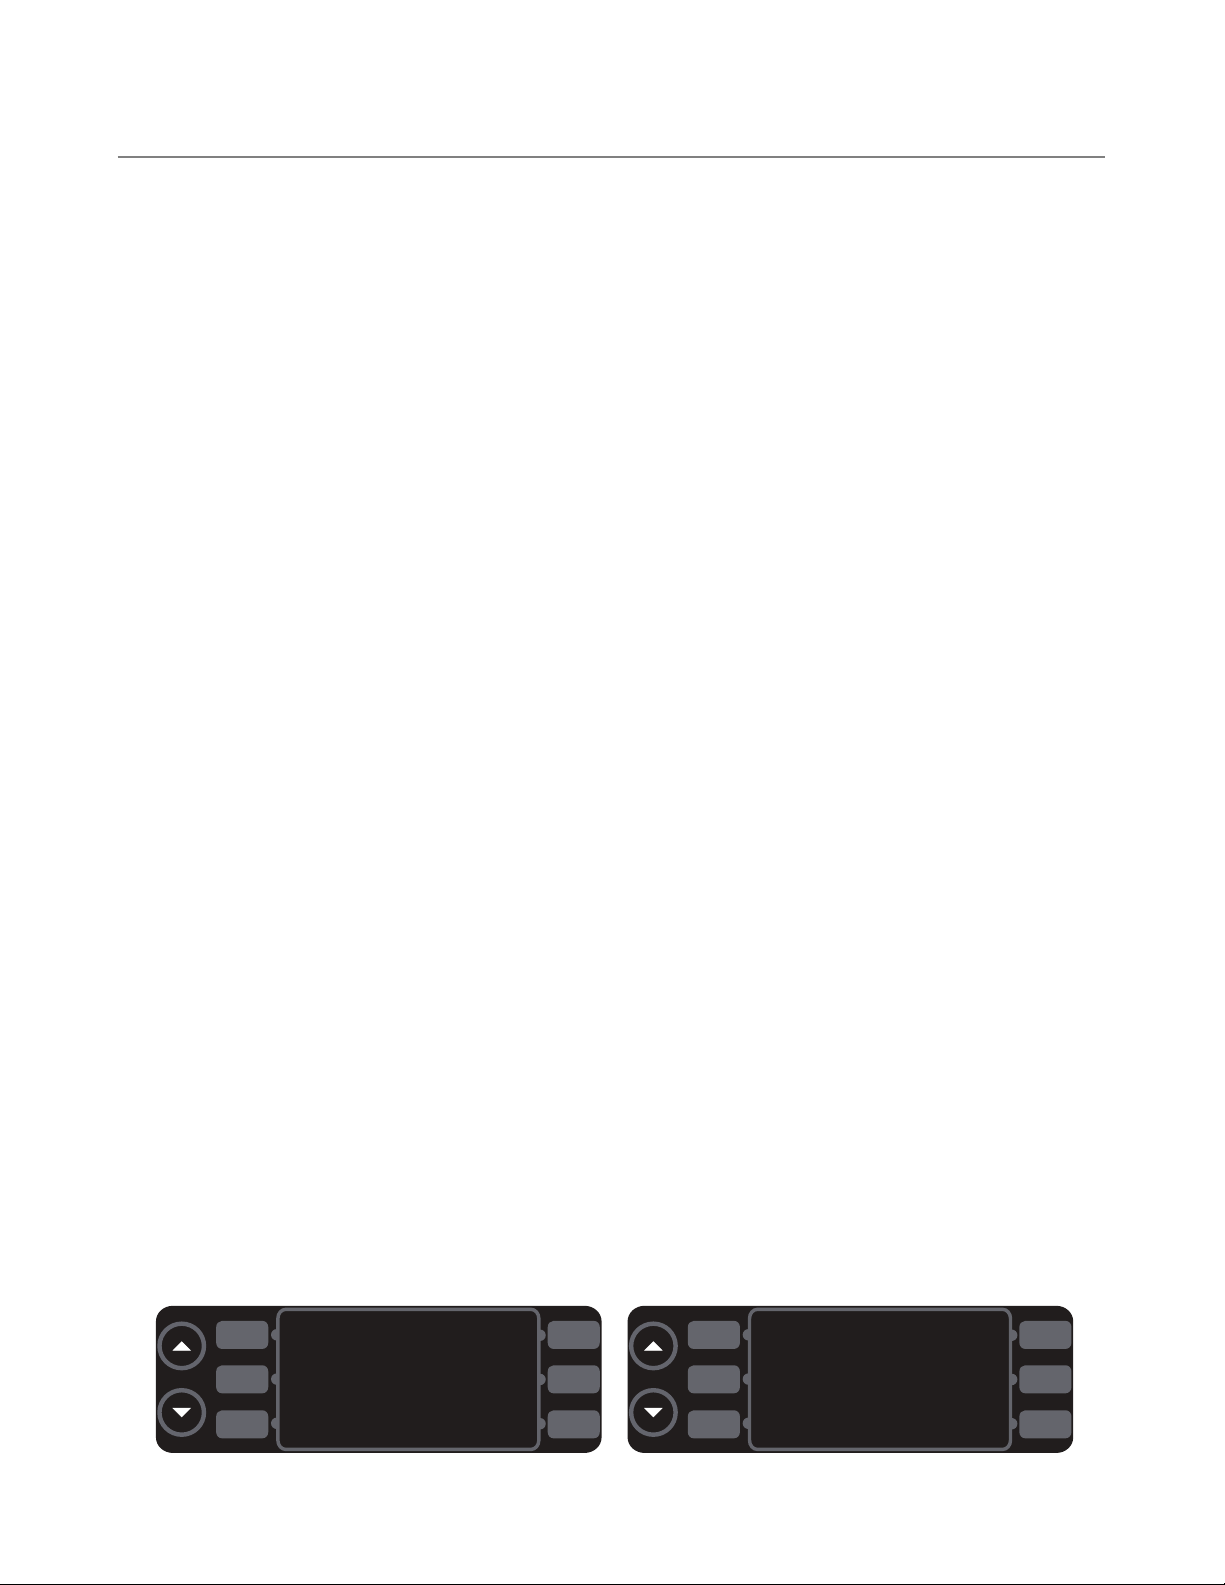
3. Up and Down Keys
When the oven is in the OVEN OFF MODE, use
the up key to access the CONFIG MODE (page
15). Use the down key to access cooking
profiles 5-8.
When the oven is in TEST MODE (page 17),
press the down key to access the second screen
of options. Press the up key to go back to the
first page.
Press the up and down keys to also change
option settings, where applicable
4. Back/Off Key
Depending on the mode the oven is in, the
back/off key will return the oven to the
previous screen or turn the oven off.
5. Idle Key
The idle key activates the IDLE MODE (page 12).
6. Emergency Stop Key
The emergency stop key shuts down the conveyor and burner, at which time the display
shows the belts halted screen. From the belts
halted screen, press the back/off key to turn the
conveyor back on and send the oven to the
COOLING DOWN MODE (page 11).
DO NOT use the emergency stop key as a
general on/off switch.
IDLE
BACK
OFF
E
M
E
R
G
E
N
C
Y
S
T
O
P
High h Conveyor
by TurboC hef
TM
2
2
3
4
5
6
1
Figure 5: Oven Controls
Page 26

Cooking a Product
This section explains how to cook a food
product by describing the “standard operation”
modes through which the oven progresses
(Figure 6).
-MODE 1: Oven Off
-MODE 2: Belt Speed Select
-MODE 3: Lighting
-MODE 4: Warming
-MODE 5: Soaking
-
MODE 6: Cooking
-
MODE 7: Cooling Down
-MODE 8: Idle
-
MODE 9: Cool To Light
NOTE:
MODES 8 and 9 are not part of a
“standard” cooking cycle. They only occur when
the user intervenes as described on page 12.
Mode 1: Oven Off
Mode during which all cooking components are
off and the oven temperature has receded below
150°F (66°C), but the display and keypad
remain on. The user can access cooking profiles
1-4 on this screen (1) or press the down key to
access cooking profiles 5-8.
Happens When...
-Power is supplied to the oven.
-The oven completes
MODE 7.
-The user presses the down key while-accessing
-The CONFIG MODE (refer to page 15 for more
information).
Goes To...
-MODE 2 when the user selects a cooking profile
(soft keys L1, L3, R1, or R3).
-CONFIG MODE when the user presses the up key.
Mode 2: Belt Speed Select
Mode during which the user selects the desired
belt speed.
NOTE: If a different key is pressed, the oven
will ask if you wish to continue or return to the
belt speed select screen. If you select continue,
the oven will not save the belt speed.
Happens When...
-The user selects a cooking profile from MODE
1 or 7.
Goes To...
-MODE 3 when the user selects a belt speed and
the set cooking temperature is higher than the
oven’s current temperature.
PROFILE 1
PROFILE 2
PROFILE 3
COOLING DOWN
OVEN TCC = 425F
PROFILE 4
LUNCH
BELT F
2:00
BELT R
3:00
TOP AIR 100%
SET
COOL TO LIGHT
OVEN TCC = 425F
400F
BTM AIR 100%
BREAKFAST
LUNCH
DINNER
OVEN OFF
DESSERT
BREAKFAST
5:00
3:00
LUNCH
DINNER
2:00
3:20
4:00
BELT SPEED
2:45
2:00 2:30
DESSERT
BREAKFAST
BELT F
5:00
BELT R
3:20
TOP AIR 80 %
SET
COOKING
475F
BTM AIR 100 %
BREAKFAST
BELT F
5:00
BELT R
3:20
TOP AIR 40 %
SET
LIGHTING
OVEN TCC = 72F
475F
BTM AIR 40 %
BREAKFAST
BELT F
5:00
BELT R
3:20
TOP AIR 60 %
SET
WARMUP
OVEN TCC = 275F
475F
BTM AIR 60 %
BREAKFAST
BELT F
5:00
BELT R
3:20
TOP AIR 80 %
SET
SOAKING
TIME LEFT = 5:00
475F
BTM AIR 100 %
1
2
3 6
5
9
4
BREAKFAST
BELT F
5:00
BELT R
3:20
TOP AIR 30%
SET
OVEN IDLE
PRESS ANY KEY
475F
BTM AIR 30%
8
BREAKFAST
LUNCH
DINNER
COOLING DOWN
OVEN TCC = 425F
DESSERT
7
STANDARD OVEN OPERATION
Figure 6: Cooking Modes
10
Page 27

11
STANDARD OVEN OPERATION
-MODE 9 when the user selects a belt speed and
the set cooking temperature is lower than the
oven’s current temperature.
Mode 3: Lighting
Mode during which the ignition module applies
voltage to the spark rod to start the burner.
Happens When...
-The user selects a belt speed from MODE 2.
Goes To...
-MODE 4 when the control board receives a
signal from the flame sensor that a flame is
present.
-
MODE 6 if the oven’s current temperature is
within 25°F (14°C) of the oven’s set
temperature.
Mode 4: Warming
Mode during which the oven warms to the preset cooking temperature defined by the cooking
profile that was selected.
Happens When...
-MODE 3 successfully completes, and the oven’s
temperature at the beginning of warmup was
not within (less than) 25°F (14°C) of the
oven’s set temperature.
Goes To...
-MODE 5 once the oven has reached the
temperature defined by the selected cooking
profile.
-MODE 7 when the user presses the back/off key
-and the oven is above 150°F (66°C).
Mode 5: Soaking
Mode during which the oven has completed
warming up and automatically allows an
additional five minutes for the oven cavity
surfaces to warm.
Happens When...
-MODE 4 completes (within 5°F [3°C] of set
point)
Goes To...
-MODE 6 when soaking completes.
-MODE 7 when the user presses the back/off key
-and the oven is above 150°F (66°C).
Mode 6: Cooking
Mode during which the oven is ready to cook.
The user can place food on the conveyor to
cook, or edit cook settings if the full edit or flex
option is enabled. See page 12 for more
information on full edit and flex options.
Happens When...
-MODE 5 completes.
-MODE 3 completes, if the oven’s current
temperature is within 25°F (14°C) of the oven’s
set temperature.
-The user presses the idle key, up key, down
key, or any soft key during MODE 8.
Goes To...
-MODE 7 when the user presses the back/off key.
-MODE 8 when the user presses the idle key.
-MODE 4 if the temperature drops 25°F (14°C)
or more below the set point.
-
MODE 9 if temperature rises 25°F (14°C) or
more above the set point.
Mode 7: Cooling Down
Mode during which the burner assembly shuts
off to allow the oven to cool.
Happens When...
-The user presses the back/off key from
-MODES 3 or 4 (and the oven temperature is
above 150°F [66°C]), or from MODES 5, 6, 8,
or 9.
Goes To...
-MODE 1 when the oven temperature has
receded below 150°F (66°C).
-MODE 2 when the user selects a cooking
profile.
Page 28
12
Mode 8: Idle
Mode during which both blowers are reduced
to 30% to save power. All other oven
components remain the same.
Happens When...
-The user presses the idle key from MODE 6.
Goes To...
-MODE 6 when the user presses the idle key, up
key, down key, or any soft key.
-MODE 7 when the user presses the back/off key.
Mode 9: Cool to Light
Mode during which the burner assembly shuts
off to allow the oven to cool to the set cooking
temperature defined by the profile that was
selected.
Happens When...
-The user selects a cooking profile from
MODE
1 or 7 that has a set cooking temperature lower
than the oven’s current temperature.
Goes To...
-
MODE 3 when the oven has cooled to the set
temperature of the current cooking profile.
-MODE 7 when the user presses the back/off key.
Editing a Cooking Profile
To edit a cooking profile, the oven must be in
the COOKING MODE and the full edit or flex
option must be enabled. For more information
on selecting between full edit, rigid, and flex
options, see Edit Options Screen on page 16.
When the rigid option is enabled, the soft keys
displayed in Figure 7 are disabled and no menu
editing is allowed.
When the full edit option is enabled, a cooking
profile is fully customizable and all changes are
saved once the oven returns to the OVEN OFF or
COOLING DOWN MODE.
When the flex option is enabled, a cooking
profile is customizable within flex option
limitations (as described in the following
sections), and all changes will reset when the
oven returns to the OVEN OFF or COOLING
DOWN MODE.
This section assumes that the full edit option is
enabled (except where otherwise noted) and
that a cooking profile has been enabled.
Changing a Cooking Profile’s Name
The full edit option must be enabled to change
a cooking profile’s name.
1. From the cooking screen (Figure 7), press
L1 to access the name change screen
(Figure 8).
2. Change the name of the cooking profile.
- The up key moves up through the
available characters. e.g. A,B,C…
- The down key moves down through the
available characters e.g. A,+,-, ,9,8,…
- INS (L1) inserts a space.
- DEL (R1) deletes the selected character.
STANDARD OVEN OPERATION
PROFILE 1
BELT F
5:00
BELT R
3:20
TOP AIR 80 %
SET
COOKING
475F
BTM AIR 100 %
INS
CANCEL
DEL
<--- --->
SAVE
[PROFILE 1 ]
Figure 7: Cooking Screen
Figure 8: Name Change Screen
L1
L2
L3
R1
R2
R3
L1
L2
L3
R1
R2
R3
Page 29

13
- ---> (R1) moves the cursor to the right.
The cursor starts at the far left character.
If ---> is pressed when the cursor is on the
far right character, the cursor moves to the
far left character.
- <--- (L1) moves the cursor to the left. The
cursor starts at the far left character.
If <--- is pressed when the cursor is on the
far left character, the cursor moves to the
far right character.
3. Press save (R3) to save the changes or cancel
(L3) to cancel any changes.
Adjusting the Belt Speed
Figure 7
The High h Conveyor Oven can accommodate
either one or two conveyor belts. The oven will
automatically detect the number of conveyor
belts installed and display the option to change
the speed of each conveyor belt independently.
1. Press the soft key adjacent to the conveyor
belt you wish to adjust (press L2 for the
front belt [Belt F] or L3 for the rear belt
[Belt R]).
2. Adjust the time it takes for the conveyor
belt to completely cycle through the oven.
- The up key increases bake time in
5-second increments.
+ Flex option enabled: the user can only
increase the time up to an additional
15 seconds.
- The down key decreases bake time in
5-second increments.
+Flex option enabled: the user cannot
decrease the time by more than 15
seconds.
3. Press the soft key adjacent to the belt that
was adjusted to exit the belt speed controls.
Adjusting the Temperature
Figure 7
1. Press R2 to access the temperature controls.
2. Adjust the temperature.
- Press the up key to increase the
temperature in 5°F/5°C increments.
+Flex option enabled: the user can only
increase the temperature up to an
additional 10°F/5°C.
- Press the down key to decrease the
temperature in 5°F/°5C increments.
+Flex option enabled: the user cannot
decrease the temperature by more than
10°F/5°C.
3. Press R2 again to exit the temperature
controls.
Adjusting the Top and Bottom Air
Figure 7
1. Press R1 to access the top air controls, or
R3 to access the bottom air controls.
2. Adjust the air speed.
- Press the up key to increase the air speed
in 5% increments up to 100%.
+Flex option enabled: the user can only
increase the air speed by up to an
additional 15%.
- Press the down key to decrease the air
speed in 5% increments down to 30%.
+Flex option enabled: the user cannot
decrease the air speed by more than
15%.
- Press the soft key again to exit the air
controls.
STANDARD OVEN OPERATION
Page 30

14 STANDARD OVEN OPERATION
This page intentionally
left blank.
Page 31

Oven Modes
Page 32

Page 33

15
The Config Mode
The CONFIG MODE (Figure 9) serves four main
purposes:
1. To access the smart card screen.
2. To access the fault count screen.
3. To access the SETUP MODE.
4. To access the TEST MODE.
To access the CONFIG MODE, press the up key
from the OVEN OFF MODE.
Smart Card Screen
The smart card screen allows the user to
-Load a menu from smart card to oven.
-Save a menu from oven to smart card.
To load or save a menu,
1. Press L3 (Figure 9) to access the smart card
screen (Figure 10).
2. Insert a smart card into the smart card slot
(Figures 11 and 12), with the gold chip
facing the inside of the oven.
3. Load or save a menu.
- Press R1 to load a menu from the smart
card to the oven (Figure 10).
- Press R2 to save a menu from the oven to
the smart card (Figure 10).
Updating the Firmware
From the oven off screen,
1. Insert the gray smart card (see Figure 11)
with the gold chip facing the inside of the
oven. If multiple smart cards are required,
they will be labeled in sequence - ensure the
correct sequence is followed.
2. From the COOLING DOWN or OVEN OFF
MODE, press and hold the idle key until the
oven resets (approximately 5 seconds). The
display will go blank until the upload is
complete.
3. When the oven beeps one long high tone,
the load was successful. If a second card
was provided, insert it.
4. When the oven restarts and the display
turns on, the update is complete. Remove
the smart card.
NOTE: If the update is unsuccessful, the
display will remain off and the oven will beep
one long, low tone. If this occurs, repeat the
above procedure. If the update fails multiple
times, a smart card may be damaged. Contact
TurboChef to obtain a new smart card.
INSERT SMART CARD
PRESS [BACK] TO EXIT
OVEN MODES
Figure 11 Smart Card slot location
SMARTCARD
FAULTS
CONFIG MENU
SETUP
TEST MODE
Figure 9: Config Mode
LOAD FROM CARD
SMARTCARD
SAVE TO CARD
Figure 10: Smart Card Screen
Figure 12: Insert Smart Card Screen
L1
L2
L3
R1
R2
R3
L1
L2
L3
R1
R2
R3
L1
L2
L3
R1
R2
R3
Page 34

Accessing the Fault Count Screen
Refer to page 29 for fault descriptions.
From the
CONFIG MODE (Figure 9, page 15),
press R1 to access the fault count screen (Figure
13). The oven will display the number of faults
that have occurred since the oven fault counts
were last cleared (page 20), the oven’s software
was last updated (page 15), or the oven was last
returned to the manufacturer’s default settings
(page 20).
Accessing the Setup Mode
From the CONFIG MODE (Figure 9, page 15),
press L1 to access the SETUP MODE. The SETUP
MODE allows the user to customize several oven
settings - see below for more details.
Accessing the Test Mode
From the CONFIG MODE (Figure 9, page 15),
press R3 to access the TEST MODE. The TEST
MODE gives the service agent the ability to
diagnose oven problems and perform other service related tasks. See page 17 for more information on the TEST MODE.
Setup Mode
Figure 14
The SETUP MODE serves four main purposes:
1. To change the display temperature.
2. To access the edit option screen.
3. To change the display language.
4. To access the info screen.
To access the SETUP MODE, press the up key
from the OVEN OFF or COOLING DOWN MODE
(to access the CONFIG MODE), and then press L1.
Changing the Display Temperature
The oven can display the temperature in either
Celsius or Fahrenheit units. To change the
display temperature, press L1 in
SETUP MODE
(Figure 14).
Edit Option Screen
The edit option screen (Figure 16) allows the
user to switch between full edit, rigid, and flex
options. For more information on the different
edit options, see Editing a Cooking Profile on
page 12.
To access the edit option screen,
1. Press L3 (Figure 14) to access the password
screen (Figure 15).
2. Input the password
6 6 3 3 by pressing the
soft key adjacent to the appropriate number.
To change the edit option (Figure 16),
-Press L1 to select the full edit option.
-Press L2 to select the rigid option.
-Press L3 to select the flex option.
1
2
3
4
5
<6633>
6
ENTER PASSWORD
Figure 15: Password Screen
FULL EDIT*
RIGID
FLEX
EDIT OPTION
Figure 16: Edit Option Screen
DEGS F
EDIT/RIGID/FLEX
ENGLISH
SETUP MENU
INFO
Figure 14: Setup Mode
16 OVEN MODES
F1: 0
F2: 0
F3: 0
F4: 0
F5: 0
F6: 0
F7: 0
F8: 0
F9: 0
F10: 0
FAULT COUNTS
Figure 13: Fault Counts Screen
L1
L2
L3
R1
R2
R3
L1
L2
L3
R1
R2
R3
L1
L2
L3
R1
R2
R3
L1
L2
L3
R1
R2
R3
Page 35

17
OVEN MODES
Changing the Display Language
NOTE: This feature is not available on all oven
models.
From the setup menu screen, press R1 to
change the language (Figure 14):
-English
-French
-German
-Spanish
Info Screen
The info screen (Figure 17) is used to display
the following information in an easy to access
place:
- The oven’s serial number
- The oven’s electrical compartment
temperature
- The oven’s voltage
- The total time the oven has been on
- The total time the oven has been idle
- The oven’s software version
To access the info screen, press R3 within the
SETUP MODE.
Test Mode
Figures 18-19
The TEST MODE serves six main purposes:
1. To test individual oven components.
2. To view oven information.
3. To reset oven parameters.
4. To input a new serial number.
5. To perform a burn-in test.
NOTE: When the oven is in
TEST MODE, the
burner does not operate unless a burn-in test is
being performed.
To access the
TEST MODE,
1. Press the up key from the
OVEN OFF or
COOLING DOWN MODE to access the
CONFIG MODE.
2. Press the R3 soft key.
3. Input the password
2 4 3 3 (Figure 20).
The TEST MODE consists of two screens (Figures
18 and 19). Use the up and down keys to
navigate between them.
From screen 1 of the TEST MODE, the user can:
-Access the burner control screen.
-Manipulate the top and bottom blowers.
-View the status indicators.
From screen 2 of the TEST MODE, the user can:
-Input a new serial number
-Initiate a burn-in test
-Erase all oven settings
-Enable/disable maintenance mode*
-Clear the fault counts
* The maintenance mode will show
temperature, burner operation, and other
diagnostics while the oven is running.
INPUT SN
BURN-IN
ERASE/CLEAR
208V
TEST PAGE 2
CLEAR FAULTS
MAINT ON
Figure 19: Test Mode Screen 2
BURNER CTRL
BELT CTRL
TOP AIR
TEST PAGE 1
BOT AIR
D EC27 45% 100% 23.9V 0.0V450F
R 1 2 _ H _ _ _ _ – – – – – _ _ _ O _ _ T B T B – F – – – –
Figure 18: Test Mode Screen 1
1
2
3
4
5
<2433>
6
ENTER PASSWORD
Figure 20: Password Screen
EC=82F 208V
RUN: 65432 HR
IDLE: 12345 HR
INFO
SERIAL_NUMBER
SOFTWARE VERSION
Figure 17: Info Screen
L1
L2
L3
R1
R2
R3
L1
L2
L3
R1
R2
R3
L1
L2
L3
R1
R2
R3
L1
L2
L3
R1
R2
R3
Page 36

18 OVEN MODES
Accessing the Burner Control Screen
From screen 1 of the TEST MODE (Figure 18,
page 17), press L1 to access the burner control
screen (Figure 21).
Use this mode to set gas pressures (see page 3).
To change the burner’s setting,
-Press L1 to set the burner to full (or to
-light the burner).
-Press L2 to set the burner to low.
-Press R1 to turn the burner off.
Accessing the Belt Control Screen
From TEST MODE screen 1 (Figure 18, page 17),
press L2 to access the belt control screen (Figure
22). Use this mode to verify the belts work correctly. The number after the belt speed shows
the pulses read by the HES. The percentage is
the amount of drive being asked of the CMSC
(100% = 10V).
To change the belt’s setting,
-Press L1 to turn the belts off.
-Press L2 to access the belt F controls.
-Press L3 to access the belt R controls.
Manipulating the Top and Bottom
Blowers
Figure 18, page 17.
The user can change the speed of the top and
bottom blowers independently. To change the
speed of the blowers,
1. From screen 1 of the TEST MODE, press R1
to access the top blower or R2 to access the
bottom blower.
2. Press the up or down keys to change the
speed of the selected blower in 5%
increments. The percentage of air cannot go
below 30% or above 100%.
Viewing the Status Indicators
Figure 21
The status indicators are located at the bottom
of TEST MODE screen 1 and the burner control
screen. The status indicators are split into two
display lines.
Top Display Line
The top display line shows values relating to
oven components. The letters a-g below and on
Figure 23 indicate the different top display line
status indicators, which are explained below.
a Shows which key is currently pressed.
-U = up key
-D = down key
-a = L1
-b = L2
-c = L3
-f = R1
-g = R2
-h = R3
-P = back/off key
-I = idle key
-S = emergency stop key
b Shows the temperature within the electrical
compartment (temperature displayed in
Celsius only).
c Shows the temperature within the cook
chamber.
d Shows the % value to which the gas valve is
set.
BURN FULL (LIGHT)
BURN LOW
BURN OFF
BURNER CTRL
TCC = 475F
D EC27 45% 100% 23.9V 0.0V450F
R 1 2 _ H _ _ _ _ – – – – – _ _ _ O _ _ T B T B – F – – – –
Figure 21: Burner Control Screen
L1
L2
L3
R1
R2
R3
BELTS OFF
10:25 1920 36%
BELT F
BELT CTRL
BELT R
12:30 1343 31%
Figure 22: Belt Control Screen
Page 37

OVEN MODES
19
e Shows whether or not the igniter is on.
0% = OFF, 100% = ON.
f Shows the voltage of the power supply.
Bottom Display Line
The bottom display line shows enabled inputs
and outputs on the control board. The numbers
1-10 indicate the different bottom display line,
which are explained below.
NOTE: A “-” or “_” displayed on the bottom
display line denotes values that are not
applicable to this oven.
1 “R” represents the real time clock pulse
used by the control board to time oven
functions. The “R” will blink once per
second.
2 The “1” shows that the rear belt’s conveyor
motor’s Hall Effect Sensor (HES) is sending
a pulse to the control board.
3 The “2” shows that the front belt’s
conveyor motor’s HES is sending a pulse to
the control board.
4 The “H” will only be missing during an F3:
Flameout fault.
5 The “O” will only be missing during an F8:
High Limit Tripped fault.
6 The first “T” is displayed while the top air
BMSC reports an ok status to the control
board.
7 The first “B” is displayed while the bottom
air BMSC reports an ok status to the
control board.
8 The second “T” is displayed while the top
air BMSC is enabled and receiving a
command.
9 The second “B” is displayed while the
bottom air BMSC is enabled and receiving
a command.
Entering a New Serial Number
Figure 24
1. Press L1 (Figure 19, page 17) on screen 2 of
the
TEST MODE to access the input new
serial number screen.
2. Enter the new serial number.
-The up key moves up through the
-available characters. i.e. A,B,C…
-The down key moves down through the
-available characters i.e. A,+,-, ,9,8,…
- INS (L1) inserts a space.
- DEL (R1) deletes the selected character.
- ---> (R2) moves the cursor to the right.
-The cursor starts at the far left character. If
- ----> is pressed when the cursor is on the
-far right character, the cursor moves to the
-far left character.
- <--- (L2) moves the cursor to the left. The
-cursor starts at the far left character, if <---
-is pressed when the cursor is on the far left
-character, the cursor moves to the-far right
-character.
3. Press save (R3) to save the changes or
cancel (L3) to cancel any changes.
D EC27 45% 100% 23.9V 0.0V450F
R 1 2 _ H _ _ _ _ – – – – – _ _ _ O _ _ T B T B – F – – – –
a b c d e f g
1 2 3 4 5 6 7 89 10
Figure 23: Status Indicator Explanation
INS
CANCEL
DEL
<--- --->
SAVE
[ ]
Figure 24: Enter New Serial Number Screen
L1
L2
L3
R1
R2
R3
Page 38

Initiating a Burn-In Test
NOTE: Burn-in tests are for manufacturing use
only. DO NOT initiate a burn-in test unless
expressly instructed by TurboChef.
To initiate a burn-in test, Press L2 (Figure 19,
page 17) on screen 2 of the TEST MODE.
The burn-in test (Figure 25) runs the oven for
45 minutes to ensure correct oven operation.
When the burn-in test completes, the burn-in
complete screen (Figure 26) appears. Press any
key to send the oven to the COOLING DOWN
MODE. If the burn-in test fails, the applicable
error code will appear and the oven will return to
the COOLING DOWN or OVEN OFF MODE.
Erasing all Oven Settings
To erase all oven settings and return the oven to
the manufacturer defaults, press L3 (Figure 19,
page 17) on screen 2 of the TEST MODE. The
oven will ask you to confirm this action (Figure
27); press R3 to confirm or the back/off key to
cancel.
CAUTION: Settings cannot be retrieved
once the erase option is confirmed.
Clearing the Fault Counts
To clear the fault counts (reset all fault counts to
0), press R3 (Figure 19, page 17) on screen 2 of
the test mode. The oven will ask you to confirm
this action (Figure 28), press R3 to confirm or
the back/off key to cancel
CAUTION: Fault counts cannot be
retrieved once the erase option is
confirmed.
Viewing the Serial Number
The serial number is located at the bottom of
screen 2 of the TEST MODE (Figure 19, page 17).
CAUTION: Write this number down
before replacing the I/O control board.
Replacing the I/O control board will erase
this number from the oven’s memory.
If replacing a control board, see page 19 for reentering the serial number.
20 OVEN MODES
Continue?
CLEAR FAULTS?
Figure 28: Confirm Clear Fault Counts Screen
BREAKFAST
BELT F
5:00
BELT R
3:20 100%
TOP AIR 80 %
SET
COOKING
OVEN TCC = 475F
475F
BTM AIR 100 %
Burn-In in Progress
Time Left = 42:37
Figure 25: Burn-In Test Screen
Continue?
ERASE ALL?
Figure 27: Confirm Erase All Screen
BURN-IN COMPLETE
OVEN TCC = 475F
PRESS ANY KEY TO CONTINUE
Figure 26: Burn-In Passed Screen
L1
L2
L3
R1
R2
R3
L1
L2
L3
R1
R2
R3
L1
L2
L3
R1
R2
R3
L1
L2
L3
R1
R2
R3
Page 39

Oven Systems
Page 40

Page 41

21
OVEN SYSTEMS
The Control System
This section contains information about the
following components:
-Control Board
-Display
-EMI Filter
-Fuses
-High-limit Thermostat
-Idle Button
-Keypad
-Power Supply - 24VDC (Domestic)
-Power Supply - 24VDC (International)
-Relay (K3 - Gas)
-Relay (K4 - Ignition)
-RTD
-Smart Card Reader
-Speaker
-Thermostat - 120ºF (Close on Rise)
-Wire Harness
This section also contains testing procedures for
the following components:
-Power Supply - 24VDC (Domestic)
-Power Supply - 24VDC (International)
-Relay (K3 - Gas)
-Relay (K4 - Ignition)
-RTD
Control Board
The control board is powered by the 24 VDC
power supply, and sends control voltage to all
the relays. See page 45 for a schematic. 24
VDC can be measured at the J9 connector, pins
19 and 8. See pages 45-47.
Display
The vacuum fluorescent display is the primary
user interface, and is powered by the control
board using 5 VDC. Its input voltage can be
tested at J7, pins 1 and 3 (page 45).
EMI Filter
The EMI filter helps suppress the amount of
RF “noise” emitted by the oven, also filtering
noise from entering the controls.
Fuses
The control circuit is ultimately protected by
two 20-amp class CC fuses, which are in the
line-voltage circuit (incoming voltage). The
fuses are designed to blow in case of an overcurrent situation.
High-Limit Thermostat
The high limit thermostat is a 3-pole, manual
reset thermostat with a trip point of 572ºF
(300ºC). The thermostat interrupts power to
both the ignition module and the closed circuit
of the I/O control board.
Idle Button
The Idle Button places the oven in idle mode,
slowing the blowers to 30%. When lit, idle
mode is active.
Keypad
The keypad is an 11-key membrane switch.
Power Supply - 24VDC (Domestic)
The power supply - 24VDC (domestic) converts line voltage (208-240 VAC) to 24 VDC.
Line voltage (208-240 VAC) is connected to
terminals 1 & 4 (jumper between terminals 2
& 3, terminal 5 is not used). The resistance
from terminals 1 to 4 (with wires disconnected)
is 20.7
W. The output (24 VDC) is on
terminals “+OUT” (power = good) and “OUT” (power = bad).
Testing Procedure
1. Disconnect line voltage from the unit.
2. Take a resistance reading on terminals
1 & 4.
a) If terminal resistance is correct
(20.7
W):
-Apply line voltage to the unit.
-Check for line voltage (208-240 VAC)
-at terminals 1 & 4.
Page 42

22 OVEN SYSTEMS
b) If terminal resistance is incorrect,
replace the power supply.
3. If correct voltage is present, disconnect the
output wires and check output (-OUT &
+OUT) for 24 VDC.
4. If voltage is present with output wires
disconnected and not present when the
wires are connected, inspect the wire
harness for damage or shorts.
5. If the wire harness is intact and undamaged,
the power supply is damaged or defective
and must be replaced (page A-8).
Power Supply - 24VDC (International)
The power supply - 24VDC (international)
converts line voltage to 24 VDC. Line voltage is
connected to terminals L & N. The output (24
VDC) is on terminals “-V” and “+V”.
Testing Procedure
1. Check for line voltage (208-240 VAC) at
terminals L & N.
2. If correct voltage is present, check output
(-V & +V) for 24 VDC (with output wires
disconnected).
3. If voltage is present with output wires
disconnected and not present when the
wires are connected, inspect the wire
harness for damage or shorts (page 45).
4. If wire harness is intact and undamaged,
the power supply - 24VDC (international)
is damaged or defective and must be
replaced (page A-8).
K3 Relay - Gas
The K3 relay is a single pole, double throw
relay with a 24 VDC coil. The coil resistance is
577
W and the contact rating is 20A at 240
VAC. When 24 VDC is applied to the coil, the
normally open contacts (7 & 4 or C & NO)
close applying line voltage to the burner transformer and the combustion blower.
Testing Procedure
1. Disconnect line voltage to the unit.
2. Take a resistance reading of the coil.
3. If coil resistance is correct (577
W):
a) Apply line voltage to the unit.
b) Check for 24 VDC at the coil of the
relay when the unit is calling for heat.
c) Check the state of the contacts.
-If the normally open contacts (7 & 4
-or C & NO) are closed when coil
-voltage is applied, the K3 relay is
-functioning normally.
-If the normally open contacts (7 & 4
-or C & NO are not closed when coil
-voltage is applied, the K3 relay is
-malfunctioning and must be replaced
-(page A-8).
4. If the coil resistance is incorrect, replace the
K3 relay.
K4 Relay - Ignition
The K4 relay is a single pole, double throw
relay with a 24 VAC coil. The coil resistance is
585 k
W and the contact rating is 20 A at 240
VAC. When 24 VAC is applied to the coil, the
normally open contacts (7 & 4 or C & NO)
close and the normally closed contacts (7 & 1
or C & NC) open.
The K4 relay uses the normally closed contacts.
If 24 VAC is applied to the ignition module
and 1.5 uA minimum is not maintained, the
ignition module applies 24 VAC to the relay
and the contacts open. When the contacts open
the I/O control board shows an “F3 No Flame”
fault.
Testing Procedure
1. Disconnect line voltage to the unit.
2. Take a resistance reading of the K4 coil.
Page 43

OVEN SYSTEMS
23
3. If coil resistance is correct (585 k W):
a) Apply line voltage to the unit.
b) Check for 24 VAC at the coil of the
relay when the unit is calling for heat.
c) Check the state of the contacts.
-If the normally open contacts (7 & 4
-or C & NO) are closed and the
-normally closed contacts (7 & 1 or C
-& NC) are open when coil voltage is
-applied, the K4 relay is functioning
-normally.
-If the normally open contacts (7 & 4
-or C & NO) are not closed and/or the
-normally closed contacts (7 & 1 or C
-& NC) are not open when coil voltage
-is applied, the K4 relay is
-malfunctioning and must be replaced.
4. If the coil resistance is incorrect, replace the
K4 relay (page A-14).
RTD
The RTD is a resistance temperature detector
used to detect the cavity temperature.
Testing Procedure
1. Disconnect the RTD from the I/O control
board.
2. Place the RTD in a bowl of ice water for 2
minutes.
3. Take a resistance reading of the RTD.
4. If RTD resistance is not 100
W, RTD is
defective and must be replaced.
NOTE: Use Figure 29, page 24 to determine
resistance readings at temperatures other than
freezing.
Smart Card Reader
The smart card reader allows the oven operator
to load a menu/firmware update from a smart
card. A menu that already exists in the oven can
also be saved to a smart card. For instructions,
see page 15.
Speaker
The speaker is separate from the control board,
and provides audible feedback to the oven operator whenever a key is pressed or a fault occurs.
Thermostat - 120ºF (Close on Rise)
The cooling fan thermostat actuates the cooling
fans when the temperature in the left end bell
reaches 120ºF (49ºC).
Wire Harness
The wire harness distributes power to the oven’s
electrical components. See page 45 for a
schematic.
The Conveyor System
This section contains information about the
following components, as well as testing
procedures:
- Gear Drive (Conveyor Motor)
- Gear Drive (Conveyor Motor) Speed
Controller (CMSC)
Gear Drive (Conveyor Motor)
The conveyor motor is a 1550 RPM, 3-phase
motor with a built in Hall Effect Sensor. The
speed of the conveyor motor is controlled by the
voltage frequency applied to the windings from
the CMSC. The Hall Effect Sensor sends a DC
pulse back to the control board to verify motor
speed. The control board uses these pulses to
determine the output DC voltage to the
CMSC.
Conveyor ovens with a split-belt configuration
will contain separate gear motors and speed controllers for each belt.
Testing Procedure
1. Disconnect line voltage from the unit.
2. Take a resistance reading of the motor
windings and use Figure 30, page 24 to
verify that the resistance readings are correct.
Page 44

To From Description Expected Resistance
White Grey Winding (A-B)
215-217 W
White Black Winding (A-C)
215-217 W
Grey Black Winding (B-C)
215-217 W
Black, Brown, or
Blue
Green
Windings to
chassis
Open
Figure 30: Conveyor Motor Ohm Chart
24 OVEN SYSTEMS
3. If the resistance readings are correct,
reconnect the motor wiring and then apply
line voltage to the unit and check for
voltage applied to the motor windings.
4. If no voltage is present, ensure the CMSC is
operating properly (see below).
5. If CMSC is operating properly, inspect the
wire harness for damage or shorts.
6. If the wire harness is intact and undamaged,
and the CMSC is operating properly, the
gear drive is damaged or defective and must
be replaced (page A-8).
Gear Drive (Conveyor Motor) Speed
Controller (CMSC)
The CMSC converts single-phase line voltage
to a three-phase output. The speed of the gear
drive is controlled by the frequency output of
the CMSC. The CMSC receives an input
voltage (0-10 VDC) from the control board
and adjusts the frequency output to the gear
drive.
Testing Procedure
WARNING: Capacitors within the CMSC
can retain charge after power is removed.
Exercise extreme caution when handling the
terminals.
WARNING: DO NOT connect incoming
AC power to output terminals U, V, or W.
This will seriously damage the Conveyor
Motor Speed Controller.
1. Ensure that no faults appear on the display
of the CMSC during oven operation. The
control will display the frequency output if
the system is operating correctly.
2. Check the input voltage on terminals L1 &
L2 and the DC voltage input on terminals
0V & AI (0.1-10 VDC).
3. Check ohms of motor (Figure 30).
4. If no voltage is present, inspect the wire
harness for damage or shorts (page 45).
5. If wire harness is intact and undamaged,
the CMSC is damaged or defective and
must be replaced.
ºF 0º +20º +40º +60º +80º +100º +120º +140º +160º +180º +200º
0º
90.03W 97.39W 101.74W 106.07W 110.38W 114.68W 118.97W 123.24W 127.50W 131.74W 135.97W
+200º
135.97W 140.18W 144.38W 148.57W 152.74W 159.90W 161.04W 165.17W 169.29W 173.39W 177.47W
+400º
177.47W 181.54W 185.60W 189.64W 193.67W 197.69W 201.69W 205.67W 209.64W 213.60W 217.54W
+600º
217.54W 221.47W 225.38W 229.28W 233.17W 237.04W 240.90W 244.74W 248.57W 252.38W 256.18W
ºC 0º +10º +20º +30º +40º +50º +60º +70º +80º +90º +100º
0º
100.00W 103.90W 107.79W 111.67W 115.54W 119.40W 123.24W 127.07W 130.89W 134.70W 138.50W
+100º
138.50W 142.29W 146.06W 149.82W 153.58W 157.31W 161.04W 164.76W 168.46W 172.16W 175.84W
+200º
175.84W 175.91W 183.17W 186.82W 190.45W 194.07W 197.69W 201.29W 204.88W 208.45W 212.02W
+300º
212.02W 215.57W 219.12W 222.65W 226.17W 229.67W 233.17W 236.65W 240.13W 243.59W 247.04W
Figure 29: Temperature/Resistance Relationship Class B. Resistance @ 0ºC = 100.0, Alpha = 0.003850
Page 45

OVEN SYSTEMS
Accessing Parameters
WARNING: DO NOT perform this
procedure unless instructed by
TurboChef.Changing the parameters to
other than those preset by TurboChef can
damage critical oven components.
NOTE: “Motor Rated Speed” (07) is RPM of
motor before gearbox, not after.
1. Open the right end bell (page 1).
2. Locate the CMSC (page A-8).
3. Press the
M key.
4. Use the and keys to navigate the
parameters.
5. Press the M key to access the parameter
shown on the CMSC display.
6. Use the and keys to manipulate the
parameter.
7. Press the M key to return to the parameter
selection.
8. Repeat steps 4-7 to manipulate other
parameters as needed.
The Blower System
This section contains information about and
testing procedures for the following
components:
-Blower Motor
-Blower Motor Speed Controller (BMSC)
Blower Motor
The main blowers are 3400 RPM, 3-phase
blower motors. The speed of the blower motor
is controlled by the voltage frequency applied to
the motor windings from the blower motor
speed controller (BMSC).
Testing Procedure
1. Disconnect line voltage from the unit.
2. Take a resistance reading of the motor
windings and use Figure 31 to verify the
resistance readings are correct.
3. If the resistance readings are correct,
reconnect motor wiring and then apply
line voltage to the unit and check for
voltage applied to the motor windings.
4. If no voltage is present, ensure the BMSC is
operating properly (see below).
5. If BMSC is operating properly, inspect the
wire harness for damage or shorts (page 45).
6. If wire harness is intact and undamaged and
the BMSC is operating properly, the blower
motor is damaged or defective and must be
replaced (page A-8 = lower, A-12 = upper).
Blower Motor Speed Controller (BMSC)
The BMSC converts single-phase line voltage
(208-240 VAC) to a three-phase output. The
speed of the blower motor is controlled by the
frequency output of the BMSC. The BMSC
receives an input voltage (0-10 VDC) from the
I/O control board and adjusts the frequency
output to the blower motor.
Testing Procedure
CAUTION: Capacitors on the BMSC
may retain charge after power is removed.
To discharge capacitors for further safety,
short B+ and B- together.
WARNING: DO NOT connect
incoming AC power to output terminals
U, V, or W or terminals B+ or B-. This
will seriously damage the BMSC.
1. Ensure that no faults appear on the display
during the operation of the BMSC. The
control will display the frequency output if
the system is operating correctly.
25
To From Description Expected Resistance
Blue Brown Winding (A-B)
5.1-5.5 W
Blue White Winding (A-C)
5.1-5.5 W
Brown White Winding (B-C)
5.1-5.5 W
Blue, Brown, or
White
Green
Windings to
chassis
Open
Figure 31: Blower Motor Ohm Chart (Motor Windings)
Page 46

2. Check the input voltage on terminals L1
& L2 (208-240 VAC) and the DC voltage
input on terminals 2 & 5 (0.1-10 VDC).
3. If no voltage is present, inspect the wire
harness for damage or shorts (page 45).
4. If wire harness is intact and undamaged,
the BMSC is damaged or defective and
must be replaced (page A-8 = lower, A-12 =
upper).
Accessing Parameters
WARNING: DO NOT perform this
procedure unless instructed by
TurboChef.Changing the parameters to
other than those preset by TurboChef can
damage critical oven components.
1. Open the right or left end bell depending
on which BMSC requires testing
(page 1, A-1).
2. Locate the BMSC (page A-1).
3. Press the MODE key.
4. Use the keys to navigate the parameters.
5. Press the MODE key to access the parameter
shown on the BMSC display.
6. Use the keys to manipulate the
parameter.
7. Press the MODE key to return to the
parameter selection.
8. Repeat steps 4-7 to manipulate other
parameters as needed.
The Burner System
This section contains information about and
testing procedures for the following
components:
- Air Pressure Switch
- Burner Transformer
- Combustion Blower
- Modulating Gas Valve
- Ignition Module
Air Pressure Switch
The air pressure switch contacts close when a
0.1in WC (2.54mm WC) differential exists
between the two ports. The air pressure switch
has one negative port and one positive. The air
tube from the combustion blower is attached to
the positive port. The air tube must not be damaged in any way (cracked or split). The connection must be tight at the combustion blower and
the switch itself to ensure proper operation of the
air pressure switch.
Testing Procedure
1. Attach a digital manometer to the air tube
coming from the combustion blower.
2. A reading above 0.1in WC (2.54mm WC)
is required to close the contacts. If the
reading is below 0.1in WC (2.54mm WC),
check the combustion blower operation.
Burner Transformer
The burner transformer converts incoming line
voltage to 24 VAC output.
Testing Procedure
1. Disconnect line voltage to the burner
transformer.
2. Remove the burner transformer lead wires.
3. Check the resistance of the primary and
secondary windings, refer to Figure 33, to
determine if the transformer is functioning
properly.
4. Set up the wire configuration for 208 or 240:
- 208 VAC installation: connect wire B
(blue) to wire C (blue). Figure 32, below, is
configured for 208 VAC operation.
- 240 VAC installation: connect wire A (red)
to wire C (blue).
26 OVEN SYSTEMS
B
C
A
Figure 32: Burner Transformer Wires
Page 47

OVEN SYSTEMS
27
Combustion Blower
The combustion blower is a 3000 RPM, 208240 VAC, 0.33 A, 50/60 hz, blower motor.
The winding resistance is 92
W. The combus-
tion blower receives line voltage (208-240 VAC)
from the K3 relay. Once the combustion blower
reaches full speed, the air pressure switch closes,
applying 24 VAC to the ignition module.
Testing Procedure
1. Disconnect line voltage from the unit.
2. Take a resistance reading of the winding;
resistance should be 92
W. If resistance
is incorrect, the combustion blower is
damaged or defective and must be replaced
(page A-14).
3. Apply line voltage to the unit and check for
line voltage (208-240 VAC) applied to the
winding when the unit is calling for heat
and the K3 relay is closed.
4. If no voltage is present, inspect the wire
harness for damage or shorts (page 45).
5. If the wire harness is intact and undamaged,
the combustion blower is damaged or
defective and must be replaced (page A-14).
Modulating Gas Valve
The modulating gas valve is a combination gas
valve with a 24 VAC primary solenoid valve
and 0.1-10 VDC modulating valve. The
primary solenoid valve receives 24 VAC from
the ignition module. The resistance of the
primary solenoid valve is 535 k
W. The
modulating valve receives 0.1-10 VDC from
the control board. The resistance of the
modulating valve is 44
W. The modulating
valve has an adjustment shaft that adjusts the
high and low flame pressure.
Testing Procedure
NOTE: See page 3 for instructions on adjusting
the high and low flame gas pressure.
1. Disconnect line voltage from the unit.
2. Take a resistance reading of both coils,
resistances should be 535k W and 44
W. If resistance is incorrect, the gas
valve is damaged or defective and must be
replaced (page A-14).
3. During warmup and cook mode, apply
line voltage to the unit and check for 24
VAC at the primary solenoid coil and
0.1-10 VDC at the modulating valve coil.
4. If no voltage is present, inspect the wire
harness for damage or shorts (page 45).
5. Check for 24 VAC leaving the ignition
module (see Figure 35, page 28)
6. If wire harness is intact and undamaged,
the modulating gas valve is damaged or
defective and must be replaced (Pipe and
valve assembly, page A-14).
Ignition Module
The ignition module generates 30,000 V at the
spark igniter stud for direct ignition of the main
burner when 24 VAC is applied. The module
senses the presence of the burner flame and
discontinues the ignition spark.
If the burner fails to ignite within 6 seconds,
the module goes into safety lockout. If the
burner does not maintain 1.5 DC uA minimum, the timed trial for ignition (6 seconds) is
repeated and safety lockout occurs. If safety
lockout occurs, power must be removed from
the module before it can be restarted.
Testing Procedure
NOTE: The ignition module is different in
domestic and international model ovens. Figure
34 shows the differences in the terminal labels
between the two models.
To From Expected Resistance
Primary
Black White (240 VAC Input)
28.1 W
Black Blue (240 VAC Input)
53.1 W
Black Red (240 VAC Input)
62.4 W
Secondary
Yellow Yellow
0.80 W
Figure 33: Burner Transformer Ohm Chart
Page 48

28
1. Shut off the gas supply.
2. Disconnect the wire spark cable from the
stud terminal of the ignition module. This
will isolate the burner spark rod from the
ignition module.
3. Using a different wire spark cable (ensure
that the cable is not damaged in any way),
attach one end to the stud terminal of the
ignition module.
4. Touch the other end of the ignition cable to
the ground terminal of the ignition module
(DO NOT remove the existing ground lead
from the ignition module).
5. Apply power to the ignition module.
6. Before the ignition module goes into a
safety lockout (6 seconds), slowly move the
end away from the ground terminal. A
spark length of 1/8” (3 mm) or more
indicates good ignition voltage. If there is
no arc or the maximum spark length is less
than 1/8” (3 mm), and the input voltage to
the ignition module is 20-25 VAC, the
ignition module is damaged or defective
and must be replaced (page A-14).
Testing Procedure for Testing Flame Rectification
Figure 35
1. Ensure the oven is in the off or cooling down
mode (page 10).
2. Remove the flame signal ground wire from
the ignition module.
3. Connect a DC multipurpose meter that is
able to read micro amps (uA) in series with
the flame signal ground wire.
-Connect the red (+) meter lead to the free
-end of the flame signal ground wire.
-Connect the black (-) meter lead to the quick
-connect flame signal ground wire terminal
-on the ignition module.
4. From the off or cooling down mode, select a
cooking profile to operate the oven burner.
5. The reading must be above 1.5 DC uA and it
must be steady.
The oven control system uses basic flame
rectification to verify if a flame is present. The
micro amps must be greater than 1.5 DC uA. If
the reading is below 1.5 DC uA or is not steady,
remove the burner assembly and investigate the
cause. Look for a loose ignition/sensor wire, or
defective sensor assembly. Follow the
troubleshooting steps outlined on pages 34-35.
OVEN SYSTEMS
Domestic International
25 VAC TH/W
25 V V2 GND
Alarm Not Used
Valve V1/PV1
Valve V2 GND
Ground V2 GND
Figure 34: Ignition Module Terminal Differences
ALARM
VALVE
GND
VALVE
RED (+)
BLACK (-)
MULTIPURPOSE METER
Figure 35: Measuring Microamps
Page 49

Troubleshooting
Page 50

Page 51

TROUBLESHOOTING
29
Overview of Troubleshooting
This section contains information on the
following:
- Fault code descriptions
- Fault code troubleshooting
- Non-fault code troubleshooting
Fault Code Descriptions
Fault codes are logged in a fault counter (page
16) for troubleshooting. Upon completing the
service call and restoring successful operation of
the oven, the technician should clear all faults
(see page 20).
F1: Blower Failure
This fault is displayed if for three consecutive
times the control board does not receive the
“status OK” signal from the BMSC.
The fault is cleared from the display if the
blowers successfully restart upon starting a cook
cycle or in TEST MODE.
F2: Low Temp During Cook
The oven will emit a beeping noise and display
this fault if the cook cavity temperature falls
25°F (14°C) below the current cooking profile’s
set temperature, and the fault will be logged in
the fault counter.
The fault is cleared from the fault display if the
cook cavity temperature returning to within
25°F (14°C) of the set cooking temperature
during cooking or in TEST MODE.
F3: Flameout
This fault is displayed if the flame fails to light
three consecutive times at startup, or once the
oven reaches the cooking temperature, the
flame goes out and fails to re-light three
consecutive times.
The fault is cleared from the display if the flame
succeeds to light when the user re-selects the
cooking profile.
F4: Emergency Stop
This fault is displayed when the emergency stop
key is pressed.
This fault acts as a counter that logs how many
times the emergency stop key (page 9) has been
pressed.
The fault is cleared from the display once the
oven is restarted.
F5: CC Over Temp
This fault is displayed if the cook cavity’s temperature reaches or exceeds 625°F (329.4°C).
The fault is cleared from the display once the
oven is restarted and the temperature recedes
below 625°F (329.4°C).
F6: EC Over Temp
This fault is displayed if the equipment chamber reaches 149°F (65°C); however, the oven
will not shut down and the fault will not be
logged in the fault count log unless the equipment chamber reaches 158°F (70°C).
The fault is cleared from the display when the
equipment chamber temperature falls below
149°F (65°C).
F7: RTD Failure
This fault is displayed if the RTD circuit is
open, shorted, reads above 645°F (340.5°C), or
reads below -40°F (-40°C).
The fault is cleared from the display if the RTD
circuit is closed, or the temperature reads within
645°F (340.5°C) and 40°F (-40°C)
Page 52

30 TROUBLESHOOTING
F8: High Limit Tripped
This fault is displayed if the high limit switch
trips. The switch trips when the high limit
probe reads approximately 600°F (315.5°C).
The fault is cleared from the display when the
high limit switch is manually reset.
F9: Belt Fault
This fault occurs if the conveyor belt fails to
start.
The fault is cleared from the display if the
conveyor belt starts when initiating cooking.
F10: Air Switch Fault
This fault occurs if the air pressure switch on
the burner fails to close when the burner circuit
is energized.
The fault is cleared from the display when the
air pressure switch closes after the burner circuit
is energized.
Fault Code and Description When Active Refer to...
Warming Idle Cooking Test
F1: Blower Failure
a a a a
Page 31
F2: Low Temp During Cook
a
Page 32
F3: Flameout
a a a a
Page 34
F4: Emergency Stop
a a a a
N/A
F5: CC Over Temp
a a
Page 36
F6: EC Over Temp
a
a a a
Page 37
F7: RTD Failure
a
a a a
Page 38
F8: High Limit Tripped
a a
Page 38
F9: Belt Fault
a a a
Page 39
F10: Air Switch Fault
a a a a
Page 40
NOTE: All fault codes, except F2 and F9 will terminate cooking upon discovery. Any fault that
occurs will be logged in the in the fault count log (page 16), except F6.
Figure 36: Fault Code Table
Page 53

TROUBLESHOOTING
31
Fault Code Troubleshooting
From TEST MODE, you can test separate oven components to help diagnose an issue. To access TEST
MODE, see page 16.
Troubleshooting:
F1:BLOWER FAULT (Blower Failure)
Access the TEST MODE.
(page 16)
Are the status indicators at
location 6 and 7 present
(pages 18-19)?
NO
YES
6
7
Open Left End
Bell.
Is a fault code
present on the
BMSC?
Open the Right
End Bell.
Is a fault code
present on the
BMSC?
CF, cF, F1, or GF fault: EPM module
is faulty. Replace BMSC (page A-8 =
lower, page A-12 = upper).
AF fault: Temperature is too high in
housing. Check cooling system (page
41).
Any other fault:
Call technical support.
YES
YES
NONO
Is the wiring connected properly?
Check the BMSC, blower motor, and
I/O control board.
Correct wiring
or replace I/O
control board,
BMSC, or
blower motor
if damaged
(page A-8 =
lower, A-12 =
upper).
YES
Check the I/O control
board, BMSC, and blower
motor wiring (page 45).
Is the blower motor
spinning freely?
NO
Remove obstruction or, if
necessary, replace blower
motor (page A-8 = lower,
A-12 = upper).
YES
Do resistance measurements
between windings and
chassis agree with values on
motor windings resistance
table (Figure 37)?
YES
Replace BMSC (page A-8 =
lower, A-12 = upper).
NO
Replace the
blower motor
(page A-8 =
lower, A-12 =
upper).
To From Description Expected Resistance
Blue Brown Winding (A-B) 5.1-5.5 W
Blue White Winding (A-C) 5.1-5.5 W
Brown White Winding (B-C) 5.1-5.5 W
Blue, Brown, or White Green Windings to chassis Open
Figure 37: Motor Windings Resistance Table
NO
Page 54

32 TROUBLESHOOTING
Troubleshooting:
F2: LOW COOK TEMP (Low Temp During Cook)
Restart the oven, access the TEST MODE, and turn on
both the top and bottom blowers. Are the status indicators at location 6, 7, 8, and 9 present (pages 18-19).
Open the right end bell.
NO
Fix wiring/connections.
Is the gas line properly
connected (i.e. no
crimps, breaks, or leaks)?
NO
Fix connection.
YES
Test the RTD
(page 24 for resistance/
temperature chart).
Is the RTD damaged
or defective (page 23)?
NO
Replace the I/O control
board (page A-8).
YES
Troubleshoot the
blowers (page 31).
NO
YES
Is the maximum and
low fire gas pressure
set correctly
(page 3)?
Reset maximum and
low fire gas pressure
(page 3).
YES
NO
Are the gas valve and RTD
properly connected to the
I/O control board (page 45)?
YES
Are the nozzles and plenums
correctly installed (pages 7-8,
steps 9-13)?
NO
Correctly reinstall the
nozzles and plenums.
YES
Page 55

TROUBLESHOOTING
33
This page intentionally
left blank.
Page 56

34 TROUBLESHOOTING
Troubleshooting:
F3: NO FLAME (Flameout)
Does the burner ignite?
NO
Is the gas line connected
and the gas supplied
turned on?
YES
NO
Is the unit calling for
heat (If % on front
display is greater
than 0%)?
Fix the
connection
or turn the
gas supply
on.
YES
Remove the cooling duct and rear
access panel (page
1). Is the manual
valve “open?”
YES
NO
Open the
manual valve
(page A-14).
Does the ignition
module have 24
VAC applied?
YES
Is the set temperature
higher than the cook
cavity temperature?
Is the burner attempting to ignite (is spark
present) (page 27)?
YES
NO
Is gas pressure present
when unit is sparking?
YES
NO
Is the
pressure on
the gas valve
set correctly
(page 3)?
NO
Reset the gas
pressure
(page 3).
YES
Inspect, clean,
or if needed,
replace the
burner
assembly
(page A-14).
Is inlet gas pressure present?
Inlet gas pressure must be between 6” W.C. (152.4
mm W.C.) & 14” W.C. (355.6 mm W.C.).
Is the wire spark
cable damaged or
disconnected
(page A-14).
YES
Replace the
modulating
gas valve
(page A-14).
NO
Check inlet gas
connections and
supply.
YES
Replace the
wire spark
cable (page
A-14).
NO
Is the spark rod
damaged or dirty?
YES
Clean or (if necessary) replace
the spark rod (page A-14).
Replace the
ignition
module
(page A-14).
NO
NO
Adjust the set
temperature.
NO
YES
Turn the oven
off and then
on. Does the
burner ignite
and the fault
clear?
NO
Operate
normally.
YES
YES
NO
Page 57

TROUBLESHOOTING
35
Is the 100% and
minimum flame
adjusted correctly
(page 3).
YES
NO
Adjust the 100% and
minimum flame
(page 3).
Is at least 1.5 uA
maintained by the
burner (page 28)?
NO
Inspect and if needed,
replace the burner
assembly (page A-14).
Inspect and if needed,
replace the flame sense
rod (page A-14).
Does the burner transformer have 24 VAC
output (page 26)?
NO
Does the burner transformer have line voltage
applied to input?
YES
Replace the burner
transformer
(page A-8).
YES
Are the contacts
on the high limit
thermostat closed
(page A-14)?
NO
Inspect or replace the
high limit thermostat
(page A-14).
Is the air pressure
switch closed?
Is the combustion
blower running?
Check the wiring.
(page 45)
YES
YES
YES
Is the air tube
tightly connected?
NO
Is voltage
applied to the
combustion
blower?
NO
Check the wiring
(page 45).
YES
Replace the
combustion
blower
(page A-14).
Replace the
air tube.
Replace the
air pressure
switch
(page A-14).
YES
NO
Is the K3 gas
relay closing
(page 22)?
NO
YES
Check the
Wiring
(page 45).
Is 24 VDC
applied to the
K3 gas relay?
YES
Replace the
K3 gas relay
(page A-8).
NO
Replace the I/O
control board
(page A-8).
NO
NO
YES
Page 58

36 TROUBLESHOOTING
Troubleshooting:
F5: CC OVER TEMP (CC Over Temp)
NO
Is the unit calling for
heat? (if % on front
display is greater
than 0%)
YES
Is the set temperature
higher than the cook
cavity temperature?
YES
Adjust the set
temperature
(page 13).
Replace the I/O
control board
(page A-8).
NO
Open the rear access
panel (page 1).
Remove the white
wire from the modulating gas valve (page
A-14). Does the unit
continue to heat?
YES
NO
Is the white wire
shorted to the
chassis?
YES
NO
Repair wiring
(page 45).
Replace the I/O
control board
(page A-8).
Reset the minimum
flame gas pressure
(page 3). Does the oven
continue to heat?
Replace the
modulating
gas valve.
(page A-14)
Operate
normally.
YES
NO
Page 59

TROUBLESHOOTING
37
Troubleshooting:
F6: EC OVER TEMP (EC Over Temp)
Are the air filters on the
left end bell clean (page 1)?
NO
Clean the air
filter(s) (page 5).
YES
Is the oven hot?
NO
YES
Access TEST
MODE (page
16). Is the status indicator at
position “b”
(page 18-19)
less than 65?
NO
Replace the I/O
control board
(page A-8).
Open the left
end bell. Are
the cooling fans
running?
YES
Check for
-Obstructions in the cooling tunnel.
-Dirt or debris in the cooling fan blades.
-A heat source near the filter.
YES
NO
Are the cooling
fans receiving
correct voltage
(page 45)?
YES
Replace the
cooling fans
(page A-12).
Is the cooling fan thermostat closed (page 23)?
NO
NO
Replace the
thermostat
(page A-14).
YES
Check the
wiring
(page 45).
Page 60

38 TROUBLESHOOTING
Troubleshooting:
F8: HIGH LIMIT TRIPPED (High Limit Trip)
Is the high limit thermostat
tripped (page 21)?
Reset and determine why it
tripped - over temp, blower
failure, etc.
Check if the high limit probe
or RTD is damaged or defective, replace if needed (page
A-8).
Ensure that the minimum gas
pressure is correctly set, reset
if needed (page 3).
NO
YES
Troubleshooting:
F7: RTD FAULT (RTD Failure)
Open the right end bell.
Is the RTD damaged or
defective (page 23)?
Is the RTD
connected
properly to the
I/O control
board
(page 45)?
Replace the I/O
control board
(page A-8).
NO
Correct wiring
(page 45).
Replace the RTD
(page A-8).
YES
NO
NO
YES
YES
Replace RTD
(page A-8).
Are all the contacts
closed on the high
limit thermostat?
Is the wiring
correct
(page 45)?
NO
YES
Replace the high
limit thermostat
(page A-14).
NO
YES
Correct wiring
(page 45).
Replace the I/O
control board
(page A-8).
Is the RTD open? Using an ohmmeter,
measure at the control board (pages 45-
47). RTD should measure approximately 4-5 W. (See page 24 for
ohm/temperature chart.)
Page 61

TROUBLESHOOTING
39
Troubleshooting:
F9: BELT FAULT (Total Belt Run Failure)
Are there any obstructions that
are blocking the conveyor’s
movement or is the conveyor
belt damaged?
Remove obstruction or
replace/repair the conveyor and
restart the oven. Is the F9 fault
code still present?
YES
Operate the oven as
you would normally.
NO
Remove the chain guard
(page A-6).
Is the chain damaged or
obstructed in any way?
NO
YES
Remove obstruction
or, if necessary,
replace the chain.
YES
NO
Open the right end bell. Is the
wiring correctfrom the conveyor
motor to the conveyor motor
controller to the control board
correct (page 45)?
NO
Correct wiring (page 45).
Is the conveyor motor, CMSC, or
I/O control board damaged or
defective (see Figure 38 for motor
winding resistance).
YES
To From Description Expected Resistance
White Gray Winding (A-B) 215-217 W
White Black Winding (A-C) 215-217 W
Gray Black Winding (B-C) 215-217 W
White, Gray, or Black Chassis Windings to chassis Open
Figure 38: Motor Ohm Chart (Motor Windings, not Hall Effect Sensor)
NO
Check that the CMSC
settings correctly
correspond with
TurboChef settings.
Call service.
YES
Replace needed
parts (page A-8).
Page 62

40 TROUBLESHOOTING
Is the output of the burner
transformer 24 VAC (page
28)?
Troubleshooting:
F10: Air Pressure Switch Fault
Are all the contacts
on the high limit
thermostat closed?
Does the burner transformer have line voltage
applied to input
(208-240 VAC)?
YES
Replace the burner
transformer
(page A-8).
NO
Investigate the reason for
the high limit tripping. If
the thermostat is defective,
replace it (page A-14).
Is the air pressure
switch closed?
YES
YES
NO
NO
YES
Is the wiring
correct
(page 45)?
NO
YES
NO
Correct wiring
(page 45).
Replace the
I/O control
board
(page A-8).
YES
NO
Is the air tube
connected tightly?
YES
NO
Replace the
air tube.
Replace the
air switch
(page A-14).
Is line voltage
applied (208-240
VAC) to the
BMSC (page 25)?
YES
NO
Check the
wiring
(page 45).
Replace the
combustion
blower
(page A-14).
Are the K3 relay
contacts closed?
YES
Check the
wiring (page 45).
NO
Is coil voltage
(24 VDC)
applied to the
K3 relay (page
22)?
NO
YES
Replace the I/O
control board
(page A-8).
Replace the K3
relay (page A-8).
Is the combustion
blower running?
Page 63

TROUBLESHOOTING
41
Troubleshooting:
Cooling System Issue
Is the oven in an area of moderate
temperature (120ºF [49ºC] or cooler)?
Does the oven have
room to ventilate
(not tightly enclosed
by other appliances
or fixtures)?
Relocate oven to
cooler area.
Move oven to open area
or remove items that are
in close proximity.
NO
NO
YES
Remove the cooling fan
tube (page 1).
Is there an obstruction?
NO
YES
Remove the
obstruction.
NO
Is the cooling fan
thermostat closed
(page 23)?
NO
YES
Replace the
cooling fan
thermostat
(page A-12).
Is line voltage
applied (208-240
VAC) to the
cooling fans?
Replace the
cooling fans
(page A-12).
YES
NO
Check the
wiring for
problems
(page 45).
YES
Is the air filter dirty and/or
the vent obstructed?
Replace air filter and/or
remove obstruction.
YES
Non-Fault Code Troubleshooting
This section provides troubleshooting tips for issues that may occur independently of an oven fault.
Page 64

42 TROUBLESHOOTING
Troubleshooting:
Food Not Cooking Properly
Does the problem occur for all
programmed recipes? For
example, are all recipes undercooked/overcooked/etc.?
Is the food item in the
correct starting state
(e.g., frozen, fresh, etc.)?
Is the correct
amount of food
(portion) being
cooked?
Ensure the
food item is
being properly stored/prepared before
cooking.
Ensure that the correct
amount is being
cooked - not more or
less than the recipe
specifies.
Is the food item being prepared correctly and consistently? For example, confirm meat is sliced at correct thickness,
pizza dough is correct consistency, etc.
Ensure that the
food item is
properly prepared.
Are there any fault
codes present?
Troubleshoot the
fault(s) using the
steps on pages
31-40.
Are there any fault
codes present
(page 29-30)?
Replace the I/O
control board
(page A-8).
Troubleshoot the
fault(s) using the steps
on pages 31-40.
Does the problem
occur EVERY time the
food item is cooked?
YES
NO
YES
NO
YES
YES
Has the oven been cleaned
or moved prior to the
problem starting?
Was the oven
cleaned?
YES
NO
YES
Ensure the gas is
connected correctly
and adjust the gas
pressures if needed
(page 3).
Does the problem
remain?
Ensure nozzles and
plenums are correctly
installed.
Does the problem
remain?
YES
Operate the
oven normally.
NO
NO
NO
YES
NO
YES
NO
YES
YES
NO
NO
NO
Are the plenums and
nozzle plates correctly
installed (pages 7-8,
steps 9-13)?
Correctly reinstall
plenums and nozzle
plates (page 7-8).
YES
Are the conveyor motors, CMSCs,
blowers, BMSCs, burner, and combustion blower working correctly
(pages 23-28)? Is the wire harness
properly connected (page 45)?
Replace/correct the
operation of the
conveyor motors
and/or CMSCs,
blower and/or
BMSCs, burner
and/or combustion
blower, and/or
wiring harness (page
23-28, 45).
NO
NO
YES
Page 65

TROUBLESHOOTING
Is the keypad cable properly connected
to the control board?
Troubleshooting:
No Keypad Input
Replace the keypad (page A-8).
If the problem persists, or if beeps occur when
buttons are pressed but commands do not register on the display, replace the control board
(page A-8).
Correct wiring.
YES
NO
Troubleshooting:
No Display - Screen is Blank
Does the keypad beep when a
key is pressed?
Replace the fuses (page A-8).
Correct wiring.
If ribbon cable is
damaged, replace the
keypad (page A-8).
Replace the power
supply (page A-8).
Replace the I/O control board (page A-8).
Check wiring from the
power supply to the control
board. Correct wiring if
necessary (page 45).
Verify 5 VDC is present
on pin 1 of the J3
connector (page 45). If
not, replace the control
board (page A-8).
Is the control board receiving correct VDC
(page 45-46)?
Is the power supply
output 24 VDC?
Is the 24 VDC power
supply receiving
power?
Replace the display and
ribbon cable.
(page A-8)
Is 5 VDC present on pin 1 of
the J3 connector? (page 45)
Is wiring from the
control board to
the display
(including the ribbon cable) OK
(page 45)?
YES
NO
NO
NO
NO
YES
YES
YES
NO
NO
YES
YES
43
Page 66

This page intentionally
left blank.
44 TROUBLESHOOTING
Page 67

Schematics
Page 68

Page 69

SCHEMATICS
45
Page 70

46
SCHEMATICS
Page 71

SCHEMATICS
47
Page 72

Page 73

Appendix A - Replacing
Oven Components
Page 74

Page 75

APPENDIX A - REPLACING OVEN COMPONENTS
A-1
Replacing Oven Components
WARNING: Before removing or replacing any oven component, thoroughly read the safety
instructions found at the front of this manual and Oven Systems (pages 21-28). Adhere to
all precautions and warnings outlined in these sections, as failure to do so could result in
serious injury or death.
To Replace This...
First Open or Remove This...
Item Part Number
No Panel
Removal
Required
(Page A-6)
Right End Bell
(Page A-8)
Left End Bell
(Page A-12)
Back Panel
(Page A-14)
Air Pressure Switch 102836
a
Blower Motor, Lower HHC-6520
a
Blower Motor, Upper HHC-6520
a
Blower Motor Controller (BMSC), Lower 103580
a
Blower Motor Controller (BMSC), Upper 103580
a
Blower Wheel, Lower 103567
a
Blower Wheel, Upper 103567
a
Bolt Retainer Bracket HHC-6426
a
Bracket, CMSC HHC-6606
a
Bracket, Dual Fan Mounting HHC-6371
a
Bracket, EMI Filter HHC-6342
a
Bracket, Gear Drive Controller HHC-6465
a
Bracket, Thermostat HHC-6390
a
Burner Assembly HHC-6468
a
Cable, Display, Power, 2-Pin 100193
a
Cable, Display, Ribbon 100184
a
Cable, Smart Card Reader 103023
a
Caster 102799
a
Catch, Slotted Eyebrow HHC-6499
a
Chain Guard HHC-6411
a
Chin Assembly, Left End HHC-6464
a
Chin Assembly, Right End HHC-6463
a
Clamp, Conduit, 1/2 Nominal, Zinc 103632
a
Collar, 5/8-inch Shaft 100257
a
Combustion Motor (90o) 103620
a
Combustion Motor (Inline) 103656
a
Combustion Motor Controller (90o, Nat Gas) HHC-6630-3
a
Combustion Motor Controller (Inline, Nat Gas) HHC-6630-4
a
Combustion Motor Controller (90o, Propane) HHC-6630-5
a
Combustion Motor Controller (Inline, Propane) HHC-6630-6
a
Control Board CON-7002
a
Conveyor Belt Kit, Single, Left to Right HHC-6561-1
a
Conveyor Belt Kit, Single, Right to Left HHC-6561-2
a
Conveyor Belt Kit, 50/50 Split, Left to Right HHC-6661-1
a
Conveyor Belt Kit, 50/50 Split, Right to Left HHC-6661-2
a
Conveyor Belt Kit, 70/30 Split, Left to Right HHC-6662-1
a
Page 76

A-2
To Replace This...
First Open or Remove This...
Item Part Number
No Panel
Removal
Required
(Page A-6)
Right End Bell
(Page A-8)
Left End Bell
(Page A-12)
Back Panel
(Page A-14)
Conveyor Belt Kit, 70/30 Split, Right to Left HHC-6662-2
a
Cord, Power, 12/3, SOOW, NEMA L620 HHC-6311-1
a
Cover, Blower Insulation, Lower HHC-6367
a
Cover, Blower Insulation, Upper HHC-6367
a
Cover, Burner Compartment HHC-6137
a
Cover, Left End Bell HHC-6529
a
Cover, Right End Bell HHC-6528
a
Display 100505
a
EMI Filter 100542
a
Fan, Cooling, Lower 100083
a
Fan, Cooling, Upper 100083
a
Filter, Air, Front, 11.75”x 7.5” HHC-6017
a
Filter, Air, Rear, 9” x 3.25” HHC-6343
a
Flame Sensor 103624
a
Flame Sensor Wire 103575
a
Flame Spreader See Burner Assembly
a
Fuse 100599
a
Fuse Block 103548
a
Gas Pipe, 8” (Between Stacked Ovens Only) 103572
a
Gas Pipe, 10” (Single or Lower Oven Only) 103576
a
Gas Valve, Modulating 102832
a
Gear Drive, Dual Belt HHC-4120
a
Gear Drive, Single Belt HHC-6538
a
Gear Drive Controller (Dual Drive) HHC-6630-2
a
Gear Drive Controller (Single Drive) HHC-6630-1
a
Geared Hub HHC-6607
a
Handle, Window HHC-6632
a
Heat Slinger, Blower, Lower 102708
a
Heat Slinger, Blower, Upper 102708
a
Ignition Module 103626
a
Keypad HHC-1234
a
Label, Caster Notice HHC-6610
a
Label, Caution, Hot Surface NGC-1137
a
Label, Cleaning Cautions HHC-6653
a
Label, Filter I5-9372
a
Label, Gas-Fired cULus HHC-6649
a
Label, Notice HHC-6611
a
Label, Operating Instructions HHC-6612
a
Label, Servicing Cautions HHC-6655
a
Label, TurboService Number NGC-1170
a
Label, UL NSF NGC-1171
a
Leg Kit, 14-Inch HHC-6850-14
a
APPENDIX A - REPLACING OVEN COMPONENTS
Page 77

APPENDIX A - REPLACING OVEN COMPONENTS
A-3
To Replace This...
First Open or Remove This...
Item Part Number
No Panel
Removal
Required
(Page A-6)
Right End Bell
(Page A-8)
Left End Bell
(Page A-12)
Back Panel
(Page A-14)
Leg Kit, 20-Inch HHC-6850-20
a
Leg Kit, 26-Inch HHC-6850-26
a
Literature Packet HHC-6654
a
Manometer Kit, Electronic with Nylon Case HHC-3001
a
Menu, HhC3240 Call Customer Service
a
Nutplate, Drive Bracket HHC-6396
a
Panel , Conveyor Drive HHC-6462
a
Pipe and Valve Assembly HHC-6513
a
Plate, Conveyor Drive, Double HHC-6467
a
Plate, Blower Motor, Lower HHC-6405
a
Plate, Blower Motor, Upper HHC-6405
a
Plate, Blower Mounting, Lower HHC-6404
a
Plate, Blower Mounting, Upper HHC-6404
a
Plenum, Lower HHC-6565-2
a
Plenum, Upper HHC-6565-1
a
Power Supply, Domestic HHC-6501
a
Power Supply, International 101211
a
Relay, K3, 24 VDC, 20A 101274
a
Relay, K4, Sealed, 24 VAC, 20A 101275
a
RTD Probe HHC-6517
a
Shield, Gas Pipe HHC-6613
a
Shutter, Inlet Air Blower HHC-6617
a
Smart Card Reader 100506
a
Spark Assembly 103623
a
Spark Assembly Wire 103574
a
Speaker 104155
a
Sprocket, 1" Bore 101906
a
Spur Gear, 2.75 PD, 1/2-inch Bore 101895
a
Spur Gear, 3.5 PD, 5/8-inch Bore 101903
a
Switch, Momentary, Mushroom (Idle Button) 102831
a
Thermostat, 120F, Close on Rise 102086
a
Thermostat, High Limit 102075
a
Top, Outer Curved HHC-6482
a
Transformer, Burner 102837
a
Tube, Cooling Fan HHC-6374
a
Tube, Flexible, Gas, 1/2-Inch 103628
a
Tube, Flexible, Gas, 1/2-Inch, with LP Orifice 103633
a
Weldment, Bracket, Single Drive HHC-6557
a
Weldment, Bracket, Split Belt HHC-6309
a
Page 78

To Replace This...
First Open or Remove This...
Item Part Number
No Panel
Removal
Required
(Page A-6)
Right End Bell
(Page A-8)
Left End Bell
(Page A-12)
Back Panel
(Page A-14)
Weldment, Shaft, Internal Drive HHC-6306
a
Window Kit HHC-3003
a
Wire Harness, Conveyor Drive AC HHC-6598-4
a
Wire Harness, Cooling Fan HHC-6598-2
a
Wire Harness, HV, Main HHC-6598-1
a a a
Wire Harness, K3 Relay and Transformer HHC-6598-3
a
Wire Harness, LOV, Air Switch, 25V HHC-6599-3
a
Wire Harness, LOV, High Limit, 25V HHC-6599-6
a
Wire Harness, LOV, Ignition Alarm HHC-6599-2
a
Wire Harness, LOV, K4 Ground HHC-6599-4
a
Wire Harness, LOV, Main HHC-6599-1
a a a
Wire Harness, LOV, Signal, Gear Drive HHC-6599-5
a
A-4 APPENDIX A - REPLACING OVEN COMPONENTS
Page 79

APPENDIX A - REPLACING OVEN COMPONENTS
A-5
This page intentionally
left blank.
Page 80

A-6 APPENDIX A - REPLACING OVEN COMPONENTS
Caster
Catch, Slotted Eyebrow
Chain Guard
Chin Assembly, Right End
Chin Assembly, Left End
Conveyor Belt Kit
(Single Belt Shown)
Cover, Right Endbell
Filter, Air, Front, 11.75” x 7.5”
Handle, Window
Window Kit
Keypad
Label, Operating Instructions
Label, Caster Notice
Label, Service Cautions
Label, Notice
Label, Gas-Fired cULus
Label, UL NSF
Label, Cleaning Cautions
Leg Kit (4 legs
with casters per kit)
Top, Outer Curved
Label, Filter
Cover, Left Endbell
Tube, Cooling Fan
Cover, Burner Compartment
(NOTE: Remove Cooling Fan Tube)
Cooling Fan Tube Thumb Screw
Filter, Air, Rear, 9” x 3.25”
Label, Filter
Replacing Items - No Panel Removal Required
WARNING: Before removing or replacing any oven component, thoroughly read the safety
instructions found at the front of this manual and Oven Systems (pages 21-28). Adhere to
all precautions and warnings outlined in these sections, as failure to do so could result in
serious injury or death.
CAUTION: Before removing/installing any component, make sure it is disconnected from
the wire harness (where applicable).
Page 81

APPENDIX A - REPLACING OVEN COMPONENTS
A-7
Item Part Number Hardware Description Hardware Part
Number(s)
Caster 102799 Use lifters - see Installation Manual for instructions. None
Catch, Slotted Eyebrow HHC-6499 Screw, Sheet Metal, #8 x 1/2 Serrated PHTRH 101688 (x3)
Chain Guard HHC-6411 None N/A
Chin Assembly, Left End HHC-6464 None N/A
Chin Assembly, Right End HHC-6463 None N/A
Conveyor Belt Kit, Single, Left to Right HHC-6561-1 None N/A
Conveyor Belt Kit, Single, Right to Left HHC-6561-2 None N/A
Conveyor Belt Kit, 50/50 Split, Left to Right HHC-6661-1 None N/A
Conveyor Belt Kit, 50/50 Split, Right to Left HHC-6661-2 None N/A
Conveyor Belt Kit, 70/30 Split, Left to Right HHC-6662-1 None N/A
Conveyor Belt Kit, 70/30 Split, Right to Left HHC-6662-2 None N/A
Cover, Burner Compartment HHC-6137 Screw, Sh Mtl, #8 x 3/8 PPHD, Type A, SS 101696 (x4)
Cover, Left End Bell HHC-6529 Screw, #10-32 x 1/2”, PPHD, SS 101460 (x2)
Cover, Right End Bell HHC-6528 Screw, #10-32 x 1/2”, PPHD, SS 101460 (x2)
Filter, Air, Front, 11.75”x 7.5” HHC-6017 None N/A
Filter, Air, Rear, 9” x 3.25” HHC-6343 None N/A
Gas Pipe, 8” (Between Stacked Ovens Only) 103572 None N/A
Gas Pipe, 10” (Single or Lower Oven Only) 103576 None N/A
Handle, Window HHC-6632 Screw, 3/4 LP RHD, 1/4-20 x 1.00 Lg, SS 101738 (x4)
Keypad HHC-1234 None N/A
Label, Caster Notice HHC-6610 None N/A
Label, Caution, Hot Surface NGC-1137 None N/A
Label, Cleaning Cautions HHC-6653 None N/A
Label, Filter I5-9372 None N/A
Label, Gas-Fired cULus HHC-6649 None N/A
Label, Notice HHC-6611 None N/A
Label, Operating Instructions HHC-6612 None N/A
Label, Servicing Cautions HHC-6655 None N/A
Label, TurboService Number NGC-1170 None N/A
Label, UL NSF NGC-1171 None N/A
Leg Kit, 14-Inch HHC-6850-14 Included Included
Leg Kit, 20-Inch HHC-6850-20 Included Included
Leg Kit, 26-Inch HHC-6850-26 Included Included
Literature Packet HHC-6654 None N/A
Manometer Kit, Electronic with Nylon Case HHC-3001 None N/A
Plenum, Lower (not pictured) HHC-6565-2 None N/A
Plenum, Upper (not pictured) HHC-6565-1 None N/A
Top, Outer Curved HHC-6482 Screw, Sheet Metal, #8 x 1/2 Serrated PHTRH 101688 (x4)
Tube, Cooling Fan HHC-6374 Screw, Thumb, , w/ WHD, #1/4-20 x 1/2”, SS 101752
Window Kit HHC-3003 Included N/A
Page 82

A-8 APPENDIX A - REPLACING OVEN COMPONENTS
Blower Motor *
Blower Motor Controller
Bracket, Gear Drive Controller (2 if split belt)
Gear Drive Controller (2 if split belt)
Wire Harness, Conveyor Drive AC
EMI Filter
Bracket, EMI Filter
Display
Cable, Display, Power, 2-Pin
Cable, Display, Ribbon
Smart Card Reader
Cable, Smart Card Reader
Control Board
Gear Drive (2 if split belt) **
Wire Harness, LOV, Signal, Gear Drive
Cord, Power, 12/3, SOOW, NEMA L620
RTD Probe
Fuses
Fuse Block
Power Supply
Relay, K3, 24 VDC, 20A
Speaker
Transformer, Burner
Wire Harness, K3 Relay and Transformer
Replacing Items - Right End Bell
WARNING: Before removing or replacing any oven component, thoroughly read the safety
instructions found at the front of this manual and Oven Systems (pages 21-28). Adhere to
all precautions and warnings outlined in these sections, as failure to do so could result in
serious injury or death.
CAUTION: Before removing/installing any component, make sure it is disconnected from
the wire harness (where applicable).
**NOTE: For blower motor detail, see page A-12.
**NOTE: For gear drive detail, see page A-10.
Page 83

APPENDIX A - REPLACING OVEN COMPONENTS
A-9
Item Part Number Hardware Description Hardware Part
Number(s)
Blower Motor, Lower HHC-6520 Key, 3/16
Shim, Shaft Seal
Sealing Block, Blower
Washer, Wave Spring
Clamp, Blower Seal
Nut, 1/4-20, Serrated Hex Flange, Plated Steel
100731 (to wheel)
700-0284 (to wheel)
NGC-1024 (to wheel)
102436 (to wheel)
NGC-1023 (to wheel)
100906 (x8 - to oven)
Blower Motor Controller (BMSC), Lower 103580 Nut, #6-32, Serrated Hex Flange, SS 100902 (x4)
Blower Wheel, Lower 103567 See “Blower Motor” hardware See “Blower Motor”
Bracket, EMI Filter HHC-6342 Nut, #10-32, Serrated Hex Flange, SS 100903 (x4)
Bracket, Gear Drive Controller HHC-6465 Screw, #8 x 3/8, Sht Mtl, PPHD, Type A, SS
Nut, #10-32, Serrated Hex Flange, SS
101696 (x4)
100903 (x4)
Cable, Display, Power, 2-Pin 100193 None N/A
Cable, Display, Ribbon 100184 None N/A
Cable, Smart Card Reader 103023 None N/A
Control Board CON-7002 Screw, #6-32 x 3/8, Int Tooth, PPHD, SS 102911 (x4)
Cord, Power, 12/3, SOOW, NEMA L620 HHC-6311-1 None N/A
Cover, Blower Insulation, Lower HHC-6367 See “Blower Motor” hardware See “Blower Motor”
Display 100505 Nut, 4-40 Hex, Nylock, SS
Standoff, Rd, .12 ID, .25 OD x .50 Lg
101060 (x4)
101954 (x4)
EMI Filter 100542 Nut, #6-32, Hex, SS 100990 (x4)
Fuse 100599 None N/A
Fuse Block 103548 Nut, #10-32, Serrated Hex Flange, SS 100903 (x2)
Gear Drive, Dual Belt HHC-4120 None N/A
Gear Drive, Single Belt HHC-6538 None N/A
Gear Drive Controller (Dual Drive) HHC-6630-2 Screw, #8 x 3/8, Sht Mtl, PPHD, Type A, SS
Nut, #10-32, Serrated Hex Flange, SS
101696 (x4)
100903 (x4)
Gear Drive Controller (Single Drive) HHC-6630-1 Screw, #8 x 3/8, Sht Mtl, PPHD, Type A, SS
Nut, #10-32, Serrated Hex Flange, SS
101696 (x4)
100903 (x4)
Heat Slinger, Blower, Lower 102708 See “Blower Motor” hardware See “Blower Motor”
Plate, Blower Motor, Lower HHC-6405 Screw, 1/4-20 x .50, Hex Serrated Washer Head, SS
Spacer, Blower Motor
101394 (x4)
NGC-1022 (x4)
Plate Weldment, Blower Mounting, Lower HHC-6404 Screw, 1/4-20 x .50, Hex Serrated Washer Head, SS
Spacer, Blower Insulation Cover
101394 (x4)
HHC-6366 (x4)
Power Supply, Domestic HHC-6501 Screw, 6-32 x 3/8, Sht Mtl Drill Point, PPHD, Zinc 101684 (x4)
Power Supply, International 101211 Screw, 6-32 x 3/8, Sht Mtl Drill Point, PPHD, Zinc 101684 (x4)
Relay, K3, 24 VDC, 20A 101274 Screw, 6-32 x 3/8, Sht Mtl Drill Point, PPHD, Zinc 101684 (x2)
RTD Probe HHC-6517 Screw, 6-32 x 3/8, Sht Mtl Drill Point, PPHD, Zinc 101684 (x2)
Smart Card Reader 100506 Washer, #6 Flat, Cres
Spacer, Round, .192 ID x .25 OD x .125 LG, SS
102170 (x4)
101885 (x4)
Speaker 104155 Screw, 6-32 x 3/8, Sht Mtl Drill Point, PPHD, Zinc 101684 (x2)
Transformer, Burner 102837 Screw, #8 x 3/8, Sht Mtl, PPHD, Type A, SS 101696 (x2)
Wire Harness, Conveyor Drive AC HHC-6598-4 None N/A
Wire Harness, K3 Relay and Transformer HHC-6598-3 None N/A
Wire Harness, LOV, Signal, Gear Drive HHC-6599-5 None N/A
Page 84

A-10 APPENDIX A - REPLACING OVEN COMPONENTS
Geared Hub
Sprocket, 1” Bore
Spur Gear, 3.5 PD, 5/8-inch Bore
Gear Drive, Dual Belt
Nutplate, Drive Bracket
Plate, Conveyor Drive, Double
Weldment, Bracket, Split Belt
Weldment, Shaft,
Internal Drive
Panel, Conveyor Drive
Spur Gear, 2.75 PD,
1/2-inch Bore
Weldment, Bracket,
Single Drive
Weldment, Shaft,
Internal Drive
Panel, Conveyor Drive
Spur Gear, 3.5 PD,
5/8-inch Bore
Collar, 5/8-inch Shaft
Gear Drive, Single Belt
Nutplate, Drive Bracket
Bolt Retainer Bracket
Gear Drive Assembly Detail
Page 85

APPENDIX A - REPLACING OVEN COMPONENTS
A-11
Item Part Number Hardware Description Hardware Part
Number(s)
Bolt Retainer Bracket HHC-6426 None N/A
Collar, 5/8-inch Shaft 100257 None N/A
Gear Drive, Dual Belt HHC-4120 Washer, Thrust, 5/8”ID x 1/16 THK
Screw, 1/4-20 x 3/4 Lg, PHTRHD, SS
Nut, 1/4-20, Serrated Hex Flange, Plated Steel
103470 (x1 each)
101399 (x4 each)
100906 (x4 each)
Gear Drive, Single Belt HHC-6538 Nut, 1/4-20, Serrated Hex Flange, Plated Steel
Screw, 1/4-20 x 3/4 Lg, PHTRHD, SS
Washer, Thrust, 5/8”ID x 1/16 THK
100906 (x4)
101399 (x4)
103470
Geared Hub HHC-6607 Washer, Thrust, 5/8”ID x 1/8 THK
Washer, Thrust, 1”ID x 1/16 THK
103471
103472
Nutplate, Drive Bracket HHC-6396 None N/A
Panel , Conveyor Drive HHC-6301 Nut, 1/4-20, Serrated Hex Flange, Plated Steel
Screw, 1/4-20 x 3/4 Lg, PHTRHD, SS
100906 (x4)
101399 (x4)
Plate, Conveyor Drive, Double HHC-6467 None N/A
Sprocket, 1" Bore 101906 None N/A
Spur Gear, 2.75 PD, 1/2-inch Bore 101895 None N/A
Spur Gear, 3.5 PD, 5/8-inch Bore 101903 Screw, Set, SKT, CUP PAWL, 1/4-20 x 1/2 Lg 101719 (x1 each)
Weldment, Bracket, Single Drive HHC-6557 None N/A
Weldment, Bracket, Split Belt HHC-6309 None N/A
Weldment, Shaft, Internal Drive HHC-6306 Washer, Thrust, 5/8” ID x 1/8 THK 103471
Page 86

A-12 APPENDIX A - REPLACING OVEN COMPONENTS
Replacing Items - Left End Bell
WARNING: Before removing or replacing any oven component, thoroughly read the safety
instructions found at the front of this manual and Oven Systems (pages 21-28). Adhere to
all precautions and warnings outlined in these sections, as failure to do so could result in
serious injury or death.
CAUTION: Before removing/installing any component, make sure it is disconnected from
the wire harness (where applicable).
Blower Motor, Upper
Combustion Motor Controller
Bracket, CMSC
Blower Wheel
Fan, Cooling, Upper and Lower
Bracket, Dual Fan Mounting
Wire Harness, Cooling Fan
Plate, Blower
Heat Slinger, Blower
Plate, Blower Mounting
Switch, Momentary, Mushroom (Idle Button)
Thermostat, 120F, Close on Rise
Blower Motor
Page 87

APPENDIX A - REPLACING OVEN COMPONENTS
A-13
Item Part Number Hardware Description Hardware Part
Number(s)
Blower Motor, Upper HHC-6520 Key, 3/16
Shim, Shaft Seal
Sealing Block, Blower
Washer, Wave Spring
Clamp, Blower Seal
Nut, 1/4-20, Serrated Hex Flange, Plated Steel
100731 (to wheel)
700-0284 (to wheel)
NGC-1024 (to wheel)
102436 (to wheel)
NGC-1023 (to wheel)
100906 (x8 - to oven)
Blower Motor Controller (BMSC), Upper 103580 Nut, #6-32, Serrated Hex Flange, SS 100902 (x4)
Blower Wheel, Upper 103567 See “Blower Motor”hardware See “Blower Motor”
Bracket, CMSC HHC-6606 Screw, #8 x 3/8, Sht Mtl, PPHD, Type A, SS
Nut, #10-32, Serrated Hex Flange, SS
101696 (x4)
100903 (x4)
Bracket, Dual Fan Mounting HHC-6371 Screw, 1/4-20 x .38 Lg, PFH, SS, 100
O
101389 (x3 - to oven)
Combustion Motor Controller (90o, Nat Gas) HHC-6630-3 Screw, #8 x 3/8, Sht Mtl, PPHD, Type A, SS
Nut, #10-32, Serrated Hex Flange, SS
101696 (x4)
100903 (x4)
Combustion Motor Controller (Inline, Nat
Gas)
HHC-6630-4 Screw, #8 x 3/8, Sht Mtl, PPHD, Type A, SS
Nut, #10-32, Serrated Hex Flange, SS
101696 (x4)
100903 (x4)
Combustion Motor Controller (90o, Propane) HHC-6630-5 Screw, #8 x 3/8, Sht Mtl, PPHD, Type A, SS
Nut, #10-32, Serrated Hex Flange, SS
101696 (x4)
100903 (x4)
Combustion Motor Controller (Inline,
Propane)
HHC-6630-6 Screw, #8 x 3/8, Sht Mtl, PPHD, Type A, SS
Nut, #10-32, Serrated Hex Flange, SS
101696 (x4)
100903 (x4)
Cover, Blower Insulation, Upper HHC-6367 See “Blower Motor” hardware See “Blower Motor”
Fan, Cooling, Lower 100083 Standoff, 10-32 x 1.50 Lg, 3/8 Hex, Stl/Zn Plt
Washer, #10 Flat, SS
Washer, #10 Split Lock
Screw, 10-32 x 2.5 Lg, Hex Head, SS
101927 (x3 - to fan)
102140 (x3 - to bracket)
102350 (x3 - to bracket)
101384 (x3 - to bracket)
Fan, Cooling, Upper 100083 Standoff, 10-32 x 1.50 Lg, 3/8 Hex, Stl/Zn Plt
Washer, #10 Flat, SS
Washer, #10 Split Lock
Screw, 10-32 x 2.5 Lg, Hex Head, SS
101927 (x3 - to fan)
102140 (x3 - to standoff)
102350 (x3 - to standoff)
101384 (x3 - to standoff)
Heat Slinger, Blower, Upper 102708 See “Blower Motor” hardware See “Blower Motor”
Plate, Blower Motor, Upper HHC-6405 Screw, 1/4-20 x .50, Hex Serrated Washer Head, SS
Spacer, Blower Motor
101394 (x4)
NGC-1022 (x4)
Plate, Blower Mounting, Upper HHC-6404 Screw, 1/4-20 x .50, Hex Serrated Washer Head, SS
Spacer, Blower Insulation Cover
101394 (x4)
HHC-6366 (x4)
Switch, Momentary, Mushroom (Idle Button) 102831 None N/A
Thermostat, 120F, Close on Rise 102086 Screw, 6-32 x 3/8, Sht Mtl Drill Point, PPHD, Zinc 101684 (x2)
Wire Harness, Cooling Fan HHC-6598-2 None N/A
Page 88

A-14 APPENDIX A - REPLACING OVEN COMPONENTS
Replacing Items - Burner Compartment Cover
WARNING: Before removing or replacing any oven component, thoroughly read the safety
instructions found at the front of this manual and Oven Systems (pages 21-28). Adhere to
all precautions and warnings outlined in these sections, as failure to do so could result in
serious injury or death.
CAUTION: Before removing/installing any component, make sure it is disconnected from
the wire harness (where applicable).
HHC-6374 (cooling fan tube) and HHC-6137 (burner compartment cover) removed.
Thermostat, High Limit
Bracket, Thermostat
Wire Harness, LOV, High Limit, 25V
Air Pressure Switch
Wire Harness, LOV, Air Switch, 25V
Burner Assembly
Clamp, Conduit,
1/2 Nominal, Zinc
Combustion Motor (90-degree)
Shutter, Inlet Air Blower
Relay, K4, Sealed, 24 VAC, 20A
Wire Harness, LOV, K4 Ground
Ignition Module
Spark Assembly Wire
Pipe and Valve Assembly
Tube, Flexible, Gas
Shield, Gas Pipe
Flame Sensor
Flame Sensor Wire
Flame Spreader
Combustion Blower
Spark Assembly
Spark Assembly Wire
Burner Assembly Detail
Page 89

APPENDIX A - REPLACING OVEN COMPONENTS
A-15
Item Part Number Hardware Description Hardware Part
Number(s)
Air Pressure Switch 102836 Screw, #8 x 3/4, PPHD, Plt-Stl 104178 (x2)
Bracket, Thermostat HHC-6390 Screw, #8 x 3/8, Sht Mtl, PPHD, Type A, SS 101696 (x2)
Burner Assembly HHC-6468 Nut, #10-32, Serrated Hex Flange, SS 100903 (x4)
Clamp, Conduit, 1/2 Nominal, Zinc 103632 None N/A
Combustion Motor (90-degree) 103620 Included Included
Combustion Motor (Inline) - not pictured 103656 Included Included
Flame Sensor 103624 None N/A
Flame Sensor Wire 103575 None N/A
Flame Spreader See Burner Assembly Included Included
Gas Valve, Modulating 102832 None N/A
Ignition Module 103626 Screw, 8-32 x 1/2”, PPH, SS
Standoff, 1/4 Hex, M/F, 8-32 x .50 Lg, Al
101630 (x4)
101946 (x4)
Pipe and Valve Assembly HHC-6513 Standoff, 5/8 Round, .25 Thru x .75 Lg, Al
Clamp, Conduit, 1.00
Screw, #10-32 x 1.5 Lg, SS
101909 (x2)
100133 (x2)
101480 (x2)
Relay, K4, Sealed, 24 VAC, 20A 101275 Screw, 6-32 x 3/8, Sht Mtl Drill Point, PPHD, Zinc 101684 (x2)
Shield, Gas Pipe HHC-6613 Screw, #8 x 3/8, Sht Mtl, PPHD, Type A, SS 101696 (x2)
Shutter, Inlet Air Blower HHC-6617 None N/A
Spark Assembly 103623 None N/A
Spark Assembly Wire 103574 None N/A
Thermostat, High Limit 102075 Screw, 6-32 x 1/4 Lg, PPHD, SS 101565 (x2)
Tube, Flexible, Gas, 1/2-Inch 103628 None N/A
Tube, Flexible, Gas, with LP Orifice 103633 None N/A
Wire Harness, LOV, Air Switch, 25V HHC-6599-3 None N/A
Wire Harness, LOV, High Limit, 25V HHC-6599-6 None N/A
Wire Harness, LOV, K4 Ground HHC-6599-4 None N/A
Item Part Number Hardware Description Hardware Part
Number(s)
Wire Harness, HV, Main HHC-6598-1 None N/A
Wire Harness, LOV, Main HHC-6599-1 None N/A
Replacing Items - Multiple Panel Removal Required
WARNING: Before removing or replacing any oven component, thoroughly read the safety
instructions found at the front of this manual and Oven Systems (pages 21-28). Adhere to
all precautions and warnings outlined in these sections, as failure to do so could result in
serious injury or death.
CAUTION: Before removing/installing any component, make sure it is disconnected from
the wire harness (where applicable).
Page 90

Page 91

Page 92

For service or information:
WITHIN NORTH AMERICA CALL
Customer Service at 800.90TURBO or
OUTSIDE NORTH AMERICA CALL
+1 214-379-6000 or Your Authorized Distributor
Part Number: HHC-6652/Revision B/May 2008
Country Code: NA/EU
Accelerating the World of Cooking
TM
Corporate Headquarters
Six Concourse Pkwy, Suite 1900
Atlanta, Georgia 30328 USA
+1 678.987.1700 PHONE
+1 678.987.1750 FAX
Sales & Marketing: 866.90TURBO
Global Operations
4240 International Pkwy, Suite 105
Carrollton, Texas 75007 USA
+1 214.379.6000 PHONE
+1 214.379.6073 FAX
Customer Service: 800.90TURBO
+1 214.379.6000
turbochef.com
 Loading...