

Trust 445A, 450I User Manual

TRUST 445A- /450I SPEEDLINK XDSL WEB STATION
1
UK
Shortened method for first use Chapter
1. Connecting (7)
2. Network Configuration (8)
3. XDSL station Configuration (10)
4. Check (11)
5. Connecting to the Internet (12)
1 Introduction
This instruction manual is for users of the ‘TRUST 445A SPEEDLINK XDSL WEB
STATION ‘and the ‘TRUST 450I SPEEDLINK XDSL WEB STATION’. You can use
the XDSL station as a XDSL modem and 4-port router to share your Internet
connection. The ‘445A’ is used for XDSL via analogue PSTN / POTS lines. The 450I
is used for XDSL via ISDN lines.
2 Safety
Carefully read the following instructions before use:
- The TRUST 445A-, 450I SPEEDLINK XDSL WEB STATION does not need any
special care. Clean the product case with a damp, soft cloth.
- Never use harsh detergents like gasoline or turpentine for cleaning the product.
These will damage the material.
- Never immerse the product in fluid. This can cause danger and can damage the
product. Never use the device near water.
- Do not put anything on top of the wire. Do not use this device in a location where
people stepping on it would cause it to wear out or be damaged.
- Do not try to repair the product yourself. If you open this device, you might make
contact with parts that contain electrical charges. This device should be
maintained only by qualified personnel.
- Under the following circumstances, have the product fixed by qualified personnel:
* the wire or plug becomes damaged or worn out
* the product has made contact with rain, water or other fluid(s).
3 Approval
- This product conforms to relevant European directives and standards. The
Declaration of Conformity (DoC) can be found at www.trust.com/13521/ce and on
www.trust.com/13523/ce
-
4 Hardware and software requirements
To setup a connection to the Internet you need the following (consult your Internet
service provider if needed):
• Activated analogue XDSL-line (Annex A, XDSL via POTS telephone line
for the 445A,
• Activated Annex B XDSL line (Annex B XDSL via ISDN line for the 450I)
• Activated XDSL-account
• Username and password, if you use a PPPoA- or PPPoE-connection.
• VPI / VCI – values.
• Internet (network) protocol. (PPPoA, PPPoE, Bridged Ethernet over ATM
or Routed Ethernet over ATM)
• Encapsulation protocol. (LLC/SNAP or VCMUX)
• XDSL-splitter (for using the Internet and the telephone at the same time)
Notice: Without the above data, your XDSL-modem will not function and
installation is useless.

TRUST 445A- /450I SPEEDLINK XDSL WEB STATION
2
Notice: The Trust 445A does not function on an analogue telephone line
(POTS, PSTN), also called XDSL Annex A.
Notice: The Trust 450I only functions on an ISDN line, also called XDSL
Annex B.
5 Getting Started with XDSL
XDSL uses your existing analogue telephone line or digital ISDN-line. This means
the XDSL-signal and your existing telephone- or ISDN-signal enter your home
through the same cable. These two signals should be separated from each other if
you want to be able to keep on using your telephone.
This separation of the two signals is done via a filter/splitter. A filter causes the
telephone signal to be filtered from the XDSL-/telephone connection. Without a filter,
you can hear the XDSL-data traffic on your telephone line. The splitter causes two
connections, one for the telephone, and one for the XDSL. The splitter is fixed to the
origin of the incoming line. The splitter goes to the XDSL -modem and the existing
telephone or, for ISDN, to the existing ISDN (NT1) - converter. Whether you received
this filter/ splitter or not depends on the subscription your Internet Service provider or
XDSL-supplier has sold to you. If you did not receive a splitter, your telephone will
not be useable while you are connected to the Internet. You can purchase a splitter
in any shop that sells telephones and accessories.
There are three types of XDSL:
Annex A – XDSL via analogue telephone, also called POTS or PSTN-line.
Annex B – XDSL via ISDN.
(Annex C – is mainly used in Japan, not in Europe.)
The choice of Annex A or B depends on the subscription you have with your Internet
Service Provider (ISP). Consult your ISP to determine which type of XDSL-line you
have.
If your XDSL line is an Annex A line you should use:
TRUST 445A SPEEDLINK XDSL WEB STATION
(Item no.13521, 13522(UK))
If your XDSL line is an Annex B line, you should use:
TRUST 450I SPEEDLINK XDSL WEB STATION (Item no. 13523)
Notice: Although you always have used an ISDN-line for your telephone calls,
your XDSL-subscription is not necessarily Annex B. Always consult
your ISP to determine the type of XDSL line.
TRUST 445A- /450I SPEEDLINK XDSL WEB STATION
3
UK
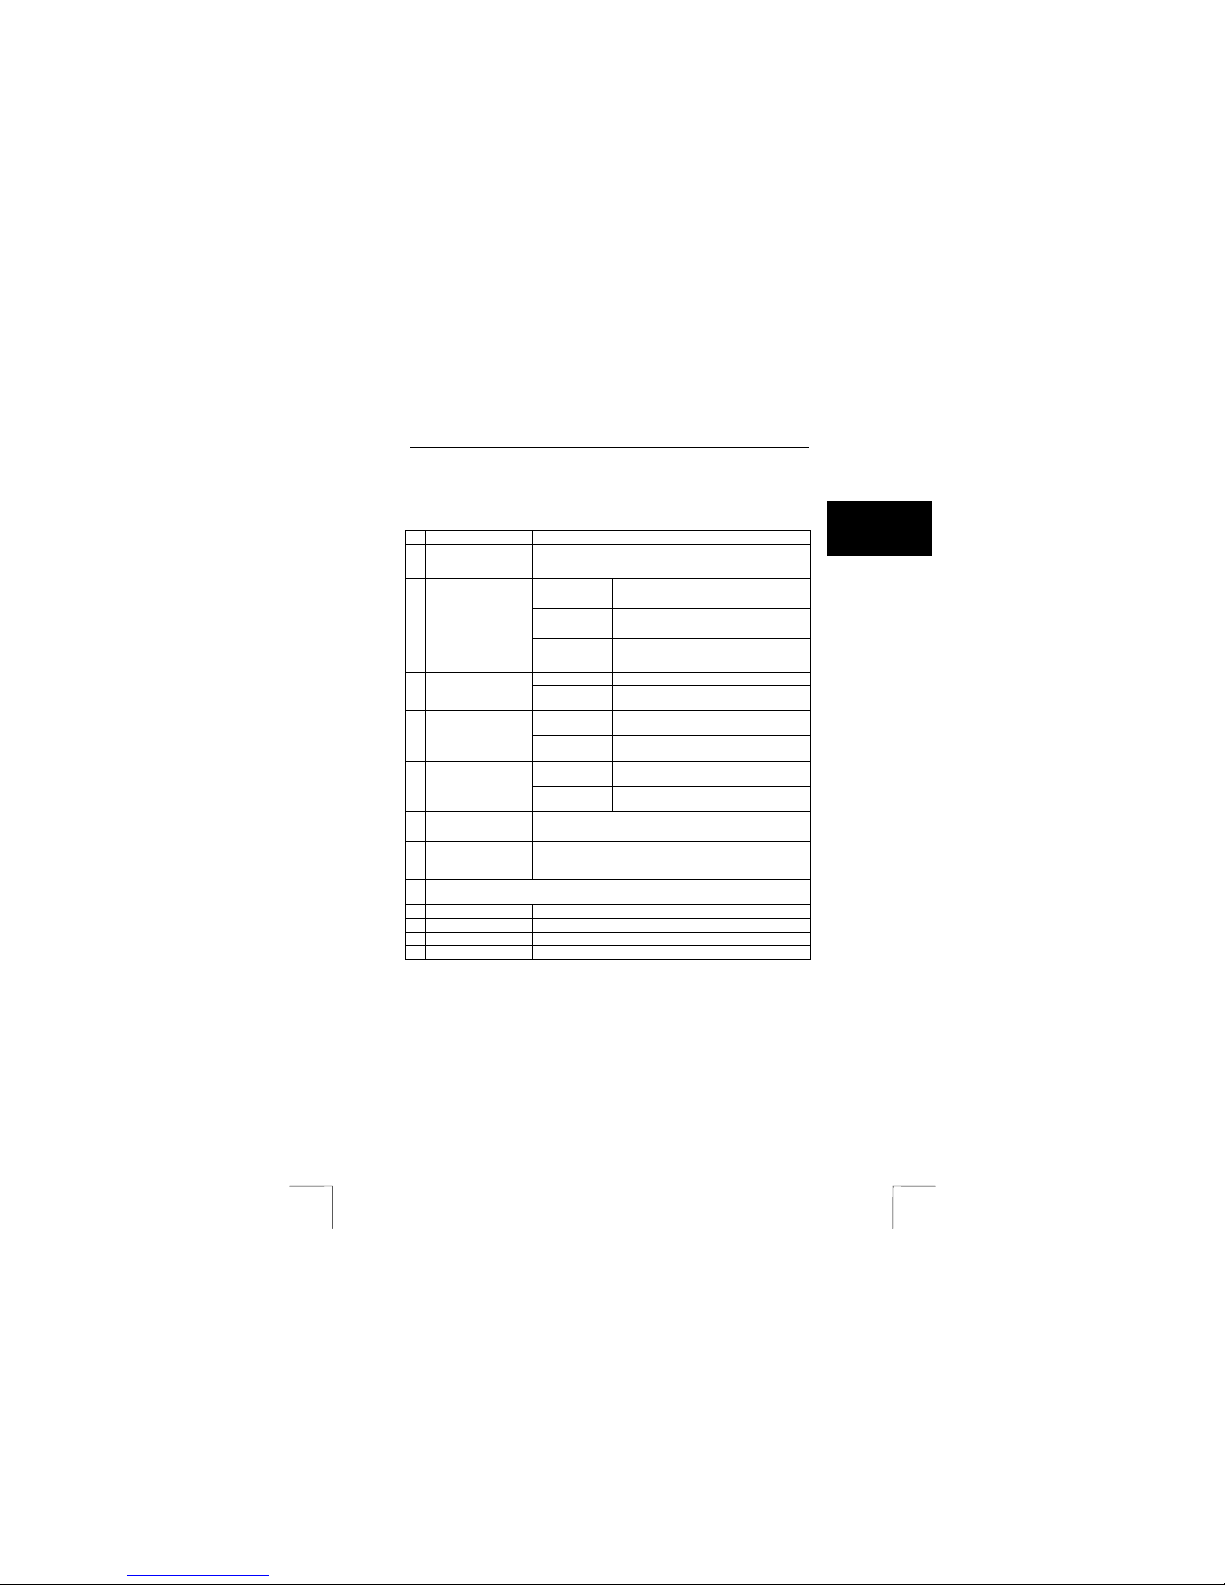
6 Functions of the 445A-, 450I XDSL station
The XDSL station has several indicator lights as shown in Figure 1 on foldout page
in the manual. The following table gives a short explanation of these LEDs and
connection plug-ins.
Function Definition
A
Power indicator
(green)
Indicates if the XDSL station is turned on or off.
On Indicates that the XDSL station is
running properly and ready for use.
Flashing The XDSL station is executing a self-
test.
B
Ready indicator
(green)
Off The XDSL station has completed its
self-test.
Flashing The XDSL station is initializing.
C
XDSL sync
indicator (green)
On Initialization is complete, and XDSL
signal is present.
Flashing Data is being sent or received over the
Internet.
D
RxD indicator
(green)
Off No data is being sent or received over
the Internet.
Flashing Data is being sent or received over the
local network.
E
4 x Act indicator
Off No data is being sent or received over
the local network.
F
4 x LINK indicator
Indicates if there is a computer connected.
G
Reset Resets the XDSL station to the factory settings. Notice:
this button deletes all your settings. See chapter 10 for
information on how to use this button.
H
On / Off button
I
Adapter plug Accepts the supplied adapter (12VDC, 1000mA).
J
USB plug For connection with USB port.
K
4 x Ethernet plug For network computers.
L
WAN plug For XDSL line
Table 1: Functions
7 Connecting
This chapter explains how to connect the XDSL station to your computer and to the
XDSL line.
7.1 Connecting to the computer
The XDSL station can be connected either to a network plug or to the USB port of a
computer. Both options are discussed below.
Notice: If you have a network plug on your computer you should connect the
XDSL station to it.
Tip: The XDSL station is ‘hot-swappable’. This means you can connect or
disconnect the XDSL station while your computer is turned on.

TRUST 445A- /450I SPEEDLINK XDSL WEB STATION
4
7.1.1 Connecting to the network plug
1. Connect the adapter to plug ‘I’ of the XDSL station. See Figure 1.
2. Plug the adapter into the power supply.
3. Switch on the XDSL station using the power button (Button H, figure 1).
4. The ‘power’ indicator (A, figure 1) flashes on. When the ‘ready’ indicator (B,
figure 1) lights steadily, the XDSL station is ready for use.
5. Power up the computer and start Windows.
6. Use a standard, STP or UTP-network cable to connect your computer's
network card to one of the four plugs (K, figure 1) of the XDSL station.
7. If the cable is connected correctly to both router and computer, the “LINK”indicator (F, figure 1) flashes on. See table 1 in chapter 4 for more
information on indicator LEDs.
7.1.2 Connecting to the USB plug
Tip: For information on the latest driver versions, visit
www.trust.com/13521/download or www.trust.com/13523/download. If a
new version is available use it for the installation.
Tip: If you use Windows 98, have the Windows 98 CD ROM ready.
Notice: Exit all other programs before beginning installation.
Notice: During installation under Windows XP, you may see a warning message
about an unsigned driver. This does not affect functionality; you may
continue the installation.
Notice: In the example we use ‘D:\’ to indicate the CD-ROM drive, although this
varies from computer to computer.
1. Connect the adapter to plug ‘I’ of the XDSL station. See Figure 1.
2. Plug the adapter into the power supply.
3. Switch on the XDSL station using the power button (button H, figure 1).
4. The ‘power’ indicator (A, figure 1) flashes on. When the ‘ready’ indicator (B,
figure 1) lights steadily, the XDSL station is ready for use.
5. Power on the computer and start Windows.
6. Place the Trust installation CD ROM into your CD ROM drive.
7. Connect the USB cable to the USB plug of the XDSL station.
8. Connect the other end of the cable to a USB port on your computer.
9. Windows will detect a ‘USB NET CARD’. Fo llow the instructions t hat appear
on the screen. If Windows asks for a driver location, enter “D:\Driver\USB” to
indicate the folder on the Trust installation CD ROM and press ‘OK’.
10. Windows will install a ‘Conexant USB network adapter’. Follow the
instructions on the screen.
11. When installation is finished, click 'Complete’. If Windows asks for it, restart
the computer.
7.2 Connecting the XDSL- line
1. Connect the XDSL line, splitter, telephone and XDSL station as shown in the
connection diagram in figure 2 for analogue POTS or PSTN connections or
as in figure 3 for ISDN connections.
2. Connect the xDSL- line to the WAN plug (L, figure 1) to the supplied RJ-11
telephone cable.
3. Plug the other end of the cable into the port on the splitter. In most cases,
this port is labelled ‘Modem’. Consult the splitter/filter manual for connection
instructions.
Your XDSL station is now connected. To set your XDSL station to the settings
required by your Internet service provider (ISP), the network must be configured.
See chapter 8 for information on how to configure the network.

TRUST 445A- /450I SPEEDLINK XDSL WEB STATION
5
UK
8 Network configuration
This chapter describes the settings required for your network, Internet Explorer, and,
if connected via the USB port of your computer, for your Conexant USB network
adapter.
8.1 Network card or Conexant USB network adapter
1. Turn on the computer and start Windows.
2. Choose Start – Settings – Control Panel – Network.
3. For Windows 98 and Me you will find the network items here . For Windows
2000 and XP right-click ‘Local Settings’ and then select ‘Properties’.
4. Double-click the TCP/IP-protocol for your network card.
5. The ‘properties’ of the TCP/IP-protocol of your network card or ‘Conexant
USB network adapter’ will appear.
Windows 98/Me:
For Windows 98 and Me set “IP address” and “DNS configuration” tabs as
shown in figures 4 and 5. Do not fill in a value for “Gate way”.
Windows 2000/XP:
For Windows 2000 and XP, enter values under the ‘General’ tab as shown in
figure 6.
8.2 Internet Explorer
1. Right-click on the MS Internet Explorer icon and select “Properties”. A new
window will open.
2. Select the ‘Connections’ tab.
3. Select the ‘Never dial a connection’ option.
4. Click the ‘LAN Settings’ button.
5. None of the checkbox options should be checked. Again, see figure 7.
9 First Check
The first check will dete rmine if the connections and settings of the network are
correct.
9.1 Connections check
If everything is connected correctly, the following indicators should flash on:
Indicator: Figure: Status:
POWER
(A, figure 1):
Lit continuously
READY
(B, figure 1):
Lit continuously
ADSL sync
(C, figure 1):
Flashing
LINK
(F, figure 1):
Lit continuously
9.2 Check Network Settings
The supplied conf iguration program will te st for correct network se ttings.
1. Put the CD-ROM in the CD-ROM drive. Th e installation progra m will start up
automatically. If not:
a) Select ‘Run..’ in the Start menu.
b) Type ‘[D:\SETUP.EXE]’ and click ‘OK’ to start the Trust software
installation program.
2. The Trust installation screen will appear. See figure 8.
3. Select the language you want for the Trust installation.
4. Click ‘Setup web station’. See figure 9.
5. Click ‘View Current Settings’ (C, figure 9). If a window appears as shown in
figure 10, the connection and configuration are correct.
6. If a window as shown in figure 11 appears, repeat the steps listed in
chapters 7 and 8.
 Loading...