

Trust 350FT Instruction Manual

TRUST 350FT POW ERC@M FLASH
UK
UK
TRUST 350FT POWERC@M FLASH
Instruction manual
Version 1.0

TRUST 350FT POW ERC@M FLASH
13136-UK-CM.DOC
Thank you
Thank you very much for purchasing this product from the Trust range. We wish you hours of fun
with it. Please read this manual carefully before using the product.
Registration
Register your purchase via our Internet site at www.trust.com so that you can receive optimal
guarantee and service support. You will be automatically informed of developments to your
product and other Trust products. You will also have the chance of winning some spectacular
prizes.
Copyright statement
No part of this instruction manual may be reproduced or transmitted, in any form or by any means,
electronic or mechanical, including photocopying, recording, or information storage and retrieval
systems, for any purpose other than the purchaser's own personal use, without prior written
permission from the manufacturer.
Disclaimer statement
The manufacturer specifically disclaims all warranties, either explicit or implied, including, but not
limited to, implied warranties for the marketability and suitability for a particular purpose, with
respect to the software, the accompanying product manual(s) and written material, and all other
accompanying hardware. The manufacturer reserves the right to revise or make improvements to
its product at any time and without obligation to notify any person of such revisions or
improvements.
In no event shall the manufacturer be liable for any consequential or incidental damages, including
any loss of business profits or any other commercial damages, arising out of the use of its
products.
All company or product names are trademarks or registered trademarks of their respective
owners.

TRUST 350FT POW ERC@M FLASH
1
UK
Contents
1. Introduction ..................................................................................................................................... 3
1.1 Conventions used in the manual............................................................................................ 3
1.2 Contents of the box.................................................................................................................. 3
1.3 Minimum system requirements ..............................................................................................3
2. Safety................................................................................................................................................ 4
2.1 General information ................................................................................................................. 4
2.2 Batteries .................................................................................................................................... 4
2.3 Camera Memory .......................................................................................................................4
3. Inserting the batteries..................................................................................................................... 5
4. Camera functions............................................................................................................................6
4.1 LCD screen ............................................................................................................................... 7
5. Using the camera ............................................................................................................................8
5.1 Setting the resolution .............................................................................................................. 8
5.2 Setting the recording surroundings.......................................................................................8
5.3 Setting the Macro button.........................................................................................................9
5.4 Setting the flash .......................................................................................................................9
5.5 Automatic exposure............................................................................................................... 10
5.6 Continuous mode................................................................................................................... 10
5.7 Deleting recordings................................................................................................................ 10
5.7.1 Deleting the last recording ............................................................................................. 11
5.7.2 Deleting all the recordings .............................................................................................11
6. Installing the driver ....................................................................................................................... 11
6.1 Uninstalling old drivers and devices.................................................................................... 11
6.2 Trust Software Installer .........................................................................................................12
6.3 Installing the driver in Windows 98 / Windows ME / Windows 2000 / Windows XP........12
7. Installing the software .................................................................................................................. 13
7.1 Photo Fantasy 2000................................................................................................................ 13
8. Connecting and checking ............................................................................................................15
8.1 Connecting.............................................................................................................................. 15
8.2 Checking after the installation ..............................................................................................15
9. Using the software and downloading recordings...................................................................... 16
9.1 Photo Fantasy 2000................................................................................................................ 16
9.2 Photo Impression 2000 .......................................................................................................... 19
9.3 Loading photographs in a higher resolution (Picture resolution) ....................................22
9.4 Video Impression 1.6 .............................................................................................................22
9.5 Photo Montage 2000 ..............................................................................................................25
10. Maintenance .................................................................................................................................. 25

TRUST 350FT POW ERC@M FLASH
2
11. Troubleshooting............................................................................................................................26
12. Specifications ................................................................................................................................ 28
13. Trust Customer Care Centers ...................................................................................................... 29

TRUST 350FT POW ERC@M FLASH
3
UK
1. Introduction
This instruction manual is for users of the Trust 350FT PowerC@m Flash. Basic knowledge of computers is
necessary to be able to install this product. Please consult one of the Trust Customer Care Centers if you
have any problems. The last page of this electronic instruction manual, as well as the back of the printed,
quick installation manual, contains more information about these Customer Care Centers.
1.1 Conventions used in the manual
The following conventions have been used in the manual to indicate instructions:
<Key> Here you should press a key. The name of the key is given between brackets.
‘System’ This is a specific term used in a program. These are terms used by, for example, Microsoft
Windows 98.
[DIR] Type the text shown between brackets [….].
Extra information will be shown as follows.
Note: If you connect the Trust 350FT PowerC@m Flash to a USB HUB, then this USB HUB should have
its own power supply.
The examples assume that the letter "D" has been assigned to your CD-ROM drive. If your system uses a
different letter for your CD-ROM drive, for example "E", you should replace "D" by "E".
1.2 Contents of the box
Check the contents of the box before reading the instruction manual. It should contain the following:
• Camera
• Camera stand
• CD-ROM containing the driver, applications and instruction manuals.
• USB cable
• Wristband
• Bag
• Two AA alkaline batteries
• Instruction manual
If anything is missing or damaged, please contact one of the Trust Customer Care Centers. You can find
more information at the back of this instruction manual.
1.3 Minimum system requirements
• Pentium 166MHz MMX CPU
• Free USB port
• 32 MB RAM
• CD-ROM drive
• 5 MB free hard disc space for the driver
• 500 MB free hard disc space for the software
• Windows 98 / Windows ME / Windows 2000 / Windows XP
• Check www.trust.com/13136 for the latest operating system support.

TRUST 350FT POW ERC@M FLASH
4
2. Safety
2.1 General information
Carefully read the following instructions before use.
- The Trust 350FT PowerC@m Flash does not require any special maintenance. Use a slightly damp, soft
cloth to clean the camera.
- Do not use aggressive substances, such as petrol or white spirit, to clean the device. These may harm
the material.
- Do not submerge the device in liquid. This may be dangerous and will damage the device. Do not use
this device near water.
- Make sure nothing is placed on the cable. Do not use this device in an area where the cable can become
worn or damaged as a result of people walking over it.
- Do not repair this device yourself. If you open this device, you may touch live components. This device
must only be repaired by qualified personnel.
- Under the following circumstances, have the device repaired by qualified personnel:
- The device has come into contact with rain, water or another liquid.
2.2 Batteries
Digital cameras are compact devices which use complex technology. As a result, high demands are placed
on the batteries, which must also be compact. Guidelines for the effective use of batteries:
• Some cameras require a voltage (energy) to store the photographs in the memory. It is, therefore, always
better to download the photographs onto a PC as quickly as possible and to remove the batteries from
the camera when it is not used.
• Cameras with a flash use a lot of energy when the flash is used. If the camera has a flash, limit its use
and take this into consideration with regard to the life span of the batteries. The flash shortens the life
span of the batteries.
• Better quality batteries, such as Duracell Ultra, are often more effective in the long run and work for a
much longer period of time.
• Rechargeable batteries are also useful if the camera is used a lot. Only use NiMH batteries, preferably at
least 1,800 mA (the maximum power can vary per battery type and size). Never use rechargeable NiCd
batteries, because the output voltage is too low for this type of camera. Also, never recharge the alkaline
batteries provided with the camera, because this may cause them to explode.
1. Never throw the batteries onto an open fire. The batteries may explode.
2. Never drill holes into the batteries.
3. Keep the batteries out of the reach of small children.
4. Only use AA alkaline batteries with this camera. It is recommended to use Duracell Ultra or NiMH
batteries.
When the batteries are empty, ask your local authority where you can dispose of them.
Note: Standard NiCd batteries are unsuitable for use with this camera.
Note: Do not use old and new batteries at the same time, because the old batteries may deplete the
new ones.
Note: The batteries should be removed if the camera is not going to be used for some time. This will
save the battery capacity.
2.3 Camera Memory
The Trust 350FT PowerC@m Flash has a Flash memory.
This type of memory ensures that all the recordings are saved when the batteries are replaced.
This type of memory requires a battery voltage in order to save the recordings.
When the camera is not used for a long period of time, it is recommended to transfer recordings from the
camera memory to a computer.
This will prevent recordings from being lost.

TRUST 350FT POW ERC@M FLASH
5
UK
3. Inserting the batteries
1. Open the battery flap by sliding it downwards. The direction is also indicated by the arrow on the battery
flap (see figure 1).
Figure 1: Inserting the batteries
2. Insert the two AA batteries as shown in figure 1. The position is also shown on the inside of the battery
flap.
Note: Inserting the batteries incorrectly may cause damage to the camera. The warranty will then no
longer be valid.
Note: The camera will make a noise when the battery voltage becomes too low.
3. Close the battery flap again by gently pushing it and sliding it upwards.
4. The Trust 350FT PowerC@m Flash is now ready for use.
TRUST 350FT POW ERC@M FLASH
6
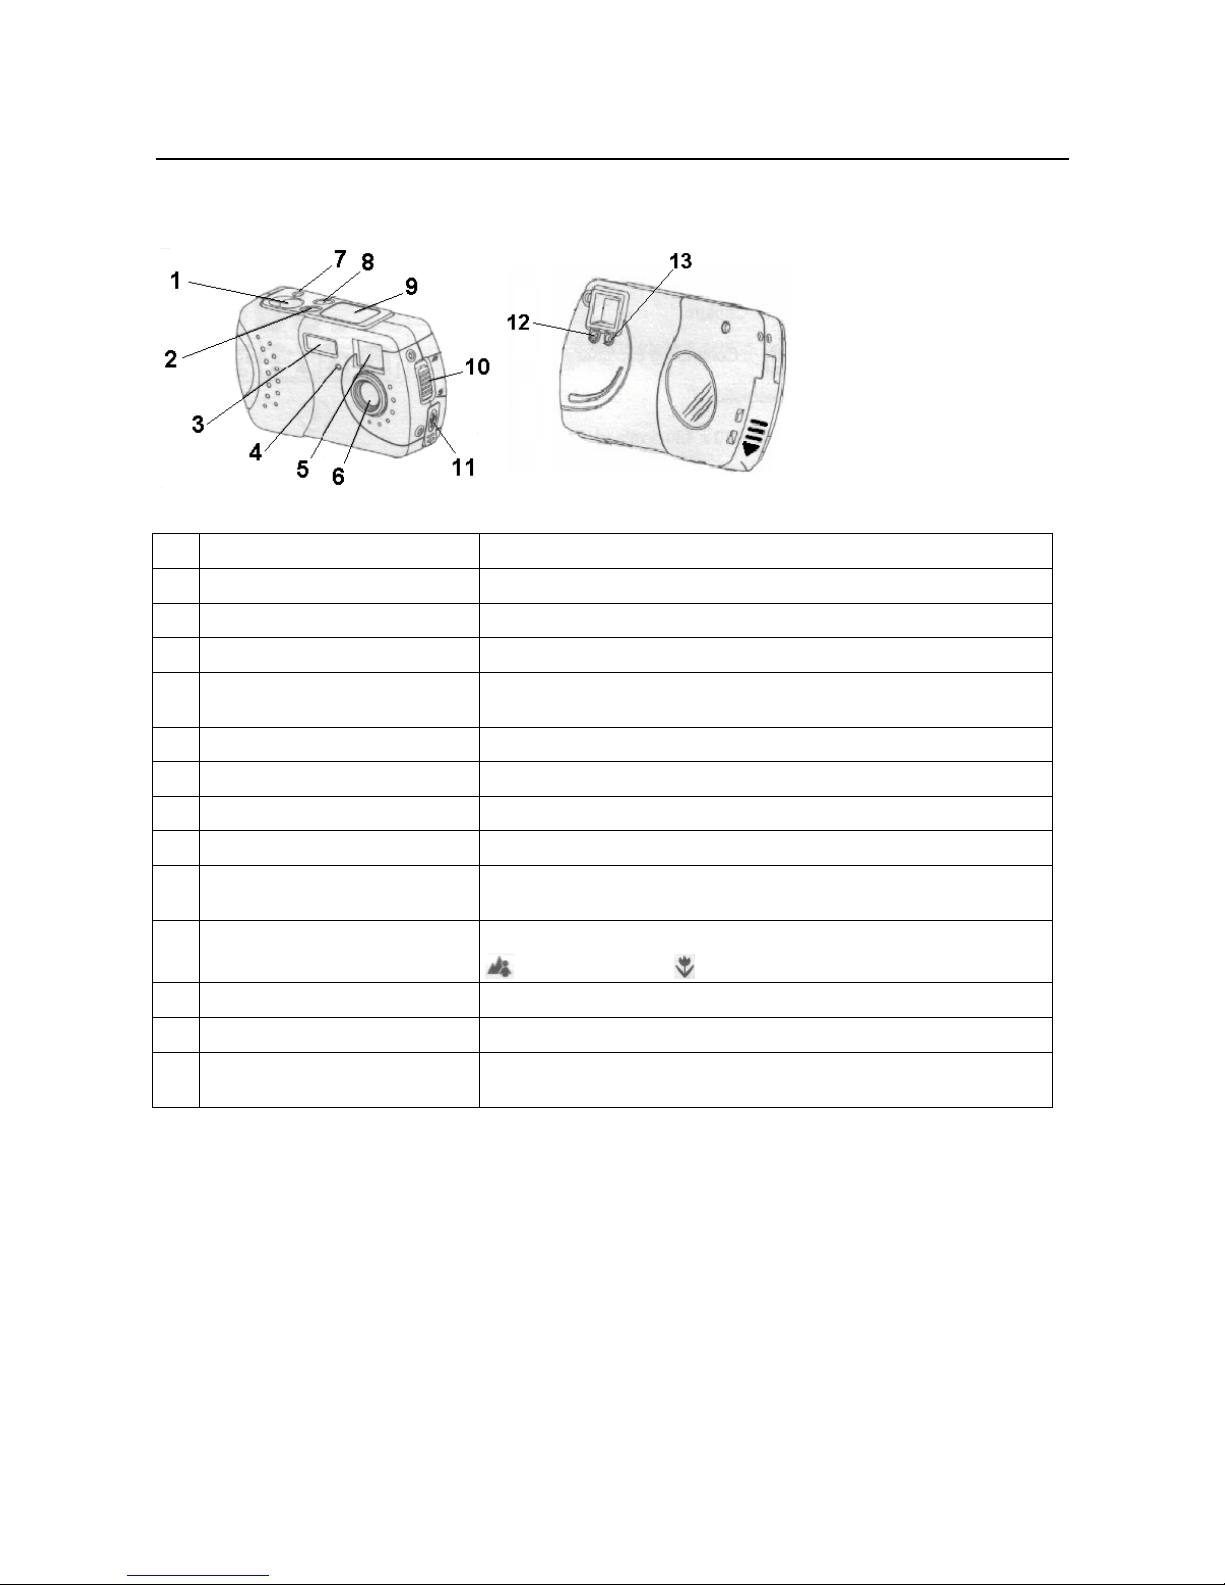
4. Camera functions
Figure 2: Camera functions
Function Description
1
Exposure button Takes a photograph.
2
Mode button Changes the camera mode.
3
Flash Gives extra lighting.
4
LED for the automatic exposure Flashes when a recording is made using the automatic exposure
function.
5
Viewfinder Look through this to view the object to be photographed.
6
Lens Records the image to be taken.
7
ON / OFF button Turns the camera on and off.
8
Select button Sets the new settings (resolution, flash, automatic exposure, etc.).
9
LCD screen Displays the life span of the battery, the number of photographs,
the photograph number and the photograph quality
10
MACRO button For setting the distance to the object to be photographed.
= 90 cm – infinity / = 25 cm ~ 30 cm
11
USB connection Connection for the cable to the PC.
12
Busy Is lit when the camera is processing recordings.
13
Macro LED Is lit when the camera is set to the MACRO function by pressing
the MACRO button (10).
Table 1: Camera functions
TRUST 350FT POW ERC@M FLASH
7
UK
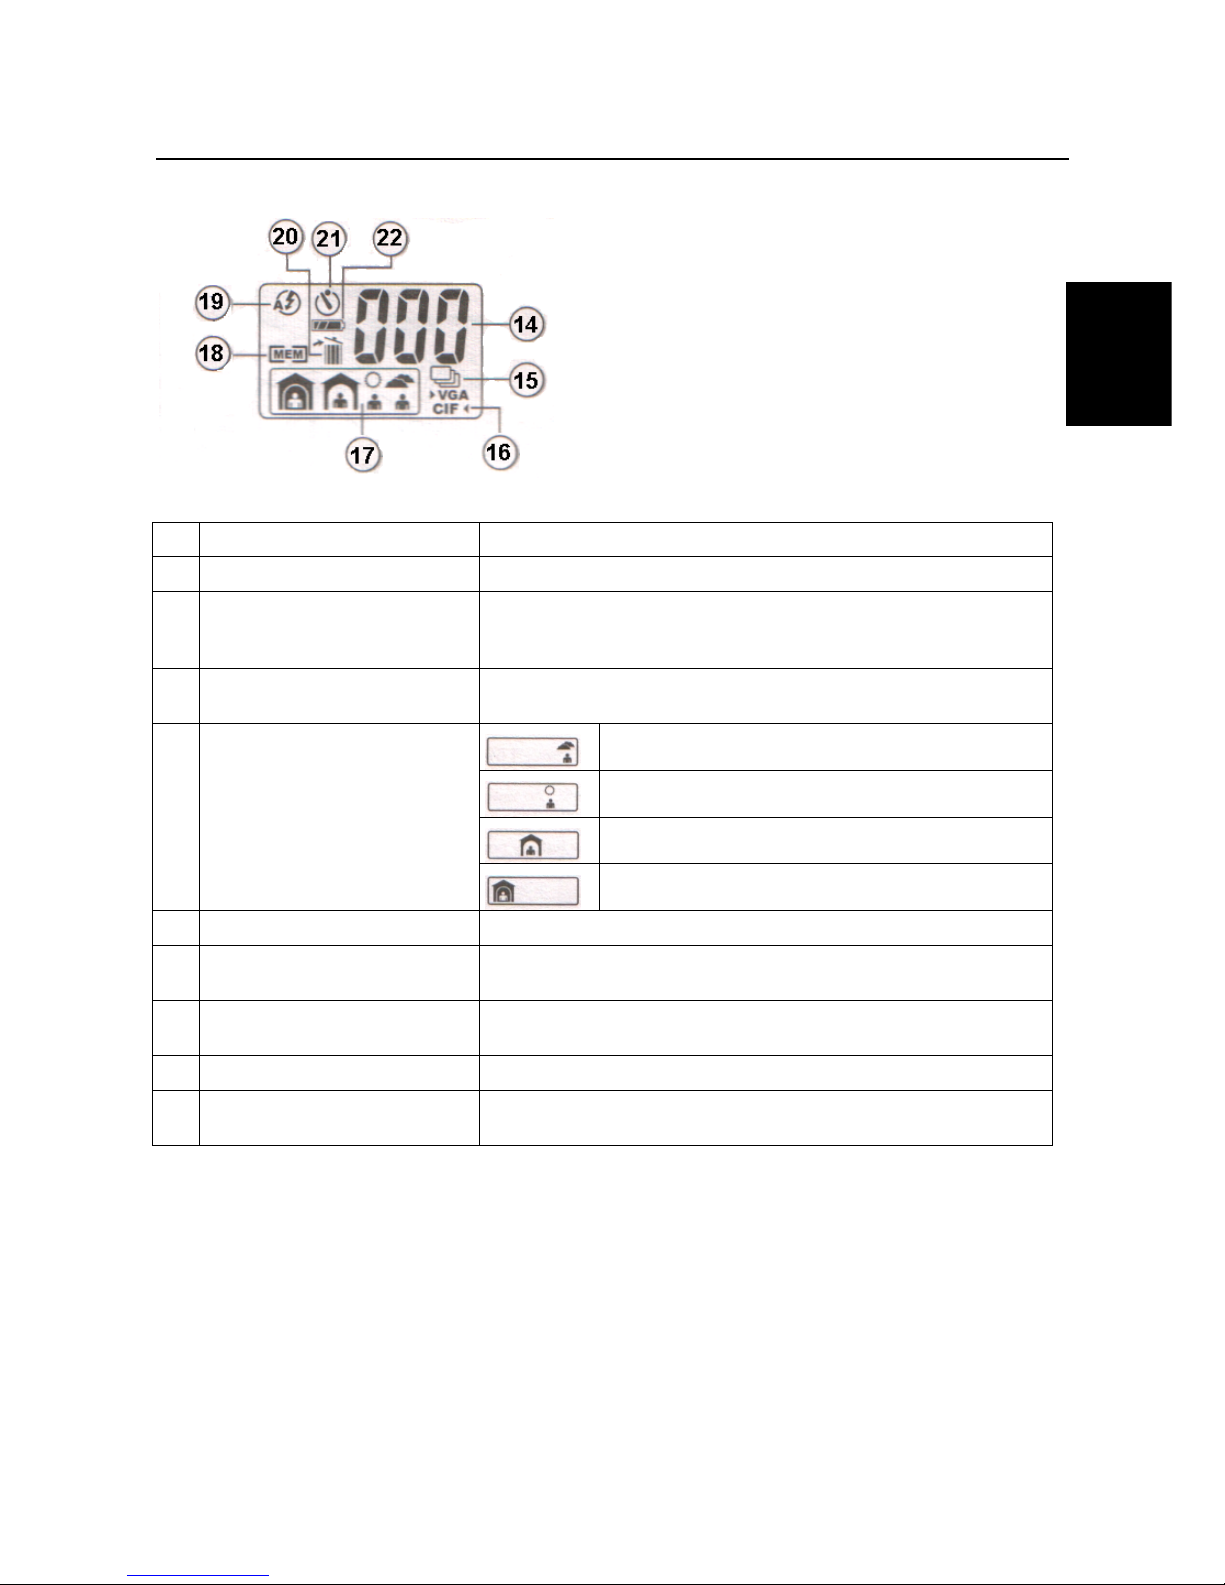
4.1 LCD screen
Figure 3: Explanation of the LCD screen
Function Description
14
Counter Indicates how many photographs have been taken.
15
Continuous mode Appears when the camera is set to the continuous mode (film
recording).
This only works in the CIF (320 x 240) resolution.
16
Resolution Shows which resolution the camera is set to.
VGA=640 x 480 / CIF=320 x 240.
Outside (default setting).
Outside (sunny).
Inside (clear).
17
Setting for making recordings in
certain surroundings.
Inside (dark).
18
Memory Appears when the camera’s memory is full.
19
Flash mode Automatic. If this is not shown on the LCD screen, then the flash is
turned off.
20
Delete recordings ALL = Deletes all the recordings from the camera’s memory.
LST = Deletes the last recording from the camera’s memory.
21
Automatic exposure Takes photographs after a time delay of 10 seconds.
22
Battery capacity Shows the amount of energy remaining in the batteries. Flashes
when the batteries are almost empty.
Table 2

TRUST 350FT POW ERC@M FLASH
8
5. Using the camera
5.1 Setting the resolution
The Trust 350FT PowerC@m Flash can take photographs in two different resolutions, i.e. VGA (640 x 480,
approx. 60 photographs) and CIF (320 x 240, approx. 190 photographs).
The camera’s default setting is the VGA (640 x 480) resolution, which can be used to take approximately 60
photographs.
If you wish to set the camera to the low (CIF) resolution, carry out the following.
See figure 1 and figure 2 with the corresponding tables.
1. Turn the camera on by pressing the ON/OFF button (7). A beep will be heard when the camera is turned
on.
2. Press the MODE button (2) twice until the letters CIF start to flash on the LCD screen (9).
A beep will be heard each time the MODE button is pressed.
3. Press the SELECT button (8) until 2 beeps are heard.
The camera is now in the low resolution mode (CIF), which can be used to take approximately 190
photographs.
4. Click on the EXPOSURE button (1) to take a photograph.
Note: When the camera is turned off, either by using the ON/OFF button or when it turns off
automatically, the camera will return to the high resolution when it is turned back on again. You
will then have to select the low resolution as described in chapter 5.1.
5.2 Setting the recording surroundings
The Trust 350FT PowerC@m Flash can be adjusted to suit the conditions of the surroundings.
The table below gives the four different possibilities which can be selected.
The default setting when the camera is turned on is the first resolution.
Outside (default setting).
Outside (sunny).
Inside (clear).
Inside (dark).
Table 3: Setting the recording surroundings
If you wish to change the camera to a different setting, carry out the following.
Use figure 2 and figure 3 with the corresponding tables.
1. Turn the camera on by pressing the ON/OFF button (7). A beep will be heard when the camera is turned
on.
2. Press the MODE button (2) three times until picture 2 (table 3) starts to flash on the LCD screen (9).
For picture 3 or picture 4, press the MODE button (2) four or five times respectively.
A beep will be heard each time the MODE button is pressed.
3. Once the desired setting has been found, press the SELECT button (8) until two beeps are heard.
The camera has now been set to the desired setting.
Note: When the camera is turned off, either by using the ON/OFF button or when it turns off
automatically, the camera will return to the first position (picture 1 in table 3) when it is turned back
on again. You will then have to adjust the camera as described in chapter 5.2.
 Loading...