

Troy-Bilt TB 510 SERIES Operator's Manual

Safe Operation Practices • Set-Up • Operation • Service • Troubleshooting
OperatOr’s Manual
Push Mower
Powered by CORE ™
Model Series TB 510
1 8 E C 7 7
Table of Contents
Safe Operation Practices ........................................ 2
Assembly & Set-Up .................................................. 7
Controls & Operation .............................................10
Service .....................................................................12
WARNING
READ AND FOLLOW ALL SAFETY RULES AND INSTRUCTIONS IN THIS MANUAL
BEFORE ATTEMPTING TO OPERATE THIS MACHINE.
FAILURE TO COMPLY WITH THESE INSTRUCTIONS MAY RESULT IN PERSONAL INJURY.
Troubleshooting .....................................................14
Spanish ....................................................................15
Parts/Warranty .............. See Separate Supplement
NOTE: This Operator’s Manual covers several models. Features may vary by model. Not all features in this manual are applicable to all
models and the model depicted may differ from yours.
Form No. 769-11115
(October 18, 2016)
Important Safe Operation Practices
1
WARNING! This symbol points
out important safety instructions
which, if not followed, could
endanger the personal safety
and/or property of yourself and
others. Read and follow all instructions in this
manual before attempting to operate this
machine. Failure to comply with these
instructions may result in personal injury.
When you see this symbol.
HEED ITS WARNING!
DANGER: This machine was
built to be operated according
to the safe operation practices in
this manual. As with any type of
power equipment, carelessness
or error on the part of the operator can result
in serious injury. This machine is capable of
amputating fingers, hands, toes and feet and
throwing foreign objects. Failure to observe
the following safety instructions could result in
serious injury or death.
CALIFORNIA PROPOSITION 65
WARNING! This
product contains a chemical
known to the state of
California to cause cancer,
birth defects or other
reproductive harm.
Operation
General Operation:
1. Read this operator’s manual carefully
in its entirety before attempting
to assemble this machine. Read,
understand, and follow all instructions
on the machine and in the manual(s)
before operation. Be completely familiar
with the controls and the proper use of
this machine before operating it. Keep
this manual and supplement in a safe
place for future and regular reference
and for ordering replacement parts.
2. This machine is a precision piece of
power equipment, not a plaything.
Therefore, exercise extreme caution
at all times. Your machine has been
designed to perform one job: to mow
grass. Do not use it for any other
purpose.
3. Do not overload the lawn mower — it
will do the job better and safer at the
rate for which it was designed.
4. Never allow children under 14 years
old to operate this machine. Children
14 years old and over should read and
understand the instructions in this
manual and should be trained and
supervised by a parent. Only responsible
individuals who are familiar with these
rules of safe operation should be
allowed to use this machine.
5. Thoroughly inspect the area where
the equipment is to be used. Remove
all stones, sticks, wire, bones, toys and
other foreign objects which could be
tripped over or picked up and thrown
by the blade. Thrown objects can
cause serious personal injury. Plan your
mowing pattern to avoid discharge
of material toward roads, sidewalks,
bystanders and the like. Also, avoid
discharging material against a wall or
obstruction which may cause discharged
material to ricochet back toward the
operator.
6. To help avoid blade contact or a thrown
object injury, stay in operator zone
behind handles and keep children,
bystanders and pets out of the area
while mower is in operation. Stop
machine if anyone enters area.
7. Always wear safety glasses or safety
goggles during operation and while
performing an adjustment or repair to
protect your eyes. Thrown objects which
ricochet can cause serious injury to the
eyes.
8. Always use a face or dust mask if
operation is dusty.
9. Wear sturdy, rough-soled work shoes
and close-fitting slacks and shirts. Shirts
and pants that cover the arms and legs
and steel-toed shoes are recommended.
Never operate this machine in bare feet,
sandals, slippery or light weight (e.g.
canvas) shoes.
10. Do not put hands or feet near rotating
parts or under cutting deck. Contact
with blade can amputate hands and feet.
11. A missing or damaged discharge cover
can cause blade contact or thrown
object injuries.
12. Many injuries occur as a result of the
mower being pulled over the foot during
a fall caused by slipping or tripping.
Do not hold on to the mower if you are
falling; release the handle immediately.
13. Never pull the mower back toward
you while you are walking. If you must
back the mower away from a wall or
obstruction first look down and behind
to avoid tripping and then follow these
steps:
a. Step back from mower to fully
extend your arms.
b. Be sure you are well balanced
with sure footing.
c. Pull the mower back slowly, no
more than half way toward you.
d. Repeat these steps as needed.
13. Do not operate the mower while under
the influence of alcohol or drugs.
14. Stay alert — Watch what you are doing.
Use common sense. Do not operate lawn
mower when you are tired.
15. The blade control is a safety device.
Never attempt to bypass its operation.
Doing so makes the safety device
inoperative and may result in personal
injury through contact with the
rotating blade. The blade control must
operate easily in both directions and
automatically return to the disengaged
position when released.
16. Never operate the mower in rain or wet
grass. Always be sure of your footing. A
slip and fall can cause serious personal
injury. If you feel you are losing your
footing, release the blade control
immediately and the blade will stop
rotating within three seconds.
17. Mow only in daylight or good artificial
light. Walk, never run.
18. Stop the motor when crossing gravel
drives, walks or roads.
19. If the equipment should start to vibrate
abnormally, stop the mower and check
immediately for the cause. Vibration is
generally a warning of trouble.
20. Shut the mower off and wait until
the blade comes to a complete stop
before removing the grass catcher
or unclogging the chute. The cutting
blade will stop rotating within three (3)
seconds. Never place any part of the
body in the blade area until you are sure
the blade has stopped rotating.
21. Never operate mower without proper
trail shield, discharge cover, grass
catcher, blade control or other safety
protective devices in place and working.
Never operate mower with damaged
safety devices. Failure to do so, can
result in personal injury.
22. Only use parts and accessories made for
this machine by manufacturer. Failure to
do so can result in personal injury.
23. If situations occur which are not covered
in this manual, use care and good
judgment. Telephone Customer Support
for the name of your nearest dealer.
2

Slope Operation:
Slopes are a major factor related to slip and
fall accidents which can result in severe injury.
Operation on slopes requires extra caution. If
you feel uneasy on a slope, do not mow it. For
your safety, use the slope gauge included as
part of this manual to measure slopes before
operating this machine on a sloped or hilly
area. If the slope is greater than 15 degrees, do
not mow it.
Do:
1. Mow across the face of slopes; never
up and down. Exercise extreme caution
when changing direction on slopes.
2. Watch for holes, ruts, rocks, hidden
objects, or bumps which can cause
you to slip or trip. Tall grass can hide
obstacles.
3. Always be sure of your footing. A slip
and fall can cause serious personal
injury. If you feel you are losing your
balance, release the blade control
handle immediately, and the blade will
stop rotating within three (3) seconds.
Do Not:
1. Do not mow near drop-offs, ditches
or embankments, you could lose your
footing or balance.
2. Do not mow slopes greater than 15
degrees as shown on the slope gauge.
3. Do not mow on wet grass. Unstable
footing could cause slipping.
Children
Tragic accidents can occur if operator is not
alert to presence of children. Children are often
attracted to mower and mowing activity. They
do not understand the dangers. Never assume
that children will remain where you last saw
them.
1. Keep children out of the mowing area
and under watchful care of a responsible
adult other than the operator.
2. Be alert and turn mower off if a child
enters the area.
3. Before and while moving backwards,
look behind and down for small children.
4. Use extreme care when approaching
blind corners, doorways, shrubs, trees,
or other objects that may obscure your
vision of a child who may run into the
mower.
5. Never allow children under 14 years old
to operate a power mower. Children
14 years old and over should read and
understand operation instructions and
safety rules in this manual and should be
trained and supervised by a parent.
Service
1. Remove key and store mower indoors
when not in use. Allow motor to cool
before storing in any inclosure. Mower
should be stored indoors in a dry place,
out of the reach of children.
2. Remove the battery(ies) from the
machine when not in use.
3. When servicing use only identical
replacement parts listed in this manual.
“Use of parts which do not meet the
original equipment specifications may
lead to improper performance and
compromise safety!”
4. Before cleaning, repairing, or inspecting,
make certain the blade and all moving
parts have stopped. Remove the key to
prevent accidental starting.
5. Remove key before servicing, cleaning,
or removing material from the lawn
mower.
6. Follow instructions for lubricating and
changing accessories.
7. Never douse or hose the machine
with water. Avoid getting any liquid in
the motor and electrical connections.
Clean the machine after each use. Refer
to Cleaning and Storage. Do not use
solvents or strong detergents.
8. Keep handles dry, clean and free from oil
and grease.
9. To reduce a fire hazard, keep the motor
free of grass, leaves and debris build-up.
10. Check the blade and motor mounting
bolts at frequent intervals for proper
tightness. Also, visually inspect blade
for damage (e.g., bent, cracked, and
worn). Replace blade with the original
equipment manufacturer’s (OEM) blade
only, listed in this manual.
11. Maintain your mower with care — Keep
mower blade sharp and clean for best
and safest performance. Mower blades
are sharp and can cut, wrap the blade or
wear gloves and use extra caution when
servicing them.
12. Keep all nuts, bolts, and screws tight to
be sure the equipment is in safe working
condition.
13. Never tamper with safety devices. Check
their proper operation regularly.
14. Never attempt to make cutting height
adjustments while the mower is running.
15. After striking a foreign object, stop the
motor, remove the key, and thoroughly
inspect the mower for any damage.
Repair the damage before operating the
mower.
16. Grass catcher components, discharge
cover, and trail shield are subject to
wear and damage which could expose
moving parts or allow objects to be
thrown. For safety protection, frequently
check components and replace
immediately with original equipment
manufacturer’s (OEM) parts only, listed
in this manual.
17. According to the Consumer Products
Safety Commission (CPSC) and the
U.S. Environmental Protection Agency
(EPA), this product has an Average Useful
Life of seven (7) years, or 140 hours of
operation. At the end of the Avera ge
Useful Life have the machine inspected
annually by an authorized service dealer
to ensure that all mechanical and safety
systems are working properly and not
worn excessively. Failure to do so can
result in accidents, injuries or death.
18. Do not dispose of the battery(ies) in
a fire. The cell may explode. Check
with local codes for proper disposal
instructions.
19. Do not open or mutilate the battery(ies).
Released electrolyte is corrosive and
may cause damage to the eyes or skin. It
may be toxic if swallowed.
20. Do not touch the motor or heat sink.
These parts can get extremely hot from
operation, even after the machine is
turned off.
21. Exercise care in handling batteries in
order not to short the battery with
conducting materials such as rings,
bracelets, and keys. The battery or
conductor may be hot and cause burns.
General Electric Safety
1. Do not expose the machine to rain or
wet conditions.
2. Do not handle the machine with wet
hands.
3. Do not operate the machine in the rain,
in wet conditions or on wet surfaces.
4. To reduce the risk of electric shock,
avoid body contact with grounded
conductors, such as metal pipes or wire
fences.
5. Do not operate the machine in explosive
atmospheres, such as in the presence of
flammable liquids, gases or dust.
3Section 1 — important Safe operation practiceS
Battery Charger Safety
WARNING: Only use a 4044
battery charger to charge 4144
or 6216 batteries. DO NOT
attempt to charge any other
batteries with a 4044 battery
charger. Other types of batteries may burst,
causing fire, personal injury or property
damage.
1. A nameplate on the charger indicates
the voltage used. Never connect the
charger to an AC voltage that differs
from this voltage.
2. An extension cord should not be used
unless absolutely necessary. Use of
an improper extension cord could
result in a risk of fire, electric shock or
electrocution.
3. Do not use multiple extension cords.
4. Make sure the extension cord is heavy
enough to carry the current drawn by
the charger. An undersized extension
cord will cause a drop in line voltage,
resulting in a loss of power and
overheating. If in doubt, use the next
heavier gauge cord. The smaller the
gauge number, the heavier the cord.
MINIMUM WIRE SIZE FOR EXTENSION
CORDS FOR 120 VOLT APPLIANCES
USING 0-6 AMPS
Cord Length (ft.) 25 50 100 150
Wire Size (AWG) 16 16 16 14
5. Make sure the cords are in good
condition. Inspect the power cord and
extension cord periodically. Look closely
for deterioration, cuts or cracks in the
insulation. If a cord is damaged in any
manner while plugged in, disconnect
the cord from both the outlet and the
charger. Do not use a damaged cord.
Damaged cords should be repaired or
replaced.
6. Do not abuse cords. Never pull or carry
the charger by a cord. Keep cords away
from heat, oil, water, sharp edges, and
moving objects. Always grasp the plug
when disconnecting a cord.
7. Never modify a plug, cord or outlet in
any way.
8. Ground Fault Circuit Interrupter (GFCI)
protection should be provided on the
circuit(s) or outlet(s) to be used with
this charger. For an extra measure of
safety, use receptacles with built-in GFCI
protection.
9. Do not place the battery charger where
cords might be stepped on, tripped over
or subjected to damage.
10. Do not charge batteries in the rain or in
wet conditions. Keep the battery charger
in a cool and dry area.
11. Keep the battery charger away from all
liquid.
12. Do not allow small metal items or
material such as steel wool, aluminum
foil or other foreign particles into the
charger port.
13. Do not probe the charger with
conductive material. There is a risk of
electric shock.
14. Do not cover the battery charger. The
battery charger may overheat.
15. Do not allow the battery or battery
charger to overheat. If they are warm,
allow them to cool down. Only charge
batteries in temperatures between 32°
and 104° F (0° and 40° C).
16. Always unplug the battery charger
before cleaning it. Always unplug the
battery charger when it is not in use.
Battery Safety
1. Do not expose the battery to fire or to
temperatures over 176º F (80º C). Doing
so could cause an explosion.
2. Handle batteries with care. Do not short
the battery with conductive materials,
such as rings, bracelets, keys, etc.
Shorting the battery may cause personal
injury, damage to the battery or a fire.
3. When the battery is not in use, keep it
away from small metal objects, such as
paper clips, coins, nails, etc. These items
could connect one terminal to another
and short the battery.
4. Do not attempt to charge a cracked or
damaged battery.
5. Do not use a damaged or modified
battery. Doing so could result in a fire,
explosion or personal injury.
WARNING: The battery may
present a risk of fire or chemical
burn if mistreated. Do not
disassemble, overheat or
incinerate the battery.
WARNING: The battery may
develop a small leak under
extreme usage or temperature
conditions.
IF battery fluid contacts skin:
• Immediately wash the area with soap
and water.
• Neutralize the battery fluid with a mild
acid (lemon juice, vinegar, etc.).
• Seek immediate medical attention.
If battery fluid gets in the eyes:
• Immediately flush the eyes with clean
water for at least 15 minutes.
• Seek immediate medical attention.
WARNING: Only use 4144 or
6216 batteries with this machine.
DO NOT use any other type of
battery, attachment or accessory
with this machine. Other types of
batteries, attachments or accessories could
lead to serious injury, property damage or
damage to the machine.
WARNING: Only charge 4144 or
6216 batteries with a 4044
battery charger. DO NOT attempt
to use any other battery charger
to charge 4144 or 6216 batteries.
Other types of battery chargers may cause the
batteries to burst, resulting in fire, personal
injury or property damage.
FCC Statement
CAUTION: Changes or
modifications not expressly
approved by the party
responsible for compliance could
void the user’s authority to
operate the equipment.
NOTE: This equipment has been tested and
found to comply with the limits for a Class B
digital device, pursuant to part 15 of the FCC
Rules. These limits are designed to provide
reasonable protection against harmful
interference in a residential installation.
This equipment generates, uses and can
radiate radio frequency energy and, if not
installed and used in accordance with the
instructions, may cause harmful interference
to radio communications. However, there is
no guarantee that interference will not occur
in a particular installation. If this equipment
does cause harmful interference to radio or
television reception, which can be determined
by turning the equipment off and on, the user
is encouraged to try to correct the interference
by one or more of the following measures:
• Reorient or relocate the receiving
antenna.
• Increase the separation between the
equipment and receiver.
• Connect the equipment into an outlet
on a circuit different from that to which
the receiver is connected.
• Consult the dealer or an experienced
radio/TV technician for help.
4
Section 1 — important Safe operation practiceS
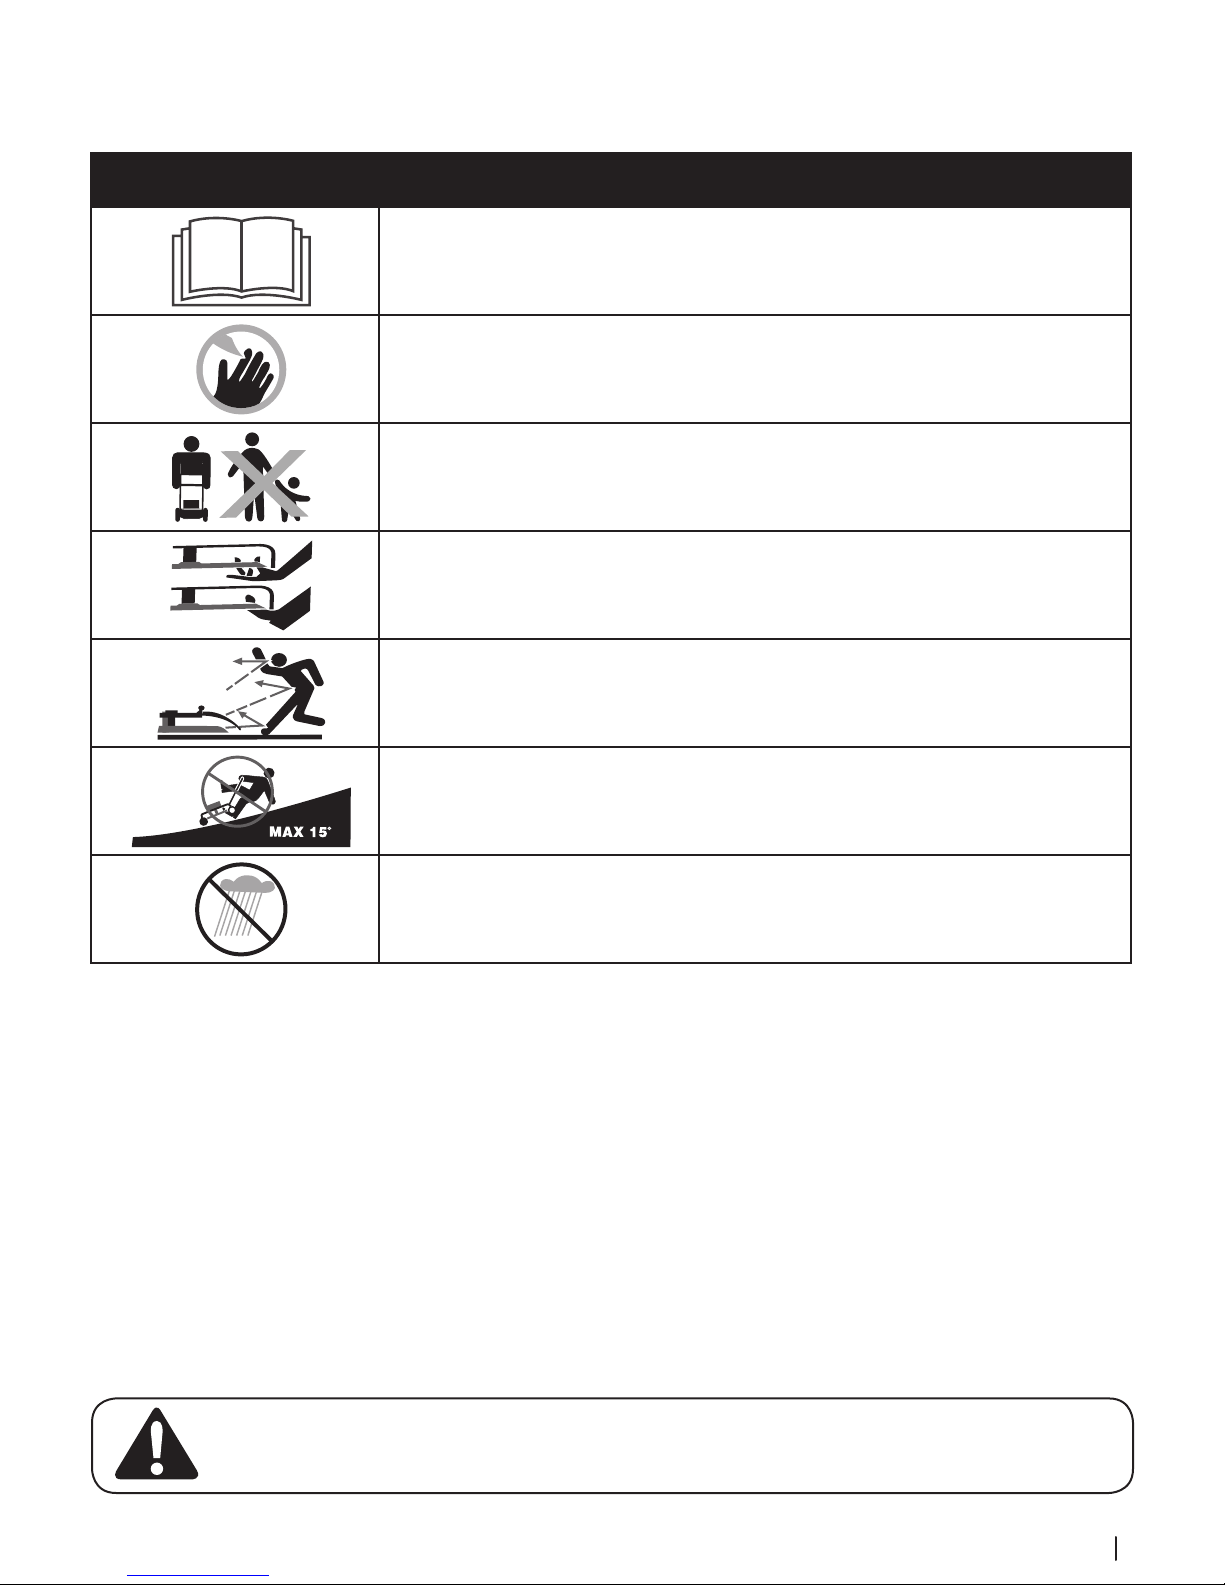
Safety Symbols
This page depicts and describes safety symbols that may appear on this product. Read, understand, and follow all instructions on the machine before
attempting to assemble and operate.
Symbol Description
READ THE OPERATOR’S MANUAL(S)
Read, understand, and follow all instructions in the manual(s) before attempting to assemble
and operate
DANGER — ROTATING BLADES
To reduce the risk of injury, keep hands and feet away. Do not operate unless discharge cover or
grass catcher is in its proper place. If damaged, replace immediately.
DANGER — BYSTANDERS
Do not mow when children or others are around.
DANGER — HAND/ FOOT CUT
Keep hands and feet away from rotating parts.
DANGER — THROWN OBJECTS
Remove foreign objects that can be thrown by the blade in any direction. Wear safety glasses.
DANGER — SLOPES
Use extra caution on slopes. Do not mow slopes greater than 15 ° .
WARNING— ELECTRICAL SHOCK
Avoid dangerous environments. Never operate the mower in the rain or in damp or wet conditions.
Moisture is a shock hazard.
WARNING! Your Responsibility—Restrict the use of this power machine to persons who read, understand and follow the warnings
and instructions in this manual and on the machine.
SAVE THESE INSTRUCTIONS!
Section 1 — important Safe operation practiceS
5
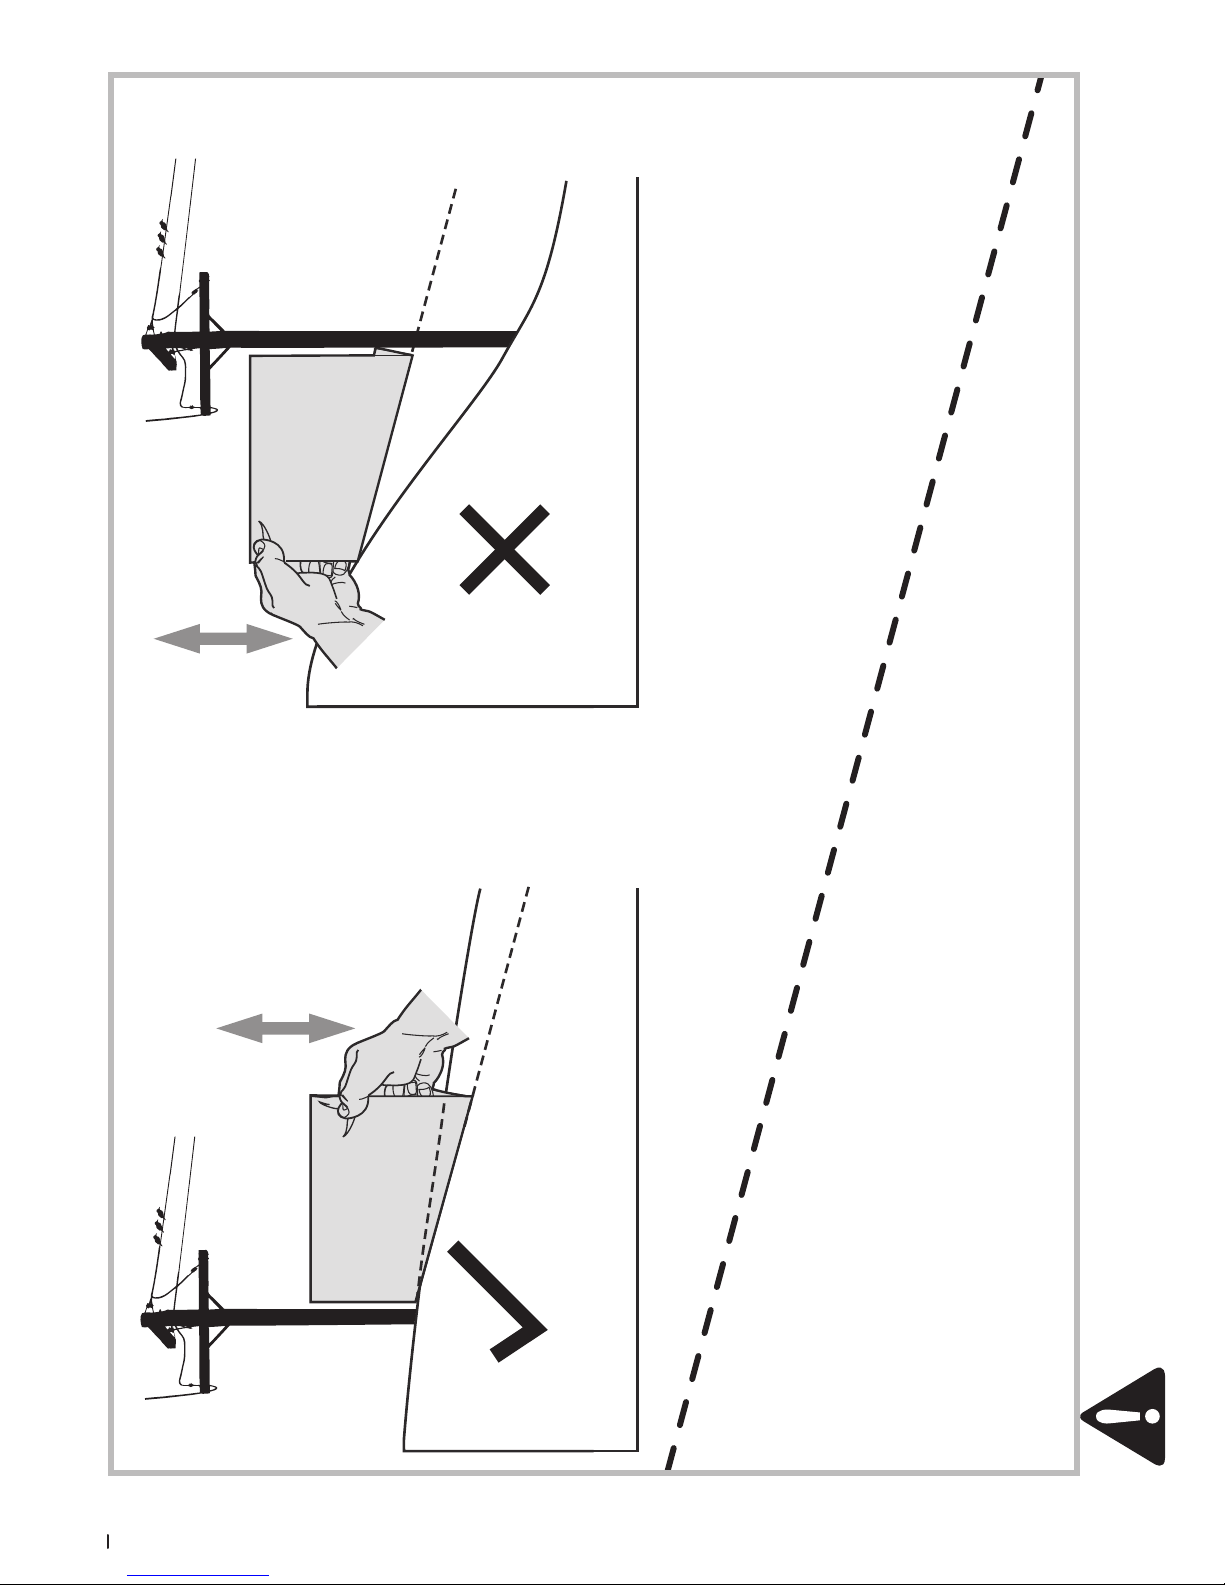
(OK) (TOO STEEP)
USE THIS SLOPE GAUGE TO DETERMINE
IF A SLOPE IS TOO STEEP FOR SAFE OPERATION!
To check the slope, proceed as follows:
1. Remove this page and fold along the dashed line.
2. Locate a vertical object on or behind the slope (e.g. a pole, building, fence, tree, etc.)
3. Align either side of the slope gauge with the object (See Figure 1 and Figure 2 ).
4. Adjust gauge up or down until the left corner touches the slope (See Figure 1 and Figure 2).
5. If there is a gap below the gauge, the slope is too steep for safe operation (See Figure 2 above).
15° dashed line
Slope Gauge
Figure 2Figure 1
15° Slope
15° Slope
6
Section 1 — important Safe operation practiceS
The machine is heavy and can speed up when going downhill. Be prepared to maintain control of the machine. To avoid loss of control, operate across slopes, not up and down. When turning,
turn uphill, not down. Do not operate machine on slopes in excess of 15 degrees.
WARNING! Slopes are a major factor related to slip and fall accidents which can result in severe injury or death.
Assembly & Set-Up
Thank You
2
Thank you for purchasing this product. It was carefully engineered to
provide excellent performance when properly operated and maintained.
Please read this entire manual prior to operating the equipment. It instructs
you how to safely and easily set up, operate and maintain your machine.
Please be sure that you, and any other persons who will operate the
machine, carefully follow the recommended safety practices at all times.
Failure to do so could result in personal injury or property damage.
All information in this manual is relative to the most recent product
information available at the time of printing. Review this manual frequently
to familiarize yourself with the machine, its features and operation. Please
be aware that this Operator’s Manual may cover a range of product
specifications for various models. Characteristics and features discussed
and/or illustrated in this manual may not be applicable to all models. We
reserve the right to change product specifications, designs and equipment
without notice and without incurring obligation.
If you have any problems or questions concerning the machine, phone your
local authorized service dealer or contact us directly. We want to ensure
your complete satisfaction at all times.
Throughout this manual, all references to right and left side of the machine
are observed from the operating position.
Contents of Carton
• Battery Mower (1) • Grass Catcher Assembly (1) • Side Discharge Chute (1)
• Battery † (1) • Charger † (1) • Mower Operator’s Manual (1)
• Parts/Warranty Document (1) • Fast Start Guide † (1)
† If Equipped
NOTE: This Operator’s Manual covers several models. Features may vary by model. Not all features in this manual are applicable to all models and the
model depicted may differ from yours.
NOTE: This mower is shipped as a mulching mower. To convert from a mulching mower to a grass catcher or side discharge mower refer to the Set-Up
instructions in this manual.
Assembly
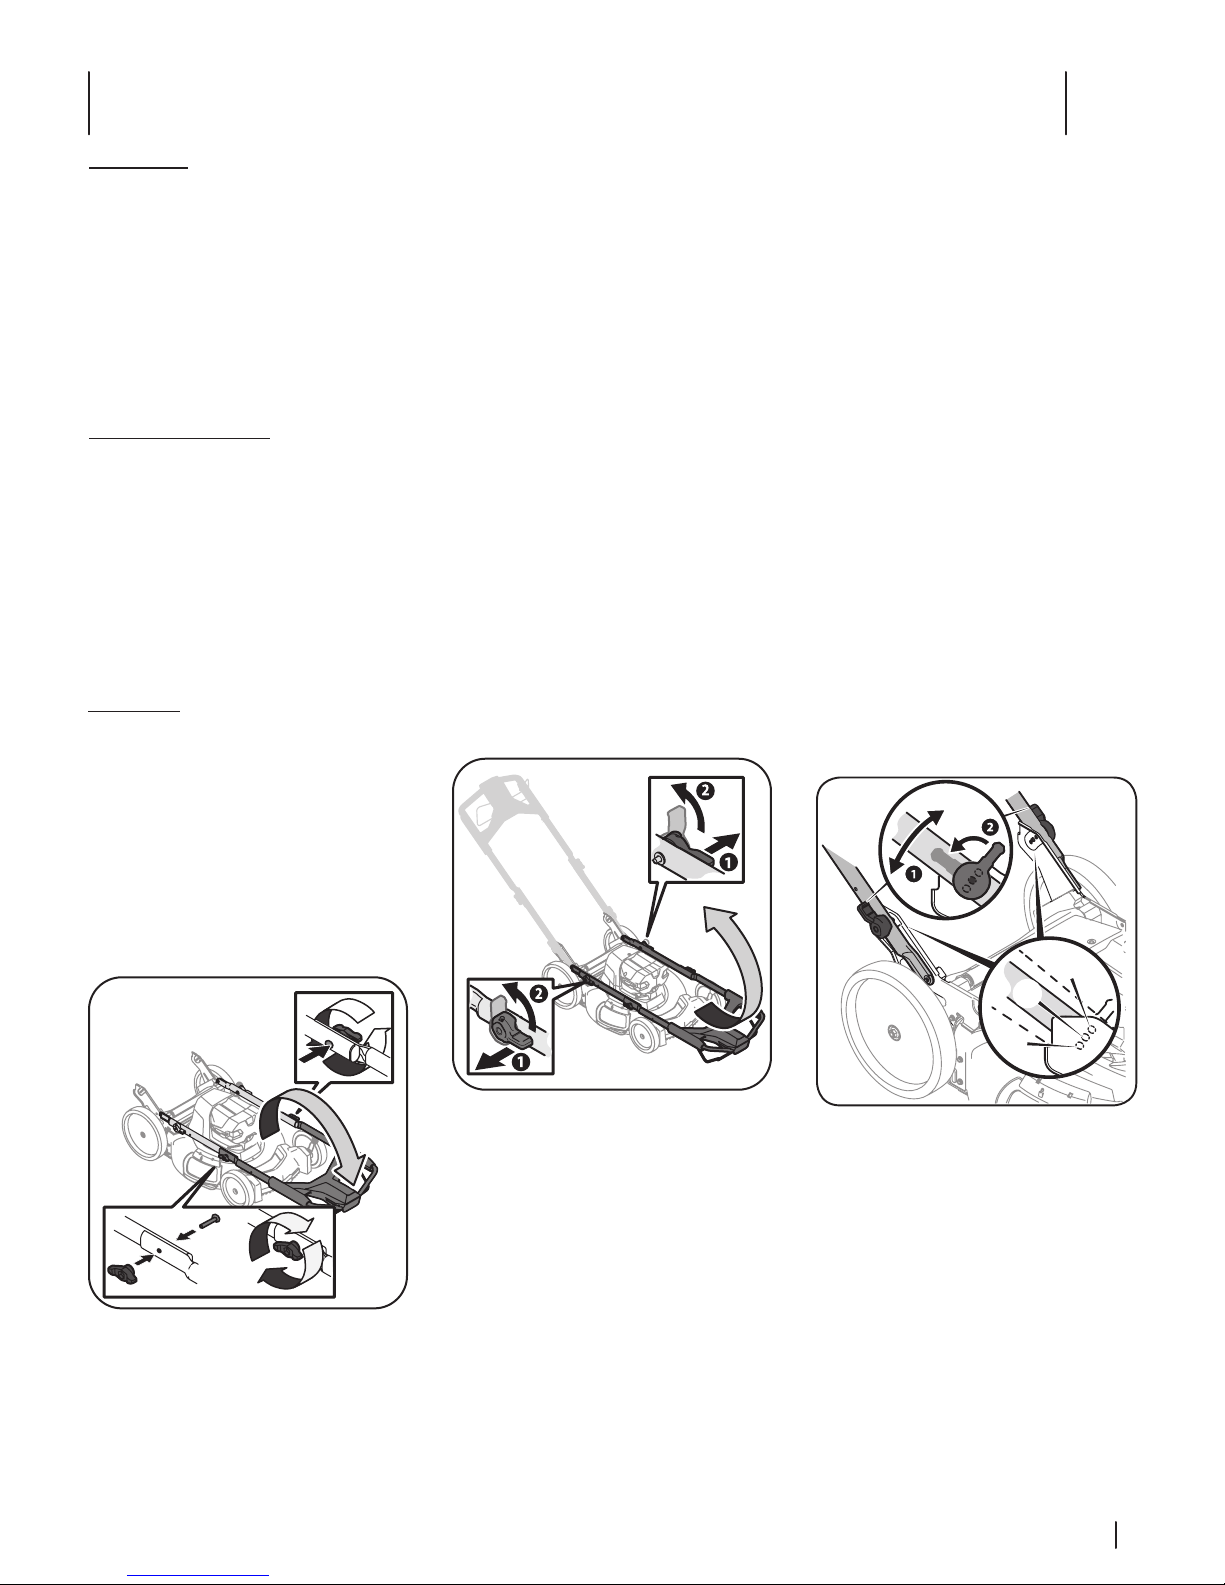
Handle Assembly
1. Loosen the wing knob securing the left
side upper and lower handle together.
2. Remove any packing material which may
be between upper and lower handles.
3. Remove the packaging with wing knob
and bolt Securing the right side upper
and lower handles together.
4. Gently lift and pivot the upper handle
into the position shown in Figure 2-1.
7. Pull out the handle adjustment levers to
release the handle adjustment pins from
the handle bracket. See Figure 2-2 insets.
9. Place the handle into one of the three
handle height positions, high (a),
medium (b) or low (c), located on the
handle brackets. See Figure 2-3.
(a)
(b)
Figure 2-1
5. Insert bolt through the right side lower
and upper handle. Thread wing knob
onto bolt. See Figure 2-1 insets.
6. Secure the upper handle and lower
handle by tightening the wing knobs.
See Figure 2-1 insets.
Figure 2-2
8. Rotate the levers (a) up perpendicular to
the handle as shown in Figure 2-2
insets. Carefully lift the handle up.
(c)
Figure 2-3
10. Turn the handle adjustment levers until
they are parallel with the handle to
release the pins and lock them into one
of the handle height holes in the handle
brackets. See Figure 2-3 inset.
7
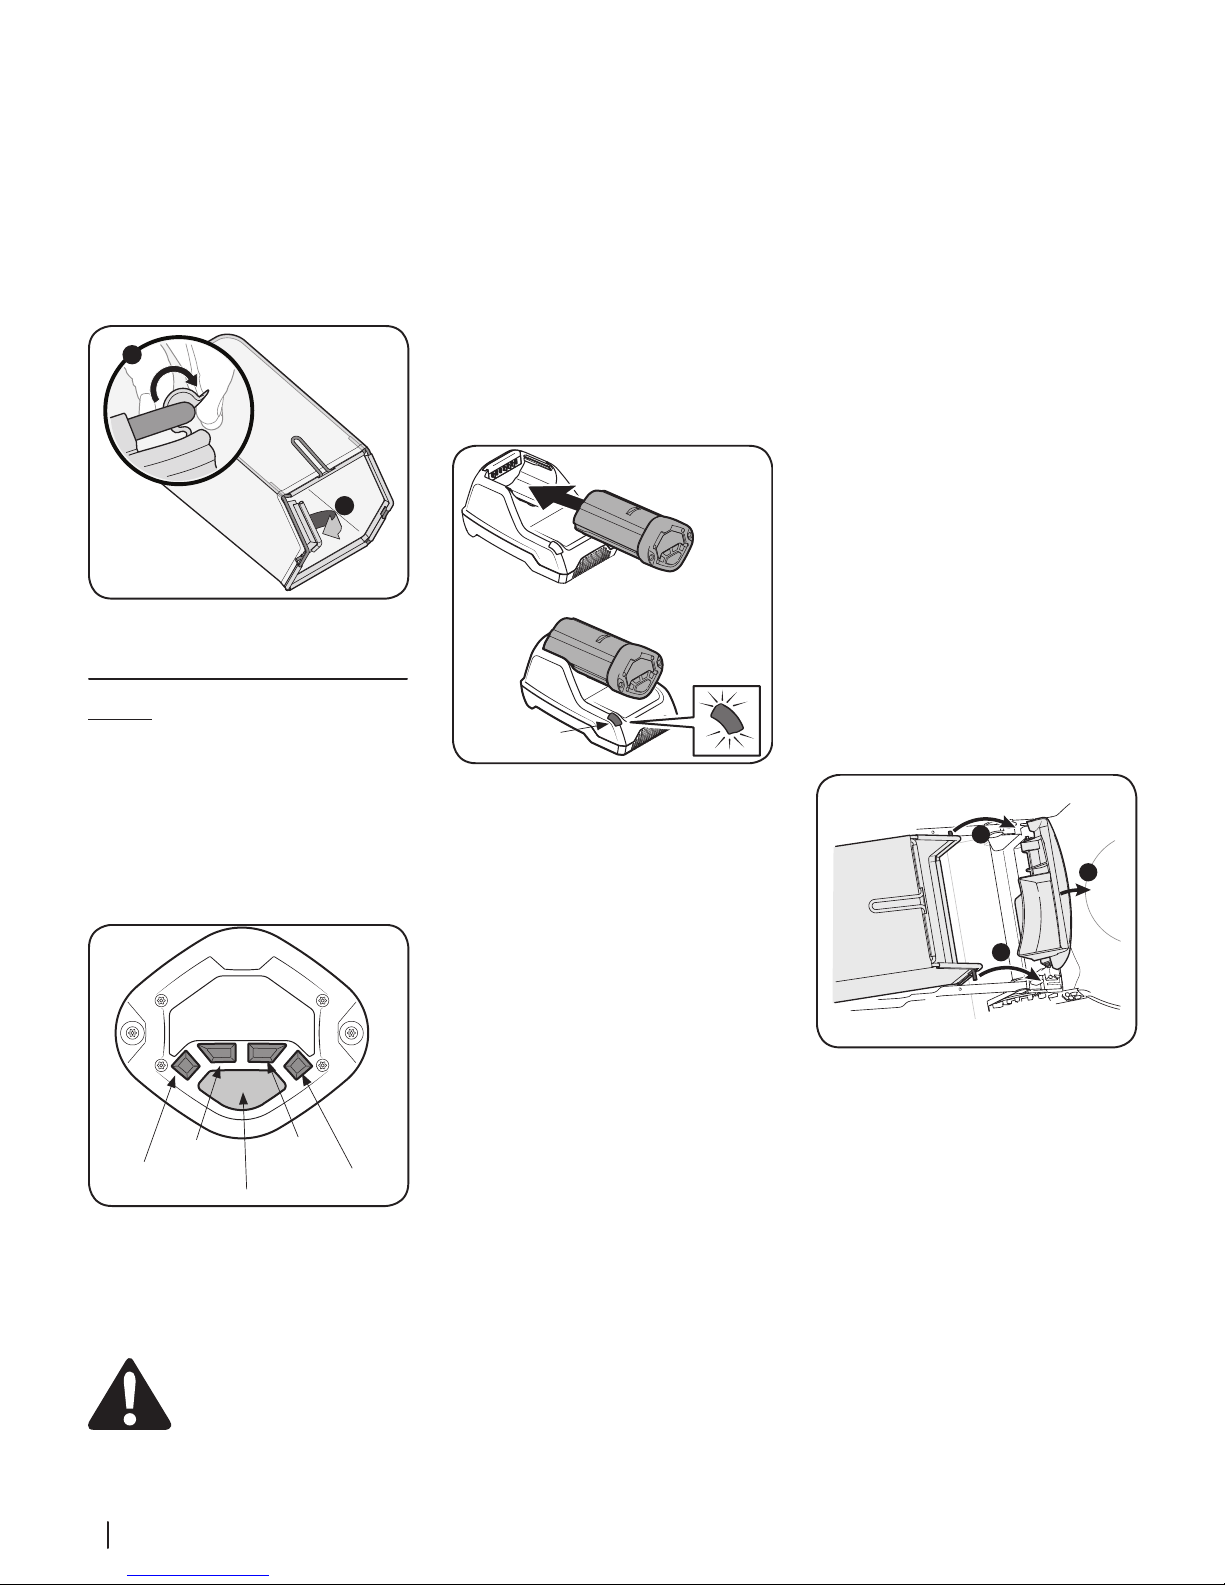
Grass Catcher Assembly
B
A
Charge Meter But ton
0% - 25%
25% - 50%
50% - 75%
75% - 100%
LED
A
B
B
1. Follow steps below to assemble the
grass catcher (if needed). Make certain
bag is turned right side out before
assembling (warning label will be on the
outside). See Figure 2-4.
a. Place bag over frame so that
its black plastic side is at the
bottom.
b. Slip plastic channel of grass bag
over hooks on the frame.
Figure 2-4
Set-Up
Checking the Battery Charge Level
Press the charge meter button on the battery.
See Figure 2-5. The number of lights that
illuminate will indicate the current charge
level of the battery. If all four lights are dark,
charge the battery before any further use. See
Charging Battery on page 8 in the Assembly &
Set-Up section.
Charging Battery
IMPORTANT: If battery is included with the
mower, follow the steps below for charging
the battery. The battery is not shipped fully
charged.
NOTE: Lithium-ion batteries will not develop
a memory and may be charged at any time.
For maximum run time, fully charge the battery
before each use.
1. Plug the battery charger into an
appropriate Ground Fault Circuit
Interrupter (GFCI) power outlet. See
manual shipped with battery charger.
2. Insert the battery into the charging
dock. The LED should illuminate.
See Figure 2-6.
Figure 2-6
If LED does not light:
NOTE:
• Make sure the battery is fully inserted
into the charging dock.
• Make sure the battery charger is fully
plugged into an appropriate power
outlet.
• Make sure the power outlet is
functioning by testing it with another
electrical device.
3. Examine the LED. The LED will indicate
the battery status:
• Green (blinking): The battery is
charging. Charge the battery until the
green light stops blinking.
• Green (constant): The battery is fully
charged.
• Red (blinking): The battery and/or
charger are too hot or too cold. Make
sure the battery and charger are in an
environment between 32° and 104° F
(0° and 40° C). Allow time for the battery
and/or charger to warm up or cool
down.
• Red (constant): The battery is no longer
functional. Refer to the Warranty section
for replacement information.
4. Once the battery is fully charged,
remove it from the battery charger.
NOTE: The battery can be stored in the
battery charger, but the battery charger
should be unplugged from the power
outlet.
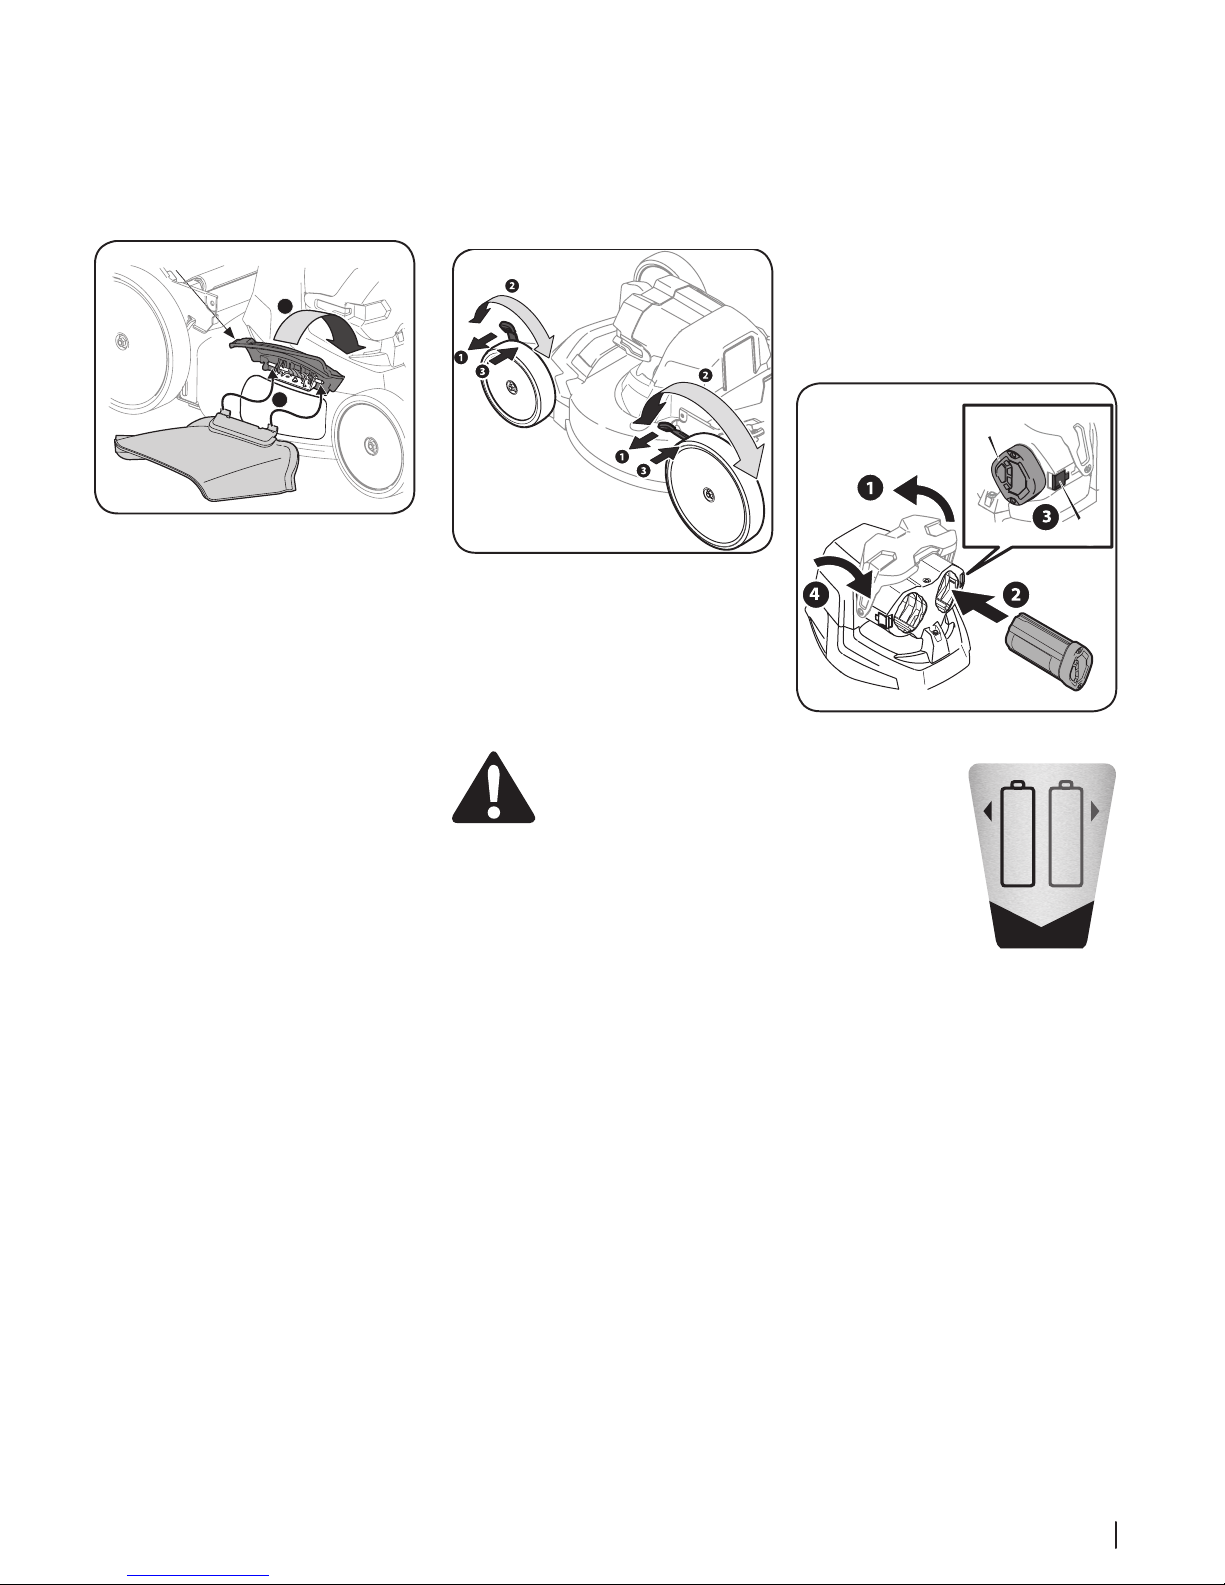
Grass Catcher
1. Follow steps below to attach grass
catcher to mower. See Figure 2-7.
a. Lift mower rear discharge door.
b. Place grass catcher into the slots
in the handle brackets. Release
discharge door so that it rests on
the grass catcher.
Figure 2-5
While in use, lithium-ion batteries
NOTE:
provide power with minimal power fade.
When the battery is fully discharged, it will
immediately cut power to the mower and
require charging.
WARNING: Do not expose the
mower to rain or wet conditions.
8 Section 2 — ASSembly & Set-Up
Figure 2-7
To remove grass catcher, lift mower rear
discharge door. Lift grass catcher up and off
the slots in the handle brackets. Release mower
rear discharge door to allow it to close.
Side Discharge Chute/Mulch Plug
Mulch Plug
2
1
STORAGE
ACTIVE
Your mower was shipped as a mulcher. To
convert to side discharge, make sure grass
catcher is not installed and rear discharge door
is closed.
1. On the right side of the mower, lift the
mulch plug. See Figure 2-8.
Cutting Height
The cutting height adjustment lever is located
above the front and rear left wheel.
1. Pull the cutting height adjustment lever
towards wheel.
2. Move lever to desired position for a
change in cutting height. See Figure 2-9.
Installing Battery
IMPORTANT: Use only with model 4144 or
6216 batteries
1. Lift up the battery housing lid.
2. Slide the battery into the active (left
side) battery port so that the battery
indicator light faces away from the
battery latch. See Figure 2-10.
3. Push the battery (a) firmly until the
battery locks into place. There should be
an audible “click” and the battery latch
(b) should be in the upright position.
4. Close battery housing lid.
(a)
Figure 2-8
2. Slide two hooks of side discharge
chute under hinge pin on mulch plug
assembly. Lower the mulch plug.
IMPORTANT: Do not remove mulch plug
at any time.
To remove side discharge chute, lift the mulch
plug. Lift the side discharge chute up to release
the slide hooks from under the mulch plug
hinge pin. Release mulch pulg to allow it to
close.
Figure 2-9
IMPORTANT: Both the front and rear
wheels must be placed in the same
relative position. For rough or uneven
lawns, move the height adjustment
levers to a higher position. This will stop
scalping of grass.
3. Release lever towards deck.
WARNING: Do not at any time
make any adjustment to lawn
mower without first stopping
motor and removing safety key.
Figure 2-10
The second
NOTE:
battery (right side) bay
can be used for storage
of a backup battery. The
backup battery installs
with the indicator lights
facing away from the
latch.
(b)
9Section 2 — ASSembly & Set-Up
 Loading...