

Page 1

3
POWER INVERTER 300 W
KH 3900
KOMPERNASS GMBH · BURGSTRASSE 21 · D-44867 BOCHUM
www.kompernass.com
ID-Nr.: KH3900-12/07-V2
POWER INVERTER
Operating instructions
JÄNNITTEMUUNNIN
Käyttöohje
SPÄNNINGSOMVANDLARE
Bruksanvisning
SPÆNDINGSTRANSFORMER
Betjeningsvejledning
SPENNINGSOMFORMER
Bruksanvisning
ÌETAÓ×HMATIÓTHÓ TAÓHÓ
ПдзгЯет чсЮузт
SPANNUNGSWANDLER
Bedienungsanleitung
Page 2
KH 3900
A
q
‚
„
r
B
C
D
e wt
Page 3

INDEX PAGE
Intended Use 2
Safety information 2
Technical data 3
Operating Elements 4
Initial operation 4
Operational information 4
Connection and operation of a load/device 6
Device operation information 7
Low battery signal 7
Changing the cable fuse 7
Handling general failures 8
Troubleshooting 9
Cleaning 9
Disposal 10
Importer 10
Warranty & Service 10
Read the operating instructions carefully before using the device for the first time and preserve this booklet
for future reference. Pass this booklet on to whoever might acquire the device at a later date.
- 1 -
Page 4
POWER INVERTER
300 W KH 3900
Intended Use
The device is intended for connection to a 12 V in
vehicle receptacle or an automotive battery and for
220 - 240 V AC output for connection of electrical
devices with a power consumption up to 300 W.
The device is not intended for commercial or industrial
purposes.
No guarantee claims will be granted for damage
resulting from improper use!
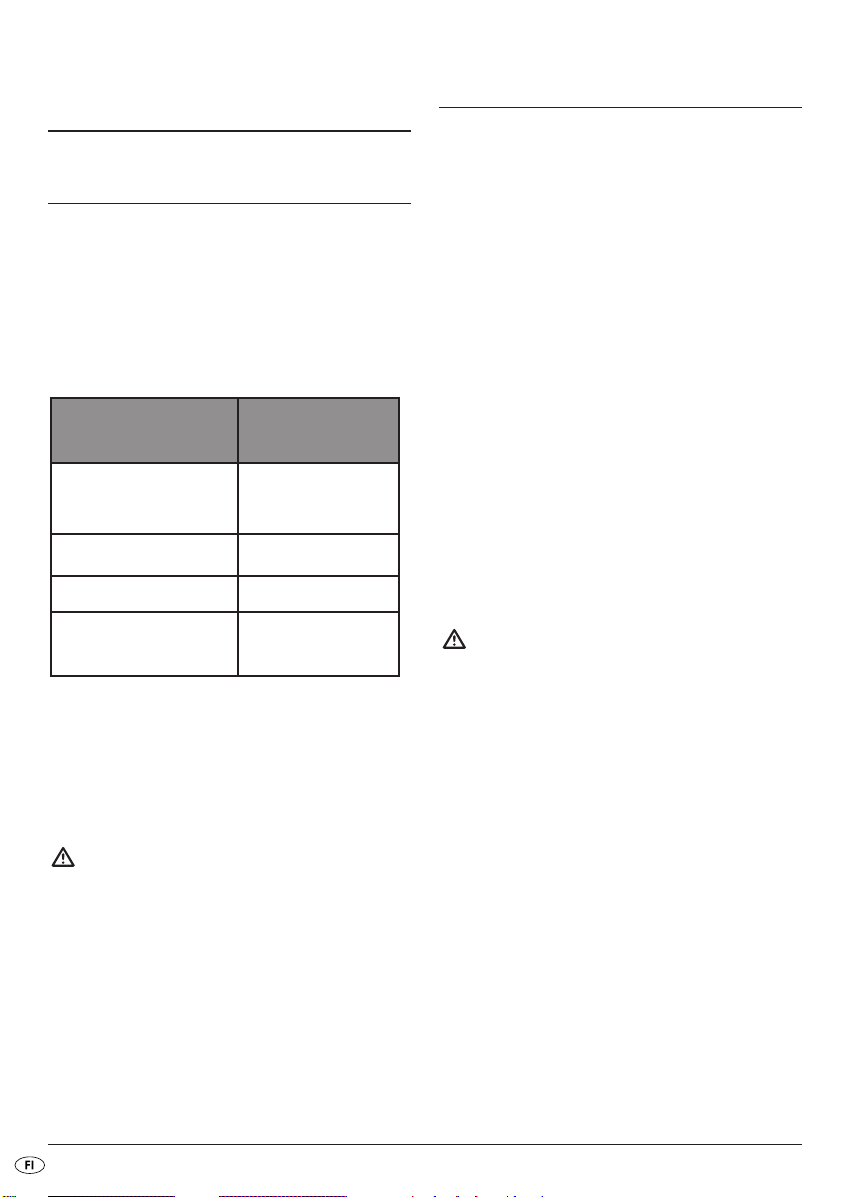
Devices recommended for
use with the power inverter*
Notebooks and computer,
radios, radio devices, CD/MP3
player, mobile telephone
Portable cooler boxes, lights Microwave ovens, coffee
Electric razors Hair dryer
Devices not recommended for use with the
power inverter*
Amplifier, drilling machines,
compressors
machines, hand mixers,
clothes irons
Safety information
• This device is not intended for use by individuals
(including children) with restricted physical, physiological or intellectual abilities or deficiences in
experience and/or knowledge unless they are
supervised by a person responsible for their safety
or receive from this person instruction in how the
device is to be used. Children should be supervised
to ensure that they do not play with the device.
• To avoid dangers remove the power inverter
from the vehicle receptacle and/or the connection terminals from the automotive battery after
each use and before every cleaning.
• Only connect the power inverter to the automotive
battery when the engine is switched off! The
possibility of injury exists from rotating parts!
• Check the device and all parts for visible damage.
The safety concept of the device can only function
properly when it is in perfect condition.
• The power inverter must always be easily accessible
so that, in case of emergency, it can be quickly
disconnected from the power supply system.
Typical low voltage devices Typical motor driven devices,
heating devices, electric
work tools
* Pay attention to the information regarding
current usage and power consumption on
the rating plate of the device you intend to
operate.
Before operation make sure that the maximum
power consumption does not exceed 1,3 A
and the maximum continuous load is not
more than 300 W.
Attention!
Sensitive electronic devices should not be operated with the power inverter since the output
voltage is not sufficiently constant for these devices.
Risk of electrical shocks.
• Connect the power inverter only to a 12 V automotive battery/vehicle receptacle. Connecting
the device to a 24 V supply could damage it.
• When connecting the power inverter via the 12 V
vehicle plug make sure that the polarity of the
vehicle plug matches the polarity of the in vehicle
receptacle. The vehicle socket must have an internal positive pole, that is to say that the positive pole
of a vehicle battery cannot be connected to the
chassis of the vehicle.
• Check before connecting the power inverter that
the vehicle receptacle is sufficiently secured. This
safeguard may not in any way be circumvented
or changed.
- 2 -
Page 5
• Use the supplied connecting cable only.
• Arrange for defective plugs, connection terminals or
cable to be replaced at once by qualified technicians or our Customer Service Department.
• Get customer service to repair or replace connecting
cables and/or devices that are not functioning
properly or have been damaged.
• You may not open the casing or repair the device
yourself. Should you do so, the safety of the
device may be compromised and the warranty
becomes void.
NEVER submerse the device in water.
Wipe it only with a slightly damp cloth.
Risk of fire!
• Do not use the device near hot surfaces.
• Do not locate the device in places exposed to
direct sunlight, Otherwise, it may overheat and
become irreparably damaged. Do not operate
the device in a vehicle that is standing out in the sun.
• Do not leave the device unattended when in use.
• Do not cover the fan's ventilation slots when the
device is switched on.
• Do not place any open sources of fire, like candles,
on the device.
• Both connection cables can become heated
when subjected to heavy loads.
• Due to high crossover resistances heating of the
plug in connector can result when using the cables
with a 12 V vehicle plug. Therefore when operating
with high loads use the connection cable with
the connection terminals.
Notice regarding disconnection
from mains-power
• This device's on/off switch does not completely
disconnect the device from the vehicle's power
and/or the battery. When the vehicle plug is
connected power is still supplied to the device.
To completely disconnect the device from the
vehicle power the 12 V vehicle plug must be removed from the vehicle socket or the connection
terminals removed from the automobile battery.
Risk of personal injury!
• Do not operate the device if it has fallen or is
damaged. Have the device checked and repaired
if necessary by qualified technicians.
Technical data
DC Input
Voltage : 12V
Maximum voltage: 15,5 V
Maximum power
consumption: 40 A
Underload alarm: at 10,6 ± 0,3 V
Underload shutoff: at 10 ± 0,3 V
Overload shutoff: at 16 ± 0,5 V
AC Output
Voltage : 220-240 V ~50 Hz
Output power: 1,3 A
Continuous load: max. 300 W
Peak load: max. 400 W/0,1 s
Efficiency ( ): approx. 90 %
Output wave form: modified sine
Overload protection: >= 320 W
Temperature shut off: at 65 ± 3 °C
Fuses
Power inverter: 30 A automotive flat fuse
Cable fuse: 30 A automotive flat fuse
- 3 -
Page 6
Power failure protection switch
Power failure shut off: >3 mA
General data
Measurements (without vehicle plug)
(L x B x H): 155 x 128 x 58 mm
Weight (without cable): 865 g approx.
Operating temperature: 0...62 °C
Operational humidity: 0 - 80 %
(relative humidity no condensation)
Initial operation
Unpacking
1. Remove the device from the packaging.
2. Remove all foils.
Warning:
Do not permit small children to play with plastic packaging.
There is a risk of suffocation!
Subject to technical changes.
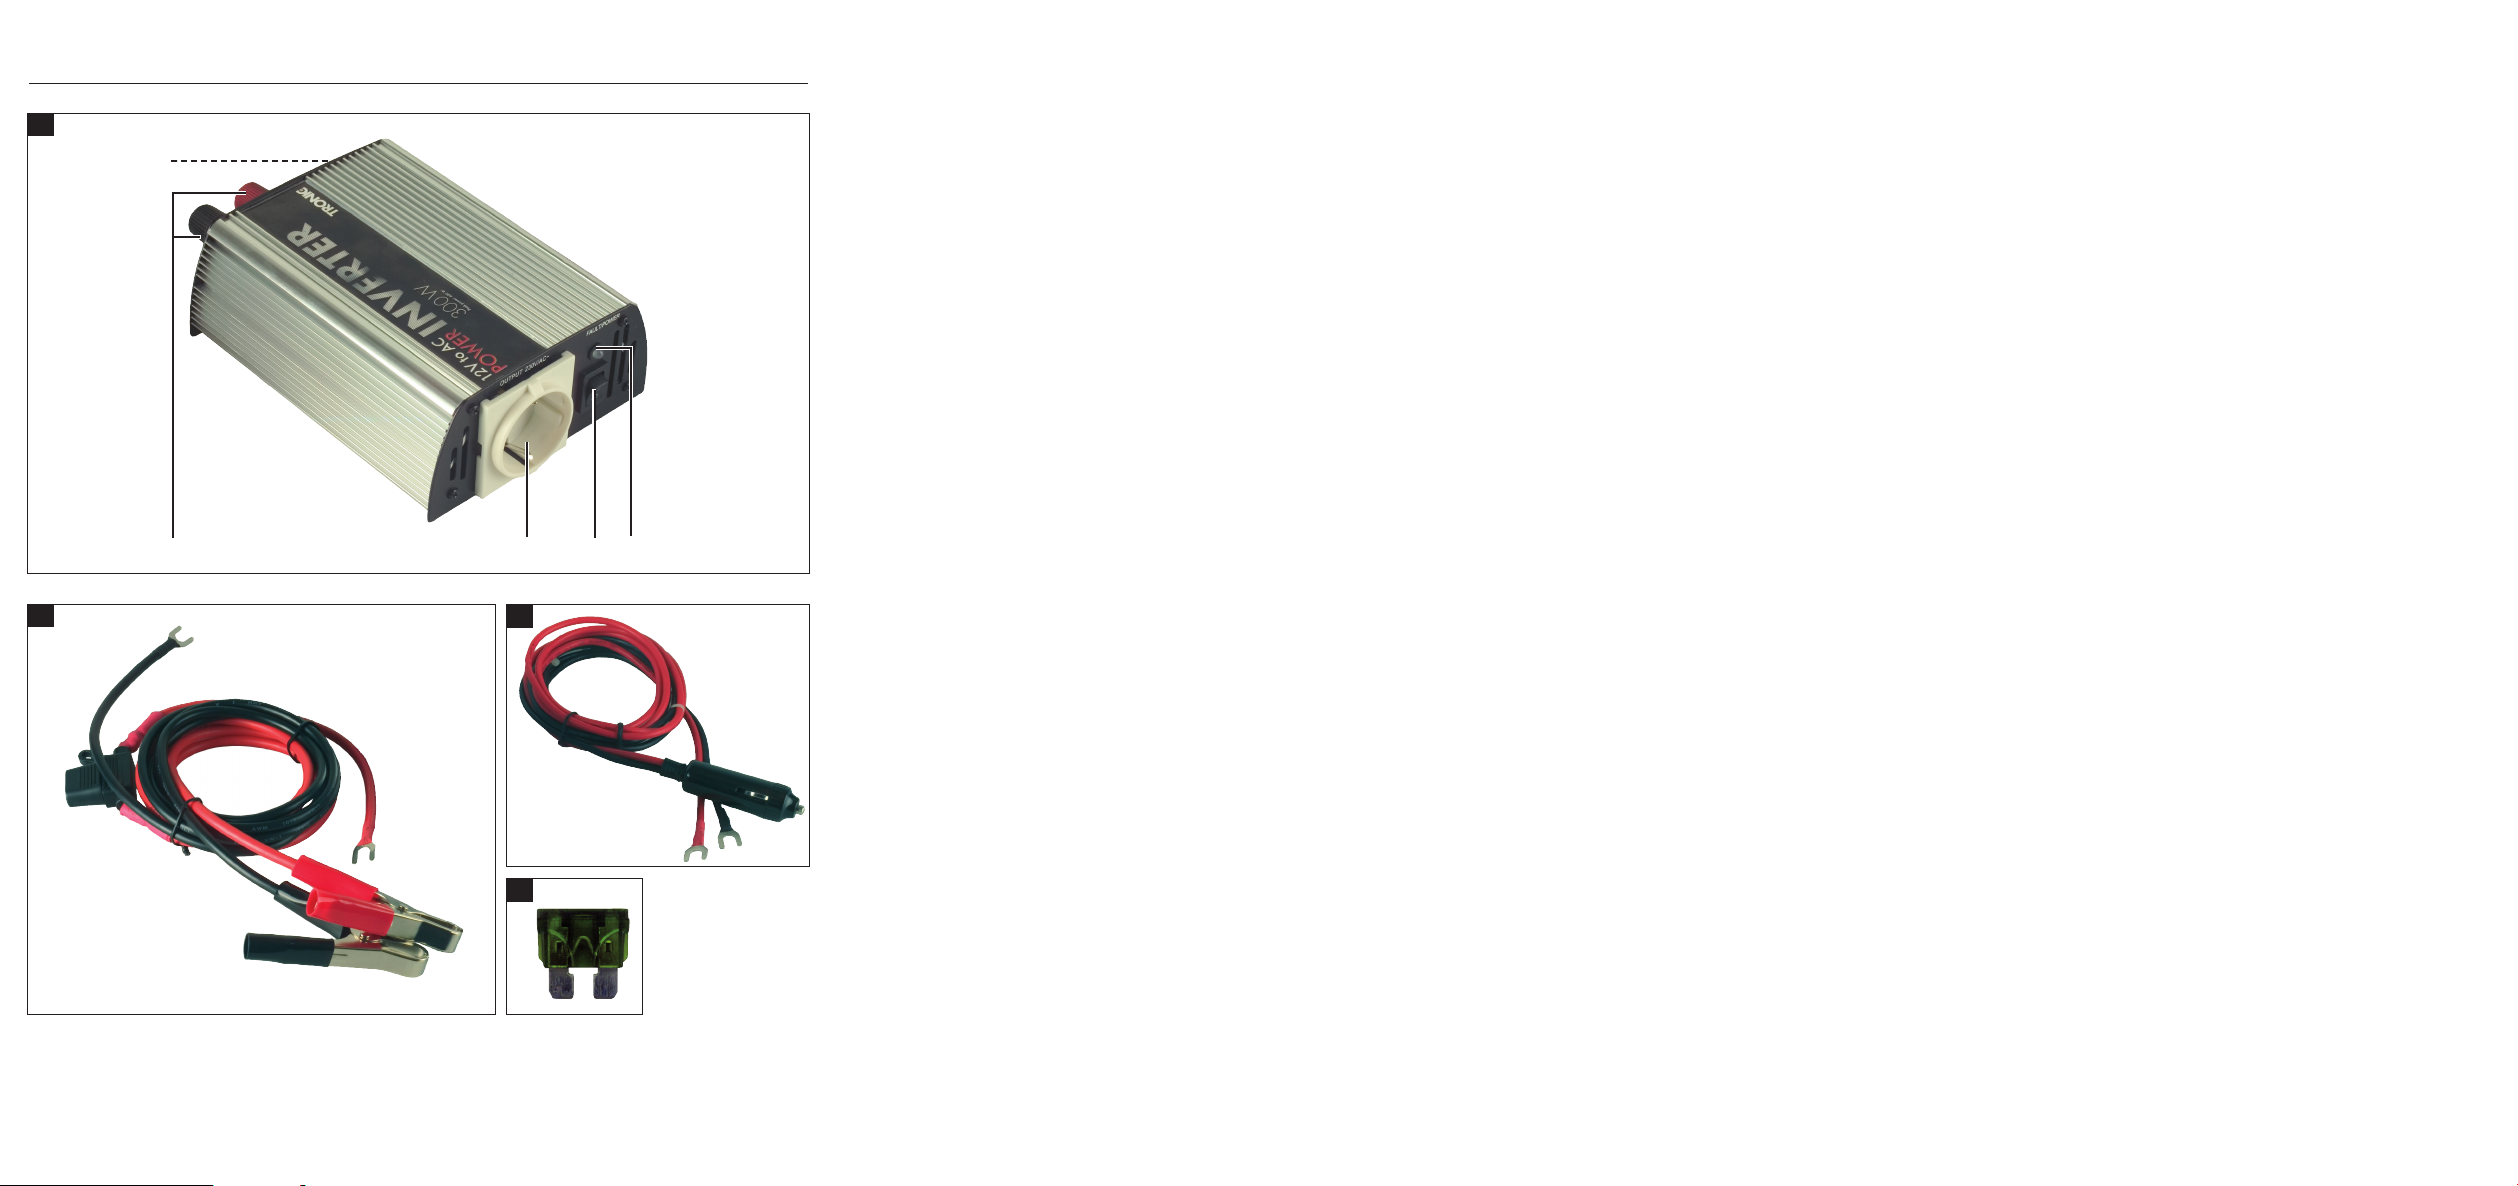
Operating Elements
A
Power inverter:
Fan (on the rear panel)
q
Operation LED/Overload indicator
w
On/Off switch
e
AC socket
r
12 V connections (Red+/Black-)
t
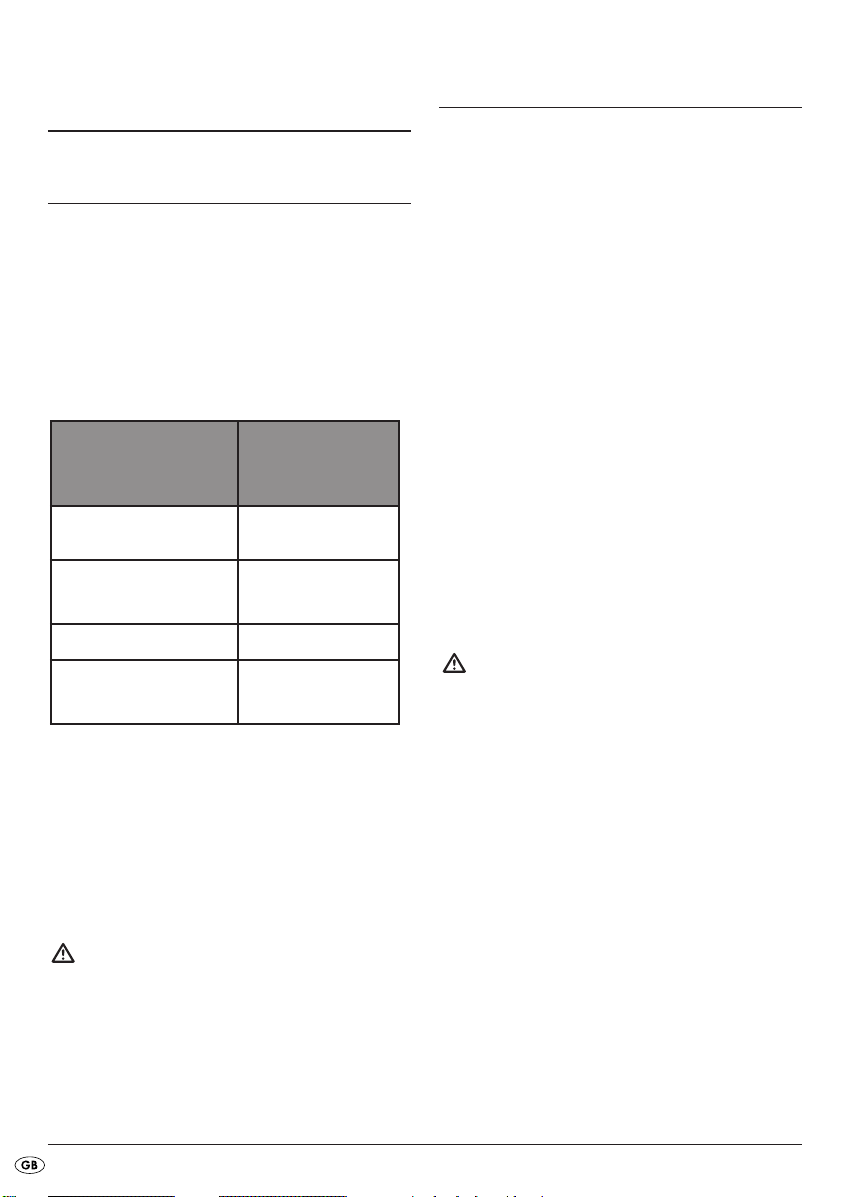
b
Cable with connection terminals
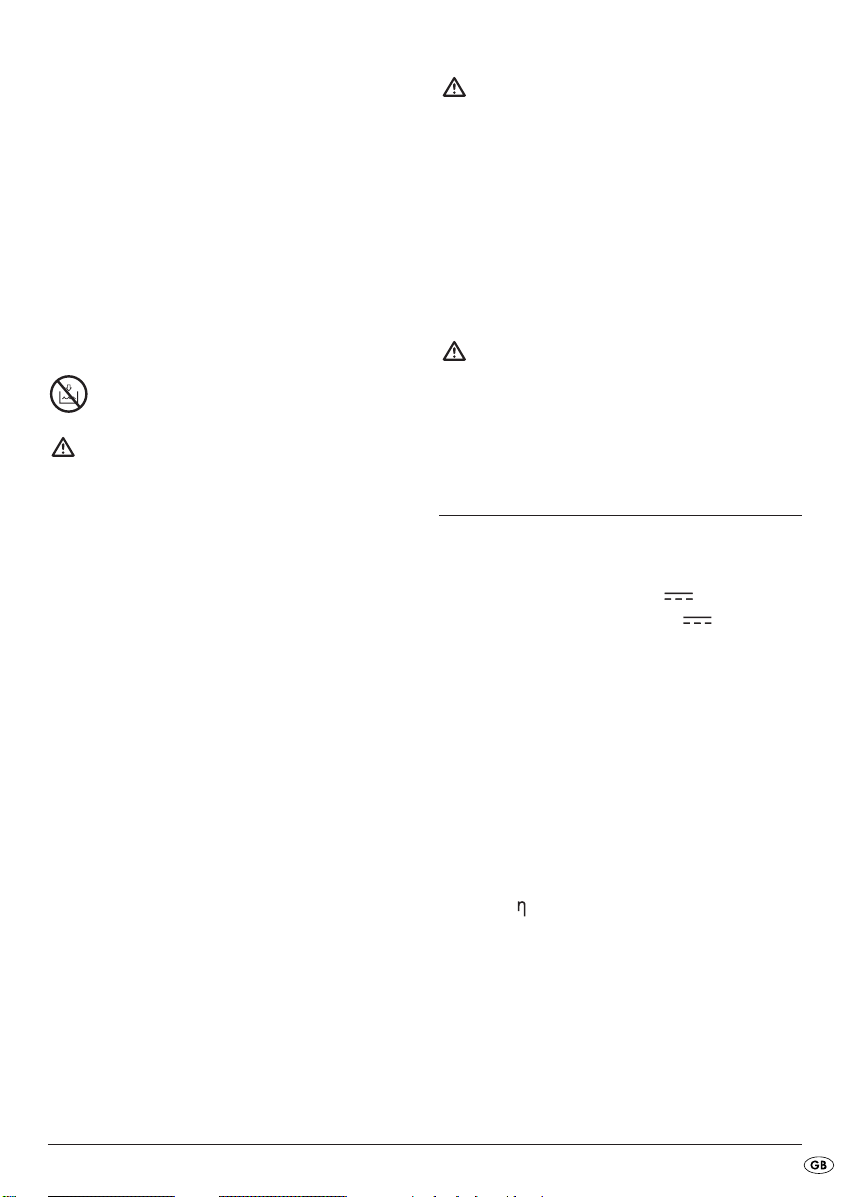
c
Cable with 12 V vehicle plug
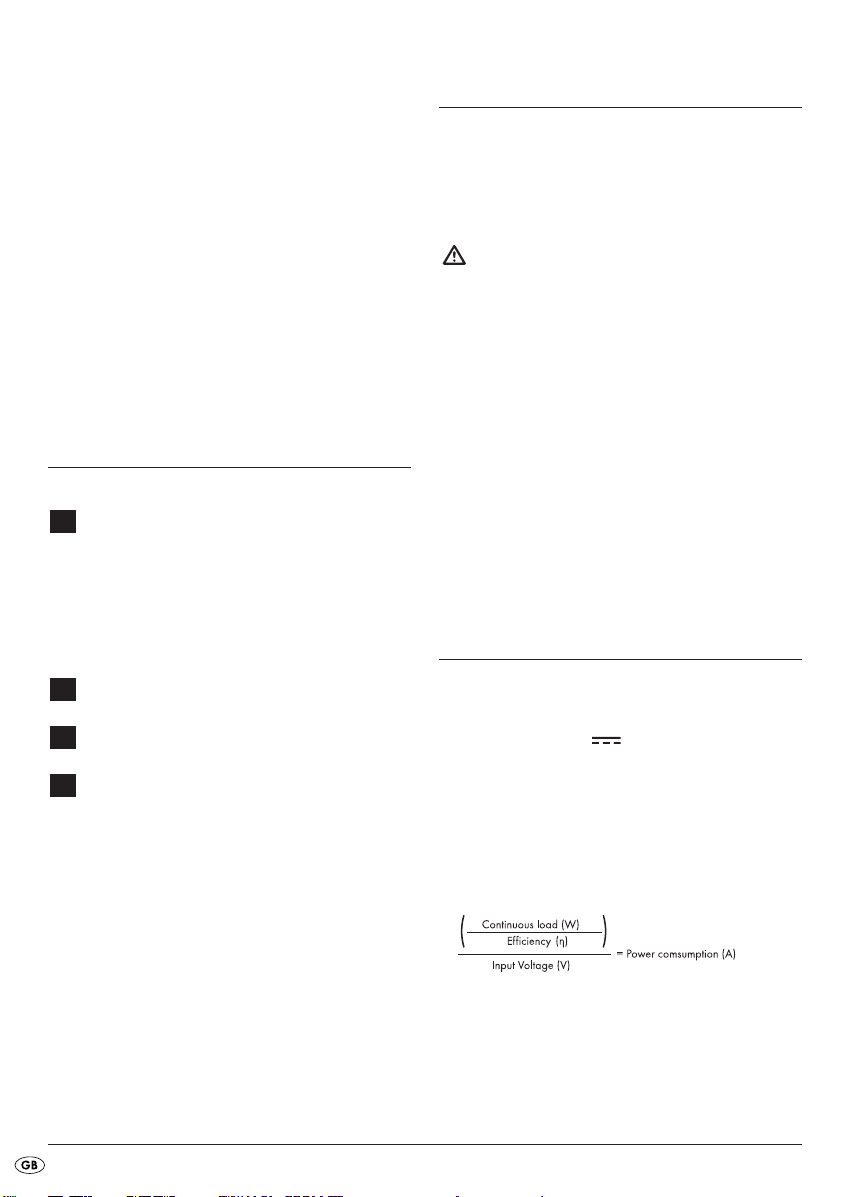
D
30 A automotive flat fuse
Check the items supplied
Before putting the device into use check to ensure
that all of the items listed are present and that there
are no visible signs of damage.
- Power inverter
- 1 Cable with connection terminals red/black
- 1 Cable with 12 V vehicle plug
- 1 30 A automotive flat fuse
- This operating manual
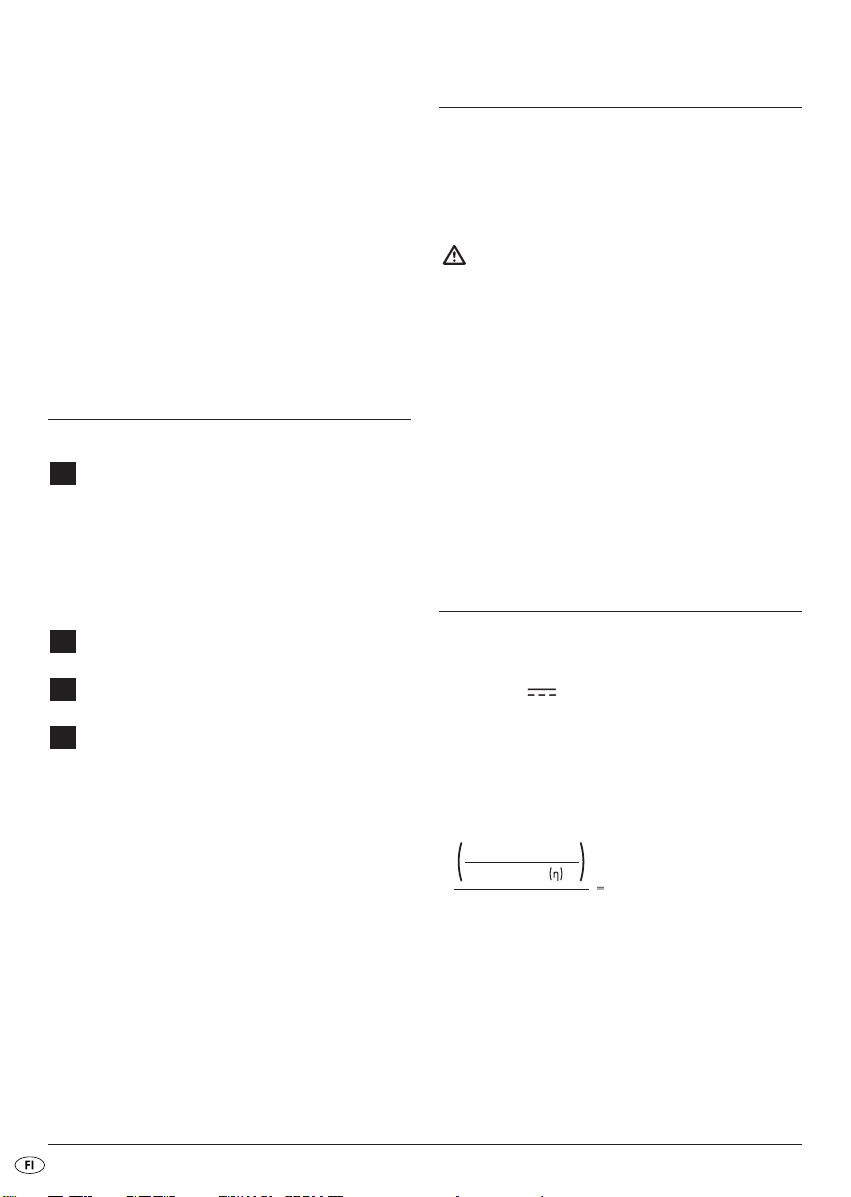
Operational information
For continuous operation of devices via the power
inverter the vehicle socket must supply a voltage
between 11 - 15,5 V . The voltage source of
the vehicle socket can be perhaps an automotive
battery or a regulated DC voltage like a transformeraccumulator station. Before connecting the power
inverter check to see that the voltage source is supplying
sufficient power for operation. The required power
needed for operation can be calculated as follows:
- 4 -
Page 7

Example
The voltage source should provide for a continuous
load of 300 W and also for a minimum of 27,7 A.
Attention!
Never connect the power inverter to a 24 V
supply system. Otherwise the device will be damaged.
The device can only be connected to a voltage
source with a rated voltage of 12 V.
Setup
• The power inverter should be positioned on an
even, flat surface. Make sure that there is 1 cm
free space remaining all around the power inverter
for air circulation.
• A distance of 50 cm must be maintained behind
the fan's ventilation slots.
In vehicle operation
If you are operating the power inverter in a vehicle
make sure that the installation is not a hindrance
when driving the vehicle.
For this, install cables so that they do not come into
contact with moveable parts in the vehicles interior
and they do not obstruct the view.
Note:
The power inverter can also be operated when
the engine is switched off. However be aware
that the power inverter possibly may not function during an engine startup.
Connection to a voltage source
Attention!
Before connecting the power inverter to a voltage source make sure that the on/off switch on
the device is in the position 0.
You can connect the power inverter with the 12 V
plug to a 12 V in vehicle receptacle or attach directly
to an automobile battery with the connection terminals.
For both connection variants the connection cable
must be connected to the power inverter's 12 V
connection screw.
Diagram: Cable shoe connection
Connection to a 12 V vehicle receptacle
• Loosen the red screw on the power inverter as
much as is needed for you to be able to place
the red cable shoe of the 12 V vehicle cable
with the opening under the screw and washer.
(See diagram: Cable shoe connection)
• Turn the red screw so tight that the cable shoe
can no longer become unattached.
• Loosen the black screw on the power inverter as
much as is needed for you to be able to place
the black cable shoe of the 12 V vehicle cable
with the opening under the screw and washer.
• Turn the black screw so tight that the cable shoe
can no longer become unattached.
- 5 -
Page 8
• Insert the 12 V vehicle plug into a vehicle receptacle.
Note:
Due to high crossover resistances heating of
the plug in connector can result when using the
cables with a 12 V vehicle plug. Therefore
when operating with high loads use the connection cable with the connection terminals.
Connection to an automobile battery
• Loosen the red screw on the power inverter as
much as is needed for you to be able to place
the red cable shoe of the red cable with the
connection terminal with the opening under the
screw and washer.
• Turn the red screw so tight that the cable shoe
can no longer become unattached.
• Loosen the black screw on the power inverter as
much as is needed for you to be able to place
the black cable shoe of the black cable with the
connection terminal with the opening under the
screw and washer.
• Turn the black screw so tight that the cable shoe
can no longer become unattached.
• First connect the red terminal clamp to the plus
pole of the automobile battery and then the
black terminal clamp to the minus pole of the
battery.
Attention!
Do not use the power inverter in vehicles whose plus pole is connected to the vehicle body
and/or the chassis.
The positive pole must be inside the receptacle.
Do not use the power inverter in vehicles with
positive earth receptacles. Otherwise the device will be damaged.
Connection and operation of a
load/device
Attention!
Before connecting a load/device to the power inverter make sure that the on/off switch on the
device is in the position 0.
Make sure that the power of the load/device
does not exceed the maximum continuous load of
the power inverter.
• Insert the plug of the connecting load/the device
to be operated into the 220 - 240 V socket of
the power inverter.
Attention!
Do not switch on the load/device to be operated
yet!
• Switch the power inverter on by moving the on/
off switch to the position I. If the power inverter
is functioning properly the operation LED/Overload indicator will light up green.
• Now switch on the load/device to be operated.
When switched on a short signal tone can be
heard.
Note:
If a signal tone can be heard and the operation
LED/ Overload indicator lights up red the input
voltage is too low or the power of the load/device connected to the power inverter is too high.
- 6 -
Page 9
Attention!
The power inverter is equipped with a residual
current protection switch, which by residual currents >3mA at the safety contacts of the 220
- 240 V socket, switches the power inverter
off. If this should happen immediately remove
the device connected to the power inverter and
under no circumstances should you connect
this device to any other power supply! The
device is defective and must be examined and
if necessary repaired by a specialist before it
can be put back into service!
Device operation information
GENERAL NOTES
Usually on the device's rating plate you can find
information regarding the power consumption in
amperes (A) or the wattage (W).
Before operation make sure that the maximum power
consumption does not exceed 1,3 A and the maximum continuous load is not more than 300 W.
• Loads with a high internal resistance operate
very well with the power inverter, on the other
hand, loads with a low internal resistance, for
example heating and cooking devices have a
power consumption in watts that is too high.
• Inductive loads, for example, televisions or stereo
systems (devices with an inductor or a transformer)
often require a much greater switch on current
than resistance loads with the same specified
wattage. When switching on, television sets
demand much more power than that indicated
on the rating plate. Therefore it may be necessary
to switch the power inverter on and off several
times in order to switch the television set on.
• Most heat producing devices, for example, hair
dryers, clothes irons or heating fans can not be
operated via the power inverter because the
power consumption of these devices exceeds
the output power of the power inverter.
Low battery signal
• When the battery runs low (under 11 V) a continuous signal tone sounds to indicate that the battery needs to be charged. The operation
LED/Overload indicator continues to light up
green.
• When the battery voltage drops below 10 V the
power inverter switches off and the operation
LED/Overload indicator lights up red.
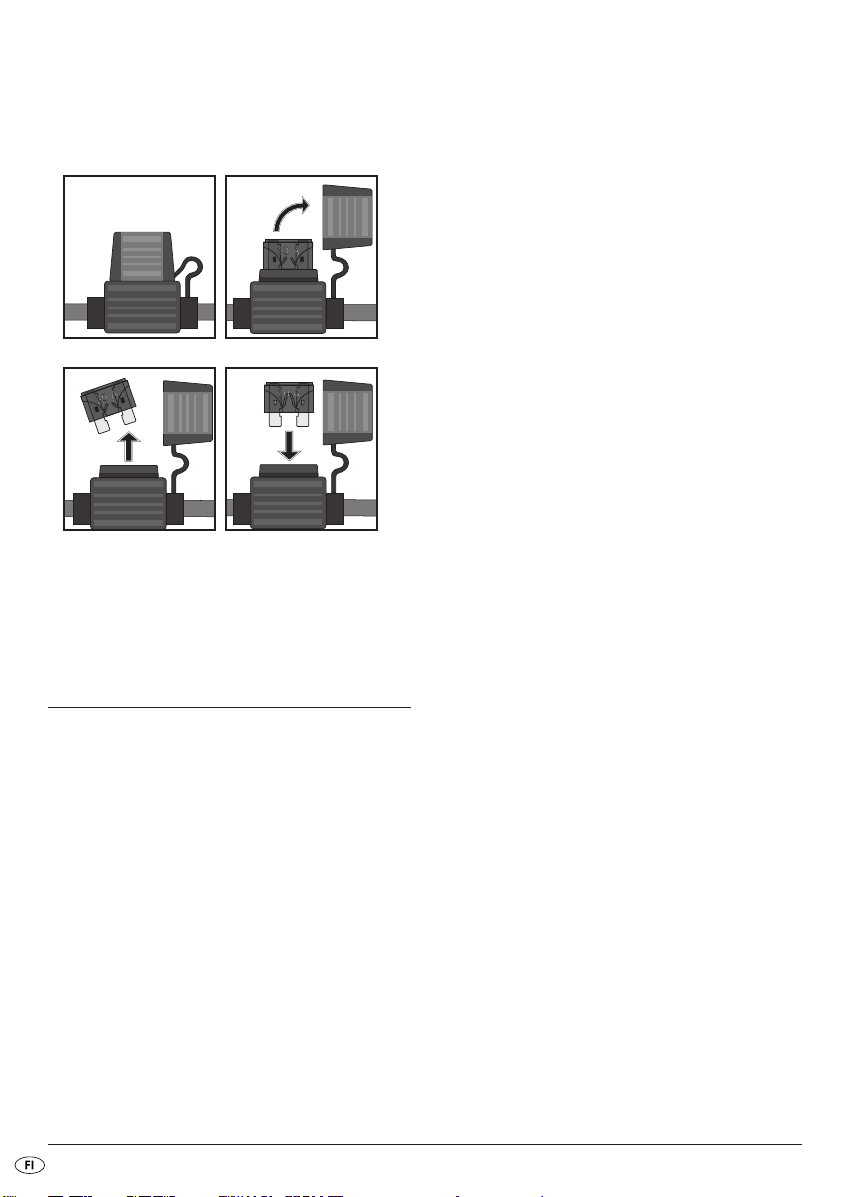
Changing the cable fuse
Risk of potentially fatal electrical
shock:
Disconnect the power inverter from the power
source before changing the fuse. Also remove
any devices connected to the power inverter.
The red cable with the connection terminal is equipped
with a fuse. When too great a load is connected to
the power inverter the fuse will blow.
Replace the fuse with one of the same value and
type as specified in the technical data and with the
same shut off characteristics.
Before switching on the power inverter again ascertain
and remedy the cause of the fuse blowing.
- 7 -
Page 10

To change the fuse proceed as follows:
• Open the cover of the fuse holder and pull the
automotive flat fuse out of the holder.
Diagram: Changing the cable fuse
• Place a new 30 A automotive flat fuse (supplied)
into the two connections and put the cover back
on the fuse holder.
Television sets
• The power inverter is shielded and puts out a
filtered sine wave.
With the reception of, for example, very weak
television stations it can, nevertheless, result in
interferences and/or image breakdown.
• In this case position the power inverter as far
away as possible from the television, antenna
cable and antenna.
• Reposition the power inverter, television, antenna
cable and antenna until reception improves.
• If possible use a high quality, shielded antenna
cable.
Audio systems
• Some audio/video systems issue a buzzing tone
through the speaker when they are being operated
via the power inverter. The reason for this is that
these devices can not filter the modified sine
wave of the power inverter and this is not a
defect in the power inverter.
Handling general failures
Electrical tools
• When an electrical tool will not switch on or
only runs for a short time switch the power inverter
on and off several times while the electrical tool
is switched on.
- 8 -
Page 11
Troubleshooting
Low output voltage
Possible cause and remedy:
• The power inverter is overloaded. Reduce the
load until you no longer exceed the maximum
load as specified in the technical data.
• The input voltage is below 11 V. Maintain the input voltage of the power inverter above 11 V
to keep the output voltage constant.
Low battery voltage signal sounds
continually
Possible cause and remedy:
• The battery is defective. Replace the battery.
• Insufficient voltage or power supply. Check the
condition of the in vehicle receptacle and the
12 V vehicle plug and if necessary clean these.
No output power
Possible cause and remedy:
• The power inverter is not fully warmed up.
Switch the power inverter on and off again until
the device attached to the power inverter is
supplied with power. Repeat this process in order
to switch the device on.
• The ignition must be switched on for the in vehicle
receptacle to be supplied with power. Switch the
ignition on and/or in the position I.
• The power inverter is overloaded. Reduce the
load until you no longer exceed the maximum
load as specified in the technical data.
• The power inverter is overheated. Wait until the
device has cooled down. Ensure that there is
sufficient ventilation space. Make sure that the
connected load does not continually exceed the
maximum load, in order to avoid overheating
again.
• The device fuse is burnt out. Consult the service
department in order to put the device back into
working condition. Make sure that the power inverter is connected to the power supply with the
correct polarity.
• The cable fuse is burnt out. Change the cable
fuse as described in the chapter "Changing the
cable fuse".
Make sure that the power inverter is connected
to the power supply with the correct polarity.
Cleaning
Risk of potentially fatal electrical
shock:
• Never submerse the device in water or other
liquids!
• Do not allow any liquids to penetrate the
housing.
• Before every cleaning remove the power inverter from the vehicle receptacle/remove the
connection terminals from the automobile battery. Also remove any devices connected to
the power inverter.
Cleaning the housing:
Clean the housing surface with a slightly damp
cloth Never use petrol, solvents or cleaners since
these could damage the surface of the device!
In the event that the ventilation slots become dusty
you can clean these with a soft brush.
- 9 -
Page 12
Disposal
Disposing of the device
Do not, under any circumstances, discard the
device in the household refuse.
Dispose of the device through an approved
disposal centre or at your community waste
facility.
This device is subject to the European Guidelines
2002/96/EG.
Observe the currently applicable regulations.
In case of doubt, please contact your waste
disposal centre.
Disposal of packaging
Dispose of the packaging materials in an
environmentally responsible manner.
Importer
Warranty & Service
The warranty for this device is for 3 years from the
date of purchase. The device has been manufactured
with care and meticulously examined before delivery.
Please retain your receipt as proof of purchase.
In the case of a warranty claim, please make contact
by telephone with our service department. Only in
this way can a post-free despatch for your goods
be assured.
The warranty covers only claims for material and
maufacturing defects, not for wearing parts or for
damage to fragile components, e.g. buttons or batteries. The device is intended for domestic use only,
NOT for commercial purposes.
If this product has been subjected to improper or
inappropriate handling, abuse, or modifications not
carried out by one of our authorised sales and service outlets, the warranty will be considered void.
Your statutory rights are not restricted in any way
by this warranty.
KOMPERNASS GMBH
Burgstrasse 21
D-44867 Bochum
www.kompernass.com
DES Ltd
Units 14-15
Bilston Industrial Estate
Oxford Street
Bilston
WV14 7EG
Tel.: 0870/787-6177
Fax: 0870/787-6168
e-mail: support.uk@kompernass.com
Irish Connection
Harbour view
Howth
Co. Dublin
Tel: 00353 (0) 87 99 62 077
Fax: 00353 18398056
e-mail: support.ie@kompernass.com
- 10 -
Page 13

SISÄLLYSLUETTELO SIVU
Määräystenmukainen käyttö 12
Turvaohjeet 12
Tekniset tiedot 13
Käyttöelementit 14
Käyttöönotto 14
Ohjeita käyttöön 14
Kuormituksen/laitteen liittäminen ja käyttö 16
Ohjeita laitteiden käyttöön 17
Signaali alhaisella akkujännitteellä 17
Johtosulakkeen vaihtaminen 17
Yleinen vikojen korjaaminen 18
Vianetsintä 19
Puhdistus 19
Hävittäminen 20
Maahantuoja 20
Takuu ja huolto 20
Lue käyttöohje ennen ensimmäistä käyttökertaa huolellisesti läpi ja pidä sitä lähettyvillä myös myöhemmissä
käytöissä. Jos myyt laitteen, anna ohje myös seuraavalle omistajalle.
- 11 -
Page 14
JÄNNITEMUUNTAJA
300 W KH 3900
Määräystenmukainen käyttö
Laite on tarkoitettu liitettäväksi auton 12 V:n pistorasiaan tai autoakkuun antamaan 220 - 240 V:n
vaihtojännitteen korkeintaan 300 W:n tehonotolla
varustettujen sähkölaitteiden liitämistä varten.
Laitetta ei ole tarkoitettu ammatti- tai teollisuuskäyttöön.
Emme vastaa laitteen määräystenvastaisesta käytöstä
johtuvista vaurioista!
Laitteet, joita suositellaan
käytettäväksi jännitemuuntajan
kanssa*
Kannettavat tietokoneet ja mikrotietokoneet, radiot, radiopuhelimet, CD-/MP3-soittimet, matkapuhelimet
Kannettavat kylmälaukut, valaisimet Mikroaaltouunit, kahvinkeitti-
Sähköparranajokone Hiustenkuivaaja
Yleisesti pienjännitelaitteet Yleisesti moottorikäyttöiset
* Noudata käytettävän laitteen arvokilvessä
virrankulutuksesta ja tehontarpeesta ilmoitettuja tietoja.
Varmista ennen käyttöä, ettei suurin tehonotto ole yli 1,3 A eikä suurin kestoteho ylitä
300 W:a.
Huomio!
Herkällä elektroniikalla varustettuja laitteita ei tulisi käyttää jännitemuuntajan avulla, koska lähtöjännite ei ole riittävän tasainen näille laitteille.
Laitteet, joita ei suositella
käytettäväksi jännitemuuntajan kanssa*
Vahvistimet, porakoneet,
kompressorit
met, sekoittimet, silitysraudat
laitteet, lämmityslaitteet,
sähkötyökalut
Turvaohjeet
• Tätä laitetta ei ole tarkoitettu sellaisten henkilöiden
(mukaan lukien lapset) käyttöön, joiden rajoitetut,
fyysiset, aistilliset tai henkiset kyvyt tai kokemuksen
ja/tai tiedon puute estävät käytön, lukuun ottamatta tilanteita, joissa heitä valvoo turvallisuudesta
vastaava henkilö tai joissa he ovat saaneet tältä
ohjeita laitteen käytöstä. Lapsia on valvottava,
jotta varmistettaisiin, etteivät he leiki laitteella.
• Vältä vaaroja irrottamalla jännitemuuntaja jokaisen
käytön jälkeen ja ennen jokaista puhdistusta
auton pistorasiasta tai auton akun liittimestä.
• Liitä jännitemuuntaja auton akkuun ainoastaan
moottorin ollessa sammutettuna! On olemassa
pyörivien osien aiheuttama loukkaantumisvaara!
• Tarkista laite ja kaikki osat näkyvien vaurioiden
varalta. Laitteen turvallisuuslaitteet toimivat ainoastaan moitteettomassa kunnossa.
• Jännitteenmuuntajan tulee sijaita helppopääsyisessä paikassa, jotta laite voidaan hätätapauksessa irrottaa nopeasti sähköverkosta.
Sähköiskun vaara!
• Liitä jännitteenmuuntaja ainoastaan auton 12 V:n
akkuun/virtalähteeseen. Jos laite liitetään 24 V:n
jännitteeseen, se saattaa vahingoittua.
• Varmista jännitteenmuuntajaa auton 12 V:n pistokkeeseen liitettäessä, että ajoneuvopistokkeen
napaisuus vastaa ajoneuvon pistorasian napaisuutta. Ajoneuvon pistorasian on oltava sisältä
positiivisesti navoitettu, eli ajoneuvon akun
plusnapa ei saa olla liitettynä ajoneuvon alustaan.
• Tarkista ennen muuntajan liittämistä, että ajoneuvon
pistorasian suojaus on riittävä. Tätä suojausta ei
saa missään tapauksessa kiertää tai muuttaa.
- 12 -
Page 15

• Käytä vain mukana toimitettua liitäntäkaapelia!
• Anna valtuutetun ammattihenkilöstön tai huoltopalvelun vaihtaa vaurioitunut pistoke, liitin tai johto
välittömästi uuteen, jotta vaaroilta vältyttäisiin.
• Jos johto tai laite eivät toimi moitteettomasti tai
ovat vahingoittuneita, vie ne välittömästi valtuutettuun huoltoliikkeeseen korjattaviksi tai vaihdettaviksi.
• Laitteen koteloa ei saa avata tai korjata itse.
Jos laitteen kotelo avataan itse, turvallisuus ei
ole taattua eikä takuu ole voimassa.
Älä koskaan kasta laitetta veteen. Pyyhi laite
ainoastaan kevyesti kosteutetulla liinalla.
Tulipalon vaara!
• Älä aseta laitetta lämmönlähteiden lähelle.
• Älä sijoita laitetta paikkaan, jossa se altistuu
suoralle auringonvalolle. Muutoin laite saattaa
ylikuumentua ja vaurioitua käyttökelvottomaksi.
Älä käytä laitetta auringossa seisovassa ajoneuvossa.
• Älä jätä laitetta käytön aikana ilman valvontaa.
• Älä peitä tuulettimen tuuletusaukkoja laitteen
ollessa päällä.
• Älä sijoita laitetta palolähteiden, kuten esimerkiksi
kynttilöiden, lähelle.
• Kumpikin liitäntäjohto voi kuumentua suuren
kuormituksen alaisena.
• Suurten ylimenovastuksien vuoksi saattaa pistoliitäntä kuumentua johtoa 12 V:n ajoneuvopistokkeessa käytettäessä. Käytä siksi suurilla kuormituksilla
käytettäessä liittimillä varustettua liitäntäjohtoa.
Ohje verkosta irrottamiseen
• Laitteen virtakytkin ei irrota laitetta täysin ajoneuvon
sähköverkosta tai akusta. Laite ottaa virtaa ajoneuvopistokkeen ollessa liitettynä. Laite irrotetaan
täysin ajoneuvon sähköjärjestelmästä irrottamalla
12 V:n ajoneuvopistoke ajoneuvon pistorasiasta
tai liittimet irrottaa auton akusta.
Loukkaantumisvaara!
• Jos laite putoaa tai vahingoittuu, sitä ei saa ottaa
käyttöön. Jätä laite pätevän ammattihenkilön
tarkastettavaksi ja tarvittaessa korjattavaksi.
Tekniset tiedot
Tasavirtatulo
Jännite: 12 V
Maksimijännite: 15,5 V
Suurin tehonotto: 40 A
Alikuormitushälytys: 10,6 ± 0,3 V:ssa
Alikuormituskatkaisu: 10 ± 0,3 V:ssa
Ylikuormituskatkaisu: 16 ± 0,5 V:ssa
Vaihtovirtalähtö
Jännite: 220-240 V ~50 Hz
Lähtövirta: 1,3 A
Kestoteho: kork. 300 W
Huipputeho: kork. 400 W / 0,1 s
Vaikutusaste ( ): n. 90 %
Lähtöaaltoprofiili: muokattu siniaalto
Ylikuormitussuoja: >= 320 W
Lämpötilasammutus: 65 ± 3 °C:ssa
Suojaukset
Jännitteenmuuntaja: 30 A:n lattasulake
Johtosulake: 30 A:n lattasulake
- 13 -
Page 16
Vikavirtasuojakytkentä
Kestoteho (W)
Vaikutusaste
Jännite (V)
Jännite (A)
Sammutus vikavirroilla: >3 mA
Yleiset tiedot
Mitat (ilman autopistoketta)
(P x L x K): 155 x 128 x 58 mm
Paino (ilman johtoa): n. 865 g
Käyttölämpötila: 0 ... 62 °C
Käyttökosteus: 0 ... 80 %
(suht. ilmankosteus - ei kondensaatiota)
Oikeus teknisiin muutoksiin pidätetään!
Käyttöelementit
A
Jännitemuuntaja
Tuuletin (taustapuolella)
q
Käyttö-LED/ylikuormitusnäyttö
w
Virtakytkin
e
Vaihtovirtapistorasia
r
12 V:n liitännät (punainen+/musta-)
t
B
Johto ja liitäntäpinteet
C
Johto ja 12 V:n autopistoke
D
30 A:n lattasulake
Käyttöönotto
Purkaminen pakkauksesta
1. Ota laite pakkauksesta.
2. Poista kaikki muovit.
Huomio:
Älä anna pikkulasten leikkiä muoveilla.
On olemassa tukehtumisvaara!
Tarkista toimituksen täydellisyys
Tarkasta ennen käyttöönottoa toimituksen täydellisyys
ja tarkasta laite mahdollisten vaurioiden varalta.
- Jännitemuuntaja
- 1 johto ja liitäntäpinteet punainen/musta
- 1 johto ja 12 V:n autopistoke
- 1 lattasulake 30 A
- Tämä käyttöohje
Ohjeita käyttöön
Laitteiden jatkuvaa käyttöä varten jännitemuuntajan
kautta on auton pistorasian jännitteen oltava välillä
11 - 15,5 V . Auton pistorasian jännitelähde
voi olla ajoneuvon akku tai säädetty vaihtovirtasyöttö,
kuten esimerkiksi akkuasema. Tarkista ennen jännitemuuntajan liitäntää, että jännitelähde syöttää riittävästi
virtaa käyttöä varten. Käyttöön tarvittava virta voidaan
laskea seuraavasti:
- 14 -
Page 17
Esimerkki
Jännitelähteen olisi toimitettava 300 W:n kestokuormitusta varten siis vähintään 27,7 A.
Huomio!
Älä koskaan liitä jännitemuuntajaa auton 24
V:n sähköjärjestelmään. Muuten laite vahingoittuu. Laitteen saa liittää ainoastaan 12 V:n nimellisjännitteellä varustettuun jännitelähteeseen.
Pystytys
• Jännitemuuntaja on sijoitettava tasaiselle ja litteälle
pinnalle. Varmista, että jännitemuuntajan ympärille jää 1 cm vapaata tilaa ilmankiertoa varten.
• Tuulettimen ilmanottoukkojen takana on säilytettävä 50 cm:n etäisyys.
Käyttö ajoneuvossa
Jos jännitemuuntajaa käytetään ajoneuvossa, varmistu,
ettei asennus estä ajotehtäviä.
Vedä siksi johto niin, ettei se kosketa ajoneuvon
sisätilojen liikkuvia osia tai ole näköesteenä.
Huomaa:
Jännitemuuntajaa voidaan käyttää myös moottorin ollessa sammutettuna. Huomaa kuitenkin, ettei jännitemuuntaja välttämättä toimi
ajoneuvon käynnistyksen aikana.
Liittäminen jännitelähteeseen
Huomio!
Varmista ennen jännitemuuntajan liittämistä
jännitelähteeseen, että laitteen virtakytkin on
asennossa 0.
Voit liittää jännitemuuntajan 12 V:n pistokkeella
auton 12 V:n pistorasiaan tai liittimillä suoraan
auton akkuun.
Molemmissa liitäntävaihtoehdoissa on liitäntäkaapeli
liitettävä jännitemuuntajan 12 V:n ruuviliitoksiin.
Kuva: Liitäntä kaapelikenkä
Liitäntä auton 12 V:n pistorasiaan
• Avaa jännitemuuntajan punaista ruuvia niin
pitkälle, että voit asettaa 12 V:n autojohdon
punaisen kaapelikengän aukon ruuvin ja aluslevyn alle. (Katso kuva: Liitäntä kaapelikenkä)
• Kiristä punaista ruuvia niin kireälle, ettei kaapelikenkä pääse irtoamaan.
• Avaa jännitemuuntajan mustaa ruuvia niin pitkälle,
että voit asettaa 12 V:n autojohdon mustan
kaapelikengän aukon ruuvin ja aluslevyn alle.
• Kiristä mustaa ruuvia niin kireälle, ettei kaapelikenkä pääse irtoamaan.
- 15 -
Page 18

• Työnnä 12 V:n autopistoke auton pistorasiaan.
Huomaa:
Suurten ylimenovastuksien vuoksi saattaa pistoliitäntä kuumentua johtoa 12 V:n ajoneuvopistokkeessa käytettäessä. Käytä siksi suurilla
kuormituksilla käytettäessä liittimillä varustettua liitäntäjohtoa.
Liittäminen auton akkuun
• Avaa jännitemuuntajan punaista ruuvia niin pitkälle,
että voit asettaa liitäntäpinteellä varustetun
punaisen johdon punaisen kaapelikengän aukon
ruuvin ja aluslevyn alle.
• Kiristä punaista ruuvia niin kireälle, ettei kaapelikenkä pääse irtoamaan.
• Avaa jännitemuuntajan mustaa ruuvia niin pitkälle,
että voit asettaa liitäntäpinteellä varustetun mustan
johdon mustan kaapelikengän aukon ruuvin ja
aluslevyn alle.
• Kiristä mustaa ruuvia niin kireälle, ettei kaapelikenkä pääse irtoamaan.
• Liitä seuraavaksi punainen liitin akun plusnapaan
ja sitten musta liitin akun miinusnapaan.
Huomio!
Älä käytä jännitemuuntajaa sellaisissa ajoneuvoissa, joiden plusnapa on liitetty ajoneuvon
runkoon tai alustaan.
Ajoneuvon pistorasian on oltava sisältä positiivisesti navoitettu. Älä käytä jännitemuuntajaa
auton pistorasioissa, jotka ovat positiivisesti
maadoitettuja.
Muuten laite vahingoittuu.
Kuormituksen/laitteen
liittäminen ja käyttö
Huomio!
Varmista ennen kuorman/laitteen liittämistä
jännitemuuntajaan, että laitteen virtakytkin on
asennossa 0.
Varmista, ettei kuorman/laitteen teho ylitä jännitemuuntajan suurinta kestotehoa.
• Liitä liitettävän kuorman/ käytettävän laitteen
pistoke jännitemuuntajan 220 - 240 V:n pistorasiaan.
Huomio!
Älä vielä kytke kuormaa/ käytettävää laitetta
päälle!
• Kytke jännitemuuntaja päälle asettamalla virtakytkin asentoon I. Käyttö-LED/ylikuormitusnäyttö
palaa vihreänä, kun jännitemuuntaja toimii moitteettomasti.
• Kytke nyt kuorma/ käytettävä laite päälle.
Päälle kytkettäessä kuuluu lyhyt merkkiääni.
Huomaa:
Jos kuullaan merkkiääni ja käyttö-LED/ylikuormitusnäyttö palaa punaisena, on tulojännite liian
alhainen tai jännitemuuntajaan liitetyn kuorman/laitteen teho on liian korkea.
- 16 -
Page 19
Huomio!
Jännitemuuntajassa on vikavirtasuojakytkentä,
joka sammuttaa jännitemuuntimen >3 mA:n vikavirtojen esiintyessä 220 - 240 V:n pistorasian suojaliittymissä. Jos näin tapahtuu, irrota heti jännitemuuntimeen liitetty laite, älä enää liitä sitä
missään tapauksessa virtalähteeseen! Laite on
viallinen ja se on annettava alan ammattilaiselle
tarkastettavaksi ja tarvittaessa korjattavaksi, ennen kuin se voidaan ottaa jälleen käyttöön!
Ohjeita laitteiden käyttöön
Yleisiä ohjeita
Yleensä laitteiden arvokilvessä on maininta virrankulutuksesta ampeereina (A) tai tehontarpeesta
watteina (W).
Varmista ennen käyttöä, ettei suurin tehonotto ole
yli 1,3 A eikä suurin kestoteho ylitä 300 W:a.
• Suuren sisäisen vastuksen omaavia kuormia voidaan
käyttää erittäin hyvin jännitemuuntajan avulla, kun
taas alhaisen sisäisen vastuksen omaavien
kuormien, kuten esim. lämmitys- ja keittolaitteiden
tehonotto on liian suuri watteina.
• Induktiiviset kuormitukset, kuten esim. televisio- tai
stereolaitteet (kelan tai transformaattorin sisältävät laitteet) vaativat usein moninkertaisesti suuremman käynnistysvirran vastuskuormituksena
samalla annetulla tehontarpeella watteina. Televisiolaitteet vaativat käynnistettäessä moninkertaisesti arvokilvessä ilmoitetun tehontarpeen.
Tämän vuoksi saatetaan jännitemuuntaja joutua
kytkemään useita kertoja päälle ja pois päältä,
jotta televisio voitaisiin kytkeä päälle.
• Useimpia lämpöä luovia laitteita, kuten esimerkiksi hiustenkuivaimia, silitysrautoja tai lämmittimiä ei voida käyttää jännitemuuntajan avulla,
koska näiden laitteiden tehontarve ylittää jännitemuuntajan lähtötehon.
Signaali alhaisella
akkujännitteellä
• Kun akkujännite on alhainen (alle 11 V), kuuluu
jatkuva merkkiääni, joka osoittaa, että akku on
ladattava. Käyttö-LED/ylikuormitusnäyttö palaa
edelleen vihreänä.
• Kun akkujännite laskee alle 10 V:n, jännitemuuntaja sammuu ja käyttö-LED/ylikuormitusnäyttö
palaa punaisena.
Johtosulakkeen vaihtaminen
Hengenvaarallisen sähköiskun
vaara:
Irrota jännitemuuntaja virtalähteestä ennen sulakkeen vaihtamista. Poista myös jännitemuuntajaan liitetty laite.
Punaisessa liitäntäpinteellä varustetussa johdossa
on sulake. Jos jännitemuuntajaan liitetään liian suuri
kuormitus, tämä sulake laukeaa.
Vaihda sulake samanarvoiseen, teknisissä tiedoissa
ilmoitetun tyyppiseen sulakkeeseen, jonka irtikytkentäominaisuudet ovat samanlaiset.
Kytke ennen jännitemuuntajan uutta käynnistämistä
sulakkeen laukeamisen syy pois päältä.
- 17 -
Page 20
Toimi sulakkeen vaihtamista varten seuraavasti:
• Avaa sulakepidikkeen suojus ja irrota lattasulake
pidikkeestä.
Kuva: Johtosulakkeen vaihtaminen
• Aseta uusi 30 A:n lattasulake (sisältyy toimitukseen) molempiin liitäntöihin ja aseta sulakepidikkeen suojus jälleen paikoilleen.
Televisiot
• Jännitemuuntaja on suojattu ja se lähettää suodatettua siniaaltoa.
Esim. erittäin heikkoja televisiolähetyksiä vastaanotettaessa saattaa kuitenkin esiintyä häiriöitä.
• Sijoita jännitemuuntaja tässä tapauksessa mahdollisimman kauas televisiosta, antennijohdosta
ja antennista.
• Suuntaa jännitemuuntaja, televisio, antennijohto
ja antenni keskenään niin, että vastaanotto paranee.
• Käytä mahdollisuuksien mukaan laadukasta,
suojattua antennijohtoa.
Audiolaitteistot
• Joistakin audio-/videolaitteistojen kaiuttimista
kuuluu hurinaa, kun niitä käytetään taajuusmuuttajalla. Tämä johtuu siitä, etteivät nämä laitteet
kykene suodattamaan jännitemuuntajan muunnettua siniaaltoa, eikä tämä ole jännitemuuntajan
vika.
Yleinen vikojen korjaaminen
Sähkötyökalut
• Jos sähkötyökalua ei voida kytkeä päälle tai työkalu käynnistyy vain lyhyeksi aikaa, kytke jännitemuuntaja useamman kerran päälle ja pois päältä
sähkötyökalun ollessa kytkettynä päälle.
- 18 -
Page 21
Vianetsintä
Alhainen lähtöjännite
Mahdollinen syy ja apu:
• Jännitemuuntaja on ylikuormitettu. Vähennä kuormitusta, kunnes se ei enää ylitä teknisissä tiedoissa
ilmoitettua suurinta kuormitusta.
• Tulojännite on alle 11 V. Säilytä jännitemuuntajan tulojännite yli 11 V:n, jotta lähtöteho säilyisi tasaisena.
Alhaisen akkujännitteen signaali
kuuluu jatkuvasti
• Jännitemuuntaja on ylikuumentunut. Odota, kunnes
laite on jäähtynyt. Huolehdi riittävästä tuuletusetäisyydestä. Varmista, että liitetty kuorma ei ylitä
suurinta kuormitusta jatkuvasti, jotta uusi ylikuumeneminen vältettäisiin.
• Laitesulake on palanut. Käänny huollon puoleen
korjauttaaksesi laitteen. Varmistu, että jännitemuuntaja on liitetty virtalähteeseen oikein navoitetusti.
• Johtosulake on palanut. Vaihda johtosulake kohdassa "Johtosulakkeen vaihtaminen“ kuvatulla
tavalla.
Varmistu, että jännitemuuntaja on liitetty virtalähteeseen oikein navoitetusti.
Mahdollinen syy ja apu:
• Akku on viallinen. Vaihda akku uuteen.
• Riittämätön jännitesyöttö tai virtalähde. Tarkista
auton pistorasian ja 12 V:n autopistokkeen kunto
ja puhdista ne tarvittaessa.
Ei lähtötehoa
Mahdollinen syy ja apu:
• Jännitesyöttö ei ole lämmennyt kokonaan. Kytke
jännitemuuntajaa päälle ja pois päältä, kunnes
jännitemuuntajaan liitettyyn laitteeseen tulee virtaa. Toista tämä tapahtuma kytkeäksesi laitteen
päälle.
• Ajoneuvon sytytyksen on oltava päällä, jotta
auton sähköjärjestelmään tulee virtaa. Kytke
ajoneuvon virta päälle tai asentoon I.
• Jännitemuuntaja on ylikuormitettu. Vähennä kuormitusta, kunnes se ei enää ylitä teknisissä tiedoissa
ilmoitettua suurinta kuormitusta.
Puhdistus
Hengenvaarallisen sähköiskun
vaara:
• Älä koskaan upota laitteen osia veteen tai
muihin nesteisiin!
• Älä päästä nesteitä tunkeutumaan laitteen koteloon.
• Irrota jännitemuuntaja auton pistorasiasta /
liitäntäpinteet auton akusta ennen jokaista
puhdistusta. Poista myös jännitemuuntajaan
liitetty laite.
Kotelon puhdistaminen:
Puhdista kotelon pinta kevyesti kostutetulla liinalla.
Älä koskaan käytä bensiiniä tai liuottimia taikka puhdistusaineita, koska ne saattavat vaurioittaa laitteen
pintaa!
Jos ilmanottoaukot ovat pölyisiä, puhdista ne
pehmeällä siveltimellä.
- 19 -
Page 22
Hävittäminen
Laitteen hävittäminen
Älä hävitä laitetta tavallisen talousjätteen
mukana.
Hävitä laite hyväksytyn jätehuoltoyrityksen
tai kunnallisen jätelaitoksen avulla.
Tämä tuote on eurooppalaisen direktiivin
2002/96/EY alainen.
Noudata voimassa olevia määräyksiä. Ota
epävarmoissa tilanteissa yhteyttä jätelaitokseen.
Pakkauksen hävittäminen
Hävitä kaikki pakkausmateriaalit ympäristöystävällisesti.
Takuu ja huolto
Laitteen takuu on 3 vuotta ostopäivästä. Laite on
valmistettu huolella ja tarkastettu perusteellisesti ennen
toimitusta. Säilytä ostokuitti tositteeksi ostosta. Ota
takuutapauksessa puhelimitse yhteyttä lähimpään
huoltopisteeseenne. Vain näin voidaan taata tuotteesi
maksuton lähettäminen huoltoon.
Takuu koskee ainoastaan materiaali- ja valmistusvirheitä, ei kuitenkaan kuluvia osia tai herkästi vaurioituvien osien, esim. kytkinten tai akkujen vaurioita.
Tuote on tarkoitettu ainoastaan yksityiseen käyttöön.
Tuotetta ei siten saa käyttää ammatillisiin tarkoituksiin.
Väärä tai asiaton käyttö, väkivallan käyttö ja muiden
kuin valtuutetun huoltopisteen suorittamat korjaukset
aiheuttavat takuun raukeamisen. Tämä takuu ei rajoita
kuluttajan lakisääteisiä oikeuksia.
Maahantuoja
KOMPERNASS GMBH
BURGSTRASSE 21
D-44867 Bochum
www.kompernass.com
Kompernass Service Suomi
Petäjäksentie 19
FIN - 26100 Rauma
Tel.: 02 822 28 87
Fax: 010 293 02 63
e-mail: support.fi@kompernass.com
- 20 -
Page 23

INNEHÅLLSFÖRTECKNING SIDAN
Föreskriven användning 22
Säkerhetsanvisningar 22
Tekniska data 23
Komponenter 24
Förberedelser 24
Driftinstruktion 24
Anslutning och drift av last/en apparat 26
Anvisningar för drift av apparater 27
Signal vid låg batterispänning 27
Byta kabelsäkring 27
Allmänna åtgärder vid fel 28
Åtgärda fel 29
Rengöring 29
Kassering 30
Importör 30
Garanti & Service 30
Läs igenom bruksanvisningen noga innan du börjar använda apparaten och spara den för senare bruk.
Lämna över den tillsammans med apparaten till en ev. ny användare.
- 21 -
Page 24

SPÄNNINGSOMVANDLARE 300 W KH 3900
Föreskriven användning
Den här apparaten ska anslutas till ett 12 V uttag
i ett internt elnät eller till ett bilbatteri och användas
för att avge 220 - 240 V växelspänning för anslutning av elektriska apparater med en effektförbrukning på upp till 300 W.
Den här apparaten är inte avsedd att användas
yrkesmässigt på arbetsplatser eller inom industrin.
Tillverkaren tar inget som helst ansvar och lämnar
ingen garanti för skador som är ett resultat av att
apparaten använts på felaktigt sätt!
Apparater som rekommenderas för drift med spänningsomvandlaren*
Bärbara och stationära datorer,
radioapparater, radioanläggningar, CD/MP3-spelare, mobiltelefoner
Bärbara kylboxar, lampor Mikrovågsugnar, kaffema-
Rakapparater Hårtorkar
Generellt för lågspänningsapparater
* Observera angivelser för ström- och effekt-
förbrukning på typskylten på den apparat som
ska anslutas.
Se till att den maximala strömupptagningen
inte överstiger 1,3 A och den maximala kontinuerliga effekten inte ligger över 300 W.
OBS!
Apparater med känslig elektronik ska inte drivas med spänningsomvandlaren eftersom deras
utgångsspänning inte är tillräckligt konstant.
Apparater som inte
rekommenderas för drift
med spänningsomvandlaren*
Förstärkare, borrmaskiner,
kompressorer
skiner, handmixers, strykjärn
Generellt för motordrivna
apparater, värmeutrustning,
elverktyg
Säkerhetsanvisningar
• Den här apparaten ska inte användas av personer
(inklusive barn) med begränsad fysisk, sensorisk
eller mental förmåga eller med bristande erfarenhet och kunskap om de inte först övervakats
eller instruerats av någon ansvarig person. Se
noga till så att barnen inte leker med apparaten.
• För att man inte ska utsättas för onödiga risker
ska spänningsomvandlaren kopplas bort från
uttaget eller anslutningsklämmorna tas bort från
bilbatteriet innan apparaten rengörs och efter
varje användningstillfälle.
• Anslut bara spänningsomvandlaren till bilens
batteri när motorn är avstängd! Annars finns
risk för att skada sig på roterande delar!
• Kontrollera om apparaten har några synliga skador.
Säkerheten kan bara garanteras om den är i felfritt skick.
• Spänningsomvandlaren måste alltid vara lätt att
komma åt så att det går snabbt att bryta strömförbindelsen vid nödsituationer.
Risk för elchock!
• Anslut endast spänningsomvandlaren till ett 12 V
bilbatteri/internt elnät. Om den ansluts till en
spänning på 24 V kan apparaten skadas.
• Kontrollera att fordonskontaktens polaritet överensstämmer med polariteten i det interna eluttaget
när du ansluter spänningsomvandlaren med 12 V
fordonskontakten. Uttaget i det interna elnätet
måste ha positiv polaritet invändigt, dvs. pluspolen
på ett bilbatteri får inte anslutas till fordonets
chassi.
• Kontrollera att uttaget i det interna nätet är tillräckligt
säkrat innan du ansluter spänningsomvandlaren.
Säkringen får absolut inte kringgås eller förändras.
- 22 -
Page 25

• Använd endast medföljande anslutningskabel!
• Lämna genast in skadade kontakter, anslutningsklämmor eller kablar till en auktoriserad yrkesman
eller vår kundtjänst för utbyte för att undvika
olyckor.
• Lämna genast in anslutningsledningar eller apparater som inte fungerar som de ska eller som
skadats till kundtjänst för reparation eller utbyte.
• Du får aldrig försöka öppna eller reparera höljet.
Gör du det kan vi inte garantera säkerheten och
garantin förlorar sin giltighet.
Doppa aldrig ner apparaten i vatten.
Torka bara av den med en lätt fuktad trasa
Brandrisk!
• Använd inte apparaten i närheten av heta ytor.
• Ställ inte apparaten i direkt solljus. Då kan den
överhettas och bli totalförstörd. Använd inte
apparaten i ett fordon som står parkerat i solen.
• Lämna aldrig apparaten helt utan uppsikt när
den används.
• Täck aldrig över fläktens ventilationsöppningar
när apparaten är påkopplad.
• Ställ inga öppna lågor, t ex stearinljus, på apparaten.
• De båda anslutningskablarna kan bli varma vid
hög belastning.
• På grund av det höga övergångsmotståndet kan
det hända att kontaktförbindelsen blir varm när
man använder kabeln med 12 V fordonskontakt.
Vid hög belastning ska man därför bara använda
kabeln med anslutningsklämmorna.
Information om hur strömförbindelsen bryts till apparaten
• Den här apparatens På/Av-knapp kan inte
användas för att skilja den helt från det interna
nätet/bilbatteriet. Apparaten tar upp ström så
långe fordonskontakten sitter i uttaget. För att
bryta strömtillförseln helt till apparaten måste
12 V fordonskontakten tas ut uttaget eller anslutningsklämmorna tas bort från batteriet.
Risk för personskador!
• Om apparaten faller i golvet eller skadas på annat
sätt får du inte använda den längre. Låt kvalificerad
fackpersonal kontrollera och reparera den om
det behövs.
Tekniska data
DC-ingång
Spänning : 12 V
Maximal spänning: 15,5 V
Maximal strömupptagning: 40 A
Underbelastningsalarm: vid 10,6 ± 0,3 V
Underbelastningsfrånkoppling: vid 10 ± 0,3 V
Överbelastningsfrånkoppling: vid 16 ± 0,5 V
AC-utgång
Spänning : 220-240 V ~50 Hz
Utgångsström: 1,3 A
Kontinuerlig effekt: max. 300 W
Toppeffekt: max. 400 W/0,1 s
Verkningsgrad ( ): ca 90 %
Utgångsvågform: modifierad sinus
Överbelastningsskydd: >= 320 W
Temperatur frånkoppling vid 65 ± 3 °C
Säkringar
Spänningsomvandlare: 30 A flat bilsäkring
Kabelsäkring: 30 A flat bilsäkring
- 23 -
Page 26

Felströmsskydd
Kontinuerlig effekt (W)
Verkningsgrad
Spänning (V)
Strömupptagning (A)
Frånkoppling vid felström: >3 mA
Allmänna data
Mått (utan fordonskontakt)
(L x B x H): 155 x 128 x 58 mm
Vikt (utan kabel): ca 865 g
Drifttemperatur: 0 - 62°C
Luftfuktighet vid drift: 0 - 80 %
(rel. luftfuktighet - utan kondensation)
Med reservationer för tekniska ändringar!
Komponenter
A
Spänningsomvandlare
Fläkt (på baksidan)
q
Drift/Överbelastningsindikator
w
På/Av-knapp
e
Växelströmsuttag
r
12 V anslutningar (röd+/svart-)
t
B
Kabel med anslutningsklämmor
C
Kabel med 12 V fordonskontakt
D
30 A flat bilsäkring
Förberedelser
Uppackning
1. Ta upp apparaten ur förpackningen.
2. Ta bort all folie.
OBS:
Låt inte småbarn leka med plastfolie.
Risk för kvävningsolyckor!
Kontrollera leveransens innehåll
Kontrollera att leveransen är komplett och inte har
några skador innan du börjar använda apparaten.
- Spänningsomvandlare
- 1 kabel med anslutningsklämmor röd/svart
- 1 kabel med 12 V fordonskontakt
- 1 platt bilsäkring 30 A
- Denna bruksanvisning
Driftinstruktion
För kontinuerlig drift av apparater genom spänningsomvandlaren måste det interna uttagets spänning
ligga mellan 11 - 15,5 V . Det interna uttagets
spänningskälla kan vara ett fordonsbatteri eller en
reglerad likströmsförsörjning, t ex en batteristation.
Kontrollera att spänningskällan kan ge tillräckligt
med ström för driften innan du ansluter spänningsomvandlaren. Hur mycket ström som krävs för driften
kan beräknas på följande sätt:
- 24 -
Page 27

Exempel
Spänningskällan ska alltså kunna leverera minst
27,7 A för en kontinuerlig belastning på 300 W.
OBS!
Anslut aldrig spänningsomvandlaren till ett
internt elnät med 24 V. Då kommer apparaten
att skadas. Apparaten får endast anslutas till
en spänningskälla med en nominell spänning
på 12 V.
Uppställning
• Spänningsomvandlaren ska sättas på en jämn
och plan yta. Försäkra dig om att det finns ett fritt
utrymme på 1 cm runt om spänningsomvandlaren
för luftcirkulationens skull.
• Från fläktens ventilationsöppningar måste det
finnas ett fritt utrymme på 50 cm.
Användning i ett fordon
Om du använder spänningsomvandlaren i ett fordon
måste du se till att den inte är i vägen när man kör.
Lägg därför kabeln så att den inte kan komma i kontakt
med rörliga delar inuti fordonet eller skymma sikten.
Observera:
Spänningsomvandlaren kan även användas när
motorn är frånkopplad. Kom ihåg att den kanske
inte fungerar vid en startprocedur.
Anslutning till en spänningskälla
OBS!
Försäkra dig om att apparatens På/Av-knapp
står på läge 0 innan du ansluter spänningsomvandlaren till en strömkälla.
Du kan ansluta spänningsomvandlaren med 12 V
kontakten till ett 12 V internt eluttag eller med
anslutningsklämmorna direkt till ett bilbatteri.
Vid båda anslutningsvarianterna måste anslutningskablarna anslutas till spänningsomvandlarens 12 V
skruvanslutningar.
Bild: Anslutning kabelsko
Anslutning till ett 12 V fordonsuttag
• Lossa den röda skruven på spänningsomvandlaren
så mycket att öppningen på 12 V kabelns röda
kabelsko kan läggas under skruven och mellanläggsbrickan. (Se Bild: Anslutning kabelsko)
• Skruva åt den röda skruven så mycket att kabelskon inte kan lossna mer.
• Lossa den svarta skruven på spänningsomvandlaren så mycket att du kan lägga öppningen på
12 V kabelns svarta kabelsko under skruven och
mellanläggsbrickan.
• Skruva åt den svarta skruven så mycket att
kabelskon inte kan lossna mer.
- 25 -
Page 28

• Sätt 12 V kontakten i ett uttag i fordonet
Observera:
På grund av det höga övergångsmotståndet
kan det hända att kontaktförbindelsen blir
varm när man använder kabeln med12 V kontakt. Vid hög belastning ska man därför bara
använda kabeln med anslutningsklämmorna.
Anslutning till ett bilbatteri
• Lossa den röda skruven på spänningsomvandlaren
så mycket att öppningen på den röda kabelskon
som sitter på den röda kabeln med anslutningsklämma kan läggas under skruven och mellanläggsbrickan.
• Skruva åt den röda skruven så mycket att kabelskon inte kan lossna mer.
• Lossa den svarta skruven på spänningsomvandlaren så mycket att öppningen på den svarta
kabelskon som sitter på den svarta kabeln med
anslutningsklämma kan läggas under skruven
och mellanläggsbrickan.
• Skruva åt den svarta skruven så mycket att
kabelskon inte kan lossna mer.
• Anslut först den röda klämman till bilbatteriets
pluspol och sedan den svarta till minuspolen.
OBS!
Använd inte spänningsomvandlaren i fordon
där pluspolen är kopplad till fordonets kaross eller chassi.
Det interna uttaget måste ha positiv polaritet
invändigt. Använd inte spänningsomvandlaren
till positivt jordade fordonsuttag. Då kommer
apparaten att skadas.
Anslutning och drift av last/en
apparat
OBS!
Försäkra dig om att lastens/apparatens På/Avknapp står på läge 0 innan du ansluter den till
spänningsomvandlaren.
Försäkra dig om att lastens/apparatens effekt
inte överskrider spänningsomvandlarens maximala kontinuerliga effekt.
• Sätt kontakten på den last/apparat som ska drivas
i spänningsomvandlarens 220 - 240 V-uttag.
OBS!
Koppla inte på lasten/apparaten ännu!
• Koppla på spänningsomvandlaren genom att
sätta På/Av-knappen på läge I. Drift/Överbelastningsindikatorn lyser med grönt sken om
spänningsomvandlaren fungerar som den ska.
• Koppla på den last/apparat som ska drivas.
Då hörs en kort signal.
Observera:
Om det hörs en signal och drift/överbelastningsindikatorn lyser rött är ingångsspänningen för låg eller också har den last/apparat
som anslutits till spänningsomvandlaren för
hög effekt.
- 26 -
Page 29

OBS!
Spänningsomvandlaren är utrustad med ett felströmsskydd som stänger av den automatiskt vid
220 - 240 V uttagets skyddskontakter vid en felström >3mA. Skulle det inträffa ska du genast ta
bort den apparat som anslutits till spänningsomvandlaren och absolut inte ansluta den till en
strömkälla igen! Då är apparaten defekt och
måste kontrolleras och ev. repareras av en
yrkesman innan den kan användas igen!
Anvisningar för drift av
apparater
Allmän information
I vanliga fall finns angivelser om strömförbrukningen
i ampere (A) eller effektförbrukningen i watt (W) på
apparaters typskyltar.
Se till att den maximala strömupptagningen inte
överstiger 1,3 A och den maximala kontinuerliga
effekten inte ligger över 300 W.
• Laster med högt inre motstånd går utmärkt att
använda tillsammans med spänningsomvandlaren,
medan däremot laster med lågt inre motstånd,
som t ex värme- och köksutrustning har för hög
effektförbrukning i watt.
• Induktiva laster, som t ex TV- eller stereoapparater
(apparater med spole eller transformator) kräver
ofta en många gånger högre påkopplingsström
än laster med motstånd som har samma värden
för effektförbrukningen i Watt. TV-apparater behöver mycket större effekt än vad som anges på
typskylten när de kopplas på. Därför kan det
vara nödvändigt att sätta på och stänga av
spänningsomvandlaren flera gånger innan en
TV kan kopplas på.
• De flesta värmealstrande apparater, som t ex
hårtorkar, strykjärn eller värmefläktar kan inte
drivas genom spänningsomvandlaren, eftersom
deras effektförbrukning är högre än spänningsomvandlarens utgångseffekt.
Signal vid låg batterispänning
• När batterispänningen börjar bli låg (under
11 V) hörs en genomträngande signal för
att tala om att batteriet behöver laddas upp.
Drift/Överbelastningsindikatorn fortsätter att
lysa grönt.
• Om batteriets spänning sjunker under 10 V
stängs spänningsomvandlaren av och drift/
överbelastningsindikatorn lyser rött.
Byta kabelsäkring
Livsfarlig elektrisk ström:
Bryt strömtillförseln till spänningsomvandlaren innan du byter säkring. Ta även bort en apparat
som ev. är kopplad till spänningsomvandlaren.
Den röda kabeln med anslutningsklämma är utrustad
med en säkring. Om alltför hög last ansluts till
spänningsomvandlaren utlöser den här säkringen.
Byt till en likvärdig säkring av den typ som anges
i tekniska data och med samma frånkopplingsautomatik.
Ta reda på varför säkringen utlöstes innan du sätter
på spänningsomvandlaren igen.
- 27 -
Page 30

Gör så här för att byta säkringen:
• Öppna skyddet över säkringshållaren och dra
loss den flata bilsäkringen ur fästet.
Bild: Byte av kabelsäkring
• Sätt in en ny 30 A flat bilsäkring (medföljer) i de
två anslutningarna och sätt tillbaka skyddet över
säkringshållaren.
TV-apparater
• Spänningsomvandlaren är avskärmad och avger
en filtrerad sinusvåg.
Vid mottagning av till exempel mycket svaga
TV-sändare kan det ändå interferenser resp.
störningar i bilden.
• Placera i så fall spänningsomvandlaren så långt
ifrån teven, antennkabeln och antennen som möjligt.
• Rikta spänningsomvandlaren, teven, antennkabeln och antennen i förhållande till varandra tills
mottagningen blir bättre.
• Använd en avskärmad antennkabel av hög kvalitet
om det finns möjlighet.
Audioanläggningar
• Vissa audio/videoanläggningar får ett brummande ljud genom högtalarna när de drivs genom spänningsomvandlaren. Det beror på att
dessa apparater inte kan filtrera den modifierade
sinusvågen och inte på att spänningsomvandlaren
är defekt.
Allmänna åtgärder vid fel
Elverktyg
• Om det inte går att sätta på ett elverktyg eller
om det bara fungerar en liten stund ska du låta
elverktyget vara påkopplat och sätta på och
stänga av spänningsomvandlaren flera gånger.
- 28 -
Page 31

Åtgärda fel
Låg utgångsspänning
Möjliga orsaker och avhjälpning:
• Spänningsomvandlaren är överbelastad. Minska
lasten tills den ligger under värdet för den maxbelastning som anges i tekniska data.
• Ingångsspänningen ligger under 11 V. Håll värdet på spänningsomvandlarens ingångsspänning
över 11 V för att få en konstant utgångseffekt.
Signalen som varnar för låg batterispänning tjuter hela tiden
• Spänningsomvandlaren är överhettad. Vänta tills
den har svalnat. Se till att luften kan passera fritt
runt omkring spänningsomvandlaren. Akta så att
inte den anslutna lasten överskrider värdet för
maximal belastning kontinuerligt för att undvika
en ny överhettning.
• Apparatens säkring har gått. Vänd dig till kundservice för att laga apparaten. Försäkra dig om
att spänningsomvandlaren anslutits med rätt polaritet till strömkällan.
• Kabelsäkringen har gått. Byt kabelsäkring så
som beskrivs i kapitel "Byte av kabelsäkring".
Försäkra dig om att spänningsomvandlaren
anslutits med rätt polaritet till strömkällan.
Möjliga orsaker och avhjälpning:
• Batteriet är defekt. Byt batteri.
• Otillräcklig spännings- eller strömförsörjning.
Kontrollera det interna uttaget och 12 V fordonskontakten och rengör dem om det behövs.
Ingen utgångseffekt
Möjliga orsaker och avhjälpning:
• Spänningsomvandlaren har inte värmts upp tillräckligt. Sätt på och stäng av spänningsomvandlaren flera gånger tills det kommer ström till den
apparat som anslutits till den. Upprepa den här
proceduren för att sätta på apparaten.
• Tändningen måste vara påkopplad för att det
ska komma ström till det interna uttaget. Slå på
tändningen resp. sätt den på läge I.
• Spänningsomvandlaren är överbelastad. Minska
lasten tills den ligger under värdet för den maxbelastning som anges i tekniska data.
Rengöring
Livsfarlig elektrisk ström:
• Doppa aldrig ner några delar av apparaten i
vatten eller andra vätskor!
• Se till att det inte kommer in vätska innanför
apparatens hölje.
• Dra alltid ut kontakten ur fordonsuttaget eller ta bort anslutningsklämmorna från bilbatteriet innan du rengör spänningsomvandlaren. Ta även bort en apparat som ev. är
kopplad till spänningsomvandlaren.
Rengöra apparaten utvändigt:
Rengör apparaten utvändigt med en lätt fuktad trasa.
Använd aldrig bensin, lösningsmedel eller rengöringsmedel, då kan apparatens yta angripas!
Om det sitter damm i ventilationsöppningarna ska
du ta bort det med en mjuk pensel.
- 29 -
Page 32

Kassering
Kassera apparaten
Apparaten får absolut inte kastas bland hushållssoporna.
Lämna in den till ett företag som har tillstånd
att ta hand om den här typen av kasserade
apparater eller till din kommunala avfallsanläggning.
Den här produkten faller under bestämmelserna
i EU-direktiv 2002/96/EG.
Följ gällande föreskrifter. Kontakta din avfallsanläggning om du har några frågor.
Kassering av förpackningen
Lämna in allt förpackningsmaterial till
miljövänlig återvinning.
Garanti & Service
För den här apparaten lämnar vi tre års garanti från
och med inköpsdatum. Den här apparaten har tillverkats med omsorg och genomgått en noggrann
kontroll innan leveransen. Var god bevara kassakvittot
som köpbevis. Vi ber dig kontakta vår kundtjänst
per telefon vid garantifall. Bara då kan du skicka in
produkten utan kostnad.
Garantin gäller endast för material- eller fabrikationsfel. Den täcker inte förslitningsdelar eller skador
på ömtåliga delar, som t ex knappar och batterier.
Produkten är endast avsedd för privat och inte för
yrkesmässigt bruk.
Vid missbruk och felaktig behandling, användande
av våld och vid ingrepp som inte gjorts av vår
auktoriserade servicefilial upphör garantin att gälla.
Den lagstadgade garantin begränsas inte av denna
garanti.
Importör
KOMPERNASS GMBH
Burgstrasse 21
D-44867 Bochum
www.kompernass.com
Kompernass Service Sverige
EA Rosengrensgata 22
42131 Västra Frölunda
Tel.: 031-491080
Fax: 031-497490
e-mail: support.sv@kompernass.com
Kompernass Service Suomi
Petäjäksentie 19
FIN - 26100 Rauma
Tel.: 02 822 28 87
Fax: 010 293 02 63
e-mail: support.fi@kompernass.com
- 30 -
Page 33

INDHOLDSFORTEGNELSE SIDE
Bestemmelsesmæssig anvendelse 32
Sikkerhedsanvisninger 32
Tekniske data 33
Betjeningselementer 34
Opstart 34
Anvisninger til drift 34
Tilslutning og drift af belastning/apparat 36
Anvisning til drift af apparater 37
Signal ved lav batterispænding 37
Udskiftning af kabelsikringen 37
Generel fejlbehandling 38
Afhjælpning af fejl 39
Rengøring 39
Bortskaffelse 40
Importør 40
Garanti og service 40
Læs betjeningsvejledningen omhyggeligt igennem, før du bruger apparatet første gang, og gem den til senere
brug. Hvis du giver apparatet videre til andre, skal vejledningen også følge med.
- 31 -
Page 34

SPÆNDINGSTRANSFORMER 300 W KH 3900
Bestemmelsesmæssig anvendelse
Apparatet er udelukkende beregnet til tilslutning til
en 12 V stikkontakt til ledningsnet i biler eller til et
autobatteri for levering af 220 - 240 V vekselspænding
til tilslutning af elapparater med et strømforbrug på
op til 300 W.
Apparatet er ikke beregnet til erhvervsmæssige eller
industrielle områder.
For skader, som resulterer af ikke bestemmelsesmæssig
anvendelse af apparatet, gives der ikke garanti!
Anbefalede apparater* til
drift med spændingstransformer
Notebooks og computere,
radioer, radiostyrede apparater,
CD/MP3-player, mobiltelefoner
Bærbare kølebokse, lamper Mikrobølgeapparater, kaffe-
El-shaver Hårtørrer
Generelt lavspændingsapparater Generelt motordrevne appa-
* Overhold de angivne data om strøm- og effekt-
forbrug på typeskiltet til apparatet, der skal
anvendes.
Vær opmærksom på før drift, at det maksimale strømforbrug ikke må være højere end
1,3 A og den maksimale vedvarende effekt
ikke mere end 300 W.
Obs!
Apparater med følsom elektronik bør ikke anvendes med spændingstransformeren, da udgangsspændingen ikke er konstant nok til disse
apparater.
Apparater, som ikke
anbefales til drift med
spændingstransformer*
Forstærkere, boremaskiner,
kompressorer
maskiner, håndmixer, strygejern
rater, varmeapparater,
elektroværktøj
Sikkerhedsanvisninger
• Dette apparat må ikke benyttes af personer
(inklusive børn) med begrænsede fysiske, sensoriske eller psykiske evner eller med manglende
erfaringer og/eller manglende viden, medmindre
en ansvarlig person holder opsyn med dem og
giver dem anvisninger til, hvordan apparatet
anvendes. Børn skal være under opsyn, så det sikres,
at de ikke leger med spændingstransformeren.
• Efter brug og før rengøring skal spændingstransformeren altid tages ud af ledningsnettets stikkontakt, eller tilslutningsklemmerne skal tages af
autobatteriet, så farerisiko undgås.
• Slut kun spændingstransformeren til autobatteriet,
hvis motoren er slukket! Der er fare for personskader på grund af roterende dele!
• Kontrollér udstyret og alle dele for synlige skader.
Apparatets sikkerhedskoncept fungerer kun i fejlfri tilstand.
• Spændingstransformeren skal altid være let tilgængelig, så strømmen til apparatet hurtigt kan
afbrydes.
Fare på grund af elektrisk stød!
• Slut kun spændingstransformeren til et autobatteri/
ledningsnet med 12 V. Ved tilslutning til 24 Vspænding kan apparatet beskadiges.
• Sørg for, at auto-stikkets polaritet er i overensstemmelse med stikkontakten til ledningsnettets
polaritet ved tilslutning af spændingstransformeren
via 12 V auto-stikket. Stikkontakten til ledningsnettet skal være polet positivt indeni, dvs. autobatteriets pluspol må ikke sluttes til bilens chassis.
• Kontrollér før tilslutning af transformeren, at stikkontakten til ledningsnettet er sikret tilstrækkeligt.
Denne sikring må aldrig omgås eller ændres.
- 32 -
Page 35

• Brug kun de medfølgende tilslutningskabler!
• Lad omgående defekte stik, tilslutningsklemmer
eller kabler udskifte af en autoriseret reparatør
eller af kundeservice, så farlige situationer undgås.
• Lad straks ledninger eller udstyr, som ikke fungerer
korrekt, eller som er beskadiget, reparere eller
udskifte af kundeservice.
• Du må ikke åbne eller reparere spændingstransformerens kabinet. Gør du det, er apparatet ikke
sikkert, og garantien bortfalder.
Læg aldrig spændingstransformeren ned
i vand. Tør den kun over med en fugtig klud.
Brandfare!
• Benyt ikke apparatet i nærheden af varme overflader.
• Stil ikke spændingstransformeren på steder, hvor
den er udsat for direkte sol. Ellers kan den blive
overophedet og ødelægges, så den ikke kan
repareres igen. Brug ikke apparatet i en bil, der
står i solen.
• Hold altid apparatet under opsyn under brug.
• Dæk ikke ventilatorens luftåbning til, når apparatet
er tændt.
• Stil ikke åbne brandkilder som f.eks. lys på
spændingstransformeren.
• De to tilslutningskabler kan varmes op ved stor
belastning.
• På grund af den høje overgangsmodstand kan
stikforbindelsen varmes op ved anvendelse af
kablet med 12 V autostik. Brug derfor tilslutningskablet med tilslutningsklemmerne ved drift med
høj belastning.
Info om nødafbrydelse
• Tænd-/sluk-knappen på dette apparat afbryder
ikke apparatet helt fra bilens ledningsnet eller
batteriet. Apparatet bruger strøm, når auto-stikket
er sluttet til. For at afbryde apparatet helt fra bilens
ledningsnet skal 12 V auto-stikket tages ud af
ledningsnettet/ tilslutningsklemmerne tages af
autobatteriet.
Fare for personskade!
• Hvis apparatet har været faldet ned eller er beskadiget, må det ikke længere tages i brug. Lad
en kvalificeret reparatør kontrollere og eventuelt
reparere apparatet.
Tekniske data
DC-indgang
Spænding : 12 V
Maksimal spænding: 15,5 V
Maksimalt strømforbrug: 40 A
Alarm ved underbelastning: ved 10,6 ± 0,3 V
Frakobling ved
underbelastning: ved 10 ± 0,3 V
Frakobling ved
overbelastning: ved 16 ± 0,5 V
AC-udgang
Spænding : 220-240 V ~50 Hz
Udgangsstrøm: 1,3 A
Vedvarende effekt: maks. 300 W
Maksimumeffekt: maks. 400 W /0,1 s
Virkningsgrad ( ): ca. 90 %
Udgangsbølgeform: modificeret sinus
Overbelastningssikring: >= 320 W
Temperatur frakobling: ved 65 ± 3 °C
Sikringer
Spændingstransformer: 30 A auto-fladsikring
Kabelsikring: 30 A auto-fladsikring
- 33 -
Page 36

Fejlstrømsrelæ
Vedvarende effekt (W)
Virkningsgrad
Spænding (V)
Strømforbrug (A)
Frakobling ved fejlstrøm: >3 mA
Generelle data
Mål (uden auto-stik)
(L x B x H): 155 x 128 x 58 mm
Vægt (uden kabel): Ca. 865 g
Driftstemperatur: 0... 62°C
Driftsfugtighed: 0 - 80 %
(rel. luftfugtighed - ingen kondensdannelse)
Ret til tekniske ændringer forbeholdes.
Betjeningselementer
A
Spændingstransformer:
Ventilator (på bagsiden)
q
Drifts-LED/overbelastningsvisning
w
Kontakt/afbryder
e
Vekselstrømsstikkontakt
r
12 V tilslutninger (rød+/sort-)
t
B
Kabel med tilslutningsklemmer
C
Kabel med 12 V auto-stik
D
30 A auto-fladsikring
Opstart
Udpakning
1. Tag apparatet ud af emballagen.
2. Fjern alle folier.
Obs:
Lad aldrig små børn lege med folier.
Der er fare for kvælning!
Kontrol af de leverede dele
Kontrollér venligst inden opstarten, at leverancen
er fuldstændig, og at spændingstransformeren ikke
er beskadiget.
Spændingstransformer:
- 1 kabel med tilslutningsklemmer rød/sort
- 1 kabel med 12 V auto-stik
- 1 30 A auto-fladsikring
- Denne betjeningsvejledning
Anvisninger til drift
For kontinuerlig drift af apparater via spændingstransformer skal der være en spænding mellem
11 - 15,5 V på bilens ledningsnet. Spændingskilden til stikkontakten kan være et autobatteri eller en
reguleret jævnstrømsforsyning som f.eks. en akkustation. Kontrollér, at spændingskilden leverer tilstrækkelig strøm til driften, før spændingstransformeren
sluttes til. Strømmen, som kræves til driften, kan
beregnes på følgende måde:
- 34 -
Page 37

Eksempel
Spændingskilden skal levere til vedvarende belastning
på 300 W altså mindst 27,7 A.
Obs!
Slut aldrig spændingstransformeren til et 24 Vledningsnet. Ellers beskadiges apparatet. Apparatet må kun sluttes til en spændingskilde
med en mærkespænding på 12 V.
Opstilling
• Spændingstransformeren skal anbringes på en
jævn og flad overflade. Sørg for, at der er 1 cm
fri plads omkring spændingstransformeren til luftcirkulation.
• Bag ventilatorens ventilationsåbninger skal der
være en afstand på 50 cm.
Drift i køretøjer
Hvis du vil anvende spændingstransformeren i et
køretøj, skal du kontrollere, at installationen ikke
hindrer dig i at betjene køretøjet.
Læg derfor kablerne, så de ikke rører ved bevægelige
dele i køretøjets indvendige rum eller hindrer udsynet.
Bemærk:
Spændingstransformeren kan også anvendes,
når motoren er slukket. Bemærk dog, at
spændingstransformeren muligvis ikke fungerer, mens køretøjet startes.
Tilslutning til en spændingskilde
Obs!
Kontrollér, at apparatets tænd-/sluk-knap står
på 0-stillingen, før spændingstransformeren
sluttes til en spændingskilde.
Du kan slutte spændingstransformeren til et 12 Vledningsnet med 12 V-stikket eller direkte til et autobatteri med tilslutningsklemmerne.
Ved begge tilslutningsvarianter skal tilslutningskablerne
sluttes til 12 V-skruetilslutningen på spændingsregulatoren.
Fig.: Tilslutning af kabelsko
Tilslutning til 12 V auto-stikkontakt
• Løsn den røde skrue på spændingstransformeren
så meget, at du kan lægge den røde kabelsko til
12 V-autokablet med åbningen under skruen og
underlagsskiven. (Se fig.: Tilslutning af kabelsko)
• Stram den røde skrue så meget, at kabelskoen
ikke længere kan løsnes.
• Løsn den sorte skrue på spændingstransformeren
så meget, at du kan lægge den sorte kabelsko til
12 V-autokablet med åbningen under skruen og
underlagsskiven.
• Stram den sorte skrue så meget, at kabelskoen
ikke længere kan løsnes.
• Sæt 12 V auto-stikket i en auto-stikkontakt.
- 35 -
Page 38

Bemærk:
På grund af den høje overgangsmodstand kan
stikforbindelsen varmes op ved anvendelse af
kablet med 12 V autostik. Brug derfor tilslutningskablet med tilslutningsklemmerne ved drift
med høj belastning.
Tilslutning til et autobatteri
• Løsn den røde skrue på spændingstransformeren
så meget, at du kan lægge det røde kabels røde
kabelsko med tilslutningsklemme med åbningen
under skruen og underlagsskiven.
• Stram den røde skrue så meget, at kabelskoen
ikke længere kan løsnes.
• Løsn den sorte skrue på spændingstransformeren
så meget, at du kan lægge det sorte kabels sorte
kabelsko med tilslutningsklemme med åbningen
under skruen og underlagsskiven.
• Stram den sorte skrue så meget, at kabelskoen
ikke længere kan løsnes.
• Slut derefter den røde klemme til autobatteriets
pluspol og derefter den sorte klemme til autobatteriets minuspol.
Obs!
Brug ikke spændingstransformeren i køretøjer,
hvis pluspol er forbundet med køretøjets karosseri eller chassis.
Ledningsnettet skal være polet positivt indvendigt. Brug ikke spændingstransformeren til
auto-stikkontakter, som er positivt jordet. Ellers beskadiges apparatet.
Tilslutning og drift af
belastning/apparat
Obs!
Kontrollér, at apparatets tænd-/sluk-knap står
på 0-stillingen, før belastningen/apparatet sluttes til spændingstransformeren.
Kontrollér, at belastningens/apparatets effekt
ikke overstiger spændingstransformerens maksimale vedvarende effekt.
• Slut stikket til belastningen/apparatet, der skal
tilsluttes, til 220 - 240 V-stikkontakten på spændingstransformeren.
Obs!
Tænd ikke for lasten/apparatet, der skal forsynes, endnu!
• Tænd for spændingstransformeren ved at stille
tænd-/sluk-kontakten på I-stillingen. Drifts-LED/
overbelastningsindikatoren lyser grønt, hvis
spændingstransformeren fungerer korrekt.
• Tænd nu for belastningen/apparatet, der skal
forsynes. Når der tændes, lyder signaltonen kort.
Bemærk:
Hvis der kan høres en signaltone, og driftsLED/overbelastningsindikatoren lyser rødt, er
indgangsspændingen for lav, eller effekten for
belastningen/apparatet, der er sluttet til spændingstransformeren, er for høj.
- 36 -
Page 39

Obs!
Spændingstransformeren har et fejlstrømsrelæ,
som ved fejlstrøm >3mA på 220 - 240 V-stikkontaktens sikkerhedskontakter kobler spændingstransformeren fra. Hvis det sker, skal du straks
fjerne apparatet, der er sluttet til spændingstransformeren, og under ingen omstændigheder
slutte det til en strømforsyning igen! Apparatet
er defekt og skal undersøges og evt. repareres
af en fagmand, før det kan tages i drift igen!
Anvisning til drift af apparater
Generelle anvisninger
Normalt findes der informationer om strømforbruget
i Ampere (A) eller strømforbruget i Watt (W) på
apparaternes typeskilte.
Vær opmærksom på før drift, at det maksimale strømforbrug ikke er højere end 1,3 A og den maksimale
vedvarende effekt ikke er mere end 300 W.
• Belastninger med høj indvendig modstand kan
uden problemer forsynes via spændingstransformeren, men belastninger med lav invendig modstand som f.eks. varme- eller kogepparater har
for højt effektforbrug i Watt.
• Induktive belastninger som f.eks. fjernsyns- eller
stereoapparater (apparater med en spole eller
en transformator) kræver ofte tilkoblingsstrøm,
der er flere gange højere end modstandsbelastningerne med det samme angivne strømforbrug
i Watt. Når fjernsynsapparater tændes, kræver
der et meget større strømforbrug end det, der er
angivet på typeskiltet. Derfor kan det være nødvendigt at tænde og slukke for spændingstransformeren flere gange for at kunne tænde for
fjernsynsapparatet.
• De fleste varmegenererende apparater som
f.eks. hårtørrer, strygejern eller varmlufter kan
ikke fungere via spændingstransformeren, da
strømforbruget for disse apparater ligger over
spændingstransformerens udgangseffekt.
Signal ved lav batterispænding
• Ved lav batterispænding (under 11 V) lyder der
en vedvarende signaltone, som viser, at batteriet skal lades op. Drifts-LED/overbelastningsindikatoren lyser stadig grønt.
• Hvis batterispændingen falder under 10 V,
kobles spændingstransformeren fra, og driftsLED/overbelastningsindikatoren lyser rødt.
Udskiftning af kabelsikringen
Livsfare på grund af elektrisk stød:
Afbryd spændingstransformeren fra strømforsyningen, før sikringen skiftes. Fjern også apparater, der er sluttet til spændingstransformeren.
Det røde kabel med tilslutningsklemme har en sikring.
Hvis der sluttes en for høj belastning til spændingstransformeren, udløses denne sikring.
Udskift sikringen med en type med samme frakoblingskarakteristik som angivet i de tekniske data.
Find årsagen til, at sikringen er udløst, før spændingstransformeren kobles til igen.
- 37 -
Page 40

Gå frem på følgende måde for at skifte sikringen:
• Åbn afdækningen til sikringsholderen, og tag
auto-fladsikringen ud af holderen.
Fig.: Udskiftning af kabelsikringen
• Sæt en ny 30 A auto-fladsikring (medfølger) i de
to tilslutninger, og sæt afdækningen på sikringsholderen igen.
Fjernsynsapparater
• Spændingstransformeren er afskærmet og
udsender en filtreret sinusbølge.
Ved modtagelse af f.eks. svage tv-stationer kan
der opstå interferens eller billedforstyrrelser.
• Hvis det er tilfældet, skal spændingstransformeren
anbringes så langt væk som muligt fra tv-apparatet,
antennekablet og antennen.
• Indstil spændingstransformeren, tv-apparatet,
antennekablet og antennen efter hinanden, til
modtagelsen er blevet bedre.
• Brug så vidt muligt et afskærmet antennekabel
af høj kvalitet.
Audioanlæg
• Nogle audio-/videoanlæg udsender en brummelyd
via højttalerne, hvis de forsynes via spændingstransformeren. Grunden hertil er, at apparaterne
ikke kan filtrere spændingstransformerens modificerede sinusbølge og er ikke nogen defekt ved
spændingstransformeren.
Generel fejlbehandling
Elektroværktøjer
• Hvis et elektroværktøj ikke kan tændes, eller
værktøjet kun starter i kort tid, tændes og slukkes
spændingstransformeren flere gange, mens
elektroværktøjet er tændt.
- 38 -
Page 41

Afhjælpning af fejl
Lav udgangsspænding
Mulige årsager og afhjælpning:
• Spændingstransformeren er overbelastet. Reducer
belastningen, indtil den ikke overskrider den
maksimale belastning, som er angivet i de tekniske
data.
• Indgangsspændingen ligger under 11 V.
Hold spændingstransformerens indgangsspænding
over 11 V for at holde udgangseffekten konstant.
Signalet for lav batterispænding lyder
hele tiden
• Spændingstransformeren er overophedet. Vent,
indtil apparatet er kølet af. Sørg for tilstrækkelig
ventilationsafstand. Sørg for, at den tilsluttede
belastning ikke overskrider den maksimale belastning vedvarende for at undgå overophedning igen.
• Apparatets sikring er brændt igennem. Henvend
dig til service for at få sat apparatet i stand igen.
Kontrollér, at spændingstransformeren er sluttet
til strømforsyningen med den rigtige polaritet
• Kabelsikringen er brændt igennem. Udskift
kabelsikringen som beskrevet i kapitlet "Udskiftning af kabelsikring".
Kontrollér, at spændingstransformeren er sluttet
til strømforsyningen med den rigtige polaritet
Mulige årsager og afhjælpning:
• Batteriet er defekt. Udskift batteriet.
• Utilstrækkelig spændings- eller strømforsyning.
Kontrollér tilstanden for ledningsnettets stikkontakt
og 12 V auto-stikket, og rengør ved behov.
Ingen udgangseffekt
Mulige årsager og afhjælpning:
• Spændingstransformeren er ikke varmet helt op.
Tænd for spændingstransformeren, og sluk den
igen, indtil apparatet, der er sluttet til spændingstransformeren, forsynes med strøm. Gentag dette
forløb for at kunne tænde for apparatet igen.
• Tændingen skal være koblet til, så ledningsnettets
stikkontakt forsynes med strøm. Kobl tændingen til,
eller stil den på I-positionen.
• Spændingstransformeren er overbelastet. Reducer
belastningen, indtil den ikke overskrider den
maksimale belastning, som er angivet i de tekniske
data.
Rengøring
Livsfare på grund af elektrisk stød:
• Læg aldrig appratets dele ned i vand eller
andre væsker!
• Der må aldrig trænge nogen form for væske
ind i kabinettet.
• Træk altid spændingstransformeren ud af
auto-stikkontakten/fjern tilslutningsklemmerne fra autobatteriet før rengøring. Fjern
også apparater, der er sluttet til spændingstransformeren.
Rengøring af kabinettet:
Rengør kabinettets overflade med en let fugtet klud.
Brug aldrig benzin, opløsningsmidler eller rengøringsmidler, da de kan angribe apparatets overflade!
Hvis ventilationsåbningen er støvet til, skal den
rengøres med en blød pensel.
- 39 -
Page 42

Bortskaffelse
Bortskaffelse af spændingstransformeren
Apparatet må under ingen omstændigheder
smides ud med det normale husholdningsaffald.
Bortskaf spændingstransformeren hos et godkendt affaldsfirma eller på dit kommunale affaldsanlæg.
Dette produkt er underkastet det europæiske direktiv
2002/96/EF.
Følg de aktuelt gældende regler. Kontakt
affaldsordningen, hvis du er i tvivl.
Bortskaffelse af emballage
Aflever alle emballagematerialer på et
affaldsdepot, så miljøet skånes.
Importør
KOMPERNASS GMBH
Burgstrasse 21
D–44867 Bochum
www.kompernass.com
Garanti og service
På dette apparat får du 3 års garanti fra købsdatoen.
Apparatet er produceret omhyggeligt og er inden
levering afprøvet samvittighedsfuldt. Opbevar kassebonen som bevis for købet. I garantitilfælde bedes
du kontakte dit servicested pr. telefon. Kun på denne
måde garanteres det, at tilsendelsen af varen er
gratis.
Garantien gælder kun for materiale- eller fabrikationsfejl, men ikke for sliddele eller skrøbelige dele
som f.eks. kontakten eller akkumulatorer. Produktet
er kun beregnet til privat og ikke til erhvervsmæssigt
brug.
Ved misbrug og uhensigtsmæssig behandling, anvendelse af vold og ved indgreb, som ikke er foretaget
af vores autoriserede service-afdeling, ophører
garantien. Dine juridiske rettigheder indskrænkes
ikke ved denne garanti.
Kompernass Service Danmark
Kratbjerg 212
DK-3480 Fredensborg
Tel.: +45 4824 5330
Fax: +45 4824 5320
e-mail: support.dk@kompernass.com
- 40 -
Page 43

INNHOLDSFORTEGNELSE SIDE
Hensiktsmessig bruk 42
Sikkerhetshenvisninger 42
Tekniske spesifikasjoner 43
Kontrollelementer 44
Igangsetting 44
Henvisninger for bruk 44
Tilkobling og drift av en last/et apparat 46
Henvisninger for drift av apparater 47
Signal ved lav batterispenning 47
Bytte kabelsikring 47
Generell feilbehandling 48
Feilbehandling 49
Rengjøring 49
Deponering 50
Importør 50
Garanti & service 50
Les bruksanvisningen nøye før første gangen apparatet tas i bruk og oppbevar den for senere bruk.
Når apparatet gis videre til andre bør de også få bruksanvisningen.
- 41 -
Page 44

SPENNINGSOMFORMER
300 W KH 3900
Hensiktsmessig bruk
Apparatet er bestemt for tilkobling til et 12 V sigarettenneruttak eller et bilbatteri, og for ytelse på 220 240 V vekselspenning for tilkobling av elektriske
apparater med et effektbehov på opp til 300 W.
Apparatet er ikke ment for bruk i kommersielle eller
industrielle områder.
For skader som oppstår av uhensiktsmessig bruk vil
intet ansvar og ingen garanti overtas!
Apparater som anbefales for
bruk med spenningsomformer*
Notebooks og PC-er, radioer,
radiotelefoner, CD/MP3-spillere,
mobiltelefoner
Bærbare kjølebokser, lamper Mikrobølgeapparater,
Elektrisk barbermaskin Hørføner
Generelt lavspenningsapparater Generelt motordrevne appa-
* Ta hensyn til spesifikasjonene om strømfor-
bruk og effektbehov på skriftskiltet på apparatet som skal brukes.
Pass før bruk på at det maksimale strømopptaket ikke er høyere enn 1,3 A og den maksimale langtidsytelsen ikke overstiger 300 W.
Obs!
Apparater med fintfølende elektronikk må ikke
drives med spenningsomformeren, siden utgangsspenningen til disse apparatene ikke er tilstrekkelig konstant.
Apparater som ikke
anbefales for bruk med
spenningsomformer*
Forsterkere, driller,
kompressorer
kaffetraktere, håndmiksere,
strykejern
rater, varmeapparater, elektriske verktøy
Sikkerhetshenvisninger
• Dette apparatet er ikke ment for bruk av personer
(også barn) som er innskrenket i sine fysiske, sensoriske eller mentale evner eller mangler erfaring
eller vitende, unntatt når de er under oppsikt av
en ansvarlig person som kan gi dem instrukser
om hvordan apparatet skal betjenes. Barn skal
overvåkes slik at de ikke bruker apparatet som
et leketøy.
• For å unngå farer, må du trekke spenningsomformeren fra sigarettenneruttaket eller klemmene fra
bilbatteriet etter hver bruk og før hver rengjøring.
• Spenningsomformeren må kun kobles til bilbatteriet
når motoren er slått av! Det er fare for skader fra
roterende deler!
• Undersøk apparatet og alle deler med hensyn til
synlige skader. Apparatets sikkerhetskonsept kan
kun fungere i feilfri tilstand.
• Spenningsomformeren må alltid være lett tilgjengelig, slik at den raskt kan skilles fra strømnettet i et
nødstilfelle.
Fare for elektriske støt!
• Spenningsomformeren må kun kobles til et 12 V
bilbatteri/sigarettenneruttak. Dersom det kobles
til 24 V spenning, kan apparatet ta skade.
• Når du kobler spenningsomformeren til med
12 V sigarettenneruttak må du passe på at polariteten til sigarettennerstøpselet stemmer overens
med polariteten til sigarettenneruttaket. Sigarettenneruttaket må være positivt inni, dvs. plusspolen
på et kjøretøysbatteri må ikke være koblet til understellet på kjøretøyet.
• Kontroller at sigarettenneruttaket er tilstrekkelig
avdekket før du kobler til omformeren. Denne
avdekningen må aldri omgås eller forandres.
- 42 -
Page 45

• Bruk kun de medleverte tilkoblingskablene!
• Skadete støpsler, tilkoblingsklemmer eller ledninger
må skiftes av autorisert fagpersonale eller kundeservice med en gang for å unngå farer.
• Ledninger eller apparater som ikke fungerer feilfritt eller har blitt skadet må med en gang repareres
eller skiftes ut av kundeservice.
• Huset til apparatet må ikke åpnes eller repareres.
Skjer dette, består det ingen sikkerhetsgaranti og
garantien forfaller.
Aldri dypp apparatet i vann.
Bare rengjør det med en lett fuktet klut.
Brannfare!
• Ikke benytt apparatet i nærheten av varme overflater.
• Ikke plasser apparatet på steder som er utsatt for
direkte sollys, ellers kan det bli overopphetet og
få uopprettelige skader. Ikke bruk apparatet i et
kjøretøy som står i solen.
• Aldri la apparatet stå uten oppsikt mens det er
i drift.
• Ikke dekk til viftens luftslisser når apparatet er
slått på.
• Still ingen åpne brannkilder (f.eks. stearinlys)
oppå apparatet,
• Begge tilkoblingskablene kan bli varme ved stor
belastning.
• På grunn av den store overgangsmotstanden kan
det hende at støpselforbindelsen blir varm når
du bruker kabelen med 12 V sigarettennerstøpsel.
Derfor må du bruke tilkoblingskabelen med
tilkoblingsklemmene når du driver med stor
belastning.
Henvisning om frakobling
• På-/av-bryteren på dette apparatet skiller ikke
apparatet fullstendig fra kjøretøyets strømnett
eller fra batteriet. Apparatet tar opp strøm når
sigarettennerstøpselet er koblet til. For å skille
apparatet fullstendig fra strømnettet, må du
trekke 12 V sigarettennerstøpselet ut av sigarettenneruttaket/ fjerne tilkoblingsklemmene fra
bilbatteriet.
Fare for personskade!
• I tilfelle at apparatet er falt ned eller har blitt skadet
må det ikke tas i bruk igjen. Apparatet må da
sjekkes av kvalifisert personale og repareres hvis
nødvendig.
Tekniske spesifikasjoner
DC-inngang
Spenning: 12 V
Maksimal spenning: 15,5 V
Maksimalt strømopptak: 40 A
Underbelastningsalarm ved 10,6 ± 0,3 V
Underbelastningsutkobling: ved 10 ± 0,3 V
Overbelastningsutkobling: ved 16 ± 0,5 V
AC-utgang
Spenning : 220-240V ~50 Hz
Utgangsstrøm: 1,3A
Langtidsytelse: maks. 300 W
Toppytelse: maks. 400 W/0,1 s
Virkningsgrad ( ): ca. 90 %
Utgangsbølgeform: modifisert sinus
Overbelastningsvern >= 320 W
Temperaturutkobling: ved 65 ± 3 °C
Sikringer
Spenningsomformer: 30A flatsikring for kjøretøy
Kabelsikring: 30A flatsikring for kjøretøy
- 43 -
Page 46

Beskyttelsesbryter for feilstrøm
Langtidsytelse (W)
Virkningsgrad
Spenning (V)
Strømopptak (A)
Utkobling ved feilstrøm: >3 mA
Generelle spesifikasjoner
Mål (uten sigarettennerstøpsel)
(L x B x H): 155 x 128 x 58 mm
Vekt (uten kabel): omtrent 865 g
Driftstemperatur: 0 - 62 °C
Driftsfuktighet: 0 - 80 %
(rel. luftfuktighet - ingen kondensasjon)
Tekniske modifikasjoner forbeholden.
Kontrollelementer
A
Spenningsomformer:
Vifte (på baksiden)
q
Drifts-LED/overbelastningsanvisning
w
På/av-bryter
e
Vekselstrømkontakt
r
12 V tilkoblinger (rød+/svart-)
t
B
Kabel med tilkoblingsklemmer
C
Kabel med 12 V sigarettennerstøpsel
D
30 A flatsikring for kjøretøy
Igangsetting
Pakke ut apparatet
1. Ta apparatet ut av forpakningen.
2. Fjern alle folier.
Observer:
La ikke små barn leke med folier.
Det kan være fare for kveling!
Kontrollere leveringsomfang
Vennligst kontroller leveringsomfanget med hensyn
til fullstendighet og eventuelle skader.
Spenningsomformer:
- 1 kabel med tilkoblingsklemmer rød/svart
- 1 kabel med 12 V sigarettennerstøpsel
- 1 30 A flatsikring for kjøretøy
- Denne bruksanvisningen
Henvisninger for bruk
For kontinuerlig drift av apparater over spenningsomformeren, må sigarettenneruttaket ha en spenning
på mellom 11 og 15,5 V . Spenningskilden til
sigarettenneruttaket kan være et kjøretøybatteri eller
en ordnet likestrømsforsyning som f.eks. en akkumulatorstasjon. Kontroller før du kobler til spenningsomformeren om spenningskilden leverer tilstrekkelig
strøm for driften. Strømmen som kreves for driften
kan beregnes på følgende måte:
- 44 -
Page 47

Eksempel
Spenningskilden må levere minst 27,7 A for en
permanent belastning på 300 W.
Obs!
Koble aldri spenningsomformeren til et 24 V
strømnett, ellers kan apparatet ta skade. Apparatet må kun kobles til en spenningskilde med
en strømspenning på 12 V.
Gjøre klar til drift
• Spenningsomformeren må plasseres på en jevn
og flat overflate. Sørg for at spenningsomformeren
har 1 cm fritt rom for luftsirkulasjon.
• Bak viftens luftslisser må det opprettholdes en
avstand på 50 cm.
Drift i et kjøretøy
Når du bruker spenningsomformeren i et kjøretøy,
må du sørge for at installasjonen ikke hindrer din
bruk av kjøretøyet.
Legg kabelen slik at den ikke kommer i kontakt med
bevegelige deler i kjøretøyet eller kan hindre sikten.
Henvisning:
Spenningsomformeren kan også drives når motoren ikke er i gang. Legg likevel merke til at
spenningsomformeren ikke fungerer mens motoren startes.
Tilkobling til en spenningskilde
Obs!
Før du kobler til spenningsomformeren til en
spenningskilde må du sørge for at på-/av-bryteren på apparatet står i posisjonen 0.
Du kan koble spenningsomformeren med 12 V sigarettennerstøpselet til et 12 V sigarettenneruttak eller
med tilkoblingsklemmene direkte til et bilbatteri.
For begge tilkoblingsvariantene må tilkoblingskabelen
være koblet til 12 V skrutilkoblingene på spenningsregulatoren.
Bilde: Tilkobling kabelsko
Tilkobling til et 12V sigarettenneruttak
• Løsne den røde skruen på spenningsomformeren
så mye at du kan legge den røde kabelskoen på
12V sigarettennerkabelen med åpningen under
skruen og underlagsskiven. (Se bilde: Tilkobling
kabelsko)
• Skru den røde skruen så hardt fast at kabelskoen
ikke kan løsne mer.
• Løsne den svarte skruen på spenningsomformeren
så mye at du kan legge den svarte kabelskoen
på 12V sigarettennerkabelen med åpningen under
skruen og underlagsskiven.
• Skru den svarte skruen så hardt fast at kabelskoen ikke kan løsne mer.
• Plugg 12V sigarettennerstøpselet i et sigarettenneruttak.
- 45 -
Page 48

Henvisning:
På grunn av den store overgangsmotstanden
kan det hende at støpselforbindelsen blir varm
når du bruker kabelen med 12 V sigarettennerstøpsel.
Derfor må du bruke tilkoblingskabelen med tilkoblingsklemmene når du driver med stor belastning.
Tilkobling til et bilbatteri
• Løsne den røde skruen på spenningsomformeren
så mye at du kan legge den røde kabelskoen på
den røde kabelen med tilkoblingsklemme med
åpningen under skruen og underlagsskiven.
• Skru den røde skruen så hardt fast at kabelskoen
ikke kan løsne mer.
• Løsne den svarte skruen på spenningsomformeren
så mye at du kan legge den svarte kabelskoen
på den svarte kabelen med tilkoblingsklemme
med åpningen under skruen og underlagsskiven.
• Skru den svarte skruen så hardt fast at kabelskoen ikke kan løsne mer.
• Koble deretter den røde klemmen på plusspolen
på bilbatteriet og så den svarte klemmen på
minuspolen på bilbatteriet.
Obs!
Bruk ikke spenningsomformeren i kjøretøy
der plusspolen er forbundet til kjøretøyets karosseri eller understell.
Sigarettenneruttaket må være positivt polet
inni. Bruk ikke spenningsomformeren i sigarettenneruttak som er positivt jordet, ellers kan
apparatet ta skade.
Tilkobling og drift av en last/
et apparat
Obs!
Før du kobler en last/et apparat til spenningsomformeren må du sørge for at på-/av-bryteren på apparatet står i posisjonen 0.
Sørg for at ytelsen til lasten/apparatet ikke overstiger den maksimale langtidsytelsen til spenningsomformeren.
• Plugg støpselet på lasten/apparatet som skal
tilkobles inn i 220 - 240 V-stikkontakten på
spenningsomformeren.
Obs!
Slå ikke på lasten/apparatet som skal drives
riktig ennå!
• Slå spenningsomformeren på ved å vri på-/
av-bryteren til posisjonen I. Drift-LED/overbelastningsanvisningen lyser grønt når spenningsomformeren fungerer uten feil.
• Slå på lasten/apparatet som skal drives.
Når du slår på, hører du en kort signaltone.
Henvisning:
Hvis du hører en signaltone og drifts-LED/overbelastningsanvisningen lyser rødt, er inngangsspenningen for lav, eller ytelsen til lasten/apparatet som er koblet til spenningsomformeren er
for høy.
- 46 -
Page 49

Obs!
Spenningsomformeren har en feilstrømutkobling som kobler ut spenningsomformeren ved
feilstrøm >3 mA på beskyttelseskontakten til
220 - 240 V-stikkontakten. Hvis dette skjer, må
du fjerne apparatet som er koblet til spenningsomformeren med en gang og aldri mer koble
det til en strømforsyning! Apparatet er defekt
og må undersøkes av en fagmann og eventuelt
repareres før det kan tas i bruk igjen!
Henvisninger for drift av
apparater
Generelle henvisninger
Vanligvis finner du spesifikasjoner om strømforbruk
i ampere (A) eller wattforbruket i watt (W) på skriftskiltet på apparatet.
Pass før bruk på at det maksimale strømopptaket
ikke er høyere enn 1,3 A og den maksimale langtidsytelsen ikke beløper seg til mer enn 300 W.
• Last med stor innvendig motstand er svært godt
egnet for drift med spenningsomformeren.Last
med liten innvendig motstand derimot, som f.eks.
varme- og kokeapparater, har for høy inngangseffekt i watt.
• Induktive belastninger, som f.eks. fjernsynsapparater eller stereoanlegg (apparater med spole
eller transformator) krever ofte mange ganger
høyere innkoblingsstrøm enn motstandsbelastninger
med samme angitte wattforbruk. Fjernsynsapparater krever ved innkobling flere ganger så høyt
wattforbruk som det som er angitt på skriftskiltet.
Da er det mulig at du må slå spenningsomformeren
av og på flere ganger for å kunne slå på et fjernsynsapparat.
• De fleste varmeproduserende apparater, som
f.eks. føner, strykejern eller vifteovn, kan ikke
drives med spenningsomformeren, siden wattforbruket til disse apparatene ligger over utgangseffekten til spenningsomformeren.
Signal ved lav batterispenning
• Ved lav batterispenning (under 11 V) høres en
gjennomgående signaltone for å anvise at batteriet
må lades. Drifts-LED/overbelastningsanvisningen
lyser fortsatt grønt.
• Når batterispenningen synker under 10 V, slår
spenningsomformeren seg av og drifts-LED/
overbelastningsanvisningen lyser rødt.
Bytte kabelsikring
Livsfare fra elektrisk støt.
Før du bytter sikring må du skille spenningsomformeren fra strømforsyningen. Fjern også eventuelle
apparater som er koblet til spenningsomformeren.
Den røde kabelen med tilkoblingsklemme har en
sikring. Dersom du kobler for høy belastning til
spenningsomformeren, blir denne sikringen utløst.
Bytt sikringen med en likeverdig sikring av samme
type med lik utkoblingskarakteristikk, slik det er
beskrevet i de tekniske spesifikasjonene.
Før du på nytt slår på spenningsomformeren, må
du slå av årsaken til sikringsutløsningen.
- 47 -
Page 50

Gå fram på følgende måte for å bytte sikring:
• Åpne dekselet på sikringsholderen og trekk
bilsikringen ut av holderen.
Bilde: Bytte kabelsikring
• Sett en ny 30 A bilsikring (medlevert) i begge tilkoblingene og sett dekselet på sikringsholderen
igjen.
Fjernsynsapparater
• Spenningsomformeren er avskjermet og gir ut
en filtrert sinusbølge.
Ved mottaking av f.eks. svært svake fjernsynskanaler, kan det likevel blir interferens eller
bildeforstyrrelser.
• Plasser spenningsomformeren i så fall så langt
unna fjernsynet, antennekabelen og antennen
som mulig.
• Rett spenningsomformeren, fjernsynet, antennekabelen og antennen mot hverandre til mottakingen
blir bedre.
• Bruk om mulig en høyverdig avstemt antennekabel.
Lydanlegg
• Noen lyd-/videoanlegg avgir en brummetone
over høyttalerne når de drives med spenningsomformeren. Det kommer av at disse apparatene
ikke kan filtrere den modifiserte sinusbølgen til
spenningsomformeren. Det er ingen defekt på
spenningsomformeren.
Generell feilbehandling
Elektriske verktøy
• Hvis du ikke kan slå på et elektrisk verktøy, eller
verktøyet kun starter i kort tid, må du slå spenningsomformeren flere ganger av og på mens
det elektriske verktøyet er slått på.
- 48 -
Page 51

Feilbehandling
Lav utgangsspenning
Mulig årsak og behandling:
• Spenningsomformeren er overbelastet. Reduser
belastningen til den ikke lenger overskrider den
maksimale belastningen som er angitt i de tekniske
spesifikasjonene.
• Inngangsspenningen ligger under 11 V. Hold
inngangsspenningen til spenningsomformeren
over 11 V for å kunne holde utgangseffekten
konstant.
Signal for lav batterispenning høres
igjen og igjen
Mulig årsak og behandling:
• Batteriet er defekt. Sett inn et nytt batteri.
• Utilstrekkelig spennings- eller strømforsyning.
Kontroller tilstanden til sigarettenneruttaket og
12 V sigarettennerstøpselet og rengjøre dem
eventuelt.
Ingen utgangseffekt
• Spenningsomformeren er overopphetet. Vent til
apparatet er avkjølt. Sørg for tilstrekkelig luftingsavstand. Pass på at den tilkoblede lasten ikke
varig overskrider den maksimale belastningen.
• Apparatsikringen er brent av. Ta kontakt med
kundeservice for å få apparatet satt i stand.
Sørg for at spenningsomformeren er koblet til
strømforsyningen med riktig polaritet.
• Kabelsikringen er brent av. Bytt kabelsikringen,
slik det er beskrevet i kapittelet "Bytte kabelsikring".
Sørg for at spenningsomformeren er koblet til
strømforsyningen med riktig polaritet.
Rengjøring
Livsfare fra elektrisk støt.
• Aldri dypp apparatdeler i vann eller andre væsker!
• La ingen væsker komme inn i apparatet.
• Trekk spenningsomformeren ut av sigarettenneruttaket/fjern tilkoblingsklemmene fra
bilbatteriet før hver rengjøring. Fjern også
eventuelle apparater som er koblet til spenningsomformeren.
Mulig årsak og behandling:
• Spenningsomformeren er ikke fullstendig oppvarmet.
Slå spenningsomformeren på og av igjen helt til
apparatet som er koblet til spenningsomformeren
blir forsynt med strøm. Gjenta dette for å kunne
slå på apparatet.
• Tenningen må være på for at sigarettenneruttaket
skal være forsynt med strøm. Slå på tenningen eller
vri den til posisjon I.
• Spenningsomformeren er overbelastet. Reduser
belastningen til den ikke lenger overskrider den
maksimale belastningen som er angitt i de tekniske
spesifikasjonene.
Rengjøre huset:
Rengjør husoverflaten med en lett fuktet klut. Bruk
aldri bensin, løsemiddel eller rengjøringsmidler, da
disse kan skade apparatets overflater!
Dersom luftslissene blir tilstøvet, må du rengjøre
dem med en myk kost.
- 49 -
Page 52

Deponering
Kaste apparatet
Kast aldri apparatet i det alminnelige husholdningsavfallet.
Kast apparatet via et godkjent avfallsmottak
eller via kommunalt mottak for spesialavfall.
Dette produktet er underlagt direktivet
2002/96/EF om kasserte elektriske og
elektroniske produkter (EE-avfall).
Ta hensyn til de aktuelle gjeldende forskriftene.
I tvilstilfeller, kontakt det lokale renholdsverket.
Fjerne emballasjen
Kildesorter all emballasje før du kaster den.
Importør
KOMPERNASS GMBH
Burgstrasse 21
D-44867 Bochum
www.kompernass.com
Garanti & service
Du får garanti på dette apparatet som gjelder i 3
år etter kjøpsdato. Apparatet har blitt produsert
omhyggelig og har blitt kontrollert nøye før levering.
Oppbevar kassakvitteringen som bevis for kjøpet.
Hvis du har garantikrav må du ta telefonisk kontakt
med serviceavdelingen som er ansvarlig for deg.
Kun slik er det mulig å garantere at apparatet ditt
kan sendes inn til oss uten at det oppstår kostnader
for deg.
Denne garantien gjelder kun for material- eller produksjonsfeil, ikke for slitasje eller for skader på ømfintlige deler, f.eks. brytere eller akkumulatorer.
Produktet er utelukkende ment for privat og ikke for
yrkesmessig bruk.
Ved uriktig og ufagmessig behandling, bruk av vold
og ved inngrep som ikke har blitt utført av vår autoriserte servicefilial forfaller garantien. Dine lovmessige
rettigheter er ikke innskrenket av denne garantien.
Kompernaß Service Norway
Telefon: 0047 35 58 35 50
- 50 -
Page 53

Περιεχόµενα Σελίδα
Σκοπός χρήσης 52
Υποδείξεις ασφαλείας 52
Τεχνικές πληροφορίες 53
Στοιχεία χειρισµού 54
Θέση σε λειτουργία 54
Υποδείξεις για τη λειτουργία 54
Σύνδεση και λειτουργία ενός φορτίου/ µιας συσκευής 56
Υποδείξεις για τη λειτουργία συσκευών 57
Σήµα σε περίπτωση χαµηλής τάσης µπαταρίας 57
Αλλαγή της ασφάλειας καλωδίου 57
Γενική αντιµετώπιση σφαλµάτων 58
∆ιόρθωση βλαβών 59
Καθαρισµός 59
Απόρριψη 60
Εισαγωγέας 60
Εγγύηση & Σέρβις 60
∆ιαβάστε το εγχειρίδιο χειρισµού πριν από την πρώτη χρήση προσεκτικά και φυλάξτε το για µια µελλοντική χρήση.
Παραδώστε το εγχειρίδιο σε όποιον παραδοθεί στη συνέχεια η συσκευή.
- 51 -
Page 54

Μετασχηµατιστής τάσης
300 W KH 3900
Σκοπός χρήσης
Η συσκευή προορίζεται για τη σύνδεση σε µια πρίζα
του αυτοκινήτου 12 V ή σε µια µπαταρία
αυτοκινήτου και για τη δηµιουργία εναλλασσόµενης
τάσης 220 - 240 V για τη σύνδεση ηλεκτρικών
συσκευών µε µια κατανάλωση ισχύος έως 300 W.
Η συσκευή δεν προβλέπεται για τη χρήση σε επαγγελµατικά ή βιοµηχανικά πεδία.
Για βλάβες οι οποίες προκύπτουν από µη σύµφωνη
µε τους κανονισµούς χρήση της συσκευής, δεν
αναλαµβάνεται καµία εγγύηση!
Προτεινόµενες συσκευές για
τη λειτουργία µε το
µετασχηµατιστή τάσης*
Σηµειωµατάρια και Η/Υ,
ραδιόφωνα, ραδιοεξοπλισµοί,
συσκευές αναπαραγωγής
CD/MP3, κινητά τηλέφωνα
Φορητά ψυγεία, λυχνίες Συσκευές µικροκυµάτων,
Ηλεκτρικές ξυριστικές µηχανές Στεγνωτήρες
Γενικά συσκευές χαµηλής τάσης Γενικά µηχανοκίνητες
* Προσέχετε τις πληροφορίες σχετικά µε την
κατανάλωση ρεύµατος και ισχύος επάνω στην
πινακίδα τύπου της συσκευής που πρόκειται να
λειτουργήσει.
Προσέχετε πριν από τη λειτουργία ώστε η µέγιστη
κατανάλωση ρεύµατος να µην είναι υψηλότερη
από 1,3 A και η µέγιστη συνεχής απόδοση να
µην ανέρχεται σε περισσότερα από 300 W.
Προσοχή!
Συσκευές µε ευαίσθητο ηλεκτρονικό σύστηµα
δεν πρέπει να λειτουργούν µε το µετασχηµατιστή
τάσης διότι για αυτές τις συσκευές η τάση
εξόδου δεν είναι επαρκώς σταθερή.
Μη προτεινόµενες
συσκευές για τη
λειτουργία µε το
µετασχηµατιστή τάσης*
Ενισχυτές, τρυπάνια,
συµπιεστές
καφετιέρες, µίξερ χειρός,
συσκευές σιδερώµατος
συσκευές, συσκευές
θέρµανσης, ηλεκτρικά
εργαλεία
Υποδείξεις ασφαλείας
• Αυτή η συσκευή δεν προορίζεται για χρήση από
άτοµα (συµπεριλαµβανοµένων παιδιών) µε
περιορισµένες, φυσικές, αισθητηριακές ή
πνευµατικές δυνατότητες ή µε έλλειψη εµπειρίας
και/ ή µε έλλειψη γνώσεων, εκτός εάν
επιτηρούνται µέσω ενός υπεύθυνου ατόµου για
την ασφάλειά τους ή εάν αυτά τα άτοµα έχουν
λάβει υποδείξεις για το πως χρησιµοποιείται η
συσκευή. Τα παιδιά πρέπει να επιτηρούνται ώστε
να εξασφαλίζεται ότι δεν παίζουν µε τη συσκευή.
• Για την αποφυγή κινδύνων, αποµακρύνετε µετά
από κάθε χρήση και πριν από κάθε καθαρισµό
το µετασχηµατιστή τάσης από την υποδοχή του
αυτοκινήτου ή τους ακροδέκτες σύνδεσης από τη
µπαταρία αυτοκινήτου.
• Συνδέετε το µετασχηµατιστή τάσης στη µπαταρία
αυτοκινήτου µόνο όταν το µοτέρ είναι
απενεργοποιηµένο! Υπάρχει κίνδυνος
τραυµατισµού µέσω περιστρεφόµενων τµηµάτων!
• Ελέγξτε τη συσκευή και όλα τα εξαρτήµατα για
ορατές βλάβες. Η διάταξη ασφαλείας της
συσκευής µπορεί να λειτουργεί µόνο σε άψογη
κατάσταση.
• Ο µετασχηµατιστής τάσης πρέπει να είναι πάντα
εύκολα προσβάσιµος έτσι ώστε σε περίπτωση
κινδύνου να µπορεί να αποσυνδεθεί γρήγορα η
συσκευή από το δίκτυο ρεύµατος.
Κίνδυνος από ηλεκτροπληξία!
• Συνδέετε το µετασχηµατιστή τάσης µόνο σε µια
µπαταρία αυτοκινήτου / σε µια τάση στο
αυτοκίνητο 12 V. Σε σύνδεση σε µια τάση 24 V
µπορεί η συσκευή να καταστραφεί.
• Προσέχετε κατά τη σύνδεση του µετασχηµατιστή
τάσης µέσω του βύσµατος αυτοκινήτου 12 V
ώστε η πολικότητα του βύσµατος αυτού να
συµφωνεί µε την πολικότητα του βύσµατος
αυτοκινήτου. Η υποδοχή αυτοκινήτου πρέπει να
έχει εσωτερικά θετική πόλωση, δηλαδή ο θετικός
πόλος µιας µπαταρίας αυτοκινήτου δεν
επιτρέπεται να συνδέεται στο σασί του οχήµατος.
- 52 -
Page 55

• Ελέγχετε πριν από τη σύνδεση του µετασχηµατιστή
εάν η υποδοχή αυτοκινήτου είναι επαρκώς
ασφαλισµένη. Αυτή η ασφάλεια δεν επιτρέπεται σε
καµία περίπτωση να παρακάµπτεται ή τροποποιείται.
• Χρησιµοποιείτε µόνο το απεσταλµένο καλώδιο
σύνδεσης!
• Τα χαλασµένα βύσµατα, οι ακροδέκτες σύνδεσης ή
τα καλώδια πρέπει να αντικαθίστανται αµέσως από
εξουσιοδοτηµένο ειδικό προσωπικό ή από το τµήµα
εξυπηρέτησης πελατών ώστε να αποφεύγονται
κίνδυνοι.
• Οι γραµµές σύνδεσης ή οι συσκευές οι οποίες δεν
λειτουργούν άψογα ή έχουν βλάβη, πρέπει να
επιδιορθωθούν ή να αλλαχτούν αµέσως, από το
τµήµα εξυπηρέτησης πελατών.
• ∆εν επιτρέπεται να ανοίξετε ή να επισκευάσετε την
επικάλυψη συσκευής. Σε αυτή την περίπτωση δεν
υπάρχει ασφάλεια και η εγγύηση ακυρώνεται.
Ποτέ µη βυθίζετε τη συσκευή σε νερό.
Σκουπίζετε τη µόνο µε ένα ελαφρώς νωπό
πανί.
Κίνδυνος πυρκαγιάς!
• Μη χρησιµοποιείτε τη συσκευή κοντά σε καυτές
επιφάνειες.
• Μη τοποθετείτε τη συσκευή σε µέρη τα οποία
εκτίθενται σε άµεση ηλιακή ακτινοβολία. Σε άλλη
περίπτωση ίσως υπερθερµανθεί και πάθει
ανεπανόρθωτη βλάβη. Μη λειτουργείτε τη
συσκευή σε όχηµα το οποίο στέκεται στον ήλιο.
• Ποτέ µην αφήνετε τη συσκευή κατά τη λειτουργία
χωρίς επιτήρηση.
• Μη καλύπτετε την εγκοπή αερισµού του
ανεµιστήρα όταν η συσκευή είναι ενεργοποιηµένη.
• Μη τοποθετείτε επάνω στη συσκευή ανοιχτές
πηγές φωτιάς, όπως π.χ. κεριά.
• Τα δύο καλώδια σύνδεσης µπορεί να ζεσταθούν
από το υψηλό φορτίο.
• Λόγω των υψηλών αντιστάσεων µετάβασης ίσως
ζεσταθεί το βύσµα κατά τη χρήση του καλωδίου
µε βύσµα αυτοκινήτου 12 V. Για το λόγο αυτό
χρησιµοποιείτε κατά τη λειτουργία µε υψηλά
φορτία, το καλώδιο σύνδεσης µε τους
ακροδέκτες σύνδεσης.
Υπόδειξη για την αποσύνδεση από
το δίκτυο
• Ο διακόπτης on/off αυτής της συσκευής δεν
αποσυνδέει πλήρως τη συσκευή από το δίκτυο
στο όχηµα ή τη µπαταρία. Όταν το βύσµα
αυτοκινήτου είναι συνδεδεµένο η συσκευή
απορροφά ρεύµα. Για να αποσυνδέσετε τη
συσκευή πλήρως από το δίκτυο οχήµατος,
πρέπει το βύσµα αυτοκινήτου 12 V να τραβηχτεί
από την υποδοχή/ οι ακροδέκτες σύνδεσης
πρέπει να αποµακρυνθούν από την µπαταρία
αυτοκινήτου.
Κίνδυνος τραυµατισµού!
• Στην περίπτωση που η συσκευή έχει πέσει κάτω ή
έχει βλάβη, δεν επιτρέπεται πλέον να την θέτετε σε
λειτουργία. Η συσκευή πρέπει να ελέγχεται και
εάν απαιτείται να επιδιορθώνεται από εξειδικευµένο
ειδικό προσωπικό.
Τεχνικές πληροφορίες
Είσοδος συνεχούς ρεύµατος DC
Τάση : 12 V
µέγιστη τάση: 15,5 V
µέγιστη κατανάλωση ρεύµατος: 40 A
Συναγερµός χαµηλού φορτίου: σε 10,6 ± 0,3 V
Απενεργοποίηση χαµηλού φορτίου:σε 10 ± 0,3 V
Απενεργοποίηση υψηλού φορτίου: σε 16 ± 0,5 V
Έξοδος εναλλασσόµενου ρεύµατος AC
Τάση : 220-240 V ~50 Hz
Ρεύµα εξόδου: 1,3 A
Συνεχής απόδοση: µέγ. 300 W
Απόδοση αιχµής: µέγ. 400 W/0,1 s
Βαθµός
αποτελεσµατικότητας ( ): περ. 90 %
Κυµατοµορφή εξόδου: τροποποιηµένο ηµιτον-
οειδές
Προστασία υπερφόρτωσης: >= 320 W
Θερµοκρασία απενεργοποίησης: σε 65 ± 3 °C
- 53 -
Page 56

Ασφάλειες
Μετασχηµατιστής τάσης: Επίπεδη ασφάλεια
αυτοκινήτου 30 A
Ασφάλεια καλωδίου: Επίπεδη ασφάλεια
αυτοκινήτου 30 A
Θέση σε λειτουργία
Αποσυσκευασία
1. Αποµακρύνετε τη συσκευή από τη συσκευασία.
2. Αποµακρύνετε όλες τις µεµβράνες.
Κύκλωµα προστασίας λανθασµένου
ρεύµατος
Απενεργοποίηση σε λανθασµένο ρεύµα: >3 mA
Γενικές πληροφορίες
∆ιαστάσεις (χωρίς βύσµα αυτοκινήτου)
(Μ x Π x Υ): 155 x 128 x 58 mm
Βάρος (χωρίς καλώδιο): περίπου 865 g
Θερµοκρασία λειτουργίας: 0...62 °C
Υγρασία λειτουργίας: 0 - 80 %
(σχ. υγρασία αέρα - καµία συµπύκνωση)
Με την επιφύλαξη τεχνικών αλλαγών!
Στοιχεία χειρισµού
A
Μετασχηµατιστής τάσης
Ανεµιστήρας (στην πίσω πλευρά)
q
LED λειτουργίας/Ένδειξη υπερφόρτωσης
w
∆ιακόπτης On/off
e
Υποδοχή εναλλασσόµενου ρεύµατος
r
Υποδοχές σύνδεσης 12 V (κόκκινο+/µαύρο)
t
B
Καλώδιο µε ακροδέκτες σύνδεσης
C
Καλώδιο µε βύσµα αυτοκινήτου 12 V
D
Επίπεδη ασφάλεια αυτοκινήτου 30 A
Προσοχή:
Μην αφήνετε µικρά παιδιά να παίζουν µε
µεµβράνες.
Υπάρχει κίνδυνος πνιγµού!
Ελέγξτε το σύνολο αποστολής
Παρακαλούµε ελέγχετε πριν από τη θέση σε
λειτουργία το σύνολο αποστολής για την πληρότητα
και για ενδεχόµενες βλάβες.
- Μετασχηµατιστής τάσης
- 1 Καλώδιο µε ακροδέκτες σύνδεσης κόκκινο/
µαύρο
- 1 Καλώδιο µε βύσµα αυτοκινήτου 12 V
- 1 Επίπεδη ασφάλεια αυτοκινήτου 30 A
- Αυτή η οδηγία χρήσεως
Υποδείξεις για τη λειτουργία
Για τη συνεχή λειτουργία συσκευών µέσω του
µετασχηµατιστή τάσης πρέπει να υπάρχει στην
υποδοχή του αυτοκινήτου µια τάση µεταξύ
11 - 15,5 V .
Η πηγή τάσης της υποδοχής αυτοκινήτου µπορεί να
είναι µια µπαταρία αυτοκινήτου ή µια ρυθµισµένη
παροχή συνεχούς ρεύµατος όπως και ένας σταθµός
συσσωρευτή. Ελέγχετε πριν από τη σύνδεση του
µετασχηµατιστή τάσης εάν η πηγή τάσης παρέχει
επαρκές ρεύµα για τη λειτουργία. Το απαιτούµενο
για τη λειτουργία ρεύµα µπορεί να υπολογιστεί ως
ακολούθως:
- 54 -
Page 57

Παράδειγµα
Η πηγή τάσης πρέπει συνεπώς να παρέχει ένα
συνεχές φορτίο 300 W δηλαδή τουλάχιστο 27,7 A.
Σύνδεση σε µια πηγή τάσης
Προσοχή!
Βεβαιώνεστε πριν από τη σύνδεση του
µετασχηµατιστή τάσης σε µια πηγή τάσης ότι ο
διακόπτης on/off της συσκευής βρίσκεται στη
θέση 0.
Προσοχή!
Ποτέ µη συνδέετε το µετασχηµατιστή τάσης σε
ένα δίκτυο αυτοκινήτου 24 V. Αλλιώς η συσκευή
θα χαλάσει. Η συσκευή επιτρέπεται να συνδέεται
µόνο σε µια πηγή τάσης µε µια ονοµαστική
τάση 12 V.
Τοποθέτηση
• Ο µετασχηµατιστής τάσης πρέπει να τοποθετείται
επάνω σε µια ίσια και επίπεδη επιφάνεια.
Βεβαιώνεστε ότι γύρω από τον µετασχηµατιστή
τάσης υπάρχει 1 εκ. ελεύθερος χώρος για την
κυκλοφορία αέρα.
• Πίσω από τις εγκοπές αερισµού του ανεµιστήρα
πρέπει να τηρείται µια απόσταση 50 εκ..
Λειτουργία σε ένα όχηµα
Όταν λειτουργείτε το µετασχηµατιστή τάσης σε ένα
όχηµα, βεβαιώνεστε ότι η εγκατάσταση δεν
εµποδίζεται από τις εργασίες οδήγησης.
Για το λόγο αυτό τοποθετείτε τα καλώδια έτσι ώστε να
µην έρχονται σε επαφή µε κινούµενα τµήµατα του
εσωτερικού χώρου του οχήµατος ή να µην µπορούν
να εµποδίζουν την ορατότητα.
Σηµείωση:
Ο µετασχηµατιστής τάσης µπορεί να λειτουργεί
επίσης και µε απενεργοποιηµένο µοτέρ. Ωστόσο
προσέχετε ότι ο µετασχηµατιστής τάσης
ενδεχοµένως να µη λειτουργεί κατά τη διάρκεια
µιας διαδικασίας εκκίνησης.
Μπορείτε να συνδέσετε το µετασχηµατιστή τάσης µε
το βύσµα 12 V σε µια υποδοχή αυτοκινήτου 12 V
ή µε τους ακροδέκτες σύνδεσης απευθείας σε µια
µπαταρία αυτοκινήτου.
Και για τις δύο εναλλακτικές σύνδεσης πρέπει τα
καλώδια σύνδεσης να συνδεθούν στις βιδωτές
συνδέσεις 12V του ρυθµιστή τάσης.
Απεικ.: Σύνδεση ακροδεκτικού πέρατος
Σύνδεση σε µια υποδοχή αυτοκινήτου 12 V
• Λασκάρετε την κόκκινη βίδα στο µετασχηµατιστή
τάσης τόσο ώστε να µπορείτε να τοποθετείτε το κόκκινο ακροδεκτικό πέρας του καλωδίου αυτοκινήτου 12
V µε το άνοιγµα κάτω από τη βίδα και τη ροδέλα.
(Βλέπε Απεικ.: Σύνδεση ακροδεκτικού πέρατος)
• Περιστρέψτε την κόκκινη βίδα τόσο ώστε το
ακροδεκτικό πέρας να µη µπορεί πλέον να λασκάρει.
• Λασκάρετε τη µαύρη βίδα στο µετασχηµατιστή τάσης
τόσο ώστε να µπορείτε να τοποθετείτε το µαύρο
ακροδεκτικό πέρας του καλωδίου αυτοκινήτου 12 V
µε το άνοιγµα κάτω από τη βίδα και τη ροδέλα.
• Περιστρέψτε τη µαύρη βίδα τόσο ώστε το
ακροδεκτικό πέρας να µη µπορεί πλέον να
λασκάρει.
- 55 -
Page 58

• Εισάγετε το βύσµα αυτοκινήτου 12 V σε µια
υποδοχή αυτοκινήτου.
Σηµείωση:
Λόγω των υψηλών αντιστάσεων µετάβασης ίσως
ζεσταθεί το βύσµα κατά τη χρήση του καλωδίου
µε βύσµα αυτοκινήτου 12 V. Για το λόγο αυτό
χρησιµοποιείτε κατά τη λειτουργία µε υψηλά
φορτία το καλώδιο σύνδεσης µε τους
ακροδέκτες σύνδεσης.
Σύνδεση σε µια µπαταρία αυτοκινήτου
• Λασκάρετε την κόκκινη βίδα στο µετασχηµατιστή
τάσης τόσο ώστε να µπορείτε να τοποθετείτε το
κόκκινο ακροδεκτικό πέρας του κόκκινου
καλωδίου µε τον ακροδέκτη σύνδεσης, µε το άνοιγµα κάτω από τη βίδα και τη ροδέλα.
• Περιστρέψτε την κόκκινη βίδα τόσο ώστε το
ακροδεκτικό πέρας να µη µπορεί πλέον να
λασκάρει.
• Λασκάρετε τη µαύρη βίδα στο µετασχηµατιστή
τάσης τόσο ώστε να µπορείτε να τοποθετείτε το
µαύρο ακροδεκτικό πέρας του µαύρου καλωδίου
µε τον ακροδέκτη σύνδεσης, µε το άνοιγµα κάτω
από τη βίδα και τη ροδέλα.
• Περιστρέψτε τη µαύρη βίδα τόσο ώστε το
ακροδεκτικό πέρας να µη µπορεί πλέον να
λασκάρει.
• Πρώτα συνδέστε τον κόκκινο ακροδέκτη στο
θετικό πόλο της µπαταρίας αυτοκινήτου και στη
συνέχεια το µαύρο ακροδέκτη στον αρνητικό
πόλο της µπαταρίας αυτοκινήτου.
Προσοχή!
Μη χρησιµοποιείτε το µετασχηµατιστή τάσης σε
οχήµατα των οποίων ο θετικός πόλος είναι
συνδεδεµένος µε το αµάξωµα του οχήµατος ή
µε το σασί.
Η υποδοχή αυτοκινήτου πρέπει να είναι
εσωτερικά θετικά πολωµένη. Μη χρησιµοποιείτε
το µετασχηµατιστή τάσης σε υποδοχές
αυτοκινήτων οι οποίες είναι γειωµένες θετικά.
Αλλιώς η συσκευή θα χαλάσει.
Σύνδεση και λειτουργία ενός
φορτίου/ µιας συσκευής
Προσοχή!
Βεβαιώνεστε πριν από τη σύνδεση ενός
φορτίου/ µιας συσκευής στο µετασχηµατιστή
τάσης, ότι ο διακόπτης on/off της συσκευής
βρίσκεται στη θέση 0.
Βεβαιώνεστε ότι η απόδοση του φορτίου/ της
συσκευής δεν υπερβαίνει τη µέγιστη συνεχή
απόδοση του µετασχηµατιστή τάσης.
• Συνδέετε το βύσµα του προς σύνδεση φορτίου/
της συσκευής προς λειτουργία στην υποδοχή
220 - 240 V του µετασχηµατιστή τάσης.
Προσοχή!
Μην ενεργοποιήσετε ακόµα το φορτίο/ τη
συσκευή προς λειτουργία!
• Ενεργοποιήστε το µετασχηµατιστή τάσης,
θέτοντας το διακόπτη on/off στη θέση I. Το LED
λειτουργίας/ η ένδειξη υπερφόρτωσης ανάβει
πράσινη όταν ο µετασχηµατιστής τάσης
λειτουργεί άψογα.
• Τώρα ενεργοποιήστε το φορτίο/ τη συσκευή προς
λειτουργία. Κατά την ενεργοποίηση ακούγεται
ένας σύντοµος ήχος σήµατος.
Σηµείωση:
Όταν ακούγεται ένας ήχος σήµατος και το LED
λειτουργίας/η ένδειξη υπερφόρτωσης ανάβει
κόκκινη, η τάση εισόδου είναι πολύ χαµηλή ή η
απόδοση του συνδεδεµένου φορτίου/ της
συσκευής στον µετασχηµατιστή τάσης είναι
πολύ υψηλή.
- 56 -
Page 59

Προσοχή!
Ο µετασχηµατιστής τάσης διαθέτει µια
απενεργοποίηση προστασίας λανθασµένου
ρεύµατος η οποία σε λανθασµένο ρεύµα >3mA
στις επαφές προστασίας της υποδοχής 220 240 V, απενεργοποιεί το µετασχηµατιστή τάσης.
Εάν συµβαίνει αυτό, αποµακρύνετε αµέσως τη
συνδεδεµένη συσκευή στο µετασχηµατιστή τάσης
και σε καµία περίπτωση µην τη συνδέσετε σε µια
παροχή ρεύµατος! Η συσκευή είναι ελαττωµατική
και πρέπει να ελεγχθεί ή επισκευαστεί από έναν
ειδικό πριν µπορεί να τεθεί πάλι σε λειτουργία!
Υποδείξεις για τη λειτουργία
συσκευών
ΓΕΝΙΚΕΣ ΣΗΜΕΙΩΣΕΙΣ
Συνήθως βρίσκετε στην πινακίδα τύπου των συσκευών
µια πληροφορία για την κατανάλωση ρεύµατος σε
Ampere (A) ή την κατανάλωση ρεύµατος σε Watt (W).
Προσέχετε πριν από τη λειτουργία ώστε η µέγιστη
κατανάλωση ρεύµατος να µην είναι υψηλότερη από
1,3 A και η µέγιστη συνεχής απόδοση να µην
ανέρχεται σε περισσότερα από 300 W.
• Φορτία µε µια υψηλή εσωτερική αντίσταση
µπορούν να λειτουργούν πολύ καλά µέσω του
µετασχηµατιστή τάσης. Αντιθέτως φορτία µε µια
χαµηλή εσωτερική αντίσταση όπως π.χ. συσκευές
θέρµανσης και µαγειρέµατος έχουν µια πολύ
υψηλή κατανάλωση ρεύµατος σε Watt.
• Τα επαγωγικά φορτία όπως π.χ. οι συσκευές
τηλεόρασης ή στέρεο (συσκευές µε ένα καρούλι
ή µε ένα µετασχηµατιστή) απαιτούν συχνά ένα
πολλαπλά υψηλότερο ρεύµα ενεργοποίησης από
ότι τα φορτία αντίστασης µε την ίδια δοθείσα
κατανάλωση ρεύµατος σε Watt. Οι συσκευές
τηλεόρασης απαιτούν κατά την ενεργοποίηση
πολλαπλή κατανάλωση ρεύµατος από αυτή που
αναφέρεται στην πινακίδα τύπου. Συνεπώς ίσως
απαιτείται να ενεργοποιείτε και απενεργοποιείτε
συχνά τον µετασχηµατιστή τάσης ώστε να
µπορείτε να ενεργοποιήσετε µια συσκευή
τηλεόρασης.
• Οι περισσότερες συσκευές που δηµιουργούν
θερµότητα όπως οι στεγνωτήρες, τα σίδερα ή τα
αερόθερµα δεν µπορούν να λειτουργήσουν µέσω
του µετασχηµατιστή τάσης διότι η κατανάλωση
ρεύµατος αυτών των συσκευών είναι µεγαλύτερη
από την απόδοση εξόδου του µετασχηµατιστή
τάσης.
Σήµα σε περίπτωση χαµηλής
τάσης µπαταρίας
• Σε περίπτωση χαµηλής τάσης µπαταρίας (κάτω
των 11 V) ακούγεται ένας ολοκληρωτικός ήχος
σήµατος που δείχνει ότι πρέπει να φορτωθεί η
µπαταρία. Το LED λειτουργίας/η ένδειξη
υπερφόρτωσης συνεχίζει να ανάβει πράσινη.
• Όταν η τάση µπαταρίας πέφτει κάτω από 10 V,
απενεργοποιείται η µετασχηµατιστής τάσης και το
LED λειτουργίας/η ένδειξη υπερφόρτωσης ανάβει
κόκκινη.
Αλλαγή της ασφάλειας
καλωδίου
Κίνδυνος ζωής από ηλεκτροπληξία:
Πριν από την αλλαγή της ασφάλειας
αποσυνδέετε το µετασχηµατιστή τάσης από την
παροχή ρεύµατος. Αποµακρύνετε επίσης και
οποιαδήποτε συνδεδεµένη συσκευή στο
µετασχηµατιστή τάσης.
Το κόκκινο καλώδιο µε ακροδέκτη σύνδεσης διαθέτει
µια ασφάλεια. Όταν συνδέεται ένα πολύ υψηλό φορτίο
στο µετασχηµατιστή τάσης, αυτή η ασφάλεια
ενεργοποιείται.
Αντικαθιστάτε την ασφάλεια µε µια του ίδιου τύπου που
αναφέρεται στις τεχνικές πληροφορίες και µε τα ίδια
χαρακτηριστικά απενεργοποίησης.
Πριν από νέα ενεργοποίηση του µετασχηµατιστή τάσης
διορθώστε την αιτία για την ενεργοποίηση της
ασφάλειας.
- 57 -
Page 60

Για να αλλάξετε την ασφάλεια, ακολουθήστε την εξής
διαδικασία:
• Ανοίξτε την επικάλυψη του διακόπτη ασφαλείας
και τραβήξτε την επίπεδη ασφάλεια αυτοκινήτου
από το συγκρατητήρα.
Απεικ.: Αλλαγή της ασφάλειας καλωδίου
• Τοποθετήστε µια νέα επίπεδη ασφάλεια αυτοκινήτου
30 A (αποστέλλεται µαζί) στις δύο συνδέσεις και
τοποθετήστε πάλι την επικάλυψη στο διακόπτη
ασφαλείας.
Συσκευές τηλεόρασης
• Ο µετασχηµατιστής τάσης είναι θωρακισµένος
και δίνει ένα φιλτραρισµένο ηµιτονοειδές κύµα.
Κατά τη λήψη π.χ. πολύ αδύναµων τηλεοπτικών
ποµπών µπορεί να υπάρξουν παρεµβολές ή
παράσιτα στην εικόνα.
• Σε αυτή την περίπτωση τοποθετήστε το
µετασχηµατιστή τάσης όσο πιο µακριά γίνεται
από τη συσκευή της τηλεόρασης, από το καλώδιο
κεραίας και την κεραία.
• Κατευθύνετε το µετασχηµατιστή τάσης, την
τηλεόραση, το καλώδιο κεραίας και την κεραία
µεταξύ τους έως ότου η λήψη βελτιωθεί.
• Όσο είναι δυνατό χρησιµοποιείτε υψηλής
ποιότητας, θωρακισµένο καλώδιο κεραίας.
Εγκαταστάσεις ήχου
• Μερικές εγκαταστάσεις ήχου/ βίντεο βγάζουν
ένα βουητό µέσω των ηχείων, όταν λειτουργούν
µέσω του µετασχηµατιστή τάσης. Αυτό έγκειται
στο ότι αυτές οι συσκευές δεν µπορούν να
φιλτράρουν το τροποποιηµένο ηµιτονοειδές κύµα
και συνεπώς δεν πρόκειται για ελάττωµα του
µετασχηµατιστή τάσης.
Γενική αντιµετώπιση σφαλµάτων
Ηλεκτρικά εργαλεία
• Όταν ένα ηλεκτρικό εργαλείο δεν µπορεί να
ενεργοποιηθεί ή το εργαλείο εκκινείται µόνο
για λίγο, ενεργοποιείτε και απενεργοποιείτε το
µετασχηµατιστή τάσης πολλές φορές όταν το
ηλεκτρικό εργαλείο είναι επίσης ενεργοποιηµένο.
- 58 -
Page 61

∆ιόρθωση βλαβών
Χαµηλή τάση εξόδου
Πιθανές αιτίες και διόρθωση:
• Ο µετασχηµατιστής τάσης έχει υπερφόρτωση.
Μειώστε το φορτίο έως ότου δεν θα υπερβαίνει
πλέον το δοθέν µέγιστο φορτίο στις τεχνικές
πληροφορίες.
• Η τάση εισόδου βρίσκεται κάτω από 11 V.
∆ιατηρείτε την τάση εισόδου του µετασχηµατιστή
τάσης πάνω από 11 V, ώστε να διατηρείτε την
απόδοση εξόδου συνεχή.
Ένα σήµα για χαµηλή τάση µπαταρίας
ακούγεται επανειληµµένα
Πιθανές αιτίες και διόρθωση:
• Η µπαταρία είναι ελαττωµατική. Αντικαταστήστε
τη µπαταρία.
• Ανεπαρκής παροχή τάσης ή ρεύµατος. Ελέγξτε
την κατάσταση της υποδοχής αυτοκινήτου και
το βύσµα αυτοκινήτου 12 V και εάν απαιτείται
καθαρίστε τα.
Καµία ισχύς εξόδου
Πιθανές αιτίες και διόρθωση:
• Ο µετασχηµατιστής τάσης δεν έχει ζεσταθεί
επαρκώς. Ενεργοποιήστε και απενεργοποιήστε το
µετασχηµατιστή τάσης έως ότου η συνδεδεµένη
συσκευή στο µετασχηµατιστή τάσης
τροφοδοτείται µε ρεύµα. Επαναλάβετε αυτή τη
διαδικασία για να µπορείτε να ενεργοποιήσετε τη
συσκευή.
• Η ανάφλεξη πρέπει να είναι ενεργοποιηµένη ώστε
η υποδοχή αυτοκινήτου να τροφοδοτείται µε
ρεύµα. Ενεργοποιήστε την ανάφλεξη ή θέστε τη
στη θέση I.
• Ο µετασχηµατιστής τάσης έχει υπερφόρτωση.
Μειώστε το φορτίο έως ότου δεν θα υπερβαίνει
πλέον το δοθέν µέγιστο φορτίο στις τεχνικές
πληροφορίες.
• Ο µετασχηµατιστής τάσης έχει υπερθερµανθεί.
Περιµένετε έως ότου η συσκευή κρυώσει.
Φροντίζετε για επαρκή απόσταση αερισµού.
Προσέχετε ώστε το συνδεδεµένο φορτίο να µην
υπερβαίνει συνεχώς το µέγιστο φορτίο, ώστε να
αποφύγετε µια νέα υπερθέρµανση.
• Η ασφάλεια συσκευής έχει καεί. Απευθυνθείτε
στο σέρβις για να επισκευάσετε τη συσκευή.
Βεβαιωθείτε ότι ο µετασχηµατιστής τάσης έχει
συνδεθεί µε τη σωστή πολικότητα στην παροχή
ρεύµατος.
• Η ασφάλεια καλωδίου έχει καεί. Αλλάξτε την
ασφάλεια καλωδίου όπως περιγράφηκε στο
Κεφάλαιο “Αλλαγή της ασφάλειας καλωδίου“.
Βεβαιωθείτε ότι ο µετασχηµατιστής τάσης έχει
συνδεθεί µε τη σωστή πολικότητα στην παροχή
ρεύµατος.
Καθαρισµός
Κίνδυνος ζωής από ηλεκτροπληξία:
• Ποτέ µη βυθίζετε τα εξαρτήµατα συσκευής
στο νερό ή σε άλλα υγρά!
• Μην αφήνετε υγρά να διεισδύουν στο
περίβληµα.
• Πριν από κάθε καθαρισµό τραβάτε το
µετασχηµατιστή τάσης από την υποδοχή
αυτοκινήτου/ αποµακρύνετε τους ακροδέκτες
σύνδεσης από την µπαταρία αυτοκινήτου.
Αποµακρύνετε επίσης και µια συνδεδεµένη
συσκευή στο µετασχηµατιστή τάσης.
Καθαρισµός της επικάλυψης:
Καθαρίζετε την επιφάνεια περιβλήµατος µε ένα
ελαφρώς νωπό πανί. Ποτέ µη χρησιµοποιείτε
βενζίνη, διαλυτικά µέσα ή καθαριστικά διότι αυτά
µπορούν να προσβάλουν την επιφάνεια της
συσκευής!
Στην περίπτωση που η εγκοπή αερισµού έχει σκόνες,
καθαρίζετε την µε ένα µαλακό πινέλο.
- 59 -
Page 62

Απόρριψη
Απόρριψη συσκευής
Σε καµία περίπτωση µην πετάξετε τη συσκευή
στα οικιακά απορρίµµατα.
Αποµακρύνετε τη συσκευή µέσω µιας εγκεκριµένης
επιχείρησης απόρριψης ή µέσω της κοινοτικής
επιχείρησης απόρριψης.
Αυτό το προϊόν υπόκειται στην Ευρωπαϊκή
Οδηγία 2002/96/E.Κ.
Να τηρείτε τους ισχύοντας κανονισµούς. Σε
περίπτωση αµφιβολιών ελάτε σε επαφή µε την
επιχείρηση απόρριψης.
Αποµάκρυνση της συσκευασίας
Αποµακρύνετε όλα τα υλικά συσκευασιών
φιλικά προς το περιβάλλον.
Εισαγωγέας
KOMPERNASS GMBH
Burgstrasse 21
D-44867 Bochum
www.kompernass.com
Εγγύηση & Σέρβις
Έχετε για αυτή τη συσκευή 3 χρόνια εγγύηση από
την ηµεροµηνία αγοράς. Η συσκευή κατασκευάστηκε
και ελέγχθηκε προσεκτικά πριν από την αποστολή.
Παρακαλούµε φυλάξτε την απόδειξη ταµείου ως
απόδειξη για την αγορά. Σε περίπτωση εγγύησης
ελάτε σε επικοινωνία µε το τµήµα του σέρβις
τηλεφωνικά. Μόνο έτσι µπορεί να εξασφαλιστεί µια
δωρεάν αποστολή του εµπορεύµατός σας.
Η απόδοση εγγύησης ισχύει µόνο για σφάλµατα
υλικού ή κατασκευής, όχι όµως για εξαρτήµατα
φθοράς ή για βλάβες σε εύθραυστα εξαρτήµατα,
π.χ. διακόπτες ή συσσωρευτές. Το προϊόν
προορίζεται µόνο για την ιδιωτική και όχι για την
επαγγελµατική χρήση.
Σε περίπτωση κακής µεταχείρισης και ακατάλληλης
χρήσης, σε χρήση βίας και σε παρεµβάσεις οι
οποίες δεν διεξήχθησαν από το εξουσιοδοτηµένο
µας τµήµα σέρβις, η εγγύηση παύει να ισχύει. Τα
νοµικά σας δικαιώµατα δεν περιορίζονται µέσω
αυτής της εγγύησης.
Kompernass Service Eλλάδα
Kalothanassi G. Amalia α 10-12 Thiatiron Str.
14231 N.Ionia Athens
Tel.: 210 2790865
Fax: 210 2796982
e-mail: support.gr@kompernass.com
- 60 -
Page 63

INHALTSVERZEICHNIS SEITE
Bestimmungsgemäßer Gebrauch 62
Sicherheitshinweise 62
Technische Daten 63
Bedienelemente 64
Inbetriebnahme 64
Hinweise zum Betrieb 64
Anschluss und Betrieb einer Last/eines Geräts 66
Hinweise zum Betrieb von Geräten 67
Signal bei niedriger Batteriespannung 67
Austauschen der Kabelsicherung 67
Allgemeine Fehlerbehandlung 68
Fehlerbehebung 69
Reinigung 69
Entsorgung 70
Importeur 70
Garantie & Service 70
Lesen Sie die Bedienungsanleitung vor der ersten Verwendung aufmerksam durch und heben Sie diese für
den späteren Gebrauch auf. Händigen Sie bei Weitergabe des Gerätes an Dritte auch die Anleitung aus.
- 61 -
Page 64

SPANNUNGSWANDLER
300 W KH 3900
Bestimmungsgemäßer
Gebrauch
Das Gerät ist für den Anschluss an eine 12 V Bordsteckdose oder eine Autobatterie und zur Ausgabe
von 220 - 240 V Wechselspannung für den Anschluss von Elektrogeräten mit einer Leistungsaufnahme bis 300 W bestimmt.
Das Gerät ist nicht zur Verwendung in gewerblichen
oder industriellen Bereichen vorgesehen.
Für Schäden, die aus nicht bestimmungsgemäßem
Gebrauch des Geräts resultieren, wird keine
Gewährleistung übernommen!
Für den Betrieb mit dem
Spannungswandler empfohlene Geräte*
Notebooks und Computer,
Radios, Funkgeräte, CD/MP3Player, Mobiltelefone
Portable Kühlboxen, Leuchten Mikrowellengeräte,
Elektrorasierer Haartrockner
Nicht für den Betrieb mit
dem Spannungswandler
empfohlene Geräte*
Verstärker, Bohrmaschinen,
Kompressoren
Kaffeemaschinen,
Handmixer, Bügeleisen
Sicherheitshinweise
• Dieses Gerät ist nicht dafür bestimmt, durch Personen (einschließlich Kinder) mit eingeschränkten physischen, sensorischen oder geistigen Fähigkeiten oder mangels Erfahrung und/oder
mangels Wissen benutzt zu werden, es sei denn,
sie werden durch eine für ihre Sicherheit zuständige Person beaufsichtigt oder erhielten von ihr
Anweisungen, wie das Gerät zu benutzen ist.
Kinder sollten beaufsichtigt werden, um sicherzustellen, dass sie nicht mit dem Gerät spielen.
• Um Gefahren zu vermeiden, entfernen Sie nach
jedem Gebrauch und vor jeder Reinigung den
Spannungswandler aus der Bordsteckdose bzw.
die Anschlussklemmen von der Autobatterie.
• Schließen Sie den Spannungswandler nur bei
ausgeschaltetem Motor an die Autobatterie an!
Es besteht Verletzungsgefahr durch rotierende
Teile!
• Prüfen Sie das Gerät und alle Teile auf sichtbare
Schäden. Nur in einwandfreiem Zustand kann
das Sicherheitskonzept des Geräts funktionieren.
• Der Spannungswandler muss immer leicht zugänglich sein, so dass im Notfall das Gerät
schnell vom Stromnetz getrennt werden kann.
Generell
Niederspannungsgeräte
Generell motorbetriebene
Geräte, Heizgeräte,
Elektrowerkzeuge
* Beachten Sie die Angaben über Stromver-
brauch und Leistungsaufnahme auf dem Typenschild des zu betreibenden Geräts.
Achten Sie vor dem Betrieb darauf, dass die
maximale Stromaufnahme nicht höher als
1,3 A und die maximale Dauerleistung nicht
mehr als 300 W beträgt.
Achtung!
Geräte mit sensibler Elektronik sollten nicht mit
dem Spannungswandler betrieben werden, da
für diese Geräte die Ausgangsspannung nicht
ausreichend konstant ist. Diese Geräte könnten
beschädigt werden.
Gefahr durch elektrischen Schlag!
• Schließen Sie den Spannungswandler nur an
eine 12 V Autobatterie/Bordspannung an. Beim
Anschluss an eine 24 V Spannung kann das
Gerät beschädigt werden.
• Achten Sie beim Anschluss des Spannungswandlers über den 12 V Kfz-Stecker darauf, dass die
Polarität des Kfz-Steckers mit der Polarität der
Bordsteckdose übereinstimmt. Die Bordsteckdose
muss innen positiv gepolt sein, d. h. der Pluspol
einer Fahrzeugbatterie darf nicht an das Chassis
des Fahrzeugs angeschlossen sein.
• Prüfen Sie vor dem Anschluss des Wandlers, ob
die Bordsteckdose ausreichend abgesichert ist.
Diese Absicherung darf auf keinen Fall
umgangen oder verändert werden.
- 62 -
Page 65

• Verwenden Sie nur die mitgelieferten
Anschlusskabel!
• Lassen Sie beschädigte Stecker, Anschlussklemmen oder Kabel sofort von autorisiertem Fachpersonal oder dem Kundenservice austauschen,
um Gefährdungen zu vermeiden.
• Lassen Sie Anschlussleitungen bzw. Geräte, die
nicht einwandfrei funktionieren oder beschädigt
wurden, sofort vom Kundendienst reparieren
oder austauschen.
• Sie dürfen das Gerätegehäuse nicht öffnen oder
reparieren. In diesem Falle ist die Sicherheit nicht
gegeben und die Gewährleistung erlischt.
Tauchen Sie das Gerät niemals in Wasser ein.
Wischen Sie es nur mit einem leicht feuchten
Tuch ab.
Hinweis zur Netztrennung
• Der Ein-/Ausschalter dieses Geräts trennt das
Gerät nicht vollständig vom Bordnetz bzw. der
Batterie. Das Gerät nimmt bei angeschlossenem
Kfz-Stecker Strom auf. Um das Gerät vollständig
vom Bordnetz zu trennen, muss der 12 V KfzStecker aus der Bordsteckdose gezogen/die
Anschlussklemmen von der Autobatterie entfernt
werden.
Verletzungsgefahr!
• Falls das Gerät heruntergefallen oder beschädigt ist, dürfen Sie es nicht mehr in Betrieb nehmen. Lassen Sie das Gerät von qualifiziertem
Fachpersonal überprüfen und gegebenenfalls
reparieren.
Brandgefahr!
• Benutzen Sie das Gerät nicht in der Nähe von
heißen Oberflächen.
• Stellen Sie das Gerät nicht an Orten auf, die direkter Sonnenstrahlung ausgesetzt sind. Andernfalls kann es überhitzen und irreparabel beschädigt werden. Betreiben Sie das Gerät nicht in
einem in der Sonne stehenden Fahrzeug.
• Lassen Sie das Gerät während des Betriebs
niemals unbeaufsichtigt.
• Decken Sie die Lüftungsschlitze des Lüfters nicht
ab, wenn das Gerät eingeschaltet ist.
• Stellen Sie keine offenen Brandquellen, wie
z. B. Kerzen auf das Gerät.
• Die beiden Anschlusskabel können sich bei
hoher Belastung erwärmen.
• Aufgrund der hohen Übergangswiderstände
kann es bei der Verwendung des Kabels mit
12 V Kfz-Stecker zur Erwärmung der Steckverbindung kommen. Verwenden Sie daher bei
Betrieb mit hohen Lasten das Anschlusskabel
mit den Anschlussklemmen.
Technische Daten
DC Eingang
Spannung: 12 V
maximale Spannung: 15,6 V
maximale Stromaufnahme: 40 A
Unterlastalarm: bei 10,6 ± 0,3 V
Unterlastabschaltung: bei 10 ± 0,3 V
Überlastabschaltung: bei 16 ± 0,5 V
AC Ausgang
Spannung: 220-240 V ~50 Hz
Ausgangsstrom: 1,3 A
Dauerleistung: max. 300 W
Spitzenleistung: max. 400 W/0,1 s
Wirkungsgrad ( ): ca. 90 %
Ausgangswellenform: modifizierter Sinus
Überlastschutz: >= 320 W
Temperatur Abschaltung: bei 65 ± 3 °C
Sicherungen
Spannungswandler: 30 A Kfz-Flachsicherung
Kabelsicherung: 30 A Kfz-Flachsicherung
- 63 -
Page 66

Fehlerstromschutzschaltung
Abschaltung bei Fehlerströmen: >3 mA
Allgemeine Daten
Abmessungen (ohne Kfz-Stecker)
(L x B x H): 155 x 128 x 58 mm
Gewicht (ohne Kabel): ca. 865 g
Betriebstemperatur: 0...62 °C
Betriebsfeuchtigkeit: 0 - 80 %
(rel. Luftfeuchte keine Kondensation)
Technische Änderungen vorbehalten!
Bedienelemente
A
Spannungswandler
Lüfter (auf der Rückseite)
q
Betriebs-LED/Überlastanzeige
w
Ein-/Ausschalter
e
Wechselstromsteckdose
r
12 V Anschlüsse (Rot+/Schwarz-)
t
B
Kabel mit Anschlussklemmen
C
Kabel mit 12 V Kfz-Stecker
D
30 A Kfz-Flachsicherung
Inbetriebnahme
Auspacken
1. Entnehmen Sie das Gerät aus der Verpackung.
2. Entfernen Sie alle Folien.
Achtung:
Lassen Sie kleine Kinder nicht mit Folien spielen.
Es besteht Erstickungsgefahr!
Lieferumfang prüfen
Bitte überprüfen Sie vor der Inbetriebnahme den
Lieferumfang auf Vollständigkeit und eventuelle
Beschädigungen.
- Spannungswandler
- 1 Kabel mit Anschlussklemmen rot/schwarz
- 1 Kabel mit 12 V Kfz-Stecker
- 1 Kfz-Flachsicherung 30 A
- Diese Bedienungsanleitung
Hinweise zum Betrieb
Für den kontinuierlichen Betrieb von Geräten über
den Spannungswandler, muss an der Bordsteckdose eine Spannung zwischen 10,3 - 15,6 V
anliegen. Die Spannungsquelle der Bordsteckdose
kann etwa eine Fahrzeugbatterie oder eine geregelte Gleichstromversorgung wie etwa eine Akkustation sein. Prüfen Sie vor dem Anschluss des
Spannungswandlers, ob die Spannungsquelle
ausreichend Strom für den Betrieb liefert. Der für
den Betrieb erforderliche Strom kann wie folgt
berechnet werden:
- 64 -
Page 67

Beispiel
Die Spannungsquelle sollte für eine Dauerlast von
300 W also mindestens 27,7 A liefern.
Anschluss an eine Spannungsquelle
Achtung!
Vergewissern Sie sich vor dem Anschluss des
Spannungswandlers an eine Spannungsquelle,
dass der Ein-/Ausschalter des Geräts in der Position 0 steht.
Achtung!
Schließen Sie den Spannungswandler niemals
an ein 24 V Bordnetz an. Das Gerät wird ansonsten beschädigt. Das Gerät darf nur an
eine Spannungsquelle mit einer Nennspannung von 12 V angeschlossen werden.
Aufstellen
• Der Spannungswandler sollte auf einer ebenen
und flachen Oberfläche positioniert werden.
Stellen Sie sicher, dass um den Spannungswandler 1 cm freier Raum für die Luftzirkulation
verbleibt.
• Hinter den Lüftungsschlitzen des Lüfters muss ein
Abstand von 50 cm eingehalten werden.
Betrieb in einem Fahrzeug
Wenn Sie den Spannungswandler in einem Fahrzeug betreiben, stellen Sie sicher, dass die Installation Sie nicht bei den Fahraufgaben behindert.
Verlegen Sie daher Kabel so, dass Sie nicht mit beweglichen Teilen des Fahrzeuginnenraums in Berührung kommen oder die Sicht behindern können.
Hinweis:
Der Spannungswandler kann auch bei ausgeschaltetem Motor betrieben werden. Beachten
Sie jedoch, dass der Spannungswandler eventuell
während eines Startvorgangs nicht funktioniert.
Sie können den Spannungswandler mit dem 12 V
Stecker an eine 12 V Bordsteckdose anschließen
oder mit den Anschlussklemmen direkt an eine
Autobatterie anklemmen.
Für beide Anschlussvarianten müssen die Anschlusskabel an die 12 V Schraubanschlüsse des
Spannungsreglers angeschlossen werden.
Abb.: Anschluss Kabelschuh
Anschluss an eine 12 V Kfz-Steckdose
• Lösen Sie die rote Schraube am Spannungswandler soweit, dass Sie den roten Kabelschuh
des 12 V Kfz-Kabels mit der Öffnung unter
Schraube und Unterlegscheibe legen können.
(Siehe Abb.: Anschluss Kabelschuh)
• Drehen Sie die rote Schraube so fest, dass sich
der Kabelschuh nicht mehr lösen kann.
• Lösen Sie die schwarze Schraube am Spannungswandler soweit, dass Sie den schwarzen
Kabelschuh des 12 V Kfz-Kabels mit der Öffnung unter Schraube und Unterlegscheibe legen
können.
• Drehen Sie die schwarze Schraube so fest, dass
sich der Kabelschuh nicht mehr lösen kann.
- 65 -
Page 68

• Stecken Sie den 12 V Kfz-Stecker in eine KfzSteckdose.
Hinweis:
Aufgrund der hohen Übergangswiderstände
kann es bei der Verwendung des Kabels mit
12 V Kfz-Stecker zur Erwärmung der Steckverbindung kommen. Verwenden Sie daher bei
Betrieb mit hohen Lasten das Anschlusskabel
mit den Anschlussklemmen.
Anschluss an eine Autobatterie
• Lösen Sie die rote Schraube am Spannungswandler soweit, dass Sie den roten Kabelschuh
des roten Kabels mit Anschlussklemme mit der
Öffnung unter Schraube und Unterlegscheibe
legen können.
• Drehen Sie die rote Schraube so fest, dass sich
der Kabelschuh nicht mehr lösen kann.
• Lösen Sie die schwarze Schraube am Spannungswandler soweit, dass Sie den schwarzen
Kabelschuh des schwarzen Kabels mit Anschlussklemme mit der Öffnung unter Schraube und
Unterlegscheibe legen können.
• Drehen Sie die schwarze Schraube so fest, dass
sich der Kabelschuh nicht mehr lösen kann.
• Schließen Sie zunächst die rote Klemme an den
Pluspol der Autobatterie an und dann die
schwarze Klemme an den Minuspol der
Autobatterie.
Achtung!
Verwenden Sie den Spannungswandler nicht in
Fahrzeugen, deren Pluspol mit der Fahrzeugkarosserie bzw. dem Chassis verbunden ist.
Die Bordsteckdose muss innen positiv gepolt
sein. Verwenden Sie den Spannungswandler
nicht an Kfz-Steckdosen, die positiv geerdet
sind. Das Gerät wird ansonsten beschädigt.
Anschluss und Betrieb einer
Last/eines Geräts
Achtung!
Vergewissern Sie sich vor dem Anschluss einer
Last/eines Geräts an den Spannungswandler,
dass der Ein-/Ausschalter des Geräts in der Position 0 steht.
Vergewissern Sie sich, dass die Leistung der
Last/des Geräts nicht die maximale Dauerleistung des Spannungswandlers übersteigt.
• Schließen Sie den Stecker der anzuschließenden
Last/des zu betreibenden Geräts an die 220 240 V-Steckdose des Spannungswandlers an.
Achtung!
Schalten Sie jetzt noch nicht die Last/das zu
betreibende Gerät ein!
• Schalten Sie den Spannungswandler ein, indem
Sie den Ein-/Ausschalter in die Position I stellen.
Die Betriebs-LED/Überlastanzeige leuchtet grün,
wenn der Spannungswandler einwandfrei
funktioniert.
• Schalten Sie jetzt die Last/das zu betreibende
Gerät ein. Beim Einschalten ist ein kurzer
Signalton zu hören.
Hinweis:
Wenn ein Signalton zu hören ist und die Betriebs-LED/Überlastanzeige rot leuchtet, ist die
Eingangsspannung zu niedrig, oder die Leistung der an den Spannungswandler angeschlossenen Last/des Geräts ist zu hoch.
- 66 -
Page 69

Achtung!
Der Spannungswandler verfügt über eine Fehlerstromschutzabschaltung, die bei Fehlerströmern >3mA an den Schutzkontakten der 220 240 V-Steckdose den Spannungswandler abschaltet. Sollte dies passieren, entfernen Sie sofort das an den Spannungswandler angeschlossene Gerät und schließen Sie es auf keinen Fall
mehr an eine Stromversorgung an! Das Gerät
ist defekt und muss von einem Fachmann untersucht und ggf. repariert werden, bevor es wieder in Betrieb genommen werden kann!
Hinweise zum Betrieb von
Geräten
Allgemeine Hinweise
Üblicherweise finden Sie auf dem Typenschild von
Geräten eine Angabe über den Stromverbrauch in
Ampere (A) oder die Leistungsaufnahme in
Watt (W).
Achten Sie vor dem Betrieb darauf, dass die maximale Stromaufnahme nicht höher als 1,3 A und die
maximale Dauerleistung nicht mehr als 300 W
beträgt.
• Lasten mit einem hohen Innenwiderstand können
sehr gut über den Spannungswandler betrieben
werden, Lasten mit einem niedrigen Innenwiderstand hingegen wie z. B. Heiz- und Kochgeräte
besitzen eine zu hohe Leistungsaufnahme in Watt.
• Induktive Lasten, wie z. B. Fernseh- oder Stereogeräte (Geräte mit einer Spule oder einem Transformator) erfordern oft einen vielfach höheren
Einschaltstrom als Widerstandslasten mit der selben angegebenen Leistungsaufnahme in Watt.
Fernsehgeräte erfordern beim Einschalten ein
Vielfaches der auf dem Typenschild angegebenen Leistungaufnahme.
Hierdurch kann es erforderlich sein, den Spannungswandler mehrmals ein- und auszuschalten,
um ein Fernsehgerät einschalten zu können.
• Die meisten hitzeerzeugenden Geräte, wie etwa
Haartrockner, Bügeleisen oder Heizlüfter können
nicht über den Spannungswandler betrieben
werden, da die Leistungsaufnahme dieser
Geräte über der Ausgangsleistung des
Spannungswandlers liegt.
Signal bei niedriger
Batteriespannung
• Bei niedriger Batteriespannung (unter 10,3 V)
ertönt ein durchgängiger Signalton, um anzuzeigen, dass die Batterie geladen werden sollte.
Die Betriebs-LED/Überlastanzeige leuchtet
weiterhin grün.
• Wenn die Batteriespannung unter 10 V sinkt,
schaltet sich der Spannungswandler ab und die
Betriebs-LED/Überlastanzeige leuchtet rot.
Austauschen der
Kabelsicherung
Lebensgefahr durch elektrischen
Schlag:
Trennen Sie vor dem Wechsel der Sicherung
den Spannungswandler von der Stromversorgung.
Entfernen Sie auch ein an den Spannungswandler angeschlossenes Gerät.
Das rote Kabel mit Anschlussklemme verfügt über
eine Sicherung. Wenn eine zu hohe Last an den
Spannungswandler angeschlossen wird, löst diese
Sicherung aus.
Ersetzen Sie die Sicherung durch einen gleichwertigen, in den technischen Daten angegebenen Typ
mit gleicher Abschaltcharakteristisk.
Stellen Sie vor einem erneuten Einschalten des
Spannungswandlers die Ursache für das Auslösen
der Sicherung ab.
- 67 -
Page 70

Um die Sicherung auszuwechseln, gehen Sie wie
folgt vor:
• Öffnen Sie die Abdeckung des Sicherungshalters und ziehen Sie die Kfz-Flachsicherung aus
der Halterung.
Abb.: Austausch der Kabelsicherung
• Setzen Sie eine neue 30 A Kfz-Flachsicherung
(mitgeliefert) in die beiden Anschlüsse und
setzen Sie die Abdeckung wieder auf den
Sicherungshalter.
Fernsehgeräte
• Der Spannungswandler ist abgeschirmt und gibt
eine gefilterte Sinuswelle aus.
Beim Empfang von z. B. sehr schwachen Fernsehsendern kann es dennoch zu Interferenzen
bzw. Bildstörungen kommen.
• Positionieren Sie den Spannungswandler in diesem Fall soweit wie möglich entfernt von Fernseher, Antennenkabel und Antenne.
• Richten Sie den Spannungswandler, den Fernseher, das Antennenkabel und die Antenne zueinander aus, bis der Empfang sich bessert.
• Verwenden Sie nach Möglichkeit ein hochwertiges, abgeschirmtes Antennenkabel.
Audioanlagen
• Einige Audio/Videoanlagen geben einen
Brummton über die Lautsprecher aus, wenn Sie
über den Spannungswandler betrieben werden.
Dies liegt daran, dass diese Geräte die modifizierte Sinuswelle des Spannungswandlers nicht
filtern können und ist kein Defekt des
Spannungswandlers.
Allgemeine Fehlerbehandlung
Elektrowerkzeuge
• Wenn sich ein Elektrowerkzeug nicht einschalten
lässt oder das Werkzeug nur für kurze Zeit startet, schalten Sie den Spannungswandler bei eingeschaltetetem Elektrowerkzeug mehrmals ein
und aus.
- 68 -
Page 71

Fehlerbehebung
Niedrige Ausgangsspannung
Mögliche Ursache und Abhilfe:
• Der Spannungswandler ist überlastet. Verringern
Sie die Last, bis sie die in den technischen Daten
angegebene maximale Belastung nicht mehr
überschreitet.
• Die Eingangsspannung liegt unter 10,3 V. Halten Sie die Eingangsspannung des Spannungswandlers über 10,3 V, um die Ausgangsleistung
konstant zu halten.
Signal für niedrige Batteriespannung
ertönt immer wieder
Mögliche Ursache und Abhilfe:
• Die Batterie ist defekt. Ersetzen Sie die Batterie.
• Unzureichende Spannungs- oder Stromversorgung. Überprüfen Sie den Zustand von Bordstekkdose und 12 V Kfz-Stecker und reinigen Sie
diese gegebenenfalls.
Keine Ausgangsleistung
Mögliche Ursache und Abhilfe:
• Der Spannungswandler ist nicht vollständig aufgewärmt. Schalten Sie den Spannungswandler
ein und wieder aus, bis das an den Spannungswandler angeschlossene Gerät mit Strom versorgt wird. Wiederholen Sie diesen Vorgang,
um das Gerät einschalten zu können.
• Die Zündung muss eingeschaltet sein, damit die
Bordsteckdose mit Strom versorgt wird. Schalten
Sie die Zündung ein bzw. in die Position I.
• Der Spannungswandler ist überlastet. Verringern
Sie die Last, bis sie die in den technischen Daten
angegebene maximale Belastung nicht mehr
überschreitet.
• Der Spannungswandler ist überhitzt. Warten Sie,
bis sich das Gerät abgekühlt hat. Sorgen Sie für
ausreichenden Belüftungsabstand. Achten Sie
darauf, dass die angeschlossene Last nicht dauerhaft die maximale Belastung überschreitet,
um ein erneutes Überhitzen zu vermeiden.
• Die Gerätesicherung ist durchgebrannt. Wenden
Sie sich an den Service, um das Gerät wieder in
Stand setzen zu lassen. Vergewissern Sie sich,
dass der Spannungswandler mit der richtigen Polarität an die Stromversorgung angeschlossen ist.
• Die Kabelsicherung ist durchgebrannt. Tauschen
Sie die Kabelsicherung aus, wie im Kapitel „Austauschen der Kabelsicherung“ beschrieben.
Vergewissern Sie sich, dass der Spannungswandler mit der richtigen Polarität an die
Stromversorgung angeschlossen ist.
Reinigung
Lebensgefahr durch elektrischen
Schlag:
• Tauchen Sie die Geräteteile niemals in Wasser oder andere Flüssigkeiten!
• Lassen Sie keine Flüssigkeiten in das Gehäuse dringen.
• Ziehen Sie vor jeder Reinigung den Spannungswandler aus der Kfz-Steckdose/ entfernen Sie die Anschlussklemmen von der Autobatterie. Entfernen Sie auch ein an den
Spannungswandler angeschlossenes Gerät.
Reinigen des Gehäuses:
Reinigen Sie die Gehäuseoberfläche mit einem
leicht angefeuchteten Tuch. Verwenden Sie niemals
Benzin, Lösungsmittel oder Reiniger, da diese diese
die Oberfläche des Geräts angreifen können!
Falls die Lüftungsschlitze verstaubt sein sollten,
reinigen Sie diese mit einem weichen Pinsel.
- 69 -
Page 72

Entsorgung
Gerät entsorgen
Werfen Sie das Gerät keinesfalls in den
normalen Hausmüll.
Entsorgen Sie das Gerät über einen zugelassenen Entsorgungsbetrieb oder über Ihre
kommunale Entsorgungseinrichtung.
Dieses Produkt unterliegt der europäischen
Richtlinie 2002/96/EG.
Beachten Sie die aktuell geltenden
Vorschriften. Setzen Sie sich im Zweifelsfall
mit Ihrer Entsorgungseinrichtung in
Verbindung.
Verpackung entsorgen
Führen Sie alle Verpackungsmaterialien einer umweltgerechten Entsorgung zu.
Importeur
Garantie & Service
Sie erhalten auf dieses Gerät 3 Jahre Garantie ab
Kaufdatum. Das Gerät wurde sorgfältig produziert
und vor Anlieferung gewissenhaft geprüft. Bitte bewahren Sie den Kassenbon als Nachweis für den
Kauf auf. Bitte setzen Sie sich im Garantiefall mit Ihrer Servicestelle telefonisch in Verbindung. Nur so
kann eine kostenlose Einsendung Ihrer Ware
gewährleistet werden.
Die Garantieleistung gilt nur für Material- oder Fabrikationsfehler, nicht aber für Verschleißteile oder
für Beschädigungen an zerbrechlichen Teilen, z. B.
Schalter oder Akkus. Das Produkt ist lediglich für
den privaten und nicht für den gewerblichen
Gebrauch bestimmt.
Bei missbräuchlicher und unsachgemäßer Behandlung, Gewaltanwendung und bei Eingriffen, die
nicht von unserer autorisierten Service-Niederlassung vorgenommen wurden, erlischt die Garantie.
Ihre gesetzlichen Rechte werden durch diese
Garantie nicht eingeschränkt.
KOMPERNASS GMBH
BURGSTRASSE 21
D-44867 BOCHUM
www.kompernass.com
Schraven
Service- und Dienstleistungs GmbH
Gewerbering 14
D-47623 Kevelaer
Tel.: +49 (0) 180 5 008107
(14 Ct/Min. aus dem dt. Festnetz, ggf. abweichende
Preise aus dem Mobilfunknetz, Stand: 12/2007)
Fax: +49 (0) 2832 3532
e-mail: support.de@kompernass.com
Kompernaß Service Österreich
Rittenschober KG
Gmundner Strasse 10
A-4816 Gschwandt
Tel.: +43 (0) 7612 6260516
Fax: +43 (0) 7612 626056
e-mail: support.at@kompernass.com
- 70 -
 Loading...