

Page 1
Triton Perspective Map
-- SeaClass User Guide --
By:
Tony M. Ramirez
September 2014
Page 2

Triton Imaging Inc.
Engineering Office
2121 41st Avenue, Suite 211
Capitola, CA 95010
USA
831-722-7373
831-475-8446
sales@tritonimaginginc.com
support@tritonimaginginc.com
© 2014 TRITON
This user guide is provided as a means to become familiar with TRITON’s software through an explanation of the
options available for classifying imagery. The user interface presented in this guide is subject to change to
accommodate software upgrades and revisions. While every precaution has been taken to eliminate errors in this
guide, TRITON assumes no responsibility for errors in this document.
Users of this document are required to have a valid license for Perspective and SeaClass in order to activate the
software. TRITON hereby grants licensees of TRITON’s software the right to reproduce this document for
internal use only.
Page ii
Page 3

Table of Contents
1.0 SeaClass Module ................................................................................. 1
1.1 Supported Formats ............................................................................................................................................. 1
1.2 Classification Process .......................................................................................................................................... 1
1.3 Available Options ................................................................................................................................................ 1
2.0 SeaClass File Tree Options ..................................................................... 2
2.1 Tree Structure ..................................................................................................................................................... 2
2.2 Manual Training .................................................................................................................................................. 2
2.3 Neural Nets ......................................................................................................................................................... 3
2.4 Classification ....................................................................................................................................................... 4
2.0 SeaClass Process ................................................................................ 5
2.1 Prepare Data ....................................................................................................................................................... 5
2.1.1 Bottom Samples ........................................................................................................................................... 5
2.1.2 Load/Create Imagery ................................................................................................................................... 5
2.2 Create Training Set.............................................................................................................................................. 6
3.2 Neural Net Training ........................................................................................................................................... 11
3.3 Classify Bottom Types ....................................................................................................................................... 13
4.0 Edit Training Set ............................................................................... 16
5.0 Quick Classification ............................................................................ 19
6.0 SeaClass Exports ............................................................................... 20
Page iii
Page 4

1.0 SeaClass Module
SeaClass is an add-on to MosaicOne which allows users to classify sediment types based
on a neural net training set created from bottom sample information and select points or
other ground truth methods.
1.1 Supported Formats
.TMAP_MOZ (Perspective Sidescan mosaic)
.DDS_VIF (Triton Map Visual Information File)
.TIF (GeoTIFF)
The classification procedure operates on the above file formats, and works the same for
any of these file types.
1.2 Classification Process
Create Training Set: Using known bottom types at discreet locations, create the
training set.
Neural Net Training: This process uses the training set created in the previous step
to train the neural net.
Classify: The neural net is used to determine the bottom type throughout the image
or mosaic layer.
1.3 Available Options
Edit Training Set: This function allows users to edit an existing training set by adding
data points to existing classes or to add a new class.
Quick Classify: Allows users to get a preview of the classification results without
having to create the classification grid.
Exporting: Results from the classification process can be exported to a vector file or
to a GeoTiff.
Page 1
Page 5
2.0 SeaClass File Tree Options
2.1 Tree Structure
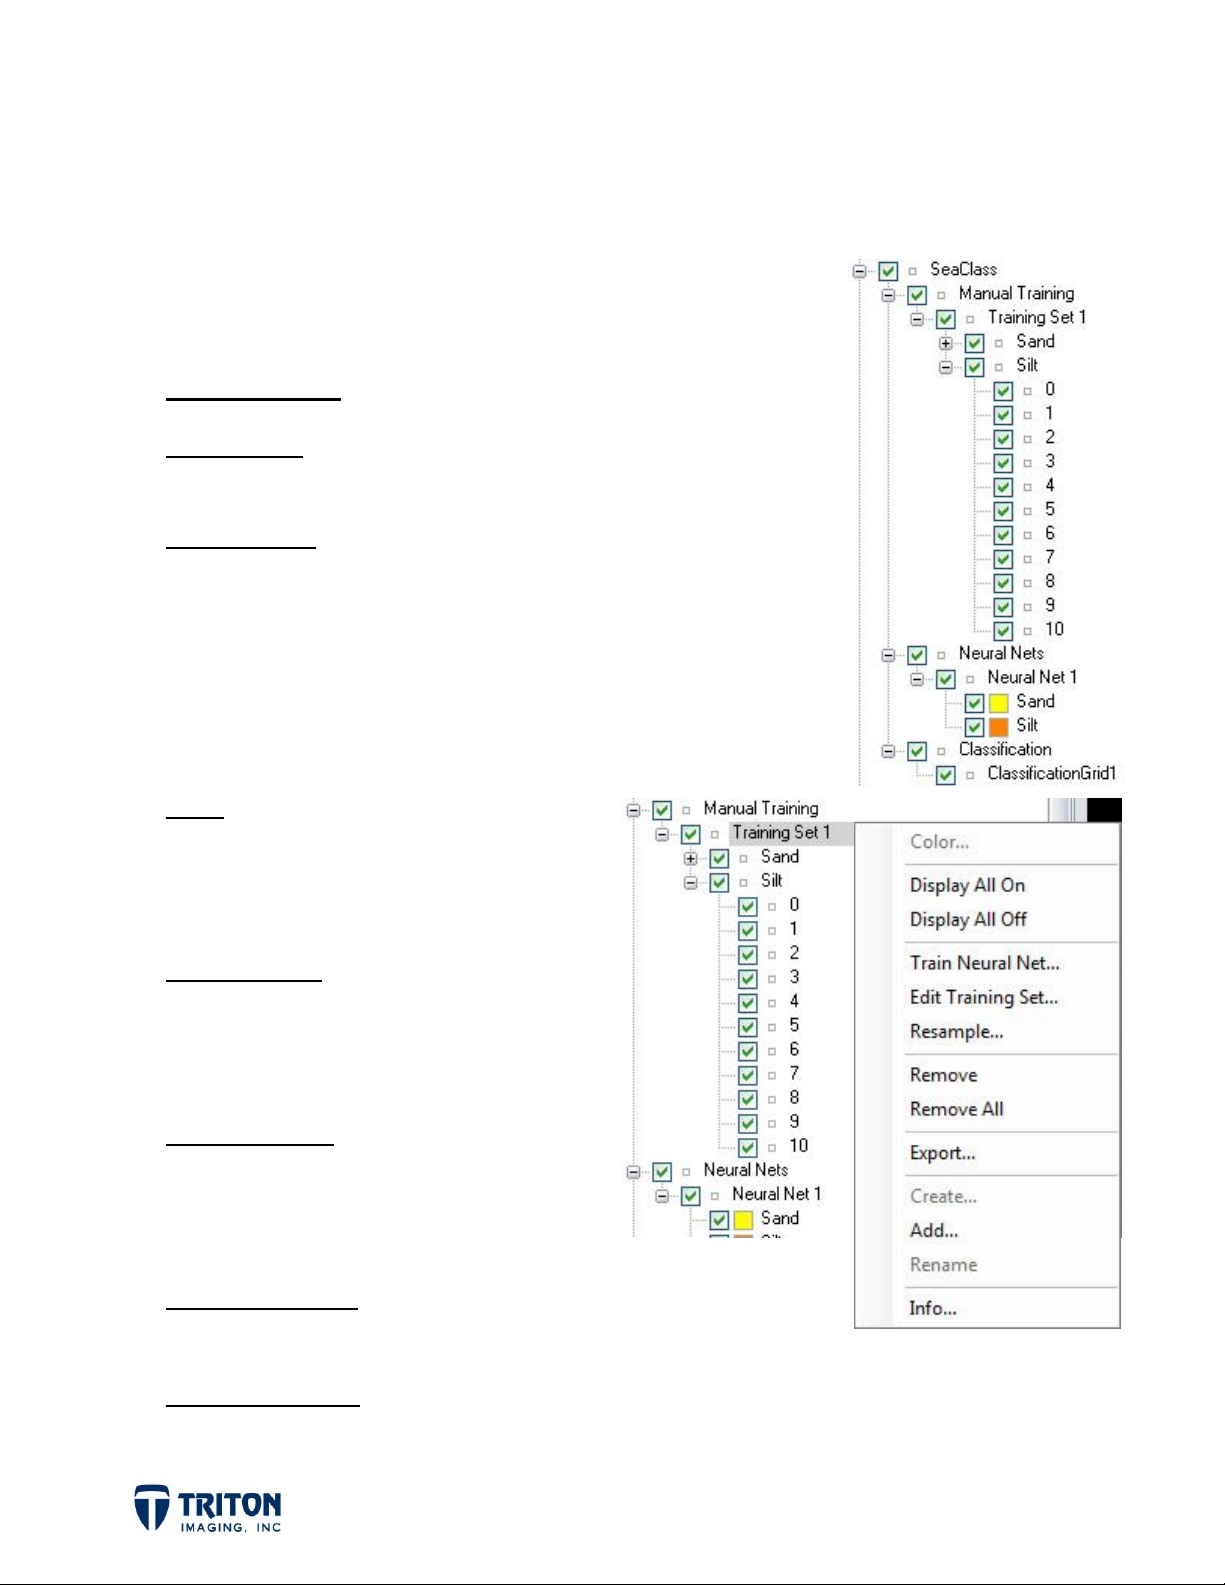
The SeaClass layer contains three sub-layers as shown in the
image below:
Manual Training - where training data points are stored
Neural Nets - for displaying the neural nets generated
from the training data
Classification - includes the results of the classification
process
2.2 Manual Training
Right-clicking on the Manual Training layer or any of its sublayers will give the following options:
Color: Available at the class file tree
level. Opens color dialog for
changing the color of the sample
point icons in the map view.
Display All On: Makes all samples in
the selected training set or the
selected sample type visible in the
Perspective map view.
Display All Off: Makes all samples in
the selected training set or the
selected sample type not visible in
the Perspective map view.
Train Neural Net: Initiates the second step in the
classification process using the training set created.
Edit Training Set: Allows user to make changes to training sets by adding or deleting
data points in a class (bottom type) or to add another class with new data points.
Page 2
Page 6

Resample: If a new sample size was set when editing the training set, selecting this will
resample the training set at the new size.
Remove: Removes the selected layer from the project. This is available at the training
set layer and the class layer nodes.
Remove All: Removes all sub-layers from the current tree node.
Export: Allows users to save the SeaClass training set created.
Create: Launches the
Create Training Set
wizard.
Add: Adds an existing training set to the project and Map View.
Rename: Allows users to rename an existing training set that is in the file tree.
Info: Allows the user to view XML info for the selected file.
2.3 Neural Nets
Right-clicking on the Neural Nets layer or any of its sub-layers will give the following
options:
Move to Top: Moves the selected layer to
the first position within the “Neural
Nets” heading.
Move Up: Moves the selected layer above
the previous file within the “Neural
Nets” heading.
Move Down: Moves the selected layer
below the succeeding file with the “Neural Nets” heading.
Add: Adds an existing neural net to the project and Map View.
Remove: Removes the selected layer from the project.
Remove All: Removes all sub-layers from the current tree node.
Rename: Allows users to rename an existing neural net that is in the file tree.
Edit Color: Opens color dialog for changing the color of the neural net class.
Page 3
Page 7
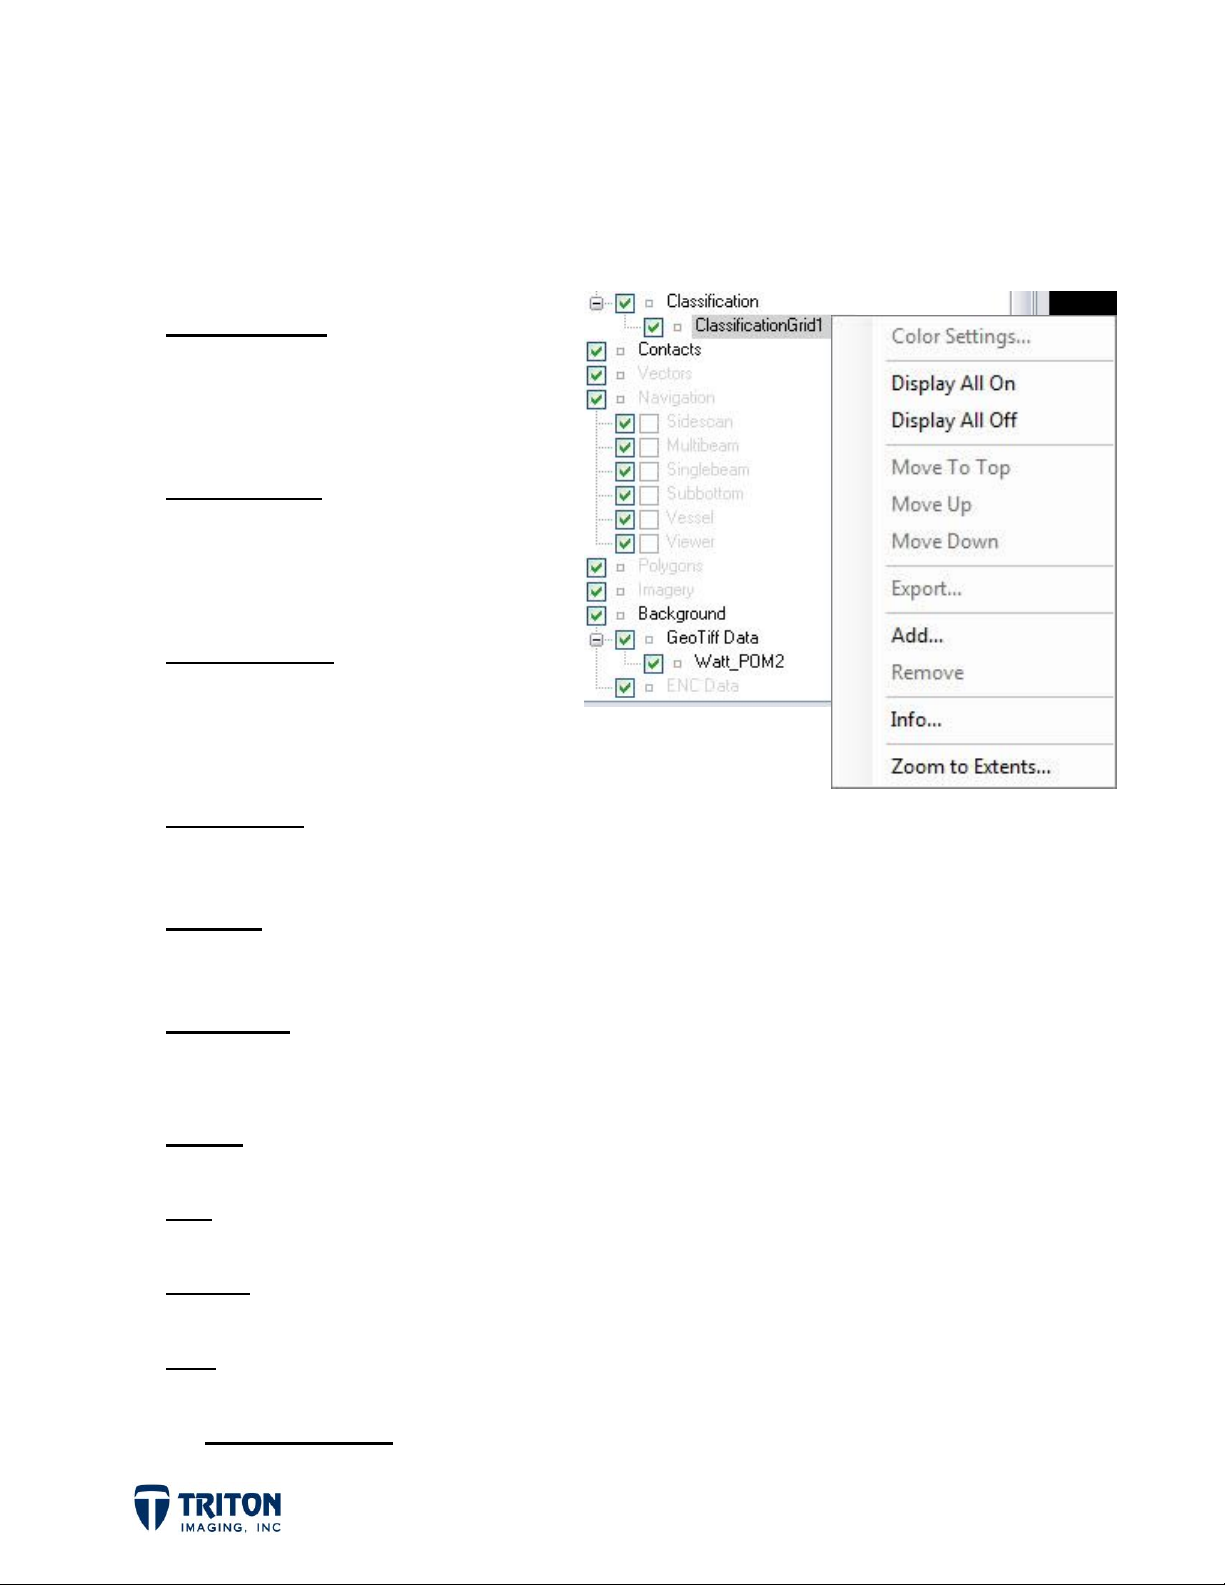
2.4 Classification
Right-clicking on the Classification layer or any of its sub-layers will give the following
options:
Color Settings: Opens following
window for changing background
color, opacity, and line drawing
settings.
Display All On: Makes all samples
in the selected training set or
the selected sample type visible
in the Perspective map view.
Display All Off: Makes all samples
in the selected training set or
the selected sample type not
visible in the Perspective map view.
Move to Top: Moves the selected layer to the first position within the “Classification”
heading.
Move Up: Moves the selected layer above the previous file within the “Classification”
heading.
Move Down: Moves the selected layer below the succeeding file with the
“Classification” heading.
Export: This will export the classification results to an AutoCAD DXF file.
Add: Adds an existing classification grid to the project and Map View.
Remove: Removes the selected layer from the project.
Info: Allows the user to view XML info for the selected file.
Zoom to Extents: Quick zoom option to zoom to full extent of selected layer.
Page 4
Page 8
2.0 SeaClass Process
2.1 Prepare Data
2.1.1 Bottom Samples
One requirement for the classification process using SeaClass is
having bottom information to use for the training set. This
information can come from diver observations, video transects, or
classical sediment sampling programs.
Before beginning the classification process, it is very useful to load
the sample information into Perspective as
sample data in CSV files using Microsoft Excel or a text editor using
the required data format for Features outlined in:
Perspective_PointFeatures_Guide.pdf
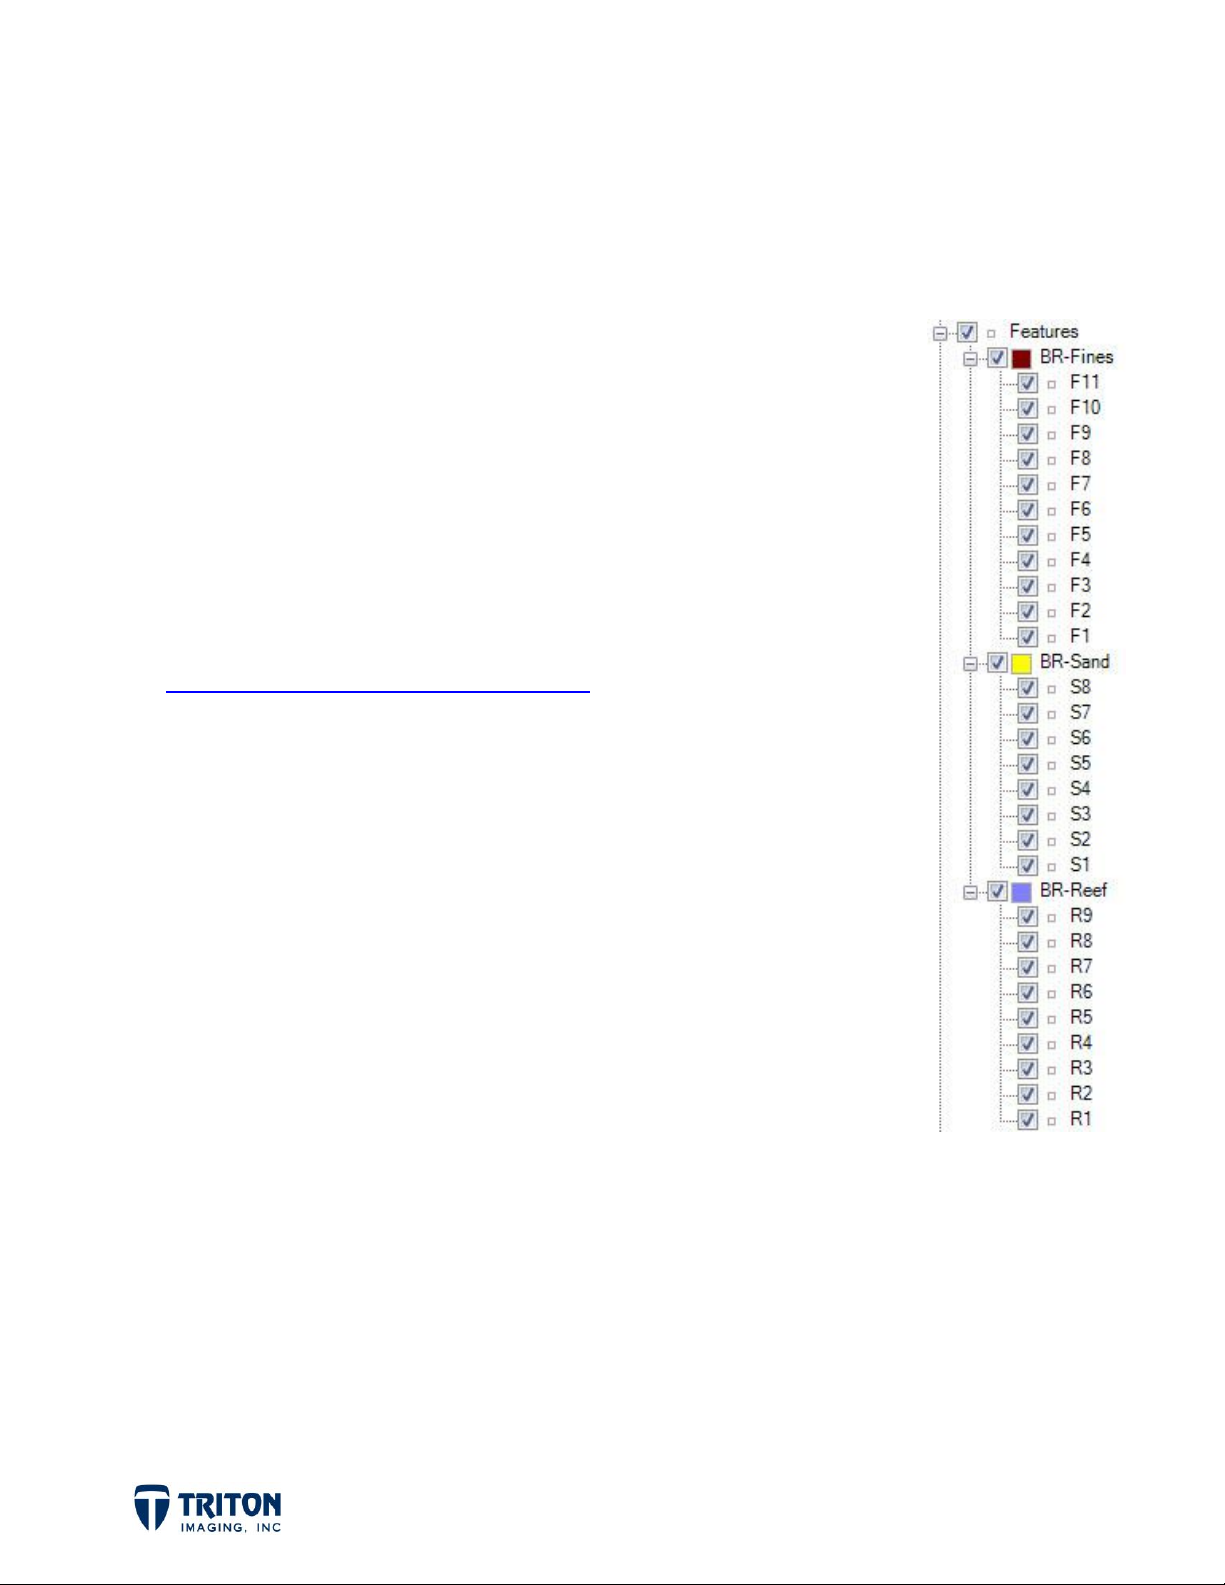
available from our downloads webpage. Make one Feature CSV file
for each bottom type and load into unique File Tree groups. In the
example shown to the right, there are three
Sand, and Reef (BR stands for Barrett Reef), with several samples
loaded into each group from the CSV files containing the sample
information.
2.1.2 Load/Create Imagery
The other requirement for the classification process using SeaClass
is having an image to classify. This can be either a GeoTiff file or a
sidescan mosaic created in Perspective or with Isis/TritonMap.
Feature
Feature
files. Format the
groups: Fines,
Note that this imagery data does not have to be in the project during the first two steps
of the classification process. Creating the training set and the neural net are independent
from the imagery and can be added to the project at any time for classification.
If there is no bottom sample information, the user can pick points for the training set
directly from the imagery to be classified. In this case it is essential that the imagery is
either created in Perspective or loaded into Perspective before creating a Training Set so
the imagery can be used as part of the process.
Page 5
Page 9

2.2 Create Training Set
The first step in the classification process is to enter ground truth information to
generate a set of data points to be used in the neural net training process. This can
originate from bottom sampling programs or video/diver surveys, or can be entered
manually if no bottom information is available.
To create the training set, click on the toolbar button or right-click on the
Training
This will open the
Options available on this page
include:
Training Set Name - Allows the
user to give the training set a
unique name.
Sampling Grid Size - Sets the
node in the SeaClass File Tree and select
'Create Training Set'
window shown below:
'Create'
as shown below:
Manual
output resolution in meters. If
'Custom'
is entered in the
Size'
******************************
is selected, the value
'Custom Grid
box below.
Important Grid Size Note!!!
Selecting the correct grid size is likely the most important factor for getting great
results! Therefore it is very important for the user to understand how this relates to the
final results.
Perspective SeaClass uses a textural segmentation algorithm for determining bottom
types in an image (see Appendix A for more information on how SeaClass works!). During
Page 6
Page 10

the classification process, the area around each sample location is compared to the
texture of the imagery to develop an understanding of what each bottom type should
look like in the imagery.
Within each sampling area (set by the
Grid Size
interpret is a function of the imagery resolution!
This is really important to understand!!! So for
0.2m resolution imagery, using a
Size
to analyze within this sampling area. This is not
enough for the software to produce the best
results. Increasing the
gives the software 25x25=625 pixels to analyze
within this sampling area. While this is plenty of
pixels to use for the analysis, the area size may
now include more than just the one bottom type
sampled at the center of the area.
Therefore, there is a trade-off between
), the number of unique values to
Sampling Grid
= 1m only gives the software 5x5=25 pixels
Sampling Grid Size
Sampling
= 5m
increasing the number of pixels in the sampling
area which is good, versus increasing the size of
the area which may not be so good depending on
the complexity of the imagery to be classified.
In general, using a sampling grid size of at least
10 times the imagery resolution will produce good
results from the classification process.
*******************************************************************************
Once the Name has been entered and
Set
page of the SeaClass wizard, click
This page is called
and then adding the sample locations to the classes. Samples can be added to each class
automatically from Feature files or manually by clicking the location in the map view.
Edit Classes & Samples
Sampling Grid Size
Next
to advance to the next page.
and is for creating a Class for each bottom type,
selected in the
Create Training
Page 7
Page 11

Click on the
'Add Class'
button to
create the class groups. Once a
Class has been created, add samples
by either selecting the correct
feature group in the drop-down list
and selecting Add, or by clicking the
red Record button and manually
double-clicking locations in the map
view to add them to the selected
Class type.
The example to the right shows
three classes defined with samples
added to the Reef class from the
selected feature group.
Options available on this page include:
Add Class - Selecting this will open a dialog for
entering the name of the class types to be
used as shown here:
- Selecting
'OK'
will open a
'Color'
window to select
the color to use for the entered bottom type as
shown to the right.
- Selecting 'OK' will add the entered name to the
'Training Classes and Samples'
field.
Recording Options - The three buttons
shown right are provided for manually
recording or for removing samples from the selected class.
- The left button is for recording. Double-Click in
the Perspective Map View on locations to use as samples for training the Neural
Net. Click on the middle pause button when you are done.
- Selecting the X button will remove the selected points.
Page 8
Page 12

Feature Groups - Once the "Classes" are defined, the
drop-down menu below the manual recording options allow
the user to load samples directly from Feature groups in Perspective.
- Select the correct feature group from the drop-down list.
- Click 'Add' to transfer the samples from the selected feature group to the
selected class.
- Repeat until all samples have been automatically added to the SeaClass
training set.
When finished adding classes and recording samples, the Edit & Classes window should look
similar to the image below. Sample points will appear in the map view in the colors chosen
as shown in the example below:
Page 9
Page 13
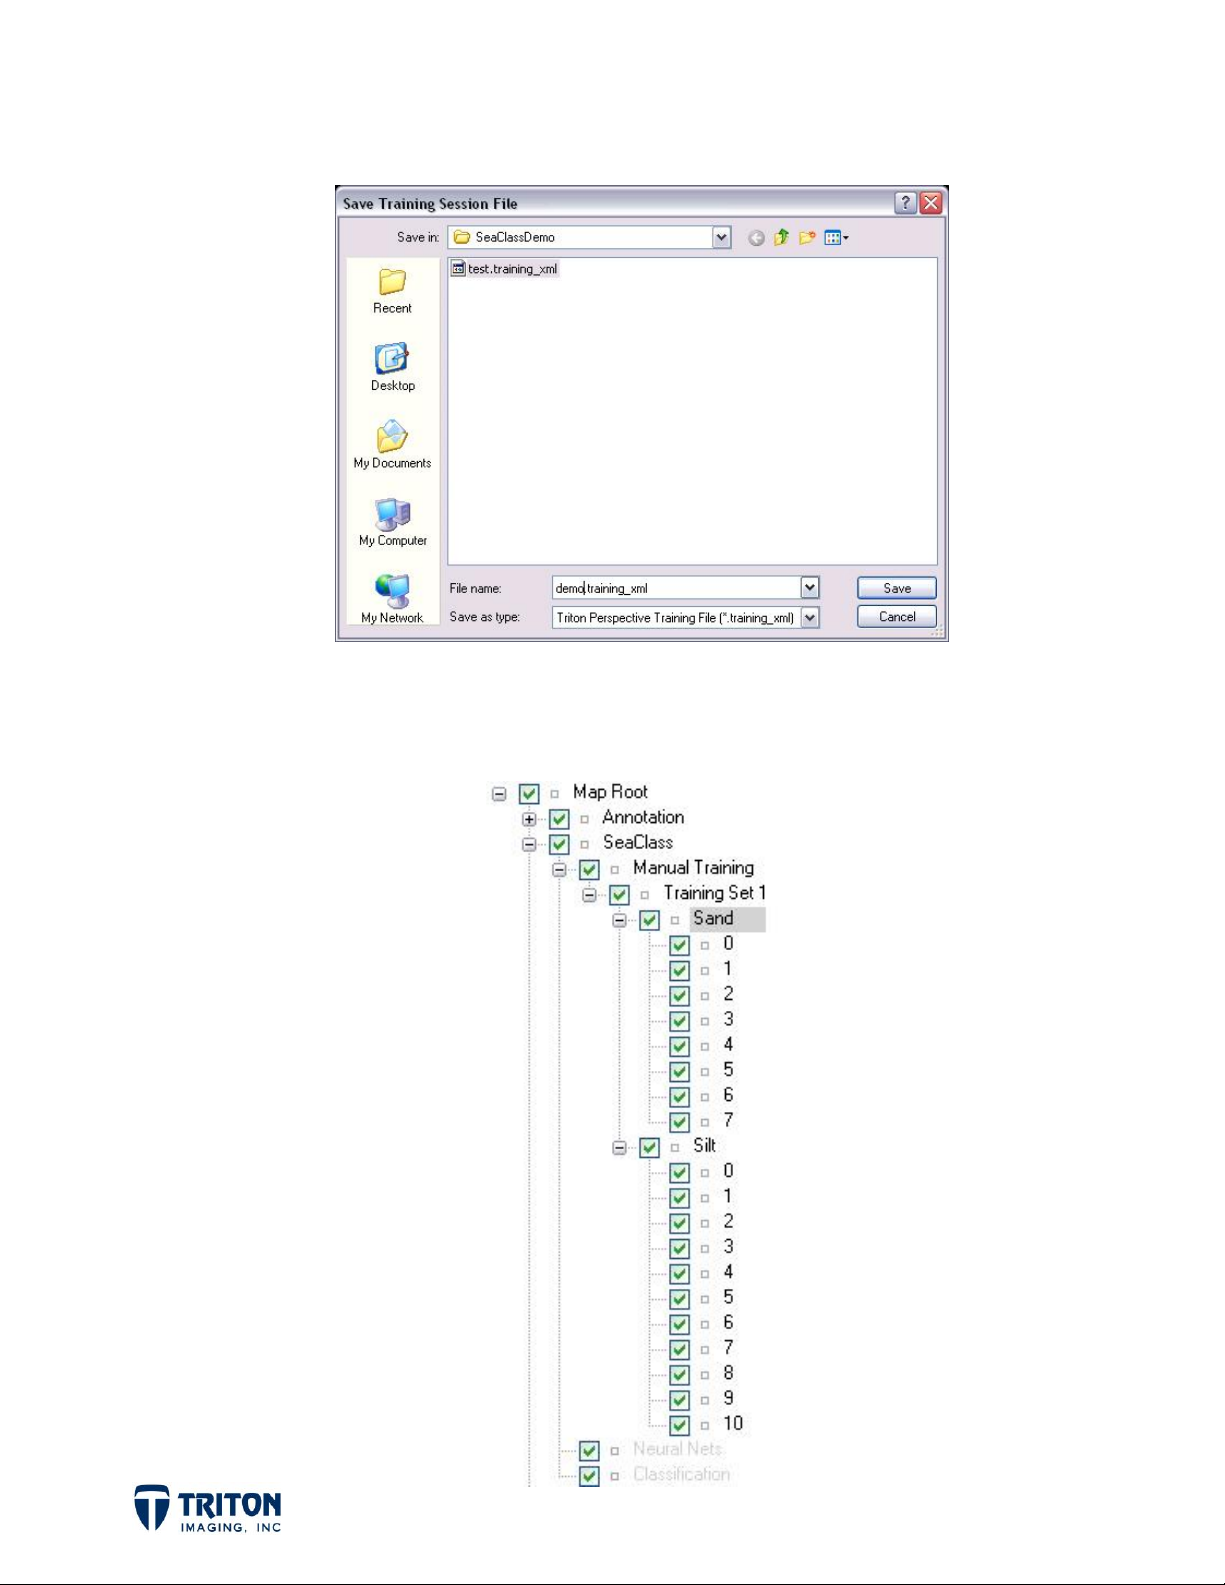
Click 'Next' to open a dialog to for naming the training set XML file as shown here:
After a name is entered for the training class, click ‘Save’ to write the information to an
XML file and to load the training set points into the SeaClass file tree as shown below.
Page 10
Page 14

3.2 Neural Net Training
The second step in the classification process is to use the training set created to train the
neural net. To train the neural net for automated image classification, right-click on the
training set node in the 'SeaClass' file tree and select 'Train Neural Net' as shown below:
This will open the 'Train Neural Net' window shown below:
To create a new neural net, click the 'Create' button which will open the following
window:
Page 11
Page 15

Enter a file name and select 'Save'. This will return you to the 'Train Neural Net' window
shown below:
Page 12
Page 16

Options available include:
Create - use to create a neural net for automated image classification
Back - allows users to return to previous pages of wizard to change values entered
Finish - select when done creating neural nets and setting parameters
3.3 Classify Bottom Types
The last step in the classification process is to use the neural net to automatically classify
an image or mosaic file. To classify an image or mosaic, right-click on file in the 'Imagery'
or 'Background' file tree and select 'Classify' as shown below:
This will open the 'SeaClass' window shown
below:
Options in this window include:
The drop down list contains all of the
available neural nets.
Select the layer to classify by clicking the
checkbox next to the layer name.
Cancel will close the SeaClass window and
stop the classification process.
OK will close the SeaClass window and will open a Save Classification Grid File
window as shown below:
Page 13
Page 17

Enter a file name and select Save. This will start the classification process. The
following dialog is displayed during classification:
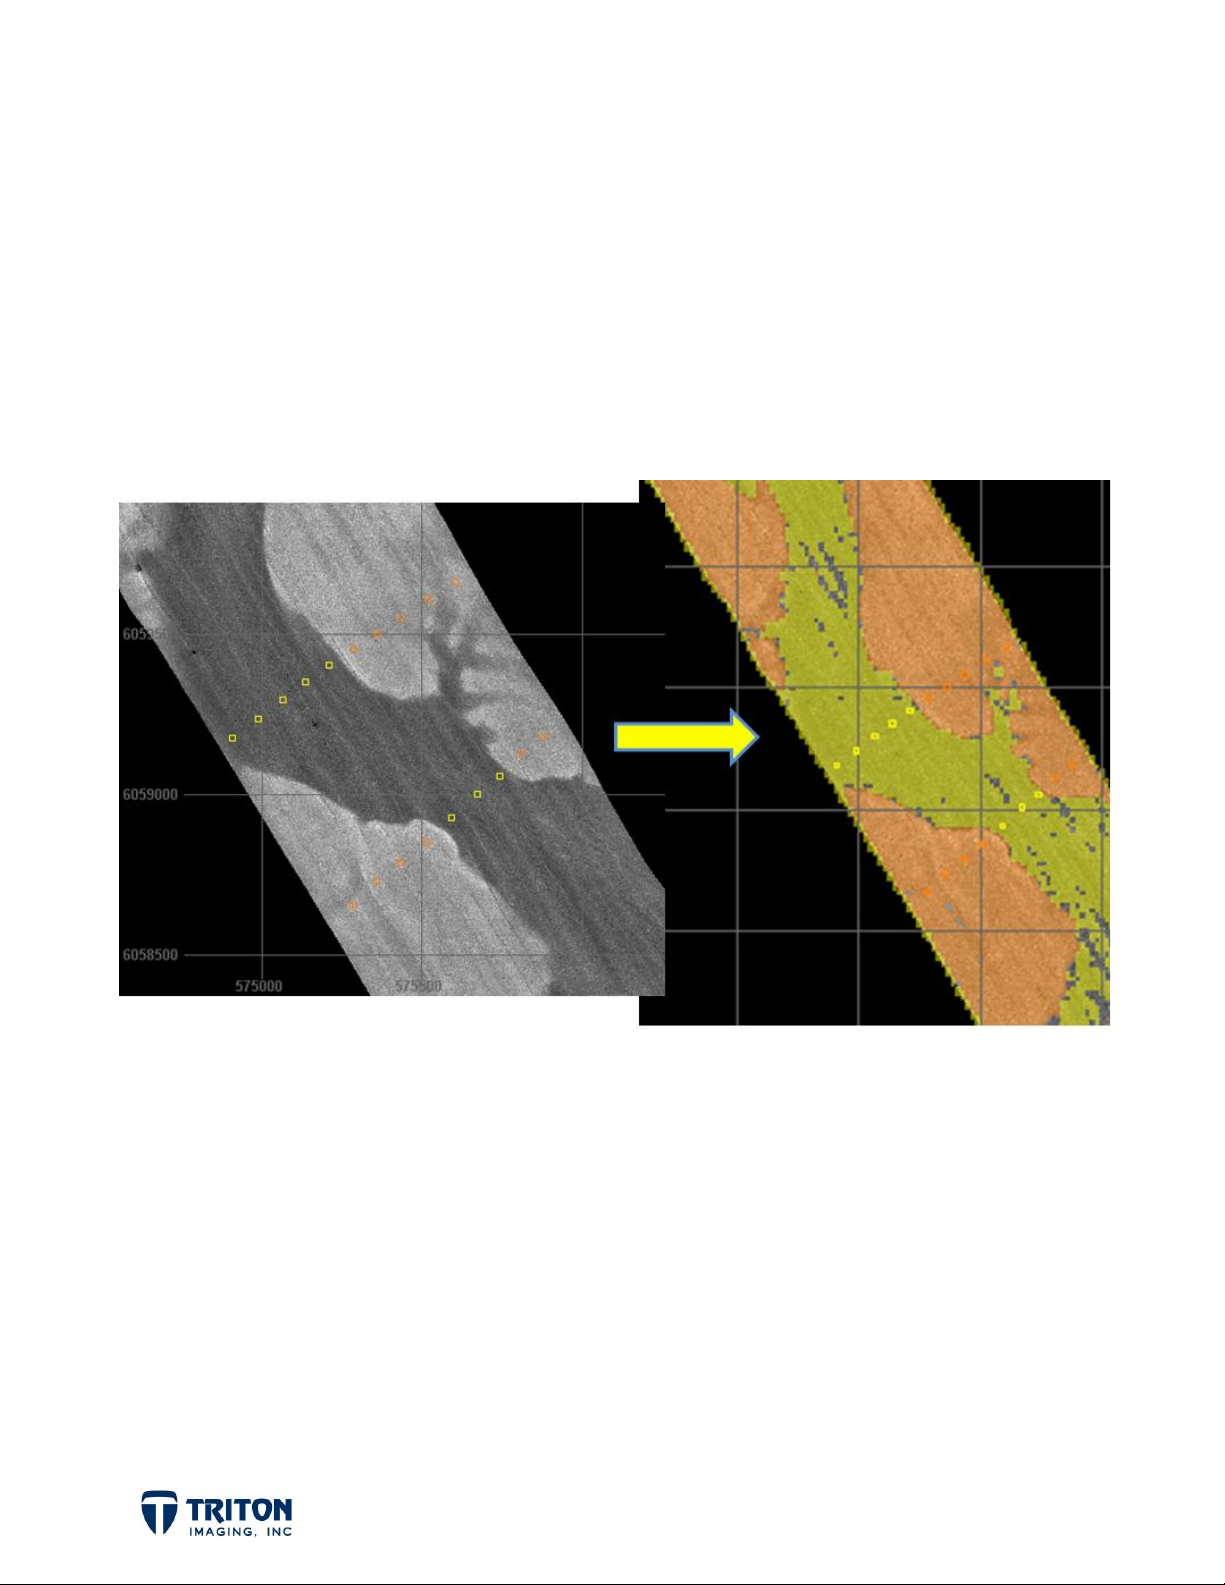
When the process is complete the results are overlain on the image in the map view as
shown below:
Page 14
Page 18

Page 15
Page 19

4.0 Edit Training Set
As more bottom information is obtained
either from additional samples or in-situ
observations by a diver or ROV, these
locations with known bottom types can be
added to the existing training set.
To edit an existing training set, rightclick on the training set in the Manual
Training layer in the SeaClass file tree
node and select the Edit Training Set
option as shown to the right:
If a new bottom type has been identified,
a new class can be defined and added to
the existing training set. Click 'Add Class' to add a new class, enter a class name and
select a color as shown below:
To add points to the new bottom class, select the record button and click on the point in
Page 16
Page 20

the map view. When finished select the pause button. The record and pause buttons can
be seen in the window below:
To add points to an existing class, select the class so it is highlighted in the Training
Classes and Samples list as shown in the window above.
When finished adding
the new bottom
information to the
training set, select
Next. This will open
the window below for
saving the training set
information to an XML
file for use in the
classification process.
Enter a name and
select Save.
After the training set
information has been
saved, select an
existing neural net or
Page 17
Page 21

create a new one using the Create button shown in the window below:
Click finish when done.
Page 18
Page 22

5.0 Quick Classification
The creation of the Classification image can take some time, although it is worth noting
that the actual classification of the image does not take very long. There is a option called
'Quick Classification ID' that can be used to check if the Classification image will be what
was expected before the actual image is created. To activate the Quick Classify button
you must complete all steps up to the end of Training the Neural net.
Using the toolbar button or leftclicking on the individual Neural Net
in the file tree and selecting 'Quick
Classify' will put the cursor in Quick
Classification mode.
When the Quick Classify button is
activated the mouse cursor becomes a
Query pointer; double clicking
anywhere on the image will briefly (3
secs) show the current classification
for that point in the image:
Page 19
Page 23

6.0 SeaClass Exports
Results from the classification process can be exported through the following methods:
1. Composite Export: This will export all layers turned on in the file tree including the
SeaClass results as a composite GeoTiff file. Selecting the following menu option
'File > Export > Composite GeoTiff' will open the export dialog window.
2. Manual Training Export: This exports the training sets to an XML file and is
launched by right-clicking on the Training Set file tree layer and selecting Export as
shown below:
This opens the file save dialog window shown below:
Page 20
Page 24

3. Classification Export: This exports the classification grid to an AutoCAD DXF file and
is launched by right-clicking on the classification grid tree layer and selecting Export
as shown below:
This opens the file save dialog window shown below:
Page 21
 Loading...