

Trimble Juno T41 User Manual

Juno T41
User Manual


i
Welcome
Thank you for purchasing a Juno T41 rugged handheld computer! This
user manual will help you configure and use your device.
Important information for using the user manual
This user manual has been prepared to guide you through the
configuration and operation of your device, which includes:
1. Initial configuration of the device
2. Operating basics
3. Navigating the operating system and software
4. Securing your device
Please read this user manual carefully before using your device for
the first time. In particular, read the Important Safety Information and
all of Chapter 1 before using your device.
This user manual describes features and functionality that may not
be present on your particular device, as features vary by model.
Document conventions
It is important to understand the typographical conventions used in
this user manual. The formatting of the text identifies special
information:
1. CAPITAL — indicates the hardware items on the device.
Example: press the POWER button.
2. Bold — indicates the items displayed on the screen, including
icons, tiles, buttons, headings, field names and options.
Example: tap the E-mail icon.
3. Italic — indicates the name of a screen/window as shown in the
upper left corner of the display.
Example: the Settings screen.

ii
4. > — describes a procedure or a navigation path.
5. Example: Tap > Settings > System > System Information >
Wireless is equivalent to:
1. Tap the (Start) icon or press the (Start) button
2. Tap the Settings icon
3. Tap the System icon
4. Tap the System Information icon
5. On the System Information screen, slide left or right until the
Wireless tab is displayed. You can also tap the < or > in the
horizontal scroll bar to activate different tabs in the System
Information screen.
Terms
The following terms are used throughout this user manual to
describe user actions.
1. Press — press and quickly release a hardware button.
2. Tap — touch and quickly release an item displayed on the
screen.
3. Select — tap an item in a list or tap a command from a menu.
4. Drag — tap and hold on the item and then move it to the target
position without releasing your fingertip.
5. Slide — touch and drag to the left/right/up/down to move to the
next item on the list.
Important safety information
THE DEVICE BATTERY IS PARTIALLY CHARGED WHEN
SHIPPED NEW FROM THE FACTORY.
BEFORE INSERTING OR REMOVING A SIM CARD, THE
PHONE MODULE MUST BE POWERED OFF. To do this,
press and hold the POWER button for two seconds to
display the Power Menu, then tap Enable Airplane mode.
Alternatively, use the Wireless Manager to disable only the
Phone module.

iii
DO NOT OPERATE THE DEVICE WITHOUT THE CARD
SLOT COVER PROPERLY INSTALLED.
IN MANY COUNTRIES YOU ARE REQUIRED BY LAW TO
TURN OFF YOUR PHONE WHEN YOU FLY. THE MOST
SECURE METHOD TO ACCOMPLISH THIS IS TO ENABLE
AIRPLANE MODE. To do this, press and hold the POWER
button for two seconds to display the Power Menu, then tap
Enable Airplane mode.
WARNING: TURNING OFF YOUR DEVICE DOES NOT
TURN OFF THE PHONE; YOU MUST USE AIRPLANE MODE.
YOUR WARRANTY IS INVALIDATED IF YOU OPEN OR
TAMPER WITH THE OUTER CASING OF THE DEVICE.
Unapproved modifications or operations beyond or in
conflict with these instructions for use may void
authorization by the authorities to operate the equipment.
ONLY APPROVED ACCESSORIES MAY BE USED WITH THIS EQUIPMENT.
IN GENERAL, ALL CABLES MUST BE HIGH QUALITY, SHIELDED,
CORRECTLY TERMINATED AND NORMALLY RESTRICTED TO TWO
METERS IN LENGTH. THE POWER SUPPLY APPROVED FOR THIS
PRODUCT EMPLOYS SPECIAL PROVISIONS TO AVOID RADIO
INTERFERENCE AND SHOULD NOT BE ALTERED OR SUBSTITUTED.

iv
Disclaimers
The manufacturer operates a policy of ongoing product development.
The manufacturer reserves the right to make changes and
improvements to any of the hardware and software products
described in this document without prior notice.
The screenshots and other presentations shown in this user manual
may differ from the actual screens and presentations generated by
the actual product. The manufacturer does not warrant that this
document is error-free.
Not all models are available in all regions of the world. Depending on
the specific model purchased, the color and look of your device and
accessories may not exactly match the graphics shown in this
document. Not all models contain all of the hardware features and
software applications described in this user manual.
All such differences are minor and the actual product will deliver the
described functionality as presented in this User Manual in all
material respects, subject to limitations of the particular model
operated by the user.
Limited Warranty & Liability Limitations
This unit and battery are limited warranted against defects in
materials and workmanship for twelve (12) months from the original
date of purchase. All accessories and peripherals are limited
warranted against defects in materials and workmanship for twelve
(12) months from the original date of purchase. If notice is received
of such defects during the limited warranty period, the proven
defective product(s) will either be repaired or replaced, at the
manufacturer’s option. Replacement products may be either new or
like new.
The manufacturer does not warrant that the operation of the
products will be uninterrupted or error free. If the product is not,
within a reasonable time, repaired or replaced to a condition as
limited warranted, the customer will be entitled to a refund of the
purchase price upon prompt return of the product.
Limited warranty does not apply to defects resulting from (a)
improper or inadequate maintenance or calibration, (b) software,

v
interfacing, parts, or supplies not supplied by manufacturer, (c)
unauthorized modification, or misuse, (d) operation in conditions
outside of the published environmental specifications for the product,
or (e) physical damage due to external causes, including accident,
abuse, misuse or problems with electrical power. Water damage
caused by improper installation of the accessories and service parts
is not covered by warranty. Removal of or tampering with the back
case voids the limited warranty. There are important seals that will be
compromised and the device will no longer be water resistant (IP65)
or waterproof (IP68).
To the extent allowed by local law, the above limited warranties are
exclusive and no other warranty or condition, whether written or oral,
is expressed or implied, specifically disclaiming any implied
warranties or conditions of merchantability, satisfactory quality, and
fitness for a particular purpose.
To the extent allowed by local law, the remedies in this limited
warranty statement are the customer’s sole and exclusive
remedies. Except as indicated above, in no event will the
manufacturer or its suppliers be liable for loss of data or for
direct, special, incidental, consequential (including lost profit or
data), or other damage, whether based in contract, tort, or
otherwise.
Standard Warranty Addendum
Trimble Navigation Limited
935 Stewart Drive
Sunnyvale, California 94085
United States of America
Notice to Australian Purchasers
The Australian Consumer Law
Our goods come with guarantees that cannot be excluded under the
Australian Consumer Law. You are entitled to a replacement or
refund for a major failure and for compensation for any other

vi
reasonably foreseeable loss or damage. You are also entitled to
have the goods repaired or replaced if the goods fail to be of
acceptable quality and the failure does not amount to a major failure.
Trimble's warranty, as set out in the user manual accompanying this
statement, or as described in the warranty card accompanying the
Product you purchased, is in addition to any mandatory rights and
remedies that you may have under the Australian Consumer Law.
Copyright
All brand and product names are trademarks or registered
trademarks of their respective companies.
Revision:2.0
(05/2013)

vii
Contents
Welcome ......................................................................................................... i
Important information for using the user manual ..................................... i
Document conventions ............................................................................. i
Terms ...................................................................................................... ii
Important safety information .................................................................... ii
Disclaimers ............................................................................................. iv
Limited Warranty & Liability Limitations ................................................. iv
Standard Warranty Addendum ................................................................ v
Copyright ................................................................................................ vi
Contents ....................................................................................................... vii
Chapter 1 Getting Started ............................................................................ 1
1.1 Device components ........................................................................... 1
1.2 Inserting a storage card and a SIM card ........................................... 6
1.3 Charging the battery .......................................................................... 8
1.4 Turning your device on and choosing your language ..................... 10
Chapter 2 Operating Basics ....................................................................... 12
2.1 Home screen ................................................................................... 12
2.2 Start screen ..................................................................................... 14
2.3 Title bar ........................................................................................... 14
2.3.1 Title bar status indicators ............................................................. 14
2.4 Tile bar ............................................................................................ 16
2.5 Power menu .................................................................................... 16
2.6 Securing your device ....................................................................... 17
Lock the keypad .................................................................................... 17
Lock your device ................................................................................... 18
2.7 Configuring the Onscreen Keyboard ............................................... 19
2.8 Perform a Clean Boot / Factory Reset ............................................ 19
2.9 Absolute Power Off mode ............................................................... 20
Chapter 3 Managing and Caring for Your Device .................................... 21
3.1 Changing basic settings .................................................................. 21
Personalizing the Home screen ............................................................ 21
Setting the date, time, and alarms ........................................................ 21
Setting regional options ......................................................................... 21
3.2 Customizing sounds and notifications ............................................. 22
Specifying the sound for an event ......................................................... 22
Setting the ring tone for incoming calls ................................................. 22
Copying a sound to your device ............................................................ 22
3.3 Managing battery power and data storage ..................................... 23
Battery Life ............................................................................................ 23

viii
Changing the power management settings .......................................... 24
Managing low battery ............................................................................ 24
Checking the phone memory ................................................................ 25
3.4 Working with files ............................................................................ 26
Copying files to your computer .............................................................. 26
Using File Explorer ................................................................................ 26
3.5 Adding and removing programs ...................................................... 27
Installing a program from your computer .............................................. 27
Removing a program ............................................................................. 27
3.6 Using Task Manager ....................................................................... 28
3.7 Checking the Device System information ....................................... 28
3.8 Caring for your Device .................................................................... 28
3.9 Safe Use of your Device ................................................................. 30
Chapter 4 Connecting to a PC and Synchronizing Information ............. 32
4.1 Setting up Windows Mobile® Device Center ................................... 32
Using Windows Mobile Device Center .................................................. 33
4.2 Setting up ActiveSync® ................................................................... 34
Setting up synchronization in ActiveSync ............................................. 34
4.3 Synchronizing with your computer .................................................. 35
Starting and stopping synchronization .................................................. 35
Selecting information to synchronize .................................................... 35
Troubleshooting sync connection problems .......................................... 36
Chapter 5 Using the Phone ........................................................................ 37
5.1 Making a call ................................................................................... 37
Making a call from the Phone screen .................................................... 37
Making a call from Contacts .................................................................. 38
Making a call from Call History .............................................................. 38
Making an international call ................................................................... 39
Making an emergency call .................................................................... 39
5.2 Receiving and ending a call ............................................................ 39
Ending a call .......................................................................................... 40
5.3 Speed dial ....................................................................................... 40
Using speed dial .................................................................................... 40
5.4 Working with WWAN (mobile data service) .................................... 41
5.5 Working with CellStart ..................................................................... 41
Removing cellular data settings ............................................................ 42
5.6 Customizing your phone ................................................................. 42
5.7 Browsing the Internet ...................................................................... 43
Internet Sharing ..................................................................................... 43
5.8 SMS messages ............................................................................... 43
5.9 Sending and receiving e-mail .......................................................... 43
Chapter 6 Using Additional Hardware Features ...................................... 45
6.1 Flashlight ......................................................................................... 45
6.2 Assigning Buttons (hardware buttons) ............................................ 45

ix
6.3 Compass Calibration ....................................................................... 45
6.4 Working with Bluetooth ................................................................... 46
6.5 Working with Wi-Fi .......................................................................... 47
Using the Summit Utilities ..................................................................... 51
Accessing the Summit Client Utility ....................................................... 51
Main Window ......................................................................................... 52
Profile Window ...................................................................................... 53
Status Window ...................................................................................... 53
Diags Window ....................................................................................... 53
Global Window ...................................................................................... 54
6.6 Working with the Camera ................................................................ 54
User Interface ........................................................................................ 55
Thumbnail Window ................................................................................ 55
Capturing Images .................................................................................. 56
Capturing Videos ................................................................................... 56
Closing application ................................................................................ 57
Image Camera Application Features..................................................... 57
Image Delete and Switch to Camera in Image review mode ................ 62
Video Camera Application Features ..................................................... 62
6.7 Working with GPS ........................................................................... 65
GPS settings: ........................................................................................ 65
Exiting GPS applications ....................................................................... 65
6.8 SatViewer ........................................................................................ 66
6.9 Battery Logger ................................................................................. 66
6.10 Barcode Scanning (For Scanner Version only)............................. 67
Appendix A: Regulatory Compliance ....................................................... 74
U.S.A. - FCC Statement ........................................................................ 74
Exposure to Radio Frequency (RF) Signals ......................................... 74
Telecommunications & Internet Association (TIA) information ............. 75
Canada Compliance, Industrie Canada (IC) ......................................... 76
RoHS Statement ................................................................................... 76
European Conformity Statement ........................................................... 77
Europe ................................................................................................... 77
Environmental Hazards ......................................................................... 78
Toxic and Hazardous Substances and Elements ................................. 78
Taiwan ................................................................................................... 79


1
Chapter 1 Getting Started
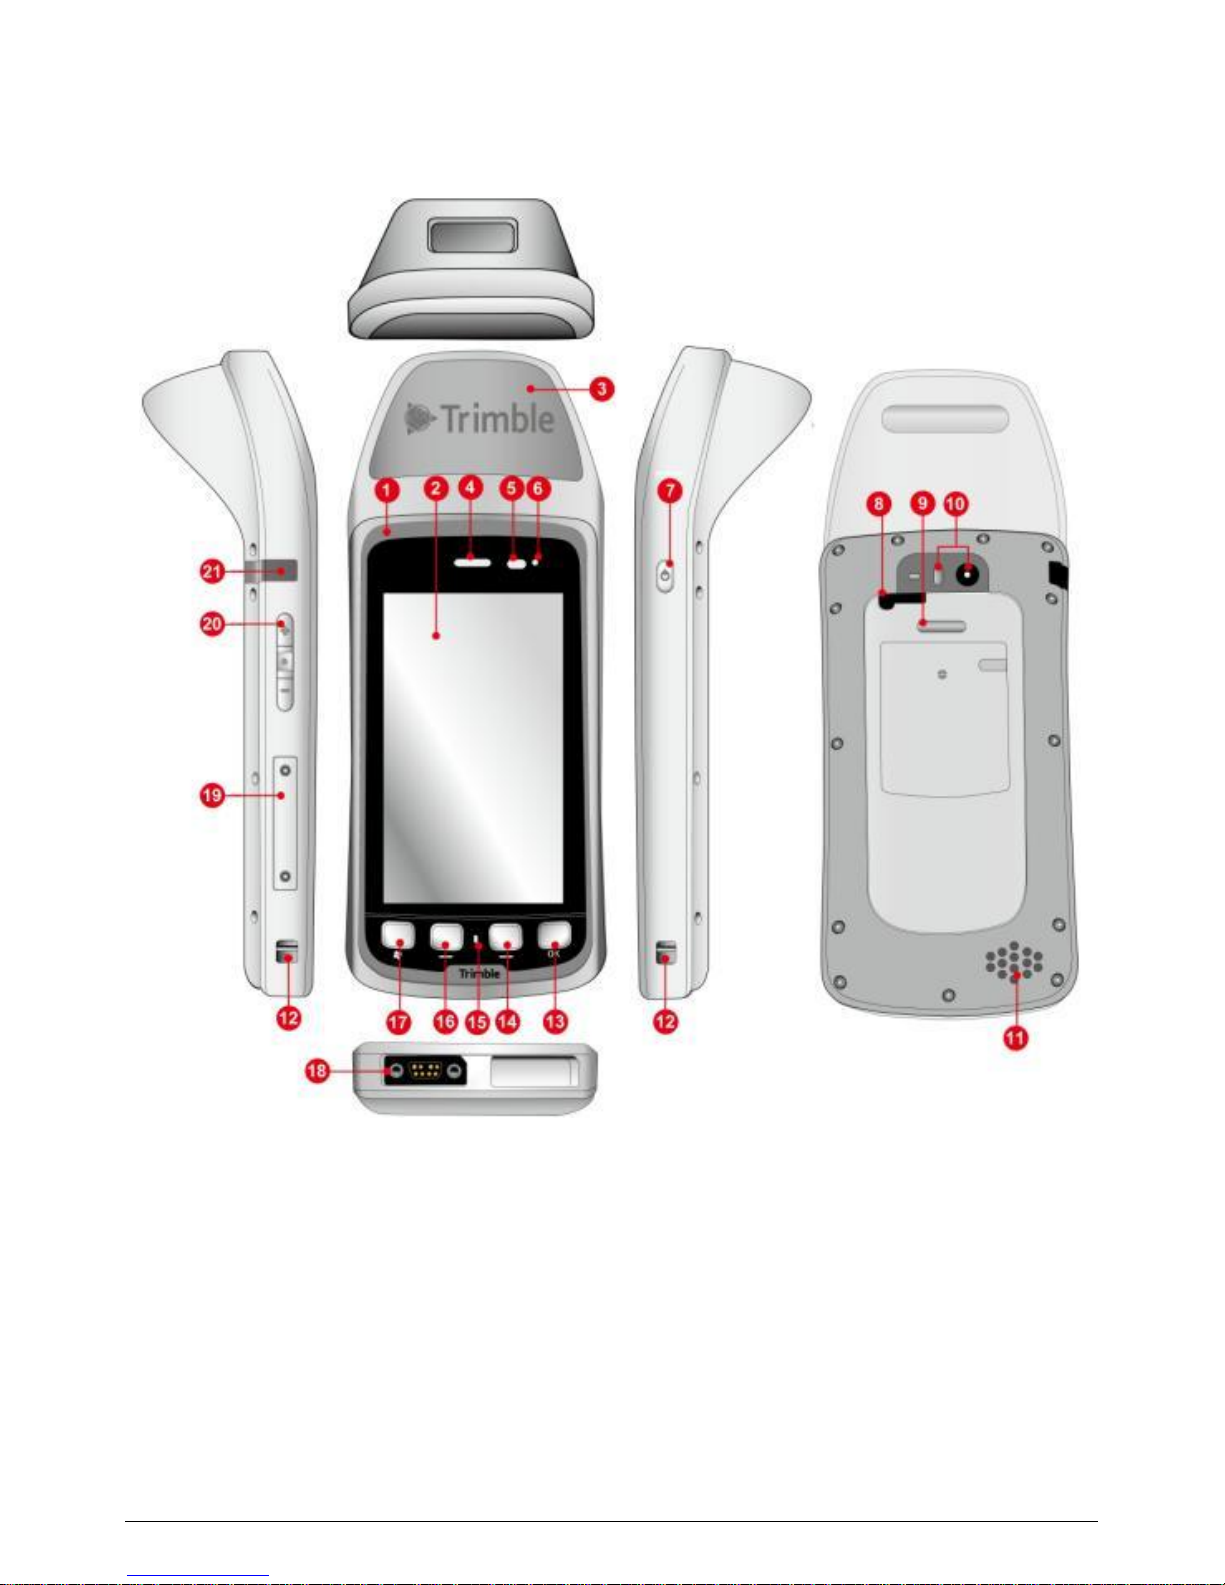
1.1 Device components
GPS Model
2
GPS + Barcodescanner Model
1. Color Band
The color band surrounding the screen is yellow or grey, and
indicates IP65 or IP68, respectively.
2. Touchscreen
The capacitive touchscreen enables handwriting, drawing and
making selections with your finger. An optional T41 Capacitive
Stylus, sold separately, is available.
3
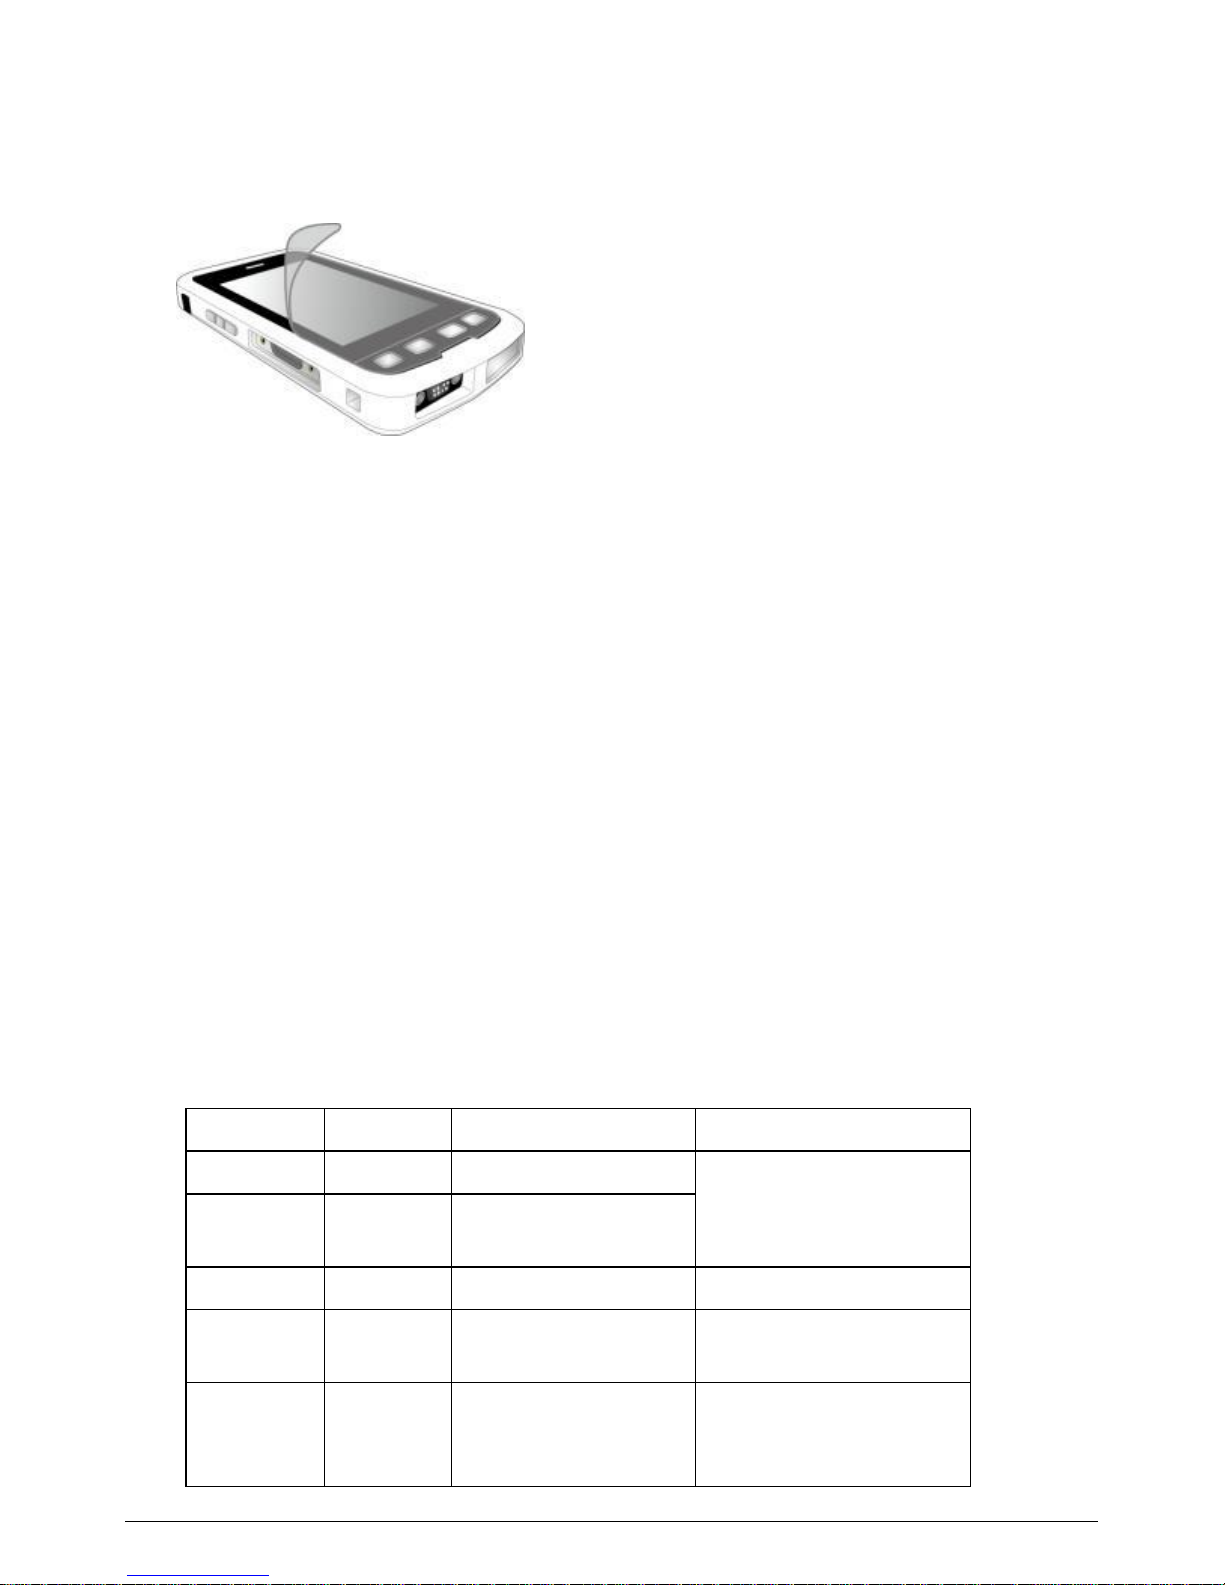
The touchscreen is on a rugged Gorilla® Glass panel, and to
prevent cosmetic scratches, a screen protector is recommended.
Follow the instruction below to apply the Screen Protector.
3. Expanded feature location
Combo of Imager and/or enhanced GPS.
4. Phone Receiver (Ear)
When using the optional phone, place the receiver to your ear to
hear the other participant(s) to the phone call.
5. Light Sensor
The Light Sensor detects ambient light in your environment. If the
Backlight control is configured to use the Light Sensor, the screen
brightness dims in a dark environment and brightens in a lighted
environment.
6. Notification LED
One tri-color LED (Red/Amber/Green) indicator is provided for
user notifications. These include battery status and other
operating system (OS) notifications. This indicator is capable of
operating even when the device is in Shutdown mode.
The LED status behavior is as follows:
Color
Pattern
Condition
Notes
Red
Solid
Low battery
Connect device to
charger before
pressing POWER.
Red
Blinking
Low battery and
OS notification
Amber
Solid
Charging
Amber
Blinking
Charging and OS
notification
Amber
Blinking
OS notification,
medium battery
charge

4
Color
Pattern
Condition
Notes
Green
Solid
Fully charged
Green
Blinking
Fully charged and
OS notification
<Off>
n/a
Battery not low,
no OS notification
7. POWER button
When the device is on, press and release to suspend or
resume the device.
Press and hold for 2 seconds to open the Power Menu.
Press and hold for 6 to 8 seconds to force the device to
Reset.
8. MCX port
The MCX port enables connecting an optional External GPS
Antenna to provide improved GPS signal reception when
operating the Juno T41 inside a vehicle or in other situations
where the sky visibility is limited.
9. Accessory Latch
The accessory latch is designed to lock the connection of
Extended Battery Pack.
10. Camera and Flash
The camera takes pictures and records videos.
The flash assists the camera in low-light conditions.
11. Speaker
Listen to audio media or a phone call from here.
12. Wrist Strap tie point
Wrist strap tie points are provide on both sides of the device to
accommodate left- and right-handed users.
13. OK button
Press to confirm your selection. Pressing this button is typically
equivalent to tapping the X tile or OK tile on the Tile bar.

5
14. RIGHT button ( )
Press to activate the associated tile (if any) on the Tile bar.
15. Microphone
Speak here when talking during a phone call.
16. LEFT button ( )
Press to activate the associated tile (if any) on the Tile bar.
17. button
Press to access the Start screen. Press again to access the
Home screen.
18. T41 Custom Port
Connect the T41 Custom USB Client cable to this port to charge
the device or connect to the device from a desktop or laptop
computer.
Two optional accessories are available, the T41 USB Host Cable
and the T41 9-Pin Serial Cable.
19. microSD storage card and SIM card slots
Use the SD/SIM Card Access Tool to loosen the protective cover.
A microSD storage card provides additional file storage.
A SIM card provides access to a GSM cellular network, enabling
the device to place and receive phone calls, send and receive
text messages and to connect to 3.75G mobile data services.
(Contact a GSM cellular service provider in your area to obtain
services and a SIM card.)
20. VOLUME control and ACTION buttons
Press the + / - button to increase/decrease the volume for your
device.
Press the ACTION button (between the + / - buttons) to select an
option.
21. Headphone or Headset connector
Connect a 3.5 mm stereo headphone to listen to audio media or
use the hands-free kit.
Connect a 3.5 mm stereo headset to listen to audio media and to
use the phone in hands-free mode.
6
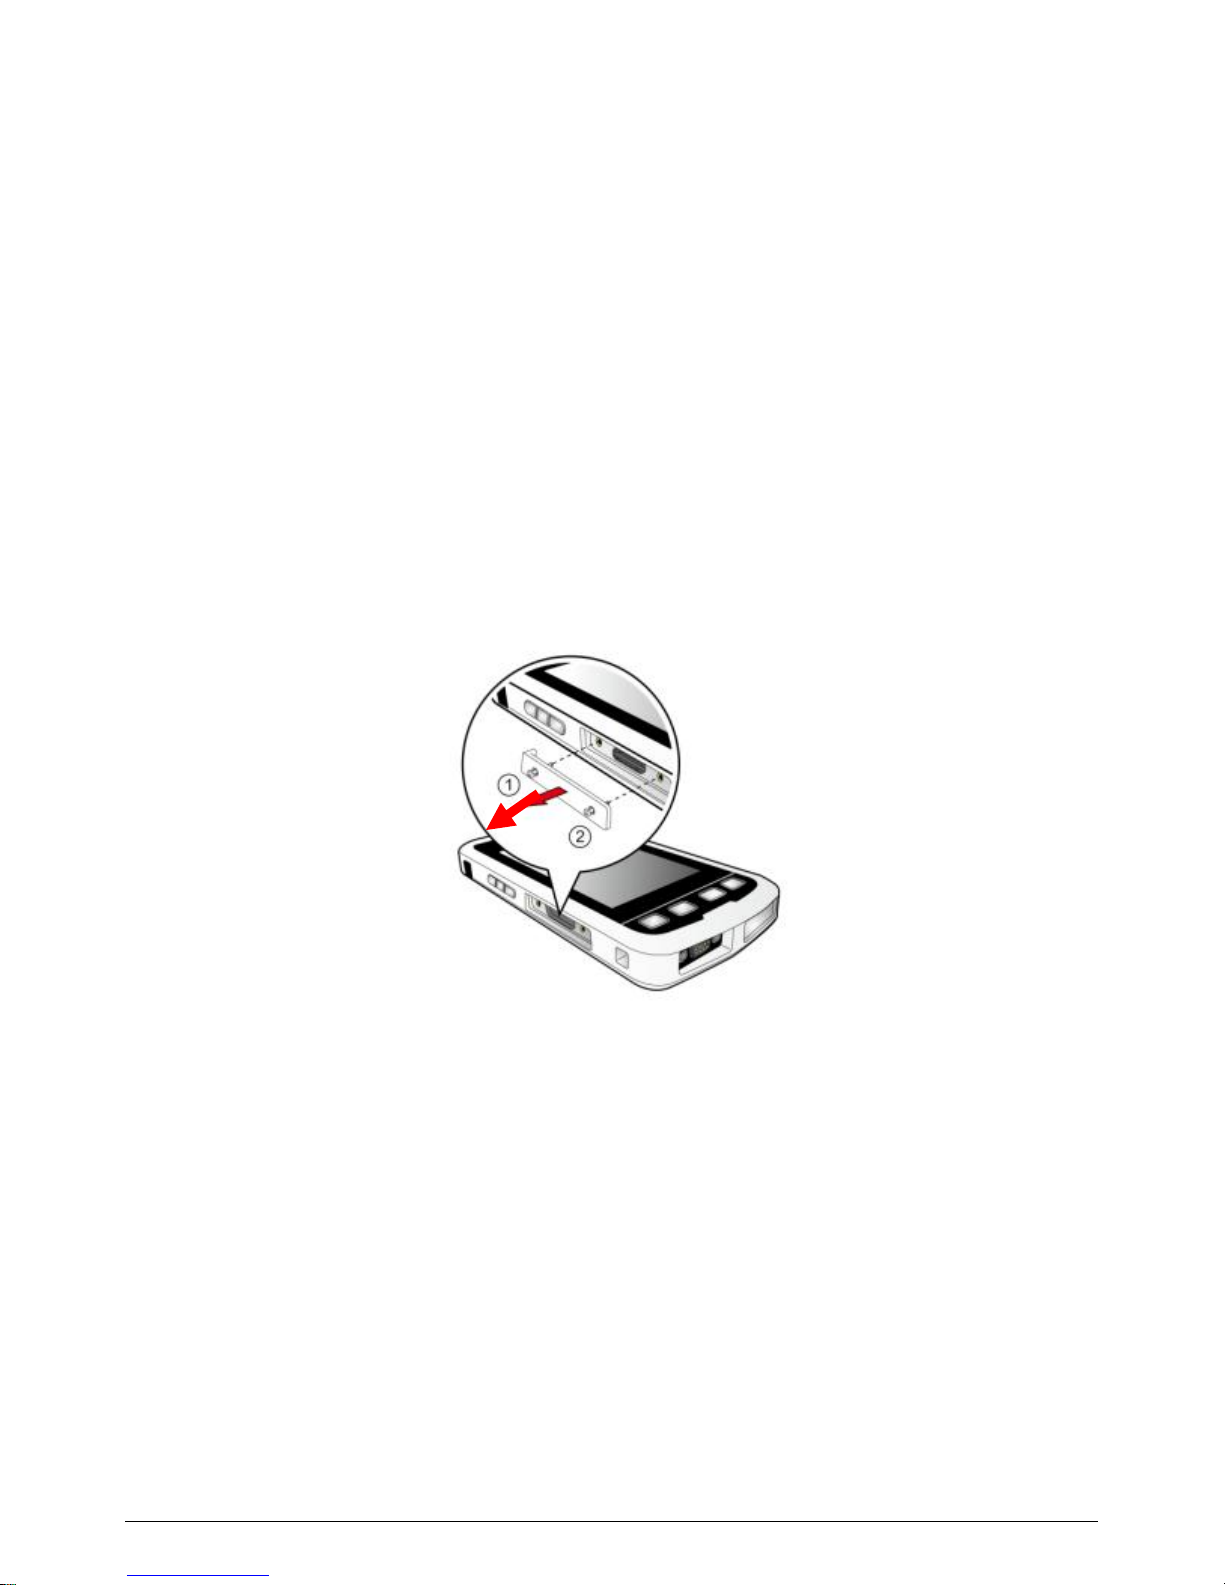
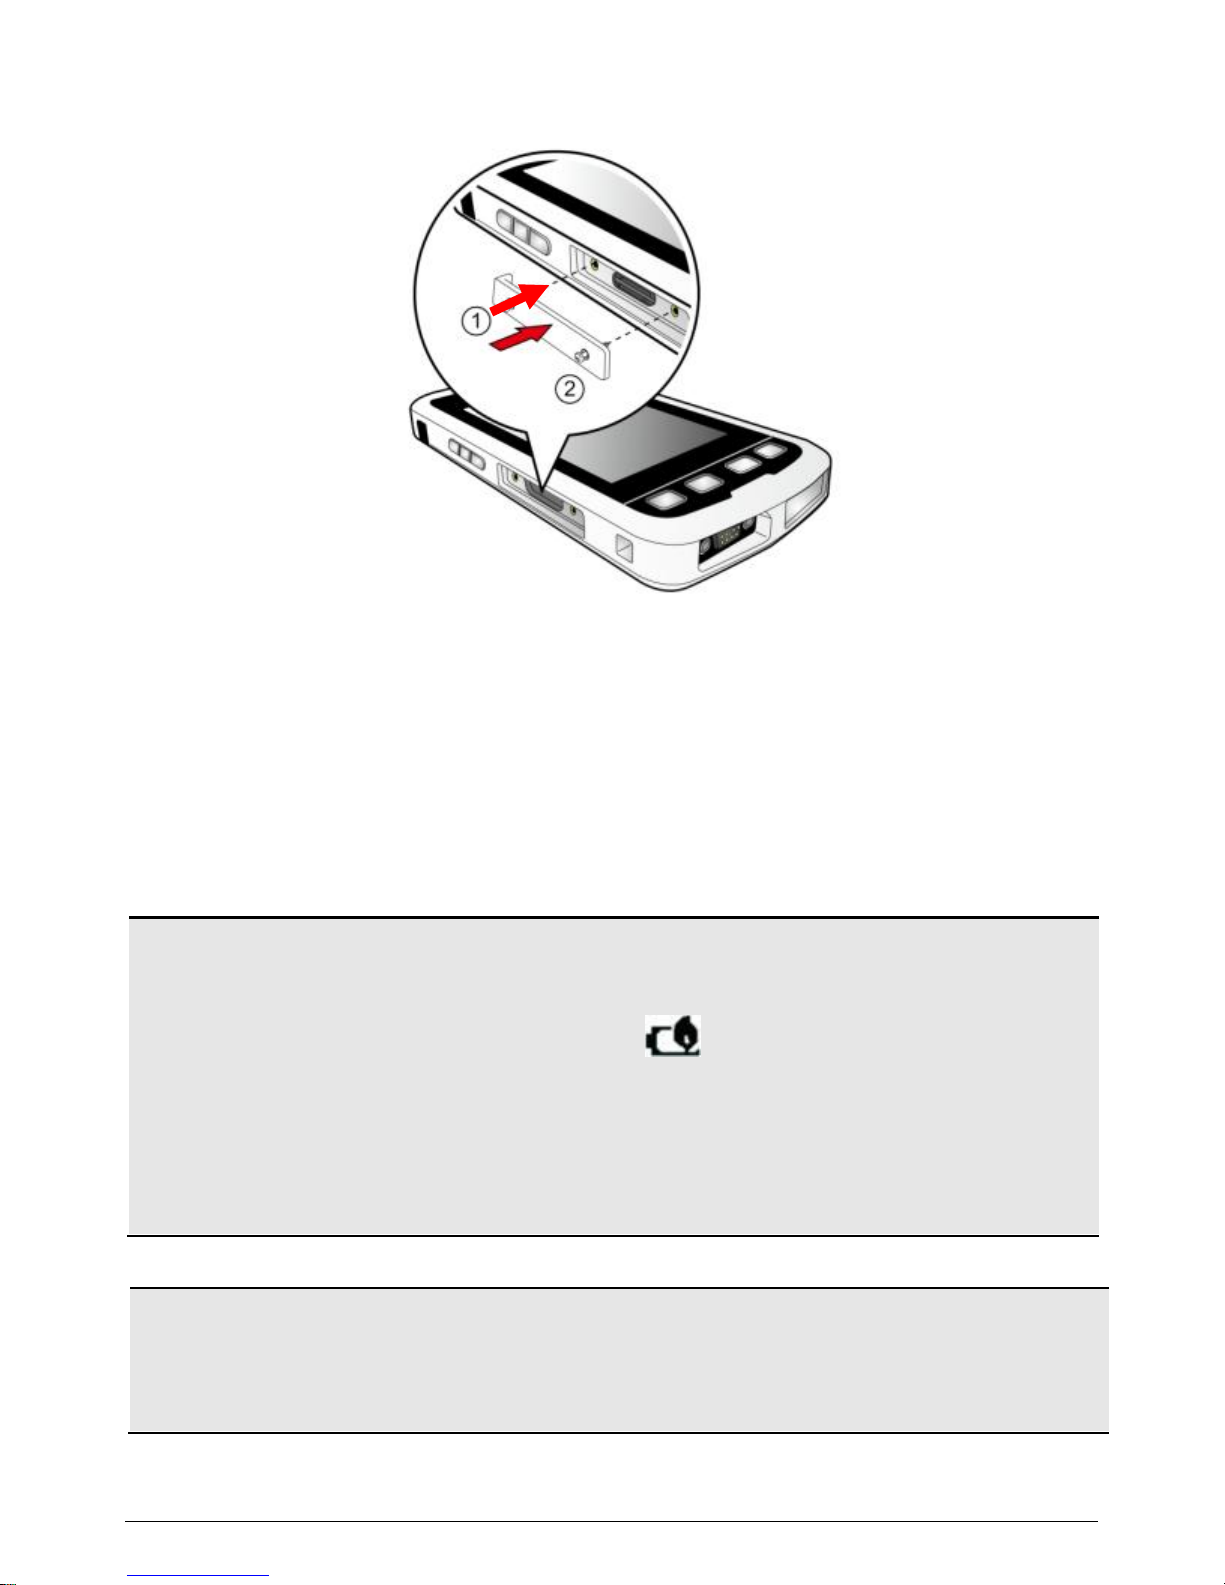
1.2 Inserting a storage card and a SIM card
To install a microSD storage card and a SIM card in your device, you need
to remove the cover on the left side using the SD/SIM Card Access Tool
included with the device accessories.
NOTE: The device supports up to 32 GB SDHC microSD storage cards. SDXC
cards are not supported.
WARNING: Insert or remove a SIM card ONLY when the Phone module is
completely off.
WARNING: Only insert a SIM card on devices with Phone/WWAN
capability.
1. Remove the cover on the left side of the device by unscrewing
the screws.
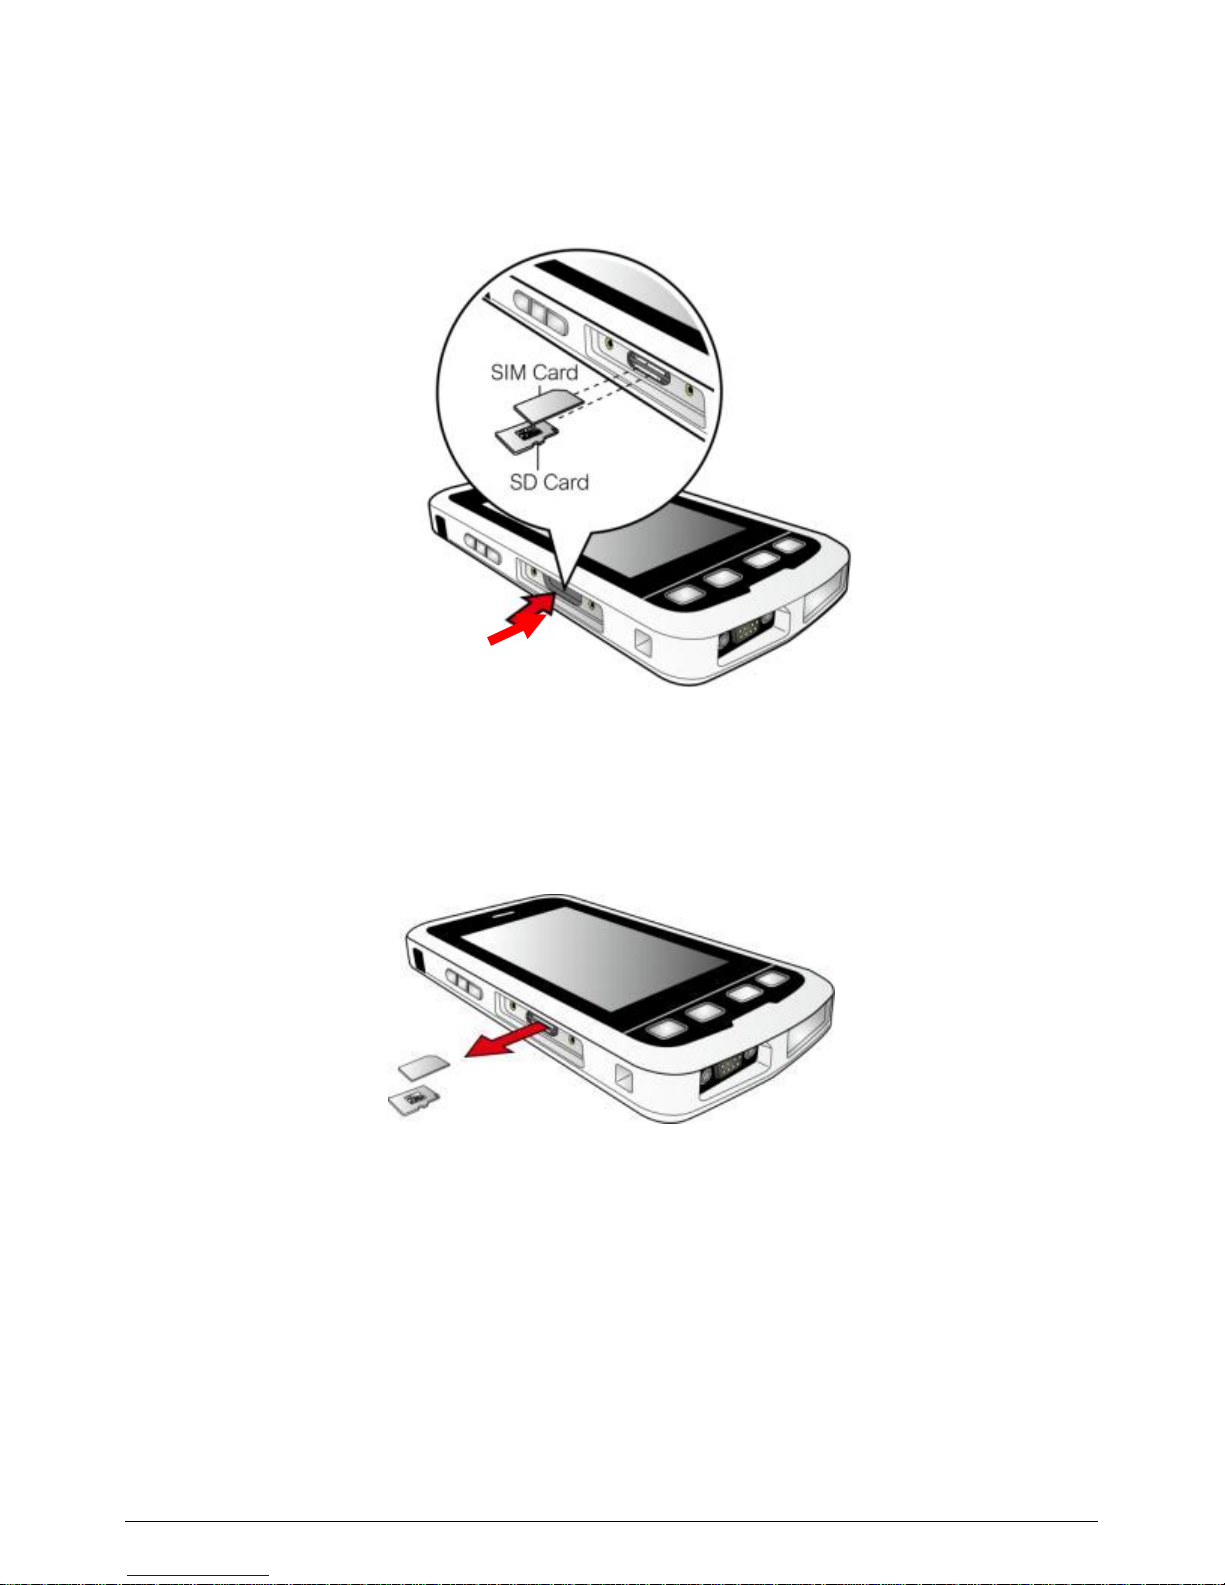
2. Follow the illustration below to insert the storage card and the
SIM card:
To insert the SIM card: push the card into the slot with its
metal contacts facing the back of your device.
To insert the storage card: hold the card by the edges and
gently insert it into the slot with the label facing the front of
your device. Do not apply pressure to the center of the
storage card while inserting the card.
7
3. To remove a card, push the card to release from the slot.
NOTE: Make sure you have saved any data in open programs
before removing the storage card.
WARNING: Only remove a SIM card when the device is in Shutdown
mode, Absolute Power Off mode, Airplane mode or when the Phone
module is off.
4. Replace the cover and then secure it with the screws.
8
1.3 Charging the battery
IMPORTANT: Before using the Juno T41 for the first time, charge the
device for at least 4 hours. The notification LED will turn green when fully
charged.
CAUTION: Avoid Extreme Heat
The battery is designed to stop operating at or above 149
°F (65 °C). If this status icon appears, the battery has
overheated to 140 °F (60 °C) or more.
If the battery temperature exceeds 158 °F (70 °C), the
battery will be disabled and the device must be sent to an
Authorized Service Provider to have the battery replaced.
Operating Temperature Range: -22 °F to 140 °F (-30 °C to 60 °C)
Storage Temperature Range: -40 °F to 158 °F (-40 °C to 70 °C)
CAUTION: Do not exceed specified storage temperature.
1. Connect the USB end of the T41 Custom USB Client cable to the
AC charger.
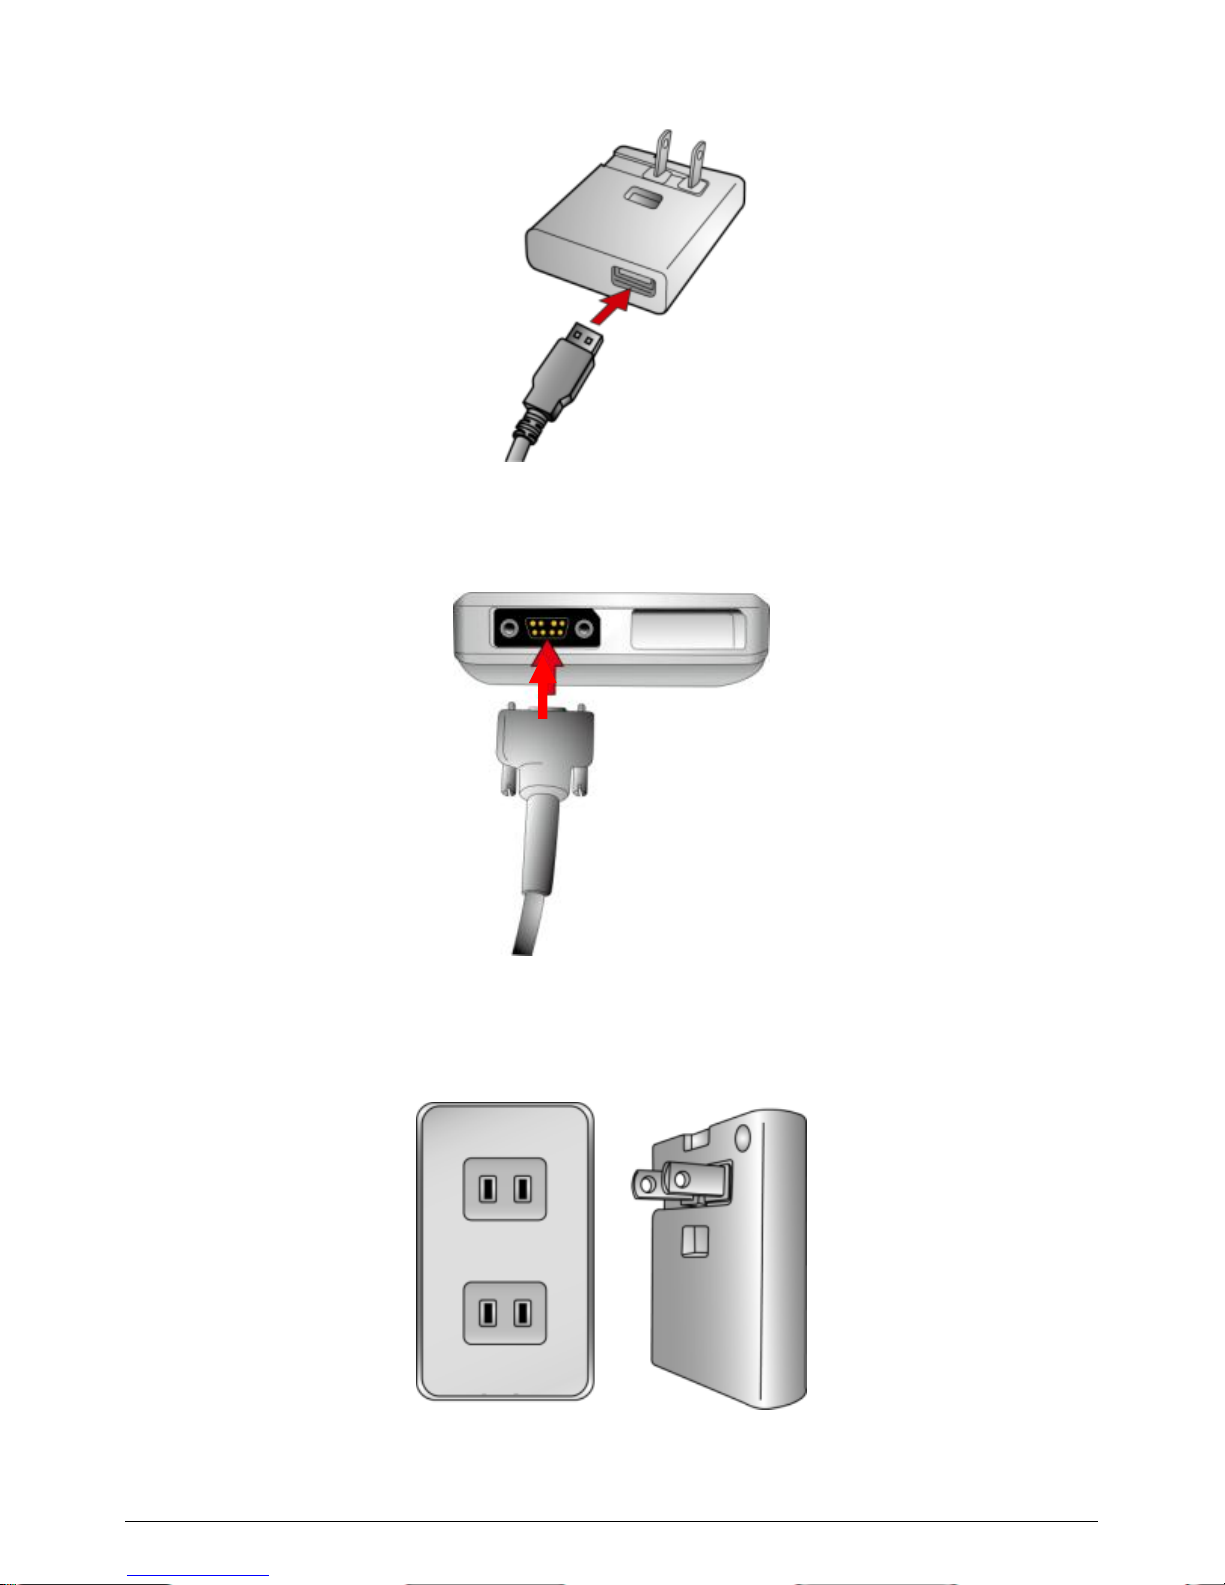
9
2. Connect the custom end of the T41 Custom USB Client cable to
the connector on the bottom face of your device.
3. Plug the AC charger into a wall outlet. If needed, attach a plug
converter onto the AC charger.

10
Tips for extending the battery life:
See Chapter 3.3 for tips on extending battery life.
1.4 Turning your device on and choosing your
language
WARNING! BEFORE TURNING THE DEVICE ON, THE DEVICE MUST BE
PLUGGED IN TO AN EXTERNAL POWER SOURCE. COMPLETE ALL STEPS
IN 1.3 CHARGING THE BATTERY.
1. Once you begin to charge your device, the device turns on
automatically.
2. The Welcome Wizard will lead you through the setup process.
3. Select your preferred language by using the + or - (shown as UP
or DOWN on the Wizard) buttons on the left side of the device,
then press the ACTION (shown as ENTER on the Wizard) button
to choose the language (the touchscreen is not enabled in the
Wizard).
4. Use the + button to highlight the box next to Yes, I want to use
<language > as the language on the device.
a. Press the ACTION (ENTER) button to check the box.
b. Press the - (DOWN) button 2 times to highlight the Next >
box.
c. Press the ACTION (ENTER) button to select Next >.
Wait while your device is being configured for the

11
language you selected.
WARNING: The only way to change the language you have
selected is to re-install the firmware using the Firmware update
utility.
NOTE: Only Microsoft applications and messages will be
translated into languages other than English. All other error
messages, notifications and other applications may appear in
English.
5. Tap the screen to set up your device with a Security PIN
(optional).
6. See Chapter 3 for instructions on setting the date and time on
your device.
12
Chapter 2 Operating Basics
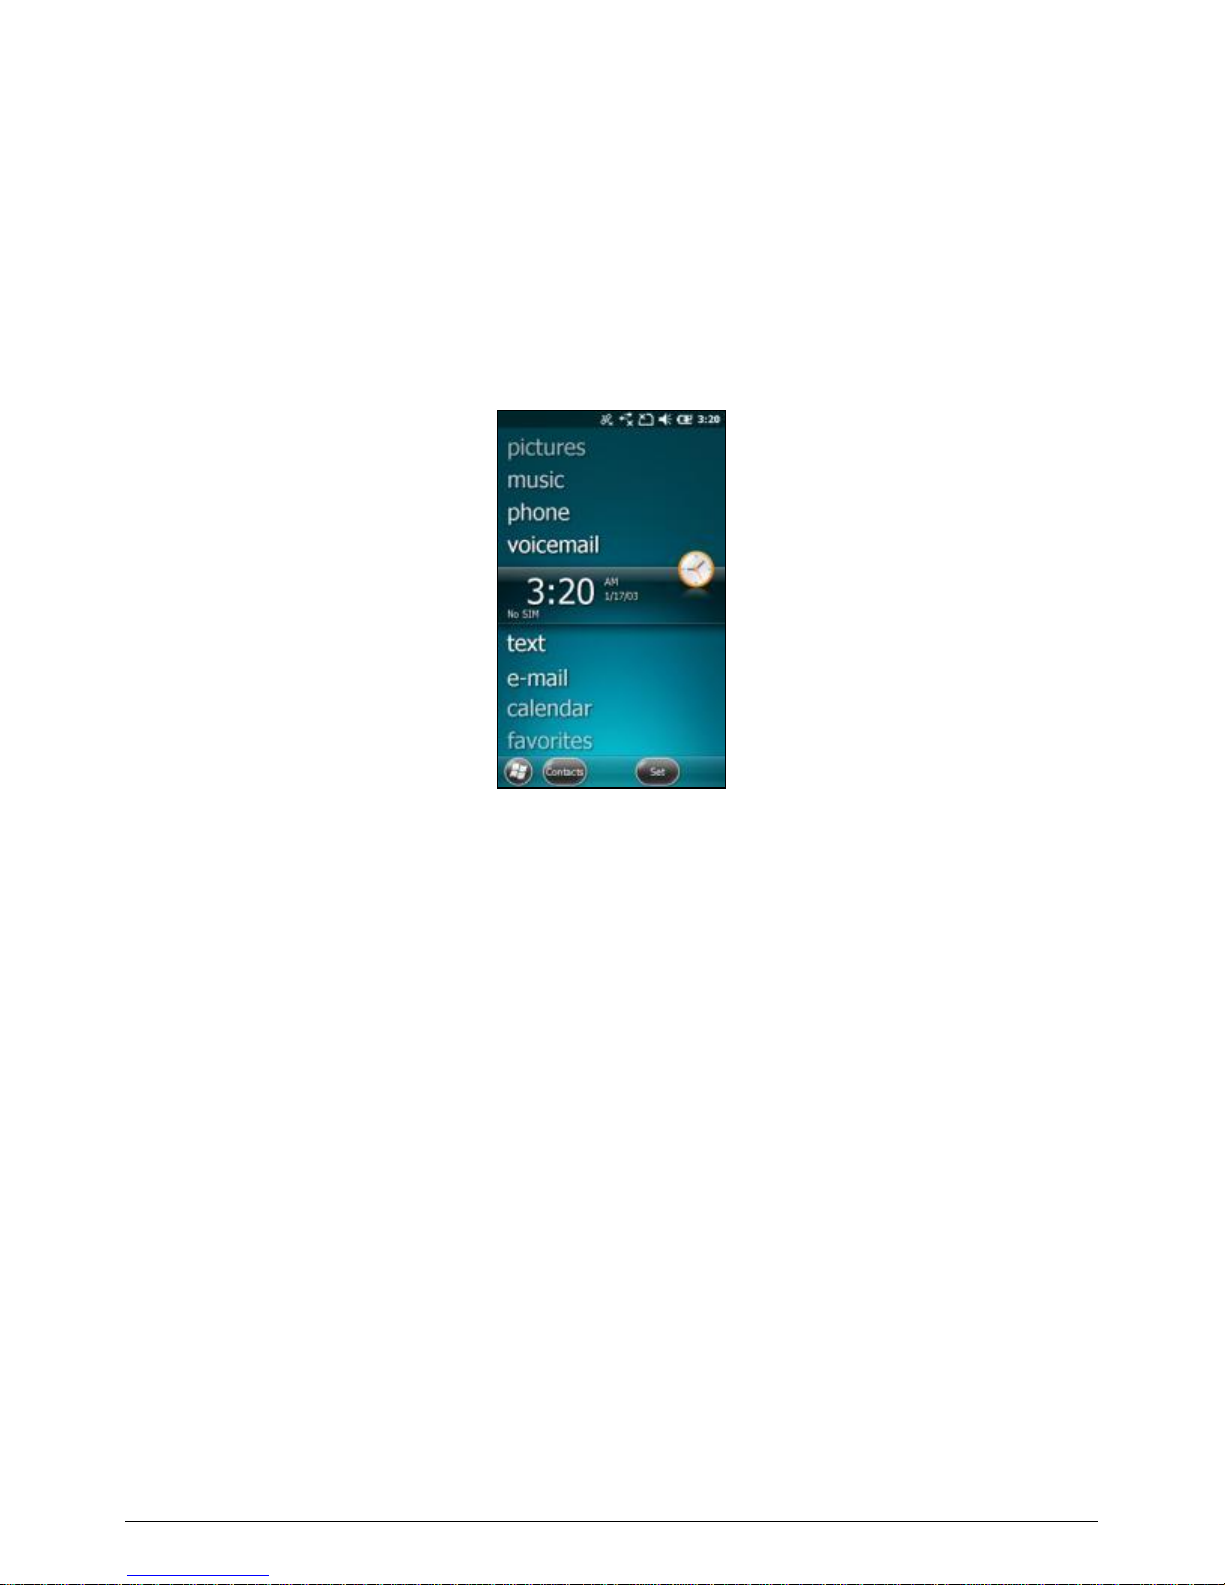
2.1 Home screen
The Home Screen is an easy way to launch common activities, such as
using the phone, checking text messages or checking e-mail. You can view
high-level information at a glance, with notifications for Live services,
e-mail, voicemail, SMS/MMS and more.
To navigate the Home screen, touch and slide your fingertip up or down
on the screen; or drag the highlight bar to the desired item on the screen.
The programs provided on the Home screen include:
pictures: Select your photos from this menu.
music: Select your music from this menu.
phone: If your device has the phone feature, select this item to
use the phone.
voicemail: If your device has the phone feature, select this item
to access your voicemail.
time: Select your time zone, set the time and date and set
alarms.
text: If your device has the phone feature, select this item to
compose and read text messages.
e-mail: Select this item to read and compose e-mail.

13
calendar: Select this item to manage appointments.
favorites: Select this item to use Internet Explorer Mobile.
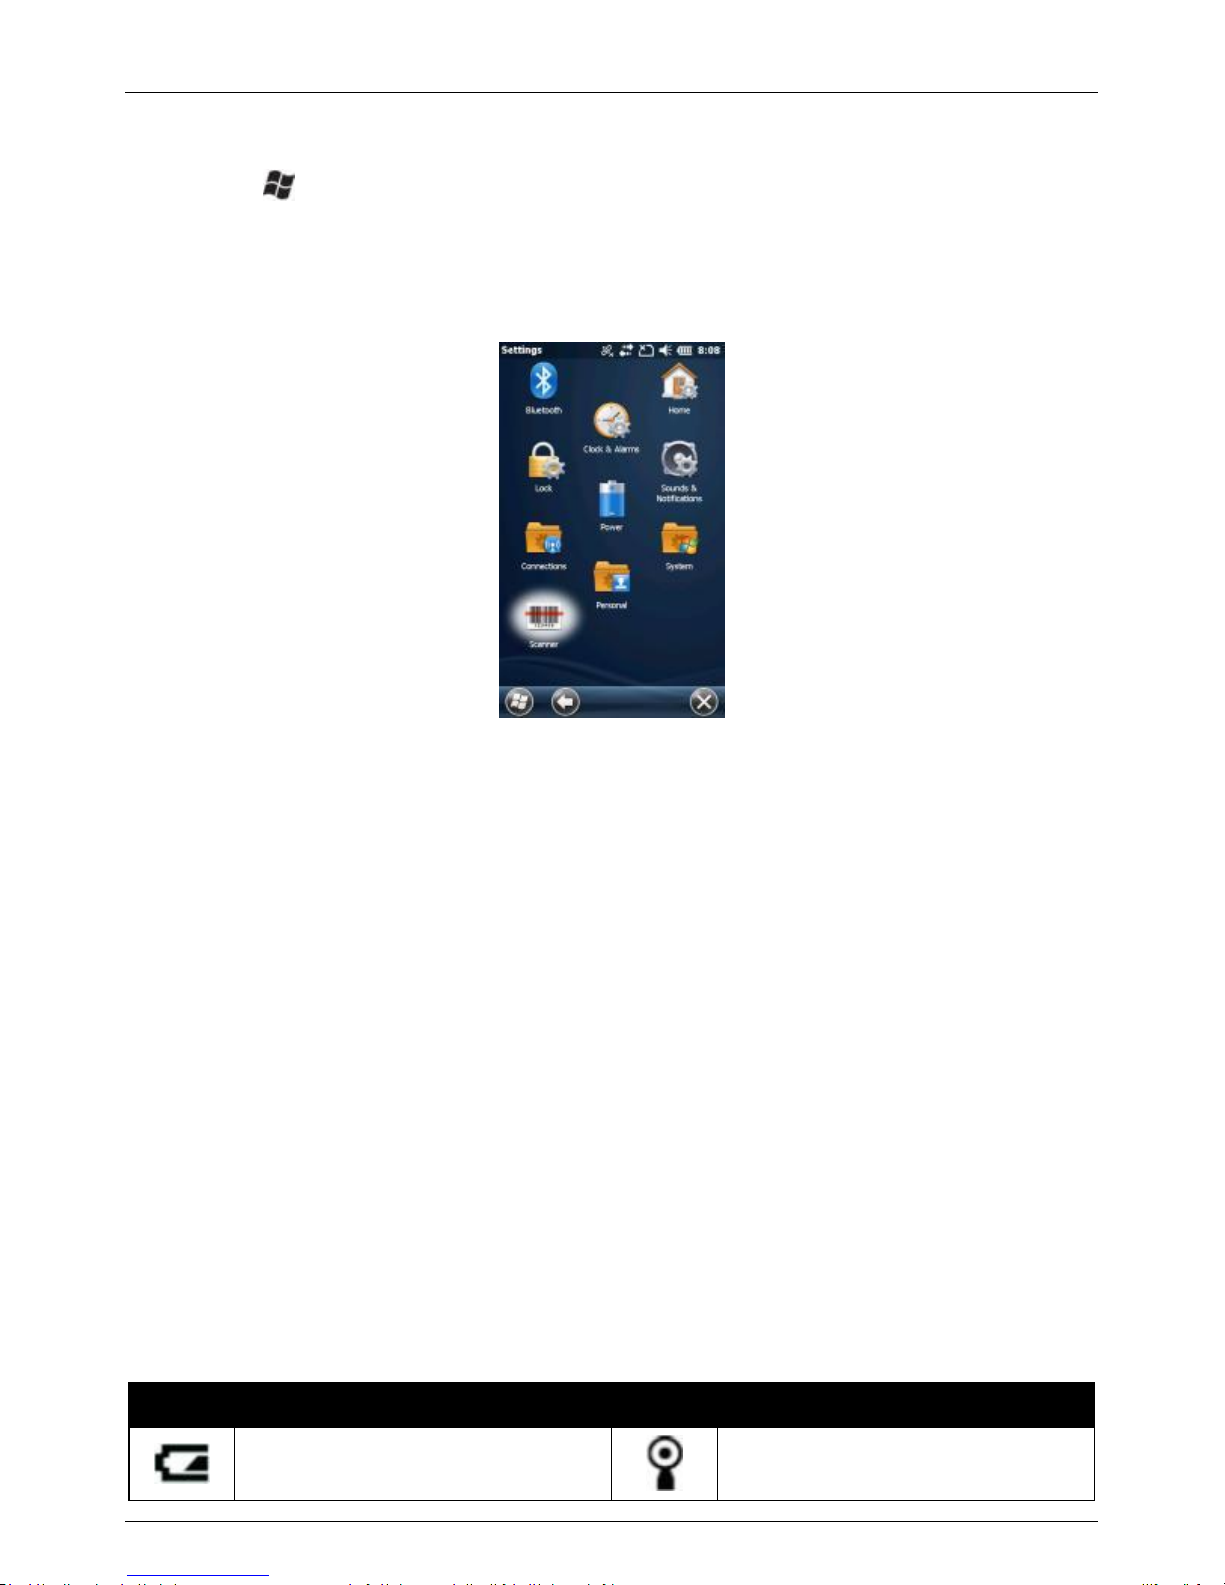
You can change to the classic Windows Mobile Today screen by tapping
> Settings > Home.
1. On the Appearance tab, change the theme to Classic Blue.
2. On the Items tab, uncheck Windows Default and select the
items that you would like to appear on the Home screen.
Juno T41
User Manual
14
2.2 Start screen
Press the button to access the Start screen where you can easily
access the software installed on your device. Slide your fingertip up/down
on the Start screen to browse more items and then access an item by
tapping on the item.
2.3 Title bar
In Windows Embedded Handheld, the title bar is located at the top of the
screen and it is touchable. Tap anywhere on the title bar to reveal a list of
vertical icon slots, representing different categories of icons. Tap an icon to
get additional notification or status information. The title bar also provides
access to the Magnify tool, providing a closer look at the data on the
screen. Simply tap the Magnify icon on the right end of the title bar to end
magnify mode.
The Start, OK, and Close (X) icons have been moved from the Title bar to
the Tile bar to improve consistency. Now, all navigation controls—Start,
OK and Close—are in one place.
2.3.1 Title bar status indicators
The following table lists common status indicators seen in the Title bar.
Icon
Description
Icon
Description
Battery power is low
Other networks are detected.
Tap to access an available

Juno T41
User Manual
15
network
Battery power is very low
Wireless network connected
Battery communication error
Active connection, but not
currently synchronizing
Battery charging
Inactive connection to computer
or wireless network
Battery level
Synchronizing
Battery out of temperature
range WARNING
Synchronizing error
Instant messages received
Pending alarm
Speaker is on
Phone is turned on and signal
strength
Speaker is off (or in mute
position)
Phone is turned off. To turn it
on, tap this icon
SIM card missing
No signal
Faulty SIM card
No service. Phone connection
unavailable or network error.
E-mail has been received
Lost signal. The device is
searching for a signal.
Tap to view more notifications
EDGE network is available
Data call is in progress
EDGE network connected
Roaming mode
GPRS network available
3G connected
GPRS network connected
Airplane mode enabled. The
device radios are all off.
HSDPA network available
GPS receiver is off.
GPS receiver is on.
Vibrate mode is on
Juno T41
User Manual
16
2.4 Tile bar
The Tile bar is located at the bottom of the screen and the information
displayed there is more uniform than on earlier versions of Windows®
Mobile operating systems. The Tile bar uses touchable tiles, and these
tiles can be activated by pressing the corresponding buttons on front
keypad of your device.
Touchable tiles can be text strings or icons, depending on the screen, and
they are at fixed positions on the Tile bar. For example, the Start icon is
always in the far left position, and the OK or Close icon is always on the far
right. If the Tile bar has a Keyboard icon, it is always in the third, or center
position; if it has additional menu or feature access icons, they will be on
either side of the Keyboard icon.
The buttons on the bezel below the screen correspond to the touchable
tiles on the Tile bar. Press a button to activate the associated tile.
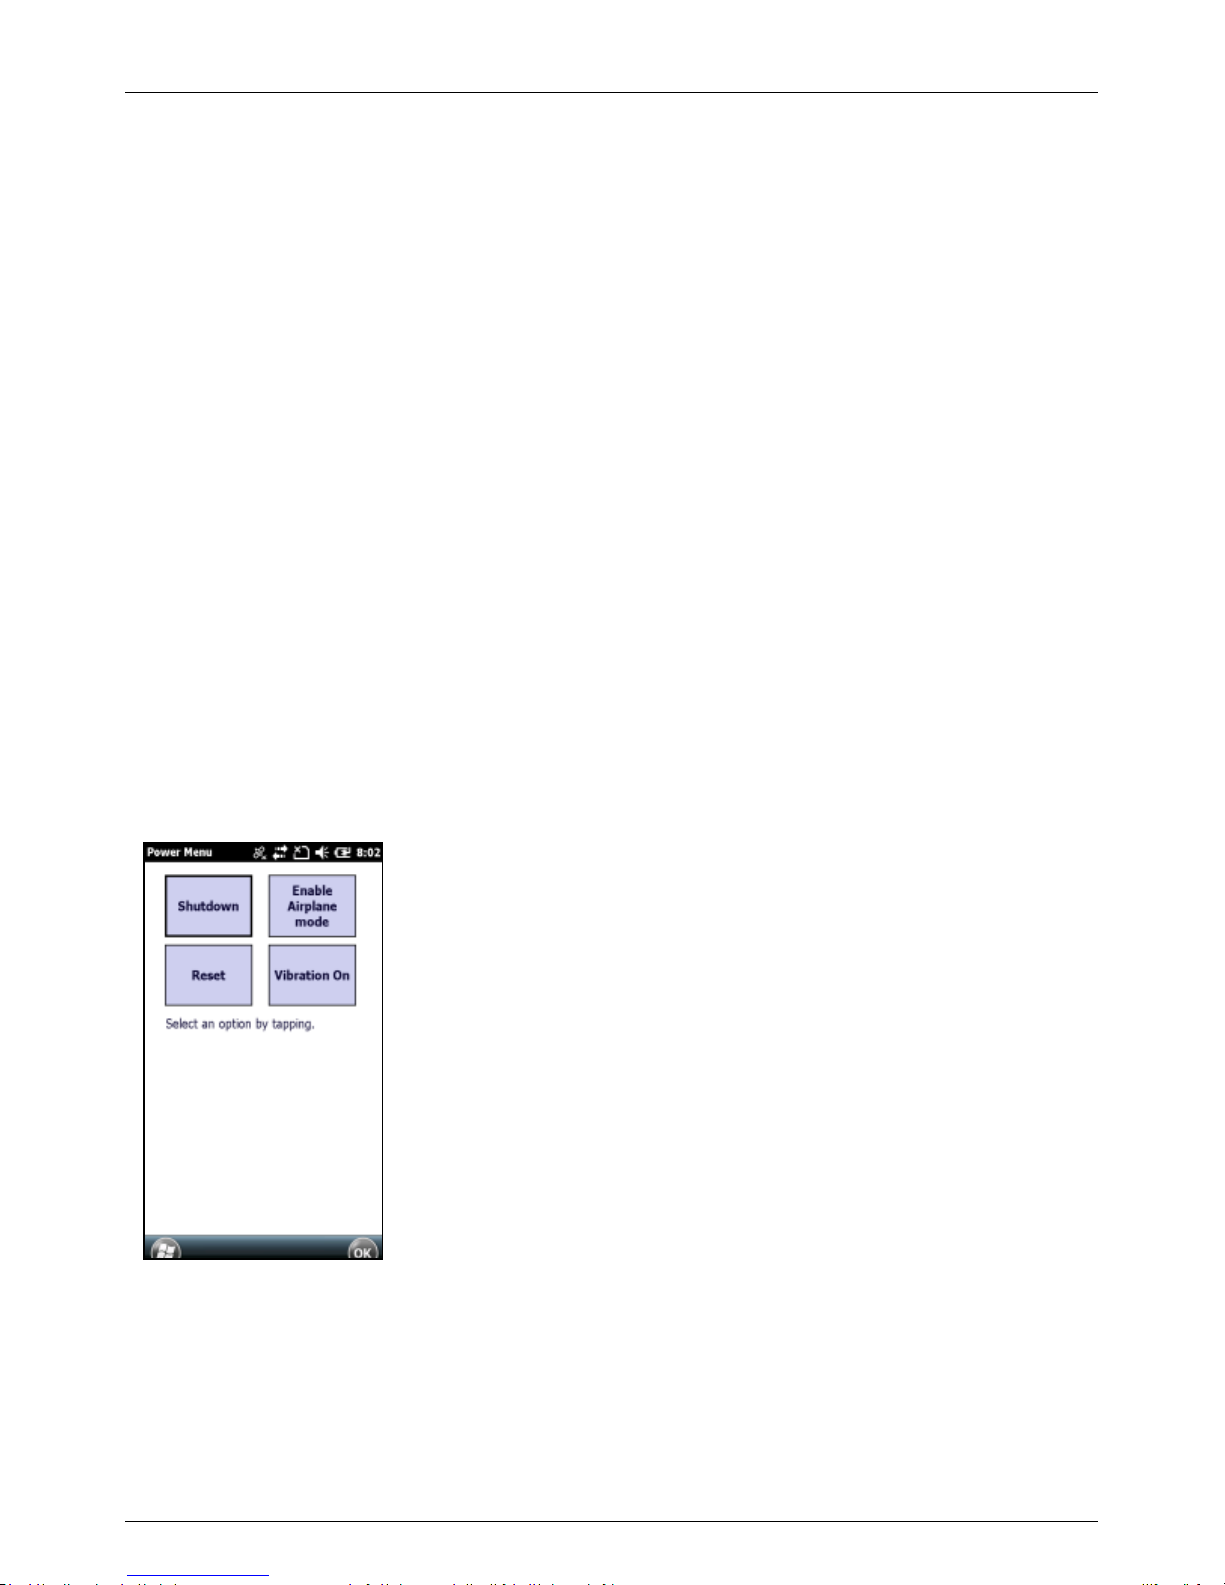
2.5 Power menu
Press and hold the POWER button for about 3 seconds until the Power
Menu appears. Tap an option or OK to exit.
Shutdown: Turn off the device.
Enable Airplane mode: Enable the
Airplane mode for the device.
Disable Airplane mode: Disable the
Airplane mode for the device.
Reset: Restart the device.
Vibration On: Enable the Vibration
mode for the device.
NOTE: If the Power Menu does not appear
when the POWER button is held down,
and/or if you continue to hold down the
POWER button for at least 7 seconds, the
device will perform a hardware reset. It may
take a few seconds for the device to start
after the POWER button has been released.
 Loading...