

Page 1

USER GUIDE
Trimble Juno 5 series handheld
Version 1.00
Revision C
July 2013
1
Page 2

Corporate Office
10368 WestmoorDrive
Suite #100
Westminster,CO 80021
USA
www.trimble.com
Legal Notices
© 2012-2013, TrimbleNavigationLimited. Allrights reserved.
Trimble,the Globe& Triangle logo, Juno and GPS Pathfinderare
trademarks ofTrimble Navigation Limited,registeredin the United
States andin othercountries. TerraSync,and VRS re trademarks of
Trimble Navigation Limited.
Microsoft,ActiveSync, Excel,OneNote,Outlook, PowerPoint,Windows,
Windows Live, Windows Media,and WindowsVista areeither
registered trademarks or trademarks ofMicrosoft Corporation in the
United States and/orother countries.
The Bluetoothwordmark andlogos are owned by the BluetoothSIG,
Inc. and any use of suchmarks by TrimbleNavigation Limitedis under
license.
All othertrademarks are the property of their respective owners.
Release Notice
This is the July 2013 release (RevisionC) of the TrimbleJuno5 series
handheld documentation.
Lim ited Warranty Terms and Conditions
Product Li mited Warranty
Subjecttothe terms and conditions setforth herein,Trimble Navigation
Limited (“Trimble”) warrants that for a period of (1) year from date of
purchase this Trimble product(the “Product”) willsubstantially conform
toTrimble's publicly available specifications for the Product and that the
hardware and any storage media components of theProductwillbe
substantially free from defects in materials and workmanship.
Product Software
Productsoftware,whetherbuiltintohardware circuitry as firmware,
provided as a standalone computer software product,embedded in flash
memory,orstoredonmagnetic or othermedia,is licensed solely for use
withoras anintegralpartof the Product and isnotsold. The termsof the
end user license agreement,as includedbelow,govern the use of the
ProductSoftware,including any differing limitedwarranty terms,
exclusionsand limitations,which shall controlover the terms and
conditions set forthinthe limitedProductwarranty.
Warranty Remedies
If theTrimble Product fails during the warranty periodforreasons
coveredby this limitedwarranty andyou notify Trimbleof such failure
during the warranty period,Trimble willrepairOR replace the
nonconforming Productwithnew,equivalenttonew,orreconditioned
partsorProduct,OR refundtheProductpurchase price paid by you, at
Trimble’s option,uponyourreturnof the Productin accordance with
Trimble's product return proceduresthenin effect.
How to Obtain Warranty Service
To obtain warranty service for the Product,please contactyour Trimble
dealer. Alternatively, you may contactTrimble to request warranty
service at +1-408-481-6940 (24 hours a day) oremailyour requestto
trimble_support@trimble.com. Please be preparedto provide:
– yourname, address,and telephone numbers;
– proof of purchase;
– a copy of this Trimblewarranty
– a description of the nonconforming Product including the model
number; and
– an explanation of the problem.
The customerservice representative may needadditional information
fromyou depending on the natureof the problem.
Warranty Exclusions and Disclaimer
This Product limitedwarranty shallonly apply intheevent andtothe
extentthat (i) the Product is properly andcorrectly installed,configured,
interfaced,maintained,stored,and operatedin accordance with
Trimble's applicableoperator's manualand specifications,and; (ii) the
Productis not modifiedormisused. This Product limitedwarranty shall
notapply to, and Trimbleshall not be responsible for,defectsor
performanceproblems resulting from (i) the combinationor utilizationof
theProductwithhardware or software products,information,data,
systems, interfaces,ordevices not made, supplied, or specifiedby
Trimble; (ii) the operation of the Product underany specification other
than,or inadditionto,Trimble's standardspecifications for its products;
(iii) the unauthorizedinstallation, modification, or use ofthe Product; (iv)
damage causedby: accident,lightning or otherelectricaldischarge, fresh
orsalt water immersionorspray (outsideof Product specifications); or
exposure to environmental conditions for whichtheProductis not
intended; (v) normal wear andtear on consumable parts (e.g.,
batteries); or (vi) cosmetic damage. Trimbledoes not warrantor
guarantee the resultsobtained through the use of the Product or
Software,or that software components will operateerrorfree.
NOTICE REGARDINGPRODUCTS EQUIPPED WITH TECHNOLOGY
CAPABLEOF TRACKING SATELLITE SIGNALS FROM SATELLITE BASED
AUGMENTATIONSYSTEMS (SBAS) (WAAS, EGNOS, ANDMSAS),
OMNISTAR, GPS, MODERNIZED GPS OR GLONASS SATELLITES, OR
FROM IALA BEACON SOURCES: TRIMBLE IS NOT RESPONSIBLE FOR
THE OPERATION OR FAILURE OF OPERATION OF ANY SATELLITE
BASED POSITIONING SYSTEM OR THE AVAILABILITY OF ANY
SATELLITE BASED POSITIONING SIGNALS.
THE FOREGOING LIMITED WARRANTY TERMS STATE TRIMBLE’S
ENTIRE LIABILITY, ANDYOUR EXCLUSIVE REMEDIES, RELATING TO THE
TRIMBLE PRODUCT. EXCEPTAS OTHERWISE EXPRESSLY PROVIDED
HEREIN,THE PRODUCT,AND ACCOMPANYINGDOCUMENTATION AND
MATERIALS ARE PROVIDED “AS-IS” ANDWITHOUT EXPRESS OR
IMPLIED WARRANTY OF ANY KIND, BY EITHER TRIMBLE OR ANYONE
WHO HAS BEEN INVOLVED IN ITS CREATION,PRODUCTION,
INSTALLATION, OR DISTRIBUTION, INCLUDING, BUT NOT LIMITED TO,
THE IMPLIED WARRANTIES OF MERCHANTABILITY ANDFITNESS FOR
A PARTICULAR PURPOSE, TITLE, AND NONINFRINGEMENT. THE
STATED EXPRESS WARRANTIES ARE INLIEU OF ALLOBLIGATIONS OR
LIABILITIES ON THE PART OF TRIMBLE ARISING OUT OF, OR IN
CONNECTIONWITH, ANYPRODUCT. BECAUSE SOME STATES AND
JURISDICTIONS DO NOT ALLOW LIMITATIONS ON DURATION OR THE
EXCLUSION OF AN IMPLIED WARRANTY,THE ABOVE LIMITATION
MAY NOT APPLYTO YOU.
Lim itation of Liability
TRIMBLE'S ENTIRE LIABILITY UNDERANY PROVISION HEREIN SHALL BE
LIMITED TO THE AMOUNT PAID BY YOU FOR THE PRODUCT. TO THE
MAXIMUM EXTENT PERMITTED BY APPLICABLE LAW,IN NO EVENT
SHALL TRIMBLE ORITS SUPPLIERS BELIABLE FOR ANY INDIRECT,
SPECIAL, INCIDENTAL,OR CONSEQUENTIAL DAMAGE WHATSOEVER
UNDER ANY CIRCUMSTANCE ORLEGAL THEORY RELATING IN ANYWAY
TO THE PRODUCTS, SOFTWARE AND ACCOMPANYING
DOCUMENTATIONAND MATERIALS, (INCLUDING,WITHOUT
LIMITATION,DAMAGES FOR LOSS OF BUSINESS PROFITS, BUSINESS
INTERRUPTION, LOSS OF DATA, OR ANY OTHER PECUNIARY LOSS),
REGARDLESS OF WHETHER TRIMBLE HAS BEENADVISED OF THE
POSSIBILITY OF ANY SUCHLOSS AND REGARDLESS OF THE COURSE OF
DEALING WHICHDEVELOPS OR HAS DEVELOPED BETWEEN YOU AND
TRIMBLE. BECAUSE SOME STATES AND JURISDICTIONS DO NOT
ALLOW THE EXCLUSION OR LIMITATION OF LIABILITY FOR
CONSEQUENTIAL OR INCIDENTAL DAMAGES, THE ABOVE LIMITATION
MAY NOT APPLYTO YOU.
PLEASE NOTE: THE ABOVE TRIMBLE LIMITED WARRANTY PROVISIONS
WILL NOT APPLY TO PRODUCTS PURCHASED IN THOSE JURISDICTIONS
(E.G., MEMBER STATES OF THE EUROPEAN ECONOMIC AREA) IN
WHICH PRODUCT WARRANTIES ARE THERESPONSIBILITY OF THE
LOCAL DEALER FROM WHOM THE PRODUCTS AREACQUIRED. IN SUCH
A CASE,PLEASE CONTACT YOURTRIMBLE DEALERFOR APPLICABLE
WARRANTY INFORMATION.
Notice to Australian Purchasers - The Australian C onsumer
Law
Our goods come with guarantees that cannotbe excludedunderthe
Australian ConsumerLaw. Youare entitledtoa replacementorrefund
fora major failureand for compensationforany otherreasonably
foreseeable loss or damage. You are alsoentitledto have the goods
repaired or replacedif the goodsfail to be ofacceptable quality and the
failure does not amount to a majorfailure.
Trimble's warranty,as set out in the user manualaccompanying this
statement, or as described in the warranty card accompanying the
Productyou purchased,is inadditionto any mandatory rights and
remedies that youmay have underthe AustralianConsumer Law.
Trimble Juno 5 Series User Guide 2
Page 3

Official L anguage
THE OFFICIAL LANGUAGE OF THESE TERMS AND CONDITIONS IS
ENGLISH. IN THE EVENT OF A CONFLICT BETWEEN ENGLISH AND
OTHER LANGUAGE VERSIONS, THE ENGLISH LANGUAGESHALL
CONTROL
End User License Agreement for Product Software
IMPORTANT,READ CAREFULLY. THIS ENDUSER LICENSE AGREEMENT
(“EULA”)IS A LEGAL AGREEMENT BETWEENYOU ANDTrimble
NavigationLimited (“Trimble”)and applies to the computersoftware
provided with the Trimble productpurchased by you (whetherbuiltinto
hardware circuitry as firmware,embedded in flash memory ora PCMCIA
card,or stored on magnetic or other media), or providedas a standalonecomputer softwareproduct,and includes any accompanying
writtenmaterials such as a user's guideorproductmanual,as well as
any "online"or electronicdocumentation("Software" or “Product
Software”). This EULA willalso apply toany Software errorcorrections,
updatesand upgrades subsequently furnishedby Trimble,unless such
are accompaniedby differentlicense terms andconditions,whichwill
govern theiruse. Youhave acquired a Trimble Product ("Device") that
includes Software,some of which was licensed by Trimble from
Microsoft Corporationor its affiliates (collectively "Microsoft"). The
Softwarelicensedfrom Microsoft, as wellas associatedupdates,
supplements,internet-based services andsupport services, media,
printedmaterials, and "online"orelectronic documentation("Microsoft
Software"),areprotectedunderthis EULA. The Softwareis also
protectedby copyright laws andinternationalcopyrighttreaties,as well
as otherintellectual property laws and treaties. The Software is licensed,
notsold.
BY USINGTHE SOFTWARE,INCLUDING USE ON THIS DEVICE, YOU
ACCEPT THESE TERMS. IF YOU DO NOT ACCEPT THEM,DO NOT USE
THE DEVICE OR SOFTWARE. INSTEAD CONTACT TRIMBLE FOR A
REFUNDOR CREDIT. As describedbelow,using some features also
operates as yourconsent to the transmission of certainstandard
computerinformation for Internet-based services.
WARNING: If the Software containsvoice operatedtechnologies,then
operating this Software requires user attention. Diverting attention
away fromthe road while driving can possibly cause an accidentorother
serious consequence. Even occasional,short diversionsof attention can
be dangerous if yourattentionis divertedaway from your driving task at
a critical time. Trimbleand Microsoftmake no representations,
warranties or otherdeterminations that ANY use of this Software is legal,
safe, or in any mannerrecommendedorintended whiledriving or
otherwiseoperating a motorvehicle. This EULA does not grantyou any
rights with respect to the Windows Mobile Device Center,Microsoft
ActiveSync orMicrosoftOutlook 2007 Trial whichare subject to the
licenses accompanying those items.
1 SOFTWARE PRODUCT LICENSE
1.1LicenseGrant. Subjectto the terms andconditions of this EULA,
Trimble grants you a non-exclusive right to use onecopy of the Software
in a machine-readableformonly as installed on the Device. Suchuse is
limited to use with the Device for whichit was intended,as set forth in
theproductdocumentation. The Device Software is licensed with the
Device as a single integratedproduct. The Device Software installed in
read only memory (“ROM”) of the Devicemay only be usedas partof
theDevice intowhichitwas embedded. Youmay use the installation
Softwarefroma computersolely todownload the Software to one
Device. In no event shall the installation Software be usedto download
theSoftware ontomore than one Device. A license for the Software
may notbe shared or used concurrently ondifferentcomputersor
Devices.
1.2Scope of License. ThisEULA only gives you some rights to use the
Software. Trimble and Microsoftreserve allotherrights. Unless
applicable law gives youmore rightsdespitethislimitation,you may use
theSoftware only as expressly permitted in this EULA. In doing so, you
must comply with any technical limitationsin the Software that allow
you to useit only in certainways. Except as expressly providedin this
EULA,rights to access theSoftware on this Devicedo not give you any
righttoimplement Microsoftpatents or other Microsoftintellectual
property insoftware or devicesthataccess this device. You may use
remote access technologies in the software such as RemoteDesktop
Mobileto access the Software remotely from a computeror server. You
are responsible for obtaining any licenses required for use of the
protocols to access othersoftware.
1.3Proof of License. If you acquired the Software on the Device,or on
a disc or othermedia, a genuine Certificateof Authenticity label with a
genuinecopy of the Software identifies licensed software. To be valid,
thislabel must be affixedtotheDevice, or included on orin the software
packaging. If you receive the label separately, it is notvalid. Youshould
keep the label onthedevice or packaging to prove that youare licensed
touse the Software. To identify genuine MicrosoftSoftware,see
http://www.howtotell.com.
1.4Connectivity Software. Your Devicepackage may include
Windows Mobile Device CenterorMicrosoft ActiveSync software. If it is
included,then you may installand use itinaccordance with the license
termsthatare provided withit. If nolicense terms areprovided, then
you may install and use only one (1) copy of the Software on a single
computer.
1.5Digital Certificates. The Software uses digitalcertificates in X.509
format. These digital certificates are usedforauthentication.
1.6Phone Functionality. If theDevice Software includesphone
functionality,all or certainportions oftheDevice Software may be
inoperableif youdo not have and maintain a service accountwith a
wireless telecommunicationcarrier(“MobileOperator”),orif the Mobile
Operator’snetwork isnotoperating or configuredtooperate with the
Device.
1.7Upgrade Software. In theevent that any upgrades to the
Software,including MicrosoftSoftware,areprovided under this EULA,
thenthe following shall apply: you may followtheapplicable instructions
accompanying this Software and installone (1) copy ofthe Software on
one (1) Devicepresently containing a licensedcopy of a predecessor
versionof the Software (unless this EULAindicates that this Software
copy has been licensedforinstallationon multiple Devices). NO
REPRESENTATION OR WARRANTY IS MADE BYTRIMBLE OR
MICROSOFT WITH RESPECT TO THE COMPATIBILITY OF THIS
SOFTWARE WITH ANY DEVICE ORANY OTHEREXISTING SOFTWARE
OR DATA OF ANY KIND CONTAINEDON SUCHDEVICES,AND NEITHER
TRIMBLE ORMICROSOFT SHALL BE RESPONSIBLE INANY REGARD
WITH RESPECT TO ANY LOSS, CORRUPTION, MODIFICATIONOR
INACCESSIBILITY OF ANY DATA,APPLICATIONS OR OTHERSOFTWARE
RESULTINGFROM THE INSTALLATION OF THE SOFTWARE ON ANY
DEVICE.
1.8Internet-Based Services Components. Microsoftprovides
Internetbased services withthe software. Microsoftmay change or
cancelthem at any time. The MicrosoftSoftwarefeaturesdescribed
belowconnectto Microsoftorservice providercomputersystems over
theInternet. In some cases,you will not receive a separate notice when
they connect. You may switchoff some ofthese features or not use
them. Formoreinformationaboutthese features, visit
http://go.microsoft.com/fwlink/?LinkId=81931. By using these
features,you consenttothe transmission of this information. Microsoft
does not use the information to identify or contactyou. Youmay notuse
these services inany way that couldharmthem or impair anyone else’s
use of them. You may not use the services totry togain unauthorized
access to any service, data, accountornetwork by any means.
1.9Device Information. The following features use Internet protocols,
which send totheappropriate systems device information, such as your
Internetprotocoladdress,thetype ofoperating system,browserand
name andversion of the Software you are using, and the language code
of the Device where you installedthe Software. Microsoftuses this
information to make the Internet-basedservices available to you. a)
Update Features: Windows Mobile Update feature providesyou the
ability toobtain and installSoftwareupdates on yourDevice if updates
are available. You may choose not to use this feature. Trimble and/or
your Mobile Operatormay notsupportthisfeatureoran update for your
device. b)Security Updates/DigitalRights Management. Content
owners use Windows Media digital rights managementtechnology
(WMDRM) toprotecttheir intellectualproperty, including copyrights.
This software and third party software use WMDRM to play and copy
WMDRM-protectedcontent. If the software fails to protectthe content,
contentowners may ask Microsofttorevoke the software'sability to
use WMDRM to play orcopy protected content. Revocationdoes not
affect othercontent. When you download licenses for protected content,
you agree that Microsoftmay includea revocationlistwiththelicenses.
Contentowners may require you to upgrade WMDRM to access their
content. Microsoftsoftware that includes WMDRM will ask foryour
consentpriortothe upgrade. If you decline an upgrade,you willnotbe
able to access content that requires the upgrade.
1.10AdditionalSoftware/Services. The Device Software may permit
Trimble,Microsoft,theiraffiliates and/ortheirdesignatedagent to
provide or make available to you Software updates,supplements,addon components,orInternet-based services components of the Software
afterthe date youobtainyourinitial copy oftheSoftware
(“Supplemental Components”).
Trimble Juno 5 Series User Guide 3
Page 4

1.10.1 If Trimble provides or makes available to you Supplemental
Components andno otherenduser license agreement terms are
provided along with the SupplementalComponents,then the terms of
thisEULA shall apply.
1.10.2 If Microsoft,its affiliates and/or its designated agentmakes
available SupplementalComponents,andno otherend user license
agreement terms are provided,then the terms of this EULA shallapply,
exceptthattheMicrosoft entity or affiliate entity providing the
Supplemental Component(s) shall be thelicensor of the Supplemental
Component(s).
1.10.3 Trimble,Microsoftandeach of theiraffiliates and/ortheir
designatedagents reserve the right to discontinueany Internetbased
services providedto you ormade availableto you through the use of the
Device Software.
1.11Links to Third Party Sites. If the Software provides links tothird
party websites,thoselinks are providedto youonly as a convenience,
and the inclusion of any link doesnotimply an endorsementof the third
party website by Microsoft or Trimble.
1.12Other Rights and Limitations. (1) TheSoftware contains
valuable trade secrets proprietary toTrimble andits suppliers. To the
extentpermittedby relevant law,you shall not,norallowany thirdparty
tocopy, decompile,disassemble or otherwise reverse engineerthe
Software,or attemptto do so, provided, however,that to the extent any
applicable mandatory laws (suchas, for example, nationallaws
implementingEC Directive 91/250 ontheLegal ProtectionofComputer
Programs) give you the right to performany of the aforementioned
activities withoutTrimble's consentin orderto gain certaininformation
abouttheSoftware for purposes specifiedin the respective statutes (i.e.,
interoperability),you hereby agree that,beforeexercising any such
rights, you shallfirst request such informationfromTrimble in writing
detailing the purpose for which youneed the information. Only if and
afterTrimble, at its solediscretion,partly orcompletely denies your
request,may you exercisesuch statutory rights. (2) This Software is
licensed as a singleproduct. You may notseparate its componentparts
foruse on more than one computernor make more copies of the
software than specifiedin this EULA. (3) You may not rent,lease,or lend
theSoftware. (4)Noservice bureau work, multiple-userlicense or
timesharing arrangement is permitted. Forpurposes of this EULA
“service bureauwork” shall be deemedto include,withoutlimitation,
use of the Software to process or to generate outputdata for the benefit
of,orforpurposes of rendering servicesto any third party overthe
Internetorother communications network. (5) You may make one
backup copy ofthe Software. Youmay use it only toreinstallthe
Softwareon the Device. (6) You may transfertheSoftware only withthe
Device,the Certificateof Authenticity label, and these license terms
directly to a third party. Before the transfer,thatparty mustagree that
these license terms apply tothetransferanduse of the Software. You
may notretain any copies of the Software including the backupcopy. (7)
The Software is subject to UnitedStates exportlaws and regulations.
You must comply with all domestic and international exportlaws and
regulations that apply totheSoftware. These laws includerestrictionson
destinations, end users, and enduse. Foradditionalinformation see
http://www.microsoft.com/exporting. (8) Without prejudice as toany
otherrights,Trimble may terminatethis EULA without notice if you fail to
comply with the terms andconditions of this EULA. In such event,you
must destroy all copiesof the Software andall of its componentparts.
(9) If the MicrosoftSoftwareincludes speech recognition component(s),
you should understand that speech recognition is aninherently statistical
process andthat recognitionerrors areinherentin the process. Neither
Trimble,Microsoft,norany oftheirsuppliers shallbe liable for any
damages arising out of errors in the speech recognition process. (10) You
may notpublish the Software for othersto copy. (11) You may not use
theSoftware for commercial software hosting services.
1.13NoticeRegarding the MPEG-4 Visual Standard. TheSoftware
may include MPEG-4 visual decoding technology. This technology is a
formatfordata compression of videoinformation. MPEG LA, L.L.C.
requiresthisnotice: USE OF THIS PRODUCT IN ANY MANNER THAT
COMPLIES WITH THE MPEG-4 VISUAL STANDARD IS PROHIBITED,
EXCEPT FOR USE DIRECTLY RELATED TO (A) DATA OR INFORMATION
(i) GENERATED BY ANDOBTAINEDWITHOUT CHARGEFROM A
CONSUMER NOT THEREBYENGAGEDIN A BUSINESS ENTERPRISE, AND
(ii)FORPERSONAL USE ONLY; AND(B) OTHERUSES SPECIFICALLY AND
SEPARATELY LICENSED BY MPEG LA, L.L.C. If you have questions about
theMPEG-4 visual standard,please contact MPEG LA,L.L.C., 250Steele
Street,Suite300,Denver,CO 80206; www.mpegla.com.
1.14If the Device Software is provided by Trimble separate from
theDevice onmedia such as a ROM chip,CD ROM disk(s) orvia web
download or othermeans, and is labeled“For UpgradePurposes Only”
you may install one (1) copy of such Device Software onto the Device as
a replacementcopy fortheexisting Device Software and use it
accordance withthisEULA, including any additionalend user license
agreement terms accompanying the upgrade DeviceSoftware.
1.15If any software component(s) is provided by Trimbleseparate
fromthe Device onCDROM disc(s)orvia webdownload or other
means, and labeled “For Upgrade Purposes Only,” you may (i) install
and use one(1) copy ofsuch component(s) on the computer(s) youuse
toexchange data with the Device as a replacementcopy fortheexisting
CompanionCD component(s).
1.16Copyright. All titleand copyrightsin and to the Software (including
butnotlimited to any images, photographs,animations,video,audio,
music,text and“applets,”incorporatedintotheSoftware),the
accompanying printed materials,and any copies oftheSoftware are
ownedby Trimble,or Microsoft(including MicrosoftCorporation), and
theirrespective suppliers. Youmay notcopy the printed materials
accompanying the Software. Alltitle and intellectualproperty rights in
and to the contentwhich may be accessedthrough use ofthe Software
is the property of the respective contentownerandmay be protected by
applicable copyrightorotherintellectualproperty laws andtreaties. This
EULA grants youno rights to use suchcontent. You shallnotremove,
cover or alter any of Trimble’s patent,copyright or trademark notices
placedupon, embedded in or displayed by the Software or on its
packaging and relatedmaterials. All rights notspecifically granted in this
EULA are reserved by Trimble,Microsoft,andtheirrespective suppliers.
1.17U.S. Government Restricted Rights. The Software is provided
with“RESTRICTED RIGHTS”. Use,duplication,ordisclosureby the United
States Government is subjecttorestrictionsas set forthinthisEULA, and
as providedin DFARS 227.7202-1(a) and 227.7202-3(a) (1995),DFARS
252.227-7013(c)(1)(ii) (OCT 1988), FAR 12.212(a) (1995),FAR 52.22719,or FAR52.227-14(ALT III),as applicable.
1.18Microsoft has contractually obligated Trimble to includethe
following terms in this EULA:
Product Support. The Product supportfor the Software is not
provided by Microsoft or its affiliates or subsidiaries. For product
support,please refertotheTrimble support numberprovided in the
documentation for the Device.
Not fault tolerant. The Software is notfaulttolerant. Trimble installed
theSoftware on the Deviceand is responsible for how itoperates on the
Device.
Restricted user. The MicrosoftSoftwarewas designed for systems that
do not require fail-safe performance. Youmay notuse the Microsoft
Softwarein any device or system in which a malfunctionof the
Microsoft Software would resultinforeseeablerisk of injury ordeathto
any person. This includesoperationof nuclearfacilities,aircraft
navigation or communicationsystems andair trafficcontrol.
No warranties for the software. Microsoftgives noexpress
warranties,guarantees or conditions regarding the MicrosoftSoftware.
Any warrantiesyou receive regarding the Deviceorthe Software do not
originate from,and are not binding on, Microsoftoritsaffiliates. When
allowedby yourlocallaws,Trimble andMicrosoftexcludeimplied
warranties of merchantability, fitness for a particularpurpose and noninfringement.
LIABILITY LIMITATIONS. Youcan recover from Microsoftand its
affiliates only directdamages uptofifty U.S. Dollars (U.S. $50.00),or
equivalentinlocalcurrency. Youcannotrecover any other damages,
including consequential,lostprofits, special,indirectorincidental
damages. This limitation applies to:
– Anything related to the Software, services, content (including code) on
thirdparty internet sites, or thirdparty programs,and
– claims forbreach of contract,breachof warranty,guarantee or
condition,strictliability,negligence,orother torttothe extentpermitted
by applicable law.
It alsoapplieseven ifMicrosoftshould have been aware ofthe
possibility ofthe damages. The above limitation may not apply toyou
because yourcountry may notallow the exclusion or limitationof
incidental, consequentialorotherdamages.
2 LIMITED WARRANTYFOR TRIMBLEPRODUCT SOFTWARE.
2.1Limited Warranty. Trimble warrants that the Software, exclusive of
theMicrosoftSoftware, willperform substantially inaccordance withthe
accompanying written materials for a periodof twelve (12) monthsfrom
thedate of purchase. This limitedwarranty gives you specificlegal
rights; you may have others, whichvary fromstate/jurisdiction to
state/jurisdiction. The above limited warranty doesnotapply to Fixes,
MinorUpdates, or MajorUpgrades of the Software afterexpiration of
thetwelve (12) monthlimited warranty period,allof whichare provided
“AS IS” and withoutwarranty unless otherwise specifiedin writing by
Trimble. Because the Software is inherently complexand may not be
Trimble Juno 5 Series User Guide 4
Page 5

completely free ofnonconformities, defects or errors,you areadvised to
verify yourwork. Trimble does notwarrant that the Software will
operate errorfreeor uninterrupted, willmeet yourneeds or
expectations, or that all nonconformitiescan or will be corrected.
2.2Software Fixes. During the limitedwarranty perioddescribedin
section 2.1 above, you willbe entitledtoreceive such Fixes to the
ProductSoftwarethatTrimble releases and makes commercially
available andforwhichitdoes not charge separately, subject to the
procedures for delivery topurchasers of Trimble productsgenerally. If
you have purchased the Product from an authorized Trimble dealer
ratherthan from Trimbledirectly,Trimble may, at itsoption,forwardthe
software Fix to the Trimble dealer for final distributionto you. Minor
Updates, MajorUpgrades, new products,orsubstantially new software
releases,as identified by Trimble,are expressly excludedfrom this
updateprocess andlimited warranty. Receiptof Software Fixesorother
enhancements shall not serve toextendthelimited warranty period. For
purposes of this warranty the following definitionsshall apply: (1) "Fix
(es)" means an errorcorrectionorotherupdate created to fix a previous
software versionthatdoes not substantially conform to its Trimble
specifications; (2)"MinorUpdate"occurs when enhancements are
made to current features in a softwareprogram; and(3) "Major
Upgrade"occurs when significantnew features are addedtosoftware,
orwhen a newproductcontaining newfeaturesreplacesthe further
developmentof a currentproduct line. Trimblereserves the right to
determine,inits sole discretion,whatconstitutes a Fix, Minor Update,or
Major Upgrade.
2.3Customer Remedies. Trimble’sand its suppliers’entire liability, and
your sole remedy, with respect to the Software shallbe either,at
Trimble’s option,(a) repairorreplacement of the Software, or (b) return
of the license fee paidfor any Softwarethat does not meet Trimble’s
limited warranty. This limited warranty is voidiffailure oftheSoftware
has resultedfrom (1) accident,misuse, abuse, or misapplication; (2)
alterationormodification of the Software withoutTrimble’s
authorization; (3) interactionwithsoftware or hardware not suppliedor
supportedby Trimble; (4) yourimproper,inadequate or unauthorized
installation,maintenance orstorage; or(5) if you violate the terms of
thisEULA. Any replacementSoftware willbe warrantedforthe
remainder of the originalwarranty periodorthirty (30) days, whichever
is longer.
2.4NO OTHER WARRANTIES. TO THE MAXIMUM EXTENT
PERMITTED BY APPLICABLE LAW,TRIMBLE ANDITS SUPPLIERS
DISCLAIM ALLOTHER WARRANTIES, TERMS ANDCONDITIONS,EITHER
EXPRESS OR IMPLIED, BY STATUTE, COMMON LAW OROTHERWISE,
INCLUDING BUT NOT LIMITED TO, IMPLIED WARRANTIES, TERMS AND
CONDITIONS OF MERCHANTABILITY AND FITNESS FORA PARTICULAR
PURPOSE, TITLE, AND NONINFRINGEMENT WITH REGARD TO THE
SOFTWARE, ITS SATISFACTORY QUALITY AND THE PROVISION OF OR
FAILURE TO PROVIDE SUPPORTSERVICES. TO THE EXTENT ALLOWED
BY APPLICABLE LAW,IMPLIED WARRANTIES,TERMS AND CONDITIONS
ON THE SOFTWARE ARE LIMITED TO NINETY (90) DAYS. Y0UMAY
HAVE OTHER LEGAL RIGHTS WHICH VARY FROM STATE/JURISDICTION
TO STATE/JURISDICTION. NO WARRANTIES FOR THE MICROSOFT
SOFTWARE. THE MICROSOFT SOFTWARE is provided “AS IS” and with
all faults,AND TRIMBLE PROVIDES NO WARRANTY WITH RESPECT
THERETO. THE ENTIRE RISK AS TO SATISFACTORY QUALITY,
PERFORMANCE,ACCURACY ANDEFFORT (INCLUDINGLACK OF
NEGLIGENCE) FOR THE MICROSOFT SOFTWARE IS WITH YOU. ALSO,
THERE IS NO WARRANTY AGAINST INTERFERENCE WITH YOUR
ENJOYMENT OF THE MICROSOFT SOFTWARE OR AGAINST
INFRINGEMENT.
2.5PLEASE NOTE: THE FOREGOING TRIMBLE LIMITED WARRANTY
PROVISIONS MAY NOT APPLY TO SOFTWARE PRODUCT LICENSES
PURCHASED IN THOSE JURISDICTIONS (SUCH AS COUNTRIES OF THE
EUROPEANUNION) IN WHICH PRODUCTWARRANTIES ARE OBTAINED
FROM THE LOCALDISTRIBUTOR. IN SUCHCASES, PLEASE CONTACT
YOUR TRIMBLE DEALER FOR APPLICABLEWARRANTY INFORMATION.
3 TRIMBLE LIMITATION OF LIABILITY.
3.1LIMITATION OFLIABILITY. TO THEMAXIMUM EXTENT
PERMITTED BY APPLICABLE LAW,IN NO EVENT SHALL TRIMBLEOR ITS
SUPPLIERS BE LIABLE FOR ANY SPECIAL, INCIDENTAL,INDIRECT,
CONSEQUENTIAL OR PUNITIVE DAMAGES HOWEVER CAUSED AND
REGARDLESS OF THE THEORY OF LIABILITY (INCLUDING,WITHOUT
LIMITATION,DAMAGES FOR LOSS OF BUSINESS PROFITS, BUSINESS
INTERRUPTION, LOSS OF BUSINESS INFORMATION, OR ANY OTHER
PECUNIARY LOSS) ARISINGOUT OF THE USE OR INABILITY TO USE THE
SOFTWARE, ORTHE PROVISION OF OR FAILURE TO PROVIDE
SUPPORT SERVICES, EVEN IF TRIMBLE HAS BEENADVISED OF THE
POSSIBILITY OF SUCH DAMAGES ANDNOTWITHSTANDINGANY
FAILURE OF ESSENTIAL PURPOSE OF ANY EXCLUSIVE REMEDY
PROVIDED IN THIS EULA. IN NO EVENT SHALL THE TOTAL
CUMULATIVE LIABILITY OF TRIMBLE ANDITS SUPPLIERS IN
CONNECTIONWITH THIS EULA ORTHE SOFTWARE,WHETHER BASED
ON CONTRACT, WARRANTY, TORT (INCLUDINGNEGLIGENCE), STRICT
LIABILITY OR OTHERWISE, EXCEED THE ACTUAL AMOUNT PAID TO
TRIMBLE FOR THE SOFTWARE LICENSE GIVING RISE TO THE CLAIM.
BECAUSE SOME STATES ANDJURISDICTIONS DO NOT ALLOW THE
EXCLUSION OR LIMITATION OF LIABILITY FOR CONSEQUENTIAL OR
INCIDENTAL DAMAGES, THE ABOVE LIMITATIONMAY NOT APPLY TO
YOU.
4 GENERAL.
4.1 ThisEULA shall begoverned by the laws oftheState ofCalifornia
and applicableUnited States Federallaw withoutreference to “conflict
of laws” principlesorprovisions. TheUnited NationsConventionon
Contracts for the International Sale of Goodswillnotapply to this EULA.
Jurisdictionand venue ofany dispute or courtaction arising from or
relatedtothis EULA orthe Software shall lie exclusively in or be
transferredtothe courts the County ofSanta Clara, California,and/orthe
United States District Courtfor the NorthernDistrictof California. You
hereby consent and agree not to contest,such jurisdiction,venue and
governing law.
4.2 Section 4.1 notwithstanding,if you acquired this product in Canada,
thisEULA is governedby the laws of the Province of Ontario,Canada. In
suchcase eachof the partiesto this EULA irrevocably attornsto the
jurisdiction of the courtsof the Provinceof Ontarioand furtheragrees to
commence any litigation that may arise underthisEULA in the courts
located in the JudicialDistrictof York, Provinceof Ontario. If you
acquired this productin the European Union,thisEULA is governed by
thelaws ofThe Netherlands,excluding its rules governing conflicts of
laws andexcluding the UnitedNations Convention on the International
Sale ofGoods. In such case each of the parties to this EULA irrevocably
attorns to the jurisdictionof the courtsof The Netherlands and further
agrees tocommence any litigation that may arise under this EULA inthe
courts of The Hague, The Netherlands.
4.3 Trimble reserves allrights not expressly granted by this EULA.
4.4 OfficialLanguage. The official language of this EULA andof any
documents relating theretois English. Forpurposes of interpretation,or
in the eventof a conflictbetweenEnglishand versions of this EULAor
relateddocumentsin any otherlanguage,the English language version
shall be controlling.
Registration
To receive informationregarding updates and newproducts, please
contact your local dealer or visitthe Trimblewebsiteat
www.trimble.com/register. Uponregistrationyou may select the
newsletter,upgrade, or new productinformationyou desire.
Notices
FCC Regulations
This device complieswithpart15 of the FCCRules. Operation is subject
tothe following two conditions: (1) This device may not cause harmful
interference,and (2) this devicemust accept any interference received,
including interferencethatmay cause undesiredoperation.
This device has been tested andfound to comply with the limits for a
Class B digital device, pursuanttoPart15 of the FCCRules. These limits
are designed to provide reasonableprotection againstharmful
interference in a residential installation. This equipmentgenerates,uses
and can radiate radiofrequency energy and,if not installedand used in
accordance withthe instructions,may cause harmful interference to
radiocommunications. However, there is noguarantee that interference
willnotoccurin a particular installation if this equipmentdoes cause
harmfulinterference to radio or televisionreception, whichcan be
determinedby turning the equipmentoff and on. The user is
encouraged to try to correct the interferenceby oneormoreof the
following measures:
- Reorientor relocate the receiving antenna.
- Increase the separationbetweenthe equipment and receiver.
- Connecttheequipment intoan outletona circuit different from that to
which the receiver is connected.
- Consultthedealer or an experienced radio/TV technicianforhelp.
Changes and modificationsnotexpressly approved by themanufacturer
orregistrant of this equipmentcan void your authority to operate this
equipment underFederal Communications Commissionrules.
The radios in this device have been designedand manufactured to not
exceedstipulatedemissionlimits for exposure to radiofrequency (RF)
energy as required by theFederal CommunicationsCommission of the
Trimble Juno 5 Series User Guide 5
Page 6
U.S. Government47 C.F.R. § 2.1091 and 2.1093. The external antenna
connectorprovided in this device is for GNSS antennas only.
IC
Operation is subjectto the following two conditions: (1) this device may
notcause interference,and (2) this device mustacceptany interference,
including interferencethatmay cause undesiredoperationof the device.
This Class Bdigital apparatus complies withCanadianICES-003.
Cetappareilnumériquede la classe B estconforme à la norme NMB-003
du Canada.
This Category II radio communicationdevice complieswithIndustry
Canada Standard RSS-310.
Ce dispositif de radiocommunicationde catégorie II respecte la norme
CNR-310 d’IndustrieCanada.
IMPORTANT NOTE:
IC Radiation ExposureStatement
This EUT iscompliant withSAR forgeneralpopulation/uncontrolled
exposure limitsin ICRSS-102 andhad been tested in accordance with
themeasurementmethodsand procedures specifiedin IEEE 1528. This
equipment shouldbe installedand operatedwithminimum distance 0.5
cm between the radiator& yourbody.
This device andits antenna(s) must not be co-located or operating in
conjunctionwith any otherantenna ortransmitter. The County Code
Selection feature is disabled for products marketed in the US/Canada.
CE
a. Caution:
• Risk of explosion if battery replacedby an incorrecttype.
• Dispose of used batteriesaccording to the instructions.
b. Make surethe temperature for adapter willnotbe higher than 40˚C.
CE SARCompliance
This device meetsthe EU requirements(1999/519/EC) on the limitation
of exposure of the generalpublicto electromagneticfieldsby way of
healthprotection.
The limits are part of extensive recommendations for the protectionof
thegeneral public. These recommendations have been developed and
checked by independentscientific organizations through regular and
thoroughevaluationsof scientific studies. Theunitof measurement for
theEuropeanCouncil's recommendedlimitfor mobile devices is the
"SpecificAbsorption Rate" (SAR),and the SAR limitis 2.0 W/ kg
averaged over 10 gram of body tissue. It meets the requirements of the
InternationalCommission on Non-Ionizing Radiation Protection(ICNIRP).
For body wornoperation,this devicehas beentestedand meets the
ICNIRP exposure guidelines and the EuropeanStandard EN 62311 and
EN 62209-2, for use with dedicatedaccessories. Useof other accessories
which containmetals may not ensure compliance with ICNIRPexposure
guidelines.
Canada
This digital apparatus does not exceed the Class Blimits for radio noise
emissionsfromdigitalapparatus as set out in the radio interference
regulations of the Canadian Departmentof Communications.
Le présent appareilnumériquen'émet pas debruits radioélectriques
dépassant les limitesapplicables auxappareils numériquesde Classe B
prescrites dansle règlement sur le brouillage radioélectriqueédicté par
le Ministèredes Communications du Canada.
Antenna Statement
Under Industry Canada regulations, this radiotransmittermay only
operate using an antenna of a type and maximum (or lesser) gain
approved forthe transmitterby Industry Canada. To reduce potential
radiointerference to otherusers,theantenna type andits gain shouldbe
so chosen that the equivalent isotropically radiatedpower(e.i.r.p.) is not
morethan that necessary forsuccessful communication. Conformément
à laréglementationd'Industrie Canada, le présentémetteurradio peut
fonctionneravec une antenne d'un type etd'ungain maximal(ou
inférieur) approuvé pourl'émetteurpar Industrie Canada. Dans le butde
réduireles risques de brouillage radioélectrique à l'intentiondes autres
utilisateurs,il faut choisirle type d'antenne et songain de sorte que la
puissanceisotroperayonnée équivalente (p.i.r.e.) ne dépasse pas
l'intensité nécessaire à l'établissement d'unecommunication
satisfaisante.
Licence exempt
This device complieswithIndustry Canada licence-exemptRSS standard
(s). Operation is subjecttothe following two conditions:
(1) this devicemay notcause interference,and
(2) this devicemust accept any interference, including interferencethat
may cause undesiredoperationof the device.
Le présent appareilest conforme auxCNR d'Industrie Canada applicables
aux appareilsradioexemptsde licence. L'exploitation est autoriséeaux
deuxconditions suivantes :
(1) l'appareilne doitpas produirede brouillage, et
(2) l'utilisateurde l'appareildoit acceptertoutbrouillage radioélectrique
subi,même si le brouillage estsusceptible d'en compromettre le
fonctionnement.
Europe / EUConformance
The following CEcompliance
information is applicableto this device
thatcarry the following CE mark:
This product has beentestedand found to comply with all requirements
forCE Marking andsale within the EuropeanEconomic Area (EEA).
The Trimble Juno 5 serieshas Bluetoothwireless technology approval in
most EU countries andsatisfies the requirements for Radioand
Telecommunication TerminalEquipment specifiedby European Council
Directive 1999/5/EC. These requirementsprovide reasonableprotection
against harmful interferencewhen the equipmentis operated
appropriately in a residential or commercialenvironment.
Juno5 series handhelds equippedwith wireless cellularmodemradios
are intendedforconnection to EuropeanNetworks operating withGSM
900,orGSM 1800. A copy ofthe CE Declaration of Conformity for the
Juno5 seriescan be accessedfrom
http://www.trimble.com/support.shtml.
Australia and New Zealand
This product conforms with the regulatory requirementsof
theAustralianCommunications Authority (ACA) EMC and
Radiocommunications framework,thussatisfying the
requirements for C-Tick Marking andsale withinAustralia andNew
Zealand.
Additionally, Geo 5T 3.5G products that incorporate a
modem also comply with the requirements for A-Tick
Marking andsale inAustralia.
Taiwan – Battery Recycling Requirements
The product contains a removable Lithium-ionbattery.
Taiwanese regulationsrequirethat waste batteries are
recycled.
廢電池 請 回 收
Japan
This device has been granted two designation numbersby Ministry of
InternalAffairs and Communications: according: Ordinance concerning
Technical Regulations Conformity Certification etc. ofSpecifiedRadio
Equipment (特定無線 設 備 の技術 基準適 合 証 明 等 に関する規
則)
Article 2 clause1 item 19
Approval no: 204WW21008300. Thisdevice should not be modified
(otherwisethe granted designationnumberwill be invalid).
European Union Customers:(WEEE)
For productrecycling instructions and more information,please go to
www.trimble.com/ev.shtml.
Recycling in Europe: To recycleTrimble WEEE (Waste Electrical and
Electronic Equipment,products that run on electrical power.), Call +31
497 53 24 30, andask forthe "WEEE Associate". Or,maila request for
recycling instructions to:
Trimble Europe BV
c/o MenloWorldwide Logistics
Meerheide45
5521 DZ Eersel,NL
Trimble Juno 5 Series User Guide 6
Page 7

Safety Information
Radio use
The Trimble®Juno® 5series contains a Bluetooth® radio and a Wi-Fi radio. The Juno 5Dhandheld
also includes a cellular modem radio, and the Juno 5 Barcode handheld (5Bor 5D)also contains a
barcode imager. In some situations, you may be required to turn off the radios. For example,
aviation authority regulations restrict the use of wireless transmission devices on board aircraft.
To prevent the handheld from emitting radio signals, do one of the following:
l
To turn off the handheld, press and hold the Power button for 3 seconds to display the Power
Menu then tap Shutdown, or Enable Airplane mode.
l
To turn off the Bluetooth, Wi-Fi, and wireless cellular modem radios only:
a.
Tap the titlebar on the Home or Start screen, and then on the pull-down list, tap the
or icon.
b. In the Connectivity or the Phone dialog, select Wireless Manager.
c. Tap All to turn off all radios. The status fields below the Wi-Fi, Bluetooth, and Phone
buttons change to Off.
Deactivating the integrated Wi-Fi and Bluetooth radio
The Juno 5series is shipped with Wi-Fi and Bluetooth wireless technology activated. To use the Wi-Fi
or Bluetooth radio, you need to turn it on (see Turning on and turning off the integrated radios,
page 43).
Note – You may need to deactivate the Wi-Fi and/or Bluetooth radio in the handheld if the country
in which you are working does not approve the use of Wi-Fi and/or Bluetooth wireless technology.
If you are unsure about whether the Juno 5 series handheld’s radios are approved for use in your
country, check with your Trimble reseller.
RF Exposure Information (SAR)
This device meets the government’s requirements for exposure to radio waves. This device is
designed and manufactured not to exceed the emission limits for exposure to radio frequency (RF)
energy set by the Federal Communications Commission of the U.S. Government. The exposure
standard for wireless devices employs a unit of measurement known as the Specific Absorption
Rate, or SAR. The SAR limit set by the FCC is 1.6W/kg. Tests for SAR are conducted using standard
operating positions accepted by the FCC with the device transmitting at its highest certified power
levelin all tested frequency bands. Although the SAR is determined at the highest certified power
level, the actual SAR level of the device while operating can be well below the maximum value. This is
because the deviceis designed to operate at multiple power levels so as to use only the poser
required to reach the network. In general, the closer you are to a wireless base station antenna, the
lowerthe power output.
The highest SAR value for the device as reported to the FCC when worn on the body, as described in
the user guide, is no more than 0.39 W/kg for GSM850 / 1.23 W/kg for PCS1900 (Body-worn
measurements differ among device models, depending upon available accessories and FCC
requirements.) While there may be differences between the SAR levels of various devices and at
Trimble Juno 5 Series User Guide 7
Page 8

various positions, they all meet thegovernment requirement. The FCC has granted an Equipment
Authorization for this device with allreported SAR levels evaluated as in compliance with the FCC RF
exposure guidelines. SAR information on this device is on filewith the FCC and can be found under
the Display Grant section of www.fcc.gov/oet/ea/fccid after searching on FCC ID: NZI802111A.
This device is compliant with SAR for general population /uncontrolled exposure limits in ANSI/IEEE
C95.1-1999and had been tested in accordance with the measurement methods and procedures
specified in OET Bulletin 65 Supplement C. For body worn operation, this device has been tested
and meets the FCC RF exposure guidelines for use with an accessory that contains no metal and the
positions the handset a minimum of 0.5 cm from the body. Use of other accessories may not ensure
compliance with FCC RF exposure guidelines. If you do not use a body-worn accessory and are not
holding the device at the ear, position the handset a minimum of 0.5 cm from your body when the
device is switched on.
Exposure to radio frequency radiation from Bluetooth and Wi-Fi transmitters
This device is approved as a portable device with respect to Radio Frequency (RF) exposure
compliance. The radiated output power of the internal wireless radio transmitters is less than 100
milliwatt, which results in exposure levels far below the FCC radio frequency exposure limits, even
when operated in close proximity to the body. The internal wireless radios operate within guidelines
found in international radio frequency safety standards and recommendations, which reflect the
consensus of the international scientific community. Trimble therefore believes the internal wireless
radios are safe for use by users. The level of electromagnetic energy emitted is hundreds of times
lowerthan the electromagnetic energy emitted by wireless devices such as mobile phones.
However, the use of wireless radios may be restricted in some situations or environments, such as
on aircraft. If you are unsure of restrictions, you are encouraged to ask for authorization before
turning on the wireless radios.
Exposure to radio frequency radiation from cellular wireless transmitters
Juno 5 series handhelds equipped with wireless cellular modem radios have been designed and
manufactured to meet safety requirements for limiting exposure to radio waves. When used in
accordance with the instructions set forth in this manual, the equipment has been independently
verified to not exceed the emission limits for safe exposure to radio frequency (RF) energy as
specified by the Federal Communications Commission of the U.S. Government in 47 CFR §2.1093.
These limits are part of comprehensive guidelines and establish permitted levels of RF energy for the
general population. The guidelines are based on standards that weredeveloped by independent
scientific organization through periodic and thorough evaluation of scientific studies. The standards
include a substantial safety margin designed to assure the safety of all persons, regardless of age
and health.
ACAdaptor safety
To charge the handheld’s battery, use the USB / power cable and adaptor kit provided with the
handheld (see Powering the handheld, page 17).
WARNING -To use ACadaptors safely
– Use only the AC adaptor intended for the handheld. Using any other AC adaptor can damage the handheld and
may void your warranty. Do not use the AC adaptor with any other product.
– Make certain that the input voltage on the adaptor matches the voltage and frequency in your location.
Trimble Juno 5 Series User Guide 8
Page 9
– Make certain that the adaptor has prongs compatible with your outlets.
– Do not use the AC adaptor in wet outdoor areas; it is designed for indoor use only.
– Unplug the AC adaptor from power when not in use.
Electrostatic discharge
WARNING - Static electricity can harm electronic components inside your handheld. To prevent static damage:
- Discharge static electricity from your body before you touch any of the electronic components inside your device,
such as a memory module. You can do so by touching an unpainted metal surface.
The handheld is designed for outdoor conditions; however under conditions of low humidity
extremely high voltage discharge events are possible. Users are advised that the risk of causing
discharge to sensitive electronics can be minimized by avoiding finger contact to the recessed
connectors at the sides of the unit.
Battery safety
The rechargeable Lithium-ion battery is supplied partially charged. Charge the battery completely
before using it for the first time (see Powering the handheld, page 17). If the battery has been stored
for longer than six months, charge it before use.
WARNING- Use only the battery intended for the product. Using any other battery can damage the handheld and
may void your warranty. If the battery becomes damaged or stops charging fully, replace it with a new battery.
WARNING - Do not damage the rechargeable Lithium-ion battery. A damaged battery can cause an explosion or
fire, and can result in personal injury and/or property damage. To prevent injury or damage:
–Do not use or charge the battery if it appears to be damaged. Signs of damage include, but are not limited to,
discoloration, warping, and leaking battery fluid.
–Do not store or leave your device near a heat source such as near a fireplace or other heat-generating
appliance, or otherwise expose it to temperatures in excess of 70 °C (158 °F) such as on a vehicle dashboard.
When heated to excessive temperatures, battery cells could explode or vent, posing a risk of fire.
–Do not immerse the battery in water.
–Do not use or store the battery inside a vehicle during hot weather.
–Do not drop or puncture the battery.
–Do not open the battery or short-circuit its contacts.
WARNING -Avoid contact with the rechargeable Lithium-ion battery if it appears to be leaking. Battery fluid is
corrosive, and contact with it can result in personal injury and/or property damage. To prevent injury or damage:
–If the battery leaks, avoid contact with the battery fluid.
–If battery fluid gets into your eyes, immediately rinse your eyes with clean water and seek medical attention.
Do not rub your eyes!
–If battery fluid gets onto your skin or clothing, immediately use clean water to wash off the battery fluid.
WARNING -Charge and use the rechargeable Lithium-ion battery only in strict accordance with the instructions.
Charging or using the battery in unauthorized equipment can cause an explosion or fire, and can result in personal
Trimble Juno 5 Series User Guide 9
Page 10
injury and/or equipment damage. To prevent injury or damage:
–Do not charge or use the battery if it appears to be damaged or leaking.
–Charge the Lithium-ion battery only in a Trimble product that is specified to charge it. Be sure to follow all
instructions that are provided with the battery charger.
–Discontinue charging a battery that gives off extreme heat or a burning odor.
–Use the battery only in Trimble equipment that is specified to use it.
–Use the battery only for its intended use and according to the instructions in the product documentation.
Storage card use
The handheld provides a storage card slot, providing an alternative storage location to the storage
memory in the handheld.
WARNING - Static electricity can harm electronic components inside your handheld. To prevent static damage:
- Discharge static electricity from your body before you touch any of the electronic components inside your device,
such as a memory module. You can do so by touching an unpainted metal surface.
WARNING- The presence of any dust or moisture in the memory card slot may adversely affect the device and
void your Trimble warranty. To prevent dust or moisture entering the memory card slot:
– Make certain that the storage card slot door is attached correctly when you are using the handheld outdoors.
–When inserting or removing a memory card, place the handheld on a dust-free indoor surface.
Trimble Juno 5 Series User Guide 10
Page 11

Contents
Safety Information 7
Radio use 7
RF Exposure Information (SAR) 7
ACAdaptor safety 8
Electrostatic discharge 9
Battery safety 9
Storage card use 10
About the Trimble Juno 5series 13
About this user guide 13
Collecting GNSS data 13
Use and care of the handheld 14
Storing the handheld 14
Technicalassistance 15
Parts of the Juno 5 series handheld 16
Powering the handheld 17
Resetting the handheld 20
Storing data 21
Inserting and removing the SIM card 23
Using the Windows Embedded Handheld operating system 24
Status indicators 25
Pre-installed programs 27
Interacting with the handheld 28
Entering information 28
Personalizing the handheld 30
Messaging 34
Using the phone (Juno 5D handheld only) 36
Connecting to an office computer 39
Connection management software 39
Connecting the handheld to a computer 40
Installing software onto the handheld 41
Using the integrated radios to connect to other devices 42
Deactivating the integrated radios 43
Turning on and turning off the integrated radios 43
Making the handheld visible (discoverable) to other Bluetooth devices 44
Allowing Bluetooth activity to turn on the handheld 45
Connecting to a cellular network from the modem (Juno 5Donly) 45
Connecting to a Wi-Fi access point 46
Connecting to a Bluetooth-enabled device 48
Connecting to a Bluetooth-enabled phone for Internet access 52
Connecting to a Bluetooth-enabled serial device 55
Connecting to an office computer using Bluetooth wireless technology 56
Beaming files to or from another device 58
Accessing a corporate network through your Internet connection 59
Using the GNSS receiver 60
Supported GNSS field software 60
Configuring the GNSS field software to connect to the receiver 60
Using the GNSS field software 61
Viewing availablesatellites 61
Resetting the GNSS receiver 62
Ensuring the accuracy of your GNSS data 62
Using an external GNSS antenna 64
Trimble Juno 5 Series User Guide 11
Page 12

Differential GNSS explained 64
Configuring NMEA output 65
Using the camera 65
Starting the camera application 65
Displaying the camera controls 65
Using the camera in Stillmode 65
Using the camera in Video mode 66
Camera setting options 66
Managing photos and videos 69
Using the barcode imager 70
Configuring the barcode imager 70
Using the barcode imager 70
Troubleshooting 71
Power issues 71
Backlight issues 72
Touch screen issues 73
Speaker and microphone issues 73
Storage card issues 74
Keypad issues 74
Connection issues 75
GNSS receiver issues 79
Real-time DGNSS issues 81
Trimble Juno 5 Series User Guide 12
Page 13

About the Trimble Juno 5series
The Trimble Juno 5series rugged handheld is rated IP65, and
combines a high sensitivity GNSS receiver with the Windows®
Embedded Handheld 6.5 Professional operating system.
The Juno 5 series includes the Juno 5Bhandheld, the Juno 5D
handheld, and the Juno 5 Barcode handheld (5B or 5D):
l
The Juno 5Band 5D handhelds have built-in Bluetooth®
wireless technology for cable-freeconnection to other
devices, Wi-Fi connectivity for connections to networks, and
an integrated 8MP camera with geotagging and dual LED
flash.
l
The Juno 5Dhandheld also has an integrated 3.75Gcellular
modem for downloading and transmitting data, and voice
and text capability.
l
The Juno 5 Barcode handheld (5B or 5D) has an integrated
barcode imager, enablling you to scan 1D and 2D barcodes.
The integrated GNSS receiver provides accurate 2-4meter
positioning information with postprocessed or real-time
differentialcorrections. For more information, see Using the GNSS
receiver, page 60.
About this user guide
This user guide describes how to set up and use the Juno 5 series handhelds. The information in this
guide supplements the information in the Trimble Juno 5 Series Quick Start Guide, which you
received with the handheld.
Even if you have used other Global Navigation Satellite System (GNSS) or Global Positioning System
(GPS) products before, Trimble recommends that you spend some time reading this guide to learn
about the specialfeatures of the product.
Collecting GNSS data
To collect GNSS data with the Juno 5 series handheld, you must installGNSS field software onto the
handheld.
You can use the Juno 5 series handheld with compatible Mapping and GIS field and office software.
For version numbers and a complete list, see the Product Compatibility List on www.trimble.com.
For more information on using the integrated GNSS receiver, see Using the GNSS receiver, page 60.
Trimble Juno 5 Series User Guide 13
Page 14

Use and care of the handheld
When using the handheld:
l
Protect the touch screen by using your finger, and avoid using excessive pressure and sharp or
abrasive objects. To protect the touch screen from pressure and abrasive objects, Trimble
recommends that you apply a screen protector.
l
Keep the outer surface free of dirt and dust.
l
Ensure that protective covers are appropriately fitted to the external antenna port, and SIM /
memory card slot, so that they are kept free from dirt, dust, fluid ingress, and electrostatic
discharge.
l
Protect the handheld from extreme temperatures. For example, do not leave the handheld on the
dashboard of a vehicle.
l
The handheld is rated IP65, but is not waterproof. Do not immerse the handheld in water, and be
careful not to drop the handheld or subject it to any strong impact.
To clean the handheld, wipe it with a clean dry cloth.
Storing the handheld
If you are not going to use the handheld for an extended period (typically longer than a week), Trimble
recommends that you do not leave the handheld in Suspend mode. Instead, place the handheld in
Absolute PowerOffmode.
Absolute PowerOffmode places the handheld in the lowest power mode possible. The purpose of this
mode is to prolong the shelf lifeof the battery while the product is between the production factory and
the customer, to ensure the handheld is completely powered down beforeair freight shipment, or when
putting the product into storage.
To exit Absolute Power Off mode, you must charge the battery.
To activate Absolute Power Offmode:
1. Transfer any data that you need to an office computer.
2. If connected, disconnect the power cable.
3. Press and hold the Power button to display the Power Menu, then tap Reset.
4.
When the handheld has reset (indicated by the Juno 5 series splash screen appearing) press and
hold the left and right buttons.
Page 15

5.
The message Please remove AC. System is turning off appears. The device is now in Absolute Power
Off mode.
6. Store the handheld at room temperature.
To use the handheld after storage, recharge the battery (See Charging the battery, page 18).
Technical assistance
Go to the Juno 5 series technical support page on the Trimble website
www.trimble.com/mappingGIS/juno5.aspx for the latest support information, including:
l
support notes detailing support issues
l
documentation
l
the latest files available for download
Additional help
If you still cannot find the information that you need, contact your Trimble reseller.
Windows error reporting
If for any reason a Microsoft® Windows Error Reporting dialog appears, indicating that the handheld or
Trimble field softwarehas encountered a problem and needs to close, you are prompted to send an
error report to Microsoft.
Trimble recommends that you click Send and then click any subsequent links that are used to obtain
additional information.
Trimble can access the report that is sent to Microsoft and use it to improve the Juno 5 series.
Page 16
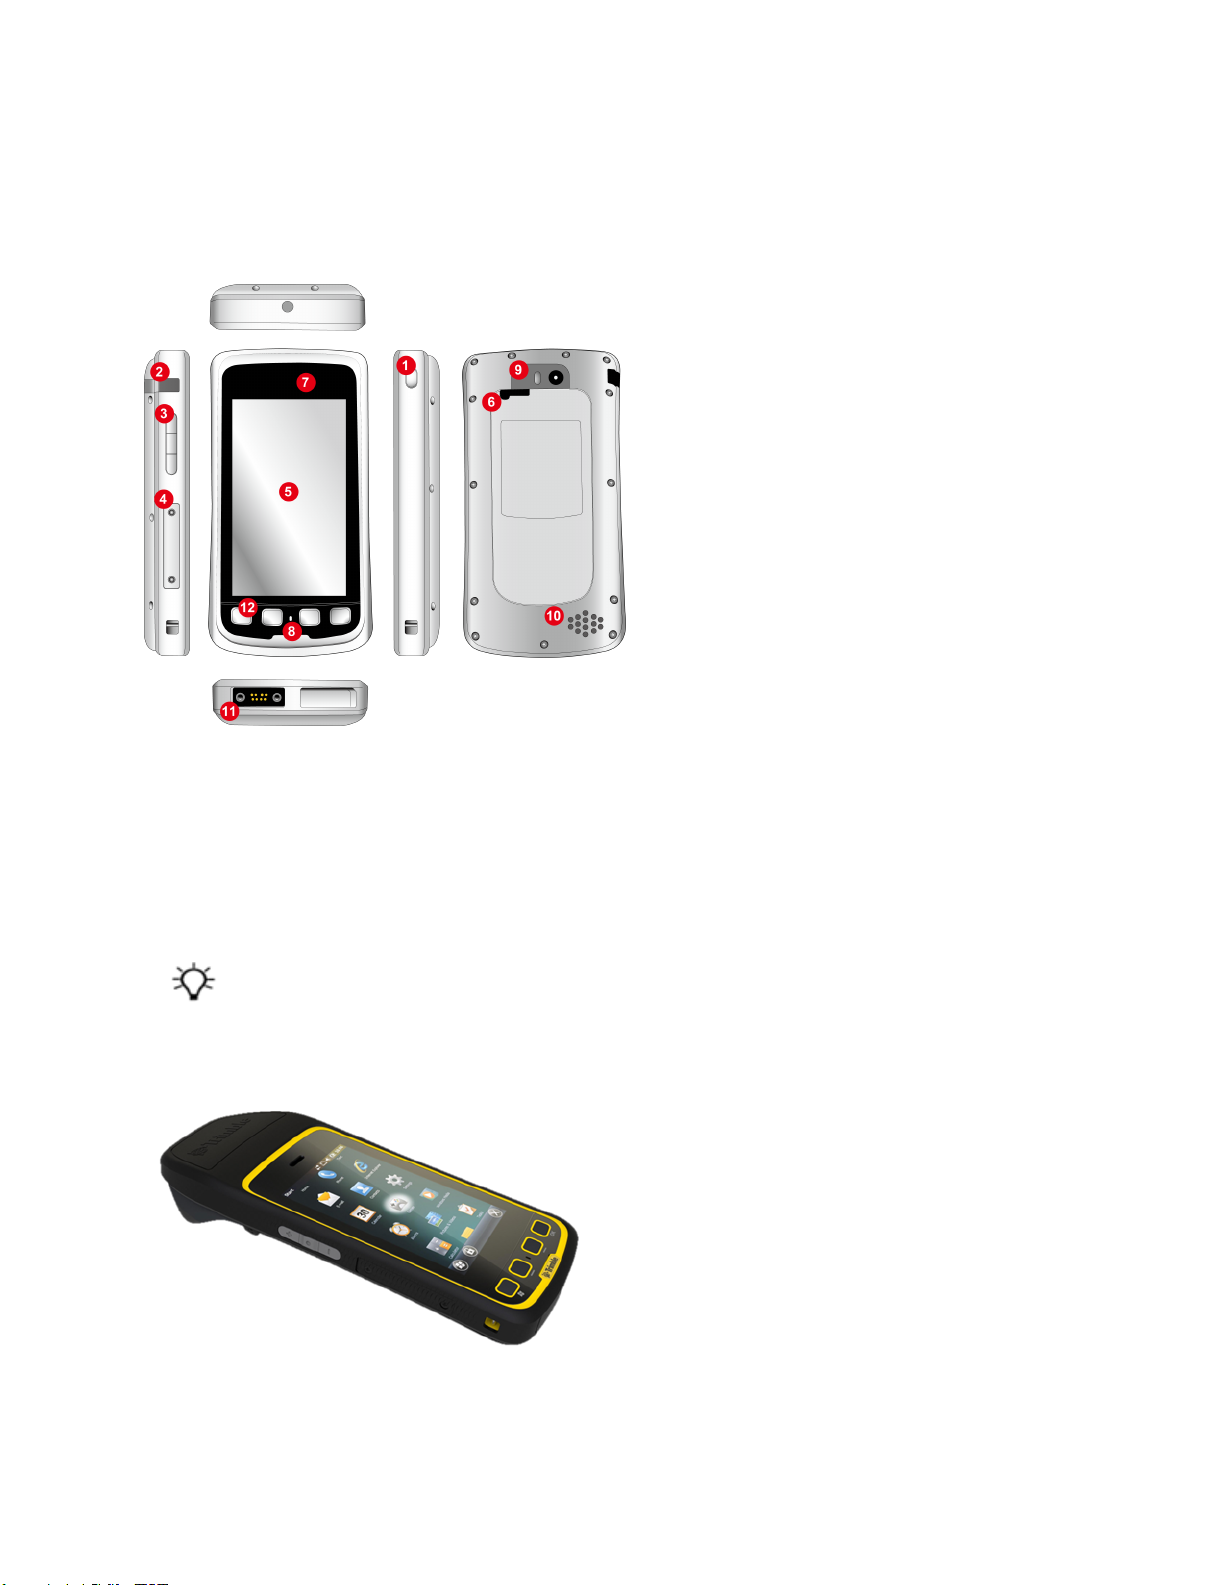
Parts of the Juno 5 series handheld
This section describes the main features of the Juno 5 series handheld, and provides the information you
need to get up and running with the handheld.
The Juno 5Band Juno 5Bhandhelds (with no barecode reader)have the following parts:
Power button
❶
Headset connector
❷
Volume / Programmable
❸
control buttons
MicroSD and SIMcard slot
❹
Tip – To lock the screen and handheld keys without turning off the handheld, use the device lock option (see Device
lock, page 32).
Touch screen
❺
GNSS antenna port
❻
Notification LED
❼
Microphone
❽
Camera and flash
❾
Speaker
❿
Power connector
⓫
Programmable buttons
⓬
The Juno 5Barcode handheld (5B or 5D)has the same parts as described above, and also had an
integrated barcode imager at the top of the device.
Page 17
Powering the handheld
The Juno 5 series handheld contains a rechargeable Lithium-ion polymer battery.
Note – Charge the battery completely before using the handheld for the first time. If the battery has
been stored for longer than six months, charge it before use. Trimble recommends charging the battery
for four hours to recharge it fully.
Note – Cold temperatures, or using Bluetooth wireless technology, Wi-Fi, or the cellular modem
consumes additional battery power and so shortens battery life between charges.
Battery safety
WARNING- Use only the battery intended for the product. Using any other battery can damage the handheld and may
void your warranty. If the battery becomes damaged or stops charging fully, replace it with a new battery.
WARNING - Do not damage the rechargeable Lithium-ion battery. A damaged battery can cause an explosion or fire,
and can result in personal injury and/or property damage. To prevent injury or damage:
–Do not use or charge the battery if it appears to be damaged. Signs of damage include, but are not limited to,
discoloration, warping, and leaking battery fluid.
–Do not store or leave your device near a heat source such as near a fireplace or other heat-generating appliance, or
otherwise expose it to temperatures in excess of 70 °C (158 °F) such as on a vehicle dashboard. When heated to
excessive temperatures, battery cells could explode or vent, posing a risk of fire.
–Do not immerse the battery in water.
–Do not use or store the battery inside a vehicle during hot weather.
–Do not drop or puncture the battery.
–Do not open the battery or short-circuit its contacts.
WARNING -Avoid contact with the rechargeable Lithium-ion battery if it appears to be leaking. Battery fluid is
corrosive, and contact with it can result in personal injury and/or property damage. To prevent injury or damage:
–If the battery leaks, avoid contact with the battery fluid.
–If battery fluid gets into your eyes, immediately rinse your eyes with clean water and seek medical attention. Do not
rub your eyes!
–If battery fluid gets onto your skin or clothing, immediately use clean water to wash off the battery fluid.
WARNING -Charge and use the rechargeable Lithium-ion battery only in strict accordance with the instructions.
Charging or using the battery in unauthorized equipment can cause an explosion or fire, and can result in personal injury
and/or equipment damage. To prevent injury or damage:
–Do not charge or use the battery if it appears to be damaged or leaking.
–Charge the Lithium-ion battery only in a Trimble product that is specified to charge it. Be sure to follow all
instructions that are provided with the battery charger.
–Discontinue charging a battery that gives off extreme heat or a burning odor.
–Use the battery only in Trimble equipment that is specified to use it.
–Use the battery only for its intended use and according to the instructions in the product documentation.
Page 18
Charging the battery
1. Connect the AC power adaptor to the Power socket on the handheld and then connect the adaptor
to mains power. An international adaptor kit is provided with the handheld.
2. Check that the Notification LED on the handheld is solid orange, indicating that the handheld is
properly connected to the power source and the battery is charging.
Fully charging the battery from empty takes approximately four hours.
The Notification LED on the handheld indicates the battery power or charging status, and operating
system notifications, as shown below:
LEDState Handheld / battery state
Solid orange Battery is charging.
Flashingorange Battery is charging, operating system notification.
Solid red Low battery charge.
Flashingred Low battery charge, operating system notification.
Solid green Battery fully charged.
Flashinggreen Battery fully charged, operating system notification.
Avoid keeping the battery at full charge at high temperatures. For more information, see Use and care of
the handheld, page 14.
Note – The life of the battery can be significantly shortened if power is constantly supplied to the
handheld. To avoid this issue, connect the handheld to an external power source only when the battery
requires charging. Once fully charged, disconnect the external power source and allow the battery to
discharge through normal use.
Checking the level of battery power
To check the levelof battery power remaining at any time while the device is running, tap the title bar of
the Home screen and then tap in the pull-down list.
The Power control appears, displaying the Battery tab.
When the handheld battery is recharging from an external power source, the battery icon in the Home
screen changes to . You can stilltap the icon to viewthe levelof battery power.
Low battery indicators
When the battery status indicator shows a low battery charge (see Status indicators, page 25),Trimble
recommends that you recharge the battery.
Page 19

Conserving power
Trimble recommends that you do the following to reduce power consumption:
l
Set the handheld to automatically turn off when idle. For more information, see Turning on and
turning off the handheld, page 19.
l
Set the backlight to automatically turn offwhen the handheld is idle for a specified time. For more
information, see Backlight and Brightness, page 34.
l
Reduce the brightness setting for the backlight. For more information, see Backlight and Brightness,
page 34.
l
Turn offthe integrated Bluetooth and Wi-Fi radios, and the Juno 5D handheld's cellular modem,
whenever you are not using them. For more information, see Turning on and turning off the
integrated radios, page 43.
Note – Do not disconnect from GNSS if you will be reconnecting within about five minutes. A GNSS
application can take up to 30seconds to reactivate the integrated GNSS receiver, so disconnecting to
save power can cost time.
Turning on and turning off the handheld
If the screen on the handheld is blank, the handheld is in Suspend mode or has been shut down. To turn
on the handheld, press the Power button until the screen lights up.
To put the handheld into Suspend mode, press the Power button briefly. The handheld is placed in a
very low power state, but the Bluetooth and wireless cellular modem radios may remain active.
To completely shut down the handheld, press and hold the Power button until the Power Menu
appears, and then tap Shutdown. All running applications are shut down, and the handheld is
completely turned off.
Suspend mode
When you press the Power button briefly to turn off the handheld, the handheld goes into Suspend
mode. This is a low-power mode that maintains the main memory contents and keeps applications
running but does not allow you to operate any of the handheld’s functions. The handheld appears to be
turned off. The integrated GNSS receiver is turned off and any application using GNSS is disconnected.
If the Bluetooth and wireless cellular modem radios were on, they will remain turned on. The handheld is
capable of receiving data via Bluetooth or the cellular modem radio while it is in Suspend mode. The
handheld is able to automatically wake up to calendar alarms if it is in Suspend mode.
CAUTION - To save battery power, use the Wireless Manager to turn off the wireless radios before you place the
handheld into Suspend mode.
To turn on the handheld when it is in Suspend mode, press the Power button briefly until the screen
lights up. The handheld is immediately ready for operation. There may be a delay of up to 30seconds
while the integrated GNSS receiver automatically reactivates.
The handheld may go into Suspend mode automatically if you dismiss two consecutive low battery
alerts. Charge the battery before you resume work.
Page 20

You can configure the handheld to automatically enter Suspend mode when it has been idle for a
specified time. By default, the handheld is set to enter Suspend mode if it is not used for three minutes.
To change the time before the handheld enters Suspend mode:
1.
Tap the titlebar of the Home or the Start screen and then tap . The Power control appears,
displaying the Battery tab.
2. Tap the Advanced tab.
3. From the On battery power option, select the Turn off screen if device not used for check box and
then select the idle time from the drop-down list.
4. Tap OK.
Resetting the handheld
If the screen on the handheld is blank, the handheld has turned off. Press and hold the Power button
until the handheld turns on, then release the Power button.
If the handheld stops responding to your finger or the stylus, or if it does not respond when you press
any of the keypad buttons, you may need to reset it.
To reset the handheld:
1. Press and hold down the power button for 3 seconds to display the Power Menu.
2. Tap Reset.
If the Power Menu does not appear, press and hold down the power button for at least 8 seconds to
start the reset. It may take up to 10 seconds for the handheld to start after the powerbutton has been
released.
Resetting the handheld to factory defaults (clean boot)
If required, you can factory-reset the Juno 5 series handheld. For example, you can perform a factoryreset if you forget the password that you use to lock the device.
WARNING- Resetting the handheld to factory default settings erases all data, installed applications, and settings
stored in the handheld, except for any data or applications that were pre-installed on the handheld or are stored on a
storage card. It does not change the language of the operating system used on the handheld.
If you have encrypted files on a storage card and you reset the handheld to factory default settings, the encryption key
on the handheld is deleted. This means that any files you have encrypted on a storage card are permanently locked and
unreadable by any device. For more information, see Encrypting files on memory cards, page 22.
1. Press and hold down the power button for 3 seconds to display the Power Menu.
2. Tap Reset.
3. When the screen is blank, press and hold the Windows Start button.
4. When the Juno 5 series screen appears, whilestillholding the Windows Start button, press the right
programmable button on the front of the handheld.
5. Let go of both buttons.
Page 21
6. Press the Action button (the middle button of the Volume / Programmablecontrol buttons on the
left side of the handheld) to clear the persistent store, and then press any other button to continue
booting.
Storing data
The handheld has two types of memory:
l
Storage memory is similar to the hard disk in a computer, and is used for storing programs and
data.
l
Program memory is similar to the RAM in a computer, and is used for running programs. You
cannot use it to save data.
To check the memory capacity on the handheld, tap /Settings/ System/Memory. The Storage and
Program columns show the current memory available, and the memory that is already in use.
Pre-installed documents and program files are not affected by power loss or resetting. However, you can
still lose data if you accidentally delete or overwrite it.
CAUTION - The WindowsEmbedded Handheld 6.5 Professional operating system does not include a Recycle Bin. When
you delete files from the handheld, they are deleted permanently.
Trimble recommends that you regularly copy important data to an office computer. For more
information, see Connecting to an office computer, page 39.
Memory cards
As an alternative to storage memory, you can save data to a memory card. Use a MicroSD memory card
to securely transfer data to and from another device that supports MicroSD memory cards.
WARNING- The presence of any dust or moisture in the memory card slot may adversely affect the device and void your
Trimble warranty. To prevent dust or moisture entering the memory card slot:
– Make certain that the storage card slot door is attached correctly when you are using the handheld outdoors.
–When inserting or removing a memory card, place the handheld on a dust-free indoor surface.
WARNING - Static electricity can harm electronic components inside the handheld. To prevent static damage, discharge
static electricity from your body before you touch any of the electronic components inside your device, such as a
memory module. You can do so by touching an unpainted metal surface.
To insert a memory card:
1. Turn off the handheld. See Turning on and turning off the handheld, page 19.
2. In a dust-free indoor environment, remove the two small screws to remove the memory card slot
cover (on the left side of the handheld).
3. Insert the memory card into the card slot.
4. Replace the cover, tightening the two small screws.
Page 22
5. When you select the Save As option in an application, the memory card appears in the list of
available storage locations.
Note – Do not store required data or applications to a memory card if the card will be removed. Data
saved to a memory card is available only when the card is inserted in the handheld.
Encrypting files on memory cards
To prevent sensitive data on a memory card from being used if the card is lost or stolen, files can be
encrypted as they are placed on the card.
When encryption is enabled, an encryption key is stored on the handheld. Files are encrypted as they are
copied or written to the memory card. Files already saved on memory cards before enabling encryption
are not automatically encrypted.
Note – Because the encryption key is stored on the handheld, encrypted files are only readable on the
handheld on which they are initially encrypted. It is not possible to read encrypted files on the storage
card with any other device, including another Juno 5 series handheld or an office computer.
CAUTION - If you reset the handheld to the factory default settings, the encryption key is deleted and the handheld is no
longer able to read any encrypted files on a memory card. This means that any files you have encrypted are
permanently locked and unreadable by any device. To avoid being unable to read previously encrypted files, Trimble
recommends that you use another device, such as an office computer, as the primary location for storing important
data and to control the encryption of important files.
To enable encryption of files as they are written to a memory card:
1.
Tap /Settings/ System/Encryption.
2. Select the Encrypt files when placed on a storage card check box.
Note – Encrypted files appear as ordinary files on the handheld they were encrypted on. If the memory
card is inserted in another device, the files appear with a .menc file extension and cannot be opened.
To disable encryption, clear the Encrypt files when placed on a storage card check box.
Note – Disabling encryption does not remove encryption from any existing files on the memory card,
but ensures that new files placed onto the memory card are not encrypted.
To encrypt files that are already stored on a memory card:
1. Copy the files to the handheld’s internal memory or to an office computer.
2. Ensure encryption is enabled on the handheld.
3. Copy the files back to the memory card. The files are encrypted as they are written to the memory
card.
To remove encryption from files so they can be read by other devices:
1. Insert the memory card in the handheld and then connect the handheld to an office computer (see
Connecting to an office computer (page 39)).
2. Copy the encrypted files from the memory card to the officecomputer.
Page 23
3. To use the decrypted files on the handheld, copy the files from the officecomputer to the
handheld’s main memory.
4. To store the decrypted files on a memory card, ensure that encryption is not enabled on the
handheld and then copy the decrypted files from the office computer to the memory card.
Inserting and removing the SIM card
CAUTION - The SIM card and its contents can be easily damaged by scratches or bending. Use caution when inserting or
removing the card.
CAUTION - The presence of any dust or moisture in the SIM card slot may adversely affect the device and void your
Trimble warranty. To prevent dust or moisture entering the SIM card slot:
–When inserting or removing a SIM card, place the handheld on a dust-free indoor surface.
WARNING - Static electricity can harm electronic components inside the handheld. To prevent static damage, discharge
static electricity from your body before you touch any of the electronic components inside your device, such as a
memory module. You can do so by touching an unpainted metal surface.
To insert or remove a SIM card:
1. Turn off the handheld (seeTurning on and turning off the handheld, page 19).
2. In a dust-free indoor environment, remove the two small screws to remove the SIM card slot cover
(on the left side of the handheld).
3. Insert or remove the SIM card, with the gold contacts facedown.
4. Replace the SIM card slot cover, tightening the two small screws.
Page 24
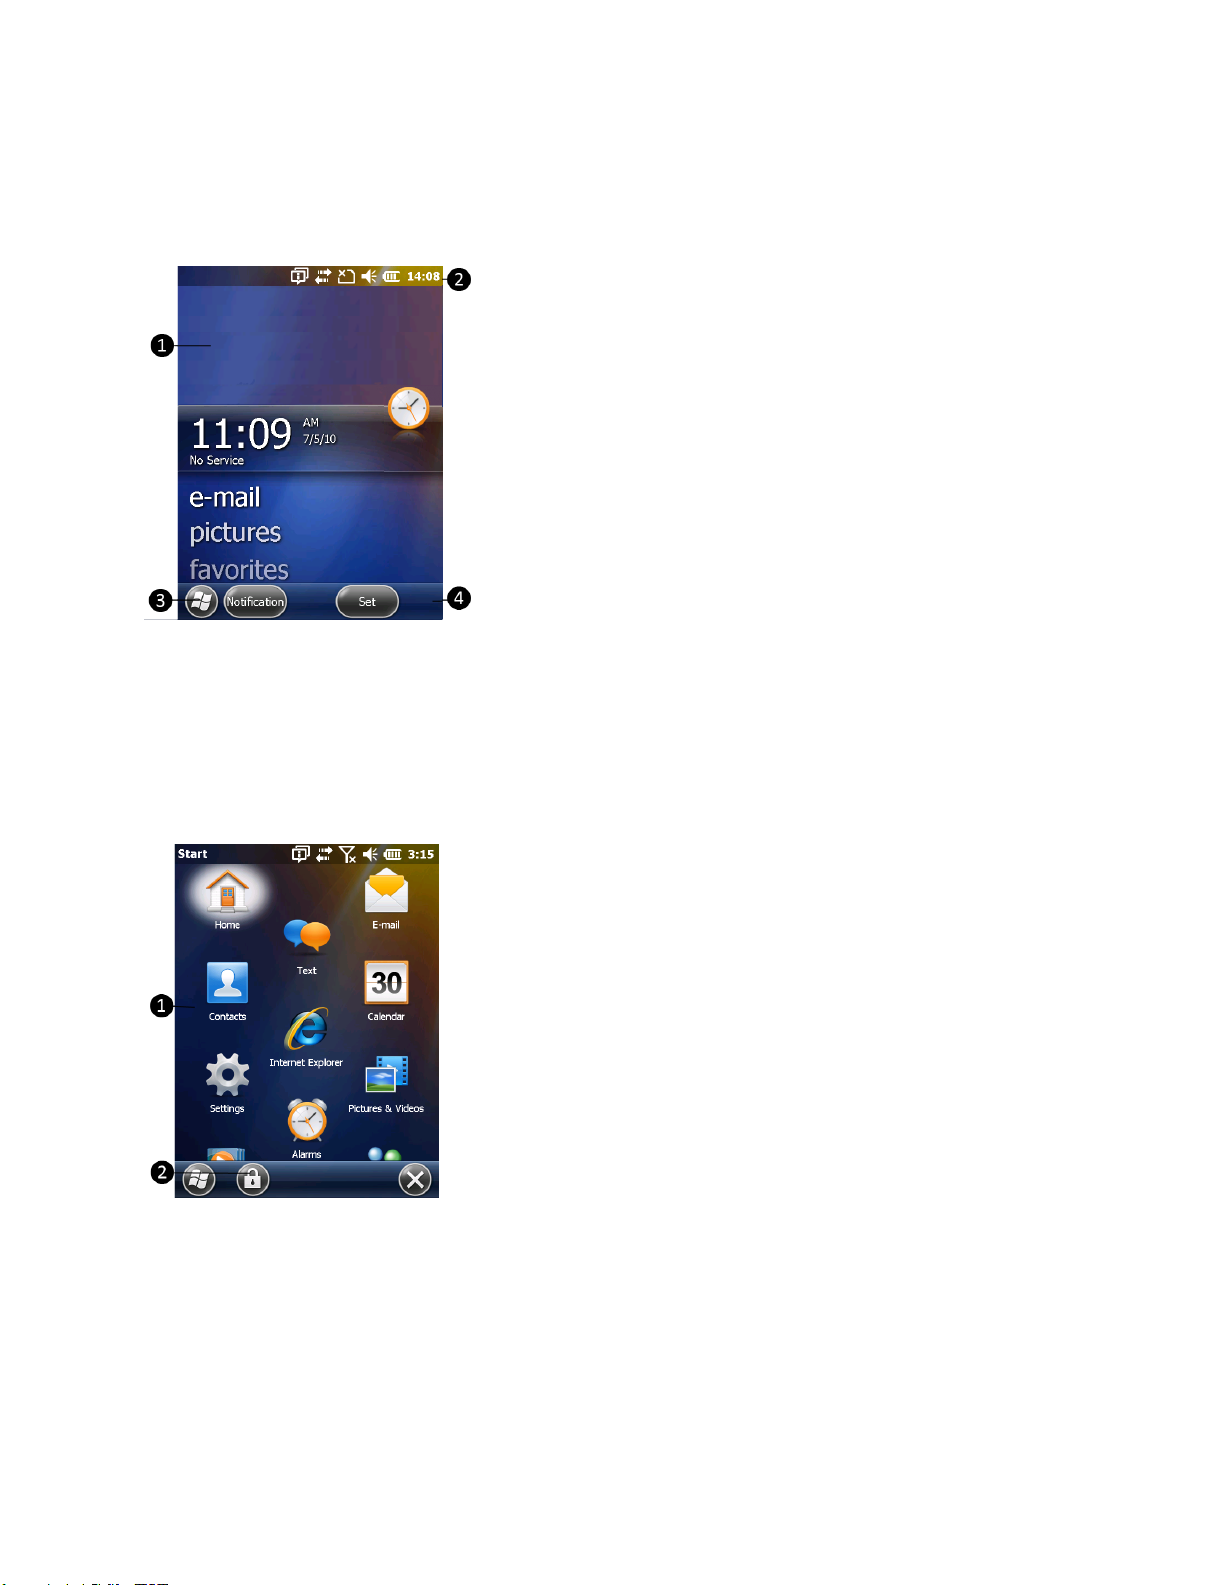
Using the Windows Embedded Handheld operating system
The Juno 5 series handheld is powered by the Windows Embedded Handheld 6.5 Professional operating
system. The main parts of the Home screen and the Start screen are shown below.
❶
❷
❸
❹
❶
Home screen:provides access to the key functions on your handheld. Scroll, and tap any item to open
it.
Title bar:contains status icons for important system functions
Start button:tap to open the Start screen, where you can access programs and system controls.
Tile bar:contains touchable tiles providing access to applications, menus, and notifications.
Start screen:tap any item on the screen to open it.
❷
Lock device:tap to lock the screen.
Page 25
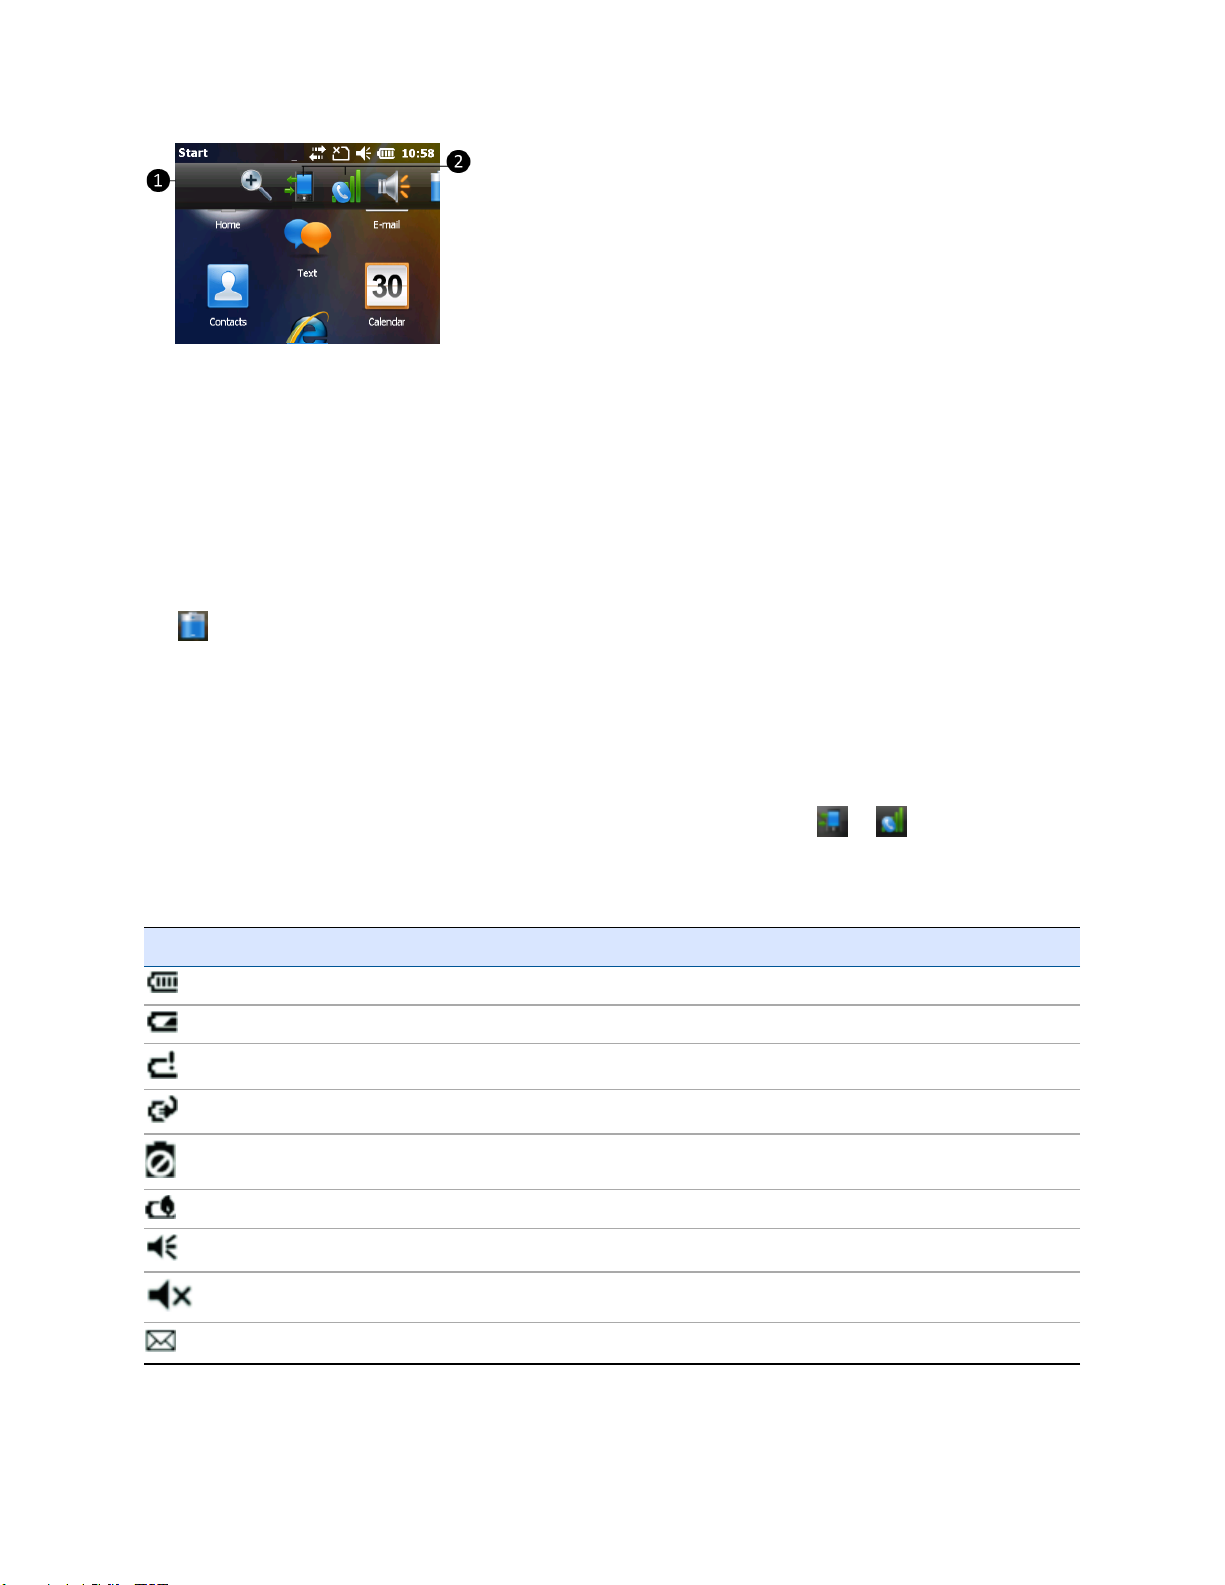
Pull down list:tap anywhere on the title bar to open the title bar pull-down list, where you can access
❶
connectivity controls (the Wireless Manager), battery information, time and date settings, and volume.
Connectivity icons:tap either icon to access the Wireless Manager.
❷
Status indicators
The battery status icon on the title bar of the Home screen or the Start screen shows the status of the
battery charge. To access the Power control dialog, tap the title bar and then on the pull-down list tap
the icon. See Checking the level of battery power , page 18.
The speaker status icon on the title bar of the Home screen or the Start screen shows the status of the
speaker. Tap the title bar and then on the pull-down list tap the icon to adjust the volume and to turn
the speaker on or off.
Note – You can also adjust the volume using the Volume buttons on the left side of the handheld.
The network and modem status icons on the title bar of the Home screen or the Start screen show the
status of each radio. Tap the titlebar and then on the pull-down list tap the or icon. In the
Connectivity or Phone dialog, select Wireless Manager and turn on or turn off the radio.
Status indicators that appear in the title bar at the top of the screen are as follows:
Icon Description
Battery has full charge
Battery has low charge
Battery has very low charge
Battery charging/using external power
Battery communication error
Battery warning (out of temperature range)
Speaker is on
Speaker is off
Email received
Page 26

Icon Description
Tap to view more notifications
Pending alarm
Connected to ActiveSync® or Windows Mobile Device Center, or a Bluetooth enabled phone
Disconnected from ActiveSync or WMDC, or a Bluetooth-enabled phone
Other networks are detected. Tap to access an available network
Wireless network connected
Synchronizing
Synchronizing error
Airplane mode enabled
Vibrate mode on
GPSreceiver on
GPSreceiver off
The following status indicators appear in the titlebar of the Juno 5Dhandheld (with integrated modem):
Icon Description
Faulty SIMcard
SIM card missing
Modem is turned on, maximum signal strength
No cellular modem signal
Cellular modem is turned off
No cellular service
Searching for cellular modem service
Data is transferring using the cellular modem
UMTS network is available
UMTS network is connecting
EDGE network is available
Page 27

Icon Description
EDGE connection is active
GPRS network is available
GPSR connection is active
HSPA+ network is available
HSPA+ connection is active
Instant message received
Roaming mode
Pre-installed programs
Programs that are pre-installed on the handheld are as follows:
Icon Program Function
ActiveSync Synchronize information between the handheld and a computer.
Adobe Reader LE Read PDFdocuments.
Alarms Set alarms.
Calculator Perform basic arithmetic functions.
Calendar Keep track of appointments and arrange meetings.
Contacts Keep track of your friends and colleagues.
E-mail Write, send, and receive email messages.
File Explorer View and manage files.
Internet Explorer Browse the World Wide Web.
Messenger Send instant messages using Windows Live™ Messenger.
Notes Create handwritten, typed, or recorded notes.
Office Mobile 2010 Provides access to these Office Mobile applications: Excel® Mobile 2010,
PowerPoint® Mobile 2010, OneNote® Mobile 2010, SharePoint WorkSpace
Mobile 2010, and Word Mobile.
Pictures and Videos Take, view, and edit pictures, or record and launch video clips.
SatViewer Provides information such as current longitude, latitude, elevation, how
many GPS satellites are visible, and the quality of the computed
coordinates.
Page 28

Icon Program Function
Search Device Search for a file or item stored on the handheld.
Tasks Keep track of your tasks.
Windows Live Access Windows Live services, including email, instant messenger and
Internet search.
Windows Media Play Windows Media® or MP3 audio and video files.
Interacting with the handheld
To interact with the handheld, use the stylus or your finger to tap items on the touch screen, or to scroll
up or down.
Action Definition
Tap Touch the screen once to open items and select options.
Tap and hold Tap and hold the stylus or your finger on an item to see a list of actions available for that item.
On the pop-up menu that appears, tap the action you want to perform.
Drag Hold the stylus or your finger on the screen and drag across the screen to select text and
images. Drag in a listto select multiple items.
Flick Flick the stylus or your finger over the screen to scroll a page or a list up or down.
If at any time the touch screen does not respond correctly to stylus taps or your finger, realign it. For
more information, see Screen, page 33.
Entering information
Depending on the program you are using, you can enter information in several ways, as described below:
Input method Description
Synchronizing Use Microsoft connection management software to exchange information between
the handheld and an office computer.
Connecting to an office computer, page 39
.
Typing
Writing
Recording
For more information,see
Use the keyboard input panel to enter typed text by tapping keys on the on-screen
keyboard.
Use your finger or a stylus like a pen to write directly on the screen.
Create a stand-alone recording or embed a recording into a note.
Page 29

Using the on-screen keyboard
The keyboard button automatically appears in the tile bar of any application.
❶ Textbox
❷ Keyboard
❸ Keyboard button
To display the keyboard, tap the keyboard button, or tap a text box in the application.
To enter characters, make sure the cursor is flashing in the required text field, and use your finger or a
stylus to tap the keys on the keyboard.
To hide the keyboard, tap the keyboard icon again.
To configure the on-screen keyboard, tap /Resco Keyboard Pro.
Drawing and writing directly on screen
In some applications, for example Notes, you can draw (or write directly) on the screen using your finger
or the stylus.
1.
Tap and then tap the Notes icon .
2.
Tap the Menu icon .
3. Select Draw.
4. Use your finger or the stylus to writeor draw on the screen.
Page 30

Making a recording
For handheld configurations equipped with an integrated microphone, you can create a stand-alone
voice note or you can add a recording to a note. Then you can work with voicenotes in the same way
that you work with notes.
To make a recording:
1.
Tap and then tap the Notes icon .
2.
Tap the Menu icon and select View Recording Toolbar.
3. Do one of the following:
ll
To create a stand-alone recording, in the screen displaying the list of notes, tap the Record
button to begin recording.
l
To add a recording to a note, create or open a note and then tap the Record button to
begin recording.
4.
When you finish recording, tap the Stop button .
5. If you are creating a stand-alone recording, an icon appears in the note list.
6. If you are recording in an open note, an icon appears in the note. Tap OK to return to the note list.
To play a recording, tap the recording in the note list or open the note and then tap the icon in the
note.
Personalizing the handheld
Use the controls in the Settings area to customize the handheld. The following examples describe the
available controls.
Buttons
Use the Buttons control under Personal settings to assign the action you want to be performed when
you press the Action button (on the left side of the handheld), or the OK button, the Windows Start
button, or the left and right programmable butons on the front of the handheld.
You can program these keys to perform another action from the drop-down list:
1.
To open the Buttons control, tap /Settings/Personal / Buttons.
2. Specify an action for the button:
a. Tap the Program Buttons tab.
b. Tap a button in the list to select it.
c. From the Assign a program drop-down list, select the action you want to occur when you press
the button or tap the softkey.
d. Tap OK.
Page 31

Home
Use the Home settings to change the display theme that controls the appearance of the Home screen,
and to customize how items appear on the Home screen.
Appearance
You can use a theme to customize the background picture on the Home screen, the color of the title and
tilebars, menus, and messages.
To change the display theme:
1.
Tap /Settings/Home.
2. Tap the Appearance tab.
3. Do one of the following:
ll
To use a predefined theme, select it from the list.
l
To select the picture that you want to display in the Home screen background, select the Use
this picture as the background check box. Then tap Browse to search for a file on the handheld.
4. Tap OK.
Items
You can choose between:
l
the Windows default Home screen view, which allows you to flick through the list of entries, giving
access to functions such as email, text messaging, current time, and Internet Explorer.
l
customising which items appear on the Home screen and the order in which they appear.
To use the default Home screen view:
1.
Tap /Settings/ Home.
2. Tap the Items tab.
3. Select the Windows Default check box.
4. Tap OK.
To customize the items which appear on the Home screen:
1.
Tap /Settings/ Home.
2. Tap the Items tab.
3. Select or clear the check boxes to show or hide the Home screen items.
4. Use the Move Up and Move Down buttons to change where the selected item appears on the
Home screen.
5. Tap OK.
Page 32

Set the time and date
1.1. On the Home screen, tap the clock item, or tap the title bar and then on the pull-down list, tap the
clock icon . The Clock & Alarms screen appears.
2. Tap the Time tab.
3. In the Time Zone field, select the required time zone from the drop-down list.
4.
In the Date field, tap the down arrow and then select the correct date.
Tip – On the calendar which appears, tap on the month or year to select the required value.
5.
In the Time field, tap in turn the hour, minute, and second values and then tap the up or down
arrows to set the correct time. Tap AM / PMto toggle between the two values to select as required.
6. Tap OK.
Device lock
Tap the Device Lock icon on the Start screen to lock the screen and keypad while the handheld
remains turned on.
Once the handheld is locked, the screen and most of the keys do not respond until the handheld is
unlocked. The exception is the Power key, which always respond when pressed.
Communication with external devices such as a GNSS receiver, or external sensors used by GNSS field
software, is not interrupted by locking the handheld. This means that you can keep using the GNSS field
software when the handheld is locked. For example, you could lock the device so that you can safely
transport it between features, whilekeeping the software connected to the GNSS receiver so that you
can continue recording GNSS positions.
The lock screen provides multiple unlock sliders for different applications, when there are new
notifications. For example, ifa new email has arrived, an email unlock slider takes you straight to the
email.
To unlock the device, slide the Unlock icon for the required application to take you straight to that
application.
You can help to keep your data secure by requiring a password each time the handheld is turned on. Tap
/Settings/Lock to set a password or to change password settings.
Power
To open the Power control, do one of the following:
l
Tap the titlebar of the Home screen or the Start screen, and then tap .
l
Tap /Settings/ Power.
Page 33

Tap the Battery tab to check the battery level (see Checking the level of battery power (page 18)).
Tap the Advanced tab to set the time before the handheld turns off when idle (seeTurning on and
turning off the handheld, page 19).
Sounds and notifications
Use the Sounds & Notifications control to set preferences for the speaker volume and system sounds. To
open the Sounds & Notifications control:
l
Tap / Settings/Sounds & Notifications.
To turn on or turn off sounds:
1. Tap the Sounds tab.
2. Select or clear the check boxes to enable or disable categories of sounds.
3. If you select the Screen taps or Hardware buttons check boxes, select the Soft or Loud option to
control the volume of the sounds.
4. Tap OK.
You can use predefined schemes to customize sounds, or you can create your own sound schemes.
To specify a sound scheme:
1. Tap the Notifications tab.
2. From the Event drop-down list, select an event.
3. Select the type of notification you want to receive for that event.
4. Tap OK.
You can also enable vibrations for screen taps:
1. Tap the Vibrations tab.
2. Select Screen taps and then select Short, Medium, or Long.
3. Tap OK.
Screen
Use the Screen control to align the touch screen or to change the appearance of text on the screen. To
open the Screen control:
l
Tap /Settings/System/ Screen.
To change the screen settings:
1. Tap the General tab.
2. To change the orientation of the screen, select an option in the Orientation group.
3.
To start the alignment sequence for the touch screen, tap Align Screen.
4. Tap OK.
Page 34

Using ClearType font smoothing can make text easier to read on the screen.
To enable ClearType:
1. Tap the ClearType tab and then select the Enable ClearType check box.
2. Tap OK.
To change the size of text on screen:
1. Tap the Text Size tab.
2. Tap and drag the slider control to the left to make text smaller, or to the right to make text larger.
3. The example text below the slider shows how the text will appear on screen.
4. Tap OK.
Backlight and Brightness
The backlight makes the screen easier to read in low light, but uses extra power. Use the Backlight
control to configure power-saving settings for the backlight. Use the brightness sliders to adjust the
display brightness.
To open the Backlight control and set the backlight to automatically turn off:
1.
Tap /Settings/System/ Backlight.
2. To automatically turn off the backlight when the handheld is idle and is using battery power, tap the
Battery Power tab. Select the Turn off backlight check box and then select a time from the
drop-down list.
3. To automatically turn off the backlight when the handheld is idle and is using external power, tap
the External Power tab. Select the Turn off backlight check box and then select a time from the
drop-down list.
4. Tap OK.
To change the brightness:
1.
Tap /Settings/System/ Backlight.
2. Do one of the following:
ll
If you want the brightness to adjust automatically according to the light conditions, select the
Use Light Sensor to adjust the brightness option.
l
If you want to set the brightness yourself, tap and drag the Brightness slider controls to the left
to make the backlight dimmer, or to the right to make the backlight brighter.
3. Tap OK.
Messaging
Use Messaging to send and receive email messages using the Juno 5 series handheld. Messaging is the
equivalent of your email Inbox.
To use email, you can do one of the following:
Page 35

l
Synchronize email messages with Microsoft Exchange or Microsoft Outlook® on an office computer.
l
Send and receive emailmessages by connecting directly to an email server through an ISP or a
network.
Synchronizing email messages
You can synchronize email messages on the handheld and the computer.
CAUTION - When you delete a message on the handheld, it is deleted from the office computer the next time you
synchronize the devices.
To synchronize email, you must enable Inbox synchronization in the Microsoft ActiveSync technology
(for Windows XP) or the WMDC (for Windows Vista® or Windows 7). For more information, refer to the
ActiveSync Help or the WMDC Help on the officecomputer.
During synchronization:
l
Messages are copied from the mail folders of Exchange or Outlook on the officecomputer to the
Messaging folder on the handheld. By default, you will receive messages from the past 3 days only,
the first 100lines of each message, and fileattachments of less than 100 KB in size.
l
Email messages in the Outbox folder on the handheld are transferred to Exchange or Outlook, and
then sent from those programs.
l
Email messages in subfolders in other email folders in Outlook are synchronized only if they were
selected for synchronization (using ActiveSync technology or the WMDC).
To send and receive email for a synchronized Exchange or Outlook account, connect the handheld to the
office computer. Synchronization automatically begins, and the handheld sends and receives email.
Connecting directly to an email server
You can send and receive email messages by connecting to an email server. Before you can send and
receive email, you must create an email account in the Messaging software.
Note – You must set up an Internet connection on the handheld before you can set up and use your
email account. For more information, see Connecting to a Bluetooth-enabled device , page 48, or
Connecting to a Bluetooth-enabled phone for Internet access , page 52
If you need to connect to different mailboxes, set up and name a different service for each connection.
Note – The Messaging software supports only the POP3 and IMAP4 protocols for incoming mail, and
SMTP for outgoing mail.
To set up a mailservice:
1.
Tap /E-mail.
2. Tap Setup E-mail.
3. Enter the emailaddress for your account.
4. Enter a password. Select Save password if you want the device to remember your password.
5. Tap Next.
Page 36

6. To automatically get connection settings for your email account from the Internet, select the check
box.
7. Tap Next.
8.
Follow the steps in the Setup wizard. If the connection settings are not automatically downloaded
from the Internet, you must enter them using the connection details supplied by your ISP or
network administrator.
Note – You cannot change the account name later.
9. Tap Finish.
10. Tap OK to download mail immediately.
Tip – To receive TerraSync™ data files by email, edit the settings for the email account you have set up. To do this,
tap Menu and then select Options. In the Accounts tab, tap the email account you want to use to receive TerraSync
files. The Email Setup wizard appears. Tap Next until you reach the last page of the wizard. From the Message
download limit drop-down list, select Entire message.
When you connect the handheld to the email server, new messages are downloaded to the Messaging
folder, messages in the Outbox folder are sent, and messages that have been deleted on the email server
are removed from the Messaging folder.
Messages received directly from an email server are linked to the email server rather than an office
computer. When you delete a message on the handheld, it is also deleted from the email server the next
time you connect the handheld to the email server.
You can work online or offline. When working online, you read and respond to messages while
connected to the email server. Messages are sent as soon as you tap Send, which saves space on the
handheld.
When working offline, you can disconnect from the email server after you download new message
headers or partial messages and then decide which messages to download completely. The next time
you connect, Messaging downloads the complete messages you have marked for retrieval and sends
any messages that you have written.
Using the phone (Juno 5D handheld only)
Use the Juno 5D handheld to make and receive phone calls. You can enter a number to dial using the
keypad, or select a number from your Contacts list.
To make a phone call:
1. Make sure that a SIM card is installed. See Inserting and removing the SIM card, page 23.
2. Make sure that the phone is turned on. See Turning on and turning off the integrated radios, page
43.
3. On the Home screen, do one of the following:
ll
Tap the Phone item, and then tap the Phone item again.
l
Tap / Phone.
Page 37

4. On the Phone screen which appears, do one of the following:
ll
Use the keypad to dial a phone number and then tap Talk.
l
Tap to hide the keypad, and select an option from the list of previously dialled numbers.
When you receive a phone call, an incoming callmessage appears on the Home screen. You can:
l
Tap to answerthe call.
l
Tap to reject the call.
To end a phone call, tap End.
Tip – When using the phone, adjust the volume if required using the Volume control buttons on the left side of the
handheld.
Phone settings
Note – You must have a SIM card in the handheld to access and change the phone settings.
You can change the ring type, ring tone, and keypad sound. If required, you can also set a PIN for the
SIM card, or change the type of network or the name of the network you want to connect to.
1. To access Phone Settings, do one of the following:
ll
Tap the modem status icon on the title bar of the Home screen and then tap Settings.
l
Tap / Settings / Personal / Phone.
2. Do any of the following:
ll
Select the Sounds tab to set the required ring type, ring tone, and keypad sound.
l
Select the Security tab to set a PIN, change the PIN, or set the handheld to require a PIN to be
entered every time the phone is used. For more information on setting a PIN, see below.
l
Select the Network tab to viewwhich network you are connected to or manually select a
network.
Setting a PIN
You can help to keep data secure by configuring your SIM card with a PIN (personal identification
number). You willneed to enter the PIN each time you want to use the phone.
Most SIM cards are preset with a PIN that is assigned by your wireless service provider. You will need to
enter this PIN first.
To set a PIN, the phone must already be turned on.
1. Select the Security tab
2. To configure the phone to always require a PIN, select Require PIN when phone is used.
3. Enter the preset PIN assigned by your wireless service provider.
4. Tap OK.
To change a PIN:
Page 38

1. Tap Change PIN.
2. Enter the current PIN and then tap Enter.
3. Enter a new PIN and then tap Enter.
Text messaging
Use the phone functionality on the Juno 5D handheld to send and receive text messages.
1. Make sure that a SIM card is installed. See Inserting and removing the SIM card, page 23.
2. Make sure that the phone is turned on. See Turning on and turning off the integrated radios, page
43.
3. On the Home screen, select the Text item (this shows Text Messages: x unread, or No New
messages) and then tap it again. Alternatively, tap / Text.
4. Do one of the following:
ll
To send a text message:
a.
Tap / New.
b.
To enter a contact number, make sure that the cursor is flashing in the To field and then do
one of the following, and then use the keyboard to enter a phone number or tap To to
select a number from your Contacts
c.
Tap in the message area (the cursor will flash) and then enter the text using the keyboard.
d.
Tap to send the message.
l
To access your text message folders:
a. Click the Inbox drop-down arrow.
b. Click the required folder to viewmessages in that folder.
Page 39

Connecting to an office computer
Connect the handheld to an officecomputer to transfer information, settings, and files from one device
to the other, or to installsoftware onto the handheld.
You can connect the handheld to a computer using a Bluetooth wireless link, or using the USB cable.
To protect your data, Trimble recommends that you regularly copy important data to an office
computer.
Connection management software
To install software onto a Windows Embedded Handheld device, or to copy files between the handheld
and a computer, you must connect the device to an office computer. If the computer is running:
l
the Windows 7 or Windows Vista operating system, use the Windows MobileDevice Center to
manage the connection.
l
the Windows XP operating system, use ActiveSync technology to manage the connection.
Note – You must install the Windows Mobile Device Center or ActiveSync technology onto the computer
before you connect the handheld.
This connection management software also enables you to synchronize officeapplications on an office
computer with the handheld.
CAUTION - The available space on the handheld is small compared to an office computer. To avoid accidentally
synchronizing the handheld with a large amount of data on the office computer, Trimble recommends that you either
connect to the handheld without forming a partnership, or that you limit the information types and amount of data that
is synchronized.
CAUTION - Synchronizing data is designed to keep the same data on both the office computer and the handheld.
Exercise care when resynchronizing applications after deleting data from one computer, as resynchronizing will delete
the same information from the other computer.
For more information see one of the following:
l
Managing the connection using the Windows Mobile Device Center, page 40
l
Managing the connection using ActiveSync technology, page 41
The Windows 7 and Windows Vista operating systems include a basic connectivity driver for Windows
Embedded Handheld devices. This driver allows you to transfer files from the handheld to an office
computer.
To install software onto a Windows embedded handheld, you must install Windows Mobile Device
Center onto an office computer.
Download the latest version of the Windows Mobile Device Center or ActiveSync technology from the
Microsoft website.
Page 40

Connecting the handheld to a computer
To connect the handheld to a computer:
1. Make sure the handheld and the computer are switched on.
2. Make sure you have installed the appropriate connection management software onto the computer
(see Connecting to an officecomputer, page 39).
3. To form a connection, do one of the following:
l
Use a USB connection:
a. Connect the USB data / power cable to the power connector on the handheld.
b. Connect the other end of the cableto a USB port on the computer.
l
Use the handheld's integrated Bluetooth radio to establish a wireless serial link to a Bluetoothenabled computer. For more information, see Connecting to an officecomputer using
Bluetooth wireless technology , page 56
When the handheld and the computer are connected, you can manage the connection through a
window that appears on the officecomputer. See one of the following:
l
Managing the connection using the Windows Mobile Device Center, page 40
l
Managing the connection using ActiveSync technology, page 41
Managing the connection using the Windows Mobile Device Center
1. Connect the handheld to the computer Connecting the handheld to a computer, page 40.
2. If the Autoplay window appears, close the window.
3.
The Windows Mobile Device Center window displays the message Connected:
Note – If the connection is not made automatically, check that the connection is enabled in the
Windows Mobile Device Center software and on the handheld. For more information, see
Troubleshooting, page 71.
4. Do one of the following:
ll
To synchronize files and data between the handheld and a computer, click Set up your device
and then follow the instructions on screen.
l
To transfer data between the handheld and the computer without synchronizing the devices,
click Connect without setting up your device.
5. To transfer files between the computer and the handheld, click File Management. A Windows
Explorer-type window appears, displaying files stored on the handheld. Copy and paste files to other
locations on the computer, or from the computer to the handheld.
6. To install software onto the handheld, see Installing software onto the handheld, page 41.
7. To uninstall software from the handheld, click Programs and Services and then click Add/Remove
Programs
Tip – If the Add/Remove Programs option does not appear below Programs and Services, click More. The
Add/Remove Programs option appears.
Page 41

For more information, refer to the Windows Mobile Device Center Help.
Tip – If the GPS Pathfinder® Office software is installed on the office computer, you can configure the Connection
Manager utility in the GPS Pathfinder Office software to automatically detect when you connect a Juno 5 series
handheld to the computer. This enables you to automatically transfer data from the TerraSync software,
differentially correct the data, and then export it to a GIS. For more information, refer to the GPS Pathfinder Office
Software Help.
Managing the connection using ActiveSync technology
1.
Connect the handheld to the computer (seeConnecting the handheld to a computer, page 40). The
Synchronization Setup Wizard appears:
Note – If the connection is not made automatically, check that the connection is enabled in the
ActiveSync technology and on the handheld. For more information, see Troubleshooting, page 71.
2. Do one of the following:
ll
To synchronize files and data between the handheld and a computer, click Next and then follow
the instructions in the Synchronization Setup Wizard.
l
To transfer data between the handheld and the computer without synchronizing the devices,
click Cancel to close the wizard.
3. The Microsoft ActiveSync window displays the message Connected:
4. To transfer files between the computer and the handheld, click Explore. A Windows Explorer-type
window appears, displaying files stored on the handheld. Copy and paste files to other locations on
the computer, or from the computer to the handheld.
5. To install software onto the handheld, see Installing software onto the handheld, page 41.
6. To uninstall software from the handheld, select Add/Remove Programs from the Tools menu. Clear
the check box beside the program you want to remove and then click OK.
For more information, refer to the ActiveSync Help.
Tip – If the GPS Pathfinder Office software is installed on the office computer, you can configure the Connection
Manager utility in the GPS Pathfinder Office software to automatically detect when you connect a Juno 5 series
handheld to the computer. This enables you to automatically transfer data from the TerraSync software,
differentially correct the data, and then export it to a GIS. For more information, refer to the GPS Pathfinder Office
Software Help.
Installing software onto the handheld
Before you begin, refer to the installation instructions provided with the software.
Some softwareinstallations are specifically designed to run on a Windows Embedded Handheld. To
install softwareon a Windows Embedded Handheld:
1. Connect the handheld to a computer (see page 40).
2. Copy the installation files to a folder on the handheld.
3. Browse to the folder on the handheld. Tap and hold the installation setup file and then select Run.
4. If prompted after installation, reset the handheld (seeResetting the handheld (page 20)).
Page 42

To install software that is provided as an installation setup that runs on an officecomputer, either from a
CD or that you have downloaded:
1. Connect the handheld to a computer (see page 40).
2. If the softwareis provided on a CD, insert the software CD into the officecomputer. Otherwise,
download the software onto the office computer.
3. Run the installation setup.
4.
If prompted, select the install option for a Windows Embedded Handheld. Once the softwareis
installed on the computer, it is automatically transferred to the handheld.
Note – If a memory card is inserted in the handheld, the card appears as an installation location
option. Trimble recommends that you install software to the handheld’s storage memory, not to a
memory card. If you install software to a card and then remove the card from the handheld, the
software will not be available for use.
5. If prompted after installation, restart the handheld.
Using the integrated radios to connect to other devices
The Juno 5 series includes an integrated Bluetooth radio and Wi-Fi radio, and provides a number of
options for connecting to networks and other devices. The Juno 3D handheld also includes an integrated
cellular modem for sending and receiving data, and supports voicecalls and text messaging.
To use the Wi-Fi or Bluetooth radio or the cellular modem, you need to turn it on (see Turning on and
turning off the integrated radios below).
Using a data connection from your local cellular provider, the Juno 5Dhandheld’s integrated cellular
modem can be used to connect to the Internet to receive real-time corrections from a VRS™network,
send and receive messages (including email, SMS, or instant messages), or to send and receive files and
other data to and from the office directly in the field.
You can use the handheld’s integrated Wi-Fi radio to connect to the Internet or a corporate network
using a connection to a Wi-Fi access point (also known as “hotspots”).
You can use Bluetooth wireless technology to connect to the Internet using a cellular phone. You can
also connect directly to other Bluetooth-enabled devices such as a laser rangefinder, or a barcode
scanner, that are within range (typically within 5 m to 10 m of the handheld).
This section describes how to enable the radios, and the main connectivity options available. Use the
table below to identify the wireless connection type you want to make and then follow the steps
provided.
Connection method To... See...
Juno 5Dcellular modem Connect to a cellular network page 45
Wi-Fi Connect to a Wi-Fi access point
Bluetooth wireless technology Connect to another Bluetooth-enabled device (paired
and non-paired connections)
page 46
page 48
Connect to a Bluetooth-enabled phone for Internet
access
page 52
Page 43

Connect to a Bluetooth-enabled serial device page 55
Wi-Fi, Bluetooth wireless technology, or Geo
5Tcellular modem
Connect to an office computer to use ActiveSync
technology
Beam files to or from another device page 58
Access a corporate network through your Internet
connection
page 56
page 59
Deactivating the integrated radios
The handheld is shipped with Wi-Fiand Bluetooth wireless technology activated. You may need to
deactivate the Wi-Fi and Bluetooth radios in the handheld if the country in which you are working does
not approve the use of Wi-Fi or Bluetooth wireless technology. If you are unsure about whether the Juno
5 series' radios are approved for use in your country, check with your Trimble reseller.
Turning on and turning off the integrated radios
You can use the Wireless Manager application to turn on and turn off the handheld's Bluetooth and WiFi radios, and the Juno 5Dhandheld's cellular modem (see Using the Wireless Manager, page 43).
You can also turn on or turn off the Bluetooth radio from within the Bluetooth application (see Turning
on and turning off the Bluetooth radio from within the Bluetooth application, page 44).
To make the handheld visible to other Bluetooth-enabled devices and enable them to connect, see
Making the handheld visible (discoverable) to other Bluetooth devices (page 44).
Using the Wireless Manager
You can use the Wireless Manager application to turn on and turn off the handheld’s Wi-Fi and
Bluetooth radio and the cellular modem. You can turn on and turn off any of the radios at the same time,
or control each individually.
To open the Wireless Manager, do one of the following:
l
Tap the titlebar, tap any of the radio icons and then tap Wireless Manager.
l
Tap /Settings/Connections/Wireless Manager.
Turn on the Wi-Fi and/or Bluetooth radio to be ableto connect to other devices or networks.
Turn on the Juno 5D handheld's cellular modem to be able to send and receive data, or use the phone to
make voice calls and send text messages.
Turn offthe Wi-Fi and/or Bluetooth radio, and/or cellular modem (Juno 5Donly)to prevent the
handheld from sending or receiving wireless signals.
Tip – To conserve power, turn off the radios when not in use.
Page 44

To turn on or turn off the radios using the Wireless Manager
1. Open theWireless Manager (seeabove).
2. Do one of the following:
ll
Tap All at the top of the screen to turn on the radios, or to turn off all the radios if they are
already on.
l
Tap Wi-Fi, Bluetooth or Phone to turn on the radio that you want to use, or to turn off the
radio if it is already on.
The status fields below the Wi-Fi button, Bluetooth button and the Phone button change from Off
when the radios are turned on and show the current state of the radio. The Wi-Fi status field shows
Connecting or Available, the Bluetooth status field shows On or Visible, and the Phone status field
shows On or the name of the cellular network that you are connected to.
3.
Tap to exit the Wireless Manager.
Turning on and turning off the Bluetooth radio from within the Bluetooth application
1.
Tap / Settings/ Bluetooth.
2. Tap the Mode tab.
3. Select the Turn on Bluetooth check box to turn on the radio, or clear this check box to turn off the
radio.
4. Tap OK.
Note – If the integrated Bluetooth radio is deactivated, the message Problem with Bluetooth hardware
may appear when you try to turn on the Bluetooth radio or discover devices.
Making the handheld visible (discoverable) to other Bluetooth devices
To allow other Bluetooth-enabled devices to connect to the handheld, or if the handheld will not connect
to or pair with another deviceyou are attempting to connect to, you must make the handheld visible
(this is sometimes referred to as “discoverable”).
To make the handheld visible to other devices:
1.
Tap / Settings/ Bluetooth.
2. Tap the Mode tab.
3. Select the Turn on Bluetooth check box, if it is not already selected. This enables the integrated
Bluetooth radio.
4. Select the Make this device visible to other devices check box, and tap OK.
Page 45

Allowing Bluetooth activity to turn on the handheld
If the Bluetooth radio is enabled, the Allow Bluetooth activity to turn the device on setting enables other
Bluetooth devices to send data to the handheld when it is turned off. The handheld will turn on.
1.
Tap / Settings/ Bluetooth.
2. Tap the Wake Settings tab.
3. Select the Allow Bluetooth activity to turn the device oncheck box. This enables the handheld to be
turned on from other Bluetooth devices, and enables the handheld to receive data.
4. Tap OK.
Note – Make sure the handheld is set to turn off automatically, to avoid draining the battery if a
Bluetooth device causes the handheld to turn on. See Turning on and turning off the handheld, page 19
Connecting to a cellular network from the modem (Juno 5Donly)
Use the integrated cellular modem in the Juno 5Dhandheld to connect to a cellular network and access
the Internet or a company network. Use this type of connection to access a background map server, or
for Internet and email access.
Before you begin the steps below, Trimble recommends that you:
l
make sure that a SIM card is inserted in the handheld. See Inserting and removing the SIM card.
l
confirm that the modem can access the Internet directly. If necessary, contact your service provicer
and confirm whether you must enter a user name, password, and domain details when connecting.
l
make sure that you have the correct APN (Access Point Name) from your cellular provider.
To configure a connection:
1.
Tap /Settings/Connections /Wireless Manager. If the modem is Off, tap Phone to turn it on.
Close the Wireless Manager.
2.
Tap /CellStart. (Click Ok if required to accept the Notice.)
3. In Available Settings, tap the + by your country to show the list of service providers. The handheld
holds a database of the most common cellular providers and the correct connection settings.
4. Tap the +by the required cellular provider, tap Typical to highlight it, and then tap New. The
connection appears in Configured Settings.
5. If you have multiple configurations, you can set the primary configuration as the default; tap it to
highlight it, then tap Default.
Some applications automatically launch the connection when you start the application, if a current
connection is not already established. To manually connect:
1.
Tap /Settings/Connections /Wireless Manager. If the modem is Off, tap Phone to turn it on.
Close the Wireless Manager.
2.
Tap /Settings/Connections / Connections.
Page 46

3. Under Tasks, tap Manage existing connections. The configured connections are listed.
4. Tap and hold the connection that you want to use. Tap Connect from the pop-up menu.
5.
The task bar shows the “connecting” icon, for example . When the connection is
open/established, the task bar shows the “connected” icon, for example . The icons shown
depend on the network—see Inserting and removing the SIM cardfor full details.
Once connected, open an application, for example, Internet Explorer, to test the connection.
You can also manually change connections settings under /Settings/Connections / Connections.
Removing a connection configuration
1.
Tap /CellStart.
2. Tap Refresh to see the list of current configurations.
3. In Configured Settings, tap the configuration that you want to remove, then tap Remove.
Connecting to a Wi-Fi access point
Use the Configure Wireless Network wizard provided with the Windows Embedded Handheld operating
system to set up and manage Wi-Fi networks, or, to establish network connections that require complex
settings, use the Summit Client Utility. See below, Using the Summit Client Utility to manage Wi-Fi
connections
Using the Configure Wireless Network wizard to manage Wi-Fi connections
Note – If you have installed a personal certificate on the handheld, you do not need to set up the
wireless connection manually as described in Step 1. To connect to the network or access point go to
Step 2: Connecting to the network or access point.
Step 1: Setting up the Wi-Fi connection
1. Make sure that the handheld’s Wi-Fi radio is enabled (see page 43).
2. Tap Menu and then select Wi-Fi Settings. Any networks that you have already configured are
displayed in the list of preferred networks.
3. To add a new network, tap Add New. To change the settings for an existing network, tap the
network.
4. Enter the name of the network and other connection details and then tap Next.
5. Do one of the following:
ll
To use authentication, select the authentication method from the Authentication list.
l
To use data encryption, select an encryption method from the Data Encryption list.
l
To automatically use a network key, select the check box for The key is automatically provided.
Otherwise, enter the Network key and the Key index.
6. Tap Next.
Page 47

7. For increased security, select the Use IEEE 802.1x network access control check box and then
configure additional authentication information.
8. Tap Finish.
Step 2: Connecting to the network or access point
1. Disconnect the USB data cable, as the handheld prioritizes a USB connection over a Wi-Fi
connection.
2. Bring the handheld within range of the network or access point.
When a Wi-Fi connection is detected, the access point icon appears on the title bar.
If the access point icon does not appear, use the Wireless Manager to turn off and then turn back
on the Wi-Firadio. When the Wi-Fi radio is turned on, any networks or access points within range
are detected and the icon appears.
3. Tap the access point icon on the title bar. A popup message shows the available networks.
4. Select the network you want to connect to and then tap OK.
5. Select The Internet (or work via a VPN) or Work and then tap Connect.
6. If a Network Log On screen appears, enter your user name, password, and domain information and
then tap OK.
7.
When the handheld is connected to the network or access point, the Wi-Fi connected icon
appears in the title bar.
8. Start using the program you want to use, for example Windows Explorer Mobile or Internet
Explorer.
Note – To disconnect from the network or an access point at any time, turn off the handheld’s wireless
radio. To do this, tap title bar, tap the Connectivity icon on the pull-down list, select Wireless Manager
and then tap the Wi-Fi button.
Tip – To delete a Wi-Fi connection, tap and hold the connection in the Wireless tab of the Wi-Fi Settings screen and
then select Remove Settings.
Using the Summit Client Utility to manage Wi-Fi connections
Summit Client Utility (SCU) is a Wi-Fi connection management and monitoring utility which enables you
to viewall radio and security settings and status, and to troubleshoot connectivity issues.
The SCU software is useful for establishing network connections that require more complex settings than
the Configure Wireless Network wizard provided in the Windows Embedded Handheld operating system.
1. Make sure that the handheld’s Wi-Fi radio is enabled (see page 43).
2.
Tap / Settings / Connections / . The Summit Client Utility window appears.
The SCUhas five screens:
Page 48

Screen Details
Main Provides an overview of the current wireless network connection configuration
(Active Profile), a snapshotof connection information, and additional information
about SCU. You can also import and export settings configurations, which is useful
if you have multiple devices to configure to access your local networks.
Profile Profile settings are radio and security settings that are stored for each
configuration profile. On this screen you can created new profiles with the
required connection settings for a Wi-Fi network access point.
Status Provides status information on the radio connection between the client device
and the associated access point.
Diags Enables you to troubleshoot connection issues.
Global Includes radio and security settings that apply to all profiles and settings.
For information on how to use the SCU, refer to the Summit User’s Guide on
http://www.summitdata.com/documentation.html.
Connecting to a Bluetooth-enabled device
The Juno 5 series handheld has an integrated Bluetooth radio that you can use to establish a wireless
connection to other Bluetooth devices that are within range.
Using a Bluetooth connection, you can communicatewith devices such as cellular phones, office
computers, other handhelds, and Bluetooth-enabled laser rangefinders and barcode scanners. You can
also communicate with peripheral devices that use Bluetooth adaptors instead of serial or USB
connections.
The handheld can act as a Bluetooth client device. The concept of client devices is explained in detail
below.
Connecting to a Bluetooth device as a client
You can use the handheld as a client device, which uses services offered by Bluetooth host devices that
are within range. In general the host device provides information to the client device, but in some cases
the client initiates the connection and also provides information to the host device.
The services used by the Juno 5 series handheld when connecting as a Bluetooth client are:
Service Description
Dialup Networking
(DUN)
Serial Port Emulates an RS-232 serial (COM) port on the handheld.
ActiveSync Enables an ActiveSync connection to a computer.
Input Device (HID) Connects the handheld to a physical input device, such as a keyboard.
Wireless Stereo Connects to Bluetooth A2DP (Advanced Audio Distribution Profile) headphones.
Connects the handheld to a cellular phone or modem for dial-up network or Internet
access.
Page 49

A client can connect to a number of different services provided by different hosts. The number of active
connections at any one time affects the speed of the connections. The diagram below shows the
handheld connected to different types of host devices using Bluetooth wireless technology.
Bluetooth headset
❶
Cell phone
❷
Laser rangefinder
❸
/barcode scanner
Laptop / PC
❹
Wireless stereo
❺
Audio output
❻
Background map
❼
DUN or PAN
❽
Input data
❾
Serial port
❿
ActiveSync
⓫
ActiveSync for file transfer
⓬
The dashed arrows indicate the client device—that is, the handheld—connecting to host devices. The
Bluetooth profile(or service)used for the connection is shown between the arrows, for example, the
DUN serviceis used for a connection to a cellphone, and the Serial Port service is used for a serial
connection to a barcode scanner or laser rangefinder.
The solid arrows indicate the flow of information between devices. For example, when the handheld
connects as a client to:
l
a cellphone, the handheld uses the DUN or PANhost serviceprovided by the phone to access the
Internet and background map data.
l
a laptop computer or officecomputer, the devices use the ActiveSync service to exchange
information to and from either device.
Page 50

l
Bluetooth headphones, the handheld uses the Wireless Stereo host service provided by the
headphones to play audio files and system sounds.
Setting up a Bluetooth connection
To use another Bluetooth-enabled device with the Juno 5 series handheld, you must form a Bluetooth
connection between the two devices, during which you select the type of serviceto use for the
connection. This defines how the devices will communicatewith each other.
After forming the Bluetooth connection between the devices you may need to configure settings for the
connection such as the COM port for the field softwareto use, or the number for the phone to dial. You
must then connect to the other device using the appropriate software application.
To connect the handheld to another Bluetooth-enabled device, you can use either a paired connection
or a non-paired connection.
Note – If you are connecting to a phone, skip this section and go to Connecting to a Bluetooth-enabled
phone for Internet access on page 52, where the pairing step is described as part of the procedure for
connecting to a phone.
Trimble recommends using a paired connection, if pairing is supported by the other device, as a paired
connection creates a more secure connection and makes reconnecting to the deviceeasier. For more
information, see Pairing with a Bluetooth-enabled devicebelow.
Some devices do not support paired connections. Use a non-paired connection if the devicedoes not
have a keyboard, and if you know that the device does not automatically exchange a pre-programmed
passkey during pairing. For more information, see Setting up a Bluetooth connection to a non-paired
device, page 51.
To connect the handhled to the other device, do one of the following:
l
Pair with a Bluetooth-enabled device(see below)
l
Set up a connection to a non-paired device (see page 51)
Pairing with a Bluetooth-enabled device
Pairing the handheld with another Bluetooth-enabled devicecreates a permanent security bond
between the devices, which helps to exchange information securely between the devices. The paired
relationship is established when two devices create and exchange a link key. Once the relationship is
established, the handheld and the other Bluetooth device only need to have their Bluetooth radios
turned on to exchange information; they do not need to be visibleto other devices.
To pair with a Bluetooth device:
1. Make sure that the handheld and the Bluetooth deviceyou want to pair with are within five meters
of each other, and that the Bluetooth radio in each device is turned on.
2.
On the handheld, tap / Settings/ Bluetooth.
3. In the Devices tab, tap Add new device. The handheld searches for other Bluetooth devices and
displays them in the list. If the device you are trying to connect is not displayed in the list, ensure
that the device is on and within range and then tap Refresh to search for devices again.
4. Tap the name of the device you want to pair with and then tap Next.
Page 51

5. In the Passcode field, enter a passcode of between 1 and 16 characters. If you are connecting to:
ll
a device with a keypad, enter a passcode of your choice.
l
a device without a keypad, but you know that the device has a pre-programmed passcode that
will be exchanged, enter that passcode on the handheld.
Note – Trimble recommends that you enter only numbers, as some devices do not support
passcodes that include letters.
6. Tap Next.
7. When prompted, enter the same passcode on the other device.
8. On the handheld, tap the name of other device. The Partnership Settings screen appears.
9. If required, change the name of the devicein the Display Name field.
10. Select the service(s) you want to use with this device. For example, if you are connecting to:
ll
a Bluetooth-enabled phone to connect to the Internet and receive real-time corrections or
download background maps, select Dialup Networking (DUN).
l
a serial device, such as a laser rangefinder, select Serial Port.
l
a computer to access ActiveSync technology (or WMDC), select ActiveSync.
Note – Only ActiveSync shows on the Windows embedded handheld. Select ActiveSync even if
you use the WMDC on the desktop computer.
Note – For more information on the types of devices that the handheld can connect to, and
the supported Bluetooth services, see Connecting to a Bluetooth-enabled device , page 48
11. Tap Save.
12. Tap OK to close the Bluetooth application.
13.
Tap to close the Settings screen.
You have now created a partnership between the handheld and the other Bluetooth-enabled device so
that they can communicate. To start using the connection, you must complete the configuration steps
for that type of connection and then connect to the device. For more information, see:
l
Connecting to a Bluetooth-enabled phone for Internet access , page 52
l
Connecting to a Bluetooth-enabled serial device, page 55
l
Connecting to an office computer using Bluetooth wireless technology , page 56
Tip – You only need to pair the handheld with a device before you connect to the device for the first time.
Setting up a Bluetooth connection to a non-paired device
Setting up a Bluetooth connection to a non-paired device enables you to connect to a device that does
not allowyou to enter a passcode on the device, or that does not automatically exchange a preprogrammed passkey during pairing.
Page 52

To set up a non-paired connection to a Bluetooth-enabled device:
1. Make sure that the handheld and the Bluetooth deviceyou want to connect to are within five
meters of each other, and that the Bluetooth radio in each device is turned on.
2.
Tap / Settings/ Bluetooth.
3. In the Devices tab, tap Add new device. The handheld searches for other Bluetooth devices and
displays them in the list.
4. Tap the name of the device you want to connect to and then tap Next. The Enter Passcode screen
appears.
5. Tap Next without entering a passcode.
6. If prompted to add the deviceto your device list, tap No.
7. On the handheld, tap the name of the other device. The Partnership Settings screen appears.
8. If required, change the name of the devicein the Display Name field.
9.
Select the service(s) you want to use with this device. For example, if you are connecting to:
ll
a Bluetooth-enabled phone to connect to the Internet and receive real-time corrections or
download background maps, select Dialup Networking (DUN).
l
a serial device, such as a laser rangefinder, select Serial Port.
l
a computer to access ActiveSync (or WMDC), select ActiveSync.
Note – Only ActiveSync shows on the Windows embedded handheld. Select ActiveSync even if
you use the WMDC on the desktop computer.
Note – For more information on the types of devices that the handheld can connect to, and
the supported Bluetooth services, see Connecting to a Bluetooth-enabled device , page 48
10. Tap Finish.
11. Tap OK to close the Bluetooth application.
12.
Tap to close the Settings screen.
You have now created a partnership between the handheld and the other Bluetooth-enabled device so
that they can communicate. To start using the connection, you must complete the configuration steps
for that type of connection and then connect to the device. For more information, see:
l
Connecting to a Bluetooth-enabled phone for Internet access , page 52
l
Connecting to a Bluetooth-enabled serial device, page 55
l
Connecting to an office computer using Bluetooth wireless technology , page 56
Connecting to a Bluetooth-enabled phone for Internet access
If your modelof the Juno 5 series handheld does not contain an integrated cellular modem, you can use
the handheld’s Bluetooth radio to connect to a Bluetooth-enabled cellular phone and then connect to
the Internet. Use this type of connection to access a background map server, or for Internet and email
access.
Page 53

To connect to a Bluetooth-enabled phone using a Bluetooth DUN (Dialup Networking) connection, you
must:
1. Connect the handheld to a Bluetooth-enabled phone and then configure the connection to the
dialup network.
2. Connect to the Internet using the dialup network.
3. Configure the softwareto use the connection. For example, you must configure the GNSS field
software to use map data received from the Internet source, or you must set up the Messaging
application to send and receive emailusing the connection.
Note – Before you begin the steps below, Trimble recommends that you confirm that the phone can
access the Internet directly. If necessary, contact the cellular phone provider and confirm whether you
must enter a user name, password, and domain details when connecting an external device to the
phone using Bluetooth dialup networking.
Step 1: Connecting the handheld to the phone and configuring the connection to the
dialup network
1. Make sure that the handheld and the Bluetooth deviceyou want to connect to are within five
meters of each other, and that the Bluetooth radio in each device is turned on. For more
information, see Turning on and turning off the integrated radios, page 43.
2.
On the handheld, tap / Settings/ Connections/Connections.
3. Below My ISP, tap Add a new modem connection.
4. Enter the name for the connection. For example, enter the name of the phone or the VRS network
that you will connect to.
5. From the Select a Modem drop-down list, select Bluetooth and then tap Next.
6. If the phone you want to connect to is:
ll
listed, go to Step 7 below.
l
not listed:
a. Tap Add new device. The handheld searches for other Bluetooth devices and
displays them in the list.
b. If the handheld’s integrated Bluetooth radio is turned off, it is now automatically
turned on.
c. From the list of available devices, select the device you want to connect to and
then tap Next.
d. To pair with the phone, enter a passcode of your choice that you willeasily
remember onto the handheld and then tap Next.
e. When prompted by the phone, enter the same password and then accept the
connection.
Page 54

f. On the handheld, tap Advanced to open the Partnership Settings screen. Make
sure that Dialup Networking (DUN) is selected and then tap Save.
You have now created a partnership between the handheld and the phone so that
they can communicate.
7. From the My Connections list, select the phone that you want to configure the connection to.
8.
Enter the GPRS access number for the Internet. Two of the common GPRS access numbers for
cellular phones on GSM networks are *99***1# and *99#. If these access numbers do not work,
contact the cellular phone provider to obtain the appropriate number to use.
Note – You do not need to set up dialling rules or change the Internet connection settings on the
phone. The connection settings you enter on the handheld are passed to the phone to use for this
connection
9. Tap Next.
10. Unless the phone provider confirmed that you must enter user name, password, and domain
settings to access the Internet, tap Finish without entering any information in this screen.
Otherwise:
a. Enter the required information.
b. If the phone provider has told you that you need to change the baud rate or other settings for
the connection, tap Advanced, configure these settings and then tap OK.
c. Tap Finish.
You are returned to the Connections screen.
You have now configured the dialup networking connection.
Step 2: Connecting to the Internet using the dialup network
1.
On the handheld, go to the Connections screen, if it is not already open (tap / Settings/
Connections/Connections).
2. Below My ISP, tap Manage existing connections.
3. Tap and hold the connection you want to use and then select Connect.
4. Unless the phone provider confirmed that you must enter user name, password, and domain
settings to access the Internet, tap OK without entering any information in this screen. Otherwise,
enter the required information and then tap OK.
5. If the phone prompts for confirmation to connect to the Internet, accept the connection.
l
The phone dials the configured GPRS access number and then connects to the
Internet.
l
A Connectivity notification appears on the handheld as the connection is being made.
l
After the connection is made you are returned to the My ISP screen.
l
To confirm that the handheld is connected to the phone, or to check the status of the
connection at any time, tap the title bar and then tap the Connectivity icon on the pull-
Page 55

down list. The notification shows the name of the current connection, and the time
elapsed since the connection was made. To hide the notification, tap Hide.
6. Tap OK to close the My ISP screen.
7. Tap OK to close the Connections / Tasks screen.
8.
Tap to close the Connections screen.
To check the connection status at any time, tap the title bar and then tap the required status icon on the
pull-down list.
To end the connection at any time, tap the title bar, tap the required status icon on the pull-down list
and then tap Disconnect.
To connect to a corporate network or Intranet, see Accessing a corporate network through your Internet
connection, page 59.
To send and receive email messages, see Messaging, page 34.
Step 3: Configuring the GNSS field software to use data received from the Internet source
Now that you have connected the handheld to the Internet, you must configure the software to use the
connection to receive data.
To use real-time corrections in Trimble field software, and background map data in the TerraSync
software, refer to the Trimblefield software documentation on www.trimble.com:
l
For the TerraSync software, go to
http://www.trimble.com/mappingGIS/TerraSync.aspx?dtID=technical_support
l
For the GPS Controller software, go to http://www.trimble.com/support_trl.asp?Nav=Collection-
32054
Connecting to a Bluetooth-enabled serial device
Use Bluetooth wireless technology to receive data from a Bluetooth-enabled serial device, such as a laser
rangefinder.
To connect to a Bluetooth-enabled serialdevice, you must:
1. Connect to the Bluetooth-enabled serial device.
2. Configure the COM port on the handheld to use for the connection.
3. If necessary, configure the GNSS field softwareto use data received from the serial device.
Step 1: Connecting to the Bluetooth-enabled serial device
Connect the handheld to the Bluetooth-enabled device, selecting the Serial Port service ifit is not
already selected (see Connecting to a Bluetooth-enabled device , page 48).
Page 56

Step 2: Configuring the COM port to use on the handheld
1.
On the handheld, tap / Settings/ Bluetooth.
2. Tap the COM Ports tab.
3. Tap New Outgoing Port.
4. Select the device you want to set up the connection to and then tap Next.
5. Select the COM port on the handheld to use for the connection.
6. Do one of the following:
ll
To communicate with any device, for example if you have formed this connection without
pairing to a device, clear the Secure Connection check box.
l
To communicate only with devices with which the handheld has a Bluetooth partnership, select
the Secure Connection check box.
7. Tap Finish.
8. Tap OK to close the Bluetooth application.
9.
Tap to close the Settings screen.
Step 3: Configuring the GNSS field software to use data from the serial device
Once you configure the connection between the handheld and the Bluetooth-enabled serialdevice, you
must configure the software to use the connection to receive data.
To use a Bluetooth-enabled external sensor such as a laser rangefinder or a barcode scanner in TerraSync
software, refer to the TerraSync software documentation on
http://www.trimble.com/mappingGIS/TerraSync.aspx?dtID=technical_support
Connecting to an office computer using Bluetooth wireless technology
Instead of using a USB cable to physically connect to an office computer, you can use Bluetooth wireless
technology to connect to ActiveSync technology or the Windows Mobile Device Center on a
Bluetooth-enabled officecomputer.
Note – Not all Bluetooth devices and Bluetooth management software support ActiveSync connections.
Check with the manufacturer of the office computer for compatibility.
Note – The exact steps required may vary depending on the office computer.
To connect to a officecomputer to use ActiveSync or WMDC with a Bluetooth connection, you must:
1. Set up the connection to the computer.
2. Connect to ActiveSync or WMDC using Bluetooth wireless technology.
Step 1: Setting up the connection to the computer
1. From the Bluetooth user interface on the office computer, make sure that the computer allows itself
to be discovered by other Bluetooth devices.
Page 57

2. Configure ActiveSync technology or WMDC on the officecomputer to connect to the correct
Bluetooth port. The steps required depend on the operating system installed on the office
computer. If the officecomputer is using:
ll
the Windows 7 or Windows Vista operating system:
a. From the Start menu on the officecomputer, select Control Panel / Windows
Mobile Device Center. If you have previously connected to a device(using USB or
another connection method), the Windows MobileDeviceCenter screen for this
device may show. In this case, select Mobile Device Settings. The Connection
Settings dialog appears.
b. Select the Allow connections to one of the following check box.
c. From the list, select Bluetooth and then click OK.
ll
the Windows XP operating system:
a. From the Bluetooth user interface on the officecomputer, identify the virtual
COM port of the of the host Bluetooth Serial Port or Local Service and ensure that
this is enabled. In this example, the virtual COM port is COM5.
b. Start the ActiveSync technology on the officecomputer.
c. Select File / Connection Settings. The Connection Settings dialog appears.
d. Select the Allow connections to one of the following check box.
e.
From the list, select the COM port that you selected in Step a and then click OK.
Note – Before you try to form a Bluetooth connection from the handheld to the
office computer, you must correctly configure the Bluetooth host serial port and
ActiveSync technology on the office computer.
3.
On the handheld, tap / Settings/ Bluetooth.
4. In the Devices tab, tap Add new device. The handheld searches for other Bluetooth devices and
displays them in the list.
5. Tap the name of the computer you want to connect to and then tap Next.
6. When prompted, enter a passcode of your choice that you willeasily remember on the handheld.
7. Enter the same passcode on the officecomputer.
8. On the handheld, select the ActiveSync check box in the list of services provided by the computer
and then tap Finish.
Note – The checkbox on the handheld still shows ActiveSync, even if the office computer is running
the Windows 7 or Windows Vista operating system and you are using the WMDC.
You have now created a partnership between the handheld and the officecomputer so that they
can communicate.
9. Tap OK to close the Bluetooth application.
10.
Tap to close the Settings screen.
11. To connect, go to Step 2 below.
Page 58

Note – The check box on the handheld shows ActiveSync even if the office computer is running the
Windows 7 or Windows Vista operating system and you are using the WMDC.
Step 2: Connecting to ActiveSync using Bluetooth wireless technology
1.
On the handheld, tap / ActiveSync.
Note – Only ActiveSync shows on the Windows embedded handheld. Select ActiveSync even if you
use the WMDC on the desktop computer.
2. Tap Menu and then select Connect via Bluetooth.
3. On the handheld, a message box shows the status of the connection as it is made.
4. When the connection to the office computer is successful, you are returned to the ActiveSync
application on the handheld.
5.
Tap to close.
The connectivity icon in the status bar shows .
To check the status of the connection, tap the title bar and then tap the connectivity icon on the pull-
down list.
To disconnect, tap / ActiveSyncon the handheld, and then select Menu / Disconnect.
Beaming files to or from another device
You can beam files, contacts, tasks, and appointments between the handheld and another device.
To receive beamed files from another device:
1. Make sure that the handheld's integrated Bluetooth radio is turned on (see Turning on and turning
off the integrated radios, page 43).
2.
Tap / Settings/ Connections / Beam.
3. Select the Receive all incoming beams check box and then tap OK.
4. When another device attempts to beam a file, you are prompted to accept the file. To receive the
file, tap Yes.
Note – All incoming files are automatically saved in the My Documents folder on the handheld.
To send beamed files to another device:
1. Make sure that the handheld's integrated Bluetooth radio is turned on (see Turning on and turning
off the integrated radios, page 43).
2. On the handheld, open File Explorer and go to the file you want to send.
3. Tap and hold the fileand then select Beam File. The handheld scans for nearby devices.
4. Tap the device you want to send the fileto. The file is sent to the device.
A message reports Done or Failed, depending on the outcome of the file transfer.
Page 59

Accessing a corporate network through your Internet connection
Use a Virtual Private Network (VPN)connection to access a corporate network or Intranet.
Before you begin, obtain the following information from your network administrator:
l
username and password
l
domain name
l
host name or IPaddress of the VPNserver
To access a corporate network through your Internet connection, you must:
1. Set up an Internet connection on the handheld.
2. Set up a VPNconnection.
3. Connect to the corporate network or Intranet.
Step 1: Setting up an Internet connection on the handheld
Do one of the following:
l
Connect to the Internet using the internal cellular modem. For more information, see page 45.
l
Connect to the Internet using a Bluetooth-enabled phone. For more information, see page 52.
Step 2: Setting up a VPN connection
1.
On the handheld, tap /Settings/ Connections / Connections.
2. From the My Work Network list, tap Add a new VPN server connection.
3. Follow the instructions in the Make New Connection wizard.
4. Tap Finish
Step 3: Connecting to the corporate network or Intranet
To connect to the corporate network or Intranet, simply start using Internet Explorer.
The Windows Embedded Handheld operating system automatically controls whether the VPN
connection is used, depending on whether the URL contains a period. For example, the URL
www.trimble.com contains periods, and so the connection to this website is made without using the VPN
connection. However, an address to a network computer or file server that does not contain periods
automatically starts the VPN connection.
If you need to use the VPN connection to access URL addresses that contain periods, specify exceptions
for the addresses that are within the corporate network. To do this:
1.
Tap /Settings/ Connections / Connections.
2. Tap the Advanced tab.
3. Tap Exceptions. The Work URL Exceptions screen appears.
4. Tap Add new URL.
Page 60

5. Enter the URL and then tap OK.
6. Repeat Step 4 and Step 5 as required.
7. Tap OK to return to the Advanced tab of the Connections screen.
8. Tap OK to close the Connections screen.
9.
Tap to close the Settings screen.
Using the GNSS receiver
The Juno 5 series handheld includes an integrated GNSS receiver that enables you to collect GPS data for
incorporating into a GIS or for managing assets.
GPS (Global Positioning System) is a Global Navigation Satellite System (GNSS), consisting of a
constellation of satellites that orbit the earth. GNSS provides worldwide, all-weather, 24-hour time and
position information.
To receive signals from GPS satellites, the handheld must have a clear viewof the sky. GPS positions may
not always be available, particularly in or near buildings, in vehicles, or under tree canopy.
Supported GNSS field software
For a list of supported software, see the Mapping & GIS Product Compatibility List.
Depending on the GNSS field software you have installed, the default GNSS field software will be
SatViewer or TerraSync.
The SatViewer software enables you to check the current GNSS status, or to configure the integrated
GNSS receiver, and to configure GNSS output settings for third party GNSS applications.
Depending on the GNSS field software you have installed, you can use the software to configure settings
such as GNSS, real-time correction, and antenna settings. You may also be able to use the software to
connect to a real-time correction source, configure logging settings, and collect features. For more
information, refer to the documentation for the GNSS field software.
Configuring the GNSS field software to connect to the receiver
The first time you use GNSS field software on the handheld, you may need to configure the software to
connect to COM2, which is the GNSS port on the handheld.
The integrated GNSS receiver has three COM ports for communicating with software on the handheld
and with external devices. Two ports are for outputting GNSS data, and one port is for receiving real-time
corrections into the receiver.
Connecting to the GNSS COM port
Details of how to configure different types of GNSS field software to connect to the GNSS COM port are as
follows:
Page 61

GNSS field software Configuration details
SatViewer Run SatViewer. The software automatically activates the integrated GNSS receiver
on COM3.
TerraSync Run Terrasync. The software automatically activates the integrated GNSS receiver
on COM2.
ArcPad
In ArcPad, tap the GPS drop-down menu and then select GPS Preferences from
the drop-down menu. Tap the GPS tab.
In the Protocol field, select NMEA 0183.
In the Port field, select COM3.
Tap OK.
Tap the GPS button and then tap Yes.
NMEA application Configure the software to connect to GNSS on COM3 and then use the Connect or
Activate GPS command.
For a list of supported software, see the Mapping & GIS Product Compatibility List.
Using the GNSS field software
Tap , and then tap the GNSS field software, for exampleTerraSync.
When you first open any Trimble GNSS field software, the Skyplot section is displayed.
Viewing available satellites
Use the graphical Skyplot section or the Satellite Info section in the installed Trimble GNSS field software
to viewdetailed GNSS information.
Note – To receive signals from GNSS satellites, the handheld must have a clear view of the sky. GNSS
positions may not always be available, particularly in or near buildings, in vehicles, or under tree
canopy.
Filled (black) boxes represent satellites that the receiver is using to compute its current GNSS position.
Unfilled (white)boxes represent satellites that the receiver is getting signals from but is not using because
the signals are too weak.
Note – Numbers with no box represent satellites that are available, but that the software is not
receiving signals from.
Your current GNSS position is displayed at the bottom of the screen.
Tip – For detailed information on satellite positions and signal strengths, use the Satellite information screen in the
Status section.
Page 62

Resetting the GNSS receiver
Trimble GNSS field applications all have options to reset the receiver to:
l
delete the almanac
l
delete information stored on the last known position
l
restart the receiver
l
reset the GNSS receiver to factory default settings
Ensuring the accuracy of your GNSS data
The Juno 5 series handheld has an integrated high-performance GNSS receiver that calculates accurate
GNSS positions. The accuracy that you obtain from the handheld is affected by a number of factors,
including whether the data is differentially corrected in real-time or after data collection, and the
availability of GNSS satellites in the sky when you collect the data.
To correct errors in the collected data and to further improve the accuracy of the GNSS positions, use
differentialGNSS. DifferentialGNSS (DGNSS) requires one or more additional receivers, called base
stations or referencestations, which are located at known points. Data collected at the base stations is
used to determine GNSS measurement errors and compute corrections to these errors. These
corrections are then applied to data collected in the field either in realtime or during postprocessing. For
more information, see DifferentialGNSS explained, page 64.
The list below identifies the most important settings and techniques that you can use in the field to
improve the accuracy of your data. This list assumes that you are using Trimble GNSS field software, and
lists items in order of most important to less important.
l
If you are using the TerraSync softwareto collect data, use accuracy-based logging. For more
information, refer to the TerraSync software Getting Started Guide on
http://www.trimble.com/mappingGIS/TerraSync.aspx?dtID=technical_support.
l
Use real-time differential corrections. If you have access to dual-frequency corrections from a VRS
network, use the corrections from the VRS network.
l
Connect to an externalantenna, if you have one.
l
Plan GNSS data collection around the times of the day when satellite geometry is best.
Connecting to a real-time differential correction source
Use a real-time differentialGNSS (DGNSS) source to give you better accuracy as you collect data. For more
information about how real-time differential GNSS works, see Differential GNSS explained, page 64.
Using real-time corrections from an Internet source
DGNSS corrections are often broadcast over the Internet. For example, corrections generated by a VRS
network are commonly broadcast over an Internet server. A VRS network uses data from several base
stations to provide rover receivers with corrections that are generally more accurate than corrections
from a single base station. Alternatively, you can connect to a server that provides DGNSS corrections
from a single base station.
The Juno 5 handheld supports RTCM 2.3 DGNSS correction data.
Page 63

For information on how to connect to the Internet and receive real-time corrections from an Internet
server, see Connecting to a Bluetooth-enabled device, page 48 or Connecting to a Bluetooth-enabled
phone for Internet access , page 52.
Using SBAS corrections
The handheld has an integrated GNSS receiver that uses SatelliteBased Augmentation Systems (SBAS)
correction messages to improve the accuracy and integrity of GNSS data.
The SBAS tracking mode is Auto. In Auto mode, the receivertracks or locks onto the most powerful
satellite signal. The GNSS receiver can track two SBAS satellites at the same time in Auto mode. It uses
corrections from only one SBAS satellite at a time, but tracking two satellites can improve the availability
of SBAS real-time corrections. For example, if you are working in environments where obstacles may
block the direct line of sight to the SBAS satellite, there is less chance of signal loss if you are tracking
more than one SBAS satellite.The receiver tracks SBAS satellites according to your geographical location:
l
Wide Area Augmentation System (WAAS) satellites are tracked in the Continental United States
including Alaska, and parts of Canada and Mexico.
l
European Geostationary Navigation Overlay Service (EGNOS) satellites are tracked in Europe.
l
MTSAT Satellite-based Augmentation System (MSAS) satellites are tracked in Japan.
Note – If you have other Trimble GNSS field software installed, configure real-time correction settings in
that application instead of the SatViwer software.
For further information on the TerraSync software, refer to the TerraSync software documentation on
www.trimble.com:http://www.trimble.com/mappingGIS/TerraSync.aspx?dtID=technical_support
Using real-time corrections from an external correction source
You can improve the accuracy of your data by using real-time corrections from an external correction
source, such as a DGNSS radio. Connect the external correction source to a Bluetooth port (Configuring
the GNSS field software to connect to the receiver, page 60). Use the GNSS field software to set up and
monitor the real-time input source that you want to use.
For information on configuring the GNSS field software to use corrections from a VRS network or single
base station that transmits corrections over the Internet, see Connecting to a Bluetooth-enabled phone
for Internet access , page 52.
For further information on setting up an external correction source, refer to the TerraSync software
documentation on
www.trimble.com:http://www.trimble.com/mappingGIS/TerraSync.aspx?dtID=technical_support
Planning a data collection session
To maximize productivity, plan GNSS data collection around the times of the day when satellite geometry
is best. The TerraSync software and the SatViewer software both include a Plan section with an animated
skyplot and DOP (satellite geometry) graph for your position for the next 12 hours.
In the Plan section, you can check the planning skyplot as you play a session, then use the timeline to
zoom in on times when geometry is poor. As you adjust GNSS settings, the Plan section is updated, so
you can see the effect of different quality control settings.
Page 64

Using an external GNSS antenna
The Juno 5 series handheld provides an external GNSS antenna port, which is suitablefor use in most
conditions. This port is suitable for GPSantennas only.
CAUTION - The presence of any dust or moisture in the external antenna port may cause the external antenna to not
work. To prevent dust or moisture entering the external antenna slot, take care when using the handheld with an
external antenna in wet or dusty conditions.
Configure antenna settings in the GNSS field software, once you have connected the external antenna to
the handheld.
For details on configuring antenna settings in the TerraSync software, refer to the TerraSync software
Getting Started Guide on http://www.trimble.com/mappingGIS/TerraSync.aspx?dtID=technical_
support.
Differential GNSS explained
Use differentialGNSS to correct errors in your collected data. Differential GNSS (DGNSS) requires one or
more additional receivers, called base stations or reference stations, which are located at known points.
Data collected at the base stations is used to determine GNSS measurement errors and compute
corrections to these errors. An unlimited number of mobileGNSS receivers, called rovers, collect GNSS
data at unknown locations within the vicinity of the base station. Errors common at both the base
station and the rover receiver are corrected with DGNSS either in real time or during postprocessing.
Real-time DGNSS
In real-time DGNSS, the base station calculates and broadcasts the error for each satellite as each
measurement is received, enabling you to apply corrections while in the field and collect accurate GNSS
data. DGNSS corrections are available from a variety of public and commercialsources. They can be
generated and broadcast in real-time by privately or self-owned GNSS base stations, or by a wide range
of government agencies.
Real-time DGNSS corrections can be used on the Juno 5 series handheld from Satellite Based
Augmentation Systems (SBAS) such as WAAS in the US and EGNOS in Europe. SBAS uses multiple base
stations to calculatethe DGNSS corrections that are then delivered to the user from a Geostationary
satellite.
For Internet-based real-time corrections, the Juno 5 series handheld supports only RTCM 2.x
DGPSformat.
Factors that affect real-time DGNSS accuracy include how often the corrections are updated, how far you
are from the base station, and whether the coordinate system used by the correction source matches
the coordinate system used by the GNSS receiver.
Postprocessed DGNSS
In postprocessed DGNSS, the collected GNSS data is transferred to an officecomputer, and
measurements from the base station are downloaded. You can postprocess GNSS data collected with
Trimble GNSS field softwareusing the GPS Pathfinder Office software.
Page 65

Factors that affect the accuracy of postprocessed DGNSS include the type of receiver and antenna used
at the base station, the distance between the base station and the location where the rover data was
collected, the accuracy of the base station position, and the logging interval at the base station.
For more information, refer to the documentation provided with the postprocessing software.
Postprocessed real-time DGNSS
If you collected data corrected in real time, you do not need to postprocess the data.
However, if your data files contain autonomous (uncorrected) positions as wellas real-time corrected
positions, Trimble recommends that you postprocess the data. During postprocessing, you can choose
whether to correct only autonomous positions, or all positions.
Postprocessed data is usually more accurate than data corrected in real time.
Configuring NMEA output
You can use the Juno 5 series handheld's integrated GNSS receiver with any GNSS field software that
accepts NMEA messages.
NMEA data is available for NMEA-based applications on COM3. This contains GGA, GLL, GSA, GSV, RMC,
ZDA, VTG sentences, at a data rate of 38400bps.
Using the camera
The Juno 5 series handheld contains an integrated 8 megapixel digitalcamera, with geotagging and dual
LEDflash, which you can use to capture photos or video.
Starting the camera application
To start the camera, tap /Pictures & Videos , then tap Camera or the Camera soft key.
Displaying the camera controls
Tap the camera previewscreen to display the camera application interface buttons. Tap to display
the Settings menu.
For more information on the Settings, see Camera setting options, page 66
You can use the camera in Still or Video mode. If you are in Still mode, the switch to video mode icon
shows in the top left of the screen. If you are in Video mode, the switch to camera mode icon
shows in the top left of the screen. To switch modes, tap the icon.
A thumbnail of the most recent image captured is also shown on the preview screen. You can tap the
thumbnail to return to Pictures & Videos.
Tap to hide the Settings menu.
Using the camera in Still mode
To take a photo:
Page 66

1. Start the camera, tap the screen to display the controls, and make sure the camera application is in
Still mode.
2. Use the viewfinder to frame the image you want to capture. If the preview is not focused, doubletap on the previewscreen to focus the image, if Focus is enabled (see Focus in Camera setting
options, page 66).
3. To capture the image, do one of the following:
ll
If the icon is visible on the screen, tap this.
l
Press the middle button (the Action key) of the Volume control / programmable buttons on the
left side of the handheld.
4. Depending on the Image reviewsettings (see Image review, in Camera setting options, page 66) the
image is stored immediately and you can continue to take photos, or you must tap to store
the image, or to deletethe captured image.
Images are stored as .jpg files.
Using the camera in Video mode
1. Start the camera, tap the screen to display the controls, and tap the Video icon to switch to Video
mode.
2.
To start recording, tap . A timer appears in the top right of the screen.
3. To stop recording, tap the Stop icon. To pause the recording, tap the Pause icon. To continue
recording, tap .
4. Depending on the Video review settings (see Video review, in Camera setting options, page 66) the
video is stored immediately and you can continue to record, or you must tap to store the
video, or to delete the captured video.
To close the camera application and return to Pictures & Videos, press the Start key, or tap the screen,
and then tap the (X) in the top right corner of the screen.
Videos are stored as .wmv files.
To play back a video, open it from Pictures &Videos.
Note – Video recordings are always recorded and displayed in Landscape mode, even if the handheld is
used in Portrait mode.
Camera setting options
To access the camera setting options, start the camera application, tap the screen to bring up the
Controls button, then tap the Controls button to display the settings. In Still mode, the settings are:
Control Available settings
Settings
There are two aspect ratios,with resolution as follows:
Page 67

Control Available settings
l
4:3 - 1.3 MP (1280x960), 3 MP (2048x1536), 5 MP (2560x1920), or 8 MP
(3264x2448)
l
5:3 - WVGA (800x480), WXGA (1280x768), 2.4 MP (2000x1200), 3.9 MP
(2560x1536), or 6 MP (3264x19600
Storage Select:Main memory or SDcard
Focus:
l
Enable - This enables the Auto Focus feature, which is activated with a doubletap on the preview screen.
l
Disable
Image Review:
l
2 Seconds: The captured image is displayed for 2 seconds.
l
3 Seconds: The captured image is displayed for 3 seconds.
l
User Prompted: The captured image is displayed until you delete or save the
image. Tap to store the image, or to delete the image.
l
Off: The captured image is not displayed. This mode is useful for capturing
images as quickly as possible.
Image Tagging: capture date, time, and location data on images. The datacan be
stored in the EXIF dataor both the EXIF data and on the image.
l
Date
l
l
Date source - Device date-time, or GPS date-time. If the current GPS time is
not available (due to lack of signal), the Device Date-Time is used.
l
Stamp settings - EXIF, EXIF & Stamp, or Off
l
GPS
l
l
Format - Deg/Min/Sec (Format in Degrees, Minutes, Seconds), or Decimal
degree (Format in Degrees with decimal precision)
l
Stamp settings - EXIF, EXIF & Stamp, or Off
Note – If Image Tagging is set to EXIF & Stamp, photos taken in Portrait mode will be
displayed in Landscape mode.
APPSettings:
l
UIorientation - rotate on tilt, fixed landscape, fixed or portrait
l
Sounds - enable the beep sound while focusing and the click sound for capturing
the images, or disable.
Page 68

Control Available settings
l
Modify prefix - Still prefix or Video prefix. Select the Modify Prefix option to
display the prefix window enabling you to edit the prefix of Image and Video
files. By default, Image files append with prefix IMG and video files append with
VID. The file is saved with a name thatis autogenerated with the prefix followed
by a four digit number. The number is sequential.
White balance Auto, Sunny, Incandescent, or Fluorescent
Zoom
1, 1.5, 2, 2.5, 3, 3.5, or 4 .
Note – If Zoom is set to any value other than 1, photos taken in Portrait mode will be
displayed in Landscape mode.
Brightness -3, -2, -1, 0, +1, +2, +3.
Flash
On, Off, or Auto.
Image quality Economy (low quality, high compression), Normal (medium quality / compression),
Fine (good quality, low compression), or Superfine (high quality, low compression).
In Video mode, the settings are:
Control Description
Settings icon
Video Resolution: QVGA 320x240, VGA 640x480, OR WVGA 800x480.
Storage Select - Main memory or SDcard
Video Review:
l
On. Video review mode is enabled. After video capturing is completed, the
video review window enables you to review the capture video by playing it
back. The captured video is displayed until you delete or save the video. Tap
to store the video, or to delete the video.
l
Off. The video review feature is disabled. The camera application returns to the
preview window after capturing the video and storing the video file.
Pause Timeout:10 seconds, 20 seconds, 60 seconds, or disable. The selected
option specifies the duration of the pause during video recording.
APPSettings:
l
Sounds - enable the beep sound while focusing and the click sound for capturing
the video, or disable.
l
Modify prefix - Still prefix or Video prefix. Select the Modify Prefix option to
display the prefix window enabling you to edit the prefix of Image and Video
Page 69

Control Description
files. By default, Image files append with prefix IMG and video files append with
VID. The file is saved with a name thatis autogenerated with the prefix followed
by a four digit number. The number is sequential.
White balance Auto, Sunny, Incandescent, or Fluorescent
Brightness -3, -2, -1, 0, +1, +2, +3.
l
Focus
Audio record Enable or disable
Enable - This enables the Auto Focus feature, which is activated with a doubletap on the preview screen.
l
Disable
The status bar at the top of the screen shows some selected settings.
Managing photos and videos
To view and manage photos and videos, tap /Pictures & Videos . The Pictures &Videos screen
appears.
To rename a photo or video:
1. Tap the required file top open it, tap Menu, then scroll down and select Properties. Alternatively,
make sure the file is selected without opening it, and then tap Menu, and select Tools/ Properties.
2. Enter a name in the Name field and tap OK.
To delete a photo or video, tap and hold the required file, and then select Delete from the pop-up menu.
To copy a photo or video, tap and hold the required file, and then select Copy from the pop-up menu.
To send a photo or video using email or SMS, tap and hold the required file, and then select Sendfrom
the pop-up menu.
To edit a photo:
1. Tap the required file, tap Menu, then scroll down and select Edit.
2. You can:
ll
Tap Rotate to rotate the photo 90 degrees clockwise. Tap Rotate again if required until the
photo has the desired orientation.
ll
Tap Menu, and then select one of the following:
Option
Crop Drag a box around the area of the photo that you want to crop, and then tap inside
the box to crop the photo.
Page 70

Option
Auto Correct Auto correct the photo.
Undo Undo the last action.
Revert to Saved Reject any changes you have made since the last Save.
Save As... Save the file with a new name.
Using the barcode imager
You can use the integrated barcode imager in the Juno 5 Barcode handheld (5B or 5D) to scan 1D and 2D
barcodes. It supports:
l
1D symbologies: EAN/UPC, GS1 Databar (limited expanded & omni-directional), Code 39, Code 128,
UCC/EAN 128, ISBN, ISBT, Interleaved/Matrix/ Industrial and Standard 2 of 5, Codabar, Code 93/93i,
Code 11, MSI, Plessey, Telepen, postal codes (Australian Post, BPO, Canada Post, Dutch Post, Japan
Post, PostNet, Sweden Post).
l
2D symbologies: Data Matrix, PDF417, Micro PDF 417, Codablock, Maxicode, QR, Aztec.
Configuring the barcode imager
Tap /Settings/Scanner. The Scanner Setup dialogue displays. From hereyou can:
l
Test the functionality of the integrated barcode imager. Tap Scan Now.
l
Edit the barcode imager configuration. Tap Edit Config. You can:
ll
set supported scan codes, and define parameters, prefixes and suffixes.
l
set reader parameters.
l
restore default settings.
Using the barcode imager
To read a barcode, make sure you have an application such as Microsoft Word or Notepad open, or that
you have your data collection softwareopen and have the cursor in a barcode field, then point the
device at the barcode and do one of the following:
l
Tap the ScanAgent icon on the Start screen.
l
Press the button that is assigned to barcode scanning. See Personalizing the handheld, page 30 for
details on setting a button to scan barcodes; from the Assign a program drop-down list, select
ScanAgent.
Page 71

Troubleshooting
Use this section to identify and solve common problems that may occur when using the Juno 5series
handheld. Please read this section before you contact technical support.
Power issues
Problem Cause Solution
The handheld
does not turn
on.
The handheld
turns on only
when
connected to a
power source.
The screen is
blank.
The handheld is
not charging.
The battery is flat. Recharge the battery. See
The Power button is not working. Contact your Trimble reseller.
The battery is not charging or
holding its charge.
The handheld is turned off. Press the Power button to turn on the handheld.
The handheld has locked up. Reset the handheld (see
The internal temperature has
risen above the allowed maximum
for charging the battery.
Charge the battery for at least 15 minutes. If it still fails to
turn on, reset the handheld (see
(page 20)
Do one or all of the following:
). If this still fails, the battery may need replacing.
l
Turn off the integrated radios before charging the
handheld.
l
Suspend the handheld before charging.
l
Remove the handheld from any external heat sources
(for example, sunlight).The handheld will
automatically start charging again when the internal
temperature has dropped below the range for
charging the battery.
Charging the battery (page 18)
Resetting the handheld
Resetting the handheld (page 20)
.
).
The battery
power
percentage bar
does not
appear in the
Power control.
Under some
circumstances
the AC adapter
may be faintly
The handheld is connected to a
computer which is turned off, or
in sleep mode.
The USBPower adaptor / cable is
faulty.
The battery has 0% power. Recharge the battery (see
The AC adapter is a highly efficient
adapter which is required to
operate at very low audible duty
cycles when unloaded so as not to
This may drain the handheld's battery, and the battery will
not charge.
Try another USBPower adaptor / cable.
Once the battery level is above 0%, the battery power
percentage bar reappears. Tap
Battery
There is no safety issue related to the faint noise. In the
event of a disconcerting noise, disconnect the mains
adapter from the mains as soon as a battery charge is
complete.
to view the level of power remaining in the battery.
Charging the battery (page 18)
Start/Settings/Power
.
/
Page 72

Problem Cause Solution
audible at close
proximity.
The charge
level of the
battery drops
when the
handheld is
turned off.
The lowbattery icon
is displayed
and the
handheld is
unresponsive.
Battery life is
short.
Battery LED is
not behaving as
expected.
waste energy
The handheld was left in Suspend
mode or was left fully charged for
a long duration.
The handheld was left in suspend
mode with a wireless radio turned
on.
The battery charge is low. Charge the handheld for at least 15 minutes. The Charging
The battery was not fully charged. Make sure you fully charge the battery. Do not charge it
Before storing the handheld, completely shut down the
handheld (see
(page 19)
Storing the handheld, page 14
Before suspending the handheld, use the Wireless Manager
to turn off all wireless radios. Make sure that all the radios
are turned off after suspending the handheld.
icon should appear. If the low-battery icon is still
displayed on the screen, turn off the handheld and then
turn it on again (see
handheld, page 19
handheld (with the Power adaptor / cable still connected).
Resetting the handheld, page 20
See
from a keyboard, or connected to a computer which is
turned off, or in sleep mode.
Reset the handheld. See
Turning on and turning off the handheld
). Then store the handheld as recommended (see
).
Turning on and turning off the
. If the problem remains, reset the
.
Resetting the handheld (page 20)
Backlight issues
Problem Cause Solution
The backlight does
not come on when
you tap the screen or
press a button.
The screen is blank
or hard to see.
The backlight is not set to turn on in the
Backlightcontrol.
The backlight is off. Tap the screen or press a button.
The backlight level needs to be adjusted. Tap
Tap Start / Settings / System / Backlight to
view the Backlight control, and make sure
thatthe Turn on backlight when a button is
pressed or the screen is tapped check box is
selected.
Tap Start / Settings / System / Backlight and
then select the Brightness tab to view the
Brightness control, and make sure thatthe
brightness is not set to Dark (slider
positioned far left).
Start/Settings/System/Backlight
then select the
Brightness control and then adjust the
slider.
Brightness
and
tab to view the
Page 73

Touch screen issues
Problem Cause Solution
The touch screen does not
respond to finger or stylus
taps.
The screen is blank. The handheld is turned off. Press the Power button to turn on the
The screen is hard to see. The brightness level needs to be
The touch screen is incorrectly aligned.
The touch screen is locked. To unlock the touch screen, slide the
The handheld has locked up. Reset the handheld. See
The battery is flat.
The handheld has locked up. Reset the handheld. See
adjusted.
Realign the screen. See Screen, page
33
The Juno 5 series screen is a capacitive
screen. You must use your finger, or a
capacitive stylus or capacitive gloves
(available as Juno 5 series accessories).
You cannot us a simple stylus, pen, or
normal gloves.
Unlock icon.
Resetting the
handheld, page 20
handheld.
Recharge the battery. See Charging the
battery, page 18.
handheld, page 20
Open the Brightness control and then
adjustthe brightness level (see
Backlightand Brightness, page 34
.
Resetting the
.
).
The backlight is off. Tap the screen to turn on the backlight.
There are bright or dark
pixels, lines in videos, or
sections of video missing.
The touch screen does not
switch between landscape
and portrait mode when
handheld is rotated.
You are unable to see parts of an
application windows when the screen is
in landscape orientation.
It may be an issue with the content you
are viewing.
Handheld is set to either Portrait or
Landscape, and does not switch mode
automatically when the handheld is
rotated.
Some applications are designed for
portrait orientation only.To view the
entire application window, change the
screen display to portrait. See
page 33
Turn off the handheld, and turn it back
on. Or reset the handheld. See
Resetting the handheld, page 20
Set either Portrait or Landscape :tap
Speaker and microphone issues
Problem Cause Solution
Poor sound through
the speaker, or the
Water has pooled in the speaker. If the handheld has been in rain or
immersed in water, turn the handheld so
/
Settings/System/Screen
Screen,
.
.
Page 74

Problem Cause Solution
microphone.
No sound when
using the phone
Headset is not
functioning
Protective case is preventing quality sound. Remove the protective case.
Phone may be muted, or the volume too
low.
Headset is not properly connected, or is not
compatible.
thatit is face-down, then shake it to expel
the water from the speaker / microphone
cavity. Allow it to dry.
Press the Volume control buttons on the
left of the device to adjust the volume.
Make sure your headset is compatible with
the Juno 5 series handheld. Make sure the
headset is properly connected.
Storage card issues
Problem Cause Solution
The handheld does
not recognize a
storage card.
Files on the storage
card are not visible
or are not able to be
opened.
The handheld does not support SDIO (SD
input/output) cards.
Files have been encrypted on another
device and have a .menc file extension.
Use a MicroSD card.
Remove encryption from the files. See
Encrypting files on memory cards, page 22
.
Keypad issues
Problem Cause Solution
Pressing the
application key does
not activate the
function shown on
the tile above it.
The hardware application key has been
programmed to run another program or to
perform another action.
Do one of the following:
l
Tap the touch screen tile to activate
the function shown on the tile.
l
Re-program the application key to
perform the same action as the touch
screen tile. To do this, tap Start /
Settings / Personal / Buttons, select the
button to reprogram and then select
<Left Softkey> or <RightSoftkey>.
Page 75

Connection issues
Network connections
Problem Cause Solution
The connection with
the cellular phone
suddenly ends.
Unable to connect to
another Juno 5series
handheld.
If you change the proxy settings of the
handheld while connected to a cellular
phone, the cellular phone ends the
connection.
Data encryption settings are set incorrectly. When setting up a peer-to-peer ad-hoc
Make any changes to proxy settings before
connecting to a mobile device.
network with a WEP encryption, set a
Network Key, rather than leaving the key
blank to be provided automatically.
Windows Mobile Device Center
Problem Cause Solution
Windows Mobile
Device Center will
not connect to the
handheld.
The connection is not initiated automatically. In the Windows Mobile Device Center
software on the office computer, select
Mobile Device Settings/Connection Settings
The Windows Mobile Device Center
software does not recognize the Juno 5
series handheld.
The connection is not enabled in Windows
Mobile Device Center on the computer.
Restart the office computer. Disconnect the
handheld from the office computer, reset it
Resetting the handheld, page 20
(see
then reconnect it to the office computer.
In the Windows Mobile Device Center
software on the office computer, click
Mobile Device Settings / Connection
Settings. If you are using:
.
) and
The connection is not enabled on the
handheld.
l
a USB cable, make sure that the Allow
USB connection check box is selected
from the drop-down list.
l
a Bluetooth connection, make sure
thatthe correct port for Bluetooth is
selected. Then open the Bluetooth
control on the handheld. In the Devices
tab,tap the partnership and in the
services list make sure thatthe
ActiveSync check box is selected.
On the handheld, tap
Menu/Connections
Synchronize all PCs using this connection
check box is selected, and thatthe correct
option is selected.
Start/ActiveSync
. Make sure that the
/
Page 76

Problem Cause Solution
The handheld connection settings conflict
with network settings or VPN client
software.
If you are using a USB cable, use the USB to
PC utility to change the connection method
the handheld uses to connect to the
Windows Mobile Device Center on the
computer. Tap
USB to PC Utility
/
advanced network functionality
The handheld stops using the default RNDIS
method to connect to the Windows Mobile
Device Center.
ActiveSync technology
Problem Cause Solution
ActiveSync
technology will not
connect to the
handheld.
The connection is not initiated automatically. In the ActiveSync technology dialogon the
office computer, select
Settings
The ActiveSync technology does not
recognize the Juno 5 series handheld.
Disconnect the handheld from the office
computer. Restart the office computer.
Reset it (see
20
) and then reconnect it to the office
computer.
Start/Settings/Connections
. Clear the
Enable
File/Connection
and then tap
Connect
.
Resetting the handheld, page
check box.
An incompatible version of ActiveSync
technology is installed.
The connection is not enabled in ActiveSync
on the computer.
The connection is not enabled in ActiveSync
on the handheld.
ActiveSync version 4.5 and later is
compatible with the Juno 5 series handheld.
If version 4.5 or later of the ActiveSync
software is not installed on the office
computer, you can download the latest
version from the Microsoft website.
In the ActiveSync technology dialog on the
office computer, click File / Connection
Settings. If you are using:
l
a USB cable, make sure that the Allow
USB connection check box is selected
from the drop-down list.
l
a Bluetooth connection, make sure
thatthe correct port for Bluetooth is
selected. Then open the Bluetooth
control on the handheld. In the Devices
tab,tap the partnership and in the
services list make sure thatthe
ActiveSync check box is selected.
On the handheld, tap
Menu/Connections
Start/ActiveSync
. Make sure that the
/
Synchronize all PCs using this connection
Page 77

Problem Cause Solution
check box is selected, and thatthe correct
option is selected.
The handheld connection settings conflict
with network settings or VPN client
software.
If you are using a USB cable, use the USB to
PC utility to change the connection method
the handheld uses to connect to ActiveSync
technology on the computer. Tap
Settings/Connections/USB to PC Utility
Clear the
functionality
using the default RNDIS method to connect
to the ActiveSync technology.
Bluetooth wireless technology
Problem Cause Solution
The handheld cannot
discover a nearby
Bluetooth device.
The integrated Bluetooth radio is not
activated.
The device is out of range. Move the devices closer to each other and
Bluetooth wireless technology is not
enabled on one or both devices.
The handheld’s Bluetooth radio has been
deactivated. If Bluetooth wireless
technology is allowed where you are
working, use the Radio Activation Manager
software to re-activate the radio (see
use, page 7
then scan again.
Make sure that the Bluetooth radio is turned
on, on both the handheld (see
and turning off the Bluetooth radio from
within the Bluetooth application, page 44
and the other Bluetooth device.
Start
Enable advanced network
check box. The handheld stops
).
Turning on
/
.
Radio
)
The COM port that
you assigned to a
serial port service is
not available in your
application.
The Bluetooth
connection fails
while in use.
The device has not been made
Discoverable.
The application cannot recognize ports if
they are added after the application opens.
The Bluetooth device has moved out of
range.
The Bluetooth radio has lostthe connection. Turn off the Bluetooth radio on the
Make sure that the Bluetooth device has
been made Discoverable.
Exit from the application, add the port and
then run the application again.
Move the devices closer to each other. The
devices should reconnect automatically. If
they do not, select the Bluetooth device in
Devices
the
name and then select
discover the device again.
handheld and then turn on the Bluetooth
radio (see
Bluetooth radio from within the Bluetooth
tab.Tap and hold the device
Delete
. Tap
Turning on and turning off the
New
to
Page 78

Problem Cause Solution
application, page 44
An error message
reports “Problem
with Bluetooth
Hardware”.
Bluetooth file transfer interrupts the
connection.
The integrated Bluetooth radio may have
been deactivated.
When you transfer large image or data files,
other Bluetooth connections may stop
responding.To avoid problems, close other
Bluetooth connections before transferring
large files.
Use the Radio Activation Manager to
reactivate the Bluetooth radio. See
use, page 7
Wi-Fi connections
Problem Cause Solution
The “New Network
Detected” notification does
not appear automatically.
The Wi-Fi radio is off. Tap the wireless icon in the Home
screen or go to the Wireless Manager
and make sure Wi-Fi is on.
The handheld is out of range of the
network.
Move to within range of the network,
then tap /
Wi-Fi
, select the
and then set up the connection.
) .
Radio
Settings/Connections
Network Adaptors
/
tab
The handheld cannot
connect to a secure site.
You cannot configure an
Internet connection.
Within range of more than
one network, you are not
connecting to the network
you would prefer to use.
The “New Network
Detected” notification
appears but the menu bar
and soft key options are not
displayed
The date on the handheld is incorrect Check thatthe handheld has the date
Home
screen. If
screen and then adjust
Wirless
tab.Tap and
Connect
.
The radio is connecting to the first
network signal ithas received
Some applications are not fully compatible
with all features of the Windows
Embedded Handheld 6.5 Professional
operating system.
set correctly on the
the date is incorrect, tap the clock icon
Home
on the
the date and time.
Tap /
and select the
hold the network you would prefer to
use and then select
Use the application buttons on the
keypad, as they map to the soft keys in
the menu bar: •To dismiss the
notification, press the right application
button on the keypad. •To connect to
the network, press the left application
button. Alternatively, select a Windows
Embedded Handheld application from
the Start menu, such as the Home
screen or File Explorer, and the menu
bar and soft keys will be displayed
correctly.
Settings/Connections/Wi-Fi
,
Page 79

Internal cellular modem connections
Problem Cause Solution
Can't download data. Your account has no remaining credit. Contact your cellular provider to ensure
thatyour account has sufficient credit.
Can't connect. The phone is turned off. Turn on the phone using the Wireless
Manager.
The connection is incorrectly configured. Check your APN and connection settings
with your provider.
Cellular service is unavailable.
Service is
intermittent.
Can't set up a
connection.
Required carrier is
not listed in CellStart
Cellular service is weak, or a protective case
is obstructing the receiver.
SIM card is missing. Insert SIM card.
SIM card is locked. Check the PIN security: tap
3G/GSMselection is incorrect for your
cellular provider.
Version of CellStart is not the latest version. Contact your Trimble reseller.
GNSS receiver issues
Check that the phone is within range of
receiving strong enough signals to connect.
Move to a location with stronger cellular
reception. Check with your cellular
provider that coverage is available in your
region.
Move to a location with a stronger signal,
and / or remove the protective case from
the handheld.
Start/Settings
Personal/Phone
tab.
Check your settings: tap
Personal/Phone
the 3G/GSM Selection to Auto.
, and select the
Start/Settings
, and select the3Gtab.Set
Security
/
/
Problem Cause Solution
The handheld is not
receiving GNSS
positions.
The integrated GNSS receiver is not
activated.
Incorrect configuration of serial COM port. When supplying GNSS data to an external
The GNSS COM port is already in use. Only
one application at a time can have the port
open.
Use the Connect or Activate GNSS/GPS
command in the field software to open the
GNSS COM port and activate the integrated
GNSS receiver. For more information, see
Using the GNSS receiver, page 60
device using the COM1 USB to serial
converter cable, set the baud rate to the
high-speed TSIP setting: 38400, 8, 1, Odd.
Do the following:
l
Exit the software thatis using the GNSS
.
Page 80

Problem Cause Solution
COM port and then retry in your
application.
l
Check that a GNSS application is not
running in the background. Tap Start /
Task Manager and then select and
close (click End Task) any GNSS
applications you are not using.
l
Make sure that connections are not
left in use by the GNSS Connector
software; close the application when
you are not using the connections.
The GNSS field software is using the wrong
GNSS COM port.
Connect to COM3 if the GNSS field software
uses NMEA messages, or COM2 for UBX
binary messages (for example, TerraSync).
For information on which protocol to use,
check the documentation for the
application.
Not enough satellites are visible. Move to a location where the receiver has a
clear view of the sky and ensure the
antenna is not obstructed. Alternatively,
adjustthe GNSS settings to increase
productivity. For more information, refer to
the Help provided with the GNSS field
software.
The DOP (Dilution of Precision) value for the
current position is above the maximum DOP
setting.
Wait until the DOP value falls below the
maximum DOP specified.
Alternatively, adjust the GNSS settings to
increase productivity. For more
information, refer to the Help provided
with the GNSS field software.
Wait for real-time
is selected in the GNSS
field software and the integrated receiver is
waiting to receive real-time corrections.
If you are collecting datafor postprocessing,
clear the wait for real-time selection.
Check that the real-time correction source
is set up correctly (see Connecting to a real-
time differential correction source, page
62).
External antenna connected but not
receiving data.
NMEA data includes
autonomous
positions.
The integrated GNSS receiver outputs
autonomous positions when real-time
corrections are unavailable.
The GNSS Connector The GNSS Connector software may report
“Unknown” on COM3.
The handheld can take up to two seconds to
detect that an external antenna has been
connected or disconnected.
Configure the NMEA application to filter out
non-DGNSS positions.
This should not interfere with operation of
the handheld.
Page 81

Problem Cause Solution
utility reports
“Unknown”.
Error Code 5
appears.
The receiver will not
connect.
A receiver timeout error has occurred,
caused by issues with communications to
the receiver, or when the receiver has
taken too long to reconnect.
There is a GNSS receiver connection error. Reset the receiver, then attempt to connect
Close the dialog and if the handheld does
not automatically connect to the receiver,
try to connect to the receiver again. If
repeated attempts to connect to the
receiver fail, contact your Trimble reseller.
again. If repeated attempts to connect to
the receiver fail, contact your Trimble
reseller.
Real-time DGNSS issues
Problem Cause Solution
The handheld is not
receiving SBAS realtime corrections.
The SBAS satellite is obstructed from view. Check the location of the SBAS satellite in
the Skyplot section of the GNSS field
software, and if possible move to a different
location.
You are outside the WAAS, EGNOS, or MSAS
coverage area.
Wide Area Augmentation System (WAAS)
satellites are tracked in the Continental
United States including Alaska, and in
southern parts of Canada.
The handheld is not
able to track a new
or a specific SBAS
satellite.
The handheld is not
receiving real-time
corrections from the
You are not using the latest SBAS
configuration (.ini) file.
There is no physical connection to the
external source.
European Geostationary Navigation Overlay
Service (EGNOS) satellites are tracked in
Europe. MTSAT Satellite-based
Augmentation System (MSAS) satellites are
tracked in Japan.
If you have selected satellites that are not
available at your location, you cannot use
SBAS corrections.
1. To download the software, go to
www.trimble.com/support.shtml, and
navigate to your receiver type. Under
the Downloadsfolder, click SBAS.INI.
2. To specify the satellites you want the
receiver to track or to ignore, select
the Custom option in the Tracking
Mode field in the Integrated SBAS
Settings form of the Trimble GNSS field
software.
Connect the external real-time correction
source to COM1 using the optional USB to
serial converter, or to a Bluetooth port on
Page 82

Problem Cause Solution
external real-time
correction source.
the handheld.
There is no Bluetooth wireless connection
to the external source.
The Bluetooth external correction source is
more than ten meters from the handheld,
or is obstructed. Move the devices closer
together, in a direct line of sight, to reconnect.
The external source is incorrectly
connected to the real-time COM port.
Real-time Settings
In the
section of the GNSS
field software, select the COM port that the
real-time source is connected to.
The port settings are incorrect. Change the port settings to match those
used by the external source.
No GNSS positions are available. You cannot use real-time corrections until
the GNSS receiver is computing positions. In
the GNSS field software, make sure thatthe
integrated GNSS receiver is activated,
enough satellites are available, and thatthe
satellite geometry (PDOP) is good enough to
compute positions.
Integrated SBAS is selected as the second
choice source of real-time corrections.
If the SBAS status is Waiting, the integrated
GNSS receiver may incorrectly change the
status of the preferred real-time choice to
Waiting as well. To avoid this, select Wait for
real-time or Use uncorrected GNSS as your
second choice.
 Loading...