

Page 1
User manual
TRIAX TR63 DVB-T2
Article Article no.
TRIAX TR63
Digital Receiver HD DVB-T2
Adaptateur TNT Haute Définition DVB-T2
Digitális vevő készülék HD DVB-T2
305263
Version B Date 02/2017 EN-FR-HU
Page 2

User Manual
EN
2
Attention! / Achtung! / Consignes de sécurité!
EN
Failure to comply
Failure to complyFailure to comply
Failure to comply
with the specified precautionary measures may cause serious injury to persons or damage to
property. The installation and commissioning may only be performed by suitably qualified persons, technicians or
installers in compliance with safety regulations.
Damage due to improper installation and commissioning, defective connectors on cables or any other incorrect
handling will void the warranty.
CAUTION: The safety requirements are according to EN 60728-11 and must be observed.
• Disconnect mains power before working on electrical systems.
• Any additional electrical wiring requirements should always be installed by a suitably qualified person(s).
Installation or service work should NEVER be undertaken during electrical / thunderstorms.
DE
Gewährleistung
Gewährleistung Gewährleistung
Gewährleistung
Die gesetzliche Gewährleistung nach Paragraph 437 BGB beträgt 24 Monate.
Bei unsachgemäßer Installation und Handhabung erlischt jeglicher Garantieanspruch.
Bestimmungsgemäße
Und sachwidrige Verwendung
Die Montage und Inbetriebnahme darf nur von eingewiesenen Personen, Technikern
oder Installateuren unter Beachtung der Sicherheitsbestimmungen durchgeführt werden.
Schaden durch falsche Montage und Inbetriebnahme sowie durch unsachgemaβe Handhabung fuhren zum Erlöschen
des Garantieanspruchs.
FR
Veillez à bien r
Veillez à bien rVeillez à bien r
Veillez à bien r
especter
especterespecter
especter
les consignes de sécurité ci
-
dessous. Leur non
-
respect peut provoquer des dommages
matériels ou corporels.
L’installation et la mise en route ne peuvent être effectués que par des techniciens ou des installateurs qualifiés en
respectant les consignes de sécurité.
La garantie ne sera pas appliquée lors de dégâts causés par une erreur de montage, de mise en route ou par un
mauvais raccordement ou toute autre manipulation incorrecte.
PRUDENCE : avant toute intervention, votre installation doit être conforme aux exigences définies par les dispositions
Européennes EN 50083 (conformité des installations collectives) et EN 60065 (normes en vigueur pour la protection
électrique).
• Débranchez l’appareil avant toute intervention, car certains composants sous tension sont dangereux
(risque d’électrocution).
Toute intervention sur l’installation ou travaux de maintenance sont à proscrire en cas d’orage.
Page 3

User Manual
3
EN
Table of contents / Inhaltsverzeichnis / Sommaire
Attention! / Achtung! / Consignes de sécurité! ................................................................................ 2
1.
Introduction ...................................................................................................................... 5
1.1
General ............................................................................................................................. 5
1.2
Front panel ........................................................................................................................ 5
1.3
Rear panel ......................................................................................................................... 5
2.
System connection ........................................................................................................... 7
2.1
General ............................................................................................................................. 7
2.2
Connecting the TV ............................................................................................................. 7
2.3
Connecting a HiFi system.................................................................................................. 7
3.
Getting started .................................................................................................................. 8
3.1
Welcome ........................................................................................................................... 8
3.2
Main Menu ........................................................................................................................ 8
3.3
Installation ........................................................................................................................ 8
3.4
Auto scan .......................................................................................................................... 9
3.5
Channel scan .................................................................................................................... 9
3.6
LCN ................................................................................................................................... 9
4.
Operation ........................................................................................................................ 10
4.1
Changing channels .......................................................................................................... 10
4.2
Accessing the Electronic Program Guide (EPG) .............................................................. 10
4.3
Accessing the Electronic Program Guide (EPG) - continued ............................................ 11
5.
Edit channel .................................................................................................................... 11
5.1
Edit Channel menu .......................................................................................................... 11
5.2
TV / Radio Channel list .................................................................................................... 12
5.3
Delete All ......................................................................................................................... 13
6.
SYSTEM SETUP .............................................................................................................. 13
6.1
System setup menu......................................................................................................... 13
6.2
Language ........................................................................................................................ 14
6.3
TV system ....................................................................................................................... 14
6.4
Local Time Setting .......................................................................................................... 15
6.5
Timer setting ................................................................................................................... 15
6.6
Parental Lock .................................................................................................................. 16
6.7
OSD setting ..................................................................................................................... 16
6.8
Favorite ........................................................................................................................... 17
6.9
Audio Description Setting ................................................................................................ 17
6.10 Multiview Setting ............................................................................................................ 18
Page 4

User Manual
EN
4
6.11 Other ............................................................................................................................... 18
7.
Tools ............................................................................................................................... 19
7.1
Tools main menu ............................................................................................................ 19
7.2
Information ..................................................................................................................... 19
7.3
Factory Setting ................................................................................................................ 20
7.4
Software Upgrade ........................................................................................................... 20
7.5
Remove USB device safely .............................................................................................. 21
7.6
Network .......................................................................................................................... 21
8.
Game .............................................................................................................................. 21
8.1
Game .............................................................................................................................. 21
9.
Media player ................................................................................................................... 22
9.1
Media Playback ............................................................................................................... 22
9.2
HDD Information ............................................................................................................. 23
9.3
DVR Setting ..................................................................................................................... 23
10.
Timeshift / Record .......................................................................................................... 24
10.1 Mass storage device on the USB port .............................................................................. 24
10.2 Timeshift ......................................................................................................................... 24
10.3 Record............................................................................................................................. 24
11.
Troubleshooting .............................................................................................................. 25
12.
Specifications ................................................................................................................. 26
Page 5
User Manual
5
EN
1. Introduction
1.1 General
Whats in the box
• 1 TR 63 Receiver
• 1 Remote control + 2 batteries LR 03
• 1 User manual
If any of this is missing, please contact your dealer
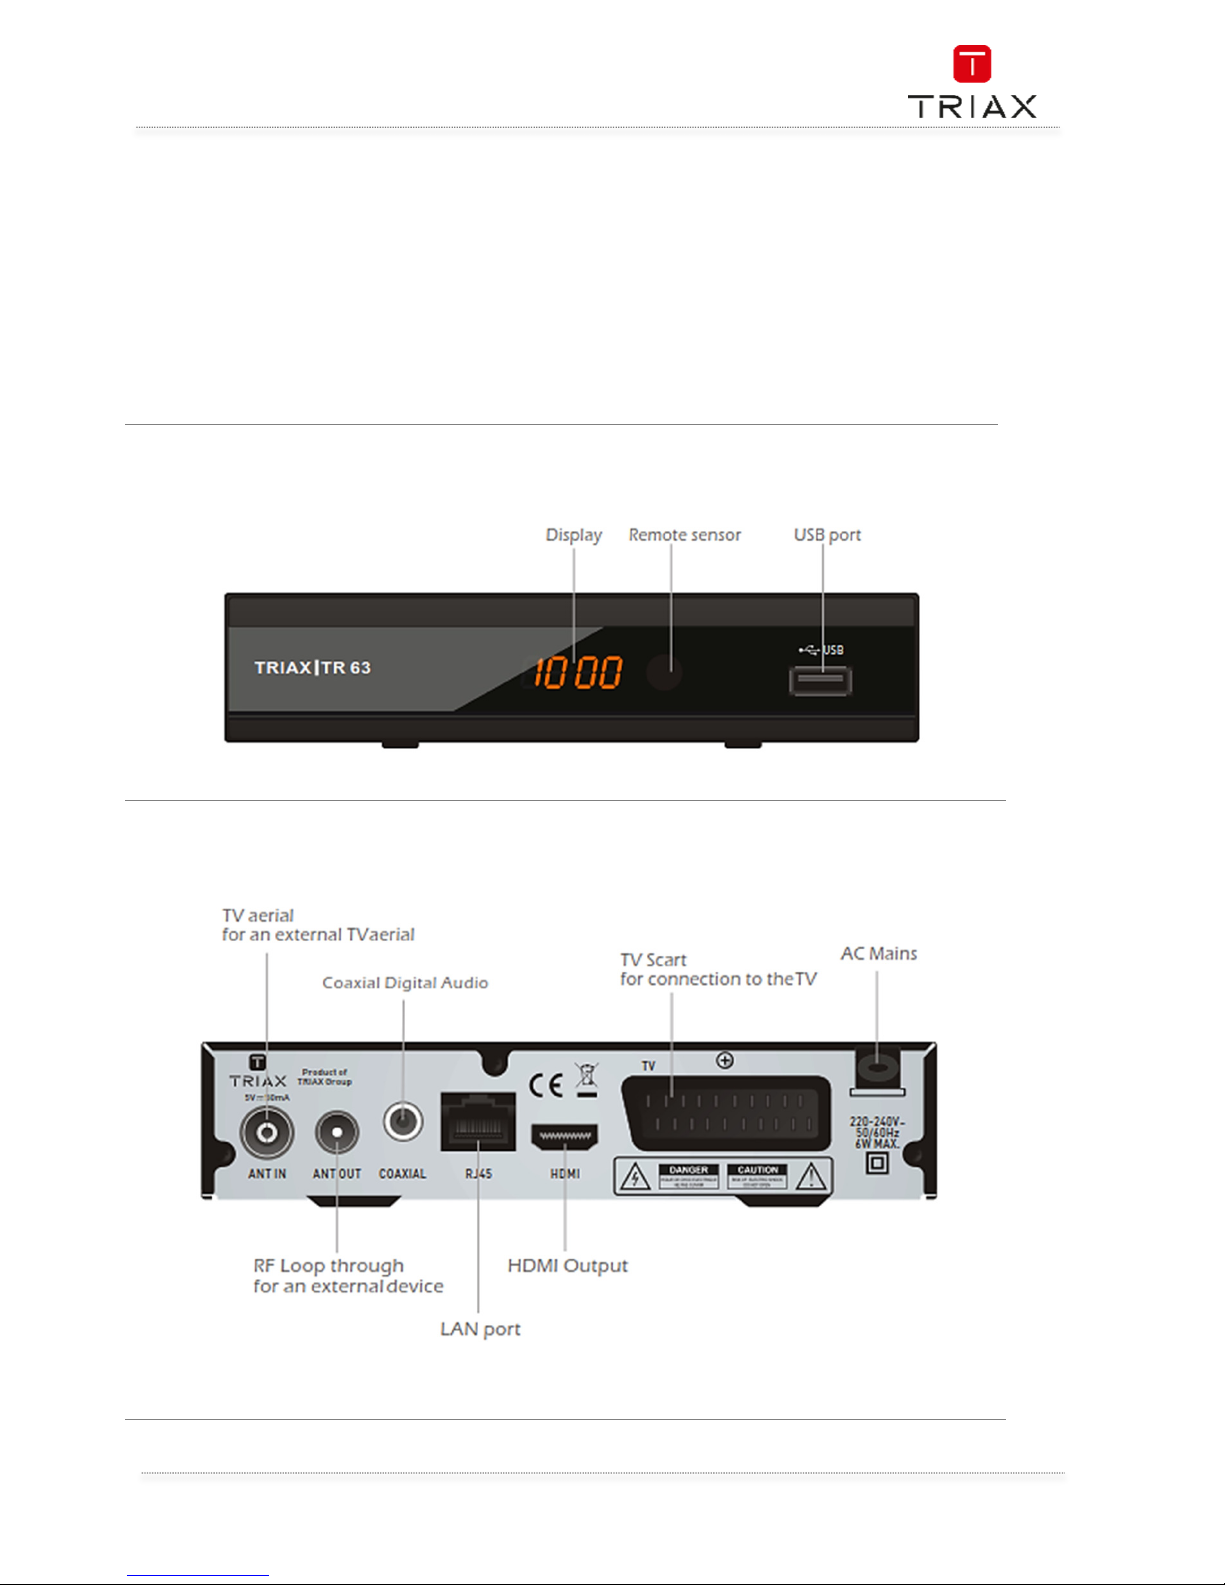
1.2 Front panel
1.3 Rear panel
Page 6
User Manual
EN
6
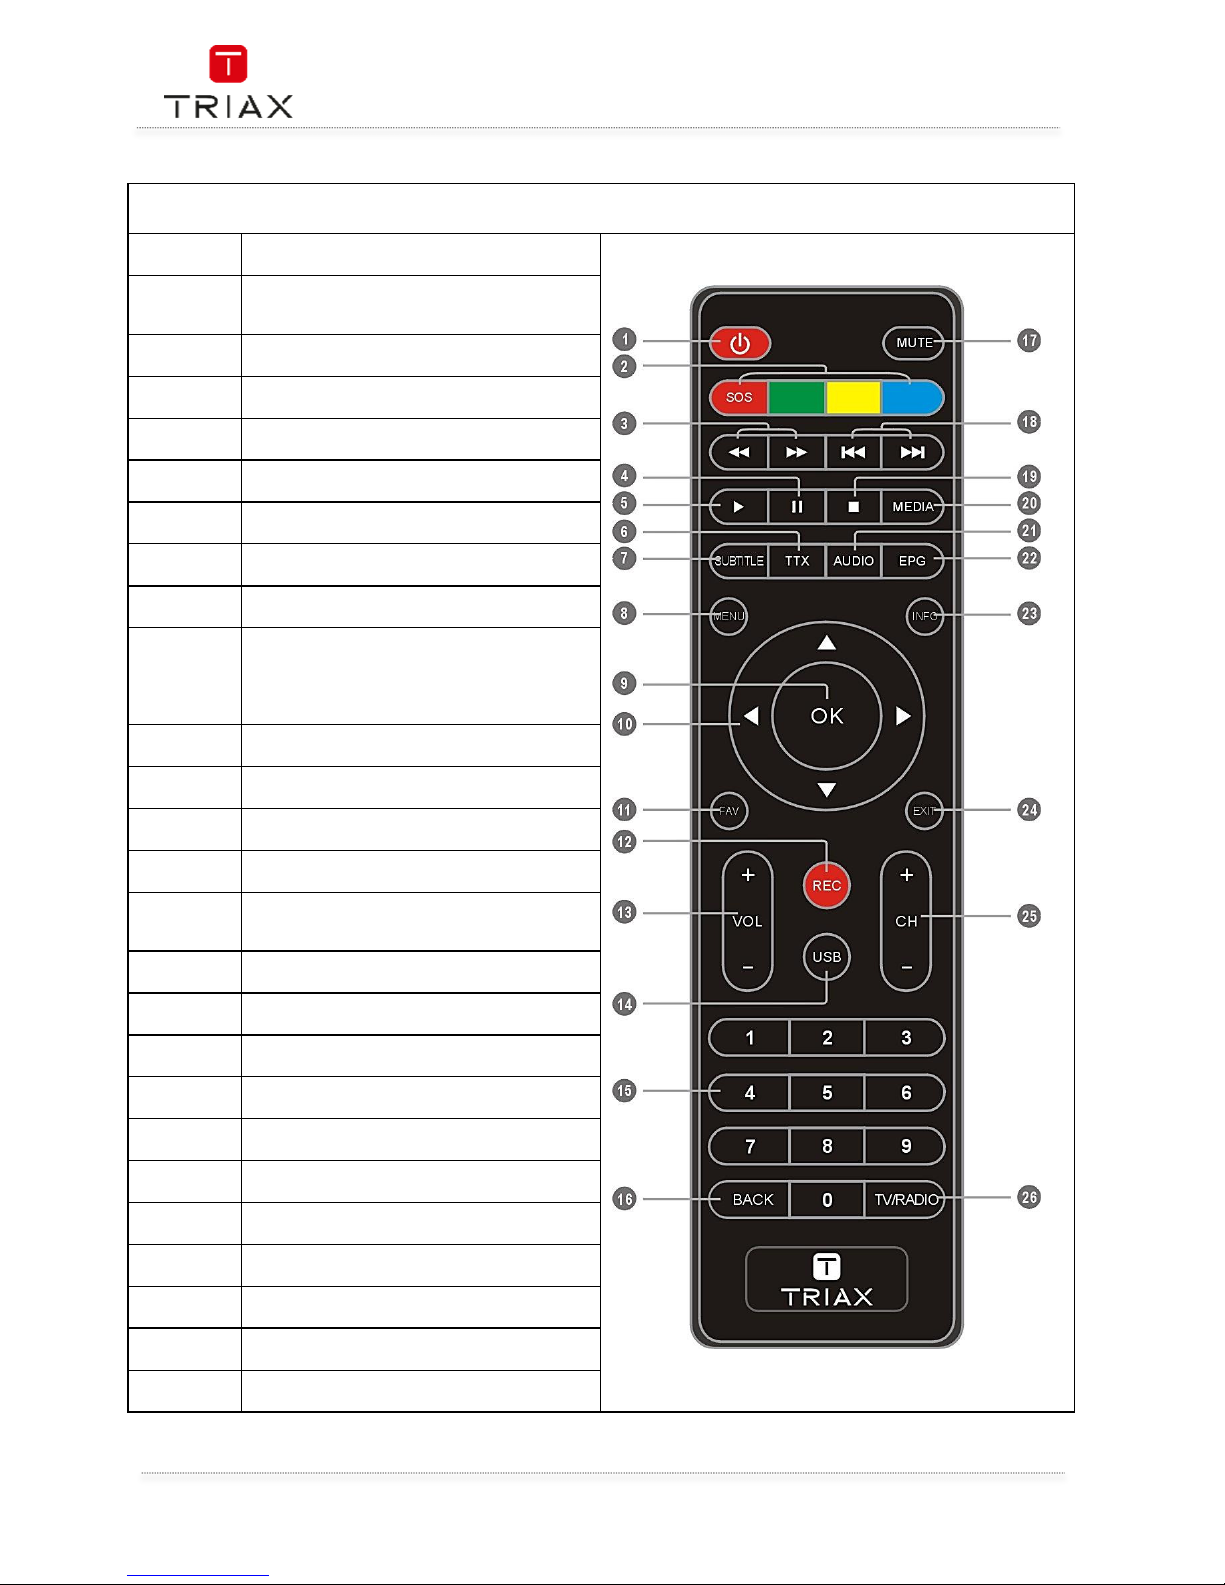
1.1 Remote control
1
STANDBY
(Switch the STB on and standby)
2
RED/GREEN/YELLOW/BLUE Buttons
(For interactive function/Submenu
function buttons)
3
REW( Rewind the playback)
FWD(Fast forward the playback)
4
PAUSE
(Pause/Active timeshift function)
5
PLAY
6
TTX (Open interactive service)
7
SUBTITLE (On/Off Subtitle)
8
Menu
(Open and close the menu screen)
9
OK button
(Confirm a selection)
10
Cursor/CH+,
-
/VOL+.
-
(Cursor: Navigation buttons used to
navigatemenus items)
(CH+/-: Channel Up and Down
VOL+/-:Volume Up and Down)
11
FAV
(Open the Favorite list)
12
RECORD
(Record the TV program and the radio)
13
VOL+,-(Volume Up and Down)
14
USB
(Enter Device List)
15
Numeric entry
(Enter numeric values and select the channel
directly by entering it's number)
16
BACK
(Switch to previous channel)
17
MUTE (Turn off/on the volume)
18
PREV(Skip Backward)/NEXT(Skip Forward)
19
STOP
20
MEDIA
(Enter Movie playback)
21
AUDIO
(Select audio mode and audio track)
22
EPG
(Open up Electronic Program Guide Menu)
23
INFO
(Press for current channel information )
24
EXIT (Exit from menu)
25
CH+,(Channel Up and Down)
26
TV/RADIO
(Switch between TV and Radio)
Page 7
User Manual
7
EN
2. System connection
2.1 General
There are many different types of TV and other equipment that you can connect to the STB.
In this manual you will see some of the most common ways to connect your equipment.
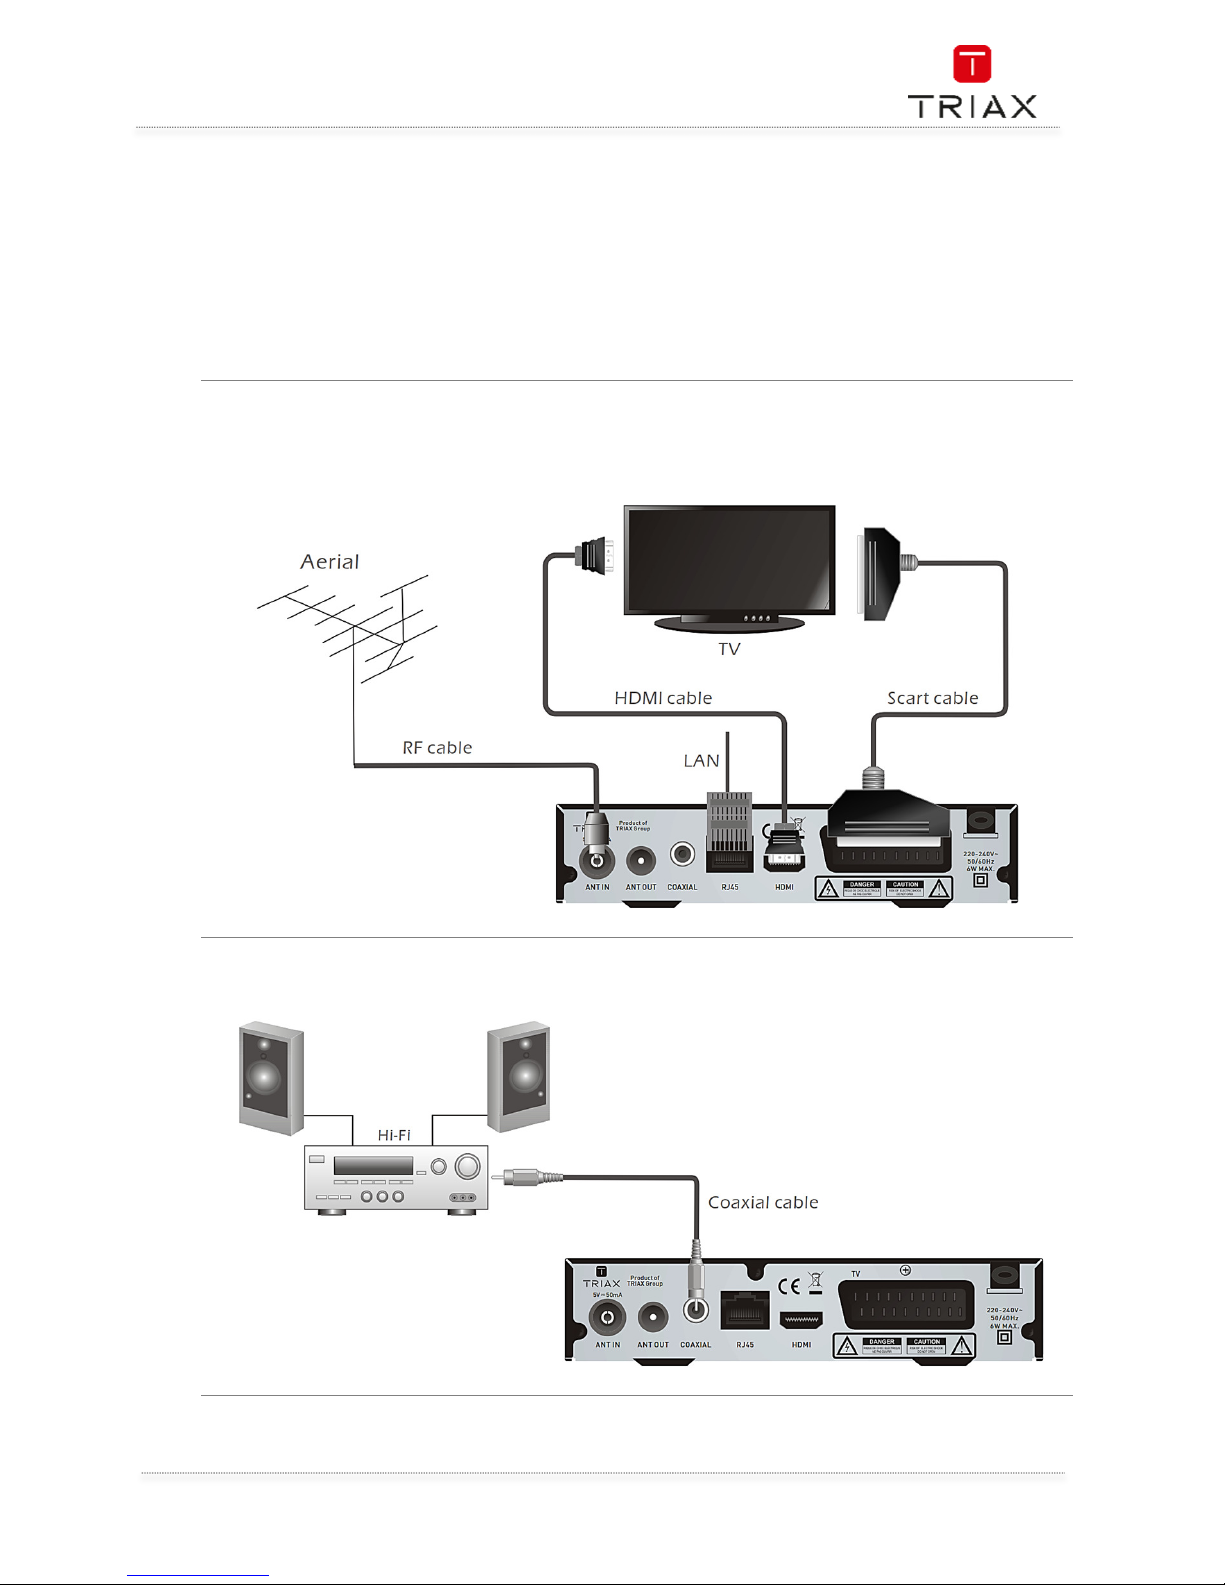
2.2 Connecting the TV
2.3 Connecting a HiFi system
Page 8
User Manual
EN
8
3. Getting started
3.1 Welcome
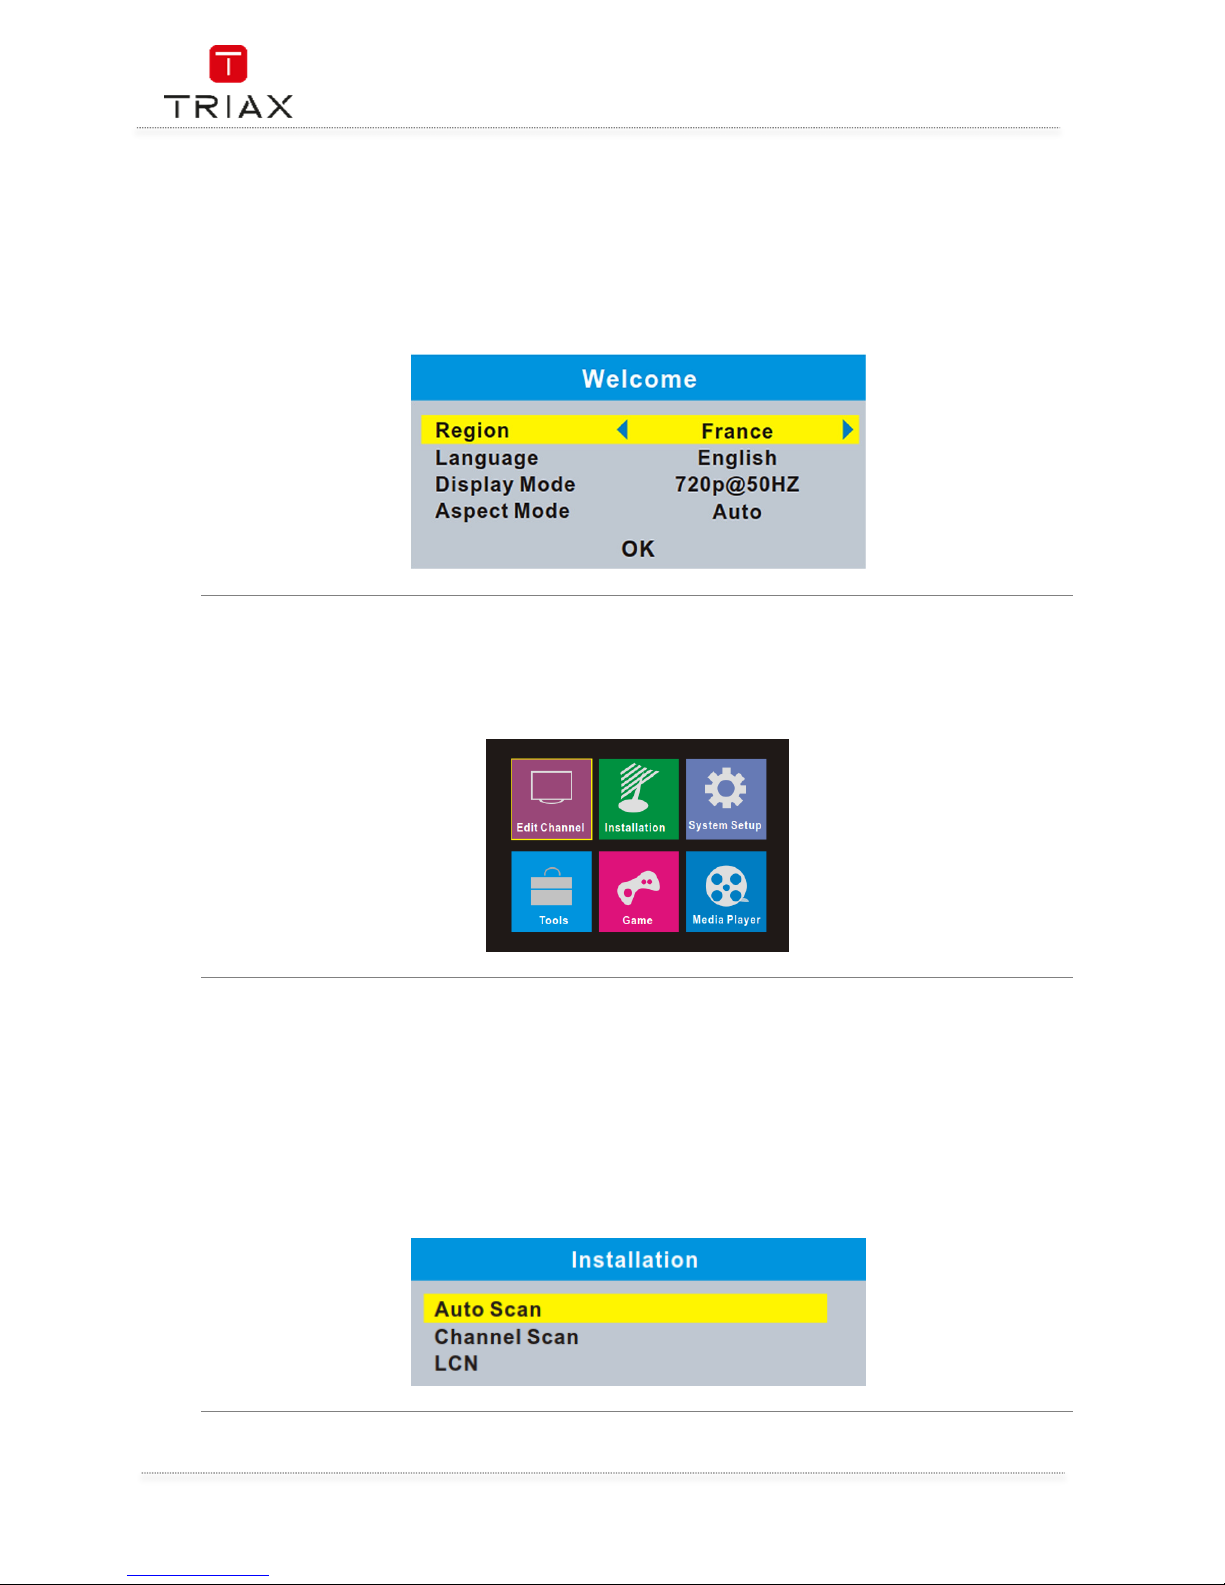
If you use the STB for the first time, the "Welcome" menu appears. Press cursor button to setup the
Region, Language, Display Mode and Aspect Mode. Highlight "OK" and press the "OK" button to start
channel search.
3.2 Main Menu
Press "MENU"button, the main menu appears. Press cursor button to select your desired item, then
pree "OK" button to enter the sub menu.
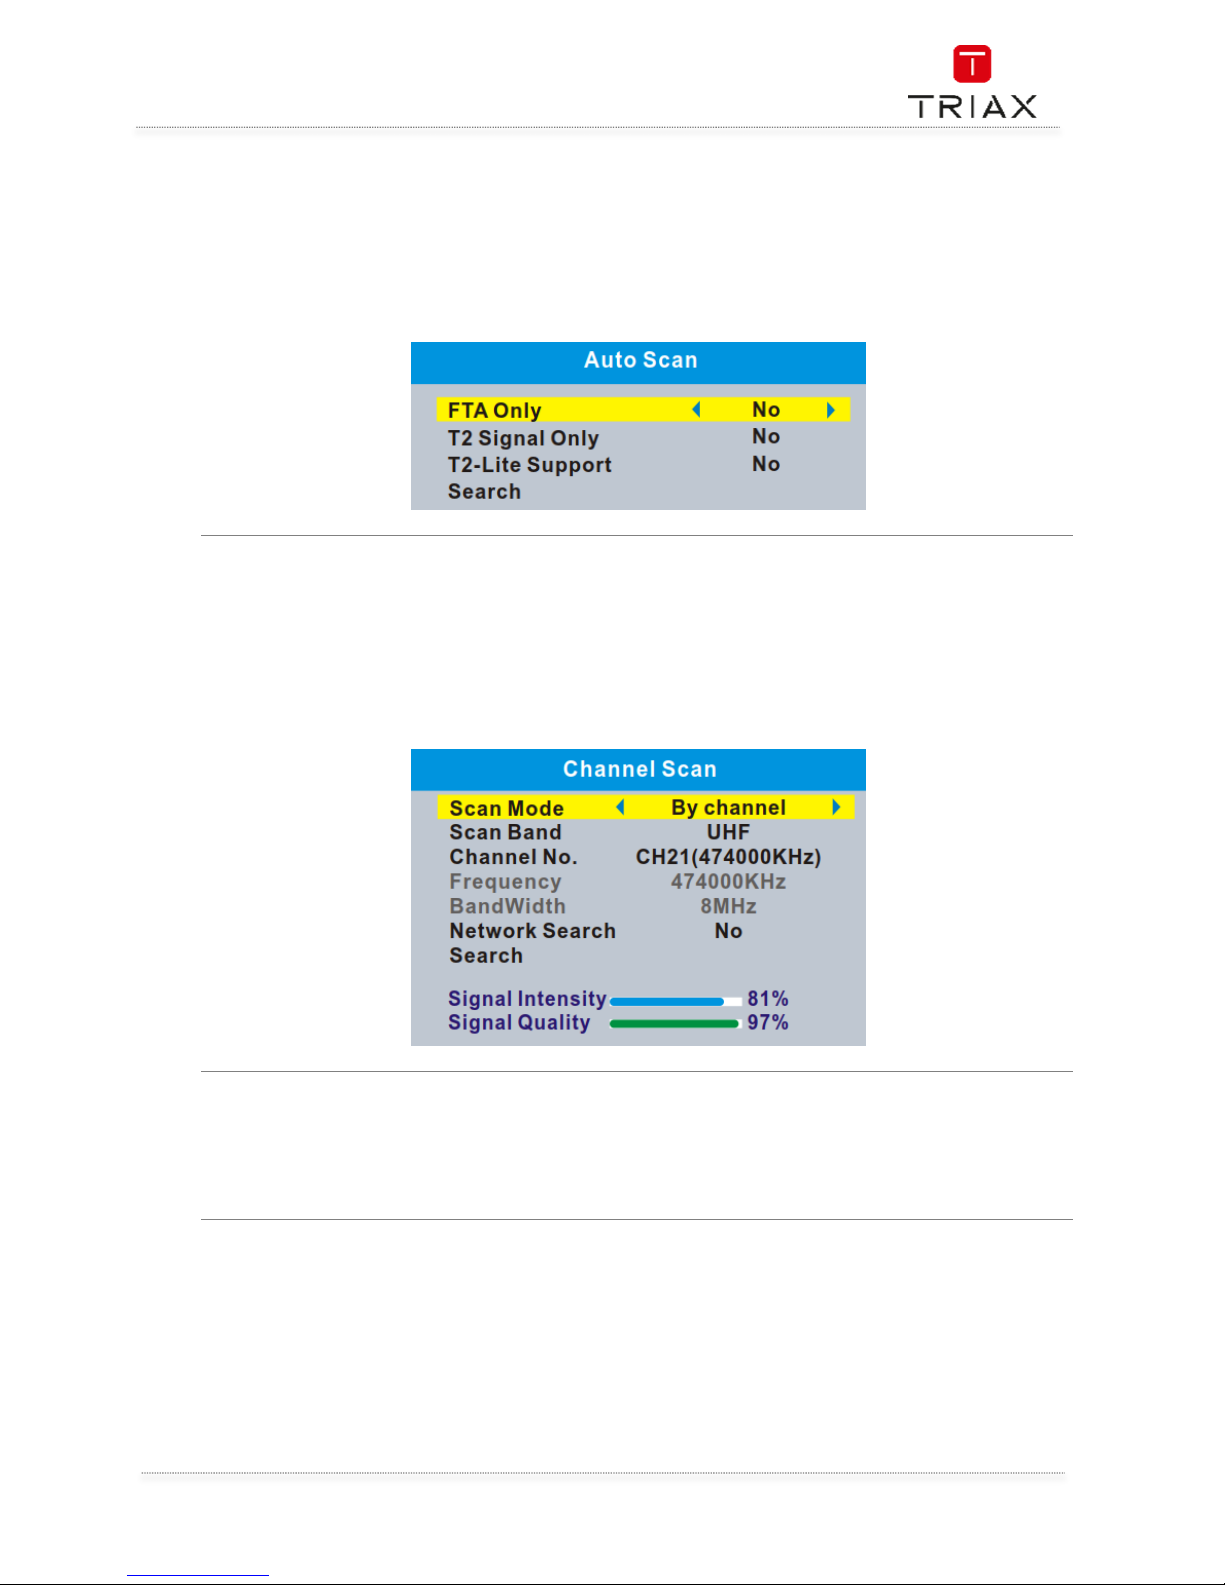
3.3 Installation
The "Installation" menu allows you to set up channel search and LCN option.
• Press the "MENU" button to enter main menu.
• Press "UP/DOWN " button to highlight "Installation", press
"RIGHT" button to enter the "Installation" menu.
• Press "UP" or "DOWN" button to select the desired item and
press "OK" button to enter the sub-menu .
• Press "EXIT" button to exit.
•
Page 9
User Manual
9
EN
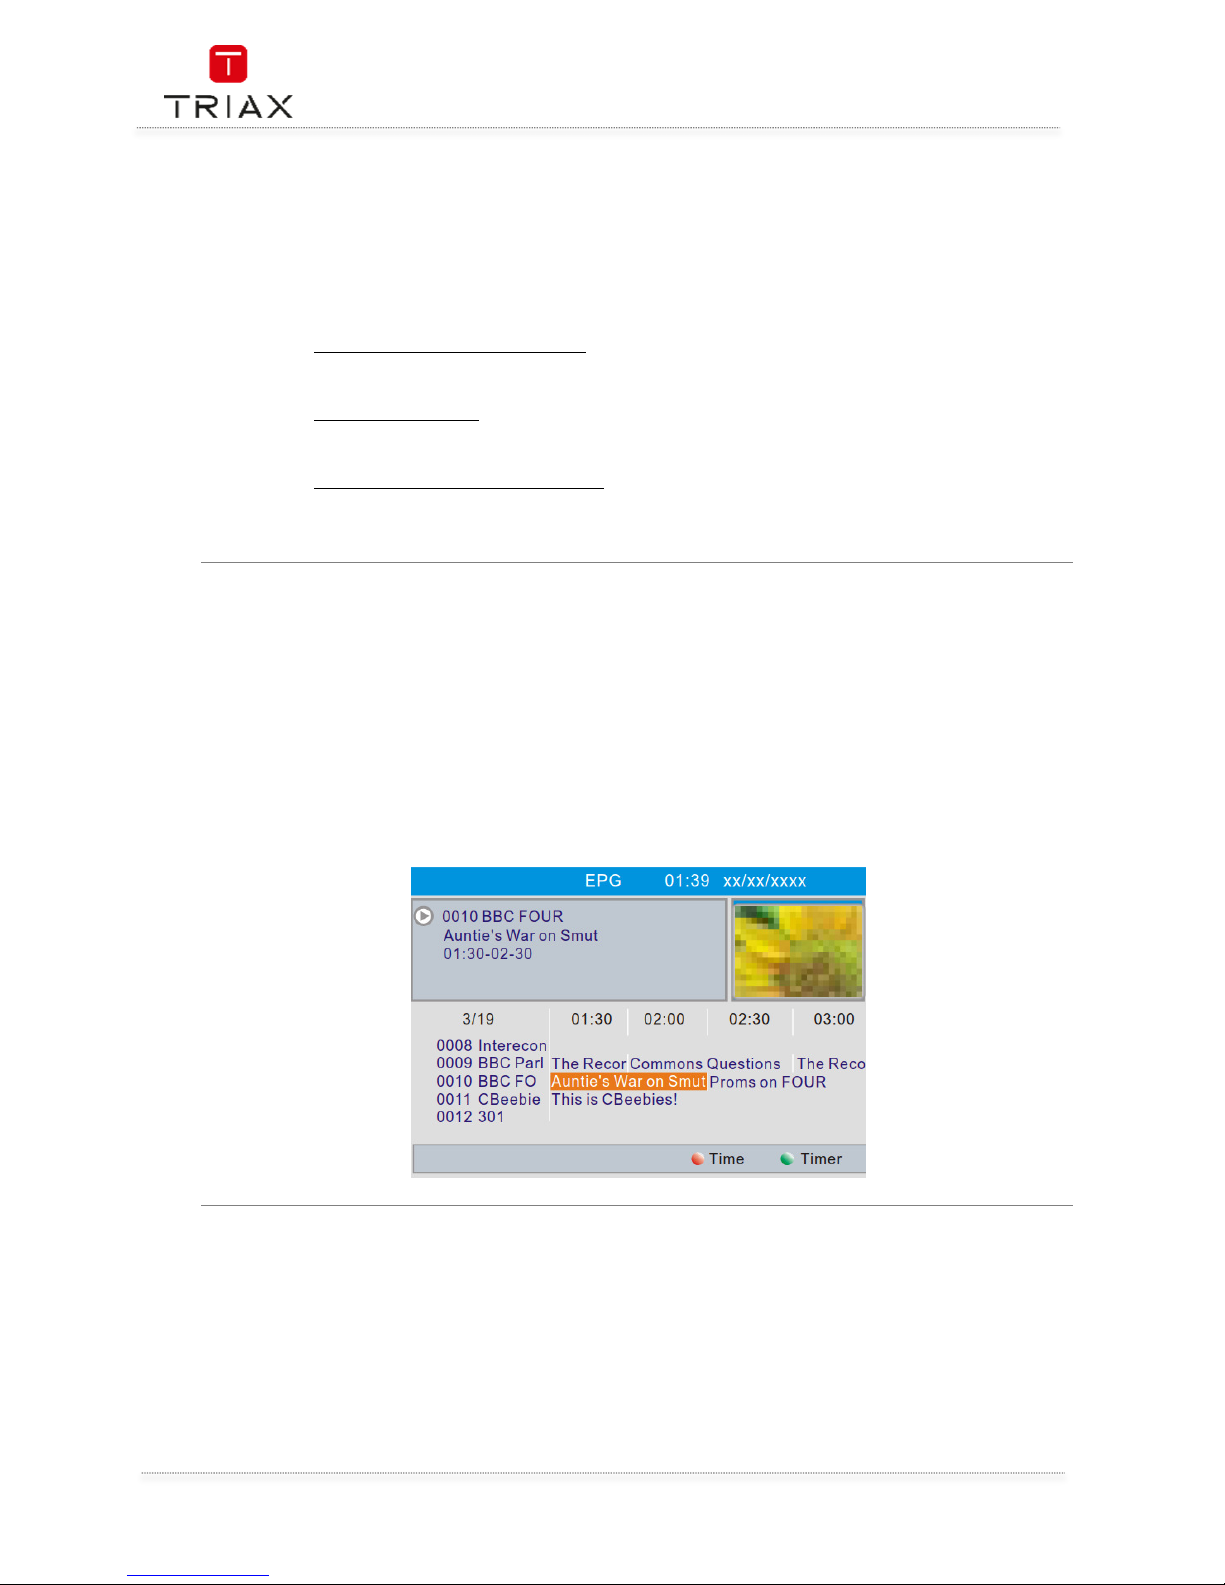
3.4 Auto scan
The "Auto Scan" menu allows you to set up automatically channel search.
• Select the "Auto Scan", press "OK" button to enter the Auto Scan menu.
• Press the cursor button to set "FTA Only" /" T2 Signal Only" / "T2-Lite Support" ,
• Highlight "Search", press the "OK" button to start automatically scan.
•
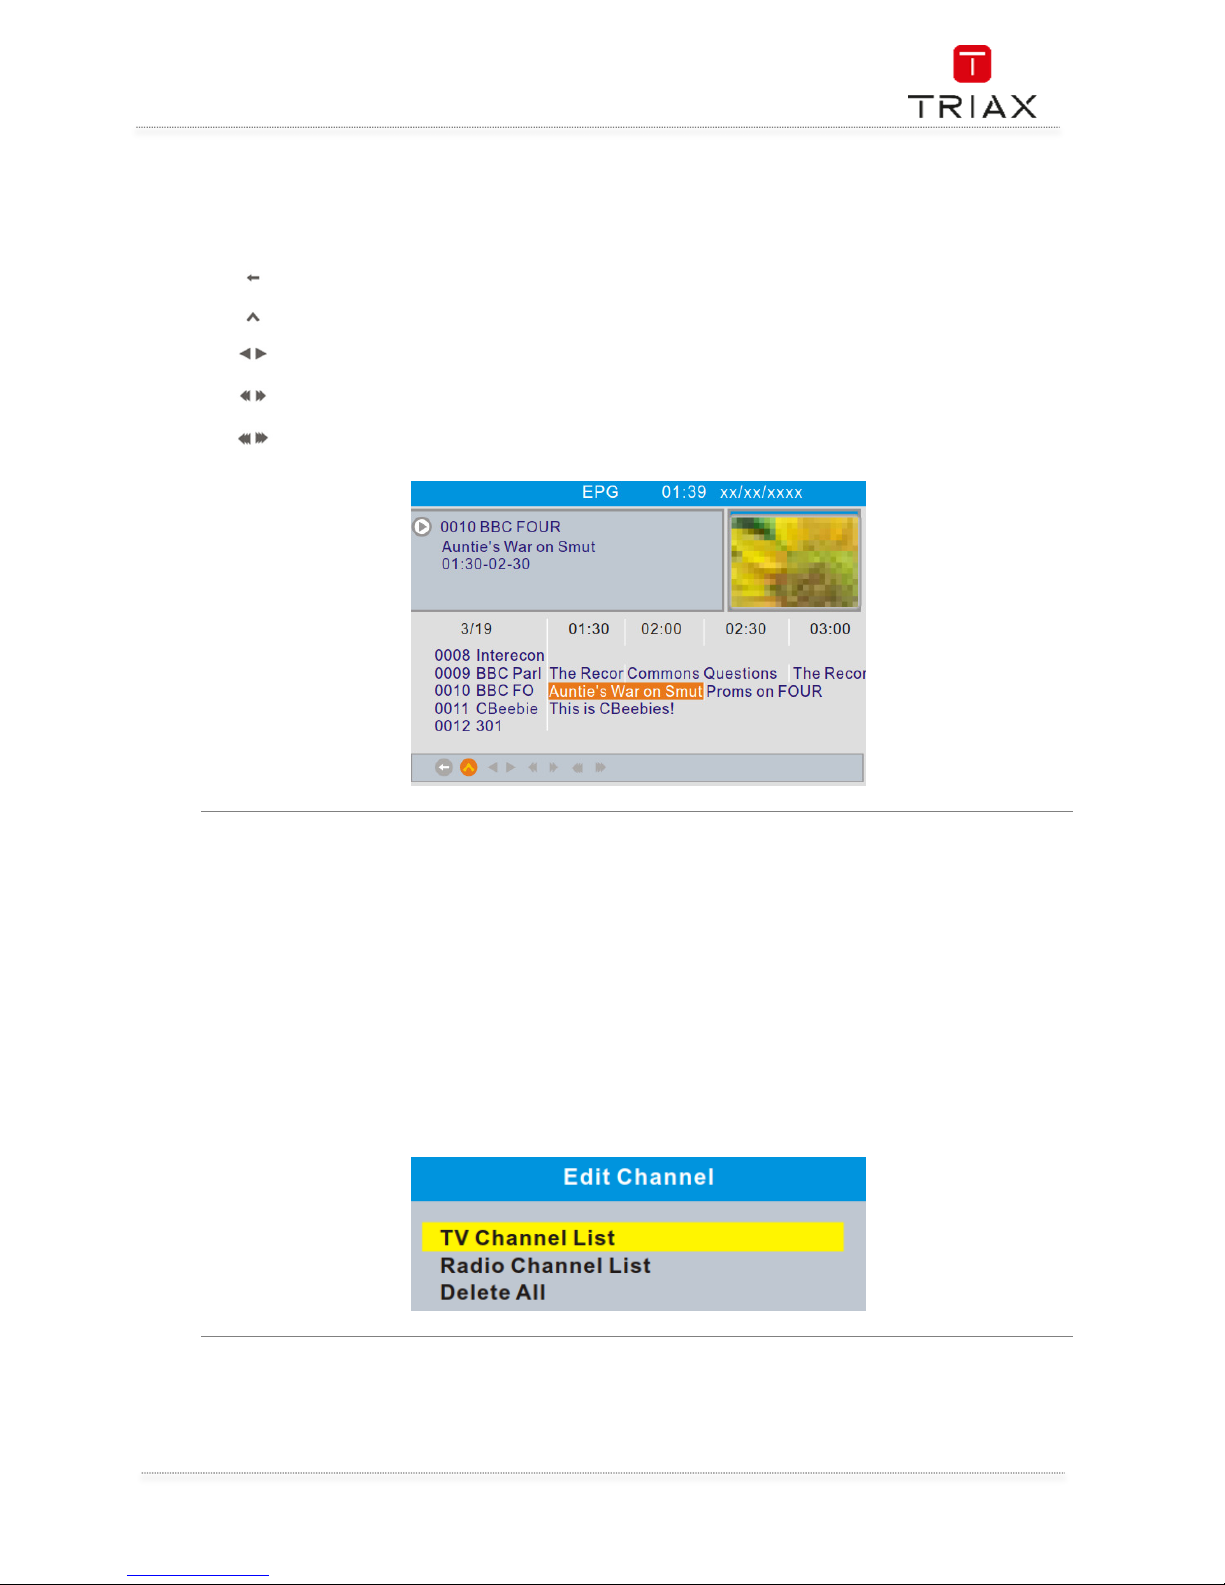
3.5 Channel scan
"Channel Scan" menu allows you to set up manually channel search.
• Select "Channel Scan", press the "OK" button to enter the Channel Scan menu.
• Press the cursor button to set Scan mode, Scan Band ,Channel No., Frequency, Bandwidth
and Network Search.
• Highlight "Search", press "OK" button to start channel scan manually.
3.6 LCN
If LCN (Logical Channel Number)Select function is activated,You can't change the original number of
TV channels by scanning . This menu allows you to activate/disactivate the LCN function.
Page 10
User Manual
EN
10
4. Operation
4.1 Changing channels
There are three ways of channel selection - stepping through the channel list, selection by number
and from the on-screen channel list.
• Stepping through the channel list:
To move through the channel list, press the upward arrow or downward arrow key on the
remote control.
• Selected by number:
Enter the channel number directly by pressing numeric buttons ,and press the "OK" button
to select desired channel.
• Selected by on-screen channels list:
You can also select the required channel directly from on-screen channel list. This is
displayed using the STB's main menu. See "Edit Channel" in this manual for operation detail.
4.2 Accessing the Electronic Program Gui
de (EPG)
Accessing the EPG of all channels:
• Press the "EPG" button to enter the EPG menu, and a preview of your current channel will be
displayed in the top right corner of the screen.
• Press "UP" or "DOWN" button to select the desired channel, Press "LEFT" or "RIGHT" button
to select the desired event, Press "GREEN" button to timer the event.
• Press "RED" button to show the "Time bar" menu, you can select the way showing time and
move time by pressing "OK" button.
• Press the "OK" button to display the information about the selected event.
• Press "EXIT" button to back to the previous menu.
Page 11
User Manual
11
EN
4.3 Accessing the Electronic Program Guide (EPG)
-
continued
In "Time bar"menu:
Exit time bar.
Back to the current time.
Jumps time forward or backward every half an hour.
Jumps time forward or backward every 2 hours.
Jumps time forward or backward every 24 hours.
5. Edit channel
5.1 Edit Channel menu
• Press the "MENU" button to enter main menu.
• Press "UP" or "DOWN " button to highlight "Edit Channel", press "RIGHT" button to enter the
Edit Channel menu.
• Press "UP" or "DOWN" cursor button to highlight the desired item and press "OK" button to
enter the sub-menu .
• Press "EXIT" button to exit.
Page 12
User Manual
EN
12
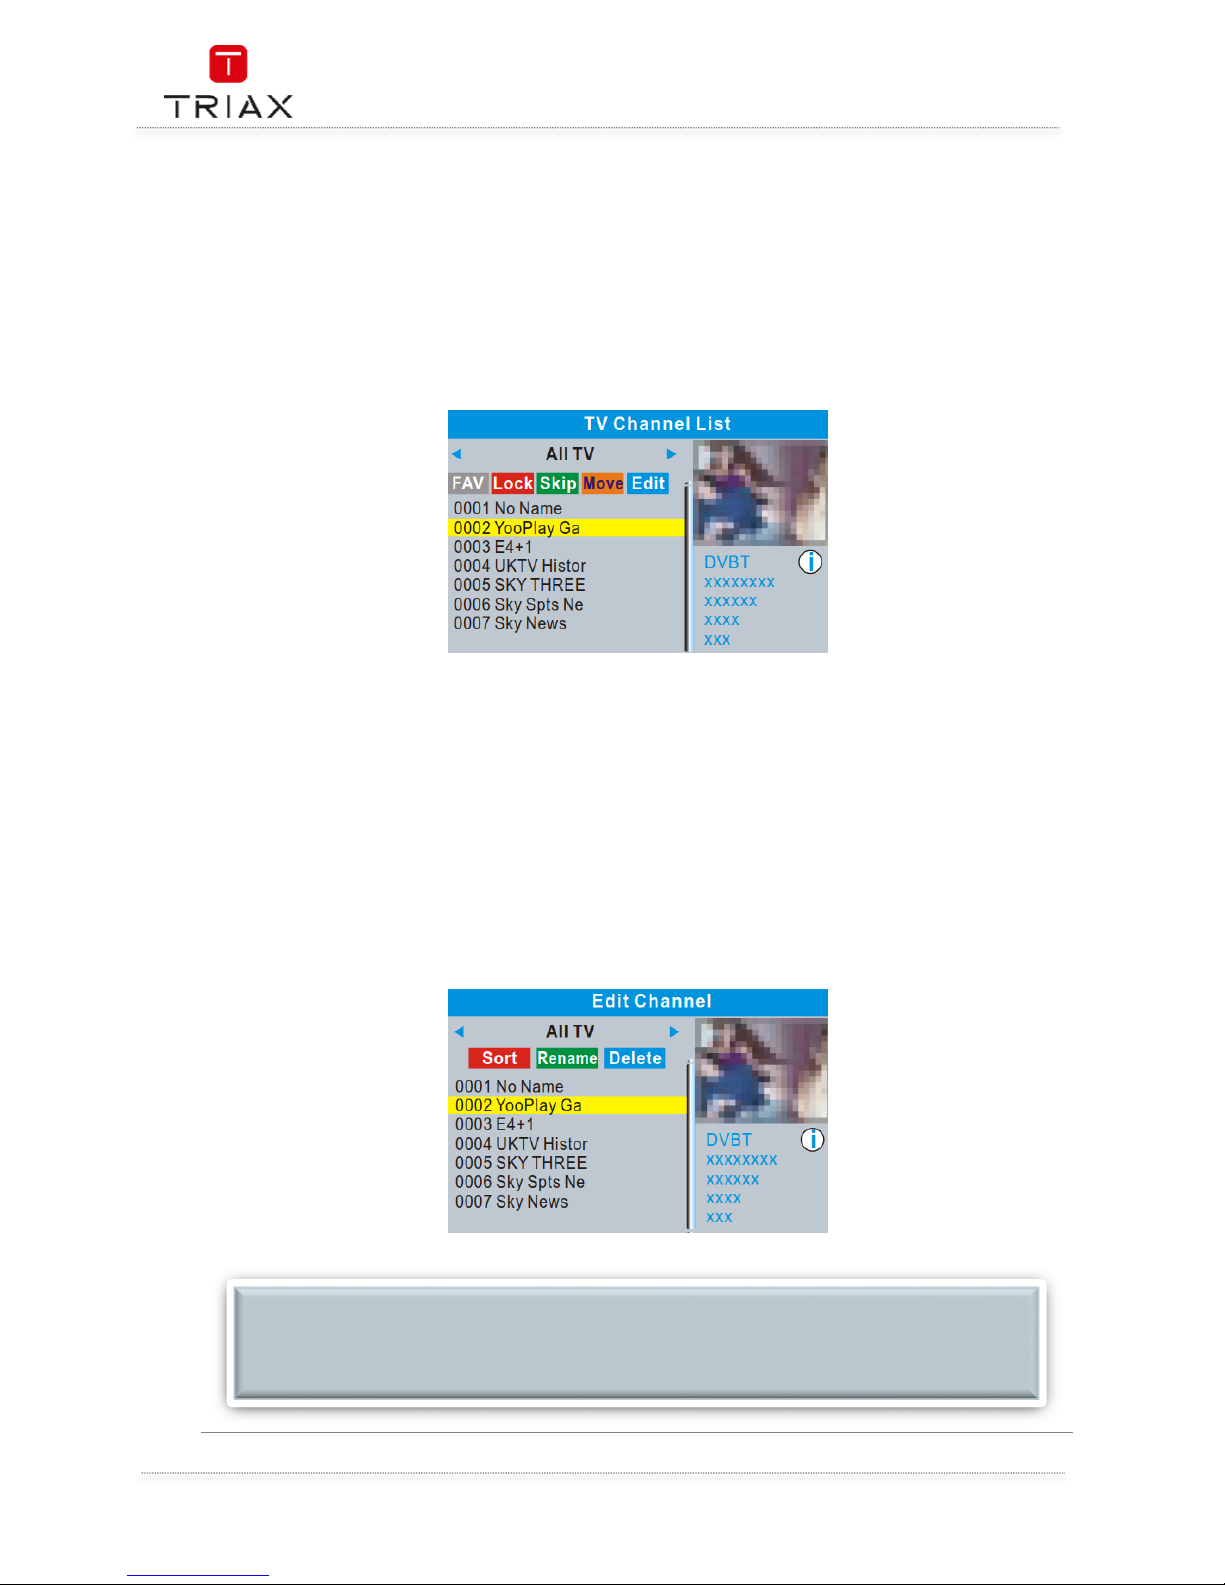
5.2 TV / Radio Channel list
Use this menu to set up Favourite, lock, skip, move, sort d,elete and rename for the selected TV/Radio
channels.
• In the Edit Channel menu, select "TV Channel List" or "Radio channel List", press "OK" button
to enter TV channel list/Radio
• Channel list menu.
Press "UP" or "DOWN" button to highlight the desired channel, press the "OK" button, a
preview of the channel will be displayed in the top right corner of the screen.
o Press "FAV" button, then press "OK" button to set the FAV channels.
o Press "Red" button to activate "Lock" function. you will be asked to input the
password (The dedault password is "0000" ) ,then Press "OK" button to lock the
selected channels.
o Press "Green" button to activate "Skip" function, press "OK" button to skip the
desired channel.
o Press "Yellow" button to activate "Move" function, highlight the desired channel
and press "OK" button to confirm.Press "UP" or "DOWN" button to select the
new position and press "OK" button, the channel will be moved to the new
position.
o Press "Blue"button to enter Edit channel sub menu .
o Press "OK" button again to cancel the corresponding function.
o Press "color" buttons again to exit the corresponding function.
NOTE:
Basically, the operation of "Radio Channel List" is the same as "TV Channel List", but there is
one point different: In "Radio Channel List" mode, there is no video information, so it will
always display Radio's logo in the right side preview window.
Page 13
User Manual
13
EN
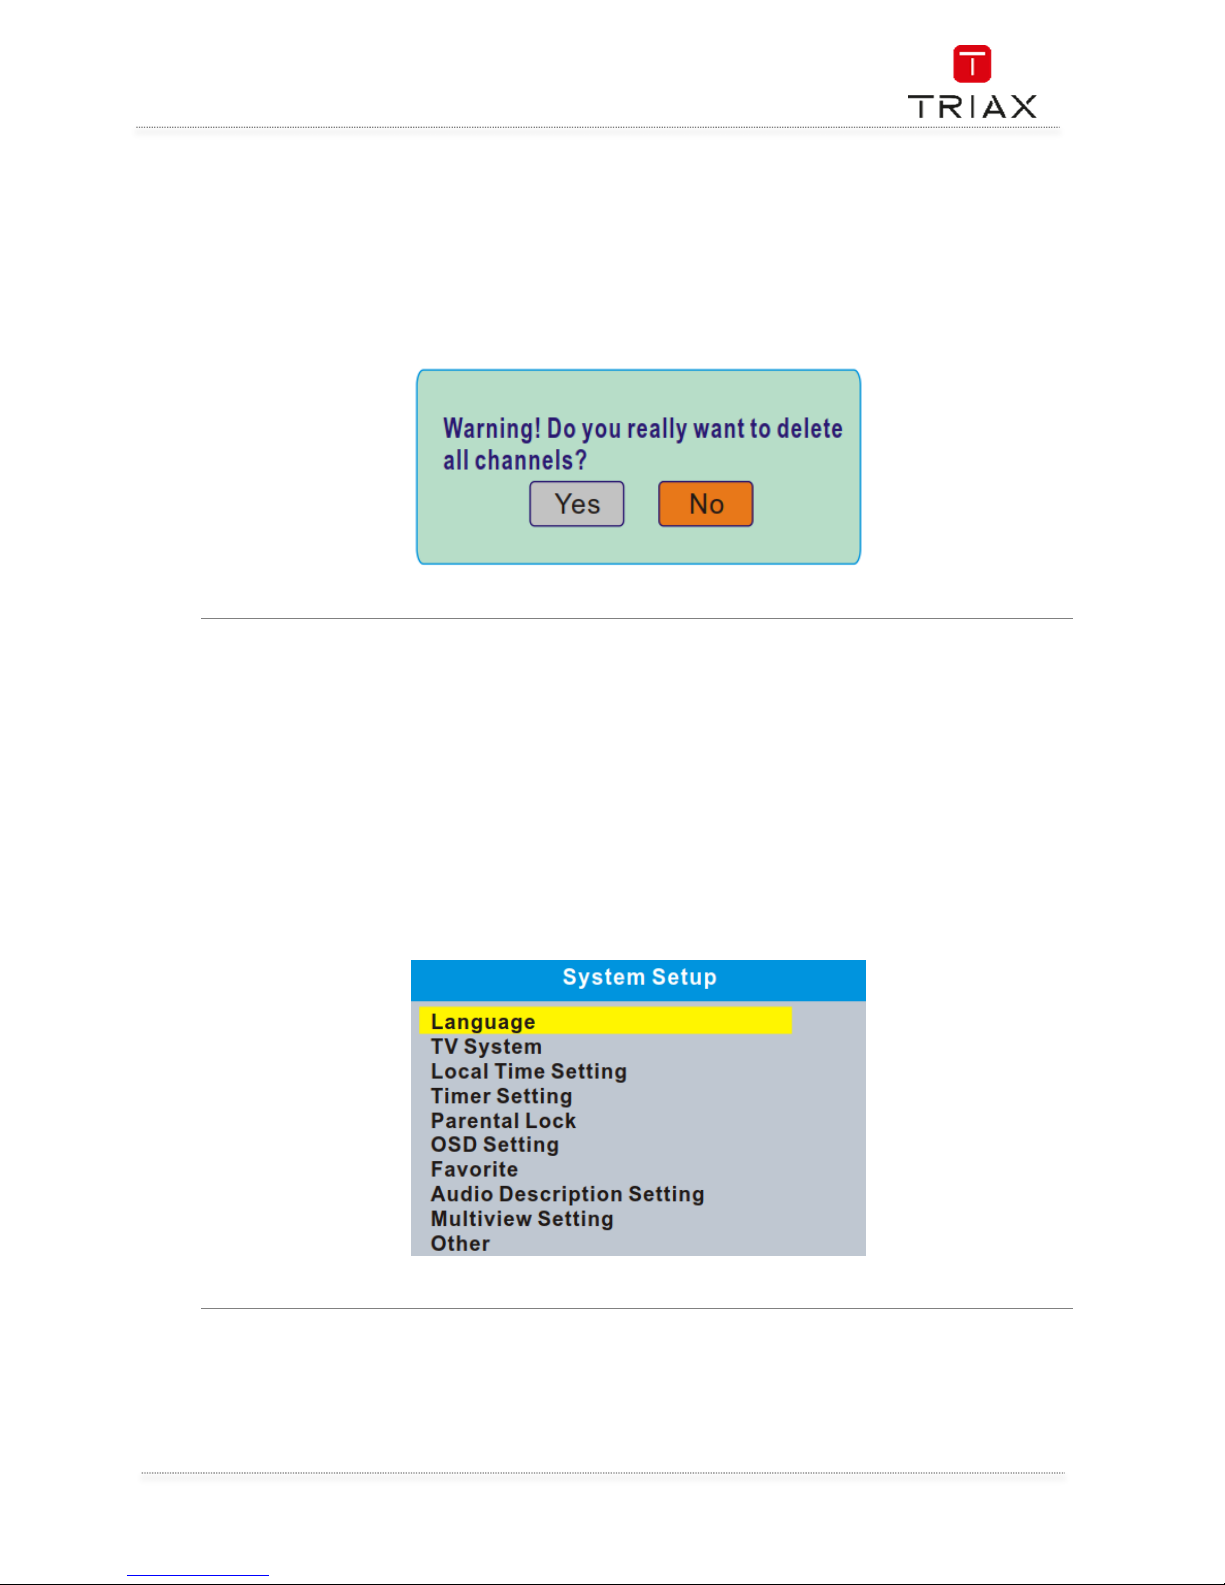
5.3 Delete All
• In the Edit Channel menu, select "Delete All", press "OK" button. You are asked to input a
password(the default password is"0000").
• A warning window appears.
Select "Yes", press "OK" button to delete all channels.
Select "No", Press "OK" button to cancel deleting.
6. SYSTEM SETUP
6.1 System setup menu
Many aspects of your STB can be set to reflect your circumstances and preference.
• Press the "MENU" button to enter the main menu.
• Press "UP" or "DOWN" button to highlight "System Setup", press "RIGHT" button to enter the
System Setup menu.
• Press "UP" or "DOWN" cursor button to highlight the desired item and press "OK" button to
enter the sub-menu.
• Press "EXIT" button to exit.
Page 14

User Manual
EN
14
6.2 Language
This menu allows you to set Language of system, Audio, Subtitle and Teletext and to set subtitle
function.
Subtitle: Off/Normal/Hard of Hearing
6.3 TV system
This menu allows you to set Video Resolution, Aspect Mode and Digital Audio Out.
Video Resolution: Set up Various video resolutions.
Aspect Mode: Auto/4:3PS/4:3LB/16:9
Digital Audio Out: BS Out/LPCM Out
Page 15
User Manual
15
EN
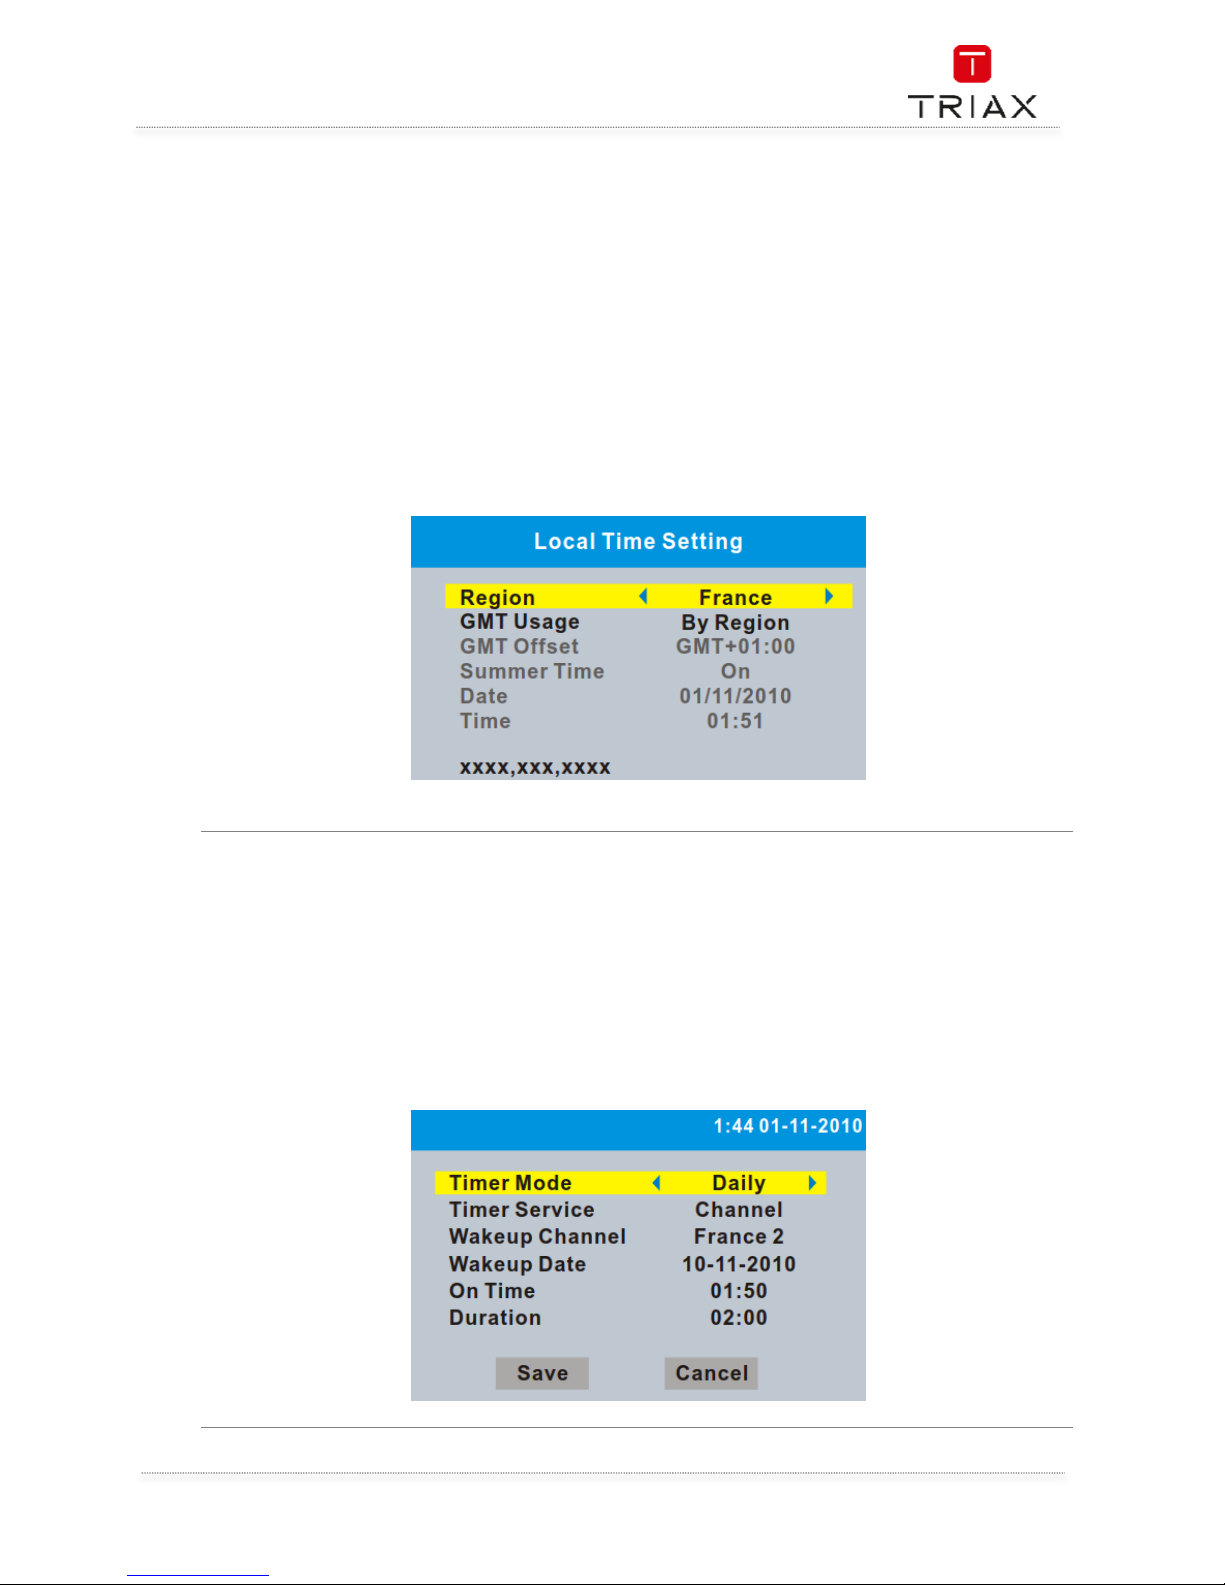
6.4 Local Time Setting
This menu allows you to set the region and the local time.
Region: Use this menu to change the region.
GMT Usage: Use this menu to open the usage of GMT by
Region/User Define.
Also to close the usage of GMT.
GMT Offset:
This menu is valid only when selected "User Define" in GMT Usage menu .
The GMT offset range is "-00:30 ~ +00:00", increasing every half hour
progressively.
Summer Time: Open/Close
Date/Time:
"Date" and "Time" menus are valid only when selected "Off" in GMT Usage
menu. Press numeric button to set the time.
6.5 Timer setting
This menu allows you to set the program timer. You can set 8 timers.
Timer Mode: Off/Once/Daily/Weekly/Monthly
Timer Service: Channel/Records
Wakeup Channel: Set a desired channel as the wakeup channel.
Wakeup Date: Set Wakeup Date by pressing numeric button.
On Time: Set On Time by pressing numeric button.
Duration: Set Duration by pressing numeric button.
Page 16
User Manual
EN
16
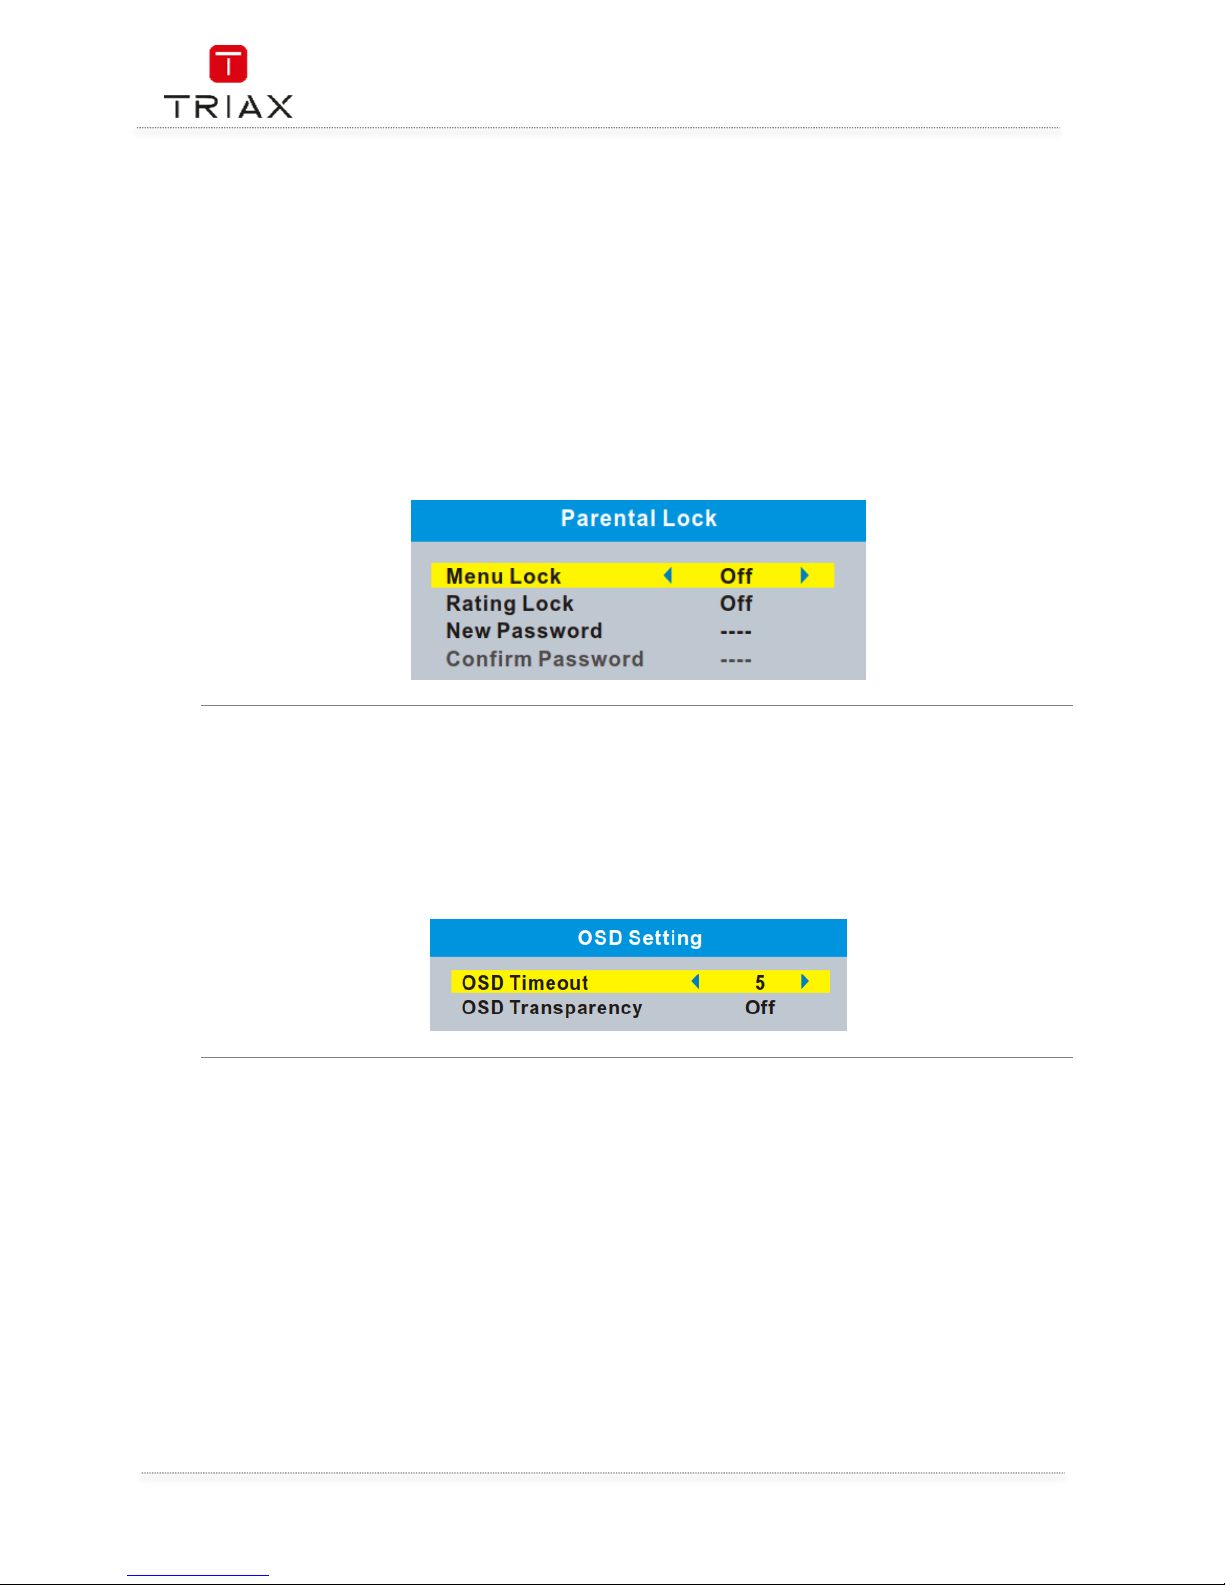
6.6 Parental Lock
This menu allows you to lock the menu and the channels, set Rating Lock and change the Password.
• In "System Setup" menu, select "Parental Lock" and press "OK" button, you are asked to
input a password(the default password is"0000").
• After inputting the correct password by pressing numeric buttons, the parental lock menu
appears.
Menu Lock:
To lock the Edit channel/ Installation menu. You can set menu lock to
on/off.
Rating Lock: Off/ AGE 4~AGE18
New Password: To change the password.
Confirm Password: To confirm the new password.
6.7 OSD setting
This menu allows you to set the time of OSD Timeout and OSD Transparency
OSD Timeout: 1-10
OSD Transparency: Off/10%/20%/30%/40%.
Page 17
User Manual
17
EN
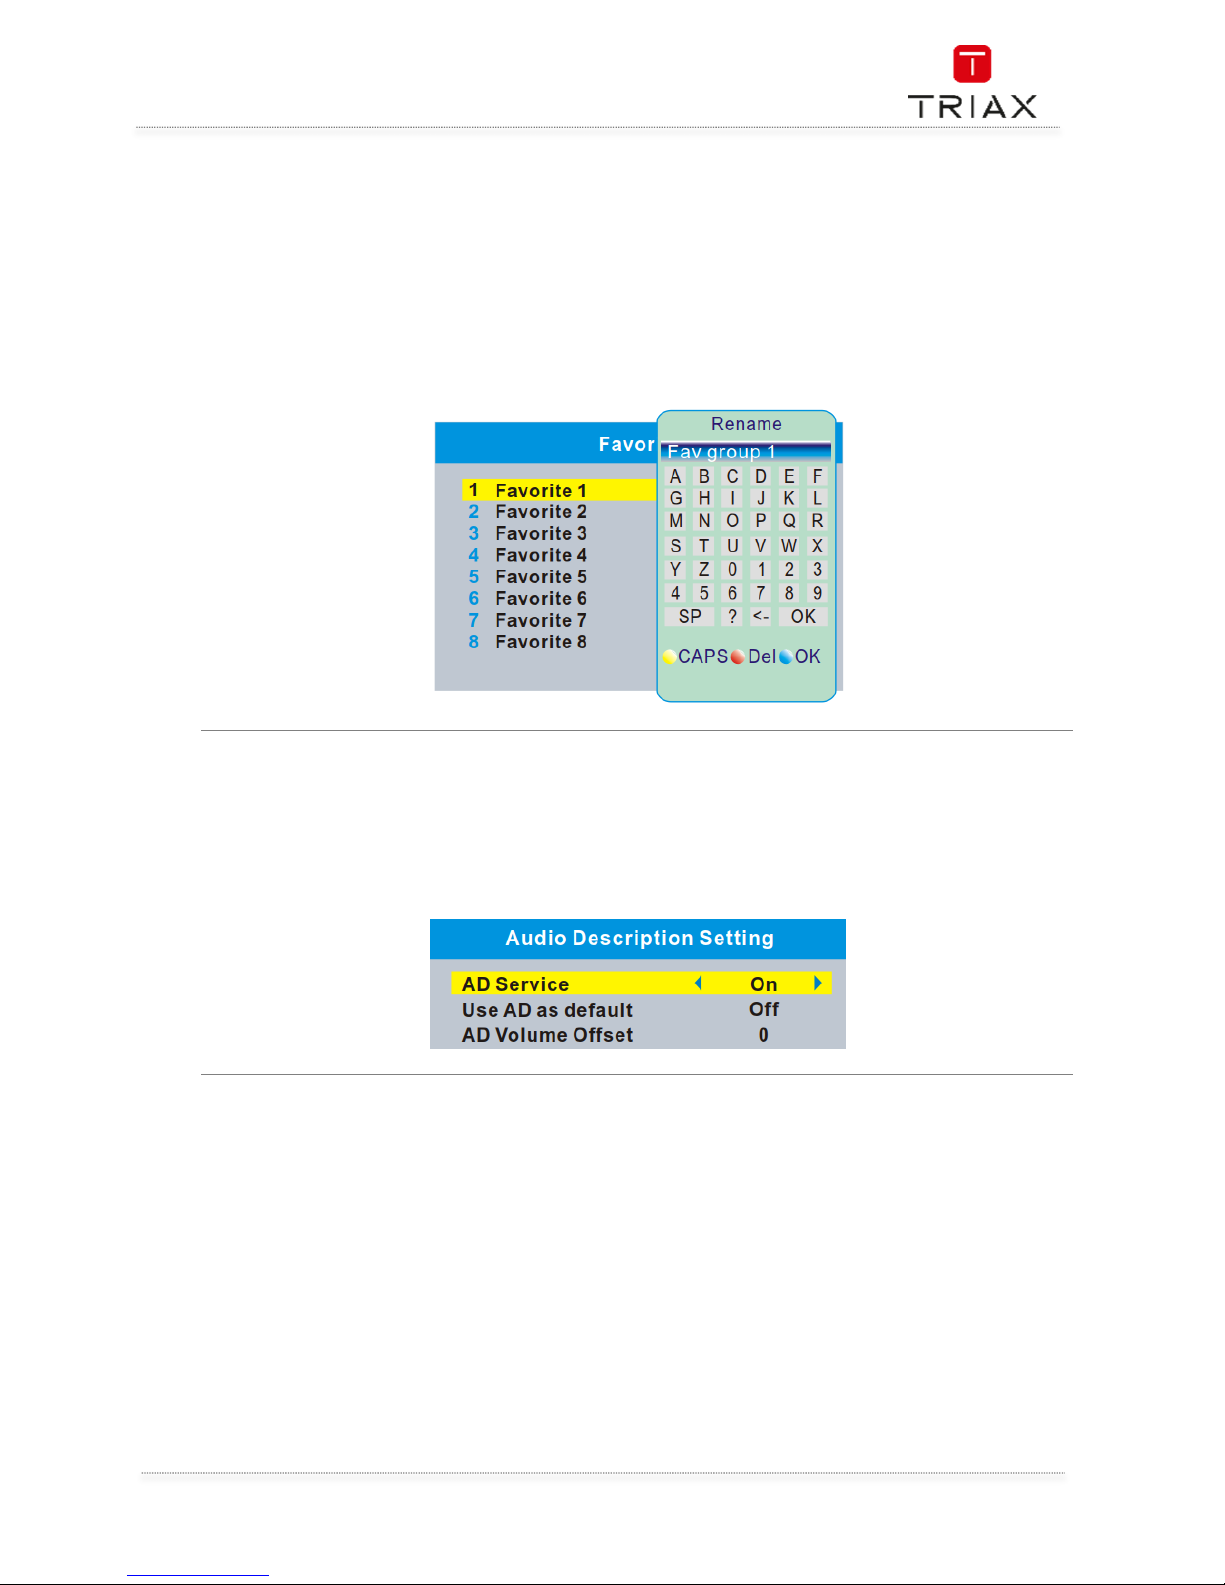
6.8 Favorite
This menu allows you to rename the favorite group.
• In "System Setup" menu, select "Favorite", press "OK" button to enter Favorite menu.
• Select the favourite group you want to change, press "OK" button to open the mock
keypad.Input letter and numeric one by one by pressing the cursor buttons and press "OK"
button to select, after
• finished input, press "Blue" button,you changed Favorite group name successfully.
• Press "EXIT" button to quit the group rename menu.
6.9 Audio Description Setting
This menu allows you to set up Audio Description Setting.
AD Service: On/Off
Use AD as default: On/Off
AD Volume Offset: -3~3
Page 18

User Manual
EN
18
6.10
Multiview Setting
This menu allows you to set Multiview screen.
• In "System Setup" menu, select "Multiview Setting" and press "OK" button, you can select
the screen of 4+1Pictures or 3x3 Pictures .
• Press "EXIT" button to exit "Multiview Setting" menu.
In full screen mode,
Press "BLUE" button to enter multiview mode.
Press "BLUE" button again to exit multiview mode.
Multiview setting:
4+1 Pictures
3x3 Pictures
6.11
Other
This menu allows you to set Antenna Power, Channel Play Type, Beeper, and Auto Standby.
Antenna Power:
On (STB will provide 5V power to antenna)
Off (STB will not provide 5V power to antenna).
Channel Play Type: All/Free/Scrambled
Beeper: On/Off
Auto Standby: 30Min/1 Hour/2 Hours/3 Hours/Off
Loopthrough In Standby: On/Off
Page 19
User Manual
19
EN
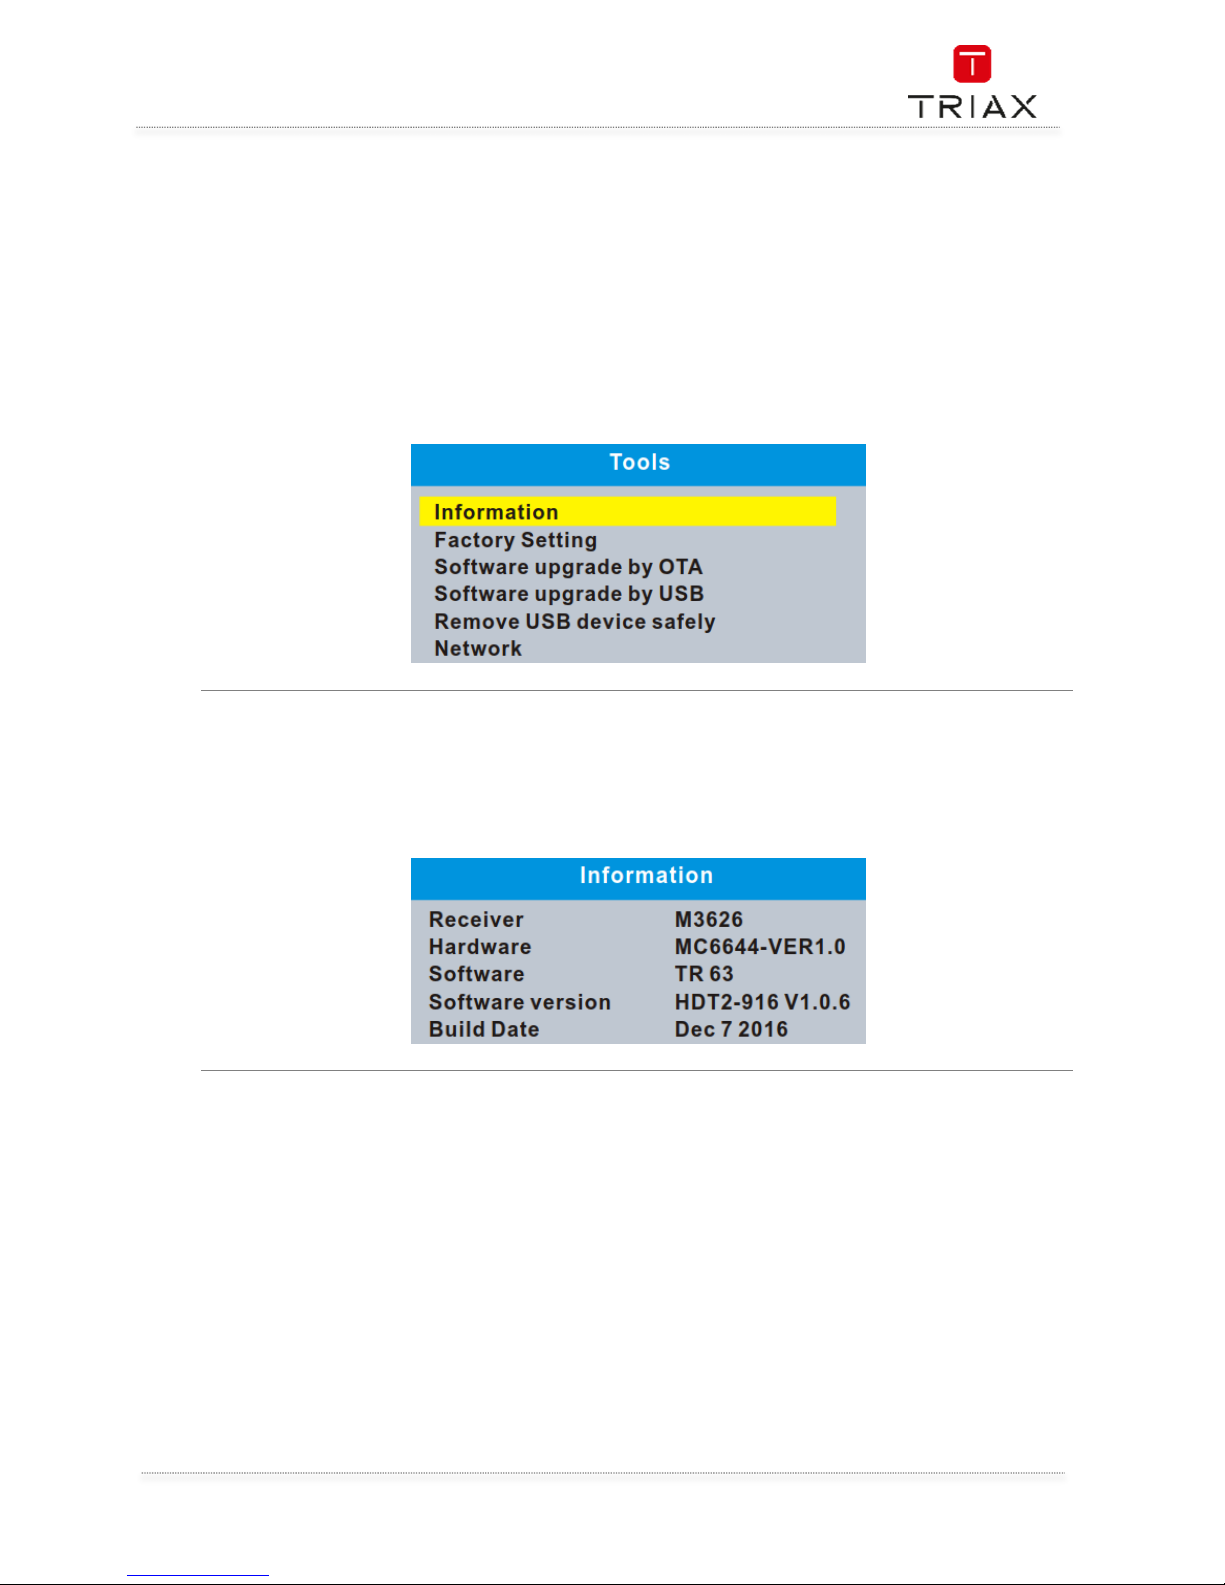
7. Tools
7.1 Tools main menu
• Press the "MENU" button to enter main menu.
• Press "UP" or " DOWN " button to highlight "Tools", press "RIGHT" button to enter the Tools
menu.
• Press "UP" or "DOWN" cursor button to highlight the desired item and press "OK" button to
enter the sub-menu.
• Press "EXIT" button to exit.
7.2 Information
You will find here important information about the hardware and embedded software.
• In "Tools" menu, select "Information", press "OK" button to open information window.
• Press "EXIT" button to exit "Information" menu.
Page 20
User Manual
EN
20
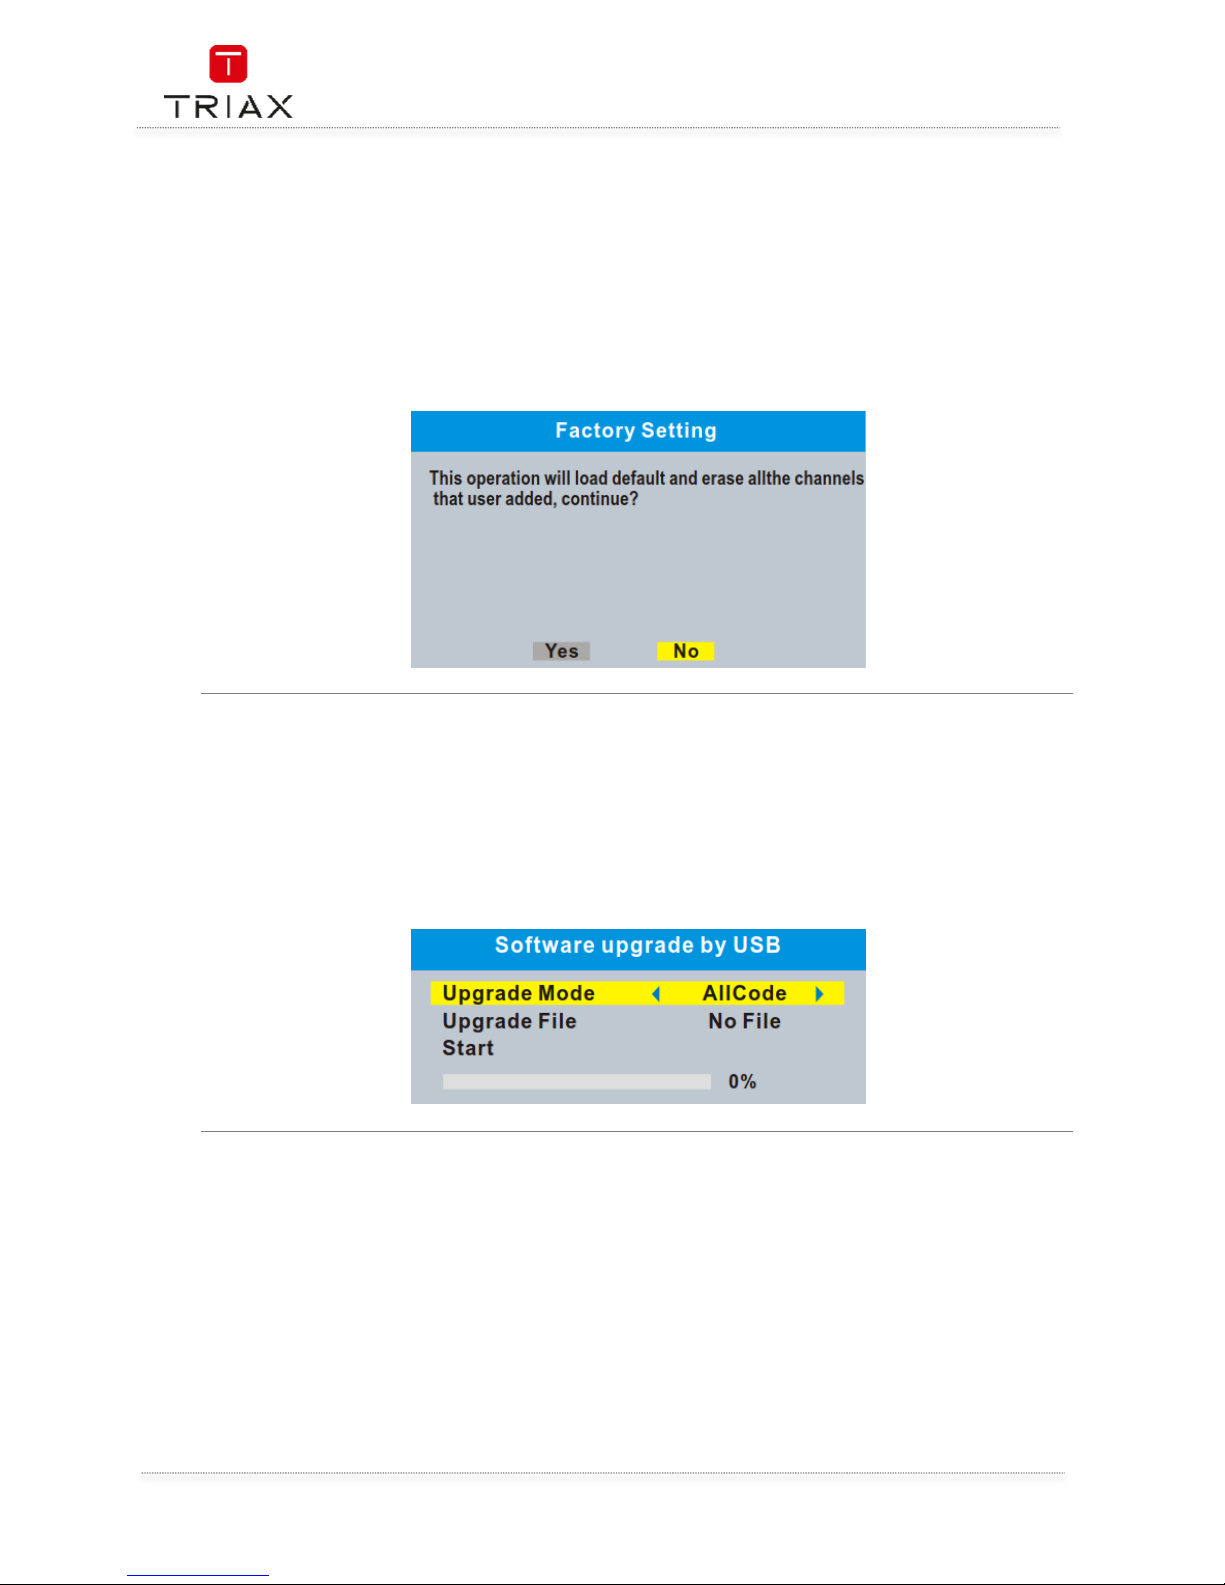
7.3 Factory Setting
This menu allows you to re-set the STB back to the factory settings, clear all existed channels.
• In the "Tools" menu, select "Factory Setting", press "OK" button.
You are asked to input a password(the default password is"0000").
• A confirmation window is displayed.
Select "Yes" to return back to factory settings and clear all channels.
Select "No" to cancel back to factory settings.
• Press "EXIT" button to exit "Factory Setting" menu.
7.4 Software Upgrade
We offer two ways to upgrade software version, upgrade by OTA or upgrade by USB.
• In the "Tools" menu, select "Software upgrade by OTA" or "Software upgrade by USB", press
"OK" button, the upgrade menu is shown.
• Press cursor button to select the desired item, then highlight "Start" and press "OK" button
to start upgrade.
• Press "EXIT" button to exit "Software Upgrade by OTA" or "Software upgrade by USB" menu.
Page 21
User Manual
21
EN
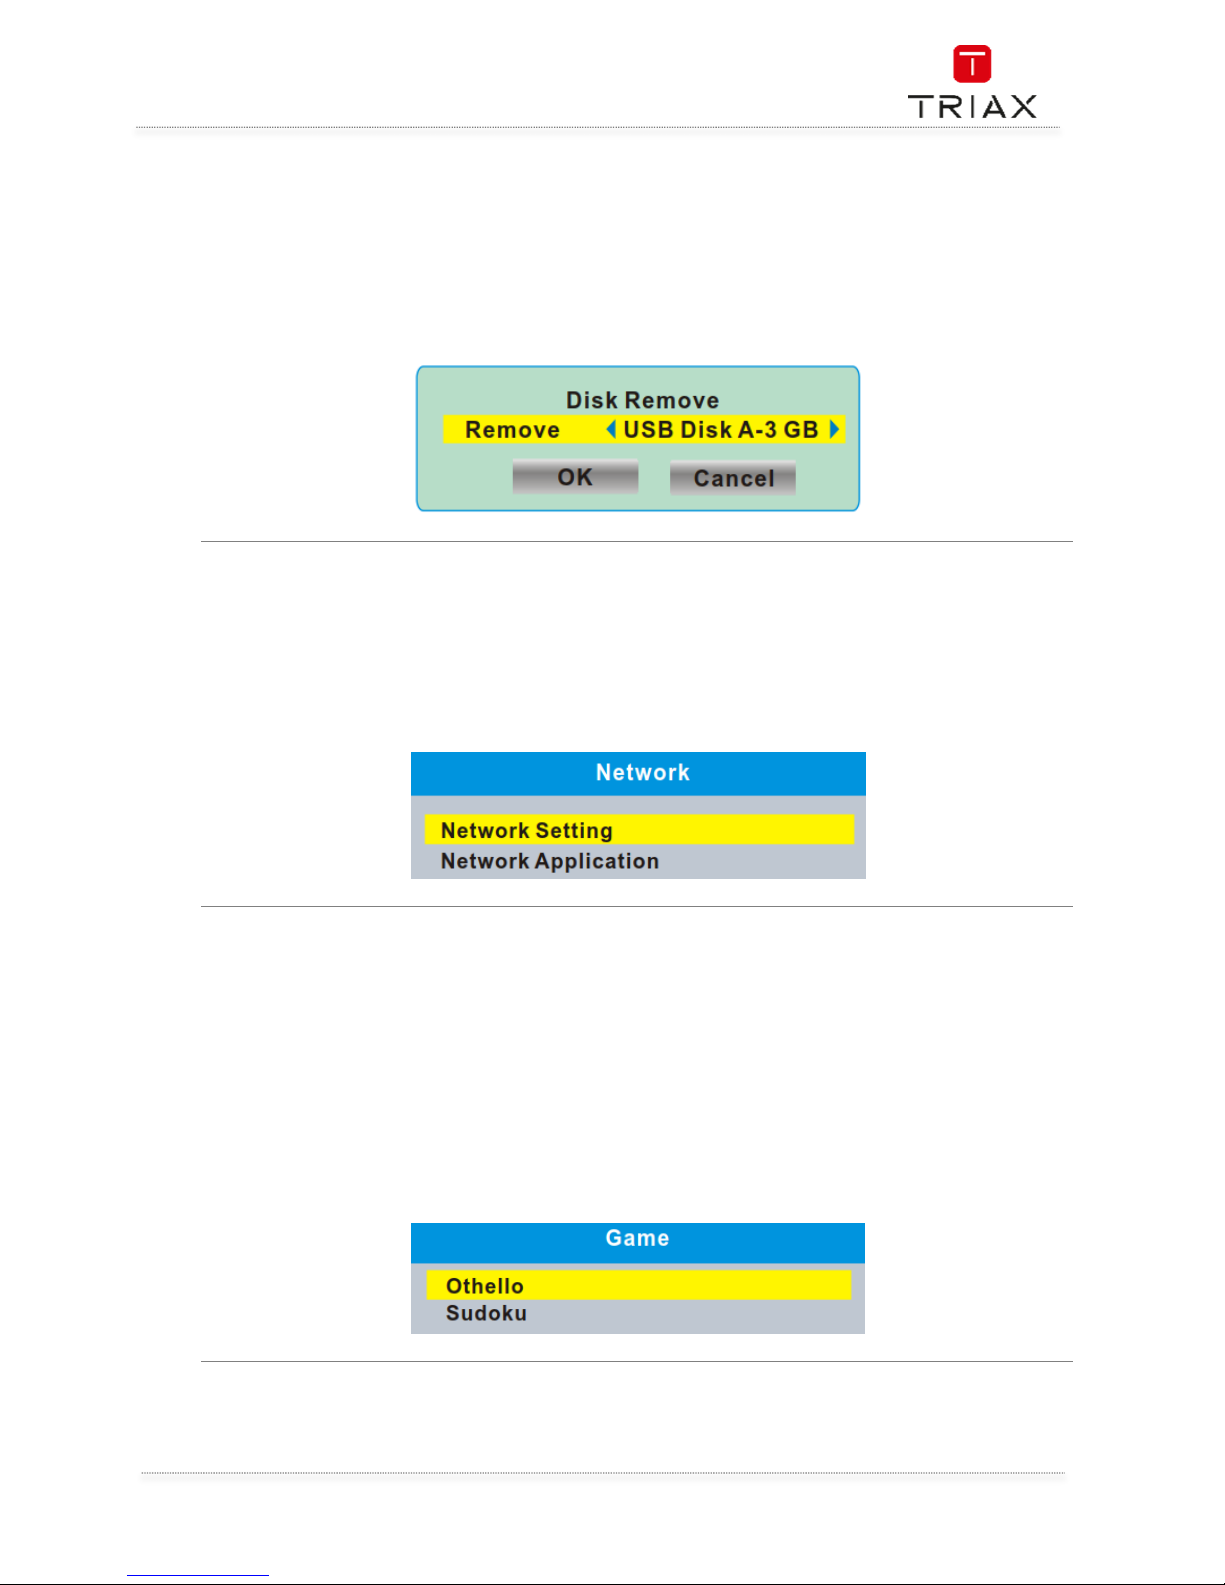
7.5 Remove USB device safely
This menu allows you to remove the external USB device safely.
• In "Tools" menu, select "Remove USB device safely",
• Press "OK" button to confirm. Then a window is displayed.
Select "OK" button to remove the USB device.
Select "Cancel" button to cancel the operation.
7.6 Network
This menu allows you to set the network options, watch the weather forecast and listen to the Net
Radio.
Network Setting: Net choose (Select the way of online) Settings (Set up network parameters)
Network
Application:
Radio Channel
Weather Channel
8. Game
8.1 Game
This menu allows you to play games.
• Press the "MENU" button to enter main menu.
• Press "UP" or "DOWN" button to highlight "Games", press "RIGHT" button to enter the
Games menu.
• Press "UP" or "DOWN" cursor button to highlight the desired item and press "OK" button to
enter the game.
• Press "EXIT" button to exit "Games" menu.
Page 22
User Manual
EN
22
9. Media player
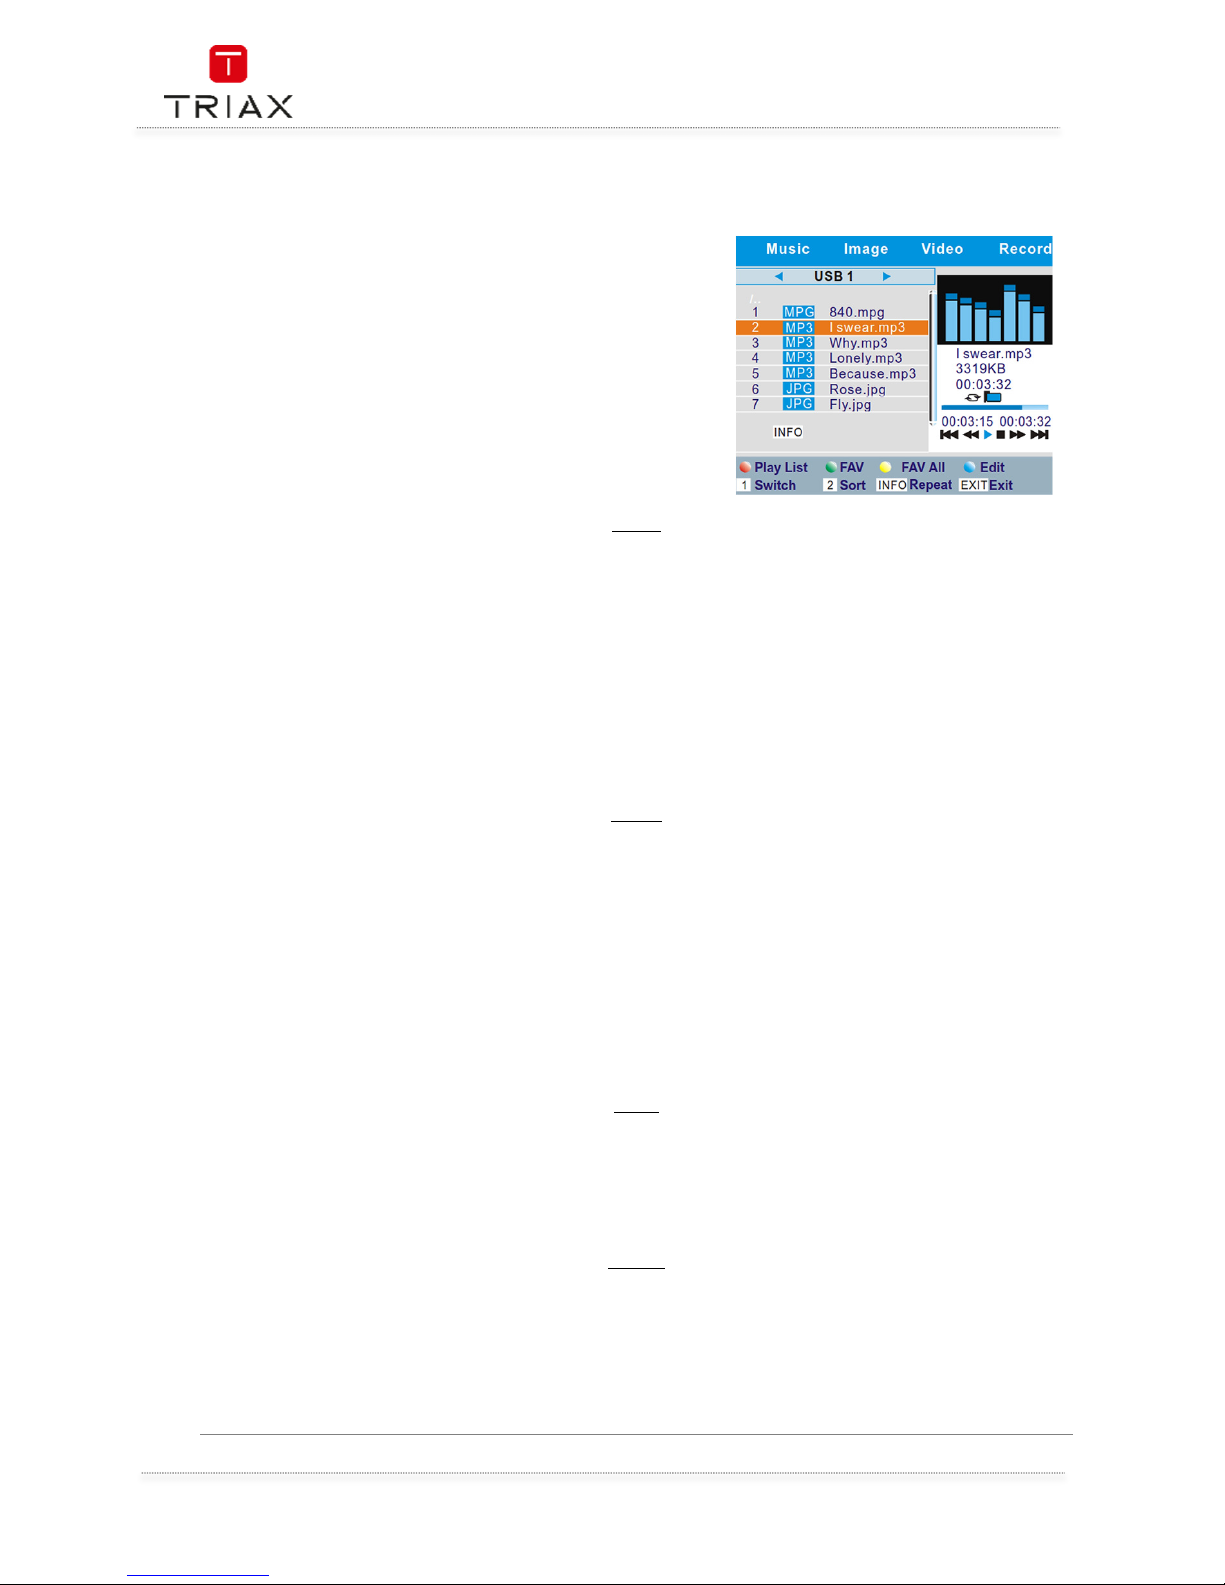
9.1 Media Playback
This function allows you to play the media files from the USB
HDD.
• In "Media player" menu, select "Record", "Video",
"Music" or "Image,
• Press "OK" button to enter Media Playback
menu.
• Press "UP" or "DOWN" cursor button to select a
desired media file, and press "OK" button to play
the files.
• Press "EXIT" button to exit.
Music
MusicMusic
Music
"RED" button: Press to show and edit the Play List.
"GREEN" button:
Press to set the selected file to Favourite file and add this file to play list.
Press again to cancel favourite and delete the file from play list.
"YELLOW" button:
Press to set all the files of current directory to Favourite files and add to play
list. Press again to cancel favourite and delete all file of current directory
from the play list.
"BLUE" button: Press to enter to edit sub-menu for the selected file.
"1" button: Press to switch TAB between Music/Image/Video/Record.
"2" button: Press to sort the files of the current directory by Name/Time/Size/Favourite.
"INFO" button: Press to set repeat mode (Repeat Folder/ Random Folder/Repeat One).
"EXIT" button: Return to the upper directory.
Image
ImageImage
Image
"RED" button: Press to show and edit the Play List.
"GREEN" button:
Press to set the selected file to Favourite file and add this file to play list.
Press again to cancel favourite and delete the file from play list.
"YELLOW" button:
Press to set all the files of current directory to Favourite files and add to play
list. Press again to cancel favourite and delete all file of current directory
from the play list.
"BLUE" button: Press to enter to edit sub-menu for the selected file.
"1" button: Press to switch TAB between Music/Image/Video/Record.
"2" button: Press to sort the files of the current directory by Name/Time/Size/Favourite.
"INFO" button: Press to set slide show option.
"3" button: Press to view image in multi view mode
"EXIT" button: Return to the upper directory.
Video
VideoVideo
Video
"BLUE" button: Press to enter to edit sub-menu for the selected file.
"1" button: Press to switch TAB between Music/Image/Video/Record.
"2" button: Press to sort the files of the current directory by Name/Time/Size.
"INFO" button: Press to set repeat mode (Repeat Folder/Repeat One).
"EXIT" button: Return to the upper directory.
Record
RecordRecord
Record
"RED" button: Press to Rename the selected recording file.
"GREEN" button:
Press to Lock the selected recording file.(The password is necessary for the
operation) Press again to unlock the recording file.
"YELLOW" button: Press to delete the selected recording file.
"1" button: Press to switch TAB between Music/Image/Video/Record.
"EXIT" button: Return to the upper directory.
Page 23
User Manual
23
EN
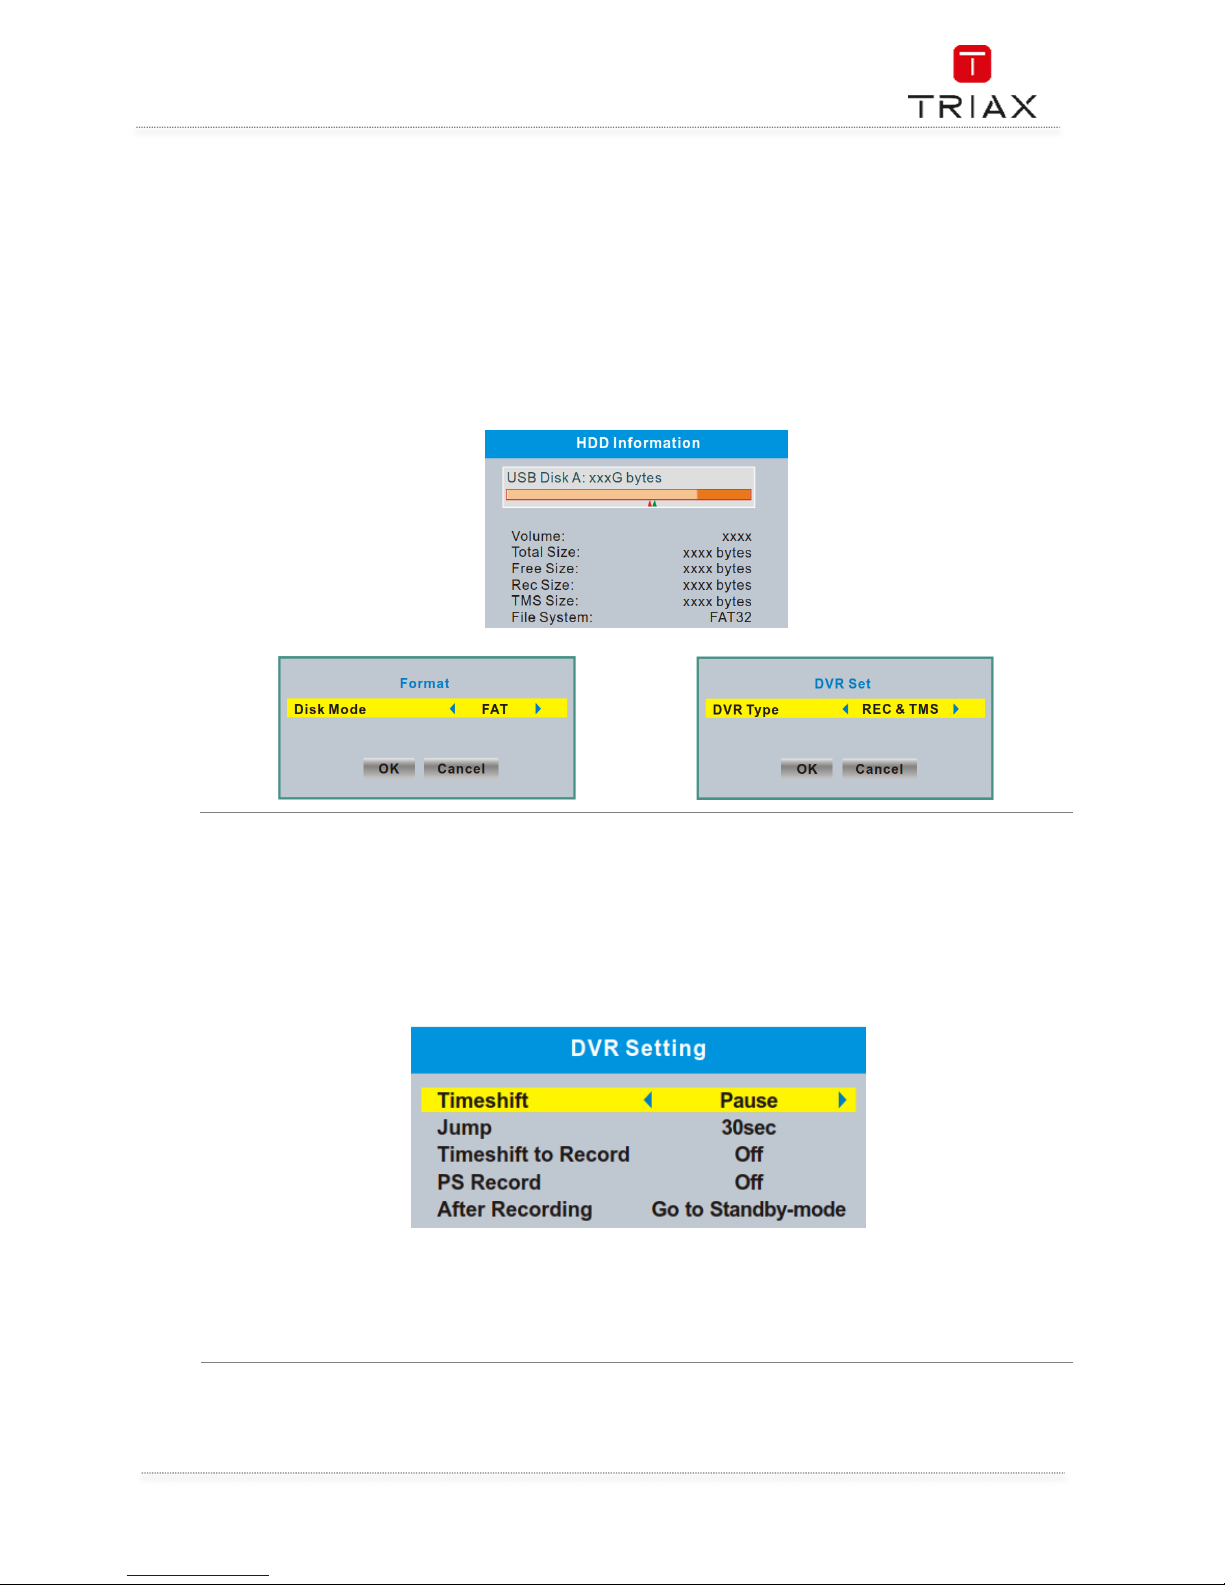
9.2 HDD Information
This menu can display some parameters of Removable HDD.
• In "Media Player" menu, select "HDD Information", press "OK" button to open HDD
information window.
• Press "EXIT" button to exit.
•
"YELLOW" button:: Press to set format option (FAT/NTFS).
"BLUE" button:
Press to set DVR Type
(REC & TMS/Record/Timeshift).
9.3 DVR Setting
This menu allows you to set the DVR Settings.
• In "Media Player" menu, select "DVR Setting", press "OK" button to enter "DVR Setting"menu.
• Press "UP" or "DOWN" cursor button to highlight the desired item and press "OK"button to
enter the sub-menu.
• Press "EXIT" button to exit.
Timeshift: Pause/Off/Auto
Step to: 30sec/1min/5min/10min/15min/20min/30min
Timeshift to Record: On/Off
PS Record: On/Off
After Recording: Watch TV/Go to Standby-mode
Page 24
User Manual
EN
24
10. Timeshift / Record
10.1
Mass storage device on the USB port
Plugging an external Mass Storage Device on the USB port gives you access to Time Shift/Record
a broadcast programme.
• Pause a broadcast programme and continue watching it later (Time Shift )
• Record a broadcast programme.
• When the space available on the Mass Storage Device runs out, recording operation of
broadcast will stop.
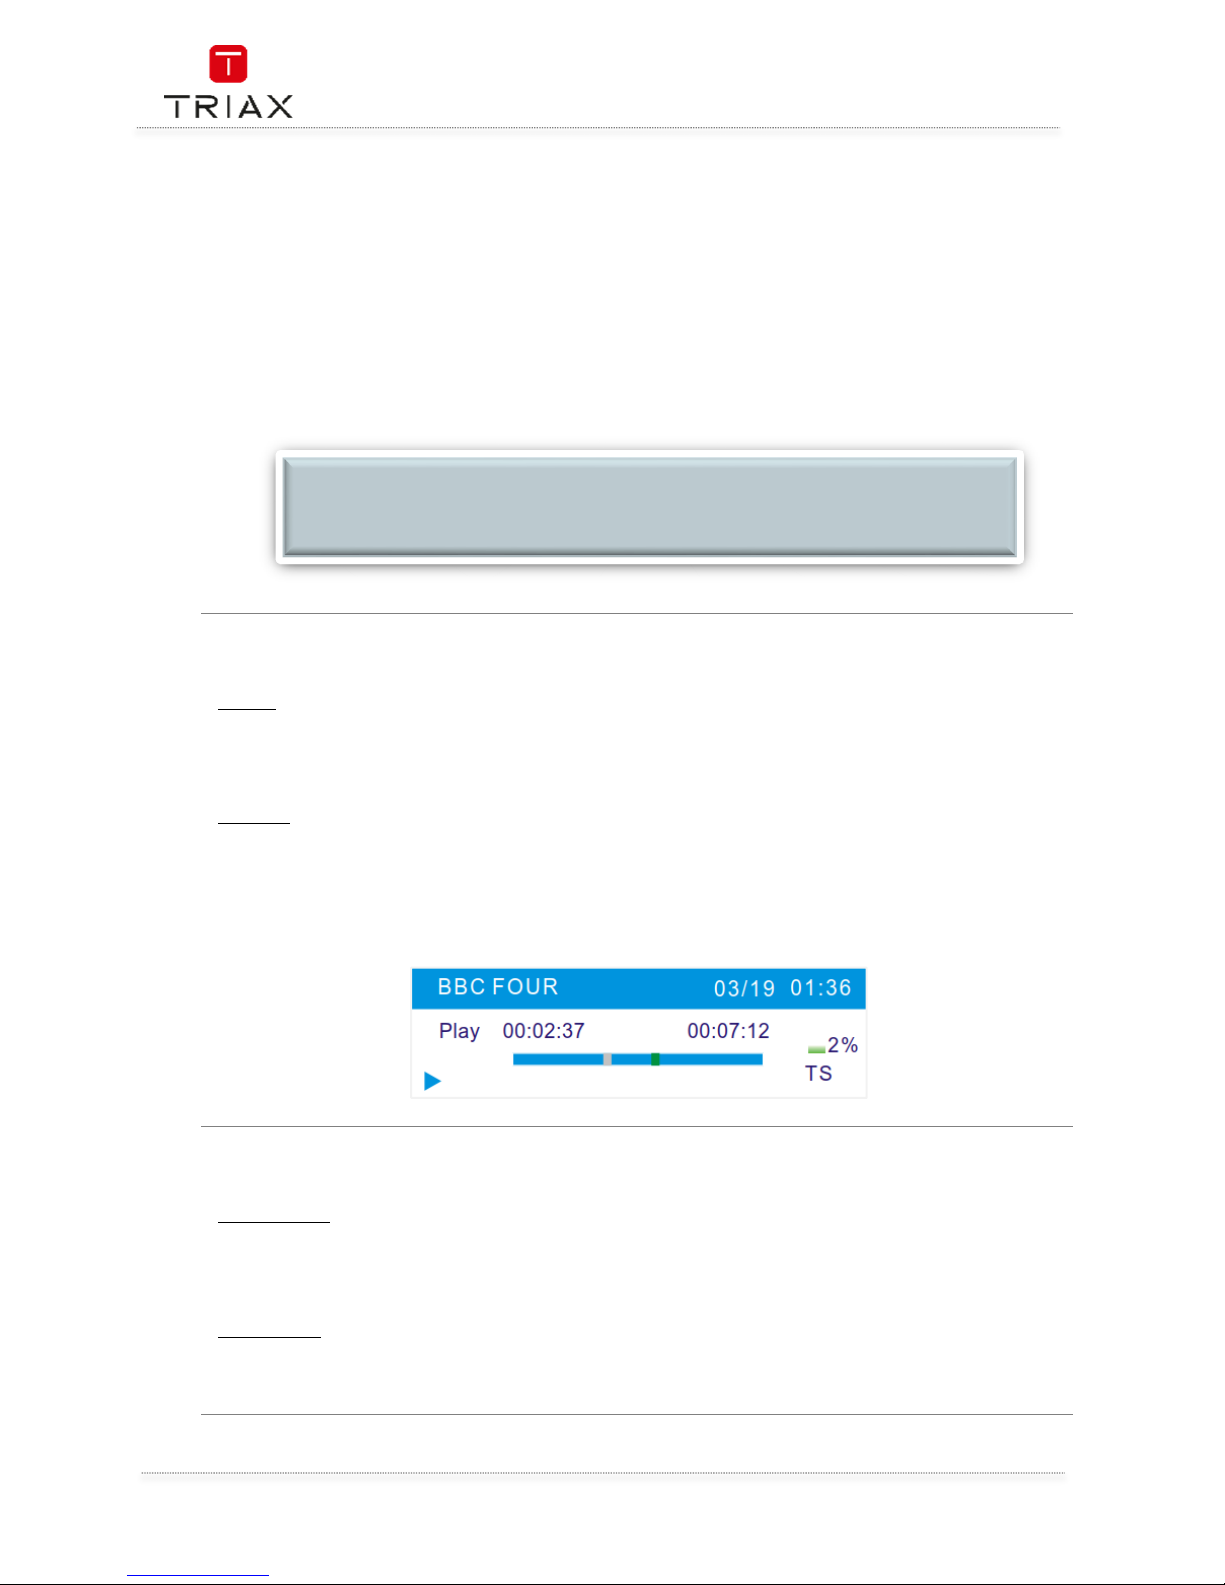
10.2
Timeshift
Initiate:
Initiate:Initiate:
Initiate:
Time Shift can be done in full screen mode by pressing the "PAUSE" button.
• Press "RIGHT" or "LEFT" button to select the time you want to start.
• Press "OK" button to start timeshift playback.
Playback
PlaybackPlayback
Playback
During the playback, it is possible to perform the following actions :
• Press "PAUSE" button to pause the playback.
• Press "FORWARD" button to fast forward the playback.
• Press "BACKWARD" button to rewind the playback.
• Press "STOP" button to stop TimeShift playback and return to Live programme.
10.3
Record
Instant
InstantInstant
Instant record
recordrecord
record
In full screen mode, press "RECORD" button to record the current programme instantaneously.
• Press "RECORD" button again can input duration.
• Press "STOP" button to stop recording, then a confirmation window appears.
• Select "Yes" to stop recording. Select "No" to continue recording.
Timer record
Timer recordTimer record
Timer record
During the playback, it is possible to perform the following actions :
•
You can enter timer setting menu to set a timer record by EPG or System set up option.
NOTE:
Please use USB 2.0 disk when recording or timeshift.
For timeshift and recording feature, you need a bigger size USB drive or HDD (>2GB).
Page 25
User Manual
25
EN
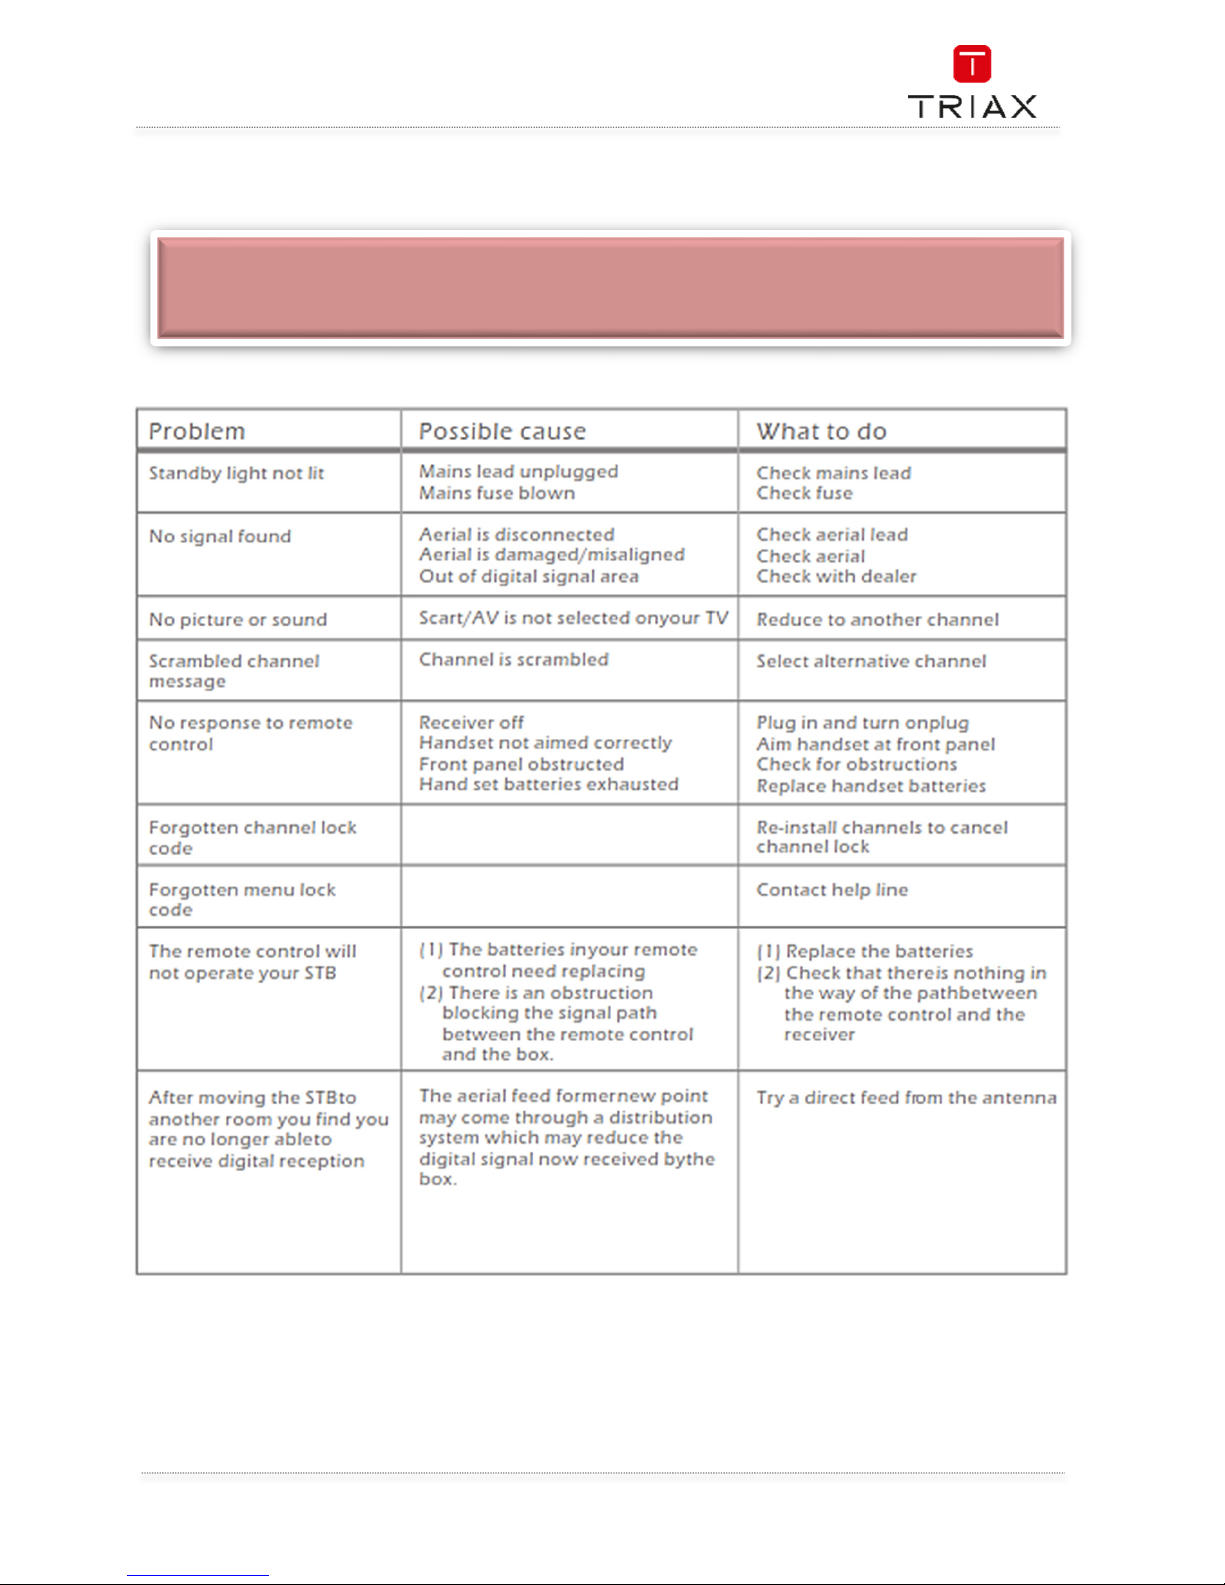
11. Troubleshooting
.
WARNING
In some regions, digital terrestrial signals may be weak. It is therefore advisable to use an antenna
amplifier to boost weak signals.
Page 26
User Manual
EN
26
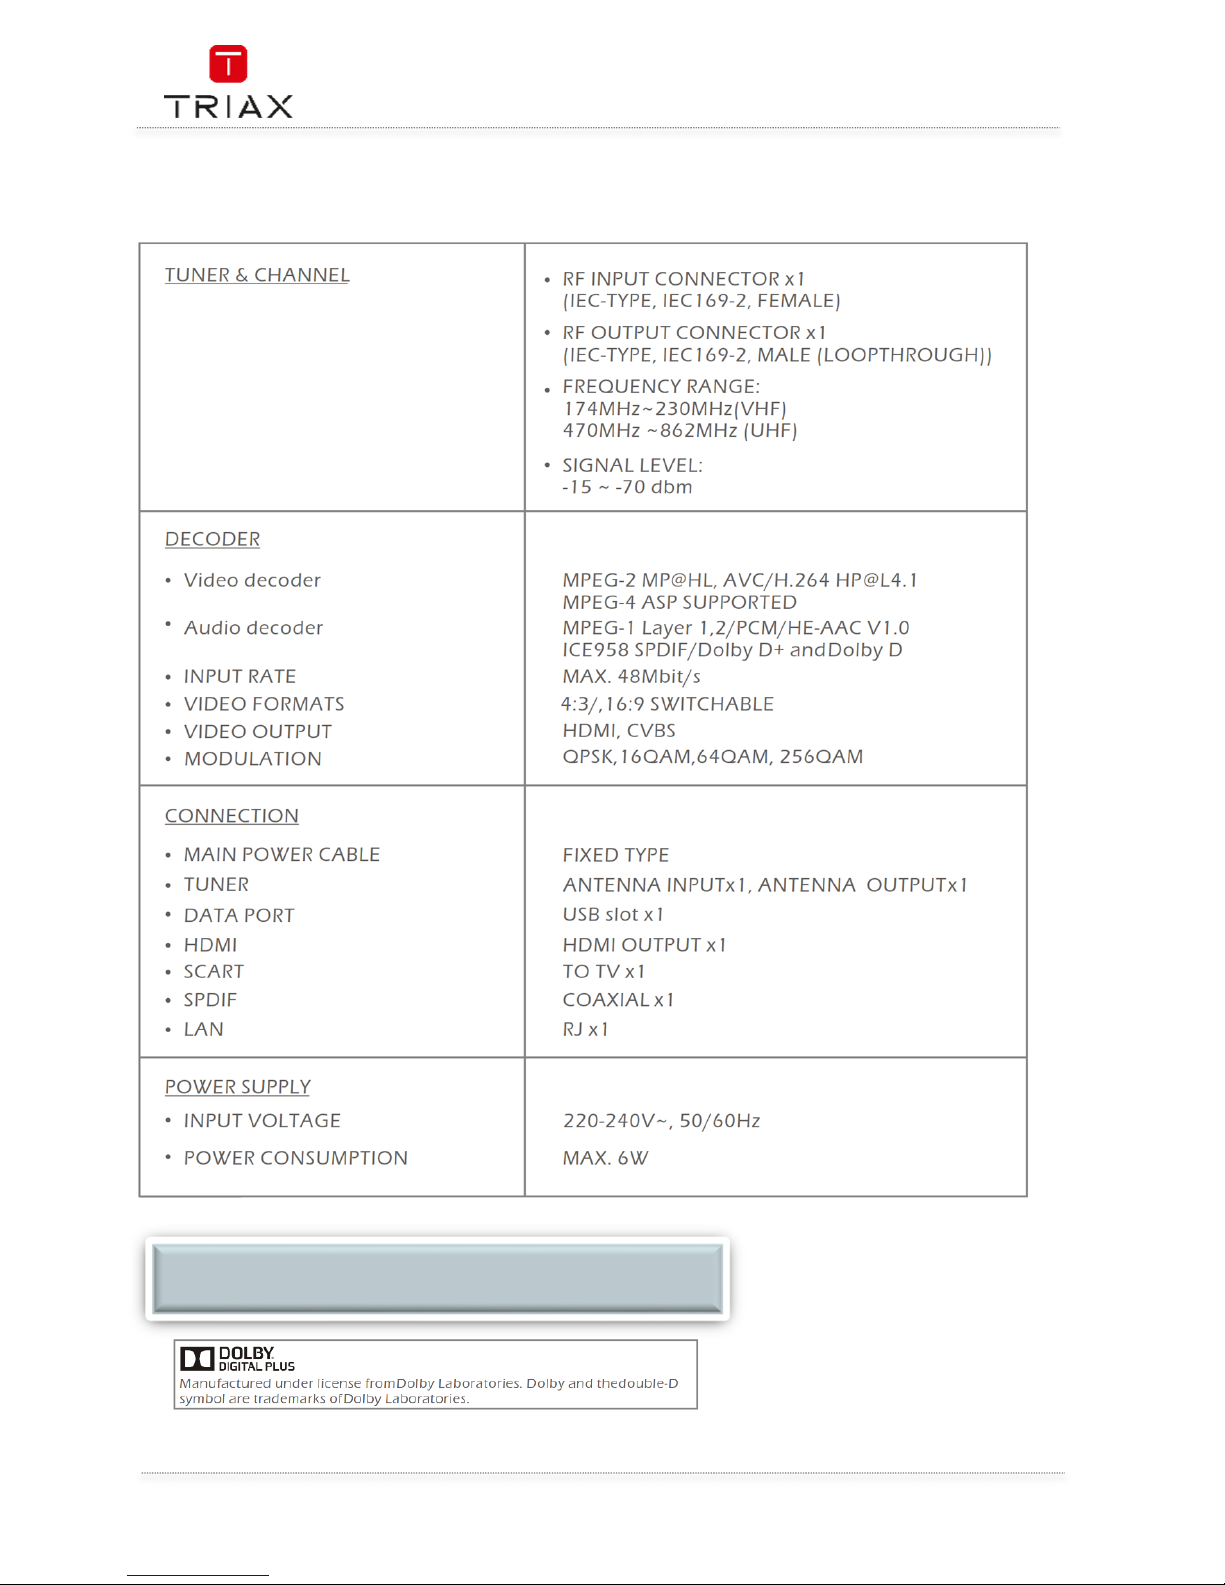
12. Specifications
NOTE:
Design and Specifications are subject to change without notice.
Page 27

User Manual
27
EN
Notes-Notizen-Notes-Notas-Notater
Page 28

User Manual
EN
28
This page is intentionally left blank !
Diese Seite ist mit Absicht leer !
Cette page a été laissée blanche intentionnellement !
Esta página se ha dejado en blanco intencionalmente !
Denne side er med vilje efterladt tom
Page 29

triax.com/support
For further information
and updated manuals go to
Copyright © 2016 TRIAX. All rights reserved.
The TRIAX Logo and TRIAX, TRIAX Multimedia are registered trademarks or trademarks
of the TRIAX Company or its affiliates.
All specifications in this guide are subject to change without further notice.
TRIAX
A/S | Bjørnkærvej 3 | 8783 Hornsyld | Denmark
Page 30

Mode d’emploi
TRIAX TR 63
Adaptateur TNT Haute Définition DVB-T2
Article Article no.
TRIAX TR 63 Adaptateur TNT Haute Définition DVB-T2 305263
Version B Date 02/2017 FR
HEVC / MPEG 4
Page 31

Mode d‘emploi
FR
2
Attention! / Achtung! / Consignes de sécurité!
EN
Failure to comply
Failure to complyFailure to comply
Failure to comply
with the specified precautionary measures may cause serious injury to persons or damage to
property. The installation and commissioning may only be performed by suitably qualified persons, technicians or
installers in compliance with safety regulations.
Damage due to improper installation and commissioning, defective connectors on cables or any other incorrect
handling will void the warranty.
CAUTION: The safety requirements are according to EN 60728-11 and must be observed.
• Disconnect mains power before working on electrical systems.
• Any additional electrical wiring requirements should always be installed by a suitably qualified person(s).
Installation or service work should NEVER be undertaken during electrical / thunderstorms.
DE
Gewährleistung
Gewährleistung Gewährleistung
Gewährleistung
Die gesetzliche Gewährleistung nach Paragraph 437 BGB beträgt 24 Monate.
Bei unsachgemäßer Installation und Handhabung erlischt jeglicher Garantieanspruch.
Bestimmungsgemäße
Und sachwidrige Verwendung
Die Montage und Inbetriebnahme darf nur von eingewiesenen Personen, Technikern
oder Installateuren unter Beachtung der Sicherheitsbestimmungen durchgeführt werden.
Schaden durch falsche Montage und Inbetriebnahme sowie durch unsachgemaβe Handhabung fuhren zum Erlöschen
des Garantieanspruchs.
FR
Veillez à bien r
Veillez à bien rVeillez à bien r
Veillez à bien r
especter
especterespecter
especter
les consignes de sécurité ci
-
dessous. Leur non
-
respect peut provoquer des dommages
matériels ou corporels.
L’installation et la mise en route ne peuvent être effectués que par des techniciens ou des installateurs qualifiés en
respectant les consignes de sécurité.
La garantie ne sera pas appliquée lors de dégâts causés par une erreur de montage, de mise en route ou par un
mauvais raccordement ou toute autre manipulation incorrecte.
PRUDENCE : avant toute intervention, votre installation doit être conforme aux exigences définies par les dispositions
Européennes EN 50083 (conformité des installations collectives) et EN 60065 (normes en vigueur pour la protection
électrique).
• Débranchez l’appareil avant toute intervention, car certains composants sous tension sont dangereux
(risque d’électrocution).
Toute intervention sur l’installation ou travaux de maintenance sont à proscrire en cas d’orage.
Félicitations pour l’achat de votre adaptateur / enregistreur TNT HD TRIAX TR 63
Félicitations pour l’achat de votre adaptateur / enregistreur TNT HD TRIAX TR 63Félicitations pour l’achat de votre adaptateur / enregistreur TNT HD TRIAX TR 63
Félicitations pour l’achat de votre adaptateur / enregistreur TNT HD TRIAX TR 63.
Avant de démarrer
Avant de démarrerAvant de démarrer
Avant de démarrer
Il n’est pas indispensable de lire entièrement ce mode d’emploi pour recevoir des images de la Télévision Numérique Terrestre dite TNT.
Toutefois, nous vous recommandons sa lecture pour vous donner un aperçu des nombreuses possibilités de votre adaptateur afin de
bénéficier du meilleur de ses services.
Conseils et recommandations
Conseils et recommandationsConseils et recommandations
Conseils et recommandations
Assurez-vous que votre adaptateur est suffisamment éloigné de sources de chaleur, par exemple radiateurs. N’exposez pas
l’adaptateur à une humidité supérieure à 80% ou à une température ambiante inférieure à +15°C ou supérieure à +35°C.
Ne couvrez pas les grilles d’aération de l’adaptateur. Laissez un minimum de 10 cm d’espace libre au-dessus de l’adaptateur. Ne rien
poser dessus (exemple vase), éviter que du liquide ne puisse entrer à l’intérieur.
Ne raccordez pas l’adaptateur à la tension secteur avant que tous les autres branchements n’aient été effectués.
Il est recommandé de débrancher l’adaptateur de la prise secteur et de l’antenne terrestre lors d’orages.
Les performances et la fiabilité de votre adaptateur sont garanties. La garantie ne couvre pas les dommages causés par l’intervention
de personnels non autorisés ni les dommages directs ou indirects résultants de chocs électriques. Ne jamais enlever le couvercle de
votre adaptateur car il y a risque d’électrocution.
Pour toute question, n’hésitez pas à contacter votre revendeur TRIAX.
Environnement
EnvironnementEnvironnement
Environnement
Les piles contiennent des éléments très polluants pour l’environnement. NE PAS LES JETER
NE PAS LES JETERNE PAS LES JETER
NE PAS LES JETER. Pensez à les déposer dans les bacs
destinés au recyclage.
Les appareils électriques et électroniques sont susceptibles de contenir des éléments qui, bien qu’indispensables au bon
fonctionnement du système, peuvent s’avérer dangereux pour la santé et l’environnement s’ils sont manipulés ou éliminés de manière
incorrecte. Par conséquent, veuillez ne pas jeter votre adaptateur usagé avec les ordures ménagères.
Aidez
AidezAidez
Aidez----nous à préserver l’environnement dans lequel nous vivons !
nous à préserver l’environnement dans lequel nous vivons !nous à préserver l’environnement dans lequel nous vivons !
nous à préserver l’environnement dans lequel nous vivons !
Entretien
EntretienEntretien
Entretien
L’adaptateur peut être nettoyé à l’aide d’un chiffon doux et sec.
N’utilisez ni tampon abrasif, ni poudre décapante, ni solvants tels qu’alcool ou térébenthine :
N’utilisez ni tampon abrasif, ni poudre décapante, ni solvants tels qu’alcool ou térébenthine : N’utilisez ni tampon abrasif, ni poudre décapante, ni solvants tels qu’alcool ou térébenthine :
N’utilisez ni tampon abrasif, ni poudre décapante, ni solvants tels qu’alcool ou térébenthine : ils pourraient endommager la finition de
l’adaptateur.
Page 32

Mode d‘emploi
3
FR
Quelques règles importantes concernant la TNT
Quelques règles importantes concernant la TNTQuelques règles importantes concernant la TNT
Quelques règles importantes concernant la TNT
Lors de réorganisation des bouquets des chaînes ou suite à l’ajout de nouvelles chaînes vous serez amenés à refaire une recherche
automatique des chaînes pour continuer à recevoir toutes les chaînes gratuites. Cette nouvelle recherche est très simple à l’aide de la
touche <SOS> de la télécommande (voir ci-dessous et au chapitre 9.10).
La disparition de certaines chaînes du jour au lendemain ne sera que la conséquence des réajustements décrits ci-dessus. Une simple
réinitialisation de l’adaptateur qui est toujours suivie du mode première installation automatique vous permettra de retrouver toutes les
chaînes perdues et de profiter pleinement de la TNT !
Le TR 63 est un produit grand public qui n’est pas destiné à fonctionner 24 heures sur 24, 7 jours sur 7. Nous vous recommandons de
le mettre régulièrement en veille au moins une fois par jour. Une mise en veille régulière lui garantira une plus grande longévité et une
qualité des signaux délivrés.
TOUCHE SOS
TOUCHE SOSTOUCHE SOS
TOUCHE SOS
Cette touche de la télécommande vous permet de forcer votre adaptateur à mettre à jour automatiquement sa liste des chaînes. Cette
fonction est très utile si des chaînes devaient vous manquer suite à un changement de fréquence. De même, lors de l’ajout de nouvelles
chaînes, une simple pression sur cette touche suivie d’une confirmation mettra automatiquement la liste des chaînes à jour de votre
adaptateur.
L’adaptateur aura ainsi en mémoire les derniers paramètres émis par les émetteurs.
Toutefois, si votre adaptateur ne fonctionne plus correctement alors que la veille tout allait bien, avant de le retourner à votre
installateur en pensant qu’il est défectueux, ayez le réflexe suivant :
Si la nouvelle recherche des chaînes suite à l’appui sur la touche SOS ne règle pas le problème, il se peut que les modifications
apportées aux signaux par les diffuseurs soient conséquentes et nécessitent une mise à jour du logiciel interne de l’adaptateur. Dans ce
cas, votre installateur ou vous-même pourrez consulter notre site Internet www.triax.fr, où vous retrouverez gratuitement toutes les
mises à jour rendues nécessaires par les modifications apportées aux signaux TNT. Cette mise à jour pourra être chargée dans
l’adaptateur à l’aide d’une clé USB. Veuillez-vous reporter au chapitre mise à jour de votre adaptateur TNT.
Enfin si tous ces conseils n’ont pas solutionné votre problème, veuillez retourner votre adaptateur à votre revendeur.
Nous espérons que ces quelques conseils vous permettrons de profiter pleinement de votre adaptateur TNT.
ECOCONCEPTION
ECOCONCEPTIONECOCONCEPTION
ECOCONCEPTION : Faible consommation
: Faible consommation: Faible consommation
: Faible consommation
Cet adaptateur TNT est conforme au RÈGLEMENT (CE) No 107/2009 de la commission du 4 février 2009 portant application de la
directive 2005/32/CE du Parlement européen et du Conseil concernant les exigences relatives à l'écoconception des décodeurs
numériques simples.
La conception de cet adaptateur notamment concernant sa faible consommation d’énergie lui permet de diminuer son impact sur
l’environnement.
La consommation de cet adaptateur est :
< 0,5 Watts en mode veille
< 5 Watts en mode actif (hors télé-alimentation d’une antenne intérieure amplifiée)
Votre adaptateur intègre également la fonction de mise en veille automatique au bout de 3 heures si celui-ci n’a subi aucun changement
de son état (changement de chaîne, changement de volume, mise en route d’un timer d’enregistrement, …). Cette mise en veille
automatique peut être désactivée mais par défaut est positionnée à 3 heures.
Attention
Ce symbole signifie que votre appareil électronique hors d’usage doit être collecté
séparément et non jeté avec les déchets ménagers. Dans ce but, l’Union Européenne a
institué un système de collecte et de recyclage spécifique dont les producteurs ont la
responsabilité.
Page 33

Mode d‘emploi
FR
4
Table of contents / Inhaltsverzeichnis / Sommaire
Attention! / Achtung! / Consignes de sécurité! ................................................................................ 2
1.
Présentation ..................................................................................................................... 6
1.1
Caractéristiques générales ............................................................................................... 6
1.2
Configuration de livraison ................................................................................................. 7
1.3
Vue de face ....................................................................................................................... 7
1.4
Vue arrière ........................................................................................................................ 7
1.5
Télécommande ................................................................................................................. 8
2.
Raccordement de votre adaptateur ................................................................................. 10
2.1
Raccordement au téléviseur, magnétoscope et chaîne hifi .............................................. 10
2.2
Raccordement à un ensemble type Home Cinéma .......................................................... 10
3.
Première mise en route : guide de démarrage rapide ...................................................... 10
4.
Menu installation ............................................................................................................ 11
4.1
Recherche automatique .................................................................................................. 12
4.2
Recherche avancée des chaînes ..................................................................................... 12
4.3
LCN ................................................................................................................................. 13
5.
Menu edition chaînes ...................................................................................................... 14
5.1
Mettre une chaîne en favoris ........................................................................................... 14
5.2
Verrouiller une chaîne ..................................................................................................... 14
5.3
Sauter une chaîne ........................................................................................................... 14
5.4
Déplacer une chaîne ........................................................................................................ 15
5.5
Trier une chaîne .............................................................................................................. 15
5.6
Renommer une chaîne .................................................................................................... 15
5.7
Supprimer une chaîne ..................................................................................................... 15
6.
Menu réglages ................................................................................................................ 16
6.1
Réglages langue .............................................................................................................. 17
6.2
Système TV ..................................................................................................................... 17
6.3
Réglages de l’heure ......................................................................................................... 17
6.4
Réglage Timer ................................................................................................................. 17
6.5
Contrôle parental ............................................................................................................ 19
6.6
Réglage OSD ................................................................................................................... 20
6.7
Favoris ............................................................................................................................ 20
6.8
Réglage audio description ............................................................................................... 20
6.9
Réglage multiécrans ....................................................................................................... 20
6.10 Autre ............................................................................................................................... 20
7.
Menu Outils ..................................................................................................................... 21
Page 34

Mode d‘emploi
5
FR
7.1
Information ..................................................................................................................... 21
7.2
Réinitialisation ................................................................................................................ 21
7.3
Mise à jour du logiciel par air .......................................................................................... 22
7.4
Mise à jour par USB ......................................................................................................... 22
7.5
Retirer le support USB en sécurité ................................................................................... 23
7.6
Réseau ............................................................................................................................ 23
8.
Jeux ................................................................................................................................ 23
9.
Utilisation quotidienne .................................................................................................... 24
9.1
Informations affichées à l’écran ...................................................................................... 24
9.2
Changement de chaîne .................................................................................................... 25
9.3
Changement du niveau sonore ........................................................................................ 25
9.4
Touche Mute ................................................................................................................... 25
9.5
Télétexte ......................................................................................................................... 25
9.6
Sous-titrage télétexte ...................................................................................................... 26
9.7
Sous-titres DVB ............................................................................................................... 26
9.8
Différente pistes audio .................................................................................................... 26
9.9
EPG / Information sur les programmes en cours et suivant............................................. 27
9.10 Touche SOS (touche ROUGE) .......................................................................................... 27
10.
Menu Multimédia ............................................................................................................ 28
10.1 Vidéo ............................................................................................................................... 29
10.2 Musique .......................................................................................................................... 29
10.3 Image .............................................................................................................................. 30
10.4 Enregistrement................................................................................................................ 30
10.5 Information sur le stockage ............................................................................................ 31
10.6 Réglage PVR ................................................................................................................... 31
11.
Enregistrement ............................................................................................................... 33
11.1 Enregistrement direct ...................................................................................................... 33
11.2 Timeshift ......................................................................................................................... 34
11.3 Interface USB .................................................................................................................. 35
Specifications – Spezifikationen – Caractéristiques – Especificaciones - Specifikationer ........... 36
Page 35

Mode d‘emploi
FR
6
1. Présentation
Cet Adaptateur/Enregistreur numérique TNT HD TRIAX TR 63
Adaptateur/Enregistreur numérique TNT HD TRIAX TR 63Adaptateur/Enregistreur numérique TNT HD TRIAX TR 63
Adaptateur/Enregistreur numérique TNT HD TRIAX TR 63 est destiné à la réception et à
l’enregistrement des programmes numériques terrestre gratuits DVB-T2 HEVC, DVB-T2 MPEG4, DVB-T1
MPEG 4 HD (Haute Définition) et MPEG 4 SD (Définition Standard).
Le TR 63 est un adaptateur, entre autres, destiné à la réception de la nouvelle norme de TNT Allemande
qui va démarrer le 30 mai 2016 et qui sera progressivement déployée entre 2016 et 2019. Il permet la
réception et l’enregistrement des programmes numériques terrestre gratuits en Haute Définition.
Sa simplicité de mise en œuvre et d’emploi, ses fonctions multimédia en font un produit convivial et
agréable. Toutes ses fonctions sont accessibles à l’aide de sa télécommande et sont directement
affichées à l’écran de votre téléviseur.
Pour pouvoir utiliser votre adaptateur / enregistreur numérique TNT HD, vous devez utiliser une antenne
correctement orientée sur l’émetteur diffusant les signaux TNT.
Le but de ce mode d’emploi est de vous permettre d’installer rapidement et facilement votre adaptateur
/ enregistreur numérique TNT HD afin d’en profiter pleinement.
1.1 Caractéristiques générales
• Réception et enregistrement des chaînes numériques gratuites COFDM DVB-T2
HEVC/MPEG, DVB-T1 MPEG 4 HD, MPEG 4 SD
• Fréquences d’entrée en mode automatique : 174-230 / 470-862 MHz
• Un tuner numérique avec sortie boucle de passage, démodulation COFDM 2K, 8K
• Capacité mémoire 1000 programmes TV et Radio
• Mode ‘Installation automatique’ de l’adaptateur lors de sa première mise en route
• Fonction LCN de tri automatique des programmes suivant l’ordre défini en France
• Menu convivial, intuitif et graphique en plusieurs langues
• Guide Electronique des Programmes (EPG) sur 7 jours si diffusé
• Décodeur Télétexte intégré (STV/VBI) et transparence vers le TV
• Contrôle parental sur les chaînes selon le niveau moral diffusé (-10, -12, -16 et -18 ans)
• Sous titrage DVB, sous titrage télétexte (si diffusés par les chaînes)
• Afficheur 4 * 7 segments, affichage du numéro de chaîne en marche et de l’heure en veille
• Touche SOS : elle permet de mettre à jour très simplement la liste des chaînes de
l’adaptateur lors de changement du signal (changement de fréquence, ajout de chaînes,
etc…)
• PVR ready, Time Shift, Instant Replay, enregistrement sur un support externe USB 2.0
• Fonctions multimédia via son interface USB pour enregistrement sur support externe
(disque dur ou clé USB 2.0) et mise à jour du logiciel interne de l’adaptateur
• Lecture de fichiers audio, photo et vidéo depuis un support externe 2.0, lecture des
enregistrements réalisés par l’adaptateur
• 1 entrée antenne IEC femelle, 1 sortie antenne IEC mâle
• 1 péritel (TV ou VCR/DVR)
• 1 sortie numérique HDMI, résolutions de 480i à 1080p
• 1 sortie audio numérique S/PDIF coaxiale
• 1 port LAN (RJ45) pour accéder aux services interactifs tels que la météo
• Tension d’alimentation : 100 - 240 V/AC, fréquence 50/60 Hz
• Faible consommation en mode actif < 6 W et < 0,5 W en mode veille
• Boitier métal noir, dimensions 168 x 36 x 90 mm, poids 0,65Kg
• Température de fonctionnement : +15°C à +35°C
• Modèle TR 63, référence 305263, code EAN 5702663052635
Page 36

Mode d‘emploi
7
FR
1.2 Configuration de livraison
Le carton de votre TR 63 contient :
• 1 adaptateur TR 63
• 1 télécommande et ses deux piles LR 03
• 1 mode d’emploi
Si l’un de ces accessoires devait manquer, veuillez contacter votre revendeur.
1.3 Vue de face
- USB : Port USB IN /OUT pour mise à jour du logiciel de l’adaptateur, lecture de fichiers
photo, audio, vidéo, enregistrement et lecture
1.4 Vue arrière
- ANT IN : Entrée des signaux d’antenne TNT
- ANT OUT : Sortie des signaux d’antenne TNT
- COAXIAL : Sortie audio numérique SPDIF coaxiale
- RJ 45 : Port LAN pour raccordement de l’adaptateur à Internet
- HDMI : Sortie vidéo et audio au format HD (Haute Définition). A raccorder sur la prise
HDMI de votre TV à l’aide d’un cordon HDMI
- TV : Sortie vidéo et audio au format SD (Définition Standard). A raccorder sur la prise
péritel de votre TV ou écran plat
- 220-240V : Raccordement de l’alimentation à la prise secteur
Page 37

Mode d‘emploi
FR
8
1.5 Télécommande
Page 38

Mode d‘emploi
9
FR
N° Bouton Fonction
1
VEILLE
Marche / Veille
2
Rouge (SOS) / VERT / JAUNE /
BLEU
SOS = Mise à jour de la liste des chaînes
Touches de couleur : fonction décrite dans
les sous-menus
JAUNE = accès au menu timer
3 ►► /◄◄
Avance rapide (x2, x4, x8, x16, x24) / retour
rapide (x2, x4, x8, x16, x24)
4 PAUSE
Arrêt sur image ou Timeshift si un support USB
est connecté
5
►
Lecture
6 TTX Menu Télétexte
7 SUBTITLE Menu sous-titres
8 MENU Affichage du Menu à l’écran
9 OK Validation d’un choix, accès à la liste des chaînes
10 ▲▼ / ◄ ► Navigation dans les menus
11 FAV Accès aux listes des chaînes mise en Favoris
12 REC Enregistrement direct
13 VOL +/- Changement du volume
14 USB Accès au répertoire USB
15 0…9 Pavé numérique
16 BACK Retour à la chaîne précédente
17 MUTE Coupure du son
18 ►►I / I◄◄
Saut avant ou arrière par bonds d’une durée
paramétrable dans le menu « saut »
19
■
Stop, arrêt de lecture
20 MEDIA Accès à la liste des enregistrements réalisés
21 AUDIO Menu audio
22 EPG Guide Electronique des Programmes
23 INFO
Information sur le programme en cours et sur la
qualité du signal
24 Exit Sortie des menus
25 CH +/- Changement de chaîne
26 TV / RADIO Commutation entre Liste TV et liste Radio
Page 39

Mode d‘emploi
FR
10
2. Raccordement de votre adaptateur
2.1 Raccordement au téléviseur, magnétoscope et chaîne hifi
Raccorder l’adaptateur aux autres appareils avant d’effectuer le branchement secteur.
Cette précaution permet d’éviter toute détérioration de l’adaptateur ou des autres appareils.
Lorsque tous les autres raccordements ont été effectués, brancher l’adaptateur à une alimentation
230 V/50 Hz.
Faire les raccordements suivants :
• brancher le câble d’antenne sur « RF IN – entrée antenne » de l’adaptateur.
• si besoin, raccorder la sortie de l’antenne de l’adaptateur « RF OUT » avec un cordon
d’antenne - non fourni - à l’entrée antenne de votre téléviseur ou magnétoscope.
• pour disposer de signaux Haute Définition HD numérique, raccorder la sortie HDMI de votre
adaptateur à une entrée HDMI de votre téléviseur (cordon HDMI non fourni).
• brancher votre adaptateur TR 63 directement sur la prise péritel AV1 de votre téléviseur, dans
ce cas les signaux délivrés seront SD.
• Pour accéder aux services Internet, raccorder un accès à votre réseau au connecteur marqué
RJ45
Pour réaliser des enregistrements il vous faudra raccorder un disque dur externe sur la sortie USB de
votre adaptateur.
2.2 Raccordement à un ensemble type Home Cinéma
Faire le raccordement suivant : brancher la sortie audio numérique « SPDIF » de l’adaptateur à l’aide d’un
cordon audio numérique coaxial – non fourni – à votre ensemble Home Cinéma.
3. Première mise en route : guide de démarrage rapide
Ce chapitre vous permettra d’effectuer, dans un minimum de temps, les réglages indispensables de votre
adaptateur avant de partir à la découverte de son utilisation.
Avant de continuer la lecture de cette « Installation Rapide », vous devez posséder une antenne terrestre
dirigée vers l’émetteur diffusant les signaux de la TNT dans votre région. Cette antenne doit pouvoir
recevoir correctement l’ensemble des multiplexes diffusant les chaînes de la TNT.
En cas d’erreur de manipulation lors de l’installation rapide, ne vous alarmez pas car vous pourrez très
facilement revenir aux réglages usine en réinitialisant l’adaptateur comme indiqué au chapitre 7.2 «
Réinitialisation ». L’écran ci-dessous apparaît à la 1ère mise sous tension de votre adaptateur.
Page 40

Mode d‘emploi
11
FR
• Région : Indiquer le pays où est installé l’adaptateur avec <◄/►>, <▼▲> puis passer à la ligne
suivante avec <▼ >
• Langue : choisir la langue des menus avec <◄/►>, puis passer à la ligne suivante avec <▼ >
• Résolution vidéo : presser sur OK pour sélectionner la meilleure résolution supportée par
votre téléviseur à l’aide de <◄/►> valider avec OK dans l’écran demandé
• Format de l’écran : laisser sur Auto
• A la fin de ces réglages, aller sur « OK » et presser sur OK pour mémoriser ces réglages. La
recherche automatique des chaînes va démarrer
L’adaptateur va démarrer la recherche automatique des chaînes TNT gratuites et les mémorisera.
A la fin de la recherche, l’adaptateur TR 63 mémorisera la liste des chaînes trouvées et affichera la chaîne
n°1.
Il vous est possible de personnaliser certains réglages comme mettre un code parental, changer la
résolution HDMI, changer les paramètres vidéo. Tous ces réglages sont détaillés au chapitre 6 « Menu
préférences ».
4. Menu installation
Si votre adaptateur a été correctement paramétré comme indiqué au chapitre 3 « première mise en route,
ce chapitre ne vous est d’aucune utilité.
Ce chapitre est plus particulièrement réservé aux professionnels de l’antenne, il leur permet de
• Démarrer une recherche automatique des chaînes
• Démarrer une recherche manuelle des chaînes (recherche avancée)
• Activer ou désactiver l’utilisation de la fonction LCN qui permet le classement automatique
des chaînes en fonction de leur numéro assigné (cas en France)
Pour naviguer dans le menu, procéder comme suit :
• Appuyer sur le bouton « MENU » pour entrer dans le menu principal
Page 41

Mode d‘emploi
FR
12
• Sélectionner « installation » avec <▼▲> et appuyer sur <OK> pour entrer dans le menu «
installation »
• Appuyer sur <▼▲> pour mettre en surbrillance le sous-menu souhaité et appuyer sur <OK>
» pour entrer dans le sous-menu
• Appuyer sur <◄/►> pour sélectionner l'option souhaitée et confirmer par <OK>, appuyer sur
<◄/►> pour changer le réglage.
•
Presser sur <EXIT> pour sortir de ce menu, presser sur <BACK> pour revenir en arrière
4.1 Recherche automatique
Le mode « recherche automatique » permet de rechercher les chaînes automatiquement. Sélectionner
le type de recherche automatique souhaitée :
• Clair seulement : non = recherche de toutes les chaînes (gratuites et codées), oui =
recherche uniquement des chaînes gratuites
• Signal T2 : Non = recherche des signaux DVB-T (Français) et DVB-T2 (Allemands), Oui =
recherche uniquement des signaux DVB-T2 (Allemands)
• T2-Lite : non utilisé, laisser sur Non
Mettre « recherche » en surbrillance, presser sur OK et confirmer cette action en pressant à nouveau
sur OK. Toutes les chaînes seront réinstallées (effacement des chaînes mémorisées et ajout de toutes
les chaînes trouvées)
Non = ajout des chaines trouvées lors d’une recherche à toutes les chaînes déjà mémorisées
Exit = quitter ce menu sans faire la moindre recherche ni ajout de chaînes.
4.2 Recherche
avancée
des chaînes
Il est possible de faire une recherche des programmes par fréquence ou par canal.
• Presser sur <MENU> pour entrer dans le menu installation puis sur <OK>
• Presser sur <▲/▼> pour sélectionner recherche avancée puis sur <OK>
• Sélectionner le canal ou la fréquence de recherche avec <◄/►> et <▲/▼>
• Si vous sélectionnez par canal, entrer la valeur du canal, si vous sélectionnez par
fréquence, entrer la valeur de la fréquence en Kilohertz
• Entrer les valeurs demandées, si les barre-graphes « Intensité du signal » et « qualité du
signal » indiquent une valeur supérieure à 60%, sélectionner « commencer la recherche »
et presser sur <OK>.
Page 42

Mode d‘emploi
13
FR
La recherche avancée (manuelle) va faire une recherche des chaînes mais n’ajoutera pas les
chaînes si elles sont déjà en mémoire dans l’adaptateur. L’utilisateur doit connaître la fréquence et la
largeur de bande du canal sur lequel il veut rechercher des chaînes.
• Sélectionner « OUI ou NON » pour ne faire la recherche que sur le canal demandé
• Pour ne pas faire de recherche manuelle presser sur « EXIT »
Remarque :
Remarque :Remarque :
Remarque :
Avec cette méthode de recherche (par fréquence), il est possible de rechercher et mémoriser des
programmes dans la bande de fréquences VHF de 120 MHz à 440 MHz.
4.3 LCN
Fonction LCN activée, les chaînes gardent leur numéro assigné par cette fonction. Fonction
désactivée, les chaînes prennent le numéro attribué lors de la recherche des chaînes. Par défaut
laisser sur « Marche ».
Page 43

Mode d‘emploi
FR
14
5. Menu edition chaînes
Ce menu permet d’agir sur les chaînes TV.
5.1 Mettre une chaîne en favoris
Utilisez ce menu pour créer des listes de favoris :
• Sélectionner la chaîne à mettre en favoris avec <▼▲> puis presser sur la touche <OK>
• Un tableau va apparaître (FAV1 à FAV8)
• Sélectionner dans quelle liste de FAV vous souhaitez placer la chaine avec <▼▲> et presser sur <OK>
pour confirmer. Un cœur va apparaître à côté de la liste
• Répéter l’opération pour d’autres chaînes
• correspondant à la liste de favoris souhaitée (Rouge = FAV1, Vert = FAV2, Jaune = FAV3, Bleu = FAV4)
• Presser 3 fois sur Exit, confirmer sur <OK> , la ou les chaînes sélectionnées font partie de la liste de
favoris sélectionnée.
Pour visualiser une liste de favoris, presser sur la touche FAV, puis sur <OK> pour entrer dans la liste FAV souhaitée.
5.2 Verrouiller une chaîne
Utilisez ce menu pour verrouiller une ou plusieurs chaînes de la liste des chaînes :
• Dans le menu « Liste de chaînes TV », appuyer sur la touche <ROUGE> de la télécommande. Entrer le
mot de passe.
• Sélectionner la ou les chaînes à verrouiller avec <▼▲> puis presser sur <OK>. le nom de la chaîne
apparaîtra avec une coche dans la colonne « cadenas » indiquant qu’elle est verrouillée et que le mot de
passe sera systématiquement demandé pour y avoir accès.
• Verrouiller d’autres chaînes et presser 2 fois sur <Exit> et confirmer par <OK>. Pour visualiser la ou les
chaînes verrouillées, il sera nécessaire d’entrer le mot de passe.
Pour déverrouiller une chaîne verrouillée, sélectionner cette chaîne dans le menu verrouiller, entrer le mot de passe
et la chaîne sera déverrouillée.
5.3 Sauter une chaîne
Utilisez ce menu pour sauter une chaîne c’est à dire que cette chaîne sera ignorée lors du zapping sur les chaînes
de la liste des chaînes. Elle sera par contre visible en tapant son numéro directement sur la télécommande.
• Dans le menu «Liste de chaînes TV», appuyer sur la touche <VERTE> de la télécommande.
• Sélectionner la ou les chaînes à sauter avec <▼▲> puis presser sur < OK >. le nom de la chaîne
apparaîtra avec une flèche dans la colonne « sauter » indiquant qu’elle sera sauté (non affichée) lors du
zapping avec les touches CH+/-.
Page 44

Mode d‘emploi
15
FR
• Sauter d’autres chaînes, presser 2 fois sur <Exit> et confirmer par <OK> pour valider le saut de ces
chaînes.
Pour rendre à nouveau visible une chaîne, sélectionner cette chaîne dans le menu sauter puis presser sur la touche
<VERTE> et sur <OK> et celle-ci sera à nouveau visible (enlever la flèche).
5.4 Déplacer une chaîne
Utilisez ce menu pour déplacer une ou plusieurs chaînes de la liste des chaînes :
• Dans le menu «Liste de chaînes TV », appuyer sur la touche <JAUNE> de la télécommande.
• Sélectionner la chaîne à déplacer avec <OK> puis la déplacer avec <▼▲> puis presser sur <OK> pour la
positionner à son nouvel endroit dans la liste. Veuillez noter que si la fonction LCN est activée, la chaîne
déplacée garde son numéro d’origine.
• Répéter l’opération pour déplacer d’autres chaînes.
Dans le menu «Liste de chaînes TV », la fonction éditer (touche BLEU) permet de trier, renommer ou supprimer les
chaînes.
5.5 Trier une chaîne
Utilisez ce menu pour trier les chaines par ordre alphabétique.
5.6 Renommer une chaîne
Utilisez ce menu pour renommer une chaîne. Un clavier virtuel permet de renommer la chaîne.
5.7 Supprimer une chaîne
Utilisez ce menu pour supprimer une chaîne. Dans le menu «Liste de chaînes TV », appuyer sur la touche <BLEU> de
la télécommande.
• Sélectionner la chaîne à supprimer avec <▼▲>, presser sur <OK> et entrer le mot de passe. Une croix
apparaît à côté de la chaîne à supprimer.
• Répéter l’opération pour supprimer d’autres chaînes.
• Presser 2 fois sur <Exit> et confirmer par <OK> pour valider la suppression des chaînes.
Page 45

Mode d‘emploi
FR
16
6. Menu réglages
Normalement, votre adaptateur TR 63 est correctement réglé lors de sa première mise en service
(menu d’installation automatique). Il vous est toutefois possible de modifier certains réglages comme
la résolution HDMI par exemple. Dans le cas contraire, vous pouvez vous reporter au chapitre 10 «
Utilisation quotidienne ».
Le menu « réglages » vous permet de personnaliser un certain nombre de réglages suivants :
• Langue OSD : la langue des menus affichés par votre adaptateur
• Système TV : réglage de la résolution
• Réglage de l’heure : à ne pas changer, l’heure se règle automatiquement via le signal TV
reçu
• Réglage Timer : réglage de programmateurs d’enregistrement (voir chapitre 6.4)
• Réglage OSD : temps d’affichage et transparence des menus
• Favoris : changement du nom des groupes de favoris
• Réglage audio description : permet de paramétrer l’affichage de l’audiodescription
Pour naviguer dans le menu, procéder comme suit :
• Appuyer sur le bouton <MENU> pour entrer dans le menu principal
• Sélectionner « réglages » et appuyer sur OK pour entrer dans le menu
• Appuyer sur <▼▲> pour mettre en surbrillance le sous-menu souhaité et appuyer sur <OK>
pour entrer dans le sous-menu
• Appuyer sur <▼▲> pour sélectionner l'option souhaitée et confirmer par <OK>, appuyer sur
<◄/►> pour changer le réglage
• Presser sur <EXIT> pour sortir de ce menu.
Page 46

Mode d‘emploi
17
FR
6.1 Réglages langue
Ce menu vous permet de régler la langue des menus, la langue associée aux programme, celle des soustitres ou du télétexte.
• Langue : langue des menus
• 1er langue : 1
ère
langue par défaut
• 2
ème
langue : 2
ème
langue par défaut
• Langue sous-titres : langue des sous-titres
• Télétexte : langue du télétexte
• Sous-titre : activation du sous-titre (éteint, normal, malentendant)
6.2 Système TV
Ce menu vous permet de régler à l’aide des touches <◄/►> :
• La résolution vidéo
• Le format de l’écran (de préférence laisser sur auto)
• Le format de la sortie audio numérique en fonction de ce que supporte votre ensemble Hi-Fi
6.3 Réglages de l’heure
Ce menu vous permet de régler le pays et l'heure. Par défaut, quand vous sélectionnez le pays lors de la
1ère mise en service de l’adaptateur, ce choix est sélectionné pour la zone horaire. L’adaptateur par défaut
utilise la référence GMT et reçoit l’heure par le réseau TNT.
En principe vous n’avez aucun changement à faire dans ce menu.
6.4 Réglage Timer
Ce menu vous permet de régler la programmation de l’enregistrement d’une chaîne :
• soit sur un appareil externe type graveur DVD, magnétoscope, raccordé sur la sortie péritel de
l’adaptateur
• soit sur un support de stockage externe USB 2.0 (disque dur, clé) raccordé au port USB 2.0 de
l’adaptateur.
L’adaptateur TR 63 est équipé d’un programmateur d’enregistrement dit TIMER qui permet de programmer
jusqu’à 8 enregistrements différés. Cette fonctionnalité vous permet d’effectuer des enregistrements d’une
chaîne même lorsque vous êtes absent.
Page 47

Mode d‘emploi
FR
18
Pour régler une programmation d’enregistrement, procéder comme suit :
• Appuyer sur <OK> pour entrer dans le réglage d’une programmation d’enregistrement
• Appuyer sur <◄/►> / <▼▲> pour mettre en surbrillance le paramètre souhaité
• Appuyer sur <◄/►> pour changer les valeurs des paramètres, puis presser sur <▼> pour
valider la valeur et passer au réglage suivant
• Une fois toutes les données d’enregistrement renseignées, appuyer sur mémoriser et presser
sur <OK> pour mémoriser les valeurs.
Pour programmer un programmateur (timer) d’enregistrement, il vous faudra remplir les informations
suivantes :
• Mode timer: permet de paramétrer l’occurrence de l’enregistrement : une fois, journalier,
hebdomadaire, mensuel, arrêt
• Mode timer : choix entre Chaîne et enregistrement :
o Enregistrement : ce choix permet d’allumer l’adaptateur sur une chaîne pour
l’enregistrer sur un dispositif de stockage externe USB 2.0 raccordé au port USB de
votre adaptateur. Il n’y aura pas d’enregistrement si aucun support externe USB
n’est raccordé à votre adaptateur.
Attention
Cette fonctionnalité nécessite soit l’emploi d’un appareil d’enregistrement (magnétoscope,
graveur) correctement branché (chapitre 2.1) et correctement programmé (Voir la notice de
votre enregistreur), soit l’emploi d’un dispositif de stockage externe (disque dur ou clé USB
2.0) raccordé sur le port USB de votre adaptateur permettant des enregistrements SD et HD.
Dans le cas d’un enregistrement d’un appareil raccordé sur la sortie péritel de votre
adaptateur TR 63 les enregistrements ne se feront qu’au format SD (Définition Standard). Un
enregistrement n’est pas possible sur la sortie HDMI conformément aux recommandations
internationales.
Page 48

Mode d‘emploi
19
FR
o Chaîne : ce choix permet d’allumer l’adaptateur sur une chaîne soit pour la visualiser
à l’écran soit pour l’enregistrer via un appareil raccordé sur la sortie péritel de votre
adaptateur
• Chaîne : sélection de la chaîne à enregistrer
• Date: Entrer la date d’enregistrement souhaitée à l’aide du clavier numérique
• Heure : Entrer l’heure de démarrage de l’enregistrement à l’aide du clavier numérique
• Durée : Entrer la durée de l’enregistrement à l’aide du clavier numérique
Pour sauvegarder votre programmation, aller sur mémoriser et presser sur <OK>. Pour ne pas sauvegarder
votre programmation aller sur Annuler et presser sur <OK>.
Lorsque vous voulez quitter le menu du programmateur d’enregistrements, une fenêtre récapitulative de
votre enregistrement apparaîtra.
N’oubliez pas de:
• raccorder votre enregistreur à la prise péritel du TR 63 ou de
• raccorder votre dispositif de stockage externe USB 2.0 au port USB du TR 63
• si l’enregistrement se fait via la prise péritel sur un enregistreur externe :
o programmer le TIMER d’enregistrement de votre enregistreur (si raccordé sur la
prise péritel)
o sélectionner comme entrée du signal de votre enregistreur la prise AV, AUX, EXT…
selon la marque de votre enregistreur. Elle se sélectionne avec la télécommande de
votre enregistreur, par la touche 0, ou AV, ou AUX, ou P - … (Voir la notice de votre
enregistreur).
6.5 Contrôle parental
Ce menu vous permet de verrouiller le menu, de mettre en place le contrôle parental lié à l’âge sur les
chaînes et de changer le mot de passe.
Dans le menu « Réglage, Verrou enfants», lors d’un appui sur <OK>, il vous sera demandé d'entrer un mot
de passe (le mot de passe par défaut est "0000").
Après avoir entré le mot de passe correct en appuyant sur les touches numériques, le menu du contrôle
parental apparaît.
• Verrouillage menu: permet le verrouillage du menu installation. Quand vous voulez entrer dans
le menu Recherche Auto / Recherche Manuelle, vous devrez entrer le mot de passe. Vous
pouvez régler cette option sur Arrêt / Marche
• Contrôle parental : les différents choix sont « arrêt », âge 10, 12, 16 à âge 18 (interdit aux moins
de 10 ans jusqu’à interdit aux moins de 18 ans » ou arrêt.
Cette fonction permet d’interdire l’accès aux chaînes en fonction du niveau moral diffusé. Par exemple, en
mettant cette valeur sur -12 ans, toutes les émissions diffusées avec l’information CSA -12ans, -16 ans et 18 ans ne seront pas affichées en clair, un mot de passe sera demandé pour afficher le programme. Les
programmes « Tout public » ou avec un niveau moral -10 ans seront visibles.
Les niveaux moraux diffusés en France par les chaînes sont -10 ans, -12 ans, -16 ans et -18 ans.
Page 49

Mode d‘emploi
FR
20
Ce niveau moral (-10, -12, -16, -18) apparaît dans le bandeau inférieur de la chaîne à chaque changement de
chaîne ou lors d’un appui sur <INFO>. Le niveau moral indiqué est celui de l’émission en cours.
• Nouveau mot de passe: il est possible de changer le mot de passe par défaut qui est 0000. Il
suffit :
o D’entrer l’ancien mot de passe (0000)
o D’entrer un nouveau mot de passe
o De confirmer le nouveau mot de passe : confirmation du changement du nouveau
mot de passe.
6.6 Réglage OSD
Ce menu vous permet de régler le temps d’affichage des menus et la transparence de ceux-ci.
6.7 Favoris
Ce menu vous permet de régler le nom du groupe de favoris (FAV 1 à FAV 8).
6.8 Réglage audio description
Ce menu vous permet de régler l’affichage en permanence de l’audiodescription (si le service
d’audiodescription est diffusé).
6.9 Réglage multiécrans
Ce menu vous permet de régler l’affichage de la mosaïque (disponible en pressant sur la touche BLEU de la
télécommande). Vous avez le choix entre 3x3 images ou 4+1 images.
6.10 Autre
Dans ce menu vous pouvez régler :
• L’alimentation d’une antenne intérieure : Ce menu permet d’alimenter une votre antenne
intérieure par l’adaptateur. A l’aide de <◄/►>, mettre sur « Marche » et valider avec OK pour
alimenter une antenne intérieure ou laisser sur « Arrêt » dans le cas contraire (utilisation d’une
antenne de toit).
• Type de chaîne : permet de sélectionner le type de chaînes que l’adaptateur va mémoriser entre
toutes (gratuites en cryptées) et les chaînes gratuites
• Buzzer : permet d’activer une aide sonore au pointage de l’antenne
• Auto Standby : Ce réglage permet à l’adaptateur de se mettre en veille automatiquement au
bout de 3 heures s’il ne voit aucun changement de son état (changement de chaîne,
changement du volume, …). Utiliser <◄/►> pour sélectionner entre Arrêt, 30mn, 1H, 2H, 3H.
Quitter ce menu en pressant sur <EXIT>. Par défaut le TR 63 s’arrêtera au bout de 3 heures
d’inactivité (norme en vigueur).
• Boucle de passage en veille : permet d’autoriser ou non le passage du signal d’antenne vers un
TV (continuité de passage entre RF In et RF Out) lorsque l’adaptateur est en veille.
Page 50

Mode d‘emploi
21
FR
7. Menu Outils
Le menu « Outils » vous permet de :
• Information : connaître la version logicielle de l’adaptateur
• Réinitialiser votre adaptateur
• Mettre à jour votre adaptateur par air ou USB
• Retirer le support USB en sécurité
• Régler les paramètres réseau
Pour naviguer dans le menu, procéder comme suit :
• Appuyer sur le bouton <MENU> pour entrer dans le menu principal
• Sélectionner « Outils » et appuyer sur OK pour entrer dans le menu
• Appuyer sur <▼▲> pour mettre en surbrillance le sous-menu souhaité et appuyer sur <OK>
pour entrer dans le sous-menu
• Appuyer sur <▼▲> pour sélectionner l'option souhaitée et confirmer par <OK>, appuyer sur
<◄/►> pour changer le réglage
Presser sur <EXIT> pour sortir de ce menu.
7.1
Information
Ce menu permet de consulter la version logicielle de l’adaptateur.
7.2 Réinitialisation
Vous pouvez, à tout moment, revenir à la configuration d’usine (configuration par défaut lorsque
l’adaptateur est neuf). Si la liste des chaînes est totalement obsolète suite à des changements effectués
par les fournisseurs de chaînes, suite au changement des fréquences des chaînes numériques, vous
pouvez tout effacer et lancer une nouvelle recherche.
Après avoir effacé toutes les chaînes, une nouvelle recherche des chaînes automatique va démarrer. Cette
recherche vous permettra de mettre en mémoire toutes les chaînes gratuites diffusées sur votre région.
• Utiliser <▲/▼> pour sélectionner « réinitialisation »
• Entrer le code PIN (par défaut 0000)
• Aller sur OK et presser sur OK
Le TR 63 va se réinitialiser et redémarrer en mode « Première mise en route » comme détaillé au chapitre
3.
Intérêts et avantages d’une réinitialisation
Intérêts et avantages d’une réinitialisationIntérêts et avantages d’une réinitialisation
Intérêts et avantages d’une réinitialisation
La télévision numérique terrestre (TNT) est une technologie récente. De nombreux ajustements,
améliorations, tests et manipulations sont faits régulièrement par les diffuseurs des programmes de la
TNT. Les chaînes elles-mêmes procèdent régulièrement à des changements pour apporter une meilleure
qualité de son, d’image et de service. Les réorganisations des bouquets numériques, déplacements des
chaînes ont des conséquences sur les adaptateurs TNT.
Une réinitialisation peut suffire à remettre en phase les paramètres mémorisés dans l’adaptateur avec ceux
émis par l'émetteur – surtout s’ils ont changé depuis leur mise en mémoire lors de sa première installation.
Il suffit de faire une réinitialisation de l’adaptateur qui est suivie par le mode d’installation automatique pour
rechercher et mémoriser les chaînes.
L’adaptateur aura ainsi mémorisé tous les derniers paramètres émis par les diffuseurs et les chaînes.
Attention
Alimenter en 5V une antenne de toit type « râteau » risque d’endommager
irrémédiablement votre TR 63.
Page 51

Mode d‘emploi
FR
22
7.3 Mise à jour du logiciel par air
Cette fonctionnalité permet – dans certaines conditions - une mise à jour par le signal TNT de votre
adaptateur. Cette fonction n’est pas disponible à l’heure actuelle sur ce modèle.
7.4 Mise à jour par USB
Il peut être nécessaire de mettre à jour le logiciel du TR 63 afin d’obtenir de nouvelles fonctionnalités ou des
corrections liées à des changements d’environnement par exemple.
Il peut être nécessaire de mettre à jour le logiciel du TR 63. Dans ce cas, votre installateur ou vous-même
pourrez consulter notre site Internet www.triax.fr rubrique « téléchargements », « Logiciels & Mise à jour »,
site sur lequel nous mettons à disposition gratuitement les mises à jour rendues nécessaires par les
modifications apportées aux signaux TNT. Cette mise à jour pourra être chargée dans l’adaptateur à l’aide
d’une clé USB.
Attention
AttentionAttention
Attention : une mise à jour logicielle effacera toutes les chaînes mémorisées et autres personnalisations mais
: une mise à jour logicielle effacera toutes les chaînes mémorisées et autres personnalisations mais : une mise à jour logicielle effacera toutes les chaînes mémorisées et autres personnalisations mais
: une mise à jour logicielle effacera toutes les chaînes mémorisées et autres personnalisations mais
pas les enregistrements faits sur un suppo
pas les enregistrements faits sur un suppopas les enregistrements faits sur un suppo
pas les enregistrements faits sur un support externe.
rt externe.rt externe.
rt externe.
Veuillez télécharger le fichier type de mise à jour (fichier au format « xxx.abs ») sur votre clé USB
(préalablement formatée en FAT 32). Le logiciel téléchargé depuis notre site Internet sera contenu dans
une archive type « .zip » qu’il vous faudra décompresser avant d’obtenir le logiciel nécessaire au TR 63 au
format « xxx.abs ».
Pour mettre à jour votre adaptateur, procéder comme suit :
• Insérer votre clé USB avec le fichier « xxx.abs »
• Presser sur <MENU>, sélectionner « Outils / Mise à jour par USB » à l’aide de <▲/▼> presser
sur <OK>
• Trouver le fichier dans le répertoire du support USB (type « /udska1 »), presser sur <OK> pour
entrer dans le répertoire
• Sélectionner le fichier de mise à jour avec <▲/▼>
• Une pression sur <OK> démarrera la mise à jour de l’adaptateur
• Pour ne pas lancer la mise à jour de l’adaptateur, presser sur <EXIT>
Page 52

Mode d‘emploi
23
FR
Si la mise à jour est démarrée, la laisser se dérouler jusqu’au bout. Ne pas débrancher votre adaptateur
pendant cette opération sous risque de l’endommager irrémédiablement. redémarrer. Il est maintenant
L’adaptateur va s’éteindre et nécessaire de réinstaller votre adaptateur en procédant comme décrit au
chapitre 3 « 1ère mise en route ».
7.5 Retirer le support USB en sécurité
Ce menu vous permet de retirer « proprement » le support USB connecté à votre adaptateur.
7.6 Réseau
Si votre adaptateur est raccordé à un accès Internet, ce menu vous permet de régler :
• La configuration réseau Ethernet (DHCP marche ou Arrêt) pour obtenir une adresse IP
automatiquement ou pour l’entrer manuellement
• D’accéder aux applications réseaux : chaînes de radio et prévisions météo
Presser sur <EXIT> pour sortir de ce menu.
8. Jeux
Votre adaptateur intègre deux jeux : Othello et Sudoku. Amusez-vous bien !
Page 53

Mode d‘emploi
FR
24
9. Utilisation quotidienne
9.1 Informations affichées à l’écran
Lors du changement de chaîne, un bandeau d’information s’affiche au bas de l’image donnant ainsi un
certain nombre d’informations sur le programme diffusé telles que la date et l’heure, le niveau moral de
l’émission en cours, une information sur le programme en cours ainsi que l’indication si le programme
diffusé diffuse du télétexte, du sous-titrage (SubT), l’audio description (AD), le Guide Electronique des
Programmes (EPG), etc…
Toutes ces informations sont également disponibles en pressant sur la touche <INFO> de la
télécommande. En pressant une deuxième fois sur la touche INFO de la télécommande vous avez
accès à un résumé sur le programme en cours.
Page 54

Mode d‘emploi
25
FR
9.2 Changement de chaîne
Il y a plusieurs façons de changer de chaîne :
• soit en entrant directement sur le clavier de la télécommande le numéro de la chaîne.
• soit en pressant sur <OK>, sélectionner la chaîne avec <▲/▼>, puis presser sur OK pour
confirmer.
• soit en utilisant les touches <CH ▲/▼> de votre télécommande.
9.3 Changement du niveau sonore
Pour augmenter ou baisser le volume, garder le doigt sur VOL + ou sur ► pour augmenter le son ou sur
◄ VOL ou sur (-) pour le diminuer.
9.4 Touche Mute
Cette touche permet de couper (une pression) ou de remettre le son (deuxième pression).
9.5 Télétexte
Si les informations de télétexte sont diffusées par les programmes, vous pouvez y avoir accès en
pressant sur la touche <TTX>. En pressant sur <TTX>, la page d’accueil du télétexte apparaît. Choisir la
page à afficher avec <0…9>. Exemple, pour la page 120, taper 1 puis 2 puis 0. Presser sur <EXIT> pour
quitter le télétexte.
Page 55

Mode d‘emploi
FR
26
9.6 Sous
-
titrage télétexte
Si le sous-titrage télétexte est diffusé (à l’attention des sourds et malentendants), il suffit d’activer le
télétexte et d’activer le sous-titre. La page du sous-titre est indiquée sur la page principale du télétexte
(888 pour TF1 par exemple). Entrer le numéro de la page du sous-titre télétexte pour activer cette
fonction. Presser sur <EXIT> pour quitter le sous-titrage télétexte.
9.7 Sous
-
titres DVB
En pressant sur la touche <SUBTITLE>, vous avez accès au menu SOUS-TITRE.
Divers choix sont possibles :
• activer ou désactiver le sous-titrage (sur OFF il est désactivé)
• si plusieurs langues sont diffusées elles seront listées, il suffira de choisir l’une d’elle pour
l’activer
• Activer l’audio description
9.8 Différente pistes aud
io
Le menu audio via la touche <AUDIO> permet de sélectionner :
• le mode audio en fonction des modes audio diffusés (Mono, Gauche, Droit. La
sélection s’effectue à l’aide de <◄/►> / ▲/▼> et en confirmant avec <OK>
•
la piste audio si différentes langues sont diffusées (comme ARTE par exemple, voir
l’exemple ci-dessous). Quitter le menu audio en pressant sur <EXIT>.
Page 56

Mode d‘emploi
27
FR
9.9 EPG / Information sur les programmes en cours et suivant
En fonction de ce que les chaînes diffusent, vous avez soit accès :
• aux informations sur les programmes en cours, presser sur la touche <INFO> de la
télécommande. Les informations seront affichées dans le bandeau en bas de l’image
comme affiché ci-dessous.
• au Guide Electronique des Programmes en pressant sur la touche <EPG> de la
télécommande. En fonction des informations diffusées, vous pouvez connaître la
programmation des chaînes jusqu’à 7 jours.
9.10
Touche SOS (touche ROUGE)
Cette touche de la télécommande vous permet de forcer votre adaptateur à mettre à jour
automatiquement sa liste des chaînes. Cette fonction est très utile si des chaînes devaient vous
manquer suite à un changement de fréquence. De même, lors de l’ajout de nouvelle chaîne, une simple
pression sur cette touche suivie d’une confirmation mettra automatiquement la liste des chaînes à jour
de votre adaptateur.
L’adaptateur aura ainsi en mémoire les derniers paramètres émis par les émetteurs.
Un appui sur la touche ROUGE (SOS) affiche le message suivant :
Page 57

Mode d‘emploi
FR
28
En confirmant par Oui, le TR 63 effacera toutes les chaînes en mémoire, et démarrera une nouvelle
recherche et mémorisation des chaînes.
Ainsi la liste des chaînes sera mise à jour automatiquement via UNE SEULE action sur la
télécommande !
10. Menu Multimédia
Ce menu permet d’avoir accès aux différents fichiers (vidéo, audio, photo et enregistrements) stockés
sur votre dispositif de stockage externe. A l’aide des touches <◄/►> (chaque pression fait passer d’un
répertoire à l’autre) vous pouvez sélectionner dans quel répertoire souhaité
• Vidéo
• Musique
• Image
• Enregistrements
• Information sur le stockage
• Réglage PVR
Pour naviguer dans le menu, procéder comme suit :
• Appuyer sur <MENU> pour entrer dans le menu principal, sélectionner « Menu multimédia »
et appuyer sur <OK> pour entrer dans le sous menu
• Appuyer sur <OK> puis naviguer entre les répertoires à l’aide de la touche <1> (le répertoire
passe en surbrillance)
Page 58

Mode d‘emploi
29
FR
• Appuyer sur <OK> pour entrer dans le sous-menu
• Appuyer sur <EXIT> pour quitter le sous menu et revenir à la barre de sélection des sous
menus.
• Appuyer sur <MENU> pour sortir de ce menu.
10.1 Vidéo
Ce répertoire contient toutes les vidéos contenues sur votre support de stockage externe.
Les différentes actions possibles sur les vidéos sont indiquées en bas de l’écran.
Il vous est également possible d’avoir accès à ce menu en pressant sur la touche <MEDIA> de la
télécommande.
• Appuyer sur <OK> pour entrer dans le répertoire de stockage
• Sélectionner un film avec <▲/▼>
• Presser sur <OK> pour démarrer sa lecture.
Une fois le film lancé, les touches multimédia peuvent être utilisées (avance et retour rapide, pause,
stop, etc…).
10.2 Musique
Ce répertoire contient tous les morceaux de musique contenus sur votre support de stockage externe.
Les différentes actions possibles sur les morceaux de musique sont indiquées en bas de l’écran.
• Appuyer sur <OK> pour entrer dans le répertoire de stockage
• Sélectionner un morceau de musique avec <▲/▼>
• Presser sur <OK> pour démarrer sa lecture.
Les touches multimédia peuvent être utilisées (avance et retour rapide, pause, stop, etc…).
Page 59

Mode d‘emploi
FR
30
10.3
Image
Ce répertoire contient toutes les images contenues sur votre support de stockage externe.
Les différentes actions possibles sur les photos sont indiquées en bas de l’écran.
• Appuyer sur <OK> pour entrer dans le répertoire de stockage
• Sélectionner les photos avec <▲/▼>
• Presser sur <OK> pour démarrer leur lecture.
10.4 Enregistrement
Ce répertoire contient tous les enregistrements réalisés par votre adaptateur TR 63.
Les différentes actions possibles sur les enregistrements sont indiquées en bas de l’écran.
Page 60

Mode d‘emploi
31
FR
10.5
Information sur le stockage
Ce menu permet de connaître la capacité du support de stockage raccordé à l’adaptateur ainsi que les
différents espaces (enregistrement, libre, …).
• La touche jaune permet de formater le support de stockage (FAT ou NFTS, choix laissé à
l’utilisateur).
• La touche bleu permet de régler l’utilisation du disque dur : REC &TMS = enregistrement et
timeshift (pause du direct), Record = enregistrement seul, timeshift = pause du direct seul.
• formater le support de stockage (FAT ou NFTS, choix laissé à l’utilisateur).
10.6 Réglage PVR
Ce menu permet de régler la partie enregistreur :
REMARQUE IMPORTANTE
:
L’opération de formatage, effectuée par votre adaptateur ou par vous-même
détruira de manière définitive toutes les données présentent sur votre disque USB
2.0 ainsi que toutes ses partitions. Le résultat final, après formatage sera une
seule partition FAT-32 qui utilisera la totalité de l’espace disque.
Page 61

Mode d‘emploi
FR
32
Timeshift : 3 réglages possibles :
• Pause = « instant replay » désactivé, il est nécessaire de lancer manuellement le démarrage
de l’enregistrement temporaire du « Timeshift » (« Pause du Direct ») en appuyant sur la
touche «PAUSE» de la télécommande.
• Automatique = « instant replay » actif (signifie Timeshift en permanence). l’enregistrement
temporaire du « Timeshift » (« Pause du Direct ») est démarré automatiquement, en tâche
de fond, à chaque changement de chaîne (il est inutile d’appuyer sur la touche « PAUSE
» de la télécommande pour démarrer l’enregistrement temporaire du Timeshift), tant que la
chaîne n’est pas changée, l’enregistrement temporaire continu, avec une limitation à 1
heure d’enregistrement. L’intérêt principal de démarrer automatiquement l’enregistrement
temporaire du « Timeshift » (« Pause du Direct ») à chaque changement de chaîne, est de
disposer à tout moment de la possibilité de revenir en arrière (par un retour rapide par
exemple en utilisant la touche ) afin de revoir une séquence qui s’est déroulée
précédemment. Cette fonctionnalité est connue sous le nom anglais de « Instant-Replay »
(« Revoir un instant passé »).
• Arrêt = pas de Timeshift ni de fonction « instant replay »
Saut : réglages des sauts en lecture des fichiers (touches >I) entre 30sec, 1min, 5min, 10min15min,
20min, et 30min.
Timeshift d’enregistrement : ne pas changer ce réglage
Enregistrement PS : ne pas changer ce réglage
Après enregistrement : paramètre réglé sur « mettre en veille » signifie qu’après un enregistrement le TR
63 passera en veille.
Attention
Étant donné que l’enregistrement temporaire du Timeshift («Pause du Direct»)
redémarre à zéro à chaque changement de chaîne, il faut comprendre que le temps
disponible pour revenir en arrière est égal au temps qui s’est écoulé entre l’instant du
changement de chaîne et l’instant présent. Par exemple : il y a 10 minutes j’ai zappé
de la chaîne «France 2» à «Arte» ; cela fait donc 10 minutes que je regarde «Arte» en
continu. Je pourrai donc revenir en arrière sur le programme « Arte » de 10 minutes au
maximum.
Attention
Le disque USD doit disposer d’au moins 1,5 Giga-octets d’espace libre pour que la
fonction « Pause du Direct » (Timeshift) puisse fonctionner. La fonction Timeshift ne
fonctionne qu’au bout d’une minute d’enregistrement.
Page 62

Mode d‘emploi
33
FR
11. Enregistrement
Deux méthodes d’enregistrement sur un support de stockage externe sont possibles :
• Programmer un Timer d’enregistrement : voir chapitre 6.4
• Démarrer un enregistrement direct en pressant sur la touche <REC> de la télécommande.
11.1
Enregistrement direct
Outre l’emploi d’un programmateur d’enregistrement pour programmer des enregistrements différés, il
vous est également possible d’enregistrer en direct un programme regardé.
Il faut au préalable qu’un disque dur externe USB 2.0 soit raccordé à l’adaptateur et reconnu par celui-ci
(formaté).
Pour effectuer un enregistrement numérique immédiat sur le disque USB 2.0, voici comment procéder :
• Regardez une chaîne de votre choix, sans aucun menu ouvert
Pour démarrer l’enregistrement numérique de cette chaîne, appuyer sur la touche ROUGE (REC) :
l’enregistrement numérique de la chaîne regardée démarre immédiatement après 2 ou 3 secondes
d’initialisation. L’enregistrement débutera jusqu’à la fin du programme en cours.
1er appui sur REC : démarrage d’un enregistrement de la durée du programme en cours
2ème appui sur REC : affichage de la durée de l’enregistrement de 2 heures et modification à 3 minutes
à l’aide de la télécommande
L’enregistrement est démarré pour 3 minutes.
Pour arrêter un enregistrement en cours, appuyer sur la touche (STOP).
Un 1er appui sur la touche <STOP> vous indiquera l’état de l’enregistrement en cours et vous
demandera de confirmer si vous souhaitez arrêter l’enregistrement en cours.
Page 63

Mode d‘emploi
FR
34
• si vous souhaitez arrêter l’enregistrement : presser sur <OK> pour arrêter l’enregistrement,
sur <EXIT> dans le cas contraire.
Pendant cet enregistrement, il vous est possible de regarder une autre chaîne diffusée par le même
multiplexe en pressant sur les touches CH <▲/▼>. L’enregistrement direct démarré continue sur la
chaîne souhaitée.
Les chaînes disponibles pendant un enregistrement sont affichées en gras (dans le cas de notre
exemple, TF1, TMC, NT1, NRJ12, LCP).
11.2
Timeshift
Avant toute chose, il est important de décrire rapidement ce qu’est le Timeshift et comment cela
fonctionne. La fonction Timeshift est ce que l’on appelle « la pause du direct ». Elle permet de mettre en
pause l’affichage d’un programme de TV qui est en cours de visionnage « en direct ». Puis de relancer le
visionnage pour regarder la suite du programme TV à partir de la pause, sans en perdre la moindre
seconde. La fonction Timeshift utilise un enregistrement temporaire sur un disque USB externe pour
fonctionner : Il est donc impératif qu’un disque USB - disque dur externe USB 2.0 soit connecté au port
USB de votre adaptateur.
Pour mettre en pause le direct (Timeshift), il suffit d’appuyer sur la touche (PAUSE) de la
télécommande lorsque vous êtes en train de regarder une chaîne : l’image se met alors en pause et
l’enregistrement temporaire du Timeshift est lancé. Vous pourrez conserver l’image en pause pendant
une heure au maximum, veillez à ne pas dépasser une heure de Timeshift afin d’éviter tous problèmes…
Page 64

Mode d‘emploi
35
FR
• Pour reprendre le programme TV au moment où vous avez pressé sur la touche <PAUSE> il
vous suffit de presser sur la touche (LECTURE).
• Appuyer sur la touche (STOP) pour quitter le Timeshift et reprendre le direct. Dans ce
cas, votre terminal vous demandera confirmation de l’arrêt du Timeshift. Il sera impossible,
pendant un Timeshift, de tenter de changer de chaîne ou encore ouvrir un menu en plein
écran.
Il est possible de se déplacer à l’intérieur du programme mis en Timeshift (pour passer une coupure
publicitaire par exemple). Pendant la lecture du Timeshift, presser sur la touche ◄◄ pour faire un
retour arrière rapide visuel (x2, x4, x8, x16, x24) ou sur ►► pour faire une avance rapide visuelle (x2, x4,
x8, x16, x24).
11.3 Interface USB
Pour que votre adaptateur puisse effectuer des enregistrements, le disque USB qui lui est connecté doit
être formaté avec une seule partition, obligatoirement en FAT-32. S’il existe plus d’une partition sur votre
disque USB, il est possible que cela fonctionne mais cela n’est pas garanti. Il est recommandé de
connecter le disque USB « à chaud » pour obtenir la meilleure analyse du disque USB par l’adaptateur.
La première fois que vous connectez un nouveau disque USB (qui n’a jamais été connecté auparavant)
sur votre adaptateur, il est fortement recommandé de procéder à une connexion dite « à chaud », c'està-dire de connecter le disque USB lorsque votre adaptateur est allumé et que vous êtes en train de
regarder une chaîne TV par exemple. Ceci assurera que votre adaptateur analyse au mieux votre disque
USB nouvellement connecté. Votre adaptateur vous proposera automatiquement de formater le disque
USB (s’il est connecté « à chaud ») lorsqu’il n’est pas reconnu. Si votre adaptateur ne vous propose pas
de formater votre nouveau disque dur, le formater par vous-même en FAT 32.
Une fois votre disque dur reconnu par votre adaptateur, celui-ci, à chaque mise en route de votre
adaptateur affichera le message « USB connecté »
Une fois le dispositif de stockage externe « raccordé » à votre adaptateur, le message suivant sera affiché
:
Attention
Étant donné que l’enregistrement temporaire du Timeshift («Pause du Direct»)
redémarre à zéro à chaque fois que la touche <PAUSE> est enfoncée il faut
comprendre que le temps disponible pour revenir en arrière est égal au temps qui
s’est écoulé entre l’instant où la touche <PAUSE> a été enfoncée et l’instant
présent. Par exemple : il y a 10 minutes j’ai pressé sur la touche <PAUSE> sur la
chaîne «Arte». Cela fait donc 10 minutes que je regarde «Arte» en continu. Je
pourrai donc revenir en arrière sur le programme « Arte » de 10 minutes au
maximum.
Page 65

Mode d‘emploi
FR
36
Specifications – Spezifikationen – Caractéristiques – Especificaciones - Specifikationer
Tuner
TunerTuner
Tuner DVB
DVBDVB
DVB----TTTT
• Fréquences d’entrée mode automatique :
174....230MHz /470....862MHz
• Fréquences d’entrée mode manuel :
120....440MHz /470....860MHz
• Niveau d’entrée :
-65dBm…-25 dBm
• Entrée tuner / Sortie tuner :
IEC femelle
IEC mâle
• Impédance d’entrée/sortie :
75 Ohm
• Bande passante :
7/8 MHz
• Démodulation :
CODFM 2k/8k
• Modulation :
QPSK, 16 QAM, 64 QAM
• Intervalle de garde / FEC :
1/32, 1/16, 1/8, 1/4, FEC 1/2, 2/3, 3/4, 5/6,
7/8
Décodage Vidéo
Décodage VidéoDécodage Vidéo
Décodage Vidéo
• Profil supporté :
MPEG-2 MP@HL, H.264 MP and HP level 4.1
• Transport stream
MPEG
-
2 ISO/IEC 13818
-
1, MPEG
-
4,
AVC/H.264, HP@L4
• Format de l’image :
4:3 / 16:9
• Format 4/3 et 16/9 :
Letterbox / Pan&Scan
Décodage Audio
Décodage AudioDécodage Audio
Décodage Audio
• Compression Audio :
MPEG
-
1 Layer 1,2/PCM/HE
-
AAC V1.0 ICE958
SPDIF
• Mode Audio :
Mono, Dual (main/sub), Stéréo, AAC, AC3, E
-
AAC
• Fréquences d’échantillonnage :
32 / 44.1 et 48 kHz
Télétexte
TélétexteTélétexte
Télétexte
o Filtrage télétexte suivant le standard ETS 300 472
o Réception données télétexte (composite) suivant ITU-R BT.653-2 lignes: 6-22 et 320-335
Page 66

Mode d‘emploi
37
FR
Specifications – Spezifikationen – Caractéristiques – Especificaciones - Specifikationer
Sortie TV
Sortie TVSortie TV
Sortie TV
• Sortie
Composite (CVBS) é RGB
• Standard vidéo
PAL / 25 Hz, RGB
• Définition image
720 x 576
HDMI
HDMIHDMI
HDMI
• Sortie audio et vidéo numérique
Résolutions 576i, 576p, 720p, 1080i, 1080p
(si diffusées)
Sortie audio
Sortie audioSortie audio
Sortie audio
• Sortie audio
1 RCA Audio numérique S/PDIF
Port USB (entrée/sortie)
Port USB (entrée/sortie)Port USB (entrée/sortie)
Port USB (entrée/sortie)
• Port USB, Connecteur 4 points type USB A pour mise à jour du logiciel via le port USB
Divers
DiversDivers
Divers
• EPG
Guide
Electronique des Programmes sur 7
jours si diffusé
• Programmateurs d’enregistrement
8
• Alimentation
AC 100 - 240 V/AC, 50/60 Hz
• Consommation en marche
< 6 W (hors téléalimentation d’une antenne
intérieure sous 5V)
• Consommation en veille
< 0,5 W
• Température de fonctionnement
+15°C....+35°C
• Humidité
< 80%
• Code EAN:
5702663052635
• Nom/Référence:
TR63 / 305263
• Conforme aux normes:
DEEE, RoHS, Ecoconception 2005/32/CE, EN
300468
Page 67

Mode d‘emploi
FR
38
Notes-Notizen-Notes-Notas-Notater
Page 68

triax.com/support
For further information
and updated manuals go to
Copyright © 2016 TRIAX. All rights reserved.
The TRIAX Logo and TRIAX, TRIAX Multimedia are registered trademarks or trademarks
of the TRIAX Company or its affiliates.
All specifications in this guide are subject to change without further notice.
TRIAX A/S | Bjørnkærvej 3 | 8783 Hornsyld | Denmark
Page 69

Használati útmutató
TRIAX TR 63
Digitális vevő készülék HD DVB-T2
Article Article no.
TRIAX TR 63 Digitális vevő készülék HD DVB-T2
305263
Version B Date 02/2017 HU
Page 70

Használati útmutató
HU
2
Attention! / Achtung! / Consignes de sécurité!
EN
Failure to comply
Failure to complyFailure to comply
Failure to comply
with the specified precautionary measures may cause serious injury to persons or damage to
property. The installation and commissioning may only be performed by suitably qualified persons, technicians or
installers in compliance with safety regulations.
Damage due to improper installation and commissioning, defective connectors on cables or any other incorrect
handling will void the warranty.
CAUTION: The safety requirements are according to EN 60728-11 and must be observed.
• Disconnect mains power before working on electrical systems.
• Any additional electrical wiring requirements should always be installed by a suitably qualified person(s).
Installation or service work should NEVER be undertaken during electrical / thunderstorms.
DE
Gewährleistung
Gewährleistung Gewährleistung
Gewährleistung
Die gesetzliche Gewährleistung nach Paragraph 437 BGB beträgt 24 Monate.
Bei unsachgemäßer Installation und Handhabung erlischt jeglicher Garantieanspruch.
Bestimmungsgemäße
Und sachwidrige Verwendung
Die Montage und Inbetriebnahme darf nur von eingewiesenen Personen, Technikern
oder Installateuren unter Beachtung der Sicherheitsbestimmungen durchgeführt werden.
Schaden durch falsche Montage und Inbetriebnahme sowie durch unsachgemaβe Handhabung fuhren zum Erlöschen
des Garantieanspruchs.
FR
Veillez à bien
Veillez à bien Veillez à bien
Veillez à bien
respecter
respecterrespecter
respecter
les consignes de sécurité ci
-
dessous. Leur non
-
respect peut provoquer des dommages
matériels ou corporels.
L’installation et la mise en route ne peuvent être effectués que par des techniciens ou des installateurs qualifiés en
respectant les consignes de sécurité.
La garantie ne sera pas appliquée lors de dégâts causés par une erreur de montage, de mise en route ou par un
mauvais raccordement ou toute autre manipulation incorrecte.
PRUDENCE : avant toute intervention, votre installation doit être conforme aux exigences définies par les dispositions
Européennes EN 50083 (conformité des installations collectives) et EN 60065 (normes en vigueur pour la protection
électrique).
• Débranchez l’appareil avant toute intervention, car certains composants sous tension sont dangereux
(risque d’électrocution).
Toute intervention sur l’installation ou travaux de maintenance sont à proscrire en cas d’orage.
BIZTONSÁGI INFORMÁCIÓK
Tűz és elektromos áramütés veszélyének elkerülése érdekében ne tegye ki a készüléket esőnek vagy
bármilyen nedvességnek.
Figyelem: Tűz és elektromos áramütés veszélyének elkerülése érdekében ne távolítsa el a készülék
fedlapját vagy hátlapját. A javítást bízza a szakszervizre.
A háromszögbe zárt villám jele készülék belsején belül nem szigetelt veszélyes
nagyfeszültség jelenlétére figyelmezteti a felhasználót, amely elektromos áramütést
eredményezhet.
A háromszögbe zárt felkiáltójel arra figyelmezteti a felhasználót, hogy a leírásban fontos
működtetési és kezelési információt talál.
Page 71

Használati útmutató
3
HU
A készüléket nem szabad csöpögő vagy spriccelő víz közelébe tenni és nem szabad rá folyadékkal teli
edényeket, mint pl.: vázát tenni. Az elemeket nem szabad nagy hőhatásnak kitenni, mint pl.: napsütés
vagy tűz.
FGYELEM: Az elemek felrobbanhatnak, ha nem megfelelően cseréli ki. Mindig csak ugyanolyan
elemeket használjon.
A hálózati dugónak könnyen elérhető helyen kell lennie.
Fontos biztonsági útmutatók
A minőségi szabályoknak megfelelően a termék gyártásánál a biztonság a legfontosabb tényező. De a
biztonság megőrzése az Ön feladata is. Ez az oldal olyan fontos információkat tartalmaz, amelyek
segítenek biztosítani, hogy problémamentesen és megfelelően használja a készüléket. Olvassa ezeket
figyelmesen végig, mielőtt elkezdi használni a készüléket.
Beüzemelés
• Olvassa el és tartsa be az instrukciókat. Mielőtt elkezdi használni a készüléket, olvasson el
minden biztonsági működési útmutatót és ezeket tartsa be.
• Minden biztonsági működési útmutatót őrizzen meg, hogy a jövőben is tájékozódni tudjon
belőlük.
• Tegyen eleget minden figyelmeztetésnek, amelyet a készüléken vagy a leírásban talál!
• Ezt a készüléket csak a mellékelt hálózati csatlakozóval szabad üzemeltetni.
• Ne terhelje túl a hálózati csatlakozót, ez tűzhöz vagy elektromos áramütéshez vezethet.
Túlterhelt hálózati csatlakozók, hosszabbítók, sérült hálózati kábelek, rossz szigetelések
vagy törött hálózati dugók veszélyesek lehetnek. Rendszeresen vizsgálja meg a hálózati
kábelt, ha az sérültnek vagy rossz szigetelésűnek néz ki, akkor cseréltesse ki a
szakszervizben.
• A hálózati kábelt úgy kell elhelyezni, hogy sose lehessen rálépni, ne kelljen megtörni, különös
tekintettel a falicsatlakozónál vagy a készülék hátuljánál.
• A szellőző nyílások a készülék túlmelegedését hivatottak megelőzni és ezzel a készülék
megbízható működését biztosítják. Ezeket sosem szabad letakarni. Ezért sem szabad a
készüléket ágyra, szőnyegre, vagy valamilyen fűtőtestre helyezni. A készüléket csak akkor
zárja be nem szellőző helyre, mint pl. könyves szekrénybe, ha megfelelő szellőzést tud
biztosítani.
• Csak a gyártó által jóváhagyott kiegészítőket használja.
• Ne használja a készüléket víz közelében, mint pl.: fürdőszobában, konyhában, uszodában. A
csatlakoztatott elektromos készülékeknek és kiegészítőiknek rendelkezniük kell biztonsági
tanúsítvánnyal. Ezzel elkerülhető az elektromos áramütés és a tűz kialakulása.
FIGYELEM
TŰZ ÉS ELEKTROMOS ÁRAMÜTÉS VESZÉLYÉNEK ELKERÜLÉSE ÉRDEKÉBEN NE
TEGYE KI A KÉSZÜLÉKET ESŐNEK VAGY BÁRMILYEN NEDVESSÉGNEK.
FIGYELEM: ELEKTROMOS ÁRAMÜTÉS VESZÉLYÉNEK ELKERÜLÉSE ÉRDEKÉBEN A
HÁLÓZATI KÁBELT MEGFELEŐEN CSATLAKOZTASSA A KONNEKTORHOZ.
Page 72

Használati útmutató
HU
4
• Ne tegye a készüléket instabil állványra, asztalra, mert leeshet onnan, amivel sérülést
okozhat és maga a készülék is károsodhat. Csak stabil helyen tárolja a készüléket, ahonnan
nem eshet le. Az elhelyezést a használati útmutatónak megfelelően kivitelezze.
• Különös gondoskodással helyezze a készüléket mozgó állványra. Az állvány gyors
megállításra, nagy erő hatására vagy egyenetlen felületen felborulhat. A beszerelésnél vegye
figyelembe az NEC szabvány 820-40-es bekezdését, mely szerint a kábel árnyékolását a
rendszer földelési pontjához kell kötni, praktikusan közel a kábel bevezetésénél.
• Ezen szabvány kitér az állvány és a levezető kábel földelésére is, amely villámvédelmi
patronhoz is csatlakozik.
• A kültéri antenna rendszer nem lehet nagyfeszültségű vezeték közelében, vagy olyan helyen,
ahonnan elektromos vezetékekre eshet. Ha kültéri antennarendszert telepítenek különös
tekintettel kell lenni, hogy véletlenül se érintsenek meg semmilyen elektromos vezetéket. A
munkát bízza szakemberre.
• Húzza ki a hálózati csatlakozót, mielőtt tisztítaná a készüléket. Ne használjon semmilyen
tisztító folyadékot vagy aerosolt. Csak egy nedves tisztítókendőt használjon.
• Tüzet vagy elektromos áramütést okozhatnak olyan eszközök, amelyek a készülék
belsejében lévő nagyfeszültségű alkatrészeket érinthetnek meg. Sose öntsön folyadékot a
készülékre.
• Ha hosszabb ideig nem használja a készüléket vagy villámlással járó vihar esetén húzza ki a
készüléket a hálózati csatlakozóból és csatlakoztassa le az antennarendszert. Ezzel
megakadályozhatja a villám- és túlfeszültségű károkat.
• Sose próbálja meg saját maga kinyitni és megjavítani a készüléket. Ezzel nagyfeszültségű
alkatrészek érintésének vagy más veszélyes szituációknak teheti ki önmagát. A javítást
mindig bízza a szakszervizre.
• A következő esetekben áramtalanítsa és vigye szakszervizbe a készüléket:
o Ha a hálózati kábel vagy csatlakozó megsérült.
o Ha folyadék került vagy valamilyen idegen tárgy esett a készülék belsejébe.
o Ha a készülék megázott.
o Ha a használati útmutatóban leírtak mellett a készülék nem működik megfelelően.
Csak a használati útmutatóban leírt beavatkozásokat végezze el, ha ezek
sikertelenek, forduljon a szakszervizhez.
o Ha a készülék leesett vagy a burkolata megsérült.
• Ha valamilyen alkatrészre lenne szüksége, forduljon a szakszervizhez.
• A készülék bármilyen javítása esetén szakembert kérjen meg a biztonsági ellenőrzés
elvégzésére, hogy a készülék biztonságosan üzemeltethető-e.
• A készüléket falra vagy a mennyezetre csak a gyártó ajánlásával szerelhető
• A készüléket fűtőtesttől, radiátortól, tűzhelytől vagy bármilyen olyan tárgytól, amely meleget
sugározhat ki (pl.: erősítő) távol kell tartani.
Page 73

Használati útmutató
5
HU
Table of contents / Inhaltsverzeichnis / Sommaire
Attention! / Achtung! / Consignes de sécurité! ................................................................................ 2
BIZTONSÁGI INFORMÁCIÓK ........................................................................................................... 2
Fontos biztonsági útmutatók......................................................................................................... 3
Beüzemelés .................................................................................................................................. 3
1.
BEVEZETÉS ....................................................................................................................... 7
1.1
Előlap ................................................................................................................................ 7
1.2
Hátlap ............................................................................................................................... 7
1.3
Távirányító ........................................................................................................................ 8
2.
RENDSZER CSATLAKOZTATÁSA ...................................................................................... 9
2.1
Általános ........................................................................................................................... 9
2.2
Csatlakozás Tv-hez és videóhoz ....................................................................................... 9
2.3
HiFi rendszer csatlakoztatása ........................................................................................... 9
3.
KEZDŐ LÉPÉSEK ............................................................................................................. 10
3.1
Üdvözlőmenü .................................................................................................................. 10
3.2
Főmenü ........................................................................................................................... 10
3.3
Telepítés ......................................................................................................................... 10
4.
MŰKÖDÉS ....................................................................................................................... 11
4.1
Csatornaváltás ................................................................................................................ 11
4.2
Az Elektronikus műsorkalauz (EPG) előhívása ................................................................ 11
5.
CSATORNASZERKESZTÉS .............................................................................................. 12
5.1
Csatornaszerkesztés menü ............................................................................................. 12
5.2
TV és Rádió csatornák listája .......................................................................................... 12
5.3
Összes csatorna törlése .................................................................................................. 12
6.
RENDSZER BEÁLLÍTÁSA ................................................................................................. 13
6.1
Rendszer menü ............................................................................................................... 13
6.2
Nyelv ............................................................................................................................... 13
6.3
TV szabvány .................................................................................................................... 13
6.4
Helyi idő beállítása .......................................................................................................... 13
6.5
Időzítő beállítása ............................................................................................................. 14
6.6
Gyermekzár ..................................................................................................................... 14
6.7
OSD beállítása ................................................................................................................. 14
Page 74

Használati útmutató
HU
6
6.8
Kedvencek ...................................................................................................................... 14
6.9
Audiokommentár (AD) beállítása .................................................................................... 15
6.10 Mozaik beállítása ............................................................................................................ 15
6.11 Egyéb .............................................................................................................................. 15
7.
ESZKÖZÖK ...................................................................................................................... 16
7.1
Eszközök főmenü ............................................................................................................ 16
7.2
Információ....................................................................................................................... 16
7.3
Gyári beállítások ............................................................................................................. 16
7.4
Szoftverfrissítés .............................................................................................................. 16
7.5
USB eszköz leválasztása ................................................................................................. 16
7.6
Hálózat............................................................................................................................ 17
8.
Játék ............................................................................................................................... 17
8.1
Játék ............................................................................................................................... 17
9.
Felvétel és media ............................................................................................................ 17
9.1
Média főmenü ................................................................................................................. 17
9.2
Médialejátszó .................................................................................................................. 18
9.3
HDD információ ............................................................................................................... 19
9.4
Felvétel beállítások ......................................................................................................... 19
10.
Időeltolás / Felvétel......................................................................................................... 20
10.1 ............................................................................................................................................. 20
10.2 Időeltolás ........................................................................................................................ 20
10.3 Felvétel ........................................................................................................................... 20
11.
Problémamegoldás ......................................................................................................... 21
12.
Műszaki adatok ............................................................................................................... 22
Page 75

Használati útmutató
7
HU
1. BEVEZETÉS
1.1 Előlap
• Kijelző / infra vevő
• USB csatlakozó
1.2 Hátlap
• ANT IN : Antenna bemenet
• ANT OUT : Antenna felfűzés egy másik eszkőzhőz
• COAXIAL : Koax digitális hangkimenet
• RJ 45 : LAN port
• HDMI : HDMI kimenet
• TV : TV SCART csatlakozó
• 220-240V : Hálózai csatlakozó
Page 76

Használati útmutató
HU
8
1.3 Távirányító
1
Készenlét (Készülék bekapcsolás és kikapcsolás
készenlétbe)
2
Piros/Zöld/Sárga/Kék gombok (Interaktív funkció /
Almenü funkció gombok) SOS (Gyorskeresés)
3
Keresés előre/hátra
4
PAUSE (Pillanat állj / aktív időeltolás funkció)
5
PLAY: Lejátszás
6
TTX (Teletext megnyitása)
7
SUBTITLE (Felirat be/kikapcsolása)
8
MENÜ (megnyitja vagy bezárja a menüképernyőt)
9
OK gomb (egy választás jóváhagyása a menüben)
10
Kurzor:
(Kurzor: navigációs gombok a menüben
való mozgásra,
Csatorna váltás/Hangerő)
11
FAV (Kedvenc lista megnyitása)
12
RECORD (Tv program felvétele)
13
VOL+/- (Hangerő növelése és csökkentése)
14
USB (Belépés a Fájl menedzserbe)
15
Számjegy gombok (értékek beírására és a
csatornaszám közvetlen megadására)
16
BACK (Visszalépés az előző csatornához)
17
MUTE (Hang némítása be/ki)
18
Előző / Következő
19
STOP (Lejátszás vagy felvétel megállítása)
20
MEDIA (Belépés a felvevő menübe)
21
AUDIO (Audio mód és hang kiválasztás)
22
EPG (Elektronikus programkalauz megnyitása)
23
INFO: Nyomja meg a jelenlegi csatorna
információiért
24
EXIT (Kilépés a menüből)
25
CH+/- (Csatorna fel-/le- váltás)
26
TV/RADIO (Váltás Tv és rádió között)
Page 77

Használati útmutató
9
HU
2. RENDSZER CSATLAKOZTATÁSA
2.1 Általános
Nagyon sokféle Tv típus és más audio/video eszköz létezik, amelyet a beltéri egységhez lehet
csatlakoztatni. Ebben a leírásban a beltéri legáltalánosabb csatlakoztatási módjai vannak leírva.
2.2 Csatlakozás Tv
-
hez és videóhoz
2.3 HiFi rendszer
csatlakoztatása
Page 78

Használati útmutató
HU
10
3. KEZDŐ LÉPÉSEK
3.1 Üdvözlőmenü
Ha először kapcsolja be a beltéri egységet, akkor egy üdvözlő menü jelenik meg. A kurzor gombok
segítségével válassza ki a régiót, a nyelvet, a kijelzés módját és a képarányt. Majd lépjen az OK sorra és
nyomja meg az OK gombot, hogy elindítsa a csatornakeresést.
3.2 Főmenü
Nyomja meg a „MENÜ” gombot, hogy belépjen a főmenübe. A fel / le gombokkal válassza ki a kívánt
menüpontot és az „OK” gombbal lépjen be az almenübe.
3.3 Telepítés
A Telepítés menü lehetővé teszi a csatornák keresését
1. Nyomja meg a „MENÜ” gombot, hogy belépjen a főmenübe.
2. A fel / le gombokkal válassza ki a „Telepítés” menüpontot és a jobb gombbal lépjen be a
menübe.
3. A fel / le gombokkal válassza ki a kívánt menüpontot és az „OK” gombbal lépjen be az
almenübe.
4. Az „EXIT” gombbal lépjen ki.
Automata keresés
Automata keresésAutomata keresés
Automata keresés
1. Válassza az „Automata keresés” menüpontot és nyomja meg az „OK” gombot.
2. A kurzorral válassza ki a „csak FTA” / „csak T2 jel” beállítást
3. Az indításhoz válassza a „Keresés” menüpontot.
Csatornakeresés (kézi)
Csatornakeresés (kézi)Csatornakeresés (kézi)
Csatornakeresés (kézi)
1. Válassza a „Csatornakeresés” menüpontot és nyomja meg az „OK” gombot.
2. A kurzorral válassza ki a keresés módját, keresési sávot, csatornát, frekvenciát,
sávszélességet.
3. Az indításhoz válassza a „Keresés” menüpontot.
Keresési mód: Csatorna szerint / Frekvencia szerint
LCN
LCNLCN
LCN
Ha az LCN (Logikai csatornaszám) funkció aktiválva van, akkor nem változtathatja meg a csatornák
keresésnél létrejött csatorna számát.
Be- ill. kikapcsolhatja az LCN funkciót az „LCN mód” menüpontban.
Page 79

Használati útmutató
11
HU
4. MŰKÖDÉS
4.1 Csatornaváltás
Három módja van a csatorna kiválasztásának – lépkedhet a csatornalistában, választhat szám szerint
és választhat a képernyőn megjelenő listából is.
• Lépkedés a csatornalistában:
A fel/le vagy CH+/- gombok nyomogatásával végigmehet a csatornalistán.
• Csatornaszám szerinti választás:
Közvetlenül a kívánt csatorna gombját (0-9) nyomja meg.
• Képernyőn megjelenő csatornalista:
A képernyőn megjelenő csatornalistából is kiválaszthatja a kívánt adást. Ehhez az „OK” gombot kell
megnyomnia először, majd a fel/le gombok megnyomásával kiválaszthatja a csatornát.
4.2 Az Elektronikus műsorkalauz (EPG) előhívása
• Nyomja meg az EPG gombot, hogy belépjen az EPG oldalra.
• A kurzorral válasszon a csatornák vagy a választott csatorna eseményei vagy a
jelenlegi/következő események közül.
• A „Zöld” gomb megnyomására időzítőt állíthat be az adott eseményhez.
• A „Piros” gomb megnyomására az Idő menübe juthat, ahol 2, illetve 24 órával növelheti vagy
csökkentheti a megtekintett EPG tartalmat.
• Az „EXIT” gombbal lépjen ki.
Page 80

Használati útmutató
HU
12
5. CSATORNASZERKESZTÉS
5.1 Csatornaszerkesztés menü
• Nyomja meg az EPG gombot, hogy belépjen az EPG oldalra.
• A kurzorral válasszon a csatornák vagy a választott csatorna eseményei vagy a
jelenlegi/következő események közül.
• A „Zöld” gomb megnyomására időzítőt állíthat be az adott eseményhez.
• A „Piros” gomb megnyomására az Idő menübe juthat, ahol 2, illetve 24 órával növelheti vagy
csökkentheti a megtekintett EPG tartalmat.
• Az „EXIT” gombbal lépjen ki.
5.2 TV és Rádió csatornák listája
• Használja ezt a menüt a kedvencekhez, a lezáráshoz, az átugráshoz, a mozgatáshoz, a
rendezéshez, a törléshez és az átnevezéshez.
• A „Szerkesztés” menüben válassza ki a „TV csatornák listája” vagy „Rádió csatornák listája”
menüpontot és nyomja meg az „OK” gombot.
• A fel/le gombokkal válasszon ki egy csatornát, majd nyomja meg az „OK” gombot, hogy
megnézhesse azt.
• Nyomja meg a „FAV” gombot, majd nyomja meg az „OK” gombot, hogy a kedvencek
funkciót szerkeszthesse.
• Nyomja meg valamelyik színes gombot, hogy az adott funkció szerkesztéséhez kerüljön.
• Megjegyzés:
Megjegyzés: Megjegyzés:
Megjegyzés: Alapvetően a „Rádió csatornalista” műveletei megegyeznek a „Tv csatornalista”
műveleteivel, csak egy különbség van: A „Rádió csatornalista” módban mivel nincs kép
információ, ezért a jobb oldali előnézeti ablakban mindig a rádió logója jelenik meg.
5.3 Összes csatorna törlése
• A „Szerkesztés” menüben válassza ki a „Összes csatorna törlése” menüpontot és nyomja
meg az „OK” gombot. Adja meg az alapértelmezett jelszót, ami vagy „0000” vagy „1234”!
• Egy figyelmeztető ablak jelenik meg ekkor.
• A törléshez válassza az „Igen”-t és nyomja meg az „OK” gombot.
• A törlés visszavonásához válassza az „Nem”-et és nyomja meg az „OK” gombot.
Page 81

Használati útmutató
13
HU
6. RENDSZER BEÁLLÍTÁSA
6.1 Rendszer menü
Ebben a menüben beállíthatjuk a nyelvet, TV szabványt, helyi időt, időzítőt, gyerekzárat, OSD kijelzést,
kedvenceket, hangos leírót és egyebeket.
• Nyomja meg a „MENÜ” gombot, hogy belépjen a főmenübe.
• A fel/le gombokkal válassza ki a „Rendszer” menüpontot, majd az „OK” gombbal lépjen bele.
• A fel/le gombokkal válassza ki a kívánt funkciót és az „OK” gombbal lépjen a kívánt
almenübe.
•
Az „EXIT” gombbal lépjen ki.
•
6.2 Nyelv
Ebben a menüben beállíthatja a készülék menünyelvét, az elsődleges és másodlagos hangot, a felirat
nyelvét és típusát illetve a teletext nyelvét.
Felirat: Ki/Normál/Nagyothalló
6.3 TV szabvány
Itt beállíthatja a kép felbontását, a képarányt, a video kimenetet és a digitális hangkimenetet.
Video felbontás: forrás szerint / TV szerint / 480i / 480p / 576i / 576p / 720p @50Hz / 720p@60Hz /
1080i@50Hz / 1080i@60Hz / 1080p@50Hz / 1080p@60Hz
Képarány: Auto / 4:3PS (Pan & Scan) / 4:3LB (Letterbox) / 16:9
Video kimenet: SCART CVBS+HDMI / SCART RGB
Digitális audio kimenet: BS / LPCM
6.4 Helyi idő beállítása
Ebben a menüben beállíthatja a régiót és az időt.
Régió: Itt állítható a régió
GMT használata: Itt be- / kikapcsolhatja a GMT idő használatát.
GMT eltolás: Ez a menü csak akkor aktív, ha „Saját beállításokat” használ a „GMT használata”
menüpontban. A beállítható tartomány: „-11:30 ~ +12:00”, fél órás lépésközökkel.
Nyári időszámítás: Be- ill. kikapcsolható a nyári időszámítás
Dátum: A „Dátum” és az „Idő” menüpontok csak akkor aktívak, ha a „GMT használata”
menüpontban „Ki” beállítást alkalmaz.
Idő: A számokkal írja be az időt
Page 82

Használati útmutató
HU
14
6.5 Időzítő beállítása
Ebben a menüben állíthatja be a programok időzítőjét. Maximum 8 időzítőt lehet beállítani.
Időzítő mód: Ki / Egyszer / Naponta / Hetente / Havonta
Időzítő szolgáltatás: Csatorna / Felvétel
Csatorna: Itt kiválaszthat egy csatornát, ami bekapcsoljon
Dátum: Nyomja meg az „OK” gombot és utána a számokkal írja be a dátumot.
Idő: Nyomja meg az „OK” gombot és utána a számokkal írja be az időt.
Hossz: Nyomja meg az „OK” gombot és utána a számokkal írja be az időtartamot.
6.6 Gyermekzár
Ebben a menüben levédheti a „Telepítés” menübe való belépést, egyes csatornákat és
megváltoztathatja a jelszót.
• A „Rendszer” menüben válassza a „Gyermekzár” menüpontot és nyomja meg az „OK”
gombot. Ha a rendszer jelszót kér, adja azt meg, a gyári alapbeállítás „0000” vagy „1234”.
• A számjegyekkel beírt helyes jelszó megadás után a „Gyermekzár” menübe lépett.
Menü zárolása
Menü zárolásaMenü zárolása
Menü zárolása:::: A „Telepítés” és a „Szerkesztés” menü lezárásához. Ha az „Automatikus keresés”
vagy a „Csatornakeresés” menüpontokhoz akar hozzáférni, akkor meg kell adnia a
jelszót. A menü zárat be- vagy kikapcsolhatja.
Korhatár zár:
Korhatár zár:Korhatár zár:
Korhatár zár: Ki / 4 - 18 év között tetszőlegesen választható
Új jelszó:
Új jelszó:Új jelszó:
Új jelszó: A jelszó megváltoztatásához.
Jelszó megerősítése
Jelszó megerősítéseJelszó megerősítése
Jelszó megerősítése: Az új jelszó megerősítése..
6.7 OSD beállítása
Ebben a pontban beállíthatja az infósáv várakozási idejét és a menü átlátszóságát.
Menü eltűnési idő: 1-10
Menü áttetszőség: Az áttetszőség a következő értékekre állítható: Ki / 10% / 20% / 30% / 40%
6.8 Kedvencek
• Ebben a menüben átnevezheti a kedvenc csoportokat.
• A „Csatornaszerkesztés” menüben válassza ki a „Kedvencek” menüpontot és nyomja meg
az „OK” gombot.
• Válassza ki a kívánt kedvenc listát, majd nyomja meg az „OK” gombot. Ekkor a képernyőn
megjelenik egy virtuális billentyűzet. Írja be a kívánt nevet a kurzor és az „OK” gomb
használatával. A bevitel befejezésével válassza a képernyőn megjelenő OK-t a
jóváhagyáshoz, ezzel sikeresen megváltoztatta a lista nevét.
• Az „EXIT” gombbal lépjen ki.
Page 83

Használati útmutató
15
HU
6.9 Audiokommentár (AD) beállítá
sa
Ebben a menüben beállíthatja a hangos leíró szolgáltatást.
• AD szolgáltatás: Be/Ki
• AD használat alapértelmezése: Be/Ki
•
AD hangerő beállítás:
6.10
Mozaik beállítása
Ebben a menüben beállíthatja a Mozaik nézetet.
• A „Rendszer” menüben válassza a „Mozaik beállítás” menüpontot és nyomja meg az „OK”
gombot. Válassza ki a kívánt nézetet!
• Majd nyomja meg az „EXIT” gombot, hogy visszalépjen a Főmenühöz. A KÉK gombbal
léphet a Multi nézetbe.
•
Mozaik beállítás: 3x3 kép / 4+1 kép
6.11
Egyéb
Ebben a menüben beállíthatja a csatornatípust, az akusztikus hangjelzést és az automatikus
kikapcsolást.
Csatorna típus: Mind / FTA(Szabadon fogható) / Kódolt
Csatorna +/- léptetésnél a kijelölt csatorna típuson léptet.
Hangjelzés: Be/Ki
Automatikus kikapcsolás: 30perc / 1 óra / 2 óra / 3 óra / Ki
Ha a beállított időtartamon belül nem nyom meg semmilyen gombot a távirányítón és nincs
időzítő se beállítva, akkor a készülék automatikusan készenléti állapotba kapcsol.
Ha ez a funkció nincs bekapcsolva, akkor a készülék nem kapcsol automatikusan standby
módba.
Átfűzés standby módban: Be/Ki.
Page 84

Használati útmutató
HU
16
7. ESZKÖZÖK
7.1 Eszközök főmenü
• Nyomja meg a „MENÜ” gombot, hogy belépjen a főmenübe.
• A fel/le gombokkal válassza ki az „Eszközök” menüpontot, majd az „OK” gombbal lépjen
bele.
• A fel/le gombokkal válassza ki a kívánt funkciót és az „OK” gombbal lépjen a kívánt
almenübe.
•
Az „EXIT” gombbal lépjen ki
7.2 Információ
Ez a menü néhány adatot jelenít meg a készülék hardver modelljéről, hardver verziójáról, szoftver
modelljéről, szoftver verziójáról és a frissítési dátumról.
• Az „Eszközök” menüben válassza az „Információ” menüpontot és nyomja meg az „OK”
gombot.
•
Az „EXIT” gombbal lépjen ki.
7.3 Gyári beállít
ások
Ebben a menüpontban visszaállíthatja a gyári beállításokat és törölheti az összes beállított csatornát.
• Az „Eszközök” menüben válassza a „Gyári beállítások” menüpontot és nyomja meg az „OK”
gombot. Ha a rendszer jelszót kér, adja azt meg, a gyári alapbeállítás „0000” vagy „1234”.
• Egy figyelmeztető ablak jelenik meg ekkor.
A visszaállításhoz és minden csatorna törléséhez válassza az „Igen”-t.
A visszaállítás elkerüléséhez válassza az „Nem”-et.
• Az „EXIT” gombbal lépjen ki.
7.4 Szoftverfrissítés
A szoftvert vagy antennán keresztül (OTA) vagy USB-n frissítheti.
• Az „Eszközök” menüben válassza a „SW frissítés - OTA” vagy a „Frissítés - USB”
menüpontot, majd nyomja meg az „OK” gombot. Ekkor megjelenik a szoftver frissítő menü.
• A kurzor gombokkal válassza ki a kívánt elemet majd a „Start” menüpontot és az „OK”
gombbal indítsa el a frissítést.
• Az „EXIT” gombbal lépjen ki.
7.5 USB eszköz leválasztása
• Az „Eszközök” menüben válassza a „USB eszköz biztonságos eltávolítása” menüpontot.
Nyomja meg az „OK” gombot a jóváhagyáshoz, ekkor megjelenik egy üzenet, hogy már
eltávolíthatja az eszközt.
Page 85

Használati útmutató
17
HU
7.6 Hálózat
Ebben a menüben beállítható a hálózat, megtekinthető a időjárás előrejelzés, hallgathatók a netes
rádiócsatornák.
Hálózatbeállítás: Hálózatválasztás
Beállítások
Hálózati alkalmazások: Rádió csatorna
Időjárás csatorna
8. Játék
8.1 Játék
Ebben a menüben játékokat játszhat.
• Nyomja meg a „MENÜ” gombot, hogy belépjen a főmenübe.
• A fel/le gombokkal válassza ki a „Játék” menüpontot, majd a jobbra gombbal lépjen bele.
• A fel/le gombokkal válassza ki a kívánt funkciót és az „OK” gombbal lépjen a kívánt
almenübe.
• Az „EXIT” gombbal lépjen ki.
9. Felvétel és media
9.1 Média főmenü
• Nyomja meg a „MENÜ” gombot, hogy belépjen a főmenübe.
• A fel/le gombokkal válassza ki a „Média” menüpontot, majd a jobbra gombbal lépjen bele.
• A fel/le gombokkal válassza ki a kívánt funkciót és az „OK” gombbal lépjen a kívánt
almenübe.
• Az „EXIT” gombbal lépjen ki
Page 86

Használati útmutató
HU
18
9.2 Médialejátszó
Ez a funkció lehetővé teszi, hogy fájlokat játsszon le USB eszközről.
• A „Média” menüben válassza a „Médialejátszó” menüpontot és nyomja meg az „OK” gombot.
• Először a Médialejátszó ablakba jut, ahol a USB/HDD eszköz lesz kijelölve. Nyomja meg a le
gombot, hogy a kijelölést a Könyvtár / fájl mezőbe mozgassa.
• Az „1”-es gombbal válthat a Zene / Kép / Videó / Felvétel között.
• A fel/le gombokkal válassza ki a kívánt elemet és az „OK” gomb megnyomásával játssza azt le.
• Az „EXIT” gombbal lépjen ki.
Zene:
PIROS gomb: Nyomja meg a PIROS gombot a Lejátszási lista megjelenítéséhez.
ZÖLD gomb: Válassza ki azt a fájlt, amit a Lejátszási listához szeretne adni, majd nyomja meg
a ZÖLD gombot. Ekkor ez egy „Kedvenc” ikonnal jelöli meg a fájlt.
SÁRGA gomb: Használja a SÁRGA gombot az adott könyvtárban lévő összes fájl Lejátszási
listához való adásához. Nyomja meg még egyszer az összes könyvtárban
található fájl Lejátszási listásból való törléséhez.
KÉK gomb: A KÉK gombbal léphet a szerkesztés almenübe.
„2” gomb: Nyomja meg a „2”-es gombot, hogy megnyissa a rendezés ablakot.
Rendezhet Név / Idő / Méret / Kedvencek szerint.
INFO gomb: Az INFO gombbal állíthatja be az ismétlés típusát: Könyvtár ismétlése / Véletlen
könyvtár / Ismétlés egyszer.
EXIT gomb: Visszalépés a szülőkönyvtárba.
Kép:
PIROS gomb: Nyomja meg a PIROS gombot a Lejátszási lista megjelenítéséhez.
ZÖLD gomb: Válassza ki azt a fájlt, amit a Lejátszási listához szeretne adni, majd nyomja meg
a ZÖLD gombot. Ekkor ez egy „Kedvenc” ikonnal jelöli meg a fájlt.
SÁRGA gomb: Használja a SÁRGA gombot az adott könyvtárban lévő összes fájl Lejátszási
listához való adásához. Nyomja meg még egyszer az összes könyvtárban
található fájl Lejátszási listásból való törléséhez.
KÉK gomb: A KÉK gombbal léphet a szerkesztés almenübe.
„2” gomb: Nyomja meg a „2”-es gombot, hogy megnyissa a rendezés ablakot.
Rendezhet Név / Idő / Méret / Kedvencek szerint.
INFO gomb: Az INFO gombbal a kép beállításokat hívhatja elő.
„3” gomb: A „3”-as gombbal léphet a multi módba.
EXIT gomb: Visszalépés a szülőkönyvtárba.
Video:
KÉK gomb: A KÉK gombbal léphet a szerkesztés almenübe.
„2” gomb: Nyomja meg a „2”-es gombot, hogy megnyissa a rendezés ablakot.
Rendezhet Név / Idő / Méret / Kedvencek szerint.
EXIT gomb: Visszalépés a szülőkönyvtárba.
Felvétel:
PIROS gomb: Nyomja meg a PIROS gombot az átnevezéshez.
ZÖLD gomb: Válassza ki azt a fájlt, amit le szeretne zárni, nyomja meg a ZÖLD gombot, ekkor
meg kell adnia a jelszót, az alapértelmezett jelszó: „0000” vagy „1234”. A helyes
elszó megadása után az adott fájl zárolva lesz, a kinyitáshoz a zöld gomb újbóli
megnyomása és a jelszó szükséges.
SÁRGA gomb: Használja a SÁRGA gombot az adott fájl törlésre való kijelöléséhez, ekkor törlés jel
jelenik meg a fájl neve mellett.
EXIT gomb: Visszalépés a szülőkönyvtárba.
Page 87

Használati útmutató
19
HU
9.3 HDD információ
Ebben a menüben a csatlakoztatott USB tárolóeszközről kaphat információkat.
• A „Média” menüben válassza a „HDD információ” menüpontot és nyomja meg az „OK”
gombot.
• Az „EXIT” gombbal lépjen ki.
o Formázás: FAT/NTFS
Nyomja meg a SÁRGA gombot, hogy megnyissa a formázás menüt.
A balra/jobbra gombokkal válassza ki a formázás módját.
Nyomja meg az „OK” gombot, vagy a „Mégse” gombbal léphet vissza.
o Felvétel beállítás: Felvétel és Időeltolás (REC & TMS) / Felvétel (Record) / Időeltolás
(Timeshift)
Nyomja meg a KÉK gombot, hogy megnyissa a Felvétel beállítás menüt.
A balra/jobbra gombokkal válassza ki a felvétel típusát.
Nyomja meg az „OK” gombot, vagy a „Mégse” gombbal léphet vissza.
9.4 Felvétel beállítások
Használja a fel/le gombokat, hogy kiválassza a kívánt funkciót, majd a balra/jobbra gombokkal
változtassa meg azok beállításait.
• Timeshift Auto / Szünet / Ki
• Timeshift felvétele Be/Ki
• PS felvétel Be/Ki
Page 88

Használati útmutató
HU
20
10. Időeltolás / Felvétel
10.1
Ha külső merevlemezt csatlakoztat az USB csatlakozón keresztül lehetősége van az időeltolás funkció
használatára vagy felvétel készítésére egy sugárzott programról.
• Állítsa meg az élő adást és folytassa a lejátszását később (időeltolás).
• Vegyen fel egy adást.
• Ha a csatlakoztatott merevlemez betelik, akkor a felvétel megáll.
Megjegyzés:
USB 2.0 szabványú merevlemezt csatlakoztasson, ha felvenni akar vagy használni akartja az időeltolás
funkciót.
Ezen funkciókhoz 2 GB-nál nagyobb merevlemezre vagy Pendrive-ra van szükség!
10.2
Időeltolás
Bevezetés:
• Az időeltolás Tv nézés közben a „PAUSE” gomb megnyomásával aktiválódik.
• Nyomja meg a balra / jobbra gombot, hogy a kívánt lejátszási pillanathoz kerüljön. Nyomja
meg az „OK” gombot a jóváhagyáshoz.
Tippek, trükkök:
Lejátszás közben a következő funkciók érhetők el:
• Nyomja meg a „PAUSE” gombot, hogy egy pillanatra megállítsa a lejátszást.
• Nyomja meg a „Keresés előre” gombot, hogy felgyorsítsa a lejátszást
• Nyomja meg a „Keresés hátra” gombot, hogy visszafelé játssza le a felvételt.
Időeltolás leállítása:
Nyomja meg a „Stop” gombot, hogy leállítsa az időeltolást.
10.3
Felvétel
Azonnali felvétel
• Tv nézés közben nyomja meg a „Felvétel” gombot, hogy azonnal elindítsa a felvételt az
éppen nézett csatornán.
• Ha a „Felvétel” gombot még egyszer megnyomja, beállíthatja a felvétel időtartamát.
Nyomja meg a „Stop” gombot, hogy leállítsa a felvételt, ekkor egy jóváhagyó üzenet jelenik
meg.
• Válassza az „Igen”-t a felvétel megállításához vagy válassza a „Nem”-et a felvétel
folytatásához.
Page 89

Használati útmutató
21
HU
11. Problémamegoldás
Probléma
ProblémaProbléma
Probléma
Lehetséges ok
Lehetséges okLehetséges ok
Lehetséges ok
Mit tegyen
Mit tegyenMit tegyen
Mit tegyen
A készenléti lámpa nem
világít.
A hálózati kábel nincs bedugva.
Kiment a biztosíték.
Ellenőrizze a hálózati kábelt.
Ellenőrizze a biztosítékot.
Nincs jel.
Nincs csatlakoztatva az
antenna.
Az antenna megsérült vagy
rossz irányba áll.
Ellenőrizze az antennakábelt.
Ellenőrizze az antennát.
Nincs kép vagy hang.
SCART/AV nincs kiválasztva a
Tv-n.
Kapcsoljon AV csatornára.
Kódolt
csatorna üzenetet
látja a képernyőn.
Kódolt az adás. Válasszon másik csatornát.
A készülék nem reagál a
távirányítóra.
A távirányítót nem a készülék
felé irányítja.
A készülék előlapját valami
eltakarja.
A távirányító elemei kimerültek.
A távirányítót a k
észülék felé
tartsa.
Tegye el az útból az akadályt.
Cserélje ki az elemeket.
Elfelejtette a csatornazár
kódját.
Kerestesse újra a csatornákat.
Elfelejtette a menüzár
kódját.
Keresse fel a szakszervizt.
A távirányító nem vezérli a
készüléket.
1) A
távirányító elemeit
ki kell cserélni.
2) A készülék előlapját
valami eltakarja.
1) Cserélje ki a
elemeket.
2) Tegye el az útból az
akadályt.
Másik szobába téve a
készüléket nem tud digitális
adásokat venni.
Az új vételi helyre lehet, hogy
hosszabb kábelen vagy
valamilyen elosztóhálózaton jut
el a jel és nagyon legyengül.
Próbálja a jelet közvetlenül
levezetni a készülékhez.
Page 90

Használati útmutató
HU
22
12. Műszaki adatok
Tuner és csatorna
•
RF bemeneti csatlakozó x1
(IEC-TYPE, IEC169-2, FEMALE)
• RF kimeneti csatlakozó x1
(IEC-TYPE, IEC169-2, MALE (felfűzhető))
• Frekvenciasáv:
174MHz~230MHz(VHF)
470MHz ~862MHz (UHF)
• Jelszint:
-15 ~ -70 dbm
Tulajdonságok
• Video dekóder
• Audio dekóder
• Video formátum
• Video kimenet
• Moduláció
MPEG-2 MP@HL, AVC/H.264 HP @L4.1
MPEG-4 ASP támogatott
MPEG-1 Layer 1,2/PCM/HE-AAC V1.0
ICE958 PDIF
4:3/16:9/ Kapcsolható
HDMI, RGB
QPSK,16QAM,64QAM
Csatlakozás
• Hálózati kábel
• Tuner
• SCART
• SPDIF
• Adat port
• HDMI
Fix
Antenna bemenet x 1, RF kimenet x1
TV-hez x1
Koax x1
USB csatlakozó
HDMI kimenet x1
Tápegység
• Bementi feszültség
• Fogyasztás
AC220~240V, 50/60Hz
Max. 6W
Page 91

Használati útmutató
23
HU
Notes-Notizen-Notes-Notas-Notater
Page 92

triax.com/support
triax.dk/support - triax.se/support - triax-gmbh.de/support -
triax.fr/support - triaxmultimedia.es/support - triax.uk/support
triax.at/support – triax.hu/support
Information and manuals:
Information og brugervejledninger:
Information och manualer:
Information und Bedienungsanleitungen:
Informations et modes d’emploi:
Información y manuales:
Lisätietoja ja oppaita:
információk és útmutatók:
Copyright © 2017 TRIAX. All rights reserved. The TRIAX Logo and TRIAX,
TRIAX Multimedia are registered trademarks or trademarks
of the TRIAX company or its affiliates.
TRIAX A/S | Bjørnkærvej 3 | 8783 Hornsyld | Denmark
Subject to change without notice
Änderungen vorbehalten
Peut être sujet à modification sans préavis
 Loading...