

Trevi RC 850 BL User Manual
RC 850 BL AM/FM ALARM CLOCK
1
1
1
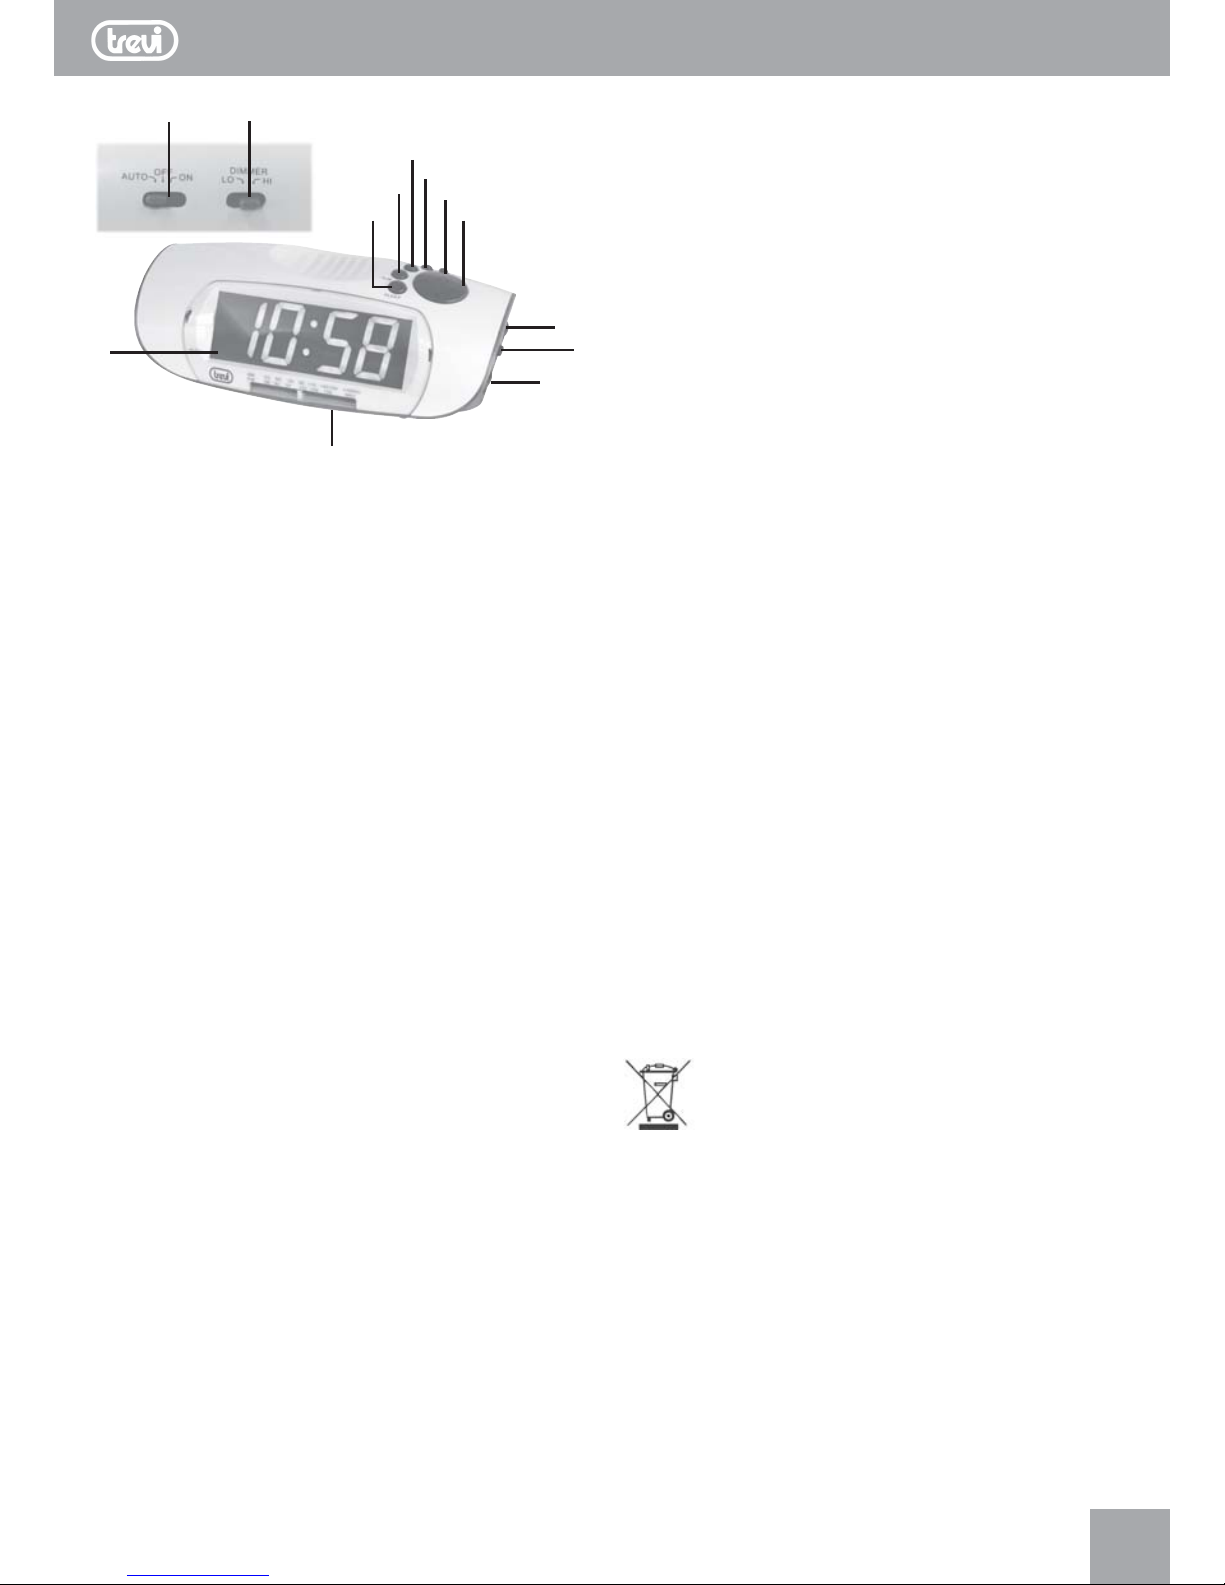
1. Selettore sveglia: ON/OFF/AUTO; Accesa/Spenta/Sveglia con
radio o buzzer.
2. Tasto TIME, regolazione orario
3. Tasto SLEEP, spegnimento programmato
4. Tasto ALM, regolazione allarme
5. Tasto HOUR, regolazione ore
6. Tasto MIN, regolazione minuti
7. Tasto SNOOZE, spegnimento temporaneo
8. Controllo sintonia
9. Controllo VOLUME
10.Vano batterie
11.Indicatore allarme inserito
12.Selettore DIMMER, regolazione luminosità
13.Selettore AM/FM
INSTALLAZIONE
Inserire la spina del cavetto di alimentazione in una presa di corrente
230V - 50Hz; il display lampeggera’ fino a quando non avrete
regolato l’ora.
RADIO
- Accendete la radio portando il selettore (1) su ON.
- Selezionate la gamma d’onda desiderata col controllo AM/FM
(13).
- Sintonizzatevi sulla vostra stazione preferita con il controllo (8).
- Regolate il volume con il controllo (9).
OROLOGIO
Premere contemporaneamente il tasto TIME (2) e HOUR (5) per
regolare l’ora; i pulsanti TIME (2) e MIN (6) per regolare i minuti.
Sul display viene visualizzata l’ora impostata.
SVEGLIA
Premere contemporaneamente i pulsanti ALM(4) e HOUR (5) per
regolare l’ora di sveglia; I pulsanti ALM(4) e MIN (6) per regolare
i minuti. Premendo il tasto ALM(4) viene visualizzato sul display
l’orario di sveglia.
SVEGLIA CON LA RADIO
Sintonizzatevi sulla stazione desiderata con il controllo (8).
Dopo aver regolato l’orario di sveglia, portare il selettore (1) su
AUTO, l'indicatore (11) si illuminerà. Regolare il volume al livello
desiderato. All’orario stabilito la radio si accenderà.
12
2
3
4
5
7
6
8
9
10
11 13
SVEGLIA CON LA SUONERIA
Portare il controllo volume (9) su OFF.
Portare il selettore (1) su AUTO, l'indicatore (11) si illuminerà.
SPEGNIMENTO DELLA SVEGLIA
Per disinserire la sveglia (suoneria o radio) portare il selettore (1) su
OFF.
Se desiderate spegnere momentaneamente la sveglia, premere
il pulsante SNOOZE (7); l’interruzione dura 9 minuti, trascorsi i quali
la sveglia si riaccende. L’operazione puo’ essere ripetuta diverse
volte entro un’ora di tempo.
FUNZIONE SLEEP
Il pulsante SLEEP (3) vi permette di programmare lo spegnimento
della radio fino ad un massimo di 1 ora e 59 minuti. Questa regolazione
viene effettuata a radio accesa.
- Portare il selettore (1) su OFF.
- Regolare il tempo di spegnimento premendo contemporanea
mente i tasti SLEEP (3) e MIN (6) oppure SLEEP (3) e HOUR(5).
- Per disinserire anzitempo la funzione SLEEP e’ sufficiente
premere il tasto SNOOZE (7).
FUNZIONE DIMMER
La funzione DIMMER vi permette di impostare la luminosità.
- Spostando il selettore DIMMER (12) in posizione LO il display
emetterà una luminosità minore.
- Spostando il selettore DIMMER (12) in posizione HI il display
emetterà una luminosità maggiore.
BATTERIA TAMPONE ANTI BLACK-OUT
Per mantenere in funzione l’orologio e la memorizzazione dell’orario
di sveglia anche durante una momentanea mancanza di energia
elettrica, inserire una batteria a 9V nell’apposito vano (10) sul
fondo dell’apparecchio. Vi consigliamo di sostituire questa batteria
ogni 6 mesi.
Se in caso di interruzione elettrica l’apparecchio mostri sul display
un orario sbagliato e lampeggiante sostituire la batteria 9V.
Alimentazione: ................. 2 batterie formato “AA”
Dimensioni: ...................... 190 x 95 x 45 mm
Avvertenze per il corretto smaltimento del prodotto.
Il simbolo riportato sull'apparecchiatura indica che il rifiuto deve
essere oggetto di "raccolta separata" pertanto il prodotto non deve
essere smaltito insieme ai rifiuti urbani.
L'utente dovrà consegnare il prodotto presso gli appositi "centri di
raccolta differenziata" predisposti dalle amministrazioni comunali,
oppure consegnarlo al rivenditore contro acquisto di un nuovo
prodotto.
La raccolta differenziata del rifiuto e le successive operazioni di
trattamento, recupero e smaltimento favoriscono la produzione di
apparecchiature con materiali riciclati e limitano gli effetti negativi
sull'ambiente e sulla salute causati da una gestione impropria del
rifiuto.
Lo smaltimento abusivo del prodotto comporta l'applicazione di
sanzioni amministrative.
ITALIANO
RC 850 BL AM/FM ALARM CLOCK
2
2
1
12
2
4
3
6
5
7
10
8
10
11
9
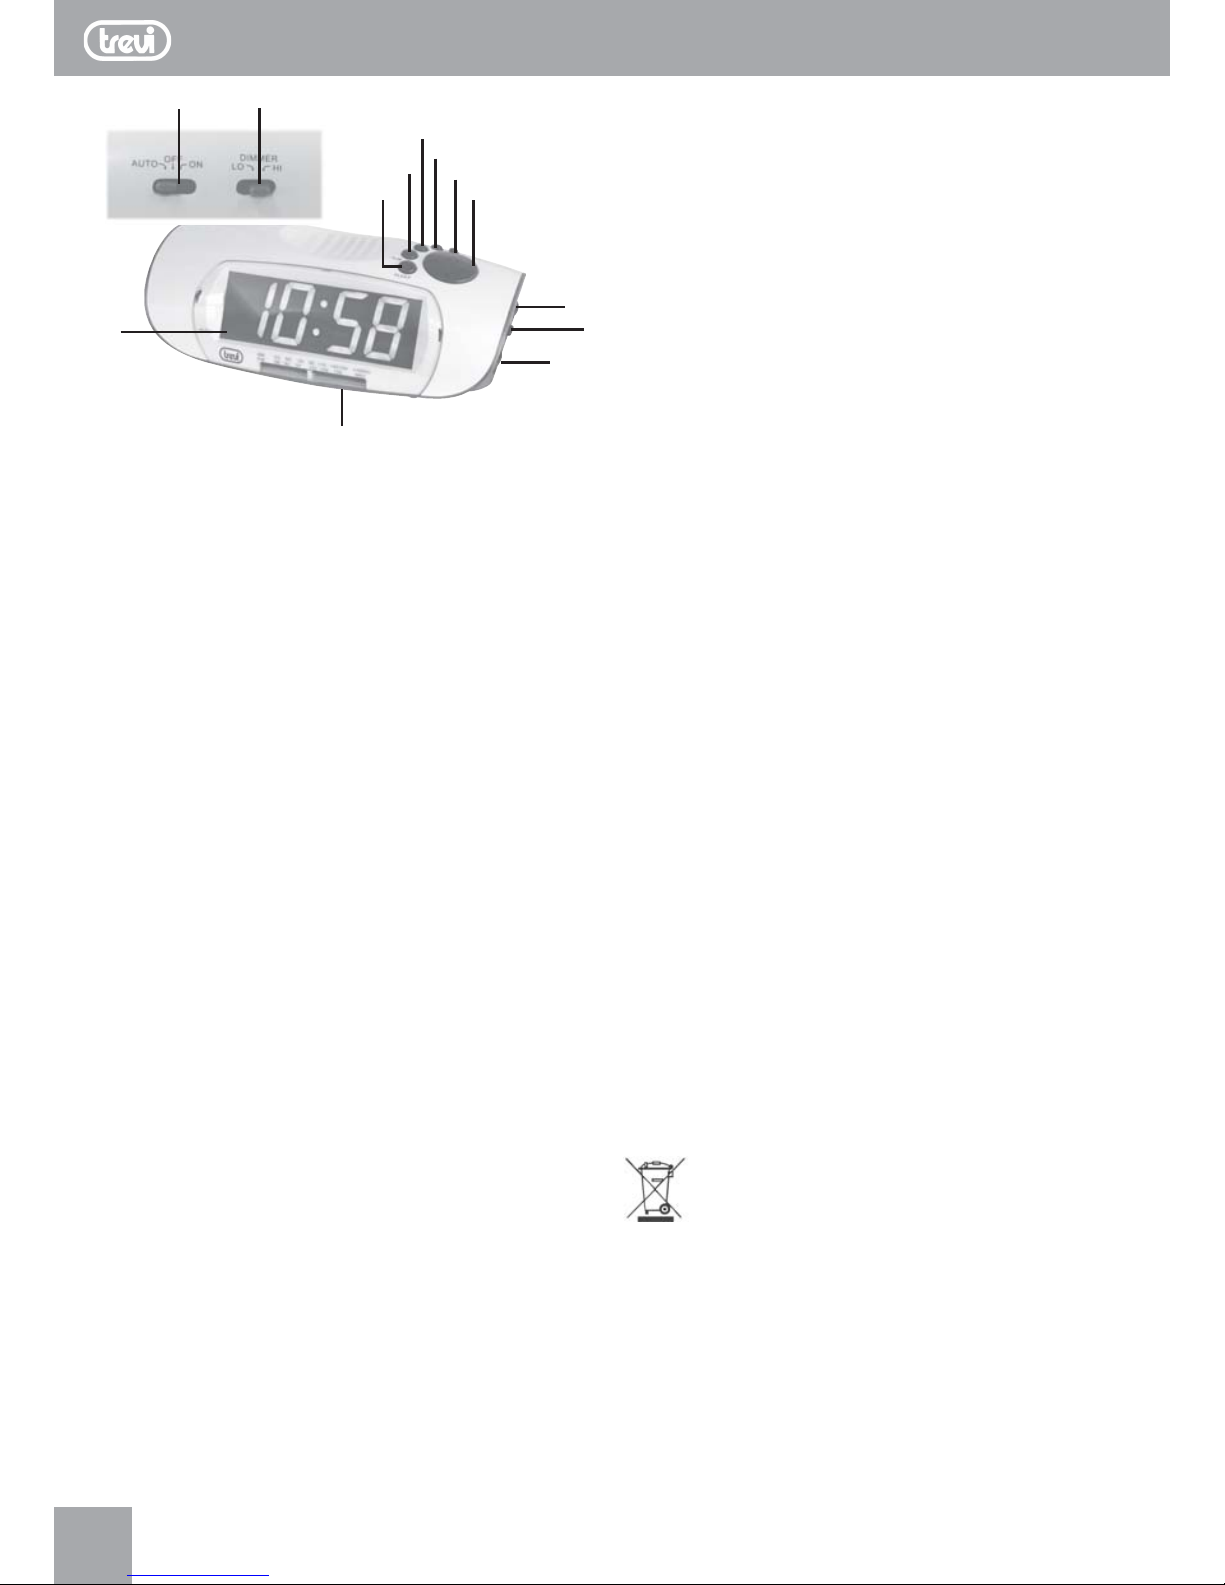
LOCATION OF CONTROL
1. On/Off/Auto
2. Time Set
3. Alarm Set/Off
4. Sleep
5. Snooze button
6. Hour
WARNING : TO REDUCE THE RISK OF FIRE OR ELECTRIC SHOCK, DO NOT
EXPOSE THIS APPLIANCE TO RAIN OR MOISTURE.
CAUTION : THE CLOCK RADIO MUST NOT BE USED IN ANY ENVIRONMENT
WHERE IT MAY BE SUBJECT TO THE DRIPPING OR SPLASHING OR WATER
OR OTHER LIQUIDS.
DO NOT CONNECT THE ANTENNA WIRE ON THE BACK OF THIS SET TO ANY
OUTDOOR ANTENNA
Mains plug is used as the disconnect device. It shall remain readily
operable and should not be obstructed during intended used. To
be completely disconnected the apparatus from supply mains, the
mains plug of the apparatus shall be disconnected from the mains
socket outlet completely.
BOTTOM OF SET : Battery compartment for 9 volt (6LR61) battery
(not included) for temporary time storage.
ELECTRONIC CLOCK OPERATION
1. Plug the AC line cord into 230V AC home outlet
2. The set is now working as an electronic clock and it will flash
the clock figures to show you it is not set correctly.
3. To set the correct time, depress the Time Set Button (2) and
Hour Button (6) simultaneously, release the buttons
approximately before the correct time is reached. Now depress
the Minute Button (7) and the Time Set Button (2)
simultaneously, to set the readout to the correct time precisely.
RADIO OPERATION
1. Slide the ON/OFF/AUTO Switch (1) to "ON" position.
2. Slide Band Switch (9) to FM or AM position.
3. Turn the Volume Control (8) to desired volume.
4. Turn the Tuning Control (10) to select your favorite station.
5. Antenna
For AM reception, this radio incorporates a highly sensitive ferrite
core bar antenna.
For FM reception, this set is specially equipped with an external
wire as FM antenna. Be sure to untwist it to its fullest length for
peak performance.
WAKE TO RADIO
Having selected your station and set the volume at the desired
level, proceed as follows :
1. Slide the ON/OFF/AUTO Switch (1) to "AUTO" position.
2. Press the Alarm Set Button (3) and whilst this button is
depressed, press the Hour Button (6) and then the Minute Button
(7) until the time is reached at which you wish to wake. The wake
up time is now entered into the timer memory. To check the wake
up time, simply press the Alarm Set Button (3) and the clock will
show the present time. The preset wake up time will continue
to be registered in the time memory and the radio will switch on
by itself at the same time the next day. To switch the radio off,
simply press the Alarm Off Button (3).
When wake to radio is set, but want to listen radio before alarm
time set. Press SLEEP button (4) once will turn radio on and
press SNOOZE button (5) once will turn radio off.
WAKE TO BUZZER
Set the controls as for "Wake to Radio" but volume control (8) to
BUZZER position. The buzzer can then be switched off by pressing
the Alarm Off Button (3) or it can be converted to the radio by
selecting switch (1) to "ON" position.
SLEEP TO RADIO
The radio can be set to play and to switch off automatically for a
length of time from 1 minute to 1 hour 59 minutes by following this
procedure - With all the controls preset in the "Wake to Radio"
positions, depress the Sleep Button (4) and press the Minute
Button (7) to count down to the desired sleep time. To switch off
the radio before the end of the registered sleep time period, simply
press the Snooze Button (5).
SNOOZE CONTROL
The Snooze Button (5) allows the user an extra sleep time of about
9 minutes after radio alarm is switched on at the preset wake up
time.
SPECIFICATION
Power Source ..........................: 230V ~ 50Hz
DC battery ...............................: 9V (1 x 9V 6LR61 Not included)
Radio Frequency ......................: AM 530-1600kHz:
: FM 88-108MHz
Power Consumption ................. : 5W
Precautions for correct disposal of the product.
The symbol shown on the equipment indicates that waste must
be disposed of in "separate collection" and so the product must not
be disposed of together with urban waste.
The user must take the product to special "separate waste
collection centres" provided by local government, or deliver it to
the retailer against the purchase of a new product.
Separate collection of waste and subsequent treatment, recycling
and disposal operations promotes the production of equipment
with recycled materials and limits negative effects on the
environment and on health caused by improper handling of waste.
Illegal disposal of the product leads to the enforcement of
administrative penalties.
7. Minute
8. Volume Control / Buzzer
9. Band Switch
10. Tuning Control
11. AUTO indicator
12. HI-LO Dimmer
ENGLISH

RC 850 BL AM/FM ALARM CLOCK
3
3
1. Sélecteur des fonctions : ON/OFF/AUTO ; Allumé/
Éteint/Réveil avec radio ou vibreur
2. Touche TIME, réglage de l’heure
3. Touche SLEEP, arrêt programmé
4. Touche ALM SET, réglage/arrêt de la sonnerie
5. Touche HOUR, réglage des heures
6. Touche MIN, réglage des minutes
7. Touche SNOOZE, arrêt temporaire
8. Bouton d’accord
9. Bouton de réglage VOLUME, réglage du volume
10. Logement des piles
11. Indicateur de sonnerie activé
12. Sélecteur DIMMER
13. Sélecteur AM/FM
INSTALLATION
Introduire la fiche du câble d’alimentation dans une prise de courant
230V - 50Hz ; l’afficheur clignotera tant que vous n’aurez pas réglé
l’heure.
RADIO
- Allumer la radio en amenant le sélecteur (1) sur ON.
- Sélectionner la gamme d'onde choisie avec le sélecteur AM/FM
(13).
- Syntoniser la station choisie au moyen du bouton d'accord (8).
- Régler le volume par le dispositif de réglage (9).
HORLOGE
Appuyer en même temps sur la touche TIME (2) et HOUR (5) pour
régler l’heure ; sur les boutons TIME (2) et MIN (6) pour régler les
minutes. L’écran affiche l’heure configurée.
RÉVEIL
Appuyer en même temps sur les touches ALM(4) et HOUR (5) pour
régler l’heure de réveil; sur les touches ALM(4) et MIN (6) pour
régler les minutes. En appuyant sur la touche ALM(4), l’écran
affiche l’heure de réveil.
RÉVEIL AVEC LA RADIO
Syntonisez la station de votre choix.
Après avoir réglé l’heure de réveil, amener le sélecteur (1) sur
AUTO, l’indicateur (11) s’allumera. Régler le volume au niveau
voulu. La radio s’allumera à l’heure fixée.
1
12
2
3
4
5
7
6
8
9
10
11 13
RÉVEIL AVEC LA SONNERIE
Apporter le contrôle de volume (9) à OFF.
Apporter le sélecteur (1) d’AUTO, le marqueur (11) s’allume
ARRÊT DU RÉVEIL
Pour désactiver l’alarme (buzzer ou radio) apportent le sélecteur
(1) à OFF.
Si vous désirez arrêter momentanément le réveil, appuyer sur la
touche SNOOZE (7); l’arrêt dure 9 minutes, passé ce délai le réveil
s’active à nouveau. L’opération peut être répétée plusieurs fois
en l’espace d’une heure.
FONCTION SLEEP
La touche SLEEP (3) vous permet de programmer l’arrêt de la radio
jusqu’à un maximum d’1 heure et 59 minutes. Ce réglage
s’effectue avec la radio allumée.
- Amener le sélecteur (1) sur OFF.
- Régler le temps d’arrêt en appuyant en même temps sur les
touches SLEEP (3) et MIN (6) ou bien SLEEP (3) et HOUR (5).
- Pour désactiver la fonction SLEEP avant le temps configuré, il
suffit d’appuyer sur la touche SNOOZE (7).
FONCTION DIMMER
La fonction d’atténuation permettent de régler la luminosité.
- Placer le sélecteur DIMMER (12) par la position LO, ils
permettent d’émettre une faible luminosité.
- Placer le sélecteur DIMMER (12) par la position HI, celles-ci
permettent d’émettre une luminosité élevée.
PILE TAMPON ANTI BLACK-OUT
Pour que l’horloge et la mémorisation de l’heure de réveil restent
en fonction même lors d’une coupure de courant électrique
momentanée, introduire une pile de 9V dans le logement spécifique
(10) sur le fond de l’appareil. Nous vous conseillons de remplacer
cette pile tous les six mois.
Si, en cas de coupure de courant, l’appareil affiche sur l’écran un
horaire incorrect et clignotant, remplacer la pile 9V.
Alimentation : ..........................2 piles de format « AA »
Dimensions : ...........................190 x 95 x 45 mm
Recommandations pour l'élimination correcte du
produit.
Le symbole figurant sur l'appareil indique que le produit fait l'objet
d'une " collecte séparée ". C'est pourquoi, le produit ne doit pas
être éliminé avec les déchets urbains.
L'utilisateur doit remettre le produit auprès de " décharges
spécialisées de collecte séparée " prévues par les autorités
locales, ou bien le rendre au revendeur quand il achètera un nouvel
appareil équivalent.
La collecte séparée du produit et les opérations successives de
traitement, recyclage et élimination favorisent la production
d'appareils composés par des matériaux recyclés ainsi que
permettent d'éviter des effets négatifs sur l'environnement et sur
la santé des personnes suite à une gestion impropre du déchet.
Toute élimination abusive du produit entraîne l'application de
sanctions administratives.
FRANCAISE
 Loading...