

Page 1
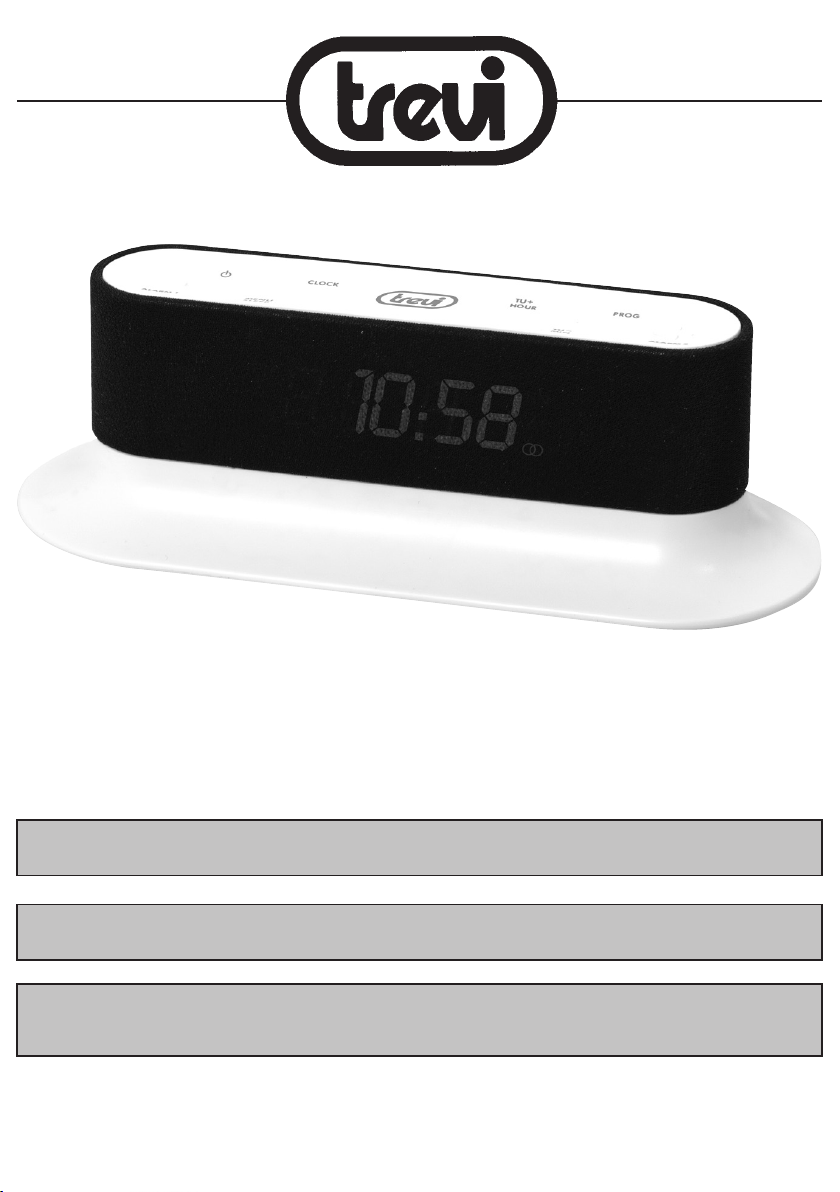
RC 830D
RADIO SVEGLIA ELETTRONICA
MANUALE D’USO
MULTILANGUAGE USER GUIDE
ENG FRA DEU ESP
* Per informazioni integrative e aggiornamenti di questo prodotto vedi: www.trevi.it
* For additional information and updates of this product see: www.trevi.it
Page 2
RC 830 D FM ALARM CLOCK
ITALIANO
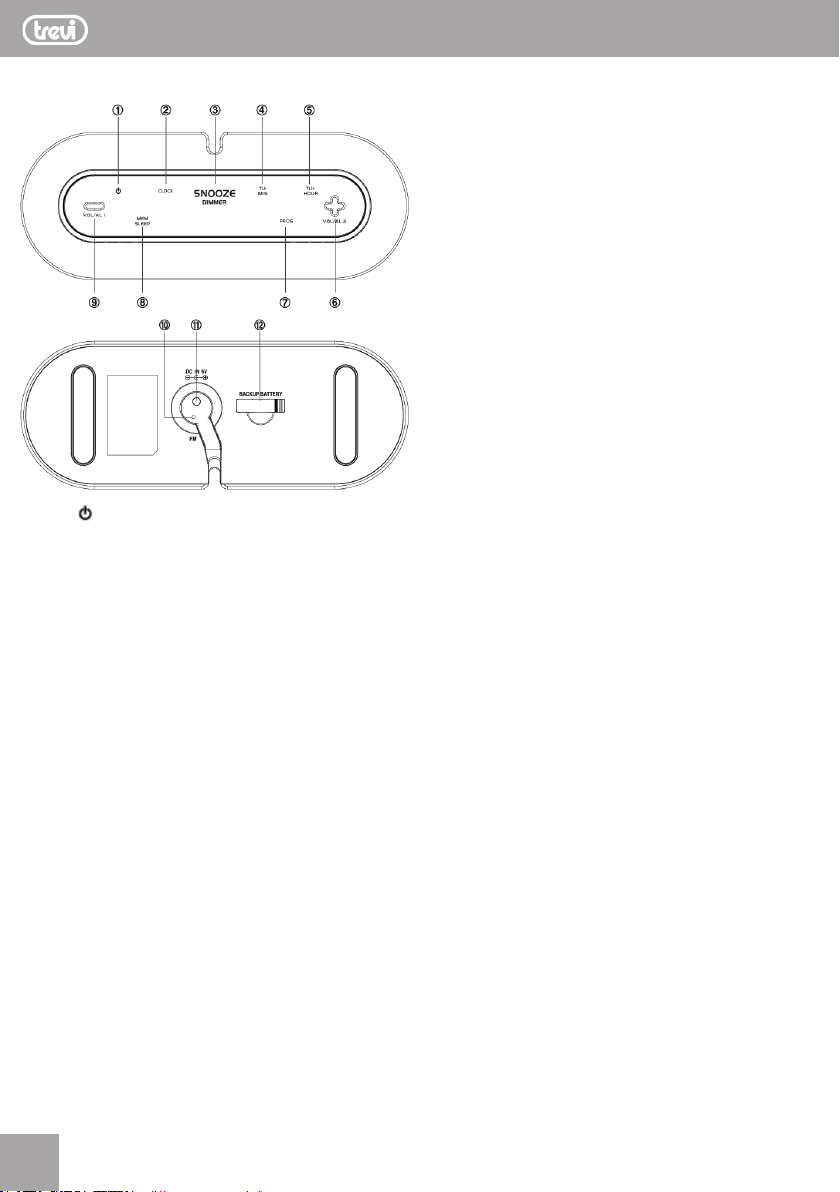
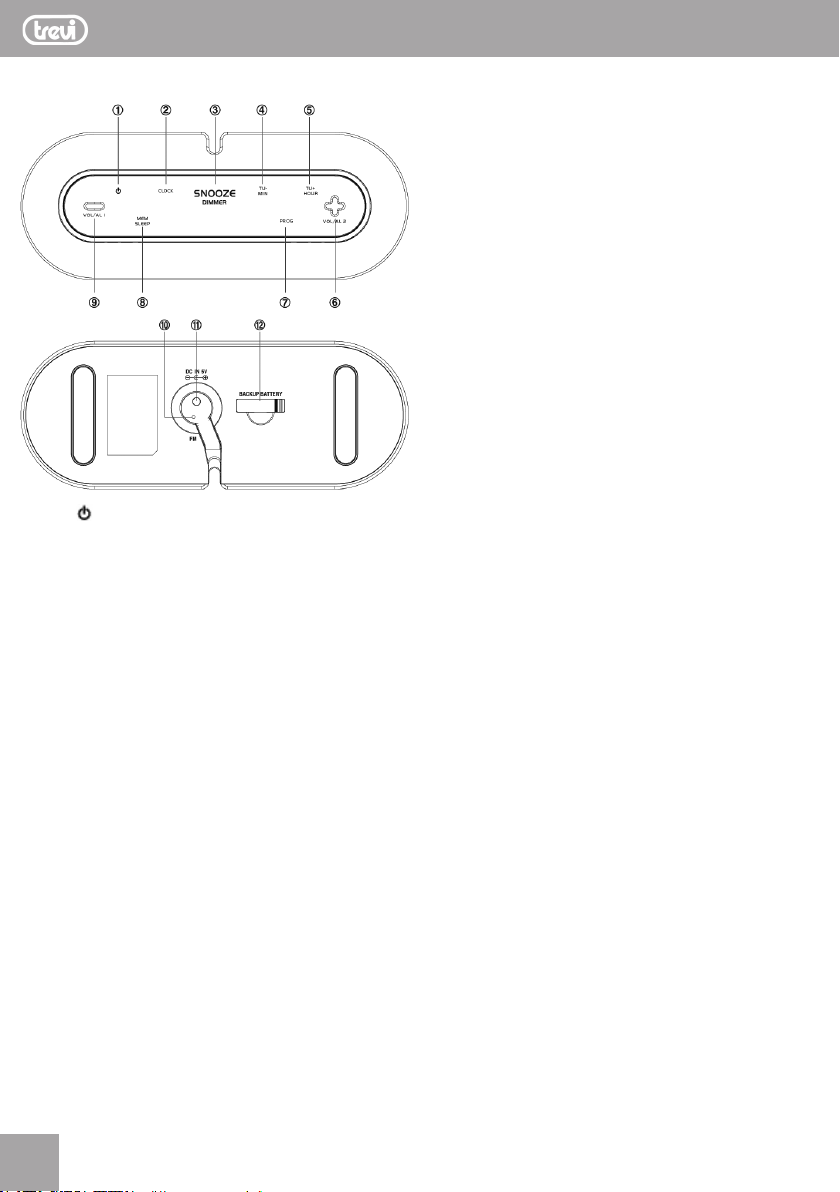
COMANDI
1. Tasto , accensione/spegnimento radio
2. Tasto CLOCK, regolazione orario
3. Tasto SNOOZE/DIMMER, arresto momentaneo allarme /
regolazione luminosità display
4. Tasto TU-/MIN, scansione frequenze radio /
regolazione minuti
5. Tasto TU+/HOUR, scansione frequenze radio /
regolazione ore Tasto
6. Tasto VOL+/AL2, regolazione volume / regolazione
sveglia2
7. Tasto PROG, selezione stazioni radio memorizzate /
automemorizzazione stazioni radio
8. Tasto MEM/SLEEP, visualizzazione orario 12/24 ore /
memorizzazione manuale stazioni radio / funzione sleep
9. Tasto VOL-/AL1, regolazione volume / regolazione sveglia1
10. Antenna FM
11. Presa DC 5V
12. Batteria tampone CR2025
INSTALLAZIONE
Inserire la spina dell’alimentatore in dotazione in una presa di
corrente 230V~50Hz, e lo spinotto nella presa DC 5V (11).
La radiosveglia RC 830D è provvista di una batteria tampone
per mantenere in funzione l’orologio e la memorizzazione
dell’orario anche durante una momentanea man canza di
energia elettrica.
Se si dovesse scaricare, estrarla dal suo alloggiamento (12)
e sostituirla seguendo le indicazioni di polarità.
REGOLAZIONE OROLOGIO E 12/24H
Una volta alimentata, il display lampeggerà per regolare
l’orario.
Se così non fosse, tenere premuto il tasto CLOCK (2).
Premere il tasto TU+/HOUR (5) per regolare l’ora.
Premere il tasto TU-/MIN (4) per regolare i minuti.
Premere il tasto CLOCK (2) per confermare la regolazione.
Tenere premuto il tasto MEM/SLEEP (8) per visualizzare
l’orario in modalità 12 o 24 ore.
REGOLAZIONE SVEGLIA
Questa radiosveglia è dotata di 2 allarmi/sveglia indipendenti.
Durante la visualizzazione dell’orario tenere premuto il tasto
VOL-/AL1 (9) per attivare l’allarme/sveglia1 (sul display
compare l’indicazione AL1).
Premere il tasto TU+/HOUR (5) per regolare l’ora.
Premere il tasto TU-/MIN (4) per regolare i minuti.
Premere il tasto VOL-/AL1 (9) per passare al tipo di allarme.
Premere il tasto TU+/HOUR (5) o il tasto TU-/MIN (4) per selezionare l’allarme come buzzer (bU22) o come radio (rAdI).
Premere il tasto VOL-/AL1 (9) per confer mare la regolazione
dell’allarme.
Nota: in caso di allarme selezionato come radio,
premere il tasto TU+/HOUR (5) o il tasto TU-/MIN (4)
per impostare il volume. Premere nuovamente il tasto
VOL-/AL1 (9) per confermare.
A questo punto l’allarme è attivo (indicazione AL1 sul display)
e suonerà all’orario indicato.
Quando suonerà premere il tasto SNOOZE/DIMMER (3)
per arrestare momentaneamente l’allarme e attivare lo
SNOOZE (indicazione AL1 sul display lampeggiante). L’allarme riprenderà a suonare dopo 9 minuti.
Per arrestare denitivamente l’allarme premere il tasto
VOL-/AL1 (9) durante il suono dell’allarme.
Per disattivare l’allarme premere il tasto VOL-/AL1 (9)
durante la visualizzazione dell’orario no alla scomparsa
dell’indicazione AL1 sul display.
Nota: per attivare l’allarme/sveglia2 seguire la stessa
procedura sopra descritta ma utilizzando il tasto
VOL+/AL2 (6).
2
2
Page 3

RC 830 D FM ALARM CLOCK
FUNZIONE DIMMER
Con la funzione dimmer è possibile impostare la luminosità
del display.
Durante la visualizzazione dell’orario premere il tasto
SNOOZE/DIMMER (3) per aumentare o diminuire la lumi-
nosità del display.
RADIO
Premere il tasto (1) per accendere la radio. Ripremerlo
per spegnerla.
Premere il tasto TU+/HOUR (5) o il tasto TU-/MIN (4) per
spostare la frequenza di 0,1MHz avanti o indietro.
Tenere premuto e rilasciare il tasto TU+/HOUR (5) o il tasto
TU-/MIN (4) per sintonizzarsi automaticamente sulla stazione
successiva o precedente.
Tenere premuto il tasto TU+/HOUR (5) o il tasto TU-/MIN (4)
per far avanzare o arretrare velocemente la frequenza. Rilasciare il tasto per arrestare l’avanzamento o l’arretramento.
Tenere premuto il tasto PROG (7) per memorizzare automaticamente le prime 20 stazioni radio disponibili.
Tenere premuto il tasto MEM/SLEEP (8) per memorizzare
la stazione radio in ascolto.
Premere il tasto PROG (7) per selezionare le stazioni radio
memorizzate.
Nel caso di stazione radio stereo, sul display verrà mostrato
il simbolo relativo.
ITALIANO
Avvertenze per il corretto smaltimento del
prodotto.
Il simbolo ripor tato sull’apparecchiatura indica che il riuto
deve essere oggetto di “raccolta separata” pertanto il
prodotto non deve essere smaltito insieme ai riuti urbani.
L’utente dovrà consegnare il prodotto presso gli appositi
“centri di raccolta differenziata” predisposti dalle amministrazioni comunali, oppure consegnarlo al rivenditore contro
acquisto di un nuovo prodotto.
La raccolta differenziata del riuto e le successive operazioni
di trattamento, recupero e smaltimento favoriscono la produzione di apparecchiature con materiali riciclati e limitano
gli effetti negativi sull’ambiente e sulla salute causati da una
gestione impropria del riuto.
Lo smaltimento abusivo del prodotto compor ta l’applicazione
di sanzioni amministrative.
REGOLAZIONE VOLUME
Durante l’ascolto della radio premere i tasti VOL+/AL2 (6)
e VOL-/AL1 (9) per regolare il volume di ascolto.
FUNZIONE SLEEP
Il pulsante MEM/SLEEP (8) vi permette di programmare lo
spe gnimento automatico della radio no a 90 minuti dopo
l’attivazione. Questa funzione va attivata a radio accesa.
Regolare il tempo di spegnimento premendo il tasto
MEM/SLEEP (8) più volte; i tempi permessi sono 90, 60,
30, 15, 00 (funzione SLEEP disattivata).
Quando la funzione SLEEP è attiva, sul display compare
l’indicazione Zz.
SPECIFICHE TECNICHE
Alimentazione: .....................DC 5V/600mA
Batteria tampone: .................1xCR2025
Gamma frequenza FM: .........87.5-108MHz
Consumo: ............................5W
3
3
Page 4
RC 830 D FM ALARM CLOCK
ENGLISH
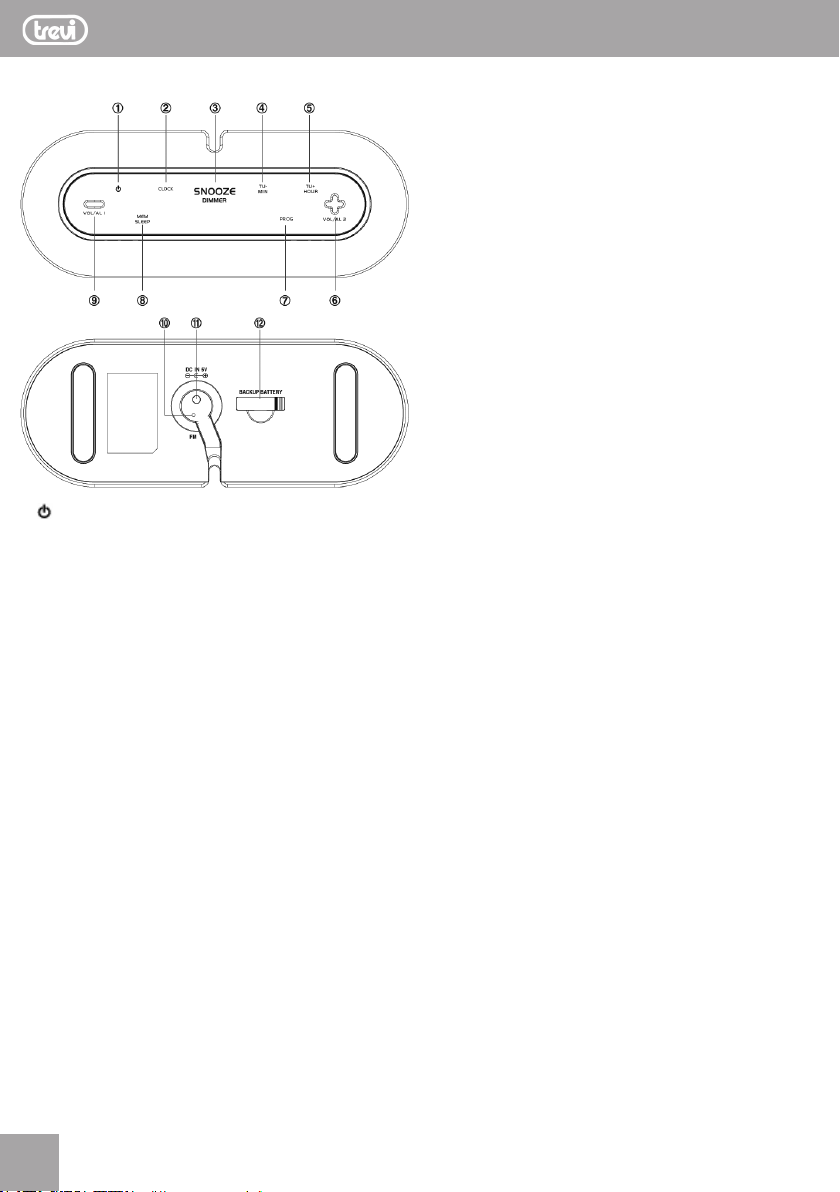
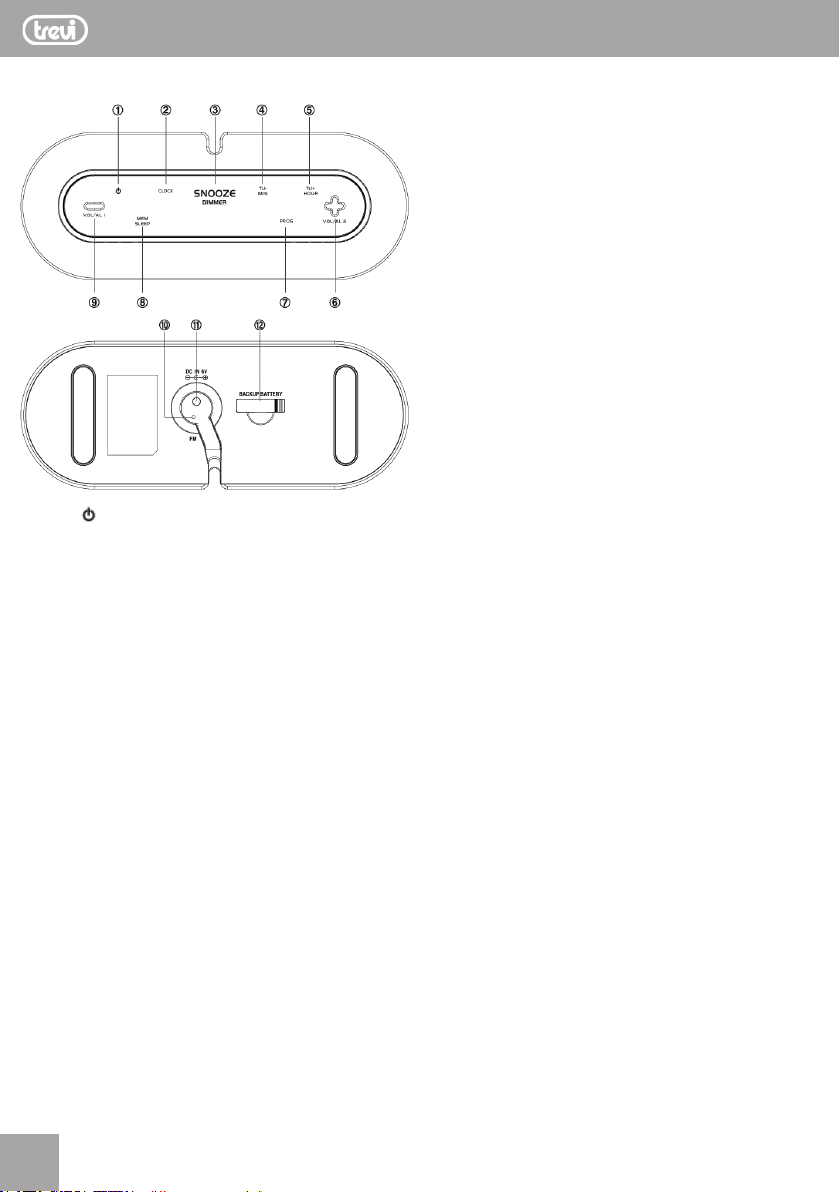
CONTROLS
1. button, radio on/off
2. CLOCK button, time settings
3. SNOOZE/DIMMER button, momentary alarm stop/display
brightness adjustment
4. TU-/MIN button, radio frequency scan / minute setting
5. TU+/HOUR button, radio frequency scan / hour setting
6. VOL+/AL2 button, volume control / alarm2 setting
7. PROG button, saved radio station selection / radio station
autosave function.
8. MEM/SLEEP button, 12/24-hour display / manual radio
station save function / sleep function
9. VOL-/AL1 button, volume control / alarm1 setting
10. FM antenna
11. 5V DC power inlet
12. CR2025 buffer battery
INSTALLATION
Insert the plug of the power supply provided into a
230V~50Hz mains outlet and the jack into the unit’s 5V
DC power inlet (11).
Your RC 830D clock radio is provided with a buffer battery,
used to keep the clock working and to retain the set time in
memory even in case of a temporary power cut.
Should the battery go at, remove it from the battery compartment (12) and replace it observing the correct polarity.
CLOCK AND 12/24-HOUR DISPLAY
SETTINGS
Once power is supplied to the unit, the display will blink,
prompting you to set the time.
If it is not blinking, hold down the CLOCK button (2).
Press the TU+/HOUR button (5) to set the hours.
Press the TU-/MIN button (4) to set the minutes.
Press the CLOCK button (2) to conrm your setting.
Hold down the MEM/SLEEP button (8) to display the time
in the 12 or 24-hour display mode.
ALARM CLOCK SETTINGS
Your clock radio has 2 independent alarms.
While the time is displayed, hold down the VOL-/AL1 button
(9) to activate the alarm1 function (‘AL1’ will appear on
the display).
Press the TU+/HOUR button (5) to set the hours.
Press the TU-/MIN button (4) to set the minutes.
Press the VOL-/AL1 button (9) to switch to the alarm type.
Press the TU+/HOUR button (5) or the TU-/MIN button (4)
to set the alarm to buzzer (bU22) or radio tuner (rAdI) mode.
Press the VOL-/AL1 button (9) to conrm your alarm setting.
Note: if you set the alarm to radio tuner mode, press the
TU+/HOUR button (5) or the TU-/MIN button (4) to set
the volume. Press the VOL-/AL1 button (9) to conrm.
The alarm is now activated (AL1 will appear on the display)
and it will sound at the time shown.
When the alarm sounds, press the SNOOZE/DIMMER button
(3) to temporarily stop the alarm and activate the SNOOZE
function (AL1 will blink on the display). The alarm will
resume after 9 minutes.
To stop the alarm completely, press the VOL-/AL1 button
(9) while it is sounding.
To deactivate the alar m, press the VOL-/AL1 button (9) while
the time is displayed, until AL1 disappears from the display.
Note: To activate the alarm2 function, follow the same
procedure as above, but use the VOL+/AL2 button (6).
4
4
Page 5

RC 830 D FM ALARM CLOCK
DIMMER FUNCTION
The dimmer function is used to adjust the display brightness.
While the time is displayed, press the SNOOZE/DIMMER
button (3) to increase or decrease the display brightness.
RADIO TUNER
Press the button (1) to turn the radio on. Press the button
again to turn it off.
Press the TU+/HOUR button (5) or the TU-/MIN button (4)
to put the frequency forward or back by 0.1MHz.
Hold down and release the TU+/HOUR button (5) or the
TU-/MIN button (4) to automatically tune to the next or
previous radio station.
Hold down the TU+/HOUR button (5) or the TU-/MIN button
(4) to rapidly increase or decrease the frequency. Release
the button to stop increasing or decreasing the frequency.
Hold down the PROG button (7) to automatically save the
rst 20 radio stations available.
Hold down the MEM/SLEEP button (8) to save the radio
station you are currently listening to.
Press the PROG button (7) to select from the radio stations
saved.
If a radio station is broadcasting in stereo, the relevant
symbol will appear on the display.
VOLUME CONTROL
Press the VOL+/AL2 button (6) or the VOL-/AL1 button (9)
while listening to the radio to adjust its volume.
ENGLISH
Precautions for correct disposal of the product.
The symbol shown on the equipment indicates that waste
must be disposed of in “separate collection” and so the
product must not be disposed of together with urban waste.
The user must take the product to special “separate waste
collection centres” provided by local government, or deliver
it to the retailer against the purchase of a new product.
Separate collection of waste and subsequent treatment,
recycling and disposal operations promotes the production
of equipment with recycled materials and limits negative
effects on the environment and on health caused by improper
handling of waste.
Illegal disposal of the product leads to the enforcement of
administrative penalties.
SLEEP FUNCTION
The MEM/SLEEP button (8) is used to schedule automatic
radio turn-off up to 90 minutes after activation. In order to
use this function, the radio must be on.
Adjust the turn-off time by repeatedly pressing the
MENU/SLEEP button (8); allowed settings are 90, 60, 30,
15 or 00 (SLEEP function deactivated).
When the SLEEP function is activated, Zz will appear on
the display.
TECHNICAL SPECIFICATIONS
Power supply: ......................DC 5V/600mA
Buffer battery: ......................1xCR2025
FM frequency range: ............87.5-108MHz
Power consumption: ............5W
5
5
Page 6
RC 830 D FM ALARM CLOCK
FRANÇAISE
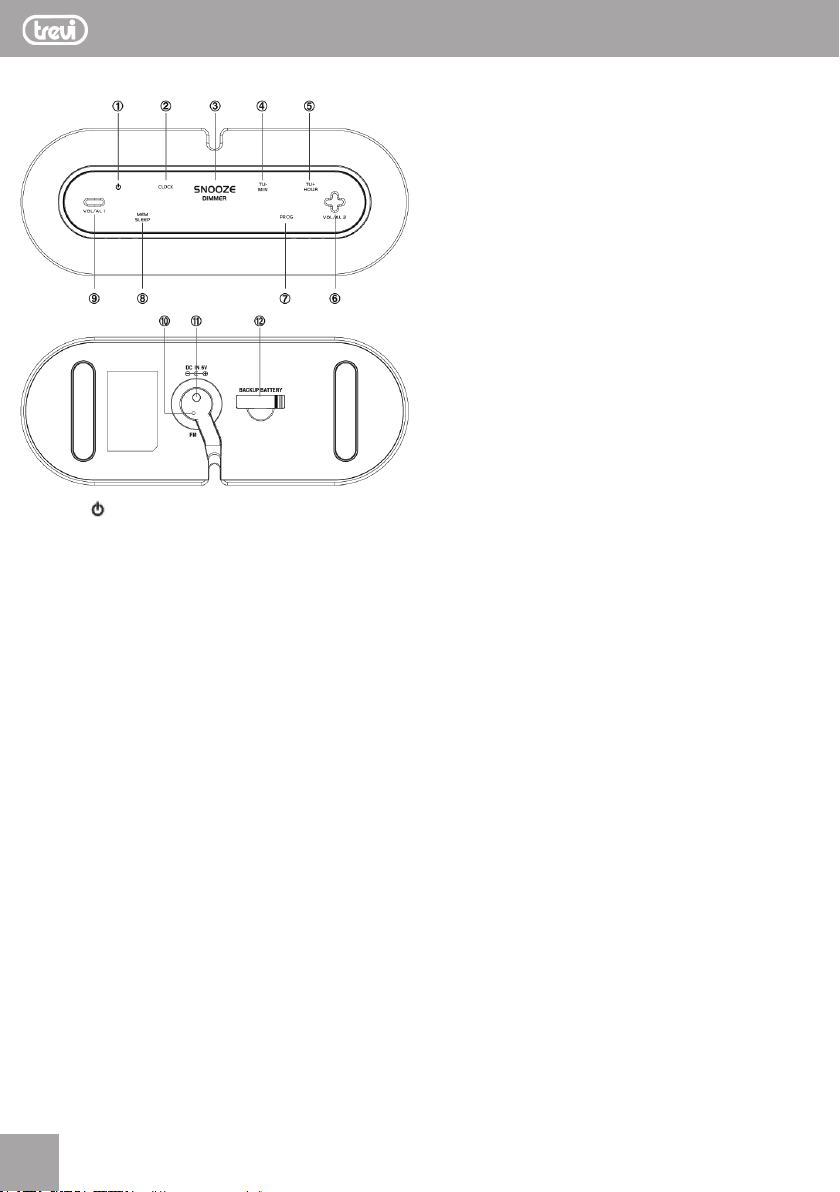
COMMANDES
1. Touche , marche/arrêt radio
2. Touche CLOCK, réglage de l’horaire
3. Bouton SNOOZE/DIMMER, arrêt momentané d’alarme /
réglage de luminosité de l’afchage
4. Touche TU-/MIN, balayage fréquences radio / réglage
des minutes
5. Touche TU+/HOUR, balayage fréquences radio/réglage
des heures
6. Touche VOL+/AL2, réglage du volume / réglage du réveil2
7. Touche PROG, sélection des stations de radio mémorisées
/ mémorisation automatique des stations de radio
8. Touche MEM/SLEEP, afchage horaire 12/24 heures /
mémorisation manuelle des stations de radio / fonction
sleep
9. Touche VOL-/AL1, réglage du volume / réglage du réveil1
10. Antenne FM
11. Prise DC 5V
12. Pile tampon CR2025
6
6
INSTALLATION
Branchez la che de l’alimentateur fournie en dotation sur
une prise de courant 230V~50Hz et la petite che sur la
prise DC 5V (11).
Le radio-réveil RC 830D est équipé d’une pile tampon qui
permet de sauvegarder le fonctionnement de l’horloge et
la mémorisation de l’horaire même pendant une panne
momentanée d’électricité.
Si elle devait se décharger, retirez-la de son logement (12)
et remplacez-la en respectant la polarité.
RÉGLAGE DE L’HORLOGE ET 12/24H
Une fois le radio-réveil branché, l’afcheur clignote pour
permettre le réglage de l’horaire.
Si cela n’était pas le cas, appuyez longuement sur la touche
CLOCK (2).
Appuyez sur la touche TU+/HOUR (5) pour régler l’heure.
Appuyez sur la touche TU-/MIN (4) pour régler les minutes.
Appuyez sur la touche CLOCK (2) pour conrmer le réglage.
Appuyez longuement sur la touche MEM/SLEEP (8) pour
afcher l’horaire en mode 12 ou 24 heures.
RÉGLAGE RÉVEIL
Ce radio-réveil est équipé de 2 alarmes/réveils indépendants.
Pendant que l’horaire est afché, appuyez longuement
sur la touche VOL-/AL1 (9) pour activer l’alarme/réveil1
(l’indication AL1 est afchée).
Appuyez sur la touche TU+/HOUR (5) pour régler l’heure.
Appuyez sur la touche TU-/MIN (4) pour régler les minutes.
Appuyez sur la touche VOL-/AL1 (9) pour basculer vers le
type d’alarme.
Appuyez sur la touche TU+/HOUR (5) ou sur la touche
TU-/MIN (4) pour sélectionner l’alarme en mode vibreur
(bU22) ou en mode radio (rAdI).
Appuyez sur la touche VOL-/AL1 (9) pour conrmer le
réglage de l’alarme.
Remarque: si l’alarme est sélectionnée en mode radio,
appuyez sur la touche TU+/HOUR (5) ou sur la touche
TU-/MIN (4) pour régler le volume. Appuyez sur le bouton
VOL-/AL1 (9) pour conrmer.
L’alarme est maintenant activée (indication AL1 afchée) et
va sonner à l’horaire indiqué.
Lorsqu’elle sonne, appuyez sur la touche SNOOZE/DIMMER
(3) pour l’arrêter momentanément et activer la fonction
SNOOZE (l’indication AL1 sur l’afcheur clignote). L’alarme
recommence à sonner au bout de 9 minutes.
Pour arrêter dénitivement l’alarme, appuyez sur la toucheVOL-/AL1 (9) pendant qu’elle sonne.
Pour désactiver l’alarme, appuyez sur la touche VOL-/AL1
(9) pendant que l’horaire est afché et tant que l’indication
AL1 sur l’afcheur ne disparaît.
Page 7

RC 830 D FM ALARM CLOCK
Remarque: pour activer l’alarme/réveil2 suivez la même
procédure telle que décrite ci-dessus, mais en utilisant
la touche VOL+/AL2 (6).
FONCTION DIMMER
La fonction dimmer permet de régler la brillance de l’afcheur.
Pendant que l’horaire est afché, appuyez sur la touche
SNOOZE/DIMMER (3) pour augmenter ou diminuer la
brillance de l’afcheur.
RADIO
Appuyez sur la touche (1) pour allumer la radio. Appuyez
à nouveau sur la même touche pour l’éteindre.
Appuyez sur la touche TU+/HOUR (5) ou sur la touche
TU-/MIN (4) pour changer la fréquence de 0,1MHz en
avant ou en arrière.
Appuyez longuement et relâchez la touche TU+/HOUR (5)
ou Ia touche TU-/MIN (4) pour syntoniser automatiquement
la station successive ou précédente.
Gardez la touche TU+/HOUR (5) ou Ia touche TU-/MIN (4)
enfoncée pour faire avancer ou reculer rapidement la fréquence. Relâchez la touche pour arrêter l’avance ou le recul.
Gardez enfoncée la touche PROG (7) pour mémoriser automatiquement les 20 premières stations de radio disponibles.
Appuyez longuement sur la touche MEM/SLEEP (8) pour
mémoriser la station de radio à l’écoute.
Appuyez sur la touche PROG (7) pour sélectionner les
stations de radio mémorisées.
Si la station de radio transmet en stéréo, sur l’afcheur
apparaît le symbole correspondant.
FRANÇAISE
Recommandations pour l’élimination correcte
du produit.
Le symbole gurant sur l’appareil indique que le produit fait
l’objet d’une “ collecte séparée “. C’est pourquoi, le produit
ne doit pas être éliminé avec les déchets urbains.
L’utilisateur doit remettre le produit auprès de “ décharges
spécialisées de collecte séparée “ prévues par les autorités
locales, ou bien le rendre au revendeur quand il achètera
un nouvel appareil équivalent.
La collecte séparée du produit et les opérations successives de traitement, recyclage et élimination favorisent
la production d’appareils composés par des matériaux
recyclés ainsi que permettent d’éviter des effets négatifs
sur l’environnement et sur la santé des personnes suite à
une gestion impropre du déchet.
Toute élimination abusive du produit entraîne l’application
de sanctions administratives.
RÉGLAGE DU VOLUME
Pendant l’écoute de la radio, appuyez sur les touches VOL+/
AL2 (6) et VOL-/AL1 (9) pour régler le volume d’écoute.
FONCTION SLEEP
En appuyant sur la touche MEM/SLEEP (8), vous pouvez
programmer l’arrêt automatique de la radio jusqu’à 90
minutes dès son activation. Pour activer cette fonction, la
radio doit être allumée.
Réglez le délai d’arrêt en appuyant plusieurs fois sur la
touche MENU/SLEEP (8) ; les délais disponibles sont 90,
60, 30, 15, 00 (fonction SLEEP désactivée).
Quand la fonction SLEEP est activée, l’indication Zz est
afchée.
SPÉCIFICATIONS TECHNIQUES
Alimentation : .......................DC 5V/600mA
Pile tampon : ........................1xCR2025
Gamme des fréquences FM: .87.5-108MHz
Consommation : ..................5W
7
7
Page 8
RC 830 D FM ALARM CLOCK
DEUTSCH
BEDIENELEMENTE
1. Taste , Radio ein-/ausschalten
2. Taste CLOCK, Uhrzeiteinstellung
3. Taste SNOOZE/DIMMER, momentane Alarm-stop /
Einstellen der Displayhelligkeit
4. Taste TU-/MIN, Suchlauf der Radiofrequenzen / Minuteneinstellung
5. Taste TU+/HOUR, Suchlauf der Radiofrequenzen /
Stundeneinstellung
6. Taste VOL+/AL2, Lautstärkeregulierung / Einstellung der
Weckzeit2
7. Taste PROG, Auswahl der gespeicherten Radiosender /
automatische Speicherung der Radiosender
8. Taste MEM/SLEEP, Anzeige der Uhrzeit 12/24 Stunden /
Manuelle Abstimmung der Radiosender / Funktion sleep
9. Taste VOL-/AL1, Lautstärkeregulierung / Einstellung der
Weckzeit1
10. FM-Antenne
11. Gleichstrombuchse DC 5V
12. Pufferbatterie CR2025
8
8
INSTALLATION
Den Netzstecker des mitgelieferten Netzgerätes an eine
Steckdose 230V~50Hz anschließen und den Stecker in
die Buchse des Versorgungseingangs DC 5V (11) stecken.
Der Radiowecker RC 830D ist mit einer Pufferbatterie ausgestattet, um die Uhrzeit und die eingestellte Weckzeit auch bei
einem vorübergehenden Stromausfall aufrecht zu erhalten.
Sollte deren Ladezustand zu gering sein, wird sie aus ihrem
Sitz (12) herausgenommen und durch eine neue ersetzt,
dabei die Polaritätskennzeichnung beachten.
EINSTELLUNG DER UHRZEIT UND
12/24H
Wenn das Gerät mit Strom versorgt wird, blinkt das Display
auf, damit die Uhrzeit eingestellt werden kann.
Wenn dies nicht der Fall ist, die Taste CLOCK (2) gedrückt
halten.
Die TU+/HOUR Taste (5) drücken, um die Stunden einzustellen.
Die Taste TU-/MIN (4) drücken, um die Minuten einzustellen.
Zur Bestätigung der Einstellung die Taste CLOCK (2) drücken.
Die Taste MEM/SLEEP (8) gedrückt halten, um den Anzeigemodus der Uhrzeit mit 12 oder 24 Stunden zu wählen.
WECKZEIT EINSTELLEN
Mit diesem Radiowecker können zwei verschiedene, voneinander unabhängige Alarme/Weckzeiten eingestellt werden.
Die Taste VOL-/AL1 (9) während der Zeitanzeige gedrückt
halten, um den Alarm/Weckzeit1 zu aktivieren (auf dem
Display erscheint die Anzeige AL1).
Die TU+/HOUR Taste (5) drücken, um die Stunden einzustellen.
Die Taste TU-/MIN (4) drücken, um die Minuten einzustellen.
Die Taste VOL-/AL1 (9) drücken, zu wechseln die Erinnerungsart.
Dann die Taste TU+/HOUR (5) oder die Taste TU-/MIN (4)
drücken, um den Alarm als Summerton (bU22) oder als
Radio (rAdI) auszuwählen.
Die Taste VOL-/AL1 (9) drücken, um die Alarmeinstellung
zu bestätigen.
Hinweis: wenn für den Alarm das Radio ausgewählt wird,
drückt man die Taste TU+/HOUR (5) oder die Taste
TU-/MIN (4), um die gewünschte Lautstärke einzustellen.
Drücken Sie die Taste VOL-/AL1 (9) zur Bestätigung.
Jetzt ist der Alarm aktiviert (Anzeige AL1 auf dem Display)
er wird bei der eingestellten Zeiteingabe läuten.
Wenn der Alarm läutet, die Taste SNOOZE/DIMMER (3)
drücken, um ihn vorübergehend abzustellen und die Funktion
SNOOZE aktivieren, (Anzeige AL1 auf dem aufblinkenden
Display). Der Alarm ertönt erneut jeweils nach 9 Minuten.
Page 9
RC 830 D FM ALARM CLOCK
Um den Alarm endgültig abzustellen, die Taste VOL-/AL1
(9) während des Läuttons drücken.
Um den Alarm auszuschalten, die Taste VOL-/AL1 (9) während der Zeitanzeige so lange drücken, bis zum Verschwinden
der Anzeige AL1 auf dem Display.
Hinweis: Um den Alarm/Weckzeit2 zu aktivieren, gleich
vorgehen, wie soeben beschrieben, dabei jedoch die
Taste VOL+/AL2 (6) verwenden.
FUNKTION DIMMER
Mit der Funktion dimmer kann der Helligkeitsgrad des
Displays eingestellt werden.
Während der Zeitanzeige die Taste SNOOZE/DIMMER (3)
drücken, um die Helligkeit des Displays zu erhöhen oder
zu verringern.
RADIOBETRIEB
Die Taste (1) drücken, um das Radio einzuschalten. Zum
Ausschalten die Taste erneut drücken.
Dann die Taste TU+/HOUR (5) oder die Taste TU-/MIN
(4) drücken, um die Frequenz um 0,1MHz vorwärts oder
rückwärts zu verschieben.
Die Taste TU+/HOUR (5) oder die Taste TU-/MIN (4) gedrückt
halten und dann loslassen, um automatisch den nächsten/
vorherigen Sender abzustimmen.
Die Taste TU+/HOUR (5) oder die Taste TU-/MIN (4) gedrückt halten, um die Frequenzabtastung schnell vor- bzw.
rücklaufen zu lassen. Die Taste loslassen, um den Vorlauf
bzw. Rücklauf anzuhalten.
Die Taste PROG (7) gedrückt halten, um die ersten 20
verfügbaren Radiosender automatisch zu speichern.
Die Taste MEM/SLEEP (8) gedrückt halten, um den Radiosender, der gerade empfangen wird, einzuspeichern.
Die Taste PROG (7) drücken, um die eingespeicher ten
Radiosender auszuwählen.
Im Fall von Stereo-Radiosendern wird das entsprechende
Symbol auf dem Display angezeigt.
DEUTSCH
TECHNISCHE SPEZIFIKATIONEN
Versorgung: .........................DC 5V/600mA
Pufferbatterie: ......................1xCR2025
Frequenzbereich FM: ............87.5-108MHz
Leistungsaufnahme: .............5W
Hinweise zur ordnungsgemäßen Entsorgung des
Produkts.
Das auf dem Gerät angebrachte Symbol weist darauf hin,
dass das Altgerät “getrennt zu sammeln” ist und das Produkt
daher nicht zusammen mit dem Gemeindeabfall entsorgt
werden darf.
Der Benutzer muss das Produkt zu den entsprechenden, von
der Gemeindeverwaltung eingerichteten “Wer tstoffsammelstellen” bringen oder dem Händler beim Kauf eines neuen
Produkts übergeben.
Die getrennte Müllsammlung und anschließende Aufbereitung, Wiederverwer tung und Entsorgung fördern die Herstellung von Geräten unter Verwendung wiederverwer teter
Materialien und vermindern die negativen Auswirkungen
auf die Umwelt und Gesundheit in Folge einer falschen
Müllverwaltung.
Die widerrechtliche Entsorgung des Produkts führt zur
Auferlegung von Verwaltungsstrafen.
LAUTSTÄRKEREGULIERUNG
Bei laufendem Radiobetrieb die Tasten VOL+/AL2 (6) e
VOL-/AL1 (9) drücken, um die Lautstärke einzustellen.
SLEEP-FUNKTION
Mit der Taste MEM/SLEEP (8) kann die Ausschaltzeit des
Radios bis 90 min. nach dem Einschalten programmiert
werden. Diese Funktion muss bei eingeschaltetem Radio
aktiviert werden.
Die Ausschaltzeit einstellen, indem die Taste MENU/SLEEP
(8) mehrere Male gedrückt wird; die vorgegebenen Zeiten
sind 90, 60, 30, 15, 00 (Funktion SLEEP nicht aktiviert).
Wenn die Funktion SLEEP aktiv ist, erscheint auf dem Display
die Anzeige Zz.
9
9
Page 10
RC 830 D FM ALARM CLOCK
ESPAÑOL
MANDOS
1. Botón , encendido/apagado de la radio
2. Botón CLOCK, ajuste de la hora
3. Botón SNOOZE/DIMMER, parada momentánea de la
alarma / ajuste de brillo de la pantalla
4. Botón TU-/MIN, exploración de las frecuencias de radio
/ ajuste de los minutos
5. Botón TU+/HOUR, exploración de las frecuencias de
radio / ajuste de las horas
6. Botón VOL+/AL2, ajuste de volumen / ajuste del despertador2
7. Botón PROG, selección de las emisoras de radio memorizadas / memorización automática de las emisoras
de radio
8. Botón MEM/SLEEP, visualización del formato horario
12/24 horas / memorización manual de las emisoras
de radio / función sleep
9. Botón VOL-/AL1, ajuste de volumen / ajuste del despertador1
10. Antena FM
11. Toma 5V CC
12. Batería-tampón CR2025
INSTALACIÓN
Introduzca el enchufe del alimentador suministrado en una
toma de corriente 230V~50Hz y la clavija en la toma 5V
CC (11).
La radio despertador RC 830D está provista de una
batería-tampón que mantiene en funcionamiento el reloj y la
memorización de la hora incluso durante una momentánea
interrupción de corriente.
En caso de que se agote, extráigala de su alojamiento (12)
y sustitúyala respetando las indicaciones de polaridad.
AJUSTE DEL RELOJ Y 12/24 H
Una vez alimentada, el display parpadeará para ajustar la hora.
Si así no fuese, mantenga pulsado el botón CLOCK (2).
Pulse el botón TU+/HOUR (5) para ajustar la hora.
Pulse el botón TU-/MIN (4) para ajustar los minutos.
Pulse el botón CLOCK (2) para conrmar el ajuste.
Mantenga pulsado el botón MEM/SLEEP (8) para visualizar
la hora en modo 12 o 24 horas.
AJUSTE DEL DESPERTADOR
Esta radio desper tador está dotada de 2 alarmas/despertador
independientes.
Durante la visualización de la hora, mantenga pulsado el
botón VOL-/AL1 (9) para activar la alarma/despertador1
(en el display aparece la indicación AL1).
Pulse el botón TU+/HOUR (5) para ajustar la hora.
Pulse el botón TU-/MIN (4) para ajustar los minutos.
Pulse el botón VOL-/AL1 (9) para cambiar el tipo de alarma.
Pulse el botón TU+/HOUR (5) o el botón TU-/MIN (4)
para seleccionar la alarma como buzzer (bU22) o come
radio (rAdI).
Pulse el botón VOL-/AL1 (9) para conrmar el ajuste de
la alarma.
Nota: en caso de haber seleccionado la alarma como
radio, pulse el botón TU+/HOUR (5) o el botón TU-/MIN
(4) para congurar el volumen. Presione el botón
VOL-/AL1 (9) para conrmar.
La alarma ha quedado activada (indicación AL1 en el display)
y sonará a la hora indicada.
Cuando suene, pulse el botón SNOOZE/DIMMER (3) para
detener momentáneamente la alarma y activar el SNOOZE
(indicación AL1 en el display parpadeante). La alarma
volverá a sonar tras 9 minutos.
Para detener denitivamente la alarma, pulse el botón
VOL-/AL1 (9) mientras esté sonando la alarma.
Para desactivar la alarma, pulse el botón VOL-/AL1 (9)
durante la visualización de la hora hasta que desaparezca
la indicación AL1 del display.
10
10
Page 11

RC 830 D FM ALARM CLOCK
Nota: para activar la alarma/despertador2, realice
el mismo procedimiento anteriormente descrito pero
utilizando el botón VOL+/AL2 (6).
FUNCIÓN DIMMER
Con la función dimmer es posible congurar el brillo del
display.
Durante la visualización de la hora, pulse el botón
SNOOZE/DIMMER (3) para aumentar o disminuir el brillo
del display.
RADIO
Pulse el botón (1) para encender la radio. Púlselo de
nuevo para apagarla.
Pulse el botón TU+/HOUR (5) o el botón TU-/MIN (4) para
avanzar o retroceder la frecuencia en pasos de 0,1MHz.
Mantenga pulsado y suelte el botón TU+/HOUR (5) o el
botón TU-/MIN (4) para sintonizar de forma automática la
emisora siguiente o anterior.
Mantenga pulsado el botón TU+/HOUR (5) o el botón
TU-/MIN (4) para realizar un avance o retroceso rápido de
la frecuencia. Suelte el botón para detener el avance o el
retroceso.
Mantenga pulsado el botón PROG (7) para memorizar
automáticamente las primeras 20 emisoras de radio
disponibles.
Mantenga pulsado el botón MEM/SLEEP (8) para memorizar
la emisora de radio actual.
Pulse el botón PROG (7) para seleccionar las emisoras de
radio memorizadas.
En caso de emisora de radio en estéreo, en el display se
mostrará el símbolo correspondiente.
ESPAÑOL
CARACTERÍSTICAS TÉCNICAS
Alimentación: .......................DC 5V/600mA
Batería-tampón: ...................1xCR2025
Rango de frecuencia FM: ......87.5-108MHz
Consumo: ............................5W
Advertencias para la correcta eliminación del
producto.
El símbolo que aparece en el aparato indica que el residuo
debe ser objeto de “recogida selectiva” por tanto el producto
no se debe eliminar junto con residuos urbanos.
El usuario deberá entregar el producto a los “centros de recogida selectiva” creados por las administraciones municipales
o bien al distribuidor cuando adquiera un nuevo producto.
La recogida selectiva del residuo y las sucesivas operaciones
de tratamiento, recuperación y eliminación favorecen la fabricación de aparatos con materiales reciclados y limitan los
efectos negativos en el medio ambiente y la salud causados
por una gestión incorrecta del residuo.
La eliminación abusiva del producto da lugar a la aplicación
de sanciones administrativas.
AJUSTE DE VOLUMEN
Durante la escucha de la radio, pulse los botones
VOL+/AL2 (6) y VOL-/AL1 (9) para ajustar el volumen de
escucha.
FUNCIÓN SLEEP
El botón MEM/SLEEP (8) permite programar el apagado
automático de la radio hasta 90 minutos después de su activación. Esta función debe activarse con la radio encendida.
Ajuste el tiempo de apagado pulsando el botón
MENU/SLEEP (8) varias veces; los tiempos permitidos son
90, 60, 30, 15, 00 (función SLEEP desactivada).
Cuando la función SLEEP está activada, en el display aparece
la indicación Zz.
11
11
Page 12

DICHIARAZIONE DI CONFORMITÀ
SI DICHIARA CHE:
L’apparecchio Radiosveglia marca
TREVI modello RC 830D
risponde alle prescrizioni dell’art. 2 comma 1
del D.M. 28 agosto 1995, n° 548
Rimini, 31/03/2013 TREVI S.p.A.
Strada Consolare Rimini-San Marino, 62
47924 Rimini (RN) Italy
Trevi S.p.A. - Strada Consolare Rimini-San Marino, 62
47924 Rimini (RN) Italy
Tel. 0541/756420 - Fax 0541/756430
www.trevi.it - E-mail: [email protected]
MADE IN CHINA
 Loading...