

Page 1
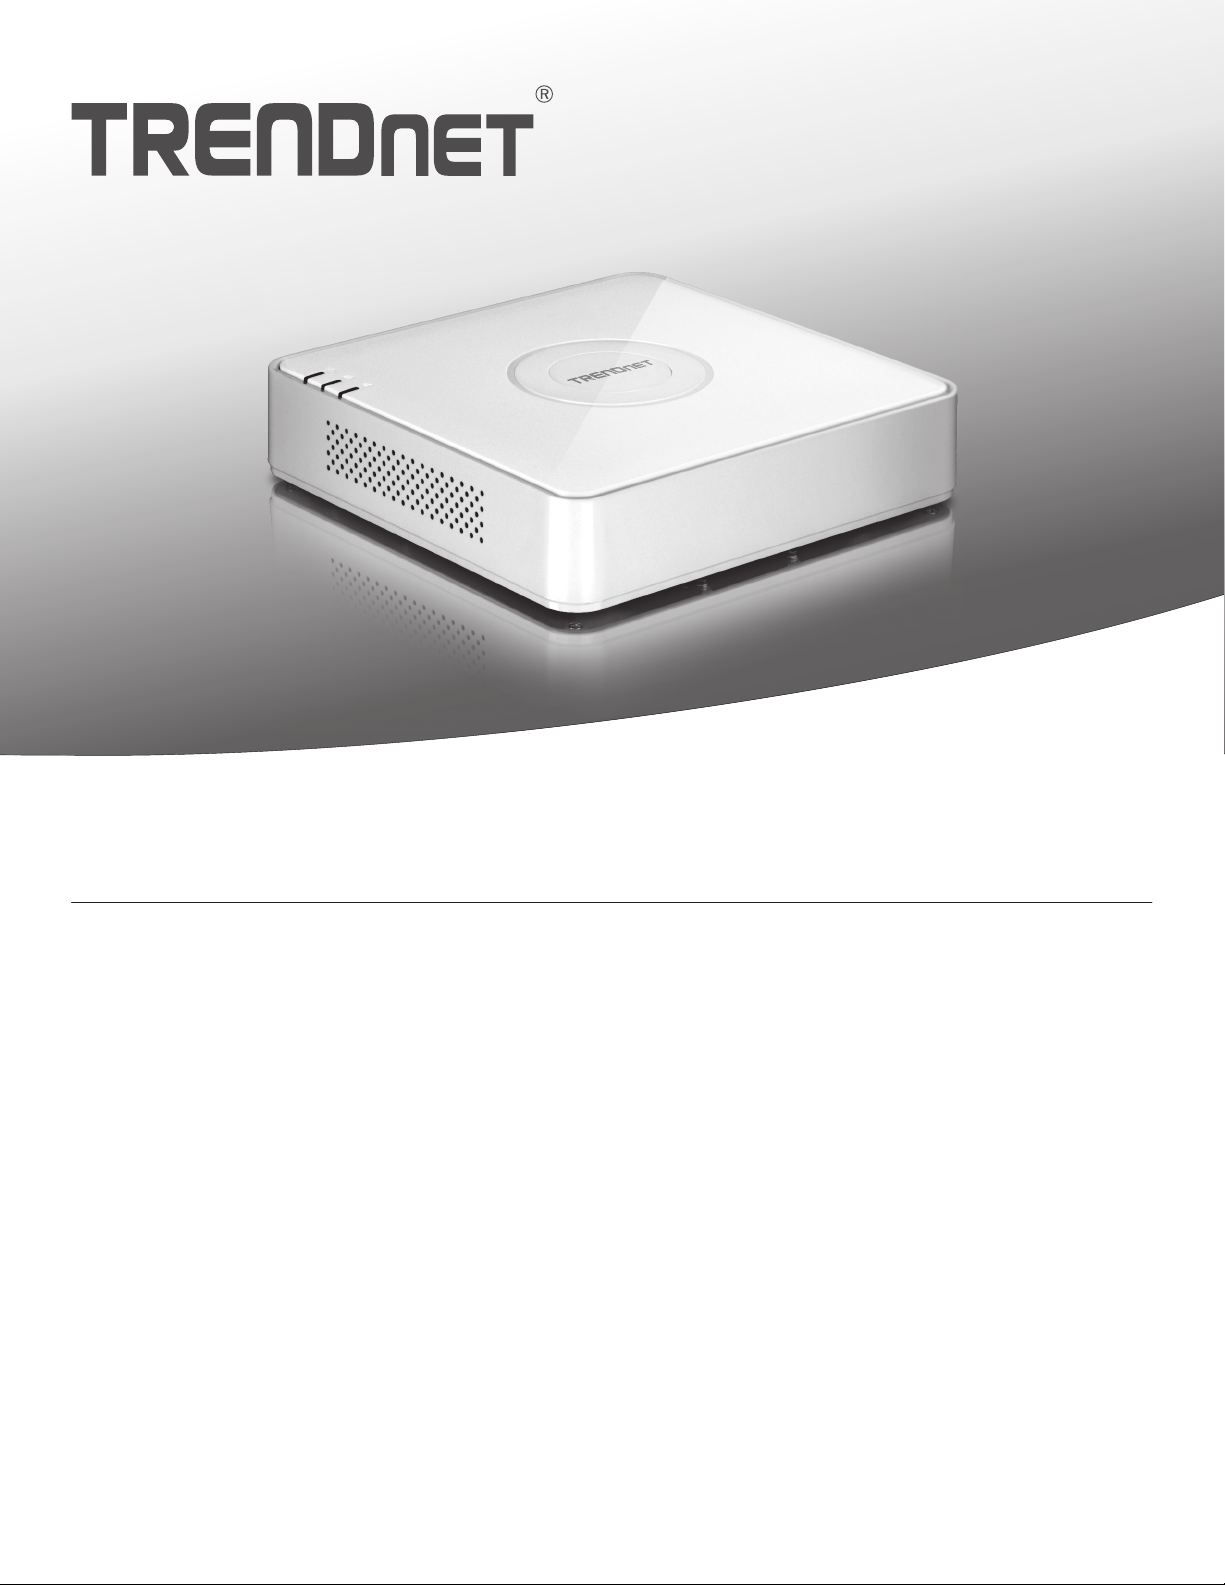
Ÿ 4-Channel 1080p HD PoE NVR
TV-NVR104
Ÿ Quick Installation Guide (1)
TV-NVR104 (V1)/06.16.2015
Page 2
1. Before You Start
TV-IP310PI
TV-IP311PI
TV-IP320PI
TV-IP321PI
TV-IP342PI
TV-IP343PI
TV-IP430PI
TV-IP450P
TV-IP662PI
Outdoor 3MP Full HD PoE Day/Night Network Camera
Outdoor 3MP Full HD PoE Dome Day/Night Network Camera
Outdoor 1.3 MP HD PoE IR Network Camera
Outdoor 1.3 MP HD PoE Dome IR Network Camera
Outdoor 2MP Full HD Vari-Focal PoE Day/Night Dome Network Camera
Outdoor 2MP Full HD Vari-Focal PoE Day/Night Network Camera
Outdoor 1.3 MP HD PoE+ Speed Dome Network Camera
Megapixel HD PoE Day/Night PTZ Network Camera
TV-IP320PI2K Outdoor 1.3 MP HD PoE IR Network Camera Twin Pack
TV-IP450PI Outdoor 1.3 MP HD PoE IR Speed Dome Network Camera
TV-IP322WI Outdoor 1.3 MP HD WiFi IR Network Camera
TV-IP312PI Outdoor 3MP Full HD 1080p PoE IR Network Camera
Outdoor 2MP Full HD 1080p PoE+ IR Mini Speed Dome Network Camera
Package Contents
Ÿ TV-NVR104 (Hard drive sold separately)
Ÿ 1 x 6 ft. Network cable
Ÿ Optical mouse
Ÿ CD-ROM (User's Guide)
Ÿ Quick Installation Guide
Ÿ Power adapter (48V DC, 1A)
Minimum Requirements
Ÿ Display with VGA or HDMI connection
Ÿ SATA I/II HDD or SSD up to 4TB
Ÿ Network camera
Ÿ Phillips screwdriver
Ÿ Computer with CD-ROM drive and wired network port (for manual configuration)
Compatible Hardware
Compatible Camera List
For the best performance and interoperability, the following camera models are suggested:
Note: Visit http://www.trendnet.com/info/TV-NVR104 for the most current camera compatibility list.
1
Page 3
Compatible Hard Drive
TV-IP310PI
TV-IP311PI
TV-IP320PI
TV-IP321PI
TV-IP430PI
TV-IP450P
Outdoor 3MP Full HD PoE Day/Night Network Camera
Outdoor 3MP Full HD PoE Dome Day/Night Network Camera
Outdoor 1.3 MP HD PoE IR Network Camera
Outdoor 1.3 MP HD PoE Dome IR Network Camera
Outdoor 1.3 MP HD PoE+ Speed Dome Network Camera
TV-IP320PI2K Outdoor 1.3 MP HD PoE IR Network Camera Twin Pack
TV-IP450PI
Outdoor 1.3 MP HD PoE IR Speed Dome Network Camera
TV-IP322WI Outdoor 1.3 MP HD WiFi IR Network Camera
Model Description
TV-IP312PI
Outdoor 3MP Full HD 1080p PoE IR Network Camera
Outdoor 2 MP Full HD 1080p PoE+ IR Mini Speed Dome Network Camera
The TV-NVR104 is compatible with 3.5” SATA I or SATA II hard drives. To ensure uninterrupted 24/7 recording, it is recommended that you
select a drive rated for video or surveillance applications.
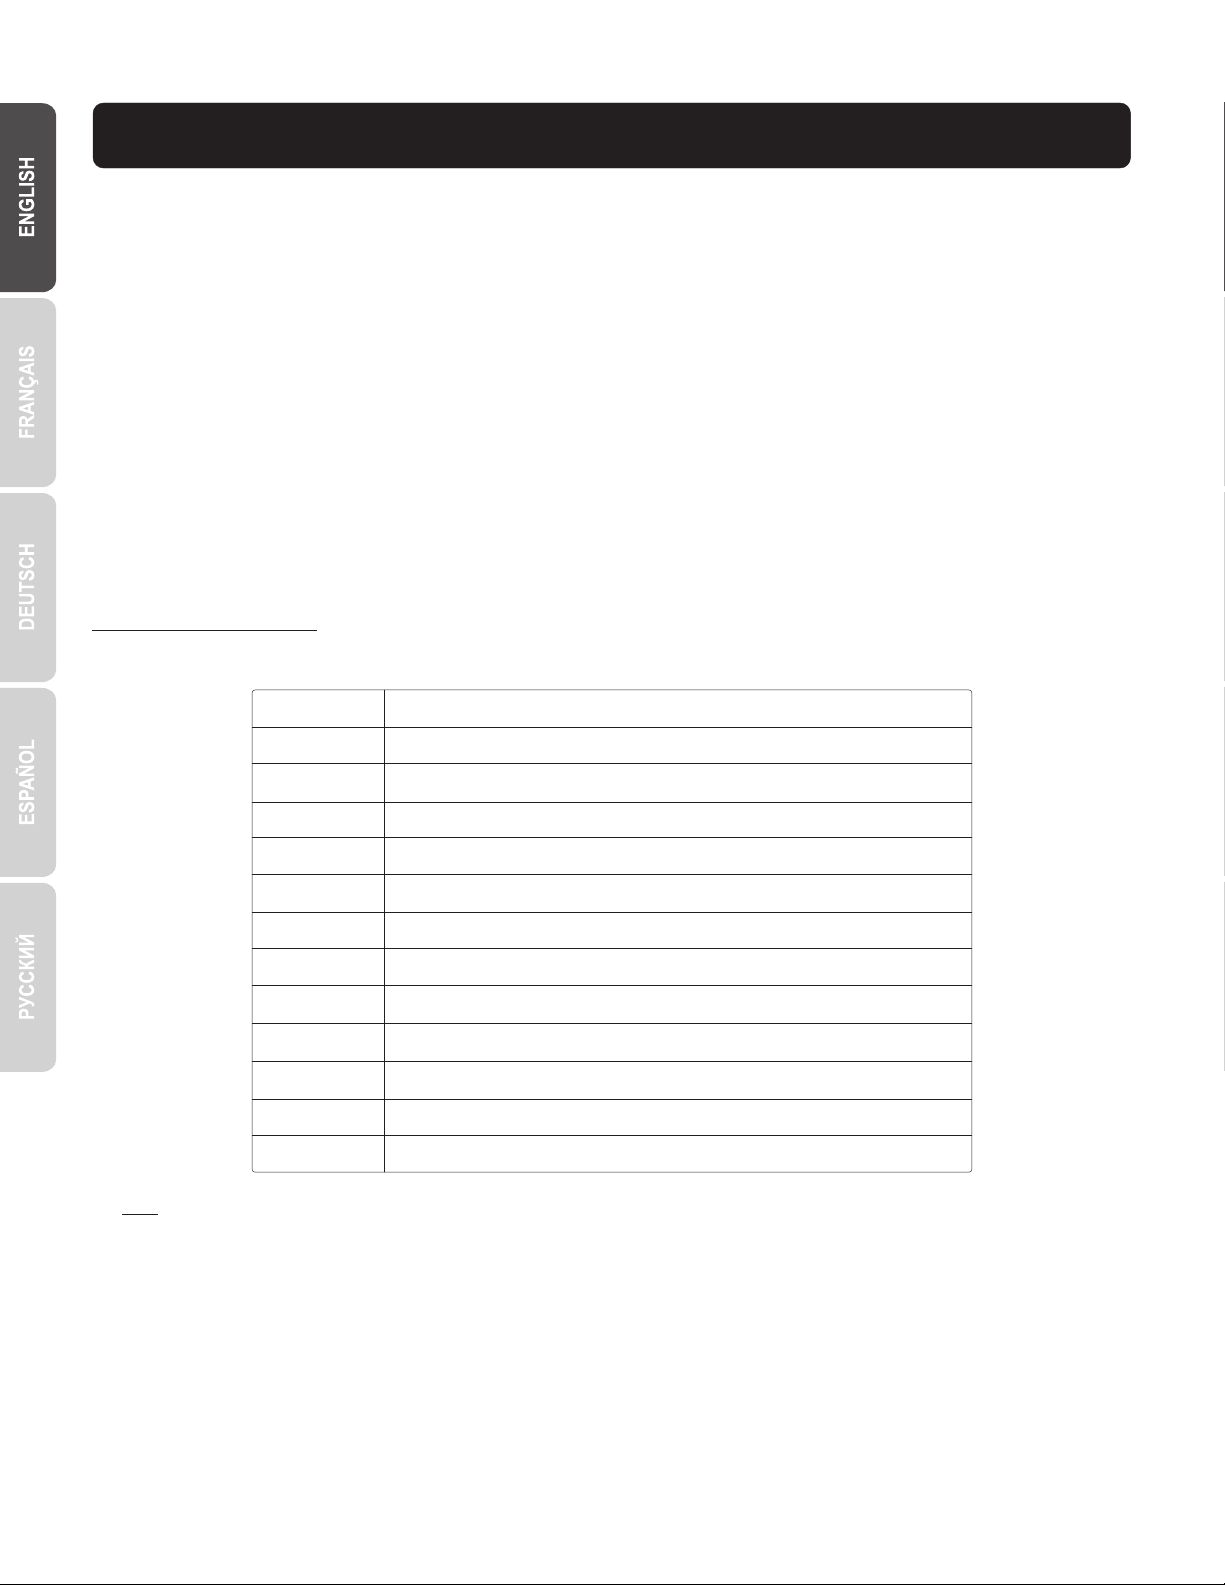
Mobile App
To remote viewing the live video
on your mobile device, please
go to the app store to search
and install the TRENDnet
IPView. Alternatively, scan the
QR code to download and install
the free TRENDnet IPView app.
Apple Android
1.1 Camera Configuration
For Plug and Play IP Cameras, no configuration is required. Go to Section 2, Hard Drive Installation.
Plug and Play IP Cameras
2
Page 4
1.2 Camera Requiring Manual Configuration
TV-IP342PI
TV-IP343PI
TV-IP662PI
Outdoor 2MP Full HD Vari-Focal PoE Day/Night Dome Network Camera
Outdoor 2MP Full HD Vari-Focal PoE Day/Night Network Camera
Megapixel HD PoE Day/Night PTZ Network Camera
Model Description
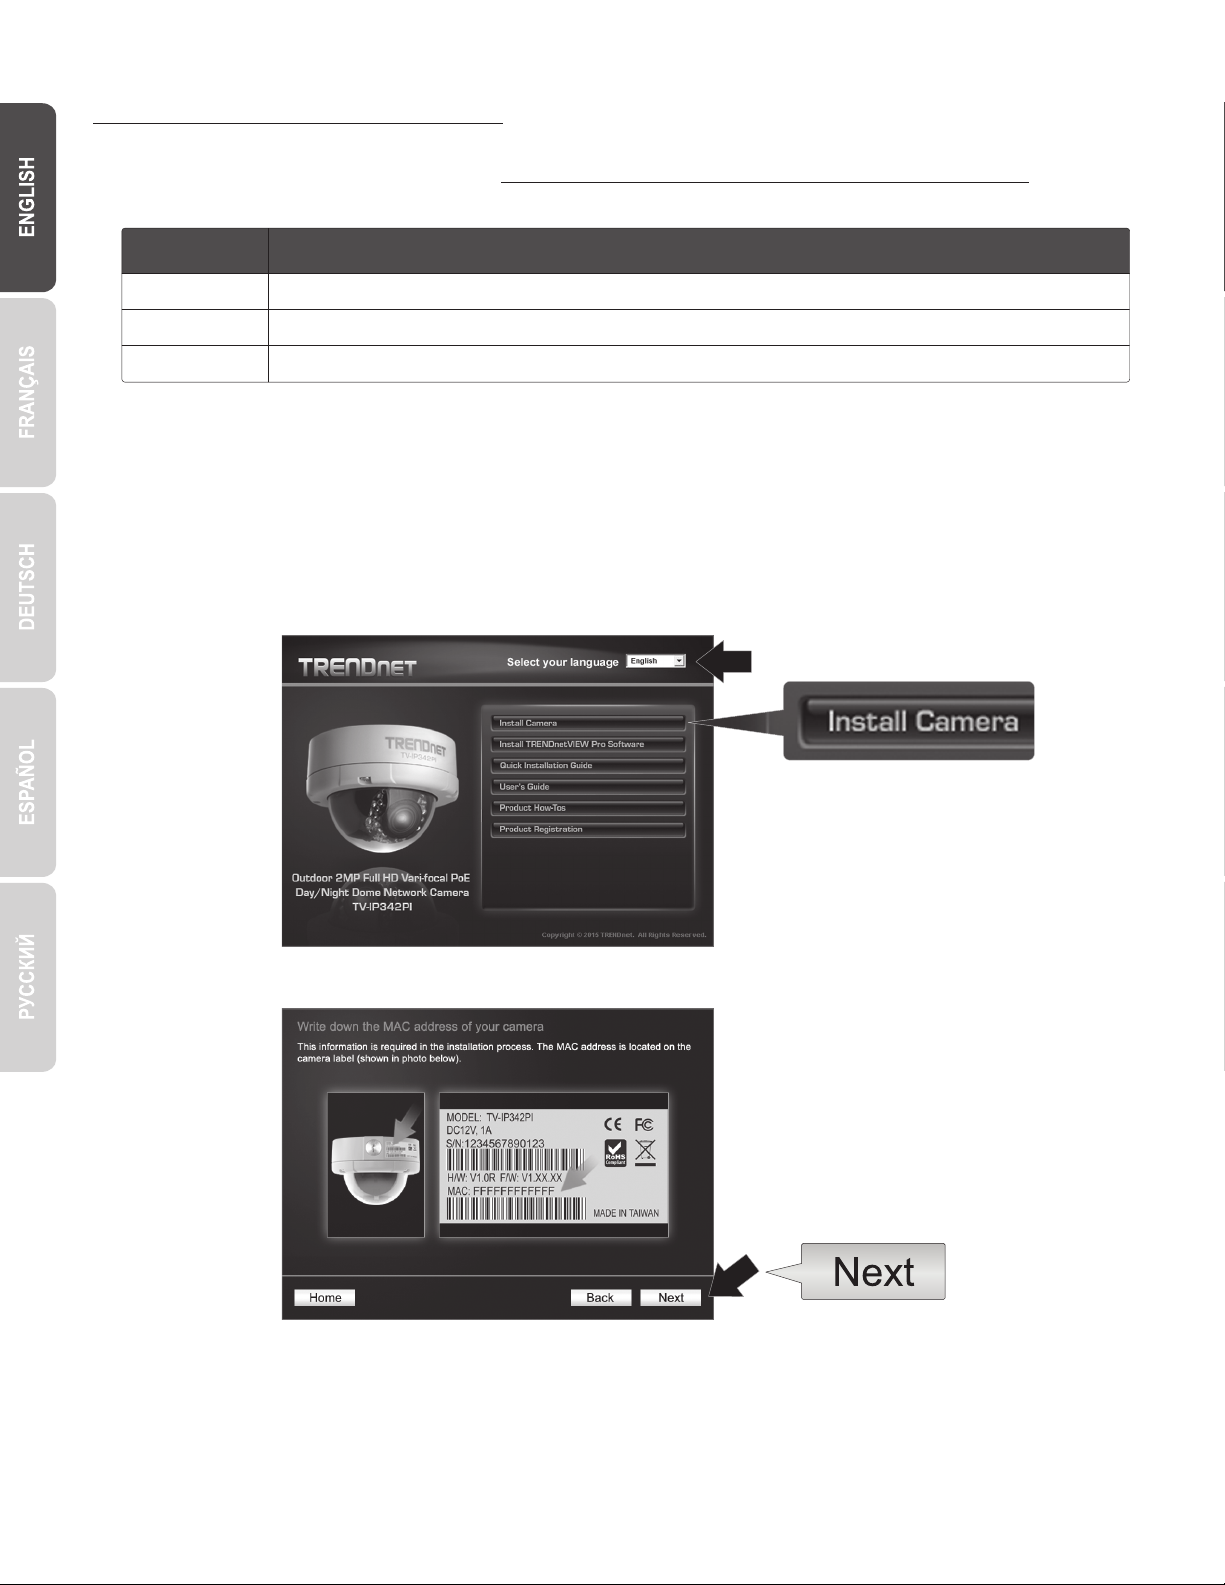
For manual configuration, follow the steps below. We recommend that you configure your camera using the CD-ROM that was included
with your camera. If you are unable to do so, skip to the Manual Camera Configuration without CD-ROM (Installation Wizard) section
below.
1. For manual installation, set your computer's IP address to a static address. Use the IP address 192.168.10.10/255.255.255.0 and leave
the default gateway and DNS settings blank.
2. Connect a network cable from your computer to a LAN port on your TV-NVR104.
3. Connect the power adaptor to the TV-NVR104 and plug the adaptor into an electrical outlet.
4. Connect your camera to the TV-NVR104 and wait 30 seconds for the camera to power on.
5. Insert the CD-ROM that was included with your camera into your computer.
6. Select your language from the dropdown menu.
7. Select Install Camera.
8. Write down the MAC ID of the camera from the white label on the camera, then click Next.
3
Page 5
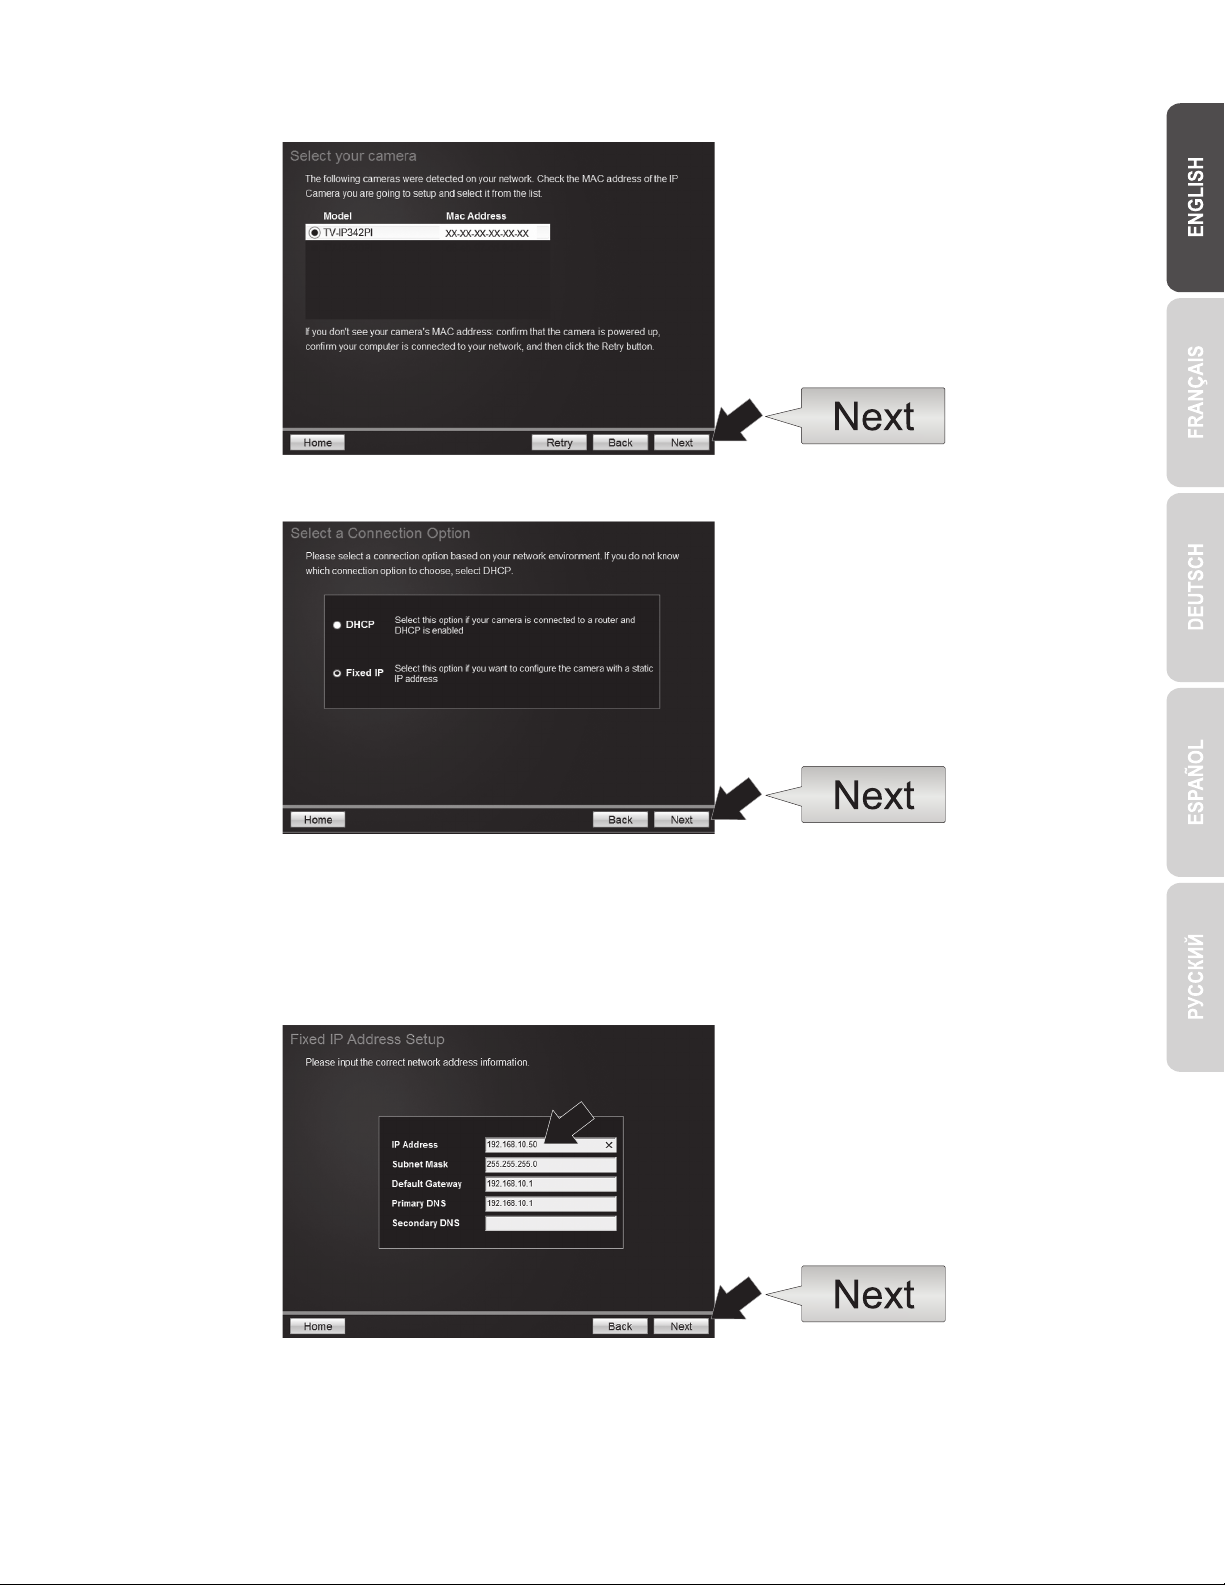
9. Select your camera from the list, then click Next.
10. Select Fixed IP and click Next.
11. Enter the IP Address for the Camera. The IP default range for the NVR unit is: 192.168.10.XX
We recommended that you assign IP values that match the default range of the TV-NVR104 (192.168.10.1 – 192.168.10.254). Except
the default IP of TV-NVR104 (192.168.10.60)
Example: Camera 1: 192.168.10.50
Camera 2: 192.168.10.51
Camera 3: 192.168.10.52
12. Click Next.
4
Page 6
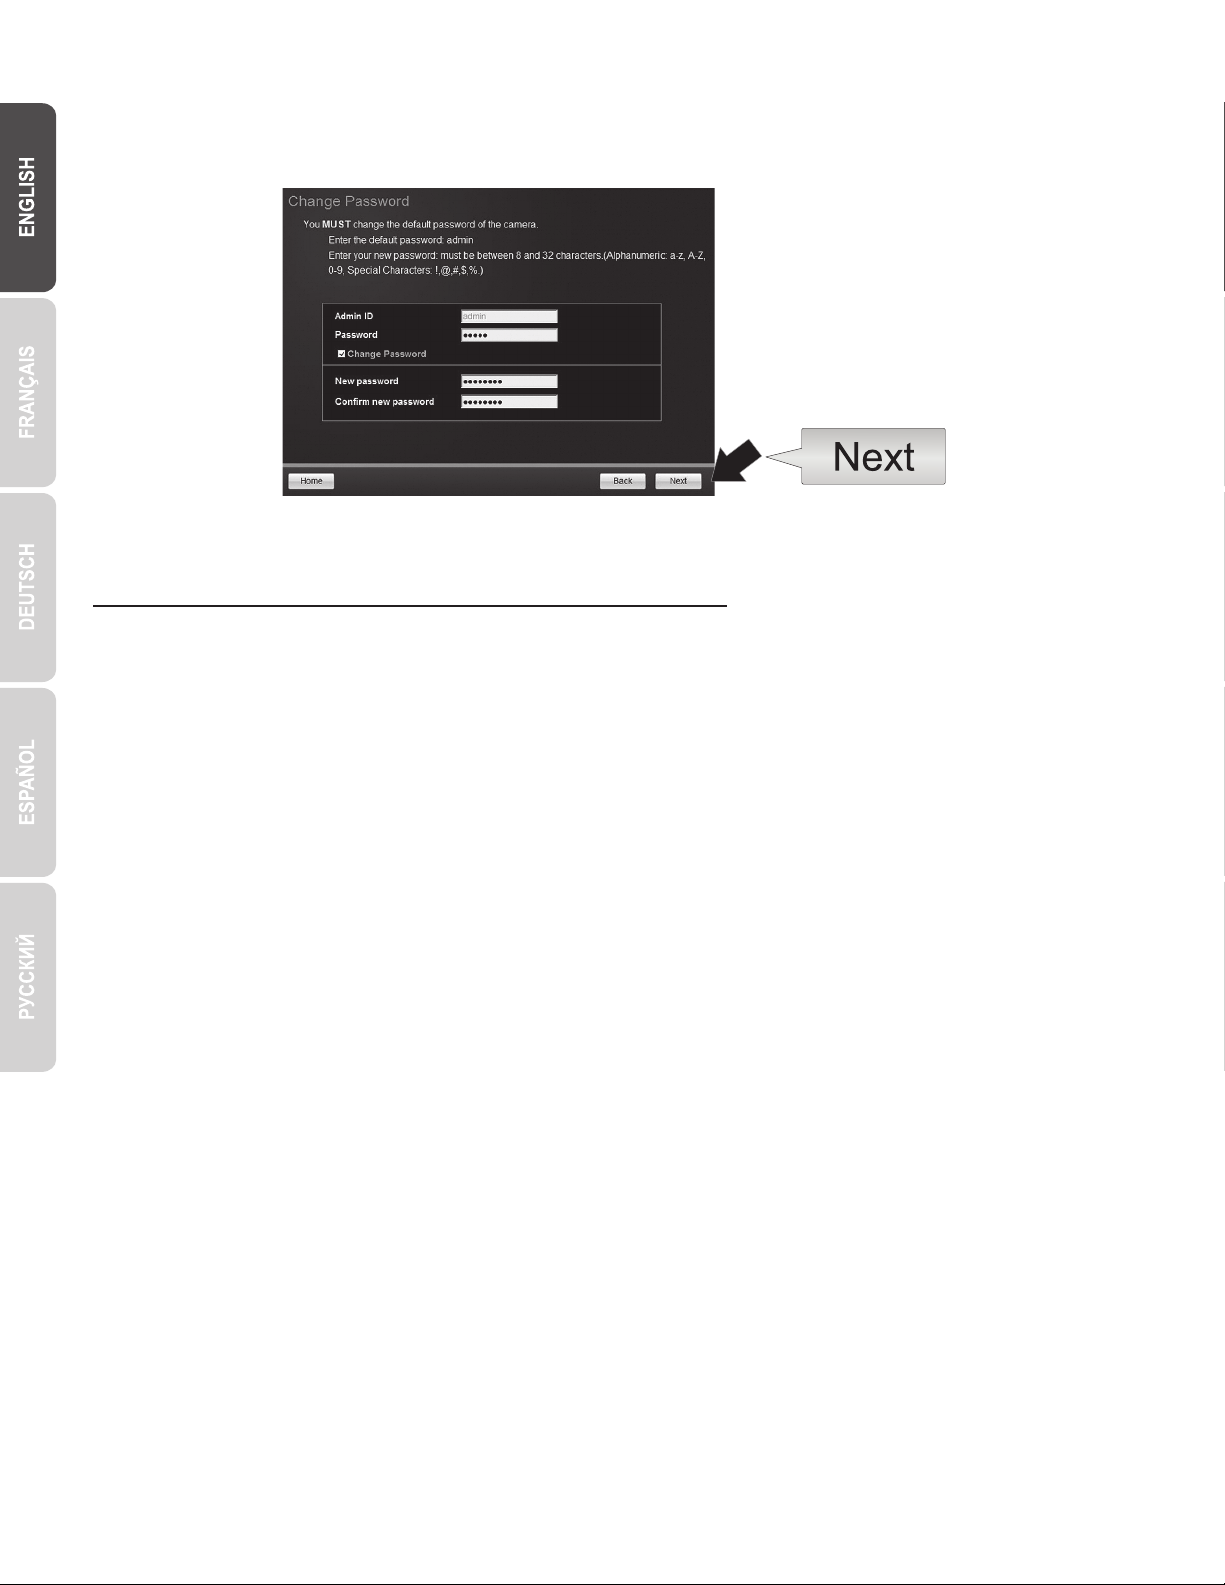
13. Enter the Admin password. The default password is admin. If this is your first time logging in, you will need to change the password of
the camera. The new password must be between 8 and 32 characters (alphanumeric: a-z, A-Z, 0-9, !, @, #, $). Confirm the new
password and click Next.
14. Camera configuration is now complete. Click Next.
15. Your camera is now ready for manual installation with the TV-NVR104. Click Finish to close the program.
Manual Camera Configuration without CD-ROM (Installation Wizard)
1. Set your computer's IP address to a static address. Use the IP address 192.168.10.10/255.255.255.0 and leave the default gateway and
DNS settings blank.
2. Connect a network cable from your computer to a LAN port on your TV-NVR104.
3. Connect the power adaptor to the TV-NVR104 and plug the adaptor into an electrical outlet.
4. Connect your first camera (one at a time only) to the TV-NVR104 and wait 30 seconds for the camera to boot up.
5. Open a web browser, and type 192.168.10.30 into the address bar. This is the default IP address of the camera.
6. Log in to your camera. If your camera is new, or if the camera has been reset, the default login credentials are:
Username: admin
Password: admin
7. Change the IP address of the camera so that the default address (192.168.10.30) is not used.
8. Disconnect the camera, and repeat steps 1 through 3 for each camera that will be used. It is recommended that the IP addresses
assigned to each camera follow in sequential order, although this is not required.
Example: Camera 1: 192.168.10.50
Camera 2: 192.168.10.51
Camera 3: 192.168.10.52
5
Page 7
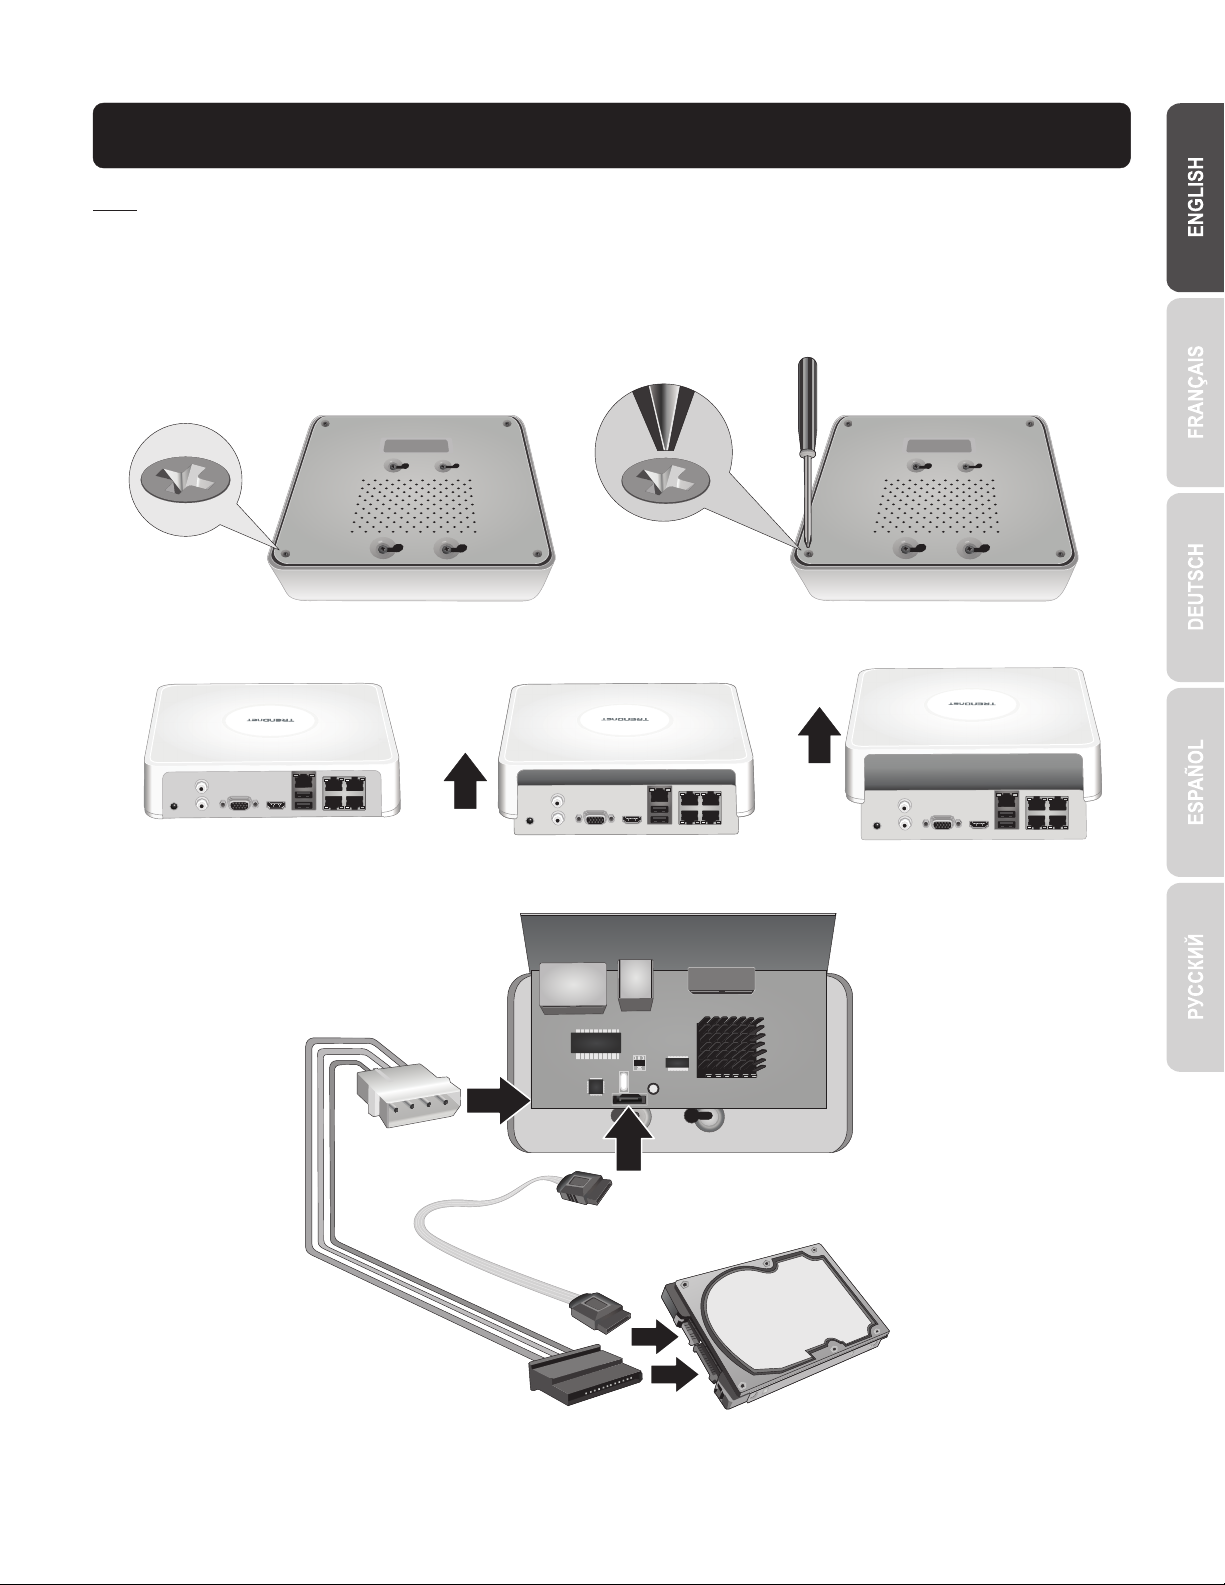
2. Hardware Drive Installation (Sold Separately)
Note:
Ÿ Static electricity can damage the TV-NVR104. Before handling the unit, discharge any static electricity by touching a metal object, or use
an anti-static wrist strap.
Ÿ The TV-NVR104 supports 3.5” SATA I and II drives up to 4TB.
1. Remove the four retaining screws from the bottom panel of the TV-NVR104.
2. The top cover is slotted vertically. From the back of the unit, gently slide the cover up to separate it from the lower panel.
3. Attach the SATA cable to the hard drive (sold separately) and control board. SATA connectors are keyed to prevent improper installation.
6
Page 8
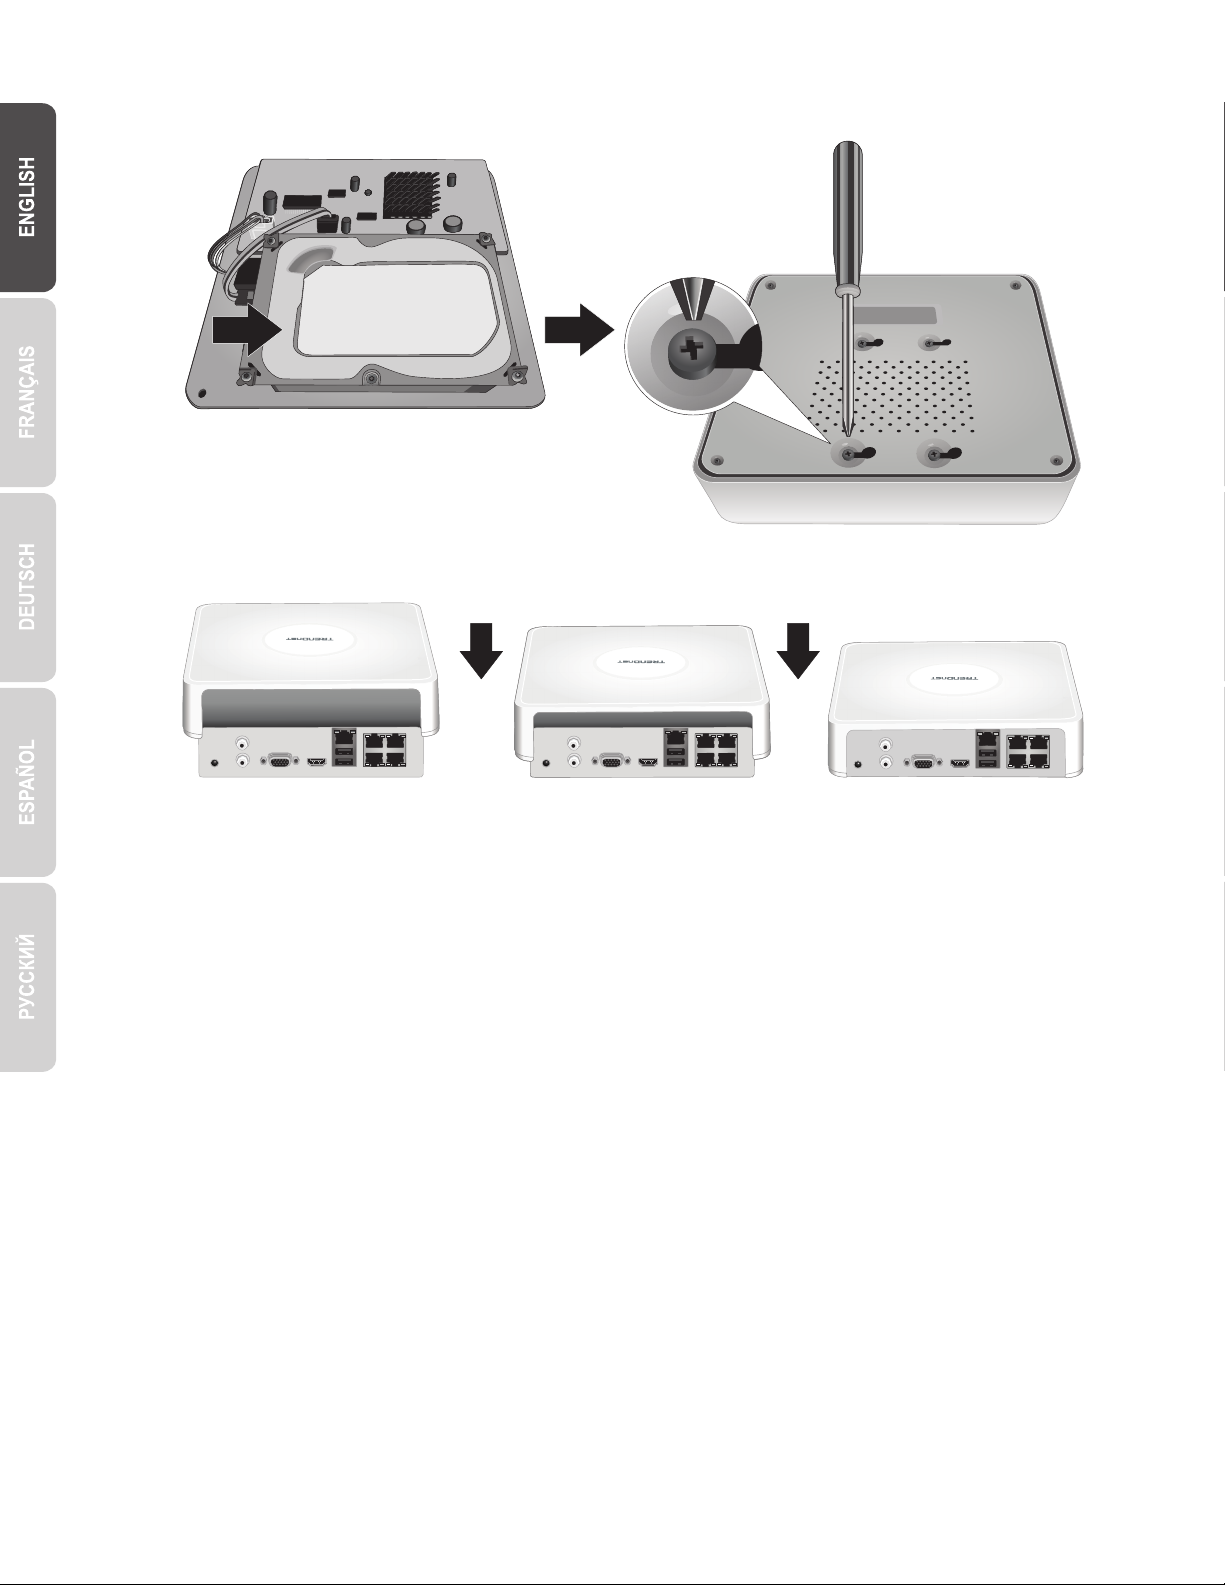
4. Mount the hard drive to the TV-NVR104's drive bay using the mounting screws included with your hard drive.
5. Reattach the top cover to the unit. Make sure the lower panel lines up with the slots on the cover.
7
Page 9

3. System Installation
Note: The following installation steps support a stand-alone setup WITHOUT a wired connection to a network. To set up the NVR using a
wired network connection (for remote access to NVR), proceed to the User's Guide for the appropriate setup steps (do not continue with
this section).
Optional
network
connection*
(Included
mouse)
(Sold separately)
(Not included)
(Sold separately)
(Not included)
(Not included)
(Sold separately)
(Sold separately)
(Not included)
USB Flash drive
(sold separately)
8
(Not included)
(Sold separately)
Page 10

3.1 Camera Installation (Sold Separately)
1. Connect the IP camera to a PoE network port on the TV-NVR104. The use of non-PoE cameras is supported by the TV-NVR104 but the
camera will require an external power supply.
2. If you are using camera model TV-IP450P or TV-IP450PI, a PoE injector is required (one included with the camera). Camera model
TV-IP430PI also requires a PoE+ injector (sold separately). For all other models, no additional steps are required, please continue with
the camera configuration.
PoE cameras
PoE network port
(Sold separately)
9
Page 11

3.2 Connect the Monitor
VGA
HDMI
1. Using an HDMI or VGA cable, connect the TV-NVR104 to your monitor.
HDMI
or
VGA cable
Display Display
(Not included)
(Sold separately)
3.3 Connect the Mouse
Plug the optical mouse into the TV-NVR104.
HDMI calbe
(Not included)
(Sold separately)
HDMI
10
Page 12

3.4 Connect the Power
Lower case text
Upper case text
Numeric keyboard
Special characters
1. TV-NVR104 Connect the power adapter to the power port.
2. Connect the power cable to the power adapter.
3. Plug the power cable into an electrical outlet.
4. (Optional) Connect a ground wire to the grounding point.
1 2 3 4
4. Soft Keyboard Instruction
1. Click to change the keyboard style.
1
2
4
List of Keyboard styles:
2. Click to enter special characters.
3. Click or to choose different symbols.
3
4. Click or to switch between uppercase and lowercase.
11
Page 13

5. System Setup
Start wizard when device starts?
Next Exit
(GMT-08:00) Pacific Time (U.S. & Cananda)
(GMT-08:00) Pacific Time (U.S. & Canada)
(GMT-07:00) Mountain Time (U.S. & Canada)
(GMT-06:00) Central Time (U.S. & Canada)
(GMT-05:00) Eastern Time (U.S. & Canada)
(GMT-04:30) Caracas
(GMT-04:00) Atlantic Time (Canada)
(GMT-03:30) Newfoundland
(GMT-03:00) Georgetown, Brasilia
(GMT-02:00) Mid-Atlantic
(GMT-01:00) Cape Verde Islands, Azores
(GMT+00:00) Dublin, Edinburgh, London
Time Zone (GMT-08:00) Pacific Time (U.S. & Cananda)
Date Format MM-DD-YYYY
System Date 11-10-2014
System Time 16:41:08
ExitPrevious Next
Admin Password
New Admin Password
New Password
Confirm
Enter your new password must be between 8 and 15 characters
(Alphanumeric : a-z, A-Z, 0-9, I @, #, $).
ExitPrevious Next
1. The setup wizard will start after the TV-NVR104 is powered up. Click Next.
1
2. Enter the default administrator password: admin.
3. Enter a new admin password.
4. Enter the new password again in the Confirm field.
5. Click Next.
4
6. Click the selection list to the right of Time Zone and select your time zone.
2
3
5
6
12
Page 14

7. Click the selection list to the right of Date Format to choose a format.
Time Zone (GMT-08:00) Pacific Time (U.S. &
Cananda)
Date Format MM-DD-YYYY
System Date 11-10-2014
System Time 16:41:08
Next
Exit
Previous
Time Zone (GMT-08:00) Pacific Time (U.S. &
Cananda)
Date Format MM-DD-YYYY
System Date 11-10-2014
System Time 16:41:08
Next
Exit
Previous
MM-DD-YYYY
YYYY-MM-DD
MM-DD-YYYY
DD-MM-YYYY
8. Click the selection list to the right of System Date.
7
8
9. Select the month by clicking on left or right arrow.
9
10. Select the day by clicking on the date.
11. Select the year by clicking on left or right arrow.
11
10
13
Page 15

12. Click the selection list to the right of System Time and then enter the time using a 24-hour format.
OK
Time Zone (GMT-08:00) Pacific Time (U.S. &
Cananda)
Date Format MM-DD-YYYY
System Date 11-10-2014
System Time 16:41:08
Next
Exit
Previous
Time Zone (GMT-08:00) Pacific Time (U.S. &
Cananda)
Date Format MM-DD-YYYY
System Date 11-10-2014
System Time 16:41:08
Next
Exit
Previous
12
13. Click Next.
14.
a) Select your hard drive.
b) Click Init to initiate your hard drive.
c) When the initiation has completed, click OK to exit the wizard.
a
13
b
c
14
Page 16

6. Camera Setup
TV-IP310PI
TV-IP311PI
TV-IP320PI
TV-IP321PI
TV-IP430PI
TV-IP450P
Outdoor 3MP Full HD PoE Day/Night Network Camera
Outdoor 3MP Full HD PoE Dome Day/Night Network Camera
Outdoor 1.3 MP HD PoE IR Network Camera
Outdoor 1.3 MP HD PoE Dome IR Network Camera
Outdoor 1.3 MP HD PoE+ Speed Dome Network Camera
TV-IP320PI2K Outdoor 1.3 MP HD PoE IR Network Camera Twin Pack
TV-IP450PI
Outdoor 1.3 MP HD PoE IR Speed Dome Network Camera
TV-IP322WI
Outdoor 1.3 MP HD WiFi IR Network Camera
TV-IP312PI
Outdoor 3MP Full HD 1080p PoE IR Network Camera
Outdoor 2 MP Full HD 1080p PoE+ IR Mini Speed Dome Network Camera
1. If your TRENDnet camera is Plug-and-Play compatible, as listed on the table below, live video will now be playing. No further setup is
required. Proceed to the next section.
Plug and Play Cameras
15
Page 17

2. If your Plug-and-Play camera is not showing live video, please confirm that the camera is properly installed, and give the system a few
Menu
OK
minutes to complete initialization.
3. If your camera is not listed on the table, continue with the following steps to manually set up your camera.
4. Right-click the mouse to bring up the popup menu. Click on the Menu button.
5. Enter the TV-NVR104 password and click on OK to bring up the main menu.
6. Click the Camera Settings icon on the Main Menu.
16
Page 18

7. Click the Edit icon for your camera. If you are installing multiple cameras, please confirm you have selected the correct device.
192.168.10.50|
TV-IP342PI
TV-IP343PI
TV-IP662PI
Outdoor 2MP Full HD Vari-Focal PoE Day/Night Dome Network Camera
Outdoor 2MP Full HD Vari-Focal PoE Day/Night Network Camera
Megapixel HD PoE Day/Night PTZ Network Camera
ONVIF 80
ONVIF 80
TRENDnet1 80
Model DescriptionProtocol Default Port
8. From the Edit IP Camera page, select the Adding Method menu, and click on Manual.
9. Enter the camera's IP address.
10. Find your TRENDnet camera from the table below, and note the unit's protocol and port information.
17
Page 19

11. Set the camera protocol according to the table in step 10.
TRENDnet1
80
admin
12. Set the management port according to the table in step 10.
13. The NVR defaults to your camera's highest set video stream (Stream 1, listed as “Channel No.1”). To use a lower camera stream,
select it from the menu.
14. Enter the camera's username. For TRENDnet cameras, the username is admin.
15. Enter the camera's password that was set up during the camera configuration.
16. Click OK to save your settings.
18
Page 20

7. Start Recording
1. In Live View, right click anywhere on the screen to access the menu options.
1
2. Click Start Recording and then choose between Continuous Record and Motion Detection Record.
3. Continuous Record is the recommended setting. Motion Detection Record mode requires advanced configuration from the main
menu before motion recording will be activated. To configure motion recording, please refer to the User's Guide.
4. Click Yes to confirm. (For more advanced video recording features, please see the User's Guide for more details.)
19
Page 21

8. Instant Playback
1. In Live View, left-click on the camera video you want to review.
2. Click the play icon to playback the last 5 minutes of recording.
3. Detailed playback is available from the main menu. Please see the User's Guide for more advanced video playback features.
20
Page 22

Manufacturer’s Name and Address
TRENDnet, Inc.
20675 Manhattan Place
Torrance, CA 90501 USA
Product Information:
Model Number:
Product Name:
TV-NVR104
4-Channel HD PoE NVR
Trade Name:
TRENDnet hereby declare that the product is in compliance with the essential requirements and
other relevant provisions under our sole responsibility.
Safety
EMC
This product is herewith confirmed to comply with the Directives.
Directives:
EN 60950-1: 2006 + A11: 2009: +A1: 2010 + A12: 2011 + A2: 2013
EN 55022: 2010 + AC: 2011 Class B
EN 50130-4:2011
EN 61000-3-2: 2006 + A2: 2009
EN 61000-3-3: 2008
Low Voltage Directive 2006/95/EC
EMC Directive 2004/108/EC
RoHS Directive 2011/65/EU
REACH Regulation (EC) No. 1907/2006
TRENDnet
Person responsible for this declaration.
Place of Issue: Torrance, California, USA
Name: Sonny Su
Signature:
Date: November 26, 2014
Title: Director of Technology
Page 23

GPL/LGPL General Information
This TRENDnet product includes free software written by third party developers. These codes are subject to the GNU General Public License ("GPL") or GNU Lesser General Public License
("LGPL"). These codes are distributed WITHOUT WARRANTY and are subject to the copyrights of the developers. TRENDnet does not provide technical support for these codes. The details
of the GNU GPL and LGPL are included in the product CD-ROM.
Please also go to (http://www.gnu.org/licenses/gpl.txt) or (http://www.gnu.org/licenses/lgpl.txt) for specific terms of each license.
The source codes are available for download from TRENDnet's web site (http://trendnet.com/downloads/list_gpl.asp) for at least three years from the product shipping date.
You could also request the source codes by contacting TRENDnet.
20675 Manhattan Place, Torrance, CA 90501, USA. Tel: +1-310-961-5500 Fax: +1-310-961-5511
Informations générales GPL/LGPL
Ce produit TRENDnet comprend un logiciel libre gratuit par des programmeurs tiers. Ces codes sont sujet à la GNU General Public License ("GPL" Licence publique générale GNU) ou à la
GNU Lesser General Public License ("LGPL" Licence publique générale limitée GNU). Ces codes sont distribués SANS GARANTIE et sont sujets aux droits d'auteurs des programmeurs.
TRENDnet ne fournit pas d'assistance technique pour ces codes. Les détails concernant les GPL et LGPL GNU sont repris sur le CD-ROM du produit.
Veuillez également vous rendre en (http://www.gnu.org/licenses/gpl.txt) ou en (http://www.gnu.org/licenses/lgpl.txt) pour les conditions spécifiques de chaque licence.
Les codes source sont disponibles au téléchargement sur le site Internet de TRENDnet web site (http://trendnet.com/downloads/list_gpl.asp) durant au moins 3 ans à partir de la date
d'expédition du produit.
Vous pouvez également demander les codes source en contactant TRENDnet.
20675 Manhattan Place, Torrance, CA 90501, USA. Tel: +1-310-961-5500 Fax: +1-310-961-5511
Allgemeine Informationen zu GPL/LGPL
Dieses Produkt enthält die freie Software "netfilter/iptables" (© 2000-2004 netfilter project http://www.netfilter.org) und die freie Software „Linux „mtd“ (Memory Technology Devices)
Implementation (© 2000 David Woodhouse), erstmals integriert in Linux Version 2.4.0-test 3 v. 10.07.2000 (http://www.kernel.org/pub/linux/kernel/v2.4/old-test-kernels/linux-2.4.0test3.tar.bz2), sowie weitere freie Software. Sie haben durch den Erwerb dieses Produktes keinerlei Gewährleistungsansprüche gegen die Berechtigten an der oben genannten Software
erworben; weil diese die Software kostenfrei lizenzieren gewähren sie keine Haftung gemäß unten abgedruckten Lizenzbedingungen. Die Software darf von jedermann im Quell-und
Objektcode unter Beachtung der Lizenzbedingungen der GNU General Public License Version 2, und GNU Lesser General Public License (LGPL) vervielfältigt, verbreitet und verarbeitet
werden.
Die Lizenz ist unten im englischsprachigen Originalwortlaut wiedergegeben. Eine nichtoffizielle Übersetzung in die deutsche Sprache finden Sie im Internet unter
(http://www.gnu.de/documents/gpl-2.0.de.html). Eine allgemeine öffentliche GNU Lizenz befindet sich auch auf der mitgelieferten CD-ROM.
Sie können Quell-und Objektcode der Software für mindestens drei Jahre auf unserer Homepage www.trendnet.com im Downloadbereich (http://trendnet.com/langen/downloads/list_gpl.asp)
downloadend. Sofern Sie nicht über die Möglichkeit des Downloads verfügen können Sie bei TRENDnet.
20675 Manhattan Place, Torrance, CA 90501 -U.S.A -, Tel.: +1-310-961-5500, Fax: +1-310-961-5511 die Software anfordern.
Información general sobre la GPL/LGPL
Este producto de TRENDnet incluye un programa gratuito desarrollado por terceros. Estos códigos están sujetos a la Licencia pública general de GNU (“GPL”) o la Licencia pública general
limitada de GNU (“LGPL”). Estos códigos son distribuidos SIN GARANTÍA y están sujetos a las leyes de propiedad intelectual de sus desarrolladores. TRENDnet no ofrece servicio técnico
para estos códigos. Los detalles sobre las licencias GPL y LGPL de GNU se incluyen en el CD-ROM del producto.
Consulte también el (http://www.gnu.org/licenses/gpl.txt) ó el (http://www.gnu.org/licenses/lgpl.txt) para ver las cláusulas específicas de cada licencia.
Los códigos fuentes están disponibles para ser descargados del sitio Web de TRENDnet (http://trendnet.com/downloads/list_gpl.asp) durante por lo menos tres años a partir de la fecha de
envío del producto.
También puede solicitar el código fuente llamando a TRENDnet.
20675 Manhattan Place, Torrance, CA 90501, USA. Tel: +1-310-961-5500 Fax: +1-310-961-5511
Общая информация о лицензиях GPL/LGPL
В состав данного продукта TRENDnet входит бесплатное программное обеспечение, написанное сторонними разработчиками. Это ПО распространяется на условиях лицензий
GNU General Public License ("GPL") или GNU Lesser General Public License ("LGPL"). Программы распространяются БЕЗ ГАРАНТИИ и охраняются авторскими правами
разработчиков. TRENDnet не оказывает техническую поддержку этого программного обеспечения. Подробное описание лицензий GNU GPL и LGPL можно найти на компакт-диске,
прилагаемом к продукту.
В пунктах (http://www.gnu.org/licenses/gpl.txt) и (http://www.gnu.org/licenses/lgpl.txt) изложены конкретные условия каждой из лицензий.
Исходный код программ доступен для загрузки с веб-сайта TRENDnet (http://trendnet.com/downloads/list_gpl.asp) в течение, как минимум, трех лет со дня поставки продукта.
Russian Technical Support: 7 (495) 276-22-90
Телефон технической поддержки: 7 (495) 276-22-90
Кроме того, исходный код можно запросить по адресу TRENDnet.
20675 Manhattan Place, Torrance, CA 90501, USA. Tel: +1-310-961-5500 Fax: +1-310-961-5511
GPL/LGPL informações Gerais
Este produto TRENDnet inclui software gratuito desenvolvido por terceiros. Estes códigos estão sujeitos ao GPL (GNU General Public License) ou ao LGPL (GNU Lesser General Public
License). Estes códigos são distribuídos SEM GARANTIA e estão sujeitos aos direitos autorais dos desenvolvedores. TRENDnet não presta suporte técnico a estes códigos. Os detalhes do
GNU GPL e do LGPL estão no CD-ROM do produto. Favor acessar http://www.gnu.org/licenses/gpl.txt ou http://www.gnu.org/licenses/lgpl.txt para os termos específicos de cada licença.
Os códigos fonte estão disponíveis para download no site da TRENDnet (http://trendnet.com/langen/downloads/list_gpl.asp) por pelo menos três anos da data de embarque do produto.
Você também pode solicitar os códigos fonte contactando TRENDnet, 20675 Manhattan Place, Torrance, CA 90501, USA.Tel: +1-310-961-5500, Fax: +1-310-961-5511.
GPL/LGPL üldinformatsioon
See TRENDneti toode sisaldab vaba tarkvara, mis on kirjutatud kolmanda osapoole poolt. Koodid on allutatud GNU (General Public License) Üldise Avaliku Litsentsi (GPL) või GNU (Lesser
General Public License) ("LGPL") Vähem Üldine Avalik Litsentsiga. Koode vahendatakse ILMA GARANTIITA ja need on allutatud arendajate poolt. TRENDnet ei anna koodidele tehnilist tuge.
Detailsemat infot GNU GPL ja LGPL kohta leiate toote CD-ROMil. Infot mõlema litsentsi spetsiifiliste terminite kohta leiate (http://www.gnu.org/licenses/gpl.txt) või
(http://www.gnu.org/licenses/lgpl.txt).
Infot mõlema litsentsi spetsiifiliste terminite kohta leiate (http://www.gnu.org/licenses/gpl.txt) või (http://www.gnu.org/licenses/lgpl.txt). Lähtekoodi on võimalik alla laadida TRENDneti
kodulehelt (http://trendnet.com/langen/downloads/list_gpl.asp) kolme aasta jooksul alates toote kättesaamise kuupäevast.
Samuti võite lähtekoodi paluda TRENDneti'lt, 20675 Manhattan Place, Torrance, CA 90501, USA. Tel: +1-310-961-5500, Fax: +1-310-961-5511.
Page 24

TV-NVR104
Limited Warranty
TRENDnet warrants its products against defects in material and workmanship, under normal use and service, for the following length of time from the date of purchase. Warranty: 2 year limited warranty (When
Applicable: 1 year warranty for power adapter, power supply, and cooling fan components.) Visit TRENDnet.com to review the full warranty policy, rights, and restrictions for this product.
Garantie Limitée
TRENDnet garantit ses produits contre les défauts matériels et de fabrication, dans des conditions normales d’utilisation et de service, pour les durées suivantes, à compter de la date de leur achat. Limitée: 2 ans
de garantie limitée (Si applicable: 1 an de garantie sur l’adaptateur secteur, l’alimentation en énergie et les composants du ventilateur de refroidissement.) Visitez TRENDnet.com pour lire la politique complète de
garantie, les droits et les restrictions s’appliquant à ce produit.
Begrenzte Garantie
TRENDnet garantiert, dass seine Produkte bei normaler Benutzung und Wartung während der nachfolgend genannten Zeit ab dem Kaufdatum keine Material- und Verarbeitungsschäden aufweisen. Garantie: 2Jahres-Garantie (Soweit zutreffend: 1 Jahr Garantie für Netzteil, Stromkabel und Ventilator.) Alle Garantiebedingungen, Rechte und Einschränkungen für dieses Produkt finden Sie auf TRENDnet.com.
Garantía Limitada
TRENDnet garantiza sus productos contra defectos en los materiales y mano de obra, bajo uso y servicio normales, durante el siguiente periodo de tiempo a partir de la fecha de compra. Garantía: 2 años
(Cuando proceda: 1 año de garantía para componentes de adaptadores de corriente, fuente de alimentación y ventiladores de refrigeración.) Visite TRENDnet.com para revisar la política de garantía, derechos y
restricciones para este producto.
Ограниченная гарантия
Гарантия компании TRENDnet распространяется на дефекты, возникшие по вине производителя при соблюдении условий эксплуатации и обслуживания в течение установленного периода с
момента приобретения (Продукт: Ограниченная гарантия: Двухлетняя ограниченная гарантия (Распространя ется: На протяжении 1 года на силовые адаптеры, источники питания и компоненты
вентилятора охлаждения. Полную версию гарантийных обязательств, а также права пользователя и ограничения при эксплуатации данного продукта смотрите на вебсайте www.trendnetrussia.ru
Garantia Limitada
TRENDnet garante seus produtos contra defeitos em material e mão de obra, sob condições normais de uso e serviço, pelo seguinte tempo a partir da data da compra. Garantia: Garantia limitada de 2 anos.
(Quando aplicável: 1 ano de garantia para adaptador de tensão, fonte e componentes de ventoinhas). Visite TRENDnet.com para conhecer a política de garantia completa, direitos e restrições para este
produto.)
Piiratud garantii
TRENDneti tavatingimustes kasutatavatel ja hooldatavatel toodetel on järgmise ajavahemiku jooksul (alates ostukuupäevast) tootmis-ja materjalidefektide garantii. garantii: 2-aastane piiratud garantii. (Garantii
kohaldatakse: toiteadapteri, toiteallika ja jahutusventilaatori osadel on 1-aastane garantii.) Täisgarantii põhimõtete, õiguste ja piirangute kohta leiate lisateavet saidilt TRENDnet.com.
Гарантія компанії
Гарантія компанії TRENDnet поширюється на дефекти, що виникли з вини виробника, при дотриманні умов експлуатації та обслуговування протягом встановленого періоду з моменту придбання.
(Продукт: Обмежена гарантія: 3 роки обмеженої гарантії (Поширюється: Протягом 1 року на силові адаптери, джерела живлення і компоненти вентилятора охолодження) Повну версію гарантійних
зобов'язань, а також права користувача та обмеження при експлуатації даного продукту дивіться на вебсайті TRENDnet.com.
Certifications
This device can be expected to comply with Part 15 of the FCC Rules provided it is assembled in
exact accordance with the instructions provided with this kit.
Operation is subject to the following conditions:
(1) this device may not cause harmful interference
(2) this device must accept any interference received including interference that may cause
undesired operation.
Waste electrical an electronic products must not be disposed of with household waste.
Please recycle where facilities exist. Check with your Local Authority or Retailer for
recycling advice.
Technical Support
If you have any questions regarding the product
installation, please contact our Technical Support.
Toll free US/Canada: 1-866-845-3673
Regional phone numbers available
at www.trendnet.com/support
Applies to PoE Products Only: This product is to be connected only to PoE networks without routing
to the outside plant.
Note:
The Manufacturer is not responsible for any radio or TV interference caused by unauthorized
modifications to this equipment. Such modifications could void the user’s authority to operate the
equipment.
Advertencia:
En todos nuestros equipos se mencionan claramente las caracteristicas del adaptador de alimentacón
necesario para su funcionamiento. El uso de un adaptador distinto al mencionado puede producir daños
fisicos y/o daños al equipo conectado. El adaptador de alimentación debe operar con voltaje y frecuencia
de la energia electrica domiciliaria exitente en el pais o zona de instalación.
Product Warranty Registration
Please take a moment to register your
product online. Go to TRENDnet’s website at:
http://www.trendnet.com/register
TV-NVR104 (V1)/06.16.2015
TRENDnet
20675 Manhattan Place, Torrance, CA 90501. USA
Copyright © 2015. All Rights Reserved. TRENDnet.
 Loading...