


TK-EX2
CAT5 KVM Extention Kit
User’s Guide
Kit d'extension CAT5 pour KVM
Guide de l'utilisateur
CAT5 KVM Extention Kit
Bedienungsanleitung
Equipo de Extensión KVM CAT5
kit de amplificador de vídeo
Version 12.21.06
Copyright ©200 . TRENDware International, Inc. 6 All Rights Reserved.

Table of Contents
Deutsch .....................................................................................................
1. Vorbereitung der Installation .............................................................
2. Einführung .........................................................................................
3. Installation .........................................................................................
Specifications ............................................................................................
Troubleshooting ........................................................................................
1
1
2
3
6
7
Deutsch UG
1. Vorbereitung der Installation
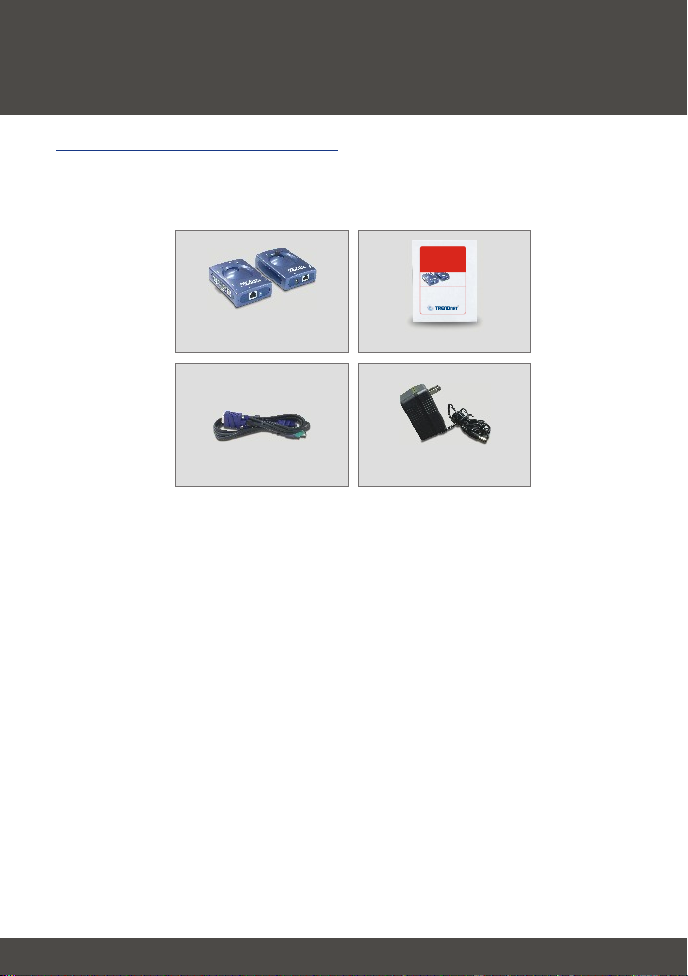
Prüfung des Paketinhalts
Prüfen Sie bitte, ob alle erforderlichen Einzelteile in der Packung vorhanden
sind:
TK-EX2
CAT5 KVM Extention Kit
User’s Guide
Kit d'extension CAT5 pour KVM
Guide de l'utilisateur
CAT5 KVM Extention Kit
Bedienungsanleitung
Equipo de Extensión KVM CAT5
kit de amplificador de vídeo
Version 12.21.06
TK-EX2
(Empfänger und Sender)
KVM-Kabel mit 3 Anschlüssen
Copyright ©200. TRENDware International, Inc. 6All Rights Reserved.
Bedienungsanleitung
Netzteil (9V 500mA)
Der Video-Extender TK-EX2 ist praktisch mit allen Computern und
Betriebssystemen kompatibel. Sie benötigen lediglich einen Monitor, eine PS/2Tastatur und eine PS/2-Maus.
1
Deutsch

2. Einführung
Mit Hilfe des Video-Extenders TK-EX2 können Sie von einem Regieraum oder pult aus über eine Entfernung von bis zu 150 Metern einen oder mehrere
Computer mit einer Tastatur, einer Maus und einem VGA-Monitor bedienen.
Hardware-Support
Der Video-Extender TK-EX2 ist praktisch mit allen Computern und
Betriebssystemen kompatibel. Sie benötigen lediglich einen Monitor, eine PS/2Tastatur und eine PS/2-Maus. Der TK-EX2 ist auch mit fast allen PS/2-Mäusen,
darunter Microsoft Intellimouse, Microsoft Optical Mouse und Logitech Net
Mouse, kompatibel.
Software-Support
Der Video-Extender TK-EX2 benötigt weder einen Treiber noch spezielle
Software. Er ist mit den folgenden Betriebssystemen kompatibel: Windows
98SE/ME/2000/XP, Linux und DOS.
„Plug-and-Play“ und „Hot-Pluggable“
Der Video-Extender TK-EX2 stellt die Verbindung zu Ihrem Computer über eine
PS/2-Schnittstelle her, die komfortable „Plug-and-Play“- (Einstecken und
Loslegen) und „Hot-Pluggable“- (während des laufenden Betriebs ansteckbar)
Funktionalitäten ermöglicht.
Mit seinen umfangreichen Funktionen auf kleinstem Raum ist der TK-EX2 von
TRENDnet ideal für einen Einsatz zuhause oder im Büro geeignet.
2
Deutsch

3. Installation
1. Schalten Sie Ihre Computer und Peripheriegeräte aus und trennen Sie alle
Stromversorgungskabel ab.
2. Verbinden Sie die gemeinsam genutzte Tastatur, den Monitor und die Maus
mit dem Konsolenport des Empfänger-TK-EX2. Die Eingänge des
Empfänger-TK-EX2 sind mit verschiedenen Farben versehen.
3. Verbinden Sie das Netzteil mit dem Empfänger-TK-EX2.
4. Verbinden Sie den Empfänger-TK-EX2 über ein Kat.5-Kabel mit dem
Sender-TK-EX2.
5. Schließen Sie den Sender-TK-EX2 über das mitgelieferte KVM-Kabel an
einen Computer oder KVM-Umschalter an. Wenn Sie den Sender-TK-EX2
an einen PC anschließen, verbinden Sie den PC-Port des Sender-TK-EX2
über ein KVM-Kabel mit den Tastatur-, Maus- und Videoanschlüssen des
PC. Falls Sie den Sender-TK-EX2 an einen KVM-Umschalter anschließen,
verbinden Sie den PC-Port des Sender-TK-EX2 mit dem Konsolenport des
Umschalters.
6. Schalten Sie die Computer ein. Sobald die Computer vollständig
hochgefahren sind, können Sie den KVM-Umschalter benutzen. Die
Installation ist jetzt abgeschlossen.
7. (Optional) Sie können an den Konsolenport des Sender-TK-EX2 ein
weiteres Set aus Monitor, Maus und Tastatur anschließen.
8. (Optional) Wenn Sie am KVM-Umschalter einen PC anschließen wollen,
verbinden Sie den Computer-Port des Umschalters mit dem Konsolenport
des Empfänger-TK-EX2. Führen Sie dann Schritte 3 - 6 aus.
3
Deutsch

5
2
4
5
4
3
8
3
5
4
5
7
4
2
3
2
3
4
Deutsch

Specifications
Computer Connections:
KVM Cable:
Console Port Connectors:
PC Port Connectors:
VGA Resolution:
Power Type:
Dimensions:
Weight:
Operating Temperature: 0° ~ 40°C (32° ~104° F)
Storage Temperature:
1
1 set of 60cm (2ft) KVM Cable.
1 x PS/2 keyboard 6-pin mini din female
1 x PS/2 mouse 6-pin mini din female
1 x VGA HDDB15 (15-pin) female
1 x PS/2 keyboard 6-pin mini din female
1 x PS/2 mouse 6-pin mini din female
1 x VGA HDDB15 (15-pin) female
1280 x 1024 at 60Mhz
9VDC, 0.5A Adapter
78 x 39 x 110mm (3.1 x 1.5 x 4.37 inches)
Approx. 269g. (9.5 Oz.)
-20º ~ 60ºC (-4º ~ 140º F)
0%~90%, Non-CondensingHumidity:
FCC and CECertifications:
6

Troubleshooting
I have the TK-EX2 Video Extention Kit connected properly, but my
Q1:
keyboard and mouse do not function. Why?
Make sure that the following connections are properly made:
A1:
1. Connection of PS/2 mouse and PS/2 keyboard to the TK-EX2
Receiver.
2. Connection of KVM cables to the KVM switch or PC.
3. Connection of KVM cables to PC.
Can I connect and disconnect the PS/2 cables while the computers
Q2:
are turned on?
Yes, you can connect or disconnect the PS/2 cables while the
A2:
computers are turned on because the PS/2 interface is Plug-and-Play and
Hot-Pluggable.
Can I still perform Hot-Key functions if the TK-EX2 is used on a KVM
Q3:
switch?
Yes, you can still perform Hot-Key functions.
A3:
There are 2 dip switches on the TK-EX2. What are they for?
Q4:
Both 1 & 2 should be up or "on" if the cable is longer than 300 feet.
A4:
Either the dip switches are both “On” if the cable is longer than 300 feet or
both “Off” if the cable is shorter than 300 feet. There are no other
combinations for the dip switches.
If you have further questions, please contact Trendnet's Technical Support
Department.
7

Certifications
This equipment has been tested and found to comply with FCC and CE Rules.
Operation is subject to the following two conditions:
(1) This device may not cause harmful interference.
(2) This device must accept any interference received. Including interference that may
cause undesired operation.
Waste electrical and electronic products must not
be disposed of with household waste. Please
recycle where facilities exist. Check with you Local
Authority or Retailer for recycling advice.
NOTE: THE MANUFACTURER IS NOT RESPONSIBLE FOR ANY RADIO OR TV
INTERFERENCE CAUSED BY UNAUTHORIZED MODIFICATIONS TO THIS
EQUIPMENT. SUCH MODIFICATIONS COULD VOID THE USER’S AUTHORITY TO
OPERATE THE EQUIPMENT.
ADVERTENCIA
En todos nuestros equipos se mencionan claramente las caracteristicas del adaptador de
alimentacón necesario para su funcionamiento. El uso de un adaptador distinto al
mencionado puede producir daños fisicos y/o daños al equipo conectado. El adaptador
de alimentación debe operar con voltaje y frecuencia de la energia electrica domiciliaria
existente en el pais o zona de instalación.

@
Product Warranty Registration
Please take a moment to register your product online.
Go to TRENDware’s website at http://www.TRENDNET.com
TRENDnet Technical Support
.
US Canada
Toll Free Telephone: 1(866) 845-3673
24/7 Tech Support
.
Europe (Germany France Italy Spain Switzerland UK)
Toll Free Telephone: +00800 60 76 76 67
English/Espanol - 24/7
Francais/Deutsch - 11am-8pm, Monday - Friday MET
Worldwide
Telephone: +(31) (0) 20 504 05 35
English/Espanol - 24/7
Francais/Deutsch - 11am-8pm, Monday - Friday MET
TRENDware International, Inc.
20675 Manhattan Place. Torrance, CA 90501
.
.
.
.
http://www.TRENDNET.com
Copyright ©200 . TRENDware International, Inc. 6 All Rights Reserved.
 Loading...