

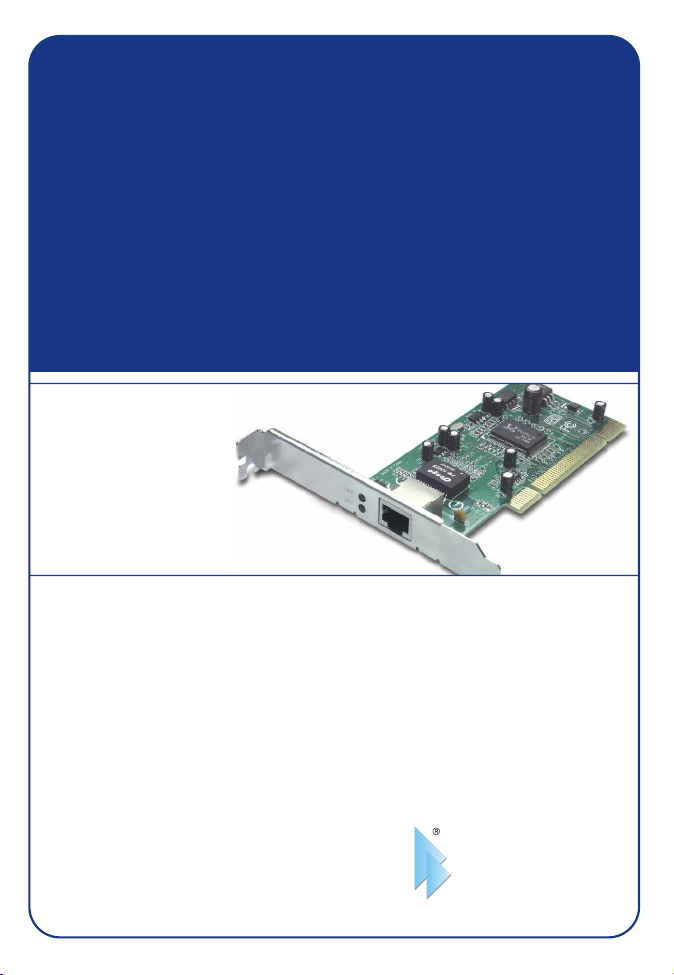
TEG-PCITXR
10/100/1000Mbps Gigabit Network Adapter
Ghidul utilizatorului pentru
10/100/1000Mbps Gigabit Network Adapter
User’s Guide
Version 07.29.05
TRENDnet
TRENDware, USA
What's Next in Networking
Copyright ©2005. All Rights Reserved. TRENDware International, Inc.

Table of Contents
English .................................................................................
1. Introduction ...................................................................
2. Hardware Installation ....................................................
3. Software Installation ......................................................
4. Configuring TCP/IP Protocol .........................................
Românǎ ................................................................................
1. Introducere ....................................................................
2. Instalarea Hardware ......................................................
3. Instalarea Software .......................................................
4. Configurarea TCP/IP Protocol .......................................
Troubleshooting ....................................................................
1
1
3
4
7
11
11
13
14
17
21

English UG
1. Introduction
Congratulations on purchasing your new 10/100/1000Mbps Gigabit PCI
Adapter. This Gigabit PCI Adapter is easy to install and suitable for a 10, 100,
or 1000Mbps Ethernet network. With Gigabit performance, you can enjoy
lightening fast file transfer, uninterrupted video/audio streaming, and excellent
response time for network gaming.
Features
– IEEE 802.3, 802.3u and 802.3z compliant
– Support 32-bit 33/66Mhz PCI Local Bus Master high-speed operation of
Rev.2.1/2.2 specification
– Plug-and-Play installation
– One RJ-45 connector: Auto detection of 10Mbps Ethernet, 100Mbps Fast
Ethernet and 1000Mbps Gigabit Ethernet & Auto MDI-X
– Supports 10/100/1000Mbps Auto-negotiation operation
– Full Duplex support for 10/100/1000Mb/s data rates
– Auto MDI-II/MDI-X crossover for all three speeds
– Two LED indicators (Link, Activity) for easy diagnostic
1
English
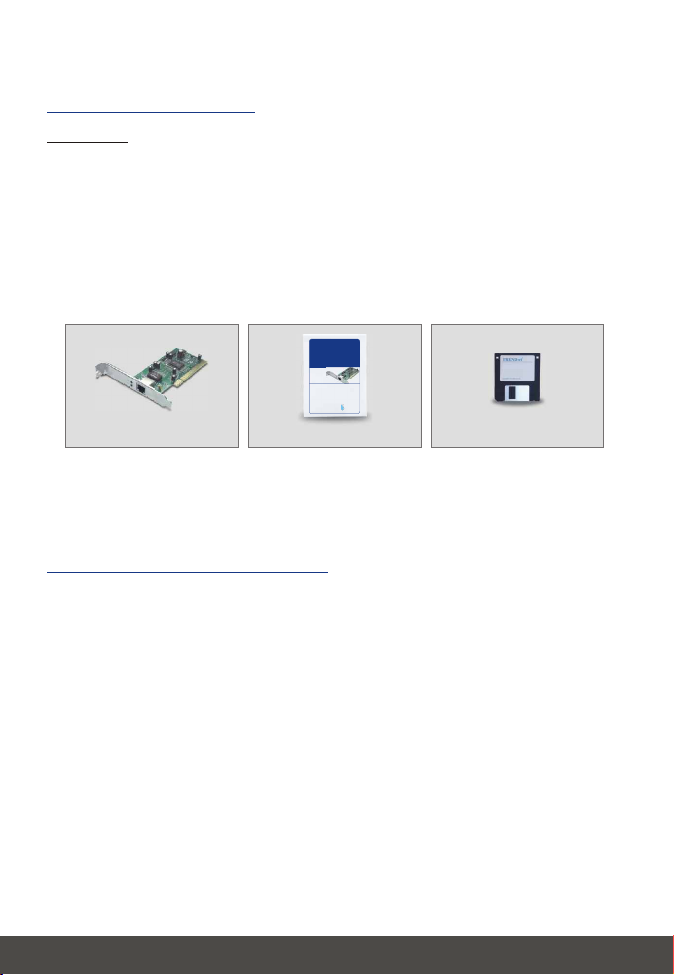
Package Contents
CAUTION:
Under ordinary circumstances, the 32-bit PCI 10/100/1000Mbps Gigabit
Ethernet Card will not be affected by static charge as may be received through
your body during handling of the unit. However, there are special
circumstances where you may carry an extraordinarily high static charge, and
possibly damage the card and/or your computer. It is good practice to eliminate
all static electricity by touching a ground (an unpainted metal area of your
computer chassis, for example) before performing any installations.
TEG-PCITXR
10/100/1000Mbps Gigabit Network Adapter
User’s Guide
Ghidul utilizatorului pentru
10/100/1000Mbps Gigabit Network Adapter
Version 07.29.05
TRENDnet
TRENDware, USA
What's Next in Networking
Copyright ©2005. All Rights Reserved. TRENDware International, Inc.
TEG-PCITXR
User’s Guide
3.5" Driver Diskette
If any item is found missing or damaged, please contact your local reseller for
replacement.
Gigabit PCI Adapter LED
Link (10, 100, 1000)
The Link LED indicates the connection speed of the adapter.
ACT
The ACT LED flashes when there is network activity.
2
English

2. Hardware Installation
Overview
Each Gigabit Network Adapter is equipped with an RJ-45 port that
automatically adjusts the connection speed to 10Mbps, 100Mbps or 1000Mbps;
allowing your PC to attach to Ethernet, Fast Ethernet or Gigabit Ethernet
networks.
For best results, we recommend using Category 5E or higher twisted-pair RJ45 cable. However, if you are connecting the adapter to 10Base-T (10Mbps)
network, you can use Category 3 or higher cable. For 100Base-TX (100Mbps)
and 1000Base-T (1000Mbps) networks, please use Category 5 or higher
cables.
Installing Gigabit PCI Adapter into your Pcs
1. Power off your PC and any peripherals attached to it and unplug your PC's
power cord.
2. Remove computer's cover.
3. Open your computer and locate the PCI slot(s) on your motherboard. PCI
slots are easily identified by their beige or white color, and by the fact that
network cards fit snugly into them. Remove the metal slot cover on the back
of the PC and then insert the Gigabit Adapter into any available PCI slot.
4. Once your Gigabit Adapter is firmly in place, secure it on your PC's
chassis with a screw.
5. Replace your PC's cover.
6. Connect one end of the Category 5/5E cable to the Adapter's RJ-45 port
and another end to a Gigabit Switch or Adapter.
7. Reconnect your PC's power, then power on your computer.
If your computer has Windows Operating System, the computer would
automatically recognize the Adapter as a new hardware and start the driver
installation wizard. Follow the instructions in the Software Installation
section to install the adapter driver.
For computers with Netware Server/Client and Linux, please go to HELP
folder from the driver diskette and select the desired operating system to
view the driver installation procedures.
The hardware installation is now complete. Next step is to load the
adapter driver and configure your PC's operating system to work with the
Gigabit Adapter.
3
English

3. Software Installation
Installing the Driver for Windows 98
1. Start up your computer.
2. Windows 98 automatically detects the presence of the Gigabit adapter.
3. Insert the Driver Diskette into your floppy drive when the Add New
Hardware Wizard window appears and click Next.
4. Select Search for the best driver for your device (Recommended). Click
Next.
5. Select Specify a location, type A:\win98 in the drop down box and click
Next (assuming A: drive is the floppy drive).
6. Windows is now ready to install the Gigabit Adapter driver. Click Next to
continue.
7. Windows will begin copying the driver files to your PC.
At this point, the installation may require files from your Windows 98 CD-
ROM. When this happens, insert your Windows 98 CD-ROM into your CD-
ROM drive and select CD-ROM drive (on the screen) to load the files.
8. After Windows has finished copying the files, it will prompt you to restart
your PC. Remove the diskette and CD-ROM and click YES to restart the
PC.
4
English

Installing the Driver for Windows ME
1. Start up your computer.
2. Windows ME automatically detects the presence of the Gigabit adapter.
3. Insert the Driver Diskette into your floppy drive when the "Add New
Hardware Wizard" window appears and click Next.
4. Select Specify the location of the driver (Advanced). Click Next.
5. Select Search for the best driver for your device (Recommended) and
check the Specify a location, enter A:\winme (assuming A: drive is the
floppy drive), and click Next.
6. Windows is now ready to install the Gigabit Adapter driver. Click Next to
continue.
7. Windows will begin copying the driver files to your PC. At this point, the
installation may require files from your Windows ME CD-ROM. When this
happens, insert your Windows ME CD-ROM into your CD-ROM drive and
select CD-ROM drive (on the screen) to load the files.
8. After Windows has finished copying the files, it will prompt you to restart
your PC. Remove the diskette and CD-ROM and click YES to restart the
PC.
Installing the Driver for Windows 2000
1. Start up your computer. You must have administrative rights to perform
the installation.
2. The Found New Hardware window appears
3. Insert the Driver Diskette into your floppy drive
4. Select Search for a suitable driver for my device (Recommended) and
click Next.
5. At the Locate Driver Files dialog box, select Specify a location, click Next,
type A:\win2k and click OK. The Driver file search results dialog box
appears. Click Next to continue.
6. At Microsoft's digital Signature window, click YES to continue the
installation.
7. Click Finish to complete the driver installation.
5
English

Installing the Driver for Windows XP
1. Start up your computer. You must have administrative rights to perform
the installation.
2. The Found New Hardware window appears
3. Insert the Driver Diskette into your floppy drive
4. Select Install from a list or specific location option and click Next.
5. Select Search for the best driver in these locations and select Include
these location option and type A:\winxp and click OK. The Driver file
search results dialog box appears. Click Next to continue.
6. At Microsoft's digital Signature window, click Continue Anyway to continue
the installation.
7. Click Finish to complete the driver installation.
After the driver files are loaded for Windows, the Gigabit network adapter is
now ready for operation. If your network requires configuring TCP/IP protocol,
please proceed to configure the PC's TCP/IP protocol to communicate with the
existing network.
6
English

4. Configuring TCP/IP Protocol
Configure TCP/IP protocol settings to match your network.
Windows 2000/XP
1. On the Desktop, right-click My Network Places and click Properties. Then,
right-click Wireless Network Connection and click Properties; the Network
Connection Properties Window will appear
2. Under the General tab, select Internet Protocol (TCP/IP) and click the
Properties button; the Internet Protocol (TCP/IP) Properties Window will
appear.
i.For DHCP IP address Setup (this should work for
most network environments)
1. Select the Obtain an IP address automatically option.
2. Select the Obtain DNS server address automatically option.
3. Click OK to save the settings.
7
English

ii.For Static IP address Setup
1. Select the Use the following IP address option and enter the IP, Subnet
Mask, and Default gateway addresses.
2. Select the Use the following DNS server address option and enter DNS
addresses.
3. Click OK to save the settings.
For Windows 98/ME users
1. On the Desktop, right-click Network Neighborhood and click Properties.
Then, right-click Wireless Network Connection and click Properties; the
Wireless Network Connection Properties Window will appear.
2. Under Configuration tab, select Realtek RTL 8169/8110 Gigabit Ethernet
NIC (TCP/IP protocol) and click on the Properties button; the TCP/IP
Protocol Properties Window will appear
8
English

i.For DHCP IP address Setup (this should work for
most network environments)
1. Select the Obtain an IP address automatically option.
ii.For Static IP address Setup
1. Select the Specify an IP address option, and enter the IP and Subnet Mask
addresses.
9
English

2. Select Gateway option and enter the Gateway IP address
3. Select DNS Configuration and add the DNS IP address and click OK to
finish.
Note: If your network has a DHCP Server (e.g. Internet Router), for ease
of configuration, please enable it and setup the network adapter with
DHCP IP configuration. After the adapter connects to the network, it will
receive the addresses automatically.
i.Checking the Adapter’s IP Address
Windows 2000/XP:
go to "start", select "run", type in cmd, then click ok. At the command prompt
(C:\), type in ipconfig/all and hit "Enter".
Windows 98/ME:
go to "Start", select "Run", type in winipcfg, then click "OK". From the dropdown menu, select the name of the network adapter (not the PPP Adapter).
Ping Command:
If you know a networked device's IP address, in the command prompt (c:\),
type in ping xxx.xxx.xxx.xxx (where xxx.xxx.xxx.xxx is the device's IP
address) and hit "Enter". If you see replies from this IP address, your computer
should be able to communicate with this device.
10
English

Românǎ QIG
1. Introducere
Felicitari pentru achizitionarea Adaptorului PCI 10/100/1000Mbps Gigabit .
Acesta este usor de instalat si si potrivit unei retele Ethernet de 10, 100, sau
1000Mbps. Cu tehnologia Gigabit va puteti bucura de viteza rapida de transfer
a datelor, streaming video/audio neintrerupt , si un raspuns excelent in ceea ce
prievste jocurile
Caracteristici
– IEEE 802.3, 802.3 sau 802.3z
– Suporta Local Bus Master 32-bit 33/66Mhz PCI , Rev.2.1/2.2
– Instalare Plug-and-Play
– Un conector RJ-45 : Auto detectare 10Mbps Ethernet, 100Mbps Fast
Ethernet si 1000Mbps Gigabit Ethernet & Auto MDI-X
– Suporta 10/100/1000Mbps operare Auto-negociere
– Suporta Full Duplex pentru rate de date 10/100/1000Mb/s
– Auto MDI-II/MDI-X pentru toate cele 3 viteze
– Doua LEDuri (Link, Activity) pentru diagnosticare rapida
11
Românǎ

Continutul Pachetului
ATENTIE :
In conditii normale, Cardul Ethernet 32-bit PCI 10/100/1000Mbps Gigabit nu va
fi afectat de incarcatura statica receptionata din corpul dvs. Totusi, exista
circumstante speciale in care purtati o incarcatura statica iesita din comun
putand astfel deteriora cardul si/sau calculatorul. Este indicat sa eliminati
energia atingand spre exemplu o portiune de metal de la computerul dvs ,
inainte de a incepe orice proces de instalare.
TEG-PCITXR
10/100/1000Mbps Gigabit Network Adapter
User’s Guide
Ghidul utilizatorului pentru
10/100/1000Mbps Gigabit Network Adapter
Version 07.29.05
TRENDnet
TRENDware, USA
What's Next in Networking
Copyright ©2005. All Rights Reserved. TRENDware International, Inc.
TEG-PCITXR
Ghidul utilizatorului
3.5” Driver Disketa
Daca un articol lipseste sau este deteriorat, va rugam sa contactati
distribuitorul pentru inlocuire.
Gigabit PCI LED Adaptor
Link (10, 100, 1000)
LEDul Link indica viteza conexiunii a adaptorului.
ACT
LEDul ACT clipeste cand exista activitate a retelei.
12
Românǎ

2. Instalarea Hardware
Vedere de Ansamblu
Fiecare Adaptor de Retea Gigabit este echipat cu un port RJ-45 care ajusteaza
automat viteza conexiunii la 10Mbps, 100Mbps sau 1000Mbps; permitand
PCului dvs sa se ataseze la retele Ethernet, Fast Ethernet sau Gigabit Ethernet
.
Pentru cele mai bune rezultate, va recomandam folosirea Categoriei 5E de
cablu sau perechii RJ-45. Cu toate acestea, daca vreti a conecta adaptorul la
reteaua 10Base-T (10Mbps), puteti folosi cablul Categoria 3 sau mai mult.
Pentru retelele 100Base-TX (100Mbps) si 1000Base-T (1000Mbps), va rugam
folositi cablul din Categoria 5 sau mai mult.
Instalarea Adaptorului Gigabit PCI in PCul dvs
1. Opriti PCul si orice alte periferice atasate acestuia, si deconectati cablul de
alimentare .
2. Indepartati carcasa PCului.
3. Localizati slotul/sloturile PCI de pe placa de baza. Acestea pot fi usor
identificate datorita culorii bej sau alb, si datorita faptului ca placile de retea
intra perfect in ele. Indepartati “coperta” de metal a slotului din spatele
PCului iar apoi introduceti Adaptorul in slotul PCI.
4. Odata plasat corect adaptorul , fixati-l cu un surub .
5. Asezati la loc carcasa PCului.
6. Conectati un capat al cablului Categoria 5 la portul RJ-45 al Adaptorului,
iar celalalt capat la un Switch sau Adaptor Gigabit
7. Reconectati cablul de alimentare ,si porniti calculatorul.
Daca dispuneti de Windows ca sistem de operare, calculatorul va
recunoaste automat Adaptorul ca fiind hardware nou si va incepe instalarea
driverului. Urmatii instructiunile din sectiunea Software Installation pentru a
instala driverul .
Pentru computerele ce dispun de Netware Server/Client si Linux, va rugam
accesati directorul HELP de pe disketa driver si selectati sistemul de
operare dorit , pentru a vizualiza procedurile de instalare ale driverelor.
Inslarea hardware este acum completa. Urmatorul pas este incarcarea
driverului Adaptorului si configurarea sistemului de operare de pe PC
pentru a lucra cu Adaptorul Gigabit.
13
Românǎ

3. Instalarea Software
Instalarea Driverului pt Windows 98
1. Porniti PCul.
2. Windows 98 va dectecta automat prezenta adaptorului Gigabit.
3. Introduceti Disketa Driver in unitatea floppy cand apare fereastra Add
New Hardware iar apoi dati click pe Next.
4. Selectati Search for the best driver for your device (Recommended).Dati
Click pe Next.
5. Selectati Specify a location, tastati A:\win98 in casuta iar apoi dati click
pe Next (presupunand ca unitatea A: este cea destinata disketei de tip
floppy).
6. Windows este acum gata pentru insalarea driverului.Dati click pe Next
pentru a continua.
7. Windows va incepe sa copieze fisierele driverului pe PC.
In acest moment, instalarea poate necesita fisiere de pe CDul Windows 98.
Cand acest lucru se iveste, introduceti CDul Windows 98, alegeti unitatea
CD-ROM (de pe ecran) pentru a incarca fisierele.
8. Dupa ce Windows a terminat de copierea fisierelor, va va cere sa restartati
PCul. Scoateti disketa si CDul si alegeti YES pentru a restarta PCul.
14
Românǎ

Instalarea Driverului Windows ME
1. Porniti PCul.
2. Windows ME va dectecta automat prezenta adaptorului Gigabit.
3. Introduceti Disketa Driver in unitatea floppy cand apare fereastra Add
New Hardware iar apoi dati click pe Next.
4. Selectati Specify the location of the driver (Advanced). Dati Click pe
Next.
5. Selectati Search for the best driver for your device (Recommended) si
alegeti e Specify a location, tastati A:\winme (presupunand ca unitatea A:
este cea destinata disketei de tip floppy) si dati click pe Next.
6. Windows este acum gata pentru instalarea driveruluir. Dati Click ep Next
pentru a continua.
7. Windows va incepe sa copieze fisierele driverului pe PC.
In acest moment, instalarea poate necesita fisiere de pe CDul Windows 98.
Cand acest lucru se iveste, introduceti CDul Windows 98, alegeti unitatea
CD-ROM (de pe ecran) pentru a incarca fisierele.
8. Dupa ce Windows a terminat de copierea fisierelor, va va cere sa restartati
PCul. Scoateti disketa si CDul si alegeti YES pentru a restarta PCul.
Instalarea Driverului pentru Windows 2000
1. Porniti PCul. Trebuie sa aveti drapturi administrative pentru a efectua
aceasta instalare.
2. Va aparea fereastra Found New Hardware.
3. Introduceti Disketa Driver in uniatea floppy.
4. Selectati Search for a suitable driver for my device (Recommended) si
dati pe Next.
5. Din casuta” Locate Driver Files”, selectati Specify a location, dati click pe
Next,si tastati A:\win2k si dati click pe OK. Va aparea casuta cu rezultatele
cautarii fisierelor Driver. DatiClick pe Next pentru a continua.
6. In fereastra Microsoft's digital Signature (semnatura digitale) dati click pe
YES pentru a continua instalarea.
7. Dati Click pe Finish pentru a completa instalarea driverului.
15
Românǎ

Instalarea Driverului pentru Windows XP
1. Porniti PCul. Trebuie sa aveti drapturi administrative pentru a efectua
aceasta instalare.
2. The Found New Hardware window appears
3. Introduceti Disketa Driver in uniatea floppy
4. Selectati Search for a suitable driver for my device (Recommended) si
dati pe Next.
5. Selectati Search for the best driver in these locations si selectati
optiunea Include these location si tastati A:\winxp si dati click pe OK. Va
aparea casutia cu rzultatele cautarii fisierelor Driver. Dati Click pe Next
pentru a continua.
6. In fereastra Microsoft's digital Signature (semnatura digitale) dati click pe
Continue Anyway pentru a continua instalarea.
7. Dati Click pe Finish pentru a completa instalarea driverului.
Dupa incarcarea fisierelor driver, adaptorul Gigabit de retea este gata pentru a
fi utilizat. Daca reteaua dvs necesita configurarea “TCP/IP protocol”, va rugam
configurati “ TCP/IP protocol” pentru asigurarea comunicarii cu reteaua
existenta.
16
Românǎ

4. Configurarea TCP/IP Protocol
Configurati setarile TCP/IP protocol pentru a se potrivi cu reteaua dvs.
Windows 2000/XP
1. Dati click-dreapta pe My Network Places din Desktop > selectati
Properties > click-dreapta pe Local Area Connection > selectati
Properties, va aparea fereastra “Network Connection Properties”.
2. Din tab-ul General , selectati Internet Protocol (TCP/IP) > dati click pe
butonul Properties ,va aparea fereastra Internet Protocol (TCP/IP)
Properties.
i.Pentru setarea adresei DHCP IP (Ar trebui sa
mearga in cazul majoritatii mediilor de retea)
1. Selectati optiunea Obtain an IP address automatically.
2. Selectati optiunea Obtain DNS server address automatically .
3. Dati Click pe OK pentru a termina.
17
Românǎ

ii. Pentru setarea adresei Static IP
1. Selectati optiunea Use the following IP address si tastati adresa IP, si
adresele Subnet Mask si Default gateway .
2. Selectati optiunea Use the following DNS server address si tastati
adresele DNS.
3. Dati Click pe OK pentru a termina.
Pentru utilizatorii Windows 98/ME
1. In Desktop, dati click-dreapta pe Network Neighborhood > selectati
Properties > dati click-dreapta pe Local Area Connection > selectati
Properties, va aparea fereastra “ Network Connection Properties”.
2. Din tab-ul Configuration , selectati Realtek RTL 8169/8110 Gigabit
Ethernet NIC (TCP/IP protocol) > dati click pe butonul Properties ,va
aparea fereastra TCP/IP Protocol Properties.
18
Românǎ

i.Pentru setarea adresei DHCP IP IP (Ar trebui sa
mearga in cazul majoritatii mediilor de retea)
1. Selectati optiunea Obtain an IP address automatically.
ii.Pentru setarea adresei Static IP address
1. Selectati optiunea Specify an IP address si tastati adresa IP si Subnet
Mask.
19
Românǎ

2. Selectati optiunea Gateway si tastati adresa IP Gateway IP.
3. Selectati DNS Configuration si adauati adresa IP DNS si dati clicl pe OK
pentru a termina.
Nota: Daca reteaua dvs dispune de un Server DHCP (Internet Router),
pentru o mai mare usurinta in configurare, va rugam activati-l si setati
adaptorul de retea cu configuratia DHCP IP . Dupa conectarea
adaptorului la retea, va primi automat adresele.
I.Verificarea adresei IP a Adaptorului
Pentru Windows 2000/XP:
dati click pe “Start”, selectati “Run”, tastati cmd si dati click ok.In command
prompt (C:\),tastati ipconfig/all si apasati tasta “Enter”.
Pentru Windows 98/ME:
dati click pe “Start”, selectati “Run”,tastati winipcfg si dati clickpe “OK”. Din
meniul “drop-down” selectati numele adaptorului de retea (NU Adaptorul PPP).
Comanda Ping :
Daca stiti adresa de IP a unui aparat legat la retea, in command prompt (c:\)
tastati ping xxx.xxx.xxx.xxx (unde xxx.xxx.xxx.xxx reprezinta adresa IP a
aparatului) si apasati tasta “Enter”. Daca observati replici de la respectiv
adresa IP, computerul dvs ar trebui sa poate counica cu acest aparatul in
cauza.
20
Românǎ

Troubleshooting
This section provides possible solutions to problems regarding the installation
and operation of the Gigabit Adapter.
1:
Windows does not detect the Gigabit Adapter installed.
Solution:
securely. Please power off the computer, remove and reinstall the Adapter.
Or, install the Adapter into a different PCI slot. The motherboard of your
system might not be Plug & Play compatible. Please check your
motherboard's user's manual for more information.
2:
Windows can't locate the driver for the Gigabit Network Adapter.
Solution:
this Adapter. For the latest driver, please visit http://www.trendnet.com,
select the "Download" section on the page, and select the "product name"
to download the driver.
Please note the driver file on the web site is either in .EXE (executable) or
.ZIP (compressed) format. After downloading the file, for .EXE file, please
double click the file and take a note on where the driver files are copying,
and then locate the driver from that location (e.g. C:\TEG-PCITXR). For
the ZIP file, please use WINZIP or other compatible decompressed
software to expand the file to a desired location and then locate the driver
from that location.
Certifications
The PCI card might not be inserted into the PCI slot correctly or
Double check the driver diskette and make sure it's labeled for
This equipment has been tested and found to comply with FCC and CE Rules.
Operation is subject to the following two conditions:
(1) This device may not cause harmful interference.
(2) This device must accept any interference received.
Including interference that may cause undesired operation.
NOTE: THE MANUFACTURER IS NOT RESPONSIBLE FOR ANY RADIO OR
TV INTERFERENCE CAUSED BY UNAUTHORIZED MODIFICATIONS TO
THIS EQUIPMENT. SUCH MODIFICATIONS COULD VOID THE USER’S
AUTHORITY TO OPERATE THE EQUIPMENT.
21

@
TRENDnet
TRENDware, USA
What's Next in Networking
Product Warranty Registration
Please take a moment to register your product online.
Go to TRENDware’s website at http://www.TRENDNET.com
TRENDnet Technical Support
US/Canada Support Center European Support Center
Contact
Telephone:
Fax:
Email:
Tech Support Hours
7:30am - 6:00pm Pacific Standard Time
Monday - Friday
1(310) 626-6252
1(310) 626-6267
support@trendnet.com
TRENDware International, Inc.
3135 Kashiwa Street. Torrance, CA 90505
Contact
Telephone
Deutsch : +49 (0) 6331 / 268-460
Français : +49 (0) 6331 / 268-461
Español : +49 (0) 6331 / 268-462
English : +49 (0) 6331 / 268-463
Italiano : +49 (0) 6331 / 268-464
Dutch : +49 (0) 6331 / 268-465
+49 (0) 6331 / 268-466
Fax:
Tech Support Hours
8:00am - 6:00pm Middle European Time
Monday - Friday
http://www.TRENDNET.com
Copyright ©2005. All Rights Reserved. TRENDware International, Inc.
 Loading...