

Page 1

DE
EN
Page 2

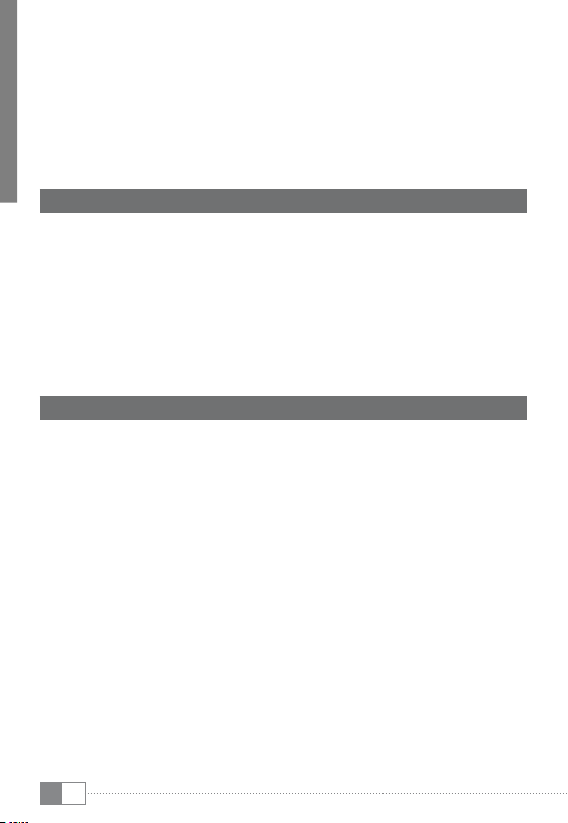
A
USB
DC 5V
DCB HGFE
RESET
I
Page 3

INDEX
DE ……………………………………………………………………… 4
EN ……………………………………………………………………… 13
Page 4
KURZANLEITUNG
b
Wir gratulieren Ihnen zum Kauf des Liro Color II und sind sicher, dass Sie viel
Freude mit diesem Produkt haben werden. Bitte lesen Sie sich die folgenden
Abschnitte aufmerksam durch, damit Sie die Funktionen dieses Produkts
und seine Bedienung kennenlernen.
Aktuelle Produktinformationen finden Sie auf der TrekStor Website
www.trekstor.de.
Lieferumfang
• Liro Color II
• Micro-USB-Kabel
• USB-Host-Kabel
• Netzteil (100-240V)
• Putztuch
• Kurzanleitung
1) Bedienelemente und Anschlüsse des Liro Color II
A) Kamera: Frontseite
B) Reset: Das Drücken dieser Taste (bspw. mit einer aufgeklappten
Büroklammer) führt ein Reset durch. Hinweis: Ein Reset setzt nur
die benutzerdefinierten Einstellungen zurück. Gespeicherte Daten
bleiben erhalten.
C) microSD-/microSDHC-Karteneinschub: Zum Einsetzen einer microSD-/
microSDHC-Speicherkarte bis zu 32 GB.
D) Lautstärkeregelung: Drücken Sie untere/obere Seite dieser Taste,
um die Lautstärke abzusenken/anzuheben. Ein längeres Drücken
ändert die Lautstärke stetig.
E) Netzteileingang: Zum Anschließen des Netzteils.
F) Micro-USB-Anschluss: Zum Anschließen an einen Computer über das
Micro-USB-Kabel.
G) Audio-Out-Anschluss: Zum Anschließen von bspw. Stereokopfhörern.
H) An-/Ausschalter: Ein längeres Drücken der Taste schaltet das Gerät an
bzw. aus. Ein kurzer Tastendruck deaktiviert/aktiviert den Ruhemodus
des Displays.
I) Lautsprecher: Für die Ausgabe von Sound.
DE
4
Page 5
2) Erste Inbetriebnahme
2.1) Laden des Liro Color II
Vor dem ersten Gebrauch empfiehlt es sich, den Liro Color II zunächst
vollständig aufzuladen. Verbinden Sie dazu den DC-Eingangsstecker
mit dem Liro Color II und schließen Sie das Netzteil an eine Steckdose an.
2.2) Erste Schritte
A) Nachdem Sie den Liro Color II aufgeladen haben, halten Sie den
Ein-/Ausschalter für 2-3 Sekunden gedrückt, um den Liro Color II
einzuschalten.
B) Nach dem Einschalten erscheint der Startbildschirm. Um die
Benutzeroberfläche auf die gewünschte Sprache einzustellen, tippen
Sie bitte im Applikationsmenü auf "SettingS" und anschließend auf
"Language & input". Tippen Sie nun in der rechten Spalte auf das erste
Feld "Language" und wählen Sie Ihre Sprache aus.
2.3) Eine Verbindung zum Internet herstellen
Mit dem Liro Color II haben Sie die Möglichkeit, über WLAN eine Verbindung
mit dem Internet herzustellen. Wenn Sie eine Verbindung mit einem neuen
Netz herstellen möchten, gehen Sie bitte wie folgt vor:
A) Gehen Sie über das Applikationsmenü zu den Einstellungen und
tippen Sie auf "WLan" unter "DrahtLoS unD netzWerke". Sollte hier die
WLAN-Funktion noch nicht aktiviert sein, schieben Sie zunächst
den An-/Ausschalter auf "an".
B) Auf der rechten Seiten werden Ihnen nun alle verfügbaren
Drahtlosnetzwerke angezeigt. Tippen Sie auf Ihr bevorzugtes
Netzwerk und geben Sie das Passwort in das entsprechende Feld ein.
C) Der Liro Color II verbindet sich daraufhin mit dem Internet. Über das
Browser-Symbol können Sie nun wie gewohnt im Internet surfen.
Haben Sie einmal eine Verbindung zu einem WLAN-Netzwerk hergestellt, wählt
i
sich der Liro Color II automatisch in dieses ein, sobald es in Reichweite ist.
Um Strom zu sparen empfiehlt es sich, die WLAN-Funktion auszuschalten,
i
wenn Sie sie nicht benötigen.
5
DE
Page 6

3) Bedienung des Liro Color II
3.1) Ein- und Ausschalten
Zum Einschalten des Liro Color II drücken Sie ca. 2-3 Sekunden den
Ein-/Ausschalter. Das Gerät schaltet sich daraufhin ein. Zum Ausschalten
drücken Sie bitte ebenfalls für ca. 2-3 Sekunden den Ein-/Ausschalter.
Es erscheint die folgende Mitteilung: "Möchten Sie DaS gerät herunterfahren?".
Tippen Sie auf "ok", um den Liro Color II auszuschalten.
3.2) Den Standby-Modus aktivieren/deaktivieren
Wenn Sie den Liro Color eine Weile nicht verwenden möchten, drücken
Sie kurz auf den Ein-/Ausschalter, um das Tablet in den Standby-Modus zu
versetzen. So sparen Sie Strom und können sichergehen, dass das Tablet
keine ungewünschten Dienste nutzt. Um den Standby-Modus wieder zu
verlassen, drücken Sie ebenfalls kurz den Ein-/Ausschalter.
Sobald Sie den Bildschirm wieder aktiviert haben, zeigt der Liro Color II
zunächst die Displaysperre an. Ziehen Sie das Sperrsymbol an den rechten
Rand des Kreises auf das offene Schloss, um das Tablet zu entsperren.
Der Liro Color II wird automatisch gesperrt, wenn es für eine bestimmte
i
Zeit nicht verwendet wird. Eine Änderung der Zeitspanne, ab wann
der Liro Color II automatisch in den Standby gehen soll, kann unter
"EinstEllungEn" + "Display" + "RuhEzustanD" individuell angepasst werden.
3.3) Verwendung des Touchscreens
Elemente auswählen
Berühren Sie das Display einmal kurz mit der Fingerspitze, um ein Element
zu öffnen oder eine Option auszuwählen.
Elemente verschieben
Halten Sie den Finger auf dem jeweiligen Element, das Sie bewegen
möchten und ziehen Sie es an die gewünschte Stelle auf dem Bildschirm.
Bildlauf
Um ein Fenster bzw. den Bildschirm nach oben, unten oder seitwärts zu
rollen, streichen Sie Ihren Finger einfach nach oben oder unten bzw. von
links nach rechts und umgekehrt.
DE
6
Page 7

Vergrößern
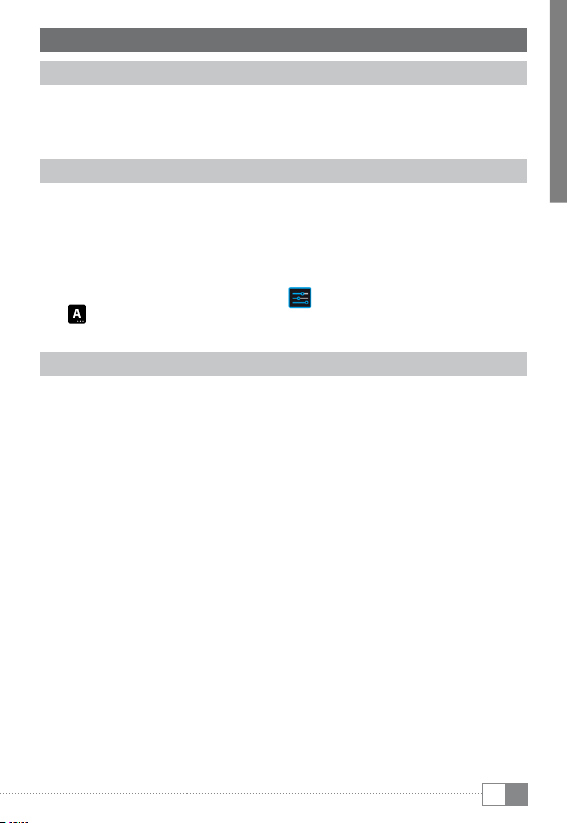
D E F G
Ziehen Sie auf dem Bildschirm gleichzeitig zwei Finger auseinander oder
tippen Sie zweimal auf das Display, um eine Website oder ein Dokument
zu vergrößern.
3.4) Elemente auf dem Startbildschirm
A B
A) Google™-Suche
B) Mikrofonfunktion für Spracheingabe
C) Applikationsmenü und Display benutzerdefinieren
D) Zurück zum vorhergehenden Bildschirm
E) Zurück zum Startbildschirm
F) Kürzlich verwendete Applikationen anzeigen (zum Beenden der
Anzeige, wischen Sie mit dem Finger über den Bildschirm)
G) Statusanzeige: Die rechte untere Ecke dient der Anzeige
unterschiedlicher Meldungen (bspw. Batterieanzeige, Uhrzeit
oder WLAN-Verbindung, zur Verfügung stehende Downloads)
C
7
DE
Page 8

3.5) Persönliche Einrichtung der Startseite
Der Startbildschirm geht rechts und links jeweils zwei Seiten über das
Display hinaus, sodass Ihnen insgesamt fünf Seiten zur individuellen
Gestaltung zur Verfügung stehen. Um diese Seiten anzuzeigen, ziehen
Sie die Fenster mit Ihrem Finger von rechts nach links oder umgekehrt.
Sie können die Startseite (sowie die vier zusätzlichen Seiten) persönlich
einrichten, indem Sie Applikationsverknüpfungen und Widgets hinzufügen
oder entfernen und den Hintergrund ändern.
Zur Anpassung des Startbildschirms tippen Sie bitte zunächst auf das
Applikationsmenü rechts oben auf der Startseite. Gehen Sie anschließend
wie folgt vor:
Applikationen
Nachdem Sie auf das Applikationsmenü getippt haben, öffnet sich ein
Bildschirm, der Ihnen alle aktuell verfügbaren Applikationen anzeigt.
Drücken Sie längere Zeit auf die jeweilige Applikation, die Sie Ihrem
Startbildschirm hinzufügen möchten und verschieben Sie sie
anschließend an die gewünschte Position.
Wenn Sie die Applikation bis an den Seitenrand ziehen, können Sie das
Icon auch auf dem nächsten Bildschirm platzieren.
Widgets
Nachdem Sie auf das Applikationsmenü getippt haben, öffnet sich ein
Bildschirm, der Ihnen alle aktuell verfügbaren Applikationen anzeigt. Tippen
Sie nun oben links im Bild auf "
nach links über den Bildschirm, um die verfügbaren Widgets anzuzeigen.
Drücken Sie nun längere Zeit auf das Widget, das Sie Ihrem Startbildschirm
hinzufügen möchten und verschieben Sie es anschließend an die
gewünschte Position.
WiDgetS" oder ziehen Sie den Finger von rechts
3.6) Applikationen vom Startbildschirm entfernen
A) Um eine Applikation oder ein Widget vom Startbildschirm zu entfernen,
drücken Sie so lange auf das entsprechende Icon, bis am oberen
Bildschirmrand "entfernen" erscheint.
B) Halten Sie das Symbol gedrückt und ziehen Sie es auf "entfernen".
C) Sobald das Symbol rot erleuchtet, können Sie es loslassen und die
Applikation bzw. das Widget wird vom Startbildschirm entfernt.
Dieser Vorgang löscht nur die Verlinkung zum Startbildschirm, nicht aber die
i
Applikation an sich. Wie eine Applikation vollständig von Ihrem Liro Color II
entfernt wird, finden Sie unter Punkt 4.2.
DE
8
Page 9

3.7) Bildschirmhintergrund ändern
A) Berühren Sie die Startseite an einer beliebigen Stelle so lange,
bis ein Fenster mit der Nachricht "hintergrunD auSWähLen von" erscheint.
B) Wählen Sie nun aus, ob Sie ein Hintergrundbild aus der Galerie, den
Hintergrundbildern oder den Live-Hintergründen (bewegte Bilder)
verwenden möchten.
C) Klicken Sie auf das gewünschte Bild und bestätigen Sie Ihre Wahl
über "hintergrunD feStLegen".
Wenn Sie einen Hintergrund aus der Galerie auswählen, haben Sie
i
zusätzlich die Möglichkeit, einen bestimmten Bereich für Ihr gewünschtes
Hintergrundmotiv auszuwählen.
3.8) Die Display-Tastatur
Wenn Sie ein Textfeld antippen, um Text einzugeben (bspw. eine
Webadresse), wird die Displaytastatur angezeigt. Geben Sie den Text wie
gewohnt über die Tasten ein. Nutzen Sie außerdem die Tasten "?123"
sowie "~\{", um Zahlen und Sonderzeichen einzugeben. Für die Eingabe
von alternativen Buchstaben (bpsw. solche mit Akzent oder Umlaute),
drücken Sie länger auf einen bestimmten Buchstaben und die verfügbaren
Buchstaben erscheinen.
Gehen Sie über "EinstEllungEn" + "spRachE unD EingabE" zu dem Menüpunkt
i
"anDRoiD™-tastatuR", um weitere Tastatureinstellungen vornehmen
zu können.
3.9) Die Kamera verwenden
Tippen Sie auf das Applikationsmenü und anschließend auf das Kamera-Icon,
um die Funktion zu aktivieren.
Um den Auslöser zu drücken, tippen Sie auf den blauen Kreis, der sich unter
i
bzw. rechts vom Bild befindet; um das Bild heran- oder herauszuzoomen,
ziehen Sie den kleinen Kreis vom "-"- zum "+"-Symbol und umgekehrt.
3.10) Ein Email-Konto einrichten
Um ein Email-Konto einzurichten, wählen Sie "eMaiL" über das
Applikationsmenü aus und gehen anschließend wie folgt vor:
A) Tippen Sie auf das obere Eingabefeld und geben Sie eine gültige
Email-Adresse sowie das dazugehörige Passwort ein.
B) Tippen Sie auf "Weiter", um Ihre Eingabe zu bestätigen.
9
DE
Page 10

C) In den nächsten Schritten können Sie weitere Kontoeinstellungen
vornehmen. Sobald Sie das Konto nach Ihren Wünschen eingerichtet
haben, ist die Email-Applikation bereit für den Gebrauch.
3.11) Ein Email-Konto entfernen
Um ein Email-Konto wieder zu entfernen, wählen Sie "eMaiL" über das
Applikationsmenü aus und gehen anschließend wie folgt vor:
A) Tippen Sie oben rechts auf die drei untereinander stehenden Punkte
(Einstellungen) und wählen anschließend links das Feld mit dem
Namen Ihres Kontos aus.
B) Scrollen Sie nun im rechten Fenster ganz nach unten und tippen
Sie auf "konto entfernen".
C) Bestätigen Sie Ihre Wahl mit OK und das Konto wird gelöscht.
4) App Center verwenden
Tippen Sie auf der Startseite oder im Applikationsmenü auf das Icon, über
das Sie zum App Center gelangen. Neben den Applikationen und Widgets,
die auf dem Liro Color II bereits vorinstalliert sind, können Sie dort eine
Vielzahl von zusätzlichen Programmen, Applikationen und Büchern finden,
mit denen Sie die Funktionen Ihres Liro Color II erweitern können.
Sollten Sie den App Center zum ersten Mal benutzen, müssen Sie die
Benutzungsbestimmungen durchlesen und annehmen. Danach können
Sie den App Center nach Kategorien durchsuchen oder einen Suchbegriff
eingeben, um gezielt nach einer Applikation zu suchen.
4.1) Applikationen herunterladen und verwenden
A) Nachdem Sie eine Applikation ausgewählt haben, tippen Sie auf
"herunterLaDen", um die Applikation zu installieren.
B) Sobald die Applikation heruntergeladen und installiert wurde, befindet sie
sich im Applikationsmenü. Bedienen Sie die Applikation entweder von dort
aus oder fügen Sie sie Ihrem Startbildschirm hinzu (siehe auch Abschnitt 3.5).
Bestimmte Applikationen müssen erst gekauft werden, bevor sie
i
heruntergeladen werden können. Befolgen Sie für die Auswahl des richtigen
Bezahlsystems die Anweisungen des App Centers.
4.2) Deinstallieren von Applikationen
Wenn Sie eine Applikation deinstallieren möchten, gehen Sie über die
"einSteLLungen" zu "appS" und wählen Sie die Applikation aus, die Sie löschen
möchten. Tippen Sie im folgenden Fenster auf DeinStaLLieren" und bestätigen
Sie Ihre Wahl nochmals mit ok".
DE
10
Page 11

5) Anschließen von anderen Geräten
5.1) Anschließen an einen PC
A) Schließen Sie den Micro-USB Stecker an den Micro-USB-Anschluss
des Liro Color II an und das andere Ende des USB-Kabels an einen
USB-Anschluss Ihres Computers.
B) Tippen Sie nun auf dem Bildschirm des Liro Color II auf "uSB-Speicher
aktivieren".
C) Einen kurzen Moment später wird Ihnen der interne Speicher des Liro
Color II als ein externes Laufwerk im Dateiexplorer des Computers
angezeigt. Von dort aus können Sie Dateien laden, kopieren, löschen
oder verschieben.
Wenn Sie den Liro Color II ordnungsgemäß vom Computer abmelden
i
möchten, tippen Sie auf "usb-spEich ER DEaktiviE REn" und trennen es
anschließend vom Computer.
5.2) Anschließen eines USB-Geräts
USB-Geräte, bspw. eine Festplatte, können über den Micro-USB-Hostanschluss
angeschlossen werden.
Unter Umständen reicht die Stromversorgung des Liro Color II nicht aus,
i
um eine volle Funktion des angeschlossenen USB-Geräts zu gewährleisten.
Versorgen Sie daher eine externe Festplatte bspw. über ein Y-Kabel mit
extra Strom.
11
DE
Page 12

Sicherheits- und Verwendungshinweise:
Technische Arbeiten an dem Produkt dürfen nur von entsprechend qualifizierten
Personen durchgeführt werden. Das Produkt darf weder geöffnet werden noch dürfen
d
Änderungen daran vorgenommen werden. Die Komponenten können nicht vom
Nutzer gewartet werden.
Setzen Sie das Gerät niemals Feuchtigkeit, Kondenswasser und Nässe aus.
e
Schützen Sie das Gerät vor extrem hohen und niedrigen Temperaturen und
Temperaturschwankungen. Betreiben Sie es nur bei einer Umgebungstemperatur
k
innerhalb des Bereichs von 5º C und 40º C.
Stellen Sie das Gerät nicht in der Nähe einer Wärmequelle auf und schützen Sie
m
es vor direkter Sonneneinstrahlung.
Achten Sie bei der Verwendung und Lagerung des Geräts auf eine möglichst
h
staubfreie Umgebung.
Die Reinigung der Oberfläche des Geräts darf niemals mit Lösungsmitteln,
Farbverdünnern, Reinigungsmitteln oder anderen chemischen Produkten erfolgen,
g
nutzen Sie stattdessen ein weiches, trockenes Tuch bzw. einen weichen Pinsel.
Achtung: Bitte beachten Sie, dass dieses Gerät Funktechnik verwendet und in allen
Ländern der Europäischen Union, der Schweiz und Norwegen nur seiner Bestimmung
gemäß verwendet werden darf.
Der Hersteller behält sich das Recht vor, das Produkt ständig weiter zu entwickeln.
Diese Änderungen können ohne direkte Beschreibung in dieser Bedienungsanleitung
vorgenommen werden. Informationen in dieser Bedienungsanleitung müssen somit
nicht den Stand der technischen Ausführung widerspiegeln.
Der Hersteller garantiert nur die Eignung für die eigentliche Bestimmung dieses Produktes.
Weiter ist der Hersteller nicht für Beschädigungen oder Verlust von Daten und deren
Folgeschäden verantwortlich.
Copyright © 2012 TrekStor GmbH. Alle Rechte vorbehalten. Bei weiteren erwähnten
Produkt- oder Firmenbezeichnungen handelt es sich möglicherweise um Warenzeichen
oder Markennamen der jeweiligen Inhaber.
Android is a trademark of Google Inc. Use of this trademark is subject to Google Permissions.
12
DE
Page 13

QUICK GUIDE
b
Thank you for buying the Liro Color II. We are confident that this product will
be the source of much enjoyment. Please read the following instructions
carefully so that you can become acquainted with the
functions of this product and its use.
Current product information can be found at the TrekStor Website
www.trekstor.de.
Package content
• Liro Color II
• Micro-USB cable
• USB host cable
• Power supply (100-240V)
• Cleaning cloth
• Quick guide
1) Controls and connections of the Liro Color II
A) Camera: Front side
B) Reset: Pressing this button (e. g. with an unfolded paperclip) performs
a reset. Note: A reset only resets the custom settings. Saved data will
remain on the device.
C) microSD/microSDHC card slot: To insert a microSD/microSDHC memory
card up to 32 GB.
D) Volume control: Press the lower/upper side of the button to lower/raise
the volume. A longer press changes the volume constantly.
E) Mains input: For connecting the power supply.
F) Micro-USB connector: To connect a computer via the micro USB cable.
G) Audio-out connector: To connect e. g. stereo headphones.
H) Power button: A longer press turns the device on or off. A short press
deactivates/activates the standby mode of the display.
I) Loud speaker: For the output of sound.
13
EN
Page 14

2) First set up
2.1) Charging the Liro Color II
Before the first use, it is recommended to fully charge the Liro Color II.
Connect the DC input connector with the Liro Color II and connect the
power supply to an electrical outlet.
2.2) Getting started
A) After charging the Liro Color II, hold down the power button for
2-3 seconds to switch on the device.
B) After switching on the device, the start screen appears. To set the user
interface to the desired language, please tap inside the applications
menu on "Set tingS" and afterwards on "Languag e & inpu t".
Tap now in the right column on the first field "Language" and
select your language.
2.3) Connecting the Internet
With the Liro Color II you have the possibility to access the Internet via Wi-Fi.
If you want to establish a connection to a new network, please proceed
as follows:
A) Go via the applications menu to the settings and tap on "Wi-fi" under
"WireLeSS anD netWorkS". In case the Wi-Fi function is not activated yet,
first pull the on/off switch to "on".
B) On the right side all the wireless networks are displayed. Tap on your
preferred network and enter the password into the appropriate field.
C) The Liro Color II then connects with the Internet. Via the browser
symbol you can now surf the Internet as usual.
If you have once established a connection to a Wi-Fi network, the Liro Color II
i
automatically connects to it as soon as it is within reach.
To save power, it is advisable to turn off the wireless function, if you do not
i
need it.
EN
14
Page 15

3) Operation of the Liro Color II
3.1) Switching on and off
To turn the Liro Color II on, press the power button approx. 2-3 seconds.
The device turns then on. To turn the device off, press also for approx.
2-3 seconds the power button. Now the following message appears:
WouLD you Like to Shut DoWn?". Tap on "ok" to shut down the Liro Color II.
3.2) Activating/Deactivating the standby mode
If you do not want to use the Liro Color for a while, press briefly the power
button to put the tablet in the standby mode. In this way you can save
power and be sure that the tablet does not use any unwanted services.
To exit the standby mode, press again briefly the power button.
Once you have activated the screen again, the Liro Color II first displays the
screen lock. Pull the lock icon to the right edge of the circle onto the open
lock, in order to unlock the tablet.
The Liro Color II is locked automatically when it is not used for a certain
i
time. A change of the interval, from when the Liro Color II is supposed to go
automatically into the standby mode, can be individually adjusted under
"sEttings" + "Display" + "slEEp".
3.3) Using the touch screen
Selecting items
Touch the screen once with your fingertip to open an element or select
an option.
Move items
Keep your finger on the item that you would like to move and drag it
to the desired position on the screen.
Scrolling
In order to roll a window or the screen up, down or sideways, simply slide
your finger up or down respective from left to the right and vice versa.
Enlarging
On the screen, pull simultaneously two fingers apart or tap twice on the
display to enlarge a website or a document.
15
EN
Page 16

3.4) Elements on the home screen
D E F G
A B
A) Google™ search
B) Microphone function for voice entry
C) Applications menu and customizing the display
D) Back to the previous screen
E) Back to the home screen
F) View recently used applications (to exit the display, wipe your finger
across the screen)
G) Status display: The lower right corner is used to display different
messages (e. g. battery indicator, time or Wi-Fi connection,
available downloads)
C
3.5) Personalizing the start screen
The start screen has two more pages on the left and the right side, so that
all together five pages are available for an individual design. To display the
pages, pull the window with your finger from right to left or vice versa. You
can set up the start screen individually (as well as the four additional pages)
by adding or removing application shortcuts and widgets or changing the
desktop background.
16
EN
Page 17

To customize the start screen, tap first on the application menu on the right
top of the page. Then proceed as follows:
Applications
After you have tapped on the applications menu, a screen opens displaying
all currently available applications. Press longer time on an application,
which you would like to add to the start screen and then move it to the
desired position.
If you pull up the application to the edge of the screen, you can also place
the icon on the next screen.
Widgets
After you have tapped on the applications menu, a screen opens displaying
all currently available applications. Tap on the left top of the picture on
WiDgetS" or pull the finger from right to left across the screen to display all
"
available widgets.
Now press longer time on the widget, which you would like to add to the
start screen and then move it to the desired position.
3.6) Removing applications from the start screen
A) To remove an application or a widget from the start screen, press as
long on the appropriate icon, until "reMove" appears on the top
of the screen.
B) Hold down the symbol and drag it on "reMove".
C) Once the symbol lights red, you can drop it and the application or
the widget is removed from the start screen.
This process only deletes the shortcuts on the start screen but not the
i
applications itself. An instruction how to fully delete an application from
your Liro Color II, can be found under point 4.2.
3.7) Changing the desktop background
A) Touch the start screen as long at any point until a window appears with
the message "Choose wallpaper from".
B) Now choose whether you want to use a background image from the
gallery, the wallpapers or the live wallpapers (moving pictures).
C) Click on the desired image and confirm your choice with "Set WaLLpaper".
If you select a background from the gallery, you also have the option to
i
select a specific area for your desired background motif.
17
EN
Page 18

3.8) The display keyboard
When you tap a text field in order to enter text (e. g. a web address), the
on-screen keyboard appears. Enter the text as usual via the keys. Besides that
use the keys "?123" or "~\{" to enter numbers and special characters. For the
entry of alternative letters (e. g. those with accents or umlauts), press and
hold a particular letter and the available characters appear.
Go via "sEttings" + "languagE anD input" to the menu point "anDRoiD™ kEyboaRD"
i
in order to adjust further keyboard settings.
3.9) Using the camera
Tap on the applications menu and afterwards on the camera icon to activate
the function.
To press the shutter button, tap on the blue circle, which is below or right
i
of the picture; to zoom the picture in or out, drag the small circle from
the "-" to the "+" symbol and vice versa.
3.10) Creating an email account
To set up an email account, choose "eMaiL" via the applications menu
and then proceed as follows:
A) Tap on the upper edit box and enter a valid email address as well
as the corresponding password.
B) Tap on "next" to confirm your entry.
C) In the next steps you can adjust other account settings. Once you have
set up the account according to your wishes, the email application
ready for use.
3.11) Removing an email account
To remove the email account, choose "eMaiL" via the applications menu
and then proceed as follows:
A) Tap the top right on the three inter-related points (settings) and then
select on the left the field with the name of your account.
B) Now scroll inside the right windows to the very bottom and tap on
"reMove account".
C) Confirm your choice with OK and the account is deleted.
EN
18
Page 19

4) Using the App Center
Tap on the start screen or in the applications menu on the icon, through
which you can access the App Center. In addition to the applications and
widgets that are preloaded on the Liro Color II already, you can find there
a variety of additional programs, applications and books used to extend
the functions of your Liro Color II.
If you use the App Center for the first time, you must read the terms of use
and accept these. Then you can browse the App Center by category or by
keywords in order to specifically look for an application.
4.1) Downloading and using applications
A) After you have selected an application, tap on "DoWnLoaD" to install
the application.
B) Once the application has been downloaded and installed, it is located
in the applications menu. Operate the applications either from there
or add them to your start screen (see also section 3.5).
Certain applications need to be purchased before they can be downloaded.
i
For the selection of the correct payment method, please follow the
instructions of the App Center.
4.2) Uninstalling applications
If you like to uninstall an application, go via "SettingS" to "appS" and select the
application that you would like to delete. Tap now in the following window
on "uninStaLL" and confirm your choice once again with ok".
5) Connecting other devices
5.1) Connecting a PC
A) Connect the Micro-USB connector to the Micro-USB port of the Liro
Color II and the other end of the USB cable to a USB port of your
computer.
B) Tap on the screen of the Liro Color II on "turn on uSB Storage".
C) A moment later, the internal memory of the Liro Color II is displayed as
an external drive inside the file explorer of the Computer. From there
you can download files, copy, delete or move them.
If you like to safely remove the Liro Color II from the computer, tap on
i
"tuRn off usb stoRagE" and disconnect it from the computer.
19
EN
Page 20

5.2) Connecting a USB device
USB devices, e. g. a hard drive, can be connected via the Micro-USB port.
It might be that the current supply of the Liro Color II is not enough to fully
i
guarantee the full function of the connected USB device. Therefore provide
extra current for an external hard drive e. g. via a Y cable.
EN
20
Page 21

Instructions for safety and use:
Only qualified persons may perform technical work on the product. The product may
not be opened or changed. The components cannot be serviced by the user.
d
Never expose the device to moisture, condensation and liquids.
e
Protect the device from extremely high and low temperatures and temperature
fluctuations. Use the device within an ambient temperature of 5º C to 40º C.
k
Never place the device close to a source of heat and protect it from direct sunlight.
m
Make sure that the surroundings are as dust-free as possible when you use and
h
store the device.
Never clean the surface of the device with solvents, paint thinners, cleansers or other
g
chemical products. Instead, use a soft, dry cloth or soft brush.
Caution: Please note that this device uses radio technology and may only be used for its
intended purpose in all countries of the European Union, Switzerland and Norway.
The manufacturer retains the right to continually improve the product. These changes may
be made without being directly described in these operating instructions. For this reason, the
information provided in these operating instructions may not reflect the current state of the art.
The manufacturer only guarantees suitability for the product's intended purpose. In
addition, the manufacturer is not responsible for damages or loss of data and subsequent
consequences.
Copyright © 2012 TrekStor GmbH. All rights reserved. Other cited product or company names
may be trademarks or brand names of the respective owner.
Android is a trademark of Google Inc. Use of this trademark is subject to Google Permissions.
21
EN
Page 22

Akku-Entsorgung
Informationspflicht gemäß Batterieverordnung (BattV)
Batterien und Akkus gehören nicht in den Hausmüll. Der Verbraucher ist dazu verpflichtet,
nicht mehr verwendete Batterien und Akkus ordnungsgemäß zurückzugeben. Lassen Sie
diese bitte nur über den Fachhandel oder durch Batteriesammelstellen entsorgen.
Hier leisten Sie einen konkreten Beitrag zum Umweltschutz.
Seit 1998 verpflichtet die Deutsche Batterieverordnung alle Bürgerinnen und Bürger,
verbrauchte Batterien und Akkus ausschließlichüber den Handel oder speziell dafür
eingerichtete Sammelstellen zu entsorgen (gesetzliche Rückgabepflicht).
Handel und Hersteller sind verpflichtet, diese Batterien und Akkus unentgeltlich
zurückzunehmen und ordnungsgemäß zu verwerten oder als Sondermüll zu
beseitigen (gesetzliche Rücknahmepflicht).
Der verbaute Li-Polymer Akku dieses Geräts ist mit dem nebenstehenden Zeichen,
bestehend aus einer durchgestrichenen Mülltonne und der Art des verwendeten
Akkus gekennzeichnet.
Akku ausbauen
Bevor Sie Ihr ausgedientes Gerät zur Entsorgung geben, muss der Akku aus dem Gerät
a
entfernt werden.
Battery disposal
Reporting requirement according to the Battery Directive (BattV)
Batteries are not part of the domestic waste. The consumer is obliged to return no longer
used batteries properly. Please dispose of them by a specialized trade or a battery collection
point. Hereby you make an important contribution to environmental protection.
Since 1998 the German Battery Directive compels all citizens to dispose of used batteries
exclusively through the trader or specially equipped departments (legal return obligation).
Trade and manufacturers are committed to take back batteries for free and to exploit it
properly or to remove it as special waste (legal take-back obligation).
The built-in lithium-polymer battery of this device is marked with the adjoining
symbol, consisting of a crossed out bin and the used battery type.
Remove battery
Before you return a disused device for disposal, the battery has to be removed from the device.
a
Page 23

EC DECLARATION OF CONFORMITY
As manufacturer and importer respectively:
■■■■■■■■■■■■■■■■■■■■■■■■■■■■■■■■■■■■■■■■■■■■■■■■■■■■■■■■■■■■■■■■■■■■■■■■■■■■■■■■■■■■■■■■■■■■■■■■■■■■■■■■■■■■■■■■■■■■■■■■■■■■■■■■■■■■■■■■■■■■■■■■■■■■■■■■■■■■■■■■■■■■■■■■■■■■■■■■
herewith declares that the products
Product: Liro Color II
■■■■■■■■■■■■■■■■■■■■■■■■■■■■■■■■■■■■■■■■■■■■■■■■■■■■■■■■■■■■■■■■■■■■■■■■■■■■■■■■■■■■■■■■■■■■■■■■■■■■■■■■■■■■■■■■■■■■■■■■■■■■■■■■■■■■■■■■■■■■■■■■■■■■■■■■■■■■■■■■■■■■■■■■■■■■■■■■
Type: Mobile Internet Device
■■■■■■■■■■■■■■■■■■■■■■■■■■■■■■■■■■■■■■■■■■■■■■■■■■■■■■■■■■■■■■■■■■■■■■■■■■■■■■■■■■■■■■■■■■■■■■■■■■■■■■■■■■■■■■■■■■■■■■■■■■■■■■■■■■■■■■■■■■■■■■■■■■■■■■■■■■■■■■■■■■■■■■■■■■■■■■■■
comply with the following directive(s):
■
99/5/EC Radio Equipment and Telecommunications Terminal Equipment
■
2004/108/EC EMC Directive: Electromagnetic Compatibility
■
2006/95/EC Low Voltage Directive
■■■■■■■■■■■■■■■■■■■■■■■■■■■■■■■■■■■■■■■■■■■■■■■■■■■■■■■■■■■■■■■■■■■■■■■■■■■■■■■■■■■■■■■■■■■■■■■■■■■■■■■■■■■■■■■■■■■■■■■■■■■■■■■■■■■■■■■■■■■■■■■■■■■■■■■■■■■■■■■■■■■■■■■■■■■■■■■■
The following norms were consulted to assess conformity:
■
EN 300 328 V1.7.1 (2006-10)
Electromagnetic compatibility and Radio spectrum Matters (ERM); Data transmission equipment
■
EN 301 489-1 V1.8.1 (2008-04)
EMC and ERM: EMC standard for radio equipment and services; Part 1: Common technical requirements
■
EN 301 489-17 V1.3.2 (2008-04):
■
EN 60065:2002 + A1:2006 + Corrigendum:2006
Audio, video and similar electronic apparatus – Safety requirements
■■■■■■■■■■■■■■■■■■■■■■■■■■■■■■■■■■■■■■■■■■■■■■■■■■■■■■■■■■■■■■■■■■■■■■■■■■■■■■■■■■■■■■■■■■■■■■■■■■■■■■■■■■■■■■■■■■■■■■■■■■■■■■■■■■■■■■■■■■■■■■■■■■■■■■■■■■■■■■■■■■■■■■■■■■■■■■■■
The CE symbol conrms that this product conforms with the above mentioned norms and regulations.
■■■■■■■■■■■■■■■■■■■■■■■■■■■■■■■■■■■■■■■■■■■■■■■■■■■■■■■■■■■■■■■■■■■■■■■■■■■■■■■■■■■■■■■■■■■■■■■■■■■■■■■■■■■■■■■■■■■■■■■■■■■■■■■■■■■■■■■■■■■■■■■■■■■■■■■■■■■■■■■■■■■■■■■■■■■■■■■■
The manufacturer also declares the conformity of the product according to the following directives:
■
2001/95/EC General Product Safety
■
2002/95/EC RoHS: Hazardous substances in electrical and electronic equipment
TrekStor GmbH
Kastanienallee 8 - 10
D-64653 Lorsch, Germany
operating in the 2,4 GHz ISM band and using wide band modulation techniques
Electromagnetic compatibility and Radio spectrum Matters (ERM); ElectroMagnetic Compatibility (EMC)
standard for radio equipment; Part 17: Specic conditions for 2,4 GHz wideband transmission systems.
Lorsch, 10.09.2012
Thorsten Koroscha, LPM
Page 24

Supportinformationen
Sollten Sie Fragen zu Ihrem TrekStor Produkt haben, gehen Sie bitte wie folgt vor:
• ÜberprüfenSieanhandderProdukteigenschaftenundderFunktionenIhresGerätes
(auf der Verpackung ersichtlich), ob Sie die richtigen Einstellungen vorgenommen haben.
• LesenSieaufmerksamdiegesamteBedienungsanleitung.
• InformierenSiesichaufunsererWebsitewww.trekstor.de über aktuelle
Informationen zu Ihrem Produkt (z. B. neu verfügbare Firmware-Updates).
Wenn Sie weitergehende Fragen zu Ihrem Produkt haben, beachten Sie bitte die folgenden
TrekStor Supportoptionen:
FAQ Der FAQ-Bereich unserer Website bietet Ihnen vielfältige Problemlösungshinweise.
Hier erhalten Sie Antworten zu den am häufigsten gestellten Fragen zu
unseren Produkten.
E-Mail Füllen Sie das Supportformular auf unserer Website aus oder senden Sie
eine E-Mail an support.de@trekstor.de.
Telefonsupport Von Deutschland aus wählen Sie bitte 01805-TREKSTOR
Die N ummer der S upporthotl ine für andere Länder finden Sie auf unserer
Website unter "SERVICE".
* 14 Cent/Min. aus dem deutschen Festnetz der DTAG, max. 42 Cent/Min. aus Mobilfunknetzen.
*
, 01805-87357867*.
Support information
If you have any questions regarding your TrekStor product, please proceed as follows:
• Checkthefeaturesaswellasthefunctionsofyourdevice(apparentonthepackaging),
in order to use the correct settings.
• Readthemanualcarefully.
• Informyourselfonourwebsite ww w.trekstor.de/en about the up-to-date information
concerning your product (e. g. available most recent firmware releases).
In the case you have further questions regarding your product, please note the following
TrekStor support options:
FAQ The FAQ area of our website offers you a wide range of problem solving hints.
Here you can obtain answers to the most frequently asked questions
concerning our products.
E-Mail Please fill in the support form on our website or send an E-Mail to
suppor t.en@trekstor.de. You can find mailing addresses for other
countries when you click "SERVICE" at the menu bar on our website.
Phone support Please find the number of the support hotline for your country on our website
under "SERVICE" as well.
TrekStor GmbH
Kastanienallee 8-10
D-64653 Lorsch, Germany
www.trekstor.de
QG-Liro-Color-2-V1-10-DE-EN-121101
 Loading...