


QUICK-START
1. POWER OVERVIEW
Vapor operates on the internal 3.0V watch type battery (#CR2032). If possible, install Vapor to the vehicle’s electrical system. Wiring to the vehicle enables a brighter backlight, longer sleep timer, and enables the shift and temperature indicator LED’s. Vapor is polarity independent and has safeguards to avoid draining the vehicle battery. See the POWER CONNECTION section for more info.
|
Included |
|
2. MOUNT VAPOR: |
Handlebar |
|
Mount |
||
|
||
Vapor is made to be bolted to the vehicle. Use the |
|
|
included handlebar mounts, or refer to the manual |
|
|
or www.trailtech.net for other options like the CNC |
|
|
aluminum protector. |
|
010-ELV-195
Tech Support: (844) 378-8143 technicalservice@apexproductgroup.com
Aluminum
Protector Mount
(optional)
3. VEHICLE SENSORS:
Refer to the sensor installation sections. You should install the wheel sensor, ignition sensor, engine temperature sensor, and vehicle power connection.
Power Wire |
Tach Ignition |
Temperature |
Wheel Speed |
|
Sensor |
Sensor (varies) |
Sensor (varies) |
4. TROUBLESHOOT ERRATIC TACH:
See the TACH IGNITION SENSOR section for more information. If everything is working, but the tach is way off, then there’s too much “ambient electrical noise”, or the tach sensor is installed incorrectly.
1.Try wrapping the tach sensor around the spark plug wire more or less times.
2.Avoid routing wires alongside other high-voltage wires that may cause noise interference.
3.Some kits include a “resistor tach sensor”. If there’s a lot of tach noise at a certain frequency, the resistor may filter and smooth it out.
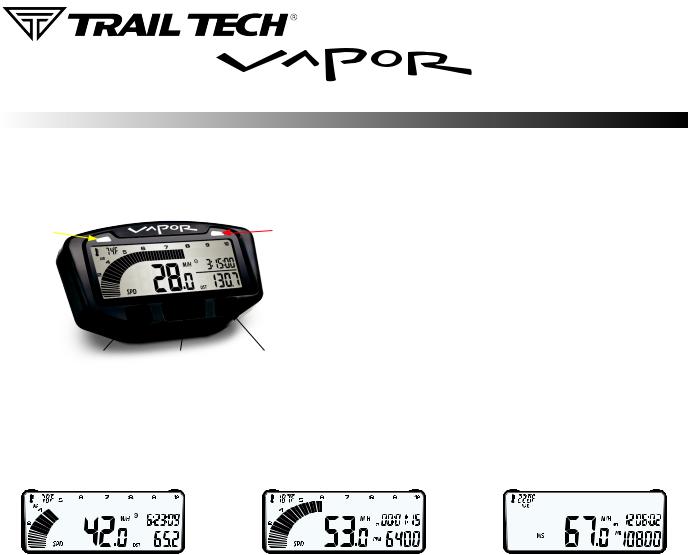
5.INDICATOR LIGHTS:
Vapor has two colored LED lights at the top. They are activated when tach or temperature goes above the thresholds to warn you about potential problems with your vehicle. The left LED is yellow, the right LED is red. When the tach is over the rev limit the LED will flash, if the temperature is high then the LED will turn on solid. Set custom thresholds in the DATA SETTING MODE. Set the thresholds to 0 to turn them off.
6. SLEEP MODE:
If Vapor sees no activity (either wheel movement or a button press) for 5 minutes, it will enter sleep mode and only display the clock. Sleep mode will end when any activity is noticed. During sleep mode Vapor is using the internal battery and will not draw down vehicle power.
QUICK-START
7. BUTTONS:
Vapor has three screens. Press MODE to toggle between them.
YELLOW |
RED |
LED |
LED |
RESET TRIP DATA:
<LEFT> + <MODE> = HOLD TO RESET VALUES FOR: Max Speed, Distance, Ride Time, Stop Watch, Max Engine Temperature, and Max RPM.
LEFT BUTTON |
MODE BUTTON |
RIGHT BUTTON |
Start stop watch |
Switch screens |
Toggle between |
|
Hold to edit trip distance |
screen features |
8. SCREENS:
Vapor has 3 screens, press MODE to cycle between screens. Press RIGHT on screen 2 to toggle Ride Time/Stop Watch. Press RIGHT on screen 3 to toggle Odometer/Accumulated Ride Time. Hold all three buttons to enter data setting mode.
SCREEN 1 |
SCREEN 2 |
SCREEN 3 |
|||||
|
|
|
|
|
|
|
|
|
|
|
|
|
|
|
|
|
|
|
|
|
|
|
|
• |
Time of Day |
• |
Engine Temperature |
• |
Maximum Temperature (MAX) |
• Ambient Air Temperature |
• |
RPM Bar Graph |
• Accumulated Ride Time (ART) |
||
• |
RPM Bar Graph |
• |
Stop Watch (TT) |
• |
Odometer (ODO) |
• |
Speed (SPD) |
• |
Ride Time (RT) |
• |
Maximum Speed (MS) |
• |
Distance (DST) |
• |
Speed (SPD) |
• |
Maximum RPM (MR) |
|
|
• |
Revolutions per Minute (RPM) |
|
|
9. DATA SETTING MODE : |
ORDER OF SETUP MODE: |
|
|
HOLD DOWN ALL 3 BUTTONS to enter data setting mode. |
1. |
Speed and Distance Format |
M/H or KM/H |
Adjust one setting at a time, then move on to the next one. |
2. |
Wheel Size |
See MEASURE WHEEL SIZE section |
|
3. |
Time Format |
12H or 24H |
<LEFT> = Scroll value. |
4. |
Time of Day |
12:00:00 |
<MODE> = Move to next data setting screen. |
5. |
PPR Pulses per Revolution |
0.5, 1, or 2 |
<RIGHT> = Move to next digit in data setting mode. |
6. |
PPR Pulse Change |
RPM when PPR changes |
|
7. |
PPR Level 2 |
0.5, 1, or 2 |
|
8. |
Temperature Unit of Measure |
°F or °C |
|
9. |
Temperature Indicator |
Yellow Indicator |
|
10. |
Temperature Indicator Danger |
Red Indicator |
|
11. |
RPM Shift Indicator |
Yellow Indicator |
|
12. |
RPM Shift Indicator Danger |
Red Indicator |
 Loading...