

Page 1
LED Explanation
© 2020 TP-Link 7106508730 REV1.0.0
Installation Guide
SafeStream Gigabit Multi-WAN VPN Router
Note: For simplicity, we take TL-R605 as an example throughout this Guide.
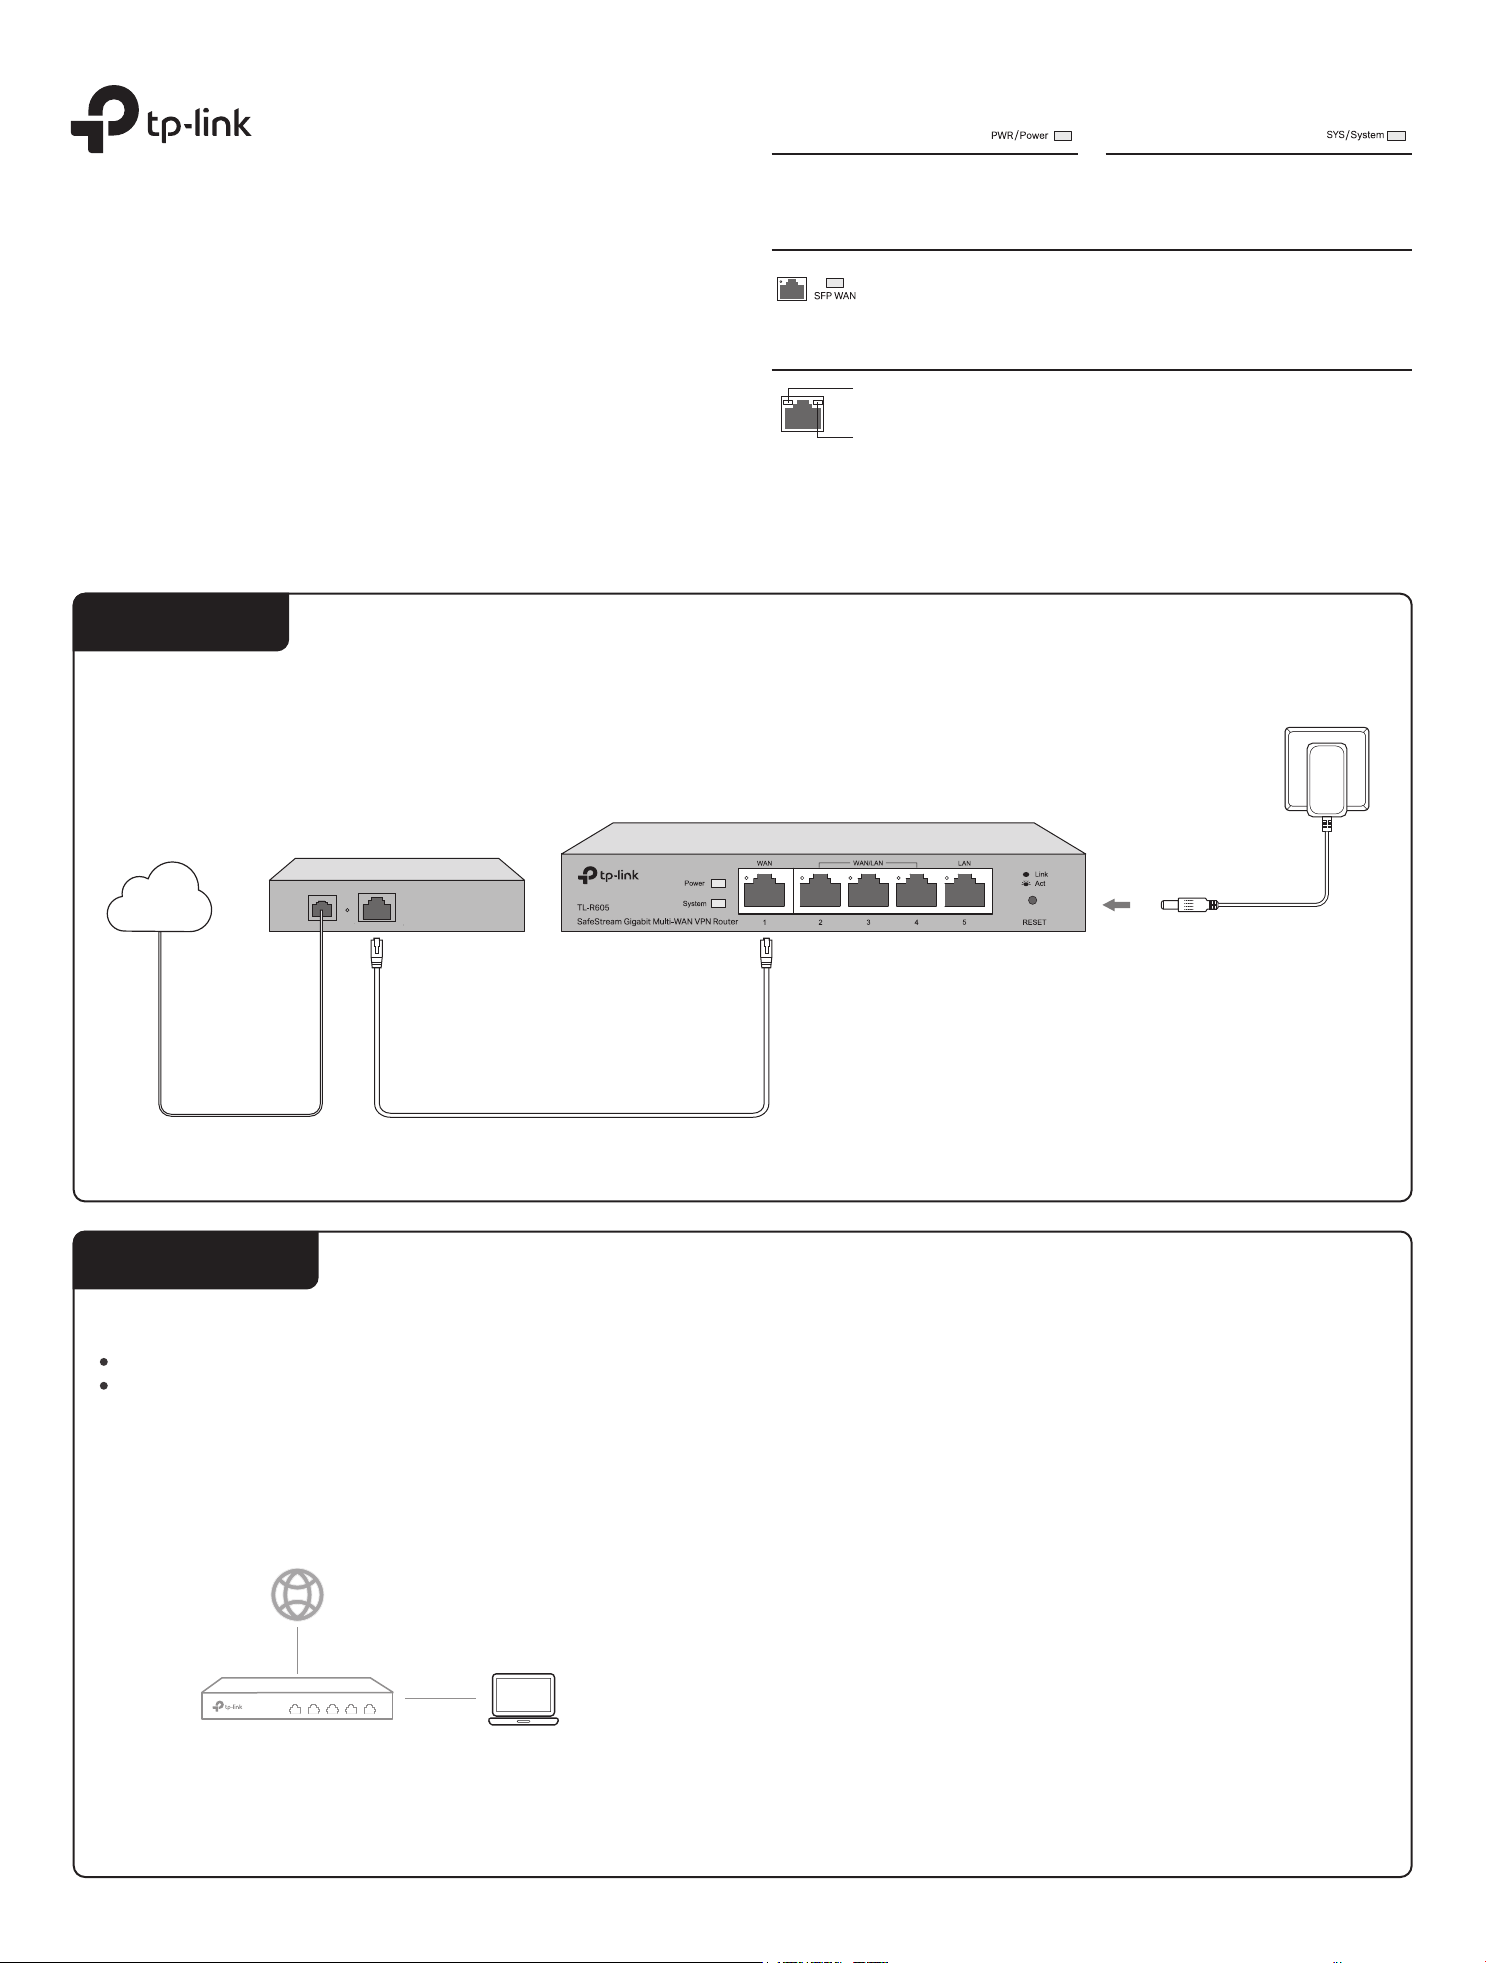
Connection
Power
On: Power on
O: Power o
System
Flashing: System running normally
On/O: System running abnormally
Link/Act (for TL-R605) | SFP WAN (for TL-ER7206)
On: There is a device connected to the port but not active.
O: There is no device connected to the corresponding port.
Flashing: Transmitting or receiving data.
Link/Act and 1000Mbps (for TL-ER7206)
On: There is a device connected to the port and running at 1000 Mbps.
O: There is no device connected to the port or not running at 1000 Mbps.
On: There is a device connected to the port but not active.
O: There is no device connected to the corresponding port.
Flashing: Transmitting or receiving data.
TL-R605
Modem
Internet
Note: Use the charger provided in the
package to power on the router.
Conguration
The router supports two conguration options:
Standalone Mode: Congure and manage the router singly.
Controller Mode: Congure and manage the network devices centrally. It is recommended in the large-scale network, which consists of mass devices such as
access points, switches, and gateways.
Note: When the router is managed by a controller, congurations of the router will be overriden by the controller.
Option 1: Standalone Mode
In Standalone Mode, use a computer to congure and manage the router.
Router
1.
Connect a computer to a LAN port of the router with an RJ45 cable
properly. If your computer is congured with a xed IP, change it to Obtain
an IP address automatically.
PC
Open a web browser and type the default management address
2.
192.168.0.1 in the address eld of the browser, then press the Enter key.
Create a username and a password for subsequent login attempts and
3.
for security.
Use the username and password set above to log in to the webpage.4.
After a successful login, you can congure the function by clicking the
5.
setup menu on the left side of the screen.
For detailed congurations, refer to the User Guide of the router. The guide
can be found on the download center of our ocial website:
https://www.tp-link.com/support/download/.
Page 2
Option 2: Controller Mode
Controller Mode applies to the large scale network with mass devices. All
devices can be centrally congured and monitored via Omada Software
Controller, Omada Hardware Controller or Omada Cloud-Based Controller.
Before managing the router centrally, refer to Standalone Mode to launch the
management page, go to Network > WAN, and congure the network to
access the internet. For further congurations, please use the controller to
manage the devices.
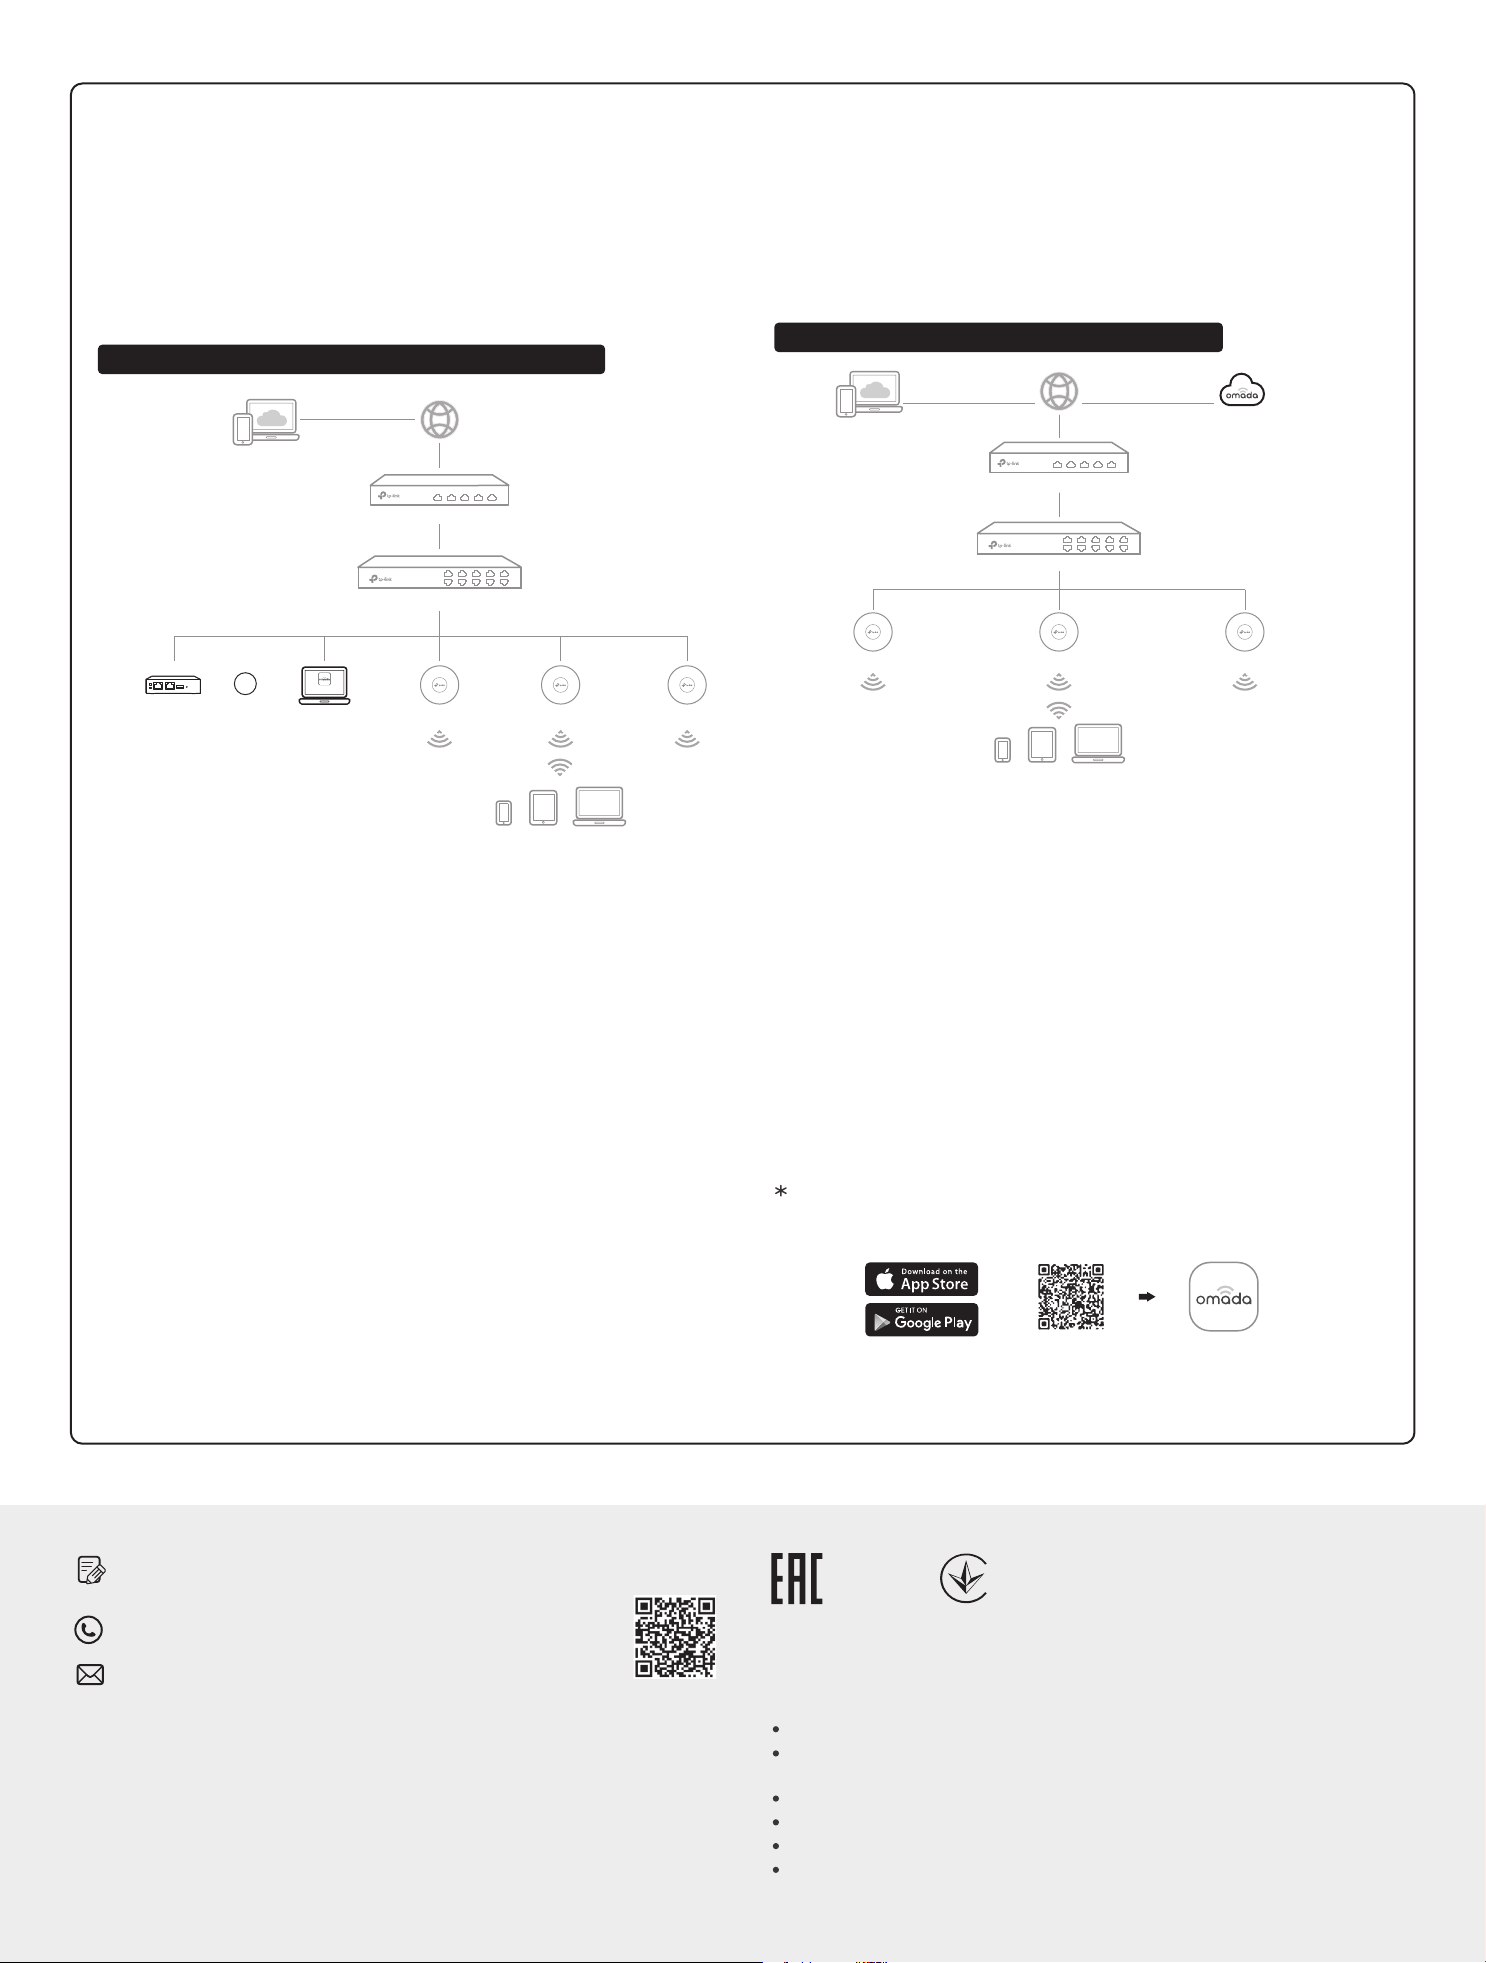
Topology 1: Via Omada Software/Hardware Controller
Router
Switch
Omada Hardware Controller
(OC200/OC300)
Or
Omada Software Controller
Controller
running on the Host PC
EAP
EAP
EAP
Via Omada Hardware Controller (OC200/OC300)
Omada Hardware Controller (OC200/OC300), which is pre-installed with
Omada Software Controller, is a good alternative if you have no spare PC to
keep running Omada Software Controller in the network. It needs to be
purchased additionally. For more details, refer to the Installation Guide of
Omada Hardware Controller.
Topology 2: Via Omada Cloud-Based Controller
Omada Cloud-Based Controller
Router
Switch
EAP EAP EAP
Clients
Via Omada Software Controller
1. On the PC with Windows OS or Linux OS, download the Omada Software
Controller installation file from
https://www.tp-link.com/support/download/omada-software-controller/.
2. Run the file and follow the wizard to install the Omada Software Controller.
3. Launch the Omada Software Controller and follow the step-by-step
instructions to complete the Quick Setup. After the wizard is finished, a
login screen will appear.
4. Enter the username and password you created and click Log in. Then you
can further configure the controller.
Omada Cloud Service
After installing Omada Software Controller, you can remotely access and
configure the controller through Omada Cloud Service. Follow the steps
below.
1. Enable Cloud Access on the setting page on the controller and bind a
TP-Link ID to your controller. If you have congured this in the setup
wizard, skip the step.
2. Launch a web browser and enter https://omada.tplinkcloud.com in the
address bar.
3. Enter your TP-Link ID and password to log in. A list of controllers that
have been bound with your TP-Link ID will appear. Then you can click
Launch to further congure the controller.
Clients
Via Omada Cloud-Based Controller
Launch the management page of the router in Standalone Mode, go to
1.
Controller Settings, and enable Cloud-Based Controller Management.
Launch a web browser and enter https://omada.tplinkcloud.com in the
2.
address bar. Enter your TP-Link ID and password to log in.
3.
Click Add Controller and subscribe to Omada Cloud-Based Controller.
Follow the instructions to choose a plan and complete the payment. Then
wait until your controller is deployed.
4.
The controller will appear in the list once bound with your TP-Link ID. Click
Launch and follow the step-by-step instructions to complete the Quick
Setup. After the wizard is nished, log in via the created username and
password.
5.
Click Devices on the side bar and then click Add Devices. Then you can
add devices to the controller manually through the serial numbers at the
bottom of the product.
Omada App
With Omada App, you can also manage your controller at a local site or a
remote site via your mobile device.
or
Scan for Omada App Download Omada App
For the detailed congurations, refer to the User Guide of the controller. The
guide can be found on the download center of our ocial website:
https://www.tp-link.com/support/download/.
To ask questions, find answers, and communicate with TP-Link users or
engineers, please visit https://community.tp-link.com to join TP-Link
Community.
For technical support and other information, please visit
https://www.tp-link.com/support, or simply scan the QR code.
If you have any suggestions or needs on the product guides, welcome
to email techwriter@tp-link.com.cn.
EU Declaration of Conformity
TP-Link hereby declares that the device is in compliance with the essential requirements
and other relevant provisions of directives 2014/30/EU, 2014/35/EU, 2009/125/EC,
2011/65/EU and (EU)2015/863.
The original EU declaration of conformity may be found at https://www.tp-link.com/en/ce.
Safety Information
Keep the device away from water, re, humidity or hot environments.
Do not attempt to disassemble, repair, or modify the device. If you need service, please
contact us.
Do not use damaged charger or USB cable to charge the device.
Do not use any other chargers than those recommended.
Adapter shall be installed near the equipment and shall be easily accessible.
Place the device with its bottom surface downward.
 Loading...