

Toyota SIENNA 2006 Owner Manual

BASIC FUNCTIONS
SECTION
I
BASIC FUNCTIONS
Basic information before operation
Display operation 2. . . . . . . . . . . . . . . . . . . . . . . . . . . . . . . . . . . . . . . . . . . . . . . . . . . . .
Initial screen 2. . . . . . . . . . . . . . . . . . . . . . . . . . . . . . . . . . . . . . . . . . . . . . . . . . . . . . . . .
Touch screen operation 4. . . . . . . . . . . . . . . . . . . . . . . . . . . . . . . . . . . . . . . . . . . . . . . .
Inputting letters and numbers/list screen operation 4. . . . . . . . . . . . . . . . . . . . . . . . .
Function help 8. . . . . . . . . . . . . . . . . . . . . . . . . . . . . . . . . . . . . . . . . . . . . . . . . . . . . . . . .
Map screen operation 9. . . . . . . . . . . . . . . . . . . . . . . . . . . . . . . . . . . . . . . . . . . . . . . .
Current position display 9. . . . . . . . . . . . . . . . . . . . . . . . . . . . . . . . . . . . . . . . . . . . .
Screen scroll operation 9. . . . . . . . . . . . . . . . . . . . . . . . . . . . . . . . . . . . . . . . . . . . . .
Switching the screens 13. . . . . . . . . . . . . . . . . . . . . . . . . . . . . . . . . . . . . . . . . . . . . .
Map scale 15. . . . . . . . . . . . . . . . . . . . . . . . . . . . . . . . . . . . . . . . . . . . . . . . . . . . . . . .
Foot print map 16. . . . . . . . . . . . . . . . . . . . . . . . . . . . . . . . . . . . . . . . . . . . . . . . . . . .
Orientation of the map 18. . . . . . . . . . . . . . . . . . . . . . . . . . . . . . . . . . . . . . . . . . . . .
Example of navigation system operation 18. . . . . . . . . . . . . . . . . . . . . . . . . . . . .
Guiding the route 18. . . . . . . . . . . . . . . . . . . . . . . . . . . . . . . . . . . . . . . . . . . . . . . . . .
Registering home 20. . . . . . . . . . . . . . . . . . . . . . . . . . . . . . . . . . . . . . . . . . . . . . . . .
1
BASIC FUNCTIONS
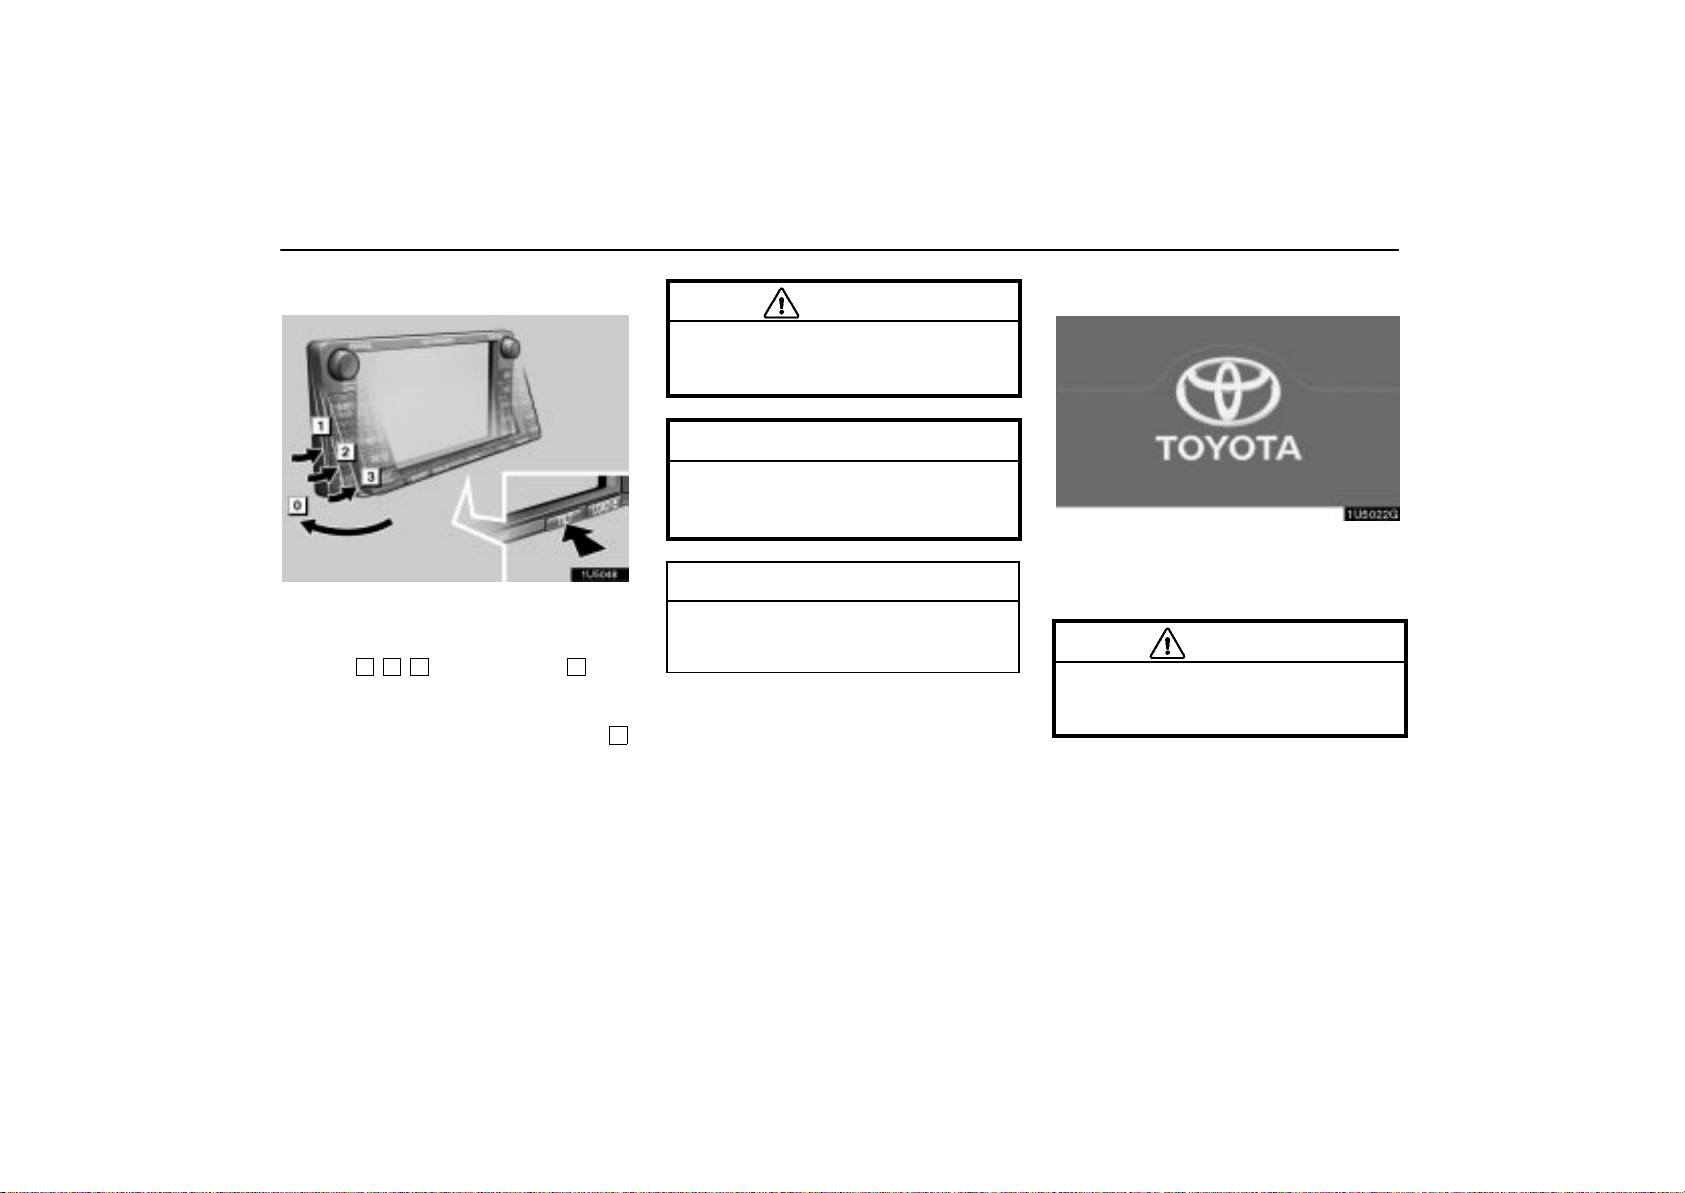
Display operation
Adjustment of the angle of the display can be
done by pushing the “TILT” button. Each
push of the “TILT” button will tilt the display to
positions
reverse order.
If the ignition switch is set at OFF, the display
will automatically move back to position
The display will automatically resume the previous position when the ignition switch is set
at ACC or ON.
1, 2, 3
and then back to 0 in the
0
CAUTION
Injury may result from placing a hand or
any fingers on the display while it is
moving.
NOTICE
Do not place any foreign objects on the
display while it is moving. It could damage your navigation system.
INFORMATION
Under extremely cold conditions, the
display may react slowly or operation
sound may become louder.
.
Initial screen
When the ignition switch is set at ACC or ON,
the initial screen will be displayed and the
system will begin operating.
CAUTION
When the vehicle is stopped with the engine running, always apply the parking
brake for safety.
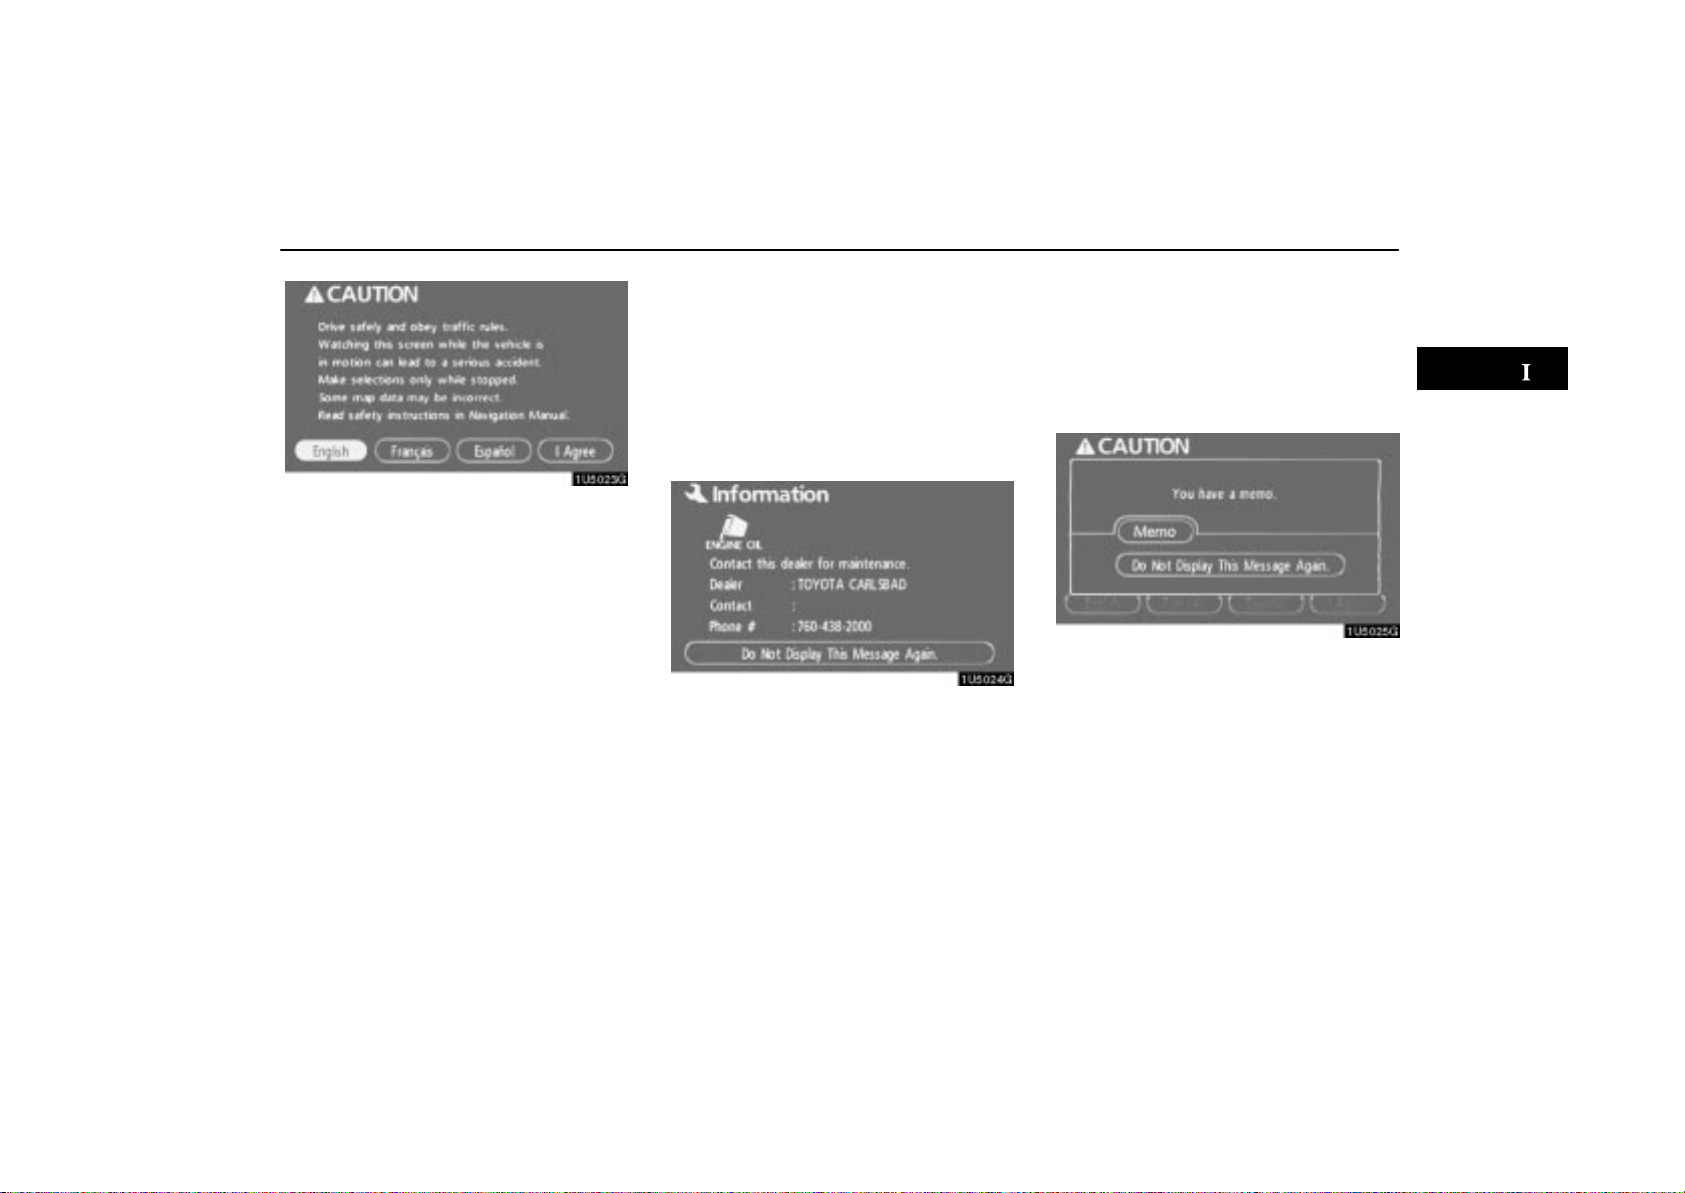
After a few seconds, the “CAUTION” screen
will be displayed.
2
BASIC FUNCTIONS
Touch “English”, “Français” or “Español”
to select a language.
When “I Agree” is touched
the map screen will be displayed.
The “CAUTION” screen will be displayed
when the “INFO” button is pushed and “Lan-
guage” is touched. Then select a language.
(See “Select language” on page 149.)
on the screen,
Maintenance information
This system informs about when to replace
certain parts or components and shows dealer information (if registered) on the screen.
When the vehicle reaches a previously set
driving distance or date specified for a scheduled maintenance check, the “Information”
screen will be displayed when the navigation
system is in operation.
To disable this screen, touch “Do Not
Display This Message Again.”. This
screen goes off if the screen is not operated for several seconds.
To prevent this information screen from being
displayed again, touch “Do Not Display This
Message Again.”.
To register “Maintenance information”, see
“Maintenance information” on page 92.
Memo information
This system notifies about a memo entry. At
the specified date, the memo information will
be displayed when the navigation system is in
operation. The memo information screen will
be displayed every time the system is turned
on.
The memo of the current date can be
viewed by touching “Memo”. (See “ —
Editing a memo” on page 98.)
To disable this screen, touch “Do Not
Display This Message Again.”. This
screen goes off if the screen is not operated for several seconds.
To prevent this information screen from being
displayed again, touch “Do Not Display This
Message Again.”.
To register “Memo information”, see “Calendar with memo” on page 95.
3

BASIC FUNCTIONS
Touch screen operation
This system is operated mainly by the touchscreen buttons on the screen.
To prevent damage to the screen, lightly
touch the touch-screen buttons on the
screen with the finger. When a touchscreen button on the screen is touched, a
beep sounds.
Do not use objects other than the finger to
touch the screen.
INFORMATION
If the system does not respond to a
touch on a touch-screen button,
move the finger away from the screen
and then touch it again.
Dimmed touch-screen buttons cannot be operated.
Wipe off fingerprints on the surface of
the display using a glass cleaning
cloth.
The displayed image may become
darker and moving images may be
slightly distorted when the display is
cold.
Under extremely cold conditions, the
map may not be displayed and the
data input by a user may be deleted.
Also, the touch-screen buttons may
be harder than usual to depress.
Inputting letters and
numbers/list screen operation
When searching for an address or a name, or
entering a memo, letters and numbers can be
input via the touch screen.
INFORMATION
Key layout can be changed. (See “ Input key layout” on page 82.)
4
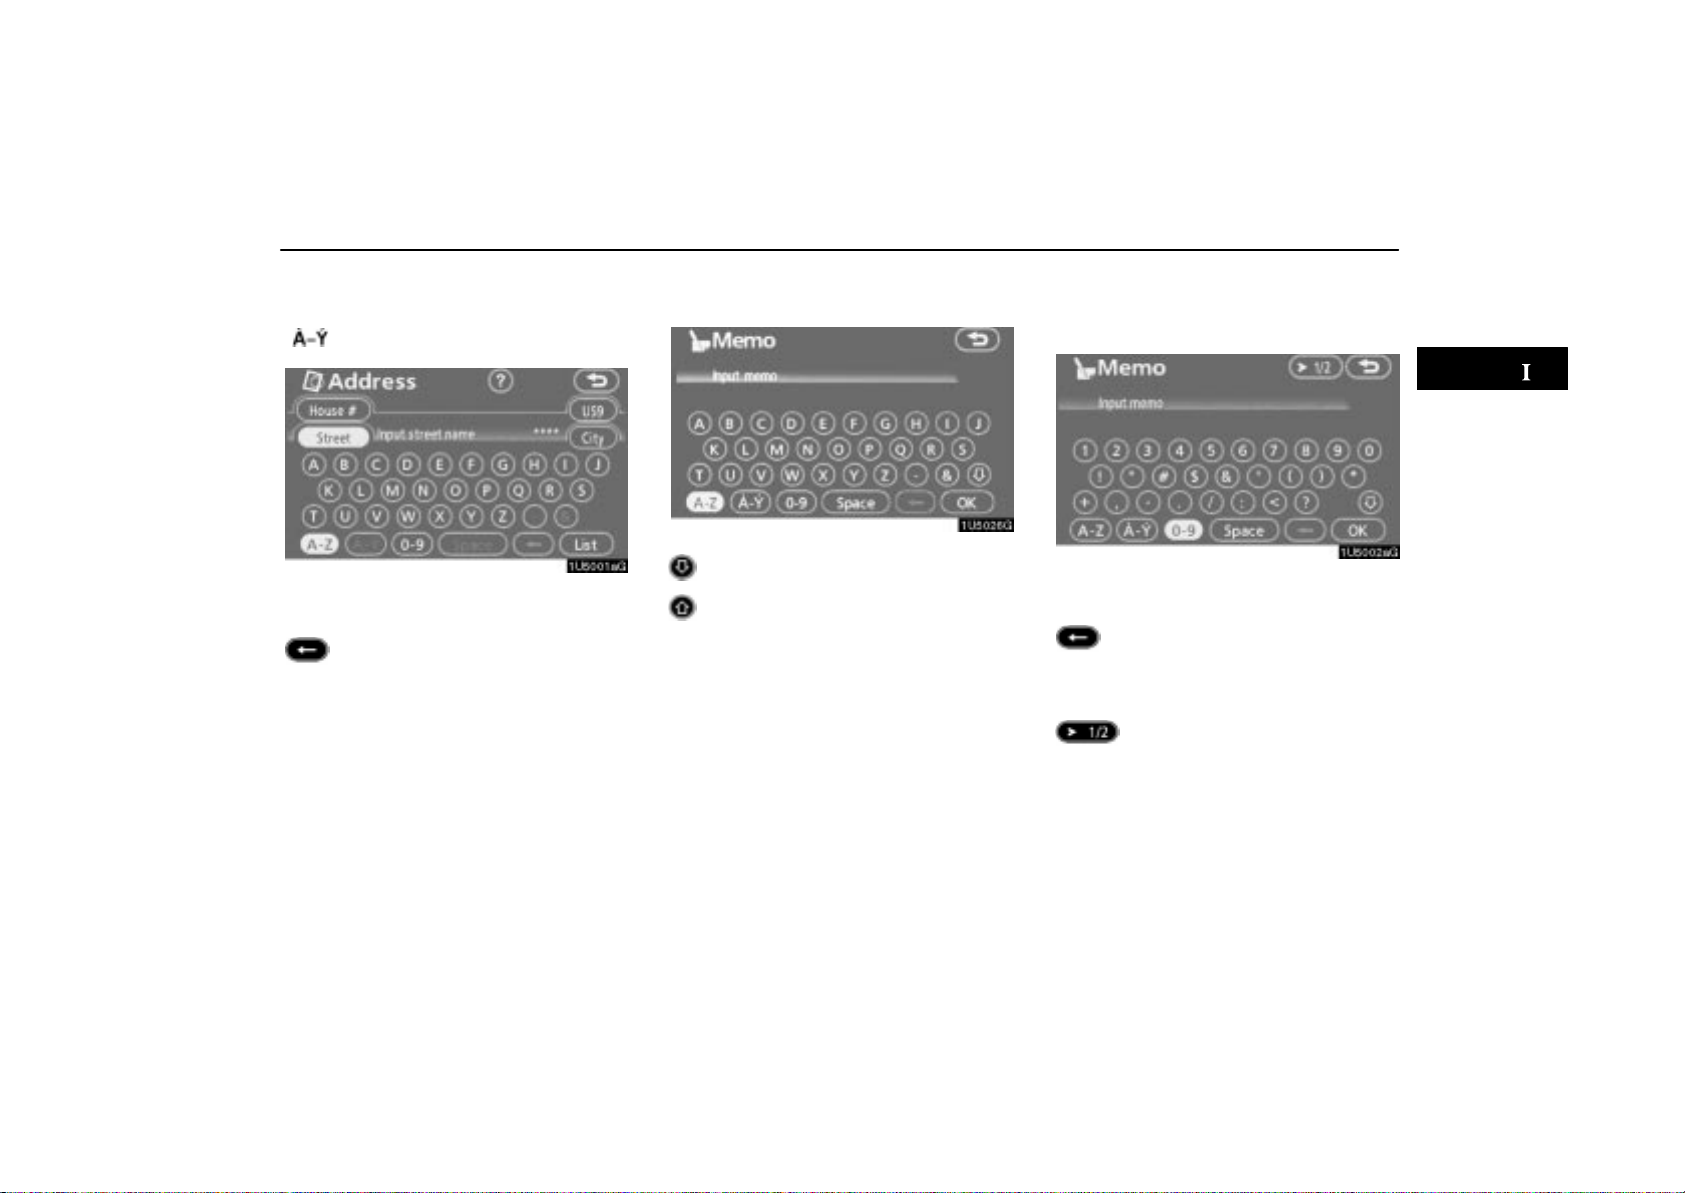
BASIC FUNCTIONS
To input letters
To display the alphabet keys, touch “A-Z” or
“ ”.
Enter letters by touching the alphabet keys directly.
: Touching this touch-screen button
erases one letter. By holding this
touch-screen button, letters will
continue to be erase.
On certain letter entry screens, letters can be
entered in upper or lower case.
: To enter in lower case.
: To enter in upper case.
To input numerals and symbols
To display the number keys and symbol keys,
touch “0-9” .
Enter numerals and symbols by touching the
number keys and symbol keys directly.
: Touching this touch-screen but-
ton erases one letter. By holding
this touch-screen button, letters
will continue to be erase.
: Touching this touch-screen but-
ton displays other symbols.
5

BASIC FUNCTIONS
To display the list
To search for an address or a name, touch
“List”. Matching items from the database are
listed even if the entered address or name is
incomplete.
If the number of matches is four or less, the list
is displayed without touching “List”.
INFORMATION
The number of matching items is shown
to the right side of the screen. If the
number of matching items is more than
9,999, the system displays “
the screen.
∗∗∗∗
” on
List screen operation
When a list is displayed, use the appropriate
touch-screen button to scroll through the list.
To shift to the next or previous
page.
To scroll up or down one item at a
time.
This expresses a displayed
screen position.
6
BASIC FUNCTIONS
If appears to the right of the
item name, the complete name is
too long for the display. Touch
to scroll to the end of the name.
T ouch t o scroll to the beginning
of the name.
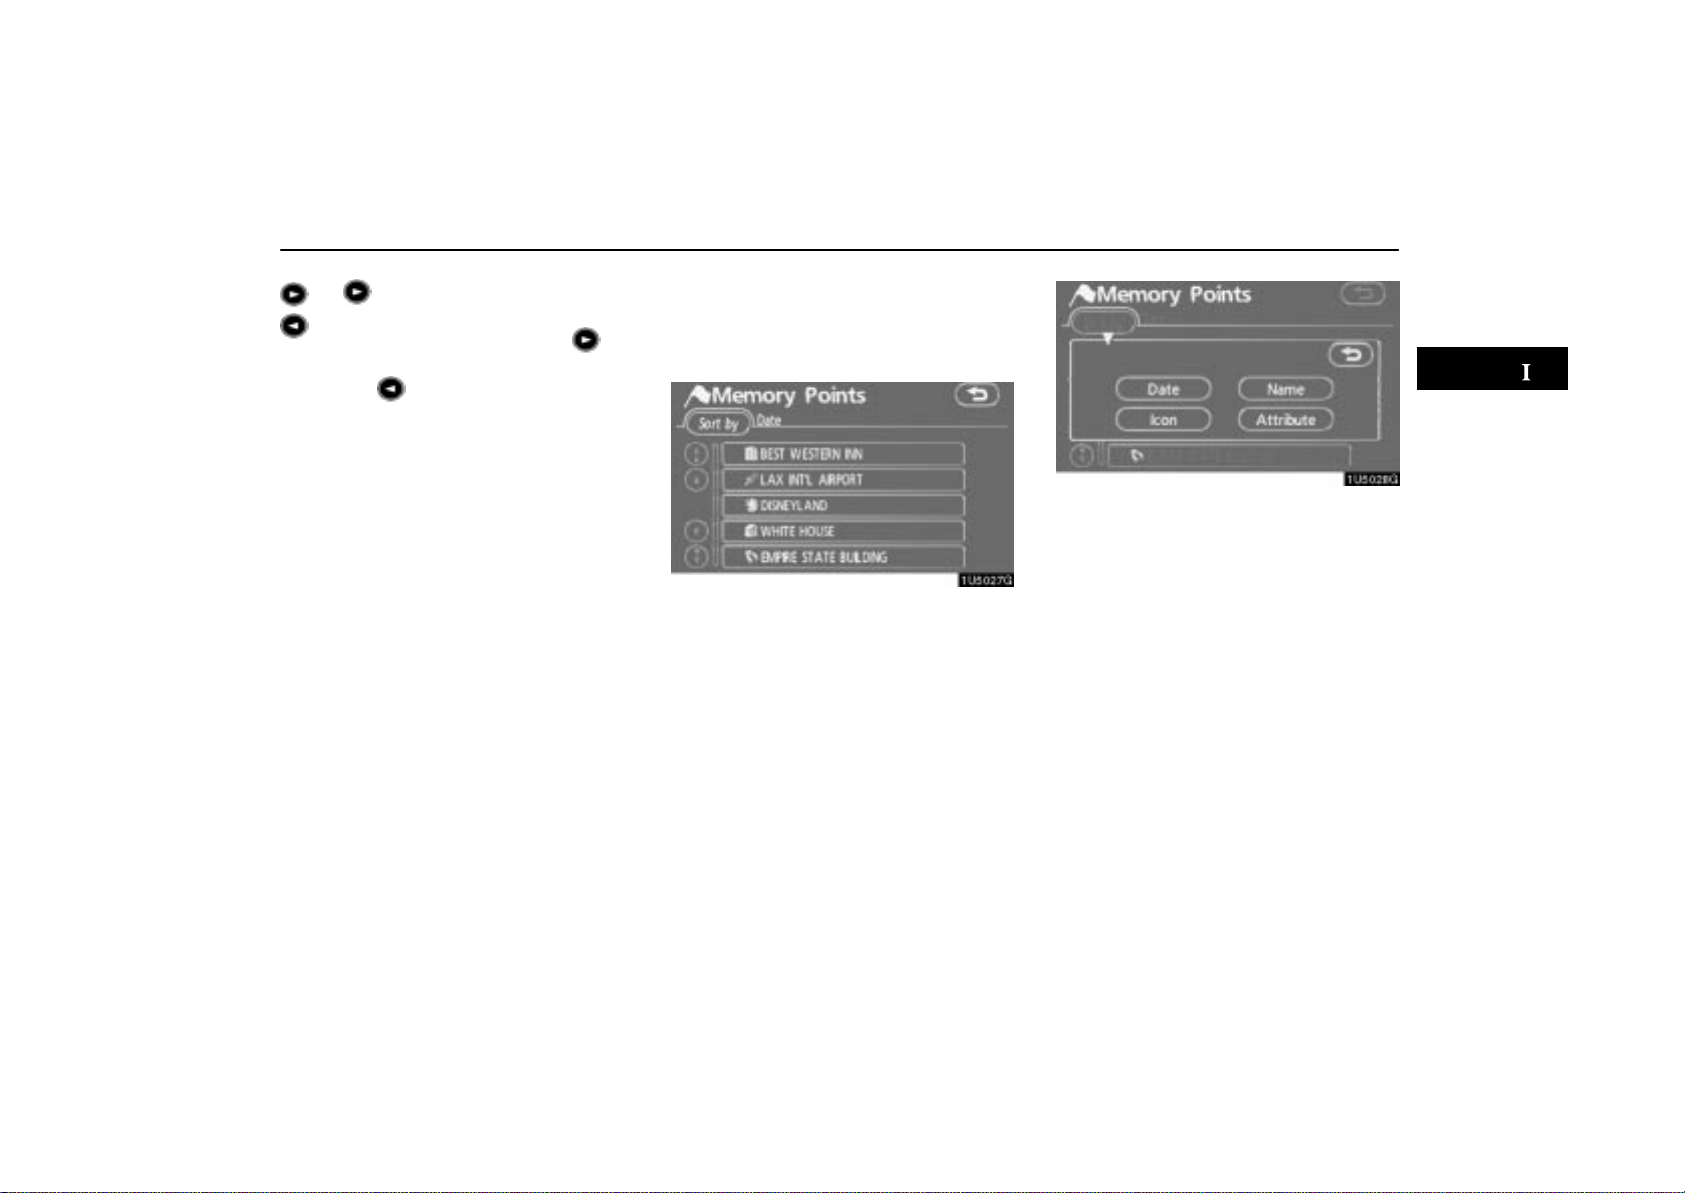
Sorting
The order of a list displayed on the screen can
be rearranged.
TYPE A
1. Touch “Sort by”.
2. Select the desired sorting criteria.
Sorting criteria are as follows:
“Distance”: To sort in the order of distance
from your current location.
“Date”: To sort in the order of the date.
“Category”: To sort in the order of the cate-
gory.
“Icon”: To sort in the order of the icons.
“Name”: To sort in order by name.
“Attribute”: To sort in order by attribute.
7
BASIC FUNCTIONS
TYPE B
“Dist. Sort”: To sort in the order of distance
from the current vehicle location. The distance from current vehicle position up to the
destination is displayed to the right of the
name.
“Name Sort”: To sort in alphabetical order by
name.
Function help
Explanations for the functions of the “Destination”, “Setup”, and “Menu” screens can be
viewed.
: To view the previous page.
: To view the next page.
: To return to the previous screen.
Touch “?”.
8
BASIC FUNCTIONS
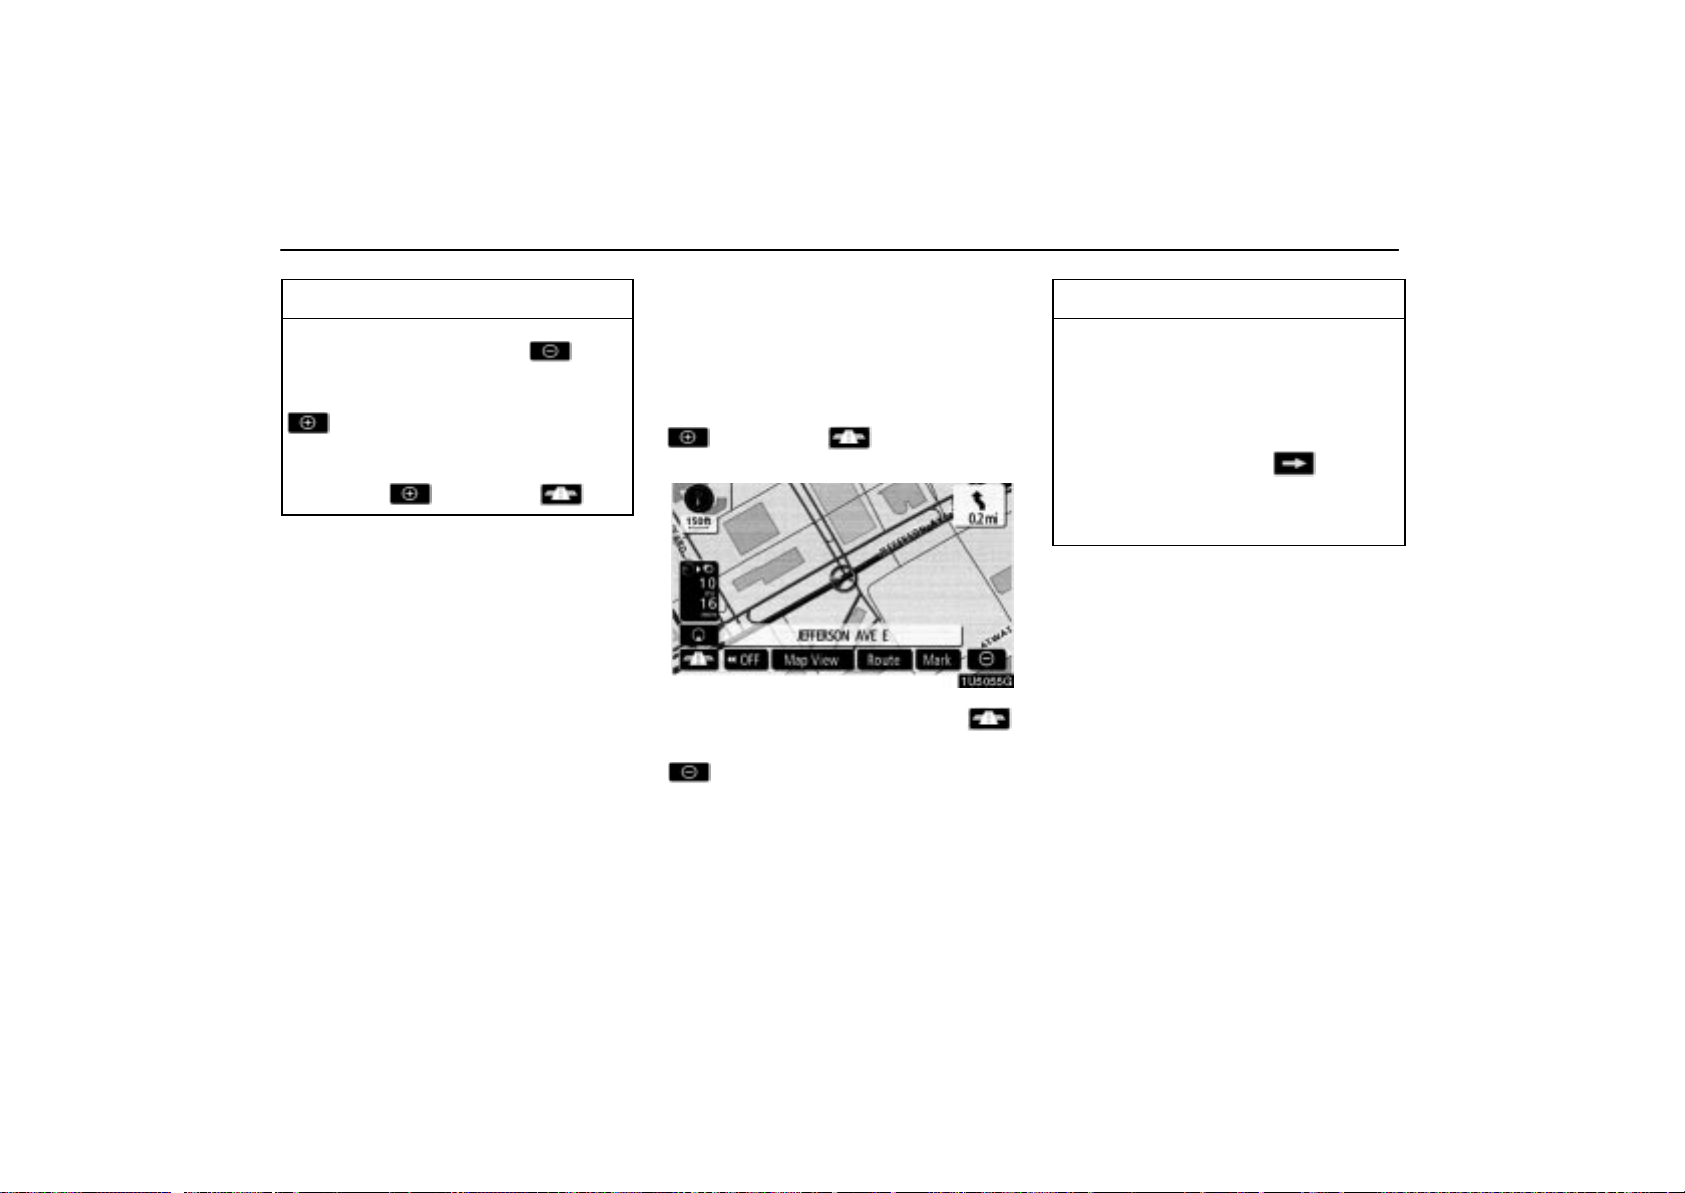
Map screen operation —
— Current position display
When starting the navigation system, the current position is displayed first.
This screen displays the current vehicle position and a map of the surrounding local area.
The current vehicle position mark (1) appears in the center or bottom center of the
map screen.
A street name will appear on the bottom of the
screen, depending on the scale of the map
2
).
(
Y ou can return to this map screen that shows
your current position at any time from any
screen by pushing the “MAP/VOICE” button.
While driving, the current vehicle position
mark is fixed on the screen and the map
moves.
The current position is automatically set as
the vehicle receives signals from the GPS
(Global Positioning System). If the current
position is not correct, it is automatically corrected after the vehicle receives signals from
the GPS.
INFORMATION
After battery disconnection, or on a
new vehicle, the current position may
not be correct. As soon as the system
receives signals from the GPS, the
correct current position is displayed.
To correct the current position manually, see “
change calibration” on page 87.
Current position/tire
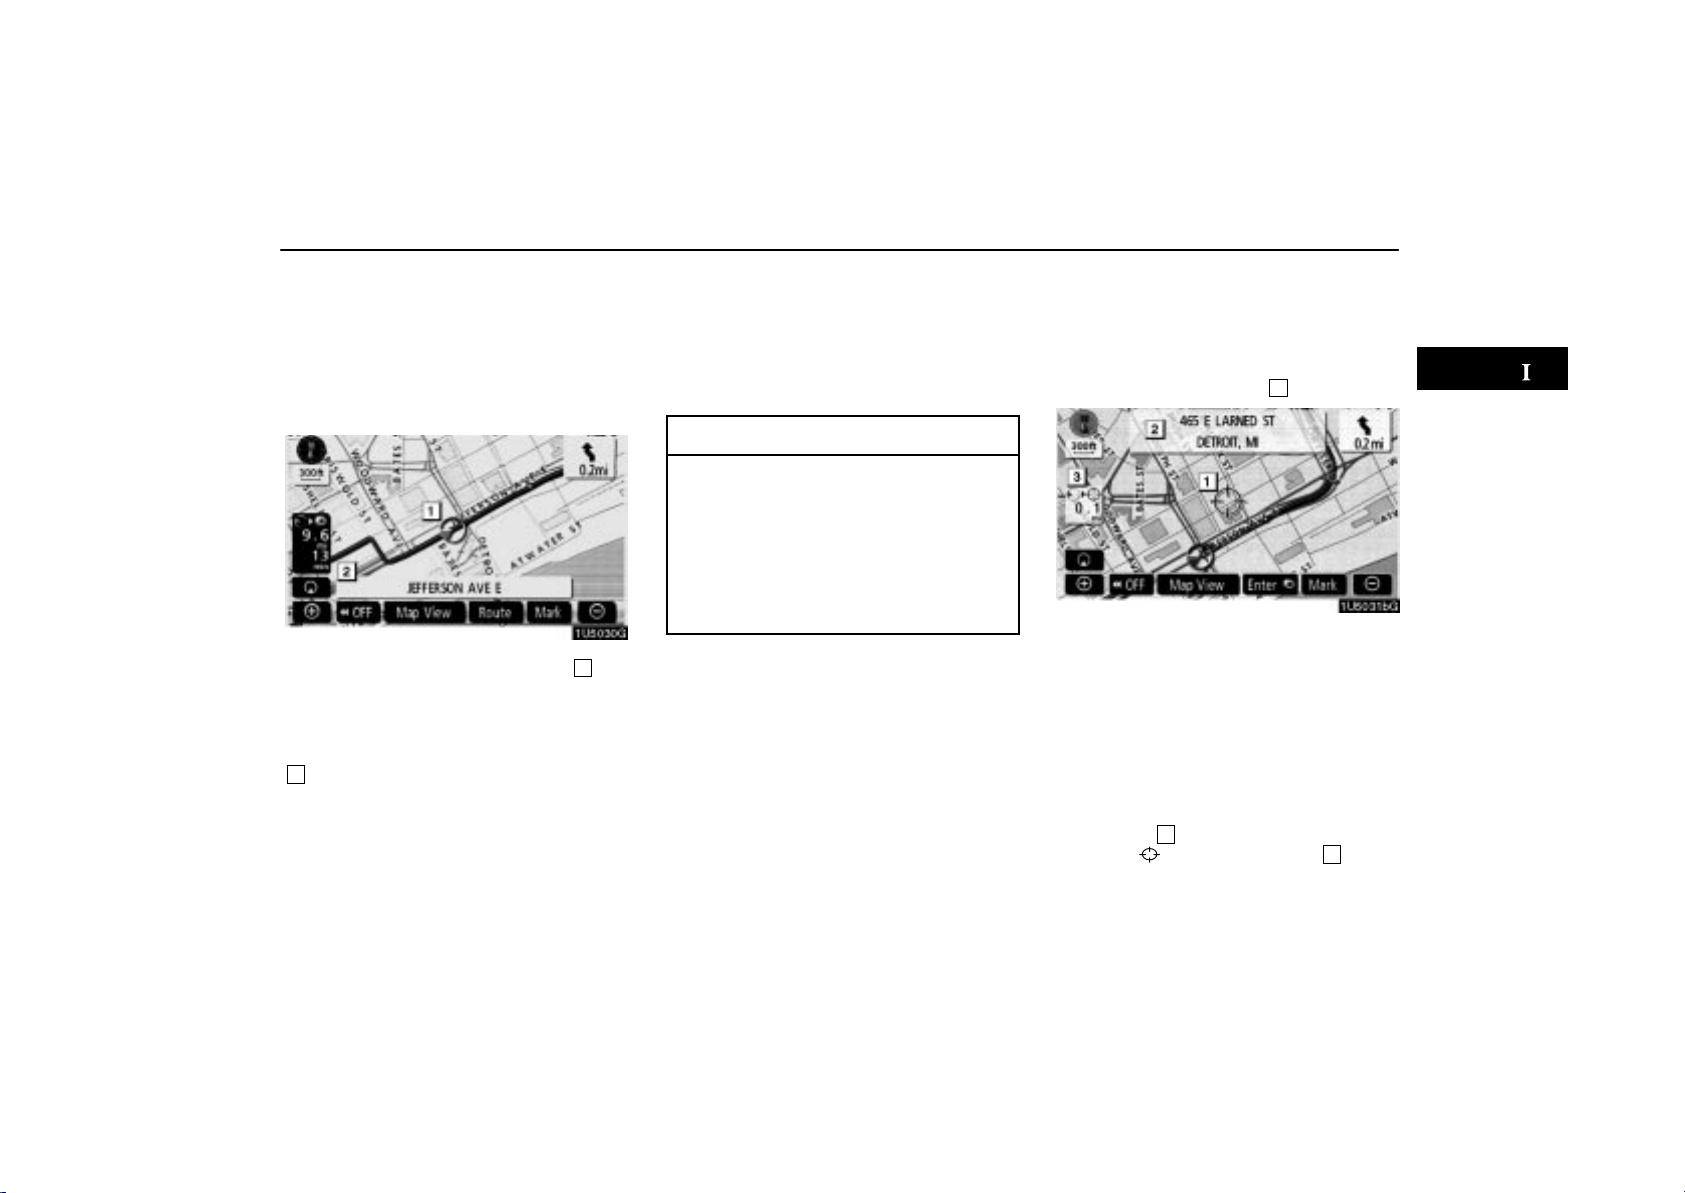
— Screen scroll operation
(one-touch scroll)
When any point on the map is touched, that
point moves to the center of the screen and is
shown by the cursor mark (
Use the scroll feature to move the desired
point to the center of the screen for looking at
a point on the map that is different from the
current position of the vehicle.
If the finger is continuously held on the
screen, the map will continue scrolling in that
direction until the finger is removed.
A street name, city name, etc. of the touched
point will be shown, depending on the scale
of the map (
position to
2
). Distance from the current
will also be shown (3).
1
).
9
BASIC FUNCTIONS
After the screen is scrolled, the map remains
centered at the selected location until another
function is activated. The current vehicle
position mark will continue to move along
your actual route and may move off the
screen. When the “MAP/VOICE” button is
pushed, the current vehicle position mark returns to the center of the screen and the map
moves as the vehicle proceeds along the designated route.
INFORMATION
When the one-touch scroll feature is
used, the current vehicle position mark
may disappear from the screen. Move
the map with a one-touch scroll again or
push the “MAP/VOICE” button to return
to the current vehicle position map location display.
To set the cursor position as a destina-
tion
A specific point on the map can be set as a
destination using the one-touch scroll function.
Touch “Enter ”.
The screen changes and displays the map
location of the selected destination and the
route preference. (See “Starting route guidance” on page 43.)
If there is already a set destination, “Add to
” or “Replace ” are displayed.
“Add to
“Replace
tions and set a new one.
”: To add a destination.
”: To delete the existing destina-
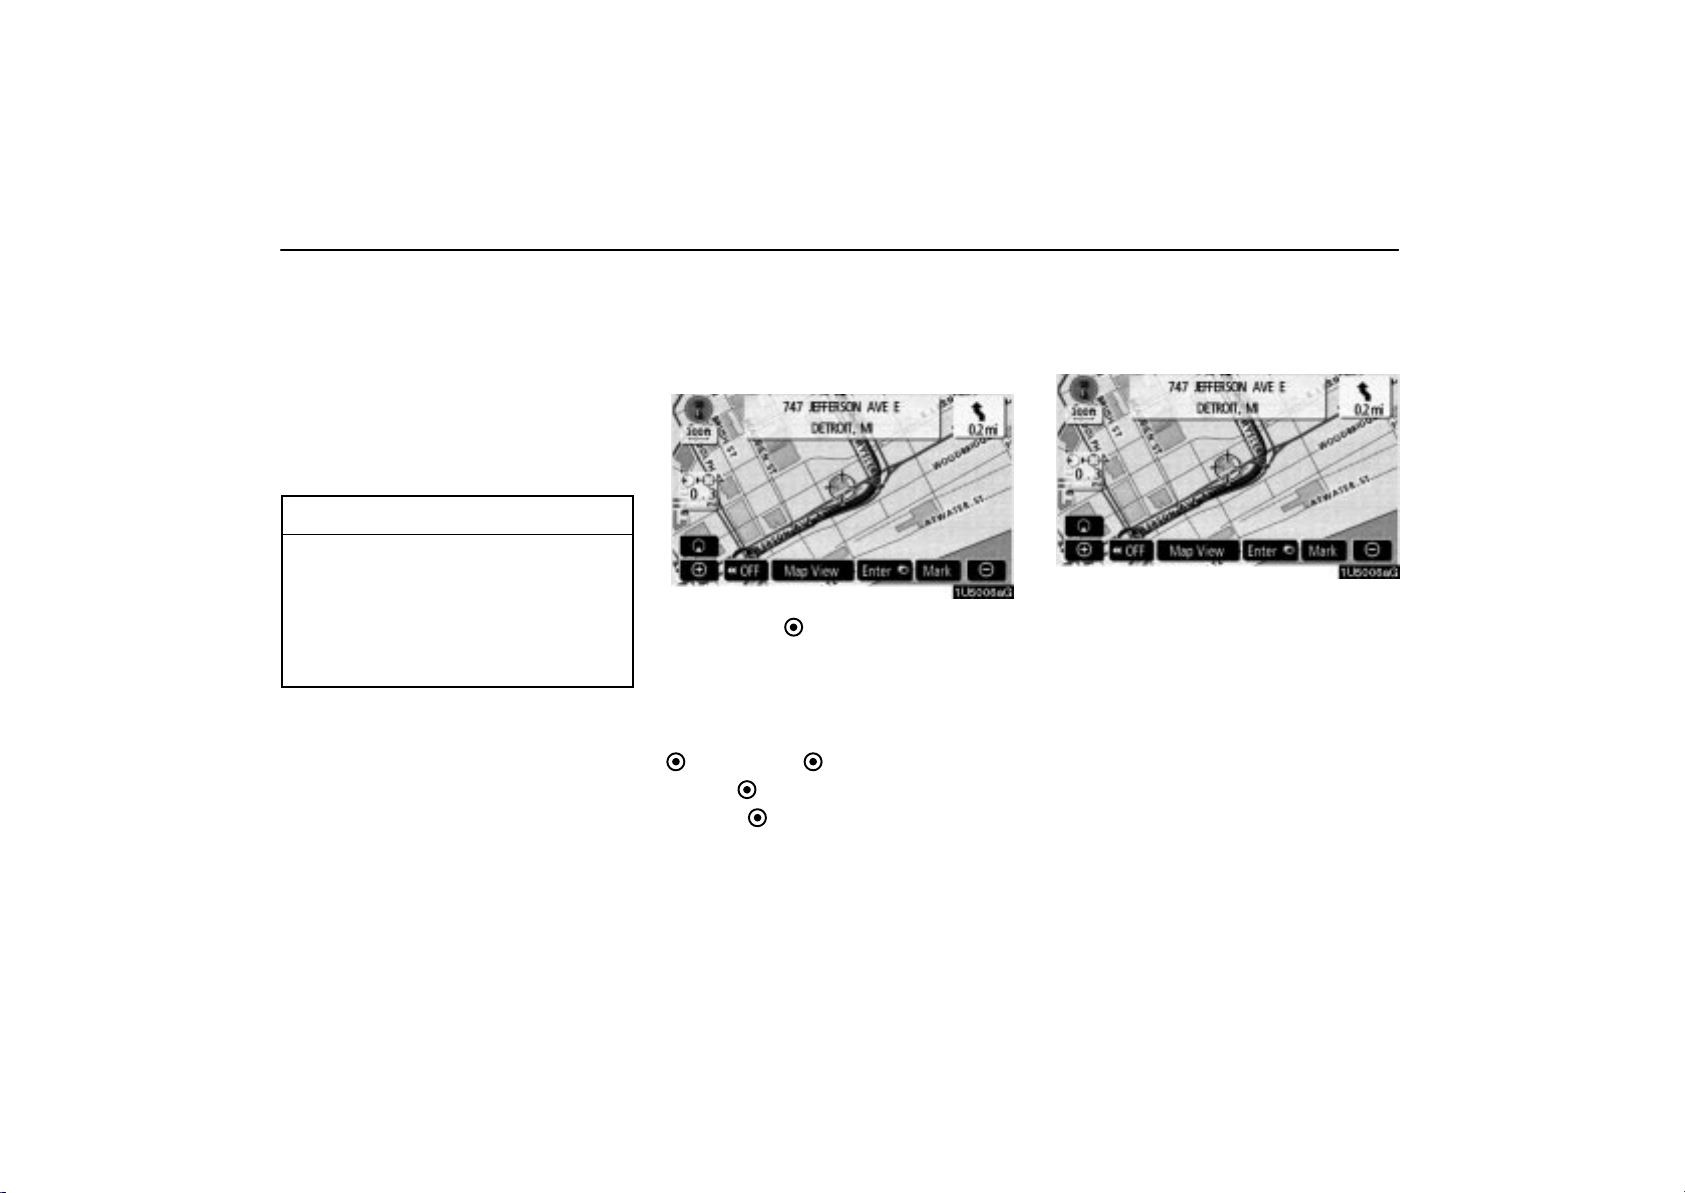
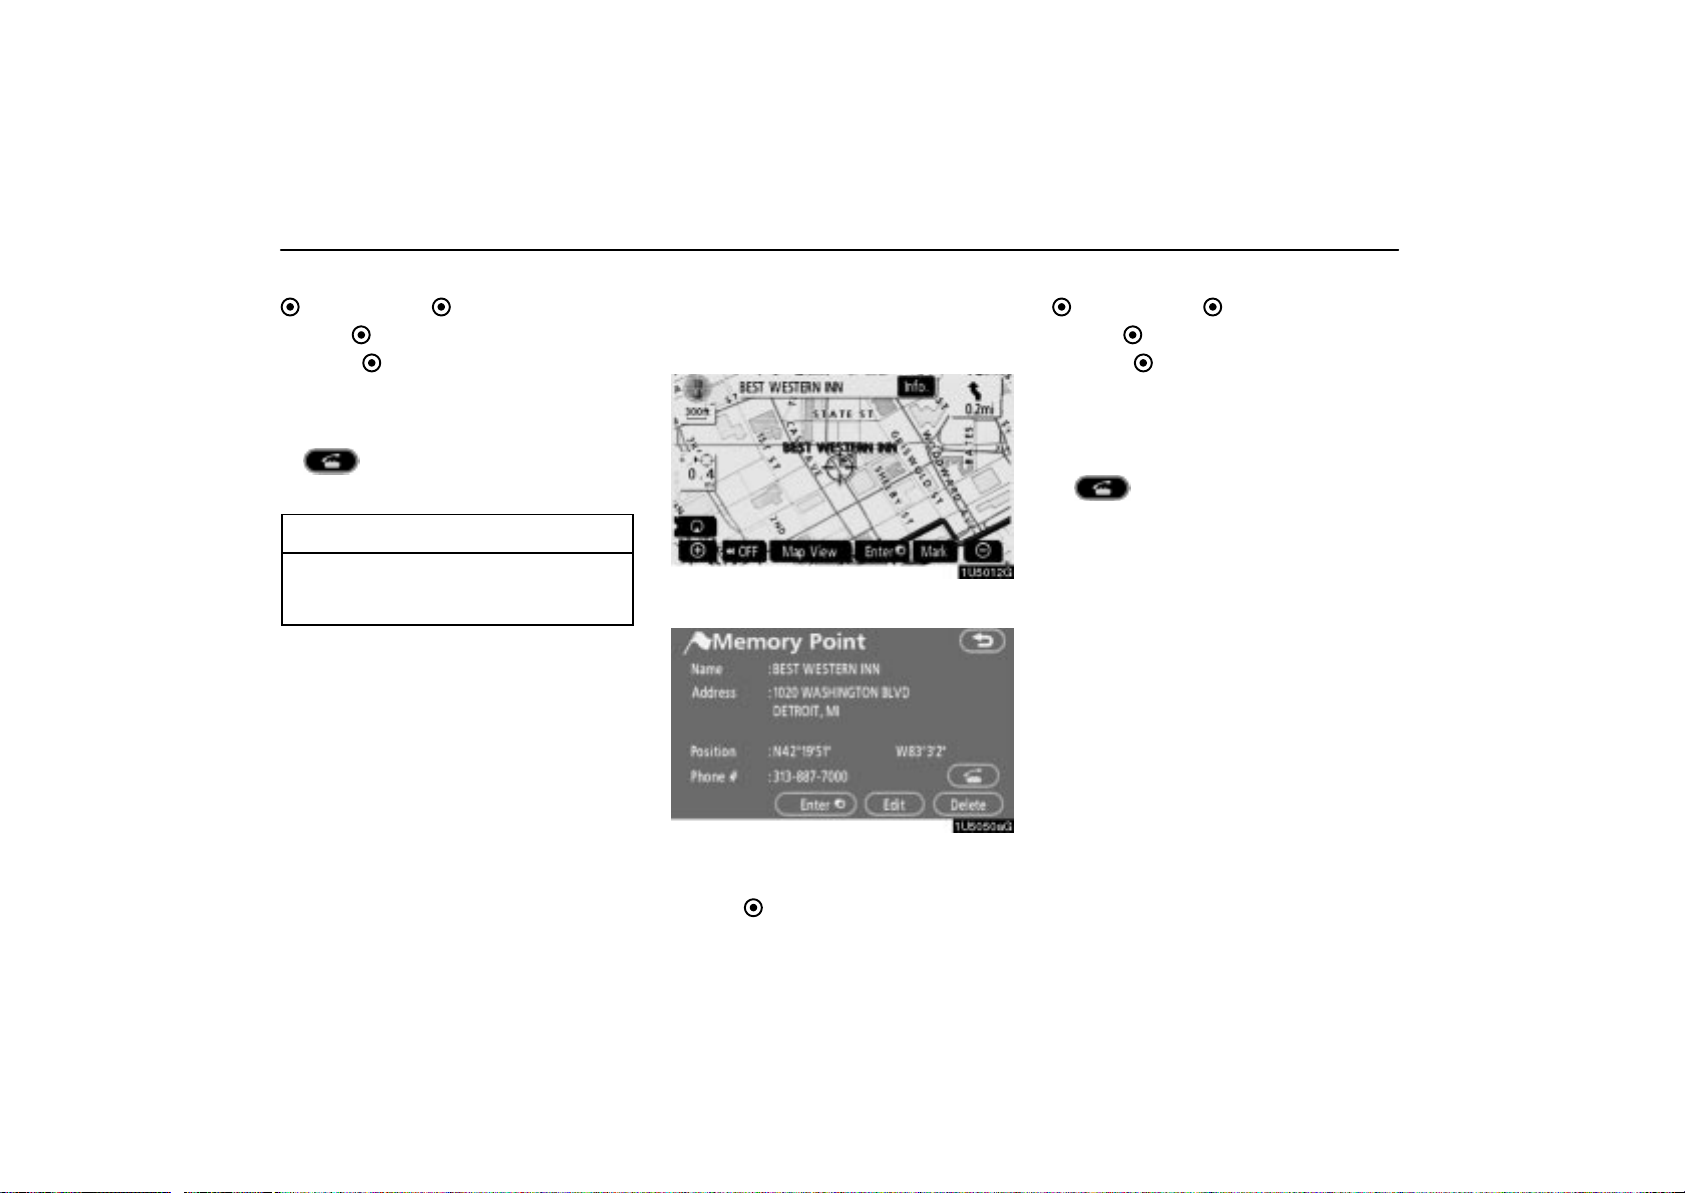
To register the cursor position as a
memory point
Memory point registration enables easy access to a specific point.
Touch “Mark”.
When you touch “Mark”, the following screen
appears for a few seconds, and then the map
screen returns.
10
BASIC FUNCTIONS
The registered point is shown by on the
map.
To change the icon or name, etc., see “ —
Editing memory points” on page 71.
Up to 106 memory points can be registered.
If there is an attempt to register more than
106, a message appears for confirmation.
To see information about the icon
where the cursor is set
To display information about an icon, set the
cursor on it.
POI INFORMATION
When the cursor is set on a POI icon, the
name and “Info.” are displayed on the top of
the screen.
Touch “Info.”.
Information such as the name, address, and
phone number are displayed.
If “Enter ” is touched, the position of the
cursor is set as a destination.
11
BASIC FUNCTIONS
If there is already a set destination, “Add to
” and “Replace ” are displayed.
“Add to
“Replace
tions and set a new one.
To register this POI as a memory point, touch
“Mark”. (See page 70.)
If
phone number can be called.
”: To add a destination.
”: To delete the existing destina-
is touched, the registered tele-
INFORMATION
The desired Point of Interest can be displayed on the map screen. (See “ — Display POI icons” on page 58.)
MEMORY POINT INFORMATION
When the cursor is set on a memory point
icon, the name and “Info.” are displayed on
the top of the screen.
Touch “Info.”.
Information such as the name, address, and
phone number are displayed.
If “Enter ” is touched, the position of the
cursor is set as a destination.
If there is already a set destination, “Add to
” and “Replace ” are displayed.
“Add to
“Replace
tions and set a new one.
To edit a memory point, touch “Edit”. (See “
— Editing memory points” on page 71.)
To delete a memory point, touch “Delete”.
If
phone number can be called.
”: To add a destination.
”: To delete the existing destina-
is touched, the registered tele-
12
BASIC FUNCTIONS
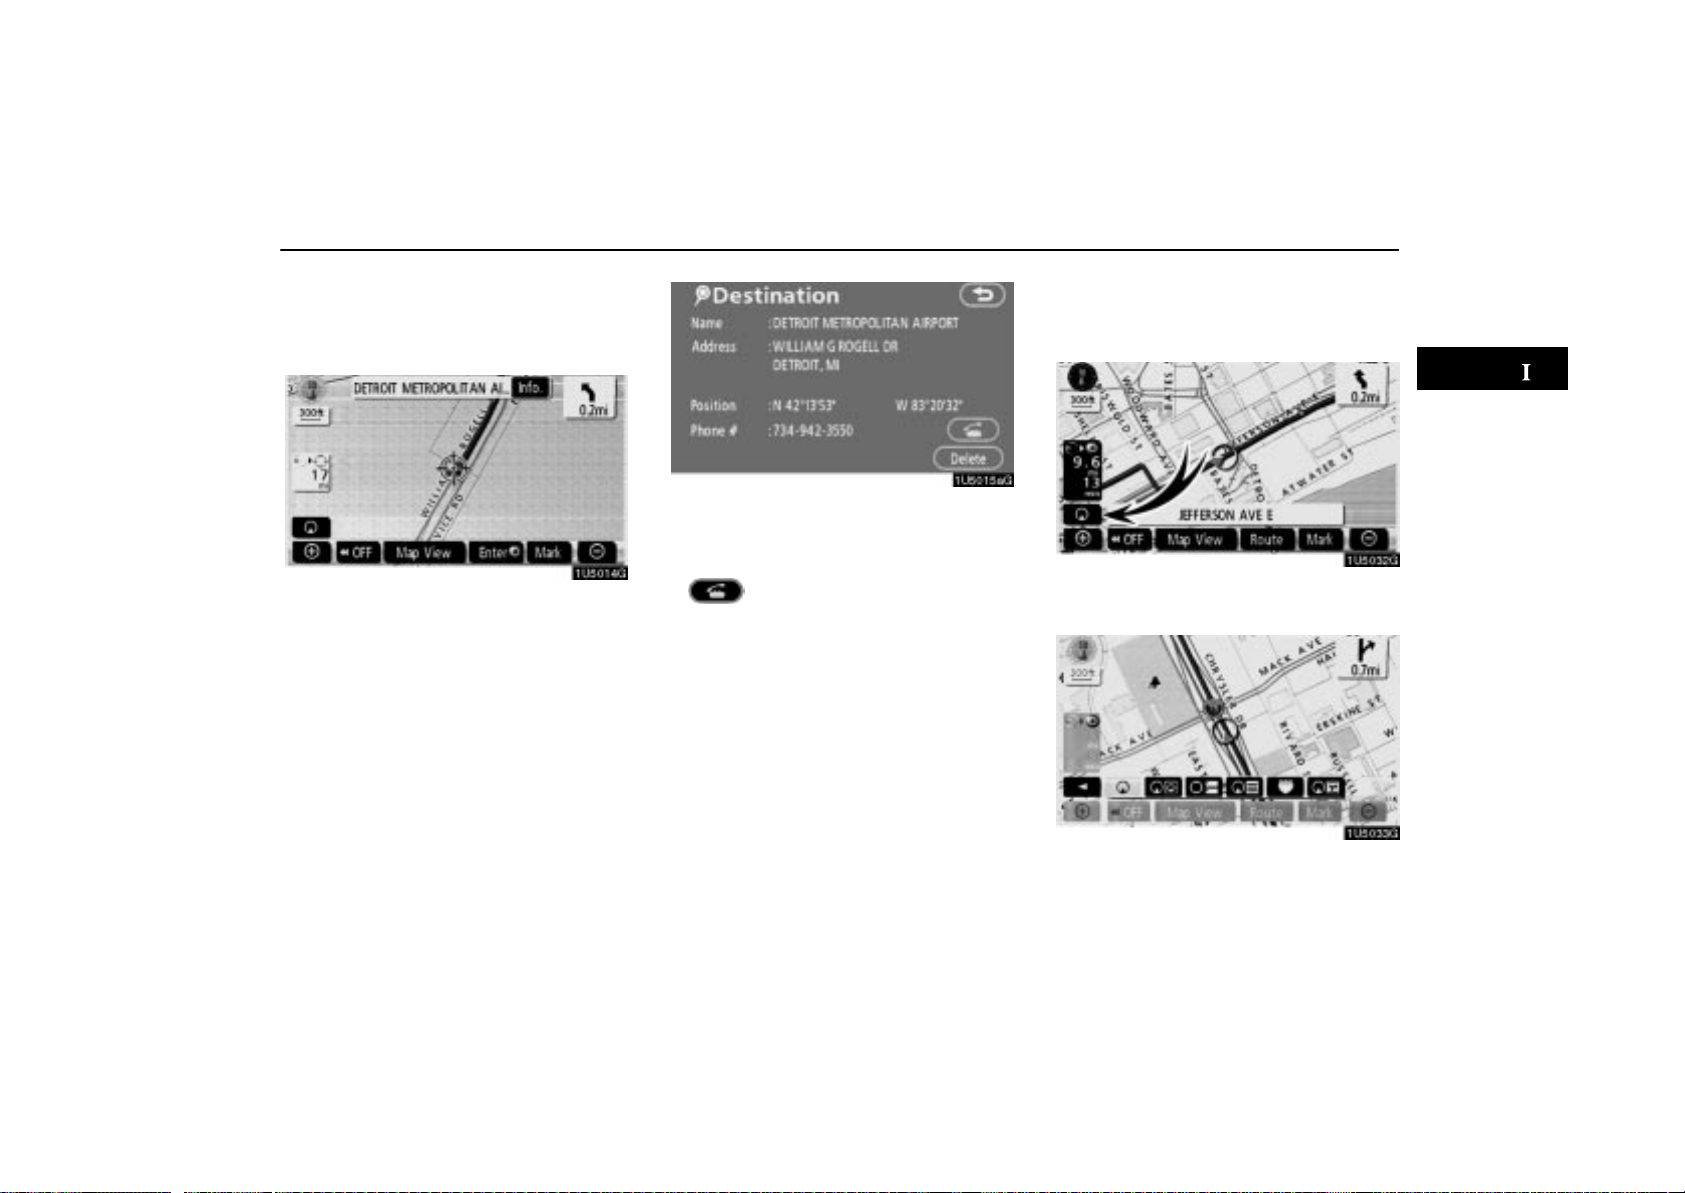
DESTINATION INFORMATION
When the cursor is set on a destination icon,
the name and “Info.” are displayed on the top
of the screen.
Touch “Info.”.
Information such as the name, address, and
phone number are displayed.
To delete a destination, touch “Delete”.
If
phone number can be called.
is touched, the registered tele-
— Switching the screens
Any one of the screen configurations can be
selected.
1. Touch this touch-screen button to display the following screen.
2. To select the desired screen configuration, touch one of the following touchscreen buttons.
13
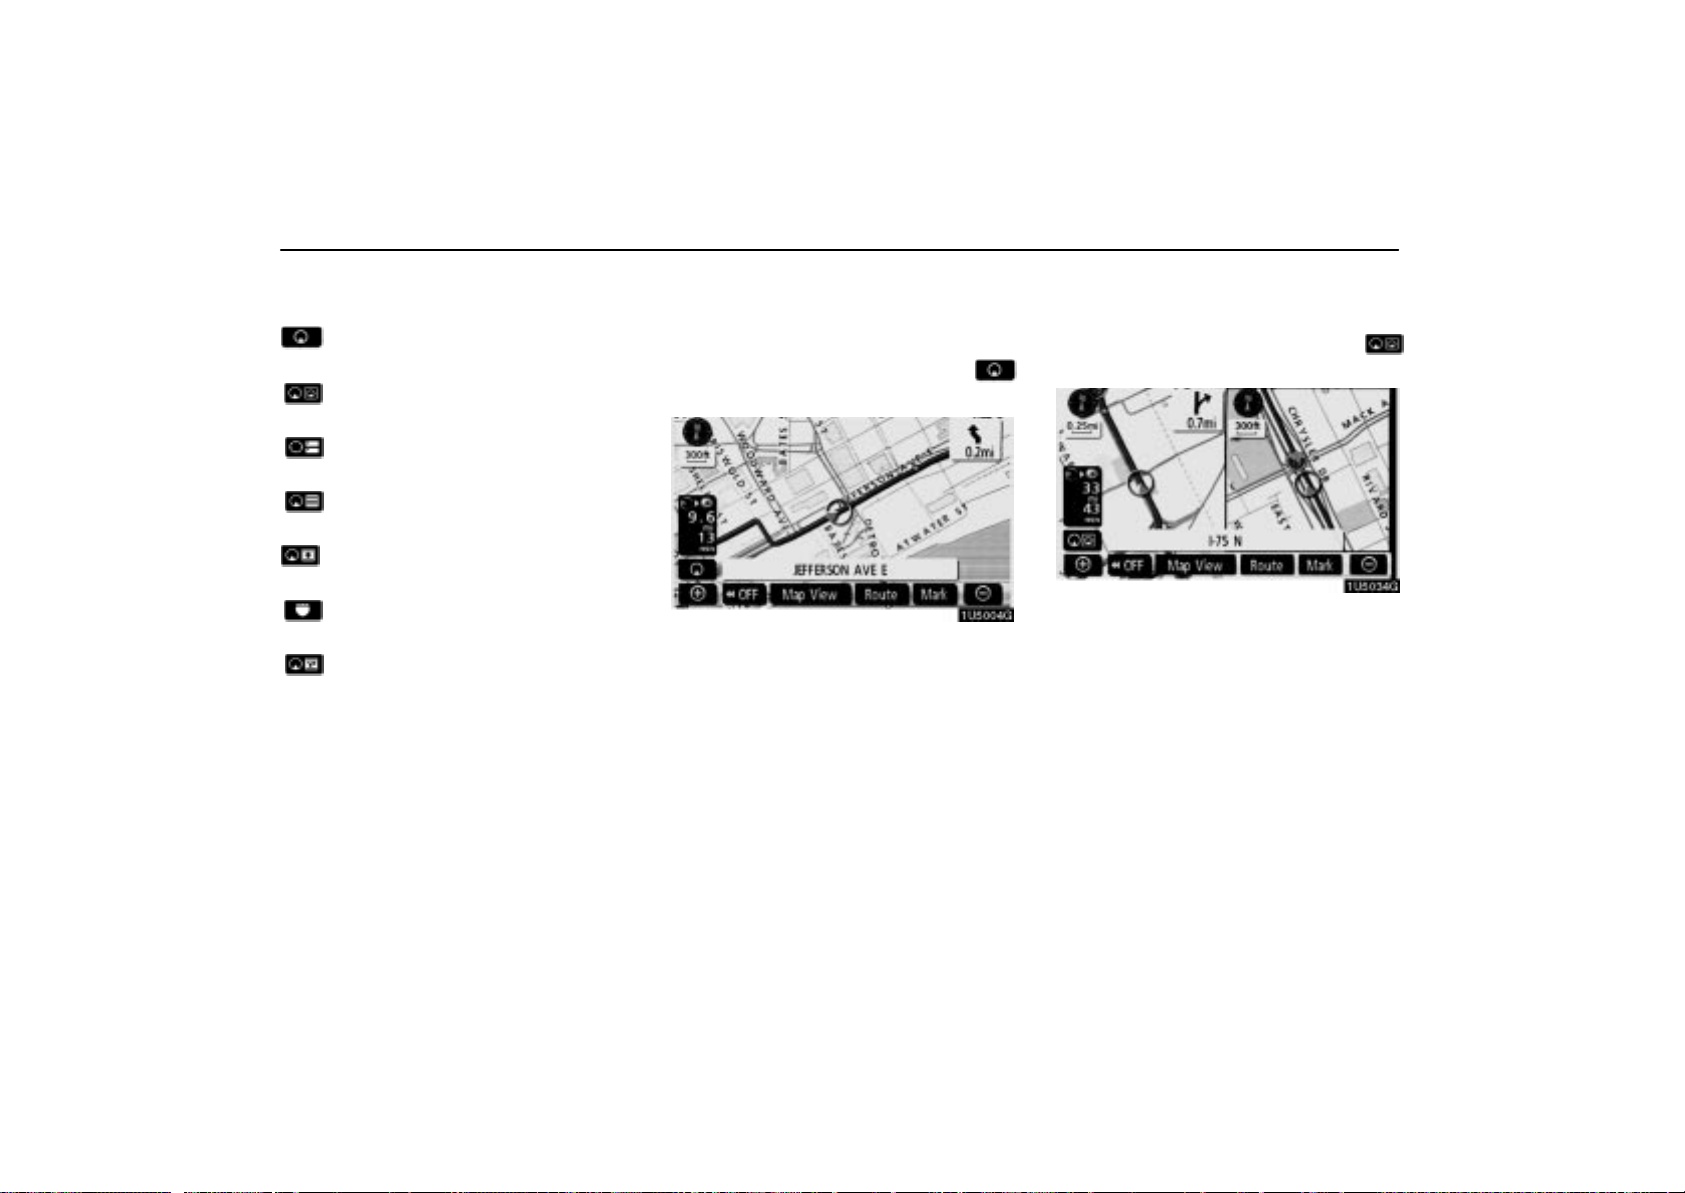
BASIC FUNCTIONS
Depending on the conditions, certain screen
configuration buttons cannot be selected.
: To display the single map screen.
(See page 14.)
: To display the dual map screen. (See
page 14.)
: To display the compass mode
screen. (See page 15.)
: To display the turn list screen. (See
page 50.)
: To display the arrow screen. (See
page 50.)
: To display the freeway information
screen. (See page 48.)
: To display the intersection guidance
screen or the guidance screen on the
freeway. (See page 49.)
Screen configurations
SINGLE MAP
This is a regular map screen.
While on a different screen, touching
will display the single map screen.
The screen shows the single map.
DUAL MAP
A map can be displayed split in two.
While on a different screen, touching
will display the dual map screen.
The screen shows the dual map. The map on
the left is the main map.
The right side map can be edited by touching
any specific point on the right side map.
14
BASIC FUNCTIONS
This screen can perform the following procedures:
1. Changing the map scale
2. Displaying the POI icon
3. Changing the orientation of the map
Touch “OK” when you complete editing.
The screen returns to the dual map screen.
COMPASS MODE
Current vehicle position is indicated with a
compass, not with a map.
While on a different screen, touching
will display the compass mode screen.
Information about the destination and current
position, as well as a compass, is displayed
on the screen.
The destination mark is displayed in the direction of the destination. When driving, refer to
the longitude and latitude coordinates and the
compass, to make sure that your vehicle is
headed in the direction of the destination.
INFORMATION
When the vehicle goes out of the disc
area, the guidance screen changes into
compass mode.
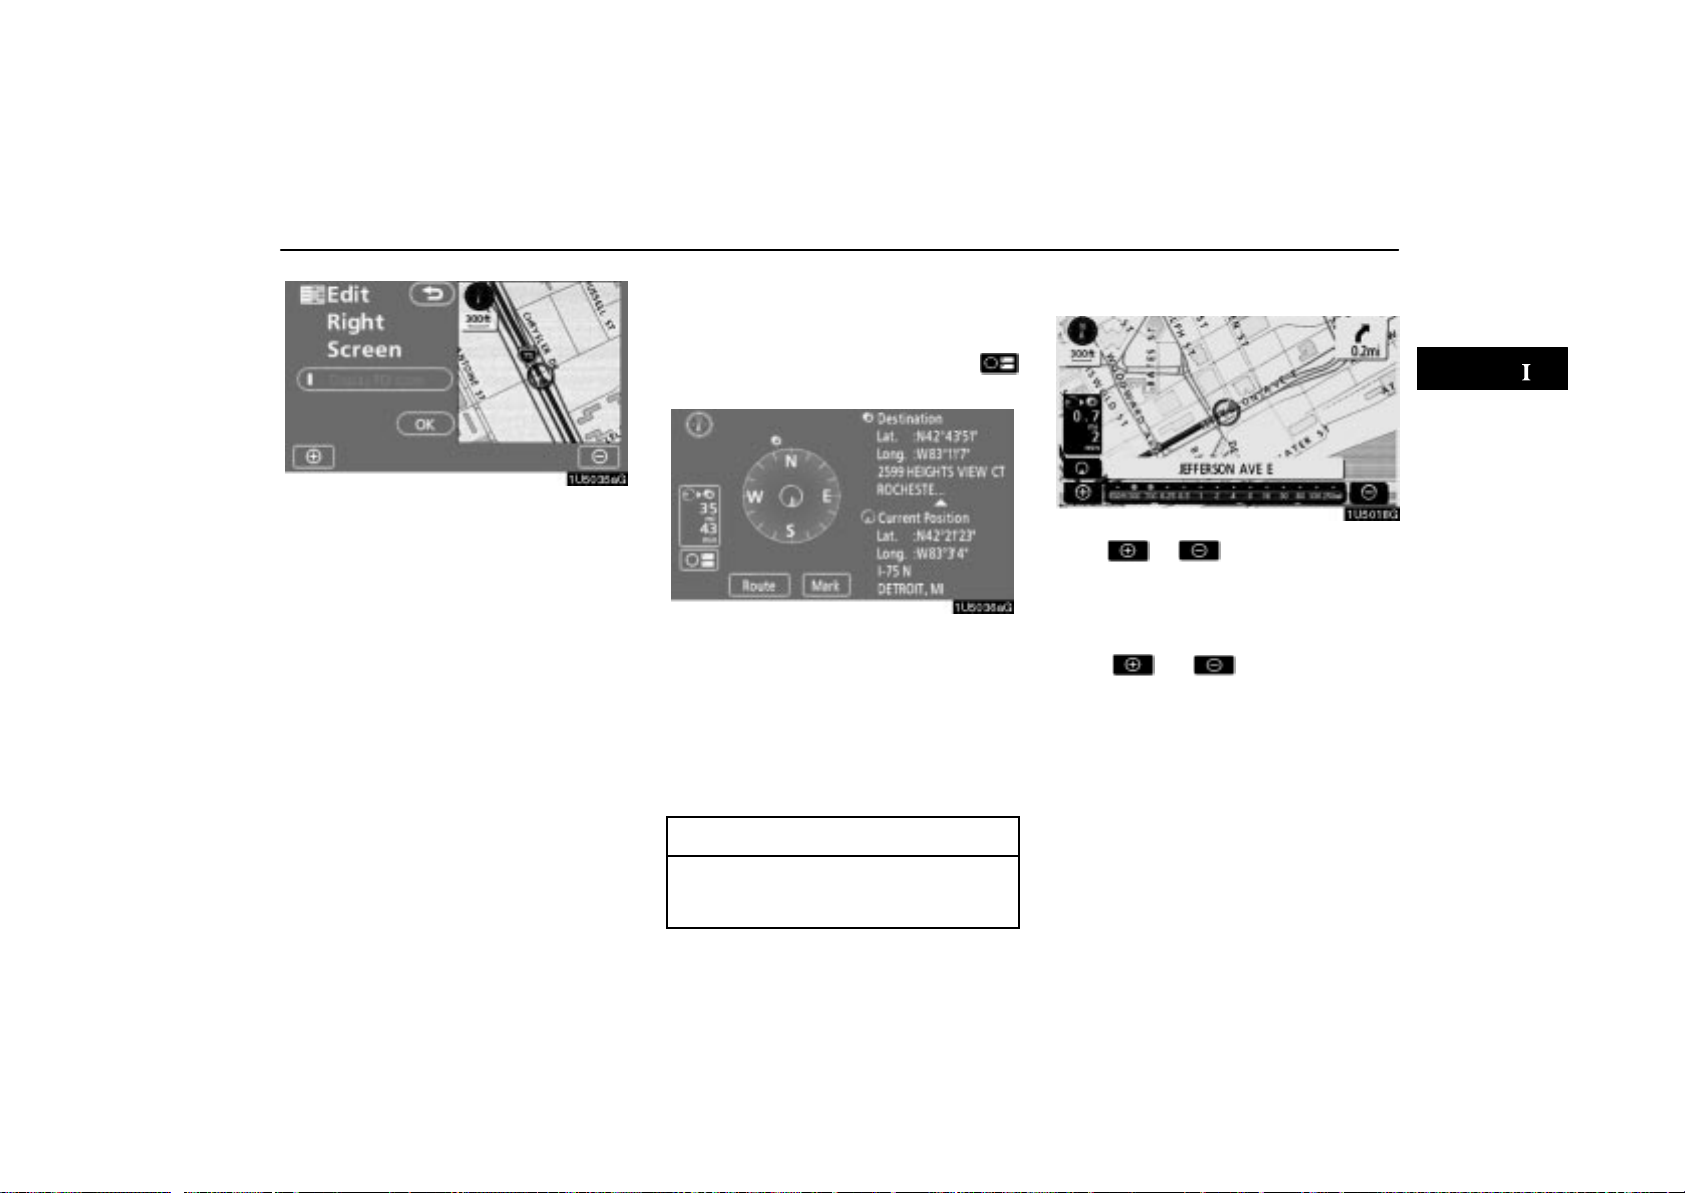
— Map scale
Touch or to change the scale of
the map display. The scale bar and indicator
at the bottom of the screen indicates the map
scale menu. The scale range is 150 feet (50
m) to 250 miles (400 km).
Touch
changes normally. B y continuing to touch t he
touch-screen button, the scale bar changes
smoothly.
The scale of the map display can be changed
by touching the scale bar directly. It is not
available while driving.
The map scale is displayed under the northup symbol or heading-up symbol at the top
left of the screen.
or until the scale bar
15
BASIC FUNCTIONS
INFORMA TION
When the map scale is at the maximum
range of 250 miles (400 km), is not
shown. When the map scale is at the
minimum range of 150 feet (50 m),
is not shown. However, in the area
where the foot print map is contained,
when the map scale is changed to 150
feet (50 m), changes to .
— Foot print map
For the area which is covered by the foot print
map (Some areas in the following cities; Detroit, Chicago, N.Y., L.A), you can switch to
the foot print map on a scale of 75 feet (25 m).
To switch to the foot print map
changes into when the map is
scaled down to 150 feet (50 m).
To display the foot print map, touch .
To delete the foot print map display, touch
.
INFORMATION
If the map or the current position is
moved to the area which is not covered by the foot print map, the screen
scale automatically changes to 150
feet (50 m).
On the foot print map, a one way
street is displayed by .
It is not possible to perform scrolling
on the foot print map (one-touch
scroll) while driving.
16
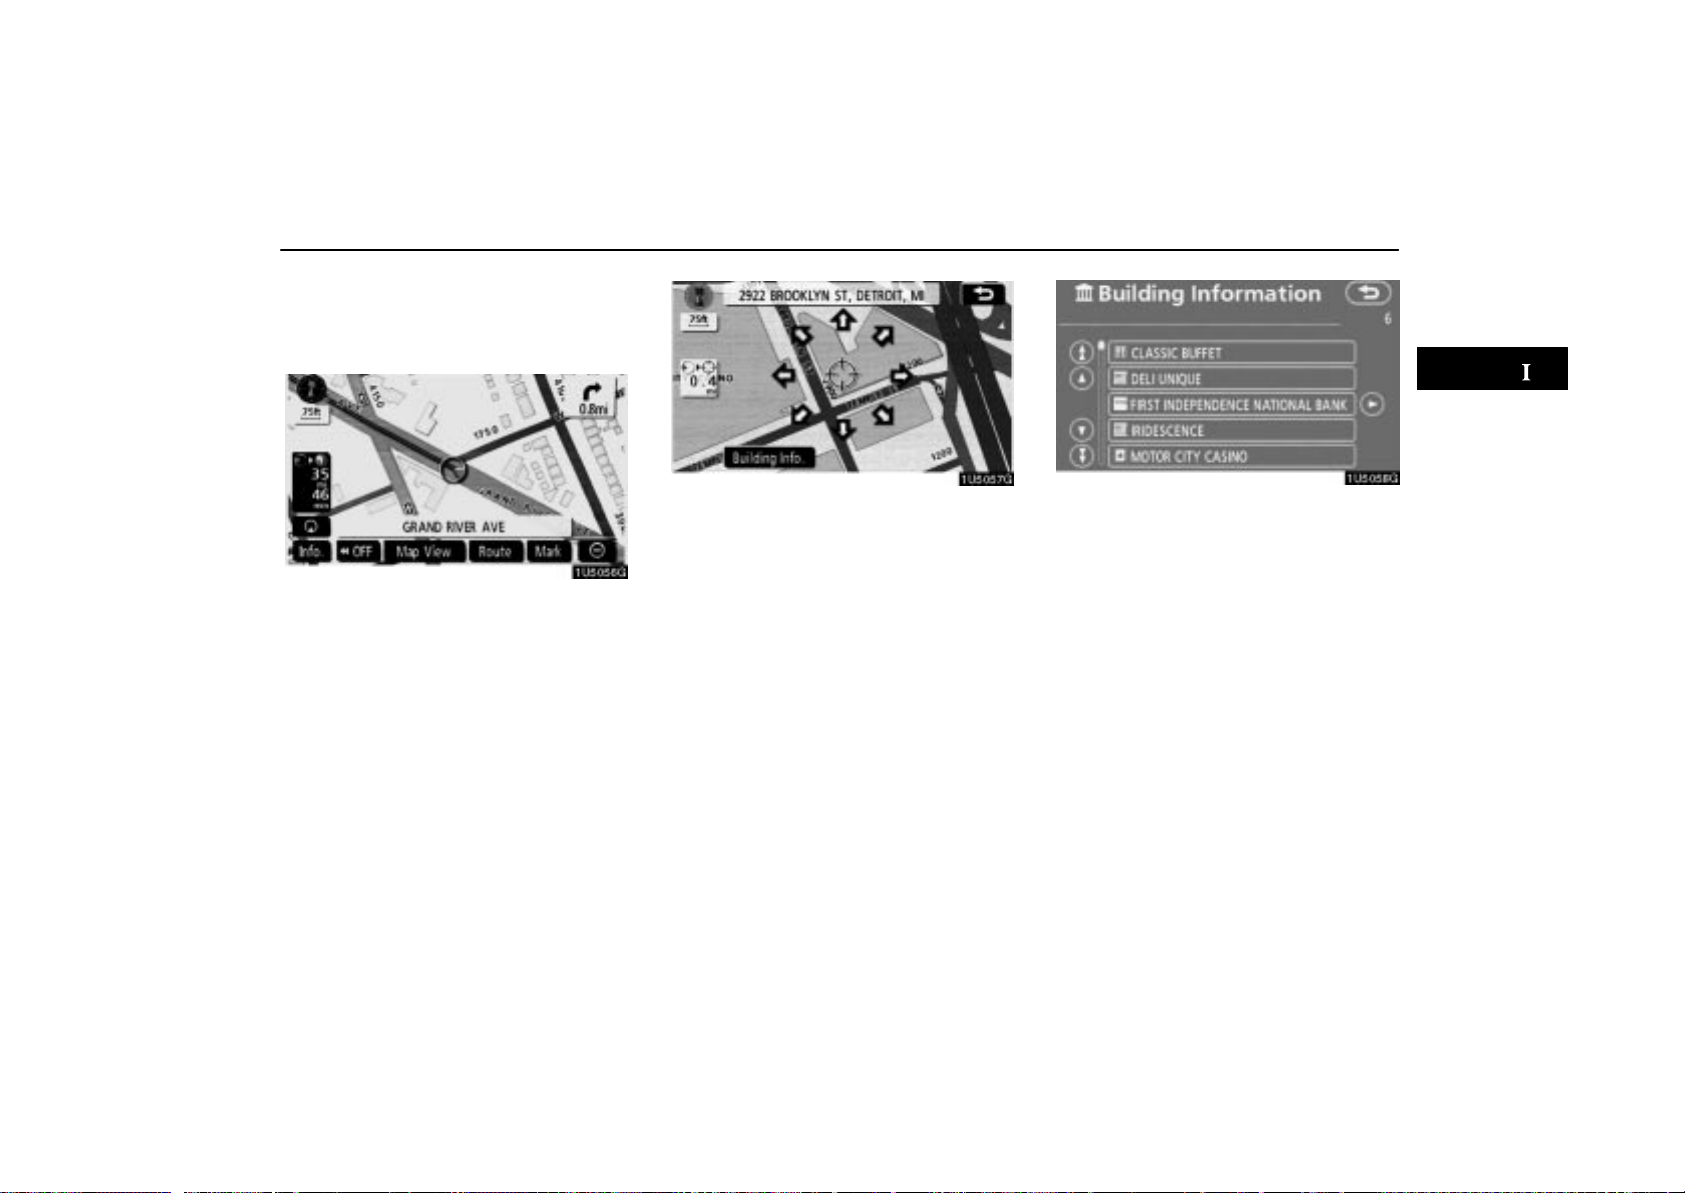
To display building information
Information is available only for buildings for
which information is recorded on the map
disc.
BASIC FUNCTIONS
1. Touch “Info.” while the foot print map
is displayed.
If the map is displayed by a split screen, the
map turned into a single map display.
2. Using an eight-direction arrow, move
the cursor to the position of the building to
display building information.
3. Touch “Building Info.”.
Details of POIs in some buildings may be displayed.
For detailed POI information, touch the building name. Y ou can see details of the selected
POIs.
17
BASIC FUNCTIONS
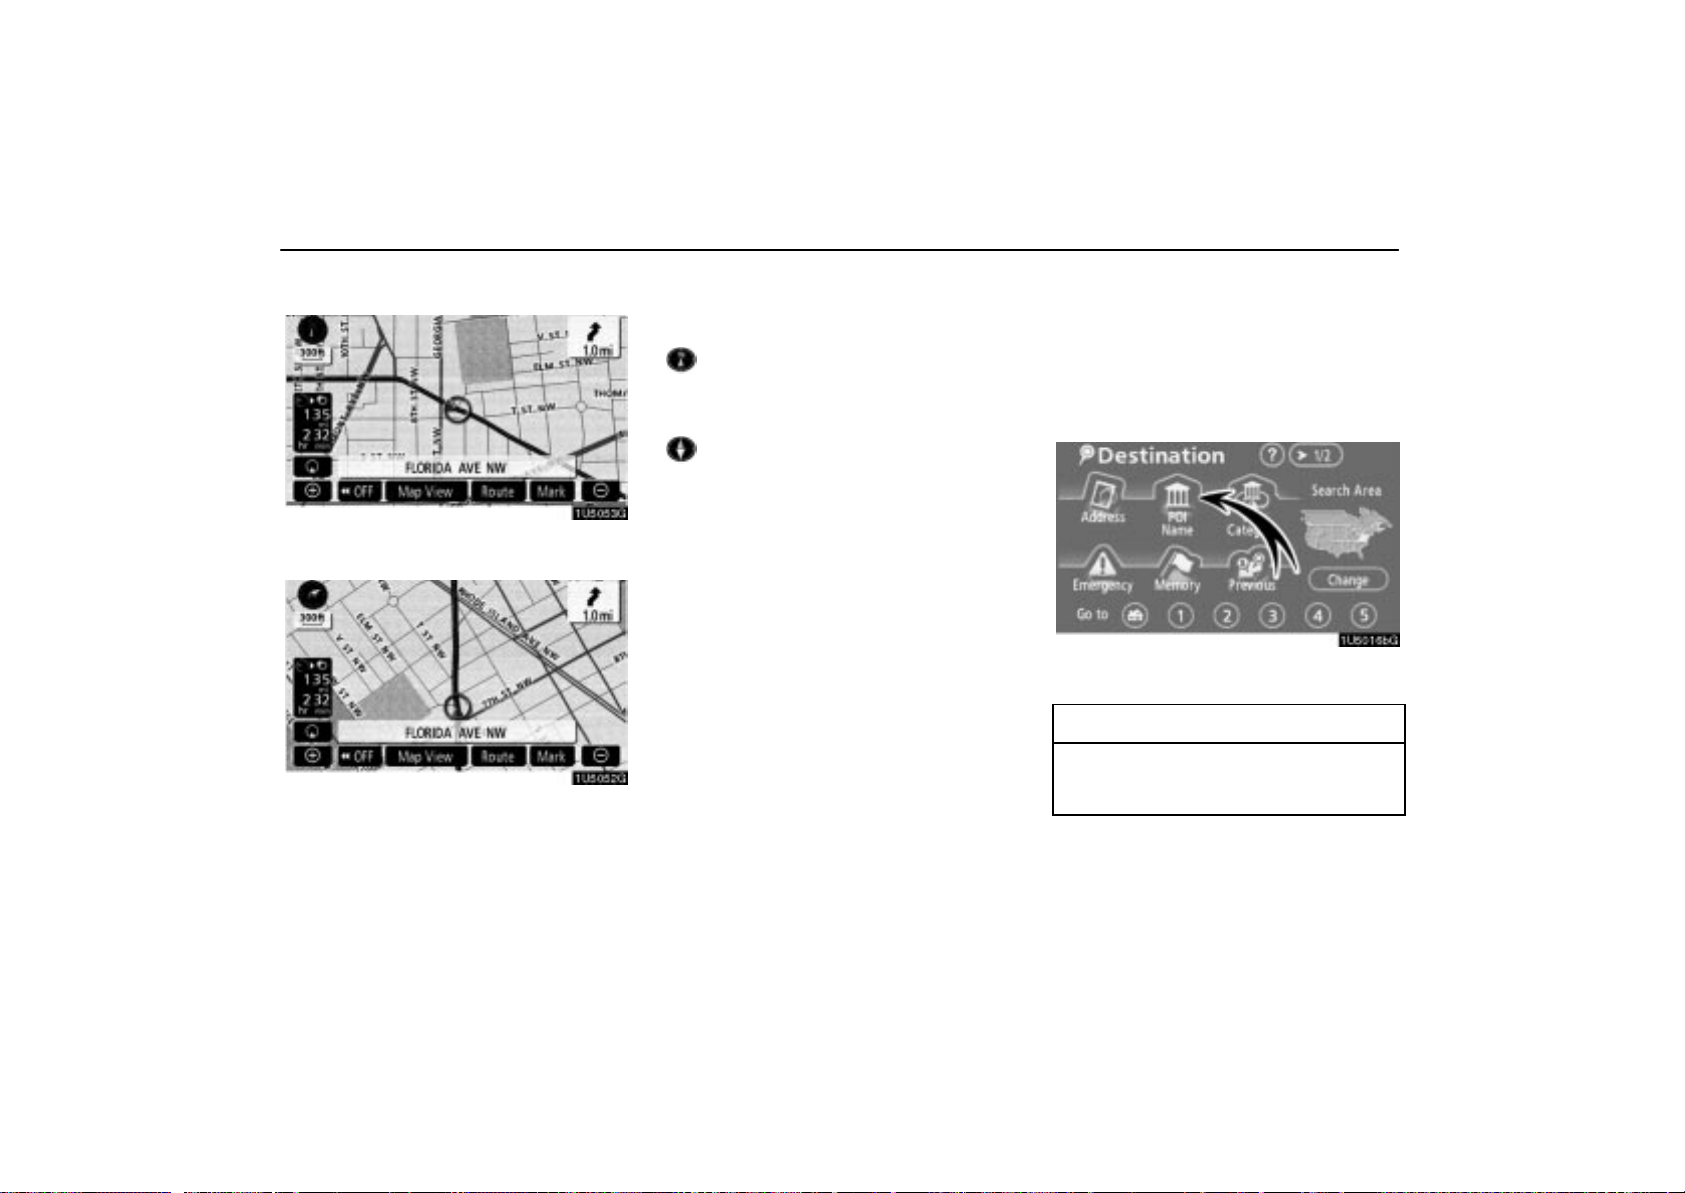
— Orientation of the map
North-up screen
Heading-up screen
The orientation of the map can be changed
from north-up to heading-up by touching the
orientation symbol at the top left of the screen.
North-up symbol
Regardless of the direction of vehicle travel,
North is always up.
Heading-up symbol
The direction of vehicle travel is always up.
A red arrow indicates North.
Example of navigation system
operation —
— Guiding the route
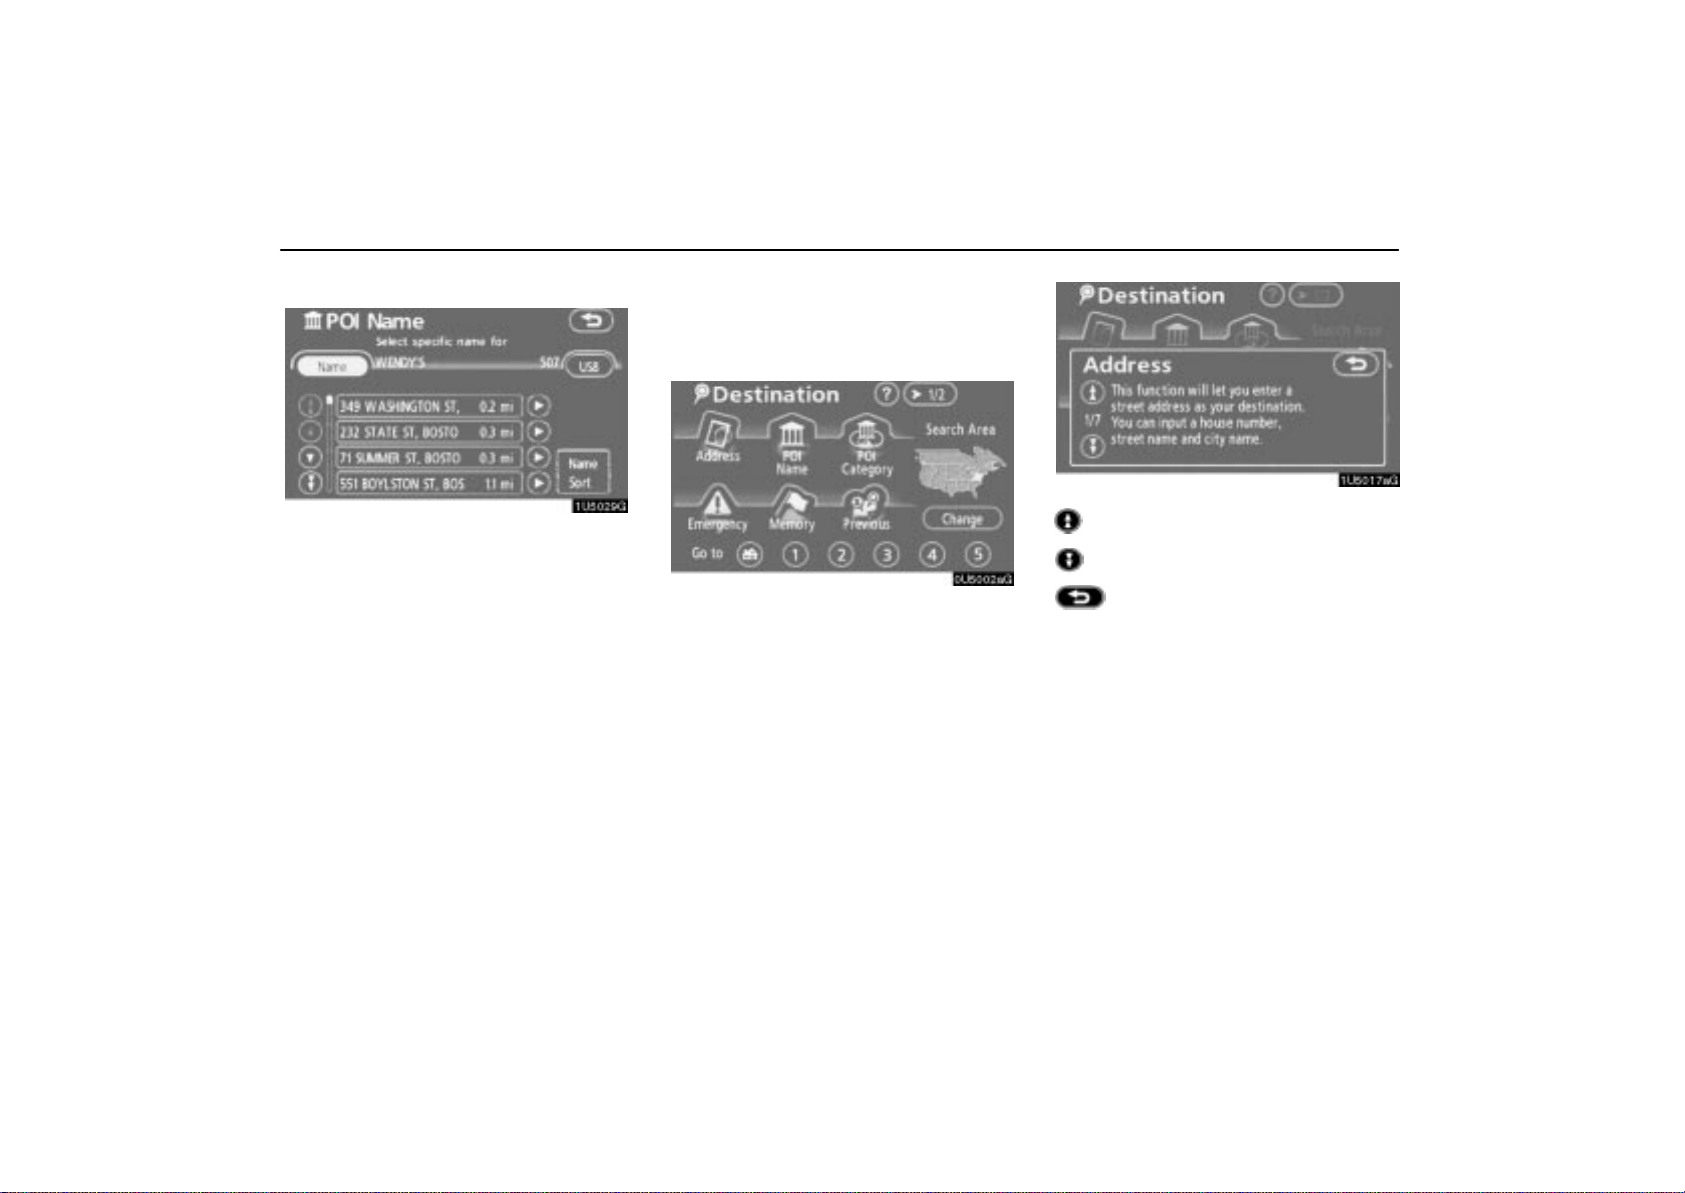
Guidance to a destination occurs by specifying the destination using the “POI Name”.
1. Push the “DEST” button.
2. Touch “POI Name”.
INFORMATION
There are 13 different methods to search
destinations. (See “Destination search”
on page 24.)
18
BASIC FUNCTIONS
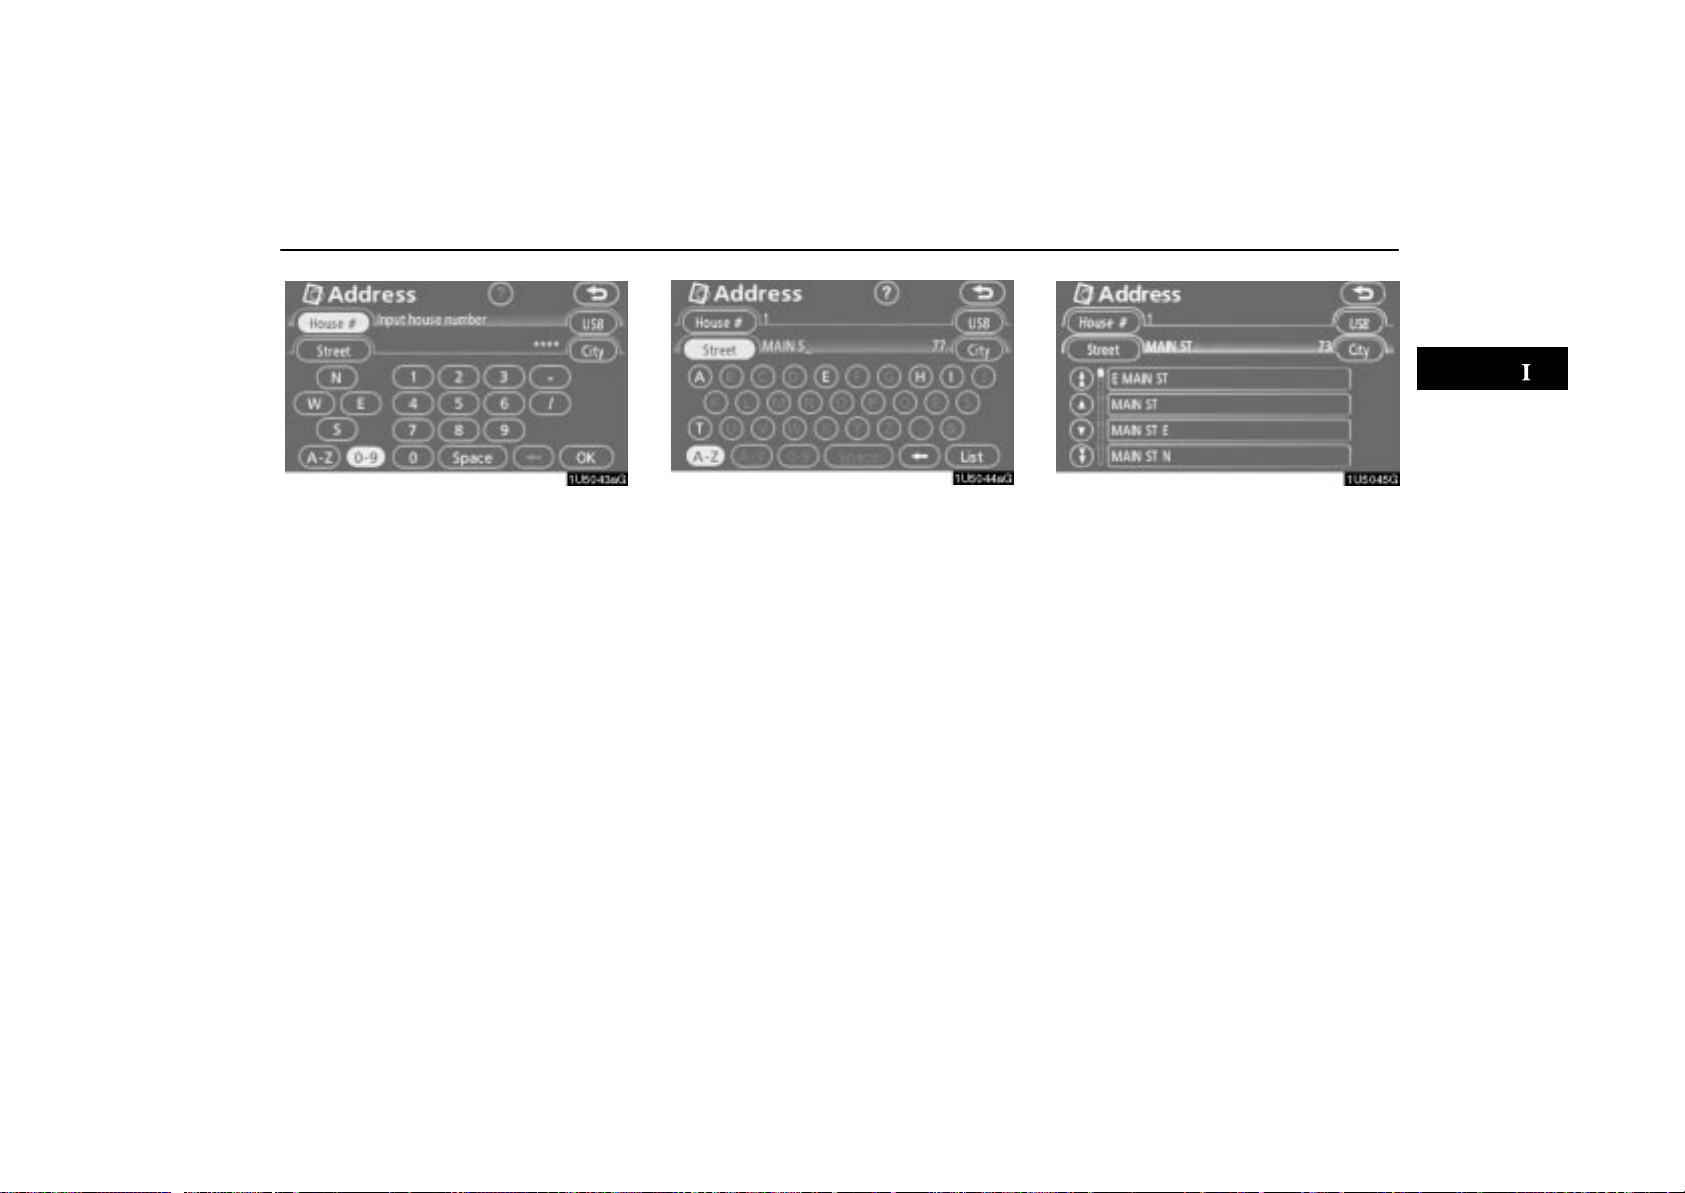
3. Enter the name of the destination.
Every touch on a letter key narrows the selection.
Letters that cannot be selected in the database are dimmed out.
When there are four or fewer database items,
these items are displayed in a list.
Even if the entered name is incomplete,
touching “List” displays the list.
4. Select the destination from the displayed list.
5. Touch “Enter”.
The system starts route search and displays
recommended routes.
19
BASIC FUNCTIONS
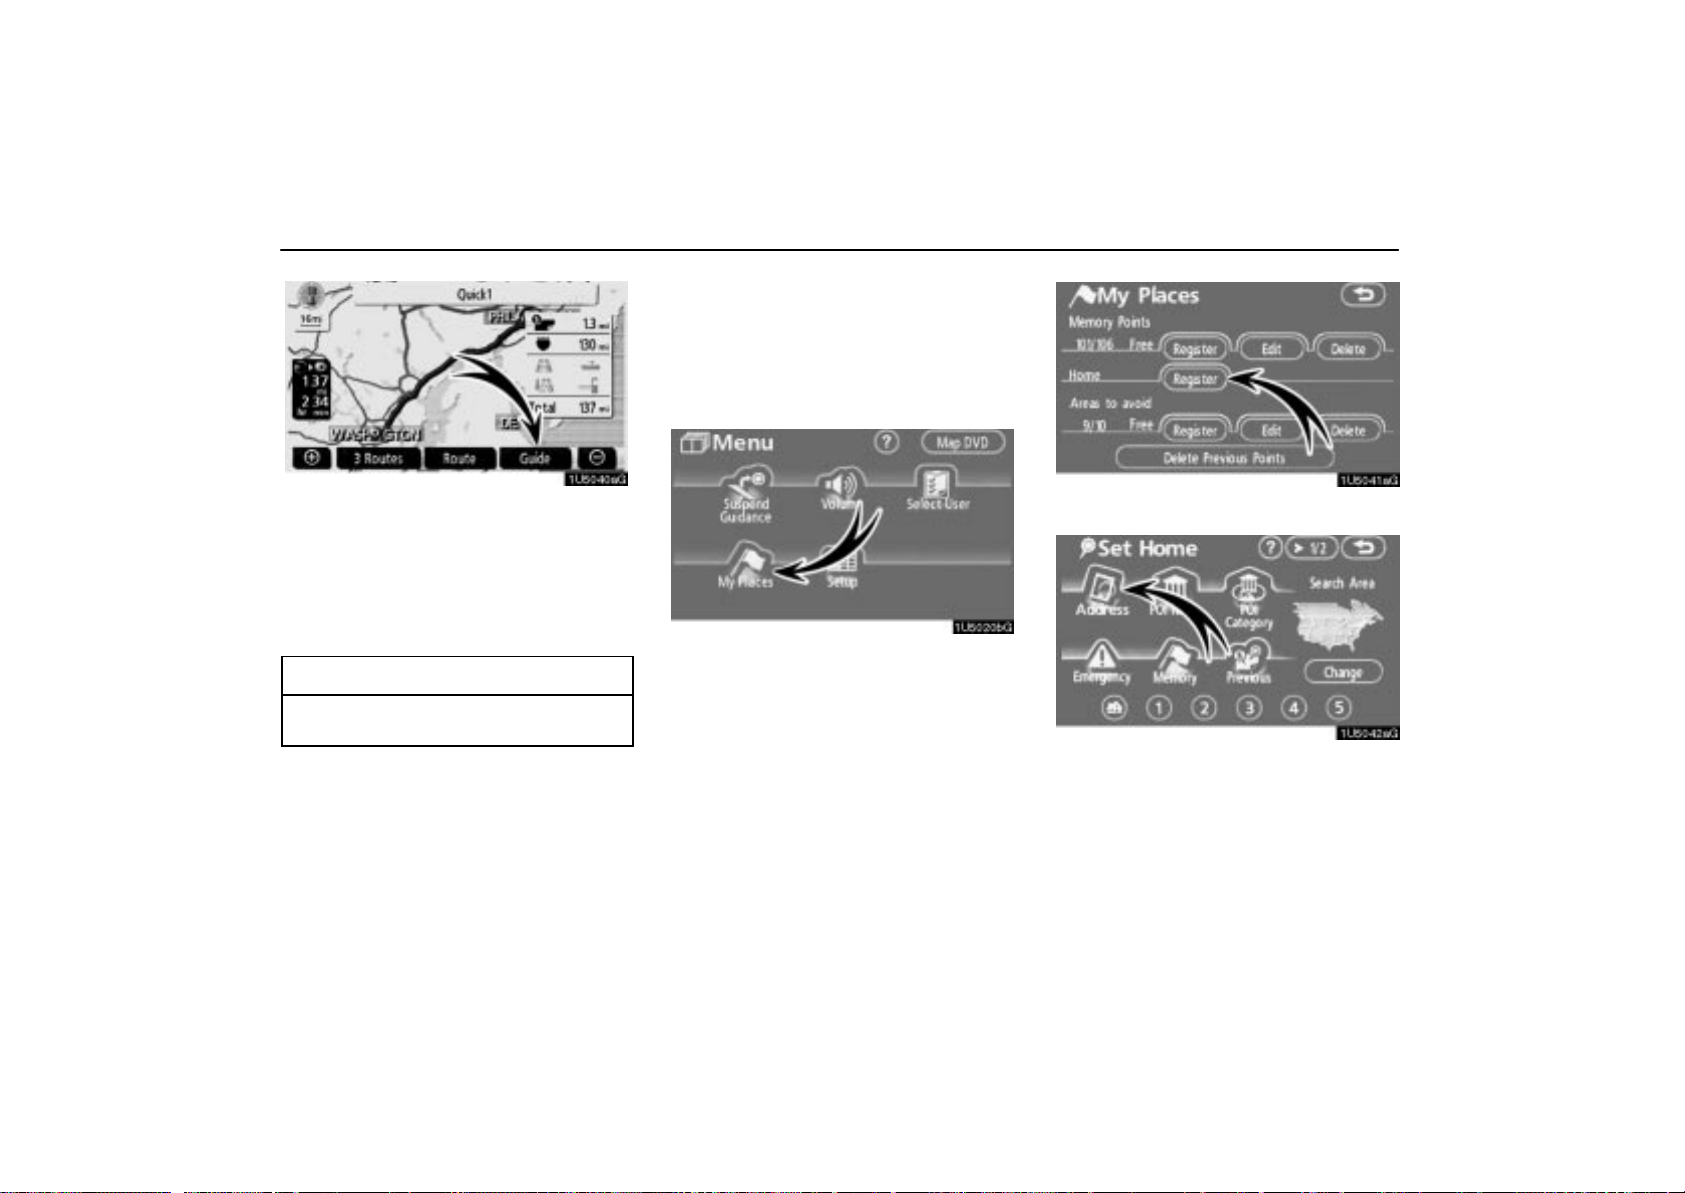
— Registering home
The home button on the “Destination” screen
can be used if your home has been registered. (See “ — Destination search by Home”
on page 26.)
1. Push the “MENU” button.
6. Touch “Guide”.
Route guidance starts.
Guidance is done by both the screen and
voice. (See “Route guidance screen” and
“Typical voice guidance prompts” on pages
48 and 50.)
INFORMATION
It is possible to change the route. (See
“Starting route guidance” on page 43.)
20
3. Touch “Register”.
2. Touch “My Places”.
4. Touch “Address”.
BASIC FUNCTIONS
5. Enter the house number. 6. Enter the street name.
Every touch on a letter key narrows the selection.
Letters that cannot be selected in the database are dimmed out.
When there are four or fewer database items,
these items are displayed in a list.
Even if the entered name is incomplete,
touching “List” displays the list.
7. Select the street name from the displayed list.
21

BASIC FUNCTIONS
8. Touch “Enter”.
Registration of home is complete and the
“Memory Point” screen is displayed.
22
Registered “Home” information will be
displayed.
The icon, quick access, name, location, and
phone number can be changed. (See “ —
Editing memory points” on page 71.)

06 SIENNA_U (L/O 0603)
SECTION 1-
OPERATION OF INST RUMENTS AND
CONTROLS
Overview of instruments and controls
Instrument panel overvi ew 2. . . . . . . . . . . . . . . . . . . . . . . . . . . . . . . . . . . . .
Instrument cluster overview 5. . . . . . . . . . . . . . . . . . . . . . . . . . . . . . . . . . . .
Indicator symbols on the instrument panel 7. . . . . . . . . . . . . . . . . . . . . . .
1
2006 SIENNA from March ‘06 Prod. (OM45443U)
1
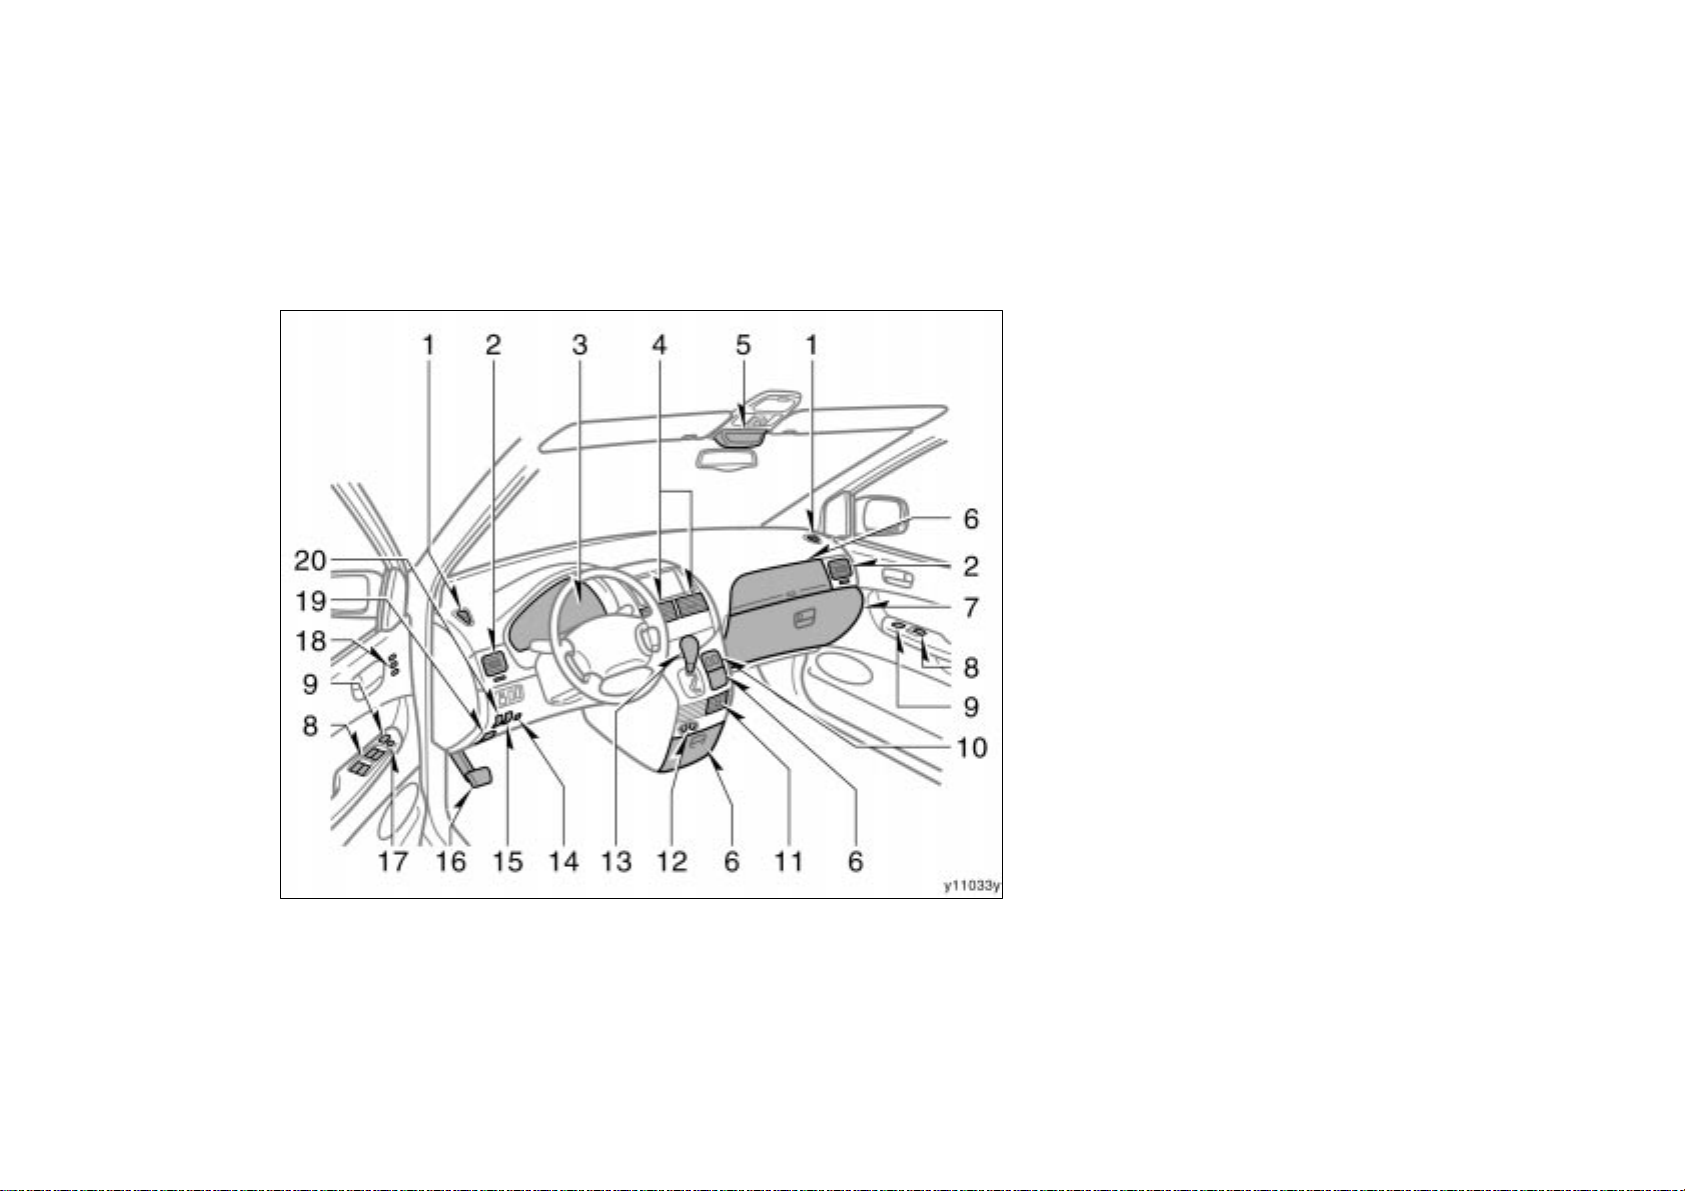
Instrument panel overview
06 SIENNA_U (L/O 0603)
1. Side defroster outlets
2. Side vents
3. Instrument cluster
4. Center vents
5. Multi- information display or garage
door opener box
6. Auxiliary boxes
7. Glov e box
8. Power window switches
9. Power door lock switches
10. Seat heater dials or auxiliary box
11. Cup holder and coin holder
12. Power outlets
13. Automatic transmission selector lever
14. Tire pressure warning system reset
switch
15. Power sliding door main switch
(“SLIDE DOOR OFF” switch)
16. Park ing brake pedal
17. Window lock switch
18. Dri ving position memory butt ons
19. Hood lock release lever
20. Power back door main switch
(“BACK DOOR OFF” switch)
2
2006 SIENNA from March ‘06 Prod. (OM45443U)
06 SIENNA_U (L/O 0603)
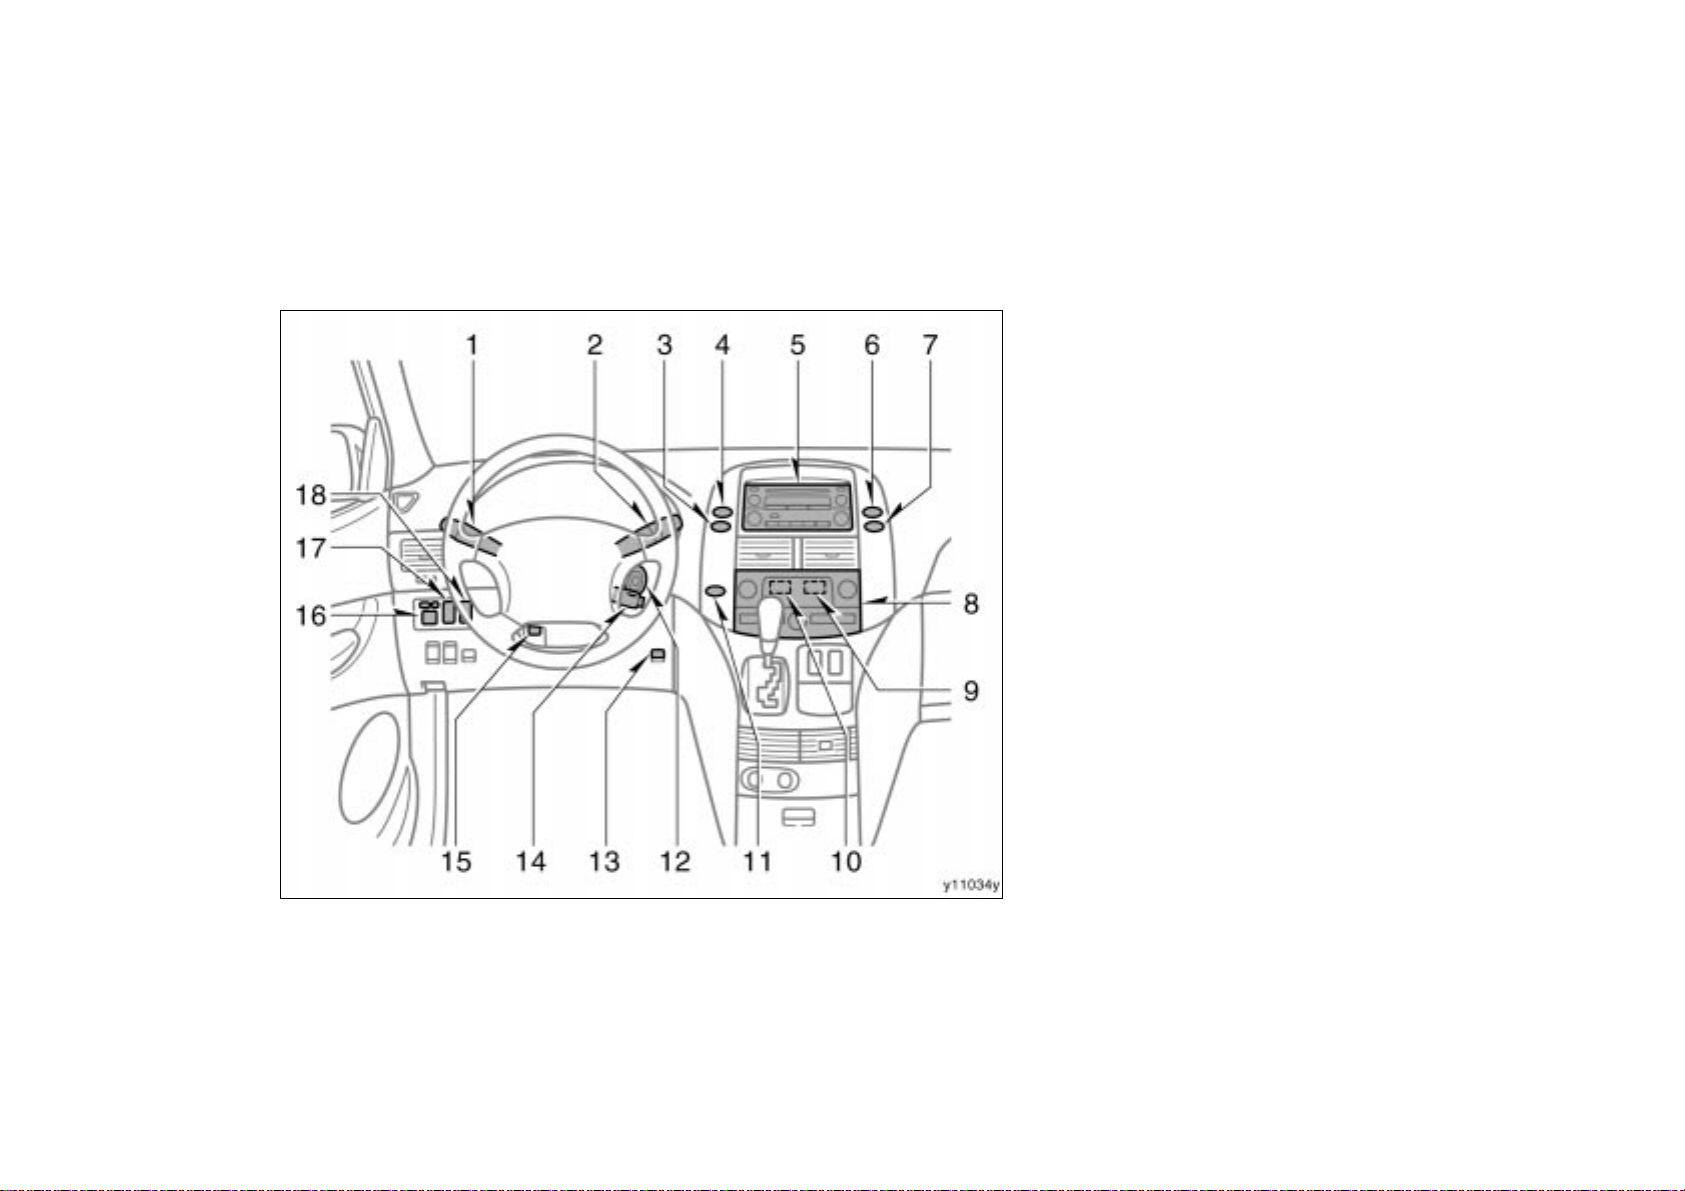
1. Headlight, turn signal and front fog
light switches
2. Wiper and washer switches
3. Rear window and outside rear view
mirror defogger and windshield wiper
de- icer switch
4. Emergency flasher switch
5. Audio syst em or rear vi ew monitor
system/navigation system including
audio system (For the navigation
system, see the separate “Navigation
System Owner’s Manual”.)
6. Power outlet main switch
7. AUX adapter
8. Air conditioning controls
9. “AIRBAG ON” and “AIRBAG OFF”
indicator lights
10. Toyota park assist system switch and
indicator light
11. Personal light main switch
12. Ignition switch
13. “TRAC OFF” switch
14. Cruise control switch or dynamic laser
cruise control switch
2006 SIENNA from March ‘06 Prod. (OM45443U)
3
15. Tilt and telescopic steering lock release
lever
16. Power rear view mirror control switches
17. “REAR VENT” switch
18. Headlight beam level control dial
06 SIENNA_U (L/O 0603)
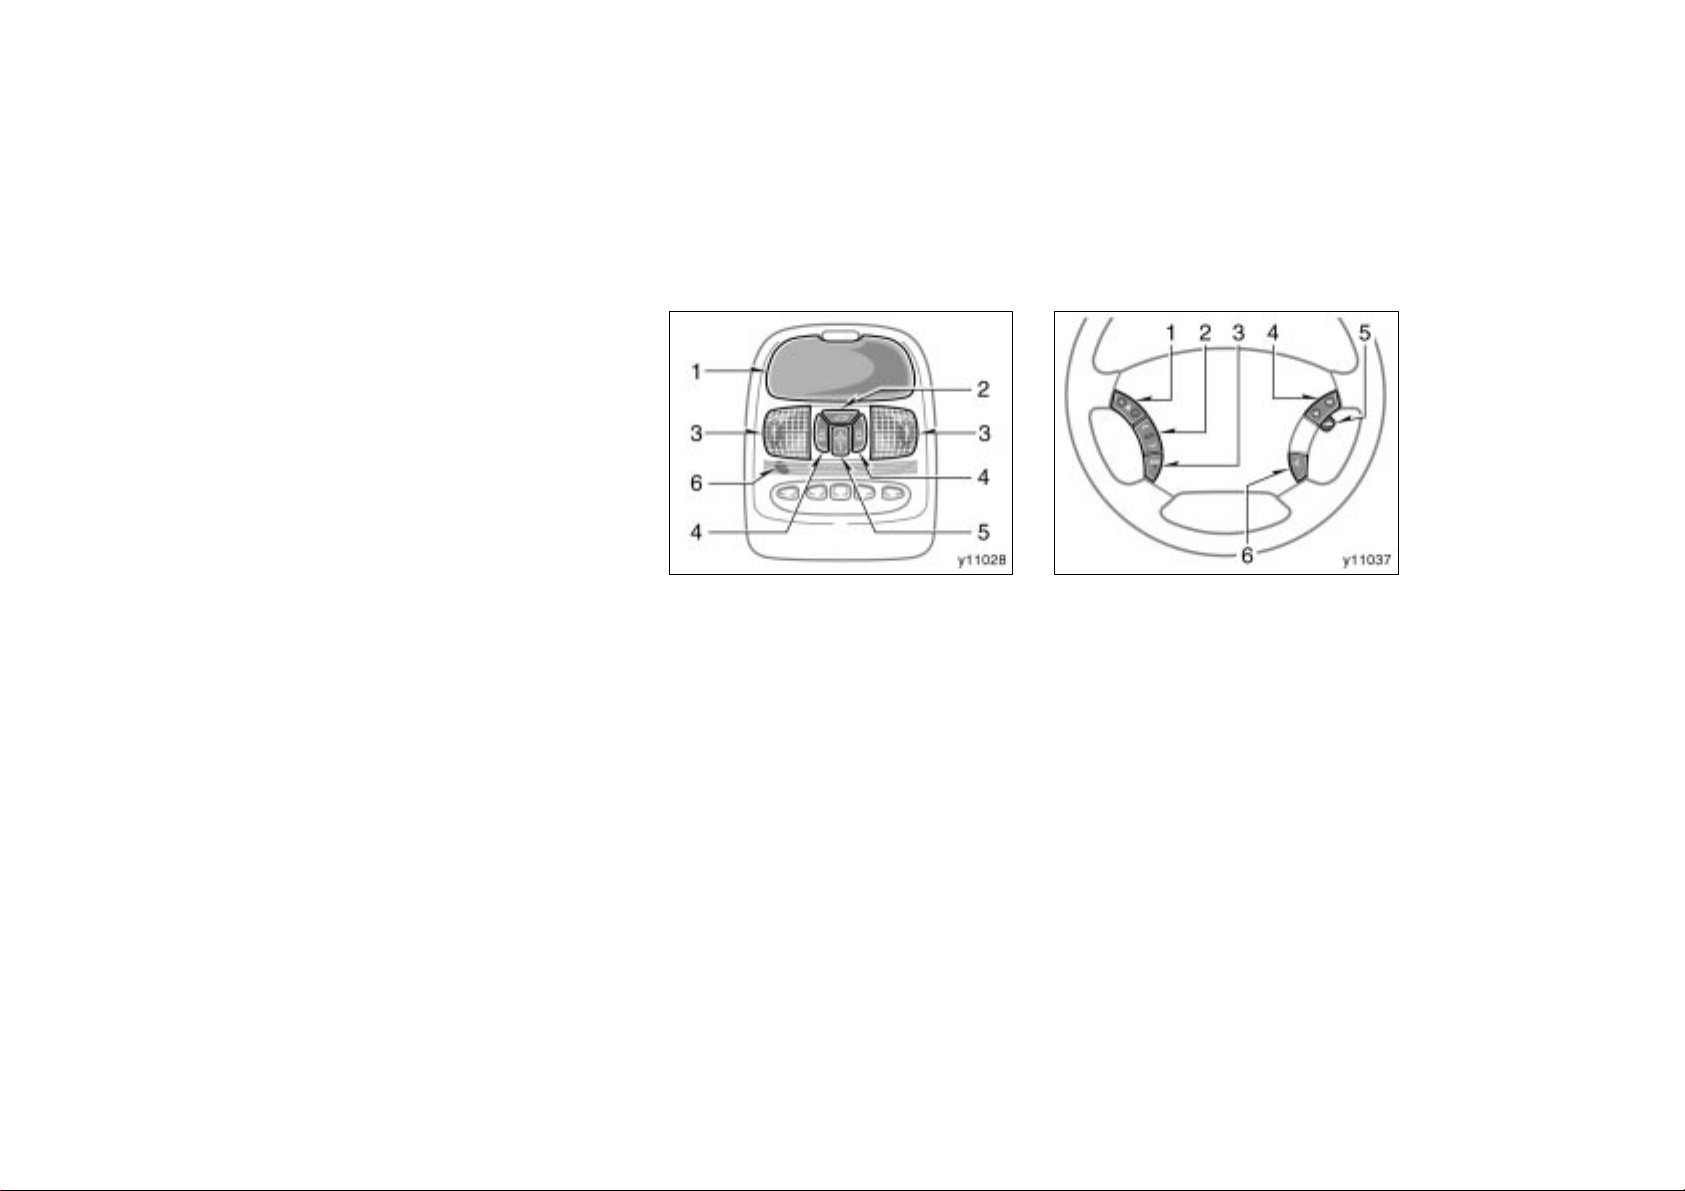
Overhead console Steeri ng switches
1. Conver sation mirror
2. Power back door switch
3. Front personal lights
4. Power sliding door switches
5. Electric moon roof switch
6. Microphone (See the separate
“Navigation System Owner ’s Manual”.)
1. Volume control switches for audio
system/hands- free system (For the
hands- free system, see the separate
“Navigation System Owner ’s Manual”.)
2. “” switch
3. “MODE” switch
4. Telephone switches (See the separate
“Navigation System Owner ’s Manual”.)
5. Distance switch
6. Speech command switch (See the
separate “Navigation System Owner’s
Manual”.)
4
2006 SIENNA from March ‘06 Prod. (OM45443U)
Instrument cluster overview
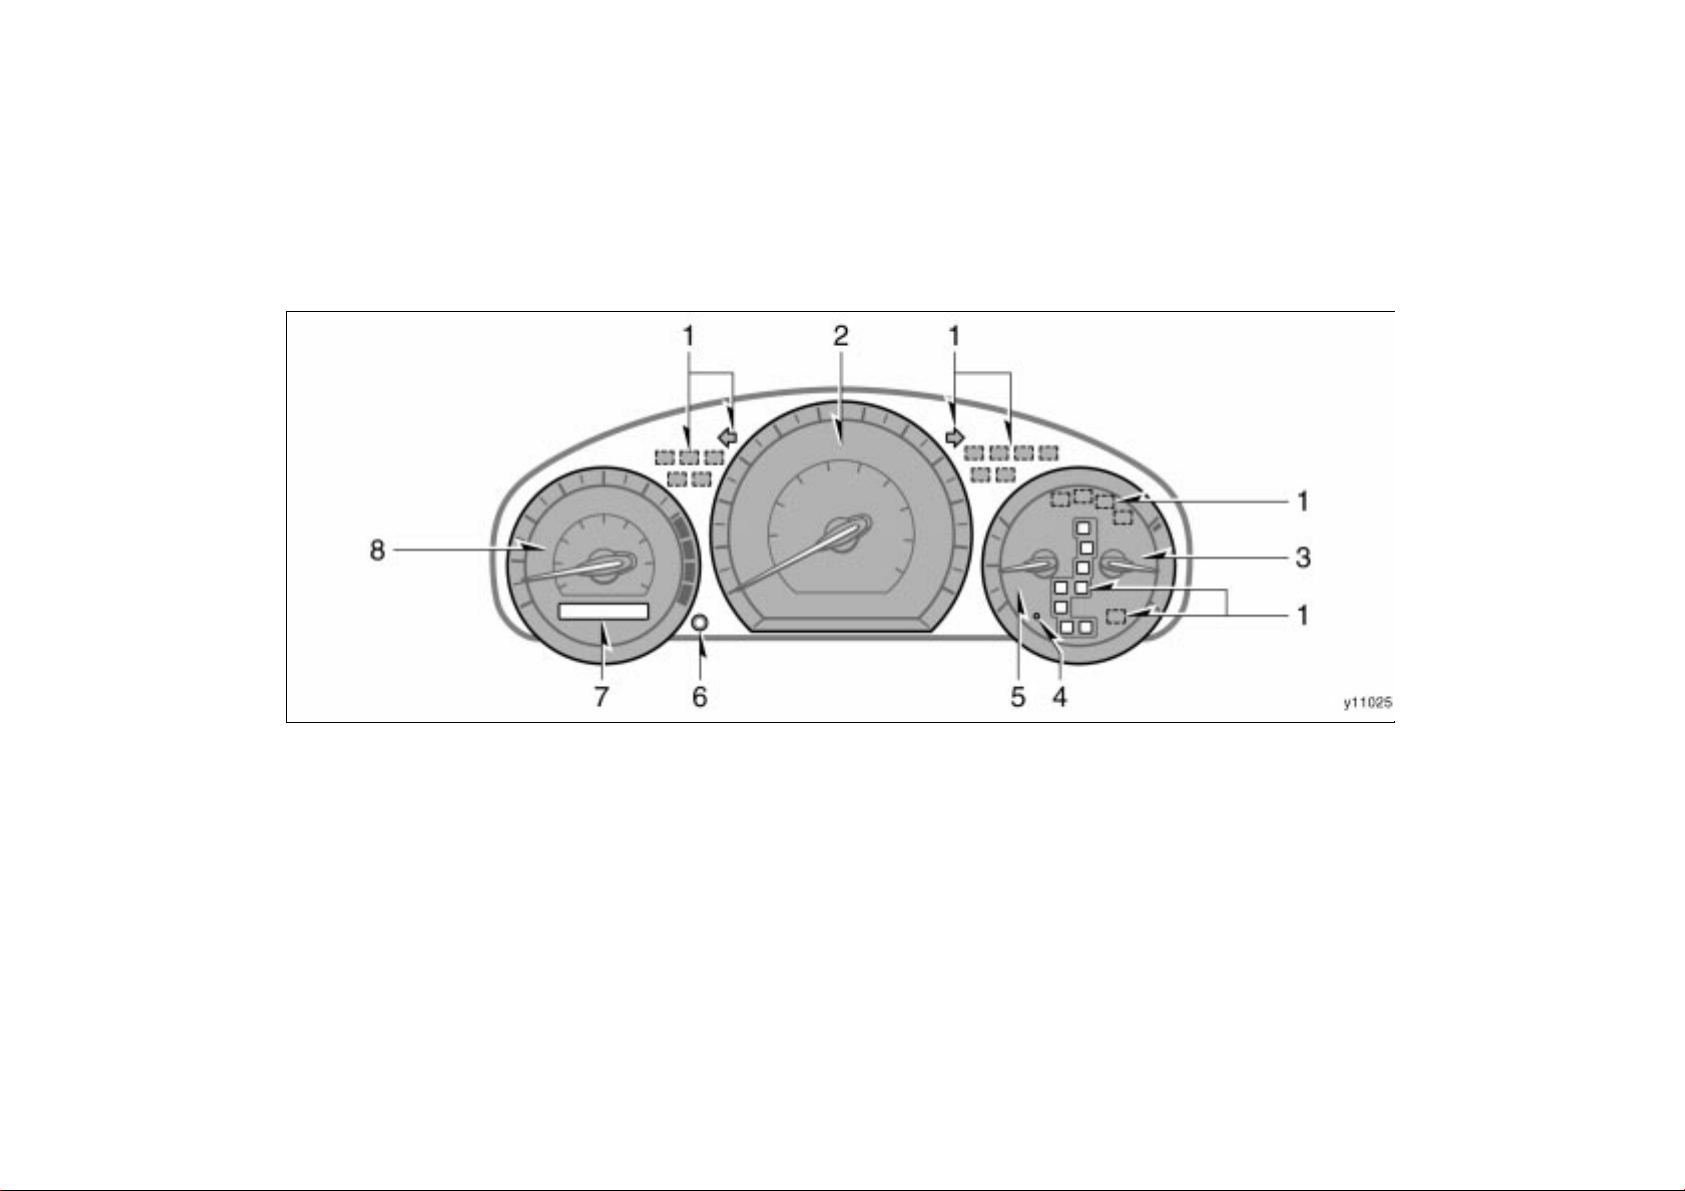
Ty pe A
06 SIENNA_U (L/O 0603)
1. Service reminder indicators and
indicator lights
2. Speedometer
3. Engine coolant temperature gauge
4. Low fuel level warning light
5. Fuel gauge
6. Trip meter res et knob/instrument panel
light control knob
7. Odometer and two trip meters
8. Tachometer
5
2006 SIENNA from March ‘06 Prod. (OM45443U)
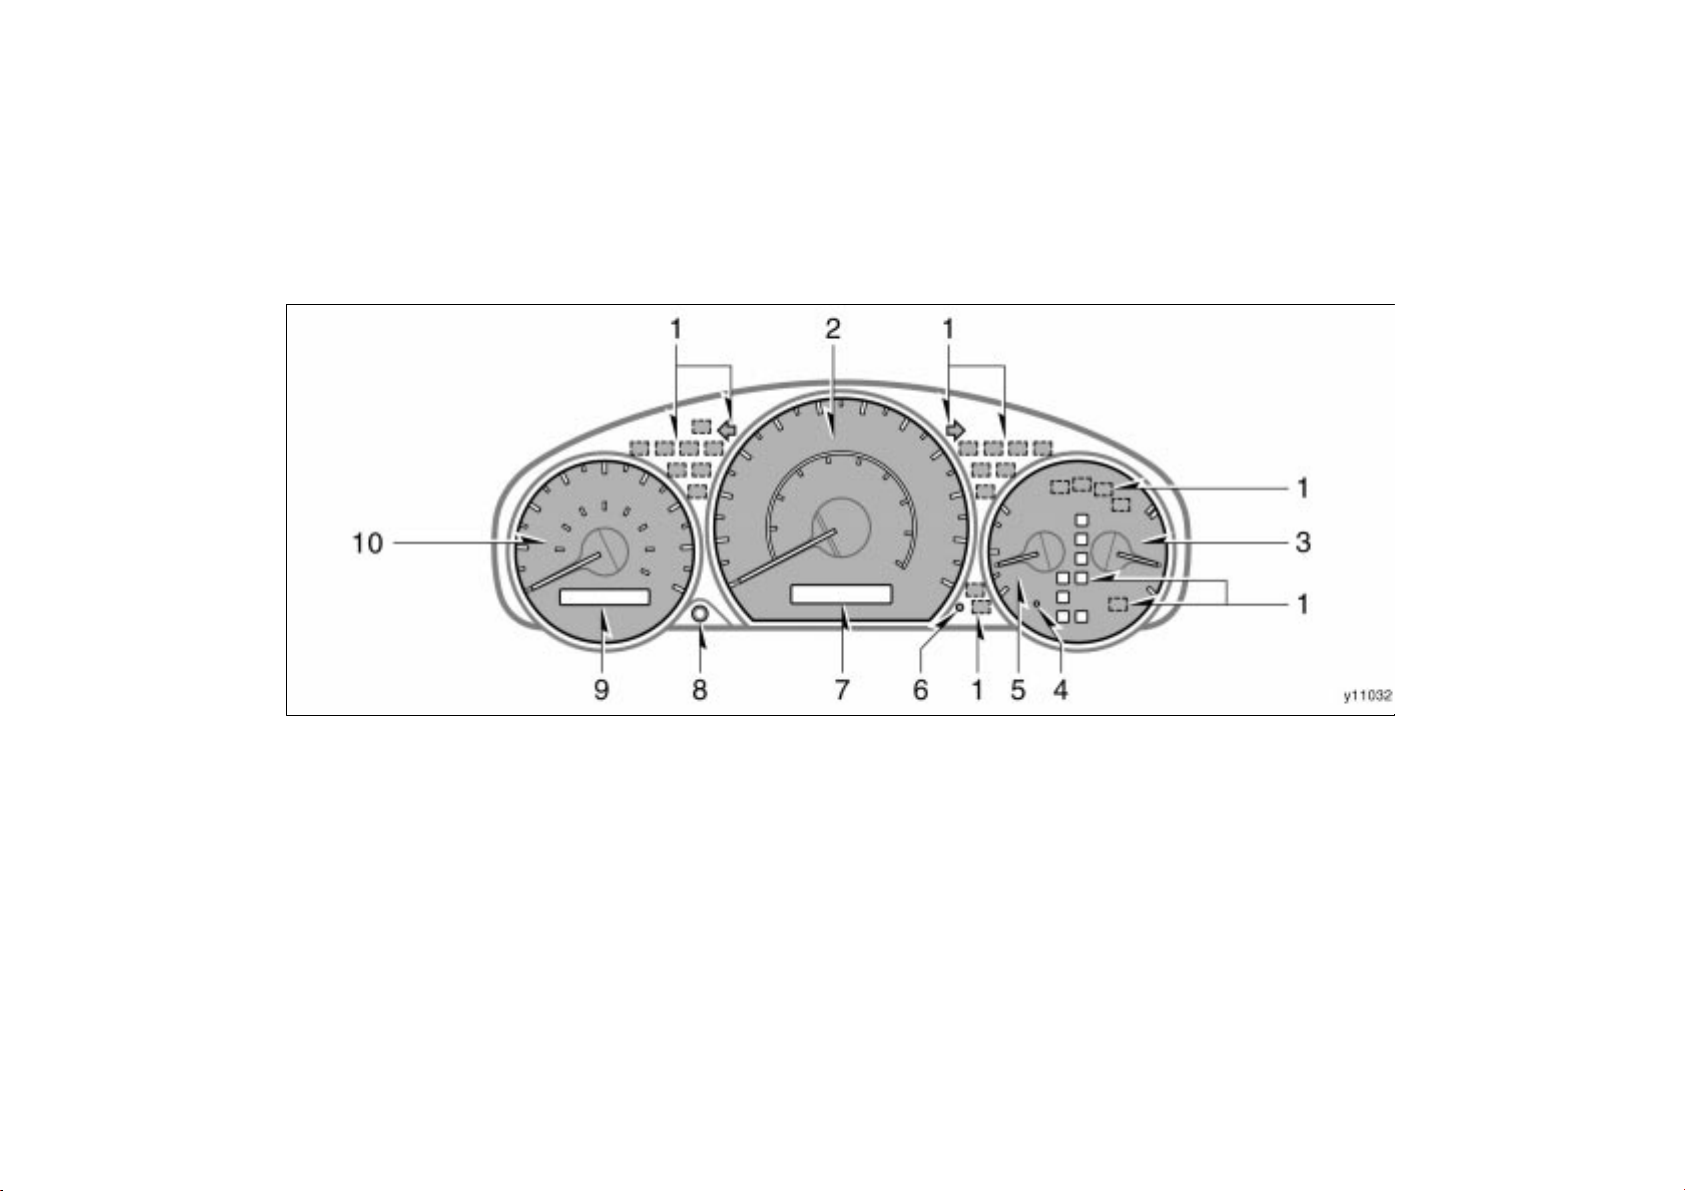
Ty pe B
06 SIENNA_U (L/O 0603)
1. Service reminder indicators and
indicator lights
2. Speedometer
3. Engine coolant temperature gauge
4. Low fuel level warning light
6
5. Fuel gauge
6. Dynamic laser cruise control master
warning light
7. Dynamic laser cruise control display
8. Trip meter res et knob/instrument panel
light control knob
9. Odometer and two trip meters
10. Tachometer
2006 SIENNA from March ‘06 Prod. (OM45443U)
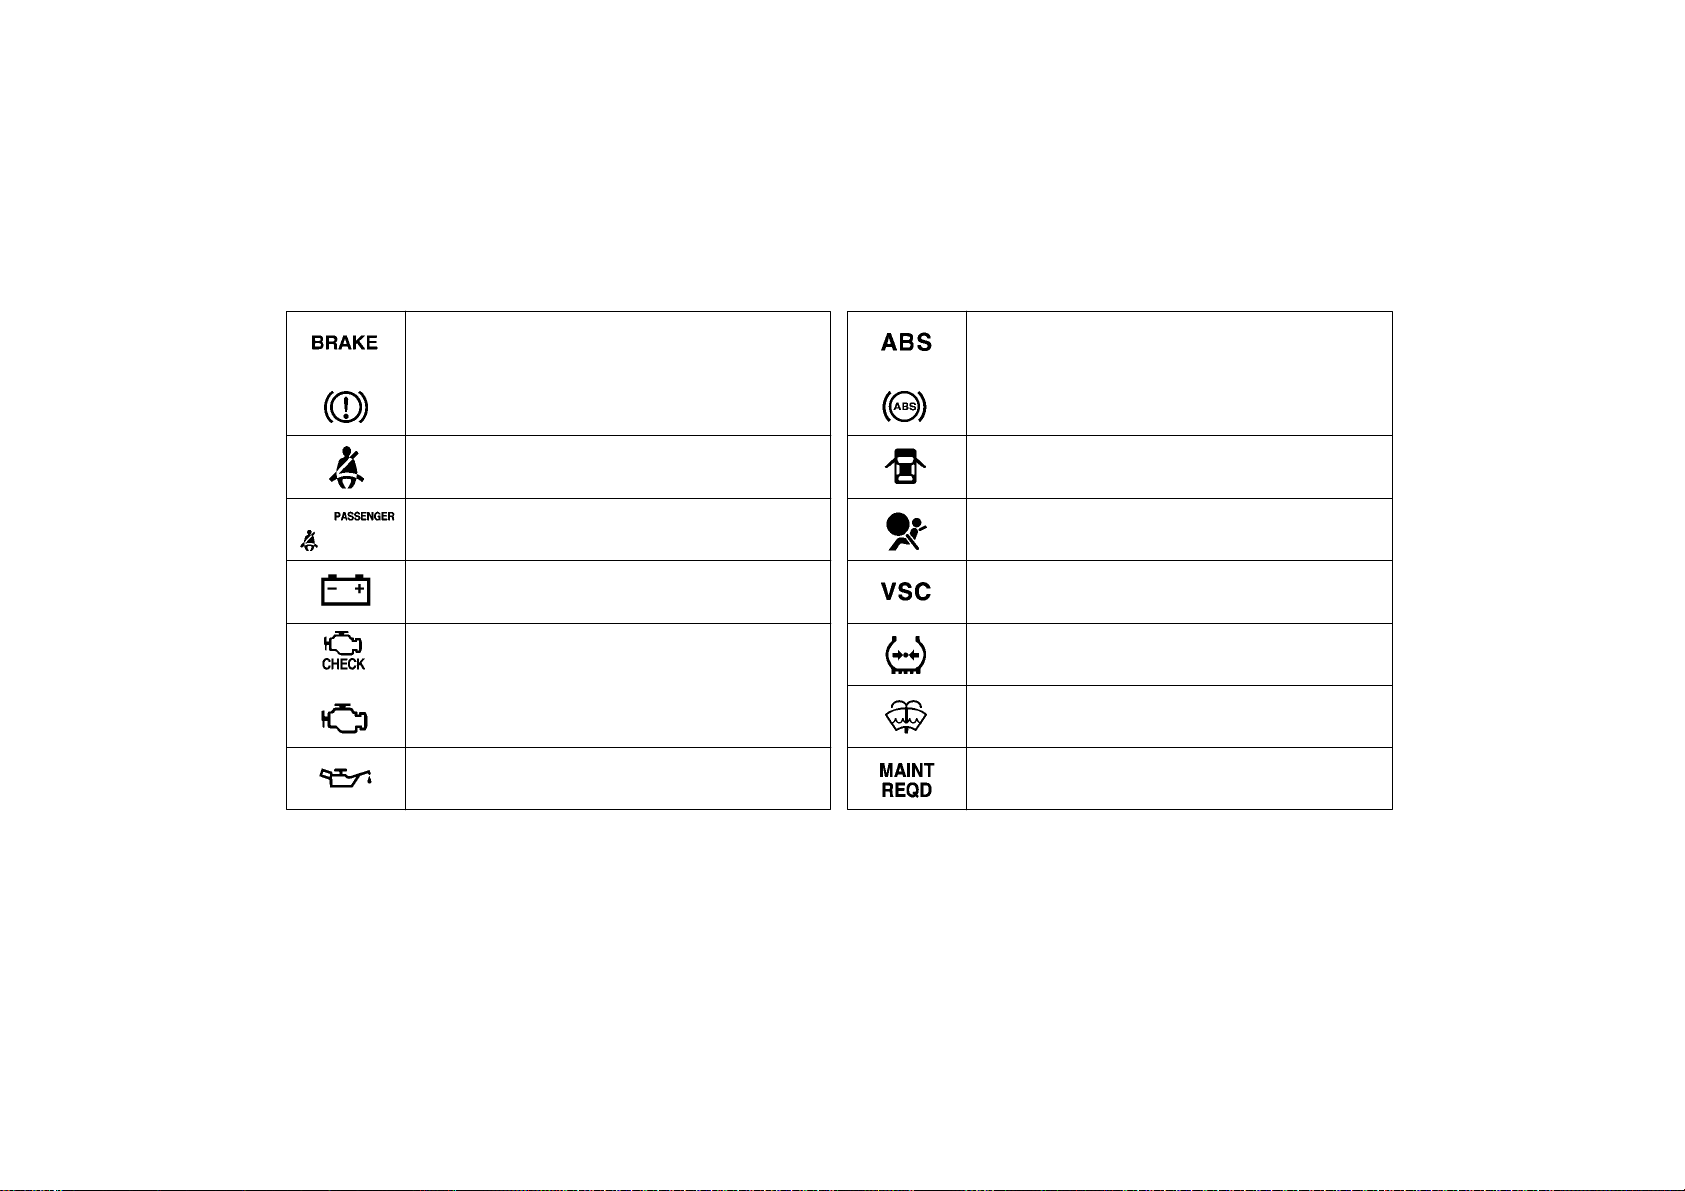
Indicator symbols on the instrument panel
06 SIENNA_U (L/O 0603)
or
Brake system warning light
Driver’s seat belt reminder light
Front passenger’s seat belt reminder light
Charging system warning light
or Malfunction indicator lamp
Low engine oil press ure warning light
∗
1
∗
1
∗
1
∗
1
or Anti- lock brake system warning light
∗
Open door warni ng light
SRS war ning light
Vehicle stability control system/traction control
system warning light
1
∗
1
∗
1
Low tire pressure warning light
∗
1
Low windshield washer fluid level warning
∗
1
light
∗
1
Engine oil replacement reminder light
∗
1
∗
1
∗
1
(for vehicles sold in U.S.A.)
2006 SIENNA from March ‘06 Prod. (OM45443U)
7
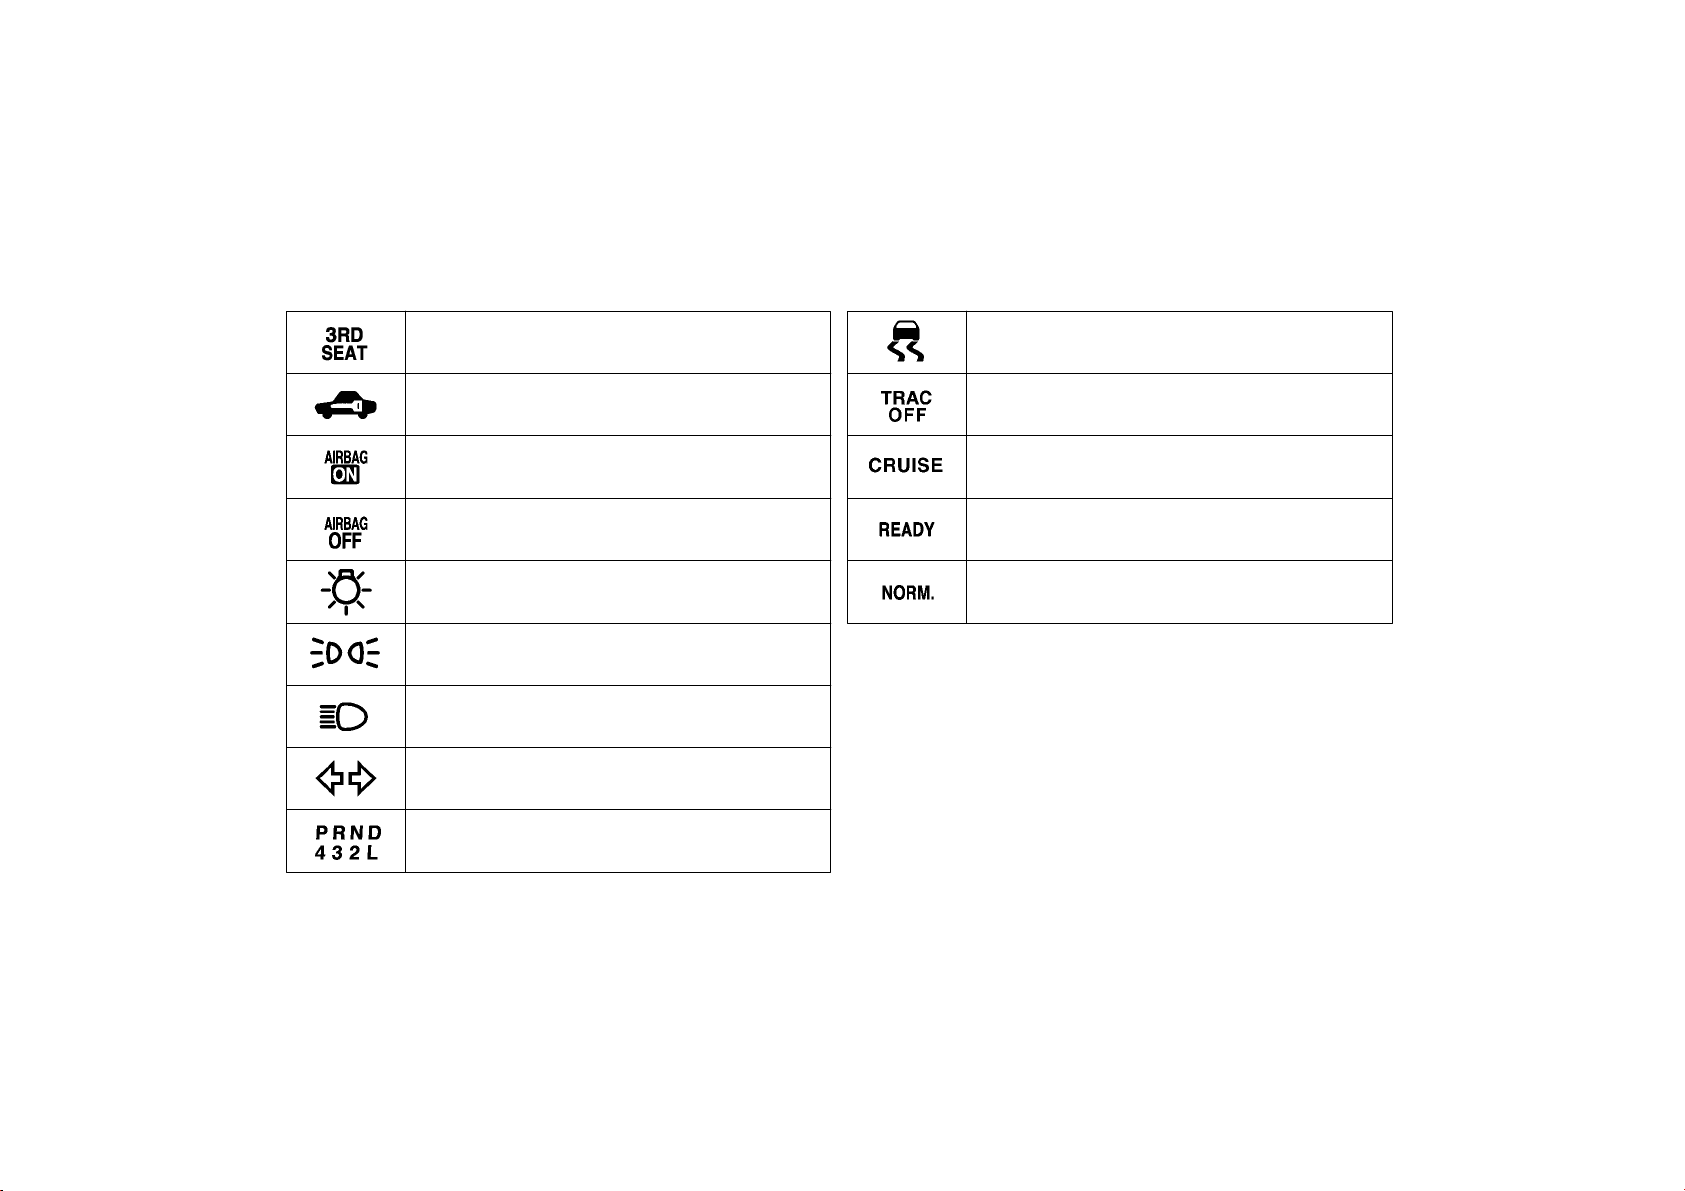
Third seat warning light
06 SIENNA_U (L/O 0603)
∗
1
Slip indicator light
Engine immobilizer/theft deterrent system
indicator light
“AIRBAG ON” indicator light
“AIRBAG OFF” indicator light
Headlight indicator light
Tail light indicator li ght
Headlight high beam indicator light
∗
1
: For details, see “Service reminder indicators and warning
buzzers” on page 187 in Section 1- 6.
∗
2
: If this light flashes, see “Cruise control” on page 213 in
Section 1- 7.
∗
3
: If this light flashes, see “Dynamic laser cruise control” on
Traction control system off indicator light
(two- wheel drive models)
∗
Cruise control indicator light
cruise control indicator light
2
or dynamic laser
∗
3
Dynamic laser cruise control ready mode
indicator light
Conventional cruise control mode indicator light
page 216 in Section 1- 7.
Turn signal indicator lights
Automatic transmission indicator lights
8
2006 SIENNA from March ‘06 Prod. (OM45443U)
 Loading...