

Toyota Prius 2004 User Manual
REPAIR INSTRUCTION
PRECAUTION
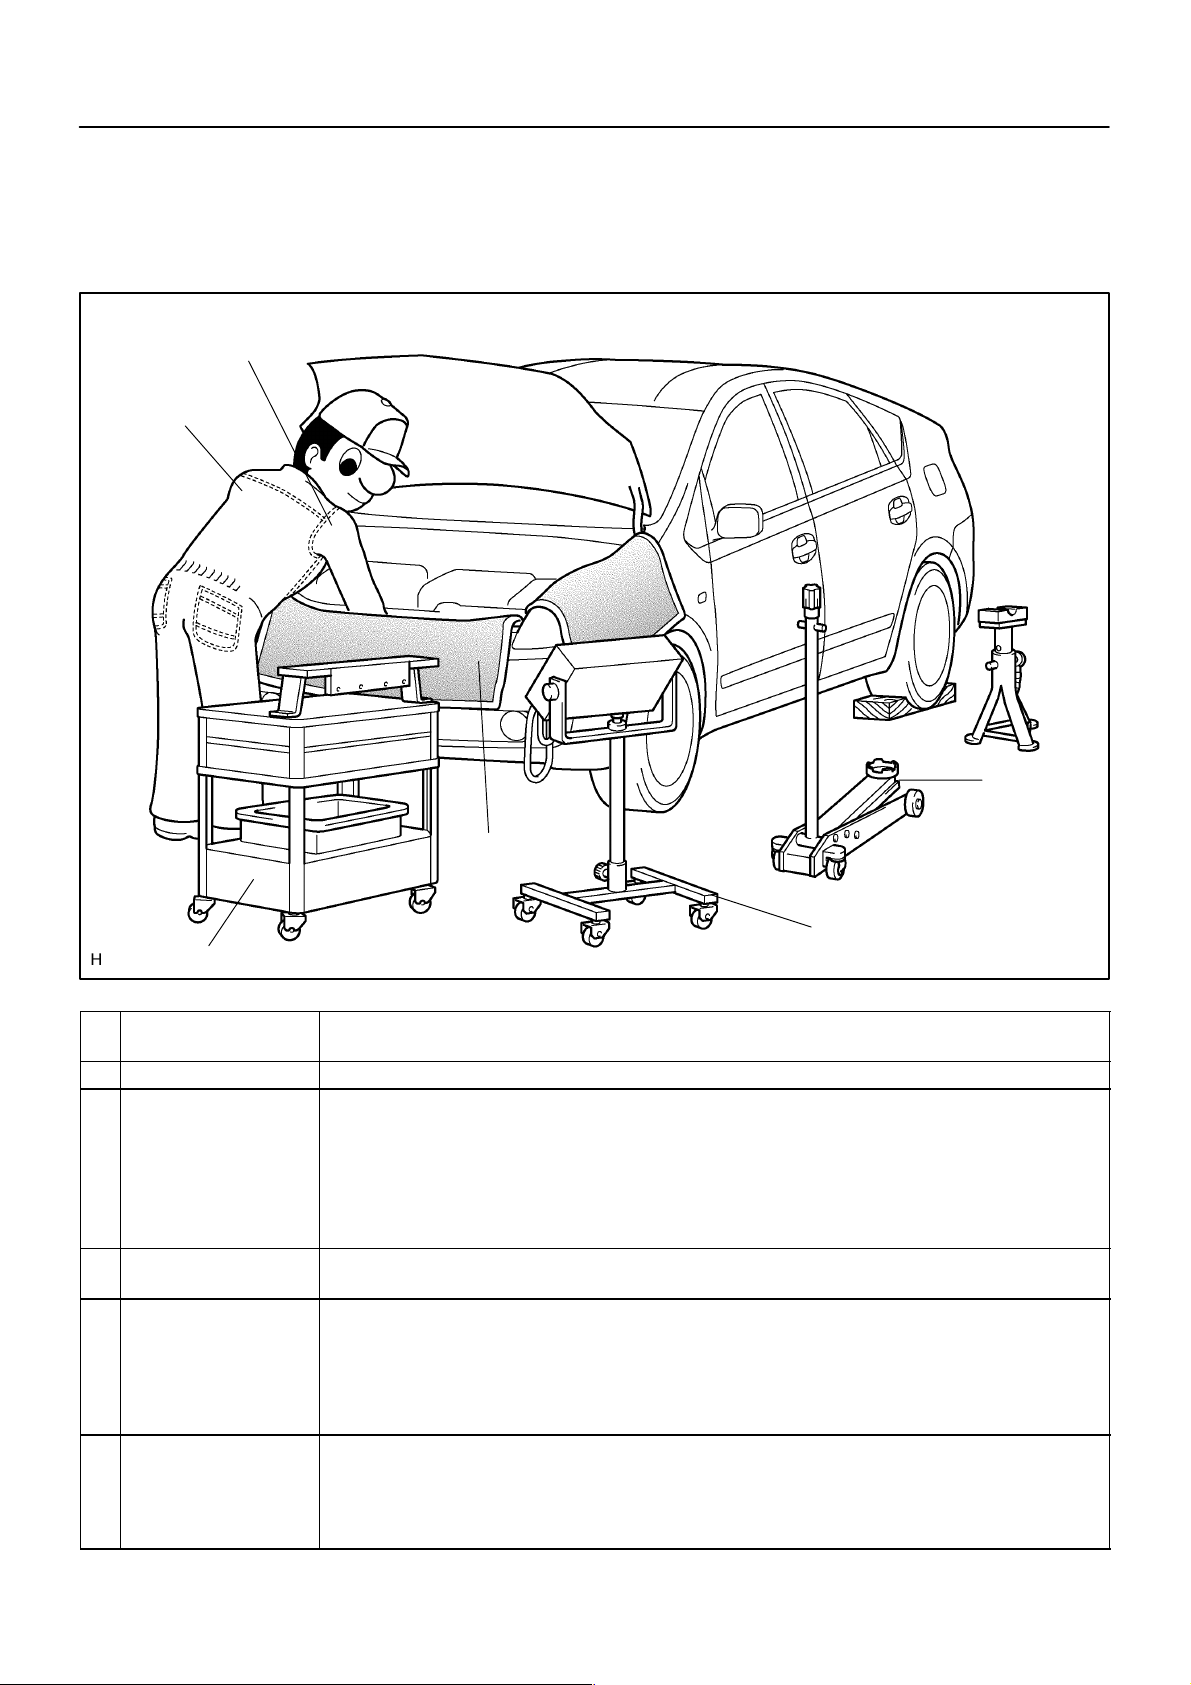
1. BASIC REPAIR HINT
(a) HINTS ON OPERATIONS
5
1
01–5
–INTRODUCTION REPAIR INSTRUCTION
010RZ–01
2
4
6
1 Looks
2 Vehicle protection Prepare a grille cover, fender cover, seat cover and floor mat before starting the repairs.
3 Safe operation
Preparation of tools and
4
measuring gauge
Removal and installation,
5
disassembly and assembly operations
6 Removed parts
Always wear a clean uniform.
A hat and safety shoes must be worn.
When working with 2 or more persons, be sure to check safety for one another.
When working with the engine running, make sure to provide ventilation for exhaust fumes in the
workshop.
If working on high temperature, high pressure, rotating, moving, or vibrating parts, wear appropriate safety
equipment and take extra care not to injure yourself or others.
When jacking up the vehicle, be sure to support the specified location with a safety stand.
When lifting up the vehicle, use appropriate safety equipment.
Before starting operation, prepare a tool stand, SST, gauge, oil, shop rag and parts for replacement.
Diagnose with a thorough understanding of proper procedures and of the reported problem.
Before removing the parts, check the general condition of the assembly and for deformation and damage.
When the assembly is complicated, take notes. For example, note the total number of electrical connections,
bolts, or hoses removed. Add matchmarks to insure re–assembly of components in the original positions.
Temporarily mark hoses and their fittings, if needed.
Clean and wash the removed parts if necessary and assemble them after a thorough check.
Place the removed parts in a separate box to avoid mixing them up with the new parts or contaminating the
new parts.
For non–reusable parts such as a gasket, O–ring, and self–locking nut, replace them with new ones following
the instructions in this manual.
Retain the removed parts for customer inspection, if requested.
3
B73283
2004 PRIUS REPAIR MANUAL (RM1075U)
5Author: Date:
01–6
–INTRODUCTION REPAIR INSTRUCTION
(b) JACKING UP AND SUPPORTING VEHICLE
(1) Care must be taken when jacking up and supporting the vehicle. Be sure to lift and support the
vehicle at the proper locations (see page 01–34 ).
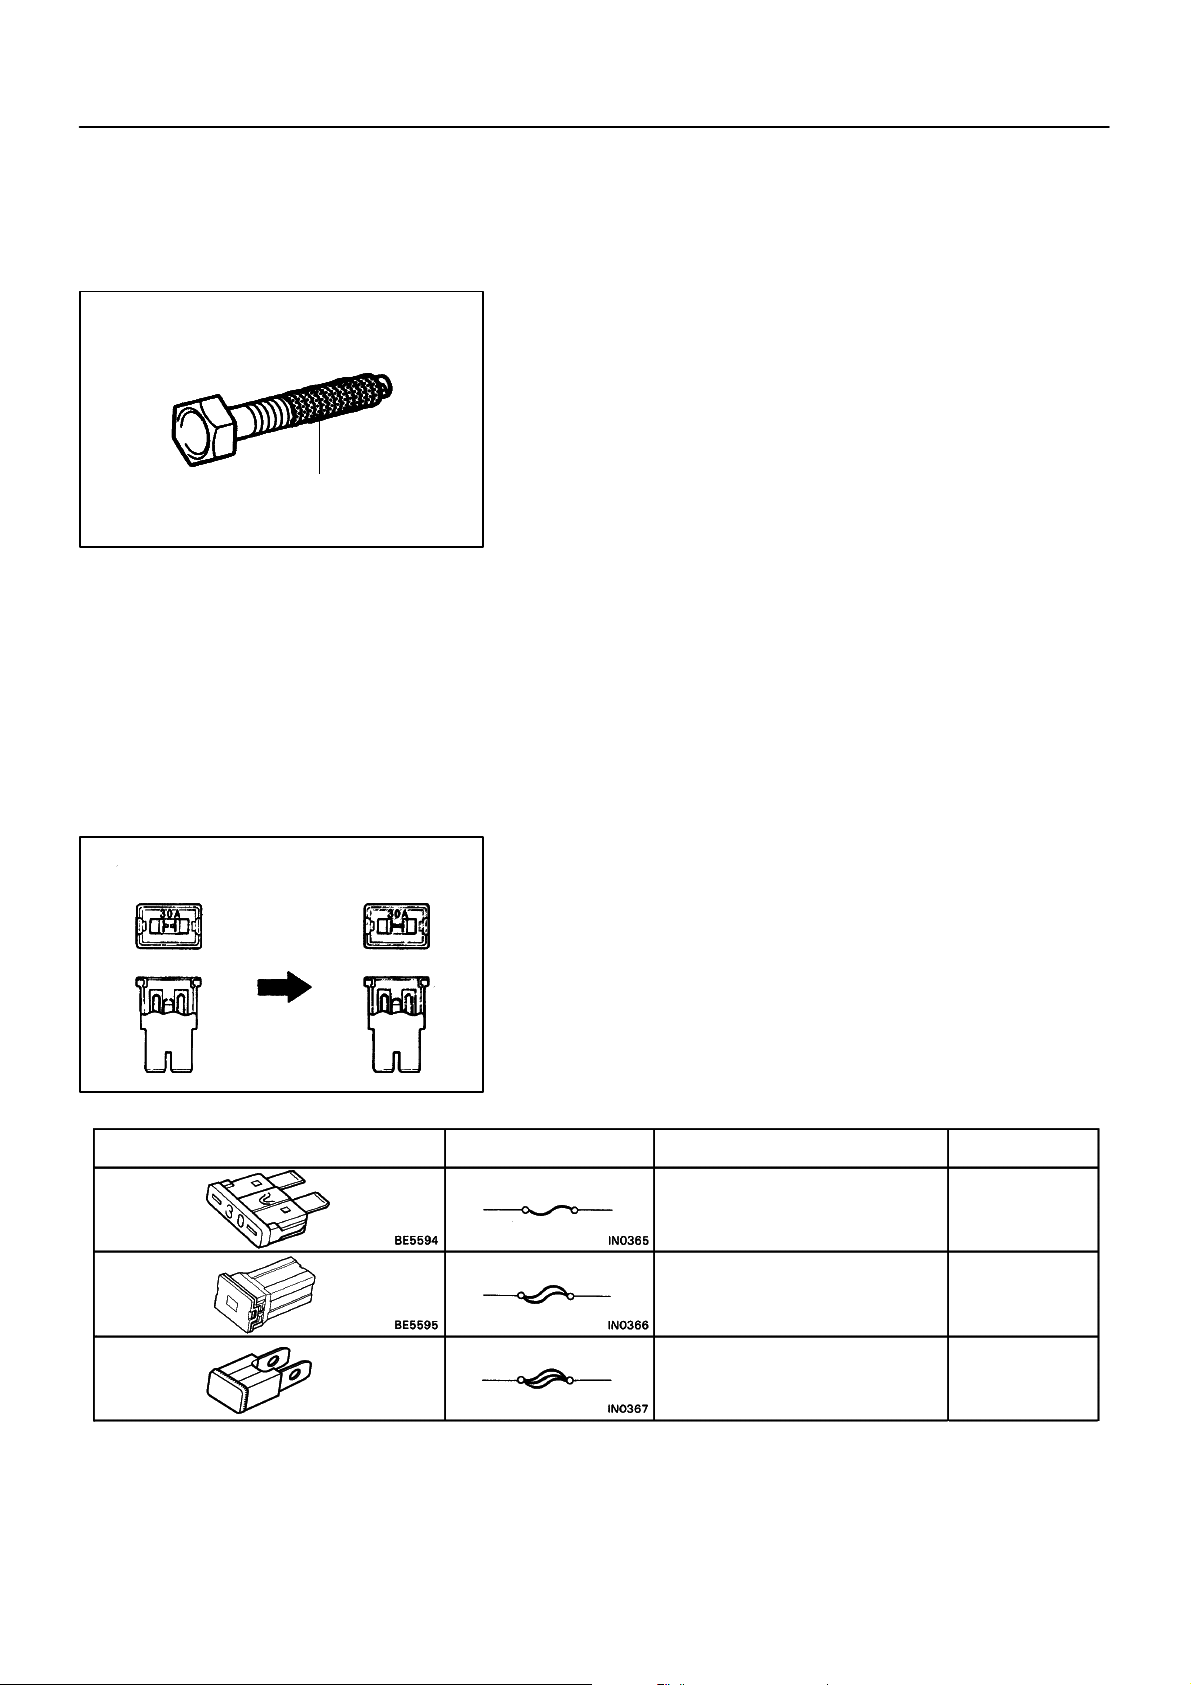
(c) PRECOATED PARTS
(1) Precoated parts are bolts and nuts that are coated
with a seal lock adhesive at the factory.
(2) If a precoated part is retightened, loosened or
moved in anyway, it must be recoated with the specified adhesive.
Seal Lock Adhesive
Z11554
(3) When reusing precoated parts, clean off the old
adhesive and dry the part with compressed air.
Then apply new seal lock adhesive appropriate to
the bolts and nuts.
NOTICE:
Perform the torque with the lower limit value of the torque
tolerance.
(4) Some seal lock agents harden slowly. You may
have to wait for the seal lock agent to harden.
(d) GASKETS
(1) When necessary, use a sealer on gaskets to prevent leaks.
(e) BOLTS, NUTS AND SCREWS
(1) Carefully follow all the specifications for tightening torques. Always use a torque wrench.
Medium Current Fuse and High Current
Fuse Equal Amperage Rating
(f) FUSES
(1) When replacing fuses, be sure that the new fuse
has the correct amperage rating. DO NOT exceed
the rating or use one with a lower rating.
Illustration
2004 PRIUS REPAIR MANUAL (RM1075U)
D27353D27353
BE1367
Symbol Part Name
FUSE
MEDIUM CURRENT FUSE
HIGH CURRENT FUSE
Abbreviation
FUSE
M–FUSE
H–FUSE
V35002
6Author: Date:
–INTRODUCTION REPAIR INSTRUCTION
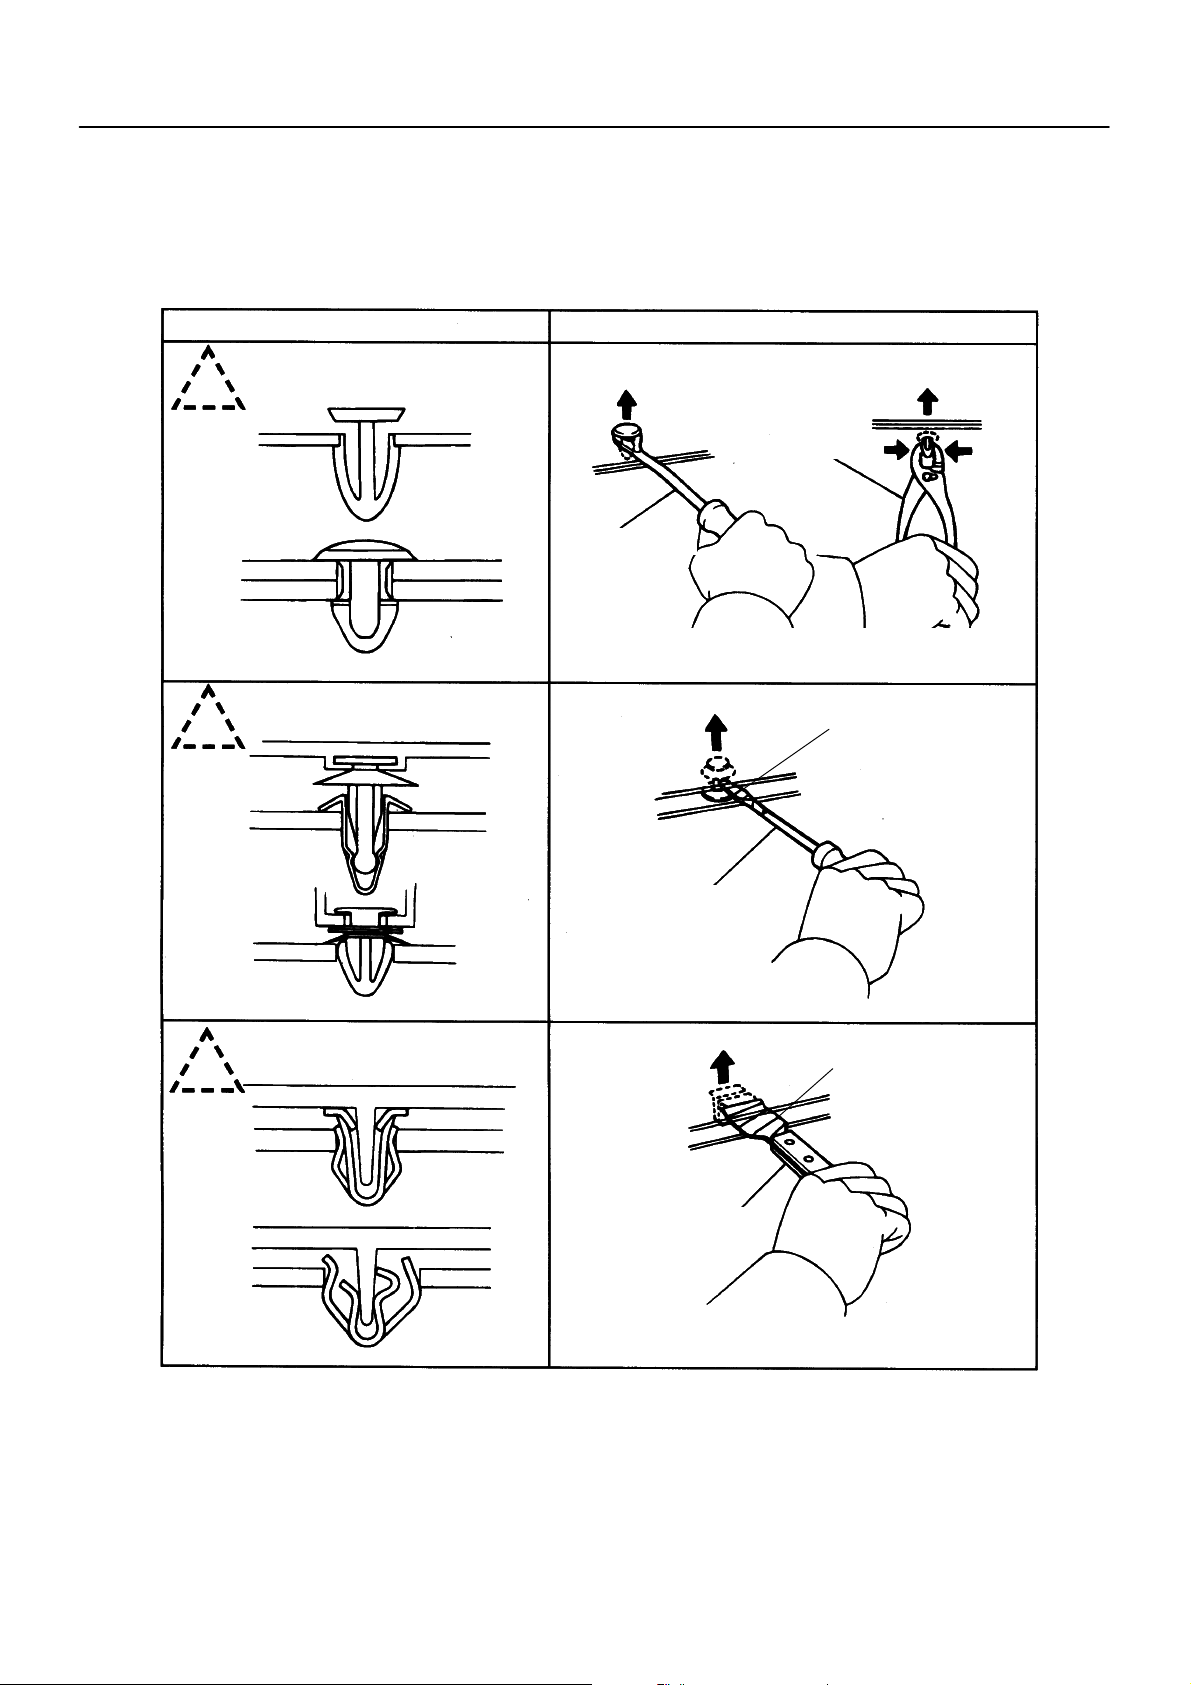
(g) CLIPS
(1) The removal and installation methods of typical clips used in body parts are shown in the table
below.
HINT:
If clips are damaged during a procedure, always replace the damaged clip with a new clip.
01–7
Shape (Example)
Clip
Removal/Installation
Pliers
Clip Remover
Remove clips from front or rear using clip remover
or pliers.
Protective Tape
Screwdriver
Remove fasteners with a clip remover or screwdriver.
Protective Tape
Scraper
Remove clips with a wide scraper to prevent
panel damage.
D25786
2004 PRIUS REPAIR MANUAL (RM1075U)
7Author: Date:
01–8
–INTRODUCTION REPAIR INSTRUCTION
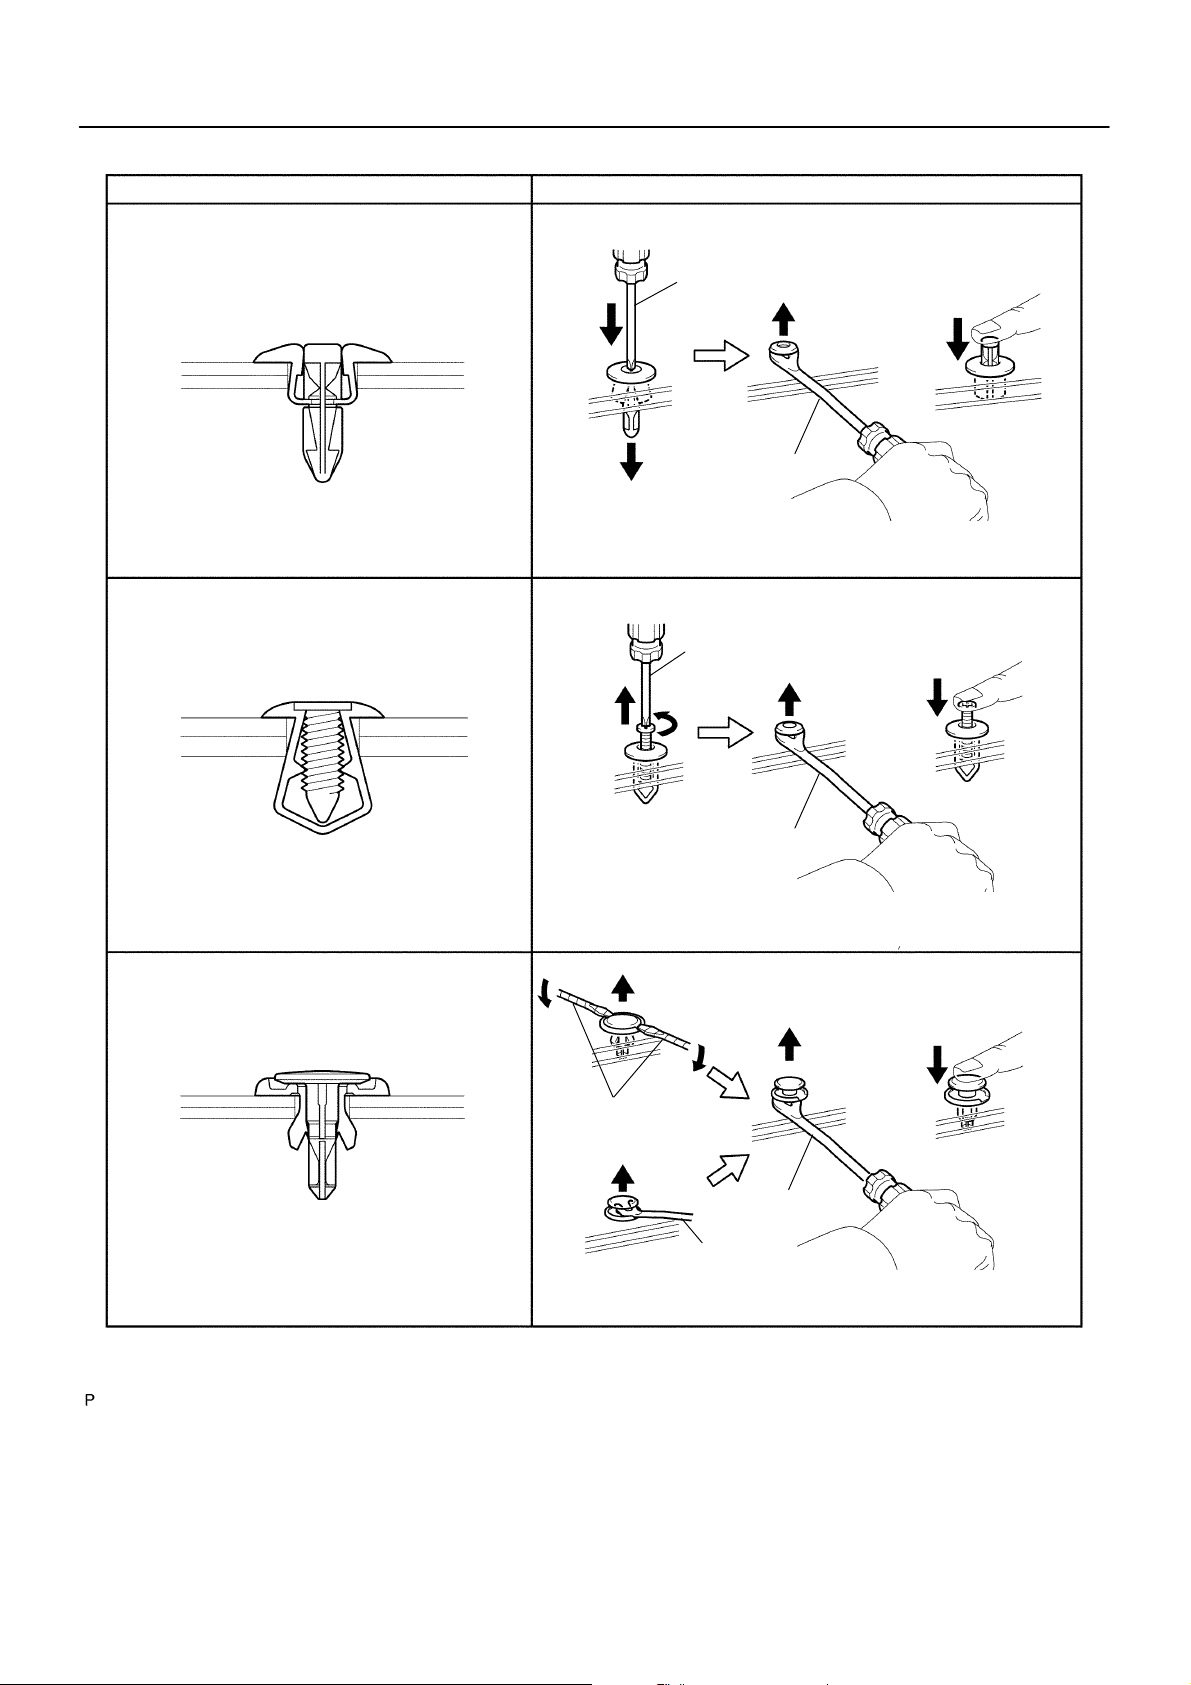
Shape (Example)
Removal/Installation
Removal Installation
Screwdriver
Push
Clip Remover
Remove rivet by pushing the center pin through and prying
out the rivet shell.
Removal Installation
Screwdriver
Push
Clip Remover
Remove rivet by unscrewing the center pin and prying out
the rivet shell.
Removal Installation
Push
Screwdriver
Clip Remover
Small Clip Remover
Remove rivet by prying out the pin and then prying out the
rivet shell.
V35006
2004 PRIUS REPAIR MANUAL (RM1075U)
8Author: Date:
INCORRECT CORRECT
D31750
D25064
01–9
–INTRODUCTION REPAIR INSTRUCTION
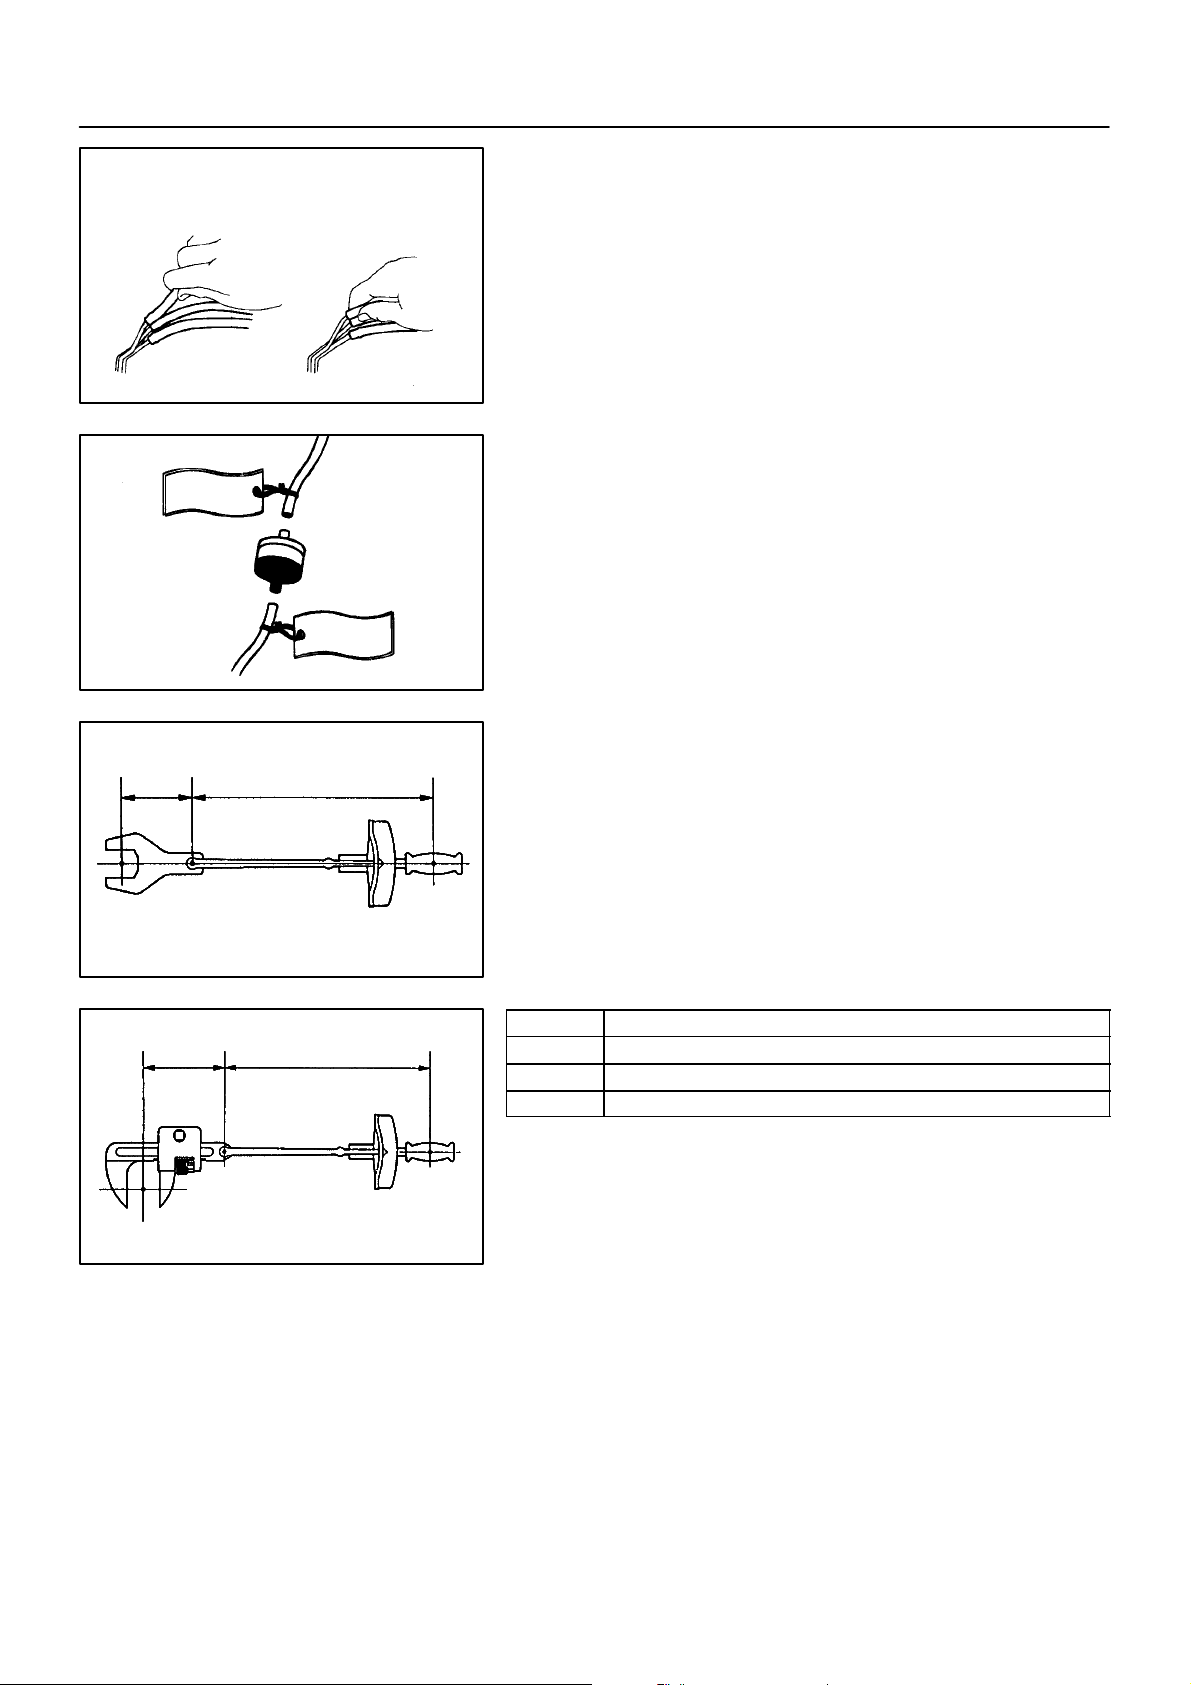
(h) REMOVAL AND INSTALLATION OF VACUUM HOSES
(1) To disconnect vacuum hoses, pull and twist from
the end of the hose. Do not pull from the middle of
the hose as this may cause damage.
(2) When disconnecting vacuum hoses, use tags to
identify where they should be reconnected.
(3) After completing the job, double check that the vac-
uum hoses are properly connected. The label under
the hood shows the proper layout.
(4) When using a vacuum gauge, never force the hose
onto a connector that is too large. Use a step–down
adapter for adjustment. Once a hose has been
stretched, it may leak air.
L1 L2L1 L2L1 L2L1 L2
(i) TORQUE WHEN USING TORQUE WRENCH WITH EX-
TENSION TOOL
(1) If SST or an extension tool is combined with the
torque wrench to extend its length, do not tighten
the torque wrench to the specified torque values in
this manual. The resulting torque will be excessive.
(2) Use the formula below to calculate special torque
values for situations where SST or an extension tool
D02612
is combined with the torque wrench.
(3) Formula: T’ = T x L2/(L1 + L2)
T’ Reading of torque wrench {N⋅m (kgf⋅cm, ft⋅lbf)}
L2L1 L2L1 L2L1 L2L1
D01201
T Torque {N⋅m (kgf⋅cm, ft⋅lbf)}
L1 Length of SST or extension tool (cm)
L2 Length of torque wrench (cm)
2004 PRIUS REPAIR MANUAL (RM1075U)
9Author: Date:
01–10
A83545
DO NOT WEAR
B76060
D32047
–INTRODUCTION REPAIR INSTRUCTION
2. PRECAUTIONS FOR HIGH–VOLTAGE CIRCUIT INSPECTION AND SERVICE
(a) Engineer must undergo special training to be able to per-
form high–voltage system inspection and servicing.
(b) All high–voltage wire harness connectors are colored
orange. The HV battery and other high–voltage components have ”High Voltage” caution labels. Do not carelessly touch these wires and components.
(c) Before inspecting or servicing the high–voltage system,
be sure to follow safety measures, such as wearing insulated gloves and removing the service plug to prevent
electrocution. Carry the removed service plug in your
pocket to prevent other technicians from reinstalling it
while you are servicing the vehicle.
(d) After removing the service plug, wait 5 minutes before
touching any of the high–voltage connectors and terminals.
HINT:
5 minutes are required to discharge the high–voltage condenser inside the inverter.
(e) Be sure to install the service plug before starting the hy-
brid system. Starting the hybrid system with the service
plug removed may damage the vehicle.
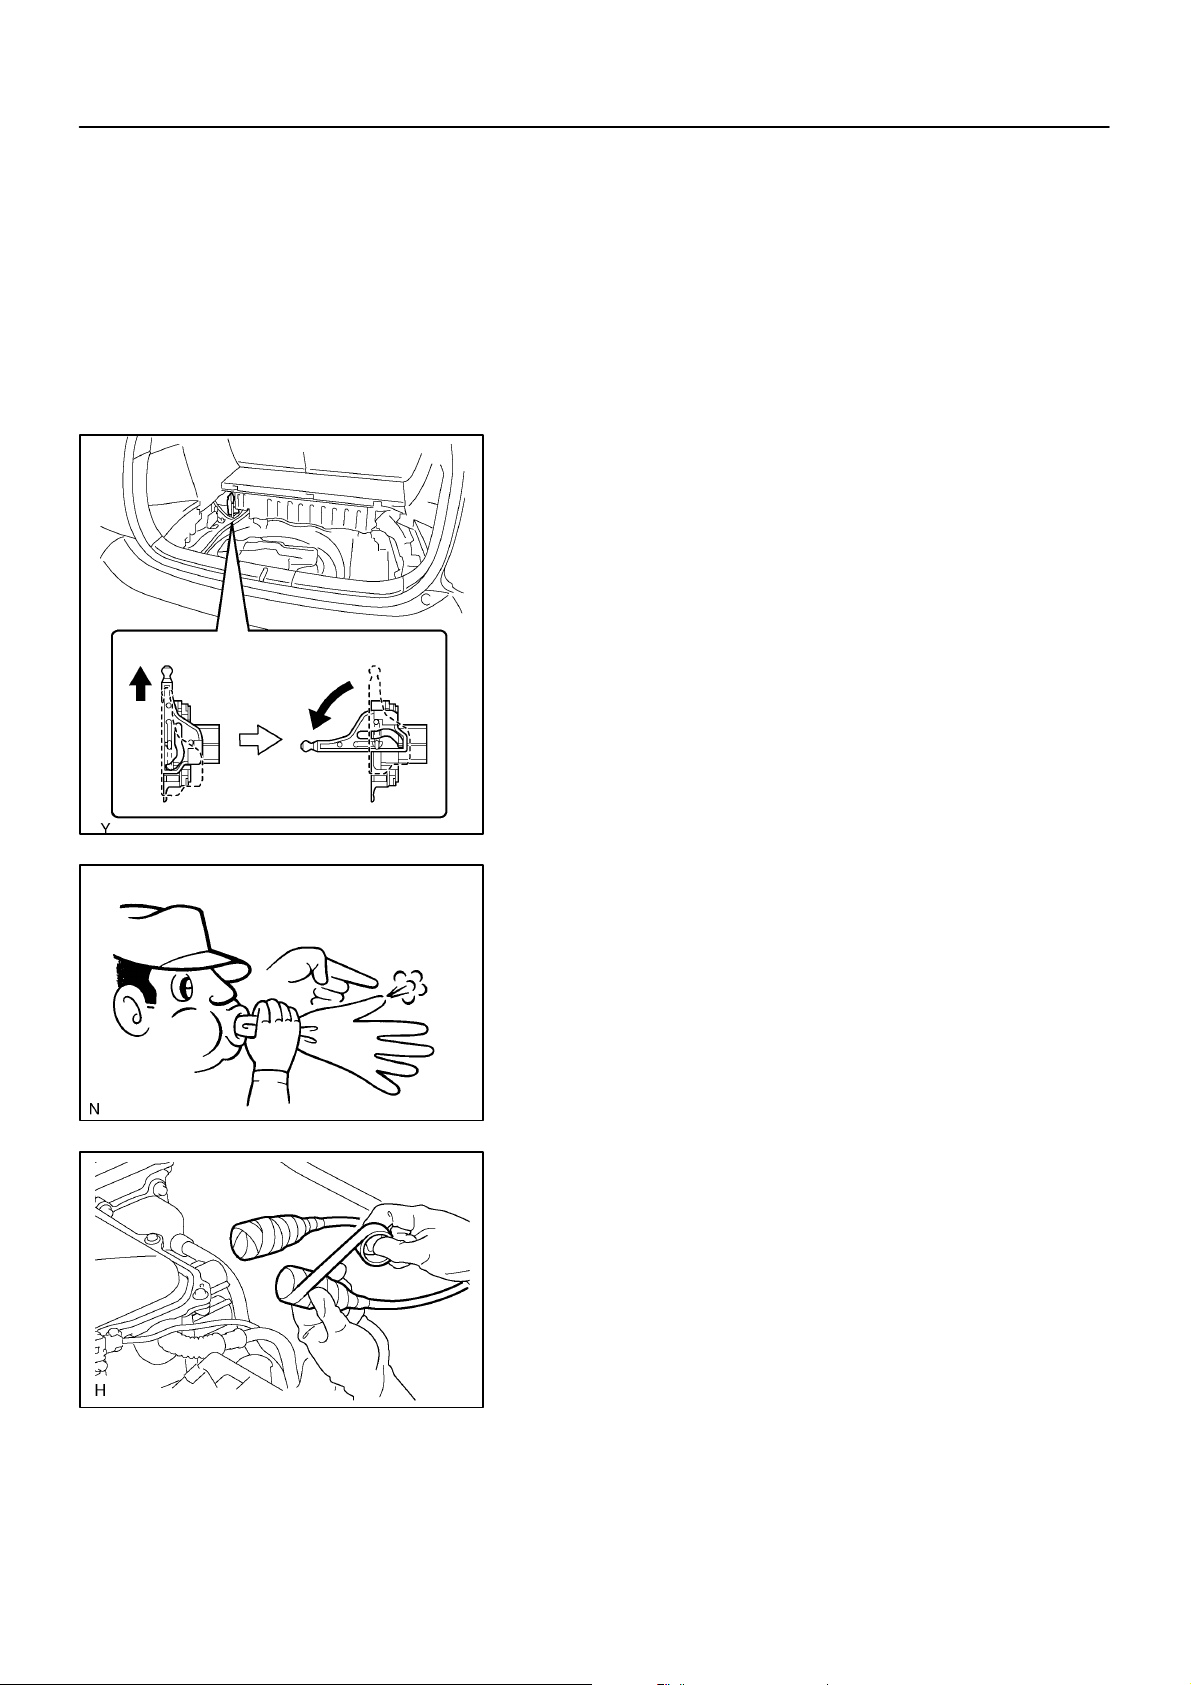
(f) Before wearing insulated gloves, make sure that they are
not cracked, ruptured, torn, or damaged in any way. Do
not wear wet insulated gloves.
(g) When servicing the vehicle, do not carry metal objects like
mechanical pencils or scales that can be dropped accidentally and cause a short circuit.
(h) Before touching a bare high–voltage terminal, wear insu-
lated gloves and use an electrical tester to ensure that the
terminal is not charged with electricity (approximately 0
V).
(i) After disconnecting or exposing a high–voltage connec-
tor or terminal, insulate it immediately using insulation
tape.
(j) The screw of a high–voltage terminal should be tightened
firmly to the specified torque. Both insufficient and excessive torque can cause failure.
(k) Use the ”CAUTION: HIGH VOLTAGE. DO NOT TOUCH
DURING OPERATION” sign to notify other engineers that
a high–voltage system is being inspected and/or repaired.
(l) Do not place the battery upside down while removing and
installing it.
2004 PRIUS REPAIR MANUAL (RM1075U)
10Author: Date:

01–11
–INTRODUCTION REPAIR INSTRUCTION
(m) After servicing the high–voltage system and before rein-
stalling the service plug, check again that you have not
left a part or tool inside, that the high–voltage terminal
screws are firmly tightened, and that the connectors are
correctly connected.
2004 PRIUS REPAIR MANUAL (RM1075U)
11Author: Date:
 Loading...