


Owner's Manual
Premium AVX
Basic AVX
PC601-00026
Thank you for your purchase of the TOYOTA Genuine Car Multimedia System.
Please note that this manual explains all functions and equipment, including options.
Therefore, you may find some explanations on features or equipment not included in your Car Multimedia System.
TOYOTA DAIHATSU ENGINEERING & MANUFACTURING CO., LTD.

Contents
Important Safety Information 4
Precautions ................................................................... 4
Before Use 5
How to read this manual ......................................... 5
Basic Operations 6
Front Panel Button Functions ................................ 6
Turning on the Unit ................................................... 7
Regional Setup ............................................................ 7
Adjusting the volume ............................................... 8
Touch screen operations ......................................... 9
Popup menu ................................................................ 9
Simple Display Mode ................................................ 9
HOME screen descriptions ....................................10
Source selection screen description ..................11
Source control screen descriptions ...................13
List screen ...................................................................13
Connection 14
Wired Connection ....................................................14
Bluetooth Control 15
Information for using Bluetooth® devices .......15
Register the Bluetooth device .............................16
Bluetooth Setup ........................................................17
Playing the Bluetooth Audio Device .................19
Using the Hands-Free Unit ....................................21
Phone Setup ...............................................................25
T-Link 26
Preparation .................................................................26
Connecting a smartphone ....................................26
Mirroring Operation ................................................26
Disc 28
Playing a disc .............................................................28
DVD/ Video-CD Basic Operation .........................28
Music CD/ Disc media Basic Operation ............30
Search Operation ......................................................31
DVD Disc Menu Operation ....................................31
DVD Setup ...................................................................32
USB 34
Connecting a USB device ......................................34
USB Basic Operation ................................................34
Search Operation ......................................................35
iPod/iPhone 37
Preparation .................................................................37
iPod/iPhone Basic Operation ...............................38
Search Operation ......................................................38
Radio 39
Radio Basic Operation ............................................39
Memory Operation ..................................................39
Selecting Operation ................................................40
Other External Components 41
Using the back camera ...........................................41
External audio players (AUX) ................................42
M-Toyota 43
Emergency Calling ...................................................43
Toyota Dealer Search ..............................................43
2

Setup 44
Display Adjust ............................................................44
Picture Adjust.............................................................44
System Setup .............................................................45
General Systems .......................................................45
User Interface Systems ...........................................46
Dual Zone Systems ..................................................48
Advanced Features ..................................................49
Controlling Audio 50
Controlling General Audio ....................................50
Equalizer Control ......................................................51
Volume Offset ............................................................52
Sound Effect ...............................................................52
Listening Position/ DTA ..........................................53
Steering Wheel Control 55
Operations using the steering switch ...............55
Remote control 56
Using the Remote control .....................................56
Functions of the Remote control Buttons .......57
Troubleshooting 59
Problems and Solutions .........................................59
Error Messages ..........................................................59
For safety reasons, this owner’s manual
indicates items requiring particular attention
with the following marks.
# WARNING
• This is a warning against anything which may
cause death or serious injury to people if the
warning is ignored. You are informed about
what you must or must not do in order to
reduce the risk of death or serious injury to
yourself and others.
# CAUTION
• This is a warning against anything which
may cause injury to people if the warning is
ignored. You are informed about what you
must or must not do in order to reduce the risk
of injury to yourself and others.
NOTE
• This is a warning against anything which may
cause damage to the vehicle or its equipment if
the warning is ignored. You are informed about
what you must or must not do in order to avoid
or reduce the risk of damage to your vehicle and
its equipment.
• Please read all materials, TOYOTA will not
be responsible for unsatisfactory product
performance due to failure to follow these
instructions. Changes to product may result in
differences between content of this manual and
actual features of the product.
Appendix 61
Playable Media and Files........................................61
Region Codes in the World ...................................63
DVD Language Codes .............................................64
Specifications .............................................................65
About this Unit ..........................................................67
For further information ..........................................70
3English

Important Safety Information
Important Safety Information
Precautions
IMPORTANT
Please read this manual carefully to ensure proper
use before using this product. It is especially
important that you read and observe WARNINGS
and CAUTIONS in this manual. Please keep the
manual in a safe and accessible place for future
reference.
# WARNINGS
• Do not watch or fix your eyes on the unit's
display for any extended period whenever you
are driving.
• Do not operate the unit while driving. Keep
focus on the road.
• Do not pair Bluetooth devices while driving,
stop on a safe road side before attempting to
pair any device.
• Do not attempt to install or service this
product by yourself. Installation or servicing
of this product by persons without proper
training and experience in electronic
equipment and automotive accessories may
be dangerous and could expose you to the risk
of electric shock, injury or other hazards.
• If liquid or foreign matter should get inside
this product, stop your vehicle in a safe
place, turn the ignition switch OFF (ACC OFF)
immediately and consult your dealer or the
nearest authorized Toyota Service Station. Do
not use this product in this condition because
doing so may result to fire, electric shock, or
other failure.
Ñ To ensure safe driving
Any video won't be played while driving to
prevent driver's eyes from fixing on the unit's
display. Stop the vehicle in a safe place and
apply the parking brake before performing such
function.
There are some functions you cannot perform
while driving because of the same reason.
# CAUTIONS
• To prevent short circuit, never put or leave
any metallic objects (such as coins or metallic
tools) inside the unit.
• Do not allow this product to come into contact
with liquids. Electric shocks as well as damage
to the product, smoke, and overheating could
result from contact with liquids.
• If you notice any abnormalities such as
smoke, strange noise or odor from using this
product, or any other abnormal signs on the
LCD screen, turn off the power immediately
and consult your dealer or the nearest Toyota
Service Station. Using this product in this
condition may result in permanent damage to
the system.
• Do not disassemble or modify this product,
as there are high-voltage components inside
which may cause an electric shock. Be sure to
consult your dealer or the nearest authorized
Toyota Service Station for internal inspection,
adjustments or repairs.
4
Before Use
Before Use
Ñ Precautions on using this unit
• You can select a language to display menus,
audio file tags, etc. See Regional Setup
(P. 7).
Ñ Protecting the monitor
• To protect the monitor from damage, do not
operate the monitor using a ball point pen or
similar tool with a sharp tip.
• If you stick a film screen protector on the
screen, it may interfere with touch panel
operation.
Ñ Cleaning the unit
• If the faceplate of this unit is stained, wipe it
with a dry soft cloth such as a silicon cloth.
If the faceplate is stained badly, wipe it with
a cloth moistened with neutral cleaner, then
wipe it again with a clean soft dry cloth.
NOTE
• Applying spray cleaner directly to the unit
may damage its mechanical parts. Wiping the
faceplate with a hard cloth or using a volatile
liquid such as thinner or alcohol may scratch the
surface or erase the screened print.
Ñ Lens fogging
When you turn on the car heater in cold
weather, dew may form on the lens in the
disc player of the unit due to condensation.
This condensation on the lens (also called lens
fogging) may not allow discs to play. In such a
situation, remove the disc and wait for the dew
to evaporate.
• If the disc center hole or outside rim has burrs,
use the disc only after removing the burrs with
a ballpoint pen etc.
• Discs that are not round cannot be used.
• 8-cm (3 inch) discs cannot be used.
• Discs with coloring on the recording surface or
discs that are dirty cannot be used.
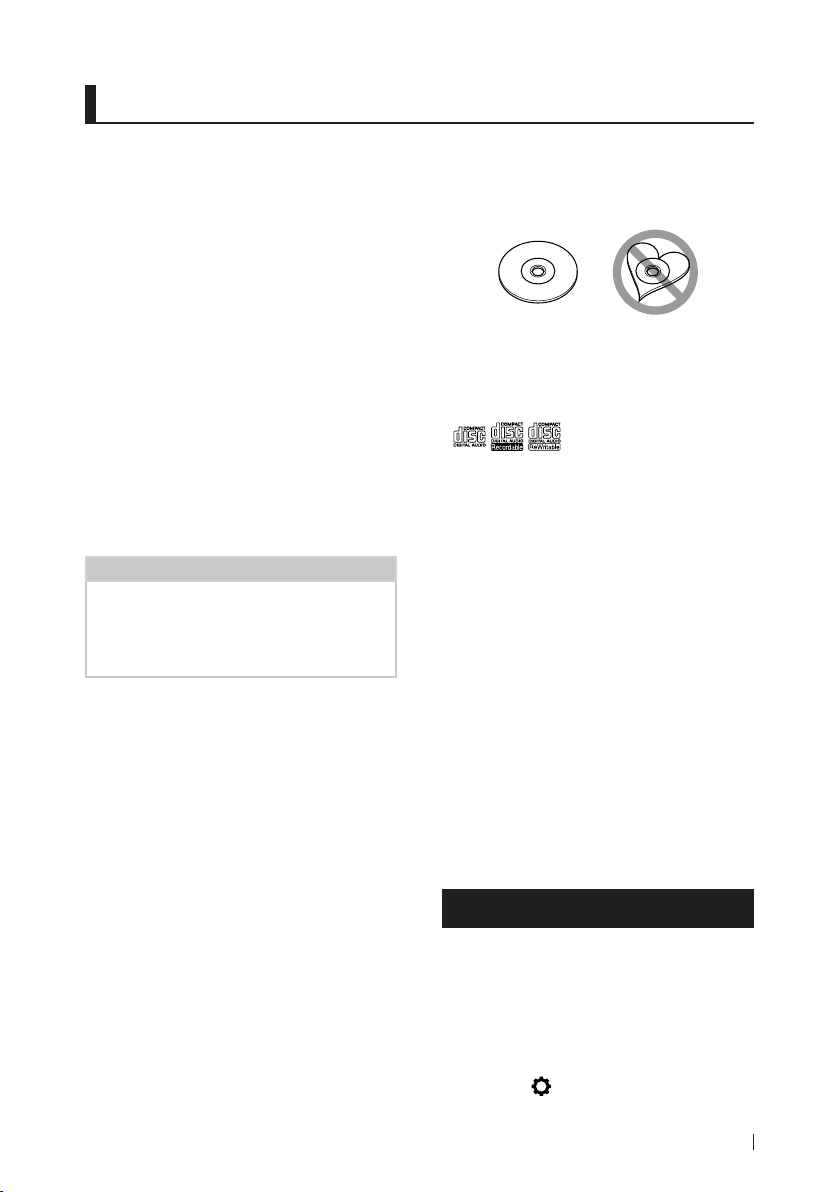
• This unit can only play the following types of
CDs.
• This unit may not correctly play discs which do
not have the mark.
• You cannot play a disc that has not been
finalized. (For the finalization process, see
your writing software and your recorder's
instruction manual.)
Ñ Before removing the vehicle
battery
It may be necessary to take note of the different
settings as the information stored in the head
unit is erased by disconnecting the power cable
from the battery (or removing the battery itself ),
however, there are some settings that will not
be reset.
Ñ In case of trouble
Should this product fail to operate properly,
contact your dealer or nearest authorized Toyota
Service Station.
Ñ Precautions on handling discs
• Do not touch the recording surface of the disc.
• Do not stick tape etc. on the disc, or use a disc
with tape stuck on it.
• Do not use disc type accessories.
• Clean the disc from the center toward the
outside rim.
• When removing a disc from this unit, pull it out
horizontally.
How to read this manual
• The screens and panels shown in this manual are just
examples used to provide clear explanations of the
operations.
For this reason, they may be different from actual
screens and panels used, or some display patterns
may be different.
• Display Language: English is used as the default
language. You can select the display language by
accessing the [
Setup (P.7).
] button function. See Regional
5English
Basic Operations
Basic Operations
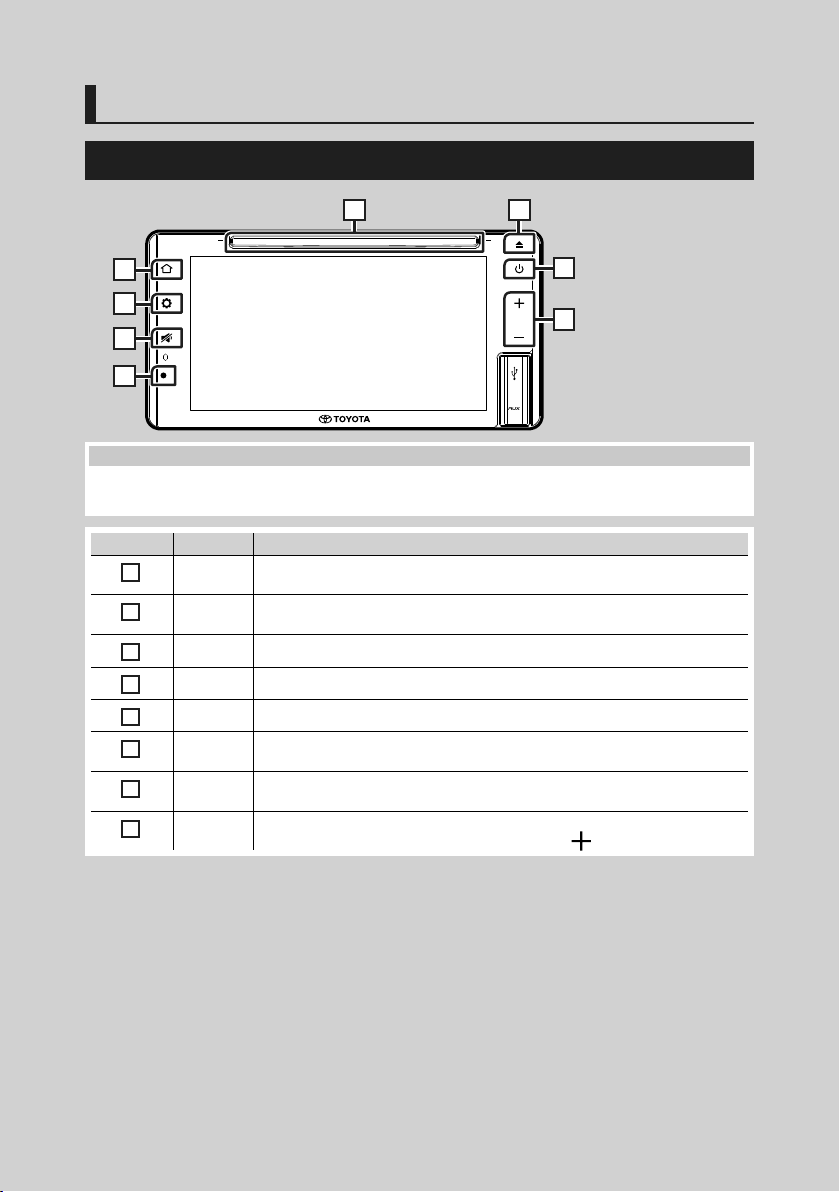
Front Panel Button Functions
1 2
3
4
7
8
5
6
NOTE
• The panels shown in this guide are examples used to provide a clear explanation of operations. For this reason,
they may be different from the actual panels.
Number Name Function
Disc-loading
1
slot
Disc eject • Ejects the disc.
2
Home • Displays the HOME screen.
3
Setting • Displays the popup menu.
4
Mute • Mutes/restores the sound.
5
Remote
6
Sensor
Power • Press and Hold : Turns on/off the unit ( P.7).
7
–, +
8
(Volume)
• A slot to insert a disc media.
• Press and hold to forcibly eject the disc.
• Receives the remote control signal.
• Short Press : Turns on/off “simple display mode” ( P.9).
• Adjusts the volume.
The volume will go up to 15 when you keep pressing [
].
6
Basic Operations
Turning on the Unit
This unit is turned on when the ignition switch
is set to ACC or ON position, and turned off
when the ignition switch is set to OFF position.
Set the ignition switch to ACC or ON
1
position.
The unit is turned on.
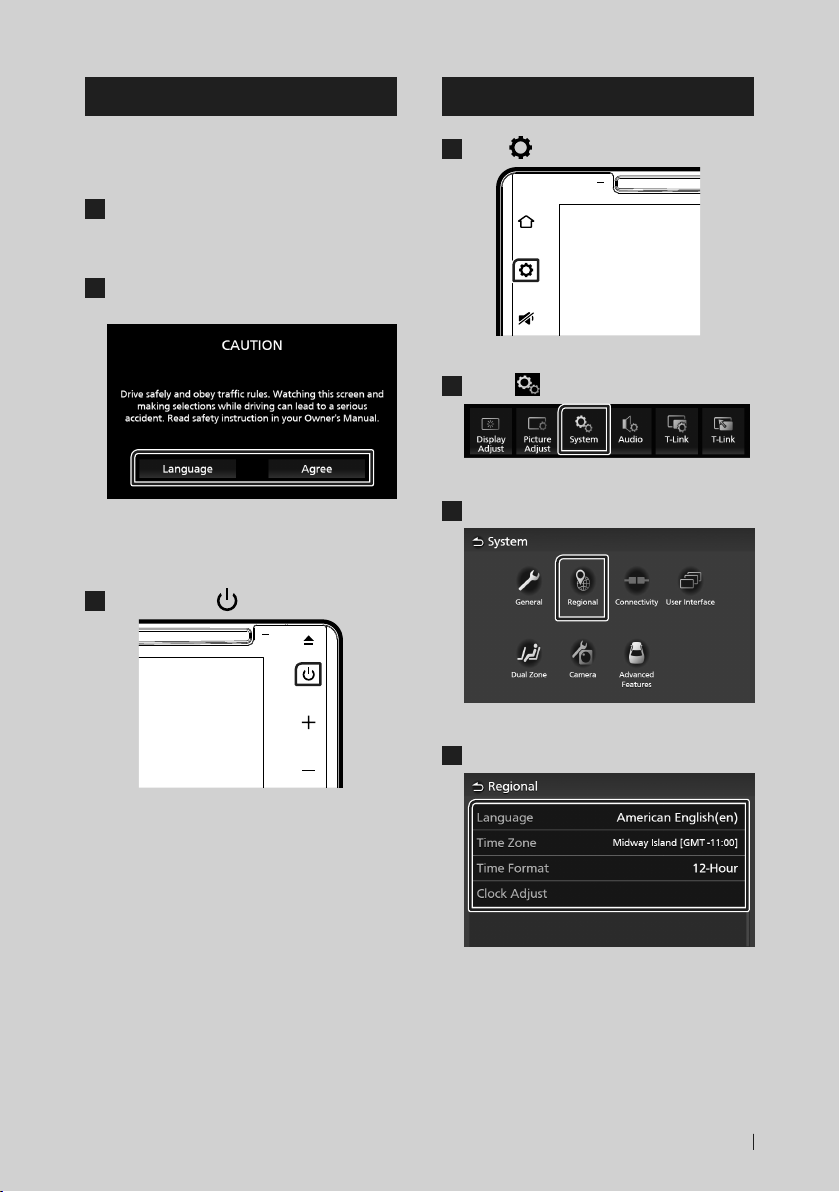
Read the caution message and touch
2
[Agree].
• Touching [Language] changes the
display language.
● To turn off/on the unit manually:
Press and hold [ ] button.
1
Regional Setup
Press [ ] button.
1
Popup menu appears.
Touch [ ].
2
System screen appears.
Touch [Regional].
3
The unit is turned off/on.
Regional screen appears.
Set each item as follows.
4
■ [Language]
Select the desired language.
■ [Time Zone]
Select the time zone.
7English
Basic Operations
■ [Time Format]
Select the time display format.
[12-Hour] (Default)/ [24-Hour]
■ [Clock Adjust]
Adjust the date and time manually. (P. 8)
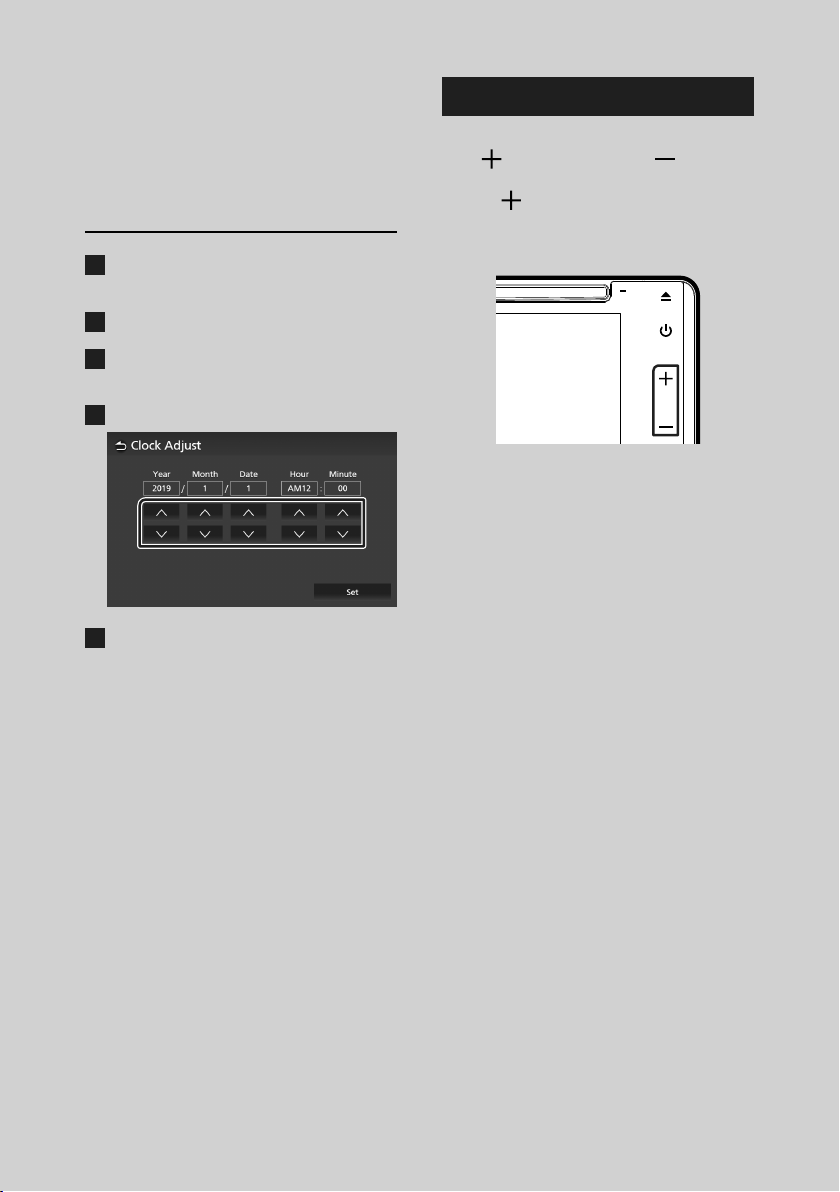
Adjusting date and time
Touch [Time Zone] on the Regional
1
screen.
Select the time zone.
2
Touch [Clock Adjust] on the Regional
3
screen.
Adjust the date, then adjust the time.
4
Touch [Set].
5
Adjusting the volume
You can adjust the volume (0 to 40).
Press [
] to increase, and press [ ] to
decrease.
Holding [
continuously to level 15.
Volume level 16 to 40 can be adjusted one
step each.
] increases the volume
8

Basic Operations
Touch screen operations
To perform operations on the screen, you need
to touch, touch and hold, flick or swipe to
select an item or change pages.
● Touch
Touch the screen gently to
select an item on the screen.
● Touch and hold
Touch the screen and keep
your finger in place until
the display changes or a
message is displayed.
● Flick
Slide your finger quickly
to the left or right on the
screen to change the page.
You can scroll a list screen
by flicking up/ down on the
screen.
● Swipe
Slide your finger up or down
on the screen to scroll the
screen.
• Displays the display control screen.
(P. 44)
• Displays the picture control screen.
(P. 44)
• Displays the System screen. ( P.45)
• Displays the Audio screen. ( P.50)
• Displays the T-Link Setup screen.*1
(P. 27)
• Displays the T-Link screen.*
• Displays the Hands Free screen. (P. 21)
• Displays the control screen of the current
3
source.*
1, *2
(P. 26)
*1 Premium AVX only
2
*
This menu is not available when a T-Link
source screen is displayed. If you select this
menu while using iPod or Bluetooth Audio
source, a message “T-Link can not be used
while using iPod / Bluetooth Audio. Would
you like to switch to T-Link?” will be displayed.
3
*
For Premium AVX, this menu is available when
a T-Link source screen is displayed.
Popup menu
Press [ ] button.
1
Popup menu appears.
Touch to display the popup menu.
2
The contents of the menu are as follows.
Simple Display Mode
When Simple Display Mode is enabled, the
screen will only display time, date and current
playback source information.
Press [ ] button.
1
● To back to the original screen:
Press [ ] button.
1
AVX displays the original screen.
9English

Basic Operations
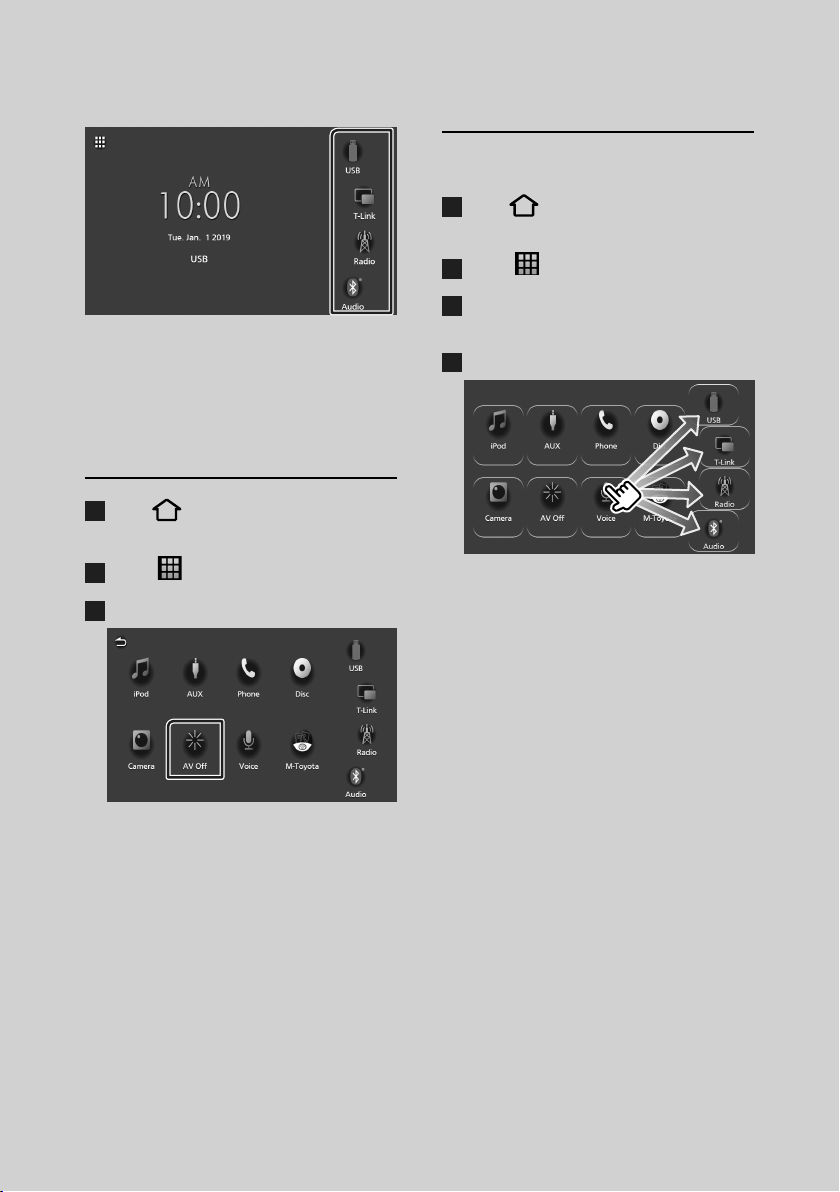
HOME screen descriptions
Most functions can be performed from the
HOME screen.
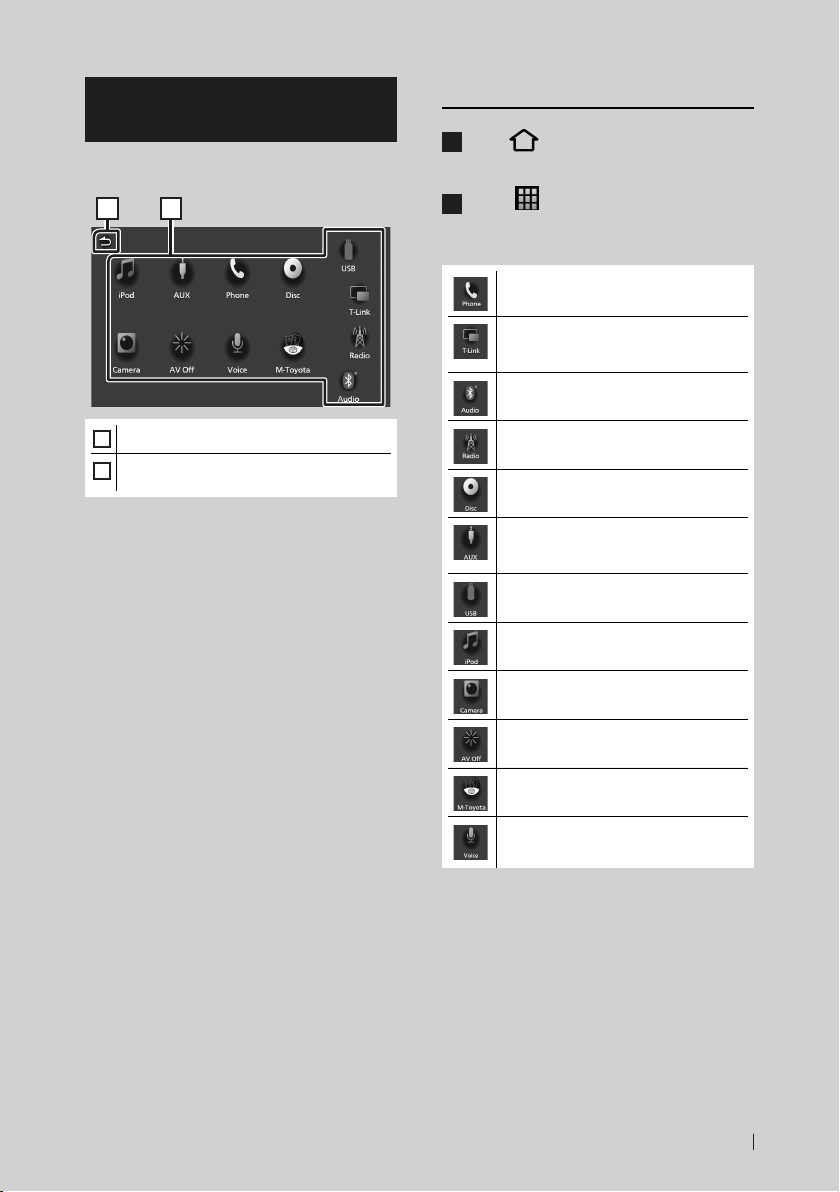
1 2 3
• Displays the source selection screen. (P.11)
1
• Current source information.
2
• Touch to display the control screen of the
current source.
• Short-cut playback source icons (P. 12)
3
Display the HOME screen
Press [ ] button.
1
HOME screen appears.
10
Basic Operations
Source selection screen description
You can display icons of all playback sources
and options on the source selection screen.
21
• Returns to the previous screen.
1
• Changes playback sources.
2
For playback sources, see P.11.
Select the playback source
Press [ ] button.
1
HOME screen appears.
Touch [ ].
2
From the screen, you can select the
following sources and functions.
• Displays the Hands Free screen. (P. 21)
• Switches to the T-Link screen from the
connected iPhone/Android device.*1
(P. 26)
• Plays a Bluetooth audio player. (P. 15)
• Switches to the Radio broadcast.
(P. 39)
• Plays a disc. ( P.28)
• Switches to an external component
connected to the AUX input terminal.
(P. 42)
• Plays files on a USB device. ( P.34)
• Plays an iPod/iPhone. (P. 37)
• Switches to the camera image screen.
(P. 41)
• Turns off the AV source. (P. 12)
• Switches to the M-Toyota screen.
(P. 43)
• Displays the Voice Recognition screen.
(P. 22)
*1 Premium AVX only.
11English
Basic Operations
To select the playback source on the
HOME screen
The 4 items displayed on the source selection
screen with large icons are shown on the
HOME screen.
You can change the items displayed on this
area by customizing the source selection
screen. (P. 12)
To turn off the AV source
Press [ ] button.
1
HOME screen appears.
Touch [ ].
2
Touch [AV Off].
3
Customize Short-cut buttons on
HOME screen
You can arrange the positions of the source
icons as you like.
Press [ ] button.
1
HOME screen appears.
Touch [ ].
2
Touch and hold the icon which you want
3
to move in the customizing mode.
Drag the icon to the desired position.
4
12
Basic Operations
Source control screen descriptions
There are some functions which can be
performed from most screens.
Indicators
1
2
Sub-control panel
1
[ ] All sources icon
Displays the source selection screen. (P. 11)
2
Sub-control panel
[
]/[ ] : Displays/hides the sub-control panel.
This function is available in Disc and USB source.
3
[ ]
Mute icon is indicated while AVX is muting.
4
Connected Bluetooth phone information.
5
Text scroll
Scrolls the displayed text.
43
5
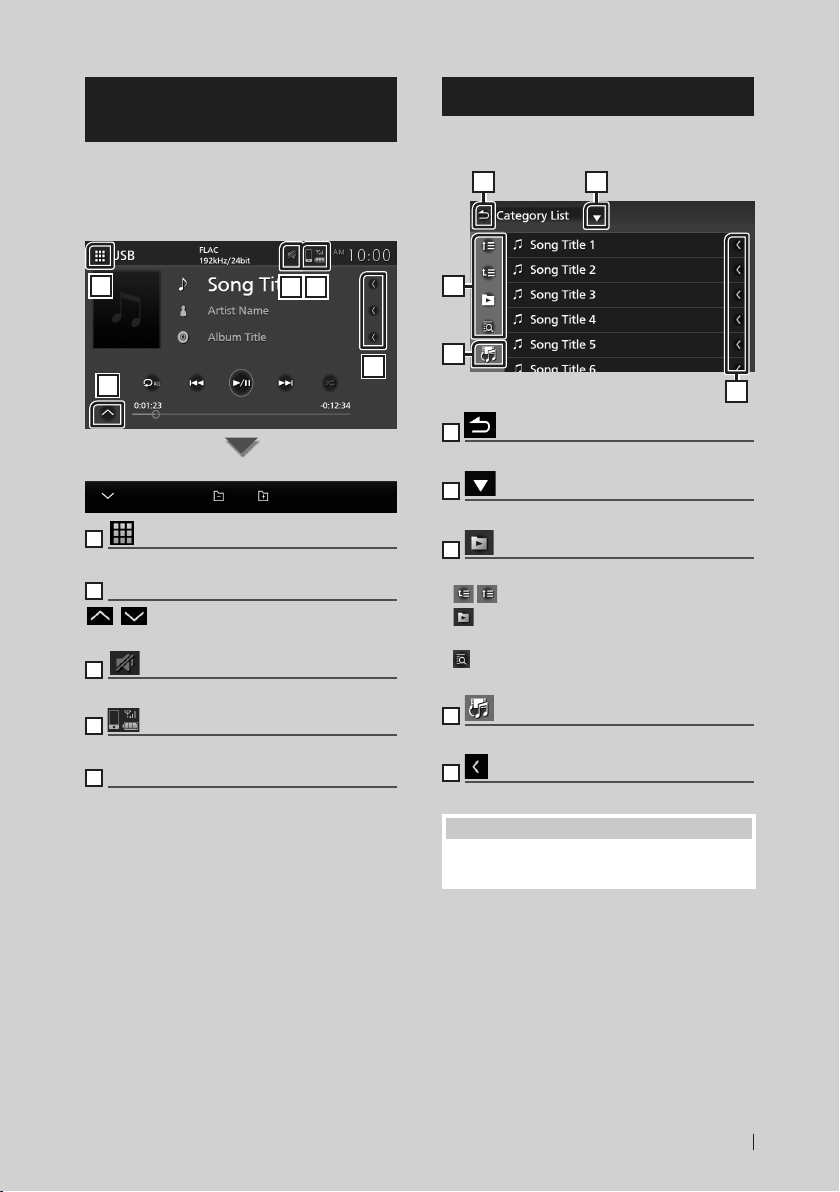
List screen
There are some common function keys in the
list screens of most sources.
1
3
4
1
Return
Returns to the previous screen.
2
Displays the list type selection window.
3
etc.
Keys with various functions are displayed here.
•
: Moves to the upper hierarchy level.
•
: Plays all tracks in the folder containing the
current track.
•
: Jumps to the letter you entered
(alphabetical search).
4
Displays a music/movie file list.
5
Text scroll
Scrolls the displayed text.
NOTE
• Depending on the current source or mode, some
function key may not appear.
2
5
13English
Connection
Connection
Wired Connection
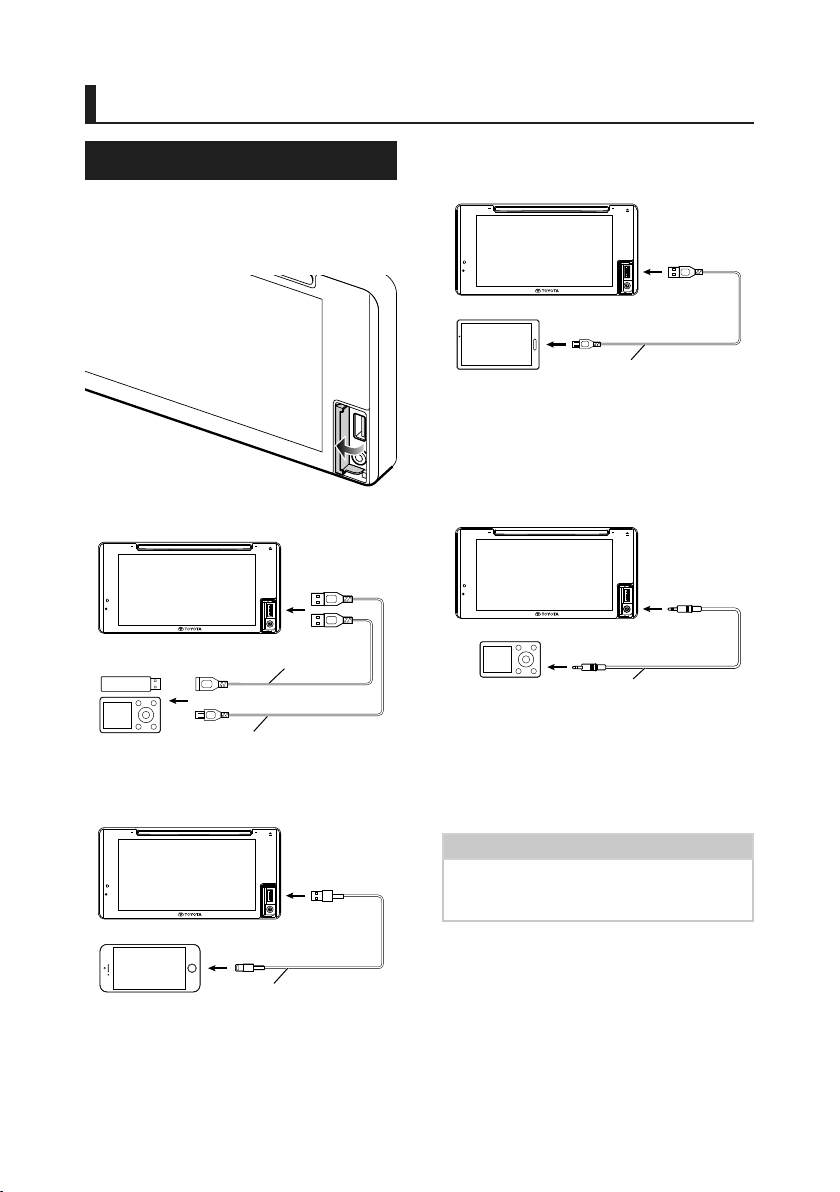
This unit can be connected to external devices.
Open the front port cover and connect the
external device via the following accessory.
Ñ Connecting a USB device
[1]
USB device
[1]
Sold separately
USB extension cable
USB cable
[1]
[1]
Ñ Connecting an iPod/iPhone
Ñ Connecting an Android
smartphone
Android smartphone
[1]
Sold separately
Micro USB to USB cable
[1]
[1]
Ñ Connecting an external
component
You can connect an external component to the
AUX input terminal.
Audio player
[1]
Sold separately
[1]
ø3.5 mm jack
# WARNING
• Install the USB device/ iPod/ iPhone/ Android
smartphone and Audio player in the place
where it will not affect safe driving.
NOTE
• Do not keep the USB device/ iPod/ iPhone/
Android smartphone/ Audio player and USB cable
in the car to avoid damage by heat.
[1]
iPod/iPhone
[1]
Sold separately
14
[1]
Lightning to USB cable
[1]

Bluetooth Control
Bluetooth Control
Using the Bluetooth function allows you to use
various functions such as listening to the audio
file and making/receiving a call.
Information for using Bluetooth® devices
Bluetooth is a short-range wireless radio
communication technology for mobile devices
such as mobile phones, portable PCs, and
other devices.
Bluetooth devices can be connected without
cables and communication with each other.
# WARNING
• While driving, do not perform complicated
operations such as dialing numbers, using the
phone book, etc. When you perform these
operations, stop your car in a safe place.
NOTE
• Some Bluetooth devices may not be connected
to this unit depending on the Bluetooth version
of the device.
• This unit may not work for some Bluetooth
devices.
• Connecting conditions may vary depending on
your environment.
• Some Bluetooth devices are disconnected when
this unit is turned off.
Ñ About the mobile phone and
Bluetooth audio player
This unit conforms to the following Bluetooth
specifications:
Version
Bluetooth Ver. 4.1
Profiles
Mobile phone:
HFP (V1.7) (Hands Free Profile)
SPP (Serial Port Profile)
PBAP (Phonebook Access Profile)
Audio player:
A2DP (Advanced Audio Distribution Profile)
AVRCP (V1.6) (Audio/Video Remote Control
Profile)
Sound codec
SBC, AAC
NOTE
• The units supporting the Bluetooth function have
been certified for conformity with the Bluetooth
Standard according to the procedure prescribed
by Bluetooth SIG.
However, it may be impossible for such units
to communicate with your mobile phone
depending on its type.
15English
Bluetooth Control
Register the Bluetooth device
It is necessary to register the Bluetooth audio
player or mobile phone in this unit before
using the Bluetooth function.
You can register up to 10 Bluetooth devices.
NOTE
• Up to 10 Bluetooth devices can be registered. If
an attempt is made to register the 11th Bluetooth
device, the Bluetooth device connected on the
earliest date will be deleted to register the 11th
one.
• This AVX is compatible with the Apple Easy
Pairing function.
When an iPhone is connected to AVX via USB
cable, a Bluetooth connection dialog appears.
Please select the function and connect your
iPhone.
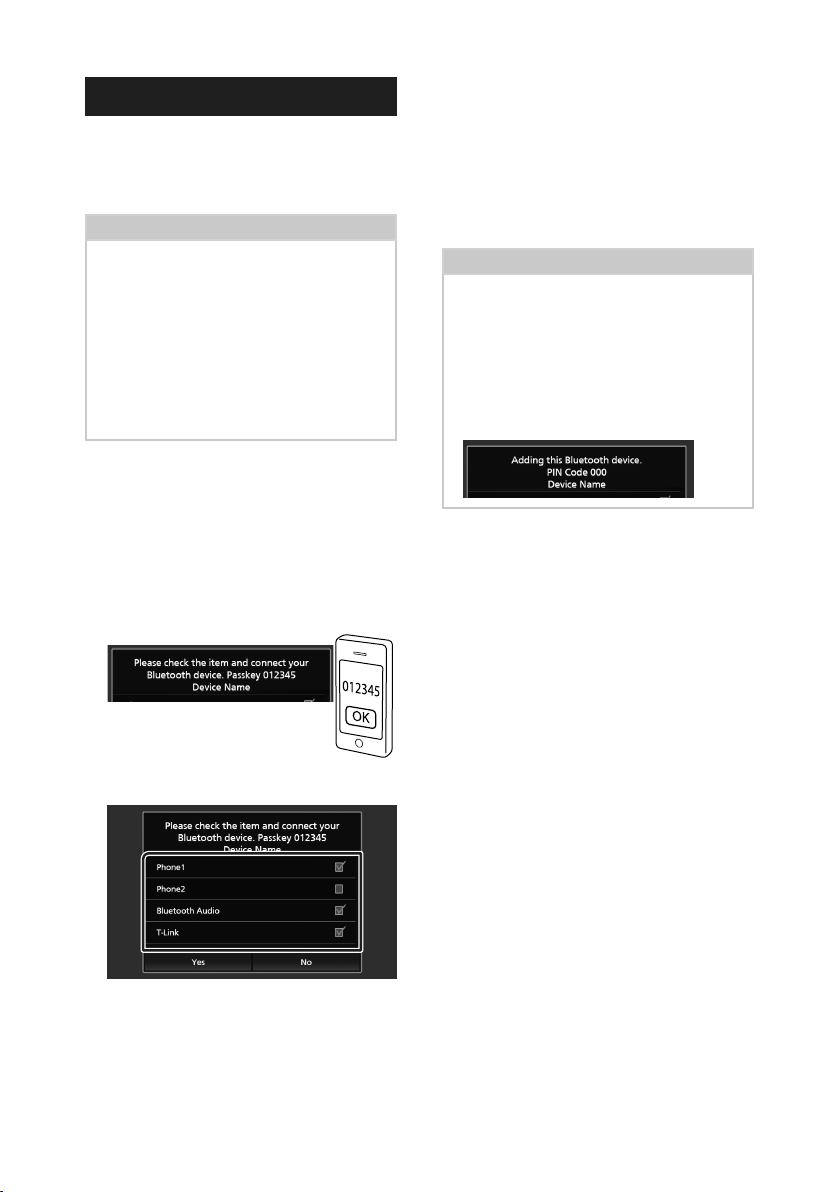
Search for the unit (“Car Multimedia”)
1
from your smartphone/mobile phone.
Complete steps 1 to 4 within 30 seconds.
Operate your smartphone/mobile phone
2
according to the displayed messages.
● Confirm the request both on the
smartphone/mobile phone.
■ [T-Link] (Premium AVX only)
Put checkmark check to use T-Link.
Touch [Yes ].
4
When data transmission and connection
have completed, the Bluetooth telephone
connection icon appears on the screen.
NOTE
• If the mobile phone supports PBAP, the
phonebook data is downloaded automatically
when you select [Phone1] or [Phone2].
• For some mobile phones, you may need to
operate the mobile phone to download the
phonebook data.
• If the PIN Code is displayed in the message, input
the PIN Code in your smartphone/mobile phone.
The PIN Code is set to “0000” as the default.
Select the function you want to use.
3
■ [Phone1]/ [Phone2]
Select the hands-free number to connect.
■ [Bluetooth Audio]
Put checkmark to use Bluetooth Audio.
16

Bluetooth Control
Bluetooth Setup
Press [ ] button.
1
Popup menu appears.
Touch [ ].
2
System screen appears.
Touch [Connectivity].
3
Connectivity screen appears.
Set each parameter as follows.
4
■ [Bluetooth]
Set whether to use the Bluetooth function.
■ [Device Select]
Connect the Bluetooth device. (P. 17)
■ [Auto Pairing]
When set to “ON”, the Apple Auto Pairing
function is turned on to automatically
register the iPod touch or iPhone connected
to this unit.
[ON ](Default): Turns on the Apple Auto
Pairing function.
[OFF]: Turns off the Apple Auto Pairing
function.
■ [Device Name]
Change the device name. (P. 18)
■ [PIN Code]
Change the PIN Code. (P. 18)
■ [Device Address]
Displays the media access control address.
Ñ Connect the Bluetooth device
Touch [Device Select] on the Connectivity
1
screen.
Touch the name of the device you want
2
to connect.
Profile select screen appears.
NOTE
• If the icon is lighted, it means that the unit will
use that device.
Set each profile as follows.
3
■ [Phone1], [Phone2]
Select when the device is connected with
the unit as hands-free phone 1 or 2.
■ [Bluetooth Audio]
Select to use as an audio player.
■ [T-Link] (Premium AVX only)
Select to use as the T-Link source.
Touch [Close].
4
17English
Bluetooth Control
To delete the registered Bluetooth
device
Touch [Delete].
1
Touch the device name to check.
2
■ [þ Select All]
Selects all Bluetooth devices.
■ [¨ Deselect All]
Clears all check marks.
Touch [Delete].
3
Confirmation message appears.
Touch [Yes ].
4
Ñ Change the device name
Touch [Device Name] on the Connectivity
1
screen.
Change Device Name screen appears.
Touch and hold [ ].
2
Input the device name.
3
Touch [Enter].
4
Ñ Change the PIN Code
Touch [PIN Code] on the Connectivity
1
screen.
Change PIN Code screen appears.
Touch and hold [ ].
2
Input the PIN Code.
3
18
Touch [Set].
4
Bluetooth Control
Playing the Bluetooth Audio Device
Most functions can be controlled from the
source control screen.
To select Bluetooth source, touch [Audio] icon
on the source selection screen. (P. 11)
Ñ Bluetooth basic operation
1
2
3
1
Information display
• Displays the current track information.
• Connected device name.
2
Operation keys *
• [
] : Searches for a file. See File search
(P. 20).
• [E] [F]: Searches for the previous/next
content.
Touch and hold to fast forward or fast
backward.
• [D]: Plays.
• [H]: Pauses.
• [
] : Repeats the current track/folder. Each
time you touch the key, repeat modes are
switched in the following sequence:
File repeat ( ), All songs repeat ( ),
Repeat off ( )
• [
] : Randomly plays all tracks in the current
folder. Each time you touch the key, random
modes are switched in the following sequence:
All random ( ), Random off ( )
3
Playing time
For confirmation of current playing position.
4
[ ]
Bluetooth audio devices can be switched easily
to play music. See Bluetooth Audio Device
Change (P.20).
NOTE
• The operation buttons, indications and
information displayed on the screen differ
depending on the connected device.
• If the operation keys do not appear, operate from
the player.
• Depending on your mobile phone or audio
4
player, sound may be heard and controlled but
text information may not appear.
• If the volume is too low, raise it on your mobile
phone or audio player.
* These items appear only when the audio player
which supports AVRCP profile is connected.
19English
Bluetooth Control
Ñ Bluetooth Audio Device Change
Up to five Bluetooth audio device can be
connected and switched easily to play music.
Touch [ ].
1
A list of registered devices is displayed.
Touch [ ] of device name you want to
2
connect.
• Touching [
connected device ( ) disconnects
this device.
Touch [ ] (white) on the left of the name
3
of the device to be played.
[
] (white) changes to [ ] (Blue) and starts
playback.
] on the left of the
NOTE
• If a connected Bluetooth audio device is operated
to play music, connections are switched.
• When a Bluetooth source is switched to another
one, its settings are deleted and the connection
is restored to the connection before source
switching.
Ñ File search
Touch [ ].
1
Touch the desired file or folder.
2
When you touch a folder its contents are
displayed.
Touch the desired item in the content list.
3
Playback starts.
NOTE
• For operations in the list screen, see List screen
(P. 13).
• (Gray) : Not connected.
•
(White) : Connected.
•
(Blue) : During playback.
Touch [ ].
4
20
Bluetooth Control
Using the Hands-Free Unit
You can use the telephone function by
connecting the Bluetooth telephone to this
unit.
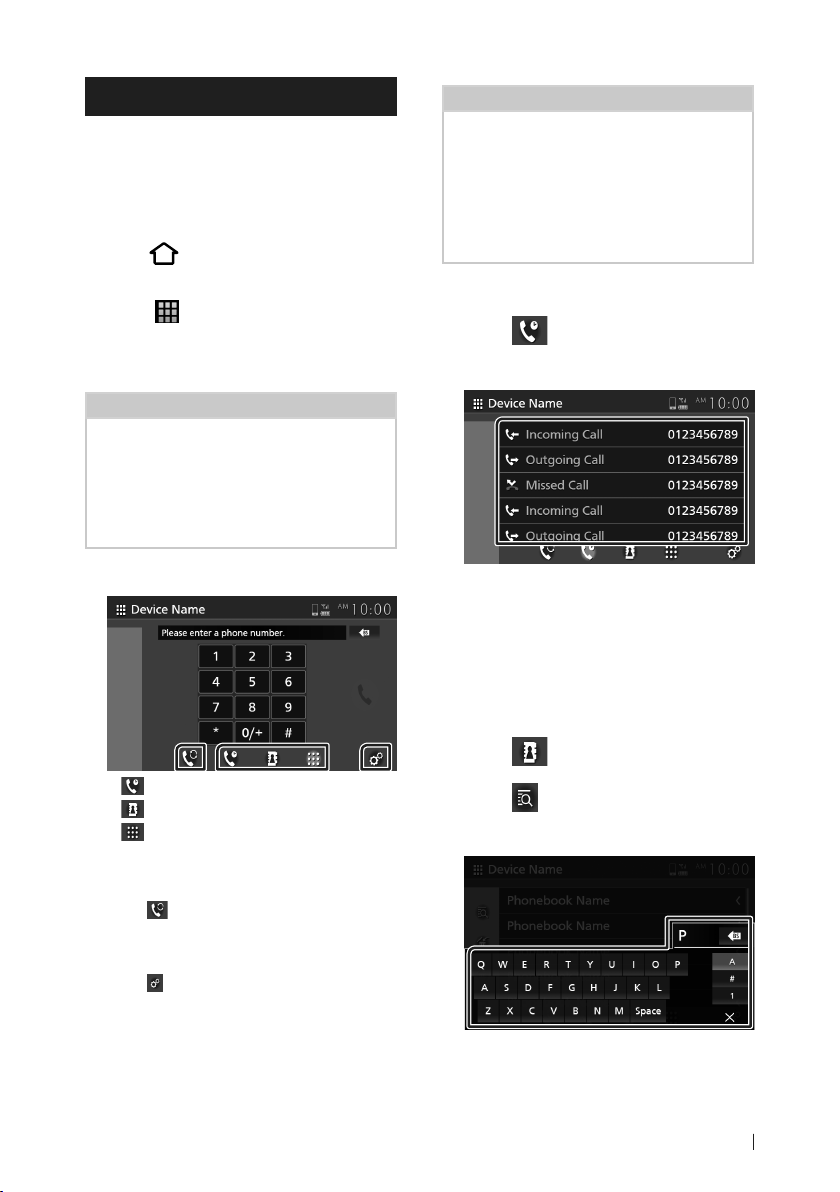
Ñ Make a call
Press [ ] button.
1
HOME screen appears.
Touch [ ].
2
Touch [Phone].
3
Hands Free screen appears.
NOTE
• If your mobile phone supports PBAP, you can
display the phone book and call lists onto the
touch panel screen when the mobile phone is
connected.
– Phone book: up to 1000 entries
– Up to 50 entries including dialed calls, received
calls, and missed calls
Select a dialing method.
4
NOTE
• Bluetooth hands free sound quality and
performance also depend on mobile phones and
carrier conditions.
• Status icons such as battery and antenna icons
may differ from those displayed on the mobile
phone.
• Setting the mobile phone in the private/ visibility
off mode can disable the hands-free function.
Call using call history
Touch [ ].
1
Select the phone number from the list.
2
Call using the phonebook
You can use the phonebook data of the
selected mobile phone to make a call.
Before starting this procedure, it is necessary
to download the phonebook data. For details,
see Phonebook transfer (P.24).
• [ ]: Call using call history
• [
]: Call using the phonebook
• [
]: Call by entering a phone number
● Select the mobile phone to use
When you connect two mobile phones
1) Touch [
use.
● Phone Setup
1) Touch [
Phone Setup screen appears. (P. 25)
] to select the phone you want to
].
Touch [ ].
1
Touch [ ].
2
Select the initial.
3
• Special characters cannot be searched
using this function.
21English
Bluetooth Control
• Accented first characters of each
name entry can be searched using the
equivalent normal character of that letter.
i.e. Ñ can be searched as N
• Accented characters cannot be searched
in the middle of the word.
Select the person you want to call from
4
the list.
Select the phone number from the list.
5
NOTE
• You can sort the phone numbers in the list by last
name or first name. For details, see Phone Setup
(P. 25).
Call by entering a phone number
Touch [ ].
1
Enter a phone number with number keys.
2
Touch [ ].
3
Ñ Voice Recognition
You can access the voice recognition function
of the mobile phone connected to this unit.
You can search the mobile phone phonebook
by voice. (The functionality depends on the
mobile phone.)
Press [ ] button.
1
HOME screen appears.
Touch [ ].
2
Touch [Voice]. (P. 11)
3
Voice Recognition screen appears.
Start speaking.
4
22
 Loading...