


®TOYOTA
Not For Reproduction
®TOYOTA
T_C_LAN_
T_C_LAN_
OW
OWM
OW
OWM
OM60938E/
OM60938E/
01999-60938
01999-60938
()wner-~§
()wner-~§
Manual
Manual
For
For
read carefully
read carefully
08/01 0
08/01 0
-
-
your
safety
your
safety
and
keep in the vehicle.
and
keep in the vehicle.
and
and
comfort,
comfort,
~
~
LAND
LAND
CRUISER
CRUISER

Foreword
Not For Reproduction
Foreword
Welcome to
Welcome to
are proud of
are proud of
build.
build.
This Owner's Manual explains the operation of your new Toyota. Please read
This Owner's Manual explains the operation of your new Toyota. Please read
it thoroughly and have all the occupants follow the instructions carefully.
it thoroughly and have all the occupants follow the instructions carefully.
Doing so will help you enjoy many years of safe and
Doing so will help you enjoy many years of safe and
For important information about this manual and your Toyota, read
For important information about this manual and your Toyota, read
ing pages carefully.
ing pages carefully.
When it comestoservice, remember that your Toyota
When it comestoservice, remember that your Toyota
best and is interested in your complete satisfaction. He will provide
best and is interested in your complete satisfaction. He will provide
nance and any
nance and any
Please leave this Owner's Manualinthis vehicle at
Please leave this Owner's Manualinthis vehicle at
owner will need
owner will need
All information and specifications in this manual are
All information and specifications in this manual are
However, becauseofToyota's policy of continual product improvement, we reserve
However, becauseofToyota's policy of continual product improvement, we reserve
the
righttomake changes at any time without notice.
the
righttomake changes at any time without notice.
Please note that this manual applies to all models and explains all equipment,
Please note that this manual applies to all models and explains all equipment,
including options. Therefore, you may find some explanations for equipment
including options. Therefore, you may find some explanations for equipment
not installed on your vehicle.
not installed on your vehicle.
© 2001 TOYOTA MOTOR CORPORATION
© 2001 TOYOTA MOTOR CORPORATION
All rights reserved.
All rights reserved.
part, without the written permission of Toyota Motor Corporation.
part, without the written permission of Toyota Motor Corporation.
the
growing groupofvalue-conscious
the
growing groupofvalue-conscious
the
advanced engineering and quality construction of each
the
advanced engineering and quality construction of each
other
assistance you may require.
other
assistance you may require.
this
information also.
this
information also.
TOYOTA
TOYOTA
This
material may not be reproduced or copied, in whole or in
This
material may not be reproduced or copied, in whole or in
people who
people who
trouble-free
trouble-free
dealer
dealer
the
time of resale. The next
the
time of resale. The next
currentatthe
currentatthe
MOTOR
MOTOR
drive
Toyotas. We
drive
Toyotas. We
vehicle
vehicle
motoring.
motoring.
the
the
knows your vehicle
knows your vehicle
quality
quality
time
of printing.
time
of printing.
CORPORATION
CORPORATION
we
we
follow-
follow-
mainte-
mainte-

Important information about this manual
Not For Reproduction
Important information about this manual
Safety and vehicle damage warnings
Safety and vehicle damage warnings
Safety symbol
Safety symbol
Throughout
Throughout
age warnings. You must follow these warnings carefully to
age warnings. You must follow these warnings carefully to
avoid possible injury or damage.
avoid possible injury or damage.
typesofwarnings, what they look like, and how
typesofwarnings, what they look like, and how
The
The
used in this manual are explained as follows:
used in this manual are explained as follows:
Thisisa
Thisisa
injury
injury
informed
informed
ordertoavoidorreduce
ordertoavoidorreduce
people.
people.
This
This
damagetothe
damagetothe
is
ignored.
is
ignored.
must
must
damagetoyour
damagetoyour
this
manual, you will see safety and vehicle dam-
this
manual, you will see safety and vehicle dam-
warning
warning
to
peopleifthe
to
peopleifthe
about
about
isawarning
isawarning
You
You
not
doinorder
not
doinorder
& CAUTION
& CAUTION
against
against
warning
warning
what
you
what
you
the
the
NOTICE
NOTICE
against
against
vehicleorits
vehicleorits
are
are
vehicle
vehicle
something
something
informed
informed
to
avoid
to
avoid
and
and
something
something
must
must
risktoyourself
risktoyourself
equipmentifthe
equipmentifthe
about
about
its
its
which
which
is
ignored.
is
ignored.
or
or
which
which
what
what
or
reduce
or
reduce
equipment.
equipment.
must
must
you
you
the
the
may
may
not
not
and
and
may
may
You
You
must
must
they
they
cause
cause
do
do
other
other
cause
cause
warning
warning
risk
risk
are
are
are
are
in
in
or
or
of
of
00060
00060
When
When
shown
shown
"Do
"Do
happen".
happen".
ii
ii
not
not
you
you
above,
above,
do
do
see
see
this";
this";
it
it
the
the
means:
means:
or
"Do
or
"Do
safety
safety
"Do
"Do
not
not
symbol
symbol
not
...
not
...
let
this
let
this
";
";
Important information about your Toyota
Not For Reproduction
Important information about your Toyota
Accessories, spare parts and
Accessories, spare parts and
modification of your Toyota
modification of your Toyota
A wide
varietyofnon-genuine
A wide
varietyofnon-genuine
for
Toyota
for
Toyota
Using
Using
genuine Toyota products may adversely affect the safety of
genuine Toyota products may adversely affect the safety of
your vehicle, even
your vehicle, even
certain authorities in
certain authorities in
accept any
accept any
ries which are not Toyota products, nor for replacement or
ries which are not Toyota products, nor for replacement or
installation involving such parts.
installation involving such parts.
This
This
Toyota products. Modification with
Toyota products. Modification with
products could affect its performance, safety or durability,
products could affect its performance, safety or durability,
and may even
and may even
tion, damage or
tion, damage or
modification may not be covered under warranty.
modification may not be covered under warranty.
vehicles
vehicles
these
spare
these
spare
liabilityorguarantee
liabilityorguarantee
vehicle
vehicle
should
should
violate
violate
performance
performance
are currently available in
are currently available in
parts and accessories which are not
parts and accessories which are not
though
though
your
your
not
not
spare parts and accessories
spare parts and accessories
the
market.
the
market.
these parts may be approved by
these parts may be approved by
country. Toyota therefore cannot
country. Toyota therefore cannot
spare
parts and accesso-
spare
parts and accesso-
be modified with
be modified with
non-genuine
non-genuine
governmental regulations. In addi-
governmental regulations. In addi-
problems resulting from the
problems resulting from the
non-genuine
non-genuine
Toyota
Toyota
Installation of a mobile
Installation of a mobile
two-way
two-way
As the installation of a mobile
As the installation of a mobile
your vehicle could affect
your vehicle could affect
port fuel injection system/sequential
port fuel injection system/sequential
system, electronically controlled fuel injection pump sys-
system, electronically controlled fuel injection pump sys-
tem and electronic engine control system. be sure
tem and electronic engine control system. be sure
check with your Toyota
check with your Toyota
or special instructions regarding installation.
or special instructions regarding installation.
Maintenance schedule
Maintenance schedule
Please refer to
Please refer to
Booklet".
Booklet".
iii
iii
the
the
radio system
radio system
two-way
two-way
electronic
electronic
dealer
dealer
separate "Warranty and Service
separate "Warranty and Service
systems
systems
multiport
multiport
for
precautionary measures
for
precautionary measures
radio
system
radio
system
such as multi-
such as multi-
fuel injection
fuel injection
in
in
to
to

On-pavement
Not For Reproduction
On-pavement
driving tips
driving tips
This
vehicle
This
vehicle
vehicles
vehicles
types
of vehicles. This
types
of vehicles. This
differently from an ordinary
differently from an ordinary
designed
designed
has a higher ground clearance and center of gravity than
has a higher ground clearance and center of gravity than
that
of an ordinary passenger car.
that
of an ordinary passenger car.
feature
feature
rbllover. Failure
rbllover. Failure
in loss of control, accidents or
in loss of control, accidents or
death or serious injury. Be
death or serious injury. Be
precautions" in Section 2 and
precautions" in Section 2 and
precautions" in Section
precautions" in Section
belongstothe
belongstothe
have a significantly
have a significantly
for
off-road
for
off-road
causes this
causes this
use also. In addition, this vehicle
use also. In addition, this vehicle
typeofvehicletobe more likely to
typeofvehicletobe more likely to
to
operate this
to
operate this
and
and
utility
utility
higher
higher
vehicle
vehicle
passenger
passenger
suretoread
suretoread
3.
3.
off-road
off-road
vehicle class. Utility
vehicle class. Utility
rollover rate than other
rollover rate than other
will handle and maneuver
will handle and maneuver
car becauseitis
car becauseitis
This
vehicle design
This
vehicle design
vehicle
vehicle
correctly
correctly
vehicle
vehicle
may result
may result
rollover causing
rollover causing
"Off-road
"Off-road
"Off-road
"Off-road
vehicle
vehicle
driving
driving
iv
iv

Table of contents
Not For Reproduction
Table of contents
1 OPERATION OF INSTRUMENTS AND CONTROLS Page
1 OPERATION OF INSTRUMENTS AND CONTROLS Page
...•..•..•.•..•........•...•
1 Overview of instruments and controls
1 Overview of instruments and controls
2 Keys and Doors
2 Keys and Doors
3 Seats, Seat belts, Steering wheel and Mirrors
3 Seats, Seat belts, Steering wheel and Mirrors
4 Lights and Wipers
4 Lights and Wipers
5 Gauges, Meters and Service reminder indicators
5 Gauges, Meters and Service reminder indicators
6 Ignition switch, Transmission and Parking brake
6 Ignition switch, Transmission and Parking brake
7 Car audio system
7 Car audio system
8 Air conditioning system
8 Air conditioning system
9 Other equipment
9 Other equipment
2 INFORMATION BEFORE DRIVING YOUR TOYOTA
2 INFORMATION BEFORE DRIVING YOUR TOYOTA
3 STARTING AND DRIVING 103 _
3 STARTING AND DRIVING 103 _
4 IN CASE OF AN EMERGENCY 117 _
4 IN CASE OF AN EMERGENCY 117 _
5 CORROSION PREVENTION AND APPEARANCE CARE 139 _
5 CORROSION PREVENTION AND APPEARANCE CARE 139 _
6 MAINTENANCE REQUIREMENTS 145 _
6 MAINTENANCE REQUIREMENTS 145 _
7
7
DO-lT-YOURSELF
DO-lT-YOURSELF
1 Introduction
1 Introduction
2 Engine and Chassis
2 Engine and Chassis
3 Electrical components
3 Electrical components
8 SPECIFICATIONS 177 _
8 SPECIFICATIONS 177 _
9 INDEX 185 _
9 INDEX 185 _
••..•••••...........•..•.•...•..•.•..........
••..•••••...........•..•.•...•..•.•..........
.••..........•.••..•.••••••••••••••••.••.•
.••..........•.••..•.••••••••••••••••.••.•
•...•..•....•••••••.•••••••••••••••••.••••
•...•..•....•••••••.•••••••••••••••••.••••
........•..•.•..••••..•••...•.••••.••
........•..•.•..••••..•••...•.••••.••
•••••••...•.............•..............•...
•••••••...•.............•..............•...
MAINTENANCE
MAINTENANCE
••.••..•..••••••.•••••••••••••••••••••••••••..•
••.••..•..••••••.•••••••••••••••••••••••••••..•
•••••••••••••.•.•••••••••••••••••.•••.••
•••••••••••••.•.•••••••••••••••••.•••.••
.•..•••••.••••••••.•.•.•.•••.••••.••••
.•..•••••.••••••••.•.•.•.•••.••••.••••
...•..•..•.•..•........•...•
••••••.••••••••••••••
••••••.••••••••••••••
.••....••.•.••.•••
.••....••.•.••.•••
••.•..•••••••••••.•
••.•..•••••••••••.•
1 _
1 _
7 _
7 _
17 _
17 _
33
33
41
41
51
51
63
63
79
79
87
87
91
91
149 _
149 _
155 _
155 _
165 _
165 _
_
_
_
_
_
_
_
_
_
_
_
_
_
_
v
v

Model code
Not For Reproduction
Model code
Check
Check
Basic code
Basic code
FZJ78, FZJ79:
FZJ78, FZJ79:
Models with 1
Models with 1
HZJ78, HZJ79:
HZJ78, HZJ79:
1HZ engine
Models with
Models with
HDJ78, HDJ79:
HDJ78, HDJ79:
Models with
Models with
H Z J 7 9
H Z J 7 9
1HZ engine
1
1
The model code appears on the manufacturer's plate with the heading "MODEL".
The model code appears on the manufacturer's plate with the heading "MODEL".
See "Your Toyota's identification" in Section 2 for the manufacturer's plate location.
See "Your Toyota's identification" in Section 2 for the manufacturer's plate location.
FZ-FE
FZ-FE
HD-FTE
HD-FTE
I
I
the
model codetosee what type of model your vehicle is.
the
model codetosee what type of model your vehicle is.
engine
engine
engine
engine
I'
'\
I'
'\
\ )
\ )
............
............
-
-
vi
vi
T
T
T
T
Body type
Body type
R:
Van
R:
Van
T:
Pick-up
T:
Pick-up
I'
I'
\ )
\ )
............
............
'\
I'
'\
I'
'\
'\
)
)
\
\
............
............
T
T
Grade
Grade
R:
Standard
R:
Standard
N:
LX
N:
LX
R
R
I'
I'
\
\
......
......
'\
'\
......
......
)
)

SECTION
Not For Reproduction
SECTION
OPERATION OF INSTRUMENTS AND
OPERATION OF INSTRUMENTS AND
CONTROLS
CONTROLS
Overview of instruments and controls
Overview of instruments and controls
Instrument panel overview 2
Instrument panel overview 2
Instrumentclusteroverview 4
Instrumentcluster overview 4
Indicator symbols on the instrument panel 6
Indicator symbols on the instrument panel 6
1-1
1-1
•
•

Instrument panel overview
Not For Reproduction
Instrument panel overview
1
1
14
14
13
13
1 4
1 4
~-w---5
~-w---5
6
6
1.
Side vents
1.
Side vents
2.
Center vents
2.
Center vents
3.
Instrument cluster
3.
Instrument cluster
4.
Side defroster outlets
4.
Side defroster outlets
5.
Four-wheel
5.
Four-wheel
6.
Power door lock switch
6.
Power door lock switch
7.
Power window
7.
Power window
8.
Window lock switch
8.
Window lock switch
9.
Hood lock release
9.
Hood lock release
10. Lower vent
10. Lower vent
11.
Four-wheel
11.
Four-wheel
12. Parking brake
12. Parking brake
13. Manual transmission gear
13. Manual transmission gear
14. Glove box
14. Glove box
drive control button
drive control button
switches
switches
lever
lever
drive
control
drive
control
lever
lever
lever
lever
shift
shift
lever
lever
12
12
2
2
11
11
10
10
9
9
7
7
8
8
1104
1104

1.
Not For Reproduction
Cigarette lighter
1.
Cigarette lighter
2.
Clock
2.
5
4
1
1
2
2
4
5
6 7
6 7
Clock
3.
Car audio
3.
Car audio
4.
Wiper and washer switches
4.
Wiper and washer switches
5.
Emergency flasher switch
5.
Emergency flasher switch
6.
Ignition switch
6.
Ignition switch
7.
Headlight and turn signal switch
7.
Headlight and turn signal switch
8.
Throttle knob
8.
Throttle knob
9.
Tilt steering lock release lever
9.
Tilt steering lock release lever
10. Front and rear differential lock switch
10. Front and rear differential lock switch
11.
Power antenna switch
11.
Power antenna switch
12. Instrument panel light control knob
12. Instrument panel light control knob
13. Rear window wiper and
13. Rear window wiper and
tank
switch
tank
14. Sub fuel
14. Sub fuel
15.
15.
Air
conditioning controls
Air
conditioning controls
16. Ashtray
16. Ashtray
switch
washer
washer
switch
switch
16
16
14313 12
14313 12
15
15
11
11
9
9
8
8
1104
1104
3
3

Instrument cluster overview (with tachometer)
Not For Reproduction
Instrument cluster overview (with tachometer)
2--.-.c
2--.-.c
1
----liiIH
1
----liiIH
3 3
3 3
4.
Tachometer
4.
1.
Fuel gauge
1.
Fuel gauge
2.
Oil pressure gauge or sub fuel gauge
2.
Oil pressure gauge or sub fuel gauge
3.
Service reminder indicators and
3.
Service reminder indicators and
indicator lights
indicator lights
Tachometer
5.
Speedometer
5.
Speedometer
6.
Voltmeter
6.
Voltmeter
Hfi--6
Hfi--6
HI!f---7
HI!f---7
9
9
8
8
3
3
7.
Engine
7.
Engine
8.
Trip meter reset knob
8.
Trip meter reset knob
9.
Odometer and
9.
Odometer and
coolant
coolant
temperature
temperature
two
trip
trip
meters
meters
two
gauge
gauge
1104
1104
4
4

Instrument cluster overview (without tachometer)
Not For Reproduction
Instrument cluster overview (without tachometer)
1---w----~
1---w----~
1.
Engine coolant
1.
Engine coolant
2.
Service reminder indicators and
2.
Service reminder indicators and
indicator lights
indicator lights
3.
Fuel gauge
3.
Fuel gauge
temperature
temperature
gauge
gauge
2
2
2
2
4.
Speedometer
4.
Speedometer
5.
Trip meter reset knob
5.
Trip meter reset knob
6.
Odometer
6.
Odometer
3
3
7
7
and
and
two
two
2
2
2
2
trip
trip
meters
meters
6
6
5
5
2
2
7. Sub fuel
7. Sub fuel
tank
tank
gauge
gauge
1104
1104
5
5

Indicator symbols on the instrument panel
Not For Reproduction
Indicator symbols on the instrument panel
Iight*l
(CD)
(CD)
0
0
~
~
----
----
~
~
to
to
i1
i1
-i'
-i'
T-BELT
T-BELT
Brake system warning
Brake system warning
warning Iight*l
Discharge
Discharge
Low engine oil level warning
Low engine oil level warning
Low engine oil
Low engine oil
Malfunction indicator
Malfunction indicator
Low fuel level warning
Low fuel level warning
Open door
Open door
Timing belt replacement
Timing belt replacement
warning Iight*l
pressure warning
pressure warning
warning
warning
Iight*l
lamp*l
lamp*l
light*l
light*l
light*l
light*l
warning
warning
light*l
light*l
Iight*l
Iight*l
light*l
light*l
,,:,,:,:>
,,:,,:,:>
..
..
..
..
,"
,"
-
-
=0
=0
~~
~~
SUB
SUB
:t
:t
:I:
:I:
:c
:c
W
W
air cleaner filter warning
Clogged
Clogged
Headlight high beam indicator light
Headlight high beam indicator light
Turn signal indicator
Turn signal indicator
Sub fuel tank indicator light*2
Sub fuel tank indicator light*2
Four-wheel
Four-wheel
Rear differential lock indicator light
Rear differential lock indicator light
Front differential lock indicator light
Front differential lock indicator light
Engine preheating indicator light
Engine preheating indicator light
air cleaner filter warning
lights
lights
drive indicator light
drive indicator light
Iight*l
Iight*l
.r-.....
6
6
.r-.....
..,.,.
..,.,.
Fuel filter warning
Fuel filter warning
Iight*l
Iight*l
*1.
For details, see "Service reminder indicators and warning
*1.
For details, see "Service reminder indicators and warning
1-5.
buzzer" in Section
buzzer" in Section
*2·Ifthis light flashes, see "Fuel gauge" in Section
*2·Ifthis light flashes, see "Fuel gauge" in Section
1-5.
1-5.
1-5.

SECTION 1-2
Not For Reproduction
SECTION 1-2
OPERATION OF INSTRUMENTS AND
OPERATION OF INSTRUMENTS AND
CONTROLS
CONTROLS
Keys and Doors
Keys and Doors
Keys 8
Keys 8
doors.
doors.
Side
Side
Power windows 10
Power windows 10
vent
vent
Door
Door
Side windows 12
Side windows 12
Rear window 12
Rear window 12
Back door 13
Back door 13
Hood 13
Hood 13
tank
tank
Fuel
Fuel
. . . .. . . . . . . . . . . . .. . . . . . . . . .. .. . . . . . . .. . . . . . . . . . ...8
. . . .. . . . . . . . . . . . .. . . . . . . . . .. .. . . . . . . .. . . . . . . . . . ...8
windows
windows
cap 15
cap 15
11
11
•
•
7
7

Keys
Not For Reproduction
Keys
The
key works in every lock.
The
key works in every lock.
Since
the
side
Since
the
be locked
be locked
ways carry a spare key in
ways carry a spare key in
dentally lock your key
dentally lock your key
doors and back door can
side
doors and back door can
without
without
a key, you should al-
a key, you should al-
inside
inside
case
case
912009
912009
you acci-
you acci-
the
vehicle.
the
vehicle.
Key number plate
Key number plate
lDD5DADl
lDD5DADl
Keep the key number plate in a safe
Keep the key number plate in a safe
your
wallet, not in the
your
place such as
place such as
vehicle.
vehicle.
If you should lose your keys orifyou
If you should lose your keys orifyou
need additional keys, duplicates can be
need additional keys, duplicates can be
made by a Toyota dealer using the key
made by a Toyota dealer using the key
number.
number.
We recommend you to write down the key
We recommend you to write down the key
number and keep it in safe place.
number and keep it in safe place.
wallet, not in the
Side doors
Side doors
LOCKING WITH KEY
LOCKING WITH KEY
Turn the key towards the front
Turn the key towards the front
vehicletolock and towards
vehicletolock and towards
unlock.
unlock.
On vehicles with a power door lock sys-
On vehicles with a power door lock sys-
the
driver's
the
the
same time.
the
same time.
driver's
tem, locking
tem, locking
other doors simultaneously.Tounlock all
other doors simultaneously.Tounlock all
the doors simultaneously, unlock
the doors simultaneously, unlock
er's
door. The back door will
er's
door. The back door will
trolled at
trolled at
door locks all the
door locks all the
the
the
also
also
of
the
of
the
back to
back to
the
driv-
the
driv-
be con-
be con-
8
8

&
Not For Reproduction
&
CAUTION
CAUTION
Unlock
Unlock
10060Ell
10060Ell
LOCKING WITH INSIDE LOCK BUTTON
LOCKING WITH INSIDE LOCK BUTTON
the
lock button to lock and pUll
the
Push in
Push in
it out to unlock.
it out to unlock.
If
you want
If
you want
outside, push
outside, push
the door. The outside door handle must be
the door. The outside door handle must be
held up while
held up while
careful not to lock your keys in the ve-
careful not to lock your keys in the ve-
hicle.
hicle.
lock button to lock and pUll
to
lock the door from the
to
lock the door from the
the
button in before closing
the
button in before closing
the
door is being closed. Be
the
door is being closed. Be
LOCKING WITH POWER DOOR LOCK
LOCKING WITH POWER DOOR LOCK
SWITCH
SWITCH
To
lock or unlock all the side doors
To
lock or unlock all the side doors
and back door simultaneously, push the
and back door simultaneously, push the
switch.
switch.
Before driving, be sure that
Before driving, be sure that
are closed and locked, especially
are closed and locked, especially
when small children are in
when small children are in
hicle. Along with the proper use of
hicle. Along with the proper use of
seat belts, locking the doors helps
seat belts, locking the doors helps
prevent the driver and passengers
prevent the driver and passengers
from being thrown out from
from being thrown out from
hicle during
hicle during
prevent
prevent
unintentionally.
unintentionally.
an
accident. It also helps
an
accident. It also helps
the
doors from being opened
the
doors from being opened
the
the
doors
doors
the
the
the
the
ve·
ve·
ve-
ve-
9
9

Power windows
Not For Reproduction
Power windows
The
windows
The
windows
switch on each side door.
switch on each side door.
The
power
The
power
switch
switch
OPERATING
OPERATING
Use
Use
Normal operation:
Normal operation:
long as you hold
long as you hold
To
To
To
To
is in
is in
the
the
open: Lightly push down
open: Lightly push down
close: Pull up
close: Pull up
can be operated with
can be operated with
windows
windows
switch on the driver's door.
switch on the driver's door.
work when
work when
the
"ON" position.
the
"ON" position.
THE
DRIVER'S WINDOW
THE
DRIVER'S WINDOW
The window moves as
The window moves as
the
switch.
the
switch.
the
switch.
the
switch.
the
the
the
the
the
the
ignition
ignition
switch.
switch.
Automatic operation (to open only):
Automatic operation (to open only):
Push
the
Push
release it. The window will fUlly open.
release it. The window will fUlly open.
stop
stop
switch up and then release it.
switch up and then release it.
switch completely down and then
the
switch completely down and then
the
window partway, lightly pull
the
window partway, lightly pull
To
To
the
the
For driver's use
For driver's use
10
10

PASSENGER'S
Not For Reproduction
on
on
the
the
door
door
the
the
the
the
switch.
switch.
door,
door,
PASSENGER'S
passenger's
passenger's
also
also
passenger's
passenger's
switch.
switch.
the
the
THEOPERATING
THEOPERATING
WINDOW
WINDOW
Use
the
Use
door.
door.
switches
switches
window:
window:
The
The
the
the
To
open: Push down
To
open: Push down
To
close: Pull up
To
close: Pull up
If
you push in the "WINDOW LOCK"
If
you push in the "WINDOW LOCK"
switch on the
switch on the
ger's
ger's
switch
the
switch
The
driver's
The
driver's
that
control
that
control
window moves as long as you hold
window moves as long as you hold
switch.
switch.
the
the
driver's
driver's
window cannot be operated.
window cannot be operated.
has
has
passen-
passen-
&
&
To
avoid
To
must
must
•
Always
•
Always
and
and
occupants
occupants
side
side
the
the
neck,
neck,
a
a
a
a
closes
closes
that
that
ly.
ly.
When
When
•
•
hicle,
hicle,
window
window
sion.
sion.
switchtoprevent
switchtoprevent
unexpected
unexpected
• Never leave
• Never leave
the
the
tion
tion
use
use
get
get
tended
tended
volvedinserious
volvedinserious
serious
avoid
serious
do
the
do
the
make
make
other
other
the
the
power
power
headorhands
headorhands
closing
closing
serious
serious
the
the
they
they
small
small
never
never
switches
switches
Use
Use
vehicle,
vehicle,
key
key
the
power
the
power
trapped
trapped
children
children
partsofthe
partsofthe
vehicle
vehicle
window,itcould
window,itcould
operate
operate
still
still
CAUTION
CAUTION
personal
personal
following.
following.
sure
the
sure
the
are
kept
are
kept
before
before
windows.
windows.
injury.
injury.
power
power
windows,
windows,
the
the
children
children
let
them
let
them
the
"WINDOW
the
"WINDOW
them
them
useofthe
useofthe
small
small
especially
especially
inserted.
inserted.
window
window
in
a
in
a
can
can
injury,
injury,
heads,
heads,
bodiesofall
bodiesofall
completely
completely
you
you
If
someone's
If
someone's
gets
caught
gets
caught
When
When
windows
windows
areinthe
areinthe
use
the
use
the
without
without
from
from
switches.
switches.
children
children
with
with
They
They
switches
switches
window.
window.
become
become
accidents.
accidents.
you
you
hands
hands
close
close
result
result
anyone
anyone
be
sure
be
sure
safe-
safe-
power
power
supervi-
supervi-
LOCK"
LOCK"
making
making
alone
alone
the
igni-
the
igni-
could
could
and
and
Unat-
Unat-
in-
in-
in
in
in
in
ve-
ve-
in-
in-
Door
Door
To
To
the
the
dow
dow
To
To
turn
turn
the
the
To
To
in
in
open:
open:
close:
close:
protect
protect
leave
leave
lock
lock
doors.
doors.
vent
windows
vent
windows
Pushinthe
Pushinthe
handle
handle
window
window
forward
forward
outward.
outward.
Pull
the
Pull
the
the
handle
the
handle
frame.
frame.
thingsinthe
thingsinthe
the
vehicle unattended, be
the
vehicle unattended, be
the
vent windows as well as
the
vent windows as well as
release
release
and
and
window
window
untilitlocks
untilitlocks
push
push
vehicle
vehicle
10775AOl
10775AOl
pin,
pin,
the
the
inward
inward
against
against
when you
when you
sure
sure
turn
turn
win-
win-
and
and
the
the
to
to
11
11

Side windows
Not For Reproduction
Side windows
Type A
Type A
10984T01
10984T01
To open
To open
ver and slide the window open.
ver and slide the window open.
When closing
When closing
completely closed.
completely closed.
the
side window, push the le-
the
side window, push the le-
the
window, make sure it is
the
window, make sure it is
Rear window
Rear window
To
open the rear window, pUll
To
open the rear window, pUll
end of the latch handle toward you and
end of the latch handle toward you and
disengage the right end from
disengage the right end from
Then slide the window open.
Then slide the window open.
When closing
When closing
completely closed.
completely closed.
(pick-up)
(pick-up)
the
the
the
window, make sureitis
the
window, make sureitis
(112022
(112022
the
the
catch.
catch.
left
left
10997AOl
10997AOl
Type B
Type B
12
12

Back
Not For Reproduction
Back
door
door
(van)
(van)
Unlock
Unlock
The
back
door
can
be
The
back
door
can
shown.
shown.
See "Luggage stowage precautions" in
See "Luggage stowage precautions" in
Section 2
Section 2
gage.
gage.
After closing
After closing
outtomake sure it is
outtomake sure it is
•
Keep
•
Keep
driving.
driving.
luggage
luggage
also
also
entering
entering
•Ifthe
•Ifthe
rear
rear
signal
signal
other
other
the
the
warning
warning
for
precautions in loading lug-
for
precautions in loading lug-
the
back door,
the
back door,
& CAUTION
& CAUTION
the
back
the
This
This
from
from
prevents
prevents
the
the
open
open
stop
and
stop
and
lights
lights
road
road
presenceofyour
presenceofyour
triangle
triangle
door
back
door
not
not
being
being
exhaust
exhaust
vehicle.
vehicle.
back
back
tail
tail
while
while
users
mustbewarned
users
mustbewarned
lightsorrear
lightsorrear
or
or
be
try
try
securely
securely
closed
closed
only
only
thrown
thrown
gases
gases
door
door
you
are
you
are
vehicle
vehicle
other
other
opened
opened
keeps
keeps
hides
hides
device.
device.
pulling
pulling
closed.
closed.
while
while
the
the
out
but
out
but
from
from
the
the
turn
turn
parked,
parked,
of
of
by
by
as
as
Hood
Hood
it
it
l0930Al0
l0930Al0
To
open
the
To
open
1.
Pull
1.
Pull
hood
hood
a
a
Before
Before
is
closed
is
closed
wise,
wise,
ly
while
ly
while
occur.
occur.
the
the
hood:
the
hood:
the
hood
the
hood
will
spring
will
spring
&CAUTION
&CAUTION
driving,
driving,
and
securely
and
securely
hood
hood
driving
driving
lock
release
lock
release
up
slightly.
up
slightly.
be
sure
sure
open
open
that
that
locked.
locked.
unexpected-
unexpected-
be
may
may
andanaccident
andanaccident
lever.
lever.
the
the
Other-
Other-
The
The
hood
hood
may
may
10984AOl
10984AOl
13
13

Auxiliary catch lever
Not For Reproduction
Auxiliary catch lever
12006
12006
10930-03
10930-03
After
After
the
the
the
the
falling
falling
body.
body.
inserting
inserting
slot,
slot,
hood
hood
down
down
Lt
CAUTION
Lt
CAUTION
make
make
securely
securely
striking
striking
the
the
sure
sure
support
support
the
the
to
avoid
to
avoid
rod
rod
your
your
rod
into
rod
into
supports
supports
the
hood
the
hood
head
head
or
or
2.Infront
2.Infront
auxiliary
auxiliary
hood.
hood.
14
14
of
of
catch
catch
the
the
vehicle,
vehicle,
lever
lever
pull
pull
and
and
lift
lift
up
up
the
the
the
the
3.
Hold
3.
Before closing
Before closing
you have not forgotten any tools, rags,
you have not forgotten any tools, rags,
etc. and return
etc. and return
clip-this
clip-this
hood and make sure it locks into place.
hood and make sure it locks into place.
If
If
front
front
the
Hold
the
support
support
prevents rattles. Then lower the
prevents rattles. Then lower the
necessary, press down gently on
necessary, press down gently on
edge to lock it.
edge to lock it.
hood
openbyinserting
hood
openbyinserting
rod
into
rod
the
the
the
into
the
hood, checktosee
hood, checktosee
the
support rod to its
the
support rod to its
slot.
slot.
the
the
that
that
the
the
Fuel
Not For Reproduction
Fuel
tank
tank
cap
cap
(van)
(van)
&
&
CAUTION
CAUTION
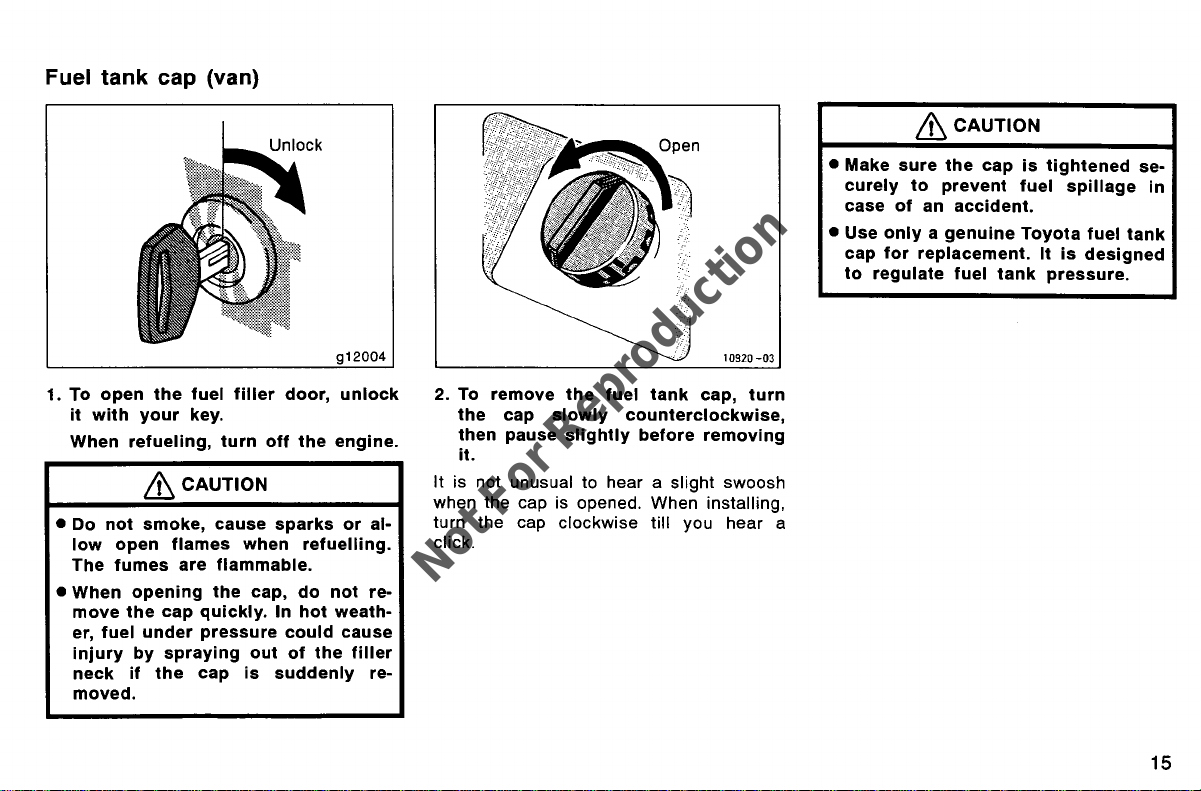
1. To
open
1. To
open
it
with
it
with
When
When
• Do
not
• Do
not
low
low
The
The
When
When
•
•
move
move
er,
fuel
er,
fuel
injury
injury
neckifthe
neckifthe
moved.
moved.
the
the
your
your
refueling,
refueling,
&
&
smoke,
smoke,
open
open
fumes
fumes
opening
opening
the
cap
the
cap
under
under
by
by
fuel
filler
fuel
filler
key.
key.
turn
turn
CAUTION
CAUTION
cause
cause
flames
flames
are
flammable
are
flammable
the
the
quickly.Inhot
quickly.Inhot
pressure
pressure
spraying
spraying
cap
cap
door,
door,
off
the
off
the
sparksoral-
sparksoral-
when
refuelling.
when
refuelling.
.
.
cap,
do
cap,
do
could
could
outofthe
outofthe
is
SUddenly re-
is
SUddenly re-
912004
912004
unlock
unlock
engine.
engine.
not
re-
not
re-
weath-
weath-
cause
cause
filler
filler
10920
-03
10920
-03
2.
To
remove
2.
To
remove
the
cap
the
cap
then
pause
then
pause
it.
it.
It is not unusualtohear a slight swoosh
It is not unusualtohear a slight swoosh
when the cap is opened. When installing,
when the cap is opened. When installing,
turn
turn
the
the
click.
click.
the
fuel
the
slowly
slowly
slightly
slightly
cap clockwise till you
cap clockwise till you
tank
fuel
tank
counterclockwise,
counterclockwise,
before
before
cap,
turn
cap,
turn
removing
removing
hear
hear
• Make
• Make
• Use
• Use
a
a
sure
sure
curely
curely
caseofan
caseofan
cap
cap
to
to
to
to
onlyagenuine
onlyagenuine
for
replacement.Itis
for
replacement.Itis
regulate
regulate
the
capistightened
the
capistightened
prevent
prevent
accident
accident
fuel
fuel
tank
tank
fuel
fuel
.
.
Toyota
Toyota
spillage
spillage
fuel
fuel
designed
designed
pressure.
pressure.
se-
se-
tank
tank
in
in
15
15

Fuel
Not For Reproduction
tank
cap
Fuel
tank
To
remove
To
remove
with
with
clockwise,
clockwise,
removing
removing
When
When
It is not unusualtohearaslight
It is not unusualtohearaslight
when
when
make sure
make sure
ly aligned with
ly aligned with
opening.
opening.
the
the
your
key,
your
key,
then
then
it.
it.
refueling,
refueling,
the
cap is opened. When installing,
the
cap is opened. When installing,
the
the
(pick-up)
cap
(pick-up)
Open
Open
fuel
tank
fuel
tank
turnitslowly
turnitslowly
pause
pause
turn
turn
tabs in
tabs in
the
cutoutsinthe
the
cutoutsinthe
cap,
cap,
slightly
slightly
off
the
off
the
the
cap are proper-
the
cap are proper-
10920-04
10920-04
unlock
unlock
counter-
counter-
before
before
engine.
engine.
swoosh
swoosh
tank
tank
&
CAUTION
&
CAUTION
• Do
not
• Do
low
low
The
The
•
When
•
When
move
move
er,
er,
injury
injury
neck
neck
moved.
moved.
• Make
• Make
curely
it
it
curely
caseofan
caseofan
•
Use
•
Use
cap
cap
to
to
smoke,
not
smoke,
open
open
fumes
fumes
opening
opening
the
the
fuel
under
fuel
under
by
by
if
if
sure
sure
to
to
onlyagenuine
onlyagenuine
for
replacement.Itis
for
replacement.Itis
regulate
regulate
cause
cause
flames
flames
are
inflammable.
are
inflammable.
the
the
cap
quickly.Inhot
cap
quickly.Inhot
pressure
pressure
spraying
spraying
the
cap
the
cap
the
capistightened
the
capistightened
prevent
prevent
accident.
accident.
fuel
tank
fuel
tank
sparksoral-
sparksoral-
when
when
is
is
refuelling.
refuelling.
cap,
do
cap,
do
could
could
outofthe
outofthe
suddenly
suddenly
fuel
spillage
fuel
spillage
Toyota
Toyota
pressure.
pressure.
not
re-
not
re-
weath-
weath-
cause
cause
filler
filler
re-
re-
se-
se-
fuel
tank
fuel
tank
designed
designed
in
in
16
16
SECTION
Not For Reproduction
SECTION
OPERATION OF INSTRUMENTS AND
OPERATION OF INSTRUMENTS AND
CONTROLS
CONTROLS
Seats, Seat belts, Steering wheel and Mirrors
Seats, Seat belts, Steering wheel and Mirrors
Seats 18
Seats 18
Front seats 18
Front seats 18
Rear seats 20
Rear seats 20
Head restraints 23
Head restraints 23
Seat belts 24
Seat belts 24
Tilt steering wheel 29
Tilt steering wheel 29
Outside rear
Outside rear
Anti-glare
Anti-glare
view
mirrors 30
view
mirrors 30
inside rear view mirror 30
inside rear view mirror 30
1-3
1-3
•
•
17
17
Seats
Not For Reproduction
Seats
While
the
While
hicle
hicle
upright,
upright,
erly
erly
• Do
• Do
occupants
occupants
not
not
folded-down
folded-down
luggage
luggage
Persons
Persons
properly
properly
canbeseverely
canbeseverely
of
of
•
During
•
During
sengers
sengers
around
around
ries
ries
gency
gency
vehicle
the
vehicle
occupants
occupants
sit
sit
wear
the
wear
the
not
not
allow
allow
emergency
emergency
can
can
braking
braking
is being driven, all ve-
is being driven, all ve-
should have
should have
well back in
well back in
seat
belts provided.
seat
belts provided.
& CAUTION
& CAUTION
drive
the
drive
compartmentorcargo
compartmentorcargo
not
not
restrained
restrained
driving,
driving,
to
to
between
between
occurinthe
occurinthe
vehicle
the
vehicle
are
properly
are
properly
sitting
sitting
seatback,
seatback,
properly
properly
injuredinthe
injuredinthe
brakingora
brakingora
do
do
stand
stand
seats.
seats.
oracollision.
oracollision.
the
the
the
seat
the
seat
unless
unless
seated.
seated.
on
top
on
top
or
or
seated
seated
by
seat
by
seat
not
allow
not
allow
up
or
up
or
Severe
Severe
eventofemer-
eventofemer-
seatback
seatback
and prop-
and prop-
the
the
Do
Do
of
of
in
the
in
the
area.
area.
and/or
and/or
belts
belts
event
event
collision.
collision.
pas-
pas-
move
move
inju-
inju-
Front
Front
-Seat
-Seat
Adjust
Adjust
pedals, steering wheel and instrument
pedals, steering wheel and instrument
panel controls are within easy reach of
panel controls are within easy reach of
the
the
a
a
seats-
seats-
adjustment
adjustment
the
driver's
the
driver's
driver.
driver.
& CAUTION
& CAUTION
•
Adjustments
•
Adjustments
while
the
while
seat
seat
cause
cause
the
the
•
When
•
When
not
not
senger
senger
•
After
•
After
try
try
to
make
to
make
tion.
tion.
•
After
•
After
back
back
lockedinposition.
lockedinposition.
•
After
•
After
pushing
pushing
ward
ward
curedinplace.
curedinplace.
vehicleismoving,
the
vehicleismoving,
may
unexpectedly
may
unexpectedly
the
drivertolose
the
adjusting
adjusting
to
hit
to
hit
or
or
adjusting
adjusting
sureitis
sureitis
adjusting
adjusting
your
your
putting
putting
the
the
to
make
to
make
drivertolose
the
the
luggage.
luggage.
bodytomake
bodytomake
seat
seat
vehicle.
vehicle.
slidingitforward
slidingitforward
precautions
precautions
seatsothat
seatsothat
should
should
the
seat,becareful
the
seat,becareful
seat
against
seat
against
the
seat
the
seat
locked
locked
the
seatback,
the
seatback,
back
the
back
the
forward
forward
sure
thatitis
sure
thatitis
not
not
and
and
the
the
be
made
be
made
as
as
move
and
move
and
control
control
a pas-
a pas-
position,
position,
backward
backward
in
posi-
in
posi-
push
push
sureitis
sureitis
seat,
seat,
and
rear-
and
rear-
foot
foot
the
the
of
of
try
try
se-
se-
• Do
• Do
The
The
seat-lock
seat-lock
edly
edly
justing
justing
move,
move,
control
control
•
While
•
While
your
your
the
the
and
and
not
put
not
put
objects
objects
push
push
lever;
lever;
causing
causing
adjusting
adjusting
hands
hands
moving
moving
injure
injure
objects
objects
may
may
mechanism
mechanism
up
the
up
the
the
the
of
the
of
the
under
under
parts.
parts.
your
your
under
under
interfere
interfere
seat
seat
seat
seat
the
driver
the
driver
vehicle.
vehicle.
the
seat,donot
the
seat,donot
the
the
You
You
hands
hands
the
seats.
the
seats.
with
with
or
unexpect-
or
unexpect-
position
position
may
suddenly
may
suddenly
to
lose
to
lose
seatornear
seatornear
may
catch
may
catch
or
fingers.
or
fingers.
the
the
ad-
ad-
put
put
18
18

-Adjusting
Not For Reproduction
-Adjusting
Seatback
Seatback
release
release
front
front
lock
lock
lever
lever
seats
seats
1302
1302
ADJUSTING SEAT POSITION
ADJUSTING SEAT POSITION
Pull
the
lock
Pull
the
lock
slide
the
the
slight
slight
lever.
lever.
forward
forward
Then
Then
and
and
reduce
reduce
lap
belt
lap
belt
protection
protection
back
back
hips
hips
event
event
increasing
increasing
seattothe
seattothe
body
body
release
release
&
&
the
the
The
The
when
when
are
are
the
the
and
and
ofafrontal
ofafrontal
slide
with
with
the
the
ADJUSTING
ADJUSTING
Lean
Lean
lever.
lever.
angle
angle
To
To
the
the
reclining
reclining
needed.
needed.
mum
mum
collision
collision
senger
senger
well
well
reclined,
reclined,
your
your
directlytothe
directlytothe
the
the
riskofpersonal
riskofpersonal
with
with
back.
back.
release
release
SEATBACK
SEATBACK
and
and
lean
lean
CAUTION
CAUTION
the
risk
the
risk
duringacollision,
duringacollision,
seatback
seatback
seat
seat
the
the
sitting
sitting
in
the
in
the
lap
lap
apply
apply
abdomen.
abdomen.
lever
lever
desired
desired
pressure
pressure
ANGLE
ANGLE
pull
the
pull
the
back
to
back
to
the
lever.
the
lever.
of
sliding
of
sliding
any
any
belts
provide
belts
provide
inafrontal
inafrontal
driver
and
driver
and
up
straight
up
straight
seats.
seats.Ifyou
belt
may
belt
may
restraint
restraint
Therefore,
Therefore,
collision,
collision,
injury
may
injury
recline
recline
may
of
of
up.
up.
and
and
lock
lock
the
the
more
more
If
slide
slide
increase
increase
the
the
Then
Then
position
position
release
release
release
release
desired
desired
under
under
avoid
avoid
than
than
maxi-
maxi-
or
rear
or
rear
the
pas-
the
pas-
and
and
you
are
are
past
past
forces
forces
the
the
seat·
seat·
in
in
-Moving
-Moving
rear seat
rear seat
Separate seat
Separate seat
Lock
release
Lock
release
Bench seat
Bench seat
passenger's
passenger's
entry
entry
Lock
Lock
lever
lever
seat
seat
release
release
for
for
lever
lever
13024
13024
10150A06
10150A06
19
19

For
Not For Reproduction
easy
easy
the
the
passengers
passengers
be
be
access
access
seat-The
seat-The
&
&
putting
putting
For
this.
this.
1. Pull one of
1. Pull one of
lease levers.
lease levers.
Separate
Separate
ward slightly.
ward slightly.
Bench
Bench
degrees toward
degrees toward
2.
Move
2.
Move
After
After
seatback
seatback
locks.
locks.
•
After
•
After
pushing
pushing
wardtomake
wardtomake
place.
place.
•
Passengers
•
Passengers
must
must
release
release
isinmotion.
isinmotion.
to
the
to
the
the
two
the
seat-The
seat-The
seattofront-most
seattofront-most
and return
and return
CAUTION
CAUTION
the
seat
the
seat
sitting
sitting
careful
careful
the
lever
the
lever
seatback
two
seatback
seat will
seat will
seat
seat
the
driver's
the
driver's
are in,
are in,
the
the
back
the
back
the
forward
forward
sureitis
sureitis
in
in
nottoaccidentally
nottoaccidentally
while
while
rear
seat,
rear
seat,
lock
lock
slide
for-
slide
for-
will rotate 17
will rotate 17
side.
side.
position.
position.
lift
up
lift
seat until
seat until
seat,
seat,
and
and
secured
secured
the
rear
the
rear
the
the
the
up
the
try
try
rear-
rear-
seat
seat
vehicle
vehicle
in
in
do
do
re-
re-
Rear
seats-
Rear
seats-
-Rear
-Rear
•
•
•
•
•
•
it
it
seat
precautions
seat
precautions
&
CAUTION
&
CAUTION
Adjustments
Adjustments
while
the
while
the
When
returning
When
returning
the
normal
the
normal
itissecurely
itissecurely
upward.
upward.
When
returning
When
returning
nal
position,
nal
position,
precautionsinordertoprevent
precautionsinordertoprevent
sonal
injury
sonal
injury
den
den
stop:
stop:
Make
Make
lockedbypushing
lockedbypushing
ward
ward
by
by
bottom
bottom
will
will
ating
ating
If
If
certaintoreplace
certaintoreplace
Make
Make
twisted
twisted
and are
and are
position
position
sure
sure
on
on
tryingtopullupthe
tryingtopullupthe
prevent
prevent
properly
properly
you
removed
you
removed
sure
sure
should
should
vehicleismoving.
vehicleismoving.
position,
position,
locked
locked
observe
observe
inacollision
inacollision
the
the
the
topofthe
the
topofthe
cushion.
cushion.
the
the
.
.
the
the
or
caught
or
caught
arranged
arranged
and
are
and
are
not
not
the
seat
the
seat
make
make
seatstotheir
seatstotheir
the
the
seat
seat
forward
forward
Failure
Failure
seat
belt
seat
belt
head
restraints,
head
restraints,
them.
them.
seat
belts
seat
belts
under
under
in
in
readytouse.
readytouse.
be
be
cushion
cushion
sure
sure
by
pUlling
by
pUlling
following
following
or
or
is
securely
is
securely
and
and
seat
back
seat
back
edgeofthe
edgeofthe
to
to
from
from
are
are
the
the
their
their
made
made
that
that
origi-
origi-
per-
per-
sud-
sud-
rear-
rear-
or
or
do
so
do
so
oper-
oper-
be
be
not
not
seat
seat
proper
proper
Folding
Folding
gage compartment. See "Luggage
gage compartment. See "Luggage
precautions" in Section 2 for
precautions" in Section 2 for
in loading luggage.
in loading luggage.
to
to
it
it
the
the
seats
seats
up will enlarge
up will enlarge
precautions
precautions
the
lug-
the
lug-
stowage
stowage
20
20

-Folding
Not For Reproduction
-Folding
(transverse
(transverse
BEFORE FOLDING UP REAR SEAT
BEFORE FOLDING UP REAR SEAT
Stow
the
Stow
the
shown
shown
This
prevents
This
prevents
falling
falling
The
seat
The
seat
stowed
stowed
seat.
seat.
out
out
rear
rear
in
in
before
before
rear
rear
the
the
when
when
belt
belt
seat
seat
type)
type)
seat
belt
seat
belt
illustration.
illustration.
the
belt
the
belt
you
foldupthe
you
foldupthe
NOTICE
NOTICE
and
buckles
and
buckles
you
fold
you
fold
and
and
and
and
buckles
buckles
buckles
buckles
rear seat.
rear seat.
must
must
up
the rear
up
the rear
as
as
from
from
be
be
Lock release strap
Lock release strap
1.
Remove
1.
Remove
the
the
fold
fold
lock
lock
the
the
the
the
release
release
seatback
seatback
head
restraints,
head
restraints,
straptounlock
straptounlock
down.
down.
and
and
pUll
pUll
and
and
2.
2.
Holding strap A
Holding strap A
Front
Front
Hook
the
Hook
the
let
under
let
under
Hook
Hook
holding
holding
the
seat
the
seat
strapAto
strapAto
cushion.
cushion.
10800A02
10800A02
the
the
eye-
eye-
21
21

3.
Not For Reproduction
Pull
3.
Pull
unlock
unlock
up
up
holding
holding
floor
floor
using
using
the
the
the
the
and
and
the
the
lock
release
lock
release
the
seat
the
seat
whole
whole
strapBto
strapBto
store
store
holesinthe
holesinthe
cushion
cushion
seat.
seat.
the
the
strap
strap
and
and
Then
Then
the
eyeletonthe
the
eyeletonthe
head
head
seat
seat
again
again
sWing
sWing
hook
the
hook
the
restraints
restraints
back.
back.
to
4.
to
Adjust
4.
Adjust
seat.
seat.
To
shorten
To
shorten
lengthen it, turn up
lengthen it, turn up
strap.
strap.
the
strap
the
the
the
lengthtosecure
strap
lengthtosecure
strap, pull the free end;
strap, pull the free end;
the tab
the tab
and pull
and pull
the
the
the
the
After
After
the
seatissecurely
the
seatissecurely
ing
forward
ing
forward
of
the
of
the
up
the
up
the
Failuretodosowill
Failuretodosowill
belt
from
belt
from
removed
removed
replace
replace
to
to
&
CAUTION
&
CAUTION
returning
returning
and
and
seat
back
seat
back
edgeofthe
edgeofthe
operating
operating
head
head
head
head
the
seat,
the
rearward
rearward
or
or
restraints,becertain
restraints,becertain
restrain.
restrain.
make
seat,
make
locked
locked
by
by
bottom
bottom
prevent
prevent
properly.Ifyou
properly.Ifyou
on
on
trying
trying
by
push-
by
push-
the top
the top
to
to
cushion.
cushion.
the
the
sure
sure
pUll
pUll
seat
seat
to
to
22
22

-Folding
Not For Reproduction
-Folding
(longitudinal
(longitudinal
Push
the
the
seat
seat
seat
seat
lock
lock
cushion
cushion
by
by
eyelet
eyelet
Push
the
the
the
the
to
to
the
the
rear
rear
type)
type)
release
release
hooking
hooking
on
on
seats
seats
fully
fully
the
the
the
the
lever
lever
up.
up.
seat
seat
and
and
Next,
Next,
holding
holding
support.
support.
Head
Head
l0810A06 10160AOl
l0810A06 10160AOl
swing
swing
secure
secure
strap
strap
When
When
seats,
seats,
belt
belt
tion
tion
folding
folding
make
make
buckle
buckle
to
avoid
to
avoid
NOTICE
NOTICE
longitudinal
longitudinal
sure
to
to
place
place
in
in
sure
as
shown
as
shown
damagetothe
damagetothe
the
the
type
type
the
the
illustra-
illustra-
buckle.
buckle.
rear
rear
seat
seat
For
For
head
head
To
To
To
To
lock release button.
lock release button.
The head
The head
it is close
it is close
a cushion on
a cushion on
mended.
mended.
restraints
restraints
your
safety
your
safety
restraint
restraint
raise: Pull it up.
raise: Pull it up.
lower: Pushitdown
lower: Pushitdown
and
and
before
before
restraintismost
restraintismost
to
your
to
head.
your
head.
the
seatbackisnot
the
seatbackisnot
comfort,
comfort,
driving.
driving.
while
while
effective
effective
Therefore,
Therefore,
adjust
adjust
pressing
pressing
recom-
recom-
when
when
using
using
the
the
the
the
23
23
 Loading...