

Toyota Land Cruiser 2005 Owners Manual

Foreword
Welcome to the growing group of value−conscious people who drive Toyotas. We are proud of the advanced engineering and
quality construction of each vehicle we build.
This Owner’s Manual explains the operation of your new Toyota. Please read it thoroughly and have all the occupants
follow the instructions carefully. Doing so will help you enjoy many years of safe and trouble−free motoring. For
important information about this manual and your Toyota, read the following pages carefully.
When it comes to service, remember that your Toyota dealer knows your vehicle very well and is interested in your complete
satisfaction. Your Toyota dealer will provide quality maintenance and any other assistance you may require.
If there is not a Toyota dealer near you, or you need emergency assistance for any reason, please call the following number:
U.S. OWNERS: Toyota Customer Assistance Center Toll−free:1−800−331−4331
Please leave this Owner’s Manual in this vehicle at the time of resale. The next owner will need this information also.
All information and specifications in this manual are current at the time of printing. However, because of Toyota’s policy of
continual product improvement, we reserve the right to make changes at any time without notice.
Please note that this manual applies to all models and explains all equipment, including options. Therefore, you may
find some explanations for equipment not installed on your vehicle.
© 2004 TOYOTA MOTOR CORPORATION
All rights reserved. This material may not be reproduced or copied, in whole or in part, without the written permission of Toyota
Motor Corporation.
i
Important information about this manual
Safety and vehicle damage warnings
Throughout this manual, you will see safety and vehicle damage warnings. You must follow these warnings carefully to
avoid possible injury or damage.
The types of warnings, what they look like, and how they are
used in this manual are explained as follows:
CAUTION
This is a warning against anything which may
cause injury to people if the warning is ignored.
You are informed about what you must or must not
do in order to reduce the risk of injury to yourself
and others.
NOTICE
This is a warning against anything which may
cause damage to the vehicle or its equipment if the
warning is ignored. You are informed about what
you must or must not do in order to avoid or reduce the risk of damage to your vehicle and its
equipment.
Safety symbol
When you see the safety symbol
shown above, it means: “Do not”; “Do
not do this”; or “Do not let this happen”.
ii

Important information about your Toyota
Occupant restraint systems
Toyota encourages you and your family to take the time
to read Section 1−3 of this Owner’s Manual carefully. In
terms of helping you understand how you can receive
the maximum benefit of the occupant restraint systems
this vehicle provides, Section 1−3 of this Owner’s Manual is the most important section for you and your family
to read.
Section 1−3 describes the function and operation concerning seats, seat belts, SRS airbags and child restraint systems of this vehicle and some potential hazards you should be aware of. These systems work together along with the overall structure of this vehicle in
order to provide occupant restraint in the event of a
crash. The effect of each system is enhanced when it is
used properly and together with other systems. No
single occupant restraint system can, by itself, provide
you or your family with the equal level of restraint
which these systems can provide when used together.
That is why it is important for you and your family to
understand the purpose and proper use of each of these
systems and how they relate to each other.
The purpose of all occupant restraint systems is to help
reduce the possibility of death or serious injury in the
event of a collision. None of these systems, either individually or together, can ensure that there is no injury
in the event of collision. However, the more you know
about these systems and how to use them properly, the
greater your chances become of surviving an accident
without death or serious injury.
Seat belts provide the primary restraint to all occupants
of the vehicle, and every occupant of the vehicle should
wear seat belts properly at all times. Children should
always be secured in child restraint systems that are
appropriate for their age and size. SRS (Supplemental
Restraint System) airbags are, as their names imply,
designed to work with, and be supplemental to, seat
belts and are not substitutes for them. SRS airbags can
be very effective in reducing the risk of head and chest
injuries by preventing contact of the head and chest
with interior portions of the vehicle.
iii

In order to be effective, the SRS airbags must deploy
with tremendous speed. The rapid deployment of the
SRS airbags makes the SRS airbags themselves potential sources of serious injury if an occupant is too close
to an airbag, or if an object or some part of his or her
body has been placed between the occupant and the
airbag at the time of deployment. This is just one example of how the instructions in Section 1−3 of this Owner’s Manual will help ensure proper use of the occupant
restraint systems, and increase the safety they can provide to you and your family in the event of an accident.
Toyota recommends you to read the provisions in Section 1−3 carefully and refer to them as needed during
your time of ownership of this vehicle.
Event data recorder
Your vehicle has computers that monitor and control
certain aspects of your vehicle. These computers assist
in driving and maintaining optimal vehicle performance.
Besides storing data useful for troubleshooting, there is
a system to record data in a crash or a near car crash
event. This is called an Event Data Recorder (EDR).
The SRS airbag sensor assembly contains the EDR. In
a crash or a near car crash event, this device records
some or all of the following information:
Engine speed
Whether the brake pedal was applied or not
Vehicle speed
To what extent the accelerator pedal was depressed
Position of the transmission selector lever
Whether the driver and front passenger wore the
seat belts or not
Driver ’s seat position
Front passenger’s occupant classification
iv

SRS airbag deployment data
SRS airbag system diagnostic data
The information above is intended to be used for the
purpose of improving vehicle safety performance. Unlike
general data recorders, the EDR does not record sound
data such as conversation between passengers.
Toyota will not disclose the data recorded in an EDR to
a third party except when:
An agreement from the vehicle’s owner (or the leas-
ing company for a leased vehicle) is obtained
Officially requested by the police or other authorities
Used as a defence for Toyota in a law suit
Ordered by the court
However, if necessary Toyota will:
Use the data for research on Toyota vehicle safety
performance
Disclose the data to a third party for research pur-
poses without disclosing details of the vehicle owner, and only when it is deemed necessary
Disclose summarized data cleared of vehicle identifi-
cation information to a non−Toyota organization for
research purposes
New vehicle warranty
Your new vehicle is covered by the following Toyota
limited warranties:
New vehicle warranty
Emission control systems warranty
Others
For further information, please refer to the “Owner’s
Warranty Information Booklet” or “Owner’s Manual Supplement”.
Your responsibility for maintenance
It is the owner’s responsibility to make sure the specified maintenance is performed. Section 6 gives details
of these maintenance requirements. Also included in
Section 6 is general maintenance. For scheduled maintenance information, place refer to the “Scheduled Maintenance Guide” or “Owner’s Manual Supplement”.
v
Important health and safety
information about your Toyota
CAUTION
D WARNING: Engine exhaust, some of its constitu-
ents, and a wide variety of automobile components contain or emit chemicals known to the
State of California to cause cancer and birth defects and other reproductive harm. In addition,
oils, fuels and fluids contained in vehicles as well
as waste produced by component wear contain or
emit chemicals known to the State of California
to cause cancer and birth defects or other reproductive harm.
D Battery posts, terminals and related accessories
contain lead and lead compounds. Wash your
hands after handling. Used engine oil contains
chemicals that have caused cancer in laboratory
animals. Always protect your skin by washing
thoroughly with soap and water.
Accessories, spare parts and
modification of your Toyota
A wide variety of non−genuine spare parts and accesso-
ries for Toyota vehicles are currently available in the
market. You should know that Toyota does not warrant
these products and is not responsible for their performance, repair, or replacement, or for any damage they
may cause to, or adverse effect they may have on,
your Toyota vehicle.
This vehicle should not be modified with non−genuine
Toyota products. Modification with non−genuine Toyota
products could affect its performance, safety or durability, and may even violate governmental regulations. In
addition, damage or performance problems resulting from
the modification may not be covered under warranty.
vi

Installation of a mobile
two−way radio system
As the installation of a mobile two−way radio system in
your vehicle could affect electronic systems such as
multiport fuel injection system/sequential multiport fuel
injection system, electronic throttle control system,
cruise control system, anti−lock brake system, active
traction control system, vehicle stability control system,
SRS airbag system and seat belt pretensioner system,
be sure to check with your Toyota dealer for precautionary measures or special instructions regarding installation.
Tires and loading on your Toyota
Underinflated or overinflated tire inflation pressure
and the excess load may result in the deterioration
of steering ability and braking ability, leading to
an accident. Check the tire inflation pressure periodically and be sure to keep the load limits given
in this Owner’s Manual. For details about tire inflation pressure and load limits, see pages 301 and
230.
vii

Scrapping of your Toyota
The SRS airbag and seat belt pretensioner devices in
your Toyota contain explosive chemicals. If the vehicle
is scrapped with the airbags and pretensioners left as
they are, this may cause an accident such as fire. Be
sure to have the systems of the SRS airbag and seat
belt pretensioner removed and disposed of by a qualified
service shop or by your Toyota dealer before you dispose of your vehicle.
On−pavement and off−road
driving tips
This vehicle belongs to the utility vehicle class. Utility
vehicles have a significantly higher rollover rate than
other types of vehicles. This vehicle will handle and
maneuver differently from an ordinary passenger car because it is designed for off−road use also. In addition,
this vehicle has a higher ground clearance and center of
gravity than that of an ordinary passenger car. This
vehicle design feature causes this type of vehicle to be
more likely to rollover. Failure to operate this vehicle
correctly may result in loss of control, accidents or
vehicle rollover causing death or serious injury. Be sure
to read “Off−road vehicle precautions” on page 208 and
“Off−road driving precautions” on page 238.
viii

Table of contents
1 OPERATION OF INSTRUMENTS AND CONTROLS Page
1 Overview of instruments and controls 1. . . . . . . . . . . . . . . . . . . . . . . . . .
2 Keys and Doors 9. . . . . . . . . . . . . . . . . . . . . . . . . . . . . . . . . . . . . . . . . . . . . . .
3 Occupant restraint systems 33. . . . . . . . . . . . . . . . . . . . . . . . . . . . . . . . . . .
4 Steering wheel and Mirrors 97. . . . . . . . . . . . . . . . . . . . . . . . . . . . . . . . . . .
5 Lights, Wipers and Defogger 107. . . . . . . . . . . . . . . . . . . . . . . . . . . . . . . . .
6 Gauges, Meters and Service reminder indicators 117. . . . . . . . . . . . . .
7 Ignition switch, Transmission and Parking brake 133. . . . . . . . . . . . . .
8 Audio system 151. . . . . . . . . . . . . . . . . . . . . . . . . . . . . . . . . . . . . . . . . . . . . . .
9 Air conditioning system 175. . . . . . . . . . . . . . . . . . . . . . . . . . . . . . . . . . . . . .
10 Other equipment 187. . . . . . . . . . . . . . . . . . . . . . . . . . . . . . . . . . . . . . . . . . . .
2 INFORMATION BEFORE DRIVING YOUR TOYOTA 207. . . . . . . . . .
3 STARTING AND DRIVING
4 IN CASE OF AN EMERGENCY
5 CORROSION PREVENTION AND APPEARANCE CARE
6 VEHICLE MAINTENANCE AND CARE
7 DO−IT−YOURSELF MAINTENANCE
1 Introduction 289. . . . . . . . . . . . . . . . . . . . . . . . . . . . . . . . . . . . . . . . . . . . . . . .
2 Engine and Chassis 295. . . . . . . . . . . . . . . . . . . . . . . . . . . . . . . . . . . . . . . . .
3 Electrical components 311. . . . . . . . . . . . . . . . . . . . . . . . . . . . . . . . . . . . . . .
8 SPECIFICATIONS 323. . . . . . . . . . . . . . . . . . . . . . . . . . . . . . . . . . . . . . . . . .
9 REPORTING SAFETY DEFECTS FOR U.S. OWNERS AND
UNIFORM TIRE QUALIT Y GRADING
10 I NDEX
ix
235. . . . . . . . . . . . . . . . . . . . . . . . . . . . . . . . . .
251. . . . . . . . . . . . . . . . . . . . . . . . . . . . . .
275. . . . .
283. . . . . . . . . . . . . . . . . . . . . . .
331. . . . . . . . . . . . . . . . . . . . . . . .
333. . . . . . . . . . . . . . . . . . . . . . . . . . . . . . . . . . . . . . . . . . . . . . . . . . . . .

x

SECTION 1− 1
OPERATION OF INSTRUMENTS AND
CONTROLS
Overview of instruments and controls
Instrument panel overview 2. . . . . . . . . . . . . . . . . . . . . . . . . . . . . . . . . . . . .
Instrument cluster overview 6. . . . . . . . . . . . . . . . . . . . . . . . . . . . . . . . . . . .
Indicator symbols on the instrument panel 7. . . . . . . . . . . . . . . . . . . . . . .
1
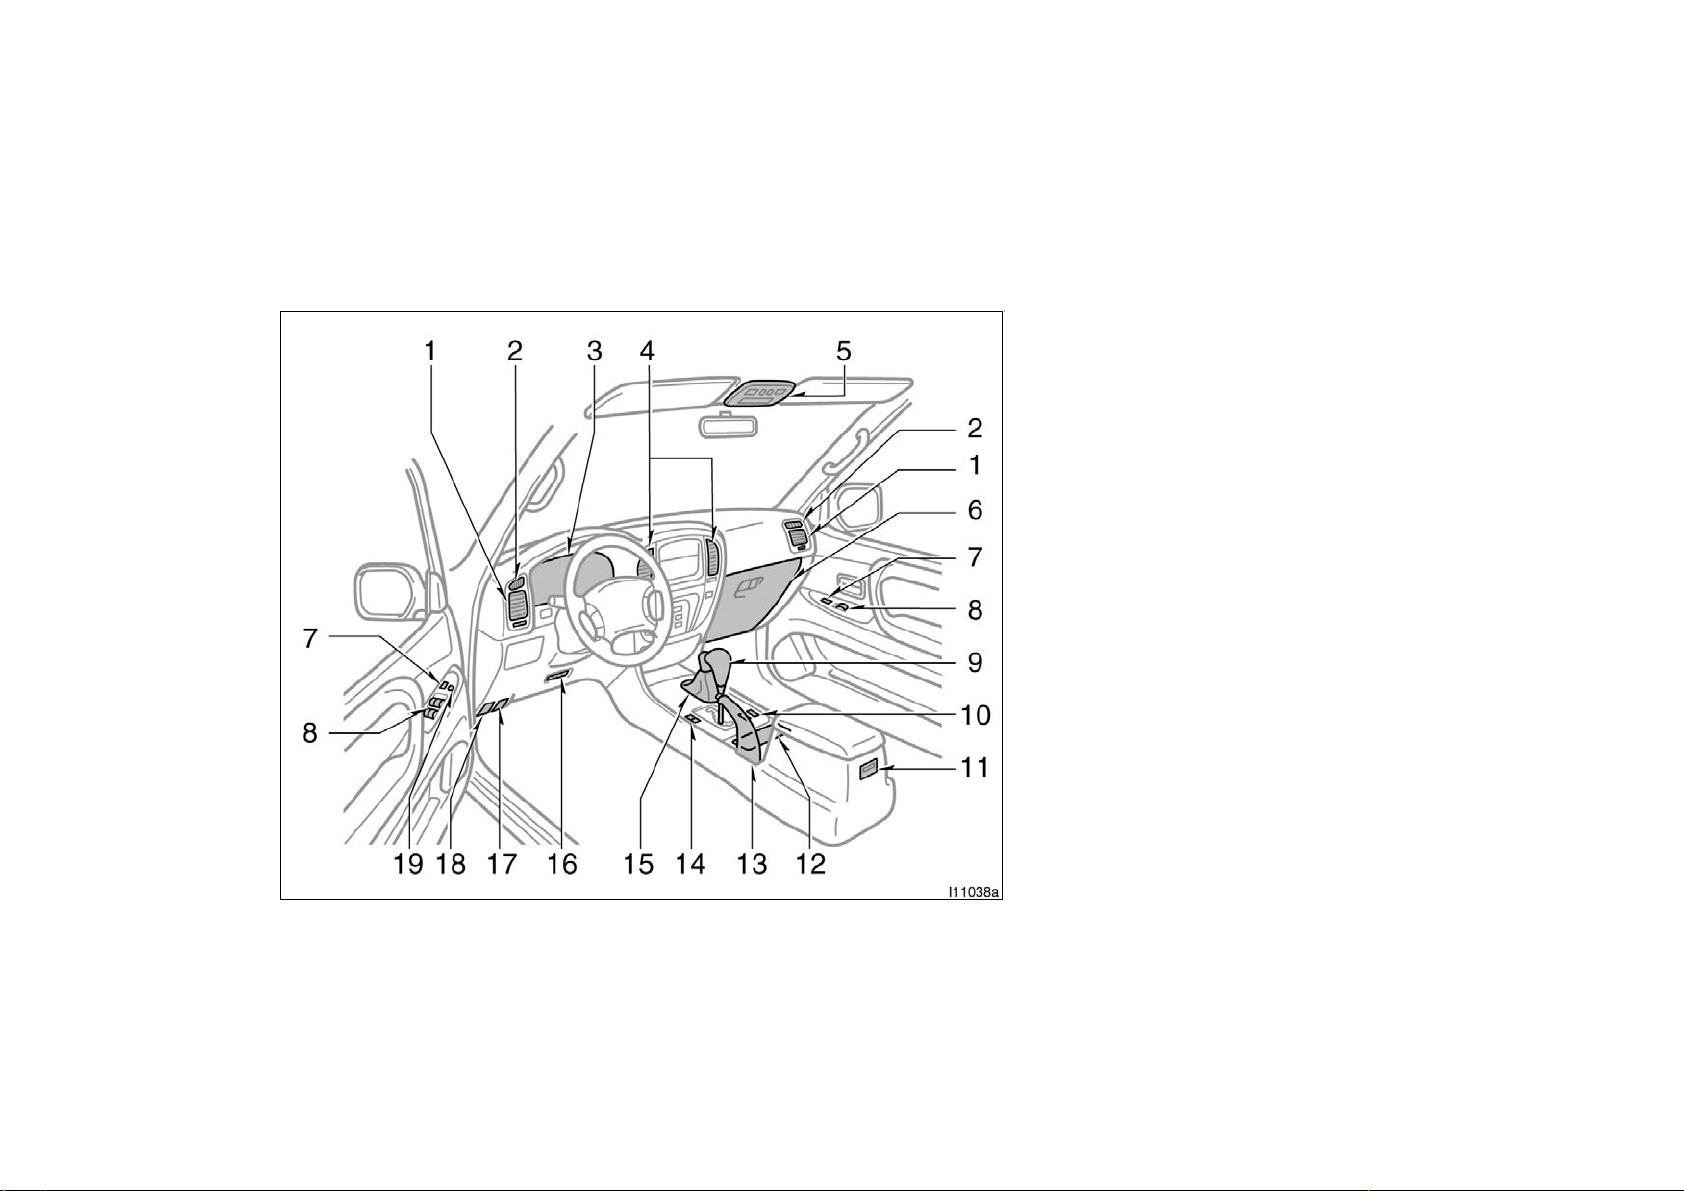
Instrument panel overview
View A
1. Side vents
2. Side defroster outlets
3. Instrument cluster
4. Center vents
5. Electric moon roof switches and/or
personal lights
6. Glove box
7. Power door lock switches
8. Power window switches
9. Automatic transmission selector lever
10. Seat heater switches
11. Rear seat audio system
12. Cup holder
13. Parking brake lever
14. Second start mode selector button and
driving pattern selector button
15. Four−wheel drive control lever
16. Lower vent
17. Hood lock release lever
18. Fuel filler door opener
19. Window lock switch
2

View B
(Vehicles with navigation syst em)
11c515a
1. Headlight, turn signal and front fog
light switches
2. Cruise control switch
3. Ignition switch
4. Wiper and washer switches
5. Emergency flasher switch
6. Navigation system including air conditioning controls (See the separate
“Navigation System Owner’s Manual”.)
7. Clock, outside temperature and trip information display
8. Front passenger’s seat belt reminder
light
9. Audio system
10. Outside rear view mirror heater switch
11. Rear air conditioning switch
12. Rear window defogger switch
13. Center differential lock switch
14. Power antenna switch
15. Power tilt and telescopic steering
switch
16. Instrument panel light control dial
17. Power rear view mirror control switches
18. Power quarter window switch
(left−hand side)
19. Power quarter window switch
(right−hand side)
20. Roll sensing of curtain shield airbags
off switch
3

View B
(Vehicles without navigation system)
1. Headlight, turn signal and front fog
light switches
2. Cruise control switch
3. Ignition switch
4. Wiper and washer switches
5. Emergency flasher switch
6. Clock, outside temperature and trip information display
7. Audio system
8. Front passenger’s seat belt reminder
light
9. Air conditioning controls
10. Outside rear view mirror heater switch
11. Rear air conditioning switch
12. Rear window defogger switch
13. Center differential lock switch
14. Power antenna switch
15. Power tilt and telescopic steering
switch
16. Instrument panel light control dial
17. Power rear view mirror control switches
18. Power quarter window switch
(left−hand side)
19. Power quarter window switch
(right−hand side)
20. Roll sensing of curtain shield airbags
off switch
4

Lower part of center cluster panel
1. Ashtray
2. Cigarette lighter
3. Power outlet
5
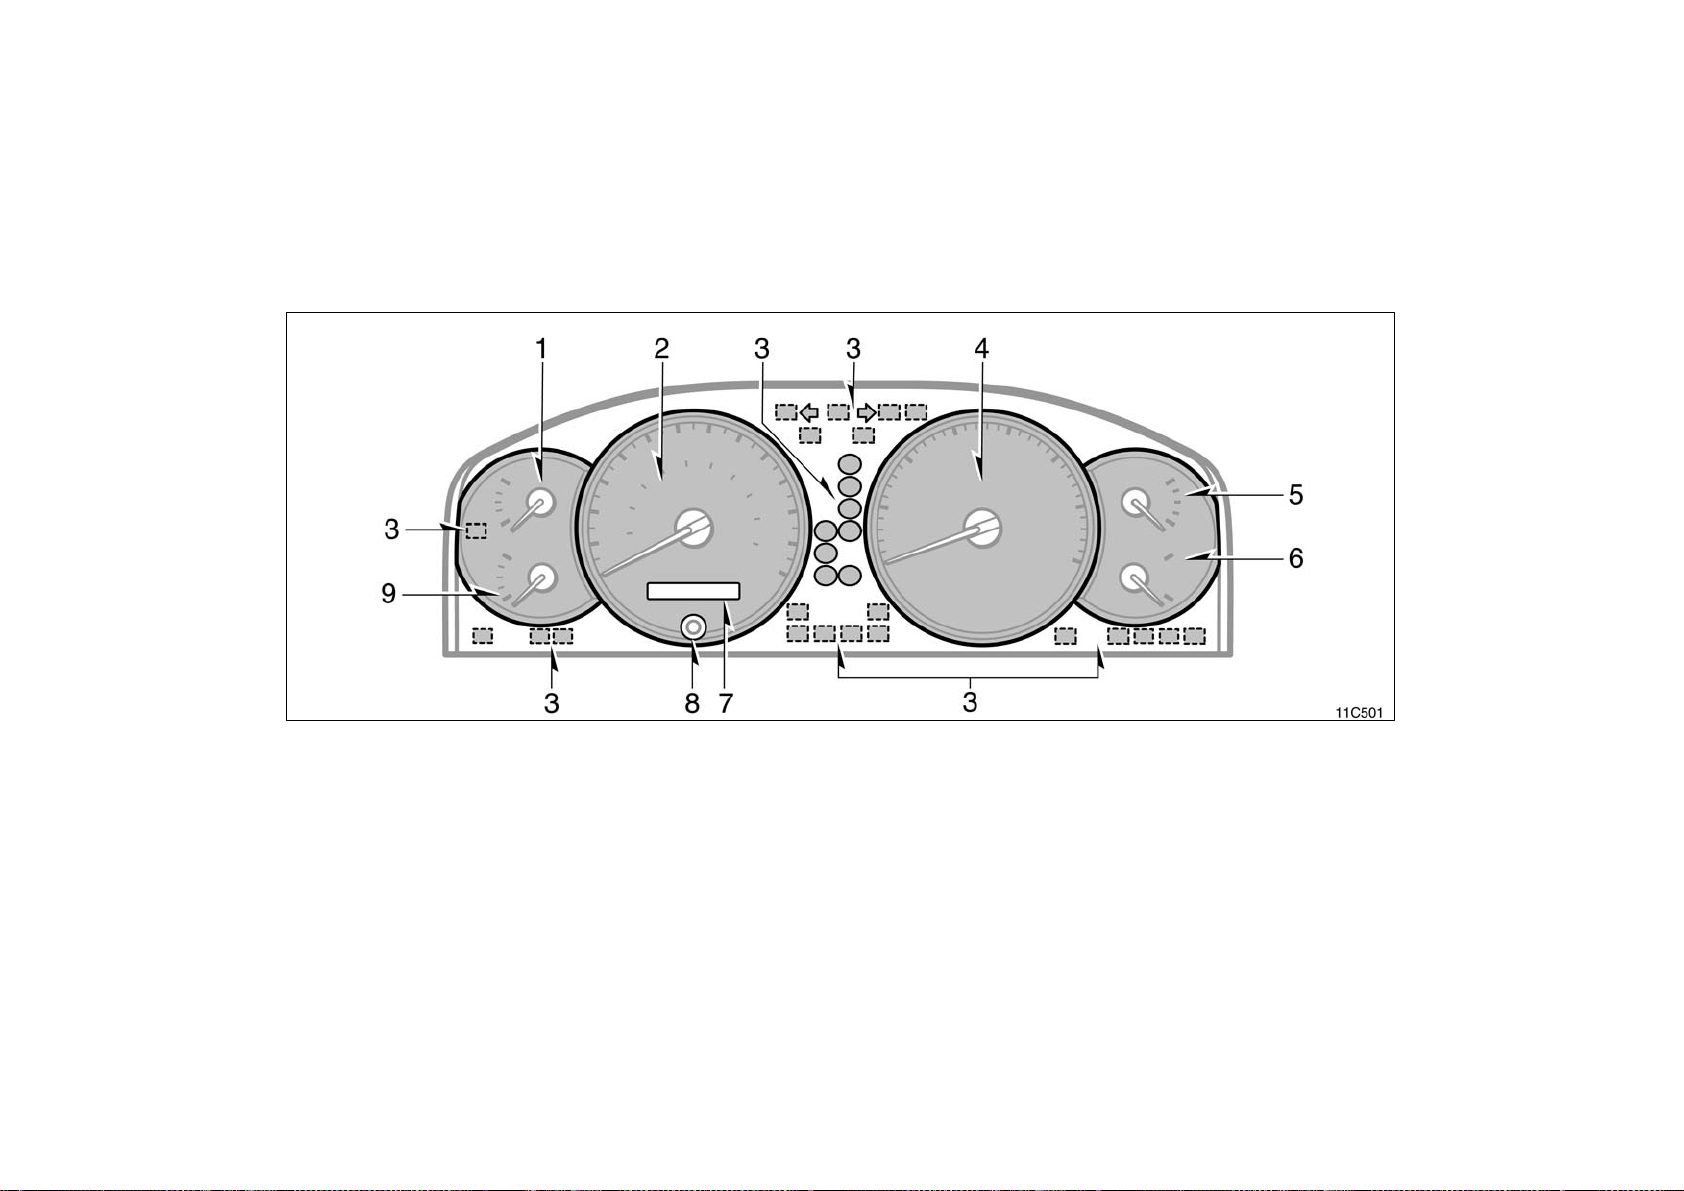
Instrument cluster overview
1. Voltmeter
2. Speedometer
3. Service reminder indicators and
indicator lights
6
4. Tachometer
5. Engine oil pressure gauge
6. Engine coolant temperature gauge
7. Odometer and two trip meters
8. Trip meter reset knob
9. Fuel gauge

Indicator symbols on the instrument panel
∗
Brake system warning light
Driver ’s seat belt reminder light
Discharge warning light
1
∗
1
∗
1
Engine oil replacement reminder light
∗
Malfunction indicator lamp
Low fuel level warning light
∗
SRS warning light
1
1
∗
1
Anti−lock brake system warning light
∗
Open door warning light
1
∗
Unengaged “Park” warning light
Automatic transmission fluid temperature warning
∗
1
light
1
Turn signal indicator lights
Headlight high beam indicator light
Driving pattern (“POWER” mode) indicator
light
Automatic transmission second start indicator
light
Center differential lock indicator light
∗
1
Cruise control indicator light
∗
2
Automatic transmission indicator lights
7

Vehicle stability control system off indicator
∗
1
light
Vehicle stability control system and active traction
control system warning light
∗
1
Active traction control system indicator light
Slip indicator light
Roll sensing of curtain shield airbags off indicator light
∗
1
: For details, see “Service reminder indicators and warning
buzzers” on page 122.
∗
2
: If this light flashes, see “Cruise control” on page 142.
∗
3
: For details, see “Roll sensing of curtain shield airbags off
switch” on page 66.
∗
3
8

SECTION 1− 2
OPERATION OF INSTRUMENTS AND
CONTROLS
Key s an d D oo rs
Keys 10. . . . . . . . . . . . . . . . . . . . . . . . . . . . . . . . . . . . . . . . . . . . . . . . . . . . . . .
Engine immobilizer system 12. . . . . . . . . . . . . . . . . . . . . . . . . . . . . . . . . . .
Wireless remote control 13. . . . . . . . . . . . . . . . . . . . . . . . . . . . . . . . . . . . . .
Side doors 18. . . . . . . . . . . . . . . . . . . . . . . . . . . . . . . . . . . . . . . . . . . . . . . . . .
Power windows 22. . . . . . . . . . . . . . . . . . . . . . . . . . . . . . . . . . . . . . . . . . . . . .
Power quarter windows 24. . . . . . . . . . . . . . . . . . . . . . . . . . . . . . . . . . . . . .
Back door 25. . . . . . . . . . . . . . . . . . . . . . . . . . . . . . . . . . . . . . . . . . . . . . . . . . .
Hood 27. . . . . . . . . . . . . . . . . . . . . . . . . . . . . . . . . . . . . . . . . . . . . . . . . . . . . . .
Theft deterrent system 28. . . . . . . . . . . . . . . . . . . . . . . . . . . . . . . . . . . . . . .
Fuel tank cap 29. . . . . . . . . . . . . . . . . . . . . . . . . . . . . . . . . . . . . . . . . . . . . . .
Electric moon roof 31. . . . . . . . . . . . . . . . . . . . . . . . . . . . . . . . . . . . . . . . . . .
9

Keys
Your vehicle is supplied with two kinds
of keys.
1. Master keys (black)—These keys work
in every lock. Your Toyota dealer will
need one of them to make a new key
with a built−in transponder chip.
2. Sub key (gray)—This key does not
work in the glove box.
A transponder chip for engine immobilizer
system has been placed in the head of
the master and sub keys. These chips are
needed to enable the system to function
correctly, so be careful not to lose these
keys. If you make your own duplicate key,
you will not be able to cancel the system
or start the engine.
To protect items locked in the glove box
when using valet parking, leave the sub
key with the attendant.
Since the side doors can be locked without a key, you should always carry a
spare master key in case you accidentally
lock your keys inside the vehicle.
For information on use of the wireless
remote control key, see “Wireless remote
control” on page 13.
NOTICE
When using a key containing a transponder chip, observe the following
precautions:
z When starting the engine, do not
use the key with a key ring resting
on the key grip and do not press
the key ring against the key grip.
Otherwise the engine may not start,
or may stop soon after it starts.
10

z Do not use the key with electromag-
netic materials.
z When starting the engine, do not
use the key with other transponder
keys around (including keys of other vehicles) and do not press other
key plates against the key grip.
Otherwise the engine may not start,
or may stop soon after it starts. If
this happens, remove the key once
and then insert it again after removing other transponder keys (including keys of other vehicles) from the
ring or while gripping or covering
them with your hand to start the
engine.
z Do not bend the key grip.
z Do not cover the key grip with any
material that cuts off electromagnetic waves.
z Do not knock the key hard against
other objects.
z Do not leave the key exposed to
high temperatures for a long period,
such as on the dashboard and hood
under direct sunlight.
z Do not put the key in water or
wash it in an ultrasonic washer.
11

Engine immobilizer system
KEY NUMBER PLATE
Your key number is shown on the plate.
Keep the plate in a safe place such as
your wallet, not in the vehicle.
If you should lose your keys or if you
need additional keys, duplicates can be
made by a Toyota dealer using the key
number.
We recommend writing down the key number and storing it in a safe place.
12
The engine immobilizer system is a
theft prevention system. When you insert the key in the ignition switch, the
transponder chip in the key’s head
transmits an electronic code to the vehicle. The engine will start only when
the electronic code in the chip corresponds to the registered ID code for
the vehicle.
The system is automatically set when the
key is removed from the ignition switch.
The indicator light will start flashing to
show the system is set.
If any of the following indicator conditions
occurs, contact your Toyota dealer.
The indicator light stays on except
when the theft deterrent system is setting or activating. (See “Theft deterrent
system” on page 28.)
The indicator light does not start flash-
ing when the key is removed from the
ignition switch.
The indicator light flashes inconsistent-
ly.

Inserting the registered key in the ignition
switch automatically cancels the system,
which enables the engine to start. The
indicator light will go off.
For your Toyota dealer to make a new key
with a built−in transponder chip, your
dealer will need your key number and
master key. However, there is a limit to
the number of additional keys your Toyota
dealer can make for you.
If you make your own duplicate key,
you will not be able to cancel the system or start the engine.
FCC ID: MOZRI−20BTY
MADE IN JAPAN
This device complies with Part 15 of the
FCC Rules. Operation is subject to the
following two conditions:
(1) This device may not cause harmful
interference, and (2) this device must
accept any interference received, including interference that may cause undesired operation.
CAUTION
Changes or modifications not expressly approved by the party responsible for compliance could void the
user’s authority to operate the equipment.
Wireless remote control*—
12c520
1. “LOCK” switch
2. Indicator light
3. “PANIC” switch
4. “UNLOCK” switch
The wireless remote control system is
designed to lock or unlock all the side
doors and back door from a distance
within approximately 1 m (3 ft.) of the
vehicle.
NOTE: *This feature can be deactivated
as vehicle theft deterrent measure in case
of the loss of the wireless remote control
key. Ask your Toyota dealer for details.
When you operate any switch, push it
slowly and securely. At this time, the indicator light flashes once.
13

The wireless remote control key is an
electronic component. Observe the following instructions in order not to cause damage and trouble to the key.
Do not leave the key in places where
the temperature becomes high such as
on the dashboard.
Do not disassemble it.
Avoid knocking it hard against other
objects or dropping it.
Avoid putting it in water.
You can use up to 4 wireless remote control keys for the same vehicle. Contact
your Toyota dealer for detailed information.
If the wireless remote control key does
not actuate the doors or operate from a
normal distance, or the indicator light on
the key is dimmed or does not come on:
Check for closeness to a radio trans-
mitter such as a radio station or an
airport which can interfere with normal
operation of the key.
The battery may have been consumed.
Check the battery in the key. To
replace the battery, see following
“—Replacing battery” on page 17.
—Locking and unlocking
doors
If you lose your wireless remote control
key, contact your Toyota dealer as soon
as possible to avoid the possibility of
theft, or an accident. (For detailed information, see “If you lose your keys” on
page 273.)
Locking operation
14
Unlocking operation

To lock and unlock all the side doors
and back door, push the switches slowly and securely.
To lock: Push the “LOCK” switch. All the
side doors and back door are locked simultaneously. At this time, turn signal
lights flash once.*
NOTE: *The turn signal lights can be set
not to flash. Ask your Toyota dealer for
details.
Check to see that all the side doors and
back door are securely locked.
If any of the side doors or back door is
not securely closed, or if the key is in the
ignition switch, locking cannot be performed by the “LOCK” switch.
To unlock: Push the “UNLOCK” switch
once to unlock the driver’s door alone.
Pushing the switch twice within 3 seconds
unlocks all the side doors and back door
simultaneously.* At this time, turn signal
lights flash twice.**
NOTE: *The 2−step unlocking function can
be changed. **The turn signal lights can
be set not to flash. Ask your Toyota dealer for details.
Together with the activation of unlocking,
the interior light comes on for 15 seconds
if the interior light switch is in “DOOR”
position.* However, this function does not
work when the ignition key is in the “ACC”
or “ON” position. (For detailed information,
see “Interior light” on page 111.)
You have 30 seconds to open a door after
using the wireless remote unlock feature.** If a door is not opened by then, all
the side doors and back door will be automatically locked again.
NOTE: *The interior light can be set not
to come on or the duration of lighting can
be changed. **The time before automatic
re−locking can be changed. Ask your
Toyota dealer for details.
If the “LOCK” or “UNLOCK” switch is kept
pressed in, the locking or unlocking operation is not repeated. Release the switch
and then push again.
—Activating panic mode
Pushing the “PANIC” switch for 1 second blows the horn intermittently and
flashes the headlights, tail lights and
interior lights.*
NOTE: *This feature can be deactivated.
Ask your Toyota dealer for details.
The “PANIC” switch is used to deter vehicle theft when you witness anyone attempting to break into or damage your
vehicle.
15

The alarm will last for 1 minute. To stop
the alarm midway, push the “PANIC”,
“LOCK” or “UNLOCK” switch, or unlock
any side door or back door with key. You
can also stop the alarm by turning the
ignition key from “LOCK” to the “ON” position.
The “PANIC” mode does not work when
the ignition key is in the “ON” position.
For vehicles sold in U.S.A.
This device complies with Part 15 of the
FCC Rules. Operation is subject to the
following two conditions: (1) This device
may not cause harmful interference, and
(2) this device must accept any interference received, including interference
that may cause undesired operation.
NOTICE:
This equipment has been tested and
found to comply with the limits for a
Class B digital device, pursuant to Part
15 of the FCC Rules. These limits are
designed to provide reasonable protection against harmful interference in a
residential installation. This equipment
generates, uses and can radiate radio
frequency energy and, if not installed
and used in accordance with the instructions, may cause harmful interference to
radio communications. However, there is
no guarantee that interference will not
occur in a particular installation. If this
equipment does cause harmful interference to radio or television reception,
which can be determined by turning the
equipment off and on, the user is encouraged to try to correct the interference by one or more of the following
measures:
Reorient or relocate the receiving an-
tenna.
Increase the separation between the
equipment and receiver.
Connect the equipment into an outlet
on a circuit different from that to
which the receiver is connected.
Consult the dealer or an experienced
radio/TV technician for help.
FCC WARNING:
Changes or modifications not expressly approved by the party responsible for compliance could void the
user’s authority to operate the equipment.
CAUTION
Changes or modifications not expressly approved by the party responsible for compliance could void the
user’s authority to operate the equipment.
16

—Replacing battery
For replacement, use a CR1616 lithium
battery or equivalent and a special screwdriver.
CAUTION
Special care should be taken to prevent small children from swallowing
the removed battery or components.
NOTICE
z When replacing the battery, be care-
ful not to lose the components.
z Replace only with the same or
equivalent type recommended by a
Toyota dealer.
z Dispose of used battery according
to the local laws.
Replace the battery by following these
procedures:
1. Remove the screw, and then the cover. 2. Remove the module from the key
frame.
17

3. Remove the 2 screws to take out the
lid of the module. Take out the discharged battery and put in a new battery with the positive side up.
NOTICE
Do not bend the terminals.
4. Install the lid with the 2 screws.
5. Install the module into the key frame
and secure the cover with the screw.
6. When pushing any switch on the wireless key, make sure the indicator light
comes on.
NOTICE
z Make sure the positive side and
negative side of the battery are
faced correctly.
z Do not replace the battery with wet
hands. Water may cause unexpected
rust.
z Do not touch or move any compo-
nents inside the transmitter, or it
may interfere with proper operation.
z Be careful not to bend the electrode
when inserting the battery and that
dust or oils do not adhere to the
case.
z Take care not to lose the screws.
z Close the cover securely.
Side doors—
LOCKING AND UNLOCKING WITH KEY
Insert the key into the keyhole and turn
it.
To lock: Turn the key forward.
To unlock: Turn the key backward.
All the side doors and back door lock and
unlock simultaneously with either front
side door. In the driver’s door lock, turning the key once will unlock the driver’s
door and twice in succession will unlock
all the side doors and back door simultaneously.*
NOTE: *The 2−step unlocking function can
be changed. Ask your Toyota dealer for
details.
18

LOCKING AND UNLOCKING WITH
INSIDE LOCK KNOB
Move the lock knob.
To lock: Push the knob forward.
To unlock: Pull the knob backward.
The front doors can be opened by pulling
the inside handles even if the lock knob
are in the lock position.
Closing the side door with the lock knob
in the lock position will also lock the side
door. Be careful not to lock your keys in
the vehicle.
Front side doors cannot be locked when
either front side door is open and the key
is in the ignition.
l12093a
Driver’s side
l12046a
Passenger’s side
LOCKING AND UNLOCKING WITH
POWER DOOR LOCK SWITCH
Push the switch.
To lock: Push the switch down on the
front side.
To unlock: Push the switch down on the
rear side.
All the side doors and back door lock or
unlock simultaneously.
When the front doors are locked from the
outside or locked with the wireless remote
control key, the power door lock switch
will not work until the either front door is
unlocked with the key, lock knob, or wireless remote control key.
19

REAR DOOR CHILD−PROTECTORS
Move the lock lever to the “LOCK”
position as shown on the label.
When the child−protector is locked, you
cannot open the rear door by the inside
door handle. We recommend using this
feature whenever small children are in the
vehicle.
CAUTION
Before driving, be sure that the doors
are closed and locked, especially
when small children are in the vehicle. Along with the proper use of
seat belts, locking the doors helps
prevent the driver and passengers
from being thrown out from the vehicle during an accident. It also helps
prevent the doors from being opened
unintentionally.
—Automatic door locking and
unlocking functions
You can select the following modes of
the automatic locking and unlocking
functions. The initial mode is mode 1.
Mode 1—Automatic locking operation
linked to shift lever position
All doors are automatically locked when
the shift lever is moved out of “P”
position, the engine is running and all
the doors are closed.
Mode 2—Automatic locking operation
linked to vehicle speed
All doors are automatically locked when
the vehicle speed goes above about 20
km/h (12 mph).
Mode 3—Automatic unlocking opera-
tion linked to the ignition switch
All doors are automatically unlocked
when the driver’s door is opened within
10 seconds after the ignition switch is
turned to the “ACC” or “LOCK” position, or the key is removed.
Mode 4—Automatic unlocking opera-
tion linked to shift lever position
All doors are automatically unlocked
when the selector lever is moved to
“P” position.
20
 Loading...