

TOYOTA DE325 User Manual [fr]
Series RS2000
RS2000-3D
Read the instruction manual.
Lisez le guide de l’utilisateur.
Lees de gebruiksaanwijzing.
Leggere il manuale istruzioni.

Type designation
RS2000 series have several types. The types are shown in the nameplate as follow.
MODEL / MODELE (MODEL NAME)
• RS2000 SERIES
• RS2000 LCD SERIES
• RS2000 EL SERIES
SERIES / SERIE
Type désignation
Les séries RS2000 comprennent plusieurs types de produits. Les différents types de produits
sont différentiables par la plaque identification comme suit:
MODELE / MODELE (NOM DU MODELE)
• SERIE RS2000
• SERIE RS2000 LCD
• SERIE RS2000 EL
SERIE
Type Aanduiding
RS2000 serie bestaat uit diverse modellen. De types zijn in het typeplaatje als volgt aangeduid.
MODEL / MODELE (MODEL NAAM)
• RS2000 SERIE
• RS2000 LCD SERIE
• RS2000 EL SERIE
SERIES / SERIE
Identificazione modello
La serie RS2000 ha diversi modelli. I modello indicati come i seguenti.
MODELLO (NOME MODELLO)
• SERIE RS2000
• SERIE RS2000 LCD
• SERIE RS2000 EL
SERIE
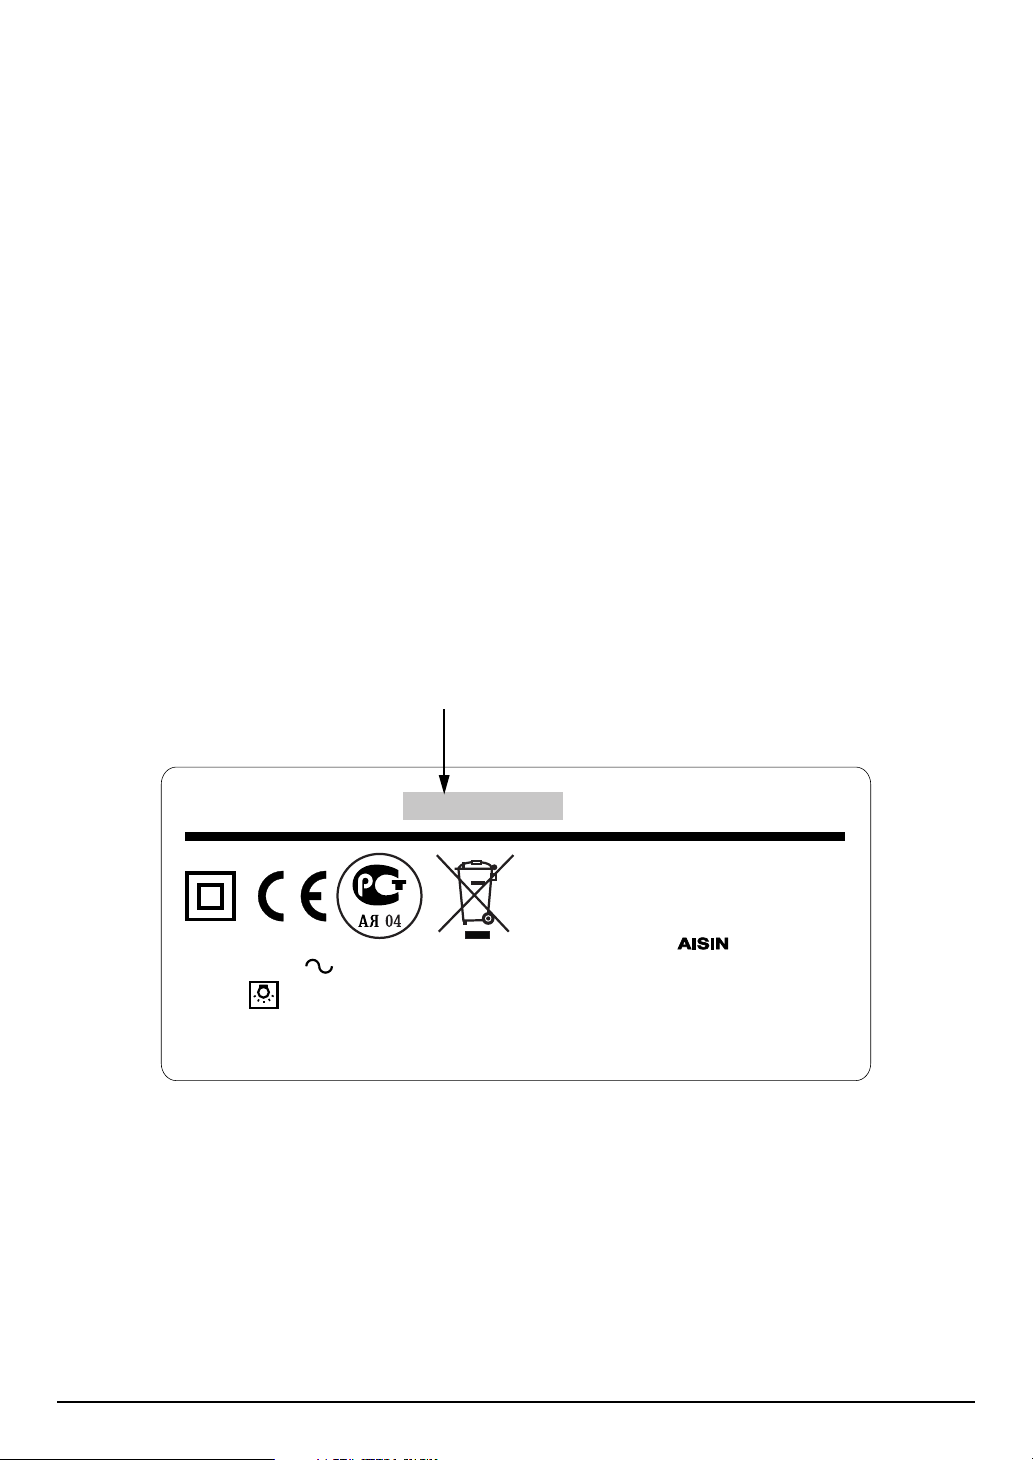
Nameplate
When calling for service, please note the MODEL NAME and SERIES that is inscribed on the
back of your sewing machine.
Plaque d’identification
Lorsque vous appelez notre service après-vente, merci d'indiquer le MODELE et la SERIE de
votre produit inscrits au dos de votre machine à coudre.
Naamplaat
Indien u opbelt voor service, noteer dan het MODEL en de SERIE die op de achterkant van uw
machine staat vermeld.
Targhetta
Quando chiamate per il servizio assistenza prendete nota del MODELLO e delle SERIE
stampigliati sulla parte posteriore della vostra macchina per cucire.
MODEL NAME
NOM DU MODELE
MODEL NAAM
NOME DEL MODELLO
MODEL / MODELE RS2000 SERIES / SERIE
Manufacturer/: ZHEJIANG AISIN ELITE
230-240V
70W
50Hz
max 15W
Fabricant MACHINERY & ELECTRIC
Importer/ : EUROPE S. A.
Importateur
CO., LTD.P.R.C.
MADE IN P. R. C. / FABRIQUE EN R.P.C.

English
“IMPORTANT SAFETY INSTRUCTIONS”
When using the sewing machine, basic safety precautions
should always be followed, including the following:
Read all instructions before using.
DANGER
1 The sewing machine should never be left unattended when plugged in. Always unplug the sewing
machine from the electrical outlet immediately after using and before cleaning.
2. Always unplug before relamping. Replace the bulb with same type rated 15 watts.
3. Do not reach for the sewing machine that has fallen into water. Unplug immediately.
4. Do not place or store sewing machine where it can fall or be pulled into a tub or sink. Do not place or
drop into water or other liquid.
WARNING
1 Do not allow to be used as a toy. Close attention is necessary when this sewing machine is used by
or near children.
2. Use this sewing machine only for its intended use as described in this manual. Use only attachments
recommended by the manufacturer as contained in this manual.
3. Never operate this sewing machine if it has a damaged cord or plug, if it is not working properly, if it
has been dropped or damaged, or dropped into water. Return this sewing machine to the nearest
authorized dealer or service center for examination, repair, electrical or mechanical adjustment.
4. Never operate the sewing machine with any air openings blocked. Keep ventilation openings of the
sewing machine and foot controller free from the accumulation of lint, dust, and loose cloth.
5. Never drop or insert any object into any opening.
6. Do not use outdoors.
7. Do not operate where aerosol (spray) products are being used or where oxygen is being
administered.
8. To disconnect, turn all controls to the off (“O”) position, then remove plug from outlet.
9. Do not unplug by pulling on cord. To unplug, grasp the plug, not the cord.
10. Keep fingers away from all moving parts. Special care is required around the sewing machine
needle.
11. Always use proper needle plate. The wrong plate can cause the needle to break.
12. Do not use bent needles.
13. Do not pull or push fabric while stitching. It may deflect the needle causing it to break.
14. Switch the sewing machine off (“O”) when making any adjustments in the needle area, such as
threading needle, changing needle, threading bobbin, or changing presser foot, etc.
15. Always unplug sewing machine from the electrical outlet when removing covers, lubricating, or when
making any other user servicing adjustments mentioned in this instruction manual.
16. Never operate on a soft surface such as a bed or couch where the air openings may be blocked.
17. Appliance (230-240V) is provided with double insulation. Use only identical replacement parts. See
instructions for servicing Double-insulate Products.
- -
To reduce the risk of electric shock.
- -
To reduce the risk of burns, fire, electric shock, or injury to
persons.
Servicing Double-Insulated Products (220V-240V)
In a double-insulated product, two systems of insulation are provided instead of grounding. No grounding
means is provided on a double-insulated product nor should a means for grounding be added to the product
Servicing a double-insulated product requires extreme care and knowledge of the system and should only
be done by qualified service personnel. Replacement parts for a double-insulated product must be identical
to those parts in the product. The symbol is marked on the double-insulated product.
This sewing machine is intended for household use.
SAVE THESE INSTRUCTIONS
UK ONLY IMPORTANT PLEASE READ CAREFULLY
The wires in this mains lead are coloured in accordance with the following code:
BLUE - NEUTRAL BROWN - LIVE (OR ACTIVE)
As the colours of the mains lead of this appliance may not correspond with the coloured markings identifying
the terminals in your plug PROCEED AS FOLLOWS:
The earth plug pin is unnecessary. As the machine is designed under double insulation structure, the earth
wire is removed from the machine. The wire coloured BROWN must be connected to the terminal marked
L or A or coloured RED. The wire coloured BLUE must be connected to the terminal marked N or coloured
BLACK. Neither core is to be connected to the earth terminal of a three-pin plug.
4

Français
“REGLES DE SECURITE ESSENTIELLES”
Lors de l’utilisation d’un appareil électrique, des mesures
élémentaires de sécurité doivent toujours être respectées.
Lire toutes les instructions avant d’utiliser la machine.
DANGER
1. Il ne faut jamais laisser un appareil sans surveillance lorsqu’il est branché.
2. Toujours déconnecter cet appareil de la prise électrique avant de remplacer une ampoule.
Remplacez l’ampoule avec une autre de la même puissance, 15 watts.”
3. Ne pas utiliser une machine tombée à l’eau. Débranchez la immédiatement.
4. Ne jamais utiliser l’appareil si les ouvertures de ventilation sont bloquées. Veiller à éviter toute
accumulation de peluches, de poussière et de morceaux de tissu devant les ouvertures de ventilation
de la machine à coudre et du rhéostat.”
5. Ne jamais laisser tomber ou introduire quelqu’objet que ce soit dans les ouvertures de la machine.
6. Ne pas utiliser la machine à l’extérieur.
7. Ne pas utiliser dans des endroits où l’on emploie des produits aérosols (sprays) et où l’on administre
de l’oxygène.
8. Pour éteindre, positionner tous les interrupteurs sur la position (“O”), puis retirer le cordon de la prise
de la machine.
9. Ne pas débrancher la machine en tirant sur le cordon. Pour débrancher, tenir la fiche, pas le cordon.
10. Eloignez les doigts de toutes les parties mobiles de la machine. Une prudence supplémentaire est
nécessaire autour de l’aiguille de la machine.
11. Toujours utiliser la plaque à aiguille appropriée. Si vous n’utilisez pas la plaque appropriée, l’aiguille
peut casser.
12. Ne pas utiliser d’aiguilles tordues.
13. Ne pas pousser ou tirer sur le tissu pendant la couture. Cela risque de tordre l’aiguille et pour finir
risque de casser.
14. Eteindre la machine à coudre (position “O”) lors de tout réglage, comme enfiler l’aiguille, enfiler une
bobine ou changer le pied presseur, etc., dans la zone de l’aiguille.
15. Toujours déconnecter la machine à coudre de la prise électrique lorsque vous enlevez les
couvercles, que vous lubrifiez ou que vous effectuez tout autre réglage mentionné dans le manuel
d’utilisation.
16. Ne jamais utiliser sur une surface molle telle qu’un lit ou un canapé où les ouvertures de ventilation
pourraient être bloquées.
- -
Pour réduire les risques de choques électriques.
CONSERVER CES INSTRUCTIONS

Nederlands
“BELANGRIJKE VEILIGHEIDSINSTRUCTIES”
Wanneer u de naaimachine gebruikt , dient u altijd een aantal belangrijke
veiligheidsmaatregelen in acht te nemen, waaronder de volgende.
Lees alle instructies voor gebruik.
GEVAAR
1. De naaimachine mag nooit onbeheerd worden achtergelaten als deze in het stopcontact
aangesloten staat. Haal altijd direct de stekker uit het stopcontact na gebruik en voor het
schoonmaken.
2. Haal altijd de stekker uit het stopcontact voordat u het lampje vervangt. Vervang het lampje met
hetzelfde type van 15 watt.
3. Grijp nooit naar een naaimachine die in het water is gevallen. Haal onmiddellijk de stekker uit het
stopcontact.
4. Zet of berg de machine nooit op een plaats waar deze in een badkuip of in een gootsteen kan vallen
of ingetrokken kan worden.
WAARSCHUWING
- -
Om het risico van electrische schokken te voorkomen.
- -
Om het risico van brandwonden, brand, electrische
schokken of andere verwondingen aan personen te
verminderen.
1. Sta niet toe de naaimachine als speelgoed te gebruiken. Zeer strikte aandacht is noodzakelijk als de
naaimachine door of dichtbij kinderen wordt gebruikt.
2. Gebruik de naaimachine alleen voor het bedoelde gebruik zoals beschreven in deze handleiding.
Gebruik alleen hulpstukken aanbevolen door de fabrikant en zoals aangegeven in deze handleiding.
3. Gebruik de naaimachine nooit als er een beschadigd snoer of stekker aan zit, als deze niet naar
behoren functioneert, als deze gevallen of beschadigd is of als deze in het water is gevallen. Breng
de naaimachine naar de dichtstbijzijnde dealer of service centrum voor onderzoek, reparatie,
electrische of mechanische afstellingen.
4. Gebruik de naaimachine nooit als er luchtopeningen afgesloten zijn. Houd de ventilatie openingen
van de naaimachine en voetpedaal vrij van opeenhoping van pluizen, stof en losse stukken weefsel.
5. Gooi of stop nooit enig voorwerp in enige opening.
6. Gebruik de machine niet buiten.
7. Gebruik de machine niet op een plaats waar aerosolprodukten (spuitbussen) worden gebruikt of
waar met zuurstof wordt gewerkt.
8. Om de machine uit te schakelen, draai alle bedieningsknoppen naar de uit (“0”) positie, haal dan de
stekker uit het stopcontact.
9. Trek de stekker er niet aan het snoer uit. Om af te koppelen pakt u de stekker zelf vast en niet het
snoer.
10. Houd uw vingers weg bij alle bewegende delen. Speciale aandacht is vereist in de buurt van de
naald.
11. Gebruik altijd de juiste naaldplaat. Een verkeerde naaldplaat kan de naald doen breken.
12. Gebruik geen kromme naalden.
13. Duw of trek niet aan de stof tijdens het naaien.Daardoor kan de naald buigen en zodoende breken.
14. Schakel de machine uit (“0”) als er afstellingen in de buurt van de naald plaatsvinden, zoals de draad
in de naald rijgen, de naald verwisselen, het spoeltje inrijgen of het verwisselen van het voetje, enz.
15. Haal altijd de stekker uit het stopcontact als er afdekkappen verwijderd worden, als er geolied of als
er andere onderhouds afstellingen moeten worden gedaan zoals in deze handleiding vermeld.
16. Gebruik de machine nooit op een zachte ondergrond zoals een bed of een bank waardoor de
luchtopeningen afgesloten kunnen worden.
BEWAAR DEZE VOORSCHRIFTEN

Italiano
“IMPORTANTI ISTRUZIONI DI SICUREZZA”
Quando usate la macchina per cucire, occorre osservare
sempre le elementari norme di sicurezza, compreso
quanto segue.
Leggere tutte le istruzioni prima dell’uso.
PERICOLO
1. Non lasciare incustodita la macchina per cucire quando è collegata alla presa elettrica. Togliere
sempre la presa elettrica dopo l’utilizzo e prima della pulizia.
2. Staccare sempre la spina per sostituire la lampadina. Sostituite la lampadina con una dello stesso
tipo da 15 watt.
3. Non toccate la macchina per cucire se essa è caduta nell’acqua. Staccate subito la presa
4. Non collocate ne riponete la macchina per cucire in luoghi da dove possa cadere o essere spinta in
una vasca o lavandino. Non collocatela né lasciatela cadere nell’acqua o in altri liquidi.
ATTENZIONE
- -
Per ridurre il rischio di scosse elettriche.
- -
Per ridurre i rischi di bruciature, incendi, scosse
elettriche, o lesioni di persone.
1. Non usatela come un giocattolo. Particolare attenzione è necessaria quando la macchina per cucire
viene utilizzata da o vicino ad un bambino.
2. Utilizzate questa mpc solo per lo scopo a cui è destinata, come da manuale. Utilizzate soltanto
accessori originali raccomandati dal costruttore come specificato in questo manuale.
3. Mai far funzionare questa mpc se il cordone o la spina sono danneggiati, se non funziona
adeguatamente, se è caduta per terra o se è danneggiata oppure se caduta nell’acqua. Riportare la
mpc al rivenditore autorizzato più vicino o al servizio assistenza perché vengano eseguiti i controlli
del caso o eventuali riparazioni o regolazioni elettriche e/o meccaniche.”
4. Mai far funzionare la mpc con qualsiasi presa d’aria bloccata. Mantenete le prese d’aria della mpc
libere e che il comando a pedale non sia attorniato da filacci, polvere o panni sporchi.
5. Non lasciate cadere o inserire alcun oggetto nelle fessure.
6. Non utilizzare all’aperto.
7. Non far funzionare quando vengono utilizzati spray o quando viene somministrato ossigeno.
8. Per scollegare, posizionate tutti i comandi su “Off” (“O”), e poi togliete la spina dalla presa.
9. Non scollegare tirando il cordone. Per scollegare, afferrare la spina e non il cordone.”
10. Tenere le dita lontano da ogni parte in movimento. Particolare attenzione va prestata all’ago della
mpc
11. Utilizzate sempre le giuste placche ago. La placca sbagliata può causare la rottura dell’ago.
12. Non utilizzate aghi curvi
13. Non tirare o spingere il tessuto mentre cucite. Potrebbe far flettere l’ago fino a romperlo.
14. Spegnere la mpc (su “O”) quando fate delle regolazioni vicino all’ago, come infilare l’ago, cambiare
ago, infilare la spola, o cambiare il piedino.
15. Scollegare sempre la mpc dalla presa elettrica quando aprite la macchina, quando lubrificate o
quando effettuate la manutenzione così come indicato in questo manuale.
16. Mai far funzionare su una superficie di appoggio morbida come un letto o un divano potrebbe ostruire
le prese d’aria.
CONSERVATE QUESTE ISTRUZIONI

English
CONTENTS
NAMES OF PARTS
Side dial type ........................................ 1
ACCESSORIES ........................................ 3
SETTING UP
Connecting foot controller and
power cord............................................ 5
Power / Light switch.............................. 5
Foot controller....................................... 5
Extension table ..................................... 5
VARIOUS CONTROLS
Pattern selection dial ............................ 7
Stitch length dial ................................... 7
Zigzag width control dial....................... 7
Presser foot lever ................................. 7
THREADING THE MACHINE
Bobbin winding ................................... 10
Bobbin threading ................................ 11
Upper threading.................................. 14
How to use needle threader ............... 15
Bringing up lower thread with
presser foot up.................................... 17
SEWING BASICS
Straight stitching ................................. 18
Adjusting thread tension ..................... 21
Changing foot ..................................... 21
Declutch knob..................................... 23
Reverse sewing lever ......................... 23
Drop feed lever ................................... 23
Presser foot pressure adjustment
knob.................................................... 25
Thick fabric sewing ............................. 25
Zigzag stitching................................... 26
Stretch Stitching ................................. 26
HOW TO USE BUILT IN STITCHES
Blind hem stitch .................................. 27
Overcasting ........................................ 27
Overlocking......................................... 29
Smocking............................................ 31
Mending.............................................. 32
Applique work ..................................... 33
Piping / Zipper Foot ............................ 34
Zipper sewing ..................................... 36
Free hand embroidery ........................ 37
Twin needle threading ........................ 40
Pin tucking using twin needle ............. 41
Walking Foot....................................... 42
Darning Foot....................................... 43
Piecing Foot........................................ 45
Open Toe Appliqué Foot .................... 46
BUTTONHOLE
Making buttonholes ............................ 47
Adjusting stitch balance of
buttonhole........................................... 49
MAINTENANCE
Changing light bulb............................. 50
Cleaning ............................................. 51
Oiling .................................................. 52
TROUBLE SHOOTING
Lower thread tension adjustment ....... 53
Changing needle ................................ 55
Checking needle................................. 56
Cleaning the shuttle race.................... 57
Trouble chart ...................................... 58
FABRIC, THREAD AND NEEDLE
TABLE .................................................... 63
NAME OF STITCH PATTERNS ............. 65
RECYCLING ......................................... 66
1

Français
SOMMAIRE
NOMS DES PIECES
Type de machine avec cadran
sélecteur de coté .................................. 1
ACCESSOIRES ........................................ 3
MISE EN MARCHE
Branchement de la pédale et du
cordon d’alimentation ........................... 5
Interrupteur du courant et de
la lumière .............................................. 5
La pédale.............................................. 5
La boîte d'accessoires.......................... 5
DIVERS REGLAGES
Cadran de sélection du point................ 7
Cadran de réglage de la
longueur du point.................................. 7
Cadran de réglage de la
largeur du zigzag .................................. 7
Levier presseur de pied-de-biche ......... 7
ENFILAGE DE LA MACHINE
Bobinage de la canette....................... 10
Enfilage de la canette......................... 11
Enfilage du fil supérieur...................... 14
Comment utiliser un enfile-aiguille...... 15
Pour faire remonter le fil inférieur ....... 17
L’ESSENTIEL DE LA COUTURE
Points droits........................................ 18
Réglage de la tension du fil ................ 21
Changement du pied-de-biche ........... 21
Bouton de débrayage ......................... 23
Levier de marche arrière .................... 23
Levier d’escamotage de la griffe
d’entraînement.................................... 23
Régulateur de pression du pied.......... 25
Couture de tissus épais ...................... 25
Points zigzag ...................................... 26
Points stretch...................................... 26
MODE D’UTILISATION DES POINTS
PRE-REGLES
Point de couture invisible.................... 27
Surfilage ............................................. 27
Surjet .................................................. 29
Fronçage ............................................ 31
Racommodage ................................... 32
Application .......................................... 33
Pied passepoil / Fermeture à glissière 34
Pose de fermeture éclair .................... 36
Broderie .............................................. 37
Enfilage d’une aiguille double............. 40
Piquage matelassé ............................. 41
Pied-de-biche double entraînement ... 42
Pied libre pour reprisage .................... 43
Pied d’application ............................... 45
Pied ouvert ......................................... 46
BOUTONNIERE
Réalisation de boutonnières ............... 47
Ajuster l’équilibre des points
de la boutonnière................................ 49
MAINTENANCE
Changement d’ampoule ..................... 50
Nettoyage ........................................... 51
Huilage ............................................... 52
SOLUTIONS DE DEPANNAGE
Réglage de la tension du fil
inférieur............................................... 53
Remplacement d’aiguille .................... 55
Vérification de l’aiguille ....................... 56
Nettoyage du logement de
la coursière......................................... 57
Tableau des derangements................ 59
TABLE DES TISSUS, FILS ET
AIGUILLES ............................................. 64
SELECTION DES PROGRAMMES
NOM DES POINTS MOTIFS .................. 65
RECYCLAGE........................................ 66
2

Nederlands
INHOUD
NAAM VAN DE DELEN
Type met knop aan de zijkant............... 1
ACCESSOIRES ........................................ 3
AANSLUITEN
Aansluiten van voetpedaal en
lichtnetsnoer ......................................... 6
Aan / Uit schakelaar ............................. 6
Voetpedaal ........................................... 6
Aanschuiftafel ....................................... 6
VERSCHILLENDE
BEDIENINGSELEMENTEN
Steekkeuzeknop ................................... 8
Steeklengteknop................................... 8
Zigzagbreedteknop............................... 8
Persvoethendel..................................... 8
HET INRIJGEN VAN DE MACHINE
Spoeltje opwinden .............................. 10
Spoeltje inrijgen.................................. 12
Bovendraad inrijgen............................ 14
Het gebruik van de draadinrijger ........ 16
Het ophalen van de onderdraad......... 17
BASIS NAAIBEGRIPPEN
Recht naaien ...................................... 18
Afstelling van de draadspanning ........ 22
Voetjes verwisselen............................ 22
Ontkoppelknop ................................... 24
Achteruit naaiknop.............................. 24
Transporteur verzinkknop................... 24
Persvoetdruk regelknop...................... 25
Dikke stof naaien ................................ 25
Zigzag naaien ..................................... 26
Stretchstof naaien............................... 26
GEBRUIK VAN DE INGEBOUWDE
STEKEN
Blindzoomsteek .................................. 28
Overhands naaien .............................. 28
Overlocken ......................................... 30
Rimpelen ............................................ 31
Herstelwerk......................................... 32
Appliqueren ........................................ 33
Biesversiering / Ritssluitingvoet.......... 35
Rits inzetten........................................ 36
Borduren............................................. 38
Tweelingnaald inrijgen........................ 40
Plooien innaaien met tweelingnaald... 41
Loopvoet............................................. 42
Maasvoet ............................................ 44
Verstelvoet.......................................... 45
Open Applicatievoet ........................... 46
KNOOPSGAT
Knoopsgaten maken........................... 48
Instellen van de steekbalans van het
knoopsgat ........................................... 49
ONDERHOUD
Verwisselen van het lampje................ 50
Schoonmaken..................................... 51
Olieën ................................................. 52
STORINGEN VERHELPEN
Onderdraad spannings afstelling........ 53
Naald verwisselen .............................. 55
Naald controleren ............................... 56
Schoonmaken van de spoelbaan ....... 57
Storings tabel...................................... 60
STOF, GAREN-EN NAALDTABEL........ 63
NAAM VAN DE STEEKSOORTEN ........ 65
HERGEBRUIK...................................... 67
3

Italiano
INDICE
ELENCO DEI COMPONENTI
Modelli con selettore laterale dei
punti...................................................... 1
ACCESSORI............................................. 3
PREPARAZIONE
Collegamento del pedale e del cavo
di alimentazione.................................... 6
Interruttore di accensione e della luce.. 6
Reostato ............................................... 6
Prolunga ............................................... 6
REGOLAZIONI
Selezione dei punti ............................... 8
Manopola di regolazione della
lunghezza del punto ............................. 8
Manopola di regolazione della
larghezza dello zig zag ......................... 8
Leva alzapiedino................................... 8
PREPARAZIONE PER LA CUCITURA
Riempimento della spolina ................. 10
Sistemazione della spolina ................. 12
Infilatura del filo superiore .................. 14
Come usare il dispositivo automatico
per infilare gli aghi .............................. 16
Per far salire il filo inferiore................. 17
COME USARE I PUNTI PREDEFINITI
Cucitura orlo invisibile......................... 28
Sopraffilo ............................................ 28
Sopraggitto ......................................... 30
Cucitura plissé .................................... 31
Rammendo ......................................... 32
Applicazioni ........................................ 33
Piedino cordoncino / Per chiusure
lampo.................................................. 35
Applicazione di cerniere lampo........... 36
Ricami................................................. 38
Cucitura con ago doppio..................... 40
Imbastitura con doppio ago ................ 41
Piedino doppio trsporto....................... 42
Piedino per rammendo ....................... 44
Piedino per patchwork ........................ 45
Piedino per applicazioni con punta
aperta ................................................. 46
ESECUZIONE ASOLA
Cucitura di asole................................. 48
Bilanciamento dei lati sinistro e destra
dell’asola............................................. 49
MANUTENZIONE
Sostituzione della lampadina.............. 50
Pulizia ................................................. 51
Lubrificazione ..................................... 52
COME ESEGUIRE I VARI PUNTI
Cucitura diritta .................................... 18
Regolazione della tensione dei fili ...... 22
Sostituzione del piedino premistoffa... 22
Bottone di disinnesto .......................... 24
Leva di retromarcia............................. 24
Leva di rientro del trasporto................ 24
Regolatore pressione del piedino....... 25
Cucitura di tessuti di grosso
spessore ............................................. 25
Cucitura zigzag................................... 26
Punti elastici ....................................... 26
4
PICCOLI INCONVENIENTI
Regolazione della tensione inferiore .. 53
Sostituzione dell’ago........................... 55
Controllo dell’ago................................ 56
Pulizia del supporto del crochet.......... 57
Piccoli inconvenienti ........................... 61
PRIMA DI SELEZIONARE IL PUNTO,
TABELLA TESSUTI, FILI ED AGHI....... 64
NOME DEI PUNTI ESEGUIBILI ............. 65
RICICLAGGIO...................................... 67
1
26
3
5
7
8
9
16
15
17
22
10
11
18
19
20
21
13
14
12
23
24
25
4
26
27
28
32
29
30
31
1

English Français
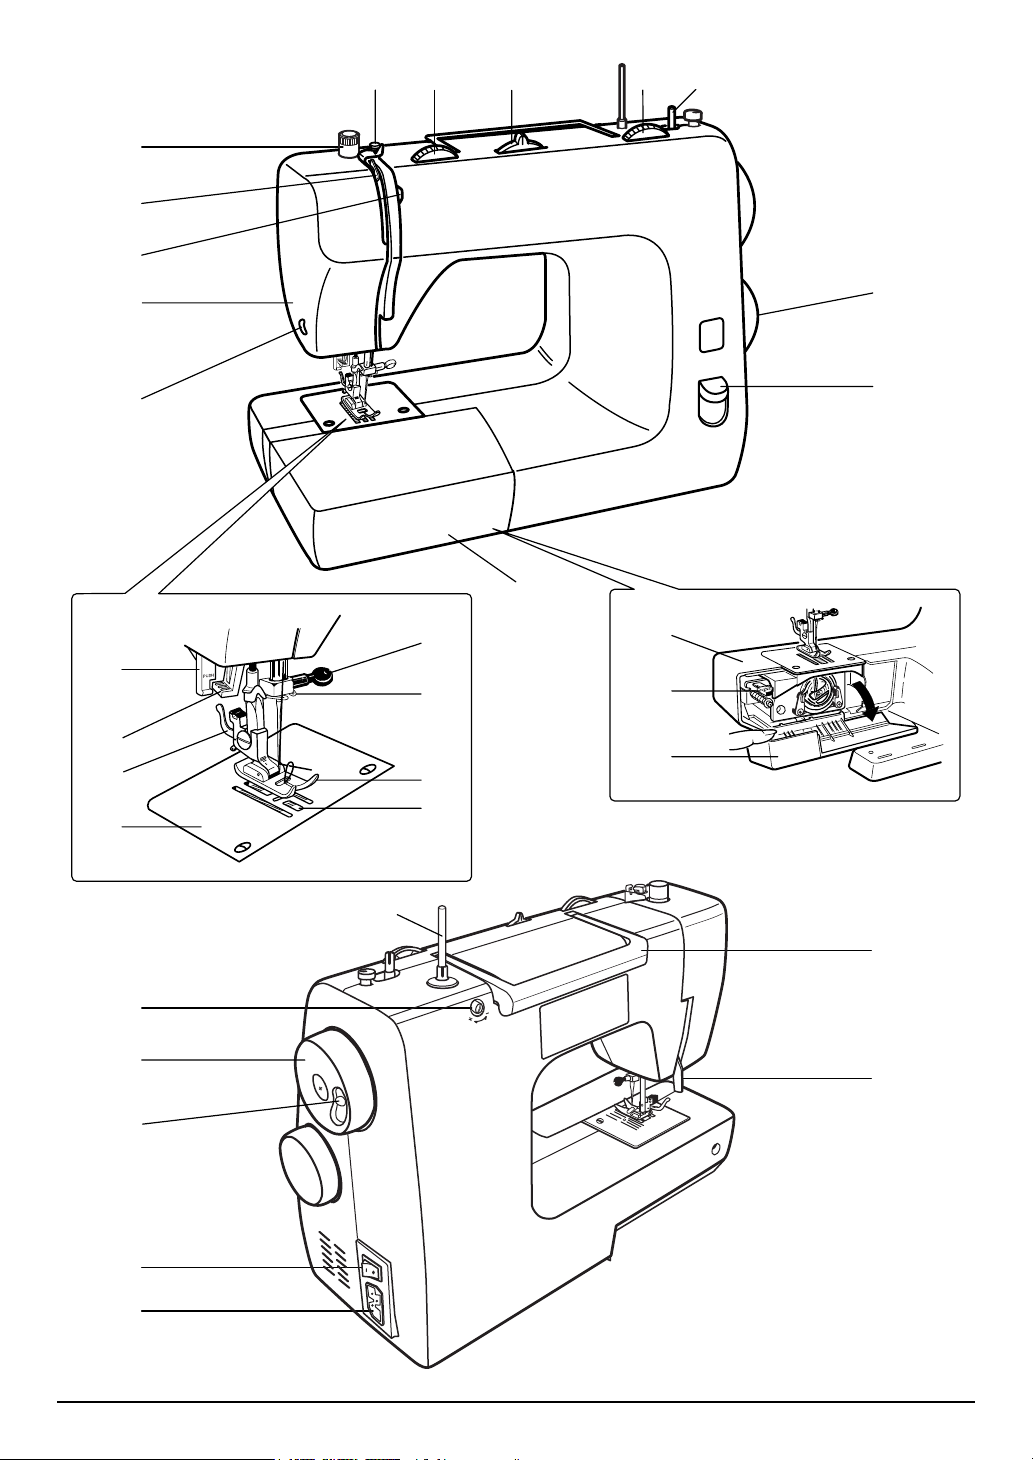
NAMES OF PARTS
Side dial type
1. Pre-tension
2. Upper thread tension
dial
3. Zigzag width control
dial
4. Spool pin
5. Bobbin winder shaft
6. Stitch length dial
7. Presser foot
pressure adjustment
knob
8. Take up lever
9. Upper tension plate
10.Face cover
11.Thread cutter
12.Extension table
13.Pattern selection dial
14.Reverse sewing
lever
15.Needle threader
lever
16.Buttonhole lever
17.Foot release lever
18.Needle clamp screw
19.Needle guide for
upper thread
20.Presser foot
21.Feed dogs
22.Needle plate
23.Free arm
24.Drop feed lever
25.Shuttle cover
26.Handle
27.Buttonhole stitch
adjuster
28.Handwheel
29.Declutch knob
30.Power / Light Switch
31.Plug socket
32.Presser foot lever
NOMS DES PIECES
Type de machine avec cadran sélecteur le coté
1. Pré-tension
2. Bouton de tension du
fil supérieur
3. Cadran de réglage de
la largeur du zigzag
4. Porte-bobine
5. Axe de bobinage de la
canette
6. Cadran de réglage de
la longueur de point
7. Bonton de réglage de
la pression du piedde-biche
8. Tendeur de fil
9. Couvercle de la
tension supérieur
10.Couvercle latéral
11.Coupe-fil
12.Boîte d’accessoires
13.Cadran de sélection
du point
14.Levier de marche
arrière
15. Levier d’enfile-aiguille
16.Levier d’enfile-aiguille
17.Levier de relache du
pied-de-biche
18.Tournevis de serrage
de l’aiguille
19.Guide-aiguille pour fil
supérieur
20.Pied-de-biche
21.Griffe d’entraînement
22.Plaque-aiguille
23.Bras libre
24.Levier de griffe
d’entraînement
25.Cache-navette
26.Poignée
27.Equilibrage de la
boutonnière
28.Vollant
29. Bouton de débrayage
30.Interrupteur (tension /
lumière)
31.Prise de courant
32.Releveur de pied-debiche
Nederlands Italiano
NAAM VAN DE DELEN
Type met knop aan de zijkant
1. Voorspanning
2. Bovendraad
spanningsknop
3. Zigzagbreedteknop
4. Garenpen
5. Spoel opwindas
6. Steeklengte knop
7. Persvoetdruk
regelknop
8. Draad hefboom
9. Bovendraad
spanningsplaatjes
10.Lampkap
11.Draadafsnijder
12.Aanschuiftafel
13.Steekkeuzeknop
14.Achteruit naaihendel
15.Naaldinrijg hendel
16.Knoopsgat hendel
17.Voet ontkoppel
hendeltje
18.Naaldklem schroef
19.Bovendraad geleider
20.Persvoet
21.Transporteur
22.Naaldplaat
23.Vrije arm
24.Transporteur
verzinkknop
25.Spoelhuis klep
26.Handgreep
27.Knoopsgat afstelling
28.Handwiel
29.Ontkoppelknop
30.Aan / uit schakelaar
31.Stekker ingang
32.Persvoet hendel
ELENCO DEI COMPONENTI
Modelli con selettore laterale dei punti
1. Pre-Tensione
2. Manopola tensione
del filo superiore
3. Manopola di
regolazione della
larghezza dello zig
zag
4. Portarocchetto
5. Asta avvolgi bobina
6. Manopola
regolazione
lunghezza punto
7. Bottone di
regolazione della
pressione del piedino
8. Tendifilo
9. Disco tensione
superiore
10.Coperchio frontale
11.Tagliafilo
12.Prolunga
13.Manopola di
selezione dei punti
14.Leva retromarcia
15.Infila-ago
16.Leva asolatore
17.Leva sgancio piedino
18.Morsetto ago
19.Guida filo superiore
dell’ago
20.Piedino premistoffa
21.Griffa di trasporto
22.Placca ago
23.Braccio libero
24.Leva per il rientro
della griffa di
trasporto
25.Coperchio navetta
26.Maniglia
27.Regolazione
asolatore
28.Volantino
29.Bottone di disinnesto
30.Interruttore corrente /
luce
31.Presa corrente
32.Leva alzapiedino
2
STANDARD ACCESSORIES / ACCESSOIRES STANDARDS
STANDAARD ACCESSOIRES / ACCESSORI STANDARD
1
150022-352
2
950012-360
3
1950002-530
4
5
850001-513
6
1650009-842
7
1921003-520
8
9
150002-481
10
719001-364
11
1921002-181
12
150002-491
#14
13
719001-367
FOOT CONTROLLER / LA PÉDALE LAMP E14 15W THIS MANUAL / CE MANUEL
VOETWEERSTAND /
PEDALE
150002-472
FITTED / INCLUSE
PASSEND / INCLUSA
1550002-184
DIT BOEK /
QUESTO NAMUALE
1921178-834 (EU) 150048-116
OPTIONAL ACCESSORIES / ACCESSOIRES EN OPTION
OPTIONELE ACCESSOIRES / ACCESSORI OPZIONALI
14
679318-CGA10
17
15
672497-CGA10
18
719001-363
16
672467-AGA10
19
672409-CGA10
672466-CGA10
679111-CFB10
20
150022-357
21
1350002-369
22
2280002-359
23
150002-360
3

English Français
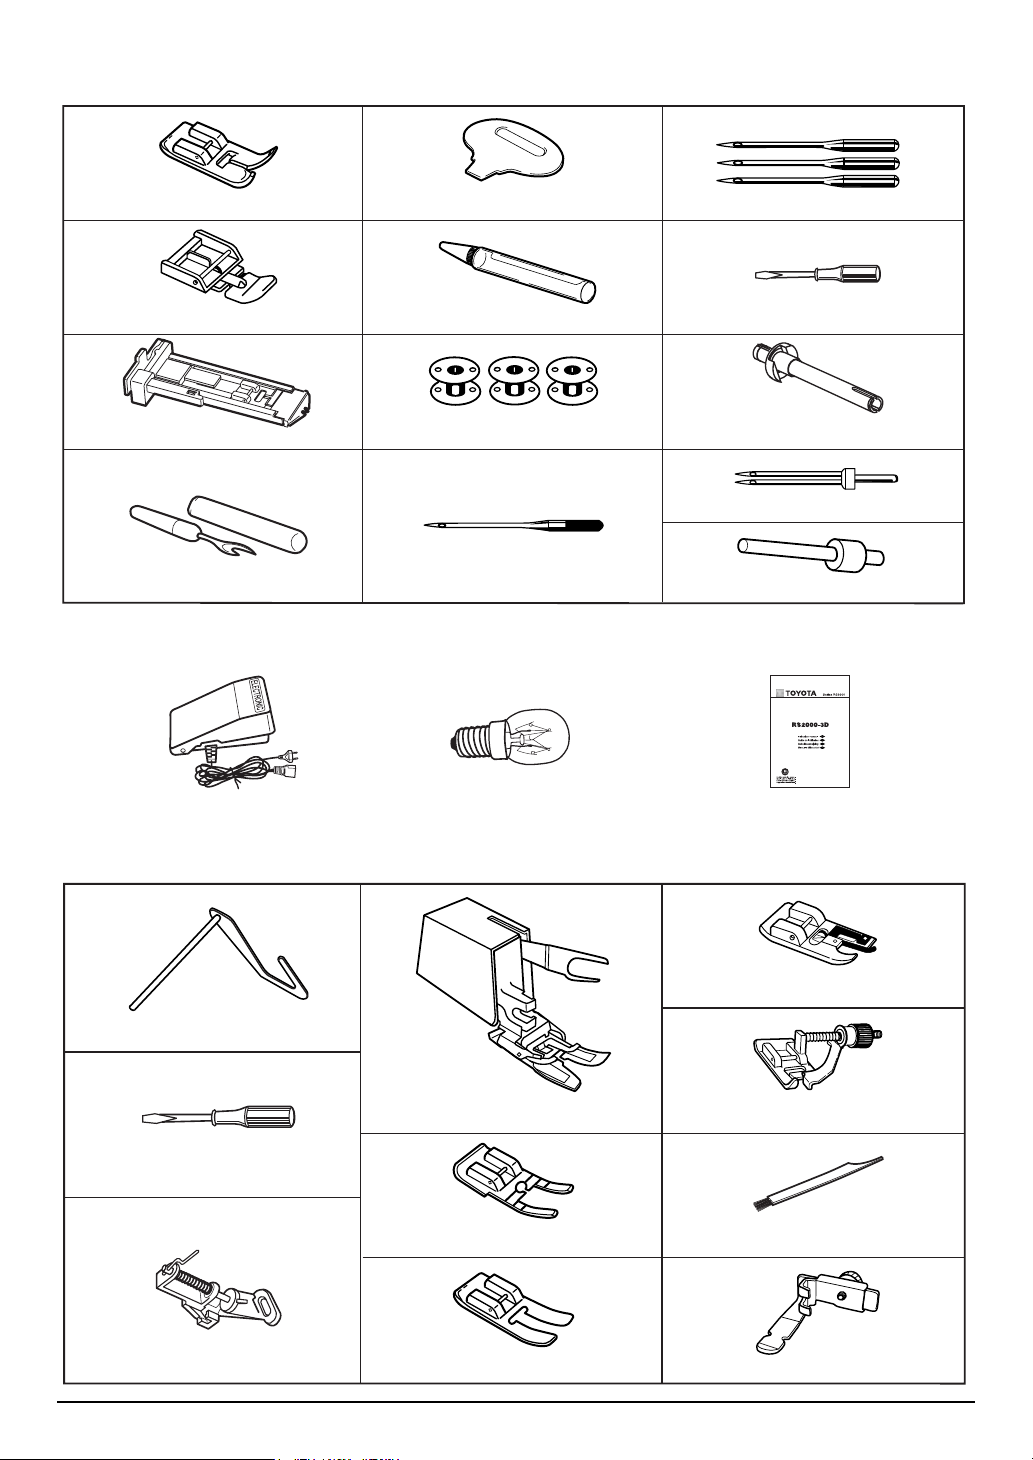
NAMES OF ACCESSORIES
Standard accessories
1. Zigzag sewing foot
(on machine)
2. Zipper foot
3. Buttonhole foot
4. Buttonhole cutter
5. Needle plate screw
driver
6. Oiler
7. Bobbins (3 pcs.)
8. Ball point needle
(1 pc.)
❈ Accessories are stored inside the extension
table.
Optional accessories
14.Quilting guide
15.Screw driver (large)
(1 pc.)
16.Darning foot
17.Walking foot
18.Piecing foot
9. Standard needle
(3 pcs., #14)
10.Screw driver (small)
(1 pc.)
11.Spool pin supplied
(1 pc.) (on machine)
12.Twin needle (1 pc.)
13.Extra spool pin (for
twin needle sewing)
19.Open toe Appliqu
foot
20.Overcasting foot
21.Blind stitch foot
22.Cleaning brush
23.Piping / Zipper foot
NNOMS DES ACCESSOIRES
Accessoires standards
1. Pied zig zag (monté
sur la machine)
2. Pied Fermeture
3. Pied pour
boutonnière
4. Couteau à
boutonnière
5. Tournevis plaque
aiguille
6. Burette d’huile
7. Canettes (3 pièces)
8. Aiguille renflée
(1 pièce)
❈ Les accessoires sont logés à l’intérieur de la
table d’extension
Accessoires en option
é
14.Guide de piquage
15.Tournevis (1 pièce)
16.Pied libre de broderie
pour reprisage
17.Pied-de-biche
double entraînement
18.Pied d’application
19.Pied ouvert
9. Aiguilles standards
(3 pièces, #14)
10.Tournevis (petit)
(1 pièce)
11.Tige porte bobine
fournie (monté sur la
machine)
12.Aiguille double
(1 pièce)
13.Tige porte-bobine
(pour couture en
aiguille double)
20.Pied-de-biche pour
faufilage
21.Pied-de-biche pour
couture invisible
22.Brosse de nettoyage
et extracteur de
canette
23.Pied passepoil /
Fermeture à glissière
Nederlands Italiano
NAAM VAN DE ACCESSOIRES
Standaard accessoires
1. Zigzagvoet
(op de machine)
2. Ritssluitingvoet
3. Knoopsgat voet
4. Tornmesje
(voor knoopsgat)
5. Naaldplaat
schroevendraaier
6. Olieflesje
7. Spoeltjes (3 stuks)
8. Balpen naald (1 st.)
❈ Accessoires zijn opgeborgen in de
aanschuiftafel
Optionele accessoires
14.Quilt geleider
15.Schroevendraaier
(1st.)
16.
Borduurmaasvoet
17.Loopvoet
18.Verstelvoet
9. Standaard naalden
(3 stuks, 14)
10.Schroevendraaier
(klein) (1st.)
11.Klospen bilgeleverd
(op de machine)
12.Tweeling naald (1 st.)
13.Extra garenpen
(voor gebruik met
tweelingnaald)
19.Open Applicatievoet
20.Overhandse voet
21.Blindzoom voet
22.Schoonmaak
borsteltje
23.Biesversiering /
Ritssluitingvoet
ELENCO DEGLI ACCESSORI
Accessori standard
1. Piedino zig-zag
(montato sulla
macchina)
2. Piedino per chiusure
lampo
3. Piedino per asola
4. Tagliasole
5. Cacciavite placca ago
6. Oliatore
7. Spoline (3 pezzi)
8. Ago con punta tonda
(a sfera) (1 pezzo)
❈ Gli accessori sono inseriti all’interno della
prolunga
9. Aghi standard
(3 pezzi)
10.Cacciavite (piccolo)
(1 pezzo)
11.Asta portarocchetto
(montato sulla
macchina)
12.Ago gemello
(1 pezzo)
13.Asta portarocchetto
(per cuciture con ago
gemello)
Accessori opzionali
14.Guida per trapuntare
15.Cacciavite (1 pezzo)
16.
Piedino per ricamo e
rammendo
17.Piedino doppio
trasporto
18.Piedino per
patchwork
19.Piedino per
applicazioni con
punta aperta
20.Piedino sopraffilo
21.Piedino per orlo
invisibile
22.Spazzolino
23.Piedino cordoncino /
Per chiusure lampo
4
AB
➀
➁
English Français
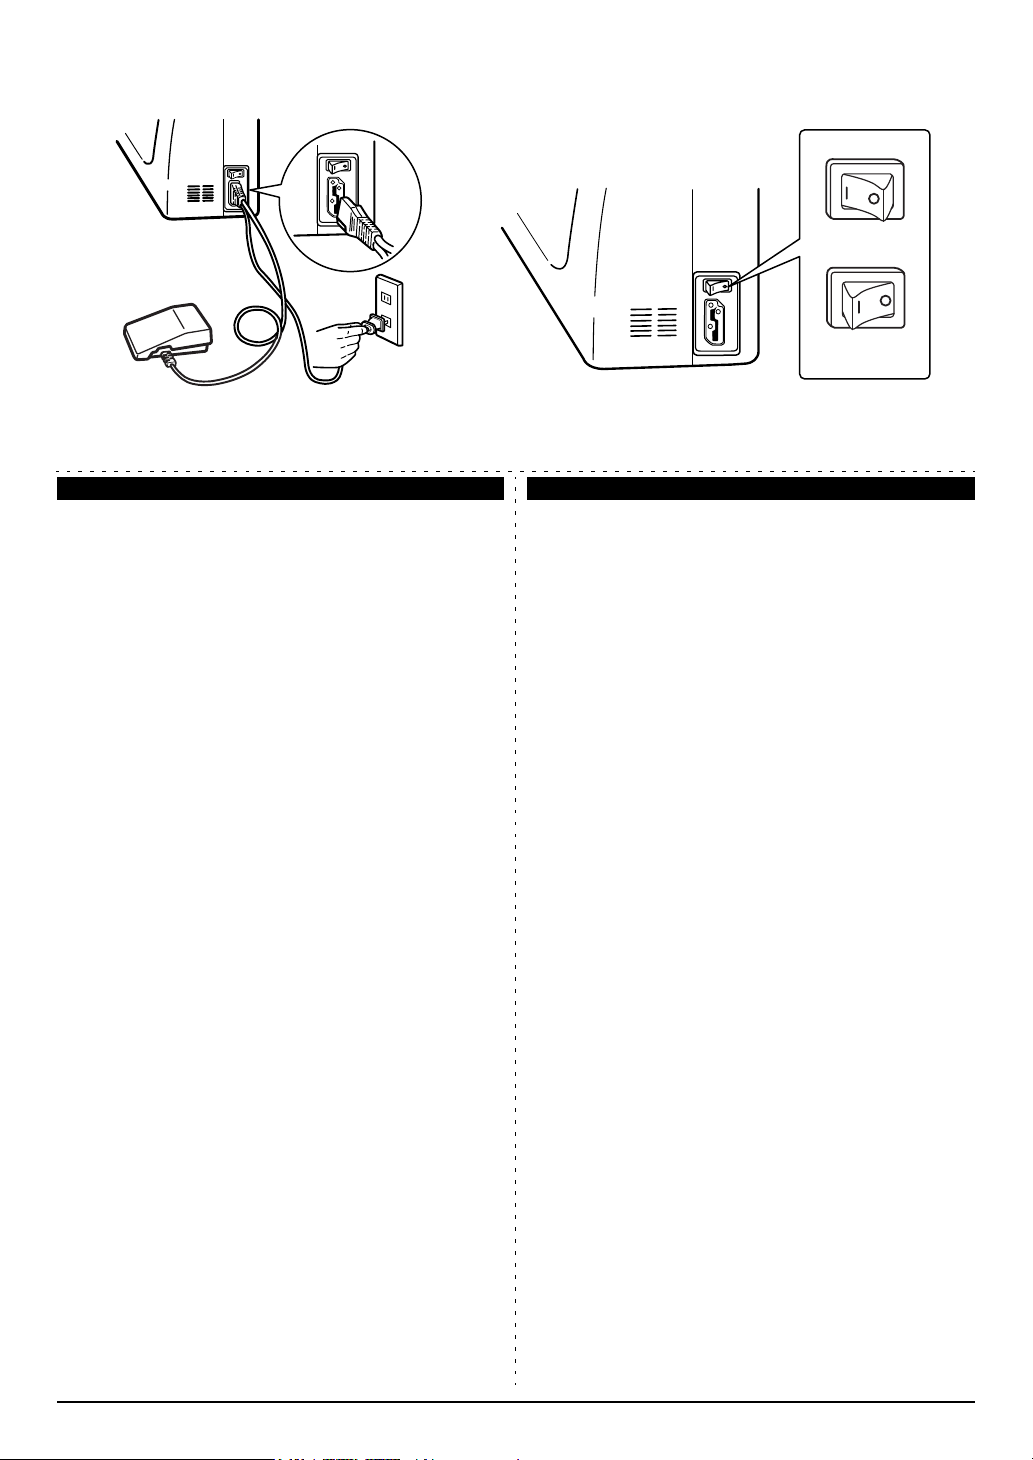
SETTING UP
Connecting foot controller and power cord
(fig A)
1. Connect the plug of the foot controller to the plug
socket.
2. Insert the power cord to an outlet.
Caution!
Be sure the voltage of the machine (information is on
the back of the machine) correspond to power supply.
The specifications vary from country to country.
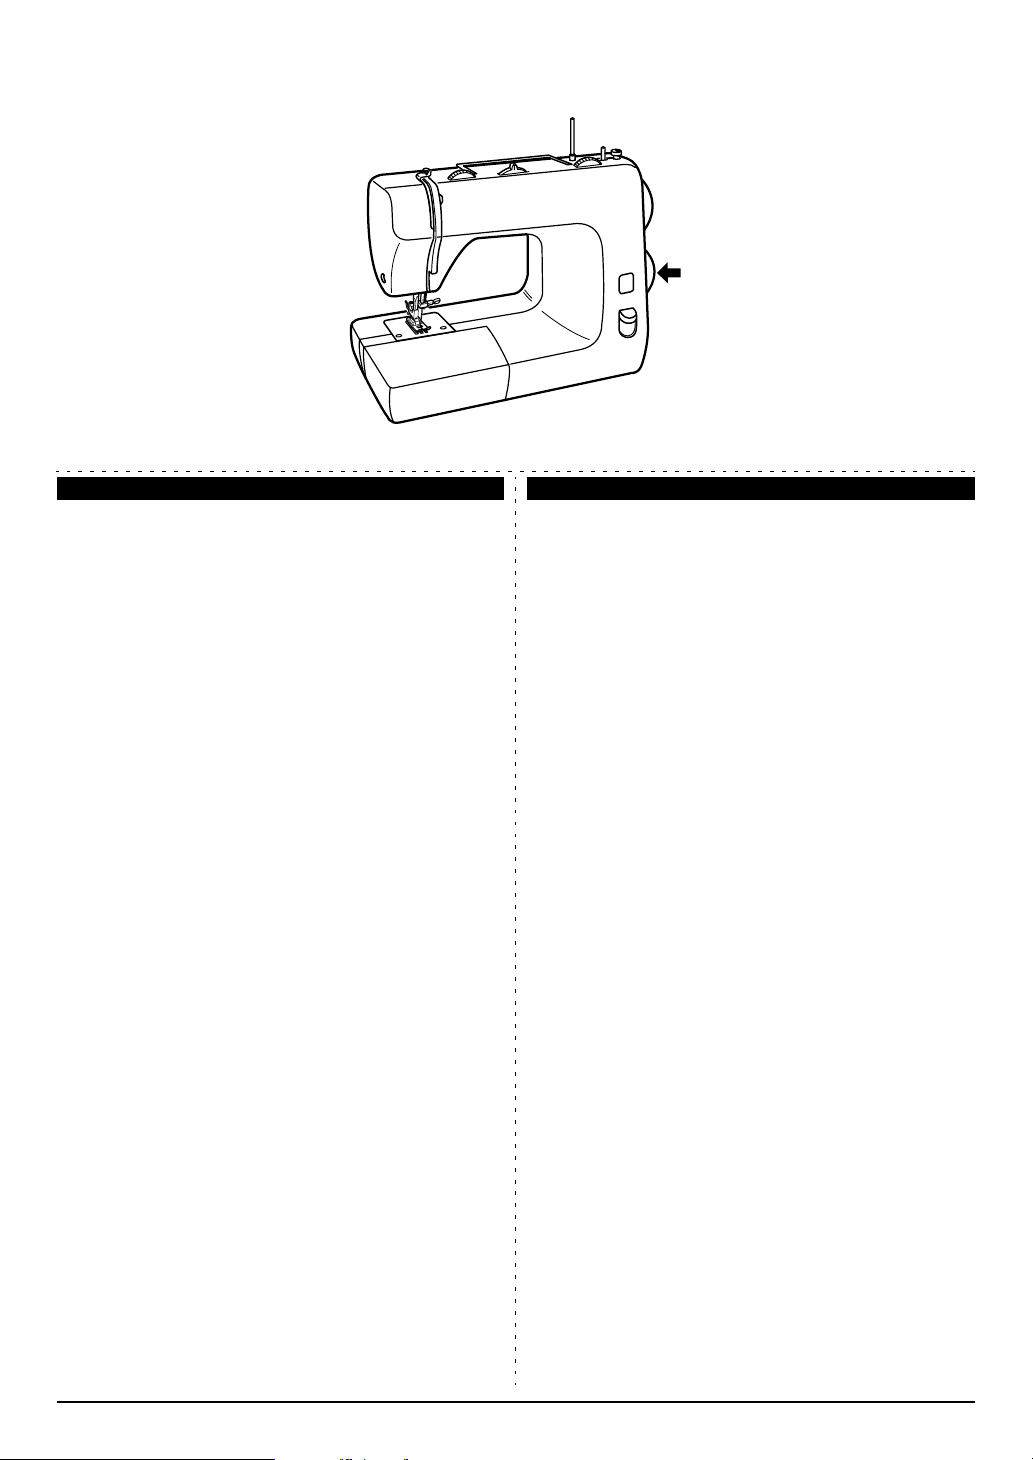
Power / Light switch (fig B)
Turn the switch on to sew.
This switch controls both power and light.
The machine will not move without the Power / Light
switch on.
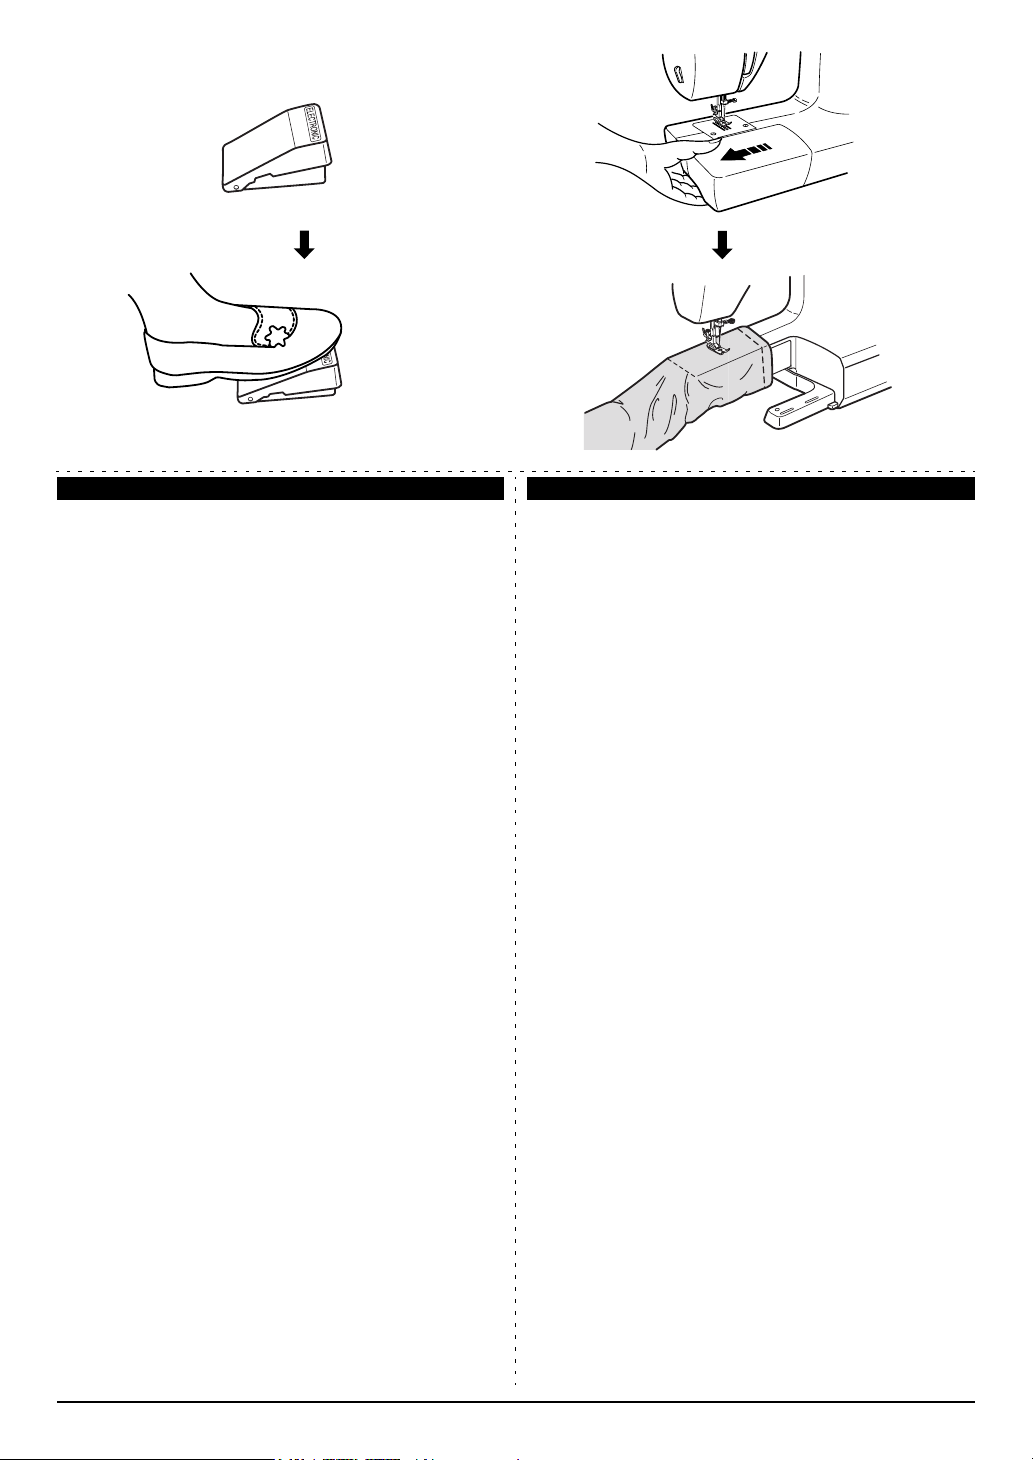
Foot controller (fig C)
The more you press the foot controller, the faster the
machine runs.
ON
OFF
MISE EN MARCHE
Branchement de la pédale et du cordon d’alimentation (fig. A)
1. Branchement de la prise de la pédale à la prise de
la machine.
2. Brancher le fil d’alimentation à une prise de
courant.
Attention!
Vérifiez que le voltage de la machine (information au
dos de la machine) correspond au voltage en vigueur.
Les spécifications varient selon les pays.
Interrupteur du courant et de la lumière (fig. B)
Mettre la machine sous tension pour commencer à
coudre.
Cet interrupteur contrôle à la fois la mise sous tension
et la lumière.
La machine ne marchera pas sans alimentation.
La pédale (fig. C)
Plus vous exercerez une pression importante sur la
pédale et plus la machine fonctionnera rapidement.
Extension table (fig D)
The machine converts into a free-arm model by
removing the extension table.
1. Remove the table by pulling it off to the left, and the
machine converts into a free-arm model.
Free-arm is more convenient to sew trousers, sleeves,
cuffs of T-shirts, blouses, etc.
5
La boîte d'accessoires (fig. D)
La machine se transforme en modèle bras-libre en
enlevant la boîte d'accessoires.
1. Enlever la table en la tirant vers la gauche, et la
machine se transforme en un modèle bras-libre.
Le bras libre est plus pratique pour coudre pantalons,
manches, manchettes de tee-shirts, chemisiers, etc....
CD
Nederlands Italiano
AANSLUITEN
Aansluiten van voetpedaal en lichtnetsnoer
(fig A)
1. Steek de stekker van het voetpedaal in de stekker
ingang.
2. Steek de lichtnetsnoer in het stopcontact.
Waarschuwing!
Overtuig u ervan dat het voltage van de machine
(vermeld op de achterkant van de machine) gelijk is
aan die van het lichtnet.
De specificaties verschillen van land tot land.
Aan / Uit schakelaar (fig B)
Zet de schakelaar aan om te gaan naaien.
Deze schakelaar regelt zowel de netspanning als de
verlichting.
De machine werkt niet als deze schakelaar niet is
ingeschakeld.
Voetpedaal (fig C)
Hoe verder u het voetpedaal indrukt, des te sneller de
machine loopt.
Aanschuiftafel (fig D)
De machine verandert in een vrije arm model als u de
aanschuiftafel afneemt.
1. Haal deze eraf door hem naar links te schuiven, de
machine is nu een vrije arm model.
De vrije arm is meer geschikt om te borduren en om
broekspijpen, mouwen en kragen van T-shirts,
blouses en dergelijke te naaien.
PREPARAZIONE
Collegamento del pedale e del cavo di alimentazione (fig. A)
1. Collegate la spina del reostato nell'apposita presa.
2. Inserite il cavo di alimentazione in una presa elettrica.
Attenzione!
Assicuratevi che la tensione indicata sulla macchina (le
informazioni sono sul retro della macchina) corrisponda
alla tensione della linea elettrica.
Le specifiche tecniche variano da paese a paese
Interruttore di accensione e della luce (fig. B)
Premete l’interruttore su “On” per cucire
L’interruttore comanda sia la luce che il motore
La macchina non si accenderà se non premete
l’interruttore su “On”.
Reostato (fig. C)
Più si spinge sul pedale, più si aumenta la velocità di
funzionamento della macchina.
Prolunga (fig. D)
La macchina si trasforma in una braccio libero togliendo
la prolunga.
1. Rimuovere la prolunga tirando verso sinistra e la
macchina diventa a braccio libero.
Per cucire pantaloni, maniche polsini delle maglie,
camicie, ecc. E’più pratico usare la macchina per cucire
con il braccio libero.
6
A SIDE DIAL MODEL
English Français
VARIOUS CONTROLS
Pattern selection dial (fig A)
To select stitch, be sure needle is at its highest
position.
The required stitch is selected by turning the Pattern
Selection Dial.
The Pattern Selection Dial can be turned either way.
Stitch length dial (B-1)
Stitch length can be easily changed by turning the
Stitch Length Dial.
For shorter stitch, turn Stitch Length Dial to a lower
number.
For longer stitch, turn to a higher number.
Standard stitch length is between 2 to 3.
However, for stitch patterns 12 through 23, the stitch
length dial should be set to 5.
Zigzag width control dial (B-2)
The width of Zigzag stitch can be selected by turning
the Zigzag Width Control Dial.
For wider zigzag stitch, turn the dial to a higher
number.
For narrower zigzag, turn the dial to a lower number.
Presser foot lever (fig C)
There are 3 positions for the presser foot lever.
1. To sew, the presser foot should be at the lowest
position a.
2. To insert or remove fabric, and to change presser
foot, middle position b.
3. To remove thick fabric, highest position c.
❈ Raise presser foot lever up as far as it will go for
position c.
The lever will not stop at position c.
Hold it in position c.
DIVERS REGLAGES
Cadran de sélection du point (fig. A)
Pour sélectionner le point, soyez sûr que l’aiguille est
à sa position la plus haute.
Le point souhaité est obtenu en tournant le cadran de
sélection du point.
Le cadran de sélection du point peut être tourné soit
vers la gauche soit vers la droite.
Cadran de réglage de la longueur de point (B-1)
La longueur du point peut être facilement réglable en
tournant le cadran de sélection du point.
Pour les points plus courts, régler le cadran de
réglage du point sur un chiffre plus petit.
Pour des points plus longs régler sur un chiffre plus
grand.
La longueur normale du point est de 2 à 3.
Toutefois, pour les points motifs de 12 à 23, le cadran
de sélection de longueur de point doit être réglé sur 5.
Cadran de réglage de la largeur du zigzag (B-2)
La largeur du zigzag peut être sélectionnée en
tournant le cadran de réglage de la largeur du zigzag.
Pour un point zigzag plus large, amener le sélecteur
sur le chiffre le plus grand.
Pour un point zigzag moins large, sélectionner le
cadran de réglage du point sur un chiffre plus petit.
Levier presseur de pied-de-biche (fig. C)
Il y a 3 positions pour le levier de pied-de-biche.
1. Pour coudre, le pied-de-biche doit être à sa
position la plus basse a.
2. Pour placer ou enlever un tissu, et pour changer de
pied-de-biche, position centrale b.
3. Pour enlever des tissus épais, position la plus
haute c.
❈ Amener le levier presseur de pied-de-biche
aussi loin qu’il puisse aller c.
Le levier ne s’arrêtera qu’à sa position c.
7

BC
c
B-1
3
2
4
5
b
B-2
Max 15W
a
Nederlands Italiano
VERSCHILLENDE BEDIENINGSELEMENTEN
Steekkeuzeknop (fig A)
Alvorens een steek te kiezen, overtuig u er eerst van
dat de naald in de hoogste stand staat.
De gewenste steek wordt verkregen door aan de
steekkeuzeknop te draaien.
De steekkeuzeknop kan zowel naar rechts als naar
links worden gedraaid.
Steeklengteknop (B-1)
De steeklengte kan eenvoudig worden ingesteld door
aan de steeklengteknop te draaien.
Voor een kortere steek draait u de steeklengteknop
naar een lager cijfer.
Voor een langere steek naar een hoger cijfer.
De standaard steeklengte ligt tussen 2 en 3.
Voor steeksoort 12 t/m 23 moet u de steeklengteknop
echter op 5 zetten.
Zigzagbreedteknop (B-2)
De breedte van de zigzagsteek kan worden ingesteld
door aan de zigzagbreedteknop te draaien.
Voor een bredere zigzagsteek draait u de knop naar
een hoger cijfer.
Voor een smallere zigzagsteek naar een lager cijfer.
Persvoethendel (fig C)
Er zijn 3 standen voor de persvoethendel.
1. Om te naaien moet de persvoethendel in de
laagste stand staan a.
2. Om de stof er onder te leggen of er onderuit te
halen en om voetjes te verwisselen, middelste
stand b.
3. Om dikke stof er onderuit te halen, hoogste stand
c.
❈ Duw de persvoethendel zover mogelijk omhoog
als deze kan voor stand c
De hendel zal niet in deze stand blijven staan c.
.
REGOLAZIONI
Selezione dei punti (fig. A)
Per selezionare i punti, assicuratevi che l’ago si nella
posizione più alta.
Il punto richiesto si seleziona ruotando la manopola di
selezione dei punti.
La manopola può girare verso destro o verso sinistra.
Manopola di regolazione della lunghezza del
punto (B-1)
La lunghezza del punto può essere facilmente
selezionata girando l’apposita manopola.
Per un punto più corto, ruotate la manopola verso un
numero basso.
Per un punto più lungo, ruotatela verso un numero
alto.
Per un punto normale regolate la manopola tra 2 e 3.
Tuttavia, per i punti dal 12 al 23, la manopola di
regolazione della lunghezza del punto deve essere
impostata a 5.
Manopola di regolazione della larghezza dello
zig zag (B-2)
La larghezza dello zz può essere selezionata girando
la manopola della regolazione della larghezza dello
zz. Per uno zz più largo ruotate la manopola verso un
numero alto.
Per uno zz più stretto ruotate la manopola verso un
numero basso.
Leva alzapiedino (fig. C)
Ci sono 3 posizioni per la leva alzapiedino.
1. Per cucire, la leva alzapiedino deve essere nella
posizione più bassa a.
2. Per inserire o rimuovere tessuti e cambiare
piedino, la posizione media b.
3. Per rimuovere tessuti spessi, la posizione più alta
c.
❈ Spingete verso l’alto la leva del piedino
premistoffa fino a fine corsa c.
La leva non si arresterà nella posizione c.
8
A
B C
12
D
E
F
9

English Français
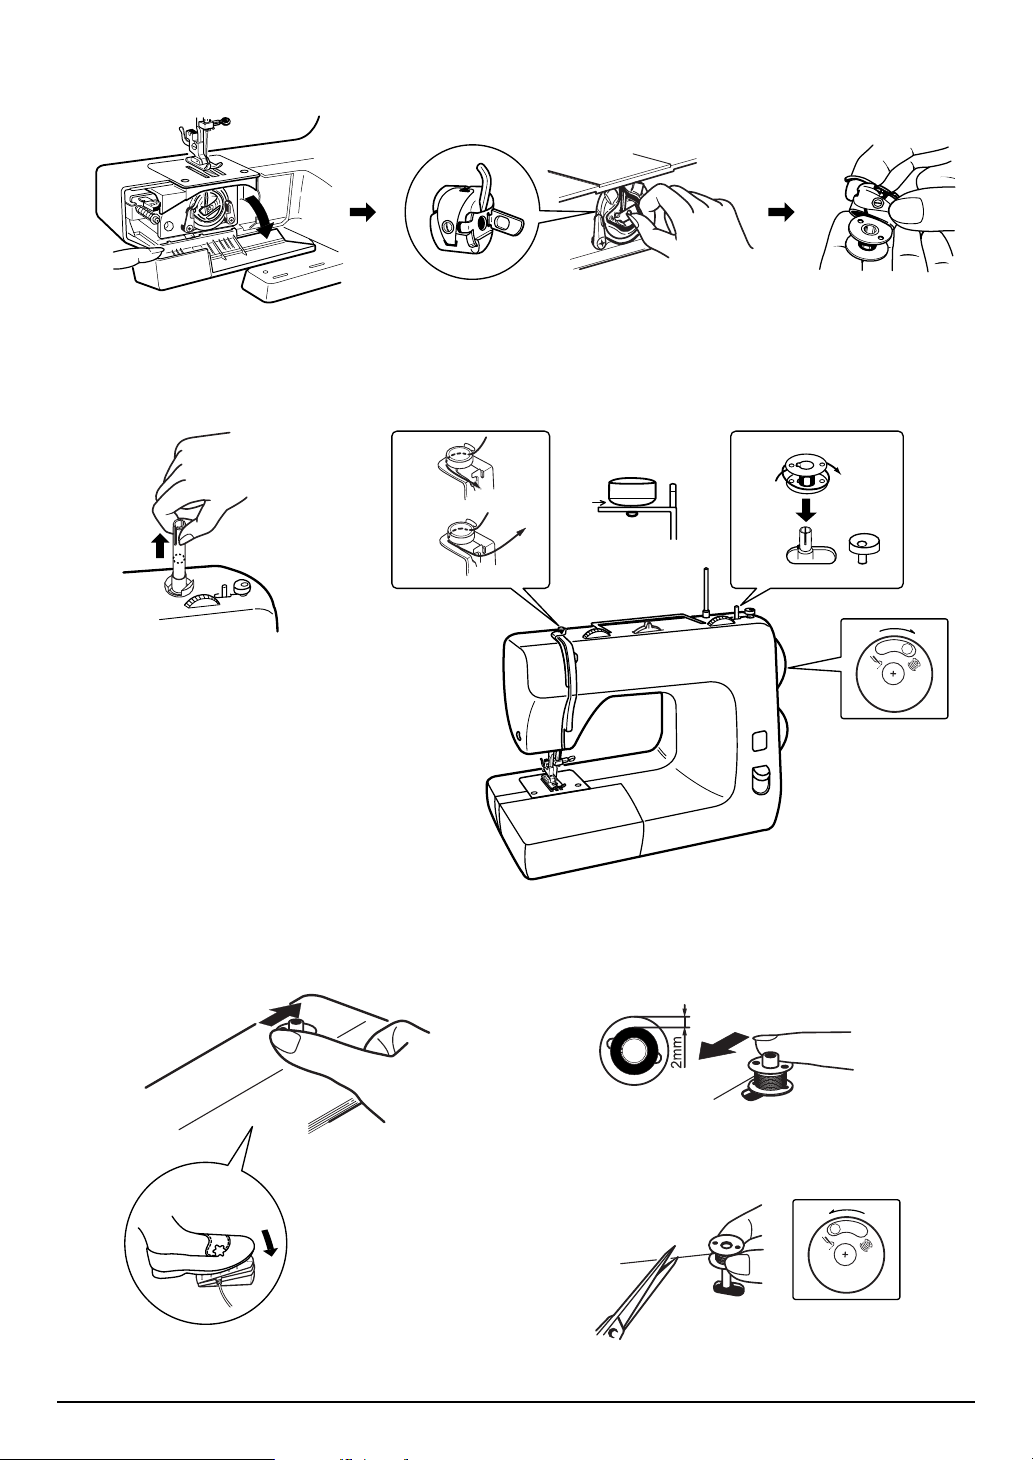
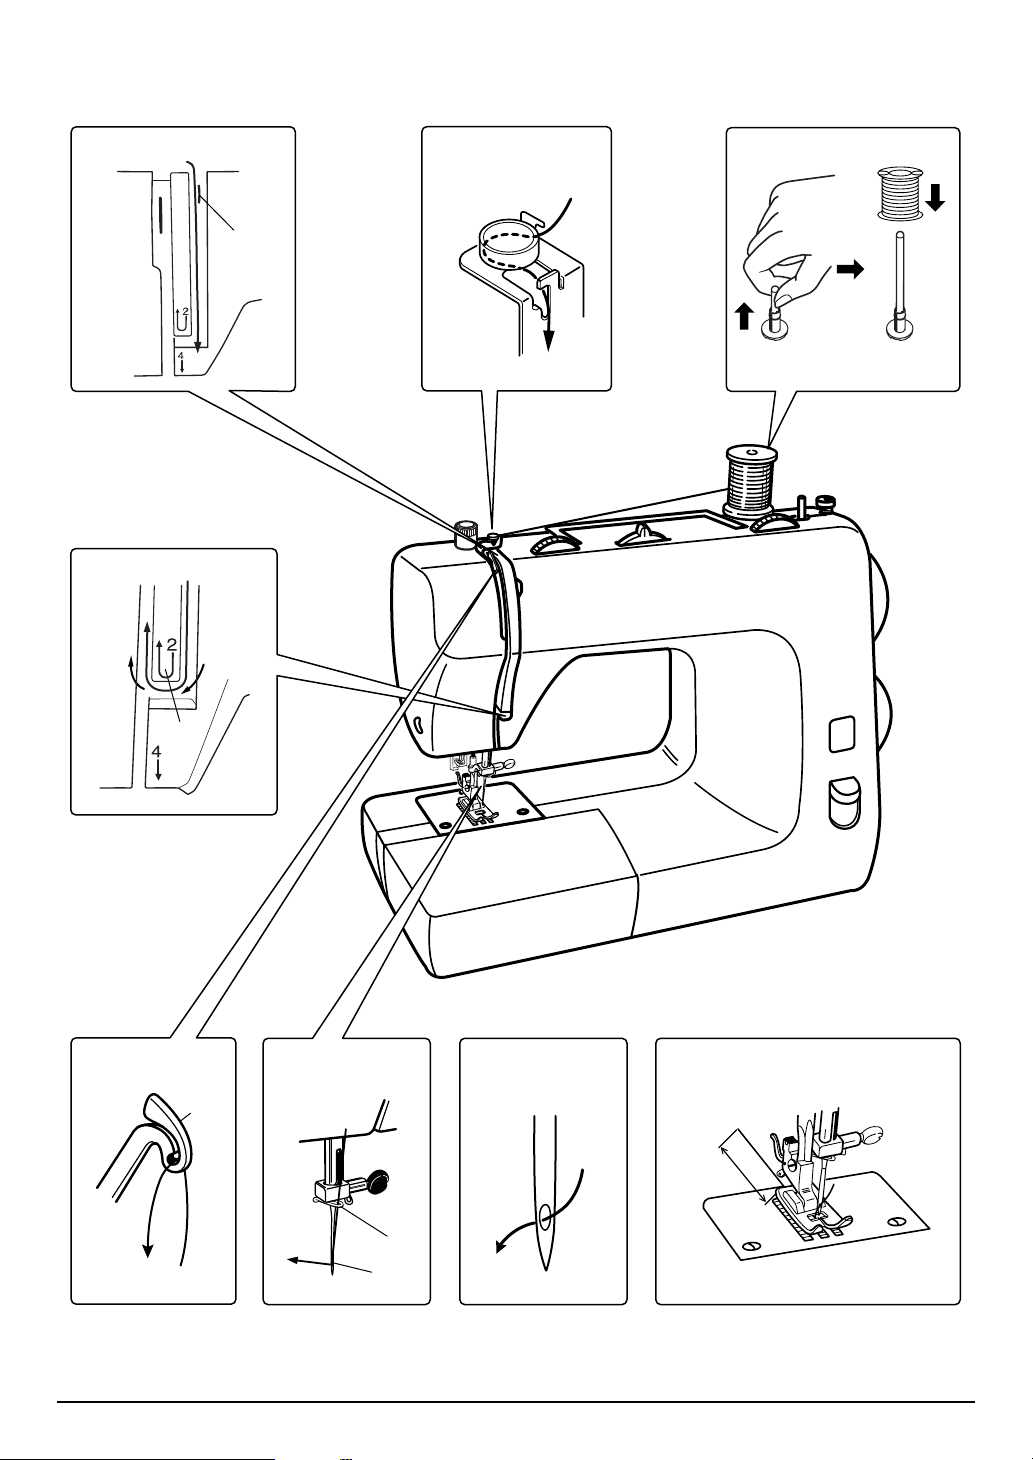
THREADING THE MACHINE
Bobbin winding
1. Set the needle at its highest position by rotating the
handwheel towards you. Open the shuttle cover. Hold
the latch of bobbin case and pull it out. Release the
latch and the bobbin comes out of the bobbin case
easily. (fig A)
NOTE
Use a TOYOTA-exclusive bobbin.
2. Pull out the spool pin until it snaps into place, as
shown in (fig B).
3. Put a spool of thread on the spool pin. Draw thread
from spool through thread guide as shown. (fig C-1)
4. Wind the end of thread from spool around the bobbin
clockwise for several times. Place bobbin on to bobbin
winder shaft. (fig C-2)
5. Move the declutch knob into the ( ) direction.
Caution!
Never touch declutch knob while sewing or it may cause
trouble.
6. Push bobbin winder shaft to right until it clicks. Press
on foot controller to wind bobbin. (fig D)
7. When the bobbin is wound enough, (see fig E) stop
the machine. Push bobbin winder shaft to the left, and
remove bobbin.
8. Take the bobbin off the bobbin winder shaft, and cut
the thread. (fig F)
9. Move the declutch knob into the ( ) direction.
10.Always turn the handwheel towards you and listen for
the “click” inside the handwheel, before sewing.
Nederlands Italiano
ENFILAGE DE LA MACHINE
Bobinage de la canette
1. Placer l’aiguille dans sa position la plus haute en tournant
le volant vers vous. Ouvrir le cache-navette. Tenir le
loquet de la navette et tirer dessus.
Libérer le loquet et la canette sortira facilement de la
navette. (fig. A)
NOTE
Utiliser exclusivement une canette TOYOTA.
2. Tirer sur le porte-bobine jusqu'à ce qu'il se mette en
place, comme indiqué (fig. B).
3. Mettre une bobine de fil sur le porte-bobine. Tirez le fil de
la bobine en le passant par le guide fil. Comme indiqué.
(fig. C-1)
4. Enroulez l’extrémité du fil de la bobine autour de la canette
plusieurs fois dans le sens des aiguilles d’une montre.
Placer la canette sur la tige porte-bobine. (fig.
5. Poussez le bouton de débrayage vers ( ) .
Attention!
Ne jamais toucher le bouton de débrayage pendant la
couture sous peine de provoquer un incident.
6. Pousser la tige porte-bobine vers la droite jusqu’à
entendre un click. Presser sur la pédale pour bobiner la
canette. (fig. D)
7. Lorsque la canette est suffisamment bobinée, (voir fig.
E) arrêter la machine, pousser la tige porte-bobine vers
la gauche, et retirer la canette.
8. Enlever la canette de la tige porte-bobine, et couper le fil.
(fig. F)
9. Pousser le bouton de débrayage vers ( ).
10.Avant de coudre, toujours tourner le volant vers vous
jusqu'à entendre un "clic".
C-2
)
HET INRIJGEN VAN DE MACHINE
Spoeltje opwinden
1. Breng de naald in de hoogste stand door het handwiel
naar u toe te draaien. Open de spoelhuisklep. Hou het
klepje op het spoelhuis vast en neem dit eruit. Laat het
klepje los en het spoeltje komt gemakkelijk uit het
spoelhuis. (fig A)
OPMERKING
Gebruik uitsluitend een spoeltje van TOYOTA.
2. Trek de garenpen uit totdat deze op zijn plaats klikt,
zoals aangegeven in
3. Zet een klos garen op de garenpen. Trek nu het garen van
de klos door de draadgeleider zoals afgebeeld. (fig
4. Draai het einde van de draad enkele malen rechtsom
op het spoeltje. Zet het spoeltje op de spoel
opwindas. (fig C-2)
5. Zet de ontkoppelingsknop in de ( ) richting.
Waarschuwing!
Raak de ontkoppelingsknop nooit aan tijdens het naaien
want dit kan storing veroorzaken.
6. Duw de spoel opwindas naar rechts totdat deze klikt. Duw
op het voetpedaal om het spoeltje op te winden. (fig
7. Wanneer het spoeltje voldoende is opgewonden, (zie
fig E) stop dan de machine. Duw de spoel opwindas
naar links.
8. Neem het spoeltje van de opwindas en knip de draad
af. (fig F)
9. Zet de ontkoppelingsknop in de ( ) richting.
10.Draai het handwiel altijd naar u toe en naai pas nadat
u een "klik" binnen het handwiel hoort.
(fig B)
C-1
D
)
)
PREPARAZIONE PER LA CUCITURA
Riempimento della spolina
1. Far ruotare il volantino verso di voi per portare la barra
ago nel punto più alto. Aprite il coperchio della capsula.
Aprite la levetta di chiusura della capsula che contiene la
spolina ed estraetela.
Rilasciate la levetta e quindi staccate la spolina (fig. A).
NOTA
Usare solo una spolina TOYOTA.
2. Estrarre il portarocchetto finché non scatta in posizione,
come mostrato in (fig. B).
3. Inserite un rocchetto di filo sul perno portarocchetto.
Estrarre il filo dal rocchetto, farlo correre attraverso il
guidafilo come mostrato nella (fig. C-1).
4. Avvolgete il filo a mano per alcuni giri intorno alla spolina
in senso orario. Posizionate la spolina sull’asse del
filarello (fig. C-2).
5. Spingete il tasto di disinnesto che si trova sul volantino
nella direzione ( ).
Attenzione!
Onde evitare inconvenienti non toccare mai il pomello di
sgancio della frizione mentre cucite.
6. Spostare il filarello a destra fino al click. Mantenere
premuto il reostato elettrico per il riavvolgimento della
spolina (fig. D).
7. Una volta riempita la spolina, (vedi fig. E) arrestate la
macchina e spostate il filarello a sinistra per poi estrarre
la spolina.
8. Togliete la spolina dall’asse del filarello e tagliate il filo
(fig. F).
9. Spostate il tasto di disinnesto nella direzione ( ).
10.Prima di iniziare a cucire ruotare sempre il volantino
verso di sé, finché non si sente il "clic" all'interno del
volantino.
10
AB
➀
English Français
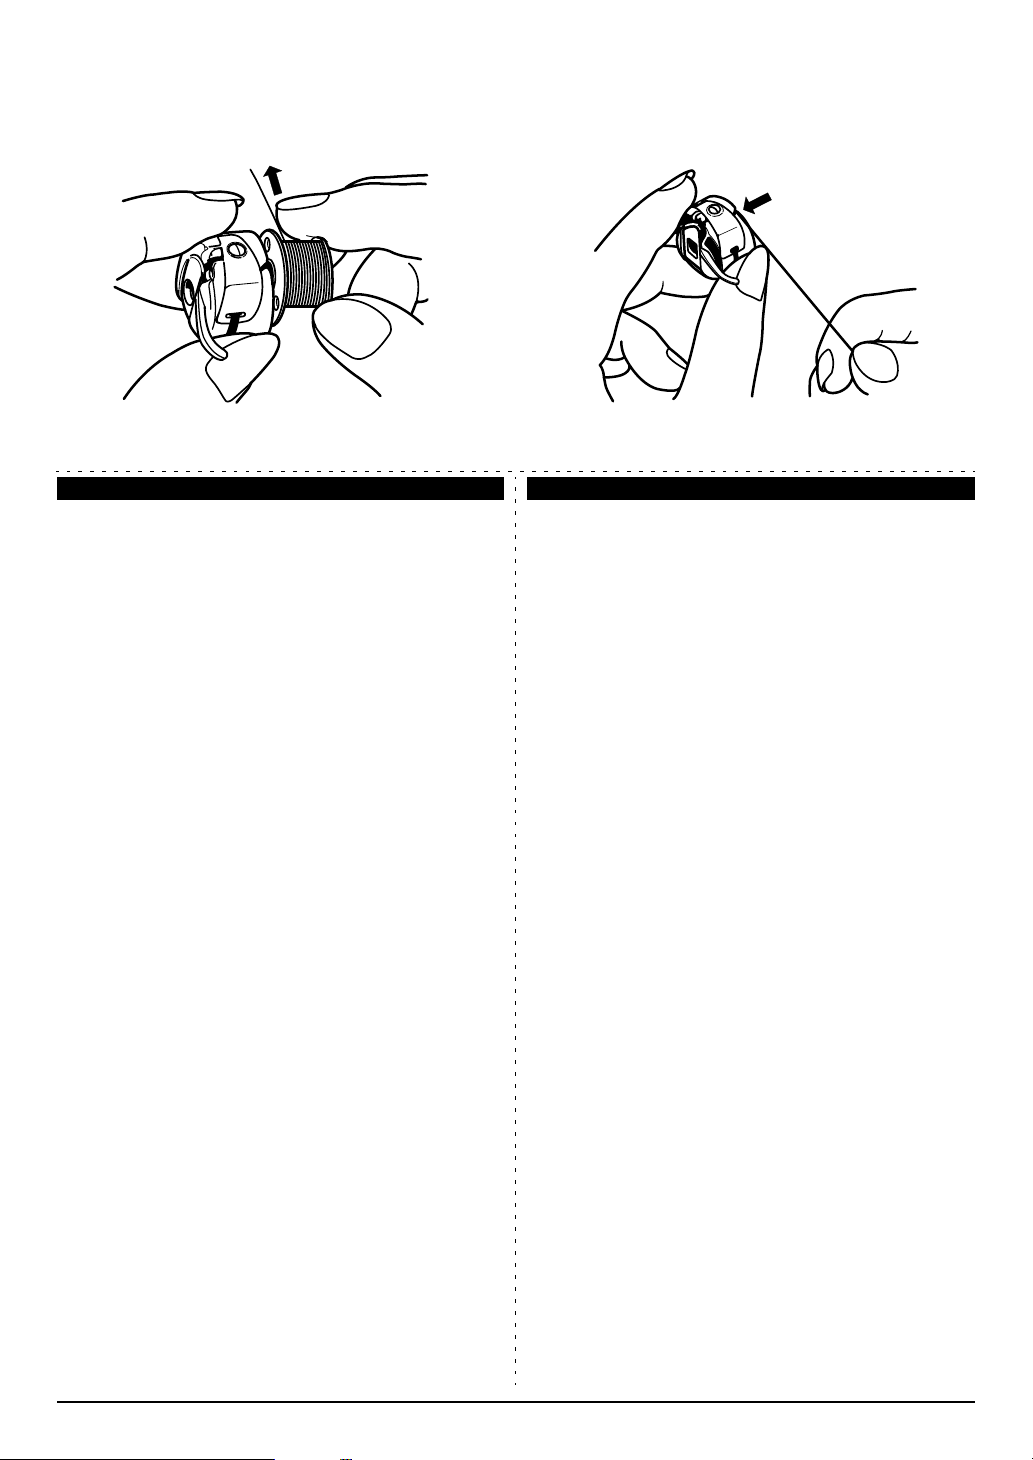
Bobbin threading
1. Place the bobbin in its case with the thread running
clockwise. (fig A)
2. Guide the thread into the slot 1 of bobbin case.
(fig B)
3. Pull the thread to the left, and bring it under the
tension spring then to delivery eye 2. (fig C-1)
❈ Make sure the thread runs clockwise when
pulling the thread as shown in (fig C-2).
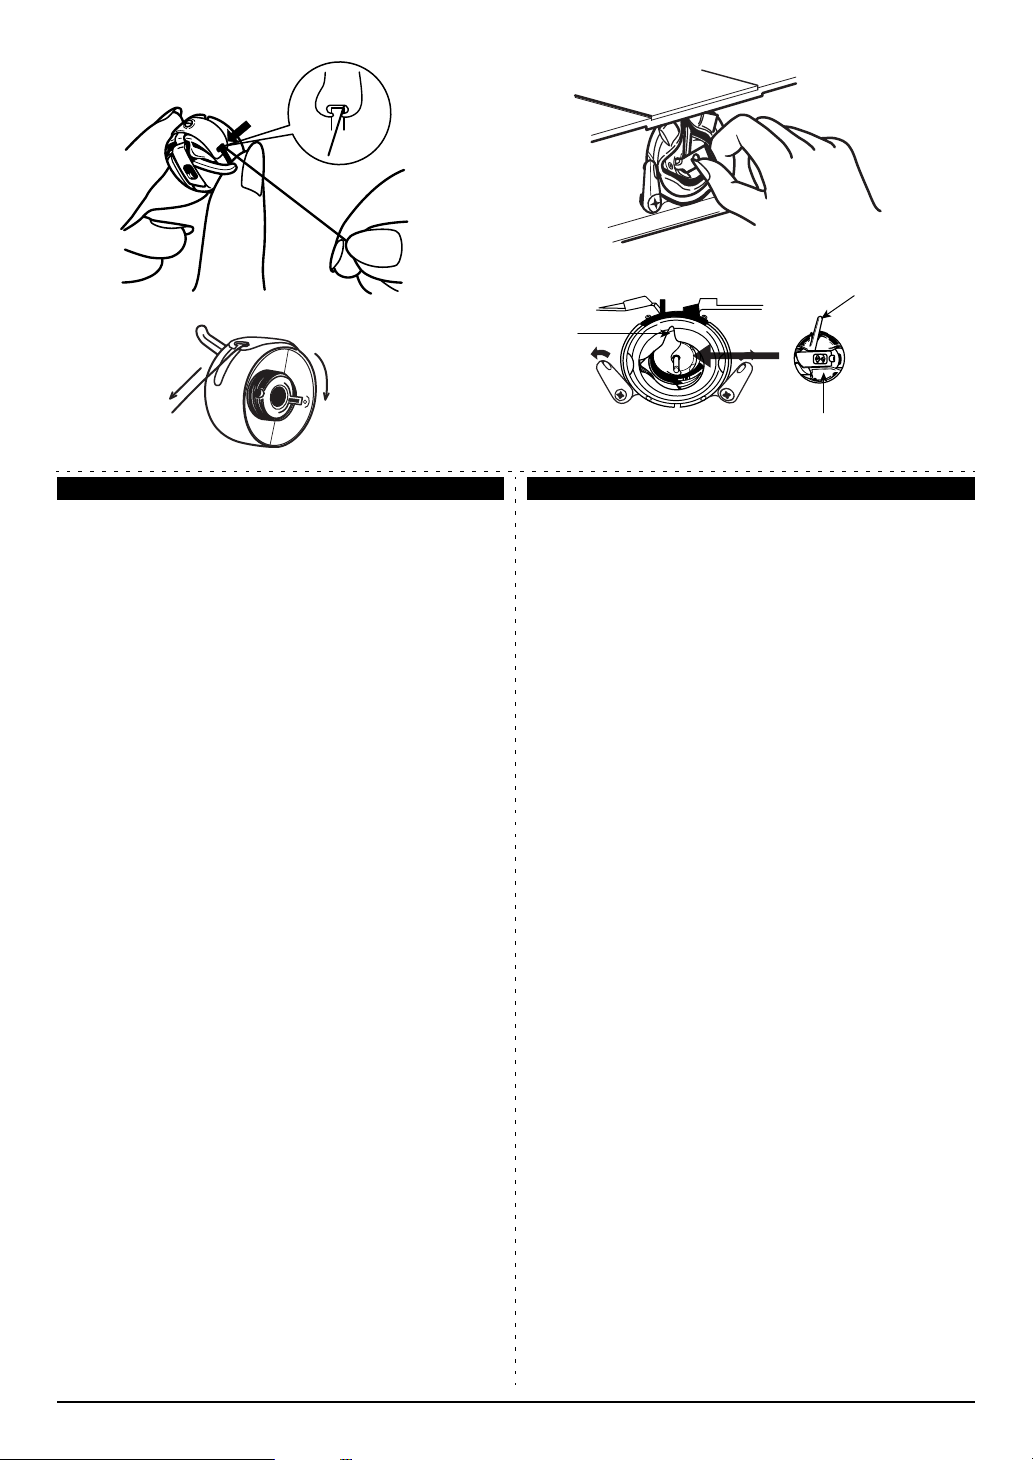
4. Raise the needle to its highest position, and raise
the presser foot lever.
Open shuttle cover.
5. Unwind about 10 cm of thread from the bobbin
case.
6. Hold the bobbin case by the latch, push it into the
shuttle race. Release the latch when the bobbin is
fully inserted. (fig D)
Bobbin case stopper should always face
7.
upwards and fit into shuttle race way slot. (fig E)
Enfilage de la canette
1. Placer la canette dans sa navette avec le fil
tournant dans le sens des aiguilles d’une montre.
(fig. A)
2. Guider le fil dans la fente 1 de la navette (fig. B)
3. Tirer le fil vers la gauche, et le passer sous le
ressort de tension, puis par l’orifice 2. (fig. C-1)
❈ Vérifier que le fil se déroule dans le sens des
aiguilles d’une montre quand vous tirez sur le fil
comme indiqué (fig. C-2)
4. Relever l’aiguille à sa position la plus haute, et
lever le levier presseur de pied-de-biche.
Ouvrir le cache-navette.
5. Dérouler environ 10 cm de fil de la navette.
6. Tenez la navette par le loquet, pousser la dans la
coursière. Relâchez le loquet lorsque la canette est
complètement insérée. (fig. D)
7. La butée de la navette doit toujours être tournée
vers le haut et s'insérer dans la fente de la
coursière (fig. E).
11
C-1 D
➁
C-2
Nederlands Italiano
Spoeltje inrijgen
1. Zet het spoeltje in het spoelhuis met de draad
rechtsom. (fig A)
2. Trek de draad in de gleuf 1 van het spoelhuis.
(fig B)
3. Trek de draad naar links, breng deze onder het
spanningsveertje en dan naar het geleideoog 2.
(fig C-1)
❈
U moet zeker zijn dat de bobijn draait in de
richting van de wijzers van het uurwerk. (fig
4. Breng de naald in de hoogste stand en zet de
persvoethendel omhoog.
Open de spoelhuisklep.
5. Trek ongeveer 10 cm garen uit het spoelhuis.
6. Hou het spoelhuis vast aan het klepje en duw het
in de spoelbaan. Laat het klepje los zodra het
spoelhuis er volledig in zit. (fig D)
7. Spoelhuisstopper moet altijd met de voorkant naar
boven liggen en in de spoelbaangleuf passen.
(fig E)
C-2
E
Slot
Fente
Gleuf
Apertura
Bobbin case / Navette
Spoelhuis / Capsula
Stopper
Butée
Stopper
Fermo
Sistemazione della spolina
1. Inserite la spolina nella capsula. Assicuratevi che il
filo sia avvolto in senso orario (fig. A)
2. Fate passare il filo nell’apertura 1 della capsula
(fig. B)
3. Tirando il filo verso sinistra, fatelo passare sotto la
molla di tensionamento e quindi attraverso il foro
2. (fig. C-1)
❈ Assicuratevi che il filo sia in senso orario
tirandolo come mostrato in (fig. C-2)
)
4. Portate l’ago nella posizione più alta e sollevate il
piedino premistoffa.
Aprite il copricrochet.
5. Estraete circa 10 cm di filo dalla spolina.
6. Tenete la levetta e spingete la capsula nel crochet.
Assicuratevi che la spolina sia bene in posizione
prima di lasciare la levetta (fig. D)
7. Il fermo della capsula deve sempre essere rivolto
verso l'alto e inserirsi nell'apertura del supporto del
crochet. (fig E)
12
C
B
A
D
➂
➁
➀
13
E
➃
F
GH
15 cm
➄
➅
 Loading...