

Page 1

2001MY ECHO (U) L/O0008
SECTION 1–
OPERATION OF INSTRUMENTS AND
CONTROLS
Overview of instruments and controls
Instrument panel o verview 2. . . . . . . . . . . . . . . . . . . . . . . . . . . . . . . . . . . . .
Instrument cluster overview 4. . . . . . . . . . . . . . . . . . . . . . . . . . . . . . . . . . . .
Indicator symbols on the instrument panel 5. . . . . . . . . . . . . . . . . . . . . . .
1
2001 ECHO (OM52440U)
1
Page 2
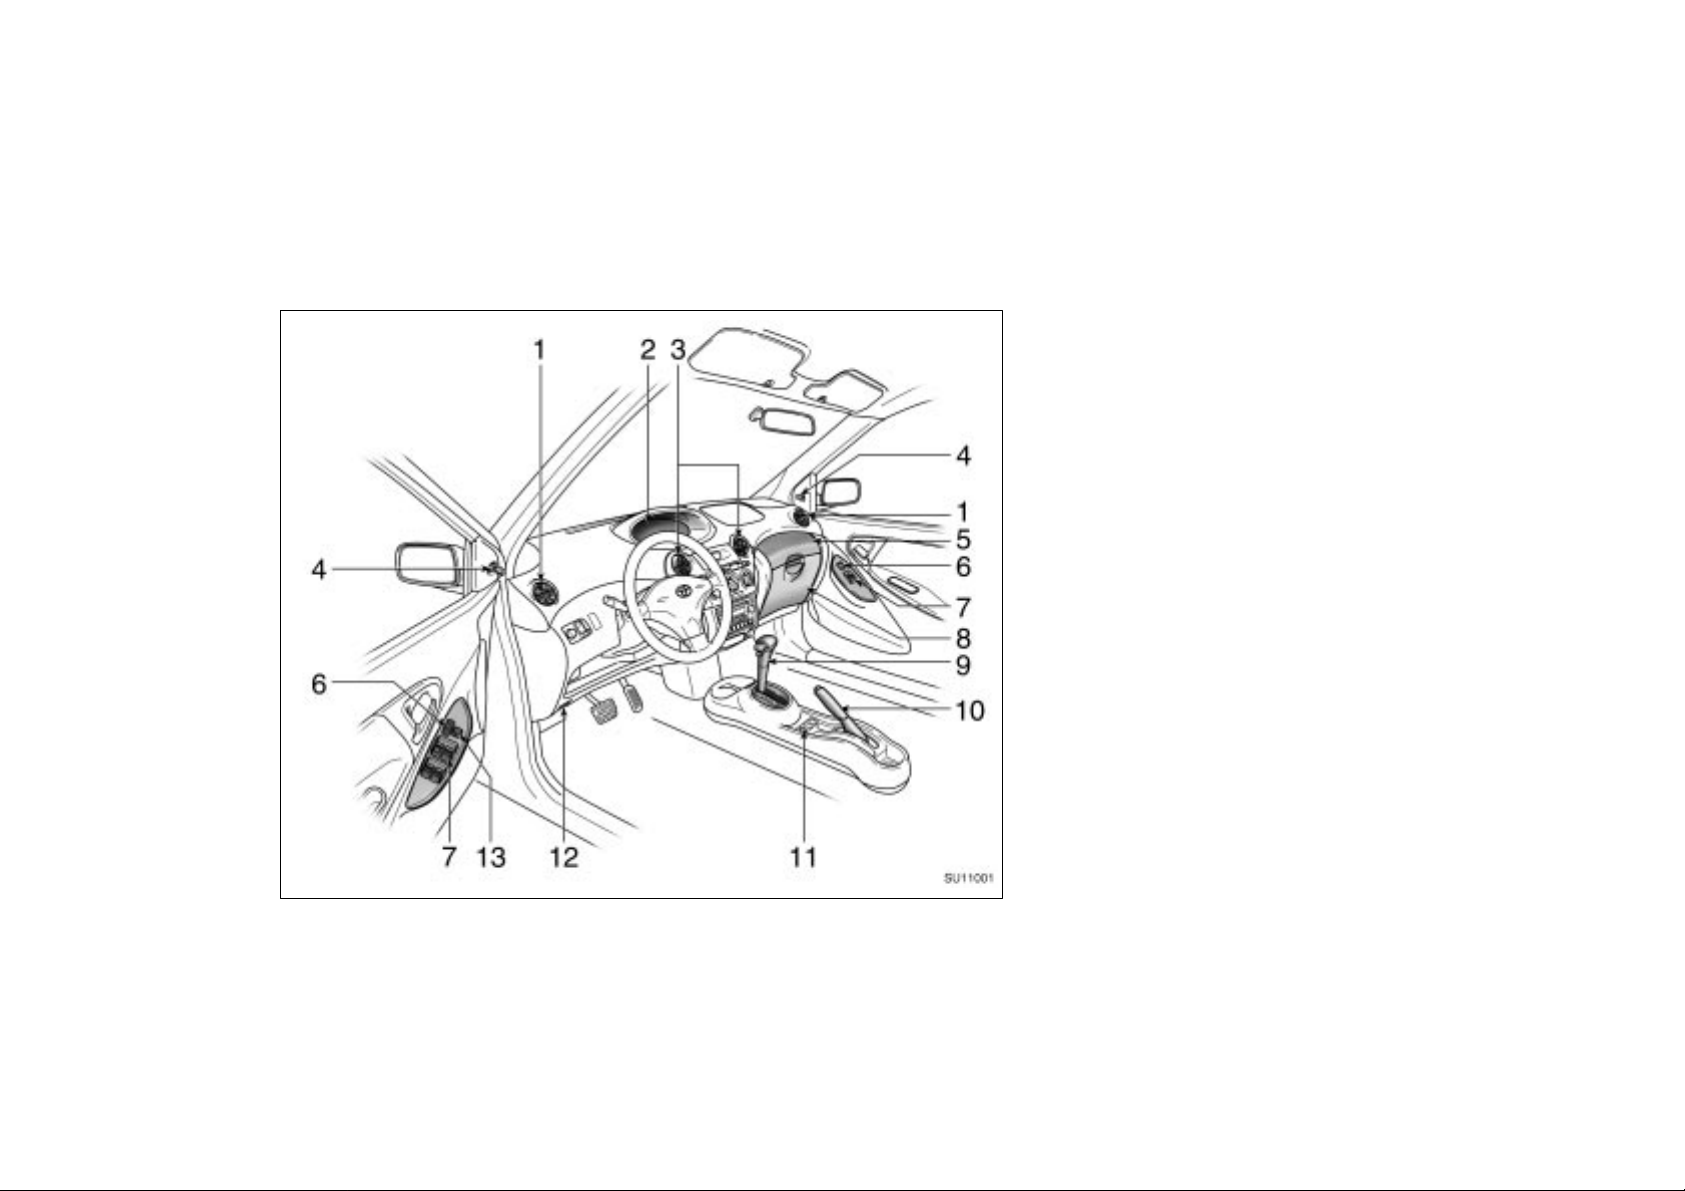
Instrument panel overview
SU11001
2001MY ECHO (U) L/O0008
1. Side vents
2. Instrument cluster
3. Center vents
4. Rear view mirror remote control levers
5. Auxiliary box
6. Power door lock switches
(with power windows)
7. Power window switches
8. Glove box
9. Automatic transmission selector lever or
manual transmission gear shift lever
10. Parking brake lever
11. Power door lock switch
(without power windows)
12. Hood lock release lever
13. Window lock switch
2
2001 ECHO (OM52440U)
Page 3
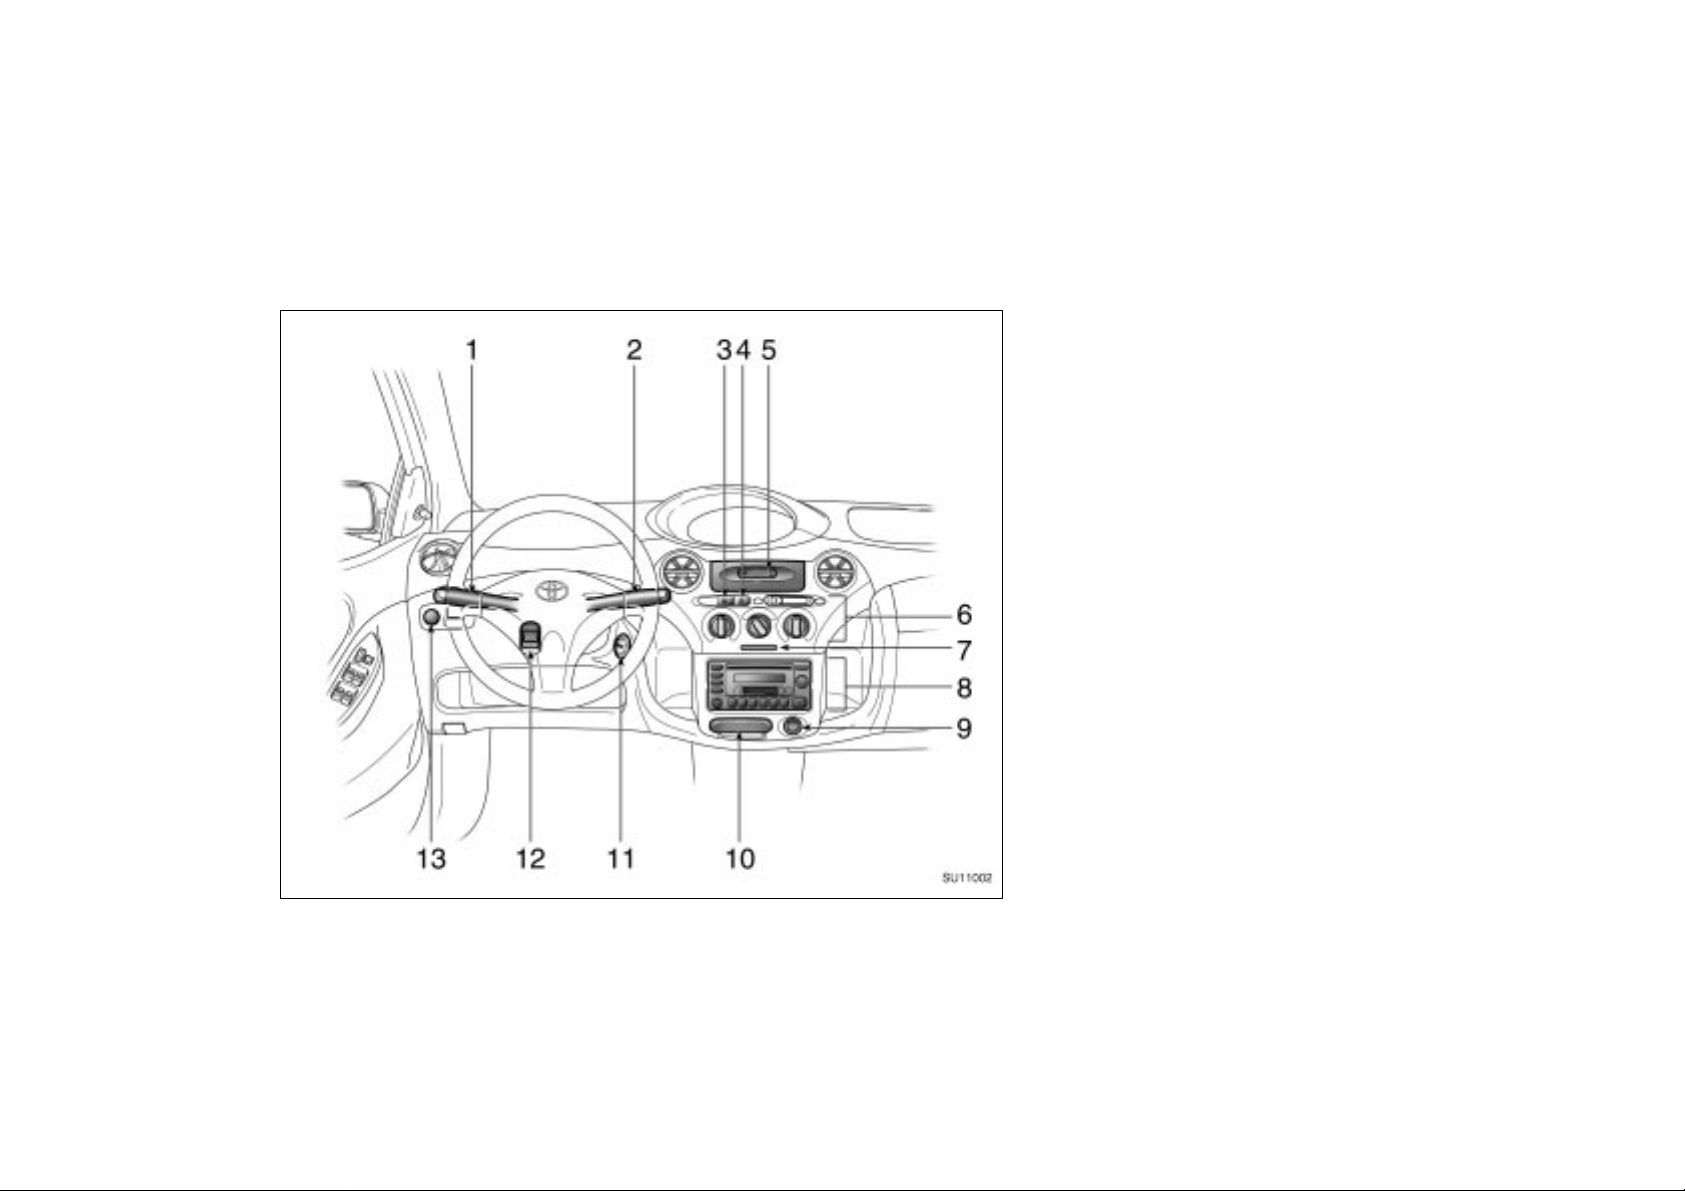
SU11002
2001MY ECHO (U) L/O0008
1. Headlight and turn signal switch
2. Wiper and washer switches
3. Rear window defogger switch
4. Emergency flasher switch
5. Clock
6. Air conditioning controls
7. Security indicator light/Front
passenger’s seat belt reminder light
8. Car audio
9. Cigarette lighter/Power outlet
10. Ashtray/Coin box
11. Ignition switch
12. Tilt steering lock release lever
13. Instrument panel light control knob
2001 ECHO (OM52440U)
3
Page 4
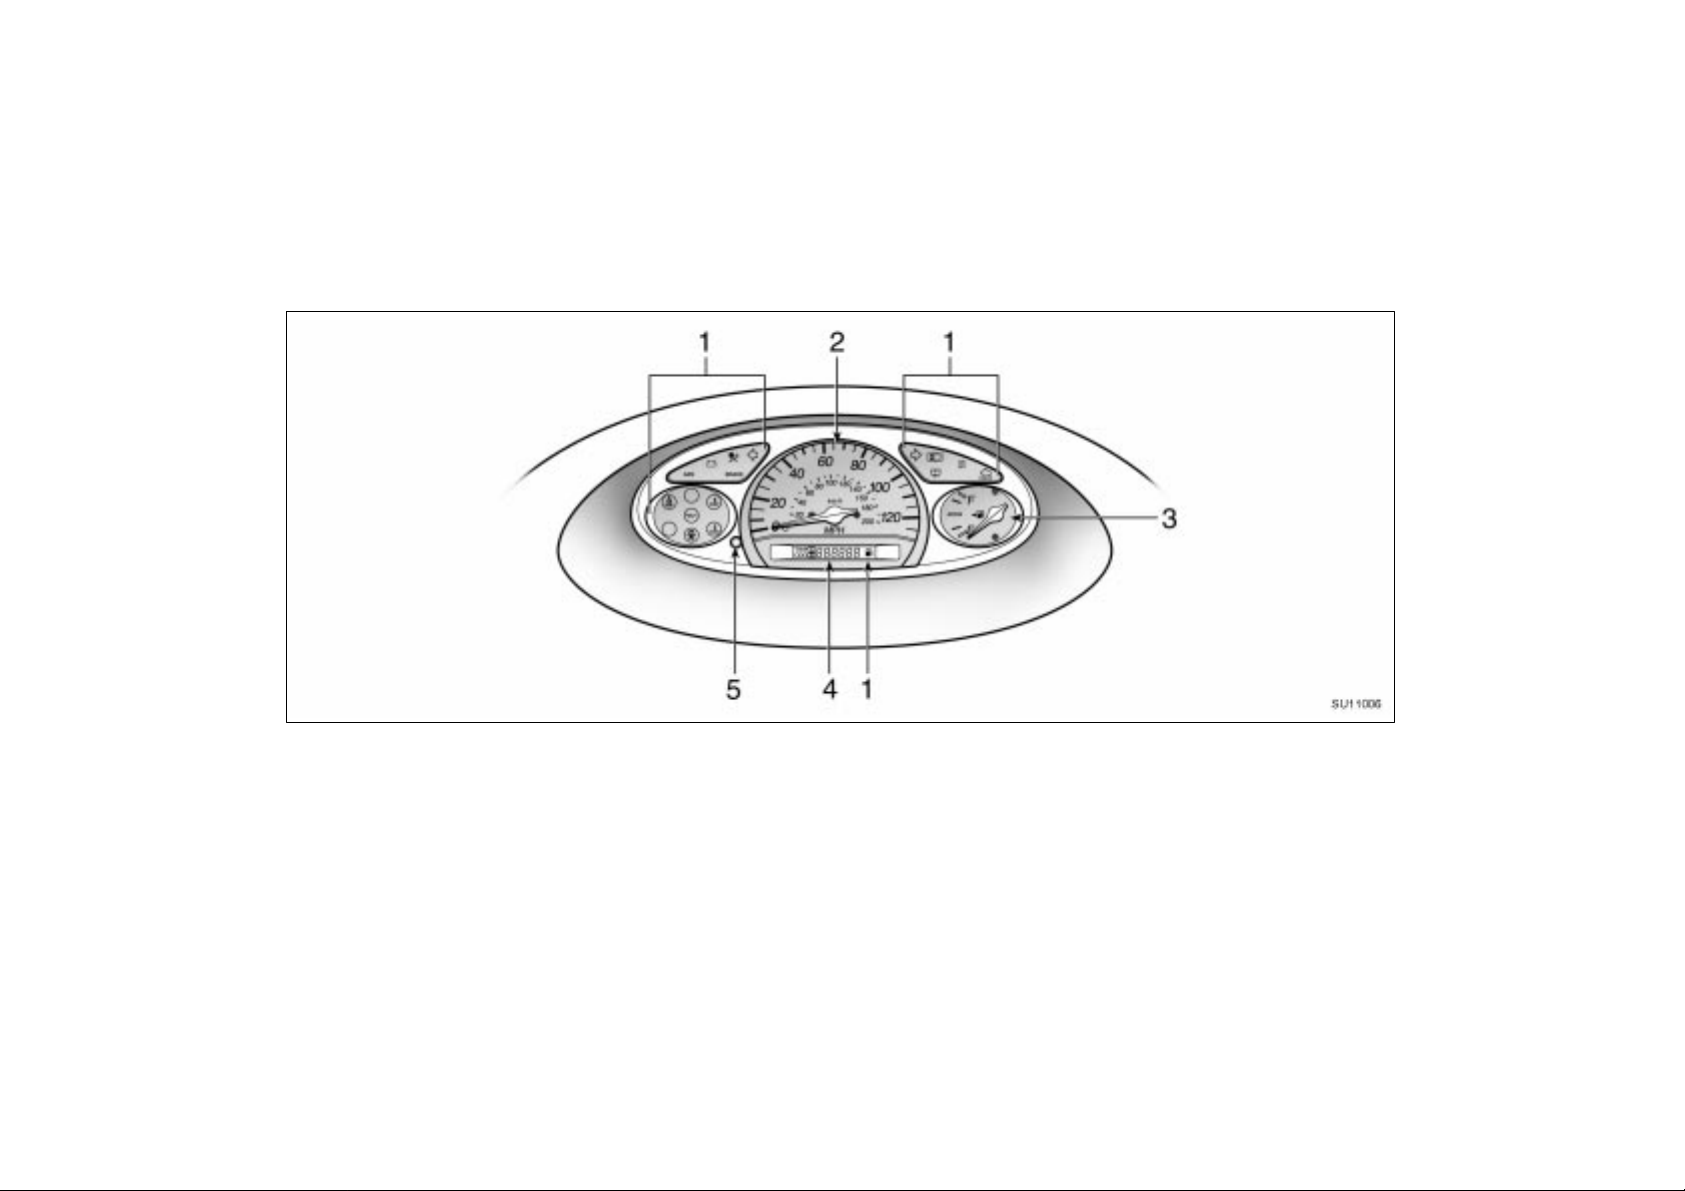
Instrument cluster overview
2001MY ECHO (U) L/O0008
SU11006
1. Service reminder indicators and
indicator lights
2. Speedometer
4
3. Fuel gauge
4. Odometer and two trip meters
2001 ECHO (OM52440U)
5. Trip m eter res et knob
Page 5
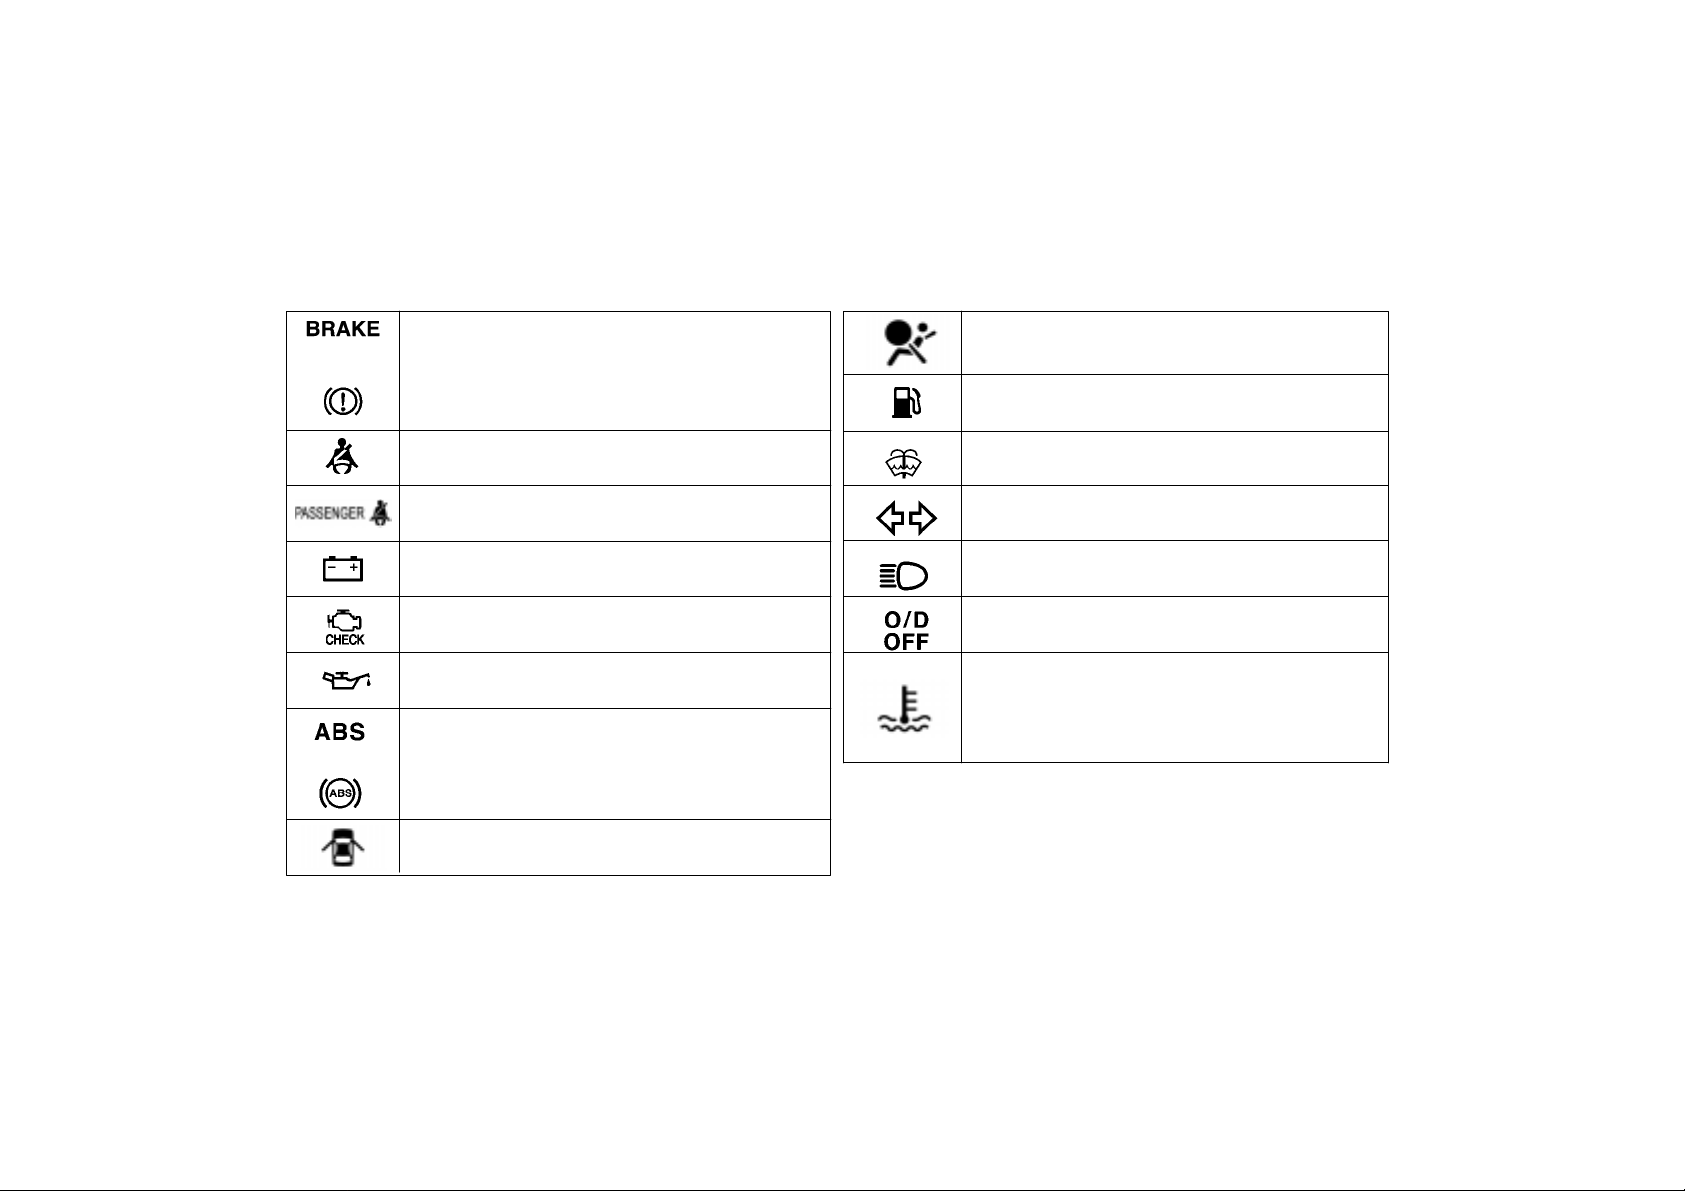
Indicator symbols on the instrument panel
2001MY ECHO (U) L/O0008
SRS warning light
or
Brake system warning light
∗
Low fuel level warning light
Driver’s seat belt reminder light
Front passenger’s seat belt reminder light
Discharge warning light
∗
Malfunction indicator lamp
Low oil pressure warning light
or
Anti-lock brake system warning light
∗
∗
Low windshield washer fluid level warning light
Turn signal indicator lights
Headlight high beam indicator light
∗
∗
∗
∗
: For details, see “Service reminder indicators and warning
Overdrive–off indicator light
Low engine coolant temperature indicator light
(in blue)
High engine coolant temperature warning light
(in red)
∗
∗
∗
∗
∗
buzzers” in Section 1–5.
Open door warning light
∗
2001 ECHO (OM52440U)
5
Page 6

2001MY ECHO (U) L/O0008
6
2001 ECHO (OM52440U)
Page 7

2001MY ECHO (U) L/O0008
SECTION 1–
OPERATION OF INSTRUMENTS AND
CONTROLS
Keys and Doors
Keys 8. . . . . . . . . . . . . . . . . . . . . . . . . . . . . . . . . . . . . . . . . . . . . . . . . . . . . . . .
Side doors 9. . . . . . . . . . . . . . . . . . . . . . . . . . . . . . . . . . . . . . . . . . . . . . . . . . .
Power windows 15. . . . . . . . . . . . . . . . . . . . . . . . . . . . . . . . . . . . . . . . . . . . . .
Trunk lid 16. . . . . . . . . . . . . . . . . . . . . . . . . . . . . . . . . . . . . . . . . . . . . . . . . . . .
Hood 18. . . . . . . . . . . . . . . . . . . . . . . . . . . . . . . . . . . . . . . . . . . . . . . . . . . . . . .
Theft deterrent s ystem 20. . . . . . . . . . . . . . . . . . . . . . . . . . . . . . . . . . . . . . .
Fuel tank cap 21. . . . . . . . . . . . . . . . . . . . . . . . . . . . . . . . . . . . . . . . . . . . . . .
2
2001 ECHO (OM52440U)
7
Page 8
2001MY ECHO (U) L/O0008
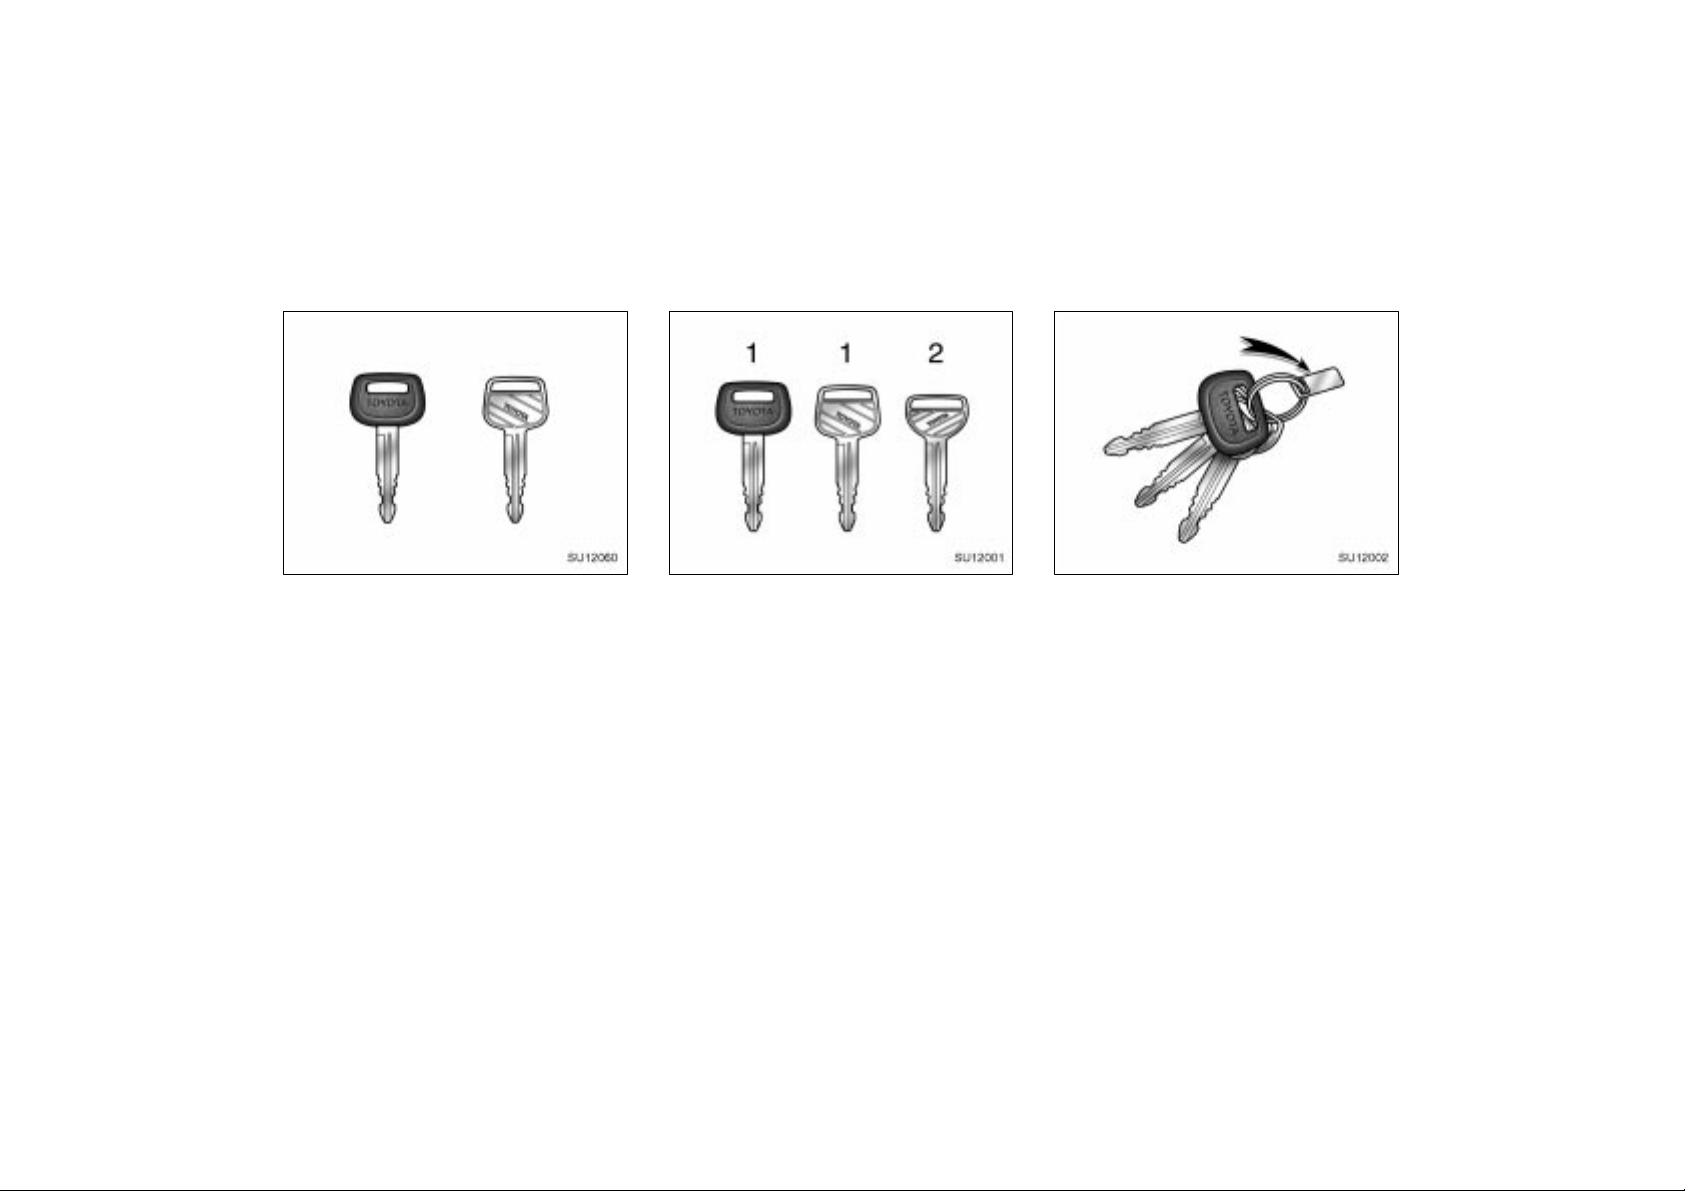
Keys (type A)
SU12060
This key works in every lock.
Since the doors and trunk lid can be
locked without a key, you should always
carry a spare key in case you accidentally
lock your keys inside the vehicle.
Keys (type B)
SU12001
Your vehicle is supplied with two kinds
of key.
1. Master key—This key works in every
lock.
2. Sub key—This key will not work in the
trunk.
To protect things locked in the trunk when
you have your vehicle parked, leave the
sub key with the attendant.
Since the doors and trunk lid can be
locked without a key, you should always
carry a spare master key in case you
accidentally lock your keys inside the vehicle.
SU12002
KEY NUMBER PLATE
Your key number is shown on the plate.
Keep the plate in a safe place such as
your wallet, not in the vehicle.
If you should lose your keys or if you
need additional keys, duplicates can be
made by a Toyota dealer using the key
number.
We recommend you to write down the key
number and keep it in safe place.
8
2001 ECHO (OM52440U)
Page 9
Side doors—
2001MY ECHO (U) L/O0008
SY12008
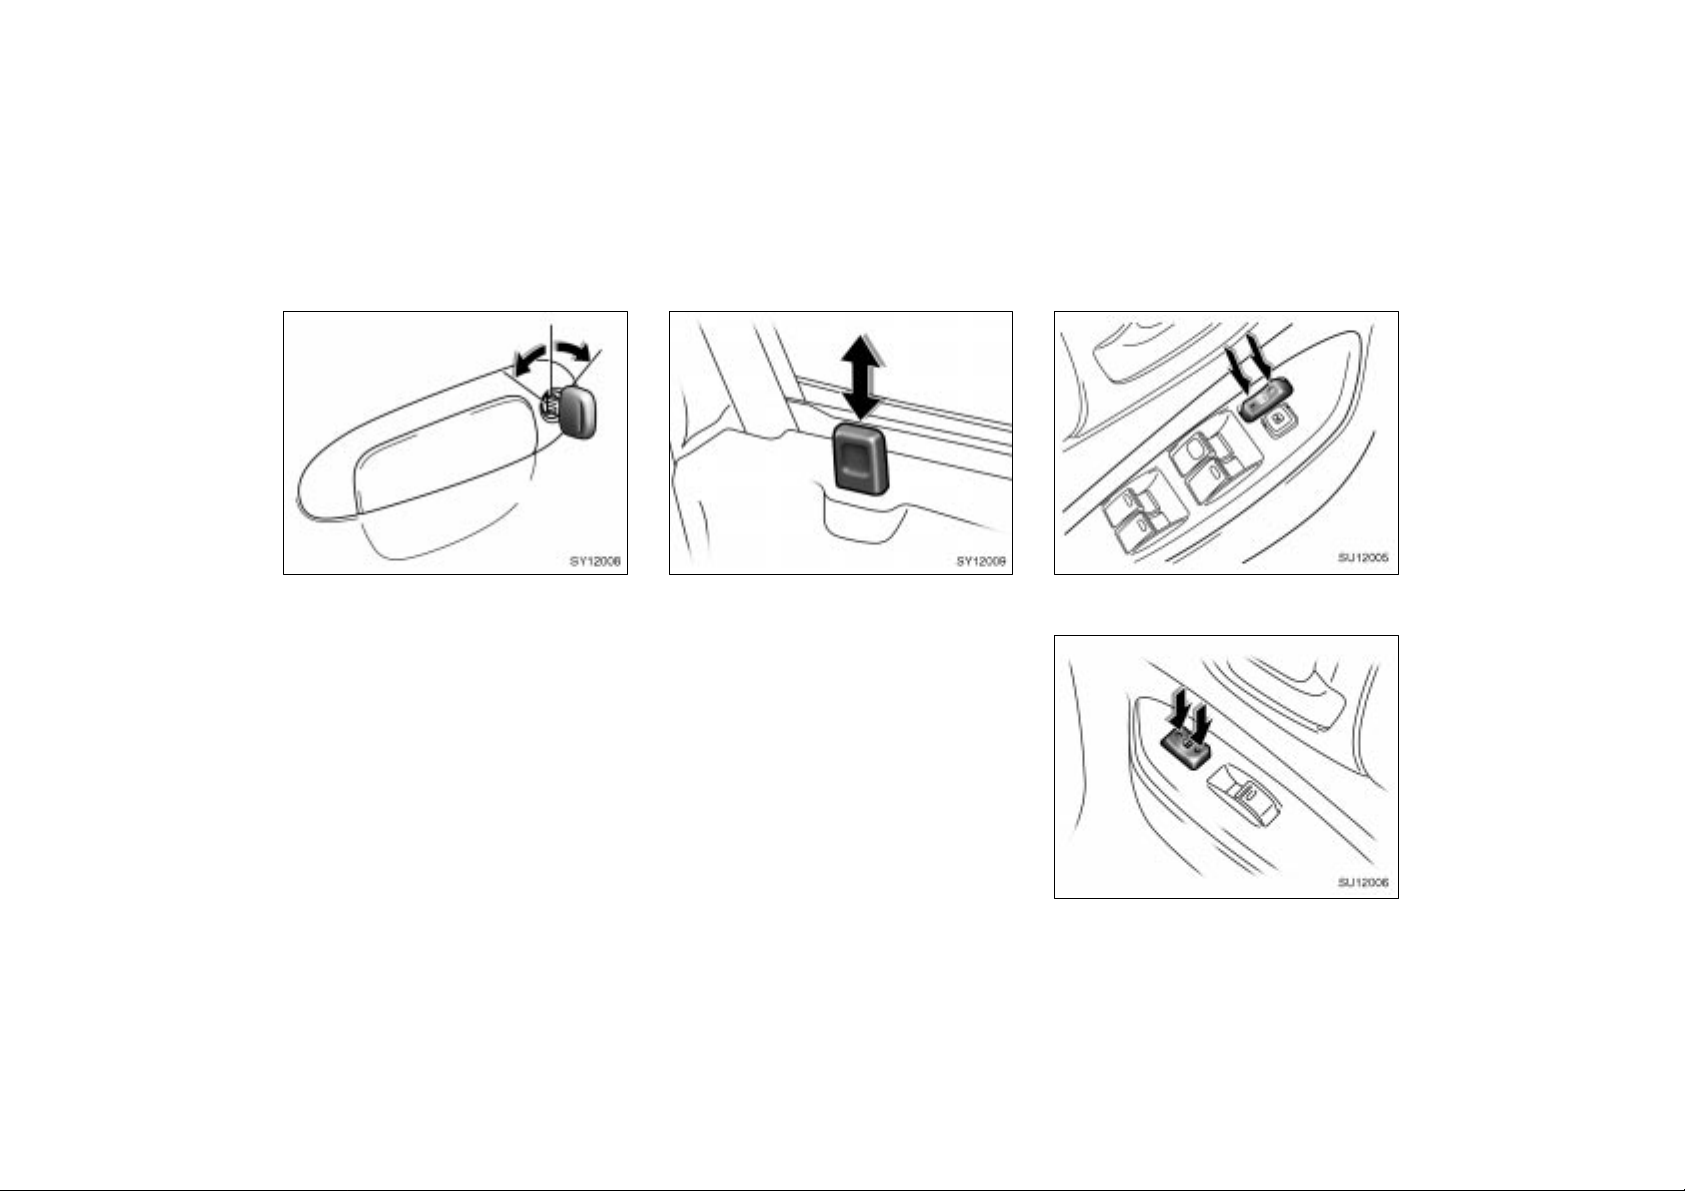
LOCKING AND UNLOCKING WITH KEY
Insert the key into the keyhole and turn
it.
To lock: Turn the key forward.
To unlock: Turn the key backward.
Vehicles with power door lock system—All
the doors lock and unlock simultaneously
with either front door. In the driver’s door
lock, turning the key once will unlock the
driver’s door and twice in succession will
unlock all the doors simultaneously.
SY12009
LOCKING AND UNLOCKING WITH
INSIDE LOCK BUTTON
Move the lock button.
To lock: Push the knob down.
To unlock: Pull the knob up.
Closing the door with the lock knob in the
lock position will also lock the door. Be
careful not to lock your keys in the vehicle.
Vehicles with power door lock system—The door cannot be locked if you
leave the key in the ignition switch.
2001 ECHO (OM52440U)
SU12005
Vehicles with power windows (driver’s
side)
SU12006
Vehicles with power windows (passenger’s side)
9
Page 10
SY12011
2001MY ECHO (U) L/O0008
SP12003
CAUTION
Before driving, be sure that the doors
are closed and locked, especially
when small children are in the vehicle. Along with the proper use of
seat belts, locking the doors helps
prevent the driver and passengers
from being thrown out from the vehicle during an accident. It also helps
prevent the doors from being opened
unintentionally.
Vehicles without power windows
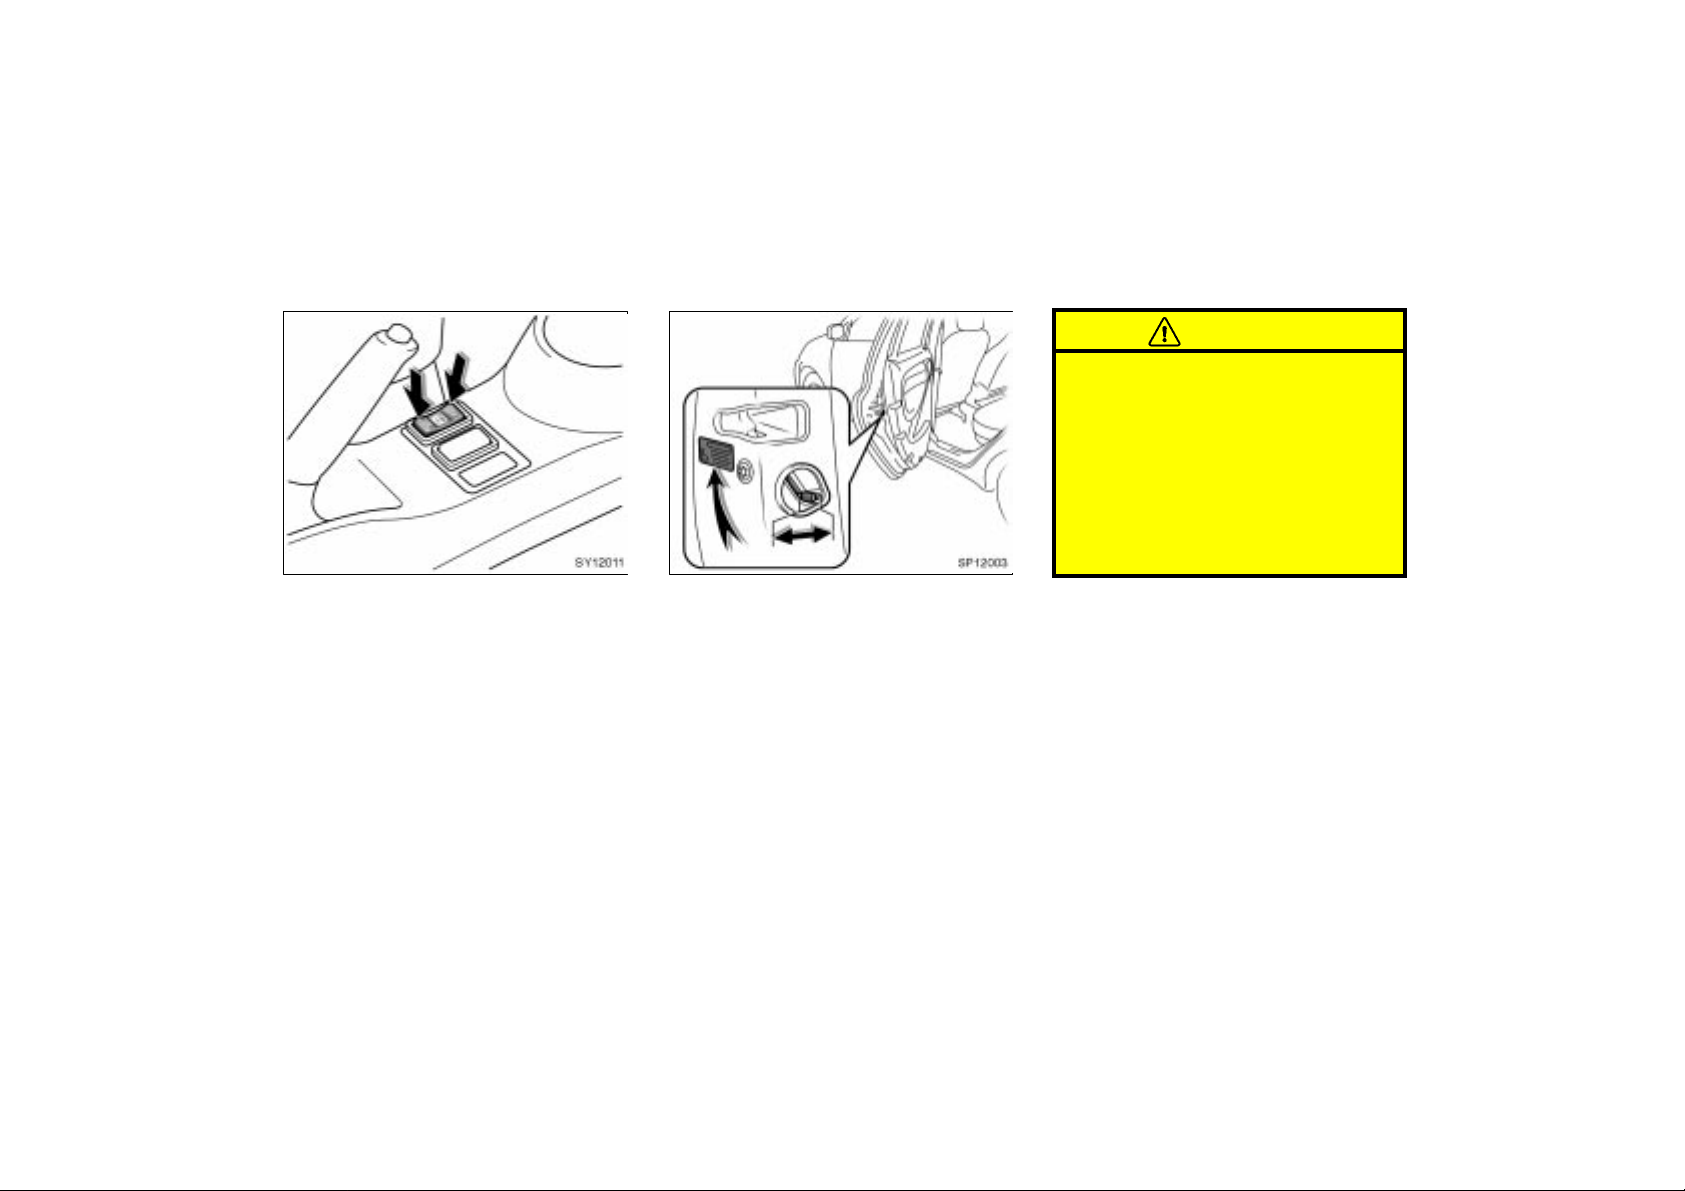
LOCKING AND UNLOCKING WITH
POWER DOOR LOCK SWITCH
Push the switch.
Vehicles with power windows—
To lock: Push the switch on the front side.
To unlock: Push the switch on the rear
side.
Vehicles without power windows—
To lock: Push the switch on the “LOCK”
side.
To unlock: Push the switch on the opposite side of the “LOCK” side.
All the doors lock or unlock simultaneously.
10
REAR DOOR CHILD–PROTECTORS
(4–door models only)
Move the lock lever to the “LOCK”
position as shown on the label.
This feature allows you to lock a rear
door so it can be opened from the outside
only, not from inside. We recommend using this feature whenever small children
are in the vehicle.
2001 ECHO (OM52440U)
Page 11
—Wireless remote control
SU12023
Locking operation
SU12024
2001MY ECHO (U) L/O0008
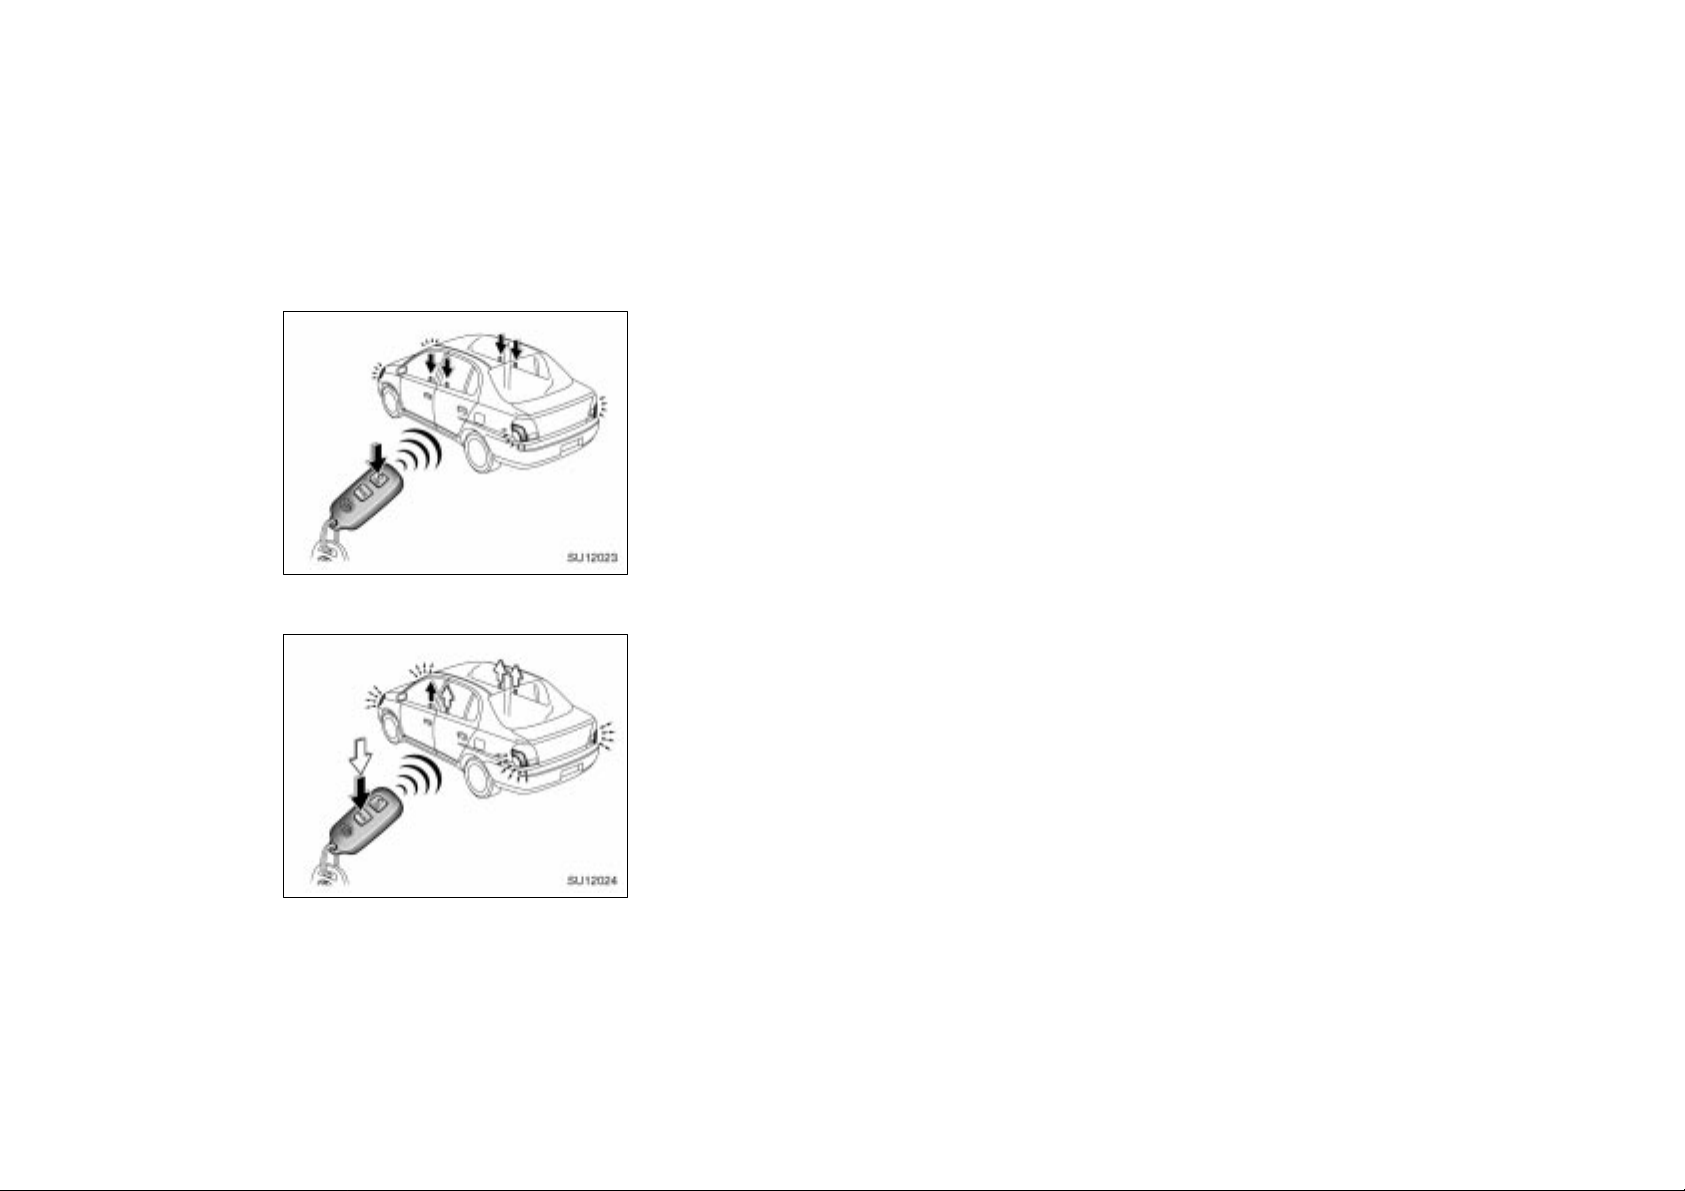
Your vehicle has a wireless remote control system that can lock or unlock all
the doors, or activate the theft deterrent system from a distance within
approximately 1 m (3 ft.) of the vehicle.
LOCKING AND UNLOCKING THE
DOORS
To lock and unlock all the doors, push
the switches of the transmitter slowly
and securely.
To lock: Push the “LOCK” switch. All the
doors are locked simultaneously. At this
time, parking lights, side marker lights and
tail lights flash.
Check to see that the doors are securely
locked.
If any of the doors is not securely closed,
or if the key is in the ignition switch,
locking cannot be performed by the
“LOCK” switch.
To unlock: Push the “UNLOCK” switch
once to unlock the driver’s door alone.
Pushing the switch twice within 3 seconds
unlocks all the doors simultaneously. At
this time, parking lights, side marker lights
and tail lights flash twice.
You have 30 seconds to open a door after
using the wireless remote unlock feature.
If a door is not opened by then, all the
doors will be automatically locked again.
If the “LOCK” or “UNLOCK” switch is kept
pressed in, the locking or unlocking operation is not repeated. Release the button
and then push again.
Unlocking operation
2001 ECHO (OM52440U)
11
Page 12
2001MY ECHO (U) L/O0008
SU12026
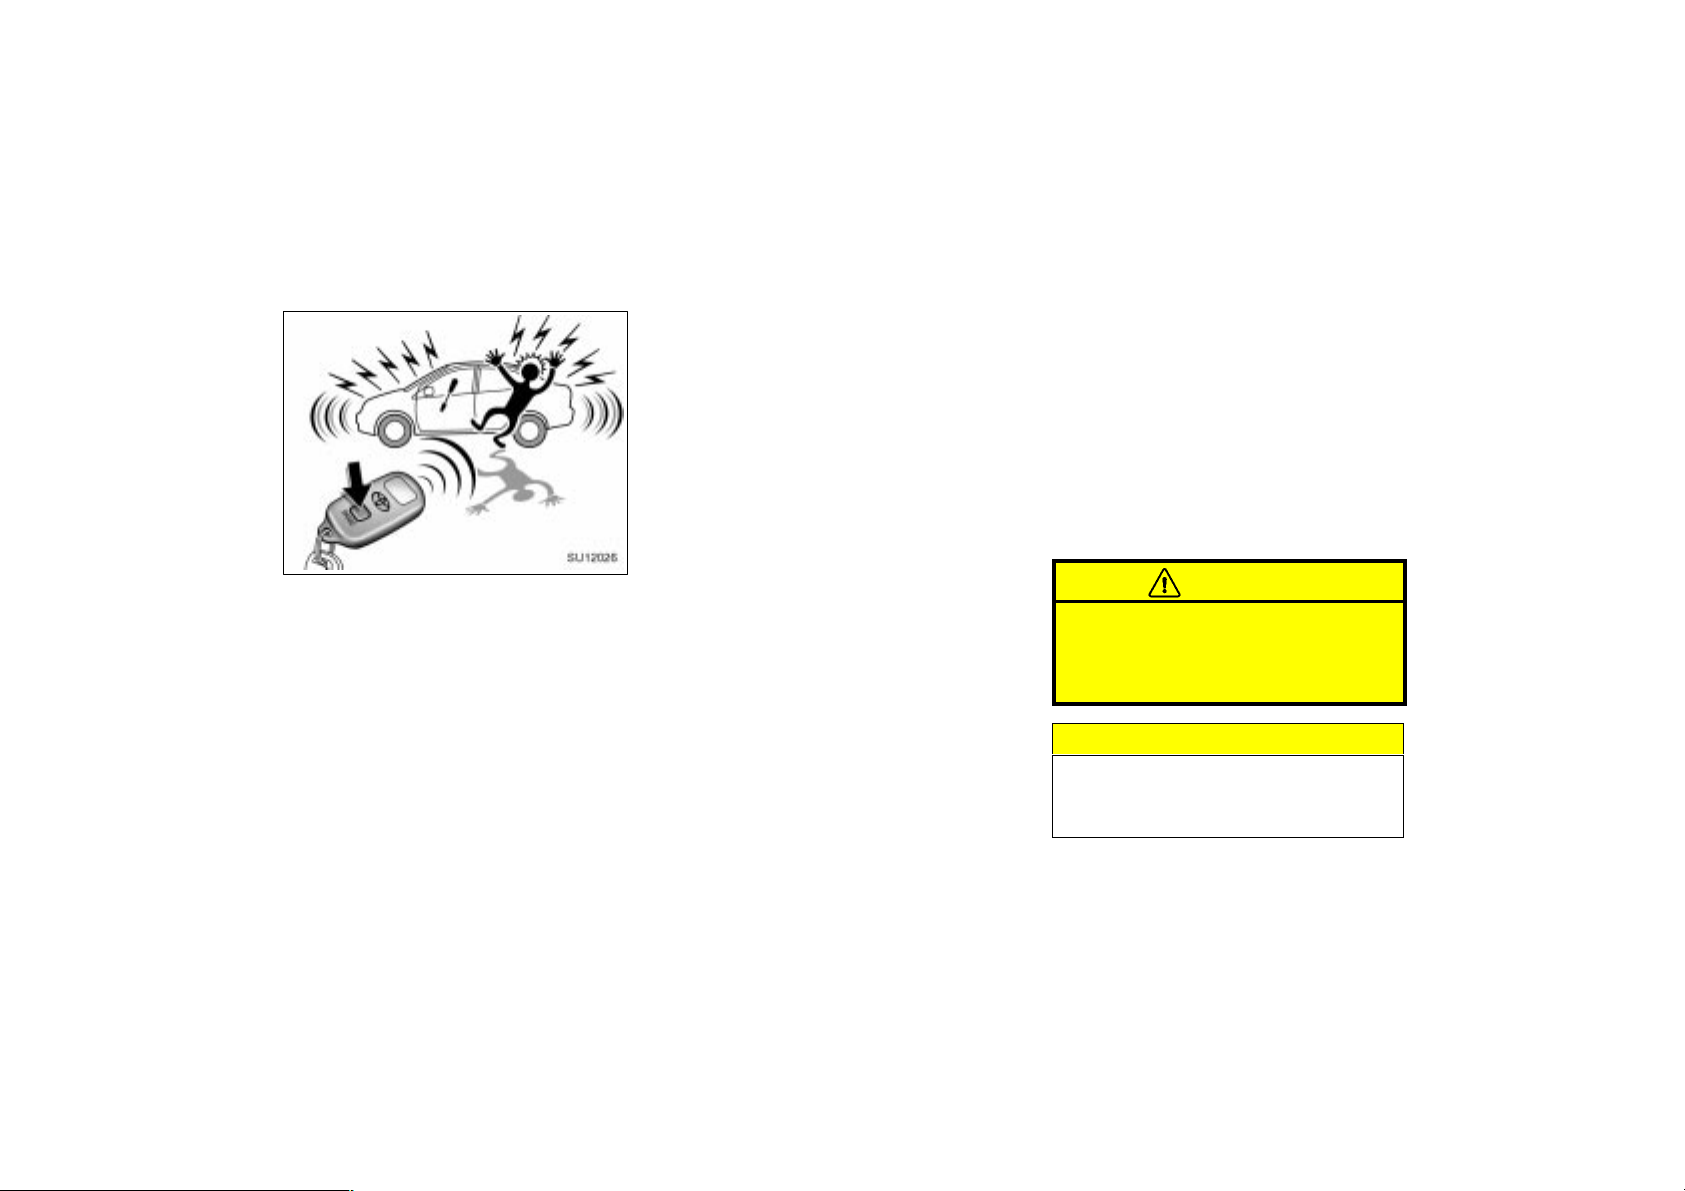
“PANIC” SWITCH
Pushing the “PANIC” switch blows the
horn intermittently and flashes the
headlight and tail lights.
The “PANIC” switch is used to deter the
vehicle theft when you witness anyone attempting to brake into or damage your
vehicle.
The alarm will last for one minute. To stop
this in the midway, push the “PANIC”
switch once again, unlock any door with
the key or transmitter, open the trunk with
the key or turn the ignition key or turn the
ignition key from the “LOCK” to “ON” position.
To cancel the “PANIC” mode, unlock any
door with the key or wireless remote control transmitter, open the trunk with the
key from the “LOCK” to “ON” position.
The “PANIC” mode does not work when
the key is inserted in the ignition switch.
WIRELESS REMOTE CONTROL
TRANSMITTER
The wireless remote control transmitter is
an electronic component. Observe the following instruction in order not to cause
damage on the transmitter.
Do not leave the transmitter on the
places where the temperature becomes
high such as on the dashboard.
Do not disassemble it.
Avoid knocking it hard against other
objects or dropping it.
Avoid putting it in water.
You can use up to 2 wireless remote control transmitters for the same vehicle.
Contact your Toyota dealer for detailed
information.
If the wireless remote control transmitter
does not actuate the doors or alarm, or
operate from a normal distance.
Check for closeness to a radio trans-
mitter such as a radio station or an
airport which can interfere with normal
operation of the transmitter.
The batteries may have been con-
sumed. Check the batteries in the
transmitter. To replace the batteries,
see “Replacing transmitter batteries”.
Replacing transmitter batteries
For replacement, use a CR2016 lithium
battery or equivalent.
CAUTION
Special care should be taken that
small children do not swallow the removed transmitter battery or components.
NOTICE
When replacing the transmitter battery, be careful not to lose the components.
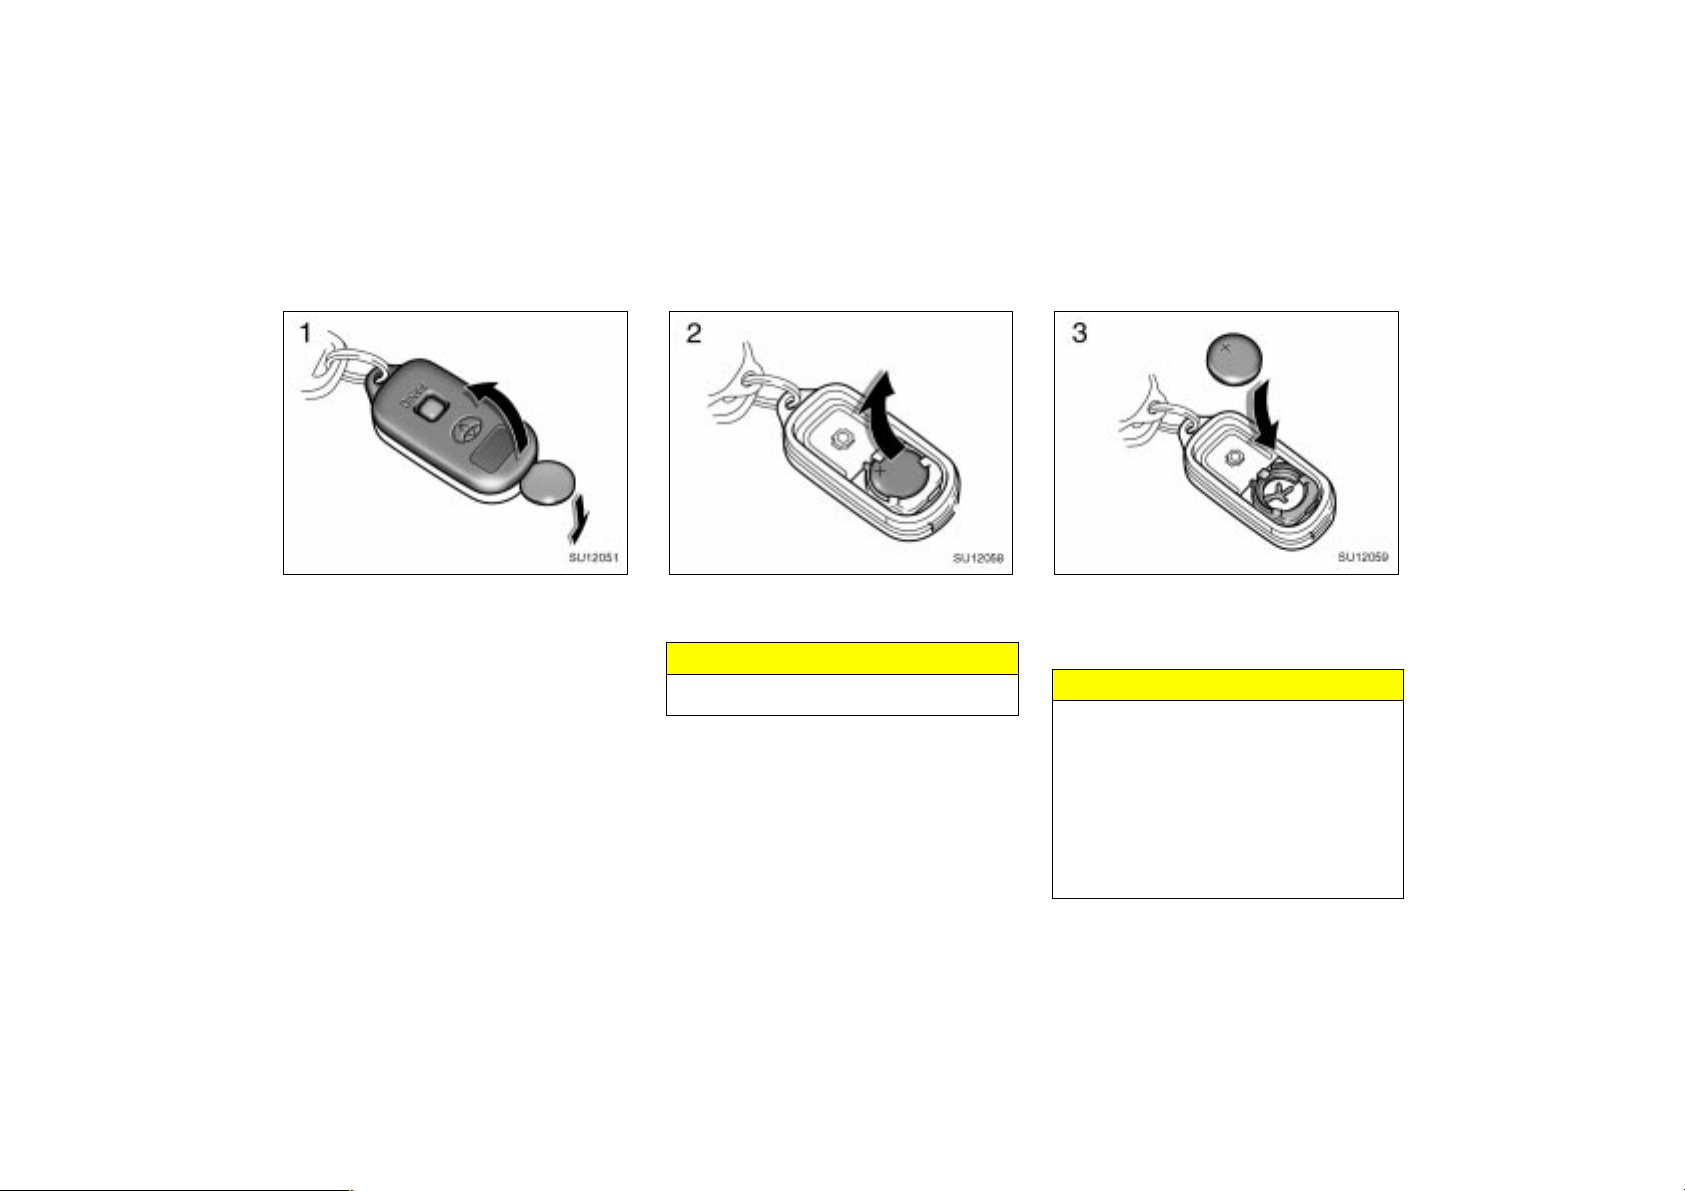
Replace the transmitter battery by the following procedures:
12
2001 ECHO (OM52440U)
Page 13
2001MY ECHO (U) L/O0008
SU12051
1. Using a coin or equivalent, open the
transmitter case.
SU12058
2. Remove the discharged transmitter battery.
NOTICE
Do not bend the terminals.
2001 ECHO (OM52440U)
SU12059
3. Put a new transmitter battery with positive (+) side up.
Close the transmitter case securely.
NOTICE
Make sure the positive side and
negative side of the transmitter battery should be faced correctly.
Be careful not to bend the electrode
of the transmitter battery insertion
and that dust or oils do not adhere
to the transmitter case.
Close the transmitter case securely.
13
Page 14
2001MY ECHO (U) L/O0008
After replacing battery, check that the
transmitter operates properly. if the transmitter still does not operate properly, contact your Toyota dealer.
If you lose your transmitter, contact your
Toyota dealer as soon as possible to
avoid the possibility of theft, or an accident. (See “If you lose your wireless remote control transmitter” in Section 4.)
For vehicles sold in U.S.A.
This device complies with Part 15 of the
FCC Rules. Operation is subject to the
following two conditions: (1) This device
may not cause harmful interference, and
(2) this device must accept any interference received, including interference
that may cause undesired operation.
NOTICE:
This equipment has been tested and
found to comply with the limits for a
Class B digital device, pursuant to Part
15 of the FCC Rules. These limits are
designed to provide reasonable protection against harmful interference in a
residential installation. This equipment
generates, uses and can radiate radio
frequency energy and, if not installed
and used in accordance with the instructions, may cause harmful interference to
radio communications. However, there is
no guarantee that interference will not
occur in a particular installation. If this
equipment does cause harmful interference to radio or television reception,
which can be determined by turning the
equipment off and on, the user is encouraged to try to correct the interference by one or more of the following
measures:
Reorient or relocate the receiving an-
tenna.
Increase the separation between the
equipment and receiver.
Connect the equipment into an outlet
on a circuit different from that to
which the receiver is connected.
Consult the dealer or an experienced
radio / TV technician for help.
FCC WARNING:
Changes or modifications not ex-
pressly approved by the party responsible for compliance could void the
user’s authority to operate the equipment.
For vehicles sold in Canada
Operation is subject to the following two
conditions: (1) this device may not
cause interference, and (2) this device
must accept any interference, including
interference that may cause undesired
operation of the device.
CAUTION
Changes or modifications not expressly approved by the party responsible for compliance could void the
user’s authority to operate the equipment.
14
2001 ECHO (OM52440U)
Page 15
Power windows
2001MY ECHO (U) L/O0008
Window lock
switch
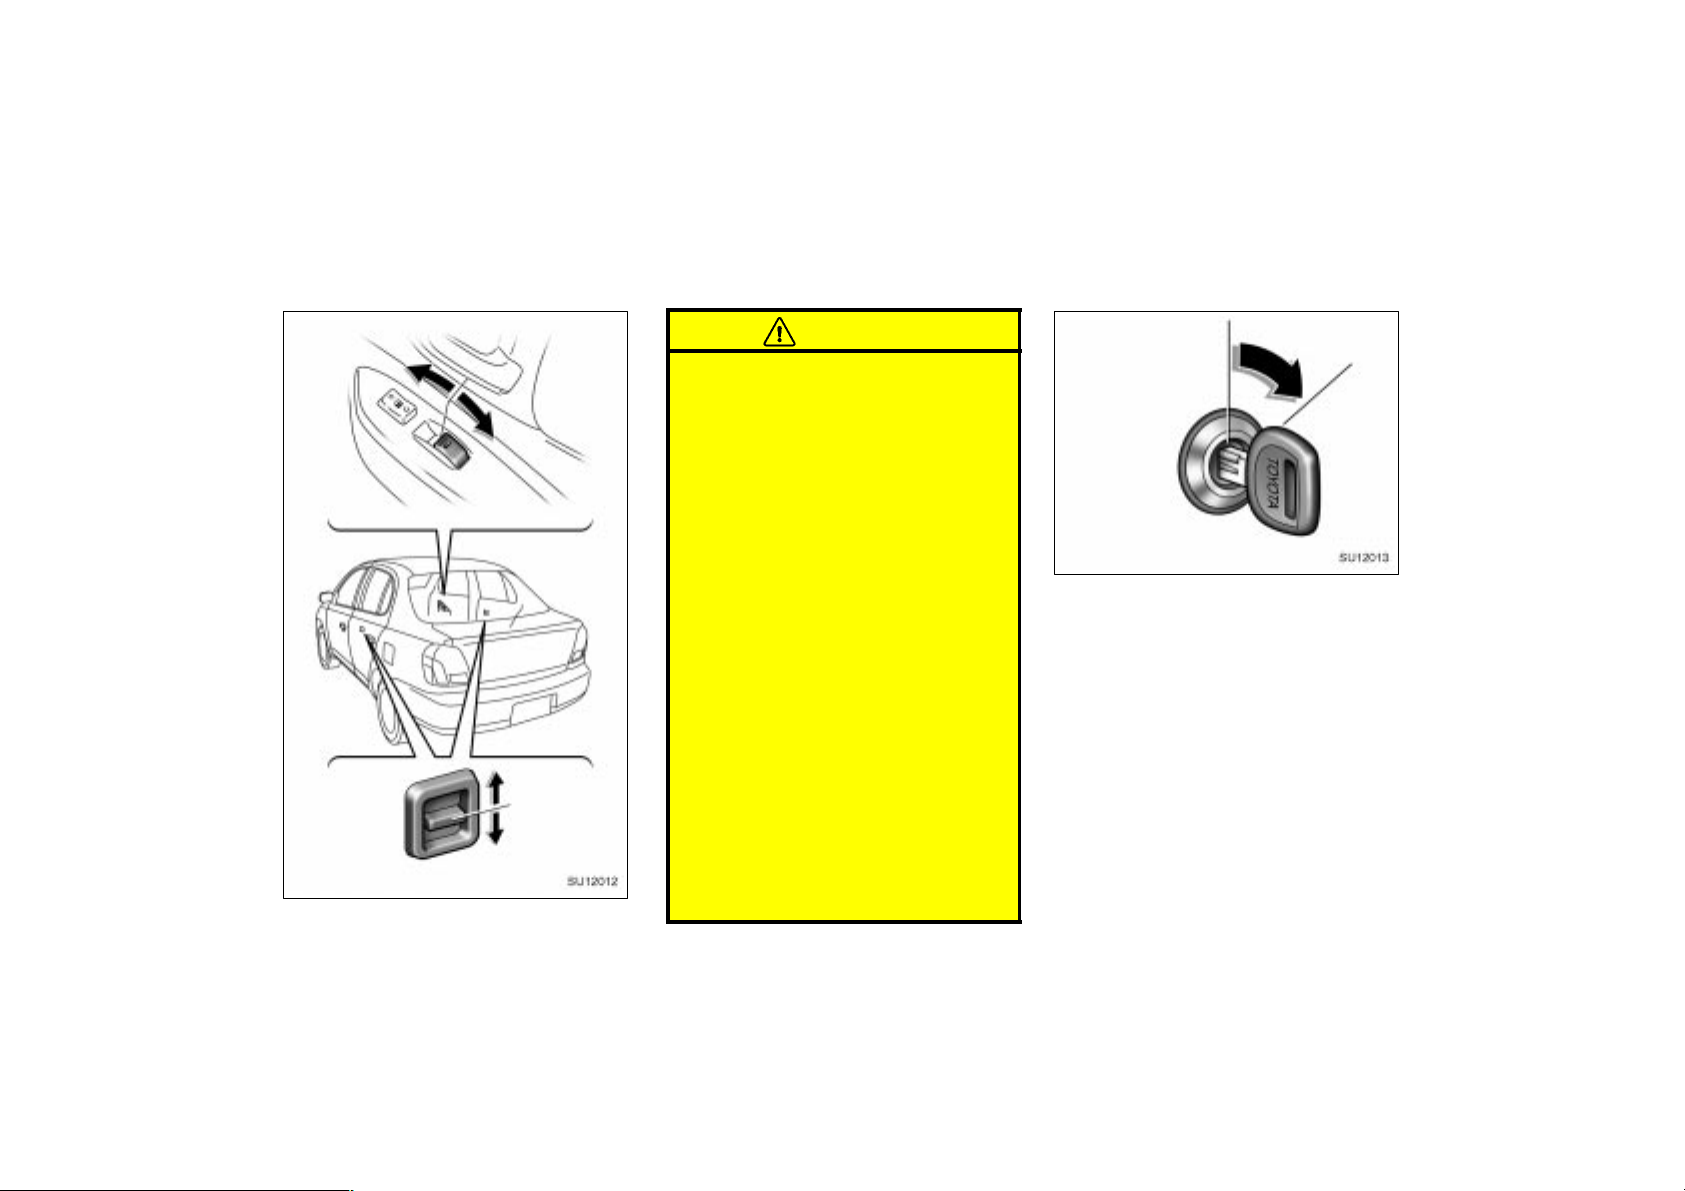
SU12009
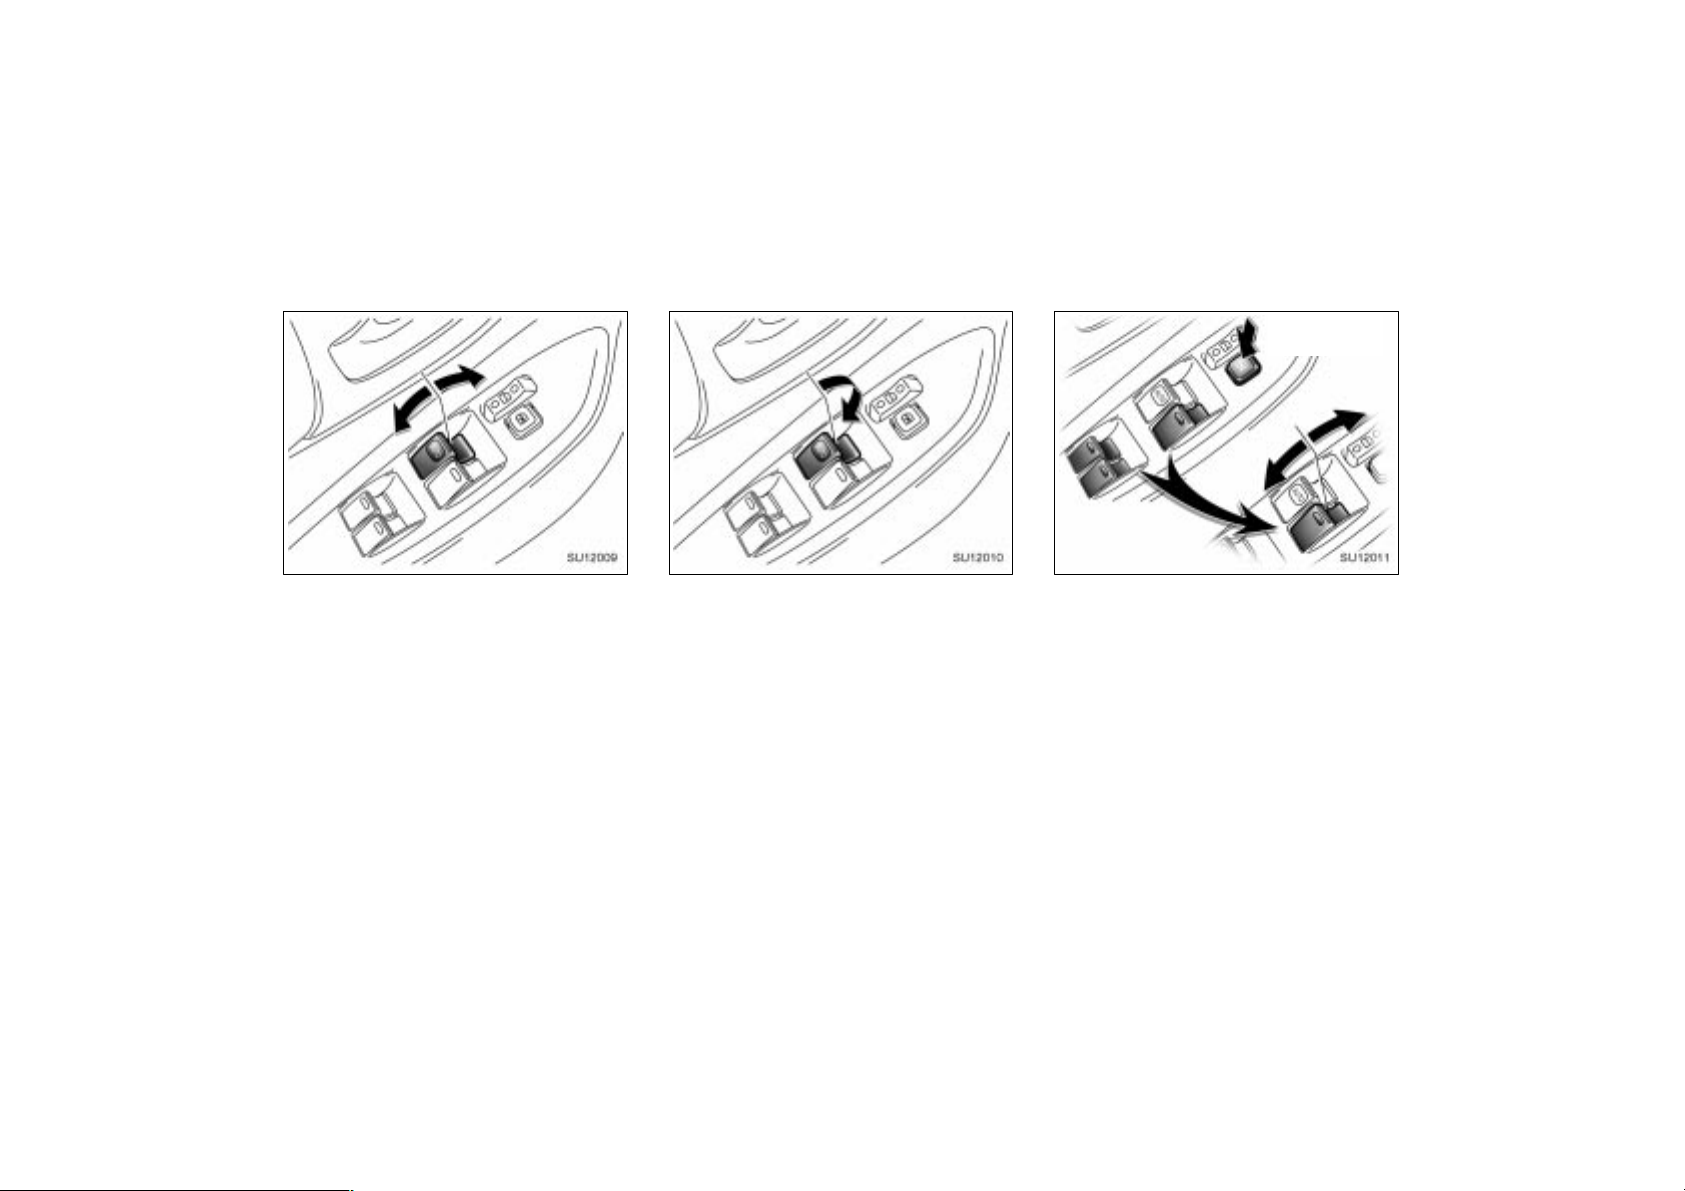
The windows can be operated with the
switch on each door.
The power windows work when the ignition
switch is in the “ON” position.
OPERATING THE DRIVER’S WINDOW
Use the switch on the driver’s door.
Normal operation: The window moves as
long as you hold the switch.
To open: Lightly push down the switch.
To close: Pull up the switch.
SU12010
Automatic operation (to open only):
Push the switch completely down and then
release it. The window will fully open. To
stop the window partway, lightly pull the
switch up and then release it.
2001 ECHO (OM52440U)
SU12011
OPERATING THE PASSENGERS’
WINDOWS
Use the switches on the passengers’
doors. The driver’s door also has
switches that control the passengers’
windows.
The window moves as long as you hold
the switch.
To open: Push down the switch.
To close: Pull up the switch.
If you push in the window lock switch on
the driver’s door, the passengers’ windows
cannot be operated.
15
Page 16
SU12012
2001MY ECHO (U) L/O0008
CAUTION
To avoid serious personal injury, you
must do the following.
Always make sure the heads, hands
and other parts of the bodies of all
occupants are kept completely inside the vehicle before you close
the power windows. If someone’s
neck, head or hands gets caught in
a closing window, it could result in
a serious injury. When anyone
closes the power windows, make
sure that he/she operates the windows safely.
When small children are in the ve-
hicle, never let them use the power
window switches without supervision. Use the window lock switch to
prevent them from making unexpected use of the switches.
Never leave small children alone in
the vehicle, especially with the ignition key still inserted. They could
use the power window switches and
get trapped in a window. Unattended children can be involved in
serious accidents.
Trunk lid—
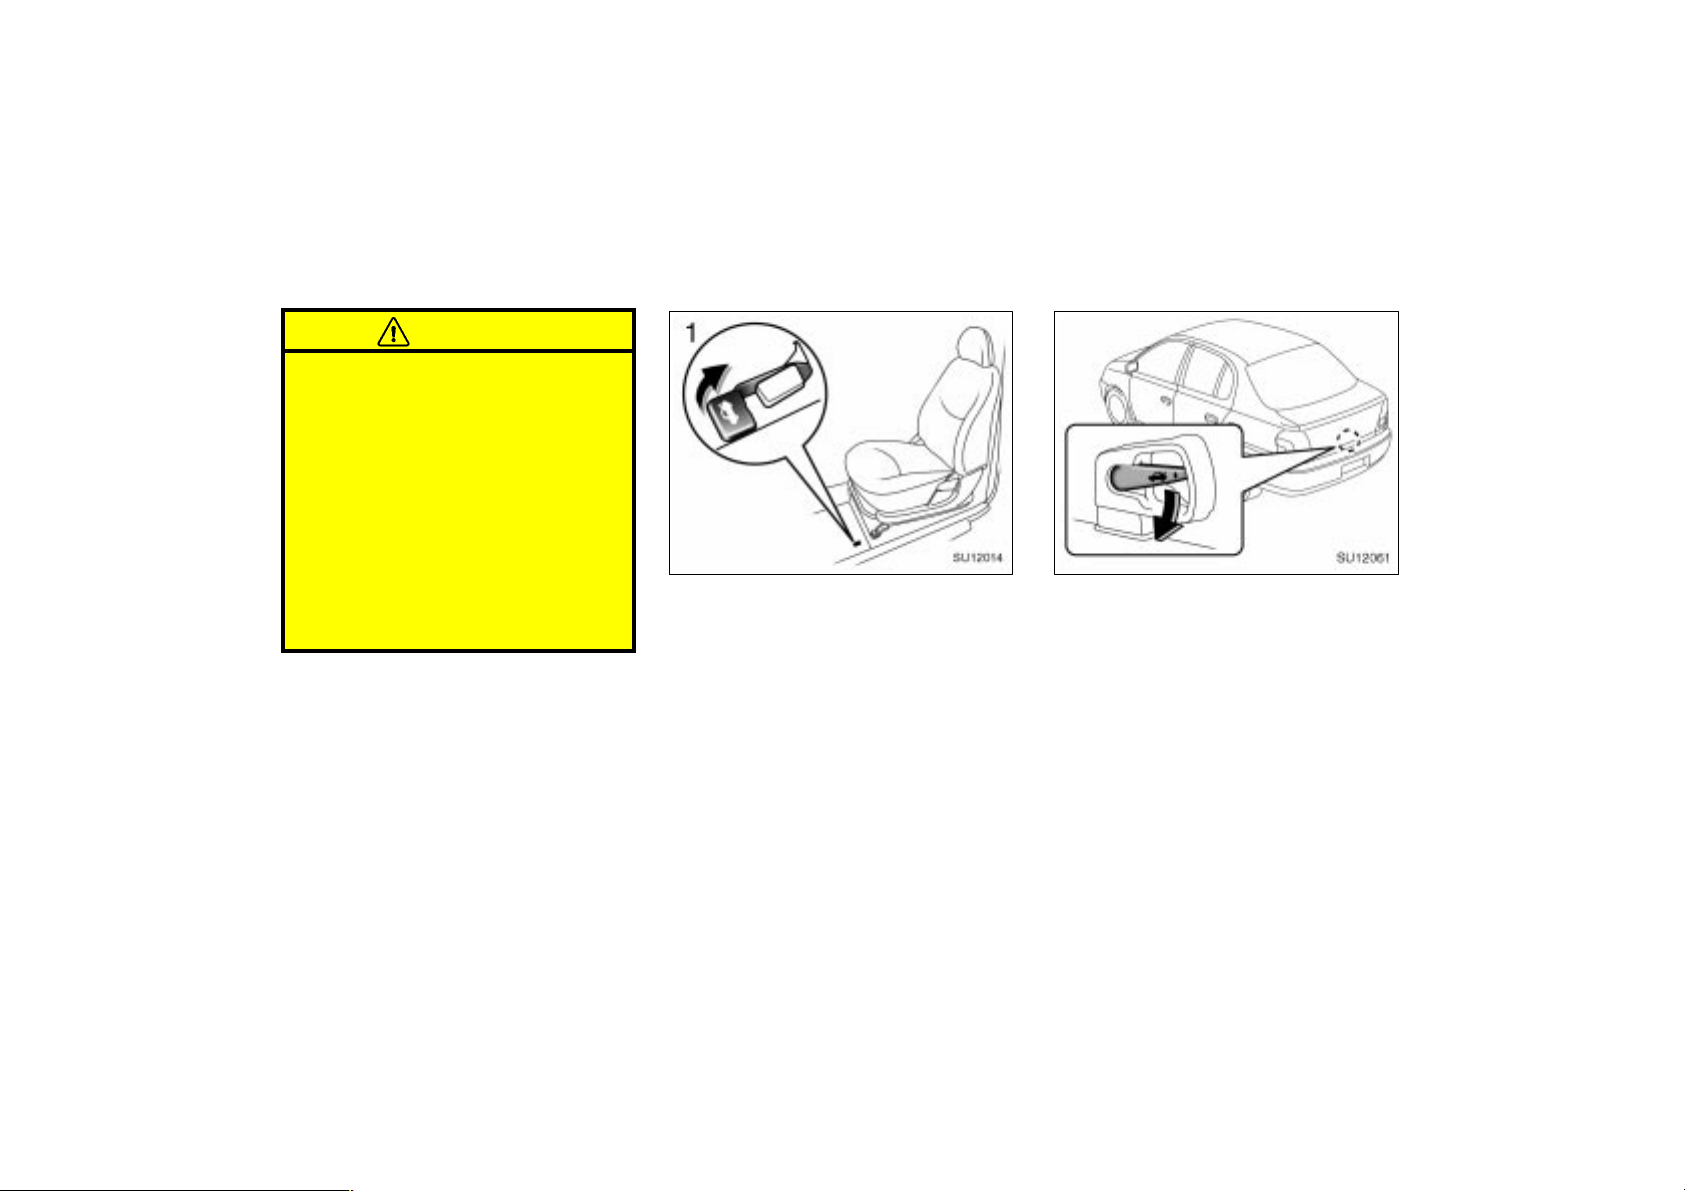
SU12013
To open the trunk lid from the outside,
insert the master key and turn it clockwise.
See “Luggage stowage precautions” in
Section 2 for precautions to observe for
loading luggage.
To close the trunk lid, lower it and press
down on it. After closing the trunk lid, try
pulling it up to make sure it is securely
closed.
16
2001 ECHO (OM52440U)
Page 17
2001MY ECHO (U) L/O0008
CAUTION
Keep the trunk lid closed while
driving. This not only keeps the
luggage from being thrown out but
also prevents exhaust gases from
entering the vehicle.
Always lock the trunk lid and all
doors, and keep away the vehicle
keys out of children’s reaches.
Never leave children unattended in
the vehicle. Unsupervised children
may lock themselves in the vehicle
or trunk and suffer serious injuries
or death.
—Lock release lever
SU12014
To open the trunk lid from the driver’s
seat, pull up on the lock release lever.
—Internal trunk release handle
SU12061
If a person is locked in the trunk, pull
down the phosphorescent handle (illuminated for a while) on the inside of
trunk lid in case of emergency to open
the trunk lid.
The handle illuminating time depends on
the intensity of the light thrown on the
handle.
2001 ECHO (OM52440U)
17
Page 18
2001MY ECHO (U) L/O0008
—Luggage security system
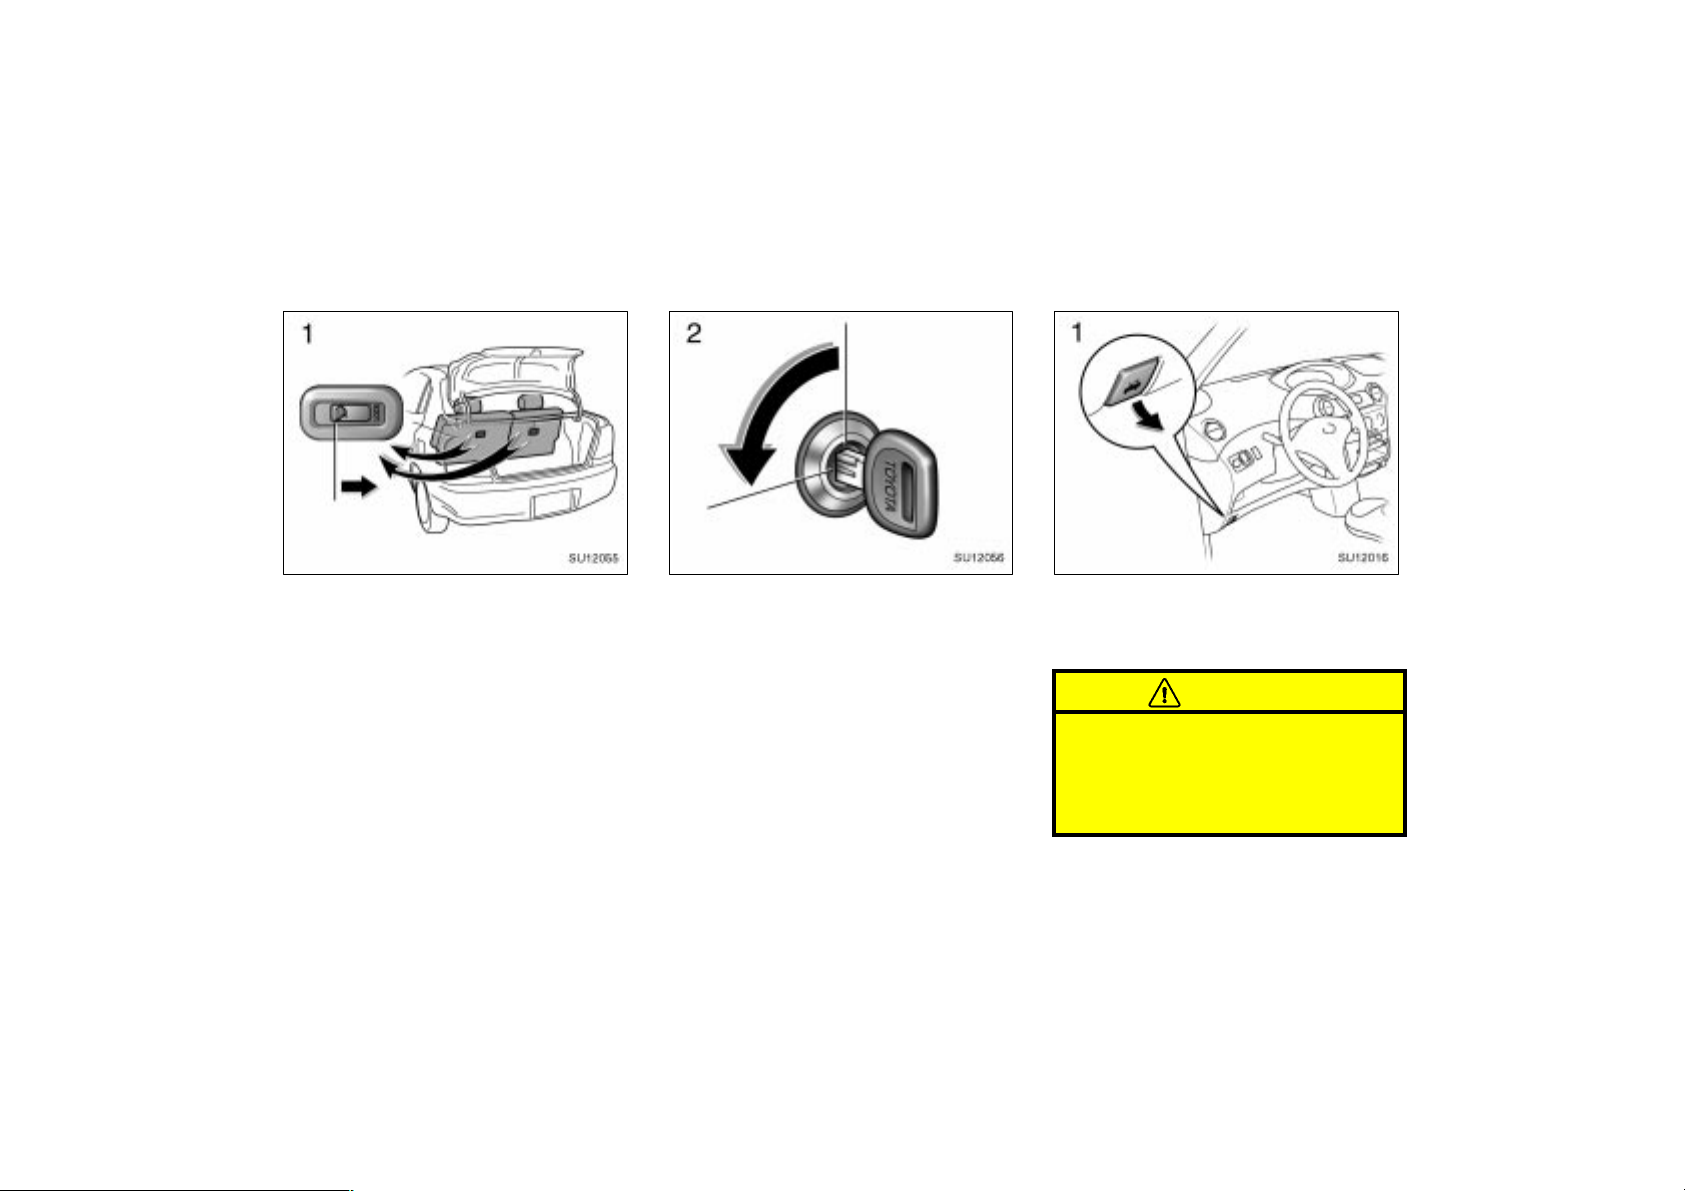
SU12055
This system deactivates the lock release lever so that things locked in the
trunk can be protected.
1. Push down the security lock levers
to lock the rear seatbacks.
On vehicles with built–in child restraint,
only the left seatback has a lock lever
and can be lowered. The right seatback
cannot be folded down.
After locking the rear seatbacks, try folding them down to make sure they are
securely locked, otherwise someone could
get into the trunk by folding down a rear
seat.
SU12056
2. After closing the trunk lid, insert the
master key and turn it counterclockwise to deactivate the lock release
lever.
After closing the trunk lid, try pulling it up
to make sure it is securely locked.
Hood
SU12016
To open the hood:
1. Pull the hood lock release lever. The
hood will spring up slightly.
CAUTION
Before driving, be sure that the hood
is closed and securely locked. Otherwise, the hood may open unexpectedly while driving and an accident may
occur.
18
2001 ECHO (OM52440U)
Page 19
SU12017
2001MY ECHO (U) L/O0008
NOTICE
Be sure to return the support rod to
its clip before closing the hood. Closing the hood with the support rod up
could cause the hood to bend.
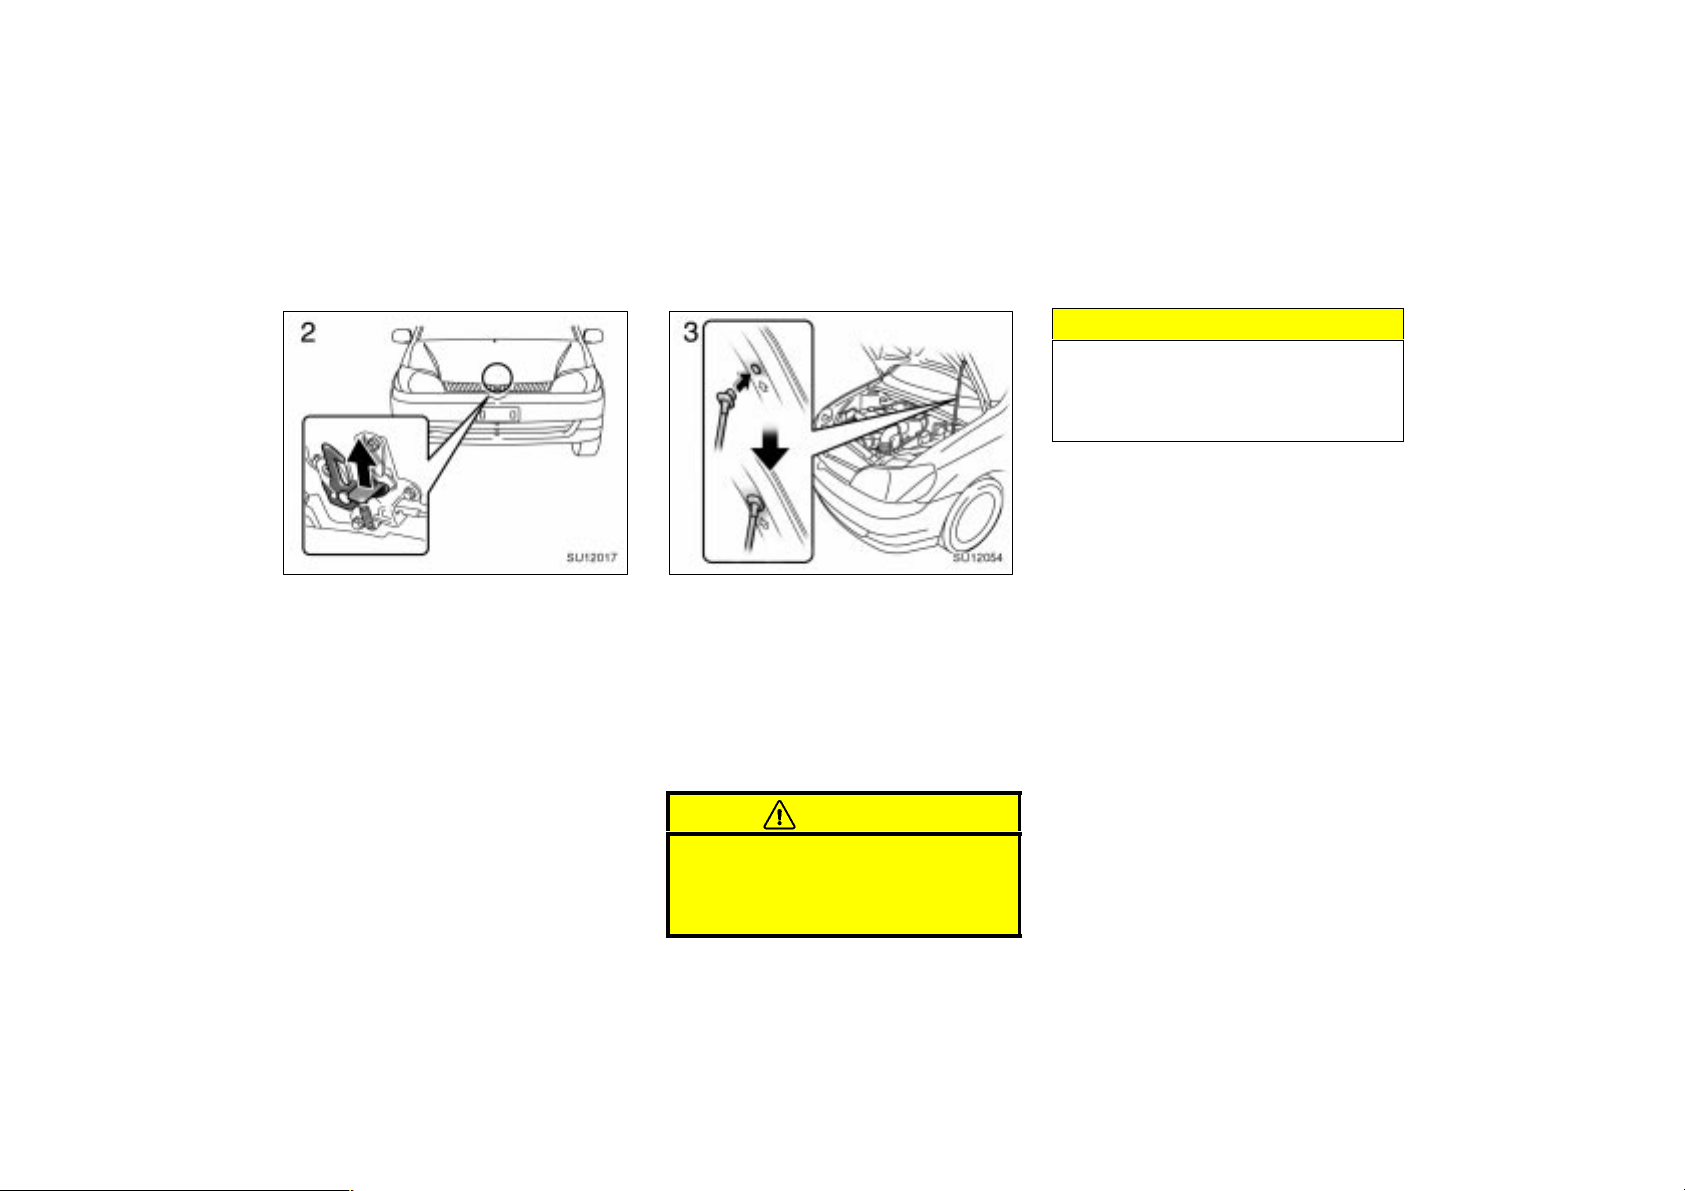
SU12054
2. In front of the vehicle, pull up the
auxiliary catch lever and lift the
hood.
3. Hold the hood open by inserting the
support rod into the slot.
Before closing the hood, check to see that
you have not forgotten any tools, rags,
etc. and return the support rod to its clip–
this prevents rattles. Then lower the hood
and make sure it locks into place. If necessary, press down gently on the front
edge to lock it.
CAUTION
After inserting the support rod into
the slot, make sure the rod supports
the hood security from falling down
on to your head or body.
2001 ECHO (OM52440U)
19
Page 20
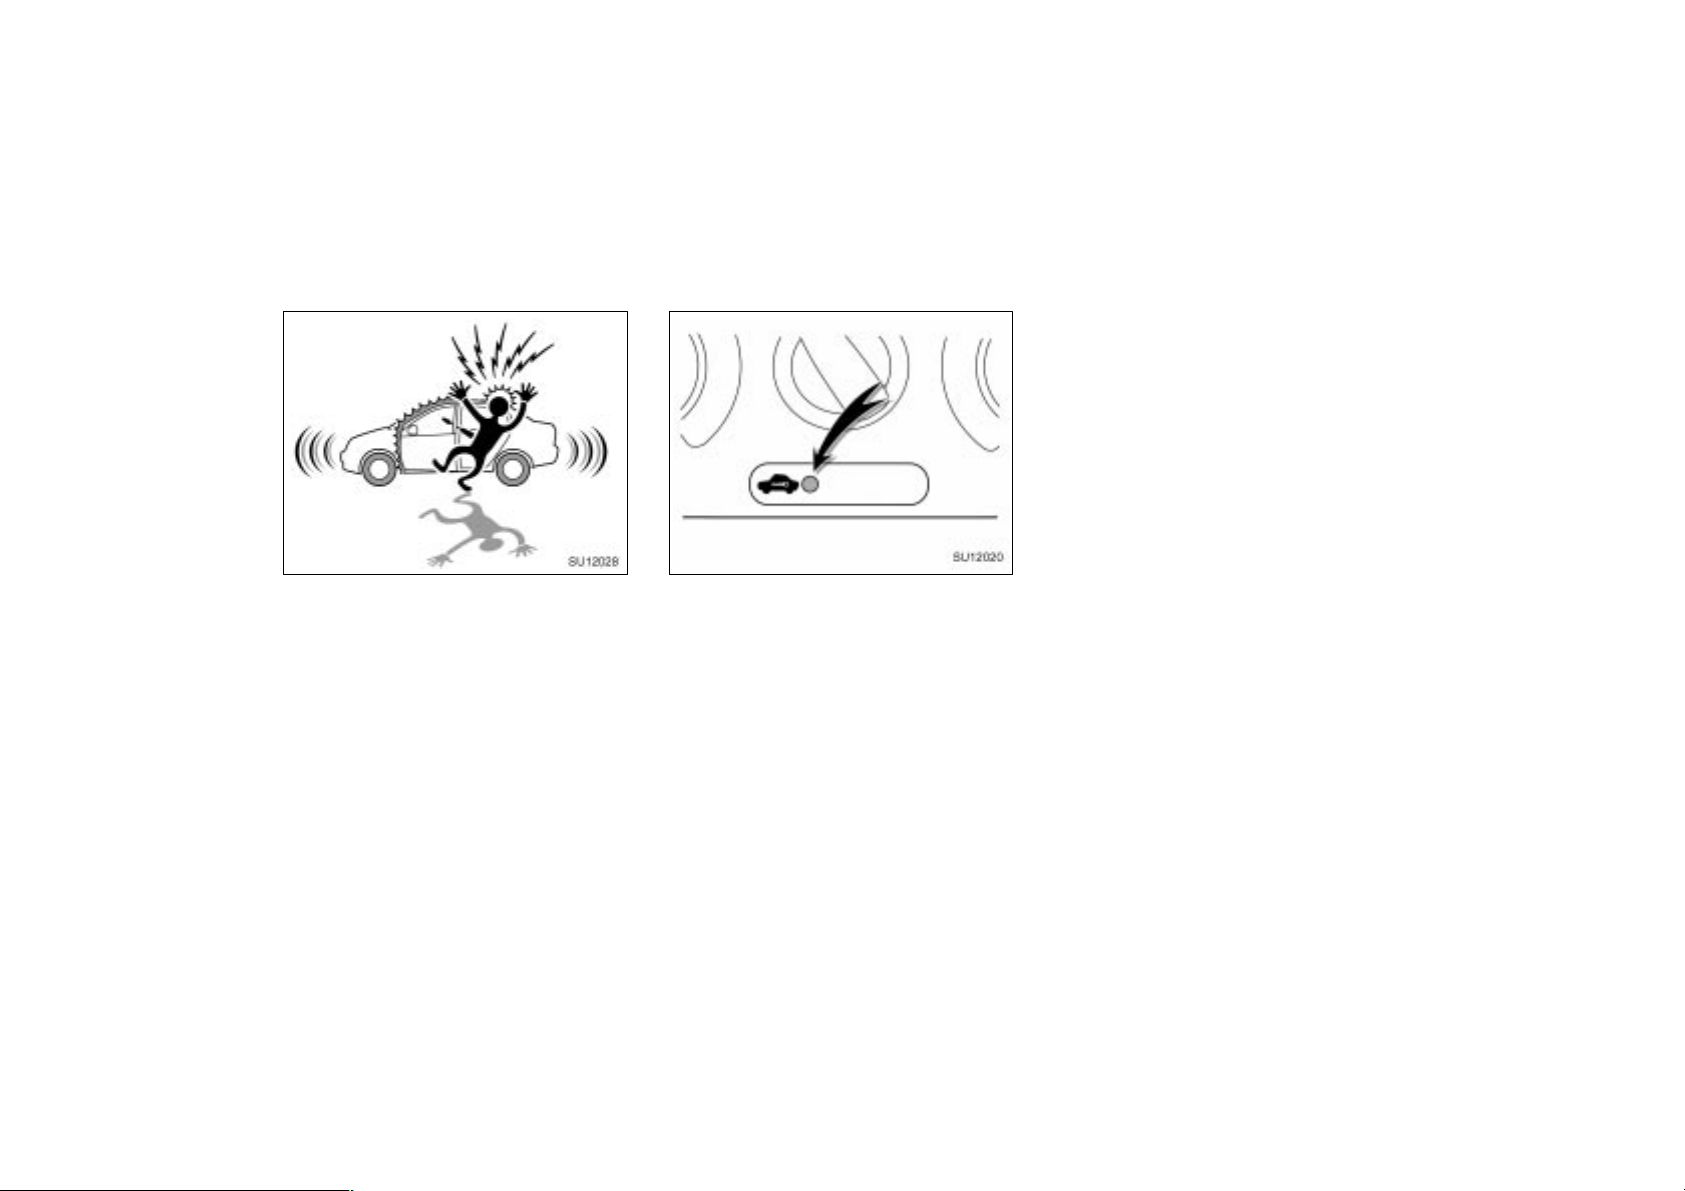
Theft deterrent system
SU12028
To deter the vehicle theft, the system
is designed to give an alarm if any of
the doors, trunk or hood is forcibly unlocked or the battery terminal is disconnected and then reconnected when the
vehicle is locked.
The alarm blows the horn intermittently
and flashes the headlights and tail lights.
2001MY ECHO (U) L/O0008
SU12020
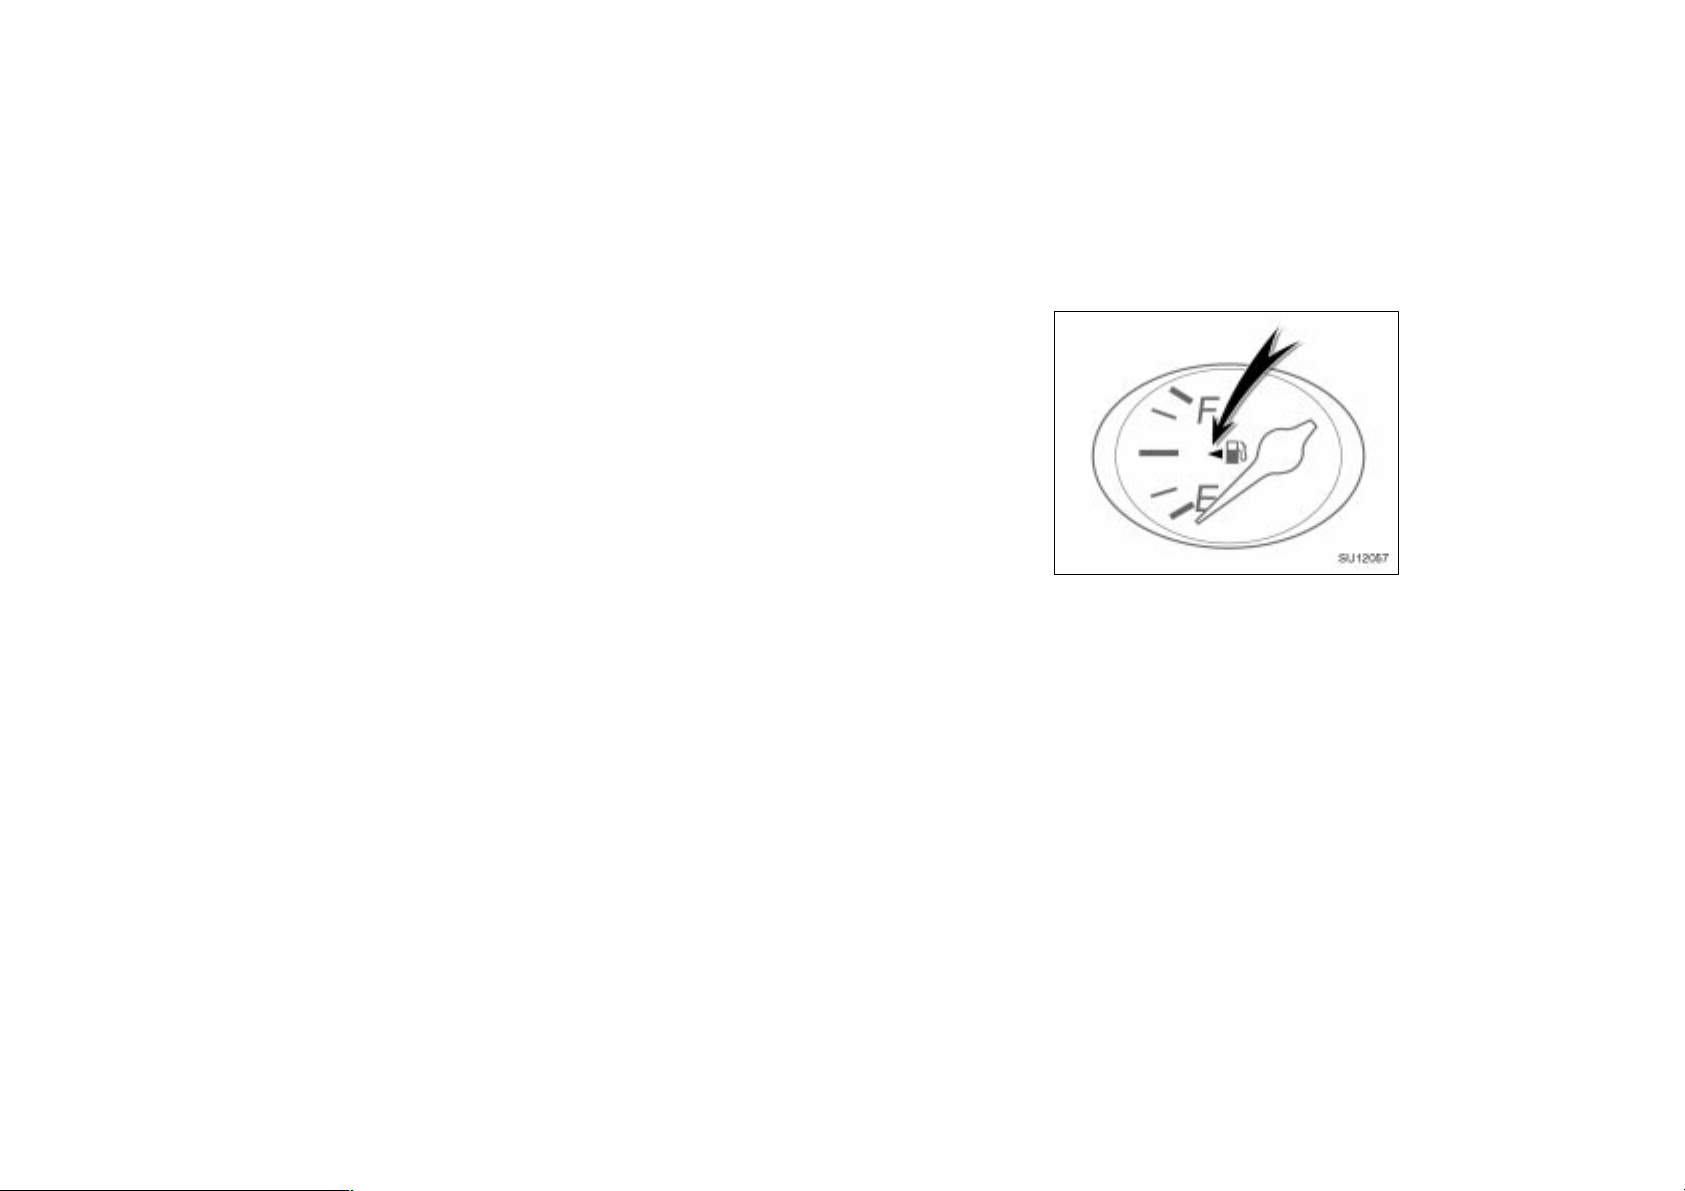
SETTING THE SYSTEM
1. Turn the ignition key to the “LOCK”
position and remove it.
The indicator light will start flashing when
the key is removed from the ignition
switch.
2. Have all passengers get out of the
vehicle.
3. Close and lock all the doors, trunk and
hood.
The indicator light will come on when all
the doors, trunk and hood are closed and
locked.
The system will automatically be set after
30 seconds. When the system is set, the
indicator light will start flashing again.
4. After making sure the indicator light
starts flashing, you may leave the vehicle.
Never leave anyone in the vehicle when
you set the system, because unlocking
from the inside will activate the system.
WHEN THE SYSTEM IS SET
Activating the system
The system will give the alarm under the
following conditions:
If any of the doors is unlocked or if
the trunk or hood is forcibly opened
without the key
If the battery terminal is disconnected
and then reconnected
The indicator light will come on when the
system is activating.
20
2001 ECHO (OM52440U)
Page 21
If any of the doors are unlocked without
the key and the key is not in the ignition
switch, all the doors will be automatically
locked again.
After one minute, the alarm will automatically stop and the indicator light will starts
flashing again.
Reactivating the alarm
Once set, the system automatically resets
the alarm after the alarm stops.
The alarm will activate again under the
same circumstances described in
“Activating the system”.
Stopping the alarm
The alarm will be stopped by the following
three ways:
Turn the ignition key from the “LOCK”
to “ON” position.
Unlock any of the doors with the key.
Open the trunk with the key.
2001MY ECHO (U) L/O0008
CANCELLING THE SYSTEM
The system will be cancelled by the
above mentioned 3 ways.
If the tail lights come on for 2 seconds,
the theft deterrent system has been
alarmed. Check to see if there is any
abnormality on your vehicle.
TESTING THE SYSTEM
1. Open all the windows.
2. Set the system as described above.
The doors should be locked with the
key. Be sure to wait until the indicator
light goes off or starts flashing.
3. Unlock any door from the inside. The
system should activate the alarm.
4. Stopping the alarm as described above.
5. Repeat this operation for the other
doors, trunk and hood. When testing on
the hood, also check that the system
is activated when the battery terminal
is disconnected and then reconnected.
If the system does not work properly,
have it checked by your Toyota dealer.
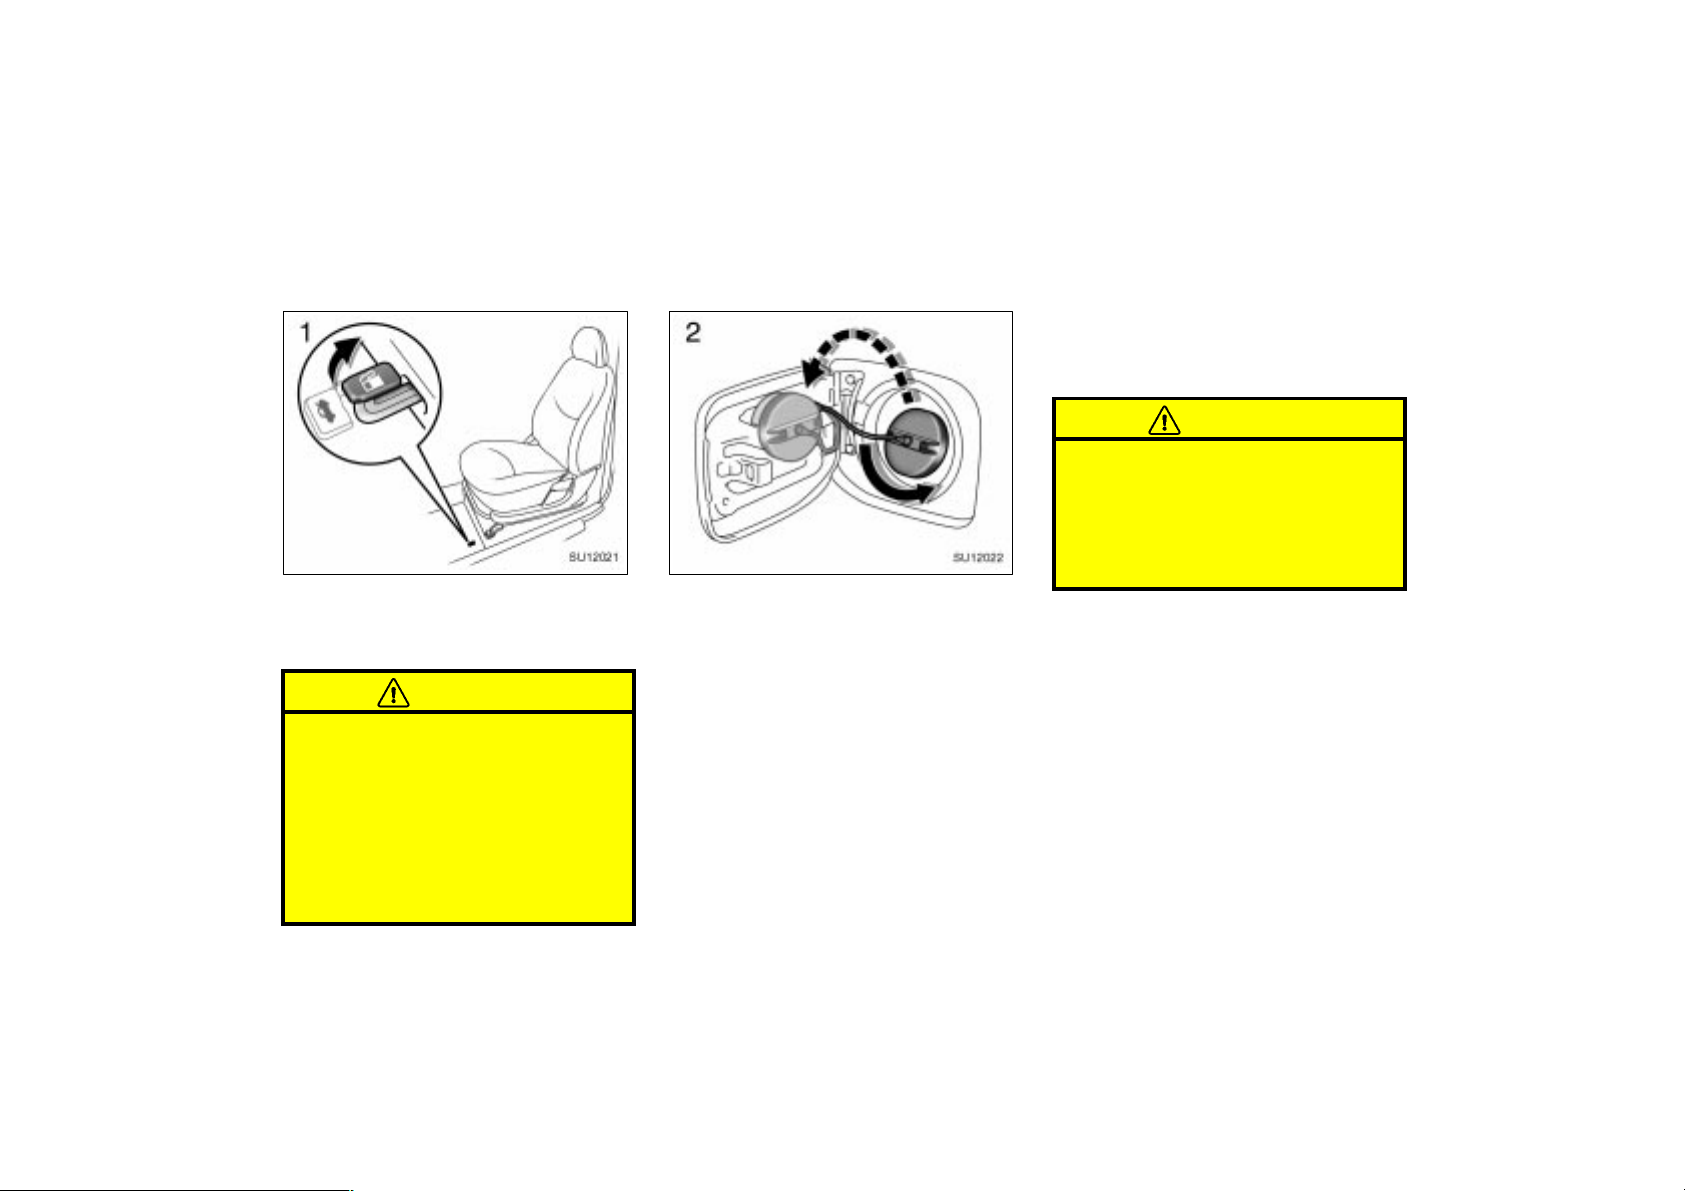
Fuel tank cap
SU12057
This indicates that the fuel filler door
is on the left side of your vehicle.
2001 ECHO (OM52440U)
21
Page 22
SU12021
2001MY ECHO (U) L/O0008
SU12022
The indicator lamp goes off after driving
several times. If the indicator lamp does
not go off, contact your Toyota dealer as
soon as possible.
CAUTION
Make sure the cap is tightened se-
curely to prevent fuel spillage in
case of an accident.
Use only a genuine Toyota fuel tank
cap for replacement. It is designed
to regulate fuel tank pressure.
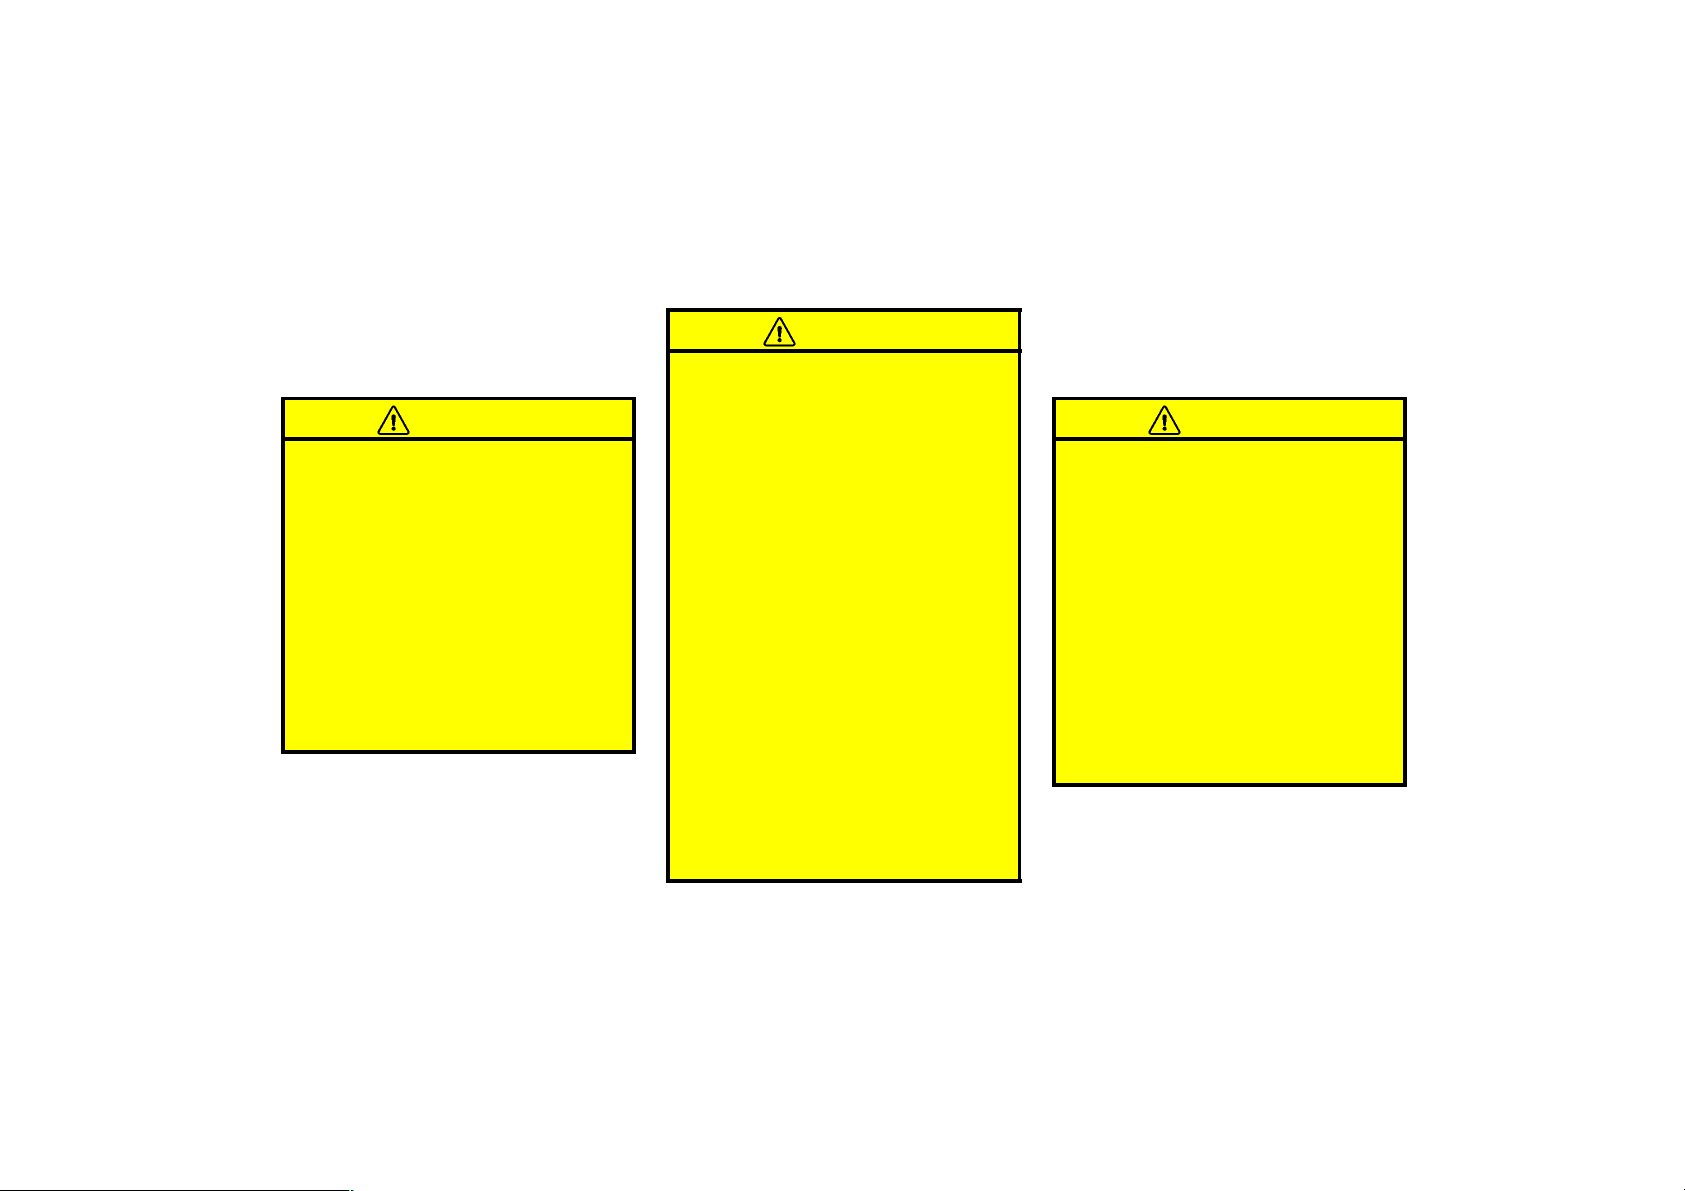
1. To open the fuel filler door, pull the
lever up.
When refueling, turn off the engine.
CAUTION
Do not smoke, cause sparks or al-
low open flames when refueling.
The fumes are flammable.
When opening the cap, do not re-
move the cap quickly. In hot weather, fuel under pressure could cause
injury by spraying out of the filler
neck if the cap is suddenly removed.
22
2. To remove the fuel tank cap, turn
the cap slowly counterclockwise,
then pause slightly before removing
it. After removing the cap, hang it
on the cap hanger.
It is not unusual to hear a slight swoosh
when the cap is opened. When installing,
turn the cap clockwise till you hear a
click.
If the cap is not tightened securely, the
malfunction indicator lamp comes on.
Make sure the cap is tightened securely.
2001 ECHO (OM52440U)
Page 23

2001MY ECHO (U) L/O0008
SECTION 1–
OPERATION OF INSTRUMENTS AND
CONTROLS
Seats, Seat belts, Steering wheel and Mirrors
Seats 24. . . . . . . . . . . . . . . . . . . . . . . . . . . . . . . . . . . . . . . . . . . . . . . . . . . . . .
Front seat s 24. . . . . . . . . . . . . . . . . . . . . . . . . . . . . . . . . . . . . . . . . . . . . . . . .
Fold–down rear seat 27. . . . . . . . . . . . . . . . . . . . . . . . . . . . . . . . . . . . . . . . .
Head rest raints 29. . . . . . . . . . . . . . . . . . . . . . . . . . . . . . . . . . . . . . . . . . . . . .
Seat belts 30. . . . . . . . . . . . . . . . . . . . . . . . . . . . . . . . . . . . . . . . . . . . . . . . . . .
SRS dri ver and front passenger airbags 38. . . . . . . . . . . . . . . . . . . . . . . .
SRS side airbags 46. . . . . . . . . . . . . . . . . . . . . . . . . . . . . . . . . . . . . . . . . . . .
Child restraint 51. . . . . . . . . . . . . . . . . . . . . . . . . . . . . . . . . . . . . . . . . . . . . . .
Tilt steering wheel 67. . . . . . . . . . . . . . . . . . . . . . . . . . . . . . . . . . . . . . . . . . .
Outside rear view mirrors 68. . . . . . . . . . . . . . . . . . . . . . . . . . . . . . . . . . . . .
Anti–glare inside rear view mirror 69. . . . . . . . . . . . . . . . . . . . . . . . . . . . . .
Vanity mirror 70. . . . . . . . . . . . . . . . . . . . . . . . . . . . . . . . . . . . . . . . . . . . . . . .
3
2001 ECHO (OM52440U)
23
Page 24
Seats
While the vehicle is being driven, all vehicle occupants should have the seatback
upright, sit well back in the seat and properly wear the seat belts provided.
CAUTION
Do not drive the vehicle unless the
occupants are properly seated. Do
not allow sitting on top of a
folded–down seatback, or in the
luggage compartment. Persons not
properly seated and/or properly restrained by seat belts can be severely injured in the event of emergency braking or a collision.
During driving, do not allow pas-
sengers to stand up or move
around between seats. Severe injuries can occur in the event of emergency braking or a collision.
2001MY ECHO (U) L/O0008
Front seats—
—Front seat precautions
(on vehicles with SRS side airbags)
CAUTION
When the SRS side airbags are
installed in the driver and front passenger seats, observe the following
precautions.
Do not lean against the front door
when the vehicle is in use. The side
airbag inflates with considerable
speed and force; you may be killed
or seriously injured.
Do not use accessories for the
seats which cover the parts where
the side airbags inflate. Such accessories may prevent the side airbags
from activating correctly, causing
death or serious injury.
Do not modify or replace the seats
or upholstery of the front seats
with the side airbags. Such changes
may disable the system or cause
the side airbags to inflate accidentally, resulting in death or serious
injury. Consult your Toyota dealer if
you insist on modifications of this
kind.
—Seat adjustment
precautions
Adjust the driver’s seat so that the foot
pedals, steering wheel and instrument
panel controls are within easy reach of
the driver.
CAUTION
Adjustments should not be made
while the vehicle is moving, as the
seat may unexpectedly move and
cause the driver to lose control of
the vehicle.
When adjusting the seat, be careful
not to hit the seat against a passenger or luggage.
After adjusting the seat position,
try sliding it forward and backward
to make sure it is locked in position.
After adjusting the seatback, exert
body pressure to make sure it is
locked in position.
24
2001 ECHO (OM52440U)
Page 25
Do not put objects under the seats
except putting in the auxiliary box.
The objects may interfere with the
seat–lock mechanism or unexpectedly push up the seat position adjusting lever; the seat may suddenly
move, causing the driver to lose
control of the vehicle.
While adjusting the seat, do not put
your hands under the seat or near
the moving parts. You may catch
and injure your hands or fingers.
2001MY ECHO (U) L/O0008
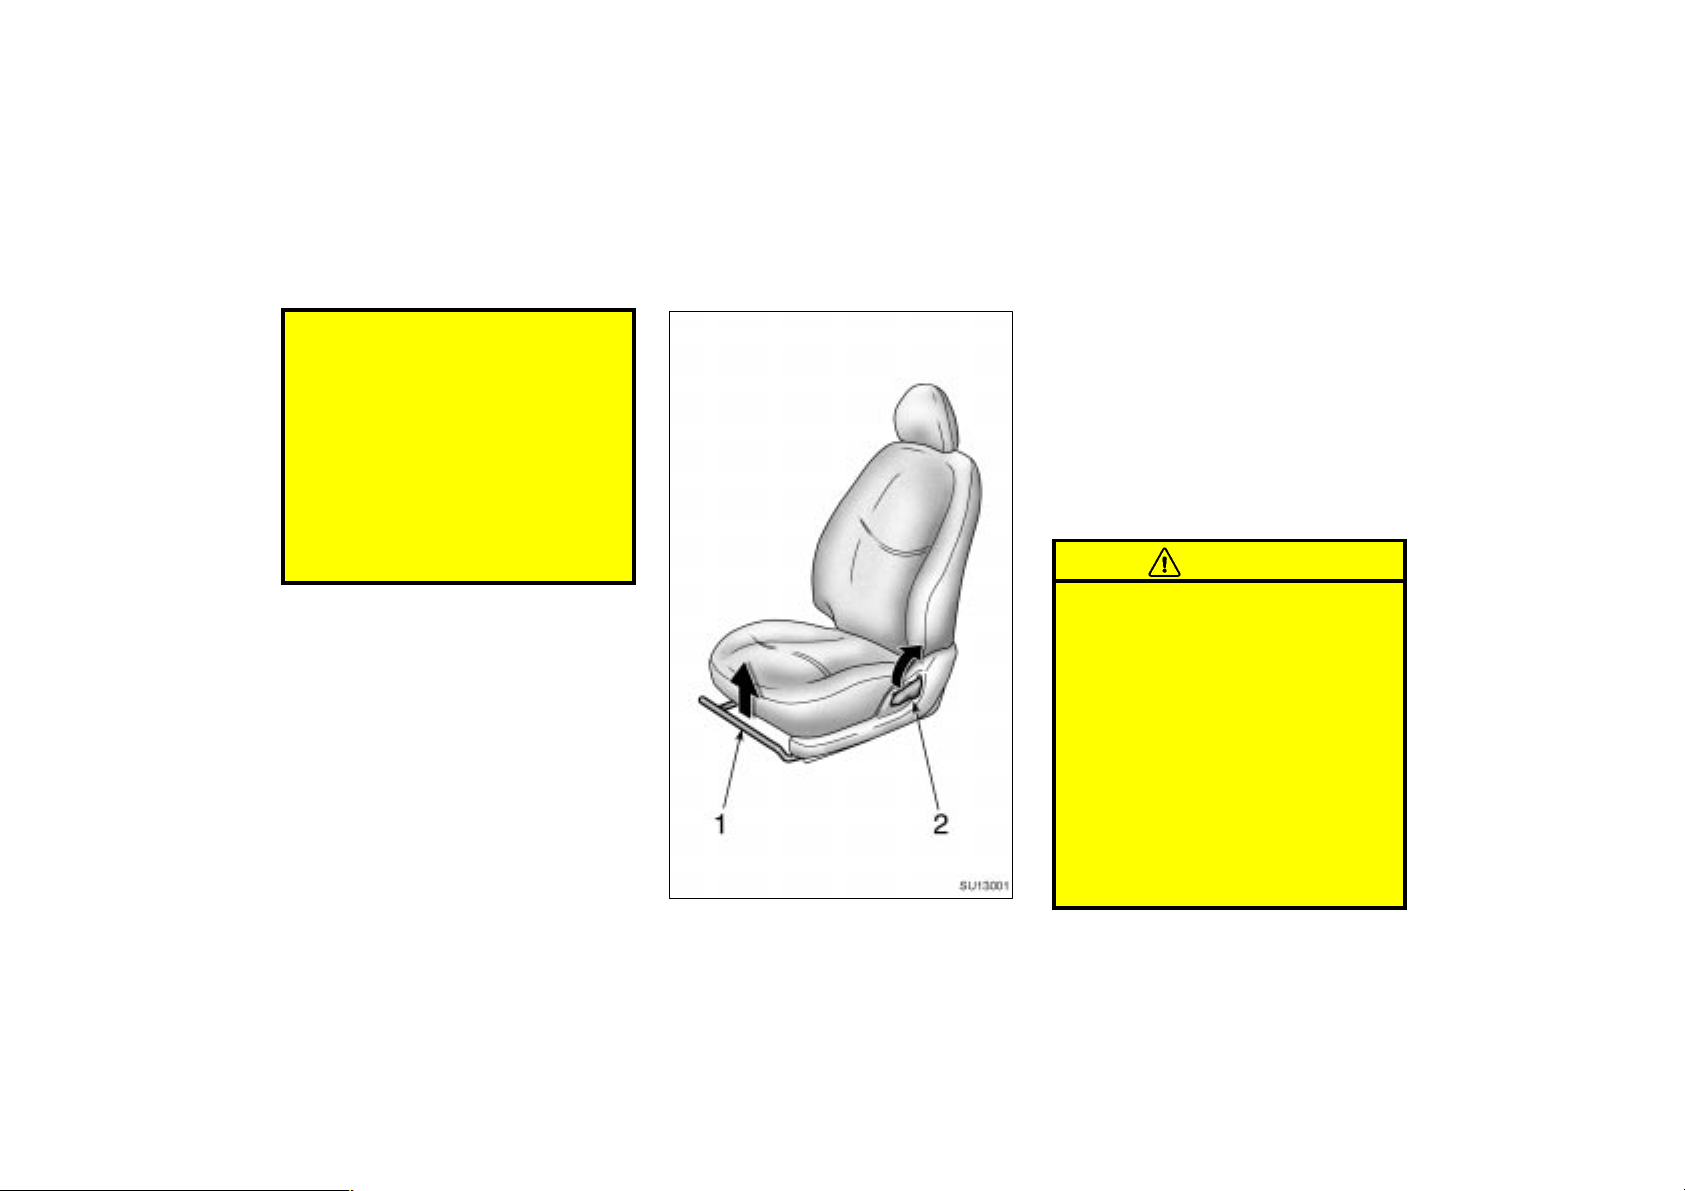
—Adjusting front seats
1. SEAT POSITION ADJUSTING LEVER
Hold the center of the lever and pull it
up. Then slide the seat to the desired
position with slight body pressure and
release the lever.
2. SEATBACK ANGLE ADJUSTING
LEVER
Lean forward and pull the lever up.
Then lean back to the desired angle
and release the lever.
CAUTION
SU13001
2001 ECHO (OM52440U)
To reduce the risk of sliding under
the lap belt during a collision, avoid
reclining the seatback any more than
needed. The seat belts provide maximum protection in a frontal or rear
collision when the driver and the passenger are sitting up straight and
well back in the seats. If you are
reclined, the lap belt may slide past
your hips and apply restraint forces
directly to the abdomen. Therefore, in
the event of a frontal collision, the
risk of personal injury may increase
with increasing recline of the seatback.
25
Page 26
2001MY ECHO (U) L/O0008
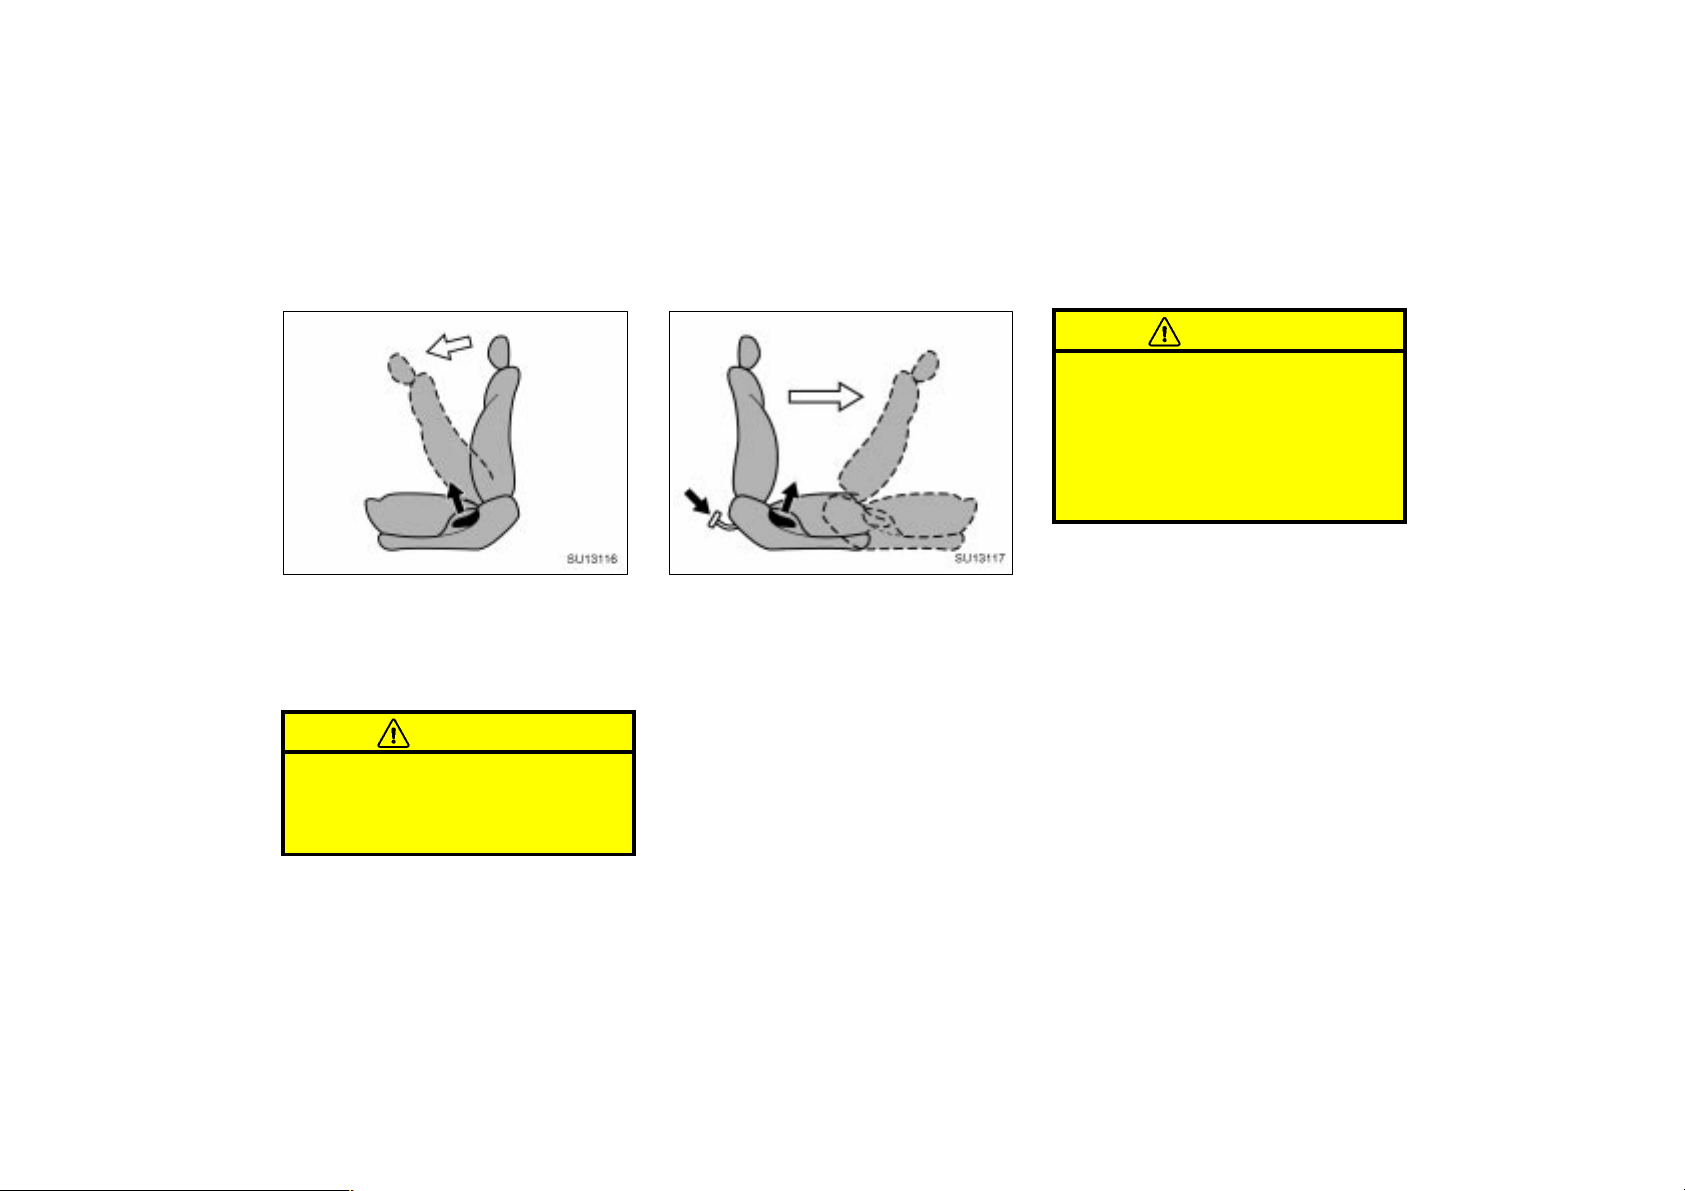
—Tilting driver’s seatback for
rear seat entry
(2–door models)
SU13116
Lift the seatback release lever—the
seatback will tilt forward.
This allows passengers to get into or out
of the rear seat easily. After passengers
are in, lift up on the seatback.
CAUTION
After putting back the seatback, try
pushing the seatback forward and
rearward to make sure it is secured
in place.
—Moving passenger’s seat
for rear seat entry
(2–door models)
SU13117
For easy access to the rear seat, do
this.
1. Lift the seatback angle adjusting lever
or press the pedal behind the seatback.
The seat will slide forward.
2. Move the seat to the front–most position.
After passengers are in, lift up the seatback and return the seat until it locks.
CAUTION
After putting back the seat, try
pushing the seat forward and rearward to make sure it is secured in
place.
Never allow anyone to rest their
foot on the release pedal while the
vehicle is moving.
26
2001 ECHO (OM52440U)
Page 27
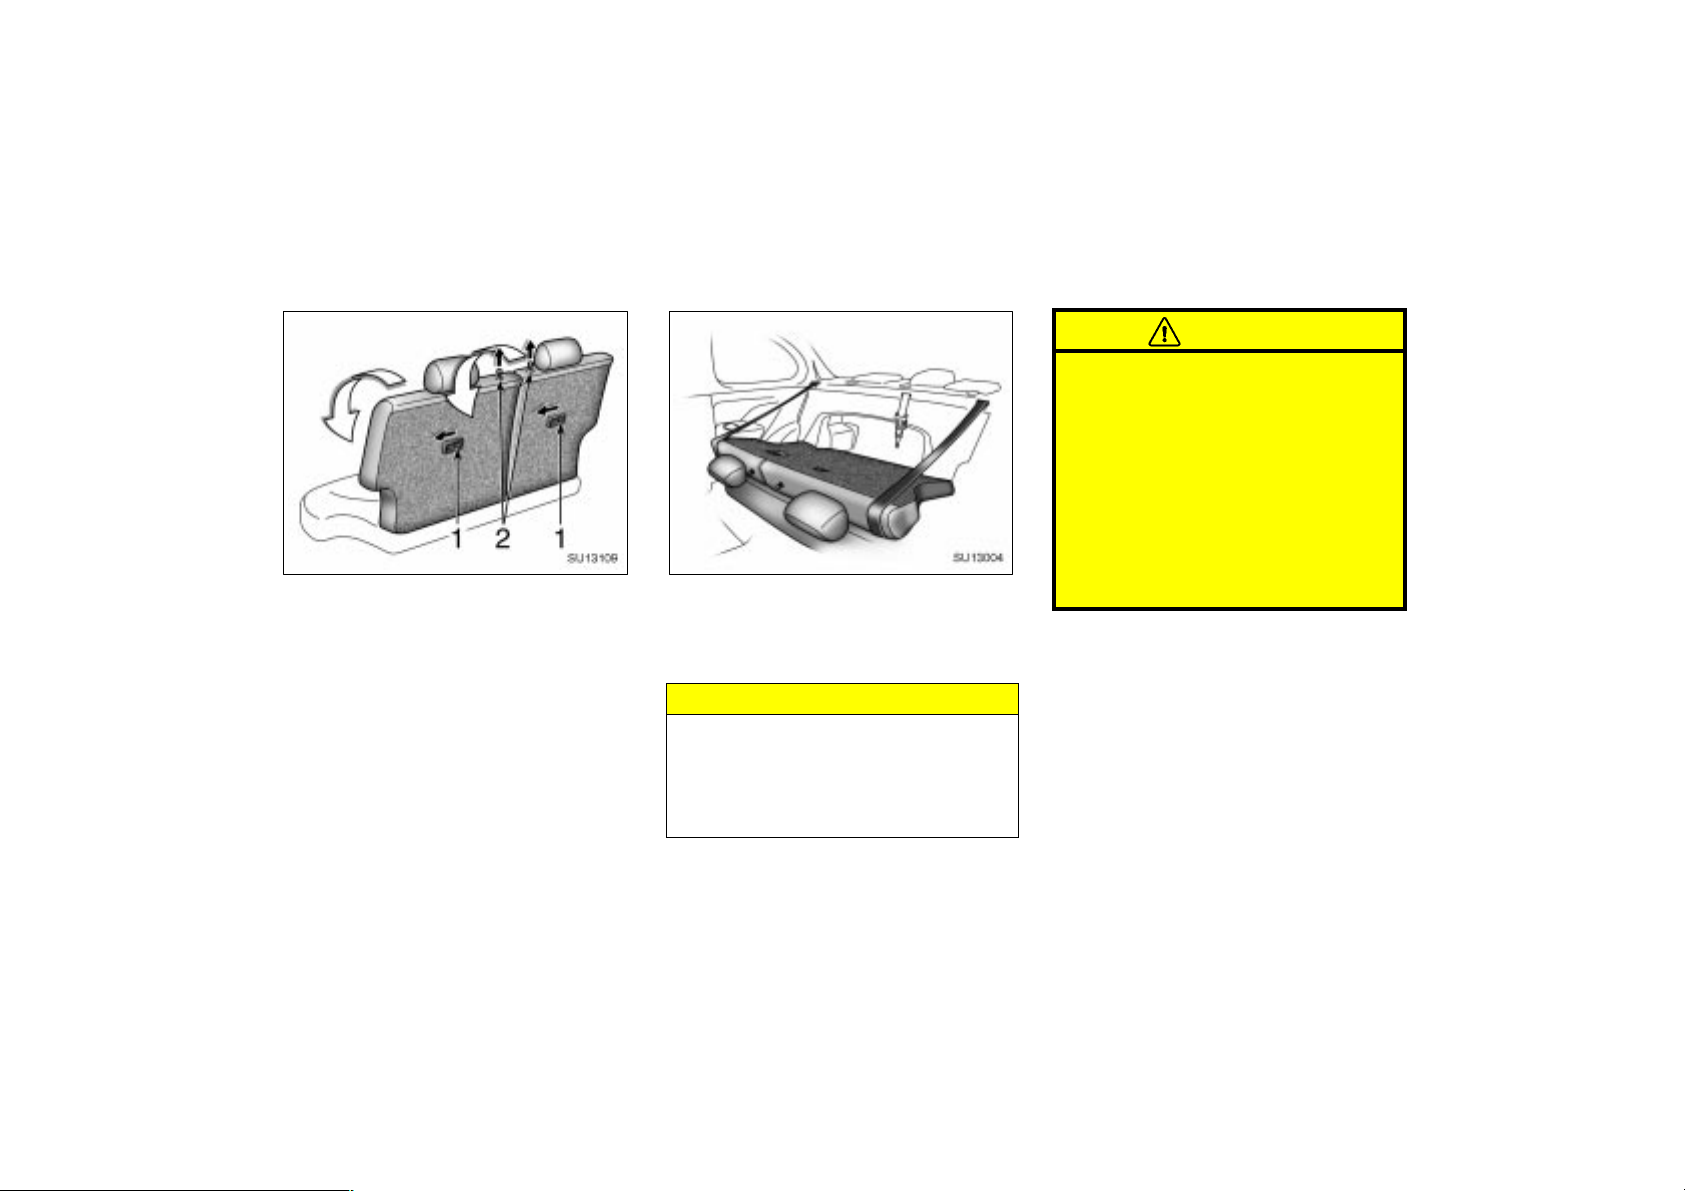
Fold–down rear seat
SU13109
(A) FOLDI NG DOWN REAR SEAT
1. Pull up the seatback security lock
lever 1 to the unlock position.
2. Pull up the lock release button 2.
3. Fold down the seatback.
Each seatback may be folded separately.
2001MY ECHO (U) L/O0008
SU13004
This will enlarge the trunk as far as the
seatbacks. See “Luggage stowage
precautions” in Section 2 for precautions
to observe for loading luggage.
NOTICE
Make sure the luggage loaded in the
enlarged trunk will not damage the
webbing of the rear center seat belt
when the left seatback is folded
down.
CAUTION
When returning the seatback to the
upright position:
Make sure the seat belts are not
twisted or caught in the seatback
and are arranged in the proper
position and are ready to use.
Make sure the seatback is securely
locked by pushing forward and rearward on the top of the seatback.
Failure to do so will prevent seat
belt from operating properly.
2001 ECHO (OM52440U)
27
Page 28

SU13110
2001MY ECHO (U) L/O0008
CAUTION
Disconnect the rear center seat belt
only under the above mentioned circumstances; do not disconnect it in
other circumstances.
SU13122
(B) PREVENTING DAMAGE TO REAR
CENTER SEAT BELT WEBBING
When folding down the left seatback, if
the luggage loaded in the enlarged
trunk will damage the webbing of the
rear center seat belt, disconnect the
rear center seat belt to prevent damage.
Insert the key into the hole (light gray)
on the buckle to release tab 1 (light
gray), and allow the belt to retract.
28
(C) B EFORE RETURNING REAR SEAT
Before returning the seatback to the
upright position, make sure to correctly
connect the center seat belt for ready
use.
Insert tab 2 into the buckle 3.
You will hear a click when the tab locks
into the buckle.
2001 ECHO (OM52440U)
Page 29
CAUTION
Be careful not to mix up the proper
match of tab and buckle. Do not
insert tab 1 (light gray) into other
buckle than the one with light gray
buckle release button. (See “Seat
belts” in this section for proper
matching of the buckles and tabs.)
After inserting the tab, make sure
the tab and buckle are locked.
Do not insert coins, clips, etc. in
the buckle as this may prevent you
from properly latching the tab and
buckle.
Make sure the belt is not twisted or
caught in the seatback and that it
is arranged in the proper position
for ready use.
If the seat belt does not function
normally, immediately contact your
Toyota dealer.
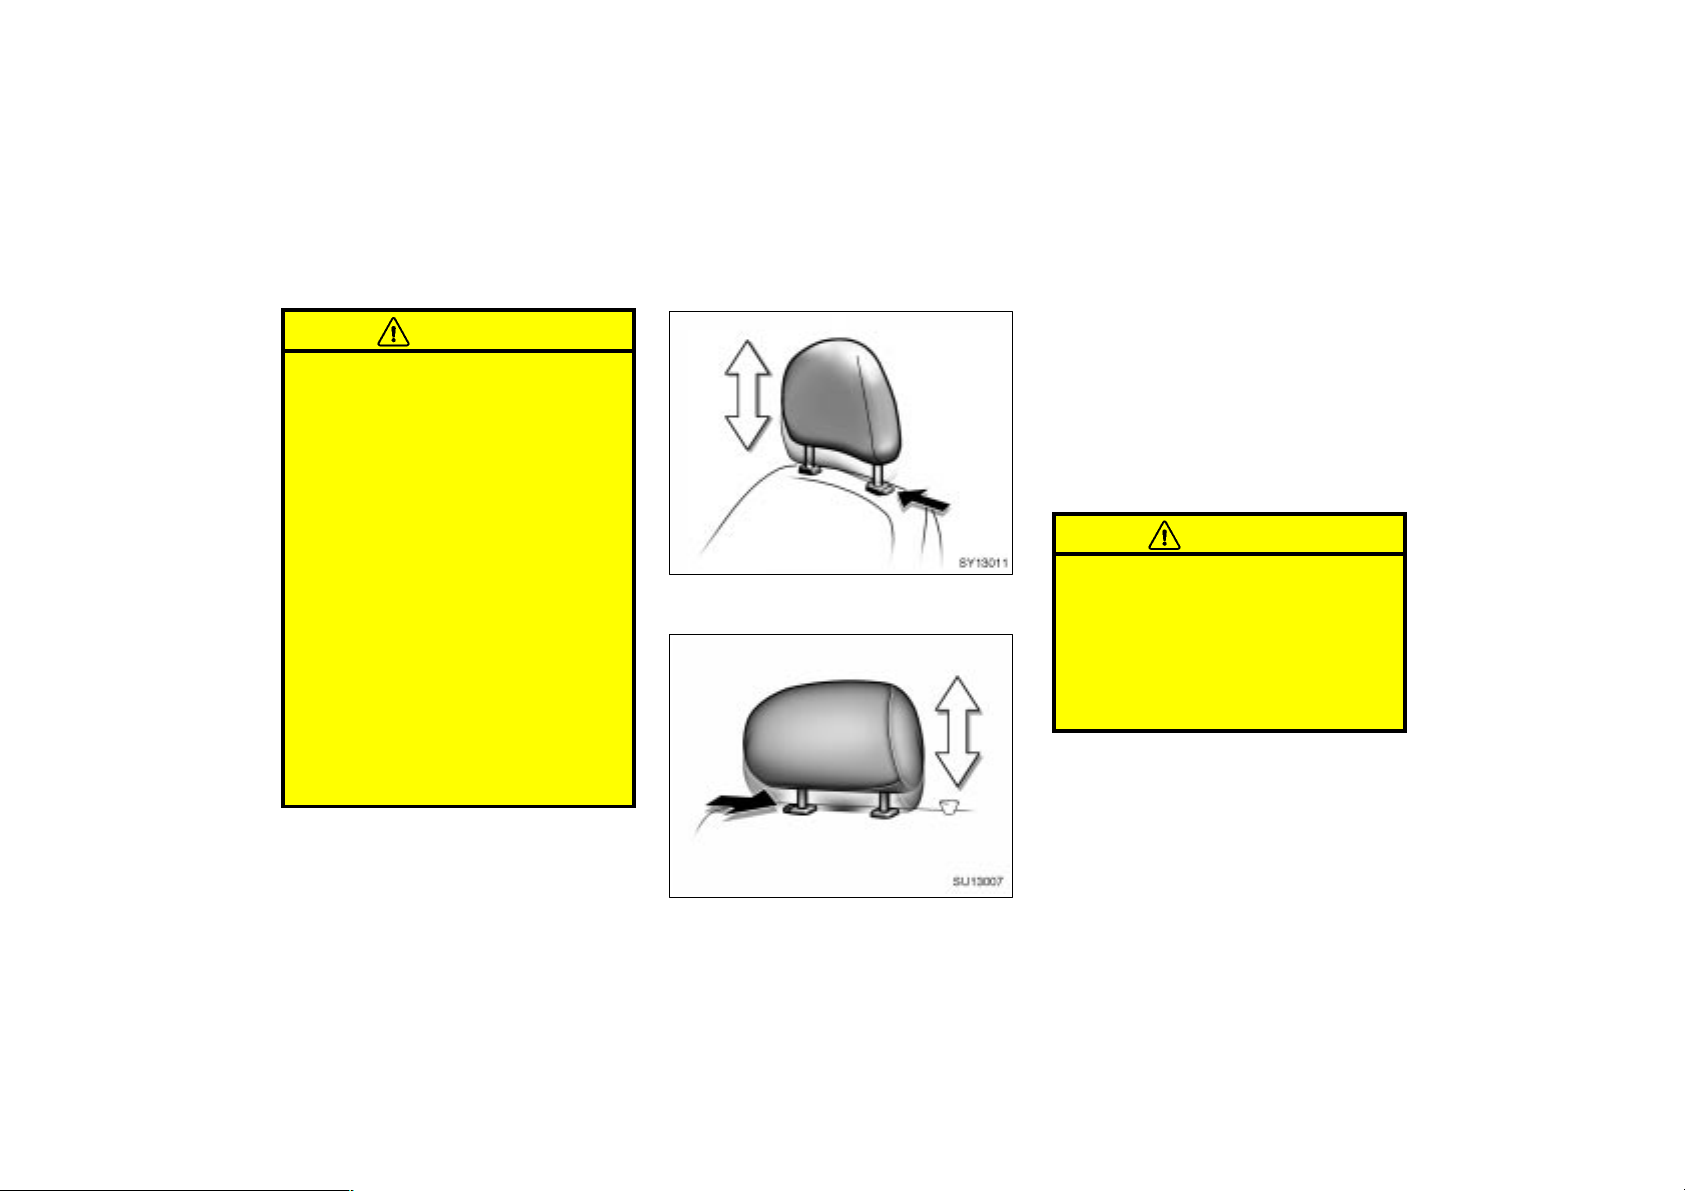
Head restraints
SY13011
Front seat
SU13007
2001MY ECHO (U) L/O0008
For your safety and comfort, adjust the
head restraint before driving.
To raise: Pull it up.
To lower: Push it down while pressing the
lock release button.
The head restraint is most effective when
it is close to your head. Therefore, using
a cushion on the seatback is not recommended.
CAUTION
Adjust the center of the head re-
straint so that it is closest to the
top of your ears.
After adjusting the head restraint,
make sure it is locked in position.
Do not drive with the head re-
straints removed.
Rear seat
2001 ECHO (OM52440U)
29
Page 30
Seat belts—
—Seat belt precautions
Toyota strongly urges that the driver and
passengers in the vehicle be properly restrained at all times with the seat belts
provided. Failure to do so could increase
the chance of injury and/or the severity of
injury in accidents.
Child. Use a child restraint system appropriate for the child until the child becomes large enough to properly wear the
vehicle’s seat belts. See “Child restraint”
for details.
If a child is too large for a child restraint
system, the child should sit in the rear
seat and must be restrained using the
vehicle’s seat belt. According to accident
statistics, the child is safer when properly
restrained in the rear seat than in the
front seat.
If a child must sit in the front seat, the
seat belts should be worn properly. If an
accident occurs and the seat belts are not
worn properly, the force of the rapid inflation of the airbag may cause death or
serious injury to the child.
2001MY ECHO (U) L/O0008
Do not allow the child to stand up or
kneel on either rear or front seats. An
unrestrained child could suffer serious injury or death during emergency braking or
a collision. Also, do not let the child sit
on your lap. It does not provide sufficient
restraint.
Pregnant woman. Toyota recommends the
use of a seat belt. Ask your doctor for
specific recommendations. The lap belt
should be worn securely and as low as
possible over the hips and not on the
waist.
Injured person. Toyota recommends the
use of a seat belt. Depending on the injury, first check with your doctor for specific
recommendations.
CAUTION
Persons should ride in their seats
properly wearing their seat belts
whenever the vehicle is moving.
Otherwise, they are much more likely
to suffer serious bodily injury or
death in the event of sudden braking
or a collision.
When using the seat belts, observe
the following:
Use the belt for only one person at
a time. Do not use a single belt for
two or more people—even children.
Avoid reclining the seatbacks too
much. The seat belts provide maximum protection when the seatbacks
are in the upright position. (Refer
to the seat adjustment instructions.)
Be careful not to damage the belt
webbing or hardware. Take care that
they do not get caught or pinched
in the seat or doors.
Inspect the belt system periodically.
Check for cuts, fraying, and loose
parts. Damaged parts should be replaced. Do not disassemble or
modify the system.
Keep the belts clean and dry. If
they need cleaning, use a mild soap
solution or lukewarm water. Never
use bleach, dye, or abrasive cleaners—they may severely weaken the
belts. (See “Cleaning the interior”
in Section 5.)
30
2001 ECHO (OM52440U)
Page 31
Replace the belt assembly (includ-
ing bolts) if it has been used in a
severe impact. The entire assembly
should be replaced even if damage
is not obvious.
2001MY ECHO (U) L/O0008
—Front and rear seat belts
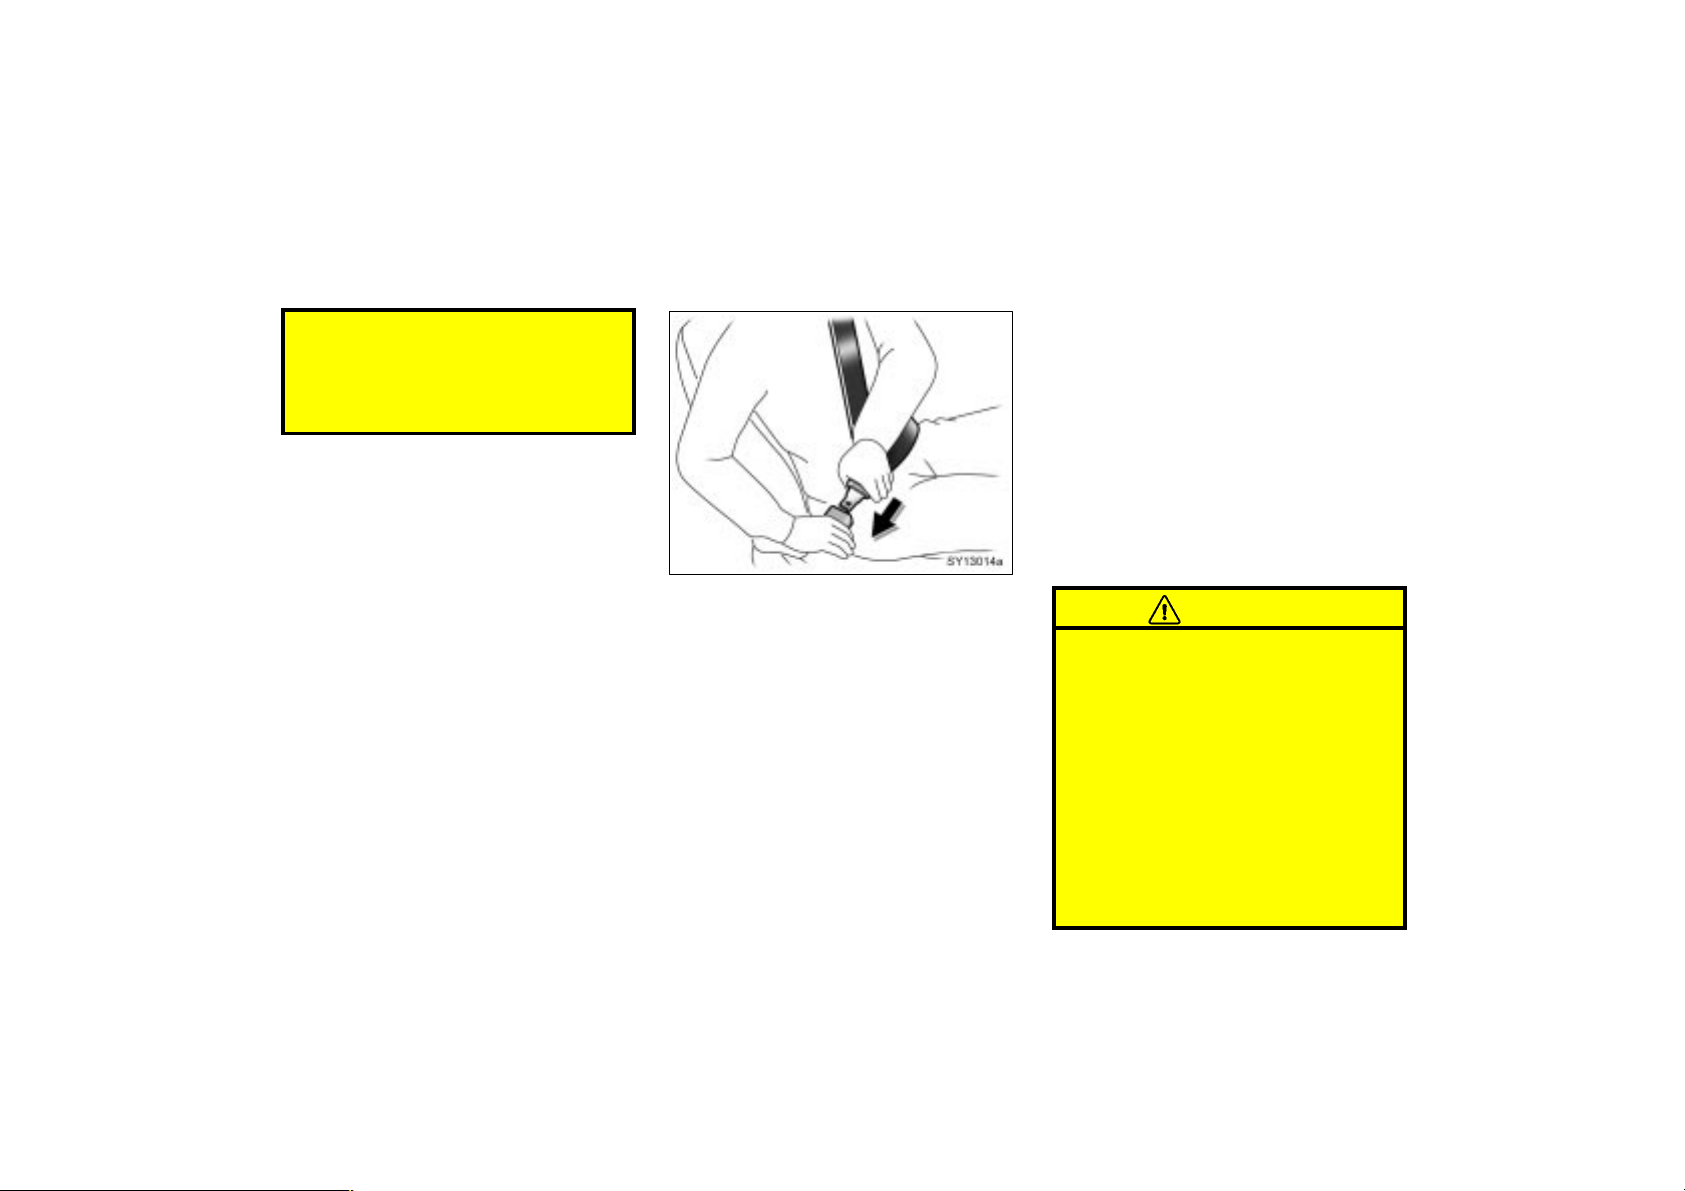
SY13014a
If the seat belt cannot be pulled out of the
retractor, firmly pull the belt and release
it. You will then be able to smoothly pull
the belt out of the retractor.
When a passenger’s shoulder belt is completely extended and is then retracted
even slightly, the belt is locked in that
position and cannot be extended. This feature is used to hold the child restraint
system securely. (For details, see “Child
restraint” in this section.) To free the belt
again, fully retract the belt and then pull
the belt out once more.
Adjust the seat as needed (front seats
only) and sit up straight and well back
in the seat. To fasten your belt, pull it
out of the retractor and insert the tab
into the buckle.
You will hear a click when the tab locks
into the buckle.
The seat belt length automatically adjusts
to your size and the seat position.
The retractor will lock the belt during a
sudden stop or on impact. It also may
lock if you lean forward too quickly. A
slow, easy motion will allow the belt to
extend, and you can move around freely.
2001 ECHO (OM52440U)
CAUTION
After inserting the tab, make sure
the tab and buckle are locked and
that the belt is not twisted.
Do not insert coins, clips, etc. in
the buckle as this may prevent you
from properly latching the tab and
buckle.
If the seat belt does not function
normally, immediately contact your
Toyota dealer. Do not use the seat
until the seat belt is fixed. It cannot
protect an adult occupant or your
child from injury.
31
Page 32
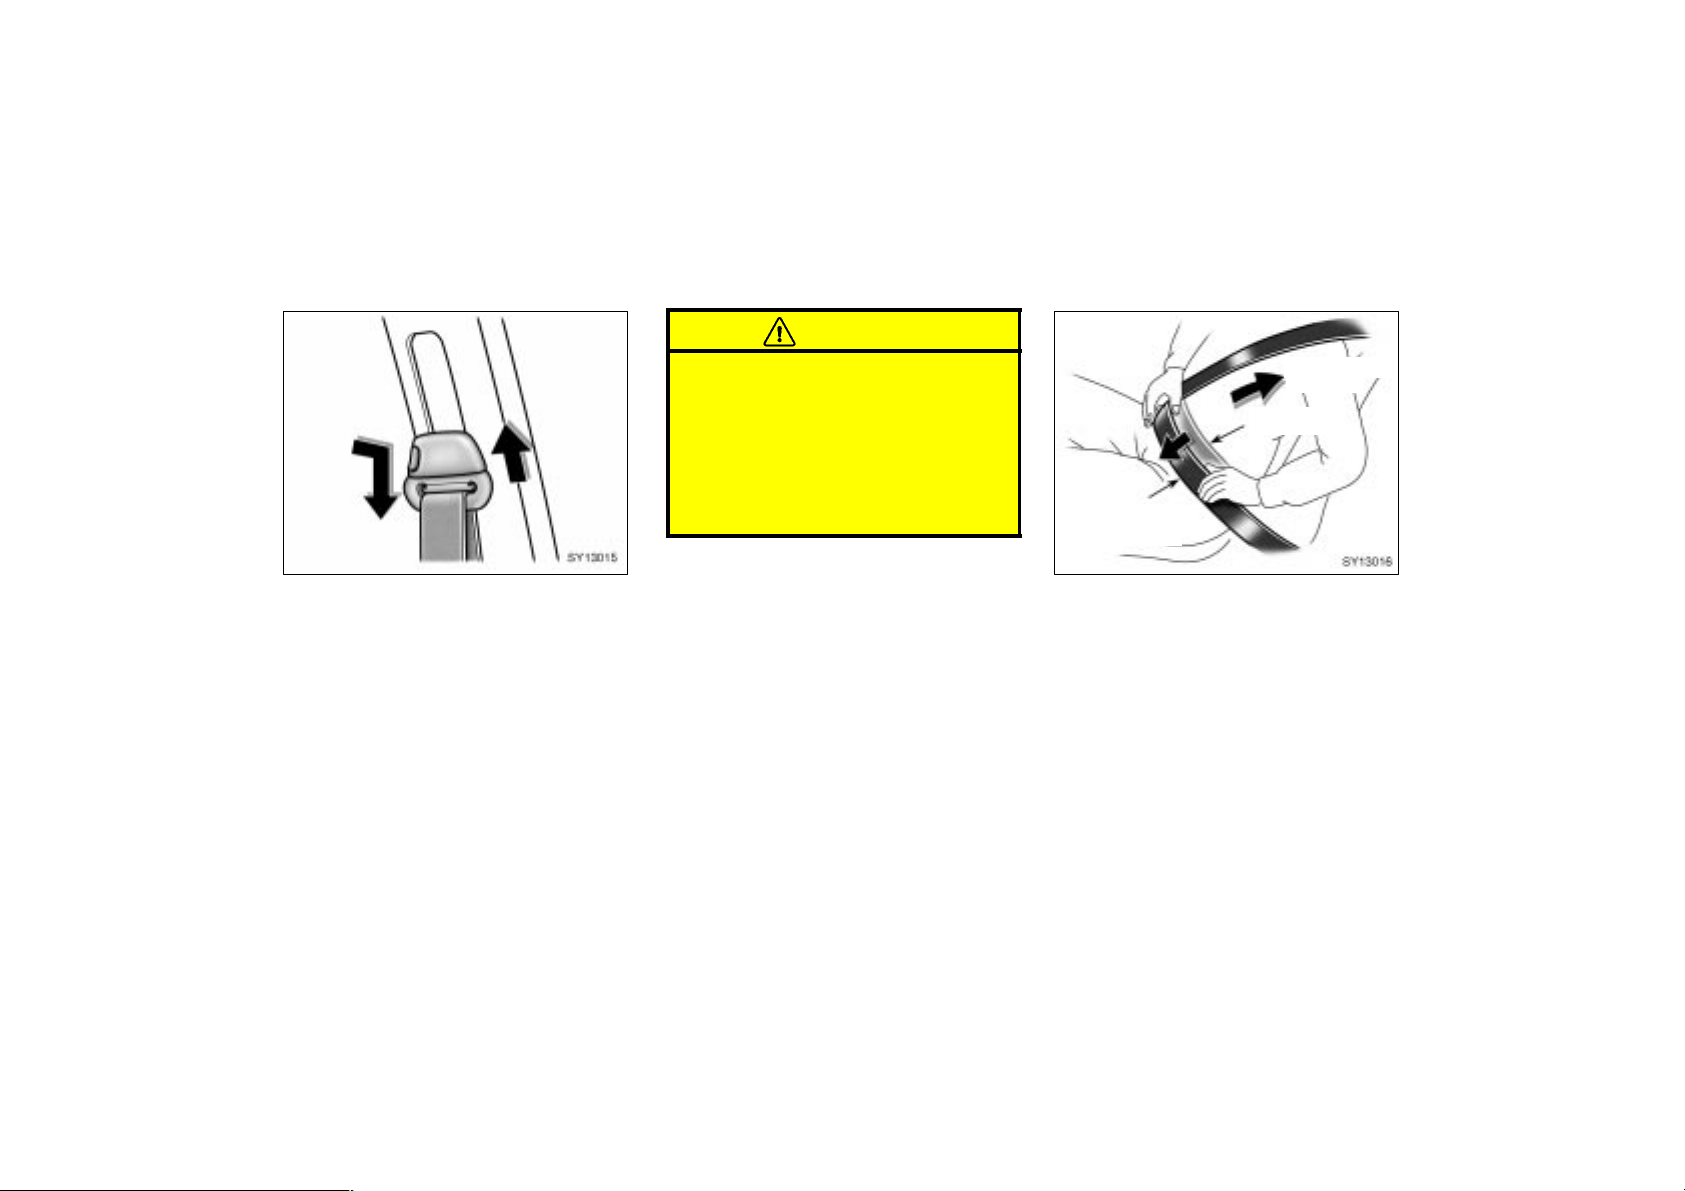
SY13015
2001MY ECHO (U) L/O0008
CAUTION
Always make sure the shoulder belt
is positioned across the center of
your shoulder. The belt should be
kept away from your neck, but not
falling off your shoulder. Failure to
do so could reduce the amount of
protection in an accident and cause
serious injures in a collision.
SY13016
Keep as low on
hips as possible
Take up
Take up
slack
slack
To o h i g h
Seat belts with an adjustable shoulder
anchor (4–door models)—
Adjust the shoulder anchor position to
your size.
To raise: Slide the anchor up.
To lower: Push in the lock release button
and slide the anchor down.
After adjustment make sure the anchor is
locked in position.
32
Adjust the position of the lap and
shoulder belts.
Position the lap belt as low as possible
on your hips—not on your waist, then adjust it to a snug fit by pulling the shoulder
portion upward through the latch plate.
2001 ECHO (OM52440U)
Page 33
CAUTION
High–positioned lap belts and
loose–fitting belts both could increase the chance of injury due to
sliding under the lap belt during an
accident or other unintended result.
Keep the lap belt as low on your
hips as possible.
For your safety, do not place the
shoulder belt under your arm.
2001MY ECHO (U) L/O0008
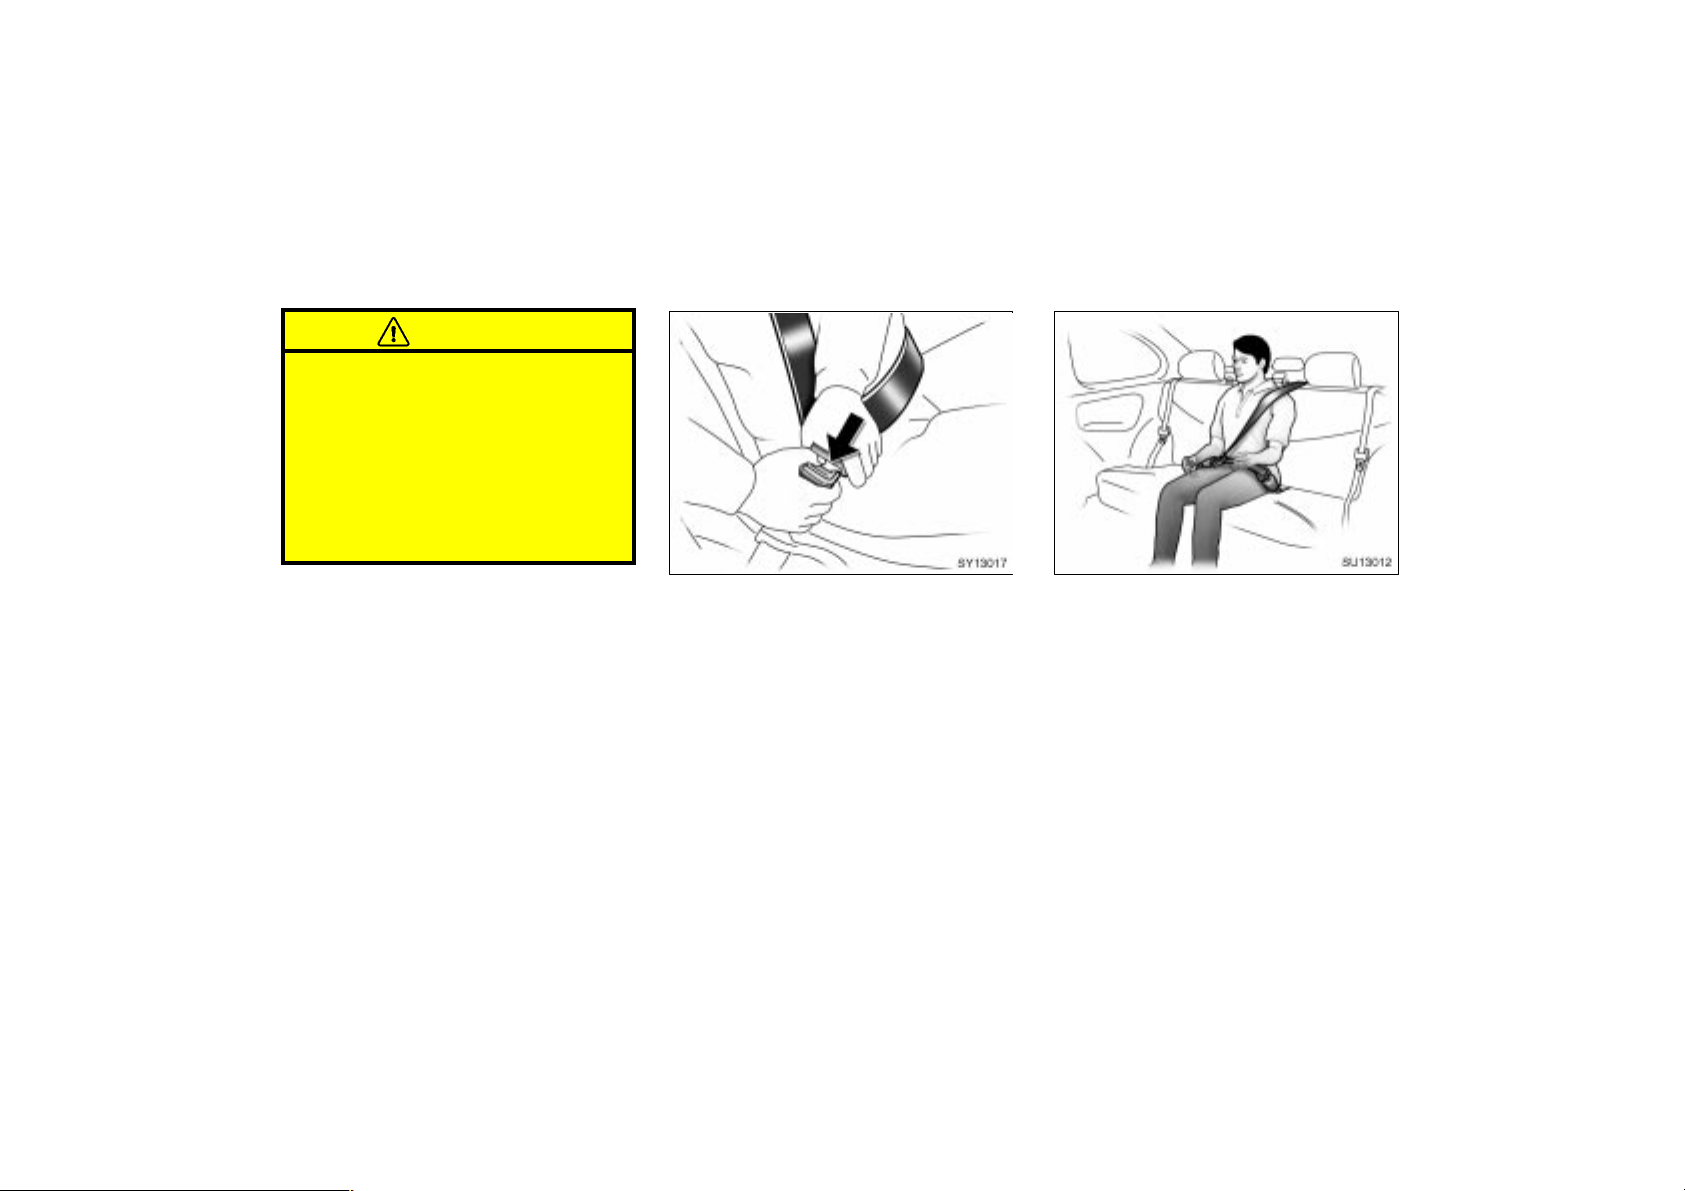
SY13017
SU13012
To release the belt, press the buckle–release button and allow the belt to retract.
If the belt does not retract smoothly, pull
it out and check for kinks or twists. Then
make sure it remains untwisted as it retracts.
2001 ECHO (OM52440U)
REAR CENTER SEAT BELT (WITH
FOLD–DOWN SEAT)
The rear center seat belt is a 3–point type
restraint with 2 buckles. Both seat belt
buckles must be correctly located and securely latched for proper operation
Make sure the buckle 1 (with light gray
buckle–release button) is securely latched
for ready use of the center seat belt.
The buckle 1 should be separated only
when the rear left seatback is folded
down, if the luggage loaded in the enlarged trunk will damage the webbing of
the rear center seat belt. (See “Fold–down
rear seat” in this section for the instruction of how to correctly connect the seat
belt.)
33
Page 34
SU13013
2001MY ECHO (U) L/O0008
CAUTION
Make sure the both buckles are correctly located and securely latched.
Failure to properly match the buckle
and tab may cause severe injury in
case of an accident or a collision.
SU13014
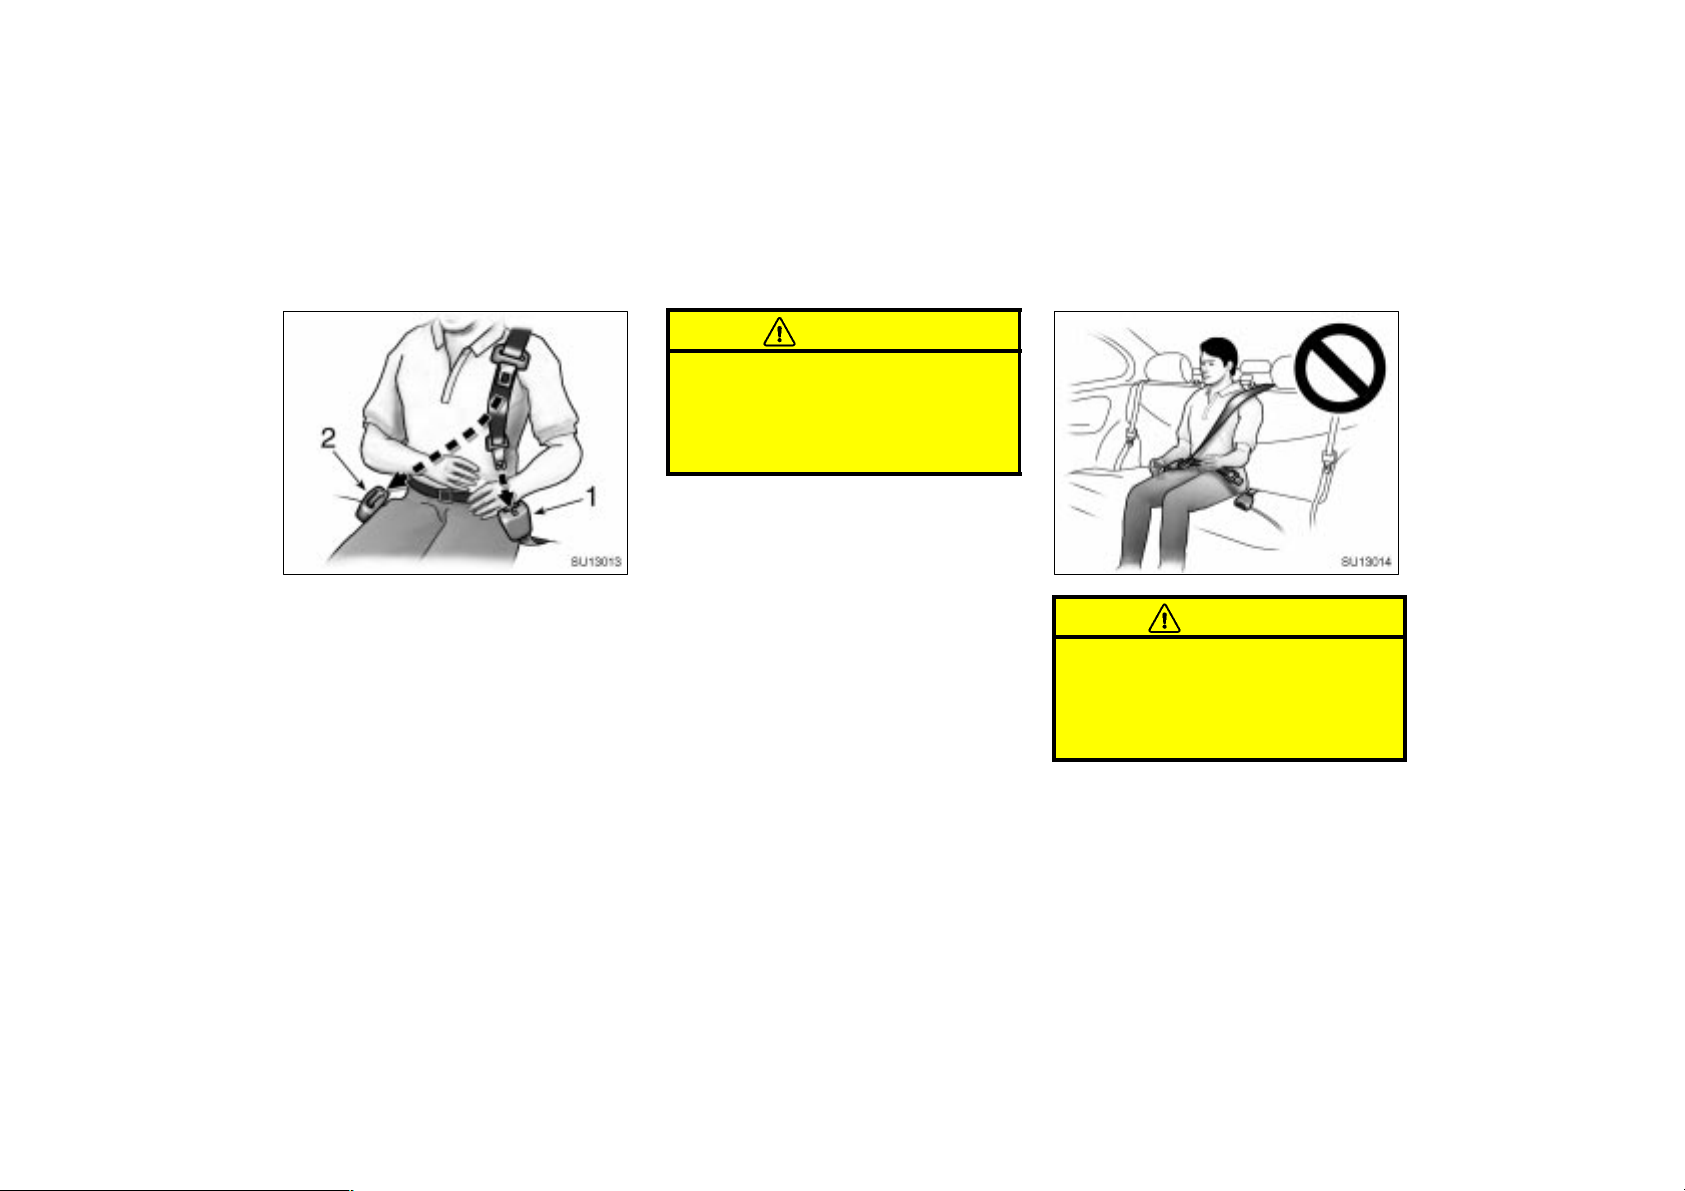
Two buckles and tabs for rear center
seat belt
The two buckles for the rear center seat
belt are distinguished with colors of the
buckle release button. Also the two tabs
have different shape for its end so that
the belt is not buckled in the wrong place.
Buckle 1—Properly matches with light
gray tab
Buckle 2—Properly matches with interior color tab
34
CAUTION
Do not use the rear center seat belt
with either buckle released. Fastening
only the shoulder belt or lap belt may
cause severe personal injury in case
of sudden braking or a collision.
2001 ECHO (OM52440U)
Page 35
—Seat belt extender
If your seat belt cannot be fastened securely because it is not long enough, a
personalized seat belt extender is available from your Toyota dealer free of
charge.
Please contact your local Toyota dealer so
that the dealer can order the proper required length for the extender. Bring the
heaviest coat you expect to wear for proper measurement and selection of length.
Additional ordering information is available
at your Toyota dealer.
2001MY ECHO (U) L/O0008
Remember that the extender pro-
vided for you may not be safe when
used on a different vehicle, or for
another person or at a different
seating position than the one originally intended for.
SU13015
CAUTION
When using the seat belt extender,
observe the following. Failure to follow these instructions could result in
less effectiveness of the seat belt restraint system in case of vehicle accident, increasing the chance of personal injury.
Never use the seat belt extender if
you can fasten the seat belt without
it.
2001 ECHO (OM52440U)
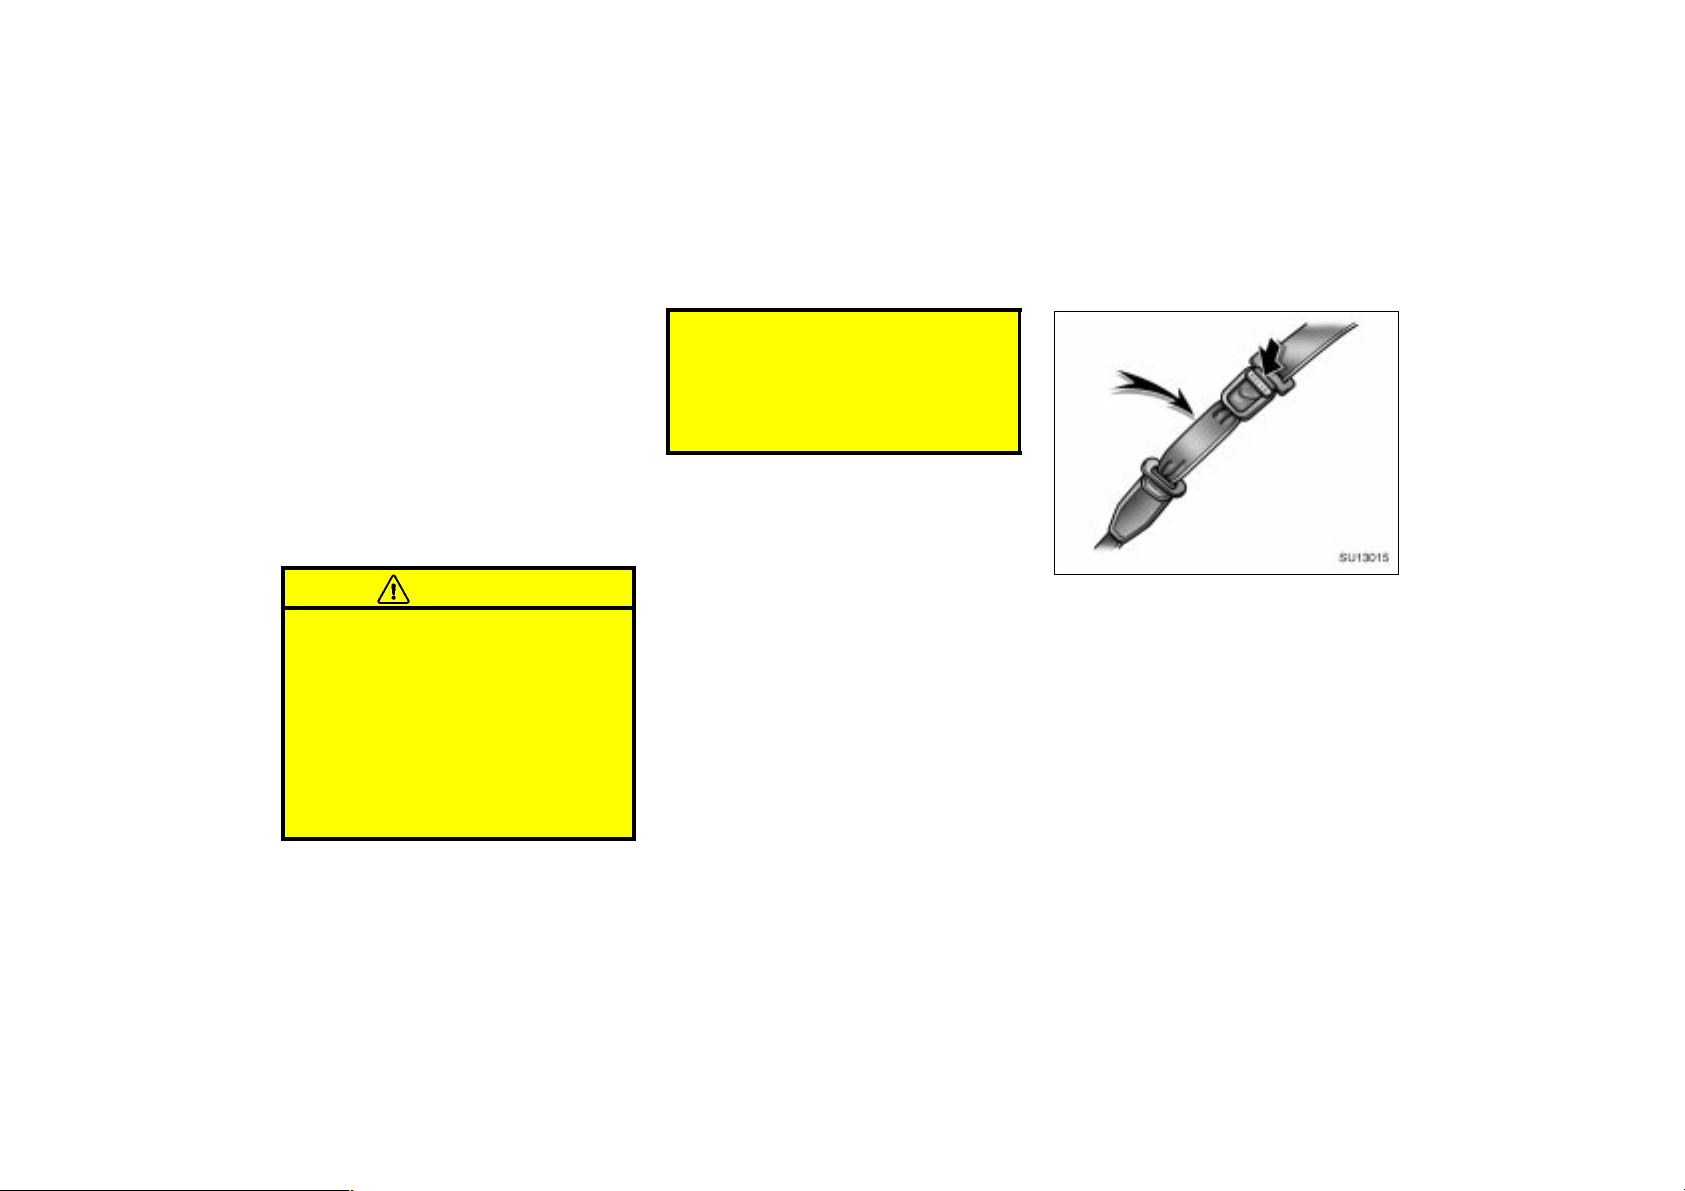
To connect the extender to the seat
belt, insert the tab into the seat belt
buckle so that the “PRESS” signs on
the buckle–release buttons of the extender and the seat belt are both facing
outward as shown.
You will hear a click when the tab locks
into the buckle.
When releasing the seat belt, press on
the buckle–release button on the extender,
not on the seat belt. This helps prevent
damage to the vehicle interior and extender itself.
When not in use, remove the extender
and store in the vehicle for future use.
35
Page 36
CAUTION
After inserting the tab, make sure
the tab and buckle are locked and
that the seat belt extender is not
twisted.
Do not insert coins, clips, etc. in
the buckle as this may prevent you
from properly latching the tab and
buckle.
If the seat belt does not function
normally, immediately contact your
Toyota dealer. Do not use the seat
until the seat belt is fixed. It cannot
protect an adult occupant or your
child from injury.
2001MY ECHO (U) L/O0008
—Front seat belt pretensioners
SY13021a
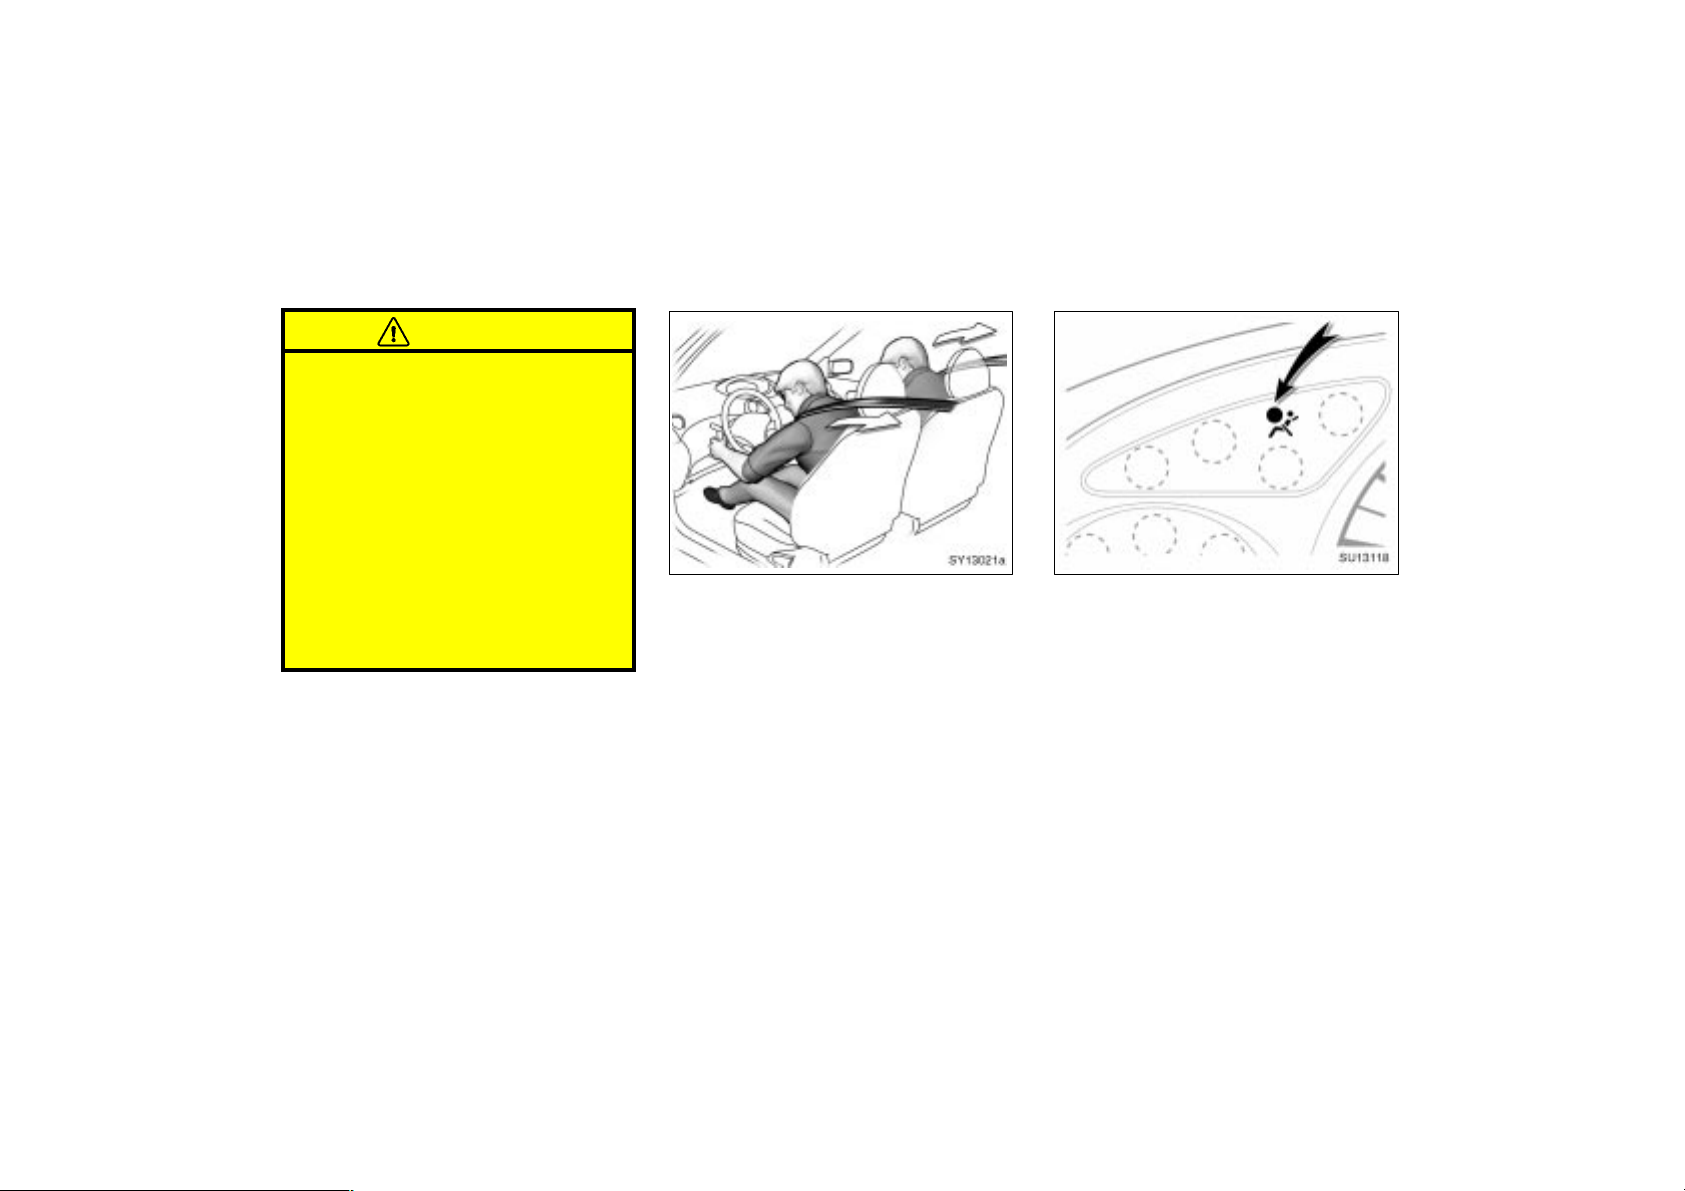
The driver and front passenger’s seat
belt pretensioners are designed to be
activated in response to a severe frontal impact.
When the airbag sensor detects the shock
of a severe frontal impact, the front seat
belts are quickly drawn back in by the
retractors so that the belts snugly restrain
the front seat occupants.
The front seat belt pretensioners are activated even with no passenger in the front
seat.
Collisions occurring at certain speeds and
angles may cause the seat belt pretensioners and SRS airbags not to operate
all together.
SU13118
This indicator comes on when the ignition key is turned to the “ON” position.
It goes off after about 6 seconds. This
means the front seat belt pretensioners
are operating properly.
This warning light system monitors the
airbag sensor assembly, front airbag sensors, side airbag sensors, door side airbag sensors, front seat belt pretensioner
assemblies, inflators, warning light, interconnecting wiring and power sources. (For
details, see “Service reminder indicators
and warning buzzers” on page 80 in Section 1–5.)
36
2001 ECHO (OM52440U)
Page 37
2001MY ECHO (U) L/O0008
SU13113
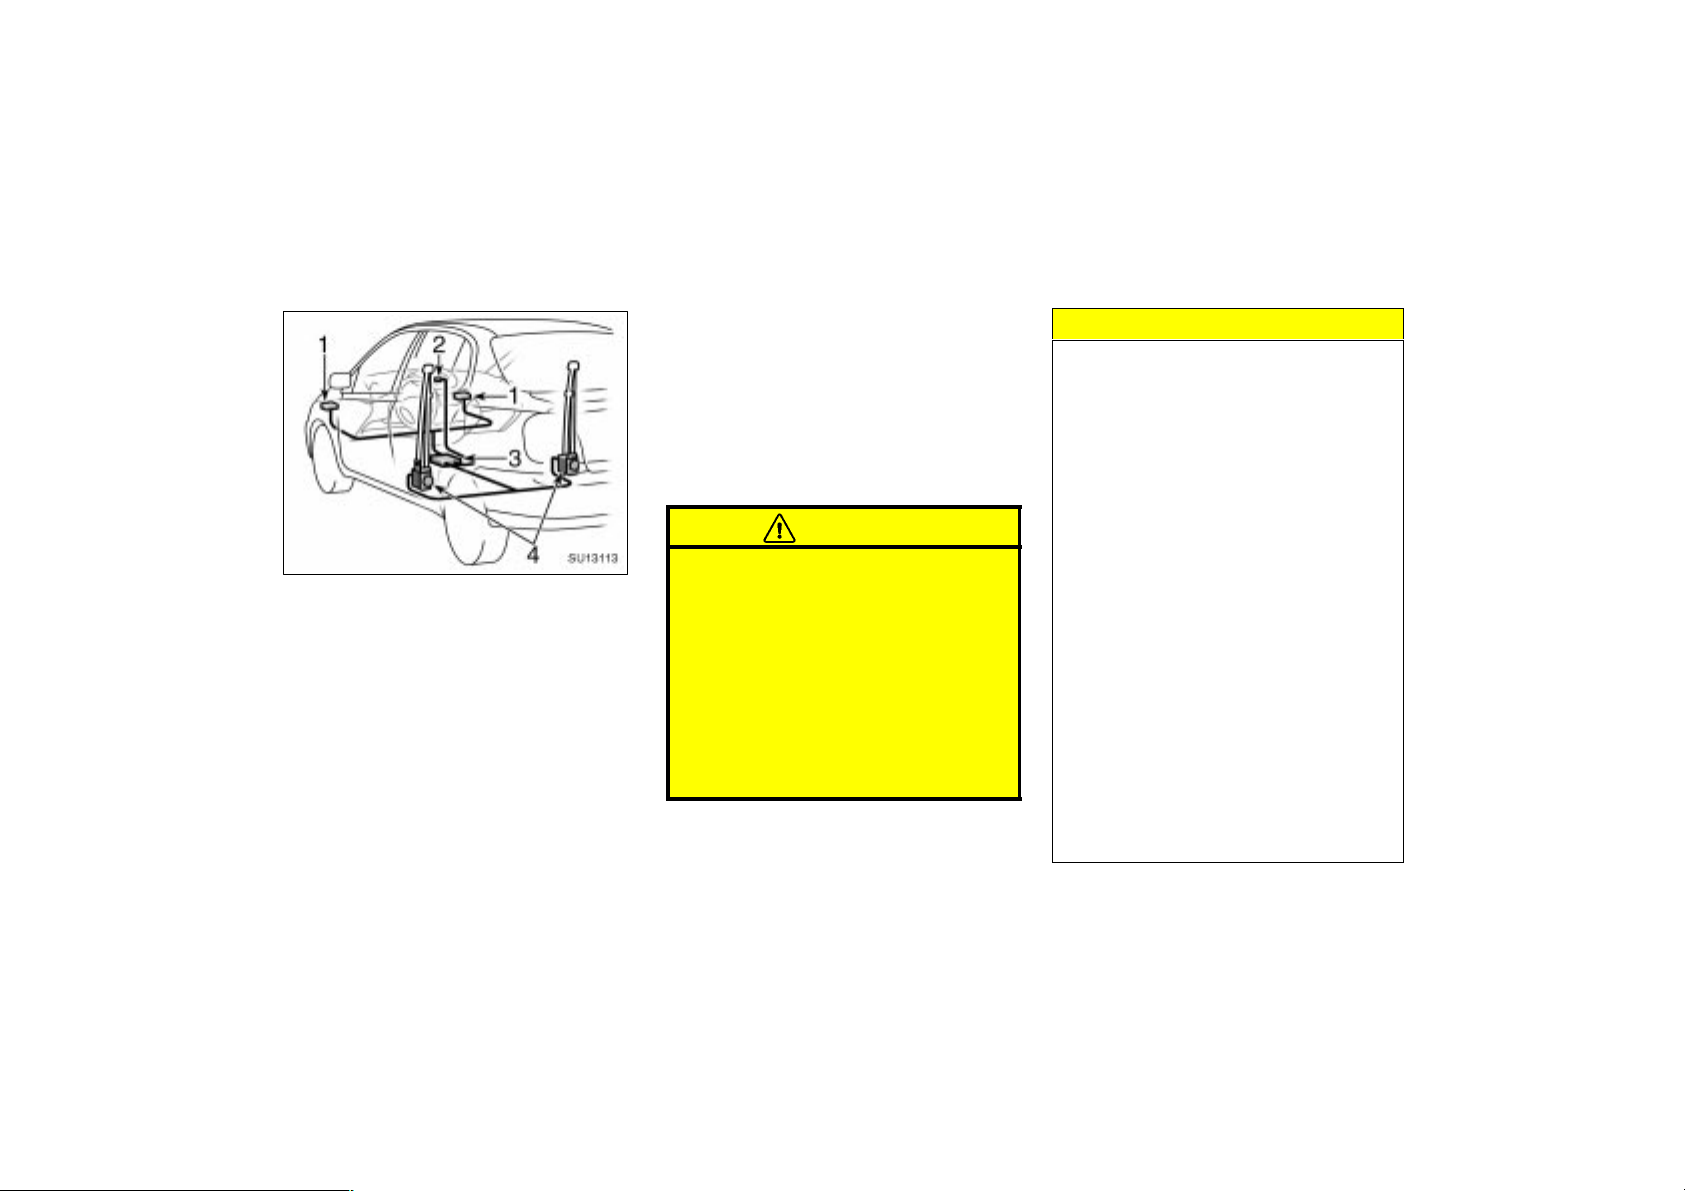
The front seat belt pretensioner system
mainly consists of the following components and their locations are shown in the
illustration.
1. Front airbag sensors
2. SRS warning light
3. Airbag sensor assembly
4. Front seat belt pretensioner assemblies
The front seat belt pretensioners are controlled by the airbag sensor assembly. The
airbag sensor assembly consists of a safing sensor and airbag sensor.
When the front seat belt pretensioners are
activated, an operating noise may be
heard and a small amount of smoke–like
gas may be released. This gas is harmless and does not indicate that a fire is
occurring.
Once the front seat belt pretensioners
have been activated, the seat belt retractors remain locked.
CAUTION
Do not modify, remove, strike or open
the front seat belt pretensioner assemblies, airbag sensor or surrounding area or wiring. Doing any of
these may cause sudden operation of
the front seat belt pretensioners or
disable the system, which could result in death or serious injury.
Failure to follow these instructions
can result in death or serious injuries.
NOTICE
Do not perform any of the following
changes without consulting your
Toyota dealer. Such changes can
interfere with proper operation of the
front seat belt pretensioners in some
cases.
Installation of electronic devices
such as a mobile two–way radio,
cassette tape player or compact
disc player
Repairs on or near the front seat
belt retractor assemblies
Modification of the suspension system
Modification of the front end structure
Attachment of a grille guard (bull
bar, kangaroo bar, etc.), snowplow,
winches or any other equipment to
the front end
Repairs made on or near the front
fenders, front end structure or console
2001 ECHO (OM52440U)
37
Page 38
2001MY ECHO (U) L/O0008
SRS driver and front
passenger airbags
SU13118
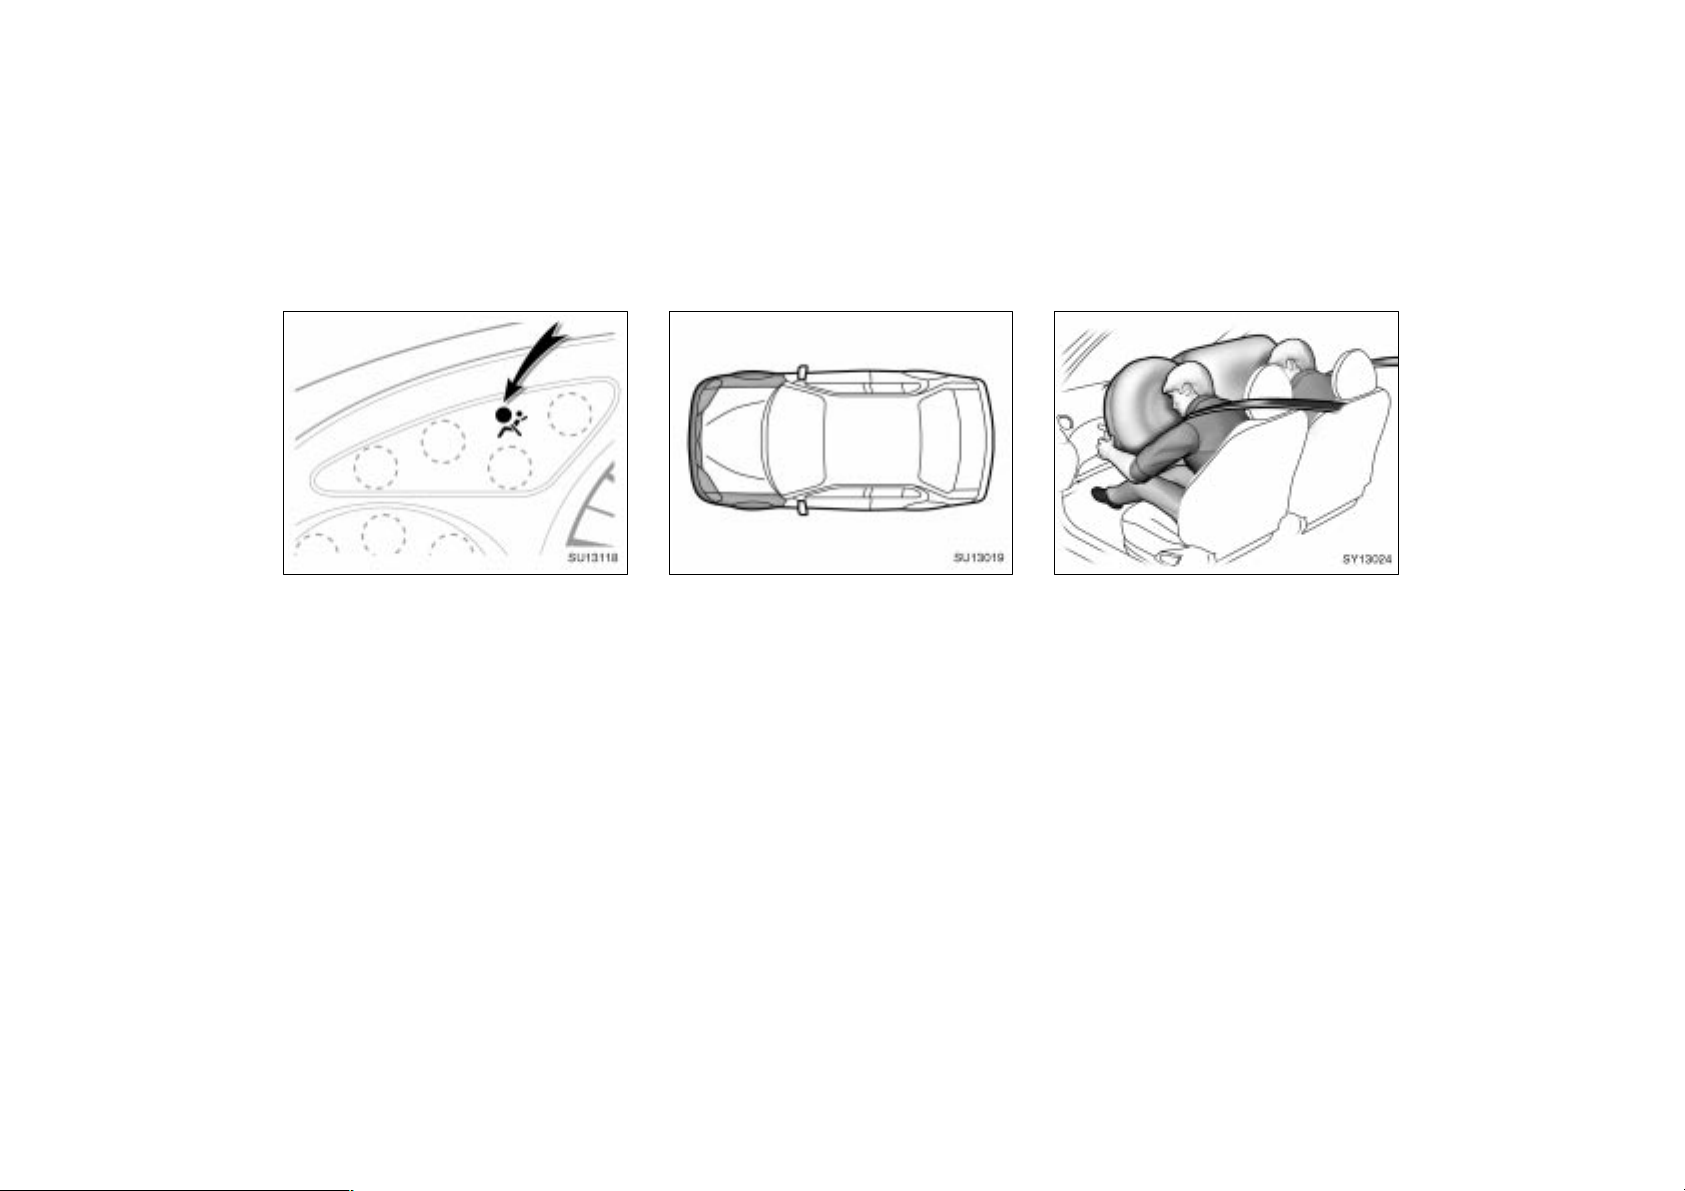
This front seat belt pretensioner system
has a service reminder indicator to inform
the driver of operating problems. If either
of the following conditions occurs, this
indicates a malfunction of the airbags or
pretensioners. Contact your Toyota dealer
as soon as possible to service the
vehicle.
The light does not come on when the
ignition key is turned to the “ON” position, or the light remains on.
The light comes on or flashes while
driving.
If either front seat belt does not retract
or can not be pulled out due to a
malfunction or activation of the relevant
front seat belt pretensioner.
38
SU13019
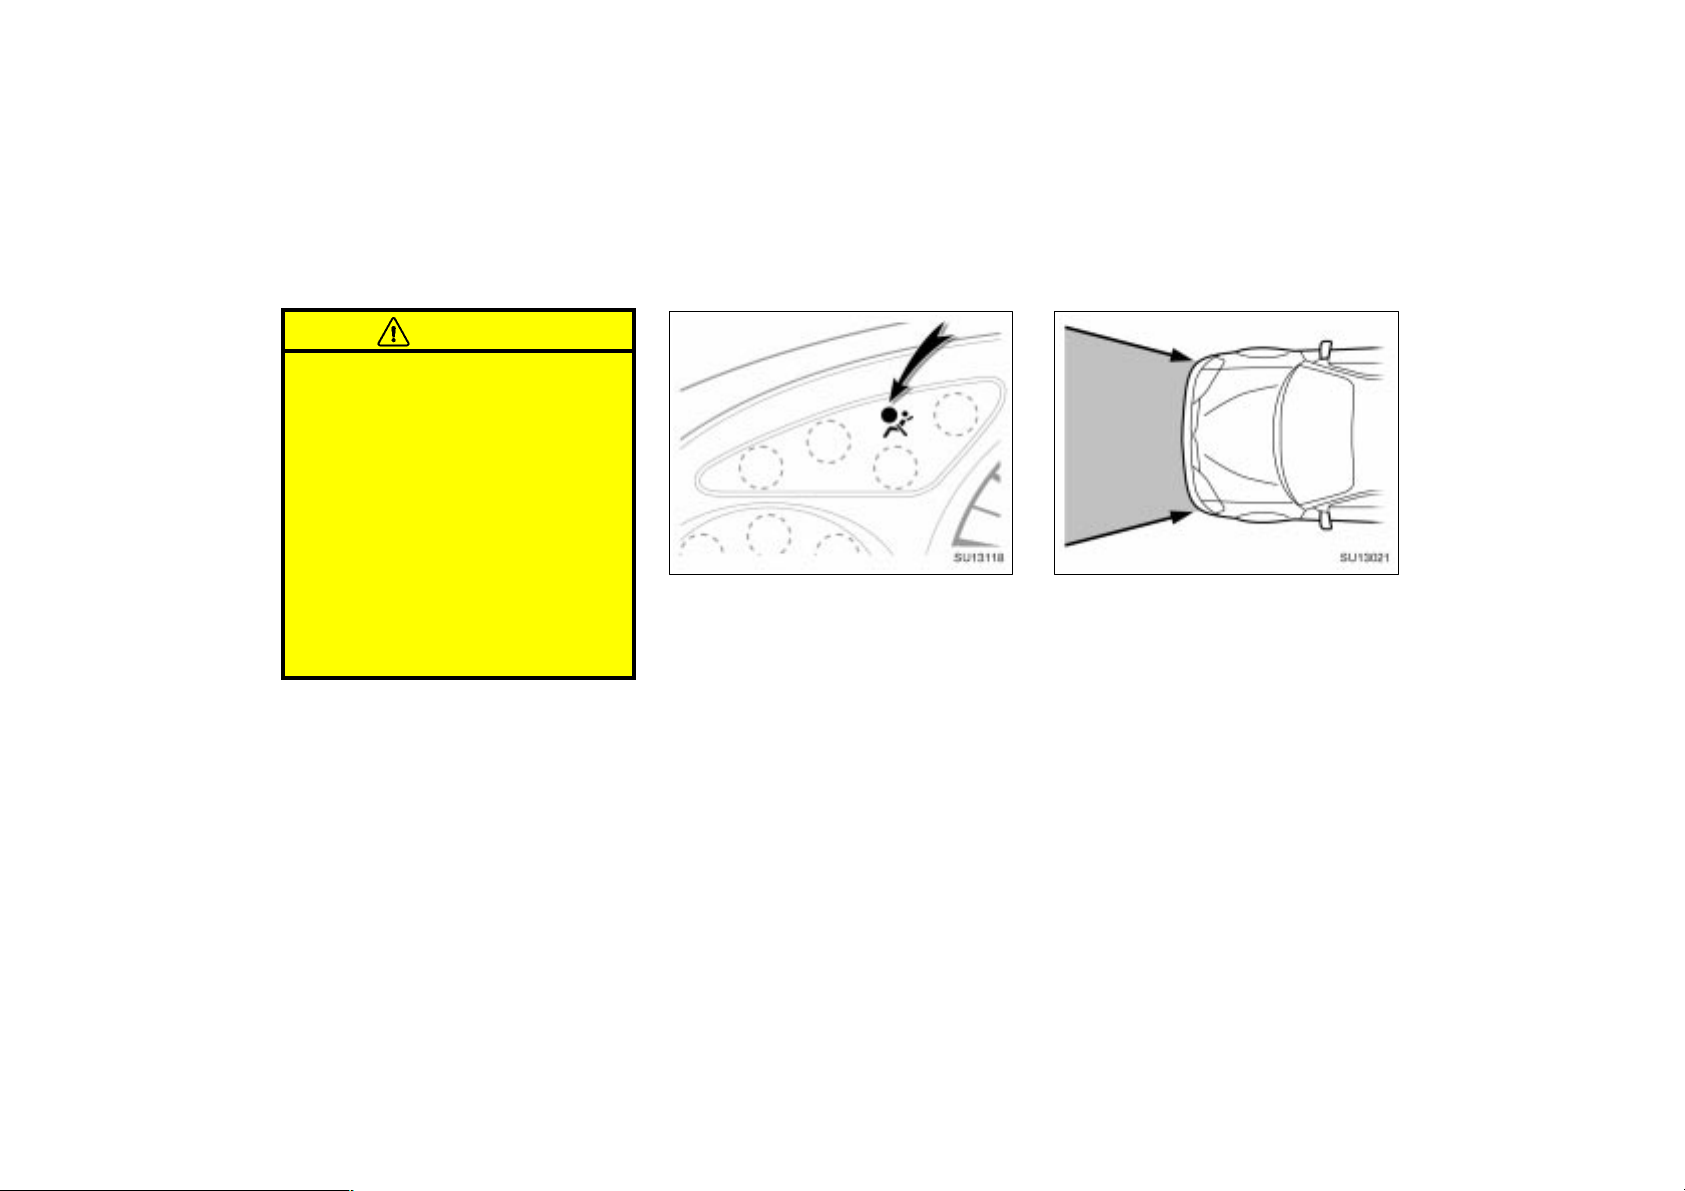
In the following cases, contact your Toyota
dealer as soon as possible:
The front part of the vehicle (shaded
in the illustration) was involved in an
accident that was not severe enough to
cause the front seat belt pretensioners
to operate.
Either front seat belt pretensioner as-
sembly or surrounding area is
scratched, cracked, or otherwise damaged.
2001 ECHO (OM52440U)
SY13024
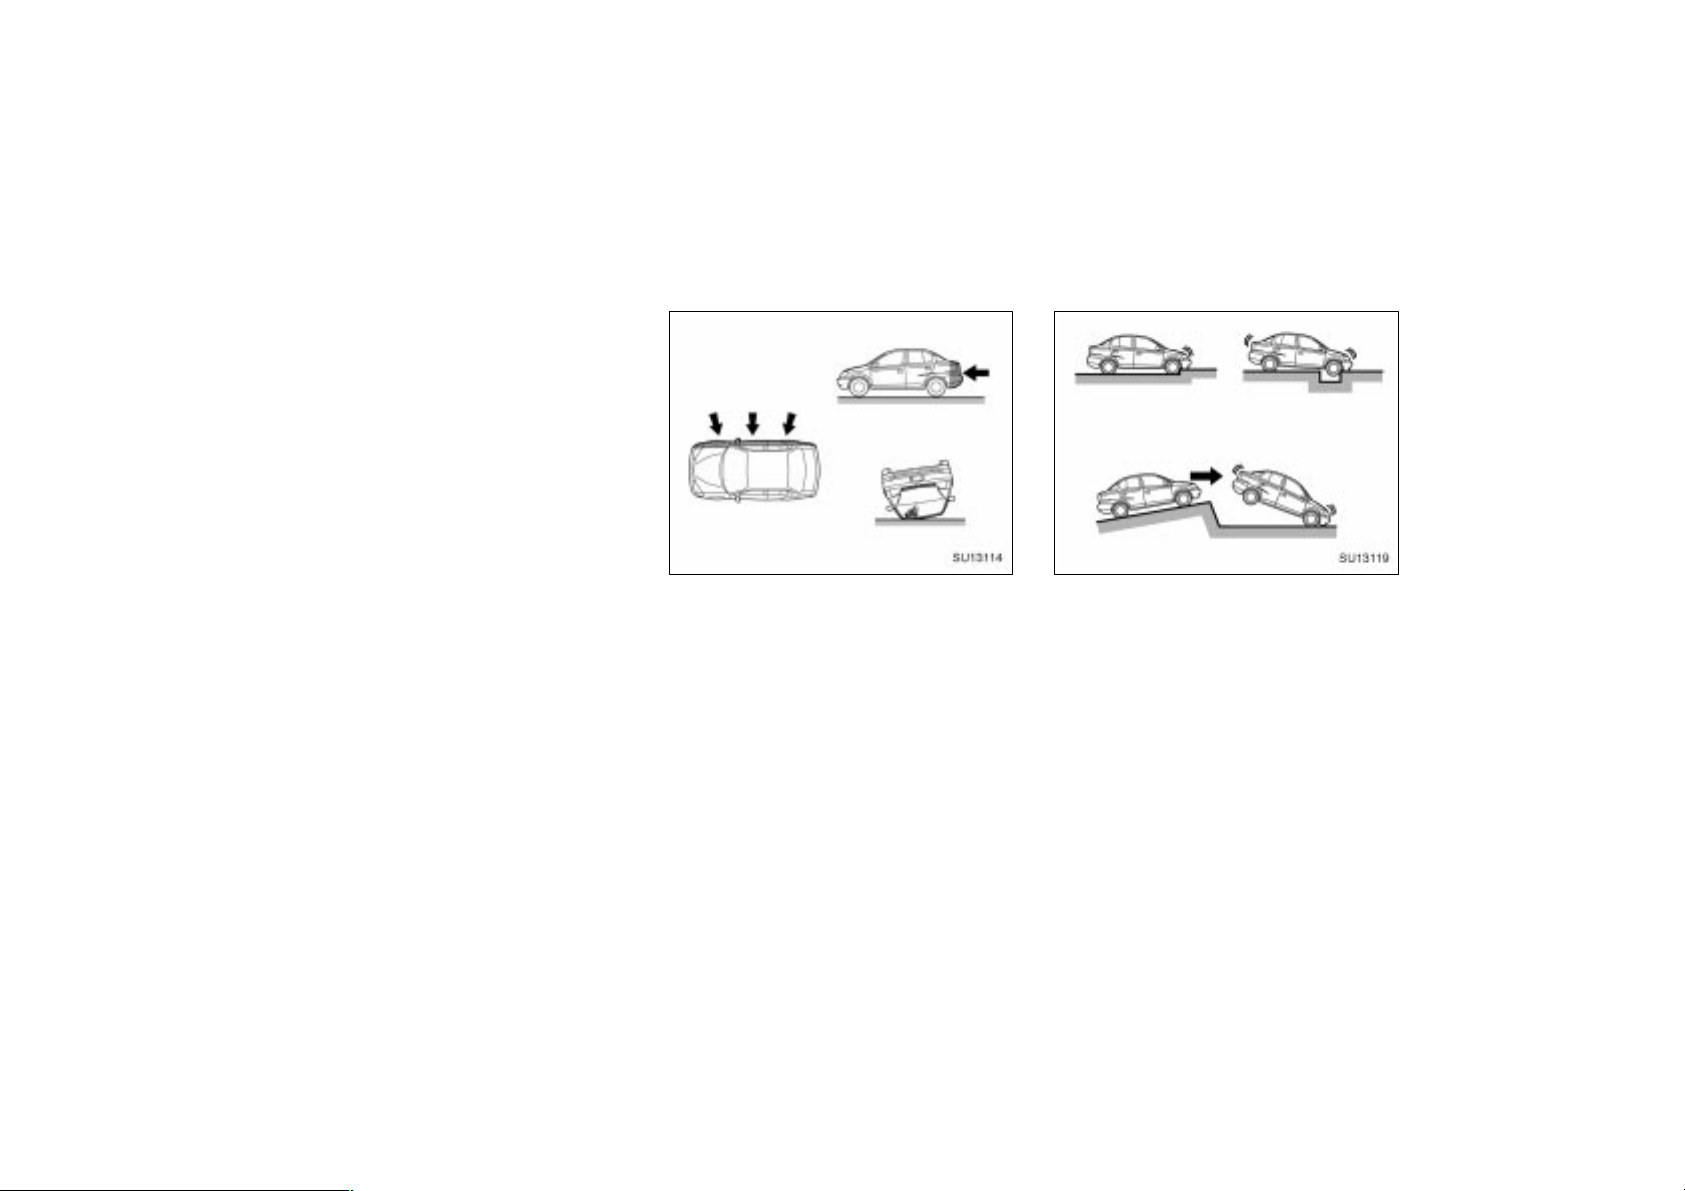
The SRS (Supplemental Restraint System) front airbags are designed to provide further protection for the driver
and front passenger in addition to the
primary safety protection provided by
the seat belts.
In response to a severe frontal impact,
the SRS front airbags work together with
the seat belts to help reduce injury by
inflating. The SRS front airbags help to
reduce injuries mainly to the driver’s or
front passenger’s head or chest caused by
directly hitting the steering wheel or dashboard. The front passenger airbag is activated even with no passenger in the front
seat.
Be sure to wear your seat belt properly.
Page 39
CAUTION
A driver or front passenger too close
to the steering wheel or dashboard
during airbag deployment can be
killed or seriously injured. Toyota
strongly recommends that:
The driver sit as far back as pos-
sible from the steering wheel while
still maintaining control of the vehicle.
The front passenger sit as far back
as possible from the dashboard.
All vehicle occupants be properly
restrained using the available seat
belts.
2001MY ECHO (U) L/O0008
SU13118
This indicator comes on when the ignition key is turned to the “ON” position.
It goes off after about 6 seconds. This
means the SRS front airbags are operating properly.
This warning light system monitors the
airbag sensor assembly, front airbag sensors, side airbag sensors, door side airbag sensors, front seat belt pretensioner
assemblies, inflators, warning light, interconnecting wiring and power sources. (For
details, see “Service reminder indicators
and warning buzzers” on page 80 in Section 1–5.)
SU13021
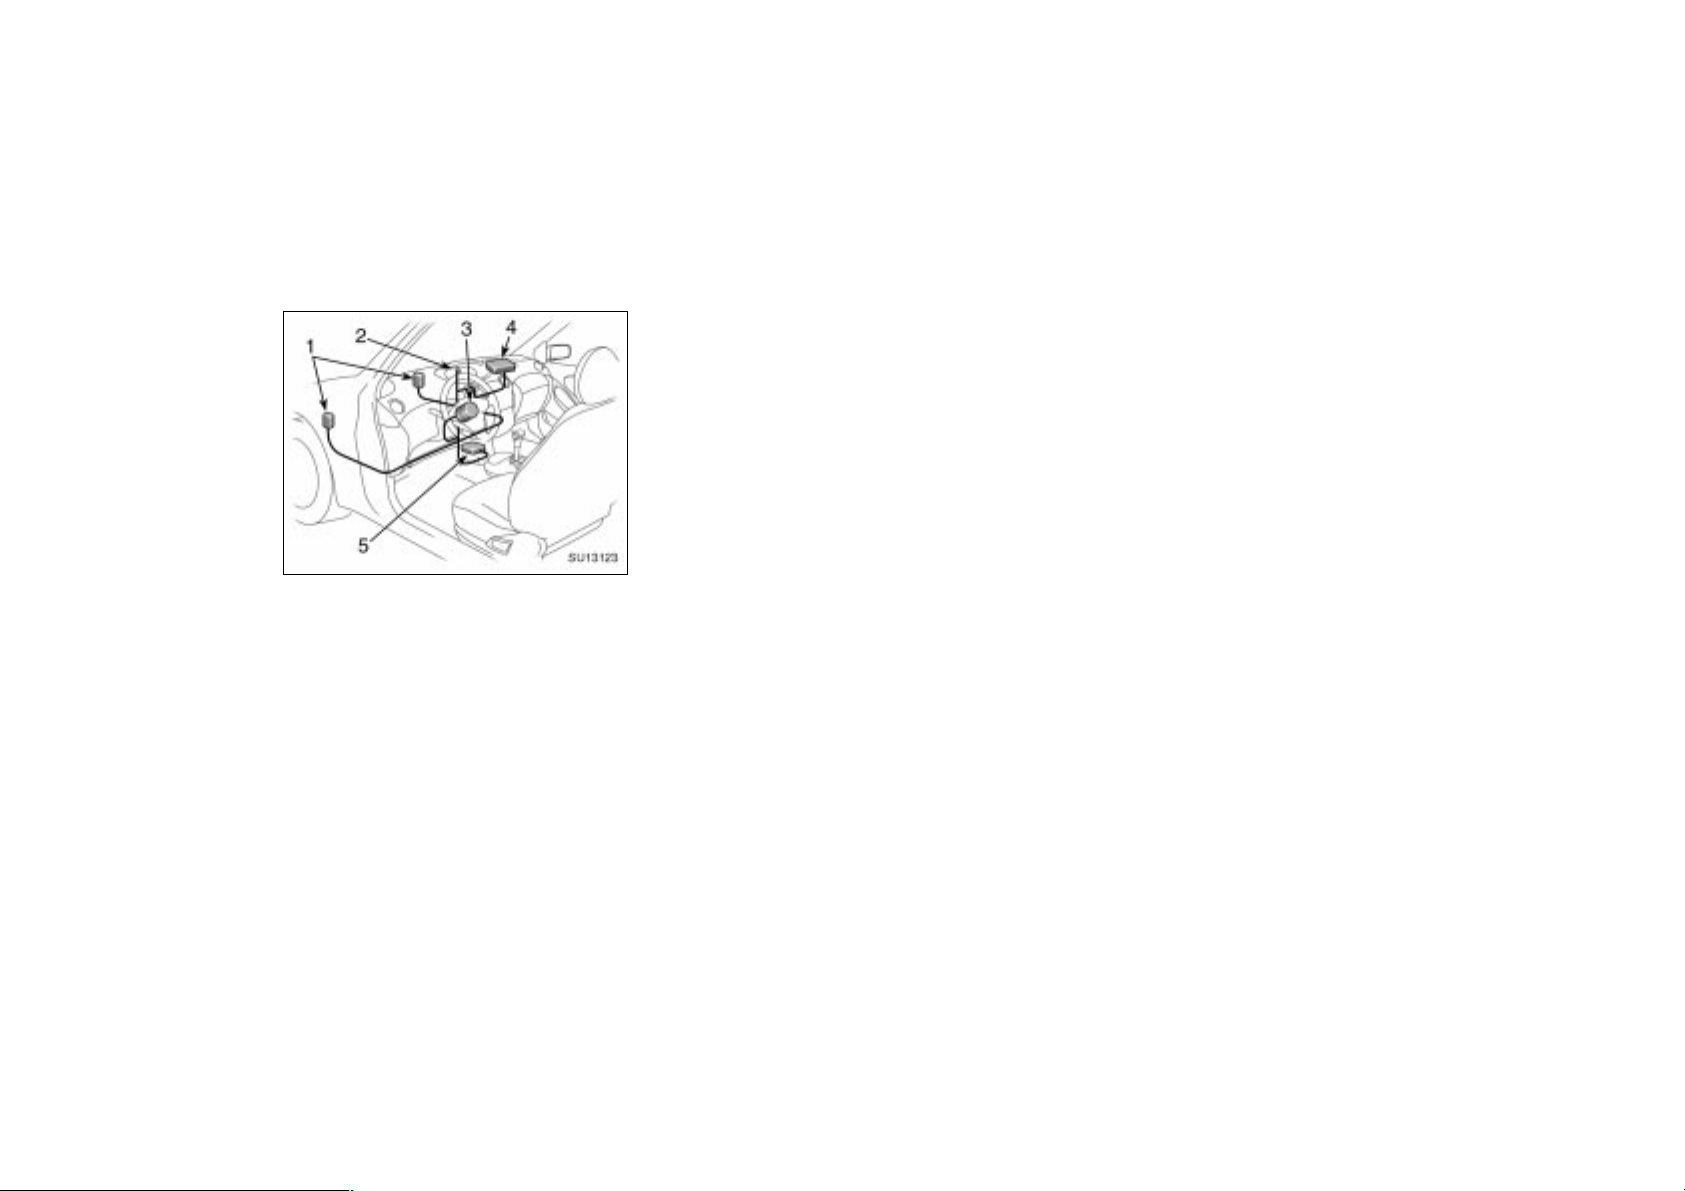
The SRS front airbag system is designed to activate in response to a severe frontal impact within the shaded
area between the arrows in the illustration.
The SRS front airbags will deploy if the
severity of the impact is above the designed threshold level, comparable to an
approximate 25 km/h (15 mph) collision in
the U.S.A. and 30 km/h (18 mph) collision
in Canada when impacting straight into a
fixed barrier that does not move or deform.
If the severity of the impact is below the
above threshold level, the SRS front airbags may not deploy.
2001 ECHO (OM52440U)
39
Page 40
However, this threshold velocity will be
considerably higher if the vehicle strikes
an object, such as a parked vehicle or
sign pole, which can move or deform on
impact, or if it is involved in an underride
collision (e.g. a collision in which the nose
of the vehicle “underrides”, or goes under,
the bed of a truck, etc.).
It is possible that in some collisions at the
lower zone of airbag sensor detection and
activation the SRS airbags and seat belt
pretensioners will not operate all together.
For the safety of all occupants, always
wear your seat belts properly.
2001MY ECHO (U) L/O0008
Collision from the rear
SU13114
Collision from the side
Vehicle rollover
The SRS front airbags are not designed
to inflate if the vehicle is involved in a
side or rear collision, if it rolls over, or
if it is involved in a low–speed frontal
collision.
Hitting a curb,
edge of pavement
or hard material
SU13119
Landing hard or vehicle falling
The SRS front airbags may deploy if a
serious impact occurs to the underside
of your vehicle. Some examples are
shown in the illustration.
Falling into or
jumping over a
deep hole
40
2001 ECHO (OM52440U)
Page 41
2001MY ECHO (U) L/O0008
SU13123
The SRS airbag system consists mainly of
the following components, and their locations are shown in the illustration.
1. Front airbag sensors
2. SRS warning light
3. Airbag module for driver (airbag and
inflator)
4. Airbag module for front passenger (airbag and inflator)
5. Airbag sensor assembly
The airbag sensor assembly consists of a
safing sensor and airbag sensor.
In a severe frontal impact, the sensors
detect deceleration and the system triggers the airbag inflators. Then a chemical
reaction in the inflators quickly fills the
airbags with non–toxic gas to help restrain
the forward motion of the occupants.
When the airbags inflate, they produce a
fairly loud noise and release some smoke
and residue along with non–toxic gas. This
does not indicate a fire. This gas is normally harmless; however, for those who
have delicate skin, it may cause a minor
skin irritation. Be sure to wash off any
residue as soon as possible to prevent
any potential skin irritation.
Deployment of the airbags happens in a
fraction of a second, so the airbags must
inflate with considerable force. While the
system is designed to reduce serious injuries, it may also cause minor burns or
abrasions and swelling.
Parts of the airbag module (steering wheel
hub, dashboard) may be hot for several
minutes, but the airbags themselves will
not be hot. The airbags are designed to
inflate only once.
A crash severe enough to inflate the airbags may break the windshield as the
vehicle buckles. In vehicles with a passenger airbag the windshield may also be
damaged by absorbing some of the force
of the inflating airbag.
2001 ECHO (OM52440U)
41
Page 42
2001MY ECHO (U) L/O0008
CAUTION
The SRS airbag system is designed
only as a supplement to the primary protection of the driver side and
front passenger side seat belt systems. The front seat occupants can
be killed or seriously injured by the
inflating airbags if they do not wear
the available seat belts properly.
During sudden braking just before
a collision, an unrestrained driver
or front passenger can move forward into direct contact with or
close proximity to the airbag which
may then deploy during the collision. To ensure maximum protection
in an accident, the driver and all
passengers in the vehicle must
wear their seat belts properly. Wearing a seat belt properly during an
accident reduces the chances of
death or serious injury or being
thrown out of the vehicle. For
instructions and precautions concerning the seat belt system, see
“Seat belts” in this section.
Improperly seated and/or restrained
infants and children can be killed
or seriously injured by the deploying front airbags. An infant or child
who is too small to use a seat belt
should be properly secured using a
child restraint system. Toyota
strongly recommends that all infants and children be placed in the
rear seat of the vehicle and properly restrained. The rear seat is the
safest for infants and children. For
instructions concerning the installation of a child restraint system, see
“Child restraint” in this section.
SU13120
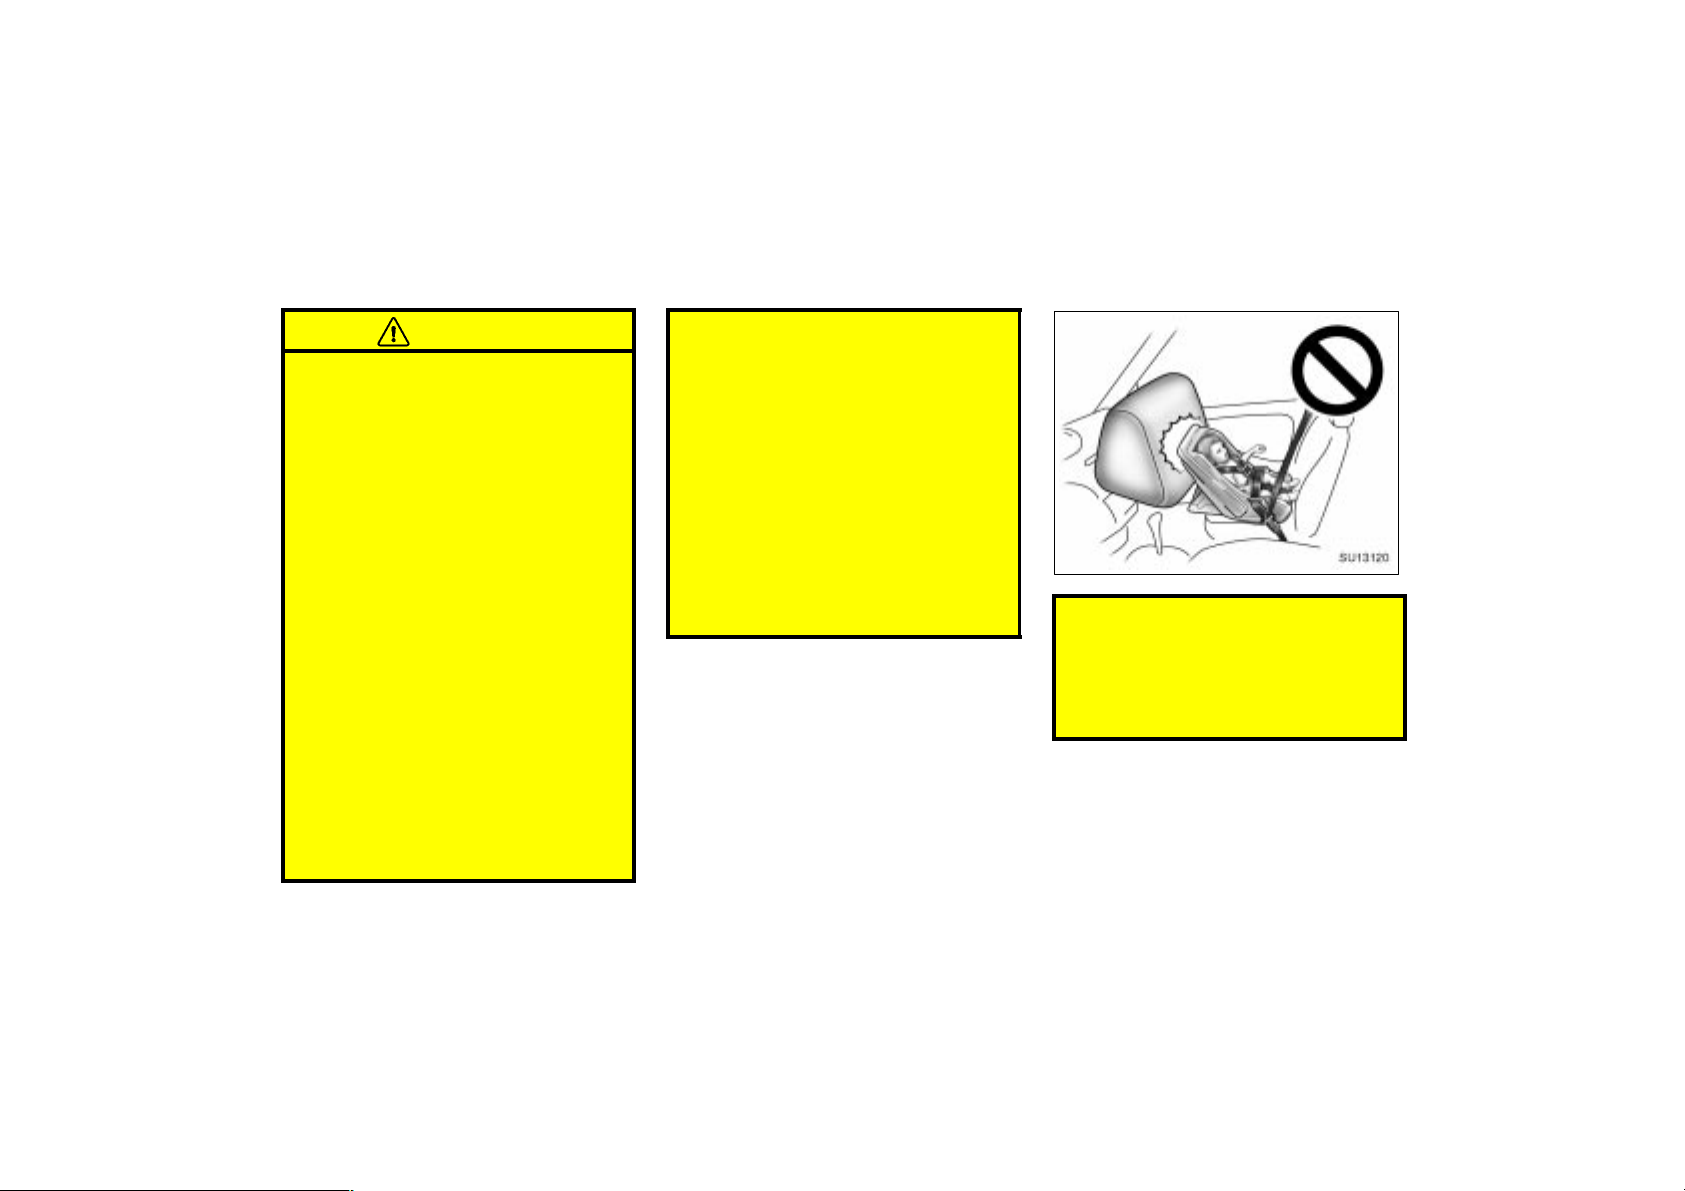
Never put a rear–facing child re-
straint system on the front passenger seat because the force of the
rapid inflation of the front passenger airbag can cause death or serious injury to the child.
42
2001 ECHO (OM52440U)
Page 43
SU13044
Move seat
fully back
2001MY ECHO (U) L/O0008
On vehicles with side airbags, do
not allow the child to lean against
the front door or around the front
door even if the child is seated in
the child restraint system. It is dangerous if the side airbag inflates,
and the impact could cause death
or serious injury to the child.
For instructions concerning the
installation of a child restraint system, see “Child restraint” in this
section.
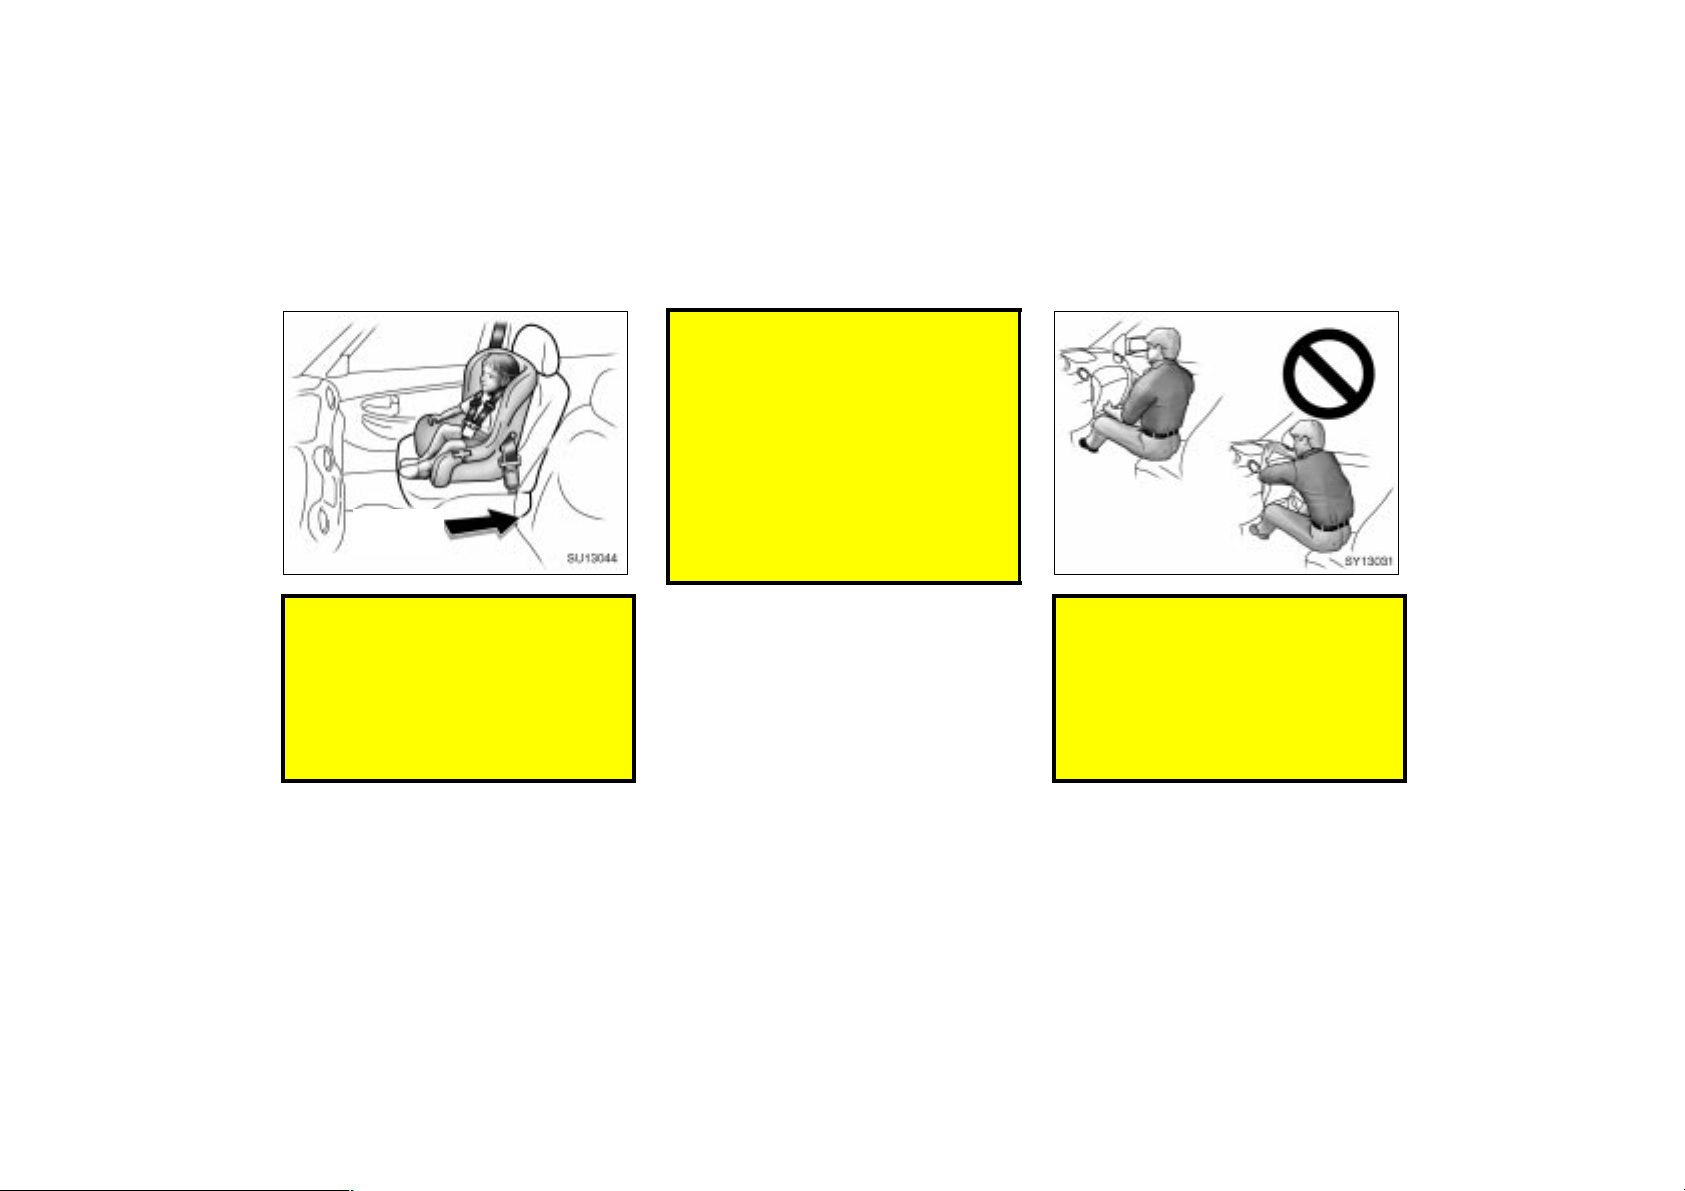
SY13031
A forward–facing child restraint sys-
tem should be allowed to be put on
the front passenger seat only when
it is unavoidable. Always move the
seat as far back as possible, because the force of the deploying
front passenger airbag could cause
death or serious injury to the child.
2001 ECHO (OM52440U)
Do not sit on the edge of the seat
or lean over the dashboard when
the vehicle is in use. The front airbags inflate with considerable
speed and force; you may be killed
or seriously injured. Sit up straight
and well back in the seat, and always use your seat belt properly.
43
Page 44
SY13032
2001MY ECHO (U) L/O0008
SY13033
Do not modify or remove any wir-
ing. Do not modify, remove, strike
or open any components such as
the steering wheel pad, steering
wheel, column cover or front passenger airbag cover, front passenger airbag or airbag sensor assembly. Doing any of these may cause
sudden SRS front airbag inflation or
disable the system, which could result in death or serious injury.
Failure to follow these instructions
can result in death or serious injury.
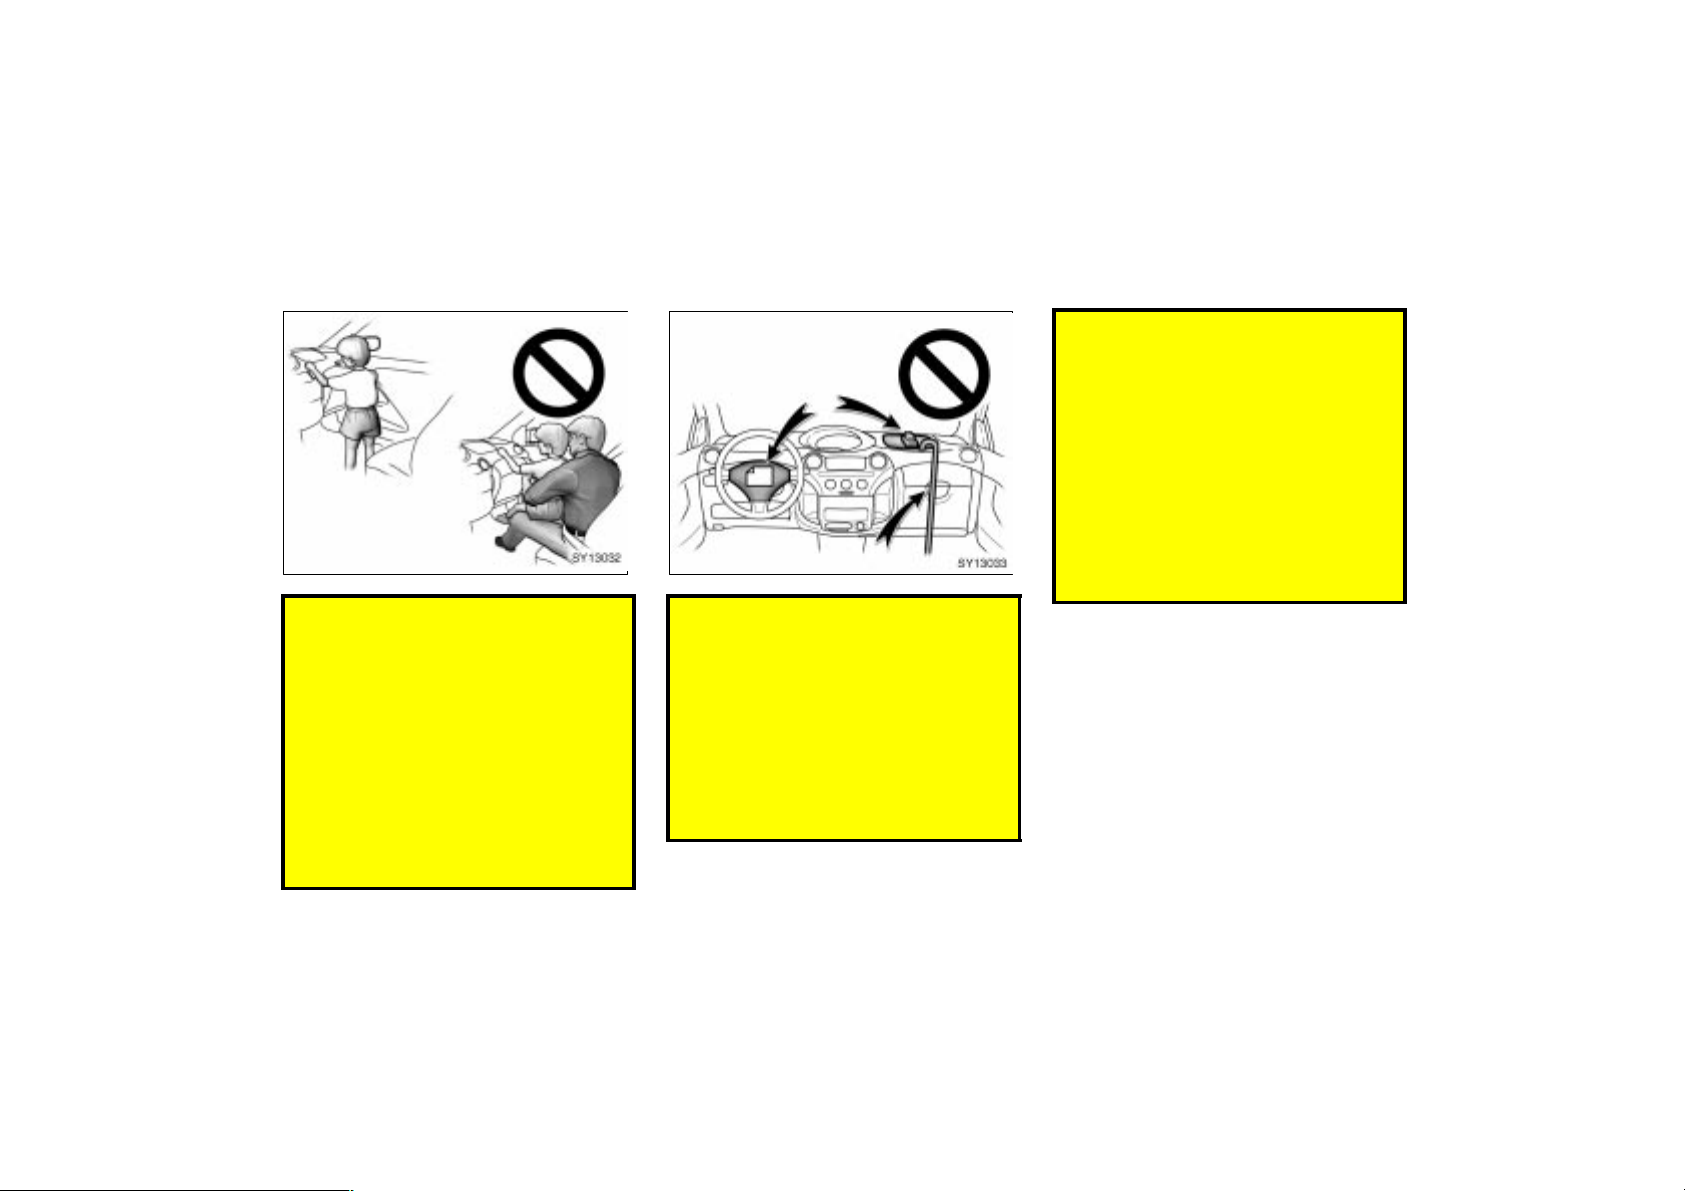
Do not allow a child to stand up,
or to kneel on the front passenger
seat. The front airbag inflates with
considerable speed and force; the
child may be killed or seriously injured.
Do not hold a child on your lap or
in your arms. Use a child restraint
system in the rear seat. For instructions concerning the installation of
a child restraint system, see “Child
restraint” on page 51 in this section.
44
Do not put objects or your pets on
or in front of the dashboard or
steering wheel pad that houses the
front airbag system. They might restrict inflation or cause death or
serious injury as they are projected
rearward by the force of deploying
airbags. Likewise, the driver and
front passenger should not hold
things in their arms or on their
knees.
2001 ECHO (OM52440U)
Page 45
NOTICE
Do not perform any of the following
changes without consulting your
Toyota dealer. Such changes can
interfere with proper operation of the
SRS front airbag system in some
cases.
Installation of electronic devices
such as a mobile two–way radio,
cassette tape player or compact
disc player
Modification of the suspension system
Modification of the front end structure
Attachment of a grille guard (bull
bar, kangaroo bar, etc.), snowplow,
winches or any other equipment to
the front end
Repairs made on or near the front
fenders, front end structure, console, steering column, steering
wheel or dashboard near the front
passenger airbag
2001MY ECHO (U) L/O0008
SU13118
This SRS front airbag system has a
service reminder indicator to inform the
driver of operating problems. If either of
the following conditions occurs, this
indicates a malfunction of the airbags.
Contact your Toyota dealer as soon as
possible to service the vehicle.
The light does not come on when the
ignition key is turned to the “ON” position, or the light remains on.
The light comes on or flashes while
driving.
SU13030
In the following cases, contact your Toyota
dealer as soon as possible:
The SRS front airbags have been in-
flated.
The front part of the vehicle (shaded
in the illustration) was involved in an
accident that was not severe enough to
cause the SRS front airbags to inflate.
The pad part of the steering wheel or
front passenger airbag cover (shaded
in the illustration) is scratched,
cracked, or otherwise damaged.
2001 ECHO (OM52440U)
45
Page 46
SRS side airbags
2001MY ECHO (U) L/O0008
NOTICE
Do not disconnect the battery cables
before contacting your Toyota dealer.
SU13134
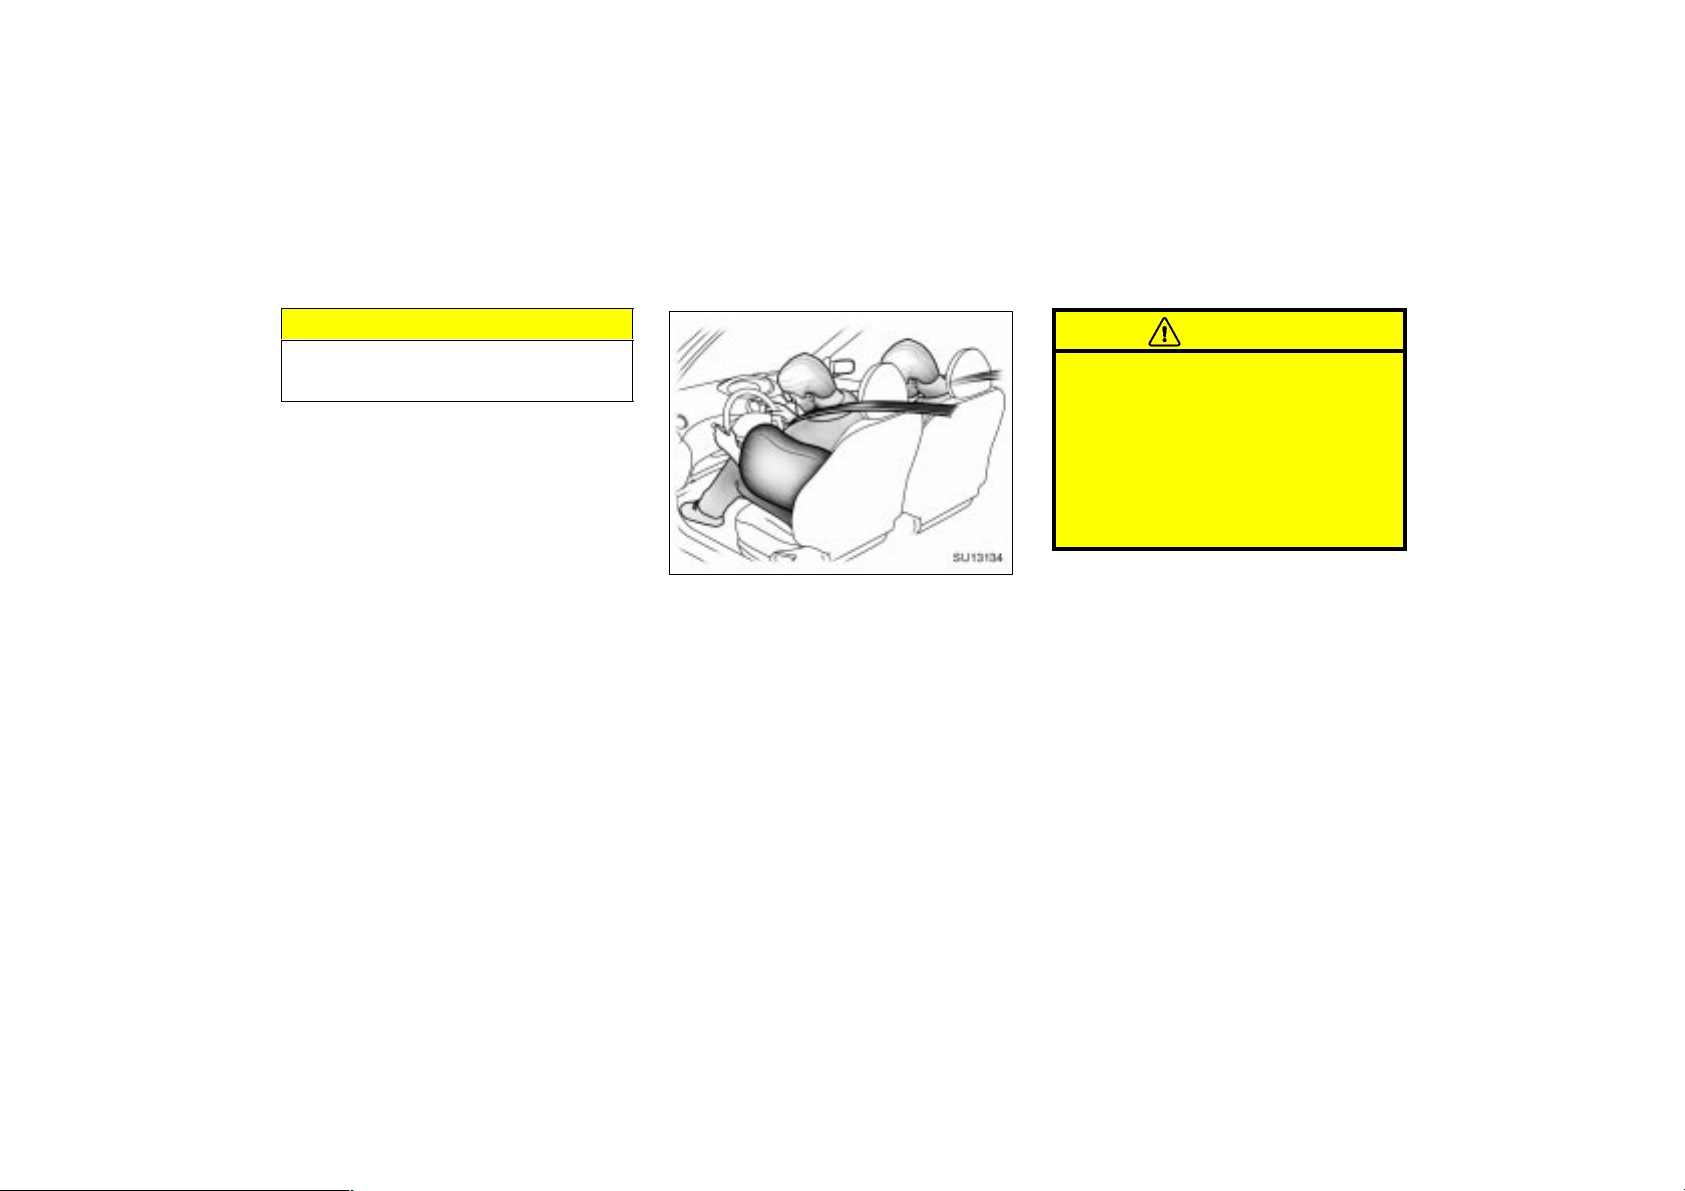
The SRS (Supplemental Restraint System) side airbags are designed to provide further protection for the driver
and front passenger in addition to the
primary safety protection provided by
the seat belts.
In response to a severe side impact, the
SRS side airbags work together with the
seat belts to help reduce injury by inflating. The SRS side airbags help to reduce
injuries mainly to the driver’s or front passenger’s chest. The SRS side airbag on
the passenger seat is activated even with
no passenger in the front seat.
Be sure to wear your seat belt properly.
CAUTION
SRS side airbags inflate with considerable force. To avoid potential death
or serious injury when they inflate,
the driver and front passenger must:
Wear their seat belts properly.
Remain properly seated with their
back upright and against the seat at
all times.
46
2001 ECHO (OM52440U)
Page 47
SU13118
2001MY ECHO (U) L/O0008
SU13125
Collision from the rear
SU13126
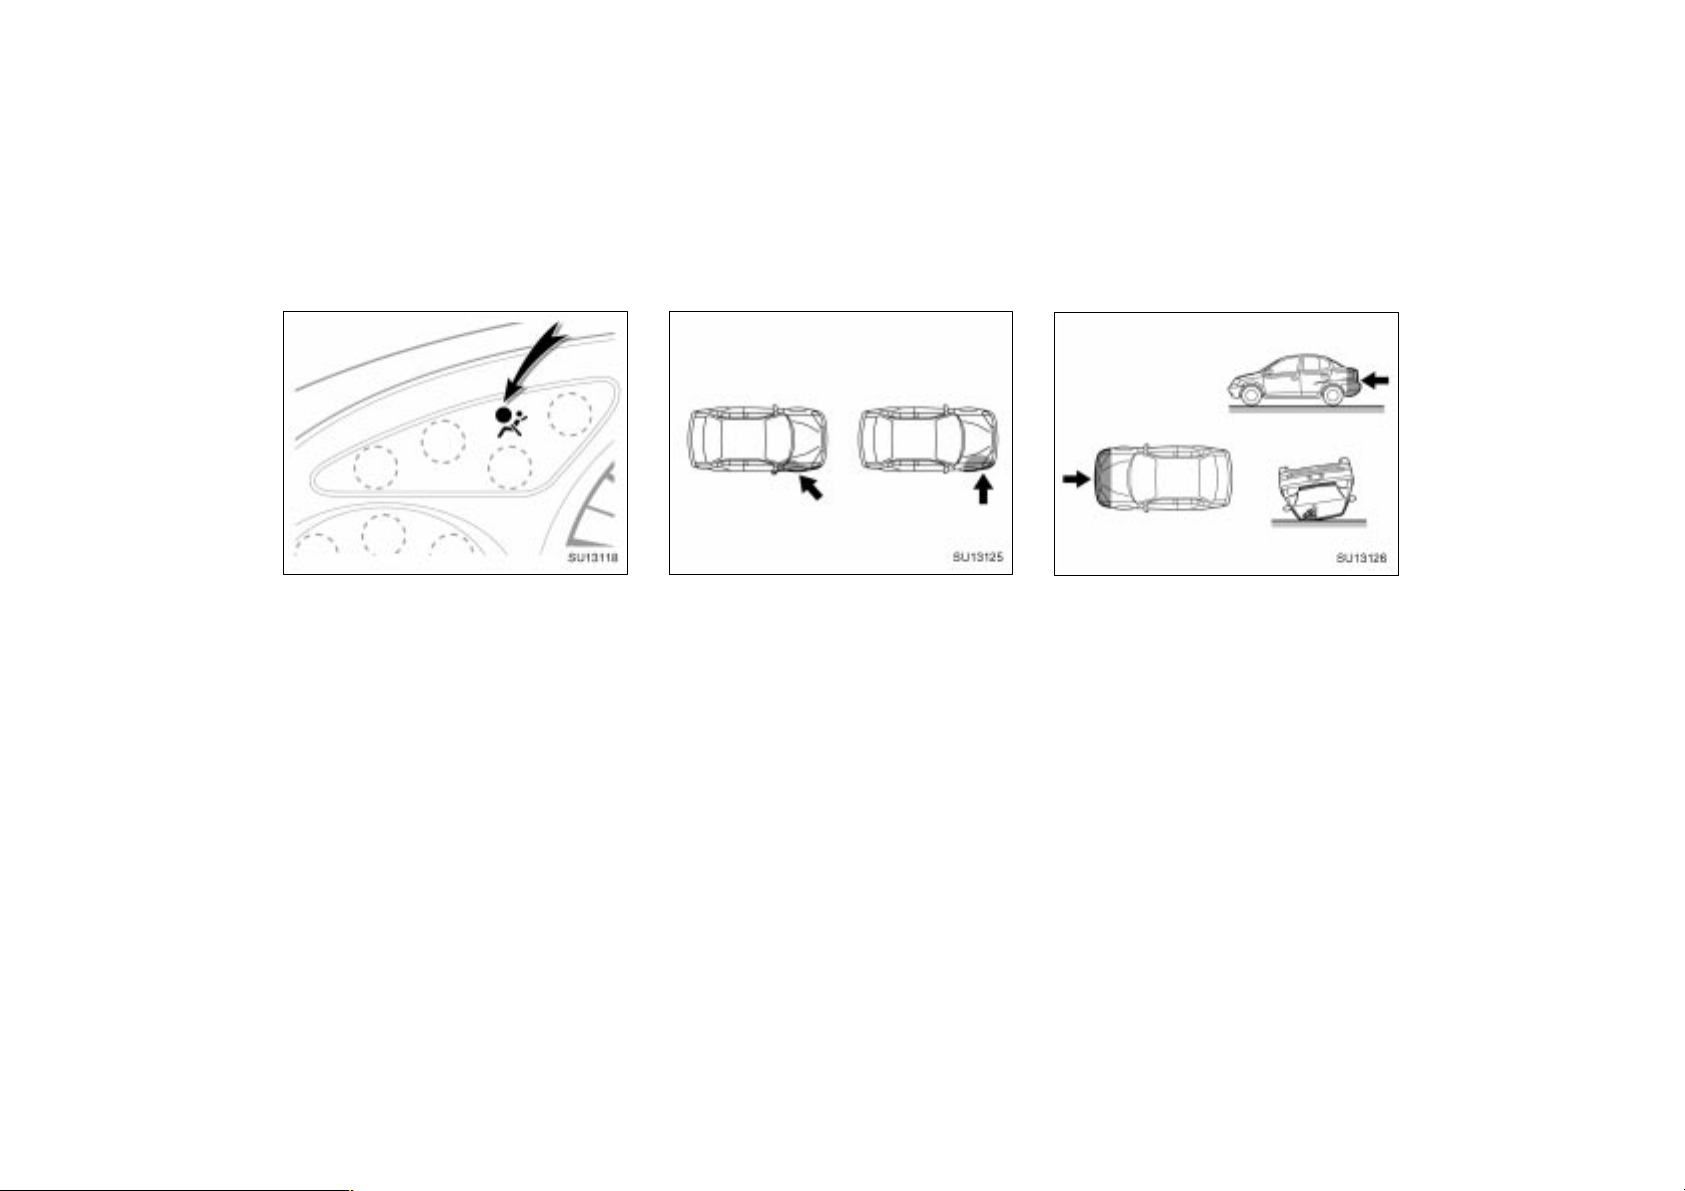
This indicator comes on when the ignition key is turned to the “ON” position.
It goes off after about 6 seconds. This
means the SRS side airbags are operating properly.
This warning light system monitors the
airbag sensor assembly, front airbag sensors, side airbag sensors, door side airbag sensors, front seat belt pretensioner
assemblies, inflators, warning light, interconnecting wiring and power sources. (For
details, see “Service reminder indicators
and warning buzzers” on page 80 in Section 1–5.)
The SRS side airbag system may not
activate if the vehicle is subjected to a
collision from the side at certain
angles, or a collision to the side of the
vehicle body other than the passenger
compartment as shown in the illustration.
The SRS side airbags are designed to
inflate when the passenger compartment
area suffers a severe impact from the
side.
For the safety of all occupants, always
wear your seat belts properly.
2001 ECHO (OM52440U)
Collision from the front
Vehicle rollover
The SRS side airbags are not designed
to inflate if the vehicle is involved in a
front or rear collision, if it rolls over,
or if it is involved in a low–speed side
collision.
47
Page 48
2001MY ECHO (U) L/O0008
SP13007
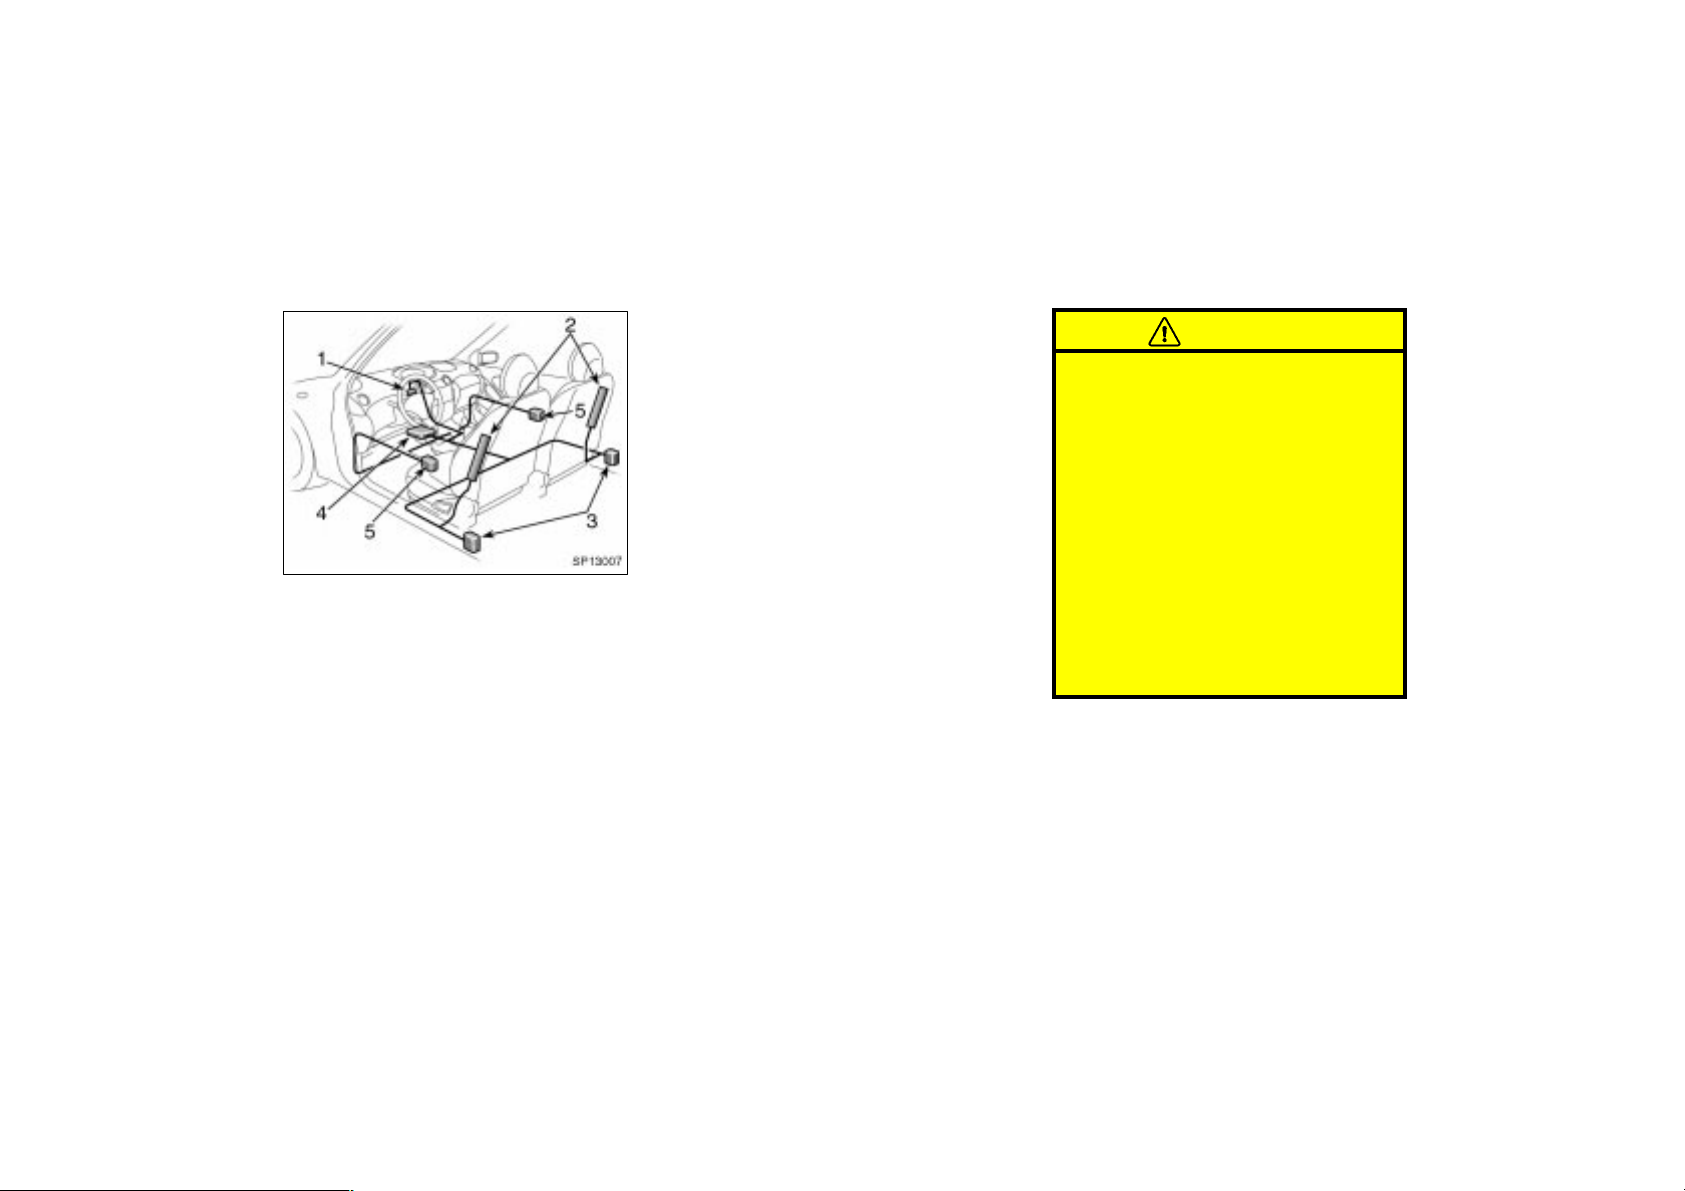
The SRS side airbag system consists
mainly of the following components, and
their locations are shown in the illustration.
1. SRS warning light
2. Side airbag modules
(airbag and inflator)
3. Side airbag sensors
4. Airbag sensor assembly
5. Door side airbag sensor (only for
2–door models)
The SRS side airbag system is controlled
by the airbag sensor assembly. The side
airbag sensors consist of a safing sensor
and airbag sensor.
In a severe side impact, the side airbag
sensor triggers the side airbag inflators.
Then a chemical reaction in the inflators
quickly fills the airbags with non–toxic gas
to help restrain the lateral motion of the
occupants.
When the airbags inflate, they produce a
fairly loud noise and release some smoke
and residue along with non–toxic gas. This
does not indicate a fire. This gas is normally harmless; however, for those who
have delicate skin, it may cause a minor
skin irritation. Be sure to wash off any
residue as soon as possible to prevent
any potential skin irritation.
Deployment of the airbags happens in a
fraction of a second, so the airbags must
inflate with considerable force. While the
system is designed to reduce serious injuries, it may also cause minor burns or
abrasions and swelling.
Front seats may be hot for several minutes, but the airbags themselves will not
be hot. The airbags are designed to inflate
only once.
CAUTION
The SRS side airbag system is de-
signed only as a supplement to the
primary protection of the driver
side and front passenger side seat
belt systems. To ensure maximum
protection in an accident, the driver
and all passengers in the vehicle
must wear their seat belts properly.
Wearing a seat belt properly during
an accident reduces the chances of
death or serious injury or being
thrown out of the vehicle. For
instructions and precautions concerning the seat belt system, see
“Seat belts—” on page 30 in this
section.
48
2001 ECHO (OM52440U)
Page 49
Improperly seated and/or restrained
infants and children can be killed
or seriously injured by the deploying airbags. An infant or child who
is too small to use a seat belt
should be properly secured using a
child restraint system. Toyota
strongly recommends that all infants and children be placed in the
rear seat of the vehicle and properly restrained. The rear seat is the
safest for infants and children. For
instructions concerning the installation of a child restraint system, see
“Child restraint—” on page 51 in
this section.
Do not allow a child to lean his/her
head or any part of his/her body
against the front door or the area
of the seat from which the side airbag deploys even if he/she is
seated in the child restraint system.
It is dangerous if the side airbag
inflates, and the impact could cause
death or serious injury to the child.
For instructors concerning the
installation of a child restraint system, see “Child restraint” in this
section.
2001MY ECHO (U) L/O0008
SP13008
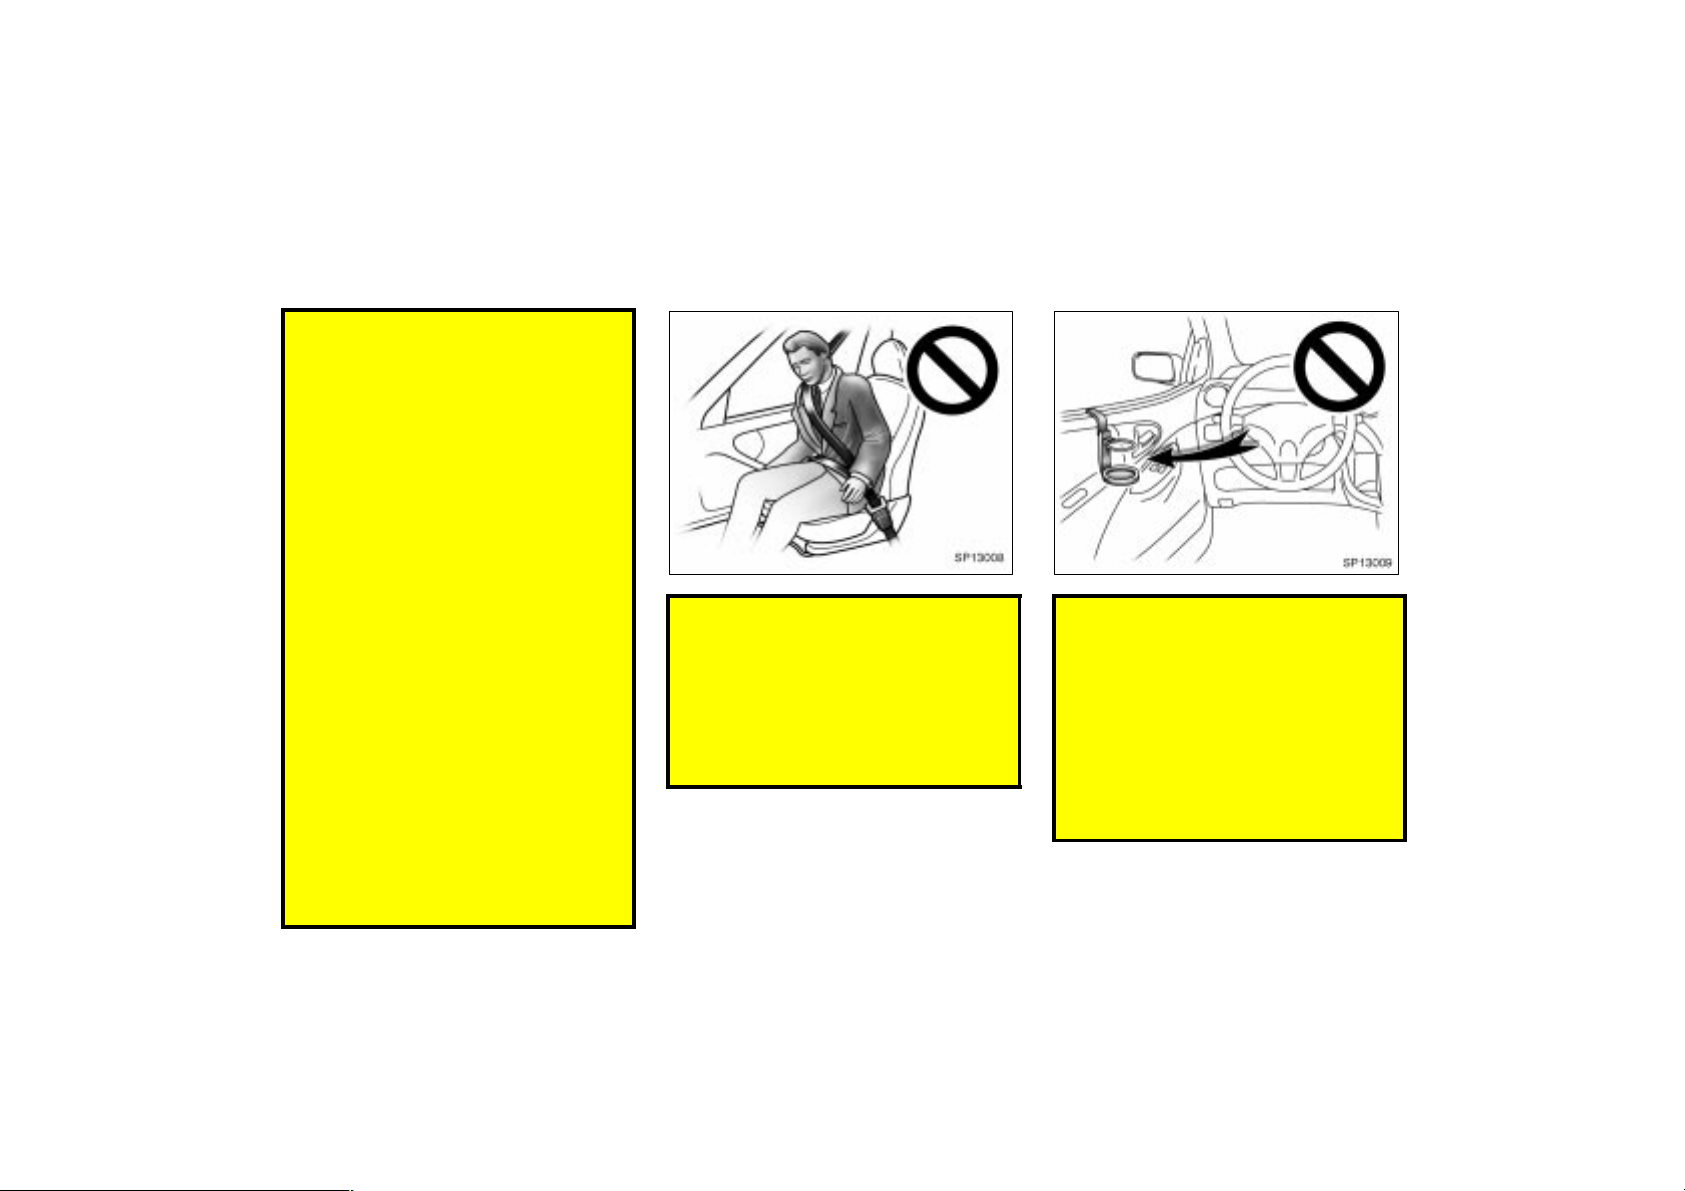
Do not lean against the front door
when the vehicle is in use. The side
airbag inflates with considerable
speed and force; you may be killed
or seriously injured.
Do not apply excessive weight to
the outer side of the front seats on
vehicles with side airbags.
SP13009
Do not attach a cup holder or any
other device or object on or around
the door. When the side airbag inflates, the cup holder or any other
device or object will be thrown with
great force or the side airbag may
not activate correctly, resulting in
death or serious injury. Likewise,
the driver and front passenger
should not hold things in their
arms or on their knees.
2001 ECHO (OM52440U)
49
Page 50
2001MY ECHO (U) L/O0008
Do not use accessories for the
seats which cover the parts where
the side airbags inflate. Such accessories may prevent the side airbags
from activating correctly, causing
death or serious injury.
Do not modify or replace the seats
or upholstery of the front seats
with the side airbags. Such changes
may disable the system or cause
the side airbags to inflate accidentally resulting in death or serious
injury. Consult your Toyota dealer if
you insist on modifications of this
kind.
Failure to follow these instructions
can result in death or serious injury.
NOTICE
Do not perform any of the following
changes without consulting your
Toyota dealer. Such changes can
interfere with proper operation of the
SRS side airbag system in some
cases.
Installation of electronic devices
such as a mobile two–way radio,
cassette tape player or compact
disc player
Modification of the suspension system
Modification of the side structure of
the passenger compartment
Repairs made on or near the console or front seat
SU13118
This SRS side airbag system has a
service reminder indicator to inform the
driver of operating problems. If either of
the following conditions occurs, this
indicates a malfunction of the airbags.
Contact your Toyota dealer as soon as
possible to service the vehicle.
The light does not come on when the
ignition key is turned to the “ON” position, or the light remains on.
The light comes on or flashes while
driving.
50
2001 ECHO (OM52440U)
Page 51
SU13128
2001MY ECHO (U) L/O0008
NOTICE
Do not disconnect the battery cables
before contacting your Toyota dealer.
Child restraint—
—Child restraint precautions
Toyota strongly urges the use of child
restraint systems for children small
enough to use them.
The laws of all fifty states in the U.S.A.
and Canada now require the use of a
child restraint system.
Your vehicle conforms to SAE J1819.
If a child is too large for a child restraint
system, the child should sit in the rear
seat and must be restrained using the
vehicle’s seat belt. See “Seat belts” for
details.
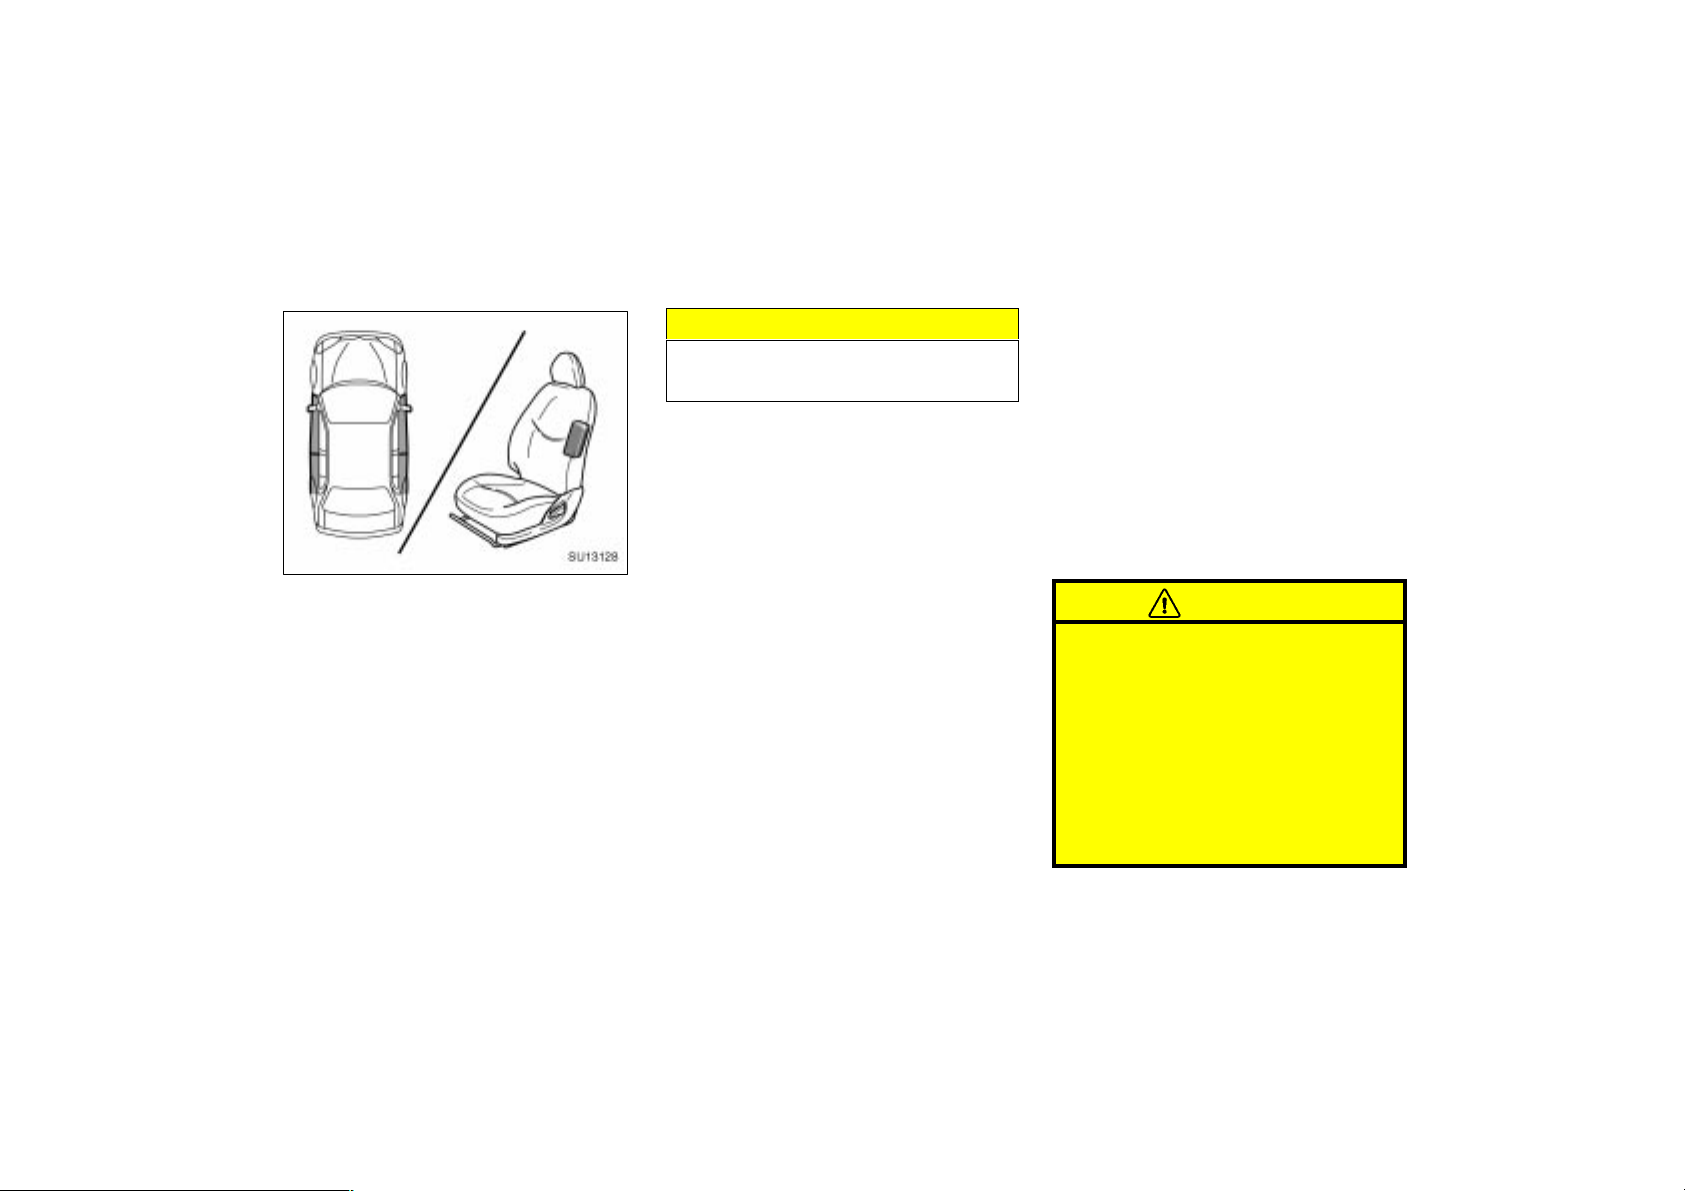
In the following cases, contact your Toyota
dealer as soon as possible:
The SRS side airbags have been in-
flated.
The portion of the doors (shaded in the
illustration) were involved in an accident that did not severe enough to
cause the SRS side airbags to inflate.
The surface of the seats with the side
airbag (shaded in the illustration) is
scratched, cracked, or otherwise damaged.
2001 ECHO (OM52440U)
CAUTION
For effective protection in automo-
bile accidents and sudden stops,
child must be properly restrained
using a seat belt or child restraint
system depending on the age and
size of the child. Holding a child in
your arms is not a substitute for a
child restraint system. In an accident, the child can be crushed
against the windshield, or between
you and the vehicle’s interior.
51
Page 52
Toyota strongly urges use of a
proper child restraint system which
conforms to the size of the child,
and is put on the rear seat. According to accident statistics, the child
is safer when properly restrained in
the rear seat than in the front seat.
Never put a rear–facing child re-
straint system on the front seat. In
the event of an accident, the force
of the rapid inflation of the airbag
can cause death or serious injury if
a rear–facing child restraint system
is put on the front seat.
Unless it is unavoidable, do not put
a forward–facing child restraint system on the front seat.
2001MY ECHO (U) L/O0008
A forward–facing child restraint sys-
tem should be allowed to be put on
the front seat only when it is unavoidable. Always move the seat as
far back as possible, because the
force of the deploying airbag could
cause death or serious injury to the
child.
On vehicles with side airbags, do
not allow the child to lean against
the front door or around the front
door even if the child is seated in
the child restraint system. It is dangerous if the side airbag inflates,
and the impact could cause death
or serious injury to the child.
Make sure that you have complied
with all installation instructions provided by the child restraint
manufacturer and that the system is
properly secured.
—Child restraint system
A child restraint system for a small
child or baby must itself be properly
restrained on the seat with the lap portion of the lap/shoulder belt. You must
carefully consult the manufacturer’s
instructions which accompany your
child restraint system.
To provide proper restraint, use a child
restraint system following the manufacturer’s instructions about the appropriate age
and size of the child for the child restraint
system.
Install the child restraint system correctly
following the instructions provided by its
manufacturer. General directions are also
provided under the following illustrations.
The child restraint system should be
installed on the rear seat. According to
accident statistics, the child is safer when
properly restrained in the rear seat than
in the front seat.
52
2001 ECHO (OM52440U)
Page 53
CAUTION
Never put a rear–facing child re-
straint system on the front seat. In
the event of an accident, the force
of the rapid inflation of the airbag
can cause death or serious injury if
a rear–facing child restraint system
is put on the front seat.
Unless it is unavoidable, do not put
a child restraint system on the
front seat.
A forward–facing child restraint sys-
tem should be allowed to be put on
the front seat only when it is unavoidable. Always move the seat as
far back as possible, because the
force of the deploying airbag could
cause death or serious injury to the
child.
After installing the child restraint
system, make sure it is secured in
place following the manufacturer’s
instructions. If it is not restrained
securely, it may cause death or serious injury to the child in the
event of a sudden stop or accident.
2001MY ECHO (U) L/O0008
When not using the child restraint system,
keep it secured with the seat belt or place
it in the trunk or somewhere other than
the passenger compartment. This will prevent it from injuring passengers in the
event of a sudden stop or accident.
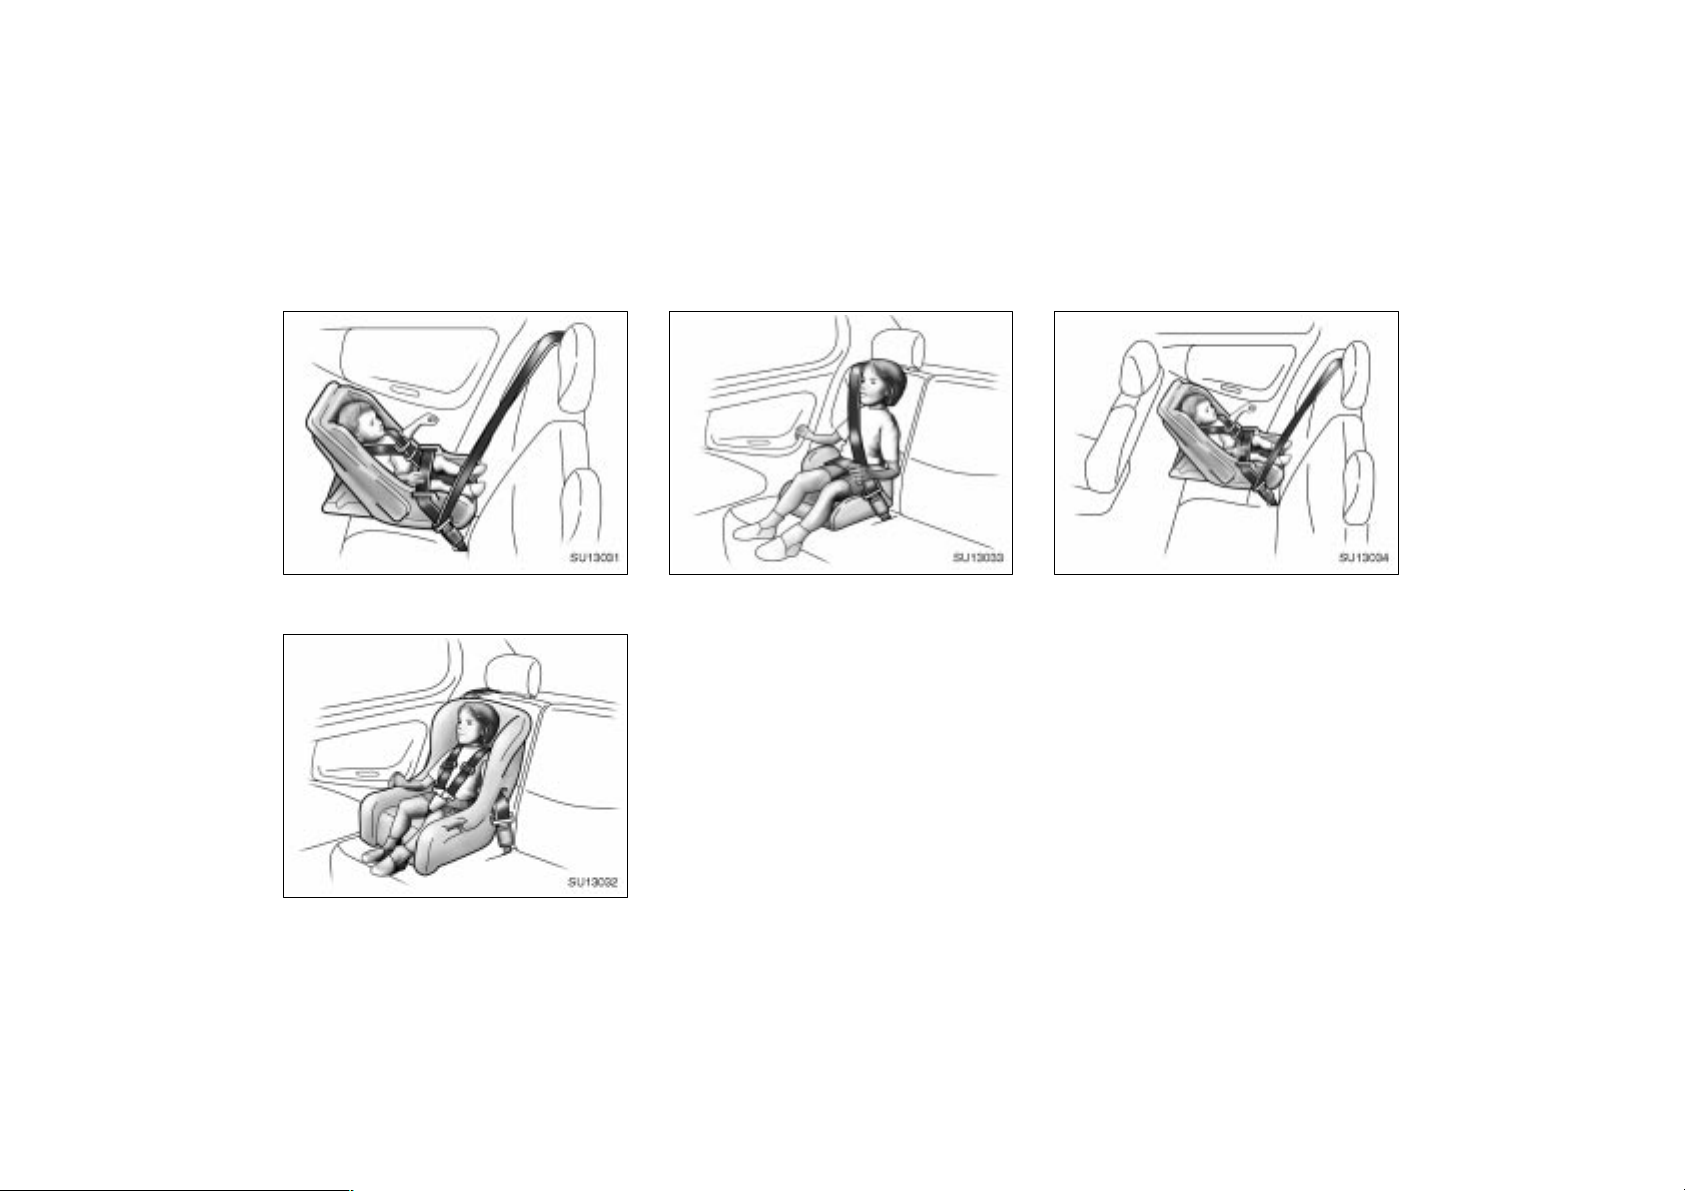
—Types of child restraint
system
Child restraint systems are classified into
the following 3 types depending on the
child’s age and size.
(A) Infant seat
(B) Convert ible seat
(C) Booster seat
Install the child restraint system following
the instructions provided by its manufacturer.
2001 ECHO (OM52440U)
53
Page 54
2001MY ECHO (U) L/O0008
—Installation with 3–point
type seat belt
SU13031
(A) Infant seat
SU13032
(B) Convertible seat
54
SU13033
(C) Booster seat
2001 ECHO (OM52440U)
SU13034
(A) INFANT SEAT INSTALLATION
An infant seat is used in rear–facing
position only.
Page 55
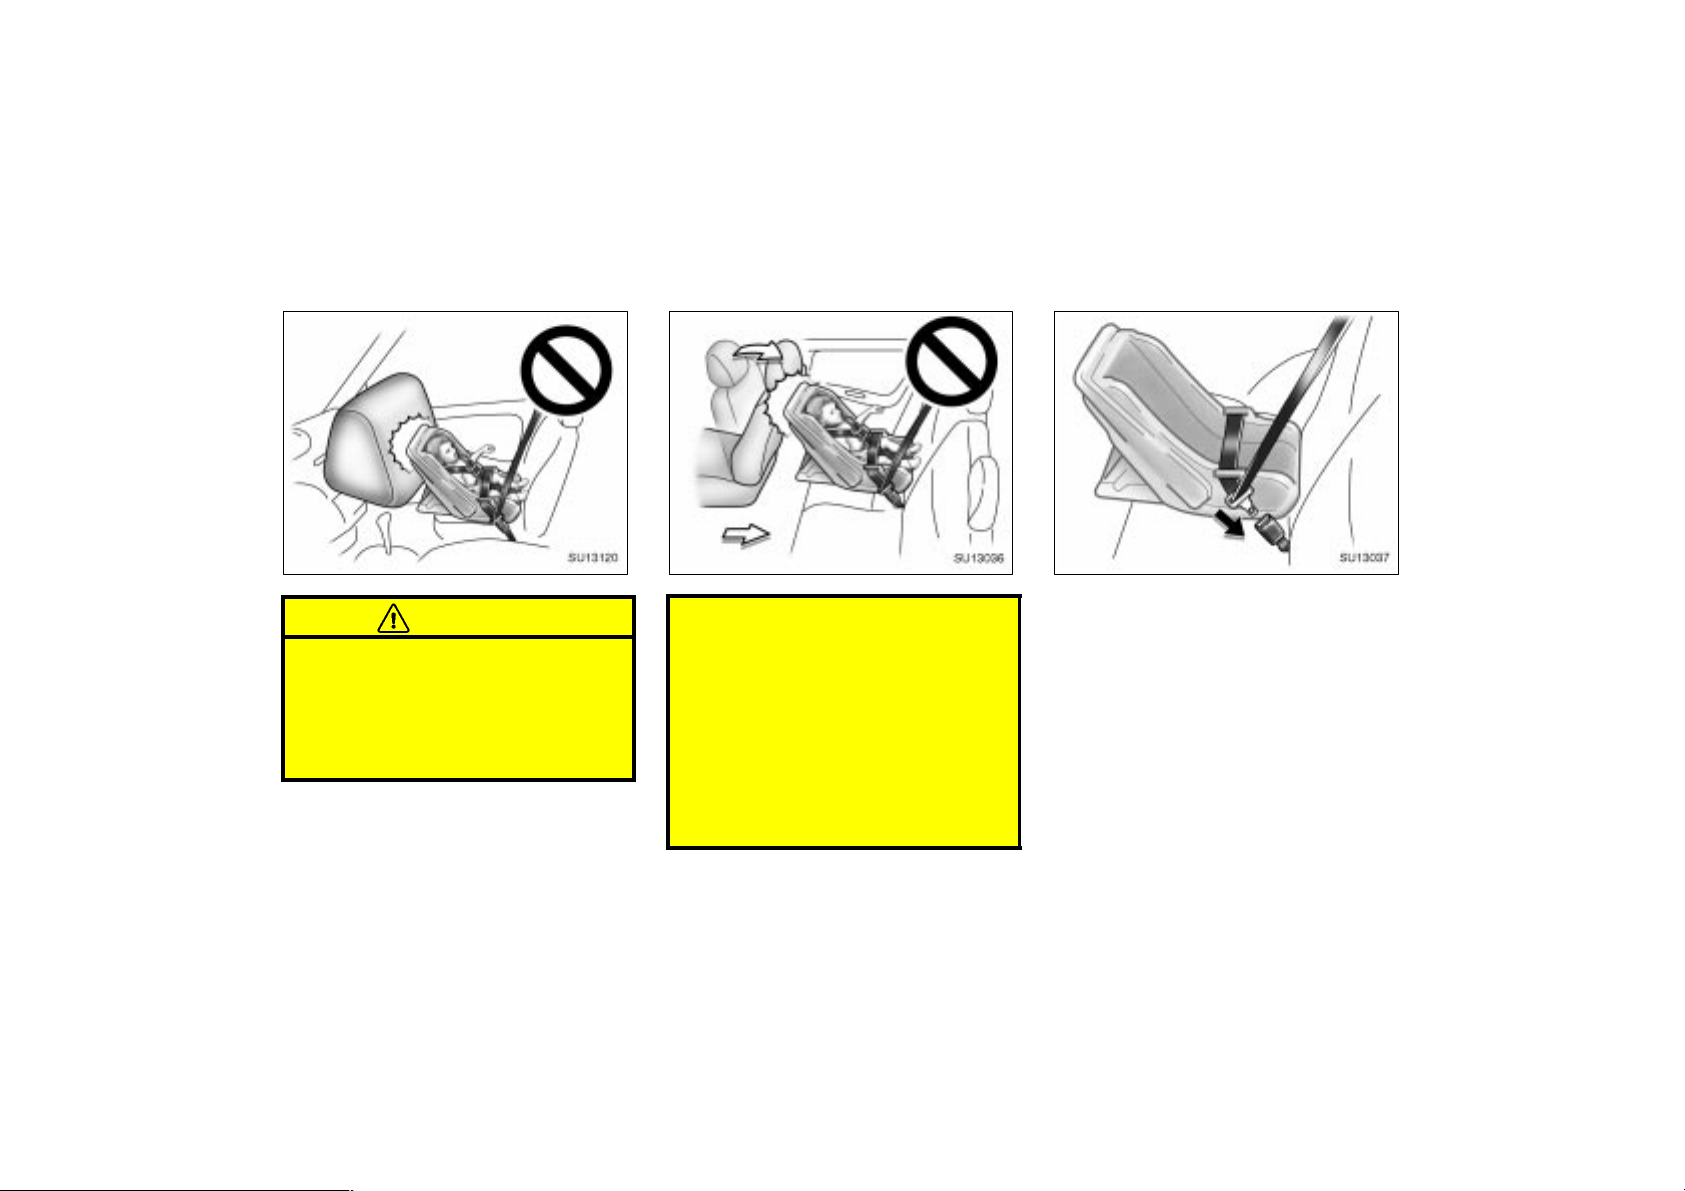
2001MY ECHO (U) L/O0008
SU13120
CAUTION
Never put a rear–facing child re-
straint system on the front passenger seat because the force of the
rapid inflation of the front passenger airbag can cause death or serious injury to the child.
SU13036
Do not put a rear–facing child re-
straint system on the rear seat if it
interferes with the lock mechanism
of the front seats. This can cause
death or serious injury to the child
and front passenger in case of sudden braking or a collision.
If your driving position is not satis-
factory, install the child restraint
system on the other seat than the
rear left seat.
2001 ECHO (OM52440U)
SU13037
1. Run the lap and shoulder belt through
or around the infant seat following the
instructions provided by its manufacturer and insert the tab into the buckle
taking care not to twist the belt. Keep
the lap portion of the belt tight.
55
Page 56
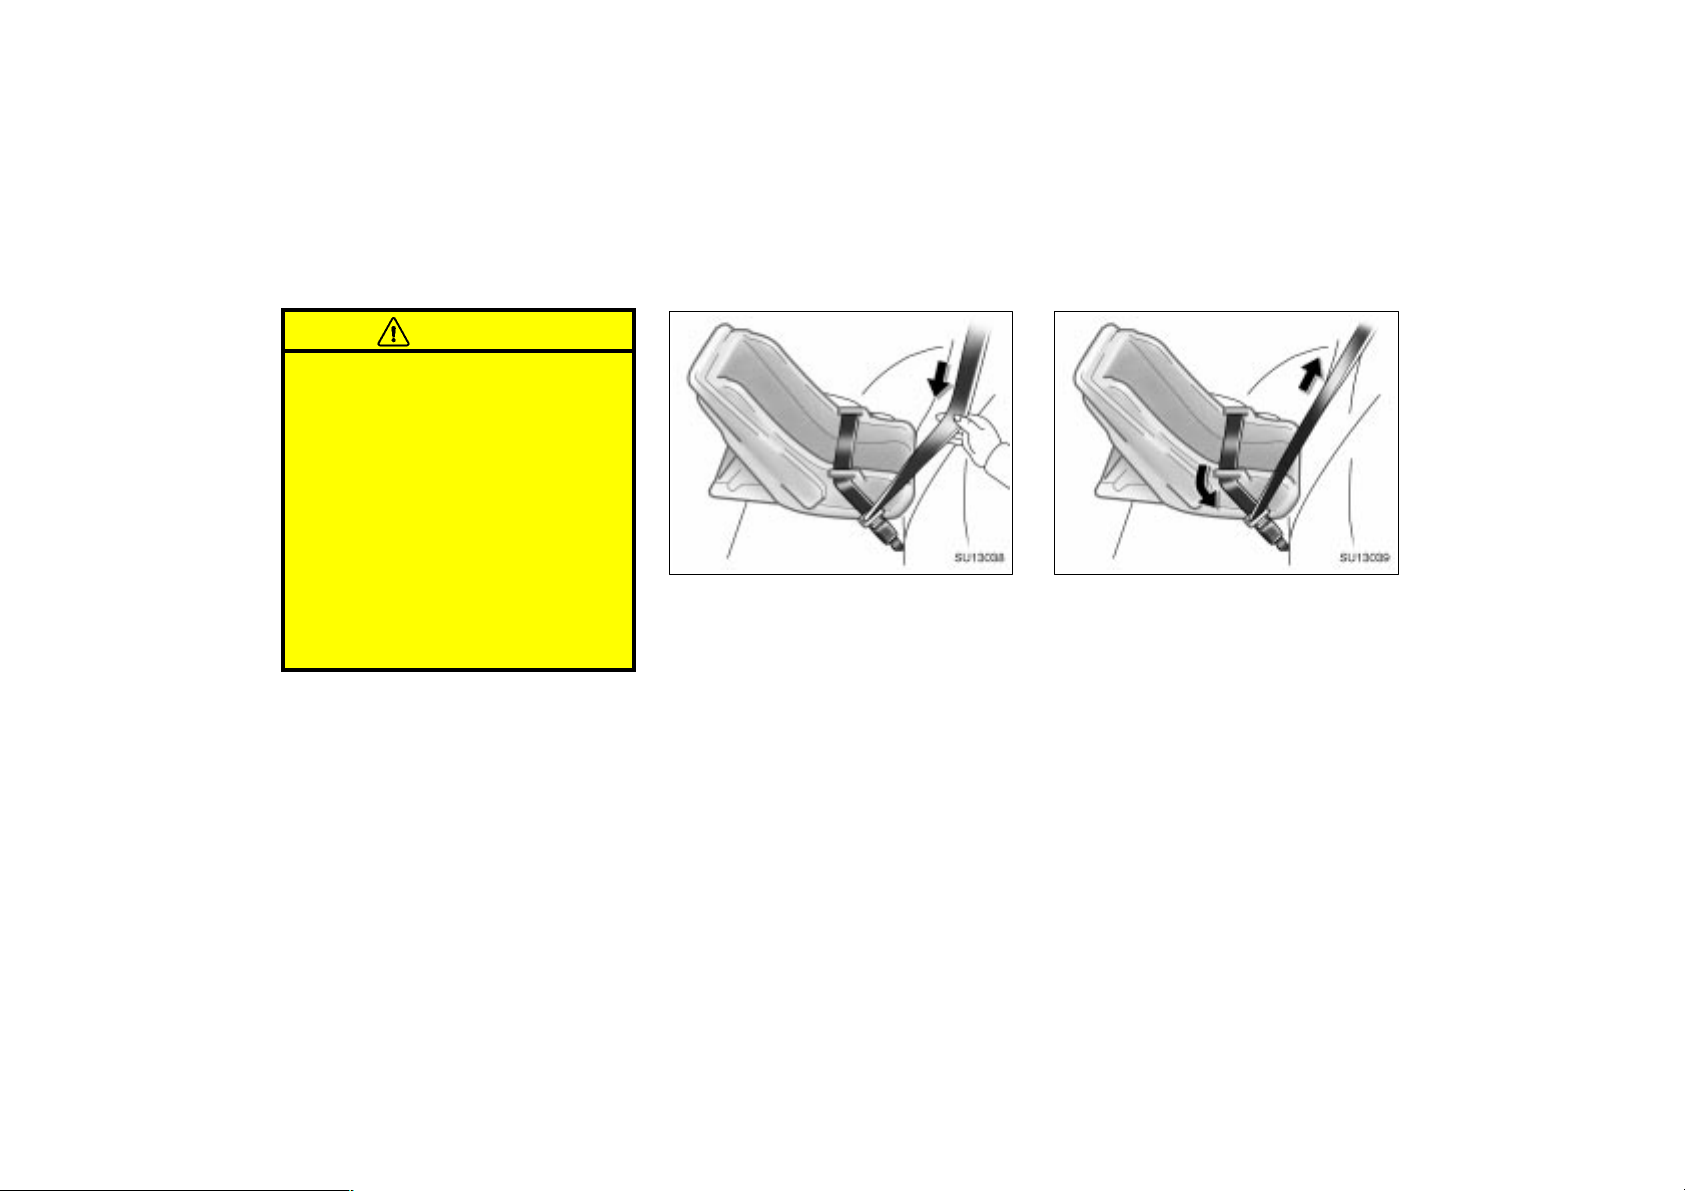
CAUTION
After inserting the tab, make sure
the tab and buckle are locked and
that the lap and shoulder portions
of the belt are not twisted.
Do not insert coins, clips, etc. in
the buckle as this may prevent you
from properly latching the tab and
buckle.
If the seat belt does not function
normally, it cannot protect your
child from injury. Contact your
Toyota dealer immediately. Do not
use the seat until the seat belt is
fixed.
2001MY ECHO (U) L/O0008
SU13038
2. Fully extend the shoulder belt to put it
in the lock mode. When the belt is
then retracted even slightly, it cannot
be extended.
To hold the infant seat securely, make
sure the belt is in the lock mode before
letting the belt retract.
SU13039
3. While pressing the infant seat firmly
against the seat cushion and seatback,
let the shoulder belt retract as far as
it will go to hold the infant seat securely.
56
2001 ECHO (OM52440U)
Page 57
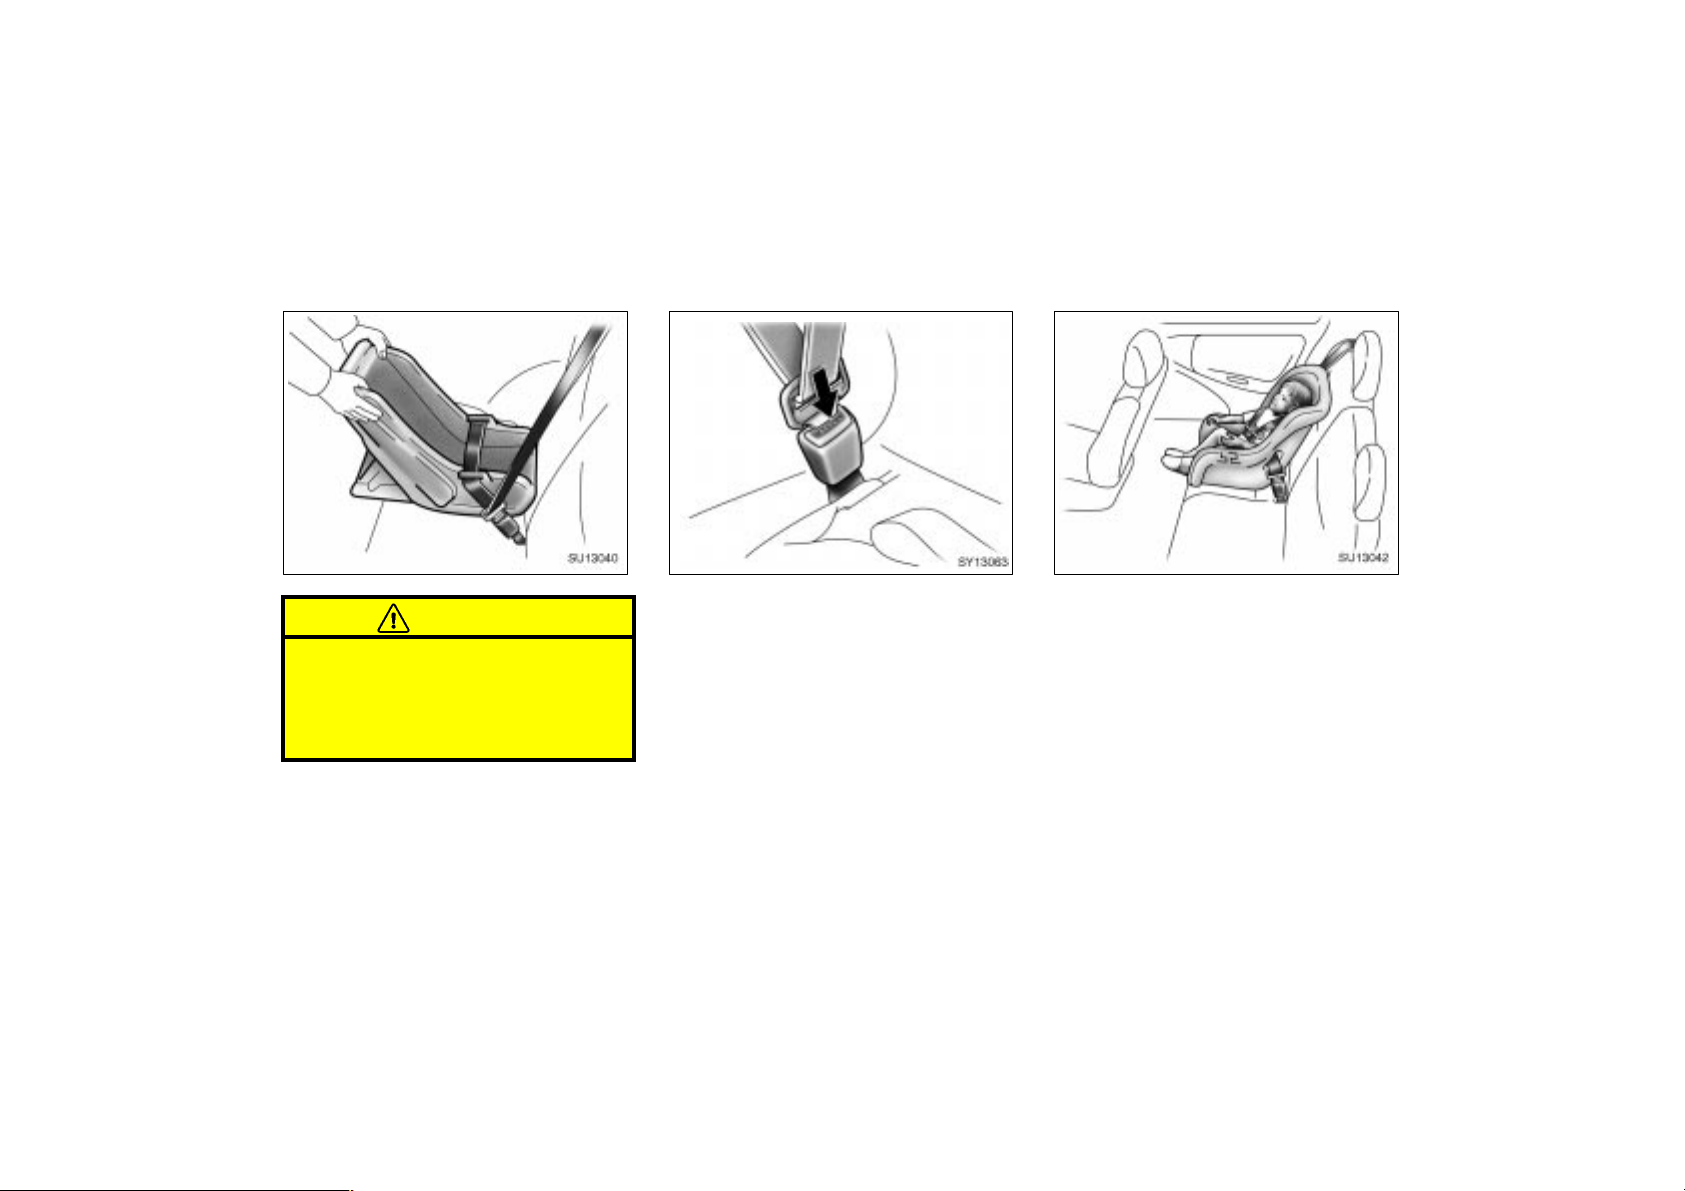
2001MY ECHO (U) L/O0008
SU13040
CAUTION
Push and pull the child restraint system in different directions to be sure
it is secure. Follow all the installation
instructions provided by its manufacturer.
SY13063
4. To remove the infant seat, press the
buckle–release button and allow the
belt to retract completely. The belt will
move freely again and be ready to
work for an adult or older child passenger.
2001 ECHO (OM52440U)
SU13042
(B) CONVERTIBLE SEAT INSTALLATION
A convertible seat is used in forward–
facing or rear–facing position depending on the child’s age and size. When
installing, follow the manufacturer’s instructions about the applicable child’s
age and size as well as directions for
installing the child restraint system.
57
Page 58
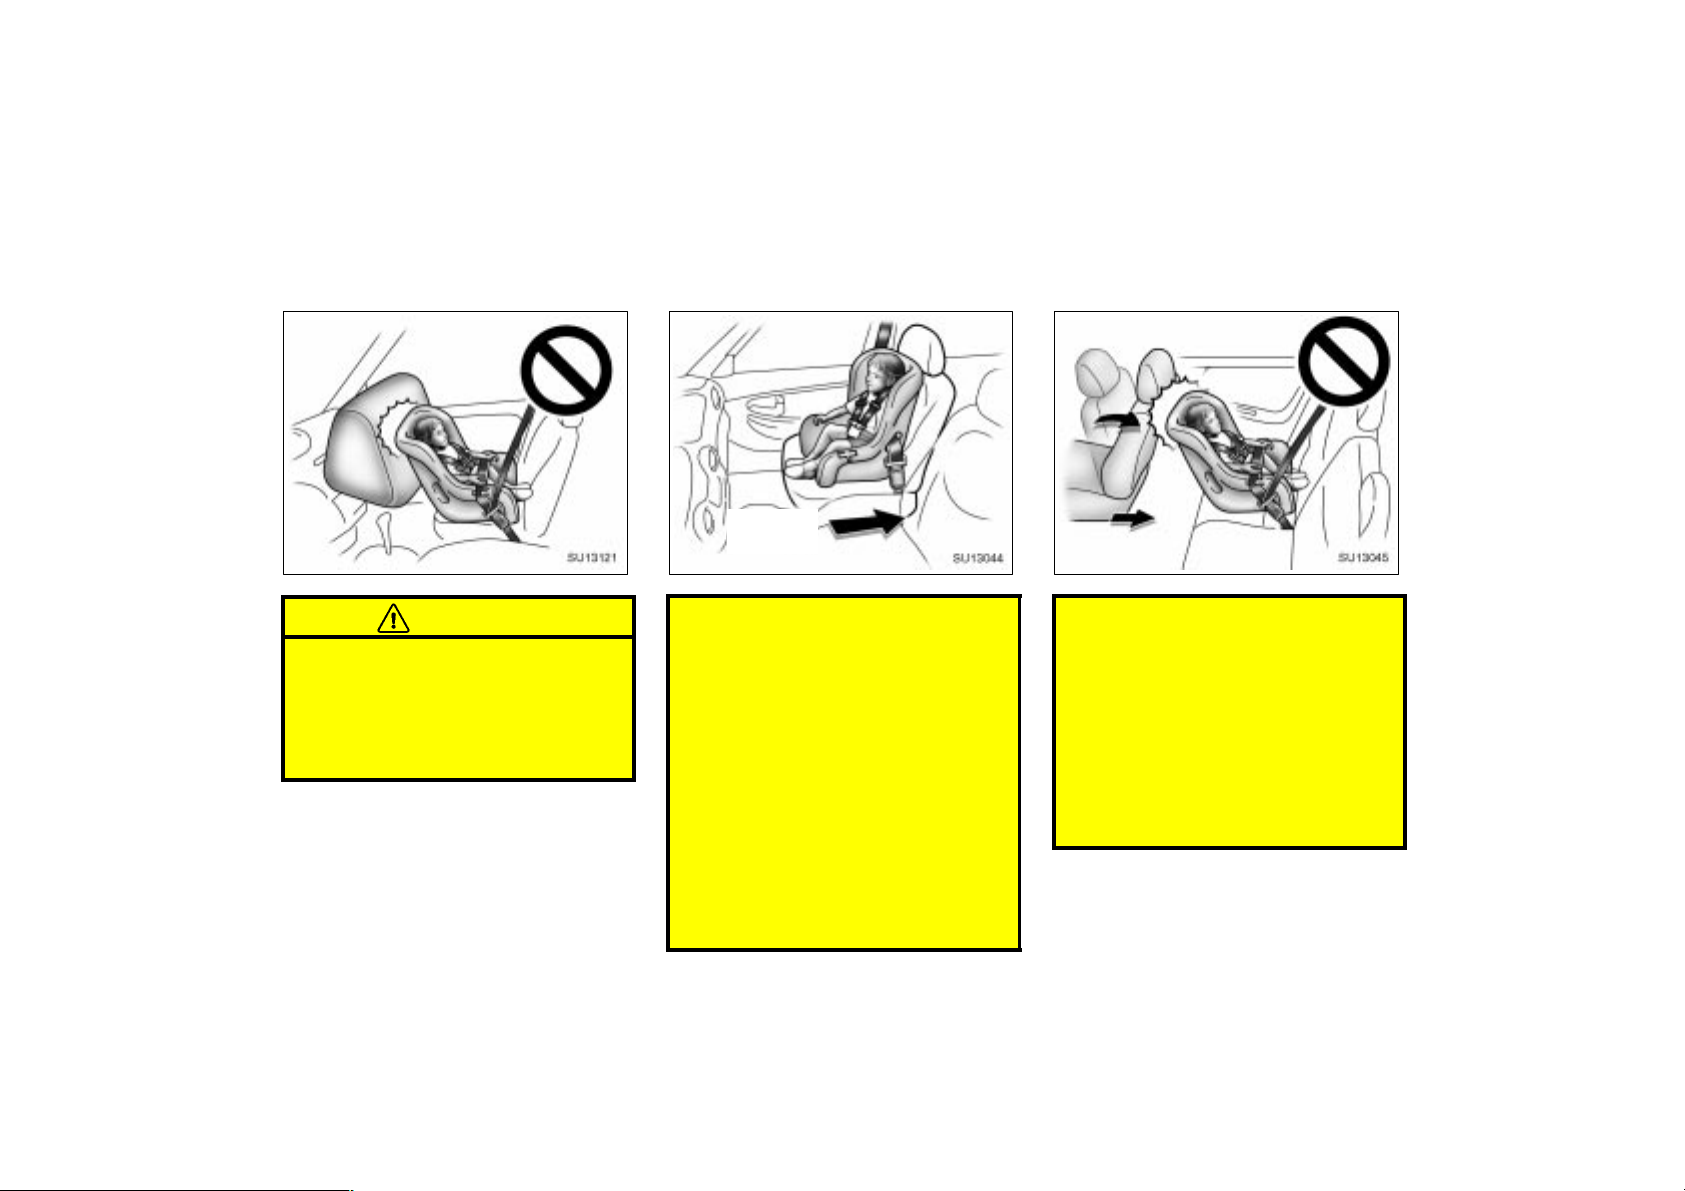
2001MY ECHO (U) L/O0008
SU12121
CAUTION
Never put a rear–facing child re-
straint system on the front passenger seat because the force of the
rapid inflation of the front passenger airbag can cause death or serious injury to the child.
58
SU13044
Move seat
fully back
A forward–facing child restraint sys-
tem should be allowed to be put on
the front passenger seat only when
it is unavoidable. Always move the
seat as far back as possible, because the force of the deploying
front passenger airbag could cause
death or serious injury to the child.
On vehicles with side airbags, do
not allow the child to lean against
the front door or around the front
door even if the child is seated in
the child restraint system. It is dangerous if the side airbag inflates,
and the impact could cause death
or serious injury to the child.
2001 ECHO (OM52440U)
SU13045
Do not put a rear–facing child re-
straint system on the rear seat if it
interferes with the lock mechanism
of the front seats. This can cause
death or serious injury to the child
and front passenger in case of sudden braking or a collision.
If your driving position is not satis-
factory, install the child restraint
system on the other seat than left
rear seat.
Page 59
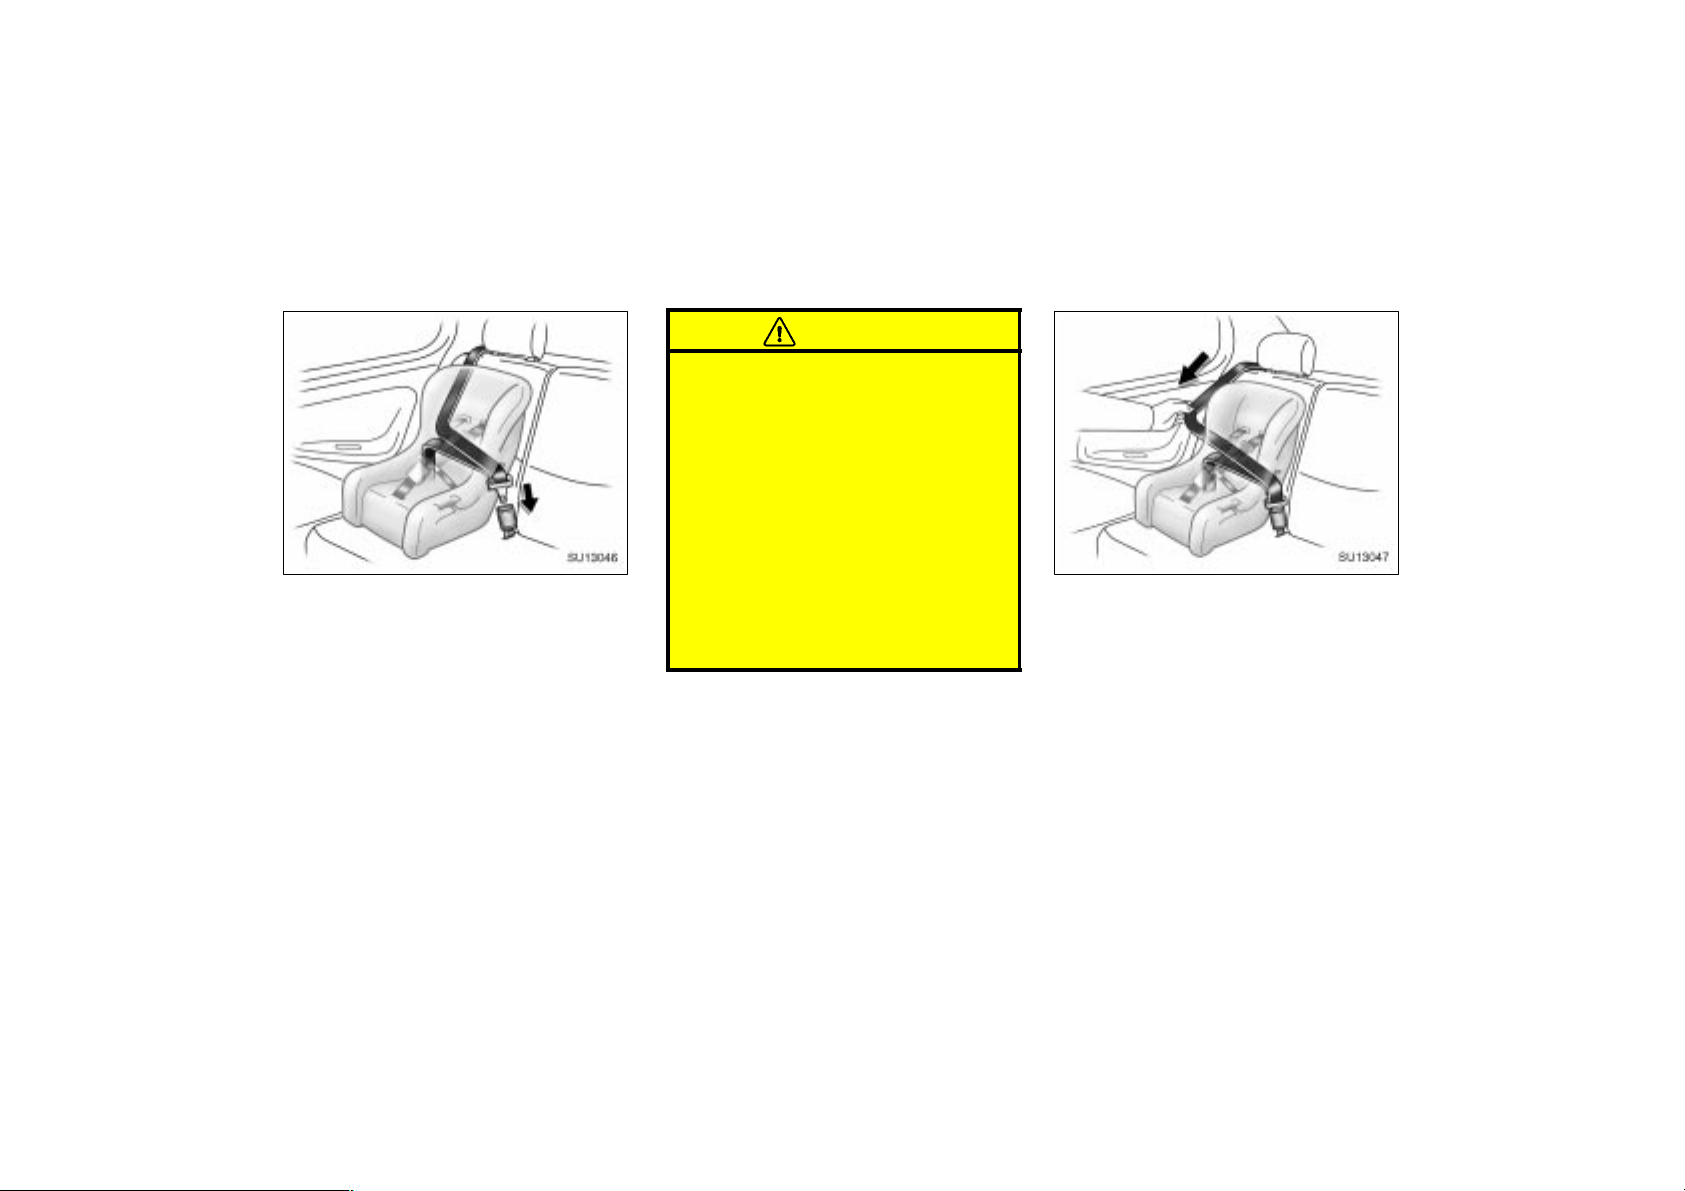
SU13046
1. Run the lap and shoulder belt through
or around the convertible seat following
the instructions provided by its
manufacturer and insert the tab into
the buckle taking care not to twist the
belt. Keep the lap portion of the belt
tight.
2001MY ECHO (U) L/O0008
CAUTION
After inserting the tab, make sure
the tab and buckle are locked and
that the lap and shoulder portions
of the belt are not twisted.
Do not insert coins, clips, etc. in
the buckle as this may prevent you
from properly latching the tab and
buckle.
If the seat belt does not function
normally, it cannot protect your
child from injury. Contact your
Toyota dealer immediately. Do not
use the seat until the seat belt is
fixed.
SU13047
2. Fully extend the shoulder belt to put it
in the lock mode. When the belt is
then retracted even slightly, it cannot
be extended.
To hold the convertible seat securely,
make sure the belt is in the lock mode
before letting the belt retract.
2001 ECHO (OM52440U)
59
Page 60
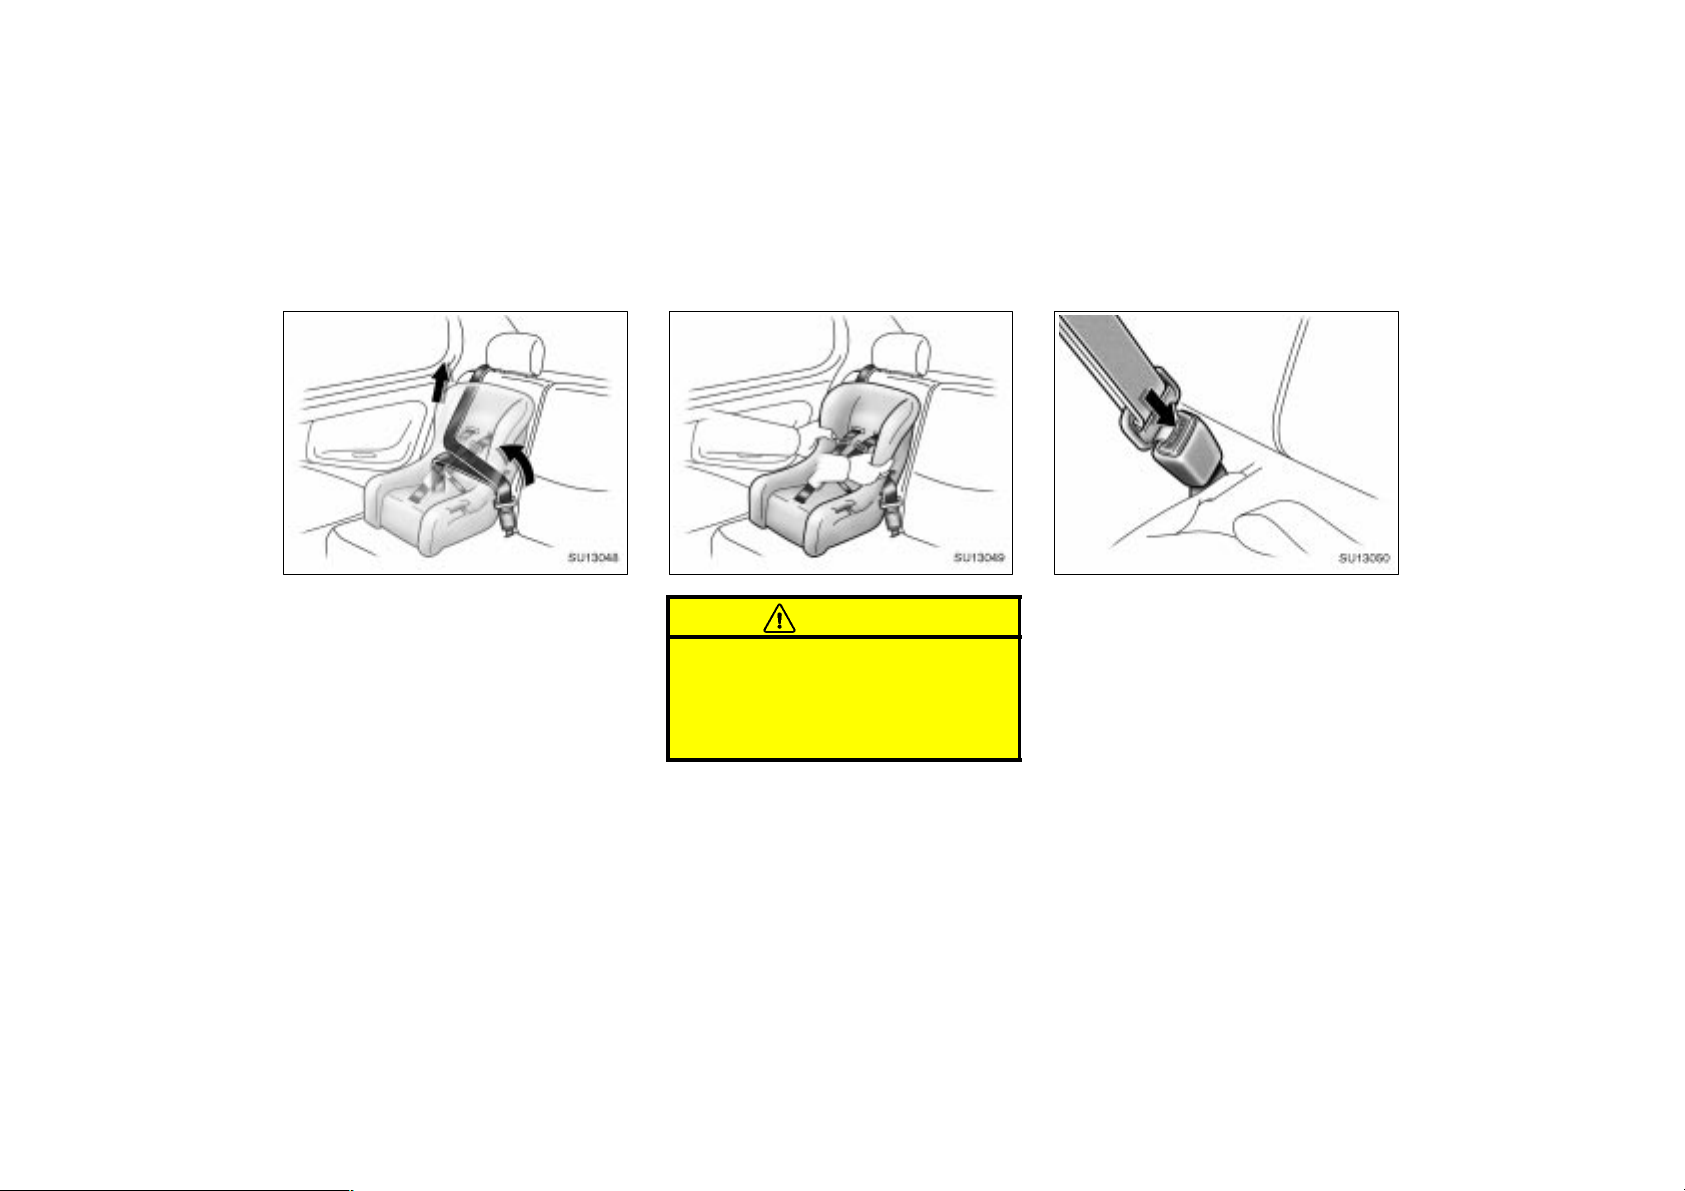
2001MY ECHO (U) L/O0008
SU13048
3. While pressing the convertible seat
firmly against the seat cushion and
seatback, let the shoulder belt retract
as far as it will go to hold the convertible seat securely.
60
SU13049
CAUTION
Push and pull the child restraint system in different directions to be sure
it is secure. Follow all the installation
instructions provided by its manufacturer.
2001 ECHO (OM52440U)
SU13050
4. To remove the convertible seat, press
the buckle–release button and allow the
belt to retract completely. The belt will
move freely again and be ready to
work for an adult or older child passenger.
Page 61
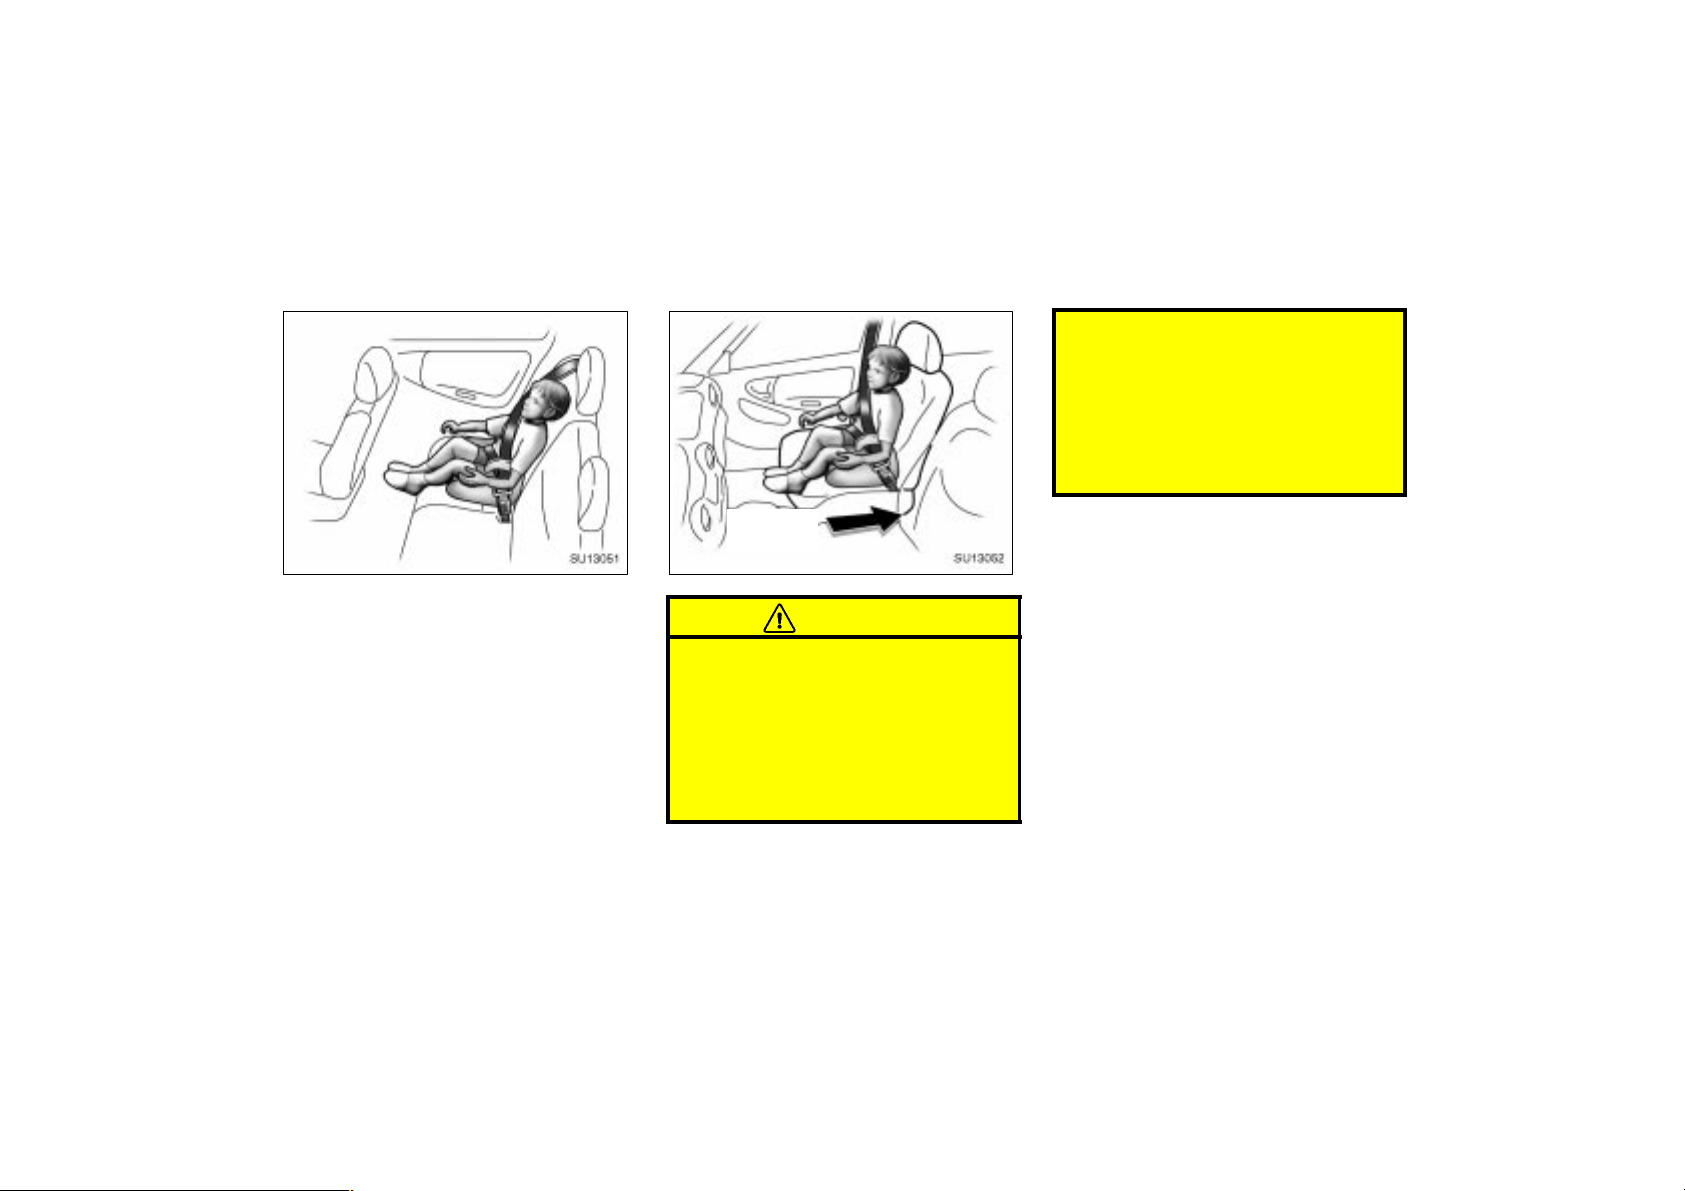
SU13051
2001MY ECHO (U) L/O0008
SU13052
Move seat
fully back
On vehicles with side airbags, do
not allow the child to lean against
the front door or around the front
door even if the child is seated in
the child restraint system. It is dangerous if the side airbag inflates,
and the impact could cause death
or serious injury to the child.
(C) BOOSTER SEAT INSTALLATION
A booster seat is used in forward–fac-
ing position only.
CAUTION
A forward–facing child restraint sys-
tem should be allowed to be put on
the front seat only when it is unavoidable. Always move the seat as
far back as possible, because the
force of the deploying airbag could
cause death or serious injury to the
child.
2001 ECHO (OM52440U)
61
Page 62
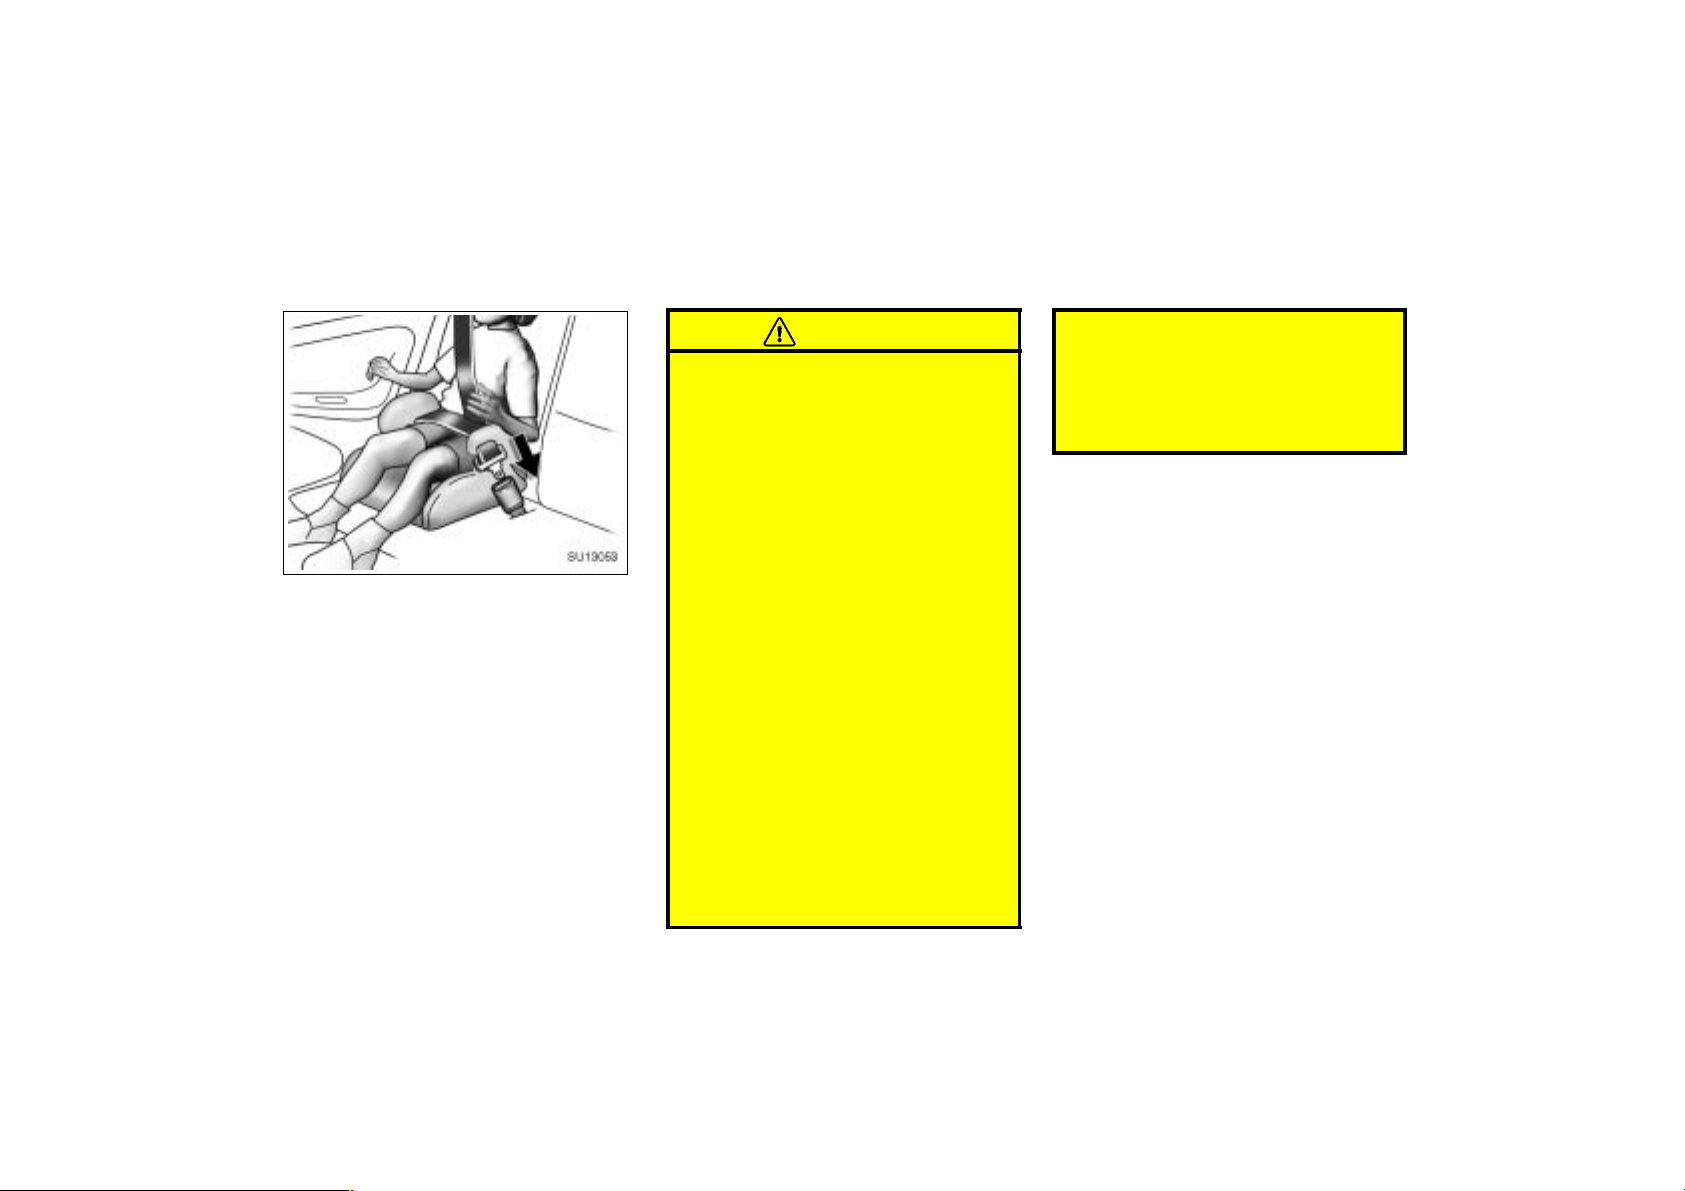
2001MY ECHO (U) L/O0008
SU13053
1. Sit the child on a booster seat. Run
the lap and shoulder belt through or
around the booster seat and child following the instructions provided by its
manufacturer and insert the tab into
the buckle taking care not to twist the
belt.
Make sure the shoulder belt is correctly
across the child’s shoulder and that the
lap belt is positioned as low as possible
on child’s hips. See “Seat belts” for details.
CAUTION
Always make sure the shoulder belt
is positioned across the center of
child’s shoulder. The belt should be
kept away from child’s neck, but
not falling off child’s shoulder. Failure to do so could reduce the
amount of protection in an accident
and cause serious injuries in a collision.
Both high–positioned lap belts and
loose–fitting belts could cause serious injuries due to sliding under
the lap belt during a collision or
other unintended result. Keep the
lap belt positioned as low on a
child’s hips as possible.
For child’s safety, do not place the
shoulder belt under child’s arm.
After inserting the tab, make sure
the tab and buckle are locked and
that the lap and shoulder portions
of the belt are not twisted.
Do not insert coins, clips, etc. in
the buckle as this may prevent your
child from properly latching the tab
and buckle.
If the seat belt does not function
normally, it cannot protect your
child from injury. Contact your
Toyota dealer immediately. Do not
use the seat until the seat belt is
fixed.
62
2001 ECHO (OM52440U)
Page 63
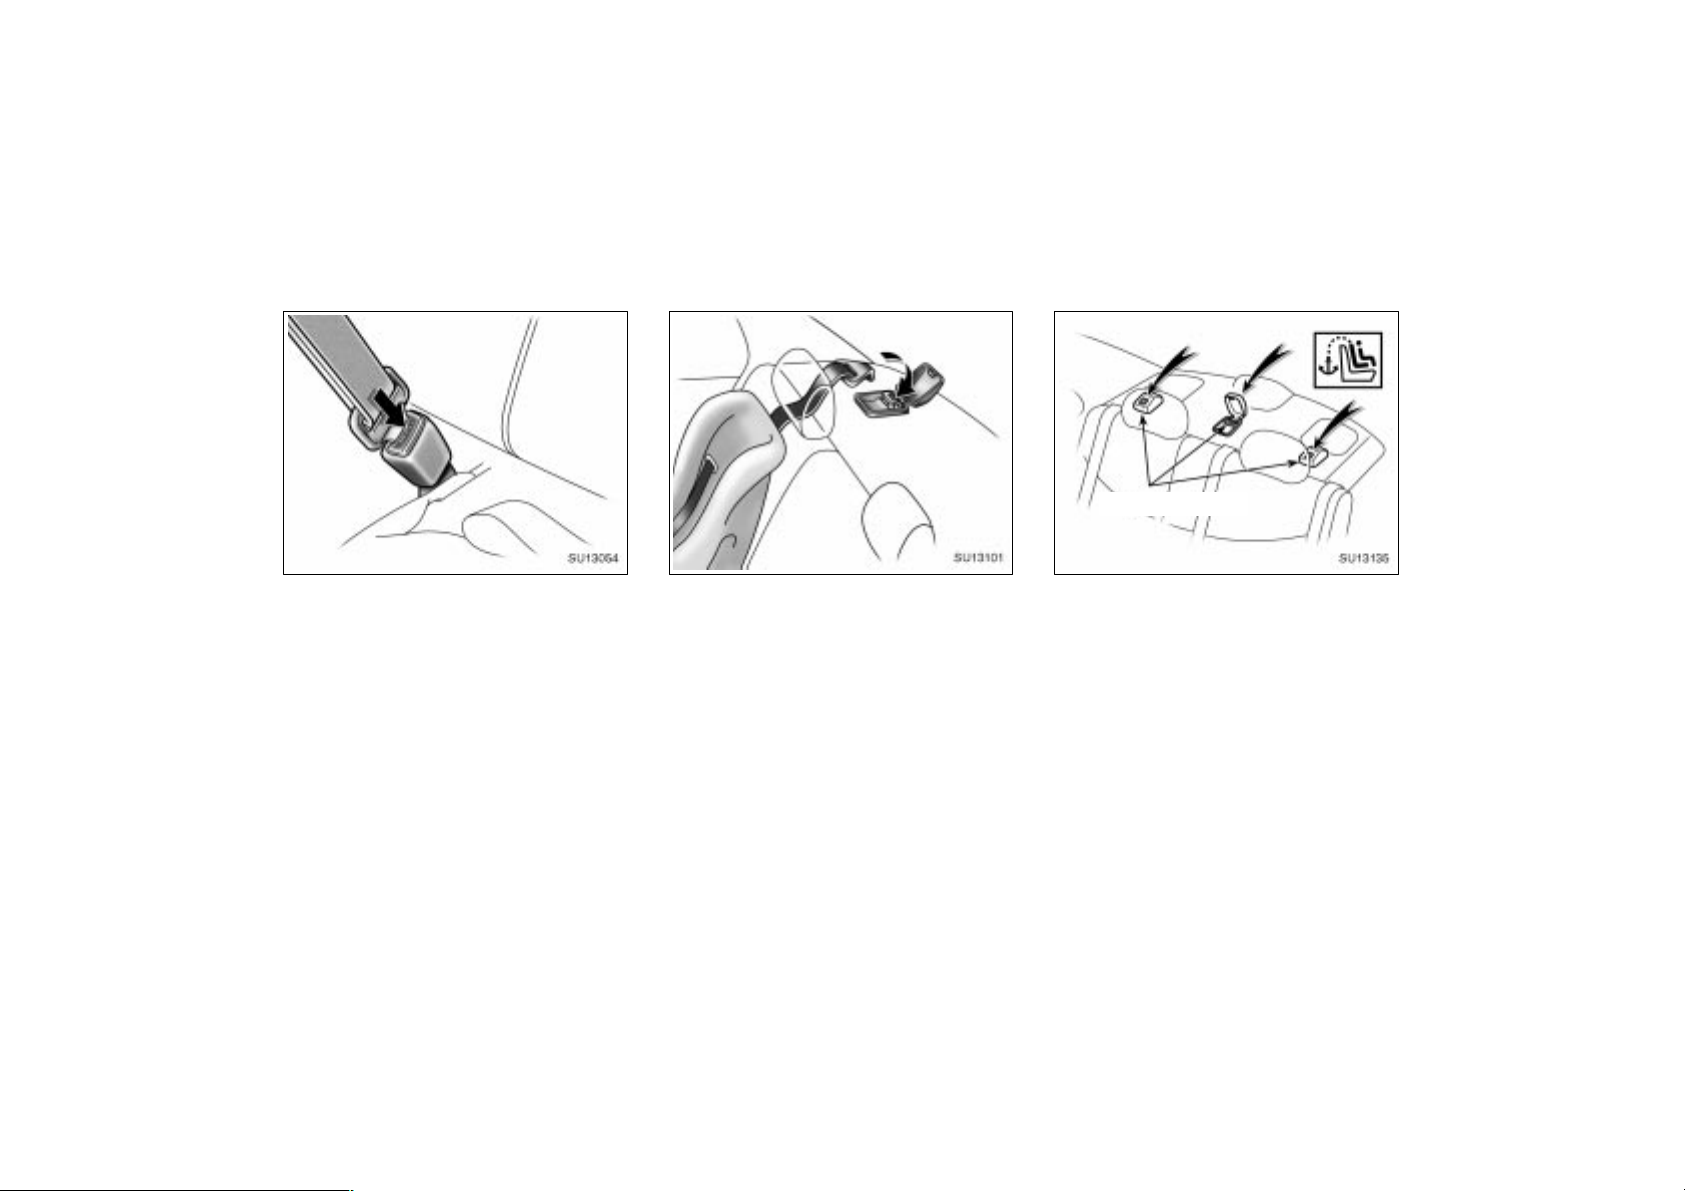
2001MY ECHO (U) L/O0008
—Using a top strap
SU13054
2. To remove the child restraint system,
press the buckle–release button and allow the belt to retract.
SU13101
Follow the procedure below for a child
restraint system that use of a top strap
to secure the system. Follow all the
installation instructions provided by its
manufacturer.
2001 ECHO (OM52440U)
SU13135
Anchor brack ets
Use the anchor bracket on the back
panel to attach the top strap.
Anchor brackets are installed for each
rear seating position.
This symbol indicates the location of user
ready anchor brackets.
63
Page 64
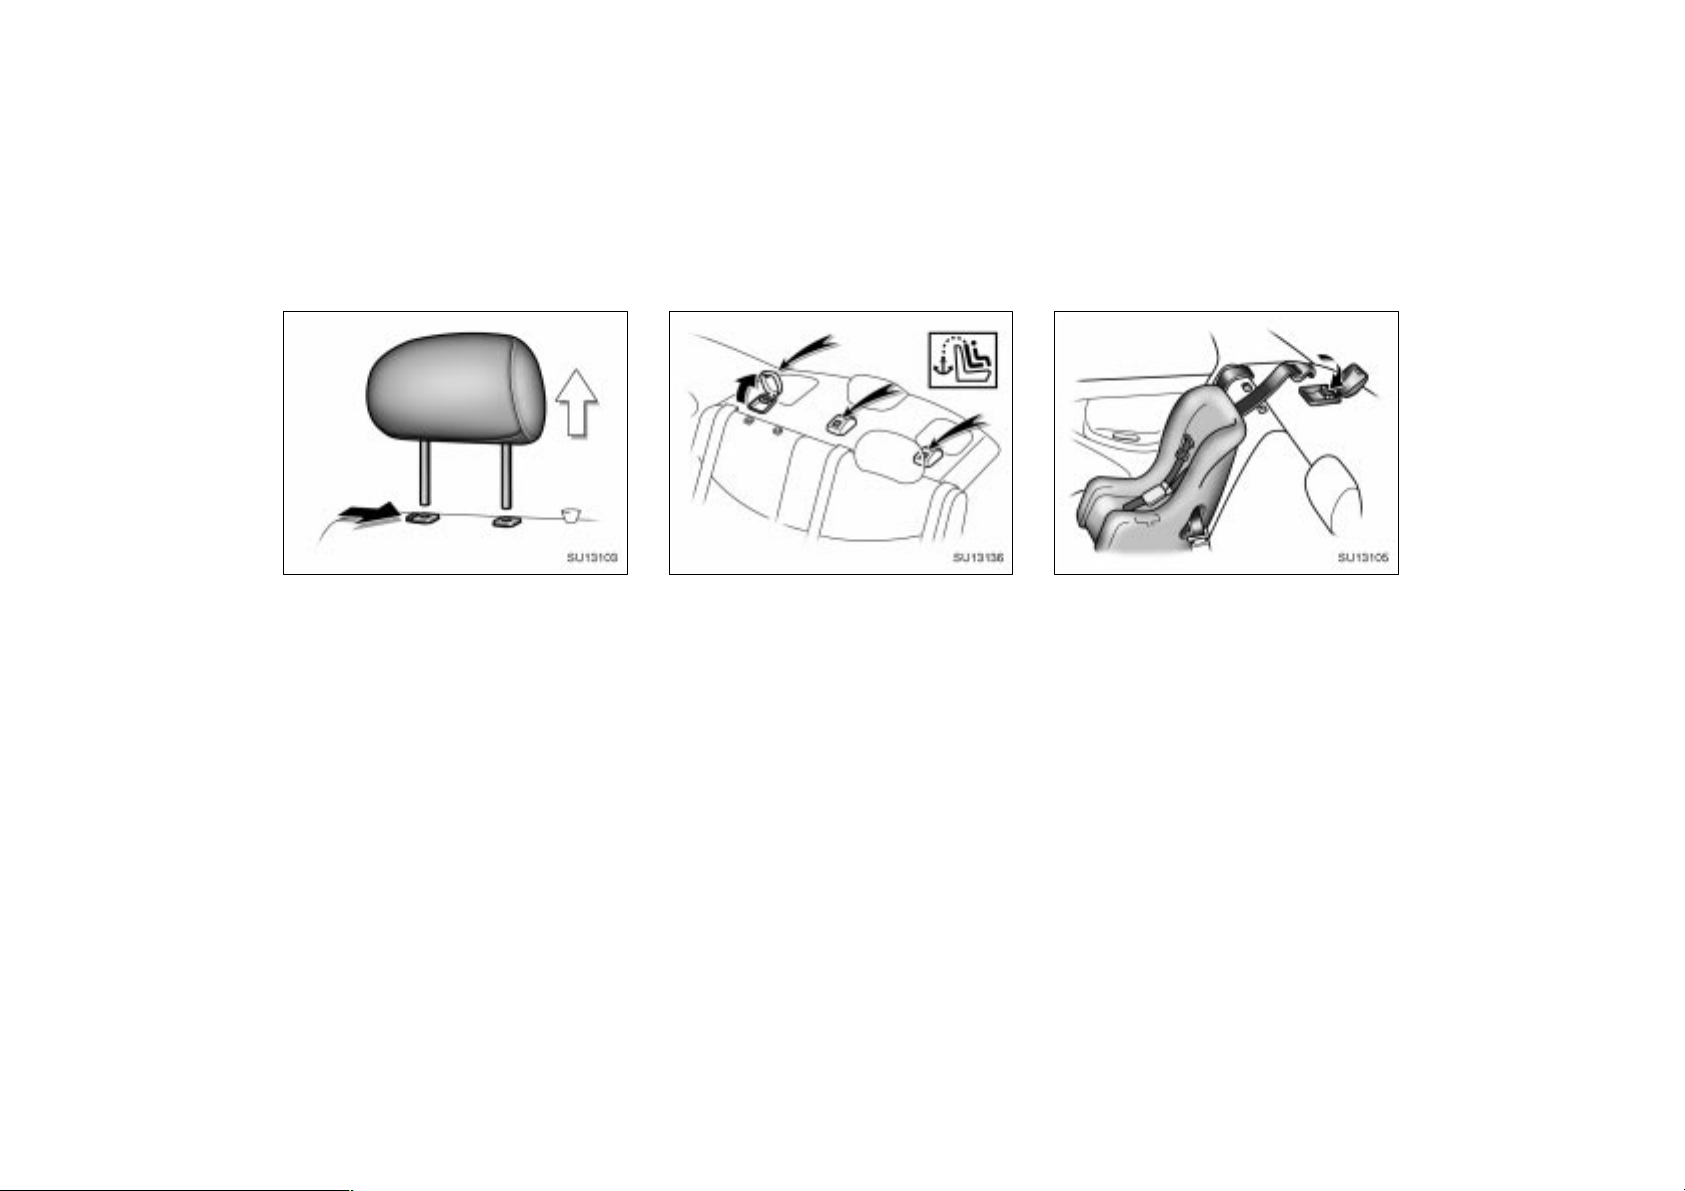
2001MY ECHO (U) L/O0008
SU13103
TO USE THE ANCHOR BRACKET:
1. Remove the head restraint.
64
SU13136
2. Open the anchor bracket cover with
the mark shown in the illustration.
2001 ECHO (OM52440U)
SU13105
3. Securely fasten the child restraint
system with the seat belt.
Latch the hook onto the anchor
bracket and tighten the top strap.
For instructions to install the child restraint system, see “Child restraint” in this
section.
Page 65
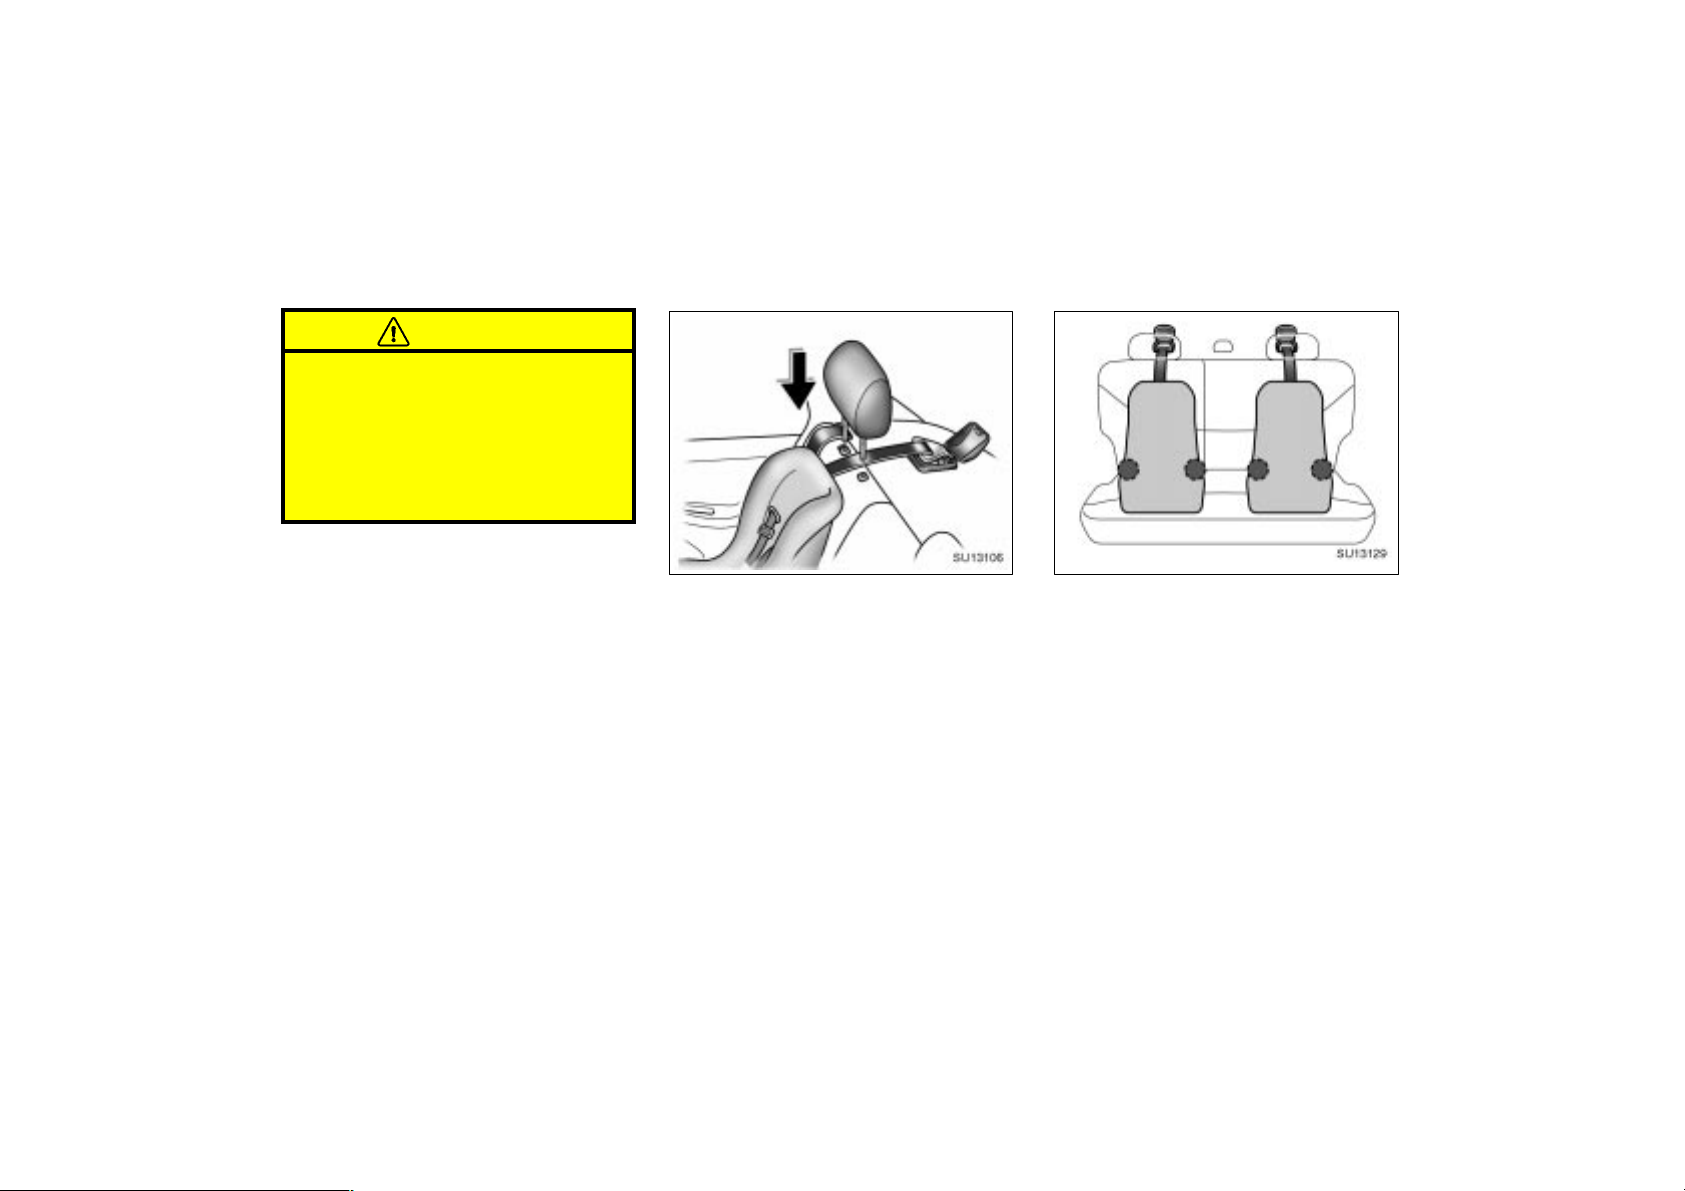
CAUTION
Make sure the top strap is securely
latched, and check that the child
restraint system is secure by pushing and pulling it in different directions.
Follow all the installation instruc-
tions provided by its manufacturer.
2001MY ECHO (U) L/O0008
SU13106
—Installation with child
restraint lower anchorages
SU13129
4. Replace the head restraint.
Be sure to replace all covers when the
anchor bracket is not in use.
2001 ECHO (OM52440U)
The lower anchorages for the child restraint system interfaced with the
FMVSS225 specification are installed in
the rear seat.
The anchorages are installed in the clearance between the seat cushion and seatback of both outside rear seats.
Child restraint system interfaced with the
FMVSS225 specification can be fixed with
these anchorages. In this case, it is not
necessary to fix the child restraint system
with a seat belt on the vehicle.
65
Page 66
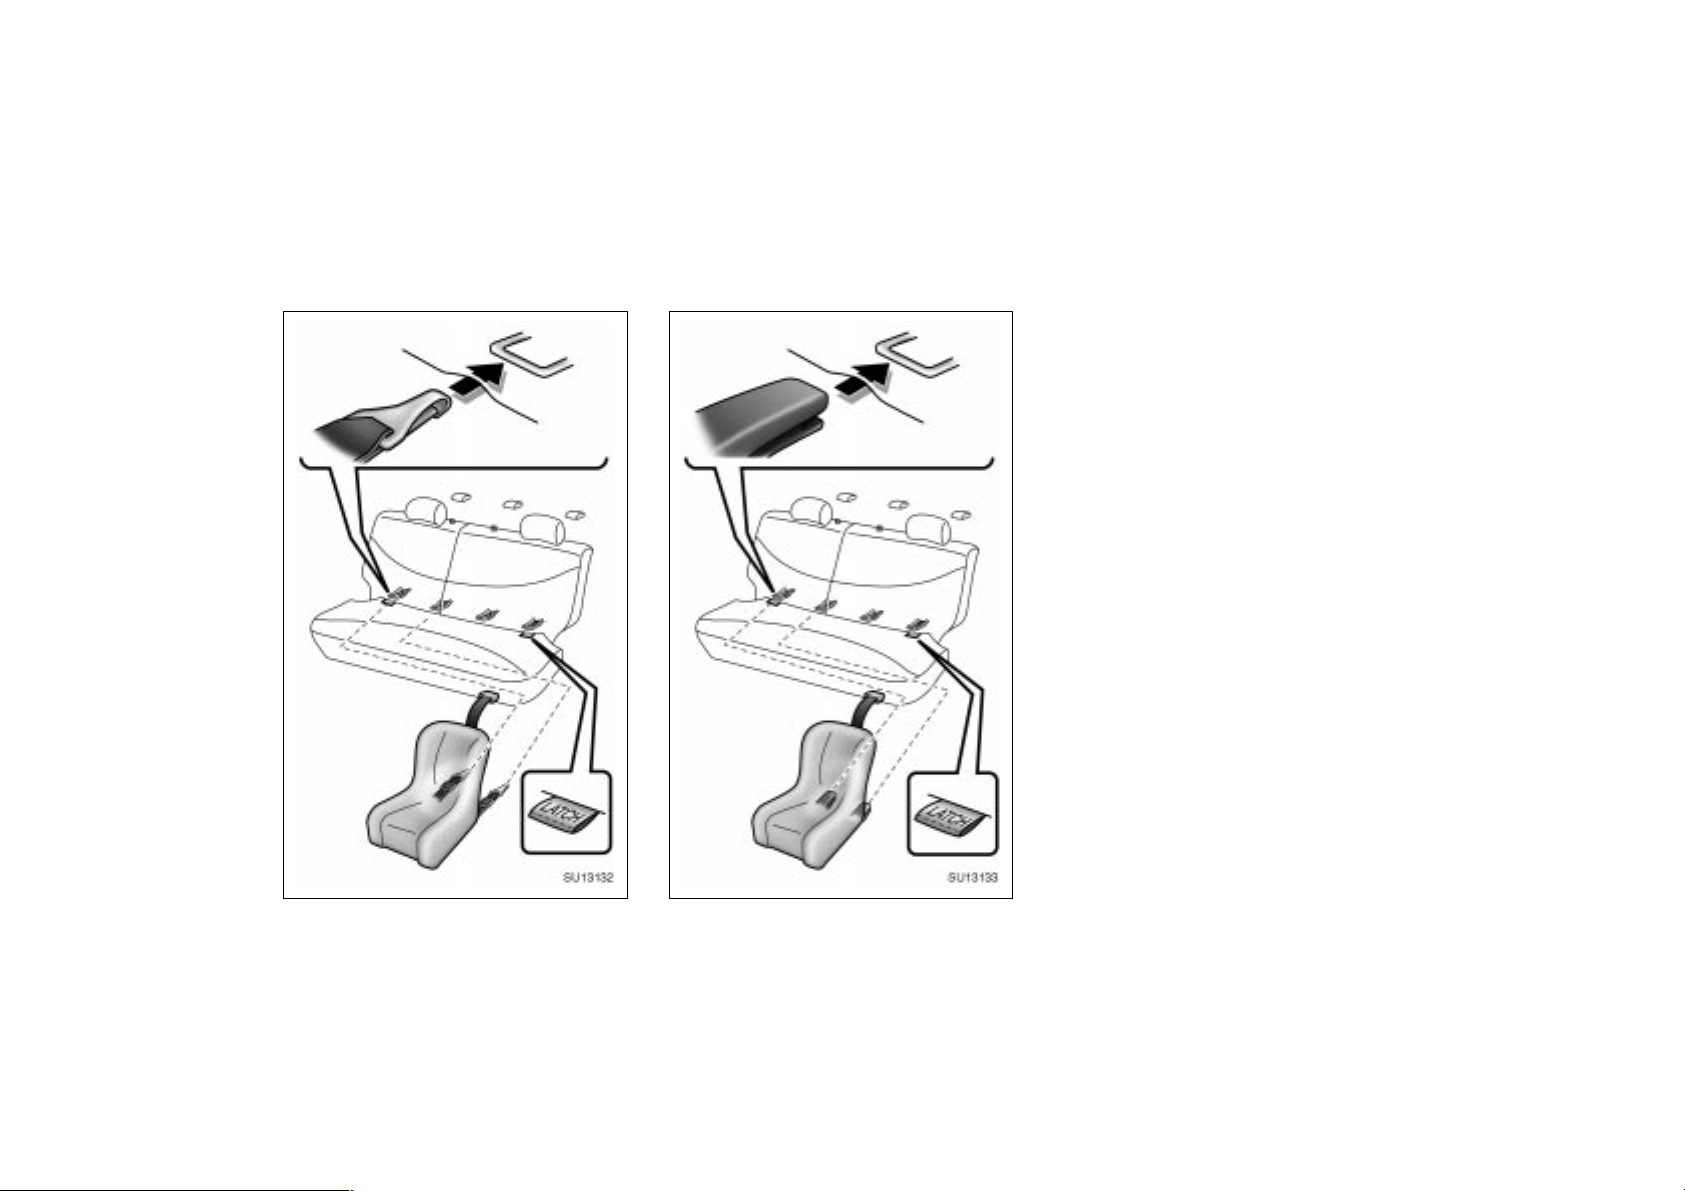
SU13132
2001MY ECHO (U) L/O0008
SU13133
CHILD RESTRAINT SYSTEM
INSTALLATION
Type A—
1. Widen the clearance between the
seat cushion and seatback a little
and confirm the position of the lower anchorages below the tag in the
seatback.
2. Latch the hooks of lower straps onto
the anchorages and tighten the lower
straps.
Type B—
1. Widen the clearance between the
seat cushion and seatback a little
and confirm the position on the lower anchorages below the tag in the
seatback.
2. Latch the buckles onto the anchorages.
If your child restraint system has a top
strap, it should be anchored. (For the
installation of the top strap, see “—Using
a top strap” in this section.)
For the installation details, refer to the
instruction manual equipped with each
product.
Type A
66
Type B
2001 ECHO (OM52440U)
Page 67
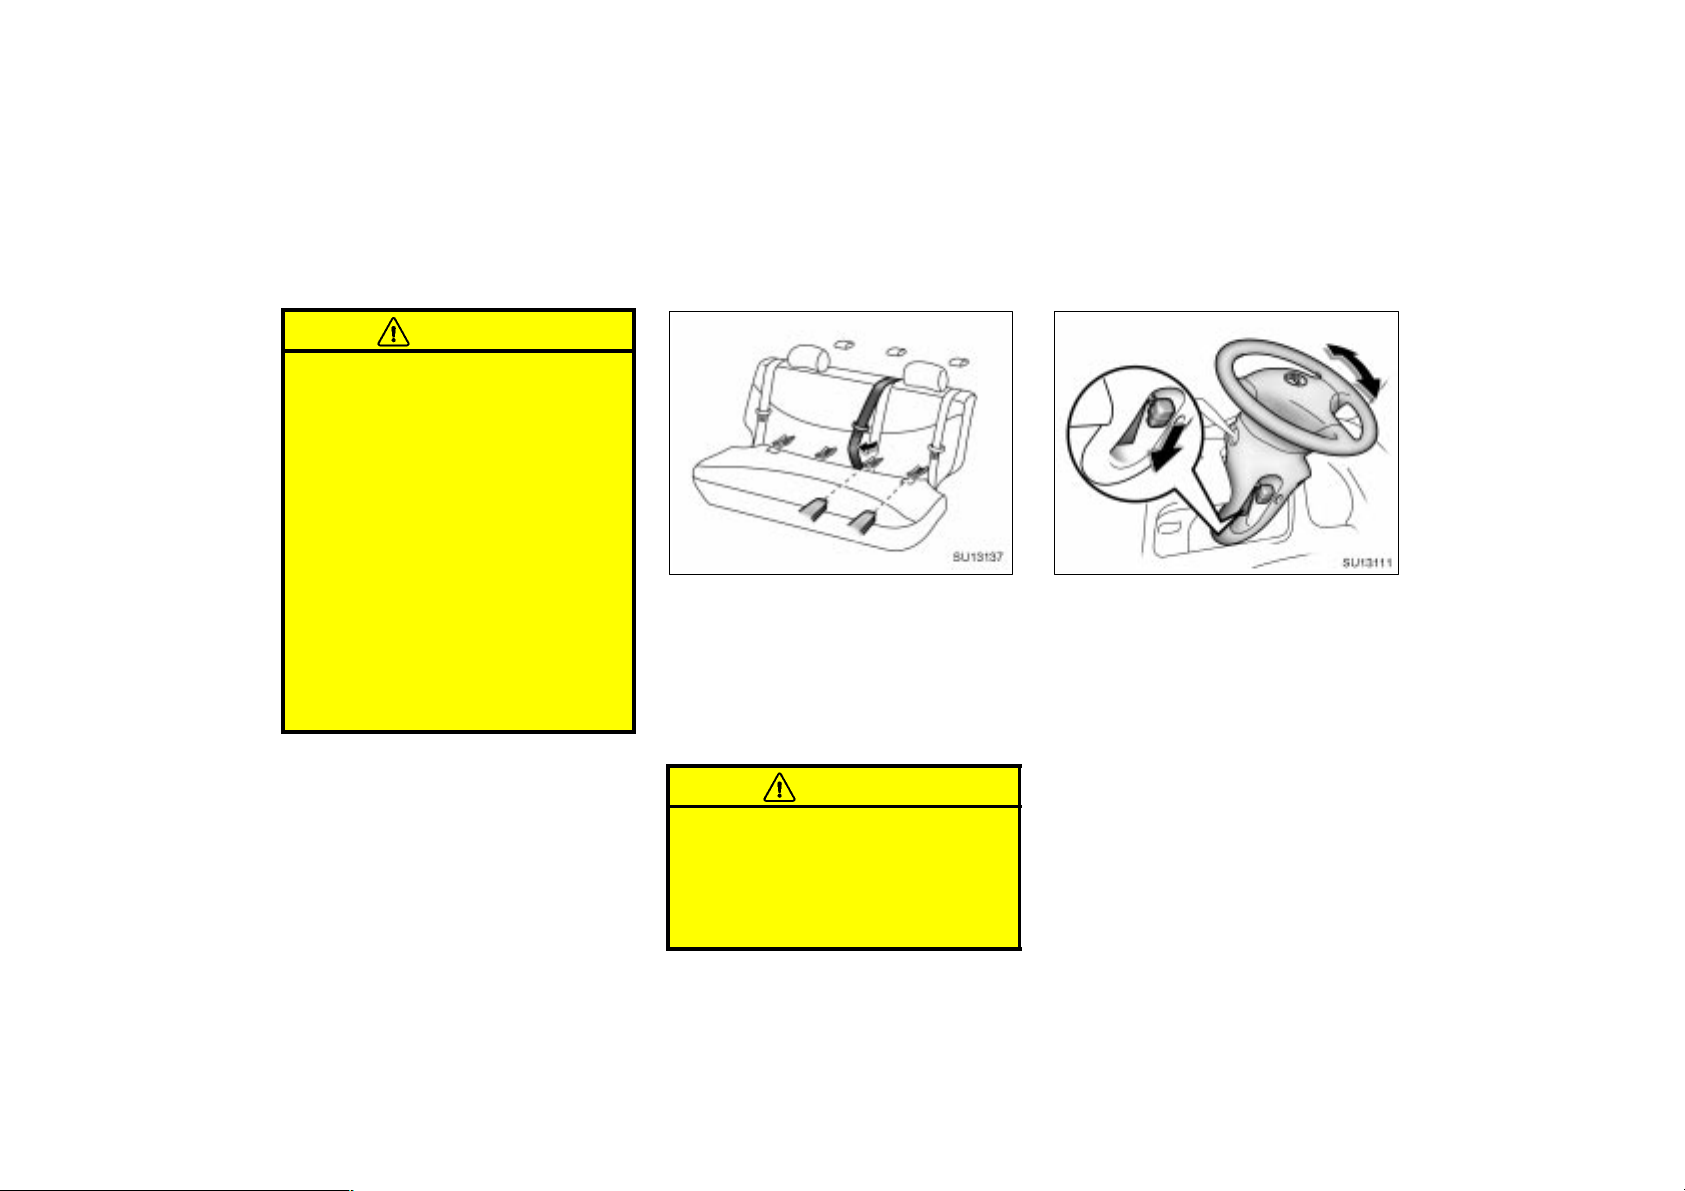
CAUTION
When using the lower anchorages
for the child restraint system, be
sure that there are no irregular objects around the anchorages or that
the seat belt is not caught.
Push and pull the child restraint
system in different directions to be
sure it is secure. Follow all the
installation instructions provided by
its manufacturer.
Do not put a child restraint system
on the rear seat if it interferes with
the lock mechanism of the front
seats. This can cause severe injury
to the child and front passenger in
case of sudden braking or a collision.
2001MY ECHO (U) L/O0008
SU13137
On the vehicle with non–separate non–
foldable fixed type seatback, a seat belt
for the rear center seat is prepared in the
front of a lower anchor. Therefore, in case
of fixing the child restraint system to the
rear left seat, slide the seat belt for the
rear center seat as shown in the illustration and fix it to the lower anchor.
Tilt steering wheel
SU13111
To change the steering wheel angle,
hold the steering wheel, push down the
lock release lever, tilt the steering
wheel to the desired angle and return
the lever to its original position.
CAUTION
When installing the child restraint
system, pay attention not to catch a
seat belt and other irregular objects.
Otherwise, this can cause severe injury to the child in case of a sudden
braking or collision.
2001 ECHO (OM52440U)
67
Page 68
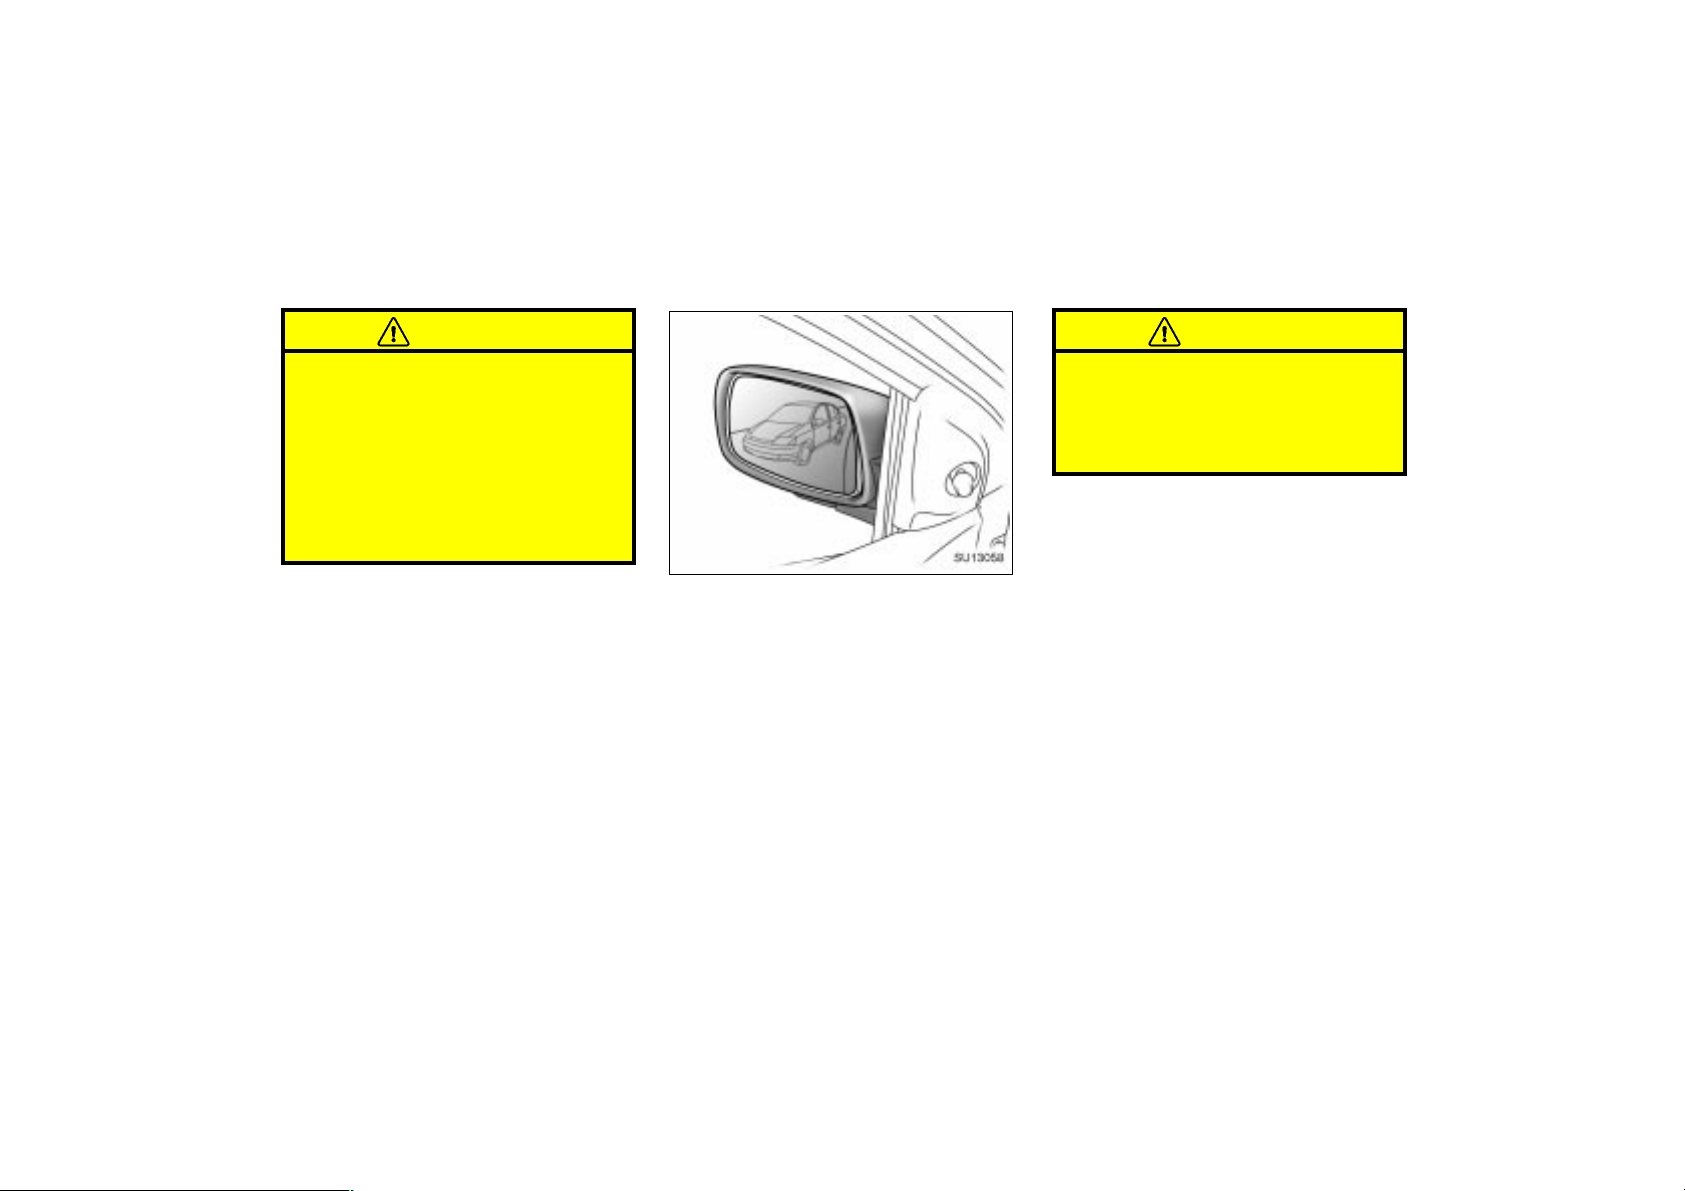
2001MY ECHO (U) L/O0008
Outside rear view mirrors—
CAUTION
Do not adjust the steering wheel
while the vehicle is moving. It may
cause the driver to mishandle the
vehicle and an accident may occur
resulting in death or serious injuries.
After adjusting the steering wheel,
try moving it up and down to make
sure it is locked in position.
SU13058
Adjust the mirror so that you can just
see the side of your vehicle in the mirror.
Be careful when judging the size or distance of any object seen in the outside
rear view mirror on the passenger’s side.
It is a convex mirror with a curved surface. Any object seen in a convex mirror
will look smaller and farther away than
when seen in a flat mirror.
CAUTION
Do not adjust the mirror while the
vehicle is moving. It may cause the
driver to mishandle the vehicle and
an accident may occur resulting in
death or serious injuries.
68
2001 ECHO (OM52440U)
Page 69
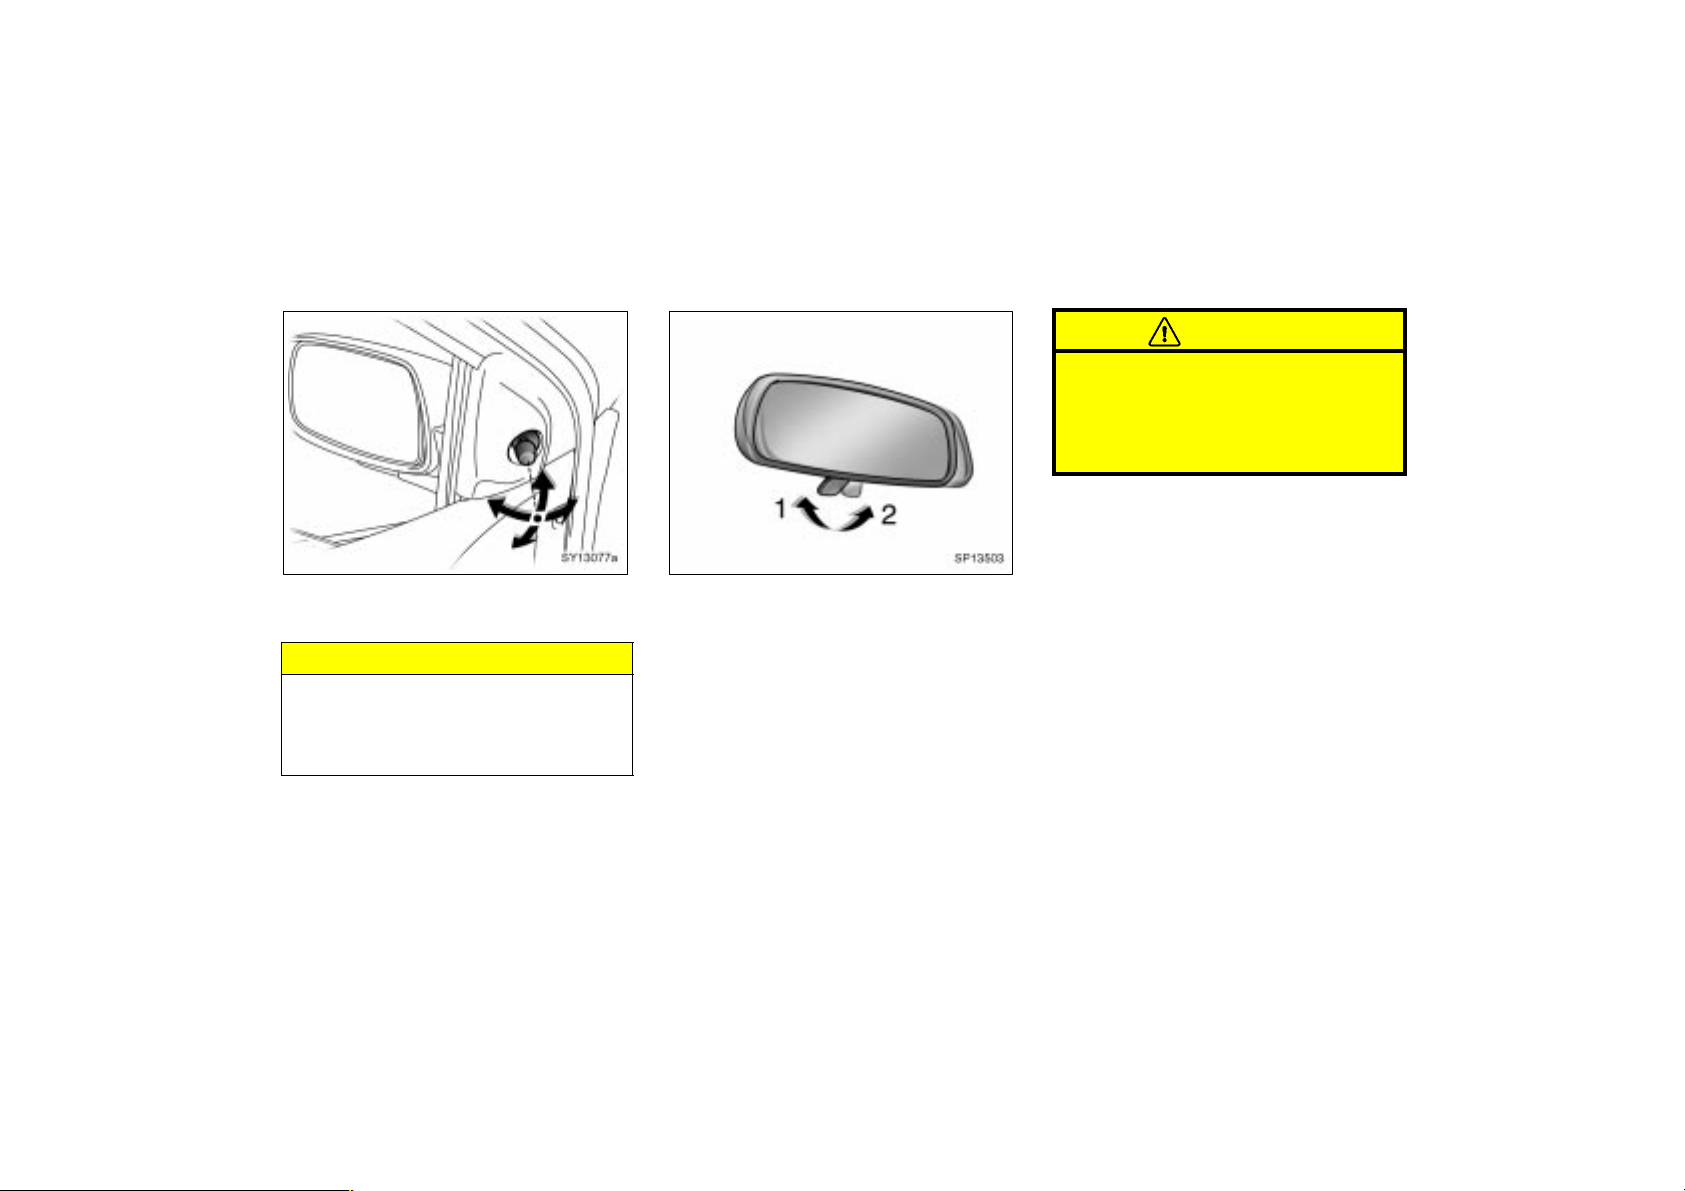
2001MY ECHO (U) L/O0008
—Rear view mirror remote
control
SY13077a
To adjust the rear view mirror, simply
operate the control lever.
NOTICE
If ice should jam the mirror, do not
operate the control or scrape the mirror face. Use a spray de–icer to free
the mirror.
Anti–glare inside rear view
mirror
SP13503
Adjust the mirror so you can just see
the rear of your vehicle in the mirror.
To reduce glare from the headlights of
the vehicle behind you during night
driving, operate the lever on the lower
edge of the mirror.
Daylight driving—Lever at position 1
The reflection in the mirror has greater
clarity at this position.
Night driving—Lever at position 2
Remember that by reducing glare you also
lose some rear view clarity.
CAUTION
Do not adjust the mirror while the
vehicle is moving. It may cause the
driver to mishandle the vehicle and
an accident may occur resulting in
personal injuries.
2001 ECHO (OM52440U)
69
Page 70
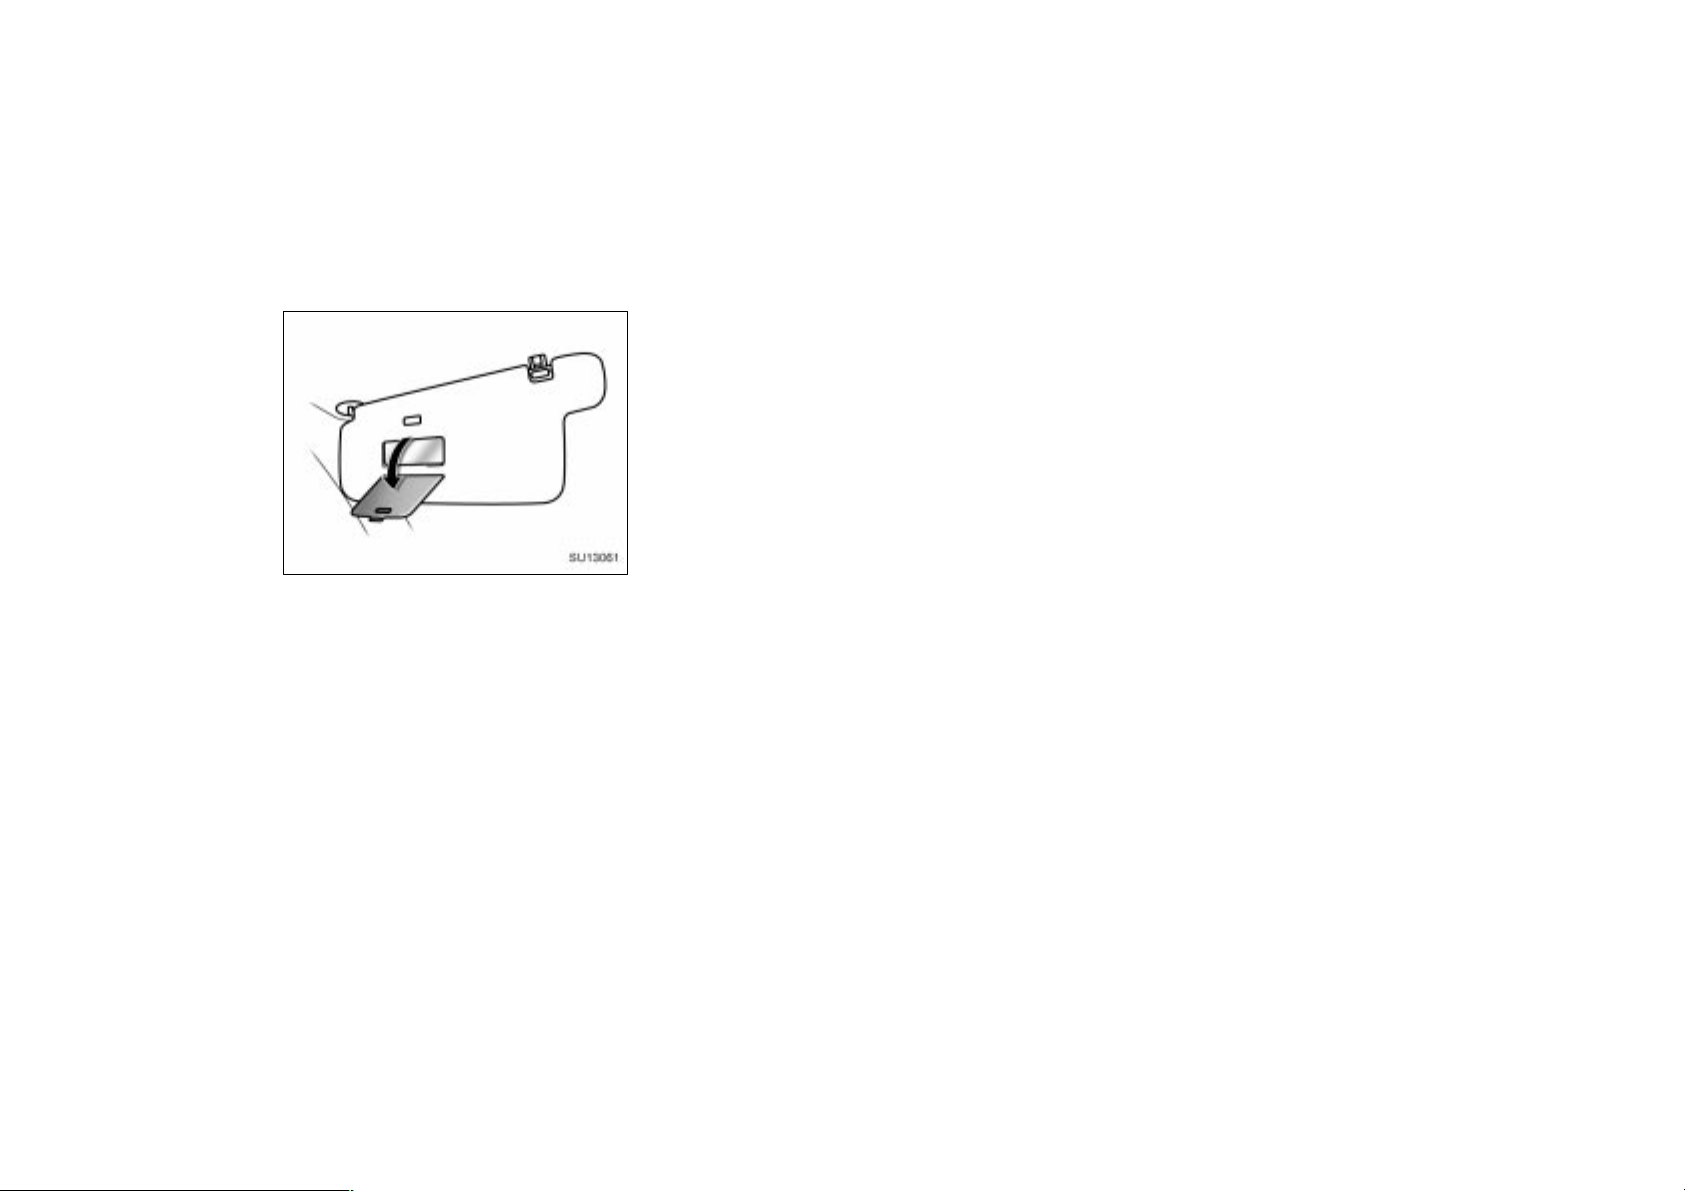
Vanity mirror
SU13061
To use the vanity mirrors, swing down
the sun visor and open the cover.
2001MY ECHO (U) L/O0008
70
2001 ECHO (OM52440U)
Page 71

2001MY ECHO (U) L/O0008
SECTION 1–
OPERATION OF INSTRUMENTS AND
CONTROLS
Lights, Wipers and Defogger
Headlights a nd turn signals 72. . . . . . . . . . . . . . . . . . . . . . . . . . . . . . . . . . .
Emergency flashers 73. . . . . . . . . . . . . . . . . . . . . . . . . . . . . . . . . . . . . . . . . .
Instrument panel light cont rol 74. . . . . . . . . . . . . . . . . . . . . . . . . . . . . . . . .
Interior light 74. . . . . . . . . . . . . . . . . . . . . . . . . . . . . . . . . . . . . . . . . . . . . . . . .
Windshield wipers and washer 74. . . . . . . . . . . . . . . . . . . . . . . . . . . . . . . .
Rear window defogger 75. . . . . . . . . . . . . . . . . . . . . . . . . . . . . . . . . . . . . . .
4
2001 ECHO (OM52440U)
71
Page 72
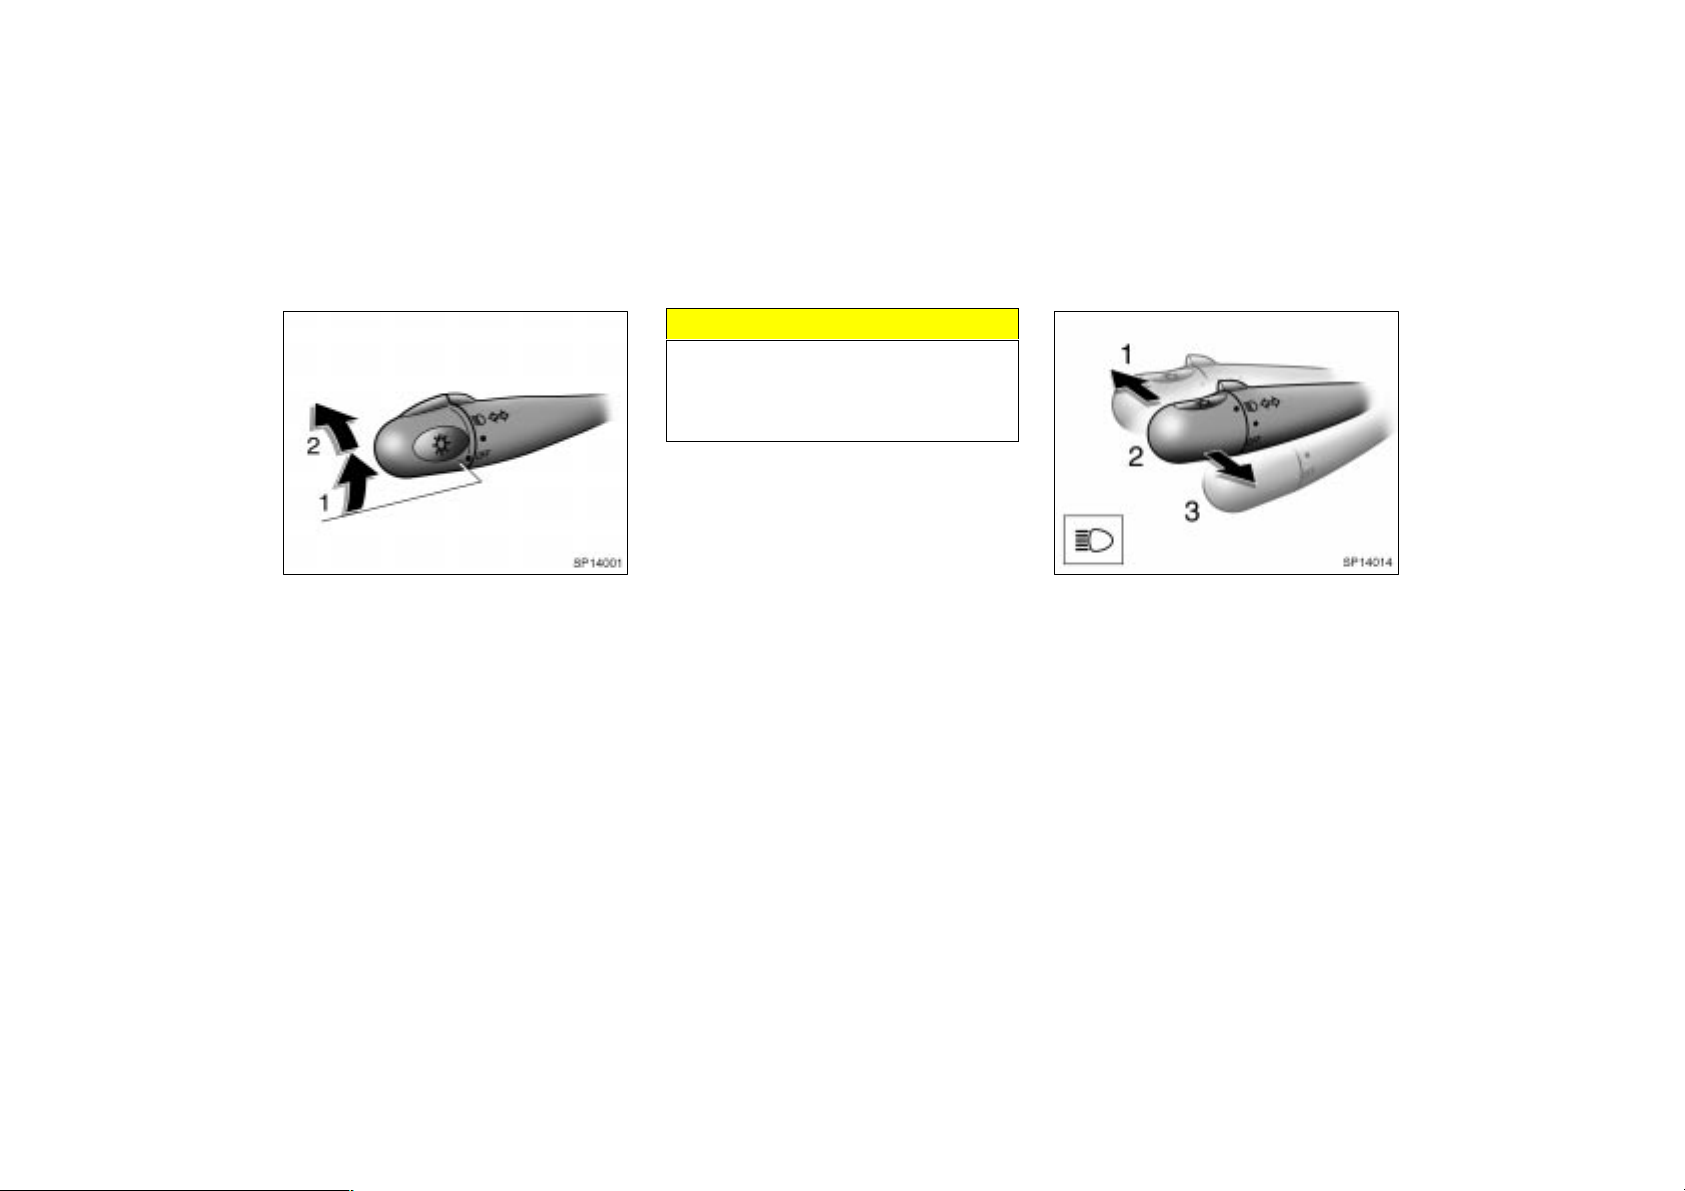
Headlights and turn signals
SP14001
HEADLIGHTS
To turn on the following lights: Twist
the headlight/turn signal lever knob.
Position 1—Parking, tail, license plate,
side marker and instrument panel lights
Position 2—Headlights and all of the
above
Light reminder buzzer
A buzzer will remind you to turn the lights
off when the driver’s door is opened if you
remove the key with the headlights and
tail lights left on.
2001MY ECHO (U) L/O0008
NOTICE
To prevent the battery from being discharged, do not leave the lights on
for a long period when the engine is
not running.
Daytime running light system
The headlights turn on at reduced intensity when the parking brake is released with
the engine started, even with the light
switch in the “OFF” position. They will not
go off until the ignition switch is turned
off.
To turn on the other exterior lights and
instrument panel lights, twist the knob to
the position 1.
Twist the knob to the position 2 to turn
the headlights to full intensity for driving
at night.
Vehicles for the U. S. A.: The headlights
automatically turn to full intensity in the
twilight even with the light switch in the
“OFF” position.
SP14014
High–Low beams—For high beams, turn
the headlights on and push the lever away
from you (position 1). Pull the lever toward you (position 2) for low beams.
The headlight high beam indicator light
(blue light) on the instrument panel will
tell you that the high beams are on.
Flashing the high beam headlights
(position 3)—Pull the lever all the way
back. The high beam headlights turn off
when you release the lever.
You can flash the high beam headlights
with the knob turned to “OFF”.
72
2001 ECHO (OM52440U)
Page 73
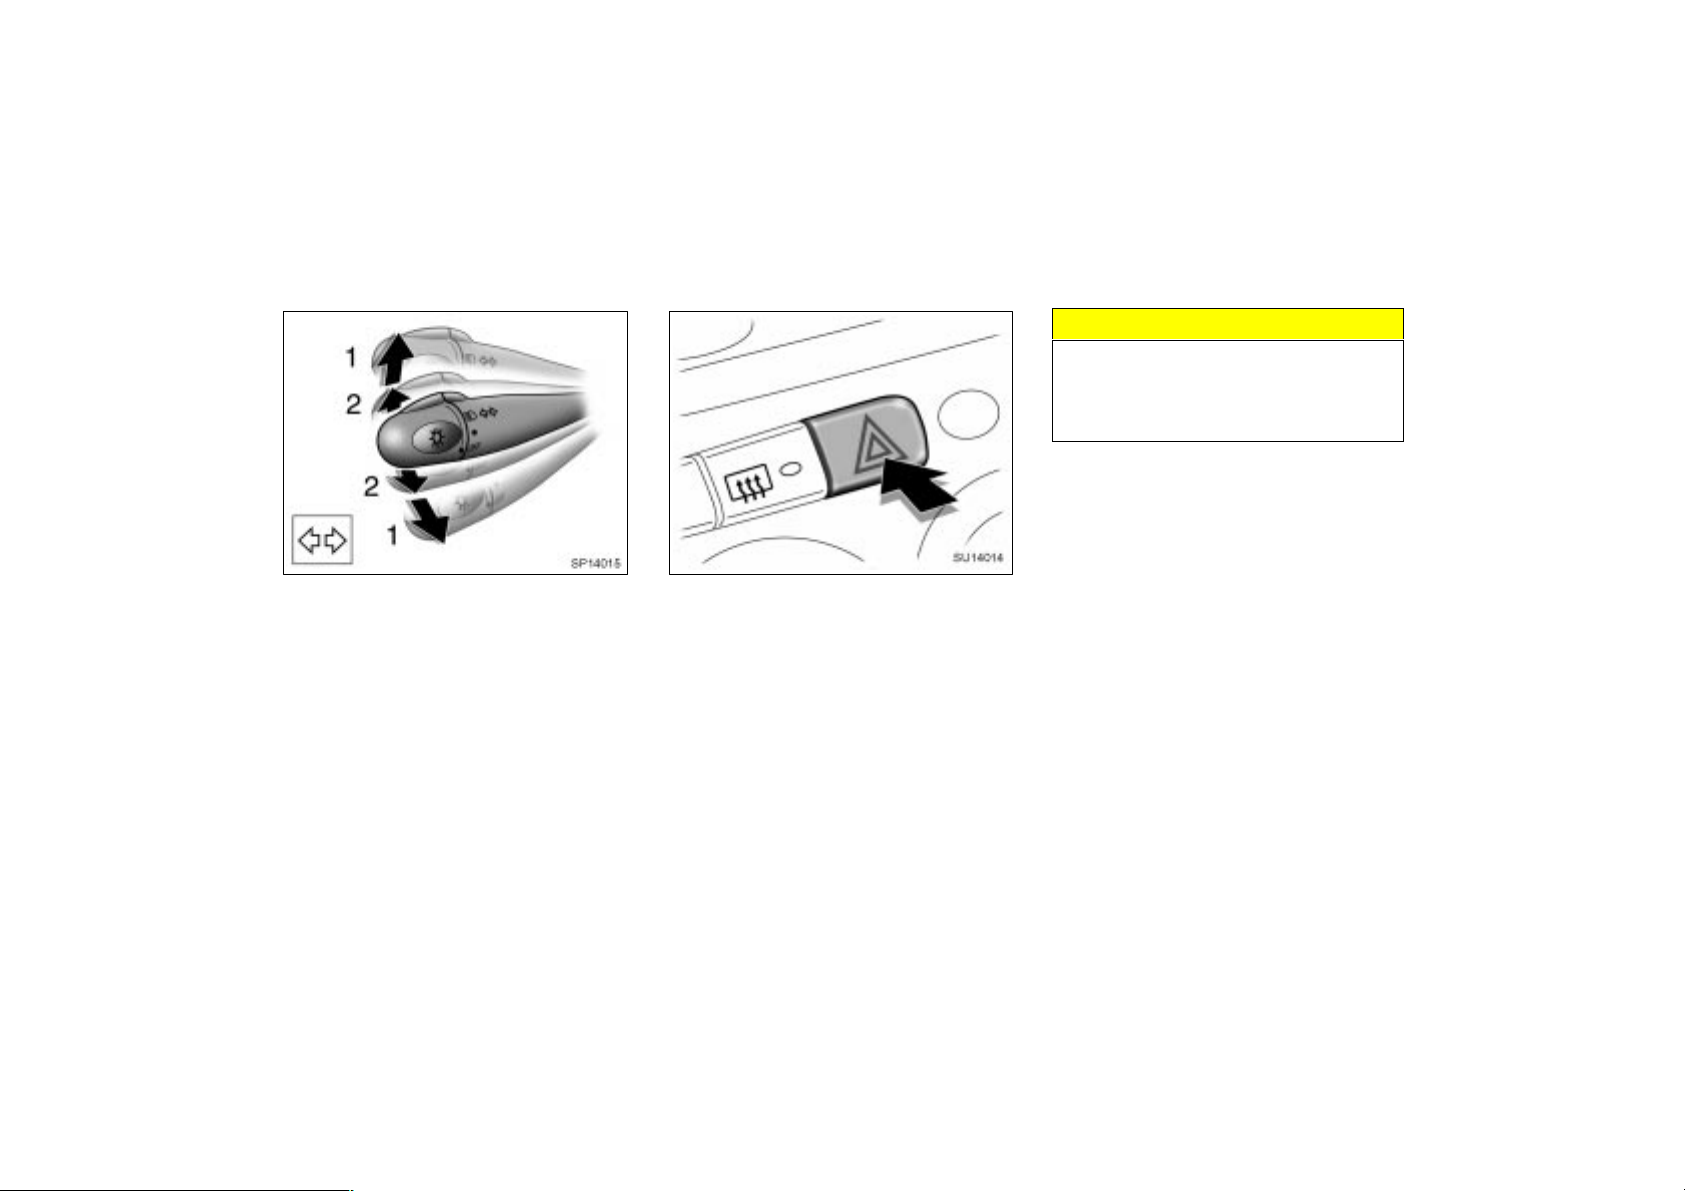
SP14015
2001MY ECHO (U) L/O0008
Emergency flashers
NOTICE
To prevent the battery from being discharged, do not leave the switch on
longer than necessary when the engine is not running.
SU14014
TURN SIGNALS
To signal a turn, push the headlight/
turn signal lever up or down to position
1.
The key must be in the “ON” position.
The lever automatically returns after you
make a turn, but you may have to return
it by hand after you change lanes.
To signal a lane change, move the lever
up or down to the pressure point (position
2) and hold it.
If the turn signal indicator lights (green
lights) on the instrument panel flash faster
than normal, a front or rear turn signal
bulb is burned out.
To turn on the emergency flashers,
push the switch.
All the turn signal lights will flash. To turn
them off, push the switch once again.
Turn on the emergency flashers to warn
other drivers if your vehicle must be
stopped where it might be a traffic hazard.
Always pull as far off the road as possible.
The turn signal light switch will not work
when the emergency flashers are operating.
2001 ECHO (OM52440U)
73
Page 74
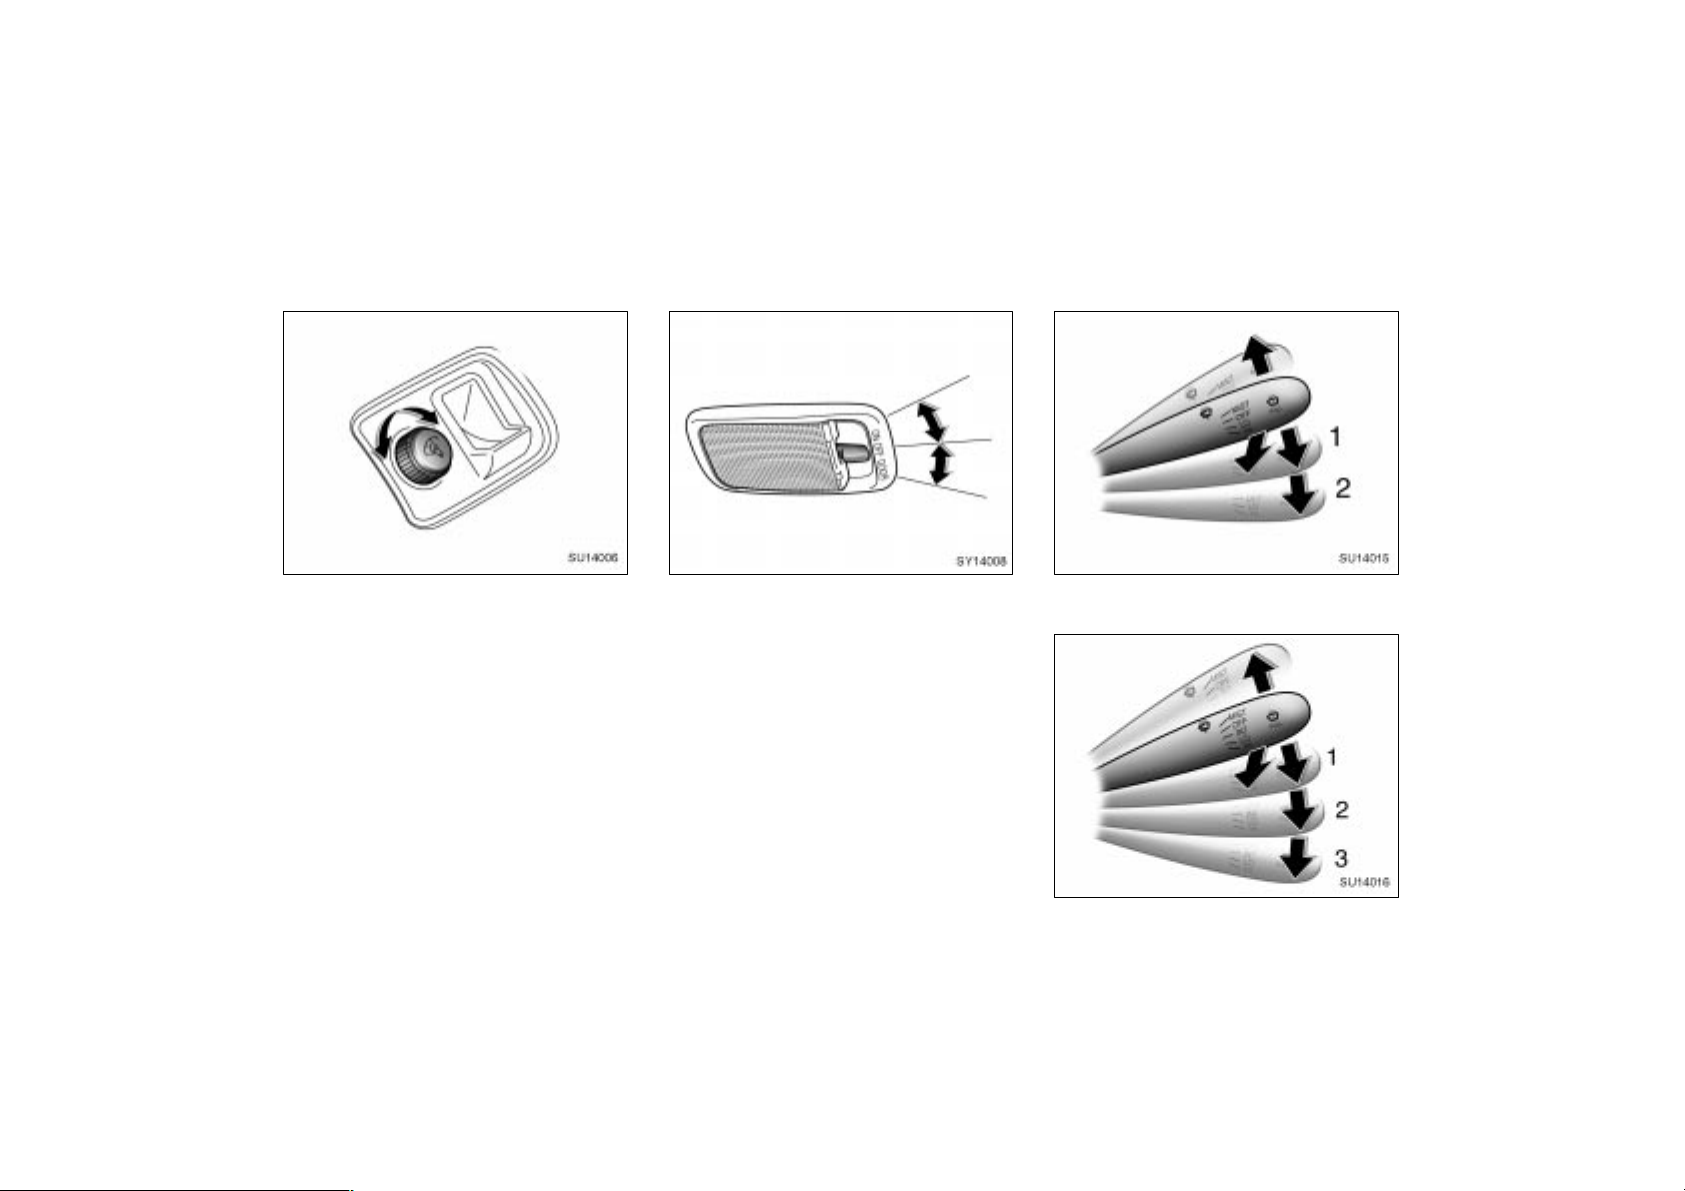
Instrument panel light control
Interior light
2001MY ECHO (U) L/O0008
Windshield wipers and
washer
SU14006
To adjust the brightness of the instrument panel lights, turn the knob.
74
SU14007
To turn on the interior light, slide the
switch.
The interior light switch has the following
positions:
“ON”—Keeps the light on all the time.
“OFF”—Turns the light off.
“DOOR”—Turns the light on when any of
the door is opened. The light remains on
for a certain time after all the doors are
closed. When all the doors are locked or
the ignition switch is turned to “ACC” or
“ON” after all the doors are closed, the
light fades out.
2001 ECHO (OM52440U)
SU14015
Type A
SU14016
Type B
Page 75
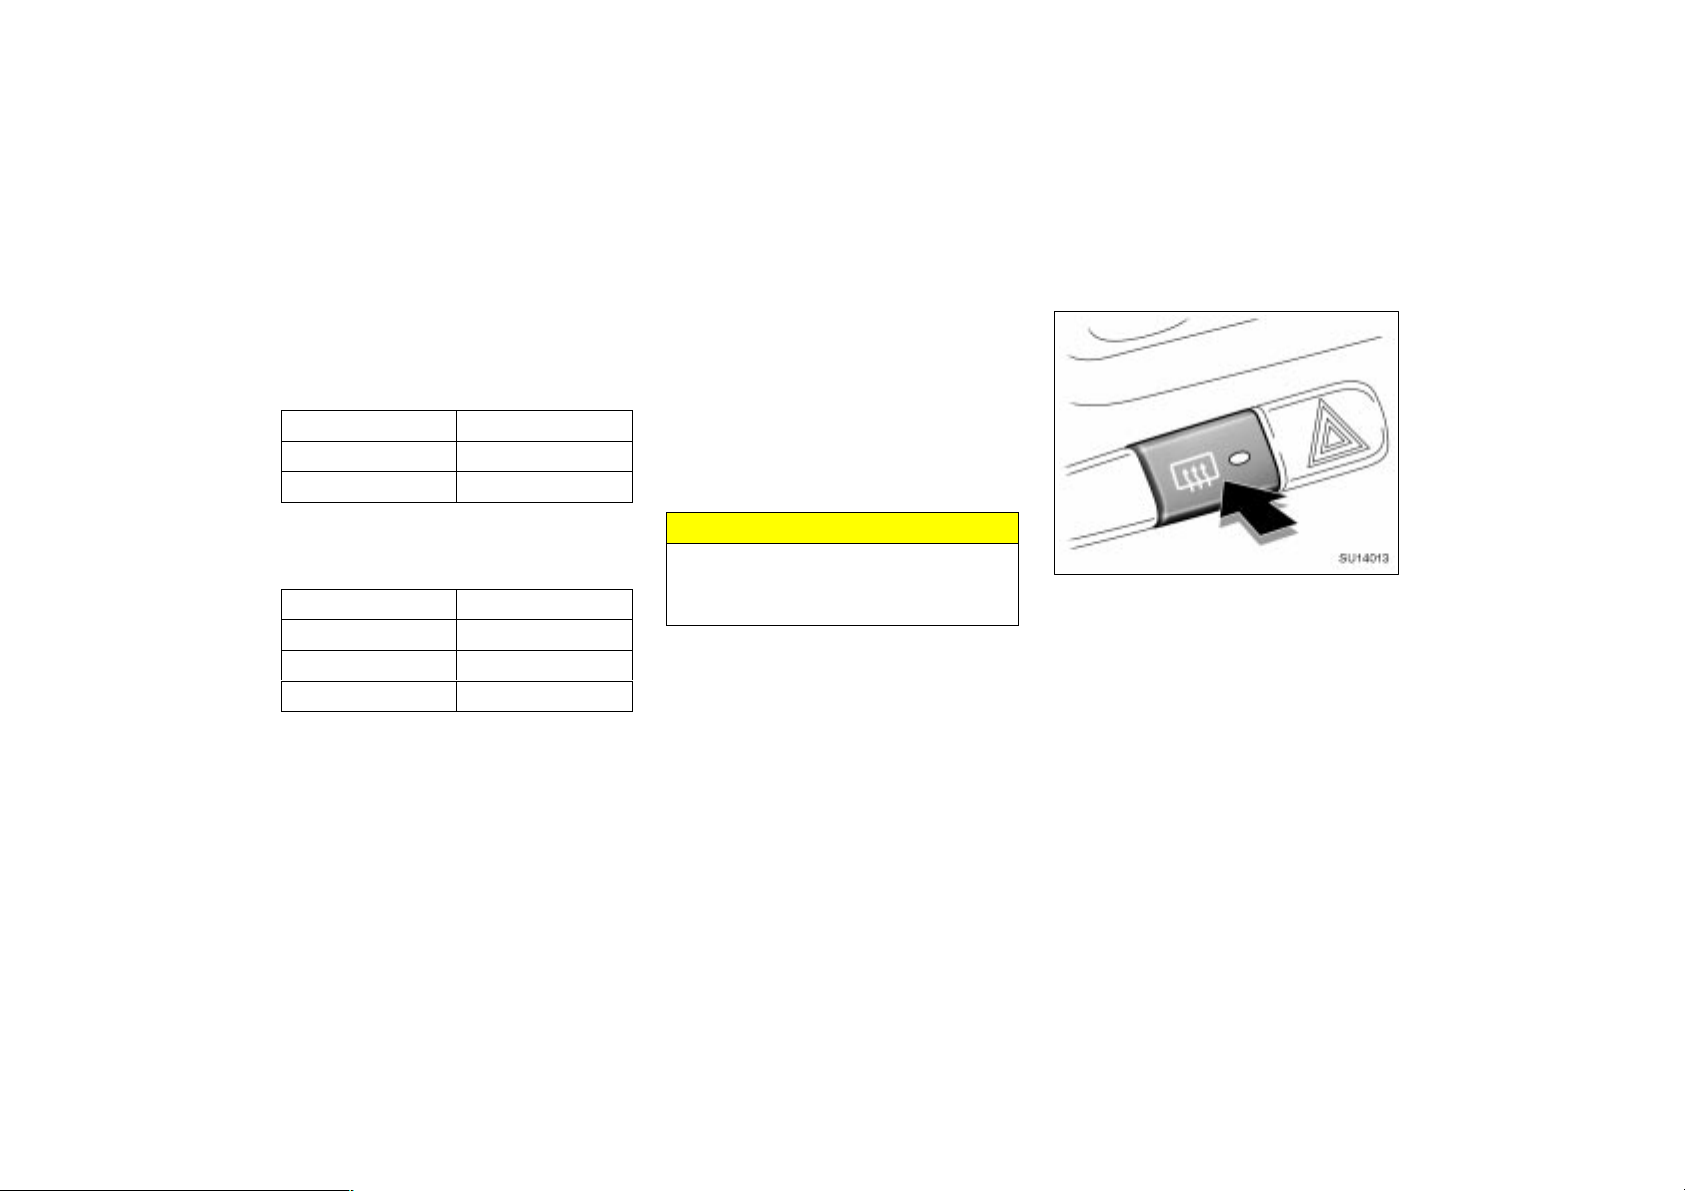
To turn on the windshield wipers, move
the lever to the desired setting.
The key must be in the “ON” position.
Type A—
Lever position
Positi on 1 Slow
Positi on 2 Fast
For a single sweep of the windshield,
push the lever up and release it.
Type B—
Lever position
Positi on 1 Intermittent
Positi on 2 Slow
Positi on 3 Fast
For a single sweep of the windshield,
push the lever up and release it.
Speed setting
Speed setting
2001MY ECHO (U) L/O0008
To squirt washer fluid, pull the lever
toward you.
For instructions on adding washer fluid,
see “Adding washer fluid” in Section 7–3.
In freezing weather, warm the windshield
with the defroster before using the washer.
This will help prevent the washer fluid
from freezing on your windshield, which
can block your vision.
NOTICE
Do not operate the wipers if the windshield is dry. It may scratch the
glass.
Rear window defogger
SU14013
To defog or defrost the rear window,
push the switch.
The key must be in the “ON” position.
The thin heater wires on the inside of the
rear window will quickly clear the surfaces. An indicator light will illuminate to
indicate the defogger is operating.
Push the switch once again to turn the
defogger off.
On some models, the system will automatically shut off after the defogger has operated about 15 minutes.
2001 ECHO (OM52440U)
75
Page 76
Make sure you turn the defogger off when
the window is clear. Leaving the defogger
on for a long time could cause the battery
to discharge, especially during stop–and–
go driving. The defogger is not designed
for drying rain water or for melting snow.
NOTICE
To prevent the battery from being
discharged, turn the switch on
when the engine is running.
When cleaning the inside of the
rear window, be careful not to
scratch or damage the heater wires
or connectors.
2001MY ECHO (U) L/O0008
76
2001 ECHO (OM52440U)
Page 77

2001MY ECHO (U) L/O0008
SECTION 1–
OPERATION OF INSTRUMENTS AND
CONTROLS
Gauges, Meters and Service reminder indicators
Fuel gauge 78. . . . . . . . . . . . . . . . . . . . . . . . . . . . . . . . . . . . . . . . . . . . . . . . .
Engine coolant temperature indicator and warning l ight 78. . . . . . . . . .
Odometer and two trip meters 79. . . . . . . . . . . . . . . . . . . . . . . . . . . . . . . . .
Service reminder indi cators and w arning buzzers 80. . . . . . . . . . . . . . .
5
2001 ECHO (OM52440U)
77
Page 78
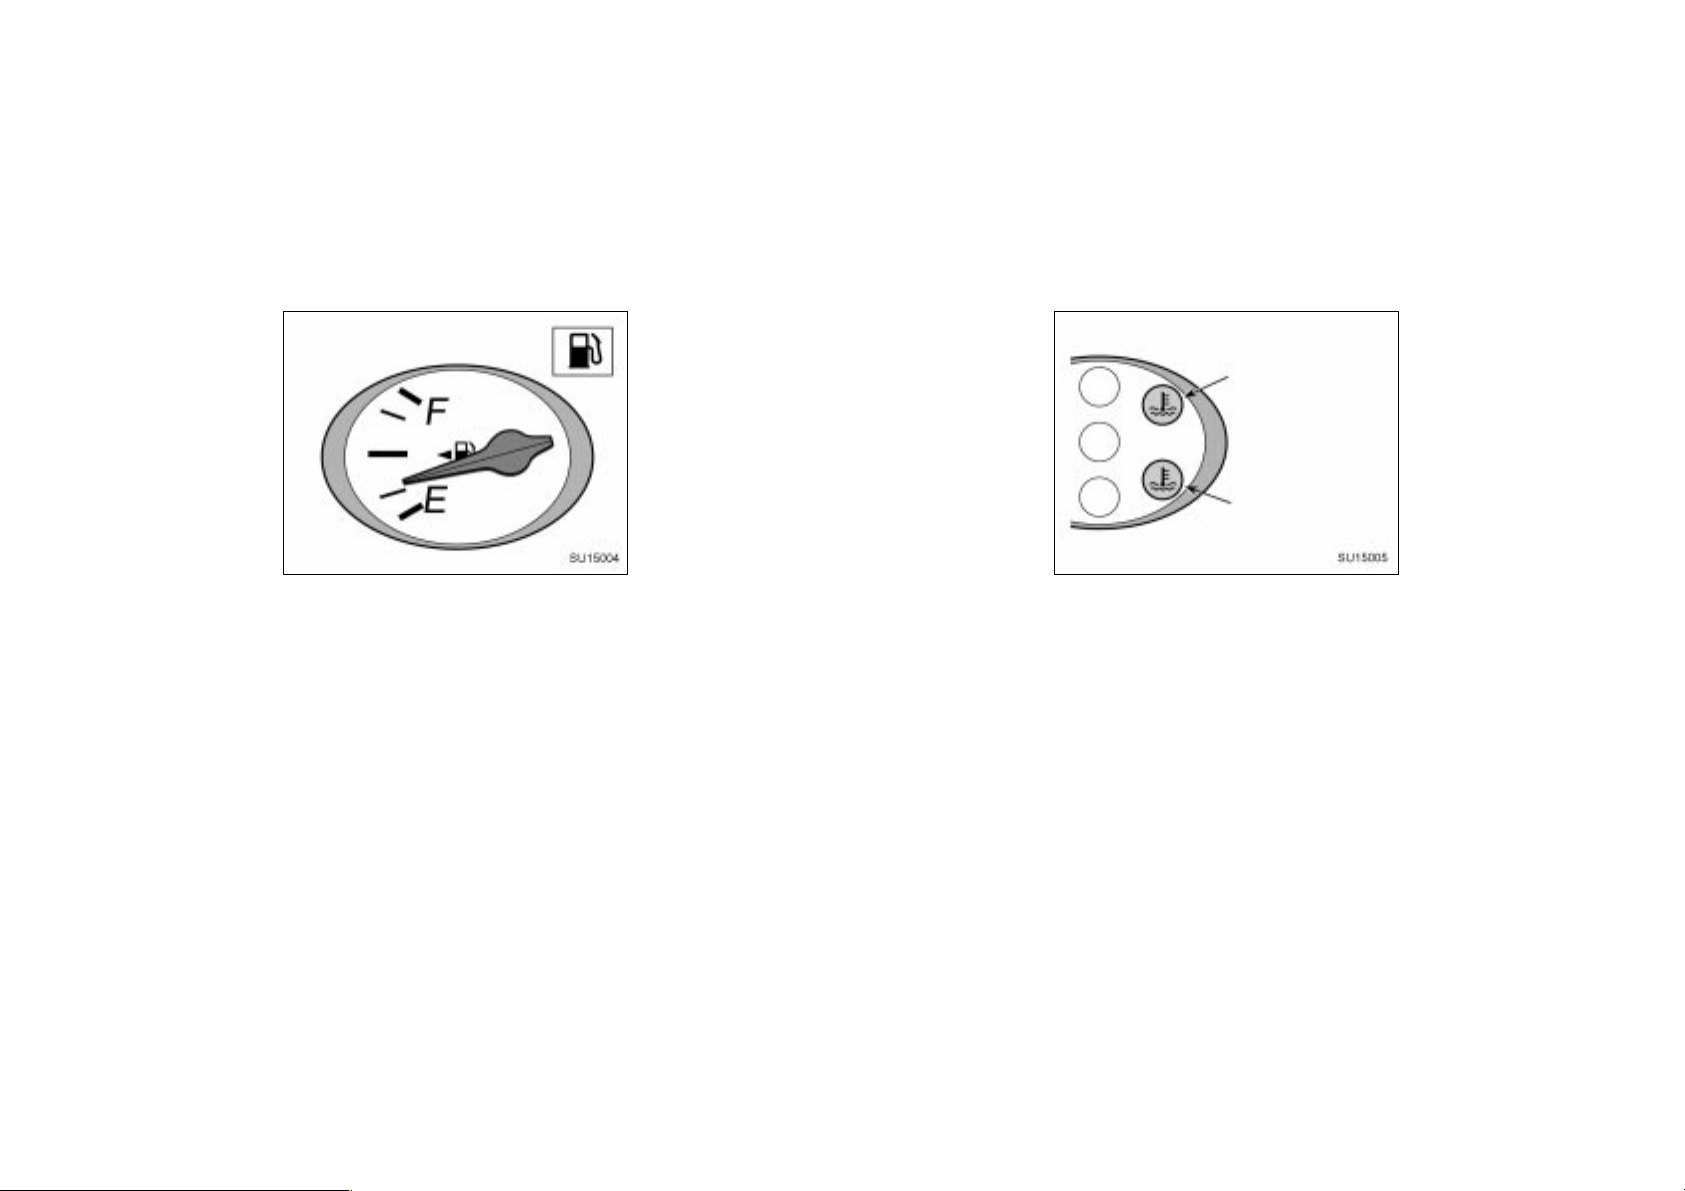
Fuel gauge
SU15004
2001MY ECHO (U) L/O0008
If the fuel tank is completely empty, the
malfunction indicator lamp comes on. Fill
the fuel tank immediately.
The indicator lamp goes off after driving
several times. If the indicator lamp does
not go off, contact your Toyota dealer as
soon as possible.
Engine coolant temperature
indicator and warning light
High engine coolant
temperature
warning light in red
SU15005
Low engine
coolant
temperature
indicator light in
blue
The gauge works when the ignition
switch is on and indicates the approximate quantity of fuel remaining in the
tank.
Nearly full—Needle at “F”
Nearly empty—Needle at “E”
It is a good idea to keep the tank over
1/4 full.
If the fuel level approaches “E” or the low
fuel level warning light flashes, fill the fuel
tank as soon as possible.
On inclines or curves, due to the movement of fuel in the tank, the fuel gauge
needle may fluctuate or the low fuel level
warning light may come on earlier than
usual.
78
The indicator and warning lights indicate the engine coolant temperature
when the ignition switch is on. The engine operating temperature will vary
with changes in weather and engine
load.
The high engine coolant temperature warning light will come on when the ignition
key is turned to the “ON” position. After
a few seconds, the light will go off.
If your engine coolant temperature is cool
with the ignition switch on, the low engine
coolant temperature indicator light comes
on. If it keeps lighting on with the engine
fully warmed, contact your Toyota dealer
as soon as possible to service the vehicle.
2001 ECHO (OM52440U)
Page 79
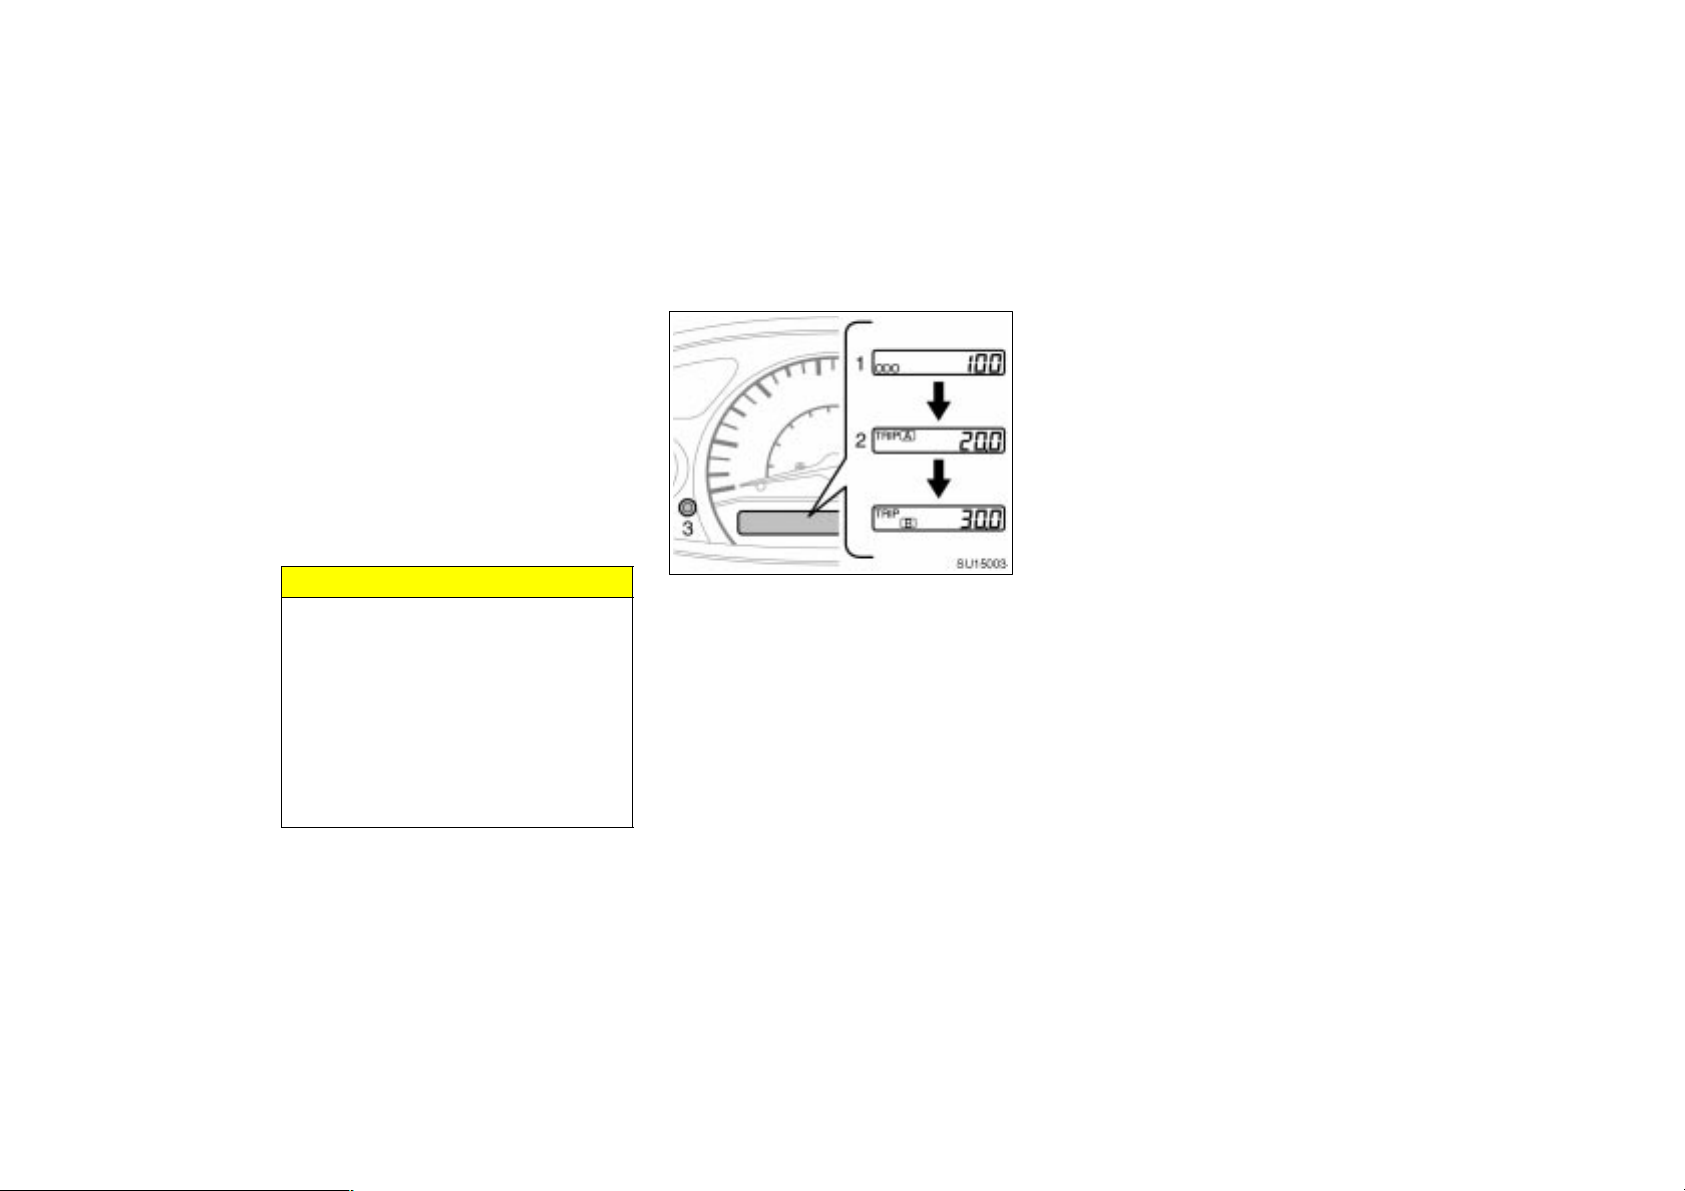
If the high engine coolant temperature
warning light flashes, your engine is too
hot. If your vehicle overheats, stop your
vehicle and allow the engine to cool.
Your vehicle may overheat during severe
operating conditions, such as:
Driving up a long hill on a hot day.
Reducing speed or stopping after high
speed driving.
Idling for a long period with the air
conditioning on in stop–and–go traffic.
NOTICE
Do not remove the thermostat in
the engine cooling system as this
may cause the engine to overheat.
The thermostat is designed to control the flow of coolant to keep the
temperature of the engine within
the specified operating range.
Do not continue driving with an
overheated engine. See “If your
vehicle overheats” in Section 4.
2001MY ECHO (U) L/O0008
Odometer and two trip meters
SU15003
This meter displays the odometer and
two trip meters.
1. Odometer—Shows the total distance
the vehicle has been driven.
2. Two trip meters—Shows two different
distances independently driven since
the last time each trip meter was set
to zero.
You can use one trip meter to calculate
the fuel economy and the other to
measure the distance on each trip. All
trip meter data is cancelled if the electrical power source is disconnected.
3. Trip meter reset knob—It can reset the
two trip meters to zero, and also
change the meter display.
To change the meter display, quickly
push and release the knob. The meter
display changes in the order from the
odometer to trip meter A to trip meter
B, then back to the odometer each
time you push.
To reset the trip meter A to zero, display the meter A reading, then push
and hold the knob until the meter is
set to zero. The same process can be
applied for resetting the trip meter B.
2001 ECHO (OM52440U)
79
Page 80
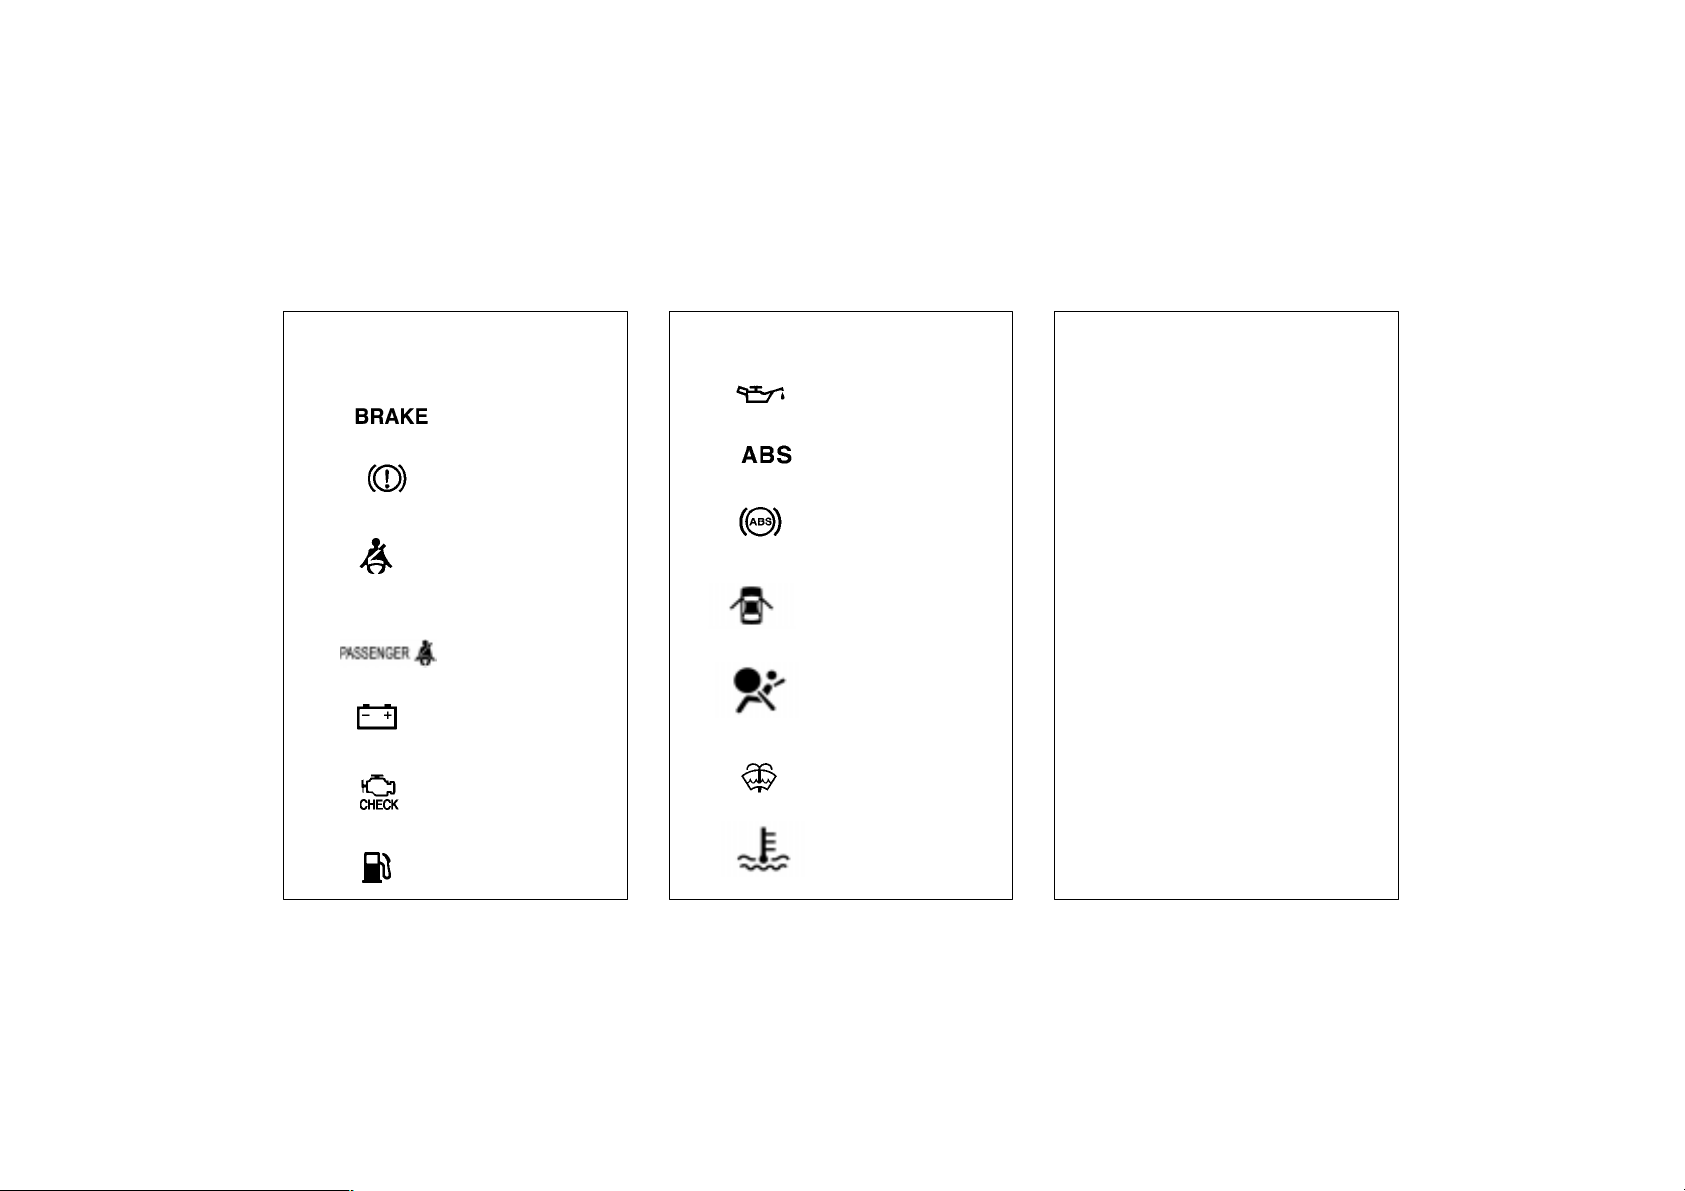
Service reminder indicators
and warning buzzers
2001MY ECHO (U) L/O0008
If the indicator or
buzzer comes on...
(a) If parking brake
or
(b) Fas ten driver ’s
(Indicator and buzzer)
(c) Fasten front
(d) Stop and check.
(e) Take vehicle to
(f) Fill up tank.
Do this.
is off, stop
immediately and
contact Toyota
dealer.
seat belt.
passenger’s
seat belt.
Toy ota dealer.
If the indicator or
buzzer comes on...
(g) Stop and check.
(h) Take vehicle to
or
(i) Close all doors.
(j) Take vehicle to
(k) Add washer
fluid.
(l) Stop and check.
(in red)
Do this.
Toy ota dealer.
Toy ota dealer
immediately.
If the indicator or
buzzer comes on...
Key reminder
(m) Remove key.
buzzer
(n) Turn off lights.Light reminder
buzzer
Do this.
80
2001 ECHO (OM52440U)
Page 81
2001MY ECHO (U) L/O0008
(a) Brake System Warning Light
This light comes on in the following cases
when the ignition key is in the “ON” position.
When the parking brake is applied...
When the brake fluid level is low...
CAUTION
It is dangerous to continue driving
normally when the brake fluid level is
low.
Have your vehicle checked at your
Toyota dealer in the following cases:
The light does not come on even if the
parking brake is applied when the ignition
key is in the “ON” position.
CAUTION
If the light does not turn off even
after the parking brake is released
while the engine is running, immediately stop your vehicle at a safe
place and contact your Toyota dealer.
In this case, the brakes may not work
properly and your stopping distance
will become longer. Depress the brake
pedal firmly and bring the vehicle to
an immediate stop.
(b) Driver’s Seat Belt Reminder Light
and Buzzer
This light and buzzer remind you to
buckle up the driver’s seat belt.
Once the ignition key is turned to “ON” or
“START”, the reminder light and buzzer
come on if the driver’s seat belt is not
fastened. Unless the driver fastens the
belt, the light stays on and the buzzer
stops after about 4 to 8 seconds.
(c) Front Passenger’s Seat Belt
Reminder Light
This light reminds you to buckle up the
front passenger’s seat belt.
Once the ignition key is turned to “ON” or
“START”, the reminder light comes on if
a passenger sits in the front passenger
seat and does not fasten the seat belt.
Unless the front passenger fastens the
belt, the light stays on. This light reminds
you to buckle up, the front passenger’s
seat belt.
If luggage load is placed on the front
passenger seat, depending on its weight
and how it is placed on the seat, built–in
sensors in the seat cushion may detect
the pressure, causing the reminder light to
come on.
(d) Discharge Warning Light
This light warns that the battery is being
discharged.
If it comes on while you are driving, there
is a problem somewhere in the charging
system.
The engine ignition will continue to operate, however, until the battery is discharged. Turn off the air conditioning,
blower, radio, etc., and drive directly to
the nearest Toyota dealer or repair shop.
NOTICE
Do not continue driving if the engine
drive belt is broken or loose.
2001 ECHO (OM52440U)
81
Page 82
2001MY ECHO (U) L/O0008
(e) Malfunction Indicator Lamp
This lamp comes on in the following
cases.
a. The fuel tank is completely empty.
(See “Fuel gauge” in this section for
instructions.)
b. The fuel tank cap is not tightened se-
curely. (See “Fuel tank cap” in Section
1–2 for instructions.)
c. There is a problem somewhere in your
engine or automatic transmission electrical system.
If it comes on while you are driving in
case c, have your vehicle checked/repaired by your Toyota dealer as soon as
possible.
(f) Low Fuel Level Warning Light
This light comes on when the fuel level
in the tank becomes nearly empty. Fill up
the tank as soon as possible.
On inclines or curves, due to the movement of fuel in the tank, the low fuel level
warning light may come on earlier than
usual.
(g) Low Oil Pressure Warning Light
This light warns that the engine oil pressure is too low.
If it flickers or stays on while you are
driving, pull off the road to a safe place
and stop the engine immediately. Call a
Toyota dealer or qualified repair shop for
assistance.
The light may occasionally flicker when
the engine is idling or it may come on
briefly after a hard stop. There is no
cause for concern if it then goes out when
the engine is accelerated slightly.
The light may come on when the oil level
is extremely low. It is not designed to
indicate low oil level, and the oil level
must be checked using the level dipstick.
NOTICE
Do not drive the vehicle with the
warning light on—even for one block.
It may ruin the engine.
(h) “ABS” Warning Light
The light comes on when the ignition key
is turned to the “ON” position. If the anti–
lock brake system works properly, the
light turns off after a few seconds. Thereafter, if the system malfunctions, the light
comes on again.
When the “ABS” warning light is on (and
the brake system warning light is off), the
anti–lock brake system does not operate,
but the brake system still operates conventionally.
When the “ABS” warning light is on (and
the brake system warning light is off), the
anti–lock brake system does not operate
so that the wheels could lock up during
a sudden braking or braking on slippery
road surfaces.
If either of the following conditions
occurs, this indicates a malfunction
somewhere in the parts monitored by
the warning light system. Contact your
Toyota dealer as soon as possible to
service the vehicle.
The light does not come on when the
ignition key is turned to the “ON” position, or remains on.
The light comes on while you are driv-
ing.
A warning light turning on briefly during
operation does not indicate a problem.
(i) Open Door Warning Light
This light remains on until all the doors
and back door are completely closed.
82
2001 ECHO (OM52440U)
Page 83
2001MY ECHO (U) L/O0008
(j) SRS Warning Light
This light will come on when the igni-
tion key is turned to the “ON” position.
After about 6 seconds, the light will go
off. This means the system of the airbags and front seat belt pretensioners
are operating properly.
The warning light system monitors the airbag sensor assemblies, front airbag sensors, seat belt pretensioner assemblies,
inflators, warning light, interconnecting wiring and power sources.
If either of the following conditions occurs,
this indicates a malfunction somewhere in
the parts monitored by the warning light
system. Contact your Toyota dealer as
soon as possible to service the vehicle.
The light does not come on when the
ignition key is turned to the “ON” position or remains on.
The light comes on or flashes while
driving.
(k) Low Windshield Washer Fluid Level
Warning Light
The light warns that the windshield washer
fluid level is too low. Add washer fluid at
your earliest opportunity. (For instructions,
see “Adding washer fluid” in Section 7–3.)
The light operates to warn that the engine
is almost overheating.
(l) High Engine Coolant Temperature
Warning Light
The light operates to warn that the engine
is almost overheating.
The light will come on when the ignition
key is turned to the “ON” position. After
a few seconds, the light will go off.
If it flashes while you are driving, stop the
vehicle and check your engine. For detailed instructions, see “If your vehicle
overheats” in Section 4.
NOTICE
Continued driving with the light on
could result in engine overheating.
(m) Key Reminder Buzzer
This buzzer reminds you to remove the
key when you open the driver’s door with
the ignition key in the “ACC” or “LOCK”
position.
2001 ECHO (OM52440U)
(n) Light Reminder Buzzer
This buzzer will sound if the head light
switch is left on and the driver’s door is
opened with the key removed from the
ignition switch.
83
Page 84

2001MY ECHO (U) L/O0008
CHECKING SERVICE REMINDER
INDICATORS (except the low fuel level
warning light and low windshield washer fluid level warning light)
1. Apply the parking brake.
2. Open one of the side doors or back
door.
The open door warning light should
come on.
3. Close the door.
The open door warning light should go
off.
4. Turn the ignition key to “ON”.
The SRS warning light should come on.
It goes off after about 6 seconds.
5. Turn the ignition key to “ON”, but do
not start the engine.
All the service reminder indicators except
the open door warning light and SRS
warning light should come on. The “ABS”
warning light goes off after a few seconds.
If any service reminder indicator or warning buzzer does not function as described
above, either the bulb is burned out or the
circuit is in need of repair. Have it
checked by your Toyota dealer as soon as
possible.
84
2001 ECHO (OM52440U)
Page 85

2001MY ECHO (U) L/O0008
SECTION 1–
OPERATION OF INSTRUMENTS AND
CONTROLS
Ignition switch, Transmission and Parking brake
Ignition switch with steering lock 86. . . . . . . . . . . . . . . . . . . . . . . . . . . . . . .
Automatic transmission 87. . . . . . . . . . . . . . . . . . . . . . . . . . . . . . . . . . . . . .
Manual transmission 91. . . . . . . . . . . . . . . . . . . . . . . . . . . . . . . . . . . . . . . . .
Parking brake 92. . . . . . . . . . . . . . . . . . . . . . . . . . . . . . . . . . . . . . . . . . . . . . .
6
2001 ECHO (OM52440U)
85
Page 86
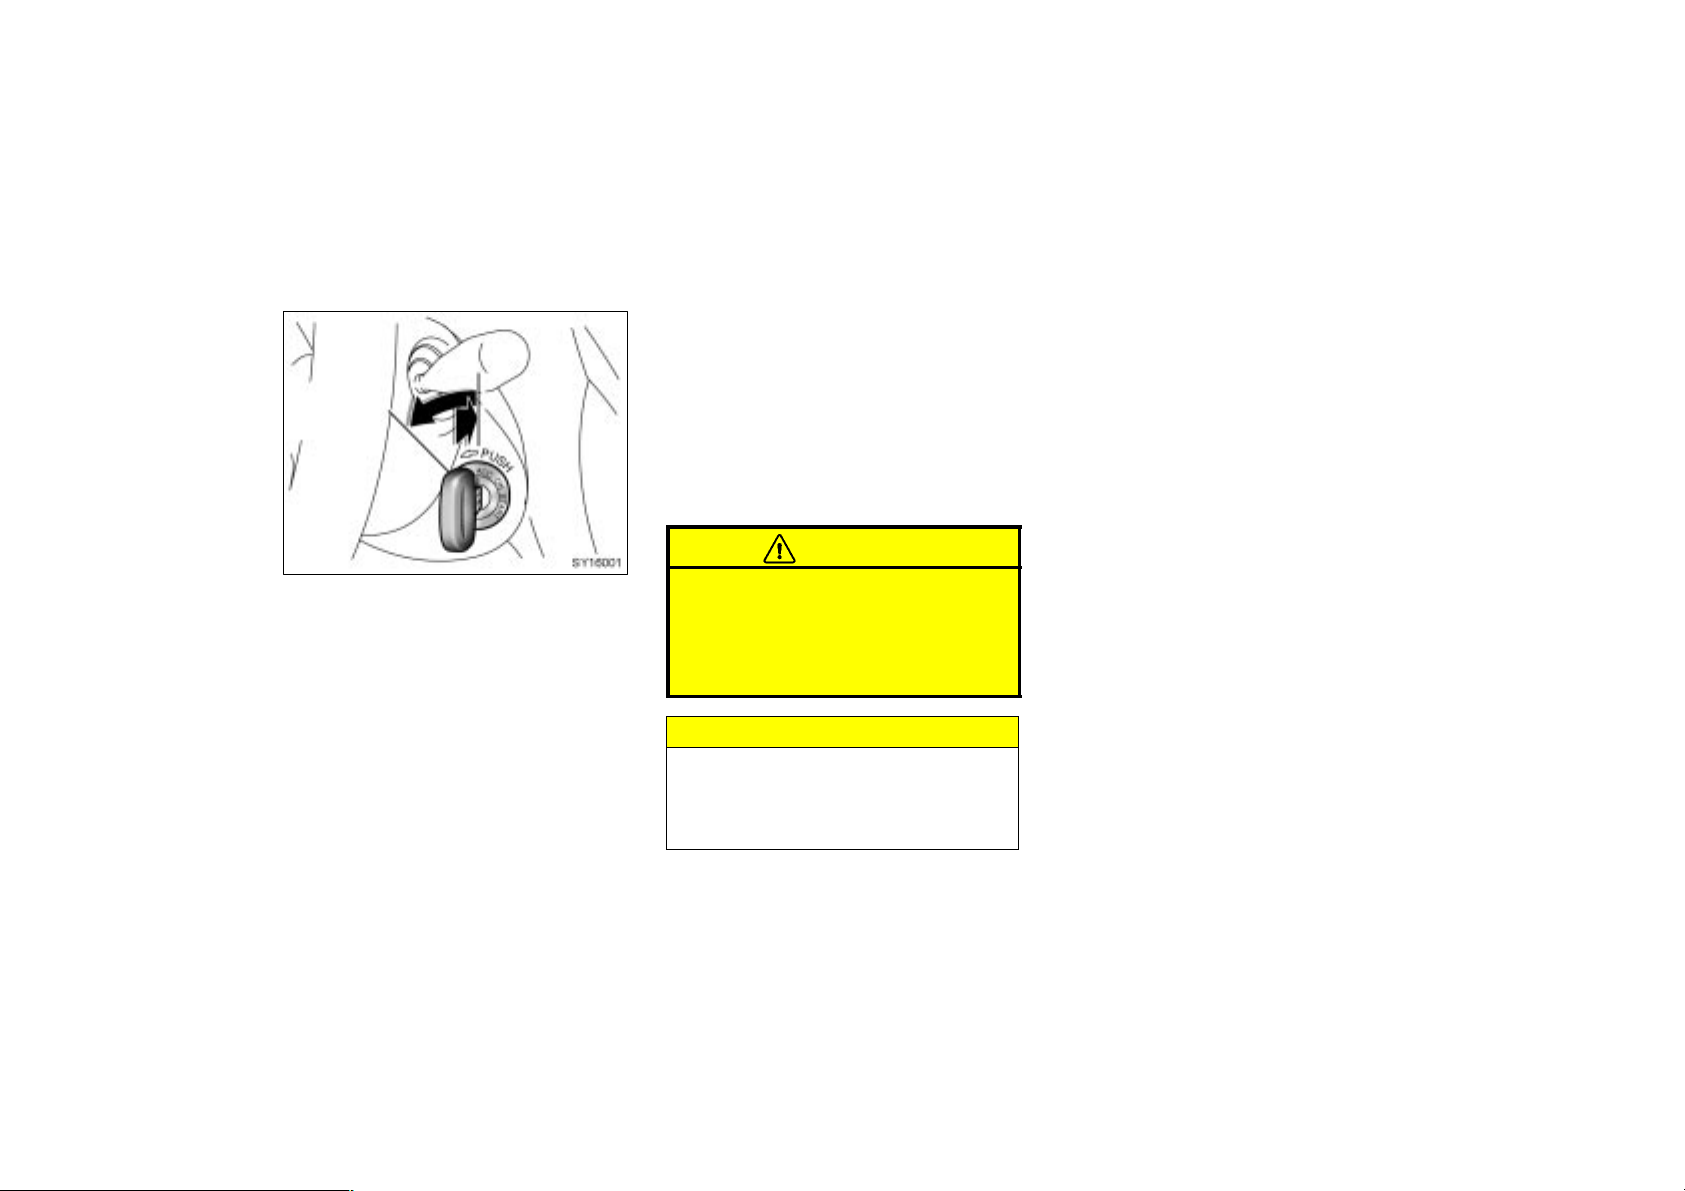
Ignition switch with steering
lock
SY16001
2001MY ECHO (U) L/O0008
You must push in the key to turn the key
from “ACC” to the “LOCK” position. On
vehicles with an automatic transmission,
the selector lever must be put in the “P”
position before pushing the key.
When starting the engine, the key may
seem stuck at the “LOCK” position. To
free it, first be sure the key is pushed all
the way in, and then rock the steering
wheel slightly while turning the key gently.
CAUTION
“START”—Starter motor on. The key
will return to the “ON” position when
released.
For starting tips, see Section 3.
“ON”—Engine on and all accessories
on.
This is the normal driving position.
“ACC”—Accessories such as the radio
operate, but the engine is off.
If you leave the key in the “ACC” or
“LOCK” position and open the driver’s
door, a buzzer will remind you to remove
the key.
“LOCK”—Engine is off and the steering
wheel is locked. The key can be removed only at this position.
86
For manual transmission:
Never remove the key when the ve-
hicle is moving, as this will lock the
steering wheel and result in loss of
steering control.
NOTICE
Do not leave the key in the “ON”
position if the engine is not running.
The battery will discharge and the
ignition could be damaged.
2001 ECHO (OM52440U)
Page 87
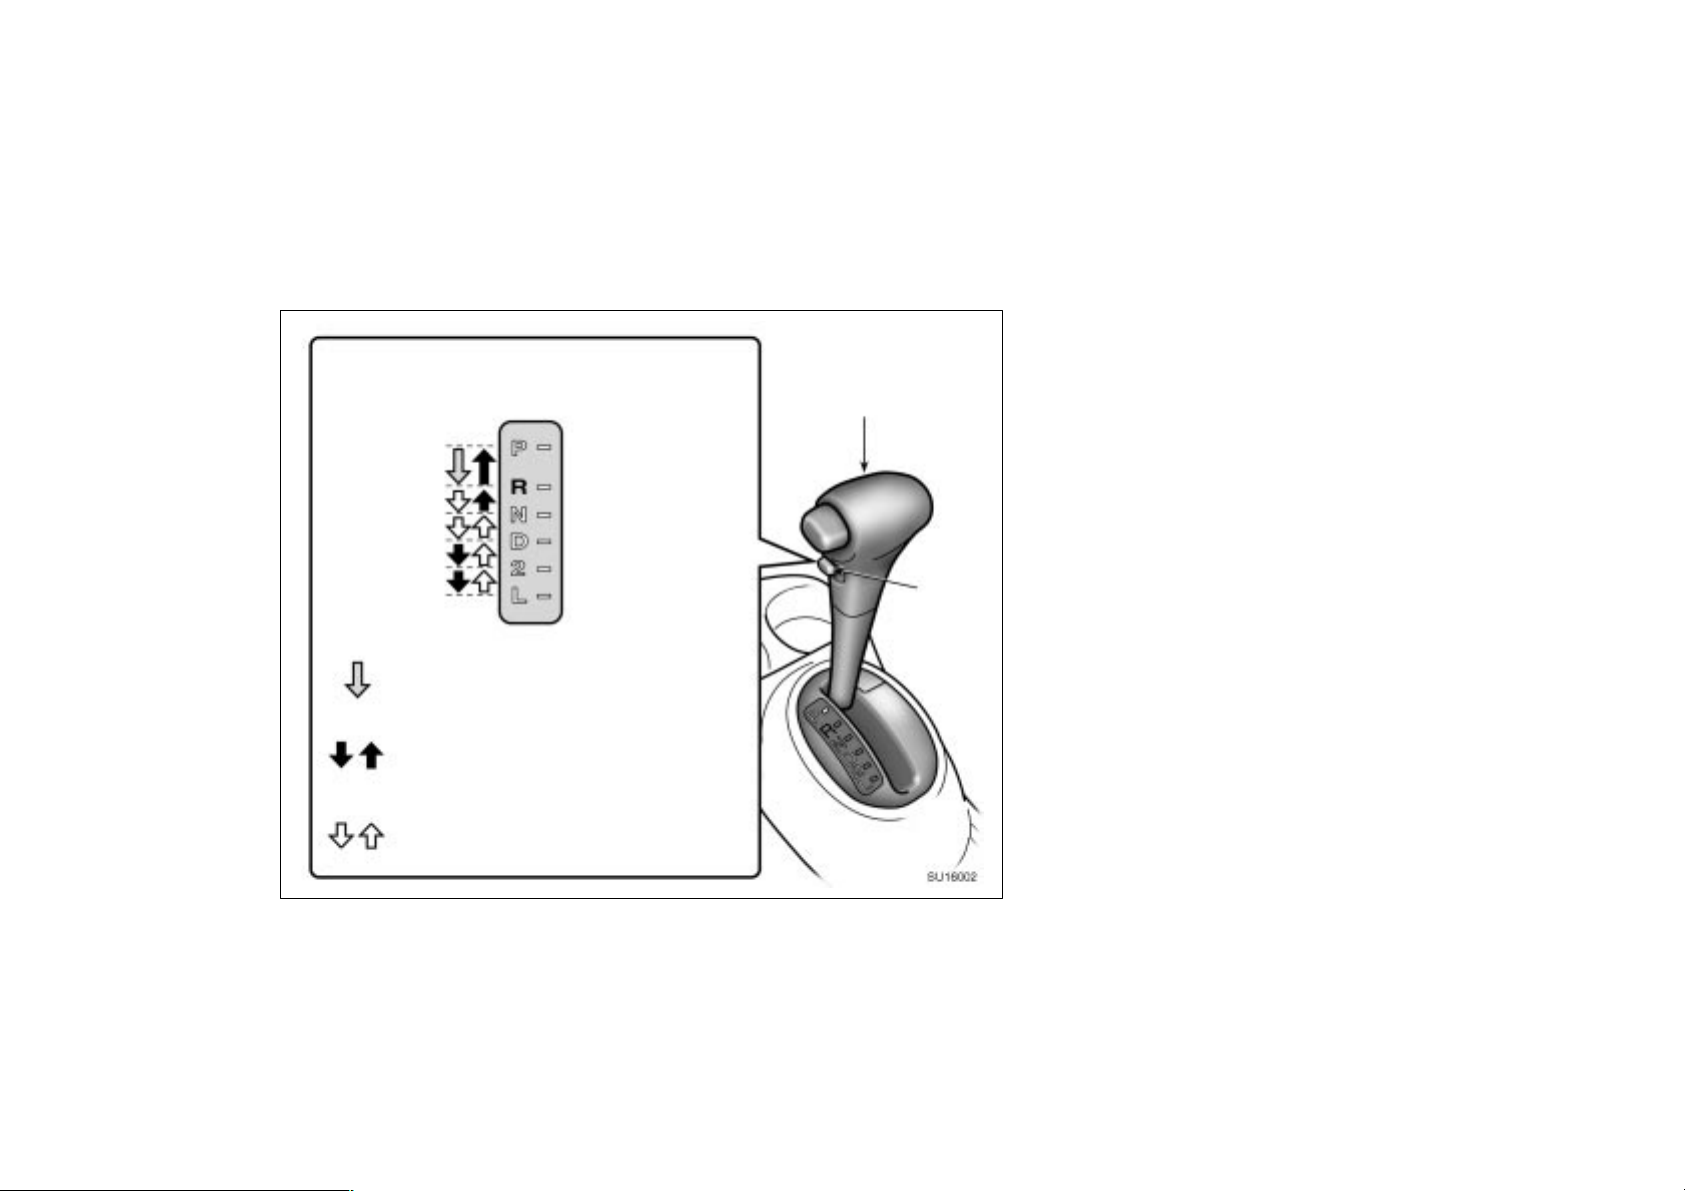
Automatic transmission
Lock release button
To prev ent misshifting
With the brake pedal depressed, shift while
holding the lock release button in. (The
ignition switch must be in “ON” position.)
SU16002
2001MY ECHO (U) L/O0008
Selector lever
Overdriv e
switch
Your automatic transmission has a shift
lock system to minimize the possibility of
incorrect operation. This means you can
only shift out of “P” position when the
brake pedal is depressed (with the ignition
switch in “ON” position and the lock release button depressed).
(a) Selector lever
The shift position is displayed on the instrument cluster.
P: Parking, engine starting and
key removal
R: Reverse
N: Neutral
D: Normal driving (with overdrive on)
2: Stronger engine braking
L: Maximum engine braking
Shift while holding the lock
release button in
Shift normally
2001 ECHO (OM52440U)
87
Page 88
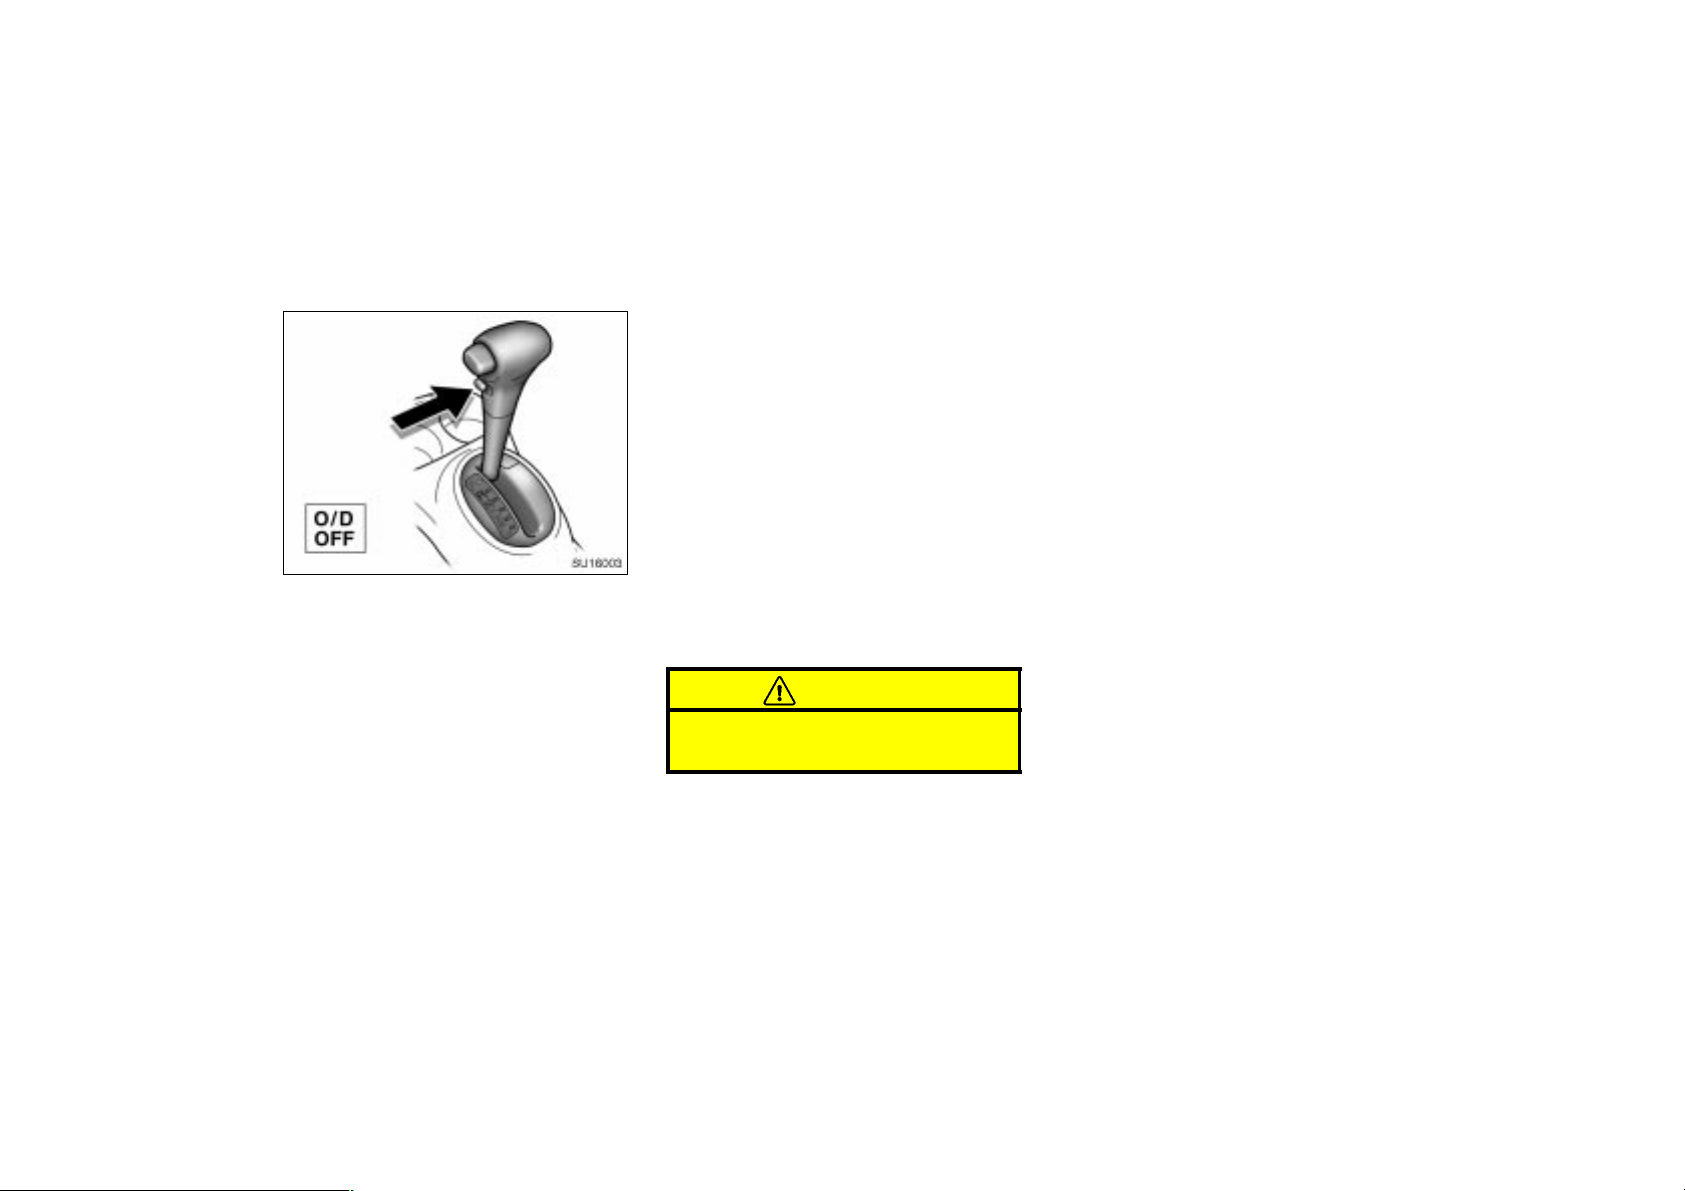
2001MY ECHO (U) L/O0008
SU16003
(b) Overdrive switch
You can select either third gear(with overdrive off) or forth gear (with overdrive on)
by pushing this switch.
To turn the overdrive off, push the switch.
The “O/D OFF” indicator light should come
on. To turn the overdrive again, push the
switch again. The “O/D OFF” indicator
light should go off.
Always drive your vehicle with the overdrive on for better fuel economy and
quieter driving.
If the engine is turned off when the overdrive is off and restarted, the overdrive
will automatically be on.
(c) Normal driving
1. Start the engine as instructed in “How
to start the engine” in Section 3. The
transmission must be in “P” or “N”.
2. With your foot holding down the brake
pedal, shift the selector lever to “D”.
When the lever is in the “D” position, the
automatic transmission system will select
the most suitable gear for running conditions such as normal cruising, hill climbing, hard towing, etc.
Always turn the overdrive switch on for
better fuel economy and quieter driving. If
the engine coolant temperature is low, the
transmission will not shift into overdrive
gear even with the overdrive switch on.
CAUTION
Never put your foot on the accelerator pedal while shifting.
3. Release the parking brake and brake
pedal. Depress the accelerator pedal
slowly for smooth starting.
(d) Using engine braking
To use engine braking, you can downshift
the transmission as follows:
Push the overdrive switch. The “O/D
OFF” indicator light will come on and
the transmission will downshift to third
gear.
Shift into the “2” position. The trans-
mission will downshift to second gear
when the vehicle speed drops down to
or lower than 96 km/h (59 mph), and
more powerful engine braking will be
enabled.
Shift into the “L” position. The trans-
mission will downshift to first gear
when the vehicle speed drops down to
or lower than 48 km/h (29 mph), and
maximum engine braking will be enabled.
88
2001 ECHO (OM52440U)
Page 89
2001MY ECHO (U) L/O0008
CAUTION
Be careful when downshifting on a
slippery surface. Abrupt shifting
could cause the vehicle to spin or
skid.
(e) Using “2” and “L” positions
The “2” and “L” positions are used for
strong engine braking as described previously.
With the selector lever in “2” or “L”, you
can start the vehicle in motion as with the
lever in “D”.
With the selector lever in “2”, the vehicle
will start in first gear and automatically
shift to second gear.
With the selector lever in “L”, the transmission is engaged in first gear.
NOTICE
Be careful not to overrev the engine. The approximate maximum allowable speed for each position is
given below for your reference:
.................
“2”
..................
“L”
Do not continue hill climbing or
111 km/h (69 mph)
60 km/h (37 mph)
hard towing for a long time in the
“2” or “L” position. This may cause
severe automatic transmission damage from overheating. To prevent
such damage, “D” position should
be used in hill climbing or hard
towing.
(f) Backing up
1. Bring the vehicle to a complete stop.
2. With the brake pedal held down with
your foot, shift the selector lever to the
“R” position.
NOTICE
Never shift into reverse while the vehicle is moving.
(g) Parking
1. Bring the vehicle to a complete stop.
2. Pull the parking brake lever up fully to
securely apply the parking brake.
3. With the brake pedal pressed down,
shift the selector lever to the “P” position.
CAUTION
While the vehicle is moving, never
attempt to move the selector lever
into “P” position under any circumstances. Serious mechanical damage
and loss of vehicle control may result.
(h) Good driving practice
If the transmission repeatedly shifts up
and down between the third gear and
overdrive when climbing a gentle slope,
the overdrive switch should be turned
off. Be sure to turn the switch on immediately afterward.
When towing a trailer, in order to main-
tain engine braking efficiency, do not
use overdrive.
2001 ECHO (OM52440U)
89
Page 90
2001MY ECHO (U) L/O0008
CAUTION
Always keep your foot on the brake
pedal while stopped with the engine
running. This prevents the vehicle
from creeping.
NOTICE
Do not hold the vehicle on an upgrade with the accelerator pedal. It
can cause the transmission to overheat. Always use the brake pedal or
parking brake.
(i) Rocking your vehicle if stuck
CAUTION
If your vehicle becomes stuck in
snow, mud, sand, etc., then you may
attempt to rock the vehicle free by
moving it forward and backward. Do
not attempt this procedure if people
or objects are anywhere near the vehicle. During the rocking operation
the vehicle may suddenly move forward or backward as it becomes unstuck, causing injury or damage to
nearby people or objects.
NOTICE
If you rock your vehicle, observe the
following precautions to prevent damage to the transmission and other
parts.
Do not depress the accelerator pedal while shifting the selector lever
or before the transmission is completely shifted to forward or reverse
gear.
Do not race the engine and avoid
spinning the wheels.
If your vehicle remains stuck after
rocking the vehicle several times,
consider other ways such as towing.
(j) If you cannot shift the selector le-
ver out of “P” position
If you cannot shift the selector lever from
“P” position even though the brake pedal
is depressed, use the shift lock override
button. For instructions, see “If you cannot
shift automatic transmission selector lever”
in Section 4.
90
2001 ECHO (OM52440U)
Page 91
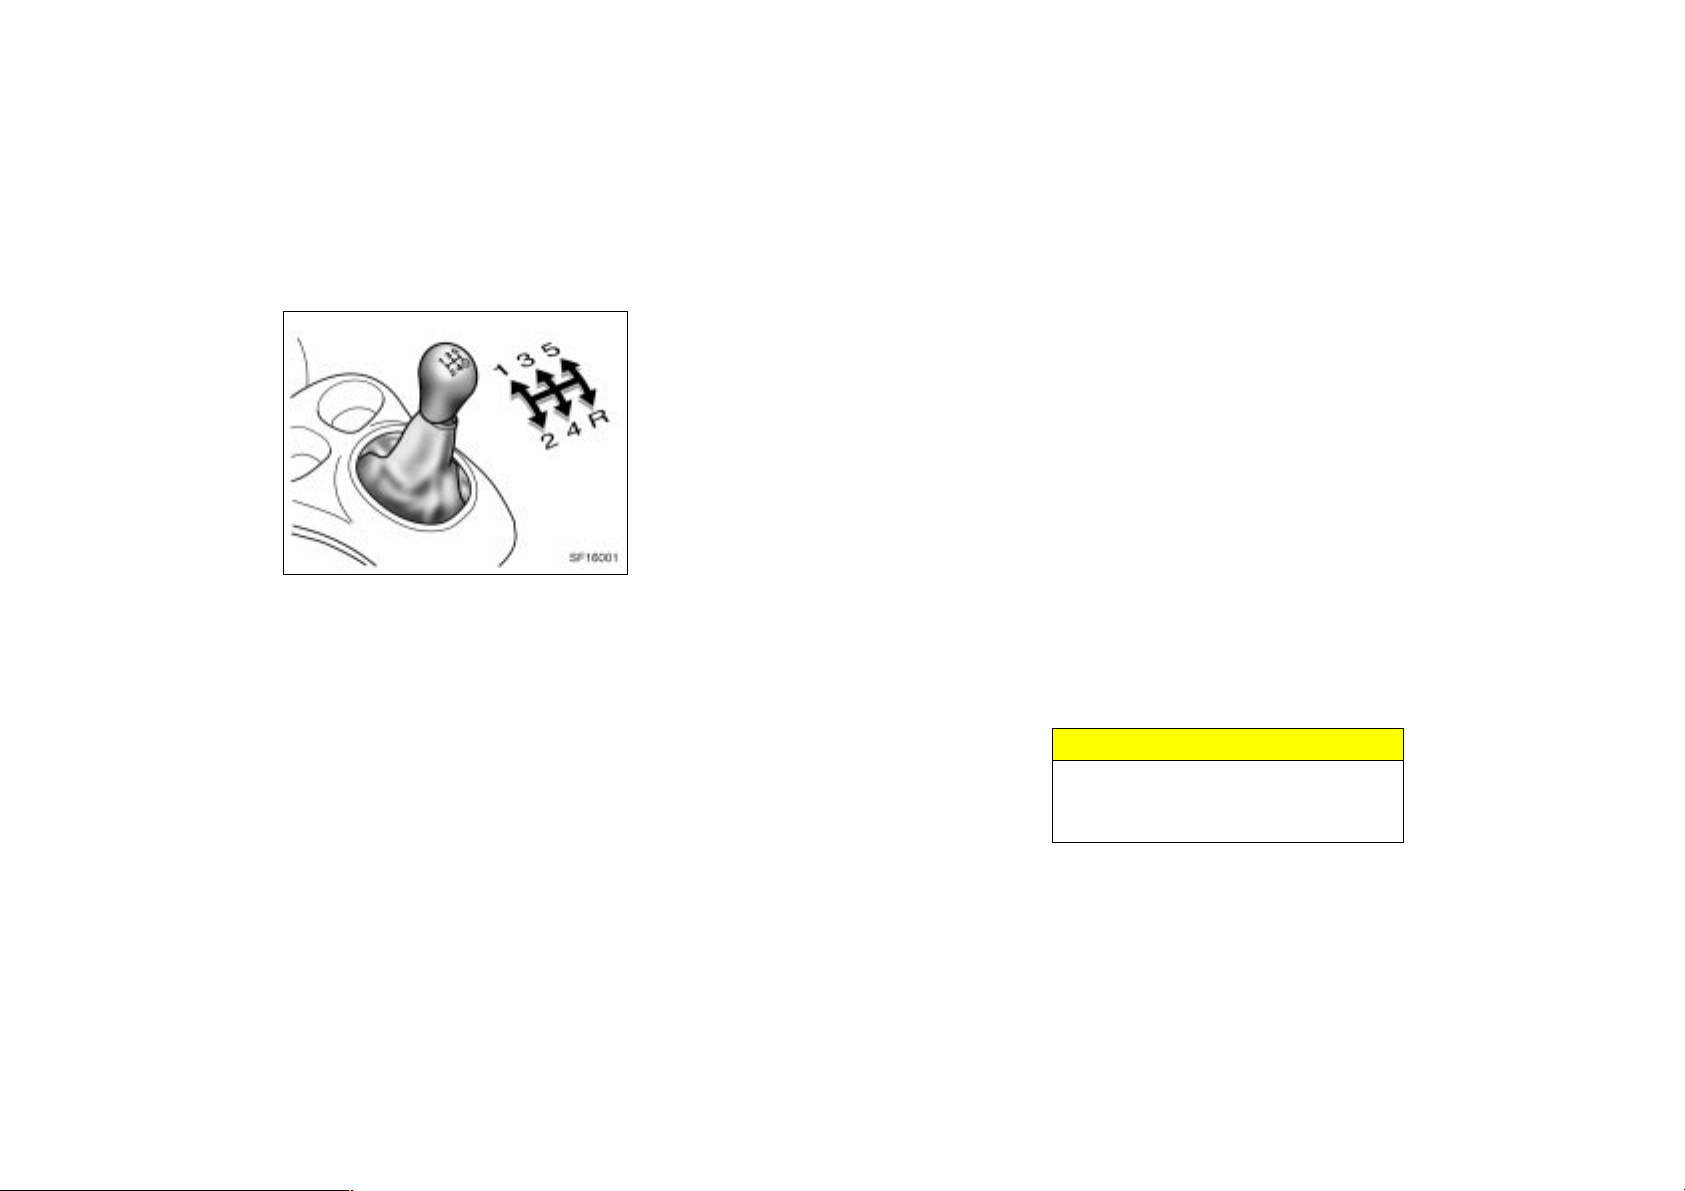
Manual transmission
SF16001
The shift pattern is conventional as
shown above.
Press the clutch pedal down fully while
shifting, and then release it slowly. Do not
rest your foot on the pedal while driving,
because it will cause clutch trouble. And
do not use the clutch to hold the vehicle
when stopped on an uphill grade—use the
parking brake.
Recommended shifting speeds
The transmission is fully synchronized and
upshifting or downshifting is easy.
For the best compromise between fuel
economy and vehicle performance, you
should upshift or downshift at the following
speeds:
2001MY ECHO (U) L/O0008
Low altitude
—1219 m (4000 ft.) or lower
gear km/h (mph)
1 to 2 or 2 to 1 24 (15)
2 to 3 or 3 to 2 40 (25)
3 to 4 or 4 to 3 64 (40)
4 to 5 / 5 to 4 72/64 (45/40)
High altitude
—Higher than 1219 m (4000 ft.)
Upshifting
gear km/h (mph)
1 to 2 24 (15)
2 to 3 57 (36)
3 to 4 72 (45)
4 to 5 85 (53)
Downshifting
gear km/h (mph)
2 to 1 24 (15)
3 to 2 40 (25)
4 to 3 64 (40)
5 to 4 64 (40)
Downshift to the appropriate gear if acceleration is needed when you are cruising
below the above downshifting speeds.
Upshifting too soon or downshifting too
late will cause lugging, and possibly pinging. Regularly revving the engine to maximum speed in each gear will cause excessive engine wear and high fuel
consumption.
Maximum allowable speeds
To get on a highway or to pass slower
traffic, maximum acceleration may be necessary. Make sure you observe the following maximum allowable speeds in each
gear:
gear km/h (mph)
1 54 (33)
2 100 (62)
3 146 (91)
NOTICE
Do not downshift if you are going
faster than the maximum allowable
speed for the next lower gear.
2001 ECHO (OM52440U)
91
Page 92
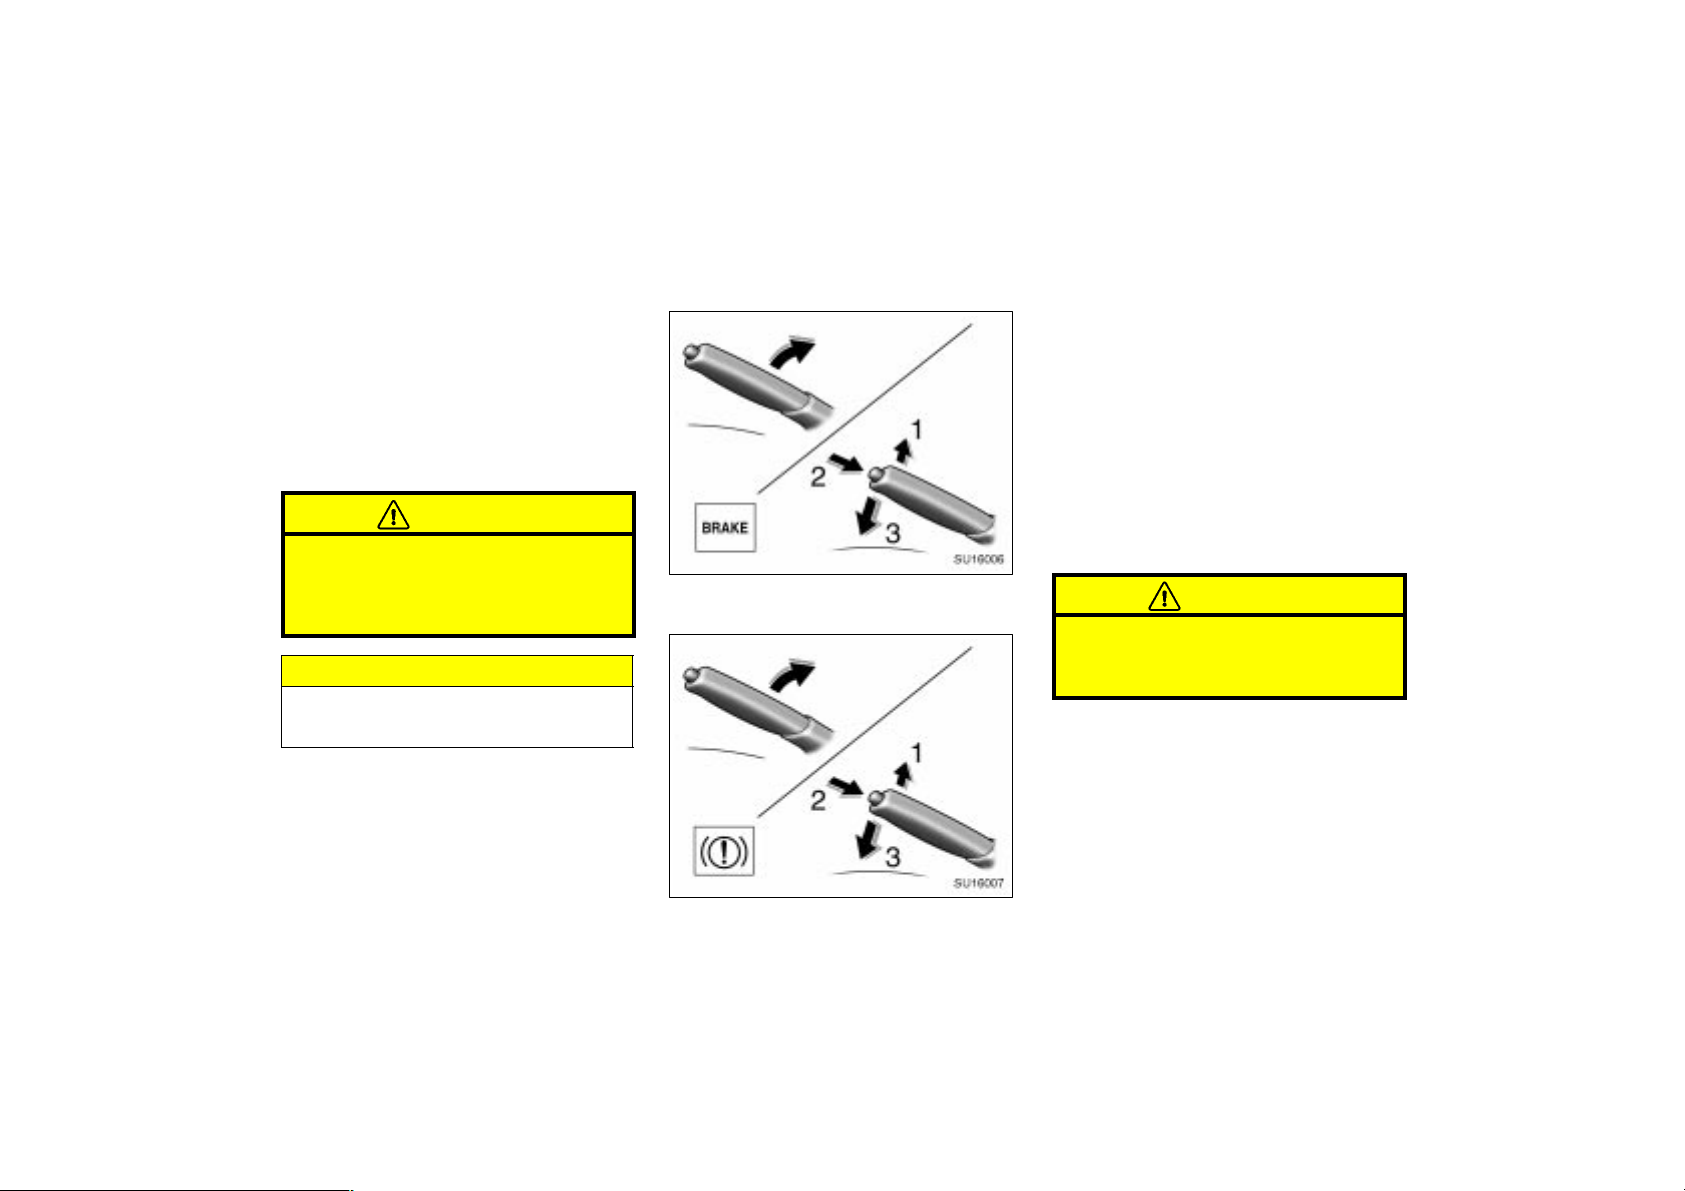
Good driving practice
If it is difficult to shift into reverse, put
the transmission in neutral, release the
clutch pedal momentarily, and then try
again.
When towing a trailer, in order to main-
tain engine braking efficiency, do not
use the fifth gear.
CAUTION
Be careful when downshifting on a
slippery surface. Abrupt shifting
could cause the vehicle to spin or
skid.
NOTICE
Make sure the vehicle is completely
stopped before shifting into reverse.
Parking brake
SU16006
Type A
2001MY ECHO (U) L/O0008
When parking, firmly apply the parking
brake to avoid inadvertent creeping.
To set: Pull up the lever. For better holding power, first depress the brake pedal
and hold it while setting the parking
brake.
To release: Pull up the lever slightly (1),
press the thumb button (2), and lower (3).
To remind you that the parking brake is
set, the parking brake reminder light in
the instrument panel remains on until you
release the parking brake.
CAUTION
Before driving, be sure the parking
brake is fully released and the parking brake reminder light is off.
92
SU16007
Type B
2001 ECHO (OM52440U)
Page 93

2001MY ECHO (U) L/O0008
SECTION 1–
OPERATION OF INSTRUMENTS AND
CONTROLS
Car audio system
Reference 94. . . . . . . . . . . . . . . . . . . . . . . . . . . . . . . . . . . . . . . . . . . . . . . . . .
Using your audio system 94. . . . . . . . . . . . . . . . . . . . . . . . . . . . . . . . . . . . .
Car audio system operating hints 114. . . . . . . . . . . . . . . . . . . . . . . . . . . . .
7
2001 ECHO (OM52440U)
93
Page 94
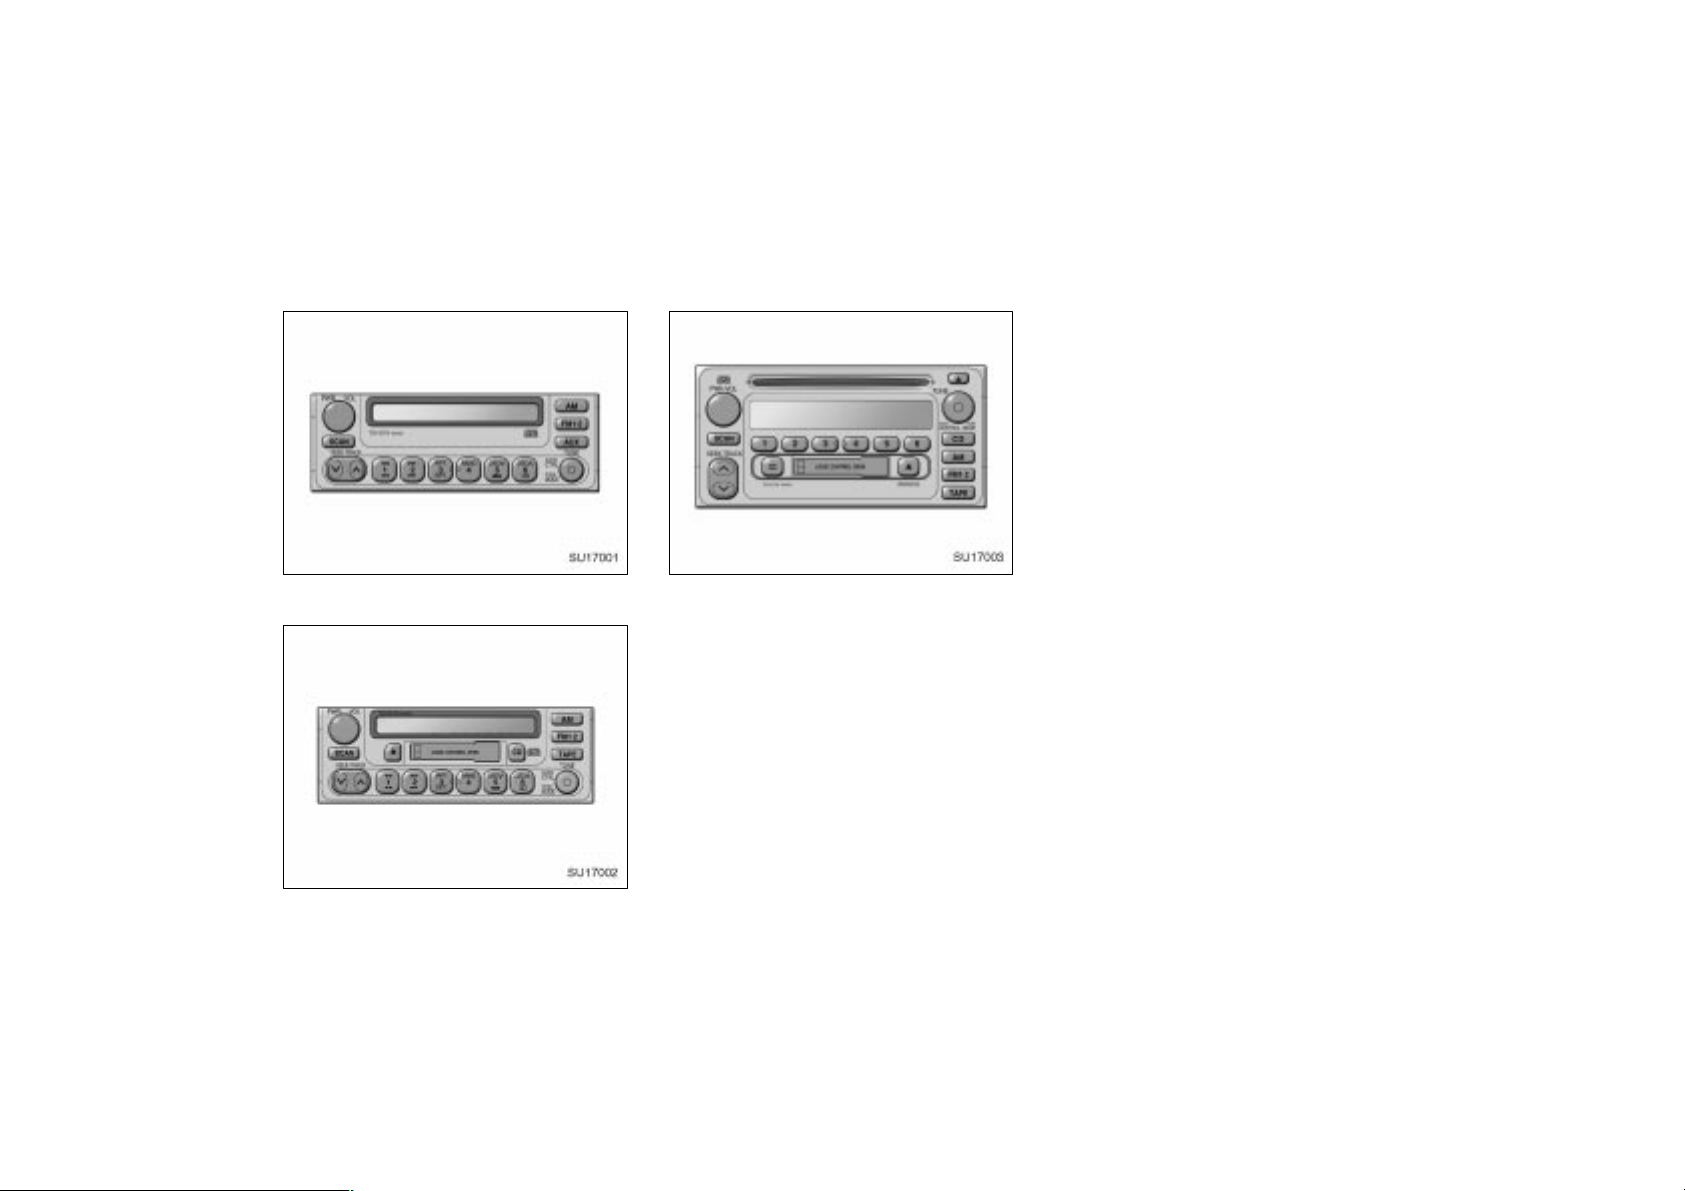
Reference
SU17001
Type 1: AM·FM ETR radio (with cassette
and compact disc auto changer controller)
SU17002
Type 2: AM·FM ETR radio/cassette player
(with compact disc auto changer controller)
94
2001MY ECHO (U) L/O0008
SU17003
Type 3: AM·FM ETR radio/cassette player/
compact disc player (with compact disc
auto changer controller)
2001 ECHO (OM52440U)
Using your audio system—
—Some basics
This section describes some of the basic
features on Toyota audio systems. Some
information may not pertain to your system.
Your audio system works when the ignition
key is in the “ACC” or “ON” position.
TURNING THE SYSTEM ON AND OFF
Push “PWR/VOL” or “PWR·VOL” to turn
the audio system on and off.
Push “AM”, “FM1·2”, “TAPE”, “CD” or
“AUX” to turn on that function without
pushing “PWR/VOL” or “PWR·VOL”.
You can turn on each player by inserting
a cassette tape or compact disc.
You can turn off each player by ejecting
the cassette tape or compact disc. If the
audio system was previously off, then the
entire audio system will be turned off
when you eject the cassette tape or compact disc. If another function was previously playing, it will come on again.
SWITCHING BETWEEN FUNCTIONS
Push “AM”, “FM1·2”, “TAPE”, “CD” or
“AUX” if the system is already on but you
want to switch from one function to another.
Page 95
2001MY ECHO (U) L/O0008
TONE AND BALANCE
For details about your system’s tone and
balance controls, see the description of
your own system.
Tone
How good an audio program sounds to
you is largely determined by the mix of
the treble, midrange, and bass levels. In
fact, different kinds of music and vocal
programs usually sound better with different mixes of treble, midrange and bass.
Balance
A good balance of the left and right stereo
channels and of the front and rear sound
levels is also important.
Keep in mind that if you are listening to
a stereo recording or broadcast, changing
the right/left balance will increase the volume of one group of sounds while decreasing the volume of another.
YOUR RADIO ANTENNA
To lower a manual antenna, carefully push
it down.
NOTICE
To prevent damage to the antenna,
make sure it is retracted before driving your Toyota through an automatic
car wash.
YOUR CASSETTE PLAYER
When you insert a cassette, the exposed
tape should be to the right.
NOTICE
Do not oil any part of the player and
do not insert anything other than cassette tapes into the slot, or the tape
player may be damaged.
YOUR COMPACT DISC PLAYER
When you insert a disc, gently push it in
with the label side up. (The player will
automatically eject a disc if the label side
is down.) The compact disc player will
play from track 1 through the end of the
disc. Then it will play from track 1 again.
NOTICE
Never try to disassemble or oil any
part of the compact disc player. Do
not insert anything except a compact
disc into the slot.
2001 ECHO (OM52440U)
95
Page 96
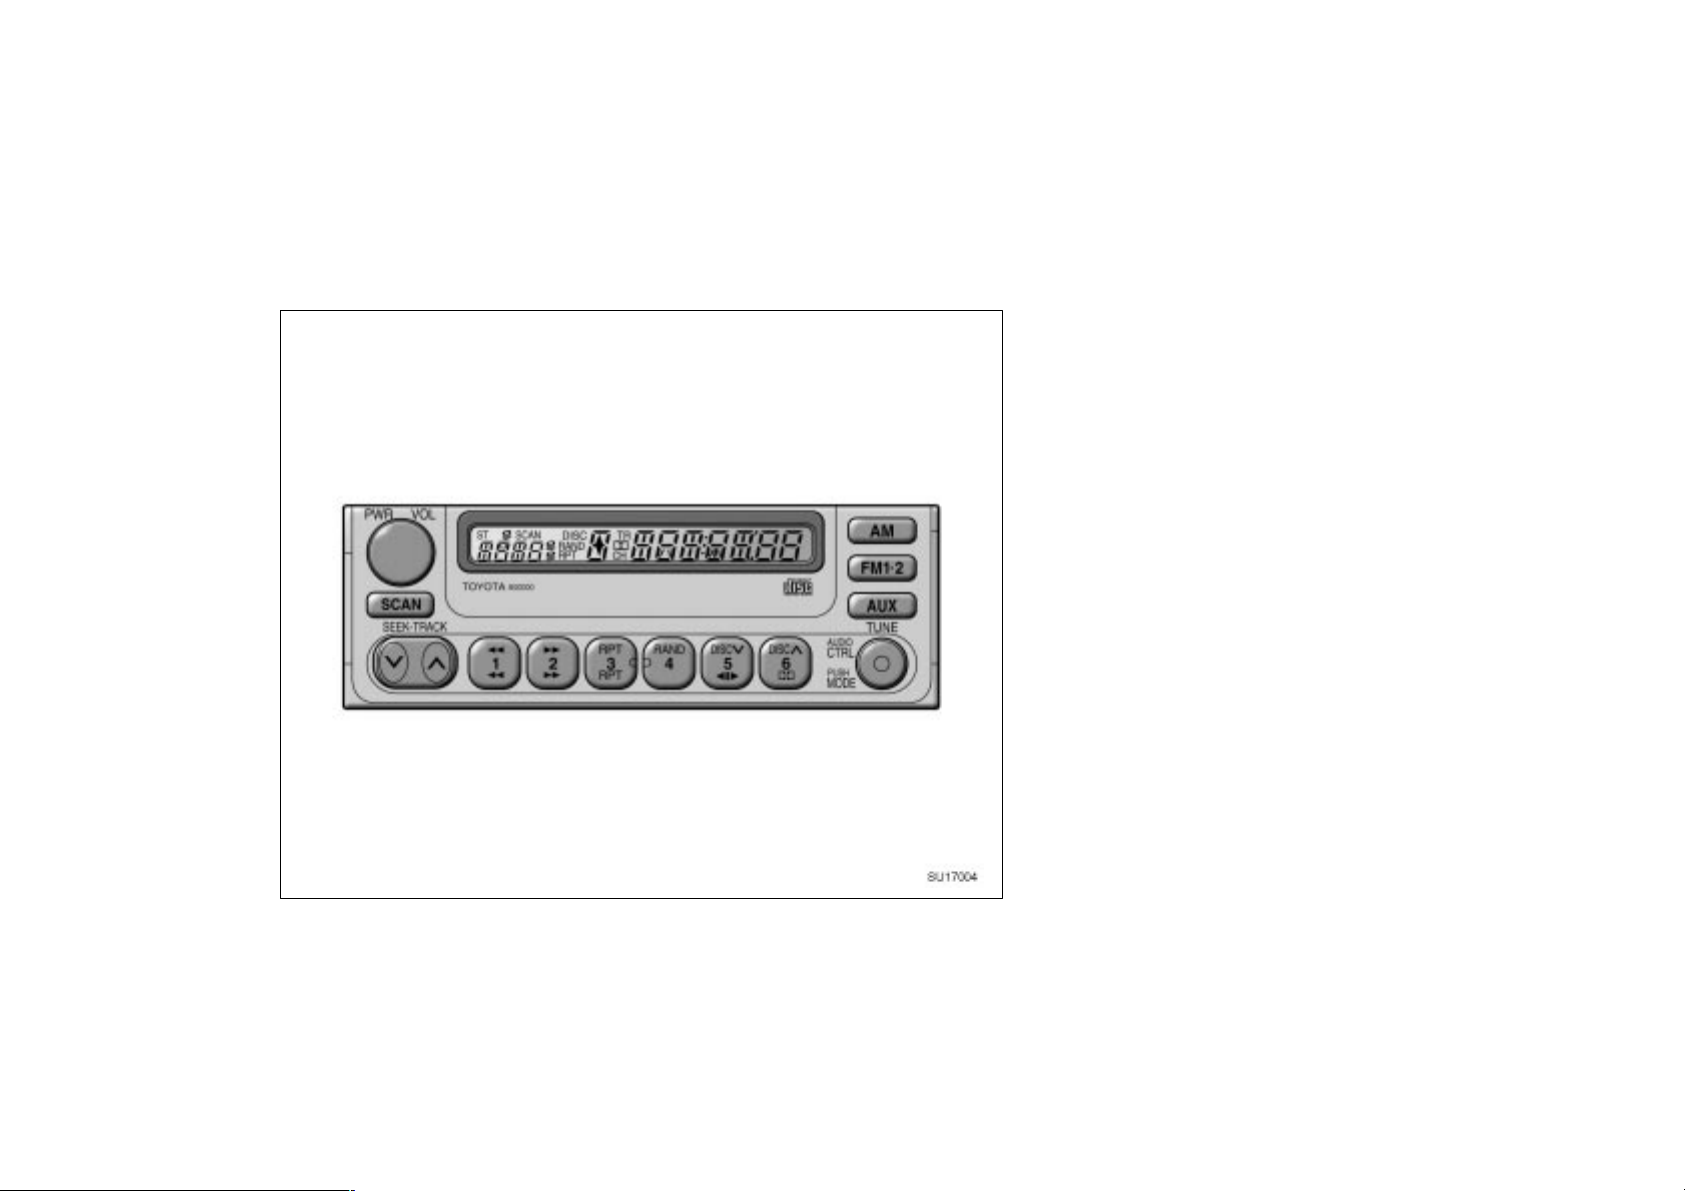
—Controls and features
Ty pe 1
2001MY ECHO (U) L/O0008
Details of specific buttons, controls, and
features are described in the alphabetical
listing that follows.
SU17004
96
2001 ECHO (OM52440U)
Page 97
2001MY ECHO (U) L/O0008
1 2 3 4 5 6 (Preset buttons)
These buttons are used to preset and
tune in radio stations.
To preset a station to a button: Tune in
the desired station (see “TUNE” knob or
“SEEK” button). Push and hold down the
button until you hear a beep—this will set
the station to the button. The button number will appear on the display.
To tune in to a preset station: Push the
button for the station you want. The button number and station frequency will appear on the display.
These systems can store one AM and two
FM stations for each button (The display
will show “AM”, “FM1” or “FM2” when you
push “AM” “FM1·2”).
(Program)
Push “
cassette tape. The display indicates which
side is currently selected (“
top side, “
Auto–reverse feature: After the cassette
player reaches the end of a tape side, it
automatically reverses and begins to play
the other side. This is true whether the
cassette was playing or fast forwarding.
” to select the other side of a
” indicates
” indicates bottom side).
(Reverse/Fast forward buttons)
Cassette Player
Push the fast forward button to fast forward a cassette tape. “FF” will appear on
the display. Push the reverse button to
rewind a tape. “REW” will appear on the
display.
To stop the tape while it is fast forwarding, push the fast forward button or
“TAPE”; to stop the tape while it is rewinding, push the reverse button or
“TAPE”.
If a tape side rewinds completely, the cassette player will stop and then play that
same side. If a tape fast forwards completely, the cassette player will play the
other side of the tape, using the auto–reverse feature.
Compact Disc Player
If you want to fast forward or reverse
through a compact disc track, push and
hold in the fast forward or reverse button.
When you release the button, the compact
disc player will resume playing.
AM
Push “AM” to turn on the radio and select
the AM band. “AM” will appear on the
display.
If the audio system is off, you can turn
on the radio by pushing “AM”. Also, push
“AM” to switch from cassette or compact
disc operation to radio operation.
CTRL / MODE (Audio control and mode
adjustment)
Manual tone adjustment function—
This knob is used to adjust the tone
manually.
For low–pitch tone adjustment, push
“CTRL / MODE” repeatedly until “BAS”
appears on the display. Then turn the
knob to suit your preference.
The display will show the range from
“BAS –5” to “BAS 5”.
For high–pitch tone adjustment, push
“CTRL / MODE” repeatedly until “TRE”
appears on the display. Then turn the
knob to suit your preference.
The display will show the range from
“TRE –5” to “TRE 5”.
2001 ECHO (OM52440U)
97
Page 98

2001MY ECHO (U) L/O0008
Sound balance adjustment function—
This knob is also used to adjust the
sound balance between the front and rear,
and the right and left speakers.
For front/rear adjustment, push “CTRL /
MODE” repeatedly until “FAd” appears on
the display. Then turn the knob to adjust
the front/rear balance.
The display will show the range from
“FAd–F7” to “FAd–R7”.
For left/right adjustment, push “CTRL /
MODE” repeatedly until “BAL” appears on
the display. Then turn the knob to adjust
the left/right balance.
The display will show the range from
“BAL–L7” to “BAL–R7”.
AUX (Auxiliary button)
This button is used to operate each player
when a cassette tape player, compact disc
player or compact disc auto changer is
equipped with this radio player.
With cassette tape player
Push “AUX” to switch from radio to cassette operation. If the audio system is off,
you can turn on the cassette player by
pushing “AUX”. In both cases, a cassette
must already be loaded in the player.
98
With compact disc player or compact
disc auto changer
Push “AUX” to switch from radio to compact disc operation. If the audio system is
off, you can turn on the compact disc
player by pushing “AUX”. In both cases,
a disc must already be loaded in the
player.
When the audio is set into compact disc
operation, the display shows the track or,
track and disc number currently being
played. Each time you push “AUX”, the
system changes to the automatic changer.
If the player malfunctions, your audio system will display one of the six following
error messages.
If “WAIT” appears on the display, it indicates that the inside of the player unit
may be too hot due to the very high ambient temperature. Remove the disc or magazine from the player and allow the player
to cool down.
If “Err 1” appears on the display, it
indicates the disc is dirty, damaged, or it
was inserted up–side down. Clean the
disc or insert it correctly.
If “Err 2” appears on the display, it
indicates no disc is loaded inside the
magazine. Insert a disc.
2001 ECHO (OM52440U)
If “Err 3” or “Err 4” appears on the
display, it indicates there is a trouble in-
side the system. Eject the disc or magazine. Set the disc or magazine again.
If “OPEn” appears on the display, it
indicates the compact disc auto changer
lid is open. Close the compact disc auto
changer lid.
If the malfunction is not rectified, take
your vehicle to your Toyota dealer.
DISC
Compact disc auto changer only—
By using this button, you can select a
disc you wish to listen to.
Push either side of the button until the
number of the disc you want to listen to
appears on the display.
∗
Dolby
If you are listening to a tape that was
recorded with Dolby B Noise Reduction,
push the button marked with the double–D
symbol. The double–D symbol will appear
on the display. Push the button again to
turn off Dolby B NR.
The Dolby NR mode reduces tape noise
by about 10 dB. For best sound reproduction, play your tapes with this button on
or off according to the mode used for
recording the tape.
B NR
Page 99

∗
: Dolby noise reduction manufactured under license from
Dolby Laboratories Licensing Corporation. “DOLBY” and the
double D symbol are trademarks of Dolby Laboratories
Licensing Corporation.
FM1·2
Push “FM1·2” to turn on the radio and
select the FM band. “FM1” or “FM2” will
appear on the display. This system allows
you to set twelve FM stations, two for
each button.
If the audio system is off, you can turn
on the radio by pushing “FM1·2”. Also,
push “FM1·2” to switch from cassette or
compact disc operation to radio operation.
PWR/VOL (Power/Volume)
Push “PWR/VOL” to turn the audio system
on and off. Turn “PWR/VOL” to adjust the
volume.
RAND (Random)
There are two random features—you can
either listen to the tracks on all the compact discs in the magazine in random order, or only listen to the tracks on a
specific compact disc in random order.
2001MY ECHO (U) L/O0008
Random playing for the tracks on a disc:
Quickly push and release “RAND”. “RAND”
will appear on the display. The disc you
are listening to will play in random order.
If you hear a beep, you held the button
too long, and the player will play all the
tracks in the magazine in random order.
To turn off the random feature, push
“RAND” again.
Compact disc auto changer only—
Random playing for all the tracks in the
magazine:
Push and hold “RAND” until you hear a
beep. “
play and the player will perform all the
tracks on all the discs in the magazine in
random order. To turn off the random feature, push “RAND” again.
RPT (Repeat)
Cassette Player
Push “RPT” while the track is playing.
“RPT” will appear on the display. When
the track ends, it will automatically be
rewound and replayed. This process will
be continued until you push the button
again to turn off the repeat feature.
There must be at least 3 seconds of blank
space between tracks in order for the repeat feature to work correctly.
·RAND” will appear on the dis-
2001 ECHO (OM52440U)
Compact Disc Player
There are two repeat features—you can
either replay a disc track or a whole compact disc.
Repeating a track:
Quickly push and release “RPT” while the
track is playing. “RPT” will appear on the
display. If you hear a beep, you held the
button too long, and the player will repeat
the whole disc. When the track ends, it
will automatically be replayed. This process will be continued until you push the
button again to turn off the repeat feature.
Compact disc auto changer only—
Repeating a disc:
Push and hold “RPT” until you hear a
beep. “
·RPT” will appear on the dis-
play. The player will repeat all the tracks
on the disc you are listening to. When the
disc ends, the player will automatically go
back to the top track of the disc and
replay. This process will be continued until
you push the button again to turn off the
repeat feature.
99
Page 100

2001MY ECHO (U) L/O0008
SCAN
Radio
You can either scan all the frequencies on
a band or scan only the preset stations
for that band.
To scan the preset stations:
Push and hold “SCAN” until you hear a
beep. The radio will tune in the next preset station up the band, stay there for 5
seconds, and then move to the next preset station. To select a station, push
“SCAN” again.
To scan all the frequencies:
Quickly push and release “SCAN”. If you
hear a beep, you held the button too long,
and the radio will scan the preset stations. The radio will find the next station
up the station band, stay there for 5 seconds, and then scan again. To select a
station, push “SCAN” again.
Compact disc player
There are two scan features—you can either scan the tracks on a specific disc or
scan the first tracks of all the discs in the
magazine.
100
Scanning the tracks on a disc:
Quickly push and release “SCAN”. “SCAN”
will appear on the display and the player
will scan all the tracks on the disc you
are listening to. If you hear a beep, you
held the button too long, and the player
will scan the first track of all the discs in
the magazine. To select a track, push
“SCAN” again. If the player scanned all
the tracks on the disc, it will stop scanning.
Compact disc auto changer only—
Scanning the first track of all the discs in
the magazine:
Push “SCAN” until you hear a beep.
·SCAN” will appear on the display
“
and the player will perform the first track
of the next disc. To select a disc, push
the “SCAN” again. If the player has
scanned all the discs, it will stop scanning.
SEEK (Seeking)
Radio
In the seek mode, the radio finds and
plays the next station up or down the
station band.
To seek a station, quickly push and release the “” or “” under the “SEEK”.
Do this again to find another station.
2001 ECHO (OM52440U)
Cassette Player
By using this button, you can skip up or
down to a different track.
You can skip up to nine tracks at a time.
Push the up or down side of the button.
“FF 1” or “REW 1” will appear on the
display.
Next, push either side of the track button
until the number on the display reaches
the number of tracks you want to skip. If
you push the button ten times, the skip
feature will be turned off.
When counting the number of tracks you
want to rewind, remember to count the
current track as well. For example, if you
want to rewind to a song that is two before the song you are listening to, push
on the down side of the button until “REW
3” appears on the display.
If you have pushed the track button more
than you wanted to, push the other side
of the button. The track number will be
reduced.
The track number you select is not valid
if it is higher than the number of tracks
remaining on the current cassette side.
After the beginning of the tape is
reached, the player will automatically
start playing the same side.
 Loading...