

Page 1

Owner's Manual
Premium AVX
Basic AVX
PC601-00026
Thank you for your purchase of the TOYOTA Genuine Car Multimedia System.
Please note that this manual explains all functions and equipment, including options.
Therefore, you may find some explanations on features or equipment not included in your Car Multimedia System.
TOYOTA DAIHATSU ENGINEERING & MANUFACTURING CO., LTD.
Page 2

Contents
Important Safety Information 4
Precautions ................................................................... 4
Before Use 5
How to read this manual ......................................... 5
Basic Operations 6
Front Panel Button Functions ................................ 6
Turning on the Unit ................................................... 7
Regional Setup ............................................................ 7
Adjusting the volume ............................................... 8
Touch screen operations ......................................... 9
Popup menu ................................................................ 9
Simple Display Mode ................................................ 9
HOME screen descriptions ....................................10
Source selection screen description ..................11
Source control screen descriptions ...................13
List screen ...................................................................13
Connection 14
Wired Connection ....................................................14
Bluetooth Control 15
Information for using Bluetooth® devices .......15
Register the Bluetooth device .............................16
Bluetooth Setup ........................................................17
Playing the Bluetooth Audio Device .................19
Using the Hands-Free Unit ....................................21
Phone Setup ...............................................................25
T-Link 26
Preparation .................................................................26
Connecting a smartphone ....................................26
Mirroring Operation ................................................26
Disc 28
Playing a disc .............................................................28
DVD/ Video-CD Basic Operation .........................28
Music CD/ Disc media Basic Operation ............30
Search Operation ......................................................31
DVD Disc Menu Operation ....................................31
DVD Setup ...................................................................32
USB 34
Connecting a USB device ......................................34
USB Basic Operation ................................................34
Search Operation ......................................................35
iPod/iPhone 37
Preparation .................................................................37
iPod/iPhone Basic Operation ...............................38
Search Operation ......................................................38
Radio 39
Radio Basic Operation ............................................39
Memory Operation ..................................................39
Selecting Operation ................................................40
Other External Components 41
Using the back camera ...........................................41
External audio players (AUX) ................................42
M-Toyota 43
Emergency Calling ...................................................43
Toyota Dealer Search ..............................................43
2
Page 3

Setup 44
Display Adjust ............................................................44
Picture Adjust.............................................................44
System Setup .............................................................45
General Systems .......................................................45
User Interface Systems ...........................................46
Dual Zone Systems ..................................................48
Advanced Features ..................................................49
Controlling Audio 50
Controlling General Audio ....................................50
Equalizer Control ......................................................51
Volume Offset ............................................................52
Sound Effect ...............................................................52
Listening Position/ DTA ..........................................53
Steering Wheel Control 55
Operations using the steering switch ...............55
Remote control 56
Using the Remote control .....................................56
Functions of the Remote control Buttons .......57
Troubleshooting 59
Problems and Solutions .........................................59
Error Messages ..........................................................59
For safety reasons, this owner’s manual
indicates items requiring particular attention
with the following marks.
# WARNING
• This is a warning against anything which may
cause death or serious injury to people if the
warning is ignored. You are informed about
what you must or must not do in order to
reduce the risk of death or serious injury to
yourself and others.
# CAUTION
• This is a warning against anything which
may cause injury to people if the warning is
ignored. You are informed about what you
must or must not do in order to reduce the risk
of injury to yourself and others.
NOTE
• This is a warning against anything which may
cause damage to the vehicle or its equipment if
the warning is ignored. You are informed about
what you must or must not do in order to avoid
or reduce the risk of damage to your vehicle and
its equipment.
• Please read all materials, TOYOTA will not
be responsible for unsatisfactory product
performance due to failure to follow these
instructions. Changes to product may result in
differences between content of this manual and
actual features of the product.
Appendix 61
Playable Media and Files........................................61
Region Codes in the World ...................................63
DVD Language Codes .............................................64
Specifications .............................................................65
About this Unit ..........................................................67
For further information ..........................................70
3English
Page 4

Important Safety Information
Important Safety Information
Precautions
IMPORTANT
Please read this manual carefully to ensure proper
use before using this product. It is especially
important that you read and observe WARNINGS
and CAUTIONS in this manual. Please keep the
manual in a safe and accessible place for future
reference.
# WARNINGS
• Do not watch or fix your eyes on the unit's
display for any extended period whenever you
are driving.
• Do not operate the unit while driving. Keep
focus on the road.
• Do not pair Bluetooth devices while driving,
stop on a safe road side before attempting to
pair any device.
• Do not attempt to install or service this
product by yourself. Installation or servicing
of this product by persons without proper
training and experience in electronic
equipment and automotive accessories may
be dangerous and could expose you to the risk
of electric shock, injury or other hazards.
• If liquid or foreign matter should get inside
this product, stop your vehicle in a safe
place, turn the ignition switch OFF (ACC OFF)
immediately and consult your dealer or the
nearest authorized Toyota Service Station. Do
not use this product in this condition because
doing so may result to fire, electric shock, or
other failure.
Ñ To ensure safe driving
Any video won't be played while driving to
prevent driver's eyes from fixing on the unit's
display. Stop the vehicle in a safe place and
apply the parking brake before performing such
function.
There are some functions you cannot perform
while driving because of the same reason.
# CAUTIONS
• To prevent short circuit, never put or leave
any metallic objects (such as coins or metallic
tools) inside the unit.
• Do not allow this product to come into contact
with liquids. Electric shocks as well as damage
to the product, smoke, and overheating could
result from contact with liquids.
• If you notice any abnormalities such as
smoke, strange noise or odor from using this
product, or any other abnormal signs on the
LCD screen, turn off the power immediately
and consult your dealer or the nearest Toyota
Service Station. Using this product in this
condition may result in permanent damage to
the system.
• Do not disassemble or modify this product,
as there are high-voltage components inside
which may cause an electric shock. Be sure to
consult your dealer or the nearest authorized
Toyota Service Station for internal inspection,
adjustments or repairs.
4
Page 5
Before Use
Before Use
Ñ Precautions on using this unit
• You can select a language to display menus,
audio file tags, etc. See Regional Setup
(P. 7).
Ñ Protecting the monitor
• To protect the monitor from damage, do not
operate the monitor using a ball point pen or
similar tool with a sharp tip.
• If you stick a film screen protector on the
screen, it may interfere with touch panel
operation.
Ñ Cleaning the unit
• If the faceplate of this unit is stained, wipe it
with a dry soft cloth such as a silicon cloth.
If the faceplate is stained badly, wipe it with
a cloth moistened with neutral cleaner, then
wipe it again with a clean soft dry cloth.
NOTE
• Applying spray cleaner directly to the unit
may damage its mechanical parts. Wiping the
faceplate with a hard cloth or using a volatile
liquid such as thinner or alcohol may scratch the
surface or erase the screened print.
Ñ Lens fogging
When you turn on the car heater in cold
weather, dew may form on the lens in the
disc player of the unit due to condensation.
This condensation on the lens (also called lens
fogging) may not allow discs to play. In such a
situation, remove the disc and wait for the dew
to evaporate.
• If the disc center hole or outside rim has burrs,
use the disc only after removing the burrs with
a ballpoint pen etc.
• Discs that are not round cannot be used.
• 8-cm (3 inch) discs cannot be used.
• Discs with coloring on the recording surface or
discs that are dirty cannot be used.
• This unit can only play the following types of
CDs.
• This unit may not correctly play discs which do
not have the mark.
• You cannot play a disc that has not been
finalized. (For the finalization process, see
your writing software and your recorder's
instruction manual.)
Ñ Before removing the vehicle
battery
It may be necessary to take note of the different
settings as the information stored in the head
unit is erased by disconnecting the power cable
from the battery (or removing the battery itself ),
however, there are some settings that will not
be reset.
Ñ In case of trouble
Should this product fail to operate properly,
contact your dealer or nearest authorized Toyota
Service Station.
Ñ Precautions on handling discs
• Do not touch the recording surface of the disc.
• Do not stick tape etc. on the disc, or use a disc
with tape stuck on it.
• Do not use disc type accessories.
• Clean the disc from the center toward the
outside rim.
• When removing a disc from this unit, pull it out
horizontally.
How to read this manual
• The screens and panels shown in this manual are just
examples used to provide clear explanations of the
operations.
For this reason, they may be different from actual
screens and panels used, or some display patterns
may be different.
• Display Language: English is used as the default
language. You can select the display language by
accessing the [
Setup (P.7).
] button function. See Regional
5English
Page 6
Basic Operations
Basic Operations
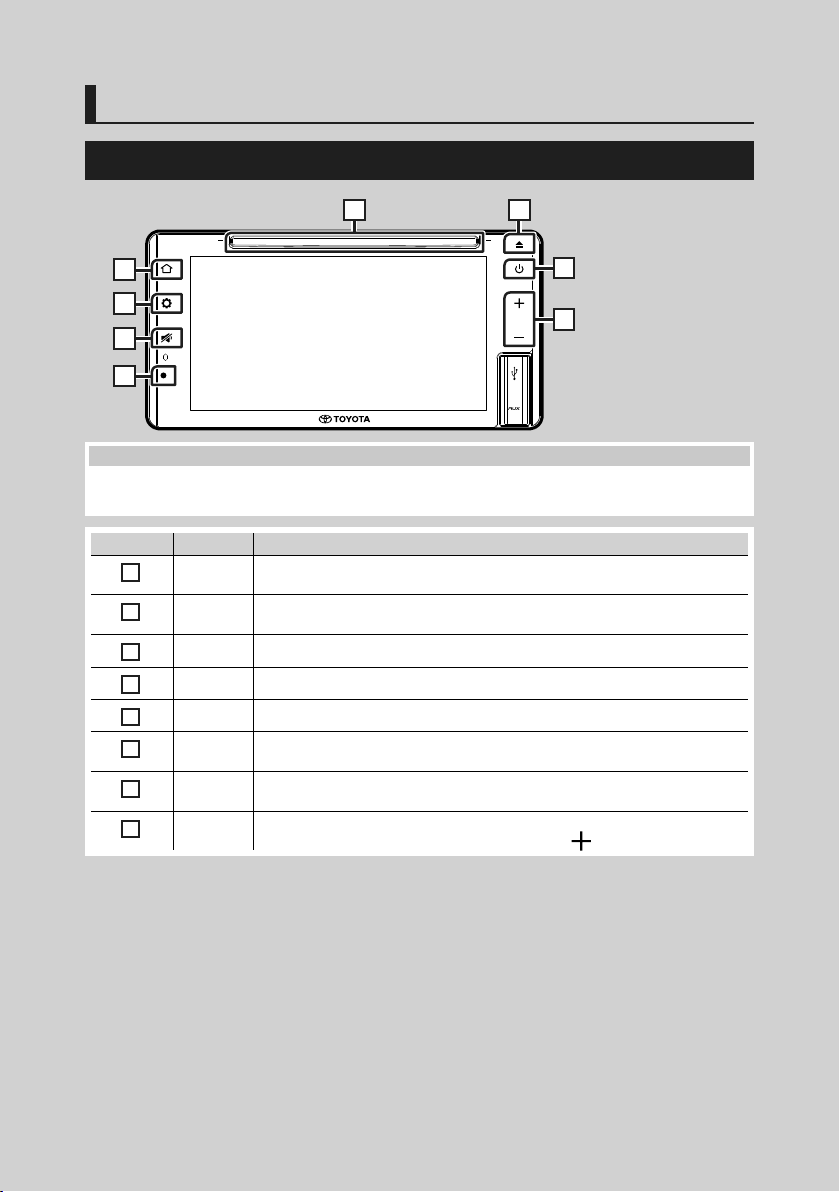
Front Panel Button Functions
1 2
3
4
7
8
5
6
NOTE
• The panels shown in this guide are examples used to provide a clear explanation of operations. For this reason,
they may be different from the actual panels.
Number Name Function
Disc-loading
1
slot
Disc eject • Ejects the disc.
2
Home • Displays the HOME screen.
3
Setting • Displays the popup menu.
4
Mute • Mutes/restores the sound.
5
Remote
6
Sensor
Power • Press and Hold : Turns on/off the unit ( P.7).
7
–, +
8
(Volume)
• A slot to insert a disc media.
• Press and hold to forcibly eject the disc.
• Receives the remote control signal.
• Short Press : Turns on/off “simple display mode” ( P.9).
• Adjusts the volume.
The volume will go up to 15 when you keep pressing [
].
6
Page 7
Basic Operations
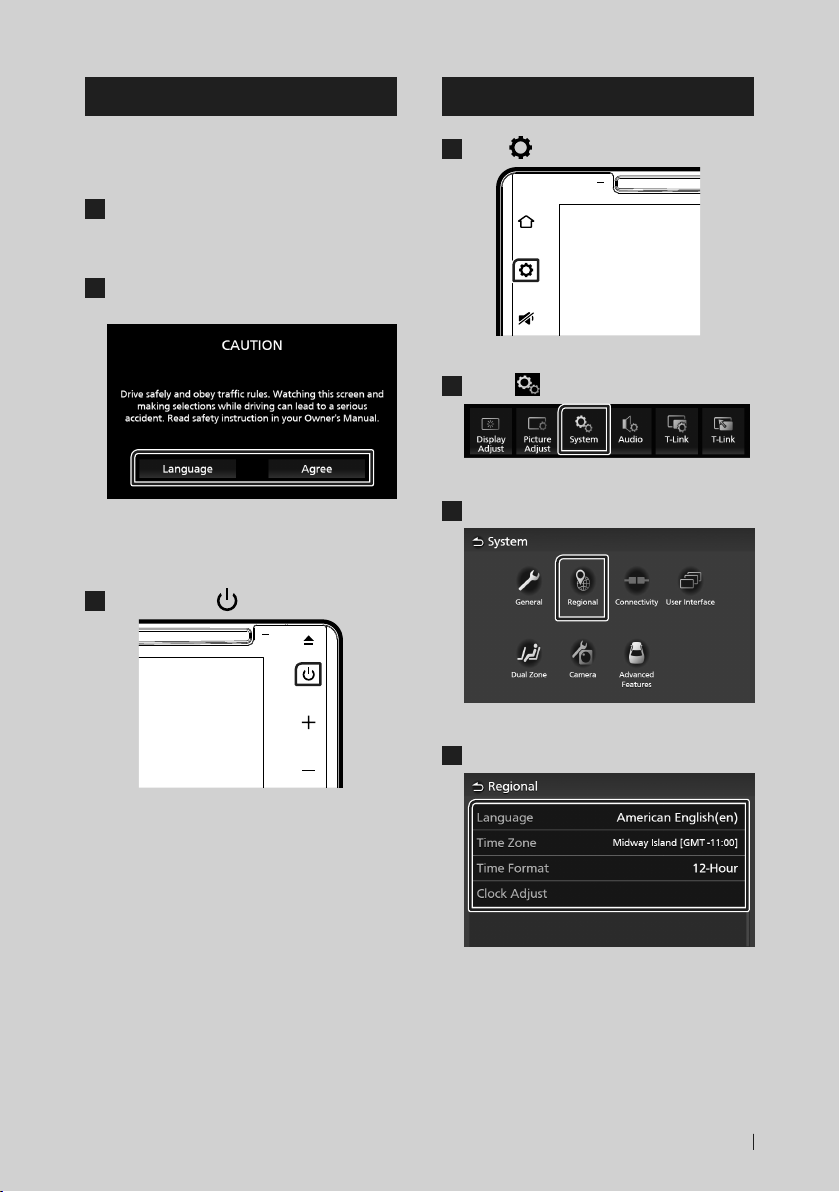
Turning on the Unit
This unit is turned on when the ignition switch
is set to ACC or ON position, and turned off
when the ignition switch is set to OFF position.
Set the ignition switch to ACC or ON
1
position.
The unit is turned on.
Read the caution message and touch
2
[Agree].
• Touching [Language] changes the
display language.
● To turn off/on the unit manually:
Press and hold [ ] button.
1
Regional Setup
Press [ ] button.
1
Popup menu appears.
Touch [ ].
2
System screen appears.
Touch [Regional].
3
The unit is turned off/on.
Regional screen appears.
Set each item as follows.
4
■ [Language]
Select the desired language.
■ [Time Zone]
Select the time zone.
7English
Page 8
Basic Operations
■ [Time Format]
Select the time display format.
[12-Hour] (Default)/ [24-Hour]
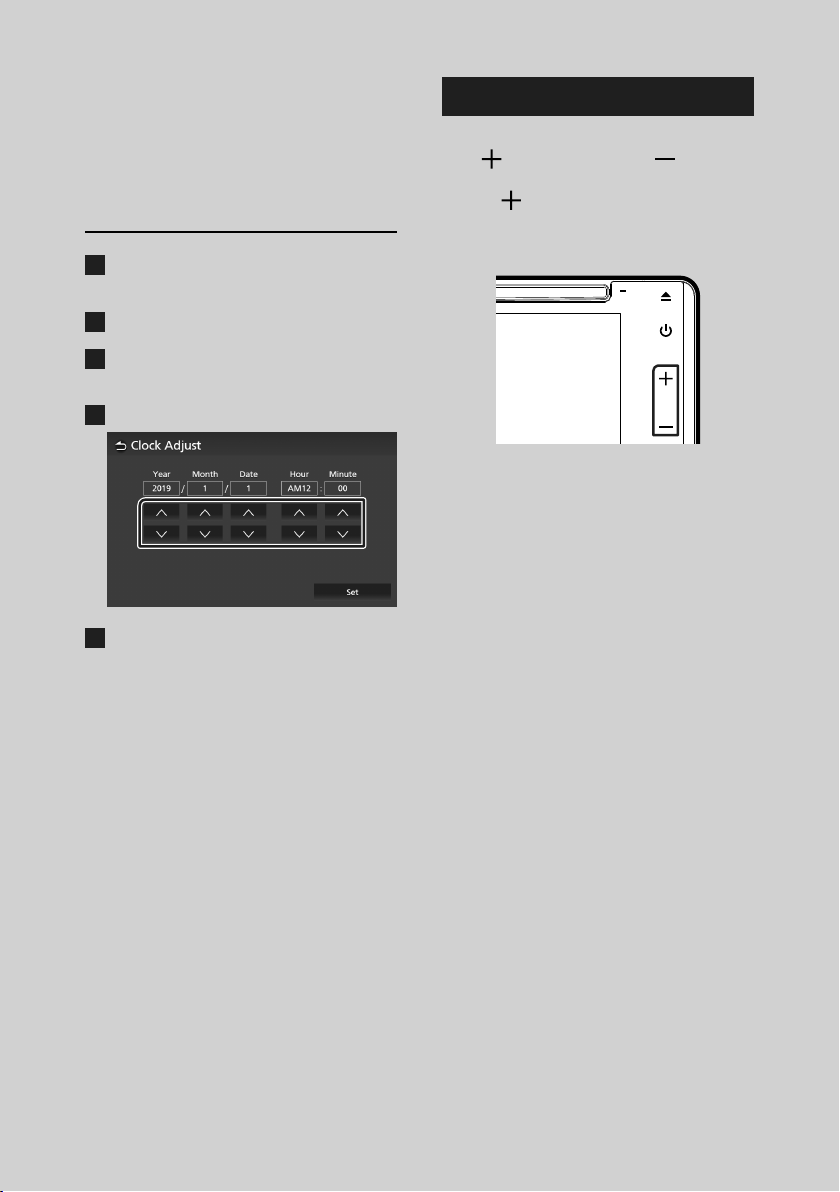
■ [Clock Adjust]
Adjust the date and time manually. (P. 8)
Adjusting date and time
Touch [Time Zone] on the Regional
1
screen.
Select the time zone.
2
Touch [Clock Adjust] on the Regional
3
screen.
Adjust the date, then adjust the time.
4
Touch [Set].
5
Adjusting the volume
You can adjust the volume (0 to 40).
Press [
] to increase, and press [ ] to
decrease.
Holding [
continuously to level 15.
Volume level 16 to 40 can be adjusted one
step each.
] increases the volume
8
Page 9
Basic Operations
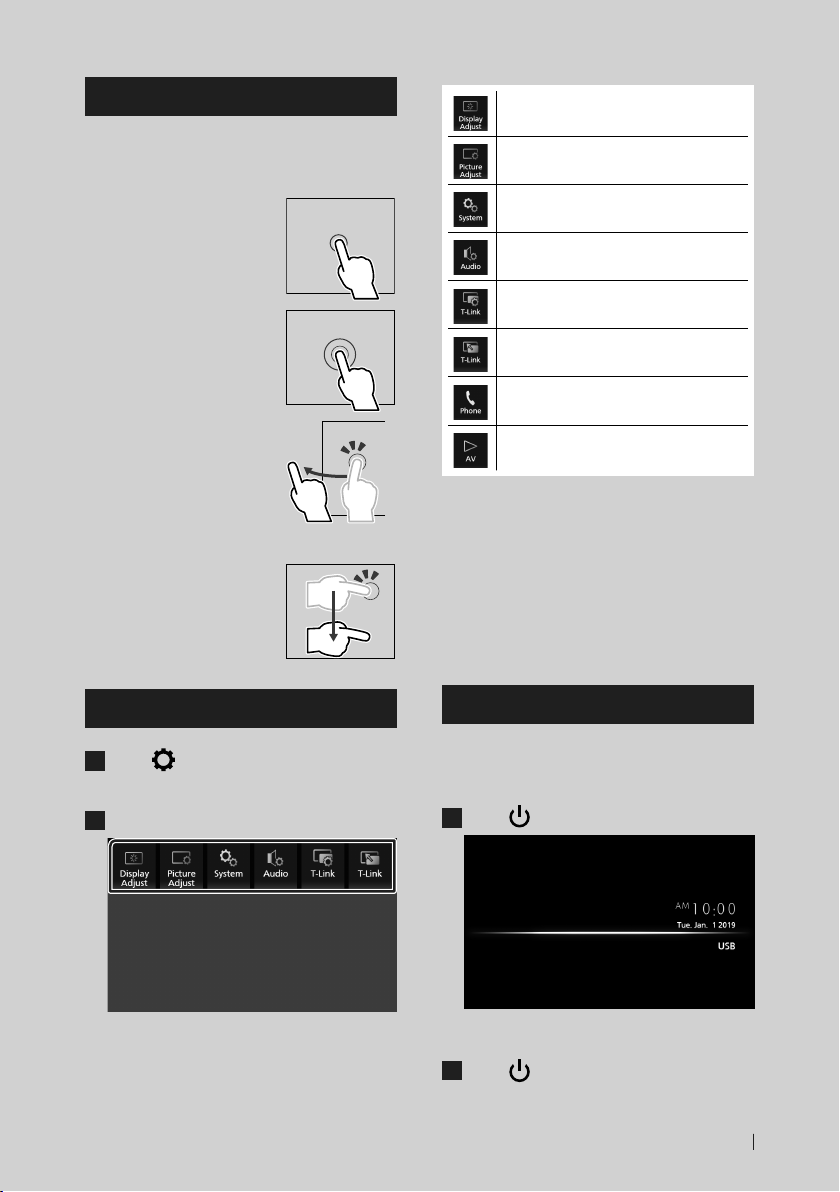
Touch screen operations
To perform operations on the screen, you need
to touch, touch and hold, flick or swipe to
select an item or change pages.
● Touch
Touch the screen gently to
select an item on the screen.
● Touch and hold
Touch the screen and keep
your finger in place until
the display changes or a
message is displayed.
● Flick
Slide your finger quickly
to the left or right on the
screen to change the page.
You can scroll a list screen
by flicking up/ down on the
screen.
● Swipe
Slide your finger up or down
on the screen to scroll the
screen.
• Displays the display control screen.
(P. 44)
• Displays the picture control screen.
(P. 44)
• Displays the System screen. ( P.45)
• Displays the Audio screen. ( P.50)
• Displays the T-Link Setup screen.*1
(P. 27)
• Displays the T-Link screen.*
• Displays the Hands Free screen. (P. 21)
• Displays the control screen of the current
3
source.*
1, *2
(P. 26)
*1 Premium AVX only
2
*
This menu is not available when a T-Link
source screen is displayed. If you select this
menu while using iPod or Bluetooth Audio
source, a message “T-Link can not be used
while using iPod / Bluetooth Audio. Would
you like to switch to T-Link?” will be displayed.
3
*
For Premium AVX, this menu is available when
a T-Link source screen is displayed.
Popup menu
Press [ ] button.
1
Popup menu appears.
Touch to display the popup menu.
2
The contents of the menu are as follows.
Simple Display Mode
When Simple Display Mode is enabled, the
screen will only display time, date and current
playback source information.
Press [ ] button.
1
● To back to the original screen:
Press [ ] button.
1
AVX displays the original screen.
9English
Page 10

Basic Operations
HOME screen descriptions
Most functions can be performed from the
HOME screen.
1 2 3
• Displays the source selection screen. (P.11)
1
• Current source information.
2
• Touch to display the control screen of the
current source.
• Short-cut playback source icons (P. 12)
3
Display the HOME screen
Press [ ] button.
1
HOME screen appears.
10
Page 11
Basic Operations
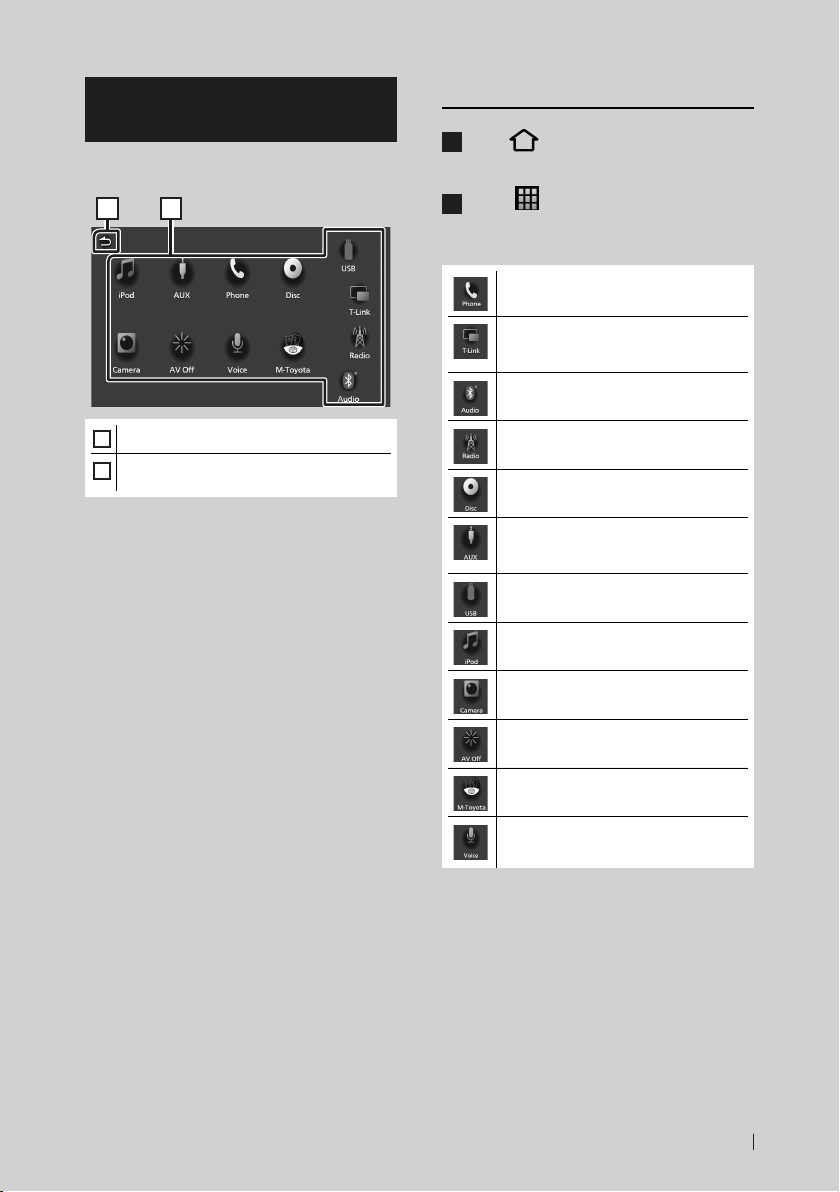
Source selection screen description
You can display icons of all playback sources
and options on the source selection screen.
21
• Returns to the previous screen.
1
• Changes playback sources.
2
For playback sources, see P.11.
Select the playback source
Press [ ] button.
1
HOME screen appears.
Touch [ ].
2
From the screen, you can select the
following sources and functions.
• Displays the Hands Free screen. (P. 21)
• Switches to the T-Link screen from the
connected iPhone/Android device.*1
(P. 26)
• Plays a Bluetooth audio player. (P. 15)
• Switches to the Radio broadcast.
(P. 39)
• Plays a disc. ( P.28)
• Switches to an external component
connected to the AUX input terminal.
(P. 42)
• Plays files on a USB device. ( P.34)
• Plays an iPod/iPhone. (P. 37)
• Switches to the camera image screen.
(P. 41)
• Turns off the AV source. (P. 12)
• Switches to the M-Toyota screen.
(P. 43)
• Displays the Voice Recognition screen.
(P. 22)
*1 Premium AVX only.
11English
Page 12
Basic Operations
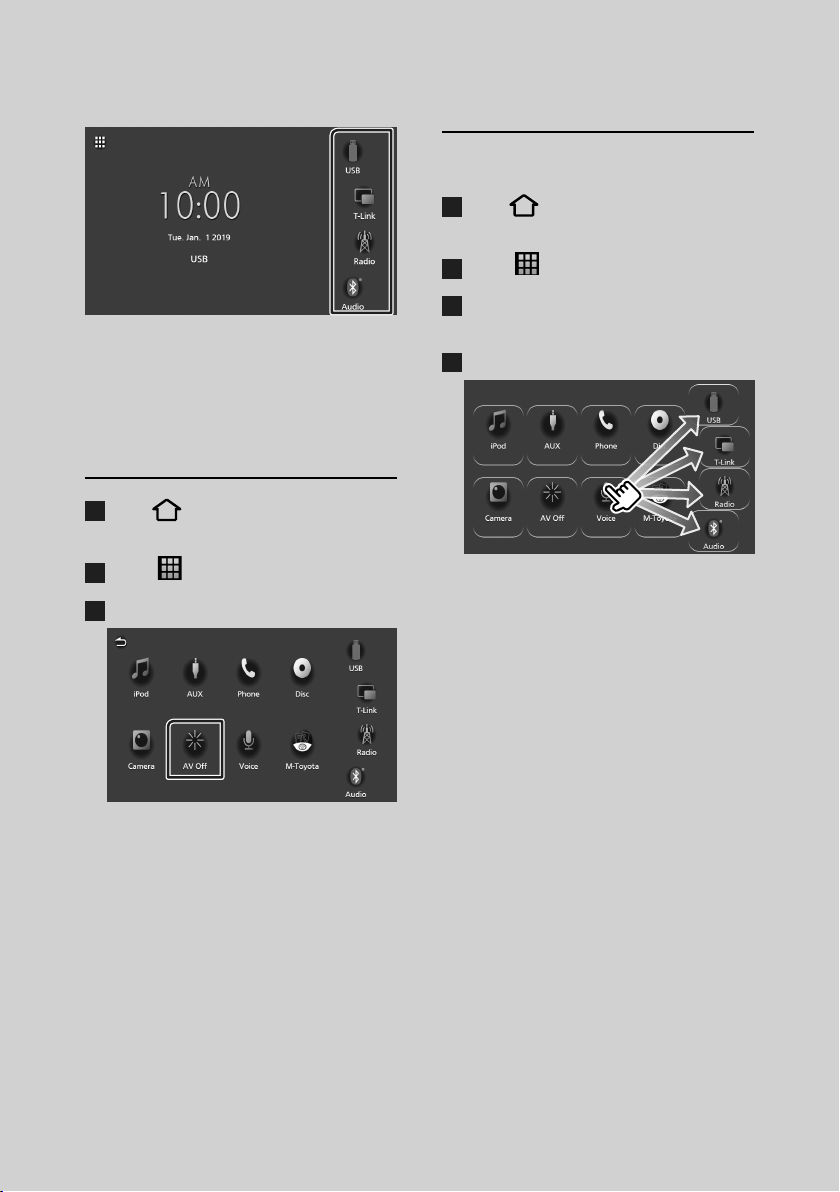
To select the playback source on the
HOME screen
The 4 items displayed on the source selection
screen with large icons are shown on the
HOME screen.
You can change the items displayed on this
area by customizing the source selection
screen. (P. 12)
To turn off the AV source
Press [ ] button.
1
HOME screen appears.
Touch [ ].
2
Touch [AV Off].
3
Customize Short-cut buttons on
HOME screen
You can arrange the positions of the source
icons as you like.
Press [ ] button.
1
HOME screen appears.
Touch [ ].
2
Touch and hold the icon which you want
3
to move in the customizing mode.
Drag the icon to the desired position.
4
12
Page 13
Basic Operations
Source control screen descriptions
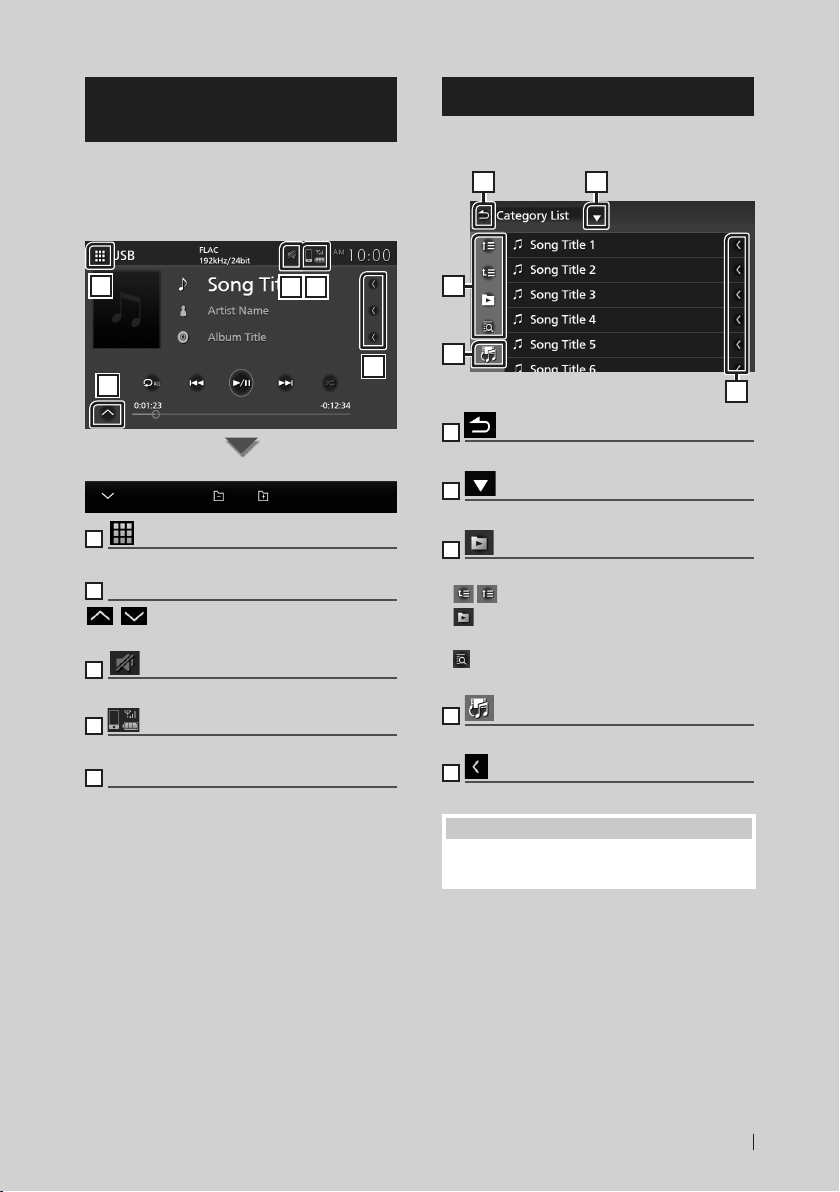
There are some functions which can be
performed from most screens.
Indicators
1
2
Sub-control panel
1
[ ] All sources icon
Displays the source selection screen. (P. 11)
2
Sub-control panel
[
]/[ ] : Displays/hides the sub-control panel.
This function is available in Disc and USB source.
3
[ ]
Mute icon is indicated while AVX is muting.
4
Connected Bluetooth phone information.
5
Text scroll
Scrolls the displayed text.
43
5
List screen
There are some common function keys in the
list screens of most sources.
1
3
4
1
Return
Returns to the previous screen.
2
Displays the list type selection window.
3
etc.
Keys with various functions are displayed here.
•
: Moves to the upper hierarchy level.
•
: Plays all tracks in the folder containing the
current track.
•
: Jumps to the letter you entered
(alphabetical search).
4
Displays a music/movie file list.
5
Text scroll
Scrolls the displayed text.
NOTE
• Depending on the current source or mode, some
function key may not appear.
2
5
13English
Page 14
Connection
Connection
Wired Connection
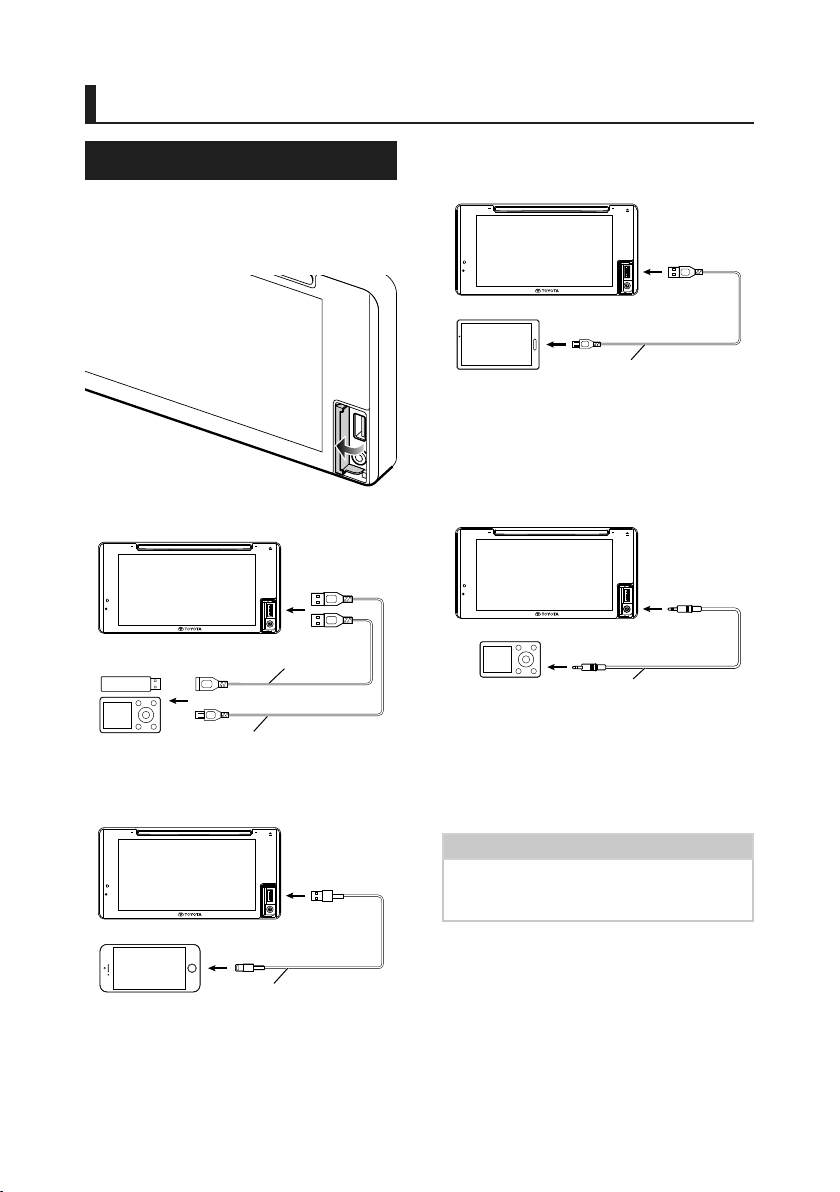
This unit can be connected to external devices.
Open the front port cover and connect the
external device via the following accessory.
Ñ Connecting a USB device
[1]
USB device
[1]
Sold separately
USB extension cable
USB cable
[1]
[1]
Ñ Connecting an iPod/iPhone
Ñ Connecting an Android
smartphone
Android smartphone
[1]
Sold separately
Micro USB to USB cable
[1]
[1]
Ñ Connecting an external
component
You can connect an external component to the
AUX input terminal.
Audio player
[1]
Sold separately
[1]
ø3.5 mm jack
# WARNING
• Install the USB device/ iPod/ iPhone/ Android
smartphone and Audio player in the place
where it will not affect safe driving.
NOTE
• Do not keep the USB device/ iPod/ iPhone/
Android smartphone/ Audio player and USB cable
in the car to avoid damage by heat.
[1]
iPod/iPhone
[1]
Sold separately
14
[1]
Lightning to USB cable
[1]
Page 15
Bluetooth Control
Bluetooth Control
Using the Bluetooth function allows you to use
various functions such as listening to the audio
file and making/receiving a call.
Information for using Bluetooth® devices
Bluetooth is a short-range wireless radio
communication technology for mobile devices
such as mobile phones, portable PCs, and
other devices.
Bluetooth devices can be connected without
cables and communication with each other.
# WARNING
• While driving, do not perform complicated
operations such as dialing numbers, using the
phone book, etc. When you perform these
operations, stop your car in a safe place.
NOTE
• Some Bluetooth devices may not be connected
to this unit depending on the Bluetooth version
of the device.
• This unit may not work for some Bluetooth
devices.
• Connecting conditions may vary depending on
your environment.
• Some Bluetooth devices are disconnected when
this unit is turned off.
Ñ About the mobile phone and
Bluetooth audio player
This unit conforms to the following Bluetooth
specifications:
Version
Bluetooth Ver. 4.1
Profiles
Mobile phone:
HFP (V1.7) (Hands Free Profile)
SPP (Serial Port Profile)
PBAP (Phonebook Access Profile)
Audio player:
A2DP (Advanced Audio Distribution Profile)
AVRCP (V1.6) (Audio/Video Remote Control
Profile)
Sound codec
SBC, AAC
NOTE
• The units supporting the Bluetooth function have
been certified for conformity with the Bluetooth
Standard according to the procedure prescribed
by Bluetooth SIG.
However, it may be impossible for such units
to communicate with your mobile phone
depending on its type.
15English
Page 16
Bluetooth Control
Register the Bluetooth device
It is necessary to register the Bluetooth audio
player or mobile phone in this unit before
using the Bluetooth function.
You can register up to 10 Bluetooth devices.
NOTE
• Up to 10 Bluetooth devices can be registered. If
an attempt is made to register the 11th Bluetooth
device, the Bluetooth device connected on the
earliest date will be deleted to register the 11th
one.
• This AVX is compatible with the Apple Easy
Pairing function.
When an iPhone is connected to AVX via USB
cable, a Bluetooth connection dialog appears.
Please select the function and connect your
iPhone.
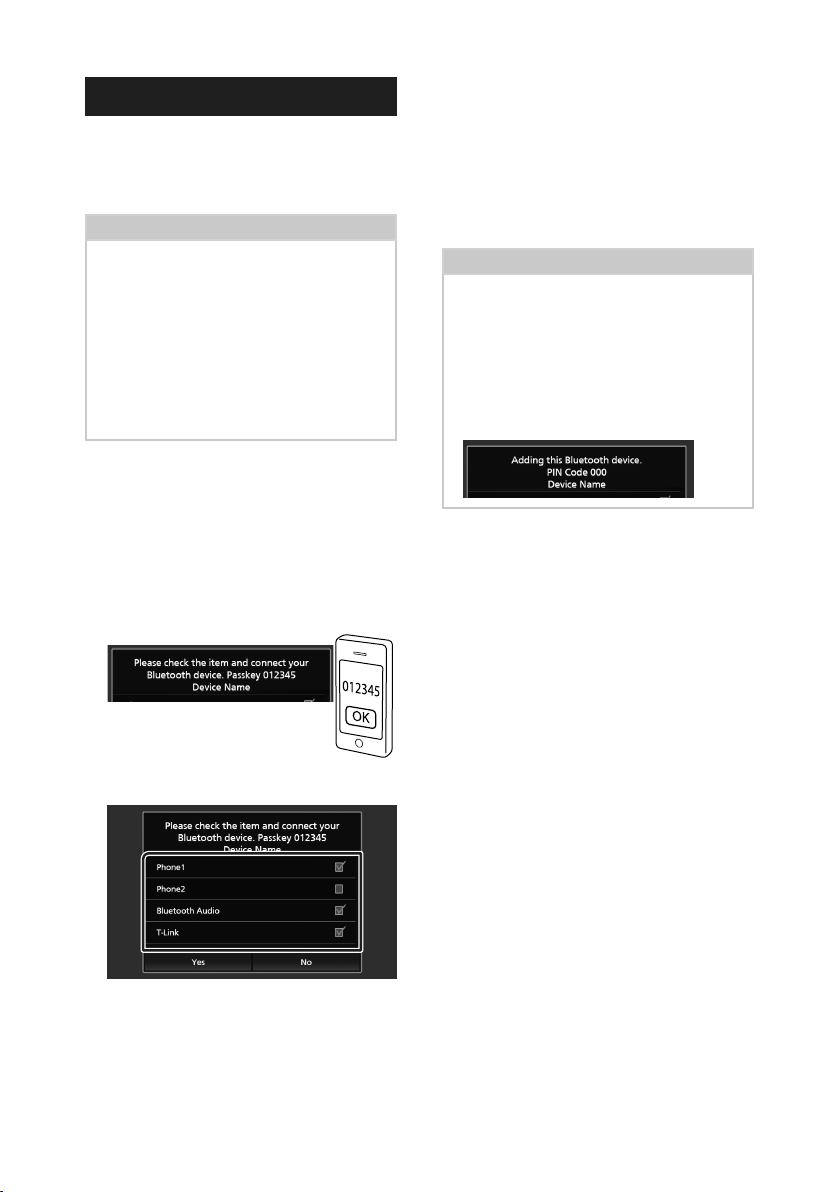
Search for the unit (“Car Multimedia”)
1
from your smartphone/mobile phone.
Complete steps 1 to 4 within 30 seconds.
Operate your smartphone/mobile phone
2
according to the displayed messages.
● Confirm the request both on the
smartphone/mobile phone.
■ [T-Link] (Premium AVX only)
Put checkmark check to use T-Link.
Touch [Yes ].
4
When data transmission and connection
have completed, the Bluetooth telephone
connection icon appears on the screen.
NOTE
• If the mobile phone supports PBAP, the
phonebook data is downloaded automatically
when you select [Phone1] or [Phone2].
• For some mobile phones, you may need to
operate the mobile phone to download the
phonebook data.
• If the PIN Code is displayed in the message, input
the PIN Code in your smartphone/mobile phone.
The PIN Code is set to “0000” as the default.
Select the function you want to use.
3
■ [Phone1]/ [Phone2]
Select the hands-free number to connect.
■ [Bluetooth Audio]
Put checkmark to use Bluetooth Audio.
16
Page 17
Bluetooth Control
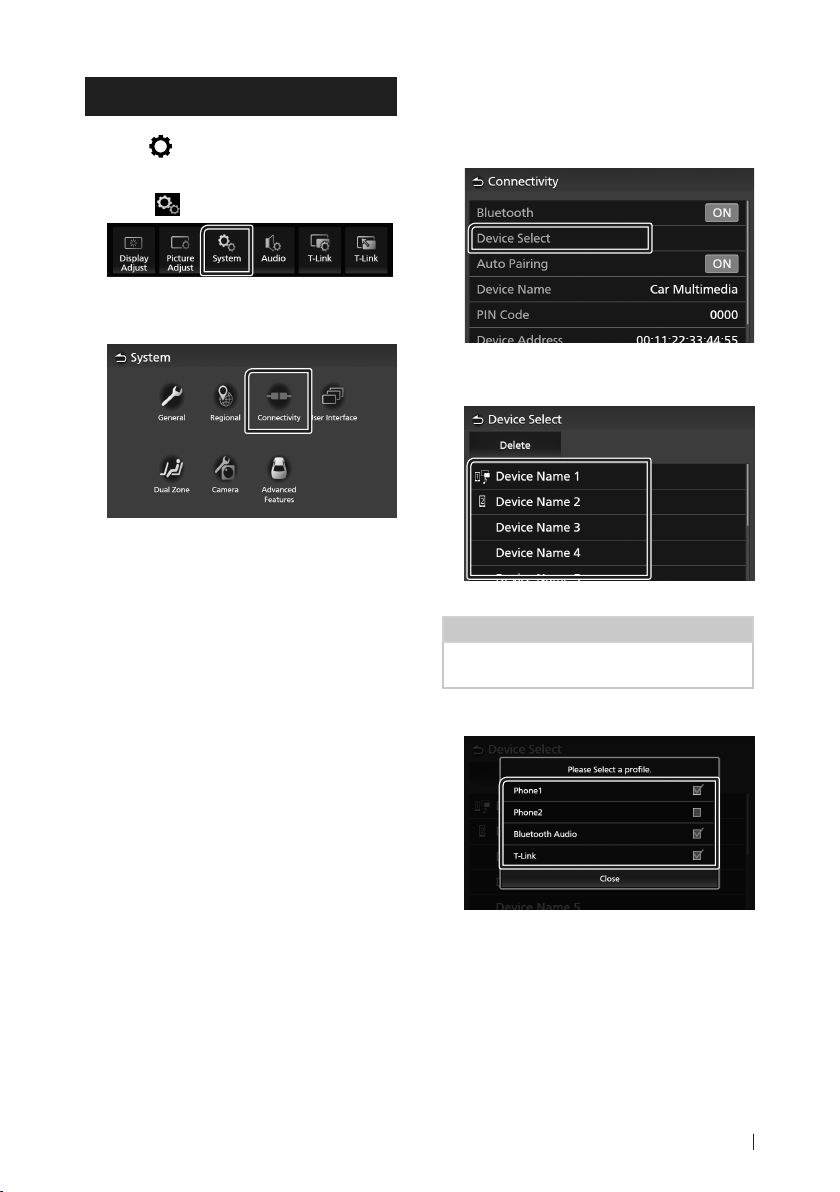
Bluetooth Setup
Press [ ] button.
1
Popup menu appears.
Touch [ ].
2
System screen appears.
Touch [Connectivity].
3
Connectivity screen appears.
Set each parameter as follows.
4
■ [Bluetooth]
Set whether to use the Bluetooth function.
■ [Device Select]
Connect the Bluetooth device. (P. 17)
■ [Auto Pairing]
When set to “ON”, the Apple Auto Pairing
function is turned on to automatically
register the iPod touch or iPhone connected
to this unit.
[ON ](Default): Turns on the Apple Auto
Pairing function.
[OFF]: Turns off the Apple Auto Pairing
function.
■ [Device Name]
Change the device name. (P. 18)
■ [PIN Code]
Change the PIN Code. (P. 18)
■ [Device Address]
Displays the media access control address.
Ñ Connect the Bluetooth device
Touch [Device Select] on the Connectivity
1
screen.
Touch the name of the device you want
2
to connect.
Profile select screen appears.
NOTE
• If the icon is lighted, it means that the unit will
use that device.
Set each profile as follows.
3
■ [Phone1], [Phone2]
Select when the device is connected with
the unit as hands-free phone 1 or 2.
■ [Bluetooth Audio]
Select to use as an audio player.
■ [T-Link] (Premium AVX only)
Select to use as the T-Link source.
Touch [Close].
4
17English
Page 18
Bluetooth Control
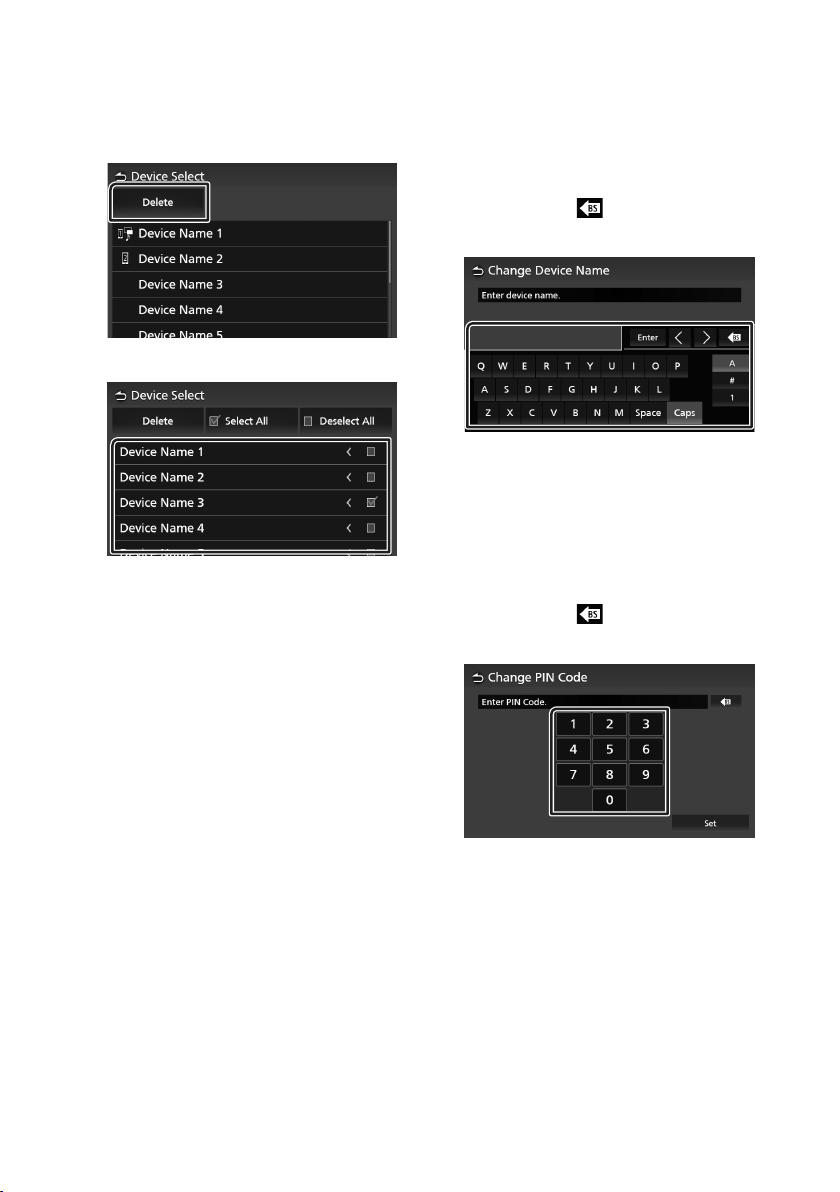
To delete the registered Bluetooth
device
Touch [Delete].
1
Touch the device name to check.
2
■ [þ Select All]
Selects all Bluetooth devices.
■ [¨ Deselect All]
Clears all check marks.
Touch [Delete].
3
Confirmation message appears.
Touch [Yes ].
4
Ñ Change the device name
Touch [Device Name] on the Connectivity
1
screen.
Change Device Name screen appears.
Touch and hold [ ].
2
Input the device name.
3
Touch [Enter].
4
Ñ Change the PIN Code
Touch [PIN Code] on the Connectivity
1
screen.
Change PIN Code screen appears.
Touch and hold [ ].
2
Input the PIN Code.
3
18
Touch [Set].
4
Page 19
Bluetooth Control
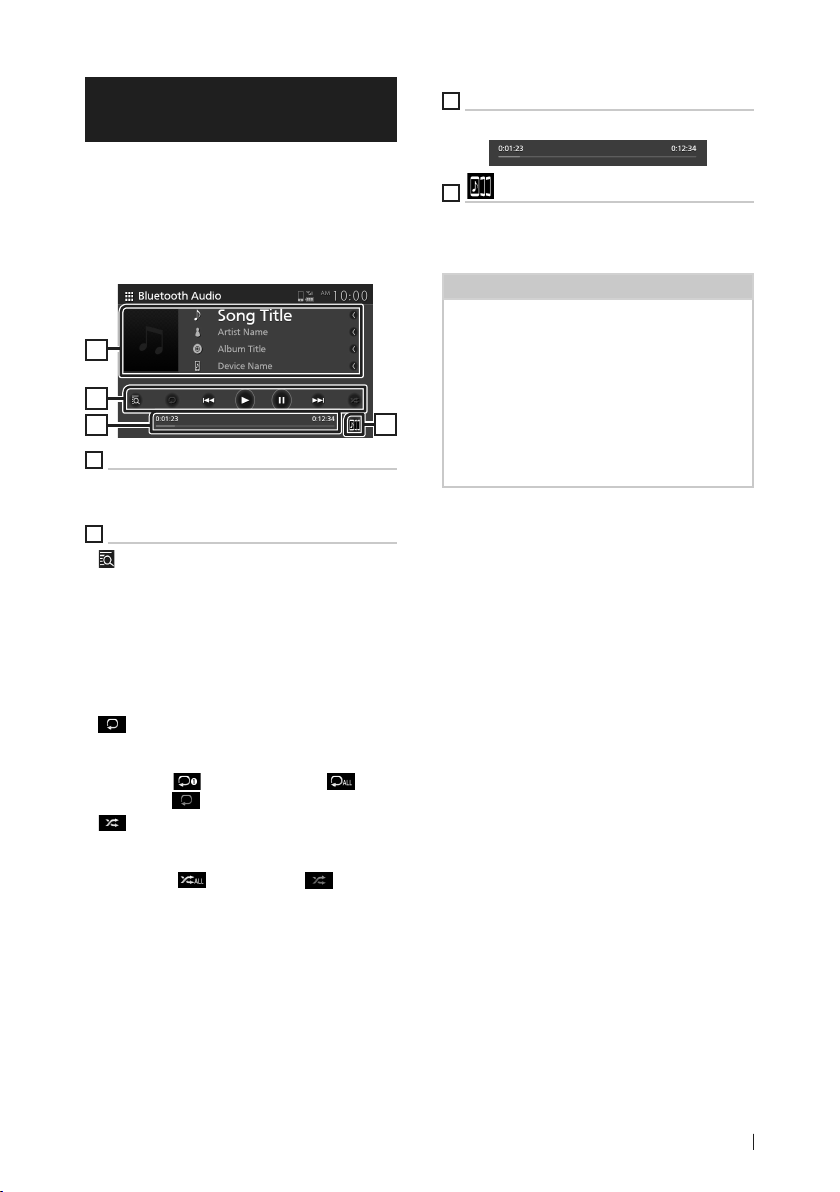
Playing the Bluetooth Audio Device
Most functions can be controlled from the
source control screen.
To select Bluetooth source, touch [Audio] icon
on the source selection screen. (P. 11)
Ñ Bluetooth basic operation
1
2
3
1
Information display
• Displays the current track information.
• Connected device name.
2
Operation keys *
• [
] : Searches for a file. See File search
(P. 20).
• [E] [F]: Searches for the previous/next
content.
Touch and hold to fast forward or fast
backward.
• [D]: Plays.
• [H]: Pauses.
• [
] : Repeats the current track/folder. Each
time you touch the key, repeat modes are
switched in the following sequence:
File repeat ( ), All songs repeat ( ),
Repeat off ( )
• [
] : Randomly plays all tracks in the current
folder. Each time you touch the key, random
modes are switched in the following sequence:
All random ( ), Random off ( )
3
Playing time
For confirmation of current playing position.
4
[ ]
Bluetooth audio devices can be switched easily
to play music. See Bluetooth Audio Device
Change (P.20).
NOTE
• The operation buttons, indications and
information displayed on the screen differ
depending on the connected device.
• If the operation keys do not appear, operate from
the player.
• Depending on your mobile phone or audio
4
player, sound may be heard and controlled but
text information may not appear.
• If the volume is too low, raise it on your mobile
phone or audio player.
* These items appear only when the audio player
which supports AVRCP profile is connected.
19English
Page 20
Bluetooth Control
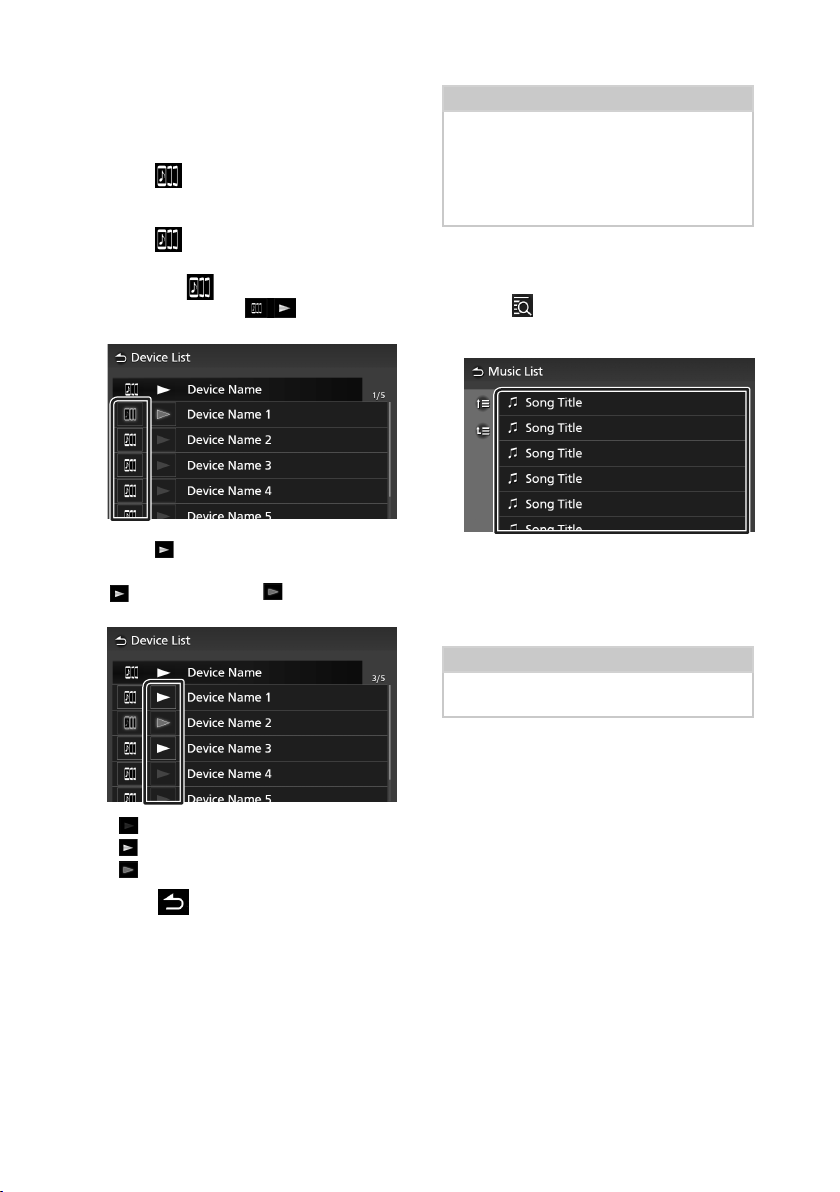
Ñ Bluetooth Audio Device Change
Up to five Bluetooth audio device can be
connected and switched easily to play music.
Touch [ ].
1
A list of registered devices is displayed.
Touch [ ] of device name you want to
2
connect.
• Touching [
connected device ( ) disconnects
this device.
Touch [ ] (white) on the left of the name
3
of the device to be played.
[
] (white) changes to [ ] (Blue) and starts
playback.
] on the left of the
NOTE
• If a connected Bluetooth audio device is operated
to play music, connections are switched.
• When a Bluetooth source is switched to another
one, its settings are deleted and the connection
is restored to the connection before source
switching.
Ñ File search
Touch [ ].
1
Touch the desired file or folder.
2
When you touch a folder its contents are
displayed.
Touch the desired item in the content list.
3
Playback starts.
NOTE
• For operations in the list screen, see List screen
(P. 13).
• (Gray) : Not connected.
•
(White) : Connected.
•
(Blue) : During playback.
Touch [ ].
4
20
Page 21
Bluetooth Control
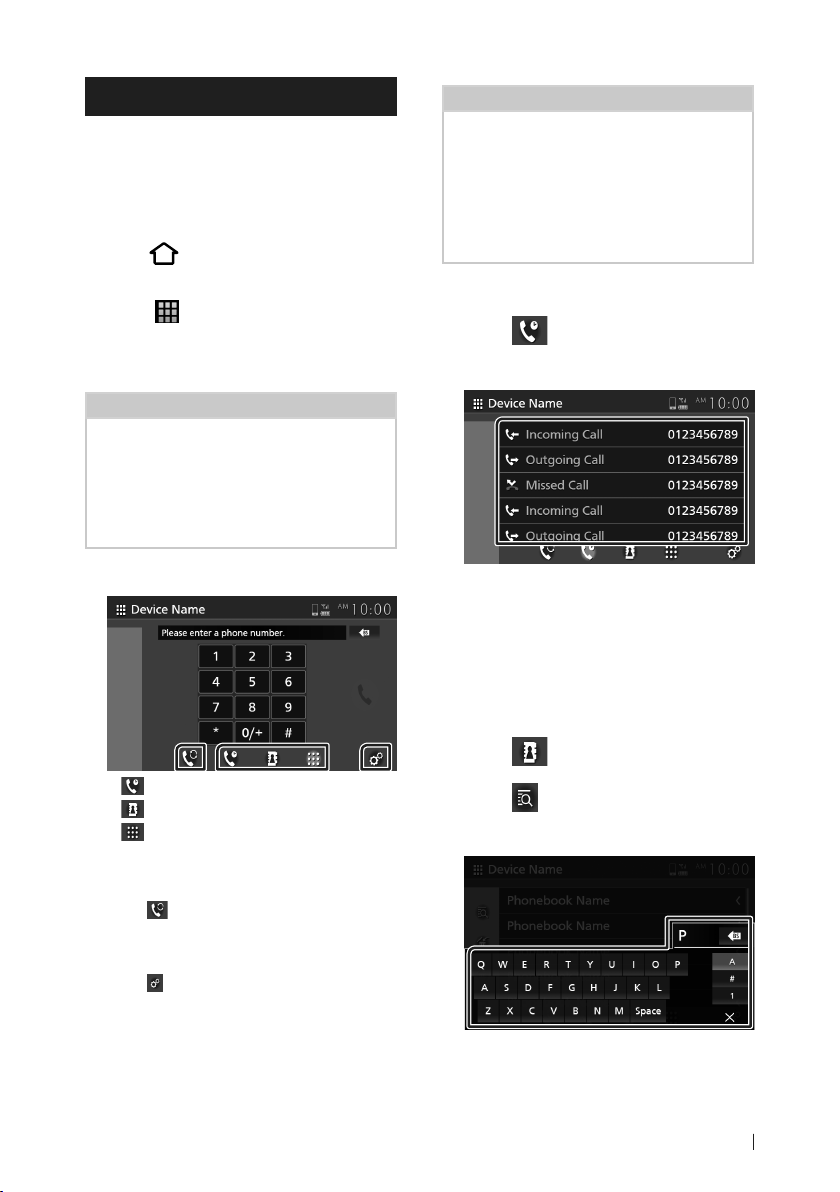
Using the Hands-Free Unit
You can use the telephone function by
connecting the Bluetooth telephone to this
unit.
Ñ Make a call
Press [ ] button.
1
HOME screen appears.
Touch [ ].
2
Touch [Phone].
3
Hands Free screen appears.
NOTE
• If your mobile phone supports PBAP, you can
display the phone book and call lists onto the
touch panel screen when the mobile phone is
connected.
– Phone book: up to 1000 entries
– Up to 50 entries including dialed calls, received
calls, and missed calls
Select a dialing method.
4
NOTE
• Bluetooth hands free sound quality and
performance also depend on mobile phones and
carrier conditions.
• Status icons such as battery and antenna icons
may differ from those displayed on the mobile
phone.
• Setting the mobile phone in the private/ visibility
off mode can disable the hands-free function.
Call using call history
Touch [ ].
1
Select the phone number from the list.
2
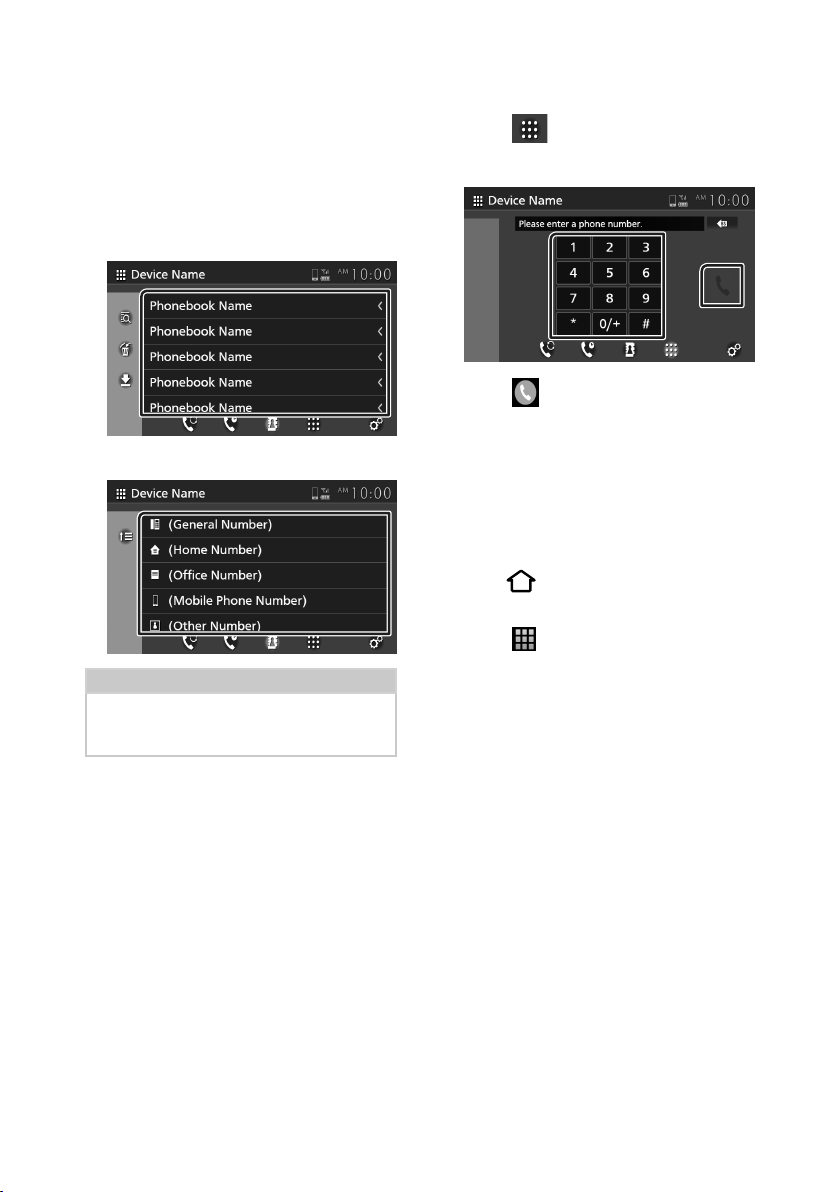
Call using the phonebook
You can use the phonebook data of the
selected mobile phone to make a call.
Before starting this procedure, it is necessary
to download the phonebook data. For details,
see Phonebook transfer (P.24).
• [ ]: Call using call history
• [
]: Call using the phonebook
• [
]: Call by entering a phone number
● Select the mobile phone to use
When you connect two mobile phones
1) Touch [
use.
● Phone Setup
1) Touch [
Phone Setup screen appears. (P. 25)
] to select the phone you want to
].
Touch [ ].
1
Touch [ ].
2
Select the initial.
3
• Special characters cannot be searched
using this function.
21English
Page 22
Bluetooth Control
• Accented first characters of each
name entry can be searched using the
equivalent normal character of that letter.
i.e. Ñ can be searched as N
• Accented characters cannot be searched
in the middle of the word.
Select the person you want to call from
4
the list.
Select the phone number from the list.
5
NOTE
• You can sort the phone numbers in the list by last
name or first name. For details, see Phone Setup
(P. 25).
Call by entering a phone number
Touch [ ].
1
Enter a phone number with number keys.
2
Touch [ ].
3
Ñ Voice Recognition
You can access the voice recognition function
of the mobile phone connected to this unit.
You can search the mobile phone phonebook
by voice. (The functionality depends on the
mobile phone.)
Press [ ] button.
1
HOME screen appears.
Touch [ ].
2
Touch [Voice]. (P. 11)
3
Voice Recognition screen appears.
Start speaking.
4
22
Page 23
Bluetooth Control
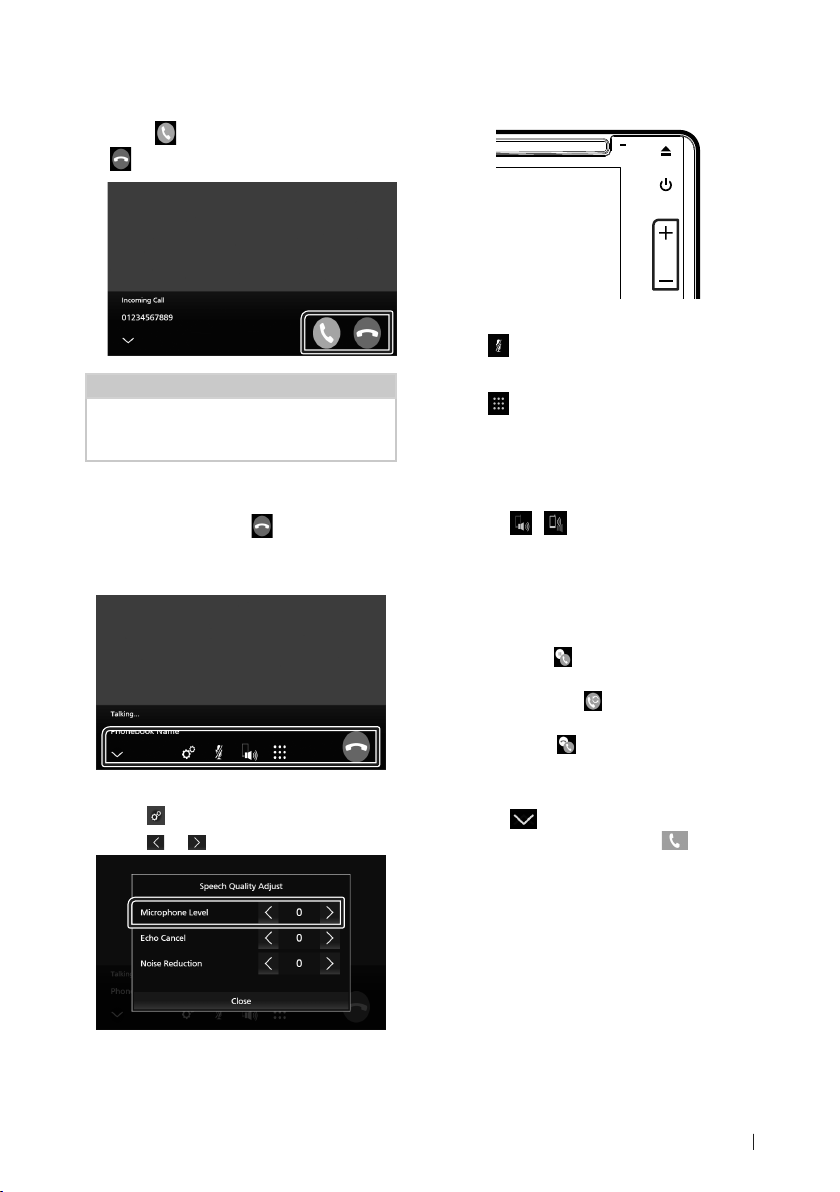
Ñ Receive a call
Touch [ ] to answer a phone call or
1
[
] to reject an incoming call.
NOTE
• While monitoring the picture from the view
camera, this screen does not appear even if a call
comes in.
To end call
While talking, touch [ ].
1
Ñ Operations during a call
● Adjust the volume of your voice
1) Touch [
2) Touch [
].
] or [ ] for [Microphone Level].
● Adjust the receiver volume
Press the [–] or [+] button.
● Mute your voice
Touch [
Touch [
You can send tones by touching desired keys
on the screen.
Touching [
speaking voice output destinations between
the mobile phone and the speaker.
When you receive a new call while talking on
the phone, you can answer the newly received
call by touching [
hold.
Each time you touch [
to the other one.
When you touch [
to be switched to the call waiting on hold.
Touching [
screen. To display it again, touch [ ] at the
top of the screen.
] to mute or not to mute your voice.
● Output the dial tone
] to display the tone input screen.
● Switching between speaking voice
output destinations
]/ [ ] each time switches
● Call-waiting
]. The current call is put on
], the caller will change
], the current call will end
● To close the Hands-Free popup screen
] to close the Hands-Free popup
23English
Page 24
Bluetooth Control
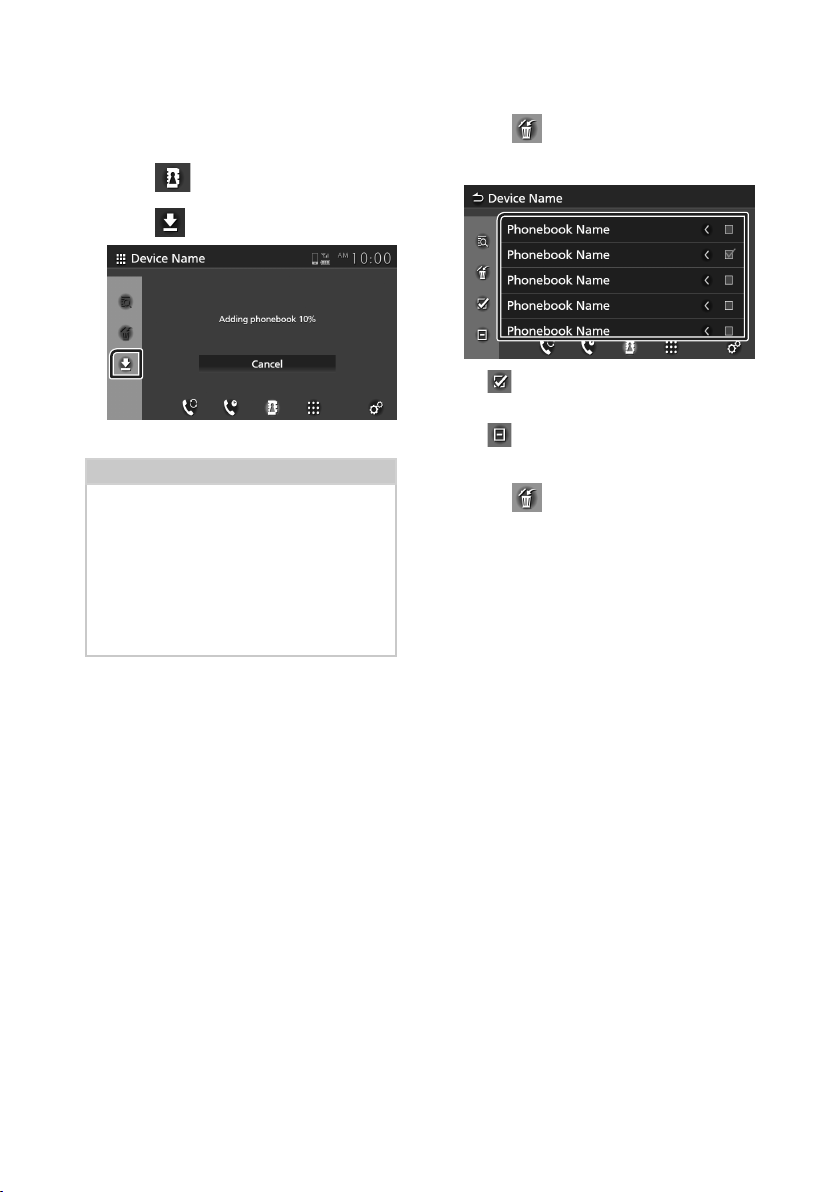
Ñ Phonebook transfer
You can transfer phonebook data from your
Bluetooth phone using PBAP.
Touch [ ].
1
Touch [ ].
2
Phonebook data transfer starts.
NOTE
• If the Phonebook contains more than 1000
entries, Phonebook data cannot be transferred.
• The phonebook data of up to 10 Bluetooth
devices can be stored.
• When you connect the mobile phone of which
the phonebook data is downloaded before, the
downloaded data will be displayed.
• If you download the phonebook data from the
same device again, the data will be overwritten.
Phonebook deletion
Touch [ ].
1
Touch the name to check.
2
■ [ ]
Checks all boxes.
]
■ [
Clears all check marks.
Touch [ ].
3
Confirmation message appears.
Touch [Yes ].
4
24
Page 25
Bluetooth Control
Phone Setup
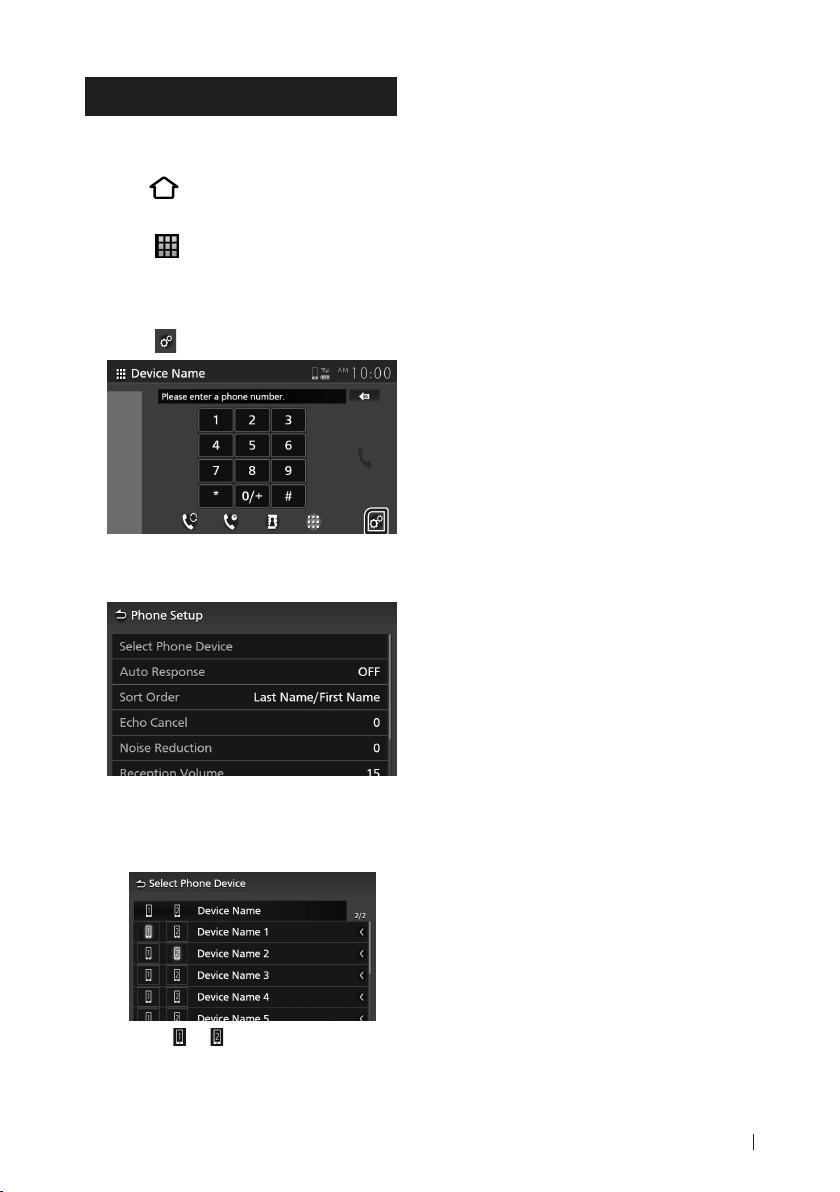
You can make various settings for the HandsFree function.
Press [ ] button.
1
HOME screen appears.
Touch [ ].
2
Touch [Phone].
3
Hands Free screen appears.
Touch [ ].
4
Phone Setup screen appears.
Set each function as follows.
5
■ [Auto Response]*
Set the automatic response time to pick-up
an incoming call.
[OFF ](Default): Turns off the Automatic
response function.
[1]/ [5]/ [10]/ [15]/ [20]/ [25]/ [30]: Sets the
ringing time (second).
■ [Sort Order]
Set how to sort the data in the mobile phone
phonebook.
[First Name/Last Name]: Sorts data by the
first name.
[Last Name/First Name ](Default): Sorts data
by the last name.
■ [Echo Cancel]
Adjust the level of echo cancellation.
Default is “0”.
■ [Noise Reduction]
Reduce the noise generated in the
surrounding environment without changing
the microphone volume. Use this function
when the voice of caller is not clear. Default
is “0”.
■ [Reception Volume]
Adjust the receiver volume.
Default is “15”.
■ [Incoming Ring Tone Volume]
Adjust the ring tone volume of a new
incoming call while talking.
Default is “15”.
■ [Select Phone Device]
Select the mobile phone to use as the
Hands-Free phone 1 or 2 from the registered
device list.
Touching [ ] or [ ] switches the selected
phone device.
* Either the auto response time set on this
unit or the time set on the mobile phone,
whichever is shorter takes effect.
25English
Page 26
T-Link
T-Link
You can display the same screen of the
smartphone on the monitor of the unit using
the T-Link source.
(Premium AVX)
Preparation
Download “T-Link” from (Apple) App
1
Store or Google Play.
T-Link is a free Application.
Compatible devices are the following
• iOS version 11 or later
• Android version 5.0 (Lollipop) or later/Linux
kernel version 3.5 or later
• Bluetooth support
For the case if you can not find "T-Link"
App in Google Play, please search again by
inputting as "T-Link JVCKENWOOD".
Pair your smartphone with AVX via
2
Bluetooth.
See Register the Bluetooth device (P.16)
and Connect the Bluetooth device (P.17).
NOTE
• Some Android Smartphone may not able
to support 2-way Touch Control due to
Smartphone's technical spec.
• While using T-Link, Smartphone temperature may
be increased due to the below factors.
– Keep running Nav App and/or Music straming
App.
– Keep running Wi-Fi, GPS and Bluetooth.
If you recognize that your Smartphone gets hot,
please stop using T-Link and disconnect USB.
Connecting a smartphone
Ñ Connecting an iPhone
On your iPhone, launch “Settings”. Touch
1
“Control Center” and then “Customize
Controls”.
Touch “Screen Recording” and add to
2
“INCLUDE” list.
Launch Control Center of your iPhone,
3
touch and hold Screen Recording
icon and then touch “T-Link” and start
broadcast.
26
Connect your iPhone with AVX via
4
Lightning to USB cable. (P. 14)
Ñ Connecting an Android device
Connect your Android Smartphone via
1
USB cable. (P. 14)
Launch T-Link App on your Android
2
Smartphone.
Press "Start now" to start capturing your
Android screen.
Press "OK" to start T-Link.
Turn on "Overlay Permission" of T-Link.
Turn on "Accessibility Service" to be able to
filter drive-safe apps.
Start to enjoy T-Link.
3
NOTE
• You can check “how to” tutorial in T-Link App.
• When you use T-Link first time, T-Link terms of
service are displayed. It is necessary to agree to
the T-Link terms of service to use this function.
Mirroring Operation
Operate your smartphone to activate
1
T-Link App, then connect to this unit.
(P. 26)
Press [ ] button.
2
HOME screen appears.
Touch [ ].
3
Touch [T-Link]. ( P.11)
4
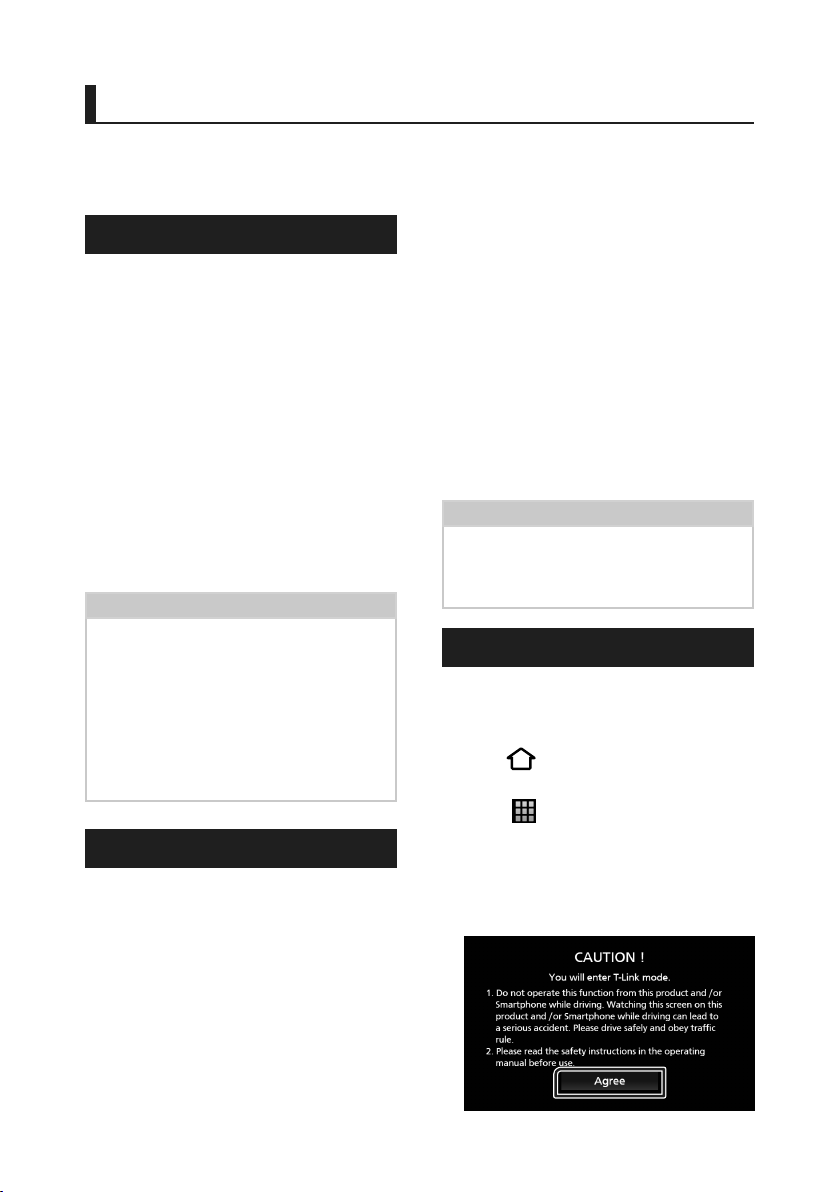
The caution message screen is displayed.
Read the caution message and touch
5
[Agree].
T-Link screen appears.
Page 27
T-Link
NOTE
• T-Link is discontinued when you switch to
another source screen. However, while displaying
the current screen, you can switch to another
source by using the steering wheel switches or
“AV Source Select” on the T-Link Setup screen.
• While you use the T-Link function with an
iPhone, T-Link is discontinued by the following
operations. To resume the T-Link functions,
disconnect the USB cable and try connecting it
again.
– Receiving a call
– iPhone's screen recording function is stopped.
– iPhone screen is turned off.
• Some Apps may not sound.
• While you use the T-Link function with an Android
device, the software keyboard is displayed only
when you operate the Android device and enable
the virtual keyboard beforehand.
• For more information on T-Link, refer to the
instruction manual supplied with T-Link App.
• While the T-Link function is enabled, you cannot
use USB source.
• You cannot use both T-Link and iPod source at
the same time.
• You cannot use both T-Link and Bluetooth Audio
source at the same time.
• After you end to use the T-Link function, stop
broadcast on iPhone’s screen recording function.
Otherwise iPod and Bluetooth Audio sources may
not work correctly.
• For iPhone users, due to iOS system limitations,
only one application can be open at a time. When
using any navigation application, please refrain
from using other applications as this will interfere
with T-Link operations.
For example, if you use Waze together with
Spotify, AVX will stop displaying Waze Navigation
screen and only Spotify sound comes from AVX.
This occurs due to iOS system limitations.
Ñ T-Link Setup
Press [ ] button.
1
Popup menu appears.
Touch [ ] .
2
T-Link Setup screen appears.
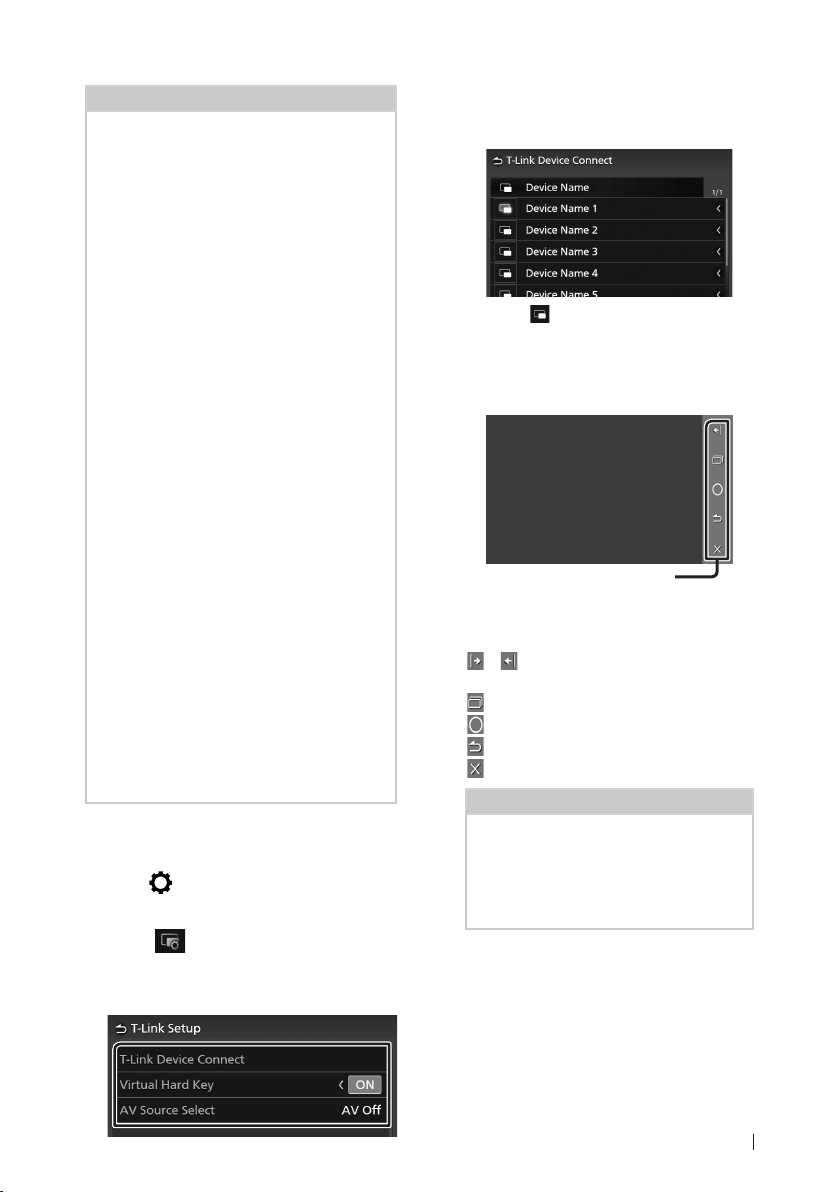
Set each item as follows.
3
■ [T-Link Device Connect]
Select the desired smartphone to use as
T-Link from the registered device list.
Touching [ ] switches the selected phone
device.
■ [[Virtual Hard Key]
Set whether to display the virtual hard key of
the smartphone.
Virtual hard keys*
You can operate the App by these virtual
hard keys in a similar way by the hard keys on
the smartphone.
[
] / [ ] : Changes the virtual hard keys
position.
[
] (Android only) : Recent Apps key
[
] : Home key
[
] (Android only) : Back key
[
] : Closes the virtual hard keys.
NOTE
• Each function of the virtual hard keys differs
depending on the connected device and
may differ from the function operated on
the device.
• The virtual hard keys can be displayed even if
there is no hard key on the connected device.
* These keys differ depending on the
connected device.
■ [AV Source Select]
While using T-Link, you can play media file in
the background.
The media file from the following sources
can be played.
CD/ Radio/ AUX/ AV Off
27English
Page 28
Disc
Disc
# WARNING
• Any video won't be played while driving to
prevent driver's eyes from fixing on the unit's
display. Stop the vehicle in a safe place and
apply the parking brake before performing
such function.
Playing a disc
Ñ Insert a disc
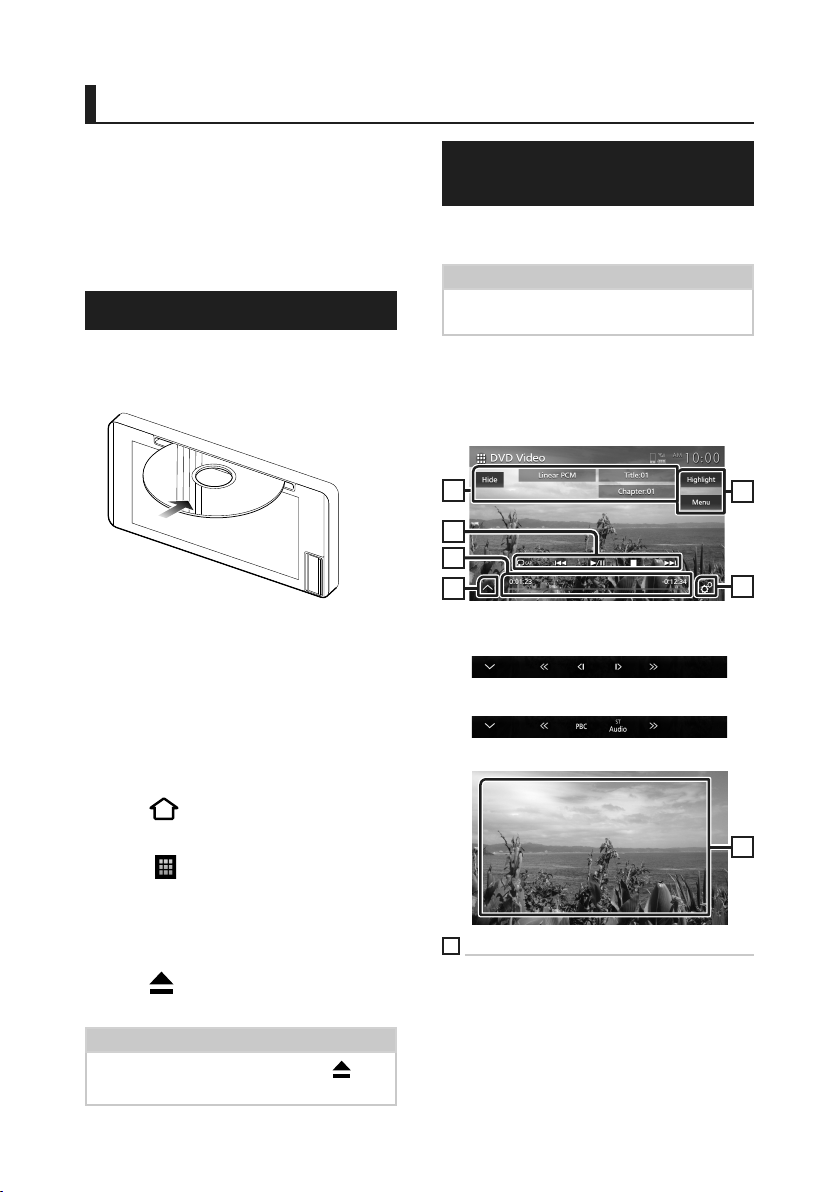
Insert the disc into the slot.
1
The unit loads the disc and playback
starts.
# CAUTION
• Do not insert anything other than a disc into
the disc-loading slot.
● Starting the disc playback manually
Press [ ] button.
1
HOME screen appears.
Touch [ ].
2
Touch [Disc].
3
DVD/ Video-CD Basic Operation
Most functions can be controlled from the
source control screen and playback screen.
NOTE
• The screen shot below is for DVD. It may be
different from the one for Video-CD.
When the operation buttons are not
1
displayed on the screen, touch the
display.
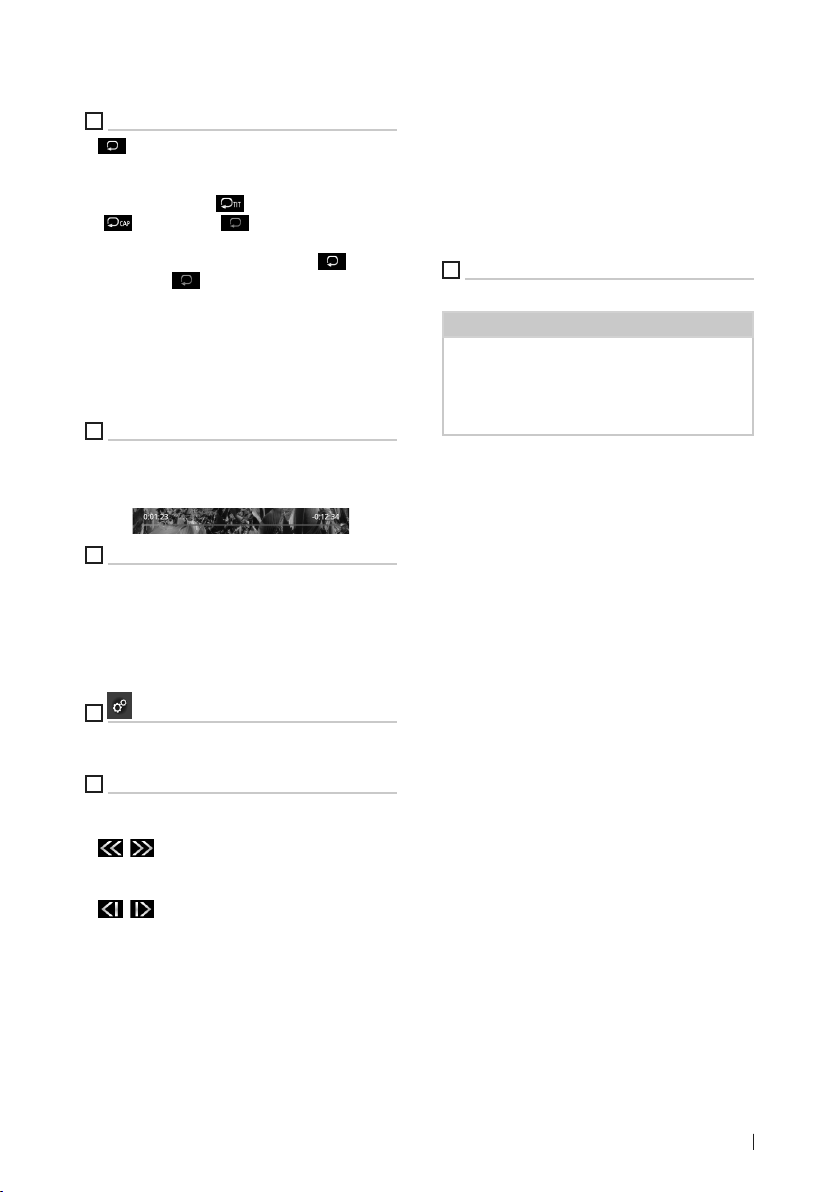
Control screen
1
2
3
6
Sub-control panel
DVD
Video-CD
Video screen
4
5
7
Ñ Eject a disc
Press [ ] button.
1
When removing a disc, pull it horizontally.
NOTE
• To forcibly eject the disc, press and hold [ ] for
2 seconds.
28
1
Information display area
Displays the following information.
• Linear PCM, etc.: Audio format
• Title #, Chapter #: DVD title and chapter
number
• Track #/Scene #: Video-CD track or scene
number. Scene # is displayed only when
Playback control (PBC) is on.
Page 29
Disc
• [Hide]: Hides the control screen.
2
Operation keys
• [
] : Repeats the current content. Each time
you touch the key, repeat modes are switched
in the following sequence;
DVD: Title repeat ( ), Chapter repeat
( ), Repeat off ( )
Video-CD (PBC On): Does not repeat
Video-CD (PBC Off ): Track repeat ( ),
Repeat off ( )
• [E] [F] : Searches for the previous/next
content.
Touch and hold to fast-forward or fastbackward the disc.
• [DH] : Plays or pauses.
• [I] : Stops.
3
Playing time (DVD only)
For confirmation of current playing position. You
can drag the circle left or right to change the
playing position.
4
Function keys (DVD only)
• [Highlight]: Touch to display the DVD Video
highlight screen. See Highlight control
(P. 32).
• [Menu]: Touch to display the DVD Video disc
menu control screen. See DVD Disc Menu
Operation (P.31).
–[1chRR/2chRR]: Identifies the right audio
output of channel 1 or 2.
–[1chST/2chST]: Identifies the stereo audio
output of channel 1 or 2.
–[LL]: Identifies the left audio output.
–[LR]: Identifies the monaural audio output.
–[RR]: Identifies the right audio output.
–[ST]: Identifies the stereo audio output.
7
Key display area
Touch to display the control screen.
NOTE
• The control screen disappears when no operation
is done for 5 seconds.
• If you use a remote control, you can jump directly
to the desired image by entering the chapter
number, scene number, play time, etc. ( P.58).
5
(DVD main control screen only)
Touch to display the DVD Setup screen. See DVD
Setup (P.32).
6
Sub-control panel
Touch the left side of the screen to display the
function panel. Touch again to close the panel.
• [
] [ ]: Fast-forwards or fast-backward the
disc. Each time you touch the key, the speed
changes. 2 times, 10 times.
• [
] [ ] (DVD only): Plays in slow motion
forward or backward.
• [PBC] (Video-CD only): Touch to turn Playback
control (PBC) on or off.
• [Audio] (Video-CD only): Touch to change
audio output channels.
–[1chLL/2chLL]: Identifies the left audio
output of channel 1 or 2.
–[1chLR/2chLR]: Identifies the monaural audio
output of channel 1 or 2.
29English
Page 30
Disc
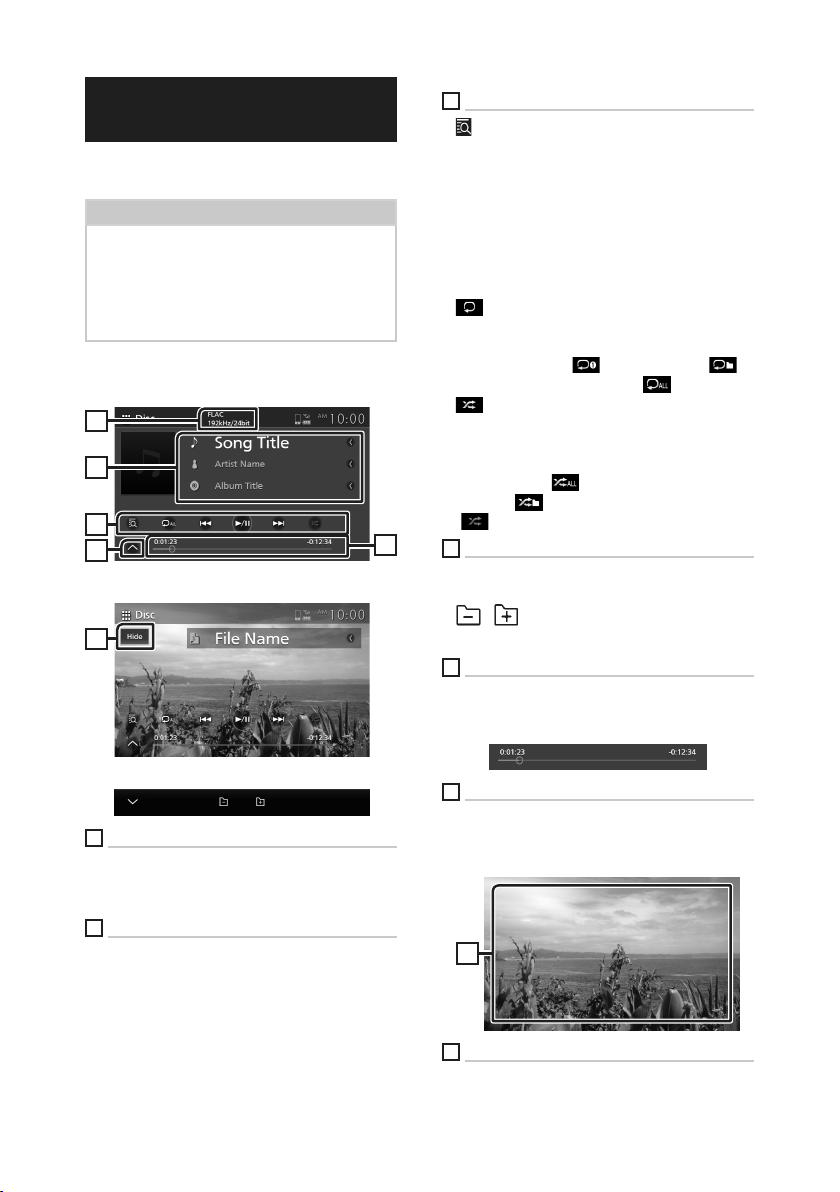
Music CD/ Disc media Basic Operation
Most functions can be controlled from the
source control screen and playback screen.
NOTE
• In this manual, “Music CD” means a general CD
which includes music tracks.
“Disc media” means a CD/DVD disc which
includes audio or video files.
• The screen shot below is for disc media. It may be
different from the one for CD.
Control screen
Music file
1
2
3
4
Video file
6
3
Operation keys
• [
] : Displays the Music list (Music CD only) or
the Folder List (Disc media only). For details
on search operation, see Search Operation
(P. 31).
• [E] [F] : Searches for the previous/next
content.
Touch and hold to fast-forward or fastbackward the disc.
• [DH] : Plays or pauses.
• [
] : Repeats the current track/folder. Each
time you touch the key, repeat mode switches
in the following sequence;
Track/ File repeat ( ), Folder repeat ( )
(Disc media only), Repeat all ( )
• [
] : Randomly plays all tracks in current
folder/disc. Each time you touch the key,
random mode switches in the following
sequence;
Track random ( ) (Music CD only), Folder
random ( ) (Disc media only), Random off
( )
5
4
Sub-control panel (Disc media only)
Touch the left side of the screen to display the
function panel. Touch again to close the panel.
• [
] [ ] : Searches for the previous/next
folder.
5
Playing time
For confirmation of current playing position. You
can drag the circle left or right to change the
playing position.
Sub-control panel
1
CODEC (Premium AVX)
When a high-resolution source is played, its
format information is displayed. (Disc media
only)
2
Track information
Displays the information of the current track/ file.
Only a file name and a folder name are displayed
if there is no tag information. (Disc media only)
30
6
[Hide] (Video file only)
Hides the control screen.
Video screen
7
7
Key display area (Video file only)
Touch to display the control screen.
Page 31
Disc
Search Operation (Music CD/ Disc media only)
You can search for a track/file.
NOTE
• For operations in the list screen, see List screen
(P. 13).
• The screen shot below is for disc media. It may be
different from the one for CD.
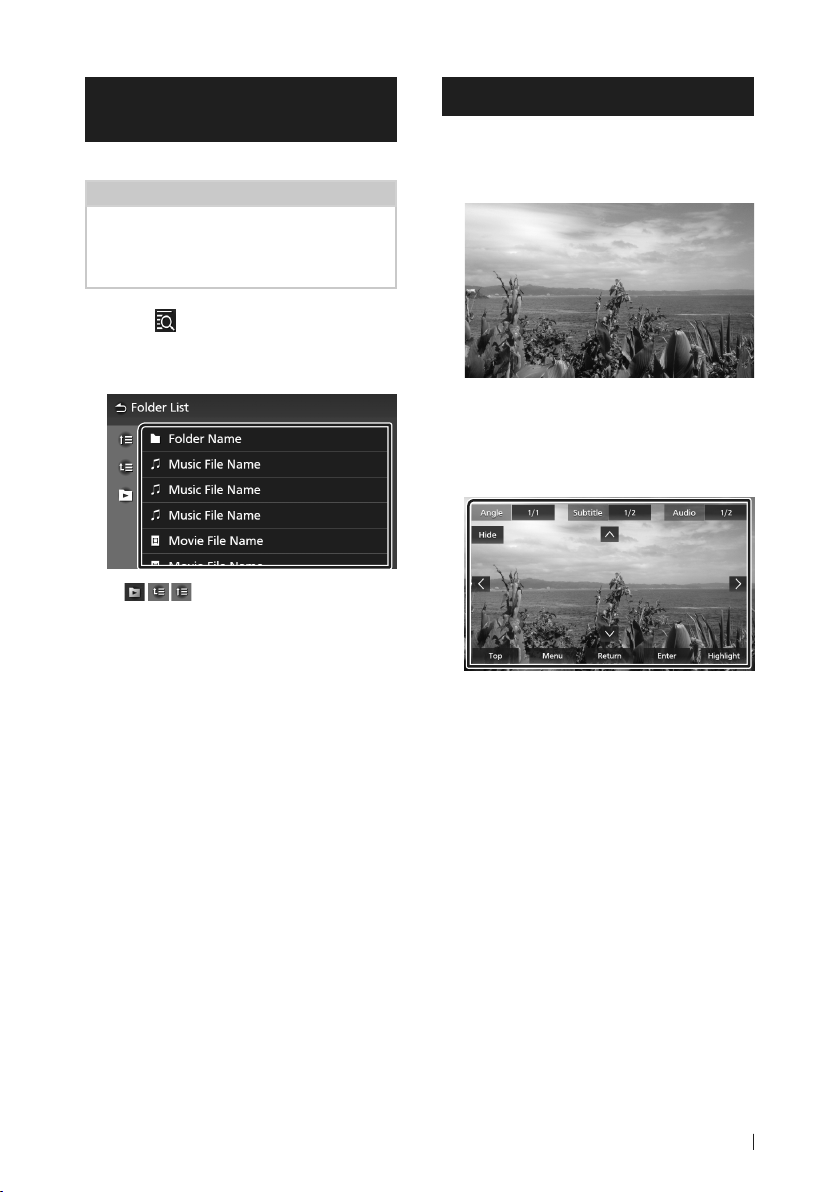
Touch [ ].
1
Folder List screen appears.
Touch the desired item in the content list.
2
■ (Disc media only)
You can search for the other folder and select
to play all files in the folder.
When you touch a folder, its contents are
displayed.
DVD Disc Menu Operation
You can set up some functions using the DVDVIDEO disc menu.
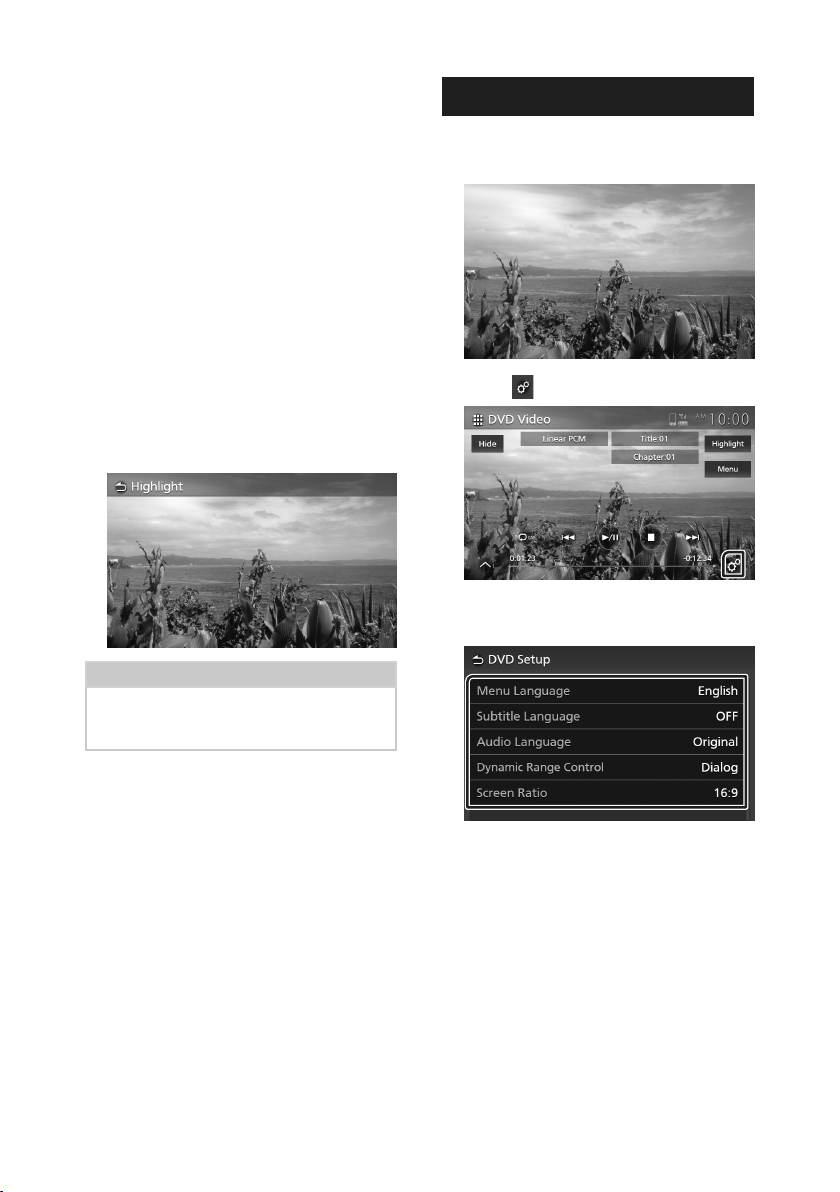
Touch the display during playback.
1
Touch [Menu].
2
Menu Control screen appears.
Perform your desired operation as
3
follows.
■ To display the top menu
Touch [Top].*
■ To display the menu
Touch [Menu].*
■ To display the previous menu
Touch [Return].*
■ To enter selected item
Touch [Enter].
■ To enable direct operation
Touch [Highlight] to enter the highlight
control mode (P. 32).
■ To move the cursor
Touch [R], [S], [C], [D].
■ To switch among subtitle languages
Touch [Subtitle]. Each time you touch this
key, subtitle languages are switched.
■ To switch among audio languages
Touch [Audio]. Each time you touch this key,
audio languages are switched.
31English
Page 32
Disc
■ To switch among picture angles
Touch [Angle]. Each time you touch this key,
picture angles are switched.
■ To close the Menu Control screen
Touch [Hide].
* These keys may not function depending on
the disc.
Ñ Highlight control
Highlight control lets you control the DVD
menu by touching the menu key directly on
the screen.
Touch [Highlight] on the Menu Control
1
screen.
Touch your desired item on the screen.
2
DVD Setup
You can set up the DVD playback functions.
Touch the display during playback.
1
Touch [ ].
2
DVD Setup screen appears.
Set each function as follows.
3
NOTE
• The highlight control function is cancelled
automatically if you do not operate for a
predetermined period of time.
32
■ [
Menu Language] / [Subtitle Language]
/ [Audio Language]
See Language setting (P.33).
■ [Dynamic Range Control]
Sets the dynamic range.
[Wide]: The dynamic range is wide.
[Normal]: The dynamic range is normal.
[Dialog] (Default): Makes the total sound
volume larger than the volumes in other
modes. This is effective only when the
Dolby Digital software is in use.
Page 33
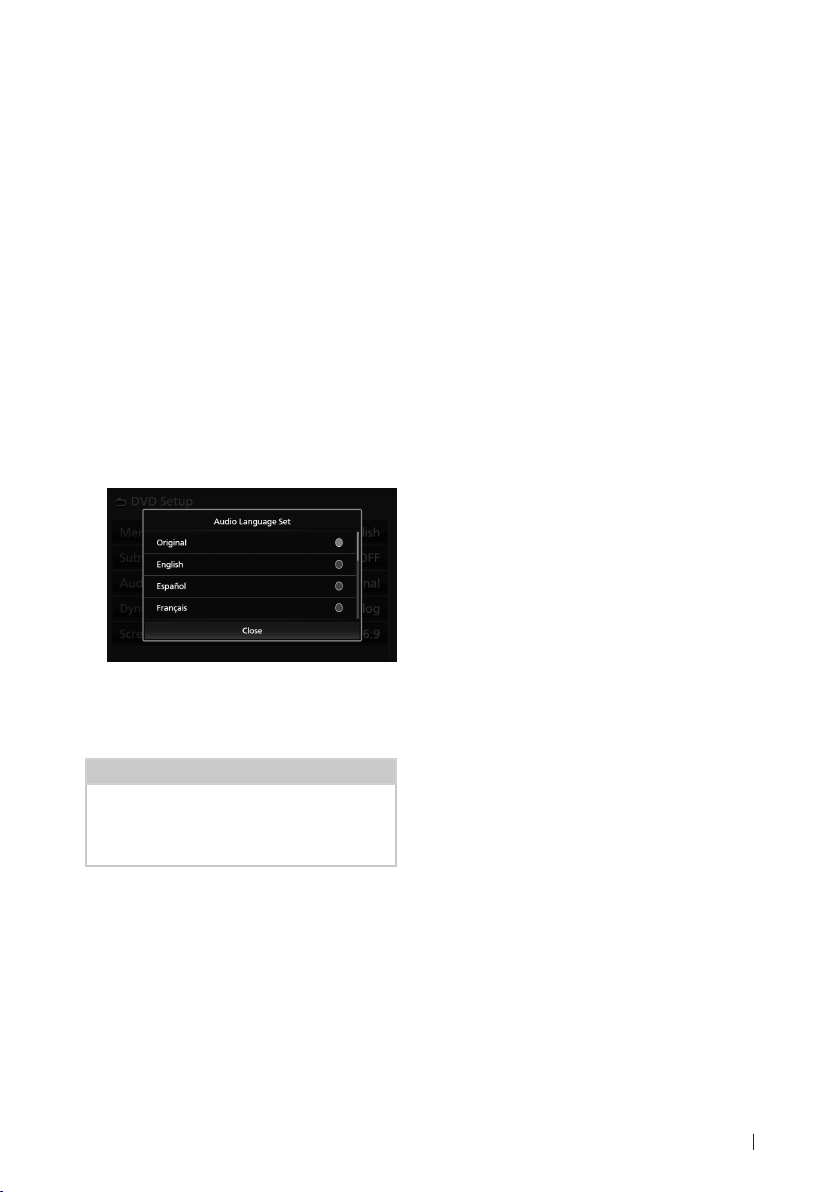
■ [Screen Ratio]
Sets the screen display mode.
[16:9 ](Default): Displays wide pictures.
[4:3 LB]: Displays wide pictures in the Letter
Box format (having black stripes at the top
and bottom of screen).
[4:3 PS]: Displays wide pictures in the Pan &
Scan format (showing pictures cut at the
right and left ends).
Ñ Language setting
This setting is for the languages used for the
menu, subtitle, and voice.
Touch the desired item;
1
[Menu Language], [Subtitle Language],
[Audio Language].
Language Set screen appears.
Select a language.
2
Disc
For language codes, refer to DVD
Language Codes (P.64).
Touch [Close] to set the entered language
and return to the DVD Setup screen.
NOTE
• To set the DVD’s original language as the audio
language, touch [Original].
• The selectable languages on each setting is
varied depends on the disc.
33English
Page 34
USB
USB
# WARNING
• Any video won't be played while driving to
prevent driver's eyes from fixing on the unit's
display. Stop the vehicle in a safe place and
apply the parking brake before performing
such function.
Connecting a USB device
Connect the USB device to the USB port.
1
(P. 14)
Press [ ] button.
2
HOME screen appears.
Touch [ ].
3
Touch [USB]. (P.11)
4
Ñ Disconnect the USB device
Press [ ] button.
1
HOME screen appears.
Touch a source other than [USB].
2
Detach the USB device.
3
Ñ Usable USB device
You can use a mass-storage-class USB device
with this unit.
The word “USB device” appearing in this manual
indicates a flash memory device.
● About the file system
The file system should be the one of the
following.
• FAT16 • FAT32 • exFAT • NTFS
NOTICE
• Install the USB device in the place where it will
not affect safe driving.
• You cannot connect a USB device via a USB hub
and Multi Card Reader.
• Take backups of the audio files used with this
unit. The files can be erased depending on the
operating conditions of the USB device.
We shall have no compensation for any damage
arising from any erased data.
USB Basic Operation
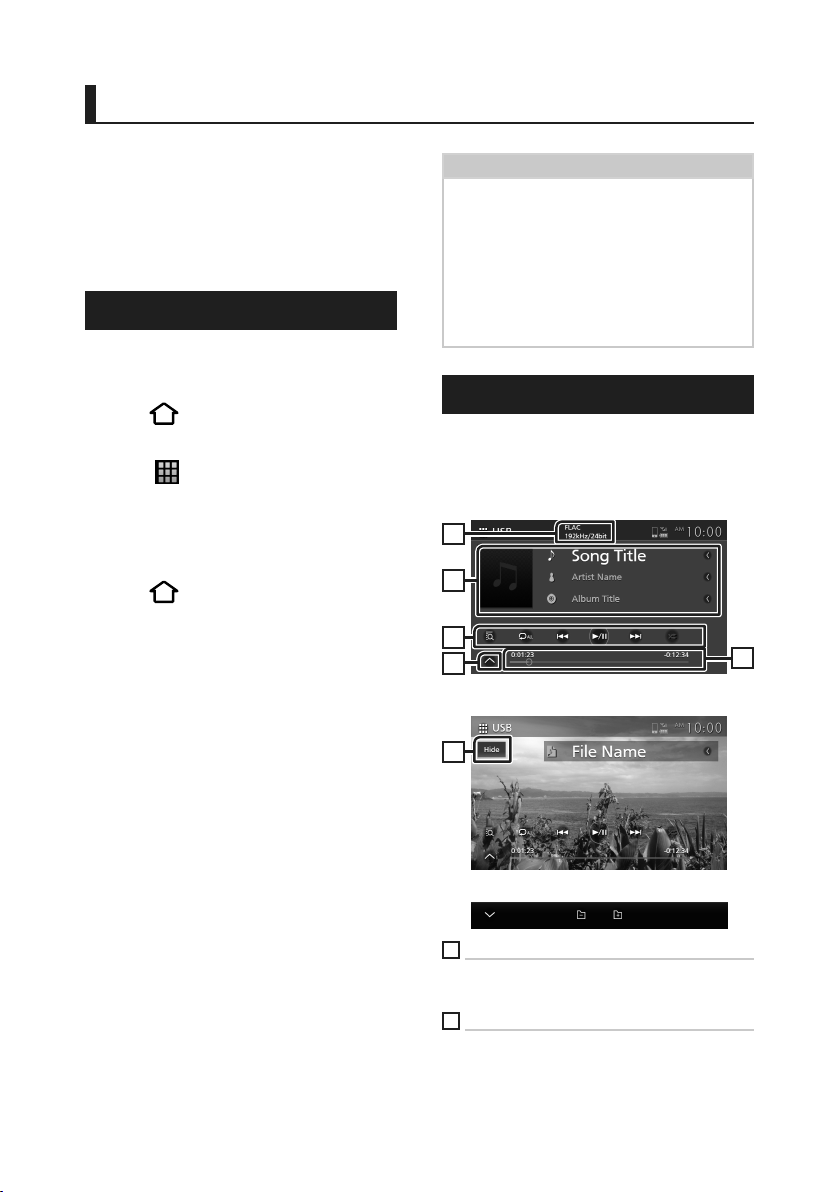
Most functions can be controlled from the
source control screen and playback screen.
Control screen
Music file
1
2
3
4
Video file
6
Sub-control panel
5
34
1
CODEC (Premium AVX)
When a high-resolution source is played, its
format information is displayed. (Music file only)
2
Track information
Displays the information on the current file.
Only a file name and a folder name are displayed
if there is no tag information.
Page 35
USB
3
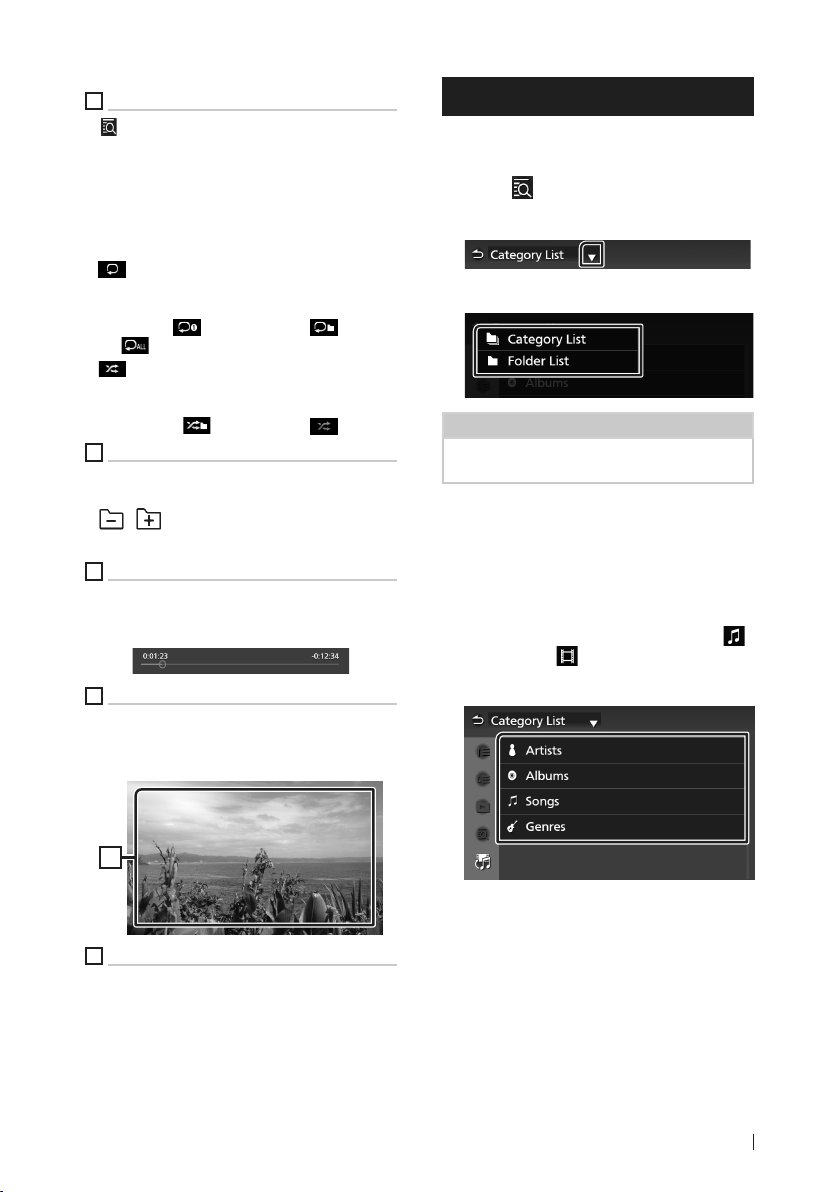
Operation keys
• [[
] : Searches track/file. For details on search
operation, see Search Operation (P.35).
• E] [F] : Searches the previous/next track/
file.
Touch and hold to fast forward or fast
backward.
• [DH] : Plays or pauses.
• [
] : Repeats the current track/folder. Each
time you touch the key, repeat modes are
switched in the following sequence:
File repeat (
all ( )
• [
] : Randomly plays all tracks in the current
folder. Each time you touch the key, random
modes are switched in the following sequence:
File random (
4
Sub-control panel
Touch the left side of the screen to display the
function panel. Touch again to close the panel.
• [
] [ ] : Searches for the previous/next
folder.
5
Playing time
For confirmation of current playing position. You
can drag the circle left or right to change the
playing position.
6
[Hide] (Video file only)
Hides the control screen.
), Folder repeat ( ), Repeat
), Random off ( )
Search Operation
You can search music or video files by the
following operations.
Touch [ ] on the USB control screen.
1
Touch [S].
2
Select a list type.
3
NOTE
• For operations on the list screen, see List screen
(P. 13).
Ñ Category search
You can search for a file by selecting a
category.
Touch [Category List].
1
Select whether you search audio files
2
or video files .
Touch the desired category.
3
Video screen
7
7
Key display area (Video file only)
Touch to display the control screen.
The list corresponding to your selection
appears.
Touch to select the desired item in the
4
list. Repeat this step until you find the
desired file.
35English
Page 36
USB
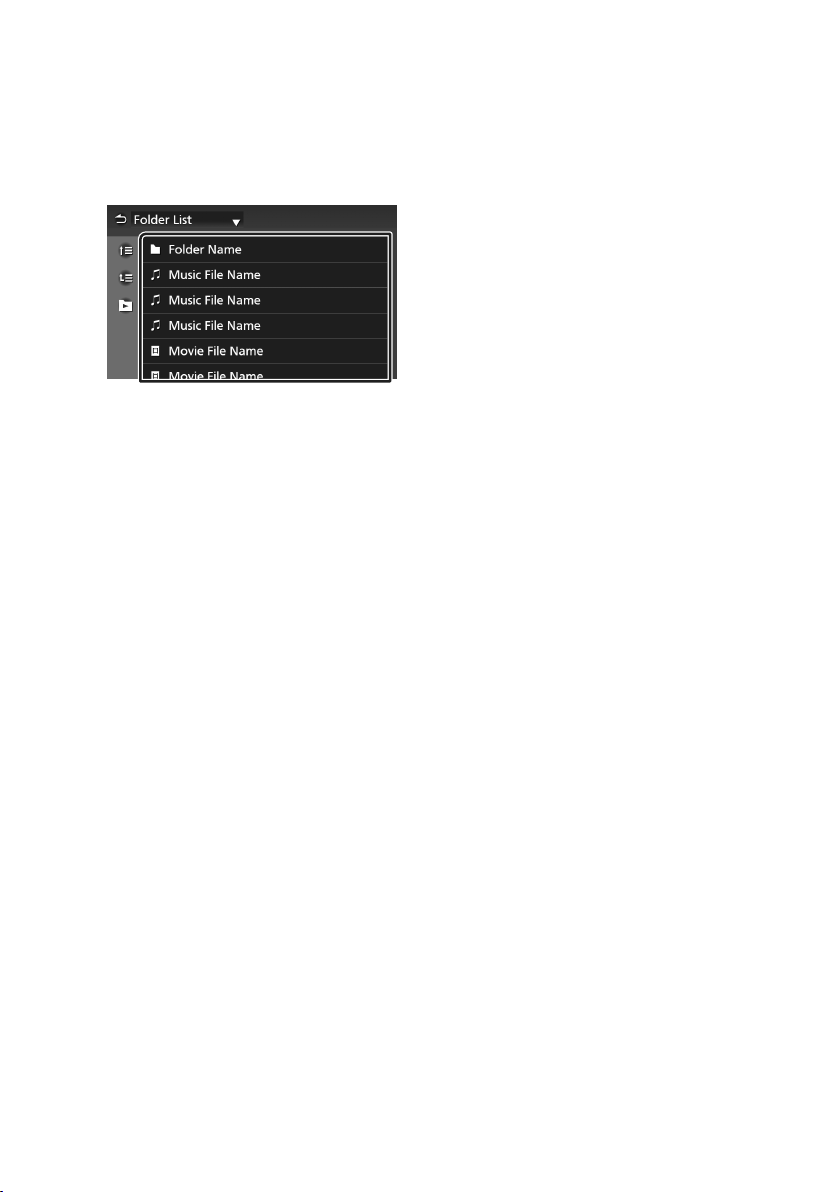
Ñ Folder search
You can search for a file according to hierarchy.
Touch [Folder List].
1
Touch the desired folder.
2
When you touch a folder its contents are
displayed.
Touch to select your desired item in the
3
list. Repeat this step until you find the
desired file.
36
Page 37
iPod/iPhone
iPod/iPhone
Preparation
Ñ Connectable iPod/iPhone
The models which have the Lightning port can
be connected to this unit.
# WARNING
• Firmly secure the iPod when driving. Do
not let the iPod fall onto the floor, where it
may become jammed under the brake or
accelerator pedal.
NOTICE
• Toyota accepts no responsibility for data lost
from an iPod, even if that data is lost while
using this product. Please back up your iPod
data regularly.
• Do not leave the iPod in direct sunlight
for extended amounts of time. Extended
exposure to direct sunlight can result in
iPod malfunction due to the resulting high
temperature.
• Do not leave the iPod in any location with high
temperatures.
NOTE
• When you turn on this unit, the iPod/iPhone is
charged through the unit.
• If you restart playback after connecting the iPod,
the music that has been played by the iPod is
played first.
Ñ Connect iPod/iPhone
Connect the iPod/iPhone to the USB port.
1
(P. 14)
Press [ ] button.
2
HOME screen appears.
Touch [ ].
3
Touch [iPod]. (P. 11)
4
● To disconnect the iPod/iPhone connected
with the cable:
Detach the iPod/iPhone.
1
37English
Page 38
iPod/iPhone
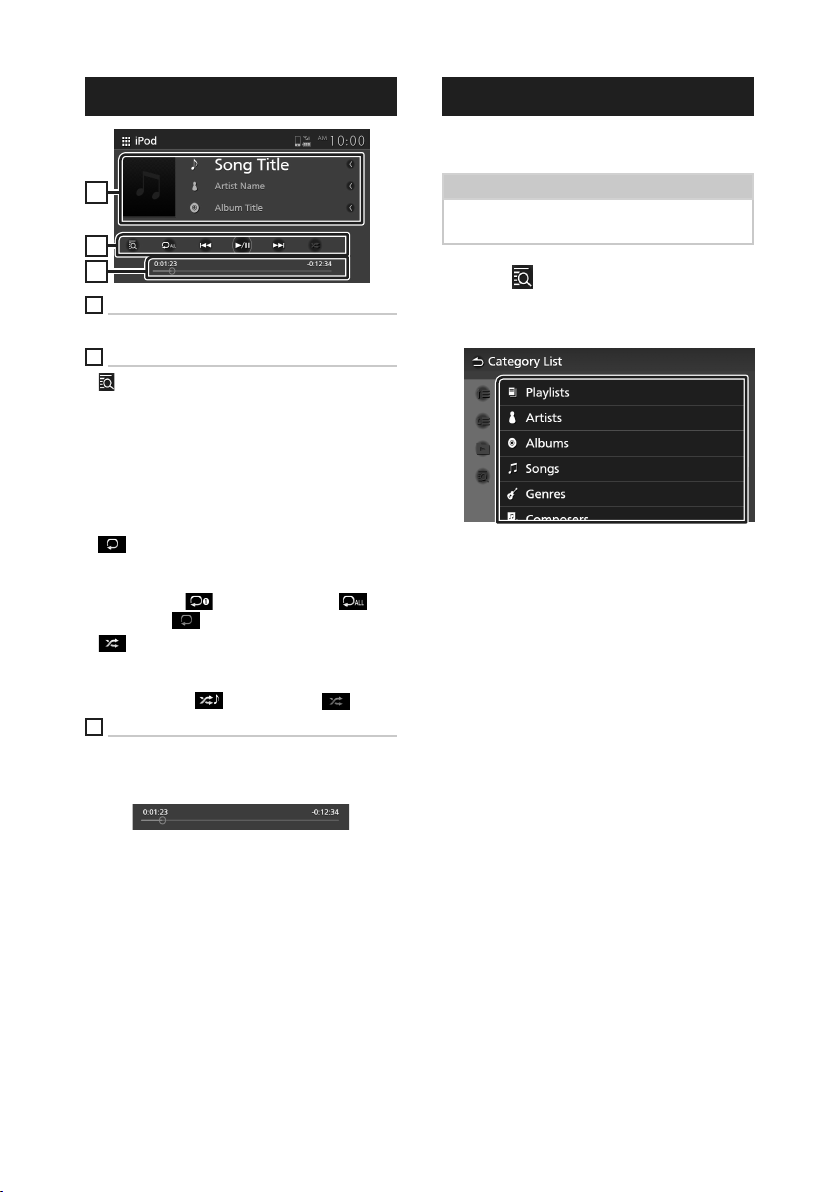
iPod/iPhone Basic Operation
1
2
3
1
Track information
Displays the information on the current file.
2
Operation keys
• [
] : Searches for a track/file. For details on
search operation, see Search Operation
(P. 38).
• E] [F] : Searches for the previous/next
track/file.
Touch and hold to fast forward or fast
backward.
• [DH] : Plays or pauses.
• [
] : Repeats the current track/album. Each
time you touch the key, repeat modes are
switched in the following sequence:
Song repeat ( ), All songs repeat ( ),
Repeat off ( )
• [
] : Randomly plays all tracks in the current
album. Each time you touch the key, random
modes are switched in the following sequence:
Song random ( ), Random off ( )
3
Playing time
For confirmation of current playing position. You
can drag the circle left or right to change the
playing position.
Search Operation
You can search music files by the following
operation.
NOTE
• For operations on the list screen, see List screen
(P. 13).
Touch [ ] on the iPod/iPhone control
1
screen.
Touch the desired category.
2
The list corresponding to your selection
appears.
Touch to select the desired item in the
3
list. Repeat this step until you find the
desired file.
38
Page 39
Radio
Radio
Radio Basic Operation
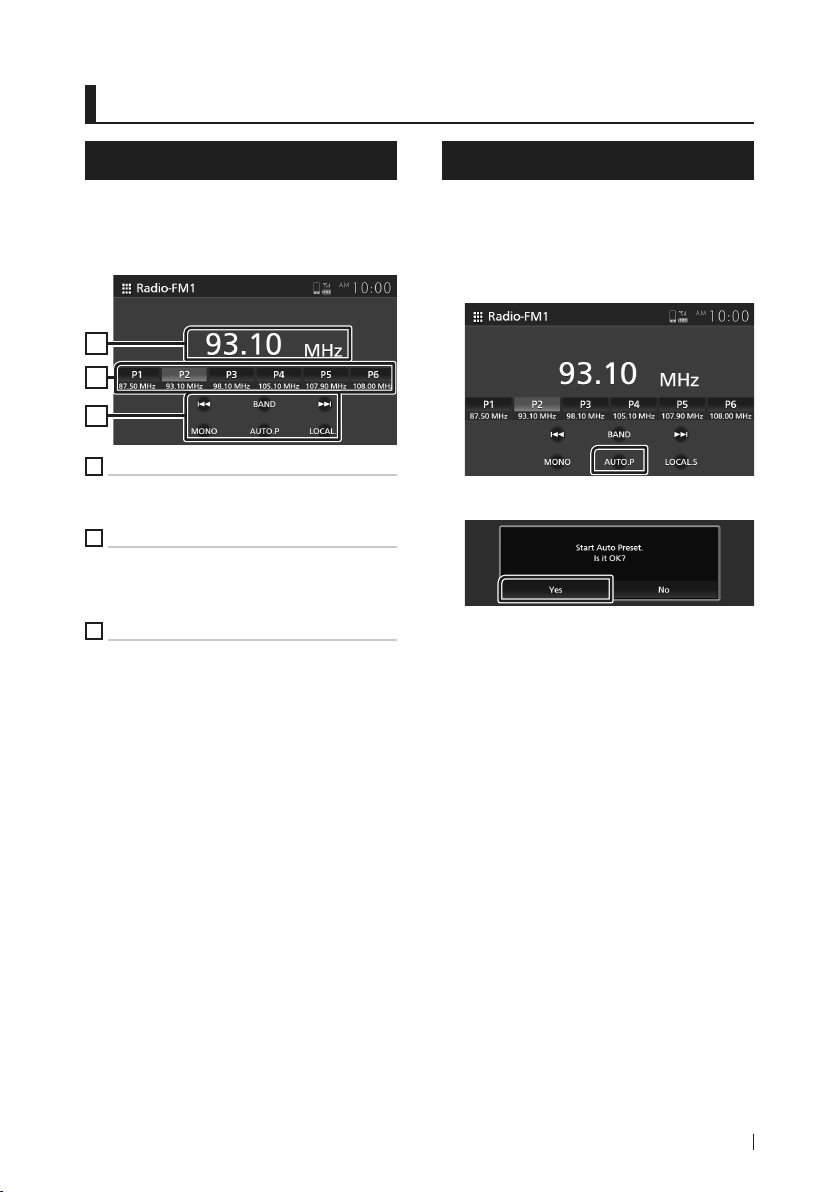
Most functions can be controlled from the
source control screen.
To enter Radio source, touch [Radio] icon in
the source selection screen. (P. 11)
1
2
3
1
Information display
Displays the information of the current station:
Frequency
2
Preset keys
Recalls the memorized station.
When touched for 2 seconds, stores the current
receiving station in memory.
3
Operation keys
• [E] [F] : Switches to the previous/next
frequency manually.
Touch and hold to tunes in a station with good
reception automatically.
• [BAND]: Switches the band (FM1/ FM2, AM).
• [MONO](FM only) : Switches the FM stereo
broadcast to in monaural reception. This is
effective to reduce the noise.
• [AUTO.P]: Presets stations automatically. For
details, see Auto preset memory (P.39).
• [LOCAL.S](FM only) : Receives only the stations
with good reception.
Memory Operation
Ñ Auto preset memory
You can store stations in memory
automatically.
Touch [AUTO.P].
1
Touch [Yes ].
2
Auto preset memory starts.
Ñ Manual memory
You can store the current receiving station in
memory.
Select a station you wish to store in
1
memory.
Touch [P#] (#:1-6) in which you want to
2
store the station for 2 seconds until a
beep sounds.
39English
Page 40
Radio
Selecting Operation
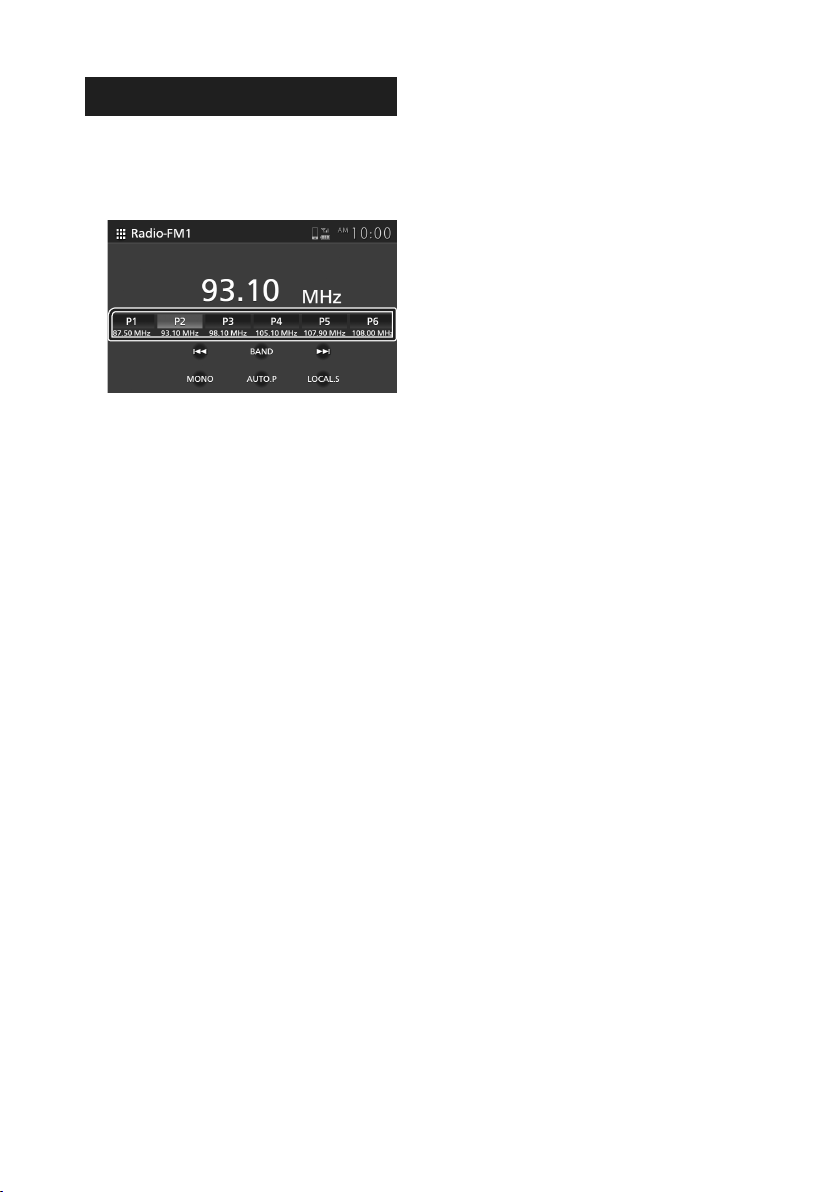
Ñ Preset select
You can select memorized station.
Touch desired preset station.
1
40
Page 41
Other External Components
Other External Components
Using the back camera
Ñ Back camera view
When the gear stick is aligned to the REVERSE
(R) position, the screen automatically switches
to full-screen back camera image. The back
camera image is automatically reversed and
displayed on the front screen.
# CAUTION
• A clear image cannot be displayed on the
screen if the back camera lens is dirty. If water
droplet or mud etc. is on the lens, wash it off
and wipe the lens with a soft cloth. If the lens
gets extremely dirty, wash it off using a mild
cleanser.
• The image quality may deteriorate depending
on the usage environment, such as at night or
in dark surroundings.
• The range projected by the back camera is
limited.
• The parking assist guidelines are for reference
purpose only. Always check with your own
eyes if the surrounding is safe and there is
enough space for your vehicle to be parked.
• The distance indicated by the guidelines is
intended for flat road surfaces and calculated
based on the ground level. If any part of the
road is sunken, the accuracy of the distance
indicated is reduced.
• The vehicle width and distance guidelines
displayed on the back camera view may differ
from the actual vehicle width and distance.
• The actual distance from bumper to bumper
may be less than the distance indicated by the
guidelines. If the bumper of another vehicle
is displayed on the screen while backing up
the vehicle, check the distance with your own
eyes.
• The guidelines may not be parallel with the
dividing lines of the parking space, even if they
appear to be parallel.
• The distances between the guidelines and the
dividing lines of the parking space may not
equal, even if they appear to be equal.
• Object located higher than the back camera
may not be displayed on the screen.
• The back camera view is closed automatically if
the gear stick is aligned to the positions other
than the REVERSE (R) position.
• The back camera view mode is to use this
product as an aid while backing up. Do not use
this function for entertainment purposes.
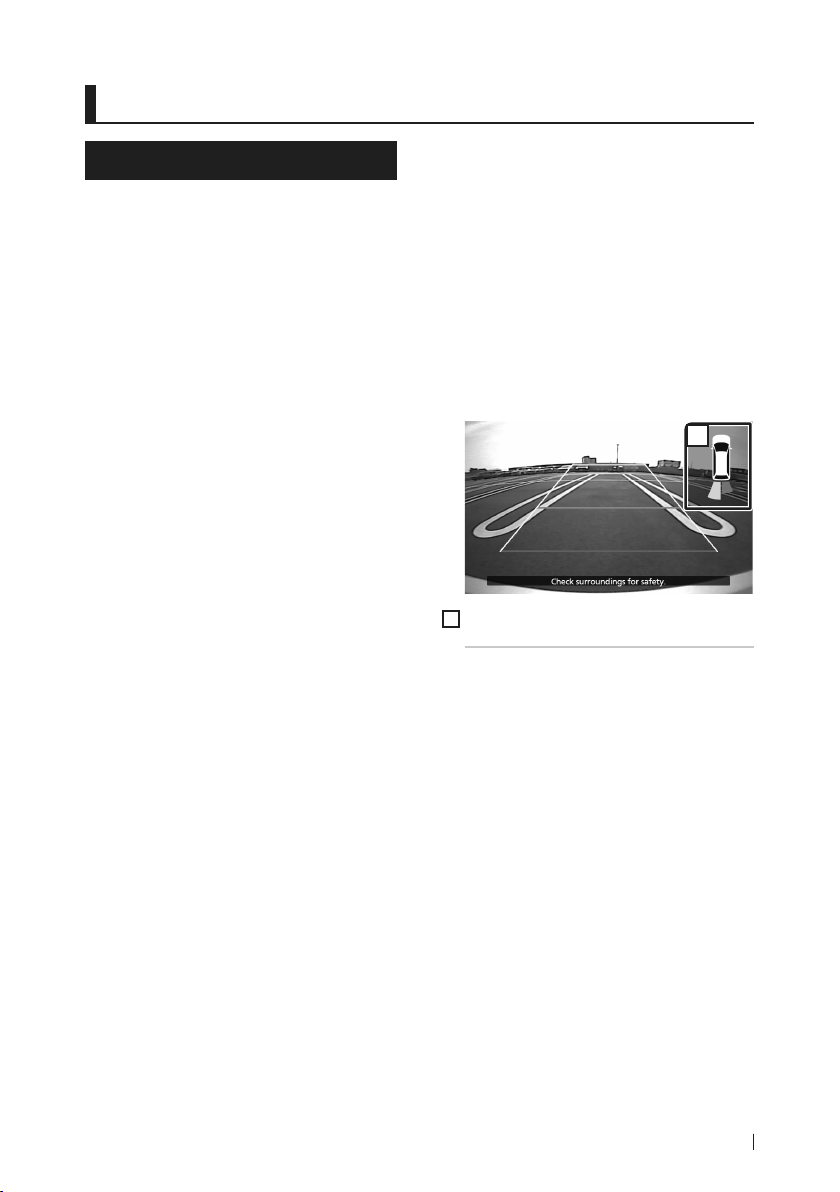
Ñ Display the camera image
screen
The camera screen is displayed when you shift
the gear to the reverse (R) position.
1
1
Back Sensor (The vehicle which equips
back camera and back sensor only)
Displays the distance between you and the
closest obstacle.
If you select [OFF] for [Camera Connection],
Back Sensor appears in full-screen.
Ñ To display the picture from the
camera manually
Select [Camera] as the source. (P. 11)
1
41English
Page 42
Other External Components
Ñ Camera Setup
Press [ ] button.
1
Popup menu appears.
Touch [ ].
2
System screen appears.
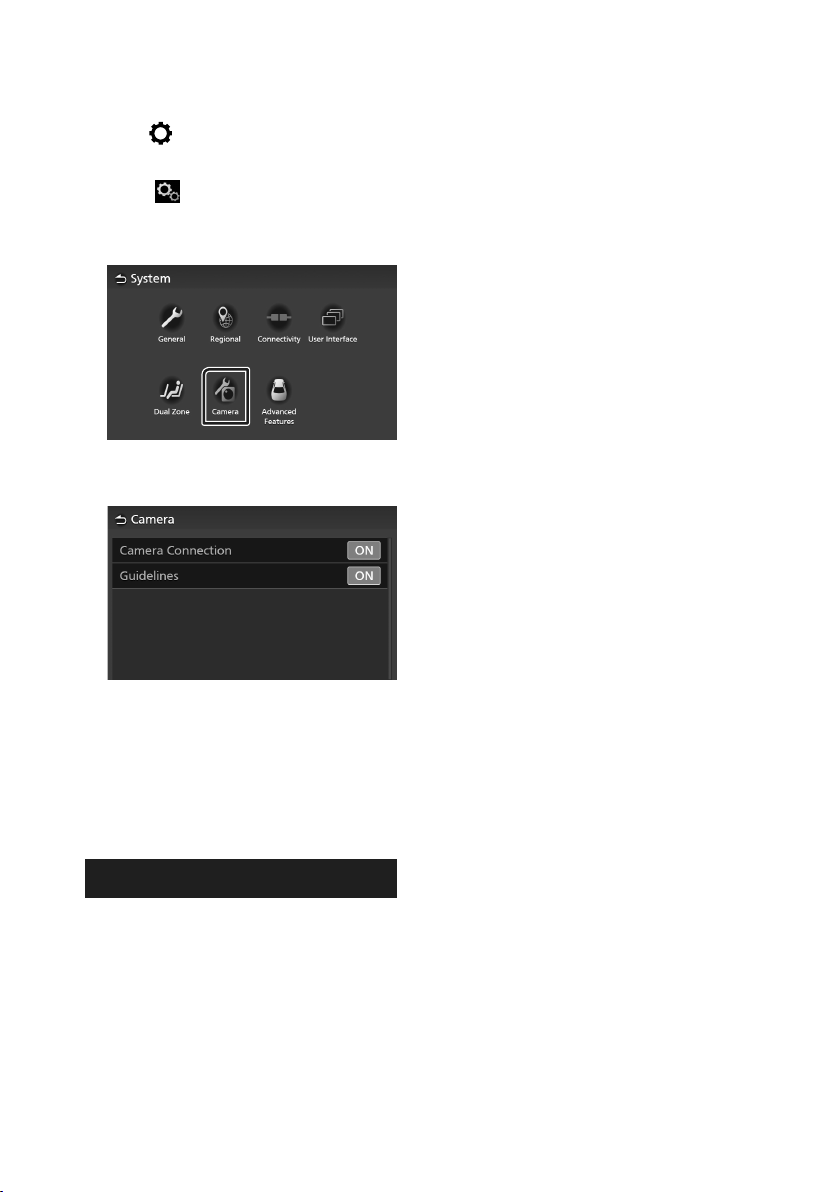
Touch [Camera].
3
Camera screen appears.
Set each item as follows.
4
■ [Camera Connection]
Set whether to use the rear view camera.
■ [Guideline]
You can display parking guidelines to enable
easier parking when you shift the gear to the
reverse (R) position.
Default is “ON”.
External audio players (AUX)
Connect an external component to the
1
AUX input terminal. (P. 14)
Select [AUX] as the source. (P. 11)
2
Turn on the connected component and
3
start playing the source.
42
Page 43
M-Toyota
M-Toyota
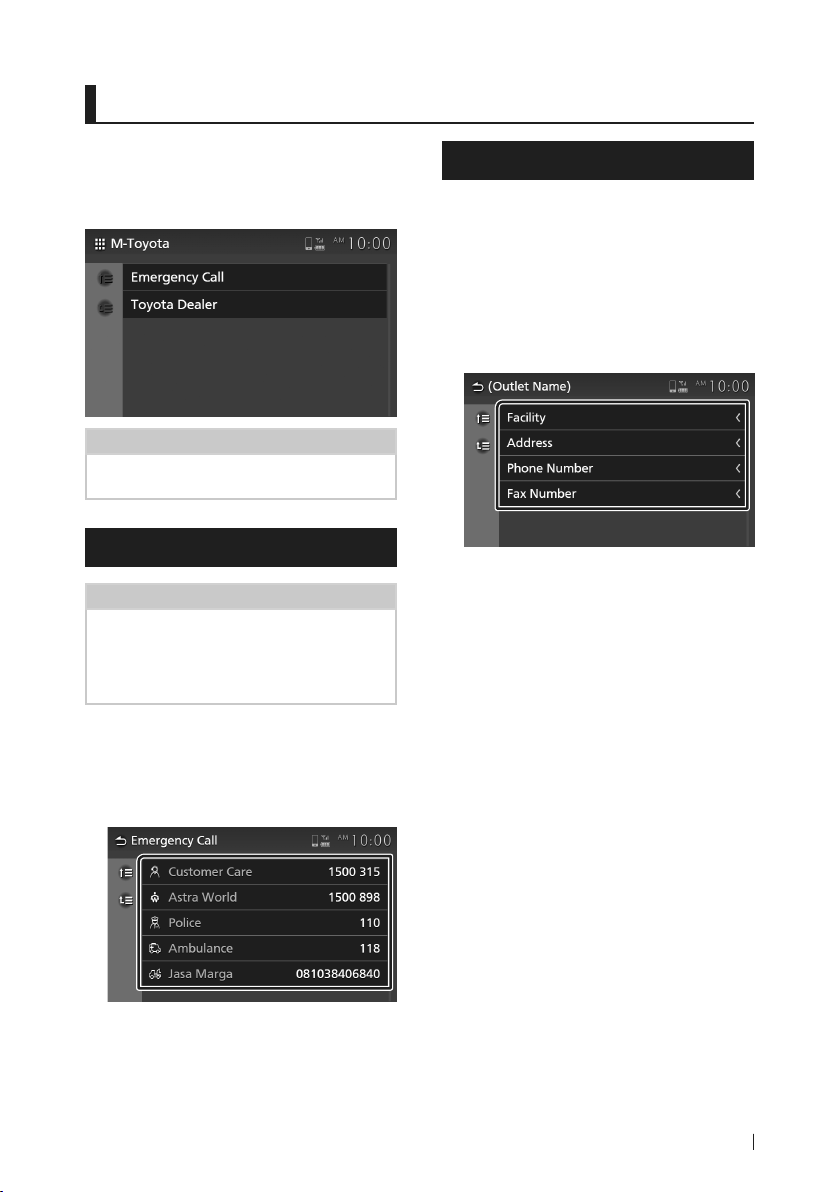
Using M-Toyota allows you to make an
emergency call and search a Toyota dealer.
To enter M-Toyota source, touch [M-Toyota]
icon in the source selection screen. (P. 11)
NOTE
• For operations on the list screen, see List screen
(P. 13).
Emergency Calling
Preparation
• To use the M-Toyota emergency call function,
connect your mobile phone as a Bluetooth
device beforehand. See Register the Bluetooth
device (P.16) and Connect the Bluetooth
device (P.17).
Toyota Dealer Search
You can search a Toyota dealer list and confirm
the dealer information.
Touch [Toyota Dealer] on the M-Toyota
1
screen.
Touch to select the desired region in the
2
list.
Touch the desired dealer.
3
Dealer information screen appears.
Touch [Emergency Call] on the M-Toyota
1
screen.
Emergency Call list appears.
Touch the desired contact information.
2
43English
Page 44
Setup
Setup
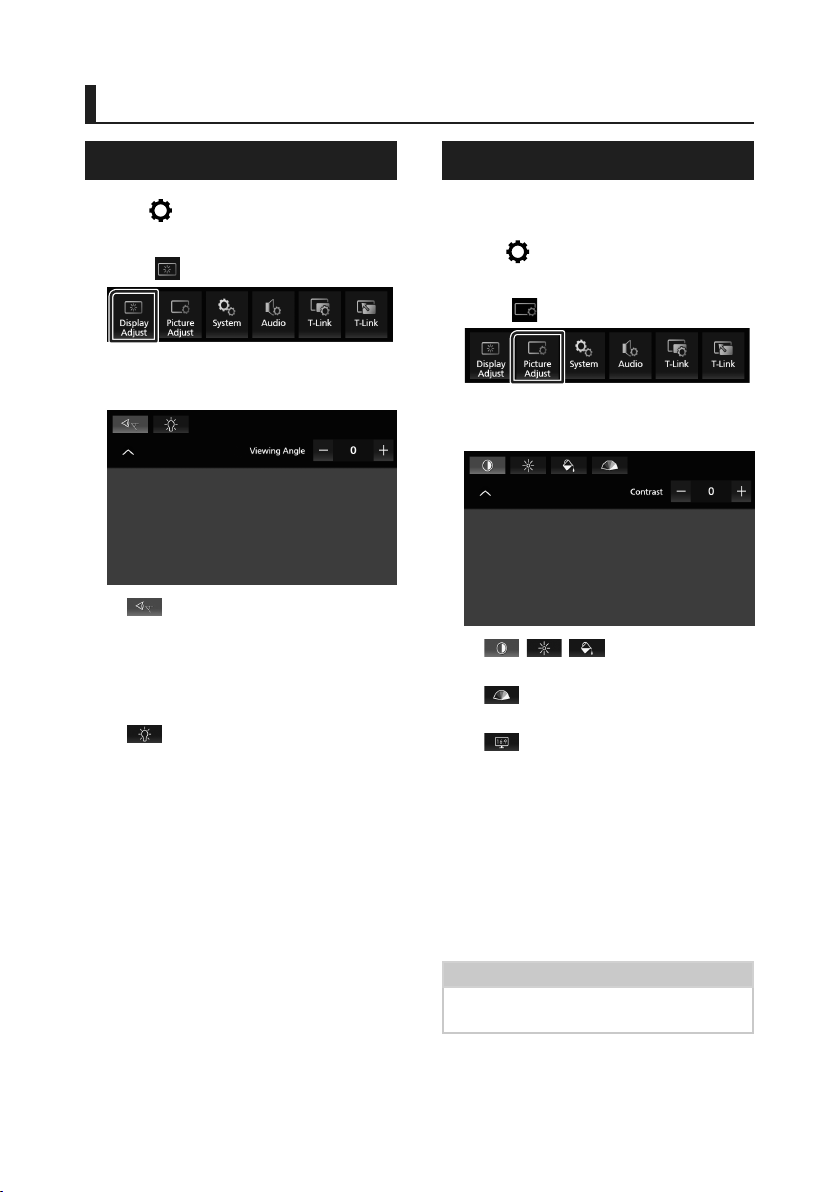
Display Adjust
Press [ ] button.
1
Popup menu appears.
Touch [ ].
2
Display control screen appears.
Adjust each setting as follows.
3
■ [ ]
If it is hard to see the image on the screen
evenly, adjust the viewing angle. The smaller
the (negative) value, the more whitish the
image on the screen looks.
"0" (Default)/ "1"/ "2"/ "3"
■ [
]
Adjust the backlight. ("-4" to "4")
Picture Adjust
You can adjust the image quality of video,
menu screen, etc.
Press [ ] button.
1
Popup menu appears.
Touch [ ].
2
Picture control screen appears.
Adjust each setting as follows.
3
■ [ ] [ ] [ ]
Adjust each setting.
] (Camera only)
■ [
Adjust the tint. ("-4" to "4")
] (Video file only)
■ [
Select a screen mode.
[Full]: Displays video at the ratio of 16:9.
[Normal]: Displays video at the ratio of 4:3.
[Auto]:
DVD and Video-CD: 16:9 video is displayed
in the Full mode and 4:3 video is displayed
in the Normal mode.
USB device and disc media: Displays video
fully (vertically or horizontally) with no
ratio change.
44
NOTE
• Settings to adjust vary depending on the current
source.
Page 45
Setup
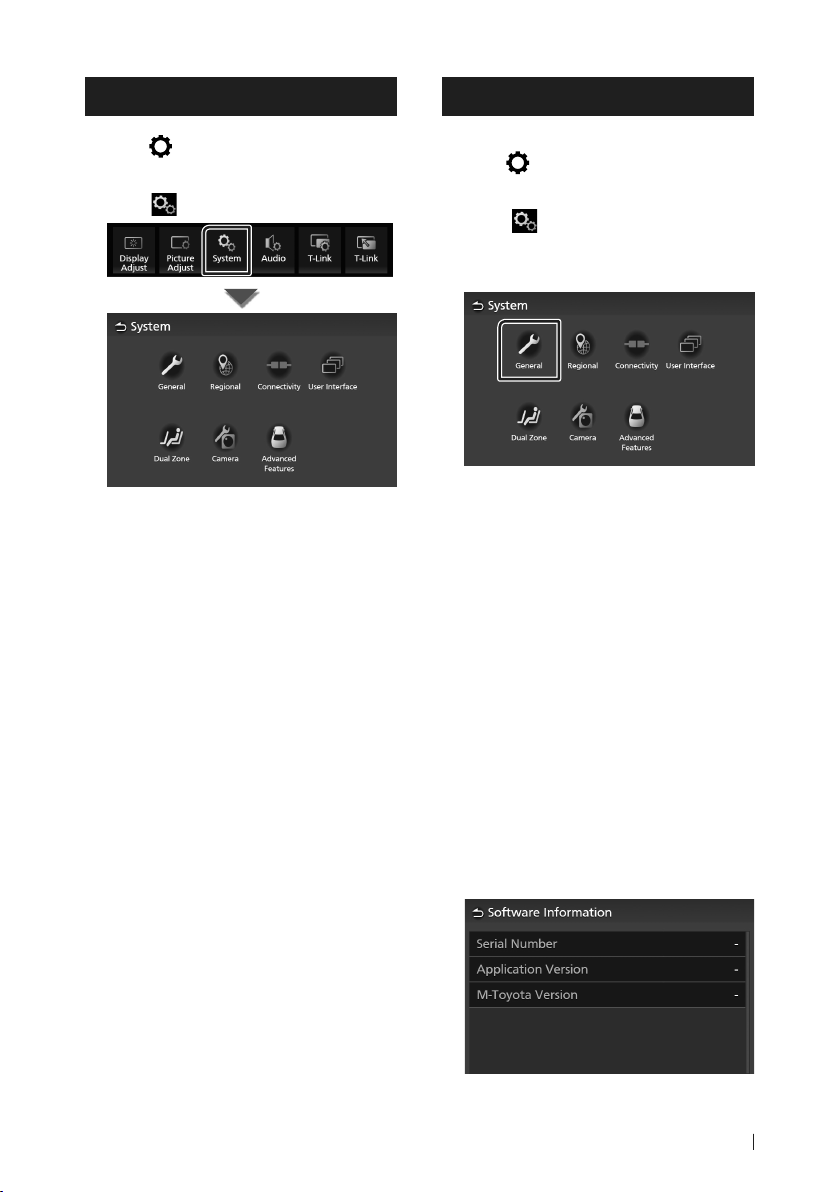
System Setup
Press [ ] button.
1
Popup menu appears.
Touch[ ].
2
See the following section for each
setting.
• General systems (P. 45)
• Regional systems (P. 7)
• Connectivity systems (P.17)
• User interface systems (P. 46)
• Dual Zone systems (P. 48)
• Camera systems (P. 42)
• Advanced Features systems*
1
*
Premium AVX only
1
(P. 49)
General Systems
You can confirm the information of this unit.
Press [ ] button.
1
Popup menu appears.
Touch [ ].
2
System screen appears.
Touch [General].
3
General screen appears.
Set each parameter as follows.
4
■ [Software Information]
Confirm the software version of this unit.
(P. 45)
■ [Open Source Licenses]
Display the open source licenses.
■ [Restore Factory Default]
Touch [Restore Factory Default] and then
touch [Ye s] to set all the settings to the initial
default settings.
Ñ Software Information
You can confirm the software version of this
unit.
Touch [Software Information] in the
1
General screen.
Confirm the software version.
2
45English
Page 46
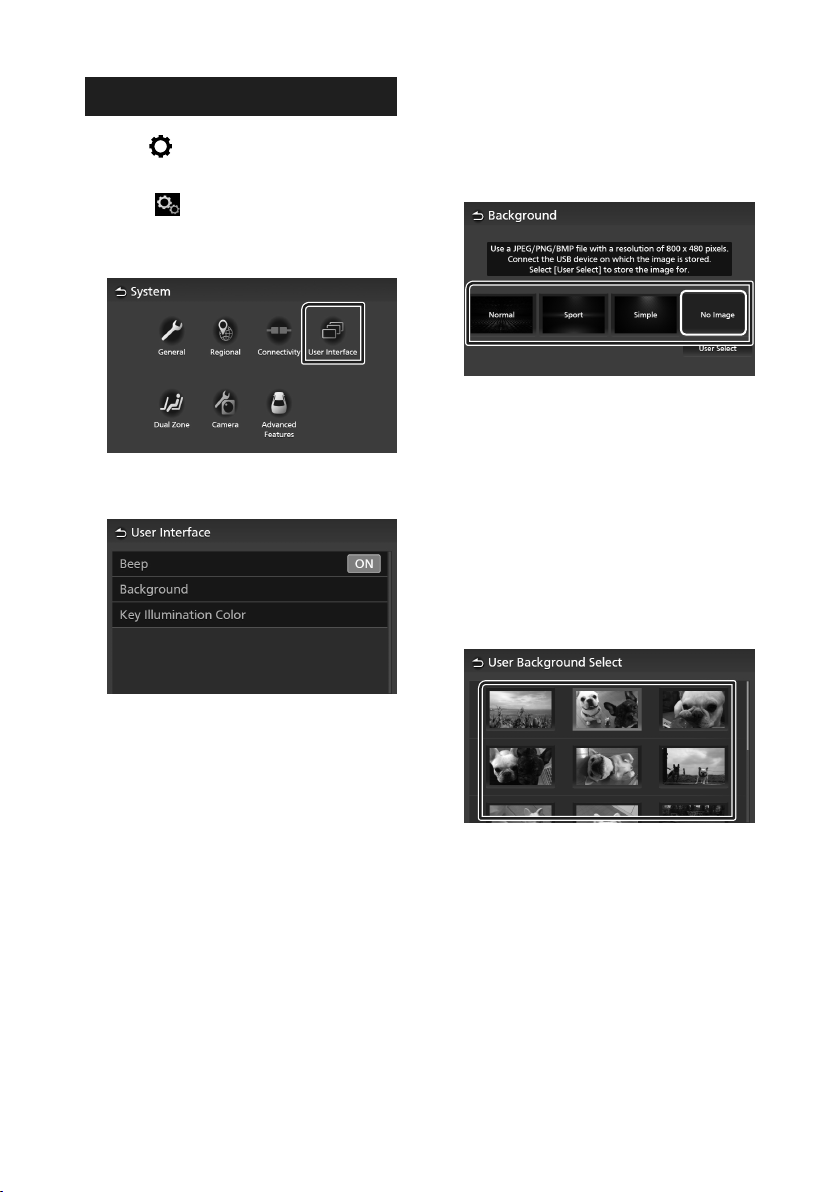
Setup
User Interface Systems
Press [ ] button.
1
Popup menu appears.
Touch [ ].
2
System screen appears.
Touch [User Interface].
3
User Interface screen appears.
Set each parameter as follows.
4
Ñ Change the background image
Touch [Background] on the User Interface
1
screen.
Select an image.
2
*
1
*
Register an original image in advance.
To register an original image
You can load an image from the connected
USB device and set it as the background
image.
Before starting this procedure, it is necessary
to connect the device which has the image to
load.
Touch [User Select] on the Background
1
screen.
Select the image to load.
2
1
■ [Beep]
Turn the key touch tone on or off.
Default is “ON”.
■ [Background]
You can change the background image.
(P. 46)
■ [Key Illumination Color]
You can change the key color. ( P.47)
46
Page 47
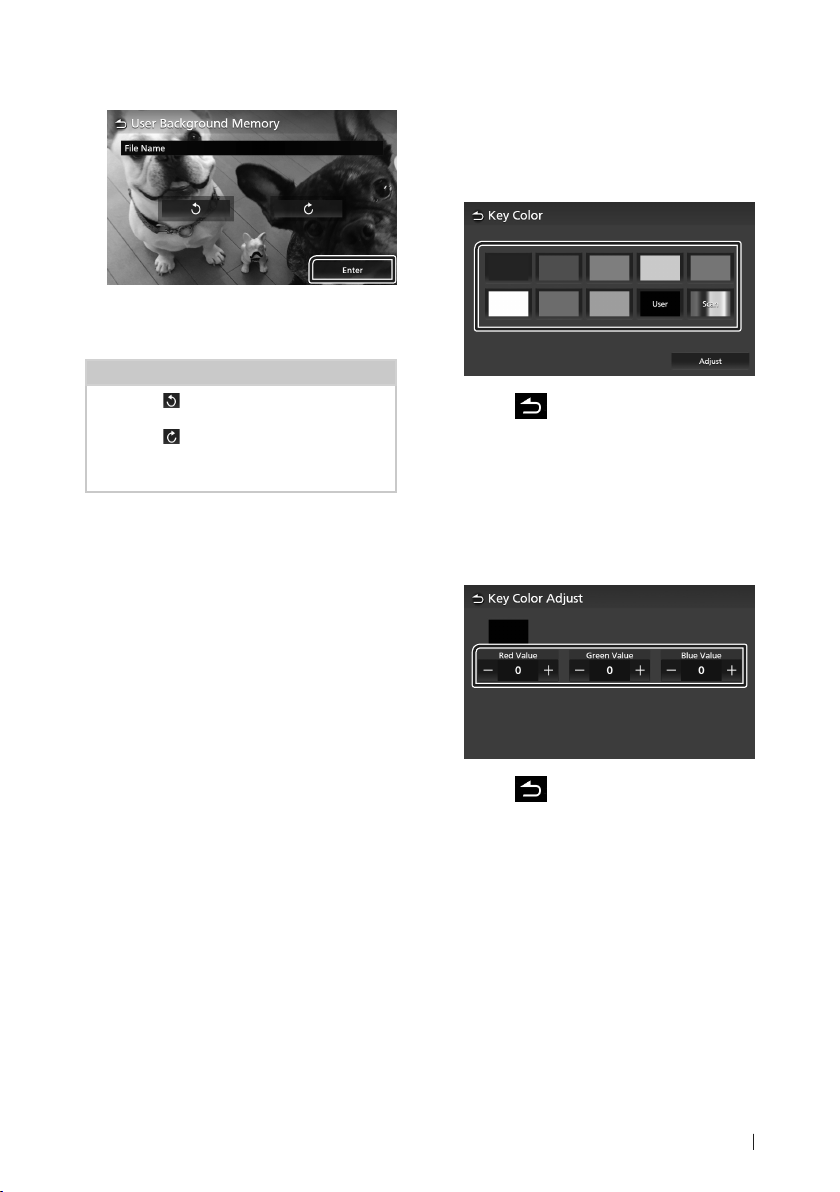
Touch [Enter].
3
The selected image is loaded and the
display returns to the Background
screen.
NOTE
• Touching [ ] rotates the image counterclockwise.
• Touching [
• Picture files: JPEG (.jpg, .jpeg), PNG (.png), BMP
(.bmp)
] rotates the image clockwise.
Ñ Change the key color
Touch [Key Color] on the User Interface
1
screen.
Select a key color.
2
Touch [ ].
3
To register an original color
You can register your original color.
Touch [User] on the Key Color screen.
1
Touch [Adjust].
2
Use [-] and [+] to adjust each color value.
3
Setup
Touch [ ].
4
47English
Page 48
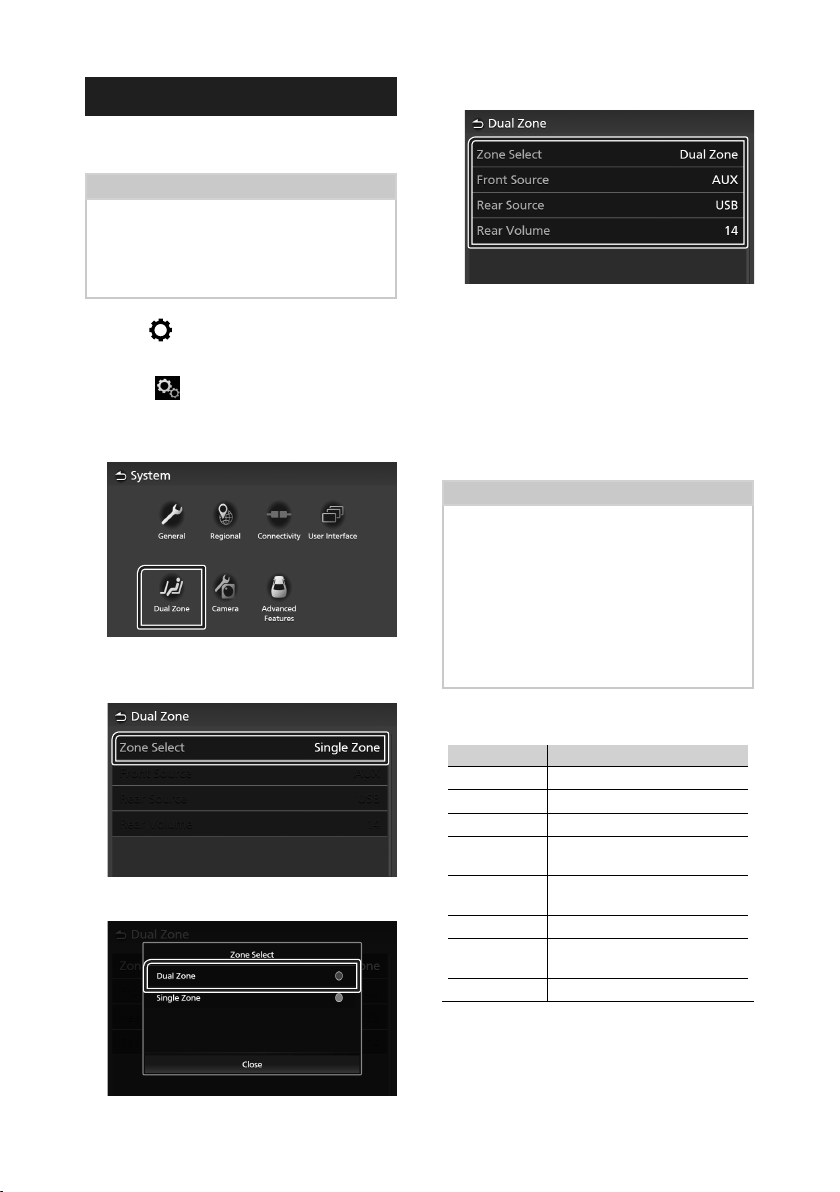
Setup
Dual Zone Systems
You can select different sources for front and
rear positions in the vehicle.
NOTE
• This function is available for the vehicle comes
with Dual Zone System.
• This function doesn’t work in below cars.
– No rear speakers are equipped.
– No Rear Monitor is equipped.
Press [ ] button.
1
Popup menu appears.
Touch [ ].
2
System screen appears.
Touch [Dual Zone].
3
Dual Zone screen appears.
Touch [Zone Select].
4
Set each source as follows.
6
■ [Zone Select]
Touch [Single Zone] to turn off the dual
zone function.
■ [Front Source]/[Rear Source]
Select a source for each.
Rear Source; OFF/ Disc/ USB/ AUX
■ [Rear Volume]
Adjust the rear source volume.
NOTE
• When you select the source which does not
include a video as Rear Source, the rear monitor
won't display any image.
• When the "Zone Select" is set to "Dual Zone", the
following functions are not available.
– Fader ( P.50)
– Equalizer Control/ Sound Effect/ Listening
Position/DTA ( P.51, 52, 53)
– High-resolution Sound Source File Playback
(Premium AVX only)
Touch [Dual Zone].
5
48
Selectable combinations
Front Source Rear Source
T-Link OFF
Bluetooth audio OFF/ Disc (DVD/Video-CD)/ AUX
Radio OFF/ Disc/ USB/ AUX
Disc (DVD/
Video-CD)
Disc (Music CD/
Disc media)
AUX OFF/ Disc/ USB/ AUX
USB OFF/ Disc (DVD/Video-CD)/ USB/
iPod OFF/ Disc (DVD/Video-CD)/ AUX
OFF/ Disc/ USB/ AUX
OFF/ AUX
AUX
Page 49
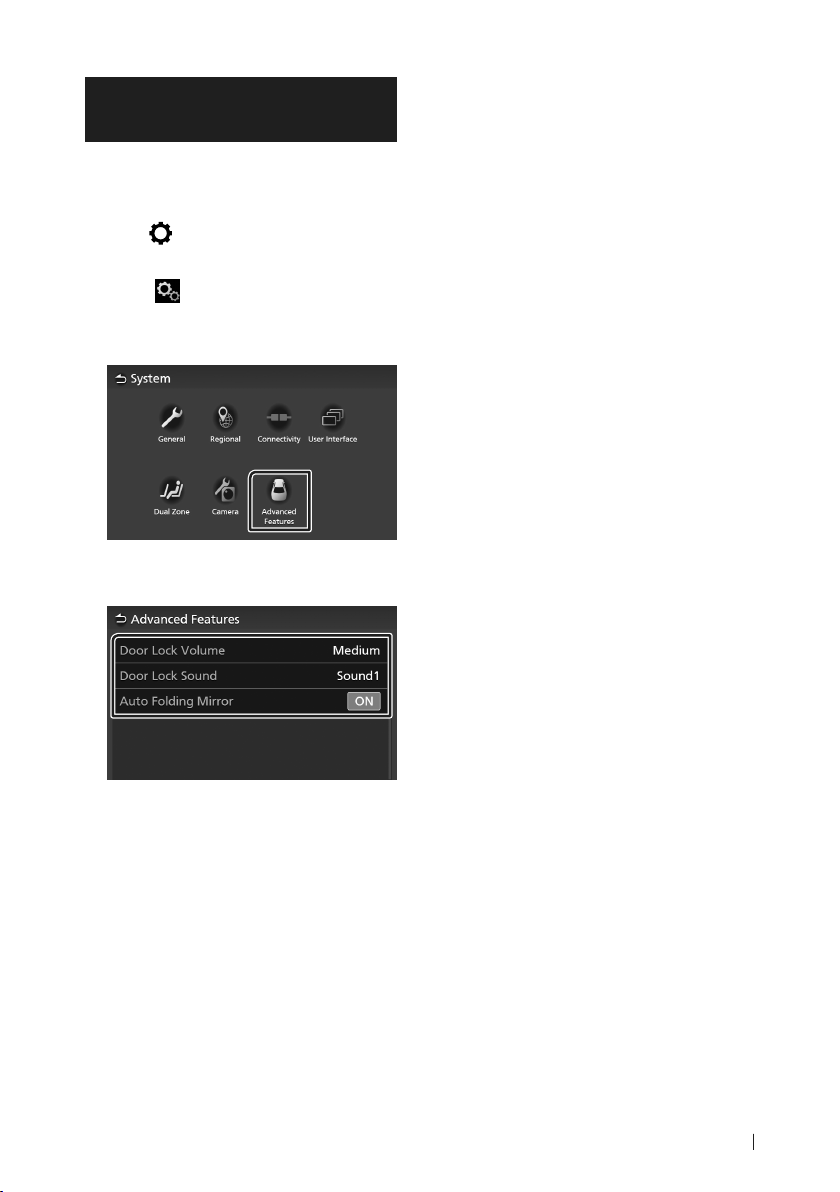
Advanced Features (Premium AVX only)
You can set the Advanced Features system
parameters, such as door lock alarm and auto
folding mirror functions.
Press [ ] button.
1
Popup menu appears.
Touch [ ].
2
System screen appears.
Touch [Advanced Features].
3
Advanced Features screen appears.
Set each parameter as follows.
4
Setup
■ [Door Lock Volume]
Adjust the volume for door lock alarm.
■ [Door Lock Sound]
Select the sound for door lock alarm.
■ [Auto Folding Mirror]
Turn the auto folding mirror function on or
off.
49English
Page 50
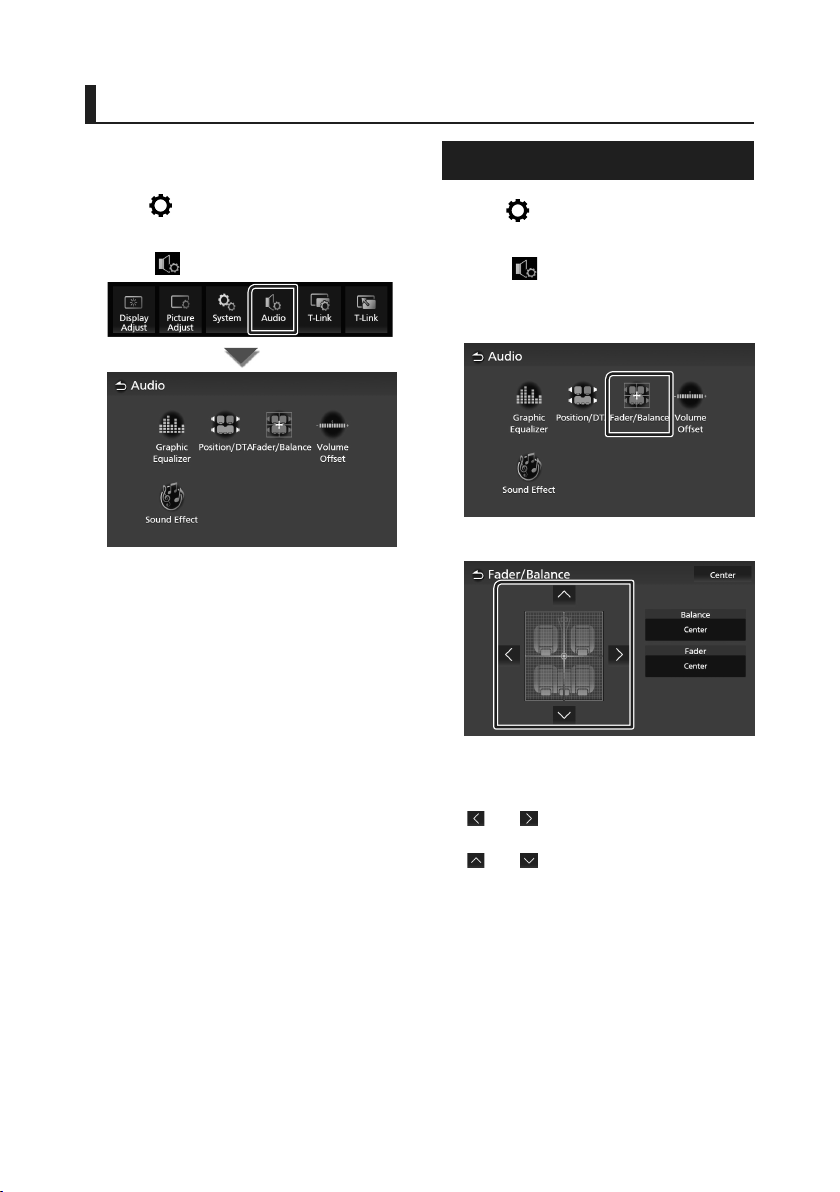
Controlling Audio
Controlling Audio
You can adjust various settings such as audio
balance.
Press [ ] button.
1
Popup menu appears.
Touch [ ].
2
See the following section for each
setting.
• Controlling equalizer (P. 51)
• Set listening position/ DTA ( P.53)
• Controlling general audio (Fader/Balance)
(P. 50)
• Set volume offset (P. 52)
• Set sound effect (P.52)
Controlling General Audio
Press [ ] button.
1
Popup menu appears.
Touch [ ].
2
Audio screen appears.
Touch [Fader/Balance].
3
Set each parameter as follows.
4
50
■ [Fader]/[Balance]
Adjust the volume balance around the
touched area.
[
] and [ ] adjust the right and left volume
balance.
[
] and [ ] adjust the front and rear volume
balance.
■ [Center]
Clear the adjustment.
Page 51
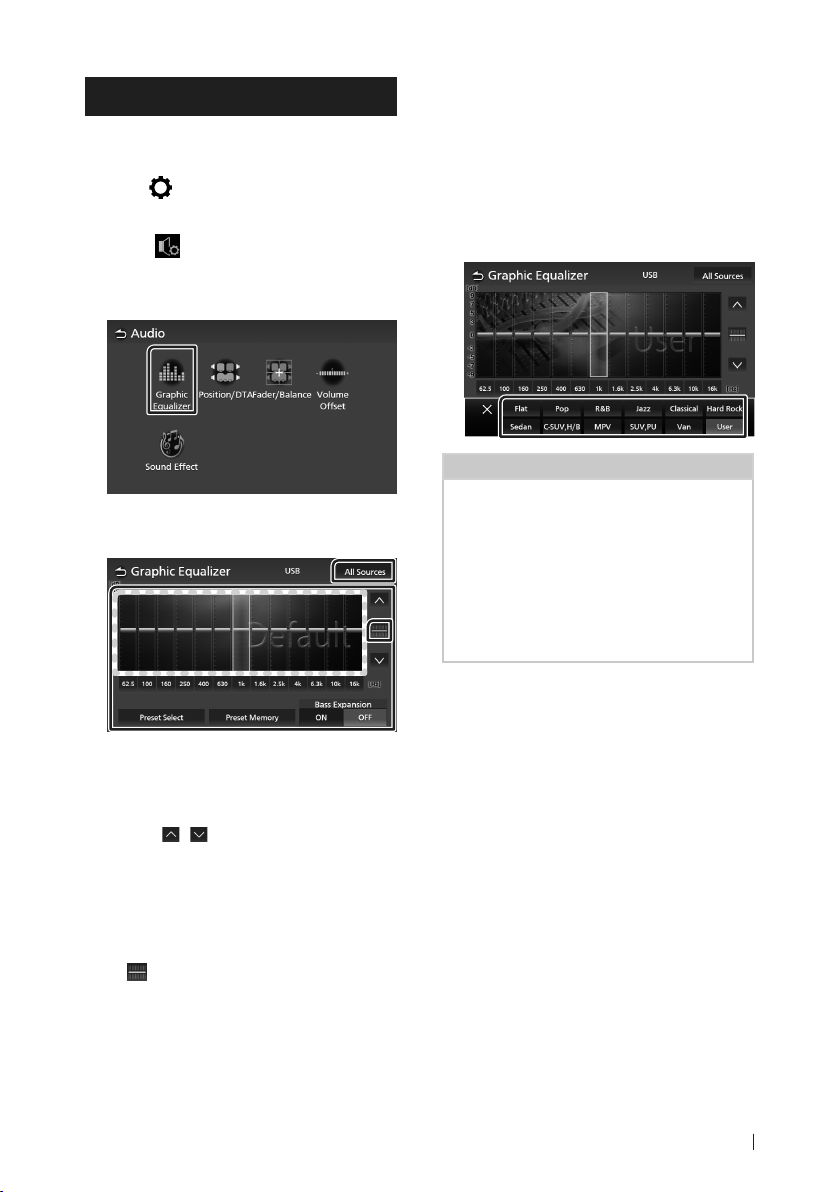
Controlling Audio
Equalizer Control
You can adjust equalizer by selecting the
optimized setting for each category.
Press [ ] button.
1
Popup menu appears.
Touch [ ].
2
Audio screen appears.
Touch [Equalizer].
3
Touch the screen and set the Graphic
4
Equalizer as desired.
■ [ON]/[OFF] (Bass Extend Settings)
When turned on, the frequencies lower than
62.5 Hz is set to the same gain level (62.5 Hz).
Ñ Recall the EQ curve
Touch [Preset Select].
1
Select an EQ curve.
2
NOTE
• This AVX equips the below vehicle type EQ
settings.
– Sedan
– C.SUV, H/B (Compact SUV and Hatchback)
– MPV
– SUV,PU (SUV and Pick Up Truck)
– Van
• The EQ setting is optimized for each vehicle type
and produce clean, distortion-free natural sound
at any listening level.
■ Gain level (area in dotted frame)
Adjust the gain level by touching each
frequency bar.
You can select a frequency bar and adjust its
level by [
Display the screen for selecting the preset
equalizer curve. (P.51)
Saves the adjusted equalizer curve as “User”.
Initialize (flatten) the current EQ curve.
Apply the adjusted equalizer curve to all
sources. Touch [All Sources] and then touch
[OK] on the confirmation screen.
], [ ].
■ [Preset Select]
■ [Preset Memory]
■ [
]
■ [All Sources]
51English
Page 52
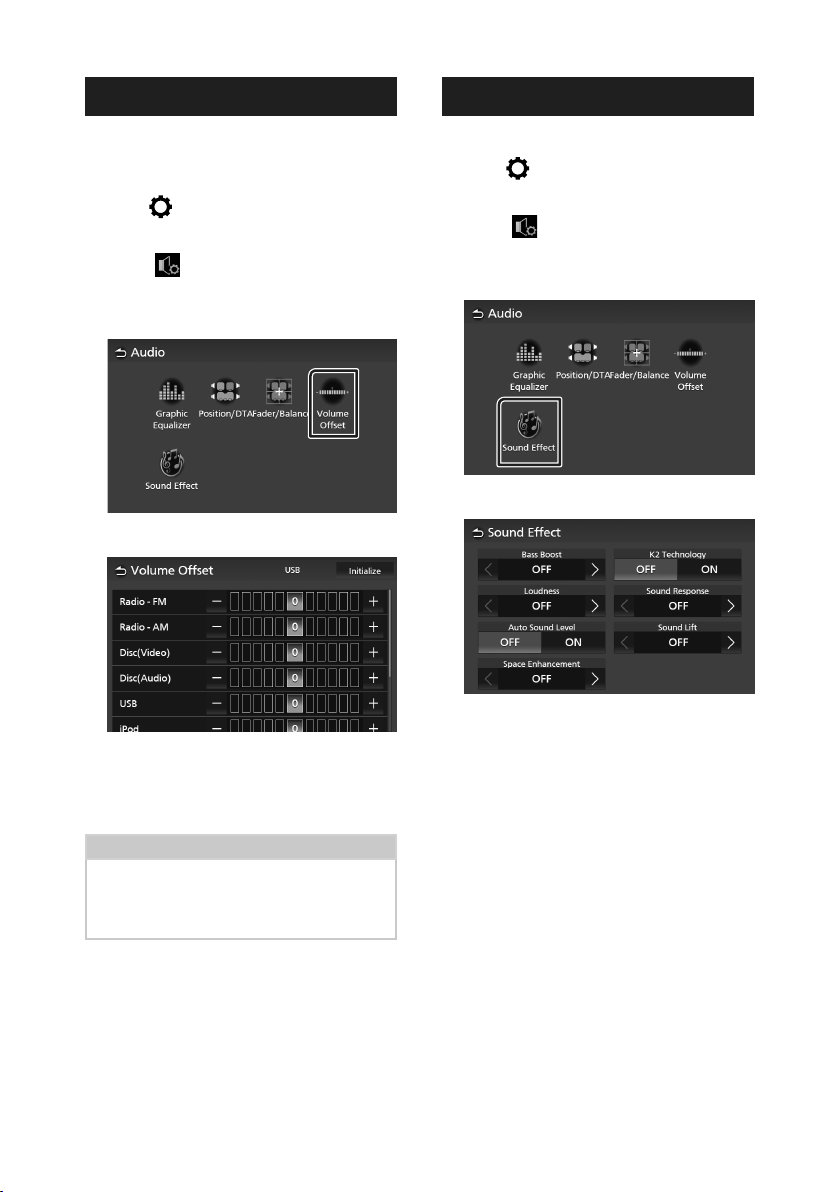
Controlling Audio
Volume Offset
Finely adjust the volume of the current source
to minimize the difference in volume between
different sources.
Press [ ] button.
1
Popup menu appears.
Touch [ ].
2
Audio screen appears.
Touch [Volume Offset].
3
Touch [+] or [-] to adjust the level.
4
Sound Effect
You can set sound effects.
Press [ ] button.
1
Popup menu appears.
Touch [ ].
2
Audio screen appears.
Touch [Sound Effect].
3
Set each parameter as follows.
4
■ [Initialize]
Returns to the initial settings.
Touch [Initialize] and then touch [Yes ] on
the confirmation screen.
NOTE
• If you have increased the volume first, then
reduce the volume using “Volume Offset”.
Switching the current source to another source
suddenly may output extremely loud sound.
52
■ [Bass Boost]
Set the amount of bass boost.
“OFF”/ “1”/ “2”/ “3”
■ [Loudness]
Set the amount of boost of low and high
tones.
“OFF”, “Low”, “High”
■ [Auto Sound Level]
AVX automatically adjust EQ setting based of
volume level or vehicle speed.
The function is varied depends on vehicle or
vehicle grade.
“OFF”, “ON”
■ [Space Enhancement]
Select the feeling of sound space
enhancement.
“OFF”/ “Small”/ “Medium”/ “Large”.
This setting is not available for the Radio
source.
Page 53
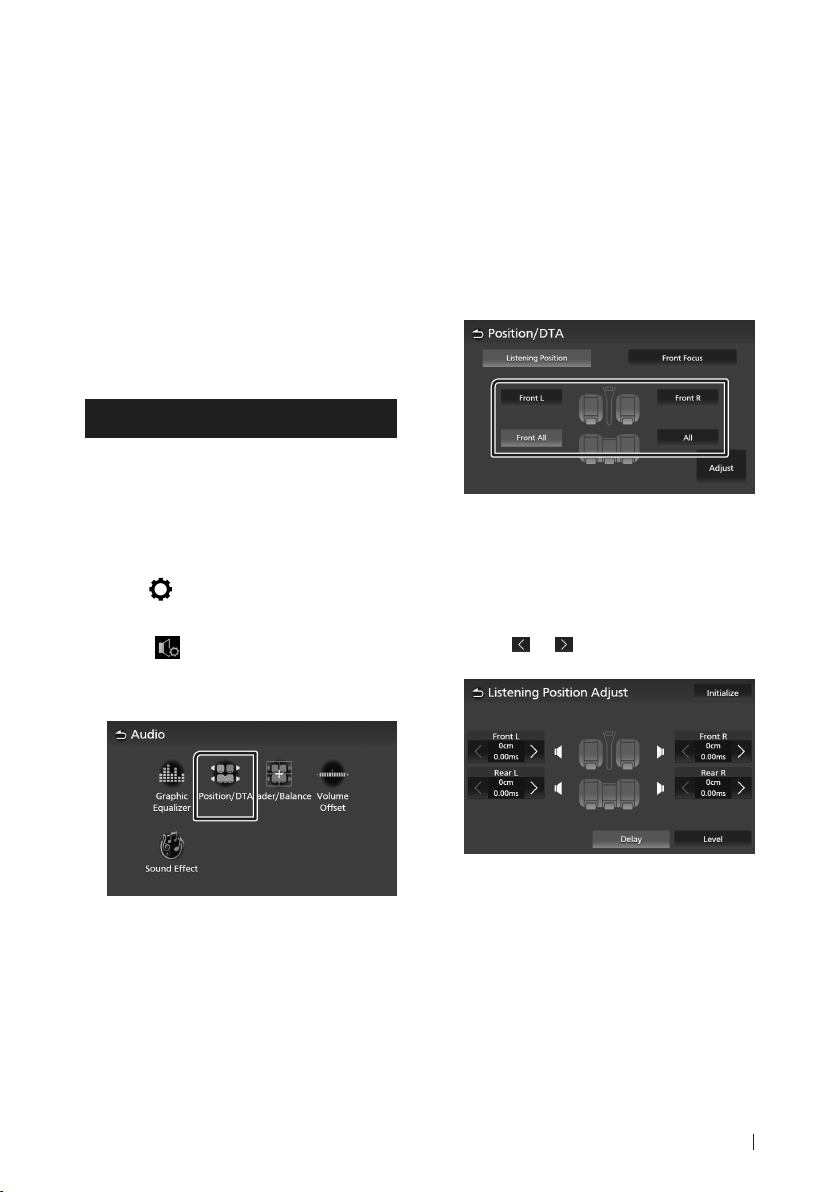
Controlling Audio
■ [K2 Technology]
Turn ON/OFF the K2 function.
Technology to extrapolate and supplement
with proprietary algorithm, the highfrequency range that is cut off when
encoding.
■ [Sound Response]
Virtually make the sound more realistic using
the Digital Signal Processor (DSP) system.
Select the level from “OFF”/ “1”/ “2”/ “3”.
■ [Sound Lift]
You can adjust the height of speakers
virtually to suit your listening position.
“OFF”/ “Low”/ “Middle”/ “High”.
Listening Position/ DTA
Listening Position/DTA allows you to improve
the sound field depending on the position of
the seat you sit.
Listening Position/DTA allows you to set
“Listening Position” and “Front Focus”. You
cannot set both at the same time.
Press [ ] button.
1
Popup menu appears.
Touch [ ].
2
Audio screen appears.
Touch [Position/DTA].
3
Ñ Listening Position
Adjust the sound delay time so that the
sounds from different speakers arrive at the
listener sitting on the selected seat at the
same time.
Touch [Listening Position] on the
1
Position/DTA screen.
Select a listening position from [Front R]
2
(Right front), [Front L] (Left front),
[Front All] (All front), and [All].
Position DTA control
You can fine-adjust your listening position.
Touch [Adjust].
1
Touch [Delay].
2
Touch [ ] or [ ] to adjust the delay time
3
of the selected speaker.
• Set up Listening Position (P. 53)
• Set up Front Focus (P. 54)
Touch [Level].
4
53English
Page 54
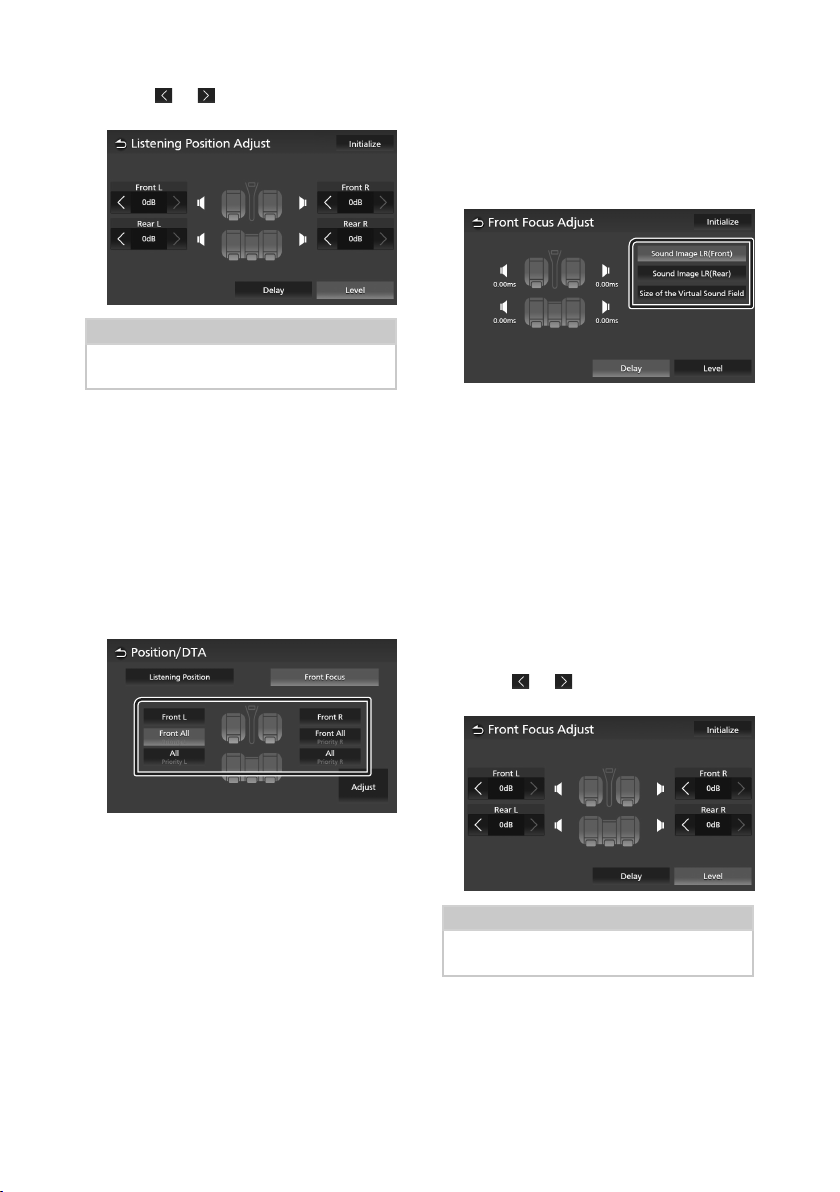
Controlling Audio
Touch [ ] or [ ] to adjust the sound level
5
of the selected speaker.
NOTE
• To initialize the Delay and Level settings, touch
[Initialize] and [Ye s] on the confirmation screen.
Ñ Front Focus
You can focus the imaginary sound image on
the front of the selected seat.
Touch [Front Focus] on the Position/DTA
1
screen.
Select a front focus position.
2
For [Front All] and [All], select Priority L or R
depending on which side you want to put
the imaginary sound image.
Front Focus fine adjustment
Touch [Adjust].
1
Touch [Delay].
2
Set each parameter as follows.
3
■ [Sound Image LR (Front)]
Focus the sound image on the front of front
seats.
■ [Sound Image LR (Rear)]
Focus the sound image on the front of rear
seats.
■ [Size of the Virtual Sound Field]
Adjust the size of sound image to meet your
taste. If the sound image is shifted from the
front, move it back by [Sound Image LR
(Front)] or [Sound Image LR (Rear)].
Touch [Level].
4
Touch [ ] or [ ] to adjust the sound level
5
of the selected speaker.
54
NOTE
• To initialize the Delay and Level settings, touch
[Initialize] and [Ye s] on the confirmation screen.
Page 55
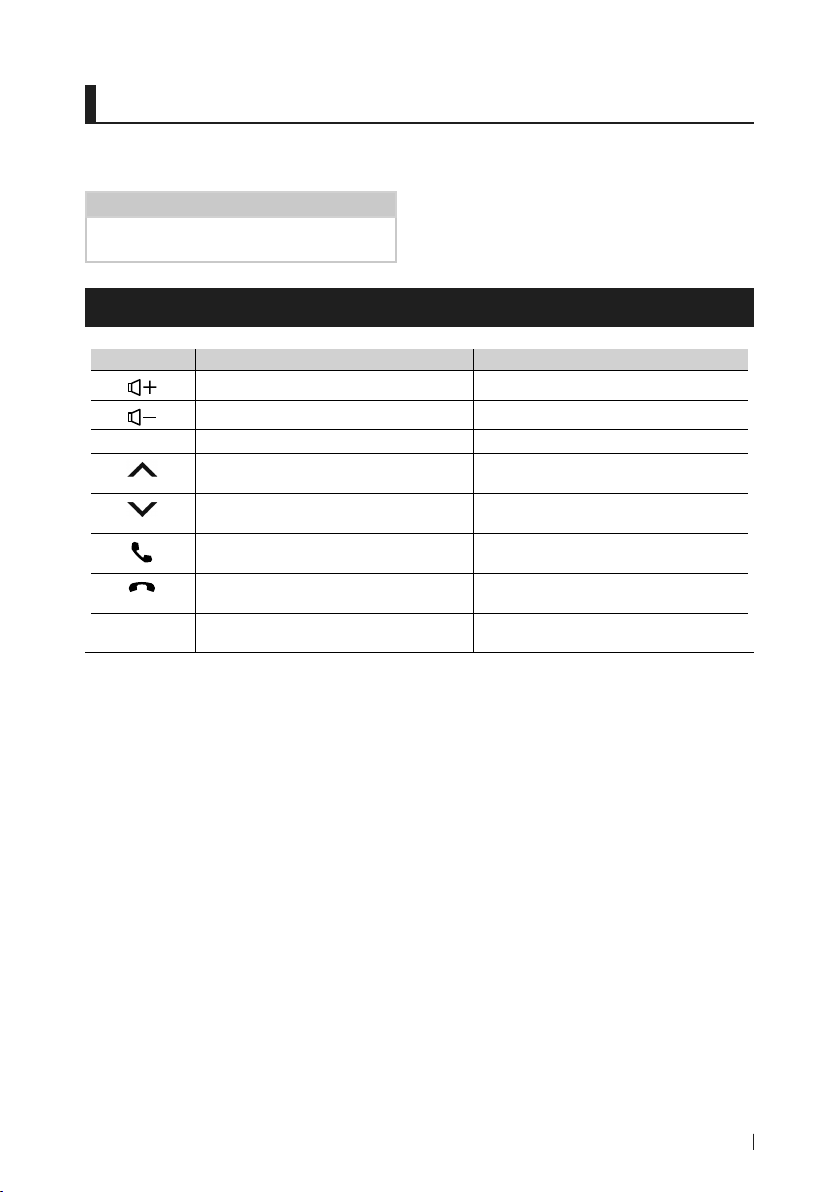
Steering Wheel Control
Steering Wheel Control
This unit can be operated using the switches
on the steering wheel.
NOTE
• Steering wheel control function is varied depends
on vehicle and vehicle grade.
Operations using the steering switch
Key Name Press Press and Hold
Volume up Volume up continuously
Volume down Volume down continuously
[MODE]
[VOICE]
Switch sources Mute ON/OFF
Select preset radio stations
Select next track, file, chapter
Select preset radio stations
Select previous track, file, chapter
Receive an incoming call
Make a phone call
Decline, refuse an incoming call
End a phone call
Start smartphone’s Voice Recognition
(Smartphone dependent)
Seek radio stations
Forward Search
Seek radio stations
Reverse Search
Decline, refuse an incoming call
End a phone call
End smartphone’s Voice Recognition
55English
Page 56
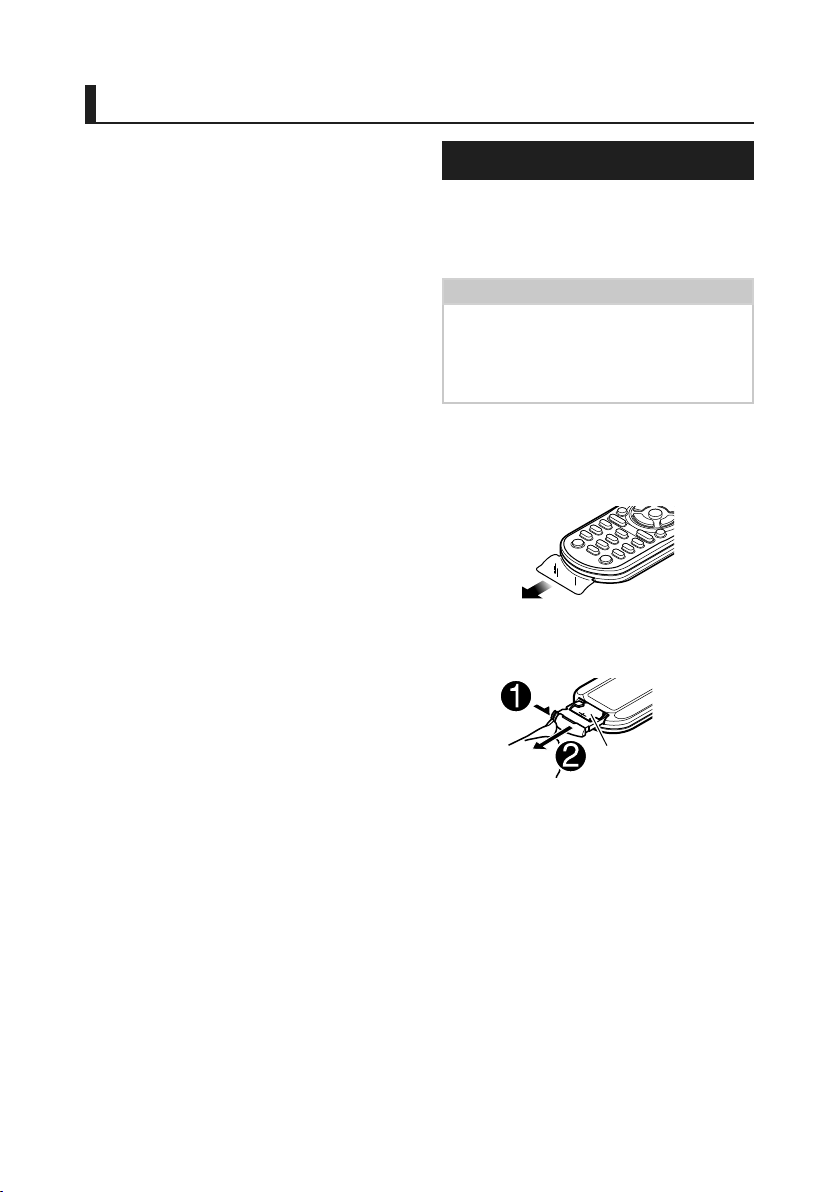
Remote control
Remote control
This unit can be operated using the remote
control.
# WARNING
• Do not ingest the battery, Chemical Burn
Hazard
The remote control supplied with this product
contains a coin / button cell battery. If the
coin/button cell battery is swallowed, it can
cause severe internal burns in just 2 hours and
can lead to death.
Keep new and used batteries away from
children. If the battery compartment does not
close securely, stop using the product and
keep it away from children.
If you think batteries might have been
swallowed or placed inside any part of the
body, seek immediate medical attention.
• Put the remote control in a place where it will
not move during braking or other operations.
A dangerous situation could result, if the
remote control falls down and gets wedged
under the pedals while driving.
# CAUTION
• Do not leave the battery near fire or under
direct sunlight. A fire, explosion or excessive
heat generation may result.
• Do not recharge, short, break up or heat the
battery or place it in an open fire. Such actions
may cause the battery to leak fluid. If spilled
fluid comes in contact with your eyes or on
clothing, immediately rinse with water and
consult a physician.
• Danger of explosion if Lithium battery is
incorrectly replaced. Replace only with the
same or equivalent type.
• Remove the battery if the remote control is not
used for a month or longer.
• When disposing of used batteries, comply with
governmental regulations or environmental
public institutions’ rules that apply in your
country/area.
Using the Remote control
Point the remote control in the direction of the
front panel to operate.
• The remote control may not function properly
in direct sunlight.
IMPORTANT
• Do not store the remote control in high tempera-
tures or direct sunlight.
• Do not let the remote control fall onto the floor,
where it may become jammed under the brake or
accelerator pedal.
Ñ Removing the battery sheet
Pull the battery sheet out from the remote
controller to activate the battery.
Ñ Changing the battery of the
remote controller
CR2025 (+side)
• Use a commercially available button battery
(CR2025).
• Insert the battery with the + and – poles
aligned properly.
– If the effectiveness of the remote controller
decreases, replace the battery.
56
Page 57
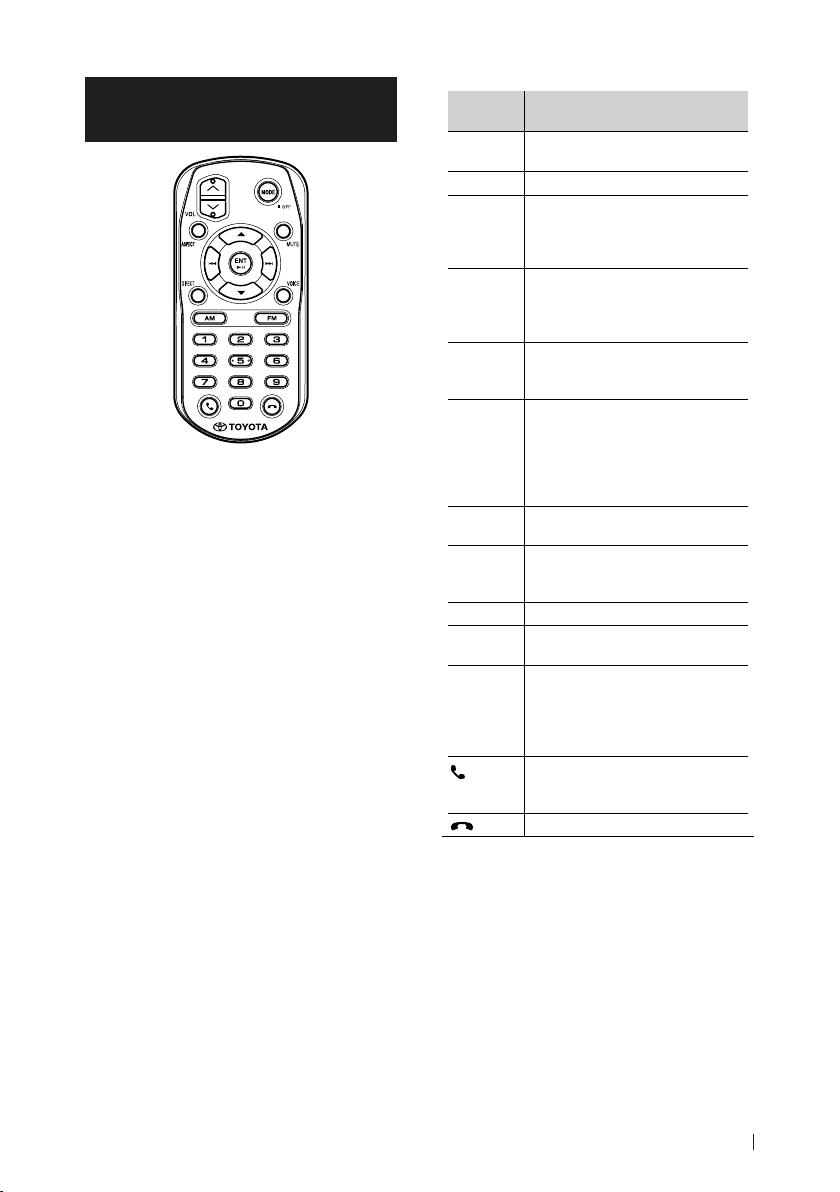
Remote control
Functions of the Remote control Buttons
Key
Function
Name
MODE • Selects the source. (Press)
VOL 3 2
ASPECT Changes the aspect ratio.
MUTE Lowers the volume when pressed
R
S
E
F
ENT
L
DIRECT Switches to the direct search mode.
VOICE Activates the voice control.
AM
FM
Numeric
Keypad
• Turns off the power. (Hold)
Adjusts the volume.
• To confirm the current aspect ratio
setting, operate on the touch panel.
(P. 44)
once.
Restores the previous volume when
pressed twice.
Selects the folder to be played.
For the DVD/Video-CD source, selects
the title to be played.
Selects the track or file to be played.
For the Radio source, switches to
broadcast stations received by the
unit.
For the DVD/Video-CD source, selects
the chapter/scene/track to be played.
• Starts/pauses playback.
• Performs the selected function.
For details on the direct search mode,
see Direct search mode (P.58).
Selects FM/ AM band to be received.
[1] - [6]: Enters preset station number.
Allows you to enter the number to
search in the direct search mode.
For details on the direct search mode,
see Direct search mode (P.58).
Displays the Hands Free screen.
(P. 21)
When a call comes in, answers the call.
Ends/rejects the call.
57English
Page 58

Remote control
Ñ Direct search mode
Using the remote control, you can jump
directly to the desired file, track chapter, etc.
by entering the number corresponding to the
content.
NOTE
• This operation cannot be performed for the USB
device and iPod.
Press the [MODE] button several times
1
until the desired source appears.
Press the [DIRECT] button to select the
2
content.
The available contents are different
depending on the source type.
■ DVD
Title number/Chapter number
■ Video-CD 1.X and 2.X (PBC OFF)
Track number
■ Video-CD 2.X (PBC ON)
Scene number/Track number
■ Music CD
Track number
■ Radio
Frequency value
Enter the number of the content you want
3
to play using the numeric keypad.
For DVD or Video-CD, music CD, press the
4
[ENT] button.
For Radio, press the [E] or [F] button.
The content corresponding to the
number you entered is played.
58
Page 59
Troubleshooting
Troubleshooting
Problems and Solutions
If you have problems operating this product,
refer to this section. The most common
problems are listed below, along with likely
causes and solutions. If a solution to your
problem cannot be found here, contact your
dealer or your nearest Toyota Service Center.
NOTE
• Some functions of this unit may be disabled by
some settings made on this unit.
• What might seem to be a malfunction in your
unit may just be the result of slight misoperation.
Ñ About settings
• Cannot select the output destination of the
subsource in the dual zone.
• Cannot adjust the volume of the rear speakers.
The dual zone function is disabled.
Set the dual zone function to on. See Dual Zone
Systems (P.48).
Cannot set up the equalizer.
The dual zone function is enabled.
Set the dual zone function to off. See Dual Zone
Systems (P.48).
Ñ About audio operations
Cannot select a folder.
The random play function is enabled.
Turn off the random function.
Cannot perform repeat play during Video-CD
playback.
The PBC function is enabled.
Turn off the PBC function.
The specified disc does not play, but another one
plays instead.
The disc is quite dirty.
Clean the disc. See Precautions on handling discs
(P. 5).
The disc is severely scratched.
Try another disc instead.
The sound skips when an audio file is being
played.
The disc is scratched or dirty.
Clean the disc. See Precautions on handling discs
(P. 5).
The recording condition is bad.
Record the file again or use another disc.
T-Link does not sound.
Verify that the T-Link installed device is selected in
Bluetooth connection setup.
Raise the volume on your smartphone.
Try another music application. Some application
does not support T-Link playback.
(Apple Music App does not support to playback during
T-Link.)
iPod or Bluetooth source does not sound.
If you used T-Link source before, verify that the
iPhone’s screen recording function is stopped.
Cannot operate T-Link with touch panel
operation.
Available operation functions may differ from the
ones operated on the device. Some functions do
not work by operation on this unit depending on
the connected device.
Error Messages
When you fail to operate the unit correctly, the
cause of the failure appears as the message on
the screen.
There is an error in the speaker wiring. Please
check the connections.
Protective circuit has been activated because a speaker
cord has shorted or it has come in contact with the car
chassis.
Wire or insulate the speaker cord as appropriate and
turn the power off and on again.
Hot Error
When the internal temperature of this unit rises to 60°C
or more, the protection circuit is activated and you may
not be able to operate the unit.
Use the unit again after reducing the temperature
of the unit.
Mecha Error
The disc player is malfunctioning.
Eject the disc and try inserting it again.
Disc Error
An unplayable disc is inserted.
Change the disc. See Playable Media and Files
(P. 61).
Read Error
The disc is quite dirty.
Clean the disc. See Precautions on handling discs
(P. 5).
Disc is upside down.
Load the disc with the labeled side up.
59English
Page 60

Troubleshooting
Region Code Error
The disc you wanted to play has a region code that
cannot be played with this unit.
See Region Codes in the World (P.63) or try
another disc.
Error 07–67
The unit is not operating correctly due to some reason
or other.
Turn the power off and on again.
No Device (USB device)
The USB device is selected as a source although no USB
device is connected.
Change the source to any source other than USB/
iPod. Connect a USB device, and change the source
to USB again.
Disconnected (iPod, Bluetooth audio player)
The iPod/Bluetooth audio player is selected as a source
although no iPod/Bluetooth audio player is connected.
Change the source to any source other than iPod/
Bluetooth Audio. Connect an iPod/Bluetooth audio
player, and change the source to iPod/Bluetooth
again.
No Media file
The connected USB device contains no playable audio
file. Media was played that doesn’t have data recorded
that the unit can play.
See Playable Media and Files (P.61) and try
another USB device.
USB device over current status detected.
The connected USB device is rated a current capacity
higher than the allowable limit.
Check the USB device. Some trouble may have
occurred to the connected USB device.
Change the source to any source other than USB.
Remove the USB device.
60
Page 61

Appendix
Playable Media and Files
You can play various kinds of media and files on this unit.
Ñ List of playable discs
Disc types / Standard Support Remark
DVD D VD Video
DVD Audio ×
DVD-VR ×
1
DVD-R*
DVD-RW
DVD+R
DVD+RW
DVD-R DL (Dual layer)
DVD+R DL (Double layer)
DVD-RAM ×
CD Music CD*
Others Dualdisc ×
v : Playback is possible.
r : Playback is partly possible.
× : Playback is impossible.
1
CD-ROM
CD-R
CD-RW
DTS-CD ×
Video CD (VCD)
Super video CD ×
Photo CD ×
CD-EXTRA
HDCD
CCCD ×
Super audio CD
■ Use of DualDisc
When playing a “DualDisc” on this unit, the surface
of the disc that is not played may be scratched
while the disc is inserted or ejected. Since the music
CD surface does not conform to the CD standard,
playback may be impossible.
(A “DualDisc” is a disc with one surface containing
DVD standard signals and the other surface
containing music CD signals.)
v
v
• MP3/ WMA/ AAC/ WAV/ FLAC/ Vorbis/ MPEG1/ MPEG2/
MPEG4/ H.264/ WMV/ MKV playback
• Multi-border/Multisession playback (Playback depends on
authoring conditions)
v
v
v
v
Only video format
v
v
v
• MP3/ WMA/ AAC/ WAV/ FLAC/ Vorbis playback
• Multisession is supported.
v
• Packet write is not supported.
v
v
r
Only music CD session can be played.
r
Normal music CD sound quality
r
Only CD layer can be played.
1
*
Incompatible with 8 cm (3 inch) discs.
■ About disc format
The disc format should be the one of the
following.
• ISO 9660 Level 1/2
• Joliet
• Romeo
• Long file name
Appendix
61English
Page 62
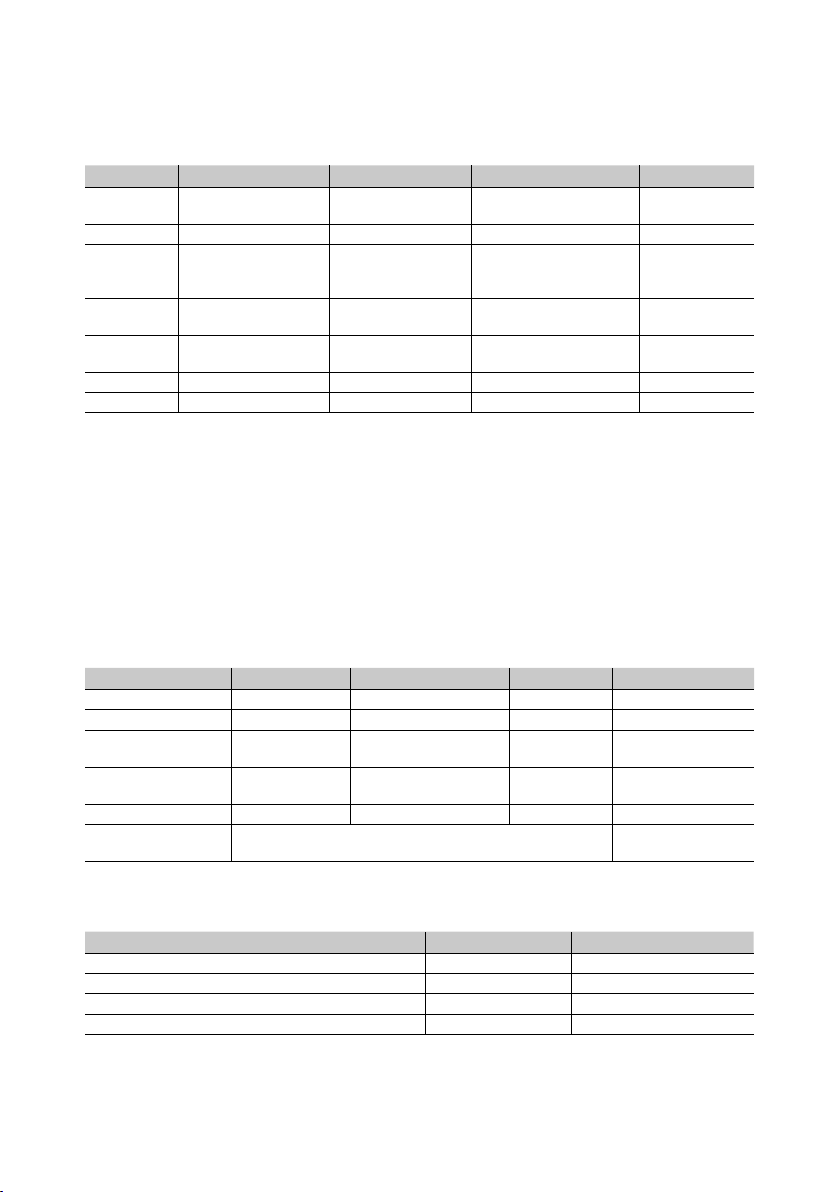
Appendix
Ñ About files
The following audio and video files are supported.
■ Playable Audio files
Format Bit rate Sampling frequency Bit count
AAC-LC (.m4a) MPEG2/4 AAC LC
MP3 (.mp3) MPEG 1/2 Audio Layer 3 8 – 320kbps, VBR 16 – 48 kHz 16 bit
WMA (.wma) Windows Media Audio
Linear PCM
(WAVE) (.wav)
FLAC (.flac)
Vorbis (.ogg) vorbis VBR 16 – 48 kHz 16 bit
DSD (.dsf, .dff)* DSF, DSDIFF – 2.8 MHz, 5.6 MHz, 11.2 MHz 1 bit
• If music of normal CD and other playback systems are recorded in the same disc, only the playback system recorded at
the first setout is played.
• WMA and AAC files with DRM cannot be played.
• DSD sound is converted to PCM sound before playback.
• The EmChinks tag of DSDIFF is not supported.
• Although the audio files complies with the standards listed above, they may not be played depending on the types or
conditions of media or device.
• This unit supports playback of High-Resolution Audio files.
It is recommended that a car audio system should be configured with all High-Resolution Audio compatible products
from player to speaker to enjoy its high quality sound.
* DSD is available for Premium AVX only.
HE-AAC(V1,V2)
Standard L3 profile
(Version 7,8,9)
RIFF waveform Audio
Format
flac –
8 – 320kbps, VBR 16 – 48 kHz 16 bit
8 – 320kbps 16 – 48 kHz 16 bit
–
16 – 48 kHz (Disc),
16 – 192 kHz (USB)
16 – 48 kHz (Disc),
16 – 192 kHz (USB)
16/ 24 bit
16/ 24 bit
■ Acceptable Video files
Profile Max. Picture size Max. bit rate Audio format
MPEG-1 (.mpg, .mpeg) – 352 × 240, 352 × 288 1.5 Mbps MPEG Audio Layer 2
MPEG-2 (.mpg, .mpeg) MP@ML 720 × 480, 720 × 576 8 Mbps MPEG Audio Layer 2
H.264/MPEG-4 AVC
(.mp4, .m4v, .avi, .flv, .f4v)
MPEG-4 (.mp4, .avi) Advanced Simple
WMV (.wmv) Main Profile 1920 × 1080 (30 fps) 8 Mbps WMA
MKV (.mkv)
• This unit can only play back files which are smaller than 4 GB.
Baseline Profile,
Main Profile
Profile
Video format follows H.264/MPEG-4 AVC, MPEG-4, WMV
1920 × 1080 (30 fps) 8 Mbps MP3, AAC
1920 × 1080 (30 fps) 8 Mbps MP3, AAC
MP3, AAC, WMA, Vorbis,
FLAC
■ Limitation on structure of file and folder
Disc media USB device
Maximum number of folder layers 8 8
Maximum number of files (per folder) 999 999
Maximum number of folders (per folder) 5000 9999
Maximum number of folders (per device) 5000 Unlimited
• You can enter a folder name and file name with 255 or fewer single-byte characters.
• Files in the folder whose folder name begins with a dot (.) cannot be played.
62
Page 63
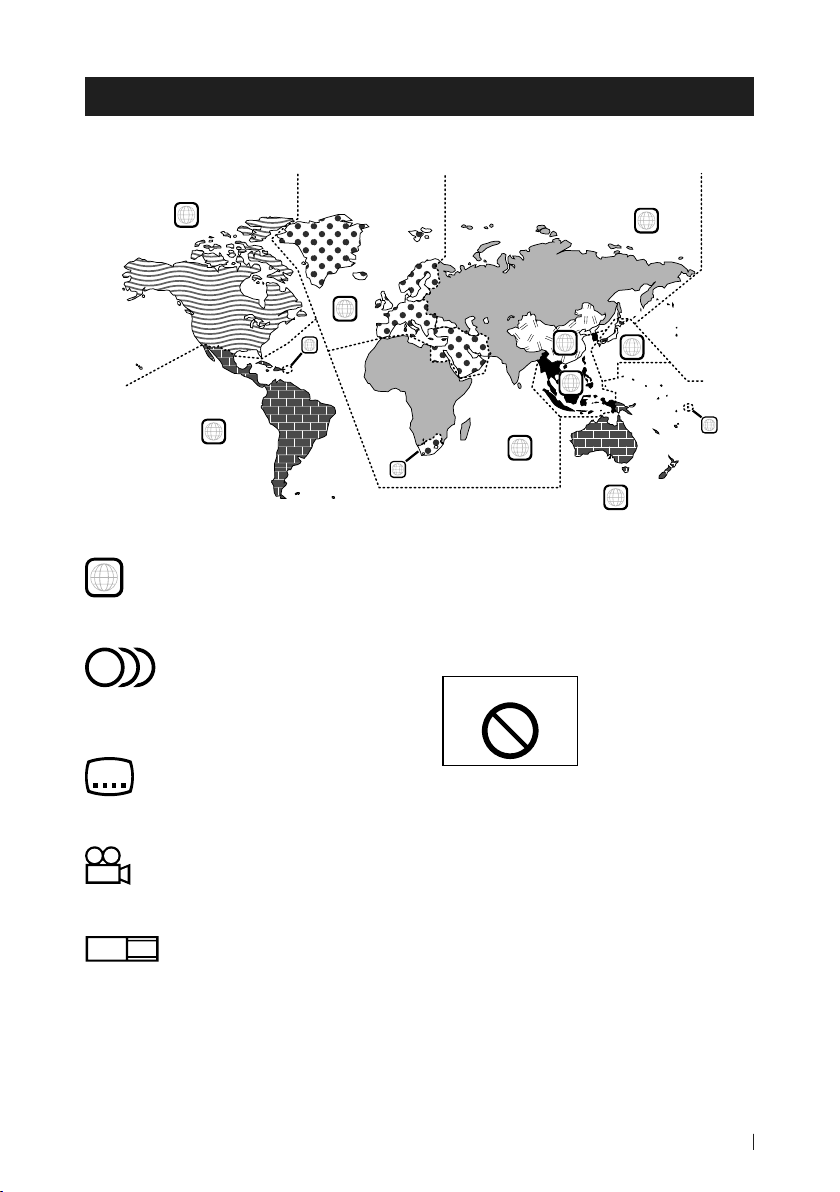
Appendix
Region Codes in the World
The DVD players are given a region code according to the country or area it is marketed, as shown in
the following map.
1
2
1
4
■ DVD disc marks
ALL
Indicates a region number. The discs with this
mark can be played with any DVD player.
8
Indicates the number of audio languages
recorded. Up to 8 languages can be recorded in
a movie. You can select a favorite language.
32
Indicates the number of subtitled languages
recorded. Up to 32 languages can be recorded.
9
If a DVD disc has scenes shot from multiple
angles, you can select a favorite angle.
16:9 LB
Indicates the type of screen for the image. The
left mark indicates that a wide image picture
(16:9) is displayed on a standard TV set screen
(4:3) with a black band at both the top and
bottom of the screen (letter box).
5
6
3
5
2
2
4
■ Operation regulatory marks
With this DVD, some functions of this unit
such as the play function may be restricted
depending on the location where the DVD is
playing. In this case, the following marks will
appear on the screen. For more information,
refer to the disc manual.
Prohibition Mark
■ Discs with limited period of use
Do not leave discs with a limited period of use in
this unit. If you load an already expired disc, you
may not be able to remove it from this unit.
1
63English
Page 64
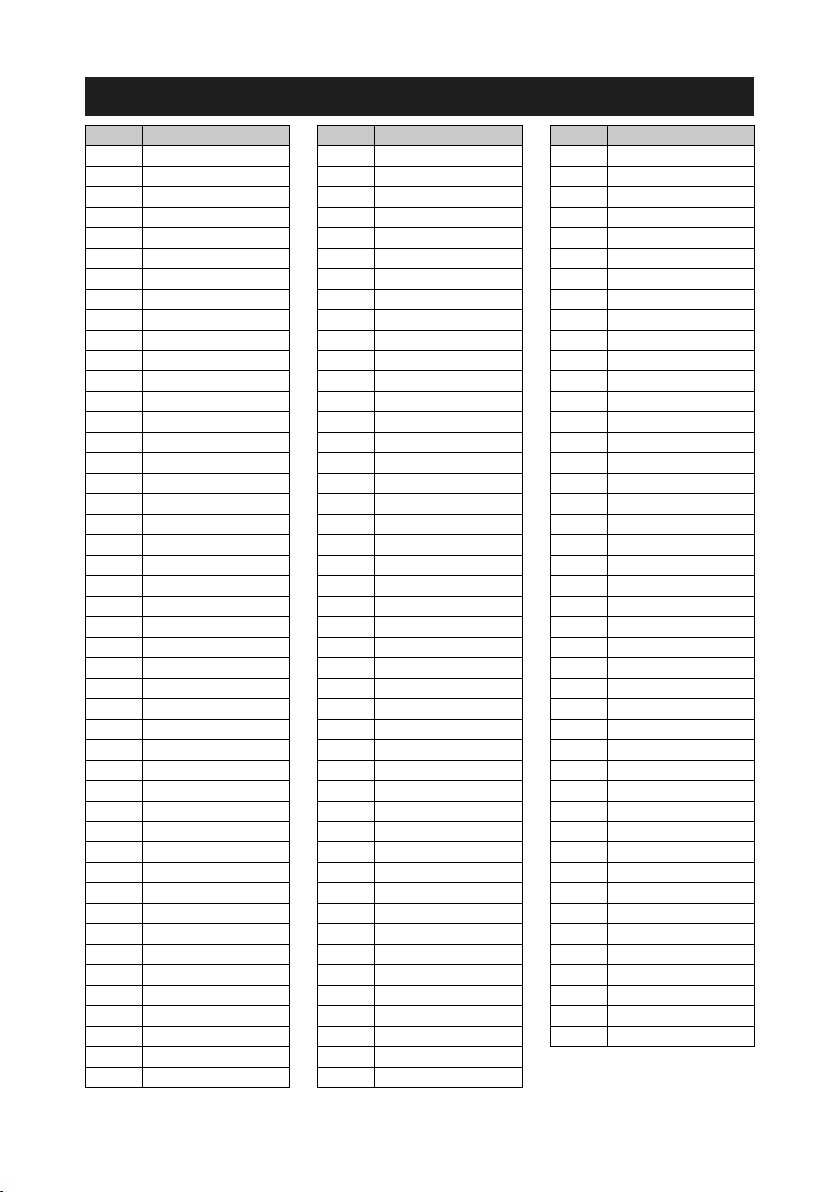
Appendix
DVD Language Codes
Code Language
aa Afar
ab Abkhazian
af Afrikaans
am Amharic
ar Arabic
as Assamese
ay Aymara
az Azerbaijani
ba Bashkir
be Byelorussian
bg Bulgarian
bh Bihari
bi Bislama
bn Bengali, Bangla
bo Tibetan
br Breton
ca Catalan
co Corsican
cs Czech
cy Welsh
da Danish
de German
dz Bhutani
el Greek
en English
eo Esperanto
es Spanish
et Estonian
eu Basque
fa Persian
fi Finnish
fj Fiji
fo Faroese
fr French
fy Frisian
ga Irish
gd Scots Gaelic
gl Galician
gn Guarani
gu Gujarati
ha Hausa
he Hebrew
hi Hindi
hr Croatian
hu Hungarian
hy Armenian
Code Language
ia Interlingua
ie Interlingue
ik Inupiak
id Indonesian
is Icelandic
it Italian
ja Japanese
jv Javanese
ka Georgian
kk Kazakh
kl Greenlandic
km Cambodian
kn Kannada
ko Korean
ks Kashmiri
ku Kurdish
ky Kirghiz
la Latin
lb Luxembourgish
ln Lingala
lo Laotian
lt Lithuanian
lv Latvian, Lettish
mg Malagasy
mi Maori
mk Macedonian
ml Malayalam
mn Mongolian
mo Moldavian
mr Marathi
ms Malay
mt Maltese
my Burmese
na Nauru
ne Nepali
nl Dutch
no Norwegian
oc Occitan
om (Afan) Oromo
or Oriya
pa Punjabi
pl Polish
ps Pashto, Pushto
pt Portuguese
qu Quechua
rm Rhaeto-Romance
Code Language
rn Kirundi
ro Romanian
ru Russian
rw Kinyarwanda
sa Sanskrit
sd Sindhi
sg Sangho
sh Serbo-Croatian
si Singhalese
sk Slovak
sl Slovenian
sm Samoan
sn Shona
so Somali
sq Albanian
sr Serbian
ss Siswati
st Sesotho
su Sundanese
sv Swedish
sw Swahili
ta Tamil
te Telugu
tg Tajik
th Thai
ti Tigrinya
tk Turkmen
tl Tagalog
tn Setswana
to Tongan
tr Turkish
ts Tsonga
tt Tatar
tw Twi
uk Ukrainian
ur Urdu
uz Uzbek
vi Vietnamese
vo Volapuk
wo Wolof
xh Xhosa
yo Yoruba
zh Chinese
zu Zulu
64
Page 65

Appendix
Specifications
■ Monitor section
Picture Size
: 6.8 inches (diagonal) wide
: 151.8 mm (W) × 79.68 mm (H)
Display System
: TN LCD panel
Drive System
: TFT active matrix system
Number of Pixels
: 1,152,000 (800H x 480V x RGB)
Effective Pixels
: 99.99 %
Pixel Arrangement
: RGB striped arrangement
Back Lighting
: LED
■ DVD player section
D/A Converter
: 24/ 32 bit
Audio Decoder
: Linear PCM/ Dolby Audio/ MP3/ WMA/ AAC/ WAV/
FLAC/ Vorbis
Video Decoder
: MPEG1/ MPEG2/ MPEG4/ WMV/ H.264/ MKV
Wow & Flutter
: Below Measurable Limit
Frequency Response
• 96 kHz : 20 – 44,000 Hz
• 48 kHz : 20 – 22,000 Hz
• 44.1 kHz : 20 – 20,000 Hz
Total Harmonic Distortion
: 0.030 % (1 kHz)
S/N Ratio (dB)
: 75 dB
Dynamic Range
: 75 dB
Disc Format
: DVD-Video/ VIDEO-CD/ CD-DA/ DVD-R/DVD-RW/
DVD+R/+RW
Quantifying Bit Number
: 16/ 20/ 24 bit
■ USB interface section
USB Standard
: USB 2.0 High Speed
File System
: FAT 16/ 32, exFAT, NTFS
Maximum Power Supply Current
D/A Converter
Audio Decoder
Video Decoder
1.0 A × 1
: DC 5 V
: 24/ 32 bit
: MP3/ WMA/ AAC/ WAV/ FLAC/ Vorbis/ DSD*
* DSD is available for Premium AVX only.
: MPEG1/ MPEG2/ MPEG4/ WMV/ H.264/ MKV
■ Bluetooth section
Technology
: Bluetooth Ver.4.1
Frequency
: 2.402 – 2.480 GHz
Output Power
: +4dBm (MAX), 0dBm (AVE), Power Class2
Maximum Communication range
: Line of sight approx. 10m (32.8 ft)
Audio Codec
: SBC/ AAC
Profile (Multi Profile support)
• HFP (V1.7) (Hands Free Profile)
• SPP (Serial Port Profile)
• A2DP (Advanced Audio Distribution Profile)
• AVRCP (V1.6) (Audio/Video Remote Control Profile)
• PBAP (Phonebook Access Profile)
■ FM tuner section
Frequency Range (step)
: 87.5 MHz – 108.0 MHz (50 kHz)
Usable Sensitivity (S/N : 30 dB)
: 9.3 dBf (0.8 μV/ 75 Ω)
Quieting Sensitivity (S/N : 46 dB)
: 15.2 dBf (1.6 μV/ 75 Ω)
Frequency Response
: 30 Hz – 15 kHz
S/N Ratio (dB)
: 60 dB (MONO)
Selectivity (± 400 kHz)
: Over 80 dB
Stereo Separation
: 45 dB (1 kHz)
65English
Page 66

Appendix
■ AM tuner section
Frequency Range (step)
: 531 kHz – 1602 kHz (9 kHz)
Usable Sensitivity
: 28 dBμ (25 μV)
■ Video section
Color System of External Video Input
: NTSC
External Audio Max Input Level (mini jack)
: 2 V/ 25 kΩ
Video Output Level
: 1 Vp-p/ 75 Ω
■ Audio section
Maximum Power (Front & Rear)
: 50 W × 4
Typical Power Output (Front & Rear)
Full Bandwidth Power (at less than 10% THD)
: 20 W × 4
Output frequency band
: 20 – 88,000 Hz
Speaker Impedance
: 4 – 8 Ω
Graphics equalizer
Band: 13 Band
Frequency (BAND1 – 13)
: 62.5/ 100/ 160/ 250/ 400/ 630/ 1k/ 1.6k/ 2.5k/ 4k/
6.3k/ 10k/ 16k Hz
Gain
: -9/-8/-7/-6/-5/-4/-3/-2/-1/0/1/2/3/4/5/6/7/8/9 dB
■ General
Operating Voltage
: 14.4 V (10.5 – 16 V allowable)
Maximum Current Consumption
: 15 A
Dimensions (W × H × D)
: 205 × 104 × 163.6 mm
Weight
: 2.1 kg
NOTE
• Although the effective pixels for the liquid crystal
panel is given as 99.99% or more, 0.01% of pixels
may not light or may light incorrectly.
Specifications are subject to change without
prior notice.
66
Page 67
Appendix
About this Unit
■ Trademarks and licenses
• The Bluetooth® word mark and logos are registered
trademarks owned by the Bluetooth SIG, Inc. and any
use of such marks by JVC KENWOOD Corporation is
under license. Other trademarks and trade names are
those of their respective owners.
• Manufactured under license from Dolby Laboratories.
Dolby, Dolby Audio and the double-D symbol are
trademarks of Dolby Laboratories.
•
• This item incorporates copy protection technology
• Microsoft and Windows Media are either registered
• This software is based in part on the work of the
• The “AAC” logo is a trademark of Dolby Laboratories.
• Use of the Made for Apple badge means that an
• Apple, iPhone, iPod, iPod touch, iTunes, and
• Android, Google Play and other marks are trademarks
is a trademark of DVD Format/Logo
Licensing Corporation registered in the U.S., Japan
and other countries.
that is protected by U.S. patents and other
intellectual property rights of Rovi Corporation.
Reverse engineering and disassembly are prohibited.
trademarks or trademarks of Microsoft Corporation in
the United States and/or other countries.
independent JPEG Group.
accessory has been designed to connect specifically
to the Apple product(s) identified in the badge, and
has been certified by the developer to meet Apple
performance standards. Apple is not responsible for
the operation of this device or its compliance with
safety and regulatory standards.
Please note that the use of this accessory with an
Apple product may affect wireless performance.
Lightning are trademarks of Apple Inc., registered in
the U.S. and other countries.
of Google LLC.
• This product includes FontAvenue® fonts licenced
by NEC Corporation.FontAvenue is a registered
trademark of NEC Corporation.
• This product includes "Ubiquitous QuickBoot
TM" technology developed by Ubiquitous Corp.
Ubiquitous QuickBoot TM is a trademark of
Ubiquitous Corp. Copyright© 2017 Ubiquitous Corp.
All rights reserved.
• THIS PRODUCT IS LICENSED UNDER THE AVC
PATENT PORTFOLIO LICENSE FOR THE PERSONAL
USE OF A CONSUMER OR OTHER USES IN WHICH IT
DOES NOT RECEIVE REMUNERATION TO (¡)ENCODE
VIDEO IN COMPLIANCE WITH THE AVC STANDARD
(“AVC VIDEO”) AND/OR (¡¡)DECODE AVC VIDEO
THAT WAS ENCODED BY A CONSUMER ENGAGED
IN A PERSONAL ACTIVITY AND/OR WAS OBTAINED
FROM A VIDEO PROVIDER LICENSED TO PROVIDE
AVC VIDEO. NO LICENSE IS GRANTED OR SHALL
BE IMPLIED FOR ANY OTHER USE. ADDITIONAL
INFORMATION MAY BE OBTAINED FROM MPEG LA,
L.L.C. SEE HTTP://WWW.MPEGLA.COM
• THIS PRODUCT IS LICENSED UNDER THE MPEG4 VISUAL PATENT PORTFOLIO LICENSE FOR
THE PERSONAL AND NON-COMMERCIAL USE
OF A CONSUMER FOR (¡) ENCODING VIDEO IN
COMPLIANCE WITH THE MPEG-4 VISUAL STANDARD
(“MPEG-4 VIDEO”) AND/OR (¡¡) DECODING MPEG4 VIDEO THAT WAS ENCODED BY A CONSUMER
ENGAGED IN A PERSONAL AND NON-COMMERCIAL
ACTIVITY AND/OR WAS OBTAINED FROM A VIDEO
PROVIDER LICENSED BY MPEG LA TO PROVIDE
MPEG-4 VIDEO. NO LICENSE IS GRANTED OR SHALL
BE IMPLIED FOR ANY OTHER USE. ADDITIONAL
INFORMATION INCLUDING THAT RELATING TO
PROMOTIONAL, INTERNAL AND COMMERCIAL USES
AND LICENSING MAY BE OBTAINED FROM MPEG LA,
LLC. SEE HTTP://WWW.MPEGLA.COM.
• THIS PRODUCT IS LICENSED UNDER THE VC-1 PATENT
PORTFOLIO LICENSE FOR THE PERSONAL AND NONCOMMERCIAL USE OF A CONSUMER TO ( i ) ENCODE
VIDEO IN COMPLIANCE WITH THE VC-1 STANDARD
(“VC-1 VIDEO”) AND/OR ( ii ) DECODE VC-1 VIDEO
THAT WAS ENCODED BY A CONSUMER ENGAGED
IN A PERSONAL AND NON-COMMERCIAL ACTIVITY
AND/OR WAS OBTAINED FROM A VIDEO PROVIDER
LICENSED TO PROVIDE VC-1 VIDEO. NO LICENSE IS
GRANTED OR SHALL BE IMPLIED FOR ANY OTHER
USE. ADDITIONAL INFORMATION MAY BE OBTAINED
FROM MPEG LA, L.L.C. SEE HTTP://WWW.MPEGLA.
COM
• libFLAC
Copyright (C) 2000-2009 Josh Coalson
Copyright (C) 2011-2013 Xiph.Org Foundation
Redistribution and use in source and binary forms,
with or without modification, are permitted provided
that the following conditions are met:
67English
Page 68

Appendix
– Redistributions of source code must retain the
above copyright notice, this list of conditions and
the following disclaimer.
– Redistributions in binary form must reproduce the
above copyright notice, this list of conditions and
the following disclaimer in the documentation
and/or other materials provided with the
distribution.
– Neither the name of the Xiph.org Foundation
nor the names of its contributors may be used to
endorse or promote products derived from this
software without specific prior written permission.
THIS SOFTWARE IS PROVIDED BY THE COPYRIGHT
HOLDERS AND CONTRIBUTORS ``AS IS'' AND ANY
EXPRESS OR IMPLIED WARRANTIES, INCLUDING,
BUT NOT LIMITED TO, THE IMPLIED WARRANTIES OF
MERCHANTABILITY AND FITNESS FOR A PARTICULAR
PURPOSE ARE DISCLAIMED. IN NO EVENT SHALL THE
FOUNDATION OR CONTRIBUTORS BE LIABLE FOR ANY
DIRECT, INDIRECT, INCIDENTAL, SPECIAL, EXEMPLARY,
OR CONSEQUENTIAL DAMAGES (INCLUDING, BUT
NOT LIMITED TO, PROCUREMENT OF SUBSTITUTE
GOODS OR SERVICES; LOSS OF USE, DATA, OR
PROFITS; OR BUSINESS INTERRUPTION) HOWEVER
CAUSED AND ON ANY THEORY OF LIABILITY,
WHETHER IN CONTRACT, STRICT LIABILITY, OR TORT
(INCLUDING NEGLIGENCE OR OTHERWISE) ARISING
IN ANY WAY OUT OF THE USE OF THIS SOFTWARE,
EVEN IF ADVISED OF THE POSSIBILITY OF SUCH
DAMAGE.
• libvorbis
Copyright (c) 2002-2008 Xiph.org Foundation
Redistribution and use in source and binary forms,
with or without modification, are permitted provided
that the following conditions are met:
– Redistributions of source code must retain the
above copyright notice, this list of conditions and
the following disclaimer.
– Redistributions in binary form must reproduce the
above copyright notice, this list of conditions and
the following disclaimer in the documentation
and/or other materials provided with the
distribution.
– Neither the name of the Xiph.org Foundation
nor the names of its contributors may be used to
endorse or promote products derived from this
software without specific prior written permission.
THIS SOFTWARE IS PROVIDED BY THE COPYRIGHT
HOLDERS AND CONTRIBUTORS ``AS IS’’ AND ANY
EXPRESS OR IMPLIED WARRANTIES, INCLUDING,
BUT NOT LIMITED TO, THE IMPLIED WARRANTIES OF
MERCHANTABILITY AND FITNESS FOR A PARTICULAR
PURPOSE ARE DISCLAIMED. IN NO EVENT SHALL THE
FOUNDATION OR CONTRIBUTORS BE LIABLE FOR ANY
DIRECT, INDIRECT, INCIDENTAL, SPECIAL, EXEMPLARY,
OR CONSEQUENTIAL DAMAGES (INCLUDING, BUT
NOT LIMITED TO, PROCUREMENT OF SUBSTITUTE
GOODS OR SERVICES; LOSS OF USE, DATA, OR
PROFITS; OR BUSINESS INTERRUPTION) HOWEVER
CAUSED AND ON ANY THEORY OF LIABILITY,
WHETHER IN CONTRACT, STRICT LIABILITY, OR TORT
(INCLUDING NEGLIGENCE OR OTHERWISE) ARISING
IN ANY WAY OUT OF THE USE OF THIS SOFTWARE,
EVEN IF ADVISED OF THE POSSIBILITY OF SUCH
DAMAGE.
• libogg
Copyright (c) 2002, Xiph.org Foundation
Redistribution and use in source and binary forms,
with or without modification, are permitted provided
that the following conditions are met:
– Redistributions of source code must retain the
above copyright notice, this list of conditions and
the following disclaimer.
– Redistributions in binary form must reproduce the
above copyright notice, this list of conditions and
the following disclaimer in the documentation
and/or other materials provided with the
distribution.
– Neither the name of the Xiph.org Foundation
nor the names of its contributors may be used to
endorse or promote products derived from this
software without specific prior written permission.
THIS SOFTWARE IS PROVIDED BY THE COPYRIGHT
HOLDERS AND CONTRIBUTORS ``AS IS’’ AND ANY
EXPRESS OR IMPLIED WARRANTIES, INCLUDING,
BUT NOT LIMITED TO, THE IMPLIED WARRANTIES OF
MERCHANTABILITY AND FITNESS FOR A PARTICULAR
PURPOSE ARE DISCLAIMED. IN NO EVENT SHALL THE
FOUNDATION OR CONTRIBUTORS BE LIABLE FOR ANY
DIRECT, INDIRECT, INCIDENTAL, SPECIAL, EXEMPLARY,
OR CONSEQUENTIAL DAMAGES (INCLUDING, BUT
NOT LIMITED TO, PROCUREMENT OF SUBSTITUTE
GOODS OR SERVICES; LOSS OF USE, DATA, OR
PROFITS; OR BUSINESS INTERRUPTION) HOWEVER
CAUSED AND ON ANY THEORY OF LIABILITY,
WHETHER IN CONTRACT, STRICT LIABILITY, OR TORT
(INCLUDING NEGLIGENCE OR OTHERWISE) ARISING
IN ANY WAY OUT OF THE USE OF THIS SOFTWARE,
EVEN IF ADVISED OF THE POSSIBILITY OF SUCH
DAMAGE.
■ The marking of products using lasers
The label is attached to the chassis/case and says
that the component uses laser beams that have been
classified as Class 1. It means that the unit is utilizing
laser beams that are of a weaker class. There is no
danger of hazardous radiation outside the unit.
68
Page 69

■ FCC WARNING
This equipment may generate or use radio
frequency energy. Changes or modifications to this
equipment may cause harmful interference unless
the modifications are expressly approved in the
instruction manual. The user could lose the authority to
operate this equipment if an unauthorized change or
modification is made.
NOTE
• This equipment has been tested and found to
comply with the limits for a Class B digital device,
pursuant to Part 15 of the FCC Rules. These limits
are designed to provide reasonable protection
against harmful interference in a residential
installation.
• This equipment generates, used and can radiate
radio frequency energy and, if not installed
and used in accordance with the instructions
may cause harmful interference to radio
communications. However, there is no guarantee
that interference will not occur in a particular
installation. If this equipment does cause harmful
interference to radio or television reception,
which can be determined by turning the
equipment off and on, the user is encouraged to
try to correct the interference by one or more of
the following measures:
– Reorient or relocate the receiving antenna.
– Increase the separation between the
equipment and receiver.
– Connect the equipment into an outlet on a
circuit different from that to which the receiver
is connected.
– Consult the dealer or an experienced radio/T V
technician for help.
Appendix
Declaration of Conformity with regard to the
RE Directive 2014/53/EU
Declaration of Conformity with regard to the
RoHS Directive 2011/65/EU
Manufacturer:
JVC KENWOOD Corporation
3-12, Moriyacho, Kanagawa-ku, Yokohama-shi,
Kanagawa 221-0022, JAPAN
EU Representative:
JVCKENWOOD Europe B.V.
Amsterdamseweg 37, 1422 AC UITHOORN, THE
NETHERLANDS
English
Hereby, JVC KENWOOD declares that the radio equipment DDXGT700R/
DDXGT500R is in compliance with Directive 2014/53/EU. The full text
of the EU declaration of conformity is available at the following internet
address:
Français
Par la présente, JVC KENWOOD déclare que l’équipement radio
DDXGT700R/ DDXGT500R est conforme à la directive 2014/53/UE.
L’intégralité de la déclaration de conformité UE est disponible à l’adresse
Internet suivante :
Español
Por la presente, JVC KENWOOD declara que el equipo de radio
DDXGT700R/ DDXGT500R cumple la Directiva 2014/53/EU. El texto
completo de la declaración de conformidad con la UE está disponible
en la siguiente dirección de internet:
Português
Deste modo, a JVC KENWOOD declara que o equipamento de rádio
DDXGT700R/ DDXGT500R está em conformidade com a Diretiva
2014/53/UE. O texto integral da declaração de conformidade da UE
está disponível no seguinte endereço de internet:
URL: http://www.kenwood.com/cs/ce/eudoc/
69English
Page 70
For further information
Please check the below special website for further information.
https://19cy.jvckenwood.com
NOTICE TO OWNER
Please retain this booklet and write the serial number of this product for identification
and accurate reporting to your local police in the event of theft.
● How to confirm the serial number of this unit.
1 Press [
2 Touch [
3 Touch [General].
4 Touch [Software Information].
5 Confirm the Serial Number.
Serial Number
] button.
].
Manufacturer Model Name
Premium AVX [DDXGT700R]
Basic AVX [DDXGT500R]
Page 71

ENGLISH
Additional Copyrights
• Apple, iPhone, iPod, iPod touch, iTunes, Apple
Music, and Lightning are trademarks of Apple
Inc., registered in the U.S. and other countries.
• App Store is a service mark of Apple Inc.,
registered in the U.S. and other countries.
• Waze is a trademark of Google LLC.
• IOS is a trademark or registered trademark of
Cisco in the U.S. and other countries and is
used under license.
• SPOTIFY and the Spotify logo are among the
registered trademark of Spotify AB.
• Linux® is the registered trademark of Linus
Torvalds in the U.S. and other countries.
• Wi-Fi® is a registered trademark of Wi-Fi
Alliance®.
INDONESIA
Hak Cipta Tambahan
• Apple, iPhone, iPod, iPod touch, iTunes,
Apple Music, dan Lightning adalah merek
dagang dari Apple Inc., terdaftar di AS dan di
negara lain.
• App Store adalah merek layanan dari Apple
Inc., yang terdaftar di A.S. dan negara lainnya.
• Waze adalah merek dagang dari Google LLC.
• IOS is a trademark or registered trademark of
Cisco in the U.S. and other countries and is
used under license.
• SPOTIFY and the Spotify logo are among the
registered trademark of Spotify AB.
• Linux® is the registered trademark of Linus
Torvalds in the U.S. and other countries.
• Wi-Fi® is a registered trademark of Wi-Fi
Alliance®.
MALAY
Lampiran Hak Cipta Tambahan
• Apple, iPhone, iPod, iPod touch, iTunes, Apple
Music dan Lightning adalah tanda dagangan
Apple Inc., yang didaftarkan di A.S. dan
negara-negara lain.
• App Store ialah tanda perkhidmatan Apple
Inc., didaftarkan di A.S. dan negara lain.
• Waze ialah tanda dagangan Google LLC.
• IOS is a trademark or registered trademark of
Cisco in the U.S. and other countries and is
used under license.
• SPOTIFY and the Spotify logo are among the
registered trademark of Spotify AB.
• Linux® is the registered trademark of Linus
Torvalds in the U.S. and other countries.
• Wi-Fi® is a registered trademark of Wi-Fi
Alliance®.
ภาษาไทย
ลิขสิทธิ์เพิ่มเติม
• Apple, iPhone, iPod, iPod touch, iTunes, Apple
Music และ Lightning เป็ นเครื่องหมายการค้าของ
Apple Inc., ซึ่งจดทะเบียน
ในประเทศสหรัฐอเมริกา และประเทศอื่นๆ
• App Store เป็ นเครื่องหมายบริการของ Apple Inc. ซึ่ง
จดทะเบียนในสหรัฐอเมริกาและในประเทศอื่นๆ
• Waze เป็ นเครื่องหมายการค้าของ Google LLC
• IOS is a trademark or registered trademark of
Cisco in the U.S. and other countries and is used
under license.
• SPOTIFY and the Spotify logo are among the
registered trademark of Spotify AB.
• Linux® is the registered trademark of Linus
Torvalds in the U.S. and other countries.
• Wi-Fi® is a registered trademark of Wi-Fi Alliance®.
TIẾNG VIỆT
Bản Quyền Bổ Sung
• Apple, iPhone, iPod, iPod touch, iTunes,
Apple Music, và Lightning là thương hiệu
của Apple Inc., được đăng ký ở Hoa Kỳ
và các nước khác.
• App Store là nhãn hiệu dịch vụ của Apple
Inc., được đăng ký tại Mỹ và các quốc
gia khác.
• Waze là một nhãn hiệu của Google LLC.
• IOS is a trademark or registered trademark
of Cisco in the U.S. and other countries
and is used under license.
• SPOTIFY and the Spotify logo are among
the registered trademark of Spotify AB.
• Linux® is the registered trademark of
Linus Torvalds in the U.S. and other
countries.
• Wi-Fi® is a registered trademark of Wi-Fi
Alliance®.
中文
著作權聲明
• Apple,iPhone,iPod,iPodtouch,
iTunes,AppleMusic 和 Lightning 是 Apple
Inc. 在美國或其他國家冊的商標。
• AppStore 是AppleInc.在美國及其他國家
或地區註冊的服務商標。
• Waze是GoogleLLC的商標。
• IOSisatrademarkorregisteredtrademarkof
CiscointheU.S.andothercountriesandis
usedunderlicense.
• SPOTIFYandtheSpotifylogoareamong
theregisteredtrademarkofSpotifyAB.
• Linux®istheregisteredtrademarkofLinus
TorvaldsintheU.S.andothercountries.
• Wi-Fi®isaregisteredtrademarkofWi-Fi
Alliance®.
Lightning Apple Music
. .Apple Inc
.
• IOS is a trademark or registered trademark of
Cisco in the U.S. and other countries and is
used under license.
• SPOTIFY and the Spotify logo are among the
registered trademark of Spotify AB.
• Linux® is the registered trademark of Linus
Torvalds in the U.S. and other countries.
• Wi-Fi® is a registered trademark of Wi-Fi
Alliance®.
PORTUGUÊS
Direitos Autorais Adicionais
• Apple, iPhone, iPod, iPod touch, iTunes, Apple
Music e Lightning são marcas registradas da
Apple Inc., registradas nos EUA e em outros
países.
• App Store é uma marca de serviço da Apple
Inc., registrada nos EUA e em outros países.
• Waze é uma marca registrada da Google LLC.
• IOS is a trademark or registered trademark of
Cisco in the U.S. and other countries and is
used under license.
• SPOTIFY and the Spotify logo are among the
registered trademark of Spotify AB.
• Linux® is the registered trademark of Linus
Torvalds in the U.S. and other countries.
• Wi-Fi® is a registered trademark of Wi-Fi
Alliance®.
ESPAÑOL
Derechos de Autor adicionales
• Apple, iPhone, iPod, iPod touch, iTunes, Apple
Music y Lightning son marcas comerciales
de Apple Inc., registradas en los EE. UU. y en
otros países.
• App Store es una marca de servicio de Apple
Inc., registrada(s) en EE UU y en otros países.
• Waze es una marca comercial de Google LLC.
• IOS is a trademark or registered trademark of
Cisco in the U.S. and other countries and is
used under license.
• SPOTIFY and the Spotify logo are among the
registered trademark of Spotify AB.
• Linux® is the registered trademark of Linus
• iTunes iPod touch iPod iPhone Apple
Torvalds in the U.S. and other countries.
• Wi-Fi® is a registered trademark of Wi-Fi
Alliance®.
• Apple Inc. App Store
FRANÇAIS
Droits d’auteurs additionnels
•.Google LLC Waz e
• Apple, iPhone, iPod, iPod touch, iTunes,
Apple Music et Lightning sont des marques
commerciales d’Apple Inc., déposées aux
États-Unis et dans d’autres pays.
• App Store est une marque de service d’Apple
Inc. déposée aux États-Unis et dans d’autres
pays.
• Waze est une marque de Google LLC.
• IOS is a trademark or registered trademark of
Cisco in the U.S. and other countries and is
used under license.
• SPOTIFY and the Spotify logo are among the
registered trademark of Spotify AB.
• Linux® is the registered trademark of Linus
Torvalds in the U.S. and other countries.
• Wi-Fi® is a registered trademark of Wi-Fi
Alliance®.
Premium AVX/Basic AVX
 Loading...