

Toyota AVALON 2009 Owners Manual

BASIC FUNCTIONS
SECTION 1
BASIC FUNCTIONS
Descriptions of basic operations in frequent use
D Your navigation system 16. . . . . . . . . . . . . . . . . . . . . . . . . . . . . . . . .
D Inputting letters and numbers 17. . . . . . . . . . . . . . . . . . . . . . . . . . . .
D How to move the cursor 18. . . . . . . . . . . . . . . . . . . . . . . . . . . . . . . . .
D Destination input 18. . . . . . . . . . . . . . . . . . . . . . . . . . . . . . . . . . . . . .
Explains 12 ways to input your destination
D Entering destination 39. . . . . . . . . . . . . . . . . . . . . . . . . . . . . . . . . . . .
D Route guidance screen 41. . . . . . . . . . . . . . . . . . . . . . . . . . . . . . . . .
D Guidance screen 43. . . . . . . . . . . . . . . . . . . . . . . . . . . . . . . . . . . . . . .
D Map appearance 43. . . . . . . . . . . . . . . . . . . . . . . . . . . . . . . . . . . . . . .
D Current position display 45. . . . . . . . . . . . . . . . . . . . . . . . . . . . . . . . .
D Voice guidance 46. . . . . . . . . . . . . . . . . . . . . . . . . . . . . . . . . . . . . . . .
D Typical voice guidance prompts 47. . . . . . . . . . . . . . . . . . . . . . . . . .
D Registration of your home 49. . . . . . . . . . . . . . . . . . . . . . . . . . . . . . .
D Detour setting 50. . . . . . . . . . . . . . . . . . . . . . . . . . . . . . . . . . . . . . . . . .
D Displaying points of interest 51. . . . . . . . . . . . . . . . . . . . . . . . . . . . .
D Turn list 54. . . . . . . . . . . . . . . . . . . . . . . . . . . . . . . . . . . . . . . . . . . . . . .
D Map scale 56. . . . . . . . . . . . . . . . . . . . . . . . . . . . . . . . . . . . . . . . . . . . .
D Screen scrolling 56. . . . . . . . . . . . . . . . . . . . . . . . . . . . . . . . . . . . . . . .
D Orientation of the map 57. . . . . . . . . . . . . . . . . . . . . . . . . . . . . . . . . .
D Limitations of the navigation system 58. . . . . . . . . . . . . . . . . . . . . .
D Map database information and updates 61. . . . . . . . . . . . . . . . . . .
15
BASIC FUNCTIONS
Your navigation system
Vehicles with smart key system—
Your navigation system can be operated by the navigation controller when
the “ENGINE START STOP” switch is
set at ACCESSORY or IGNITION ON
mode.
Vehicles without smart key system—
Your navigation system can be operated by the navigation controller when
the engine switch is set at “ACC” or
“ON” position.
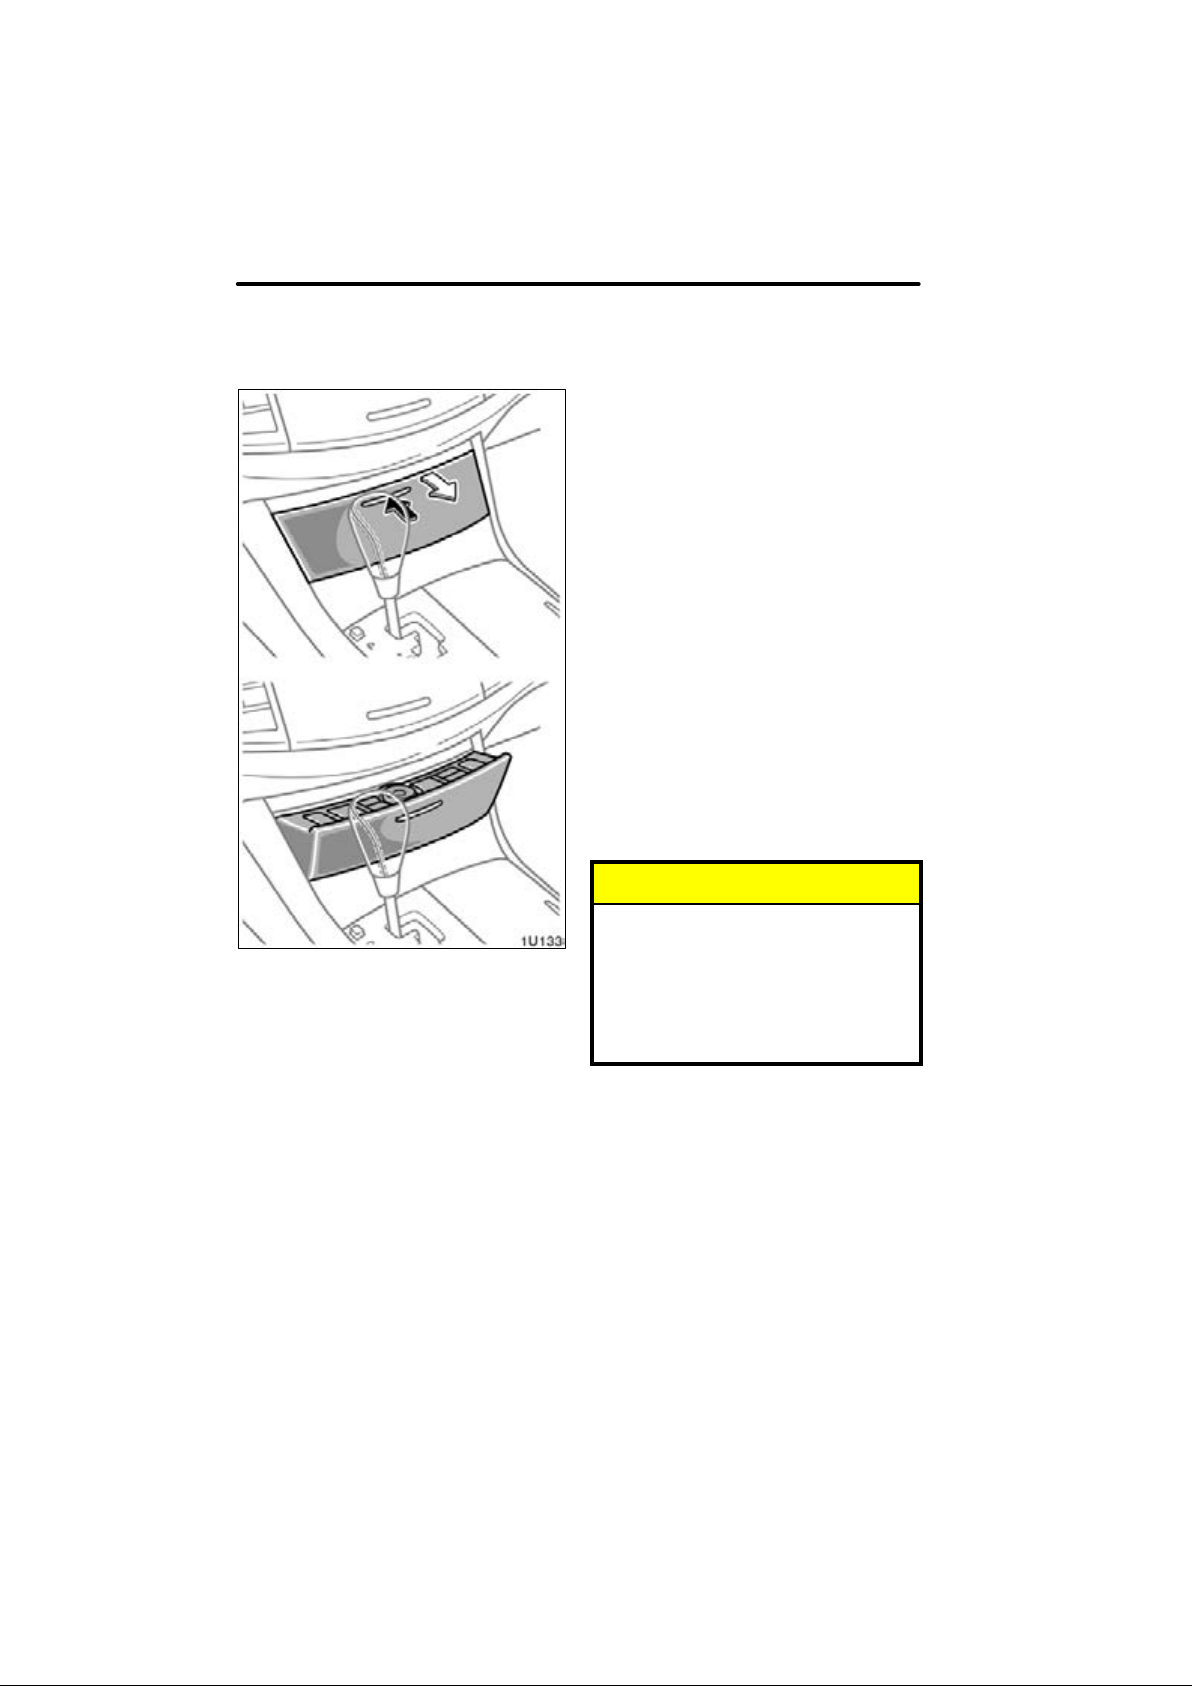
To access the navigation controller—
Push the lid to open.
To turn on the navigation display—
Push the
“MAP/VOICE”, “MENU”,
“DEST” or “INFO” button.
To turn off the navigation display—
Push the
“DISP” button and select the
“SCREEN OFF”.
For details, see “Controller and buttons” on
page 14.
16
NOTICE
D To prevent the battery from being
discharged, do not leave the navigation system on longer than necessary when the engine is not running.
D Do not place heavy objects on the
controller.
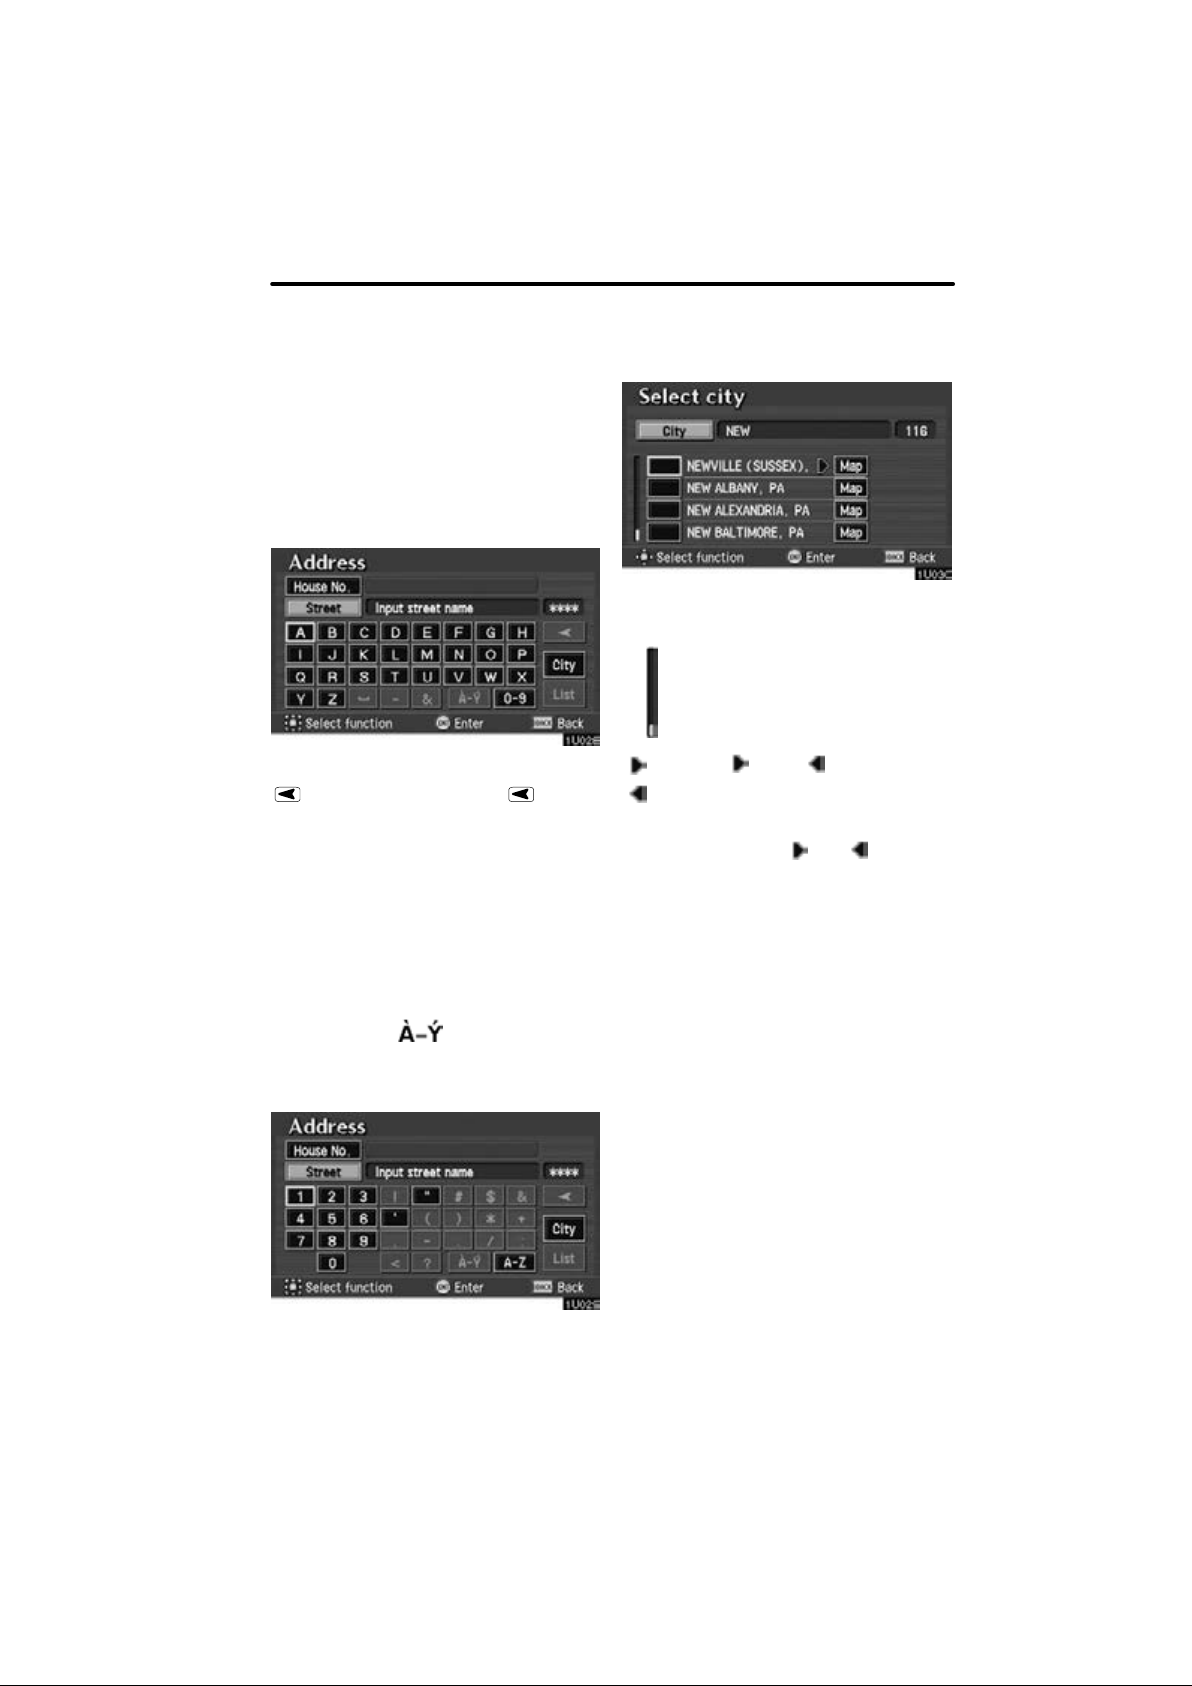
Inputting letters and
numbers—
To input letters and/or numbers, move
the select and scroll lever to the 8 directions, and when the letter or number
you wish to input is lit up, push the
“ENTER” button. A beep sound is
heard, and the letter or number is input.
Repeat this procedure to input the
name or number, etc.
BASIC FUNCTIONS
When a list is displayed, you can scroll the
list by using the select and scroll lever.
This expresses a displayed
screen position.
If you type a wrong letter, delete it with the
switch. Selecting the switch
erases one letter.
Selecting the
screen, the screen will be changed to display the database items that match the
name or address that you have entered on
the screen. The number of matching items
is shown to the right side of the screen. If
the matching items are more than 9,999,
the system displays “::::” on the
screen.
Selecting the
the diacritics input screen, the
switch to display the numeral input
screen.
Selecting the “A−Z” switch changes the
screen back to the alphabet input screen.
“List” switch on the
“ ” switch to display
“0−9”
If a or a appears to
the right or left of the item
name, the complete name
is too long for the display.
Select the or switch,
and the name will scroll to
the end or beginning of its
name.
17
BASIC FUNCTIONS
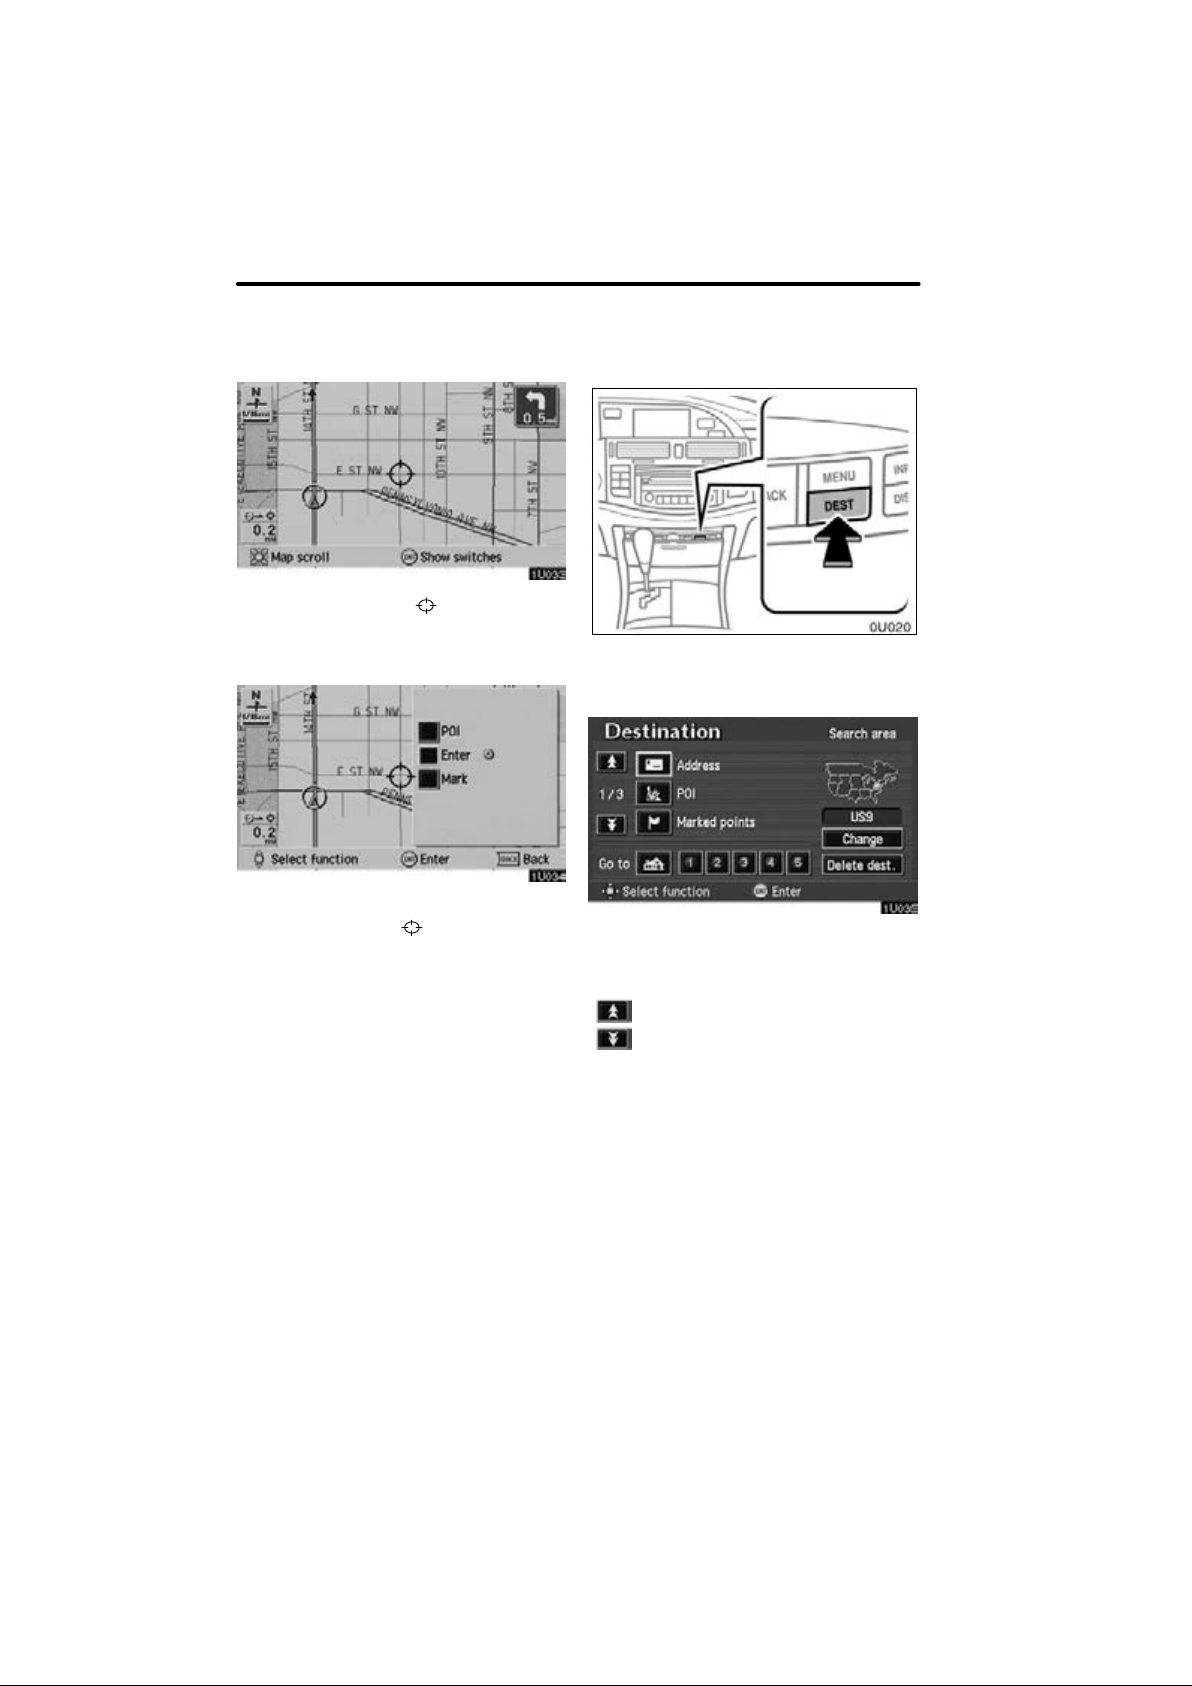
How to move the cursor
Destination input
1. Move the cursor to the desired
point by operating the select and scroll
lever. When you release the lever,
scrolling stops.
Push the “DEST” button on the navigation controller and the “Destination”
screen appears.
2. In case of making the position indicated by the cursor
a destination, push
of the navigation controller and select
your desired switch on the switch menu
on the right of the screen.
on the display as
“ENTER” button
18
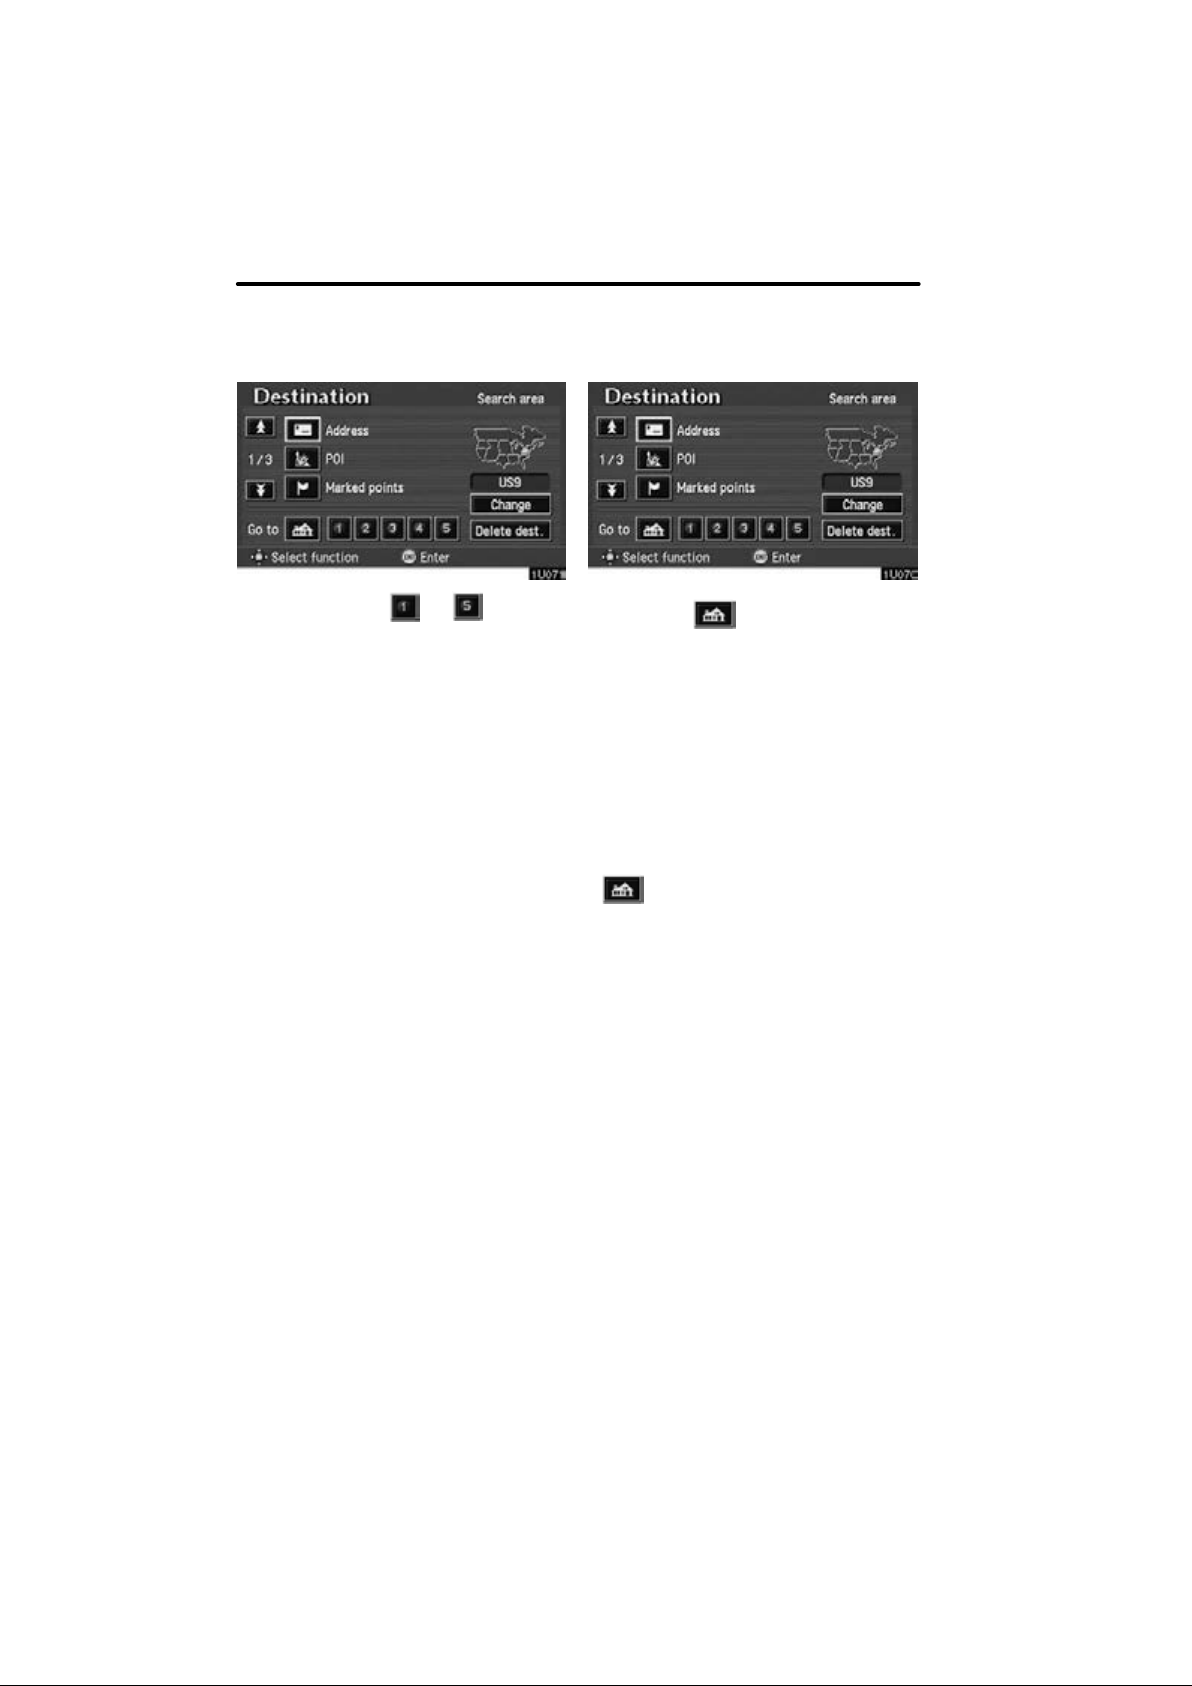
The destination screen allows you to select the country to be searched for your
destination.
To shift to the next or previous
page.
Select the “Change” switch on the
screen to display a map of the United
States divided into 10 regions and a
part of Canada.

Select an area by the select and scroll lever to select the search area and the destination screen returns.
Once you choose the region of the country
to search, you can use one of 12 different
methods to enter your destination.
BASIC FUNCTIONS
United States of America
Idaho
Oregon
US1
Washington
California
US2
Nevada
Arizona
Colorado
Montana
US3
New Mexico
Utah
Wyoming
Iowa
Kansas
Minnesota
Missouri
US4
Nebraska
North Dakota
South Dakota
Oklahoma
US5
Texas
Illinois
Indiana
Kentucky
US6
Michigan
Ohio
Wisconsin
19

BASIC FUNCTIONS
Alabama
Arkansas
Louisiana
US7
Mississippi
Tennessee
Connecticut
Maine
Massachusetts
New Hampshire
US8
New Jersey
New York
Rhode Island
Vermont
Delaware
Maryland
Pennsylvania
US9
Virginia
Washington, DC
West Virginia
Florida
Georgia
US10
North Carolina
South Carolina
CANADA
Alberta
British Columbia
Manitoba
New Brunswick
Newfoundland and Labrador
Nova Scotia
CAN
Ontario
Prince Edward Island
Québec
Saskatchewan
Yukon Territory
You can find your destination using various
methods. See pages 22 through 38 for the
detailed steps.
1. By “Address”: You can input the
house number and the street address by
using the input keys. See page 22 for the
detailed steps.
2. By “POI” (Point of Interest): You can
select one of the many points of interest
that have been already stored in the system’s database. There are 54 categories
to choose from including restaurants, hotels and so on. See page 26 for the detailed
steps.
3. By “Marked points”: You can select
your own favorite destinations as “Marked
points”. The system allows you to store up
100 marked points. See page 32 for the
detailed steps.
4. By “Previous destination”: You can
select a destination from any of the last 20
previously set destinations. See page 33
for the detailed steps.
20
5. By “Emergency”: You can select one
of the three points of emergency service
points that have been already stored in the
system’s database. See page 33 for the
detailed steps.
6. By “Phone #”: You can enter a destination by the telephone number. See
page 34 for the detailed steps.
7. By “Intersection”: You can enter the
names of two intersecting streets. This is
helpful if you do not know the specific
street address of your destination but
know the general vicinity. See page 35 for
the detailed steps.
8. By “Freeway Ent./Exit”: You can enter the name of the freeway (interstate) entrance or exit. See page 36 for the detailed
steps.
9. By “Previous starting point”: You
can enter a point where the system has
started to guide last time. See page 37 for
the detailed steps.
10. By Map Selection: You can select a
destination simply by selecting the location
on the displayed map. See page 37 for the
detailed steps.
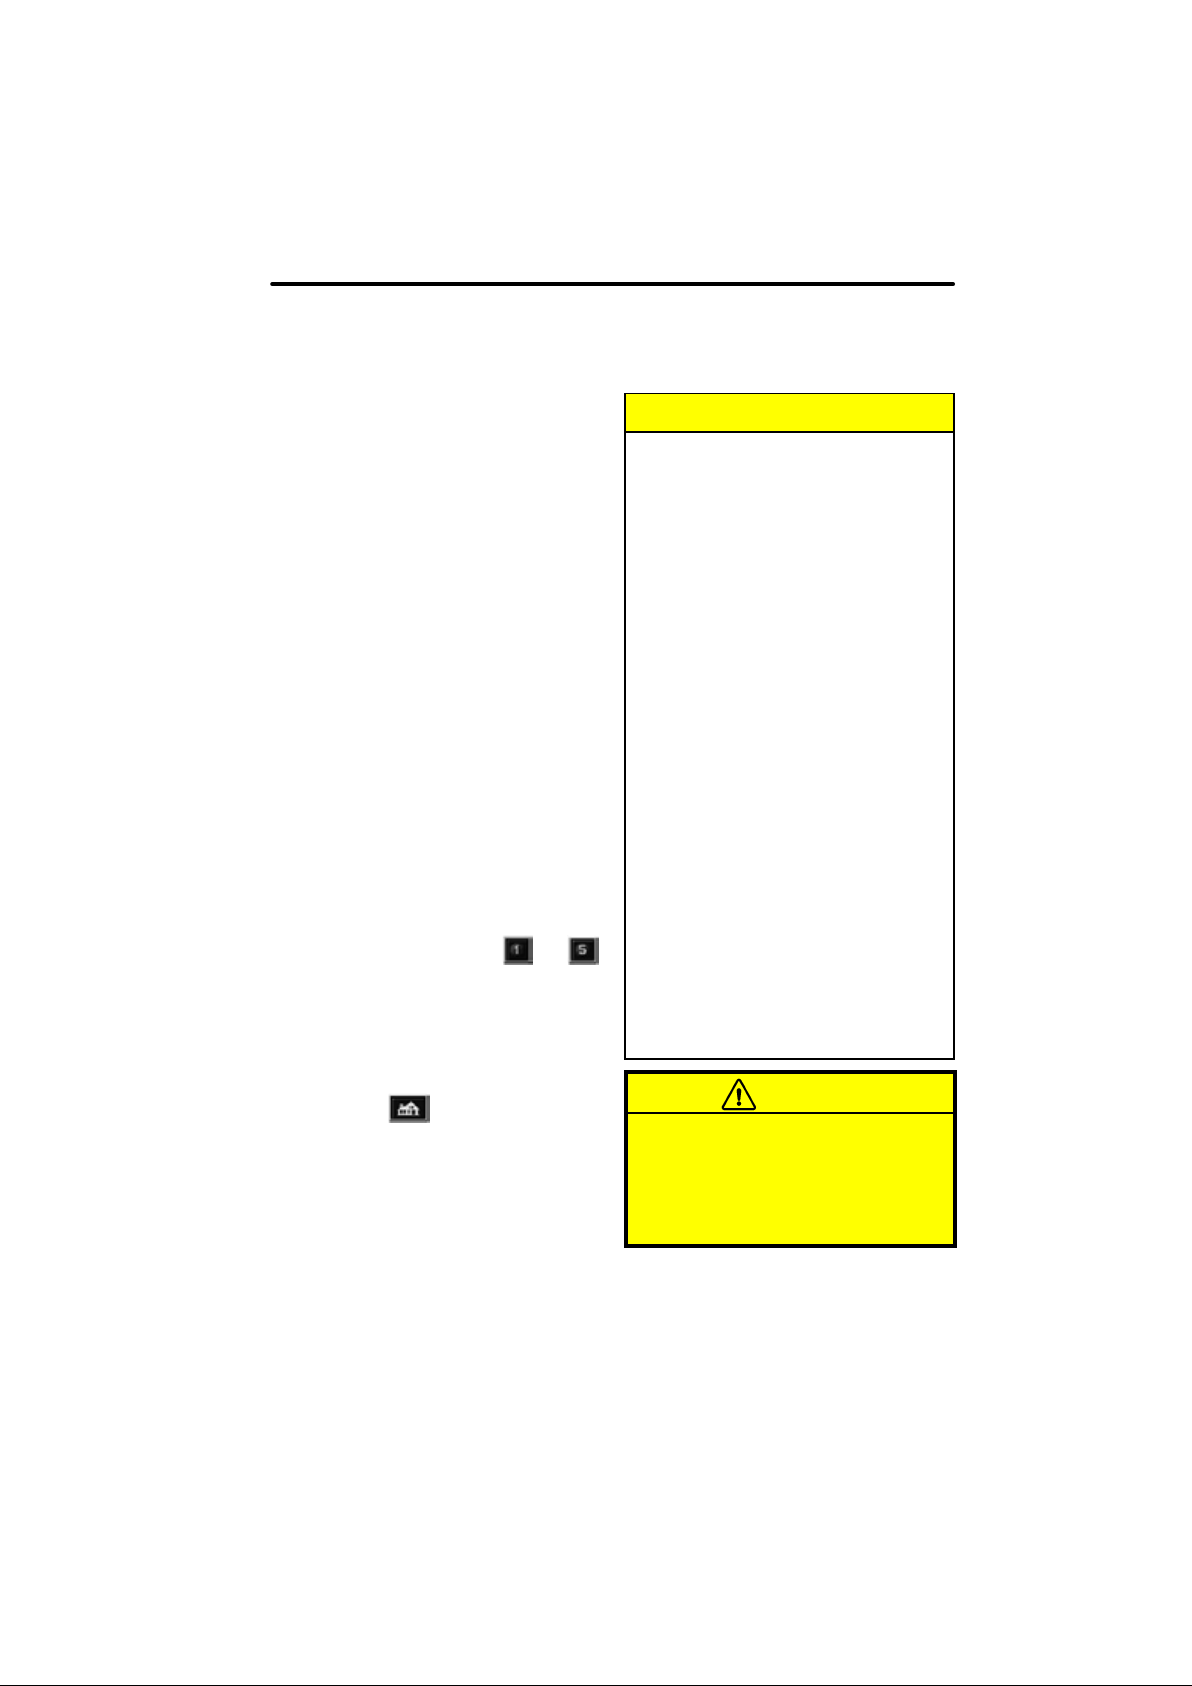
11. By Preset Destination (
switches on the “Destination” screen):
You can choose the destination by selecting one of the preset destination switch. In
this case, it is necessary to register your
desired destination beforehand. See page
38 for the detailed steps.
12.By Home (
tination” screen): You can select your
own home without entering the address
each time. In this case, it is necessary to
register your home beforehand. See page
38 for the detailed steps.
switch on the “Des-
—
BASIC FUNCTIONS
INFORMATION
D When inputting the destination,
the response to the switch may be
slow.
D “Points of interest” registration is
made based on the NAVTEQ
“Standard POI Inclusion List” and
infoUSA POI data.
D If there is no point registered,
switches such as “Marked points”,
“Home”, “Previous destination” or
“Previous starting point” are
dimmed and not available.
D The route for returning may not be
the same as that for going.
D The route guidance to the destina-
tion may not be the shortest route
or a route without traffic congestion.
D Route guidance may not be avail-
able if there is no road data for the
specified location.
D When setting the destination, you
should use the map on a scale of
one half mile or smaller.
D To select an “Address”, “POI”,
“Freeway Ent./Exit” or “Intersection” in a di fferent region, a search
area’s change is necessary.
CAUTION
While you are driving, be sure to follow traffic regulations and keep the
road condition in mind. If a traffic
sign on the road has been changed,
the route guidance may provide
wrong information.
21
BASIC FUNCTIONS
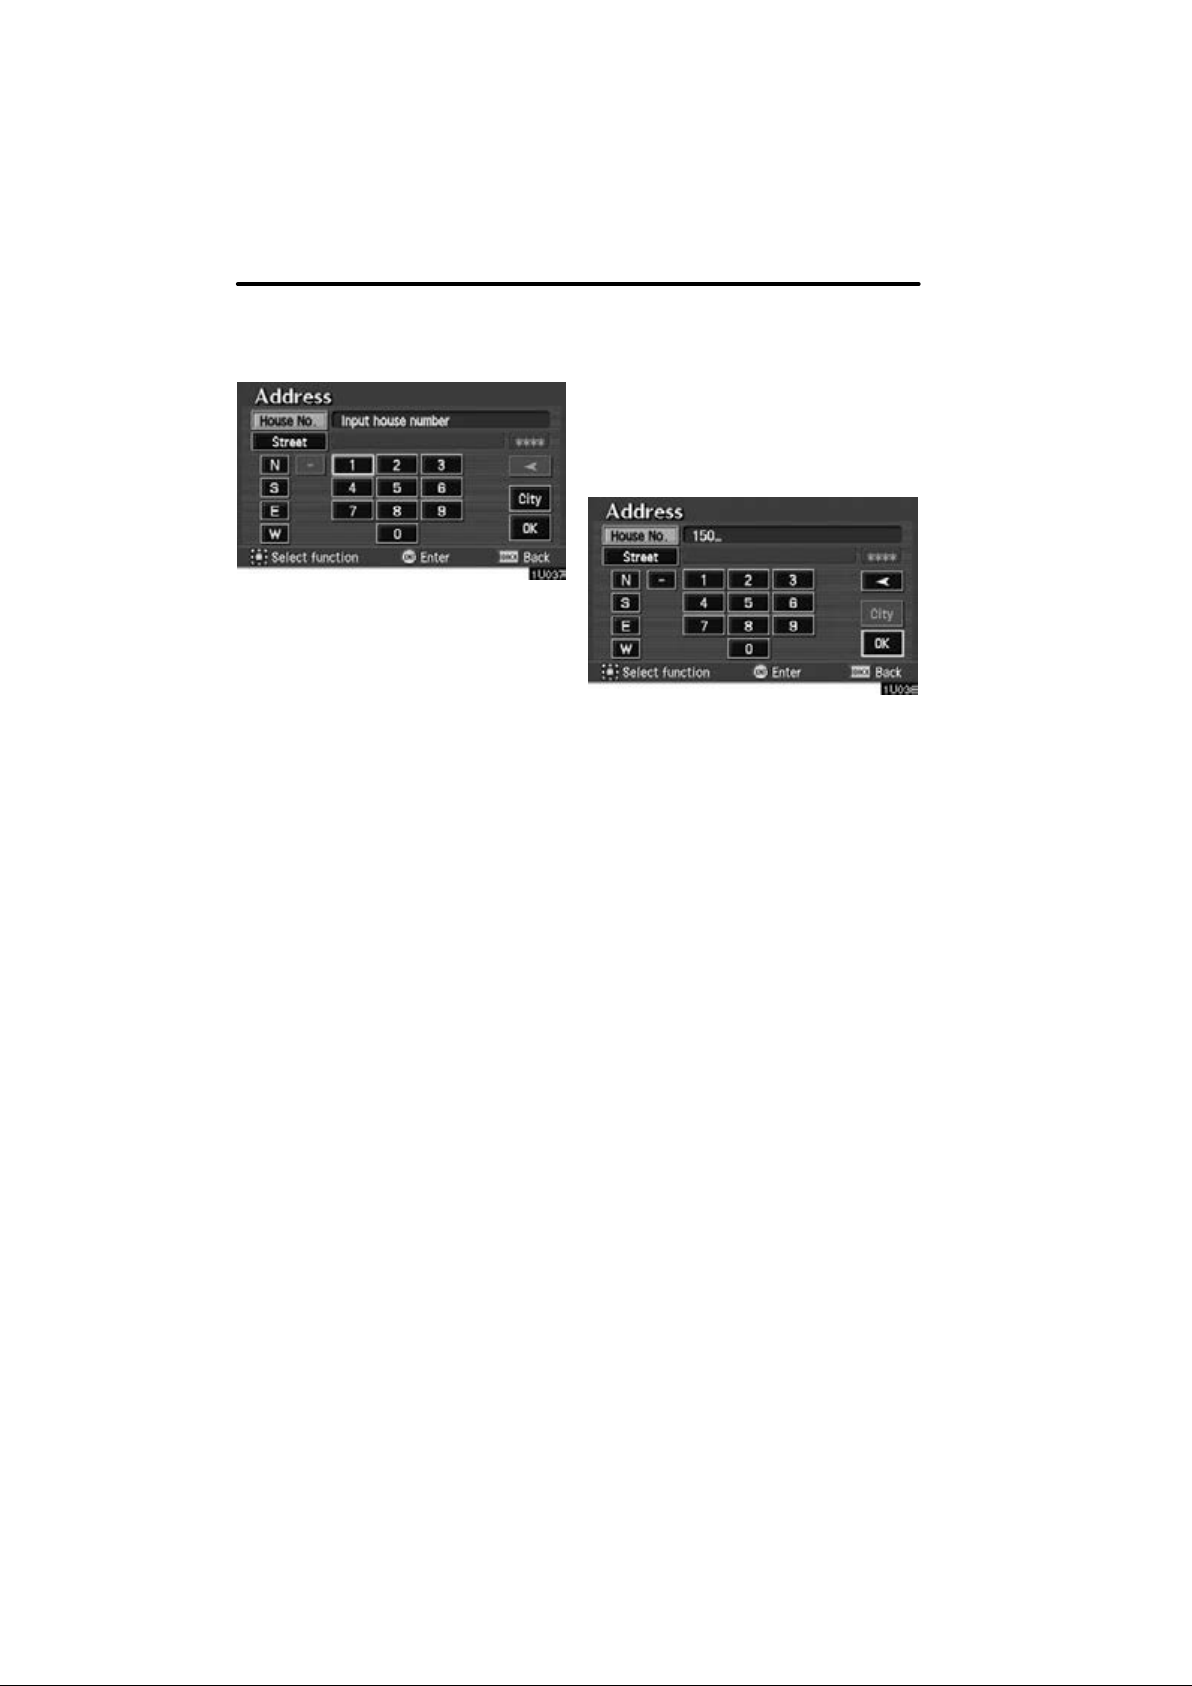
Destination input by
ADDRESS
There are 2 ways to input a destination
by address.
(a) Inputting a street name
Select the
“Destination” screen. The “Address”
screen appears, and then you can input
a house number.
After inputting a house number, select the
“Address” switch on the
“OK” switch which you can input a street
name.
It is possible to input a street name first.
Select the
to display the screen which you can input
a street name.
“Street” switch on the display
22
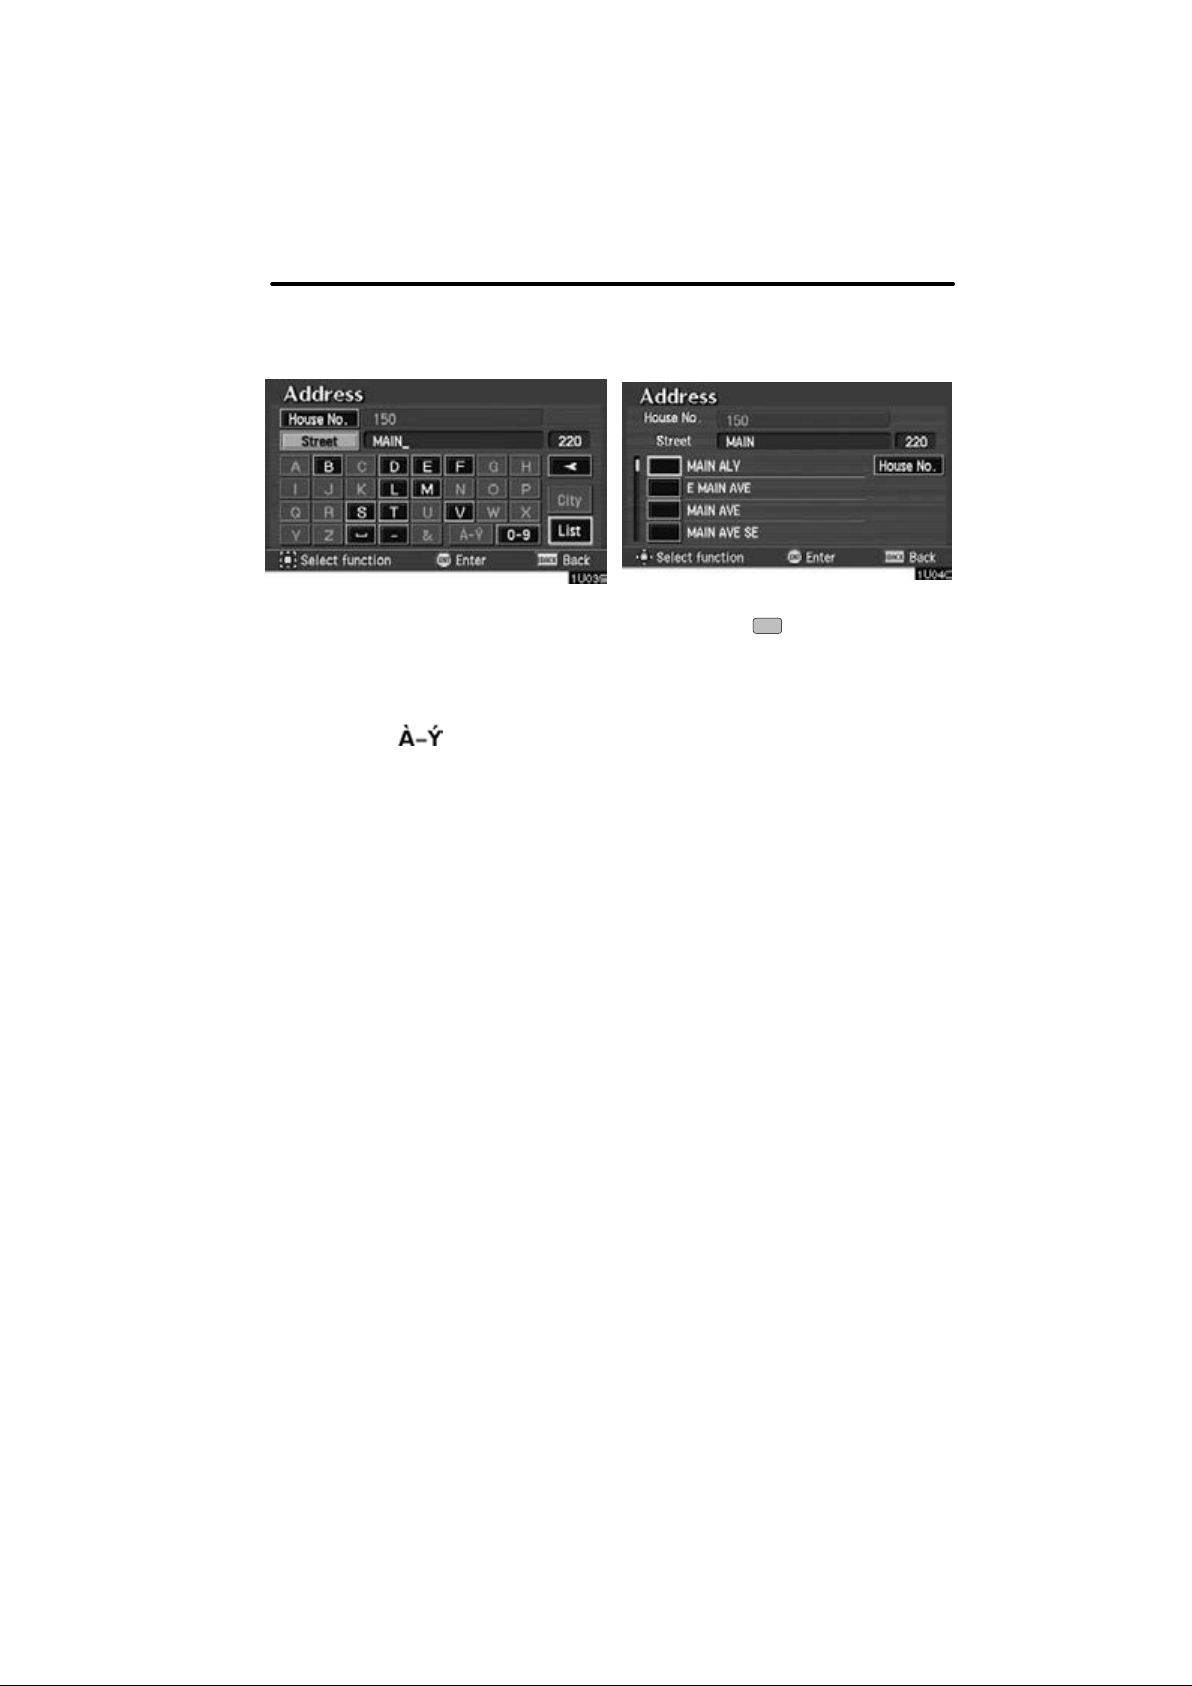
BASIC FUNCTIONS
After each letter is inputted, the system
searches the database for street names
that match. Alphabet keys are dimmed if
the database does not have a match for
the next letter in the remaining list of
matching street names.
Selecting the
the diacritics input screen, the
switch to display the numeral input
screen.
Based on your input, the number of matching sites appears at the top right of the
screen. After the number decreases to
some extent, select the
display the street selection list. If the number of matches decreases to 4 or less, the
screen changes automatically to the
selection list.
“ ” switch to display
“0−9”
“List” switch to
When you find your desired street
name, select
screen changes and displays the map
location of the selected destination and
the route preference. (See “Entering
destination” on page 39.)
If the same street exists in more than one
city, the current screen changes to the “Select city” screen. Select or enter your desired city.
of the item. The
23

BASIC FUNCTIONS
If you input a street name first, the screen
changes. You can then input a house number.
If the above screen appears, you can select an address range on that screen.
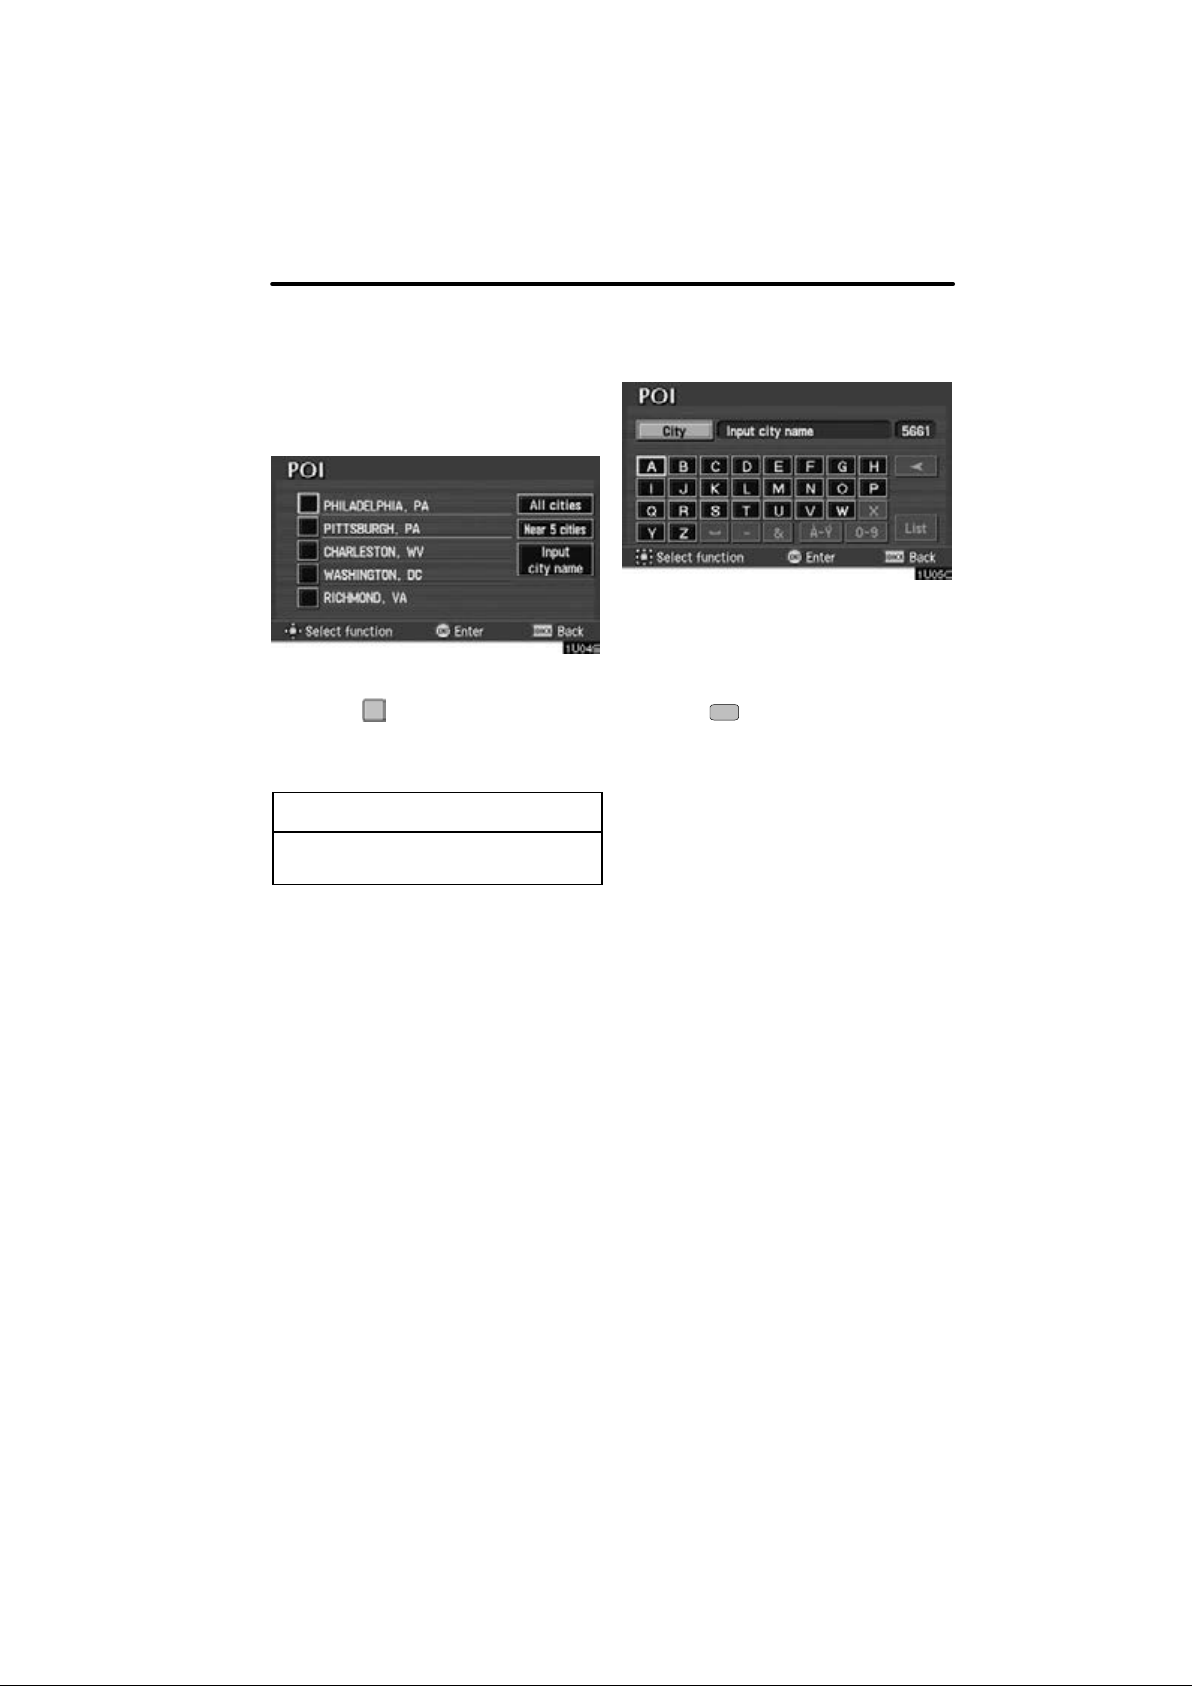
(b) Inputting a city name
The screen for selecting the last 5 towns
appears if you select the
the “Address” screen on page 22.
5 cities are displayed on the screen.
Select the
The current screen changes to the
screen which is for inputting a street
name.
of the desired city name.
“City” switch on
INFORMATION
Under the initial condition, town
name will not be displayed.
“All cities”: All cities are selected.
“Near 5 cities”: 5 near cities are dis-
played. Selecting a city in the list changes
to the display to input a street name.
“Input city name”: The screen for inputting a city name appears.
24
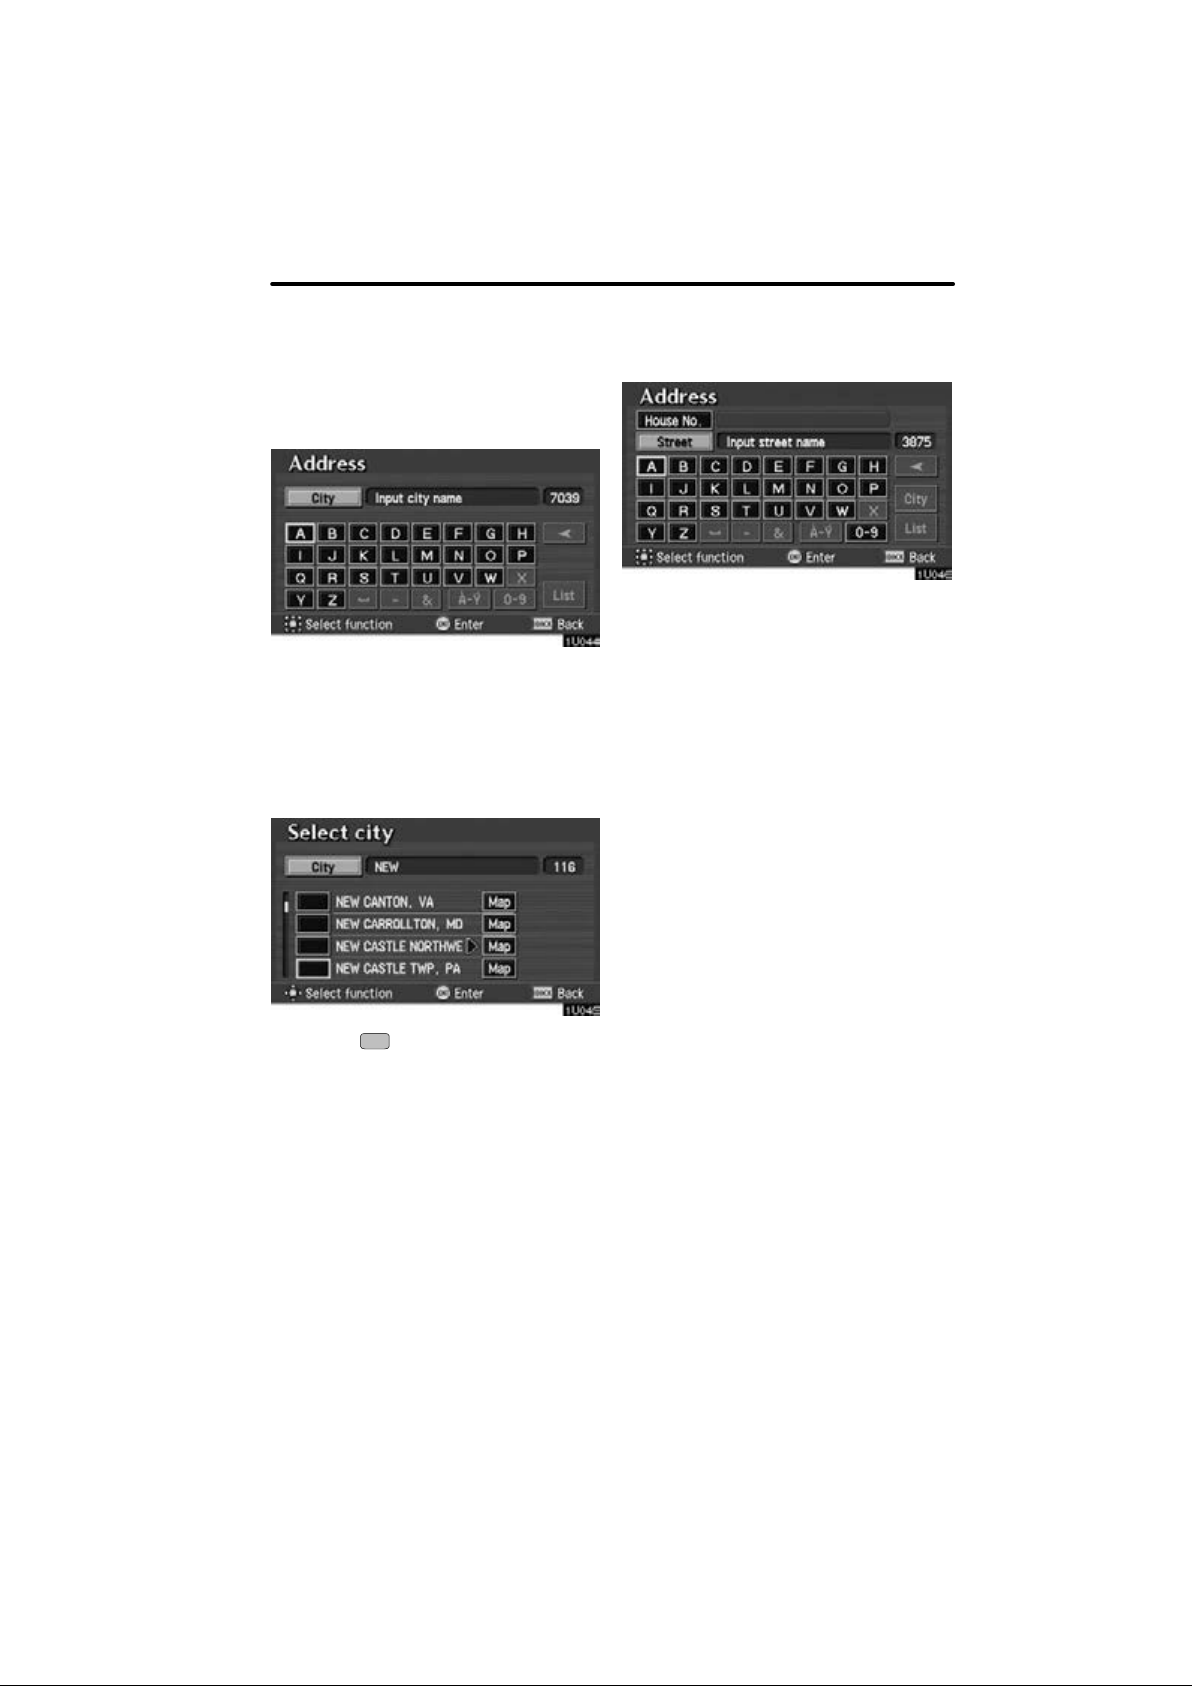
BASIC FUNCTIONS
The screen for inputting a city name appears if you select the
name”
Input a city name.
After the number decreases to some
extent, select the
play the city selection list. If the number
of matches decreases to 4 or less, the
screen changes automatically to the
selection list.
switch on the “Address” screen.
“List” switch to dis-
“Input city
Input a street name. (See “(a) Inputting
a street name” on page 22.)
The screen changes and displays the
map location of the selected destination and the route preference. (See “Entering destination” on page 39.)
Select the of the desired city name.
“Map”: If you select this switch, the screen
changes and displays the map location of
the selected city and the route preference.
(See “Entering destination” on page 39.)
The current screen changes to the
screen which is for inputting a street
name.
25
BASIC FUNCTIONS
Destination input by
POI (Point of Interest)
There are 3 ways to select a point of interest (POI) location.
(a) Input the name of the point of inter-
est directly.
(b) Inputting a city name first.
(c) Selecting from the points of inter-
est categories.
It will not take a long time for you to find
your destination if you use a combination of the searching ways of (a), (b) and
(c).
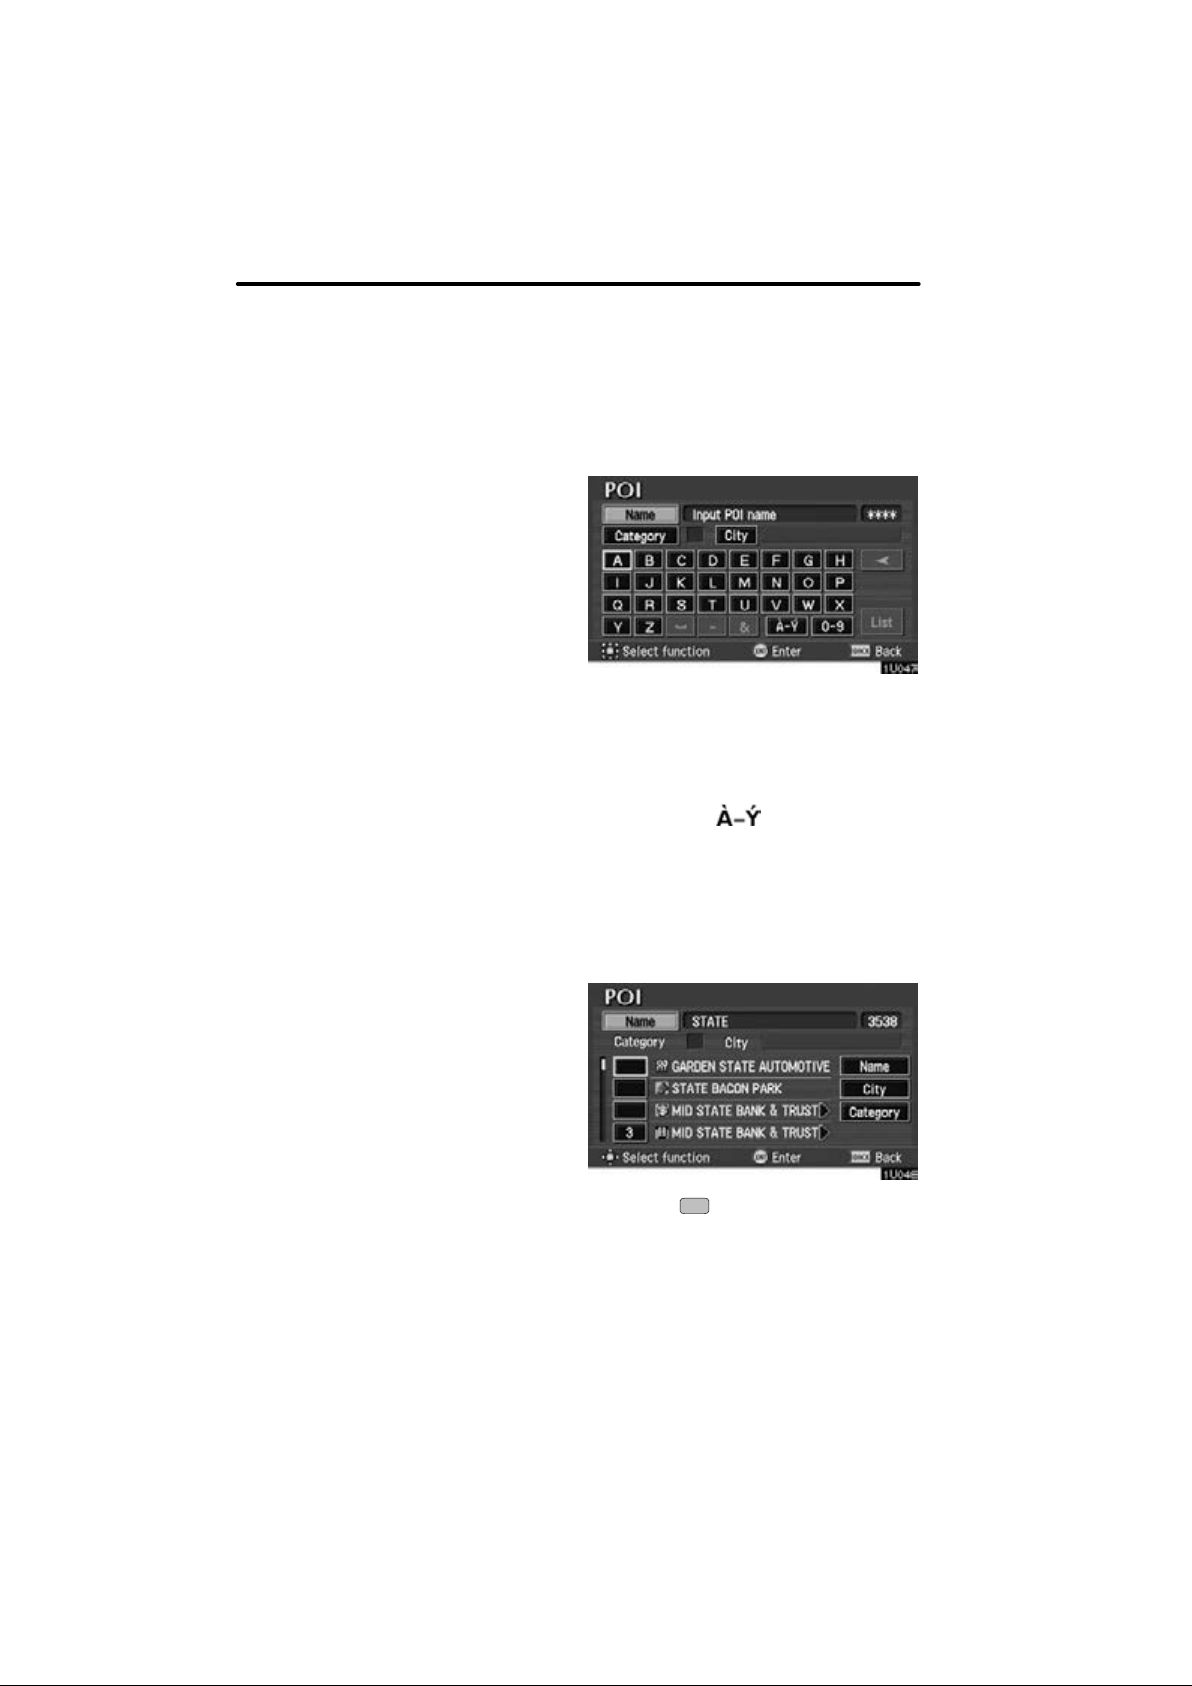
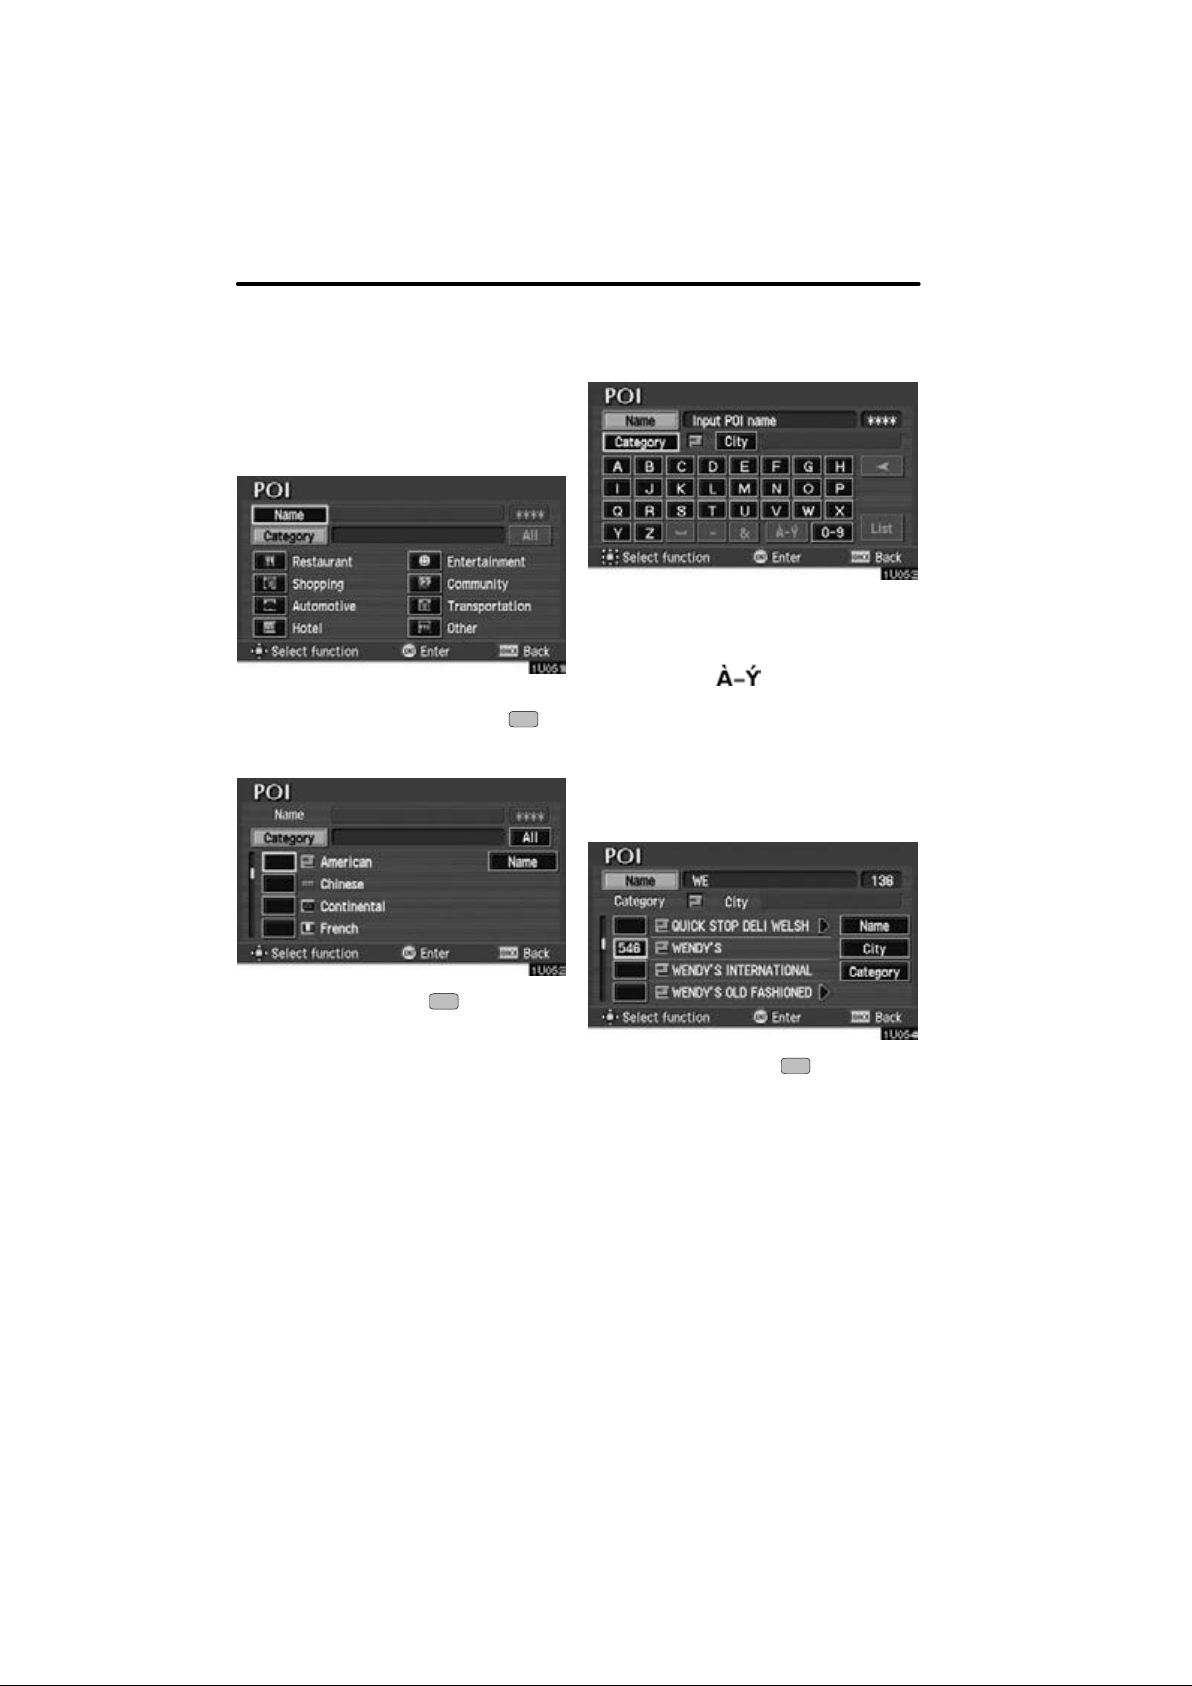
(a) Inputting the name of the point of
interest directly
Select the
switch on the “Destination” screen.
The “POI” (Point of Interest) screen appears, and then you can input the name of
the point of interest.
Select letters on the screen to input a
name.
Selecting the
the diacritics input screen, the
switch to display the numeral input
screen.
If the number of sites becomes 4 or less,
or if you select the
bottom right of the screen, the screen
changes and displays a list of sites.
“POI” (Point of Interest)
“ ” switch to display
“0−9”
“List” switch at the
Select the of your desired destination.
You can search it more easily with the
“City” and “Category” switches.
(See “(b) Inputting a city name” on page 27
and “(c) Selection from the point of interest
categories” on page 28.)
26
(b) Inputting a city name
Select the
(Point of Interest) screen.
5 cities are displayed on the screen.
Select the
The current screen changes to the
screen which is for inputting a name of
point of interest.
“City” switch on the “POI”
of the desired city name.
INFORMATION
Under the initial condition, town
name will not be displayed.
BASIC FUNCTIONS
Input a city name.
If the number of sites becomes 4 or less,
or if you select the
bottom right of the screen, the screen
changes and displays the selection list.
Select the
After entering the city name, input the
name of the point of interest.
“List” switch at the
of the desired city name.
“All cities”: All cities are selected.
“Near 5 cities”: 5 near cities are dis-
played. Selecting a city in the list changes
to the display to input a name of the point
of interest.
“Input city name”: The screen for inputting a city name appears.
27
BASIC FUNCTIONS
(c) Selection from the point of interest
categories
Select the
“POI” (Point of Interest) screen.
The categories are shown on the
screen. When you select the
your desired category, more detailed
categories are shown.
“Category” switch on the
of
Once you have selected a category, select
letters directly on the screen to input a
name.
Selecting the
the diacritcs input screen, the
switch to display the numeral input
screen.
If the number of sites becomes 4 or less,
or if you select the
bottom right of the screen, the screen
changes and displays a list of sites.
“ ” switch to display
“0−9”
“List” switch at the
When you select the of your desired category , th e screen changes and
displays the previous screen.
“All” categories: You can select the point
of interest by the name in all categories.
28
When you select the of your desired item, the screen changes and displays the map location of the selected
destination and the route preference.
(See “Entering destination” on page
39.)

BASIC FUNCTIONS
In case of having some POIs of the same
name, this screen appears.
“Name sort”: Select this switch to list the
categories in alphabetical order.
“Dist. sort”: Select this switch to list the
categories in order of nearest place from
your current location.
INFORMATION
The information on the desired point
of interest can be displayed on the
map screen.
Select the “Info.” switch to display the
selected destination name, address and
telephone number.
29
BASIC FUNCTIONS
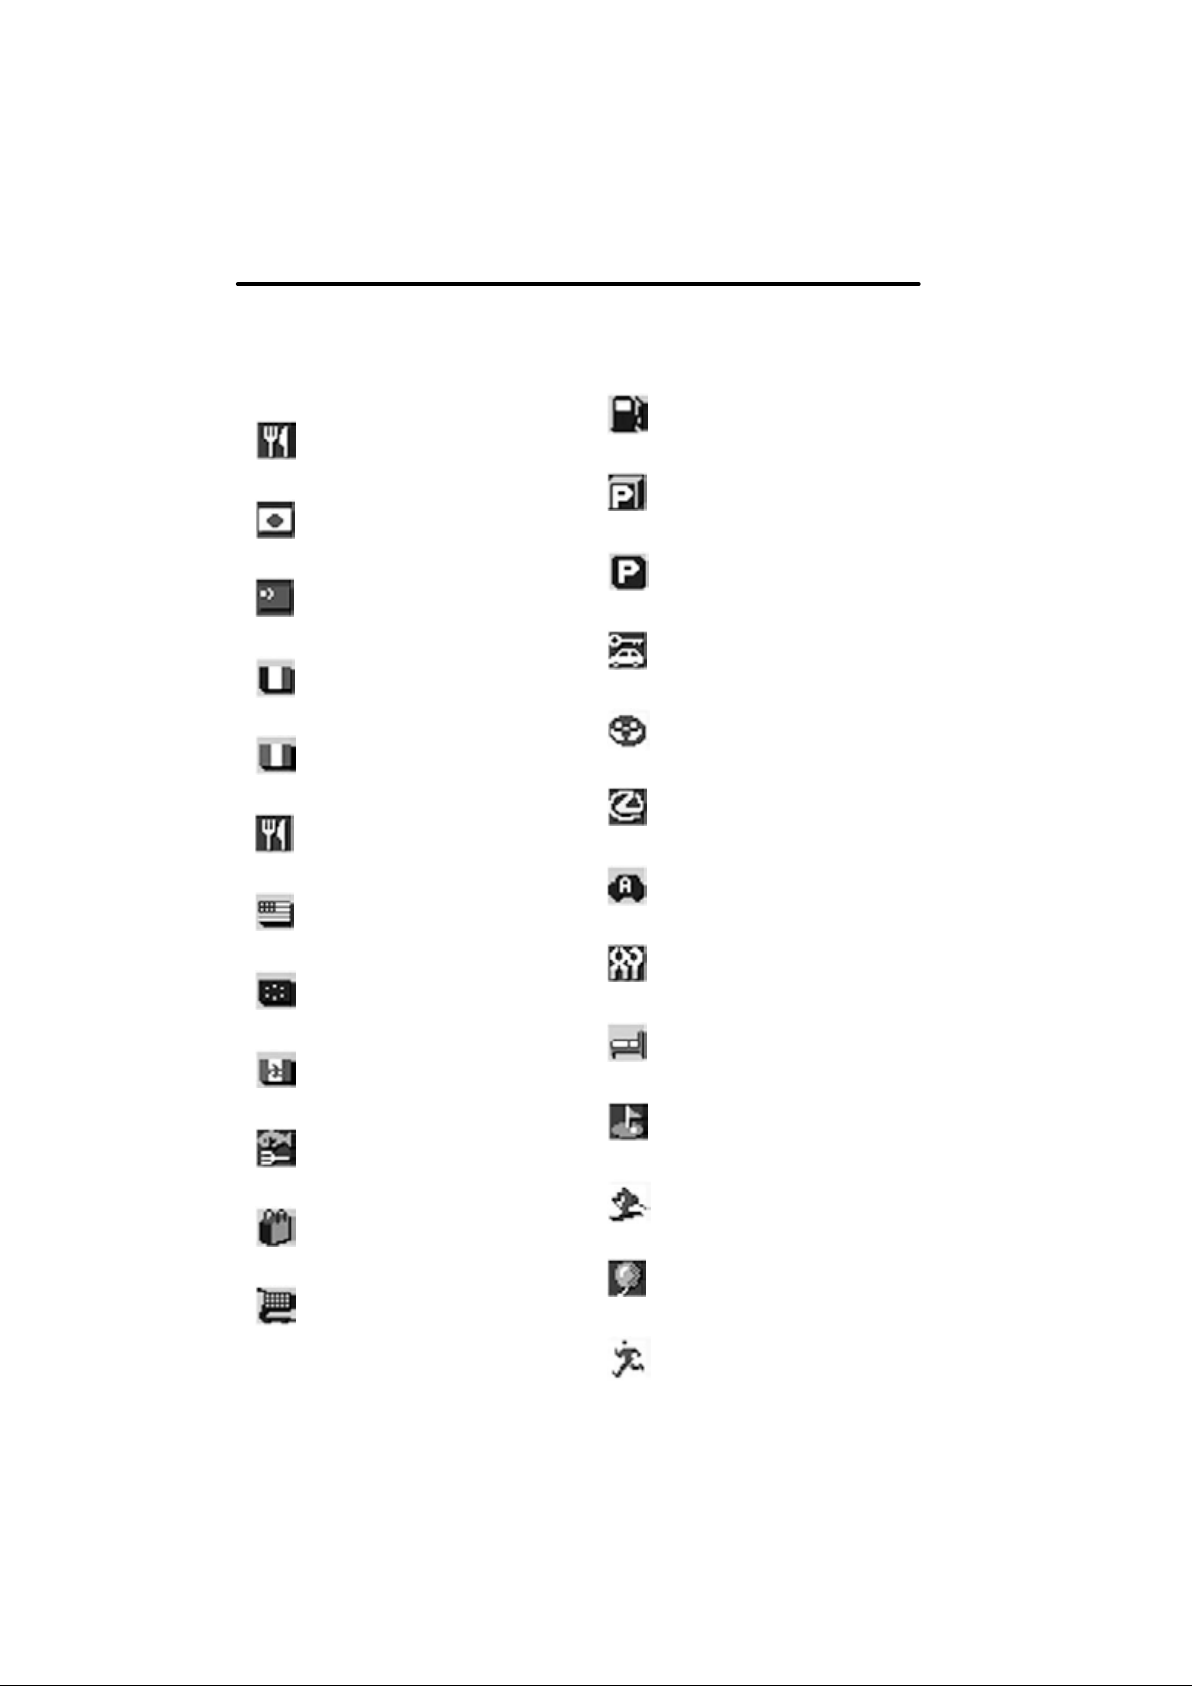
List of points of interest
RESTAURANT
JAPANESE
CHINESE
FRENCH
ITALIAN
OTHER
GAS STATION
PARKING GARAGE/
HOUSE
PAR KING LO T
RENTAL CAR AGENCY
TOYOTA DEALERSHIPS
LEXUS DEALERSHIPS
30
AMERICAN
CONTINENTAL
MEXICAN
SEAFOOD
SHOPPING
GROCERY STORE
AUTOMOBILE CLUB
AUTO SERVICE &
MAINTENANCE
HOTEL
GOLF COURSE
SKI RESORT
AMUSEMENT PARK
SPORTS COMPLEX
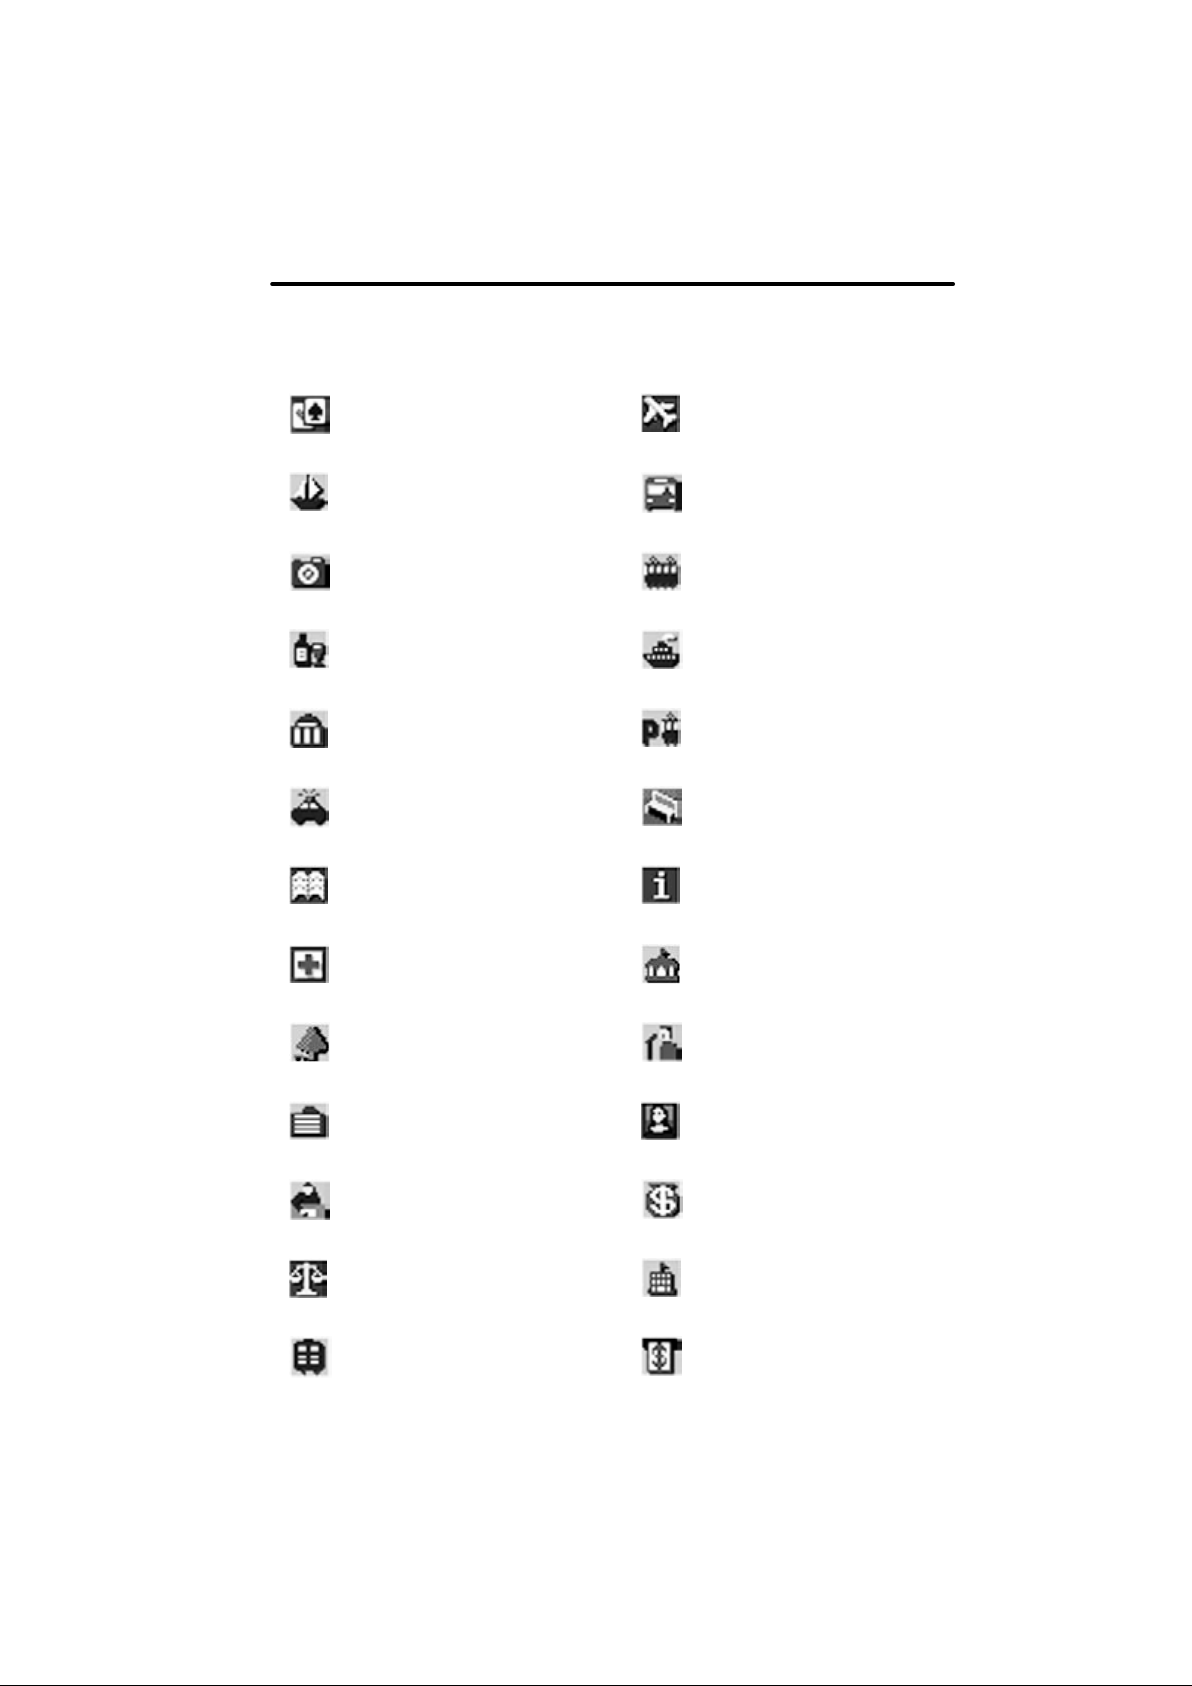
BASIC FUNCTIONS
CASINO
MARINA
TOURIST ATTRACTION
WINERY
CITY HALL
POLICE STATION
LIBRARY
HOSPITAL
AIRPORT
BUS STATION
COMMUTER RAIL STATION
FERRY TERMINAL
PARK & RIDE
REST AREA
TOURIST INFORMATION
HISTORICAL MONUMENT
PARK/RECREATION
CIVIC/COMMUNITY CENTER
CONVENTION/EXHIBITION CENTER
COURT HOUSE
TRAIN STATION
PERFORMING ARTS
MUSEUM
BANK
SCHOOL
ATM
31
BASIC FUNCTIONS
Destination input by
HIGHER EDUCATION
BUSINESS FACILITY
CITY CENTER/NAMED
PLACE
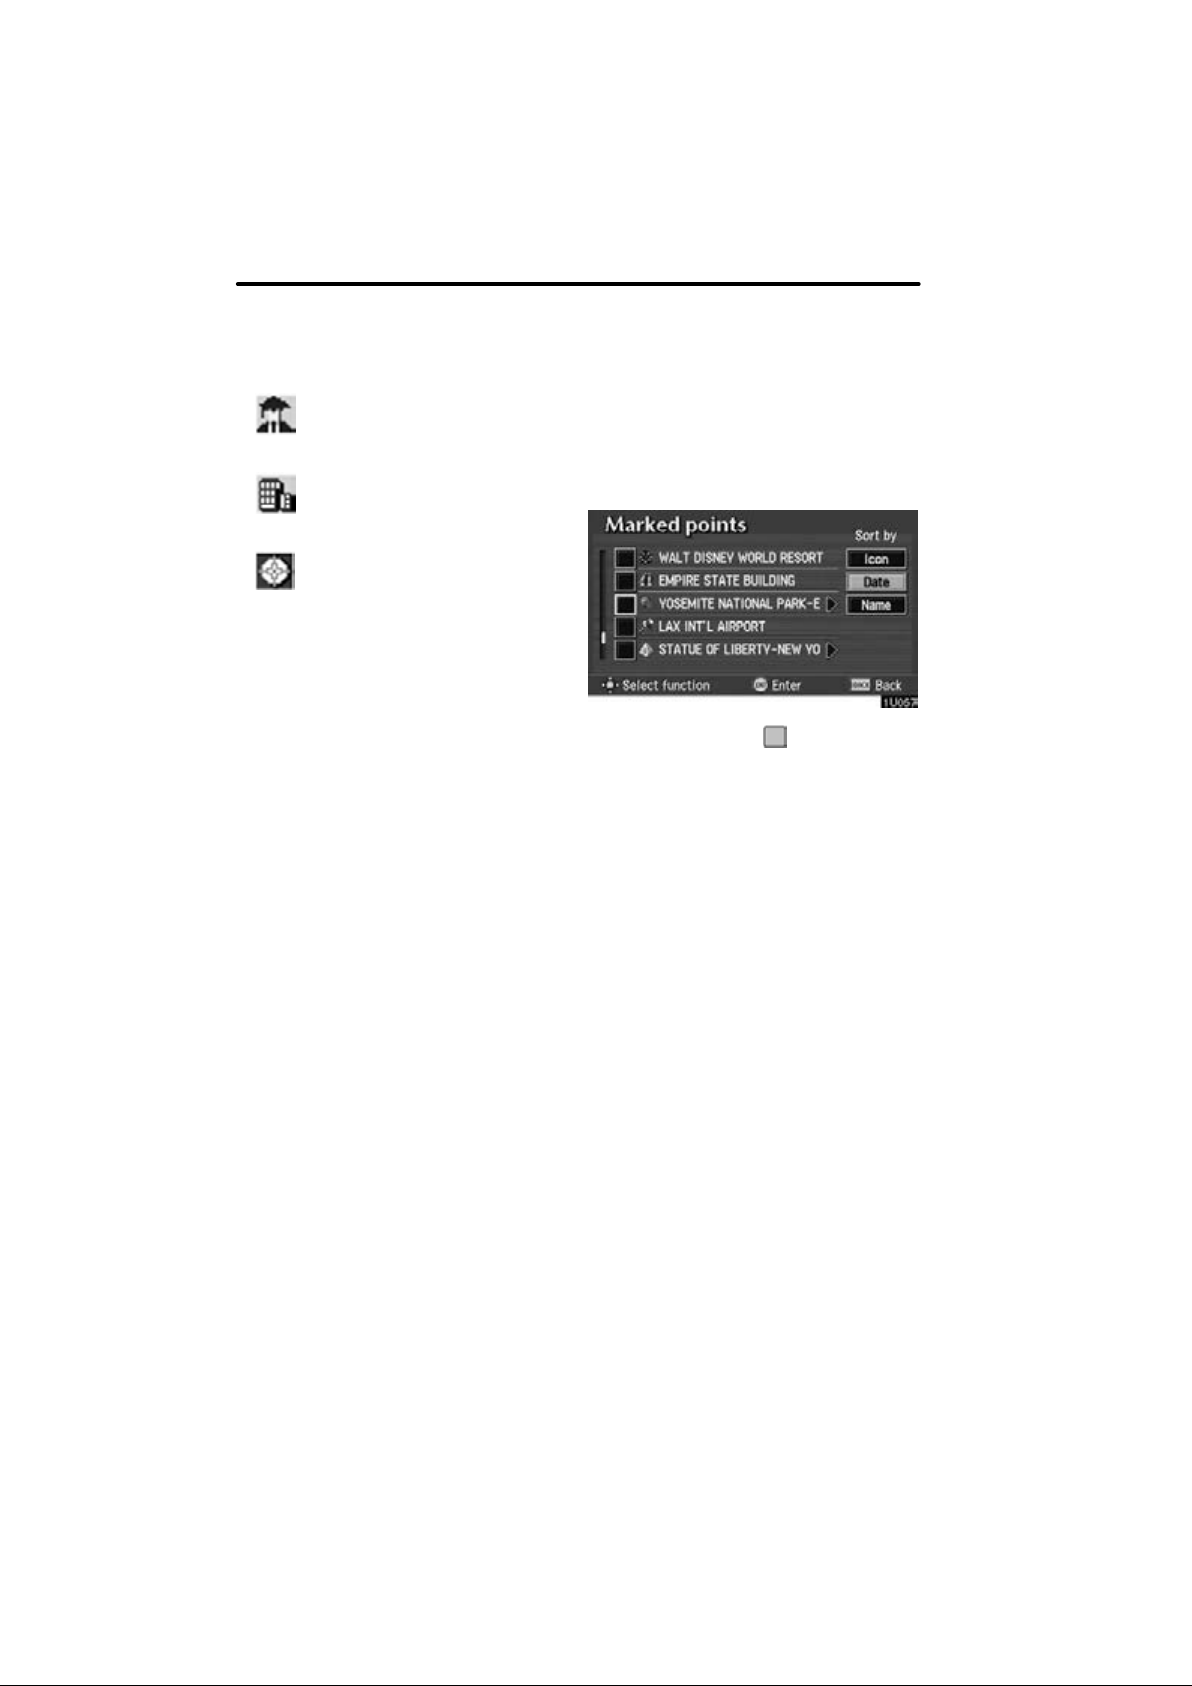
MARKED POINTS
Selecting the “Marked points”
switch on the “Destination” screen displays your list of registered marked
points. (Refer to pages 84 through 88
on “Registering”, “Editing” or “Deleting” marked points.)
When you select the of your desired
item, the screen changes and displays
the map location of the selected destination and the route preference. (See
“Entering destination” on page 39.)
Then, select the
the route guidance. This new destination
will not be registered as a marked point or
alter the location of the marked point.
There are 3 ways to list the marked point
by selecting switches.
Sort by “Icon”: Select this switch to list
the marked points by using the registered
icon. There are 46 icons and 4 sound
icons. (For details, see page 86.)
Sort by “Date”: Select this switch to list
the marked points in order of registered
date.
Sort by “Name”: Select this switch to list
the marked points in alphabetical order.
“Enter” switch to start
32
BASIC FUNCTIONS
Destination input by
Destination input by
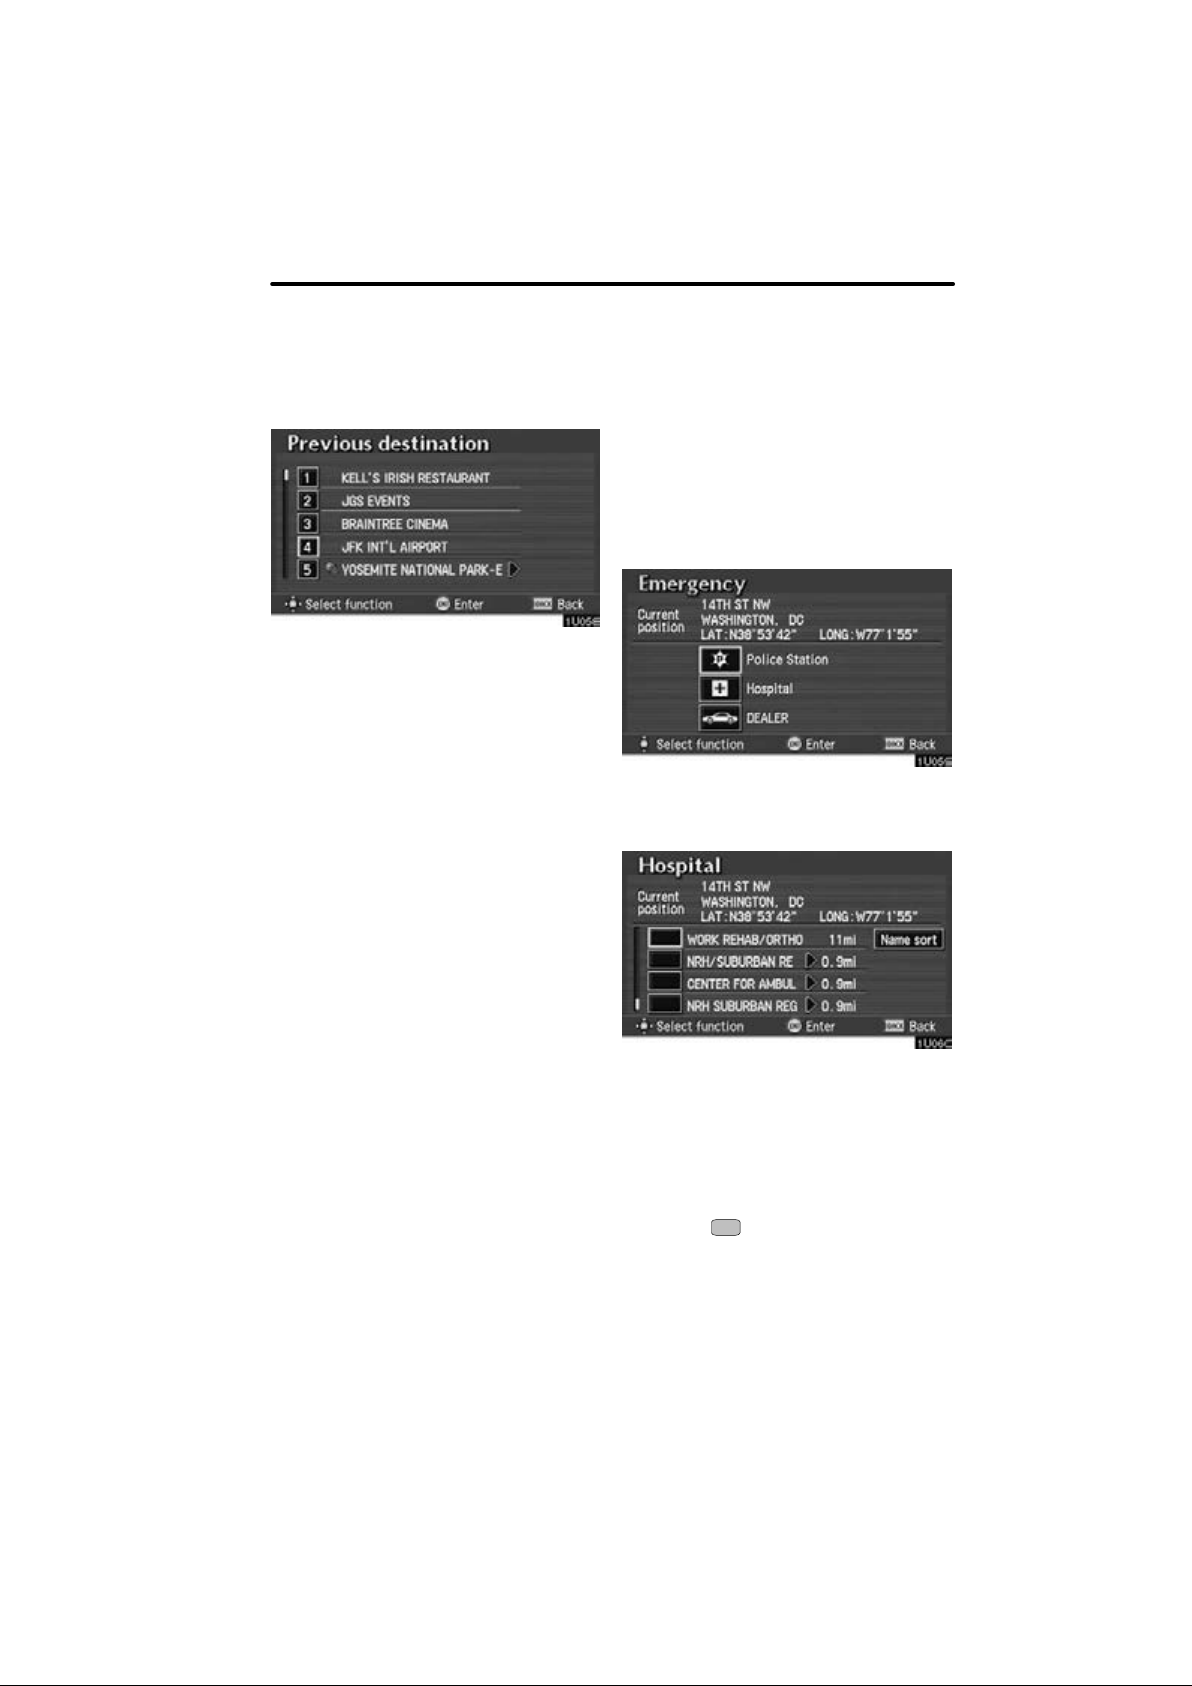
PREVIOUS DESTINATION
Select the “Previous destination”
switch on the “Destination” screen.
The screen lists to 20 previously set destinations.
Select your desired destination. The
screen changes and displays the map
location of the selected destination and
the route preference. (See “Entering
destination” on page 39.)
You can delete the list of previous destinations while you stop your vehicle if you no
longer need them. (See page 98 for details.)
EMERGENCY
By selecting the
switch on the “Destination” screen, the
display changes to a screen to select
police stations, hospitals or dealers.
While driving, only nearby police stations, hospitals or dealers are shown.
The current position is shown with an
address, the latitude and the longitude
at the top of the screen.
When you select your desired emergency
category, the selected emergency category list is displayed.
“Emergency”
The distance from your current position up
to the destination is displayed on the right
of the name.
You can see the names of the emergency
destinations in alphabetical order by selecting the
screen.
Select the
screen changes and displays the map
location of the selected destination and
the route preference. (See
destination” on page 39.)
“Name sort” switch on the
of your desired item. The
“Entering
33
BASIC FUNCTIONS
Destination input by
Select the “INFO” switch to display the
selected emergency destination name,
address and telephone number.
INFORMATION
In an area which has not been registered for route guidance, the navigation does not guide. (See pages 60.)
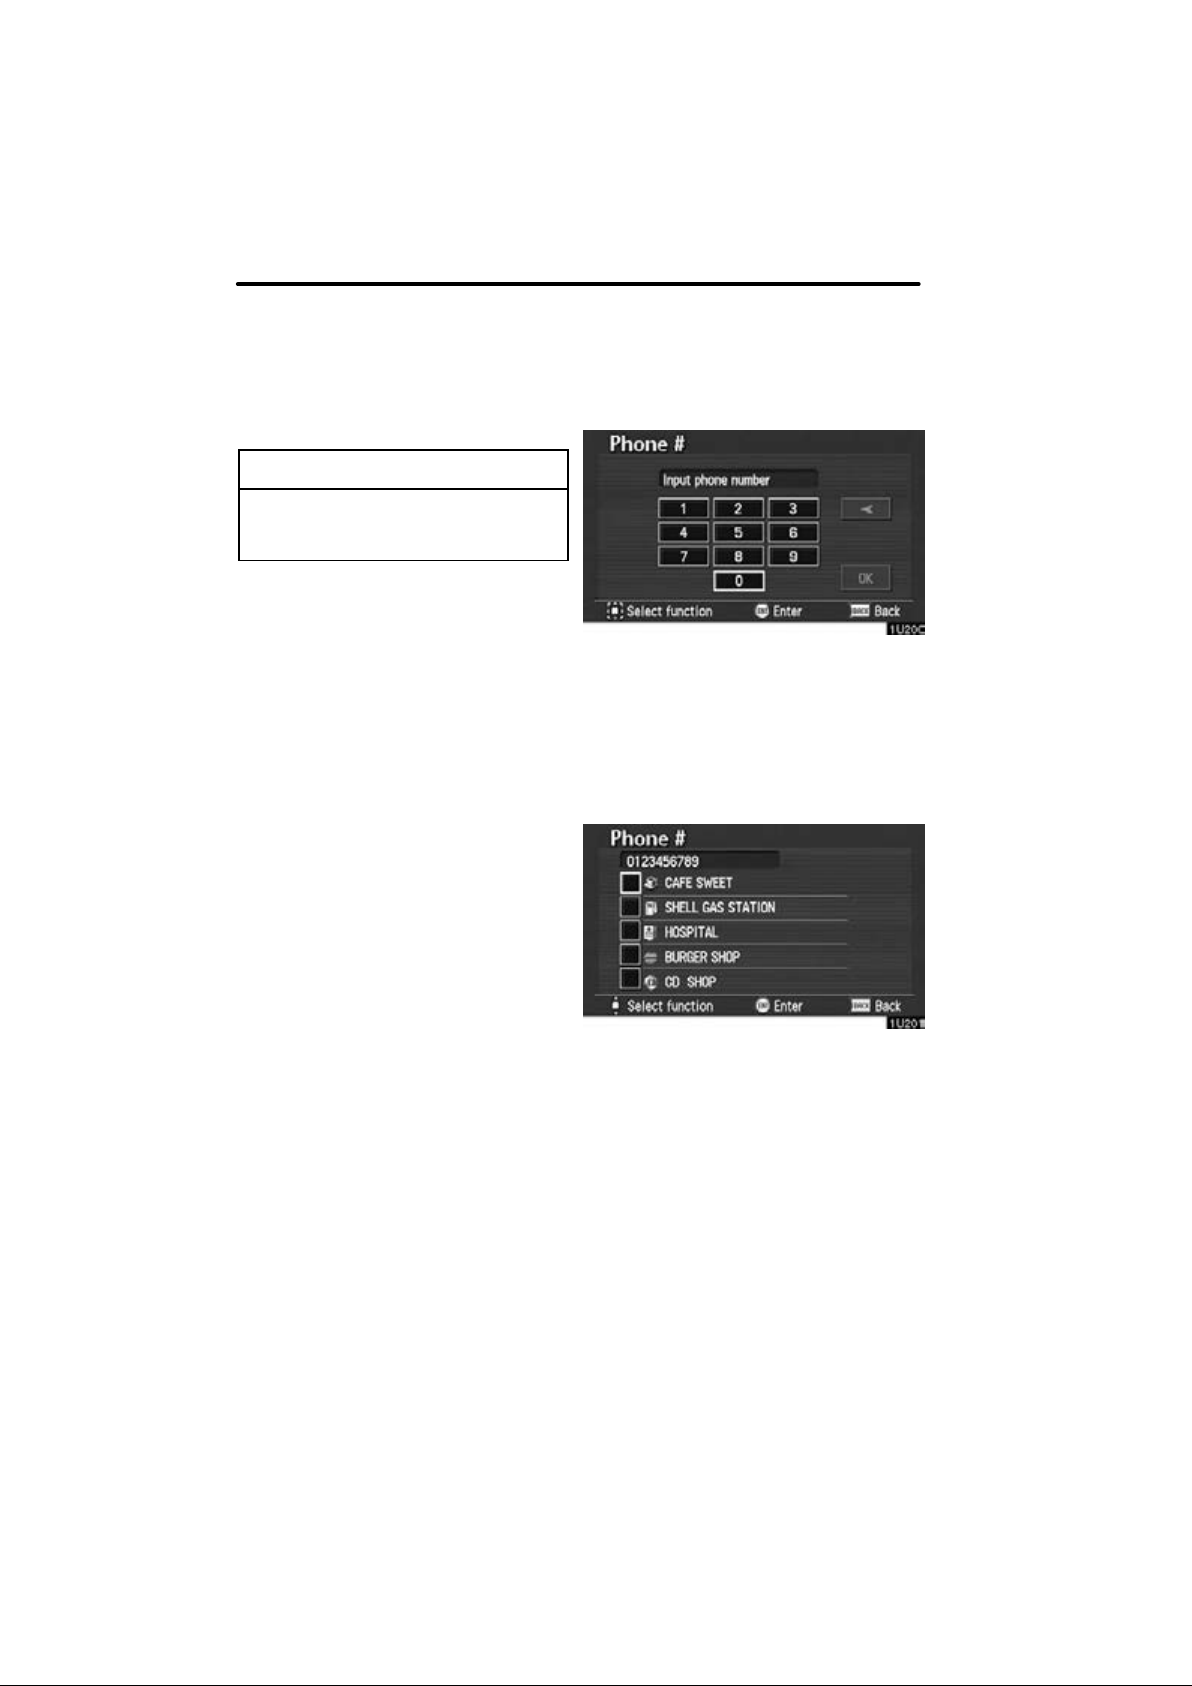
TELEPHONE NUMBER
Select the “Phone #” switch on the
“Destination” screen.
Input a phone number.
After inputting it, select the
and the screen changes and displays the
map location of the selected destination
and the road preference. (See “Entering
destination” on page 39.)
If there are many sites having a same number, the following screen appears.
“OK” switch,
34

Destination input by
INTERSECTION
Select the “Intersection” switch on
the “Destination” screen.
Input the name of the two intersecting
streets which are located near the destination to be set.
When you select the
number of sites becomes 4 or less, the list
of matching street names appears.
“List” switch or the
BASIC FUNCTIONS
Select the of your desired item. After inputting the two intersecting
streets, the screen changes and displays the map location of the selected
destination and the route preference.
(See “Entering destination” on page
39.)
If the same two streets cross at more than
one intersection, the screen changes and
displays the menu to select the city name
where the streets intersect. Select the city
and the map location of the selected destination and the route preference. (See
“Entering destination” on page 39.)
35
BASIC FUNCTIONS
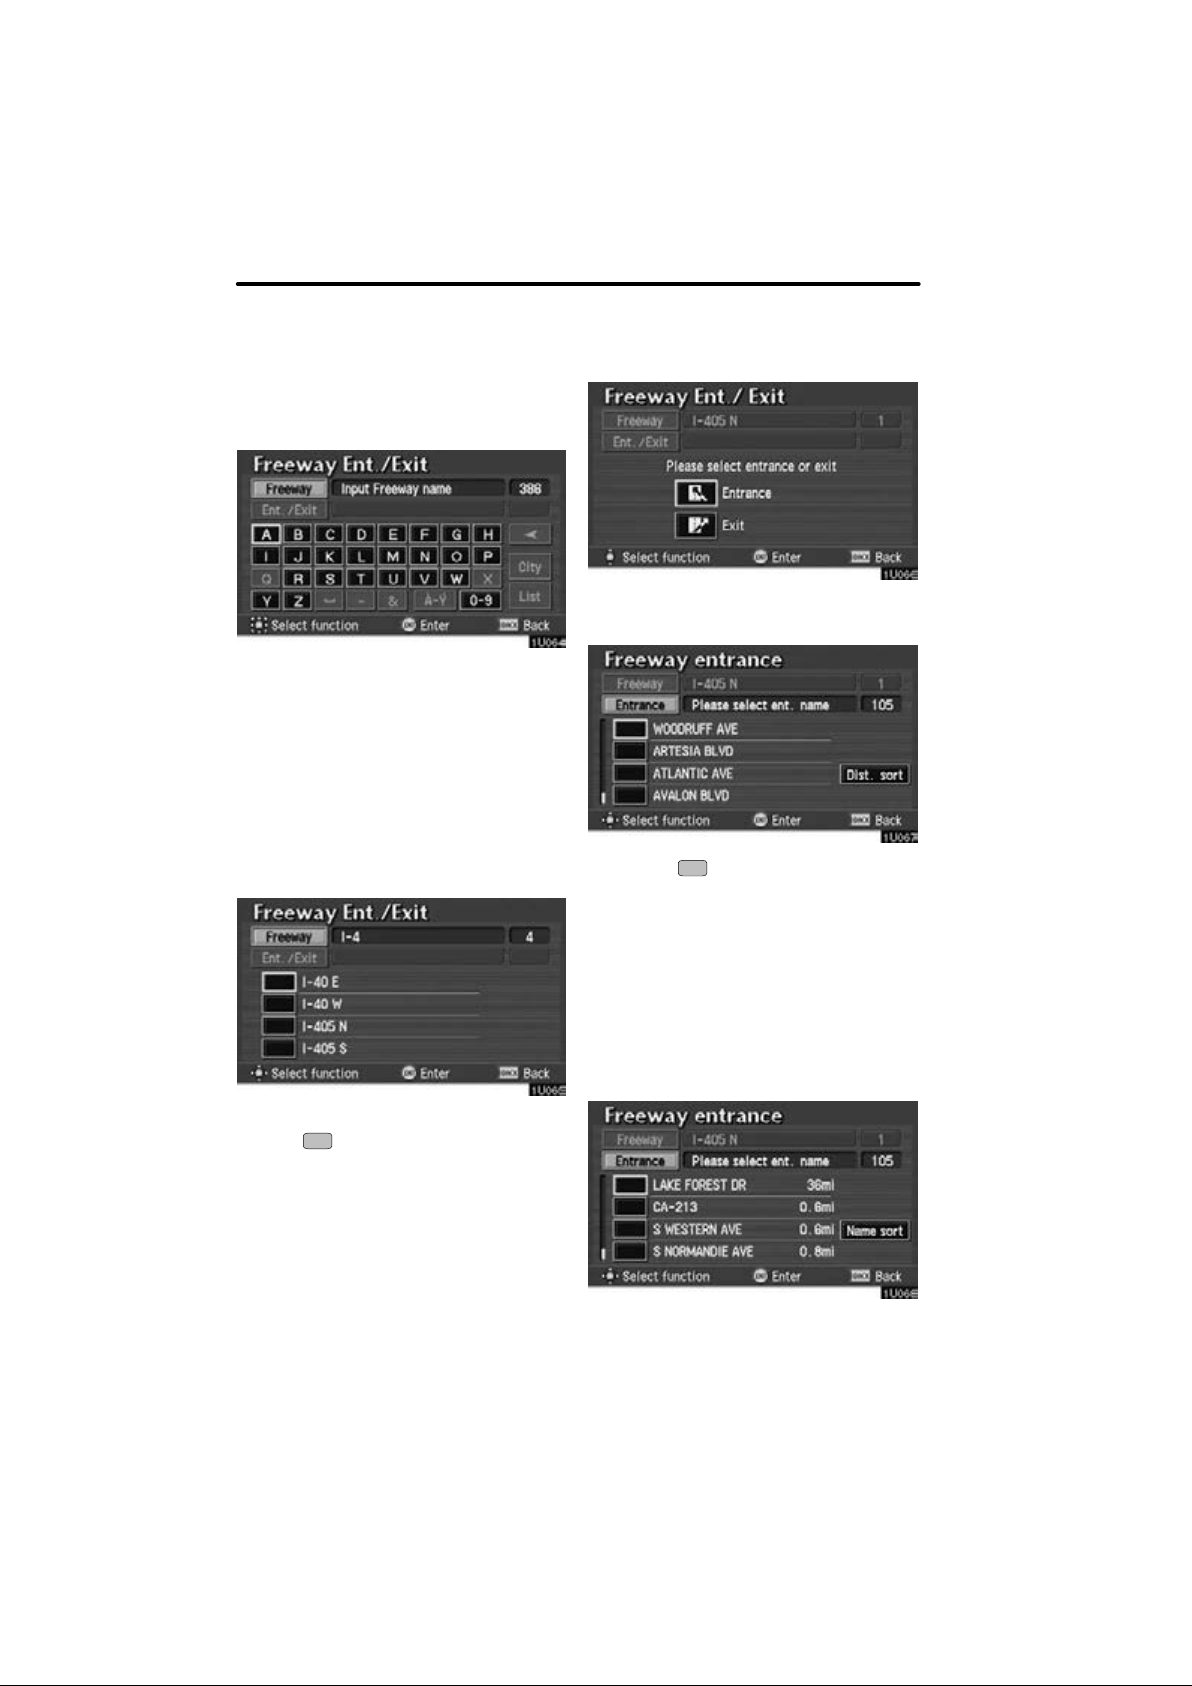
Destination input by
FREEWAY ENTRANCE or
EXIT
To input a freeway entrance or exit, select the
on the “Destination” screen.
Be sure to use the complete name of the
freeway or highway, including the hyphen,
when entering the destination. Freeways
and interstates use an “I” (I−405). US highways use the state designation before the
number (CA−118).
As the number of matching freeways decreases, you can select the
to display the list. When the number of
sites becomes 4 or less, the list screen appears automatically.
“Freeway Ent./Exit” switch
“List” switch
You can then select either a freeway
“Entrance” or “Exit”.
Select the of your desired entrance
or exit name. The screen changes and
displays the map location of the selected destination and the route preference. (See “Entering destination” on
page 39.)
There are 2 ways to list the freeway entrance or exit.
“Dist. sort”: Select this switch to list the
entrances or exits in order of distance from
your current location.
Choose the desired freeway by selecting the
.
36
“Name sort”: Select this switch to list the
entrances or exits in alphabetical order.

Destination input by
PREVIOUS STARTING
Destination input by MAP
POINT
Select the “Previous starting
point”
screen.
The screen changes and displays the
map location of the previous starting
point and the route preference. (See
“Entering destination” on page 39.)
If you have not used the navigation yet,
you can not set the destination by the
“Previous starting point” switch.
switch on the “Destination”
BASIC FUNCTIONS
Select the
tination” screen.
The screen change and displays the
map location of the last map and the
route preference. (See “Entering destination” on page 39.)
“Map” switch on the “Des-
37
BASIC FUNCTIONS
Destination input by
Destination input by HOME
PRESET DESTINATION
Select one of the — switches
on the “Destination” screen, the screen
changes and displays the map location
of your desired preset destination. In
this case, it is necessary to register
your desired preset destination beforehand. (Refer to pages 90 through 91,
“Registering”, “Editing” or “Deleting”
preset destination.)
Select the “ (home)” switch on
the destination input screen.
The screen changes and displays the
map location of your home and the
route preference. (See “Entering destination” on page 39.)
The screen changes to display the map
location of your home about 3 seconds,
and then the system starts to search the
way to your home.
If you have not registered your home yet,
you can not set the destination by the
“ (home)” switch.
For the steps to register or delete your
home, see page 49.
38
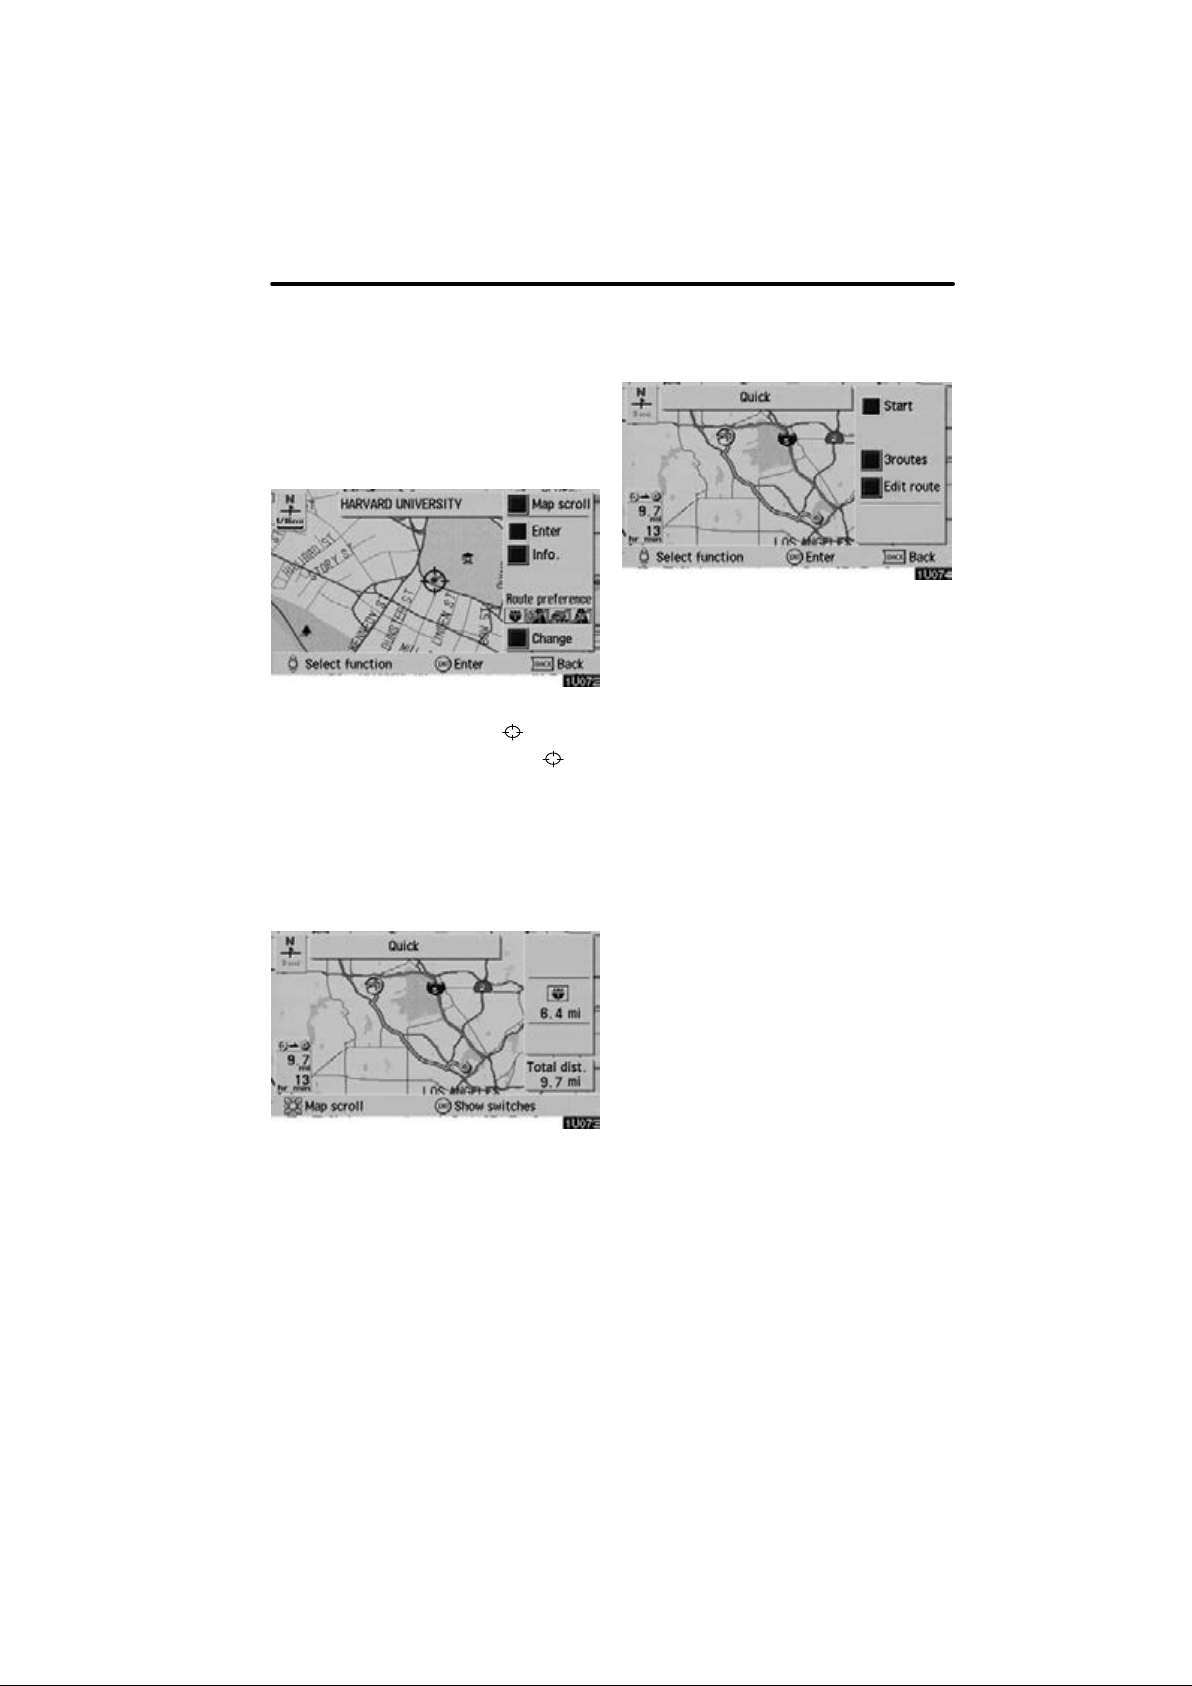
After you input the destination by one
Entering destination
of the 12 methods, the screen changes
and displays the map location of the selected destination and the route preference.
Select the “Map scroll” switch on the
screen to move the cursor
You can move and set the cursor
desired point. (For the method of how to
move the cursor, see page 18.)
“Change”: Selecting this switch can
change “Route preference”.
When you select the
system starts searching for a route to your
destination using the conditions entered.
“Enter” switch, the
.
at a
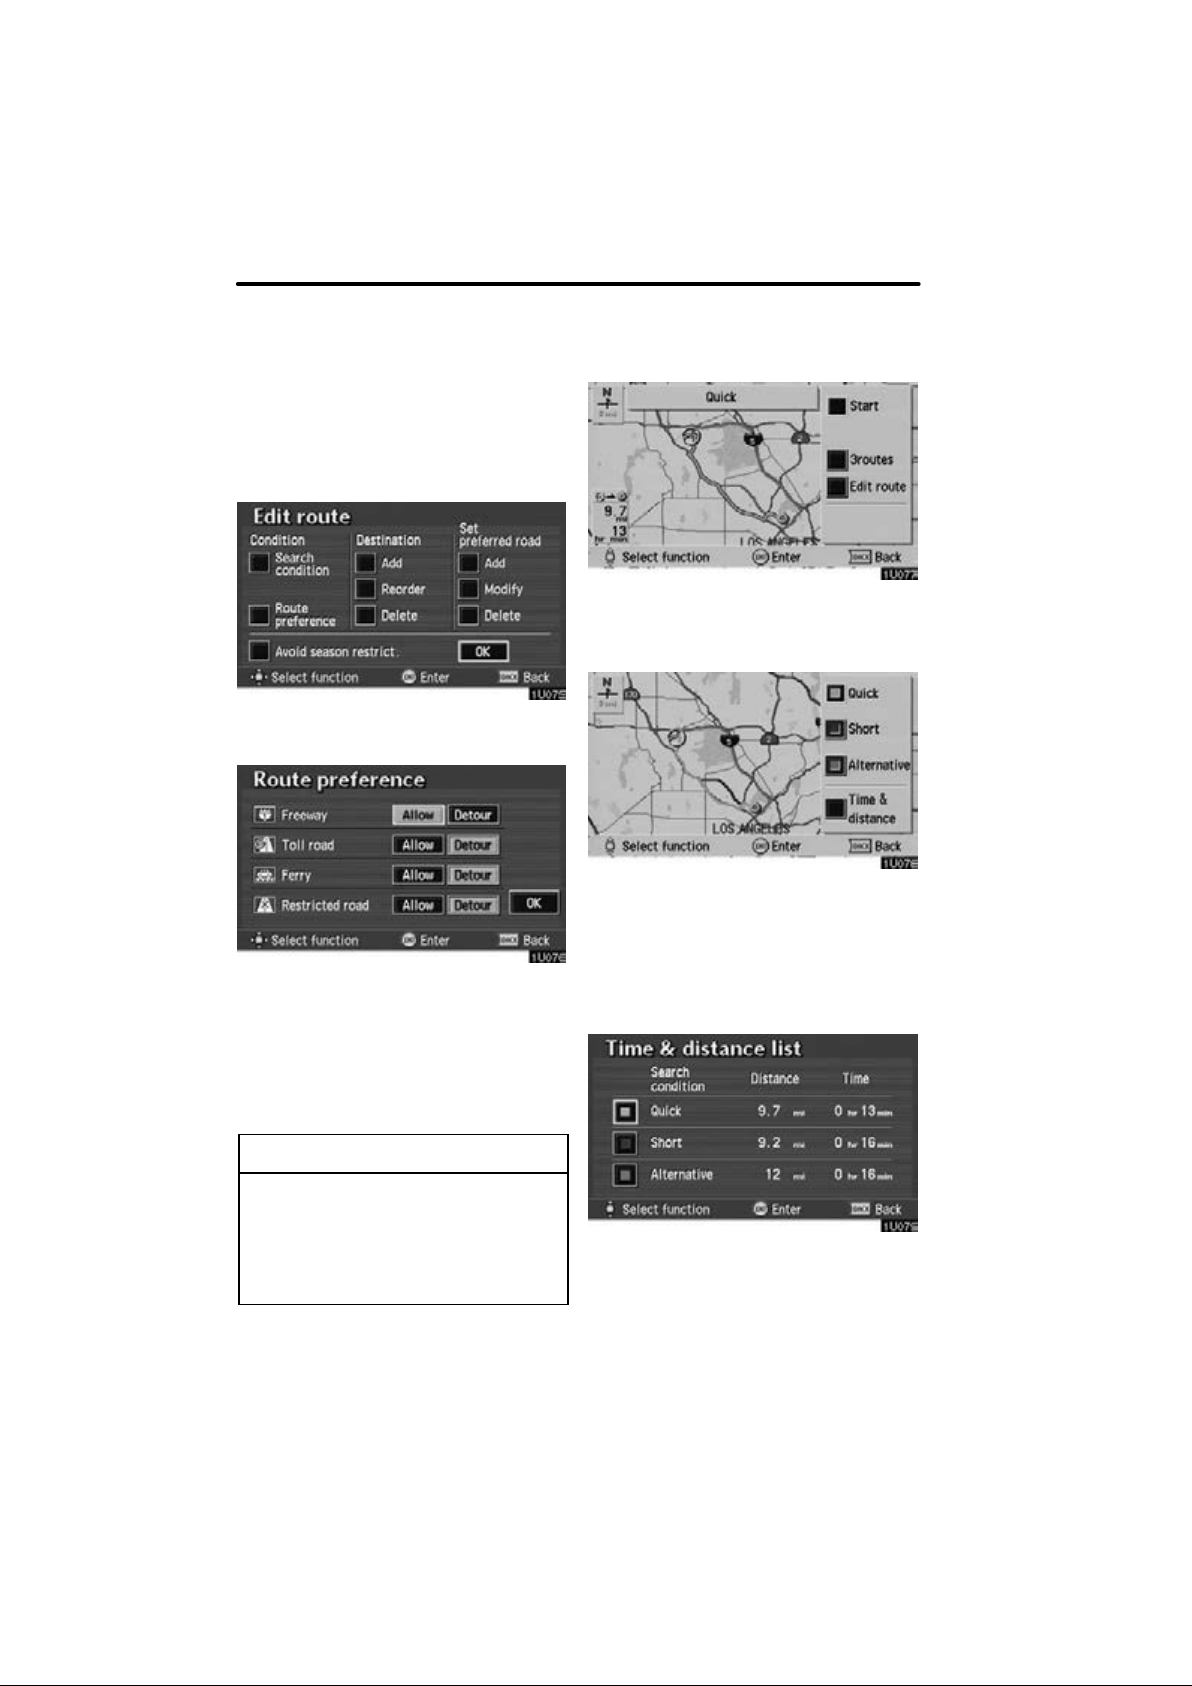
BASIC FUNCTIONS
Select the “Edit route” switch on the
screen. The screen changes and displays
the edit route menu. (For details, see page
99.)
You can start the route guidance by select-
ing the
starting to move your vehicle.
If you continue to push the
button on the navigation controller until
you hear a beep, the “demo” mode will
start.
“Start” switch on the screen or
“ENTER”
If you want to set a preferred road point between the starting point and the destination or change the search condition, push
“ENTER” button on the navigation
the
controller to display the menu switches.
39
BASIC FUNCTIONS
Route preference:
To change the conditions of the route
preference.
Select the
the “Edit route” screen appears.
Select the “Route preference”
switch.
“Edit route” switch, and
Select the “3routes” switch.
“3routes”: You can choose your route out
of 3 types of route.
Select either “Allow” or “Detour”
switch. When you select the “OK”
switch, the system starts searching for
a route up to the destination.
Even if you select the
switch, it cannot be avoid in some
cases.
“Detour”
INFORMATION
If the calculated route includes a trip
by ferry, the route guidance shows a
sea route. After you travel by ferry,
the current vehicle position may be
incorrect. Upon reception of GPS signals, it is automatically corrected.
40
Choose one from the three routes.
“Quick”: A route on which you can reach
the destination in the shortest time.
“Short”: A route on which you can reach
the destination in the shortest distance.
“Alternative”: Other route.
Select the “Time & distance”
switch to display the time and distance
list.

The route guidance system displays
Route guidance screen
two different screen modes.
Single screen: Only map is shown in a
screen mode like the above.
Split screen: Map and guidance screen
are shown in a screen mode like the
above. (For details about guidance
screen, see page 43.)
The two route guidance screens have a
number of ind i c a t o r s a n d s w itches with
which you should be familiar.
BASIC FUNCTIONS
Map screen with switch: When the
“ENTER” button on the navigation con-
troller is pushed while the map is displayed, the switch screen is displayed on
the right side of the screen.
“GPS”: Upon reception of signals from the
GPS (Global Positioning System), this
mark appears. (For details, see page 58.)
“Map orient”: To switch the map orientation between North−up and Heading−up.
(For details, see page 57.)
“POI”: Select this switch, and symbols of
points of interest are shown on the screen.
(For details, see page 51.)
“Chg. route”: The “Change route” screen
appears and the following settings are
available.
“Mark”: Select this switch for quick registration of the marked point. (For details,
see page 89.)
“Guide”: When POI icons are displayed
on the map, select this switch, and the
name of a POI icon near the cursor is displayed. Move the select and scroll lever to
the right or left, and the name of the next
POI icon is displayed. If no POI icons are
displayed on the screen, “No guidance information available” is displayed. Push the
“ENTER” button while the name of a
POI icon is displayed to see detailed information about that POI (name, location,
phone number, etc.) displayed on the
screen.
41

BASIC FUNCTIONS
“ ”: Select this switch when you have
several destinations to go. The distance
and time from the current position to the
destination can be displayed for each destination. When you are not traveling on the
route, however, only the distance is displayed.
INFORMATION
D The distance to your destination
appears on the left of the screen.
D The time to your destination can
also be displayed. (For the setting
steps, see page 108.)
Selecting these
switches changes the
guidance screen.
Selecting these switches
changes the map screen.
“Search condition”: To change the condition for reroute. (For details, see page
101.)
“Del. next dest.”: To delete the setting of
the next destination.
“Delete preferred road”: To delete the
preferred road that you registered.
“Start from adjacent road”: To start the
route guidance from the adjacent road.
(ex. When the route guidance guides the
route on a freeway, but you drive on the
parallel way along a freeway.)
“Detour for”: To change the condition for
detour. (For details, see page 50.)
“Whole route”: To calculate an entire new
route to the destination.
42
BASIC FUNCTIONS
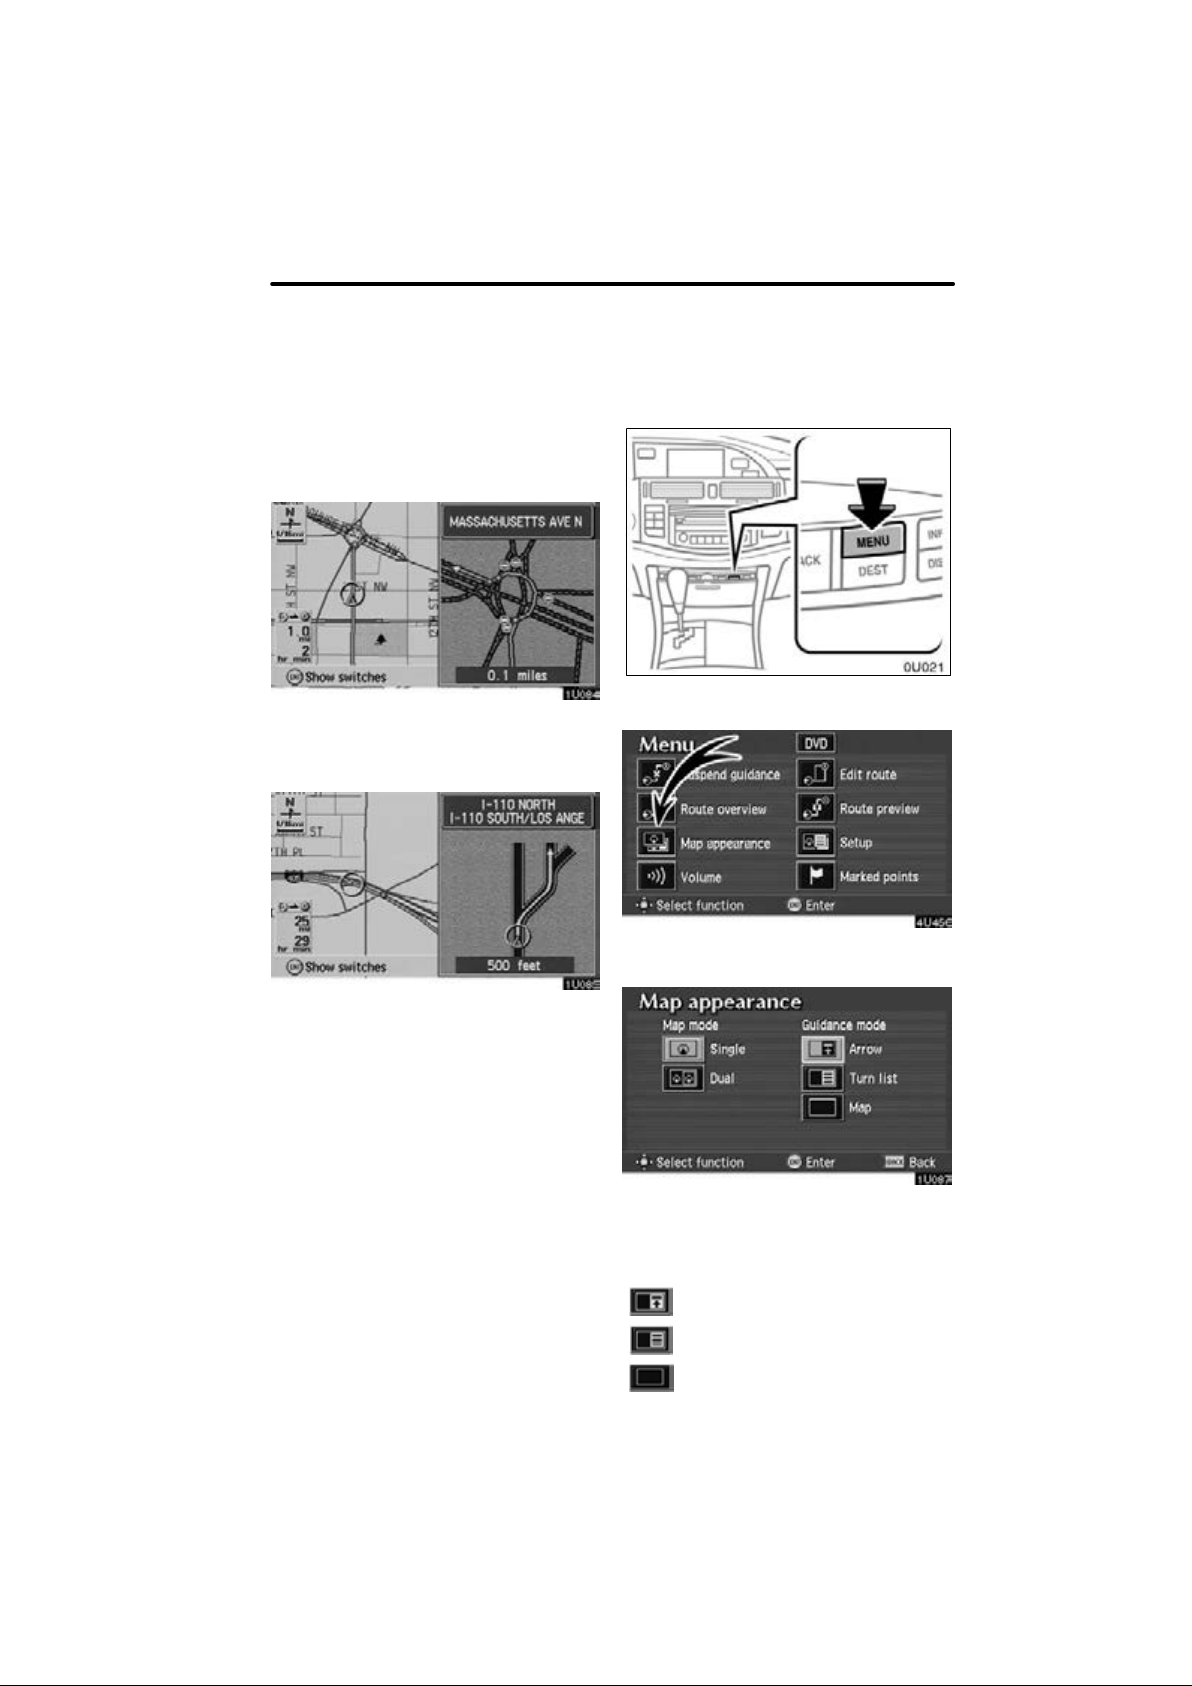
Guidance screen
Map appearance
The right half of the screen can be used
as a guidance screen.
See also “Route guidance screen” on page
41.
Split screen near the intersection.
The distance to the intersection is shown
at the bottom of the screen.
Split screen near the exit of the freeway.
You can set the map mode and guidance mode.
1. Push the “MENU” button on the
navigation controller.
2. Select the “Map appearance”
switch.
3. It changes to the “Map appearance”
screen and you can select the “Guidance mode”.
Guidance mode:
To display arrow screen
To display turn list screen
To display map screen
43
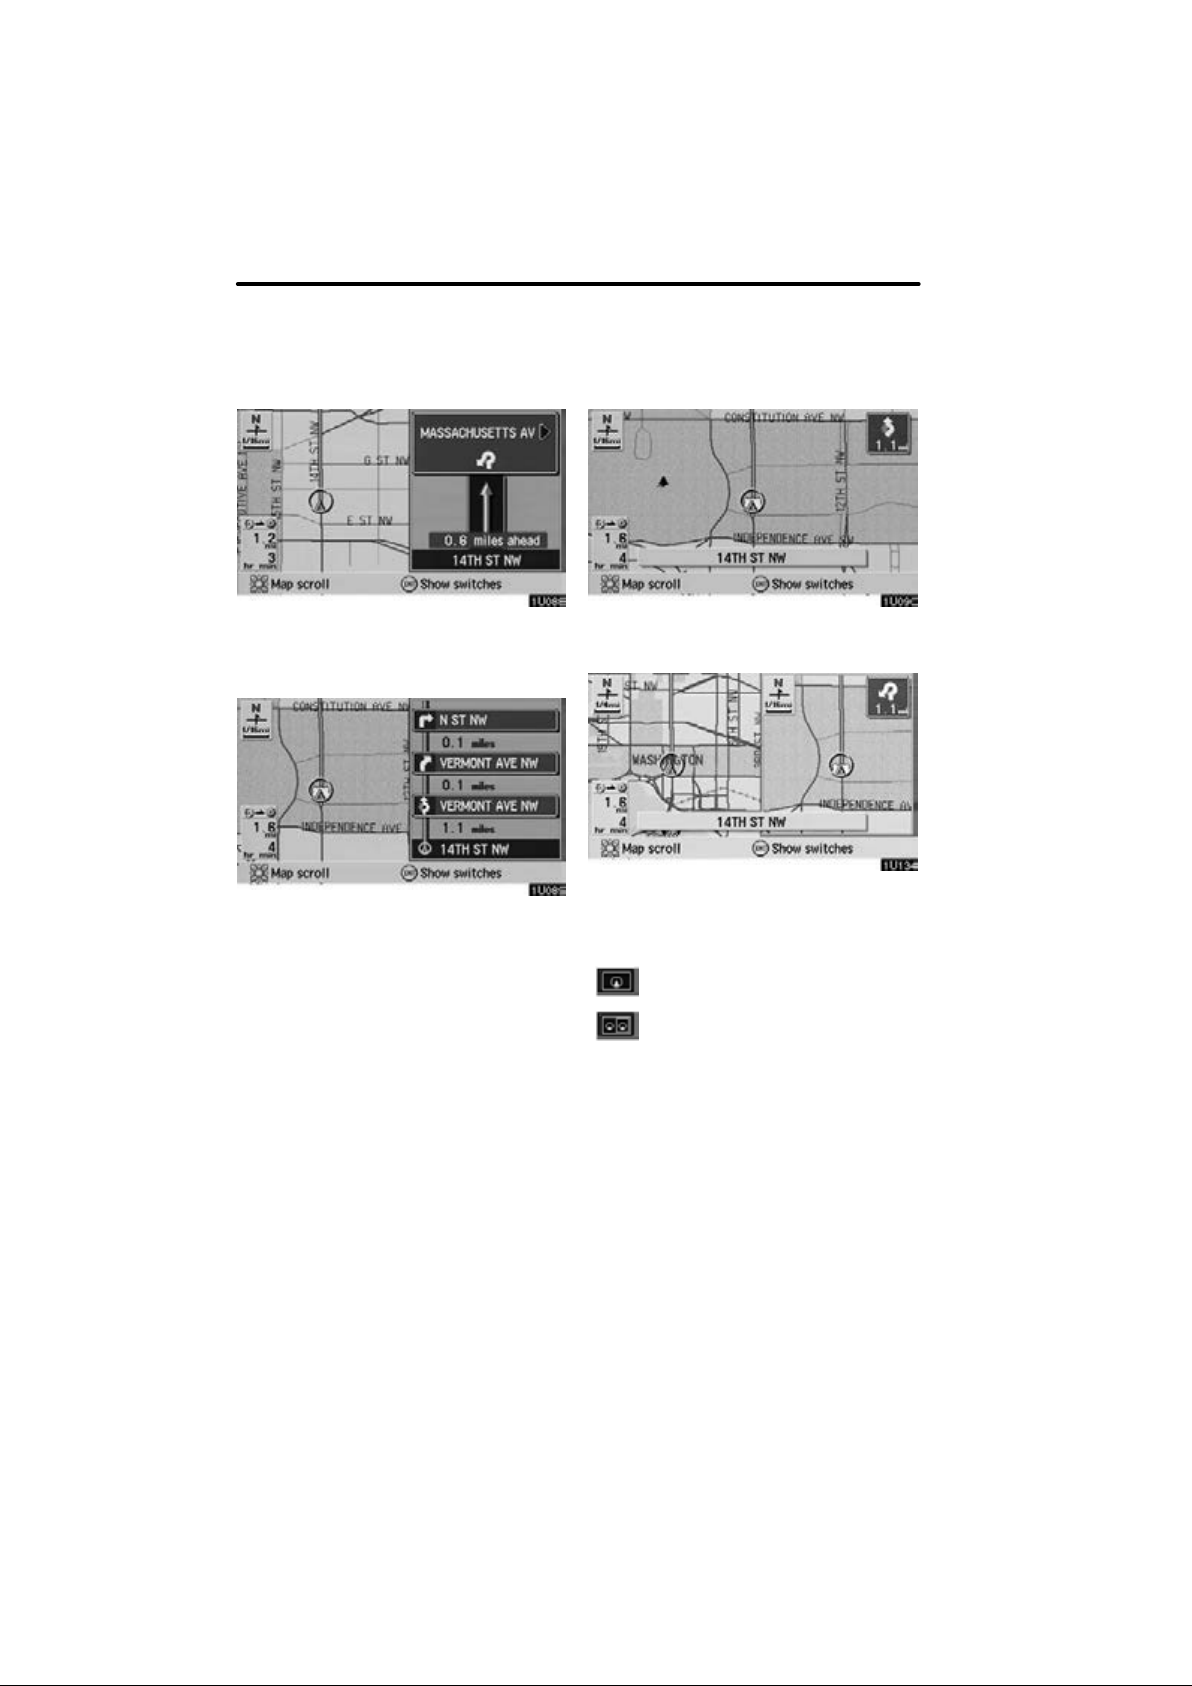
BASIC FUNCTIONS
Arrow screen
This screen shows the current road name
and the distance to the next corner.
Turn list screen
This screen shows the “turn list” like the
above. You cannot scroll through the list of
roads.
Map screen
Single mode
Dual mode
The map screen has 2 modes:
Single mode
44
Dual mode
The dual mode screen can perform the
following procedures.
D Changing the map scale
D Displaying the POI icon (See page 51.)
D Changing the orientation of the map
 Loading...