

Page 1

TFT LCD COLOR MONITOR
User’s manual
Model: LCD-1042VB 10.4”
Model: LCD-1211VB 12.1”
Model: LCD-1512VB 15.1”
®
1319 Dexter Avenue N., Suite 020
Seattle, WA 98109
TEL:206/623-6000
FAX:206/623-6609
Page 2

2
Thank you for Purchasing this ToteVision product.
Before attempting to operate your video Monitor,
please carefully read this manual.
Content
1. Precautions
2. Package contents
3. Location of Controls
4. Monitor Use
5. Cleaning instructions
6. Adjust the monitor
7. Specifications
Page 3

Page 4

4
3. Location of Controls
10.4” Front View
10.4” Rear View
10.4” Vesa View
13
7. SPECIFICATION:
z On screen display for: brightness, contrast, back light, hue & Tint
z S-video capability
z Sunlight readable Very High Brightness LCD panel
z For color applications
z Wide viewing angle
z High contrast ratio
z Active matrix technology eliminates distortion
Page 5

12
Miscellaneous:
Signal Source:To choice signal for D-SUB 、CVBS or S-VIDEO.
Mode Select:To choice mode by 640x400 or 720x400.
Reset:Select this function can make the monitor have the best
efficiency.
Vol ume :Without audio function.
EXIT OSD:Exit the OSD function selection main menu.
Note:You don’t need to use AUTO CONFIG function when in the
VIDEO IN mode.
5
12.1” Front View
12.1” Rear View
12.1” Vesa View
Page 6

6
15.1” Front View
15.1” Rear View
11
Function:
Auto Adjust:Select this function can make the monitor have
the best efficiency.
Auto Colour:Select this function can make the color have the
best efficiency.
OSD Menu:
Language:There are 8 type languages can be selected.
OSD H. Position:Pressing + moves the OSD menu to right;
Pressing - moves the OSD menu to left.
OSD V. Position:Pressing + moves the OSD menu upward;
Pressing - moves the OSD menu downward.
OSD Timer:To choice on or off the OSD list timer.
Translucent:To choice on or off the OSD list translucent.
Page 7

10
OSD
Colour:
Contrast:Adjust the contrast using + and - buttons.
Brightness:Adjust the brightness using + and - buttons.
Colour Adjust:
9300:set current color temperature as 9300K.
6500:set current color temperature as 6500K.
USER:
RED Color:Red range.
GREEN Color:Green Range.
BLUE Color:Blue Range.
Picture:
H POSITION:Pressing + moves the display image to right;
Pressing - moves the display image to left.
V POSITION:Pressing + moves the display image upward;
Pressing - moves the display image downward.
Sharpness:Adjust the sharpness using + and - buttons.
Phase:Adjust input video sampling clock’s phase using + and
- buttons.
CLOCK:Adjust input video sampling clock using + and -
buttons.
7
4. Monitor use
a. Make sure your video source ( CCD CAMERA,VTR, e.t.c.)
power is on
b. Connect your video source to video input (VGA, RCA video
or S-video)
c. Push the Power Switch ON
5. Cleaning instructions
Turn off the monitor before cleaning the LCD screen. Use a Slightly
damp (not wet) cloth.
Do not use an aerosol spray directly on the LCD screen because
over-spray may cause electrical shock.
Page 8
8
6. Adjusting the monitor
Control Button
1.Power Switch:Pressing this button turns the display system power
on or off.
2.Power LED:This Power LED indicates different status when this
unit operates in different modes. It shows the orange
color in standby mode and it shows the green color in
power-on mode.
3.Decrease (-):This button is used to select OSD control option and
to adjust the decreasing value of selected OSD
control option.
4.Menu / Enter :Pressing this button pops up the menus on the screen,
and used to select the control options on the screen.
5.Increase (+):This button is used to select OSD control option and
to adjust the increasing value of selected OSD
control option.
Power
Switch
Power
LED
Menu / Enter
Decrease
( - )
Increase
( + )
9
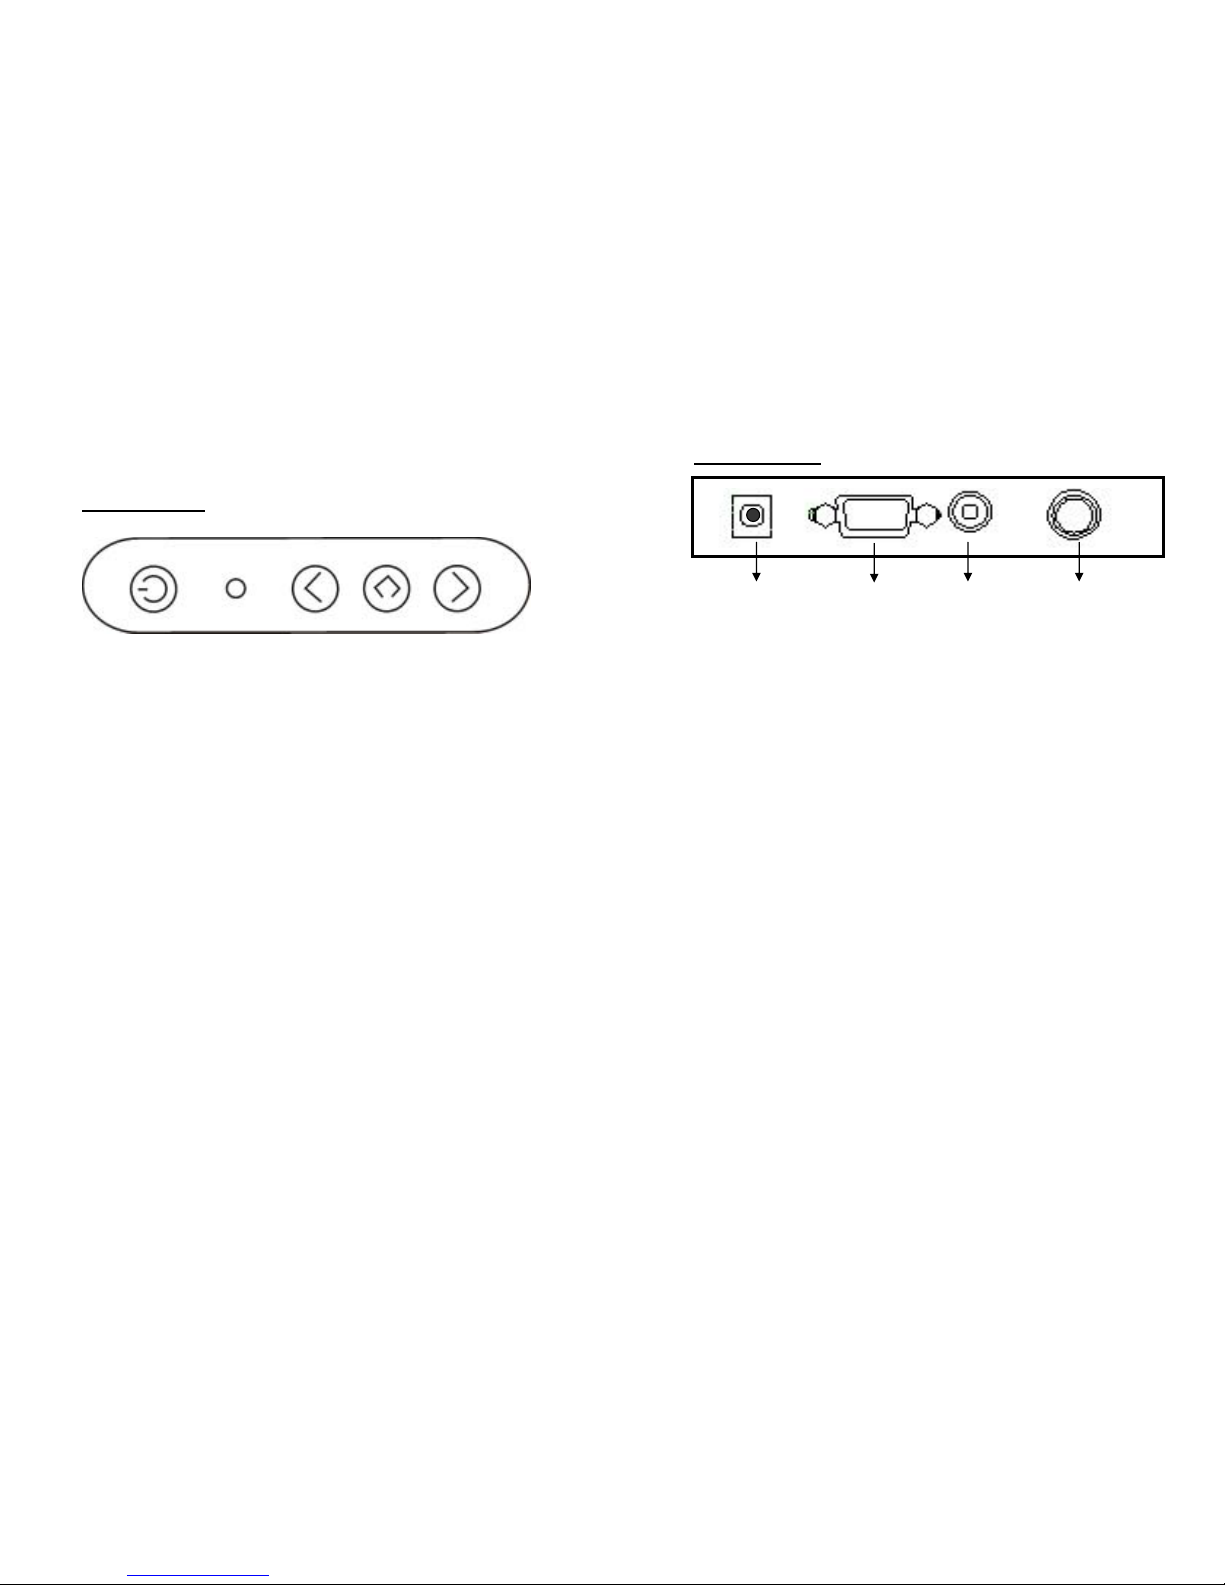
Inputs Diagram
【1】 【2】 【3】 【4】
【1】DC IN:This is for connecting the power cable.
【2】RGB ANALOG IN :This can be connected with the D-Sub 15 pin
signal connector.
【3】COMPOSITE VIDEO:This can be connected to the composite
video-out connector of any video resource.
【4】 S-VIDEO:This can be connected to the S-video-out connector
of any video resource.
 Loading...