

Page 1

®
Strata CIX
Programming Manual
Volume 2
Stratagy ES Voice Mail Application
Release 5
Page 2

Publication Information
Toshiba America Information Systems, Inc.
Telecommunication Systems Division
Publication Information
Toshiba America Information Systems, Inc., Telecommunication Systems Division, reserves the right,
without prior notice, to revise this information publication for any reason, including, but not limited to,
utilization of new advances in the state of technical arts or to simply change the design of this document.
Further, Toshiba America Informat ion Systems, Inc ., Telecommunication Systems Division, also reserves
the right, without prior notice, to make such changes in equipment design or compone nts as engine ering or
manufacturing methods may warrant.
CIX-MA-PRGM2-VA
Version A1, January 2007
Our mission to publish accurate, complete and user accessible documentation. At the time of printing the
information in this document was as accurate and current as was reasonably possible. However, in the
time required to print and distribute this manual additions, corrections or other changes may have been
made. To view the latest version of this or other documents please refer to the Toshiba FYI web site.
Toshiba America Information Systems shall not be liable for any commercial losses, loss of revenues or
profits, loss of goodwill, inconvenience, or exemplary, special, incidental, indirect or consequential
damages whatsoever , or claims of third parties, regar dless of the form of any claim that may re sult from the
use of this document.
THE SPECIFICATIONS AND INFORMATION PROVIDED HEREIN ARE FOR INFORMATIONAL
PURPOSES ONLY AND ARE NOT A WARRANTY OF ACTUAL PERFORMANCE, WHETHER
EXPRESSED OR IMPLIED. THE SPECIFICATIONS AND INFORMATION ARE SUBJECT TO CHANGE
WITHOUT NOTICE. ACTUAL PERFORMANCE MAY VARY BASED ON INDIVIDUAL
CONFIGURATIONS, USE OF COLLATERAL EQUIPMENT, OR OTHER FACTORS.
© Copyright 2007
This document is copyrighted by Toshiba America Information Systems, Inc. with all rights reserved. Under
the copyright laws, this document cannot be reproduced in any any form or by any means—graphic,
electronic, or mechanical, including recording, taping, photocopying, without prior written permission of
Toshiba. No patent liability is assumed, however, with respect to the use of the information contained
herein.
Trademarks
Strata, SmartMedia, SD (Secure Digital) and CIX are registered trademarks of Toshiba Corporation.
VCS (Video Communcation Solution), VCSManag er , eManager, My Phone Manager and Info Manager are
registered trademarks of Toshiba America Information Systems, Inc.
Windows and Microsoft are registered trademarks of Microsoft.
Trend Micro and PC-cillin are registered trademarks of Trend Micro Inc.
Norton Anti-Virus is a registered trademark of Symantec Corp.
McAfee and Virusscan are registered trademarks of McAfe e, Inc.
Trademarks, registered trademarks, and service marks are the property of their respective owners.
Page 3

Strata Video Communication Solution General End User Information
The Strata Video Communication Solution is registered in accordance with the provisions of Part 68 of the
Federal Communications Commission’s Rules and Regulations.
FCC Requirements
Means of Connection: The Federal Communications Commission (FCC) has established rules which
permit the Strata CIX system to be connected directly to the telephone network. Connection points are
provided by the telephone company—connections for this type of customer-provided equipment will not be
provided on coin lines. Connections to party lines are subject to state tariffs.
Incidence of Harm: If the system is malfunctioning, it may also be disrupting the telephone ne twork. The
system should be disconnected until the proble m ca n be determined and repaired. If this is not done, the
telephone company may temporarily disconnect service. If possible, they will notify you in advance, but, if
advance notice is not practical, you will be notified as soon as possible. You will be informed of your right to
file a complaint with the FCC.
Service or Repair: For service or repair, contact your local Toshiba telecommunications distributor. To
obtain the nearest Toshiba telecommunications distributor in your area, log onto www.toshiba.com/taistsd/
pages/support_dealerlocator.html or call (800) 222-5805 and ask for a Toshiba Telecom Dealer.
Radio Frequency Interference
Warning: This equipme nt gene ra te s, u ses, and ca n r adi ate r adio fre quency en er gy and if n ot installed and
used in accordance with the manufacturer’s instruction manual, may cause interference to radio
communications. It has been tested and fo un d to comply with the limits for a Class A computing device
pursuant to Subpart J of Part 15 of FCC Rules, which are designed to provide reasonable protection
against such interference when operated in a commercial environment. Operation of this equipment in a
residential area is likely to cause interference, in which case, the user, at his/her own expense, will be
required to take whatever measures may be required to correct the interference.
Page 4

TOSHIBA AMERICA INFORMATION SYSTEMS, INC. (“TAIS”)
Telecommunication Systems Division License Agreement
IMPORTANT: THIS LICENSE AGREEMENT (“AGREEMENT”) IS A LEGAL AGREEMENT BETWEEN YOU (“YOU”) AND TAIS. CAREFULLY READ THIS LICENSE AGREEMENT. USE OF ANY
SOFTWARE OR ANY RELATED INFORMATION (COLLECTIVELY, “SOFTWARE”) INSTALLED ON OR SHIPPED WITH A TAIS DIGITAL SOLUTIONS PRODUCT OR OTHERWISE MADE AVAILABLE TO
YOU BY TAIS IN WHATEVER FORM OR MEDIA, WILL CONSTITUTE YOUR ACCEPTANCE OF THESE TERMS, UNLESS SEPARATE TERMS ARE PROVIDED BY THE SOFTWARE SUPPLIER. IF
YOU DO NOT AGREE WITH THE TERMS OF THIS LICENSE AGREEMENT, DO NOT INSTALL, COPY OR USE THE SOFTWARE AND PROMPTLY RETURN IT TO THE LOCATION FROM WHICH YOU
OBTAINED IT IN ACCORDANCE WITH APPLICABLE RETURN POLICIES. EXCEPT AS OTHERWISE AUTHORIZED IN WRITING BY TAIS, THIS SOFTWARE IS LICENSED FOR DISTRIBUTION
THROUGH TAIS AUTHORIZED CHANNELS ONLY TO END-USERS PURSUANT TO THIS LICENSE AGREEMENT.
1. License Grant. The Software is not sold; it is licensed upon payment of applicable charges. TAIS grants to you a personal, non-transferable and non-exclusive right to use the copy of the Software
provided under this License Agreement. You agree you will not copy the Software except as necessary to use it on one TAIS system at a time at one location. Modifying, translating, renting, copying,
distributing, printing, sublicensing, transferring or assigning all or part of the Software, or any rights granted hereunder, to any other persons and removing any proprietary notices, labels or marks from the
Software is strictly prohibited except as permitted by applicable law; you agree violation of such restrictions will cause irreparable harm to TAIS and provide grounds for injunctive relief, without notice,
against you or any other person in possession of the Software. You and any other person whose possession of the software violates this License Agreement shall promptly surrender possession of the
Software to TAIS, upon demand. Furthermore, you hereby agree not to create derivative works based on the Software. TAIS reserves the right to terminate this license and to immediately repossess the
software in the event that you or any other person violates this License Agreement. Execution of the Software for any additional capabilities require a valid run-time license.
2. Intellectual Property. You acknowledge that no title to the intellectual property in the Software is transferred to you. You further acknowledge that title and full ownership rights to the Software will remain
the exclusive property of TAIS and/or its suppliers, and you will not acquire any rights to the Software, except the license expressly set forth above. You will not remove or change any proprietary notices
contained in or on the Software. The Software is protected under US patent, copyright, trade secret, and/or other proprietary laws, as well as international treaties. Any transfer, use, or copying of the
software in violation of the License Agreement constitutes copyright infringement. You are hereby on notice that any transfer, use, or copying of the Software in violation of this License Agreement constitutes
a willful infringement of copyright.
3. No Reverse Engineering. You agree that you will not attempt, and if you employ employees or engage contractors, you will use your best efforts to prevent your employees and contractors from
attempting to reverse compile, reverse engineer, modify, translate or disassemble the Software in whole or in part. Any failure to comply with the above or any other terms and conditions contained herein
will result in the automatic termination of this license and the reversion of the rights granted hereunder back to TAIS.
4. Limited Warranty. THE SOFTWARE IS PROVIDED “AS IS” WITHOUT WARRANTY OF ANY KIND. TO THE MAXIMUM EXTENT PERMITTED BY APPLICABLE LAW, TAIS AND ITS SUPPLIERS
DISCLAIM ALL WARRANTIES WITH REGARD TO THE SOFTWARE, EITHER EXPRESS OR IMPLIED, INCLUDING, BUT NOT LIMITED TO, THE WARRANTY OF NON-INFRINGEMENT OF THIRD
PARTY RIGHTS, THE WARRANTY OF YEAR 2000 COMPLIANCE, AND THE IMPLIED WARRANTIES OF MERCHANTABILITY AND FITNESS FOR A PARTICULAR PURPOSE. THE ENTIRE RISK AS
TO THE QUALITY AND PERFORMANCE OF THE SOFTWARE IS WITH YOU. NEITHER TAIS NOR ITS SUPPLIERS WARRANT THAT THE FUNCTIONS CONTAINED IN THE SOFTWARE WILL MEET
YOUR REQUIREMENTS OR THAT THE OPERATION OF THE SOFTWARE WILL BE UNINTERRUPTED OR ERROR-FREE. HOWEVER, TAIS WARRANTS THAT ANY MEDIA ON WHICH THE
SOFTWARE IS FURNISHED IS FREE FROM DEFECTS IN MATERIAL AND WORKMANSHIP UNDER NORMAL USE FOR A PERIOD OF NINETY (90) DAYS FROM THE DATE OF DELIVERY TO
YOU.
5. Limitation Of Liability. TAIS’ ENTIRE LIABILITY AND YOUR SOLE AND EXCLUSIVE REMEDY UNDER THIS LICENSE AGREEMENT SHALL BE AT TAIS’ OPTION REPLACEMENT OF THE MEDIA OR
REFUND OF THE PRICE PAID. TO THE MAXIMUM EXTENT PERMITTED BY APPLICABLE LAW, IN NO EVENT SHALL TAIS OR ITS SUPPLIERS BE LIABLE TO YOU FOR ANY CONSEQUENTIAL,
SPECIAL, INCIDENTAL OR INDIRECT DAMAGES FOR PERSONAL INJURY, LOSS OF BUSINESS PROFITS, BUSINESS INTERRUPTION, LOSS OF BUSINESS INFORMATION/DATA, OR ANY
OTHER PECUNIARY LOSS OF ANY KIND ARISING OUT OF THE USE OR INABILITY TO USE THE SOFTWARE, EVEN IF TAIS OR ITS SUPPLIER HAS BEEN ADVISED OF THE POSSIBILITY OF
SUCH DAMAGES. IN NO EVENT SHALL TAIS OR ITS SUPPLIERS BE LIABLE FOR ANY CLAIM BY A THIRD PARTY.
6. State/Jurisdiction Laws. SOME STATES/JURISDICTIONS DO NOT ALLOW THE EXCLUSION OF IMPLIED WARRANTIES OR LIMITATIONS ON HOW LONG AN IMPLIED WARRANTY MAY LAST, OR
THE EXCLUSION OR LIMITATION OF INCIDENTAL OR CONSEQUENTIAL DAMAGES, SO SUCH LIMITATIONS OR EXCLUSIONS MAY NOT APPLY TO YOU. THIS LIMITED WARRANTY GIVES YOU
SPECIFIC RIGHTS AND YOU MAY ALSO HAVE OTHER RIGHTS WHICH VARY FROM STATE/JURISDICTION TO STATE/JURISDICTION.
7. Export Laws. This License Agreement involves products and/or technical data that may be controlled under the United States Export Administration Regulations and may be subject to the approval of the
United States Department of Commerce prior to export. Any export, directly or indirectly, in contravention of the United States Export Administration Regulations, or any other applicable law, regulation or
order, is prohibited.
8. Governing Law. This License Agreement will be governed by the laws of the State of California, United States of America, excluding its conflict of law provisions.
9. United States Government Restricted Rights. The Software is provided with Restricted Rights. The Software and other materials provided hereunder constitute Commercial Computer Software and
Software Documentation and Technical Data related to Commercial Items. Consistent with F.A.R. 12.211 and 12.212 they are licensed to the U.S. Government under, and the U.S. Government’s rights
therein are restricted pursuant to, the vendor’s commercial license.
10. Severability. If any provision of this License Agreement shall be held to be invalid, illegal or unenforceable, the validity, legality and enforceability of the remaining provisions hereof shall not in any way
be affected or impaired.
11. No Waiver. No waiver of any breach of any provision of this License Agreement shall constitute a waiver of any prior, concurrent or subsequent breach of the same or any other provisions hereof, and no
waiver shall be effective unless made in writing and signed by an authorized representative of the waiving party.
12. Supplier Software. The Software may include certain software provided by TAIS suppliers. In such event, you agree that such supplier may be designated by TAIS as a third party beneficiary of TAIS with
rights to enforce the Agreement with respect to supplier’s software.
YOU ACKNOWLEDGE THAT YOU HAVE READ THIS LICENSE AGREEMENT AND THAT YOU UNDERSTAND ITS PROVISIONS. YOU AGREE TO BE BOUND BY ITS TERMS AND CONDITIONS. YOU
FURTHER AGREE THAT THIS LICENSE AGREEMENT CONTAINS THE COMPLETE AND EXCLUSIVE AGREEMENT BETWEEN YOU AND TAIS AND SUPERSEDES ANY PROPOSAL OR PRIOR
AGREEMENT, ORAL OR WRITTEN, OR ANY OTHER COMMUNICATION RELATING TO THE SUBJECT MATTER OF THIS LICENSE AGREEMENT.
Toshiba America Information Systems, Inc.
Telecommunication Systems Division
9740 Irvine Boulevard
Irvine, California 92618-1697
United States of America
DSD 020905
5932
Page 5

T
Toshiba America Information Systems, Inc.
Telecommunication Systems Division
End-User Limited Warranty
Toshiba America Information Systems, Inc., (“TAIS”) warrants that this telephone equipment manufactured by
Toshiba (except for fuses, lamps, and other consumables) will, upon delivery by TAIS or an authorized TAIS
dealer to a retail customer in new condition, be free from defects in material and workmanship for twenty-four (24)
months after delivery, except as otherwise provided by TAIS in the TAIS warranty accompanying the products or
posted on TAIS’s website. Products which are not manufactured by Toshiba but are purchased from Toshiba, will
be subject to the warranty provisions provided by the equipment manufacturer, unless TAIS notifies the end-user
of any additional warranty provisions in writing.
This warranty is void (a) if the equipment is used under other than normal use and maintenance conditions, (b) if
the equipment is modified or altered, unless the modification or alteration is expressly authorized by TAIS, (c) if
the equipment is subject to abuse, neglect, lightning, electrical fault, or accident, (d) if the equipment is repaired
by someone other than TAIS or an authorized TAIS dealer, (e) if the equipment’s serial number is defaced or missing, or (f) if the equipment is installed or used in combination or in assembly with products not supplied by TAIS
and which are not compatible or are of inferior quality, design, or performance.
The sole obligation of TAIS or Toshiba Corporation under this warranty, or under any other legal obligation with
respect to the equipment, is the repair or replacement of such defective or missing parts as are causing the malfunction by TAIS or its authorized dealer with new or refurbished parts (at their option). If TAIS or one of its authorized dealers does not replace or repair such parts, the retail customer’s sole remedy will be a refund of the price
charged by TAIS to its dealers for such parts as are proven to be defective, and which are returned to TAIS through
one of its authorized dealers within the warranty period and no later than thirty (30) days after such malfunction,
whichever first occurs.
Under no circumstances will the retail customer or any user or dealer or other person be entitled to any direct,
special, indirect, consequential, or exemplary damages, for breach of contract, tort, or otherwise. Under no circumstances will any such person be entitled to any sum greater than the purchase price paid for the item of equipment
that is malfunctioning.
To obtain service under this warranty, the retail customer must bring the malfunction of the machine to the attention of one of TAIS’ authorized dealers within the applicable warranty period and no later than thirty (30) days
after such malfunction, whichever first occurs. Failure to bring the malfunction to the attention of an authorized
TAIS dealer within the prescribed time results in the customer being not entitled to warranty service.
THERE ARE NO OTHER WARRANTIES FROM EITHER TOSHIBA AMERICA INFORMATION SYSTEMS,
INC., OR TOSHIBA CORPORATION WHICH EXTEND BEYOND THE FACE OF THIS WARRANTY. ALL
OTHER WARRANTIES, EXPRESS OR IMPLIED, INCLUDING THE WARRANTIES OF MERCHANTABILITY,
FITNESS FOR A PARTICULAR PURPOSE, AND FITNESS FOR USE, ARE EXCLUDED.
No TAIS dealer and no person other than an officer of TAIS may extend or modify this warranty. No such modification or extension is effective unless it is in writing and signed by the Vice President and General Manager, Telecommunication Systems Division.
Page 6

WARRANTIES FOR NON-TOSHIBA BRANDED THIRD
PARTY PRODUCTS
A valuable element of Toshiba’s product strategy is to offer our customers a complete product portfolio. To
provide this value to our customers at the most optimal prices, we offer both Toshiba-branded and thirdparty manufactured products that support our Toshiba Strata CIX product portfolio. Similar to other
resellers of software, hardware and peripherals, these third-party manufactured products carry warranties
independent of our Toshiba limited warranty provided with our Toshiba-branded products. Customers
should note that third-party manufacturer warranties vary from product to product and are covered by the
warranties provided through the original manufacturer and passed on intact to the purchaser by Toshiba.
Customers should consult their product documentation for third-party warranty information specific to thirdparty products. More information may also be available in some cases from the manufacturer’s public
website.
While Toshiba offers a wide selection of software, hard ware and peripheral product s, we do not specifically
test or guarantee that the third-party product s we of fer work under e very configuration with any o r all of the
various models of the Toshiba Strata CIX. Toshiba does not endorse, warrant nor assume any liability in
connection with such third party products or services. If you have questions about compatibility, we
recommend and encourage you to contact the third-party software, hardware and peripheral product
manufacturer directly.
Page 7

Content s
Chapter 1 – Overview
System Administrators........................................................................................................................ 1-1
Basic Features....................................................................................................................................1-1
User Agents ........ ... ... .... ... ............................................................................................................ 1-1
Voice Messaging. ... ... ....................................................... .... ... ... .................................................. 1-2
Automated Attendant .......... ... .... ... ... ... .... ... ... ... ... ....................................................... .... ... ... ...... .. 1-2
Telephone Answering .................................................................................................................. 1-2
Fax Tone Detection......................................................................................................................1-3
Multiple System Languages.........................................................................................................1-3
Feature Groups ..................................................................................................................................1-3
Enabling Feature Groups.............................................................................................................1-3
Fax Server (feature to be added later).........................................................................................1-3
Automatic Speech Recognition (ASR) Automated Attendant (AA) ..............................................1-4
Unified Messaging (UM)...................................... .... ....................................................... ... ... ........ 1-4
Text-To-Speech (TTS).................................................................................................................1-5
System Software ................................................................................................................................ 1-6
Windows XP.. ... ... ... ... .... ... ... ... ....................................................... .... ... ........................................1-6
Diagnostic Programs..................................................... ... .... ... ... ... .... ... ... .....................................1-6
eManager Software......................................................................................................................1-6
System Integration.............................................................................................................................. 1-7
Proprietary Integration..................................................................................................................1-7
Centralized Voice Mail ..... ... ... .... ....................................................... ... ... ... ..................................1-7
Maintenance.......................................................................................................................................1-8
Trace and Log Utilities ................................................................................................................. 1-8
Chapter 2 – eManager
Log on to eManager ......................................... ... ... ... .... ... ... ... .... ... ... ... .... ........................................... 2-2
eManager Profile................................................................................................................................ 2-3
Backup Database Utility...................... .... ...................................................... .... ... ... ... .... ... ... ........ 2-7
Restore Database Utility ..............................................................................................................2-8
Options............................................................................................................................................... 2-8
Select Equipment ............................................................................................................................... 2-8
MAS Licensing.................................................................................................................................... 2-9
Access Main MAS Licensing Screen ........................................................................................... 2-9
Upload Licenses.........................................................................................................................2-10
Issue Licenses ...........................................................................................................................2-10
Activate Licenses............................. ... .... ... ... ... ... .... ...................................................................2-10
Delete Licenses................................ ... .... ... ... ... ... ....................................................... .... ............2-11
View Licenses............................................................................................................................ 2-11
View Current Licenses...............................................................................................................2-11
Strata CIX Programming Vol.2 01/07 i
Page 8

Contents
Logout of eManager ...................................... ... ... ... ... .... ... ................................................................2-12
eManager Main Screen.................................................................................................................... 2-12
Program Menu........................................... .... ... ... ... ... ....................................................... ................2-13
Help Topics...................... ................................................................................................................. 2-13
Help Topics/Context Help .......................................................... ... .... ... ... ... ... .... .........................2-13
About CIX eManager..................................................................................................................2-13
Client PC .......................................................................................................................................... 2-14
How to Prepare the Client PC....................................................................................................2-14
Load Voice Mail Application Software on Client PC...................................................................2-14
Run eManager from Network (Client) PC ............................... ... ... .... ... ... ... ................................ 2-14
Chapter 3 – Voice Mail Configuration
Configuration Menu Screens..... ... .... ... ... ... .... ... ... ... ... .... ... ....................................................... ...........3-2
Access the Configuration Menu Screens.....................................................................................3-2
Exit the Configuration Menu Screens............................... .... ... ... ... .... ... ... ... ... .... ... ... ... .... ... ...........3-2
Refresh Configuration Screen...................................................................................................... 3-2
Update Voice Mail Database.............................................................................................................. 3-2
Configure Voice Ports......................................................................................................................... 3-2
Main Menu.......................................................................................................................................... 3-3
Change System Date/Time ................................................................................................................3-4
Holidays.............................................................................................................................................. 3-4
Add Holidays................................................................................................................................ 3-5
Delete Holiday.. ... ... ....................................................... ... .... ... ..................................................... 3-5
Copy To........................................................................................................................................ 3-5
Configuration Wizard....... .... ....................................................... ... ... ... ............................................... 3-6
Use Configuration Wizard............................................................................................................3-6
User Setup Wizard ................................. ... .... ...................................................... .... ... ... .....................3-6
Use User Setup............................................................................................................................3-6
Telephone Systems............................................................................................................................3-7
Add Integration Group................................................................................................................ 3-10
Delete Integration Group .. ... ....................................................... ... .... ... ... ... ... .... ... ......................3-10
Add or Delete Switch Type.........................................................................................................3-11
Answer Methods...............................................................................................................................3-12
Add Answer Methods................................................................................................................. 3-13
Delete Answer Methods............................................................................................................. 3-13
Voice Ports.......................... ... ... ... .... ... ............................................................................................. 3-14
Add Voice Port Definition...........................................................................................................3-15
Display Voice Port Status...........................................................................................................3-15
Serial Ports.......................................................................................................................................3-16
Add Serial Port Definition........................................................................................................... 3-17
Notification Groups........................................................................................................................... 3-18
Add Notification Group............................................................................................................... 3-19
Delete Notification Group.................... .... ... ... .............................................................................3-19
Port Statistics................ ... .... ... ... ... .... ... ... .......................................................................................... 3-20
Add Port Statistics Group...........................................................................................................3-21
Delete Port Statistics Group.......................................................................................................3-21
Scheduler ......................................................................................................................................... 3-22
Add Scheduled Action................................................................................................................3-23
Delete Scheduled Action .. ... ... .... ... ... ....................................................... ... ... .... ... ... ... .... ... .........3-23
Language..........................................................................................................................................3-24
ii Strata CIX Programming Vol.2 01/07
Page 9

Change System Language Setting ............................................................................................ 3-25
Change Mailbox Language Setting............................................................................................3-25
Edit Prompts............................................................................................................................... 3-25
Voice Menu...................... .... ... ... ... .... ....................................................... ... ... ... ................................3-26
Add Voice Command.................................................................................................................3-27
Delete Voice Command................................ ... ... .... ....................................................... ... ... ... ... 3-27
Parameters.......................................................................................................................................3-28
Methods for Modifying the Parameters......................................................................................3-29
Modify Parameters............................................................................ ... ... ................................... 3-30
Add Parameters.........................................................................................................................3-30
Delete Parameters..................................... ... ....................................................... ... ... .... ............3-30
Chapter 4 – Voice Processing
User Agent(s) ...................................... ... ... .... ... ... ... ....................................................... .....................4-1
Voice Mail Menu.................................. .... ... ... ... ... .... ... ..................................................................4-2
Defined User Agents.................................................................................................................... 4-2
Class of Service (COS) ................................. ...................................................... .... ... ... .....................4-3
Inherit Function ............................................................................................................................4-3
Explore Function..........................................................................................................................4-4
Create COS for Mailboxes...........................................................................................................4-4
Edit COS for Mailboxes................................................................................................................ 4-4
User Mailbox.................... ...................................................................................................................4-5
Reserved Mailboxes.....................................................................................................................4-5
Create User Mailbox .................................................................................................................... 4-5
Modify User Mailbox................................ ... ... ... ....................................................... ... .... ... ...........4-6
Delete User Mailbox .. .... ....................................................... ... ... .................................................. 4-6
Copy Mailbox ...............................................................................................................................4-6
User Mailbox Reports................................. ... ... ....................................................... ... .... ... ... ........4-7
Mailbox Editor Menu........................................................................................................................... 4-7
Refresh Function..........................................................................................................................4-7
Lock Function...............................................................................................................................4-8
Reset Function............................................................................................................................. 4-8
Mailbox Search Function..............................................................................................................4-8
Mailbox Editor Screens....................................................................................................................... 4-9
Mailbox Header............................................................................................................................ 4-9
User Mode..................................... ... ... .... ... ... ....................................................... ... ... ................4-12
Auto Attendant .............................................................. ... .... ...................................................... 4-16
Unified Messaging............................... .... ... ... ... ... .... ... ....................................................... .........4-20
Notify.......................................................................................................................................... 4-23
Chains/Groups/Fax....................................................................................................................4-31
ASR Auto Attendant...................... ... ... .... ...................................................... .... ... ... ...................4-36
Info............................................................................................................................................. 4-39
Menus ........................................................................................................................................4-41
Auto (Scheduling)............................. ... .... ... ... ... ... .... ... ................................................................4-43
Distribution List (System).................................................................................................................. 4-48
Create Distribution List............................................................................................................... 4-49
Modify Distribution List..................... ... .... ... ... ... ... ....................................................... .... ... ......... 4-49
Delete Distribution List........................................ .... ... ... ... .... ... ... ... .... ... ... ... ... .... ... ......................4-49
Direct Send Voice............................................................................................................................. 4-50
Create/Modify Direct Send Voice User Agent............................................................................4-50
Contents
Strata CIX Programming Vol.2 01/07 iii
Page 10

Contents
Direct Send Fax................................................................................................................................ 4-51
Create/Modify Direct Send Fax User Agent...............................................................................4-51
Chapter 5 – Fax Server
Chapter 6 – Automatic Speech Recognition (ASR)
ASR AA Version 5 Software Features................................................................................................6-1
ASR AA with Continuous Speech Processor ................................... ... .... ... ... ... ... .... ... ... ... .... ... ... ........6-2
Hardware/Software Requirements............. ... ... ... .... ... ... ... .... ...................................................... .. 6-2
Prior to Installing............................................ ... ... ... ... .... ... ..................................................................6-2
ASR Installation...... ... ... ... .... ... ... ... ....................................................... ............................................... 6-3
Automatic Directory Synchronization for ASR AA Feature Group...................................................... 6-8
Chapter 7 – Unified Messaging (UM)
Feature Description............................................................................................................................ 7-2
Voice File Compression.................... ... ... ... .... ... ... ... ... .... ....................................................... ..............7-2
UM Synchronization ...........................................................................................................................7-2
IMAP4 ..........................................................................................................................................7-2
Message Disposition Notification (MDN)......................................................................................7-3
Components....................................................................................................................................... 7-3
Server Components................................... ... ... ... .... ... ... ... .... ... ... .................................................. 7-3
Client Components....................................................................................................................... 7-3
Installation .......................................................................................................................................... 7-6
Server Installation...................................... .... ... ....................................................... ... ... .....................7-6
Client PC Installation .......................................................................................................................... 7-9
Using Outlook 2000/98...............................................................................................................7-10
Using Outlook XP/2002/2003..................................................................................................... 7-11
SMTP Dedicated Gateway Server.................................................................................................... 7-13
Installation.................................................................................................................................. 7-13
Configuration..............................................................................................................................7-14
Record Voice Messages (Using Windows Sound Recorder) ........................................................... 7-15
Send WAV File as Voice Message...................................................................................................7-16
Chapter 8 – Text-to-Speech (TTS)
Hardware/Software Requirements ......................... ... .... ... ... ... .... ... ... ... .... ........................................... 8-1
Installation .......................................................................................................................................... 8-2
Prior to Installing ....... .... ... ... ... .... ... ... ... .... ... ....................................................... ... ... ... ..................8-2
Server Installation...................................... .... ... ....................................................... ... ... .....................8-2
Client PC Programming......................................................................................................................8-4
Chapter 9 – Interactive Voice Response (IVR)
IVR User Agents............................................ ... ... ....................................................... ... ... ..................9-1
Create IVR User Agents...............................................................................................................9-2
Delete IVR User Agents.............................................................................................................. 9-3
Edit/Modify IVR User Agents........................................................................................................9-3
Answer Methods.................................................................................................................................9-3
Voice Ports.......................... ... ... ... .... ... ............................................................................................... 9-3
IVR Alias Editor ...................................... ... .... ... ... ... ....................................................... .....................9-4
Edit IVR Alias...............................................................................................................................9-4
Run IVR Alias.......................................................................................................... .....................9-5
iv Strata CIX Programming Vol.2 01/07
Page 11

Chapter 10 – Advanced Integrations and
Applications
CIX Integration................. .... ... ... ....................................................... ................................................ 10-1
AMIS Networking.............................................................................................................................. 10-5
AMIS User Agents...................................................................................................................... 10-5
AMIS Node.................................................................................................................................10-8
Destination System Number ...................................................................................................... 10-9
Configuring Voice Mail for AMIS................................................................................................10-9
Testing AMIS........................................................................................................................... 10-11
AMIS Operation........................................................................................................................ 10-11
Private/Urgent Message Handling .......................................... ... ... ........................................... 10-12
Notification ...............................................................................................................................10-12
AMIS User Agent Reports........................................................................................................10-13
VPIM Networking............................................................................................................................10-13
VPIM User Agents.................................................................................................................... 10-13
VPIM Operation........................................................................................................................ 10-16
Chapter 11 – Token Programming
Using the Token Programming Language........................................................................................ 11-1
Users Mode Screen’s Extension Field.......................................................................................11-1
Auto Screen’s Extension Field...................................................................................................11-1
Notify’s Template Editor Parameter Field .................................................................................. 11-1
Singular Tokens................................................................................................................................ 11-2
Replaced or Variable Tokens........................................................................................................... 11-4
Defined Tokens ................................................................................................................................11-7
Contents
Chapter 12 – System Reports
Data Retention.................................................................................................................................. 12-1
Report Types....................................................................................................................................12-1
Report Elements............................................................................................................................... 12-2
Reports.............................................................................................................................................12-2
Run/Print/Save/E-mail Report................. ... ... ... ..........................................................................12-2
Port Information and Statistics...................................................................................................12-2
Mailbox Information and Statistics ................................ ... .... ... ... ... .... ... ...................................... 12-6
System Information.......................... ... .... ... ... ... ... .... ... ..............................................................12-10
Custom Reports.............................................................................................................................. 12-11
Report Templates..................................................................................................................... 12-11
Create Voice Mailbox Template...............................................................................................12-11
Edit Voice Mailbox Template....................................................................................................12-12
Create Voice Mail AMIS/VPIM Template.................................................................................12-12
Edit AMIS/VPIM Template ......................................................................................................12-12
Run/Print/Save/E-mail Report................. ... ... ... ........................................................................12-12
Chapter 13 – Maintenance/Troubleshooting
Backup Procedure........... .... ....................................................... ... ... ... ............................................. 13-1
Restore Procedure ...........................................................................................................................13-2
Utilities/Tools....................................................................................................................................13-3
VM Port Status........................................................................................................................... 13-3
VM Tracer/Tracer Files .............................................................................................................. 13-3
Strata CIX Programming Vol.2 01/07 v
Page 12

Contents
IVR Alias Editor.......................................................................................................................... 13-6
Run IVR Alias.......................................................................................................... ...................13-6
ASR Sync............................................................................................................. ......................13-6
SES Restart...................................................................................................................................... 13-7
vi Strata CIX Programming Vol.2 01/07
Page 13

Introduction
This Programming Manual provides detailed step-by-step instructions for programming the Voice
Mail Processing Application. It is intended for qualified Service Technicians (Installers) and
System Administrators.
Organization
This manual is divided into the following chapters:
• Chapter 1 – Overview covers the qualifications of an Installer/System Administrator and
provides details on the Stratagy ES software’s Feature Groups and hard ware.
• Chapter 2 – eManager gives information on access levels, passwords, toolbars and a chart of
the configuration menu. Instructions on starting up the system and accessing the Voice Mail
Administration are also provided.
• Chapter 3 – Voice Mail Configuration describes each of the menu options and gives detailed
instructions on using the screen functions.
• Chapter 4 – Voice Processing provides detailed information on creating/modifying and
deleting mailboxes (e.g., COS, user, Distribution List, AMIS, and Direct Send Voice).
• Chapter 5 – Fax Server (chapter to be added later).
• Chapter 6 – Automatic Speech Recognition (ASR) covers how the ASR feature operates and
how to install the required hardware/software.
• Chapter 7 – Unified Messaging (UM) covers how the UM feature operates and how to install
the required hardware/software.
• Chapter 8 – Text-to-Speech (TTS) covers how the TTS feature operates and how to install the
required hardware/software.
• Chapter 9 – Interactive Voice Response (IVR) provides information on how the IVR feature
operates and how to create/delete/modify IVR user agents.
• Chapter 10 – Advanced Integrations and Applications covers procedures for enabling and
testing SMDI, AMIS, and VPIM for the Stratagy ES.
• Chapter 11 – Token Programming provides detailed instructions for customizing and
administering the Stratagy ES system. A complete list of tokens and descriptions are included.
• Chapter 12 – System Reports covers running, viewing, saving and printing reports.
• Chapter 13 – Maintenance/Troubleshooting contains instructions on Backup, Restore,
VM Tracer functions.
• Index
Strata CIX Voice Mail Programming 01/07 1
Page 14

Introduction
Conventions
This manual uses these conventions:
Conventions Description
Elaborates specific items or references other information. Within
Note
some tables, general notes apply to the entire table and numbered
notes apply to specific items.
Important!
CAUTION!
WARNING!
Arial Bold
Calls attention to important instructions or information.
Advises you that hardware, software applications, or data
could be damaged if the instructions are not followed closely.
Alerts you when the given t ask could cause personal injury or
death.
Represents telephone buttons.
Courier Shows a computer keyboard entry or screen display.
“Type” Indicates entry of a string of text.
“Press”
Arial Bold
Italics
Indicates entry of a single key. For example: Type prog then
press Enter.
Represents LCD displays, tokens or custom IVR functions. For
example:
M( ).
Represents parameter and menu/screen field names, and book
titles. For example: hot_box parameter, Extension field.
Shows a multiple PC keyboard or phone button entry. Entries
Plus (+)
without spaces between them show a simultaneous entry.
Example: Esc+Enter. Entries with spaces between them show a
sequential entry. Example: #
+ 5.
Tilde (~) Means “through.” Example: 350~640 Hz frequency range.
!
!
Start > Settings > Printers
Denotes the step in a one-step procedure.
Denotes a procedure.
Denotes a progression of buttons and/or menu options on the
screen you should select.
Grey words within the printed text denote cross-references. In the
See Figure 10
electronic version of this document (Library CD-ROM or FYI
Internet download), cross-references appear in blue hypertext.
-2 Strata CIX Voice Mail Programming 01/07
Page 15

Related Documents/Media
Note Some documents listed here may appear in different versions on the CD-ROM, FYI, or in
print. To find the most current version, check the version/date in the Publication
Information on the back of the document’s title page.
• Strata CIX General Description
• Strata CIX Application and Documentation Library CD-ROM
• Strata CIX Installation and Maintenance Manual
• Strata CIX Stratagy Voice Processing User Guide
• Strata CIX Stratagy Voice Processing Quick Reference Guide
• Strata CIX Stratagy Voice Processing System Administrator Guide
For authorized users, Internet site FYI (http://fyi.tsd.toshiba.com) contains all current voice
processing documentation and enables you to view, print, and download current publications.
Introduction
Strata CIX Voice Mail Programming 01/07 3
Page 16

This page is intentionally left blank.
Page 17

Overview 1
This chapter covers the qualifications of Installers and System Administrators and provides an
overview of basic features and Feature Groups.
System Administrators
Service Technicians install, upgrade, and maintain the Stratagy ES system. System Administrators’
functions vary by company.
Your company will assign all or some System Administrator functions to an employee who knows
your telephone system, organizational structure, and the needs of your customers and employees.
The Toshiba Dealer’s Technical Service Representative will perform the remaining functions.
System Administrator functions may include:
• Initial setup (assisting the Installer with defining your company’s configuration and
customization requirements)
• Customizing mailboxes
• Generating reports
Overview
• Performing system shutdown and restart
• Backing up the system
Basic Features
Stratagy ES provides User Agents, Voice Messaging, Automated Attendant and Telephone
Answering as standard features with Fax Server (feature to be added later), ASR AA, UM, TTS/
Email and IVR as options.
See Chapter 4 – Voice Processing for more details.
User Agents
Stratagy ES is a system capable of numerous applications. Most applications are performed by
software objects that hold properties and privileges for various functions. These objects are called
User Agents. Similar to the User ID concept in the DOS-based Stratagy systems, a User Agent can
be used to define a Class of Service, a system distribution list, an IVR application, a user mailbox,
an AMIS Gateway or Proxy mailbox, a Voice Profile Internet Mail (VPIM) Gateway or Proxy
mailbox and the Direct Send Voice or Fax (feature to be added later) function. It is the properties
of the User Agent that determines its identity.
Throughout this manual, you will see various forms of User Agents, most notably in a voice
mailbox identity. Once a User Agent is created and defined as a mailbox, the system software, voice
prompts, and eManager Administration screens refer to it as a mailbox and not a User Agent. To
better understand this concept, consider a User Agent to be a template that can be used to form
numerous applications.
Strata CIX Voice Mail Programming 01/07 1-1
Page 18

Overview
Basic Features
Voice Messaging
Automated Attendant
Answer Company Lines
Available All of the Time
Voice messaging features enable users to create, send, receive and save voice messages. Users can
access their messages from any touchtone telephone and perform many voice messaging functions
(e.g., play, edit, delete, or forward messages). Stratagy ES users can also use many of the same
functions for an optional fax messaging application (feature to be added later).
The Stratagy ES system’s Automated Attendant application can be set up to solve various
answering requirements.
Callers do not have to wait when the operator is busy with other calls. Company lines are answered
quickly and courteously by customized, automated greetings. If callers have a rotary phone or do
not know the extension, they are directed to an operator for assistance; or, if the Stratagy ES is
equipped with ASR AA, the caller can say the user’s name and the ASR AA feature directs the call
to the appropriate extension.
Callers can reach the Stratagy ES from any touchtone telephone 24-hours-a-day, 365-days-a-year.
Call Routing
Once a call is answered by voice mail, callers are routed to the extension, department, etc., they
enter. If the extension number is not known, a company directory can be used by entering the first
few letters of a user’s name on the dial pad. If Stratagy ES is equipped with ASR AA, callers can
also say the user’s name and be routed to the extension they want.
Stratagy ES can also be set up to direct rotary callers to an operator for assistance. Additionally, if
the line is unanswered or busy, the call can be routed to another extension or to the company
operator.
If all extensions are unavailable, callers can hold or hang up. If they hold, they are placed in a queue.
They are then periodically told of their position in the queue and can be offered options to hold for
the next available assistant, leave a message or dial another extension.
If a fax tone is detected, voice mail automatically transfers the call to a fax machine connected to a
telephone system extension.
Provides Callers with Information
Callers can receive prerecorded information such as the company address, directions, product
specifications, service offerings and price information (also described as an Audiotex feature).
Telephone Answering
Stratagy ES offers comprehensive message taking capabilities by providing telephone answering
when an individual is busy or unavailable.
Up to seven greetings per mailbox can be recorded and scheduled to play at various times of the
day. This ensures coverage 24-hours-a-day, 7-days-a-week.
When extensions are busy or do not answer, the system plays the appropriate busy or personal
greeting and offers the caller the choices of leaving a message, calling another extension, holding,
call queuing, or receiving assistance.
See Chapter 4 – Voice Processing for more details.
1-2 Strata CIX Voice Mail Programming 01/07
Page 19

Fax Tone Detection
Overview
Feature Groups
Whenever voice mail detects a fax CNG tone at the caller menu, it automatically loads mailbox 994
(default fax box). Mailbox 994 acts as a system fax box that keeps all the incoming faxes that do
not address a specific mailbox number. This mailbox can also be programmed to transfer fax calls
to an external fax machine.
Note Ports configured for ASR AA cannot perform Fax Tone Detection.
Multiple System Languages
Stratagy ES can be configured with any number of different audio prompt files and communicate
in different languages on different ports simultaneously. American English comes as a standard
prompt option.
Feature Groups
Feature Groups are software components that can perform discretely or in conjunction with other
Feature Groups. For example, some Fax Server (feature to be added later) features work in
conjunction with Unified Messaging.
A majority of the Feature Groups within the Stratagy ES software are implemented using an
advanced technology, such as ASR and TTS.
Feature Groups provide specific functionality. For example, the ASR Automated Attendant (ASR
AA) Feature Group provides a set speech enabled automated attendant function.
This section will include some detail on the technology of Feature Groups.
Overview
Enabling Feature Groups
Feature Groups are enabled by purchasing a license for the feature group through the Toshiba FYI
site at http://fyi.tsd.toshiba.com. Once you have purchased the license, follow the detailed
instructions in “MAS Licensing” on page 2-9 to activate the license.
Fax Server (feature to be added later)
Note See Chapter 5 – Fax Server for complete details on this feature.
The Voice Mail Application provides a comprehensive set of fax capabilities to use either from the
phone or from the user’s PC. Some of the functions available will be:
• Send a fax message
• Fax Mail – immediate retrieval
• Fax Mail – send/retrieve
• Fax on Demand/Fax Back
• Fax Broadcasting – custom IVR application enabling single or multiple fax documents to be
transmitted to a single or multiple list of clients that are stored in a database.
• Client Fax Printer Driver available with the UM Feature Group
• UM used in conjunction with the fax server will provide a Fax Viewer that enables the fax to be
read from the user’s PC.
The Fax Server is supported by software called SoftFAX. When licensed for the Fax Feature Group,
two channels of Fax will be available for each eight channels of voice.
Strata CIX Voice Mail Programming 01/07 1-3
Page 20

Overview
Feature Groups
Automatic Speech Recognition (ASR) Automated Attendant
(AA)
Note See Chapter 6 – Automatic Speech Recognition (ASR) for complete details on this
feature.
Automatic Speech Recognition (ASR) is the term for recognizing human speech. It is used to create
a more natural way of interacting with machines.
The ASR AA Feature Group supports up to 250 names in its directory, and comes with a User Login
and Quick Message feature.
The ASR Feature Group comes with two channels of ASR resources.
Important!
• Ports that are configured for ASR AA can only accept inbound voice mail integration using
Simplified Message Desk Interface (SMDI). Dual Tone Multi-frequency (DTMF) in-band
integration is not supported on these ports. If DTMF integration is necessary, additional ports
not configured for ASR Auto Attendant are required.
• Ports configured for ASR AA cannot perform Fax Tone Detection.
The Stratagy ES’ Media Application Server provides the processing power required for the ASR
Feature Group, no additional speech-related hardware is required. A maximum capacity of eight
channels of ASR can be invoked simultaneously.
Unified Messaging (UM)
Note See Chapter 7 – Unified Messaging (UM) for details on this feature.
Stratagy ES integrates with e-mail servers to insert voice messages into an e-mail client in-box.
Stratagy ES provides two Unified Messaging client solutions, Microsoft
and Internet Protocol (IP) Integration.
For a complete Unified Messaging solution, the Voice Mail Application must also be equipped with
the Fax Server Feature Group (feature to be added later) and boards, if required.
Microsoft Outlook Integration
Stratagy ES has a proprietary integration designed to work with Microsoft Outlook. With this
proprietary integration, voice messages are displayed along with e-mail messages in the Outlook
Inbox screen.
When a voice message is selected, a Toshiba designed edit screen is automatically presented that
enables voice playback through the multimedia speakers of the user’s PC, or if desired, through the
user’s telephone.
When a fax message (fax feature to added later) is selected, a preloaded fax viewer software is
launched with the fax image loaded. The fax viewer software can be any Tagged Image File Format
(TIFF) format compatible software of the user’s choice.
This integration does not require Microsoft Exchange as the e-mail server. Any e-mail
server/service that is compatible with the Simple Message Transport Protocol (SMTP), Post Office
Protocol version 3 (POP3) or Internet Message Access Protocol 4 (IMAP4) Internet protocols is
supported.
® Outlook® Integration
1-4 Strata CIX Voice Mail Programming 01/07
Page 21

Internet Message Access Protocol 4 (IMAP4) Synchronization
If IMAP4 is selected, the following occurs:
• If a user logs into his/her voice mail via the TUI and deletes a message, Stratagy uses IMAP to
identify and delete the message in the e-mail server. This also deletes the messages from the
user’s e-mail client inbox screen if the messages were displayed on it at the time.
If a user logs into his/her voice mail via the TUI and listens to a message in the NEW folder, the
corresponding message in the e-mail server or e-mail client inbox is flagged as “read” or
“seen.” This includes messages that are marked by Stratagy as Pending and kept in the New
Message folder. Messages marked as Deleted are not actually deleted until the user logs out
from his or her UM-enabled mailbox.
• If Stratagy voice messages are deleted in the e-mail client, the corresponding messages in the
Stratagy system are deleted or saved to a Personal message folder of the user’s voice mailbox.
Whether the message is deleted or moved to a Personal Folder is a configurable option within
each mailbox. If the Message Transport Scheme field on the Mailbox Editor Unified Messaging
Tab screen is set to IP Standard, this synchronization is performed periodically via the Stratagy
Scheduler feature. If that field is set to SES Proprietary, the update is performed realtime.
Internet Protocol Integration
Stratagy ES sends voice messages to any e-mail service that supports the SMTP and POP3 Internet
protocols. With this integration any e-mail client that supports SMTP/POP3 (e.g., Eudora Pro
Netscape Messenger) receives Stratagy ES voice messages as e-mail messages with audio (voice
messages) file attachments. Though not as proficient as the Microsoft Outlook Integration, the
Internet Protocol (IP) Integration provides limited Unified Messaging capabilities for users who
want to use an e-mail client other than Microsoft Outlook. IMAP4 synchronization is also available
using this method of Unified Messaging.
Overview
Feature Groups
Overview
™,
Message Disposition Notification (MDN)
Stratagy adds a Message Disposition Notification (MDN) request when it sends a voice message to
the e-mail server. When the user opens up a voice message (sent by Stratagy), a MDN is sent to
Stratagy voice mail. As soon as Stratagy receives the MDN, it deletes or saves the messages in the
user’s mailbox. Whether the message is deleted or saved is a configurable option within each
mailbox. Some e-mail servers may not support MDN protocol or may label it in some other manner.
Check their documentation for Return Receipt operation across the Internet.
Text-To-Speech (TTS)
Note See Chapter 8 – Text-to-Speech (TTS) for details on this feature.
TTS is the term for converting text to computer-generated speech output. It is used in applications
where the customer either does not want to use the disk space or does not have the required disk
space to record every necessary variable in a database. This is particularly effective for speaking
e-mail messages using the telephone user interface.
The TTS/Email Feature Group enables e-mail messages to be read back to users via the Telephone
User Interface (TUI) and requires voice mail to be equipped with the UM Feature Group.
TTS/Email capabilities are delivered in a host-based configuration. The Media Application Server
provides the processing power for TTS.
Strata CIX Voice Mail Programming 01/07 1-5
Page 22

Overview
System Software
System Software
Stratagy ES’s flexibility is provided by the Windows® XP operating system and the voice mail
software. The following provides a brief overview of the system software.
Important! Older Stratagy ES software is not supported on Windows XP.
Windows XP
This multi-tasking operating system controls all processing functions through the use of Windowsbased menus and icons that provide administration, configuration, diagnostics, system monitoring,
and reporting functions.
Diagnostic Programs
On-line diagnostic tests for Windows XP and voice mail run continuously to detect and report errors
in operation. The tests run in the background and do not interfere with normal system operation.
Other diagnostic tests can be run upon demand, either from a directly-connected or remote terminal.
eManager Software
The eManager Administration program uses a Graphical User Interface (GUI) and is composed of
the configuration screens and other administrative menus for the system.
System configuration consists of eleven screens—Telephone System Integration, Answer Methods,
Voice Ports, Serial Ports, Notification Port Groups, Statistical Port Groups, Scheduler, Language,
Parameters, and Voice Menu. These screens serve as the basis for configuring and programming the
voice mail basic system operating procedures.
Voice Mail configuration consists of ten screens—Mailbox, Mailbox COS, Distribution List, IVR,
AMIS Gateway and Proxy, VPIM Gateway and Proxy, Direct Send Voice and Direct Send Fax (not
supported at this time).
In addition to the configuration screens, you can also run reports using prepro grammed templates
and reports—Port Statistics, Port Group Statistics, All Port Statistics, Mailbox Call Statistics,
Mailbox Usage, Mailbox Info/Status, Mailbox Message Statistics, System Information, Mailbox
Template, and AMIS/VPIM Template.
eManager software can also be installed on a separate Windows 2000/ME/98 or Windows NT
computer for remote administration over a network. Remote Access Service (RAS) capability
enables administration via a Local Area Network (LAN) connection.
The eManager Administration softwa re program i s preloaded on every system an d is co mposed of
the administrative and configuration menus for the system. Operating software, voice p rompts, and
database access utilities are all stored on the Media Application Server’s hard drive.
Administrative Menus
A series of voice processing menus enable an Installer or System Administrator to customize:
• Enable and disable configuration and mailbox features
• Define and configure features
• View status of voice ports
• Define and generate system reports
• Define telephone system integration
• Program user mailboxes
1-6 Strata CIX Voice Mail Programming 01/07
Page 23

Configuration Wizard
The Configuration Wizard guides the Administrator through the Stratagy ES basic operation setup.
It includes:
• Configure the System Database – specifies telephone systems, set up voice lines and answering
methods for Automated Attendant and designate holidays.
• Configure User Agents Database – creates Class of Service (COS) and user mailboxes.
System Integration
The following is a partial list of the system integrations supported by the Voice Mail Application.
Proprietary Integration
The Proprietary Integration between the Stratagy ES software and a Strata CIX system only requires
the IP network connection between the two systems.
If a company has a Toshiba Strata CIX phone system and Toshiba Strata 2000- or 3000-series
digital phones, this proprietary integration provides interoperability between the Stratagy ES and
the Strata CIX.
Overview
System Integration
Overview
• Soft Key Control of Voice Mail – Working in conjunction with the LCD digital telephones of
the Strata CIX, voice mail integration provides a visual display of the voice mailbox user menu.
Menu navigation can be accomplished by use of the soft keys adjacent to the various menu
options on the display.
• Call Record – By using a programmable feature key called Record on the digital telephones of
the Strata CIX, users have the ability of recording live telephone conversations directly into
voice mailboxes on the Voice Mail Application.
Note Once the Record button is pressed, the Record LED flashes rapidly and there is
approximately a one second interval (in extreme busy conditions, up to five seconds)
before the recording starts and the Record LED changes to the in-use interval flash rate.
A secondary feature key can be programmed to pause/resume the recording.
This integration requires both the Strata CIX and the Stratagy ES be properly configured to work
with each other.
Centralized Voice Mail
The Stratagy ES Voice Mail Application can be configured to service environments such as,
enterprise-modeled businesses with multiple office locations and office suites.
Companies with multiple Strata CIX systems networked together using Toshiba’s StrataNet can be
supported by one Stratagy ES for all voice mail requirements.
Note Call Record and Soft Key Control of Voice Mail features are not available across the
StrataNet network nodes.
To take this capability one step further, each mailbox can also be configured to perform a separate
set of transfer commands than those defined for the CIX the Stratagy ES is connected to locally.
This means that calls can be transferred to cell phones and home offices, while the Voice Mail
Application still maintains control in order to provide alternate call routing options or voice
messaging features in case of an unsuccessful transfer.
Strata CIX Voice Mail Programming 01/07 1-7
Page 24

Overview
Maintenance
Maintenance
Toshiba Voice Mail Application hardware and software base platforms are easily maintained by a
Toshiba authorized dealer. Procedures for backing up, restoring and maintaining the system,
Feature Groups, and call processing database information are efficient and easily performed by
trained administrators and technical personnel.
Trace and Log Utilities
These features are used to analyze the voice mail functions and system operation for development
and troubleshooting.
Voice mail traces system behavior without shutting down the system. The Trace function starts at
system startup time and logs the information related to each individual call, mailbox, port, thread
and message.
The Log function provides four types of data: user mailbox log in/log out, messages, abnormal
events and ckdb (check database) results.
1-8 Strata CIX Voice Mail Programming 01/07
Page 25

eManager 2
eManager™ is a powerful Microsoft® Windows®-based telephone system management tool used
to program, maintain and upgrade the Strata CIX Digital Business Telephone System and
Stratagy ES Voice Mail System. eManager normally resides on the Media Application Server
(MAS) with the Stratagy ES and ACD applications or loaded on a Server with network access to
CIX and the applications on the MAS.
The Client’s PC (see “Client PC” on page 2-14 for specifications) must have Microsoft® Internet
Explorer 6.00 or above. The user connects to eManager with the browser in the same manner as
connecting to any Website.
Note At this time eManager only supports Windows IE. Other browsers are not supported.
eManager uses a variety of networking and software technologies as follows:
• Local Area Network (LAN) – System Administrators can connect their PC to
Strata CIX via a network interface jack or modem. eManager views the Strata CIX system and
Stratagy ES as a LAN providing a stable environment in which to program and access data.
• Windows Management Instrumentation (WMI) – enables query-based information retrieval
and event notification. WMI is an access mechanism which enables eManager to access,
monitor, command and control Strata CI X and Stratagy ES.
• Virtual Web Server and Manager – creates a virtual World Wide Web environment in
Strata CIX and Stratagy ES. This technology enables eManager to view Strata CIX and
Stratagy ES as service providers providing services for the system administrator.
• Microsoft Internet Explorer® browser access – Virtual Web Service enables System
Administrators to access Strata CIX and Stratagy ES using the Internet Explorer browser.
• eManager Graphical User Interface (GUI) – Sophisticated programming tasks are just a
click-of-the-mouse away with eManager’s GUI.
• Mobile Access – enables System Administrators to program, maintain, and/or upgrade a
Strata CIX and Stratagy ES from any mobile location with an Internet connection—without
ever leaving the office.
• Internet Access – eManager uses Microsoft IP technology to enable access to your Strata CIX
and Stratagy ES as easy as browsing the World Wide Web.
• Internet Explorer – provides a stable environment in which to program, maintain and
upgrade your Strata CIX and Stratagy ES.
eManager’s tight integration of the above technologies provide System Administrators with
convenient, stable, user friendly and comprehensive access to Strata CIX/Stratagy ES system
information.
eManager can connect directly to your Strata CIX Digital Business T elephone System/Stratagy ES
Voice Mail System via Network Interface (located on the Strata CIX’s processor board). Mobile
System Administrators can access a Strata CIX/Stratagy ES system from any location that
provides Internet access.
eManager
Strata CIX Voice Mail Programming 01/07 2-1
Page 26

eManager
Log on to eManager
Log on to eManager
1. From Microsoft Internet Explorer window, type
http://<PC Name>/emanager and press Enter.
The eManager window displays (shown right).
2. T ype the Us er Name (defaul t is Administrator) in
the User Name field. Press Tab.
3. Type the password (default is password) in the
Password field.
Note For security reasons, if you haven’t changed
the default password you should change it
now.
4. Click Login. The Select CIX
System screen displays (shown
at right).
5. Select the StrataCIX Network
Domain from the left hand
portion of the screen and click
Connect. The eManager Main
Menu displays (see “eManager
Main Screen” on page 2-12).
...or if no Network Domains
appear in the window, you must
go to the eManager Profile
windows to add them.
7457
Important! If the Stratagy Voice
Mail System is not
running, you receive a
warning that you cannot connect to the MAS (Media Application Server) and log
onto the voice mail portion of the eManager program. Check the Strata CIX
Programming Manual Volume 2 for Stratagy ES Voice Mail System for instructions
on starting Stratagy ES.
The following options are available at login from the Select CIX screen:
• eManager Profile
• Login Accounts
• Equipment Editor
• Classes Setup
• DB Utility
• Options
• Select Equipment
• MAS Licensing
• Logout
7334
2-2 Strata CIX Voice Mail Programming 01/07
Page 27
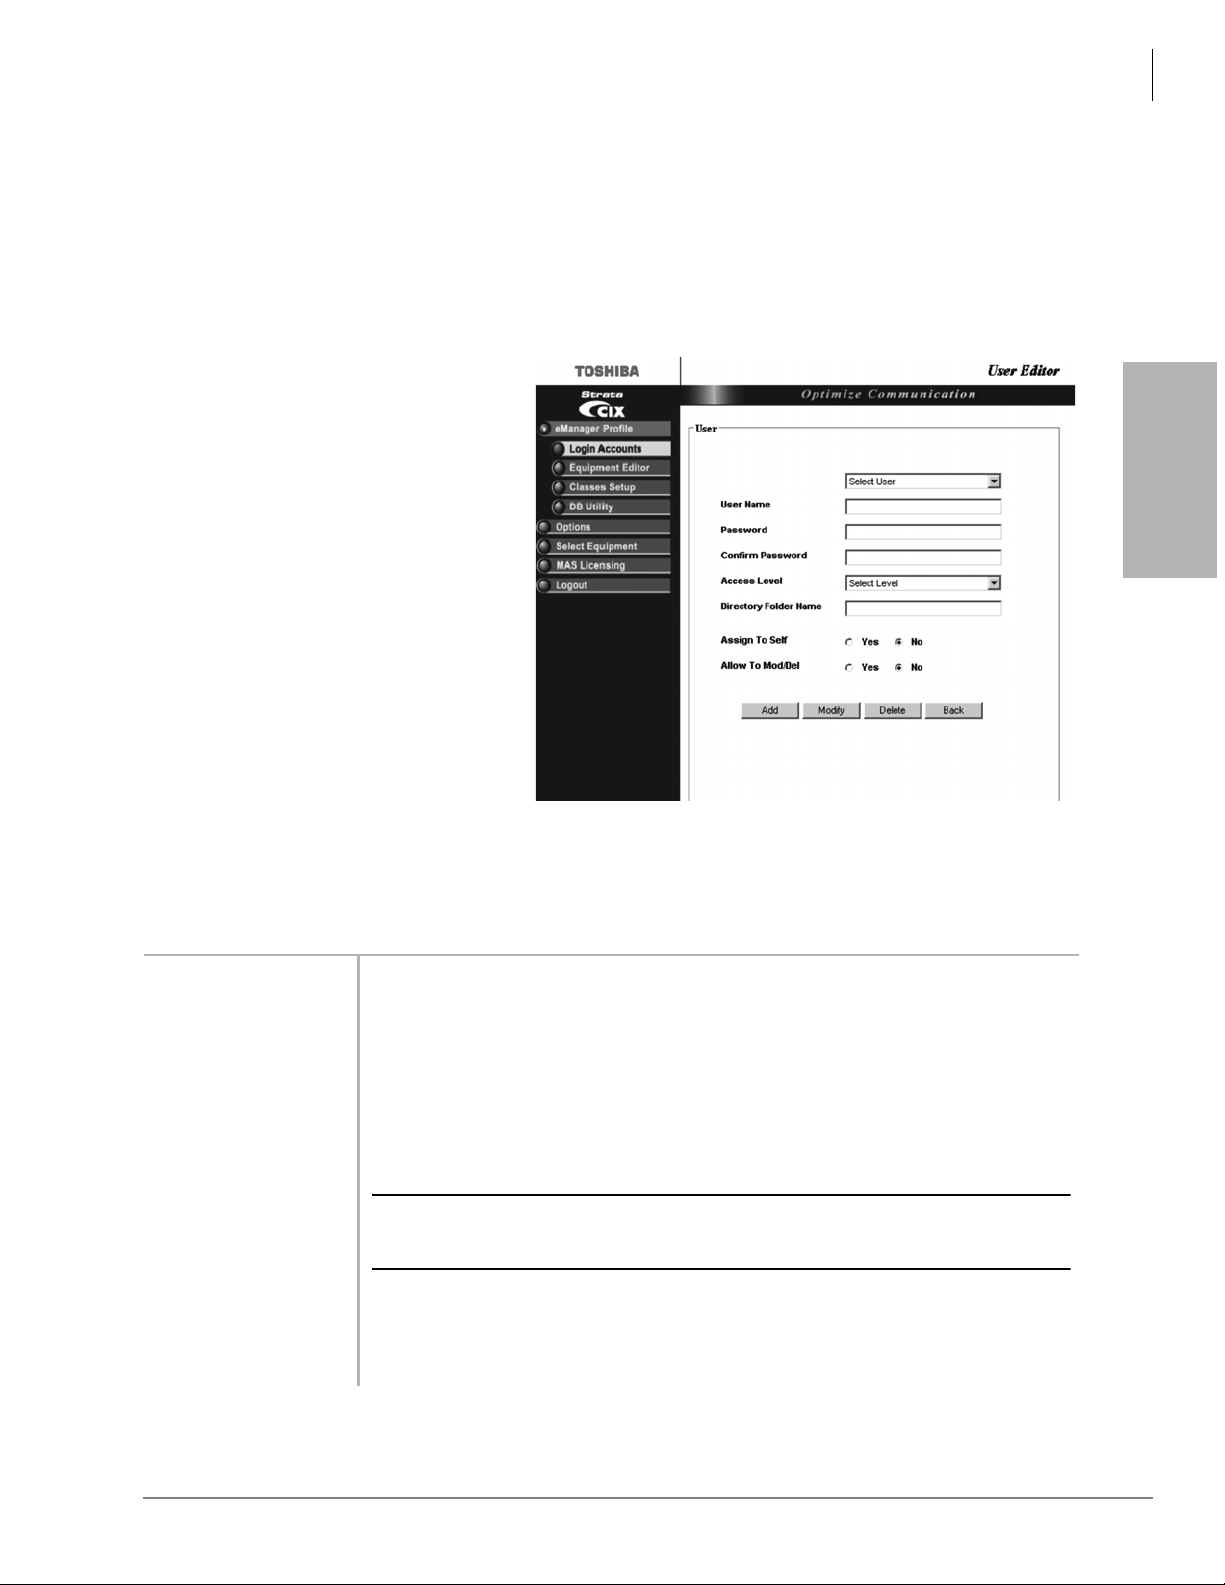
eManager Profile
The eManager User’s Profile database creation and initialization is only required the first time you
logon to eManager or to use the screens to make revisions later on.
Step 1: Login Accounts
This screen is for administrating (adding/deleting/modifying) access levels and users for the
eManager (CIX/voice mail) system.
1. Log on to eManager.
2. Click on eManager Profile >
Login Accounts from the
menu.The User Editor screen
displays (shown right).
3. If this is the first time you
have accessed this screen,
select Administrator from the
drop-down menu
...or select the appropriate
user’s name from the list.
eManager
eManager Profile
eManager
4. Fill in the appropriate fields
based on the descriptions
found in Table on page 2-3.
5. Click Add, Modify, or Delete.
6. To exit the screen and return to
the previous screen, click
Back.
Table 2-1 Login Accounts Screen Fields
FIELD DESCRIPTION
User Name Enter the new User name. The initial user name of the administrator is Administrator.
Possible values: Alphanumeric characters.
Note The administrator user name cannot be changed.
Password Enter the new password. The initial password is password. This password can be
changed by the administrator or user. The password is case sensitive.
To protect User Passwords, open Internet Explorer and go to Tools > Internet Options >
Content > Autocomplete. Uncheck User Names and Password on forms, then click on
Clear Passwords.
CAUTION! Be sure to change the default password to protect the system from
unauthorized access. Record all your passwords that use Internet
Explorer.
Possible values: Alphanumeric characters.
Confirm Password Repeat password entered in Password field.
Possible values: Alphanumeric characters.
Strata CIX Voice Mail Programming 01/07 2-3
Page 28

eManager
Login Accounts
Table 2-1 Login Accounts Screen Fields
FIELD DESCRIPTION
Access Levels Multiple users can access the program at one time. There are four access levels:
• Level 1: Complete access to all system administrative functions. Creates and deletes
• Level 2: Given privileges by Level 1. Can assign department levels. Only Level 1 that
• Level 3: Takes care of departmental administration. This level can be assigned the
• Level 4: The single client/user has access to only his/her personal objects.
Note Access to menu functions vary by access level. Functions that are disabled appear
Directory Folder Name If left blank, system uses the user’s name from the first field.
Assign to Self Assigns equipment control to this user.
Allowed to Mod/Del Allows this user to modify or delete equipment.
all other access levels.
created Level 2 can delete or reset the password.
following responsibilities for specified mailboxes: define class of service; set up user's
Options, Auto schedule and Notify screens; and report generating capabilities.
grayed out on the menu.
2-4 Strata CIX Voice Mail Programming 01/07
Page 29
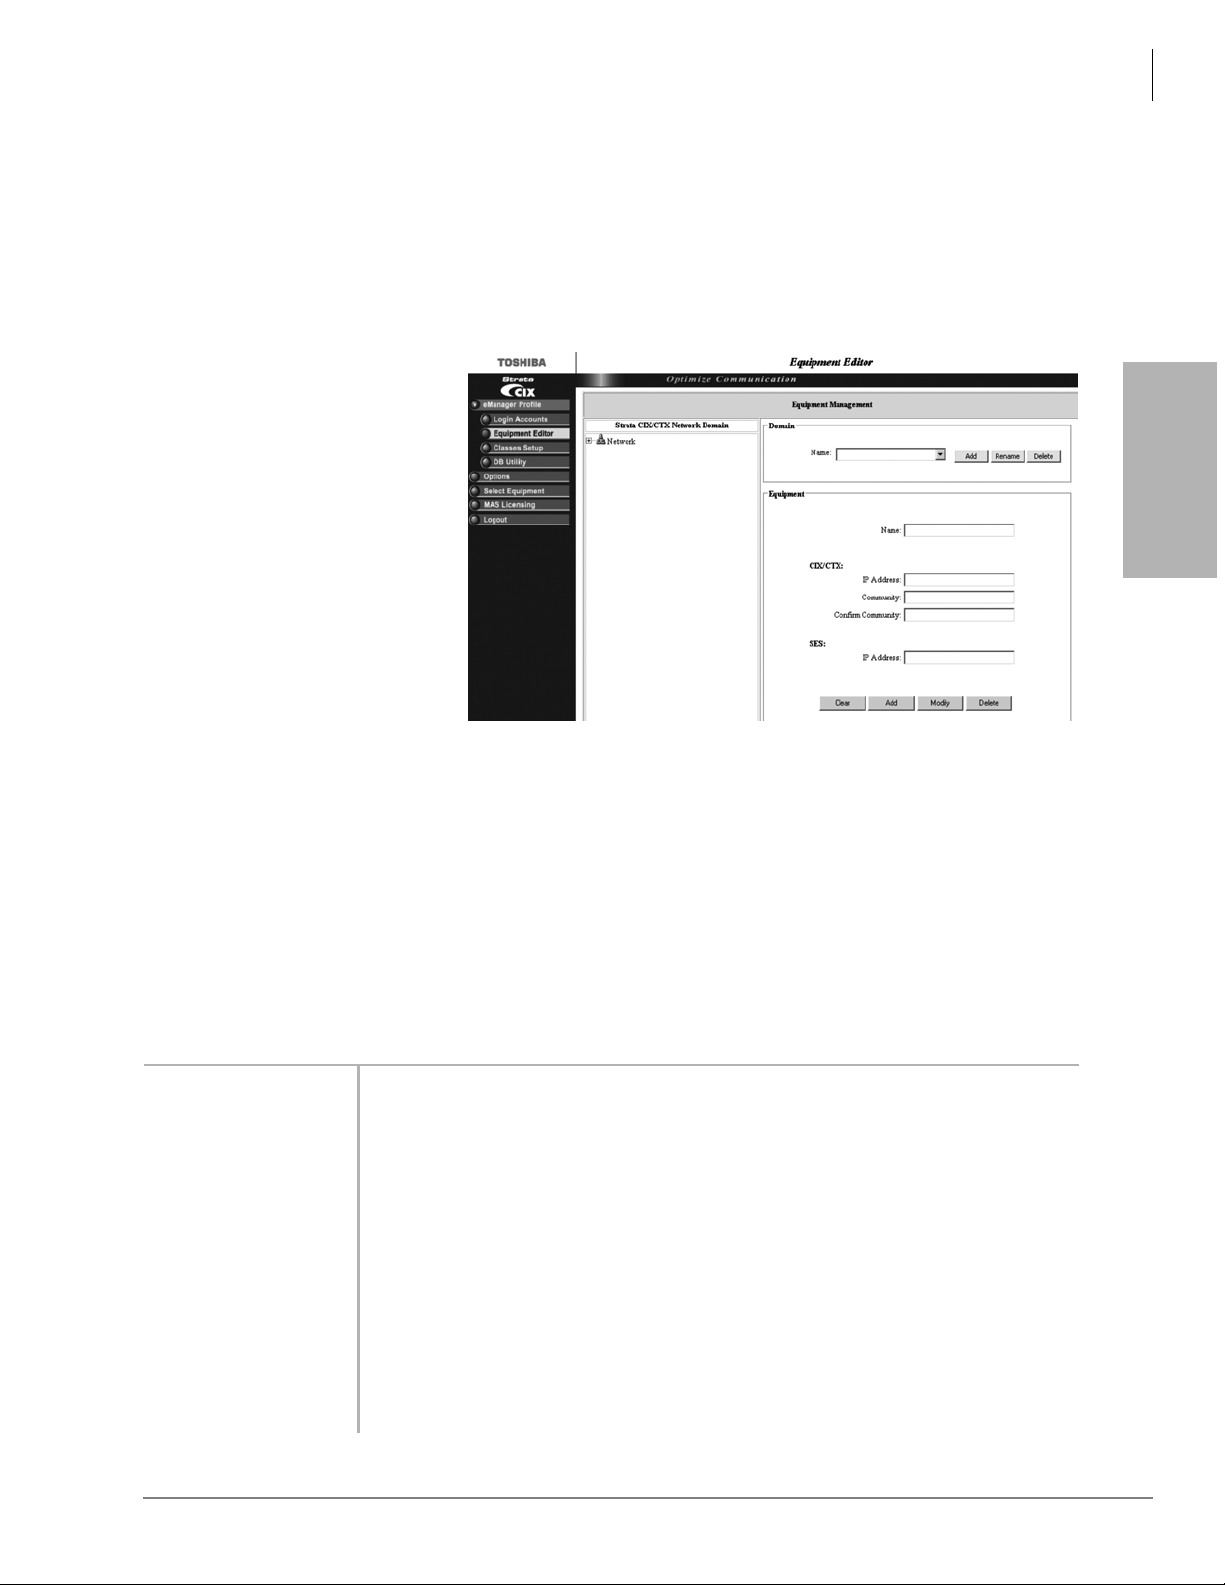
Step 2: Equipment Editor
This screen is for adding, modifying or deleting equipment. If you enter the information for both
the CIX and SES Media Application Server as one piece of equipment, the menu you view will be
a blended menu of both CIX and Stratagy options (see “Program Menu” on page 2-13).
If you want the option of viewing only CIX programming or only Stratagy ES programming, you
need to enter the equipment separately in this screen. For example: For CIX only, leave the IP
Address for the SES blank and for Stratagy only, leave the CIX fields blank.
1. Log on to eManager.
2. Click on eManager
Profile > Equipment
Editor from the
menu.The Equipment
Editor screen displays
(shown right).
3. To add a Domain name,
click Add and enter the
name in the pop-up
box. Click OK
eManager
Equipment Editor
eManager
Note The creation of a
domain name is
not mandatory. A
piece of
equipment can be added directly to the root (network).
...or to rename a Domain, select it from the drop-down menu and click Rename. Type the name
in the pop-up box. Click OK
...or to delete a Domain name, select it from the drop down menu and click Delete.
4. In the Equipment section, fill in the appropriate fields based on the descriptions shown in Table
below.
5. Click Add, Modify, or Delete.
6. To cancel your entries and clear the screen, click Clear.
Table 2-2 Equipment Editor Screen Fields
FIELD DESCRIPTION
Name Name designating the equipment. For example: CIX999.
Possible values: alphanumeric characters
CIX
IP Address Enter the IP Address of the CIX system. For example: 192.168.254.253 (default).
Format: xxx.xxx.xxx.xxx
Community Enter the Community password.
Possible values: Alpha characters
Default: communityName
Confirm Community Re-enter the Community password.
SES
IP Address Enter the IP Address of the SES. For example: 192.168.254.252 (default).
Format: xxx.xxx.xxx.xxx
Strata CIX Voice Mail Programming 01/07 2-5
Page 30
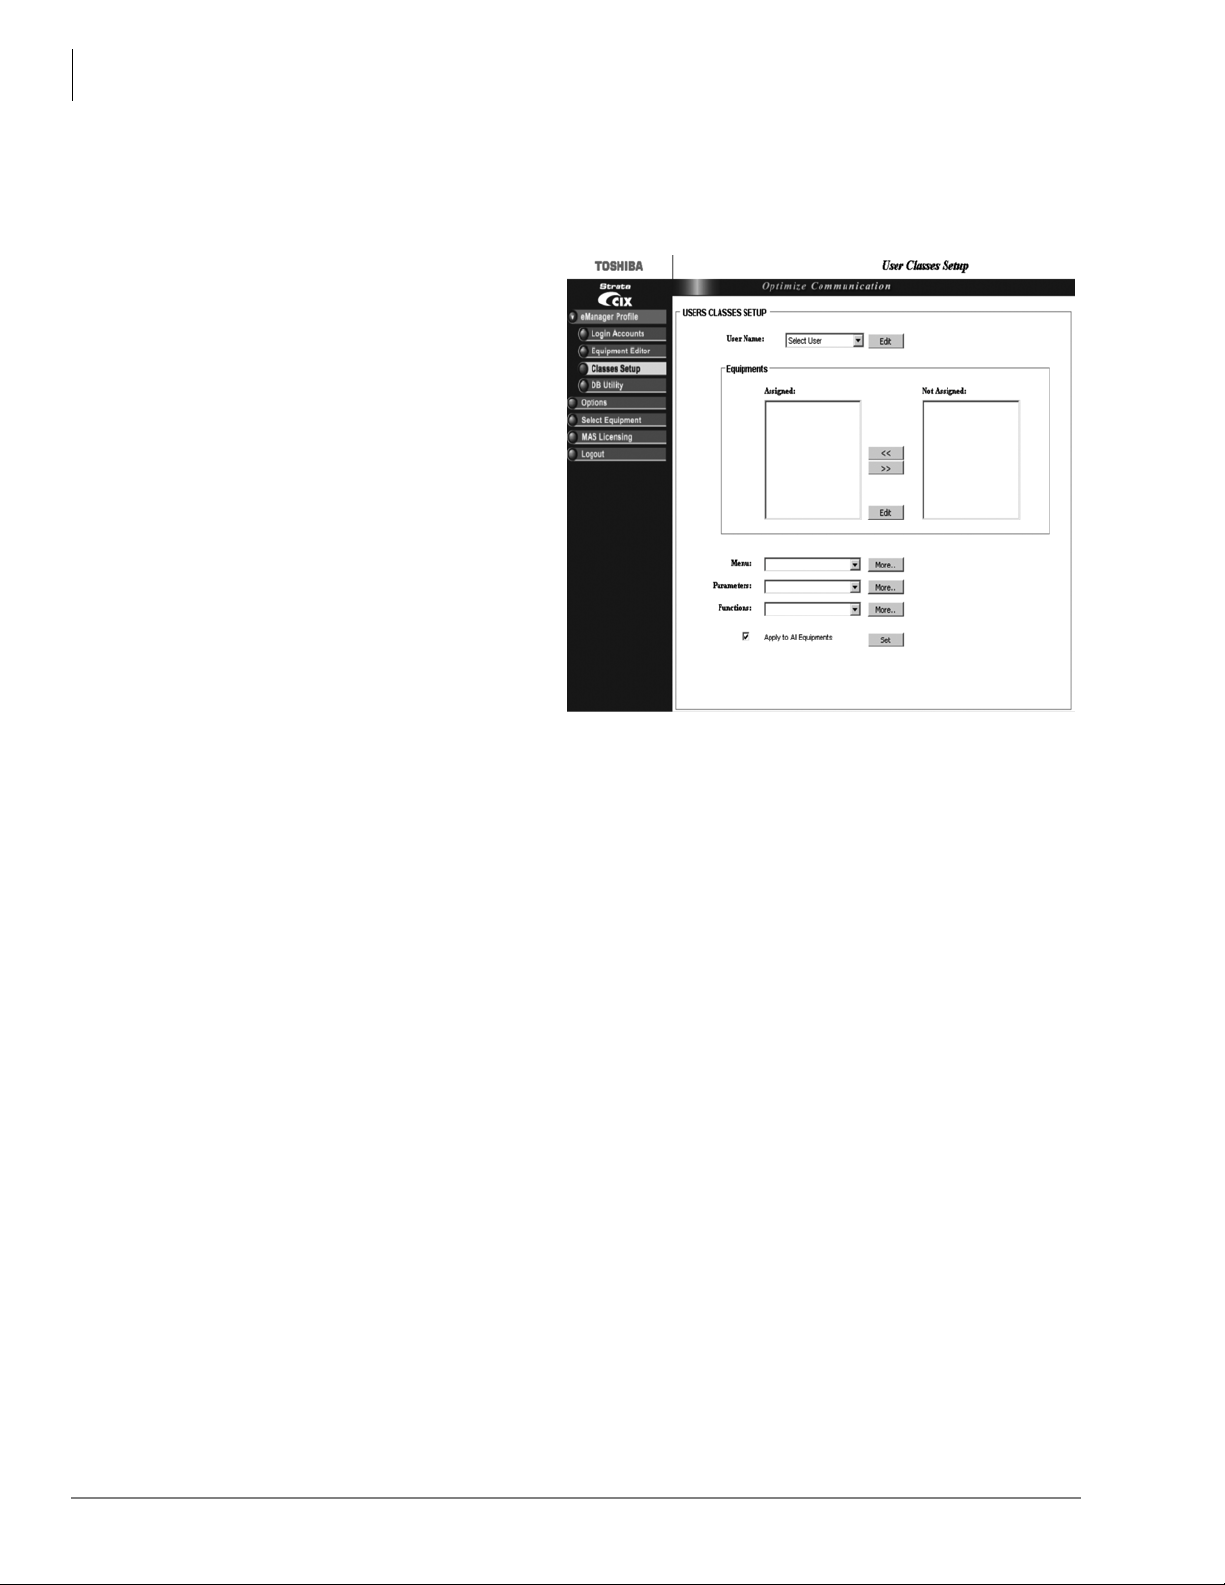
eManager
Classes Setup
Step 3: Classes Setup
Assigns equipment, menus, parameters, and functions to each user.
1. Logon to eManager.
2. Click on eManager Profile > User
Classes Setup from the menu.The
User Classes Setup screen displays
(shown right).
3. To edit a User Name, select a User
Name from the drop-down menu
and click Edit. The Login
Accounts screen displays.
When you are finished making
your changes, click Back and you
are returned to this screen.
4. In the Equipments section, you
can assign or not assign specific
equipment by highlighting the
item and clicking the arrow
buttons on the screen.
The designated equipment moves
from one box to the other based on
the arrow you selected.
5. If you want to edit the equipment, click Edit in the Equipments box and the Equipment Editor
screen displays.
6. In the Menu, Parameters and Functions fields you can assign on e of the default levels to the
User Name or click More and modify the list(s) for the individual user.
Menus: Options that have an arrow (
!) next to them can be expanded further. If you uncheck
an option it will be grayed out for this user in eManager menu.
Parameters: A list is displayed showing the CIX commands/parameters that are available along
with the permission given (H – hide, R – read, W – write). For example, if you change an
option from W to R the user can only read but not write to that parameter.
Functions: A list is displayed showing the functions available. Uncheck a function when you do
not want it available to the user.
After making the changes to the list, click Save As and type a name for the new list in the popup box. Click Back.
7. When you are finished making the changes to the screen and want to apply these specifications
to all equipment, check the field “Apply to All Equipments” and click Set
...or uncheck the “Apply to All Equipments” field and highlight the equipment in the Assigned
box that applies to the revised defaults. Click Set.
In this manner, you can set different defaults for different pieces of equipment.
2-6 Strata CIX Voice Mail Programming 01/07
Page 31

Step 4: DB Utility
This function allows you to back up your eManager database.
‰ To access the screen
1. Logon to eManager.
2. Click on eManager Profile > DB
Utility from the menu.The DB
Utility screen displays (shown
right).
eManager
DB Utility
‰ To backup the profile database
1. Check Database Backup.
2. Type into the Browse field
C:backup and click Submit.
‰ To import a partial profile database
1. Check Import Partial Database.
2. Click Browse and find the database
you want to import.
3. At the bottom of the screen, select
an option from the Import
Selections list.
4. Click Submit.
‰ To export a partial profile database
1. Check Export Partial Database.
2. Type c:\export.xls in the Browse field.
3. Highlight the items in the Export Selections box that you want to export.
4. Click Submit.
eManager
Backup Database Utility
This procedure backs up the eManager Profile database.
1. Locate and select the eManager program directory on your hard drive. The Backup/Restore
screen displays.
Note The default location for backup/restore program is: C:\eManager\bin\BackupRestore.exe.
2. Click Connect.
3. In the Backup/Restore File Name field, type a file and pathname (e.g., c:\backup.bak).
4. Click Backup. The system creates a backup database and the screen displays the progress.
5. When the backup is complete, click Disconnect and close the screen.
Strata CIX Voice Mail Programming 01/07 2-7
Page 32

eManager
Options
Options
Restore Database Utility
Important! Everything must be closed, including eManager, to do a restore.
1. Locate and select the eManager program directory on your hard drive. The Backup/Restore
screen displays.
Note The default location for backup/restore program is: C:\eManager\bin\BackupRestore.exe.
2. Click Browse to select a backup file to restore.
3. Click Restore. The system restores the database and displays the progress on the screen.
4. When the restore is complete, click Disconnect and close the screen.
This function allows you to update the password and personal directory folder name.
1. From the Login
Manager menu,
click Options. The
Options screen
displays (shown
right).
2. Type old and new
passwords in
respective fields
and confirm.
3. (Optional) Type a
new directory
folder name in the
next field.
4. Click Modify to
save the changes.
Select Equipment
! Click Select Equipment and the Select CIX screen displays (see Step on page 2-2).
7336
2-8 Strata CIX Voice Mail Programming 01/07
Page 33

MAS Licensing
See Chapter 10 in the Strata CIX Programming Manual Volume 1 for CIX Licensing.
This option enables you to manage, issue and activate MAS licenses in the eManager server host.
It is required that administrators should be able to manage licenses for all applications in the MAS.
Access Main MAS Licensing Screen
! From the Login Manager Menu, click MAS Licensing. The screen below displays.
eManager
MAS Licensing
The upper part of the screen is a list of MAS License Container files stored in the eManager
server in the <eManager entry point>\Licenses.folder. The following columns are shown:
• Generation Time – date and time assigned by the FYI application when it creates the
container file.
• File Name – specified by the administrator when the container file was created in eManager
using the Upload button.
• MAS Serial Number – defined in the header of the container file.
• Local Status
• Local MAS – The MAC address in this container file is the same as the local MAS
host MAC address (where the eManager server is running).
• Issued in Local MAS – Same as “Local MAS” but the licenses in this container have
been issued already. eManager stores a log of the issued container files.
• Remote MAS – The MAC address in this container file is different than the local
MAS host MAC address (where the eManager server is running). This file could be
viewed, uploaded to other MAS, but it cannot be issued in the local MAS host.
Strata CIX Voice Mail Programming 01/07 9
Page 34

eManager
MAS Licensing
Upload Licenses
Note The Upload button is enabled if no file is selected, otherwise disabled.
The MAS License Container File is an XML file generated by the FYI application. The FYI GUI
presents this file in a text box, where the Administrator can copy and paste the content either directly
to a text box provided by the eManager GUI or to a file which may be transported to another PC
and its content pasted into eManager at a later time. In order to be able to copy and paste directly,
both applications should be accessed from the same client machine.
If uploaded using this function, use the following procedure.
1. From the MAS Licensing screen, click
Upload. The Upload MAS License
Container File screen displays (shown
right).
2. If the file is stored in the local client PC,
click Browse. Select the Container file.
The file’s contents and file name are
copied into the fields of the Upload
screen
...or go to FYI and open the MAS
License Container File in a text file such as Notepad. Copy and paste the displayed file in the
Content portion of the Upload MAS license screen shown here. The File Name field is blank.
Note If you chose to fill in the File Name before you copied/pasted the file, the file name
remains in the field after pasting the file.
3. If the file name was filled in automatically, change the file name so that it is unique to the file.
If you copy/pasted the file into this screen, you need to enter a unique file name.
Note File names must conform with the Windows filenames and conventions. If the file you
uploaded does not have an .xml extension, you must add it before saving the file.
4. Click Save.
Issue Licenses
Note The file you selected must be “Local” or “Issued in local MAS” to use this feature. Any
file with a local status of Remote MAS must be issued from the controlling server.
! From the MAS Licensing screen, select a file and click Issue Licenses. eManager parses the
selected container file, extracts each license for the different applications and services and
delivers the licenses. This process can take several minutes depending upon the number of
applications installed.
Activate Licenses
! To activate the licenses, click Activate Licenses. A warning box displays telling you that the
MAS operating system will be shut down and rebooted. The MAS attempts to shut down and
reboot immediately.
Important! During the activation process, the MAS cannot be processing calls. Any current
connection being processed by the MAS is disconnected. In order not to disrupt daily
activity in your customer’s business, you can choose to do the activation process
unattended during the evening/early morning hours by scheduling the procedure
using the Windows scheduling process.
2-10 Strata CIX Voice Mail Programming 01/07
Page 35

Delete Licenses
Note You can delete more than one file at a time by highlighting the files.
1. From the MAS Licensing screen, highlight a Container file(s).
2. Click Delete. A pop-up box displays and you are asked to confirm your deletion.
3. Click OK.
View Licenses
Note The V iew button is enabled when one file is highlighted, disabled when none or more than
one is highlighted.
1. From the MAS Licensing screen, highlight a Container file.
2. Click View. The MAS Licensing Container File displays (sample shown below).
eManager
MAS Licensing
View Current Licenses
1. From the MAS Licensing screen, make sure that none of the listings in the License Container
Directory is highlighted.
Note To remove a highlight, press Ctrl and click the highlighted item.
2. Click View Current Licenses.
eManager checks the status of the
license activation through each
application’s licensing interface
and displays the results (sample
shown right).
3. When finished, click OK.
Status Values Shown on Screen
• 0 – New license was issued, but
not activated yet.
• 1 – The license activation during
the startup procedure was
successful.
• 2 – The license activation during the startup procedure failed.
Strata CIX Voice Mail Programming 01/07 11
Page 36

eManager
Logout of eManager
Logout of eManager
! From the eManager Menu, click Logout to exit eManager.
eManager Main Screen
After you start eManager, log in and connect to the CIX, the main screen (shown below) displays.
Verify the information on this screen. It contains the System type and Software version.
Software
Versions
Program Menu
7593
Notes
• You can verify the Strata CIX system type and the software version on the Title screen shown
above.
• The software version is organized as follows:
b Example: AR3.00.MJ033.00
b A = Country code (USA, Canada, Mexico).
b R3.00 = CIX Release 1.01
b MJ0xx.00 = Strata CIX software version.
2-12 Strata CIX Voice Mail Programming 01/07
Page 37

Program Menu
The Program Menu is the primary tool used to navigate through
eManager. Click the Expand or Collapse buttons at the left to expand or
collapse the Program menu.
The Program menu consists of three possible configurations—only CIX
options, only Stratagy ES options or a blend of both. What you see
depends upon the equipment you are connected to using the Select CIX
screen (see “Equipment Editor” on page 2-5). The figure to the right
shows a blended menu.
The menu is divided into the following subjects:
Note The FeatureFlex options on the menu display only when you
are connected to the Media Application Server.
• Basic Configuration (see Chapter 3 – Voice Mail Configuration)
• Advanced Configuration (see Chapter 3 – Voice Mail Configuration)
• Utilities (for Reports see Chapter 12 – System Reports, for Tools see
below)
• Help (see “Help Topics” on page 2-13)
eManager
Program Menu
• Switch Equipment – Takes you back to
• Logout (see “Logout of eManager” on page 2-12)
Help Topics
Help Topics/Context Help
! From the eManager Main menu, click Help > Help Topics or Context Help. A help screen
displays with the following options: Contents, Index, and Search.
About CIX eManager
! From the eManager Main menu, click Help > About CIX eManager. A screen displays with
software version numbers.
Strata CIX Voice Mail Programming 01/07 13
Page 38

eManager
Client PC
Client PC
eManager can be loaded on a client PC with network access to the voice mail application on the
Stratagy ES MAS. Minimum requirements for the client PC are:
• Windows 2000 Pro SP4, Windows XP Pro SP1
• 512MB RAM
• Pentium 400 MHz processor
• 1.6GB of free hard disk storage
• CD-ROM drive
• 38.4 Kbps baud modem (optional for remote maintenance through telephone network)
• 3.5” 1.44MB floppy disk drive
• SVGA card and color monitor
• mouse
• keyboard
• 10BaseT Network Interface Card (optional for remote connection through a Local Area
Network (LAN)/Wide Area Network (WAN))
There is a separate installation package (CD-ROM) provided to the client for installing the Dongle
driver. A preprogrammed USB RainBow SuperPro Dongle is used to access the eManager at a
client PC via IE Browser (not at the eManager Server).
How to Prepare the Client PC
1. Install the Rainbox Technologies, Inc. Sentinel Driver.
2. Install the MLA.dll by copying the file to the target PC (System32 folder recommended).
3. Register the MLA.dll by clicking Start >
Run and browsing for the regsvr32 file
(shown right).
4. Click OK.
Load Voice Mail Application Software on Client PC
1. Uninstall StrataCIXAdmin.
1. Insert the CD-ROM Disk into the PC
drive. The Software Menu displays.
2. Select Stratagy ES Administration. The Welcome screen displays.
3. Accept the defaults on the following screens by clicking Next.
4. When the installation is complete, click Finish.
5. Restart the Stratagy ES Server.
Run eManager from Network (Client) PC
! Type IE//http://<PC Name>/eManager (example: http://WEBFOOT/eManager) and press
<Enter>. The Welcome screen displays.
2-14 Strata CIX Voice Mail Programming 01/07
Page 39

eManager
Client PC
Anti-Virus Software
When a system has access to the internet anti-virus protection is recommended. Refer to Table 2-1
for the list of approved applications.
Table 2-1 Anti-Virus Software
Application Configuration Notes
PC-cillin™ Internal Security 2005 Should not be run in batch mode when running any other applications.
Symantec’s Norton Anti-Virus™ 2005 Script blocking option must be un-checked.
McAfee® Virusscan® 2005 Ver. 9.0 Script blocking option must be un-checked.
Strata CIX Voice Mail Programming 01/07 15
Page 40

This page is intentionally left blank.
Page 41

Voice Mail Configuration 3
This chapter covers the Stratagy ES Configuration screens. You are given instructions on accessing
and exiting the menus, and saving entered data. In addition, procedures for using each of the
configuration options are given in detail.
These menus are available only to personnel with Administrator access level or higher. Changes
made in these screens are not active until the voice mail system is restarted using the Stratagy ES
Server Control Service.
The Configuration is divided into two sections – Basic and Advanced.
The Basic Configuration menu consists of the following voice mail options:
• Date and Time (System)
• Holidays
• Voice Mail Configuration (Configuration Wizard)
• User Setup (telephone wizard)
The Advanced Configuration menu consists of the following voice mail options:
• Telephone Systems
• Answer Methods
• Voice Ports
• Serial Ports
• Notification Groups
• Port Statistics
• Scheduler
• Language
• Voice Menu
• Parameters
Configuration
V oi c e Mail
Strata CIX Voice Mail Programming 01/07 3-1
Page 42

Voice Mail Configuration
Configuration Menu Screens
Configuration Menu Screens
Access the Configuration Menu Screens
1. From eManager’s main menu, select either Basic or Advanced Configuration.
2. Click on one of the selections under Basic/Advanced Configuration and the screen displays.
Exit the Configuration Menu Screens
1. Click Submit from any of the screens. A dialog screen states that the changes will take effect
the next time the Stratagy ES software is restarted. Click OK. The screen remains open.
...or Cancel. The screen remains open.
2. Click on another selection from the eManager Main menu on the left.
Refresh Configuration Screen
1. Click Submit. A dialog screen asks if you want to update the configuration data in the voice
server.
2. Click OK. The changes will be made the next time the Stratagy ES software is restarted. the
sc reen rema ins o pen.
Update Voice Mail Database
Changes made to the eManager Configuration screens are not implemented in the Stratagy ES
software database until you click Submit on the individual Configuration screen and restart the
voice mail system.
Configure Voice Ports
There are three screens that are required to properly configure voice mail voice ports for answering
calls: Telephone Systems, Answer Methods, and Voice Ports. Starting with the Telephone Systems
option, each screen builds upon the data of the previous screen. Configure the screens in the order
listed here:
1. Telephone Systems – Defines the attributes and functionality of telephone systems that are
connected to the voice mail system.
2. Answer Methods – Links the Telephone System Integration Group to an User Agent mailbox
that supplies the Primary greeting heard by the caller and defines the number of rings the
system must wait before it answers an incoming call on the voice port.
3. Voice Ports – Assigns the Answer Method along with an extension number to the Voice Port.
3-2 Strata CIX Voice Mail Programming 01/07
Page 43

Main Menu
The eManager program menus enable you to (see Figure 3-1 for a complete list of menu items):
• Manage User Agents (create, modify, delete)
• Configure the voice mail system (voice ports, serial ports, system parameters, etc.)
• Run reports
MENU
Basic Configuration
Date and Time
Holidays
Voice Mail Configuration
User Setup
Advanced Configuration
System
VM Phone Systems
VM Ans Methods
VM Voice Ports
VM Serial Ports
VM Notifications
VM Port Statistic
VM Scheduler
VM Language
VM Parameters
Voice Menu
Voice Mail Configuration
Main Menu
Configuration
V oi c e Mail
Voice Mail
Utilities
Tools
Reports
Help
Mailbox
Mailbox COS
Distribution List
IVR
AMIS Gateway
AMIS Proxy
VPIM Gateway
VPIM Proxy
Direct Send Voice
Direct Send Fax
VM Port Status
VM Tracer
VM Tracer File
IVR Alias Editor
Run IVR Alias
ASR Sync
Port Statistics
Port Grp Statistics
All Port Statistics
Mbx Call Statistics
Mbx Usage
Mbx Info/Status
Mbx Msg Statistics
System Information
Mailbox Template
AMIS/VPIM Template
Help Topics
Context Help
About CIX eManager
User Mode
Auto Attendant
Chains/Groups/Fax
Menus
Info
Auto
Notify
Unified Messaging
ASR Auto Attendant
Switch Equipment
Log Out
Back to eManager Log in Screen.
Figure 3-1 eManager Menu Structure
Strata CIX Voice Mail Programming 01/07 3-3
Page 44

Voice Mail Configuration
Change System Date/Time
Change System Date/Time
The Date/Time function changes the system cloc k at the ser ve r.
1. From the eManager Main
menu, click Basic
Configuration > Date and
Time. The Change system
clock screen displays
(shown at right).
2. Using the calendar button,
select a new date.
3. Using the spin button,
select a new time
...or type a time in using
hh:mm:ss format.
4. Click on another Main menu selection to close out of this screen.
Holidays
7327
There is no limit to the number of holidays that can be added to the table. Holidays defined in this
screen can be used in the Auto (Scheduling) and Notify screens of a mailbox.
The Holidays screen (see Figure 3-1) displays the programmed holidays for the system.
Figure 3-1 Holidays Screen with Sample Data
The left side of the screen has a drop-down menu where you can create/select up to 9 holiday lists—
MS Holidays List and Tenant 1~8 Holidays List. Also displayed are the dates of the current year’s
holidays. A “+” sign next to a date designates a recurring holiday date (e.g., July 4).
The right side of the screen includes a drop-down calendar and the Add, Delete and Copy to
functions.
3-4 Strata CIX Voice Mail Programming 01/07
Page 45

Voice Mail Configuration
Add Holidays
1. From eManager Main menu, click Basic Configuration > Holidays. The Holidays screen
displays (see Figure 3-1).
2. On the left side of the screen, select from the drop-down menu the list to which you want to add
a holiday.
3. In Add or Delete Holidays section, click the down arrow. A pop-up calendar displays.
4. You can use the arrows in the top left/right corner of calendar to scroll through month/year
...or you can click on the month (e.g., May) to select a month from the menu and click on a year
(e.g., 2007) to select a year.
5. Click on desired date. A dialog box displays asking if you want to set the date for every year.
6. Click Yes. The date is set for every year. The date displays in the left section of the screen in
chronological order. A “+” is placed next to it to indicate it is a recurring date.
...or click No. The date is set for the selected year. The date displays in the left section of the
screen in chronological order.
7. Click Submit. Y our changes are saved and the screen remains open. A dialog box displays. The
changes are added to the voice mail database the next time voice mail service is shutdown and
restarted.
Holidays
Configuration
V oi c e Mail
Delete Holiday
1. From eManager Main menu, click Basic Configuration > Holidays. The Holidays screen
displays (see Figure 3-1).
2. On the left side of the screen, select from the drop-down menu the list to which you want to
delete a holiday.
3. Highlight the desired date on the screen.
4. Click Delete. A dialog box displays asking you to confirm the deletion.
5. Click Yes.
6. Click Submit. Your changes are saved and the screen remains open. The changes are added to
the voice mail database the next time voice mail service is shutdown and restarted.
Copy To
1. From eManager Main menu, click Basic Configuration > Holidays. The Holidays screen
displays (see Figure 3-1).
2. On the left side of the screen, select from the drop-down menu the list you want to copy.
3. Click Copy To. A pop-up box displays showing the lists available.
4. Highlight the desired list.
5. Click Copy Now. Your changes are saved and the screen remains open. The changes a re a dde d
to the voice mail database the next time voice mail service is shutdown and restarted.
Strata CIX Voice Mail Programming 01/07 3-5
Page 46

Voice Mail Configuration
Configuration Wizard
Configuration Wizard
The Configuration Wizard guides you through the voice mail basic operation setup. It includes:
• Configure the System Database - specifies telephone systems, set up voice lines and answering
methods for AA and designate holidays.
• Configure User Agents Database
The set of screens are user friendly. If you choose to bypass the screens at log in, you can always
access the Configuration Wizard later through the Configuration Menu.
When the Configuration Wizard program starts, it reads the current configuration of the Stratagy
ES software into memory. As data is entered, the program stores the data until the following
specified intervals:
• Clicking Next on the Update System Configuration screen.
• Clicking Create on the Create Classes of Service screen.
• Clicking Create on the Create Mailboxes screen.
Use Configuration Wizard
1. From the eManager Main menu, click Basic Configuration > Voice Mail Configuration. The
Configuration Wizard screen displays.
2. Follow the prompts on the screens. When the Configuration Wizard process is complete, click
Finish.
User Setup Wizard
The User Setup wizard provides the creation of extensions and mailboxes for telephone users and
typical setup scenarios to associate the extensions and mailboxes.
The following basic options are available on the screen:
• Create Primary Extension with mailbox
• Create Primary Extension sharing the same mailbox
• Create mailboxes and route them to the same extension
• Create Primary Extensions without mailboxes
• Create mailboxes without extensions
To access more advanced features, click “More options.” The following selections display:
• Create Primary Extensions
• Assign Mailbox Numbers to Extensions
• Create mailboxes and assign extensions for Auto Attendant
• Assign User Names to mailboxes and extension LCD screen
Use User Setup
1. From the eManager Main menu, click Basic Configuration > User Setup. The User Setup
screen displays.
2. Click the box in front of the option. A dialog box displays. Fill in the fields and click Create.
3. You can choose another selection or exit the wizard.
Note Options that create Primary Extensions require you to select the type of extension from a
drop-down menu. If you select “Any Type,” the wizard scans all types of station interface
cards for available spots, and on an LIPU card it prefers to create an IPT-L type Primary
Extension.
3-6 Strata CIX Voice Mail Programming 01/07
Page 47

Telephone Systems
f
The Stratagy ES supports multiple telephone system integrations. Each integrated system includes
a set of integration characteristics, such as integration dial codes and integration patterns to support
either DTMF or SMDI.
Note Each Stratagy ES system has been pre-configured at the factory for out-of-box operation
with a Toshiba Strata CIX telephone system. This includes the required programming for
CTX Proprietary Integration, Reserved Mailboxes (e.g., 990, 998, etc.), and the factory
recorded company and instructional greetings for mailbox 990.
The Telephone Systems screen (see Figure 3-2, Table 3-2) enables a user to define all telephone
systems which are either directly connected to the Stratagy ES MAS or are host telephone systems
of one or more mailbox owners.
Important! When configuring voice ports, you must enter the data in the following order:
Telephone System Integration, Answer Methods, and Voice Ports. See “Configure
Voice Ports” on page 3-2.
Voice Mail Configuration
Telephone Systems
Figure 3-2 Telephone Systems Tab Screen with Sample Data
Displays when Integration
Type is set to SMDI.
Arrows re-order sequence o
integration pattern lines.
7275
Configuration
V oi c e Mail
Strata CIX Voice Mail Programming 01/07 3-7
Page 48

Voice Mail Configuration
Telephone Systems
Table 3-2 Telephone Systems Tab Screen Fields
FIELD DESCRIPTION
Integration Group Name Alphanumeric field. Underscores are allowed. If you type in more than one word, the
Stratagy ES adds an underscore between words when it updates.
Note The Integration Group Name, once entered and saved in this screen, is
Switch Type Designates the telephone system switch type.
Important! If you accidently enter only spaces in this field, voice mail does not
Defaults to Strata CIX. Possible values are: Strata CIX, <Create/save Switch Type>.
Integration Type Defaults to CTX Proprietary.
Important! For Strata CIX, do not change the default on this field.
Possible values are: DTMF, SMDI and CTX Proprietary. If you choose SMDI, the
Serial Port and Max. Ext. Length fields to the right on the screen must be filled in.
automatically added to the Telephone System Integration Name drop-down
menu in the Answer Methods screen.
reject it. Instead, voice mail accepts the invalid pure space name and
uses it as a switch type.
Serial Port — Defaults to blank. Possible values are: COM1~COM2.
Max. Ext. Length — Maximum number of digits the connecting switch expects to
receive, specifically for message notification. Standard is 10. Some switches are
limited to seven digits.
Possible values: 1~10
Note The Stratagy ES will send the number of digits specified here. If the actual
mailbox extension number has a smaller quantity of digits than this value,
voice mail will insert the appropriate quantity of digits.
Example: Max. Ext. Length = 10
Mailbox/Ext. Number = 3752
Voice mail sends 0000003752.
Line Type This field designates the line type as IP Proprietary.
Defaults to IP Proprietary (cannot be changed).
Integration Pattern If your telephone system supports integration, this selection controls the definition of
its integration. Perform this step only to refine, verify, or modify the integration of the
Stratagy ES system with your telephone system.
Notes
© This field is not applicable to the Strata CIX.
© Integration patterns support only Analog Integration.
3-8 Strata CIX Voice Mail Programming 01/07
Page 49

Voice Mail Configuration
Telephone Systems
Table 3-2 Telephone Systems Tab Screen Fields (continued)
FIELD DESCRIPTION
Integration Dial Codes Voice mail controls certain actions on your telephone system by using defined
telephone system dial codes. To define the dial codes, you must modify a telephone
system dial code parameter(s).
With this option, preset dial codes for other manufacturers’ systems can be enabled
or modified. The following fields display on the screen:
© Dial code to put a caller on transfer hold
© Dial code to use when there is no transfer dial tone
© Dial code to return to caller after Ring No Answer
© Dial code to return to caller after Busy
© Dial code to use after call screening reject
© Dial code to connect the caller to the extension
© Number of milliseconds to wait for dial tone detection
© Number of milliseconds delay after flash hook
© Which DTMF tone to listen to for answer detection
© Which DTMF tone to listen to for hangup detection
© What to dial AFTER dialing the user ID extension
© What to dial BEFORE dialing the user ID extension
© What to dial when the system first starts up
© What to dial when the system performs a shutdown
© What to dial when a port goes off-hook
© Number of minimum milliseconds to define CPM silence
© Number of minimum milliseconds to define CPM sound
© Message lamp ON
© Message lamp OFF
© Trunk access code
© Number of milliseconds to use for Flash time
© CIX/CTX IP Address — Enter IP address assigned to the Strata CIX (LCTU)
© Simple Network Management Protocol (SNMP) Community — Enter the
community name that has been assigned in the target Strata CIX.
© IPU IP Address — change address to the one assigned to the Strata CIX (LIPU))
Configuration
V oi c e Mail
Note If an LIPX is installed, enter the IP of the LIPU.
Strata CIX Voice Mail Programming 01/07 3-9
Page 50

Voice Mail Configuration
Telephone Systems
Add Integration Group
1. From the eManager Main menu on the left, click Advanced Configuration > Systems > VM
Phone Systems. The Voice Mail Telephone Systems screen displays (see Figure 3-2).
2. Click Add Group. The Add New Telephone Systems screen displays.
3. Type a new Integration Group name and click OK.
4. Select the Switch Type from the drop-down menu.
Note If you select <Create/Save/Delete Switch Type>, the Create/Save/Delete Switch Type
screen displays and you need to type the name for the new switch type and click OK. The
new switch type is saved with the settings that appear on the screen at the time it is saved.
The name is added to the drop-down menu for the Switch Type field.
5. Select an Integration Type from the drop-down menu. For Strata CIX, select CTX Integration.
Note For Strata CIX skip to Step 8.
6. Select the Serial Port from the drop-down menu.
7. Double-click the Max. Ext. Length field and using the spin-button, select a number from 1~10.
Note The standard is 10.
8. (Analog Integrations Only) Modify Dial Codes and Integration Patterns, as required. T o change
the sequence of integration patterns, highlight the line and use the Move arrows to the right of
the screen.
For Strata CIX only, scroll down to the bottom of the Integration Dial Codes list to locate three
parameters: Call Agent IP Address, Simple Network Management Protocol (SNMP)
Community, LIPU IP Address (MAS).
• Change the “Call Agent IP Address” to the IP address that has been assigned to the Strata
CIX (LCTU).
• Enter the SNMP Community name that has been assigned in the target Strata CIX.
• Verify/change the “IPU IP Address” that has been assigned to the Strata CIX (LIPU).
Note If an LIPX is installed, enter the IP of the LIPU.
9. Click Submit. Your changes are saved and the screen remains open. A dialog box displays.
10.Click OK. The changes are added to the voice mail database the next time voice mail is shut
down and restarted.
Delete Integration Group
1. From the eManager Main menu on the left, click Advanced Configuration > Systems > VM
Phone Systems. The Voice Mail Telephone Systems screen displays (see Figure 3-2).
2. From the drop-down menu, select the Integration Group Name you want to delete.
3. Click Delete Group. A dialog box asks you to confirm the deletion.
Important! When you delete a group, references to it in the Answer Methods screen are
removed. References in User Agent or COS must be removed manually by you. After
deletion, validate Answer Method, User Agent, and COS definitions, otherwise, Auto
Attendant (AA) and notification does not work properly.
4. Click OK. The Telephone Systems screen displays without the deleted group in the windows.
The changes are added to the voice mail database the next time voice mail service is shutdown
and restarted.
3-10 Strata CIX Voice Mail Programming 01/07
Page 51

Add or Delete Switch Type
1. From the Switch Type drop-down menu,
select the <Create/Save/Delete Switch Type>
option. The Create/Save/Delete Switch Ty pe
screen displays (shown at right).
2. Add Switch Type: Type the name for the new
switch type and click OK. A pop-up box
displays. Click OK again. The name is added
to the drop-down menu for the Switch Type
field. Click Submit. The new switch type is
saved with the settings that appear on the
screen at the time it is saved.
...or to delete Switch Type: From the Switch Type field, select the switch type that you want to
delete. Click Delete. A dialog box asks you to confirm the deletion. Click OK. The Telephone
System Integration screen displays without the deleted group in the Switch Type drop-down
box. Click Submit. The changes are added to the database the next time voice mail service is
shutdown and restarted.
Voice Mail Configuration
Telephone Systems
7187
Configuration
V oi c e Mail
Strata CIX Voice Mail Programming 01/07 3-11
Page 52

Voice Mail Configuration
Answer Methods
Answer Methods
This function defines a method of answering calls in order to support multiple-system integration
groups within voice mail.
The Answer Methods screen (see Figure 3-3, Table 3-3) enables you to assign a name (e.g., IVR),
a Greeting User Agent and the Number Of Rings To Answer. The Telephone System Integration
name must be defined in the Telephone System Integration screen.
Important! When configuring voice ports, you must enter the data in the following order:
Telephone Systems, Answer Methods, and Voice Ports. See “Configure Voice Ports”
on page 3-2.
7276
Figure 3-3 Answer Methods Screen with Sample Data
Table 3-3 Answer Methods Screen Fields
FIELD DESCRIPTION
Answer Method Name A label that is assigned to the Answer Method. This name is carried over to the
Voice Ports screen. Defaults to Default_Name. Max. 34 characters. Underscores
are allowed.
Example: IVR
Greeting User Agent User Agent/mailbox that answers the call after the Number Of Rings To Answer is
detected. Defaults to 990.
Number of Rings To
Answer
Telephone System
Integration Name
Number of rings the system waits before it answers an incoming call on the voice
port. Defaults to 1.
The integration group to which the answer method is linked.
3-12 Strata CIX Voice Mail Programming 01/07
Page 53

Voice Mail Configuration
Add Answer Methods
1. From the eManager Main menu, click Advanced Configuration > Systems > VM Ans Methods.
The Answer Methods screen displays (see Figure 3-3).
2. Click Add. A blank line displays below the other entries.
3. Click in the Answer Method Name field and type a name. The entry cannot be longer than 34
alphanumeric characters. An underscore is allowed (e.g., Default_Name).
4. Using the drop-down menu, select an available Greeting User Agent. The drop-down list
contains all the User Agent numbers already referenced in the Answer Method lines as well as
an Add function.
5. (Optional) If you clicked Add in Step 4, a pop-up box displays asking you to enter a new
greeting user agent. Enter the User Agent number and click OK.
6. Using the spin button to the right of the Number of Rings To Answer field, select the number of
rings.
7. Using the drop-down menu, select an available Telephone System Integration Group.
8. Click Submit. Your changes are saved and the screen remains open. A dialog box displays.
9. Click OK. The changes are added to the voice mail database the next time voice mail service is
shutdown and restarted.
Answer Methods
Configuration
V oi c e Mail
Delete Answer Methods
1. From the eManager Main menu, click Advanced Configuration > Systems > VM Ans Methods.
The Answer Methods screen displays (see Figure 3-3).
2. Highlight the Answer Method you want to delete.
3. Click Delete. You are asked to confirm the deletion. Click OK.
4. Click Submit. The changes are saved, the screen remains open for use, and the Answer Method
listing is removed from the screen. A dialog box displays.
5. Click OK. The changes are added to the voice mail database the next time voice mail service is
shutdown and restarted.
Strata CIX Voice Mail Programming 01/07 3-13
Page 54

Voice Mail Configuration
Voice Ports
Voice Ports
The Voice Ports screen (see Figure 3-4, Table 3-4) enables you to assign the Answer Method and a
telephone system’s extension number for each voice mail voice port.
Important! When configuring voice ports, you must enter the data in the following order:
Telephone Systems, Answer Methods, and Voice Ports. See “Configure Voice Ports”
on page 3-2.
7287
Figure 3-4 Voice Ports Screen with Sample Data
Table 3-4 Voice Ports Screen Fields
FIELD DESCRIPTION
Port (Display only) Displays actual port numbers based on voice card(s) installed.
Extension Specific telephone system’s extension or terminal number (e.g., Centrex application
= 0001). Voice mail uses this value for SMDI integration.
Important! Be careful when making your entry in this field. The voice mail system
does not validate your input.
Answer Method Indicates integration group connected, greeting mailbox, and number of rings
needed to answer calls. Defaults to Default_Name.
Notification Groups (Display only) Port assignment in a Notification Group. Voice mail obtains this value
from the information assigned in the Notification Groups Tab screen (see
“Notification Groups” on page 3-18).
Statistical Groups (Display only) Port assignment in a Statistical Group. Voice mail obtains this value
from the information assigned in Statistical Groups Tab screen (see “Port Statistics”
on page 3-20).
3-14 Strata CIX Voice Mail Programming 01/07
Page 55

Voice Mail Configuration
Add Voice Port Definition
1. From the eManager Main Menu, click Advanced Configuration > Systems > VM Voice Ports.
The Voice Ports screen displays (see Figure 3-4).
2. Type the extension number.
3. Using the drop-down menu, select the Answer Method.
4. Click Submit. Your changes are saved and the screen remains open. A dialog box displays.
5. Click OK. The changes are added to the voice mail database the next time voice mail service is
shutdown and restarted.
Display Voice Port Status
1. If you are logged on to eManager, click Utilities > Tools
> Port Status and the screen displays (shown at right).
Voic e Por ts
Configuration
V oi c e Mail
2. T o view statistics on an indivi dual port (example screen
shown at right), double-click the port listing on the Voice
Ports Status screen.
3. Click Refresh to update the Statistics screen at any time
...or click Close to close the screen. The Voice Ports
Status screen remains on the desktop.
7228
7628
Strata CIX Voice Mail Programming 01/07 3-15
Page 56

Voice Mail Configuration
Serial Ports
Serial Ports
Important! This screen is not required by the Strata CIX.
Serial ports in the Stratagy ES are used in three ways:
• Available – Serial ports not running within voice mail and available for Windows XP use.
Note Serial ports may be reported on this screen as “available” when in fact there is no
hardware installed on them. You must verify serial port hardware installation prior to
assigning the port’s functionality.
• SMDI – Serial ports used for voice mail SMDI.
• Resource – Serial ports available as a resource for Stratagy ES (e.g., IVR).
The Serial Ports screen (see Figure 3-5, Table 3-5) enables you to assign a COM port to a specific
application (e.g., IVR) or integration (e.g., SMDI).
7288
Figure 3-5 Serial Ports Screen with Sample Data
Table 3-5 Serial Ports Screen Fields
FIELD DESCRIPTION
Port Name (Display only) Default is COM1.
Assign As Possible values are:
Available — Not in use by the Stratagy ES software.
SMDI — Defined in the Telephone System Integration screen.
Resource — Reserved under Resource Manager.
Note You cannot type entries into this field. Selection must be made from the
drop-down menu.
3-16 Strata CIX Voice Mail Programming 01/07
Page 57

Table 3-5 Serial Ports Screen Fields (continued)
FIELD DESCRIPTION
Voice Mail Configuration
Serial Ports
Telephone System or
Resource Name
Serial Port Default Settings Settings are for the port highlighted.
Baud Rate Default is blank. Possible values are: 110, 300, 600, 1200, 2400, 4800, 9600,
Data Bits Default is blank. Possible values are: 7, 8.
Parity Bits Default is blank. Possible values are: none, odd, even, mark, space.
Stop Bits Default is blank. Possible values are 1, 1.5, 2.
Target Phone Number Modem phone number used when the application does not define its own dialed
Possible values are:
Blank — When Assigned As field reads Available, this field is blank.
Telephone System — If reserved as a SMDI in the Assigned As field, you must enter
a Telephone System name.
Resource Name — If reserved as a Resource in the Assigned As field, you must
enter a Resource Name.
Notes
© A drop-down menu is provided for this field.
© More than one port can be configured to the same Resource Name.
14400, 19200, 38400, 56000, 57600, 115200, 128000, 256000.
number when making a call.
See screen for examples.
Add Serial Port Definition
Configuration
V oi c e Mail
1. From the eManager Main Menu, click Advanced Configuration > Systems > VM Serial Ports.
The Serial Ports screen displays (see Figure 3-5).
2. Click Assigned As field. Drop-down menu button appears.
3. From the drop-down menu, select an entry.
Note You cannot type into this field.
4. Click in Telephone System or Resource Name field.
5. Ty pe in a Resource Name
...or select a name from the drop-down menu. If the port is assigned to SMDI or Resource, you
must make an entry in this field.
6. Set Baud Rate, Data Bits, Parity Bits and Stop Bits for the serial port.
7. Repeat Steps 2~6 for each port.
8. Click in the Target Phone Number field. Type in the phone number.
9. Click Submit. Your changes are saved and the screen remains open. A dialog box displays.
10. Click OK. The changes are added to the voice mail database the next time voice mail service is
shutdown and restarted.
Strata CIX Voice Mail Programming 01/07 3-17
Page 58

Voice Mail Configuration
Notification Groups
Notification Groups
Any port can be used for traditional notification purposes. Ports can also be grouped to restrict their
use to a specific application such as IVR, AMIS, etc. In voice mail, each port can be its own group
and a group name can be used to identify a notification group.
The Notification Groups screen (see Figure 3-6, Table 3-6) requires three entries: Group ID, Group
of Voice Ports, and Group Limit (%).
7289
Figure 3-6 Notification Groups Screen with Sample Data
Table 3-6 Notification Groups Screen Fields
FIELD DESCRIPTION
Group ID Name of Notification Group. Can refer to specific application (e.g., IVR, AMIS).
Group of Voice Ports Defines ports that belong to the notification group ID (e.g., 1~10, 32, 43).
Group Limit (%) Defines the percentage of ports within a group that must be busy before outbound
notification is suspended.
Possible values are: 0~100.
Example:
IVR Notification Port Group has 10 ports.
Group Limit (%) field is set to 75%.
When eight ports of the IVR port group are busied by incoming calls, notification
requests for the group are suspended until the number of busy ports diminishes.
3-18 Strata CIX Voice Mail Programming 01/07
Page 59

Voice Mail Configuration
Notification Groups
Add Notification Group
1. From the eManager Main Menu, click Advanced Configuration > Systems > VM Notifications.
The Notification Groups screen displays (see Figure 3-6 ).
2. Click Add. A pop-up box displays.
3. Type the Group ID in the Group ID field for the new Notification Group and click OK.
Note The Group ID should be different than existing Group IDs.
4. In the Group of Voice Ports field, select a port group from the drop-down menu or click Add at
the bottom of the screen.
5. If you selected Add, a pop-up box displays asking you to type a new Group of Voice Ports into
the available field and click OK.
Note The Group should be numerical and an existing port number.
6. In the Group Limit (%) field, use the spin-button or typeover the number in the field to select
the percentage.
7. Click Submit. Your changes are saved and the screen remains open. A dialog box displays.
8. Click OK. The changes are added to the voice mail database the next time voice mail service is
shutdown and restarted.
Configuration
V oi c e Mail
Delete Notification Group
1. From the eManager Main Menu, click Advanced Configuration > Systems > VM Notifications.
The Notification Groups displays (see Figure 3-6).
2. Highlight the Group ID you want to delete.
3. Click Delete. A dialog box asks you to confirm the deletion.
Note Do not delete a group that is used in a User Agent Notification Record.
4. Click OK.
5. Click Submit. Your changes are saved and the screen remains open. A dialog box displays.
6. Click OK. The changes are added to the voice mail database the next time voice mail service is
shutdown and restarted.
Strata CIX Voice Mail Programming 01/07 3-19
Page 60

Voice Mail Configuration
Port Statistics
Port Statistics
The Port Statistics screen (see Figure 3-7, Table 3-7) provides reporting and troubleshooting tools
by displaying the number of calls handled by the ports.
This screen provides the groups and group ID information for the Port Group Statistics Report. See
“Port Group Statistics Report” on page 12-4.
Figure 3-7 Port Statistics Screen with Sample Data
Table 3-7 Port Statistics Screen Fields
FIELD DESCRIPTION
Group ID Any number starting with 1.
Group of Voice Ports Por ts in the group.
Entry can be a single, multiple or a range of ports (e.g., 1~4, 10, 12).
7290
7290
3-20 Strata CIX Voice Mail Programming 01/07
Page 61

Voice Mail Configuration
Add Port Statistics Group
1. From the eManager Main Menu, click Advanced Configuration > Systems > VM Port Statistic.
The Port Statistics screen displays (see Figure 3-7).
2. Click Add. A blank line appears.
3. Double-click on Group ID field and type a Group ID.
4. In the Group of Voice Ports field, use the drop-down menu to select the ports or select Add. If
Add is selected a pop-up box asks you to enter the ports.
Note Entry can be a single, multiple or range of ports (e.g., 1-4, 10, 12).
5. Click Submit. Your changes are saved and the screen remains open. A dialog box displays.
6. Click Yes. The changes are added to the voice mail database the next time voice mail service is
shutdown and restarted.
Delete Port Statistics Group
1. From the eManager Main Menu, click Advanced Configuration > Systems > VM Port Statistic.
The Port Statistics screen displays (see Figure 3-7).
2. Highlight the Group ID you want to delete.
3. Click Delete. You are asked to confirm the deletion.
4. Click Yes.
Port Statistics
Configuration
V oi c e Mail
5. Click Submit. Your changes are saved and the screen remains open. A dialog box displays.
6. Click Yes. The changes are added to the voice mail database the next time voice mail service is
shutdown and restarted.
Strata CIX Voice Mail Programming 01/07 3-21
Page 62

Voice Mail Configuration
Scheduler
Scheduler
The Scheduler screen (see Figure 3-8, Table 3-8) enables you to create/modify/delete scheduled
system tasks. You can set up automatic changes for each action to occur at a specified time, on
certain days of the week, and on a specified date.
Drop-down
calendar
7291
Figure 3-8 Scheduler Screen with Sample Data
Table 3-8 Scheduler Screen Fields
FIELD DESCRIPTION
Scheduled Action Name of action to be executed. Action name must be a registered TCL command
name.
Next run (Display only) Date and time the next change occurs (mm/dd/yyyy hh:mm). Time is
expressed in military format (24-hour clock). If a record is disabled, this field
displays the word NEVER.
Timetable Section
Effective from Day of week and calendar date (mm/dd/yy) when the action is scheduled to start.
At Time in hh:mm:ss format. Designates whether action is to be Repeat or a One Time
Only action.
Every Number of times per minute, hour, day, week, month or year.
Active Days Days of the week to which the change is restricted.
3-22 Strata CIX Voice Mail Programming 01/07
Page 63

Voice Mail Configuration
Add Scheduled Action
1. From the eManager menu, click Advanced Config uration > Systems > VM Scheduler. The
Scheduler screen displays (see Figure 3-8).
2. Click Add. A blank line appears below the already scheduled actions.
3. Click on the blank line and type a name of the action to be executed.
Note The action name must be a registered TCL command name.
4. In the Timetable section, click drop-down arrow in the Effective from field. A drop-down
calendar displays.
5. Highlight a date on the calendar. Calendar closes and the date is listed in the Effective from
field.
6. Using the drop-down menu, select the time notation in the three At fields.
7. In the second section of the At field, use the drop-down menu to select either Repeat or One
Time Only. If you select Repeat, another field (On The) appears on the screen.
8. Using the drop-down menu, select the number of times you want the action to happen from the
first section (numeric) of the Every field.
9. Click on the second section of the field and use the drop-down menu to select the frequency of
the action. Possible values are: Minute, Hour, Day, Week, Month and Year.
10. (Optional) If you selected Repeat in the At field, you must now select a day of the month from
the drop-down menu in the On The field. Possible values are: 1st, 2nd, 3rd ... 31st.
11. Click on second portion of the On The field and use the drop-down menu to select the
frequency. Possible values are: Day of Month, Active Day in Month.
Scheduler
Configuration
V oi c e Mail
12. Highlight the days of the week in the Active Days field.
13. Click Submit. Your change s are saved and the screen remains open. A dialog box displays.
14. Click OK. The changes are added to the voice mail database the next time voice mail service is
shutdown and restarted.
15. Click the Scheduled Action number (e.g., “1” next to OSShutdown 600). The Next Run field
refreshes.
Delete Scheduled Action
1. From the eManager menu, click Advanced Config uration > Systems > VM Scheduler. The
Scheduler screen displays (see Figure 3-8).
2. Highlight the action.
3. Click Delete. You are asked to confirm the deletion.
4. Click OK.
5. Click Submit. Your changes are saved and the screen remains open. A dialog box displays.
6. Click OK. The changes are added to the voice mail database the next time voice mail service is
shutdown and restarted.
Note In order to maintain the validity of both Windows XP and voice mail data, a periodic soft
boot of the system is required. For that reason the OSShutdown routine cannot be deleted
from the Scheduler’s list of Scheduled Actions. If desired, the timetable for this action can
be extended to a date and time in the future.
Strata CIX Voice Mail Programming 01/07 3-23
Page 64

Voice Mail Configuration
Language
Language
Voice mail can be configured to communicate in different languages (default is American
English).The Language screen (see Figure 3-9, Table 3-9) enables you to configure the new
languages for the voice mail. This includes:
• System prompts that give callers and users instructions for message recording and mailbox
management.
• Each mailbox can be assigned to one or more of the configured languages, so greetings and
instructions for message recording are spoken in the predefined language.
At present the two available languages are American English (system default) and French.
Important! American English is the standard language of the Stratagy ES software. Spanish
prompts are also available as an option (part number SES-SPANISH-SYS). Other
languages for system prompts, as well as the Voice Mail Soft Keys, is a custom
option that is available from Toshiba DSD’s Integrated Software Solutions Group.
Please contact a TSD Regional Sales Manager for more details.
7292
Figure 3-9 Language Screen with Sample Data
Table 3-9 Language Screen Fields
FIELD DESCRIPTION
Language The name of the available languages.
Language Prompt Files Available prompt files already installed in the system.
Language Configuration Displays the active language for voice mail.
3-24 Strata CIX Voice Mail Programming 01/07
Page 65

Voice Mail Configuration
Change System Language Setting
Important! Prior to performing this procedure, you must set the sys_language_table parameter
to the correct language file.
1. From the eManager menu, click Advanced Configuration > Systems > VM Language. The
Language screen displays (see Figure 3-9).
2. Click Configure Language List. A dialog box
displays (shown right).
3. Click Add. The Add Language screen
displays.
4. From the drop-down menu, select the new
language and click OK. The dialog box
reappears.
5. Click Move Down/Move Up > OK. The
Language screen displays.
6. Click Submit. Yo ur changes are saved and the screen remains open. A dialog box displays.
7. Click OK. The changes are added to the voice mail database the next time voice mail service is
shutdown and restarted.
Language
Configuration
V oi c e Mail
Change Mailbox Language Setting
See “Chains/Groups/Fax” on page 4-31 for information on the required settings.
Edit Prompts
The Edit Prompts function enables you to configure the prompts so that specific languages are used
where needed in the system.
Important! Prior to performing this procedure, you must have a language prompt file saved in
the c:\stratagyes\prompts directory with a filename that defines the language. The
file must be saved with the .VOX extension.
1. From the eManager menu, click Advanced Configuration > Systems > VM Language. The
Language screen displays (see Figure 3-9).
2. Highlight a prompt file on the screen and click Edit Prompts. The Confirm Prompt File screen
displays (shown right).
3. Click Add. A dialog box displays.
4. Type in the name of your prompt
file and click OK.
5. You can now move the file up or
down in the list using the Move Up/
Down buttons.
6. Click OK and the new file appears
on the screen.
7. When finished, click Submit.
Strata CIX Voice Mail Programming 01/07 3-25
Page 66

Voice Mail Configuration
Voice Menu
Voice Menu
This feature enables the use of speech enabled single-digit menus that exist in each mailbox.
The Administrator can add/delete voice commands for all the applications available in single digit
command menus under the mailbox editor, and record a confirmation recording through the
telephone for each command. The recordings are for verifying “voice commands” at runtime, and
do not play back unless the system is not confident about the match and wants to confirm the user’s
choice.
Note This screen works in conjunction with the Mailbox Menus screen.
7335
Figure 3-10 Voice Menu Screen
Table 3-10 Voice Menu Screen Fields
FIELD DESCRIPTION
Prompt Recording Phone Number: Enter the extension number of the telephone that can be used for
recording the corresponding command. Once entered, this number remains
consistent for administration of other mailboxes.
3-26 Strata CIX Voice Mail Programming 01/07
Page 67

Voice Mail Configuration
Add Voice Command
1. From the eManager Main menu, click Advanced Configuration > System > Voice Menu. The
Voice Menu screen displays (see Figure 3-10 on page 3-26).
2. Click Add and a box appears under the Voice Command column on the screen.
3. Type the voice command in the box.
4. Enter the applicable phone number in the Phone Number field.
5. Click Record and record the command’s confirm prompt.
Notes
• You are allowed to record multiple voice commands (voice synonyms).
• If the voice command recording is missing then the application can’t be triggered by speech
and the caller must use the keypad to trigger the application.
6. Click Disconnect when you are finished recording.
7. Click Play to verify what you have recorded.
8. Click Submit when you are finished.
9. Proceed to the Menus screen in Mailbox Editor to set the voice command for the application.
Important! Without setting the Menus screen, the voice command is invalid.
Voic e Men u
Configuration
V oi c e Mail
Delete Voice Command
1. From the eManager Main menu, click Advanced Configuration > System > Voice Menu. The
Voice Menu screen displays (see Figure 3-10 on page 3-26).
2. Highlight a voice command and click Delete.
3. Voice mail asks you to confirm the deletion. Click OK and the command is deleted.
Note If a user tries to remove a voice command from the voice menu, a warning message pops
up; the system won’t delete the voice command until it confirms it with the user.
4. Click Submit when you are finished. A pop-up box displays asking if you want to synchronize
the change(s) with ASR files now.
5. Click OK.
Strata CIX Voice Mail Programming 01/07 3-27
Page 68

Voice Mail Configuration
Parameters
Parameters
The Parameters screen enables you to change voice mail’s system options and parameters, define
timeout values, and set AMIS, VPIM configurations.
Most voice mail system parameters do not require modification. Default values can be modified as
required and system parameters can be added or deleted.
Important!
• You must contact Toshiba Technical Support if you need to add or delete a parameter to/from
the Parameters List.
A parameter added to the system must be an already recognized system parameter and cannot
be created by the individual installer/technician. Deleting a parameter could cause the system
to fail if the parameter is tied into more than one operation.
• We recommend that you use the Windows XP Backup Utility (see “Backup Procedure” on page
13-1) to periodically preserve system data. Before making changes to this selection, ensure you
have a current backup.
7293
Figure 3-11 Parameters Screen with Sample Data
Table 3-11 Parameters Screen Fields
FIELD DESCRIPTION
Parameter Names The name of the system parameter.
Val ue s Current value. When the system is first started, the value is the system default.
Parameter Descriptions Gives a brief description of the highlighted parameter (left column), the possible
values, and the system default value for the parameter.
3-28 Strata CIX Voice Mail Programming 01/07
Page 69

Voice Mail Configuration
Methods for Modifying the Parameters
To modify a parameter, you must double-click the parameter’s corresponding Values field.
Depending upon the parameter, the Stratagy ES places a cursor at the end of the line, or displays a
drop-down list or a dialog box.
Cursor in Field
A parameter that has many valid
values can be changed by placing
your cursor in the field. Typeover
the current value/information in
the field. Be sure to check Table
3-11 for the parameter’s valid
entries.
Drop-down List
A parameter that has set values
(e.g., true, false) can be changed
using the drop-down list
provided for the field. Select one
of the values in the list by
clicking on the value.
Parameters
7630
7631
Configuration
V oi c e Mail
Dialog Box
Double-clicking on a parameter
field with element values (e.g.,
prompt file, etc.), produces a
dialog box for editing as well as
selection of the value.
Using the Dialog box, you can
select, add, delete or reposition
the value in the list (move up/
down).
Important! If you are deleting
an element value
from the box, make su re the correct value is highlig hted before clicking Delete. You
are not asked to confirm the deletion.
7632
Strata CIX Voice Mail Programming 01/07 3-29
Page 70

Voice Mail Configuration
Parameters
Modify Parameters
1. From the eManager Main menu, click Advanced Configuration > Systems > VM Parameters.
The Parameters screen displays (see Figure 3-11).
2. Locate the parameter in the list using the scroll bar.
3. Place your cursor in the field and modify the parameter (see “Methods for Modifying the
Parameters” on page 3-29).
4. Click Submit. Yo ur changes are saved and the screen remains open. A dialog box displays.
5. Click OK. The changes are added to the voice mail database the next time voice mail service is
shutdown and restarted.
Add Parameters
1. From the Parameters screen (see Figure 3-11), right click anywhere in the Parameter N a m e s or
Va l ue s fields. A pop-up box displays with the words “Add” and “Remove.”
2. Click Add. The Add a System Parameter screen displays.
3. Type the new parameter’s name and its appropriate value.
Note The required prefix “sys” is automatically added by the system.
4. Click OK. The parameter is saved and displays alphabetically in the parameter list on the
screen.
...or Cancel. The parameter is not saved and the dialog box closes.
Delete Parameters
1. From the Parameters screen (see Figure 3-11), right click anywhere in the Parameter N a m e s or
Va l ue s fields. A pop-up box displays with the words “Add” and “Remove.”
2. Click Remove. The Delete the System Parameter screen displays.
3. Click OK. The parameter is deleted and is removed from the list on the screen.
...or Cancel. The parameter is not deleted and the dialog box closes.
3-30 Strata CIX Voice Mail Programming 01/07
Page 71

Voice Mail Configuration
Table 3-12 Parameter Definitions
Parameter Description
sys_accept_0_calling_id Accept or reject 0 as calling ID in integration packet.
Possible values:
True: Accept 0.
False: (default) Reject 0.
sys_active_hold Controls how a caller must select to hold for a busy extension.
Possible values:
True: (default) Caller must continue pressing
extension, enter another extension, or leave a message at the tone.
False: Caller selects * once to hold for a busy extension and the system
allows the caller to hold until the is either transferred, selects
another extension, or presses
sys_amis_area_code Area code of the resident Stratagy ES MAS. Single quotes are required.
Default: blank comment line
sys_amis_country_code Country code of the resident Stratagy ES MAS. Single quotes are required.
Default: comment line starting with 1 for North America.
sys_amis_disk_full Percentage of the hard drive that must be free in order for Stratagy ES MAS
to accept new AMIS messages. If free space is less than this figure, The
Stratagy ES MAS tells the calling AMIS system that the hard drive is full.
Default: 5 (percent)
again to leave a message.
*
to hold for a busy
*
Parameters
Configuration
V oi c e Mail
sys_amis_enabled Whether Stratagy ES processes incoming AMIS calls.
Possible values:
True: Voice mail processes incoming AMIS calls.
False: (default) AMIS calls told that this node is not accepting network
calls.
sys_amis_failure_retry Number of retries after failure.
Possible values: 0~9 (default = 3)
sys_amis_loopback_enable Enables the AMIS loopback test feature.
Possible values:
True: (default) enables feature
False: disables feature
sys_amis_ltm User Agent number to use for the AMIS Loopback mailbox. User Agent other
AMIS nodes can use for testing the network. Any AMIS message to this User
Agent is sent back to the sender, if accessible from this voice mail system.
Possible values: valid User Agent number.
Default: 989
sys_amis_max_msg Maximum number of messages the AMIS system can receive.
Default: 1000
sys_amis_max_node Maximum number of remote nodes (Gateway and Proxy User Agents) that
can be in the network. If the actual number exceeds this value, some nodes
are inaccessible.
Possible values: 1~256 (default = 255)
Strata CIX Voice Mail Programming 01/07 3-31
Page 72

Voice Mail Configuration
Parameters
Table 3-12 Parameter Definitions (continued)
Parameter Description
sys_amis_rna Enables the ring no answer time-out to be increased to allow for slow
sys_amis_telephone_number Local telephone number of the resident Stratagy ES MAS. Single quotes are
sys_amis_unknown_node_action Whether voice mail accepts messages from unknown AMIS nodes.
sys_answering_machine Whether Stratagy performs answering machine detection on outgoing calls.
answers from AMIS systems.
Possible values: 1~10 (default = 4)
required.
Default: blank comment line
Possible values:
1: Refuses to accept messages.
2: (default) Delivers this message even though replies are impossible.
Possible values:
True: Stratagy performs answering machine detection on outgoing calls.
False: (default) Stratagy does not perform answering machine detection
on outgoing calls.
Note Do not modify the default value unless instructed to do so by Toshiba
personnel.
sys_asr_enabled Enables system to recognize human speech.
Possible values: 0 disabled (default), 1 (enabled)
sys_asr_login_aliases Aliases for the word Login. To be used in ASR Auto Attendant. Every alias to
be separated by a space and multiple words in an alias to be connected with
an underscore. Please also add an aslia.vox file in the
StratagyES\Scripts\ASR_AA_data\prompts directory.
Default: user_log_in mailbox_log_in log_me_in access_mailbox
mailbox_log_on user_log_on
sys_asr_sendmsg_aliases Aliases for the word send_message. To be used in ASR Auto Attendant.
Every alias to be separated by a space and multiple words in an alias to be
connected with an underscore. Please also add an alias.vox file in the
\StratagyES\Scripts\ASR_AA_data\prompts directory.
Default: quick_message
sys_begin_rec_prompt Whether the system says “Begin recording at the tone, ... or hang up” before
taking a message. This also affects the “to re-record press 2” and “to append
press 3” menu selections during the record menu that is given after a
recording.
Possible values:
True: (default) The system plays the above prompt.
False: The system does not play the above prompt. The caller only hears
a tone.
3-32 Strata CIX Voice Mail Programming 01/07
Page 73

Voice Mail Configuration
Table 3-12 Parameter Definitions (continued)
Parameter Description
sys_box_idx Specifies the digits that a caller must dial to launch the directory application.
The auto attendant compares dialed digits with this pattern before
attempting to select a user agent for transfer.
Note Voice mail builds an index file based on information given in the
Directory Name fields. It enables you to use one or more letters to
perform the search, matching all entries possible. For every mailbox
number that matches, the Stratagy ES plays the name recording–
which really may play any recording you want, if available.
Possible values: any valid digits
Default: 411
sys_cancel_busy_hold Whether the system allows callers to hold for busy extensions.
Possible values:
True: Callers cannot hold for busy extensions.
Calls proceed as if a Ring No Answer.
False: (default) Callers can hold for busy extensions.
sys_cng_tone Fax “CNG” tone in line tone construction format, which is described below.
There are four kinds of tones: single frequency, single frequency with
cadence, dual frequency and dual frequency with cadence. Each tone
description consists of a comma separated by a list of numbers.
Possible values:
Single Frequency: ID, F1, F1Dev, Leading_Edge
Dual Frequency: ID, F1, F2, F1Dev, F2Dev, Leading_Edge
Single w/cadence: ID, F1, F1Dev, On, OnDev, Off, OffDev, Repeat
Dual w/cadence: ID, F1, F2, F1Dev, F2Dev, On, OnDev, Off, OffDev, Repeat
where: ID Fax Carrier Tone (this should be 103)
F1, F2 Frequencies in Hz
F1Dev, F2Dev Frequency deviations in Hz
On Time the tone must be present (ms)
Off Time the tone must be absent (ms)
OnDev Allowable deviation in the on time (ms)
OffDev Allowable deviation in the off time (ms)
Leading_Edge If 1, signals the presence of the tone at its
leading edge, If 0, at its trailing edge.
Repeat The number of on-off cycles that must occur
before signalling the presence of the tone.
Default: 113, 1100, 100, 500, 100, 3000, 100, 1
Parameters
Configuration
V oi c e Mail
sys_company_fax_number This telephone number is used when sending faxes to identify the source of
the fax.
Note This parameter is not currently supported.
Default: blank comment line
sys_company_name The name that will appear in the fax header for sent faxes. This field is
limited to 32 characters.
Note This parameter is not currently supported.
Default: blank comment line
Strata CIX Voice Mail Programming 01/07 3-33
Page 74

Voice Mail Configuration
Parameters
Table 3-12 Parameter Definitions (continued)
Parameter Description
sys_connect_tone Determines whether voice mail beeps when completing a transfer.
sys_default_user_agent User Agent used by the main application at startup.
sys_directory_min_digits Specifies the number of digits the caller has to enter before the directory
sys_discard_SMDI_source Discards SMDI information for calling party ID when a message is sent from
sys_dtmf_gate Before dialing any User ID extension, voice mail verifies that DTMF was
Possible values:
True: Voice mail plays a beep when completing a transfer.
False: (default) Voice mail does not play a beep when completing a
transfer.
Default: 990
lookup application starts searching the directory.
Default: 3
998 or a Direct Send User Agent.
Possible values: True, False (default)
entered since the call last accessed the User ID (default is 991) specified in
the DONE chain of the initial User ID (default is 990).
This “gate” prevents the transfer of a dead/phantom call to the Operator on
those switches that do not have disconnect supervision. Voice mail does not
perform the “gate” action when the Extension field begins with the “@”
character.
Possible values:
True: (default) When prompted, the Caller must say “yes” to complete the
chain and transfer.
False: Caller does not have to say “yes” to complete the chain and
transfer.
sys_dtmf_interdigit_delay Time between digits in DTMF dialing in ms. units.
Default: 50
sys_fax_dl_init A token %A is replaced by this parameter, usually it is a dial code to access
an outside line.
Note This parameter is not currently supported.
Default: 9 (dial 9 and pause for two seconds)
sys_fax_fail_entry Specifies whether voice mail resends a fax if it detects a failure during
transmit.
Note This parameter is not currently supported.
Possible values:
0 no resent
1 resends starting from the first page
2 resends starting from the failure page
Default: 0
3-34 Strata CIX Voice Mail Programming 01/07
Page 75

Voice Mail Configuration
Table 3-12 Parameter Definitions (continued)
Parameter Description
sys_fax_max_retries Defines the maximum number or retries.
Note This parameter is not currently supported.
Possible values: 1, 0
Default: 1
sys_fax_num_rings The number of rings before voice mail determines the fax machine will not
answer.
Note This parameter is not currently supported.
Default: 3
sys_fax_requeue_interval Number of milliseconds to wait between retries for fax_max_retries.
Note This parameter is not currently supported.
Default: 300000 (ms)
Parameters
sys_fixed_len0 Maximum number of digits voice mail expects when a caller dials a mailbox
number beginning with 0.
There is only one mailbox that can have zero as its first digit, and that is
Mailbox Number 0. If the value of this parameter is changed to 1, and a caller
dials 0 in a place where a mailbox number is expected, then voice mail
immediately accepts the 0 as the mailbox number and goes to the next
processing step. If the parameter’s value is left at 8, then a timeout or pound
sign (#) is required to terminate the mailbox number. This latter procedure is
compatible with earlier versions of Stratagy.
Possible values: 1~8
Default: 8
sys_fixed_len1 Maximum number of digits voice mail expects when a caller dials a mailbox
number beginning with 1.
When changing this value, make certain that it is still possible to log in and
send messages to all existing mailboxes that begin with this digit. For
example, if there are five-digit mailboxes that begin with this digit, then you
should not set the value of this parameter less than five. Check all
mailboxes, including users, guests, and reserved (411, 990, etc.)
Possible values: 1~8
Default: 8
sys_fixed_len2 Maximum number of digits voice mail expects when a caller dials a mailbox
number beginning with 2.
When changing this value, make certain that it is still possible to log in and
send messages to all existing mailboxes that begin with this digit. For
example, if there are five digit mailboxes that begin with this digit, then you
should not set the value of this parameter less than five. Check all
mailboxes, including users, guests, and reserved (411, 990, etc.)
Possible values: 1~8
Default: 8
Configuration
V oi c e Mail
Strata CIX Voice Mail Programming 01/07 3-35
Page 76

Voice Mail Configuration
Parameters
Table 3-12 Parameter Definitions (continued)
Parameter Description
sys_fixed_len3 Maximum number of digits voice mail expects when a caller dials a mailbox
sys_fixed_len4 Maximum number of digits voice mail expects when a caller dials a mailbox
number beginning with 3.
When changing this value, make certain that it is still possible to log in and
send messages to all existing mailboxes that begin with this digit. For
example, if there are five digit mailboxes that begin with this digit, then you
should not set the value of this parameter less than five. Check all
mailboxes, including users, guests, and reserved (411, 990, etc.)
Possible values: 1~8
Default: 8
number beginning with 4.
When changing this value, make certain that it is still possible to log in and
send messages to all existing mailboxes that begin with this digit. For
example, if there are five digit mailboxes that begin with this digit, then you
should not set the value of this parameter less than five. Check all
mailboxes, including users, guests, and reserved (411, 990, etc.)
Possible values: 1~8
Default: 8
sys_fixed_len5 Maximum number of digits voice mail expects when a caller dials a mailbox
number beginning with 5.
When changing this value, make certain that it is still possible to log in and
send messages to all existing mailboxes that begin with this digit. For
example, if there are five digit mailboxes that begin with this digit, then you
should not set the value of this parameter less than five. Check all
mailboxes, including users, guests, and reserved (411, 990, etc.)
Possible values: 1~8
Default: 8
sys_fixed_len6 Maximum number of digits voice mail expects when a caller dials a mailbox
number beginning with 6.
When changing this value, make certain that it is still possible to log in and
send messages to all existing mailboxes that begin with this digit. For
example, if there are five digit mailboxes that begin with this digit, then you
should not set the value of this parameter less than five. Check all
mailboxes, including users, guests, and reserved (411, 990, etc.)
Possible values: 1~8
Default: 8
sys_fixed_len7 Maximum number of digits voice mail expects when a caller dials a mailbox
number beginning with 7.
When changing this value, make certain that it is still possible to log in and
send messages to all existing mailboxes that begin with this digit. For
example, if there are five digit mailboxes that begin with this digit, then you
should not set the value of this parameter less than five. Check all
mailboxes, including users, guests, and reserved (411, 990, etc.)
Possible values: 1~8
Default: 8
3-36 Strata CIX Voice Mail Programming 01/07
Page 77

Voice Mail Configuration
Table 3-12 Parameter Definitions (continued)
Parameter Description
sys_fixed_len8 Maximum number of digits voice mail expects when a caller dials a mailbox
number beginning with 8.
When changing this value, make certain that it is still possible to log in and
send messages to all existing mailboxes that begin with this digit. For
example, if there are five digit mailboxes that begin with this digit, then you
should not set the value of this parameter less than five. Check all
mailboxes, including users, guests, and reserved (411, 990, etc.)
Possible values: 1~8
Default: 8
sys_fixed_len9 Maximum number of digits voice mail expects when a caller dials a mailbox
number beginning with 9.
When changing this value, make certain that it is still possible to log in and
send messages to all existing mailboxes that begin with this digit. For
example, if there are five digit mailboxes that begin with this digit, then you
should not set the value of this parameter less than five. Check all
mailboxes, including users, guests, and reserved (411, 990, etc.)
Possible values: 1~8
Default: 8
Parameters
Configuration
V oi c e Mail
sys_hub_count Number of times that a message can be forwarded automatically by
distribution lists and auto copy mailboxes. After this count is exceeded for a
message, it can not be distributed or copied. The purpose of this setting is to
limit the number of copies that can be created if there is a loop in the
distribution list or copy box structure. A loop can occur, for example, when
two distribution lists include each other as members.
Default: 2
sys_language_table Sets language name and language ID in system.
Possible values: American English (default)
sys_line_begin The number of the first line that voice mail should use for processing its calls.
Lines with numbers greater than this value will not be used by voice mail,
and will be available for use by other telephony programs (i.e., ACD). It must
be less than or equal to sys_line_end. If not specified, this field defaults to
blank.
sys_line_end The number of the last line that voice mail should use for processing its calls.
Lines with numbers greater than this value will not be used by Stratagy, and
will be available for use by other telephony programs. It must be less than or
equal to sys_line_end. If not specified, this field defaults to the largest
installed line number in the system.
sys_local_amis_node Gateway User Agent number that represents the local AMIS node.
Messages addressed to this node are delivered directly to the real local box
number instead of being shipped out on the network.
Possible values: valid User Agent number.
Default: blank comment line
Strata CIX Voice Mail Programming 01/07 3-37
Page 78

Voice Mail Configuration
Parameters
Table 3-12 Parameter Definitions (continued)
Parameter Description
sys_local_trace Generates trace information in file form and if desired, displays the data on
the screen.
Syntax: {name filter {list} flags cycle}
where:
name Subdirectory where trace files are stored.
filter Type of trace information to be generated and specifies the
components for which the trace information will be generated.
Possible values are:
1 normal (general nature)
2 support (determines correct installation and
configuration of the Stratagy)
4 debug (intended for debugging—useful for software
developers)
-1 All data
list Specifies the list of trace producers. The trace producer is defined
in the format of “session/application/userID.” The “*” is the wild
character. For example, */*/* specifies all producers.
Note {} also specifies all producers.
flags Defines the action to be taken on the trace information generated.
Possible values are:
0 store only
1 store and display
2 neither store nor display
3 display only
cycle The number of days of history to keep for this trace.
Default: {C:/StratagyES/Message_Log -1 {} 0 5} {Displ -1 {} 3 5}
where:
C:/StratagyES/Message_Log = file name
-1 = all data
{} = all producers
0 = store only
5 = store for 5 days
Displ = display
-1 = all data
{} = all producers
3 = display only
5 = store for 5 days
sys_login_pound Determines whether prompt will say “finish by pressing the pound key” in
login process.
Possible values:
True: (default) Plays prompt, “finish by...”
False: Does not play prompt.
sys_max_call_scr_name_dur Defines the maximum duration for a recording caller’s name when call
screening is enabled on a mailbox.
Default: 5000 ms
3-38 Strata CIX Voice Mail Programming 01/07
Page 79

Voice Mail Configuration
Table 3-12 Parameter Definitions (continued)
Parameter Description
sys_max_guest_box Last mailbox number that can be used when creating a Guest Mailbox.
When used with the sys_min_guest_box parameter, they limit the number of
Guest Mailboxes that can be created.
Example: If this value is 90200, then the last Guest Mailbox that can be
created is Mailbox 90200.
Possible values: valid mailbox number larger than the sys_min_guest_box
parameter setting
Default: 90200
sys_max_prompt Number of times a prompt should repeat until deciding to hang up.
Possible values: 1~9
Default: 3
sys_max_sec_code_len Controls the maximum length security code that voice mail accepts as a new
security code when a user attempts to change it from a telephone.
Note Value must be greater than or equal to the minimum length security
code (i.e., sys_min_sec_code_len).
Possible values: 1~16
Default: 16
Parameters
Configuration
V oi c e Mail
sys_max_silence Specifies maximum number of milliseconds in silence before recording is
terminated.
Default: 5000 ms
sys_maximum_box_length Maximum number of digits voice mail expects in the case that the maximum
number of digits voice mail expects for the beginning digit of that mailbox
number is not defined.
Default: 5
sys_min_guest_box Starting mailbox number that may be used when creating a Guest Mailbox.
When used with the sys_max_guest_box parameter, they limit the number of
Guest Mailboxes that can be created.
Examples: If this value is 90000, then the first Guest Mailbox that is created
is Mailbox 90000. The second guest has Mailbox 90001, etc.
Possible values: valid mailbox number smaller than sys_max_guest_box
parameter setting
Default: 90000
sys_min_sec_code_len Controls the minimum length security code that voice mail accepts as a new
security code when a suer attempts to change it from a telephone.
Note Value must be less than or equal to the maximum length security code
(i.e., sys_max_sec_code_len).
Possible values: 1~16
Default: 3
sys_minimum_message_length Minimum message length in milliseconds for the system to be able to
recognize the message.
Default: 1000 ms
sys_minimum_record_length Minimum record length in milliseconds.
Default: 100 ms
Strata CIX Voice Mail Programming 01/07 3-39
Page 80

Voice Mail Configuration
Parameters
Table 3-12 Parameter Definitions (continued)
Parameter Description
sys_msg_recording_audio_type Sets the audio type for incoming messages. There are four different audio
sys_multiple_destination Sets control for destination entry while addressing a message.
types from which you can select.
Important! If you change this option on an active system, all previously
recorded messages are lost.
Notes
© The better the quality, the more disk space is taken by the recordings.
© In order to not have to install the Toshiba audio codec on a user PC, this
parameter must be set to 5.
Possible values:
2: Dialogic ADPCM at 6KHz sampling (3000 bps)
3: Dialogic ADPCM at 8KHz sampling (4000 bps)
4: PCM at 6KHz sampling (6000 bps)
5: PCM at 8KHz sampling (8000 bps)
Default: 3
Possible values:
0 - Users must press 04 to add multiple destinations for a
message prior to recording. (default)
1: Users can enter multiple destinations before recording a
message. Requires users press # at end of entries.
sys_nam_maxlen Maximum number of milliseconds for recording a user’s name. The name
recording is used for directory access and whenever voice mail tries to
identify the mailbox number.
Possible values: number of milliseconds
Default: 10000 (ms)
sys_name_announce Sets the name announcement at user log on.
Possible values:
True: System announces the user’s name at log-on time.
False: (default) System skips the name announcement at log-on time.
sys_name_recording_audio_type Sets the audio type for name recordings, list comments, and greetings.
There are four different audio types from which you can select.
Notes
© If you change this option on an active system, all previously recorded
messages are lost.
© The better the quality, the more disk space is taken by the recordings.
Possible values:
2: Dialogic ADPCM at 6KHz sampling (3000 bps)
3: Dialogic ADPCM at 8KHz sampling (4000 bps)
4: PCM at 6KHz sampling (6000 bps)
5: (default) PCM at 8KHz sampling (8000 bps)
sys_operator_ua Operators User Agent used by Auto Attendant.
Default: 0
3-40 Strata CIX Voice Mail Programming 01/07
Page 81

Table 3-12 Parameter Definitions (continued)
Parameter Description
sys_page_ready_tone Tone from Page Terminal indicates ready to page.
Note This parameter is not currently supported.
Possible values:
Single Frequency: ID, F1, F1Dev, Leading_Edge
Dual Frequency: ID, F1, F2, F1Dev, F2Dev, Leading_Edge
Single w/cadence: ID, F1, F1Dev, On, OnDev, Off, OffDev, Repeat
Dual w/cadence: ID, F1, F2, F1Dev, F2Dev, On, OnDev, Off, OffDev, Repeat
where: ID Fax Carrier Tone (this should be 103)
F1, F2 Frequencies in Hz
F1Dev, F2Dev Frequency deviations in Hz
On Time the tone must be present (ms)
Off Time the tone must be absent (ms)
OnDev Allowable deviation in the on time (ms)
OffDev Allowable deviation in the off time (ms)
Leading_Edge If 1, signals the presence of the tone at its
leading edge. If 0, at its trailing edge.
Repeat The number of on-off cycles that must occur
before signalling the presence of the tone.
Default: 114, 1850, 1000, 75, 50, 75, 50, 2
Voice Mail Configuration
Parameters
Configuration
V oi c e Mail
sys_partial_q_ok Enables the Q( ) token to save the message even though all prompts are not
completed.
Tr u e: Q( ) token saves the messages.
False: Messages are not saved if prompts are not completed.
Possible values: true, false
Default: false (To enable, remove the starting # and set the value.)
sys_pending_threshold Threshold value determining message pending in seconds.
Default: 2 (secs.)
sys_play_skip Number of seconds message rewinds or skips forward during message
playback when a user presses
Possible values: number of seconds
Default: 5 (secs.)
sys_play_user_id Determines whether directory search feature plays mailbox number that it
finds.
Possible values:
True: (default) If name recording available, the caller hears mailbox
number and name recording. If name recording unavailable, the
caller hears only the mailbox number.
False: Mailbox number never plays. If name recording available, name
recording plays.
sys_prompt_files Default prompt file that voice mail should use on an incoming call. This
enables you to redefine the default language prompt file from English. It
does not preclude you from changing the prompt file during the call.
Possible values: valid prompt file. The brackets are required.
Default: {C:/StratagyES/prompts/english2 0}
*
or #.
Strata CIX Voice Mail Programming 01/07 3-41
Page 82

Voice Mail Configuration
Parameters
Table 3-12 Parameter Definitions (continued)
Parameter Description
sys_rings_no_answer When a mailbox is transferring a call to an extension, it needs to know how
sys_security_code_suffix Defines the suffix used in constructing the default security code. The default
sys_sendfax_line_group The name of the notification port group to use when sending fax
many ringback cycles to wait before signalling a no-answer. This value is
used if the mailbox doesn’t provide its own setting.
Default: 3
security code for a mailbox number is the mailbox number suffixed with the
value specified in this option.
For example: Assume that you specify the suffix value as 335, the default
security code for Mailbox 200 generated by the system would be 200335.
Default: 997
transmissions. This applies to the user mode fax features, the SENDFAX
application and IVR programs that send faxes.
By creating a notification port group, then assigning that port group to this
configuration variable, you can limit fax transmissions to the member ports of
that group.
Note This parameter is not currently supported.
Default: Q1 (enables any line to be used)
sys_short_direct_send What voice mail plays when the Direct Message Mailbox Number (usually
998) is entered followed by the mailbox number.
Possible values:
True: “You entered” and the user’s name recording plays.
False: (default) Mailbox’s current greeting plays (as if received a Ring No
Answer).
sys_short_pause Duration of the short pause in ms.
Default: 500 (.5 secs.)
sys_skip_to_record Enables a caller to press # and skip over a user’s personal greeting and go
directly to recording a message.
Possible values:
True: A caller can press # during the user’s mailbox greeting to skip past
the greeting and the prompt to begin recording immediately.
False: Only the greeting is skipped and the prompt plays before recording
begins.
sys_smdi_tcpport Defines the port number that Stratagy SMDI/SMDI+ TCP server is listening
on.This value must match with the IP Port configured in the CIX for IP SMDI.
Default: 1000
sys_smtp_retry_count Defines the maximum number of retries for sending voice messages to the
E-mail server.
Default: 5
sys_smtp_retry_delay Number of milliseconds voice mail waits between retries for
sys_smtp_retry_count.
Default: 60 (milliseconds)
3-42 Strata CIX Voice Mail Programming 01/07
Page 83

Voice Mail Configuration
Table 3-12 Parameter Definitions (continued)
Parameter Description
sys_smtpserver_gateway Configures a dedicated SMTP Gateway server for SES UM to use. This
gateway can be running on the SES or another server in the network. Enter
the Gateway server’s Name or IP Address and Port Number.
Name;9875
Note The server name and the port number should be separated with a
blank, a comma, or a semicolon.
Default: blank
sys_smtpserver_host Stratagy ES hosts its own internal SMTP server in order to support the UM
feature. SMTP servers require host names to identify them in an SMTP
transmission. This parameter defines the host name for the Stratagy ES
SMTP server.
The host name is used as a part of the source address of an UM message
sent to an e-mail server. For example, if the sys_smtpserver_host parameter
is set to “stratagyes,” then an UM message from mailbox 200 would have a
source address of “200@stratagyes”.
In most cases using the computer name of the Stratagy ES server is
sufficient. However, Toshiba recommends that you confirm the appropriate
host name for the Stratagy ES SMTP server with your site System
Administrator.
Default: blank
Parameters
Configuration
V oi c e Mail
sys_smtpserver_maxconn Defines the maximum number of connections allowed to this voice mail
SMTP server by client applications. If set to zero, then the server is not
available to the client.
UM client seats are fixed to mailboxes. This value can be used to limit net
work traffic, if necessary.
Default: 10
sys_smtpserver_types2accept Defines MIME types that this voice mail server accepts as voice messages.
Note There is no validation for this field.
Default: audio/x-wav audio/wav audio/microsoft-wave
sys_sofkey_length Sets softkey template ID length. Set this value to 3 if sofkeys are multilingual.
Possible values:
2 (set for Strata CTX Release 1.02 and earlier) (default)
3 (set for Strata CTX Release 1.03 or later)
sys_speakname_dir Defines the directory where the prompts are located for the Notification
Applications (e.g., MsgLampOn, MsgLampOff). Prompts play when the user
changes his/her message notification in the Change User Options menu.
Possible values: Any valid path/filename.
Default: C:/StratagyES/Prompts
sys_startup_apps Default: Snmp SOFTKEYNOTIFYDialogModuleInit
sys_statistics_interval Defines the time interval in milliseconds that the information page gets
updated.
Possible values: number of milliseconds
Default: 30000 (ms)
Strata CIX Voice Mail Programming 01/07 3-43
Page 84

Voice Mail Configuration
Parameters
Table 3-12 Parameter Definitions (continued)
Parameter Description
sys_tape_length When a User selects option 1 (Play Messages), and then 78 (Continuous
sys_timestamp_forward Controls the date/time stamp the system uses on a forwarded message.
sys_tmo_answer_prompt Delay in milliseconds to answer a call after line goes off-hook for SMDI.
Play) or 76 (Continuous Delete), this parameter specifies the number of
minutes to play or delete. Usually it is the length of one side of a tape that
might be used for recording a set of messages in a mailbox.
Possible values: 0~99
Default: 30
Note Setting the value to 0 disables both Continuous Play and Continuous
Delete.
Possible values:
True: (default) Use the date/time that the message was forwarded.
False: Use the original date and time the message was first recorded.
Possible values: number in milliseconds
Default: 500 (ms)
sys_tmo_auto_record Specifies the length of pause time (in ms) during Auto Recording. If the Auto
Recording is paused longer than this, the recording is terminated.
Default: 60000 (ms)
sys_tmo_dir_interdigit Specifies the timeout in milliseconds that Stratagy waits between two
consecutive digits during Directory lookups.
Possible values: number of milliseconds
Default: 5000ms
sys_tmo_dtmf Amount of time in milliseconds voice mail waits to determine that the caller
has finished entering DTMF digits (provided the caller does not press #).
Possible values: number in milliseconds
Default: 1200 (ms)
sys_tmo_dtmf_login Amount of time in milliseconds voice mail waits to determine that the caller
has finished entering DTMF digits (provided that the caller does not press #)
when entering the mailbox number and security code during the log in
process.
Possible values: number in milliseconds
Default: 2000 (ms)
sys_tmo_dtmf_start_timeout Specifies the timeout in milliseconds that voice mail waits before receiving
the first digit.
Possible values: number in milliseconds
Default: 4000 (ms)
3-44 Strata CIX Voice Mail Programming 01/07
Page 85

Voice Mail Configuration
Table 3-12 Parameter Definitions (continued)
Parameter Description
sys_tmo_hold Number of milliseconds before voice mail attempts to transfer a caller after
the caller has pressed
When a caller presses
called C:\Stratagy\HOLD.VOX after which voice mail attempts to transfer the
caller again. If that file is missing, voice mail is silent for the number of
seconds specified by this parameter.
Note To have callers hear a specialty recording while on hold, record over
HOLD.VOX by accessing the System Administration Menu. See
System Administrator Guide for details.
Possible values: number in milliseconds
Default: 20000 (ms)
sys_tmo_host Name of machine where CIX Adaptability Service is running.
Default: localhost
to hold for a busy extension.
*
to hold for a busy extension, voice mail plays a file
*
Parameters
sys_tmo_port Port on CIX that CIX Adaptability Service is using. This is defined in
AdaptabilityTsp.cnf.
Default: 4001
sys_tmo_interdigit_timeout Specifies the timeout (in units of 100 ms) that voice mail waits between two
consecutive digits.
Possible values: number of milliseconds
Default: 1200 (ms)
sys_tmo_menu Amount of time in milliseconds voice mail waits before repeating a choice
menu.
Possible values: number of milliseconds
Default: 2000 (ms)
sys_tmo_serial Maximum number of milliseconds voice mail waits for a response when
communicating with peripheral devices through a serial port. Otherwise,
voice mail could potentially wait forever.
Possible values: 2000~9000 (ms)
Default: 2000 (ms)
sys_tmo_sound Maximum amount of sound/dial tone time in milliseconds the system waits
before deciding to finish a recording and hang up.
Possible values: number of milliseconds
Default: 5000 (ms)
sys_tmo_voicehome_login Specifies the timeout in milliseconds for login to VoiceHome.
Possible values: number of milliseconds
Default: 10000 (ms)
Configuration
V oi c e Mail
sys_tsp_host Default: localhost
sys_tsp_port Default: 4001
sys_tts_playback_order See Table 8-1 on page 8-3 of Chapter 8 — Text-to-Speech (TTS) for complete
description of this Text-to-Speech (TTS) parameter.
Strata CIX Voice Mail Programming 01/07 3-45
Page 86

Voice Mail Configuration
Parameters
Table 3-12 Parameter Definitions (continued)
Parameter Description
sys_um_directory suffix Text value to be appended to the From field when sending Unified
sys_um_subject_fax_only Appears in Subject field on Message inbox to identify the type of message
sys_um_subject_voice_only Appears in Subject field on Message inbox to identify the type of message
sys_um_subject_voicefax Appears in Subject field on Message inbox to identify the type of message
Messaging e-mails.
Default: None
received.
Note This parameter is not currently supported.
Default: Stratagy Fax Message
received.
Default: Stratagy Voice Message
received.
Note This parameter is not currently supported.
Default: Stratagy Voice Message
sys_um_unknown_name Configures a name for unknown senders in SES.
Anonymous, unspecified
Note Some anti-spam filters do not pass on e-mail from ambiguous
sources. Check with your e-mail administrator for acceptable entries.
Default: unknown
sys_voicehome_num_rings Set number of rings before Voice Home application hangs up to call.
Default: 4
sys_voicemail_pilot_number Defines the hunt group pilot for the voice mail ports. This parameter is used
in FeatureFlex scripts to direct calls to VM ports.
Default: blank
sys_vpim_enabled Voice Profile for Internet Mail (VPIM) is an industry standard protocol that
facilitates server-to-server message exchange between voice processing
systems from different manufacturers. VPIM can exchange both voice
messages as long as they are of the format dictated by the VPIM standard.
Possible values: 0 disabled (default), 1 (enabled)
3-46 Strata CIX Voice Mail Programming 01/07
Page 87

Voice Processing 4
This chapter gives instructions on using the User Agent function for voice processing. It covers in
detail the Mailbox Editor Menu and how to create, modify and delete mailboxes (e.g., COS, user,
Distribution List, Direct Send Voice).
User Agent(s)
The Stratagy ES is a system capable of numerous applications. Most applications are performed by
software objects that hold properties and privileges for various functions. These objects are called
User Agents. Similar to the User ID concept in the DOS-based Stratagy ES systems, a User Agent
can be used to define a COS, a system distribution list, or a user mailbox. It is the properties of the
User Agent that determines it’s identity.
Once a User Agent is created and defined as a mailbox, the system software, voice prompts, and
Administration screens refer to it as a mailbox and not a User Agent. To better understand this
concept, consider a User Agent to be a template that can be used to form numerous applications.
The following User Agents are available:
• COS (see “Class of Service (COS)” on page 4-3 ).
• Mailbox (see “User Mailbox” on page 4-5 ).
• Distribution List (see “Distribution List (System)” on page 4-48 ).
• IVR
• AMIS Gateway and AMIS Proxy (see “AMIS Networking” on page 10-5 ).
• VPIM Gateway and VPIM Proxy (see “VPIM Networking” on page 10-13 ).
• Direct Send Voice (see “Direct Send Voice” on page 4-50 ).
• Direct Send Fax (see “Direct Send Fax” on page 4-51 ).
Note This feature is not currently supported.
Voice Processing
Strata CIX Voice Mail Programming 01/07 4-1
Page 88

Voice Processing
User Agent(s)
Voice Mail Menu
The Voice Mail Menu is available from the eManager Menu, Advanced Configuration and offers
the following options:
User Agents
1. See Chapter 9 — Interactive Voice Response (IVR) for information on IVR User Agents.
2. See Chapter 10 — Advanced Integrations and Applications for information on AMIS and VPIM User
Agents.
3. See Chapter 5 — Fax Server for information on Direct Send Fax User Agents.
Figure 4-1 eManager Menu — Voice Mail Submenu
Mailboxes
Mailbox COS
Distribution List
1
IVR
AMIS Gateway
AMIS Proxy
VPIM Gateway
VPIM Proxy
Direct Send Voice
Direct Send Fax
2
2
2
2
3
Mailbox/COS Editor Menu:
User Mode Options
AA Options
Chains/Groups/Fax
Menus
Info (not on COS)
Auto
Notify
Unified Messaging
ASR Auto Attendant
7206
Stratagy’s design revolves around user mailboxes. How a user mailbox has been customized
determines what a caller hears and is able to do. For example, if Mailbox 990 contains the initial
company greeting, a caller accessing Mailbox 990 hears the greeting recorded as the greeting for
Mailbox 990.
Defined User Agents
Stratagy ES comes with several defined User Agents. Each of the following User Agents have been
defined by Toshiba to perform a specific function.
User Agent 900: ASR Auto Attendant default User Agent – ASR Automated Attendant default
User Agent.
User Agent 988: Direct Send Fax –User Agent used to send fax messages to other voice mail
users. See the Stratagy ES User Guide for details on using this User Agent.
Note This feature is not currently supported.
User Agent 989: AMIS Loopback – User Agent used by other AMIS nodes for testing the
network. Any AMIS message directed to this User Agent is sent back to the sender, if accessible to
Stratagy. By default, the User Agent is disabled. See the voice mail system configuration parameter
sys_amis_ltm under “AMIS User Agents” on page 10-5 .
User Agent 998: Direct Send Voice – Direct Send Voice User Agent for all ports. Voice mail
records a message for a mailbox number without having to execute the Extension field and/or hear
the mailbox’s greeting. This is particularly useful for an Operator transferring directly to voice mail.
4-2 Strata CIX Voice Mail Programming 01/07
Page 89

Class of Service (COS)
Stratagy ES has the ability to centrally manage the attributes of mailboxes with User Agents called
Class of Service (COS).
The COS design is based on a parent/dependent concept. The COS assignment within a mailbox
User Agent and any mailbox that references that number in the Class of Service field inherits the
feature set or properties of the parent COS and is considered a dependent.
Any changes to the parent COS affect the corresponding dependent mailboxes. However, any
change made to an individual dependent mailbox does not change other mailboxes belonging to the
COS. (See “Inherit Function” on page 4-3 for instructions on making changes to dependent
mailboxes.)
With a COS design, a feature belonging to a group of mailboxes can be modified by simply making
the change in the COS User Agent that is the master or parent of the g roup. If a mailbox has no COS
number, it is considered independent and is not affected by a COS.
The following rules apply to Classes of Service:
• Mailboxes can be taken out of COS by selecting the No COS selection in the Class of Service
field.
• Established mailboxes given a COS number after their creation only inherit changes that are
made after they have been included in the group.
• A COS User Agent cannot be deleted until its COS number has been removed from all
dependent mailboxes.
• If a COS is copied, the new (copied) COS inherits all attributes of the original COS but remains
independent from the original COS.
Voice Processing
Class of Service (COS)
• If a dependent mailbox is copied, the new mailbox becomes a dependent mailbox and a part o f
the COS group.
Inherit Function
When you right-click a Mailbox Editor screen field, a small
“Inherited” box displays. If the box is checked, the field has
inherited the setting from the COS parent’s mailbox (shown right).
If the box is unchecked, the field has not been inherited.
If you modify the value in an Inherited field, the Inherited check
mark is removed when you display the “Inherited” box. To chang e
the field back to the inherited value, right click on the field and
when the Inherited box displays, check the box.
Note See “Reset Function” on page 4-8 for instructions on resetting a group of fields to the
inherited features for the mailbox.
Voice Processing
7209
Strata CIX Voice Mail Programming 01/07 4-3
Page 90

Voice Processing
Class of Service (COS)
Explore Function
The Explore function assists you in selecting a COS parent by displaying the existing Class of
Services and the lineage between them. The function is accessed using the Explore button that
appears at the top right corner of the Mailbox and Mailbox COS screens.
Select COS Using Explore Button
1. From one of the aforementioned screens, click
Explore. The Select COS screen displays (shown
at right).
2. Highlight the COS and click OK. The COS parent
displays in the Class of Service field and the
mailbox inherits the COS settings.
Create COS for Mailboxes
1. From the eManager menu, click Advanced
Configuration > Voice Mail > Mailbox COS. The
Mailbox COS screens display.
Note Currently, only mailboxes can be assigned to
COS. Future development may include other
User Agents that can be governed by COS.
7207
2. Click Create UA at the bottom of the screen. The Create User Agent screen displays.
3. Type a single User Agent number (e.g., 881), a range of numbers (e.g., 800-804) or a
combination of both separated by a comma or a space (e.g., 800-802, 881 888).
Note The number you enter must be unique. If the number already exists, the Stratagy ES
indicates that the User Agent could not be created.
4. (Optional) Type a COS number into the field or use the drop-down menu to select a preexisting COS number. The field defaults to No COS.
Note Since COS relationships can have several layers, confusion may occur if layers are not
properly planned out and maintained.
5. Click OK. The Creating dialog box displays while the program creates the User Agents. When
the process is complete, the screen indicates whether the creation of the User Agent(s) was
successful.
6. Click Exit. The Mailbox Editor tab screens display (see “Mailbox Editor Menu” on page 4-7 ).
7. Modify the screen fields and click Submit (see Figure 4-13 on page 4-9 through Figure 4-17 on
page 4-24). The changes are saved and the screen remains open.
Edit COS for Mailboxes
1. From the eManager Main menu, click Advanced Configuration > Voice Mail > Mailbox COS.
The Mailbox COS Editor tab screens display (see Figure 4-13 on page 4-9).
2. To the right of the Mailbox COS Editor screen, highlight the Mailbox listing for the mailbox
you want to edit
...or type the mailbox number in the mailbox header at the top of the screen and click Refresh.
The Mailbox COS Editor screen displays the data for the mailbox number.
3. Edit the mailbox fields.
4. Click Submit. The changes are saved and the screen remains open.
4-4 Strata CIX Voice Mail Programming 01/07
Page 91

User Mailbox
Stratagy’s design revolves around user mailboxes. How a user mailbox has been customized
determines what a caller hears and is able to do. For example, if Mailbox 990 contains the initial
company greeting, a caller accessing Mailbox 990 hears the greeting recorded as the greeting for
Mailbox 990.
Reserved Mailboxes
Voice mail comes with several reserved mailboxes. Only Mailbox 999 cannot be assigned to
another mailbox number. Each of the following mailboxes performs a specific function.
Mailbox 0: Operator – For an after hours caller who is unable to direct his own call or does not
know the extension of the person he wants to reach.
Mailbox 987: IP Address – Plays the Stratagy ES MAS IP address to the caller.
Mailbox 990: Company Greeting – The salutation that lets the caller know which company he
called.
Mailbox 994: Fax Tone Detect – Mailbox voice mail “jumps” to when voice mail detects a carrier
tone originating from a remote fax machine.
Mailbox 995: ASR Auto Attendant COS – Mailbox voice mail uses for the default values when
creating a Company Greeting User Agent for an ASR Auto Attendant application other than 900
(see page 4-2).
Voice Processing
User Mailbox
Note This mailbox is located in the Mailbox COS option.
Mailbox 996: Guest Defaults – Mailbox voice mail uses for the default values when creating a new
Guest User ID. The field values are copied into a new Guest User ID upon initialization.
Note This mailbox is located in the Mailbox COS option.
Mailbox 997: Defaults Box – Mailbox voice mail uses for the default values when creating a new
mailbox. The field values are copied into a new mailbox upon initialization. See the System
Configuration parameter sys_default_user_agent on page 3-34.
Mailbox 999: System Administrator Mailbox – Enables the System Administrator to create
system lists, record and delete system announcements, record the busy-hold music or message,
manage User IDs, and review system status. See System Administrator Guide for details. This
mailbox has a pre-programmed extension of H for Hang-up. This enables (999) its use as a
disconnect code for telephone systems that provide this feature.
Create User Mailbox
1. From the eManager Main menu, click Advanced Configuration > Voice Mail > Mailbox. The
Mailbox Editor screen displays.
2. Click Create UA at the bottom of the screen. The Create User Agent screen displays.
3. Type a single User Agent number (e.g., 881), a range of numbers (e.g., 800-804) or a
combination of both separated by a comma or a space (e.g., 800-802, 881 888).
Note The number you enter must be unique. If the number already exists, the Stratagy ES
indicates that the User Agent could not be created.
Voice Processing
4. (Optional) Type a COS number into the field or use the drop-down menu to select a preexisting COS number. The field defaults to No COS.
5. Click OK. The Creating dialog box displays while the program creates the User Agents. When
the process is complete, the screen indicates whether the creation of the User Agent(s) was
successful.
Strata CIX Voice Mail Programming 01/07 4-5
Page 92

Voice Processing
User Mailbox
6. Click Exit. The Mailbox Editor T ab screens display (see “Mailbox Ed itor Menu ” on page 4-7 ).
7. Modify the screen fields and click Submit (see Figure 4-13 on page 4-9 through Figure 4-17 on
Modify User Mailbox
1. From the eManager Main menu, click Advanced Configuration > Voice Mail > Mailbox. The
2. To the right of the Mailbox Editor screen, highlight the Mailbox listing for the mailbox you
3. Modify the mailbox fields.
4. Click Submit. The changes are saved and the screen remains open.
Delete User Mailbox
Important! Only available to Department level users or higher. Mailbox must be controlled by
page 4-24). The changes are saved and the screen remains open.
Mailbox Editor tab screens display (see Figure 4-13 on page 4-9).
want to edit
...or type the mailbox number in the mailbox header at the top of the screen and click Refresh.
The Mailbox Editor screen displays the data for the mailbox number.
user attempting to delete it.
1. From the eManager Main menu, click Advanced Configuration > Voice Mail > Mailbox. The
Mailbox Editor tab screens display (see Figure 4-13 on page 4-9).
2. Click Delete UA. A pop-up box displays.
3. Type a single User Agent number (e.g., 881), a range of numbers (e.g., 800-804) or a
combination of both separated by commas (e.g., 800-802, 881, 888) you want to delete in the
Range field.
Note Field defaults to the user agent on the screen at the time you click Delete UA.
4. Click OK.
5. Click Exit. The database is updated and the deleted user agents are removed from the list on the
right.
Copy Mailbox
This function copies a mailbox to one or more new mailboxes.
1. From the eManager Main menu, click Advanced Configuration > Voice Mail > Mailbox. The
Mailbox Editor screen displays (see Figure 4-13 on page 4-9).
2. To the right of the Mailbox Editor screen, highlight the Mailbox listing for the mailbox you
want to copy
...or type the mailbox number in the mailbox header at the top of the screen and click Refresh.
The Mailbox Editor screen displays the data for the mailbox number.
3. Click Copy UA. The Copy User Agent screen displays.
4. Type the new mailbox numbers you want to create in the To field. Click OK. The new
mailbox(es) are created.
5. Click Exit.
4-6 Strata CIX Voice Mail Programming 01/07
Page 93

Voice Processing
Mailbox Editor Menu
User Mailbox Reports
You can run standard reports on all user mailboxes. The available reports are: Mailbox Call
Statistics, Mailbox Usage Summary, Mailbox Info and Status, and Mailbox Message Statistics.
A customized report can also be run using a template and include any or all user mailboxes (see
“Custom Reports” on page 12-11 for instructions).
Figure 4-12 Mailbox Usage Summary Report
Statistics on an individual mailbox can be viewed on the Mailbox Editor’s Info Tab screen (see
“Info” on page 4-39 ).
Mailbox Editor Menu
There are two identical versions of the this menu: the Mailbox Editor Menu that displays user
mailboxes and the COS Mailbox Editor Menu that displays Classes of Service. Both versions have
the same tab screens and fields – User Mode, Auto Attendant, Chains/Groups/Fax, Menus, Info (not
on COS), Auto, Notify and Unified Messaging. Together these screens provide the basis for
programming all user, information, control and System Administrator mailboxes.
This section will refer to both screens as a Mailbox Editor Menu and only where differences exist
will references be made to the COS Mailbox Editor Menu.
Refresh Function
This function enables you to manually refresh the screen with the most up-to-date database
information.
! From the Mailbox Editor screen, click Refresh (bottom of screen). The screen displays the
current data for the mailbox.
7329
Voice Processing
Strata CIX Voice Mail Programming 01/07 4-7
Page 94

Voice Processing
Mailbox Editor Menu
Lock Function
Set fields on the Mailbox Editor screens can be locked so that users cannot enable/disable user
option features (e.g., call screening, DND, etc.) from his/her touchtone telephone.
The fields that can be locked on each mailbox is:
• Do Not Disturb
• Screen Calls
• Busy Greeting
• Record Name
• Selected Greeting
• Playback Volume
! To lock/unlock a field, click on the “Lock” icon (shown right)
Reset Function
The Reset button on the bottom of the Mailbox Editor tab screens clears all inheritance overrides
and locks from the displayed mailbox. Overrides/locks are cleared from all tab screens within the
mailbox.
next to the field and the lock closes or opens depending on its
initial state.
721‘0
Mailbox Search Function
The display varies depending upon:
• Mailbox Editor – The COS Mailbox Editor only displays existing COS in the system while the
Mailbox Editor displays user mailboxes.
• Access Level – If you are assigned a department access level, your screen displays only the
mailboxes you have been assigned to administer.
Search for Mailbox
1. From the Mailbox Editor screen, move
that portion of the screen (far right
hand side) over by clicking and
holding the cursor on the right-hand
line. The Search screen displays
(shown at right) the following fields
for each mailbox: Mailbox, Name1,
Name2 and Comment.
2. Enter values in the Search Conditions
screen fields.
Note Fields left blank are considered
wildcards. If all fields are left
blank, the system retrieves all
mailboxes.
3. Click Start. System shows search
results in a list and displays the first
matching mailbox in the editor pane.
4. You can view the listing for any
existing mailbox using << >>.
7330
4-8 Strata CIX Voice Mail Programming 01/07
Page 95

Access a Specific Mailbox from the Search Screen
! From the Search screen, double-click a mailbox listing. The desired mailbox displays on the
Mailbox Editor tab screen.
Mailbox Editor Screens
The Mailbox Editor consists of the following screens:
• User Mode Options (see Figure 4-14 and Tab le on page 4-12)
• Auto Attendant Options (see Figure 4-15 and Table on page 4-16)
• Unified Messaging (see Figure 4-16 and Table on page 4-20)
• Notify (see Figure 4-17 and Table on page 4-24)
• Chains/Groups/Fax (see Figure 4-18 and Table on page 4-31)
• ASR Auto Attendant (see Figure 4-19 and Table on page 4-37)
• Info (see Figure 4-20 and Table on page 4-39)
• Menus (see Figure 4-21 and Table on page 4-42)
• Auto (see Figure 4-22 and Table on page 4-44)
Mailbox Header
Voice Processing
Mailbox Editor Screens
The first seven fields (i.e., Mailbox ID, Security code, Class of Service (COS), Extension, Name 1
and 2, and
Comment) shown on the top of each Mailbox Editor screen (Figure 4-13) comprise the
message header for the Mailbox Editor screens.
The information in these fields (see Table on page 4-10) are shared among all the Mailbox Editor
screens.
Screen Tabs
Mailbox
Header
Explore
COS Button
Voice Processing
Function Buttons
Figure 4-13 Mailbox Editor Menu — Mailbox Header
Strata CIX Voice Mail Programming 01/07 4-9
7329
Page 96

Voice Processing
Mailbox Editor Screens
Table 4-1 Mailbox Editor Menu — Mailbox Header Screen Fields
FIELD DESCRIPTION
Mailbox ID Mailbox number. Usually associated with a telephone extension (for simplicity).
Employees without a telephone extension can have a mailbox from which they can
send and receive messages. Mailboxes can be used for special functions such as
directories or question and answer surveys.
Note This field displays at the top of all Mailbox Editor screens.
Possible values: 0~99999999 (must be unique).
Extension Programmed dial actions voice mail performs to transfer a call that has accessed
the mailbox (i.e., Do Not Disturb is Off). Includes transfer to a mailbox, a remote
number, or paging. Normally a simple extension number.
Required by a COS mailbox.
Note This field may be modified by the Auto Scheduler. Any changes to the field’s
value (including directly changing the value or reverting the value to the
parent’s COS) is only temporary, and lasts only until the next scheduled
change.
Default: value entered in Mailbox ID field.
Comment Notation or reminder about the function of the mailbox. This field is 16 characters
long. Default is a blank field. Only field not affected if changes are made to the COS
parent mailbox.
For example, a mailbox may be identified by function (extension, information box,
etc.) or contents (greeting, directory, etc.).
Name 1 The first of two names voice mail searches when a caller uses the directory (default
411). The field is 16 characters long. Entries can contain any alphabetical
characters. Digits 2~9 are allowed for entry by the System Administrator via a tonedialing telephone’s dial pad. They cannot contain spaces or digits 0 and 1.
For most companies, this is the mailbox user’s first name. For COS mailboxes, this
field is used as the mailbox identifier. For example, if you type “Special” in this field
and “Mailbox” in the Name 2 field, “Special Mailbox” appears in the BoxList Name
field and in the COS Explore list.
Notes
l It is important that each user record his/her name.
l When the System Administrator enters a user’s name into the directory using
the telephone dial pad, the name is stored in the Options screen Directory
Name 1 and Name 2 fields as numeric digits. For administration clarity, it is
advisable to change the digits to their alpha equivalents.
The directory works as follows. If a caller wants to speak with Donna, the caller
would enter digits corresponding to these letters on the tone-dialing telephone (i.e.,
36662). For the first mailbox Directory Name field that matches the caller’s entry,
voice mail plays the name recording.
Depending upon the System Configuration parameter sys_directory_app_uid, voice
mail also plays the digits of the Mailbox ID field. If no name recording is available,
depending on the sys_directory_app_uid setting, voice mail does not present an
entry or play the digits of the Mailbox ID field.
4-10 Strata CIX Voice Mail Programming 01/07
Page 97

Voice Processing
Mailbox Editor Screens
Table 4-1 Mailbox Editor Menu — Mailbox Header Screen Fields (continued)
FIELD DESCRIPTION
Name 1 (continued) Since voice mail plays the name recording of all mailboxes that match a caller’s
entry for the company directory, you can use this capability as a general search and
playback system. The digit string used for directory searching is defined using the
sys_box_idx System Configuration parameter.
For details about the System Configuration parameters, see Chapter 3 — Voice Mail
Configuration. For users who do not wish to have their name accessible from the
directory, leave this field blank.
Note This field displays at the top of all Mailbox Editor screens.
Name 2 The second of two names voice mail may search when a caller uses the directory
(default 411). The field is 16 characters long. Entries can contain any alphabetical
characters. Digits 2~9 are allowed for entry by the System Administrator via a
tone-dialing telephone’s dial pad. They cannot contain spaces or digits 0 and 1.
For most companies, this is the mailbox user’s last name or another way to
reference this user, such as a variation in spelling (Cathy, Kathy) or a nickname
(Michael, Mike). It can also be used for the name of an additional user when a
mailbox is shared.
For COS, this field is used as the mailbox identifier (see “Name 1” on page 4-10 ).
For users who do not wish to have their name accessible from the directory, leave
this field blank.
Note This field displays at the top of all Mailbox Editor screens.
Security code Password (up to 16 digits long) that permits the user access to this mailbox. The
security code insures that only appropriate users can change a greeting, record a
custom busy message, listen to messages left for this mailbox, or change option
settings.
The initial value is the number of the new mailbox plus the value in the
sys_security_code_suffix (default 997) parameter.
For example, if a mailbox 234 is created, the default security code for the new
mailbox is 234997.
If the sys_security_code_suffix parameter is changed, only the mailboxes created
after rebooting the system have the new default security code. If the security code is
set to something that can not be entered from a telephone (such as an X), no one
can log into the mailbox.
The user can change the password to assure confidentiality. For added security, the
code does not display on the screen. You cannot view the security code; you can
only change it.
Class of service Indicates whether the mailbox is inherited from a COS parent and the COS parent’s
name. Field is 20 characters long.
To enter a COS in this field:
© Type a COS into the field.
© Highlight a COS on the drop-down menu provided. The menu contains a list of
all available COS. Choose “No COS” if the mailbox has no COS parent.
© Highlight a COS on the explore list using the Explore button (see Figure 4-14).
The list shows a detailed view of the available COS mailboxes in the system.
Voice Processing
Strata CIX Voice Mail Programming 01/07 4-11
Page 98

Voice Processing
Mailbox Editor Screens
User Mode
Explore Button
7295
Figure 4-14 User Mode Tab Screen with Sample Data
Table 4-2 User Mode Tab Screen Fields
FIELD DESCRIPTION
Mailbox Header See “Mailbox Header” on page 4-9 for field definitions.
Generic Options
Guests Number of Guest Mailboxes the user can create. For each Guest Mailbox created,
the value decrements by 1. For example, if the Guests field was set to 5 and the
user created 3 Guest Mailboxes, Guests would now display 2.
Possible values:
1~99: Number of Guest Mailboxes the user can create.
0: (Default) User cannot use the Guest Mailbox feature
Record Name Whether the user can record his/her name for playback/identification to a caller.
Possible values:
On: (Default) User can record his/her name
Off: User cannot record his/her name.
Slow menu Defines whether voice mail pauses between mailbox menu choices when stating
them to the user (e.g. Main Menu options).
Possible values:
On: Add extra time between menu choices.
Off: (Default) Do not add extra time.
4-12 Strata CIX Voice Mail Programming 01/07
Page 99

Mailbox Editor Screens
Table 4-2 User Mode Tab Screen Fields (continued)
FIELD DESCRIPTION
Tutorial at next login Whether the mailbox plays the tutorial when the user logs in the next time.
Note Once the user logs in to his/her mailbox and hears the tutorial, the field is
turned off automatically.
Possible values:
On: (Default) Mailbox plays the tutorial
Off: Mailbox does not play the tutorial
Message Attributes
Store Messages Whether voice mail enables the mailbox to store messages. If this field is set to Off,
the mailbox plays information only and does not record messages.
Possible values:
On: (Default) This mailbox stores messages.
Off: This mailbox does not store messages.
Voice Processing
Maximum length in
seconds
Purge Messages in
days
Play date/time During message playback, voice mail plays the date and time a message was
Message Pending Messages that a user partially hears (two seconds or longer) are called Pending
Maximum message length in seconds a caller is allowed when leaving a message.
Possible values: -0 (unlimited), 1~6000 (seconds)
Default: 180 (180 seconds = 3 minutes)
CAUTION! Setting this value to -1 (unlimited length) should be done with
extreme caution. If the Stratagy ES port does not properly detect
the abandonment of a call, it could remain off hook and recording
until there is no recording space left on the hard drive.
Number of days before a message is set for purging/deletion. Whenever a user
accesses his/her User ID and presses 1 to Play Messages, the system tells the
user how many messages will be automatically deleted when he/she exits the Main
Menu. This field is three-digits long.
CAUTION! Once a message is deleted by purging, there is no way to retrieve
it.
Possible values: 0 (purging disabled), 1~999 (days)
Default: 0
recorded.
Possible values:
On: (Default) The date and time plays before the message.
Off: The date and time does not play before the message.
messages and are processed differently than unheard (new) messages. They
remain in the new message folder but the Message Waiting LED is turned off and a
Return Receipt is sent, if applicable.
Possible values:
On: (Default) The system marks partially heard messages as Pending.
Off: The system does not mark partially heard messages as Pending. All
messages (partially heard and new) are stored in the new message folder,
the Message Waiting LED remains on and a Return Receipt is not sent, if
applicable.
Voice Processing
Strata CIX Voice Mail Programming 01/07 4-13
Page 100

Voice Processing
Mailbox Editor Screens
Table 4-2 User Mode Tab Screen Fields (continued)
FIELD DESCRIPTION
Message Order
(FIFO/LIFO)
Message folders
(Single/Dual/Multiple)
Playback
Volum e Volume at which messages are played back to the user. This value can be set by the
Alternate rate Alternate speed voice mail uses while playing messages or prompts. While listening
Order in which voice mail plays back caller messages to the user.
Possible values:
FIFO: (Default) First-In First-Out. Voice mail plays the oldest messages first.
LIFO: Last-In First-Out. Voice mail plays the most recent message first.
Number of folders voice mail uses to store the caller messages.
Possible values:
Single: One folder, no separate save folder.
Dual: (Default) New and Saved Message folders.
Multiple: New and Saved Message folders and up to seven personal folders that are
created by the mailbox user for the purpose of saving messages.
user through the telephone, using the Play Message Controls.
Possible values: -4 (softest), 0 (normal) 4 (loudest)
Default: 0
to a message, the user can press
Note Alternate rate can only be implemented while listening to a message. When
the user exits the Play Messages Menu, the system returns to default speed
unless the User alternate rate at login field is set On.
## to toggle between the two speeds.
Possible values: 0 (normal), 1~10 (fastest)
Default: 0 (normal)
User alternate rate at
login
Inter-digit Guard Timer Used to define the time delay between repetitive entries of the same digit pressed
Message Copy There are two types of new messages that can be copied to a specific destination
Delete after copy Deletes the message from the original target mailbox after copying the message to
Whether the selected Alternate Rate applies at login.
Possible values:
On: (Default) Alternate Rate applies at login.
Off: Alternate Rate does not apply at login. Default speed applies.
by a user while playing messages. For example, users who press the digit 1 (i.e.,
111) in quick succession may cause the system to jump over messages and give
the users the perception of delayed messages.
Possible values: 0 (default)~1000 msec.
Note 0 default equals 50 msec.
mailbox using this feature–all new or new urgent messages. Only one type of
message can be enabled at one time.
the destination mailbox.
Possible values:
On: Deletes a message after copying to another mailbox.
Off: (Default) Does not delete a message after copying it to another mailbox.
All New Messages
4-14 Strata CIX Voice Mail Programming 01/07
 Loading...