

Page 1
Telecommunication Systems Division
Release 4.0
Administrator Manual
June 2001
BETA DOCUMENT - PRELIMINARY & CONFIDENTIAL
Page 2

Publication Information
To shiba America Informati on Sys tems, Inc.,
Te lec ommunication Systems Division, reserv es th e ri g ht ,
without prior notice, to revise this information publication for
any reason, including , but not limited to, utilization of new
advances in the state of technical ar ts or to simply change the
design of this document.
Further, Tos h iba America Information Systems, Inc.,
Telec ommunication Syste ms Division, also reserves the right,
without prior notice, to make such changes in equipment
design or components as engineering or manufacturing
methods may warrant.
SCS-AG-ADMR4-VC
4016190
Version C, June 2001
© Copyright 2001
Toshiba America Information Systems, Inc.
T ele com mun ica tion Syste ms D ivis ion
All rights reserved. No part of thi s ma nual, covered by the
copyrights hereon, may be reproduced in any form or by an y
means—graphic, elect roni c, or mechanical, including
recording, taping, photocopying, or information retrieval
systems—without express written permission of the publisher
of this material.
Strata is a registered trademark of Toshiba Corporation.
Microsoft, Windows, and Windows NT are registered
trademarks of Microsoft Corporation. SQL Server is a
trademark of Microsoft Corporation. Adobe an d A cr obat are
registered trademarks of Adobe Systems Incorporated.
Dialogic is a registered trademark of Dialogic Corpor ation.
Trademark s , registered trademarks, and service marks are the
property of th eir respective owners.
Page 3

CONTENT S
CONTENT S
Chapter 1. Overview of Upgrading and Configuring Strata CS
Welcome to Strata CS...........................................................................1-2
Significant Strata CS features...........................................................1-2
What’s New in Strata CS 4.0.................................................................1-3
Miscellaneous new features.............................................................. 1-6
What’s automatically upgraded......................................................... 1-6
Before you begin...................................................................................1-7
Changes in Strata CS from version 2.1 to 3.0 or later ..........................1-7
Changes in Strata CS 3.0 or later.........................................................1-8
Configuring Strata CS for the first time .................................................1-9
Where to get help................................................................................1-10
Strata CS documentation................................................................ 1-10
Your Strata CS provider..................................................................1-11
Chapter 2. The Strata CS Administrator
About the Strata CS Administrator........................................................2-2
Linking computers and phones.........................................................2-2
Logging on to the Administrator........................................................ 2-3
The Administrator interface...................................................................2-3
Working in views ............................................................................... 2-5
Performing basic actions in the Administrator.......................................2-8
Creating items ...................................................................................2-8
Deleting items.................................................................................... 2-9
Renaming items ................................................................................ 2-9
Copying and pasting items................................................................ 2-9
Customizing columns........................................................................ 2-9
Working with voice files...................................................................2-10
Chapter 3. Strata CS Licenses
About Strata CS licenses......................................................................3-2
Entering licenses...................................................................................3-2
Removing licenses................................................................................3-4
Chapter 4. Defining System Settings
About system settings...........................................................................4-2
Customizable settings....................................................................... 4-2
The General tab....................................................................................4-3
Defining business hours and holidays ..............................................4-5
The Call Log tab....................................................................................4-8
BETA DOCUMENT - PRELIMINARY & CONFIDENTIAL
Page 4

Logging internal calls.........................................................................4-8
Archiving the Call Log ....................................................................... 4-8
The Storage tab..................................................................................4-10
Allocating disk space.......................................................................4-11
Moving voice files............................................................................ 4-11
The Dialing tab....................................................................................4-12
Defining special access codes........................................................4-12
Setting dialing timeouts ...................................................................4-13
The Emergency tab ............................................................................4-14
Using standard 911 service with Strata CS ....................................4-14
Using extended 911 service with Strata CS....................................4-14
How emergency numbers are handled...........................................4-15
The Other tab......................................................................................4-17
Setting dial-by-name directory options............................................4-17
Presenting a confirmation menu before voice mail.........................4-18
Setting up Microsoft Exchange synchronization.............................4-18
Setting the minimum password length............................................4-20
Chapter 5. Managing Trunks and Spans
About trunks..........................................................................................5-2
Trunk types........................................................................................5-2
Adding trunks.....................................................................................5-3
Naming trunks ...................................................................................5-3
Monitoring trunks...............................................................................5-3
Deleting trunks...................................................................................5-3
Configuring trunks.................................................................................5-4
Inbound and outbound calls and hunt groups...................................5-4
Matching trunk settings with your phone company............... ............5-4
Routing inbound calls on a trunk.......................................................5-5
Placing outbound calls on a specific trunk........................................5-5
ANI/DID digit collection.........................................................................5-5
Collecting ANI/DID digits...................................................................5-6
Using DID with Robbed Bit T1 lines..................................................5-7
Using DID with analog lines..............................................................5-7
Setting up fax routing............................................................................5-7
Customizing fax routing.....................................................................5-8
The Trunks view ...................................................................................5-8
About digital and Internet spans........................................................5-9
Adding an analog trunk.......................................................................5-10
Setting up digit collection on an analog trunk .................................5-11
Adding a digital Robbed Bit T1 span ..................................................5-13
Configuring signaling using the Robbed Bit T1 Experimenter........5-13
STRAT A CS ADMINISTRATOR MANUAL
BETA DOCUMENT - PRELIMINARY & CONFIDENTIAL
Page 5

Adding the Robbed Bit T1 span in the Trunks view........................ 5-13
Using a signaling template..............................................................5-15
Entering trunk defaults for a span................................................... 5-16
Adding a digital ISDN or CAS span.....................................................5-17
Adding a digital ISDN BRI span..........................................................5-18
Optimizing your ISDN settings............................................................5-19
Enabling ISDN Megacom support.......................................................5-20
Adding an Internet span......................................................................5-21
Modifying Strata CS IP codecs ....................................................... 5-22
Fine-tuning your IP connection ......................................................5-24
Chapter 6. Managing Users and Stations
The Users view .....................................................................................6-2
About users and roles...........................................................................6-4
Users................................................................................................. 6-4
Roles .................................................................................................6-6
Setting user options ..............................................................................6-6
Where to set user options ................................................................. 6-6
About adding a user..............................................................................6-7
Adding a user at the telephone ......................................................... 6-7
Adding a user in the User dialog box................................................6-8
Adding a user by using a template.................................................... 6-9
The General tab....................................................................................6-9
The Recordings tab.............................................................................6-15
Allocating space for voice messages..............................................6-15
Allocating space for recorded greetings and voice titles ................6-15
Enabling Microsoft Exchange Server synchronization ................... 6-16
Setting up call recording.................................................................. 6-16
The Notifications tab ...........................................................................6-17
Setting e-mail notification................................................................6-18
Setting pager notification.................................................................6-18
Scheduling notifications .................................................................. 6-19
Defining a schedule for e-mail and pager notification.....................6-20
Setting up custom time rules........................................................... 6-22
The Call Handling tab..........................................................................6-24
Setting up call forwarding................................................................ 6-25
Mobile phone issues with forwarded calls ......................................6-27
Call forwarding and voice mail ........................................................ 6-27
Forwarding calls over Centrex/PBX trunks.....................................6-27
Listing a user in the dial-by-name directory.................................... 6-27
The Phone tab.....................................................................................6-28
Activating features on Toshiba digital phone................................6-30
CONTENTS
BETA DOCUMENT - PRELIMINARY & CONFIDENTIAL
Page 6

The Dialing tab....................................................................................6-33
Setting account code modes...........................................................6-35
The Permissions tab...........................................................................6-37
New Role............................................................................................6-39
The Other tab......................................................................................6-40
Managing users..................................................................................6-41
Recording the new user’s voice title and greeting ..........................6-41
Updating users’ mail, greeting, and disk usage totals ....................6-42
Moving a user..................................................................................6-42
Deleting a user ................................................................................6-42
Managing stations...............................................................................6-43
Adding a station...............................................................................6-43
Supported phones...........................................................................6-43
Supporting different types of CLASS phones .................................6-43
Viewing station activity ....................................................................6-44
Chapter 7. Managing Workgroups
About Workgroups................................................................................7-2
Workgroups view...............................................................................7-3
Creating a Workgroup...........................................................................7-3
Using the General tab .......................................................................7-3
Using the Dialing tab .........................................................................7-4
Chapter 8. Managing Outbound Calls
About dialing services ...........................................................................8-2
Dialing service types .........................................................................8-2
The Dialing Services view.....................................................................8-4
How you can use dialing services.........................................................8-5
Access codes........................................................................................8-7
Tips on access codes and names for services.................................8-7
How Strata CS uses access codes...................................................8-8
Setting default access codes for ringbacks.......................................8-9
Adding a Phone Number dialing service.............................................8-10
Adding a Centrex/PBX Extension service...........................................8-12
Adding an Internet Address service....................................................8-14
Adding an Internet-to-Phone Number service ....................................8-15
Adding an Internet-to-Centrex/PBX Extension service.......................8-17
Trunks tab........................................................................................8-18
Location Settings tab..........................................................................8-20
Codecs tab ...................................................................................... 8-21
Dialing Exceptions tab..................................................................... 8-22
Permissions tab...............................................................................8-26
STRAT A CS ADMINISTRATOR MANUAL
BETA DOCUMENT - PRELIMINARY & CONFIDENTIAL
Page 7

Routing services..................................................................................8-29
How you can use routing services.................................................. 8-30
An example of routing rules ............................................................8-31
Adding a routing service..................................................................8-33
Routing Rules tab............................................................................ 8-35
Add a new routing rule ....................................................................8-36
Defining patterns to match the dialed digits.................................... 8-38
Adding new routing variables.......................................................... 8-38
Defining a new number for a routing rule........................................8-40
Chapter 9. Handling Inbound Calls
About call routing ..................................................................................9-2
Using auto attendants ..........................................................................9-4
About auto attendants....................................................................... 9-4
The Auto Attendants view ................................................................. 9-6
Setting up an auto attendant.................................................................9-7
Creating a new auto attendant.......................................................... 9-7
Defining menu choices...................................................................... 9-8
Scheduling transfers and greetings ................................................ 9-14
Setting up hold music......................................................................9-17
Deleting auto attendants ................................................................. 9-17
Routing calls directly to a user............................................................9-18
Routing calls to workgroups................................................................9-19
Chapter 10. Using Account Codes
About account codes...........................................................................10-2
Setting up account codes....................................................................10-3
Setting general account code options.............................................10-3
Setting a user’s account code modes.............................................10-4
Creating a text file of valid account codes ......................................10-5
Using a verbal account code prompt ..............................................10-7
How users enter account codes..........................................................10-7
Indicating the end of an account code............................................ 10-8
Viewing account codes in the Call Log ...............................................10-8
Generating account code reports........................................................10-8
Chapter 11. Monitoring & Backing Up
About monitoring and backing up your Strata CS system...................11-2
Using the Device Monitor....................................................................11-3
Monitoring station activity................................................................ 11-3
Monitoring trunk activity................................................................... 11-4
Enabling and disabling trunks......................................................... 11-5
BETA DOCUMENT - PRELIMINARY & CONFIDENTIAL
CONTENTS
Page 8

Restarting stations or trunks............................................................ 11-6
Starting a new Server log................................................................11-7
Using the Call Log ..............................................................................11-7
Displaying a specific number of Call Log entries..........................11-10
Exporting the Call Log...................................................................11-11
Monitoring database and disk usage................................................11-11
Backing up Strata CS .......................................................................11-11
Restoring Strata CS data ..............................................................11-12
Shutting down the Strata CS Server.............................................11-14
Moving a Strata CS Server to another machine ...........................11-14
Viewing the Windows Event Log ......................................................11-14
Strata CS-related Windows Event Log messages........................11-15
T1 alarms.......................................................................................11-19
Using the Maintenance Log view......................................................11-20
Reporting problems ..........................................................................11-20
The problem report package.........................................................11-21
Using the Problem Report Wizard.................................................11-22
Reporting Strata CS Server problems ..........................................11-23
Reporting workstation application problems.................................11-24
Reporting distributed problems.....................................................11-24
Chapter 12. System Prompts
About system prompts........................................................................12-2
The System Prompts view..................................................................12-2
Controlling the prompt display.........................................................12-3
Managing system prompts..................................................................12-3
Recording system prompts.................................................................12-5
Recording system prompts professionally......................................12-6
Recording over system prompts yourself........................................12-8
Testing system prompts ................................................................12-10
Localizing the telephone commands ................................................12-12
Chapter 13. Configuring Internet Telephony Support
About IP telephony and Strata CS......................................................13-2
Internet telephony requirements .....................................................13-2
Placing calls to H.323 terminals such as NetMeeting......................... 13-2
Placing calls to Net Meeting from the Strata CS Client .................. 13-3
Placing calls to Net Meeting from a Strata CS phone.....................13-3
Calling Strata CS from H.323 terminals such as Net Meeting........13-4
Using Windows 2000 Phone Dialer as an H.323 terminal..............13-6
Enhancing a Web page with a “Call Us!” button.................................13-6
Connecting two Servers using IP Gateways.......................................13-7
STRAT A CS ADMINISTRATOR MANUAL
BETA DOCUMENT - PRELIMINARY & CONFIDENTIAL
Page 9

Overview of creating an IP Gateway connection............................ 13-8
Illustration of an IP Gateway ........................................................... 13-9
Creating an IP Gateway..................................................................13-9
Creating IP Gateway dialing services........................................... 13-13
Calling Strata CS extensions on the remote Server..................... 13-13
Placing phone calls through the remote Server............................13-15
Placing Centrex/PBX calls through the remote Server.................13-16
Creating Gateway users to unify two Strata CS Servers.............. 13-17
Fine-tuning your IP connection .........................................................13-20
Chapter 14. Extending Strata CS
About extending Strata CS..................................................................14-2
Extending Strata CS with off-the-shelf applications............................14-3
In-band signaling applications.........................................................14-3
TAPI applications ............................................................................ 14-3
Extending Strata CS with third-party devices......................................14-4
The Strata CS SDK.............................................................................14-8
Installing the Strata CS SDK........................................................... 14-9
The Strata CS SDK Application Programming Interfaces ..............14-9
The IVR Plug-in API........................................................................ 14-9
The Device Status API..................................................................14-11
The Client API ...............................................................................14-12
Appendix A. Strata CS Configuration Settings
About Strata CS configuration settings................................................A-2
Strata CS Server registry settings........................................................A-2
Strata CS Workstation applications registry settings ........................... A-7
Current User Settings........................................................................A-8
Local Machine Settings.....................................................................A-9
Strata CS Server language locale settings ........................................ A-11
Locale definitions.............................................................................A-11
Defining custom tones........................................................................A-12
Disabling Dialogic devices ................................................................. A-13
Dialogic device names ....................................................................A-15
Toshiba device names................................................................. A-17
Dialogic voice board settings ............................................................. A-18
VoiceBoard settings ........................................................................A-18
VoiceBoard channel settings ..........................................................A-20
E1 and T1 board settings................................................................A-23
ISDN Megacom service settings.....................................................A-24
MSI station board settings...............................................................A-25
Using the Strata CS Settings program............................................... A-26
CONTENTS
BETA DOCUMENT - PRELIMINARY & CONFIDENTIAL
Page 10

Logging in........................................................................................A-26
Viewing current values ....................................................................A-27
Changing key values.......................................................................A-28
Modifying other supported Strata CS settings ................................A-28
Appendix B. Command Line Options
Appendix C. IP Gateway Configuration Worksheet
Appendix D. Using Quicknet and E-Tel with Strata CS
Using Quicknet hardware with Strata CS ............................................ D-2
Using Quicknet with Internet Switchboard 3.5................................. D-2
Using Quicknet with Internet Switchboard 4.0................................. D-6
Calling a Quicknet card from Strata CS......................................... D-10
Forwarding your calls to a Quicknet phone.................................... D-10
Using the Strata CS Client with a Quicknet card ........................... D-11
For More Information...................................................................... D-11
Contacting Quicknet....................................................................... D-11
Using an E-tel FreeRide IP phone with Strata CS............................. D-12
Setting up a FreeRide phone to connect to Strata CS................... D-12
Transferring and handling calls with a FreeRide phone ................ D-16
E-tel contact information................................................................. D-17
Appendix E. Using Performance Counters
The Strata CS performance counters...................................................E-2
Viewing performance counters in Windows NT/2000...........................E-2
Glossary .................................................................................... Gloss-1
Index .......................................................................................... Index-1
STRAT A CS ADMINISTRATOR MANUAL
BETA DOCUMENT - PRELIMINARY & CONFIDENTIAL
Page 11

CHAPTER 1
CHAPTER 1
OVERVIEW OF UPGRADING AND
C
ONFIGURING S TRAT A CS
CHAPTER CONTENTS
Welcome to Strata CS . . . . . . . . . . . . . . . . . . . . . . . . . . . . . . . . . . 1-2
What’s New in Strata CS 4.0 . . . . . . . . . . . . . . . . . . . . . . . . . . . . . 1-3
Before you begin . . . . . . . . . . . . . . . . . . . . . . . . . . . . . . . . . . . . . . 1-7
Changes in Strata CS from version 2.1 to 3.0 or later . . . . . . . . . . 1-7
Changes in Strata CS 3.0 or later. . . . . . . . . . . . . . . . . . . . . . . . . . 1-8
Configuring Strata CS for the first time. . . . . . . . . . . . . . . . . . . . . . 1-9
Where to get help. . . . . . . . . . . . . . . . . . . . . . . . . . . . . . . . . . . . . 1-10
BETA DOCUMENT - PRELIMINARY & CONFIDENTIAL
Page 12

Welcome to Strata CS __________________________________
Toshiba’s Strata CS is dramatically improving the way business professionals
communicate. An intelligent phone system designed specifically for small- to
medium-sized businesses and branch offices, Strata CS combines the power of
the desktop computer with the most advanced communications technology
available. With Strata CS you have unprecedented call management that lets you
maximize your productivity while controlling costs. Strata CS offers you more
functionality than a stand-alone PBX, and at a lower price.
Significant Strata CS features
The following is a partial list of significant Strata CS features.
n Fault Tolerant architecture is designed to ke ep your phone system up
and running. If the network or your desktop PC goes down, your phone
lines are unaffected. Even in the case of a Strata CS server malfunction or
power outage, your critical phone lines will stay open.
n Multi-line call control gives you an easy graphical way to place calls,
transfer, put on hold, send to voice mail, set up conference calls and more.
n Verbal menus guide you through all call handling and user management
tasks, so you can use Strata CS even without a PC.
n Full-featured voice mail lets you create caller-specific greetings, log in
remotely, and manage your voice messages graphically. You can also
easily call back the person who left you a message.
n E-mail and pager notification of incoming voice mail, with or without
voice mail attachments.
n Advanced caller identification via PIN or caller ID lets you easily screen
every call and message, either visually or by announcing the caller's name
when you answer the phone.
n Call recording lets you record conversations of calls or conferences.
n Personal Status lets you create vacation, out-of-the-office, and other
status settings for ringer, greeting, and routing list behavior when you are
not able to answer calls.
n The Strata CS Web Client enables users with a browser to access voice
mail or manage personal settings from anywhere in the world over the
Internet or from non-Windows platforms in the office.
n “Follow-me” call forwarding features routing lists that try several
locations to find you. You can set different routing lists for the callers you
choose.
n Call logging lets each user see a record of his or her own calls, while
giving administrators access to the company’s complete log.
1-2 STRATA CS ADMINISTRATOR MANUAL
BETA DOCUMENT - PRELIMINARY & CONFIDENTIAL
Page 13

n Automatic call distribution (ACD) lets you create call center
workgroups, keep a call log of workgroup activity, and use the Call Center
Reporter to analyze workgroups, agents, hold time and more.
n Scheduled auto attendants allow greetings to change and calls to be
routed to different extensions at different times of the day and days of the
week.
n Built in Internet H.323 gateway saves money by routing calls over the
Internet or your intranet. It supports tie-lines between branch offices, and
even allows your customers to call you from a Web page.
n TAPI Service Provider and Co nt act M ana ger Assistant let you use
Act!, Outlook, GoldMine, or other TAPI-compliant applications,
including Front Office 2000, with Strata CS. You can place calls and
receive screen-pop identifications when you receive calls.
n The Strata CS SDK lets you extend Strata CS functionality. The IVR
Plug-in API lets you integrate IVR and call control applications that pass
caller input or database information to Strata CS users, place outbound
calls; process initial command line arguments defined in the
Administrator; and, for security purposes, determine if the caller is a
Strata CS “logged in” user. Use the Client API for applications that
require a subset of the functions available in the Client (for example,
monitoring the status of stations and trunks).
n Multi-lingual system prompts let both users and callers select the
language of their choice for Strata CS's verbal commands.
n Support for CLASS feature phones with caller ID displays, caller ID on
Call Waiting and message waiting lights.
What’s New in Strata CS 4.0 _____________________________
New features in Toshiba Strata CS 4.0 include the following:
n Completely Rewritten Client Application. The Strata CS Client has
been rewritten using a collection of COM objects that make it more
modular, internationalized, and flexible. Third-party developers can use
these COM objects to build custom applications that can harness all of the
Client’s data and call information. Third-party applications will be able to
do anything the Client does .
n Monitor Calls from Mult iple Users and Queues. You can click the
appropriate tab in the Call Monitor and see any calls that ring your phone,
calls in ACD workgroups, or call center queues. You can also share your
Call Monitor with other users, so that they can cover your calls as needed.
You no longer need to run multiple Clients to see and manage these calls.
CHAPTER 1. OVERVIEW OF UPGRADING AND CONFIGURING STRATA CS 1-3
BETA DOCUMENT - PRELIMINARY & CONFIDENTIAL
Page 14

n Call Center Queues. Call center queues can be configured to distribute
calls to agents using a variety of distribution algorithms. Agents can sign
in/out of one or more queues, see calls in queues and take them before
being offered them, if they so choose. Queues can prompt callers for
Customer ID numbers or other data. On-hold messages can be highly
customized or can change based on caller data.
n Calling workgroups. You can call a public workgroup’s extension to ring
all of the users’ phones in the workgroup at the same time.
n More drag and drop. Drag a message or Call Log entry onto the Call
Monitor to call it back.
n Ringback numbers. Your caller s can enter a ringback number by
pressing a specific key while they listen to the voice-mail greeting. This
feature is useful when caller ID is inaccurate or is not available at all.
n Dialing toolbar. You can quickly enter a number to dial using the optional
dial toolbar wi thout opening
n Drag and drop to make calls, transfers, confer enc es, and more. You
can drag a call onto an extension to transfer the call to that extension. To
call an extension, drag the extension from the extension pane onto the Call
Monitor. To create a conference, hold down the shift key drag and a call
onto another call and drop.
n Integrated Call Monitor and Extensions panes . The optional
Extensions pane shows the system’s extensions (users, and so forth) along
with the Call Monitor’s calls. The optional Calls pane lets you manage
your calls in any Strata CS view, such as the Voice Messages view. See
the
View menu to turn the optional panes on or off.
n Personal Status. You can indicate to your co-workers what you are
doing by setting your personal status to Available, In a Meeting, Out of
the Office, Do Not Disturb, and more. You can see everyone’s personal
status in the extensions pane, just like they can see your personal status.
You can create personal status settings that can change your forwarding
number, your active greeting, your routing list, or prevent your phone
from ringing. You can also create custom personal statuses such as On
Sales Call, or At Client Presentation. Personal statuses can be selected
from the Client or from the phone while you are on the road. Personal
statuses replace Do Not Disturb in previous versions.
n Workgroups. Workgroups are collections of extensions, such as all the
users in Sales and Marketing. Workgroups appear as tabs in the extensions
pane so that yo u can q uickly find people in differ ent depar tments. To pick
up a ringing phone within workgroups you are a member of, pick up the
phone and press *99. Users can create personal workgroups that help them
quickly find p eop le the y wor k with . Wo rkgr oups can gr oup r elat ed i tems
1-4 STRATA CS ADMINISTRATOR MANUAL
BETA DOCUMENT - PRELIMINARY & CONFIDENTIAL
Page 15

together such as auto attendants, queues, IVR plug-ins, and contacts.
Workgroups replace Contact Groups used in previous versions.
n Call Rules. You can change the way calls are handled based on who calls
or a particular date or time. For example, you can automatically send
specific calls to voice mail during lunch, change your personal greeting
after hours, or forward calls from your mother or special co-workers to
your cell phone. Call rules replace people rules and Smart Do Not Disturb
used in previous versions.
n Hands-free Answering. You can leave your phone off-hook while
waiting for calls and will not hear dial tone. When a new call arrives, you
hear a zip-tone and then you are connected to the call. Connect an
overhead speak to a station using hands-free answering to set up a paging
system.
n Permissions. User groups provide administrators a way to assign
permission s to a group of people, similar to Class of Service. Users can
now inherit permissions from one or more groups, such as Administrators
or Users.
n Account Codes. You can use account codes to help track calls back to
one or more “accounts” such as clients or customers you may need to bill.
Account codes can be used for any call, are saved in the Call Log, and can
be reported on using the Call Center Reporter. Administrators can
optionally force that users enter account codes for every call on a per user
basis. Account codes can be optionally verified against a list configured
by the Administrator.
n New Call Center Reporter. The new Call Center Reporter does not
require any roll-ups or separate roll-up database. All reports are run
directly from the Strata CS server and get the latest data. Several new
reports allow better analysis of call center, trunk, and agent performance
and behavior.
n Custom greetings in Routing Lists. You can define special greetings
between routing list actions, such as “Attempting to call my cell phone,
please stay on the line.” You can also define special greetings for final
actions.
n Streamlined Place Call To Dialog Box. The Place Call To dialog box
has been optimized so that in one place you can easily make calls to any
contact, extension or number, including your own home, mobile, and
other personal numbers.
n Easily forward your calls to your remote phone. If caller ID is
available, you can press *51 from the account menu to forward your calls
to a remote phone, such as your cell phone.
CHAPTER 1. OVERVIEW OF UPGRADING AND CONFIGURING STRATA CS 1-5
BETA DOCUMENT - PRELIMINARY & CONFIDENTIAL
Page 16

n Voic e Mail Bookmarks. Drag the green bookmarks to save the beginning
and end of an important segment of a voice message. After you set the
bookmarks, t he message is only played between the bookma rks.
n Windows Performance Counters. Strata CS now includes several
standard Windows performance counters that can show you the number
of calls in use, total calls handled, and more.
n Custom folders and folder list. You can organ iz e yo ur cont acts,
messages and greetings in different folders. Display the folder list to
quickly jump between any folder or view.
n Share Contacts. Share any contacts folder to other users, just like you
can share any messages folder or your Call Monitor.
n Custom data easier to use. Cu stom data items are now centrally defined
in the Administrator so that it is easy to see a list of all custom variables
that can be associated with calls.
Miscellaneous new features
n Voice messages include a list of all recipients, allowing you to reply to all
of them at o nce
n 5-Digit extensions are now supported
n Extensions and station IDs are automatically suggested when you create
new users
n All Call Log entries are displayed at once in the Client, instead of a page
at a time
What’s automatically upgra ded
The following items are upgraded automatically when you upgrade to Strata CS
4.0:
n Contact groups become workgroups
n Permissions
n Routing lists and greetings
n People rules become call rules
n Personal status
n Phone settings
n Folders
n Custom data
1-6 STRATA CS ADMINISTRATOR MANUAL
BETA DOCUMENT - PRELIMINARY & CONFIDENTIAL
Page 17

Before you begin ______________________________________
Before you begin to upgrade Strata CS or configure it for the first time, first
complete the following tasks as described in Strata CS Installation &
Maintenance Manual:
n Install the Dialogic hardware and drivers in the Strata CS server computer.
n Physically connect your trunks and stations.
n Install the Strata CS server and Strata CS Administrator.
This chapter outlines the tasks you must perform after installation. Detailed
instructions for each step are in subsequent chapters.
Changes in Strata CS from version 2.1 to 3.0 or later_________
The following administrative tasks have changed in this version of Strata CS:
n Licensing has changed. See “About Strata CS licenses” on page 3-2.
n Outbound calls are now made via dialing services that you create and
configure in the Administrator. See “About dialing services” on page 8-2.
n Dialing services provide a way to restrict the numbers that can be dialed by
all users. You can also define exceptions to further restrict or permit user
dialing. See “Permissions tab” on page 8-26.
n Location settings and dialing rules are now part of dialing services, and must
be defined separately for each service. See “Location Settings tab” on
page 8-20.
n Business hours and hol idays are now defined cen trally. This lets both users
and administrators set up features that change automatically according to
schedules. If you previously had auto attendants that included business
and holiday hours, those hours must be redefined in system settings. See
“Business Hours” on page 4-5.
n Based on the business hours you defined, auto attendants can now include
scheduled greetings or transfers (to other auto attendants or IVR
Plug-ins). See “Scheduling transfers and greetings” on page 9-14.
n Robbed Bit T1 signall ing is now defined using t he R obbed Bit T1
Experimenter instead of the A dministrator . See Installing Strata CS for
more information.
n Fax routing is now set up at the trunk le vel. Several oth e r trunk properties
have moved to dia lin g servi ces. Se e “Setting up fax routing” on page 5-7.
n An ACD workgroup user can be configured so that only supervisors can put
an ACD workgroup in Do Not Disturb. See the Strata CS Call Center
Administrator Guide for details.
CHAPTER 1. OVERVIEW OF UPGRADING AND CONFIGURING STRATA CS 1-7
BETA DOCUMENT - PRELIMINARY & CONFIDENTIAL
Page 18

n You can no longer enter # at the beginn ing of a pho ne numbe r to bypa ss least
cost routing for the call. Instead, create another dialing service that does
not use least cost routing.
n
*8900
to hear a station ID has been replaced with
*0
.
Wherever possible, Strata CS 2.1 settings are upgraded seamlessly to work with
new Strata CS features.
For example, dialin g pe r missions—set for dialing services and users—have
replaced the old dialing exceptions, previously set only at the user level. When
you upgrade to this version of
permissions setting
Use dialing service per m i ssions except t he following, and
Strata CS, all Strata CS 2.1 users are assigned the
their preexisting dialing exceptions are carried forward.
Changes in Strata CS 3.0 or later _________________________
The following administrative tasks have changed in this version of Strata CS:
n Workgroups. You can arrange users into specific workgroups (such as
Sales, Marketing, Gold Box Team, and so forth) to better manage calls, or
share specific information. Workgroups can also include auto attendants,
queues, IVR plug-ins, a nd contacts. Work groups replac e Contact Groups.
See Chapter 7, “Managing Workgroups.”
n Account codes. Account codes can be entered on any call to help track
calls back to one or more “accounts” such as clients or customers you may
need to bill for. Account codes are saved in the call log and can be
reported on using the Call Center Reporter. Administrators can optionally
force account codes be entered for every call on a per user basis. Account
codes can be set up to be verified against a list of valid account codes.See
Chapter 10, “Using Account Codes.”
n User permissions. You can now assign permissions to groups of users.
User groups prov ide administra tors a way to assig n permissions to a group
of people, similar to Class of Service. Users can now inherit permissions
from one or more groups such as Administrators or Users. See “The
Permissions tab” on page 6-37.
n New Call Center Reporter. Accessible from the Client’s Tools menu, the
new reporter does not require any roll ups or separate roll-up database. All
reports are run directly from the Strata CS server and get the latest data.
Several new reports allow better analysis of call center, trunk, and agent
performance a nd behavior.
n Windows Performance Counters. Strata CS now includes several
standard Windows performance counters that can show you the number
of calls in use, total calls handled, and more.
1-8 STRATA CS ADMINISTRATOR MANUAL
BETA DOCUMENT - PRELIMINARY & CONFIDENTIAL
Page 19

n Custom data easier to use. Custom data items are now centrally defined
in the Administrator so that it’s easy to see a list of all custom variables
that can be associated with calls.
n Miscellaneous new features and changes.
n Five-digit extensions are now supported
n Extensions and station IDs are automatically suggested when
creating new users
n Personal Status has replaced Do Not Disturb (DND)
n Call Rules replace People Rules and Smart DND
n In the Client, Extensions view replaces User view
Wherever possible,
new
Strata CS features.
Strata CS 3.x settings are upgraded seamlessly to work with
Configuring Strata CS for the first time ____________________
When you are configuring your Strata CS system for the first time, you must
complete the following tasks, which are explained in detail in the remainder of
this manual:
1. Add licenses.
To configure Strata CS, you must first enter the license codes that your
system requires. See “About Strata CS licenses” on page 3-2.
2. Configure system settings.
For more information, see “About system settings” on page 4-2.
3. Config ur e your trunks.
In addition to physically connecting your trunks, you must define them
in the Trunks view in the Administrator in order to use them, and
configure the trunk behavior. This is true for every kind of
trunk—analog, T1, E1 or Internet. See “Adding trunks” on page 5-3.
4. Create users.
Define your Strata CS users, assign them stations, extensions and
passwords, record their voice titles, set up their voice mailboxes and
define their permissions. See “About adding a user” on page 6-7.
5. Set up outb ou nd ca ll ha nd l ing.
See Chapter 8, “Managing Outb ound Calls.”
6. Set up call r o uti n g fo r i nbo un d c a lls .
You can have calls sent to an operator or directly to users via direct
inward dial (DID) without going through the main auto attendant. See
CHAPTER 1. OVERVIEW OF UPGRADING AND CONFIGURING STRATA CS 1-9
BETA DOCUMENT - PRELIMINARY & CONFIDENTIAL
Page 20

“About call routing” on page 9- 2.
Optionally, you can route calls to an auto attendant that answers
incoming calls automatically and lets callers enter extensions to connect
with users. If you want to use auto attendants, record a greeting and
prompts for each one, and set up any options that your menu should
offer the caller. Apply scheduling to your auto attendants to have them
change with your business hours. See “About auto attendants” on pa ge
9-4.
Where to get help______________________________________
You can get help from Strata CS documentation and from your Strata CS
provider.
Strata CS documentati on
Strata CS includes the following documentation:
n Strata CS Administrator Manual—This manual contains instructions for
configuring and managing your Strata CS system, including Strata CS
Administrator system settings, licenses, trunks and stations, users, dialing
services, auto attendants, inbound and outbound call routing, and system
prompts.
n Strata CS Client User Guide—This manual describes how to use Strata
CS’s Client Web Client, Contact Manager Assistant, TAPI Service
Provider features, and the telephone commands.
n Strata CS Call Center Administrator Guide—This manual contains
complete instructions for setting up and maintaining a call center in which
multiple agents answer calls to a single number, such as a sales or
customer support departm e nt.
n Strata CS Quick Reference Card—This wallet-sized card is a convenient
reference for the Strata CS telephone commands.
n Strata CS Quick Reference Guide—This quick-start guide for new users
describes
n Strata CS SDK and API Programming Guide—This m anual describe s
how to extend Strata CS's built-in features using the Client API, the IVR
Plug-in API, and Dev i c e Stat us AP I.
n Online Help—Context-sensitive Help is available in all Strata CS
applications. To access Help in the current dialog box, click the
button or press F1.
basic Strata CS commands for the Client and telephone.
Help
1-10 STRATA CS ADMINISTRATOR MANUAL
BETA DOCUMENT - PRELIMINARY & CONFIDENTIAL
Page 21

This table list the available components in the Strata CS documentation set and
the presentation format:
Document Printed
Strata CS Installation &
Maintenance Manual
Strata CS Administrator
Manual
Yes Yes Yes
Yes Yes Yes
Online
Book
Acrobat (PDF)
Strata CS Client User Guide Yes Yes Yes
Strata CS Call Center
Administrator Guide
SDK and API Programming
Guide
Strata CS Quick Reference
Card
Yes Yes Yes
Yes No Yes
Yes Yes Yes
Notes:
n The online books are available in HTML-based format. To access an
online book, click
n The PDF-formatted books are available on the Strata CS CD, in the
Help > O nline Books f rom any Strata CS application.
Manuals directory. Use Adobe Acrobat Reader—also available on the
Strata CS CD—to view and print these files.
Your S trata C S provider
Contact your Strata CS provider for technical support. To view your provider's
contact information, choose
Administrator.
CHAPTER 1. OVERVIEW OF UPGRADING AND CONFIGURING STRATA CS 1-11
BETA DOCUMENT - PRELIMINARY & CONFIDENTIAL
Help > About from the Strata CS Client or
Page 22

Page 23

CHAPTER 2
CHAPTER 2
THE STRAT A CS ADMINISTRATOR
CHAPTER CONTENTS
About the Strata CS Administrator . . . . . . . . . . . . . . . . . . . . . . . . . 2-2
The Administrator interface . . . . . . . . . . . . . . . . . . . . . . . . . . . . . . 2-3
Performing basic actions in the Administrator . . . . . . . . . . . . . . . . 2-8
BETA DOCUMENT - PRELIMINARY & CONFIDENTIAL
Page 24

About the Stra t a CS Admini strator________________________
The Strata CS Administrator is a Microsoft Windows program that lets you
configure, monitor, and manage your Strata CS system. Through the
Administrator you can control the following items:
n System settings (see Chapter 4)
n Trunk configuration (see Chapter 5)
n User configuration and permissions (see Chapter 6)
n Workgroups (se e Chapter 7)
n Dialing services (see Chapter 8)
n Auto attendants (see Chapter 9)
n System prompts (see Chapter 12)
n IVR Plug-ins (see Chapter 14)
n Queues (see Strata CS Call Center Administrator Guide)
This chapter describes logging on to the Administrator, using the interface of the
Administrator, and performing basic actions in the Administrator.
Linking computers and phones
Strata CS runs simultaneously on two communication systems:
n Your internal telephone wiring. Connects the Strata CS Server to users’
telephones around the office.
n A Microsoft TCP/IP Local Area Network. Connects the Strata CS Server
to users’ Windows PC workstations. This network is required if users will
be running the Client or the Administrator on a computer other than the
Server. This is the typical setup in most installations.
For information about the network and phone wiring in your office, consult the
appropriate vendor. For details on configuring the network for Strata CS, see
Strata CS Installation & Maintenance Manual.
2-2 STRATA CS ADMINISTRATOR MANUAL
BETA DOCUMENT - PRELIMINARY & CONFIDENTIAL
Page 25
Logging on to the Administrator
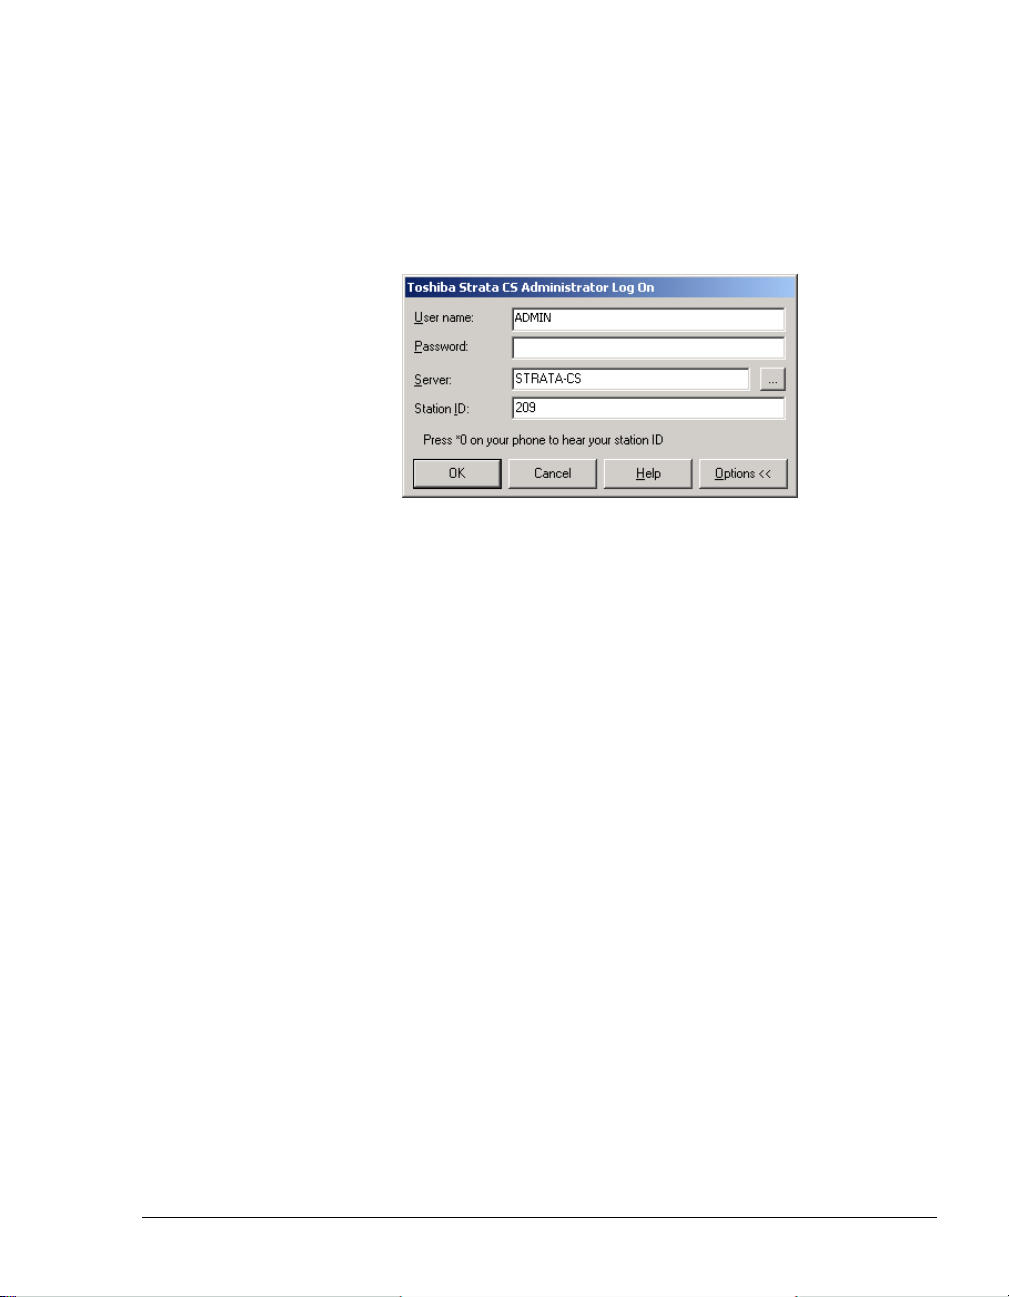
1. Choose Start > Strata CS Administrator. The Log on dialog box opens.
2. If you want to change your default Server or station ID, click
to view the expanded dialog box. You also can log on as a different user
to access this dialog box.
Options
3. Type your
A user called “Admin” exists by default. To create other administrators,
you must add use rs to whom you give Adminis trator permissio ns (see
“The Permissions tab” on page 6-37).
4. Type your
installation. Change the password for the Administrator user after you
log on for the first time (see “Creating a password” on page 6-14).
5. If you want to log on to a different Server than the one already selected
under
6. If you want to change your station ID, enter a valid station ID in the
Station ID field.
7. Click
For information about logging on to the Administrator using command line
options, see Appendix B.
User name.
Password. The Administrator password is set to 100 at
Server, choose a Server name on the drop-down list.
OK.
The Administrator interface _____________________________
The Strata CS Administrator interface is composed of views (see “Working in
views” on page 2-5). Views are used in Strata CS to configure, manage, and
monitor the components of the Strata CS system.
CHAPTER 2. THE STRATA CS ADMINISTRATOR 2-3
BETA DOCUMENT - PRELIMINARY & CONFIDENTIAL
Page 26
This section introduces the Strata CS Administrator’s views, explains how to
work in views, and shows you how to perform basic tasks in them. It also explains
how to work with voice files.
View Description See
Add, edit, and delete Strata CS u sers.
Users
Includes changing passwords and
allotting users disk space for voice
mail messages and greetings.
Chapter 6,
“Managing Users and S tations”
Workgroups
Trunks
Dialing
Services
Device
Monitor
Auto
Attendants
Queues
Create and manage workgroups
(groups of related extensions or
contacts).
Manage the phone lines that connect
your Strata CS system to the public
phone network.
Create and manage dialing services,
which define outbound trunk
allocation and dialing behavior for
groups of trunks.
View and manage Strata CS stations
and trunks.
Create, modify, and delete auto
attendants.
Create and manage groups of agents
in Strata CS call center queues.
Chapter 7
“Managing Workgroups”
Chapter 5,
“Managing Trunks and Spans”
Chapter 8,
“Managing Outbound Calls”
Chapter 11,
“Monitoring & Backing Up”
Chapter 9,
“Handling Inbound Calls”
Strata CS Call Center
Administrator Guide
System
Prompts
Call Log
Listen to and change recordings used
for standard system prompts and
auto attendants.
View a record of the calls made on
the system.
Chapter 12,
“System Prompts”
Chapter 11,
“Monitoring & Backing Up”
2-4 STRATA CS ADMINISTRATOR MANUAL
BETA DOCUMENT - PRELIMINARY & CONFIDENTIAL
Page 27
View Description See
Manage Strata CS IVR Plug-ins, the
IVR Plug-Ins
IP Gateways
interactive voice response
applications that share the Dialogic
hardware with the Strata CS Server.
Create, modify, and delete IP
Gateways, by which you can
exchange calls with remote S trat a CS
Servers over the Internet or an IP
network.
Chapter 14,
“Extending Strata CS”
Chapter 13
“Configuring Internet
Telephony Support”
Maintenance
Log
Tracks specific actions and presents
details about each action
Working in views
To open a view, click its button in the vertical view bar on the left side of the
Administrator window. To change the location of a button on the view bar, drag
and drop it.
Chapter 11
“Monitoring & Backing Up”
You can also open a view by clicking one of the choices under
menu bar.
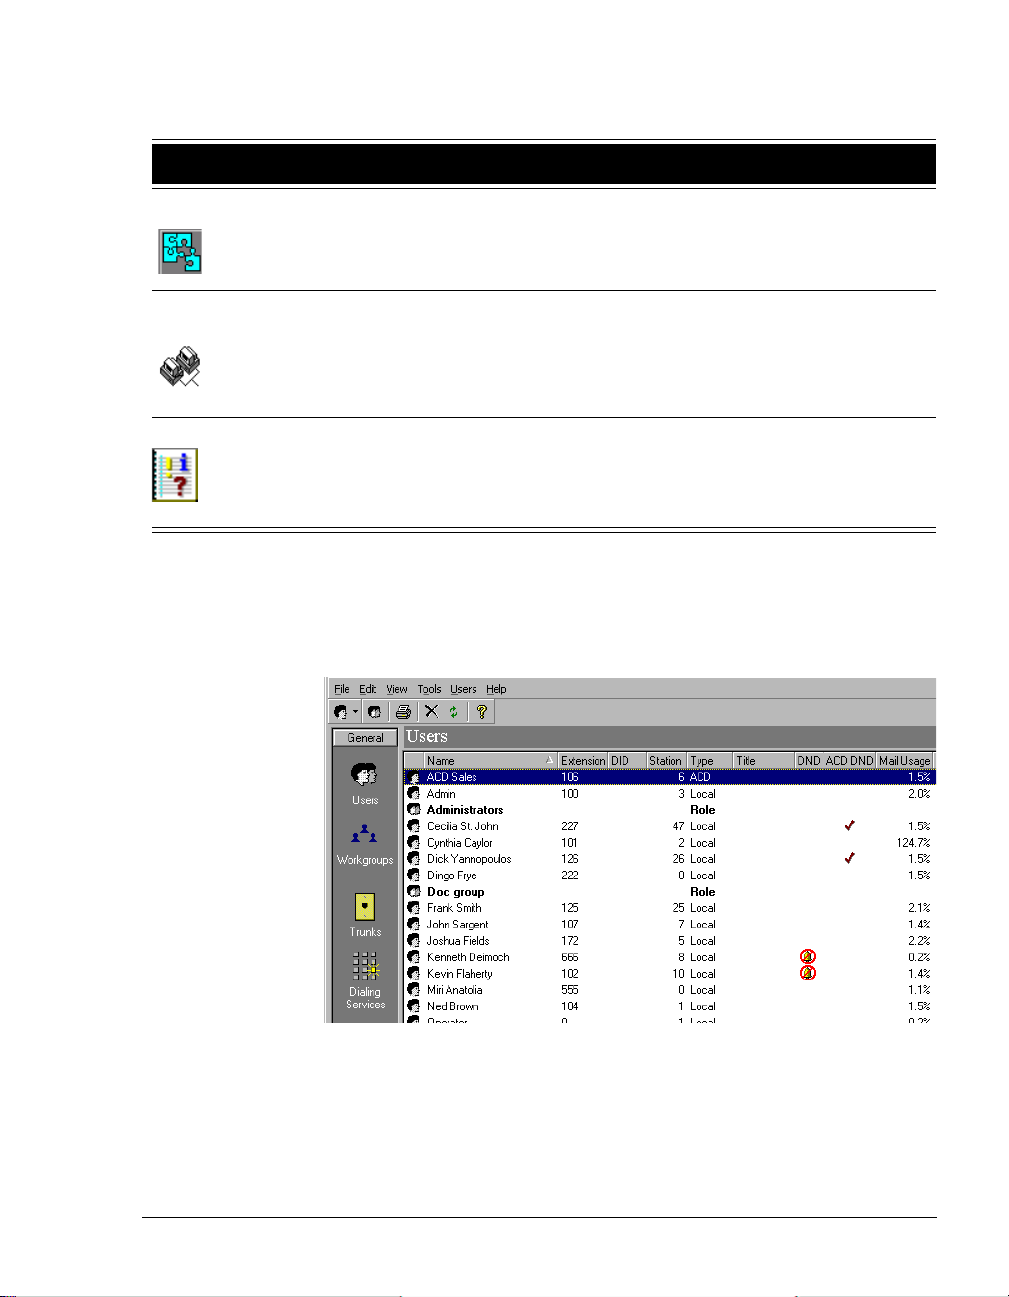
The main part of a view contains rows of the items that pertain to that view. For
example, in the Users view, each Strata CS user appears as an item on a row. In
some views, such as the Users or the Trunks view, you can double-click an item
to open the related dialog box for the item. For example, in the Users view,
View on the main
CHAPTER 2. THE STRATA CS ADMINISTRATOR 2-5
BETA DOCUMENT - PRELIMINARY & CONFIDENTIAL
Page 28

double-clic king an item opens the User dialog box for that user. This dialog box
contains Strata CS settings for that user. Some views, such as the Call Log and
Device Monitor, display read-only information that cannot be expanded or
changed.
Using commands in a view
A command always affects the item or items that are selected. You can access
commands in a view by the following methods:
n Selecting an item or items and choosing a command from the view’s
menu. For example, in the Trunks view, click the
Trunks menu and
choose a command.
n Selecting an item or items and clicking a toolbar button (see the next
table).
n Right-clicking an item in a view and choosing a command from the
shortcut menu. Right-clicking an item selects it and opens the shortcut
menu, so it is often the fastest way to perform an action.
Using the Administrator toolbar
The Administrator toolbar is located on the main menu bar in each view. It gives
you quick access to Administrator commands that are also available through the
Administrat o r me nus.
Some toolbar bu ttons c hange de pendin g on th e view. For exampl e, the buttons in
the next table for new items in Strata CS each appear as the first button in their
respective views.
New User Create a new user.
New Workgroup Create a new wo rkgroup.
New Trunk Create a new trunk or digital span.
2-6 STRATA CS ADMINISTRATOR MANUAL
BETA DOCUMENT - PRELIMINARY & CONFIDENTIAL
Page 29

New Auto Attendant Create a new auto attendant.
New Queue Create a new queue.
New Dialing Service Create a new dialing service.
New IVR Plug-in Create a new IVR Plug-in.
Print Print the contents of the current view.
Delete Delete the selected item.
Refresh Refresh and update the current view.
Help Open the Strata CS Administrator Help.
CHAPTER 2. THE STRATA CS ADMINISTRATOR 2-7
BETA DOCUMENT - PRELIMINARY & CONFIDENTIAL
Page 30
Performing basic actions in the Administrator
This section shows you how to perform the following basic actions in most views:
n Creating items
n Deleting items
n Renaming ite ms
n Copying and pasting items
n Customizing columns
Creating items
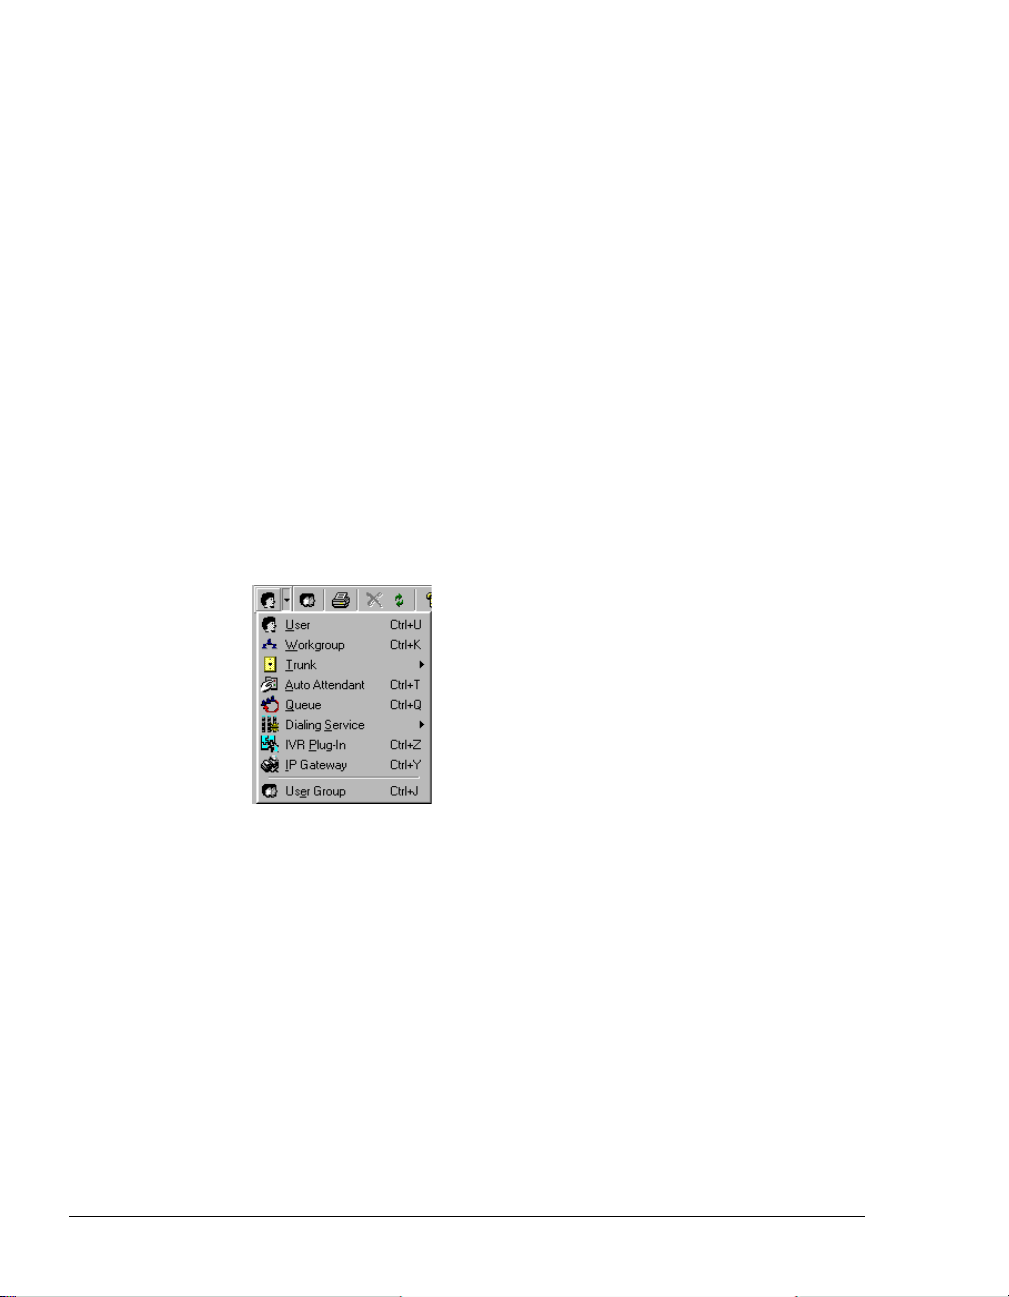
In any view, clicking the first toolbar button opens a dialog box for a new item
associated with that view. For example, in the Users view, clicking the first
toolbar button opens a User dialog box with the title
You can also click the small arrow to the right of the first toolbar button and use
the menu that opens to create any new Administrator item. The arrow is available
in every view.
Untitled - User.
You also can create all items from any available view. To create a new item,
File > New.
choose
To create a new item that is based on an existing item
1. Select the item on which you want to base a new item, such as a user in
the Users view.
2. Choose
3. Choose
copied>
Edit > Copy.
Edit > Paste . A User dialog box opens. Copy of <item that you
appears in the title bar of the dialog box. It contains a duplicate
of the selected item’s information. You can use the this information as
a basis for creating a new item.
4. Enter the information about the new item in the dialog box.
5. Click
OK to save the changes as a new copy.
2-8 STRATA CS ADMINISTRATOR MANUAL
BETA DOCUMENT - PRELIMINARY & CONFIDENTIAL
Page 31

Deleting items
1. Right-click the item. To select more than one item, use SHIFT-click or
CTRL-click.
2. Choose
Yes or No.
Edit > Delete. In the confirmation dialog box that opens, click
Renaming items
Items in some views cannot be renamed, for example, Call Log items cannot be
renamed.
To rename an item
1. Double-click the item to open its dialog box.
2. In the
3. Click
Name field, type a new name for the item.
OK.
Copying and pasting items
Copying a row in any view places the information about the item in that row on
the clipboard as text, for easy pasting into other applications. Use this method to
paste Call Log entries and voice message information into the Problem Report
Wizard (See “Using the Problem Report Wizard” on page 11-22.).
Customizing columns
Click a column header to sort by that column. Click again to sort in the reverse
order. The triangle in the column header shows by which column and in what
direction the display is currently sorted.
You can resize column widths by dragging the sides of the column headers.
For each view in the Administrator, you can choose the columns that you want to
see and the columns that you want to hide. Some views do not show all the
available columns by default.
To show or hide columns in a view
1. Choose
dialog box opens.
2. From the
3. Check a column to show it. Uncheck a column to hide it. For an
explanation of the various columns, click
4. Click
Tools > Columns, or right-click a column header.The Columns
View drop-down list, choose the view you want to change.
Help.
OK.
CHAPTER 2. THE STRATA CS ADMINISTRATOR 2-9
BETA DOCUMENT - PRELIMINARY & CONFIDENTIAL
Page 32

Working with voice files
A voice file is an audio recording that is stored as a file. Strata CS stores system
prompts, greetings, voice messages, and recorded conversations in voice files that
you can play over your computer speakers or on the telephone. You can record
voice files using the telephone.
Strata CS supports the following file formats for voice files:
n .WAV
n .VOX (a-law and µ-law formats)
The Strata CS Server natively uses 8-bit PCM .VOX format.
Changing the voice file format
You can change the format of your Strata CS .VOX voice files from a-law to
µ-law, or from µ-law to a-law by using the TVConvert utility. To do so:
1. Run the file
TVConvert.exe
in the Strata CS Server directory on the
Strata CS Server computer. The default path is:
C:\Program Files\Strata CS Server\CSConvert.exe.
2. Click OK to convert all your Strata CS voice files to the other format. If
the voice files are a-law, they become µ-law. If they are µ -law, they
become a-law.
In most cases you will not need to use this procedure, because your voice file
format will have been correctly set by your Strata CS provider.
Using the audio c ontro ls
Strata CS makes it easy to create and listen to recordings. The following controls
appear in Strata CS wherever you can make a recording.
To create recordings, use the buttons on the recording control as shown in the
following table and speak into your phone.
Record When you are ready to record, pick up your phone, and
then click this button. A beep signals that recording has
begun.
Stop When you are done recording, you can either hang up or
click this button.
2-10 STRATA CS ADMINISTRATOR MANUAL
BETA DOCUMENT - PRELIMINARY & CONFIDENTIAL
Page 33

Play To hear the recording, click this button.
To move forward and backward within the recording, drag the slider bar.
Importing and exporting voice files
To import or export a voice file, use the import or export buttons on the recording
control, as shown in the next table.
Import You can import a voice file in .WAV or .VOX format to
use for any Client recording (greetings, voice titles, and so
on).
Strata CS can import .WAV files with a frequency of
8Khz, 11.025 Khz, 22.05 Khz, or 44.1 Khz. You can also
import an 8 kHz PCM .VOX file (µ-law format for North
America and Japan, a-law format for other countries).
Export You can export any of your Client recordings, including
voice messages and recorded conversations, to a .WAV
file.
Changing audi o output
Strata CS can play audio files over your telephone. You can also play them on
your computer if it has a sound card and speakers.
To hear audio output over the phone, click the telephone button on the
status bar, or choose Tools > Audio Output > Phone.
To hear audio output over your computer speakers, click the speaker
button on the status bar, o r choose
Tools > Audio Output > Speak er s.
CHAPTER 2. THE STRATA CS ADMINISTRATOR 2-11
BETA DOCUMENT - PRELIMINARY & CONFIDENTIAL
Page 34

Page 35

CHAPTER 3
CHAPTER 3
STRATA CS LICENSES
CHAPTER CONTENTS
About Strata CS licenses . . . . . . . . . . . . . . . . . . . . . . . . . . . . . . . . 3-2
Entering licenses . . . . . . . . . . . . . . . . . . . . . . . . . . . . . . . . . . . . . . 3-2
Removing licenses . . . . . . . . . . . . . . . . . . . . . . . . . . . . . . . . . . . . . 3-4
BETA DOCUMENT - PRELIMINARY & CONFIDENTIAL
Page 36

About Strat a CS lice nses _____________________ ___________
The following types of licenses are required for your Strata CS system:
n Server license. One license for each Strata CS Server. A Server license
is provided when you purchase Strata CS. The Server license authorizes
you to run one copy of the Strata CS Server. Only one Server license is
required per S trata CS S erver regardle ss of the number of trun ks or user s.
n Trunk licenses. One license for each analog, T1, E1, or BRI trunk that is
connected to the Strata CS Server.
n IP Port licenses. One license for each Internet trunk that is connected to
the Strata CS Server.
n Station licenses. One license for each internal telephone that is
connected to the Strata CS Server. A station license is also required for
each running instance of an IVR Plug-in. For more information about how
to enter licenses for IVP Plug-ins, see Chapter 14, “Extending Strata CS.”
n Client licenses. One license for each computer that is using Strata CS.
One Client license allows a user to log on to multiple Clients or to have
multiple Client API sessions using a single user name and password. An
additional Client license is required each time a user logs on using a
different user name and pas sword.
n Call Center Agent licens es. Each agent in a call center queue must have
a license. A single licensed agent can participate in multiple call center
queues. Call Center Agent licenses are also used by the Strata CS Call
Center Reporter. If you want to use the Reporter, even for non-queue
reports such as call activity on trunks, you need a minimum of four Call
Center Agent licenses.
To see a license summary that shows the total number of each type of license
currently installed on the Server, in the Administrator choose
Settings
, and then click the Licenses tab.
Tools > System
Stations field under License su mmary displays the total number of licenses.
The
You must supply the appropriate license serial numbers and verification keys to
the Server before you can use the corresponding trunks, stations, and Strata CS
Clients. For this reason, you may want to purchase additional licenses for
expected system growth so that you do not have to wait for a license the next time
you expand yo ur system.
Entering licenses ______________________________________
You must enter your Strata CS Server license, as follows, before you enter any
other licenses and bef or e you co nf igure the Server.
3-2 STRATA CS ADMINISTRATOR MANUAL
BETA DOCUMENT - PRELIMINARY & CONFIDENTIAL
Page 37

To enter your Strata CS Server license
1. Select
2. Select
Tools > System Settings, and then click the Licenses tab.
Server from the Show License Category drop-down list.
3. Enter the
fields.
4. Click
OK.
Serial number and Verification key in the corresponding
CHAPTER 3. STRATA CS LICENSES 3-3
BETA DOCUMENT - PRELIMINARY & CONFIDENTIAL
Page 38

To enter all other license types
1. On the Licenses tab, select the license type from the
Category
2. Click
drop-down list.
Add. The Modify License dialog box opens.
3. Enter the license serial number and verification key and click
Show License
OK.
4. If you are entering more than one license, repeat the procedure until you
have finished entering all licenses.
5. Click
OK on the Licenses tab of the System Settings dialog box.
Removing licenses ____________________________________
You can remove installed licenses and use them on another Strata CS Server as
long as you do so according to the following rules:
n Before you remove a Trunk, IP Port, or Cli ent license, yo u must delete the
trunk or user that had used the license from the system configuration (see
“Deleting trunks” on page 5-3 and “Deletin g a use r” on page 6-42).
n Before you remov e the S erver license, make su re t h a t you have removed
all Trunk, IP Port, Station, Client, and Call Center Agent licenses.
3-4 STRATA CS ADMINISTRATOR MANUAL
BETA DOCUMENT - PRELIMINARY & CONFIDENTIAL
Page 39

To remove all licenses
1. Choose
Tools > System Settings. The System Settings dialog box
opens.
2. On the Licenses tab, select the license type from the
Category
drop-down list.
Show License
3. Select the license that you want to remove.
4. Click
Delete and then click OK to close the System Settings dialog box.
To remove the Server license
1. Verify that you have removed all other licenses.
2. On the Licenses tab of the System Settings dialog box, select
from the
Show License Category drop-down list.
3. Delete the serial number and verification key that are displayed in the
fields.
4. Click
OK and then click Yes or No when the system prompts you for
confirmation.
Server
CHAPTER 3. STRATA CS LICENSES 3-5
BETA DOCUMENT - PRELIMINARY & CONFIDENTIAL
Page 40

Page 41

CHAPTER 4
CHAPTER 4
DEFINING SYSTEM SETTINGS
CHAPTER CONTENTS
About system settings . . . . . . . . . . . . . . . . . . . . . . . . . . . . . . . . . . 4-2
The General tab . . . . . . . . . . . . . . . . . . . . . . . . . . . . . . . . . . . . . . . 4-3
The Call Log tab. . . . . . . . . . . . . . . . . . . . . . . . . . . . . . . . . . . . . . . 4-8
The Storage tab . . . . . . . . . . . . . . . . . . . . . . . . . . . . . . . . . . . . . . 4-10
The Dialing tab . . . . . . . . . . . . . . . . . . . . . . . . . . . . . . . . . . . . . . . 4-12
The Emergency tab . . . . . . . . . . . . . . . . . . . . . . . . . . . . . . . . . . . 4-14
The Other tab . . . . . . . . . . . . . . . . . . . . . . . . . . . . . . . . . . . . . . . . 4-17
BETA DOCUMENT - PRELIMINARY & CONFIDENTIAL
Page 42

About system setting s _______ ____________ ____________ __
System settings control overall system behavior. Before you can add Strata CS
trunks or users, you must define your system settings using the tabs in the System
Settings dialog box. You can use system settings to customize Strata CS as your
system develops.
To open the System Settings dialog box, choose
This chapter assume you have already entered the required licenses (see
Chapter 3) and describes how to create system settings by using the following
tabs in the System Settings dialog box:
n General. Use to set number of rings before answering, set hold audio,
generate tones using software, select default l anguage for system prompt s,
set up Windows NT Event Log notifications, and define business hours.
n Call Log. Use to set configuration and archiving options for the Call Log
(see “Using the Call Log” on page 11-7).
n Storage. Use to view current disk usage and set locations for backups of
voice files and the database (see “Monitoring database and disk usage” on
page 11-11).
n Dialing. Use to set up access codes for the dial-by-name directory and
trunk access. Also use to set default access codes and dialing timeouts.
n Emergency. Use to configure emergency dialing options.
n Other. Use to configure the dial-by-name directory, present a
confirmation menu before sending callers to voice mail, set up Microsoft
Exchange synchronization, and set the minimum password length.
Customizable settings
Here are some frequently referenced settings that you can customize:
Tools > System Settings.
n Set minimum password length (see page 4-20).
n Use hold audio (see page 4-4).
n Specify the number of rings before Strata CS answers a call (see
page 4-3).
n Select the defau lt language for system prompts (see page 4-4).
n Set special access codes (see page 4-12).
n Configure Microsoft Exchange synchronization (see page 4-19).
n Set up business hours and holidays (see pag e 4-5).
n Set up 911 and E- 911 dialing (see page 4-14).
n Set dial-by-name directory options (see page 4-17)
4-2 STRATA CS ADMINISTRATOR MANUAL
BETA DOCUMENT - PRELIMINARY & CONFIDENTIAL
Page 43

Changing Windows NT/2000 registry settings
Some Strata CS settings are maintained in the Windows NT/2000 registry. These
are low-level settings that are rarely changed, or settings that cannot be changed
from the Administrator. For a complete description of these settings, see
Appendix A, “Strata CS Configuration Settings.”
Rerecording v oice pr ompt s
For information about how to rerecord the Strata CS system prompts or translate
them into another language, see Chapter 12, “System Prompts.”
The General tab _______________________________________
Choose Tools > System Settings and then click the General tab to set general
Server options.
Server Configur ation
n Number of rings before answering a call. For analog trunks only, this
field sets the number of times Strata CS allows the phone to ring before it
answers the call.
The default of 2 rings allows for the capture of caller ID on analog trunks.
In the U.S. this information appears between the first and second ring. In
other areas, such as the U.K., or when using digital trunks, where caller
CHAPTER 4. DEFINING SYSTEM SETTINGS 4-3
BETA DOCUMENT - PRELIMINARY & CONFIDENTIAL
Page 44

ID appears before the first ring, this setting can be changed to 1 so that
calls on an inbound trunk are answered after the first ring.
n Use hold audio from stat ion number. Check this box to play music for
callers on hold. The music can be played on a CD player or other
music-on-hold device that is attached to the specified station. It is highly
recommended that you use music on hold for systems with ACD
workgroups or fol low-me call forwar ding.
Strata CS plays whatever is on the specified channel. It does not monitor
the channel. If the music device stops, callers on hold hear nothing.
n Generate tones using software. Check this box to generate dial,
reorder, ringback, and stutter dial tones using Strata CS software. This
feature supports Dialogic boards that do not generate these tones in
hardware.
U.S. customers should leave this box unchecked, because U.S. Dialogic
hardware generates the tones. International customers who use the
D/41ESC board must check this box.
n Default system prompts. Use this drop-down list to select the language
version of system prompts presented to callers and users on the Strata CS
system.
U.S. English is installed by default. You must reinstall Strata CS to access
additional languages, such as U.K. English or Latin American Spanish.
For more information, see Strata CS Installation & Maintenance Manual.
n Allow voice-first answering. Check this box to enable voice-first
answering for users who have Toshiba Strata (digital) phones (see Strata
CS Client User Guide for details about voice-first answering).
Windows Event Lo g not ifi catio ns
When a Strata CS-related event is logged in the Windows NT/2000 Event Log, a
notification is sent based on the settings described in this section.
n E-mail Strata CS events fo r
Select one of the following from the drop-down list:
n All events.
n Errors and warnings.
n Errors only.
n No events. This is the default. No notifications are sent.
n E-mail to
Identify to whom the notifications are sent. The users you identify here
must also have e-mail notification set to receive Windows Event Log
notifications (see “Setting e-mail notification” on page 6-18 ).
4-4 STRATA CS ADMINISTRATOR MANUAL
BETA DOCUMENT - PRELIMINARY & CONFIDENTIAL
Page 45

n All Strata CS Administrators . Notifications go to all Strata CS
users with Administrator permissions who have e-mail notification
turned on. This is the default setting.
n E-mail address(es). Type the e-mail addresses of users whom you
want to receive notifications, separated by semicolons.
Business Hours
Click Business Hours to schedule specific Strata CS behavior for particular
hours and on specific dates.
Your settings are used by Strata CS to schedule the following:
n Transfers and greetings. See “Scheduling transfers and greetings” on
page 9-14.
n E-mail and pager notifications. See “Scheduling notifications” on
page 6-19.
n Business hours and holid ays for call rules. See “Defining business
hours and holidays” on page 4-5.
Strata CS uses the following categories to define business hours and holidays:
n Work days and work hours for each work day
n Full or partial holidays
n Custom work days, hours, a nd dates
Strata CS inclu des a defaul t set of bus iness hours th at you can c ustomize. Yo u can
create as many sets of business hours as you need. For example, you can create a
set of business hours for the company as a whole, and then create additional sets
of business hours for individual departments, shi f ts , and so fo rth.
Note:
When you define bu si ness hours and holidays , yo u can type dates and
times in most formats. Your entries are converted to a standard format that is
based on your Wi ndows region al settings.
Defining business hours and holidays
Business hours and holidays are used by Strata CS to schedule transfers and
greetings, notifications, and call rules.
CHAPTER 4. DEFINING SYSTEM SETTINGS 4-5
BETA DOCUMENT - PRELIMINARY & CONFIDENTIAL
Page 46

To define business hours and holidays
1. On the General tab, click
Business Hours. The Business Hours dialog
box opens.
2. If you have more than one set of business hours defined, select the
Name of the set to edit from the drop-down list.
3. On the Work Hours tab, check each day that is a
4. Set
Work hours for each work day by entering the starting and en ding
Work day.
times for that day in your organization.
4-6 STRATA CS ADMINISTRATOR MANUAL
BETA DOCUMENT - PRELIMINARY & CONFIDENTIAL
Page 47

5. To define holidays, click the Holidays tab.
6. Click
Add to add a new holiday. Click Edit to edit an existing one.
7. Type the Holiday date.
8. Choose if this is an
All day holiday or Partial day holiday. For a partial
day holiday, enter:
n Work hours begin at. Starting time for work on the holiday.
n Work hours end at. Ending time for work on the holiday.
9. When you finish creating holidays, click
OK.
CHAPTER 4. DEFINING SYSTEM SETTINGS 4-7
BETA DOCUMENT - PRELIMINARY & CONFIDENTIAL
Page 48

The Call Log t ab__________ _________ _________ _________ __
The Call Log tab contains settings for logging internal calls and for archiving the
Call Log.
Logging internal calls
By default, Strata CS logs only external calls. If Call Log information is important
to you, and you can afford the additional disk space, you can log in ternal calls as
well.
To log internal calls as well as external calls
1. Choose
2. Under
Tools > System Settings and then click the Call Log tab.
Configuration, check Log internal calls.
Archiving the Call Log
Over time, Call Log information will begin to fill up your Strata CS database (see
“Monitoring database and disk usage” on page 11-11). To recover database space,
you can archive old Call Log information that is no longer needed to a location
outside the database.
4-8 STRATA CS ADMINISTRATOR MANUAL
BETA DOCUMENT - PRELIMINARY & CONFIDENTIAL
Page 49

Archived information is permanently removed from the Strata CS database. Use
the Export command (see “Exporting the C all Log” on page 11-11) to create a file
containing Call Log information without removing the information from the
database.
Call Log information is written to a comma separated value (.CSV) text file that
can be read by most spreadsheet and database programs. The default path for this
file is
C:\Program Files\Strata CS Server\Archive\Calllog.csv
You can archive Call Log data in the following ways:
n Set up automatic archiving, which takes place at 1:00 a.m. every day.
n Automatically overwrite the Call Log after a number of days that you
specify.
n Perform a manual archive on an as-needed basis, in addition to daily
automatic archiving. You can do a manual archive whether or not
automatic archiving is turned on.
You do not need to stop the Strata CS Server or any other Strata CS components
to perform an archive. However, because archiving is database-intensive you may
want to perform it during off-peak hours so as not to affect normal system
operation.
To archive Call Log information
1. Choose
Tools > System Settings. The System Settings dialog box
opens.
2. Click the Call Log tab and specify how you want to perform archiving:
n Archive Call Log daily. If checked, the Call Log is archived
automatically at 1:00 a.m. every day. Calls are archived according to
the settings you make in the following fields. If unchecked, the Call
Log will continue to grow unless you manually archive it.
n Archive cal ls older than __ _ days. Number of days a call remains
in the Call Log until it is archived.
n Archive filename. Location of the Call Log archive file on the Strata
CS Server. This file is in .CSV format and can be viewed with most
spreadsheet or database programs.
n Overwrite archive ev er y ___ days. Number of days' worth of
automatically archived information that will be appended to the Call
Log archive file. At the end of that time, information in the file will
be deleted and the file will be reused.
CHAPTER 4. DEFINING SYSTEM SETTINGS 4-9
BETA DOCUMENT - PRELIMINARY & CONFIDENTIAL
Page 50

n Archive will be overwritten on. Date and time when the Call Log
archive file will next be overwritten and the data in it deleted. To
preserve the archived data, back up the file just before it will be
overwritten.
3. Click
Archive Now to manually archive the Call Log according to the
settings specified above. The archive begins immediately and may take
several minutes to complete. You cannot perform any other
Administrator functions until the archive completes. You can perform a
manual archive at any time whether or not automatic archiving is turned
on.
4. Click
OK to save your archiving settings.
The Storage tab _______________________________________
The Storage tab controls how Strata CS’s database stores your system
configuration settings and voice files.
Disk usage
n Database. Percentage of disk space allocated for the Strata CS database
that is currently used, also shown in kilobytes used out of the total number
of kilobytes allocated. The size of the Strata CS database is set and the
required disk space allocated when the Strata CS Server is installed. The
4-10 STRATA CS ADMINISTRATOR MANUAL
BETA DOCUMENT - PRELIMINARY & CONFIDENTIAL
Page 51

default database size is 100 MB. This space is allocated automatically if
necessary.
When you start the Administrator, Strata CS displays a warning message
if the Strata CS database is 80% or more full. You must check the database
usage periodically to make sure you are not running out of space.
n Messages. Percentage of disk space allocated for all users’ voice mail
messages, as well as any call recordings users have made, that is currently
used.
n Greetings. Percentage of disk space allocated for all users’ greetings and
voice titles that is currently used.
n Call Log. Amount of space currently used in the Strata CS database for
Call Log records, in kilobytes. Some or all of this space can be recovered
by archiving Call Log information if total database usage is high (see
page 4-8).
Allocating disk space
When you set up new users, you specify the maximum size of each user’s voice
mailbox and the maximum space permitted for each user's greetings and voice
titles.
If there is not enough free disk space for all mailbox and greeting allotments to be
full at the same time, the Administrator displays a warning, but allows you to
continue. When you see a disk space warning message, you must take steps to
reduce disk space usage, such as reducing the space allocated to users or having
users delete their stored messages.
See page 6-15 for more information about allocating disk space for new users.
When users log into the Client or use the telephone commands, they may
Note:
get a warning if their voice mailboxes are more than 80% fu l l. You can check
available message an d gr eeting space on a per-user ba si s using the Users view.
If the free disk space on the Server drops below 50 MB, a verbal message alerts
you when you pi ck up a Strata CS phone.
Moving voice files
If you are running out of disk space on the drive where you installed Strata CS but
have space available on another local drive, you can move your voice message
and prompt files to the other drive. To move voice files, the user name with which
you logged into the Administrator must have write access to both the source and
destination directory.
CHAPTER 4. DEFINING SYSTEM SETTINGS 4-11
BETA DOCUMENT - PRELIMINARY & CONFIDENTIAL
Page 52

To move voice message files
1. Shut down the Strata CS Server. You cannot move voice files while the
Server is running.
2. Start the Strata CS Administrator.
3. Choose
4. Click
Tools > Systems Settings and then click the Storage tab.
Move.
5. Choose a new location for your voice files. The drive you select must be
a local drive on the Strata CS Server, not a network drive.
6. Click
OK.
The Dialing tab ________________________________________
System-wide settings for special access codes and dialing timeouts are made on
the Dialing tab.
Choose
Tools > System Settings and then click the Dialing tab (see the next
illustration).
Defining special access codes
Enter the access codes that users must dial to reach the following:
n Dial-by-name directory. Number to access the Strata CS dial-by-name
directory. Th e default is 411.
n Select a trunk. Number to dial to place a call on a particular trunk. The
default is 88.
To place a call on a specific trunk, dial the access code and the trunk
number. Only users with Administrator permissions can select a trunk
before placing a call. If you must allow users to select a trunk, create
dialing services for the appropriate trunks. See “About dialing services”
on page 8-2 for more info rmation.
You also enter default access codes on this tab. Default access codes are used for
ringbacks from the Client. For more information, see “Setting default access
codes for ringbacks” on page 8-9
4-12 STRATA CS ADMINISTRATOR MANUAL
BETA DOCUMENT - PRELIMINARY & CONFIDENTIAL
Page 53

.
Setting dialing timeouts
Strata CS uses timeouts that you specify to determine the end of a number that
was entered by a user. If users press # after entering the final digit of a number,
Strata CS dials the number immediately and does not wait for the timeout period
to elapse.
n Internal dialing incomplete timeout. Number of milliseconds before
Strata CS times out on an internal call if not enough digits were entered.
The default is 8000 milliseconds (8 seconds).
n Internal dialing ambiguous timeout. Number of milliseconds before
Strata CS times out on an internal call if the digits entered cannot be
resolved into a recognized number. The default is 3000 milliseconds (3
seconds).
n Dialing service incomplet e t imeout. Number of milliseconds before
Strata CS times out on an external call if not enough digits were entered.
The default is 8000 milliseconds.
n Dialing service ambiguous timeout. Number of milliseconds before
Strata CS times out on an external call if the digits entered cannot be
resolved into a recognized number. The default is 3000 milliseconds.
Note:
The default dialing timeouts work in most installations, and they should be
modified carefully.
CHAPTER 4. DEFINING SYSTEM SETTINGS 4-13
BETA DOCUMENT - PRELIMINARY & CONFIDENTIAL
Page 54

You may want to consider increasing the dialing service ambiguous timeout by
half-second intervals if users report intermittent problems hearing “Number not
available” when they dial out on analog or Robbed Bit T1 trunks (this is not a
problem for ISDN or IP lines).
If you increase this timeout by too much, you can introduce other problems, such
as users missing the beginning of the audio signal at the target, for example, the
beginning of an auto attendant that answers calls immediately. If this problem
occurs, you can do any of the following:
n Reduce the dialing service ambiguous timeout.
n Instruct users to enter # after dialing a number.
n Collect all dig its before diali ng (see page 8-10).
The Emergency tab ____________________________________
Strata CS supports two kinds of emergency dialing services—standard 911 and
Enhanced 911 (E-9 11 ).
Using standard 911 service with Strata CS
A standard 911 call does not require any additional hardware. All standard 911
calls use a Strata CS trunk and go through the local phone company to the
emergency dispatching cent e r.
To support 911 c alls in Strata CS , you must provide an emergenc y a ccess code
for users to dial.
Using extended 911 service with Strata CS
An extended 911 (E-911) call includes the calling station’s ANI information (the
Strata CS station ID). This information helps the phone company’s E-911 center
identify the location of the person who made the emergency call, for example, the
specific floor and office in a large building.
An E-911 call does not use a Strata CS trunk. Typically, a dedicated trunk
connects the E-911 device directly to the emergency dispatching center.
All E-911 calls go through an E-911 device. For information about obtaining,
installing, and configuring an E-911 device, see Strata CS Installation &
Maintenance Manual.
After the E-911 device is instal led and configured, you must enable E-911 and
assign E-911 sta tions. You ass ign one or mor e Strata CS st ations for the exclusive
purpose of handling E-911 calls. An E-911 station is physically connected to a
port on the E-911 device, and can be any station that is not already assigned and
that has a valid station license.
4-14 STRATA CS ADMINISTRATOR MANUAL
BETA DOCUMENT - PRELIMINARY & CONFIDENTIAL
Page 55

Note: When you select stations to connect to the E-911 device, do not use the
first 4 stations on the BCP connection panels. The Strata CS Watchdog mode uses
these stations to maintain phone service during a power or Windows Server failure.
For more information ab out W at chdog mode, see Strata C S Installation &
Maintenance Manual.
How emergency numbers are handled
Users can make an emergency call from any station, including a station that has
not yet been assigned to a user. Users can make an emergency call even if they
are blocked from making external calls.
If E-911 is enabled and the E-911 device has been installed and configured
correctly, the emergency call is routed to one of the stations connected to the
E-911 device. As soon as the E-911 station takes the call, the station ID of the
caller’s station is passed to the device. The E-911 device then calls the emergency
center directly over a dedicated trunk.
If for any reason the emergency call cannot be placed using E-911 service, Strata
CS automatically places a standard 911 call to the emergency center using the
local carrier. Reasons why an E-911 call cannot be placed include:
n All the E-911 stations are busy.
n The E-911 device fails.
n The dedicated trunk from the E- 911 device to the e mergency center is
down.
n The trunk does not respond within a certain time period.
n E-911 is not enabled in Strata CS.
To set emergency dialing options
1. Choose
Tools > Sy stem Setti ngs and then click the Eme rgency tab (see
the next illustration).
2. Check
Emergency number can be di al ed at in te rnal dial tone if you
want users to be able to dial the emergency number without dialing an
access code first. If unchecked, users must dial the access code and then
the emergency number. This setting only affects emergency calls.
3. If you have configured an E-911 device and service (as described in
Strata CS Installation & Maintenance Manual), check
for E-911 service
, and then go to the next step.
Enable support
If you leave this option unchecked, calls to the emergency number are
made using sta ndard 911 servic e.
CHAPTER 4. DEFINING SYSTEM SETTINGS 4-15
BETA DOCUMENT - PRELIMINARY & CONFIDENTIAL
Page 56

4. Click
5. In the
Add to add each station that is connected to the E-911 device.
Add E-911 Station dialog box, choose a station from the list of
available stations, and then click
OK.
If the list in this dialog box is empty, make more stations available by
unassigning users that are no longer used, or purchase additional station
licenses (see “About Strata CS licenses” on page 3-2).
6. Repeat steps 4-5 until all E-911 stations have been added. Click
when you are done.
OK
4-16 STRATA CS ADMINISTRATOR MANUAL
BETA DOCUMENT - PRELIMINARY & CONFIDENTIAL
Page 57

The Other tab _________________________________________
Choose Tools > System Settings and then click the Other tab to set the options
that appear in the next figure.
Setting dial-by-name directory options
Specify the method by which callers can search the dial-by-name directory:
n Last name. Caller enters “Smith”. This is the default.
n First name. Caller enters “John”.
n Last name or First name. Caller enters “Smith” or “John”.
In
Present names using, select one of the following methods for presenting
users’ names to callers:
n Extension number. Callers hear an extension number after each name,
as in “For John Smith, press 175”. This is the default.
n Numbered list. Callers hear a sequence number after each name, as in
“For John Smith, press 1”.
By default Strata CS connects a caller immediately to the user that was chosen in
a menu of multiple names. Similarly, when the system finds one match only, the
call is immediately transferred to the user.
CHAPTER 4. DEFINING SYSTEM SETTINGS 4-17
BETA DOCUMENT - PRELIMINARY & CONFIDENTIAL
Page 58

Select Present a confirmation menu before transferring if you want callers to
confirm their choices before they are transferred to the extension that matched the
names they entered. For example, a caller would hear, “For Cecilia St. John, press
1. To try again, press *.”
Presenting a confirmation menu before voi ce mail
Check Present a confirmation menu before voice mail so that callers hear the
message “To leave a message press 1, or press * to return to the menu” after they
hear a user's voice mail greeting. If unchecked (the default), callers go directly to
voice mail.
Setting up Microsoft Exchange synchroniza tion
If your organiza tion is using Mic rosoft Exchan ge Server for e-mail, you can
choose this option to synchronize Strata CS voice mail messages with the
corresponding e-mail notifications in Exchange on a per-user basis.
Synchronization behavior depends on whether e-mail not ifications ha ve voice
attachments or not, as follows:
n If a voice message is attached to an e-mail notification, the following
occurs:
n Moving a voice message from the Inbox folder to the Deleted folder
(or the reverse) in either system moves the voice message on the
other system as well. For example, messages deleted from the Strata
CS Inbox are deleted from the Exchange Inbox as well.
n A voice message in Strata CS is deleted permanently when the
associated e-mail notification in Exchange is deleted or is moved to
any folder other than the Inbox or Deleted folder in Exchange.
n An e-mail notification in Exchange is deleted permanently when the
associated voice message is deleted permanently in Strata CS.
n If the voice message is not attached to an e-mail notification, the
following occurs:
n An e-mail notification in Exchange is deleted permanently when the
associated Strata CS voice message is deleted, either via the Client or
telephone commands.
n Deleting an e-mail notification in Exchange has no effect on the
voice message in Strata CS. Voice messages therefore cannot be
deleted in Strata CS before a user has the opportunity to listen to
them.
4-18 STRATA CS ADMINISTRATOR MANUAL
BETA DOCUMENT - PRELIMINARY & CONFIDENTIAL
Page 59

Exchange Se rver Mail box Pe rmiss ions
In order to synchronize with Microsoft Exchange, the Strata CS account must be
a domain account that has User role permissions to all Exchange mailboxes that
are to be synchronized.
One way you can do this is by assigning the Strata CS User role permissions to
each individual mailbox. This method is secure but time-consuming.
Alternatively, you can assign the Strata CS User role permissions to all mailboxes
at the site level. This method is less secure, but it requires less intervention by
system administrators. For more information about assigning User role
permissions, see your Exchange Server documentation.
With Exchang e Serve r versi on 5.5 or later, note tha t depen ding on how Excha nge
Server is configu red, it may t ake up to tw o hours for ma ilbox per mission chan ges
to take effect, because changes are cached before they are applied. For more
information and details on how to change the cache interval for Exchange Server
5.5, see:
http://support.microsoft.com/support/kb/articles/q179/0/65.asp
To set up Microsoft Exchange synchronization for a user
1. In the System Settings dialog box Other tab, check
messages with Microsoft Exchange
to synchronize message deletions
Synchronize
between Strata CS and Microsoft Exchange. Then enter:
n Exchange Server name. Name of the Exchange Server on you r
LAN.
n Synchronization interval. How often the synchronization takes
place, in minutes. The default is one minute.
2. Set up e-mail notification for the user (see “Setting e-mail notification”
on page 6-18).
3. Enable Exchange synchronization for the user (see “Enabling Microsoft
Exchange Server synch ro ni za t io n” on page 6-16).
Note:
The user’s Microsoft Outlook client must be configured to deliver messages
to a mailbox on the Exchange Server. Exchange Server synchronization does not
work if the user’s Outlook client is configured to deliver messages to a PST file on
the local computer.
CHAPTER 4. DEFINING SYSTEM SETTINGS 4-19
BETA DOCUMENT - PRELIMINARY & CONFIDENTIAL
Page 60

Setting the minimum password length
Enter the Minimum password length, the shortest permissible password to log in
to Strata CS (the maximum password length is 12 numeric digits). Set this field
to 0 if you want to allow users to log in without using a password. The default is 0.
When you change the minimu m password le ngth, exist ing passwords s horter than
the new minimum length continue to work until they are changed.
4-20 STRATA CS ADMINISTRATOR MANUAL
BETA DOCUMENT - PRELIMINARY & CONFIDENTIAL
Page 61

CHAPTER 5
CHAPTER 5
MANAGING T RUNKS AND SPANS
CHAPTER CONTENTS
About trunks . . . . . . . . . . . . . . . . . . . . . . . . . . . . . . . . . . . . . . . . . . 5-2
Configuring trunks . . . . . . . . . . . . . . . . . . . . . . . . . . . . . . . . . . . . . 5-4
ANI/DID digit collection. . . . . . . . . . . . . . . . . . . . . . . . . . . . . . . . . . 5-5
Setting up fax routing . . . . . . . . . . . . . . . . . . . . . . . . . . . . . . . . . . . 5-7
The Trunks view . . . . . . . . . . . . . . . . . . . . . . . . . . . . . . . . . . . . . . . 5-8
Adding an analog trunk. . . . . . . . . . . . . . . . . . . . . . . . . . . . . . . . . 5-10
Adding a digital Robbed Bit T1 span . . . . . . . . . . . . . . . . . . . . . . 5-13
Adding a digital ISDN or CAS span . . . . . . . . . . . . . . . . . . . . . . . 5-17
Adding a digital ISDN BRI span . . . . . . . . . . . . . . . . . . . . . . . . . . 5-18
Optimizing your ISDN settings . . . . . . . . . . . . . . . . . . . . . . . . . . . 5-19
Enabling ISDN Megacom support . . . . . . . . . . . . . . . . . . . . . . . . 5-20
Adding an Internet span . . . . . . . . . . . . . . . . . . . . . . . . . . . . . . . . 5-21
BETA DOCUMENT - PRELIMINARY & CONFIDENTIAL
Page 62

About trunks __________ ___________ __________ ___________
Trunks are the outside phone lines that connect your business to the telephone
company and other providers.
Adding a trunk to your Strata CS system is a three-step process:
1. Connecting the physical trunk line to the Dialogic voice board in the
Strata CS Server computer. You can find instructions for this step in
Strata CS Installation & Maintenance Manual.
2. Defining the trunk in the Strata CS Administrator’s Trunks view. See
“Adding trunks” on page 5-3.
3. Including the trunk in a dialing service, so that users can place outbound
calls on it. See “About dialing services” on page 8- 2.
For information about required hardware and how to order service s from your
phone company, see Strata CS Installation & Maintenance Manual.
Trunk types
Strata CS supports analog and digital trunks.
The analog trunks supported are the following:
n Standard analog trunks. Analog Direct Inwar d Dial (DID) trunks. For
Strata CS to support analog DID trunks, they must be properly configured
following the instructions in Strata CS Installation & Maintenance
Manual.
n Centrex trunks or analog ex te nsi ons fr om another PBX. In Strata CS,
these are referred to collectively as Centrex/PBX extensions.
The digital trunks supported are the following:
n Robbed Bit T1 trunks
n ISDN PRI over T1 trunks
n ISDN PRI over E1 trunks
n ISDN BRI over BRI trunks
n E1 CAS trunks
Note:
Strata CS supports Internet telephony and does not require any additional
telephone compan y trunks. A Dialogic Internet telephony board connect s directly
to your network and acc esses the Internet over your com pany’s norma l Internet
connection.
5-2 STRATA CS ADMINISTRATOR MANUAL
BETA DOCUMENT - PRELIMINARY & CONFIDENTIAL
Page 63

Adding trunks
This chapter contains instructions for adding new trunks of each type, as follows:
n “Adding an analog trunk” on page 5-10
n “Adding a digital Robbed Bit T1 span” on page 5-13
n “Adding a digital ISDN or CAS span” on page 5-17
n “Adding an Internet span” on page 5-21
Before you perform the steps in each section of this chapter, make sure you have
installed and configured the Dialogic boards and drivers that are necessary to
support your trunks. See Stra ta CS Installation & Maintenance Manual for
instructions.
As long as the Dialogic boards and drivers have been properly installed and
configured, you can start using a trunk as soon as you add it according to the
instructions in this chapter. Note that if you add a trunk in the Administrator
before it is physically installed or configured, the trunk has a status of “Not
Installed” in the Device Monitor.
Naming trunks
Give your trunks names that convey important information about them, so that
you can identify trunks quickly and easily. Information to use in a trunk name
includes:
n The telephone number of an analog trunk
n The IP address of an Internet trunk
n The name of the digital or Internet span to which the trunk belongs
Monitoring trunks
For instructions on how to monitor the activity on a trunk, enable or disable a
digital trunk, or restart a trunk that is experiencing problems, see “Using the
Device Monitor” on page 11-3.
Deleting trunks
Deleting a trunk removes it from your Strata CS system configuration, but does
not affect the telephone line or hardware, or the trunk license.
Although you can delete a single analog trunk, you cannot delete a T1, E1, or
Internet trunk from the span it belongs to. If you must permanently remove a
digital line, you must delete the entire span. To disable an individual trunk in a
span temporarily, edit the trunk and uncheck the options for receiving inbound
and placing outbound calls.
CHAPTER 5. MANAGING TRUNKS AND SPANS 5-3
BETA DOCUMENT - PRELIMINARY & CONFIDENTIAL
Page 64

A deleted trunk appears in the Device Monitor as “NA” if a telephone line is still
connected to the BCP Connection Panel.
For information about deleting items in Strata CS, see “Deleting items” on
page 2-9.
Configuring trunks_____________________________________
You can configure trunks as inbound-only, outbound-only, or both inbound and
outbound. In most Strata CS systems, trunks are configured for both inbound and
outbound use.
If it is critical that a phone line is always available for inbound calls (for example,
if you have an emergency hotline), you can set up an inbound-only trunk.
Similarly, if it is critical that there is always a trunk available for outbound calls,
you can set up an outbound-on ly trunk.
For instructions on configuring a trunk for inbound and outbound calls, see
“Adding trunks” on page 5-3.
Inbound and outbound calls and hunt gro ups
The best arrangement for Strata CS is to ask the telephone company for a
terminated hunt grou p. In this arrangement, inbound calls try the lowest phone
number first and then the next lowest until a free line is found. When you are
adding trunks to your configuration in the Administrator, assign the lowest phone
numbers to the lowest Strata CS trunk numbers.
On outgoing calls, by default Strata CS starts searching for a free line with the
highest Strata CS trunk number. This behavior results in the fewest conflicts for
lines, since inbound calls are c oming in on the l ower-numbered trunks, and
outbound calls are goin g out on the hi gh e r- nu mb e re d tr unk s. Th i s be ha vio r i s
defined by the dialing service used to place the call, and can be changed to
accommodate other configurations and needs. See “About dialing services” on
page 8-2 for more inform ation.
Matching trunk settings with your phon e company
Strata CS inbound and outbound settings control only how Strata CS treats the
line, and they do not affect how the telephone company treats the line.
For example, if you configure a trunk for inbound calls only, Strata CS does not
use the line for outbound calls. You do not receive any calls on the line, however,
unless you have distributed the number to callers and instructed your telephone
company to include the trunk in your inbound hunt group.
5-4 STRATA CS ADMINISTRATOR MANUAL
BETA DOCUMENT - PRELIMINARY & CONFIDENTIAL
Page 65

Similarly, specifying a trunk as exclusively outbound does not prevent inbound
calls if you have given the line’s telephone number to outside parties or included
the trunk in your inbound hunt group. If calls arrive on a trunk designated for
exclusive outbound use, Strata CS plays a message indicating that the caller
dialed a wrong number and then hangs up.
The message played under these circumstances is the system prompt
Note:
“Wrong Number.” You can r er ecord it to have the message gi ve the caller the
correct number to reach your company. See Chapter 12 for more information about
recording system prompts.
Routing inbound calls on a trunk
If you set a trunk to accept inbound calls, you can route the calls to the following
places in Strata CS:
n An auto attendant
n A user
n An automatic call distribution (ACD) workgroup
n A group of internal users simultaneously
n An IVR Plug-in application
Placing outbound calls on a specific tru nk
Administrators can place a call on a specific trunk for testing purposes by dialing
88, the trunk number, and then the phone number. For example, to place a call on
trunk #1, dial 8801 (you must use 4 digits). To place a call on trunk #12, dial 8812.
When you are using specific-trunk dialing, you do not need to dial the access code
to make an external call.
You can change the
88 code to other digits. See “Defining special access codes”
on page 4-12.
If you want to allow specific trunk access for users, create a dialing service
Note:
that allocates that trunk. S ee “About dialing services” on page 8-2.
ANI/DID digit collection _________________________________
The following services from your phone company enable Strata CS to work with
maximum efficiency:
n Caller ID.
n ANI (Automatic Number Identification). Provides Caller ID
information about analog DID and digital trunks
n DID (Direct Inward Dial). Enables direct routing of incoming calls to
the individual stations
CHAPTER 5. MANAGING TRUNKS AND SPANS 5-5
BETA DOCUMENT - PRELIMINARY & CONFIDENTIAL
Page 66

n DNIS (Dialed Number Identification Service). Provides DID data
on toll-free lines such as 800, 877, and 888 numbers. Throughout Strata
CS, “DID” refers to DNIS as well.
DID information appears in the following Administrator and Client views:
n The Users view in the Administrator shows the DID number assigned to
a user in the DID Number column.
n The Auto Attendants view in the Administrator shows the DID number
assigned to an auto attendant in the DID Number column.
n The Trunks view in the Administrator identifies analog trunks configured
to handle DID calls. Digital trunks will retrieve DID depending on the
configuration.
n The Call Log in the Administrator shows the DID number associated with
a call in the DID Number column.
n The Call Monitor in the Client shows the DID number associated with a
call in the DID Number column.
Collecting ANI/DID digits
Some caller or number identification services that you can order with your analog
or Robbed Bit T1 phone lines require that Strata CS collect information that
arrives with an inbound call.
Note:
Strata CS automatically coll ects caller ID digits on analog trunks, and
ANI/DNIS digits on ISDN or CAS trunks if available. If your system is configured to
collect digits automat i cally, you can skip this sect i on.
For Strata CS to collect DID/DNIS information when a call arrives on an analog
or Robbed Bit T1 trunk, or to collect ANI digits on a Robbed Bit T1 trunk, the
Server needs to know exactly how the data is signaled. Use the information
supplied by your telephone company or T1 carrier to define these signals to Strata
CS. For detailed instructions, see:
n “Setting up digit collection on an analog trunk” on page 5-11
n “Configuring signaling using the Robbed Bit T1 Experimenter” on
page 5-13
See S trata CS Installation & Maintenance Manual for information about ordering
and installing DID/DNIS for analog or digital lines.
5-6 STRATA CS ADMINISTRATOR MANUAL
BETA DOCUMENT - PRELIMINARY & CONFIDENTIAL
Page 67

Using DID with Robbed Bit T1 lines
1. Make sure that your Robbed Bit T1 lines have been installed correctly.
2. Configure digit collection signaling for the trunks (see “Configuring
signaling usin g the Ro bbed Bit T1 Experi menter” o n page5-13 for step
by step instructions and examples).
3. Verify that each trunk in the digital span is configured to accept inbound
calls, and that calls are sent to a user or auto attendant (see “Entering
trunk defaults for a span” on page 5-16).
4. Assign DID numbers to users or auto attendants (see “The General tab”
on page 6-9).
Using DID with analog lines
1. Make sure your analog DID lines and digital interface units have been
correctly installed and configured. See Strata CS Installation &
Maintenance Manual.
2. Configure analog digit collection signaling for the trunks (see “Setting
up digit collection on an analog trunk” on page 5-11).
3. Enable DID for each inbound analog DID trunk (see “Adding an analog
trunk” on page 5-10).
4. Assign DID numbers to users or auto attendants (see “Assigning a DID
number” on page 6-13).
Setting up fax routing __________________________________
You set up fax routing on a per-trunk basis for the following trunk types:
n Analog
n Robbed Bit T1
n ISDN/CAS T1/E1
Fax calls can be routed to an auto attendant, user, or IVR Plug-in. Usually you
route faxes to a user whose station is connected to a fax Server or fax machine.
Whenever Strata CS detects a fax signal on the trunk, the call is automatically
routed to this station.
If a DID match occurs on an inbound call, the fax is not routed to the auto
Note:
attendant, user, or IVR Plug-in as described in the trunk. The fax instead is routed
directly to the DID target.
For instructions on how to configure specific trunk types to support fax routing,
see the sections on adding these trunk types later in this chapter.
CHAPTER 5. MANAGING TRUNKS AND SPANS 5-7
BETA DOCUMENT - PRELIMINARY & CONFIDENTIAL
Page 68

Customizing fax routing
To route incoming faxes to a pool of fax machines, set up a routing list for the user
that points to a series of users whose stations are attached to fax machines. To
handle faxes differently based on time or date, route fax calls to an auto attendant,
and then schedule transfers to the appropriate users.
The Trunks view_______________________________________
Click the trunks button in the view bar to open the Trunks view.
Each trunk you add appears as a row in the view. The following table show the
information that appears for each trunk.
Column Description
Number Port number on the Dialogic board associated
with this trunk.
Type Type of trunk: Analog, Robbed Bit T1, Internet, or
ISDN/CAS E1/T1.
Inbound If checked, this trunk is used for inbound calls.
Outbound If checked, this trunk is used for outbound calls.
Retrieve DID If checked, Strata CS retrieves Direct Inward Dial
digits from calls coming in on this trunk.
Centrex If checked, indicates a Centrex trunk.
5-8 STRATA CS ADMINISTRATOR MANUAL
BETA DOCUMENT - PRELIMINARY & CONFIDENTIAL
Page 69

Column Description
Span For digital spans, the number of the span to which
the trunk belongs.
Name Descriptive name assigned to the trunk.
Send calls to Auto attendant, operator, user, or IVR Plug-in that
receives inbound calls on this trunk.
Send faxes to User to whom inbound faxes on this trunk are
routed.
IP Address IP address of the trunk.
Span Description Optional information provided when the span was
added.
Because you can add trunks to the configuration before the physical lines are
added to your system, the number of trun ks shown in the trunks view may not
reflect the actual number of trunks available for Strata CS’s use.
About digital and Internet spans
Strata CS represents digital and Internet trunks as a span of individual trunks,
corresponding to the number of available channels. For example, a Robbed Bit T1
trunk offers 24 channels, so when you add a Robbed Bit T1 trunk, 24 individual
trunks appear in the Trunks view. You can set some properties for an individual
trunk in a span, and other properties for the span as a whole.
n To set properties for an individual trunk, right-click the trunk, and then
Open Trunk.
choose
n To set properties for a span as a whole, right-click a trunk in the span, and
then choose Open Span.
When Strata CS dials out over a board, it reads the board configuration
information that was entered when the board was installed using the Dialogic
Configuration Manager (DCM). However, the Administrator does not read this
information when you add or configure a digital span that uses the board. When
you add a digital span, make sure that the span type matches the protocol type
specified using DCM.
You cannot change a span’s type after you add it. If you create a span of the wrong
type, delete the span and add a new one of the correct type.
After adding Internet trunks to a span, you must restar t the computer. If the
Note:
trunks fail to appear, delet e t he span and add the span again .Th en restart the
computer.
CHAPTER 5. MANAGING TRUNKS AND SPANS 5-9
BETA DOCUMENT - PRELIMINARY & CONFIDENTIAL
Page 70

Adding an analog trunk_________________________________
Use the following procedure to add a new analog, analog DID, or analog Centrex
trunk.
1. Choose
opens.
Trunks > New Trunk > Analog Trunk. A new Trunk dialog box
2. Enter the number and name of the trunk:
n Number. Identifies the hardware resource on the Server used for this
line. The number must correspond to the port on the Dialogic BCP
Connection Panel to which the trunk is connected.
If you have a mix of ana log and digita l trunks, be sure that you assign
trunk numbers that reflect how trunks will be installed in your
system. Analog trunks always use the lower-numbered trunks, so
either add the analog trunks first, or bump up the starting trunk
number for the digital span to reflect the actual line number. See
“About digital and Internet spans” on page 5-9 for info rmation about
adding a digital span.
n Name. Descriptive name for the trunk. See “Naming trunks” on
page 5-3.
3. Choose whether the trunk is used for inbound calls, outbound calls, or
both, using the following fields:
n Accept inbound calls. Check this box if the trunk is used for
inbound calls.
5-10 STRATA CS ADMINISTRATOR MANUAL
BETA DOCUMENT - PRELIMINARY & CONFIDENTIAL
Page 71

n Calls are sent to. Select the auto attendant, user or IVR Plug-in
that answers all inbound voice calls on this trunk. If you change
the target by time of day, send the calls to an auto attendant and
define the appropriate scheduled transfer action.
n Faxes are sent to. Select the auto attendant, user or IVR Plug-in
that answers all inbound fax calls on this trunk. See “Setting up
fax routing” on page 5-7 for more informati on.
n Retrieve DID digits from this an al og lin e. Check this box to
collect DID digits on the line. When checked, Strata CS routes
inbound calls directly to the user, auto attendant, or IVR Plug-in
associated with the DID number. See “Setting up digit collection
on an analog trunk” on page 5-11 for more information.
n Allow outbound calls. Check this box if the trunk is used for
outbound calls .
n Registered for least cost routing. This feature is not available
in this version.
n Centrex/PBX transfers supported. If this is a Centrex trunk or a
trunk connected to an external PBX, check the box to enable users to
transfer or forward calls using only Centrex or PBX extensions.
When this option is selected (and if supported by your Centrex/PBX),
Strata CS can transfer or forward a call without using any Strata CS
trunks.
n Pre-transfer sequence. Type the keys required before
transferring a call to a Centrex or PBX extension. The valid keys
are 0-9, *, #, and & (Flash). The default is &.
n Post-trans fer se quen ce. Type the keys required after Strata CS
dials the pre-transfer sequence and the extension, to transfer a call
to a Centrex or PBX extension. The valid keys are 0-9, *, #, and
& (Flash). After the post-transfer sequence is dialed, Strata CS
hangs up.
4. Click
OK to add the trunk to your configuration.
Before Strata CS can use the new trunk, you must start it from the Device Monitor
(see “Restarting stations or trunks” on page 11-6).
Setting up digit collection on an anal og trunk
The format used to transmit ANI and DID/DNIS information on analog trunk
varies with the carrier, as follows:
n Fixed format. Each piece of information is always the same length. For
example, DID information is typically the last four digits that the caller
dialed.
CHAPTER 5. MANAGING TRUNKS AND SPANS 5-11
BETA DOCUMENT - PRELIMINARY & CONFIDENTIAL
Page 72

n Variable format. Each piece of information can vary in length, with filler
digits used as separators, for example, 4 DID digits and 5 ANI digits in the
format #DDDD#AAAAA#.
To collect the variable-format digits in this example, you must specify 3 separate
actions to Strata CS, using the procedure that follows:
n The first action collects the filler digit # that indicates the start of the DID
information. The digit type is
Filler, and the number of digits to collect is
1.
n The second action collects the DID digits sent by the carrier. The digit
DID. You collect a variable number of digits up to the separator
type is
digit, #.
n The third action collects the ANI digits sent by the carrier. The digit type
is ANI. You collect a variable number of digits up to the separator digit, #.
To collect digits on an analog trunk
1. In the Trunks vie w, select the trunk.
2. Choose
Trunks > Analog Digit Collection. The Analog Digit
Collection dialog box lists the digit collection actions that have been
defined already for this trunk.
3. Type the number of milliseconds that you want Strata CS to wait for the
analog DID interface device to send digits.
4. Click
Add to add an action to collect the digits that you expect, or Edit
to modify the highlighted action.
5-12 STRATA CS ADMINISTRATOR MANUAL
BETA DOCUMENT - PRELIMINARY & CONFIDENTIAL
Page 73

5. In the Modify Action dialog box, select the Digit type to retrieve. You
can retrieve DID, ANI, or filler digits.
n To retrieve fixed-format data, click Exactly __ digits, and then type
the number of digits to collect.
n To retrieve variable-format data in which each piece of information
may vary in length, and filler digits are used as separators, click
Variable up to the first ___ digit, and then type the separa tor
character.
6. Click
7. Repeat steps 4-6 to add all the actions required to collect digits coming
8. Click
After analog digit collection has been configured correctly, make sure that the
trunk is configured to accept inbound calls and retrieve DID digits. Both these
settings appear in the Trunks view and can be configured in the Trunks dialog
box.
OK.
in on the trunk.
OK.
Adding a digital Robbed Bit T1 span ______________________
This section explains how to add a digital Robbed Bit T1 span by configuring
signalling and adding the span to Strata CS in the Trunks view.
Configuring signaling using the Robbed Bit T1 Experimenter
Before you add a Robbed Bit T1 span in t he Administrato r, you must run the
Strata CS Robbed Bit T1 Experimenter on the Strata CS Server computer to
configure signaling on the T1 trunk. For information about installing and using
the Experimenter, see Strata CS Installation & Maintenance Manual.
Adding the Robbed Bit T1 span in the T runks vie w
After you configure signaling on the span correctly using the Robbed Bit T1
Experimenter, you can add the span in the Administrator.
CHAPTER 5. MANAGING TRUNKS AND SPANS 5-13
BETA DOCUMENT - PRELIMINARY & CONFIDENTIAL
Page 74

1. Choose Trunks > New Trunk > Robbed Bit T1 Span. A new Robbed
Bit T1 Span dialog box opens.
2. On the General tab, specify the following information for the span:
n Span number. The sequence number of this Dialogic T1 board as
installed in your Strata CS Server computer (the sequence number of
the first T1 board is 1, not 0).
n Starting trunk number. The starting trunk number of the span. T he
numbers of the 2 4 trunks belo nging to thi s span are disp layed. If yo ur
system also has analog trunks, the analog trunks must have the lower
trunk numbers, so if you have not added them yet, leave roo m for
them in your numbering of the span.
n Wink duration. The length in milliseconds of the signal Strata CS
sends to your T1 carrier to indicate that it is ready to receive digits.
You can also set the wink duration using the Robbed Bit T1
Experimenter.
n Send and rece ive. For T1 lines with ANI or DID/DNIS service only,
the signaling type—DTMF or MF—used for inbound digit
collection. You can also set this in the Robbed Bit T1 Experimenter.
n Description. A description of the span, typically including the main
phone number of the span.
3. On the Signaling tab, review the event definitions for your T1 trunk that
you specified using the Robbed Bit T1 Experimenter. The definit ions
must match your carrie r’s definitions for the trunk to work. To change
a definition, use the Robbed Bit T1 Experimenter (see “Configuring
signaling using the Robbed Bit T1 Experimenter” on page 5-13).
5-14 STRATA CS ADMINISTRATOR MANUAL
BETA DOCUMENT - PRELIMINARY & CONFIDENTIAL
Page 75

Note: If you are running the Administrator on the S er ver , clic k Edit to
start the Experimenter. Otherwise, you must run the Experimenter on the
Strata CS Server.
4. On the Trunks tab, set the default values for the 24 trunks that will be
created in this span. You can then change these values for each trunk
individually. See “Entering trunk defaults for a span” below.
5. Click
OK to add the span to your configuration.
Using a signaling template
The Robbed Bit T1 Experimenter includes templates that contain Robbed Bit T1
signaling definitions that will be valid in many cases:
n E&MSignaling. Use if your Robbed Bit T1 line supports E&M
signaling.
n Local1. Use for a local Robbed Bit T1 line.
n Longdistance. Use for a long-distance Robbed Bit T1 line.
To apply a template to a span, click
the template to apply, click
Apply Template on the Signaling tab . Sel ect
Open, and then click OK.
Note: If you have installed the Robbed Bit T1 Exper i m enter to a directory other
than the
Strata CS Administrator’s directory, you must look for the template there.
CHAPTER 5. MANAGING TRUNKS AND SPANS 5-15
BETA DOCUMENT - PRELIMINARY & CONFIDENTIAL
Page 76

To edit signaling definitions applied from a template, use the Robbed Bit T1
Experimenter.
Entering trunk defaults for a span
When you create a new digital span, you can set the defaults for all the trunks in
the span on the Trunks tab.
To enter trunk defaults for a span
1. Check
2. In
Accept inbound calls if the trunk is used for inbound calls.
Calls are sent to, select the auto attendant, user or IVR Plug-in that
answers all inbound voice calls on this trunk.
In
Faxes are sent to. Select the auto attendant, user or IVR Plug-in that
answers all inbound fax calls on this trunk. See “Setting up fax routing”
on page 5-7 for more info rmation.
3. Check
Allow outbound calls if the trunk is used for outbound calls.
Registered for least cost routing is not available in this version.
After you add the span, the Trunks tab is disabled. To modify the settings for an
individual trunk af te r the spa n has bee n add ed, e dit t he trunk in the Trunks view.
5-16 STRATA CS ADMINISTRATOR MANUAL
BETA DOCUMENT - PRELIMINARY & CONFIDENTIAL
Page 77

Adding a digital ISDN or CAS span _______________________
Use the followi ng proc edu re to add an ISDN T1, IS DN E1 , or CAS E1 tr unk. T o
add ISDN Basic Rate Interface (BRI) trunks, see “Adding a digital ISDN BRI
span” on page 5-18.
1. Choose
Trunks > New Trunk > ISDN/CAS T1/E1 Span. A new
ISDN/CAS T1/E1 Span dial og box op en s.
2. On the General tab, specify the following information for the span:
n Board number. The sequence number of the span.
n Description. A description of the span, typically including the main
phone number of the span.
n Protocol type. Select whether the trunk is an ISDN T1 or an E1 type.
The actual protocol used is determined when the Dialogic drivers are
installed, as described in Strata CS Installation & Maintenance
Manual.
If you are using an E1 board w ith the CAS protocol, and your
Note:
country’s E1 CAS protocols are different from the standard format, see
“Manually entering E1 CAS protocols” in Strata CS Installation &
Maintenance Manual.
n Starting trunk number. The starting trunk number of the span. T he
numbers of the trunks that belong to this span are displayed. If your
system also has analog trunks, the analog trunks must have the lower
CHAPTER 5. MANAGING TRUNKS AND SPANS 5-17
BETA DOCUMENT - PRELIMINARY & CONFIDENTIAL
Page 78

trunk numbers, so if you have not added them yet, leave roo m for
them in your numbering of the span.
3. On the Tuning tab, optimize your ISDN settings as needed. See
“Optimizing your ISDN settings” on page 5-19.
4. On the Trunks tab, set the default values for the 24 trunks that will be
created in this span. You can then change these values for each trunk
individually. See “Entering trunk defaults for a span” on page 5-16.
5. Click
Note:
ANI/DNIS is automatically retrieved by Strata CS for these types of digital
trunks.
OK to add the span to your configuration.
Adding a digital ISDN BRI span __________________________
Use the following procedure to add a new ISDN Basic Rate Interface (BRI) span.
To add Primary Rate Interface (PRI) spans, see “Adding a digital ISDN or CAS
span” on page 5-17.
1. Choose
Trunks > New Trunk > ISDN BRI Span. A new ISDN BRI Span
dialog box opens
2. On the General tab, specify the following information for the span:
n BRI board number. The sequen ce number of the span.
5-18 STRATA CS ADMINISTRATOR MANUAL
BETA DOCUMENT - PRELIMINARY & CONFIDENTIAL
Page 79

n Description. A description of the span, typically including the main
phone number of the span.
n Number of channels. The number of trunks supplied by your
Dialogic BRI board. If you are using a BRI/80-SC board, select
8. If
you are using a BRI/160-SC board, select 16.
n Protocol. The protocol of your BRI span, as given to you by your
BRI supplier.
n Starting trunk number. The starting trunk number of the span. T he
numbers of the trunks belonging to this span are displayed. If your
system also has analog trunks, the analog trunks must have the lower
trunk numbers, so if you have not added them yet, leave roo m for
them in your numbering of the span.
n Server Protocol Identifier Number (SPID). A unique number
assigned to each trunk in the BRI span. Enter the SPID numbers
supplied to you by your BRI supplier . SPID numbers a re required fo r
North American BRI installations only. If your BRI board is the
Dialogic BRI/2VFD, you do not need to enter SPID numbers.
3. On the Tuning tab, optimize your ISDN settings as needed. See the next
section, “Optimizing your ISDN settings.”
4. On the Trunks tab, set the default values for the 24 trunks that will be
created in this span. You can then change these values for each trunk
individually. See “Entering trunk defaults for a span” on page 5-16.
5. Click
OK to add the span to your configuration.
Optimizing your ISDN settings ___________________________
When you are adding an ISDN trunk, you can use the Tuning tab to change ISDN
board parameters. Changes you make while a call is in progress on the board are
not reflected until the current call ends and a new call begins.
To set your ISDN parameters
1. Run the Dialogic Makecall Utility (DMU), supplied on the Strata CS
CD. For instructions, see Strata CS Installation & Maintenance
Manual. The DMU wizard steps you through the process of testing your
ISDN board, and generates a file in the Output subdirectory called
Outbound_MCB.txt.
CHAPTER 5. MANAGING TRUNKS AND SPANS 5-19
BETA DOCUMENT - PRELIMINARY & CONFIDENTIAL
Page 80

2. On the Tuning tab, click Import and select the
This method updates all ISDN parameters based on their optimum value as
determined by the DMU. To undo the update, click
Tuning tab to its initial values.
Outbound_MCB.txt
Restore Def ault s to reset the
file.
You can also change each parameter individually. Click
each parameter and its possible values.
Help for a description of
Enabling ISDN Megacom support ________________________
If you are using ISDN Megacom service, you must change the Strata CS Server
computer’s registry in order to make outbound international calls. Without this
change, international calls will fail, because Strata CS does not provide the
parameter indicating national or international calls that ISDN Megacom service
requires.
For instructions on changing the registry for ISDN Megacom calls, see “ISDN
Megacom service settings” on page A-24.
5-20 STRATA CS ADMINISTRATOR MANUAL
BETA DOCUMENT - PRELIMINARY & CONFIDENTIAL
Page 81

Adding an Internet span ________________________________
1. Choose Trunks > New Trunk > Internet Span. A new Internet Span
dialog box opens.
2. On the General tab, specify the following information for the span:
n IP Board number. The sequence number of this Dialogic DM3
IPLink board as installed in your Strata CS Server computer (the
sequence number of the first DM3 board is 1, not 0).
n IP Address. The IP address of the IP Link board if it has its own
built-in Network Interface Card (NIC), otherwise the IP address of
the Strata CS Server computer’s NIC.
n Description. A description of the span. Include the address of the
span in the description for easy reference.
n Number of trunks. The numbe r of trunks contained in the span.
Enter the number of channels available on the Dialogic DM3 IPLink
board. To find the number of channels available on your board, refer
to the model number of the board and Strata CS Installation &
Maintenance Manual.
n Starting trunk number. The starting trunk number of the span. T he
numbers of the trunks belonging to this span are displayed. If your
system also has analog trunks, the analog trunks must have the lower
trunk numbers, so if you have not added them yet, leave roo m for
them in your numbering of the span.
CHAPTER 5. MANAGING TRUNKS AND SPANS 5-21
BETA DOCUMENT - PRELIMINARY & CONFIDENTIAL
Page 82

n Send inbound calls to. Select the auto attendant, user or IVR
Plug-in that answers all inbound voice calls on the trunks in this span.
3. Click the Trunks tab to specify how trunks in this span are used:
n Accept inbound calls. If checked, the trunks are used for inbound
calls.
n Allow outbound calls. If checked, the trunks are used for outbound
calls.
4. Click the Codecs tab to view the default codecs used by this span for all
inbound calls and as dialing service defaults for outbound calls. If you
must change Strata CS’s default codec list, see the next section,
“Modifying Strata CS IP codecs.”
You can override the default span codecs when you set up a
Note:
dialing service that all ocates trunks i n t his span (see “Codecs tab” on
page 8-21).
5. Click OK to add the span to your configuration.
Modifying Strata CS IP codecs
A codec is a protocol used to compress and decompress voice signals for
transmission over an IP network. When an IP call is established between two
devices, the devices automatically choose which codec to use. This choice is
based on whether the codec is available to both devices and how highly the codec
is preferred by both. This ta b l ets you make code c s a va i la b l e t o y ou r device, and
arrange them in order of preference, with the topmost codec being the most
preferred. For example, you may prefer one codec over another for bandwidth
reasons.
Important:
connection, the Servers must use the same codec lists, otherwise audio failure can
occur during calls. See “Connecting two Servers using IP Gateways” on page 13-7
for more information about IP Gateway connections.
When you are connecting two Strata CS Servers over an IP Gateway
The codecs you can make available are listed below. See the Known Issues in the
Administrator online Help for up-to-date information about the availability of
codecs.
n G.729a. Best for Strata CS-to-Strata CS connections. Offers a good
balance between sound quality and bandwidth. (8.8 kbs.)
n G.711 a-law, G.711 µ-law. Supported by all H.32 3 gateways and
terminals, but high bandwidt h. (64 kbs.)
n G.723.1. Best for NetM eetin g and ot her H. 323 te rmi nals. (5.3 kbs . or 6.3
kbs.)
n MSGSM. (13.0 kbs.)
5-22 STRATA CS ADMINISTRATOR MANUAL
BETA DOCUMENT - PRELIMINARY & CONFIDENTIAL
Page 83

n GSM. (13.0 kbs.)
To modify Strata CS IP codecs
1. In the Trunks view, double-click the Internet span to open its dialog box,
and then click the Codecs tab.
2. If necessary, click
Edit to change any of the parameters used with the codec.
Add to add another codec, or select a codec and click
3. In the Add Codec dialog box, select a
Codec name from the list of
codecs supported by the Dialogic IPLink boards in the drop-down list.
4. If you want to modify any of the parameters used with the codec, enter
the new values. The fields you can change may vary depending on the
codec you select. If enabled for a particular parameter, select
Any to
accept whatever parameter value the other device sends.
n Frame size. Frame buffer size, in milliseconds. A larger frame size
means more latency (time delay).
n Frames per packet. Number of frames in a packet.
n Bit rate. Rate at which data is transmitted over the network.
n Transmit audio only when voice is detected. If checked, only
actual voice audio signal is digitized for transmission, not silence.
5. Click
OK to add the codec.
6. Click the up or down arrows to promote or demote a specific codec
within the list. The topmost codec is the most preferred. Continue to add
codecs to the service.
7. Click
OK to return to the Codecs tab.
CHAPTER 5. MANAGING TRUNKS AND SPANS 5-23
BETA DOCUMENT - PRELIMINARY & CONFIDENTIAL
Page 84

Fine-tuning your IP connection
Strata CS’s IP Span dia log box includes a T un ing tab that you u se to change any
of the IPLink board parameters between IP calls. Changes you make while a call
is in progress on the board are not reflected until the call completes and a new call
is initiated.
Parameters are listed in the following groups:
n General
n Debug print levels
n DTMF parameters
n Echo canceler
n Level controls
n Miscellaneous
n Packet loss recovery
n Redundancy
Parameters that may be useful to change include echo cancellation and volume
(located under Level Controls).
To change an IPLink board parameter
1. In the Trunks view, double-click the Internet span to open its dialog box,
and then click the Tunings tab.
2. Click a
Parameter to expand it.
5-24 STRATA CS ADMINISTRATOR MANUAL
BETA DOCUMENT - PRELIMINARY & CONFIDENTIAL
Page 85

3. Enter the new Value. Some fie lds are text boxe s or drop-down lists.
Other fields enable the slider bar at the bottom of the dialog box.
4. Click
OK to save your changes. Click Restore def aults to restore the
IPLink board defa ult s.
Note:
If you dial out on an IP-to-Ph one Number service and yo u can not send
digits to external phone systems, increase DTMF Gain and DTMF On-time, under
DTMF Parameters on this tab.
CHAPTER 5. MANAGING TRUNKS AND SPANS 5-25
BETA DOCUMENT - PRELIMINARY & CONFIDENTIAL
Page 86

Page 87

CHAPTER 6
CHAPTER 6
MANAGING USERS AND STATIONS
CHAPTER CONTENTS
The Users view. . . . . . . . . . . . . . . . . . . . . . . . . . . . . . . . . . . . . . . . 6-2
About users and roles. . . . . . . . . . . . . . . . . . . . . . . . . . . . . . . . . . . 6-4
Setting user options . . . . . . . . . . . . . . . . . . . . . . . . . . . . . . . . . . . . 6-6
About adding a user . . . . . . . . . . . . . . . . . . . . . . . . . . . . . . . . . . . . 6-7
The General tab . . . . . . . . . . . . . . . . . . . . . . . . . . . . . . . . . . . . . . . 6-9
The Recordings tab . . . . . . . . . . . . . . . . . . . . . . . . . . . . . . . . . . . 6-15
The Notifications tab. . . . . . . . . . . . . . . . . . . . . . . . . . . . . . . . . . . 6-17
The Call Handling tab. . . . . . . . . . . . . . . . . . . . . . . . . . . . . . . . . . 6-24
The Phone tab . . . . . . . . . . . . . . . . . . . . . . . . . . . . . . . . . . . . . . . 6-28
The Dialing tab . . . . . . . . . . . . . . . . . . . . . . . . . . . . . . . . . . . . . . . 6-33
The Permissions tab. . . . . . . . . . . . . . . . . . . . . . . . . . . . . . . . . . . 6-37
The Other tab . . . . . . . . . . . . . . . . . . . . . . . . . . . . . . . . . . . . . . . . 6-40
Managing users . . . . . . . . . . . . . . . . . . . . . . . . . . . . . . . . . . . . . . 6-41
Managing stations . . . . . . . . . . . . . . . . . . . . . . . . . . . . . . . . . . . . 6-43
BETA DOCUMENT - PRELIMINARY & CONFIDENTIAL
Page 88

The Users view________________________________________
The Users view presents information about individual users and roles in your
organization. Roles appear in bold in the Users view. Roles are collections of
specific permissions that are used to grant permissions to users. You can grant
additional permissions to users by changing that user’s permissions (see “The
Permissions tab” on page 6-37).
To add, edit, or delete Strata CS users, click the Users button in the view bar The
Users view opens. Double-click a user in the view to open the User dialog box for
that user.
Each user that you add appears as a row in the Users view. The following table
shows the information that is displayed for each user.
Column Description
Name Logged-on user’s name.
Extension Extension number dialed to reach the user.
DID Direct inward dial number used to dial the
user directly.
Station Default station (phone device) assigned to
the user.
6-2 STRATA CS ADMINISTRATOR MANUAL
BETA DOCUMENT - PRELIMINARY & CONFIDENTIAL
Page 89

Column Description
Type The type of user:
User. An individual with an extension on this
Server. Can also be a conference room.
ACD workgroup. An automatic call
distribution workgroup user.
IP Gateway. A user created to enable IP calls
to a user on a remote Server.
Title The job title entered for this user. You can
enter titles for users when you create them.
Mail Usage Percentage of allocated voice mail space
currently used. For details on how the
information in this and the following two
columns is calculated, see “Updating users’
mail, greeting, and disk usage totals” on
page 6-42.
Greeting Usage Percentage of allocated greeting and voice
title space currently consumed by the user.
Disk Usage Amount of disk space in megabytes
consumed by the user's voice message,
greeting, and voice title files.
Mailbox Size Total space allocated to the user for voice
messages, in minutes.
Greeting Size T otal space allocated to the user for greetings
and voice titles, in minutes.
Forwarding To Number to which the user is currently
forwarding calls.
Listed If checked, the user is listed in the
dial-by-name directory.
Voice Title If checked, the user has a recorded voice
title. You can record titles for users or they
can record their own.
Announce Callers If checked, the caller's name is announced
on incoming calls.
Exchange Sync If checked, Strata CS and Microsoft
Exchange inboxes are synchronized.
Comments Comments added about the user.
CHAPTER 6. MANAGING USERS AND STATIONS 6-3
BETA DOCUMENT - PRELIMINARY & CONFIDENTIAL
Page 90

About users and role s______________ ____________ ________
Unlike a traditional PBX, Strata CS manages phone traffic by user rather than by
device. Adding a user allows that person to make and receive calls through the
Strata CS system. Roles are collections of permissions that you assign to users.
You can add a user to an existing role and grant them the same permissions as
every member who also has that role, and you can create new roles.
Users
Users in Strata CS are of the following types:
n User. A person using a telephone in your office.
n ACD workgroup. This special type of user sends callers to one or more
automatic call distribution groups. To create an ACD workgroup, select
ACD workgroup under Type. For more about setting up ACD
workgroups, see the Strata CS Call Center Administrator Guide.
n IP Gateway. This special type of user represents a user on a remote
Strata CS Server that is linked to your Server by an IP Gateway
connection over the Interne t or other IP networ k. With IP Gat eway us ers,
the users on both Servers appear to be local, effectively creating a single
large Strata CS site. To create an IP Gateway user, select
under Type. For more information, see “Connecting two Servers using IP
Gateways” on page 13-7.
The Admin and Operat or users
Strata CS comes with two default Users already defined, Admin and Operator.
IP Gateway
n Admin user. Allowed to run the Administrator and Device Monitor
program and to perform al l administra tive funct ions. You can not delete or
rename the Admin user, nor can you remove the Admin user’s
administrative permissions.
n Operator. The user to whom all calls go to by default if they cannot be
handled in any other way. For example, if a caller presses
0, or a user’s
mailbox cannot be found, the call is sent to the extension assigned to the
Operator. You cannot delete or rename the Operator, but you can remove
the Operator user’s Operator permissions.
You can assign Ad minis tra tor a nd O pera tor pe rmis si ons to o the r user s (s ee “The
Permissions tab” on page 6-37).
Configuring a system without an Operator
If you choose not to have a person act as an Operator in your system, the Operator
extension still receives calls whenever callers press
6-4 STRATA CS ADMINISTRATOR MANUAL
BETA DOCUMENT - PRELIMINARY & CONFIDENTIAL
0 from within the system.
Page 91

Even if the Operator extension has no station associated with it, voice messages
left by callers are saved in the Operator user’s mailbox.
If you do not want this to happen, edit the Operator user’s Standard routing list so
that its only action transfers calls to another extension. For instructions on editing
routing lists, see Strata CS Client User Guide.
Understanding personal Operators
The Strata CS system has one Operator user, but each user can specify a personal
Operator. A user’s personal Operator is the extension to which callers are
transferred if the caller presses
list. By default, a user’s personal Operator is the Operator user, but users can
specify any extension as their personal Operators. See “Creating a password” on
page 6-14.
0 from within the user’s voice mailbox or routing
How callers are transferred to Operators
The following table shows to which Operator callers are transferred, depending
on their location when they press
Caller presses 0 within Caller is transferred to
Auto attendant Operator user
Dial by name directory Operator user
User’s voice mailbox Personal Operator
0.
User’s routing list Personal Operator
On hold Personal Operator
If a user does not set up a personal operator, callers are transferred to the
Note:
Operator user in all cases.
Changing the Operator’s exte nsion fr om 0
You can change the Operator’s extension to a number other than the default of 0
(for example, in order to use 0 as a dialing service access code). However, even
when the Operator’s extension is something other than 0, callers must press 0
from within the system to transfer to the Operator. For example, if a caller reaches
a user’s voice mail, and wants to transfer to the Operator instead of leaving a voice
message, the caller dials 0, even if the Operator’s extension is 111.
Setting up work group s for t he Opera tor
To make the Operator’s job easier, you can set up a separate workgroup for each
department in your system. The Operator’s Call Monitor will then display a tab
for each department, and the Operator will be able to see a list of people in a
CHAPTER 6. MANAGING USERS AND STATIONS 6-5
BETA DOCUMENT - PRELIMINARY & CONFIDENTIAL
Page 92

specific department by clicking on the appropriate tab. See Chapter 7, “Managing
Workgroups,” for details about setting up workgroups.
Roles
Roles are collections of specific permissions that are granted to users according
to the roles they perform in the organization. By default Strata CS contains two
roles—Administrators and Users. You can edit these roles as needed and you can
also create new roles (see “To create a new role” on page 6-39).
Setting user options ___________________________________
You can set user options in Strata CS in the following ways:
n Set options for all users. To set up all users with the same options,
create a template user, and then base all users on the template (see
“Adding a user by using a templa te ” on page 6-9).
n Set options for a group of users. Create a template user for each group
of users with common characteristics, and then base each user in the group
on the template.
n Set options for individual users. Follow the steps described in “Adding
a user in the User dialog box” on page 6-8.
Also, users can customize many options themselves using the Client. You
control the options that they can customize by allowing or restricting
access to specific Options dialog box tabs in the Client.
Where to set user options
User options are set in both the Strata CS Administrator and Client.
n Some options can only be set in the Administrato r. These options are
described in detail in this chapter.
n Some options are set in the Client. To edit these options from the
Administrator, click the
box. Client options are described in detail in Strata CS Client User Guide.
n Some options can be set in both places. This allows you to set up
users using standard defaults for your organization. Individual users can
then customize the settings further, or you can restrict the options that
users can customize. These options are described in this chapter and in
Strata CS Client User Guide.
6-6 STRATA CS ADMINISTRATOR MANUAL
BETA DOCUMENT - PRELIMINARY & CONFIDENTIAL
Edit All Client Settings button in the User dialog
Page 93

About adding a user ___________________________________
Adding a user to the system allows that person to make and receive calls using
Strata CS. Unlike other telephone systems, Strata CS assigns access permissions
to specific people rather than to devices. Users access the system using their own
identities regardless of the identity of the telephone device they use.
Generally, you must have a station license available for each user you create. It is
possible, however, to add a user who does not h ave a station (an actual telephone).
Such a user is commonly created for ACD workgroups, voice mail-only users, or
remote users who always have their calls forwarded outside the office. Users
without stations do not require station licenses. For more information about
license requirements, see “Entering licenses” on page 3-2.
You can add a new user in the following ways:
n At the telephone. This is a convenient way to quickly activate phones
when you are setting up a new Strata CS system. However, you must
physically go to each user’s telephone to activate it, and must still use the
Administrator to finish adding each user.
n In the User dialog box. This method allows you to set up all user options
at one time from one location.
n Using a template. You can save time and reduce typing when adding
new users in the Administrator by creating a template user with
characteristics common to all users. This template user can then be copied
and customized for each new user. You can create different template users
for various types of users who share specific properties, for example,
ACD agents, remote users, and so on.
Adding a user at the telephone
From the new user’s telephone, press *0 and follow the prompts to create the user
and assign an extension. The user is created with default information.
For example, assigning the extension 123 creates a user with a default first name
of “New”, a default last name of “User123”, and a defaul t password of “123”.
You are also prompted to record a voice title for the user or change user
preferences. You must run the Administrator at a later time to modify the default
properties to reflect the new user’s real name and password and to set additional
user properties.
This method does not wor k if the phone is already assigned to anot her
Note:
user. For a phone that has already been assigned an exte nsion, dialing
the extension and station I D .
CHAPTER 6. MANAGING USERS AND STATIONS 6-7
BETA DOCUMENT - PRELIMINARY & CONFIDENTIAL
*0
plays
Page 94

If for any reason Strata CS is unable to create the user at the telephone extension
(for example, a user with that name already exists, or there are no more Client
licenses available), you must run the Strata CS Administrator, resolve the issue,
and add the user there.
Adding a user in the User dialog box
To create a user, choose Users > New User. The tabs in the User dialog box allow
you to add and modify user properties. These properties are described later in this
chapter.
n General tab (see page 6-9). Enter basic information that defines the user
to Strata CS. Assign an extension, station ID, and DID number. Create a
password, specify a personal operator, and select a language for telephone
prompts.
You also use this tab to create a user for handling ACD agents (see Strata
CS Call Center Administrator Guide) or an IP Gateway user that allows
users to directly dial the extension of a user on a remote Strata CS Server
(see “Creating Gateway users to unify two Strata CS Servers” on
page 13-17).
n Recordings tab (see page 6-15). Allocate space for the user’s voice
messages, greetings, and voice title. Indicate where call recordings made
by this user are sent. Record a voice title. Set up Microsoft Exchange
synchronization.
n Notifications tab (see page 6-17). Set up and schedu le e -ma il and page r
notifications.
n Call Handling tab (see page 6-24). Set up call screening. Specify how
the user is listed in the dial-by-name directory. Set up call forwarding for
the user.
n Phone tab (see page 6-28). Enable features on the user’s telephone, such
as caller ID and message waiting indicator. Specify how long the phone
rings before continuing to voice-mail.
n Dialing tab (see page 6-33). Allow the user to make external calls, and
specify phone numbers the user is permitted or restricted from dialing.
n Permissions tab (see page 6-37). Control user permissions to determine
the options or features that the user can access. Set the permission roles
that the user belongs to.
n Other tab (see page 6-40). Set hands-free options.
6-8 STRATA CS ADMINISTRATOR MANUAL
BETA DOCUMENT - PRELIMINARY & CONFIDENTIAL
Page 95

Adding a user by using a template
Create a user, named, for example, “User Template” that has the settings you want
all users to share, such as mailbox size and dialing permissions. You can also set
up e-mail and pager notification options in the template, and you can enable
phone features that are applied to all users that are created using the template.
To add a new user based on the template, select the template user in the Users
view, and then choose
box, in which you can customize the new user’s properties, such as first and last
name, extension and station ID, e-mail address for notifications, and so on.
Edit > Copy. Choose Edit > Paste to open the User dialog
The General tab _______________________________________
Choose File > New > User in the Administrator, and then click the General tab.
Identifying the user
In Type, choose User. Then enter the user’s First name and Last name. At least
one of the name fields is required. You can enter the user’s
Comments (such as the user's department) that you want to be displayed along
with the user name in the User view.
It can be helpful to use the
“Sales.” When a caller requests to be transferred to someone in Sales, the
Operator can see all the users in the Sales department grouped together in the
Client’s Transfer Call dialog box.
Title field for the user’s department, for exa mple,
CHAPTER 6. MANAGING USERS AND STATIONS 6-9
BETA DOCUMENT - PRELIMINARY & CONFIDENTIAL
Title and any
Page 96

Assigning a n ext ensi on
A user’s extension is the number callers dial to reach the user. Extensions must
comply with the following restrictions:
n No longer than 5 digits
n Numeric characters only
n Must be unique
In addition, follow these recommendations when assigning extensions:
n Avoid extensions that begin with another extension or access code. For
example, if one user is given extension 17 and another extension 177,
users who dial extension 17 will experience a brief delay while Strata CS
waits to see if another “7” is dialed. See “Avoiding dialing ambiguities”
on page 8-8 for more info rmation.
n Avoid extensions that begin with frequently dialed area codes—if users
forget to dial an access code, they may unexpectedly dial the extension
instead. For example, if 1-617 is a commonly dialed prefix for your
location, do not assign extension 161.
When you create a new user, you can accept the extension suggested
automatically by Strata CS or you can assign a different one. Strata CS suggests
the next-highest extension number that has not yet been assigned, and it reuses
extensions that have been unassigned.
By default, new extensions are assigned starting with extension 100. If you want
all your extensions to start in a different range, choose
enter the
Starting extension number under User auto suggestion.
Tools > Options, and then
You can give the Operator user an extension other than the de fa ult o f 0.
Note:
See “Changing the Op er at or ’s extension from 0” on page 6-5.
6-10 STRATA CS ADMINISTRATOR MANUAL
BETA DOCUMENT - PRELIMINARY & CONFIDENTIAL
Page 97

Assigning a st at ion ID
The station assigned to a user of the type User is the numeric identifier of the
telephone at the user’s default location. A station ID is not used for users of the
ACD workgroup or IP Gateway.
type
Strata CS assumes that a user is located at the phone specified by the user’s station
ID unless someone specifies otherwise.
n Inbound calls. Calls to the user’s extension ring that station, unless the
user routes calls elsewhere by using call forwarding or a routing list.
n Outbound calls. Calls from that station appear in the Call Log as from the
user and are subject to the user’s dialing restrictions and permissions,
unless another user logs in to that station.
Outbound calls from a station are identified by Strata CS as belonging to
one of the following:
n The user logged in using the telephone commands.
n If no one is logged in using the telephone commands, the user who
last logged in using the Client.
n If no one else is logged in, the default user for that station.
When you create a new user of the type
User, you can accept the station ID
suggested automatically by Strata CS, or you can assign a different one. Strata CS
suggests the next-highest station ID that has not yet been assigned, and it reuses
station IDs that have been unassigned. By default, new station IDs are assigned
starting with station ID 1. If you want to start with a different station ID, choose
Tools > Options, and then enter the Starting station number under User auto
suggestion
.
Station ID corresponds to the interface on the MSI board to which the station is
connected. On systems with analog trunks, this number is often the same number
as that displayed on the BCP connection jack to which the phone is attached.
n If you are using analog trunks and the BCP panel, assign station ID 1 to
your operator and station IDs 2-4 to people who are assigned to answer
phones in the event of a system failure. With analog phone service, Strata
CS's Watchdog mode provides limited telephone support if power fails or
the Windows NT/2000 server goes down. In Watchdog mode, the
Dialogic hardware routes the first 4 incoming analog trunks to the first 4
stations (stati on ID s 1- 4) .
n For a user without a physical telephone (for example, a voice mail-only
user, an ACD wo rkgroup, or a use r who works permanently off-site),
assign station ID 0.
CHAPTER 6. MANAGING USERS AND STATIONS 6-11
BETA DOCUMENT - PRELIMINARY & CONFIDENTIAL
Page 98

All stations must be assigned to a user, even phones that are not associated with
an individual in the workplace, such as a conference room phone. To represent
such phones, create dummy users called “Conference Room 1,” “Mail room,” and
so forth, and assign the stations to them.
Linking users and phones
In Strata CS, the computer—not the user—is linked to the telephone. Each Client
workstation has an assigned phone, which is usually be the phone closest to it. The
station ID of the phone is specified during the Client installation and is stored in
the computer’s Windows Registry.
It is important to understand the distinction between a user’s extension and station
ID:
n Extension. The number that callers dial to reach the user, not the number
they dial to reach the telephone on the user’s desk. Because users can set
up call forwarding or routing lists to route their calls elsewhere, a call to
a user’s extension might actually ring another phone in the office, their
home phone, a cell phone, and so on.
n Station ID. The station ID represents the physical telephone jack assigned
to the user. A station ID is never dialed. The number corresponds to the
MSI board interface that the phone is plugged into. To identify a phone’s
station ID, pick up the phone and dial
*0.
6-12 STRATA CS ADMINISTRATOR MANUAL
BETA DOCUMENT - PRELIMINARY & CONFIDENTIAL
Page 99

Assigning multiple users to the s ame station. You can give multiple users
the same station ID, which means they share the same phone. Outgoing calls from
the phone are attributed in the Call Log to the user who logged on most recently.
For example, Steve and Dorothy work different shifts, but they share the same
computer and phon e. A t the be ginn ing of his sh ift , Ste ve log s on to t he Cl ient. I n
the Call Log, the
From column for calls he makes contains “Steve”. At the end of
his shift he logs off and exits the Client. Dorothy then starts work, and makes a
call using the telephone. Because she forgot to log in, this call is also identified in
the Call Log as having been placed by Steve. After Dorothy logs in, either via the
Client or the telephone commands, the station is in her name and the calls she
makes are attributed to her in the Call Log.
Logging in at a st ation other tha n the assi gned on e. A user can temporari ly
log in to someone else’s default station, either through the telephone commands
or the Client. While logged in, Strata CS treats outgoing calls as coming from the
user, and applies the user’s own dialing permissions and permissions. Calls to the
user appear in the Call Monitor. However, calls do not ring at this phone unless
the user forwarded calls to the new location or selected “Take Call” from the Call
Monitor. Calls for the default user at the location still ring there, but are not
displayed in the Call Monitor.
When the user logs off, the station reverts to its default extension. To find out the
default extension for a phone, dial
n To log off using the teleph one commands, hang up the phon e.
n To log off using the Client, exit the Client or log in as a different user.
*0.
Reconfiguring a stati on for a diffe rent phone. Each Strata CS Client is
configured to work with a specific station. For example, if you move a user’s
Client workstation to a different office with a different phone, you must change
the station ID, as described in “Assigning a station ID” on page 6-11.
Assigning a DID number
You can assign a DID number to a user from the block of numbers provided by
your telephone company or T1 provider. When Strata CS recognizes this number
as the final digits on an inbound call, the caller is automatically connected to this
user, bypassing the main auto attendant.
To assign multiple DID numbers to a user, separate each number with a comma
(,). For more information about DID, see “ANI/DID digit collection” on page 5-5.
CHAPTER 6. MANAGING USERS AND STATIONS 6-13
BETA DOCUMENT - PRELIMINARY & CONFIDENTIAL
Page 100

Creating a p ass word
Enter a numeric Password used to access the user’s voice mail, options, and to
start the Strata CS Client. The minimum password length for your system is
specified in the General tab of the System Settings dialog box. The password can
be changed either on this tab or in the Client.
Retype the new password in the
Confirmation field.
Setting up a per sonal op erator
By default, Strata CS dials the Operator user’s extension whenever a caller
presses 0 while listening to a user's greeting or leaving a message. To transfer
calls to another user instead (for example, a departmental operator, personal
assistant, or other auto attendant), select the user from the
list on the General tab. For more information about operators, see “The Admin
and Operator users” on page 6-4. A personal operator can be also be set in the
Strata CS Client.
Operator drop-down
Choosing a langu age f or tele phone pr ompt s
On the General tab, in the Telephone prompts drop-down list, select the
language that you want to be used. When the user logs in or is identified on the
telephone, Strata CS automatically switches to this language for all subsequent
system prompts for that user. The language can be also be set in the Strata CS
Client. This setting does not affect the prompts that callers hear.
Editing a user’s Client settings
A user’s Contacts, Greetings, Routing list settings, and Call rules can only be
viewed or changed in the Strata CS Client.
To edit these settings from the Administrator, click
any tab. The Client starts, automatically logged in to the user’s account without
your having to e nter the user’s password. For privacy reaso ns, the Call Monitor
and Voice Messages views are hidden. Using the Client you can view and edit any
of the user’s custom settings.
Edit All Client Settings from
The Client must be installed on the same computer as the Administrator for you
to use this feature.
6-14 STRATA CS ADMINISTRATOR MANUAL
BETA DOCUMENT - PRELIMINARY & CONFIDENTIAL
 Loading...