

Page 1
Introduction
3
Connections
15
TV Operation
DVD&VCD Operation
MP3/WMA files Operation
Others
COMBINATION
LCD TELEVISION AND DVD
VIDEO PLAYER
SD-P7000
OWNER’S MANUAL
©2004 Toshiba Corporation
Before operating the unit, please read this manual thoroughly.
20
35
43
Audio CD Operation
44
JPEG file Operation
46
47
Page 2
2
Introduction
Regulatory compliance statements
United States of America
Federal Communications Commission (FCC) Unintentional emitter per FCC Part 15
This device has been tested and found to comply with the limits for a Class B digital device, pursuant to Part
15 of the FCC rules. These limits are designed to provide reasonable protection against harmful interference
in a residential installation. This equipment generates, uses, and can radiate radio frequency energy and, if not
installed and used in accordance with the instructions, may cause harmful interference to radio or television
reception. However, there is no guarantee that interference will not occur in a particular installation. If this
equipment does cause interference to radio and television reception, which can be determined by turning the
equipment off and on, the user is encouraged to try to correct the interference by one or more of the following
measures:
v Reorient or relocate the receiving antenna
v Increase the separation between the equipment and receiver
v Connect the equipment to an outlet on a different circuit from that to which the receiver is connected
v Consult the dealer or an experienced radio/TV technician for help.
FCC declaration of conformity
This device complies with Part 15 of the FCC Rules. Operation of this device is subject to the following two
conditions: (1) this device may not cause harmful interference, and (2) this device must accept any interference
received, including interference that may cause undesired operation.
Changes or modifications not expressly approved by Toshiba could void the FCC compliance and negate your
authority to operate the product.
Canada
Industry Canada (IC) Unintentional emitter per ICES-003
This digital apparatus does not exceed the Class B limits for radio noise emissions from digital apparatus as
set out in the radio interference regulations of Industry Canada.
Le présent appareil numérique n’émet pas de bruits radioélectriques dépassant les limites applicables aux
appareils numériques de Classe B prescrites dans le règlement sur le brouillage radioélectrique édicté par
Industrie Canada.
California Law Proposition 65 Warning
WARNING
Handling the cord on this product or cords associated with accessories sold with this product, will expose
you to lead, a chemical known to the State of California to cause birth defects or other reproductive harm.
Wash hands after handling.
Vermont and Connecticut Mercury Warning
WARNING
This LCD TV/DVD Combination contains mercury. Disposal of mercury may be regulated due to
environmental considerations. For disposal or recycling information, please contact your local authorities
or the Electronic Industries Alliance: www.eiae.org.
Page 3
3
IMPORTANT SAFEGUARDS
Introduction
WARNING:
TO REDUCE THE RISK OF ELECTRIC SHOCK DO NOT REMOVE COVER (OR BACK). NO USER
SERVICEABLE PARTS INSIDE. REFER TO QUALIFIED SERVICE PERSONNEL.
The lightning flash with arrowhead symbol, within an equilateral triangle, is intended to alert the user to
the presence of uninsulated “dangerous voltage” within the product’s enclosure that may be of
sufficient magnitude to constitute a risk of electric shock to persons.
The exclamation point within an equilateral triangle is intended to alert the user to the presence of
important operating and maintenance (servicing) instructions in the literature accompanying the
appliance.
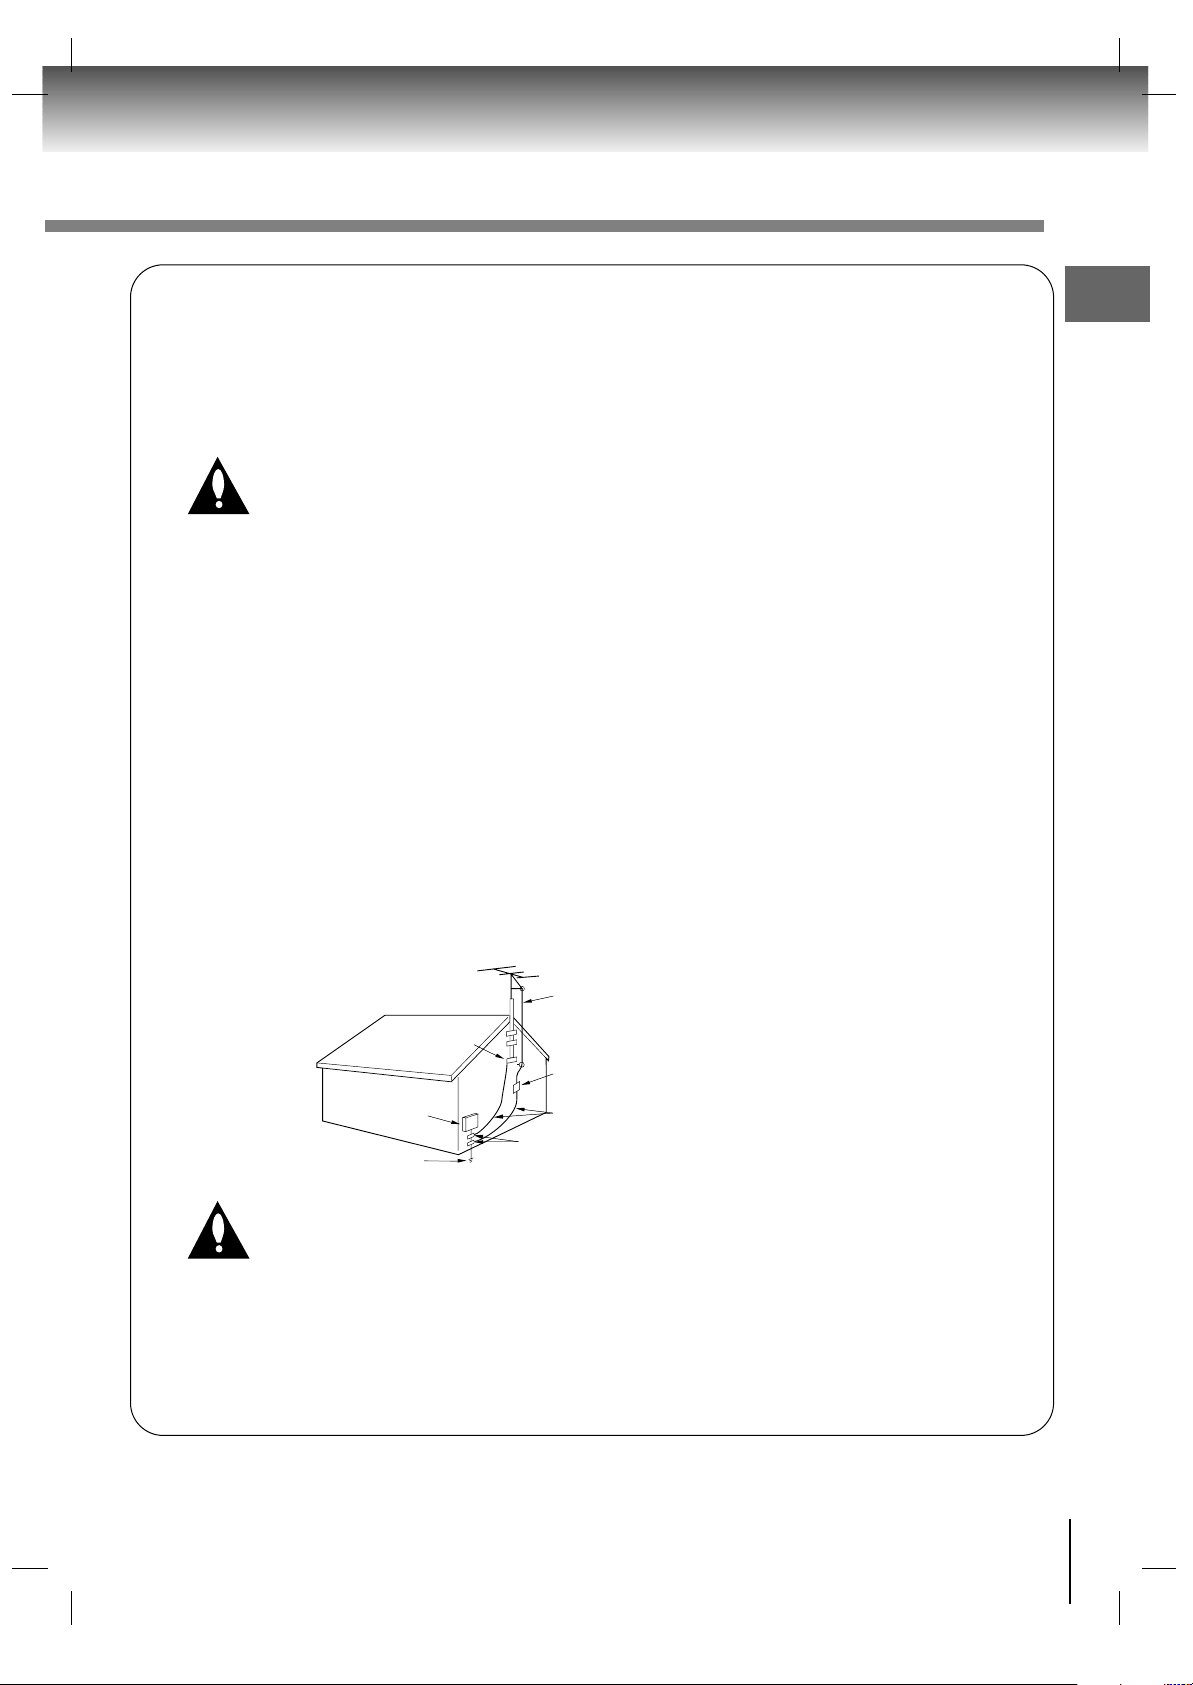
NOTE TO CABLE/TV INSTALLER:
This reminder is provided to call the CATV system installer’s attention to Article 820-40 of the National
Electric Code (U.S.A.). The code provides guidelines for proper grounding and, in particular,
specifies that the cable ground shall be connected to the grounding system of the building, as close
to the point of the cable entry as practical. For additional antenna grounding information, see items
25 and 26 on page 5.
CAUTION:
Do not attempt to modify this product in any way without written authorization from Toshiba
Corporation. Unauthorized modification could void the user’s authority to operate this product.
This LCD TV employs a Laser System.
To ensure proper use of this product, please read this owner’s manual carefully and retain for future
reference should the unit require maintenance, contact an authorized service location.
Use of controls, adjustments, or the performance of procedures other than those specified herein
may result in hazardous radiation exposure.
To prevent direct exposure to laser beam, do not try to open the enclosure. Visible laser radiation
when open. DO NOT STARE INTO BEAM.
CAUTION
RISK OF ELECTRIC SHOCK
DO NOT OPEN
Page 4
4
Introduction
(Continued)
IMPORTANT SAFEGUARDS
WARNING :
To Reduce The Risk Of Fire Or Electric Shock, Do Not Expose This Apparatus To Rain Or Moisture.
Apparatus shall not be exposed to dripping or splashing and no objects filled with liquids, such as vases, shall be
placed on the apparatus.
CAUTION :
To reduce the risk of electric shock, do not perform any servicing other than that contained in the operating
instructions unless you are qualified to do so.
Important Safety Instructions
1. Read these instructions.
2. Keep these instructions.
3. Heed all warnings.
4. Follow all instructions.
5. Do not use this apparatus near water.
6. Clean only with dry cloth.
7. Do not block any of the ventilation openings. Install in accordance with the manufacturer’s instructions.
8. Do not install near any heat sources such as radiators, heat registers, stoves, or other apparatus (including
amplifiers) that produce heat.
9. Do not defeat the safety purpose of the polarized or grounding type plug. A polarized plug has two blades
with one wider than the other. A grounding type plug has two blades and a third grounding prong. The wide
blade or the third prong is provided for your safety. When the provided plug does not fit into your outlet,
consult an electrician for replacement of the obsolete outlet.
10. Protect the power cord from being walked on or pinched particularly at plugs, convenience receptacles, and
the point where they exit from the apparatus.
11. Only use the attachments / accessories specified by the manufacturer.
12. Use only with a cart, stand, tripod, bracket, or table specified by the manufacturer, or sold with the
apparatus. When a cart is used, use caution when moving the cart / apparatus combination to avoid injury
from tip-over.
13. Unplug this apparatus during lightning storms or when unused for long periods of time.
14. Refer all servicing to qualified service personnel. Servicing is required when the apparatus has been
damaged in any way, such as power supply cord or plug is damaged, liquid has been spilled or objects
have fallen into the apparatus, the apparatus has been exposed to rain or moisture, does not operate
normally, or has been dropped.
15. CAUTION: To reduce the risk of electric shock, do not use the polarized plug with an extension cord,
receptacle, or other outlet unless the blades can be inserted completely to prevent blade exposure.
Page 5
5
Installation, Care, and Service
Installation
Follow these recommendations and precautions and heed all warnings when installing your TV:
16. Never modify this equipment. Changes or modifications may void: a) the warranty, and b) the user’s
authority to operate this equipment under the rules of the Federal Communications Commission.
17. DANGER: RISK OF SERIOUS PERSONAL INJURY, DEATH, OR EQUIPMENT DAMAGE!
Never place the TV on an unstable cart, stand, or table. The TV may fall, causing serious
personal injury, death, or serious damage to the TV.
18. Never place or store the TV in direct sunlight; hot, humid areas; areas subject to excessive dust or
vibration; or locations with temperatures at or below 41 °F (5 °C).
19. Always place the TV on the floor or a sturdy, level, stable surface that can support the weight of the unit.
20. Never place items such as vases, aquariums, or candles on top of the TV.
21. Never block or cover the slots or openings in the TV cabinet back, bottom, and sides. Never place the TV:
v on a bed, sofa, rug, or similar surface;
v too close to drapes, curtains, or walls; or
v in a confined space such as a bookcase, built-in cabinet, or any other place with poor ventilation.
The slots and openings are provided to protect the TV from overheating and to help maintain reliable
operation of the TV.
22. Never allow anything to rest on or roll over the power cord, and never place the TV where the power cord
is subject to wear or abuse.
23. Never overload wall outlets and extension cords.
24. Always operate this equipment from a 120 VAC, 60 Hz power source only.
25. Always make sure the antenna system is properly grounded to provide adequate protection against
voltage surges and built-up static charges (see Section 810 of the National Electric Code).
26. DANGER: RISK OF SERIOUS PERSONAL INJURY OR DEATH!
v Use extreme care to make sure you are never in a position where your body (or any item you
are in contact with, such as a ladder or screwdriver) can accidentally touch overhead power
lines. Never locate the antenna near overhead power lines or other electrical circuits.
v Never attempt to install any of the following during lightning activity:
a) an antenna system; or b) cables, wires, or any home theater component connected to an antenna or
phone system.
Introduction
Antenna lead-in wire
Ground clamps
Electric service
equipment
Power service grounding electrode
system (NEC Art 250 part H)
Antenna discharge unit
(NEC section 810-20)
Grounding conductors
(NEC section 810-21)
Page 6
6
Introduction
(Continued)
IMPORTANT SAFEGUARDS
Care
For better performance and safer operation of your TOSHIBA TV, follow these recommendations and precautions:
27. Always sit approximately 10 –25 feet away from the TV and as directly in front of it as possible. The
picture can appear dull if you sit too far to the left or right of the TV, or if sunlight or room lights reflect on
the screen. Turn the TV off to check for reflections on the screen, and then remove the source of reflections while viewing the TV.
28. Always unplug the TV before cleaning. Never use liquid or aerosol cleaners.
29. WARNING: RISK OF ELECTRIC SHOCK!
Never spill liquids or push objects of any kind into the TV cabinet slots.
30. For added protection of your TV from lightning and power surges, always unplug the power cord and
disconnect the antenna from the TV if you leave the TV unattended or unused for long periods of time.
31. During normal use, the TV may make occasional snapping or popping sounds. This is normal, especially
when the unit is being turned on or off. If these sounds become frequent or continuous, unplug the power
cord and contact a Toshiba Authorized Service Center.
Service
32. WARNING: RISK OF ELECTRIC SHOCK! Never attempt to service the TV yourself. Opening
and removing the covers may expose you to dangerous voltage or other hazards. Refer all
servicing to a Toshiba Authorized Service Center.
33. If you have the TV serviced:
v Ask the service technician to use only replacement parts specified by the manufacturer.
v Upon completion of service, ask the service technician to perform routine safety checks to determine that
the TV is in safe operating condition.
34. When the TV reaches the end of its useful life, ask a qualified service technician to properly dispose of the
TV. The fluorescent lamp in the LCD panel contains a small amount of mercury.
Page 7
u When shipping the unit, the original shipping carton
and packing materials come in handy. For maximum
protection, repack the unit as it was originally packed
at the factory.
u Do not use volatile liquids, such as insect spray, near
the unit. Do not leave rubber or plastic products in
contact the unit for prolonged period. They will leave
marks on the finish.
u The top and rear panels of the unit may become
warm after a long period of use. This is not a
malfunction.
u When the unit is not in use, be sure to remove any
discs and turn off the power.
u The unit may not function properly if you do not use it
for a long period of time. It is recommended that you
turn the unit on occasionally to prevent potential
problems in operation.
u Place the unit on a level surface. Do not use it on a
shaky or unstable surface such as a wobbling table or
inclined stand. The loaded disc may become disaligned and damage the unit.
u When you place this unit near a TV, radio, or VCR,
the playback picture may become poor and the sound
may be distorted. In this case, place the unit away
from the TV, radio, or VCR.
Use a soft, dry cloth for cleaning.
v Do not use any type of solvent, such as thinner and
benzine, as they may damage the surface of the unit.
v If you use a chemical saturated cloth to clean the unit,
follow that product’s instructions.
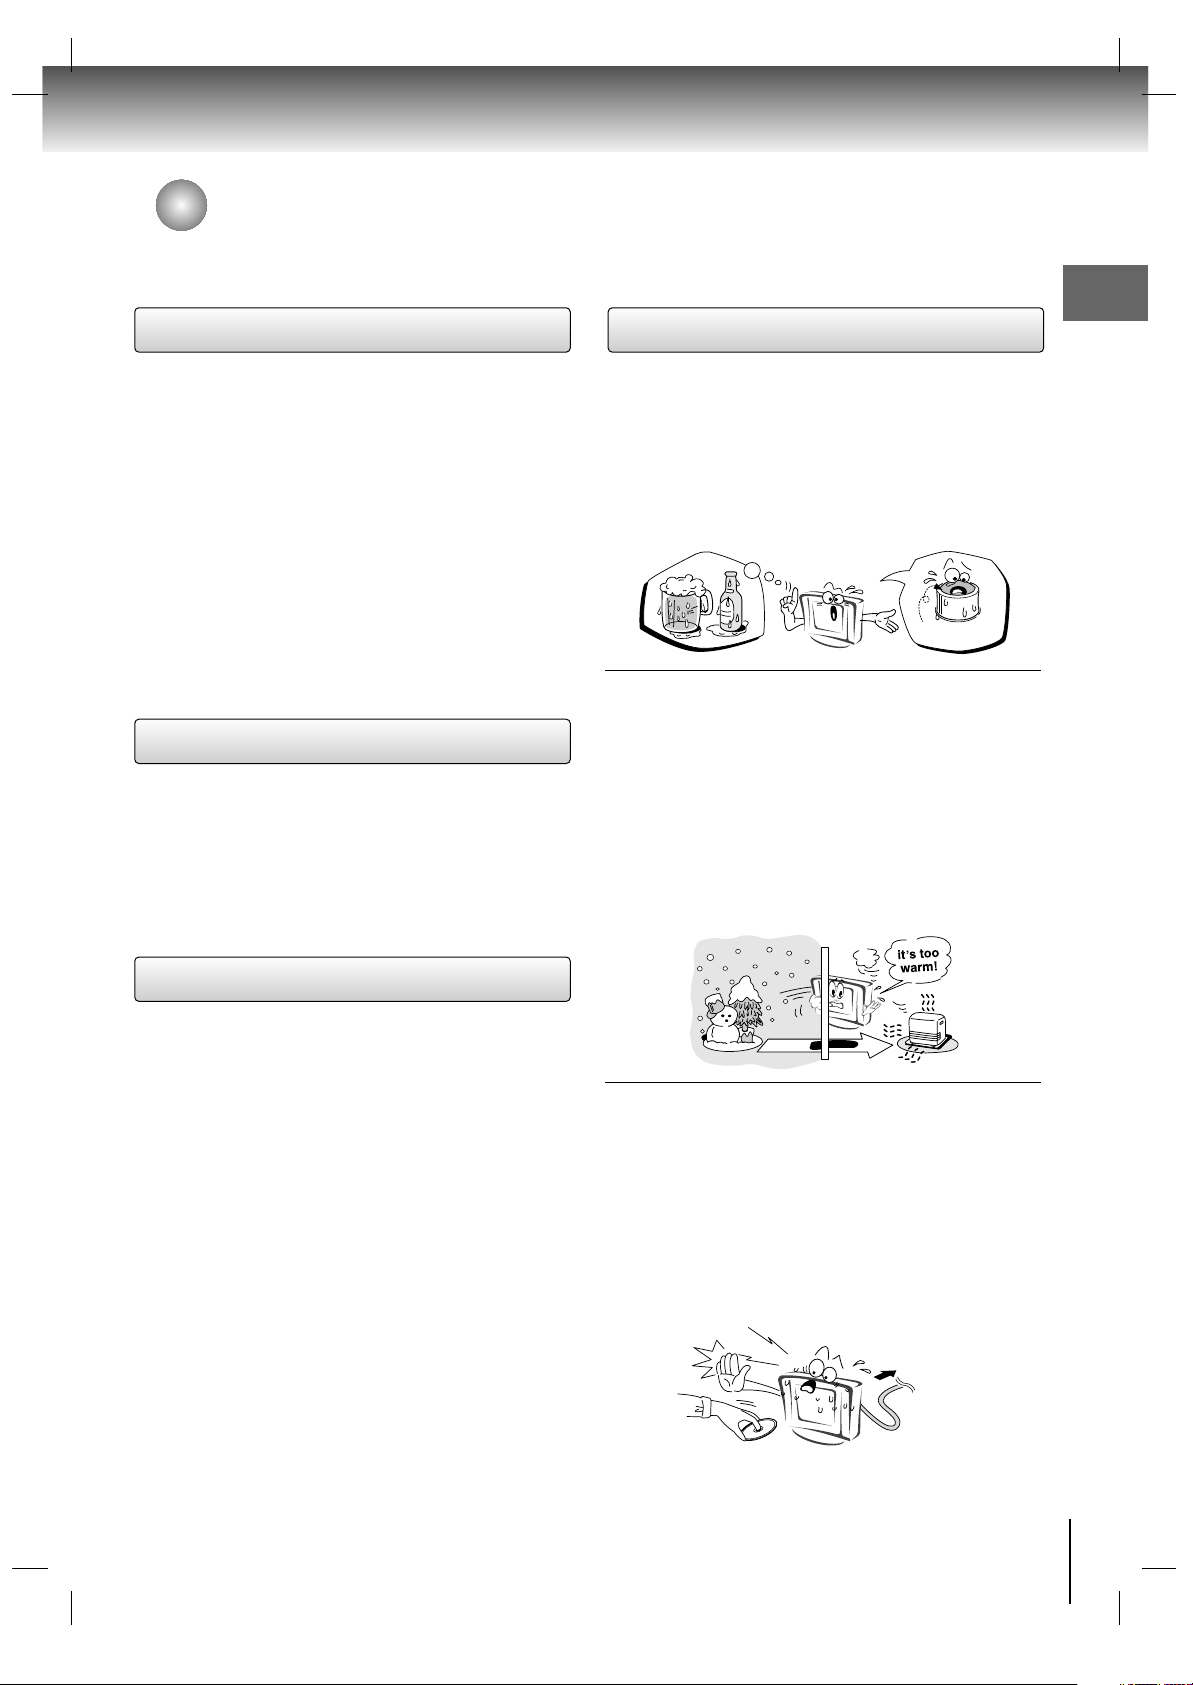
Moisture condensation damages the unit. Please
read the following carefully.
Moisture condensation occurs, for example, when you
pour a cold drink into a glass on a warm day. Drops of
water form on the outside of the glass. In the same way,
moisture may condense on the optical pick-up lens
inside this unit, one of the most crucial internal parts of
the unit.
u Moisture condensation may occur in the
following cases.
v When you bring the unit directly from a cold place to
a warm place.
v When you use the unit in a room where you just
turned on the heater, or a place where the cold wind
from the air conditioner directly hits the unit.
v In summer, when you use the unit in a hot and humid
place just after you move the unit from an air
conditioned room.
v When you use the unit in a humid place.
u Do not use the unit when moisture condensation
may occur.
If you use the unit in such a situation, it may damage
discs and internal parts. Remove the disc, connect
the power cord of the unit to the wall outlet, turn on
the unit, and leave it for two or three hours. After two
or three hours, the unit will have warmed up and
evaporated any moisture. Keep the unit connected to
the wall outlet and moisture condensation will seldom
occur.
7
Precautions
Notes on handling
Notes on cleaning
Notes on moisture condensation
E
x
a
m
p
l
e
o
f
m
o
i
s
t
u
r
e
c
o
n
d
e
n
s
a
t
i
o
n
!
Optical pick-up
lens
Wait!
Wall outlet
Introduction
Notes on locating
Page 8
8
Introduction
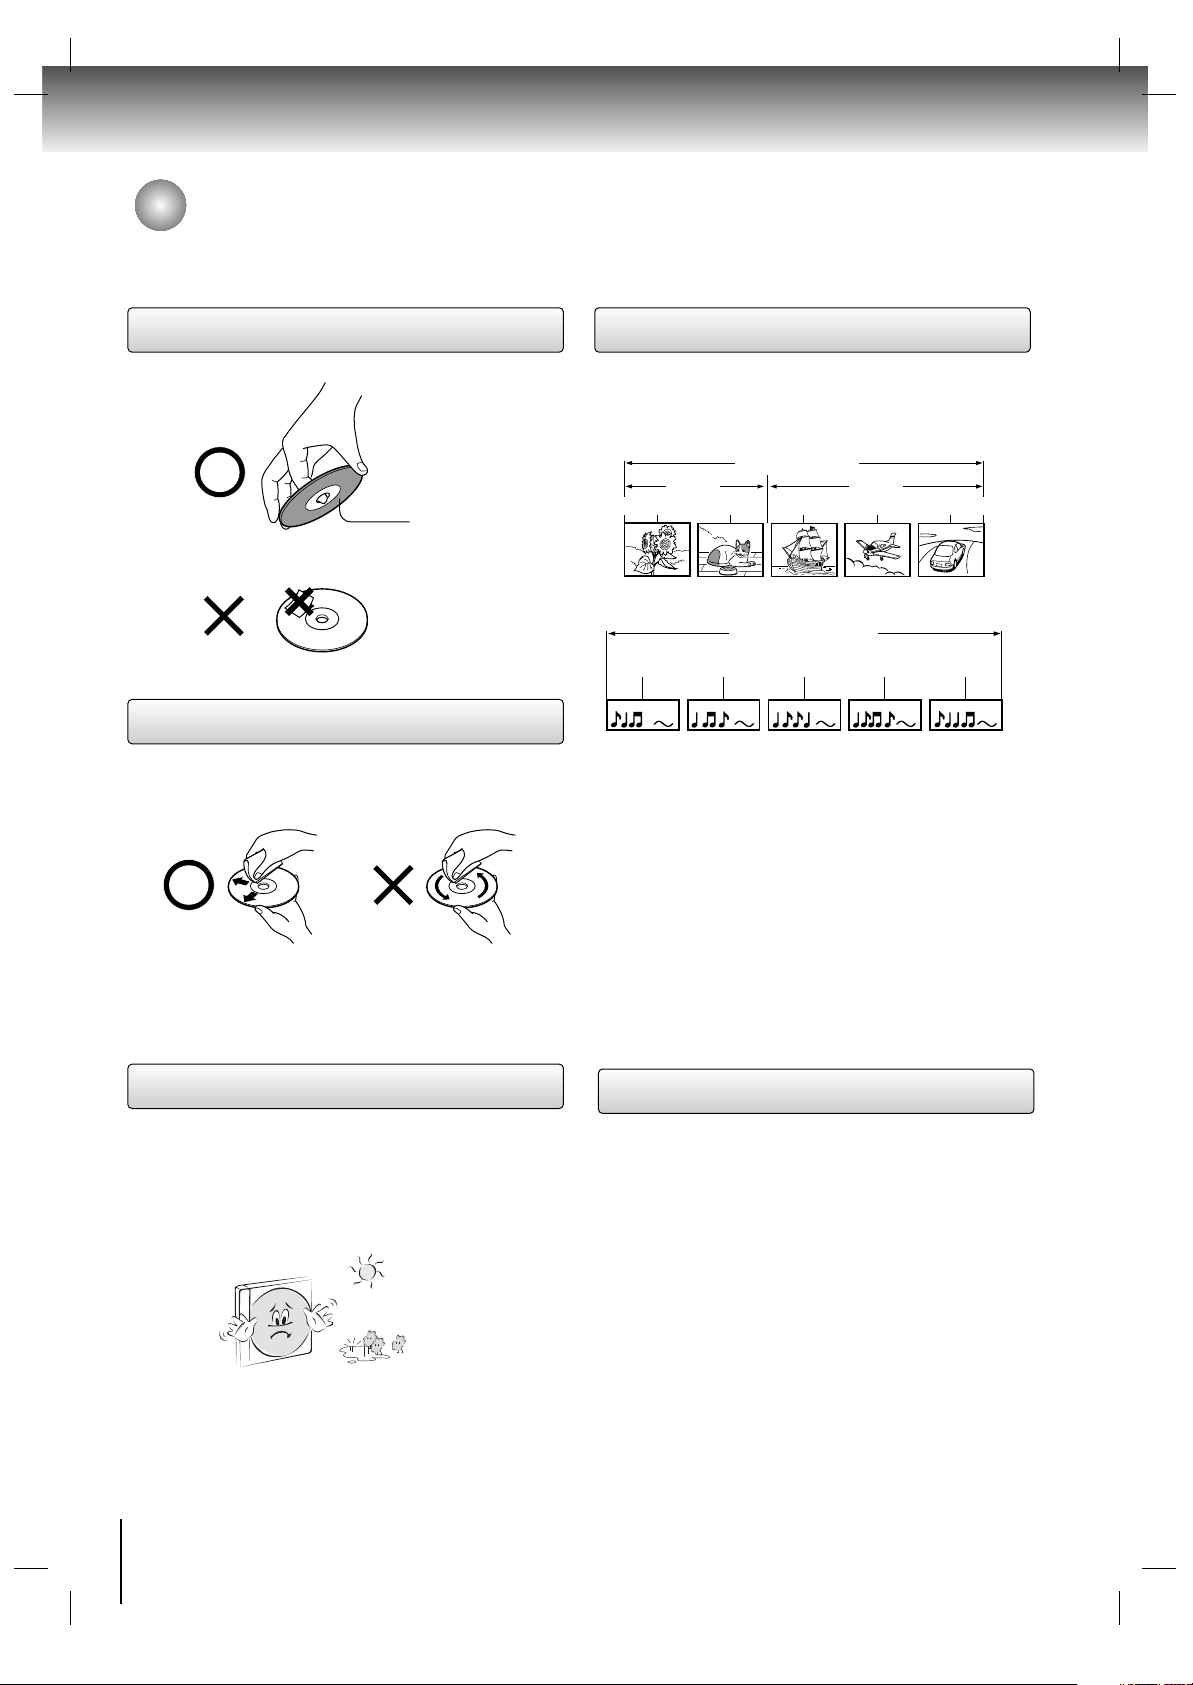
v Do not touch the playback side of the disc.
v Do not attach paper or tape to discs.
v Fingerprints and dust on the disc cause picture and
sound deterioration. Wipe the disc from the center
outwards with a soft cloth. Always keep the disc
clean.
v Do not use any type of solvent such as thinner,
benzine, commercially available cleaners or
antistatic spray for vinyl LPs. It may damage the
disc.
v Do not store discs in a place subject to direct
sunlight or near heat sources.
v Do not store discs in places subject to moisture and
dust such as a bathroom or near a humidifier.
v Store discs vertically in a case. Stacking or placing
objects on discs outside of their case may cause
warping.
Normally, DVD video discs are divided into titles, and
the titles are sub-divided into chapters. Video CDs and
Audio CDs are divided into tracks.
DVD video disc
Video CD/Audio CD
Each title, chapter or track is assigned a number, which
is called “title number”, “chapter number” or “track
number” respectively.
There may be discs that do not have these numbers.
Notes
• If an MP3 or JPEG file CD is created using an incorrect
method, the player may not be able to recognize it. If
this happens, try reburning another CD after setting up
the disc writing parameters correctly on your PC.
• Manufactured under license from Dolby Laboratories.
Dolby and the double-D symbol are trademarks of
Dolby Laboratories.
• DTS and DTS Digital Out are trademarks of Digital
Theater Systems, Inc.
On handling discs Structure of disc contents
On cleaning discs
On storing discs
DVD video disc
Video CD/Audio CD
Title 1 Title 2
Chapter 1 Chapter 2 Chapter 3 Chapter 4 Chapter 5
Track 1 Track 2 Track 3 Track 4 Track 5
Playback side
Notes on discs
Notes on copyright
It is forbidden by law to copy, broadcast, show, broadcast on
cable, play in public, and rent copyrighted material without
permission.
DVD video discs are copy protected, and any recordings
made from these discs will be distorted.
This product incorporates copyright protection technology
that is protected by method claims of certain U.S. patents
and other intellectual property rights owned by Macrovision
Corporation and other rights owners.
Use of this copyright protection technology must be
authorized by Macrovision Corporation, and is intended for
home and other limited viewing uses only unless otherwise
authorized by Macrovision Corporation. Reverse engineering
or disassembly is prohibited.
Page 9
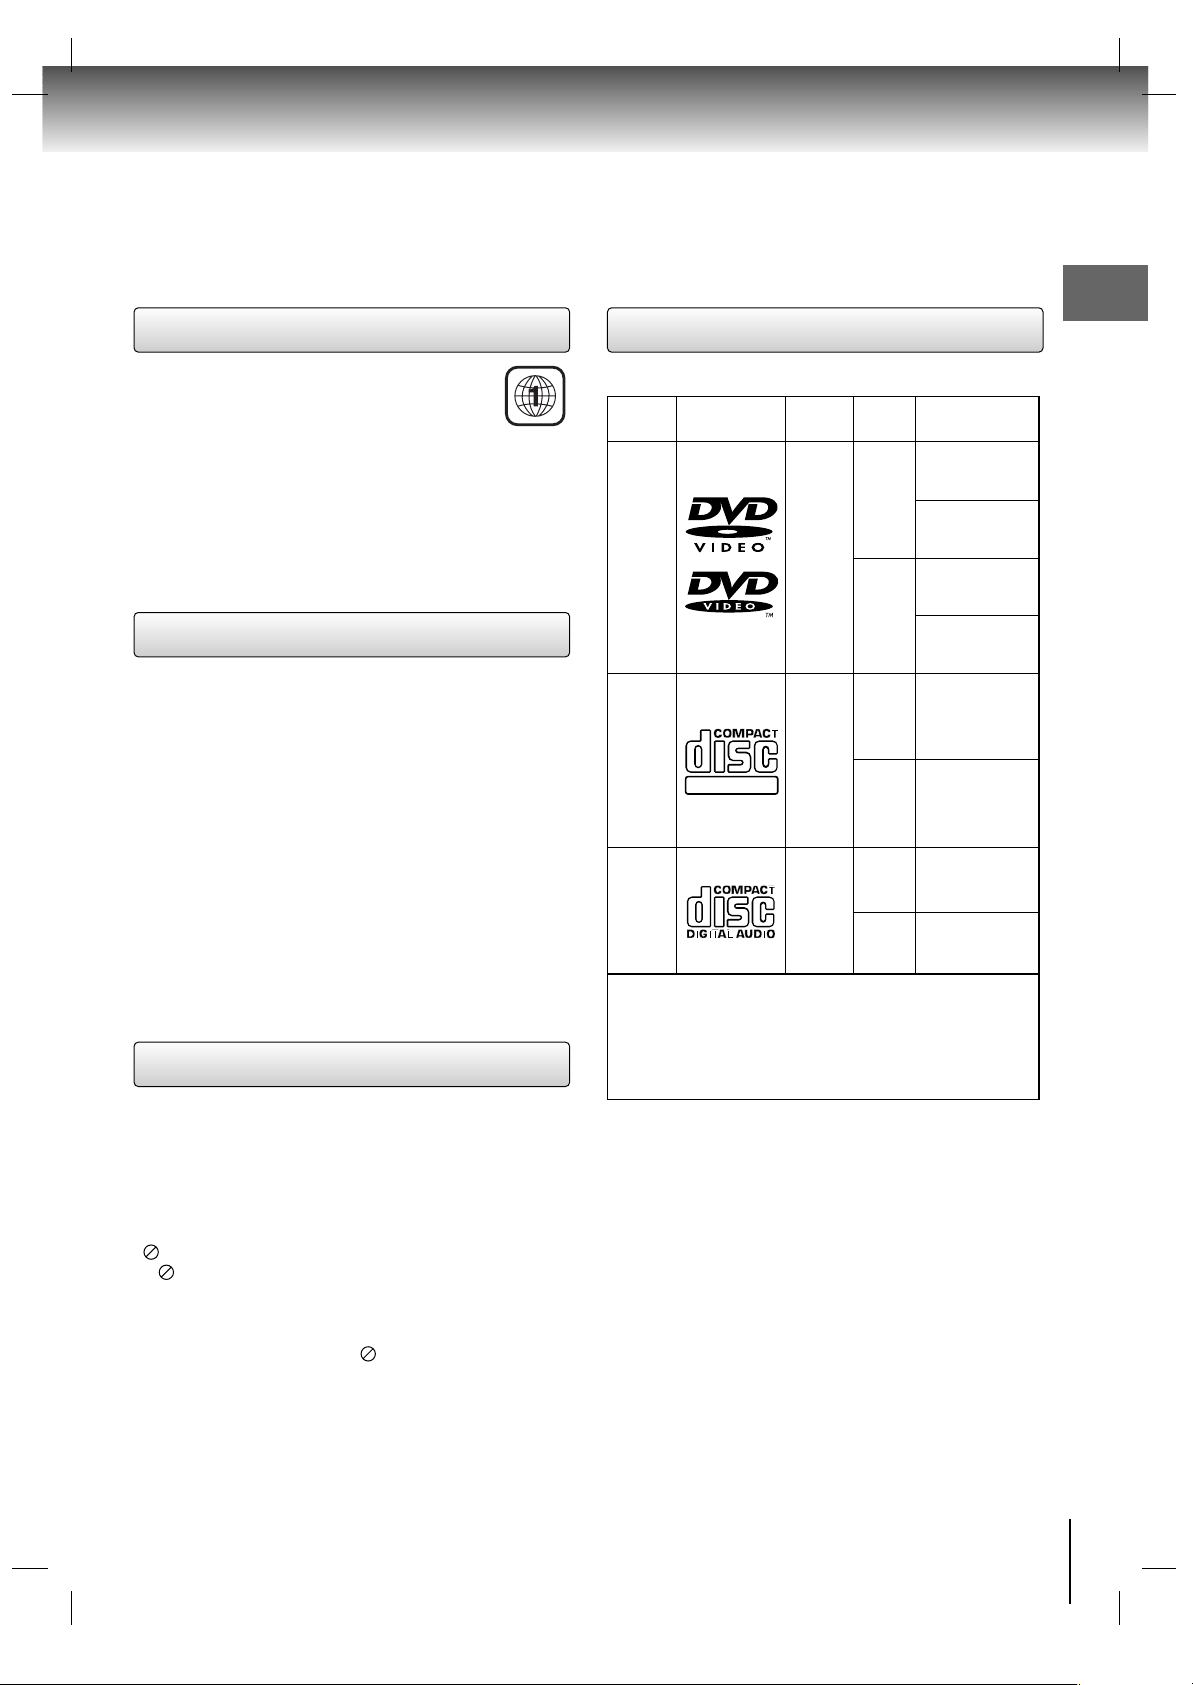
This DVD player is designed and manufactured for playback of region “1” encoded DVD
software. The region code on the labels of
some DVD discs indicates which type of player
can play those discs. This unit can play only DVD discs
labeled “1” or “ALL”. If you try to play any other discs, the
message “Check Regional Code” will appear on the TV
screen. Some DVD discs may not have a region code
label even though their playback is prohibited by area
limits.
Introduction
9
Playable discs
Notes on region numbers
On Video CDs
DIGITAL VIDEO
Disc Mark
DVD
video
discs
Video
CDs
Audio
CDs
The following discs are also available.
••
CD-R/CD-RW discs of CD-DA, Video CD, MP3, WMA
or JPEG format
••
Kodak Picture CD and FUJICOLOR CD format.
Some of these discs may be incompatible.
Audio
+
Video
(moving
pictures)
Audio
+
Video
(moving
pictures)
Audio
12 cm
8 cm
12 cm
12 cm
8 cm
(CD
single)
8 cm
Approx. 4 hours
(single sided disc)
Approx. 8 hours
(double sided disc)
Approx. 80 minutes
(single sided disc)
Approx. 160 minutes
(double sided disc)
Approx. 74 minutes
Approx. 20 minutes
Approx. 74 minutes
Approx. 20 minutes
Contents
Disc
Size
Maximum
playback time
This unit can play the following discs.
• You cannot play discs other than those listed above.
• You cannot play discs of DVD-RAM, DVD-ROM, Photo CD,
etc., or non standardized discs even if they may be labeled as
above.
• Some CD-R/RWs can not be played back depending on the
recording conditions.
• This unit uses the NTSC color system, and cannot play DVD
video discs recorded in any other color system (PAL, SECAM,
etc).
Because of problems and errors that can occur during the
creation of DVD software and/or the manufacture of DVD
discs, Toshiba America Consumer Products, Inc., and
Toshiba of Canada, Ltd. cannot guarantee that this unit will
play every feature of every DVD bearing the DVD logo.
As one of the creators of DVD technology, this unit is
manufactured to the highest standards of quality and, as a
result, such incompatibilities are very rare.
If you happen to experience and difficulty playing a DVD on
this unit, please feel free to call our Contact listed in "How to
Obtain Warranty Services" (page 51).
This DVD supports Video CDs equipped with the PBC
(Version 2.0) function. (PBC is the abbreviation of
Playback Control.) You can enjoy two playback
variations depending on types of discs.
• Video CD not equipped with PBC function
(Version 1.1)
Sound and movie can be played on this DVD in the
same way as an audio CD.
• Video CD equipped with PBC function
(Version 2.0)
In addition to operation of a Video CD not equipped
with the PBC function, you can enjoy playback of
interactive software with search function by using the
menu displayed on the TV screen (Menu Playback).
Some of the functions described in this owner’s
manual may not work with some discs.
About this owner’s manual
This owner’s manual explains the basic instructions of
this unit. Some DVD video discs are produced in a
manner that allows specific or limited operation during
playback. As such, the unit may not respond to all
operating commands. This is not a defect in the unit.
Refer to instruction notes of discs.
“ ” may appear on the TV screen during operation.
A “ ” means that the operation is not permitted by the
unit or the disc.
For example, sometimes it is unable to stop the playback
of copyright message of the disc when the STOP button
is pressed. Alternatively, the “ ” may also indicate that
the feature is not available for the disc.
Page 10

10
Contents
Introduction
IMPORTANT SAFEGUARDS.......................... 3
Precautions ..................................................... 5
Notes on discs................................................. 8
Contents .......................................................... 10
Identification of controls .................................. 11
Connections
External equipment connections ................... 15
Antenna Connection & Cable without a Cable box .......... 15
VCR Setup ..................................................................... 16
Cable TV Setup .............................................................. 16
External A/V Source Setup............................................. 17
External DVD Setup........................................................ 17
DTV Setup....................................................................... 18
Using Headphones......................................................... 18
DVD Output Setup.......................................................... 18
PC Setup......................................................................... 19
TV operation
TV operation .................................................. 20
Channel Menu Options.................................. 22
Picture Menu Options ................................... 24
Sound Menu Options .................................... 25
Time Menu Options ....................................... 27
Special Menu Options ................................... 29
PC Menu Options .......................................... 34
Antenna Connection & Cable without a Cable box
DVD&VCD operation
DVD&VCD operation ..................................... 35
DVD Menu Options ........................................ 39
MP3/WMA files Playback Options ..............43
Audio CD Playback Options ........................44
JPEG file viewing Options ........................46
Others
Troubleshooting .............................................. 47
Specifications .................................................. 49
Limited warranty ..............................................50
Page 11
Introduction
11
Identification of controls
Introduction
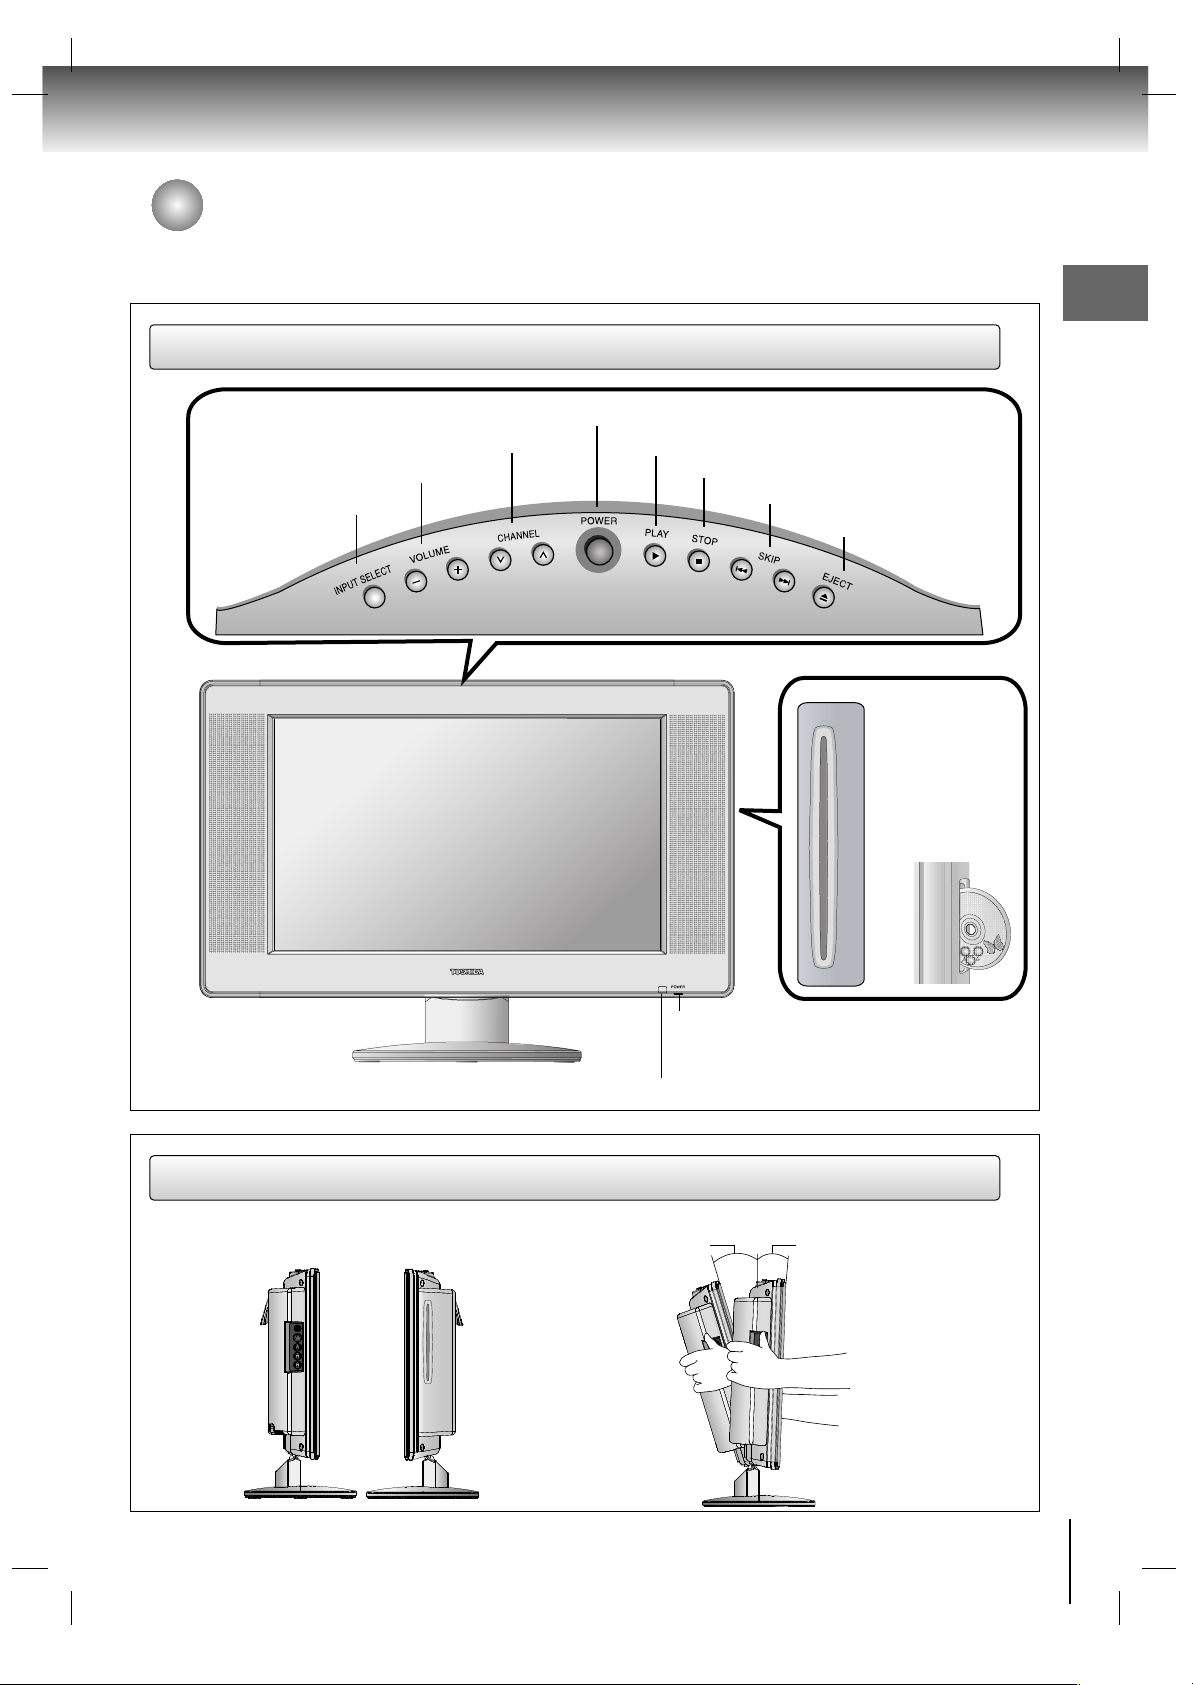
Front
Side
Remote Control Sensor
Left Side
Right Side
Adjusting the angle of the base
Power/Standby Indicator
Glows orange in Standby mode,
Glows green when the TV is turned on.
0°
Approx. 3°
You can adjust the angle of
the TV-screen by 3° forward
or by 10° backward from
vertical angle.
Approx. 10°
Disc Slot:
Place a disc in the
disc slot.
Note : Insert a disc
with the logo-printed
side facing the front.
INPUT SELECT Button
VOLUME Buttons
CHANNEL Buttons
PLAY Button
STOP Button
SKIP Buttons
EJECT Button
POWER Button
Page 12
75
ANT IN
Identification of controls (Continued)
12
Introduction
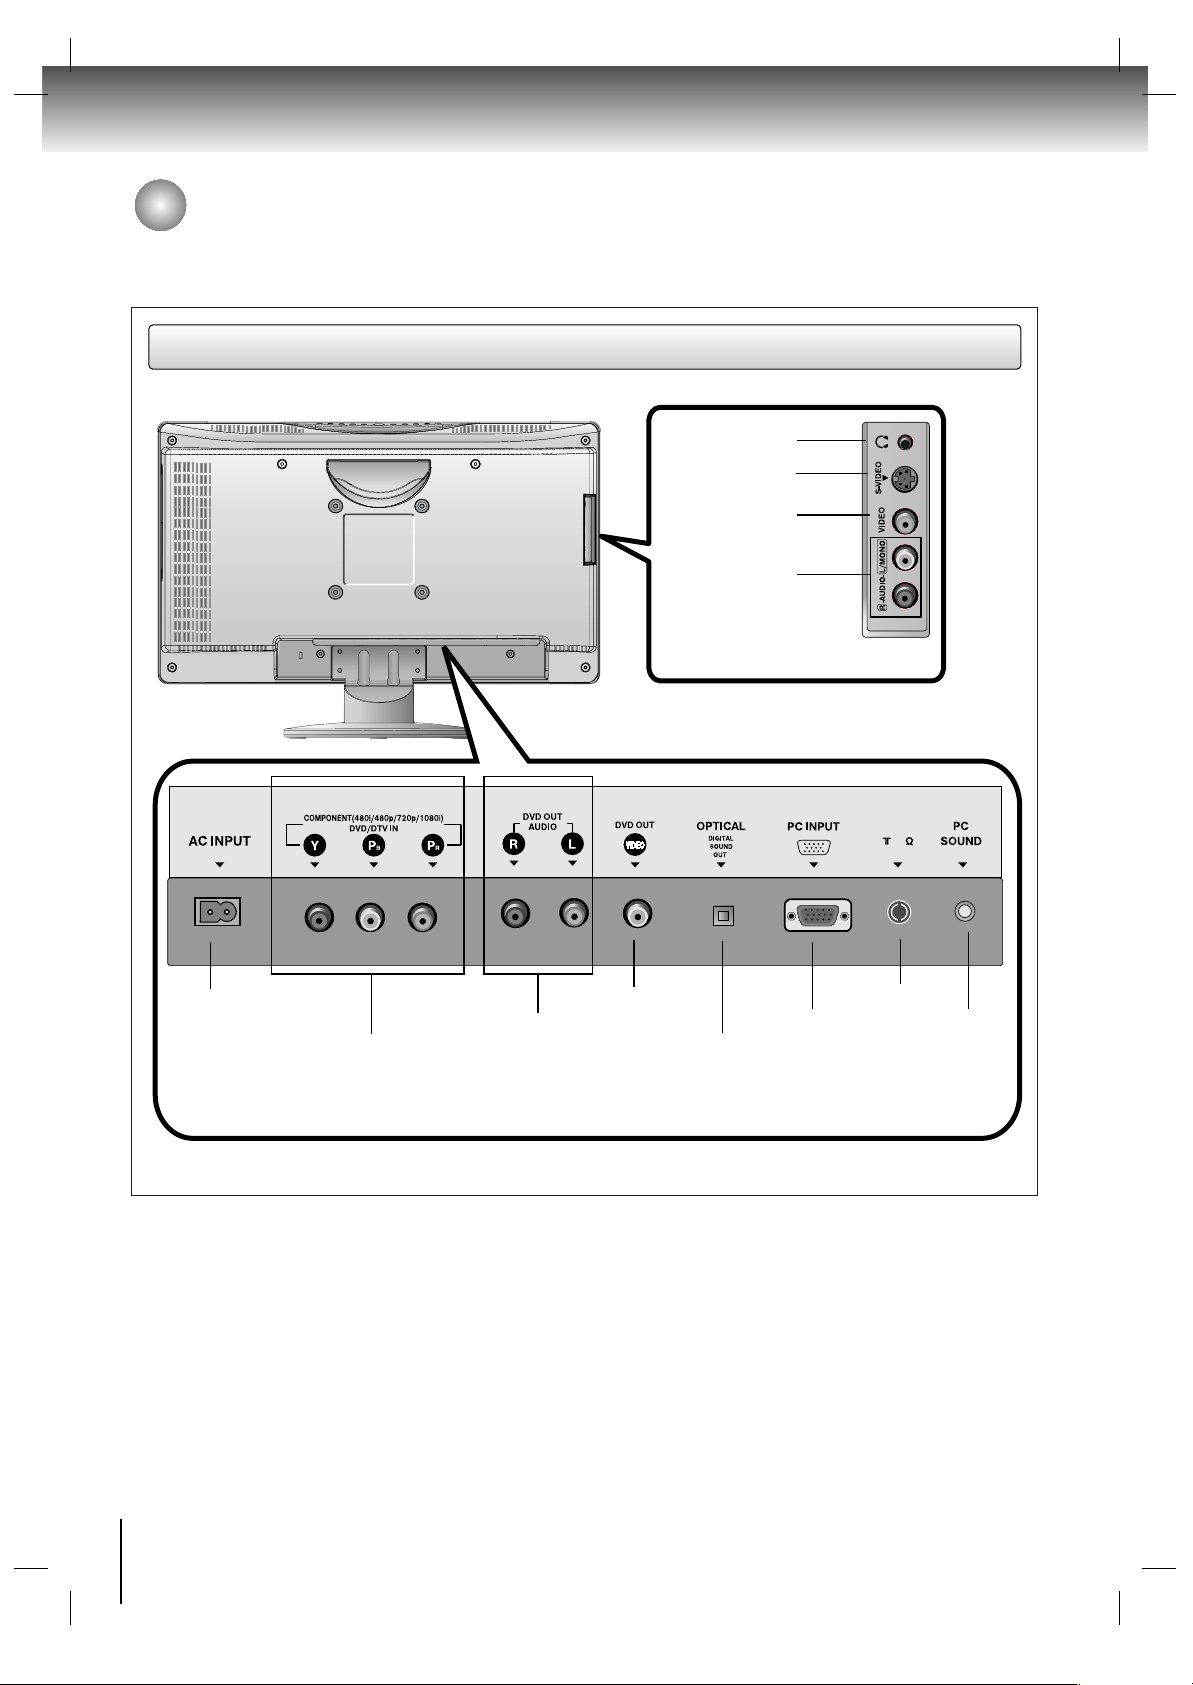
Rear
Headphone Jack
S-Video Input
Video Input
Audio Input
DVD/DTV Input
Component (480i/480p/720p/1080i)
DVD Audio Output
DVD Video Output
AC Input
PC Input
Antenna Input
PC Sound Input
Digital Sound Optical Output
Page 13

Introduction
13
Remote control
SKIP buttons
35
37
ZOOM button
PAUSE button
35
SUB TITLE button
39
PLAY button
35
REV button
35
FWD button
35
MUTE button
SLOW FWD button
35
35
STOP button
SLOW REV buttons
35
Direction buttons
( / / / )
CHANNEL / button
ANGLE button
37
VOLUME +/- button
RETURN button
Numbered buttons (0
-
9)
POWER button
RMT CODE(1/2)
SET UP button
SLEEP button
28
REPEAT button
37/45
37/45
36/44
CAP/TEXT button
RANDOM button
30
38
+10 button
37/45
MEMORY button
DISPLAY button
36/43
TOP MENU button
36
100
INPUT SELECT button
Selects: TV, Video, S-Video, DVD,
Component, or PC mode.
[1]: For controlling SD-P7000 model
and other Toshiba brand TV.
[2]: For controlling SD-P7000 model only.
Switches the TV between ON
and STANDBY.
T button
MENU button
36
38
DIMMER button
24
REPEAT A-B button
36
MONO/STEREO/SAP button
26
AUDIO button
38
E.A.M. button
37/43
CLEAR button
PICTURE button
24
Direct channel selection
buttons (0
-
9)
INPUT
SELECT
SET UP SLEEP DIMMER E.A.M.
MEMORY REPEAT REPEAT A-B CLEAR
DISPLAY CAP/TEXT
MONO/
STEREO/SAP
PICTURE
RANDOM
+10
TOP MENU MENU
SKIP
MUTE
SKIP
AUDIO
RMT CODE
1 2
POWER
VOLUME CHANNEL
1 2 3
4 5 6
7 8 9
100 0 T
PLAY
REV PAUSE FWD
SLOW REV
ZOOM ANGLE SUB TITLE RETURN
STOP SLOW FWD
ENTER
+
-
Use to turn the sound on or off temporarily.
Allows you to go back to the last scene
you were watching.
The instructions in this manual describe the function on the remote control. See the page in for details.
Page 14
14
Introduction
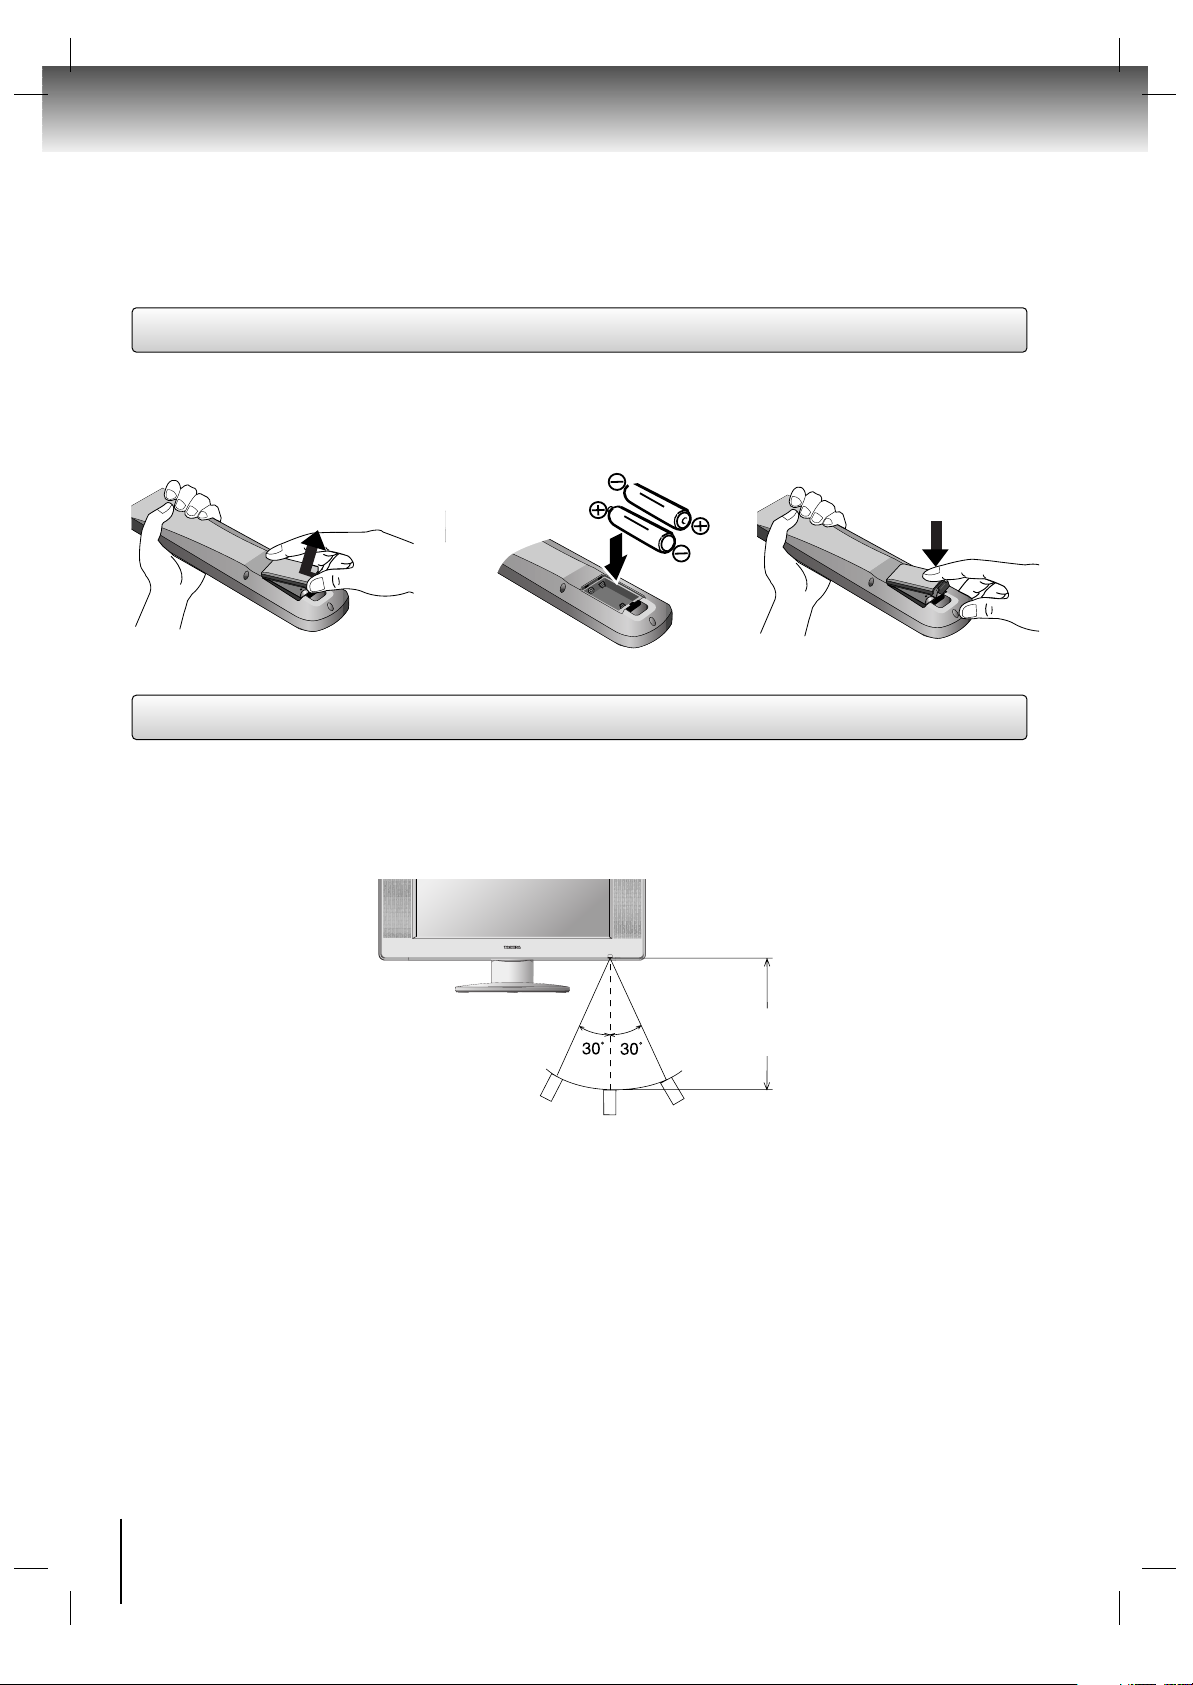
Slide the battery compartment
cover in the direction of the
arrow.
Install two “AA” batteries
(supplied), paying attention to
the polarity diagram in the
battery compartment.
Replace the compartment
cover.
• Aim the remote control at the remote sensor and press control buttons to operate.
• Operate the remote control within 30° angle on either side of the remote sensor, up to a distance of approx.
7 meters (Approx. 21 feet).
The precautions below should be followed when using batteries in this device:
1. Use only the size and type of batteries specified (AA type).
2. Be sure to follow the correct polarity when installing the batteries as indicated in the battery compartment.
Reversed batteries may cause damage to the device.
3. Do not mix different types of batteries together (e.g. Alkaline and Carbon-zinc) or old batteries with fresh ones.
4. If the device is not to be used for a long period of time, remove the batteries to prevent damage or injury from
possible battery leakage.
5. Do not try to recharge batteries not intended to be recharged; they can overheat and rupture (follow battery
manufacturer’s directions).
6. Dispose of used batteries in a designated disposal area. Do not throw batteries into a fire.
Attention should be drawn to the environmental aspects of battery disposal.
Inserting batteries
Operation
123
Approx. 7 meters
(Approx. 21 feet)
Page 15
Connections
15
Connections
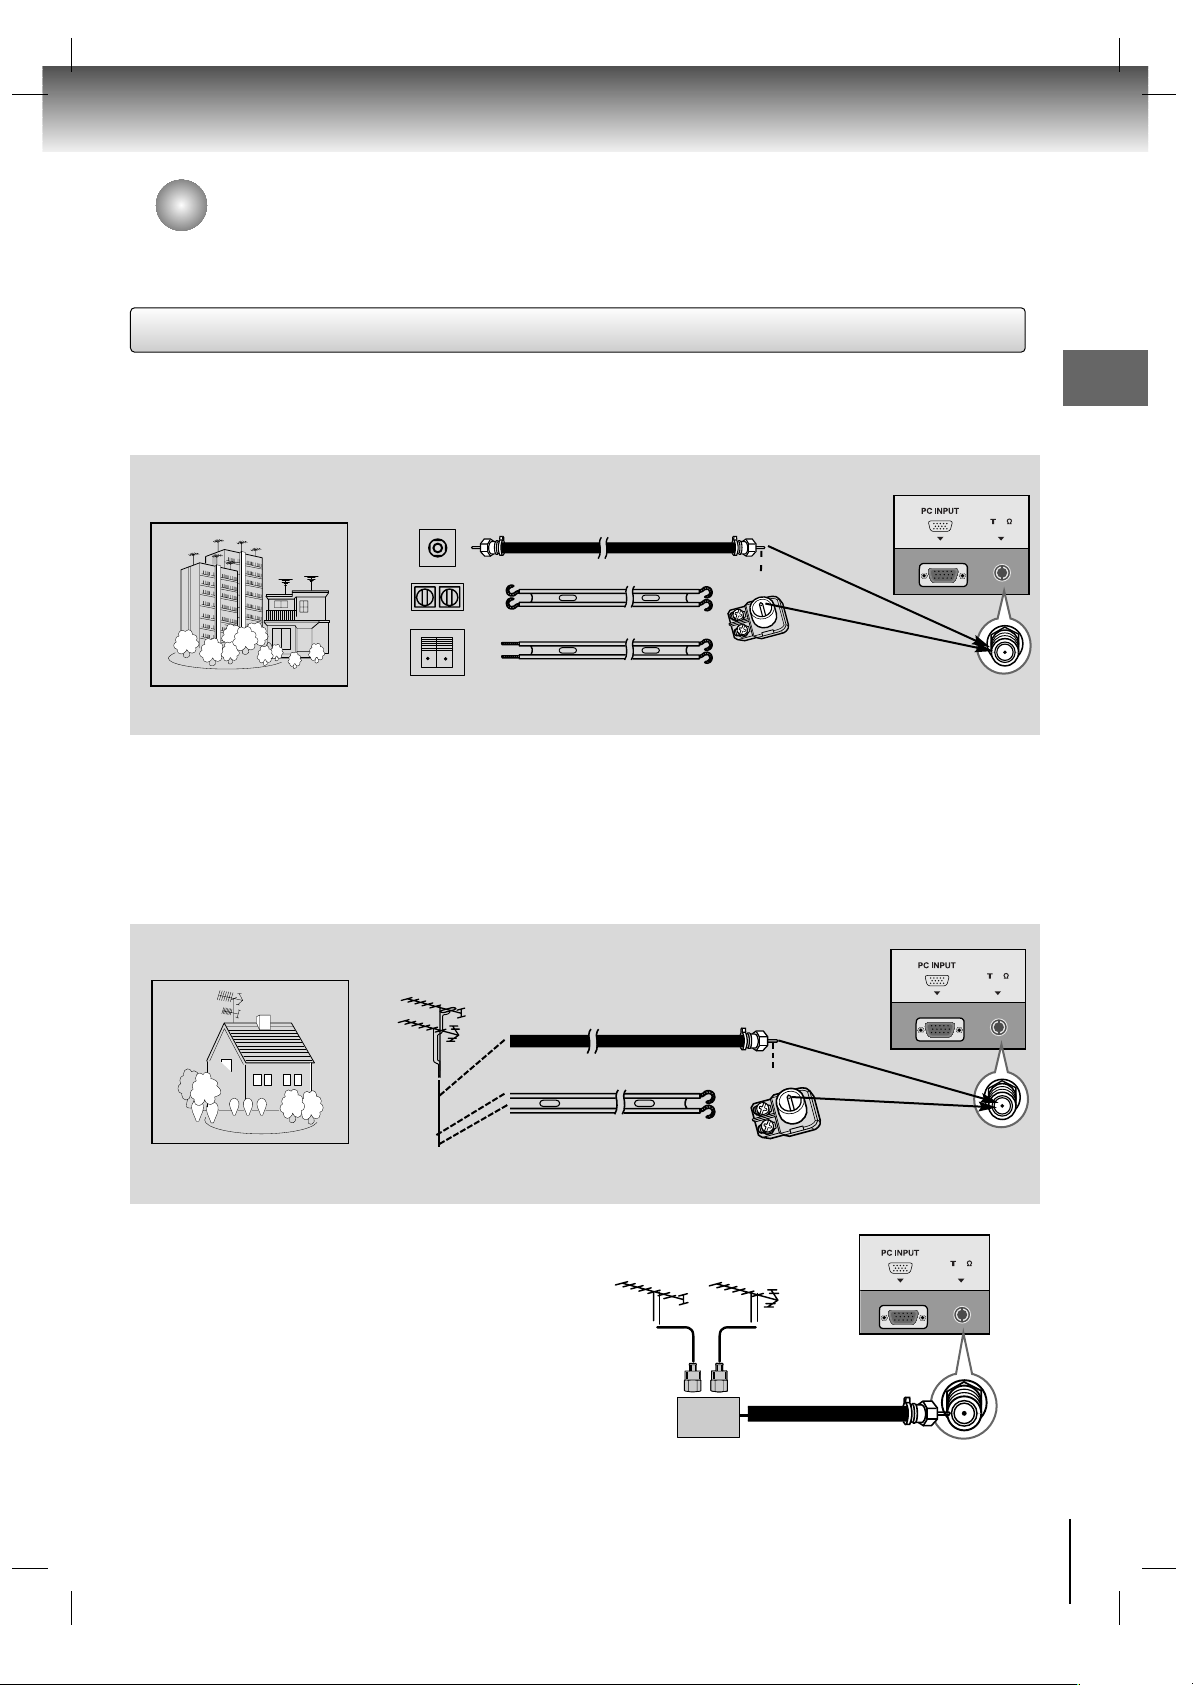
Antenna Connection & Cable without a Cable box
External equipment connections
- For optimum picture quality, adjust antenna direction.
- An antenna cable and converter are not supplied.
To prevent the equipment damage,never plug in any power cords until you have finished connecting all equipment.
- Typical wall antenna jack used in apartment buildings, connect the antenna cable as shown below.
(Use the correct type of antenna cable for the type of wall antenna jack.)
Wall Connection Jack
Apartment Buildings
Antenna Jack
Bronze Wire
Turn clockwise to tighten.
Antenna
Converter
(Not supplied)
300Ω Flat Wire
75Ω Round Cable
- This type of antenna is commonly used in single family dwellings.
UHF
Antenna
VHF Antenna
- If you have a 75Ω round cable, insert the bronze wire and then tighten the connection nut. If you have a 300Ω flat wire, connect
the twisted wire to the antenna converter and then connect the converter to the antenna jack on the TV.
- If using 75Ω round cable, do not bend the bronze wire. It may cause poor picture quality.
- In poor signal areas, to get better picture quality, install a
signal amplifier to the antenna as shown to the right.
- If signal needs to be split for two TVs, use an antenna
signal splitter for connection.
Signal
Amplifier
UHF
VHF
Single Family Home
Connecting to an Inside Antenna Setup
Connecting to an Outside Antenna Setup
75
ANT IN
75
ANTANT IN
75
ANT IN
7575
ANTANT IN
Antenna Jack
Bronze Wire
Turn clockwise to tighten.
300Ω Flat Wire
75Ω Round Cable
75
ANT IN
ANT
Antenna
Converter
(Not supplied)
ANT
IN
75
Page 16
16
Connections
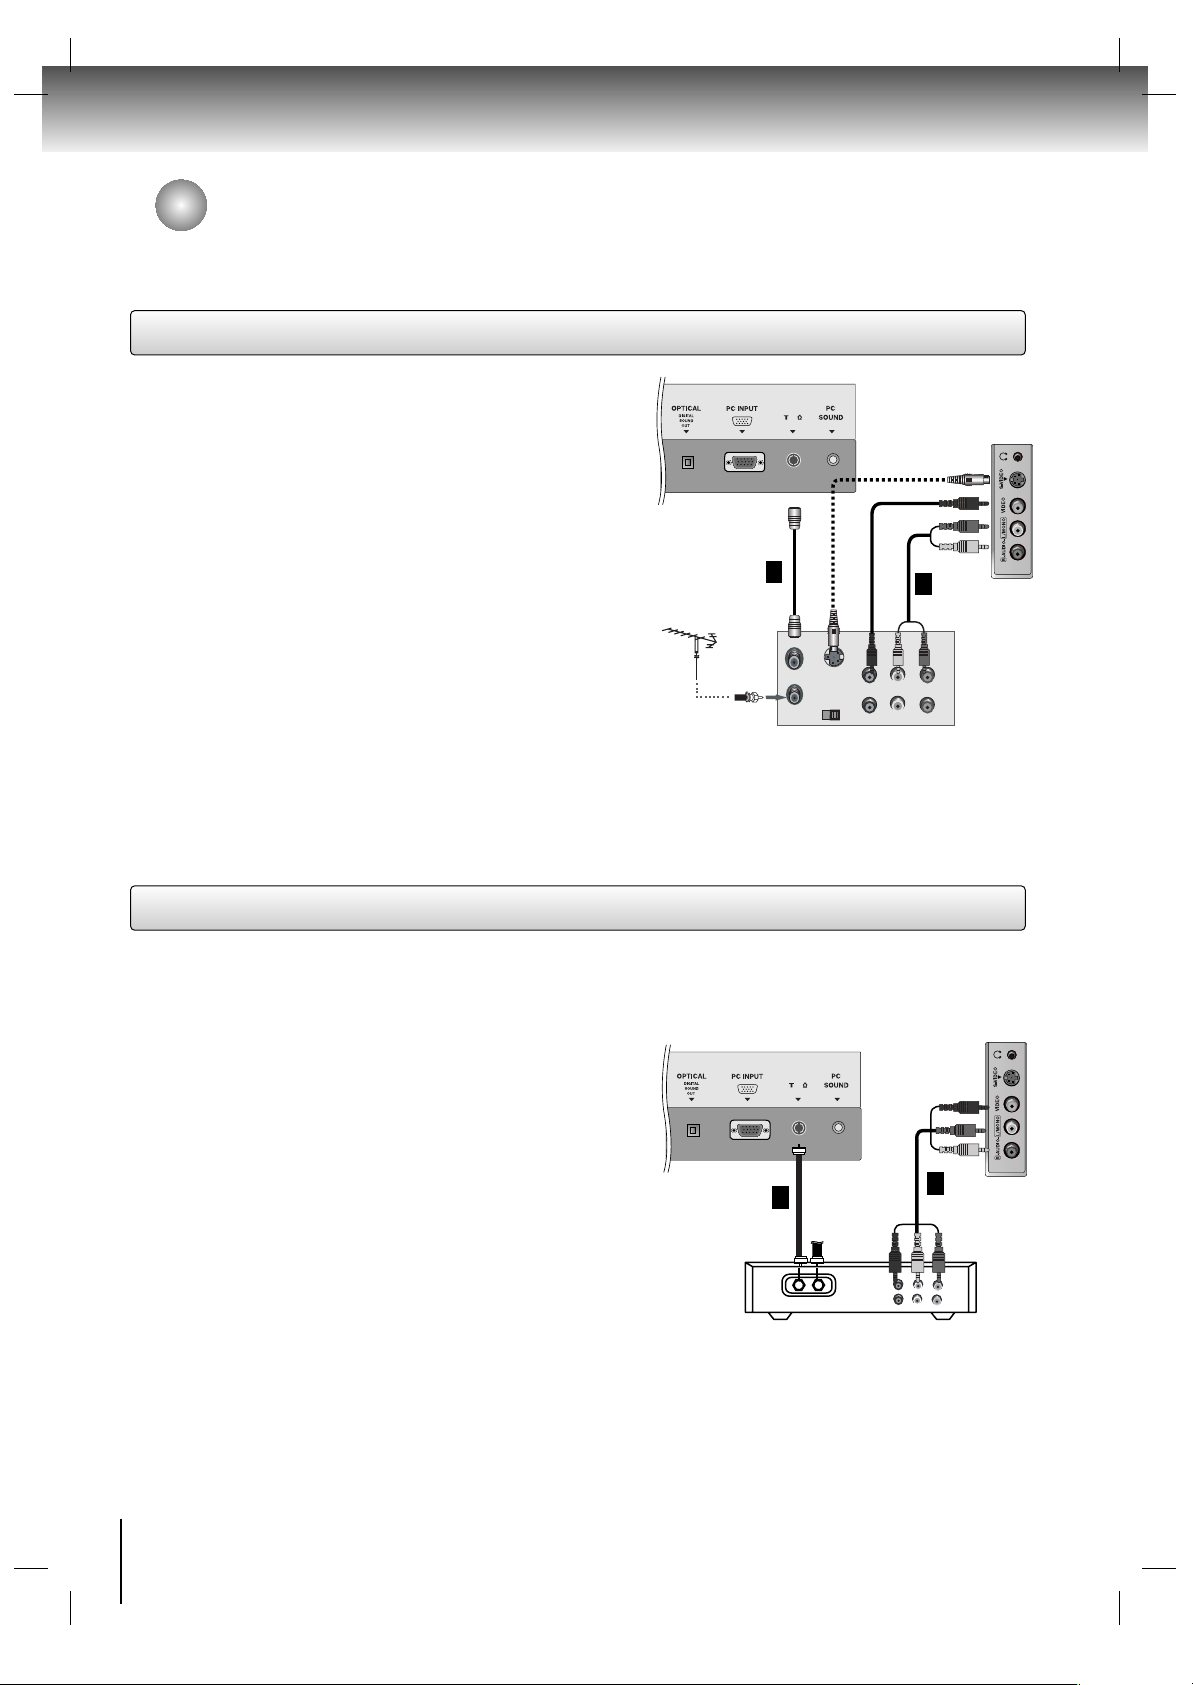
VCR Setup
Cable TV Setup
External equipment connections (Continued)
Connection 1
Set VCR CH switch to 3 or 4 and then tune TV to the
same channel number.
Connection 2
1. Connect the audio/video output jacks on the VCR to the
corresponding input jacks on the TV. When connecting the
TV to a VCR, match the jack colors (Video = yellow, Audio
Left = white, and Audio Right = red).
2. Insert a video tape into the VCR and press PLAY on the
VCR. (Refer to the VCR owner’s manual.)
3. Use the INPUT SELECT button on the remote control to
select Video. (If connected to S-VIDEO on the side panel,
select the S-Video external input source.)
75
ANT IN
OUT
IN
CH3 CH4
S-VIDEO
ANT IN
ANT OUT
(R) (L)
AUDIO
VIDEO
1
Typical
Antennas
TV Back Panel
TV Side Panel
VCR
2
Connection 1
1. Select channel 3 or 4 with the channel switch on the
cable box.
2. Tune the TV channel to the same selected output channel
of the cable box.
3. Select channels at the cable box or with the cable box
remote control.
Connection 2
1. Connect the audio/video output jacks on the Cable Box to
the corresponding input jacks on the TV. When connect-
ing the TV to the Cable Box, match the jack colors
(Video = yellow, Audio Left = white, and Audio Right =
red).
2. Use the INPUT SELECT button on the remote control to
select Video.
3. Select channels using the cable box remote control.
TV Side Panel
- After subscribing to a local cable TV service and installing a converter, you can watch cable TV programming.
- For further cable TV information, contact your local cable service provider.
75
ANT IN
TV
VCR
(R) AUDIO (L)
VIDEO
RF Cable
1
Cable Box
2
TV Back Panel
The connection cables are not supplied.
Page 17
17
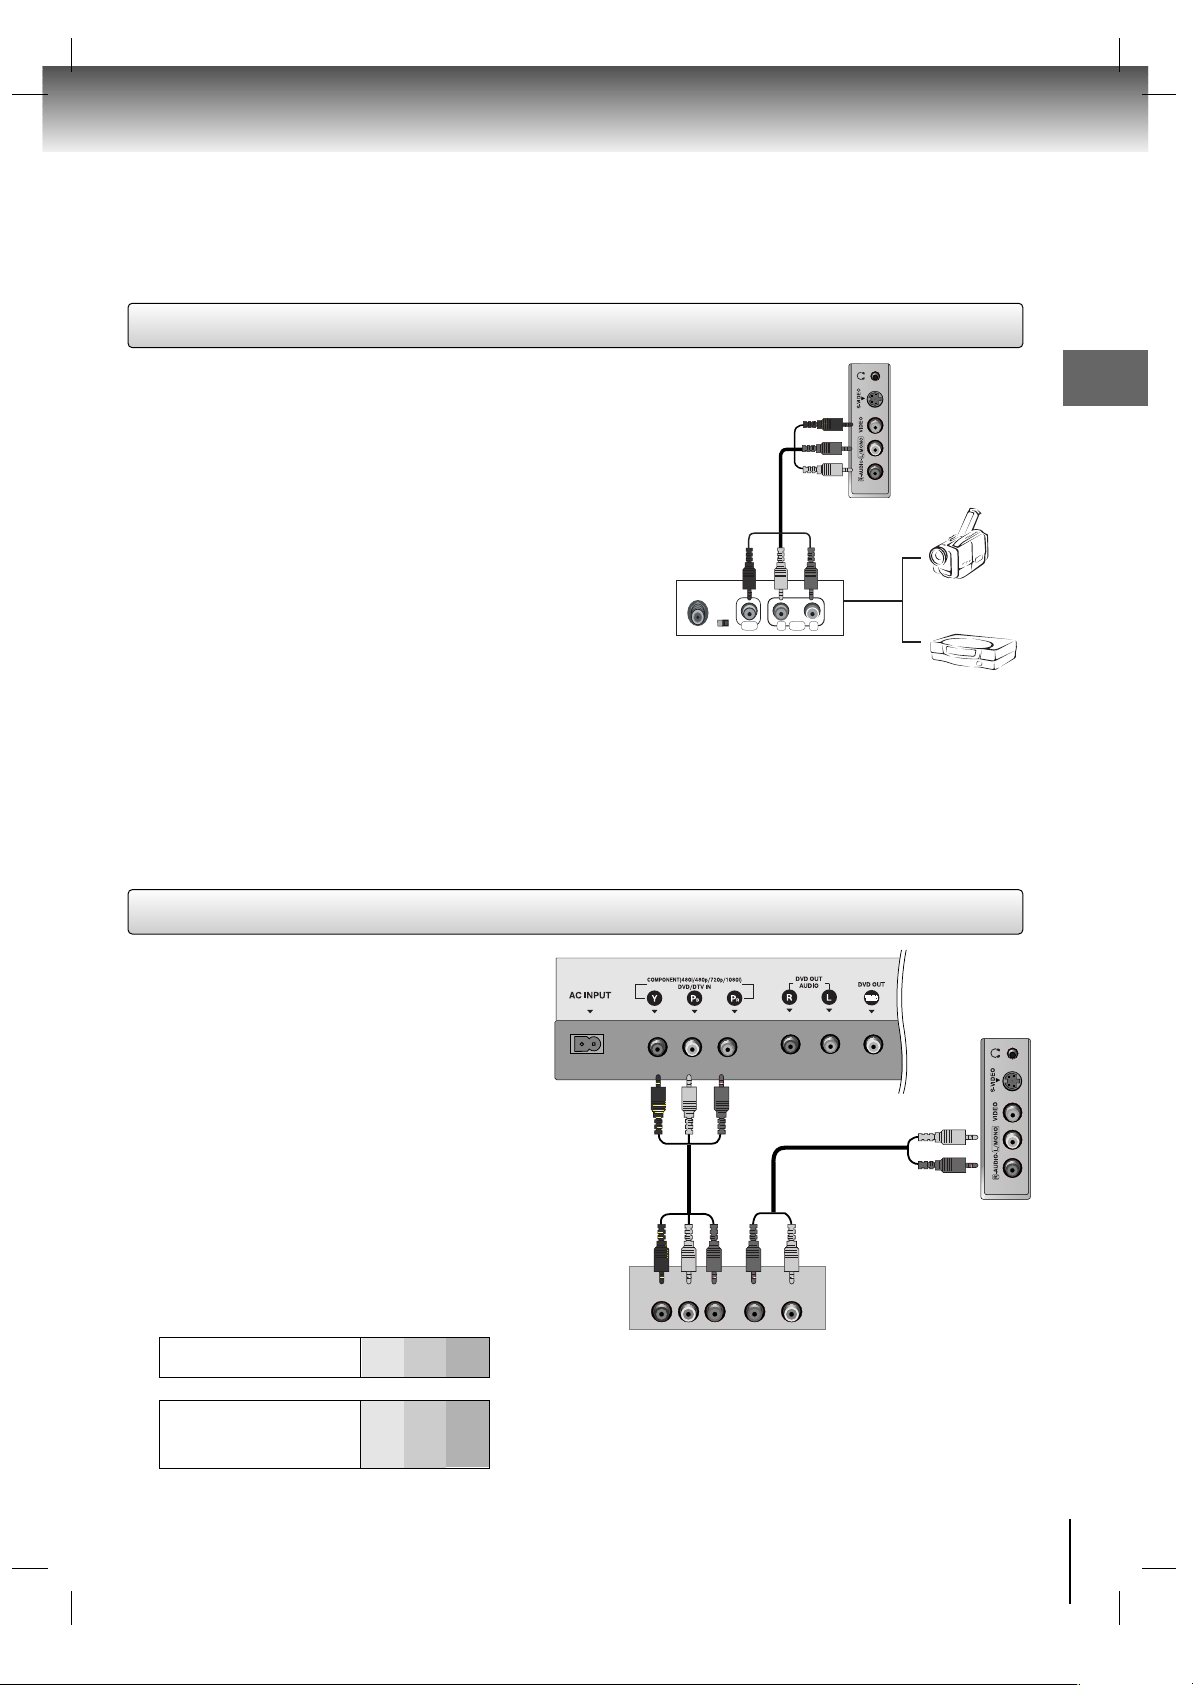
External A/V Source Setup
External DVD Setup
Connections
Connect the audio/video output jacks on the external A/V
equipment to the corresponding input jacks on the TV.
When connecting the TV to external A/V equipment,
match the jack colors (Video = yellow, Audio Left = white,
and Audio Right = red).
Viewing Setup
1. Turn on the external A/V equipment.
2. Use the INPUT SELECT button on the remote control
to select Video.
3. Operate the corresponding external equipment. Refer
to the external equipment operating guide.
Camcorder
Video Game set
RL
AUDIOVIDEO
External Equipment
Connections
Connect the DVD video outputs to the COMPONENT
(Y, P
B
, PR) jacks and connect the DVD audio outputs
to the AUDIO jacks.
Viewing Setup
1. Turn on the DVD player, insert a DVD disc.
2. Use the INPUT SELECT button on the remote control
to select Component.
3. Refer to the DVD player's manual for operating
instructions.
DVD
AUDIOYPB PR (L)
(R)
Component ports
of the TV
Y
P
B
P
R
Video output ports
of DVD player
Y
Y
Y
Y
Pb
B-Y
Cb
PB
Pr
R-Y
Cr
P
R
• Component Input ports
To get better picture quality, connect a DVD player to
the component input ports as shown below.
- This TV can play a DVD without a separate DVD
player. However, if you want to watch a DVD from a
separate DVD player, refer to the figure as shown on
the right.
TV Back Panel
TV Side Panel
TV Side Panel
External DVD
Connections
Page 18

Connecting to optional equipment (Continued)
18
75
ANT IN
VIDEO
DIGITAL AUDIO
OPTICAL
AUDIOYPB PR (L)
(R)
Connections
TV Side Panel
TV Side Panel
DTV Setup
Using Headphones
- To watch digitally broadcast programs, purchase
and connect a digital set-top box.
Connections
Connect the digital set-top box video outputs to the
COMPONENT (Y, P
B, PR
) jacks and connect the
digital set-top box audio outputs to the AUDIO
jacks.
Viewing Setup
1. Turn on the digital set-top box. (Refer to the
owner’s manual for the digital set-top box.)
2. Use the INPUT SELECT button on the remote
control to select Component.
TV Back Panel
- Plug headphones into the H/P jack as shown.
- Adjust the sound level of the headphone using the
VOLUME ( + , -) buttons. While you are listening through a
headphone(s), TV speakers will not be heard.
DTV Receiver (Set-top Box)
DVD Output Setup
TV Back Panel
Second TV or Monitor
input terminals
75
ANT IN
75
ANT IN
VIDEO
AUDIO (L)
(R)
TV Back Panel
Second TV or Monitor
input terminals
OR
The TV has a special signal output capability which allows you to hook up a second TV or monitor.
Connect the second TV or monitor to the TV’s DVD OUTPUT and OPTICAL DIGITAL SOUND OUT jack. (See the
Operating Manual of the second TV or monitor for further details regarding that device’s input settings.)
Notes: • If your second TV or monitor has no optical digital audio input jack, it’s impossible to use DVD digital sound output.
• Do not look into the optical output port. Looking at the laser beam may damage your vision.
• If your external audio equipment has a digital audio input optical port, you can connect it to your TV.
Page 19

19
PC Setup
75
ANT IN
TV Back Panel
- After setup, be sure to select RGB-PC source on TV.
Connections
1. Set the monitor output resolution on the PC before
connecting to the TV.
2. Connect the TV to the PC with the PC cable.
3. Connect the PC audio output to the TV's PC SOUND
input.
Viewing Setup
1. Turn on the PC.
2. Use the INPUT SELECT button on the remote control
to select PC.
NOTES
a. For optimum picture quality, use standard WXGA (1280x768) computer output at a 60Hz refresh rate. Using other formats
(VGA, SVGA, etc.) or refresh rates may result in reduced picture quality. (To change the computer video output format, please
refer to the operating manual for the computer you are using).
b. If the message “
Out of range” appears on the screen, adjust the PC output to a format listed in the ‘Displayable Monitor
Output Format Specifications' chart above.
c. The synchronization input form for Horizontal and Vertical frequencies is separate.
DPM (Display Power Management) mode
If the PC goes to power saving mode, the monitor automatically switches to DPM mode.
Resolution
640x480
800x600
Horizontal
Frequency(kHz)
31.47
35.00
37.50
35.16
37.88
48.08
46.88
60
66.67
75
56.25
60
72.19
75
48.36
56.48
60.02
47.78
60
70
75
60
Vertical
Frequency(Hz)
1024x768
1280x768
Monitor Display Specifications
Connections
Page 20

20
TV Operation
TV Operation
TV Operation Overview
First, make all equipment connections. Connect
the AC power cord into the TV, then plug the power
cord into a wall outlet. Press the POWER button
located on the TV to turn on the TV. The power
indicator will light.
• In the standby mode, press the
POWER,
CHANNEL, INPUT SELECT
or number buttons on
the remote control to turn on the TV.
1
Note:
If you want to turn the TV off, press the POWER button
located on the remote control. If you intend to be
away on vacation, disconnect the plug from the wall
outlet.
Select the viewing source by pressing
INPUT
SELECT
repeatedly.
Note:
See page 22 if you have not auto programmed the
TV to receive channels in your local broadcast
area.
2
After viewing, press the POWER button on the
remote control. The TV reverts to standby mode.
3
POWER/INPUT SELECT
TV channel Video
PC Component
S-video
DVD
Page 21

21
Menu Language Selection
Press the SET UP button and then use the
DD / EE
buttons
to select the
Special menu.
1
Press the SET UP button to save and return to TV
viewing.
Press the
GG
button and then use the
DD / EE
buttons
to select
Language.
2
Press the GGbutton and then use the
DD / EE
buttons
to select your desired language from
English,
Español
or Français.
From this point on, the on-screen menus will be
shown in the language of your choice.
3
4
TV Operation
SET UP
DD / EE
,
FF / GG
Special
Language
Caption / Text
Captions
Key lock
Parental
Screen size
FG
ENTER SETUP
D
E
Special
Language
Caption / Text
Captions
Key lock
Parental
Screen size
F
ENTER SETUP
D
E
English
Español
Français
Page 22

22
TV Operation
Channel Menu Options
Memorizing the Channels with
Auto Scan
Press the SET UP button and then use the
DD / EE
buttons
to select the Channel menu.
1
- For Auto program to work, the programming source must be
connected to the TV and the TV must be receiving
programming signals either over-the-air or from a
cable-type service provider.
Press the
GG
button and then use the
DD / EE
buttons
to select
Auto Scan.
2
Press the GGbutton to begin the channel search.
• Wait for auto program to complete the channel
search cycle before choosing a channel. The
TV scans for over-the-air channels and then
channels provided by a cable service.
3
Channel
To start
Auto Scan
Manual prog.
Favorite ch.
TV/Cable
FG
ENTER SETUP
D
E
Note:
• When the channel search is complete, use the
DD / EE
buttons to review the memorized channels.
• If you press the ENTER button in auto programming, the
function will stop and only channels programmed up to
that time will remain.
• Auto program function can memorize only the channels
which are being received at that time.
Channel
Auto Scan
Manual prog.
Favorite ch.
TV/Cable
FG
ENTER SETUP
D
E
SET UP
DD / EE
,
FF / GG
ENTER
Antenna Setup
Press the SET UP button and then use the
DD / EE
buttons
to select the
Channel menu.
1
Press the GGbutton and then use the
DD / EE
buttons
to select
TV/Cable.
2
Press the GGbutton and then use the
DD / EE
buttons
to select
TV or CATV.
3
Channel
Auto Scan
Manual prog.
Favorite ch.
TV/Cable
F
ENTER SETUP
D
E
Channel
Auto Scan
Manual prog.
Favorite ch.
TV/Cable
FG
ENTER SETUP
D
E
Press the ENTER button to save.
4
TV
CATV
Page 23

23
Add/Delete Channels with
Manual Program
- You can manually include or erase individual channels.
Press the SET UP button and then use the
DD / EE
buttons
to select the Channel menu.
1
Press the GGbutton and then use the
DD / EE
buttons
to select
Manual prog.
2
Press the GGbutton and then use the
FF / GG
buttons
to select a channel you want to add to memory or
erase.
3
Press the EEbutton and then use the
FF / GG
buttons
to select
Memory (add) or Erase (delete).
4
Press the ENTER button to save. The current
channel is added to Memory or Erased from the
channel list.
5
Channel
Auto Scan
Manual prog.
Favorite ch.
TV/Cable
FG
ENTER SETUP
D
E
TV 30
Memory
The current channel number is displayed.
TV Operation
Channel
Auto Scan
Manual prog.
Favorite ch.
TV/Cable
FG
ENTER SETUP
D
E
Favorite Channels Setup
Press the SET UP button and then use the
DD / EE
buttons
to select the Channel menu.
1
- Favorite Channel lets you quickly tune in up to 8
of your choice without having to wait for the TV to scan
through all the in-between channels.
Press the
GG
button and then use the
DD / EE
buttons
to select
Favorite ch..
2
Press the GGbutton and then use the
DD / EE
buttons
to select the first favorite channel position.
3
Use the
FF / GG
buttons to set the desired channel
number for the first favorite channel.
4
Repeat steps 3 to 4 to memorize other channels.
5
Press the ENTER button to save.
6
Channel
Favorite Ch.
Auto Scan
Manual prog.
Favorite ch.
TV/Cable
FG
ENTER SETUP
D
E
To set
- - - - - - - - -
- - - - - - - - -
- - - - - - - - -
- - - - - - - - -
- - - - - - - - -
- - - - - - - - -
- - - - - - - - -
- - - - - - - - -
D
E
FG
ENTER SETUP
Channel
Auto Scan
Manual prog.
Favorite ch.
TV/Cable
FG
ENTER SETUP
D
E
Page 24

24
TV Operation
Picture Menu Options
Dimmer
Manual Picture Control (User option)
Press the DIMMER button repeatedly to select the brightness setup option as shown below.
Maximum Brightness
Normal Brightness
Minimum Brightness
Bright Normal Dark
Press the SET UP button and then use the
DD / EE
buttons
to select the Picture menu.
1
• Press the PICTURE button and you can also
adjust these picture options.
- You can adjust picture contrast, brightness, color, sharpness and tint to the levels you prefer.
Press the
GG
button and then use the
DD / EE
buttons
to select the desired picture option
(Contrast,
Brightness, Color, Sharpness, Tint)
.
2
Use the
FF / GG
buttons to make appropriate
adjustments.
•
Contrast, Brightness, Color, and Sharpness are
adjustable from 0 to 100.
• Tint is adjustable from Red 50 to Green 50.
3
Press the ENTER button to save.
4
Picture
Contrast 85
Picture Preference
Contrast
Brightness
Color
Sharpness
Tint
FG
ENTER SETUP
D
E
SET UP
DIMMER
DD / EE
,
FF / GG
ENTER
PICTURE
Picture
Picture Preference
Contrast
Brightness
Color
Sharpness
Tint
FG
ENTER SETUP
D
E
Page 25

25
TV Operation
Sound Menu Options
EQualizer Adjustments
Press the SET UP button and then use the
DD / EE
buttons
to select the
Sound menu.
1
Press the GGbutton and then use the
DD / EE
buttons
to select
Preset EQualizer.
2
Press the GGbutton and then use the
DD / EE
buttons
to select
User.
3
Press the GGbutton and then use the
FF / GG
buttons
to select the band you want to adjust. Then, use
the
DD / EE
buttons to adjust the band level.
4
Press the ENTER button to save.
5
Sound
Preset EQualizer
Stable Sound
Balance
FG
ENTER SETUP
D
E
Flat
Music
Movie
Sports
User
G
D
E
FG
MOVE ADJUST ENTER
0.1 0.5 1 5 10 kHz
SET UP
DD / EE
,
FF / GG
ENTER
Sound
Preset EQulizer
Stable Sound
Balance
FG
ENTER SETUP
D
E
Press the SET UP button and then use the
DD / EE
buttons
to select the
Sound menu.
1
Press the GGbutton and then use the
DD / EE
buttons to
select
Preset EQualizer.
2
Press the GGbutton and then use the
DD / EE
buttons
to select the appropriate sound option;
Flat, Music, Movie, Sports.
3
Press the ENTER button to save.
4
Sound
Preset EQualizer
Stable Sound
Balance
F
ENTER SETUP
D
E
Flat
Music
Movie
Sports
User
G
Sound
Preset EQualizer
Stable Sound
Balance
FG
ENTER SETUP
D
E
Preset EQualizer
- This function lets you enjoy the high quality sound by
simply selecting the sound format that matches the program content.
Page 26

26
TV Operation
StableSound™
Press the SET UP button and then use the
DD / EE
buttons
to select the
Sound menu.
1
Press the GGbutton and then use the
DD / EE
buttons
to select
Stable Sound.
2
Press the GGbutton and then use the
DD / EE
buttons
to to select
On or Off.
3
Press the ENTER button to save.
4
- StableSound™ maintains an equal volume level automatically even if the channel is changed.
Sound
Preset EQualizer
Stable Sound
Balance
F
ENTER SETUP
D
E
On
Off
Sound Balance
Press the SET UP button and then use the
DD / EE
buttons
to select the
Sound menu.
1
Press the GGbutton and then use the
DD / EE
buttons
to select
Balance.
2
Press the GGbutton and then use the
FF / GG
buttons
to adjust the sound balance.
• Balance is adjustable from Left 50 to Right 50.
3
Press the ENTER button to save.
4
MONO/STEREO/SAP
Sound
Preset EQualizer
Stable Sound
Balance
FG
ENTER SETUP
D
E
0
-
+
1. Press the MONO/STEREO/SAP button repeatedly.
• Select mono sound mode if the signal is not clear or in
poor signal reception areas.
•
Stereo, SAP mode are available only if included on the
broadcast signal.
- The TV can receive MTS stereo programs and any
SAP (Secondary Audio Program) that accompanies the
stereo program, if the broadcaster transmits an
additional sound signal as well as the original one.
- Mono: The primary language is heard from left and
right speakers. Signal mode is mono.
- Stereo: The primary language is heard from left and
right speakers. Signal mode is stereo.
- SAP: The secondary language is heard from left and
right speakers.
Mono Stereo SAP
Sound Menu Options (Continued)
SET UP
DD / EE
,
FF / GG
ENTER
Page 27

27
TV Operation
Time Menu Options
Auto Clock Setup
Press the SET UP button and then use the
DD / EE
buttons
to select the
Timer menu.
1
Press the GGbutton and then use the
DD / EE
buttons
to select
Clock
2
Press the GGbutton and then use the
DD / EE
buttons
to select
Auto.
3
Press the GGbutton and then use the
DD / EE
buttons
to select the time zone for your viewing area. Your
choices are:
Auto, E.S.T. (Eastern Standard Time),
C.S.T. (Central Standard Time), M.S.T. (Mountain
Standard Time),
P.S.T. (Pacific Standard Time),
Alaska, and Hawaii.
4
Press theGGbutton and then use the
DD / EE
buttons
to set
D.S.T. (Daylight Savings Time) Auto, Off or On,
depending on whether or not your viewing area
observes Daylight Savings Time.
6
Press the ENTER button to save.
7
Press the GGbutton and then use the
DD / EE
buttons
to set
PBS channel.
5
- The time is set automatically through from a PBS
broadcast signal.
- The PBS channel signal includes information for the
correct time and daylight saving time.
Timer
Auto G
Manual
Clock
Off timer
On timer
Auto off
FG
ENTER SETUP
D
E
Auto Clock
Time zone Auto
PBS Ch. TV 1
D.S.T. Auto
D
E
FG
MOVE ADJUST ENTER
Manual Clock Setup
Press the SET UP button and then use the
DD / EE
buttons
to select the
Timer menu.
1
Press the GGbutton and then use the
DD / EE
buttons
to select Clock
2
Press the GGbutton and then use the
DD / EE
buttons
to select
Manual.
3
Press the GGbutton and then use the
DD / EE
buttons
to set the hour.
4
Press the ENTER button to save.
6
Press the GGbutton and then use the
DD / EE
buttons
to set the minutes.
5
- If the time on the clock is incorrect, reset the clock
manually.
Timer
Auto
Manual
G
- - : - - AM
Clock
Off timer
On timer
Auto off
FG
ENTER SETUP
D
E
SET UP
DD / EE
,
FF / GG
ENTER
Page 28

28
TV Operation
On/Off Timer Setup
Press the SET UP button and then use the
DD / EE
buttons
to select the Timer menu.
1
Press the GGbutton and then use the
DD / EE
buttons
to select
Off timer or On timer.
2
Press the GGbutton and then use the
DD / EE
buttons
to set the hour.
3
Press the GGbutton and then use the
DD / EE
buttons
to set the minutes.
4
Press the GGbutton and then use the
DD / EE
buttons
to select
Run or Hold.
• Hold: Off timer/On timer will not work.
Run: Off timer/On timer are active.
You need to select
Run to activate Timer setup.
6
Press the ENTER button to save.
7
For On timer function only:
Press the
GG
button and then use the
DD / EE
buttons to
set the channel at turn-on. Then, press the
GG
button
and then use the
DD / EE
buttons to set the turn-on sound
level.
5
- Timer function operates only if the current time is set.
- Off-Timer function overrides On-Timer function if they
are set to the same time.
- The TV must be in standby mode for the On-Timer to
work.
- If you don’t press any button within 2 hours after
turning on the TV with the On-Timer function, the TV
will automatically revert to standby mode.
Sleep Timer Setup
- The Sleep Timer turns the TV off at a preset time.
- The Sleep Timer do not function in PC mode.
Timer
Clock
Off timer
On timer
Auto off
FG
ENTER SETUP
D
E
- - : - - AM
TV 2
Volume 30 Run
Press the SLEEP button repeatedly to select the
number of minutes. First the Sleep --- option
appears on the screen, followed by the following
sleep timer options: 10, 20, 30, 60, 90, 120, 180,
and 240 minutes.
1
When the number of minutes you want is displayed on the screen, press the ENTER button.
The timer begins to count down from the number
of minutes selected.
2
To check the remaining minutes before the TV
turns off, press the SLEEP button once.
3
To cancel the Sleep Timer, press the SLEEP button
repeatedly until Sleep --- appears.
4
Auto Off
- If Auto Off is active and there is no input signal, the TV
switches to Standby mode automatically after 10 minutes.
Press the SET UP button and then use the
DD / EE
buttons
to select the
Timer menu.
1
aPress the GGbutton and then use the
DD / EE
buttons
to select
Auto off.
2
Press the GGbutton and then use the
DD / EE
buttons
to select
On or Off
3
Press the ENTER button to save.
4
Timer
Clock
Off timer
On timer
Auto off
F
ENTER SETUP
D
E
On
Off
Time Menu Options (Continued)
SET UP/SLEEP
DD / EE
,
FF / GG
ENTER
Page 29

29
TV Operation
Special Menu Options
Closed Captions
2. An old, bad, or illegally recorded tape is being played.
3. Strong, random signals from a car or airplane interfere with the TV signal.
4. The signal from the antenna is weak.
5. The program wasn’t captioned when it was produced, transmitted, or taped.
Closed captioning is a process which converts the audio portion of a television program into written words which then
appear as subtitles on the television screen. Closed captions allow viewers to read the dialogue and narration of
television programs.
Captions are the subtitles of the dialogue and narration of television programs. For
prerecorded programs, program dialogue can be arranged into captions in advance.
Its possible to caption a live program by using a process called real-time captioning,
which creates captions instantly. Real-time captioning is normally done by
professional reporters using a machine shorthand system and computer for translation into English.
Captioning is an effective system for the hearing-impaired, and it can also aid in
teaching language skills.
• The picture at left shows a typical caption.
• IGNITION:
Picture may flutter, drift, suffer from black spots, or horizontal streaking. Usually caused
by interference from automobile ignition systems, neon lamps, electrical drills, and other
electrical appliances.
• GHOSTS:
Ghosts are caused when the TV signal splits and follows two paths. One is the direct path
and the other is reflected off tall buildings, hills or other objects. Changing the direction
or position of the antenna may improve reception.
• SNOW:
If your receiver is located at the weak, fringe area of a TV signal, your picture may be
marred by small dots. It may be necessary to install a special antenna to improve the
picture.
Caption Tips
FOLLOW ME
Using Closed Captions
• Not all TV broadcasts include closed caption signals.
• Sometimes TV stations broadcast four different caption signals on the same channel. By selecting From CC 1 to CC 4,
you can choose which signal you view. CC 1 is usually the signal with the captions, while Another mode might show
demonstration or programming information.
• Your TV might not receive caption signals normally in the following situations.
1. Poor reception conditions are encountered:
Page 30

30
TV Operation
Caption/Text
Press the SET UP button and then use the
DD / EE
buttons
to select the Special menu.
1
Press the GGbutton and then use the
DD / EE
buttons to
select
Caption / Text.
2
Press the GGbutton and then use the
DD / EE
buttons
to select caption:
CC1, CC2, CC3, CC4, Text1,
Text2, Text3,
or Text4.
• CAPTION
The term for the words that scroll across the
bottom of the TV screen; usually the audio
portion of the program provided for the hearing
impaired.
• TEXT
The term for the words that appear in a large
black frame and almost cover the entire screen;
usually messages provided by the broadcaster.
3
Press the ENTER button to save.
4
Special
Language
Caption/Text
Captions
Key lock
Parental
Screen size
F
ENTER SETUP
D
E
CC1
CC2
CC3
CC4
Text1
Text2
Text3
Text4
Captions
Press the SET UP button and then use the
DD / EE
buttons
to select the Special menu.
1
Press the GGbutton and then use the
DD / EE
buttons to
select
Captions.
2
Press the GGbutton and then use the
DD / EE
buttons
to select Caption
On, Closed Caption Mute, or
Off.
• Closed Caption Mute shows the selected
captions option (if available on program) when
the TV sound is muted.
You can also press the CAP/TEXT button repeatedly
to select Caption
On, Closed Caption Mute, or Off.
3
Press the ENTER button to save.
4
Special
Language
Caption/Text
Captions
Key lock
Parental
Screen size
F
ENTER SETUP
D
E
On
Closed Caption Mute
Off
Press the GGbutton and then use the
DD / EE
buttons
to select
On or Off.
3
Press the ENTER button to save.
4
- The TV can be set up so that it can only be used with the remote control.
- This feature can prevent unauthorized viewing.
Special
Language
Caption/Text
Captions
Key lock
Parental
Screen size
F
ENTER SETUP
D
E
On
Off
Press the SET UP button and then use the
DD / EE
buttons
to select the
Special menu.
1
Press theGGbutton and then use the
DD / EE
buttons
to select
Key lock
2
SET UP
DD / EE
,
FF / GG
ENTER
CAP/TEXT
Special Menu Options (Continued)
Key Lock
Page 31

31
TV Operation
Lock options
Parental Control can be used to block specific channels, ratings and other viewing sources.
The Parental Control Function (V-Chip) is used to block program viewing based on the ratings sent by the broadcast station.
The default setting is to allow all programs to be viewed. Viewing can be blocked by the type of program and by the categories
chosen to be blocked. It is also possible to block all program viewing for a time period. To use this function, the following must
be set :
1. Ratings and categories to be blocked.
2. Set a password
3. Enable the lock
V-Chip rating and categories
Rating guidelines are provided by broadcast stations. Most television programs and television movies can be blocked by TV
Rating and/or Individual Categories. Movies that have been shown at the theaters or direct-to-video movies use the Movie
Rating System (MPAA) only.
For Movies previously shown in theaters :
Movie Ratings :
• Unblocked
• G and Above (general audience)
• PG and Above (parental guidance suggested)
• PG-13 and Above (13 years and older)
• R and above (restricted)
• NC-17 and Above (18 years and older)
• X (adult)
If you set PG-13 and Above : G and PG movies will be available , PG-13, R, NC-17 and X will be blocked.
For Television programs including made-for-TV movies:
General TV Ratings:
• Unblocked
• TV-G and Above (general audience) (individual categories do not apply)
• TV-PG and Above (parental guidance suggested)
• TV-14 and Above (14 years and older)
• TV-MA (mature audience)
Children TV Ratings:
• Unblocked
• TV-Y and Above (youth) (individual content categories do not apply)
• TV-Y7 (youth, 7 years and up)
Content Categories:
• Dialog - sexual dialogue (applies to TV-PG and Above, TV-14)
• Language - adult language (applies to TV-PG and Above, TV-14 and Above, TV-MA)
• Sex scenes - sexual situations (applies to TV-PG and Above, TV-14 and Above, TV-MA)
• Violence (applies to TV-PG and Above, TV-14 and Above, TV-MA)
• F Violence - fantasy violence (applies only to TV-Y7)
For Canadian English/French language rating system:
Canadian English language rating system:
• C and Above (Children)
• C8+ (8 years and older)
• G and Above (General programming. Suitable for all audiences.)
• PG and Above (Parental guidance suggested)
• 14+ (Viewer 14 years and older)
• 18+ (Adult programming)
Canadian French language rating system:
• G and Above (General)
• 8 ans+ (8 years and older)
• 13 ans+ (13 years and older)
• 16 ans+ (16 years and older)
• 18 ans+ (Adults only)
Page 32

32
TV Operation
Lock Menu Setup
Press the SET UP button and then use the
DD / EE
buttons
to select the Special menu.
1
Press the GGbutton and then use the
DD / EE
buttons
to select
Parental. Then, press the
GG
button.
• If
Lock is already set, enter the password
requested.
• The TV is set with the initial password “0-0-0-0”.
2
Setting Lock on/off:
Press the
DD / EE
buttons to select Lock on/off.
Press the GGbutton and then use the
DD / EE
buttons
to select
on or off.
3
Set password:
Press the
DD / EE
buttons to select Set password.
Press the GGbutton and then enter a four digit
password.
Enter it again when requested.
4
Press the
DD / EE
buttons to select type of blocking to
be set .
5
Press the GGbutton and then use the
DD / EE
buttons
to select type of ratings to block .
•
Age block, and Content block, and Canadian
menus, also have sub menus. So, repeat steps 4
and 5 in the sub menu, to set the types of blocking
and ratings.
6
Special
Language
Caption / Text
Captions
Key lock
Parental
Screen size
FG
ENTER SETUP
D
E
To set
Parental
Lock
Set password
MPAA
Age block
Content block
Aux. block
Canadian
F
ENTER SETUP
D
E
On
Off
SET UP
DD / EE
,
FF / GG
ENTER
0-9
Special Menu Options (Continued)
Note:
If you ever forget your password, key in ‘7’, ‘7’, ‘7’, ‘7’ on
the remote control.
Page 33

33
TV Operation
Screen Size Setup
Press the SET UP button and then use the
DD / EE
buttons
to select the Special menu.
1
Press the GGbutton and then use the
DD / EE
buttons
to select
Screen size.
2
Press the GGbutton and then use the
DD / EE
buttons to
to select
4:3 or Wide.
3
Press the ENTER button to save.
4
Special
Language
Caption / Text
Captions
Key lock
Parental
Screen size
F
ENTER SETUP
D
E
4:3
Wide
Special
Language
Caption / Text
Captions
Key lock
Parental
Screen size
FG
ENTER SETUP
D
E
- You can watch TV in various picture formats; 4:3, Wide.
•
4:3
This is the format 4 measure to 3 measures (square) of most
general TV content.
•
Wide
You can enjoy widescreen formatted movies or general TV programs
with the 16:9 mode. The screen itself is 16:9 (16 measure to 9
measures), and content that is not formated in the widescreen
format, will be stretched on the left and right to fill the entire screen.
•
4:3
• Wide
Page 34

34
TV Operation
PC Menu Options
PC menu
Press the SET UP button and then use the
DD / EE
buttons
to select the
PC menu.
1
Press the GGbutton and then use the
DD / EE
buttons to
select desired item.
2
Press the ENTER button to save.
4
- After setup, be sure to select PC source to see the PC image the on TV screen.
PC
H-Position
V-Position
Clock
Phase
Auto Configure
Reset
FG
ENTER SETUP
D
E
85
Use the
FF / GG
buttons to make appropriate adjust-
ments.
• H-position/V-position
Adjusts picture left/right and up/down. The
adjustment ranges of H-Position is 0~100.
(Based on the input mode, the adjustable
range may change.)
• Clock
Minimizes any vertical bars or stripes appearing
on the screen background. The adjustment
range is 0~100. (Based on the input mode, the
adjustable range may change.)
• Phase
Reduces (or Minimizes) any horizontal noise and
clear up or sharpen the character images. The
range adjustment is 0~100. (Based on the input
mode, the adjustable range may change.)
• Auto-configure
Automatically adjusts the screen position, clock,
and clock phase. (The displayed image will
disappear for a few seconds while Auto-configuration is in progress.)
• Reset
Returns to the default settings programmed at
the factory; default settings cannot be changed.
3
SET UP
DD / EE
,
FF / GG
ENTER
Note:
Depending on the specification of the PC you are playing the DVD VIDEO on, and the DVD's title, some scenes may
be skipped, or you may not be able to pause during multi-angle scenes.
Page 35

35
DVD&VCD Operation
DVD&VCD operation
Basic Playback
Insert your chosen disc into the disc slot on the
side panel. Be sure to face the top of the disc (with
title etc.) toward the front of the screen. Playback
starts.
2
Press the EJECT button on the TV to remove the
disc.
3
REV / PAUSE / FWD
SLOW REV / STOP /
SLOW FWD
PLAY
Press the POWER button on the TV to turn the unit
on.
1
Stop Playback
Press the STOP button again to stop playback
fully. (At this time if you press PLAY button, the
disc playback starts from the beginning.)
2
Press the STOP button to stop playback. At this time
the DVD video player stops playback temporarily and
maintains the current playback position.
• If you PLAY button is pressed, playback will
resume from the location where you stopped playback.
1
Fast Forward/Backward
Press the PLAY button to resume normal
playback.
2
Press the FWD (
GGGG
) or REV (
FFFF
) button during
playback.
Each time you press the FWD (
GGGG
) or REV (
FFFF
)
button, the playback speed changes as shown.
• FWD (
GGGG
):
GGGG
2x
→→
GGGG
4x
→→
GGGG
8x
→→
GGGG
16x
→→
GGGG
32x
→→
1x.
•
REV (
FFFF
):
FFFF
2x
→→
FFFF
4x
→→
FFFF
8x
→→
FFFF
16x
→→
FFFF
32x
→→
1x.
1
Slow Forward/Backward
Press the PLAY button to resume normal play-
back.
2
Press the SLOW FWD ( IGG) or SLOW REV (
FF
I )
button during playback.
Each time you press the SLOW FWD ( I
GG
) or
SLOW REV (
FF
I ) button, the playback speed
changes as shown:
• SLOW FWD ( I
GG
):
GGGG
1/2
→→
GGGG
1/4
→→
GGGG
1/8
→→
GGGG
1/16
→→
1x.
• SLOW REV (
FF
I ) :
FFFF
1/2
→→
FFFF
1/4
→→
FFFF
1/8
→→
FFFF
1/16
→→
1x. (DVD only)
1
Skip a Chapter or a Track
Press the SKIP (
GGGG
I ) button or SKIP ( I
FFFF
) button
to locate a desired chapter during playback. Each time
you press the button, a chapter or track is skipped.
• Press the SKIP (
GGGG
I ) button to locate succeeding
chapters or tracks.
• Press the SKIP ( I
FFFF
) button to go back to the
beginning of the current chapter or track.
• Press the SKIP ( I
FFFF
) button twice in quick succession, playback will start from the beginning of
the preceding chapter or track.
1
Pause Playback (Still mode)
Press the PLAY button again to return to normal
playback.
2
Press the PAUSE (II) button during playback.
1
Note :
a. Press the PLAY button to return to the DVD mode from
the TV, Video or PC mode.
b. If you have a disc problem during playback, remove the
disc by pressing and holding down the EJECT button on
the top panel for more than 4 seconds.
Note :
There is no sound during fast or slow playback for DVDs
or Video CDs.
DVD&VCD Operation
SKIP
Page 36

DVD&VCD Operation (Continued)
36
DVD&VCD operation
Frame by Frame Playback (II
GG
)
Press PAUSE (II) button during still playback.
Each time you press the PAUSE (II) button, the
picture advances one frame.
1
OSD (On-Screen Display)
Press the DISPLAY button during DVD playback.
Title and Chapter information appears on the
screen. Each time you press the DISPLAY button,
the OSD changes as follows.
• DVD: Title Elapsed
→→
Title Remain
→→
Chapter
Elapsed
→→
Chapter Remain
→→
Display off
• VCD: Single Elapsed
→→
Single Remain
→→
Total
Elapsed
→→
Total Remain
→→
Display off
1
Note :
The OSD display may be different depending on the type
of DVD disc.
Note :
The unit may not be able to select the disc or title menu
depending on the type of DVD disc.
You can display the playback status on the TV screen
as follows: Title, Chapter number, Playing time.
Selecting the disc menu
Title Elapsed
TT 01/03 CH 01/09 0:28:22
Title Number
Chapter Number
Playing Time
DVD
Sigle Elapsed
Track 02/02 01:58
Track Number
Playing Time
VCD
Use the
DD / EE
,
FF / GG
, or ENTER button to select
the desired menu option.
2
Press the MENU button during playback.
1
Selecting the title menu
Use the
DD / EE
,
FF / GG
, or ENTER button to select
the desired item.
2
Press the TOP MENU button during playback.
1
You can play a specific title, chapter, track, or segment
repeatedly.
Repeat playback
Press the REPEAT button during playback.
Each time you press the REPEAT button, the
repeat mode changes as follows.
• DVD : Chapter
→→
Title
→→
ALL
→→
Repeat Off
• VCD : Track
→→
ALL
→→
Repeat Off
1
- A-B repeat playback allows you to repeat material
between two selected points.
A-B repeat playback
Press the REPEAT A-B button to select the start
point during playback. “ A” is displayed on the
TV screen and the starting point of your selected
segment is set up.
1
Press the REPEAT A-B button again to select the
end point. “ AB” is displayed on the TV screen
and the ending point is set up.
Playback starts at the point that you selected.
Playback stops at the end point, returns to Point A
automatically, then starts again.
2
Repeatedly press the REPEAT A-B button again
to resume normal playback.
“Off” appears on the screen.
3
TOP MENU / MENU
DD / EE
,
FF / GG
ENTER
REPEAT / REPEAT A-B
DISPLAY
Note :
a.
Some discs may not permit A-B repeat operation.
b. You cannot set the A-B repeat function for a segment that
includes multiple camera angles.
c. You can specify a segment only within the current title or
track (VIDEO CD).
d. There may be a slight difference between point A and the
location where playback actually resumes depending on
the disc.
Page 37

DVD&VCD Operation
37
Selecting camera angles
Repeatedly press the ANGLE button to select the
desired angle.
2
Press the ANGLE button during playback.
1
If the scene was recorded from multiple angles, you can
easily change the camera angle of the scene you are
currently watching.
E.A.M. (Enhanced Audio Mode)
Each press of the E.A.M. button changes the
sound display as indicated below:
: Off
→→
Concert →→Living room →→Hall →→Shower
→→
Arena.
2
Press the E.A.M. button during playback.
1
Used to simulate multi-channel sound from just two
speakers without the need to add extra speakers or
equipment.
Picture Size Zoom
Each press of the ZOOM button changes the
screen display as indicated below:
: 2x, 3x, 4x, 1/2, 1/3, 1/4, (Zoom off)
2
Adjust the main picture position using the
DD / EE
/
FF / GG
buttons while in the enlarged picture mode.
3
Press the ZOOM button during playback.
1
When enlarging or reducing the picture, it may become
distorted.
Note:
a. You can only change the angle for DVDs that provide
multiple angles of scenes.
b. The angle function will not work on DVD video discs that
do not contain scenes recorded at different angles.
c. The number of angles varies from disc to disc.
Note:
Depending on the disc, programmed playback may not be
possible.
E.A.M.
ZOOM / ANGLE
+10
MEMORY/CLEAR
DD / EE
,
FF / GG
ENTER
Programmed Playback
Use the
DD / EE
buttons to select the program position.
2
Use the +10 button and the number buttons to
enter the desired Title(TT)/Chapter(CH) numbers.
Each time you press the +10 button, it increases by 10.
When you input a two-digit number,input the digit of
ten with +10 button and then input the digit of one
with the number buttons (0~9).
To program others, repeat Steps 2 and 3.
• If you input a wrong number, press CLEAR.
• Depending on the disc, Programmed playback
menu may look different from the example shown.
3
Press the
DD / EE
/
FF / GG
buttons to select Start and
then press the ENTER button.
• The programs you selected will start to playback
in the order.
• To resume normal playback, select Stop in step 3.
• Select Exit to quit the programmed palyback
menu.
4
Press the MEMORY button in the stop mode or
during playback.
1
- You can arrange the playback order of tracks on the disc.
TT 03/12 CH 01/09 0:28:22
Programme : TT (11)/CH(10)
0 1 TT: 01 CH:01 0 6 TT: CH:
0 2 TT: 10 CH:01 0 7 TT: CH:
0 3 TT: 11 CH: 05 0 8 TT: CH:
0 4 TT: CH: 0 9 TT: CH:
0 5 TT: CH: 1 0 TT: CH:
Exit Start Right
TT: CH:
Page 38

DVD&VCD Operation (Continued)
38
DVD&VCD operation
RANDOM/AUDIO
Random Audio
Used to change the audio-related setting during
DVD playback. Each time you press it, the set value
is changed.
1
Locating a desired section by entering
its corresponding number (T)
Each time you press the RANDOM button,the
random mode changes in the following order:
Random
→→
Shuffle
→→
Off
• Random: Begins random playback from the
beginning.
• Shuffle : Begins random playback from the
current playback position.
2
Press the RANDOM button during playback.
1
Use the number buttons to enter the time counter
(hour:minutes:seconds)of the desired location.
Playback begins from the time location designated
on the current title or track .
2
Press the T button during playback.
1
Title 02/03 : :
Title Number
Time
Audio 1/3: D 5.1CH English
Note :
Depending on the disc, Audio setup may not be possible.
About DVD Screen Saver
If you pause or stop a picture of a DVD video disc and leave it still for approximately 5 minutes, the screen saver of the player
automatically appears.
To turn off the screen saver, press any button related DVD on the remote control.
0-9
T
Page 39

While in the DVD input, if you press SET UP button in the stop ( / )
mode, the DVD menu is displayed, and in the play or pause mode, the TV
setup menu is displayed.
39
DVD Menu options
Selecting an audio language
Press the GGbutton and then use
DD / EE
buttons to
select your desired language.
2
Press the ENTER button.
3
Press the SET UP button to resume normal
playback.
4
Press the SET UP button in the stop mode and
then use the
DD / EE
buttons to select Audio
Language.
1
- Select your preferred audio language. If an audio
language is selected, the selected audio language is
played whenever you start a new disc playback. (The
disc must contain the selected language.)
Audio Language
GG
Subtitle Language
Menu Language
Rating Level
New Password
TV Screen
OSD Language
Digital Output
Special
DD EE
: Move
GG
: Next
Original
Korean
English
French
German
Spanish
Italian
Chinese
Polish
Japanese
Audio Language
GG
Selecting a subtitle language
Press the GGbutton and then use the
DD / EE
buttons
to select your desired language.
2
Press the ENTER button.
3
Press the SET UP button to resume normal
playback.
4
Press the SET UP button in the stop mode and
then use the
DD / EE
buttons to select Subtitle
Language.
1
- Select your preferred subtitle language. If a subtitle
language is selected, the selected subtitle language is
played whenever you start a new disc playback. (The
disc must contain the selected language.)
- You can also select another available subtitle language
during playback with the SUB TITLE button on the
remote control during playback.
Audio Language
Subtitle Language
Menu Language
Rating Level
New Password
TV Screen
OSD Language
Digital Output
Special
DD EE
: Move
GG
: Next
Original
Korean
English
French
German
Spanish
Italian
Chinese
Polish
Japanese
Off
Subtitle Language
GG
SUB TITLE
SETUP
DD / EE
,
FF / GG
ENTER
DVD&VCD Operation
Page 40

DVD Menu options (Continued)
40
DVD&VCD operation
Disc menu language selection
Press the GGbutton and then the
DD / EE
buttons to
select your desired language.
2
Press the ENTER button.
The menus and on screen displays will appear in
the selected language.
3
Press the SET UP button to resume normal
playback.
4
Press the SET UP button in the stop mode and
then use the
DD / EE
buttons to select Menu
Language
.
1
- Select your preferred language for the disc menus and
DVD messages. (The disc must contain the selected
language)
Audio Language
Subtitle Language
Menu Language
Rating Level
New Password
TV Screen
OSD Language
Digital Output
Special
DD EE
: Move
GG
: Next
Original
Korean
English
French
German
Spanish
Italian
Chinese
Polish
Japanese
Menu Language
GG
Parental Control Setup
Press the GGbutton and then use number buttons
to key in a 4-digit password.
Be sure to remember the password!
If you key in an incorrect number, press the
SETUP button and start over.
2
Use the
DD / EE
buttons to set the restriction level
from 0 to 8. Viewing becomes more restricted as
the number decreases.
• 0: Unlock
• 1: Kids
• 2: G (General audience)
• 3: PG (Parental guidance suggested)
• 4: PG-13 (13 years and older)
• 5: PG-r
• 6: R (Restricted)
• 7: NC-17 (18 years and older)
• 8: Adult (Adults only)
3
Press the SET UP button to resume normal
playback.
4
Press the SET UP button in the stop mode and
then use the
DD / EE
buttons to select Rating Level.
1
- Use to block viewing of unsuitable discs.
Audio Language
Subtitle Language
Menu Language
Rating Level
New Password
TV Screen
OSD Language
Digital Output
Special
DD EE
: Move
GG
: Next
8 Adult
7 NC - 17
6 R
5 PG - r
4 PG - 13
3 PG
2 G
1 Kids
0 Unlock
Rating Level
GG
Note:
If you ever forget your password, key in ‘7’, ‘7’, ‘7’, ‘7’ on
the remote control.
0-9
DD / EE
,
FF / GG
ENTER
SETUP
Page 41

41
Note :
Depending on the disc, the TV screen feature may not be
available.
- You can watch TV in various picture formats.
Changing the password
Press the GGbutton and then use number buttons
to key in a 4-digit password.
2
Press the FFbutton and then use the
DD / EE
buttons
to select
New password.
3
Press the GGbutton and then enter a 4 digit password.
Enter it again when requested.
4
Press the SET UP button to resume normal
playback.
5
Press the SET UP button in the stop mode and
then use the
DD / EE
buttons to select Rating Level.
1
Audio Language
Subtitle Language
Menu Language
Rating Level
New Password
TV Screen
OSD Language
Digital Output
Special
DD EE
: Move
GG
: Next
- - - -
New Password
GG
TV Screen
Press the GGbutton and then the
DD / EE
buttons to
select
4 : 3 LB, 4 : 3 PS, or 16 : 9 Wide.
2
Press the ENTER button
3
Press the SET UP button to resume normal
playback.
4
Press the SET UP button in the stop mode and
then use the
DD / EE
buttons to select TV Screen.
1
Audio Language
Subtitle Language
Menu Language
Rating Level
New Password
TV Screen
OSD Language
Digital Output
Special
DD EE
: Move
GG
: Next
4 : 3 LB
4 : 3 PS
16 : 9 Wide
TV Screen
GG
Letter Box (4:3 LB)
Pan & Scan (4:3 PS)
16:9 Wide
DVD&VCD Operation
Page 42

DVD Menu options (Continued)
42
DVD&VCD operation
Disc OSD language selection
Press the GGbutton and then use the
DD / EE
buttons
to select your desired language.
All the on screen displays will appear in the
selected language.
2
Press the SET UP button to resume normal
playback.
3
Press the SET UP button in the stop mode and
then use the
DD / EE
buttons to select OSD
Language
.
1
- The onscreen display can be shown on the screen in
your specified language.
Digital audio output
Press the GGbutton and then use the
DD / EE
buttons
to select
OFF, RAW (Original SPDIF signal), or
PCM (Pulse Code Modulation: Encodes SPDIF
signal to PCM).
2
Press the ENTER button.
3
Press the SET UP button to resume normal
playback.
4
Press the SET UP button in the stop mode and
then use the
DD / EE
buttons to select Digital
Output.
1
-You can select the output for SPDIF (Sony/Philips Digital
Interface).
Audio Language
Subtitle Language
Menu Language
Rating Level
New Password
TV Screen
OSD Language
Digital Output
Special
DD EE
: Move
GG
: Next
OFF
RAW
PCM
Digital Output
GG
DRC (Dynamic Range Compression)
Press the GGbutton and then use the
DD / EE
buttons
to select
DRC Off (Decrease the DRC range) or
DRC On (Reset the DRC range to original values).
2
Press the ENTER button.
3
Press the SET UP button to resume normal
playback.
4
Press the SET UP button in the stop mode and
then use the
DD / EE
buttons to select Special.
1
- Confines the audio range to prevent excessively loud
sound yet allows you to hear the low sounds clearly.
Audio Language
Subtitle Language
Menu Language
Rating Level
New Password
TV Screen
OSD Language
Digital Output
Special
DD EE
: Move
GG
: Next
DRC Off
DRC On
Special
GG
SET UP
DD / EE
,
FF / GG
ENTER
Page 43

43
MP3/WMA files Playback options
MP3/WMA files operation
MP3/WMA Files Playback
Use the
DD / EE
buttons to find desired folder and
then press the ENTER button.
2
Use the
DD / EE
buttons to find the desired MP3 title
and then press the ENTER button.
3
When inserted, the MP3 menu screen appears
automatically depending on the MP3 disc’s folder
(directory) structure as shown to the below.
1
02 : 30 03 : 37 128K
001 / 011
/
GG
DD
EE
MP3
MP3
MP3
O.S.T. - 1
PICTURE 2
PICTURE 1
O.S.T. - 3
PICTURE 3
O.S.T. - 4
Stop/Pause Playback
Pause Playback
Press the PAUSE (II) button during playback.
Press the PLAY button again to return to normal
playback.
1
2
Stop Playback
Press the STOP button to stop playback.
E.A.M. (Enhanced Audio Mode)
Each press of the E.A.M. button changes the
sound option as indicated below:
: Off
→→
Concert →→Living room →→Hall →→Shower
→→
Arena.
2
Press the E.A.M. button during playback.
1
- Used to simulate multi-channel sound from just two
speakers without the need to add extra speakers or
equipment
- You can play a specific track repeatedly.
Repeat playback
Press the REPEAT button during playback.
Each time you press the REPEAT button, the
repeat mode changes in the following order:
: Repeat Track
→→
Repeat Directory →→Off
1
A-B repeat playback
Press the REPEAT A-B button to select the start
point during playback. “ A” is displayed on the
TV screen and the starting point of your selected
segment is set up.
1
Press the REPEAT A-B button again to select the
end point. “ AB” is displayed on the TV screen
and the ending point is set up.
Playback starts at the point that you selected.
Playback stops at the end point, returns to Point A
automatically, then starts again.
2
Repeatedly press the REPEAT A-B button until
“Off” appears on the screen to resume normal
playback.
3
- A-B repeat playback allows you to repeat material
between two selected points.
Playable files
MP3/WMA disc compatibility with this player is limited as folllows:
• Playable discs: CD-ROM, CD-R, CD-RW
• Sampling Frequency: MP3: 11 kHz, 16 kHz, 32 kHz, 44,1 kHz, 48 kHz
WMA: 44,1 kHz, 48 kHz
• Bit rate: MP3: 32 kbps - 320 kbps (CBR)
WMA: 64 kbps - 192 kbps(CBR)
• CD physical format: Mode 1
• File system: ISO9660, UDF without interleave
• File name: File names are limited to eight characters or less
and must incorporate “MP3” or “WMA” extension.
e.g.“********.MP3”, “********.WMA”
File names cannot contain special characters such
as “?!><+*}{`[@]:;\ /.,” etc.
Less than 50 bytes
• Total number of files: Less than 650
• WMA codec version: V2, V7, V8, V9 (Stereo sound only)
ENTER
PAUSE
REPEAT / REPEAT A-B
DD / EE
E.A.M
MP3/WMA files Operation
Page 44

44
Audio CD operation
Audio CD Playback options
OSD (On-Screen Display)
1
- You can display the Track, and Playback time status on
the TV screen.
Single Elapsed
Track 01/21 01:00
Track Number
Playing Time
Press the DISPLAY button during CD playback.
Track information appear on the screen. Each time
you press the DISPLAY button, the OSD changes
as follows:
Single Elapsed
→→
Single Remain
→→
Total Elapsed
→→
Total Remain
Stop Playback
Press the STOP button again to stop playback
fully. (At this time if you press the PLAY button,
disc playback starts from the beginning.)
2
Press the STOP button to stop playback. At this
time the DVD video player stops playback
temporarily and maintains the current playback
position.
• If the PLAY button is pressed, playback will
resume from the location where you stopped
playback.
1
Pause Playback (Still mode)
Press the PLAY button again to return to normal
playback.
2
Press the PAUSE (II) button during playback.
1
- You can play a specific track repeatedly.
Repeat playback
Press the REPEAT button during playback.
Each time you press the REPEAT button, the
repeat mode changes as indicated: Track
→→
ALL
→→
Repeat Off
1
Fast Forward/Backward
Press the PLAY button to resume normal
playback.
2
Press the FWD (
GGGG
) or REV (
FFFF
) button during
playback.
Each time you press the FWD (
GGGG
) or REV (
FFFF
)
button, the playback speed changes as shown.
• FWD (
GGGG
) :
GGGG
2x
→→
GGGG
4x
→→
GGGG
8x
→→
GGGG
16x
→→
GGGG
32x.
• REV (
FFFF
) :
FFFF
2x
→→
FFFF
4x
→→
FFFF
8x
→→
FFFF
16x
→→
FFFF
32x.
1
ENTER
REV / PAUSE / FWD
STOP
DD / EE
REPEAT
DISPLAY
Page 45

45
Skip Tracks
1
- A-B repeat playback allows you to repeat material
between two selected points.
A-B repeat playback
Press the REPEAT A-B button to select the start
point during playback. “ A” is displayed on the
TV screen and the starting point of your selected
segment is set up.
1
Press the REPEAT A-B button again to select the
end point. “ AB” is displayed on the TV screen
and the ending point is set up.
Playback starts at the point that you selected.
Playback stops at the end point, returns to Point A
automatically, then starts again.
2
Repeatedly press the REPEAT A-B button again
to resume normal playback.
“Off” appears on the screen.
3
MEMORY/REPEAT A-B
SKIP
Use the SKIP (
GGGG
I ) or SKIP ( I
FFFF
) button to locate
a desired track during playback. Each time you press
the button, the unit skips to the next/previous track.
Audio CD Operation
Programmed Playback
Use the
DD / EE
buttons to select the program position.
2
Press the MEMORY button in the stop mode or
during playback.
1
- You can arrange the playback order of tracks on the disc.
Use the +10 button and the number buttons to
enter the desired Track(TT) numbers.
Each time you press the +10 button, it increases by 10.
When you input a two-digit number,input the digit of
ten with +10 button and then input the digit of one
with the number buttons (0~9).
To program others, repeat Steps 2 and 3.
• If you input a wrong number, press CLEAR.
3
Press the
DD / EE
/
FF / GG
buttons to select Start and
then press the ENTER button.
• The programs you selected will start to playback
in the order.
• To resume normal playback, select Stop in step 3.
• Select Exit to quit the programmed palyback
menu.
4
Track 14/21
Programme: Track (01 - 21)
0 1 03 0 6
0 2 06 0 7
0 3 01 0 8
0 4 0 9
0 5 1 0
Exit Start Right
00:03
Page 46

46
JPEG file viewing options
Picture Selection
Press the ENTER button to enlarge the JPEG file
to fill the screen.
2
Press the PLAY button again to start the slide
show mode.
Press the STOP button to return to the menu.
3
Use the
D / E
buttons to select the desired picture.
The selected JPEG file appears on the right side of
the screen.
1
Note:
If you press the ENTER button while playing a JEPG disc,
the picture slide show starts.
Resolution 500 x 375
02 : 30 03 : 37 128K
001 / 011
/
GG
DD
EE
MP3
MP3
MP3
O.S.T. - 1
PICTURE 2
PICTURE 1
O.S.T. - 3
PICTURE 3
O.S.T. - 4
Image Zoom
Adjust the picture position using the
DD / EE
/
FF / GG
buttons while in the enlarged picture mode.
To exit Zoom mode, press the ZOOM button one
more time.
2
Press the STOP button to return to the menu.
3
Press the ZOOM button and use the FWD (
GGGG
)
or REV (
FFFF
) button to see the zoom mode at 50%
~ 200%.
1
Picture transition modes
Use the MEMORY button to change the slide show
transition mode as shown below:
Wipe Top
→→
Wipe Bottom
→→
Wipe Left
→→
Wipe
Right
→→
Diagonal Wipe Left Top
→→
Diagonal Wipe
Right Top
→→
Diagonal Wipe Left Bottom
→→
Diagonal Wipe Right Bottom
→→
Extend From
Center H
→→
Extend From Center V
→→
Compress
To Center H
→→
Compress To Center V
→→
Window
H
→→
Window V
→→
Wipe From Edge To Center
→→
Move in From Top
→→
None
1
Image Rotation
Use the
D / E
buttons to rotate a picture. There are 2
modes to rotate picture:
•
D
button: invert.
•
E
button: mirror
- You can show JPEG files repeatedly.
Repeat playback
Press the REPEAT button during playback. Each
time you press the REPEAT button, the repeat
mode changes as indicated: Repeat One
→→
Repeat All
→→
Repeat Off
1
JPEG file viewing options
- As a JPEG file is loaded, the table of contents appears on
the TV screen. 16 slide show transition modes are available.
MEMORY/REPEAT
STOP
ZOOM
REV / PAUSE / FWD
DD / EE
,
FF / GG
ENTER
JPEG files compatibility
Discs and pixels whose compatibility with this player has been
confirmed by TOSHIBA are as follows.
Kodak Picture CD
JPEG disc compatibility with this player is limited as follows:
• Playable discs: CD-ROM, CD-R, CD-RW
• File system: ISO9660, UDF without interleave
• File name: File names are limited to eight characters or less
and must incorporate “JPG” extension.
e.g.“********.JPG”
File names cannot contain special characters such
as “?!><+*}{`[@]:;\ /.,” etc.
• File size: 3.3 M bytes
• File format: BASELINE, PROGRESSIVE
• Resolution: Baseline JPG: 3072x2048
Progressive JPG: 2000x1500
Page 47

Troubleshooting
47
Others
Use the following check list for troubleshooting when you have problems with your unit. Consult your local dealer or
Toshiba Authorized Service Center if problems persist.
Be sure all connections are properly made when using with other units.
SYMPTOMS POSSIBLE SOLUTIONS
POWER
• Make sure the power cord is plugged in.
• Try another Wall outlet.
TV BROADCAST RECEPTION
• Station or Cable TV experiencing problems, tune to another station.
• Check Volume adjustments.
• Check for sources of possible interference.
• Station or Cable TV experiencing problems, tune to another station.
• Check antenna or Cable TV connections, reorient antenna.
• Check for sources of possible interference.
• Check picture control adjustments.
• Station or Cable TV experiencing problems, tune to another station.
• Station signal is weak, reorient antenna to receive weaker station.
• Check for sources of possible interference.
• Station or Cable TV experiencing problems, tune to another station.
• Make sure channels are set into memory.
• Check picture control adjustments.
• Check antenna or Cable TV connections, reorient antenna.
• Check for sources of possible interference.
• Station or Cable TV experiencing problems, tune to another station.
• Make sure channels are set into memory.
• Cable TV company is scrambling signal.
• Check antenna orientation.
• Check all Cable TV connections.
• Check antenna connections, reorient antenna.
• Check for sources of possible interference.
• If using antenna, check UHF antenna connections.
• No broadcast on station tuned with Auto off activated.
• Sleep Timer is set.
• Power interrupted.
• Select proper language in the menu options.
TV/DVD does not operate.
Poor sound or No sound.
Poor picture or No picture.
Poor reception on some channels.
Poor color or no color.
Picture wobbles or drifts.
No CATV reception.
Horizontal or diagonal bars on
screen.
No reception above channel 13.
TV shuts off.
Display is not shown in your
language.
Others
Page 48

Troubleshooting (Continued)
48
Others
SYMPTOMS POSSIBLE SOLUTIONS
DVD
• No disc is inserted.
• The disc may be dirty. Clean up the disc.
• The unit cannot play CD-ROMs, etc.
• INPUT SELECT is not set correctly.
• Check that the input selector of the amplifier is set properly.
• The unit is in the special playback mode.
• The picture will be distorted occasionally. This is not a defect of the
unit.
• Some discs may not do some of the functions.
• Select appropriate screen size.
• The setup does not match your stereo system.
• Turn off the unit and unplug the AC power cord for several minutes,
then replug it.
• Multilingual language is not recorded on the DVD disc.
• Some discs have no subtitles.
• Subtitles are cleared. Press the SUB TITLE button.
• Multi-angles are not recorded on the DVD disc.
• Aim the remote control at the remote sensor.
• Operate within approx. 7 meters or reduce the light in the room.
• Clear the path of the beam.
• The batteries are weak. Replace the batteries.
• Check the batteries are inserted correctly.
Playback doesn’t start.
No picture.
No sound.
Picture is distorted during fast
reverse/forward playback.
Stopping playback, search, slow-
motion play, repeat play, or program play, etc. cannot be performed.
No 4:3 (Wide) picture.
No surround sound.
The unit or remote operation key
is not functioning.
Audio soundtrack and/or subtitle
language is not changed when
you play back a DVD.
No subtitle.
Angle cannot be changed.
REMOTE CONTROL
The remote control does not
function.
Page 49

49
General
Power supply AC 120V~ 60 Hz 1.2A
Power consumption Operation: 65 W, Stand by: 2 W
Speaker 2.68 x 1.61 inches (68 x 41 mm), 4 ohm x 2
Audio output power 3 W + 3 W
Weight 16.8 lbs (7.62 kg)
Dimensions Width: 20.24 inches (514.0 mm)
Height: 14.47 inches (367.5 mm)
Depth: 7.09 inches (180.0 mm)
Tuner VHF 2~13
UHF 14~69
Cable 01~125
Antenna input UHF/VHF: 75Ω coaxial
Applicable disc DVD (12 cm, 8 cm), CD (12 cm, 8 cm)
Frequency range DVD: 4 Hz-22 kHz, CD: 4 Hz-20 kHz
Operating conditions Temperature: 0˚C-35˚C
Input/Output
Video input 1.0 V (p-p), 75Ω, negative sync., RCA jack x 1
Audio input 400mVrms, 470 kΩ, RCA jack (L/R) x 1
S-Video input (Y) 1.0 V (p-p), 75Ω, negative sync., Mini DIN 4-pin x 1
(C) 0.286 V (p-p), 75Ω
Component input (Y) 1.0 V (p-p), 75Ω
(Pb)0.7 V (p-p), 75Ω
(Pr) 0.7 V (p-p), 75Ω
PC input 15-pin D-Sub
PC sound input 800mVrms, 470 kΩ, Stereo Mini jack x 1
DVD video output 1.0 V (p-p), 75Ω, negative sync., RCA jack x 1
DVD audio output 400mVrms, RCA jack(L/R)x1
Audio output (SPDIF) Optical connector 2.4V/10pF
Headphone output ø 3.5mm stereo mini jackx1
Supplied accessories
Remote control ..................................................... 1
Batteries (AA) ....................................................... 2
Power cord ........................................................... 1
Owner’s Manual (This booklet) ............................ 1
• This model complies with the above specifications.
• Designs and specifications are subject to change without notice.
• This model may not be compatible with features and/or specifications that may be added in the future.
Specifications
Others
Others
Page 50

50
Others
Limited United States Warranty
LCD TV/DVD Combination-Repair Warranty
Toshiba America Consumer Products, L.L.C. ("TACP") makes the following limited warranties to original
consumers in the United States. THESE LIMITED WARRANTIES EXTEND TO THE ORIGINAL CONSUMER
PURCHASER OR ANY PERSON RECEIVING THIS DVD PLAYER AS A GIFT FROM THE ORIGINAL
CONSUMER PURCHASER AND TO NO OTHER PURCHASER OR TRANSFEREE.
PRODUCTS PURCHASED IN THE U.S.A. AND USED IN CANADAARE NOT COVERED BY THESE WARRANTIES.
PRODUCTS PURCHASED IN CANADAAND USED IN THE U.S.A. ARE NOT COVERED BY THESE WARRANTIES.
Limited One (1) Year Warranty on Parts and Labor*
TACP warrants this LCD TV/DVD Combination and its parts against defects in materials or workmanship for a
period of one (1) year after the date of original retail purchase. DURING THIS PERIOD, TACP WILL, AT TACP'S
OPTION, REPAIR OR REPLACE A DEFECTIVE PART, WITH A NEW OR REFURBISHED PART, WITHOUT
CHARGE TO YOU. YOU MUST CONTACT TOSHIBA'S CONSUMER SOLUTIONS CENTER FOR INSTRUCTIONS
ON HOW TO PROCESS YOUR IN WARRANTY REPAIR REQUEST. THE CONSUMER IS RESPONSIBLE FOR
ALL INBOUND TRANSPORTATION AND INSURANCE CHARGES FOR THE LCD TV/DVD COMBINATION TO
THE REPAIR CENTER.
*Rental Units
The warranty for rental units begins on the date of the first rental or thirty (30) days from the date of shipment to
the rental firm, whichever comes first.
*Commercial Units
LCD TV/DVD Combination units sold and used for commercial purposes have a limited warranty for all parts and
labor, which warranty begins on the date of original retail purchase and ends on the date that is ninety (90) days
thereafter.
Owner's Manual and Demographic Card
Read this owner's manual thoroughly before operating this LCD TV/DVD Combination. Complete and mail the
enclosed Product Registration Card or register your product on-line at www.tacp.toshiba.com/service as soon as
possible. By registering your product you will enable TACP to bring you new products specifically designed to meet
your needs and help us contact you in the unlikely event a safety notification is required under the Consumer
Product Safety Act. Failure to complete and return the Product Registration Card does not diminish your warranty
rights.
Your Responsibility
THE ABOVE WARRANTIES ARE SUBJECT TO THE FOLLOWING CONDITIONS:
(1) You must provide your bill of sale or other proof of purchase.
(2) All warranty servicing of this LCD TV/DVD COMBINATION must be made by an Authorized TACP Service
Station.
(3) These warranties from TACP are effective only if the LCD TV/DVD COMBINATION is purchased and operated
in the U.S.A. or Puerto Rico.
(4) Labor service charges for set installation, set up, adjustment of customer controls and installation or repair of
antenna systems are not covered by these warranties. Reception problems caused by inadequate antenna
systems are your responsibility.
(5) Warranties extend only to defects in materials or workmanship as limited above and do not extend to any LCD
TV/DVD COMBINATION or parts which have been lost or discarded by you or to damage to LCD TV/DVD
COMBINATION or parts caused by fires, misuse, accident, Acts of God, such as lightning or fluctuations in
electric power, improper installation, improper maintenance or use in violation of instructions furnished by TACP;
use or malfunction through simultaneous use of this product and connected equipment; or to units which have
been modified or had the serial number removed, altered, defaced or rendered illegible.
Page 51

51
Limited United States Warranty (Continued)
Others
How to Obtain Warranty Services
If, after following all of the operating instructions in this manual and checking the section "Troubleshooting", you find that
service is needed:
(1) For instructions on how to obtain warranty service, contact TACP'S toll free Call Center at 1-866-583-7353.
(2) Include your bill of sale or other proof of purchase along with the LCD TV/DVD COMBINATION, when sending it to the
Authorized TACP Service Station SPECIFIED by TACPs Call Center.You must pay for all transportation and insurance
charges for the LCD TV/DVD Combination to and from the Service Station.
For additional information, visit TACP's web site:
www
.tacp.toshiba.com
ALL WARRANTIES IMPLIED BYTHE LAW OF ANY STATE OF THE U.S.A., INCLUDING THE IMPLIED WARRANTIES
OF MERCHANTABILITYAND FITNESS FOR A PARTICULAR PURPOSE, ARE EXPRESSLY LIMITED TO THE
DURATION OF THE LIMITED WARRANTIES SET FORTH ABOVE. WITH
THE EXCEPTION OF ANY WARRANTIES IMPLIED BY THE LAW OF ANY STATE OF THE U.S.A. AS HEREBY
LIMITED, THE FOREGOING WARRANTY IS EXCLUSIVE AND IN LIEU OF ALL OTHER WARRANTIES,
GUARANTEES, AGREEMENTS AND SIMILAR OBLIGATIONS OF TACP WITH RESPECT TO THE REPAIR OR
REPLACEMENT OF ANY PARTS. IN NO EVENT SHALL TACP BE LIABLE FOR CONSEQUENTIAL OR INCIDENTAL
DAMAGES (INCLUDING, BUT NOT LIMITED TO, LOST PROFITS, BUSINESS INTERRUPTION, MODIFICATION OR
ERASURE OF RECORDED DATA CAUSED BY USE, MISUSE OR INABILITY
TO USE THIS PRODUCT).
No person, agent, distributor, dealer or company is authorized to change, modify or extend the terms of these warranties in
any manner whatsoever. The time within which action must be commenced to enforce any obligation of TACP arising under
this warranty or under any law of the United States or of any state thereof is hereby limited to three hundred sixty five (365)
days from the date you discovered or should have discovered, the defect. This limitation does not apply to implied warranties
arising under the law of any state of the U.S.A.
THIS WARRANTY GIVES YOU SPECIFIC LEGALRIGHTS, AND YOU MAY ALSO HAVE OTHER RIGHTS WHICH MAY
VARY FROM STATE TO STATE IN THE U.S.A. SOME STATES OF THE U.S.A. DO NOT ALLOW LIMITATIONS ON
HOW LONG AN IMPLIED WARRANTY LASTS, WHEN AN ACTION MAY BE BROUGHT, OR THE EXCLUSION OR
LIMITATION OF INCIDENTALOR CONSEQUENTIAL DAMAGES, SO THE ABOVE LIMITATIONS OR EXCLUSIONS
MAY NOT APPLY TO YOU UNDER SUCH CIRCUMSTANCES.
Others
Page 52

52
- IMPORTANT -
CANADIAN WARRANTY INFORMATION
GARANTIE CANADIENNE
STANDARD WARRANTY
TYPE OF SET DVD Player
DVD/VCR Combination
Home Theatre in a Box
DVD Recorder
Portable DVD
DVD/LCD Television Combination
WARRANTY PERIOD 12 MONTHS
GARANTIE NORMALE
TYPE D’APPAREIL Lecteur DVD
DVD/magnétoscope combo
Cinéma maison dans une boîte
Enregistreur DVD
DVD Portatif
Combo téléviseu ACL / DVD
DURÉE DE LA GARANTIE: 12 MOIS
CANADIAN WARRANTY
Toshiba of Canada Limited (TCL) makes the following limited warranties to original consumers in Canada.
Please retain your “Bill of Sale” as proof of purchase.
To obtain a “Canadian Warranty” please register online at
www.toshiba.ca.
Canadian Warranty Information
Should service be required on this unit during the one year warranty
period, TCL's option will be to repair or exchange the defective unit. It
will be necessary to follow this procedure:
Contact: Toshiba of Canada Limited at the Consumer
Electronics Group, customer support line.
Phone: 1-800-268-3404
Email: ceg_customer_support@toshiba.ca
All in-warranty repairs must be made by an authorized TCL service
centre.
For service exchange TCL will arrange to have the unit picked up by
courier and a replacement unit will be returned via same courier. (Note:
A major credit card number will be required as a charge of $25.00 will
apply if no fault is found with the unit.)
During the first 3 months of ownership, a new unit will be supplied as a
replacement. During the remainder of the warranty period a servicerenewed unit will be supplied.
The original “Bill of Sale” must be provided as proof of purchase (it will
be returned with the replacement unit.)
This 12-month warranty will be strictly adhered to.
Out of warranty units should be repaired by a TCL authorized service
centre.
Note: It is the responsibility of the owner to ensure proper packaging.
Should damage in shipping occur, due to poor packaging, a charge
back for the repair will result.
This warranty applies to the original purchaser only and is not transferable.
This warranty does not apply to sets that have been subjected to miuse,
neglect, accident, physical damage or acts of nature.
Sets with the serial number removed, altered, replaced or defaced will
not be covered by this warranty.
The warranties from TCL are effective only if the product is purchased
in Canada from an authorized TCL dealer and operated in Canada.
Products utilized for rental or commercial purposes are not covered by
this warranty.
This warranty is in lieu of all other warranties, guaranties or agreements, whether expressed or implied, and no person, agent distributor,
dealer, service centre or company is authorized to change, modify or
extend its terms in any manner whatsoever.
GARANTIE CANADIENNE
1) Toshiba du Canada Limitée (TCL) offre au Canada les garanties limitées suivantes aux consommateurs originaux.
Veuillez conserver votre « facture » comme preuve d’achat.
Pour obtenir une garantie canadienne, veuillez vous inscrire en
ligne à www.toshiba.ca
Information sur la garantie Canadienne
Si vous avez besoin de service sur cet appareil au cours le l'année de
garantie, Toshiba du Canada Limitée aura l'op tion de réparer ou
échanger l'appareil défectueux. Vous devrez suivre la procédure suivante:
Contact: Toshiba du Canada Limitée au Groupe Électronique aux
consommateurs, service à la clientèle.
Tél: 1-800-268-3404
Courriel: ceg_customer_support@toshiba.ca
Toutes les réparations au cours de la garantie doivent être faites par un
centre de service autorisé Toshiba.
Pour un échange TCL s'assurera qu'un service de courrier ramassera
l'unité et qu'un appareil de remplacement soit expédié par le même service de courrier.
(Note: Un numéro de carte de crédit sera requis car une charge de
25,00$ sera appliquée si toutefois l’appareil n’avait aucun problème de
fonctionnement.)
Une nouvelle unité sera fournie comme remplacement durant les premiers 3 mois de propriété. Par contre durant la balance de la garantie
une unité remise à neuf sera fournie.
La «facture originale doit être fournie comme preuve d’achat (elle vous
sera retournée avec l’unité de remplacement.)
Cette garantie de 12 mois sera strictement adhérée.
Les unités hors de garantie devraient être réparées par un centre de
service autorisé Toshiba.
Note: C’est la responsabilité du propriétaire de s’assurer que l’emballage est adéquat. Vous serez facturé pour toutes réparations causées
par des dommages encourus à cause d’un emballage non adéquat.
Cette garantie est octroyée à l’acheteur initial et n’est pas transférable.
Cette garantie ne s’aplique pas aux appareils qui ont été sujets aux
abus, négligences, accidents, dommages physiques ou actes naturels.
Les appareils dont le numéro de série a été enlevé, altété, remplacé ou
barbouillé ne sont pas couverts par cette garantie.
Les garanties de TCL sont valides seulement sur les unités sont
achetées et utilisées au Canada d'un marchand autorisé TCL.
Cette garantie ne couvre pas les produits de location ou à usage commercial. Cette garantie remplace toutes autres garanties ou ententes
exprimées ou sous-entendues. Aucune personne, agent, distributeur,
concessionaire ou compagnie n’est autorisé à changer, modifier ou
prolonger les termes de cette garantie de quelque façon que ce soit.
Toshiba of Canada Limited 191 McNabb Street Markham, Ontario L3R 8H2
Page 53

Page 54

Dolby and the double-D symbol are trademarks of Dolby Laboratories.
DTS and DTS Digital Out are trademarks of Digital Theater Systems, Inc.
StableSound is a trademark of Toshiba America Consumer Products, LLC.
 Loading...