

Page 1
OWNER’S MANUAL
MANUEL DU PROPRIETAIRE
MANUALE DEL PROPRIETARIO
AIR CONDITIONER (SPLIT TYPE)
MANUAL DEL PROPIETARIO
MANUAL DO UTILIZADOR
CLIMATISEUR (TYPE SPLIT)
KLIMAGERÄT (SPLIT-SYSTEM)
CONDIZIONATORE D’ARIA (TIPO SCOMPONIBILE)
APARATO DE AIRE ACONDICIONADO (TIPO SPLIT)
AR CONDICIONADO (TIPO SPLIT)
AIRCONDITIONER (GESPLITST TYPE)
ΚΛΙΜΑΤΙΣΤΙΚΟ ΜΗΧΑΝΗΜΑ (∆ΙΑΙΡΟΎΜΕΝΟΣ ΤΎΠΟΣ)
<Under Ceiling/Console Type>/<Type Sous Plafond/Console>
<Unterdecken-/Konsolenmodell>/<Tipo a Soffitto/Console>
<Tipo Instalación en Techo/Consola>/<Sob Tecto/Tipo de Consola>
<Plafond-/Consoletype>/<Τυποσ Για Τοποθετηση Κατω Απο Την Οροφη/Κονσολασ>
Heat Pump Model/Modèle à thermopompe
Geräte mit Heizung/Modello con pompa di riscaldamento
Modelo con bomba de calor/Modello de bomba térmica
Model met warmtemomp/Μοντέλο µε Αντλία Θερµτητασ
Indoor Unit/Unité intérieure Outdoor Unit/Unité extérieure
Raumeinheit/Unità interna Außengerät/Unità esterna
Unidad interior/Unidade interior Unidad exterior/Unidade exterior
Binnenunit/Εσωτερική Μονάδα Buitenunit/Εξωτερική Μονάδα
BETRIEBSANLEITUNG
GEBRUIKSAANWIJZING
Ο∆ΗΓΙΕΣXΡΗΣΗΣ
RAV-SM562XT-E RAV-SM562AT-E
RAV-SM802XT-E RAV-SM802AT-E
Thank you very much for purchasing TOSHIBA Air Conditioner.
Please read this owner’s manual carefully before using your Air Conditioner.
• Be sure to obtain the “Owner’s manual” and “Installation manual” from constructor (or dealer).
Request to constructor or dealer
Please clearly explain the contents of the Owner’s manual and hand over it.
Nous vous remercions pour avoir choisi un climatiseur TOSHIBA.
Veuillez lire attentivement ce Manuel du propriétaire avant d’utiliser votre climatiseur.
• Assurez-vous que le constructeur (ou le revendeur) vous remette le “Manuel du propriétaire”
et le “Manuel d’installation”.
Demande au constructeur ou au revendeur
Veuillez expliquer clairement le contenu du Manuel du propriétaire et le remettre au client.
Wir danken Ihen, dass Sie sich für ein TOSHIBA Klimagerät entschieden haben.
Bitte lesen Sie diese Betriebsanleitung, bevor Sie lhr Klimagerät benutzen, sorgfältig.
• Lassen Sie sich die “Betriebsanleitung” und das “Installations-Handbuch” unbedingt vom Installateur
oder vom Lieferanten aushändigen.
Eine Bitte an den Installateur oder Lieferanten:
Bitt erklären Sie dem Käufer den Inhalt der Betriebsanleitung und händigen sie ihm aus.
Grazie di aver acquistato un condizionatore d’aria TOSHIBA.
Prima di usare il condizionatore d’aria, leggere con attenzione questo manuale del proprietario.
• Si raccomanda di tenere a portata di mano il “Manuale del proprietario” e il “Manuale di installazione” ricevuti dal produttore (o dal rivenditore).
Richiesta al produttore o al rivenditore
Spiegare chiaramente il contenuto del Manuale del proprietario e consegnarne una copia all’utente.
Muchas gracias por haber adquirido el aparato de aire acondicionado TOSHIBA.
Lea atentamente este manual del propietario antes de utilizar el aparato de aire acondicionado.
• Asegúrese de que el fabricante (o distribuidor) le proporcione el “Manual del propietario” y el “Manual de instalación”.
Solicitud al fabricante o distribuidor
Explique con claridad el contenido del Manual del propietario y entréguelo al cliente.
Muito obrigada por adquirir o Ar Condicionado TOSHIBA.
Leia atentamente este manual do utilizador antes de utilizar o seu ar condicionado.
• Não se esqueça de receber o “Manual so utilizador” e o “Manual de inslatação” do fabricante (ou agente).
Pedido ao fabricante ou agente
Explique por favor o conteúdo do Manual so utilizador e entregue-o.
Hartelijk dank voor uw keuze voor een airconditioner van TOSHIBA.
Lees deze gebruiksaanwijzing zorgvuldig door voordat ude airconditioner gaat gebruiken.
• Zorg ervoor dat u zowel de ‘gebruiksaanwijzing’ als de ‘installatiehandleiding’ van de installateur (of leverancier) krijgt.
Verzoek aan de installateur of de leverancier
Leg de inhoud van de gebruiksaanwijzing duidelijk uit en overhandig de gebruiksaanwijzing nadien aan de klant.
Σασ ευχαριστούµε πολύ που πρστιµήσατε για την αγορά σασ ένα Κλιµατιστικ TOSHIBA.
Παρακαλούµε διαβάστε προσεκτικά τισ οδηγίεσ χρήσησ πριν απ τη χρήση του Κλιµατιστικού.
• Βεβαιωθείτε τι ο κατασκευαστήσ (ή ο πωλητήσ) σασ παρέδωσε και τισ “Οδηγίεσ Χρήσησ” και το “Εγχειρίδιο Εγκατάστασησ”.
Παράκληση για τον κατασκευαστή ή τον πωλητή
Παρακαλώ εξηγήστε µε σαφήνεια τα περιεχµενα των Οδηγιών Χρήσησ και παραδώστε το.
Page 2

This product is compliant with Directive 2002/95/EC, and cannot be disposed as unsorted municipal waste.
Cet article est conforme à la Directive 2002/95/CE et doit être éliminé à travers la collecte sélective.
Dieses Produkt entspricht der Richtlinie 2002/95/EC und muss als Sondermüll behandelt werden.
Questo prodotto è conforme alla direttiva 2002/95/CE e non può essere smaltito utilizzando la generica raccolta
rifiuti da parte della municipalizzata.
Este producto cumple con las especificaciones de la directiva 2002/95/CE, y no se puede desechar como
residuo doméstico no clasificado.
Este produto cumpre a Directiva 2002/95/CE e não pode ser descartado como resíduo municipal não tratado.
Dit product voldoet aan de richtlijn 2002/95/EC en mag niet afgevoerd worden als ongesorteerd huishoudelijk
afval.
Αυτ το προϊν είvαι συµβατ µε την Oδηγία 2002/95/ΕC, και δεv µπορεί να απορριφθεί µαζί µε τα µη
ταξιvoµηµέvα δηµοτικά απβλητα.
Page 3

ADOPTION OF NEW REFRIGERANT
This Air Conditioner is a new type which adopts a new refrigerant HFC (R410A) instead of the conventional
refrigerant R22 in order to prevent destruction of the ozone layer.
UTILISATION DU NOUVEAU REFRIGERANT
Ce climatiseur est d’un type inédit qui utilise le nouveau réfrigérant HFC (R410A) au lieu du réfrigérant traditionnel
R22, afin d’ éviter la destruction de la couche d’ozone.
EINFÜHRUNG EINES NEUEN KÜHLMITTELS
Dies ist ein neuartiges Klimagerät. Anstatt des herkömmlichen Kühlmittels R22 verwendet es das neue
ozonschichtschonende HFC Kühlmittel R410A.
ADOZIONE DI UN NUOVO REFRIGERANTE
Questo condizionatore d’aria è di un tipo nuovo che adotta un nuovo refrigerate HFC (R410A) al posto del
refrigerante convenzionale R22, per prevenire la distruzione dello strato di ozono dell’atmosfera terrestre.
ADOPCIÓN DE NUEVO REFRIGERANTE
Este aparato de aire acondicionado es un modelo reciente que incorpora el nuevo refrigerante HFC (R410A) en
lugar del refrigerante convencional R22 para así evitar daños en la capa de ozono.
ADOPÇÃO DO NOVO REFRIGERANTE
Este ar condicionado é um modelo novo que adopta um novo refrigerante HFC (R410A) em vez do refrigerante
convencional R22 para evitar a destruição da cama de ozono.
TOEPASSING VAN EEN NIEUW KOELMIDDEL
Deze airconditioner is een nieuwe type dat werkt met een nieuw koelmiddel HFC (R410A) in plaats van met het
conventionele koelmiddel R22, als bijdrage om de aantasting van de ozonlaag te reduceren.
YIOΘETHΣH NEOY ΨYKTIKOY
To παρv Kλιµατιστικ είναι νέος τύπος που υιοθετεί νέο ψυκτικ HFC (R410A) στη θέση του συµβατικού
ψυκτικού R22 προκειµένου να βοηθήσει στην προστασία του ζοντος.
Page 4

ACCESSORIES/AIR FILTER COMPONENTS ............................................ 1
PRECAUTIONS FOR SAFETY .................................................................... 1
PARTS NAME .............................................................................................. 3
ENGLISH
NAMES AND FUNCTIONS OF INDICATORS AND CONTROLS ON
INDOOR UNIT .............................................................................................. 3
REMOTE CONTROLLER AND ITS FUNCTIONS ....................................... 4
NAMES AND FUNCTIONS OF INDICATIONS ON
REMOTE CONTROLLER ............................................................................. 5
PREPARATION AND CHECK BEFORE USE ............................................. 5
HANDLING THE REMOTE CONTROLLER ................................................ 7
AUTOMATIC OPERATION .......................................................................... 8
AUTOMATIC OPERATION (AUTO CHANGEOVER) .................................. 8
COOLING/HEATING/FAN ONLY OPERATION .......................................... 9
DRY OPERATION ........................................................................................ 9
ACCESSOIRES/COMPOSANTS DU FILTRE A AIR ................................ 25
MESURES DE SECURITE ......................................................................... 25
FRANÇAIS
NOM DES PIECES ..................................................................................... 27
NOM ET FONCTION DES INDICATEURS ET COMMANDES DE
L’UNITE INTERIEURE ............................................................................... 27
LA TELECOMMANDE ET SES FONCTIONS ........................................... 28
NOMS ET FONCTIONS DES INDICATIONS DE LA
TELECOMMANDE ..................................................................................... 29
PREPARATION ET VERIFICATION AVANT UTILISATION ..................... 29
MANIPULATION DE LA TELECOMMANDE ............................................. 31
FONCTIONNEMENT AUTOMATIQUE ...................................................... 32
FONCTIONNEMENT AUTOMATIQUE
(PERMUTATION AUTOMATIQUE) ........................................................... 32
REFROIDISSEMENT/CHAUFFAGE/VENTILATEUR SEUL ..................... 33
CONTENTSCONTENTS
HIGH POWER OPERATION ...................................................................... 10
TIMER OPERATION .................................................................................. 10
MEMORY/PRESET OPERATION .............................................................. 12
ADJUSTING AIR FLOW DIRECTION ........................................................ 13
AUTO RESTART OPERATION ................................................................. 14
HOW THE AIR CONDITIONER WORKS ................................................... 15
TEMPORARY OPERATION ....................................................................... 16
MAINTENANCE ......................................................................................... 17
AIR CONDITIONER OPERATIONS AND PERFORMANCE ..................... 19
TROUBLES AND CAUSES ....................................................................... 20
SPECIFICATIONS ...................................................................................... 22
TROUBLES AND CAUSES (Concerning Remote Controller) ................ 23
SOMMAIRE
DESHUMIDIFICATION ............................................................................... 33
MODE HIGH POWER ................................................................................. 34
MODE MINUTERIE .................................................................................... 34
MODE MEMOIRE/PREREGLAGE ............................................................. 36
REGLAGE DU SENS DU FLUX D’AIR ...................................................... 37
FONCTION DE REDEMARRAGE AUTOMATIQUE .................................. 38
MODE DE FONCTIONNEMENT DU CLIMATISEUR ................................ 39
FONCTIONNEMENT TEMPORAIRE ......................................................... 40
MAINTENANCE ......................................................................................... 41
FONCTIONNEMENT ET PERFORMANCES DU CLIMATISEUR ............. 43
PROBLEMES ET CAUSES ........................................................................ 44
DONNÉES TECHNIQUES .......................................................................... 46
PROBLEMES ET CAUSES (Concernant la Télécommande) ................. 47
ZUBEHÖR/BESTANDTEILE DES LUFTFILTERS .................................... 49
SICHERHEITSVORKEHRUNGEN ............................................................. 49
TEILEBEZEICHNUNG ............................................................................... 51
DEUTSCH
BEZEICHNUNGEN UND FUNKTIONEN DER ANZEIGEN UND
REGLER AM RAUMGERÄT ...................................................................... 51
DIE FERNBEDIENUNG UND IHRE FUNKTIONEN ................................... 52
BEZEICHNUNG UND FUNKTION DER ANZEIGEN AUF DER
FERNBEDIENUNG ..................................................................................... 53
VORBEREITUNGEN UND ÜBERPRÜFUNGEN VOR DEM
BETRIEB .................................................................................................... 53
HANDHABUNG DER FERNBEDIENUNG ................................................. 55
AUTOMATIKBETRIEB ............................................................................... 56
AUTOMATIKBETRIEB (AUTOMATISCHER
BETRIEBSARTWECHSEL) ....................................................................... 56
KÜHL-/HEIZ-/NUR VENTILATOR - BETRIEB ........................................... 57
ACCESSORI/COMPONENTI DEI FILTRI DELL’ARIA .............................. 73
PRECAUZIONI PER LA SICUREZZA ....................................................... 73
NOMBRE DE LOS COMPONENTES ........................................................ 75
ITALIANO
NOMI E FUNZIONI DEGLINDICATORI E DEI COMANDI
SULL’UNITÀ INTERNA .............................................................................. 75
FUNZIONAMENTO DEL TELECOMANDO ............................................... 76
NOMI E FUNZIONI DELLE INDICAZIONI SUL TELECOMANDO ............ 77
OPERAZIONI PRELIMINARI E CONTROLLO PRIMA DELL’USO .......... 77
USO DEL TELECOMANDO ....................................................................... 79
FUNZIONAMENTO AUTOMATICO ........................................................... 80
FUNZIONAMENTO AUTOMATICO (COMMUTAZIONE
AUTOMATICA) ........................................................................................... 80
FUNZIONAMENTO DI RAFFREDDAMENTO/DI RISCALDAMENTO/
A SOLO VENTILATORE ............................................................................ 81
USO PER LA DEUMIDIFICAZIONE .......................................................... 81
INHALT
ENTFEUCHTUNGS-BETRIEB ................................................................... 57
HOCHLEISTUNGSBETRIEB ..................................................................... 58
TIMERBETRIEB ......................................................................................... 58
SPEICHERBETRIEB .................................................................................. 60
REGULIERUNG DER LUFTSTROMRICHTUNG ....................................... 61
AUTOMATISCHER NEUSTART ................................................................ 62
WIE DIE KLIMAANLAGE FUNKTIONIERT ............................................... 63
BETRIEB OHNE FERNBEDIENUNG (TEMPORARY) .............................. 64
WARTUNGSHINWEISE ............................................................................. 65
BETRIEB UND LEISTUNG DER KLIMAANLAGE .................................... 67
STÖRUNGEN UND IHRE URSACHEN ..................................................... 68
TECHNISCHE DATEN ............................................................................... 70
STÖRUNGEN UND IHRE URSACHEN
(Betreffend die Fernbedienung) .............................................................. 71
INDICE
FUNZIONAMENTO HIGH POWER ............................................................ 82
FUNZIONAMENTO DEL TIMER ................................................................ 82
FUNZIONI MEMORY/PRESET .................................................................. 84
REGOLAZIONE DELLA DIREZIONE DEL FLUSSO D’ARIA ................... 85
FUNZIONE DI RIACCENSIONE AUTOMATICA (AUTO RESTART) ........ 86
MODI DI FUNZIONAMENTO DEL CONDIZIONATORE D’ARIA .............. 87
FUNZIONAMENTO TEMPORANEO .......................................................... 88
MANUTENZIONE ....................................................................................... 89
FUNZIONAMENTO E PRESTAZIONI DEL CONDIZIONATORE
D’ARIA ........................................................................................................ 91
PROBLEMI DI FUNZIONAMENTO E RELATIVE CAUSE ........................ 92
CARATTERISTICHE TECHNICHE ............................................................ 94
PROBLEMI DI FUNZIONAMENTO (Del Telecomando)
E RELATIVE CAUSE ................................................................................. 95
Page 5

CONTENIDO
ACCESORIOS/COMPONENTES DEL FILTRO DE AIRE ......................... 97
PRECAUCIONES SOBRE SEGURIDAD ................................................... 97
NOMBRE DE LOS COMPONENTES ........................................................ 99
NOMBRES Y FUNCIONES DE LOS INDICADORES Y CONTROLES
DE LA UNIDAD INTERIOR ........................................................................ 99
MANDO A DISTANCIA Y SUS FUNCIONES .......................................... 100
NOMBRES Y FUNCIONES DE INDICACIONES DEL MANDO A
DISTANCIA .............................................................................................. 101
PREPARATIVOS Y COMPROBACIONES PREVIAS ............................. 101
MANEJO DEL CONTROL REMOTO ....................................................... 103
FUNCIONAMIENTO AUTOMÁTICO ........................................................ 104
FUNCIONAMIENTO AUTOMÁTICO (AUTO CHANGEOVER) ............... 104
REFRIGERACIÓN/CALEFACCIÓN/VENTILACIÓN ............................... 105
FUNCIONAMIENTO DE DESHUMIDIFICACIÓN .................................... 105
ACESSÓRIOS/COMPONENTES DO FILTRO DE AR ............................ 121
PRECAUÇÕES RELATIVAS A SEGURANÇA ....................................... 121
DESIGNAÇÃO DAS PEÇAS .................................................................... 123
DESIGNAÇÃO E FUNÇÕES DOS INDICADORES E CONTROLOS DA
UNIDADE INTERIOR ............................................................................... 123
COMANDO À DISTÂNCIA E RESPECTIVAS FUNÇÕES ...................... 124
DESIGNAÇÕES E FUNÇÕES DE INDICADORES DO COMANDO À
DISTÂNCIA .............................................................................................. 125
PREPARAÇÃO E VERIFICAÇÃO ANTES DA UTILIZAÇÃO ................. 125
UTILIZAÇÃO DO TELECOMANDO ......................................................... 127
FUNCIONAMENTO AUTOMÁTICO ......................................................... 128
FUNCIONAMENTO AUTOMÁTICO (AUTO CHANGEOVER) ................ 128
MODO DE AQUECIMENTO/REFRIGERAÇÃO/VENTILAÇÃO .............. 129
FUNCIONAMENTO A SECO ................................................................... 129
FUNCIONAMIENTO DE ALTA POTENCIA (HIGH POWER) .................. 106
FUNCIONAMIENTO DEL TEMPORIZADOR ........................................... 106
MEMORIA/FUNCIONAMIENTO PREDEFINIDO ..................................... 108
AJUSTE DE LA DIRECCIÓN DEL FLUJO DE AIRE .............................. 109
FUNCIONAMIENTO DE REINICIO AUTOMÁTICO ................................. 110
CÓMO TRABAJA EL ACONDICIONADOR DE AIRE ............................. 111
FUNCIONAMIENTO TEMPORAL ............................................................ 112
MANTENIMIENTO .................................................................................... 113
FUNCIONAMIENTO Y RENDIMIENTO DEL ACONDICIONADOR
DE AIRE ................................................................................................... 115
PROBLEMAS Y CAUSAS ....................................................................... 116
ESPECIFICACIONES ............................................................................... 118
PROBLEMAS Y CAUSAS (Relativas al Mando a distancia) ................ 119
ÍNDICE
OPERAÇÃO DE ALTA POTÊNCIA ......................................................... 130
OPERAÇÃO DO TEMPORIZADOR ......................................................... 130
MEMÓRIA/OPERAÇÃO PRÉ CONFIGURADA ...................................... 132
AJUSTE DA DIRECÇÃO DO FLUXO DE AR .......................................... 133
FUNÇÃO DE REPOSIÇÃO EM MARCHA AUTOMÁTICA ..................... 134
COMO FUNCIONA O AR CONDICIONADO ........................................... 135
FUNCIONAMENTO TEMPORÁRIO ......................................................... 136
MANUTENÇÃO ........................................................................................ 137
FUNCIONAMENTO E DESEMPENHO DO AR CONDICIONADO .......... 139
PROBLEMAS E CAUSAS ....................................................................... 140
CARACTERÍSTICAS TÉCNICAS ............................................................ 142
PROBLEMAS E CAUSAS (relativos ao controlo remoto) ................... 143
ESPAÑOL
PORTUGUÊS
ACCESSOIRES/LUCHTFILTERCOMPONENTEN .................................. 145
VEILIGHEIDSVOORZORGEN ................................................................. 145
ONDERDELEN ......................................................................................... 147
BENAMING EN FUNCTIE VAN INDICATOREN EN
BEDIENINGSELEMENTEN OP BINNENMODULE ................................. 147
AFSTANDSBEDIENING EN FUNCTIES ................................................. 148
NAMEN EN FUNCTIES VAN AANDUIDINGEN OP DE
AFSTANDSBEDIENING .......................................................................... 149
VOORBEREIDING EN CONTROLE VOORAF ........................................ 149
BEHANDELING VAN DE AFSTANDSBEDIENING ................................ 151
AUTOMATISCHE WERKING ................................................................... 152
AUTOMATISCHE WERKING (AUTOMATISCHE
OMSCHAKELING) ................................................................................... 152
KOELING/VERWARMING/VENTILATIE ................................................. 153
ΠΕΡΙΕΧΟΜΕΝΑ
ΕΞΑΡΤΗΜΑΤΑ/ΜΕΡΗ ΦΙΛΤΡΟΥ ΑΕΡΑ ................................................. 169
ΠΡΟΦΥΛΑΞΕΙΣ ΑΣΦΑΛΕΙΑΣ ................................................................... 169
ΟΝΟΜΑΤΟΛΟΓΙΑ ΕΞΑΡΤΗΜΑΤΩΝ ....................................................... 171
ΟΝΟΜΑΤΑ ΚΑΙ ΛΕΙΤΟΥΡΓΙΕΣ ΤΩΝ ΕΝ∆ΕΙΞΕΩΝ ΚΑΙ
ΧΕΙΡΙΣΤΗΡΙΩΝ ΤΗΣ ΕΣΩΤΕΡΙΚΗΣ ΜΟΝΑ∆ΑΣ ..................................... 171
ΤΟ ΤΗΛΕΧΕΙΡΙΣΤΗΡΙΟ ΚΑΙ ΟΙ ΛΕΙΤΟΥΡΓΙΕΣ ΤΟΥ ............................... 172
ΟΝΟΜΑΤΑ ΚΑΙ ΛΕΙΤΟΥΡΓΙΕΣ ΤΩΝ ΕΝ∆ΕΙΞΕΩΝ ΤΟΥ
ΤΗΛΕΧΕΙΡΙΣΤΗΡΙΟΥ ............................................................................... 173
ΠΡΟΕΤΟΙΜΑΣΙΑ ΚΑΙ ΕΛΕΓΧΟΣ ΠΡΙΝ ΑΠΟ ΤΗ ΧΡΗΣΗ ....................... 173
ΧΕΙΡΙΣΜΟΣ ΤΟΥ ΤΗΛΕΧΕΙΡΙΣΤΗΡΙΟΥ .................................................. 175
ΑΥΤΟΜΑΤΗ ΛΕΙΤΟΥΡΓΙΑ ....................................................................... 176
ΑΥΤΟΜΑΤΗ ΛΕΙΤΟΥΡΓΙΑ (AYTOMATOΣ EΛEΓXOΣ AΛΛAΓHΣ) ......... 176
ΛΕΙΤΟΥΡΓΙΑ ΨΥΞΗΣ/ΘΕΡΜΑΝΣΗΣ/ΜΟΝΟ ΑΝΕΜΙΣΤΗΡΑ ................. 177
ΛΕΙΤΟΥΡΓΙΑ ΑΦΥΓΡΑΝΣΗΣ ................................................................... 177
INHOUD
DROGE WERKINGSSTAND (DRY) ......................................................... 153
WERKING MET HOOG VERMOGEN (HIGH POWER) ........................... 154
TIMERGESTUURDE WERKING .............................................................. 154
GEHEUGEN-/VOORINSTELWERKING .................................................. 156
LUCHTSTROOM REGELEN .................................................................... 157
AUTOMATISCHE HERSTART ................................................................ 158
WERKING VAN DE AIRCONDITIONING ................................................ 159
TEMPORARY FUNCTIE .......................................................................... 160
ONDERHOUD .......................................................................................... 161
WERKING EN PRESTATIES AIRCONDITIONING ................................. 163
PROBLEMEN EN OORZAKEN ............................................................... 164
TECHNISCHE GEGEVENS ..................................................................... 166
PROBLEMEN EN OORZAKEN (betreffende afstandsbediening) ........ 167
ΛΕΙΤΟΥΡΓΙΑ HIGH POWER .................................................................... 178
ΛΕΙΤΟΥΡΓΙΑ TIMER ................................................................................ 178
ΛΕΙΤΟΥΡΓΙΑ MEMORY/PRESET ........................................................... 180
ΡΥΘΜΙΣΗ ΤΗΣ ΚΑΤΕΥΘΥΝΣΗΣ ΡΟΗΣ .................................................. 181
ΛΕΙΤΟΥΡΓΙΑ ΑΥΤΟΜΑΤΗΣ ΕΠΑΝΕΚΚΙΝΗΣΗΣ .................................... 182
ΠΩΣ ΛΕΙΤΟΥΡΓΕΙ ΤΟ ΚΛΙΜΑΤΙΣΤΙΚΟ ΜΗΧΑΝΗΜΑ ............................ 183
ΠΡΟΣΩΡΙΝΗ ΛΕΙΤΟΥΡΓΙΑ ...................................................................... 184
ΣΥΝΤΗΡΗΣΗ ............................................................................................ 185
ΛΕΙΤΟΥΡΓΙΕΣ ΚΑΙ ΑΠΟ∆ΟΣΗ ΤΟΥ ΚΛΙΜΑΤΙΣΤΙΚΟΥ
ΜΗΧΑΝΗΜΑΤΟΣ ..................................................................................... 187
ΒΛΑΒΕΣ ΚΑΙ ΑΙΤΙΑ ................................................................................. 188
ΠΡΟ∆ΙΑΓΡΑΦΕΣ ..................................................................................... 190
ΒΛΑΒΕΣ ΚΑΙ ΠΙΘANA ΑΙΤΙΑ (Σχετικά µε το τηλεχειριστήριο) .......... 191
NEDERLANDS
EΛΛΗΝΙΚΑ
Page 6
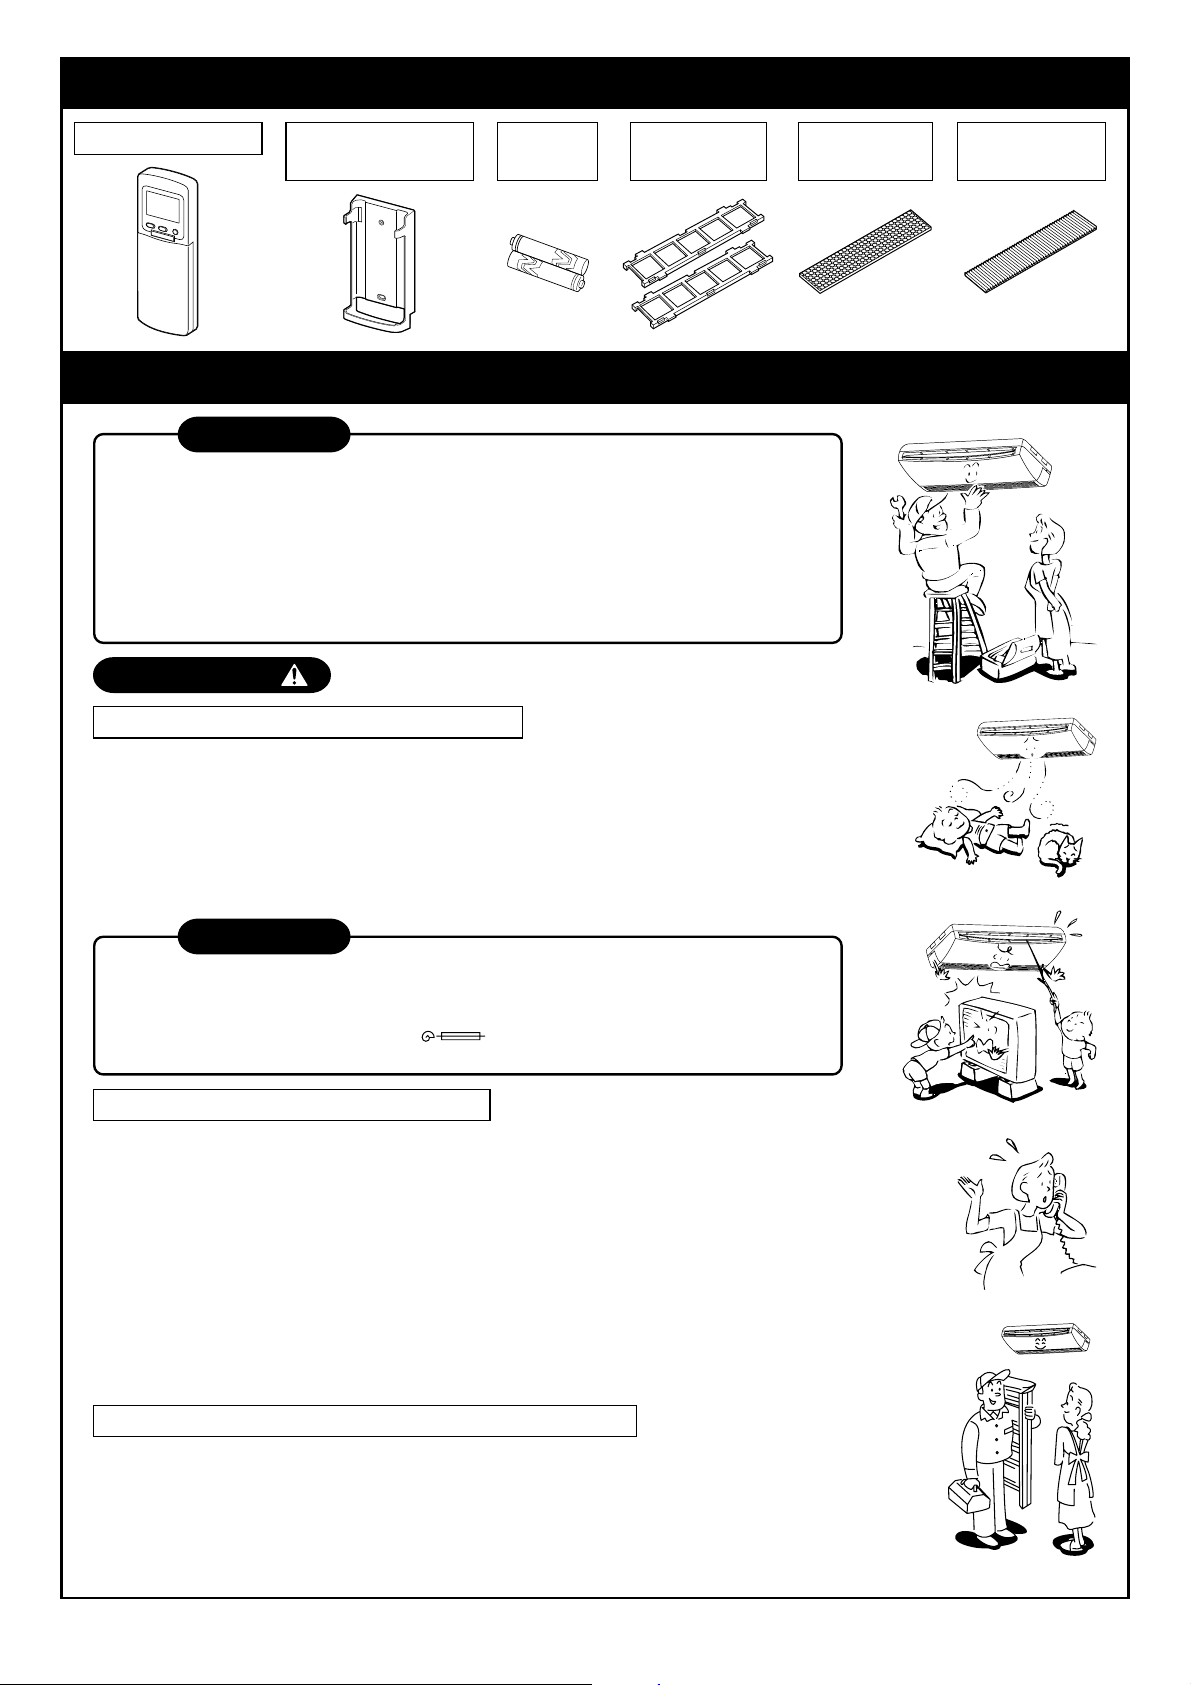
ACCESSORIES AIR FILTER COMPONENTS
Remote controller Remote controller
holder
Batteries
(two)
Filter frames
(two)
PRECAUTIONS FOR SAFETY
DANGER
• DO NOT ATTEMPT TO INSTALL THIS UNIT BY YOURSELF.
THIS UNIT REQUIRES QUALIFIED INSTALLER.
• DO NOT ATTEMPT TO REPAIR THE UNIT BY YOURSELF.
THIS UNIT HAS NO COMPONENTS WHICH YOU CAN REPAIR.
• OPENING OR REMOVING THE COVER WILL EXPOSE YOU TO
DANGEROUS VOLTAGES.
• TURNING OFF THE POWER SUPPLY WILL NOT PREVENT POTENTIAL
ELECTRIC SHOCK.
WARNING
Sasa-Zeolite
plus filter
Bio-enzyme &
Gingko filter
WARNINGS ABOUT INSTALLATION
• Make sure to ask a dealer or a store specialized in electric work to install the
air conditioner.
If the air conditioner is imperfectly installed by yourself, it may cause some
problems such as water leak, electric shock, fire, and so on.
• Ground the air conditioner without fail.
Do not connect the ground wire to gas pipe, water pipe, lightning rod or ground
wire of telephone. If the air conditioner is imperfectly grounded, it may cause
electric shock.
CAUTION
TO DISCONNECT THE APPLIANCE FROM THE MAIN POWER SUPPLY
This appliance must be connected to the main power supply by means of a circuit
breaker or a switch with a contact separation of at least 3 mm.
The installation fuse (25A D type
line of this conditioner.
WARNINGS ABOUT OPERATION
• Avoid cooling the room too strong or exposing the human body to cool wind for a
long time, because it is bad for the health.
• Do not insert fingers and sticks into the air outlet and air inlet to avoid getting
injured and damaging the machine, because there are fans running at a high
speed inside both the air inlet and air outlet.
• When you are aware of something abnormal with the air conditioner (smells
something scorching, cools weak, etc.), immediately turn off the main switch, the
circuit breaker, from the main power supply to stop the air conditioner, and make
contact with the dealer.
If the air conditioner is continuously operated with something abnormal, it may
cause machine failure, electric shock, fire, and so on.
• Do not spill water or other liquid on the indoor unit. If the unit is wet, it may cause
an electric shock.
) must be used for the power supply
WARNINGS ABOUT MOVEMENT AND REPAIR
• Do not move nor repair any unit by yourself.
Since there is high voltage inside the unit, you may get an electric shock when
removing the cover and main unit.
• Whenever the air conditioner needs repair, make sure to ask the dealer to do it.
If it is repaired imperfectly, it may cause electric shock or fire.
• When moving the air conditioner for re-installing in another place, ask the dealer to
do it. If it is imperfectly installed, it may cause electric shock or fire.
1
Page 7
CAUTION
CAUTIONS ABOUT INSTALLATION
• Certainly lay the drain hose for perfect draining.
Wrong drainage may cause flooding in the house and getting furniture wet.
• Make sure to connect the air conditioner to an exclusive power supply of the
rated voltage; otherwise, the unit may break down or cause a fire.
• Do not install the unit in a place where inflammable gas may leak.
If inflammable gas accumulates around the unit, it may cause a fire.
CAUTIONS ABOUT OPERATION
• Carefully read this manual before starting the air conditioner. The manual
includes many important things for daily operation.
• Do not use this air conditioner for other purposes such as preserving food,
precision instruments, art objects, breeding animals, growing potted plants, etc.
• Avoid exposing potted plants and animals to wind of the air conditioner,
because it badly affects the health and growing of them.
• When the air conditioner is operated together with a combustion appliance in
the same place, be careful of ventilation to let fresh air into the room.
Poor ventilation causes oxygen shortage.
• When the air conditioner is used in a closed room, be careful of sufficient
ventilation of the room. Poor ventilation causes oxygen shortage.
• Do not touch operation button with wet finger; otherwise, you may get an
electric shock.
• Do not place any combustion appliance in a place where it is directly exposed
to wind of the air conditioner; otherwise, it may cause imperfect combustion.
• When the air conditioner won’t be used for a considerably long time, turn off
the main switch or the circuit breaker, for safety. Disconnection from the
power supply prevents the unit from lightning and power source surge.
• Check the concrete blocks, etc. underneath the outdoor unit occasionally. If
the base is left damaged or deteriorated, the unit may topple over and inflict
an injury on a person as the worst case.
• When cleaning the unit, make sure to turn off the main switch or circuit
breaker beforehand for preventing you from getting injured by the electric fan
running inside.
For details of cleaning method, refer to “Maintenance” on page 17 and 18.
• Do not put a vessel with water such as a vase on the unit, because water may
possibly sink into the unit and will bring about electric shock because of
deterioration in electric insulation.
• Do not put anything on the outdoor unit or step onto it. If you do so, it may not
only topple over the unit but also injure yourself.
• To make the air conditioner demonstrate its original performance, operate it
within the range of the operating temperature specified in the instructions.
Otherwise it may malfunction, break down or water may leak from the unit.
• Prevent any liquid from falling into the remote controller. Do not spill juice,
water or any kind of liquid. (In case of Wireless Remote controller)
ENGLISH
2
Page 8
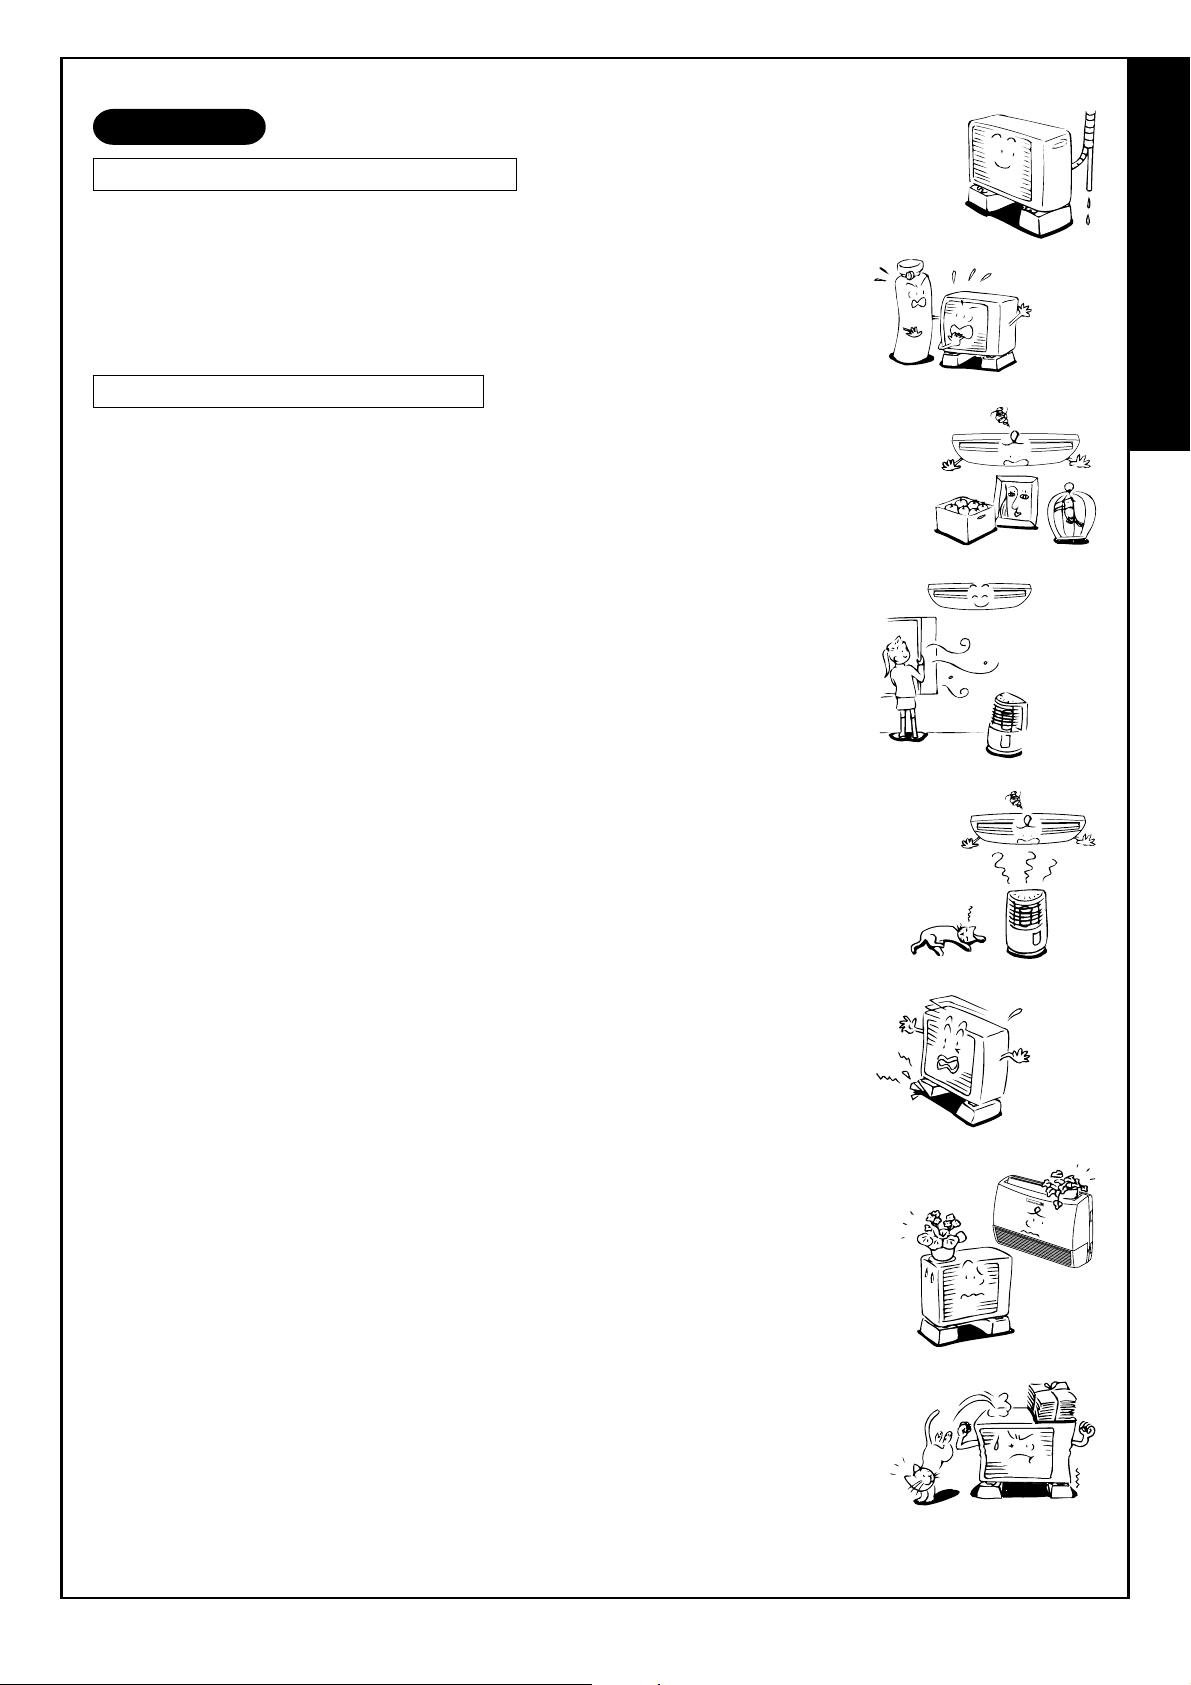
PARTS NAME
PRE.DFILTERHi POWER
Outdoor unit
(1) Air outlet (Blows off hot air during cooling or
cool air during heating)
(2) Power supply box (Contains electrical parts)
(3) Earth screw (In the electrical parts box)
(4) Refrigerant line connections
Indoor unit
(5) Room temperature sensor
(6) Front panel
(7) Air inlet grille
(8) Air filter
(9) Air outlet
(10) Horizontal air flow louver
(11) Vertical air flow louver
(12) Display panel
(13) Infrared signal receiver
(14) Remote controller
(1)
(14)
(10)
(11)
(9)
(12)
(13)
(8)
(7)
(2),(3)
(4)
(6)
(5)
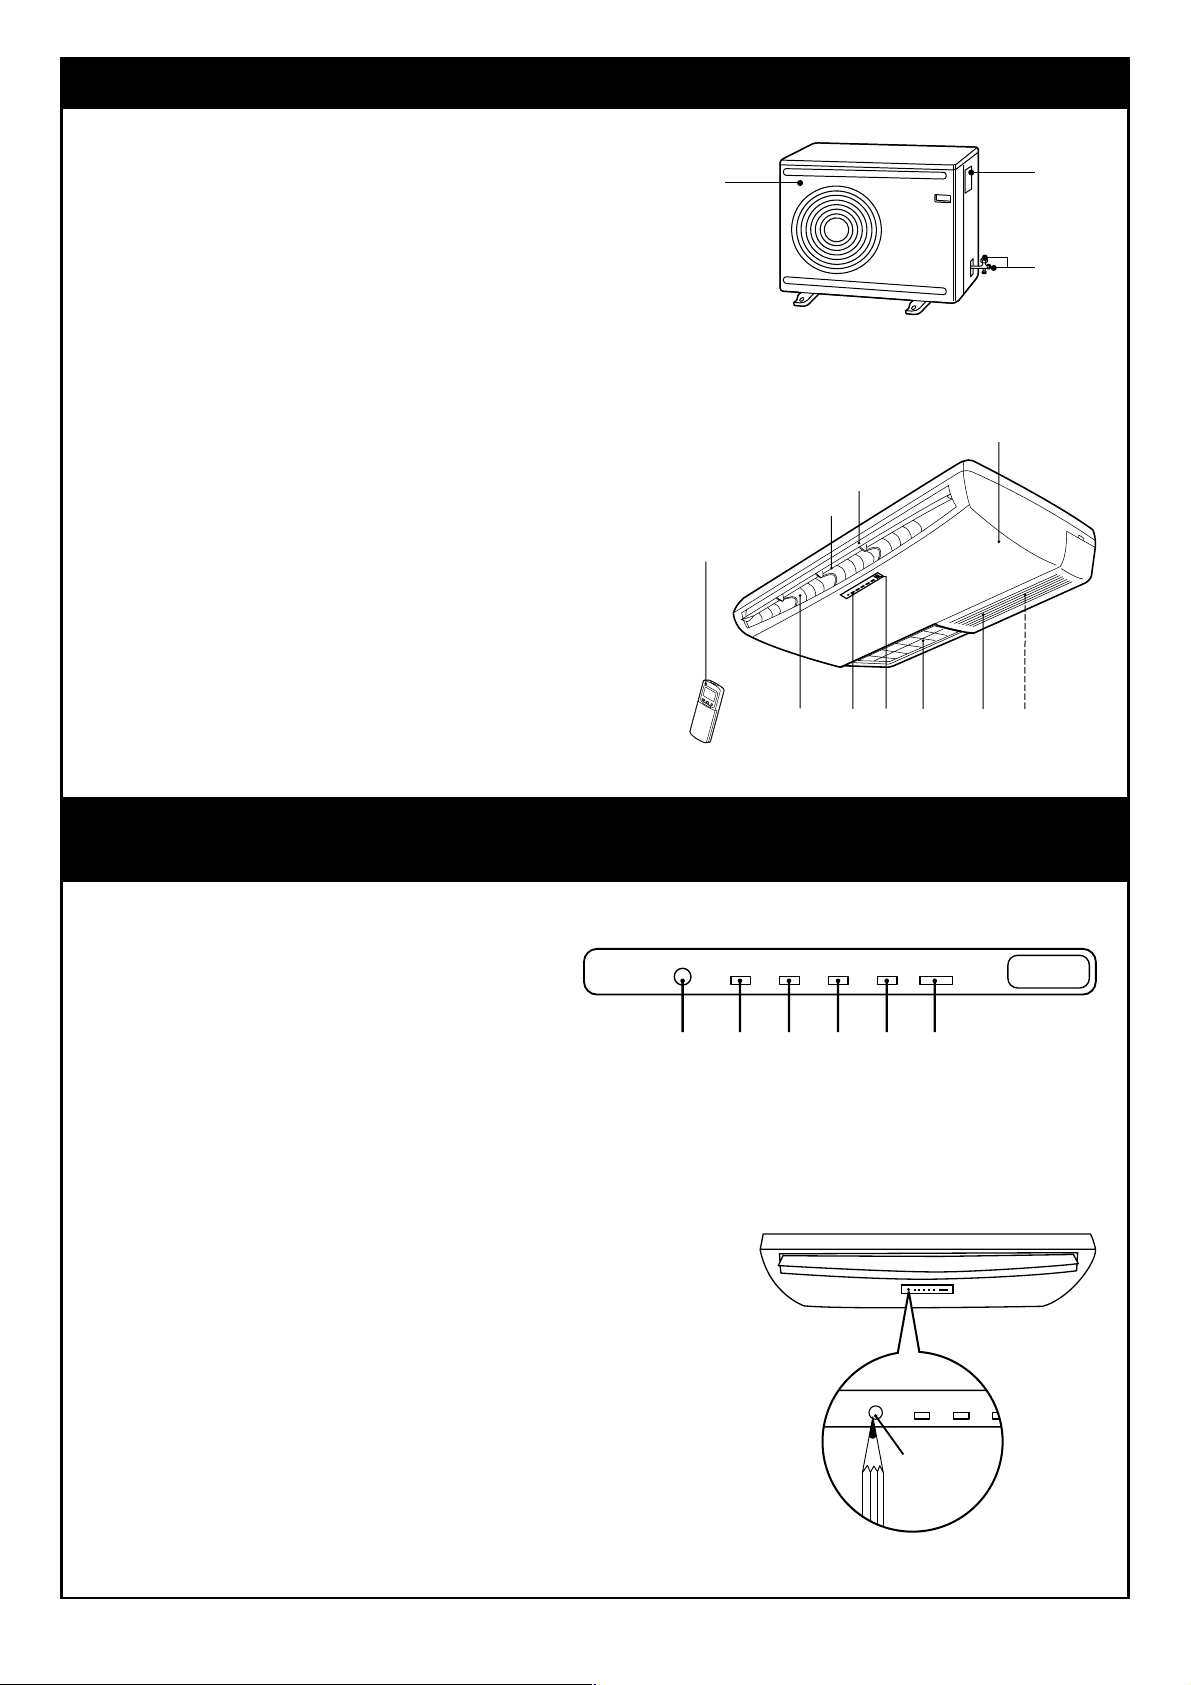
NAMES AND FUNCTIONS OF INDICATORS AND CONTROLS
ON INDOOR UNIT
Display panel
The operating conditions are indicated below.
(1) TEMPORARY button
(2) Hi POWER lamp (Green)
(3) FILTER lamp (Orange)
(4) PRE.DEF lamp (Orange)
(5) TIMER lamp (Yellow)
(6) OPERATION lamp (Green/*Orange)
The operation lamps flash rapidly (five times per second),
when safety protection features come into operation.
* When the auto restart function is in operation, the
OPERATION lamp is orange.
TEMPORARY button
If you misplace or lose the remote controller or its batteries are
exhausted, push the TEMPORARY button.
• Push the TEMPORARY button to start the air conditioner.
• Push this button once again to stop it.
(2) (3)(1) (4) (5) (6)
PRE.DEF TIMER OPERATIONFILTERHi POWER
TEMPORARY
button
3
Page 9
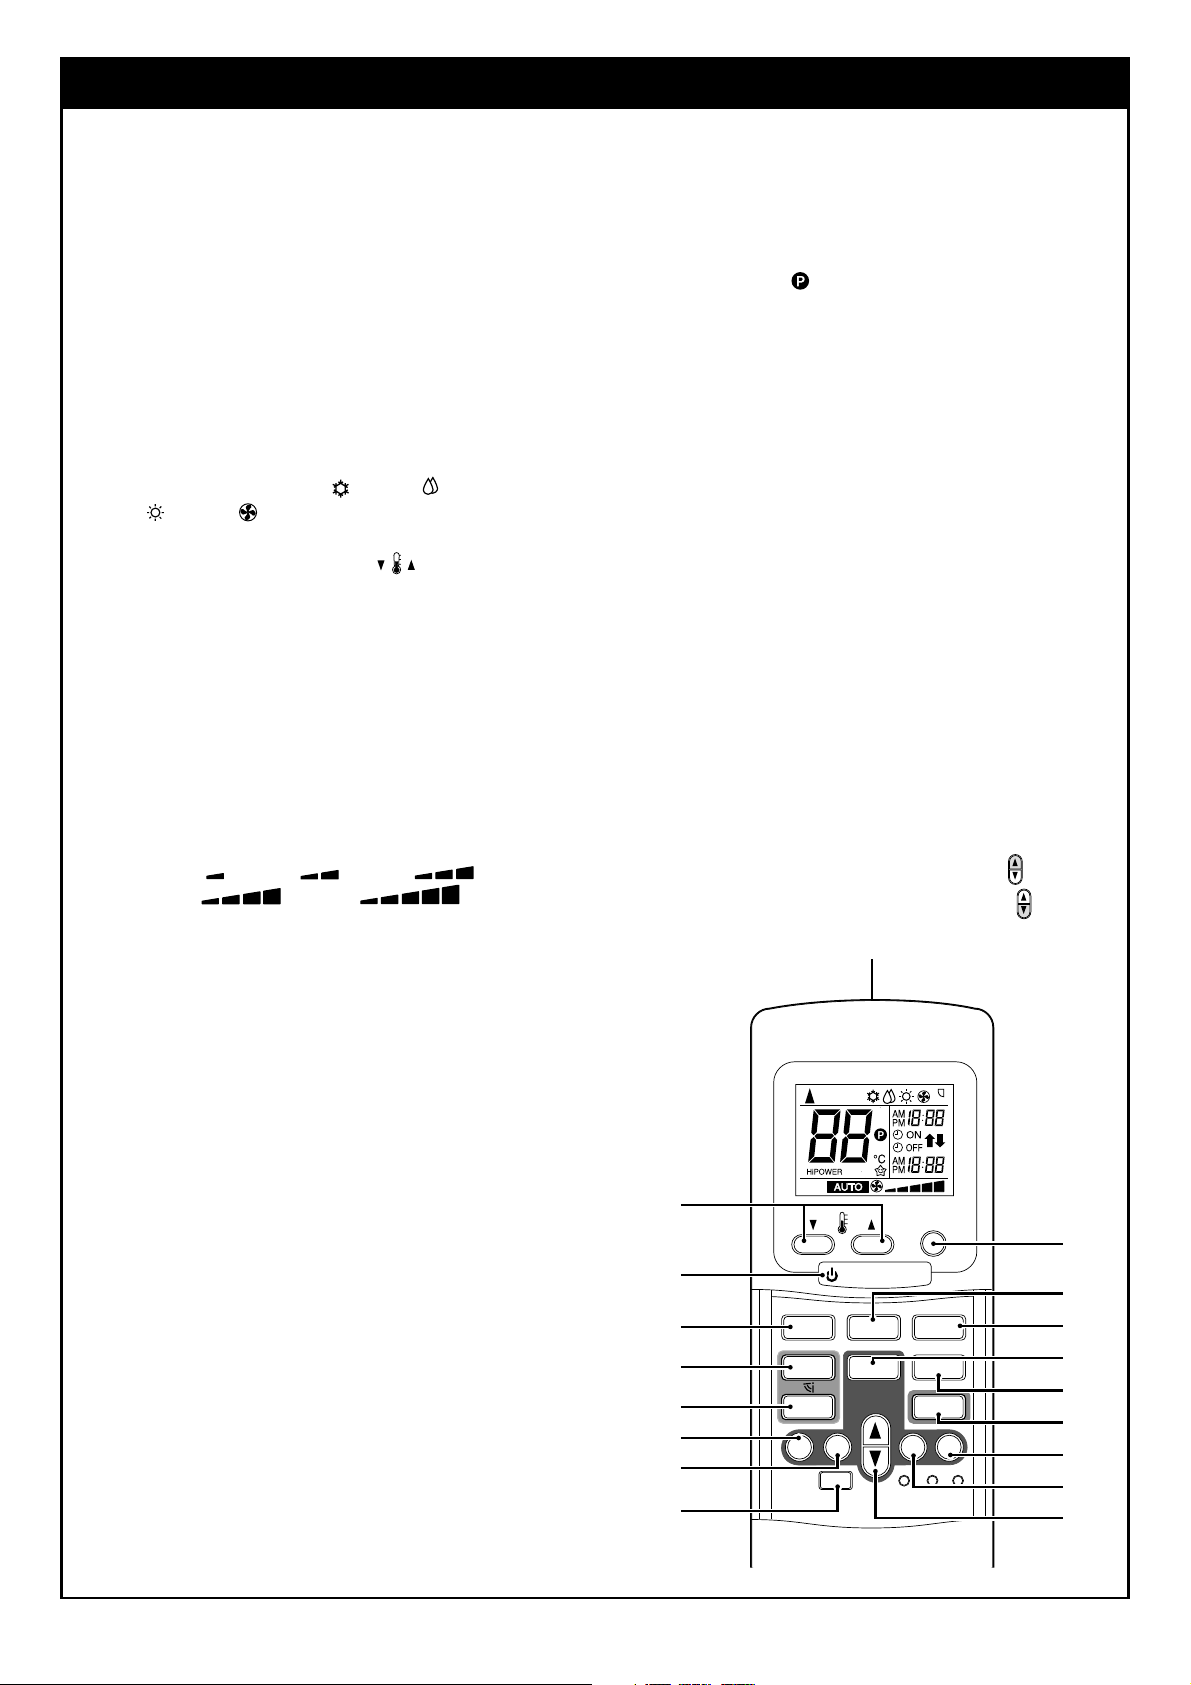
REMOTE CONTROLLER AND ITS FUNCTIONS
(1) Infrared signal emitter
Transmits a signal to the indoor unit.
(2) START/STOP button
Push the button to start operation.
(A receiving beep is heard.)
Push the button again to stop operation.
(A receiving beep is heard.)
If no receiving sound is heard from the indoor
unit, push the button twice.
(3) Mode select button (MODE)
Push this button to select a mode.
Each time you push the button, a mode is
selected in a sequence that goes from A : Auto
changeover control,
: Cool, : Dry,
: Heat, : Fan only, and back to A.
(A receiving beep is heard.)
(4) Temperature button ( )
....... The set temperature is increased up to
,
30°C.
....... The set temperature is dropped down to
9
17°C.
(A receiving beep is heard.)
(5) Fan speed button (FAN)
Push this button to select fan speed. When you
select AUTO, the fan speed is automatically
adjusted according to the room temperature.
You can also manually select the desired fan
speed from among five settings.
(LOW
MED
, LOW
+
+
, MED ,
, HIGH )
(A receiving beep is heard.)
(6) Auto louver button (SWING)
Push this button to swing the louver.
(A receiving beep is heard.)
Push the SWING button to stop the louver
swinging. (A receiving beep is heard.) (to see
page 13.)
(7) Set louver button (FIX)
Push this button to adjust the air flow direction.
(A receiving beep is heard.)
While this button is kept depressed, the
receiving tone continuously sounds. (to see
page 13.)
(8) Off timer button (OFF)
Push this button to set the OFF timer.
(9) On timer button (ON)
Push this button to set the ON timer.
(10) Reserve button (SET)
Push this button to reserve time settings.
(A receiving beep is heard.)
(11) Cancel button (CLR)
Push this button to cancel ON timer and OFF
timer. (A receiving beep is heard.)
(12) High power button (High POWER)
Push this button to start the high power
operation. (to see page 10.)
(13) Memory button (MEMO)
Push this button to stand by memorizing the
settings.
Push the button again for more than 3 seconds to
memorize the setting indicated on the remote
controller and
mark is indicated. (to see page
12.)
(14) Automatic operation button (AUTO)
Push this button to operate the air conditioner
automatically.
(A receiving beep is heard.) (to see page 15.)
(15) ECO timer button (ECO)
Push this button to start the ECO timer (OFF
timer) operation.
You can select the OFF timer time from among
four settings (1, 3, 5 or 9 hours). (to see page 15.)
(16) FILTER button
Push this button to turn off the filter cleaning lamp
on the indoor unit.
Push this button after cleaning the air filter.
(to see page 17.)
(17) PRESET button
Push this button to operate the air conditioner
according to settings memorized by the MEMO
button. (to see page 12.)
(18) TIMER button
Use this button to change the clock, ON timer, and
OFF timer times.
To forward the time, push the “TIMER
To set back the time, push the “TIMER
” button.
” button.
(1)
AUTOA
A
B
(4)
PRESET
(2)
(5)
(6)
(7)
(9)
(8)
START/STOP
FAN MODE
SWING
FIX
ON
ECO
TIMER
OFF SET CLR
FILTER
AUTO
Hi-POWER
MEMO
CLOCK CHECKRESET
(16)
(17)
(3)
(14)
(15)
(12)
(13)
(11)
(10)
(18)
4
Page 10

NAMES AND FUNCTIONS OF INDICATIONS ON REMOTE
FAN MODE
Hi-POWER
ON
OFF SET CLR
ECO
AUTO
TIMER
CLOCK CHECKRESET
FILTER
FIX
SWING
MEMO
(2)
CONTROLLER
Display
All indications, except for clock time indication, are indicated by pushing the START/STOP button.
(1) Transmission mark
This transmission mark (,) indicates when the remote controller transmits signals to the indoor unit.
(2) Mode display
Indicates the current operation mode.
(AUTO : Automatic control, A : Auto changeover control, : Cool,
: Dr y, : Heat, : Fan only)
(3) Temperature display
Indicates the temperature setting (17°C to 30°C).
When you set the operating mode to
: Fan only, no temperature
setting is indicated.
(4) FAN speed display
Indicates the selected fan speed. AUTO or one of five fan speed
levels (LOW
, LOW
HIGH
Indicates AUTO when the operating mode is either AUTO or
: Dr y.
+
, MED , MED
) can be indicated.
+
(5) TIMER and clock time display
The time set for timer operation or clock time is indicated.
The present time is always indicated except for TIMER operation.
(6) Hi POWER display
Indicates when the Hi POWER operation starts.
Push the Hi POWER button to start and push it again to stop the
operation.
(7) (MEMORY) display
Flashes for 3 seconds when the MEMO button is pushed during
operation.
mark is indicated when keeping the button pushed for more
than 3 seconds while the mark is flashing.
Push another button to turn off the mark.
(8) ECO TIMER display
Indicates when the ECO TIMER is in operation.
Each time you push the ECO button, the display changes in the
sequence of 1, 3, 5 or 9h.
,
(1)(3) (2) (7)
AUTOA
A
B
(8) (5)(6) (4)
• In the illustration, all indications
are indicated for explanation.
During operation, only the
relevant indications will be
indicated on the remote controller.
AUTO
A
B
PREPARATION AND CHECK BEFORE USE
• Slide off the cover while
• Battery replacement
Loading the remote controller batteries.
(1) Remove the cover, and insert the batteries.
(2) Push the RESET button.
The clock display flashes.
Adjust the clock.
Place back the cover.
Batteries
• To replace the batteries, use two new batteries (AAA type).
• In normal use, the batteries will last about one year.
• Replace the batteries if there is no receiving beep from the
indoor unit or when the air conditioner cannot be operated using
the remote controller.
• To avoid malfunctions by battery leakage, remove the batteries
when not using the remote controller for more than one month.
5
pushing the sides.
Be careful not to
reverse the (+) position
and the (–) position.
Page 11

Setting the clock
Before you start operating the air conditioner, set the clock of the
remote controller using the procedures given in this section. The clock
panel on the remote controller will indicate the time regardless of
whether the air conditioner is in use or not.
Initial setting
When batteries are inserted in the remote controller, the clock panel
will indicate AM 0:00 and will flash.
(1) TIMER button
Push the TIMER button to set the current time.
Each push of the TIMER button changes the time in one minute steps.
Pushing the TIMER button continually changes the time in ten
minute steps.
(2) SET
SET
button
Push the SET
SET
button.
The current time is indicated and the clock starts.
Clock adjusting
(1)
(2)
START/STOP
FAN MODE
SWING
ON
ECO
TIMER
FIX
OFF SET CLR
FILTER
PRESET
AUTO
Hi-POWER
MEMO
CLOCK CHECKRESET
(1) CLOCK button
Push the CLOCK button.
The CLOCK display flashes.
(2) TIMER button
Push the TIMER button to set
the current time.
Each push of the TIMER button
changes the time by one minute.
Pushing the TIMER button
continually changes the time by
ten minutes.
(3) SET
SET
button
Push the SET
SET
button.
The current time is indicated and
the clock starts.
Preparing the filters
(1) Open the Air inlet grille with both
hands until the stop position.
(2) Remove the Air filters from the
Front panel.
FAN MODE
SWING
ON
ECO
TIMER
FIX
OFF SET CLR
FILTER
AUTO
Hi-POWER
MEMO
CLOCK CHECKRESET
Push CLOCK
(2)
(3)
START/STOP
FAN MODE
SWING
ON
ECO
TIMER
FIX
OFF SET CLR
FILTER
PRESET
AUTO
Hi-POWER
MEMO
CLOCK CHECKRESET
(1)
(3) Install the Sasa-Zeolite plus filter
and Bio-enzyme & Gingko filter in
the Filter frame and then install it
to the Air filters.
(4) Insert the Air filters in the Front
panel and hook them into position.
(5) Close the Air inlet grille.
Filter frame
Sasa-Zeolite
plus filter
Air filter
Filter frame
Bio-enzyme &
Gingko filter
Air filter
6
Page 12

HANDLING THE REMOTE CONTROLLER
CAUTION
• The air conditioner will not operate if curtains, doors or other materials block the signals from the remote
controller to the indoor unit.
• Prevent any liquid from falling into the remote controller.
• Do not expose the remote controller to direct sunlight or heat.
If the infrared signal receiver on the indoor unit is exposed to direct sunlight, the air conditioner may not
function properly.
Use curtains to prevent the sunlight from reaching the receiver.
• If the room using the air conditioner has fluorescent lighting with electronic starters, signals may not be
properly received. If you are planning to use such fluorescent lamps, consult your local dealer.
• If other electrical appliances react to the remote controller, move these appliances or consult your local
dealer.
Location of the remote controller
• Keep the remote controller where its signals can reach the
receiver of the indoor unit (a distance of 7 m is allowed).
• When you select the timer operation, the remote controller
automatically transmits a signal to the indoor unit at the
specified time.
If you keep the remote controller in a position that hinders
proper signal transmission, a time lag of up to 15 minutes
may occur.
7 m
Remote controller holder
Installing the remote controller holder
• Before you actually install the remote controller holder
on a wall or pillar, check whether the remote controller
signals can be received by the indoor unit.
Mounting and removing the remote controller
• To mount the remote controller, hold it parallel to the
remote controller holder and push it in fully. To remove
the remote controller, slide the remote controller
upwards and out from the holder.
7
Page 13

AUTOMATIC OPERATION
When you set the air conditioner in AUTO mode, it will automatically select cooling, heating, or fan only operation
depending on the room temperature. (to see page 15.)
In addition, fan speed and louver are automatically controlled.
Start
(1) START/STOP button
Push this button to start the air conditioner.
(2) AUTO button (AUTO)
Push AUTO button.
• The OPERATION lamp (green) on the display panel of the
indoor unit lights. The operating mode is selected in
accordance with the room temperature and operation starts
after approximately 3 minutes.
• If the AUTO mode is uncomfortable, you can select the desired
conditions manually.
Temperature, fan speed and louver position can be changed.
When fan speed or louver position is changed, MODE is also
changed from AUTO to A.
At the same time, fan speed and louver positioning indications
are indicated.
(1)
(2)
AUTO
START/STOP
FAN MODE
SWING
ON
ECO
TIMER
FIX
OFF SET CLR
FILTER
PRESET
AUTO
Hi-POWER
MEMO
CLOCK CHECKRESET
Stop
START/STOP button
Push this button again to stop the air conditioner.
AUTOMATIC OPERATION (AUTO CHANGEOVER)
When you set the air conditioner in A mode or switch over from AUTO operation because of some settings
change, it will automatically select cooling, heating, or fan only operation depending on the room temperature.
(to see page 15.)
Start
(1) START/STOP button
Push this button to start the air conditioner.
(2) Mode select button (MODE)
Select A.
(3) Temperature button ( )
Set the desired temperature.
• The OPERATION lamp (green) on the display panel of the
indoor unit lights. The operating mode is selected in accordance with the room temperature and operation starts after
approximately 3 minutes.
• When you select the A mode, it is unnecessary to set the fan speed.
The FAN speed display will show AUTO and the fan speed will be
automatically controlled.
• If the A mode is uncomfortable, you can select the desired
conditions manually.
(3)
(1)
(2)
A
START/STOP
FAN MODE
SWING
ON
ECO
TIMER
FIX
OFF SET CLR
FILTER
PRESET
AUTO
Hi-POWER
MEMO
CLOCK CHECKRESET
Stop
START/STOP button
Push this button again to stop the air conditioner.
8
Page 14

COOLING/HEATING/FAN ONLY OPERATION
PRESET
FAN MODE
Hi-POWER
ON
OFF SET CLR
ECO
AUTO
TIMER
CLOCK CHECKRESET
FILTER
START/STOP
FIX
MEMO
SWING
(3)
(1)
(4)
(2)
PRESET
FAN MODE
AUTO
ON
OFF SET CLR
ECO
Hi-POWER
TIMER
CLOCK CHECKRESET
FILTER
START/STOP
FIX
MEMO
SWING
(3)
(1)
(2)
Start
(1) START/STOP button
Push this button to start the air conditioner.
(2) Mode select button (MODE)
Select Cool , Heat , or Fan only .
(3) Temperature button ( )
Set the desired temperature.
Cooling 21°C or higher.
Heating 28°C or lower.
When the air conditioner is in FAN ONLY operation,
the temperature display is not indicated.
(4) Fan speed button (FAN)
Select one of “AUTO” LOW , LOW
+
MED
• The OPERATION lamp (green) on the display panel of the indoor unit
goes on. And operation starts after approximately 3 minutes.
(if you select FAN ONLY mode, the unit will start immediately.)
• The
: Fan only mode does not control temperature.
Therefore, perform only steps (1), (2) and (4) to select this mode.
, HIGH .
+
, MED ,
Stop
START/STOP button
Push this button again to stop the air conditioner.
DRY OPERATION
Start
(1) START/STOP button
Push this button to start the air conditioner.
(2) Mode select button (MODE)
Select DRY .
(3) Temperature button ( )
Set the desired temperature.
• The fan speed display indicates AUTO.
• The OPERATION lamp (green) on the display panel of the
indoor unit lights, and operation starts after approximately
3 minutes.
Stop
START/STOP button
Push this button again to stop the air conditioner.
9
Page 15

HIGH POWER OPERATION
High power (High POWER)
• The High POWER (high power operation) mode automatically controls
room temperature, air flow and operation mode so that the room is quickly
cooled in summer and warmed in winter.
Setting High POWER mode
(1) High POWER button
Push the High POWER button. The High POWER lamp (green) on
the display panel of the indoor unit lights up. At the same time, the
“High POWER” mark on the remote controller is indicated.
A
PRESET
START/STOP
Canceling High POWER mode
(1) High POWER button
Push the High POWER button once again.
The High POWER lamp on the display panel of the indoor unit
lights goes out.
At the same time, the “High POWER” mark on the remote
controller goes out.
CAUTION
The High POWER mode cannot be activated in the DRY and FAN ONLY
operation and when the ON TIMER operation is reserved.
TIMER OPERATION
ON timer and OFF timer
Setting TIMER
(1) ON/OFF TIMER button
Push the ON or OFF TIMER buttons as required.
• The previous timer setting is displayed and flashes along
with ON/OFF TIMER display.
(2) TIMER button
Push the TIMER button.
Set the timer to the desired time.
Each push of the TIMER button changes the time in ten minute steps.
Pushing the TIMER button continually changes the time in one hour steps.
(3) SET
(4) CLR
• When you select the timer operation, the remote controller
• If you do not push the SET
SET
button
Push the SET
SET
button to set the timer.
The timer time is indicated and the timer starts.
CLR
button
Push the CLR
CLR
button to cancel the timer setting.
CAUTION
automatically transmits the timer signal to the indoor unit at
the specified time. Therefore, keep the remote controller in a
location where it can transmit the signal to the indoor unit
properly.
setting the time, the setting will be cancelled.
SET
button within 30 seconds after
(1)
(1)
(2)
(3)
(4)
FAN M ODE
SWING
ON
SWING
ON
ECO
TIMER
FIX
OFF SET CLR
FILTER
START/STOP
FAN MODE
ECO
TIMER
FIX
OFF SET CLR
FILTER
AUTO
Hi-POWER
MEMO
CLOCK CHECKRESET
PRESET
AUTO
Hi-POWER
MEMO
CLOCK CHECKRESET
Once you select the timer operation mode, the settings are saved in the remote controller.
Thereafter, the air conditioner will start operating under the same conditions when you simply push the ON/OFF
button of the remote controller.
If the clock display is flashing, you cannot set the timer.
Follow the instructions in the section “SETTING THE CLOCK” on page 6 to set the clock, and then set the timer.
10
Page 16

Combined timer (Setting both ON and OFF timers simultaneously)
OFF timer —> ON timer
(Operation —> Stop —> Operation)
This feature is useful when you want to stop the air conditioner after you go to sleep, and start it again in the
morning when you wake up or you return home.
Example:
To stop the air conditioner and start it again next morning.
Setting combined TIMER
(1) Push the OFF
OFF
(2) Push the TIMER
(3) Push the ON
ON
(4) Push the TIMER
(5) Push the SET
SET
button.
button to adjust the OFF timer.
button.
button to adjust the ON timer.
button.
Operation
Operation again
Stop
ON timer —> OFF timer
(Stop —> Operation —> Stop)
You can use this setting to start the air conditioner when you wake up and stop it when you leave the house.
Example:
To start the air conditioner next morning and stop it.
Setting combined TIMER
(1) Push the ON ON button.
(2) Push the TIMER
(3) Push the OFF
(4) Push the TIMER
(5) Push the SET
button to adjust the ON timer.
OFF
button.
button to adjust the OFF timer.
SET
button.
Stop Stop
Operation
• Either ON or OFF timer function which is closer to the current
time, is activated first.
• If the same time is set for both ON and OFF timers, no timer
operation is performed. Also, the air conditioner may stop
operating.
Every day combined timer (setting both ON and OFF timer simultaneously and activate every
day.)
This feature is useful when you want to use combined timer at the same time every day.
Setting combined TIMER
(1) Push the ON ON button.
(2) Push the TIMER
(3) Push the OFF
(4) Push the TIMER
(5) Push the SET
(6) After step (5), an arrow mark (
3 seconds and during this flashing, push the SET
• During the every day timer is activating, both arrows (
Cancel the timer operation
Push the CLR
CLR
button to adjust the ON timer.
OFF
button.
button to adjust the OFF timer.
SET
button.
or ) flashes for about
button.
SET
button.
, ) are indicated.
A
START/STOP
FAN MODE
SWING
TIMER
FIX
ECO
PRESET
AUTO
Hi-POWER
MEMO
Clock display
During the TIMER operation (ON-OFF, OFF-ON, OFF timer) clock display is
disappeared so as to show the setting time. To see the present time, push
SET button briefly and the present time is displayed about 3 seconds.
11
ON
OFF SET CLR
FILTER
CLOCK CHECKRESET
Page 17

MEMORY/PRESET OPERATION
Memorize the frequently used operation setting by the MEMO button
for convenience.
Start the air conditioner in the operation mode which you want the
remote controller to memorize.
Push the button as follows while the air conditioner is in operation.
(1) MEMO button
Push this button briefly to standby memorizing the setting.
All the icons currently displayed except for the clock display and
mark flashes.
PRESET
START/STOP
(2) MEMO button
Push and hold the MEMO button for more than 3 seconds while
the display flashes.
mark is indicated and the setting is memorized.
The
• If you do not push the MEMO button within 3 seconds or if you
push another button, the MEMORY setting is cancelled.
• Operation modes which can be memorized with the MEMO button
are MODE, Temperature, FAN, TIMER and High POWER.
To operate the air conditioner with the setting memorized by the
MEMO button.
(1) PRESET button
Push the PRESET button. The setting memorized with the MEMO
button will be indicated and the air conditioner operates with
regards to the setting.
• The OPERATION lamp (green) on the display panel of the indoor
unit goes on, and operation starts after approximately 3 minutes.
• Initial setting:
MODE : AUTO
Temperature : 22
(1)
(2)
(1)
FAN MODE
SWING
ON
SWING
ECO
TIMER
FIX
OFF SET CLR
FILTER
START/STOP
FAN MODE
TIMER
FIX
ECO
AUTO
Hi-POWER
MEMO
CLOCK CHECKRESET
PRESET
AUTO
Hi-POWER
MEMO
12
ON
OFF SET CLR
FILTER
CLOCK CHECKRESET
Page 18

ADJUSTING AIR FLOW DIRECTION
• Adjust the air flow direction properly. Otherwise, it might cause
discomfort and make the room temperature uneven.
• Adjust the vertical air flow using the remote controller.
• Adjust the horizontal air flow manually.
Adjust the vertical air flow
The air conditioner automatically adjusts the vertical air flow direction
in accordance with the operating conditions when AUTO or A mode
is selected.
To set the air flow direction you desire
Perform this function when the air conditioner is in operation.
(1) FIX button
Keep pushing or pushing briefly the FIX button on the
remote controller to move the louver in the desired direction.
• Change the vertical air flow louver direction within the range
indicated.
• In subsequent operations, the vertical air flow is automatically
set in the direction to which you adjusted the louver using the
FIX button.
(1)
START/STOP
FAN MODE
SWING
FIX
ON
OFF SET CLR
FILTER
ECO
TIMER
PRESET
AUTO
Hi-POWER
MEMO
To automatically swing the air flow direction
Perform this function when the air conditioner is in operation.
(1) SWING button
Push the SWING button on the remote controller.
• To stop the function, push the SWING button.
• To change the swing direction, push the FIX button.
CAUTION
• The FIX and SWING buttons will be disabled when the air conditioner is
not in operation (including when the ON TIMER is set).
• Do not operate the air conditioner for long hours with the air flow
direction set downward during the cooling or dry operation. Otherwise,
condensation may occur on the surface of the vertical air flow louver and
cause dew dripping.
• Do not move the vertical air flow louver manually. Always use the FIX
button.
If you move the louver manually, it may malfunction during operation.
If the louver malfunctions, stop the air conditioner once, and restart.
• When the air conditioner is started immediately after it was stopped, the
vertical air flow louver might not move for 10 seconds or so.
Adjust the horizontal air flow
Preparation:
• Take hold of the lever on the horizontal air flow louver and move
them to adjust the air flow direction as required.
• You can adjust the air flow at the left, center, and right locations of
the grilles.
(1)
START/STOP
FAN MODE
SWING
FIX
ON
OFF SET CLR
FILTER
ECO
TIMER
PRESET
AUTO
Hi-POWER
MEMO
CLOCKCHECKRESET
13
Page 19

AUTO RESTART OPERATION
PRE.DFILTERHi POWER
PRE.DFILTERHi POWER
This air conditioner is equipped with an Automatic restarting facility which allows the air conditioner to resume
the set operating conditions in the event of a supply power shutdown without the use of the remote controller.
The operation will resume without warning three minutes after the power is restored.
INFORMATION
The AUTO RESTART OPERATION is not set to work on shipment from the factory, and so it is necessary
to set it to function as required.
HOW TO SET THE AUTO RESTART
To set the auto restart function, proceed as follows:
The power supply to the unit must be on the function will not set if the power is off.
To enable the auto restart function, push the TEMPORARY button continually for 3 seconds.
The air conditioner will acknowledge the setting and beep 3 times. The system will now restart automatically.
The above auto restart settings can be carried out:
(1) When the air conditioner is in stand-by (not running).
Push the TEMPORARY button for more than 3 seconds.
• The air conditioner starts to operate.
The green lamp will be indicated.
• About 3 seconds after, the air conditioner beeps 3 times.
The lamp will change from green to orange.
• The air conditioner is operating.
If the air conditioner is not required to run at this time, push the
TEMPORARY button once more or use the remote controller to stop
the air conditioner.
(2) When the air conditioner is in operation.
Push the TEMPORARY button for more than 3 seconds.
• The air conditioner stops operating.
The green lamp goes off.
• The air conditioner beeps 3 times 3 seconds later, after pushing the button.
• The air conditioner stops.
If the air conditioner is not required to stop at this time, use the remote controller to restart the air conditioner.
During the subsequent operation, the orange lamp is indicated.
• The auto restart operation will not accept an instruction if timer operation with the remote controller is
selected.
• The louver swing operation will not resume, after restarting the air conditioner by the AUTO RESTART
OPERATION.
TEMPORARY
button
HOW TO CANCEL THE AUTO RESTART
To cancel the auto restart operation, proceed as follows:
Repeat the setting procedure: the air conditioner will acknowledge the instruction and beep three times.
The air conditioner will now require to be manually restarted with the remote controller after the main supply is
turned off.
Cancellation is carried out:
(1) When the air conditioner is in stand-by (not running).
Push the TEMPORARY button for more than 3 seconds.
• The air conditioner starts to operate.
The orange lamp will be indicated.
• About 3 seconds after, the air conditioner beeps 3 times.
The lamp will change from orange to green.
• The air conditioner is operating.
If the air conditioner is not required to run at this time, push the
TEMPORARY button once more or use remote controller to stop the
air conditioner.
(2) When the air conditioner is in operation.
Push the TEMPORARY button for more than 3 seconds.
• The air conditioner stops operating.
The orange lamp is turned off.
• About 3 seconds after, the air conditioner beeps 3 times.
• The air conditioner stops.
If the air conditioner is not required to stop at this time, use the remote controller to restart the air conditioner.
During subsequent operation, the green lamp is indicated.
TEMPORARY
button
14
Page 20

HOW THE AIR CONDITIONER WORKS
Automatic operation
• The air conditioner selects and operates in one of the operating modes of cooling, heating, or fan only,
depending on the room temperature.
• If the AUTO mode is uncomfortable, you can select the desired conditions manually.
Room temperature in operation Operating condition
The set temperature +1°C or higher
(in case that the room is hot)
The set temperature –1°C to +1°C
Cooling
operation
Fan only
operation
Performs the cooling operation at a temperature
1°C higher than the setting.
Performs the fan only operation (low speed) while
monitoring the room temperature. When the room
temperature changes, the air conditioner will select
the cooling or heating mode.
The set temperature –1°C or lower
(in case that the room is cold)
Heating
operation
Performs the heating operation at a temperature
1°C lower than the setting.
ECO timer operation
When you push the ECO button during cooling, heating or A operation, the air conditioner will start the following
operation.
The fan speed will be automatically controlled.
After setting hours (1, 3, 5 or 9 hours) operation, the air conditioner will stop.
• Cooling operation ( )
In the operation suppression zone, where capacity is
kept to the minimum, overcooling is prevented by raising
the temperature setting by 1°C after 1 hour and by 2°C
after 2 hours of operation. The room temperature is thus
regulated between the operation suppression zone and
the set temperature.
1°C
1 hour
2 hours
Operation starts
Operation suppression zone
2°C
Set temperature
• Heating operation ( )
In the operation suppression zone, where capacity is
kept to the minimum, overheating is prevented by
lowering the temperature setting by 1°C after 1 hour and
by 2°C after 2 hours of operation.
The room temperature is thus regulated between the set
temperature and the operation suppression zone.
Set temperature
1°C
1 hour
Operation starts
2 hours
2°C
Operation
suppression zone
15
Page 21

PRE.DFILTERHi POWER
HINTS FOR ECONOMICAL OPERATION
TIMER
Maintain room temperature at comfortable level
Clean air filters
The clogged air filters impairs the performance of the air conditioner.
Clean them every 2 weeks.
Never open doors and windows more often than
necessary
To keep cool or warm air in the room, never open doors and
windows more often than necessary.
Window curtains
In cooling, close the curtains to avoid direct sunlight.
In heating, close the curtains to keep the heat in.
Use the timer effectively
Set the timer for the desired operating time.
Get uniform circulation of room air
Adjust air flow direction for even circulation of
room air.
Clean, please
Blows upward
Cool
and
dry
air
Gee, chilly
Control
Use the timer
effectively
TEMPORARY OPERATION
TEMPORARY operation
This function is used to operate the unit temporarily in case you
misplace the remote controller or its batteries are exhausted.
• Push the TEMPORARY button to start the air conditioner.
• While the substitute operation is set, the remote controller
operation is disabled.
• Continue to push the button for 10 seconds to start the cooling
operation.
Air filter reset
When the FILTER lamp on the air conditioner is indicated, it is time
for cleaning. (The lamp will start to indicate, after every 1000 hours
of operation.)
• The FILTER lamp will go out when the TEMPORARY button is
pushed.
• The FILTER lamp will also go out when the FILTER button on
the remote controller is pushed. (to see page 4.)
Please close
I cannot find the
remote controller
Warm
air
Blows downward
Air flow adjustment
A temporary
operation feature
is provided!
TEMPORARY
button
16
Page 22

MAINTENANCE
WARNING
Before you clean the air conditioner, be sure to turn off the circuit breaker,
or main power switch.
Cleaning of indoor unit and remote controller
CAUTION
• Use a dry cloth to wipe the indoor unit and remote controller.
• A cloth dampened with cold water may be used on the indoor unit if it is
very dirty.
• Never use a damp cloth on the remote controller.
• Do not use a chemically-treated duster for wiping or leave such
materials on the unit for long. It may damage or fade the surface of the
unit.
• Do not use benzine, thinner, polishing powder, or similar solvents for
cleaning.
These may cause the plastic surface to crack or deform.
• Do not wash the unit with water. It may cause an electric shock.
• Do not use alcohol, benzene, thinner, glass cleaner, polishing powder,
etc. for cleaning the unit, because they deteriorate in electric insulation.
If you will not use the unit for at least 1 month
(1) Operate the air conditioner in FAN ONLY mode for about half a day to
dry the inside of the unit.
(2) Stop the air conditioner and turn off the circuit breaker.
(3) Remove the batteries from the remote controller.
Check before operation
Wipe with dry cloth
With the
MODE button
set to
FAN ONLY.
FAN ONLY operation
CAUTION
• Check that the Air filters are installed.
• Check that the Air outlet or inlet of the outdoor unit is not blocked.
Cleaning the Air filter
Clean the Air filters every 2 weeks.
If the Air filters are covered with dust, the performance of the air conditioner
will deteriorate.
Clean the Air filters as often as possible.
(1) Open the Air inlet grille with both hands until the stop position.
(2) Remove the Air filters from Front panel.
(3) Remove the Sasa-Zeolite plus filter and Bio-enzyme &
Gingko filter from the Air filters.
(4) Use a vacuum cleaner to remove the dust from the
filters or wash them with water.
If you wash the Air filters, dry them in the shade.
(5) Install the Sasa-Zeolite plus filter and Bio-enzyme &
Gingko filter in Filter frame.
(6) Insert the Air filters into the front panel guide, and hook
it into position.
(7) Close the Air inlet grille.
If the FILTER lamp on the indoor unit is indicated,
push the FILTER button on the remote controller, or
the TEMPORARY button on the indoor unit to turn
off the lamp.
Filter frame
SasaZeolite plus
filter
Air filter
Filter frame
Bio-enzyme
& Gingko
filter
Air filter
17
Page 23

INFORMATION
Sasa-Zeolite plus filter
Maintaining your strong deodorizing and anti-virus filter.
Clean every 6 months or when dust covers the filter.
1.Gently clean the surface of the filter with a vacuum cleaner.
2.If the filter remains unclean, rinse it briefly and gently in cool
water.
3.Dry under the sunlight at least 6 hours to recharge Zeolite’s
deodorizing properties.
4.Replace every 2 years. (P/N : RB-A610DE)
Bio-enzyme & Gingko filter
Maintaining your strong purifying and anti-allergy filter.
Clean every 6 months or when dust covers the filter.
1.Gently clean the surface of the filter with a vacuum cleaner.
(Do not use water to clean the filter.)
2.Replace every 2 years. (P/N : RB-A606SE)
Note: Filter life depends on the level of impurities in your operating
environment. Higher levels of impurities may require more
frequent cleaning and replacement. In all cases, Toshiba
recommends on additional set of filters to improve the
purifying and deodorizing performance of your air conditioner.
Sasa-Zeolite
plus filter
(Inside)
Bio-enzyme &
Gingko filter
(Inside)
18
Page 24

AIR CONDITIONER OPERATIONS AND PERFORMANCE
Three-minute protection feature
A protection feature prevents the air conditioner from being activated for approximately 3 minutes when it is
restarted immediately after operation or when the power supply switch is set to on. This will protect the machine.
Heating characteristics
Preheating operation
The air conditioner will not deliver warm air immediately after it is started.
Warm air flows out after approximately 5 minutes when the indoor heat exchanger warms up.
(The PRE.DEF lamp is on during this intervals indicating the preheating operation.)
Warm air control
When the room temperature reaches the set temperature, the fan indoor speed is automatically reduced to
prevent a cold draft.
At this time, the outdoor unit will stop.
Defrosting
If the outdoor unit is frosted during heating operation, defrosting is started automatically (for approximately 5 to
10 minutes) to maintain the heating effect, and the PRE.DEF lamp is on.
• The fans in both the indoor and outdoor units stop during the defrost operation.
• During defrost operation, defrosted water is drained from the bottom plate of the outdoor unit.
Heating capacity
In the heating operation, heat is absorbed from outdoors and released into the room. That is called the heat
pump system. When the outdoor temperature is too low, to use another heating apparatus in combination with
the air conditioner is recommended.
Consideration for accumulated snow
Select the position for the outdoor unit where it will not be subjected to snow drifts, accumulation of leaves or
other seasonal debris. It is important that the air flow of the outdoor unit is not impeded as this will result in
reduced heating or cooling performance. During the heating mode, and at sub-zero temperatures, the water
drained off the outdoor unit as a result of the automatic defrost may accumulate and freeze. It is important that
adequate drainage or a soak-way is provided.
Power failure
Power failure during operation will stop the unit completely.
• The OPERATION lamp (green) on the indoor unit will start flashing when power is restored.
• To restart operation, push the START/STOP button on the remote controller.
• Lightning or a car wireless telephone operating nearby may cause the unit to malfunction. Turn the power
supply switch to off and then to on. Push the START/STOP button on the remote controller to restart.
Air conditioner operating conditions
For proper performance, operate the air conditioner under the following temperature conditions:
Cooling
operation
Outdoor temperature : –15°C to 43°C
Room temperature : 21°C to 32°C (Dry valve temp.), 15°C to 24°C (Wet valve temp.)
CAUTION
Room relative humidity – less than 80%. If the air conditioner operates in excess of this
figure, the surface of the air conditioner may cause dewing.
Heating
operation
If air conditioner is used outside of the above conditions, safety protection may work.
Outdoor temperature : –15°C to 15°C (Wet valve temp.)
Room temperature : –15°C to 28°C (Dry valve temp.)
19
Page 25

TROUBLES AND CAUSES
CAUTION
If any of the following conditions occur, stop the air conditioner immediately, set to off the main power
switch and contact the dealer:
• The indicator lamps blink at short intervals (5 Hz). Reset the circuit breaker 2 to 3 minutes after the
power main switch is turned off. Despite the above-mentioned resetting the lamps still continue going
on and off.
• Switch operation are erratic.
• The main power fuse often blows out, or the circuit breaker is often activated.
• Foreign matter or water has fallen inside the air conditioner.
• Any other unusual condition is observed.
Before you ask for servicing or repairs, check the following points.
Inoperative
• The power main switch is turned off.
• The circuit breaker is activated to cut off the power supply.
• The main power fuse has blown out.
• Stoppage of electric current.
• The batteries in the remote controller are exhausted.
• ON timer is set.
Poor cooling or heating performance
• The air inlet or outlet of the outdoor unit is blocked.
• Doors or windows are opened.
• The air filter is clogged with dust.
• The louver is not at the correct position.
• The fan speed is set to low.
Recheck
• The air conditioner is set in the DRY mode.
• The set temperature is too high. (In cooling operation)
• The set temperature is too low. (In heating operation)
20
Page 26

Before you ask for servicing or repairs, check the following points.
The back of indoor unit is dewed.
• Dewdrops on the back of the indoor unit are automatically
collected and drained out.
Indoor unit or outdoor unit makes a strange noise.
• When temperature sharply changes, the indoor or outdoor unit
occasionally makes a strange noise (like tit-tack noise or
flowing noise) because of expansion/contraction of parts or
change of refrigerant flow.
The room air is smelly.
A bad odor comes from the air conditioner.
• Smells impregnated in the wall, carpet, furniture, clothing, or
furs, are coming out.
The OPERATION lamp goes on and off.
• The lamp goes on and off 1 Hz when power is restored after a
power failure, or when the power main switch is set to on.
Reset the circuit breaker to ON.
Outdoor unit is frosted in heating operation.
Water is drained out of outdoor unit.
• The outdoor unit is sometimes frosted in heating operation.
In that case, the unit automatically performs defrosting (for 2 to
10 minutes) for raising the heating efficiency.
• In defrosting operation, both the indoor and outdoor units stop
air flow.
• Hiss sound is heard when flow of the refrigerant is changed for
These are not failures.
defrosting.
• Resultant water of automatic defrosting in heating operation is
drained out of the outdoor unit.
Air flow changes though the FAN button is not
set to the AUTO mode.
• When the temperature of blown air goes down in heating
operation, the air conditioner automatically changes or stops
air flow from the indoor unit not to make persons in the room
feel chilly.
A white mist of chilled air or water is generated from
the outdoor unit.
• The indoor unit in cooling operation or the outdoor unit in
defrosting operation occasionally steams.
Automatic operation of vertical air flow louver.
• When the room temperature or outdoor temperature is high in
the heating operation, the vertical air flow louver once close and
then set themselves automatically to the original set position
again.
21
Page 27

SPECIFICATIONS
Type Reverse cycle, Under Ceiling/Console Type
Model
Power supply 50Hz, 220-240 V~ 50Hz, 220-240 V~
Cooling capacity (kW) CAPA. 5.0 (1.5 ~ 5.6) 6.7 (1.5 ~ 8.0)
Heating capacity (kW) CAPA. 5.6 (1.5 ~ 6.3) 8.0 (1.5 ~ 9.0)
Cooling Amps (A) AMP. 0.52 8.43 – 7.68 0.52 12.63 – 11.54
Cooling Watts (W) WATT. 110 1760 110 2610
Heating Amps (A) AMP. 0.52 7.61 – 6.94 0.52 12.39 – 11.32
Heating Watts (W) WATT. 110 1590 110 2560
Width (mm) 1093 780 1093 900
Dimension Height (mm) 633 550 633 780
Depth (mm) 208 290 208 550
Net weight (kg) 23 38 23 42
• The specifications may be subject to change without notice for purpose of improvement.
The specified air-conditioning capabilities are based on the data determined under the following conditions:
For cooling
Indoor Unit Outdoor Unit Indoor Unit Outdoor Unit
RAV-SM562XT-E RAV-SM562AT-E RAV-SM802XT-E RAV-SM802AT-E
Air-inlet temperature °C
Indoor coil assembly Outdoor coil assembly
Dry bulb Wet bulb Dry bulb Wet bulb
27 19 35 24
For heating
Air-inlet temperature °C
Indoor coil assembly Outdoor coil assembly
Dry bulb Wet bulb Dry bulb Wet bulb
20
— 76
22
Page 28

TROUBLES AND CAUSES (Concerning Remote Controller)
Before you ask for servicing or repairs, check the following points.
Setting Change Is Impossible
Symptoms Causes Reason and Disposal
The fan speed
cannot be changed.
• Check whether the MODE
indicated on the display is “AUTO”.
When the automatic mode is
selected, the air conditioner
automatically selects the fan speed.
AUTO
• Check whether the MODE indicated
on the display is “
: DRY”.
: DRY
The Display Never Goes On
Symptoms Causes Reason
The temperature
display does not go
on.
• Check whether the MODE indicated
on the display is “
: FAN ONLY”.
When dry operation is selected, the
air conditioner automatically selects
the fan speed. The fan speed can
be selected during “
HEAT” and “ FAN ONLY”.
“
The temperature cannot be set
during fan only operation.
: FAN ONLY
The Display Goes Off
COOL”,
Symptoms Causes Reason
The indication on the
display disappears
after a lapse of time.
The TIMER display
goes off after a certain
period of time.
• Check whether the timer operation
has come to an end when the OFF
TIMER is indicated on the display.
• Check whether the timer operation
has started when the ON TIMER is
indicated on the display.
: ON
The air conditioner stops since the
setting time elapsed.
When the time reaches the setting
time for the ON timer operation, the
air conditioner starts to operate
automatically and the ON timer
display goes off.
The Signal Receiving Tone Does Not Sound
Symptoms Causes Reason
No receiving tone
sounds from the
indoor unit even when
the START/STOP
button is pushed.
• Check whether the signal
transmitter of the remote controller
is properly directed to the receiver
of the indoor unit when the
START/STOP button is pushed.
Direct the signal transmitter of the
remote controller to the receiver of
the indoor unit, and then repeatedly
push the START/STOP button.
23
Page 29

MEMO
24
 Loading...