

Page 1

Page 2

IMPORTANT
Y ou should read this first before you use this software.
Notice and Request Regarding Software and Instruction Manual
(1) Copying or duplication of the software and Instruction Manual packaged with this Software
Application in part or in whole is not allowed without the prior permission of Toshiba
Corporation.
(2) Use of the software and Instruction Manual packaged with this Software Application is allowed
only on one personal computer.
(3) Toshiba Corporation is not liable whatsoever for any damages to the user or a third party as a
result of use of a device by the software and Instruction Manual packaged with this Software
Application.
(4) Every effort has been made in assuring the quality during production of the CD-ROM contained
in this package. If for any reason the CD-ROM has been damaged during production and within
the warranty, the disk will be replaced free of charge. For all other nonconformities or damages
made other than during the production of the CD-ROM, Toshiba Corporation will not be held
liable whatsoever.
(5) The contents of the software, Design, Specifications and Instruction Manual packaged with this
Software Application are subject to change without notice.
(6) The personal computer screens shown in this Instruction Manual are examples, and may differ from
actual screens.
(7) Toshiba Corporation is not liable whatsoever for any compensation arising from errors in descriptions
in this Instruction Manual.
(8) Do not play back the CD-ROM packaged with this Software Application on a musical CD player or
a similar device. Doing so might damage the headphones or speakers, or injure your ears.
Page 3
Before Reading This Manual
This Instruction Manual describes how to install the software provided and a brief explanation of how to use
the Software Application.
To ensure that you use this Software Application correctly, read this Instruction Manual carefully before you
start using the Software Application.
This document has been written assuming that you basically understand how to use the Toshiba PDR-4300
Digital Still Camera and your personal computer that the Software Application is running on.
For basic details on the PDR-4300 and your personal computer, refer to the Toshiba PDR-4300 Digital Still
Camera’s Instruction Manual or the Instruction Manual for your personal computer.
Trademark Information
Microsoft and Windows are registered trademarks of the Microsoft Corporation of the U.S. registered in
the USA and other countries.
Windows is an abbreviated term referring to the Microsoft Windows Operating System.
Macintosh is a trademark of Apple Computer, Inc.
ACDSee is a registered trademark of ACD Systems Ltd.
Direct X is a registered trademark of Microsoft Corporation.
SD is a trademark .
Other companies or product names are trademarks or registered trademarks of the respective companies.
Conventions Used In This Manual
• Indicates items or details that you should observe to prevent loss of data, malfunction and impaired
performance. Also indicates information relating to specifications and functions.
• Indicates extra useful information.
Getting Ready
When Using
Windows
When Using
Macintosh
Operations in
ACD See
1
Page 4
Before Reading This Manual (continued)
Abbreviations Used In This Manual
Windows 98
This refers to the Microsoft
Windows 2000
This refers to the Microsoft
Getting Ready
Windows ME
This refers to the Microsoft
Windows XP
This refers to the Microsoft
Images
This refers to both still images and movies.
Windows
When Using
About bundle software in CD-ROM
After USB connection between the camera and the computer is established, the system will automatically
launch ACDSeeTM software.
Either using Classic or X environment mode on Macintosh, the software installations remain the same.
Macintosh
When Using
About OS Platform
Windows
Do not remove SD Memory Card from your camera or your PC card adapter until USB connection is properly
terminated between the computer and the camera.
At Windows 2000, software installation is required on Administrator mode.
Macintosh
ACD See
Operations in
On Macintosh OS X, the images reviewed via ACDSee software cannot be copied or moved to another storage
media.
On Macintosh, ACDSee software does not support [Copy to Camera] function.
Windows
Windows
Windows
Windows
98 operating system.
2000 Professional operating system.
ME operating system.
XP operating system.
2
Page 5
Before Reading This Manual (continued)
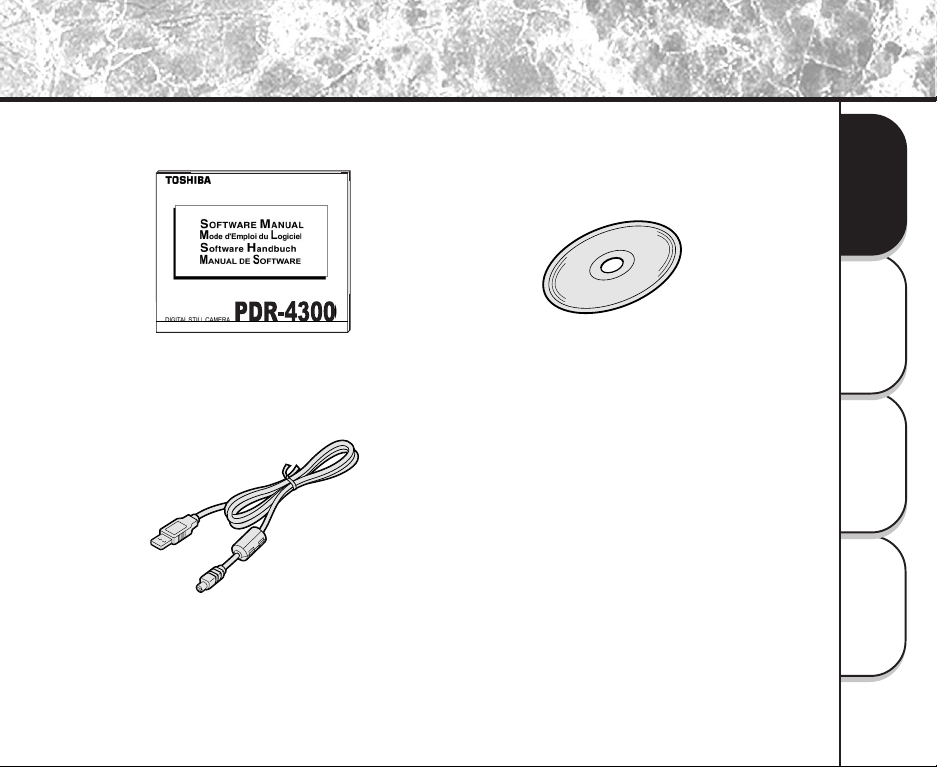
Make sure that you have all of the items below before you start using your software application.
Getting Ready
When Using
Windows
Software Manual(1)
(this manual)
USB cable (1)
Software application(1)
(CD-ROM)
When Using
Macintosh
Operations in
ACD See
3
Page 6

Contents
Getting Ready
Before Reading This Manual ...................... 1
Contents ..................................................... 4
Getting Ready
Features of This Software Application........ 5
About Files .................................................. 6
About the Software ...................................... 8
Pre-installation Checks .............................. 9
Windows
When Using
Installation Procedure .............................. 10
Using USB Cables
(Windows 98/2000/ME/XP) ........................
Copying Images to Camera ..................... 15
Macintosh
When Using
ACD See
Operations in
4
When Using Windows
When Using Macintosh
Installation Procedure .............................. 17
Operations in ACDSee
General Operations ......................................
Starting the Photo Enhancer........................
Playing Movies...............................................
Installing DirectX............................................
How to Access the Service and Support....
Global Contacts .............................................
12
18
20
22
23
24
25
Page 7

Features of This Software Application
If you install the software and drivers on your personal computer, you can perform the following:
Importing Images
You can import images taken on the Toshiba PDR-4300 Digital Still Camera into your personal computer.
To import images, you need to use the USB cable (packaged with this camera), or PC card adapter.
Editing Still Images
You can edit imported still images using ACDSee, or print them out on a printer connected to the
personal computer you are using.
Playing Movies
You can play imported movies.
Saving Images
You can save imported images or edited images on the personal computer you are using.
When You Use SD Memory Card on Your Personal Computer
When you use SD Memory Card on your personal computer, do not change or delete the folder or names of
files (image data) on the SD Memory Card. Otherwise, you may no longer be able to use the SD Memory
Card on the PDR-4300.
Format the
To edit image data, first copy the image data to the personal computer’s hard disk, and edit the copied
image data.
SD Memory Card
on the PDR-4300.
Getting Ready
When Using
Windows
When Using
Macintosh
Operations in
ACD See
5
Page 8
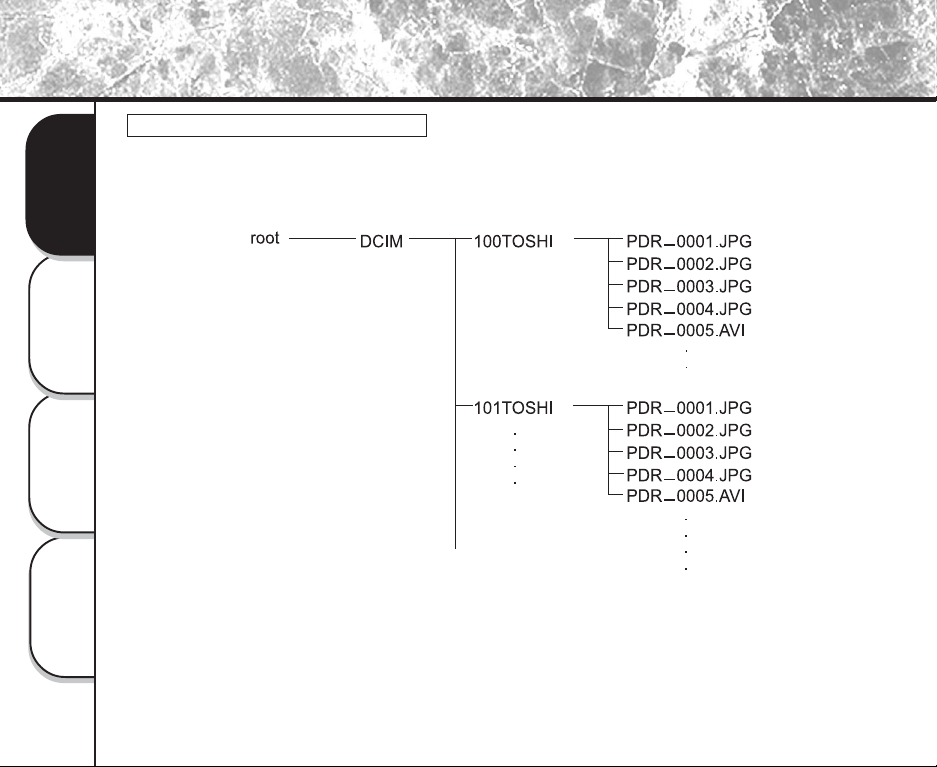
About Files
File Structure of SD Memory Card
The images taken on the Toshiba PDR-4300 Digital Still Camera are stored to the SD Memory Card as shown
below.
Getting Ready
Windows
When Using
Macintosh
When Using
ACD See
Operations in
6
Page 9

About Files (continued)
About Still Picture Data
On the PDR-4300, still image data is saved in Exif format. This format is JPEG data that includes a
thumbnail image and the photographic settings.
Still image data is saved as follows as shown on page 6:
Folder name : XXXTOSHI (XXX is any number within the range 100 to 999)
File name : PDR_XXXX (XXXX is any number within the range 0001 to 9999)
About Movie Data
Movie data is saved in the following format on the PDR-4300:
File format : AVI
Movie size : 320 x 240 or 160 x 120
Movie codec : Motion-JPEG
• The quality or size of movie data cannot be changed.
Getting Ready
When Using
Windows
When Using
Macintosh
Operations in
ACD See
7
Page 10

About the Software
You can install the following software from the CD-ROM:
ACDSee
This software allows you to edit and print imported still images and to playback movies.
USB driver(Ver. 1.1)(for Windows 98 only)
Getting Ready
Windows
When Using
Macintosh
When Using
ACD See
Operations in
This USB driver provided on the CD-ROM is exclusively for Windows 98. Installing the USB driver for use in
Windows 2000, Windows ME, Windows XP and Macintosh is not necessary.
Direct X
This software allows you to playback movies.
8
Page 11

Pre-installation Checks
To install the software supplied on the CD-ROM, your personal computer must conform to the system requirements
in the table below. Check the following items before you install the software.
Minimum system requirements
*Proper connections with not all PCs will be assured.
When using Mac OS 9.0 or 9.1, you need to install CarbonLib 1.3 or later.
You can download the program from the web site of Apple Computer, Inc.
Getting Ready
When Using
Windows
When Using
Macintosh
Operations in
ACD See
9
Page 12

Installation Procedure(for Windows)
Installing ACDSee
Before installing the ACDSee, install the USB driver(only required on Windows 98).
Getting Ready
Windows
When Using
Macintosh
When Using
ACDSee
Operations in
10
Insert the CD-ROM supplied with this software package into the CD-ROM drive.
The screen for selecting the display language appears.
Click
Click
Follow the on-screen instructions to continue the setup.
• After ACDSee software had properly installed into your personal computer, CamDetect icon
will appear on the Windows Task bar.
Page 13

Installation Procedure(for Windows) (continued)
Installing the USB Driver (for Windows 98 only)
Install this driver when the USB cable(provided) is used. (The USB driver provided on the CD-ROM
is exclusively for Windows 98. Installing the USB driver for use in Windows 2000/ME/XP is not
necessary.)
Insert the CD-ROM supplied with this software package into the CD-ROM drive.
The screen for selecting the display language appears.
Click
Click
Follow the on-screen instructions to continue the setup.
Getting Ready
When Using
Windows
When Using
Macintosh
Operations in
ACDSee
11
Page 14

Using USB Cables (Windows 98/2000/ME/XP)
To enable importing of images on the PDR-4300 to your personal computer, the PDR-4300 must be
connected to your personal computer by USB cable(provided).
When you connect the PDR-4300 to your personal computer by USB cable, the connection can only be
made with both the PDR-4300 and your personal computer turned ON. The USB connection will be
automatically recognized by the computer.
Connectable personal computer: Windows 98/2000/ME/XP pre-installed machine
Getting Ready
• If the camera’s power is turned OFF while image data is being transferred to the PC, the data may be
damaged. When the PDR-4300 is connected to the personal computer, use the AC adapter.
Windows
When Using
Macintosh
When Using
<When using Windows 98>
ACDSee
Operations in
<When using Windows 2000/ME/XP>
12
It is added as a Removable Disk as the standard Windows 2000/ME/XP driver is installed.
Set the mode dial to [ ] .
Connect one end of the USB cable to the DIGITAL terminal on the PDR-4300.
Connect the large end of the USB cable to the USB port on your personal
computer.
Perform the following operation with Windows 98/2000/ME/XP already booted up.When the
icon appears on the Windows task bar, it means the USB cable is successfully connected.
If this is the first time for an image to be imported using the USB cable, the Add New Hardware
Wizard screen appears. Install USB driver.
Refer to "Installing the USB driver (for Windows 98 only)".
))
) Installing the USB Driver (for Windows 98 only). page 11.
))
Follow the on-screen instructions to perform the driver installation.
Page 15

Using USB Cables (Windows 98/2000/ME/XP)(continued)
• When connecting the USB cable, pay attention to insert the connector in a proper direction.
If CamDetect function is active ( icon will appear on Windows task bar), ACDSee software will
be automatically launched.
If CamDetect icon is not active, you can open the Camera Detector program:
1.Click the [Start] menu.
2.Select [Programs|ACD Systems].
3.Click CamDetect.
Once ACDSee starts up, it will automatically open the existing XXXTOSHI subfolder stored in DCIM
folder. The Removable disk automatically appears once the camera’s power is ON after USB
connection is successfully accomplished between the camera and the computer.
Getting Ready
When Using
Windows
When Using
Macintosh
Operations in
ACDSee
13
Page 16

Using USB Cables (Windows 98/2000/ME/XP)(continued)
Download the images.
<To download all images>Go to [Edit|Select All Files]
All the images are being highlighted. Drag and drop those images to copy on your hard disk.
Getting Ready
Windows
When Using
Macintosh
When Using
ACDSee
Operations in
14
Page 17

Copying Images to Camera
Click [Start]-[Program]-[ACD Systems]-[ACDSee] on the Windows task bar.
ACDSee is started.
Select images that you want to copy to the camera.
Go to [Plug-ins| Copy to Camera]
[Copy Image to Camera] will appear.
Choose Camera source, select PDR-4300 camera
[TOSHIBA PDR USB Device on G:]
Select the options on Resize Images:
Best fit to standard camera resolutions
If the current image size between 640x480 ~ 1024x768, it
will resize to 640x480.
If the current image size is bigger than 1024x768, it will
resize to 1024x768.
Resize for TV viewing
The current image size will be automatically resize to
1024x768.
Do not resize
It will remain at the original size and the copied
images may not properly display on the camera.
Getting Ready
When Using
Windows
When Using
Macintosh
Operations in
ACDSee
15
Page 18

Copying Images to Camera(continued)
Click OK.
After copying images process completed, one XXXACDSE folder will be automatically created on
the Folder tree pane.
XXXACDSE folder is created next to the last existing XXXTOSHI folder on the folder tree pane.
Getting Ready
Windows
When Using
Macintosh
When Using
• [Do not resize] option on [Copy to Camera] function, the copied images may not
properly display on the camera.
ACDSee
Operations in
16
Page 19

Installation Procedure(for Macintosh)
Installing ACDSee
Insert the CD-ROM supplied with this software package into the CD-ROM drive.
The screen for selecting the display language appears.
Click
Click
Follow the on-screen instructions to continue the setup.
• During the ACDSee installation process, LaunchACDSee will automatically be installed along with it.
With this feature, ACDSee will automatically launch when the camera is connected to your computer
with the USB cable.
• LaunchACDSee can be accessed by [Function Extend Manager] - [Setup Item] for MacOS9, and in
the case of MacOSX LaunchACDSee can be accessed by the [Login Items] tab under [Systems
Preferences] - [Login].
Getting Ready
When Using
Windows
When Using
Macintosh
Operations in
ACD See
17
Page 20

General Operations
ACDSee is a program composed of three main windows, which work to manage, view and manipulate
your images.
The Browse Window
Getting Ready
It presents an Explorer-like interface that lets you locate and manage
images stored in your file system. By default, this window comes up
when you start ACDSee. You can open more than one Browser at a
time by going to [File | New Window].
Several customization features allow you to choose the windowpanes,
the toolbars, and the shortcut buttons you wish to use.
Windows
When Using
Macintosh
The View Window
When Using
It lets you view a selected sequence of images, one at a time. Slide
show, zoom, and some file management features are also available
in this window. To switch between the Browse window and the View
window, doubleclick an image file in the Browser, or select an image
and press the <Enter> key.
Clicking the Browse button, double -clicking the image, or pressing
<Enter> will return you to Browse mode.
ACD See
Operations in
18
Page 21

General Operations(continued)
The Photo Enhancer
It lets you touch up your photographs, or alter them dramatically, with
a wide range of easy-to-use tools.
Clicking the Enhance button or selecting the [Tools | Edit…]
command, will begin a photo enhancement session. You can have as
many Photo Enhancer windows open simultaneously as you like.
Getting Ready
When Using
Windows
When Using
Macintosh
Operations in
ACD See
19
Page 22

Starting the Photo Enhancer
Select an image and click the Photo Enhancer shortcut button from either the
Browse window or the View window.
Go to [ Tools | Edit ].
Getting Ready
Enhancement Functions
The Photo Enhancer lets you express your creativity by altering the appearance of your photos.
Its easy-to-use enhancement features let you touch up your photos in minute detail, or radically change their look
and feel.
Windows
When Using
Multiple levels of undo / redo: The undo and redo functions are layered, allowing you to make
a series of changes and then flip between them, instead of starting over each time.
Crop: Selects a specific region of an image to be saved and manipulated.
Resize: Adjusts the size of the image in either pixels or percentage of image size.
Macintosh
When Using
ACD See
Operations in
20
Rotate: Spins your images around quickly, without losing their quality.
Flip: Mirrors the image along the vertical or horizontal plane of the image.
Color balance: Adjusts the hue, saturation, and lightness of the image.
Levels: Adjusts the contrast and brightness, as well as whitepoint / blackpoint and gamma levels of
your images manually, using the levels function.
Auto-levels: Automatically adjusts the brightness, contrast and color balance of a photo to a default
standard.
Blur: Reduces the amount of detail shown in an image by increasing the blur level.
Sharpen: Increases the amount of detail of an image by adjusting the sharpness level.
Page 23

Starting the Photo Enhancer(continued)
Despeckle: Creates a smoother looking presentation by removing unwanted noise from an image.
Red-eye Reduction: Removes the unwanted red-eye effect from images.
Sepia: Gives a photo a dated or old-fashioned look. Sepia is a term that describes dated photos that
consist of shades of reddish brown.
Colorize: Alters an image to reflect an adjustable monochrome format.
Negative: Creates a negative representation of an image.
Emboss: Gives an image the three-dimension look of a brass plaque, or a logo on quality paper.
Pasting Images to Other Application
If you have another application that is OLE-compatible, you can easily paste still images in the
ACDSee into that application by dragging-and-dropping them.
If you double-click the still image pasted into the OLE-compatible application, the application will be
replaced with the ACDSee menu bar and tool bar, and you can correct the still image.
If the application is not OLE-compatible, you can paste the still images in the ACDSee by using the
Copy/Paste command.
1.Left-click the still image to copy from among the still images in the folder.
2.Drag the still image to another application with the left mouse button held down.
3.Move the mouse cursor to the copy destination, and release the left mouse button to drop the still
image in the application.
• “OLE” stands for Object Linking and Embedding.
Getting Ready
When Using
Windows
When Using
Macintosh
Operations in
ACD See
21
Page 24

Playing Movies
You can play imported movies with ACDSee.
Double click on the movie in the folder.
Getting Ready
Windows Media Player automatically start playing the
movie.
Play button
Windows
When Using
Macintosh
When Using
ACD See
Operations in
22
Pause button : Click on play button once
again to resume movie playing
Stop button
Page 25

Installing DirectX
Please install Direct X, if Windows Media Player does not playback movies recorded by this camera.
Insert the CD-ROM supplied with this software package into the CD-ROM drive.
The screen for selecting the display language appears.
Click
Click
Follow the on-screen instructions to continue the setup.
• If Windows Media Player does not play the selected movie, it will start up DirectX Installation.
Getting Ready
When Using
Windows
When Using
Macintosh
Operations in
ACD See
23
Page 26

How to Access the Service and Support
You can use the supplied CD-ROM to access the Toshiba website for frequently asked question, firmware
upgrades on application models, service and support, and more.
Insert the CD-ROM supplied with this software package into the CD-ROM drive.
Getting Ready
Windows
When Using
Macintosh
When Using
ACD See
Operations in
The screen for selecting the display language appears.
Click
Click
Follow the on-screen instructions to continue the setup.
24
Page 27

Global Contacts
Getting Ready
When Using
Windows
When Using
Macintosh
Operations in
ACD See
25
Page 28

Global Contacts(continued)
For customers in the United States and Canada
Register your product On-Line
There are many advantages to being a member of the Toshiba Digital Camera community.Toshiba provides
free firmware upgrades for applicable models, allowing you to get the latest technology and enhancement
for your camera direct from the web site. There are links, updates and notices for special options available at
the Toshiba Digital Community,like special adapter mounts for Tele-photo, Wide-angle, and other filters and
Getting Ready
lenses designed specifically for your digital camera. There are frequent discounts and promotions on printing
services, carrying cases, service plans, and digital camera accessories. To find out more, visit the Toshiba
Digital Community at www.toshiba.com/taisisd
Inquiries about the Supplied ACDSee Software
ACD Systems Online Support:
Windows
http://www.acdsystems.com/English/Support/index.htm
When Using
Macintosh
When Using
ACD See
Operations in
TM
26
Page 29

Getting Ready
When Using
Windows
When Using
Macintosh
Operations in
ACD See
27
Page 30

 Loading...