

Page 1

Attention
2005.09.08
数码说明书之家
www.54gg.com
数码说明书之家
www.54gg.com
2005.09.08
For Customers in the U.S.A.
Getting Ready
FCC Statement
This device complies with Part 15 of the FCC Rules. Operation is subject to the following two conditions:
(1) This device may not cause harmful interference, and
(2) this device must accept any interference received, including interference that may cause undesired operation.
Note
This equipment has been tested and found to comply with the limits for a Class B digital device, pursuant to Part 15 of
the FCC Rules. These limits are designed to provide reasonable protection against harmful interference in a residential
installation.
This equipment generates, uses and can radiate radio frequency energy and, if not installed and used in accordance
with the instructions, may cause harmful interference to radio communications. However, there is no guarantee that
interference will not occur in a particular installation. If this equipment does cause harmful interference to radio or
television reception, which can be determined by turning the equipment off and on, the user is encouraged to try to
correct the interference by one or more of the following measures:
• Change the direction of the radio or TV antenna.
Move the equipment or the radio or TV. For example, if the equipment is to the right of the TV, move it to the left of
the TV.
Or, move the equipment farther away from the radio or TV.
• Plug the equipment into a different outlet. Don’t plug your radio or TV into the same circuit as your equipment.
• Ensure that all expansion slots are covered.
Also, ensure that all metal retaining brackets are tightly attached to the equipment.
• If these suggestions don’t help, consult your equipment dealer or experienced radio/TV technician for help.
Taking Pictures
Playing Back/
Erasing Images
Video Clips
Recording & Viewing
the Computer
Connecting to
Information
Other Useful
1
Page 2

Attention (continued)
Caution
If you modify the camera in any way, without getting approval from Toshiba Corporation, your camera may violate
FCC regulations. Violation of FCC regulations may cause the FCC to void your right to use the modified camera.
Getting Ready
TOSHIBA AMERICA INFORMATION SYSTEMS, INC.
Imaging Systems Division
9740 Irvine Boulevard,
Irvine, California 92618-1697
Phone Number: (800) 288-1354
Taking Pictures
For Customers in Canada
Caution
This Class B digital apparatus complies with Canadian ICES-003.
Playing Back/
Erasing Images
Video Clips
Recording & Viewing
the Computer
Connecting to
Information
Other Useful
2
Page 3
Before Reading This Manual
Thank you for purchasing the Toshiba PDR-2300 Digital Still Camera.
To ensure that you use this camera safely and correctly, read this Instruction Manual carefully before using the camera.
Once you have finished reading this Instruction Manual, keep it handy at all times.
The Design, Specifications, Software and Contents of Instruction manual are subject to change without prior notice for
improvement.
Trademark Information
• Microsoft® and Windows® are registered trademarks in the
U.S. and other countries by the U.S. Microsoft Corporation.
Windows® is an abbreviated term referring to the Microsoft
Windows Operating System.
• Macintosh is a trademark of Apple Computer, Inc.
• ACDSee™ is a trademark of ACD Systems Ltd.
• SD™ is a trademark.
™
• Other companies or product names are trademarks or
registered trademarks of the respective owners.
Notes on Copyright
Images taken with digital still cameras are for personal
enjoyment only and should not be used, indicated, distributed
or exhibited, etc. without the permission of the copyright holder
as per copyright laws.
Note that photographing some performances, exhibitions, etc.,
is restricted, even when photographs are taken for personal
enjoyment. In addition, the transfer of memory cards (SD
memory cards, etc.) containing copyrighted images and files
is limited to purposes within the range permitted by copyright
laws.
Software Version Update
For better use, the firmware of the camera may be
upgraded after shipment. The methods of version
upgrade are available in our website on page 97.
About OS Abbreviations
• Windows 98
This abbreviation stands for the Microsoft
Windows® 98 operation system.
• Windows 2000
This abbreviation stands for the Microsoft
Windows® 2000 operation system.
• Windows Me
This abbreviation stands for the Microsoft
Windows® Me operation system.
• Windows XP
This abbreviation stands for the Microsoft
Windows® XP operation system.
®
®
®
®
Getting Ready
Taking Pictures
Playing Back/
Erasing Images
Video Clips
Recording & Viewing
the Computer
Connecting to
Information
Other Useful
3
Page 4
Safety Precautions
Read these safety precautions carefully before using the PDR-2300. These instructions contain valuable information
on safe and proper use that will prevent harm and damage to the operator and other persons. Make sure that you fully
understand the following details (indications) before proceeding to the main descriptions in this manual.
Getting Ready
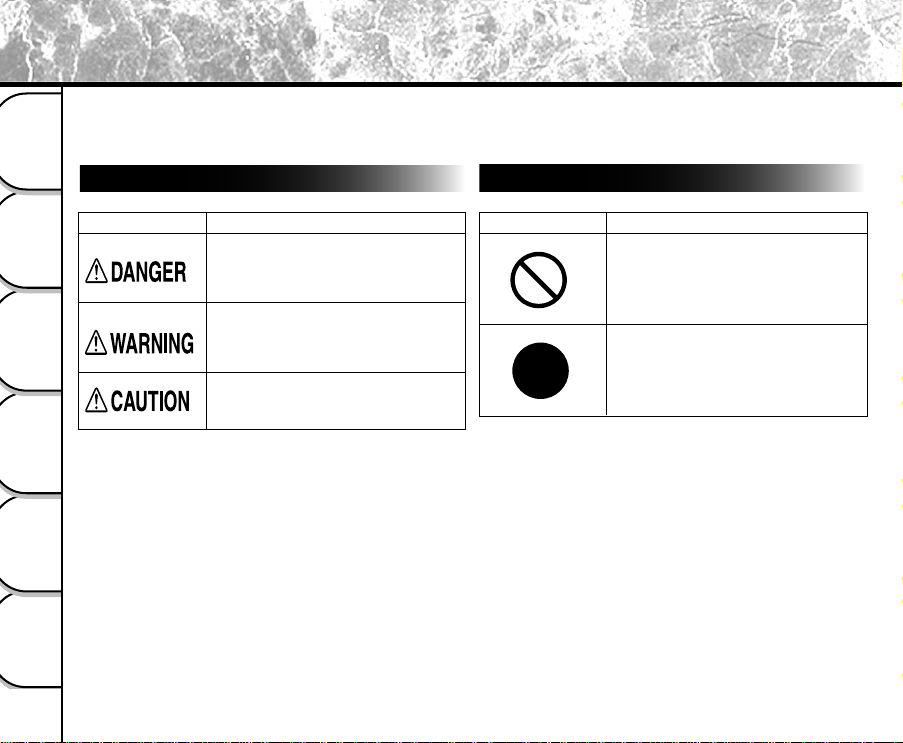
Indication Definitions
Graphic Symbol Definitions
Indication Meaning
This indicates the existence of an
imminent hazard that could result in
Taking Pictures
Playing Back/
Erasing Images
*1“Serious bodily injury” means loss of eyesight, injuries,
burns (high and low temperature), electric shock,
Video Clips
Recording & Viewing
Connecting to
Other Useful
fracture, and poisoning, which leaves a sequela and
requires hospitalization or prolonged treatment.
*2“Bodily injury” means injuries, burns, and electric shock,
which does not require hospitalization or prolonged
treatment.
*3“Property damage” means extended harm to home,
the Computer
household effects, domesticated animals, and pets.
Information
death or serious bodily injury*1, if the
safety instruction is not observed.
This indicates the existence of a
hazard that could result in death or
serious bodily injury*1, if the safety
instruction is not observed.
This indicates the existence of a
hazard that could result in bodily
injury*2 or property damage*3.
4
Graphic Symbol Meaning
Indicates a prohibited action that must
not be carried out.
The prohibited action is indicated
graphically in or near the symbol or
described in text.
Indicates a necessary action that must
be carried out.
The necessary action is indicated
graphically in or near the symbol or
described in text.
Page 5

Safety Precautions (continued)
Exemption Clauses
• Toshiba Corporation bears no responsibility in the case
of damages arising from earthquakes, fire not liable to
Toshiba Corporation, operating by third parties, other
accidents, or use under abnormal conditions including
erroneous or improper operation and other problems.
• T oshiba Corporation bears no responsibility for incidental
damages (lost profit suspension of business activities,
corruption or loss of the memory contents, etc.) arising
from the use of or the inability to use this unit.
• Toshiba Corporation accepts no liability whatsoever for
any damages arising from the incorrect use not in
compliance with instructions in this instruction manual.
• Toshiba Corporation accepts no liability whatsoever for
any damages arising from malfunctions arising from
combination with equipment or software that is not
related to Toshiba Corporation.
• Toshiba Corporation accepts no liability whatsoever for
any damages arising from repair or modifications made
by the user or cause to be made by the user and carried
out by an unauthorized third party.
• Toshiba’s liability, with the exception of a deliberate act
or gross negligence by Toshiba, shall not exceed the
purchase price of the product in any circumstances.
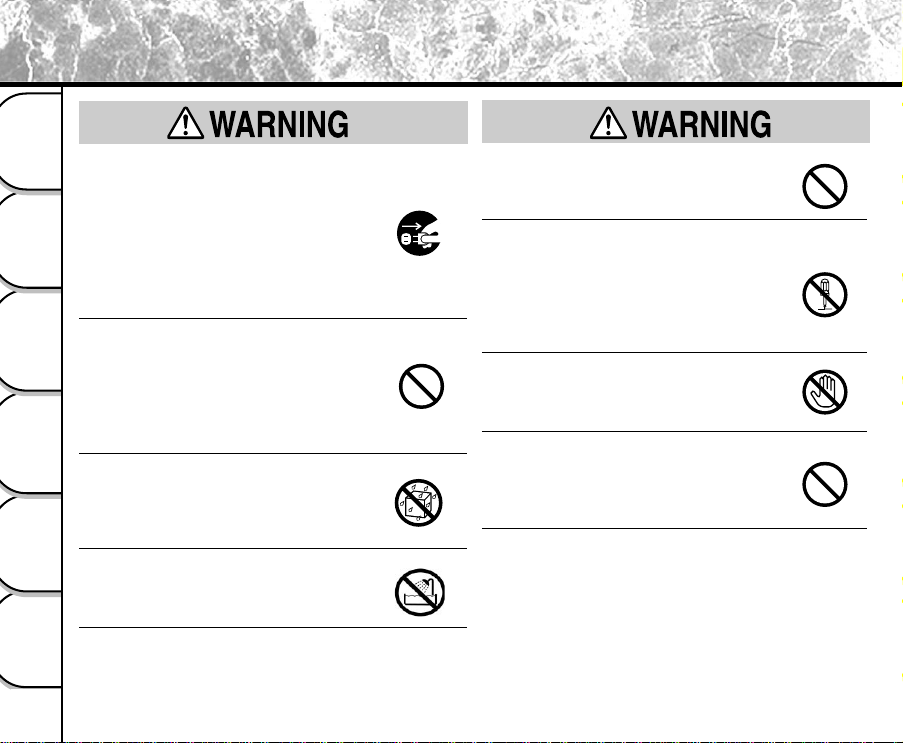
When Using the Product
Should you ever notice smoke, a strange
odor or excessive heat coming from the
camera, immediately turn OFF the power
and remove the batteries and AC power
adapter.
Continued use in this state might cause fire,
electric shock or burns. For details on repair,
consult the store of purchase, or please contact
the technical support number.
If foreign objects or water have entered the
camera, immediately turn the power OFF
and remove the batteries and AC power
adapter.
Continued use in this state might cause fire or
electric shock. For details on repair, consult the
store of purchase, or please contact the technical
support number.
Getting Ready
Taking Pictures
Playing Back/
Erasing Images
Video Clips
Recording & Viewing
the Computer
Connecting to
Information
Other Useful
5
Page 6
Safety Precautions (continued)
If the camera has fallen or its case is
Getting Ready
damaged, immediately turn the power OFF
and remove the batteries and AC power
adapter.
Continued use in this state might cause fire or
electric shock. For details on repair, consult the
Taking Pictures
store of purchase, or please contact the technical
support number.
Do not allow the camera having metallic
objects or other flammable foreign matter
Playing Back/
inside.
Erasing Images
This might cause fire or electric shock. Do not
insert or drop foreign objects in the SD memory
card slot, jacks, other holes or openings.
Video Clips
Do not use in areas near water.
Recording & Viewing
This might cause fire or electric shock. Take
special care during rain, snow, on the beach or
near the shore.
Do not use the camera in the bath or
the Computer
Connecting to
shower.
This might cause fire or electric shock.
Information
Other Useful
6
(continued)
(continued)
Do not place the camera on inclined or
unstable surfaces.
This might cause the camera to fall or tilt over.
Do not disassemble, change or repair the
camera.
This might cause fire or electric shock. For
details on repair and internal inspection, consult
the store of purchase, or please contact the
technical support number.
Do not touch power or TV antenna cords
during a thunderstorm.
This might cause electric shock.
Do not use the camera while you are
walking, driving or riding a motorcycle.
This might cause you to fall over or result in a
traffic accident.
Page 7
Safety Precautions (continued)
(continued)
If you want to use the camera on an
airplane, consult with the airline and follow
their instructions.
Use of the camera is sometimes restricted due to
potential radio interference.
Do not use the camera in humid, steamy,
smoky or dusty places.
This might cause fire or electric shock.
Do not leave the camera in places where
the temperature may increase significantly,
such as inside a car.
This might adversely affect the case or the parts
inside, resulting in fire.
Do not play the supplied CD-ROM with a
music CD player or a similar device.
This might damage the headphone or speaker,
and /or may damage your ears.
Do not look at the sun through the camera
viewfinder.
This may cause injury of the eyes.
Do not drop or subject the camera to
strong impact.
This might cause fire, electric shock or
malfunctions.
Before moving the camera, disconnect the
cables.
Not doing this might damage the cables, resulting
in fire or electric shock.
Do not wrap the camera or place it in cloth
or blankets.
This might cause heat to build up and deform the
case, resulting in fire. Use the camera in a wellventilated place.
Before cleaning the camera, remove the
batteries and AC power adapter.
Not doing this might cause fire.
Do not use the flash near the eyes.
This might cause temporary damage to the
eyesight.
Getting Ready
Taking Pictures
Playing Back/
Erasing Images
Video Clips
Recording & Viewing
the Computer
Connecting to
Information
Other Useful
7
Page 8
Safety Precautions (continued)
Do not subject the LCD monitor to impact.
Getting Ready
This might damage the glass on the screen or
cause the internal fluid to leak. If the internal
fluid enters your eyes or comes into contact with
your body or clothes, immediately rinse them
with fresh water. If the internal fluid has entered
Taking Pictures
your eyes, immediately consult a physician to
receive treatment.
For the internal cleaning of the camera,
consult the store of purchase every two
Playing Back/
years.
Erasing Images
If dust accumulates inside the camera, this might
result in fire or malfunction. Consult the store of
purchase regarding the cleaning costs.
Video Clips
Do not swing the camera while walking.
Recording & Viewing
If you hold the strap and swing the camera, the
camera might come into contact to other people
or any object, resulting in injury or malfunction.
the Computer
Connecting to
Information
Other Useful
8
(continued)
About the AC Power Adapter
Use the AC power adapter only with the
indicated power supply voltage.
Use with any other power supply voltage might
cause fire or electric shock.
Do not disassemble, modify, or repair the
AC power adapter.
This might case fire or electric shock.
If dirt or dust has adhered to the plug on
the AC power adapter cable or the plug
joints, remove the plug from the power
source and clean it.
The insulation decrease of the plug might result
in fire.
Page 9
Safety Precautions (continued)
(continued)
Do not place blankets over the AC power
adapter connected with the power source
or place the Adapter near a heater or on an
electric (warm) carpet.
This might cause fire or malfunction.
Do not damage, modify (e.g., to extend), or
heat the AC power adapter cable.
Do not pull the AC power adapter cable,
place something heavy on it, or pinch it.
Do not bend, twist, or bundle the AC power
adapter cable with an excessive force.
These might cause fire or electric shock.
Do not connect or disconnect the AC power
adapter plug with a wet hand.
This might cause electric shock.
Do not remove the AC power adapter plug
from an electrical outlet by pulling the
cable.
This might damage the cable or plug, resulting in
fire or electric shock. Make sure to hold the plug
when removing it.
Getting Ready
Taking Pictures
Playing Back/
Erasing Images
Video Clips
Recording & Viewing
the Computer
Connecting to
Information
Other Useful
9
Page 10
Safety Precautions (continued)
2005.09.08
数码说明书之家
www.54gg.com
Getting Ready
Taking Pictures
Playing Back/
Erasing Images
Video Clips
Recording & Viewing
the Computer
Connecting to
Information
Other Useful
10
(continued)
Use only the supplied AC power adapter
and power cable.
Use of an AC power adapter and/or a power
cable other than specified might cause fire or
malfunction.
If you plan not to use the camera for a long
period of time, remove the AC power
adapter plug from an electrical outlet.
Not doing this might cause malfunction on the
camera, resulting in fire.
Do not use the supplied AC power adapter
with another model or device.
This might cause fire or electric shock.
Firmly insert the AC power adapter plug
into an electrical outlet.
Not doing this might cause fire or electric shock.
About Batteries
Use only the specified batteries.
Use of batteries other than specified might cause
fire, or malfunctions.
Do not drive a nail into the batteries,
hammer it, or step on it.
Electrode shorting (if happens) might cause the
batteries to heat up, rupture, or ignite, resulting in
fire or serious injury.
Do not connect the battery electrodes (plus
and minus terminals) with any metal such
as wire. Also do not carry or store the
batteries with metal objects such as a
necklace or hairpins.
Electrode shorting (if happens) might cause the
batteries to rupture, ignite or heat up, resulting in
fire or serious injury.
Page 11
Safety Precautions (continued)
(continued)
Do not heat, disassemble or throw the
batteries into fire or water.
Doing this might cause the batteries to rupture,
ignite or heat up, resulting in fire or serious
injury.
Dispose of the exhausted batteries
properly according to your local
regulations. Before disposing of, attach
insulating tape to both the electrodes.
Electrode shorting (if happens) might cause the
batteries to rupture or ignite, resulting in fire or
serious injury.
Keep the batteries out of the reach of
children.
Swallowing a battery might result in poisoning. If
a child swallows a battery, immediately consult a
physician.
If battery fluid enters the eyes, immediately
rinse the eyes with fresh water and consult
a physician to receive treatment.
Not doing this might cause permanent damage to
the eyes.
Getting Ready
Taking Pictures
Playing Back/
Erasing Images
Video Clips
Recording & Viewing
the Computer
Connecting to
Information
Other Useful
11
Page 12
Safety Precautions (continued)
Insert the batteries with careful attention
Getting Ready
according to the polarities (+ or -) of the
terminals.
Inserting the batteries with inverted polarities
might cause fire and injury, or damage the
surrounding areas.
Taking Pictures
When carrying or storing the batteries,
place each one in a separate plastic bag.
Not doing this might cause shorting through any
metal objects, resulting in liquid leak, ignition,
Playing Back/
rupture, burn, or injury.
Erasing Images
When changing batteries, replace both with
new batteries.
Not doing this might cause them to rupture, ignite
Video Clips
or heat up, resulting in fire, major injury or
Recording & Viewing
damaging the camera.
“New batteries” refers either to recently
purchased, never used Nickel or Lithium
batteries, those within the expiry date of
recommended use, or to Nickel Metal Hydrogen
the Computer
Connecting to
(Ni-MH) or Nickel Cadmium batteries that have
recently been charged simultaneously.
(continued)
Do not use different types of batteries
together, or mix old and new batteries.
This might cause them to rupture, ignite or heat
up, resulting in fire, major injury or damaging the
camera.
Do not remove batteries immediately after
using the camera for a long period of time.
The batteries are heated up, which might result in
fire injury.
Do not leave dead or exhausted batteries
in the camera.
Not doing this might cause the batteries to
rupture, ignite or heat up, resulting in fire, major
injury or damaging the camera.
Information
Other Useful
12
Page 13

Contents
Preface
Attention ..................................................................... 1
Before Reading This Manual .....................................3
Safety Precautions ..................................................... 4
Indication Definitions ..............................................4
Graphic Symbol Definitions .................................... 4
Exemption Clauses ................................................5
When Using the Product ........................................5
About the AC Power Adapter..................................8
About Batteries .....................................................10
Contents................................................................... 13
Using Your Camera Correctly ..................................16
Handling Y our Camera............................................. 16
Handling the Batteries.............................................. 18
Handling the AC Power Adapter ..............................20
Handling the SD Memory Card ................................22
Getting Ready
Accessories.............................................................. 24
Getting to Know the Camera.................................... 25
Front View ............................................................25
Rear View .............................................................26
LED Indicators ......................................................27
Mode Dial .............................................................28
Status LCD ...........................................................29
LCD Monitor Indicators.........................................30
Installing and Removing the Batteries .....................32
Loading the Batteries ...........................................32
Removing the Batteries ........................................ 33
Battery Status .......................................................34
Using the AC Power Adapter ................................... 35
Loading and Removing the SD Memory Card ......... 36
Loading the SD Memory Card ..............................36
Removing the SD Memory Card ..........................36
Turning the Power On/Off ........................................ 37
Turning the Power On ..........................................37
Turning the Power Off ..........................................37
How to Hold Your Camera ....................................... 38
How to Press the Shutter Button.............................. 39
Choosing the Language ........................................... 41
Setting the Date and Time ....................................... 42
Setting the Image Resolution and Quality................ 43
Taking Pictures
Taking Pictures......................................................... 45
Using the Viewfinder.............................................45
Using the LCD Monitor .........................................46
Reviewing the Last Picture in the Record Mode ...... 47
Using the Optical Zoom ...........................................48
Using the Digital Zoom............................................. 49
Using the Self-timer .................................................50
Using the Macro Mode ............................................. 51
Using the Flash ........................................................ 52
Getting Ready
Taking Pictures
Playing Back/
Erasing Images
Video Clips
Recording & Viewing
the Computer
Connecting to
Information
Other Useful
13
Page 14

Contents (continued)
Taking Pictures Manually ......................................... 54
Changing the System Settings (Rec Mode) ............. 55
Record Menu ........................................................55
Getting Ready
Taking Pictures
LCD BRIGHTNESS ................................................ 55
DIGITAL ZOOM ...................................................... 55
WHITE BALANCE (Manual mode only).................. 56
EV COMPENSATION (Manual mode only) ............ 56
SHARPNESS (Manual mode only) ......................... 57
SELFTIMER............................................................ 57
EXIT ........................................................................ 57
Playing Back/Erasing Images
Playing Back Images ...............................................58
Zooming Images in and out .....................................59
Playing Back/
Erasing Images
Displaying Thumbnail Images .................................. 60
Slideshow Display .................................................... 61
Protecting Images .................................................... 62
Video Clips
Recording & Viewing
the Computer
Connecting to
Information
Other Useful
14
Protecting an Image .............................................62
Removing the Protection ...................................... 63
DPOF Settings ......................................................... 64
Deleting Images ....................................................... 66
Changing the System Settings (Playback Mode)..... 67
Playback Menu .....................................................67
LCD BRIGHTNESS ................................................ 67
SLIDE SHOW ......................................................... 67
COPY TO CARD..................................................... 67
PROTECT............................................................... 68
DPOF ...................................................................... 68
EXIT ........................................................................ 68
Recording Video Clips
Recording Video Clips ..........................................69
Reviewing Video Clips..........................................70
Connecting to the Computer
About the Software Application ................................ 71
System Requirements.............................................. 72
Connecting to a Computer Running Windows ......... 73
Installing ACDSee™ .............................................73
Installing the USB Driver ......................................74
Connecting to the PC ...........................................75
Connecting to a Macintosh Running Mac OS 9.0 or
Later ......................................................................... 76
Installing ACDSee™ .............................................76
Connecting to the Macintosh ................................77
Disconnecting the Camera from the Computer........ 78
Using ACDSee™ .....................................................79
Transferring Recorded Images to the Computer ..79
Copying Processed Images to the Camera..........81
Installing DirectX ...................................................... 83
For Windows Only ................................................83
File Structure............................................................ 84
About Still Image Data..........................................84
About Movie Data .................................................84
Page 15

Contents (continued)
Other Useful Information
Changing the System Settings (Setup mode) ...............
DATE/TIME............................................................. 85
LANGUAGE ............................................................ 85
SOUND ................................................................... 85
FORMAT MEDIA..................................................... 85
VIDEO MODE ......................................................... 85
VERSION INFO ................................................. 86
AUTO POWER OFF ............................................... 86
RESET TO DEFAULT ............................................. 87
Connecting the Camera to Other Devices ............... 88
Camera Specifications ............................................. 89
Messages Displayed on the LCD Monitor................ 91
Troubleshooting ....................................................... 92
Glossary ................................................................... 94
Global Contacts .......................................................97
For Customers in the United States and Canada.98
85
Getting Ready
Taking Pictures
Playing Back/
Erasing Images
Video Clips
Recording & Viewing
the Computer
Connecting to
Information
Other Useful
15
Page 16

Using Your Camera Correctly
When you use your camera, strictly observe the Safety Precautions on page 4 and the notes below.
Handling Your Camera
Getting Ready
Taking Pictures
Playing Back/
Erasing Images
Video Clips
Recording & Viewing
the Computer
Connecting to
● Avoid using or storing the camera in the following places:
• Places subject to humidity, dust and dirt
• Places subject to direct sunlight
• Places subject to high or low temperature
• Places filled with highly flammable gas
• Places near gasoline, benzene or paint thinner
• Places subject to strong vibrations
• Places subject to smoke or steam
• Places subject to strong magnetic fields (such as electric motors, transformers or magnets)
• Places contacting chemicals such as pesticides or next to rubber or vinyl products for a long period
● Do not expose the camera to sand or dust.
The PDR-2300 is particularly sensitive to sand and dust. If the camera comes into contact with sand or
dust, not only will the camera become damaged, it will also no longer be repairable. Pay special attention
when using the camera at the beach or where sand or dust is likely to be present.
● Condensation
Due to a sudden change in temperature, such as when you move the camera from a cold location to a warm
one, water droplets (condensation) may form on the inside of the camera or on the lens. When this occurs,
turn the camera OFF and wait an hour before using the camera. Condensation may also form on the SD
Memory Card. If this happens, remove the SD Memory Card, wipe off any condensation and wait a short
time before using it again.
Information
Other Useful
16
Page 17

Using Your Camera Correctly (continued)
● Carrying out maintenance on your camera
• To prevent the lens, surface of the LCD monitor or viewfinder from being scratched, blow off any dust from
these parts with a blower brush and lightly wipe with a soft dry cloth.
• Clean the body of the camera with a soft dry cloth. Do not use volatile liquids such as paint thinner,
benzene or insecticide, as these may react with the camera body and cause deformation or remove the
coating.
Getting Ready
Taking Pictures
Playing Back/
Erasing Images
Video Clips
Recording & Viewing
the Computer
Connecting to
Information
Other Useful
17
Page 18

Handling the Batteries
When you use the battery, strictly observe the Safety Precautions on page 4 and the notes described below.
● Recommended Batteries
Getting Ready
Taking Pictures
Playing Back/
Erasing Images
Video Clips
Recording & Viewing
the Computer
Connecting to
Information
Other Useful
18
To extend the use of the camera, we strongly recommend that you only use the following types of batteries:
• AA Alkaline batteries (Not Rechargeable): LR6AG (Toshiba)
• AA Nickel Metal Hydride (Ni-MH) batteries (Rechargeable): TH-3 (Toshiba)
The camera does not have a rechargeable function. Please use the battery charger on the market when
recharging the Nickel Hydride (Ni-MH) battery.
• AA Lithium battery (Not Rechargeable)
● Notes on batteries other than the recommended batteries
AA Manganese batteries cannot be used in this camera.
Please be careful to purchase the proper batteries.
For consideration of the environment, we do not recommend the use of AA Nickel Cadmium batteries.
● Note on Battery Life
The battery life may vary depending on individual brand of the battery, length of storage since
manufacture, temperature of the camera and batteries, and operating condition such as flash. Moreover, if
the polarities of the batteries (+ or -) and the terminal of the camera that come in contact with the
electrodes are contaminated, electricity will not flow properly and the camera will decide that the batteries
are exhausted. When removing and loading the batteries, be careful not to touch these parts. If the parts
are contaminated, clean them with a dry cloth.
When using the supplied AA Alkaline batteries, the number of photographs that can be taken are shown
as below.
Conditions: 25°C, Flash use rate 100%,LCD ON
Photography interval: 1 frame every 30 seconds
Possible number of shots: 100 shots
• The number of frames shown above is a reference value.
Page 19

Handling the Batteries (continued)
● Method of Extending Battery Life
Even if the camera is turned off, the battery power is slightly consumed. We strongly recommend that you
remove the batteries when the camera is not in use for an extended period of time. However, removing the
batteries will return the date and time settings to the default values. If this happens, reset them.
Low temperatures can also affect the performance of the battery . We recommended that you keep the camera
and batteries warm to prevent from cold by placing them in clothes.
Furthermore, the battery performance affected by low temperature, resulting in decreasing the possible shots,
will restore its function when batteries return to the adequate temperature (25°C).
Getting Ready
Taking Pictures
Playing Back/
Erasing Images
Video Clips
Recording & Viewing
the Computer
Connecting to
Information
Other Useful
19
Page 20

Handling the AC Power Adapter
Be sure to use only the specified AC power adapter (PDR-AC20 : sold separately). Using a different AC power adapter
might cause the camera to malfunction.
When you use the AC power adapter , strictly observe the Safety Precautions on page 4 and the notes described below.
Getting Ready
Taking Pictures
Playing Back/
Erasing Images
Video Clips
Recording & Viewing
the Computer
Connecting to
Information
Other Useful
20
• Use the AC cord with the rating of the country/region where the camera is used.
• Be sure that you do not allow the AC power adapter to contact any other metal object as this might cause
a short circuit.
• To connect the AC power adapter, firmly insert the plug on the end of the cable into the DC IN jack. Do not
insert the plug into other terminals. This might cause the camera to malfunction.
• Before disconnecting the connector cable, turn the camera off and then disconnect the cable by its plug.
Do not disconnect the connector cable by pulling the cable.
• Do not drop the AC power adapter or subject it to strong impacts.
• Do not use the AC power adapter in very hot and humid locations.
• Do not plug in the AC power adapter while using the battery.
• The AC power adapter is for indoor use only.
• Use only the specified AC power adapter.
• The AC power adapter may sometimes become warm during use. This is normal and not a malfunction.
• Buzzing or whirring noises may come from inside the camera. This is normal and not a malfunction.
• Do not use the AC power adapter near a radio as it could interfere with radio signal reception.
• If you remove the battery or AC power adapter while the camera is in operation, the date may be lost from
memory. If this happens, reset the date.
Page 21

Handling the AC Power Adapter (continued)
Specifications
AC Adapter (PDR-AC20)
Input : 100 to 240V AC, 50/60Hz
Output : 5V DC 3A
Operating temperature : 0°C to +40°C
Storage temperature : -20°C to +65°C
Maximum outer Dimensions : 40 x 30.5 x 94.2mm (W x H x D)
Weight : Approx, 150g
Getting Ready
IMPORTANT
• Use the power supply indicated on the supplied AC cord. When using power supply other than the
displayed voltage in other countries/region, please purchase the AC cord that applies to the standard of
the country/region.
• The AC power adapter can be used with 100V to 240V.
Taking Pictures
Playing Back/
Erasing Images
Video Clips
Recording & Viewing
the Computer
Connecting to
Information
Other Useful
21
Page 22
Handling the SD Memory Card
When you use the SD memory card(sold separately), strictly observe the Safety
Precautions on page 4 and the notes described below.
™
Getting Ready
Taking Pictures
Playing Back/
Erasing Images
Video Clips
Recording & Viewing
the Computer
Connecting to
Information
Other Useful
22
● Cautions
The SD memory card includes a non-volatile semiconductor memory (NAND Flash EEP-ROM).
Under normal use, data saved in the SD memory card is not damaged or lost. If used improperly,
however, the data may be damaged or lost. Please be aware that Toshiba Corporation will accept no
responsibility whatsoever for damaged or lost data, regardless of the type or cause of the problem or
damage.
The SD memory card uses part of the memory as its system area. The actually usable memory capacity
is therefore lower than the indicated capacity.
The supplied SD memory card has been already formatted for image storage. Always use this camera
when reformatting the card to erase images or folders. Formatting the SD memory card on other devices
(PC, etc.) may result in problems such as inability to read or write data.
We strongly recommend that you make backups of important data.
When the SD memory card comes to the end of its life, it does not allow image data to be written or
deleted. If this happens, purchase a new SD memory card.
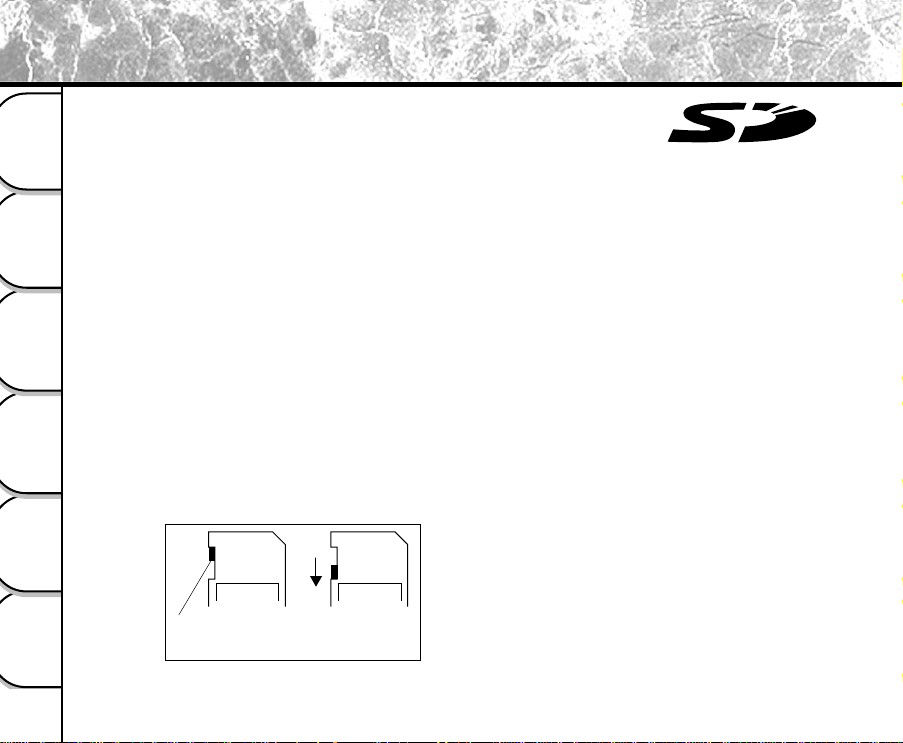
● Write Protection
To prevent valuable data from being erased accidentally, switch the write protect tab at the side of the SD
memory card to “LOCK.” To save, edit, or erase data in the card, cancel the write protection state.
LOCK LOCK
Write protection
tab
Write protection
state
Page 23

Handling the SD Memory Card (continued)
● Specifications
• Memory type : NAND Flash memory
• Operating temperature : 0°C to +40°C
• Storage temperature : -20°C to +60°C
• Operating/Storage humidity : 30% to 80% (no condensation)
• Dimensions : 24.0 mm x 32.0 mm x 2.1 mm (W x H x D)
• Weight : Approx. 2g
Getting Ready
Taking Pictures
Playing Back/
Erasing Images
Video Clips
Recording & Viewing
the Computer
Connecting to
Information
Other Useful
23
Page 24
Accessories
2005.09.08
数码说明书之家
www.54gg.com
Carefully unpack your package and make sure that you have the following items. In the event that any item is missing
or if you find any mismatch or damage, promptly contact your dealer.
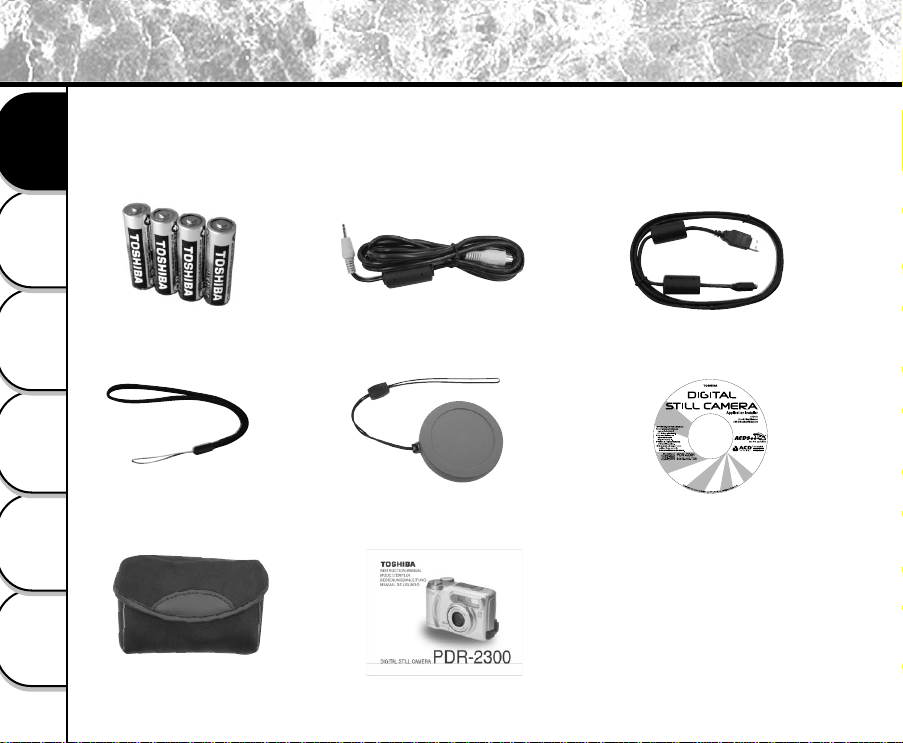
• 4 x AA alkaline batteries • Video cable • USB cable
Getting Ready
Taking Pictures
Playing Back/
Erasing Images
Video Clips
Recording & Viewing
the Computer
Connecting to
Information
Other Useful
24
• Wrist strap • Lens cap with lens strap
• Camera case
• Instruction manual
• Software CD-ROM
Sold separately
• AC power adapter
PDR-AC20
• SD memory card
SD-M3201M(32MB)
SD-M6401M(64MB)
SD-M1280M(128MB)
Page 25

Getting to Know the Camera
Front View
Getting Ready
Taking Pictures
Playing Back/
Erasing Images
Video Clips
Recording & Viewing
the Computer
Connecting to
Information
Other Useful
25
Page 26
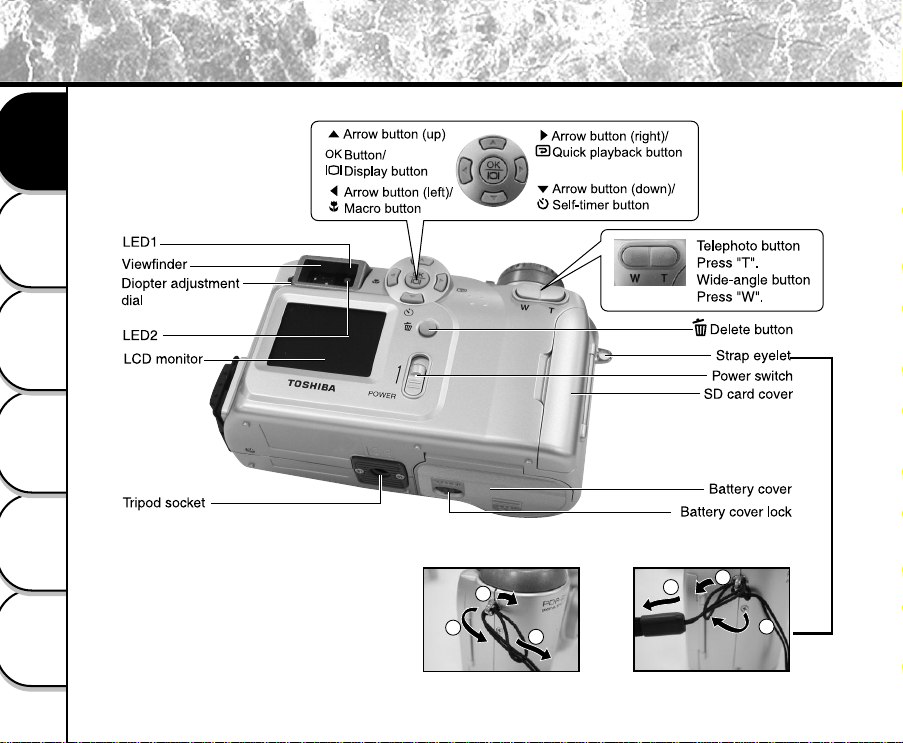
Getting to Know the Camera (continued)
Rear View
Getting Ready
Taking Pictures
Playing Back/
Erasing Images
Video Clips
Recording & Viewing
Attach the lens strap and wrist strap as illustrated below.
the Computer
Connecting to
Information
Other Useful
1
2
1
3
3
2
26
Page 27

Getting to Know the Camera (continued)
LED Indicators
Indicator Status Description Sound
LED1 Solid orange The camera is powered on. No
LED1 Blinking orange When detecting the system error Yes *(3)
LED1 Solid orange Charging the flash No
LED1 Blinking orange Image is being recorded to
the SD memory card. No
LED1 Blinking orange When transferring images to your computer No
LED2 Solid green The system is ready. Yes *(1)
LED2 Solid green is ready to record images or movie clips
(after AF is locked) Yes *(1)
LED 1 Blinking orange Out of focus No
LED 2 Solid green
Self-timer indicator Blinking red self-timer function is activated Yes *(1)
* (3) The camera sounds three beeps.
* (1) The camera sounds one beep.
Getting Ready
Taking Pictures
Playing Back/
Erasing Images
Video Clips
Recording & Viewing
the Computer
Connecting to
Information
Other Useful
27
Page 28
Getting to Know the Camera (continued)
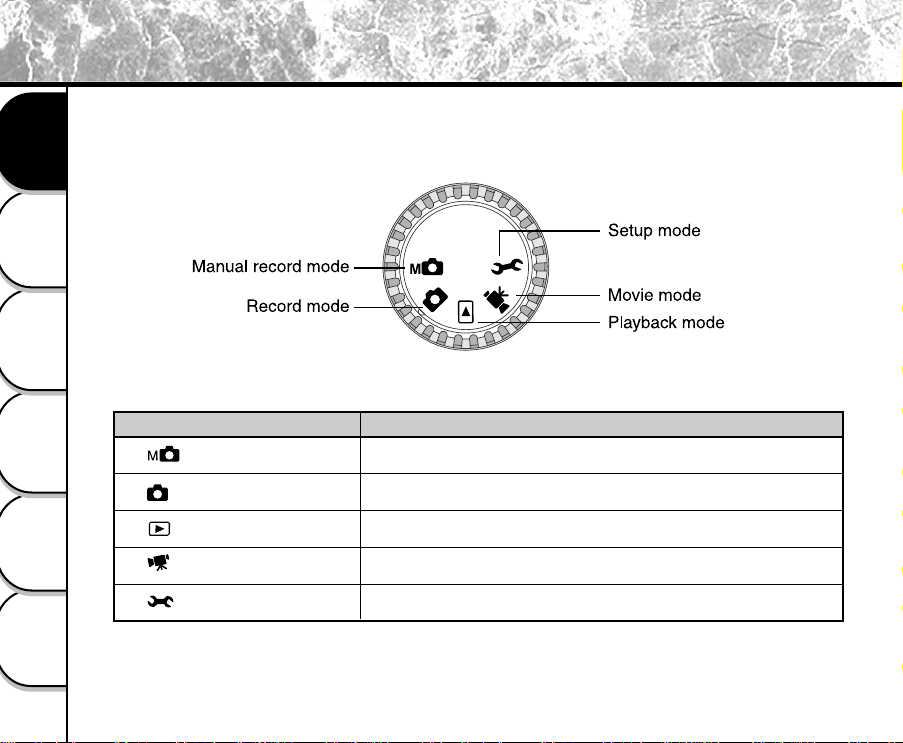
Mode Dial
Getting Ready
Taking Pictures
Playing Back/
Erasing Images
Mode Description
Video Clips
Recording & Viewing
the Computer
Connecting to
[ ] Manual record mode
[ ] Record mode
[ ] Playback mode
[ ] Movie mode
[ ] Setup mode
Use this mode to take still images by manually adjusting camera
settings such as white balance, EV compensation and sharpness.
Use this mode to take still images.
Use this mode to view or delete your images or video clips. Slide
show for recorded images is also available in this mode.
Use this mode to record video clips.
You can choose your preferences on the camera’s settings in this
mode.
Information
Other Useful
28
Page 29
Getting to Know the Camera (continued)
Status LCD
Getting Ready
Taking Pictures
Playing Back/
Erasing Images
Video Clips
Recording & Viewing
the Computer
Connecting to
Information
Other Useful
29
Page 30
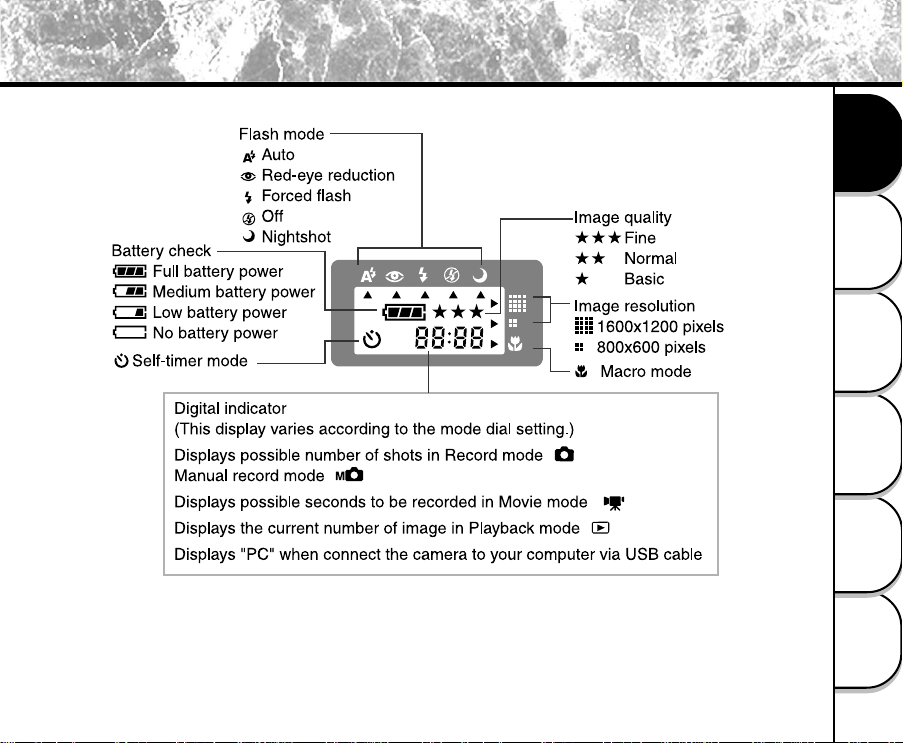
Getting to Know the Camera (continued)
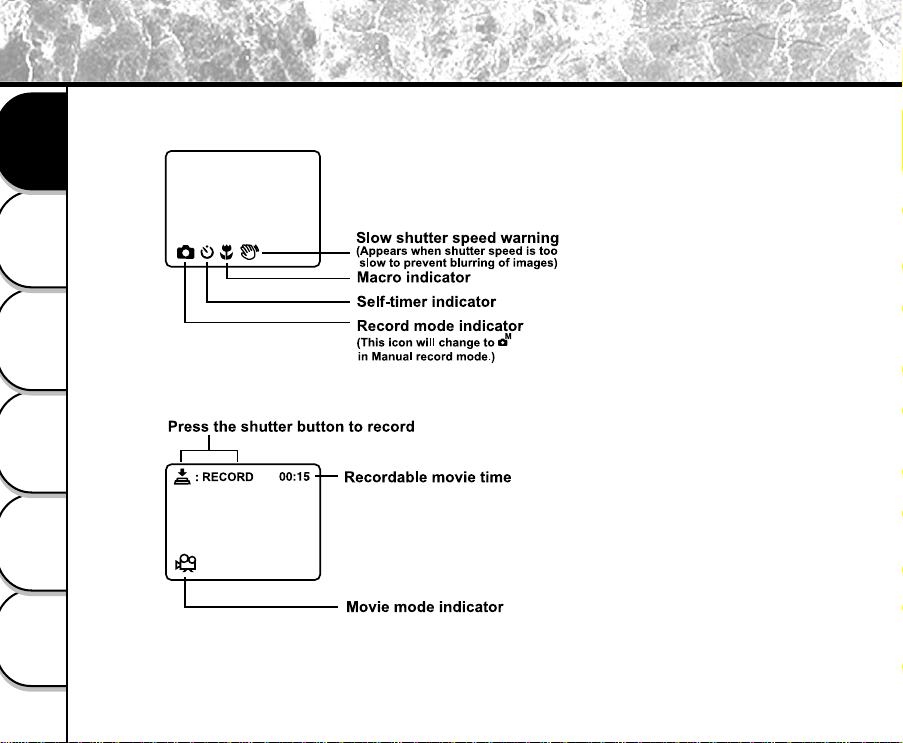
LCD Monitor Indicators
The displayed indicators when recording images:
Getting Ready
Taking Pictures
Playing Back/
Erasing Images
Video Clips
Recording & Viewing
the Computer
Connecting to
The displayed indicators when recording video clips:
Information
Other Useful
30
Page 31

Getting to Know the Camera (continued)
The displayed indicators when playing still images back:
The displayed indicators when playing video clips back:
NOTE
• If no operation is performed for 90 seconds, the LCD Monitor will be automatically turned off.
Getting Ready
Taking Pictures
Playing Back/
Erasing Images
Video Clips
Recording & Viewing
the Computer
Connecting to
Information
Other Useful
31
Page 32

Installing and Removing the Batteries
2
3
1
This camera uses four AA batteries. Acceptable batteries include alkaline, Ni-MH and lithium.
Loading the Batteries
Getting Ready
IMPORTANT
• Before you load or remove the batteries, be sure to turn the camera off.
• The camera may not start normally if you load batteries with the power on. If this happens, turn the
camera off, and then turn it on again.
Taking Pictures
Playing Back/
Erasing Images
Video Clips
Recording & Viewing
the Computer
Connecting to
Information
Other Useful
32
Make sure the camera is off. Unlock and slide the
battery cover in the direction of the OPEN arrow.
Insert the batteries according to the correct polarity
marks (+ or -).
Page 33

Installing and Removing the Batteries (continued)
2
3
1
Close and lock the battery cover firmly.
Removing the Batteries
To remove the batteries, open the battery cover, remove batteries and close the battery cover.
IMPORTANT
• Pay attention while removing the batteries to prevent the camera or batteries from dropping by accident.
• When the image is being recorded to the SD memory card or the internal memory, the LED 1 is blinking
orange. Do not open the battery cover during this process.
Getting Ready
Taking Pictures
Playing Back/
Erasing Images
Video Clips
Recording & Viewing
the Computer
Connecting to
Information
Other Useful
33
Page 34

Installing and Removing the Batteries (continued)
Battery Status
The following battery status is displayed on the LCD monitor when the camera is turned on.
Getting Ready
Taking Pictures
Playing Back/
Erasing Images
Video Clips
Recording & Viewing
the Computer
Connecting to
Icon Status
Sufficient amount left
Fairly consumed
Nearly exhausted
Completely exhausted
IMPORTANT
• Before you load or remove the batteries, be sure to turn the camera off.
• The camera may not start normally if you load batteries with the camera powered on. If this happens,
turn the camera off, and then turn it on again.
• When you remove the batteries from the camera for over 5 minutes, the date and time may return to the
default setting. If this happens, set them again when using the camera.
Information
Other Useful
34
Page 35

Using the AC Power Adapter
Open the jack cover and connect one end of the AC
power adapter to the DC IN jack on the camera.
Connect the other end to an electrical outlet.
Getting Ready
Taking Pictures
IMPORTANT
• When the image is being recorded to the SD memory card or the internal memory, the LED 1 is blinking
orange. Do not disconnect the AC power adapter from the camera during this process.
NOTE
• Make sure to use only the specified AC power adapter (5V/3A) for the camera. Otherwise, it may cause
damages to the camera, which is not covered under the warranty.
Playing Back/
Erasing Images
Video Clips
Recording & Viewing
the Computer
Connecting to
Information
Other Useful
35
Page 36

Loading and Removing the SD Memory Card
LOCK LOCK
The camera comes with 8MB of internal memory, allowing you to store images and video clips in the camera. However,
you can expand the memory capacity by using an optional SD memory card so that you can store more images and
video clips.The SD version working on PDR-2300 is 1.01.
Getting Ready
Loading the SD Memory Card
Make sure the camera is off.
Taking Pictures
Open the SD memory card cover. Insert a SD memory
card with the contact connector facing forward.
If the card cannot be inserted, check whether the direction is correct.
Playing Back/
Erasing Images
Close the SD memory card cover.
Removing the SD Memory Card
To remove the card, make sure the camera is off. Press the SD memory card once and remove the card.
Video Clips
Recording & Viewing
the Computer
Connecting to
Information
Other Useful
36
IMPORTANT
• When the image is being recorded to the SD memory
card or the internal memory, the LED 1 is blinking
orange. Do not open the SD card cover during this
process.
NOTE
• If you set the SD memory card in the LOCK position,
you cannot record, edit or delete images stored on the
SD memory card.
• You cannot use the internal memory while the camera
with the SD memory card installed.
Write protection
tab
Write protection
state
Page 37

Tur ning the Power On/Off
Turning the Power On
Slide the [POWER] switch to turn the camera on.
Remove the lens cap during photography.
In the [ ], [ ] or [ ] modes, the lens extends from the
camera body.
When the camera is turned on, the Auto Power Off function starts to
work.
IMPORTANT
• If no operation is carried out for a certain period of time, the power is turned off to prevent battery wear.
This is called “Auto Power Off”.
Turning the Power Off
Slide the [POWER] switch to turn the camera off.
The power is turned off, and the lens returns to its original position in
the body.
Getting Ready
Taking Pictures
Playing Back/
Erasing Images
Video Clips
Recording & Viewing
the Computer
Connecting to
Information
Other Useful
37
Page 38

How to Hold Your Camera
When taking a picture, remember to hold the camera firmly and prevent your finger or straps from covering the lens or
flash.
Getting Ready
Taking Pictures
Playing Back/
Erasing Images
Video Clips
Recording & Viewing
the Computer
Connecting to
Information
Other Useful
38
Right
Holding the camera by using both hands with your
arms firmly held against the sides of your chest.
Wrong
Holding the camera with your fingers covered over the
lens.
Page 39

How to Press the Shutter Button
The shutter button can be pressed down in two stages: halfway down and fully down. When pressing the shutter button
halfway down, the camera adjusts the exposure and focus. When pressing the shutter button fully down, the camera
takes a picture.
Press the shutter button down halfway [ ].
The camera adjusts the exposure and focus, and LED 1 lights orange.
Take a picture until the LED 1 is off and LED 2 lights green.
Getting Ready
And then press it the rest of the way down [ ].
The camera takes a picture.
The LED1 blinks orange while the image is being saved to the memory.
IMPORTANT
• Never open the battery cover or remove the SD memory card while an image is being recorded. This
may corrupt the data on the SD memory card or damage the SD memory card itself.
Taking Pictures
Playing Back/
Erasing Images
Video Clips
Recording & Viewing
the Computer
Connecting to
Information
Other Useful
39
Page 40

How to Press the Shutter Button (continued)
NOTE
• The image in the LCD monitor sometimes darkens while the shutter button is pressed down halfway until
the image becomes focused.
Getting Ready
Taking Pictures
Playing Back/
Erasing Images
Video Clips
Recording & Viewing
the Computer
Connecting to
• If the subject is not in the center of your desired image, you can point the subject and press the shutter
button down halfway first. And then with the shutter button held halfway down (focus and exposure
locked), reframe your picture and press the shutter button the rest of the way down to complete the
shooting.
• Moving the camera while pressing the shutter button will cause the image blurred.
• The PDR-2300 uses an accurate auto-focus mechanism. However, it may have difficulty focusing or not
be able to focus under the following situations.
- When the subject is distant and dark
- When there are objects in front of or behind the subject (such as an animal in a cage or a person in
front of a tree)
- Subjects with little reflection, such as hair or fur
- Subjects with no solidity, such as smoke or flames
- Subjects viewed through glass
- Subjects moving at high speed
- Very shiny subjects such as a mirror or car body
- Extremely low contrast subjects
- Subjects that have low contrast and merge into the background (such as white walls or subjects
dressed in the same color as the background)
• If the image cannot be focused in dark places, the focus is automatically fixed to infinity. When the flash
is used at this time, PDR-2300 will detect the distance to the subject by emitting the pre-flash and then
focus at the subject.
Information
Other Useful
40
Page 41

Choosing the Language
When you first turn the camera on, the language setting screen appears, prompting you to choose a language for
displayed information on the LCD monitor. Follow the steps below to set the language.
Select a language that you require by using the [ / ] button.
The provided languages are [ENGLISH], [FRANÇAIS], [DEUTSCH], [ESPAÑOL], [ ].
Press the [OK] button to confirm.
NOTE
• The language setting will be saved even when the camera is turned off.
Getting Ready
Taking Pictures
Playing Back/
Erasing Images
Video Clips
Recording & Viewing
the Computer
Connecting to
Information
Other Useful
41
Page 42

Setting the Date and Time
When you first turn the camera on, the language setting screen prompts. Once the language is set, the date and time
setting screen follows to appear, allowing you to define. You can also skip this step by pressing the [OK] button repeatedly.
Getting Ready
Taking Pictures
Playing Back/
Erasing Images
Video Clips
Recording & Viewing
the Computer
Connecting to
Information
Other Useful
42
Enter the values of the [YEAR], [MONTH], [DAY] and [TIME] fields by using the [
/ / / ] button. And then press the [OK] button.
Set the last field and press the [OK] button, the date and time setting screen will
exit.
NOTE
• Each time you remove the batteries or AC power adapter from the camera, the date and time settings
might restore to the default values. If this is happened, reset the date and time.
Page 43

Setting the Image Resolution and Quality
The resolution and quality settings determine the size and compression ratio of your images and how many images can
be stored in internal memory or on the SD memory card. The higher resolution and quality produce the large size and
less compressed image but take up more space in memory.
Higher resolution and quality are recommended if you want to enlarge images. Lower resolution and quality take up
less memory space, suitable for sharing images via e-mail or the Internet. To change the image resolution and quality,
press the [ ] on the top of the camera repeatedly until the settings that you want appear on the status LCD.
Resolution & Quality: The camera provides 2 resolution modes and 3 quality modes, which can be changed cyclically
Resolution & Quality Indicators on the status LCD
In [
] / [ ] mode: shows the resolution & quality settings of the image to be recorded
In [ ] mode: shows the resolution & quality settings of the recorded image
by pressing the resolution & quality button. The cyclical order is [1600x1200] [ ★★★ ] ➔
[1600x1200] [ ★★ ] ➔ [1600x1200] [★ ] ➔ [800x600] [ ★★★ ] ➔ [800x600] [ ★★ ] ➔ [800x600]
[ ★ ] ➔ repeat.
Getting Ready
Taking Pictures
Playing Back/
Erasing Images
Video Clips
Recording & Viewing
the Computer
Connecting to
Information
Other Useful
43
Page 44

Setting the Image Resolution and Quality (continued)
The table below shows the approximate shots that you can take at each setting based on 8MB internal memory (7MB
internal memory for storing image/video clip files) or a 8MB SD memory card.
Getting Ready
Taking Pictures
Playing Back/
Erasing Images
Video Clips
Recording & Viewing
the Computer
Connecting to
Information
Other Useful
44
Resolution
Full size:
[ ]1600x1200 pixels
Half size:
[ ]800x600 pixels
• The above data shows the standard testing results. The actual capacity varies according to the shooting conditions and
settings.
NOTE
• You cannot use the internal memory while the camera with the SD memory card installed.
Quality
[ ★★★ ] Fine
[ ★★ ] Normal
[ ★ ] Basic
[★★★ ] Fine
[★★ ] Normal
[★ ] Basic
Compression
Ratio
8:1
12:1
16:1
8:1
12:1
16:1
8 MB Internal
Memory
10
15
20
41
62
83
8MB SD
Memory Card
9
14
18
37
56
75
Page 45

Taking Pictures
The camera is equipped with an optical viewfinder and a 1.6" LCD monitor to compose pictures. Taking pictures by
using the viewfinder can conserve battery power. If the battery level is low and no extra batteries are handy, we
recommend that you compose pictures by using the viewfinder. Using LCD monitor can accurately compose pictures
and examine all details but consume more battery power.
The sensitivity value is automatically selected in the range of ISO100 to ISO400.
Using the Viewfinder
Getting Ready
Turn the camera on by sliding the [ POWER ] switch.
Turn the mode dial to the [ ] mode or the [ ]
mode.
Compose the picture in the viewfinder.
Turn the “diopter adjustment dial” until the image appears clearly within
the viewfinder.
Press the shutter button down halfway (the camera
adjusts the exposure and the focus), then press it the
rest of the way down.
When the camera adjusts the exposure and focus, the LED 1 lights
orange. Take a picture until the LED 1 is off and the LED 2 lights green.
The LED1 blinks orange while the image is being saved to the memory.
Taking Pictures
Playing Back/
Erasing Images
Video Clips
Recording & Viewing
the Computer
Connecting to
Information
Other Useful
45
Page 46

Taking Pictures (continued)
Using the LCD Monitor
Getting Ready
Taking Pictures
Playing Back/
Erasing Images
Video Clips
Recording & Viewing
the Computer
Connecting to
Information
Other Useful
46
Turn the camera on by sliding the [ POWER ] switch.
Turn the mode dial to the [ ] mode or the [ ]
mode.
Turn the LCD monitor on by pressing the [ ] button
and compose the picture with it.
Press the shutter button down halfway (the camera
adjusts the exposure and the focus), then press it the
rest of the way down.
When the camera adjusts the exposure and focus, the LED 1 lights
orange. Take a picture until the LED 1 is off and the LED 2 lights green.
The LED1 blinks orange while the image is being saved to the memory.
NOTE
• The image in the LCD monitor darkens when in strong sunlight or bright light. This is not a malfunction.
• Using the LCD monitor for an extended period of time may result in the decrease of shots that you can
take. To increase the shots and conserve battery power, turn the LCD monitor off and use the viewfinder
instead.
• If no operation is performed for 90 seconds, the LCD Monitor will be automatically turned off.
Page 47

Reviewing the Last Picture in the Record Mode
The camera is equipped with the [ ] button, allowing the most recent image to be displayed on the LCD monitor in
the [ ]/[ ] mode. However, you can only view the last image with this function. To view all your recorded images,
go to the [ ] mode.
If you intend to view the image just after taking a picture, you can press the [ ]
button. The last image displays on the LCD monitor. To return to the record mode
from the quick playback status and continue shooting, press the [ ] button
again.
Getting Ready
Taking Pictures
Playing Back/
Erasing Images
Video Clips
Recording & Viewing
the Computer
Connecting to
Information
Other Useful
47
Page 48

Using the Optical Zoom
The lens moves during the zoom photography. Zoom photography allows you to take telephoto and wide-angle shots.
The subject appears closer by pressing the Telephoto button and appears farther away by pressing the Wide-angle
button.
Getting Ready
Taking Pictures
Playing Back/
Erasing Images
Video Clips
Recording & Viewing
the Computer
Connecting to
Information
Other Useful
48
Turn the camera on.
Turn the mode dial to the [ ] mode or the [ ] mode.
Turn the LCD monitor on by pressing the [ ] button.
Press the Telephoto button to enlarge the subject.
Press the shutter button down halfway, then press it
the rest of the way down.
Page 49

Using the Digital Zoom
2X
By using the digital zoom function, images can be enlarged the center of the screen so that the subject appears closer.
However, the more the image is enlarged, the grainier the image will become. The digital zoom function is only available
when you set the LCD monitor and the digital zoom to on. To enable the digital zoom, refer to DIGIT AL ZOOM in Record
menu.
Turn the camera on.
Turn the mode dial to the [ ] mode or the [ ] mode.
Turn the LCD monitor on by pressing the [ ] button.
Press the Telephoto button as far as it can go.
Activate 2X digital zoom function by pressing the
Telephoto button again.
The 2X icon appears on the LCD monitor.
To cancel digital zoom function, press the Wide-angle button.
Press the shutter button down halfway, then press it
the rest of the way down.
NOTE
• You can only set the digital zoom at the resolution of 1600x1200 pixels; digital zoom is not available at the
resolution of 800x600 pixels. When you play back the image recorded with digital zoom, the image size
is 800x600 pixels.
• The maximum zoom magnification is 2X for recording and 4X for viewing an image.
• Turn on the LCD monitor while using the digital zoom function.
Getting Ready
Taking Pictures
Playing Back/
Erasing Images
Video Clips
Recording & Viewing
the Computer
Connecting to
Information
Other Useful
49
Page 50

Using the Self-timer
The self-timer duration is 10 seconds (default) or 2 seconds. After the activation of the self-timer by pressing the shutter
button, the self-timer LED starts blinking slowly for 7 seconds and then blinking faster for the rest of 3 seconds. With this
design, you can get in the frame when taking group pictures.
Getting Ready
Taking Pictures
Secure the camera to a tripod or place it on a stable surface.
Turn the camera on.
Set the mode dial to the [ ] mode or the [ ] mode.
Playing Back/
Erasing Images
Video Clips
Recording & Viewing
the Computer
Connecting to
Information
Other Useful
50
Press the [ ] button.
The [ ] icon appears on the LCD monitor and status LCD.
Compose the picture.
Press the shutter button down halfway, then press it
the rest of the way down.
The self-timer function is activated.
After the self-timer indicator blinks for 10 or 2
seconds, the camera takes a picture automatically.
To cancel self-timer photography at any time, press the [ ] button again or press the shutter button.
NOTE
• After one shot is taken, the self-timer mode is turned to off.
Page 51

Using the Macro Mode
Use the macro mode to shoot a close-up of the subject, such as flowers or insects. The effective range is between
20cm and infinity.
Turn the camera on.
Turn the mode dial to the [ ] mode or the [ ] mode.
Press the [ ] button.
The [ ] icon appears on the LCD monitor and the arrow points to the
macro icon on the status LCD.
Compose the picture.
Press the shutter button down halfway, then press it
the rest of the way down.
To cancel macro photography at any time, press the [ ] button again.
NOTE
• When shooting a close-up of the subject, you can compose the picture by using the viewfinder or the
LCD monitor. However, composing the picture by using the viewfinder in macro mode may cause
images composed to be off-center due to the parallax phenomenon. We recommend that you use the
LCD monitor instead to compose the picture in this situation.
• The camera remains in the macro setting even if one shot is taken. To cancel the macro setting, you
have to press the [
] button again.
Getting Ready
Taking Pictures
Playing Back/
Erasing Images
Video Clips
Recording & Viewing
the Computer
Connecting to
Information
Other Useful
51
Page 52

Using the Flash
The flash is designed to function automatically in dark places. You can take a picture with the suitable flash setting
according to the different conditions. If you change the flash setting, the camera will remain in that setting even when
the camera is turned off.
Getting Ready
Taking Pictures
Playing Back/
Erasing Images
Video Clips
Recording & Viewing
the Computer
Connecting to
Turn the camera on.
Turn the mode dial to the [ ] mode or the [ ] mode.
Press the [ ] button located on the top of the
camera repeatedly until your desired flash mode
appears.
Press the shutter button down halfway, then press it
the rest of the way down.
IMPORTANT
• When taking pictures in too bright places or under the situation that the subject is too close, the pre-flash
together with the main flash sometimes reach up to four times.
• When the white balance is set to the mode other than AUTO, the flash is automatically changed to OFF.
At this time, you can still select the flash mode that you require if necessary by manually pressing the [
button.
]
Information
Other Useful
52
Page 53

Using the Flash (continued)
The camera provides 5 flash modes: Auto (default), Red-eye reduction, Forced flash, Off, Night Shot, which can be
changed cyclically by pressing the flash button on the top of the camera. The table below tells you how to choose the
appropriate flash mode while shooting.
Flash Mode Description
Getting Ready
[ ]Auto
[ ]Red-eye Reduction
[ ]Forced Flash
[ ]Off
[ ]Night Shot
NOTE
• If you take a picture in the [ ] mode at a place with a dark background or in the [ ] mode at a dark
place, the shutter speed slows down, and [
the LED1 lights and [ ] is displayed on the LCD monitor.) We recommend that you use a tripod to
prevent blurred image caused by shaking.
The flash fires automatically according to the ambient conditions. Select this mode for
general photography.
The flash emits a pre-flash before the main flash flashes, which causes the pupil in the
human eye to close and eliminates red-eye phenomenon. Select this mode when
taking pictures of people and animals in low-light conditions.
The flash always fires regardless of the surrounding brightness. Select this mode for
recording images in artificial light (backlighting, fluorescent lighting, etc.).
The flash does not fire. Select this mode when taking pictures at a place where the
flash photography is prohibited or under the situation that the distance to the subject is
too far away for the flash to have any effect.
The flash fires and the shutter speed becomes slow in this mode so that the subject
and background will be exposed correctly while taking a picture with dark background
at night.
] is displayed. (When the shutter is pressed halfway,
Taking Pictures
Playing Back/
Erasing Images
Video Clips
Recording & Viewing
the Computer
Connecting to
Information
Other Useful
53
Page 54

Taking Pictures Manually
You can take pictures by manually adjusting conditions such as white balance, EV compensation and sharpness. For
white balance, EV compensation and sharpness information, refer to WHITE BALANCE, EV COMPENSATION and
SHARPNESS in Manual Record menu.
To take pictures manually:
Getting Ready
Turn the camera on.
Turn the mode dial to the [ ] mode.
Taking Pictures
Press the [MENU] button.
Playing Back/
Erasing Images
Move to WHITE BALANCE, EV COMPENSATION or
Video Clips
Recording & Viewing
the Computer
Connecting to
Information
Other Useful
54
SHARPNESS by using the [ / ] button.
Change the settings by using the [ / ] button and
then press the [OK] button.
Compose the picture.
Press the shutter button down halfway, then press it
the rest of the way down.
Page 55

Changing the System Settings (Rec Mode)
Record Menu
You can use the record menu/manual record menu to change LCD brightness, enable digital zoom, and determine the
conditions such as white balance, EV compensation and sharpness. To do this, press the [MENU] button and then
scroll through the options by using the [ / ] button.
LCD BRIGHTNESS
This option adjusts the brightness of the LCD monitor (-5 to +5). Press the [OK] button, the LCD
brightness bar appears. Press the [ / ] button to brighten the LCD monitor while press the [ / ]
button to darken the LCD monitor. And then press the [OK] button.
DIGITAL ZOOM
You can take digital zoom shots by activating the digital zoom function. Use the [ ] button to select [ON]
if necessary. And then press the [OK] button.
Getting Ready
Taking Pictures
Playing Back/
Erasing Images
Video Clips
Recording & Viewing
the Computer
Connecting to
Information
Other Useful
55
Page 56

Changing the System Settings
WHITE BALANCE (Manual mode only)
The image appears different under different color of lighting. Human eyes can solve this problem. But for
camera, you need to make adjustments. Normally, the camera adjusts the white balance automatically.
Getting Ready
Taking Pictures
Playing Back/
Erasing Images
Video Clips
Recording & Viewing
Effective Subjects and Set Values
the Computer
Connecting to
Information
Other Useful
56
However, if the image appears in strange colors, we recommend that you change the white balance
setting. Use the [ / ] button to select the appropriate white balance and then press the [OK] button.
[AUTO]: automatically adjusting the white balance
[SUN]: for recording outdoors on a bright day
[SHADE]: for recording under cloudy and shady sky
[FLUORESCENT 1]: for recording under bluish fluorescent lighting
[FLUORESCENT 2]: for recording under reddish fluorescent lighting
[TUNGSTEN]: for recording under tungsten lighting
NOTE
• When the white balance is set to the mode other than AUTO, the flash is automatically changed to OFF.
At this time, you can still select the flash mode that you require if necessary by manually pressing the [ ]
button.
EV COMPENSATION (Manual mode only)
When the subject is too dark or too bright, the camera adjusts the brightness to make the subject
becomes brighter or darker. This is called EV compensation. The EV compensation of the camera is
ranged from -1.8EV to +1.8EV. Use the [ / ] button to select the EV compensation that you want and
then press the [OK] button.
• Positive (+) Compensation
• Copying of printed text (black characters on white paper)
• Backlight portraits
• Very bright scenes (such as snowfields) and highly reflective subjects
• Shots made up predominantly of sky
(Rec Mode)
(continued)
Page 57

Changing the System Settings
• Negative (-) Compensation
• Spotlight subjects, particularly against dark backgrounds
• Copying of printed text (white characters on black paper)
• Scenes with low reflectivity, such as shots of green or dark foliage
SHARPNESS (Manual mode only)
This option sets the level of image sharpness. Use the [ / ] button to select the sharpness mode that
you want and then press the [OK] button.
[NORMAL] : Leave the image detail as captured.
[SOFT] : Soften the edge of the image detail for the special effects.
[HARD] : Sharpen the edge of the image detail.
(Rec Mode)
(continued)
Getting Ready
Taking Pictures
SELFTIMER
This option allows you to set the self-timer delay with 10 seconds or 2 seconds. Use the [ / ] button to
select the delay time and then press the [OK] button.
[10 SEC]: the shutter button will be released automatically after 10 seconds
[2 SEC]: the shutter button will be released automatically after 2 seconds
EXIT
This option exits the manual record/recond menu and then returns to the [ ] / [ ] mode. Press the
[OK] button to exit. You can also press the [ MENU ] button again to exit.
Playing Back/
Erasing Images
Video Clips
Recording & Viewing
the Computer
Connecting to
Information
Other Useful
57
Page 58

Playing Back Images
In the [ ] mode, you can view, magnify, delete your images or play video clips back. This mode even provides
thumbnail images display and slide show, allowing you to quickly search for the image that you want or play the images
back one by one automatically.
Getting Ready
Turn the camera on by sliding the [ POWER ] switch.
TTking Pictures
Playing Back/
Erasing Images
Video Clips
Recording & Viewing
the Computer
Connecting to
Information
Other Useful
58
Turn the mode dial to the [ ] mode.
Select the image that you want to view by using the
[ / ] button.
To view the previous image, press the [ ] button.
To view the next image, press the [ ] button.
NOTE
• If there is no image stored in the internal memory or on the memory card, “no images” message will
appear on the LCD monitor.
•You can also view your images on the TV screen. First connect one end of the video cable to the video
out jack of the camera. Then connect the other end to the video input socket of the TV. Turn the mode
dial to the [
] mode and then turn the TV and camera on.
Page 59

4X
Zooming Images in and out
This mode allows you to enlarge your image on the selected portion of the image with 4X magnification to check for
small details.
Turn the mode dial to the [ ] mode with the
camera powered on.
Current position of enlargement
Entire image
Select the image that you want to view by using the
[ / ] button.
Enlarge the image by pressing the Telephoto button.
Pressing the T elephoto button once magnifies the image to 2X. Pressing
it again magnifies the image to 4X.
When enlarging the recorded image, you will see a red frame with a
red box inside. The red frame indicates the entire image, while the red
box shows the enlarged area.
To view the different portion of the enlarged image,
press the [
/ / / ] button.
To return to the regular display from 4X-enlarged status, press the Wide-angle
button twice.
NOTE
• The zoom in function magnifies the image from 1X ➔ 2X ➔ 4X.
• The zoom out function reduces the image from 4X ➔ 2X ➔ 1X.
Getting Ready
Taking Pictures
Playing Back/
Erasing Images
Video Clips
Recording & Viewing
the Computer
Connecting to
Information
Other Useful
59
Page 60

Displaying Thumbnail Images
This function allows you to view 9 thumbnail images on the LCD monitor at the same time, which can quickly search for
the image that you want.
Getting Ready
TTking Pictures
Playing Back/
Erasing Images
Video Clips
Recording & Viewing
the Computer
Connecting to
Information
Other Useful
60
Turn the mode dial to the [ ] mode with the camera powered on.
Press the [ ] button once.
The image information appears on the LCD monitor.
Press the [ ] button again.
Nine thumbnail images show on the LCD monitor if the image number
reaches up to nine frames.
To view a full-size image, press the [OK] button after selecting it by
using the [ / / / ] button.
NOTE
• By pressing the [ ] button repeatedly, the image will show as follows.
Image only ➔ Image and OSD (on-screen display) ➔ Thumbnail image display
Page 61

Slideshow Display
Slideshow function enables you to play your images back in order automatically, which is very useful and convenient
for checking recorded images and for presentations.
Turn the mode dial to the [ ] mode with the
camera powered on.
Press the [ MENU ] button and move to SLIDE SHOW
by using the [
/ ] button.
Set the playback interval by using the [ / ]
button and press the [OK] button.
The slideshow display starts. You can view the image displayed on the LCD monitor one by one with the
interval that you set.
To stop the slideshow display, press the [OK / / / ] button.
NOTE
•You can adjust the slideshow display interval within the range of 2 sec. to 10 sec. For interval setting,
refer to SLIDE SHOW in Playback menu.
• The auto power off does not function during slideshow display.
Getting Ready
Taking Pictures
Playing Back/
Erasing Images
Video Clips
Recording & Viewing
the Computer
Connecting to
Information
Other Useful
61
Page 62

Protecting Images/Video Clips
You can protect your desired images/video clips from being accidentally erased by using the protect function. To protect
an image/video clip , follow the steps below:
Protecting an Image/Video Clip
Getting Ready
Turn the mode dial to the [ ] mode with the
camera powered on.
The last image/video clip appears on the LCD monitor.
TTking Pictures
Playing Back/
Erasing Images
Video Clips
Recording & Viewing
the Computer
Connecting to
Select the image/video clip you want to protect by
using the [
/ ] button.
Press the [MENU] button on top of the camera.
The playback menu appears.
Move to the PROTECT option by using the [ / ]
button. Use the [ / ] button to select [ON], and
then press the [OK] button.
Once the image is protected, the protection icon will display on the left
bottom of the selected image.
Information
Other Useful
62
Page 63

Protecting Images/Video Clips (continued)
For the video clip, the protection icon will display on the right bottom as
illustrated.
To protect more images/video clips, repeat steps 2 to 4 in “Protecting
an Image/Video Clip”.
IMPORTANT
• The protected image/video clip cannot be erased except using
FORMAT MEDIA function (refer to FORMAT MEDIA in Setup
menu).
Removing the Protection
Carry out the steps 1 to 3 in “Protecting an Image/Video Clip”.
Move to the PROTECT option by using the [ / ] button. Use the [ / ]
button to select [OFF], and then press the [OK] button.
The protection icon displayed on the selected image/video clip is removed.
To remove the protection from more images/video clips, repeat this procedure described in “Removing the
Protection”.
Getting Ready
Taking Pictures
Playing Back/
Erasing Images
Video Clips
Recording & Viewing
the Computer
Connecting to
Information
Other Useful
63
Page 64

DPOF Settings
DPOF is the abbreviation for Digital Print Order Format, which allows you to embed printing information on your memory
card. You can select the pictures to be printed and how many prints to make by using the DPOF menu on the camera
and insert the memory card to the card-compatible printer. When the printer starts printing, it will read the embedded
information on the memory card and print the specified images.
Getting Ready
To do the DPOF setting:
Turn the mode dial to the [ ] mode with the camera powered on.
TTking Pictures
Playing Back/
Erasing Images
Video Clips
Recording & Viewing
the Computer
Connecting to
Information
Other Useful
64
Select the image you want to use the DPOF settings by using the [ / ] button.
Press the [MENU] button on the top of the camera.
Move to the DPOF option by using the [ / ] batton.
Press the [OK] button to enter the DPOF sub-menu.
Use the [ / ] button to set the values for each
field and then press the [OK] button.
[PRINT QUANTITY] : you can select image quantity from 1~9
[PRINT SIZE] : you can select your preferred image size
(PRINT STD, 3x5, 4x6, 5x7, 8x10)
[PRINT INDEX] : allows you to print the images in index format
[PRINT ENABLE] : If you select ENABLE, the camera saves the
DPOF settings.
If DISABLE is selected, all the settings will be
erased.
Page 65

DPOF Settings (continued)
(DPOF shortcut)
You can use the shutter button to quickly do the DPOF setting. Follow the steps below:
Turn the mode dial to the [ ] mode with the camera powered on.
Press the shutter button to toggle the DPOF print tag setting for the specified
image.
NOTE
• When using the shutter button to enable the DPOF setting, the default setting is size=standard, and
quantity=1.
IMPORTANT
• The PDR-2300 may take several minutes to process the DPOF-setting images. Please wait until this
processing is complete.
Getting Ready
Taking Pictures
Playing Back/
Erasing Images
Video Clips
Recording & Viewing
the Computer
Connecting to
Information
Other Useful
65
Page 66

Deleting Images
You can delete one image/video clip or all images/video clips at a time depending how long you press the [ ] button.
To delete one image at a time:
Getting Ready
Turn the mode dial to the [ ] mode with the
camera powered on.
Select the image/video clip you want to delete by
using the [
TTking Pictures
Select [YES], and press the [OK] button. The next
image/video clip appears.
If you want to cancel the deletion, select [NO].
Playing Back/
Erasing Images
To delete all images at a time:
Video Clips
Recording & Viewing
Continue the deletion if necessary. If all images are deleted, [ NO IMAGES ]
pops up. To exit, turn the mode dial to other mode.
Press the [ ] button for over 1 second.
Select [YES] and press the [OK] button. The [ NO IMAGES ] pops up. To exit,
turn the mode dial to other mode. If you select [NO], the screen will return to the
[
the Computer
Connecting to
Information
Other Useful
66
/ ] button. Press the [ ] button.
] mode.
NOTE
• To delete the images or video clips stored in the internal memory, remember not to insert the SD memory
card in the camera. Otherwise, you will delete the images or video clips stored in the SD memory card.
Page 67

Changing the System Settings (Playback Mode)
Playback Menu
You can use the playback menu to automatically display your images one by one or configure DPOF setting, etc. To do
this, press the [MENU] button and then move through the options that you want to configure by using the [ / ]
button.
LCD BRIGHTNESS
Refer to LCD BRIGHTNESS in Record menu.
SLIDE SHOW
This option can automatically display one image at a time in order with
the delay time that you select. Use the [ / ] button to select the
delay time that you want and then press the [OK] button.
[2 sec], [4 sec], [6 sec], [8 sec], [10 sec]
COPY TO CARD
This option allows you to copy your images from the camera’s internal
memory to a SD memory card. However, you can only do this with a
SD memory card installed and internal memory contains images. Use
the [ / ] button to select [YES] if necessary and then press the
[OK] button.
Getting Ready
Taking Pictures
Playing Back/
Erasing Images
Video Clips
Recording & Viewing
the Computer
Connecting to
Information
Other Useful
67
Page 68

Changing the System Settings (Playback Mode) (continued)
PROTECT
Refer to page 62 for PROTECTING IMAGES.
Getting Ready
DPOF
Refer to page 64 for DPOF SETTINGS.
EXIT
TTking Pictures
Playing Back/
Erasing Images
Video Clips
Recording & Viewing
the Computer
Connecting to
This option exits the playback menu and then returns to the [ ] mode. Press the [OK] button to exit.
You can also press the [ MENU ] button again to exit.
Information
Other Useful
68
Page 69

Recording Video Clips
The movie mode allows you to record video clips in Motion JPEG AVI format at the resolution of 320 x 240 pixels.
Turn the camera on by sliding the [POWER] switch.
Turn the mode dial to the [ ] mode.
The recordable movie time is displayed on the status LCD and the
LCD monitor.
You can start recording a video clip by pressing the
shutter button down fully.
The elapsed time is displayed on the LCD monitor while the recording
starts.
To stop recording, press the shutter button again.
IMPORTANT
• When recording the video clip, the AVI file and THM file are automatically generated, which are
necessary for playing the video clip back. Be careful not to delete these 2 files by mistake.
• When transferring the video clips to your computer, the AVI file and THM file will exist in the same folder.
NOTE
• The maximum recordable movie time is 15 seconds.
• The zoom function cannot be activated while playing the video clip back.
• In movie mode, resolution/quality, macro, self-timer, and digital room cannot be set or activated.
• In movie mode, the flash mode is automatically set to [OFF].
Getting Ready
Taking Pictures
Playing Back/
Erasing Images
Video Clips
Recording & Viewing
the Computer
Connecting to
Information
Other Useful
69
Page 70

Reviewing Video Clips
To view the recorded video clips, follow the steps below.
Turn the mode dial to the [ ] mode with the camera powered on.
Getting Ready
Select the video clip that you want to view by using the [ / ] button.
Press the shutter button to start.
TTking Pictures
Playing Back/
Erasing Images
Video Clips
Recording & Viewing
the Computer
Connecting to
To pause playback at any time, press the shutter button again.
To stop playback, press the [ ] button.
Pressing the shutter button or the [ ] button while playing back the video clip will change the status as
follows:
Information
Other Useful
70
Page 71

About the Software Application
The supplied CD-ROM includes the following software applications, which allows you to import images (by installing
the USB driver) and edit images (by using ACDSee™).
● ACDSee™ (Image Viewing Software)
This software allows you to view, process, or modify recorded images on your computer. For detailed
information about this software, refer to its help file.
● DirectX (Video Playback Software)
Install this software when Windows Media Player cannot play back the recorded video clips.
● USB Driver (for Windows® 98 Only)
Install this driver when connecting this camera to the computer running Windows® 98. This driver is exclusively
used for Windows® 98. Installing the USB driver on computers running Windows® 2000, Windows® ME or
Windows® XP is not necessary. For computers running Mac OS 9.0 or higher, installing the USB driver is
also unnecessary as the computer will automatically recognize the camera and load its own USB driver.
● Service & Support File
This file includes information on service and support. We recommend that you save this file in your computer
in case you lose this manual.
IMPORTANT
Software and Instruction Manual
• Copying or duplication of the supplied software applications or Instruction Manual in part or in whole is not
allowed without the prior permission of Toshiba Corporation.
• Use of the supplied software applications and Instruction Manual is allowed only on one personal computer.
• Toshiba Corporation is not liable whatsoever for any damages to the user or a third party as a result of use
of a device with the supplied software applications and Instruction Manual.
• The personal computer screens shown in this Instruction Manual are examples and may differ from actual
screens. Toshiba Corporation is not liable whatsoever for any compensation arising from errors in this
Instruction Manual.
Getting Ready
Taking Pictures
Playing Back/
Erasing Images
Video Clips
Recording & Viewing
the Computer
Connecting to
Information
Other Useful
71
Page 72

System Requirements
To install the supplied software, you computer must conform to the system requirements below.
Getting Ready
TTking Pictures
Playing Back/
Erasing Images
Video Clips
Recording & Viewing
the Computer
Connecting to
Information
Other Useful
72
Windows PC Macintosh
CPU
OS
Memory
Free Space on Hard Disk
Color Monitor
Required Devices
Pentium® processor or higher
®
Windows
pre-installed PC
98/2000/ME/XP
20 MB or more (The empty space should be large enough to save images.)
256 colors (800 x 600 dots min., 32,000 colors or more recommended)
PowerPC G3 processor 266 MHz or higher
Mac OS 9.0 or later (Mac OS 9.2 or later recommended)
Mac OS X 10.1 or later
(Mac OS X 10.1.3 or later recommended)
64 MB or more
CD-ROM drive, USB port
*Proper connections with not all PCs will be assured.
When using Mac OS 9.0 or 9.1, you need to install CarbonLib 1.3 or later.
You can download the program from the web site of Apple Computer, Inc.
Page 73

Connecting to a Computer Running Windows
The computer must have Windows 98, Window 2000, Windows Me or Windows XP pre-installed.
Installing ACDSee™
Insert the supplied CD-ROM into the CD-ROM drive.
The screen for selecting the displayed language appears.
Click [ ].
Click [ ].
Follow the on-screen instructions to complete the installation.
When the installation is complete, the ACDSee™ icon appears on the
desktop.
Getting Ready
Taking Pictures
Playing Back/
Erasing Images
Video Clips
Recording & Viewing
the Computer
Connecting to
Information
Other Useful
73
Page 74

Connecting to a Computer Running Windows
Installing the USB Driver
For Windows 98
Getting Ready
Insert the supplied CD-ROM into the CD-ROM drive.
The screen for selecting the displayed language appears.
(continued)
TTking Pictures
Playing Back/
Erasing Images
Video Clips
Recording & Viewing
the Computer
Connecting to
Information
Other Useful
74
Click [ ].
Click [ ].
Follow the on-screen instructions to complete the installation.
Restart you computer after installing the USB driver.
Installing the USB driver for use in Windows 2000/Me/XP is not
necessary. PDR-2300 conforms with USB Mass Storage Class.
Page 75

Connecting to a Computer Running Windows
Connecting to the PC
(continued)
Turn the computer and camera on.
Connect one end of the USB cable to the USB port on
the computer, and the other end to the USB
connector on this camera.
Follow the on-screen instructions to complete the
installation.
IMPORTANT
• When transferring images to the camera, the LED 1 is blinking orange. Do not disconnect the USB
cable/AC power adapter or open the battery cover/SD card cover during this process.
NOTE
• When the USB cable is connected, this camera is considered to be a removable disk.
• With the USB driver installed, the computer will recognize the camera while reconnecting the USB cable
so that images can be transferred.
• Auto Power Off does not function while connecting this camera to the computer.
Getting Ready
Taking Pictures
Playing Back/
Erasing Images
Video Clips
Recording & Viewing
the Computer
Connecting to
Information
Other Useful
75
Page 76

Connecting to a Macintosh Running Mac OS 9.0 or Later
The Macintosh must have Mac OS 9.0 or later pre-installed.
Installing ACDSee™
Getting Ready
Insert the supplied CD-ROM into the CD-ROM drive.
The screen for selecting the displayed language appears.
TTking Pictures
Playing Back/
Erasing Images
Video Clips
Recording & Viewing
the Computer
Connecting to
Information
Other Useful
76
Click [ ].
Click [ ].
Follow the on-screen instructions to complete the installation.
When the installation is complete, the ACDSee™ icon appears on the
desktop.
Page 77

Connecting to a Macintosh Running Mac OS 9.0 or Later (continued)
Connecting to the
For Mac OS 9.0 or later users, the computer will recognize the camera and load its own USB driver while the USB cable
is connected so that installing the USB driver is not necessary.
Macintosh
Turn the computer and camera on.
Connect one end of the USB cable to the USB port on
the computer, and the other end to the USB
connector on this camera.
NOTE
• When the USB cable is connected, this camera is considered to be a removable disk.
• With the USB driver installed, the computer will recognize the camera while reconnecting the USB cable
so that images can be transferred.
• Auto Power Off does not function while connecting this camera to the computer.
Getting Ready
Taking Pictures
Playing Back/
Erasing Images
Video Clips
Recording & Viewing
the Computer
Connecting to
Information
Other Useful
77
Page 78

Disconnecting the Camera from the Computer
For Computers Running Windows 98:
Turn the camera off, and then remove the USB cable from the computer and camera.
Getting Ready
For Computers Running Windows 2000, Windows Me or Windows XP:
Double-click [ ] on the status bar located at the bottom right of the desktop. The Remove Hardware
window appears. Select the USB disk removal, and then follow the on-screen instructions. After finishing
the operations, remove the USB cable from the computer and camera.
TTking Pictures
For Macintosh Running Mac OS 9.0 or Later:
On the desktop, drag the folder (untitled) of this camera over the trash icon, and then remove the USB
Playing Back/
Erasing Images
Video Clips
Recording & Viewing
the Computer
Connecting to
cable from the computer and camera.
Information
Other Useful
78
Page 79

Using ACDSee™
Installing ACDSee™ allows you to view a list of recorded images and transfer processed images from the computer to
the camera.
Transferring Recorded Images to the Computer
Connect this camera to the computer by using the
USB cable.
ACDSee™ is activated automatically and a list of images stored on the
SD memory card is displayed.
Select the image that you want to copy, and then
click “Copy” in the Edit menu.
Getting Ready
Taking Pictures
Playing Back/
Erasing Images
Video Clips
Recording & Viewing
the Computer
Connecting to
Information
Other Useful
79
Page 80

Using ACDSee™ (continued)
Select a copy destination, and then click “Paste” in
the Edit menu.
Getting Ready
TTking Pictures
The image is transferred successfully and displayed in the selected
destination.
IMPORTANT
It is recommended that you use the AC power adapter as a power
supply for the camera while transferring images from the camera
to you computer to prevent recorded images from being damaged.
Playing Back/
Erasing Images
Video Clips
Recording & Viewing
the Computer
Connecting to
Information
Other Useful
80
If ACDSee™ is not activated while connecting the camera to your computer via the USB
cable:
For Computers Running Windows:
Double-click the ACDSee™ icon on the desktop.
For Macintosh Computers:
Open the ACDSee™ folder on the hard disk, and then double-click the ACDSee™ icon.
Page 81

Using ACDSee™ (continued)
Copying Processed Images to the Camera
You can process recorded images on the computer, make copies of them and send them back to the camera.
Connect this camera to the computer by using the
USB cable.
ACDSee™ is automatically activated.
Select the image that you want to copy, and then
select “Copy to Camera” in the Plug-ins menu.
When using a Macintosh, drag the image that you want to copy onto
[X]. When a confirmation message appears, select “Yes.”
Getting Ready
Taking Pictures
Playing Back/
Erasing Images
Video Clips
Recording & Viewing
the Computer
Connecting to
Information
Other Useful
81
Page 82

Using ACDSee™ (continued)
Select a post-conversion image size, and then click “OK.”
The image is named “ACDXXX.jpg” and is copied to the XXXACDSE folder on the SD memory card in the
Getting Ready
camera.
TTking Pictures
Playing Back/
Erasing Images
Video Clips
Recording & Viewing
the Computer
Connecting to
Information
Other Useful
82
When copies are made, image size will be converted
to 640x480 pixels.
Image is copied with the original size.
Resultant image size differs depending on the
original size of copied image.
1024x768 or larger : The image will be converted to 1024x768 pixels.
640x480 to 1024x768 : The image will be converted to 640x480 pixels.
640x480 or smaller : The image size will remain unchanged. For an image smaller than the
NOTE
• This camera may not display images properly while selecting “no size change”.
• Images copied from a Macintosh to this camera cannot be thumbnail displayed no matter which size is
selected. This is not a malfunction on camera design.
• For details of ACDSee™, refer to its Help.
screen, a black frame will surround it.
Page 83

Installing DirectX
For Windows Only
Insert the supplied CD-ROM into the CD-ROM drive.
The screen for selecting the displayed language appears.
Click [ ].
Click [ ].
Follow the on-screen instructions to complete the installation.
Getting Ready
Taking Pictures
Playing Back/
Erasing Images
Video Clips
Recording & Viewing
the Computer
Connecting to
Information
Other Useful
83
Page 84

File Structure
The images taken on the Toshiba PDR-2300 Digital Still Camera are stored in the SD memory card as shown below.
Getting Ready
TTking Pictures
Playing Back/
Erasing Images
About Still Image Data
On the PDR-2300, still image data is saved in Exif format. This format is a JPEG data, which contains a thumbnail
image and photographic settings.
Video Clips
Still image data is saved as follows:
Recording & Viewing
Folder name : XXXTOSHI (XXX is any number within the range 100 to 999)
File name : PDR_XXXX.jpg (XXXX is any number within the range 0001 to 9999)
About Movie Data
Movie data is saved in the following format:
the Computer
Connecting to
File format : AVI
Movie size : 320x240
Movie code : Motion JPEG
File name : PDR_XXXX.avi (XXXX is any number within the range 0001 to 9999)
Information
Other Useful
84
: PDR_XXXX.thm (XXXX is any number within the range 0001 to 9999)
Page 85

Changing the System Settings (Setup Mode)
You can select your preferences on the camera in the [ ] mode. Switch the mode dial to the [ ] mode and move
to the option you want to configure by using the [
/ ] button.
DATE/TIME
Refer to page 42 for SETTING THE DATE AND TIME.
LANGUAGE
Refer to page 41 for CHOOSING THE LANGUAGE.
SOUND
Camera sounds beep each time you press the camera button if this function is enabled. Select [ON] or
[OFF] by using the [ / ] button and then press the [OK] button.
FORMAT MEDIA
This function formats the internal memory or the SD memory card and erases all images stored on either
of them. If you select [YES] with the [ / ] button and press the [OK] button, the FORMAT MEDIA
message appears on the LCD monitor. When you select [YES] and press the [OK] button again, a
progress bar displays, showing the progress of the formatting.
NOTE
The MEDIA indicates the SD memory card while the camera with the SD memory card installed.
If not, the MEDIA indicates the internal memory.
VIDEO MODE
This option allows you to view your images on a TV. Connect the camera to your TV via the video cable
connection first. Then select the video output format by using the [ / ] button and press the [OK]
button.
Getting Ready
Taking Pictures
Playing Back/
Erasing Images
Video Clips
Recording & Viewing
the Computer
Connecting to
Information
Other Useful
85
Page 86

Changing the System Settings (Setup Mode)
(continued)
Getting Ready
VERSION INFO.
TTking Pictures
AUTO POWER OFF
Playing Back/
Erasing Images
Video Clips
Recording & Viewing
the Computer
Connecting to
Information
Other Useful
[NTSC] : select this format when located in the U.S.A., Canada, Japan, Korea, Taiwan, Central
America, Mexico, etc.
[PAL] : select this format when located in Australia, Austria, Belgium, China, Denmark, Finland,
Germany, Great Britain, Holland, Italy, Kuwait, Malaysia, New Zealand, Singapore, Spain,
Sweden, Switzerland, Thailand, Norway, etc.
This option displays the firmware version. “Firmware” refers to the software that controls the camera’s
operation. The firmware is pre-installed in the camera.
In case no operation is carried out for a certain period of time while powered on, the camera stays idle or
turns off automatically to conserve power after the inactivity period as mentioned below.
Inactivity Period Camera Status
90 seconds stay idle
3 minutes (default) shut off
To activate the camera again while stayed idle, press any button or switch the mode dial.
If the camera is shut off automatically, you need to turn the camera on again by sliding the [ POWER ]
switch. The table above shows the default settings of auto power off. You can change the setting by using
the [ / ] button and then press the [OK] button.
[3 min], [5 min], [10 min], [30 min]
NOTE
The camera will remain the auto power off setting even if it is turned off.
86
Page 87

Changing the System Settings (Setup Mode)
(continued)
RESET TO DEFAULT
If you want to restore all settings to their original status, select [YES] by using the [ / ] button if
necessary and then press the [OK] button.
The following table shows the default setting for each item.
Item Description
Image Resolution 1600x1200 pixels
Image Quality [ ★★★ ] Fine
Flash Auto
LCD Brightness 0
White Balance Auto
EV Compensation 0.0
Slide Show Delay 4 seconds
Auto Power Off 3 minutes
Sound On
Digital Zoom Off
Getting Ready
Taking Pictures
Playing Back/
Erasing Images
Video Clips
Recording & Viewing
the Computer
Connecting to
Information
Other Useful
87
Page 88

Connecting the Camera to Other Devices
Getting Ready
TTking Pictures
Playing Back/
Erasing Images
Video Clips
Recording & Viewing
the Computer
Connecting to
Information
Other Useful
88
Page 89

Camera Specifications
Item Description
Sensor Approx. 2.14 megapixels (effective pixels: approx. 2.06 megapixels), 1/2.7" CCD
Resolution 1600x1200 pixels; 800x600 pixels
LCD 1.6" color TFT LCD
Self-timer 2/10 seconds delay
Shutter speed 1/3~1/1000 second
Zoom 3 x optical zoom, 2 x digital zoom
Capture modes Still photographs or video recording
Memory type 8 MB internal memory (7MB internal memory for storing image/video clip files):
Estimated shots
to be taken
<Still image mode>
Rcordable movie time
<Movie image mode>
• The above data shows the standard testing results. The actual capacity varies according to the shooting conditions and
settings.
SD memory card (optional) (up to 256MB capacity)
SD
memory
card
8MB
16MB
32MB
64MB
128MB
256MB
Fixed recordable movie time—15 seconds
Resolution—320x240 pixels
1600x1200 pixels 800x600 pixels
[ ★★★ ] Fine [ ★★ ] Normal [ ★ ] Basic [ ★★★ ] Fine [ ★★ ] Normal [ ★ ] Basic
91418375675
20 30 41 82 123 164
43 64 86 172 258 344
88 132 176 352 529 705
178 267 356 712 1069 1425
355 532 710 1420 2130 2840
Getting Ready
Taking Pictures
Playing Back/
Erasing Images
Video Clips
Recording & Viewing
the Computer
Connecting to
Information
Other Useful
89
Page 90

Camera Specifications (continued)
Item Description
Flash settings Auto, Red-eye Reduction, Forced Flash, Off, Night Shot
Getting Ready
Flash effective range 0.5m ~ 2.5m
Lens Auto focus zoom lens
TTking Pictures
Exposure compensation Auto; Manual: -1.8 ~ +1.8EV (0.3EV step)
White balance Auto; Manual: Sun, Shade, Fluorescent 1, Fluorescent 2, Tungsten
Playing Back/
Erasing Images
Compressed format JPEG, Motion JPEG AVI for video clip
Standards JPEG, EXIF 2.1, DPOF, DCF 1.0, Motion JPEG AVI
Language supported English, French, German, Spanish, Japanese
Video Clips
Recording & Viewing
Interface DC IN jack, USB connector, VIDEO OUT jack (NTSC or PAL)
Operating environment Operation: 5°C~40°C, 30~80% humidity; Storage: -20°C~60°C, 10~70% humidity
Power AA x 4 (Alkaline, Ni-MH or Lithium); AC power adapter
the Computer
Connecting to
Tripod socket Yes
Dimensions 110 x 51x 68 mm (W x D x H)
Weight About 230g (without batteries and the SD memory card)
Information
Other Useful
*Design and specifications are subject to change without notice.
90
-f :5.4 ~ 16.2mm (equivalent to 36mm ~ 108mm on a 35mm camera)
-Focal range :Standard-50cm ~ infinity
:Macro-approx. 50cm ~ infinity at telephoto
-Aperture ratio: F2.8/F5.6 (W), F4.4/F8.6 (T)
-approx. 20cm ~ infinity at wide angle
Page 91

Messages Displayed on the LCD Monitor
The following warning messages are displayed on the LCD monitor.
Message Meaning
[ ]
[ ]
[ ]
MEDIA FULL
WRITE PROTECT
NO IMAGES
PROTECT
Fairly consumed
Nearly exhausted
Completely exhausted
No space left in the SD memory card. You cannot take photographs.
The SD memory card is locked. You cannot take photographs.
No image stored in the SD memory card.
You attempted to erase a protected image.
Getting Ready
Taking Pictures
Playing Back/
Erasing Images
Video Clips
Recording & Viewing
the Computer
Connecting to
Information
Other Useful
91
Page 92

Troubleshooting
When the camera does not operate properly, check the following items and find the solution for each problem.
Problem Cause Solution
Getting Ready
The power cannot be
turned on.
TTking Pictures
The camera is
powered off during
operation.
The batteries run out
quickly.
Playing Back/
Erasing Images
Video Clips
Recording & Viewing
the Computer
Connecting to
The batteries are running out.
The AC power adapter plug is disconnected from
an electrical outlet.
The batteries are loaded in incorrect orientation.
The batteries are running out.
Auto power off is functioning.
You are using the camera in extremely cold
conditions.
The battery terminals are dirty.
The batteries have reached the effective life.
Replace with new batteries.
Plug the AC power adapter into an
electrical outlet.
Load the batteries in correct orientation.
Replace with new batteries.
Turn the camera on again.
Put the batteries in your pocket or another
warm place, and then load them into the
camera just before taking a photograph.
Wipe the battery terminals with a clean,
dry cloth.
Replace with new batteries.
Information
Other Useful
92
Page 93

Troubleshooting (continued)
Problem Cause Solution
No photograph is taken
when the shutter button
is released.
The flash cannot be
used.
The played-back image
is too dark even though
the flash fired.
The played-back image
is blurred.
A single image cannot be
erased.
The date and time
settings are cleared.
Internal memory full or the SD memory
card full.
No enough space in the SD memory card.
The SD memory card is write-protected.
The SD memory card is not formatted.
The SD memory card is damaged.
Auto Power Off is functioning.
You selected flash Off mode.
You pressed the shutter button while the
flash was charging.
The subject is too far away.
The lens is not clean.
You didn’t hold your camera firmly while
taking photographs.
The SD memory card is write-protected.
The image is protected.
The camera is left for a long period of time
without batteries.
Erase some images in either of them to
increase space for photographing.
Insert a new SD memory card. Erase saved
images to increase the empty space.
Cancel the write-protection. Replace with a
new SD memory card.
Format the SD memory card.
Insert a new SD memory card.
Turn the camera on again.
Select another flash mode.
Take a photograph until flash charging is
complete.
Move closer to the subject.
Clean the lens.
Place the camera on a stable surface or
use a tripod to take photographs.
Cancel the write-protection.
Cancel the image protection.
Set the date and time again.
Getting Ready
Taking Pictures
Playing Back/
Erasing Images
Video Clips
Recording & Viewing
the Computer
Connecting to
Information
Other Useful
93
Page 94

Glossary
● AF/AE
AF (auto-focus)......A function for automatically focusing your camera.
AE (auto-exposure).......A function for automatically setting your camera’s exposure.
Getting Ready
TTking Pictures
Playing Back/
Erasing Images
Video Clips
Recording & Viewing
the Computer
Connecting to
AF/AE lock......Locking of the focus and exposure settings.
● DPOF (Digital Print Order Format)
A standard for directly writing print information to the SD Memory Card. Files in this format can be printed
easily by printers or photo print service bureaus that support this format.
● DCF (Design Rule for Camera File System)
A file system standard defined by the JEIDA (Japan Electronic Industry Development Association) that is
required for exchanging data between digital still cameras or a digital camera and a printer. This standard
defines the hierarchy and file names used when storing image files on memory cards or other recording
medium.
● Exif File Format (Exchangeable Image File Format)
A color still image format for digital still cameras, which is approved by the JEITA (Japan Electronics and
Information Technology Industries Association). JPEG-compliant, this format is compatible with TIFF and
JPEG and can be used in image processing software for most personal computers.
● JPEG
A file format used for compressing and saving color images. The compression ratio can be selected, but
the higher the compression ratio, the worse image quality becomes. This format is widely used in the
paint software for PCs and on the Internet.
Information
Other Useful
94
Page 95

Glossary (continued)
● NTSC (National Television System Committee)
Method of television transmission, used in Japan and North America.
● PAL (Phase Alternate Line)
Method of television transmission, used in the United Kingdom, Germany and other western European
Countries.
● Red-Eye Effect
The phenomenon that people’s eyes sometimes appear red in the picture when you use a flash to take a
picture of them in low-light conditions. This is caused by the light of the flash reflecting off the inside of the
eye.
● White Balance
When the brightness of the light changes, the human eye adapts so that a white object still looks white.
On the other hand, devices such as digital still cameras see a white subject as white by first adjusting the
balance to suit the color of the ambient light around the subject. This adjustment process is called white
balance.
● SD Memory Card
The Secure Digital (SD) Memory Card is a flash memory storage device designed by the consortium of
Matsushita Electronic (Panasonic), SanDisk and Toshiba to meet the security, capacity, performance and
environmental requirements inherent in emerging audio and video consumer electronics devices. This
recording medium can be used over and over again.
Getting Ready
Taking Pictures
Playing Back/
Erasing Images
Video Clips
Recording & Viewing
the Computer
Connecting to
Information
Other Useful
95
Page 96

Glossary (continued)
● Formatting
Transforming the contents of the SD Memory Card to a recordable state. (This is sometimes called
“initialization”.)
Getting Ready
● Exposure Compensation
When the screen contains an extremely bright or dark object, the camera automatically adjusts the
brightness, resulting in the subject being reproduced darker or lighter. Exposure compensation adjusts for
this.
TTking Pictures
Playing Back/
Erasing Images
Video Clips
Recording & Viewing
the Computer
Connecting to
Information
Other Useful
96
Page 97

Global Contacts
Country/Region Company Name Phone Number E-mail Website
Canada
China Hong Kong
France
Germany
Italy
Mexico
Singapore
Switzerland
United Kingdom
United States
In the supplied CD-ROM, a file containing information regarding service and support is recorded; we recommend that
you save this file to your computer in case you lose the instruction manual.
Toshiba America
Information
Systems, Inc.
Toshiba Hong Kong
Ltd.
Toshiba Systems
(France)
Toshiba Europe
Gmbh
Toshiba Europe
Gmbh
Sede Secondaria in
Italia
Toshiba de Mexico,
S.A. de C.V.
Toshiba Singapore
Pte.
Toshiba Europe
Gmbh
Swiss Sales Branch
Toshiba Information
Systems (U.K.) Ltd.
Toshiba America
Information
Systems, Inc.
(800) 829-8318
2956-0222
08 92 35 01 92
(02131) 158 01
(039) 6099342
(800) 712-6764
270-7776
01-9085656
(01932) 828828
(800) 829-8318
dsc.support@tais.toshiba.com
NA
consommateur@toshiba-tsf.
com
consumer@toshiba-teg.com
toshiba.italia@toshiba-tuk.com
NA
NA
info@toshiba.ch
enquiries@toshiba-tuk.com
dsc.support@tais.toshiba.com
www.toshiba.com/taisisd
www.toshiba.com.hk
www.toshiba.fr/produits/
video/index.htm
www.toshiba.de/comsumer
www.toshiba.it/
www.toshiba.com.mx
www.cp.toshiba.com.sg
www.toshiba.ch/
www.toshiba.co.uk
www.toshiba.com/taisisd
Getting Ready
Taking Pictures
Playing Back/
Erasing Images
Video Clips
Recording & Viewing
the Computer
Connecting to
Information
Other Useful
97
Page 98

Global Contacts (continued)
For Customers in the United States and Canada
Register your product On-Line.
To be a member of the Toshiba Digital Camera community, you can enjoy many advantages. Toshiba provides free
Getting Ready
firmware upgrades for applicable models, allowing you to get the latest technology and enhancement for your camera
from the web site. There are links, updates and notices for special options at the Toshiba Digital Community, such as
special adapter mounts for Tele-photo, Wide-angle, and other filters and lenses designed specifically for your digital
camera. There are frequent discounts and promotions on printing services, carrying cases, service plans, and digital
camera accessories. To find out more, visit the Toshiba Digital Community at www.toshiba.com/taisisd
TTking Pictures
Inquiries about the Supplied ACDSee™Software
ACD Systems Online Support:
http://www.acdsystems.com/English/Support/index.htm
Playing Back/
Erasing Images
Video Clips
Recording & Viewing
the Computer
Connecting to
Information
Other Useful
98
 Loading...