

Page 1
Toshiba Mobile Audio Player
Model: MEGF60 / MEGF40 / MEGF20 / MEGF10
Owner’s Manual
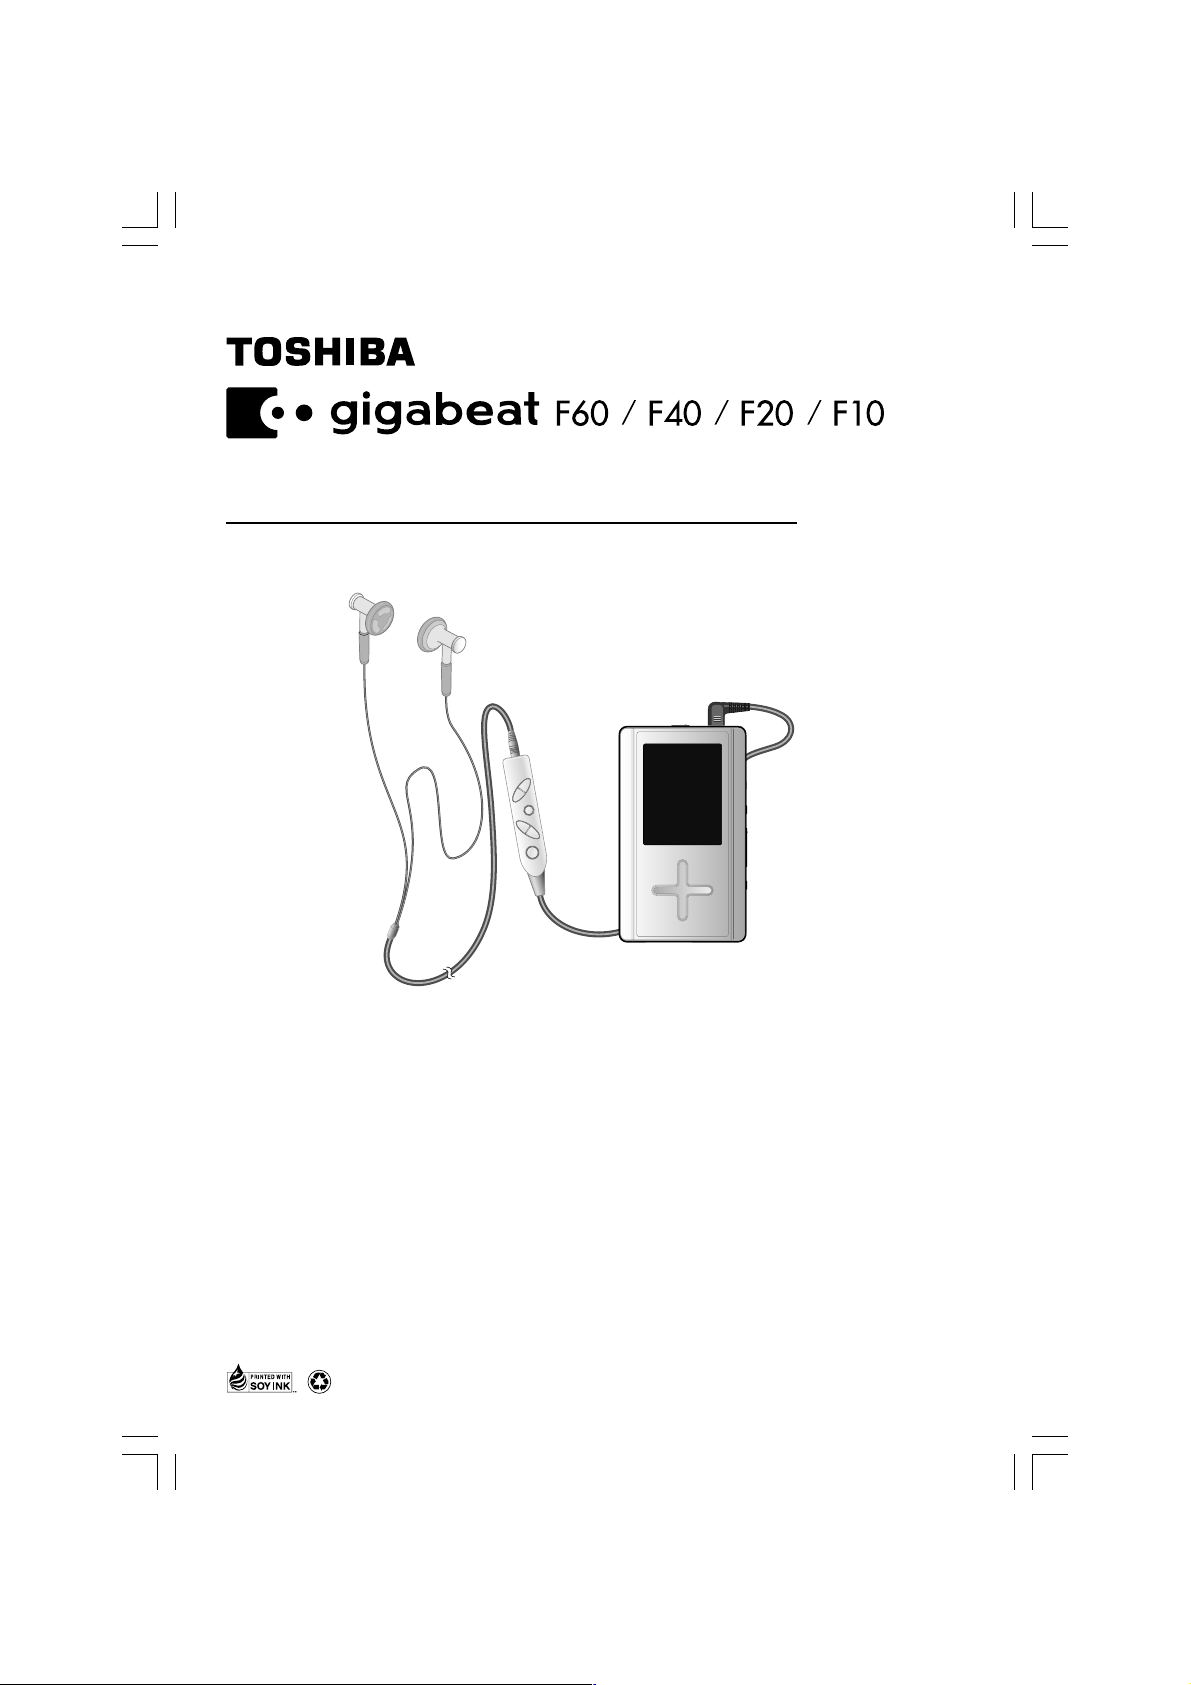
The illustration above shows
the image of the MEGF60, MEGF40.
● Thank you for purchasing a Toshiba gigabeat Mobile Audio Player.
● Please read this manual carefully before using your gigabeat Mobile
Audio Player to ensure correct use of the product.
● After reading the manual, keep it for future reference.
TOSHIBA CORPORATION 2005
gigabeat F60_OP01Cover(E)â¸î 05.4.15, 3:05 PM1
Printed in China
GX1C0008CA10
PX1C0008CAAA
Page 2
Welcome
Getting Ready
Product Name : MOBILE AUDIO PLAYER
Model Number(s) :
FCC Notice
This equipment has been tested and found to comply with the limits for a Class B digital
device, pursuant to part 15 of the FCC Rules. These limits are designed to provide
reasonable protection against harmful interference in a residential installation. This
equipment generates, uses and can radiate radio frequency energy and, if not installed
and used in accordance with the instructions, it may cause harmful interference to radio
communications. However, there is no guarantee that interference will not occur in a
particular installation. If this equipment does cause harmful interference to radio or
television reception, which can be determined by turning the equipment off and on, the
user is encouraged to try to correct the interference by one or more of the following
measures:
- Reorient or relocate the receiving antenna.
- Increase the separation between the equipment and receiver.
- Connect the equipment into an outlet on a circuit different from that to which the receiver
is connected.
- Consult the dealer or an experienced radio/TV technician for help.
MEGF60, MEGF40, MEGF20, MEGF10
FOR HOME OR OFFICE USE
Only peripherals complying with the FCC Class B limits may be attached
to this equipment. Operation with noncompliant peripherals or peripherals
not recommended by Toshiba is likely to result in interference to radio and
TV reception. Changes or modifications made to this equipment not
expressly approved by Toshiba or parties authorized by Toshiba could
void the user’s authority to operate the equipment.
Tested To Comply
With FCC Standards
This device complies with part 15 of the FCC Rules. Operation is subject to the following
two conditions :
Using the Product
- This device may not cause harmful interference.
- This device must accept any interference received, including interference that may
cause undesired operation.
Contact:
Toshiba America Consumer Products, L.L.C.
82 Totowa Road
Wayne, NJ 07470
(973) 628-8000
Industry Canada Requirement
This Class B digital apparatus complies with Canadian ICES-003.
Cet appareil numerique de la classe B est conforme a la norme NMB-003 du Canada.
Other Helpful Information
Handling the cord on this product will expose you to lead, a chemical
known to the State of California to cause birth defects or other
reproductive harm.
2
gigabeat F60_OP02(E)â¸î 05.4.15, 3:06 PM2
Wash hands after handling.
Page 3
Safety Precautions
Safety icons
This manual contains safety instructions that must be observed in order to avoid
potential hazards that could result in personal injuries, damage to your
equipment, or loss of data. These safety cautions have been classified according
to the seriousness of the risk, and the icons highlight these instructions as
follows:
Indicates a potentially hazardous situation which, if not avoided,
could result in death or serious injury.
Welcome
Indicates a potentially hazardous situation which, if not avoided,
may result in minor or moderate injury.
Indicates a potentially hazardous situation which, if not avoided,
may result in property damage.
Provides important information.
Getting Ready
Using the Product
Other Helpful Information
gigabeat F60_OP03_09(E)â¸î 05.4.15, 3:06 PM3
3
Page 4

Safety Precautions (Continued from the previous page)
Precautions for Use
Should you notice any abnormality such as odor, smoke or overheating,
turn off the power and disconnect the AC adapter. Continuing to use the
product may result in fire, electric shock or burn, possibly resulting in
serious injury.
Welcome
Getting Ready
Using the Product
If water or other foreign object should enter the equipment, turn off the
power and disconnect the AC adapter. Continuing to use the product
may result in fire or electric shock, possibly resulting in serious injury.
If you have dropped the product or damaged its top panel, turn off the
power and disconnect the AC adapter. Continuing to use the product
may result in fire or electric shock, possibly resulting in serious injury.
Do not disassemble, modify or repair the product. It may result in fire or
electric shock, possibly resulting in serious injury.
Do not cause metals to contact the product or any inflammable objects
to enter the product. Do not cause foreign objects to enter or drop into
the holes in the terminals and other openings or gaps. It may result in
fire or electric shock, possibly resulting in serious injury.
Turn off the power and refrain from using the product on an airplane, in
a hospital or other place where use of the product is prohibited. Using
the product in these places may affect systems of operation, the
functioning of medical equipment, resulting in an accident and possibly
serious injury.
Do not use the product in a place that is exposed to water. Doing so may
result in fire or electric shock possibly resulting in serious injury. Be
particularly cautious when using the product in rain, snow or on beach
or other waterfront area.
Do not use the product in a bathroom or shower. Doing so may result in
fire or electric shock possibly resulting in serious injury.
Do not touch the power cable or main unit while in a thunderstorm.
Doing so may result in electric shock possibly resulting in serious injury.
Do not operate the product while walking, driving a car, or riding a
motorcycle. You may fall or cause a traffic accident, possibly resulting in
serious injury. You cannot hear sounds from the surrounding
environment, which may lead to an unexpected accident, possibly
resulting in serious injury.
Be careful not to let a small child play with the plastic bag used to wrap
the product. The child may place the bag over his/her head or swallow it,
resulting in suffocation.
Other Helpful Information
Should you notice leaking fluid or odor from the product, immediately
move it away from any source of fire. The fluid from the product is
leaking from the built-in battery. In the event of battery leakage, the fluid
may ignite and cause explosion, possibly resulting in serious injury.
4
gigabeat F60_OP03_09(E)â¸î 05.4.15, 3:07 PM4
Page 5
Do not charge the built-in battery other than by the specified method.
Doing so may result in fire, explosion or electric shock, possibly resulting
in serious injury.
Do not charge or discharge the product near fire or under the hot sun.
The built-in battery may leak, resulting in ignition or explosion, possibly
resulting in serious injury.
Do not use the product in a humid or steamy environment, nor use it in a
place that is dusty or subject to lamp soot. Doing so may result in fire or
electric shock, possibly resulting in serious injury.
Remove the cables when moving the product. Failure to do so may
damage the cables, resulting in fire or electric shock, possibly resulting
in serious injury.
Disconnect the AC adapter before cleaning the product. Cleaning the
product with the AC adapter still connected may result in electric shock,
possibly resulting in serious injury.
Do not play the supplied CD-ROM on a music CD player. Doing so may
damage the headphones or speaker or injure your ears, possibly
resulting in serious injury.
Should you discover leakage from the product, do not touch the fluid.
The leakage from the product is fluid from the built-in battery. If battery
fluid should enter the eye or contact the skin, eye injury or skin damage
may result. If battery fluid should enter your eye, rinse thoroughly with
clean water and seek immediate medical advice. If battery fluid should
adhere to your skin or clothes, immediately rinse it away with clean
water.
Welcome
Getting Ready
Using the Product
Do not place the product in a hot place. Placing the product under direct
sunlight, in a closed car, near a stove, etc., may result in heat generation
or fire, possibly resulting in serious injury. The product may also break
possibly resulting in serious injury.
Do not subject the display surface to impact. Doing so may result in a
damaged display, broken glass or leaking fluid possibly resulting in
serious injury. If fluid should enter your eye or adhere to your body or
clothes, immediately rinse it away with clean water. If fluid should come
in contact with your eye, rinse with clear water and seek immediate
medical advice from a doctor.
Store the product in a place out of the reach of small children. Failure to
do so may result in injury or accident.
gigabeat F60_OP03_09(E)â¸î 05.4.15, 3:07 PM5
Other Helpful Information
5
Page 6
Welcome
Getting Ready
Safety Precautions (Continued from the previous page)
Do not place the product on, or cover it with, a cloth or cushion. The
buildup of heat may cause the top panel to deform or result in fire
possibly resulting in serious injury. Use the product in a well-ventilated
place.
Do not drop the product or subject it to strong impact. The product may
be damaged, or fire or electric shock may result, possibly resulting in
serious injury.
Do not swing the product around when transporting or carrying it. The
product may strike a person or object, resulting in injury.
If you should experience an abnormal sensation on your skin,
immediately stop using the product and consult a dermatologist. In rare
occasions the materials or surface treatments used in this product may
cause itchiness, rash, eczema, etc., depending on the user’s physical
constitution or health condition.
When using the headphones, be careful not to listen at excessive
volume. Listening to very loud sound levels may adversely affect hearing
ability.
AC Adapter
Connect the power plug of the AC cable to a power outlet in the home.
Using a power source other than 100 to 240 VAC may result in fire or
electric shock, possibly resulting in serious injury.
Do not attempt to disassemble, modify or repair the AC adapter. Doing
so may cause fire or electric shock, possibly resulting in serious injury.
Occasionally disconnect the power plug and clean it if dirt or dust has
adhered to the prongs or the mounting surface of the prongs. The
insulation of the power plug may decrease, resulting in fire possibly
Using the Product
Other Helpful Information
resulting in serious injury.
Do not cover the AC adapter with a cushion or place it near a heater or
on a carpet when the adapter is conducting current. Doing so may result
in fire, possibly resulting in serious injury.
Do not subject the AC adapter’s power cable to any of the following:
● Scratching, extending or otherwise modifying, or heating
● Pulling, placing below a heavy object, or pinching
● Bending with force, twisting or bundling
Doing so may result in fire or electric shock, possibly resulting in serious
injury.
Do not use the supplied AC adapter with any device other than the
product. Using the AC adapter for any other purpose may result in fire or
damage, possibly resulting in serious injury.
6
gigabeat F60_OP03_09(E)â¸î 05.4.15, 3:08 PM6
Page 7
Insert the power plug firmly into the power outlet. If the power plug is not
fully inserted, fire or electric shock may result, possibly resulting in
serious injury.
When removing the power plug from the power outlet, do not pull
directly on the cable. Always hold the plug to remove it. Pulling the plug
by the cable may damage the cable or plug, resulting in fire or electric
shock, possibly resulting in serious injury.
Do not connect or disconnect the power plug with a wet hand. Doing so
may result in electric shock, possibly resulting in serious injury.
If the product will not be used for a prolonged period, such as when you
are traveling, disconnect the power plug from the power outlet to ensure
safety. Should the product experience a circuit failure, fire may result,
possibly resulting in serious injury.
Use the supplied AC adapter and AC cable. Using an AC adapter or AC
cable other than the specified part may result in fire, possibly resulting in
serious injury.
Welcome
Getting Ready
Using the Product
gigabeat F60_OP03_09(E)â¸î 05.4.15, 3:08 PM7
Other Helpful Information
7
Page 8

Welcome
Getting Ready
Using the Product
Other Helpful Information
Contents
Welcome
● Safety Precautions ...................................................................................................... 3
● Contents ...................................................................................................................... 8
● Welcome ...................................................................................................................... 9
● Important Information on Use .................................................................................... 10
● AC Adapter ................................................................................................................ 14
● Key Product features ................................................................................................. 15
Getting Ready
● Product Overview ...................................................................................................... 16
● Names and Functions of the Parts ............................................................................ 20
● Display Windows ....................................................................................................... 26
● Charging the Built-in Battery ..................................................................................... 30
●
Direct Charging from the AC Adapter ............................................................................. 30
●
Charge Using the USB CRADLE .................................................................................... 31
●
Charge with Connected to PC Using USB Cable ........................................................... 31
Using the Product
● Turning the Power ON/OFF ....................................................................................... 33
●
Turning the Power ON/OFF ............................................................................................ 33
● Playing Music Tracks ................................................................................................. 34
●
Playing the Track Selected .............................................................................................. 35
●
Stopping Playback .......................................................................................................... 36
●
Controlling the Volume .................................................................................................... 36
●
Fast Forward/Reverse ..................................................................................................... 37
●
Skip Forward or Back...................................................................................................... 37
●
Skip to the Next Album ................................................................................................... 37
● Setting the Play Mode ............................................................................................... 38
● Setting the Equalizer Mode ....................................................................................... 40
●Adjustments When “USER” Has Been Selected ............................................................. 42
● Bookmarking .............................................................................................................. 44
●
Viewing Bookmarked Tracks ........................................................................................... 45
●
Playing All of the Tracks that were Registered to the Bookmark ..................................... 45
● Playing Back Playlists ................................................................................................ 46
● Moving Tracks to the Recycle Bin .............................................................................. 47
●
Viewing Tracks in the Recycle Bin .................................................................................. 48
●
Deleting Tracks in the Recycle Bin.................................................................................. 48
● Viewing Track Information .......................................................................................... 50
● Playing Intro ............................................................................................................... 51
● Changing Screen Themes ......................................................................................... 52
● Displaying Images (Photo Viewer) ............................................................................. 54
●
Set the Full-Screen Display ............................................................................................ 54
●
Running the Slideshow ................................................................................................... 55
●
Setting an Image as the Background .............................................................................. 56
● Output of Audio from An Audio System ..................................................................... 57
● Backing up Data to the gigabeat ............................................................................... 58
Other Helpful Information
● Track Selection and Playback Sequence................................................................... 60
● Changing/Checking Settings ..................................................................................... 62
●
Setting Time Zone .......................................................................................................... 64
●
Setting DATE/TIME ......................................................................................................... 65
● Terminology ............................................................................................................... 66
● Error Message List .................................................................................................... 67
● Troubleshooting ......................................................................................................... 68
● Specifications ............................................................................................................ 69
●
License Information on the Software Used in the TOSHIBA Mobile Audio Player .............
● Limited Warranty ........................................................................................................ 72
71
8
gigabeat F60_OP03_09(E)â¸î 05.4.15, 3:08 PM8
Page 9
Welcome
Contents of the Owner's Manual
This manual describes the basic operations of the gigabeat. For additional information, refer
to the Owner’s Manual-“gigabeat room”.
The information contained in this manual, including but not limited to any product specifications,
is subject to change without notice.
Trademarks
• The gigabeat is a registered trademark of Toshiba Corporation. Plus Touch, gigabeat room,
and RipRec are trademarks of Toshiba Corporation.
• Microsoft, Windows and Windows Media are either registered trademarks or trademarks
of Microsoft Corporation in the United States and/or other countries.
• Pentium is a registered trademark of Intel Corporation and its subsidiaries in the U.S.A.
and other countries.
• WOW, SRS and (
incorporated under license from SRS Labs, Inc.
• The product names referred to in this manual may be registered trademarks or trademarks
of their respective companies.
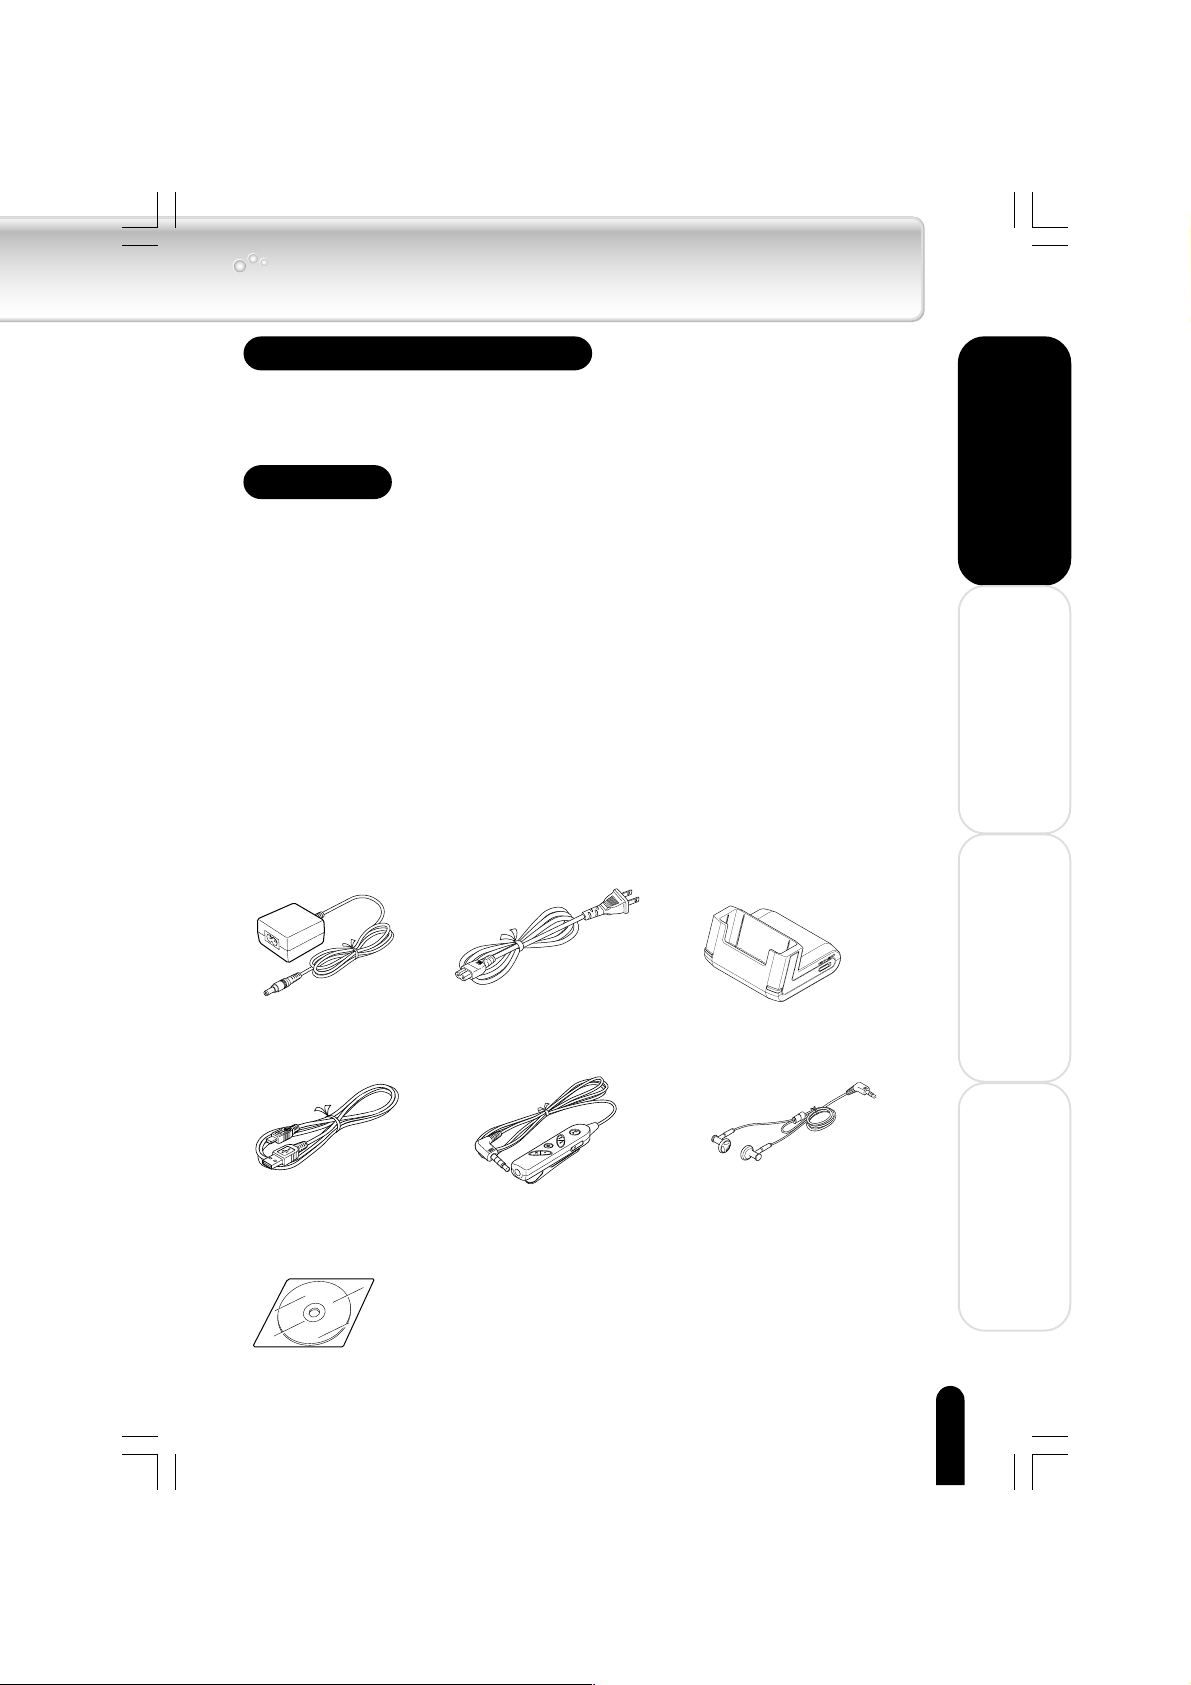
Supplied accessories
The gigabeat ships with the following accessories. Confirm that all items are included in the
package.
) symbol are trademarks of SRS Labs, Inc. WOW technology is
•
Welcome
Getting Ready
AC adapter
USB cable
Software CD-ROM
(TOSHIBA gigabeat room
Applications Software CD)
USB CRADLEAC cable
Wired remote control
(Supplied with the
MEGF60, MEGF40)
HOLD
● Owner’s Manual (this document)
●
Owner’s Manual-“gigabeat room”
● QUICK START GUIDE
● End-User License Agreement
● Product Registration Card
● STOP SHEET
Using the Product
EARBUDS
Other Helpful Information
9
gigabeat F60_OP03_09(E)â¸î 05.4.15, 3:09 PM9
Page 10
Welcome
Important Information on Use
Handling the Product
Do not subject the product to strong impact, as it may damage the
product or destroy the recorded data.
Do not apply unnecessary force to the product's display surface, as it
may damage the display.
Placing the product in a bag along with hard objects may damage the
product in the event of contact with those objects.
Do not spray insecticide or apply other volatile chemicals on or around
the product. Also, avoid keeping a rubber or PVC product in contact with
the product for a long period. The surface color may change or the
exterior coating may peel off.
Do not place the product in a trouser pocket, etc. When you sit down,
the product may receive strong impact and sustain damage.
Do not forcibly press in the Plus Touch. A strong force will be exerted on
the internal parts and may damage them.
Getting Ready
Using the Product
Other Helpful Information
Location of Use
Using this product near a radio, television, cellular phone, etc., may
cause radio interference. If interference should occur, move the product
away from such appliances/devices.
Condensation
Water droplets may form on the surface of the product after the product
has been carried into a warm place directly from a cold place or when a
cold room where the product is used is heated quickly. In such cases,
water droplets may also be present inside the product, so do not turn on
the power but wait for approximately one hour. Failure to do so may
result in damage, malfunction or loss of recorded data.
Cleaning the Product
To clean the exterior, wipe it gently with a soft cloth.
Never use benzine or thinner, as it may cause discoloration or damage
to the finish.
When using a chemical cleaning cloth, follow the instructions for the
cleaning cloth you’re using.
10
gigabeat F60_OP10_15(E)â¸î 05.4.15, 3:09 PM10
Page 11
Recorded Tracks
Tracks that have been damaged or erased due to a problem in the
product or PC may not be recovered.
Once transferred to and recorded in the gigabeat, tracks cannot be
decrypted simply by transferring it back to a PC.
Once transferred to and recorded in the gigabeat, tracks cannot be
played on another gigabeat simply by copying it to the other gigabeat.
Copyrights
● The unauthorized recording, downloading, use, distribution, or revision of copyrighted
content is prohibited under the Copyright Laws of the United States and other countries,
and may subject you to civil and/or criminal liability. Please be advised that you must
obtain permission from the applicable copyright owners to download copyrighted
content, including music files, in any format, including the MP3 and WMA formats, prior
to the downloading thereof. Toshiba has no right to grant and does not grant permission
to download any copyrighted content.
Music CD
● Use a disc that has the mark on the disc label surface. When discs that fall outside
of the CD standard are used, stable playback and optimum sound quality cannot be
guaranteed.
Welcome
Getting Ready
Using the Product
gigabeat F60_OP10_15(E)â¸î 05.4.15, 3:10 PM11
Other Helpful Information
11
Page 12
Welcome
Getting Ready
Important Information on Use (Continued from the previous page)
Internal Hard Disk
This product has a built-in hard disk. If the disk is subjected to impact,
vibration or change in the environment, such as temperature change, it
may result in damage to the unit, malfunction and/or data loss. When
using this product, pay attention to the following instructions:
• Do not place the product under direct sunlight, in a closed car, near a
heater or where the product will be subject to high temperatures.
• Do not place the product in a place where it will be subject to
extremely low temperatures.
• Do not subject the product to sudden changes in temperature as
condensation may occur.
• Do not use the product in a thunderstorm.
• Do not place the product near a magnet, speaker or other object
generating a magnetic field.
• Do not place the product where it will be subject to strong vibrations.
• Do not place or drop an object on the product.
• Do not place the product where it will be exposed to water or high
humidity.
• Do not place a cup or other container of liquid near the product since
spilled liquid may enter the product.
• Do not subject the product to vibration or impact, or swing it around or
drop it, regardless of whether or not the product is operating.
• Do not forcibly push, squeeze or twist the product.
• While writing to or reading from the built-in hard disc, do not turn off
the power, disconnect the USB cable, nor remove the gigabeat from
the USB CRADLE.
Regularly back up the data in the internal hard disk so that it can be
Using the Product
recovered in the event of corruption or loss.
TOSHIBA shall not be liable whatsoever for loss of data stored on the
internal hard disk.
Other Helpful Information
12
gigabeat F60_OP10_15(E)â¸î 05.4.15, 3:10 PM12
Page 13

Precautions Concerning the Built-in Hard Disk
● Do not format the built-in hard disk. If the disk were to be formatted, the firmware (which
is the software that gigabeat uses to operate) would be deleted and the product would no
longer be able to function. If the hard disk has been formatted, restoration of the firmware
will be necessary. Restore the firmware according to “Restoration of Firmware Data”
under “Troubleshooting” in the Owner’s Manual-“gigabeat room”.
The internal hard disk contains system files and demo files for the gigabeat. The disk
area that can actually be used is the area except for these files.
Precautions Concerning Data Deletion at Time of Disposal or Transfer
● When the gigabeat is disposed of or sold with the hard disk in an as-used condition,
information on the hard disk may be viewed by a third party. When disposing of or reselling
the gigabeat, please delete all of the data on the hard disk.
Built-in Battery
● The built-in battery will gradually discharge, even when the product is not being used. If
the product is not used for a prolonged period, the built-in battery may discharge completely.
If this should happen, recharge the battery before using the product.
● The recharging time will vary depending on the condition of the built-in battery, ambient
temperature, etc.
● Using the product at low temperatures will shorten the continuous playback time.
● The built-in battery can be recharged approximately 500 times. (This number is an estimate
and is for reference purposes only.)
● The built-in battery is a consumable part. Repeated use will gradually decrease the
operating time. If the battery is consumed quickly after a full charge, the built-in battery
may have failed. Please contact TOSHIBA Customer Service by calling (Phone # on
“STOP SHEET”).
Welcome
Getting Ready
Using the Product
TOSHIBA shall not be liable whatsoever for any corruption or loss of
stored data due to the complete discharge of the built-in battery.
gigabeat F60_OP10_15(E)â¸î 05.4.15, 3:10 PM13
Other Helpful Information
13
Page 14
Welcome
Getting Ready
AC Adapter
When using the AC adapter, carefully read and observe the information in “Safety Precautions”
(
p. 6) as well as the following instructions.
Be sure to use the supplied AC adapter. The use of another adapter may
result in damage, heat generation or fire, possibly resulting in serious
injury.
Do not use the AC adapter with any equipment other than this product.
Do not allow other metal to touch the plug of the connector cable.
Short-circuiting may result.
When connecting the adapter, firmly insert the plug of the connector
cable into the AC adapter jack on the product. Inserting the plug into
another terminal may result in damage.
When removing the connector cable, pull it by the plug. Do not pull
directly on the cable.
Do not drop the AC adapter or otherwise subject it to strong impact.
Do not use the AC adapter in a hot, humid place.
Do not use the AC adapter on an object that is easily affected by
temperature increases. Heat marks may remain where the AC adapter
has been placed.
The AC adapter is designed for indoor use only.
The surface temperature of the AC adapter may increase while the
power is on, but this does not mean the adapter is faulty. Before
carrying, unplug the AC cable and wait until the AC adapter cools.
Buzzing noises may occasionally be heard from the inside of the AC
adapter, but this is not abnormal.
Using the AC adapter near a radio, television or cellular phone may
cause radio interference, so use the adapter at a sufficient distance from
such appliances/devices.
Using the Product
Specifications
AC adapter (ADP-15HH)
Power source: 100 to 240 VAC, 50/60 Hz
Rated input capacity: 100 to 240 VAC, 31 to 50 VA
Rated output: 5 VDC, 3 A
Operating temperature: 0 to +40°C
Storage temperature: -20 to +65°C
Maximum external dimensions: 50 mm x 28 mm x 65 mm (width x height x depth)
Weight: Approx. 200 g
Other Helpful Information
gigabeat F60_OP10_15(E)â¸î 05.4.15, 3:10 PM14
Length of connector cable: Approx. 1.5 m
The supplied AC cable is designed for use in the particular region. When
using the product overseas, provide a separate AC cable conforming to
the local standard.
14
Page 15

Key Product features
■ Photo Viewer-Download your favorite images to gigabeat and
view slideshows. Download album covers and search via album
cover.
■ Plus Touch sensor control - lets you scroll through your music
collection and photos quickly and easily.
■ Use the supplied gigabeat room, Windows Media Player or
Napster To Go software to manage your music and photos. ****
■ Supports MP3, WMA and WAV music formats.
■ Transfer an entire CD to your gigabeat at the push of one button
in as little as 5 minutes*.
■ Rechargeable Lithium Ion battery for up to 16 hours** of
playback.
■ Built in 10, 20, 40 and 60GB hard drives offer up to 2500, 5000,
10000 and 15000 songs*** respectively.
This number is based on a 60-minute CD being transferred using a desktop PC with
*
a 3.4 GHz Pentium 4 processor and 512MBytes of RAM. Transfer time depends on
the total length of the CD to be transferred with the RipRec function and the PC’s
performance.
Battery life and number of charge cycles will vary depending on use and settings.
**
Rechargeable battery has a limited service life and may eventually need to be
replaced. The continuous playback time will vary depending on the operating
condition, environment, the number of times the built-in battery has been recharged,
etc.
These values are for reference purposes only and may vary.
***
The gigabeat room software must be used to download photos.
****
Welcome
Getting Ready
Using the Product
gigabeat F60_OP10_15(E)â¸î 05.4.19, 3:43 PM15
Other Helpful Information
15
Page 16
Welcome
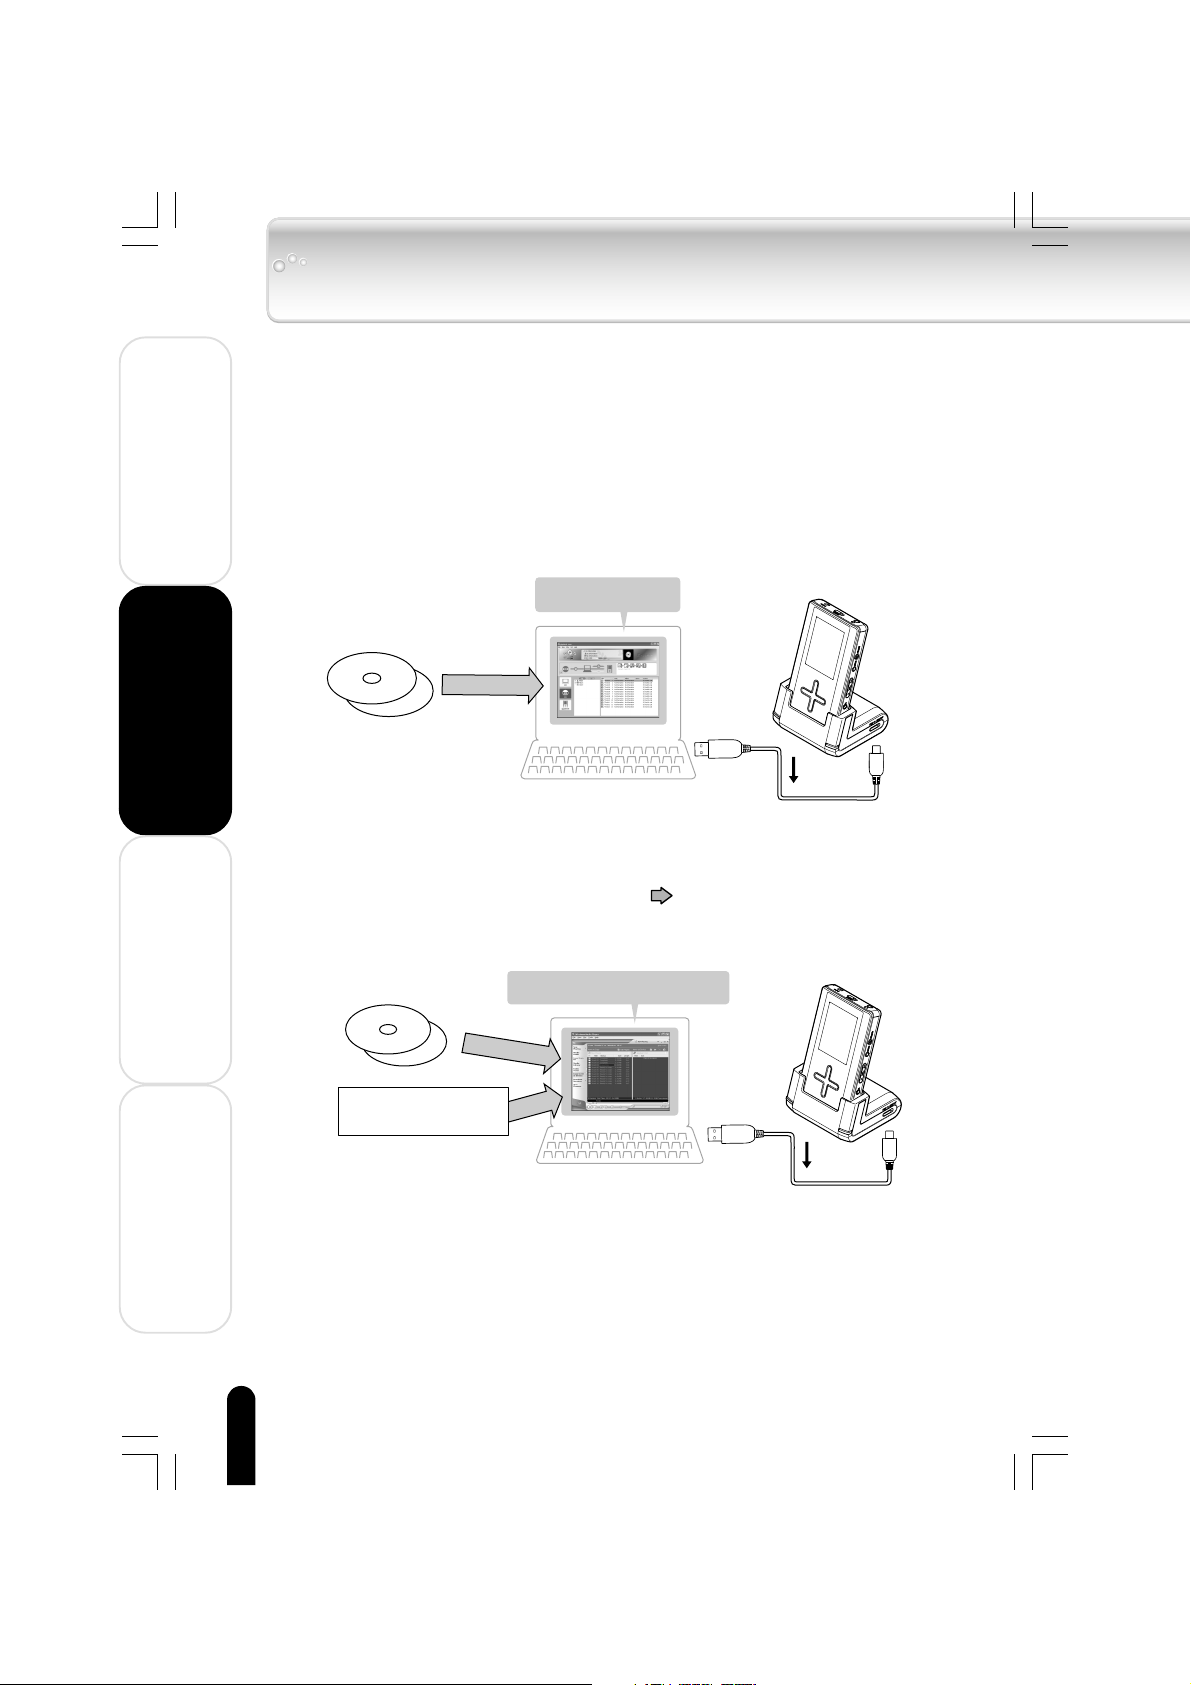
Product Overview
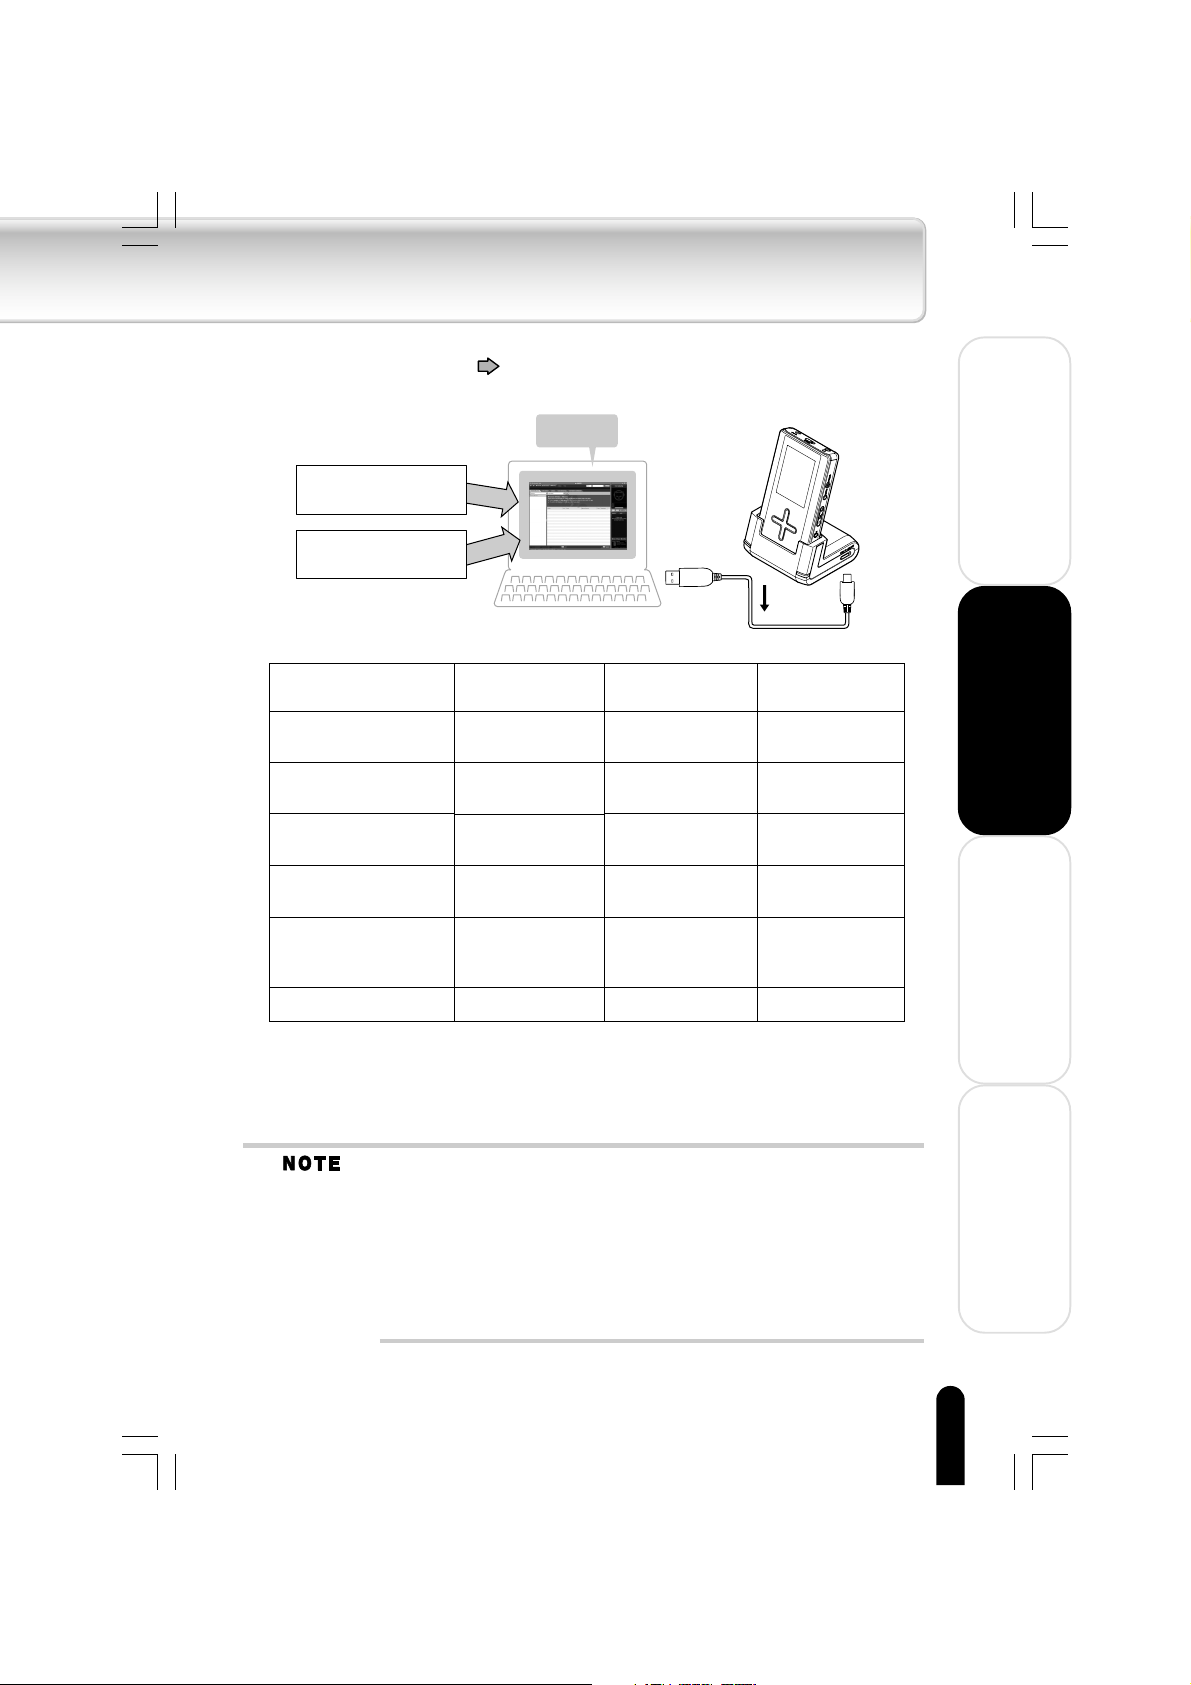
The gigabeat is a portable, hard disk drive (HDD) audio player.
The tracks that will be played back are transferred to the gigabeat from the personal computer
(PC) using the supplied “gigabeat room” software, Windows Media Player 10 or Napster.
■ Transfer Using gigabeat room
See Owner’s Manual-“gigabeat room” for details about the gigabeat room software.
The RipRec function (which transfers the data of a music CD to the gigabeat with one
touch of a button) can be used.
Getting Ready
Using the Product
gigabeat room
Music CD
PC
■ Transfer Using Windows Media Player 10
See “When Using Windows Media Player 10” (
when using Windows Media Player 10 or Napster.
Music CD
Tracks
(MP3, WMA, WAV)
Windows Media Player 10
PC
USB CRADLE
USB
cable
Owner’s Manual-“gigabeat room” p. 44)
USB CRADLE
USB
cable
Other Helpful Information
16
gigabeat F60_OP16-32(E)â¸î 05.4.15, 3:13 PM16
Page 17
■ Transfer Using Napster
See “When using Napster” (
Owner’s Manual-“gigabeat room” p.46)
Tracks downloaded
from Napster
Tracks
(MP3, WMA)
Transferring of protected
WMA files
Transferring of nonprotected WMA files
Transferring of image
files
Album cover photograph
settings
Functions of RipRec
button and Sync button
on the USB CRADLE
USB connection
Yes: Available
No: Not available
Napster
When using
gigabeat room
No
Ye s
Ye s
Ye s
Ye s
USB 2.0
PC
When using Windows
Media Player 10
USB
cable
Ye s
Ye s
No
No
No
USB 1.1
USB CRADLE
When using
Napster
Ye s
Ye s
No
No
No
USB 1.1
Welcome
Getting Ready
Using the Product
Convert the music CD to WMA tracks on your PC beforehand, using Windows
Media Player 10 or Napster.
The gigabeat cannot play tracks other than that which is transferred by using
gigabeat room or Windows Media Player 10 or Napster.
Track transferred to the gigabeat by using gigabeat room or Windows Media
Player 10 or Napster has been encrypted and therefore cannot be played on
any other gigabeat or media player.
Tracks copied to other gigabeat cannot be played.
Operation cannot be guaranteed when the gigabeat has been connected to
a PC using a USB hub.
gigabeat F60_OP16-32(E)â¸î 05.4.15, 3:13 PM17
Other Helpful Information
17
Page 18
Welcome
Product Overview (Continued from the previous page)
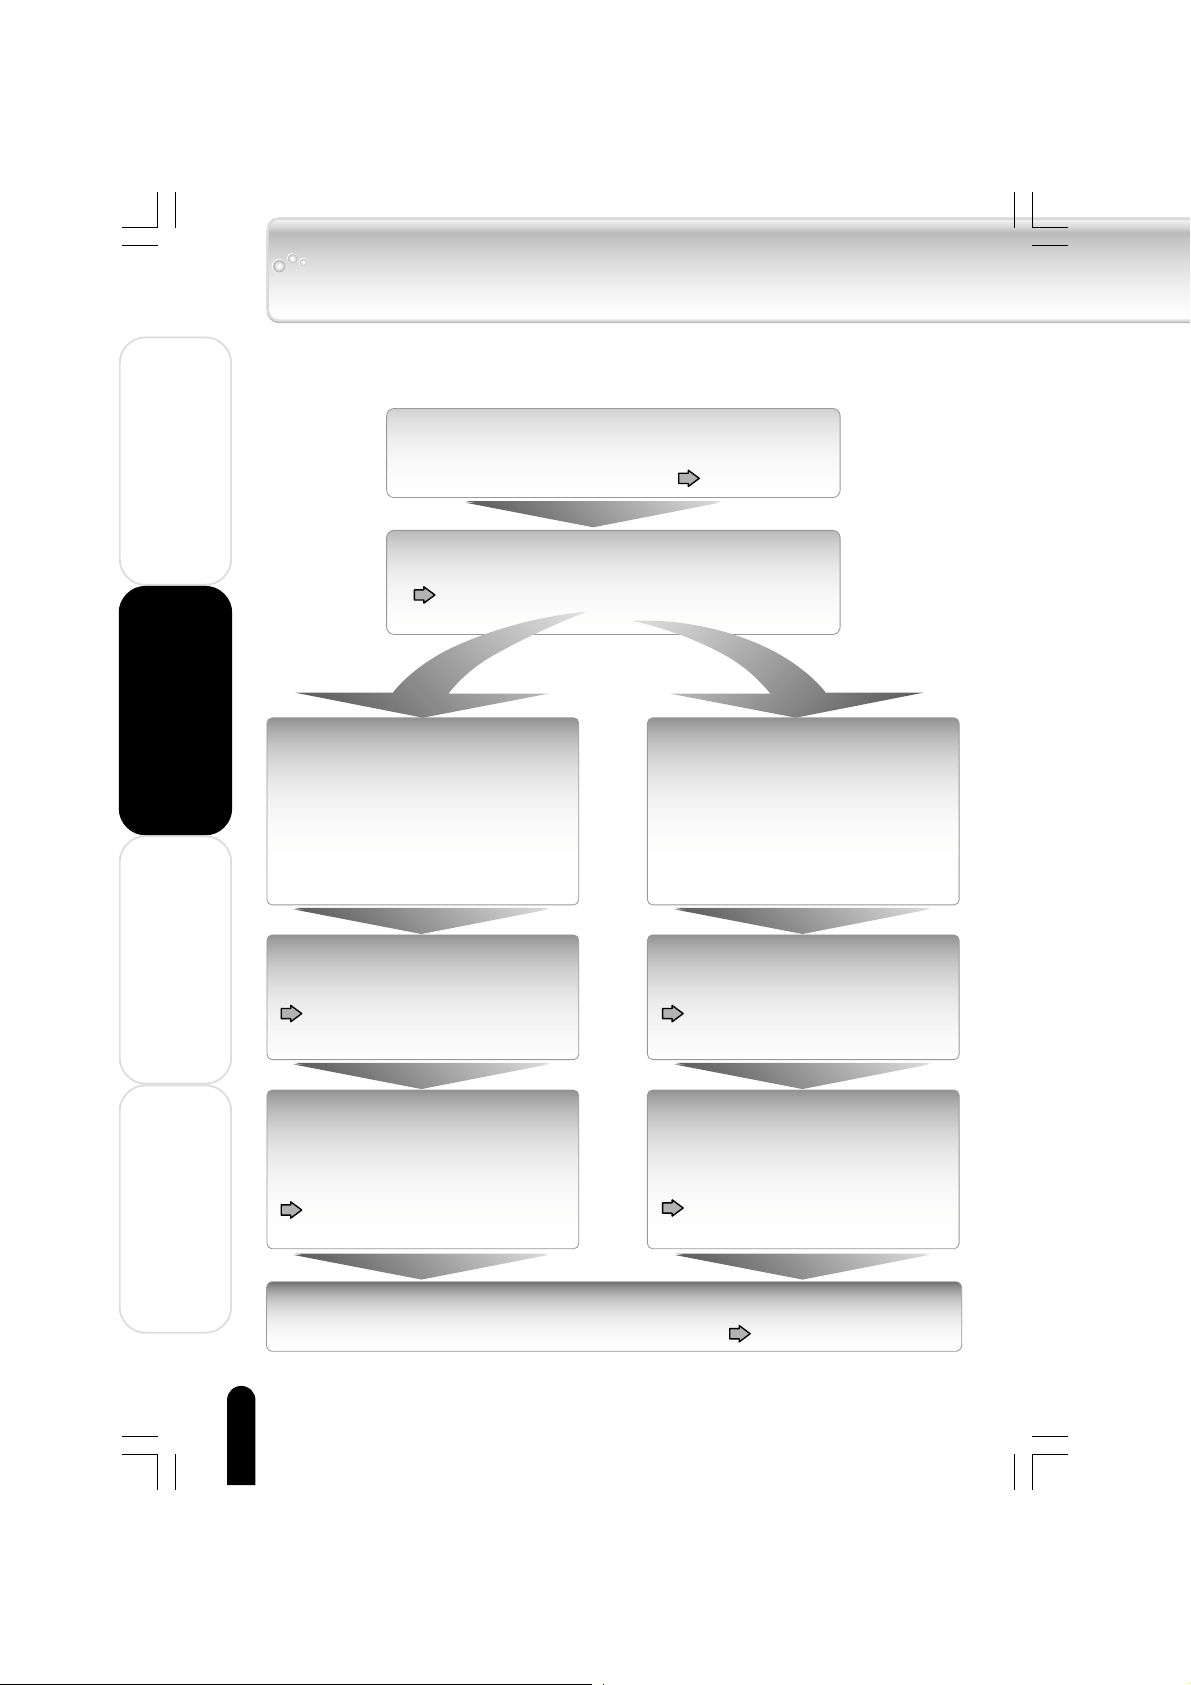
Transfer the tracks to the gigabeat before using the gigabeat.
Prepare the gigabeat:
Charging the Built-in Battery.
p.30
Prepare the PC:
Install the supplied software.
Owner's Manual-“gigabeat room”, p.9
Getting Ready
Using the Product
Using gigabeat room
Insert a music CD into
the CD-ROM drive of the PC.
Connect the PC and
the gigabeat.
Owner's Manual“gigabeat room” , p.14
Transfer of tracks:
Transfer tracks of the music
CD to the gigabeat using
gigabeat room.
Owner's Manual“gigabeat room”, p.22
Using Windows Media
Player 10
Prepare the
tracks:
Convert a music CD to tracks
using Windows Media Player
10.
See Windows Media Player 10
“Help” for details about the
method.
Connect the PC and
the gigabeat.
Owner's Manual“gigabeat room”, p.14
Transfer of tracks:
Transfer tracks to the
gigabeat using Windows
Media Player 10.
Owner's Manual“gigabeat room”, p.44
Other Helpful Information
Tracks can also be transferred to the gigabeat using Napster.
18
gigabeat F60_OP16-32(E)â¸î 05.4.15, 3:14 PM18
Play the tracks on the gigabeat.
p.34
Page 19

■ About the gigabeat room
The gigabeat room is software that encrypts the tracks of a music CD or tracks in the
form of an MP3, WMA, or WAV file to the WMA format, and transfers it to the gigabeat
player. See Owner’s Manual-“gigabeat room” for details about the gigabeat room.
Welcome
Getting Ready
Using the Product
gigabeat F60_OP16-32(E)â¸î 05.4.15, 3:14 PM19
Other Helpful Information
19
Page 20
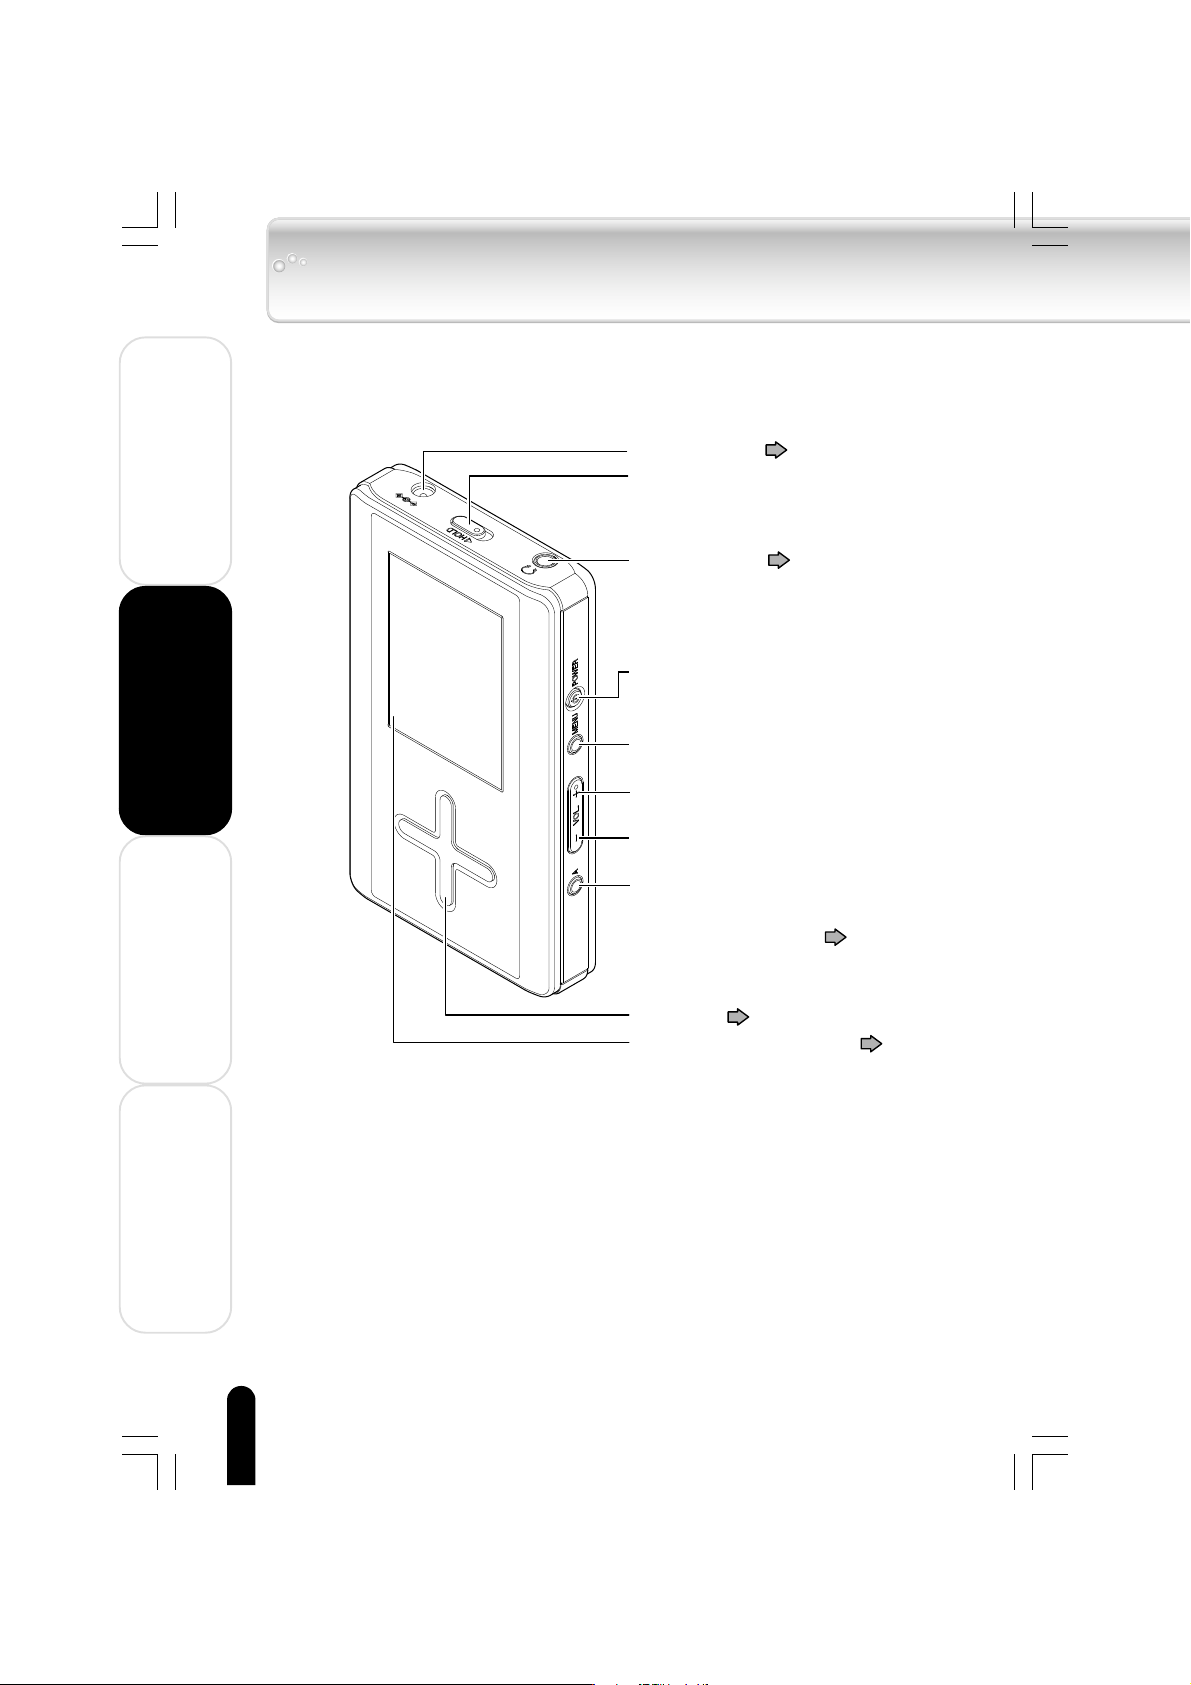
Names and Functions of the Parts
■ Front/Side View
Welcome
Getting Ready
AC adapter jack ( p. 30)
HOLD switch
Slide this switch in the direction
of the arrow to lock the gigabeat
and prevent inadvertent button
operations.
Headphone jack ( p. 34)
POWER button
Returns to the MAIN MENU
(When pressed for 2 seconds or longer:
Turns power Off/On)
MENU button
Displays the Menu window
VOL (+) button
Increases the volume
VOL (-) button
Decreases the volume
A button
Uses the function assigned with
the Setup window
“A-BUTTON FUNCTION”
( p. 62)
Using the Product
Other Helpful Information
20
gigabeat F60_OP16-32(E)â¸î 05.4.15, 3:14 PM20
Plus Touch ( p. 21)
Display screen (Color panel) ( p. 26)
Page 21
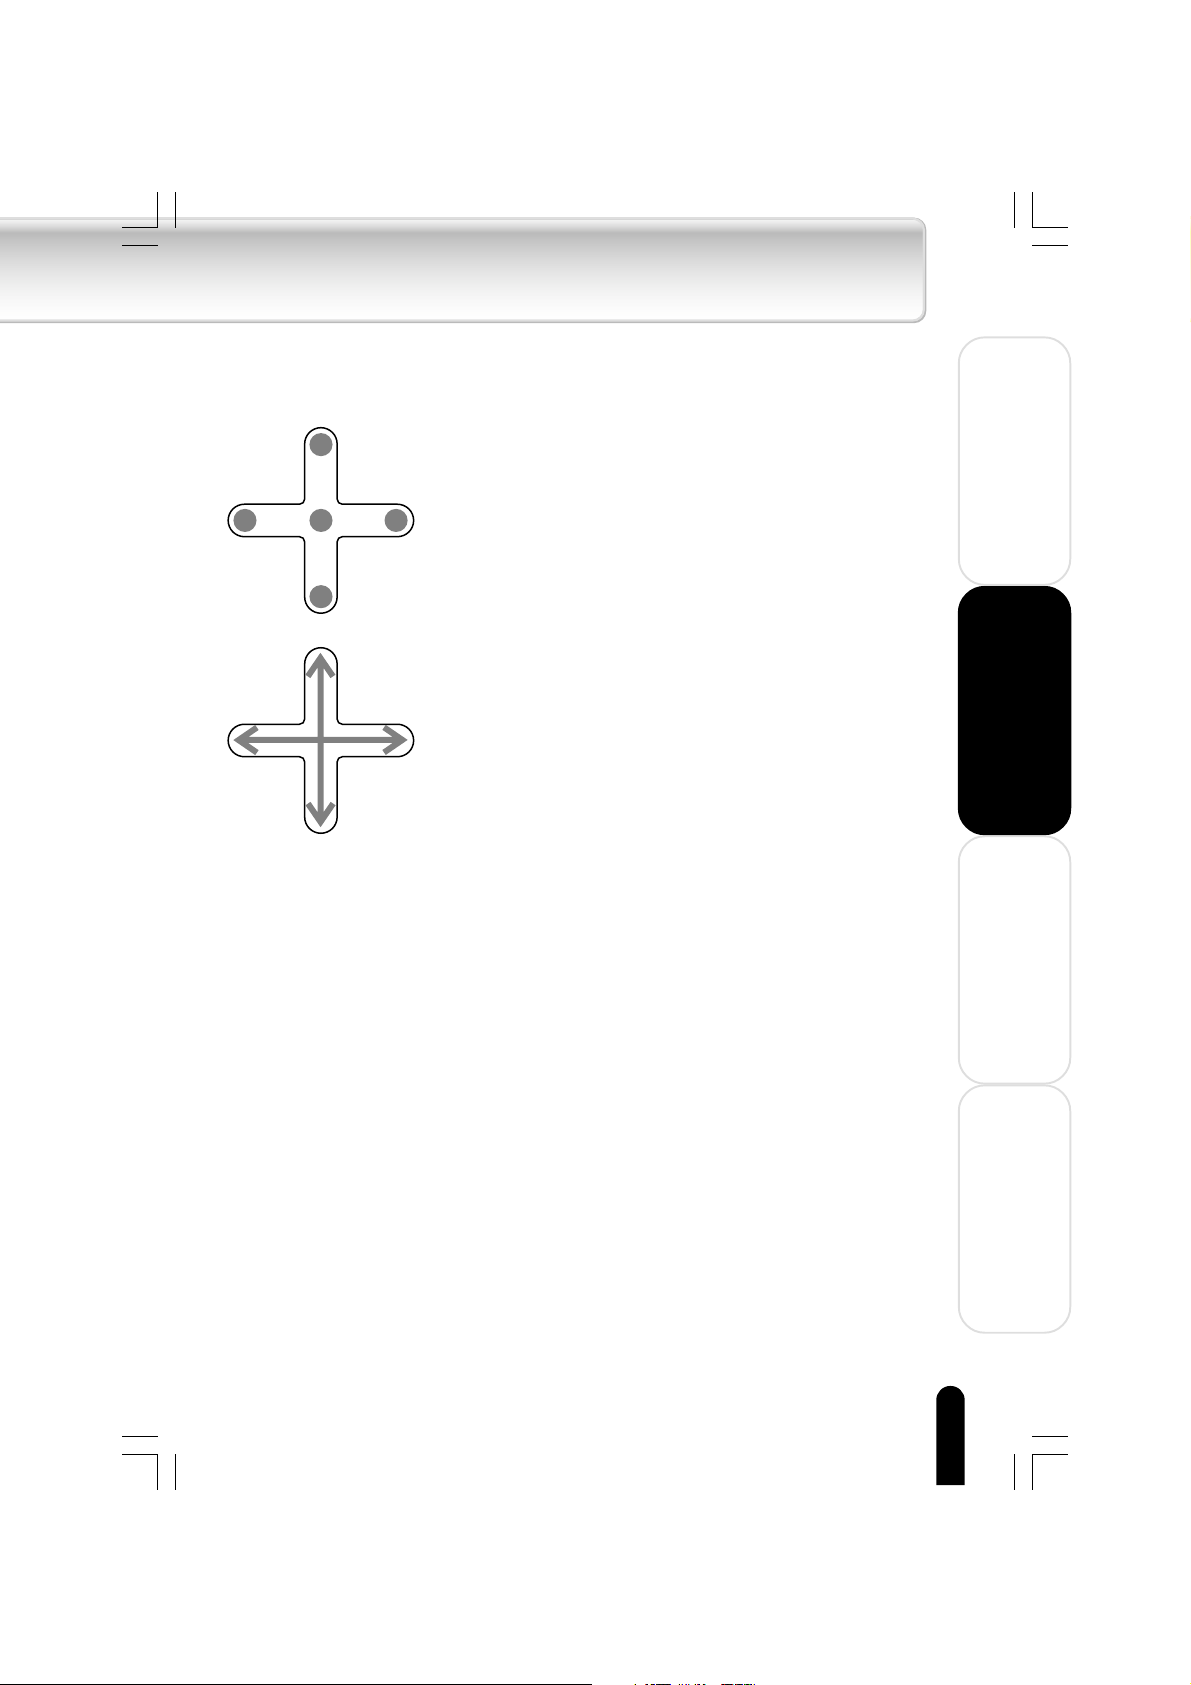
■ Plus Touch Operation
Welcome
Touch : Tap
Hold : Press and Hold
Getting Ready
Scroll : Slide your finger across the Plus
Touch in the desired direction
Using the Product
Other Helpful Information
gigabeat F60_OP16-32(E)â¸î 05.4.15, 3:14 PM21
21
Page 22

■ Rear View
Welcome
■ Bottom View
Names and Functions of Parts (Continued from the previous page)
Strap attachment hole
BATTERY switch ( p.30)
Getting Ready
The bodies of the MEGF60 and MEGF40 are slightly thicker than those of the MEGF20 and
MEGF10, but in this manual all descriptions use illustrations of the MEGF20 and MEGF10.
Using the Product
Connect only supplied accessories and genuine options to the USB
CRADLE connector at the bottom of the unit.
USB2.0 connector (Port B)
USB CRADLE connector
Other Helpful Information
22
gigabeat F60_OP16-32(E)â¸î 05.4.15, 3:14 PM22
Page 23

■ Wired remote control (Supplied with the MEGF60 and MEGF40 and available as an
option with the MEGF20 and MEGF10)
VOL (+) button
Increases the volume
button
VOL
Skips forward (Press and hold for fast forward.)
button
Plays/pauses
(Press for two seconds or longer to turn the power ON/OFF.)
button
Skips backward (Press and hold for fast reverse.)
Equalizer button
Changes the equalizer ( p. 40)
(Press for two seconds or longer to skip the album.)
VOL (-) button
Decreases the volume
Welcome
Getting Ready
To the headphone jack
of the main unit
HOLD
HOLD switch
Slide this switch in the direction of the arrow to lock the
gigabeat against inadvertent button operations of the wired
remote control.
Note that the operations of the main unit will continue to
function as long as the main unit is not in the HOLD
condition.
Using the Product
Other Helpful Information
23
gigabeat F60_OP16-32(E)â¸î 05.4.15, 3:15 PM23
Page 24

Names and Functions of Parts (Continued from the previous page)
■ USB CRADLE
Welcome
Getting Ready
USB/LINE OUT switch
( p.57)
BUTTON
( Owner’s Manual-“gigabeat
room” p.23)
BUTTON
( Owner’s Manual-“gigabeat
room” p.39)
Using the Product
Other Helpful Information
24
gigabeat F60_OP16-32(E)â¸î 05.4.15, 3:15 PM24
USB1.1 connector (Port A)
( p.58)
AC adapter jack
LINE OUT jack ( p.57)
USB2.0 connector (Port B)
( Owner’s Manual-“gigabeat room” p.14)
Page 25

● How to Connect the gigabeat and the USB CRADLE
Insert and press down gently.
Welcome
Getting Ready
Using the Product
gigabeat F60_OP16-32(E)â¸î 05.4.15, 3:15 PM25
Other Helpful Information
25
Page 26

Display Windows
■ MAIN MENU
This window is displayed when the power is turned on. A press of the POWER button
while another window is displayed will also result in a display of the MAIN MENU.
Welcome
Getting Ready
Using the Product
XXXXXXX
ARTIST
5 items
ALBUM
GENRE
PLAYLIST
FOLDER
Equalizer( p. 40)
Play mode( p. 38)
Intro( p. 51)
Time ( p. 65)
Playback status/the current track name
ARTIST
Folder listing tracks by artist ( p. 35)
ALBUM
Folder listing tracks by album ( p. 35)
GENRE
Folder listing tracks by genre ( p. 35)
PLAYLIST
Folder containing a playlist
created using gigabeat room ( p. 46)
FOLDER
Folder containing files
transferred from the PC ( p. 35)
BOOKMARK ( p. 44)
RECYCLE BIN ( p. 47)
PHOTO
Folder of image files ( p. 29, 54)
DEMO MUSIC
Pieces that combine images and
music that have been collected.
SETUP ( p. 62)
Operation guide( p. 29)
Sleep timer( p. 62)
HOLD states( p. 20, 23)
Remaining battery power ( p. 32)
will be displayed while the AC adapter
is connected.
The various display windows can be customized. See “Changing Screen
Themes”. ( p. 52)
■ Artist in MAIN MENU/Album/Genre Structure
The tracks that were transferred to the gigabeat enter the FOLDER inside the gigabeat.
The desired tracks can be selected in ARTIST, ALBUM, and GENRE.
• Actually, even with tracks having the same artist name, album name, or genre name,
should there be a differing portion in the track information, it will be handled as a different track.
Other Helpful Information
26
gigabeat F60_OP16-32(E)â¸î 05.4.15, 3:16 PM26
Page 27

■ Browse window
In the MAIN MENU, items except for settings are selected such as artist, album, and
genre, and touching the right of the Plus Touch will display the Browse window. Details
of the selected item will be displayed.
Playback status
Current track name
Name of folder
currently displayed
Selected folder, playlist,
or track
Folder icon
Track icon
Album cover photograph
display area
When there is album cover
photograph information, the
album cover photograph will be
displayed.
(
Owner’s Manual-
“gigabeat room”
p. 35)
XXXXXXX
FOLDER1
FOLDER2
Track1
Track2
Artist1
4:48
Track3
Track4
■ Play window
Information regarding the current track is displayed.
Album cover photograph
display area
When there is album cover photograph
information, the album cover photograph
will be displayed.
(
Artist icon
Album icon
Number of
album tracks
Track icon
Track number
Artist1
Album1
12
tracks
Track1
010
52:08
0:09/4:55
Owner’s Manual-“gigabeat room”
Artist name*
Album name*
Playback time of album
Title*
Elapsed time/Playback time
Elapsed time display bar
Welcome
Getting Ready
Using the Product
p. 35)
Other Helpful Information
Playback status
The MAIN MENU, Browse and Setup windows will switch to the Play window
if no operation is performed for approximately 60 seconds.
When NORMAL3 is selected in the SCREEN THEME ( p. 52), “playback
time” will not be displayed.
gigabeat F60_OP16-32(E)â¸î 05.4.15, 3:17 PM27
*
When there is no tag information
(Terminology p. 66), the artist
name and album name will be
displayed as “No Information” and
the title name will be displayed as
the track name.
27
Page 28

Welcome
Getting Ready
Display Windows (Continued from the previous page)
■ Setup window
Selecting SETUP in the MAIN MENU and touching the right of the Plus Touch will
display the Setup window. You can change or confirm settings in this window. (
XXXXXXX
SETUP
SLEEP TIMER
BACKLIGHT OFF
A-BUTTON FUNCTION
OPERATION GUIDE
BEEP
AUTO POWER OFF
USB PRIORITY
Return
TIME
■ Menu window
Pressing the MENU button will display the Menu window on the screen.
●
Pressing the MENU button again will close the
MENU
ALBUM SKIP
REGISTER BOOKMK
アーティスト1
PLAY MODE
アルバム1
INTRO
74:06
EQUALIZER/SRS WOW
オーディオデータ1
USER SETTING EQ
10/12 0:09/4:55
window. If no operation is performed, the
window will close in approximately 10 seconds.
●
Touching the left of the Plus Touch at the uppermost
window of the Menu window will also cause the Menu
window to go off.
p. 62)
Menu
Menu
Using the Product
Other Helpful Information
28
gigabeat F60_OP16-32(E)â¸î 05.4.15, 3:17 PM28
Page 29

■ Photo Viewer window
Selecting PHOTO in the MAIN MEMU and touching the right of the Plus Touch will
display the Photo Viewer window.
When the Photo Viewer window is set, the screen display will appear in the horizontally
(wide screen).
Thumbnail
PHOTO
Images transferred from the PC are
displayed in a table.
“Displaying Images (Photo Viewer)”
( p. 54)
■ Operation Guide
The operation guide displays the operation when the Plus Touch has been touched.
Welcome
Getting Ready
TOP
CENTER
RIGHT
LEFT
BOTTOM
●
The operation guide can be hidden by setting OPERATION GUIDE to OFF at the
Menu window, or by setting OPERATION GUIDE (
p. 62) to OFF in the Setup
window.
●
When the screen is displayed horizontally, pressing button A will turn off the
operation guide and another press of button A will display the operation guide.
Using the Product
Other Helpful Information
29
gigabeat F60_OP16-32(E)â¸î 05.4.15, 3:24 PM29
Page 30

Welcome
Getting Ready
Charging the Built-in Battery
When the AC adapter is connected to the gigabeat, charging starts automatically.
If you are using the gigabeat for the first time after purchase, or when the
gigabeat hasn't been used for a prolonged period, fully charge the battery
beforehand.
One charging method is to connect the AC adapter directly to the gigabeat,
another method is to use the USB CRADLE. Note that a USB connection with
the PC will also permit charging.
● Preparation
Set the BATTERY switch on the bottom of the main unit to ON.
This switch prevents over-discharge of the built-in battery after shipment.
Set the BATTERY switch to ON the first time the gigabeat is used after purchasing it.
If you will not be using the gigabeat for a prolonged period, set the BATTERY switch
to OFF.
Setting the BATTERY switch to
values (which is the condition when the gigabeat was first used after purchasing
it).
Using the Product
Direct Charging from the AC Adapter
Connect the AC adapter to the gigabeat in the order indicated in the diagram below.
Other Helpful Information
30
gigabeat F60_OP16-32(E)â¸î 05.4.15, 3:24 PM30
OFF
will return all of the settings to their default
3
Connect to
the outlet.
1
2
Page 31

Charge Using the USB CRADLE
Connect the gigabeat to the USB CRADLE, then make further connections in the order
indicated in the diagram below.
3
Connect to
the outlet.
1
2
When removing the gigabeat from the USB CRADLE, pull straight out in the direction of the
arrow (
) in the above diagram.
Charge with Connected to PC Using USB Cable
Connect the gigabeat to the PC with the supplied USB cable.
Welcome
Getting Ready
Using the Product
To the USB connector of the PC
When the gigabeat does not transfer tracks and does not function even though there is a
USB connection has been made and there is charging, it is possible that the battery is weak.
Charging with a USB connection is dependent on the performance of the USB bus power
supply function of the PC and might not be possible depending on the model of PC.
When a USB connection is made with a PC that cannot support charging, the connection
may soon be lost and the USB function of the PC may not be available for use temporarily. If
this happens, restart the PC, connect the AC adapter to the gigabeat, and then once again
make a USB connection with the PC.
gigabeat F60_OP16-32(E)â¸î 05.4.15, 3:25 PM31
Other Helpful Information
31
Page 32

Welcome
Getting Ready
Charging the Built-in Battery (Continued from the previous page)
When charging of the gigabeat has started, the charging icon (orange)
is displayed on the display screen. When charging is completed, the charging
completion icon (green) is displayed on the display screen. If the screen
does not function in this way, see “Troubleshooting” ( p. 68).
The charging icon is not displayed when charging with a USB connection.
Pressing the POWER button during USB charging might not turn on the
power when the gigabeat has not been used for a long time or when the
battery is too weak to supply power. Cancel the USB connection, connect
the AC adapter, and then turn on the power.
The charge time will vary depending on the condition of the built-in battery,
ambient temperature, etc.
The charge may stop temporarily to limit the temperature increase in the
gigabeat.
Charge the built-in battery within the specified operating-temperature
range.
If the temperature is outside the specified range, the gigabeat may
not be charged. ( p. 69)
As the remaining battery power drops, the indication ( p. 26) will change in
the following sequence: ( → → → ). Recharge the gigabeat
when the remaining battery power becomes low.
will be displayed while the AC adapter is connected.
Using the Product
Other Helpful Information
32
gigabeat F60_OP16-32(E)â¸î 05.4.15, 3:25 PM32
Page 33

Turning the Power ON/OFF
● Preparation
●
Set the BATTERY switch to ON. (
Turning the Power ON/OFF
Press and hold the POWER button.
Holding down the button of the wired remote control (supplied with the
MEGF60, MEGF40) for 2 seconds or longer will also turn the power on or off.
The power cannot be turned on or off during the HOLD condition. Switch off
HOLD and then press the POWER button.
When the gigabeat is used for the first time or when turning on the power for
the first time after resetting (
and was subsequently charged, a TIMEZONE Setup window will be displayed.
Set the TIMEZONE (
When not playing music and not in use of the screen and power will turn off
automatically. While connected to the AC adapter, the screen will darken, but
it will not go off.
See “BACKLIGHT OFF TIME” (
See “AUTO POWER OFF” (
When the screen is off, the press of a button on the side of the gigabeat will
light the screen and the gigabeat will receive the input of that button.
When the screen is off, operation of the Plus Touch will light the screen, but
that input will not be received by the gigabeat.
p. 30)
p.68) or after the battery became exhausted
p.64) and DATE/TIME (
p. 62).
p. 62).
Welcome
Getting Ready
p.65).
Using the Product
Other Helpful Information
gigabeat F60_OP33_39(E)â¸î 05.4.19, 3:44 PM33
33
Page 34

Welcome
Getting Ready
Playing Music Tracks
● Preparation
●
Transfer tracks to the gigabeat beforehand. See the Owner’s Manual-“gigabeat
room” for the procedure for transferring tracks.
●
Connect the supplied EARBUDS to the headphone jack on the main unit.
●
When using the wired remote control (supplied with the MEGF60 and MEGF40,
optional for MEGF20/MEGF10), connect the wired remote control to the headphone jack on the main unit, and connect the supplied EARBUDS to the wired
remote control.
●
Turn the power ON. ( p. 33)
Using the Product
Turn the power to the gigabeat OFF before connecting or disconnecting the
wired remote control.
Insert the plug of the wired remote control firmly to the end. Incomplete insertion
may disable the remote controller operation, although sound may be heard.
When connecting any equipment other than EARBUDS, do so via the supplied
wired remote control. Connecting other equipment directly to the headphone
jack may cause a malfunction.
Other Helpful Information
34
gigabeat F60_OP33_39(E)â¸î 05.4.15, 3:28 PM34
Page 35

Playing the Track Selected
ALBUM
GENRE
PLAYLIST
FOLDER
ARTIST
5
items
XXXXXXX
Album1
Artist1
Album2
Album3
Album5
Album4
ALBUM
12 tracks
58:49
XXXXXXX
Track2
Track3
Track4
Track5
Album2
Track1
Artist1
4:48
In the MAIN MENU, touch the top or
bottom of the Plus Touch and select
a folder (from among ARTIST,
ALBUM, GENRE, FOLDER), then
touch the right of the Plus Touch.
The Browse window (the content of the
selected folder) will be displayed.
Touch the top or bottom of the Plus
Touch and select the folder or the
track that you want to play back.
Once the folder has been selected,
touching the right of the Plus Touch
permits the display of the folders or
tracks within that folder. Touching the
left of the Plus Touch will cause a return
to the display of the content of the
folder one level higher.
Touch the center of the Plus Touch.
This will play back the selected folder or
track according to PLAY MODE (
38).
Performing the operations of Steps 1
through 3 during playback will
discontinue the playback and start
playback of the selected folder or track.
Welcome
Getting Ready
Using the Product
p.
Other Helpful Information
To change the track order, press the MENU button, then select and execute SORT
of the displayed Menu window or SORT of the Setup window.
To display an enlarged cover photograph, select the track, then press the MENU
button and select DISPLAY JACKET on the displayed Menu window.
To display the album cover photograph as thumbnails, select the album, press the
MENU button and select SHOW THUMBNAIL on the displayed Menu window.
WMA data that is copyright protected in Windows Media DRM10 might display the
errors described below and not be playable.
(1) “PLAY LIMIT EXCEEDED” (The play limit during which playback is possible
has been exceeded and playback is not possible.)
(2)
“SYNCHRONIZE WITH THE PC” (The message is displayed when the gigabeat
hasn’t been connected to the PC for a prolonged period or after a reset. In this
circumstance, a USB connection is made with the PC and playback becomes
possible upon synchronization with Windows Media Player 10.)
gigabeat F60_OP33_39(E)â¸î 05.4.15, 3:28 PM35
35
Page 36

Welcome
Getting Ready
Playing Music Tracks (Continued from the previous page)
Stopping Playback
Touch the center of the Plus Touch during playback.
Touching the center of the Plus Touch one more time will continue
playback.
Controlling the Volume
Press the VOL (+) or VOL (-) button.
Pressing the VOL (+) button will increase
the volume.
Pressing the VOL (-) button will decrease
the volume.
Pressing the button will display the volume
control bar. The bar will disappear in
approximately two seconds after releasing
the button.
The volume can also be adjusted by touching the top or bottom
of the Plus Touch.
Touching the top raises the volume.
Touching the bottom lowers the volume.
The PLUS TOUCH
at the Setup window ( p. 62) can be used to
toggle between VOLUME and ALBUM SKIP.
Artist1
Album1
12
TRACKS
52:08
Track1
010 0:09/4:55
Using the Product
When the folder to be played back contains a number of files, or after
playback has been stopped, it may take several seconds from the time the
center of the Plus Touch is touched until playback begins.
On rare occasions noise may be heard, depending on the track.
Assigning MUTE to button A of the gigabeat ( p. 62) and pressing button
A will mute the audio. While in mute, pressing the button A again will cancel
the mute function.
Setting PRESET VOLUME at the Setup window ( p. 62) to ON permits
playback at the volume that was set with Music information edit of the
gigabeat room.
Editing Tag Information ( Owner’s Manual-“gigabeat room” p. 34)
When the gigabeat is connected to the AC adapter via the USB CRADLE,
Other Helpful Information
the setting of the PRESET VOLUME has no effect.
36
gigabeat F60_OP33_39(E)â¸î 05.4.15, 3:28 PM36
Page 37

Fast Forward/Reverse
Hold the left or right of the Plus Touch while the Play window
is displayed during playback.
Left : Fast reverse
Right : Fast forward
When the end or beginning of a given track is reached, the gigabeat
will move to the next or previous track.
Releasing the Plus touch will return the Playback mode.
Welcome
If the play mode ( p. 38) is set to Repeat One Song, holding the Plus
Touch will not move to the next/previous track.
No sound will be played during fast reverse/forward.
Skip Forward or Back
Touch the left or right of the Plus Touch while the Play
window is displayed during playback or during pause.
Left : Skips to the beginning of the current track.
When at the beginning of the track, skips to the beginning of
the previous track.
Right : Skips to the beginning of the next track.
Holding the left or right of the Plus Touch during pause will continue the
skip until you stop holding the Plus Touch.
Skip to the Next Album
Press the MENU button during the display of the Play window
to display the Menu window, touch the top or bottom of the
Plus Touch and select “ALBUM SKIP”.
Getting Ready
Using the Product
Other Helpful Information
You can also skip to the next album by pressing the equalizer button on the
wired remote control for two seconds or longer.
Setting the PLUS TOUCH at the Setup window ( p. 62) to ALBUM
SKIP permits a skip to be made to the previous or the next album by
touching the top or bottom of the Plus Touch.
gigabeat F60_OP33_39(E)â¸î 05.4.15, 3:29 PM37
37
Page 38

Welcome
Artist1
Album1
Track1
12
tracks
52:08
010 0:09/4:55
Getting Ready
Setting the Play Mode
You can select a desired play mode, such as “REPEAT” or “RANDOM”.
Press the MENU button in the Play
window.
The Menu window appears.
Touch the top or bottom of the Plus
Touch and select “PLAY MODE”,
then touch the right of the Plus
Touch.
A list of play modes will be displayed.
MENU
ALBUM SKIP
REGISTER BOOKMK
アーティスト1
PLAY MODE
アルバム1
INTRO
12曲 52:08
EQUALIZER/SRS WOW
オーディオデータ1
USER SETTING EQ
010/012 0:09/4:55
Touch the top or bottom of the Plus
Using the Product
Touch and select the play mode that
you would like to set, then touch the
right of the Plus Touch.
Other Helpful Information
38
gigabeat F60_OP33_39(E)â¸î 05.4.15, 3:30 PM38
The mode will be set and there will be a
return to the Play window. When
playback is in progress the response is
immediate, and during the pause
condition touching the right of the Plus
Touch will star t playback in the play
mode that was set.
PLAY MODE
PLAY ALL
PLAY ALBUM
アーティスト1
REPEAT ONE
アルバム1
REPEAT ALBUM
12
曲
RAND. ALBUM
オーディオデータ1
RAND. ALL
010 0:09/4:55
52:08
OK
Page 39

Display in the
Play window
Play mode Operation
None PLAY ALL Plays all tracks in the gigabeat repeatedly
PLAY ALBUM Plays the tracks in the selected folder (album etc.)/
playlist
REPEAT ONE Repeats single track repeatedly
REPEAT ALBUM Plays the tracks in the selected folder (album etc.)/
playlist repeatedly
RAND. ALBUM Plays the tracks in the selected folder (album etc.)/
playlist in random order
RAND. ALL Plays all tracks in the gigabeat in random order
You can also set the play mode in the Setup window. ( p. 62)
If you have selected RAND. ALBUM or RAND. ALL while the gigabeat is
playing, the random playback of tracks will start after the current track is
finished.
Welcome
Getting Ready
Using the Product
gigabeat F60_OP33_39(E)â¸î 05.4.15, 3:31 PM39
Other Helpful Information
39
Page 40

Welcome
Artist1
Album1
Track1
12
tracks
52:08
010 0:09/4:55
Getting Ready
Setting the Equalizer Mode
You can select a desired equalizer mode. (Terminology p.66)
Press the MENU button in the Play
window.
The Menu window appears.
Touch the top or bottom of the Plus
Touch and select the “EQUALIZER/
SRS WOW”, then touch the right of
the Plus Touch.
MENU
ALBUM SKIP
REGISTER BOOKMK
アーティスト1
PLAY MODE
アルバム1
INTRO
12曲 52:08
EQUALIZER/SRS WOW
オーディオデータ1
USER SETTING EQ
010/012 0:09/4:55
Touch the top or bottom of the Plus
Touch and select the type of
Using the Product
equalizer that you would like to set,
then touch the right of the Plus
Touch.
The equalizer mode is set and the screen
returns to the Play window.
Selecting USER will result in playback at the
sound quality that was set with USER
SETTING EQ. See “Adjustments When
‘USER’ Has Been Selected” (
Other Helpful Information
40
gigabeat F60_OP40_43(E)â¸î 05.4.15, 3:34 PM40
p.42).
EQUALIZER/SRS WOW
FLAT
BASS+
アーティスト1
BASS++
アルバム1
LOUDNESS
12曲 52:08
ACOUSTIC1
オーディオデータ1
ACOUSTIC2
010/012 0:09/4:55
OK
Page 41

Display in the
Play window
Equalizer mode
Display in the
Play window
Equalizer mode
None FLAT
BASS+
BASS++
LOUDNESS
ACOUSTIC 1
ACOUSTIC 2
CLASSIC 1
CLASSIC 2
DANCE 1
DANCE 2
HARD 1
HARD 2
HIP HOP 1
HIP HOP 2
JAZZ 1
JAZZ 2
* The SRS WOW function (which offers a natural, three-dimensional sound stage, rich bass,
and a distinctly delineated clear sound) is activated. There are 3 types of function modes.
LATIN 1
LATIN 2
PIANO 1
PIANO 2
POPS 1
POPS 2
R&B 1
R&B 2
ROCK 1
ROCK 2
VOCAL 1
VOCAL 2
USER
SRS WOW1*
SRS WOW2*
SRS WOW3*
Welcome
Getting Ready
Using the Product
Touching the top or bottom of Plus Touch temporarily sets the sound quality
setting of the selected equalizer. Note that the setting will not be finalized
unless the center of the Plus Touch is touched.
The equalizer mode can also be selected by pressing the equalizer button
( ) on the wired remote control.
You can also set the equalizer mode in the Setup window. ( p. 62)
Setting PRESET EQ at the Setup window ( p. 62) to ON permits playback
at the equalization that was set with Music information edit of the gigabeat
room.
Editing Tag Information ( Owner’s Manual-“gigabeat room” p. 34)
The equalization that was set with the gigabeat room Edit Track Information
is not reflected in the equalizer icon on the screen. The equalization that was
set can be checked with PROPERTIES ( p. 50) on the Menu window that
is displayed by pressing the MENU button.
When the gigabeat is connected to the AC adapter via the USB CRADLE,
the equalizer is set to FLAT in spite of its setting and display and the PRESET
EQ has no effect.
gigabeat F60_OP40_43(E)â¸î 05.4.15, 3:34 PM41
Other Helpful Information
41
Page 42

Welcome
BOOKMARK
RECYCLE BIN
DEMO MUSIC
PHOTO
SETUP
XXXXXXX
AUTO POWER OFF
USB PRIORITY
PC CONNECTIONS
PLAY MODE
INTRO
EQUALIZER/SRS WOW
SETUP
USER SETTING EQ
Enter
XXXXXXX
USER SETTING EQ
TREBLE
0
BASS
0
OK
Getting Ready
Setting the Equalizer Mode (Continued from the previous page)
Adjustments When “USER” Has Been Selected
In the MAIN MENU, touch the top or
the bottom of the Plus Touch and
select “SETUP”, then touch the right
of the Plus Touch.
The Setup window appears.
Touch the top or the bottom of the
Plus Touch and select “USER
SETTING EQ”, then touch the right of
the Plus Touch.
The adjustment window of the User Setting
Equalizer will be displayed.
Touch the right or left of the Plus Touch
and select “TREBLE” or “BASS”.
Right : Treble
Using the Product
Other Helpful Information
42
gigabeat F60_OP40_43(E)â¸î 05.4.15, 3:36 PM42
Left : Bass
Page 43

XXXXXXX
AUTO POWER OFF
USB PRIORITY
PC CONNECTIONS
PLAY MODE
INTRO
EQUALIZER/SRS WOW
SETUP
USER SETTING EQ
Touch the top or bottom of the Plus
XXXXXXX
USER SETTING EQ
OK
TREBLE
0
BASS
0
XXXXXXX
USER SETTING EQ
OK
TREBLE
+2
BASS
0
Touch to adjust.
Top : Stronger
Bottom : Weaker
Welcome
When the adjustment is finished,
touch the center of the Plus Touch.
The adjustment contents will be finalized and
there will be a return to the Setup window.
Touch the left of the Plus Touch.
Returns to the MAIN MENU.
Getting Ready
Using the Product
Other Helpful Information
43
gigabeat F60_OP40_43(E)â¸î 05.4.15, 3:37 PM43
Page 44

Welcome
XXXXXXX
オーディオデータ1
Audio data4
Track5
FOLDER
オーディオデータ3
MENU
DISPLAY JACKET
PROPERTIES
REGISTER BOOKMK
SORT
OPERATION GUIDE
DELETE FILE
OK
XXXXXXX
Track1
Track2
Track4
Track5
FOLDER
Track3
Artist1
4:48
Getting Ready
Bookmarking
By bookmarking your favorite tracks, you can play only the bookmarked tracks.
Touch the top or bottom of the Plus
Touch in the Browse window and
select the track that you would like to
register to a bookmark.
Press the MENU button.
The Menu window appears.
Touch the top or the bottom of the
Plus Touch and select “REGISTER
BOOKMK”, then touch the right of
Using the Product
Other Helpful Information
44
gigabeat F60_OP44_49(E)â¸î 05.4.15, 3:40 PM44
the Plus Touch.
The selected track is bookmarked and a
bookmark icon will be displayed beside the
name.
You can also select REGISTER BOOKMK by pressing the MENU button in
the Play window.
To cancel bookmark, select the bookmarked tracks and select ERASE
BOOKMK in step 3.
You can bookmark up to 50 audio files.
Playlists and folders cannot be bookmarked.
The REGISTER BOOKMK function can be assigned to “A button”. See “A-
BUTTON FUNCTION” ( p. 62).
Page 45

Viewing Bookmarked Tracks
XXXXXXX
BOOKMARK
RECYCLE BIN
PHOTO
FOLDER
10 tracks
PLAYLIST
XXXXXXX
BOOKMARK
RECYCLE BIN
PHOTO
FOLDER
10 tracks
PLAYLIST
In the MAIN MENU, touch the top or
bottom of the Plus Touch and select
“BOOKMARK”, then touch the right
of the Plus Touch.
The bookmarked tracks will be displayed.
Touching the center of the Plus Touch permits
playback of the selected tracks.
You can cancel the bookmark of the selected tracks by pressing the MENU
button in the Bookmark window and selecting ERASE BOOKMK.
When the gigabeat is reset ( p. 68) or the battery power is low and the
power has been cut off, there will be a return to the condition of the bookmark
when the PC and USB connection were last made.
Playing All of the Tracks that were Registered to the Bookmark
In the MAIN MENU, touch the top or
the bottom of the Plus Touch and
select “BOOKMARK”, then touch the
center of the Plus Touch.
All of the tracks that were registered will be
played back.
Welcome
Getting Ready
Using the Product
Other Helpful Information
45
gigabeat F60_OP44_49(E)â¸î 05.4.15, 3:41 PM45
Page 46

Welcome
XXXXXXX
Playlist1
Playlist2
Playlist4
Playlist5
Playlist3
PLAYLIST
10 tracks
50:08
ALBUM
GENRE
FOLDER
XXX
PLAYLIST
BOOKMARK
10 items
XXXXXXX
Playlist2
Playlist3
Playlist4
Playlist5
Playlist1
PLAYLIST
10 tracks
50:08
Getting Ready
Playing Back Playlists
Using the gigabeat room to create a playlist on the gigabeat will permit playback of the
playlist from the contents of the PLAYLIST.
Creating a Playlist (
In the MAIN MENU, touch the top or
bottom of the Plus Touch and select a
“PLAYLIST”, then touch the right of the
Plus Touch.
Touch the top or bottom of the Plus
Touch and select the playlist that you
want to play back.
Owner’s Manual-“gigabeat room” p. 27)
The contents of the PLAYLIST will be
displayed.
A further touch to the right of the Plus
Touch will also permit selection of the
tracks in that playlist.
Touch the center of the Plus Touch.
Using the Product
Other Helpful Information
46
gigabeat F60_OP44_49(E)â¸î 05.4.15, 3:43 PM46
This will play back the selected playlist
or track according to PLAY MODE
p. 38).
(
Performing the operations of Steps 1
through 3 during playback will
discontinue the playback and start
playback of the selected playlist or
track.
Page 47

Moving Tracks to the Recycle Bin
XXXXXXX
オーディオデータ1
オーディオデータ2
Audio data4
Track5
FOLDER
オーディオデータ3
MENU
DISPLAY JACKET
PROPERTIES
REGISTER BOOKMK
SORT
OPERATION GUIDE
DELETE FILE
OK
XXXXXXX
Track1
Track2
Track4
Track5
FOLDER
Track3
Artist1
4:48
You can move unwanted tracks or playlists to the recycle bin. Once in the recycle bin, the files
no longer become playback targets. You can delete the data in the recycle bin altogether at a
later time.
Touch the top or bottom of the Plus
Touch at the Browse window and
select the track that you would like to
delete.
Press the MENU button.
The Menu window appears.
Welcome
Getting Ready
Using the Product
Touch the top or bottom of the Plus
Touch and select “DELETE FILE”,
then touch the right of the Plus
Touch.
The selected tracks, etc., will move to the
recycle bin and turn to the recycle bin icon.
When tracks are placed in the recycle bin from one of either the folders (ART-
IST, ALBUM, GENRE or FOLDER) or playlists, the same track item selected
from another folder will also have a recycle bin icon associated with it.
You can also select DELETE FILE by pressing the MENU button in the Play
window.
Selecting tracks, etc., in the recycle bin and choosing RESTORE FILE in step
3 will restore the tracks.
Up to 50 files can be placed in the recycle bin.
gigabeat F60_OP44_49(E)â¸î 05.4.15, 3:44 PM47
Other Helpful Information
47
Page 48

Welcome
BOOKMARK
RECYCLE BIN
DEMO MUSIC
5
items
PHOTO
FOLDER
XXXXXXX
Track2
Track3
Track4
Track5
RECYCLE BIN
Track1
Artist1
4:48
BOOKMARK
RECYCLE BIN
FOLDER
5
items
DEMO MUSIC
PHOTO
Getting Ready
Moving Tracks to the Recycle Bin (Continued from the previous page)
Viewing Tracks in the Recycle Bin
In the MAIN MENU, touch the top or
bottom of the Plus Touch and select
“RECYCLE BIN”, then touch the right
of the Plus Touch.
The track, etc., in the recycle bin will be
displayed.
The track data that was placed in the
recycle bin cannot be played back.
To restore tracks, etc., from the recycle bin, select a desired file in the Recycle Bin window, press the MENU button to display the Menu window, and
select RESTORE FILE.
If the gigabeat was reset ( p. 68) or has shut down due to a dead battery,
the recycle bin contents effective in the last session will be restored the next
time the gigabeat is started.
Deleting Tracks in the Recycle Bin
You can completely remove tracks or playlists in the recycle bin from the gigabeat. To delete
the contents of recycle bin, connect the AC adapter to the gigabeat beforehand.
p. 30)
(
In the MAIN MENU, touch the top or
the bottom of the Plus Touch and
select “RECYCLE BIN”, then touch
Using the Product
the right of the Plus Touch.
The tracks, etc., in the recycle bin will be
displayed.
Press the MENU button.
The Menu window appears.
Other Helpful Information
48
gigabeat F60_OP44_49(E)â¸î 05.4.15, 3:46 PM48
Page 49

Touch the top or bottom of the Plus
XXXXXXX
Track2
Track3
Track4
Track5
RECYCLE BIN
オーディオデータ1
MENU
PROPERTIES
DISPLAY JACKET
RESTORE FILE
DELETE ALL
OPERATION GUIDE
XXXXXXX
オーディオデータ1
Track2
Track3
Track4
Track5
RECYCLE BIN
DO YOU REALLY
WANT TO
DELETE ALL?
YES
NO
OK
Touch and select “DELETE ALL”,
then touch the right of the Plus
Touch.
The deletion confirmation window appears.
Welcome
Touch the top or bottom of the Plus
Touch and select “YES”, then touch
the right of the Plus Touch.
The data in the recycle bin will be deleted
from the Recycle Bin folder and also from the
original folders.
Getting Ready
Using the Product
Other Helpful Information
49
gigabeat F60_OP44_49(E)â¸î 05.4.15, 3:47 PM49
Page 50

Welcome
Enter
XXXXXXX
オーディオデータ1
オーディオデータ2
Audio data4
Track5
FOLDER
オーディオデータ3
MENU
DISPLAY JACKET
PROPERTIES
REGISTER BOOKMK
SORT
OPERATION GUIDE
DELETE FILE
XXXXXXX
Track1
Track2
Track4
Track5
FOLDER
Track3
Artist1
4:48
Getting Ready
Viewing Track Information
You can view the information of any track, playlist or folder.
Touch the top or bottom of the Plus
Touch in the Browse window and
select the track information that you
would like to view.
Press the MENU button.
The Menu window appears.
Touch the top or bottom of the Plus
Touch and select “PROPERTIES”, then
touch the right of the Plus Touch.
The information of the selected track, etc.,
will be displayed.
Using the Product
●
Information displayed for a
track:
Track name
File format
Bit rate
Sampling frequency
Playback time
Artist name
Album name
Genre
Preset volume
Preset equalizer
Other Helpful information
You can also select PROPERTIES by pressing the MENU button in the Play
window.
50
gigabeat F60_OP50_51(E)â¸î 05.4.15, 5:07 PM50
●
Information displayed for a
playlist:
Number of files registered
in the playlist
Playback time
●
Information displayed for a
folder:
Number of folders and
audio files
Page 51

Playing Intro
Artist1
Album1
Track1
12
tracks
52:08
010 0:09/4:55
You can play the beginning of each track for 10 seconds or one minute.
Press the MENU button in the Play
window.
The Menu window appears.
Touch the top or bottom of the Plus
Touch and select “INTRO”, then
touch the right of the Plus Touch.
Touch the top or bottom of the Plus
Touch and select the desired intro
mode, then touch the right of the
Plus Touch.
The intro mode is set and the window
returns to the Play window.
Intro playback in the selected mode will
start immediately if the gigabeat is currently
playing, or after touching the right of the
Plus Touch if the gigabeat is paused.
MENU
ALBUM SKIP
REGISTER BOOKMK
アーティスト1
PLAY MODE
アルバム1
INTRO
12
曲
EQUALIZER/SRS WOW
オーディオデータ1
USER SETTING EQ
010 0:09/4:55
INTRO
NONE
10SEC. INTRO
60SEC. INTRO
アーティスト1
Album1
12tracks 52:08
Track1
010 0:09/4:55
52:08
OK
Welcome
Getting Ready
Using the Product
Other Helpful information
Display in the
Play window
Intro mode
None NONE Plays the entire track without playing an intro.
10 SEC. INTRO
60 SEC. INTRO
You can also set the intro mode in the Setup window. ( p. 62)
gigabeat F60_OP50_51(E)â¸î 05.4.15, 5:09 PM51
Operation
Plays each track 10 seconds from the beginning according to
the selected play mode.
Plays each track one minute from the beginning according to
the selected play mode.
51
Page 52

Welcome
Artist1
Album1
Track1
12
tracks
52:08
010 0:09/4:55
Getting Ready
Changing Screen Themes
The design of the screen, the orientation of the screen display, the size of the display
characters, and the size of the cover photograph display area can be changed.
Press the MENU button in the Play
window.
The Menu window appears.
Touch the top or bottom of the Plus
Touch and select “SCREEN THEME”,
then touch the right of the Plus
Touch.
MENU
REGISTER BOOKMK
PLAY MODE
アーティスト1
INTRO
アルバム1
EQUALIZER/SRS WOW
12
曲
USER SETTING EQ
オーディオデータ1
SCREEN THEME
010 0:09/4:55
52:08
Touch the top or bottom of the Plus
Touch and select the desired screen
Using the Product
theme, then touch the right of the
Plus Touch.
The screen theme is set and there is a
return to the Play window.
Screen themes can also be changed from the Setup window. ( p. 62)
The background can be changed from the Setup window. ( p. 62)
Other Helpful Information
52
gigabeat F60_OP52_59(E)â¸î 05.4.15, 4:03 PM52
SCREEN THEME
BALL
SPEAKER
アーティスト1
SPECTRUM
Album1
NORMAL1
12
TRACKS
52:08
NORMAL2
Audio data1
NORMAL3
010 0:09/4:55
OK
Page 53

Screen themes
BALL
SPEAKER
SPECTRUM
ANALYZER
NORMAL1
NORMAL2
Orientation
of the
screen
display
Size of
the
display
characters
ABC
ABC
ABC
ABC
ABC
Size of the
cover
photograph in
the Play window
NONE
NORMAL3
NORMAL4
NORMAL5
NORMAL6
NORMAL7
Orientation
of the
screen
display
Size of
the
display
characters
AB
ABC
AB
ABC
AB
Size of the
cover
photograph in
the Play window
Welcome
Getting Ready
Using the Product
gigabeat F60_OP52_59(E)â¸î 05.4.15, 4:04 PM53
Other Helpful Information
53
Page 54

Welcome
PHOTO
20 items
RECYCLE BIN
BOOKMARK
SETUP
DEMO MUSIC
PHOTO
Getting Ready
Displaying Images (Photo Viewer)
Using the gigabeat room, images transferred from the PC can be shown in a thumbnail
display, full-screen display, or slideshow.
In the photo viewer mode, (i.e., thumbnail display, full-screen display, or
slideshow display), press the button A to return to previous screen or the
POWER button to return.
In the photo viewer mode, scrolling from left to right results in a move to the
track Play window.
In the photo viewer mode, press the MENU button and select GUIDE DISPLAY
on the Menu window that has been displayed. The operation guide will be
displayed.
In the photo viewer mode, up to 5000 images can be displayed.
In the MAIN MENU, touch the top or
bottom of the Plus Touch and select
“PHOTO”, then touch the right of the
Plus Touch.
The image display will be in the horizontal
orientation and images transferred from the
PC will be displayed as thumbnails.
Set the Full-Screen Display
Using the Product
While thumbnails are displayed,
touch the top, bottom, left, or right
of the Plus Touch and select the
image that you would like to
display full screen.
Top : Selects the image above
Bottom : Selects the image below
Left : Selects the left image
Right : Selects the right image
Other Helpful Information
54
gigabeat F60_OP52_59(E)â¸î 05.4.15, 4:11 PM54
Page 55

Touch the center of the Plus
PHOTO
Touch.
The selected image will be displayed
full screen.
Touching the left or right of the Plus
Touch during a full-screen display will
result in a move to the previous or next
image.
Welcome
Running the Slideshow
While in the full-screen display,
touch the center of the Plus Touch.
The slideshow will start.
To stop the slideshow, touch the center of the Plus Touch or press the MENU
button and select SLIDESHOW STOP from the Menu window that is displayed.
In the photo viewer mode, press the MENU button. On the displayed Menu
window, touch the right portion of the Plus Touch and select the items below
to allow slideshow operations and settings.
SLIDESHOW START
SLIDE INTERVAL
SLIDESHOW EFFECT
Interval of the slideshow and slideshow effects can also be changed from the
Setup window. ( p.62)
The slideshow will start.
Select the interval of the slideshow from 2
SECONDS, 3 SECONDS, 5 SECONDS, 10
SECONDS, and 20 SECONDS.
Select the image changeover effect from among NO
EFFECT, FADE(WHITE), FADE(BLACK) and WIPE.
Getting Ready
Using the Product
Other Helpful Information
55
gigabeat F60_OP52_59(E)â¸î 05.4.15, 4:19 PM55
Page 56

Welcome
PHOTO
Displaying Images (Photo Viewer ) (Continued from the previous page)
Setting an Image as the Background
Touch the top, bottom, left, or
right of the Plus Touch and select
the image that you would like to
place in the background.
Getting Ready
Using the Product
Other Helpful Information
Press the MENU button.
The Menu window appears.
Touch the top or bottom of the
Plus Touch and select “SET
WALLPAPER”, then touch the
right of the Plus Touch.
The selected image will be set in the
background of the screen.
Touch the top or bottom of the
Plus Touch and select any one of
“USER 1”, “USER 2”, and “USER
3”, then touch the right of the Plus
Touch.
The selected image will be set to the
user background, USER 1, or USER
2, or USER 3, and then set to the
current background.
PHOTO
PHOTO
MENU
SLIDESHOW START
SLIDE INTERVAL
SLIDESHOW EFFECT
SET WALLPAPER
GUIDE DISPLAY
PHOTO
SET WALLPAPER
USER1
USER2
USER3
56
gigabeat F60_OP52_59(E)â¸î 05.4.15, 4:45 PM56
Page 57

Output of Audio from An Audio System
Use of the LINE OUT jack of the USB CRADLE permits playback with any analog device.
Connect the gigabeat to the USB CRADLE.
Connect the LINE OUT jack of the USB CRADLE with a
PC speaker or another device.
Set the USB/LINE OUT switch of the USB CRADLE to
“LINE OUT”.
Welcome
Getting Ready
To LINE OUT jack
USB/LINE OUT switch
When changing the USB/LINE OUT switch from USB to LINE OUT, with
USB connected, do so as described below.
Close the gigabeat room, then make the change when the gigabeat is not
connected to the PC.
When using the LINE OUT jack for output, the equalizer is set to FLAT in
spite of its setting and display and the PRESET VOLUME and PRESET EQ
( p. 63) have no effect.
Stereo mini-plug
Audio Cable
Commercially available
PC speakers, etc.
Using the Product
Other Helpful Information
gigabeat F60_OP52_59(E)â¸î 05.4.15, 4:46 PM57
57
Page 58

Welcome
Getting Ready
Backing up Data to the gigabeat
Images and other data that are stored in digital cameras or other devices that support the
USB Mass Storage Class (Terminology
gigabeat will be used as a storage device only because images that have been backed up to
it cannot be displayed on the gigabeat.
● Note
Operation cannot be guaranteed for all devices under the conditions above.
● Preparation
●
Connect AC adapters to the digital camera and to the USB CRADLE, then turn on
the power of the digital camera.
●
Depending on the model of digital camera, if necessary, switch it to the mode that
connects to a PC or another device.
Connect the digital camera to the USB 1.1 connector
(port A) of the USB CRADLE.
p.66) can be backed up to the gigabeat. The
Turn on gigabeat.
Using the Product
Connect the gigabeat to the USB CRADLE.
A screen that prompts whether or not to start the backup will be displayed.
Touch the top or bottom of the Plus Touch and select
“YES”, then touch the right of the Plus Touch.
The backup will start.
Data that has been backed up will be saved under the “Backup” folder in the
gigabeat with the folder name of the date on which it was backed up. When the
Other Helpful Information
58
gigabeat F60_OP52_59(E)â¸î 05.4.15, 4:46 PM58
message of backup completion has been displayed, touch the right of the Plus
Touch to complete the backup, then remove the gigabeat from the USB CRADLE.
Page 59

Loading can be performed even when there is a change to the order of Steps
1 to 3.
Cancellation is not possible part way through the backup.
When a cable is also connected to the USB 2.0 connector (port B), please set
USB PRIORITY of the Setup window to CAMERA.
Please check the owner's manual of your camera for information about making
the USB connections with the digital camera.
You can check whether digital cameras or other devices support USB Mass
Storage Class by following the procedure below on the PC.
1 Select “Properties” by right-clicking “My Computer icon” on the PC’s
desktop or right-clicking “My Computer” on the “Start” menu.
“System Properties” window will be displayed.
2 Select “Hardware” and then select “Device Manager”.
3 Click “+” of “Universal Serial Bus controllers”.
4 Connect the PC and the digital camera.
If the connected digital camera supports USB Mass Storage Class, “USB
Mass Storage Device” will be displayed newly in the list of “Universal
Serial Bus controllers”.
(Use the connection cable supplied with the digital camera.)
If “Imaging devices” is displayed, the digital camera supports PTP (Picture
Transfer Protocol). In this case, the function in “Backing up Data to the
gigabeat” cannot be available.
Welcome
Getting Ready
Using the Product
gigabeat F60_OP52_59(E)â¸î 05.4.28, 4:00 PM59
Other Helpful Information
59
Page 60

Track Selection and Playback Sequence
If the folders tree in the gigabeat is as shown below, the playback sequence will follow the
rules on the next page.
Folders in the gigabeat
Welcome
Getting Ready
Using the Product
Artist name A
Artist name B
Album name A1
Album name A2
Album name A3
Album name B1
Track1
Track2
Track3
Track4
Track1
Track2
Track1
1
2
3
4
5
6
7
Artist name C
Other Helpful Information
60
gigabeat F60_OP60_61(E)â¸î 05.4.15, 4:50 PM60
Track2
:Folder
:
Track
8
Page 61

XXXXXXXX
FOLDER
Artist name A
Artist name B
Artist name C
Artist name D
Artist name E
10
items
XXXXXXXX
Artist name A
Album name A1
Album name A2
Album name A3
Album name A4
Album name A5
10
items
XXXXXXXX
Album name A1
Track 1
Artist name A
Track 2
Track 3
Track 4
Track 5
4:48
Welcome
Touch the center
The track of artist
name A will be played.
Highlighted line
( p. 60)
●
If the play mode is PLAY ALL, the playback sequence will follow the rules below
Touch the center
The track of album name
A1 will be played.
Highlighted line
( p. 60)
Touch the center
The track1 will be
played.
When the center of the Plus
Touch is touched at the
Playback Order
following location
Artist name A
Album name A2
●
If the play mode is PLAY ALBUM, the playback sequence will follow the rules below
Repeat in the order of 1 to 6, 7, and 8
Repeat in the order of 5, 6, 7, 8, and
1 through 4
When the center of the Plus
Touch is touched at the
Playback Order
following location
Artist name A
Album name A2
Artist name B
Play in the order of 1 to 6
Play in the order of 5, 6
Play in the order of 7, 8
Getting Ready
Using the Product
Other Helpful information
The gigabeat can play or display only the track transferred by the gigabeat
room, Windows Media Player 10 or Napster.
A maximum of 999 tracks can be played from one folder.
gigabeat F60_OP60_61(E)â¸î 05.4.15, 4:51 PM61
61
Page 62

Welcome
Return
XXXXXXX
SLEEP TIMER
BACKLIGHT OFF
TIME
A-BUTTON FUNCTION
BEEP
AUTO POWER OFF
USB PRIORITY
OPERATION GUIDE
SETUP
BOOKMARK
RECYCLE BIN
DEMO MUSIC
PHOTO
SETUP
Getting Ready
Changing/Checking Settings
The gigabeat allows you to set various items such as play mode and beeper sound. Check
the current settings or change to desired settings in the Setup window.
In the MAIN MENU, touch the top or
bottom of the Plus Touch and select
“SETUP”, then touch the right of the
Plus Touch.
The Setup window appears.
Touch the top or bottom of the Plus
Touch and select the setting item
that you would like to change/check,
then touch the right of the Plus
Touch.
The selections for the selected setting item
will be displayed.
SLEEP TIMER
Using the Product
BACKLIGHT
OFF TIME
A-BUTTON
FUNCTION
OPERATION
GUIDE
BEEP
AUTO POWER
OFF
Other Helpful Information
62
gigabeat F60_OP62_70(E)â¸î 05.4.15, 4:52 PM62
Select the number of minutes after which the power should turn OFF.
Selecting OFF will disable this function.
Selects how many seconds must elapse in a condition without any
operations being conducted before the backlight of the screen is
automatically turned off or dimmed.
Assign button A on the side of the gigabeat to any one of EQUALIZER/
SRS WOW, ALBUM SKIP, BOOKMARK, MUTE, and DISPLAY
JACKET.
Selects whether or not to display the operation guide.
Select whether or not to emit a beep sound.
In conditions other than during playback or when there is a USB connection, NONE selects how many minutes must elapse without any operations
being performed before the power is turned off automatically. When “None”
has been selected, this function will not operate.
Page 63

USB PRIORITY
PC CONNECTIONS
PLAY MODE
INTRO
EQUALIZER/SRS
WOW
USER SETTING EQ
PRESET EQ
PRESET VOLUME
PLUS TOUCH
WALLPAPER
SCREEN THEME
SLIDE INTERVAL
SLIDESHOW
EFFECT
SORT
TIME FORMAT
TIMEZONE
DATE/TIME
SYSTEM
LANGUAGE
Selects the operation when cables or adapters have been connected
to both the USB 2.0 connector (port B) and USB 1.1 connector (port
A).
PC
:
CAMERA: Prioritizes the connection with a digital camera or
This sets the connection method between the gigabeat and gigabeat
room or Windows Media Player 10 on the PC. Connection is via the
USB CRADLE (USB connection). When a direct connection has been
made with the USB connector of the gigabeat, the operation will be the
same as when the setting is made to gigabeat room, regardless of
this setting.
Windows Media Player 10:
gigabeat room:
SELECT WHEN CONNECT:
Select repeat or random. ( p. 38)
Select the intro playback time. ( p. 51)
Select the equalizer mode. ( p. 40)
USER, one type of equalizer, can be set as desired ( p. 42)
When set to ON, the tone setting that was changed with Edit Track
Information of the gigabeat room will be enabled at time of playback.
When set to ON, the volume setting that was changed with Edit Track
Information of the gigabeat room will be enabled at time of playback.
This set the top/bottom operation of the Plus Touch to either the
VOLUME operation or the ALBUM SKIP operation.
Selects the background.
This selects the screen theme (i.e., the design of the screen, the
orientation of the screen display, the size of the display characters, and
the size of the cover photograph display area). ( p. 52)
This select the interval of the slideshow (in seconds).
Select the slideshow effects from among the following.
NO EFFECT, FADE(WHITE), FADE(BLACK), WIPE
Selects whether to sort tracks by track number, name, or date.
Select whether to display the format by 12 hours or 24 hours.
Select Time Zone.
Set date and time. ( p. 65)
The gigabeat version and the number of files already played will be
displayed.
Select the display language for the Menu window and error messages. The display language for the Play window and Browse window
remains the same.
Prioritizes the connection with the PC using a USB
cable in the USB 2.0 connector (port B).
other device using a USB cable in USB 1.1 connector
(port A).
This supports the Windows Media Player.
This corresponds to the gigabeat room. Connection can also be
made to Windows Media Player 10; however, in this mode
Windows Media Player 10 is not supported.
This is selected when a connection is made with the PC.
Welcome
Getting Ready
Using the Product
Other Helpful Information
gigabeat F60_OP62_70(E)â¸î 05.4.15, 4:52 PM63
63
Page 64

Welcome
XXXXXXX
SORT
SLIDESHOW INT.
SLIDESHOW EFFCT
TIEMZONE
DATE/TIME
SYSTEM
TIME FORMAT
SETUP
OK
TIMEZONE
US EASTERN
US EASTERN(DST)
CARACAS
BUENOS AIRES
MID-ATLANTIC
MID-ATLANTIC(DST)
XXXXXXX
SLEEP TIMER
BACKLIGHT OFF TIME
A-BUTTON FUNCTION
BEEP
AUTO POWER OFF
USB PRIORITY
OPERATION GUIDE
SETUP
XXXXXXX
スリープタイマー
バックライトオフ時間
A-BUTTON FUNCTION
BEEP
AUTO POWER OFF
USB PRIORITY
OPERATION GUIDE
SETUP
OK
BEEP
ON
OFF
Getting Ready
Changing/Checking Settings (Continued from the previous page)
Touch the top or bottom of the Plus
Touch and select setting, then touch
the right of the Plus Touch.
The setting will be changed and a “ ” mark
will appear to the left of the selection.
Touch the left of the Plus Touch.
The screen will return to the MAIN MENU.
You can also select SORT in the Menu window of the Browse window.
When Windows Media Player 10 has been set with PC CONNECTIONS
and the connection is via the USB CRADLE, the number of tracks that can be
handled is approximately 25,000 tracks.
Using the Product
Setting Time Zone
Touch the top or bottom of the Plus
Touch at the “TIMEZONE” Setting
window and select the time zone that
you would like to set, then touch the
right of the Plus Touch.
The Time Zone will be set and a “ ” mark
will appear to the left of the selection.
DST: Daylight Saving Time
Other Helpful Information
If you have turned on the power for the first time after purchase, or after a
reset, the window to set the TIMEZONE will appear. Set the TIMEZONE and
DATE/TIME ( p.65).
64
gigabeat F60_OP62_70(E)â¸î 05.4.15, 4:53 PM64
Page 65

Setting DATE/ TIME
XXXXXXX
DATE/TIME
12:00 AM
1 M/ 1D/ 2005Y
OK
XXXXXXX
DATE/TIME
12:00 AM
3 M/ 1D/ 2005Y
OK
Touch the right or left of the Plus
Touch at the “DATE/ TIME” setting
window and select the item that you
want to change.
Each touch to the right moves one step
in the following sequence: Month → Day →
Year → Hour → Minute → AM/PM
Touching to the left moves through the
sequence in the opposite direction.
Touching to the left of the Plus Touch while
Month is selected results in a return to the
Setup window.
When the TIME FORMAT setting (
is set to 24 HOUR, a.m./p.m. is not
displayed.
p. 63)
Touch the top or bottom of the Plus
Touch and adjust the value.
Up : Increases the value
Down: Decreases the value
Welcome
Getting Ready
Using the Product
Repeat steps 1 and 2 to adjust other items.
Other Helpful Information
Touch the center of the Plus Touch.
The date and time will be set.
65
gigabeat F60_OP62_70(E)â¸î 05.4.15, 4:53 PM65
Page 66

Welcome
Getting Ready
Terminology
CDDB
This is a database service of song information that is recorded on music CDs. You can get
the information from the Internet.
EQUALIZER
This is a device or function that controls the tone by increasing or decreasing the scale of a
number of equal frequency bandwidths using a knob or another method.
MP3 (MPEG-1 Audio Layer 3)
An international standard established by MPEG, a working group under the International
Standardization Organization (ISO). This standard permits files to be compressed at a
scale of 1/10 to 1/12.
Tag Information
This is information such as the song titles, artist’s name, album name, and genre which is
written to an audio file.
USB Mass Storage Class
This is a standard of peripheral devices which are identified as drives, such as hard disk
drives (HDD), when connected. It is also called USB storage class.
WAV
This is a Windows standard non-compressed audio file.
WMA (Windows Media Audio)
This designates the audio-compression coding method developed by Microsoft Corporation
or audio files compressed according to this standard.
Using the Product
Other Helpful Information
66
gigabeat F60_OP62_70(E)â¸î 05.4.15, 4:53 PM66
Page 67

Error Message List
The gigabeat may display the following error messages. When an error message is displayed,
take appropriate action by referring to the instructions below.
Message
UNSUPPORTED DATA
UNABLE TO READ DISK
NO DATA FOUND
DATA ERROR
FAILED TO OPEN
RECHARGE BATTERY
NO SYSTEM FOUND ON
HDD
Content and Corrective Action
The format of the selected data cannot be played on the
gigabeat. Use the gigabeat room to transfer the data. (Refer to
“Transferring Tracks to the gigabeat” in the Owner’s Manual“gigabeat room”.)
Reformat the built-in hard disk to the FAT32 format. Use the
gigabeat format. (Refer to “Troubleshooting” in the Owner’s
Manual-“gigabeat room”.)
Transfer data to the gigabeat. (Refer to “Transferring Tracks to
the gigabeat” in the Owner’s Manual-“gigabeat room”.)
The selected data is damaged. Use the gigabeat room to
transfer the data again. (Refer to “Transferring Tracks to the
gigabeat” in the Owner’s Manual-“gigabeat room”.)
The track could not be opened and played.
Use TOSHIBA Audio Application to transfer the data again.
(Refer to “Transferring Tracks to the gigabeat” in the Owner’s
Manual-“gigabeat room”.)
There is insufficient power remaining in the built-in battery.
Connect the AC adapter and charge the battery. ( p. 30)
The gigabeat cannot be started because the firmware on the
hard disk has been destroyed.
Please restore the firmware. (Refer to “Troubleshooting” in the
Owner’s Manual-“gigabeat room”.)
Welcome
Getting Ready
Using the Product
gigabeat F60_OP62_70(E)â¸î 05.4.15, 4:54 PM67
Other Helpful Information
67
Page 68

Welcome
Getting Ready
Troubleshooting
If you experience any of the following issues while using the gigabeat, check the following
guide for the possible cause before requesting service.
Issue
The gigabeat
doesn’t power up.
The button doesn’t
work.
The battery is
consumed quickly
after charge.
Playback cannot be
performed.
There is no sound.
Cause
The BATTERY switch
is set to OFF.
There is insufficient
power remaining in the
built-in battery.
The gigabeat is in
HOLD mode.
The button is not
being pressed long
enough.
The gigabeat is
connected to a PC.
The built-in battery
has failed.
There is no track.
The EARBUDS are
not connected
properly.
Set the BATTERY switch to
ON.
Connect the AC adapter and
charge the built-in battery.
Reset the HOLD switch to
cancel the HOLD mode.
When turning on the power,
press the POWER button for
two seconds or longer.
The gigabeat cannot be
operated while being connected to a PC.
Replace with a new battery. To
replace the built-in battery,
contact TOSHIBA Customer
Service by calling.
(Phone # on “Stop SHEET”)
Use gigabeat room to transfer
tracks.
Check the connection between
the EARBUDS and wired
remote control and main unit.
Solution
Reference
page
30
30
20, 23
33
Owner’s
Manual-
“gigabeat room”
13
Owner’s
Manual-
“gigabeat room”
34
The volume is set to
the minimum.
The charge indicator
doesn’t illuminate, in
charging operation.
The BATTERY switch
is set to OFF.
The gigabeat is not
connected properly.
Using the Product
Outside the specified
operating-temperature
range.
The charge indicator
turned off while the
AC adapter was
connected.
The PC does not
recognize the
gigabeat.
The charge is
automatically stopped
to limit the temperature increase in the
gigabeat.
The gigabeat is not
properly connected to
the PC.
■ Resetting
Other Helpful Information
If the issue cannot be resolved after taking the above corrective actions, reset the main
unit by following the steps below:
1 Unplug the AC adapter from the main unit.
2 Set the BATTERY switch to OFF and then set it to ON again after approximately five
seconds. The play mode and other conditions will return to their initial settings.
68
gigabeat F60_OP62_70(E)â¸î 05.4.15, 4:54 PM68
Adjust the volume.
Set the BATTERY switch to
ON.
Check the connection between
the AC adapter/AC cable and
the main unit.
Charge within the operatingtemperature range.
This is a safety feature. Keep
the gigabeat in the charging
operation. Charging will
resume after a while.
Check the connection with the
PC.
36
30
30
69
32
Owner’s
Manual-
“gigabeat room”
Page 69

Specifications
Built-in battery Rechargeable lithium-ion battery
Weight MEGF60 and MEGF40 Approx. 170 g (main unit only)
MEGF20 and MEGF10 Approx. 160 g (main unit only)
External dimensions MEGF60 and MEGF40 Approx. 63 mm x 19 mm x 106 mm
(width x height x depth), excluding
projections
MEGF20 and MEGF10 Approx. 63mm x 16 mm x 106 mm
(width x height x depth), excluding
projections
Audio format
Sampling frequency 22.05 to 48 kHz (
Bit rate 16 to 320 kbps (
Recording media MEGF60 Internal hard disk 60 GB*
Maximum recording time
Continuous playback time
Operating conditions Temperature: 5 to 35°C, Humidity: 30 to 80% (RH) (No condensation)
USB port USB2.0/USB1.1
Headphone jack 3.5-mm jack/stereo type
S/N ratio 95 dB or higher
AC adapter Input power condition: 100 to 240VAC, 50/60Hz
Color panel*** 2.2 inch diagonal QVGA low temperature polysilicon TFT color panel
●
MPEG-1 Audio Layer 3 (MP3)
●
Windows Media Audio (WMA)
●
PCM (WAV)
p. 70)
p. 70)
MEGF40 Internal hard disk 40 GB*
MEGF20 Internal hard disk 20 GB*
MEGF10 Internal hard disk 10 GB*
MEGF60 Approx. 996** hours (at 128 kbps bit rate)
MEGF40 Approx. 664** hours (at 128 kbps bit rate)
MEGF20 Approx. 332** hours (at 128 kbps bit rate)
MEGF10 Approx. 166** hours (at 128 kbps bit rate)
Approx. 16 hours** (Built-in battery)
Assuming 128 kbps, 44.1 kHz WMA tracks (excluding content
protected with Windows Media DRM 10), in normal temperature
(25°C), backlight unlit, volume adjusted to center
The continuous playback time is a reference value but is not
guaranteed, since the actual playback time will vary depending on
the operating condition, ambient operating temperature, the number
of times the built-battery has been recharged, etc.
Even under allowable operating conditions, using the gigabeat at
low temperature will result in a reduction of the maximum continuous
playback time.
WAV tracks consume a lot of battery power, so the continuous
playback time of WAV tracks are significantly shorter than when MP3
or WMA tracks are played.
Load impedance 16 Ω
Rated output: 5V DC, 3 A
Welcome
Getting Ready
Using the Product
Other Helpful Information
69
gigabeat F60_OP62_70(E)â¸î 05.4.19, 3:45 PM69
Page 70

Welcome
Getting Ready
Specifications
* 1 Gigabyte = 1 billion bytes when referring to hard drive capacity. Available storage
capacity will also be less if the product includes pre-installed operating system and/or
application software. Actual formatted capacity may vary.
** These values are for reference purposes only and may vary.
***The color LCD is made with extremely high-precision technology. There may be the
existence of display (pixels) that might not light or might be lit all the time; however,
please note that this does not constitute malfunction of the product and is not covered
by your warranty.
■ Combination of Sampling Frequency and Bit Rate
The tracks that can be played on the gigabeat have the following combinations of sampling
frequency and bit rate. Tracks with another combination may not play properly.
● MP3 (stereo)
Sampling frequency: 22.05, 44.1, 48 kHz
Bit rate: 32 to 320 kbps
● MP3 (mono)
Sampling frequency: 22.05, 44.1, 48 kHz
Bit rate: 16 to 64 kbps
● WMA (stereo)
Sampling frequency: 22.05/44.1 kHz
Bit rate: 32/48 to 192 kbps
(Continued from the previous page)
● WMA (mono)
Sampling frequency: 44.1 kHz
Bit rate: 32 kbps
● WAV (stereo/mono)
Using the Product
Other Helpful Information
Sampling frequency: 22.05, 44.1, 48 kHz
Bits: 16 bits
This product complies with the above specifications.
Designs and specifications are subject to change without notice.
This product may not be compatible with features and/or specifications that
may be added in the future.
The illustrations and screen displays appearing in this manual may differ
somewhat from the actual appearance for the purpose of easy viewing.
The display position and other aspects of the icons are subject to change.
70
gigabeat F60_OP62_70(E)â¸î 05.4.15, 4:54 PM70
Page 71

License Information on the Software Used in the TOSHIBA Mobile Audio Player
The software pre-installed in the TOSHIBA Mobile Audio Player consists of multiple,
independent software components. Each software component is copyrighted by TOSHIBA
or a third party.
The TOSHIBA Mobile Audio Player uses software components that are distributed as
freeware under a third-party end-user license agreement or copyright notice (hereinafter
referred to as a “EULA”).
Some EULAs require that the source code of the applicable component be disclosed as
the condition for distributing the software component in executable format. You can check
the software components subject to such EULA requirements on the following website:
Website: http://www.gigabeat.net/mobileav/audio/eula/
The software components of the TOSHIBA Mobile Audio Player also include software
developed or created independently by TOSHIBA. Such software and accompanying
documents are owned by TOSHIBA and protected under copyright laws, international treaty
provisions and other governing laws. See the attached “Software License Agreement” for
the terms and conditions governing the use of software components owned by TOSHIBA.
Source code is not disclosed for the software components developed or created
independently by TOSHIBA that are not subject to any EULA.
TOSHIBA provides a warranty for the TOSHIBA Mobile Audio Player you have purchased
under conditions set forth by TOSHIBA.
However, some of the software components distributed under an EULA are made available
for use by the user on the assumption that they are not copyrighted or warranted by TOSHIBA
or any third party. These software components are licensed to the user free of charge and
therefore not covered by any warranty within the scope of the applicable laws. These software
components are not subject to any copyrights or other third-party rights and are provided in
“as is” condition without any warranty, whether express or implied. “Warranty” here includes,
but not limited to, an implied warranty for marketability or fitness for specific uses. All risks
associated with the quality or performance of these software components are assumed by
the user. TOSHIBA shall not be liable whatsoever for any cost of repair or correction or other
incidental expense incurred in connection with a defect found in any of these software
components. Unless specified under the applicable laws or in a written agreement, a party
who changes or redistributes the software with consent from the copyright holders or based
on the aforementioned licenses shall not be held liable whatsoever for any loss arising from
the use of or inability to use such software components. The same applies even when the
copyright holders or relevant third parties have been informed of the possibility of such loss.
“Loss” here includes normal, special, incidental and indirect loss (including, but not limited
to, the loss of data or its accuracy; loss incurred by the user or any third party; and interface
incompatibility with other software). Please read each EULA for details on the use conditions
and items that must be observed regarding these software components.
The table below lists the software components pre-installed in the TOSHIBA Mobile Audio
Player, which are subject to EULAs. The user should read the applicable EULAs carefully
before using these software components. The EULAs are attached to the supplied CDROM in their original text (English) as exactly written by the respective parties other than
TOSHIBA.
Applicable software module
Linux kernel, Busybox,
Samba, linux-wlan, dhcpcd
glibc
Original Text (English) of the End User License
Agreement Relating to the Freeware Components
Used in the TOSHIBA Mobile Audio Player
Original Text (English) of the End User License
Agreement Relating to the Freeware Components
Used in the TOSHIBA Mobile Audio Player
Reference section
(CD-ROM)\GPL\gpl.txt
(CD-ROM)\GPL\lgpl.txt
71
gigabeat F60_OP71_75(E)â¸î 05.4.15, 4:55 PM71
Page 72

Limited United states Warranty
MEG-F Series Mobile Audio Player - Depot Repair Warranty
Toshiba America Consumer Products, L.L.C. (“TACP”) makes the following limited warranties to original
consumers in the United States.
THESE LIMITED WARRANTIES EXTEND TO THE ORIGINAL CONSUMER PURCHASER OR
ANY PERSON RECEIVING THIS MEG-F SERIES MOBILE AUDIO PLAYER AS A GIFT FROM
THE ORIGINAL CONSUMER PURCHASER AND TO NO OTHER PURCHASER OR TRANSFEREE.
MEG-F SERIES MOBILE AUDIO PLAYERS PURCHASED IN THE U.S.A. AND USED ANYWHERE
OUTSIDE OF THE U.S.A., INCLUDING, WITHOUT LIMITATION, CANADA AND MEXICO, ARE
NOT COVERED BY THESE WARRANTIES.
MEG-F SERIES MOBILE AUDIO PLAYERS PURCHASED ANYWHERE OUTSIDE OF THE U.S.A.,
INCLUDING, WITHOUT LIMITATION, CANADA AND MEXICO, AND USED IN THE U.S.A., ARE
NOT COVERED BY THESE WARRANTIES.
Limited One (1) Year Warranty on Parts and Labor
TACP warrants this MEG-F Series Mobile Audio
Player and its parts against defects in materials or
workmanship for period of one (1) year after the date
of original retail purchase.
DURING THIS PERIOD, TACP WILL, AT
TACP’S OPTION, REPAIR OR REPLACE A
DEFECTIVE PART WITH A NEW OR
REFURBISHED PART WITHOUT CHARGE
TO YOU.
Rental Units
The warranty for MEG-F Series Mobile Audio Player
rental units begins on the date of the first rental or
thirty (30) days after the date of shipment to the rental
firm, whichever comes first.
Commercial Units
MEG-F Series Mobile Audio Players sold and used
for commercial purposes have a limited warranty for
all parts and labor, which warranty begins on the date
of original retail purchase and ends on the date that
is ninety (90) days thereafter.
Owner’s Manual and Product Registration Card
Read this owner’s manual thoroughly before
operating this MEG-F Series Mobile Audio Player.
Complete and mail the enclosed product registration
card or register your MEG-F Series Mobile Audio
Player online at www.tacp.toshiba.com/service as
soon as possible. By registering your MEG-F Series
Mobile Audio Player you will enable TACP to bring
you new products specifically designed to meet your
needs and help us to contact you in the unlikely event
a safety notification is required under the U.S.
Consumer Product Safety Act. Failure to complete
and return the product registration card does not
diminish your warranty rights.
Your Responsibility
THE ABOVE WARRANTIES ARE SUBJECT
TO THE FOLLOWING CONDITIONS:
(1) You must retain your bill of sale or provide other
proof of purchase.
(2) All warranty servicing of this MEG-F Series
Mobile Audio Player must be made by the Depot
Warranty Repair Center specified by the TACP
Consumer Solutions Center.
(3) The warranties from TACP are effective only if
this MEG-F Series Mobile Audio Player is
purchased and operated in the Continental U.S.A.
or Puerto Rico.
(4) Labor service charges for set installation, setup,
adjustment of customer controls and installation
or repair of antenna systems are not covered by
this warranty. Reception problems caused by
inadequate antenna systems are your
responsibility.
(5) Warranties extend only to defects in materials or
workmanship as limited above, and do not extend
to any MEG-F Series Mobile Audio Player or
parts that have been lost or discarded by you or
to damage to the MEG-F Series Mobile Audio
Player or parts caused by fires, misuse, accident,
Acts of God (such as lightning or fluctuations in
electric power), improper installation, improper
maintenance, or use in violation of instructions
furnished by TACP; use or malfunction through
simultaneous use of this MEG-F Series Mobile
Audio Player and connected equipment; or to
units that have been modified or had the serial
number removed, altered, defaced, or rendered
illegible.
72
gigabeat F60_OP71_75(E)â¸î 05.4.15, 4:55 PM72
Page 73

How to Obtain Warranty Services
If, after following all of the operating instructions in this manual and reviewing the section entitled
“Troubleshooting”, you find that service is needed:
(1) For instructions on how to obtain warranty service for your MEG-F Series Mobile Audio Player, contact
TAC P’s Consumer Solution Center toll free at 1-800-631-3811.
(2) You must include a copy or original bill of sale or other proof of purchase along with the entire MEG-
F Series Mobile Audio Player to the Depot Warranty Repair Center specified by the TACP Consumer
Solutions Center. You are responsible for all inbound transportation and insurance charges for the
MEG-F Series Mobile Audio Player to the Depot Warranty Repair Center specified by the TACP
Consumer Solutions Center.
For additional information, visit TACP's website: www.tacp.toshiba.com
ALL WARRANTIES IMPLIED BY THE LAW OF ANY STATE OF THE U.S.A., INCLUDING THE
IMPLIED WARRANTIES OF MERCHANTABILITY AND FITNESS FOR A PARTICULAR
PURPOSE, ARE EXPRESSLY LIMITED TO THE DURATION OF THE LIMITED WARRANTIES
SET FORTH ABOVE. WITH THE EXCEPTION OF ANY WARRANTIES IMPLIED BY THE LAW
OF ANY STATE OF THE U.S.A. AS HEREBY LIMITED, THE FOREGOING WARRANTY IS
EXCLUSIVE AND IN LIEU OF ALL OTHER WARRANTIES, GUARANTEES, AGREEMENTS, AND
SIMILAR OBLIGATIONS OF TACP WITH RESPECT TO THE REPAIR OR REPLACEMENT OF
ANY PARTS.
IN NO EVENT SHALL TACP BE LIABLE FOR CONSEQUENTIAL OR INCIDENTAL DAMAGES
(INCLUDING, BUT NOT LIMITED TO, LOST PROFITS, BUSINESS INTERRUPTION, OR
MODIFICATION OR ERASURE OF RECORDED DATA CAUSED BY USE, MISUSE OR INABILITY
TO USE THIS MEG-F SERIES MOBILE AUDIO PLAYER).
No person, agent, distributor, dealer or company is authorized to change, modify or extend the terms of these
warranties in any manner whatsoever. The time within which an action must be commenced to enforce any
obligation of TACP arising under the warranty or under any statute, or law of the United States or any state
thereof, is hereby limited to ninety (90) days from the date you discover or should have discovered, the defect.
This limitation does not apply to implied warranties arising under state law.
THIS WARRANTY GIVES YOU SPECIFIC LEGAL RIGHTS AND YOU MAY ALSO HAVE OTHER
RIGHTS WHICH MAY VARY FROM STATE TO STATE IN THE U.S.A. SOME STATES OF THE
U.S.A. DO NOT ALLOW LIMITATIONS ON HOW LONG AN IMPLIED WARRANTY LASTS, WHEN
AN ACTION MAY BE BROUGHT, OR THE EXCLUSION OR LIMITATION OF INCIDENTAL OR
CONSEQUENTIAL DAMAGES, SO THE ABOVE PROVISIONS MAY NOT APPLY TO YOU UNDER
SUCH CIRCUMSTANCES.
gigabeat F60_OP71_75(E)â¸î 05.4.15, 4:55 PM73
73
Page 74

74
gigabeat F60_OP71_75(E)â¸î 05.4.15, 4:55 PM74
Page 75

TOSHIBA CORPORATION 2005
gigabeat F60_OP71_75(E)â¸î 05.4.15, 4:55 PM75
 Loading...