


FILE NO. 400-200503
SERVICE MANUAL
HDD AUDIO PLAYER
MEGF60,MEGF40
MEGF20,MEGF10
(UK)
(MEGF60)
Jun., 2005
Precautions
Safety Precautions for Service
This section provides critical information for safety. Be sure to observe the content.
Meaning of each indication is as follows:
Death or serious injury may be caused to service personnel and/or surrounding people
WARNING or users due to incorrect work by neglecting the following instructions or due to resulting defects of the product.
Injury or physical damage* may be caused to service personnel and/or surrounding
CAUTION people or users due to incorrect work by neglecting the following instructions or due to resulting defects of the product.
* Physical damage includes damage to buildings, household goods, properties, livestock, and pets.
 WARNING
zUnplug the power cable before starting work (for example, disassembly) that does not need power supply.
Otherwise, it may cause electric shock.
zUse an insulation transformer and/or wear protective gloves when power is ON, and unplug the power cable when replacing parts to avoid electric shock.
zUse specified spare parts of the product for replacement.
Since some parts have safety characteristics (fire resistance, withstand voltage, etc.), use replacement parts with same characteristics.
For safety-sensitive parts specified by marking in circuit diagrams or parts lists, use specified parts.
zAfter repair work is completed, properly reassemble disassembled parts and securely reconnect cables as they were.
For safety reasons, some insulating materials such as tubes and tapes are used, and some parts are mounted with a gap from the board surface. Furthermore, internal wiring is kept away from heating parts or highvoltage parts by using clampers or by other means. When reassembling/reconnecting these parts, put them as they were.
Do not catch the internal cables by the cabinet or cover. Improper assembling or cable connection may cause electric leak or fire, which may lead to an accident on the user side.
zAfter repair work is completed, unplug the power cable, and measure the insulation resistance between the external metal portion and plug blade with a 500V megger. The resistance shall be 1M ohms or more.
If the resistance is lower than 1M ohms, inspect and rectify the product.
zDo not alter the product.
Alteration of the product may cause malfunction or failures, which may lead to an accident such as electric leak or fire on the user side.
zAdvise users to keep children away from the on-site work area.
Children in the work area may be injured by tools, disassembled product or parts.
Precautions for discarding built-in battery
The gigabeat uses a built-in rechargeable lithium-ion battery.
Follow the government regulations when discarding the battery.
Precautions for built-in hard disk
This product has a built-in hard disk. If the disk is subjected to impact, vibration or change in the environment, such as temperature change, it may result in damage to the unit, malfunction and/or data loss. When using this product, pay attention to the following instructions:
•Do not place the product under direct sunlight, in a closed car, near a heater or where the product will be subject to high temperatures.
•Do not place the product in a place where it will be subject to extremely low temperatures.
•Do not subject the product to sudden changes in temperature as condensation may occur.
•Do not use the product in a thunderstorm.
•Do not place the product near a magnet, speaker or other object generating a magnetic field.
•Do not place the product where it will be subject to strong vibrations.
•Do not place or drop an object on the product.
•Do not place the product where it will be exposed to water or high humidity.
•Do not place a cup or other container of liquid near the product since spilled liquid may enter the product.
•Do not subject the product to vibration or impact, or swing it around or drop it, regardless of whether or not the product is operating.
•Do not forcibly push, squeeze or twist the product.
•Do not turn off the power or disconnect the USB cable while data is being written to or read from the internal hard disk.
•Inform users that hard disk data may be lost when HDD is replaced or formatted, and advise them to back up “important data” before taking their HDDs for repair.
•Do not impact on the HDD.
An impact exceeding the specified allowable value is generated even if a vertically standing HDD falls down.
|
CONTENTS |
|
1. |
Product overview ........................................................................................................................... |
2 |
|
1.1. Product outline ........................................................................................................................................ |
2 |
2. |
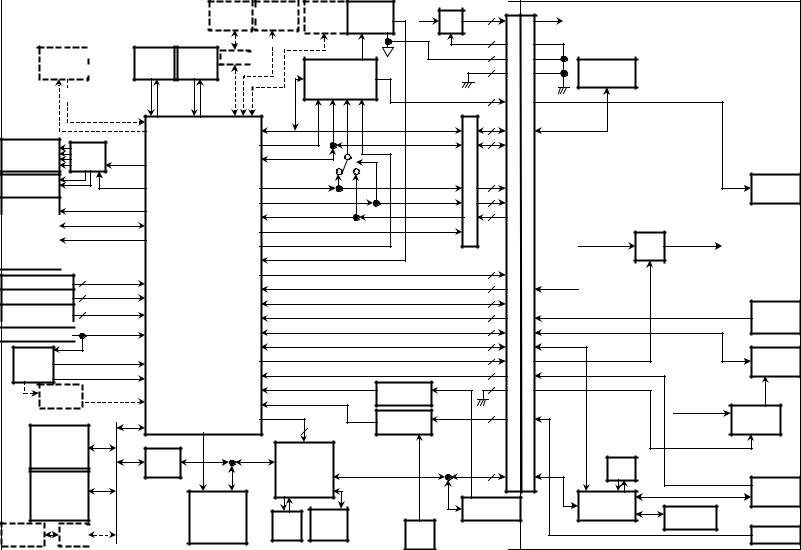
Block diagram................................................................................................................................. |
5 |
|
2.1. Logic circuit block diagram ..................................................................................................................... |
5 |
|
2.2. Power circuit block diagram .................................................................................................................... |
6 |
3. |
Cautions on repair ......................................................................................................................... |
7 |
|
3.1. Tell the owner that the contents of the HDD may be erased. ................................................................. |
7 |
|
3.2. Remove the AC adaptor and set the BATTERY switch to OFF.............................................................. |
7 |
|
3.3. When replacing the HDD ........................................................................................................................ |
8 |
|
3.4. When replacing the main board ............................................................................................................ |
22 |
|
3.5. Replacing the base ............................................................................................................................... |
24 |
|
3.6. Replacing the frame .............................................................................................................................. |
25 |
|
3.7. Replacing the LCD and LCD backlight unit .......................................................................................... |
26 |
|
3.8. Replacing the lithium - ion battery ........................................................................................................ |
27 |
|
3.9. Replacing the cradle ............................................................................................................................. |
27 |
4. |
Troubleshooting ........................................................................................................................... |
28 |
|
4.1. Anticipated defects................................................................................................................................ |
28 |
|
4.2. Defect analysis procedure as a maintenance service .......................................................................... |
29 |
5. |
Procedure to confirm the firmware version ............................................................................... |
36 |
6. |
About the version of firmware..................................................................................................... |
36 |
7. |
Disassembling/Reassembling Procedures ............................................................................... |
37 |
|
7.1. Disassembling Procedures ................................................................................................................... |
38 |
|
7.2. Reassembling Procedures .................................................................................................................... |
42 |
8. |
Exploded view .............................................................................................................................. |
45 |
9. |
Parts List ....................................................................................................................................... |
46 |
|
Specifications |
|
1
1. Product overview
The Toshiba HDD Audio Player gigabeat F Series is a family of portable audio players incorporating a built-in HDD of 10 to 60GB. F40 and F60 are thick because the HDD they incorporate is thick.
The main features are as follows:
-A positive touch sensor, Plus TouchTM, interlocks with the Operation Guide displayed on the screen to allow you operate the unit without thinking hard.
-The unit comes with a 2.2" QVGA low-temperature polysilicon TFT color liquid crystal display. If you relate audio data with a photo in the jacket, you can select a song while looking at the photos in the jacket.
-With gigabeat room, which is software furnished with the unit, you can take in music CDs and can automatically obtain titles and artist names from the Internet, according to the CDDB.
-The HDD capacity ranges widely from 10 to 60GB.
-The unit is compatible with SRS WOW.
-A built-in lithium ion rechargeable battery enables playback for about 16 consecutive hours.
-The unit is compatible with a USB cradle, enables transfer of music CDs with a single press of the RipRec button, and also comes with a Line Out terminal.
1.1. Product outline
1.1.1. Internal composition
The gigabeat F series consists of the following main components:
-Main board
The FlashROM on the main board incorporates part of the firmware.
-HDD
It stores encrypted musical data.
The ¥GBSYSTEM folder stores firmware.
As an ordinary external HDD, this HDD can store Word and other non-musical files.
-TFT color liquid crystal display
-White LED backlight
-Battery
-Switches
Cross-type feather touch sensor Pushbuttons and blue LED on the side
-Cabinet parts
The HDD is covered with special rubber and held in the air. This keeps it resistant to impact and vibration.
2
1.1.2. Accessories
The product is furnished with main accessories as follows:
-AC adaptor
This AC adaptor is compatible worldwide (with inputs 100 to 240V AC) having a 5V 3A DC output.
-Power cord (which varies with destinations)
-USB cradle
Placing the unit on the cradle will start recharging.
The cradle has a USB Mini-B connector and can connect the unit to a PC. It has a Line Out terminal (3.5mm dia. stereo jack).
It comes with a USB and a Line Out switch. It has a RipRec and a Sync button.
-USB cable
The cable is designed for fast data transfer with USB 2.0.
-Wired remote controller (optional for some models)
It is connected to the headphone terminal of the unit. The remote controller comes with a headphone terminal, which receives a pair of headphones.
-Headphones (whose cord length and plug type vary according to whether there is a wired remote controller)
It is a pair of inner-ear type 16 stereo headphones. The models furnished with the wired remote controller have a short cord and a straight plug. The models not furnished with a wired remote controller have a long cord and a right-angles plug.
-Software CD-ROM
This software runs on a PC, including TOSHIBA gigabeat room.
-Owner’s manual
1.1.3. Place for storing firmware
Firmware is stored on FlashROM and HDD on the main board. The ¥GBSYSTEM folder on the HDD stores the firmware. The ¥GBSYSTEM folder comes with the SYSTEM and HIDDEN attributes. Connecting it therefore does not allow it to be seen on the Explorer. However, reconfiguring the Explorer will enable it to be displayed.
In case the user deletes the ¥GBSYSTEM folder by mistake, the gigabeat room creates a backup copy of the ¥GBSYSTEM folder in the PC the first time the gigabeat is connected to the PC. This method of recovery with backup is described in the owner’s manual.
1.1.4. Encryption
Transfer (copy) musical data (WMA/MP3/WAV format) stored in the PC to the HDD by using a PC application, TOSHIBA gigabeat room. This transfer is possible via USB. Data transferred is encrypted in the SAT format (Toshiba's unique format) to prevent reproduction of a reproduction.
Encryption is HDD dependent. For that reason, if you move encrypted musical data to the PC and write it back into the same HDD, then the data can be played back. However, it cannot be played back if the data was copied onto another HDD. If the HDD was replaced at the time of a repair, the encrypted musical data (a file with an extension .SAT) cannot be played back even if written into the new HDD.
3
1.1.5. How music is played back
This section explains how the unit plays back compressed musical data (WMA/MP3) or PCM musical data (WAV) stored on the HDD.
The CPU reads the compressed musical data (WMA/MP3) from the HDD and stores it on the SDRAM. The CPU accesses the HDD every few minutes and accumulates the data on the SDRAM. If the HDD is not used, the HDD is turned off to save power. PCM musical data (WAV) contains a large amount. When such data is handled, therefore, the HDD is always kept on.
The CPU restores compressed musical data on the SDRAM and converts it to PCM data. The musical data restored to PCM data is sent from the SDRAM to the DAC by the CPU.
The DAC converts the sent PCM musical data to analog format and outputs it to the headphones. The CPU sets the volume control and equalizer levels on the DAC, which controls the volume control level and equalizer levels according to the settings made.
1.1.6. Transfer of musical data from the PC
When the unit is connected to the PC by USB, the Cypress AT2+ forms a bridge between the USB and HDD. The PC recognizes the unit as a USB mass storage device (a USB large-capacity storage device).
Copying musical data on the PC by using the TOSHIBA gigabeat room will encrypt the data on the PC. The encrypted data will then be sent to the gigabeat via USB.
The Cypress AT2+ writes the encrypted data onto the HDD according to the instructions issued by the PC.
4
|
|
|
|
-% / |
|
*$'8 |
|
|
4 * |
|
|
|
|
|
|
|
blockcircuitLogic12.. |
diagramBlock2. |
|||||
|
|
|
|
|
- |
|
/ 2 |
|
2 |
|
|
||||||||||||
|
|
|
|
|
|
|
|||||||||||||||||
|
|
|
|
|
|
|
0-C#3 |
|
& |
|
% |
|
|
|
|
|
|||||||
|
|
|
|
! |
|
|
|
|
|
|
|
|
|
|
|||||||||
|
|
|
|
|
|
|
|
|
|
|
|
|
|
|
|
|
|
||||||
|
|
|
|
|
|
|
|
|
|
#'-$ |
|
|
|
|
|
1 |
|
|
|
|
|||
|
|
|
|
|
|
|
|
|
|
|
|
|
|
|
|
|
|
|
|
||||
|
"F |
:; |
:; |
|
|
|
|
|
|
|
|
'9$,99' '89 |
1 |
'89 |
|
|
|
||||||
|
4< |
|
/ 67 |
7 =/ |
|
|
|
|
|
|
|
|
89 |
5 |
89 |
+ ,,-" |
|
|
|||||
|
|
4< |
|
4< |
|
|
|
|
|
|
|
|
|
|
|||||||||
|
|
|
|
|
'! ' |
|
|
. |
|
|
|||||||||||||
|
|
|
|
|
|
|
|
|
|
|
|
||||||||||||
|
|
,:$> |
-$ |
:$+ |
#'-$ |
|
|
|
62 |
|
|
|
|
|
|
|
|
diagram |
|
||||
|
|
|
|
|
|
|
|
|
|
+9,"#$ |
2 |
|
|
|
|
|
|||||||
|
08 +"3 |
|
|
|
|
|
|
|
|
|
|
|
|
|
|
|
|
|
|
||||
|
|
|
|
|
|
|
|
|
|
|
|
|
|
|
|
|
|
|
|
|
|||
|
|
|
|
|
|
|
|
|
|
|
|
|
"9"+9H |
|
|
|
|
|
|
|
|||
|
|
|
|
|
|
%' %#98 '%% |
|
+ |
|
|
|
|
|
|
2 |
+ |
|
|
|
|
|||
|
|
|
|
D! F |
|
|
>0+ %3 |
|
|
|
|
|
|
|
|
|
|
|
|||||
|
@ #& |
|
, |
|
%/ ' |
|
|
|
|
|
|
# |
2 |
|
|
|
|
|
|
||||
|
|
+ |
|
|
|
|
->?% >0+ %3 |
|
|
|
|
% |
|
|
|
|
|
|
|
||||
|
, ( |
|
|
|
|
|
|
|
|
|
|
|
|
|
|
|
|
||||||
|
B |
08 +"3 |
|
'-=$ |
|
|
|
|
|
|
|
|
|
|
|
|
|
||||||
|
A ! |
|
|
|
|
|
|
|
|
|
|
|
|
|
|
|
|
|
|||||
|
|
|
|
|
|
|
|
|
|
|
|
|
|
|
% |
|
|
|
|
|
|
|
|
|
|
|
|
,9' , |
|
|
|
|
|
|
|
|
|
|
|
|
|
|
|
|
|
|
|
|
@ |
|
|
|
|
|
|
|
|
|
|
|
|
|
|
|
|
|
|
|
|
|
|
|
|
|
08 +"3 |
|
|
|
|
% "0+ %3 |
|
|
|
|
|
+ |
1 |
|
|
|
|
|
|||
|
! |
|
|
|
|
|
|
|
|
|
|
|
|
|
|
|
|
|
|
|
"#$ |
|
|
|
|
|
|
|
|
|
|
+ % '%$,-08 +"3 |
|
|
|
|
$ |
|
|
|
|
|
|
||||
|
$C$ |
|
|
|
|
|
|
|
|
|
|
|
1 |
|
|
|
|
|
|
||||
|
%08 +"3 |
|
|
|
|
% +0+ %3 |
|
|
|
|
|
|
|
|
|
|
|
|
|
||||
|
|
% + @ |
|
|
|
|
|
|
|
|
|
|
4 |
1 |
|
|
|
|
|
|
|||
|
! |
|
|
|
|
|
"$+"9 #% 08 +"3 |
|
|
|
|
|
|
|
|
|
|
||||||
|
$/ |
|
|
|
|
|
|
|
|
|
|
|
|
|
|
|
|
|
|||||
|
+ C |
|
|
|
|
|
|
|
|
|
|
|
|
|
|
|
|
|
|
|
|
||
|
|
|
|
|
|
|
4 ,, 0$+ ,-3 |
|
|
|
|
|
|
|
* 02 3 |
/ / 1 ,,-" ) 4# |
|
||||||
|
|
-E8E A |
|
|
|
|
|
|
|
|
|
|
|
|
|
||||||||
|
D 8' |
|
|
|
|
|
4-, "$,0' 3 |
|
|
|
|
|
|
|
|
|
|
|
|
||||
|
2E7E2 2E2E2E+ |
|
|
|
|
|
|
|
|
|
|
|
|
|
|
|
|
||||||
|
(/ |
|
|
|
|
|
|
|
|
|
|
|
|
|
|
|
|
||||||
|
|
|
|
|
|
|
|
|
|
|
|
|
|
|
|
|
|
|
|
|
|
|
|
*$ %& ' & 08 +"3 |
|
|
2 |
|
|
|
|
|
|
||||||||||||||
5 |
|
|
1 |
8 +" |
|
|
|
|
|
|
|
|
|
|
|
|
|
|
|
|
|
|
|
!1 |
% % @ |
|
|
|
|
"$+"9 ,$,$08 +"3 |
|
|
|
|
1 |
/ / 0 1 2 3 |
|
|
|
|
|||||||
|
|
|
|
|
|
|
|
|
|
|
|
|
|
||||||||||
!F@ ! |
5 |
8 +" |
|
|
|
|
-+ "9>5" + C08 +"3 |
|
|
|
|
2 |
|
|
|
|
|
|
|||||
|
|
|
|
|
|
|
|
|
|
|
|
|
|
|
|
|
|||||||
|
C @$! @ |
13 |
8 +" |
|
|
|
|
! ( 08 +")' 3?% % ( 08 +"3 |
3 |
|
|
|
|
! ( |
|
||||||||
|
% F |
|
|
|
|
|
|
|
|
|
|
|
|
|
|
|
|
|
|
|
|
) |
|
|
|
|
|
|
|
|
|
#% 4"%$I J |
|
|
|
|
|
|
|
|
|
|
% % |
|
|||
|
% @ |
|
8 +" |
|
|
|
|
|
|
|
|
|
2 |
|
|
|
|
|
|||||
|
|
|
|
|
|
|
|
|
|
|
|
|
|
|
|
|
|
|
|
|
|||
|
|
|
|
|
|
|
#% , + , |
|
|
|
|
|
|
|
|
|
|
|
|
||||
|
|
|
|
|
|
|
|
|
|
|
|
|
|
2 |
|
|
|
|
|
|
|||
|
|
0' 3 |
|
|
|
|
'+9 ,$,$08 +"3 |
|
|
|
|
1 |
|
|
|
|
#% |
|
|||||
|
) |
|
|
|
|
|
|
|
|
|
|
|
$& ' |
|
|||||||||
|
|
|
|
|
|
|
|
|
|
|
|
|
|
|
|
|
|
|
|||||
|
|
|
|
|
|
|
|
-' , #% 2 ,$,$08 +"3 |
|
|
|
|
|
|
|
|
|
||||||
|
@ |
4'-8, %$'$#%08 +"3 |
|
|
|
|
|
|
|
1 |
|
|
|
|
|
|
|||||||
|
! . |
! |
|
|
|
|
'+9 #% 2 ,$,$08 +"3 |
'+9 #% 2 |
|
1 |
|
|
|
#% 2 %!&& |
|
||||||||
|
|
|
|
|
|
|
|
|
|
|
|
|
|
|
|
||||||||
|
! F 08 +"3 |
|
|
|
|
' ' '$"-,$,$08 +"3 |
|
,$,$ |
|
|
|
|
|
|
|||||||||
|
! |
|
|
|
|
|
|
|
|
|
|
|
|
|
|||||||||
|
|
|
|
|
|
|
|
|
|
|
|
|
* 02 3 |
|
|
||||||||
|
|
|
|
|
|
|
|
'$ -%$08 +"3 |
|
|
|
2 |
4 |
|
|
|
! |
|
|||||
|
|
|
|
|
|
|
|
|
|
2 |
|
|
|
|
|
||||||||
|
|
|
|
|
|
|
|
|
|
|
|
|
|
|
|
|
|
|
|
|
|
|
|
|
|
|
|
|
|
|
|
|
|
3 |
|
|
|
|
,$,$ |
|
|
|
|
|
|
|
|
|
. %-' |
|
|
|
|
|
|
|
|
|
|
|
|
|
|
|
|
|
|
||||
|
|
|
|
|
|
|
|
|
|
|
|
|
|
|
|
|
|
|
|
|
|||
|
|
|
|
|
|
"9 "CC08 +"3 |
#% '$' |
|
|
|
|
|
|
|
|
|
, . |
|
|
||||
|
27 . |
|
#% |
|
|
'$' |
|
|
|
|
|
|
|
|
|
|
|
|
|
||||
|
( 7. @ |
|
|
|
|
|
|
|
|
|
|
|
|
|
|
|
|
||||||
"9 "CC |
% @ |
|
|
|
|
|
|
|
|
|
:; |
|
|
|
|
||||||||
|
|
|
|
|
|
|
|
#% 4 %& |
|
|
|
|
|
|
|
||||||||
C F@-" |
|
|
|
|
|
|
|
& FF'$H |
|
2 |
|
4< |
|
#% 2 |
|
|
|||||||
|
|
|
|
|
|
|
|
|
|
|
|
|
|
|
|
#% |
|
||||||
9"- |
|
|
|
|
|
|
|
56 7 / ' |
|
|
|
|
|
|
|
|
|
|
|
||||
|
|
|
|
|
$"%4+ ' |
|
|
|
|
+ |
|
|
|
|
|
#% 4# |
|
|
|
|
|||
|
|
|
|
|
|
|
|
|
|
#% |
|
|
|
|
|
||||||||
. |
|
, "-5 #% |
|
G4 |
|
|
|
|
|
|
|
|
|
56 727 |
% + |
% + ,,-" |
|
|
|||||
( 7. @ |
|
|
|
|
:; |
+ |
|
|
|
|
|
|
|
|
|
||||||||
|
|
|
|
|
|
|
|
|
|
|
|
|
|
|
|
. |
|
|
|||||
|
|
|
|
|
|
|
/ |
|
|
,,-" |
|
|
|
|
|
|
|
|
|
|
|
||
|
'%,$ |
, @ |
|
|
|
|
|
4< |
|
|
|
|
|
|
|
|
|
|
|
||||
|
|
|
|
|
|
|
|
|
|
|
|
|
|
|
* |
|
|||||||
|
|
|
|
7 8 |
|
|
|
. |
|
|
|
* |
|
|
|
|
|
|
|
||||
|
|
|
|
|
|
|
|
|
|
|
|
|
|
|
|
|
|
|
|||||
|
|
|
|
|
|
|
|
|
|
|
|
|
|
|
|
|
|
|
|
|
|||
8

2.2. Power circuit block diagram
6
3. Cautions on repair
Before repairing a product of the gigabeat F series, take the following cautions:
3.1. Tell the owner that the contents of the HDD may be erased.
Replacing or formatting the HDD will clear the contents of the HDD. In receiving the product from the owner, ask him or her to make backup copies of important data.
3.2. Remove the AC adaptor and set the BATTERY switch to OFF.
Before disassembly, be sure to remove the AC adaptor and set the BATTERY switch to "OFF."
The gigabeat F series is such that its LCD and almost all ICs are powered even if the unit is turned off, if it is powered by the AC adaptor or battery. Before conducting a repair, therefore, the AC adaptor and battery must be removed.
Setting the BATTERY switch to "OFF" will stop the power supply from the battery, thus putting the unit into the same state as when the battery is removed.
7
3.3. When replacing the HDD
3.3.1. Protect the HDD from impact
Note that the HDD is vulnerable to impact. Merely falling the HDD from a vertical position would give an impact exceeding the specifications.
3.3.2. Holding the HDD
When holding the HDD, hold it at the following position:
Do not hold it at the following position:
8
3.3.3. Formatting the HDD and transferring and updating the firmware
Replace the unformatted HDD, then format it.
After the formatting, transfer the firmware to the HDD and update the firmware.
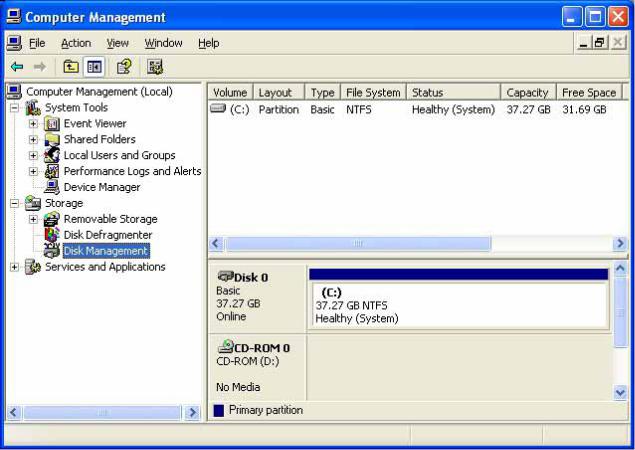
Take the following steps to format the HDD:
1)Connect the HDD to the gigabeat F series.
2)Start "Computer Management" and select "Disk Management."
3)Make sure that the USB cable is connected to the PC, then connect the USB cable to the gigabeat F series.
4)Connect the AC adaptor to the gigabeat F series.
5)Hold down the POWER button to turn on the gigabeat F series.
6)Wait until the PC recognizes the gigabeat F series.
9
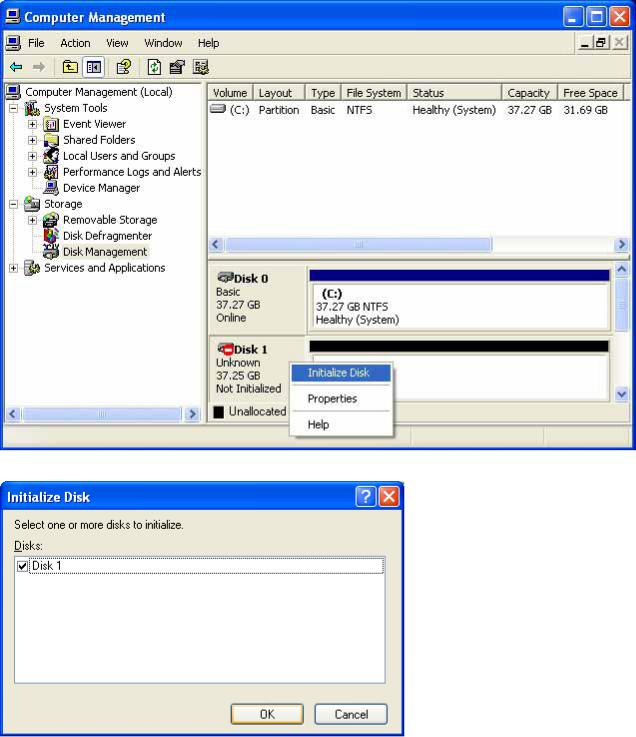
7) Right-click "Not Initialized" displayed on "Computer Management." Then click "Initialize Disk."
8) Confirm that Disk (in this case, Disk 1) of the gigabeat F series is checked. Then click OK.
10
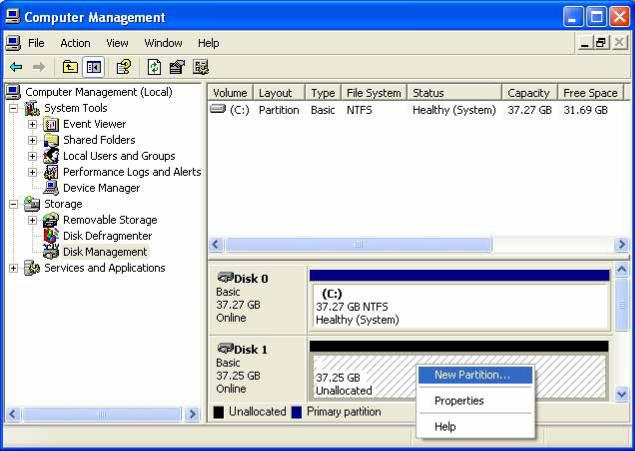
9) Right-click "Unallocated" displayed on "Computer Management." Then click "New Partition...."
11
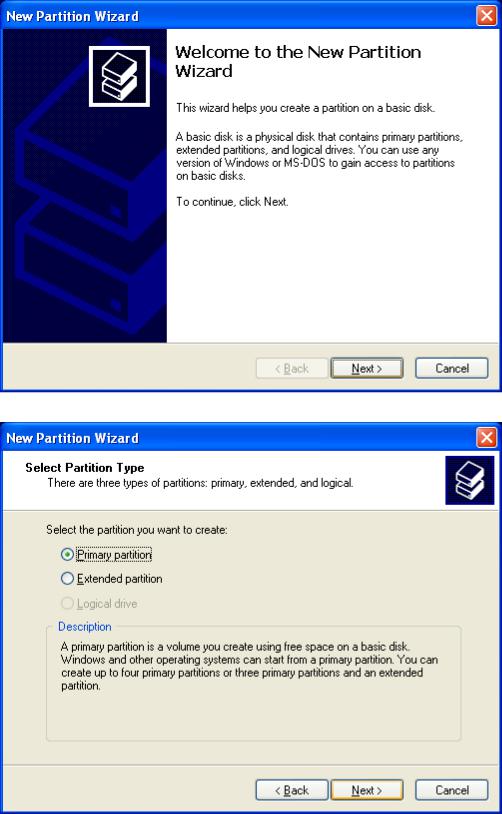
10) The screen displays "Welcome to the New Partition Wizard." Click "Next>."
11) In "Select Partition Type," confirm that "Primary partition" is selected. Then click "Next>."
12
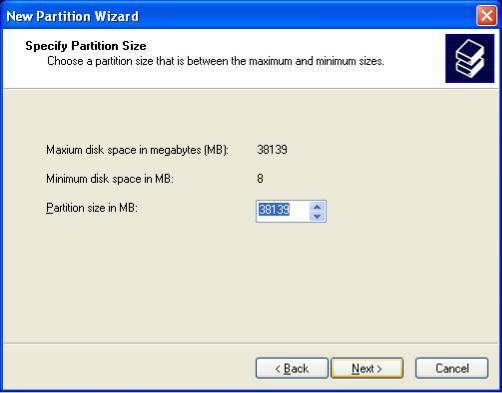
12)In "Specify Partition Size," confirm that the partition size is set to the maximum (in this case, 38139). Then click "Next>."
(Confirm that the default is set to the maximum. Click "Next>.")
13
 Loading...