

Page 1
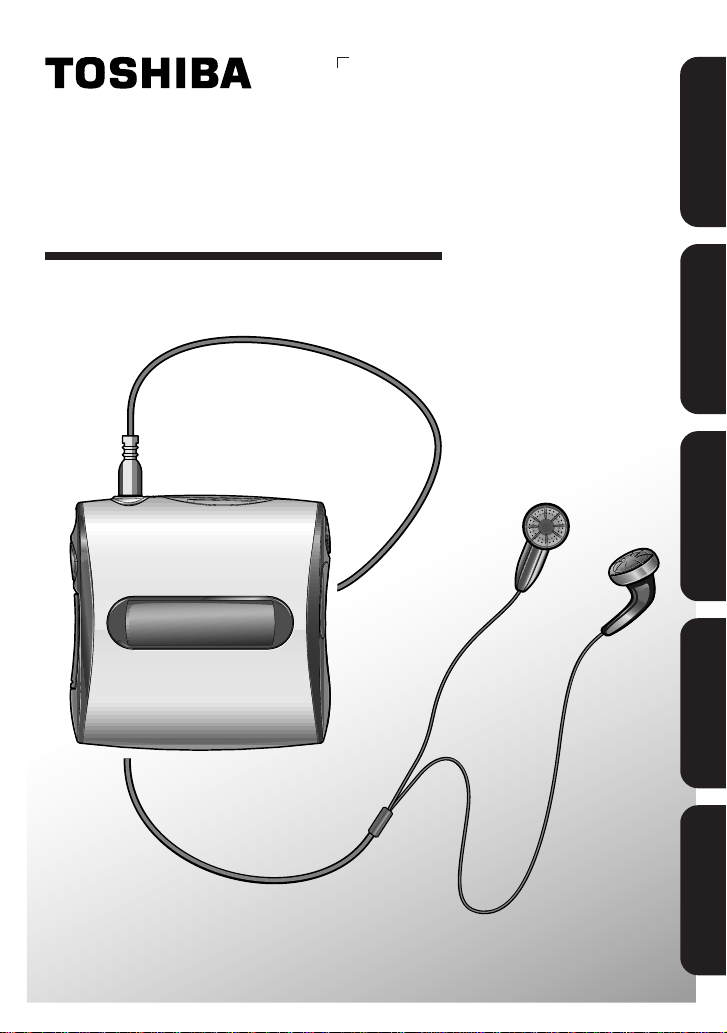
DIGITAL AUDIO PLAYER
MEA210
Introduction
OWNER’S MANUAL
Preparation
Audio data preparation
Operation Others
© 2001 TOSHIBA CORPORATION
XZ2029P012
Page 2

Introduction
Product Name : DIGIT AL AUDIO PLAYER
Model Number(s) : MEA210
FOR HOME OR OFFICE USE
Tested To Comply
With FCC Standards
FCC Notice “Declaration of Conformity Information”
Introduction
This equipment has been tested and found to comply with the limits for a
Class B digital device, pursuant to part 15 of the FCC Rules. These limits are
designed to provide reasonable protection against harmful interference in a
residential installation. This equipment generates, uses and can radiate radio
frequency energy and, if not installed and used in accordance with the
instructions, may cause harmful interference to radio communications.
However, there is no guarantee that interference will not occur in a particular
installation. If this equipment does cause harmful interference to radio or
television reception, which can be determined by turning the equipment off
and on, the user is encouraged to try to correct the interference by one or
more of the following measures:
- Reorient or relocate the receiving antenna.
- Increase the separation between the equipment and receiver.
- Connect the equipment into an outlet on a circuit different from that to which
the receiver is connected.
- Consult the dealer or an experienced radio/TV technician for help.
Warning : Changes or modifications made to this equipment, not expressly
approved by Toshiba or parties authorized by Toshiba could void
the user’s authority to operate the equipment.
This device complies with part 15 of the FCC Rules. Operation is subject to
the following two conditions :
(1) This device may not cause harmful interference, and
(2) this device must accept any interference received, including interference
that may cause undesired operation.
Toshiba America Consumer Products, Inc.
82 Totowa Road, Wayne, New Jersey, 07470
(973)628-8000
Industry Canada
This Class B digital apparatus complies with Canadian ICES-003.
2
Page 3

IMPORTANT SAFETY
INSTRUCTIONS
CAUTION: PLEASE READ AND OBSERVE ALL WARNINGS AND
INSTRUCTIONS GIVEN IN THIS OWNER’S MANUAL AND
THOSE MARKED ON THE UNIT. RETAIN THIS BOOKLET FOR
FUTURE REFERENCE.
This set has been designed and manufactured to assure personal safety .
Improper use can result in unit’s overheating or fire hazard. The safeguards
incorporated in this unit will protect you if you observe the following
procedures for installation, use and servicing. This unit is fully transistorized
and does not contain any parts that can be repaired by the user.
1. Read owner’s manual
After unpacking this product, read the owner’s manual carefully, and follow
all the operating and other instructions.
2. Heat
The product should be situated away from heat sources such as radiators,
heat registers, stoves, or other products that produce heat.
3. Water and Moisture
Do not use this product near water - for example, near a bath tub, wash
bowl, kitchen sink, or laundry tub; in a wet basement; or near a swimming
pool and the like.
Introduction
4. Cleaning
Remove all cables and battery from this product before cleaning. Do not
use liquid cleaners or aerosol cleaners. Use a soft cloth for cleaning.
5. Object and Liquid Entry
Never push objects of any kind into this product through openings as
they may touch electrical parts and could result in a fire or unit’s
overheating. Never spill liquid of any kind on the product.
6. Attachments
Do not use attachments not recommended by the product manufacturer
as they may cause hazards.
3
Page 4

Introduction
IMPORTANT SAFETY
INSTRUCTIONS
Introduction
7. Burden
Do not place a heavy object on, or step on the product. Doing so may
cause serious damage to the product.
8. Headphones
When you use headphones, keep the volume at a moderate level. If you
use the headphones continuously with high volume sound, it may cause
hearing damage.
9. Damage Requiring Service
Remove all cables and battery from this product and refer servicing to
qualified service personnel under the following conditions:
a) If liquid has been spilled, or objects have fallen into the product.
b) If the product has been exposed to rain or water.
c) If the product does not operate normally by following the operating
instructions. Adjust only those controls that are covered by the
operating instructions as an improper adjustment of other controls may
result in damage and will often require extensive work by a qualified
technician to restore the product to its normal operation.
d) If the product has been dropped or damaged in any way.
e) When the product exhibits a distinct change in performance - this
indicates a need for service.
10.LCD
When the LCD panel is broken and the liquid leaks out, do not touch the
liquid as it may cause a rash. If your hands or clothes touch the liquid,
immediately wash it off.
11.Restriction
Do not use this product if a medical instrument such as a pacemaker is
embedded in your body, or if you are in a location where use of electronic
instruments is restricted, such as an aircraft cabin.
12.Children’s misuse
Do not put this product or SD memory card in your mouth. For children’s
safety , keep this product out of their reach.
4
Page 5

13.Traffic
Do not use this product while driving. Do not operate this product while
walking. You may become distracted and cause a traffic accident.
14.Servicing
Do not attempt to service this product yourself as opening or removing
covers may expose you to high temperature or other hazards. Refer all
servicing to qualified service personnel.
15.Replacement Parts
When replacement parts are required, be sure the service technician
has used replacement parts specified by the manufacturer or have the
same characteristics as the original part. Unauthorized substitutions may
result in fire, unit overheating, or other hazards.
16.Safety Check
Upon completion of any service or repairs to this product, ask the service
technician to perform safety checks to determine that the product is in
proper operating condition.
Introduction
5
Page 6
Introduction
Precautions
Notes on handling
Do not shock the unit. It may cause damage to the audio data.
Introduction
Do not press against the display of the unit. It may cause damage.
Do not use volatile liquids, such as insect spray, near the unit. Do not leave rubber or
plastic products in contact with the unit for a long time. They will leave marks on the
finish.
Do not put the unit in a pants pocket. Sitting down may crush the unit.
Notes on locating
When you use this unit near a TV, radio, or portable phone, radio interference may
occur. In this case, operate the unit away from the TV, radio, or portable phone.
Notes on cleaning
Use a soft, dry cloth for cleaning.
For stubborn dirt, soak the cloth in a weak detergent solution, wring well and wipe.
Use a dry cloth to wipe it dry. Do not use any type of solvent, such as thinner and
benzine, as they may damage the surface of the unit.
If you use a chemical saturated cloth to clean the unit, follow that product’s
instructions.
Copyrights
It is forbidden by law to copy, broadcast, play in public, or rent copyrighted material
without permission.
Audio data
Toshiba is not liable for any data damaged or lost by malfunction of this unit or a
connected computer.
Audio data imported by the software of this system is encoded, and cannot be copied
for back-up on your computer and any other drive. Therefore, audio data in your
computer may be lost in the event of system failure, crash, or recovery .
6
Page 7

Restrictions for copyright protection
This player system incorporates copy protection encoding technology in compliance
with the terms and conditions of SDMI. Therefore, users are required to acknowledge
the following restrictions on usage of this system.
1 Data imported to a computer or transferred to the player using the TOSHIBA Audio
Manager cannot be played on any other device even if it has been copied.
2 In compliance with the terms and conditions of SDMI, the TOSHIBA Audio Manager
cannot read data that contains copy protection signals.
3 Data which contains no restrictions on usage (such as CD) is limited to 3 transfers
according to the terms and conditions of SDMI.
SDMI: Secure Digital Music Initiative, an organization established to construct
technology specifications to protect digital music against illegal copy and
distribution.
PD: An SDMI authorized device that records audio data inside or onto external
media. (Portable Device)
Note: The TOSHIBA Audio Manager defines the TOSHIBA digital audio player as the
PD.
Exemptions
Toshiba is not liable for any damage caused by fire, earthquake, uses by a third
person, accidents, owner’s intentional or unintentional misuse, or uses in other
improper conditions.
Toshiba is not liable for incidental damages (such as profit loss or interruption in
business, modification or erasure of recorded data, etc.) caused by use or misuse of
this unit.
Toshiba is not liable for any damage caused by neglect of the instructions described in
the owner’s manual.
Toshiba is not liable for any damage caused by misuse or malfunction through joint
use of this unit and connected equipment.
Introduction
7
Page 8
Introduction
System Outline
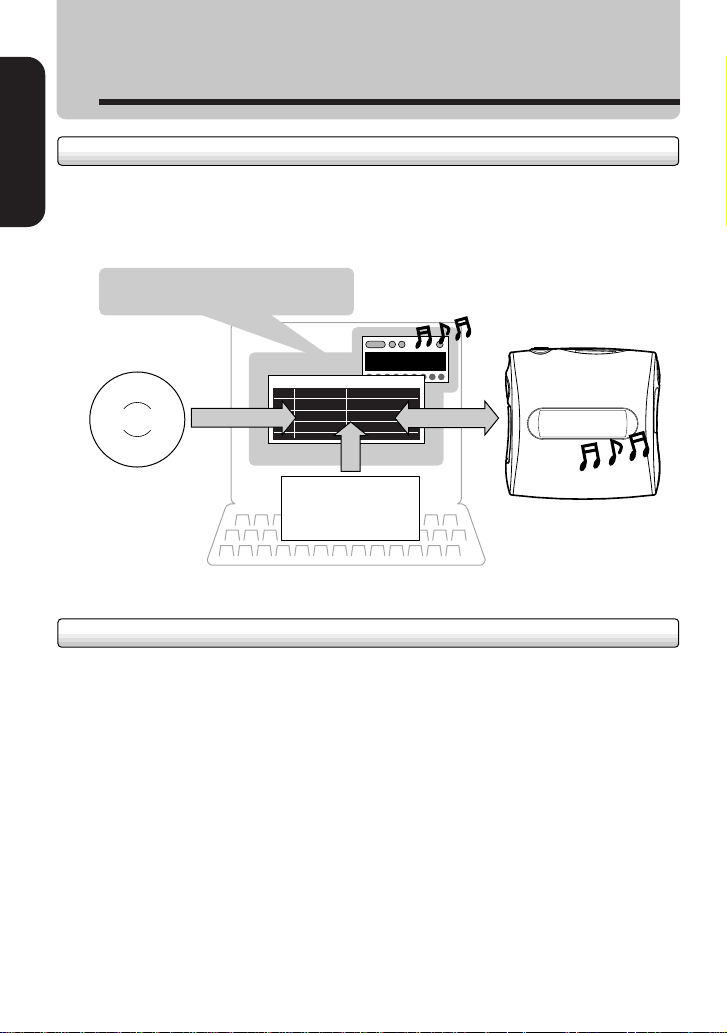
What is the TOSHIBA digital audio player?
Introduction
The TOSHIBA digital audio player plays audio data which is stored in its
internal memory or on an SD memory card (optional). To store them you must
use the supplied TOSHIBA Audio Manager software.
TOSHIBA Audio Manager
LIBRARY MANAGER
Audio CD
Audio CD and WAVE
data is compressed and
encoded to an AAC
format file.
Audio data file
(MP3, WA VE)
What is the TOSHIBA Audio Manager?
The TOSHIBA Audio Manager is a software program that imports your audio
data from audio CDs or audio files (MP3 or WAVE file) and transfers them to
the player. The audio data is encoded and imported by the computer.
MP3 (MPEG-1/Audio Layer3)
An international standardized compression format of sound data. This format can
compress audio data to a 10th to 12th volume.
WAVE
Standard sound file format in Windows.
AAC (MPEG-2/Advanced Audio Coding)
An international standardized compression format of audio data that improves upon the
compression rate of MP3.
8
Page 9
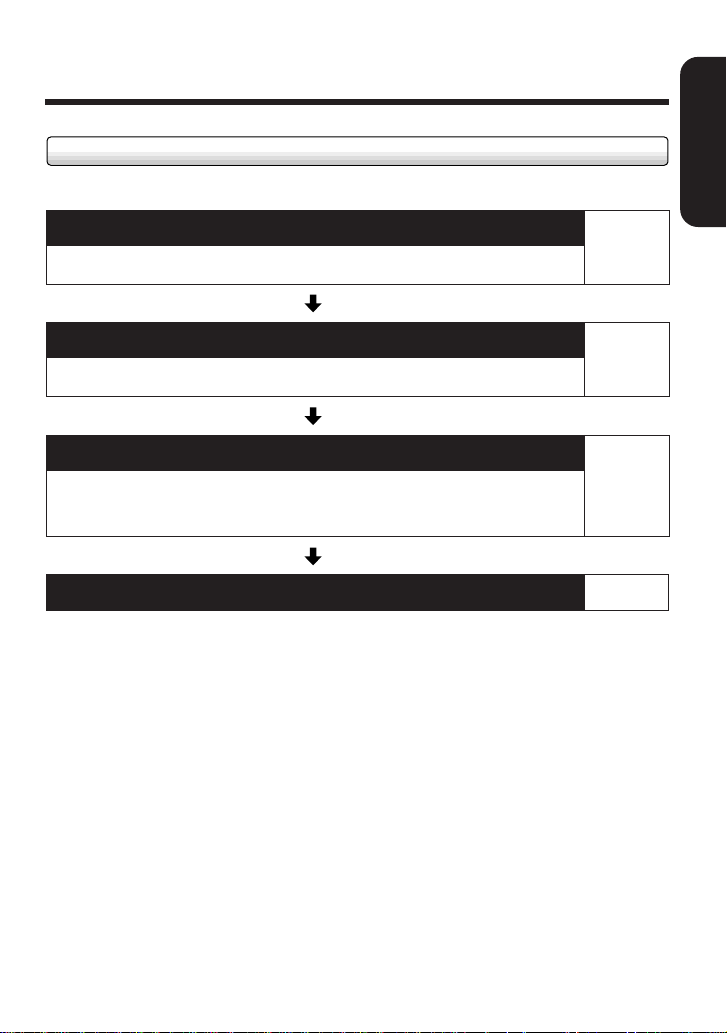
What you have to do is ...
Perform the following procedures.
Preparation 1: Get the player ready.
Load battery in the player.
Preparation 2: Get your computer ready.
Install the TOSHIBA Audio Manager in your computer.
Preparation 3: Prepare audio data.
Import audio data into your computer and transfer it
to the player via the TOSHIBA Audio Manager.
Introduction
Page
12
Page
14
Page
20
Play the audio data on the player.
Preparations 1 to 3 are necessary for all first time users of this TOSHIBA
digital audio player.
Once you set up and operate the player, you will not need to make
preparations 1 and 2 again.
Make preparation 3 when you want to change audio data in the player.
(continued)
Page
31
9
Page 10
Introduction
System Outline (continued)
Minimum PC Requirements
OS: Microsoft® Windows® 98 (Windows® 98 preinstalled)
Introduction
CPU: Pentium® MMX® 233MHz or higher processor
Memory: 32MB minimum (64MB or more recommended)
Sound: Sound card 16bit or more
Hard Disk: 30MB free space except for audio data
CD-ROM Drive: (SCSI) ANSI X3T10-1048D Standard drive
Microsoft, Windows are registered trademarks of the Microsoft Corporation of the U.S.
registered in the USA and other countries.
MMX, Pentium are trademarks or registered trademarks of Intel Corporation registered
in the USA.
Microsoft® Windows® Millennium Edition
Microsoft® Windows® 2000 (Function is not supported under Microsoft
Windows® 2000 system with Dual CPU configuration.)
(Pentium® II 300MHz or higher processor recommended)
(ATAPI) SFF-8020 Standard drive
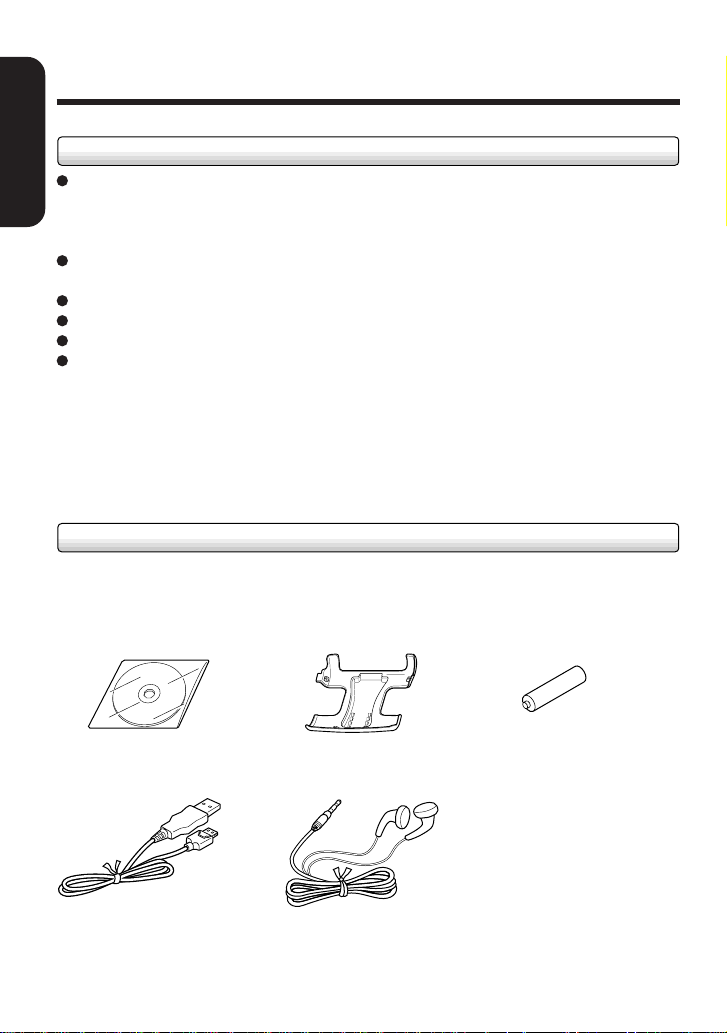
Accessories
Check to insure that the following items are supplied with the player.
®
CD-ROM
• Clip• TOSHIBA Audio Manager
• Interface cable • Headphones
• End User License Agreement
• REGISTRATION CARD
10
• AAA Battery (1)
Page 11

Introduction
Table of contents
Introduction
IMPORTANT SAFETY INSTRUCTIONS.......................................................... 3
Precautions ..................................................................................................... 6
System Outline ................................................................................................ 8
Table of contents........................................................................................... 11
Preparation
Loading battery ............................................................................................. 12
Installing the TOSHIBA Audio Manager ...................................................... 14
Installing the TOSHIBA Audio Manager ........................................................... 14
Installing the USB driver................................................................................... 15
Connection to a computer ........................................................................... 16
Using an SD memory card (option) ............................................................. 18
Inserting an SD memory card .......................................................................... 18
Ejecting the SD memory card .......................................................................... 18
Audio data preparation
Using the TOSHIBA Audio Manager ............................................................ 20
Using Wizard to import/transfer audio data ............................................... 22
Importing audio data from an audio CD...................................................... 23
Importing audio files..................................................................................... 25
Transferring audio data to the player.......................................................... 26
Deleting audio data from the player ............................................................ 29
Creating a PlayList........................................................................................ 30
Operation
Playing a song............................................................................................... 31
T o stop playback............................................................................................... 32
To turn the power off......................................................................................... 33
To play in fast forward or reverse direction ....................................................... 33
To locate a song ............................................................................................... 33
Changing the function settings ................................................................... 34
Others
Error messages ............................................................................................. 37
Formatting an SD memory card .................................................................. 38
Attaching the clip .......................................................................................... 40
Troubleshooting ............................................................................................ 41
Specifications................................................................................................ 42
Identification of controls .............................................................................. 44
LIMITED WARRANTY.................................................................................... 46
Introduction
11
Page 12
Preparation
Loading battery
Caution
• Do not use battery other than that specified.
• Do not insert battery in the wrong direction.
• Do not charge, heat, open, or short-circuit the battery. Do not throw battery into a fire.
• Do not charge the supplied battery.
• When using re-chargeable battery, follow the instructions for the battery and the
charger for safe handling.
• Do not leave a dead or exhausted battery in the unit.
Neglecting the above may cause battery leakage and corrosion, resulting in burns or
injury.
If your fingers or clothes touch the battery acid, wash them immediately . If your eyes
come in contact with battery acid, wash them and immediately consult your doctor. If the
Preparation
surface of an object becomes soiled, use a cloth to wipe if off, avoiding direct contact.
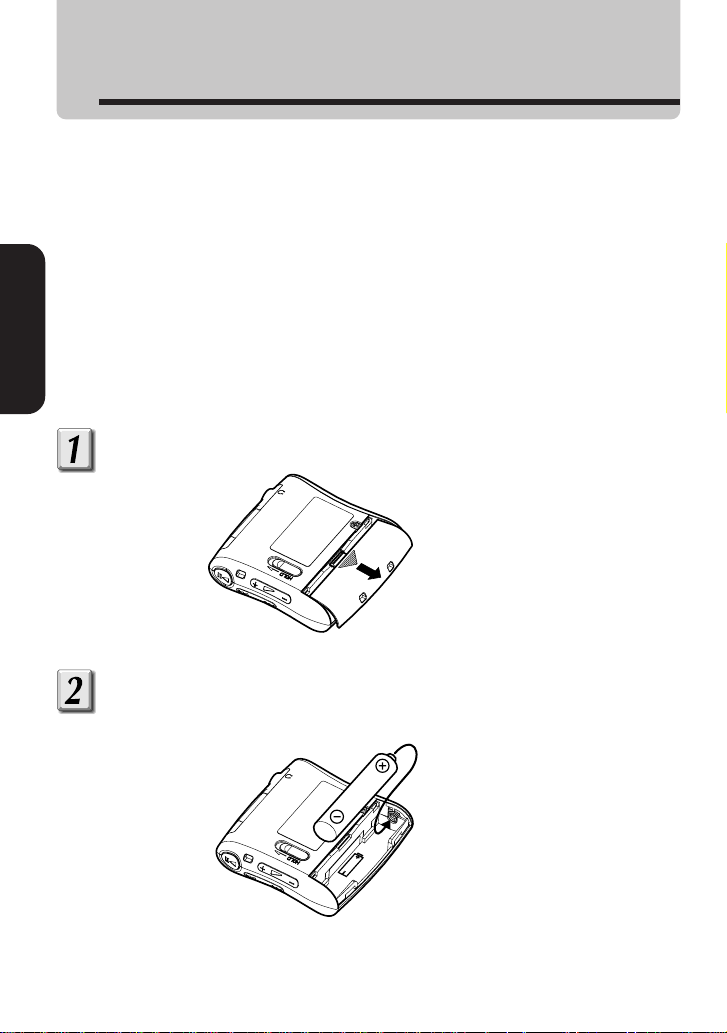
Open the battery cover on the player.
Load battery.
Make sure to match the polarity of the battery to its contacts.
12
Page 13
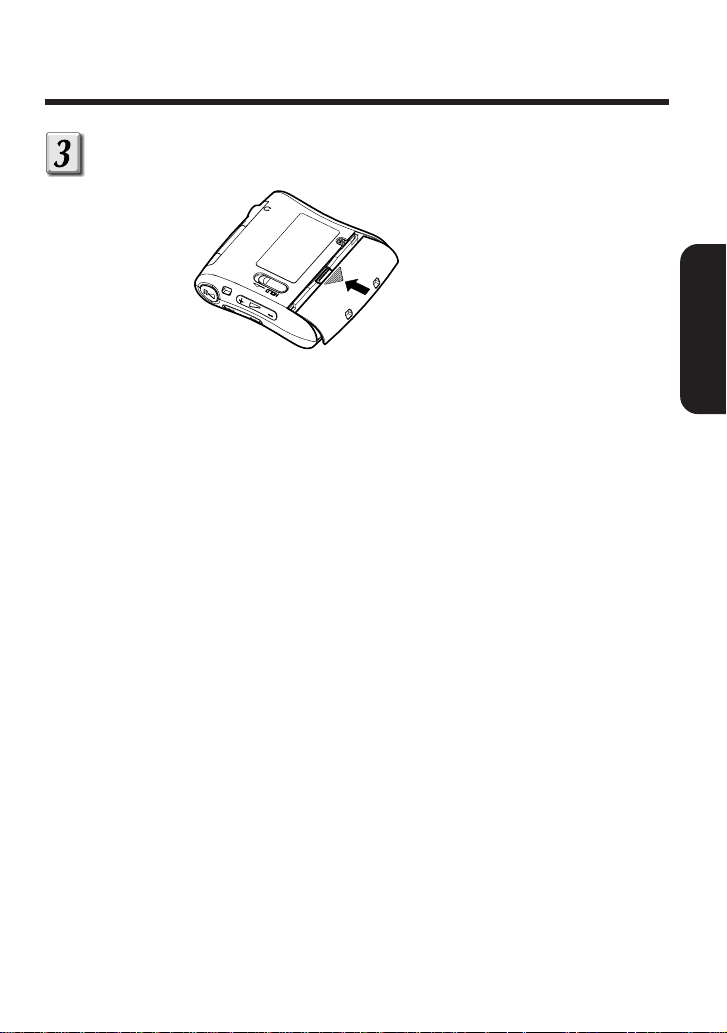
Close the battery cover.
Notes on battery
• A durable alkaline battery or economical nickel-metal hydride rechargeable battery is
recommended.
• Battery life may depend on the type of the battery or the operating condition such as
storage conditions, storing, using, surrounding temperature, etc.
• If you do not use the player for a long period of time (for longer than one week),
remove the battery to avoid possible damage from battery corrosion.
• A very small amount of battery life will be consumed even while the player is turned
off.
Notes on battery indicator
• The battery consumption indicator will display when using the player. (page 45)
• When using nickel-metal hydride rechargeable battery, the battery indicator on the
player may not correspond to actual battery consumption.
• If an exhausted battery is used, the battery indicator on the player may read full when
you turn the player on. However the player will turn off the moment you begin
operating it.
Notes on battery changing
Load a new battery more than 30 seconds after removing the old one. If failed to do so,
the battery consumption indicator may keep displaying the status before battery
changing.
Preparation
13
Page 14
Preparation
Installing the TOSHIBA Audio Manager
When you use this player for the first time, install the supplied TOSHIBA Audio
Manager software into your computer. Make sure that a CD-ROM drive and a
USB interface are available on your computer.
Perform the following 2 steps.
1. Installing the TOSHIBA Audio Manager
2. Installing the USB driver
Once you complete these steps, you do not have to repeat them every time.
Preparation
Preparation
• Startup your computer. Turn of f all applications including virus-protection software.
• Confirm that a battery is loaded into the player. (page 12)
• Insure an unconnected USB port is available on your computer.
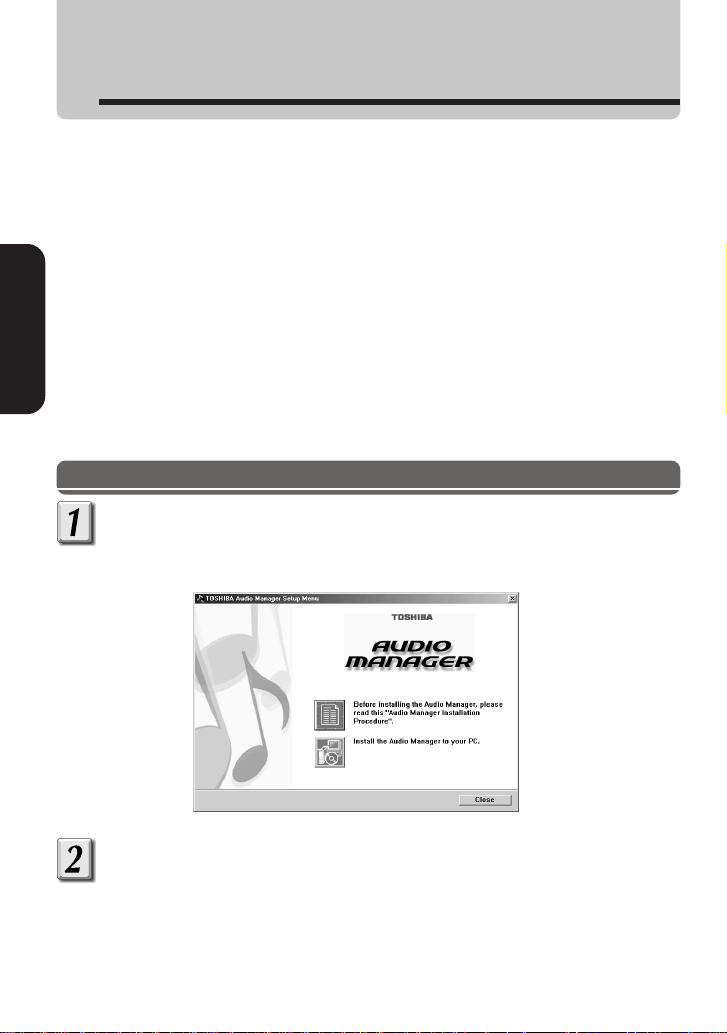
Installing the TOSHIBA Audio Manager
Insert the supplied TOSHIBA Audio Manager CD-ROM into a
CD-ROM drive on your computer.
“TOSHIBA Audio Manager Setup Menu” appears.
Click the button of “Audio Manager Installation Procedure.”
“Audio Manager Installation Procedure” appears. Be sure to read this
before proceeding.
14
Page 15
Click the button of “AUDIO MANAGER.”
The setup window of TOSHIBA Audio Manager appears. Follow the
instructions in the windows to install.
Notes
• If the setup menu does not appear in step 1, double-click “default.htm” in the CD-ROM
to display “Audio Manager Installation Procedure.” If you want to display the setup
window, double-click “Setup.exe” in the CD-ROM.
• Read the “readme.txt” in the CD-ROM. It contains the system requirements of the
computer and additional precautions.
Installing the USB driver
Make sure your computer has safely restarted.
Refer to page 16 and connect the player to a USB connector
on your computer using the supplied interface cable.
“Found New Hardware Wizard” appears.
Be sure to confirm that a battery is loaded into the player before
connecting it to your computer.
Follow the instructions on the “Installing the USB drivers”
located in the “Audio Manager Installation Procedure”
window.
Preparation
Your computer is ready.
Now go to page 20 to prepare your favorite songs to play.
15
Page 16

Preparation
Connection to a computer
You must connect the player to your computer using the supplied interface
cable in the following examples.
• When you install the USB drive to your computer.
• When you transfer audio data to the player.
• When you delete audio data from the player.
Open the interface door.
Interface door
Preparation
Open from here
Connect to a computer using the interface cable.
Computer
To the USB
To the I/F connector
PUSH
Interface cable (supplied)
When you connect the player to your computer for the first time, “Found New
Hardware Wizard” appears on the screen of your computer. Follow the on-screen
instructions to install the USB driver. (page 15)
connector
16
Page 17

To disconnect the interface cable from the player, pull out the cable while
simultaneously pressing the “PUSH” mark on the connector.
Caution
• Be sure to use the supplied interface cable when connecting to a computer.
Substitution by other means may result in damage or malfunction.
• The player consumes power of 500mA/5V while connected to a computer. Confirm
that a USB connector of your computer (or USB hub) satisfies this requirement before
connecting the player.
• Make sure that battery is loaded before connecting to a computer. The player cannot
turn on if it is connected to a computer with no battery loaded. When the player is
connected to your computer, it is powered from the USB connector (or USB hub).
• Never remove the interface cable while exchanging data between the player and the
computer. Doing so may damage the data.
• Close the interface door when the I/F connector is not used.
• Do not use the supplied interface cable to connect to any device other than this player.
Notes
• You cannot operate the player when connected to a computer. The player will stop
playback when connected to a computer.
• The display of the player may be darker when connected to a computer. It is not
abnormal.
Preparation
17
Page 18

Preparation
Using an SD memory card (option)
If you insert an SD memory card (optional) into the player, you can write audio
data to it for playback.
Inserting an SD memory card
Open the card slot on the player.
Insert an SD memory card into the
card slot.
Slowly and fully insert an SD memory card in
Preparation
the correct direction. (The player automatically
turns on while the SD memory card is
inserted.)
Close the card slot.
SD memory card
Ejecting the SD memory card
Open the card slot.
Eject the SD memory card.
Press the SD memory card slightly and
release to eject it a little way , then pull out
the SD memory card straight and slowly .
Close the card slot.
Note
Never eject the SD memory card while you are operating the player or exchanging data
between the player and the connected computer. Doing so may damage the SD
memory card or the audio data in it.
Push slightly
Ejected a little way
Write protect tab
An SD memory card has a write protect
tab to prevent accidental erasure of the
data in it.
18
Write protect tab
Writing possible/
erasure possible
Data protected
Page 19

Notes on SD memory cards
SD memory card
An SD memory card is a rewritable media designed in compliance with SDMI
standards that protect intellectual copyrights. It contains a semiconductor memory, so
that digital audio recording can be made on it. Deleting and re-writing of audio data is
also possible.
Safety precautions to insure integrity of audio data
Audio data may be deleted in the following cases.
• When an SD memory card is misused.
• When an SD memory card is exposed to static electricity or electric noise.
• When an SD memory card is ejected during operation.
Toshiba is not liable for erasure (damage) of audio data.
Precautions on handling
Insert an SD memory card slowly and straight into the slot on this unit.
Never eject an SD memory card while it is being used for writing, playing or deleting of
audio data. Doing so may damage audio data in the SD memory card.
Use a recommended SD memory card. Other content may be incompatible.
An SD memory card is a precision electronic device. Do not bend, drop or shock or
otherwise abuse an SD memory card.
Do not use or store an SD memory card in a location subject to strong static
electricity.
Do not use or store an SD memory card in a hot and humid place.
Keep fingers and objects off the metallic “gold” surface of an SD memory card.
Keep the SD memory card in its own case or in a commercially available storage case
to protect it from static electricity.
Inserting a static charged SD memory card may cause unit malfunction.
Do not put an SD memory card into a pocket of pants. Sitting down may crush the unit
and damage the SD memory card.
The cartridge may become warm after a long period of use. This is not a malfunction.
An SD memory card may become incapable of writing or deleting after a prolonged
period of use. In such a case, use a new one.
An unformatted SD memory card can not be used. This player can format the SD
memory card. (page 38)
Preparation
Recommended SD memory card
TOSHIBA SD memory card SD-M3201M (32MB), SD-M6401M (64MB),
SD-M1280M (128MB)
19
Page 20

Audio data preparation
Using the TOSHIBA Audio Manager
Launching the TOSHIBA AUDIO Manager
Choose “Audio Manager” from the start menu.
The following window (player window) appears.
When you launch the “Audio Manager” for the first time, a message to input
user ID appears. Input the user ID number, which is specified by a label on the
cover of the English Owner’s manual.
(Player window)
Audio data preparation
LIBRARY MANAGER
Wizard
Close (to quit the TOSHIBA Audio
Manager)
Online help
If you have any questions or problems, refer to the online help of the
TOSHIBA Audio Manager.
20
Page 21

Procedures for importing and transferring audio data
Audio CD data
“Importing audio data from
an audio CD” (page 23)
“Transferring audio data to
the player” (page 26)
Using Wizard
“Using Wizard to import/transfer
audio data” (page 22)
Audio file (MP3, WAVE) data
“Importing audio file”
(page 25)
“Transferring audio data to
the player” (page 26)
Notes on the TOSHIBA Audio Manager
• Display requirement
Use the TOSHIBA Audio Manager on a computer with a color monitor
with resolution greater than 800 x 600 and more than 65536 color
capacity. If color resolution is less than 800 x 600, windows of the
program will be displayed outside the visible screen area.
• Drive assignment
A computer will recognize this player as a new drive when connected,
and assign it the first available position. However, if the last position is
occupied by a network drive, a computer will not assign the player the
first vacant position, but instead to last position, thereby voiding the
network drive position. Assign your network drive a position that does not
include the player.
• If you cannot click a window of TOSHIBA Audio Manager, your system
may be running short of available application memory . Quit all
unnecessary applications.
• Refer to the README.TXT for CD-ROM drives on which the TOSHIBA
Audio Manager has been approved to run. If you use a CD-ROM drive
not included there, the TOSHIBA Audio Manager may not import audio
data directly. In this case, encode audio data from the analog input device
on your computer into an WAVE file using software commercially
available on market, then import it into the TOSHIBA Audio Manager.
Audio data preparation
21
Page 22

Audio data preparation
Using Wizard to import/transfer audio data
Following the instructions in the window, you can import audio data from an
audio CD and transfer it to the player or an SD memory card.
Launch the TOSHIBA Audio Manager.
Click on the player window.
The Audio Manager Wizard window appears.
Audio data preparation
Click the button you want to operate.
Each Wizard window appears.
Copy music from audio CDs:
Copy audio files: To import data from audio file. You can also
Transfer audio data: To transfer audio data to the player or SD
Edit PlayLists: To edit the PlayList or create a new one.
To import audio data from an audio CD. You
can also transfer audio data to the player or
SD memory card at the same time.
transfer data to the player or SD memory card
at the same time.
memory card at the same time.
Follow the instructions on the window.
Note
If you want to import or transfer audio data in the LIBRARY MANAGER window but not
included in the Wizard window, refer to page 23 to page 30.
22
Page 23

Audio data preparation
Importing audio data from an audio CD
This section explains how to import audio data from an audio CD. To import
using the Wizard window, refer to page 22.
Launch the TOSHIBA Audio Manager.
Insert an audio CD into a CD-ROM drive on your computer.
Click on the player window.
The LIBRARY MANAGER window appears.
Click “CD→” on the menu, then click “Refresh.”
Contents of the audio CD are displayed.
Step 4-1
Audio data preparation
Step 4-2
Note
Depending on the operation status of the CD-ROM drive, the LIBRARY MANAGER
may not show the entire contents of the audio CD. In this case, click “Refresh” again.
(continued)
23
Page 24

Audio data preparation
Importing audio data from an audio CD (continued)
Click the check box of the song you want to import, and
click “↑Import.”
The process indicator starts counting. The “LIBRARY” list shows
imported songs.
Before clicking “↑Import,” you can enter a name in the “PlayList” for
songs you selected.
Creating a “PlayList” here will help you designate songs to transfer or
play later.
Audio data preparation
Step 5
To transfer imported audio data to the player, refer to page 26.
24
Page 25

Audio data preparation
Importing audio files
This section explains how to import audio file (MP3 or WAVE file) data. To
import using the Wizard window, refer to page 22.
Launch the TOSHIBA Audio Manager.
Click on the player window.
The LIBRARY MANAGER window appears.
Click “FILE→” on the menu.
A window for file importing appears.
Choose the folder that contains the audio file you want to
import.
The audio file (WAVE or MP3 file) appears.
Step 3
Audio data preparation
Step 4
Choose the file you want to import, and click “↑Import.”
The process indicator starts counting.
To transfer imported audio data to the player, refer to page 26.
25
Page 26

Audio data preparation
Transferring audio data to the player
This section explains how to transfer imported audio data to the player or an
SD memory card. To import using the Wizard window, refer to page 22.
If you want to transfer data to the SD memory card, leave the SD memory
card inserted in the player. (page 18)
Launch the TOSHIBA Audio Manager.
Click on the player window.
The LIBRARY MANAGER window appears.
Connect the player to the computer.
See page 16, “Connection to a computer.”
Click “→PD/SD” on the menu.
Contents in the PD (player) or the SD (SD memory card inserted in the
player) are displayed.
At this point, be sure to turn the player on, otherwise contents will not be
displayed.
Audio data preparation
Step 4
26
Step 5
Page 27

Select the location where you transfer the songs.
Internal memory : to transfer to the internal memory of the player.
SD card : to transfer to an SD memory card in the player.
Select songs to transfer from the “LIBRARY” table, and click
“↓Add”.
The audio data selected is displayed in a lighter color on the lower part
of the window.
If you want to transfer all songs in the PlayList simultaneously , choose
“PlayList” from the “Search” menu, then choose a desired PlayList using
the “Keyword” menu, then click “↓Add All”.
Step 6
Audio data preparation
Step 7
(continued)
27
Page 28

Audio data preparation
Transferring audio data to the player (continued)
Click “Export.”
Transferring begins. The process indicator starts counting.
When transferring is complete, the indicator disappears.
Important
Never remove the interface cable while transferring audio data.
Notes
• You can transfer one song to the player up to 3 times. If you delete a song in the
player using the same computer that transferred it previously , allowable transfers are
increased by one. This is not applicable when a song is deleted utilizing a computer
that did not originally transfer the song to the player.
• To play MP3 audio data on this player, be sure to use the TOSHIBA Audio Manager to
transfer it. The player cannot play MP3 data which did not originate from the TOSHIBA
Audio Manager.
• The PlayList is not available for this player.
• Depending on the combination of audio data’s sampling frequency and bit rate, the
player may not playback normally. For details, refer to page 43.
Audio data preparation
The audio data preparation is completed. To operate this player, refer to
page 31.
To quit the TOSHIBA Audio Manager, click
on the window. (Page 20)
28
Page 29

Audio data preparation
Deleting audio data from the player
This section explains how to delete audio data from the player or SD memory
card.
Launch the TOSHIBA Audio Manager.
Click on the player window.
The LIBRARY MANAGER window appears.
Connect the player to a computer.
Click “→PD/SD” on the menu.
Step 4
Choose the memory that contains the data you want to
delete.
Internal memory : the internal memory of the player.
SD card : an SD memory card inserted in the player.
Choose audio data you desire to delete from the “PD/SD” on
the lower part of the window, then click .
The audio data selected is deleted from the player or SD memory card.
29
Audio data preparation
Page 30

Audio data preparation
Creating a PlayList
You can create a new PlayList of your favorite songs from the audio data in the
Library.
Launch the TOSHIBA Audio Manager.
Click on the player window.
The LIBRARY MANAGER window appears.
Click “PLAYLIST” on the menu.
The window for editing the PlayList appears.
Step 3
Step 4
Audio data preparation
Click “New List”.
The PlayList editing screen is displayed.
Input the PlayList name, and click “Save”.
Choose the audio data you want to register in the PlayList
from the “LIBRARY” table, and click “↓Add”.
Click “Save PlayList”.
The contents of the PlayList are stored.
30
Page 31

Operation
Playing a song
Preparation
• Load battery into the player. (page 12)
• Prepare audio data for playback. (page 20)
• If the player is connected to your computer, finish writing/deleting audio data, and
disconnect the cable.
• Connect the supplied headphones to the headphone jack of the player.
• For instructions on how to attach the clip to the player, refer to page 40.
To the headphone jack
Headphones
button
(
Fast-forward, locating
button
(
Fast-reverse, locating
Display (refer to page 45 for details)
button
(Power, playback,
)
)
pause)
Volume (+/
-
) button
Operation
(continued)
31
Page 32

Operation
Playing a song (continued)
Playback procedure
Turn on the power.
Press the button and hold for more
Display song’s name
Display
than 1 second, the power turns on.
To play an SD memory card (option), insert
it into the player. The power turns on
automatically .
Note
After you have played once, the player automatically resumes playback from the location
where the unit was last turned off except when:
you remove the battery./you eject the SD memory card./you change the audio data in
the SD memory card or the internal memory of the player./you re-format the SD memory
card or the internal memory of the player./ the player is turned on by power from the
connected computer.
Start playback.
Press the button.
Adjust the volume.
Press the volume (+/-) button.
(+) : to turn up the volume.
-
) : to turn down the volume.
(
Note
The graphic display returns to normal mode a few seconds after adjusting the volume.
Operation
Volume meter
Volume control
mode display
To stop playback
Press the button during playback.
Playback is stopped.
Press again to resume playback.
Note
The player automatically turns off if you do not operate it for approximately 1 minute
after playback is stopped.
32
Page 33

To turn the power off
Press the button for more than
1 second.
To play in fast forward or reverse direction
Fast-forward : press and hold the
button.
Fast-reverse : press and hold the
button.
While holding the button, fast-forward or fast-reverse playback continues.
If you release the button, the playback speed returns to normal.
To locate a song
Forward : press and release the
button.
Reverse : press and release the
button.
Each time you push the button, the song number in the display changes.
Repeat this action until you find the desired song number.
Notes
• If you press the button one time, you will only locate the beginning of the current
song. To locate a previous song, repeat this action as necessary.
• To resume playback of a song you located after playback was stopped, press the
button.
Operation
33
Page 34

Operation
Changing the function settings
Y ou can customize your playback by changing the function settings.
Repeatedly press the MENU button to select
the desired mode.
Each time you press the MENU button, the display
changes.
(Volume control mode)
To adjust the volume. (page 32)
(Tone control mode)
To select a preset audio equalizer.
(Playback media selection mode)
To select between internal memory or SD memory
card.
(Playback selection mode)
To select the playback order.
(Beep)
To select beep on or off.
Press the volume (+/-) button to change settings.
Operation
Refer to the explanations on the following page.
-
) key is utilized to reverse the setting.
(
Notes
• If you do not operate for a while after step 1, the display returns to normal.
• If you press and hold the MENU button in, the display returns to normal.
34
Page 35

Tone control mode
To select
To go to another
mode
FLAT
BASS+
BASS++
LOUDNESS
HIGHCUT
Playback media selection mode
To select
To go to another
mode
IN. MEMORY
SD CARD
Plays faithfully to the original
sound.
Emphasizes bass
frequencies.
Further emphasizes bass
frequencies.
Emphasizes the bass and
treble so that a wide dynamic
range can be obtained even if
you lower the volume.
Reduces the treble to prevent
noise leakage from
headphones.
Plays songs in the internal
memory.
Operation
Plays songs in the SD
memory card.
Notes
• You cannot select blank media.
• You cannot operate the media selection mode if there is no song in the internal
memory or SD memory card.
(continued)
35
Page 36

Operation
Changing the function settings (continued)
Playback selection mode
To select
To go to another
mode
Notes
• If you select “RANDOM” during playback, this playback mode will become active once
the current song is finished.
• If you change the internal memory/SD memory card during playback, the player stops
and begins playback from the first song of the selected media; when “RANDOM” has
been selected, the player stops and plays the first song of the selected media, and
then plays remaining songs at random.
REPEAT ALL
PLAY ONCE
REPEAT ONE
RANDOM
Repeatedly plays all songs in
the internal memory, and then
those in the inserted SD
memory card.
Plays all songs in the internal
memory, and then those in the
SD memory card, and then
stops.
Plays the current song
repeatedly.
Plays all songs in the internal
memory and the SD memory
card, on a random basis.
Beep setting mode
To select
Operation
To go to another
mode
BEEP ON
BEEP OFF
In the following cases, the beep will not sound even when set to “BEEP ON”.
• Any button is operated in the HOLD mode.
• Any button is operated when connecting to a computer. (However, the end
buzzer is sound soon after turning the power off.)
The beep (a short high sound
made for confirming the
operation) sounds.
The beep (a short high sound
made for confirming the
operation) does not sound.
36
Page 37

Others
Error messages
Depending on the status, the player displays the following error messages for
about 2 seconds.
UNUSABLE
ERROR FORMAT
REJECTED
UNSUPPORT
READ ERROR
DAT A ERROR
CODE ERROR
NO MUSIC
An SD memory card that
the player does not support
is inserted.
The inserted SD memory
card is not formatted, or the
format is not supported by
this system.
The inserted SD memory
card is not playable on this
player.
The data is of a file format
that the player does not
support.
A reading error occurred.
The data is damaged.
No playable audio data.
An SD memory card that
displays this message cannot
be used.
Format the SD memory card.
(page 38)
Formatting an SD memory
card deletes all data in it.
Contact service. (page 47)
The data cannot be played.
Connect the player to your
computer and transmit the
data again.
If an error of this type occurs
often, empty the SD memory
card and format it.
Formatting an SD memory
card deletes all data in it.
Transfer the audio data into
the player or SD memory
card.
37
Others
Page 38

Others
Others
Formatting an SD memory card
You need to format the SD memory card when you use an unformatted disc.
This player can format the SD memory card or the player’s internal memory.
While the player is in the formatting mode, it cannot play songs.
Important
Formatting an SD memory card or the internal memory of the player deletes all data in it.
Preparation
• Turn off the player.
• When you format an SD memory card, insert it into the player and turn the player off.
Press the and button and
hold until “FORMAT” is displayed.
The player turns on and enters the
formatting mode.
Press the volume (+/-) button to
select a formatting function:
SD CARD : to format an SD memory
card.
IN. MEMORY : to format the internal
memory.
Others
38
Press the button.
The formatted item is selected.
To return to the step 2, press the MENU button.
Press the button.
Formatting starts.
When formatting is complete, the message
“FINISH” appears.
Press the button.
The display returns to step 2 status.
To turn off the power, press the
button for more than 1 second.
Page 39

Important
• Improper formatting may result from the use of an incompatible computer. Use this
player whenever formatting.
• Never eject an SD memory card while formatting. Doing so may damage the SD
memory card.
Notes
• An error message may be displayed during these steps.
• Press any button to return the display to the format menu screen.
NO MEDIA
PROTECTED
ERROR
LOW BATT.
No SD memory card is
inserted.
The write protect tab of SD
memory card is set to the
data protected position.
A formatting error occurred.
The battery is exhausted,
Formatting is not possible.
Insert an SD memory card,
then start formatting.
Set the write protect tab of SD
memory card to the
unprotected position. (page
18)
The SD memory card may be
damaged.
Replace the battery. (page 12)
Others
39
Page 40

Others
Attaching the clip
You can use the supplied clip to fasten the player to your belt.
Attaching the clip
(Back side)
Hole for the upper hook
Holes for the lower hooks
Hole for the upper hook
(Clip)
Upper hooks
Lower hooks
Secure the two lower hooks of the clip into the player’s holes,
and then fit the upper two.
2
1
Removing the clip
To remove the clip, pull the pull tab marked “ ” toward you to
detach the hook, and slide the clip in the leftward direction.
Others
40
Page 41

Others
Troubleshooting
Check the following guide for the possible cause of a problem before
contacting service.
The player does not turn on. The buttons do not work.
• Battery is not loaded or the battery is exhausted.
→ Load battery or replace the battery. (page 12)
• The player is locked by the HOLD switch.
→ Return the HOLD switch back to its normal position. (page 44)
• The
→ To turn the power on, press it in for more than 1 second.
• The player is connected to a computer.
→ Any operation other than turning the power off is not available when
Playback does not start.
• There is no playable audio data in the internal memory or the SD
memory card.
→ Prepare audio data playable on this player. (page 26)
No sound.
• The supplied headphones are not connected firmly.
→ Connect the supplied headphones firmly. (page 31)
• The volume is set to the minimum.
→ Adjust the volume. (page 32)
Cannot exchange audio data.
• The inserted SD memory card is write protected.
→ Set the write protect tab back to its unprotected position. (page 18)
• The connection to a computer is not proper.
→ Check the connection. (page 16)
Unusual operation or display.
→ Remove the interface cable and the battery, and wait for more than
button was not pressed in for more than 1 second.
the player is connected to the computer.
30 seconds to load the battery . (Reset operation)
41
Others
Page 42

Others
Specifications
Power supply AAA size battery (1)
Mass Approx. 30g (41g including the supplied battery)
Dimensions 53 mm × 13.5 mm × 52 mm (W/H/D)
Recording system SD audio V1.0/V1.1
Recording media Internal flash memory (approx. 32 MB) (the available
Maximum recording time Internal flash memory:
Playback duration Battery Duration
(except projecting parts)
CODEC:
MPEG-2 AAC (low complexity profile) / ADTS stream
MPEG-1 Audio Layer 3 (MP3)
Sampling frequency: 16 kHz to 48 kHz
Bit rate: 16 kbps to 192 kbps
capacity is 27 MB), SD memory card
Approx. 35 minutes (bit rate 96 kbps)
Approx. 54 minutes (bit rate 64 kbps)
Alkaline Approx. 4 hours
Nickel-Metal
Hydride rechargeable Approx. 4 hours
(Measured at 25°C, bit rate 96 kbps, with alkaline
battery or nickel-metal hydride rechargeable battery
when played on internal flash memory)
The playback duration depends on the type of the
battery and the operating environment. Toshiba does
not guarantee either. The playback duration may be
shortened when the player is operated in a low
temperature environment.
Operating conditions Temperature: 5°C to 35°C, Humidity: 30% to 80% (RH)
I/F connector USB interface
Headphone jack 3.5mm stereo mini jack, impedance 32 Ω
Signal-to-noise ratio More than 85 dB
• The design and specifications are subject to change without notice.
Others
(no moisture condensation)
(Required power from a connected device: 500mA)
42
Page 43

Audio data sampling frequency and bit rates
Player performance will vary , according to bit rate and sampling frequency.
A higher value will generally of fer the best audio performance, however,
overall title capacity will be diminished.
AAC (stereo)
Sampling frequency
16kHz, 22.05kHz, 24kHz 32kHz, 44.1kHz 48kHz
Bit rate
AAC (monaural)
Bit rate
MP3 (stereo)
Bit rate
MP3 (monaural)
Bit rate
32kbps to 64kbps 64kbps to 144kbps 64kbps to 192kbps
Sampling frequency
16kHz 22.05kHz, 24kHz, 32kHz, 44.1kHz, 48kHz
16kbps 16kbps to 48kbps
Sampling frequency
16kHz, 22.05kHz 32kHz, 44.1kHz, 48kHz
32kbps to 160kbps 64kbps to 192kbps
Sampling frequency
16kHz, 22.05kHz 32kHz, 44.1kHz, 48kHz
32kbps to 160kbps 64kbps to 192kbps
43
Others
Page 44

Others
Others
Identification of controls
For details, see pages in 2.
Main unit
(Front side)
(Left side)
(Top side)
Others
Display
45
Strap attaching hole
(Strap is not supplied)
MENU button
Interface door
34
16
button
(
Fast-forward,
title skip
(
title skip
)
button
Fast-reverse,
)
(Back side)
HOLD switch
Setting this switch in the direction of the
arrow will render the unit unresponsive to
any command-related activity, avoiding
undesirable operation by unintentional
contact. This protects your playback
settings from being accidentally modified.
Headphone jack
(Right side)
33
33
31
button
(Power, playback,
pause)
Volume (+/
32 34
,
(Volume control,
mode selection)
Battery cover
32
-
) button
12
SD memory card slot cover
44
18
Page 45

Display
You can view information including operational status or text included in the
audio data.
(Display example while playing)
Operational status
Playing
Pause
Fast-forward
Playback mode
REPEAT ALL
REPEAT ONE
PLAY ONCE
RANDOM
Fast-reverse
Locating in the forward direction
Locating in the reverse direction
Error
No playable data
Song name
may not be displayed. They are
displayed as “ ”.)
(some characters
Battery indicator
Full.
Nearing the end.
Replace the battery.
Song number
AAC format of the internal memory
MP3 format of the internal memory
AAC format of the SD memory card
MP3 format of the SD memory card
No playable data
Elapsed time of the
current song (minute : second)
The elapsed time is only for reference, it
may differ from actual play time.
Others
45
Page 46

Others
LIMITED WARRANTY DIGITAL AUDIO PLAYER
Toshiba America Consumer Products, Inc. (“TACP”) and Toshiba Hawaii, Inc. (“THI”)
make the following limited warranties. These limited warranties extend to original
consumer purchaser or any person receiving this set as a gift from the original
consumer purchaser and to no other purchaser or transferee.
Limited Ninety (90) Day Warranty
TACP/ THI warrants this product against defects in materials or workmanship for a
period of ninety (90) days after the date of original retail purchase. During this period,
TACP/THI will repair a defective product or part, without charge to you. You must deliver
the entire product to a T ACP/THI Authorized Service Station. You are responsible for all
transportation and insurance charges for the unit to and from the Authorized Service
Station.
Limited One (1) Year Warranty
TACP/THI further warrant the parts in this product against defects in materials or
workmanship for a period of one (1) year after the date of original retail purchase.
During this period, TACP/THI will repair or replace a defective unit, without charge to
you, except that if a defective unit is replaced after ninety (90) days from the date of the
original retail purchase you pay labor charges involved in the replacement. You must
also deliver the entire product to a T ACP/THI Authorized Service Station. You are
responsible for all transportation and insurance charges for the unit to and from the
Authorized Service Station.
Rental Units
The warranty for rental units begin with the first rental or thirty (30) days from the date of
shipment to the rental firm, whichever comes first.
Commercial Units
Products sold and used for commercial use have a limited ninety (90) day warranty for
all parts and labor.
Owner’s Manual
Y ou should read the owner’s manual thoroughly before operating this product.
You should complete and mail the enclosed Demographic card within ten (10) days after
you, or the person who has given you this product as a gift, purchased this product. This
is one way to enable T ACP to provide you with better customer service and improved
products. Failure to return the card will not affect your rights under this warranty.
Others
46
Page 47

Your Responsibility
The above warranties are subject to the following conditions:
(1) You must retain your bill of sale or provide other proof of purchase.
(2) You must notify a TACP/THI/TCL Authorized Service Station within thirty (30) days
after you discover a defective product or part.
(3) All warranty servicing of this product must be made by a TACP/THI/TCL Authorized
Service Station.
(4) U.S.A. warranties are effective only if the product is purchased and operated in the
Continental U.S.A. or Puerto Rico.
(5) Labor service charges for set installation. Set up, adjustment of customer controls
and installation or repair of antenna systems are not covered by this warranty .
Reception problems caused by inadequate antenna systems are your responsibility.
(6) Warranties extend only to defects in materials or workmanship as limited above and
do not extend to any product or parts which have been lost or discarded by you or to
damage to products or parts caused by misuse, accident, damage caused by Acts
of God, such as lightning or fluctuations in electric power, improper installation,
improper maintenance or use in violation of instructions furnished by us; or to units
which have been altered or modified without authorization of TACP/THI/TCL or to
damage to products or part thereof which have had the serial number removed,
altered, defaced or rendered illegible.
(7) Physically damaged products are not acceptable for repair or exchange whether in
or out of warranty and will be returned as received.
How to Obtain Service
(1) Refer to the troubleshooting guide in your owner’s manual. This checklist may
solve your problem or check our web site at WWW.TOSHIBA.COM/TA CP.
(2) Products shipped to the Service Station must be insured and safely and securely
packed, preferably in the original shipping carton, and a letter explaining the
defect and a copy of the bill of sale or other proof of purchase must be enclosed.
In United States contact:
Toshiba America Consumer Product Inc.
(800) 631-3811
In Canada contact:
Consumer Electronics Group
191 McNabb St
Markham, Ontario L3R 8H2
(905) 470-5400
Consumer Electronics Group
22171 Fraserwood Way
Richmond, B.C. V6w 1J5
(604) 303-2500
In Hawaii contact:
T oshiba Hawaii, Inc.
327 Kamakee St
Honolulu, HI 96814
(808) 521-5377
Consumer Electronics Group
1643 North Service Rd
Dorval, QC H9P 1J1
(514) 856-4100
Others
47
Page 48

Others
All warranties implied by state law, including the implied warranties of merchantability
and fitness for a particular purpose, are expressly limited to the duration of the limited
warranties set forth above. With the exception of any warranties implied by state law as
hereby limited, the foregoing warranty is exclusive and in lieu of all other warranties,
guarantees, agreements and similar obligations of manufacturer or seller with respect to
the repair or replacement of any parts. In no event shall T ACP/ THI be liable for
consequential or incidental damages.
No person, agent, distributor, dealer, or company is authorized to change, modify, or
extend the terms of these warranties in any manner whatsoever. The time within which
an action must be commenced to enforce any obligation of TACP/THI arising under the
warranty or under any statute, or law of the United States or any state thereof, is hereby
limited to ninety (90) days from the date you discover or should have discovered, the
defect. This limitation does not apply to implied warranties arising under state law.
This warranty gives you specific legal rights and you may have other rights, which may
vary from state to state. Some states do not allow limitation on how long an implied
warranty lasts, when an action may be brought, or the exclusion or limitation of
incidental or consequential damages, so the above provisions may not apply to you.
A TTENTION CANADIAN CONSUMERS: (Toshiba Canada “TCL”)
Canadian consumers are requested to complete the special Canadian “Warranty
Registration Form” enclosed, and forward this completed form with a copy of bill of sale
to TOSHIBA OF CANADA to “Register and Validate” their warranty. Product must be
purchased from an Authorized Canadian Dealer.
IMPORTANT: PACKING AND SHIPPING INSTRUCTION
When you send the product to a Service Station, you must use the original carton box
and packing material, and then insert the original carton box containing the unit into
another carton, using more packing material.
Products purchased in the U.S.A. and used in Canada are not covered by these
warranties.
Products purchased in Canada and used in the U.S.A. are not covered by these
warranties.
Others
Printed in Japan
48
 Loading...