

Page 1
Telecommunication Systems Division
Digital Business Telephone Systems
DKT3000/2000-Series
Digital Telephone
User Guide
May 2002
Page 2

Publication Information
Tosh ib a A mer ica Information Syst ems, Inc.,
Telecommunication Syst ems D ivision, reserves the right,
without prior notice, to revise this information publication for
any reason, including, but not limi te d to , ut iliz a ti on of ne w
advances in the state of technical arts or to simply change the
design of this document.
Further, Toshiba America Information Systems, Inc.,
Tele commu nica ti on Sy st ems Divis ion , also r es erv es t he r igh t,
without prior notice, to ma ke such changes in equipment
design or components as engi neering or manufacturing
methods may warrant.
CTX-UG-D3K2K-VB
4016213
Version B, May 2002
© Copyright 2002
Toshiba America Information Systems, Inc.
Telecommunication Systems Division
All rights reserved. No part of this manual, covered by the
copyrights hereon, may be reproduced in any form or by any
means—graphic, electronic, or mechanical, including
recording, taping, photoc opying, or information retriev al
systems—without express written permission of the publisher
of this material.
Strata is a registered trademark of Toshiba Corporation.
Stratagy is a regist ered trademark of Toshiba America
Information Systems, Inc.
Trademarks, registered trademarks, and service marks are the
property of their respective owners.
Page 3

TOSHIBA AMERICA INFORMATION SYSTEMS, INC. (“TAIS”)
A
A
w
A
Telecommunication Systems Division License Agreement
IMPORTANT: THIS LICENSE AGREEMENT (“AGREEMENT”) IS A LEGAL AGREEMENT BETWEEN YOU (“YOU”) AND TAIS. CAREFULLY READ THIS LICENSE AGREEMENT. USE OF ANY
SOFTWARE OR ANY RELATED INFORMATION (COLLECTIVELY, “SOFTWARE”) INSTALLED ON OR SHIPPED WITH A TAIS TELECOMMUNICATION SYSTEM PRODUCT OR OTHERWISE MADE
VAILABLE TO YOU BY TAIS IN WHATEVER FORM OR MEDIA, WILL CONSTITUTE YOUR ACCEPTANCE OF THESE TERMS, UNLESS SEPARATE TERMS ARE PROVIDED BY THE SOFTWARE
SUPPLIER. IF YOU DO NOT AGREE WITH THE TERMS OF THIS LICENSE AGREEMENT, DO NOT INSTALL, COPY OR USE THE SOFTWARE AND PROMPTLY RETURN IT TO THE LOCATION
FROM WHICH YOU OBTAINED IT IN ACCORDANCE WITH APPLICABLE RETURN POLICIES. EXCEPT AS OTHERWISE AUTHORIZED IN WRITING BY TAIS, THIS SOFTWARE IS LICENSED FOR
DISTRIBUTION ONLY TO END-USERS PURSUANT TO THIS LICENSE AGREEMENT.
1. License Grant. The Software is not sold; it is licensed upon payment of applicable charges. TAIS grants to you a personal, non-transferable and non-exclusive right to use the copy of the Software
provided under this License Agreement. You agree you will not copy the Software except as necessary to use it on one TAIS system at a time at one location. Modifying, translating, renting, copying,
distributing, transferring or assigning all or part of the Software, or any rights granted hereunder, to any other persons and removing any proprietary notices, labels or marks from the Software is strictly
prohibited; You agree violation of such restrictions will cause irreparable harm to TAIS and provide grounds for injunctive relief, without notice, against You or any other person in possession of the Software.
You and any other person whose possession of the software violates this License Agreement shall promptly surrender possession of the Software to TAIS, upon demand. Furthermore, you hereby agree not
to create derivative works based on the Software. TAIS reserves the right to terminate this license and to immediately repossess the software in the event that You or any other person violates this License
greement.
2. Intellectual Property. You acknowledge that no title to the intellectual property in the Software is transferred to you. You further acknowledge that title and full ownership rights to the Software will remain
the exclusive property of TAIS and/or its suppliers, and you will not acquire any rights to the Software, except the license expressly set forth above. You will not remove or change any proprietary notices
contained in or on the Software. The Software is protected under US patent, copyright, trade secret, and/or other proprietary laws, as well as international treaties. Any transfer, use, or copying of the
software in violation of the License Agreement constitutes copyright infringement. You are hereby on notice that any transfer, use, or copying of the Software in violation of this License Agreement constitutes
a willful infringement of copyright.
3. No Reverse Engineering. You agree that you will not attempt, and if you employ employees or engage contractors, you will use your best efforts to prevent your employees and contractors from
attempting to reverse compile, reverse engineer, modify, translate or disassemble the Software in whole or in part. Any failure to comply with the above or any other terms and conditions contained herein will
result in the automatic termination of this license and the reversion of the rights granted hereunder back to TAIS.
4. Limited Warranty. THE SOFTWARE IS PROVIDED “AS IS” WITHOUT WARRANTY OF ANY KIND. TO THE MAXIMUM EXTENT PERMITTED BY APPLICABLE LAW, TAIS AND ITS SUPPLIERS
DISCLAIM ALL WARRANTIES WITH REGARD TO THE SOFTWARE, EITHER EXPRESS OR IMPLIED, INCLUDING, BUT NOT LIMITED TO, THE WARRANTY OF NON-INFRINGEMENT OF THIRD
PARTY RIGHTS, THE WARRANTY OF YEAR 2000 COMPLIANCE, AND THE IMPLIED WARRANTIES OF MERCHANTABILITY AND FITNESS FOR A PARTICULAR PURPOSE. THE ENTIRE RISK AS
TO THE QUALITY AND PERFORMANCE OF THE SOFTWARE IS WITH YOU. NEITHER TAIS NOR ITS SUPPLIERS WARRANT THAT THE FUNCTIONS CONTAINED IN THE SOFTWARE WILL MEET
YOUR REQUIREMENTS OR THAT THE OPERATION OF THE SOFTWARE WILL BE UNINTERRUPTED OR ERROR-FREE. HOWEVER, TAIS WARRANTS THAT ANY MEDIA ON WHICH THE
SOFTWARE IS FURNISHED IS FREE FROM DEFECTS IN MATERIAL AND WORKMANSHIP UNDER NORMAL USE FOR A PERIOD OF NINETY (90) DAYS FROM THE DATE OF DELIVERY TO YOU.
5. Limitation Of Liability. TAIS’ ENTIRE LIABILITY AND YOUR SOLE AND EXCLUSIVE REMEDY UNDER THIS LICENSE AGREEMENT SHALL BE AT TAIS’ OPTION REPLACEMENT OF THE MEDIA OR
REFUND OF THE PRICE PAID. TO THE MAXIMUM EXTENT PERMITTED BY APPLICABLE LAW, IN NO EVENT SHALL TAIS OR ITS SUPPLIERS BE LIABLE TO YOU FOR ANY CONSEQUENTIAL,
SPECIAL, INCIDENTAL OR INDIRECT DAMAGES FOR PERSONAL INJURY, LOSS OF BUSINESS PROFITS, BUSINESS INTERRUPTION, LOSS OF BUSINESS INFORMATION/DATA, OR ANY
OTHER PECUNIARY LOSS OF ANY KIND ARISING OUT OF THE USE OR INABILITY TO USE THE SOFTWARE, EVEN IF TAIS OR ITS SUPPLIER HAS BEEN ADVISED OF THE POSSIBILITY OF
SUCH DAMAGES. IN NO EVENT SHALL TAIS OR ITS SUPPLIERS BE LIABLE FOR ANY CLAIM BY A THIRD PARTY.
6. State/Jurisdiction Laws. SOME STATES/JURISDICTIONS DO NOT ALLOW THE EXCLUSION OF IMPLIED WARRANTIES OR LIMITATIONS ON HOW LONG AN IMPLIED WARRANTY MAY LAST, OR
THE EXCLUSION OR LIMITATION OF INCIDENTAL OR CONSEQUENTIAL DAMAGES, SO SUCH LIMITATIONS OR EXCLUSIONS MAY NOT APPLY TO YOU. THIS LIMITED WARRANTY GIVES YOU
SPECIFIC RIGHTS AND YOU MAY ALSO HAVE OTHER RIGHTS WHICH VARY FROM STATE/JURISDICTION TO STATE/JURISDICTION.
7. Export Laws. This License Agreement involves products and/or technical data that may be controlled under the United States Export Administration Regulations and may be subject to the approval of the
United States Department of Commerce prior to export. Any export, directly or indirectly, in contravention of the United States Export Administration Regulations, or any other applicable law, regulation or
order, is prohibited.
8. Governing Law. This License Agreement will be governed by the laws of the State of California, United States of America, excluding its conflict of law provisions.
9. United States Government Restricted Rights. The Software is provided with Restricted Rights. Use, duplication, or disclosure by the United States Government, its agencies and/or instrumentalities is
subject to restrictions as set forth in subparagraph (c)(1)(ii) of The Rights in Technical Data and Computer Software Clause at DFARS 252.227-7013 (October 1988) or subparagraphs (c)(1) and (2) of the
Commercial Computer Software - Restricted Rights at 48 CFR 52.227-19, as applicable.
10. Severability. If any provision of this License Agreement shall be held to be invalid, illegal or unenforceable, the validity, legality and enforceability of the remaining provisions hereof shall not in any way be
affected or impaired.
11. No Waiver. No waiver of any breach of any provision of this License Agreement shall constitute a waiver of any prior, concurrent or subsequent breach of the same or any other provisions hereof, and no
aiver shall be effective unless made in writing and signed by an authorized representative of the waiving party.
YOU ACKNOWLEDGE THAT YOU HAVE READ THIS LICENSE AGREEMENT AND THAT YOU UNDERSTAND ITS PROVISIONS. YOU AGREE TO BE BOUND BY ITS TERMS AND CONDITIONS. YOU
FURTHER AGREE THAT THIS LICENSE AGREEMENT CONTAINS THE COMPLETE AND EXCLUSIVE AGREEMENT BETWEEN YOU AND TAIS AND SUPERSEDES ANY PROPOSAL OR PRIOR
GREEMENT, ORAL OR WRITTEN, OR ANY OTHER COMMUNICATION RELATING TO THE SUBJECT MATTER OF THIS LICENSE AGREEMENT.
Toshiba America Information Systems, Inc.
Telecommunication Systems Division
9740 Irvine Boulevard
Irvine, California 92618-1697
United States of America
TSD 081601
5932
Page 4

Toshiba America Information Systems, Inc.
Telecommunication Systems Division
Limited Warranty
Toshiba America Information S ys tems, Inc., (“TAIS”) warrants that this teleph one equipment (except for fuses, lamps, and other
consumables) will, upon delivery by TAIS or an authorized TAIS dealer to a retail customer in new condition, be free from defects
in material and workma nshi p for twenty-four (24) months afte r de li ve ry. This warranty is void (a) if th e equipment is used under
other than normal use an d maintenance conditions, (b) if th e equipment is modified or al te red, unless the modification or
alteration is expressly authorized by TAIS, (c) if the equipment is subject to abuse, neglect, lightning, electrical fault, or accident,
(d) if the equipment is r epaired by someone ot he r than TAIS or an authorized TAIS dealer, (e) if the equipment’s serial number is
defaced or missing, or (f) if the equip me nt is inst al l ed or used in combination or in assembl y with products not supplied by TAIS
and which are not compatible or are of inferior quality, design, or performan ce.
The sole obligation of TAIS or Toshiba Corporation under this warranty, or under any other legal obligatio n w ith respect to the
equipment, is the repa ir or re pl acement by TAIS or its authorized dealer of such defect ive or missing parts as are causing the
malfunction with new or refurbished parts (at their option). If TAIS or one of its authorized dealers does not replace or repair such
parts, the retail customer ’s sole remedy will be a refund of the price charged by TAIS to its dealers for such parts as are proven to
be defective, and which are returned to TAIS through one of its authorized dealers wi thin the warranty period and no late r tha n
thirty (30) days after such malfu nct ion, whichever first occurs.
Under no circumstances will the retail customer or any user or dealer or other person be ent it led to any direct, special, indir ect,
consequential, or exemp la ry da m age s, for bre ac h of c ontract, tort, or otherwise. Under no ci rcumstances will any such person be
entitled to any sum greater tha n the purchase price paid for th e it e m of equipment that is malfunctioning.
To obtain service under this warranty, the retail customer must bring the malfunction of the machi ne to th e attention of one of
TAIS’ authorized dealers within the twenty-four (24) month period and no later than thirty ( 30) da ys after such malfunction,
whichever first occurs. Failure to bring the malfunction to the attention of an authorized TAIS dealer within the prescribed time
results in th e customer being not entitled to warran ty service.
THERE ARE NO OTHER WARRANTIES FROM EITHER TOSHIBA AMERICA INFORMATION SYSTEMS, INC., OR
TOSHIBA CORPORATION WHICH EXTEND BEYOND THE FACE OF THIS WARRANTY. ALL OTHER WARRANTIES,
EXPRESS OR IMPLIED, INCLUDING THE WARRANTIES OF MERCHANTABILITY, FITNESS FOR A PARTICULAR
PURPOSE, AND FITNESS FOR USE, ARE EXCLUDED.
No TAIS dealer and no person other than an officer of TAIS may extend or modify this warranty. No such modification or
extension is effective unless it is in writing and signe d by the vice president and general ma na ge r, Telecommunication Systems
Division.
Page 5

Contents
Introduction
Organization......................................................................................................................vii
How to Use This Guide....................................................................................................viii
Conventions .....................................................................................................................viii
Related Documents/Media..................................................................................................ix
Chapter 1 – The Grand Tour
DKT3000-series Telephones ...............................................................................................1
Fixed Buttons....................................................................................................................2
Flexible Buttons................................................................................................................3
Liquid Crystal Display......................................................................................................3
DKT2000-series Telephones ...............................................................................................4
Fixed Buttons....................................................................................................................5
Flexible Buttons................................................................................................................6
Liquid Crystal Display......................................................................................................6
Chapter 2 – The Basics
Important - Read First ..........................................................................................................7
What’s My Line?..............................................................................................................7
Which Outgoing/Incoming Call Features Do I Have? .....................................................8
Making a Call................................................................................... ......... ...........................9
Hot Dialing .......................................................................................................................9
Spkr Button.......................................................................................................................9
Handset.............................................................................................................................9
Answering a Call................................................................................................................10
Strata CTX DKT3000/2000-Series Telephone 05/02 i
Page 6

Contents
Chapter 3 – Advanced Operation
Handset...........................................................................................................................10
Speaker ...........................................................................................................................10
Handsfree Answerback...................................................................................................10
Switching Between Handset and Speakerphone.............................................................10
Message Waiting................................................................................................................11
Responding to a Lit Msg LED........................................................................................11
Turning On/Off Message Waiting LED on Another Extension.....................................12
Microphone........................................................................................................................12
Call Transfer ......................................................................................................................13
Conference Calls................................................................................................................14
Adding Voice Mail to a Conference...............................................................................15
Connecting Two Outside Lines......................................................................................15
Hold....................................................................................................................................16
Exclusive Hold................................................................................................................16
Automatic Hold ..............................................................................................................16
Consultation Hold...........................................................................................................16
Volume Control .................................................................................................................17
LCD Contrast Adjustments................................................................................................17
Chapter 3 – Advanced Operation
Using Your LCD................................................................................................................19
Soft Keys............................................................................................................................20
Soft Key Example...........................................................................................................21
Advisory Messages............................................................................................ ................22
Account Code Calls ...........................................................................................................23
Verified/Non-Verified Account Codes........................................................... ......... .......23
Forced Account Codes....................................................................................................23
Voluntary Account Codes (Verified/Non-Verified).......................................................24
Automatic Busy Redial......................................................................................................25
Automatic Callback ...........................................................................................................26
Background Music.............................................................................................................27
Call Forward ......................................................................................................................28
System.............................................................................................................................28
Station.............................................................................................................................28
Call Forward Categories.................................................................................................28
ii Strata CTX DKT3000/2000-Series Telephone 05/02
Page 7

Contents
Chapter 3 – Advanced Operation
Call Forward Settings.....................................................................................................29
Call History........................................................................................................................32
Call Park Orbits..................................................................................................................32
Call Pickup.........................................................................................................................33
Group Pickup..................................................................................................................33
Page/Internal Call Pickup...............................................................................................34
Call Waiting.......................................................................................................................35
Direct Inward System Access (DISA)...............................................................................36
Direct Station Selection Buttons (Hotline )........................................................................36
Distinctive Ringing............................................................................................................37
Do Not Disturb...................................................................................................................37
Setting DND for Another Extension...............................................................................38
Door Lock(s)......................................................................................................................38
Door Phone(s)....................................................................................................................39
Emergency Ringdown........................................................................................................40
Language Codes.................................................................................................................40
Off-hook Call Announce....................................................................................................41
Override Calls....................................................................................................................42
Busy Override.................................................................................................................42
Do Not Disturb Override................................................................................................42
Executive Override.........................................................................................................43
Destination Restriction/Traveling Class Override..........................................................43
Class of Service Override...............................................................................................44
Privacy Override.............................................................................................................44
Paging ................................................................................................................................44
Answering a Page....................................................... ....................................................45
All Call Page...................................................................................................................45
Emergency Page .............................................................................................................45
Privacy ...............................................................................................................................46
Redial.................................................................................................................................46
Speed Dial...................................................................... ....................................................47
Making a Call Using Speed Dial....................................................................................47
Storing a Station Speed Dial Number.............................................................................48
Advanced Speed Dial Operation ....................................................................................49
Tone/Pulse Dialing.............................................................................................................50
Strata CTX DKT3000/2000-Series Telephone 05/02 iii
Page 8

Contents
Chapter 4 – DKT3014 LCD Features
Voice Mail - Direct Transfer..............................................................................................51
Voice Mail Soft Keys.........................................................................................................51
Call Recording...................................................................................................................55
Other Voice Mail Features..............................................................................................56
Chapter 4 – DKT3014 LCD Features
Directory and Speed Dial Listings.....................................................................................58
Direct Station Selection.................................................................................. ................58
System Speed Dial and Personal Speed Dial..................................................................59
Internal Directory and External Directory......................................................................59
Alphanumeric Entry.................................. ......... .............................................................60
Chapter 5 – User Programming
Programming Feature Buttons...........................................................................................63
User Programming Mode ...............................................................................................64
Flexible Button Codes........................................................................................................64
Setting/Changing a Flexible Button’s Function.............................................................65
One Touch Buttons............................................................................................................66
Changing a One Touch Button.......................................................................................66
To Use a One Touch Button...........................................................................................67
Setting/Changing a Personal Speed Dial Code...............................................................67
Feature Codes.....................................................................................................................68
LED Indicator Details........................................................................................................73
Chapter 6 – DADM/DSS Console
DADM ...............................................................................................................................76
Buttons and LEDs...........................................................................................................76
DSS Console......................................................................................................................77
DSS Buttons....................................................................................................................77
Features...........................................................................................................................77
Calling a Station .............................................................................................................78
Transferring to an Idle Station........................................................................................78
Call Transfer with Camp-on...........................................................................................79
Call Answering (Outside Line).......................................................................................79
Speed Dial................................................................... ......... ...........................................79
iv Strata CTX DKT3000/2000-Series Telephone 05/02
Page 9

Contents
Appendix A – Centrex Application
Paging.............................................................................................................................80
Call Forward Override (DSS Override)..........................................................................80
Night Transfer Button.....................................................................................................80
Appendix A – Centrex Application
Flexible Directory Numbering...........................................................................................81
Centrex Feature Buttons ....................................................................................................81
Ringing Repeat...................................................................................................................81
Delayed Ringing ................................................................................................................82
Appendix B – Button Labels........................................................................................83
Index ......................................................................................................................................87
Strata CTX DKT3000/2000-Series Telephone 05/02 v
Page 10

Contents
Appendix A – Centrex Application
vi Strata CTX DKT3000/2000-Series Telephone 05/02
Page 11

Introduction
This user guide describes how to use the 3000-series and 2000-series digital phones
for Strata CTX systems. Also discussed are Digital Add-on Modules (DADMs) and
the Direct Station Selection (DSS) Console.
Organization
• Chapter 1 – The Grand Tour provides an overview of the digitial telephones.
• Chapter 2 – The Bas ics cover s the b asic t eleph one fea tures th at you n eed to k now.
• Chapter 3 – Advanced Operation includes an explanation of Soft Key
operations. Features are presented alphabetically and, when applicable, include
LCD information.
• Chapter 4 – DKT3014 LCD Features explains how to use the DKT3014-SDL
features. It also includes a guide to the Stratagy ES voice mail Soft Keys.
• Chapter 5 – User Programming provides instructions on programming Flexible
Button features, setting One Touch buttons, changing Personal Speed Dial
numbers and other user programmable functions.
• Chapter 6 – DADM/DSS Console explains how to use these consoles with the
digital telephone.
• Appendix A – Centrex Application describes the Centr ex f eat ur es whi ch may be
available with your Strata CTX system.
• Appendix B – Button Labels lists the feature button designations of the 3000-
series digital telephone models.
Strata CTX DKT2000/3000-Series Telephone 05/02 vii
Page 12

Introduction
How to Use This Guide
How to Use This Guide
This guide provides in-depth instructions for the DKT3000- and DKT2000-series
digital telephones and their features. Most telephone users can use the “Strata CTX
3000/2000-series Digital Telephone Quick Reference Guide” instead of this guid e.
Conventions
Conventions Description
Elaborate s specific items or references other inf ormation. Within some
Note
tables, general no tes appl y to the entire table a nd numbered notes app ly to
specific items.
Important!
Extension
Number
$ULDO%ROG
+
Tilde (~) Means “through.” Example: 350~640 Hz frequency range.
Calls attention to important instructions or information.
Press to answer a call to the Extension Number. Each station can have
multiple extension buttons. Incoming calls ring the extension button(s)
from the top down. For example, station 10’s extensions ring 10-1 first,
then 10-2, 10-3, and 10-4. A station is considered busy when all
extensions are being used.
Note The naming convention for DKT assignments within Toshiba is
Directory Numbers. For clarity and ease of understanding, the
terms Extension Number and Phantom Extension Number will be
used in this document in lieu of PDN and PhDN.
Represents telephone buttons.
shows a multiple PC keyboard or telephone button entry. Entries without
spaces between them show a simultaneous entry.
Example:
Entries wi th spaces between them sh ow a sequent ial entry.
Example:
Delete+Enter.
+ .
viii Strata CTX DKT2000/3000-Series Telephone 05/02
Page 13
Conventions Description
Grey words within the printed text denote cross-references. In the
See Figure 10
electronic version of this document (Library CD-ROM or FYI Internet
download), cross-references appear in blue hypertext.
Related Documents/Media
Note Some documents listed here may appear in different versions on the
CD-ROM or in print. To find the most current version, check the version/date in
the Publication Information on the back of the document’s title page.
Refer to the fo llowing for m ore information:
• Strata CTX 3001/2001 Digital Single Line Telephone Guide
• Strata CTX 3000/2000-series Digital Telephone Quick Reference Guide
• Strata CTX WinAdmin Application Software and Documentation Library
Introduction
Related Documents/M edi a
Strata CTX DKT2000/3000-Series Telephone 05/02 ix
Page 14

Introduction
Related Documents/Media
x Strata CTX DKT2000/3000-Series Telephone 05/02
Page 15

The Grand Tour 1
This chapter familiarizes you with DKT3000-series and DKT2000-series digital
speakerphones (model numbers appear on the bottom of your telephone).
DKT3000-series Telephones
The DKT3000-series models include:
• DKT3010-S 10-button
• DKT3020-S 20-button (shown on the next page)
• DKT3010-SD 10-button with two-line by 24-character LCD
• DKT3020-SD 20-button with two-line by 24-character LCD
• DKT3014-SDL 14-button with eight-line by 24-character tilting LCD and 16 Soft
Key buttons (shown on page 57)
All of the above Toshiba speake rph ones enable you to place and receive cal ls without
lifting the handset.
Toshiba LCD telephones provide easy access to frequently-used features. Prompts
guide you through specific tasks. They also provide Outside Line Identification, User
Name/Number, Call Duration, Date/Time of Day displays, and the ability to display
names and telephone numbers of outside, incoming callers.
The DKT3001 single line digital telephone is also available - see the Strata CTX
3001/2001 Digital Single Line Telephone User Guide for more details.
Strata CTX DKT3000/2000-Series Telephone 05/02 1
Page 16
The Grand Tour
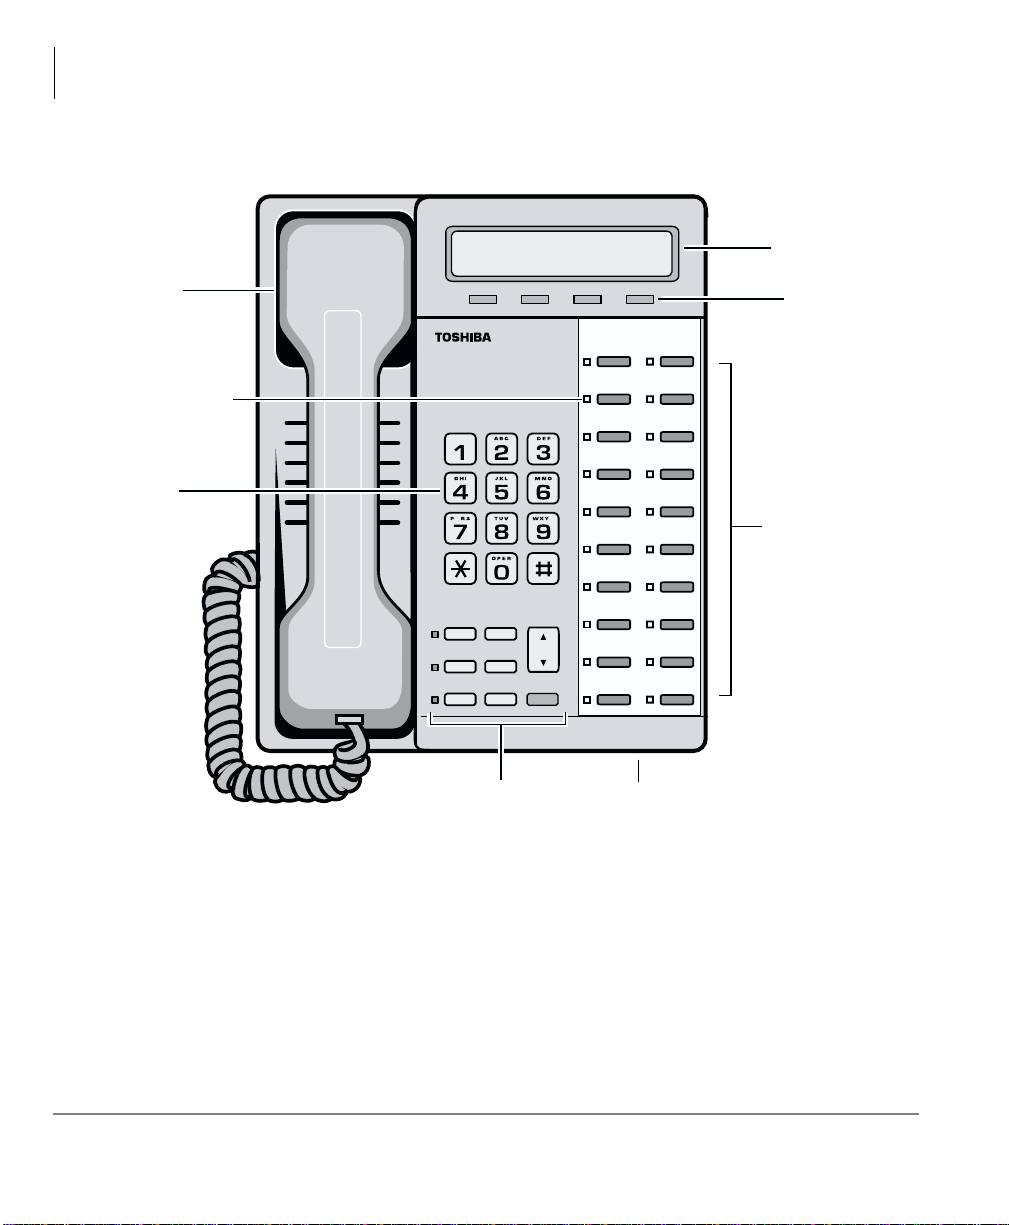
DKT3000-series Telephones
LCD Display
Handset
Red/Green
LED Indicators
Dial Pad
5649
DKT3020-SD Telephone
Page ScrollMode Feature
Q
Msg
Spdial
Vol
Redial
Mic
Cnf/Trn
Spkr
Hold
Fixed Buttons
Z
Microphone Location
LCD Control
Buttons/
Soft Keys
Flexible Buttons
(also known as
Programmable
Buttons - PB)
Fixed Buttons
The fixed buttons on your dial pad enable you to perform standard functions quickly
and easily. These buttons are described in Chapter 2 – The Basics.
2 Strata CTX DKT3000/2000-Series Telephone 05/02
Page 17

The Grand Tour
DKT3000-series Telephones
Flexible Buttons
Your telephone can have 10, 14, or 20 Flexible Buttons (shown in the illustration on
the previous page) that can be programmed to do many button functions, including:
• Line is used to access an outside line.
• Primary Extension is your extension button.
• Pooled Line Group enables you to access available outside lines from a group of
lines appearing under one button.
• Feature Access Buttons enables you to store features onto a single button.
• One Touch Buttons are used for storing Speed Dial numbers or feature access
code sequences onto a single button.
Note See Table 12 on page 83 fo r a c om ple te li st of Feature Access Buttons and One
Touch Buttons.
Liquid Crystal Display
Your Liquid Crystal Display
(LCD) (shown right) shows:
• Desk Clock and Calendar in
idle mode
• Call Duration during an
outside call
LCD Control
Buttons/Soft Keys
CF-ALL 202-203+
AUG 08 MON 03:56
Mode Page Scroll Feature
5800
• Operational, Advisory, and
Notificati on messages
LCD Control Buttons
There are two types of LCD button functions: LCD Control Buttons and Soft Keys.
The DKT3000-series LCD Control Buttons consist of
)HDWXUH.
0RGH, 3DJH, 6FUROO and
When the Soft Key prompts appear on the LCD, the LCD Control Button just below
the prompt offers access to that feature. See “Using Your LCD” on page 19 for more
information.
Strata CTX DKT3000/2000-Series Telephone 05/02 3
Page 18

The Grand Tour
DKT2000-series Telephones
• 0RGH is generally us ed as a Soft Key.
• Pressing
display.
• Pressing
•
)HDWXUH will be used in the future.
3DJH switches you from the Call Forward ( CF) dis play to the User Name
6FUROO advances you through information.
DKT2000-series Telephones
The following speakerphone models belong to the 2000-series:
• DKT2010-S 10-button speakerphone
• DKT2010-SD 10-button with LCD
• DKT2020-S 20-button
• DKT2020-SD 20-button with LCD (shown below)
• DKT2020-FDSP 20-button with LCD and External Microphone jack
• DKT2001 (See the Strata CTX DKT3001/2001 Digit al Single Line Telep hone User
Guide).
An illustration of the DKT2020-SD is shown on the next page.
4 Strata CTX DKT3000/2000-Series Telephone 05/02
Page 19
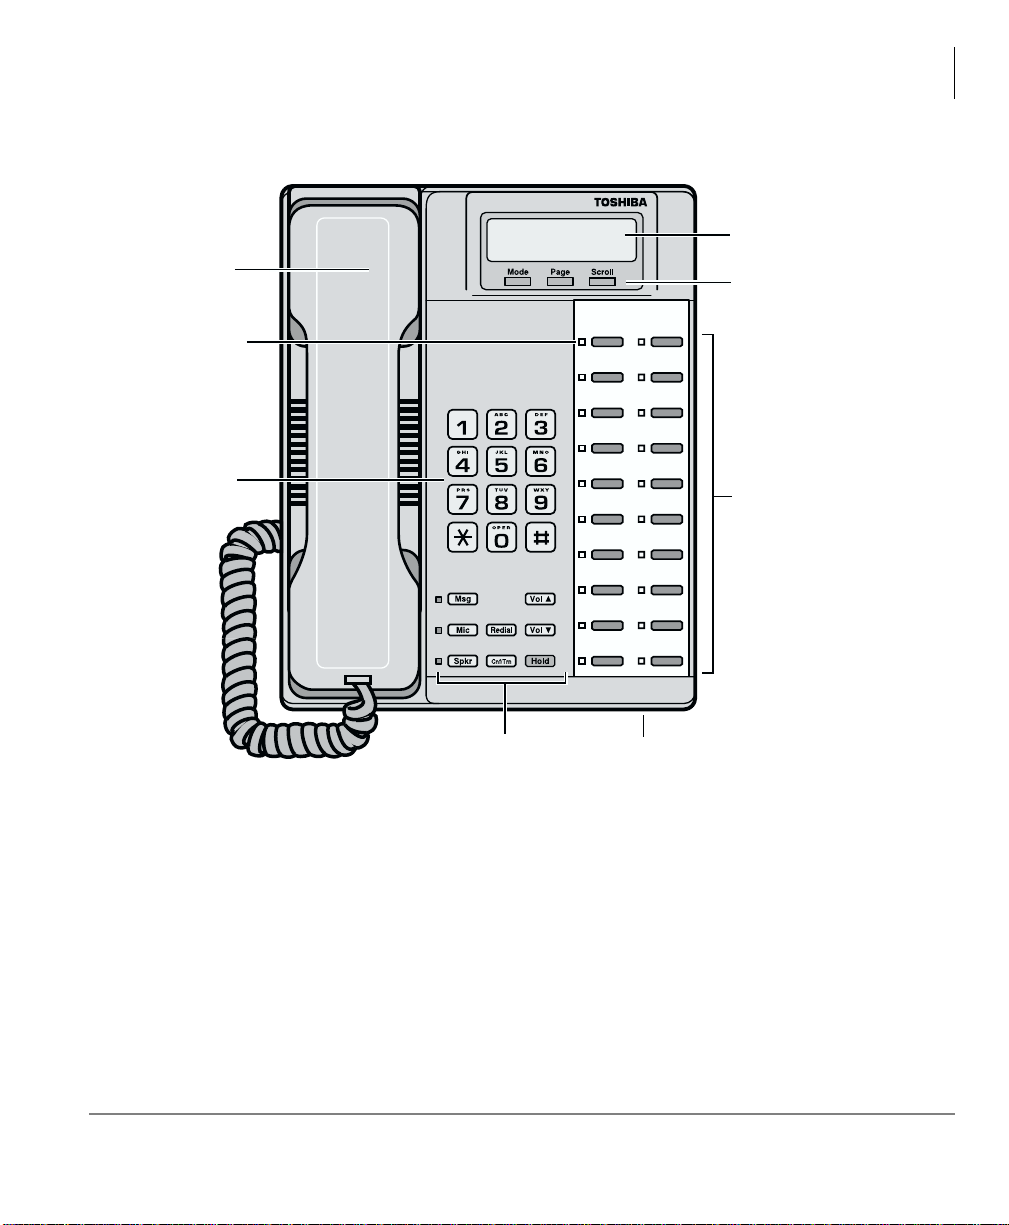
Handset
Red/Green
LED Indicators
The Grand Tour
DKT2000-series Telephones
LCD Display
LCD Control
Buttons/
Soft Keys
Dial Pad
DKT2020-SD Telephone
Fixed Buttons
The fixed buttons on y our t elepho ne ena ble yo u to perfor m sta ndard functi ons qu ickly
and easily. These buttons are described in Chapter 2 – The Basics.
Flexible
Buttons
5972
Fixed Buttons Microphone
Location
Strata CTX DKT3000/2000-Series Telephone 05/02 5
Page 20

The Grand Tour
DKT2000-series Telephones
Flexible Buttons
All Flexible Buttons must be programmed for your t el ephone in system programming
and vary for individual telephones. If a button does not appear on your display or
telephone keystrip label, see your CTX System Administrator for button assignments.
Line Buttons
You may have buttons designated as /LQH and/or 3RROHG/LQH*U S which enable
you to directly access outside lines.
available CO Lines from a group of lines appearing under one button.
Liquid Crystal Display
Your Liquid Crystal Display (LCD)
(shown right) shows:
• Desk Clock and Calendar in idle
mode
• Call Duration during an outside call
• Operational, Advisory, and
Notificati on messages
3RROHG/LQH*US enables you to access
CF-ALL 202-203+
AUG 08 MON 03:56
LCD Control
Buttons/Soft Keys
Mode Page Scroll
5909
Important! The LCD width of the DKT2000-series telephones is shorter than the
DKT3000-series LCDs. This difference causes some features to display
differently.
LCD Control Buttons
There are two types of LCD button functions: LCD Control Buttons and Soft Keys.
The DKT2000-series LCD Control Buttons consist of
0RGH, 3DJH and 6FUROO.
When the Soft Key prompts appear on the LCD, the LCD Control Button just below
the prompt offers access to that feature. See “Using Your LCD” on page 19 for more
information.
0RGH is generally us ed as a Soft Key.
•
• Pressing
3DJH switches you from the Call Forward ( CF) dis play to the User Name
display.
• Pressing
6FUROO advances you through information.
6 Strata CTX DKT3000/2000-Series Telephone 05/02
Page 21

The Basics 2
This chapter shows you the basic operation of your DKT3000-series or DKT2000series telephone.
Important! The text in this chapter applies to both the DKT3000-series and
DKT2000-series telephones, unless otherwise noted.
Important - Read First
Be sure to check with your CTX System Administrator and make sure you know
which features are enabled on your system. Use the check boxes
book to mark which features you have.
Note LEDs on your telephone flash at different speeds depending on the function
performed. Flash rates can be found under “LE D Indicator Details” on page 73.
❐ throughout this
What’s My Line?
Throughout this guide, the word “Line” is mentioned. For example, you will be
instructed to “select a Line.” “Line” can be:
❐ Linebutton
❐ Pooled Line Group button
❐ Group Line button
❐ Line out requiring an access code - where you enter an outside line or line group
access code (for example, dialing
Check mark which Line type you have, then use that selection when instructed to
“select a Line.”
Strata CTX DKT3000/2000-Series Telephone 05/02 7
to get an outside line).
Page 22

The Basics
Important - Read First
Which Outgoing/Incoming Call Features Do I Have?
Check mark here which outgoing/incoming features you have on your system.
❐ Automatic Line Selection (ALS): When making outgoing calls, you have ALS i f
when you lift the handset or press
Emitting Diode (LED) lights steady green. The LCD displays the station number
and the seized outside line.
❐ Ringing Line Preference: Yo u answer an incoming line ringing your station by
lifting the handset or pres sing
to answer.
❐ Tone Signaling: Internal incoming call – you hear successive ring tones, then lift
the handset or press
6SNU to answer the call.
❐ Voice First Signaling: Internal incoming call – your telephone does not ring;
instead you hear a long tone, then the caller’s voice. Talk in the direction of your
telephone, or answer the call as you normally would by lifting the handset or
pressing
6SNU.
❐ Switching Signaling: Check with your CTX System Administrator to see if you
have the ability to change between Tone and Voice Signaling on a call-by-call
basis. If you do, you can press
change the signaling.
6SNU you hear dial tone and the Line Light
6SNU. You do not have to press an extension bu tton
after dialing an internal telephone number to
❐ Hot Dialing: If your telephone is programmed for “hot dialing,” you do not have
to press
calls. When you dial a number, the speakerphone automatically turns on and the
Spkr and Mic LEDs light.
8 Strata CTX DKT3000/2000-Series Telephone 05/02
6SNU or lift the handset before dialing internal or external speakerphone
Page 23

Making a Call
There are three ways to originate a call from your digital telephone:
Hot Dialing
1. To make a call using Hot Dialing, dial the number.
When you start to dial, the extension button, Spkr and Mic LEDs light. Digits
display as they are dialed. Call progress tones (Ringback Tone, Busy Tone, etc.)
play through the speaker.
2. When connected, you can continue speakerphone operation or lift the handset and
continue the conversation.
Spkr Button
1. To make a call, press 6SNU.
A line may be automatically selected or you can manually choose a line. Your
extension or
plays through the speaker. The Spkr and Mic LEDs light.
/LQH button lights (depending on system programming). Dial tone
The Basics
Making a Call
2. Dial the number.
Digits display as they are dialed. Call progress tones (Ringback Tone, Busy Tone,
etc.) play through the speaker.
3. When connected, you can continue to use the speakerphone or lift the handset and
continue the conversation.
Handset
1. To make a call, lift the handset, then dial the number.
A line may be automatically selecte d or you ca n manual ly choose a line. Dial tone
plays through the handset. The Spkr and Mic LEDs do not light.
Digits display as they are dialed. Call progress tones (Ringback Tone, Busy Tone,
etc.) are heard through the handset.
2. When connected, you can cont inue to use the hand set or switch to speake rphone by
holding down
Strata CTX DKT3000/2000-Series Telephone 05/02 9
6SNU and replacing the handset.
Page 24

The Basics
Answering a Call
Answering a Call
There are several ways to answer a call:
Handset
➤ If your telephone is programmed for Ringing Line Preference, pick up the handset
and the telephone automatically answers the ringing line.
➤ If not, press the button associated with the ringing line (flashing green LED).
Speaker
➤ If your telephone is programmed for Ringing Line Preference, press 6SNU and the
telephone automatically answers the ringing line.
➤ If not, press the button assoc iated wi th the ring ing line ( flash ing gr een LED). Once
connected, you can continue on the speakerphone or lift the handset.
Handsfree Answerback
If you have a speakerphone, it may be programmed for Handsfree Answerback. You
hear a single long tone, followed by the caller’s voice. The extension LED flashes
green (incoming call). The Mic LED lights steady red (microphone is active). The
Spkr LED flashes red.
1. Do not lift the handset; speak toward the telephone in a normal voice.
2. Press
6SNU or take the handset of f-ho ok befo re trans ferring the cal l or plac ing it o n
hold.
Switching Betwee n Handset and Speaker phone
➤ Press 6SNU and place the ha ndset on-hoo k to switch fr om handset to spe akerphone
mode.
➤ Take the handset off-hook to switch from speakerphone to handset mode.
10 Strata CTX DKT3000/2000-Series Telephone 05/02
Page 25

Message Waiting
Use your 0VJLED/button and LCD to see/retrieve m essage(s).
An extension can receive up to four simultaneous Message Waiting indications and
LCD messages. One message is reserved for the Message Center.
Your telephone can be programmed to have up to four additional (flexible) Message
Waiting buttons/LEDs. Check with your CTX System Administrator to see if these
buttons have been programmed on your telephone. If so, substitute them when the
0VJ button/LED is mentioned in the following steps.
Responding to a Lit Msg LED
1. On an LCD telephone, if you see a “+,” press 6FUROO to display additional
messages; otherwise, go to Step 2. The “+” indicates additional messages. The
LCD can show up to three station messages for your extension and three for each
additional (phantom) extension that you may have.
2. Press
3. After answering the message(s), place the handset back on-hook.
4. If the Msg LED continues to flash, you have more messages; repeat Steps 1~3
5. To manually turn off your Msg LED, press your extension button, then press
0VJ, then lift the handset. Your telephone rings the extension or voice mail
device that sent the indication. The LED continues to flash red.
above to retrieve them. Voice mail devices tur n off the LED/LCD indications aft er
a short delay, after you checked all messages.
. Do this step for each message received.
The Basics
Message Waiting
Strata CTX DKT3000/2000-Series Telephone 05/02 11
Page 26

The Basics
Microphone
Turning On/Off Message Waiting LED on Another Extension
If you call an extension and it’s busy or there is no answer, you can light that
extension’s Message Waiting LED and enable that extension to call you back.
1. Dial an internal extension. You hear busy tone or there’s no answer.
2. Press
3. Press
4. To turn Off a Message LED that you have set on another ext ension, press
0VJ or . The Msg LED flashes red on the called telephone. At your
telephone, the Msg LED lights steady red and the LCD shows the station number
where you set a Message Waiting light.
6SNU. Your Msg LED turns Off. The Msg LED on the called telephone
flashes until the called party presses the flashing
back.
the extension number that has the message light set. Then hang up to release your
telephone.
0VJ button - which calls you
Microphone
➤ To turn the Microphone On/Off when the speakerphone is active (Spkr LED is
On), press
0LF.
plus
When the Microphone is On, the Mic LED is On, steady red. When the
microphone is Off, the Mic LED is Off and you cannot be heard through the
microphone.
The microphone and its LED are always On when you receive a Voice-first internal
call and Off when you receive a Ring-first call.
Each station’s microphone can be set in system programming to:
• switch On/Off with one touch
• switch Off only while pressed and held
• either On/Off at the start of handsfree dialing.
➤ To talk back to a Handset Off-hook Call Announce call, press and hold 0LF and
talk over your telephone handset/headset. The LED and microphone remain Off.
12 Strata CTX DKT3000/2000-Series Telephone 05/02
Page 27

Call Transfer
1. While on a c all, pr ess &QI7UQ. Your Lin e LED flashes green and you he ar internal
dial tone.
2. Dial the extension where the call will be transferred. You can remain on th e line
and announce the call or immediately “blind transfer” the call.
During call transfer, you can connect all three parties by pressing your flashing
extension button or
• If you get voice mail, you can leave a message or hang up and let the
transferred caller leave a message.
• If you hear a long single ton e, then announc e the call over the called teleph one’s
speaker.
3. Transfer with Camp On: If the station to which you want to transfer the call is busy,
you may hang up and the t ransf erred trunk or s tati on will be c amped on to the busy
destination.
➤ To transfer a call directly to Voice Mail (VM)
&QI7UQ.
The Basics
Call Transfer
1. While on a call, pre ss
2. Enter
3. Enter the VM mailb ox number (usually the sam e as the exten sion number) +
4. Hang up and the caller is connected to the VM mailbox. This feature does a blind
.
transfer to VM.
&QI7UQ.
.
➤ To perform Call Transfer Immed iate
1. Whi le on a call, press the
“TRANSFER.”
2. Di al t he ext ensio n where you wi sh t o tra nsfer the ca ll.The call rin gs th e dest in ation
station and your telephon e returns to the idle state.
Strata CTX DKT3000/2000-Series Telephone 05/02 13
TRNS Soft Key. The DKT3014 LCD shows
Page 28

The Basics
Conference Calls
Conference Calls
You can conference together up to eight parties (including your own) - with up to six
parties being external network lines. The actual number of conference parties with
acceptable volume levels depends on the local and far end telephone line conditions.
The person who initiates the conference call is the Master. If, after the conference is
established and the Master exits the co nfe re nce, the first stati on t o h ave been added to
the conference becomes the Master.
➤ To conference calls
1. While on a call, press
2. Call another station or outside line.
3. When the called party answers, press
answer, press
All parties are conferen ced. If the second ca ll was placed on a /LQH that appears on
your telephone, the LED also flashes green.
4. Repeat the above steps to add lines to the conference. Keep in mind the maximum
number of allowed conference parties.
Note When the “master” of the conference hangs up, the control is automatically
transferred to the first internal station added to the conference call. If no other
internal stations are included in the conference call, the call will be
disconnected.
&QI7UQ again to return to the original connection.
&QI7UQ
. You hear dial tone and your Line LED flashes green.
&QI7UQ. If you receive a busy tone or no
➤ To transfer conference control
1. Do Steps 1 and 2 above to add the line to which you wish to transfer conference
control. See previous Note.
2. Announce the call and hang up to transfer it. This station now becomes the
conference “master” with the ability to add or delete parties.
➤ To hold a conference call
➤ If you are the Conference Master , press the +ROG key once (or twi ce for Exec utive
Hold) to place the conference call on hold. The other parties can continue with the
conference. Music-on-hold is suppressed and your extension LED flashes green.
You can r ejoin th e conferenc e at any time by pressin g your ext ension but ton. When
you return, you retain Master status.
14 Strata CTX DKT3000/2000-Series Telephone 05/02
Page 29

The Basics
Conference Calls
Adding Voice Mail to a Conference
The Conference Master can add voice mail to a conference. This feature enables
participants in a conference to listen to or leave a voice mail message during one
telephone call.
➤ To add Voice Mail to a conference call (performed by Conference Master)
1. Press
&QI7UQ to place the current call on Consultation Hold.
2. Dial the voice mail (VM) extension number, then enter the VM mailbox and
security code. This adds the voice mailbox to the conference.
3. Press
&QI7UQ to reconnect to the original party. (You can continue to add
conference members by pressing
&QI7UQ and dialing another extension.)
Now, all parties in the conference can listen to or record a message to this voice
mailbox. Only the Master can control the VM with touchtones or Soft Keys.
Connecting Two Outside Lines
1. Whi le talkin g on an o utside call, pr ess &QI7UQ. You hea r dial tone. The e xtensi on
LED flashes (conference rate).
2. Dial an outside line access code and outside telephone number.
3. After the party answers, press
and all parties are conferenced.
If you receive a busy tone or if the station does not answer, press the flashing
extension button to return to the original connection, press
4. Hang up. The extension LED flashes (exclusive-hold rate) and the two lines are
connected. The LED turns Off when the parties hang-up.
5. To supervise a tandem call, press the extension button. If the parties have finishe d ,
hang up...or if the parties are still talking, press
LEDs turn Off and the connection is released.
&QI7UQ. The extension LED flashes (in-use rate)
&QI7UQ.
&QI7UQ and hang-up. Both Line
If your telephone company provides auto disconnect, the connection may release
automatically when the parties hang up. If not, the lines must be supervised to be
disconnected.
Strata CTX DKT3000/2000-Series Telephone 05/02 15
Page 30

The Basics
Hold
Hold
1. To place a call on hold, press +ROG. Your LCD shows the line on hold. The held
Line’s LED flashes green w hile appearances of the line at other stations fl ash red.
• To return to the held call, press the held
• If you do not return to the hel d cal l with in a sp ecifi ed ti me, it r ings b ack to your
telephone. The call remains camped-on to your station indefinitely.
• If the held party hangs up, the call is rele ased.
2. Repeat Step 1 to place additional lines on hold.
Note See the Call Pickup section to pick up a call on hold from another extension.
/LQHbutton.
Exclusive Hold
This feature enables you to place a call on hold so that only you can retrieve it.
➤ While on a call, press +ROG twice. That line’s LED flashes green while
appearances of the line at other stations are steady red (in use).
Automatic Hold
This feature enables you to place a call on hold by pressing another /LQH button – no
need to press
existing calls will dro p.
➤ While on a call, press another exte nsion b utton t o rece ive /orig inate a new cal l. The
accessed line’s LED flashes (in-use). The first call is put on hold and your
extension’s LED flashes. You can also switch between calls without having to
press
+ROG. Make sure this feature is programmed on your system; if not,
+ROG.
Consultation Hold
1. While on a call, pre ss &QI7UQ. The call goes on hold.
2. Dial another line.
3. Transfer the call or retu rn to the held call by pressing its
16 Strata CTX DKT3000/2000-Series Telephone 05/02
/LQH button.
Page 31

Volume Control
➤ To adjust the handset volume
➤ Press the 9RO ▲ to increas e volume and 9RO ▼ to decrease volume duri ng the ca ll.
When you hang up, the volume returns to the default setting.
➤ To adjust the speaker volume for internal/external calls and background music
The Basics
Vol ume Control
1. Press
2. Press an extension button - you hear dial tone.
3. Press the
6SNU.
9RO ▲ to increase volume and 9RO ▼ to decrease volume. This volume
setting applies to all calls until changed.
➤ To adjust Ring Tone, Handsfree Answerback and Speaker Off-hook Call
Announce
➤ Make sure the telephone is idle and the handset is on-hook. Press the 9RO ▲ to
increase volume and
telephone’s ring tone, Han dsfree Answer back and Speake r Offho ok Call Announce
simultaneously.
9RO ▼ to decrease volume. This adjusts volume for your
➤ To adjust handset Beep Tone
1. With the handset off-hook, dial the Beep Tone Adjustment Code
code). You hear busy tone.
2. Press
9RO ▲ or ▼ to reach the desired level.
LCD Contrast Adjustments
➤ Press and hold down the 0LF button, and press and release 9RO ▲ or 9RO ▼
repeatedly.
Each time you press
are eight steps in either direction. To return to the middle setting, repeat the above
step.
9RO ▲ or 9RO ▼, the contrast increases or decreases. There
(default
Strata CTX DKT3000/2000-Series Telephone 05/02 17
Page 32

The Basics
LCD Contrast Adjustments
18 Strata CTX DKT3000/2000-Series Telephone 05/02
Page 33

Advanced Operation 3
This chapter gives you more details about your DKT3000-series or DKT2000-series
telephone’s advanced functions.
Using Your LCD
If your telephone has an LCD, use this section to learn more about its functions.
In its idle sta te, the LCD is a d esk cloc k and cal endar. When you are on an outside call ,
the call duration displays.
A “+” on the LCD readout
(shown at right) indicates there
is more data to display.
➤ Press 6FUROO to advance
through the information.
➤ Press 3DJH to switch from
the Call Forward (CF)
display to the User Name display.
LCD Control
Buttons/Soft Keys
CF-ALL 202-203+
AUG 08 MON 03:56
Mode Page Scroll Feature
5800
Strata CTX DKT3000/2000-Series Telephone 05/02 19
Page 34

Advanced Operation
Soft Keys
Soft Keys
When Soft Keys are on, they replace the functions on the 0RGH, 3DJH, 6FUROO and
)HDWXUH buttons below the LCD. ()HDWXUH is a future feature for DKT3000-series
phones only.) The following table defines Soft Key Prompts.
Table 1 Soft Key Prompts
Soft Key Definition
ABR
ACB
BUSY
CONF
EXEC
EXIT
JOIN
LINE
MESG Sets a message waitin g indi cation at a busy or unanswered station.
OVRD Override s options, busy mode, or overrides Do Not Disturb mode.
PGE Enables you to enter a Pag e Gro up number (01~16).
RING Makes a called station ring when making a voice announce call to the station.
RLS Disconnects a call and returns te le pho ne to the idle state.
RTRN Terminates a feature operation and to return to a previously displayed state.
STA.
Activates Automatic Busy Redial after dialing a busy outside telephone number.
Activates Automatic Cal l bac k af t er rea ching a busy station, CO line, or CO Lin e gr oup.
(Busy Override) Send s a cal l-w aiting tone to a busy station.
Initiates or complet es a conference.
(Executive Override) Breaks into the conversation of a busy called station.
Exits you from a conferenc e; remaining parties are connec ted.
Joins all parties to a conf er ence while on a conference call .
Adds a CO line to an existing c al l wh ile in t he C onference mode. The LC D prompts you to
access a CO line after you pres s t his key.
Adds a station to an existing call while in the Conference mode. The LCD prompts you to dial a
station nu mber after you pre ss this key.
TALK
TRNS
Makes a voice announcement to a called station that is ringing.
Initiates or complet es a Transfe r whi le on a n ou ts id e call. Press once for an imm ediate or
announced transfer, depending on system programming. Pressing TRNS again completes the
transfer.
20 Strata CTX DKT3000/2000-Series Telephone 05/02
Page 35

Advanced Operation
Soft Key Example
When the Soft Key prompts appear on the LCD, the LCD Control Button just below
the prompt offers access to that feature. Here’s an example of how Soft Keys work.
1. When an outside call is in
progress, the LCD appears as
shown on the right.
ABR = Automatic Busy Redial
CONF = Conference
PAGE = Pagin g
Soft Key
Prompts
LCD Control
Buttons/Soft Keys
ABR CONF PGE
Mode Page Scroll Feature
00:01:01
Soft Keys
6060
2. I f you select
CONF (press 3DJH),
the display changes as shown right.
LINE = Add an outside line to the conference
STA = Add another station
RTRN = Return to the original caller without
making a conference
3. You will be prompted to dial the desired station.
The
RTRN Soft Key (press 6FUROO) enables you
to return to the original caller without making a
conference.
Until the call is answered, you see the screen
shown right.
When the call is answered, you see the screen
shown right.
the first par ty to the seco nd.
TRNS = exit the call and transfer
JOIN = create a
conference with you and both other parties.
RTRN = drop the s econd party a nd return to a
two-way conversation with the original party.
LINE OR STATION?
LINE STA. RTRN
Mode Page Scroll Feature
6061
DIAL STATION NO.
RTRN
Mode Page Scroll Feature
6062
CALLING
200
Mode Page Scroll Feature
6063
TALK WITH 200
TRNS JOIN RTRN
Mode Page Scroll Feature
6064
Strata CTX DKT3000/2000-Series Telephone 05/02 21
Page 36

Advanced Operation
Advisory Messages
Advisory Messages
Advisory messaging enabl es you to st ore an in for mative messag e for LCD tele phones
that call your telephone. The messages can be up to 16 characters long. The Strata
CTX provides a number of stored messages, shown in the table below. Message
numbers 5~9 can be defined by your CTX System Administrator.
Msg No. Characters Displayed Additional Digits
0 OUT TO LUNCH
1 IN A MEETING
2 CALL _____________ Directory Number 76345
3 BACK A T ___ ___ ___ _ Time (e.g., 1030)
4 RETURN ON________ Date (e.g., 10 20)
5
6
7
8
9
➤ To set an advisory message
1. Go of f-hoo k or pr ess yo ur ext ension butto n or phanto m direc tory n umber but ton t o
hear dial tone.
Note A phantom directory number button is similar to an extension button that is
shared on other telephones.
2. Press
3. Go on-hook or press
+ Message No. (see table) + any additional digits (such as time, etc.)
6SNU to release the line.
➤ To clear the registered message
1. Go of f-hoo k or pr ess yo ur ext ension butto n or phanto m direc tory n umber but ton t o
hear dial tone.
2. Press
3. Go on-hook or press
.
6SNU to release the line.
22 Strata CTX DKT3000/2000-Series Telephone 05/02
Page 37

Account Code Calls
Account Codes (Forced or Voluntary) can be used for a variety of reasons including
billing, tracking, and line restriction applications. Account Codes are assigned in the
system as a fixed length (default is six digits) and are recorded by the system, along
with the details of the calls, which can be printed on a Station Message Detail
Recording (SMDR) report.
Verified/Non-Verified Account Codes
If programmed for Verified Account Codes, the system checks the account code you
entered against a list created by the CTX System Administrator. The code you enter
must be on the list for the call to proceed. Non-verified account codes must be of a
uniform length specified by the CTX System Administrator.
Forced Account Codes
Some applications require you to enter an Account Code. These Forced Account
Codes may be verified or non-verified, depending upon the application, but in either
case, the caller must enter a code before proceeding.
Advanced Operation
Account Code Calls
➤ To dial using Forced Account Codes
1. Place a call in the normal method.
If the call requires an Account Code, a burst of tone (Success Tone) is heard after
dialing the telephone number alerting you to enter the Account Code.
2. Enter the account number.
When the number of digits designated for account codes has been entered, the
number will be checked against the verified list, if chosen, and the call will
continue as normal. If the number of digits entered for the account code is not
reached or the ver ified code does not mat ch, then r e-order t one is he ard and th e call
is rejected.
You can bypass Forced Account Code requirements with three emergency numbers,
including 911. See your CTX System Administrator for these numbers:
911 2) _______ 3) _______
1)
Strata CTX DKT3000/2000-Series Telephone 05/02 23
Page 38

Advanced Operation
Account Code Calls
Voluntary Account Codes (Verified/Non-Verified)
Voluntary Account Codes are optional. They can be ent ered dur ing a call and are used
for tracking selected cal ls using Station Message Detail Report (SMD R) call detail
recording option.
If the system is set for Verified Account Codes, station users must enter a specific
code when entering t he Voluntary Account Code (s) or th e code i s not va lidat ed for the
SMDR call report. This does not affect the call.
There are two ways to dial using a Voluntary Account Code:
➤ To dial using the Account Code button
1. After accessing a CO line, press the
prompt you to “ENTER ACCOUNT CODE NOW.”
2. Enter the account code digits. The LCD prompt disappears upon entry of the first
account code digit. After the account code is e nte red, the time indicator i s r estored
in the LCD.
3. I f y our st ati on is set for Verified Account Codes, you hear confirmation tone when
the code is valid. If the code is invalid, you hear two short tones.
4. Enter the Account Code. Your conversation is not interrupted.
$FFRXQW&RGH button. LCD telephones
➤ To enter an Account Code using access codes
Note It’s a good idea to warn the other party that you will be disconnected
momentarily when you enter the ac cess code. Once the cod e is entered, you wil l
be connected again.
1. After accessing a CO line, press
interrupted; you and the other party cannot hear each other. You will hear feature
dial tone.
2. Dial
3. Enter the account code digits. The prompt disappears upon entry of the first
. LCD telephones prompt you to “ENTER ACCOUNT CODE NOW.”
account code digit. After the account code is entered, the connection is restored
and the LCD shows the time.
&QI7UQ. Once you press &QI7UQ, your call is
24 Strata CTX DKT3000/2000-Series Telephone 05/02
Page 39

Automatic Busy Redial
After reaching a busy outside number, you can activate Automatic Busy Redial so tha t
the system automatically redials the number at regular intervals. The system repeats
the redial until the destination is no longer busy. This feature may not be on some
telephones on your system.
Automatic Busy Redial is not attempted while your station is busy, but continues to
time-out. The system inserts a pause (P) on your LCD before redialing the number.
➤ To activate Automatic Busy Redial
Advanced Operation
Automatic Busy Redial
1. When you reach a busy number, press
The LED flashes red. You hear confirmation tone.
2. Han g up or press
seconds (depending on system programming). Your telephone receives ring tone
when Automatic Busy Redial dials the number and it is available. The extension
and Spkr LEDs flash green.
3. Lift the handset or press
up the handset or press
connection is made, you hear a muted ring for another 30 seconds, then the call
disconnects.
6SNU. The system redial s, up to five to 20 times, ev ery 30 to 180
6SNU and wait for the party to answer. If you do not pick
6SNU within re call timeout (five to 60 seconds) after a
$XWR%XV\5HGLDO or &QI7UQ + .
➤ To cancel Automatic Busy Redial
➤ Press $XWR%XV\5HGLDO or extension + .
Strata CTX DKT3000/2000-Series Telephone 05/02 25
Page 40

Advanced Operation
Automatic Callback
Automatic Callback
When you reach a busy station, you can set Automatic Callback to have the system
monitor the busy extension and notify you when it becomes idle.
Automatic Callback can also place you in queue for an available outside line, if you
reach a line group in which all lines are busy. When a station or line becomes
available, the system rings your telephone. Then when you answer, it automatically
rings the intended desti nation. The amount of time the system will wait for an idle
destination is set in system programming. Automatic Callback is also known as “CO
Line Queuing.”
➤ To set Automatic Callback
1. If you hear busy tone after dialing an outside line access code or a station number,
$XWR&DOOEDFN or . Busy tone stops, followed by success ton e, the n busy
press
tone resumes.
2. Hang up. You can make other calls while waiting.
3. When the called station or outside line becomes idle, your telephone rings with a
fast LED.
• If you called a busy station, the extension LED flashes green (incoming call)
and the called number displays.
• If you called a busy outside line, the extension LED flashes green (incoming
call rate). The seized line’s number displays.
4. Answer within about three rings (five to 180 seconds, set in programming) to
prevent the callback from being cancelled. After you answer, you hear success
tone, and the LED flashes green (in-use).
If you hear a busy tone after answering a callback, the called party is already on
another call or the line has already been seized or has received an incoming call.
Your req uest is not cance lled. You will be called again the next time a l ine becomes
idle.
If you were attempting to make an outside call, the telephone number is
automatically dialed, including the account code or override codes that were used.
➤ To cancel ACB
➤ Press $XWR&DOOEDFN or extension button + .
26 Strata CTX DKT3000/2000-Series Telephone 05/02
Page 41

Background Music
You can se t b ackground music over your te lephone speaker or over ext er nal speakers.
Up to 16 different music so urces can be applied to th e Strata CTX system: the first
source is Quiet Tone, all others can be music or recorded information.
➤ To enable background music on your telephone speaker
➤ Press the %*0+ n() + %*0, where n is the music sources 1~16
Advanced Operation
Background Music
...or press an extension button +
source 1~16. If the music source is a single digit, press
the source is omitted, then the last selected music source is selected.
+ n + + 6SNU, where n is the music
before pressing 6SNU. If
➤ To cancel background music on your telephone speaker
➤ Press %*0
...or press an extension button + + 6SNU.
➤ To enable background music over your external paging speakers
➤ Press %*0H[W and enter a source number (1~16) to select a music source
...or press an exten sion but ton +
1~16. If the music source is a single digit, press
source is omitted, then the last selected music source is selected.
+ n() + 6SNU, where n is the music source
before pressing 6SNU. If the
➤ To cancel background music over your external paging speakers
➤ Press %*0H[W
...or press an extension button + + 6SNU.
Strata CTX DKT3000/2000-Series Telephone 05/02 27
Page 42

Advanced Operation
Call Forward
Call Forward
System
System Call Forward (which is set in Programming) automatically directs calls to a
predefined location, such as Voice Mail. See your CTX System Administrator to
determine which type of Call Forward you have, as well as the Call Forward location.
Station
Station Call Forward enables you to assign Call Forward destinations for each
extension on your telephone. Each extension can be independently set for a different
Call Forward feature. You can set a Flexible Button to perform any Call Forward
function - see “Programming Feature Buttons” on page 63 for more details. Call
Forward must be set prior to receiving the call.
The following calls to your station can be forwarded:
• Internal calls
• Auto Attendant calls
• Outside lines that ring o nly your station
• Transferred internal or incoming line calls
Call Forward Categories
You can set Call Forward for the following categories o f calls. Within these
categories, you can use five different types of Call Forward Settings.
• Call Forward Any Call – Forwards any call, whether an internal call or incoming
line call.
• Call Forward - Incoming Line – Forward inc oming line cal ls only.
• Call Forwa rd Any Call - Set for Another Station – Enables you to forward all
calls for another telephone within your telephone system.
• Call Forward - Incoming Line Set for Another Station– Enables you to set
forwarding of incoming line calls for another telephone within your telephone
system.
• Call Forward System – Forwards the calls to the destination preset for the entire
telephone system, commonly voice mail.
28 Strata CTX DKT3000/2000-Series Telephone 05/02
Page 43

Advanced Operation
• Call Forward - External Location – Forwards incoming line calls that ring
directly to your extension to a destination outside the system.
You can change your forwarding destination from outside the system using the DISA
feature. See your CTX System Administrator for DISA telephone numbers and
security code access.
Call Forward Settings
• Call Forward All Calls – Forwards all calls immediately.
• Call Forward Busy/Do Not Disturb – Forwards calls immediately when your
extension is busy or in Do Not Disturb (DND) mode.
In Tone-first systems w ith multiple li nes, Call Forward Busy fo rwards calls only
when all line appearances are in use. In Voice-first systems, Call Forward Busy
forwards all calls any time your telephone is in use.
• Call Forward - No Answer – Forwards all calls to your station whenever you do
not answer the call within a designated time (set by you when you enable the
feature).
• Call Forward Busy/Do Not Disturb/No Answer – Forwards all calls to your
station whenever you are busy, in the DND mode, or after ringing and you do not
answer the call within a designated time (set by you when you enable the feature).
Call Forward
• Call Forward Cancel – Cancels the set Call Forward feature. Notice that each
category of Call Forward has a different code for canceling.
Station Call Forward Procedures
The following table contains Call Forward Button sequences. You can do a Call
Forward function by, one, entering the button sequence as described, or two, by
programming a Flexible Button to perform the sequence. See “Programming Feature
Buttons” on page 63 for instructions on programming a Flexible Button.
Some Call Forward features require a Pass Code entry. Use the following procedure to
change your Pass Code.
➤ To change your Pass Code
➤ Press Extension button + + ext. no. + old Pass Code (1~15 digits) + + new
Pass Code (1~15 digits) +
Strata CTX DKT3000/2000-Series Telephone 05/02 29
.
Page 44

Advanced Operation
Call Forward
➤ To use the Call Forward button sequence
➤ Follow the instructions in the following table, shown under “Button Sequence.”
Some features require additional input, such as:
• Destination – If the destinatio n is an out si de number, press
destination. The CTX accepts destination numbers of up to 32 digits.
• Timer – This is a two digit entry representing how long (eight to 160 seconds)
your telephone should ring before forwarding the call. If you enter one digit,
you must press
• Pass Code – A four-digit code established by system programming to prevent
unauthorized changes. The code applies to the station to be forwarded; not to
the station entering the code.
Note In the following table, (Tone) means that a confirmat ion tone will play at that
point in the sequence.
Table 2 Call Forward Procedure
Feature Button Sequence
Call Forward Any Call - Internal and Incoming Line Calls:
Forwards any call, whether an internal call or incoming line call.
All Calls Extension (Ext.) button +
Busy Ext. button +
No Answer Ext. button +
Busy No Answer Ext. button +
Cancel Ext. button +
after entering the single digit.
(Tone) + Dest. No. (Tone)
(Tone) + Dest. No. (Tone) + Timer +
+ Dest. No. + Timer +
(Tone)
(Tone) + Destination No. (Tone)
after entering the
Call Forward - Incoming Line Calls:
Forward incoming line calls only.
All Calls Ext. button +
Busy Ext. button +
No Answer Ext. button +
Busy No Answer Ext. button +
Cancel Ext. button +
(Tone) + Dest. No. (Tone)
(Tone) + Dest. No. (Tone)
+ Dest. No. (Tone) + Timer (Tone) +
+ Dest. No. (Tone) + Timer (Tone) +
(Tone)
30 Strata CTX DKT3000/2000-Series Telephone 05/02
Page 45

Advanced Operation
Call Forward
Table 2 Call Forward Procedure (continued)
Feature Button Sequence
Call Forward Any Call - Set for Another Station:
Enables you to forwa rd all calls for another telephone within your telephone syst em .
All Calls Ext. button +
Busy
No Answer
Busy No Answer
Ext. button +
(Tone)
Ext. button +
+ Timer +
Ext. button +
(Tone)
+
Cancel Ext. button +
(Tone) + ext. no. + Pass Code (Tone) +
(Tone) + ext. no. + Pass Code (Tone) +
(Tone) + ext. no. + Pass Code (Tone) +
(Tone)
+ ext. no. + Pass Code + (Tone) + Dest. No. (Tone) + Timer
(Tone) + ext. no. + Pass Code + (Tone)
Call Forward - Incoming Line Call - Set for Another Station:
Enables you to set forwarding of incoming line calls for another telephone w i t hin your telephone system
All Calls Ext. button +
Busy Ext. button +
No Answer
Busy No Answer
Ext. button +
+ Timer +
Ext. button +
+ Timer +
Cancel Ext. button +
Change Pass Code
Ext. button +
Code (Tone) +
(Tone) + ext . no. + P a ss C ode +
(Tone) + ext . no. + P a ss C ode +
(Tone) + ext. no. + Pass Code +
(T one) + ext. no. + Pass Code + (T one) + Dest. No. (Tone) +
(Tone) + ext. no. + Pass Code + (Tone)
(Tone) + ext. no. (Tone) + old Pass Code + (Tone) + new Pass
+ Dest. No. +
+ Dest. No. +
+ Dest. No. (Tone) +
(Tone) + Dest. No. (Tone) +
(Tone) + Dest. No. (Tone) +
(Tone) + Dest. No. (Tone) +
(Tone)
Call Forward - System:
Forwards the calls to the destination preset for the entir e te le phone system, common ly voice mail.
Activate
Cancel
Strata CTX DKT3000/2000-Series Telephone 05/02 31
(Tone)
(Tone)
Page 46

Advanced Operation
Call History
Call History
Incoming ca lls with Call er ID or ANI information can be optionally recorded into a
rolling list for the station where the call is ringing . The call is placed in the list along
with the number, name (if provided), time and date of the call, and status of the call
(answered, abandoned, or redi rect ed). You can acces s thi s lis t fr om an LCD te lephone
with a flexible
&DOOHU,' button.
➤ To view Call History
➤ When your station is idle, press the &DOOHU,' button. The Caller ID LED lights
green and the latest record displays.
➤ Press 9RO ▲ for the next record; press 9RO ▼ for the previous record.
➤ To view the call date, time and status, press 3DJH (press again to toggle t o call
name/number).
Call Park Orbits
The Call Park feature enables you to hold a call temporarily in a location other than
your telephone. These areas are called orbits. You or another telephone user can
retrieve a parked call from its orbit by specifying the orbit number. You can specify
one of 20 General Park Orbits (7000~7019) or a valid extension number within the
system.
Once you have parked a call in an orbit, you can:
• Hang up and retrieve the parked call at a later time
• Originate another call
• Access a voice paging device to announce the parked call for pickup from another
station
If you park a call and it is not retrieved, it will recall to the parking station and one of
the following occurs:
• If your station is idle when the system Call Park recall timer expires, the parked
call automatically recalls to your station.
• If your station is busy, the parked call camps on.
If you have an LCD telephone, you can let the system automatically select an
available orbit number which displays on your LCD.
32 Strata CTX DKT3000/2000-Series Telephone 05/02
Page 47

➤ To park a call
Advanced Operation
Call Pickup
1. While on a call, pre ss
...or &QI7UQ + . The LED flashes green (consultation-hold).
2. Specify the Park Orbit using one of the following:
• Press
~. The chosen orbit appears on the LCD.
• Enter a vali d extension.
• Press
3. Han g up. Th e cal l er’s extension or line numbe r a nd th e or bit number are shown. If
the parked call is not retrieved within a specified time, the call rings back to your
telephone. When a parked call recalls your telephone, the LCD shows the line or
extension that is recalling and the orbit number.
and the system automatically selects a General Park Orbit between
and the system automatically selects your extension as the orbit.
3DUNLQ2UELW
➤ To retrieve a parked call
1. Press
2. Enter the Orbit Number where the call is parked or
3DUNLQ2UELW
...or press your extension button +.
you are calling. You cannot use
flashes at th e in-use rate when the call is retrieved .
to retrieve a parked call. The extension LED
for the extension from which
Call Pickup
You can pi ck up a call that is ringing another station’s extension, a call placed on hold
at another station and other types of calls. When you pick up an internal call, the
calling station and the called station displays on your LCD.
Group Pickup
Stations can be assigned in system programming to Pickup Groups. As many as 32
groups can be crea ted to enabl e you to ea sily p ick up incomin g (n ew or t ransf erred) or
internal calls that are ringing stations that are in your group or in other groups. This
feature does not pick up held calls. You may belong to more than one grou p. See your
CTX System Administrator for group assignments.
Strata CTX DKT3000/2000-Series Telephone 05/02 33
Page 48

Advanced Operation
Call Pickup
Page/Internal Call Pickup
This feature picks up I nter nal (s tati on to st ation ), Group P age, and Al l Call Page calls.
If these types of calls occur at the same time, the pickup priority is station-to-station
and then Page calls in the order of occurrence. In some systems, this feature can be
applied to pick up All Call Page exclusively.
➤ To perform Call Pickup
1. Press an extension button.
2. Enter a code from the following table.
Table 3 Call Pickup Feature Codes
For Incoming Calls:
Group
Directed Extension
Directed Group
Directory Number
Any External Call
For Calls On Hold: Dialing Description
Local Retrieve
Remote Retrieve
Outside Line Retrieve
Directed Extension
Retrieve
Dialing
+ Primary
Ext. No.
+ Group
No.
+ Ext. No.
+ Primary
Ext. No.
+ Outside
Line No. (1~128)
+ Ext. No.
Description
Picks up a call ringing to a member of your pickup group .
Picks up a call ringing on any l in e appearance of the telephone
specified by its Primary extension number.
Picks up a call ringing to a extension in the specified Pickup
Group.
Picks up a call ringing to the specified extension numb er onl y.
Other lines ringing on the s am e t el ephone are unaffected.
Picks up any incoming out side line call.
Picks up a call held on the tele phone from which it is dialed.
Retrieves a call held on t he t el ephone specified extens io n
number.
Picks up a call held on the spe ci f ie d CO l in e re gar dl ess of the
telephone placing the c al l on hold. M ust enter three digits
(e.g., 007).
Picks up a call held on the spe ci f ied extension number,
regardless of the instr um ent(s) on which it appears.
34 Strata CTX DKT3000/2000-Series Telephone 05/02
Page 49

Notes
• The Primary extension number is the directory number by which the telephone set
is defined. Other, non-primary extension numbers may also appear on the
telephone. By convention, the Primary extension number is assigned to the first
button on a multi-button telephone.
• If more than one call is on hold, the call on the telephone ’s lowest button nu mber is
picked up.
• Ringing calls are picked up over held calls as a priority.
Call Waiting
You can answer a call that is transferred to your station, even when your station is
busy. When another call is camped onto your station, you hear two Camp-on tone
beeps and the extension or Line LED flashes red (on-hold).
If a call is sent to yo ur s ta ti on whe n busy , and your station does not have an extension
button available to receive the call, two camp-on tone beeps are sent to your
telephone. You must disconnect or transfer the existing call to answer the waiting call.
Advanced Operation
Call Waiting
➤ To answer a waiting call by placing the current call on hold
➤ Press +ROG.The existing call is placed on hold. The camped-on line rings your
station (the Line LED flashes green - incoming call)....or if your telephone has the
Auto Hold feature, just press the flashing extension button.
You are conne cted t o the trans ferr ed cal l. The e xtensi on or Line LED f lashe s gree n
(in-use).
Note See your CTX System Administrator to find out if you have Auto Hold.
➤ To answer a waiting call by disconnecting or transferring the current call
➤ Hang up or transfer the existing call; the camped-on call rings your station. The
camped-on line rings your telephone and the Line LED flashes green (incoming
call).
...or press the flashing extension or
camped-on line rings your station (t he Line LED flash es gre en - incomi ng call ).
This disconnects the current call and connects you to the transferred call. The
extension or Line LED flashes green (in-use).
Strata CTX DKT3000/2000-Series Telephone 05/02 35
/LQH. The existing call is placed on hold. The
Page 50

Advanced Operation
Direct Inward System Access (DISA)
Direct Inward System Access (DISA)
Outside callers with tou ch tone telephones can call in to lines programmed for Direct
Inward System Access (DISA) and dial an extension or outgoing line without going
through an attendant or operator. See your CTX System Administrator for details.
1. From outside the system, dial the public telephone number assigned to DISA. The
call will be answered and you will hear CTX dial tone.
If you do not dial within 10 seconds, the line disconnects.
2. When you hear dial tone, dial an extension or an outside line.
3. If you dial an outside destination, you may need to enter a security code provided
to you by the CTX System Administrator. When you hear the tone, enter the
security code. If accepted, the call will proceed.
4. If you receive busy tone and you want to dial another number while the station is
still ringing, press
and repeat Step 2.
Direct Station Selection Buttons (Hotline)
This optional feature enables you to use a '66 button to connect directly to another
station’s line extension. The DSS LED shows the status (idle/busy) of the station and/
or the statio n’s primary extension. For example, a station’s DSS button LED shows
busy (light steady red) when the station is:
• busy on a call on any bu tton
• idle but all appearances of the station’s extension are in use by other stations.
When the station is in DND, the LED flashes red.
➤ To connect directly to another station’s extension
1. When connected to a line or another station, press
The original party is put on-hold. You can call a station even if the DSS LED
shows busy (steady red).
2. Announce the call...or transfer the call by hanging up or pressing
Note You can transfer the call to an id le or busy station.
'66.
5HOHDVH.
36 Strata CTX DKT3000/2000-Series Telephone 05/02
Page 51

Distinctive Ringing
1. Press to enter User Programming Mode.
2. Press a
3. Enter the ringing pitch number:
= Low, = Middle, = High, = Combination
/LQH button. The Line LED is steady green.
Advanced Operation
Distinctive Ringing
4. Lift the handset
to return to idle.
Do Not Disturb
If your station is in Do Not Disturb (DND) mode, internal, external and transferred
calls do not ring your station and Off-hook Call Announce calls are denied. You can
continue to make calls while in the DND mode. When originating a call in DND
mode, you will hear a short burst of interrupted dial tone followed by continuous dial
tone. You can start dialing at any time during either tone.
If you put your Primary extension into DND mode, all calls to that telephone are
rejected. If your extension is set for Call Forward-Busy or Call Forward-Busy/No
Answer, the call is redirected to the forwarding destination immediately.
If you put an extension other than the Primary extension into DND, only calls to that
extension on your telephone will be blocked. Appearances of that extension on other
telephones continue to ring.
➤ To activate DND on your Primary extension
➤ Press 'R1RW'LVWXUE or (he ar Succes s Tone). The LED lights steady red
and DND mode is activated for the entire station.
➤ To activate DND on a non-Primary extension
➤ Press the desired extension appearance and 'R1RW'LVWXUE or (hear
Success Tone). The LED lights steady red and DND mode is activated for that
extension on your telephone.
➤ To deactivate DND
➤ Press 'R1RW'LVWXUE or (hear Success Tone). The LED lights goes out
and DND mode is de-activated.
Strata CTX DKT3000/2000-Series Telephone 05/02 37
Page 52

Advanced Operation
Door Lock(s)
Setting DND for Anot her Extension
➤ To activate DND for another extension
➤ Enter (hear Entry T one ) + the Pr imary ex tensi on of the remote ex ten sion +
the pass code +
(hear Success Tone). This sets DND as if activated by the
Primary extension on the target telephone.
➤ To deactivate DND for another extension
➤ Enter (hear Entry T one ) + the Pr imary ex tensi on of the remote ex ten sion +
the pass code +
(hear Success Tone). This removes DND from the target
telephone.
➤ To change your DND Pass Code
➤ Enter (hear Entry Tone) + ext. no. (hear Entry Tone) + old pass code +
(hear Entry Tone) + new pass code + (hear Succ ess Tone).
If you activate DND while a call is ringing, the ringing stops. The LED continues
to flash on your telephone and ring on other appearances.
Door Lock(s)
Your telephone may have 8QORFN'RRU button(s). Each 8QORFN'RRUbutton is
programmed to unlock a specifi c door . Check wi th your CTX System Administr ator to
find out the locations of your system’s door phones and record them below.
Door Lock No. Location Door Lock No. Location
06
17
28
39
410
5
➤ To unlock a door
➤ Press the specific 8QORFN'RRU button or + the Door Lock Number (see
above table). The door unloc ks for t hre e~30 sec onds (s et in sys tem progr amming).
The Unlock Door LED is lit while the door is unlocked.
38 Strata CTX DKT3000/2000-Series Telephone 05/02
Page 53

Door Phone(s)
Door phones can be used to call phon es selected in system programming. When a door
phone calls, you hear a distinctive ringing tone, one or five times (set in system
programming). You can also call a door phone and monitor the surrounding area.
The number of possibl e door pho nes varies b y Str ata CTX syst em, with up to 24 as th e
maximum for larger systems.
LCD telephones dis pl ay the door phone name ID whe n c al ls ar e made t o or from door
phones. Check with your CTX System Administrator to find out the names and
locations of your system’s door phones and rec ord them below .
Door Phone Name/Location Door Phone Name/Location
Advanced Operation
Door Phone(s)
➤ To answer a door phone call
➤ Lift the handset while the door phone is still ringing. The extension LED flashes
green (in-use) and you are connected to the door phone.
...or to pick up door phone calls ringing someone else’s telephone, press ext ens ion
+ directory number.
+
Strata CTX DKT3000/2000-Series Telephone 05/02 39
Page 54

Advanced Operation
Emergency Ringdown
➤ To call/monitor a door phone
1. With the handset off-hook, press a extension. You hear dial tone and the LED
flashes green (in-use).
2. Press + extension for the door location. A two-way talk-path exists between
your telephone and the call ed door phone. You can audibly monitor the area around
the door phone.
➤ To call from a door phone
1. Press the door phone button and then release it. You hear a distinctive ringing
tone–one or five times (set in system programming).
2. When answered, speak at a normal voice level in the direction of the door phone.
Emergency Ringdown
If a station remains off-hook for a programmable period, it can be automatically
treated as an Emergency Call and directed to an emergency destination. The station
may have partially dialed a number or have dialed no digits at all. Each station is
programmed with its specific emergency ringdown destination.
A station number or a gr oup pilot number can be specified as an eme rgency ringdown
destination. In a private network, the station or pilot number must be in the same
network node. Remote emergency destination and door phones are not permitted.
Language Codes
This feature enables you to change the language sent from the Attendant Console or
from a PC. See your CTX System Administrator to find out if your telephone is
programmed with the ability to change languages.
➤ To change the Language Display
➤ Enter the Change Language access code + the Language Code (see below).
: Englis h date format – MM/DD (/YY)
: British English – DD/MM (/YY)
: French – DD/MM (/YY)
40 Strata CTX DKT3000/2000-Series Telephone 05/02
Page 55

Off-hook Call Announce
Off-hook Call Announce (OCA) enables you to complete a call to a busy digital
telephone. Your telephone must be programmed to ei ther announce aut omatically or t o
announce after you pres s a button on your di al pad . The d estin ation telep hone mu st be
programmed to accept an OCA. The announcement may be deliv ered over the handset
or the speaker.
Handset OCA Announce can oper at e on a ny di gi ta l t el ephone. Speaker OCA requires
the addition of a special circuit board inside the DKT speakerphone.
➤ To make an OCA call
➤ Manual – Dial an extension. When you hea r busy ton e, pres s and, a fter one lon g
tone, you can talk thr ough the spe aker of the de stinati on teleph one. The pers on you
are calling has answering options described below.
➤ Automatic – If your telephone and the extension you are calling have been
programmed for Automatic OCA, you can talk through the speaker of the
destination telephone without hearing the busy tone and without dialing
➤ To answer a Handset OCA call
While you have a call in pr ogr ess, you hear one tone in you r ha ndse t t o i ndi cat e that a
second station is calling.
➤ Press 0VJ to toggle between the new and original callers.
You talk to t he new c aller for as long a s you ho ld down
button, you return to the original caller. In both cases, neither caller can hear the
other. Your LCD indicates which station or CO line you are connected to.
Advanced Operation
Off-hook Call Announce
.
0LF. When you release the
➤ To answer a Speaker OCA call
1. Whi le you have a handse t call in progres s and you hear on e tone, this in dicates th at
a second station is calling. The second caller connects to the speaker in your
telephone. The Spkr LED flashes and t he Mic LED ligh ts . You will be speaking to
the first caller through your handset and the second caller through the microphone.
Press
0LF; the Mic LED turns Off. You will no longer be talking to the second
caller, although he/she can still speak through your speaker.
2. Press
Strata CTX DKT3000/2000-Series Telephone 05/02 41
0LF again to reconnect to the second caller. You can toggle as often as you
choose. If you do not want the firs t caller to hear your con versation wi th the second
caller, cover the mouthpiece of your handset.
Page 56

Advanced Operation
Override Calls
Override Calls
The available override features are:
Busy Override
Ring Over Busy Override enables you to send a muted ring tone to a busy station to
indicate a call is waiting. The Busy Override (BOV) muted ring can be programmed
for each station to be two muted rings only or continued muted rings until the call is
answered. This option applies to the station receiving the muted ring. The muted ring
can be sent to the telephone speaker or to the telephone handset/headset and speaker.
➤ To use Busy Override
➤ After reaching a busy station, press . A muted tone is heard at the busy station,
indicating that a call is waiting. The station number displays.
Do Not Disturb Override
Do Not Disturb (DND) Override lets you send a call waiting tone or ringing to a
station in DND mode to indicate that a call is coming in. Your telephone may be
programmed to block DND Override from other telephones. Your station’s LCD
shows the station you have called is in the DND mode.
OCA is possible to DND stations from stations that are programmed for DND
Override.
➤ To use DND Override
➤ After reaching a station in DND mode, press . A tone signal is heard at the DND
station, indicating a call is coming in. On your station, the LCD shows the station
number you have overridden.
Your LCD displays
Override.
DND OVR DENY, if the station you called denies DND
42 Strata CTX DKT3000/2000-Series Telephone 05/02
Page 57

Advanced Operation
Executive Override
Executive Override enables you to enter an established conversation. Your telephone
can also be programmed to block Executive Override from other telephones.
➤ To perform Executive Override
➤ After reaching a busy station, press
...or, if you have an LCD telephone, use the OVRD Soft Key.
You enter a con ference wit h the busy stat ion and the par ty to whom he was talki ng.
The called parties may hear an optional tone signal prior to your entering the
conversation.
Override Calls
Your LCD displays
Override. If you do not have Override privileges, you will camp on.
EXEC OVR DENY, if the station you called denies Executive
Destination Restriction/Traveling Class Override
Enables a station user to override the Destination Restriction or Traveling Class of a
particular telephone by entering a pre-determined account code.
➤ To use Destination Restriction or Traveling Class Override
1. Press
2. Enter the trunk access code or LCR access code.
3. Dial the external telephone number.
. Confirmation tone plays and the LCD shows “Enter OVR Code.”
Strata CTX DKT3000/2000-Series Telephone 05/02 43
Page 58

Advanced Operation
Paging
Class of Service Overri de
By dialing a Class of Service (COS) Overri de code, a user can change a station’s set of
privileges to one associated with the override cod e. When the ca ll is terminated and
another is attempted from the same station, the original COS is applied. This allows
selected users to override restrictions that are placed on any telephone in the system.
➤ To perform Class of Service Override
1. Access an outside line. You hear dial tone and the LED flashes at the in-use rate.
2. Press
3. Enter the COS Override Code (four digits). You hear dial tone. For security
4. Dial a telephone number.
&QI7UQ + . Dial tone stops. Your LCD prompts you to enter a code.
reasons, the override codes are only available on a selected basis. See your CTX
System Administrator.
Privacy Overrid e
This feature enables you to enter an established call on a line you share with another
telephone. Up to two station users can enter an existing CO line-to-station call (i.e., up
to three stations can be connected to a CO line). You can also use this feature if the
station that is already connected to the CO line is in the Privacy Release mode.
Station users with
appearance to enter their conversations, even if the station entering the conversation is
not programmed for Privacy Override. (see “Privacy” on page 46.)
3ULYDF\5HOHDVH can allow stations with the shared button
Paging
Station users can make page announcements to telephones and external speakers.
Check with your CTX System Adminis trat or to f i nd out t he z one numbers for various
paging groups.
➤ To make a Page Announcement to telephones or external speakers
1. Lift the handset, press extension and enter a paging access code.
2. Make your announcement, then hang up.
44 Strata CTX DKT3000/2000-Series Telephone 05/02
Page 59

➤ To make a Group Page
➤ Press *URXS3DJH and enter the Group number (01~16)
Advanced Operation
Paging
...or press extension +
and enter the zone number.
Answering a Page
➤ To answer a Group Page, lift the handset off-hook, press extension + and
enter the Group number.
➤ To answer an External Group Page, lift the handset off-hook, press extension +
and enter the Group number.
All Call Page
You can make an All Call Page to telephones assigned to the “All Call Page Group.”
Stations are assigned to the “All Call Page Group” in system programming.
➤ To make an All Call Page
1. With the handset off-hook, press
...or extension + . This pages all telephones in the All Call Page Group but,
depending on system programming, you may or may not page external speakers.
2. Make your announcement then hang up.
➤ To answer an All Call Page
➤ Lift the handset off-hook, press extension + .
$OO&DOO3DJH
Emergency Pa ge
An Emergency Page overrides Group Pages or All Call Pages to telephone and
external paging devices.
➤ To make an Emergency Page, lift the handset off-hook, press extension + .
➤ To make an Emergency Page to a group, lift the handset off-hook, press extension
+
and enter the Zone number.
Strata CTX DKT3000/2000-Series Telephone 05/02 45
Page 60

Advanced Operation
Privacy
Privacy
Privacy controls the ability of more than one person to use the same extension or CO
line at the same time. Pri vacy applies to multiple ap pear an ces of extensions, Phantom
extensions, outside Lines and outside Line Group buttons. The application of Privacy
to individual telephones is controlled in system programming.
By default, the system is private. If you are in a conversation, another telephone with
an appearance of the line on which you are talking cannot intrude unless that
telephone has been programmed for Privacy Override. In that event, the other
telephone may enter and leave the conversation at will. If all users are provided with
Privacy Release in Class of Service, the system will function as non-private.
Your telephone may be equipped with a
/LQH
button. On a normally private telephone, 3ULYDF\5HOHDVH allows other
appearances of you line to j oin the conversa tion. On a normally non- private teleph one,
3ULYDF\RQ/LQH allows you to exclude others. The Privacy condition may be
toggled at any time during a conversation. At the end of the conversation, the line’s
privacy condition returns to its original state.
➤ To use Privacy Release
➤ While on a CO line call, press 3ULYDF\5HOHDVH. The LED lights red. The
outside line fla shes at al l appearan ces. When an other s tation us er enters the outsi de
line call by pressing a common outside
To add a third station, press
➤ To set/cancel Privacy
➤ Press 3ULYDF\RQ/LQH to set privacy. The LED lights steady red. Others are
blocked from entering your outside line calls when they press a common
...or press 3ULYDF\RQ/LQH again to cancel the feature. The LED turns Off.
Redial
Use this button to redial the last number dialed from your telephone.
➤ To redial the last number, press 5HGLDO or
3ULYDF\5HOHDVH and/or a 3ULYDF\RQ
/LQH, the Privacy Release LED turns Off.
3ULYDF\5HOHDVH again; the process repeats.
.
/LQH
46 Strata CTX DKT3000/2000-Series Telephone 05/02
Page 61

Speed Dial
Speed Dial enables you to dial a sequence of up to 32 digits with a shorter code. Dial
sequences can include telephone numbers, authorization codes, passwords feature
activation codes and pauses. Speed Dial may be used to originate a call or invoked
after a call is established. There are two types of Speed Dial:
• Station – Your CTX Syst em Admini st ra tor al locates a block of up to 100 personal
speed dial numbers in increments of 10 per telephone. You can create and change
these numbers from your own telephone. You have exclusive use of them. If you
have a DKT3014 large display telephone and want your named station speed dial
numbers to appear on the display, see your CTX System Administrator.
• System – All telephones in your sy stem can s hare a l ist of up to 800 Sys tem Speed
Dial numbers under the exclusive co ntrol of the CTX System Administrator. In
some cases, System Speed Dial will allow you to reach numbers that you would
not be allowed to dial directly from your telephone.
Making a Call Using Speed Dial
There are three ways to begin a Speed Dial Call.
Advanced Operation
Speed Dial
1. Dial
2. Dial the Station or System Speed Dial Number. Station Speed Dial numbers
Strata CTX DKT3000/2000-Series Telephone 05/02 47
...or press 6SGLDO on a DKT3000-series telephone
...or press the
occupy numbers 100~199. Syst em Speed Dia l numb ers oc cupy number s 200~9 99.
6SHHG'LDO feature key on any DKT.
Page 62

Advanced Operation
Speed Dial
Storing a Station Speed Dial Number
There are three ways to store a Station Speed Dial number, including Programming
Mode, Access Codes and through system programming by your CTX System
Administrator.
➤ To store a Station Speed Dial Number using User Programming Mode
1. Press
to enter User Programming Mode. The LCD shows “USER PROG
MODE.”
2. Press the fixed
6SGLDO button or the Speed Dial feature button. The LCD shows
“SPEED DIAL MODE.” If this display does not appear, see your CTX System
Administrator to determine if Speed D ialing memory is assigned to your
telephone.
3. Press
4. Enter the two digits which, combined with the
. The LCD shows “INDEX NUMBER.”
, form the Station Speed Dial
Number.
Example: Entering
would result in storing Station Speed Dial Number .
The LCD shows this number in the upper left corner. If there is already a number
stored, it appears below the Speed Dial Number.
5. Enter the desired destination. It appears in the lower right of the LCD. Instructions
are given below for more complex dialing strings, usually telephone numbers.
6. Press the fixed
6SGLDO button or the Speed Dial feature button. The LCD shows
“DATA PROGRAMMED.”
7. If you want to enter another number, press the fixed
6SGLDO button or the Speed
Dial feature button. The LCD shows “SPEED DIAL MODE.”
8. Pressing
6SGLDO or the Speed Dial feature button again toggles you between User
Programming and Speed Dial mode. Lift and replace the handset to exit User
Programming altogether.
➤ To store a Station Speed Dial Number using an Access Code
1. Dial
2. Dial the Station Speed Dial number (100~199). The LCD shows your digits and
. The display shows “SPEED DIAL” and you hear Entry Tone.
you hear Entry Tone.
48 Strata CTX DKT3000/2000-Series Telephone 05/02
Page 63

Advanced Operation
Note Selected telephones may have the ability to change System Speed Dial
numbers. Follow this procedure but specify a System Speed Dial number
(200~999) instead.
Speed Dial
3. Enter the destination digits, then press
. The LCD shows “SPEED DIAL” + the
Speed Dial Number + destination + #. You hear Success Tone.
4. Release the telephone. To enter another number, repeat the process, starting with
Step 1.
CTX System Administration
The third method of storing station Speed Dial numbers is via your CTX System
Administrator, who can establish your Station Speed Dial number through
administrative software and associate a name with it. This name is used by the
Directory Dialing feature of DKT3014 large display telephones.
Advanced Speed Dial Operatio n
Special Characters
Speed Dial Numbers may include ~, , and Pause. When using the Access Code
input method (see above) it is also necessary to use
entering the destination number. This creates 14 functions to be input from the 12
buttons on the dial pad.
Long Speed Dial Numbers
Speed Dial Numbers are stored sequentially in memory areas capable of holding 32
digits. If you exceed 32 digits, the excess are stored in the next higher area and
consume the next sequential Speed Dial Number.
to indicate you have finished
Y ou can dial the entir e string by enter ing the original Spee d Dial Number and all digits
will be sent, including those in excess of 32. If that were Speed Dial Number 100,
Number 101 would no longer be available. You are not prevented from storing a new
Number 101 but, if you do, Number 100 will be shortened to 32 digits.
Strata CTX DKT3000/2000-Series Telephone 05/02 49
Page 64

Advanced Operation
Tone/Pulse Dialing
The numbers are defined in Table 4:
Table 4 Dial String Characters
Entry Meaning
a
a
0~9
End of Speed Dial Numb er w hen entering via access code (
Escape. “” functions as an escap e key indicating that the number immediately followi ng
represents someth i ng exceptional. When
one Speed Dial digit. Entering
characters.
Pause (1~9) seconds. If you need to pause longe r than nine seconds, enter addi ti onal
pause escape seque nces. For example, to insert a 17- second pause, enter
display of a paus e in t he S pe ed Di al Numb er show s a “P” wit hou t s pec if yi ng t h e dura tion. In
this example, you wo uld see “PP.”
Tone/Pulse Dialing
With some older Central Offices, you may have to make calls on outside lines
programmed for rotary dial pulses. This feature enables you, while on these lines, to
switch to tone dial to access remote equipment (such as an answering machine)
requiring touchtones.
Note With ISDN calls, when 7RQH'LDO6HOHFW is pressed, all of the digits entered
after that point will be sent with touchtones.
is used as an escape char acter, it consumes
to insert a seven-sec ond pause would use two of 32
. The
➤ To change Tone Dialing
1. Access an outside line.
2. Dial a telephone number.
3. While on the call, press
7RQH'LDO6HOHFW. Although the outside line is
programmed for rotary dial pulses, access the outside line and dial the telephone
number like any other call described in this user guide.
The T o ne LED ligh ts steady red and you are a ble to sen d toucht ones wit h your d ial
pad. The feature is cancelled when the call is completed.
50 Strata CTX DKT3000/2000-Series Telephone 05/02
Page 65

Voice Mail - Direct Transfer
The Strata CTX enables you to trans fe r a cal l di re ct ly to a voice mailbox without fir st
ringing that person’s telephone.
➤ To transfer a call directly to Voice Mail (VM)
Advanced Operation
Voice Mail - Direct Transfer
1. While on a call, pre ss
2. Enter
. You hear entry tone.
&QI7UQ. You hear feature dial tone.
3. Enter the VM mailb ox number (usually the sam e as the exten sion number), then
press
. The call transfers immediately and your extension becomes idle.
Voice Mail Soft Keys
This section provides simple definitions of the Stratagy ES Voice Mail Soft Keys.
Once your telephone is connected to your Stratagy ES voice mailbox, the LCD
displays the Stratagy ES Main Menu options shown in Table 5 below.
You are then able to perform many of the standard Stratagy ES voice mail functions
using the Soft Keys on your telephone. Table 6 shows a sample of some of the
available S oft Keys.
For more information on Stratagy ES voice mail features, refer to the Stratagy Voic e
Processing User Guide.
Table 5 Stratagy ES Main Menu Soft Keys for CTX Digital Telephones
DKT 3014 SDL
PLAY MSGS PLAY PLAY Play Messages
DKT 3010 SD
DKT 3020 SD
DKT 2010 SD
DKT 2020 SD
Voi ce Mail Functions
SEND SEND SEND Send Messages
MANAGE MBX MGMT MGMT Manage Mailbox
EXIT
HANGUP QUIT
Strata CTX DKT3000/2000-Series Telephone 05/02 51
Exit Mailbox
Disconnect from Stratagy ES
Page 66

Advanced Operation
Voice Mail Soft Keys
Table 6 Soft Keys for CTX Digital Telephones
DKT 3014 SDL
ACCEPT
ADD ADD ADD Creat e a Guest Mailbox
ADD DESTS Additional Destinations
ADD MBX ADD ADD Add a mailbox to the list
ALL MSGS
AM?
APPEND APND
AUTO COPY
BACK UP
BSY GRT REC
BUSY GREET
CALL SCREEN
CANCEL
CANCEL MSG CANC CNCL
CHANGE
CHG
GREETING
CONT DELETE
CONT PLAY
DATE & TIME DATE
DELAY TIME
DELETE DEL DEL Delete the message/guest mailbox
DELETE MBX DEL DEL
DELETE MSG
DKT 3010 SD
DKT 3020 SD
GRT GRT Change Greeting
DKT 2010 SD
DKT 2020 SD
Vo ice Ma il Fu nctio ns
Confirm automatic copy destination
Copy All Messages
AM
Append recording
Set Automatic Msg Copy
Backup (rewind)
Record Busy Greeting
Select Busy Greeting (toggle)
Change Call Screening (On/Off)
Cancel recording
Cancel message and select new
destination
Change notification digits
Continuous Delete
Continuous Play
Message Date and Time
Set Delay Time
Delete a mailbox from the personal
distribut ion list
Delete message (Future Delivery Review)
52 Strata CTX DKT3000/2000-Series Telephone 05/02
Page 67

Table 6 Soft Keys for CTX Digital Telephones (continued)
Advanced Operation
Voice Mail Soft Keys
DKT 3014 SDL
DESTINATION Enter automatic copy destination
DIRECTORY DIR DIR Directory plus name
DND DND DND Change Do Not Disturb (On/Off)
ENABLE/
DISABLE
DKT 3010 SD
DKT 3020 SD
DKT 2010 SD
DKT 2020 SD
Vo ice Ma il Fu nctio ns
Enable/Disable:
• Notification template (toggle)
• Automatic copy
END TIME
FOLDERS FLDR
FORWARD FWD FWD Forward the current message
FUTURE DLVR
GO FORWARD Go forward (advance)
GUEST MBXES GST GST Manage Guest Mailboxes
IMM ALL FAX SNDN Immediate Fax (all faxes in folder)
IMM THS FAX SND1
MARK PRIVAT PRV PRV Set Private status (On/Off)
MARK
URGENT
MSG
FOLDERS
MSG NOTIFY
MULTI ENTRY MULTI MULTI Multiple Destinations
NAME
RECORD
NEXT NEXT NEXT Play next message
NEXT MSG
NEXT NAME NEXT NEXT Play next name
URG URG Set Urgent status (On/Off)
FLDR FLDR Manage Personal Folders
NAME NAME Record your Name
Set copy End Time
New/Saved message folder
Set Future Delivery, Future Delivery
Review
Immediate Fax (current fax doc)
Change message Notification
Play next message (Future Delivery
Review)
Strata CTX DKT3000/2000-Series Telephone 05/02 53
Page 68

Advanced Operation
Voice Mail Soft Keys
Table 6 Soft Keys for CTX Digital Telephones (continued)
DKT 3014 SDL
PAUSE PAUS PAUS Pause recording
PAUSE PLAY
PER DST LST LIST LIST Manage Personal Distribution Lists
PERSONAL
LIST
PM?
PREVIOUS
PREV MENU PREV
REC
COMMENT
RECORD REC REC Record
REENTER Re-enter automatic copy destination
REENTER
NAM
REPLAY
REPL Y RPLY RPLY Reply to the current message
RE RECORD RREC RREC Re-record
RESET
PWORD
RETRN RECPT RTRC RTRC Set Return Receipt request (On/Off)
REVIEW REVW REVW Review recording/guest mailboxes
REVIEW LIST REVW REVW Review current list
REV OPTIONS
SA VE SAVE SA VE Save the message/recording/c han ges
SAVE MSG Save message (Future Delivery Review)
SECURITY
COD
SELECT NAME PICK PICK Select name
DKT 3010 SD
DKT 3020 SD
LIST LIST Personal distribution list (1~25)
COMM COMM Record a list Comment
REDO REDO Re -enter name or Exi t
RSET RSET Reset Guest Password
CODE CODE Change Security Code
DKT 2010 SD
DKT 2020 SD
Vo ice Ma il Fu nctio ns
Pause playback
PM
Play the Previous message
Return to previous menu
Replay current message
Review Option Settings
54 Strata CTX DKT3000/2000-Series Telephone 05/02
Page 69

Table 6 Soft Keys for CTX Digital Telephones (continued)
Advanced Operation
Call Recording
DKT 3014 SDL
SEND MSG SEND SEND Send and Return to Main menu
SET DAY
SET HOUR
SET MINUTES
SET MONTH
SET YEAR
SPCL FUNCT SPCL
SND ALL FAX FAXN
SND THS FAX FAX1
SPCIAL SEND SPCL SPCL Special Delivery Options
START TIME Set copy Start Time
STOP STOP STOP End recording
URGENT
MSGS
USER OPTNS OPTN OPTN Change User Options
YES Resume playback
DKT 3010 SD
DKT 3020 SD
DKT 2010 SD
DKT 2020 SD
Vo ice Ma il Fu nctio ns
Set the Day (1~31)
Set the Hour (1~12)
Set the Minutes (0~59)
Set up Month (1~12)
Set up Year (last two digits)
Special Functions
Send All Fax (in folder to fax dev)
Send Current Fax (to fax device)
Copy Urgent Messages
Call Recording
While on an active call, a station user can record the conversation and store it in a
Stratagy ES voice mailbox. Recordings can also be paused or restarted. Depending
upon your System Administrator, you are given either a manual method of recording
that allows you to designate the mailbox where the recording will be sent or an auto
method that automatically sends the recording to a predefined mailbox that is assigned
to the phone you are using. This may be your personal mailbox.
Note Ask your System Administrator which method to use when recording a call.
This feature requires the presence of a
button on your telephone. Feature codes are not available.
Strata CTX DKT3000/2000-Series Telephone 05/02 55
5HFRUG and a 365(6 (Pause/Resume)
Page 70

Advanced Operation
Call Recording
Important! Stratagy ES mailboxes have a definable limit on the le ngth one message
➤ To record a call
1. With a call in progress, press
If you are using the auto method, the Record LED flashes rapidly and there is
approximately a one second interval (in extreme busy conditions, up to five
seconds) before the recording starts and the Record LED changes to the in-use
interval flash rate. You are now recording. Continue to Step 3.
...or if you are using the manual method, the Record LED flashes green rapidly.
Continue to Step 2.
2. (Manual method only) If you want to record the call to the predefined mailbox
associated with the phone you are using, press
and there is approximat ely a one second int erval (in ext reme busy condition s, up to
five seconds) befor e the r ecordi ng st arts and th e Recor d LED changes to t he in- use
interval flash rate. You are now recording.
...or if you want to record this call to another mailbox, enter the mailbox number
(usually the extension number). Finish by pressing
rapidly and there is approximately a one second interval (in extreme busy
conditions, up to five seconds) before the recording starts and the Record LED
changes to the in-use int erval flash rate. You are now recording.
3. To stop recording, press
resume recording at this point, you need to begin a new recording, see Step 1.
can be. If you plan on making lengthy recordings, see your System
Administrator so your message recording time can be properly defined.
5HFRUG.
. The Record LED flashes rapidly
.The Record LED flashes
5HFRUG. The LED turns off and the recording stops. To
Pause/Resume Reco rding
You can pause the recording while continuing the conversation by pressing 365(6.
The PS/RES LED flashes red. Your conversation is no longer being recorded.
To resume recording as part of the same message, press the
365(6 button again.
You can pause and resume indefinitely throughout the conversation. The only limit
may be a message length imposed by the voice mail system.
Other Voice Mail Features
Another voice mail feature lets you to include a voice mailbox in a conference call.
See “Adding Voice Mail to a Conference” on page 15. For instructions on the Stratagy
Voice Mail features, re fer to the Stratagy Voice Processing User Guide.
56 Strata CTX DKT3000/2000-Series Telephone 05/02
Page 71

DKT3014 LCD Features 4
This chapter shows how to use the DKT3014-SDL (shown below) large screen
directory display and individual name searches.
5908
DKT3014-SDL Telephone
Mode
FRED S NO. 3371
Page
FEB 19 MONDAY 12:00
DIRECT SS
SYSTEM SD
PERSONAL SD
EXTERNAL DIR
INTERNAL DIR
Q
Msg
Mic
Spkr
Spdial
Redial
Cnf/Trn
Z
Vol
Hold
Feature
Scroll
Strata CTX DKT3000/2000-Series Telephone 05/02 57
Page 72

DKT3014 LCD Features
Directory and Speed Dial Listings
Directory and Speed Dial Listings
The directory menu (idle state) is shown below.
Mode
FRED S NO. 3371
Page
FEB 19 MONDAY 12:00
Scrolling
Directories
Search by
Initials
Direct Station Selection
System Speed Dial
Personal Speed Dial
Direct Station Selection
System Speed Dial
Soft Keys
DIRECT SS
SYSTEM SD
PERSONAL SD
EXTERNAL DIR
INTERNAL DIR
Direct Station Selection
This option displays all named stations in alphabetical order.
1. Press the
the first screen.
2. To view the following page, press the
MORE Soft Key; press PREVIOUS to
page back.
DIRECT SS Soft Key to view
Feature
Scroll
5860
FRED J NO. 3371
MAR 18 MONDAY 01:35
BOB T
DON U
CAROL F FRED M
CUST SERV GRAY W
PREVIOUS MORE
EXIT
3. To select someone from the list, press the
Soft Key next to their name. The system
calls that number.
CALLING
3200
58 Strata CTX DKT3000/2000-Series Telephone 05/02
Page 73

DKT3014 LCD Features
Directory and Speed Dial Listings
System Speed Dial and Per sonal Speed Dial
Using System Speed Dial and Personal Speed Dial is very similar to using Direct
Station Selection, described above.
1. Pr ess the Soft Key next to
2. To view the following pages, press the
SYSTEM SD or PERSONAL SD to view the first screen.
MORE Soft Key; press PREVIOUS to page
back.
3. To select someone from the list, press the Soft Key next to their name. The system
calls that number and displays its directory information.
Internal Directory and External Directory
External D i rectory enables you to search the System Spe ed Dial Numbers
alphabetically (typically, external destinations). Internal Directory enables you to
search all of the intern al name exten sio ns alpha betic ally. This saves time since you do
not have to step through the lists screen-by-screen.
See Table 7 on page 61 for instructions on entering letters, numbers and punctuation
from the dial pad.
1. Press the
DIR
2. Begin by entering the name (see
Table 7) and pressing the
INTERNAL DIR or EXTERNAL
Soft Key to v iew the first screen.
FIND Soft Key.
FRED J NO. 3371
INPUT THE NAME?
EXIT FIND
FRED J NO. 3371
B
LEFT RIGHT
EXIT FIND
Strata CTX DKT3000/2000-Series Telephone 05/02 59
Page 74

DKT3014 LCD Features
Directory and Speed Dial Listings
If you entered “B,” all names beginning
with “B” are listed. You can press the
MORE Soft Keys to view adjacent pages.
3. To select someone from the list, press the
Soft Key next to the name. The directo ry
information displays.
4. Press the Soft Key ne xt to the person or
dept. you wish to call. The system calls
and displays the directory informat i on.
5. Press any key to return to the idle
screen...or, from the directory listing
screen, press
EXIT to return to idle.
Alphanumeric Entry
You can enter alphanumeric
characters from the dial pad
to refine a name search in the
Internal or External
Directory (see example
below and Table 7).
FRED J NO. 3371
B
BAKER G BALL F
BAWLER S BRETON l
PREVIOUS MORE
EXIT FIND
FRED J NO. 3371
00:00:01
CONFERENCE
ABR
PAGE
Example:
Press the for “A.”
Press the again for “B,” etc.
Refer to the table for other characters.
5859
60 Strata CTX DKT3000/2000-Series Telephone 05/02
Page 75

Table 7 Dial Pad Alphanumeric Characters
DKT3014 LCD Features
Directory and Speed Dial Listings
Press Dial
Pad Buttons
-.:,1
ABC ‘ 2
DEF ! 3
GH I &4
JKL*5
MNO# 6
PQRS7
TUV?8
WXY Z 9
()&/0
Number of times to press t he di al pad button
1 2 3 4 5
➤ To add a space or move one character to the right, press the RIGHT Soft Key.
➤ To backspace (delete previous character), press the LEFT Soft Key.
➤ To cycle back to the first letter, continue pressing the LEFT Soft Key.
Strata CTX DKT3000/2000-Series Telephone 05/02 61
Page 76

DKT3014 LCD Features
Directory and Speed Dial Listings
62 Strata CTX DKT3000/2000-Series Telephone 05/02
Page 77

User Programming 5
User programming enables you to change your telephone’s layout/registration and
other settings. With user programming you can re-define Flexible Buttons to perform
other functions.
• Enter numbers in your personal Speed Dial list
• Program One Touch and Flexible Buttons
• Register Call Forward assignments for easy use (max. of four buttons per
telephone)
• Assign Message Waiting Keys
• Assign the background music (BGM) source to be played over the telephone’s
speaker
Note User Programming applies to LCD telephones only.
Programming Feature Buttons
Digital telephone users can use the programming mode for customizing their Toshiba
telephones without the aid of an Administrator or Service Technician. The User
Programming mode is accesse d with a
or through an access code. User Programming enables users to customize these
features:
• Flexible Buttons – Toshiba telephones have 10, 14, or 20 Flexible Buttons to
which the user can assign any one of approximately 50 different features (DND,
ACB, Release, etc.). Once assigned to a button, th e fe at ure is accessed by pressing
that button. Some of the types of feature buttons that users can set on their
telephones include:
Strata CTX DKT3000/2000-Series Telephone 05/02 63
3URJUDP button assigned t o a Flexibl e Button
Page 78

User Programming
Flexible Button Codes
• Call Forward – Users can set the Call Forward (CF) destination and CF-No
Answer Timer for the CF buttons.
• One Touch – Users can set speed dial and custom feature access code
sequences for One Touch buttons.
• Background Music – Users can select Quiet Tone or the music source (up to
15) that will play on their telephone’s speaker when they activate the
button.
Note Directory number and external l ine buttons canno t be added or d eleted, but thei r
ring tones can be individually changed.
In addition to the Programming Mode, an advanced programming function enables
your CTX System Administrator to individually turn On/Off the telephone’s beep
tone, handset call wai ting tone, an d microphone back ground noise c ancellatio n option.
This mode enables LCD contrast adjustment and testing the DKT3014 LCD screen.
User Program mi ng Mode
➤ To enter User Programming Mode, press the 3URJUDP button
%*0
...or dial
LED is steady green.
➤ To exit User Program Mode, press 3URJUDP
… or go off- and on-hook press
Note A DKT equipped with a headset adapter ignores the hookswitch. It can only
. “USER PROG MODE” appears on your LCD. The Program
.
exit User Programming by timing out (approximately 15 seconds).
Flexible Button Codes
Flexible buttons are the unassigned buttons on your keystrip that can be used to store
features. The number of available Flexible Buttons depends on your telephone model
and how the buttons are preassigned by the CTX System Administrator. See pages 3
and 6 for the Flexible Button locations.
The following steps enable you to program features onto Flexible Buttons for onetouch feature access.
64 Strata CTX DKT3000/2000-Series Telephone 05/02
Page 79

User Programming
Flexible Button Codes
Setting/Changing a Flexible Button’s Function
1. Press to enter User Programming Mode.
2. Press
3. Press the Flexible Button to set or change.
4. Enter the Flexible Button Code (see Table 8), plus any optional parameters.
5. Press the same Flexible Button (flashing) to save the setting. “DATA
Table 8 Flexible Button Codes
Account Co de
Automatic Busy Redial - On
Automatic Callback
Background Music
Call Forward (CF) - Any Calls Door Lock Cancel
All Call
Busy
No Answer
Busy No Answer
CF - External (Outside) Calls Paging
All Call
Busy
No Answer
Busy No Answer
Call Park Orbit
Call Pickup Phantom Extension Message Waiting
Incoming - Group Pickup
Incoming - Directed Extension Pickup
Incoming - Directed Group Pickup
Incoming - Directed Extension Pickup
On hold - Local Retrieve
On hold - Remote Retrieve
On hold - Outside Line Retrieve
On hold - Directed Extension Retrieve
Incoming - Any External Call
+ROG.
PROGRAMMED” appears on your LCD.
Feature Code Feature Code
On hold and Incoming
Caller ID
Cancel
Do Not Disturb (On/Off)
DSS Button
Flash - Short
Flash - Long
One Touch Button
Page All Groups
Page Individual Groups
Emerg. Page - Individ. Group
Emerg. Page - All Groups
Answer Page - All Groups
Privacy
Privacy Release
Night Transfer
Record to VM
Pause/Resume recording
Release Button
Release/Answer
Speed Dial
User Programming Mode
Strata CTX DKT3000/2000-Series Telephone 05/02 65
Page 80

User Programming
One Touch Buttons
One Touch Buttons
One T ouch butt ons can be used for storing fr equently us ed feature s or dialed numbe rs,
such as Speed Dial numbers (use Speed Dial Codes to store additional numbers). Onetouch buttons can be preassigned to your telephone – your System Administrator can
help you identify them.
If you do not have a One Touch button, but you have an avai lable Flexi ble but ton, yo u
can convert the Flexible button to a One Touch button. Perform the procedure called
“Setting/Changing a Flexible Button’s Function” on page 65 (in Step 4, enter the
access code for One Touch button). Once you have created a One Touch button, you
can change the function by using the following procedure.
Changing a One Touch Button
1. Press to enter User Programming Mode.
2. Press the One Touch button to be set.
3. Ent er t he dig its o r spec ial b utt ons f or the funct ion t o be di aled. You can include the
following in the dial stri ng:
• Dial pad digits
• A maximum of 32 characters.
• Station and System Speed Dial index (or bin) numbers can be entered. The
Speed Dial index number will automatically dial out on the extension or Line
programmed on the One Touch button with the associated Speed Dial index
number.
• Function buttons, except One Touch or a
• Handset hooking (on-hook/off-hook) cannot be recorded.
4. Press the One Touch button to save the entry.
We suggest writing the name or number of the One Touch button on your button
strip.
~.To program special characters, see Table 9.
3URJUDP button.
66 Strata CTX DKT3000/2000-Series Telephone 05/02
Page 81

Table 9 Special Characters
Entry Meaning
User Programming
One Touch Buttons
+
a
Indicates “stop.” The One Touc h button blinks rapidly and sto ps the del ivery of the remaining
+ROG
digits in th e string unti l it is pressed again. Multiple “stops” can be programmed into one string.
Pause (1~9) seconds. If you need to pause longer than nine seconds, enter additional pause
escape sequences. For example, to insert a 17-second pause, enter
pause in the Speed Dial Number shows a “P” without specifying the duration. In this example, you
would see “PP.”
To Use a One Touch Button
➤ Press the One Touch button.
Setting/Changing a Personal Speed Dial Code
See “Storing a Station Speed Dial Number” on page 48.
. The display of a
Strata CTX DKT3000/2000-Series Telephone 05/02 67
Page 82

User Programming
Feature Codes
Feature Codes
Feature Access Codes are entered as a sequence on your telephone to use a particular
feature.
Table 10 Feature Access Codes
Feature Feature Access Code Sequences
Account Code
Attendant Console
Automatic Busy Redial - On
Automatic Busy Redial - Off
Automatic Callback Cancel
Background Music
Telephone Speaker On Ext. button +
Telephone Speaker Off Ext. button +
External Speaker On Ext. button +
External Speaker Off Ext. button +
Call Forward - Any Calls (Internal and External)
All Call Ext. button +
Busy Ext. button +
No Answer Ext. button +
Busy No Answer Ext. button +
Cancel Ext. button +
Call Forward - Incoming Line Calls
All Call Ext. button +
Busy Ext. button +
No Answer Ext. button +
Busy No Answer Ext. button +
Cancel Ext. button +
&QI7UQ
+
+ Account code digits
+ source number +
+ source number +
+ Dest. No
+ Dest. No.
+ Dest. No. + Timer +
+ Dest. No. + Timer +
+ Dest. No.
+ Dest. No.
+ Dest. No. + Timer +
+ Dest. No. + Timer +
68 Strata CTX DKT3000/2000-Series Telephone 05/02
Page 83

Table 10 Feature Access Codes (continued)
Feature Feature Access Code Sequences
Call Forward Any Call - Set for Another Station
All Call Ext. button +
Busy Ext. button +
No Answer
Busy No Answer
Cancel Ext. button +
Call Forward - Incoming Line Call - Set for Another Station
All Calls Ext. button +
Busy Ext. button +
No Answer
Busy No Answer
Cancel Ext. button +
Change Pass Code
Call Forward - System
Activate
Cancel
Call Park
Activate
Retrieve Ext. button +
System Orbits
Call Pickup
Incoming - Group Pickup Ext. button +
Incoming - Directed Exte ns io n Pi ck up Ext. button +
Incoming - Directed Gr oup Pickup Ext. button +
Ext. button +
+ Timer +
Ext. button +
+ Timer +
Ext. button +
+ Dest. No. + + Timer +
Ext. button +
+ Dest. No. + + Timer +
Ext. button +
Code +
&QI7UQ
~
User Programming
Feature Codes
+ ext. no. + Pass Code +
+ ext. no. + Pass Code +
+ ext. no. + Pass Code + + Dest. No. +
+ ext. no. + Pass Code +
+ ext. no. + Pass Code +
+ ext. no. + Pass Code +
+ ext. no. + Pass Code +
+ Dest. No. + + ext. no. + Pass Code +
+ Dest. No. +
+ ext. no. + Pass Code +
+ ext. no. + old Pass Code + + new Pass
+ ext. no. + Pass Code +
+ Orbit Number
+ Orbit Number
+ Ext. Number to be picked up
+ Group Number to be picked up
+ Dest. No. +
+ Dest. No. +
+ Dest. No. +
+ Dest. No. +
+ Dest. No. +
Strata CTX DKT3000/2000-Series Telephone 05/02 69
Page 84

User Programming
Feature Codes
Table 10 Feature Access Codes (continued)
Feature Feature Access Code Sequences
Incoming - Directed Exte ns io n Pi ck up Ext. button +
On hold - Local Retrieve Ext. button +
On hold - Remote Retrieve Ext. button +
On hold - Outside line Retrieve Ext. button +
On hold - Directed Extension Retrieve Ext. button +
Incoming - Any External Call Ext. button +
Conferencing - Three Way
Dialing
Dial
Dial
DISA Security Code - Change
Do Not Disturb
Local - On
Local - Off
Remote - On
Remote - Off
Door Lock Control
Door Phone Calling
Emergency Call
Flash - Short
Flash - Long
LCD Language (Change)
LCR (Outgoing Call)
Message Waiting (MW)
Release a received MW
Retrieve a received MW
Code (1~15 digits) +
+ Ext. Number
+ Remote Ext. No.
+ Line on hold
+ Ext. No. on hold
+ old Security Code (1~15 digits) + + new Security
+ ext. no. + Pass Code Number+
+ ext. no. + Pass Code Number+
+ Door Lock Number
+ Door Phone No.
+ Language No.
70 Strata CTX DKT3000/2000-Series Telephone 05/02
Page 85

Table 10 Feature Access Codes (continued)
Feature Feature Access Code Sequences
Activate MW at another Station
without Ringing
Cancel MW at another Station
without Ringing
+ Ext. no.
+ Ext. no.
Messaging - Advisory
Advisory Message - Activation
Advisory Messag e - Cancellation
Network Access Code (Private
Network)
Night Ring Answer
Off-hook Call Announce (Manual
Mode)
Override
Busy, Do Not Disturb
Executive
Paging
Page All Groups
Page Individual Grou ps
Emergency Page - Individual Group
Emergency Page - All Groups
Answer Page - All Groups
Answer for External Group Page
Repeat Last Number Dialed
+ Private Network No.
Voice First:
+ Group Number
+ Group Number
+ Message No.
; Tone First : , , or
+ Zone Number
User Programming
Feature Codes
Strata CTX DKT3000/2000-Series Telephone 05/02 71
Page 86

User Programming
Feature Codes
Table 10 Feature Access Codes (continued)
Feature Feature Access Code Sequences
Speed Dial Register
Station (00~99)
System
Start Application
Substitution of Dial “”
Substitution of Dial “”
Travelling Class Override
Enter Code
Change Code
User Programming Mode
Voice Mail (VM)
Direct Transfer to Voice Mail
Volume Control - Beep
Volume Control - Ringing
+ Index Number (00~99)
+ Index Number ( 000~099)
+ Index Number ( 100~199)
+ Index Number ( 200~299)
+ Index Number (300~399)
+ Index Number ( 400~499)
+ Index Number ( 500~599)
+ Index Number ( 600~699)
+ Index Number ( 700~799)
+ Index Number + old Code + + new Code +
+ Ext. Number
72 Strata CTX DKT3000/2000-Series Telephone 05/02
Page 87

LED Indicator Details
Each line and feature button has a LED next to it which indicates the status of the line
or feature associate d with the button. Lin e LEDs light red or green and f lash at varying
rates to ind icate call status (see Table 11).
Table 11 LED Indicators
User Programming
LED Indicator Details
LED
Extension In-Use
(access outside line)
Incoming Call
(while ringing)
Hold (outside line) If using 3RROHG/LQH
*US, the hold indication is only at the station
that places the call on hold.
Hold – Consultation
(during consultation/transfer to another
station)
Hold – Exclusive (outside line)
Hold – Recall
(when held call recalls your idle station)
Hold – Exclusive Recall
Internal Call
(while station ringing)
Busy Station Transfer
(outside call transfer re d t o your busy station
from a designated station or AA)
Your Sta tion ( Green) Other Station (Red)
Interval Rates
2 seconds On, 1/8 se cond Off
— 1/8 second On/Off
1 second on at 10 pulses /
second —1 seco nd Off
4 pulses/second for 1/8 second
On/Off
10 pulses/second steady
10 pulses/second steady
1 second at 2 pulses/second,
1 second at 10 pulses/second
1 second at 2 pulses/second,
1 second at 10 pulses/second
Your extension button flashes
10 pulses/second—1 second
Off
4 pulses/second, 1/8 seco nd
On/Off
steady
one second On/Off
1/2 second On/Off
flashes
steady
[SDN] red flashing or
green ringing
3/4 second on, 1/8 second
Off
After disconnecting fi rs t ca ll.. . 10 puls es/second 2 pulses/sec ond
Conference 10 pulses/second steady
Strata CTX DKT3000/2000-Series Telephone 05/02 73
Page 88

User Programming
LED Indicator Details
74 Strata CTX DKT3000/2000-Series Telephone 05/02
Page 89

DADM/DSS Console 6
This chapter provides an overview of the following two optional units and describes
the features, buttons and associated LEDs. There’s a 3000-series and 2000-series
model for each of these units.
• Digital Add-on Module (DADM) – adds 20 line/feature buttons to digital
telephones. Up to two DADMs can be connected to a telephone.
• Direct Station Selection (DSS) Console – adds 60 l ine/feature buttons to a digital
telephone. Available for system operators who do not have an attendant console.
Strata CTX DKT3000/2000-Series Telephone 05/02 75
Page 90

DADM/DSS Console
DADM
DADM
Digital add-on Modules (DADM) can be connected to both the 3000- and 2000-series
telephones to provide additional buttons.The 3000-series telephone requires a 3000series DADM; the 2000-series telephone requires a 2000-series DADM.
The DADM3020 model, is shown below, right. The DADM2020 (not shown) looks
similar and has the same functions.
Buttons and LEDs
The buttons can be programmed for Direct
Station Selection (DSS), outside line access,
and Station or System Speed Dial. Directory
Numbers or other functions cannot be
assigned to DADMs.
Each DSS button and
/LQH button has an
LED that provides a status of the outside line
or station assigned to it. The DSS button acts
like a speed dial button to a specific
extension.
• A station or line shows stead y red when in
use by others; green when in use by the
DADM.
• A DSS LED will flash red whil e maki ng a
call and turn intermittently green once
connected.
• An outside Line LED is green when the
outside line is in use by the DADM
console user. It is red if it is in use by
another telephone user.
Note Button numbers in the figure to the
right are examples only.
209
219
208
218
207
217
206
216
205
215
204
214
203
213
202
212
201
211
200
210
229
239
228
238
227
237
226
236
225
235
224
234
223
233
222
232
221
231
220
230
First DADM Second DADM
2038
76 Strata CTX DKT3000/2000-Series Telephone 05/02
Page 91

DSS Console
The Direct Station Selection (DSS)
console operates alongside of a digital
telephone to provide 60 additional
buttons. The 3000-series telep hone
requires a 3000-series DSS; the 2000series telephone requires a 2000-series
DSS. An example of the DDSS3060 is
shown right. The DDSS2060 (not
shown) looks similar and has the same
button/LED functions.
The buttons can be programmed as
DSS, outside Line, All Call Page, Night
Transfer, and Station or System Speed
Dial. LEDs on the DSS light or flash
red or green, depending on the status.
Note Button numbers in the above
figure are examples only.
DSS Buttons
DADM/DSS Console
DSS Console
NT
239
219
209
218
208
217
207
216
206
215
205
214
204
213
203
212
202
211
201
210
200
229
238
228
237
227
236
226
235
225
234
224
233
223
232
221
231
221
230
220
249
AC
248
257
247
256
246
255
245
254
244
253
243
252
242
251
241
250
240
2039
DSS buttons can appear on both the DADM and DSS Console. Each DSS button is
associated with a particular statio n in your t elephone s ystem. DSS butt ons can tr ansfer
an outside call to the associated station or make a direct call to the associated station.
The DSS LED lights steady red when the station associated with the DSS button is
ringing, busy on a call, or when t he associated st ation is idle , but all appearanc es of the
station’s extensions are busy or in-use by other stations. When the associated DSS
button is in the Do Not Disturb mode, the LED blinks red at a slow rate.
DSS buttons cannot call statio n Phant om exte nsion numbers, Distributed Hunt Group
Directory Numbers, or ACD Groups. DSS buttons may be configured as One Touch
Buttons that may be programmed to call these destinations
Features
The LED colors described in this section apply to the DADM3020 and DDSS3060.
Described Flash conditions apply to all DSS console models and the DADM.
Strata CTX DKT3000/2000-Series Telephone 05/02 77
Page 92

DADM/DSS Console
DSS Console
Calling a Station
➤ To call a stati on’s extension fr om either a DSS console or a DADM, press th e DSS
associated with the station.
A station call with a DSS button can be made on-hook or of f-h ook, and with Voice
First or Tone signaling. After pressing the button, treat the call like any other
station call made from a digital telephone.
DSS LEDs indicate whether the associated station is idle or busy. The LED is
steady red if the station is busy or ringing, and is not lit if idle. If all the station’s
PDN buttons are being used by other stations, the DSS LED of the station is lit
steady red, but the statio n may be idle. If the stat ion is in the Do Not Dis turb mode,
its DSS LED lights blinking red.
Transferring to an Idle Station
You can transfer internal or outside calls to an idle station from either a DSS console
or a DADM.
➤ To transfer a call to an idle station
1. Press the DSS button corresponding to the station to be called.
The call is placed automatically on hold. The Li ne or extension LED flash es green
at double the on-hold rate, and the DSS LED flashes green. You hear a single ring
tone. (If using the Tone signaling mode, you hear successive ring tones.)
2. Announce the call.
With Tone signaling, you would have to wait for the call ed stat ion to ans wer bef ore
announcing the call.
3. Hang up.
The call rings the called station when you hang up. While the called station is
ringing, the DSS LED is stead y red, and t he Line LED fl ashes gr een at the on-ho ld
rate or if on a extension button, it goes idle.
When the called station answers the call, the DSS LED stays steady red, and the
Line LED becomes steady red.
4. If the station does not answer before a period set in system programming, the call
recalls your station.
78 Strata CTX DKT3000/2000-Series Telephone 05/02
Page 93

DADM/DSS Console
Call Transfer with Camp-on
You can transfer a call to a busy station from either a DSS console or an DADM. Use
the DSS to transfer th e call , even t hough th e DSS LED a ssoci ated wit h the s tati on you
are “transferring to” is red.
➤ To transfer call to a busy station
1. Press DSS corresponding to the busy station to be called.
You may hea r a busy tone. The original cal le r is placed automaticall y on hold. The
Line or extension LED flashes gre en at doubl e the on- hol d ra te, an d the DSS LED
remains steady red.
2. Hang up.
The call rings the called station once with the camp-on tone. While the called
station is receiving this tone, the Line LED flashes green (on-hold rate) or if you
are on a extension button, it goes idle. The [DSS] LED remains steady red.
When the called station ans wers the tra nsferred call, the Line LED beco mes steady
red. The [DSS] LED remains steady red.
Note If the busy station is in the Do Not Disturb mode, the call will not transfer, but
will recall your telephone immediately.
DSS Console
If the call is not answe red aft er a sp eci fied Re call t ime set in syst em progra mming,
camp-on is cancelled and the transferred call rings back.
Call Answering (Outside Line)
If your DADM or DSS console is equipped with a /LQH button, you can answer
outside line calls from the DADM or DSS console as you would from a digital
telephone.
➤ To answer an incoming outside line call to a DADM or DSS Console, press the
flashing
/LQH.
Speed Dial
Your DADM or DSS console may be equipped with 6' (Speed Dial) but tons tha t can
be programmed to dial telephone numbers or to access features.
the DADM or DSS console function like
Strata CTX DKT3000/2000-Series Telephone 05/02 79
6' buttons on digital telephones.
6' buttons on either
Page 94

DADM/DSS Console
DSS Console
Paging
You can make an announcement page to a group of telephone speakers selected in
system programming with
on either the DSS console or the DADM can be used for page announcements. See
“All Call Page” on page 45.
$OO&DOO3DJH on the DSS console. 6' (if programmed)
Call Forward Override (DSS Override)
Either the DSS buttons on your DSS console or the associated telephone can be set in
system programming to ring stations that are in the Call Forward mode, instead of
being forwarded. Usually the console’s telephone is the unit activated to perform this
function. Among other applications, this feature can be used to notify a person who
forgets to deactivate the Call Forward feature after returning to the office.
➤ To override call forward with the console’s associated telephone
1. Press
2. Dial the station number set for call forward.
&QI7UQ or extension button.
Make the call as you would from any other station. This procedure assumes your
station has a typical program setting.
➤ To override call forward with your DSS Console
➤ Press the station DSS button set for Call Forward.
Night Transfer Button
This button enables a pre-programmed station to place the system into Day, Day2 or
Night Mode . See your System Administrator for information on the settings for Day,
Day2 or Night Mode. Usually, these modes will transfer calls to a designated location
or voice mailbox, depending on programming.
1. Press
2. Press the desired Mode number:
1LJKW7UDQVIHU.
• Press
• Press
• Press
for Day Mode (LED remains off).
for Day2 Mode (LED flashes red).
for Night Mode (LED is solid red).
80 Strata CTX DKT3000/2000-Series Telephone 05/02
Page 95

Centrex Application A
Your system may be equipped with the Centrex Application, which enhances its
feature capability when installed behind a Centrex or PBX system. Your telephone
may have access to one or more of the enhanced Centrex features listed below:
Flexible Directory Numbering
A station’s extension can be three o r four digits. It is, therefore, possible to match a
station’s extension and Centrex line extension number. Dial the entire station number
when indicated.
Note Some access code numbers may hav e been changed to av oid system numb ering
plan conflicts.
Centrex Feature Buttons
You can acce ss some Cent r ex fe at ures by pressing a pre-progr ammed Flexible Button
on your telephone, instead of dialin g a Centrex ac cess cod e. The Centre x access code,
including the necessary flash and/or pause sequence, is activated when the button is
pressed. See your Centrex or PBX operations manual for specific details.
Ringing Repeat
The distinctive ring patterns available in your Centrex system are automatically
repeated with your digital telephone, enabling you to answer appropriately for either
outside, inside or callback calls.
Strata CTX DKT3000/2000-Series Telephone 05/02 81
Page 96

Centrex Application
Delayed Ringing
Delayed Ringing
Outside line or Centrex line(s) can be programmed for a 12-second and/or 24-second
ring delay at stations to permit alternate answering conditions. Answer the line when
your telephone is ringing.
82 Strata CTX DKT3000/2000-Series Telephone 05/02
Page 97

Button Labels B
All Flexible Buttons must be programmed for your t el ephone in system programming
and vary for individual telephones. If a button does not appear on your display or
telephone keystrip label, see your CTX System Administrator for button assignments.
The button labels in Table 12 are for the Programmable Buttons on your telephone.
Programmable buttons are the unmarked buttons on your keystrip.
Table 12 Feature Button Definitions
Button Definitions
$FFRXQW
&RGH
$OO&DOO
3DJH
$XWR%XV\
5HGLDO
$XWR
&DOOEDFN
&DOO)UZG
$OO&DOOV
&DOO)UZG
%XV\
&DOO)UZG
%XV\1$QV
Account Code – Press to enter a Voluntary Account Code anytime during a Central
Office (outside) line call without interrupting the conversation.
All Call Voice Page – Press to page all of the telephones in the All Call Page group.
Automatic Busy Redial – Press to set up Automatic Busy Redial after receiving a busy
tone on a dialed outside line call (not available when calling on Tie or Direct Inward
Dialing (DID) outside lines).
Automatic Callback – Press to recall a busy s t a tio n or station in the Do Not Disturb (Do
Not Disturb) mode as so on as that station becomes idle or deactiva tes Do N ot D i stu rb.
Also used for outside line queuing when all lines are busy.
Call Forward-All Cal ls – Press to forward all calls to another station or voice mail
device.
Call Forward-Busy – Press to forward calls imme diatel y to an other s tati on or v oice m ail
device when your station is busy or in the D o Not Disturb mode.
Call Forward-Busy/No Answer – Press to forward calls immediately to another station
or voice mail d evice whe n your st atio n is busy or in Do Not Distu rb mode. Also forw ards
calls when your station is not answered after 8~60 seconds (set at your station).
Strata CTX DKT3000/2000-Series Telephone 05/02 83
Page 98

Button Labels
Delayed Ringing
Table 12 Feature Button Definitions (continued)
Button Definitions
&DOO)UZG
1R$QVZHU
&DOO)UZG
([WHUQDO
&DOOHU,'
'LUHFWHG
3LFNXS
'R1RW
'LVWXUE
'66
)ODVK
*URXS
3LFNXS
/LQH
0VJ:DLW
1LJKW
7UDQVIHU
3DUNLQ
2UELW
3RROHG/LQH
*US
3ULYDF\RQ
/LQH
3ULYDF\
5HOHDVH
3URJUDP
Call Forward-No Answer – Press to forward calls to anot her st ation or v oice ma il device
when your station is not answered after 8~60 seconds (set at your station).
Call Forward-External – Press to forward Private or DID line calls to an external or
internal telephone number.
Caller ID – Press to view the Call History list (may include name/number, date, status).
Call Pickup – Press to initiate a ringing Directed Call Pickup of outside line, extension,
and page calls.
Do Not Disturb – Press to lock your station in or out of the Do not Disturb mode.
Direct Station Selection(s) – Press to ring a preselected station. The LED associated
with each DSS button provides the status (idle/busy) of the station assigned to the
button.
Flash – Press to perform the following functions: Disconnect and recall dial tone on a
outside line; access Centrex or PBX features; enter a pause or flash signal when
programming speed dial numbers.
Group Pickup – Press to pick up a call th at is ringi ng a st a t io n tha t belo ngs to a Pick up
Group that your station is a member of.
Line – Press to answer or access an outside line.
Additional Messages Waiting
Press to cont rol the system’s outside line ringing pattern for after-hours incoming calls.
Park – Press to park internal or outside calls in an orbit. Call retrieval can be made
locally from the same parking telephone or remotely from a different telephone.
Pooled Line – Press to acces s an avai lable outsi de li ne from a g roup o f line s app earing
under one button.
Privacy – Press to block Privacy Overri de on co mmon outsi de lin e buttons . This butto n
does not block Busy Override or Executive Override.
Privacy Release – Press to release privacy on common outside line buttons, enabling
other station users to enter your conversations on those buttons. Privacy release does
not apply to common extension buttons which are always private.
Program – Press to enter User Programming mode, which enables you to re-define
Flexible Buttons to perform other functions, including programming One Touch and
Flexible Buttons, register Call Forward assignments, assign Message Waiting Keys
and assign BGM sources played over the telephone speaker.
84 Strata CTX DKT3000/2000-Series Telephone 05/02
Page 99

Table 12 Feature Button Definitions (continued)
Button Definitions
365(6
5HFRUG
5HOHDVHDQG
$QV
5HOHDVH&DOO
6'RU
&XVWRPL]HG
%XWWRQ
6SG'LDO/QJ
3DXVH
6SG'LDO
3DXVH
6WDUW
6XE
7HO6HW
0XVLF
7RQH'LDO
6HOHFW
8QORFN'RRU
Pause/Resume – Press to pause or resume recording a conversation to a voice
mailbox or when playing back the recording.
Record to Voi ce Ma il – Press to record current conversation to voice mailbox.
Release and Answer – Pre ss to d iscon nect or co mplete t he tran sfer t he cu rrent outside
or extension call an d aut om ati cal ly ans wer the new incoming outside o r exte ns ion ca ll.
Release – Press to disconnect or complete the transfer of the current outside or
extension call and to place your sta tion in the idle conditio n.
Speed Dial – Press to Speed Dial a telephone number or feature access codes. SD
buttons can be used as either System Speed Dial numbers or Station Speed Dial
numbers.
Pause (Long) – Press to insert a 10-second pause when programming Speed Dial
numbers.
Pause – Press to set eith er a one-ha lf or two-second pause w hen program ming Spe ed
Dial numbers. (The pause time is set in system programming).
Start – Press to make an outgoing call using an ISDN trunk.
Sub address – Press to enter a sub address on an ISDN trunk outgoing call.
Background Music – Press to turn Background Music on or off over your station
speaker.
Tone – Press to change the outgoing dia ling of th e ou tside l ine in use from dial pu lse to
tone signaling.
Door Unlock – Press to unlock a door lock mechanism.
Button Labels
Delayed Ringing
Strata CTX DKT3000/2000-Series Telephone 05/02 85
Page 100

Button Labels
Delayed Ringing
86 Strata CTX DKT3000/2000-Series Telephone 05/02
 Loading...