

Page 1
Telecommunication Systems Division
Digital Business Telephone Systems
DKT2204-CT/DKT2304-CT
Cordless Digital Telephones
User Guide
June 2005
Page 2

Publication Information
Tosh ib a A mer ica Information Syst ems, Inc.,
Telecommunication Syst ems D ivision, reserves the right,
without prior notice, to revise this information publication for
any reason, including, but not limi te d to , ut iliz a ti on of ne w
advances in the state of technical arts or to simply change the
design of this document.
Further, Toshiba America Information Systems, Inc.,
Tele commu nica ti on Sy st ems Divis ion , also r es erv es t he r igh t,
without prior notice, to make such changes in equipment
design or components as engi neering or manufacturing
methods may warrant.
CTX-UG-CRDLS-VA
4016233
Version A, June 2005
© Copyright 2005
Toshiba America Information Systems, Inc.
Telecommunication Systems Division
All rights reserved. No part of this manual , cove re d by t he
copyrights hereon, may be reproduced in any form or by any
means—graphic, electronic, or mechanical, including
recording, taping, photoc opying, or information retriev al
systems—without express written permission of the publisher
of this material.
Strata is a registered trademark of Toshiba Corporation.
Stratagy is a regist e r ed trademark of Toshiba Amer ica
Information Systems, Inc.
Trademarks, registered trademarks, and service marks are the
property of their respective owners.
Page 3

TOSHIBA AMERICA INFORMATION SYSTEMS, INC. (“TAIS”)
A
A
w
A
Telecommunication Systems Division License Agreement
IMPORTANT: THIS LICENSE AGREEMENT (“AGREEMENT”) IS A LEGAL AGREEMENT BETWEEN YOU (“YOU”) AND TAIS. CAREFULLY READ THIS LICENSE AGREEMENT. USE OF ANY
SOFTWARE OR ANY RELATED INFORMATION (COLLECTIVELY, “SOFTWARE”) INSTALLED ON OR SHIPPED WITH A TAIS TELECOMMUNICATION SYSTEM PRODUCT OR OTHERWISE MADE
VAILABLE TO YOU BY TAIS IN WHATEVER FORM OR MEDIA, WILL CONSTITUTE YOUR ACCEPTANCE OF THESE TERMS, UNLESS SEPARATE TERMS ARE PROVIDED BY THE SOFTWARE
SUPPLIER. IF YOU DO NOT AGREE WITH THE TERMS OF THIS LICENSE AGREEMENT, DO NOT INSTALL, COPY OR USE THE SOFTWARE AND PROMPTLY RETURN IT TO THE LOCATION
FROM WHICH YOU OBTAINED IT IN ACCORDANCE WITH APPLICABLE RETURN POLICIES. EXCEPT AS OTHERWISE AUTHORIZED IN WRITING BY TAIS, THIS SOFTWARE IS LICENSED FOR
DISTRIBUTION ONLY TO END-USERS PURSUANT TO THIS LICENSE AGREEMENT.
1. License Grant. The Software is not sold; it is licensed upon payment of applicable charges. TAIS grants to you a personal, non-transferable and non-exclusive right to use the copy of the Software
provided under this License Agreement. You agree you will not copy the Software except as necessary to use it on one TAIS system at a time at one location. Modifying, translating, renting, copying,
distributing, transferring or assigning all or part of the Software, or any rights granted hereunder, to any other persons and removing any proprietary notices, labels or marks from the Software is strictly
prohibited; You agree violation of such restrictions will cause irreparable harm to TAIS and provide grounds for injunctive relief, without notice, against You or any other person in possession of the Software.
You and any other person whose possession of the software violates this License Agreement shall promptly surrender possession of the Software to TAIS, upon demand. Furthermore, you hereby agree not
to create derivative works based on the Software. TAIS reserves the right to terminate this license and to immediately repossess the software in the event that You or any other person violates this License
greement.
2. Intellectual Property. You acknowledge that no title to the intellectual property in the Software is transferred to you. You further acknowledge that title and full ownership rights to the Software will remain
the exclusive property of TAIS and/or its suppliers, and you will not acquire any rights to the Software, except the license expressly set forth above. You will not remove or change any proprietary notices
contained in or on the Software. The Software is protected under US patent, copyright, trade secret, and/or other proprietary laws, as well as international treaties. Any transfer, use, or copying of the
software in violation of the License Agreement constitutes copyright infringement. You are hereby on notice that any transfer, use, or copying of the Software in violation of this License Agreement constitutes
a willful infringement of copyright.
3. No Reverse Engineering. You agree that you will not attempt, and if you employ employees or engage contractors, you will use your best efforts to prevent your employees and contractors from
attempting to reverse compile, reverse engineer, modify, translate or disassemble the Software in whole or in part. Any failure to comply with the above or any other terms and conditions contained herein will
result in the automatic termination of this license and the reversion of the rights granted hereunder back to TAIS.
4. Limited Warranty. THE SOFTWARE IS PROVIDED “AS IS” WITHOUT WARRANTY OF ANY KIND. TO THE MAXIMUM EXTENT PERMITTED BY APPLICABLE LAW, TAIS AND ITS SUPPLIERS
DISCLAIM ALL WARRANTIES WITH REGARD TO THE SOFTWARE, EITHER EXPRESS OR IMPLIED, INCLUDING, BUT NOT LIMITED TO, THE WARRANTY OF NON-INFRINGEMENT OF THIRD
PARTY RIGHTS, THE WARRANTY OF YEAR 2000 COMPLIANCE, AND THE IMPLIED WARRANTIES OF MERCHANTABILITY AND FITNESS FOR A PARTICULAR PURPOSE. THE ENTIRE RISK AS
TO THE QUALITY AND PERFORMANCE OF THE SOFTWARE IS WITH YOU. NEITHER TAIS NOR ITS SUPPLIERS WARRANT THAT THE FUNCTIONS CONTAINED IN THE SOFTWARE WILL MEET
YOUR REQUIREMENTS OR THAT THE OPERATION OF THE SOFTWARE WILL BE UNINTERRUPTED OR ERROR-FREE. HOWEVER, TAIS WARRANTS THAT ANY MEDIA ON WHICH THE
SOFTWARE IS FURNISHED IS FREE FROM DEFECTS IN MATERIAL AND WORKMANSHIP UNDER NORMAL USE FOR A PERIOD OF NINETY (90) DAYS FROM THE DATE OF DELIVERY TO YOU.
5. Limitation Of Liability. TAIS’ ENTIRE LIABILITY AND YOUR SOLE AND EXCLUSIVE REMEDY UNDER THIS LICENSE AGREEMENT SHALL BE AT TAIS’ OPTION REPLACEMENT OF THE MEDIA OR
REFUND OF THE PRICE PAID. TO THE MAXIMUM EXTENT PERMITTED BY APPLICABLE LAW, IN NO EVENT SHALL TAIS OR ITS SUPPLIERS BE LIABLE TO YOU FOR ANY CONSEQUENTIAL,
SPECIAL, INCIDENTAL OR INDIRECT DAMAGES FOR PERSONAL INJURY, LOSS OF BUSINESS PROFITS, BUSINESS INTERRUPTION, LOSS OF BUSINESS INFORMATION/DATA, OR ANY
OTHER PECUNIARY LOSS OF ANY KIND ARISING OUT OF THE USE OR INABILITY TO USE THE SOFTWARE, EVEN IF TAIS OR ITS SUPPLIER HAS BEEN ADVISED OF THE POSSIBILITY OF
SUCH DAMAGES. IN NO EVENT SHALL TAIS OR ITS SUPPLIERS BE LIABLE FOR ANY CLAIM BY A THIRD PARTY.
6. State/Jurisdiction Laws. SOME STATES/JURISDICTIONS DO NOT ALLOW THE EXCLUSION OF IMPLIED WARRANTIES OR LIMITATIONS ON HOW LONG AN IMPLIED WARRANTY MAY LAST, OR
THE EXCLUSION OR LIMITATION OF INCIDENTAL OR CONSEQUENTIAL DAMAGES, SO SUCH LIMITATIONS OR EXCLUSIONS MAY NOT APPLY TO YOU. THIS LIMITED WARRANTY GIVES YOU
SPECIFIC RIGHTS AND YOU MAY ALSO HAVE OTHER RIGHTS WHICH VARY FROM STATE/JURISDICTION TO STATE/JURISDICTION.
7. Export Laws. This License Agreement involves products and/or technical data that may be controlled under the United States Export Administration Regulations and may be subject to the approval of the
United States Department of Commerce prior to export. Any export, directly or indirectly, in contravention of the United States Export Administration Regulations, or any other applicable law, regulation or
order, is prohibited.
8. Governing Law. This License Agreement will be governed by the laws of the State of California, United States of America, excluding its conflict of law provisions.
9. United States Government Restricted Rights. The Software is provided with Restricted Rights. Use, duplication, or disclosure by the United States Government, its agencies and/or instrumentalities is
subject to restrictions as set forth in subparagraph (c)(1)(ii) of The Rights in Technical Data and Computer Software Clause at DFARS 252.227-7013 (October 1988) or subparagraphs (c)(1) and (2) of the
Commercial Computer Software - Restricted Rights at 48 CFR 52.227-19, as applicable.
10. Severability. If any provision of this License Agreement shall be held to be invalid, illegal or unenforceable, the validity, legality and enforceability of the remaining provisions hereof shall not in any way be
affected or impaired.
11. No Waiver. No waiver of any breach of any provision of this License Agreement shall constitute a waiver of any prior, concurrent or subsequent breach of the same or any other provisions hereof, and no
aiver shall be effective unless made in writing and signed by an authorized representative of the waiving party.
YOU ACKNOWLEDGE THAT YOU HAVE READ THIS LICENSE AGREEMENT AND THAT YOU UNDERSTAND ITS PROVISIONS. YOU AGREE TO BE BOUND BY ITS TERMS AND CONDITIONS. YOU
FURTHER AGREE THAT THIS LICENSE AGREEMENT CONTAINS THE COMPLETE AND EXCLUSIVE AGREEMENT BETWEEN YOU AND TAIS AND SUPERSEDES ANY PROPOSAL OR PRIOR
GREEMENT, ORAL OR WRITTEN, OR ANY OTHER COMMUNICATION RELATING TO THE SUBJECT MATTER OF THIS LICENSE AGREEMENT.
Toshiba America Information Systems, Inc.
Telecommunication Systems Division
9740 Irvine Boulevard
Irvine, California 92618-1697
United States of America
TSD 081601
5932
Page 4

Toshiba America Information Systems, Inc.
Telecommunication Systems Division
Limited Warranty
To shib a Amer ica I nfo rmat ion Syst ems, Inc. , (“TAIS”) warrants that this voice processing equipment (except for fuses, lamps, and
other consumables) will, upon delivery by TAIS or an authorized TAIS dealer to a retail customer in new condition, be free from
defects in material and workmanship for twenty-four (24) months after delivery. This warranty is void (a) if the equipment is used
under other than normal use and maintenance conditions, (b) if the equipment is modified or alt ere d, unl ess the modification or
alteration is expressly authorized by TAIS, (c) if the equipment is subject to abuse, neglect, lightning, electrical fault, or accident,
(d) if the equipment is r epaired by someone other than TAIS or an authorized TAIS dealer, (e) if the equipment’s serial number is
defaced or missing, or (f) if the equip me nt is inst al l ed or used in combination or in assembl y with products not supplied by TAIS
and which are not compatible or are of in f er ior quality , design, or performance.
The sole obligation of TAIS or Toshiba Corporation under this warranty, or under any other legal obligatio n w ith respect to the
equipment, is the repa ir or re pl acement by TAIS or its authorized dealer of such defect iv e or m issing parts as are causing the
malfunction with new or refurbished parts (at their option). If TAIS or one of its authorized dealers does not replace or repair such
parts, the retail customer ’s sole remedy will be a refund of the price charged by TAIS to its dealers for such parts as are proven to
be defective, and which are ret urned to TAIS through one of its authorized dealers within th e w a rranty period and no later than
thirty (30) days after such malfu nct io n, w hic he ve r first occ urs.
Under no circumstances will the retail customer or an y user or dealer or other person be entitled to any direct, special, indir ect,
consequential, or exemp lary da mages, for breach of contract, tort, or othe rw i se. U nde r no ci rcumstances will any such person be
entitled to any sum greater tha n the purchase price paid for th e item of equipment that is malfunctioning.
To obtain service under this warranty, the retail customer must bring the malfunction of the machi ne to th e attention of one of
TAIS’ aut horized dealers within the twenty-four (24) month perio d and no later than thirty (30) days af te r su ch malfunction,
whichever first occurs. Failure to bring the malfunction to the attention of an authorized TAIS dealer within the prescribed time
results in th e customer being not entitl ed to warranty service.
THERE ARE NO OTHER WARRANTIES FROM EITHER TOSHIBA AMERICA INFORMATION SYSTEMS, INC., OR
TOSHIBA CORPORATION WHICH EXTEND BEYOND THE FACE OF THIS WARRANTY. ALL OTHER WARRANTIES,
EXPRESS OR IMPLIED, INCLUDING THE WARRANTIES OF MERCHANTABILITY, FITNESS FOR A PARTICULAR
PURPOSE, AND FITNESS FOR USE, ARE EXCLUDED.
No TAIS dealer and no person other than an officer of TAIS may extend or modify this warranty. No such modification or
extension is effective unless it is in writing and signed by the vice president and general ma na ge r, Telecommunication Systems
Division.
Page 5

Contents
Introduction
Organization............................................................ ................................ .......................... v
Conventions ............................................................ ...................... .................................. vi
Related Documents and Media .................................. ...................................................... vi
Chapter 1 – The Grand Tour
Technology ..........................................................................................................................2
Applications.........................................................................................................................3
Benefits................................................................................................................................3
Handset ................................................................................................................................4
DKT2204-CT....................................................................................................................5
DKT2304-CT ...................................................................................................................7
LCD Display........................................................................................................................9
Base Unit..............................................................................................................................9
Charging Unit........................................................ ......... ....................................................10
DKT2204-CT..................................................................................................................10
DKT2304-CT..................................................................................................................10
Cordless Digital Telephone Standard Parts .......................................................................11
Chapter 2 – Installation
Step 1: Review Safety Instructions.................................................................................. 13
Step 2: Select Location ................................................. ................................................... 16
Step 3: Place DKT3000-series Telephones into 2000-Mode........................................... 16
Step 4: Connect Telephone Cables.................................................................................. 17
Step 5: Connect and Apply Power................................................................................... 18
Strata CTX DKT2204-CT/DKT2304-CT Cordless Digital Tel ephones 06/03 i
Page 6

Contents
Chapter 3 – Handset Operation
Base Unit ........................................................................................................................18
Charging Unit ................................................................................................. ......... .......18
Step 6: (Optional) Wall Installation................................................................................. 19
Standard Wall Plate Mounting........................................................................................19
Direct Wall Mounting.............................................................................................. .......20
Charging Unit Wall Mounting........................................................................................21
Step 7: Raise the Base Unit Antenna............................................................................... 23
Step 8: Install Handset Battery Pack................................................................................ 23
DKT2204-CT..................................................................................................................23
DKT2304-CT..................................................................................................................23
Step 9: Charge Batteries for First Time ........................................................................... 24
Step 10: Install Headset (Optional)................................................................................... 24
Step 11: Attach Belt Clip (Optional)................................................................................ 25
Chapter 3 – Handset Operation
Handset Controls................................................................................................................27
Earpiece Volume ............................................................................................................27
Handset Ringer Tone and Volume .................................................................................28
Mute (DKT2204-CT only) .............................................................................................28
Handset Ringer Mute (DKT2304-CT only)...................................................................28
Vibrate Mode..................................................................................................................28
Ringer Off Slide Switch (DKT2204-CT only)...............................................................29
F1~F4 Feature Buttons.......................................................................................................29
Making a Call................................................................................... ......... ......... ................30
Internal Call................................................................ ......... ...........................................30
External Call...................................................................................................................30
Answer a Call................................................................................... ......... ......... ................31
Internal Call................................................................ ......... ...........................................31
External Call...................................................................................................................31
Place a Call on Hold ..........................................................................................................32
Transfer a Call....................................................................................................................32
Redial a Number................................................................................................................32
Retrieve Messages .............................................................................................................32
Conference a Call...............................................................................................................32
Conference Calls Using Strata CTX..................................................................................33
ii Strata CTX DKT2204-CT/DKT2304-CT Cordless Digital Telephones 06/03
Page 7

Contents
Chapter 5 – Troubleshooting and Specifications
Adding Voice Mail to a Conference..................................................................................34
Connecting Two Outside Lines .........................................................................................34
Switch a Call to Your Cordless Digital Telephone............................................................35
Switch a Call to the Desk Telephone.................................................................................35
Chapter 4 – Feature Access Codes ........................................................................37
Chapter 5 – Troubleshooting and Specifications
Troubleshooting.................................................................................................................45
Low Battery.................................................................................. ..................................47
Cleaning Charging Unit Contacts...................................................................................48
Charging Spare Battery Packs (DKT2204-CT only)......................................................48
Simultaneous Conversation Channels................................................................................49
DKT2204-CT..................................................................................................................49
DKT2304-CT..................................................................................................................49
Range and Performance.....................................................................................................50
Radio Interference..............................................................................................................50
Telephone Line Problems..................................................................................................50
Privacy ...............................................................................................................................51
Specifications.....................................................................................................................52
Index ......................................................................................................................................53
Strata CTX DKT2204-CT/DKT2304-CT Cordless Digital Tel ephones 06/03 iii
Page 8

Contents
Chapter 5 – Troubleshooting and Specifications
iv Strata CTX DKT2204-CT/DKT2304-CT Cordless Digital Telephones 06/03
Page 9

Introduction
This guide describes the features and operation of the Strata CTX DKT2204-CT and
DKT2304-CT Cordless Digital Telephones with Strata CTX Business Telephone
Systems. To get the most from your cordless telephone, please read this guide
thoroughly.
The DKT2204-CT and DKT2304-CT also work with Strata DK telephone systems
(except Strata DK24/56/96, Release 3). Refer to the appropriate user guide for your
telephone system (see “Related Documents and Media” on page viii).
The information presente d in thi s gui de ap pli es to bot h models of cor dle ss telephones
unless otherwise noted.
Organization
This user guide is divided as follows:
Chapter 1 – The Grand Tour is an equipment overview of the handset and
•
batteries, base and charging units.
•
Chapter 2 – Installation has step-by-step installation instructions.
•
Chapter 3 – Handset Operation covers operating controls a nd features.
•
Chapter 4 - Feature Access Codes includes codes used for specific feature
access.
•
Chapter 5 - Troubleshooting and Specifications covers troubleshooting, range
and performance, simultaneous conversation channels, radio interference,
specifications, and access codes.
Strata CTX DKT2204-CT/DKT2304-CT Cordless Digital Telephones 06/03 v
Page 10
Introduction
Conventions
Conventions
Conventions Description
Elaborates specific items or references other information. Within some
Note
tables, general notes apply to the enti re table and numbe red notes app ly
to specific items.
Important!
WARNING!
$ULDO%ROG
Courier Shows a computer keyboard entry or screen display.
Tilde (~) Means “through.” Example: 350 ~ 640 Hz frequency range.
➤
➤
See Figure 10
Calls attention to important instructions or information.
Alerts you when the given task could cause personal injury or
death.
Represents telephone buttons.
Denotes the step in a one-step procedure.
Denotes a procedure.
Grey words within the printed text denote cross-references. In the
electronic version of th is doc ument . Libr ar y CD-ROM or FYI Inter net
download), cross-references appear in blue hypertext.
Related Documents and Media
Note Some documents listed here may appear in different versions on the
CD-ROM or in print. To find the most current version, check the version/date in
the Publication Information on the back of the document’s title page.
The following documents/media can be used to reference further information about
the Strata CTX systems.
• Strata CTX WinAdmin Application Software and CTX/DK/Partner Products
Document ation Libr ary
• Strata CTX DKT/IPT Telephone User Guide
vi Strata CTX DKT2204-CT/DKT2304-CT Cordless Digital Telephones 06/03
Page 11

The Grand Tour 1
This chapter familiarizes you with the Strata CTX DKT2204-CT and DKT2304-CT
Cordless Digital Telephones (e.g., handset, batteries, base and charging units, fixed
buttons). Chapter 4 – Feature Access Codes, beginning on p age 37 covers the four
pre-assigned flexible buttons.
Your cordless digital telephone is engineered to work with your Toshiba digital
telephone system and provide you with reliability, long life, and outstanding
performance.
The cordless digital telephone is compatible with all Strata CTX and Strata DK
telephone systems (exce pt Strata DK24/5 6/96, Release 3). All it requires for
connection is a digital station port.
Fully charged, your cordless digital telephone provides:
• DKT2204-CT: six hours of talk time and four days of standby time.
• DKT2304-CT: seven hours of talk time and five days of standby time.
There is a fast charger in the handset and a trickle charger in the base.
You can use your cordless as a stand-alone phone attached to a digital port, or in
conjunction with a DKT3000/2000-series digital telephone—in which case both
phones share the same digital port a nd exte nsion nu mber. You c an swit ch betwe en use
of your DKT and your cordless, just by pressing a button.
Note If using a DKT3000 digital telephone, it must be set to operate in DKT2000
mode.
Strata CTX DKT2204-CT/DKT2304-CT Cordless Digital Tel ephones 06/03 1
Page 12

The Grand Tour
Technology
Some of its features are:
• Liquid Crystal Display (LCD) that wraps using two lines, total of 32 characters
• Ringer and handset volume control
• Single button access to: Conference, Hold, Redial, Message and Transfer features
• Four programmable function buttons
• Charging stand (with spare battery charging capability on DKT2204-CT)
• AutoStandby
• AutoTalk
• Vibrate ringer alert
• Out-of-range protection
• Low-battery protection system
• Wall-mountable separate base and charging unit
• Headset jack (2.5mm)
• Stand-alone or DKT operation
• High quality ultra-secure conversation with 32Kbps Adaptive Differential Pulse
Code Modulation (ADPCM) voice code combination.
• Three ring tones
Technology
Your DKT2204-CT uses digital 900 MHz spread-spectrum technology, which
represents state-of-the-art design and engineering. The DKT2304-CT uses 900 MHz
Digital Narrow Band technology. These technologies provide:
• Unsurpassed range, several times greater than conventional analog or cordless
digital telephones.
• Clarity that is so good, it is indistinguishable from corded telephones in most
environments.
• (DKT2204-CT) Fully secure communications for up to 10 cordless digital
telephones within a given environment.
• (DKT2304-CT) Maximum security for up to 30 cordless digital telephones that is
almost impossible to scan.
2 Strata CTX DKT2204-CT/DKT2304-CT Cordless Digital Telephones 06/03
Page 13

Applications
Your cordless digital telephone brings mobility and productivity to office telephones.
Greater call access cuts down on “telephone tag” delays. Its compact design makes it
easy to take with you.
Benefits
Your cordless digital telephone uses advanced technology and provides important
features that place it far above the compe ti ti on i n func ti onality and value. You benefit
from much greater performance than other cordless telephones currently available.
This means better sound quality, longer range, greater security, multi-line access,
helpful LCD display information, and many other important advantages.
The cordless digital telephone provides many advantages over a single-line analog or
digital telephone. Some of those advantages are:
• Your cordless digital telephone has four flexible feature buttons. They have the
same functions as the first four buttons on the 3000/2000-series desk DKT. If you
do not use these buttons for the assigned features, you can invoke other features
with access codes.
The Grand Tour
Applications
• Your cordless digital telephone rings to the same extension number as the regular
DKT it is used with, enabling you to answer via either telepho ne. Both follow the
same forwarding and hunt ing r egardl ess of which t elephone is in use . This i s much
simpler than having a separate extension number and standard station port for a
single-line cordless.
• An SLT cordless is not only a cumbersom e alternative to the Toshiba digital
cordless; but also, if you forget to forward your calls, you cannot receive the calls
on your SLT cordless. With your cordless digital telephone it is easy. Just press a
button, grab your cordless, and go!
• A Message Waiting icon appears on the LCD when message(s) are in the
user’s mailbox.
In addition to the benefits mentioned above, the DKT2204-CT also has the following
benefits:
• Spread-spectrum technology provides five to seven times greater range than
conventional cordless telephones, making your cordless digital telephone much
more useful and valuable.
Strata CTX DKT2204-CT/DKT2304-CT Cordless Digital Tel ephones 06/03 3
Page 14

The Grand Tour
Handset
• 900 MHz spread-spect rum oper ation pro vides maximu m secu rity with a freq uency
range that is almost impossible to scan. Regular 900 MHz cordless digital
telephones are difficult to scan, but less so than spread spectrum. Analog cordless
telephone frequencies are easy to scan and provide virtually no security from the
outside. Hackers and thieves can use this to hear conversations and pick up credit
card numbers.
• Sound quality is better on your cordless digital telephone than non-spread
spectrum 900 MHz digital cordless telephones. Sound quality on conventional
analog cordless telephon es is s o poor by compari son that they ar e onl y practi cal for
short range usage.
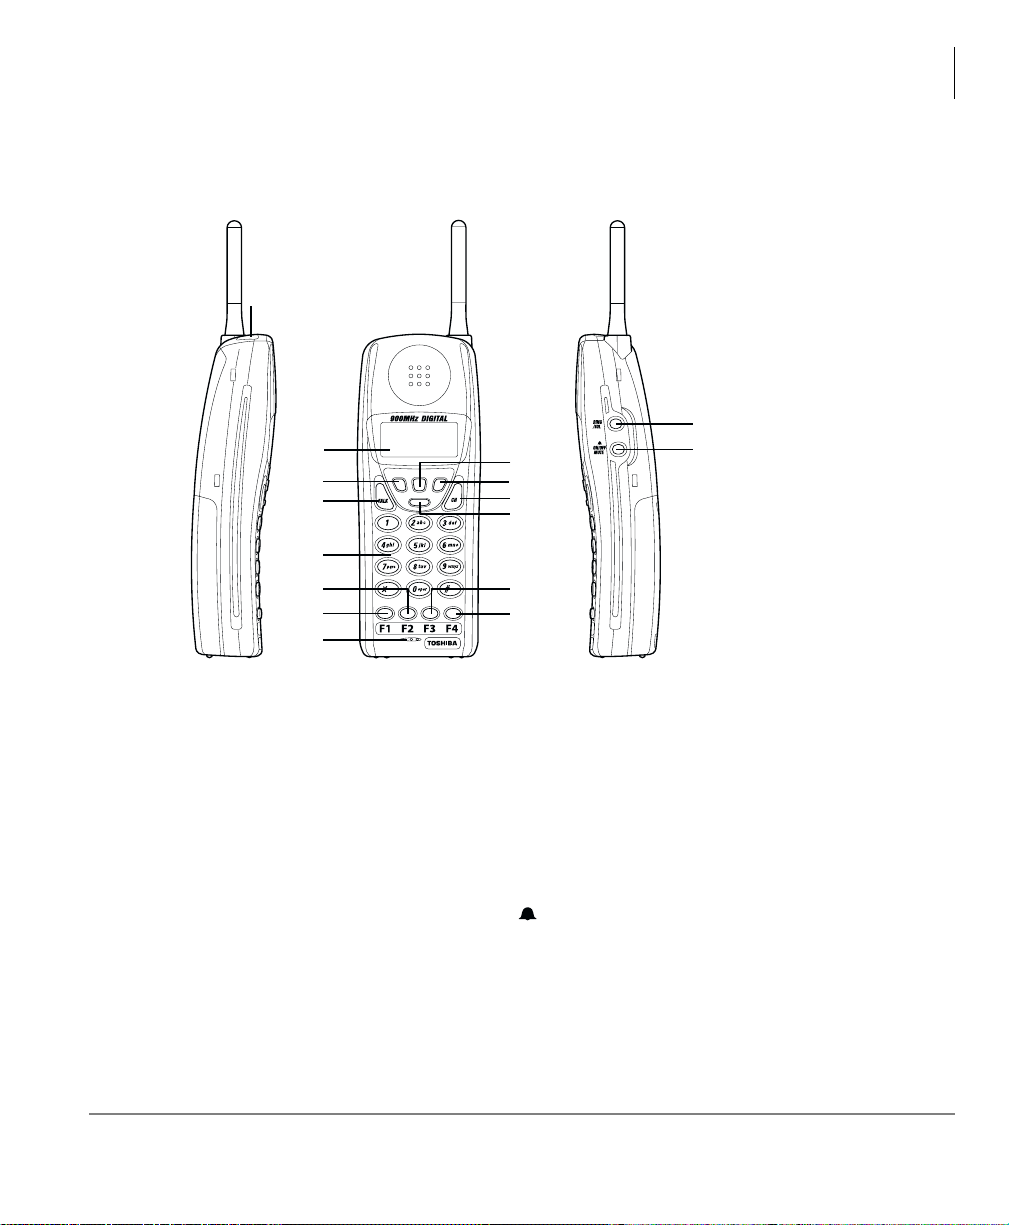
Handset
Your cordless handset has special function buttons (shown below) and an LCD that
shows operating conditions.
Note The handset and bas e unit of your cordl ess t eleph one is equipp ed with the sa me
security code. In order for this handset to operate, it must be installed with the
matching base unit.
4 Strata CTX DKT2204-CT/DKT2304-CT Cordless Digital Telephones 06/03
Page 15
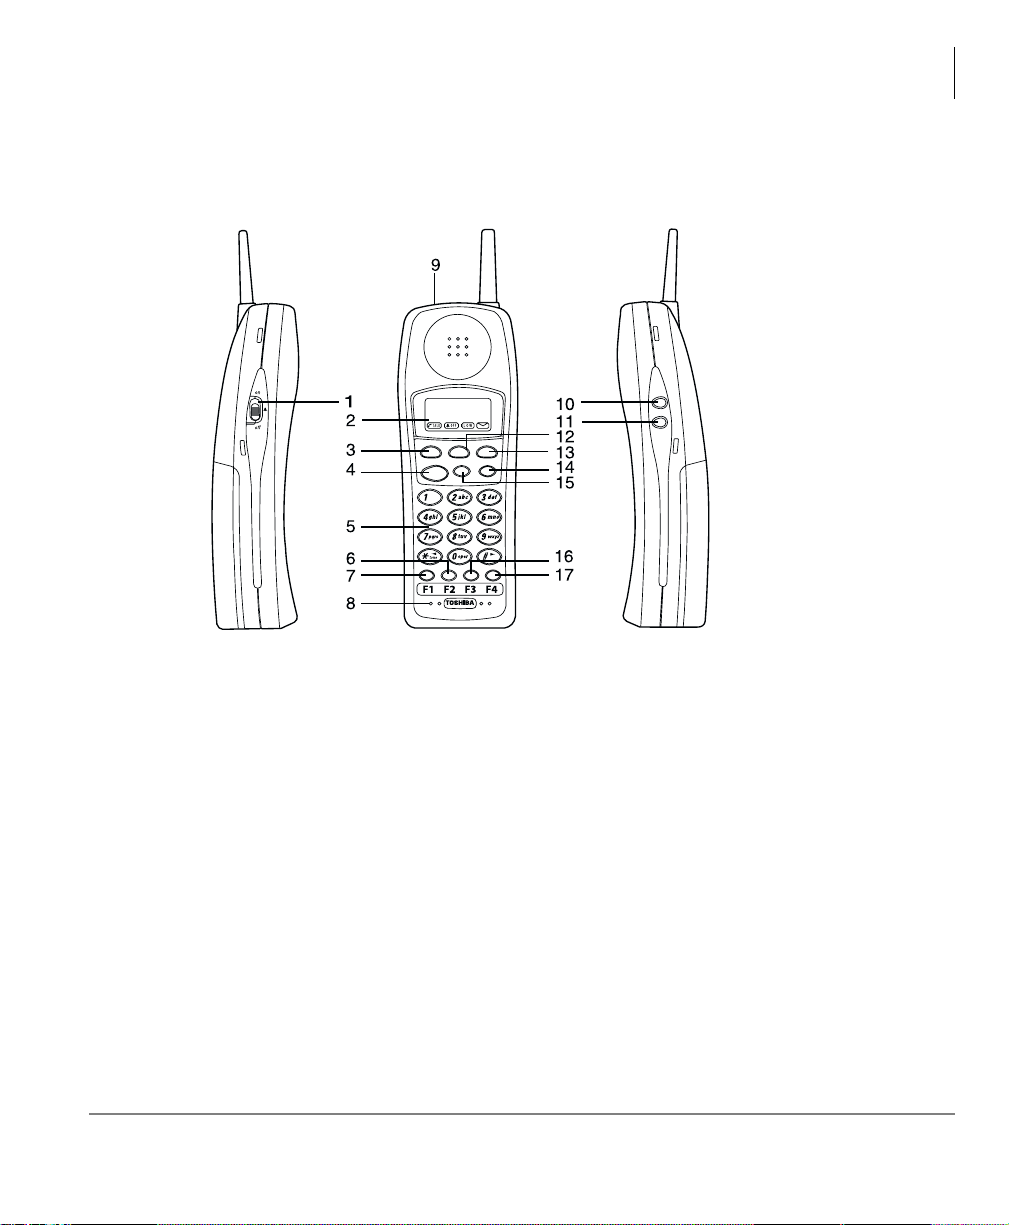
DKT2204-CT
The Grand Tour
Handset
R/VOL
MUTE
Msg
Hold
Cnf/Trn
Redial
Channel
Talk
R/VOL
1.Ringer Off Slide Switch
2.Message Display
3.
4.
Msg
Talk
(
Message
Button
)Button
5.Numeric Dial Pad
6.
F2
Button
7.
F1
Button
8.Microphone
10. Volume(
11.
MUTE
12.
Hold
Button
Cnf/Trn
13. Conference/Transfer(
14.
Redial
15.
Channel
16.
F3
Button
17.
F4
Button
) Button
Button
)Button
Button
Button
9.Headset Jack
Strata CTX DKT2204-CT/DKT2304-CT Cordless Digital Tel ephones 06/03 5
Page 16
The Grand Tour
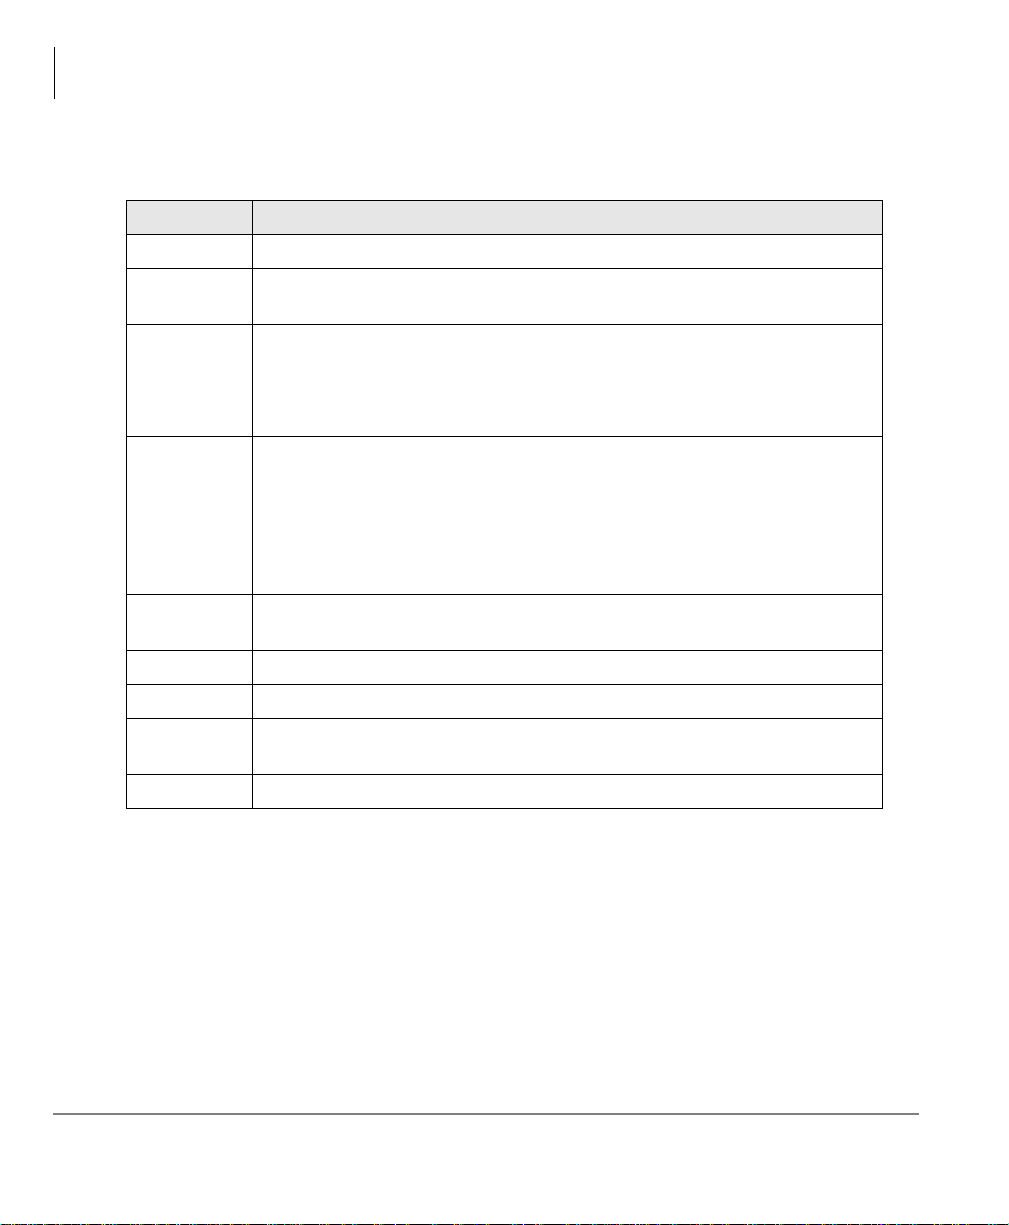
Handset
Table 1 DKT2204-CT Fixed Button Description
Button Description
7DON Initiates and disconnects calls.
592/
&KDQQHO
Selects ringer tone and volume in standby mode and speaker volume in talk
mode.
Selects channel while in talk mode and locks the handset while in standby
mode.
Press this key if you encounter interference while using your telephone. You
can manually change the telephone’s channel for clear operation.
To dial the last number called, press 7DON, then 5HGLDO. The last number
called is redialed.
5HGLDO
Note If you are using the Strata C T X s yst em, the 5HGLDO button works only
with the last dialed number that was answered. If you dial a number
and receive no answer , the 5HGLDO button will not us e that nu mber as
the last one dialed.
+ROG
Press once and the call is placed on hold. Press +ROG or 7DON to resume the
call (local hold).
0VJ Press to retrieve voice messages.
&QI7UQ Conferences and transfers cal ls.
087(
T ogg les the mute feature On and Off (mutes your conversation awa y from the
handset).
RQRII This Ringer Off Slide Switch turns the handset ringer On or Off.
6 Strata CTX DKT2204-CT/DKT2304-CT Cordless Digital Telephones 06/03
Page 17
DKT2304-CT
1
2
3
4
5
6
7
8
The Grand Tour
Handset
15
Msg
Hold
Cnf/Trn
Redial
9
10
11
12
13
14
16
. Headset Jack
. Display
Msg (Message) Button
.
.
TALK
Button
. Numeric Dial Pad
. F2 Button
. F1 Button
. Microphone
Strata CTX DKT2204-CT/DKT2304-CT Cordless Digital Tel ephones 06/03 7
Hold
Cnf/Trn
CH
Redial
Button
) Button
Button
9.
10. Conference/Transfer(
11. Channel(
12.
13. F3 Button
14. F4 Button
15. Volume(
RING/VOL
) Button
16. Ringer On/Off & Mic Mute
(
ON/OFF MUTE
Button
)
) Button
Page 18
The Grand Tour
Handset
Table 2 DKT2304-CT Fixed Button Description
Button Description
7$/ . Initiates and disconnects calls.
5,1*92/
&+
5HGLDO
+ROG
0VJ Press to retrieve voice messages.
&QI7UQ Conferences and transfers cal ls.
212))
087(
Selects ringer tone and volume in standby mode and speaker volume in talk
mode.
Selects channel while in talk mode and locks the handset while in standby
mode.
Press this key if you encounter interference while using your telephone. You
can manually change the teleph one’s channel for clear operation.
To dial the last number called, press 7DON, then 5HGLDO. The last number
called is redialed.
Note If you are using the Strata C T X s yst em, the 5HGLDO button works only
with the last dialed number that was answered. If you dial a number
and receive no answer , the 5HGLDO button will not us e that nu mber as
the last one dialed.
Press once and the call is placed on hold. Press +ROG or 7DON to resume the
call (local hold).
Toggles the handset ringer tone On and Off.
8 Strata CTX DKT2204-CT/DKT2304-CT Cordless Digital Telephones 06/03
Page 19
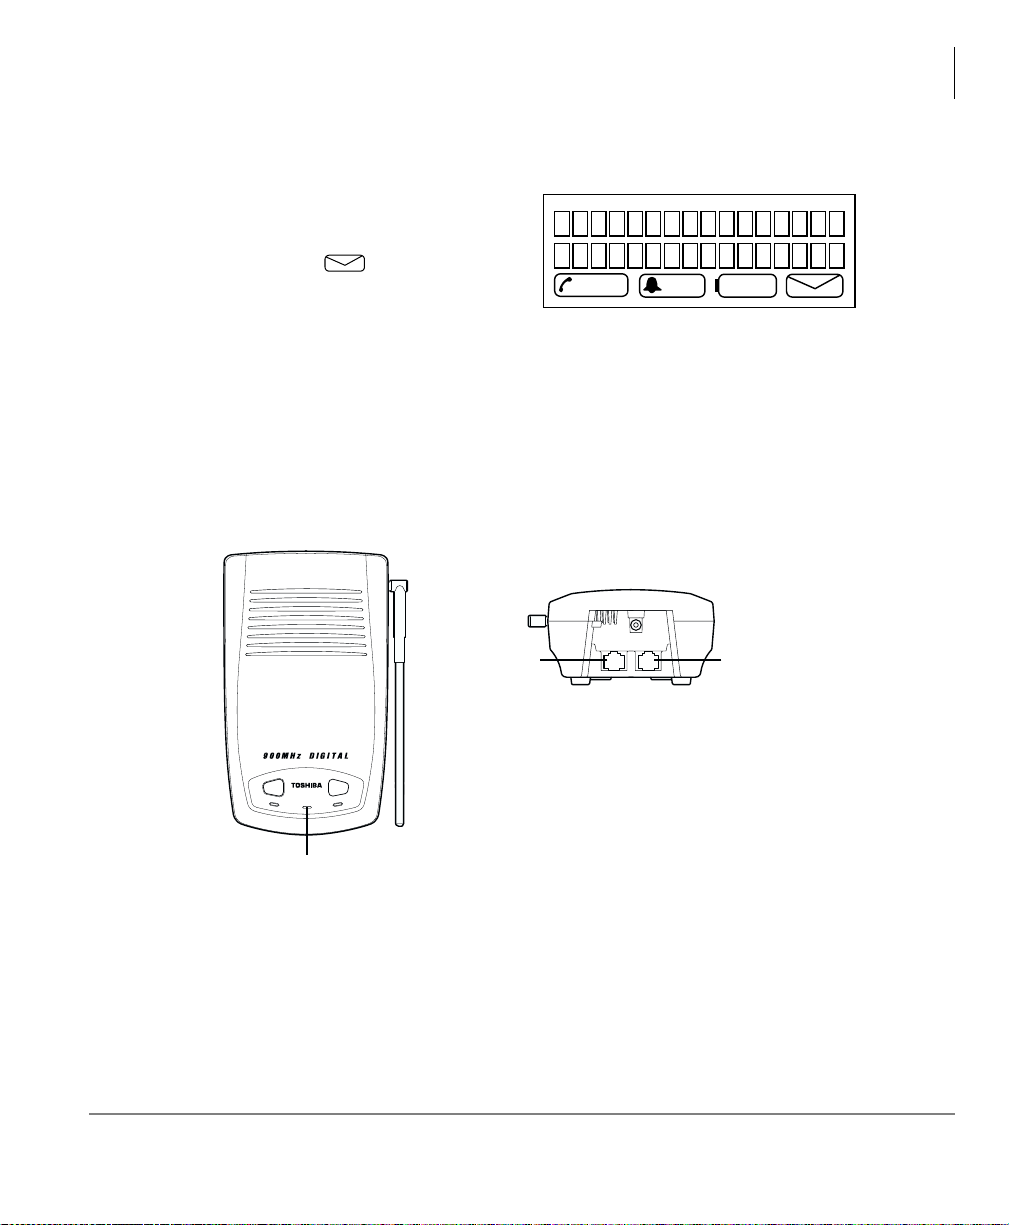
LCD Display
The LCD display consists of two lines of
16 characters each with four icons—
Talk, Ringer Off, Low (Battery) and
Message Waiting .
Base Unit
The base unit can be used a s a desktop or wall-moun ted unit ( shown below). Th ere are
two LEDs that indicate Desk or Cordless mode.
Note The handset and bas e unit of your cordl ess t eleph one is equipp ed with the sa me
security code. I n o rde r for this base unit t o oper at e, it must be installe d wi th the
matching handset.
TALK
The Grand Tour
LCD Display
OFF LOW
Line Out
CordlessDesk
Power
POWER
Strata CTX DKT2204-CT/DKT2304-CT Cordless Digital Tel ephones 06/03 9
LED
Line In
Page 20
The Grand Tour
Charging Unit
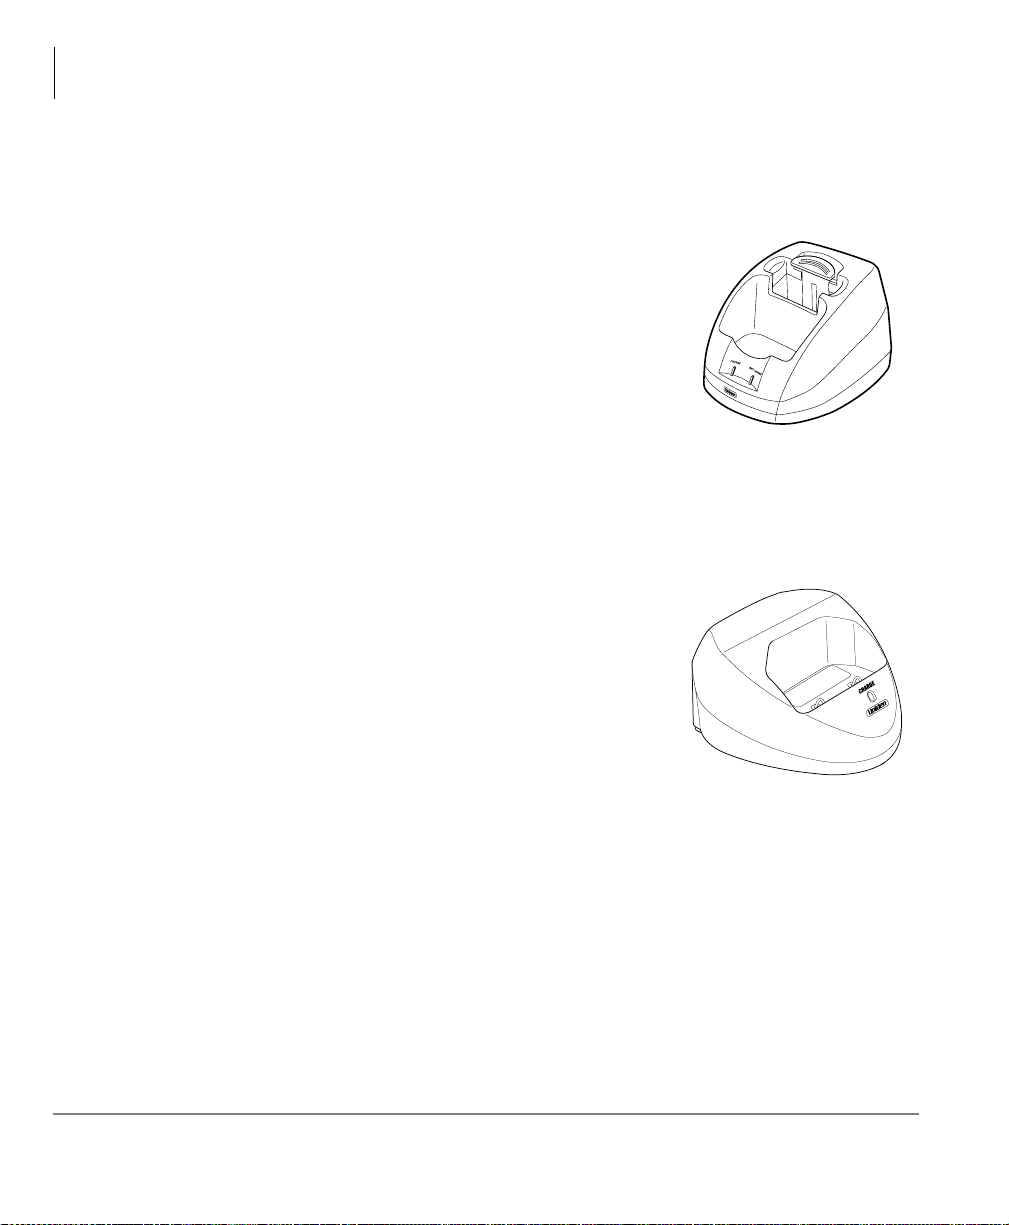
Charging Unit
DKT2204-CT
The handset comes with a charging unit (shown at right)
that has two slots.
The front slot functions as a cradle for the handset when
idle and a charger for the handset battery.
The rear slot is for spare battery charging. It
automatically di sch ar ges whe n it d ete cts t hat di schar gi ng
is necessary.
&+$5*( and %$77&+$5*( LEDs indicate battery
charging status. The LEDs flash red when charging, and are steady red when the
battery is charged.
DKT2304-CT
The handset comes with a charging unit (shown at right)
that has a sl ot in the front .
The slot functions as a cradle for the handset when idle
and a charger for the handset battery.
&+$5*( LED indicates battery charging status.
The
The LED flashes red when charging, and is steady red
when the battery is charged.
10 Strata CTX DKT2204-CT/DKT2304-CT Cordless Digital Telephones 06/03
Page 21

The Grand Tour
Cordless Digital Telephone Standard Parts
Cordless Digital Telephone Standard Parts
Your Toshiba cordless digital telephone includes the following items:
• Base unit
• Handset
• Telephone cord (two ft.)
• Two AC adapters
• Rechargeable battery
• Belt clip
• Wall plate ad apter
• Wall mount for charging unit (DKT2304-CT only)
• Charging unit
• User Guide
If any of these items are missing or damaged, contact your System Administrator.
Strata CTX DKT2204-CT/DKT2304-CT Cordless Digital Tel ephones 06/03 11
Page 22

The Grand Tour
Cordless Digital Telephone Standard Parts
12 Strata CTX DKT2204-CT/DKT2304-CT Cordless Digital Telephones 06/03
Page 23

Installation 2
Step 1: Review Safety Inst ructions
WARNING! T oshiba DOES NOT represent this unit to be waterproof. T o reduce
the risk of fire, electrical shock, or damage to the unit, DO NOT
expose this unit to rain or moisture.
➤ Read and understand all product instructions.
➤ Follow all warnings and instructions marked on the product.
➤ Cleaning precautions:
• Unplug this product from the wall outlet before cleaning.
• Do not use liquid cleaners or aerosol cleaners.
• Use a dry cloth for cleaning.
➤ Do not use this product near water; for example, near a sink, or in any wet area.
➤ Never spill liquid of any kind on the product.
➤ Do not place this product on an unstable cart, stand, or table. The telephone could
fall, causing serious damage to the unit.
➤ To protect the product from overheating, do not:
• Block or cover any slots or openings in the base unit.
• Place near or over a radiator or heat register.
• Place in an enclosed cabinet unless proper ventilation is provided.
Strata CTX DKT2204-CT/DKT2304-CT Cordless Digital Tel ephones 06/03 13
Page 24

Installation
Step 1: Review Safety Instructions
➤ Operate this product only from the type of power source indicated on the marking
label.
➤ Do not allow anything to rest on the power cord. Do not locate this product where
the cord could be damaged by persons walking on it.
➤ Do not overload wall outlets and extension cords because it could result in fire or
electrical shock.
➤ Never push objects of any kind into the base unit slots, as the objects could touch
dangerous voltage points or short out parts that could cause fire or electric shock.
➤ To reduce the risk of electric shock, do not disassemble this product. Opening or
removing covers could expose you to dangerous voltages or other risks. Incorrect
re-assembly can cause electric shock when the appliance is subsequently used.
Contact qualified service personnel when service or repair work is required.
➤ Unplug this product from the wall outlet and refer servicing to qualified service
personnel under the following conditions:
• When the power supply cord is damaged or frayed.
• If liquid has been spilled into the product.
• If the product has been exposed to rain or water.
• If the product does not operate normally when following the operating
instructions. Adjust only those controls that are covered by the operating
instructions. Improper adjustment of other controls may result in damage, and
will often require extensive work by a qualified technician to restore the
product to normal operation.
• If the product has been dropped, or the cabinet has been damaged.
• If the product exhibits a distinct change in performance.
➤ Do not use the telephone to report a gas leak in the vicinity of the leak.
WARNING! Do not attempt to unplug any appliance during an electrical storm.
➤ Unplug all electrical appliance s when y ou know an e lectri cal storm is appro aching.
Lightning can pass thro ugh the wiri ng and damage any device conne cted to it. Thi s
telephone is no exception.
14 Strata CTX DKT2204-CT/DKT2304-CT Cordless Digital Telephones 06/03
Page 25

Installation
Step 1: Review Safety Instructions
CAUTION! Changes or modifications to this product not expressly approved by
Toshiba, or operation of this product in any way other than as
detailed by this User Guide, could void your aut hori t y t o operate this
product.
WARNING! To reduce the risk of fire and/or personal injury from the Nickel-
Cadmium battery, follow these instructions:
➤ Use only battery model BT-2499 (DKT2204-CT) or BT930
(DKT2304-CT). Use of any other battery could cause a safety
hazard.
➤ Do not dispose of the battery in a fire. The cell will explode.
Under federal, state and local laws, it could be illegal to
dispose of old batteries by placing them in the trash. Check
with your local government for information on where to recycle
or dispose of old batteries. If you cannot find the information
you need, contact Toshiba for assistance.
➤ Do not remove or damage the battery casing.
➤ Do not short circuit the battery. Exercise care in handling the
battery in order not to short the battery with rings, bracelets,
and keys or other conductive materials. The battery or
conductor could overheat and cause burns.
➤ Charge the battery only in accordance with the instructions
and limitations specified in the instruction manual provided for
this product.
➤ Do not charge the Rechargeable battery in any charger other
than the one designed to charge it as specified in this user
guide. Using another charger may damage the battery, or
cause the battery to explode.
➤ Observe proper pola rity or ient atio n betw een the bat tery an d
charging unit.
Strata CTX DKT2204-CT/DKT2304-CT Cordless Digital Tel ephones 06/03 15
Page 26

Installation
Step 2: Select Locat ion
Step 2: Select Location
1. Select a location that is not subject to excessive heat or humidity. Keep the base
unit and handset away from sources of electrical noise, such as motors and
fluorescent light ing .
2. Determine if the base unit will sit on your desk or be wall mounted. If wall
mounted, go to Step 6: “(Optional) Wall Installation” on page 19.
3. Plac e the base unit on a des k or table top near a standa rd 120VAC outlet and within
reach of the Strata CTX digital line connection.
Important! Place the b ase unit to the right of the DKT. If placed on the left, the
cordless antenna picks up a tone due to its close proximity to the DKT
speaker and electronic parts.
Step 3: Place DKT3000-series Telephones
into 2000-Mode
You must place your DKT3000-series telephone into 2000-mode before connecting
the cordless telephone; otherwise, the 3000-series telephone will not work.
In 2000-mode, the DKT3000 telephone operation changes are:
• Only 16 characters by two lines display on the LCD.
• LCD Feature button does not work
• 6SGLDO button does not work
➤ To change DKT3000-series telephones into 2000-mode
1. On the DKT3000 telephone, press
2. Press
3. Press
Note Flexible Buttons (FB) are numbered from the bottom up and left to right.
4. Press
5. Lift the handset to exit programming mode. Wait a few seconds for the telephone
.
)% (or )% on the DKT3014). LED On = 2000 mode. LED Off = 3000
mode.
)% for example would be the seventh button up on the left.
+ROG.
to reset itself.
++++ROG (simultaneously).
16 Strata CTX DKT2204-CT/DKT2304-CT Cordless Digital Telephones 06/03
Page 27

Step 4: Connect Telephone Cables
Step 4: Connect Telephone Cables
Your cordless telephone must be connected to a digital telephone PBX port.
WARNING! ➤ Never install telephone wiring during a lightning storm.
➤ Never touch uninsulated telephone wires or terminals unless
the telephone line has been disconnected at the network
interface.
➤ Use caution when installing or modifying telephone lines.
➤ To connect as a stand-alone telephone
➤ Connect the modular jack labeled “Line
In” directly to the telephone wall jack
using one of the supplied cables (shown
at right).
➤ To connect to a Strata DKT
1. Unplug the cable from the DKT and
plug into the “Line In” jack of cordless
telephone base unit (show n at right).
2. Plug the additional two-foot cable into
the “Line Out” jack of the base unit and
into the DKT jack located on the
bottom of the telephone.
Installation
Strata CTX DKT2204-CT/DKT2304-CT Cordless Digital Tel ephones 06/03 17
Page 28

Installation
Step 5: Connect and Apply Power
Step 5: Connect and Apply Power
Base Unit
1. Plug the AC adapter cord into the AC adapter
input jack on the base unit (shown at right).
2. Plug the AC adapter into a standard 120VAC
wall outlet.
3. Check to see that th e power LED i s on.
Charging Unit
1. Plug the AC adapter cord into the input jack on
the charging unit (shown at right).
2. Plug t he AC adapter int o a standard 120VAC wall
outlet.
3. Check to see that the
Note You can place the handset in the charging unit
with or without the belt clip attached.
Important!
• Use only the supplied AC adapter.
• If the &+$5*( LED on the char ging uni t and/or
32:(5 LED on the base unit do not light,
the
return everything to your Authorized Dealer.
• Always ro ute th e power cord where it is not a t ri p
hazard, and where it cannot become chafed and
create a fire or electrical hazard.
&+$5*( LED is on.
DKT2204-CT (pictured)
18 Strata CTX DKT2204-CT/DKT2304-CT Cordless Digital Telephones 06/03
Page 29

Step 6: (Optional) Wall Installation
Step 6: (Optional) Wall Installation
Important! You must place you r DKT3 000- ser ie s telephone into 2000-mode before
connecting the cordl ess telephone; ot herwise, the 3000 -series teleph one
will not work. See “Place DKT3000-series Telephones into 2000-
Mode” on page 16 for instructio ns.
Standard Wall Plate Mounting
These telephones are designed to be mounted on a standard wall plate. To attach the
wall mount stand to the base unit:
1. Select a wall location near a 120VAC outlet and within reach of the Strata CTX
digital line connection.
2. Slide the wall mount stand into the notches at
the top of the base unit, push the wall mount
stand down and snap it into place (shown
right).
3. Plug the AC adapter into the base unit.
4. Place the AC adapter cord inside the molded
channel of the wall mount stand.
5. Plug one end of the telephone cord into the
LINE jack on the base unit. Optionally, plug
one end of a Strata DKT telephone into the
PHONE jack. Then place the telephone
cord(s) inside the molded channel(s) on the bottom of the wall mount stand.
6. Plug the other end of the telephone cord into the modular wall jack.
Installation
7. Place the base unit on the posts of the wall plate and
push down until it’s firmly seated (shown right).
8. Plug the AC adapter into a standard 120VAC wall
outlet.
Note Do not use an outlet controlled by a wall switch.
Strata CTX DKT2204-CT/DKT2304-CT Cordless Digital Tel ephones 06/03 19
Page 30

Installation
Step 6: (Optional) Wall Installation
Direct Wall Mounting
If you do not have a standard wall plate, you can mount your telephone directly on a
wall. Before mounting your telephone, consider the following:
• Select a location away from electrical cables, pipes, or other items behind the
mounting location that could cause a hazard when inserting screws into the wall.
• Make sure the wall material is capable of supporting the weight of the base unit.
• Use #10 screws with anchoring devices suitable for the wall.
➤ To wall mount the base unit
1. Insert two mounting screws 3-15/16 inches apart. Allow
about 3/16 of an inch between the wall and screw heads
for mounting the telephone (shown right).
2. Plug and secure the AC adapter cord by following Steps
2 and 3 of the “Standard Wall Plate Mounting” on page
19.
3. Plug one end of the telephone line cord into the LINE
jack on the base unit . Option ally, plug one end of a Strata
DKT telephone into the PHONE jack. Then place the
telephone cord(s) inside the molded channel(s) on the
bottom of the wall mount stand.
4. Pl ac e th e base unit on the posts of the wall screws
and push down until it’s firmly seated.
5. Plug the other end of the telephone cord into a
telephone wall jack.
6. Plug t he AC adapter into a standard 120VAC wall
outlet by following Step 7 of the Standard Wall
Plate Mounting.
20 Strata CTX DKT2204-CT/DKT2304-CT Cordless Digital Telephones 06/03
Page 31

Step 6: (Optional) Wall Installation
Charging Unit Wall Mounting
The charging unit is also designed to be wall mounted. Before mounting your
charging unit, consider the following:
• Select a location away from electrical cables, pipes, or other items behind the
mounting location that could cause a hazard when inserting screws into the wall.
• Make sure the wall material is capable of supporting the weight of the charging
unit.
• Use #10 screws with anchoring devices suitable for the wall material where the
charging unit will be placed.
DKT2204-CT
1. Insert two mounting screws 1-9/10 inches apart.
Allow about 3/16 of an inch between the wall and
screw heads for mounting the telephone.
2. Plug the AC adapter into the charging unit as
previously described. Wrap the AC adapter cord
around the strain relief (shown right).
Installation
3. Pl ace the char gin g unit on the pos ts of th e wall
screws and push down until it’s firmly seated
(shown right).
4. Plug the AC adapter into a standard 120VAC
wall outlet.
Strata CTX DKT2204-CT/DKT2304-CT Cordless Digital Tel ephones 06/03 21
Page 32

Installation
Step 6: (Optional) Wall Installation
DKT2304-CT
1. Insert two mounting screws 1-1/5 inches apart.
Allow about 3/16 of an inch between the wall and
screw heads for mounting the telephone (shown
right).
2. Pass the one end through the hole of the wall mount
stand and plug it int o the char ging unit. W rap the AC
adapter cord around the st rain relief.
3. Slide the wall mount stand into the notches on the
bottom of the charging unit.
4. Place the charging unit on the posts of the
wall screws and push down until it’s firmly
seated (shown right).
5. Plug the AC adapter into a standard 120VAC
wall outlet.
22 Strata CTX DKT2204-CT/DKT2304-CT Cordless Digital Telephones 06/03
Page 33

Step 7: Raise the Base Unit Antenna
Step 7: Raise the Base Unit Antenna
➤ Before using your handset, raise the base unit antenna to the vertical position.
Step 8: Install Handset Battery Pack
DKT2204-CT
1. Remov e t he ba tt ery cover by pressing the latch and sliding the cove r do wn and o ff
the handset.
2. Slide the battery pack down into the handset
(shown right).
3. Securely close the battery compartment cover
by sliding it up until it snaps into place.
DKT2304-CT
1. Remov e t he ba tt ery cover by pressing the latch and sliding the cove r do wn and o ff
the handset.
Installation
2. Connect the battery pack connector observing
correct polarity to the jack inside the battery
compartment. Do not exert any force on this
connection. It could cause damage to the
battery or handset. Once you are certain that
you have made a good connection, then insert
the battery pack into the battery compartment.
Do not pinch the wires (shown right).
3. Securely close the battery compartment cover
by sliding it up until it snaps into place.
CAUTION! Rechargeable Nickel-Metal-Hydride batteries must
be disposed of properly.
4.
Strata CTX DKT2204-CT/DKT2304-CT Cordless Digital Tel ephones 06/03 23
Page 34

Installation
Step 9: Charge Batteries for First Time
Step 9: Charge Batteries for First Time
Important! Before using your hands et, the battery must be continu ously char ged fo r
five hours.
1. Place the handset in the charging unit (shown at right).
2. Ensure that the
make sure that the AC adapt er is pl ugged in and that the
handset is making good contact with the charging unit
contacts.
&+$5*( LED lights. If it does not,
DKT2204-CT Charging
Unit (pictured)
Step 10: Install Headset (Optional)
The optional heads et provid es a hands -free opti on. With the head set i nstal led, yo u can
use the belt clip to carry the handset and conduct a conversation. All feature
operations remain the same except the handset earphone and microphone are
disconnected.
➤ Open the cover over the headset jack that is
located on the top of the handset and plug in the
headset as shown at right.
Important! Only use headsets especially designed
or modified for use with radio
frequency equipment.
24 Strata CTX DKT2204-CT/DKT2304-CT Cordless Digital Telephones 06/03
Page 35

Step 9: Charge Batteries for First Time
Step 11: Attach Belt Clip (Optional)
Note The belt clip is designed to fit snugly onto the handset.
1. Snap the tab out of the belt clip notch on the top of the
handset.
2. Slide the belt clip into the space where the belt clip tab was,
carefully aligning the belt clip sides to the notches.
3. Press firmly until it snaps into place.
4. Use the belt clip to attach the handset to your belt or pocket.
➤ To remove the belt clip
1. Press the retaining clip in toward the belt clip blade and slide
the clip up at the same time.
2. Reinstall the cove r tab.
Installation
Strata CTX DKT2204-CT/DKT2304-CT Cordless Digital Tel ephones 06/03 25
Page 36

Installation
Step 9: Charge Batteries for First Time
26 Strata CTX DKT2204-CT/DKT2304-CT Cordless Digital Telephones 06/03
Page 37

Handset Operation 3
This chapter covers the handset volume control and various functions related to the
handset itself.
Handset Controls
Earpiece Volume
➤ Press 592/ (on DKT2204-CT) or 5,1*92/ (on DKT2304-CT) on the si de of
the handset during a call to select the earpiece volume of the handset (shown
below). There are four levels—low, medium, high and maximum—from which to
choose.
DKT2204-CT
The LCD displays the volume level for two seconds.
Strata CTX DKT2204-CT/DKT2304-CT Cordless Digital Tel ephones 06/03 27
DKT2304-CT
Page 38

Handset Operation
Handset Controls
Handset Ringer Tone and Volume
➤ Press 592/ (DKT2204-CT) or 5,1*92/ (DKT2304-CT) on the side of the
handset in standby mode to select six ringer tones and volume combinations—
Ring Type A, B and C. Each ring type has two levels, high and low.
Mute (DKT2204-CT only)
➤ Press the 087( button on the side of the handset to consult another person in the
room without the caller hearing you. The
➤ Press the 087( button again to cancel the mute condition.
Note Finishing the conversation can also cancel mute condition.
7DON icon blinks.
Handset Ringer Mute (DKT2304-CT only)
You can temporarily mute the handset ringer tone. In standby mode, press and hold
212))087(on the side of the handset for two seconds. The Ring Off icon
displays on the LCD. If you press and hold the key for two seconds again also in
standby mode, the icon disappears.
Vibrate Mode
➤ With the handset not on the charging unit:
• (DKT2204-CT) Turn the Ringer Off Slide Switch to Off. The Ring Off icon
displays on the LCD.
• (DKT2304-CT) Press
the LCD.
The handset vibrates when there is an incoming call.
Note If you set the ringer Off with the handset on the charger, the handset rings as
Ring Type-A Low.
28 Strata CTX DKT2204-CT/DKT2304-CT Cordless Digital Telephones 06/03
5,1*92/ until the Ring Off icon displays on
Page 39

Ringer Off Slide Switch (DKT2204-CT only)
The switch on the side of the handset turns the handset ringer
On or Off (shown right). When the switch on the side of the
handset is turned to
the LCD and incoming cal ls will no long er ring on the ha ndset.
When the switch on the side of the hands et is tu rne d to
Ring Off icon disappears and incoming calls ring on the
handset.
Note Ringing is automat ically turned on agai n if you press
7DON, function or ringer/volume buttons, receive an
incoming call, or if there is no user operation for five
minutes in standby mode.
RII, the Ring Off icon displays on
F1~F4 Feature Buttons
The )~) buttons on your cord less t elephone pe rform the same functi ons as t he firs t
four buttons on a Strata DKT3000/2000-series telephone. The
preassigned upon system installation. Ask your System Administrator which
button functions you have.
Handset Operation
F1~F4 Feature Buttons
RQ, the
)~)buttons were
)~)
If you are not using these buttons for the assigned features, you can invoke the
features with access codes. Please see Table 3 on page 37 for access code sequences
that match your Toshiba telephone system.
For detailed feature descriptions, see the Strata CTX DKT/IPT Telephone User Guide.
Strata CTX DKT2204-CT/DKT2304-CT Cordless Digital Tel ephones 06/03 29
Page 40

Handset Operation
Making a Call
Making a Call
Note If you are talking on a call and you have reached the range limit, move back in
range within 35 seconds or the call is dropped.
Internal Call
1. Pick up t he hands et and press 7DON. The message “$&48,5,1*/,1.” displays
on the LCD.
If the connection is made bet ween t he ha nds et a nd base,
you will see the current vol ume setting (shown r ight) for
approx. two seconds. The
If the connection is not made or the handset is at the
range limit of the DKT2204-CT/DKT2304-CT, the
message “
2. When you hear a dial tone, enter the number you are calling. The numbers display
on the LCD.
126(59,&(” displays.
) LED turns on.
3. When you finish the call, press the
and puts it in Auto Standby.
7DON button again, this hangs up the telephone
External Call
1. Press ). The handset starts to establish a connection with the base unit.
If the connection is made between the handset and base, you will see the current
volume setting for approx. two seconds. The
2. When you hear a dial tone, enter the number you
are calling. The numbers display on the LCD
(shown right).
3. When you finish the call, press the
again, this hangs up the telephone and puts it in
Auto Standby.
7DON button
30 Strata CTX DKT2204-CT/DKT2304-CT Cordless Digital Telephones 06/03
) LED turns on.
Page 41

Answer a Call
Internal Call
1. When you receive a call, the handset rings and the LCD displays “67[[
&$//,1*
2. Pick up the handset. The AutoTalk feature allows you to answer the call
immediately.
Note If the handset is not in the charging unit, you must press 7DON . The message
$&48,5,1*/,1.” displays on the LCD.
“
If the connection is made between the handset and base, you see the current
volume setting for approx. two seconds. The
3. When you fi nish t he cal l, place t he hand set back i n the c har ging unit. AutoS tand by
automatically hangs up the telephone .
...or
press
External Call
” (where the calli ng pa rty’s station number shows). The ) LED blinks.
7DON to hang up the telephone.
Handset Operation
Answer a Call
) LED turns on.
1. When you receive a call, the handset rings and the LCD displays “/,1(
5,1*,1*
2. Pick up the handset. The AutoTalk feature allows you to answer the call
immediately.
Note If the handset is not in the charging unit, you must press 7DON . The message
“
If the connection is made between the handset and base, you see the current
volume setting for approx. two seconds. The
3. When you fi nish t he cal l, place t he hand set back i n the c har ging unit. AutoS tand by
automatically hangs up the telephone .
...or
press
Strata CTX DKT2204-CT/DKT2304-CT Cordless Digital Tel ephones 06/03 31
.” The ) LED blinks.
$&48,5,1*/,1.” displays on the LCD.
) LED turns on.
7DON to hang up the telephone.
Page 42

Handset Operation
Place a Call on Hold
Place a Call on Hold
➤ Press +ROG.
➤ To resume the call
➤ Press +ROG or 7DON.
Transfer a Call
➤ Press &QI7UQ. The dialed numbers saved in transfer memory is shown on the
display after two seconds. When the receiving party answers, press
complete the transfer.
Redial a Number
➤ Press 7DON and then 5HGLDO. The last number called is redialed.
Note If you are using the Strata CTX system, the 5HGLDO button works only wit h the
last dialed number that was answered. If you dial a number and receive no
answer, the
5HGLDO button will not use that number as the last one dialed.
&QI7UQ to
Retrieve Messages
➤ Press 0VJ when you see the envelope icon on the
LCD to retrieve your message(s).
Conference a Call
➤ Press &QI7UQ. The dialed numbers saved in conference memory is shown on the
display after two seconds. When the other party answers, press
three-way conversation.
32 Strata CTX DKT2204-CT/DKT2304-CT Cordless Digital Telephones 06/03
&QI7UQ to have a
Page 43

Conference Calls Using Strata CTX
Conference Calls Using Strata CTX
You can conference together up to eight parties (including your own) - with up to six
parties being external CO or network lines. The actual number of conference parties
with acceptable volume levels depends on the local and far end telephone line
conditions.
The person who initiates the conference call is the Master. If, after the conference is
established and th e Mas ter exits the confere nce , the first station to have been added to
the conference becomes the Master. If no other internal stations are included in the
conference call, the call is disconnected.
➤ To conference calls
1. While on a call, pre ss
2. Call another station or outside line.
3. When the called party answers, press
answer, press
conferenced.
4. Repeat the above steps to add lines to the conference. Keep in mind the maximum
number of allowed conference parties.
&QI7UQ again to return to the original connection. All parties are
&QI7UQ. You hear dial tone.
&QI7UQ. If you receive a busy tone or no
Handset Operation
➤ To transfer conference control
1. Do Steps 1 and 2 above to add the line to which you wish to transfer conference
control.
2. Announce the call and hang up to transfer the call. This station now becomes the
conference “master” with the ability to add or delete parties.
➤ To hold a conference call
➤ If you are the Conference Master, press the +ROG key once (or twi ce for Exec utive
Hold) to place the conference call on hold. The other parties can continue with the
conference. Music-on-hold is suppressed.
➤ Press &QI7UQ to rejoin the conference at any time. When you return, you retain
Master status.
Strata CTX DKT2204-CT/DKT2304-CT Cordless Digital Tel ephones 06/03 33
Page 44

Handset Operation
Adding Voice Mail to a Conference
Adding Voice Mail to a Conference
The Conference Master can add voice mail to a conference. This enables participants
in a conference to listen to or leave a voice mail message during a telephone call.
➤ To add Voice Mail to a conference call (performed by Conference Master)
1. Press
2. Dial the voice mail (VM) extension number, then enter the VM mailbox and
&QI7UQ to place the current call on Consultation Hold.
security code. This adds the voice mailbox to the conference.
3. Press
&QI7UQ to reconnect to the original pa rty. (You ca n continue to add
conference members by pressing
Now, all parties in the conference can listen to or record a message to this voice
mailbox. Only the Master can control the VM with touchtones or Soft Keys.
&QI7UQ and dialing another extension.)
Connecting Two Outside Lines
1. While talking on an outside call, press &QI7UQ. You hear dial tone.
2. Dial an outside line access code and outside telephone number.
3. After the party answers, press
If you receive a busy tone or if the station does not answer, press
4. Hang up. The two lines are connected.
5. To supervise a tandem call, press &QI7UQ. If the parties have finished, hang up or
if the parties are stil l talki ng, press
and the connection is released.
If your telephone company provides auto disconnect, the connection may release
automatically when the parties hang up. If not, the lines must be supervised to be
disconnected.
&QI7UQ. All parties are conferenced.
&QI7UQ and hang-up. Both Line LEDs turn off
&QI7UQ.
34 Strata CTX DKT2204-CT/DKT2304-CT Cordless Digital Telephones 06/03
Page 45

Handset Operation
Switch a Call to Your Cordless Digital Telephone
Switch a Call to Your Cordless Digital
Telephone
1. Press +ROG on the desktop telephone and press 7DON on the DKT2204-CT/
DKT2304-CT handset.
2. Pick up the cordless telephone and press the flashing Line LED. The call is now
transferred to the DKT2204-CT/DKT2304-CT handset, and the DKT telephone is
disconnected.
Switch a Call to the De sk Telephone
1. Press +ROG on the DKT2204-CT/DKT2304-CT handset.
2. Pick up the DKT telephone and press the flashing Line LED. The cordless
telephone is disconnected.
Strata CTX DKT2204-CT/DKT2304-CT Cordless Digital Tel ephones 06/03 35
Page 46

Handset Operation
Switch a Call to the Desk Telephone
36 Strata CTX DKT2204-CT/DKT2304-CT Cordless Digital Telephones 06/03
Page 47

Feature Access Codes 4
This chapter gives you all of the cordless digital telephone features in alphabetical
order. Your cordless digital telephone provides many of the same features as a 2000series corded digital telephone.
In addition to the
telephone’s
0VJ,+ROG, &QI7UQ and 5HGLDO functions, your cordless digital
)~) buttons perform the same way as the first four buttons on your
3000- or 2000-series digital telephone. They are assigned during system installation.
See your System Administrator for the features that have been assigned.
If you are not using these buttons for the assigned features, you can invoke the
features with access codes. Please see Table 3 below for access code sequences that
match your Toshiba telephone system.
For detailed feature des cript ions, se e the Strata CTX DKT/IPT Telephone User Guide.
Table 3 Feature Access Codes
Feature Feature Access Code Sequences
Account Code
Attendant Console
Automatic Busy Redial - On
Automatic Busy Redial - Off
Automatic Callback Cancel
Background Music
Telephone Speaker On
Telephone Speaker Off
External Speaker On
&QI7UQ
Ext. button +
Ext. button +
Ext. button +
+
+ Account code digits
+ source number +
+ source number +
Strata CTX DKT2204-CT/DKT2304-CT Cordless Digital Tel ephones 06/03 37
Page 48

Feature Access Codes
Switch a Call to the Desk Telephone
Table 3 Feature Access Codes (continued)
Feature Feature Access Code Sequences
External Speaker Off
Call Forward - See Table 4 on page 41.
Call Park
Activate
Retrieve
System Orbits
Call Pickup
Incoming - Group Pickup
Incoming - Directed Exte nsion Pickup
Incoming - Directed Gr oup Pickup
Incoming - Directed Exte nsion Pickup
Directed DN Pickup of eit her R ingi ng
or Held Call
On hold - Local Retrieve
On hold - Remote Retr ieve
On hold - Outside line Re tr ieve Ext. button +
On hold - Directed Exte nsion Retrieve
Conferencing - Three Way
Dialing
Dial
Dial
DISA Security Code - Change
Do Not Disturb
Local - On
Local - Off
Remote - On
Remote - Off
Ext. button +
&QI7UQ
Ext. button +
~
Ext. button +
Ext. button +
Ext. button +
Ext. button +
Ext. button +
Ext. button +
Ext. button +
Ext. button +
+ old Security Code (1~15 digits) + + new Security
Code (1~15 digits) +
+ Orbit Number
+ Orbit Number
+ Ext. Number to be picked up
+ Group Number to be pick ed up
+ Ext. Number
+ Ext. Number
+ Remote Ext. No.
+ Line on hold
+ Ext. No. on hold
+ ext. no. + Pass Code Number+
+ ext. no. + Pass Code Number+
38 Strata CTX DKT2204-CT/DKT2304-CT Cordless Digital Telephones 06/03
Page 49

Table 3 Feature Access Codes (continued)
Feature Feature Access Code Sequences
Door Lock Control
Door Phone Calling
Emergency Call
Flash - Short
Flash - Long
LCD Language (Change)
LCR (Outgoing Call)
Message Waiting (MW)
Release a received MW
Retrieve a received MW
Activate MW at another Station
without Ringing
Cancel MW at another Station
without Ringing
Messaging - Advisory
Advisory Message - Activation
Advisory Messag e - Cancellation
Network Access C ode (Private
Network)
Night Ring Answer
Off-hook Call Announce (Manual
Mode)
Override
Busy, Do Not Disturb
Executive
Paging
Page All Groups
Page Individual Grou ps
Emergency Page - Individual Group
Voice Firs t: ; Tone First: , , or
Feature Access Codes
Switch a Call to the Desk Telephone
+ Door Lock Number
+ Door Phone No. (01~24, depending on system size)
+ Language No.
+ Ext. no.
+ Ext. no.
+ Message No.
+ Private Network No.
+ Group Number
+ Group Number
Strata CTX DKT2204-CT/DKT2304-CT Cordless Digital Tel ephones 06/03 39
Page 50

Feature Access Codes
Switch a Call to the Desk Telephone
Table 3 Feature Access Codes (continued)
Feature Feature Access Code Sequences
Emergency Page - All Groups
Answer for External Group Page
Repeat Last Number Dialed
Speed Dial Register
Station (00~99)
System
Start Application
Substitution of Dial “”
Substitution of Dial “”
+ Zone Number
+ Index Number (00~99)
+ Index Number (000~099)
+ Index Number (100~199)
+ Index Number (200~299)
+ Index Number (300~399)
+ Index Number (400~499)
+ Index Number (500~599)
+ Index Number (600~699)
+ Index Number (700~799)
Travelling Class Override
Enter Code
Change Code
User Programming Mode
Voice Mail (VM)
Direct Transfer to Voice Mail
Volume Control - Beep
Volume Control - Ringing
+ Index Number + old Code + + new Code +
+ Ext. Number
40 Strata CTX DKT2204-CT/DKT2304-CT Cordless Digital Telephones 06/03
Page 51

Table 4 Call Forward Procedure
Feature Button Sequence
Call Forward Any Call - Internal and Incoming Line Calls:
Forwards any call, whether an internal call or incoming line call.
All Calls to an ext. Press ext. button +
All Calls to outside
telephone no.
Press ext. button +
no. +
(tone)
Busy to an ext. Press ext. button +
Busy to outside
telephone no.
Press ext. button +
no. +
(tone)
No Answer to an ext. Press ext. button +
No Answer to
outside telephone
no.
Busy No Answer to
an ext.
Busy No Answer to
outside telephone
no.
Press ext. button +
no. +
(tone) + timer (~) (tone)
Press ext. button +
Press ext. button +
+ timer (~) (tone)
Cancel Press ext. button +
(tone) + dial the dest. ext. no. (tone)
(tone)+ outside line access code + dest. telephone
(tone)+ dial the dest. ext. no. (tone)
(tone)+ outside line access code + dest. telephone
(tone)+ dial the dest. ext. no. + timer (~) (tone)
(tone)+ outside line access code + dest. telephone
+ dial the dest. ext. no. (tone)+ timer (~) (tone)
+ outside line acce ss cod e + des t. tel ep hon e no. +
(tone)
Feature Access Codes
Switch a Call to the Desk Telephone
Call Forward - Incoming Line Calls:
Forward incoming line calls only.
All Calls to an ext. Press ext. button +
All Calls to outside
telephone no.
Press ext. button +
no. +
(tone)
Busy to an ext. Press ext. button +
Busy to outside
telephone no.
Press ext. button +
(tone)
no. +
No Answer to an ext. Press ext. button +
No Answer to
outside telephone
no.
Busy No Answer to
an ext.
Strata CTX DKT2204-CT/DKT2304-CT Cordless Digital Tel ephones 06/03 41
Press ext. button +
(tone) + timer (
~
Press ext. button +
(tone)+ dial the dest. ext. no. (tone)
(tone)+ outside line access code + dest. telephone
(tone)+ dial the dest. ext. no. (tone)
(tone)+ outside line access code+ dest. telephone
+ dial the dest. ext. no. (tone) + timer (~)
+ outside line access co de + des t. telephone no. +
)
+ dial the dest. ext. no. (tone) + timer (~) (tone)
Page 52

Feature Access Codes
Switch a Call to the Desk Telephone
Table 4 Call Forward Procedure (continued)
Feature Button Sequence
Busy No Answer to
outside telephone
no.
Press ext. button +
(tone) + timer (
Cancel Press ext. button +
Call Forward Any Call - Set for Another Station:
Enables you to set call forwarding for another telephone within your telephone system. You will need
the other telephone’s CF pass code in order to do this. CF Pass Codes are created in system
programming.
All Calls to an ext.
All Calls to outside
telephone no.
Busy to an ext.
Busy to outside
telephone no.
Press ext. button +
other telephone’s CF pass code +
Press ext. button +
other telephone’s CF pass code +
telephone no. +
Press ext. button +
other telephone’s CF pass code +
Press ext. button +
other telephone’s CF pass code +
telephone no. +
Press ext. button +
No Answer to an ext.
No Answer to
outside telephone
no.
Busy No Answer to
an ext.
Busy No Answer to
outside telephone
no.
Cancel
other telephone’s CF pass code (tone) +
(
~
) (tone)
Press ext. button +
other telephone’s CF pass code (tone) +
telephone no. +
Press ext. button +
telephone’s CF pass code +
~
) (tone)
(
Press ext. button +
telephone’s CF pass code +
telephone no. +
Press ext. button +
other telephone’s CF pass code +
+ outside line access co de + des t. telephone no. +
~
) (tone)
(tone)
(tone) + dial the other telephone’s ext. no. + enter
+ dest. telephone no. (tone)
(tone) + dial the other telephone’s ext. no. + enter
+ outside line access code+ dest.
(tone)
(tone) + dial the other telephone’s ext. no. + enter
+ dest. telephone no. (tone)
(tone) + dial the other telephone’s ext. no. + enter
+ outside line access code+ dest.
(tone)
(tone) + dial the other telephone’s ext. no. + enter
(tone) + dial the other telephone’s ext. no. + enter
(tone) + timer (~) (tone)
+ dial the other telephone’s ext. no. + enter other
(tone) + dest. telephone no. (tone) + timer
+ dial the other telephone’s ext. no. + enter other
(tone) + outside line access code + dest.
WRQH
+ timer (~) (tone)
(tone) + dial the other telephone’s ext. no. + enter
(tone)
+ dest. telephone no. (tone) + timer
+ outside line access code+ dest.
42 Strata CTX DKT2204-CT/DKT2304-CT Cordless Digital Telephones 06/03
Page 53

Table 4 Call Forward Procedure (continued)
Feature Button Sequence
Call Forward - Incoming Line Call - Set for Another Station:
Enables you to set forw arding of inc oming line cal ls for a nother t ele phone within y our tel ephone syst em
All Calls to an ext.
All Calls to outside
telephone no.
Busy to an ext.
Busy to outside
telephone no.
Press ext. button +
other telephone’s CF pass code +
Press ext. button +
other telephone’s CF pass code +
telephone no. +
Press ext. button +
other telephone’s CF pass code +
Press ext. button +
other telephone’s CF pass code +
telephone no. +
Press ext. button +
No Answer to an ext.
No Answer to
outside telephone
no.
Busy No Answer to
an ext.
Busy No Answer to
outside telephone
no.
Cancel
Change Call Forward Pass Code:
other telephone’s CF pass code +
(
~
)
Press ext. button +
other telephone’s CF pass code +
telephone no. +
Press ext. button +
other telephone’s CF pass code +
(
~
) (tone)
Press ext. button +
other telephone’s CF pass code +
telephone no. +
Press ext. button +
other telephone’s CF pass code +
(tone)
(tone)
(tone) + timer (~) (tone)
(tone) + timer (~) (tone)
(tone) + dial the other telephone’s ext. no. + enter
(tone) + dest. telephone no. (tone)
(tone) + dial the other telephone’s ext. no. + enter
(tone) + outside line access code + dest.
(tone) + dial the other telephone’s ext. no. + enter
(tone) + dest. telephone no. (tone)
(tone) + dial the other telephone’s ext. no. + enter
(tone) + outside line access code + dest.
(tone) + dial the other telephone’s ext. no. + enter
(tone) + dest. telephone no. (tone) + timer
(tone) + dial the other telephone’s ext. no. + enter
(tone) + outside line access code + dest.
(tone) + dial the other telephone’s ext. no. + enter
(tone) + dest. telephone no. (tone) + timer
(tone) + dial the other telephone’s ext. no. + enter
(tone) + outside line access code + dest.
(tone) + dial the other telephone’s ext. no. + enter
(tone)
Your telephone must be enabled in programming to have the ability to change pass codes.
Change Pass Code
Press ext. button +
(tone) + new pass code (tone) +
(tone) + dial the dest. ext . no. (tone ) + old pas s code +
Strata CTX DKT2204-CT/DKT2304-CT Cordless Digital Tel ephones 06/03 43
Page 54

Feature Access Codes
Switch a Call to the Desk Telephone
44 Strata CTX DKT2204-CT/DKT2304-CT Cordless Digital Telephones 06/03
Page 55

Troubleshooting
and Specifications 5
This chapter covers these topics:
• Troubleshooting
• Simultaneous conversation channels
• Range and performance
• Radio interference
• Telephone line problems
• More than one cordless telephone
• Privacy
• Specifications
Troubleshooting
If your cordless telephone is not performing to your expectations, try the suggestions
in Table 5. If you are still unable to resolve the problem, contact your telephone
System Administrator.
Important! Do not attempt to serv ic e t his unit yourself. All serv ice must be done by
qualified service personnel.
Strata CTX DKT2204-CT/DKT2304-CT Cordless Digital Tel ephones 06/03 45
Page 56

Troubleshooting and Specifications
Troubleshooting
Table 5 Troubleshooting Suggestions
Condition Suggestion
CHARGE LED does not light when
handset is placed on charging unit.
Conversation is interrupted frequently.
Warning tone and NO SERVICE
message.
Handset doesn’t ring.
• Make sure the AC adapter is plugged into the charging
unit and wall outlet.
• Make sure handset is properly seated in charging unit.
• Make sure the battery pack is properly placed in the
handset.
• Make sure that the charging contacts on the handset
and charging unit are clean.
• Make sure that the base unit antenna is fully vertical.
• Move closer to the base unit.
• Check for low battery warning.
• Move closer to the base unit.
• Make sure the AC adapter is plugged into the base unit
and wall outlet.
• The battery pack may be weak. C harge the battery pa ck
for five~six hours.
• Make sure the base unit antenna is fully vertical.
• The handset may be too far away from the base unit.
• The ringer may be set to Off.
• Make sure the AC adapter is plugged into the base unit
and wall outlet.
46 Strata CTX DKT2204-CT/DKT2304-CT Cordless Digital Telephones 06/03
Page 57

Troubleshooting and Specifications
Troubleshooting
Low Battery
Your cordless telephone comes equipped with one rechargeable battery:
• DKT2204-CT: BT2499 battery that provides six hours of talk and four days of
standby time (fully charged).
• DKT2304-CT: BT930 battery that provides seven hours of talk and five days of
standby time (fully charged).
A “fast charge” in the handset and a “trickle charge” in the charging unit enables the
extended talk and standby times.
When the battery is low, the Battery icon displays on
the LCD (shown right) and the handset beeps. Low
battery symptoms are:
• On a call
• All buttons and functions operate
• Handset beeps once every three seconds
Note To continue your call, you must replace the battery pack within 20 seconds.
• In standby mode
• None of the buttons operate
• LCD messages are cleared
• Handset beeps every 15 seconds for three minutes
• Cannot make or receive call
T o resto re your bat tery capa city, return the handset to the charging uni t for char ging or
replace the handset battery with a charged one. If the handset is on the charging unit
for one minute, battery low condition is cancelled. The Battery icon is turned Off and
battery low tone stops.
For more information on installing and charging the battery, see Step 8: “Install
Handset Battery Pack” on page 23.
Strata CTX DKT2204-CT/DKT2304-CT Cordless Digital Tel ephones 06/03 47
Page 58

Troubleshooting and Specifications
Troubleshooting
Cleaning Charging Unit Contacts
To maintain a good charge, it is important to clean all
charging contacts on the handset, spare battery pack
(DKT2204-CT only) and charging unit about once a
month (shown right). Use a pencil eraser or a soft dry
cloth. Do not use any liquids or solvents.
DKT2204-CT Charging
Unit (pictured)
Charging Spare Battery Packs (DKT2204-CT only)
The charging unit of your cordless telephone is equipped to charge the spare battery
pack with or without the handset in the front slot.
1. Slide the spare battery pack into the second slot in the
charging unit until the retaining clip snaps over the top of
the pack.
2. Make sure the
%$77&+$5*( indicator doesn’t light, check to see that
%$77&+$5*( indicator lights. If the
the AC adapter is plugged in, and that the battery pack is
making good contact with the unit’s charging contacts.
Note Charge the battery pack without interruption for 12~15
hours.
3. When charging is complete, press out on the latch and
remove the battery pack for use. Or, if you don’t need the
battery pack immediately, leave it in the charging compartment. It will not
overcharge.
48 Strata CTX DKT2204-CT/DKT2304-CT Cordless Digital Telephones 06/03
Page 59

Troubleshooting and Specifications
Simultaneous Convers ati on Chann el s
Simultaneous Conver sation Channels
DKT2204-CT
The DKT2204-CT cordless digital telephone has 10 operating channels available.
A common misconception is that this limits a customer to 10 cordless telephones. This
is not the case. Each cordless digital telephone can operate on any of the 10 channels.
When you turn on a cordless digital telephone, the telephone selects an available
channel within its’ range. In a given cordless range, 10 simultaneous calls can be
made. In most businesses, it is unlikely that all 10 channels will be in use at the same
time. Typically 20 to 30 telephones can share the 10 channels.
Another factor i s the dist ribut ion of the t el ephones in a faci lity. If your cordless digital
telephones are disbursed throughout a facility, there should not be contention for
channels. If ther e are more th an 10 cordl ess dig ital te lephones i n one area an d 10 user s
are using their cordless telephones, an 11
time.
DKT2304-CT
The DKT2304-CT cordless handset has 30 operating channels available. A common
misconception is that this limits a c ustomer to 3 0 handsets. T his is not the case. Each
handset can operate on any of the 30 channels because each one selects an available
channel within its range. In a given range, 30 simultaneous calls can be made.
th
user would not be able to connect at that
Another factor is the distribution of the telephones in a facility. If your handsets are
disbursed through out a fac ility, there should not be contention for a ll channe ls. If there
are more than 30 in one area and 30 use rs are using the ir hands ets, t he 31
not be able to get dial tone.
Strata CTX DKT2204-CT/DKT2304-CT Cordless Digital Tel ephones 06/03 49
st
user would
Page 60

Troubleshooting and Specifications
Range and Performance
Range and Performance
The DKT2204-CT operates up to 1.1 miles and the DKT2304-CT .7 miles from its
base in a completely unrestricted test environment. Typically, ranges of 300 to 400
feet are possible, dependi ng on t he buil ding s truct ure i n which it i s used. For opt imum
range and performance from your handset, try the following:
• Place the base units at least three to six feet away from the DKT; three feet from
metal structures; and six feet from computers, fax machines or other electronic
equipment.
• Use an AC outlet not associated with computer or electromagnetic equipment.
• Wherever possible, put the base unit in the middle of the coverage area.
• Mount the base unit high in the room for maximum range.
• If you have two to three cordless telephones, put them 12 feet apart.
• If you have four to 10 cordless telephones, put them 20 feet apart.
• If you want to use more than one cordless telephone in your office, they must
operate on different channels. Press the
CT) button on the handset to select a channel that provides the clearest
communication.
&KDQQHO (DKT2204-CT)/&+ (DKT2304-
Radio Interference
Radio interference occasionally interrupts conversations, which does not mean that
your unit is defective. Move to a different location while you are talking. If the
interference continues, move the base unit. If there is still interference, contact your
System Administrator.
Telephone Line Problems
The FCC and IC have granted the telephone company the right to disconnect service
in the event that your telephone causes problems on the telephone line. Also, the
telephone company may make changes in facilities and services which may affect the
operation of your unit. However, your telephone company must give adequate notice
in writing prior to such actions to allow you time for making necessary arrangements
to continue uninterrupted service.
50 Strata CTX DKT2204-CT/DKT2304-CT Cordless Digital Telephones 06/03
Page 61

If you are having trouble with your telephone service, you must first disconnect your
telephone to dete rmine i f it is the ca use of your pr oblem. If you det erm ine th at it is th e
cause, you must leave it disconnected until the trouble has been corrected.
Privacy
Cordless telephones are radio devices. Communications between the hand set and base
unit of your cordless telephone are accomplished by means of radio waves which are
broadcast over the open airways. Because of the inherent physical properties of radio
waves, your communications can be received by radio receiving devices other than
your own cordless telephone unit. Consequently, any communications using your
cordless telephone may not be private.
Troubleshooting and Specifications
Privacy
Strata CTX DKT2204-CT/DKT2304-CT Cordless Digital Tel ephones 06/03 51
Page 62

Troubleshooting and Specifications
Specifications
Specifications
For frequencies, power requirements, weight and size specifications, see Table 6.
Table 6 Specifications
Feature DKT2204-CT DKT2304-CT
General
Frequency Control Phase Lock Loop
Modulation Spread Spect rum Digital
Operating Temperature 0
Base Unit
Receive/Transmit Frequency 902~928 MHz
Power Requirements 10VDC from supplied AC adapter
Width – 4.25 inches
Size
Weight Approximately 15.4 oz. Approximately 13.7 oz.
Handset
Receive/Transmit Frequency 902~928 MHz 905~925 MHz (30 channels)
Power Requirements Nickel-cadmium battery pack Ni-MH Battery Pack
Size
Weight Approximately 8.8 oz. w ith ba ttery Approximately 5.2 oz. with battery
Battery
Depth – 7.5 inches
Height – 2.25 inches
Width – 2 1/5. inches
Depth – 1 2/3 inches
Height – 8 2/3 inches with
antenna
Capacity – 800 mAh, 3.6V
Talk Mode – 6 hours (typical)
Standby Mode – 4 days (typical)
° to 50° C (+32° F to + 122°F)
Width – 4.25 inches
Depth – 7 5/8 inches
Height – 2.25 inches
Width – 2. inches
Depth – 1.25 inches
Height – 5.5 inches without
antenna
Capacity – 800 mAh, 3.6V
Talk Mode – 7 hours (typical)
Standby Mode – 5 days (typical)
52 Strata CTX DKT2204-CT/DKT2304-CT Cordless Digital Telephones 06/03
Page 63

Index
A
AC adapter, 18
access codes, 37
account codes, 37
advisory messaging, 39
answering calls, 31
applications, 3
attach belt clip, 25
attendant console, 37
automatic
busy redial, 37
callback cancel, 37
B
background music (BGM), 37
base unit, 9, 18
antenna, 23
battery, 10, 15
charging, 24
charging spare packs, 48
install in ha ndset, 23
low, 47
removing and charging, 24
warnings, 15
belt clip, 25
benefits, 3
buttons
F1~F4 feature, 29
fixed, 6, 8
C
call
hold, 32
park, 38
pickup, 38
charging unit, 10, 18
cleaning contacts, 48
conference, 6, 8
calls, 32, 33, 38
Strata CTX calls, 33
voice mail, 34
connect and apply power, 18
connect telephone cables , 17
D
digital technology, 2
DISA
security code, 38
do not disturb, 38
door lock
control, 39
door phone
calling, 39
Strata CTX DKT2204-CT/DKT2304-CT Cordless Digital Tel ephones 06/03 53
Page 64

Index
E ~ S
E
emergency call, 39
F
feature access codes, 29, 37
features, 2
fixed buttons, 6, 8
flash, 39
H
handset, 4, 27
controls, 27
mute button, 28
ringer mut e, 28
ringer off s lide switch, 29
ringer tone and volume, 28
vibrate mode, 28
volume, 27
hold, 6, 8
I
installation instructions, 13
installing optional headset, 24
L
language changes, 39
LCD display, 9
LCR dialing out, 39
advisory, 39
mute, 6, 8, 28
N
narrow band technology, 2
network access, 39
night ring answer, 39
O
off-hook call announce (OCA), 39
on hold calls, 32
override
access codes, 39
travelling class, 40
P
paging
access codes, 39
park, 38
performance, 50
privacy, 51
private network access, 39
R
radio interference, 50
range, 50
redial, 6, 8, 32, 40
retrieve messages, 32
M
making calls, 30
memory, 29
message
retrieve, 32
waiting, 39
message waiting, 3, 9
messaging
S
safety instructions, 13
select location, 16
simultaneous conversation channels, 49
specifications, 52
speed dial
access codes, 40
spread spectrum technology, 2
54 Strata CTX DKT2204-CT/DKT2304-CT Cordless Digital Telephone 06/03
Page 65

standard parts, 11
start applic ation, 40
switching calls between desk/cordless, 35
T
telephone line problems, 50
transfer calls, 6, 8, 32
travelling class override, 40
troubleshooting, 45
two (tandem) CO line connection, 34
U
user programming, 40
V
voice mail
access codes, 40
conference, 34
volume control, 40
Index
T ~ W
W
wall installation
charging unit wall mounting, 21
direct wall mounting, 20
standard wall plate mounting, 19
Strata CTX DKT2204-CT/DKT2304-CT Cordless Digital Tel ephones 06/03 55
 Loading...