

Page 1

Issue 1, September 1992
STRATA DK
Release 3 and 4
© COPYRIGHT 1992 TOSHIBA AMERICA INFORMATION SYSTEMS, INC.
All rights reserved. No part of this manual may be reproduced in any form or by any means — graphic, electronic, or
mechanical, including recording, taping, photocopying, or the use of information retrieval systems — without express written
permission of the publisher of this material.
Check with your Telephone System Administrator to find out which software release is installed for your Strata DK 24/56/96
telephone system. Enter the release version number below.
Release _________
DIGITAL TELEPHONE USER GUIDE
Page 2

STRATA DK
TRADEMARKS AND SERVICE MARKS
The following trademarks and service marks are used in this document:
■ STRATA®: registered trademark of Toshiba America Information Systems, Inc.
In accordance with U.S. Copyright Law, a license may be required from the American Society of Composers,
Authors, and Publishers, or other similar organization, if radio or television broadcasts are used for the Musicon-Hold feature of this telecommunications system. Toshiba America Information Systems, Inc. disclaims any
liability arising out of the failure to obtain such a license.
Toshiba America Information Systems, Inc. reserves the right to change any of this information including, but
not limited to, product characteristics and operating specifications, without prior notice.
Page 3

Table of Contents
SUBJECT PAGE
INTRODUCTION
General Description.............................................................................................................. iii
Purpose................................................................................................................................. iii
Organization.......................................................................................................................... iii
How to Use This Guide......................................................................................................... iv
CHAPTER 1
LIQUID CRYSTAL DISPLAY................................................................................................. 1-1
Summary of LCD Functions.............................................................................................. 1-3
CHAPTER 2
FEATURE OPERATION........................................................................................................ 2-1
Date/Time/Day Adjustment............................................................................................... 2-1
Call Forward Display......................................................................................................... 2-2
To Set Call Forward...................................................................................................... 2-2
Station-to-Station Message Waiting ................................................................................. 2-3
Voice Mail (VM)................................................................................................................. 2-4
Busy Field Display............................................................................................................ 2-5
Mode Exit.......................................................................................................................... 2-5
DISA Security Code: Add/Delete/Change ........................................................................ 2-5
Toll Restriction Override/Traveling Class Code Change................................................... 2-6
Verified Account Code Change......................................................................................... 2-7
CHAPTER 3
SOFT KEY OPERATION ...................................................................................................... 3-1
General Description.......................................................................................................... 3-1
How to Use Soft Keys....................................................................................................... 3-1
Using Soft Keys to Make a Conference Call................................................................ 3-1
Soft Key Prompt Definitions.................................................................................................. 3-4
Soft Key Activation............................................................................................................ 3-6
Soft Key Deactivation ....................................................................................................... 3-6
CHAPTER 4
MESSAGES AND MEMOS
LCD AlphaNumeric Messages, Names, Memos .............................................................. 4-1
Storing a Message In Memory.......................................................................................... 4-1
Recording a Message....................................................................................................... 4-1
Recording a Message, Name, or Memo....................................................................... 4-1
Preprogramming System Messages............................................................................ 4-3
Adding to Preprogrammed Messages .................................................................................. 4-3
Messaging ........................................................................................................................ 4-4
Calling Station Messaging............................................................................................ 4-4
Cancelling a Calling Station Message.......................................................................... 4-4
Setting/Chaning Calling Station Messages.................................................................. 4-5
STRATA DK TABLE OF CONTENTS
i
Page 4

SUBJECT PAGE
Storing LCD Name/Number Display................................................................................. 4-5
Speed Dial Memo............................................................................................................. 4-7
Timed Reminders Wtih Memo.......................................................................................... 4-9
Message Sending............................................................................................................. 4-10
Called Station Messaging............................................................................................. 4-10
Group Called Station Messaging.................................................................................. 4-11
Remote Calling Station Messaging (Release 1, 3, and 4)............................................ 4-12
Busy Station Messaging (Release 1, 3, and 4)............................................................ 4-12
INDEX ................................................................................................................................................... Index-1
FIGURE LIST
FIGURE TITLE PAGE
I-1 Sample Page ........................................................................................................................ v
I-2 20-button Digital Speakerphone with Liquid Crystal Display ................................................ vi
4-1 Dialpad Information............................................................................................................... 4-2
STRATA DK TABLE OF CONTENTS
ii
Page 5

Introduction
GENERAL DESCRIPTION
The STRATA®DK 2000-series Digital Liquid Crystal Display (LCD)
telephone provides you with display information and feature prompting to
make call handling more efficient.
The LCD Feature Prompting with Soft Keys provides a quick and easy
way to access frequently-used features. If this feature is activated at your
station, abbreviated feature prompts help guide you through the steps to
performing specific tasks.
In addition, the LCD telephones provide you with Alphanumeric
Messaging, Busy Lamp Field (BLF) Identification, Central Office (CO)
Line Identification, Timed Reminders with Messaging, Speed Dial Memo
Directory Dialing, Intercom User Name/Number Display, Call Duration
Display, and Date/Time of Day Display.
PURPOSE
This document is designed as a feature operating guide for users of the
2000-series LCD telephones, as well as the 1000-series LCD telephones
(models DKT2010-SD, DKT2020-SD, and DKT1020-SD). This guide only
covers the LCD functions of the digital telephone. It should be used in
conjunction with the
STRATA DK Digital Telephone User Guide
.
An overview of this user guide will acquaint you with the various features
that are available to your telephone, and will provide you with the
necessary instructions to perform each feature.
ORGANIZATION
This user guide is divided into four main chapters. The first chapter
explains the Liquid Crystal Display (LCD), including a summary of LCD
functions and sample screens. The second chapter explains the
operation of each specific calling feature. Operating instructions are
provided in an easy-to-follow, step-by-step method. The third chapter
explains the operation and use of the Soft Key feature, including a list of
Soft Key prompt definitions. The fourth chapter details the message and
memo features. An index is also included at the back of this user guide,
allowing you to reference material quickly and easily.
STRATA DK INTRODUCTION
iii
Page 6

HOW TO USE THIS GUIDE
Your telephone’s specific calling allowances are determined by its Class
of Service, as determined by system programming. Your system
administrator can inform you which features are actually accessible from
your specific telephone. Once you are aware of the features that are
available to your telephone, review each feature’s description and
operational procedure contained in this guide.
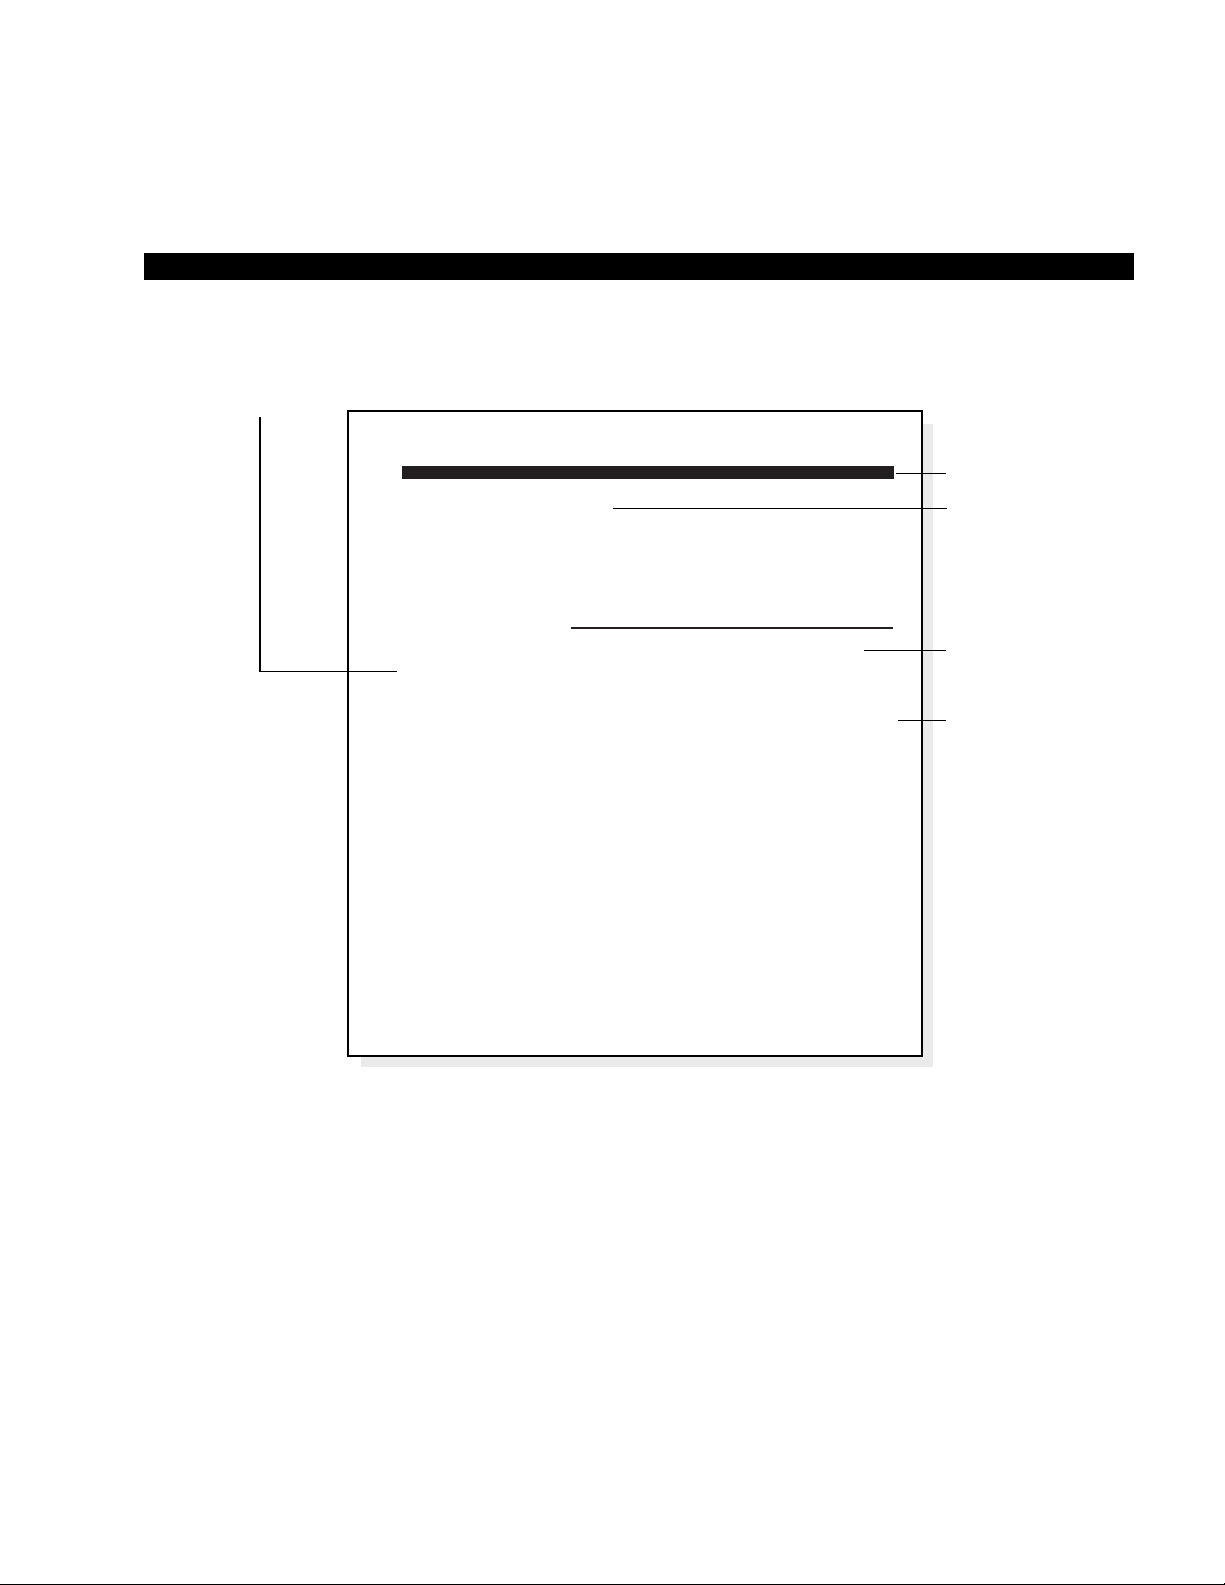
To assist you in achieving greater performance efficiency, the information
in this user guide is divided into distinct areas of content. Instructions for
various procedures are referred to as Action Text and appear in the lefthand column of the page. Instructions appear in numerical sequence,
enabling you to quickly perform a specific task. More detailed
descriptions of these procedures, or explanations of their effects, are
located in the right-hand column. The following illustration shows you the
structure followed in each Feature Operation section.
STRATA DK INTRODUCTION
iv
Page 7
STRATA DK INTRODUCTION
v
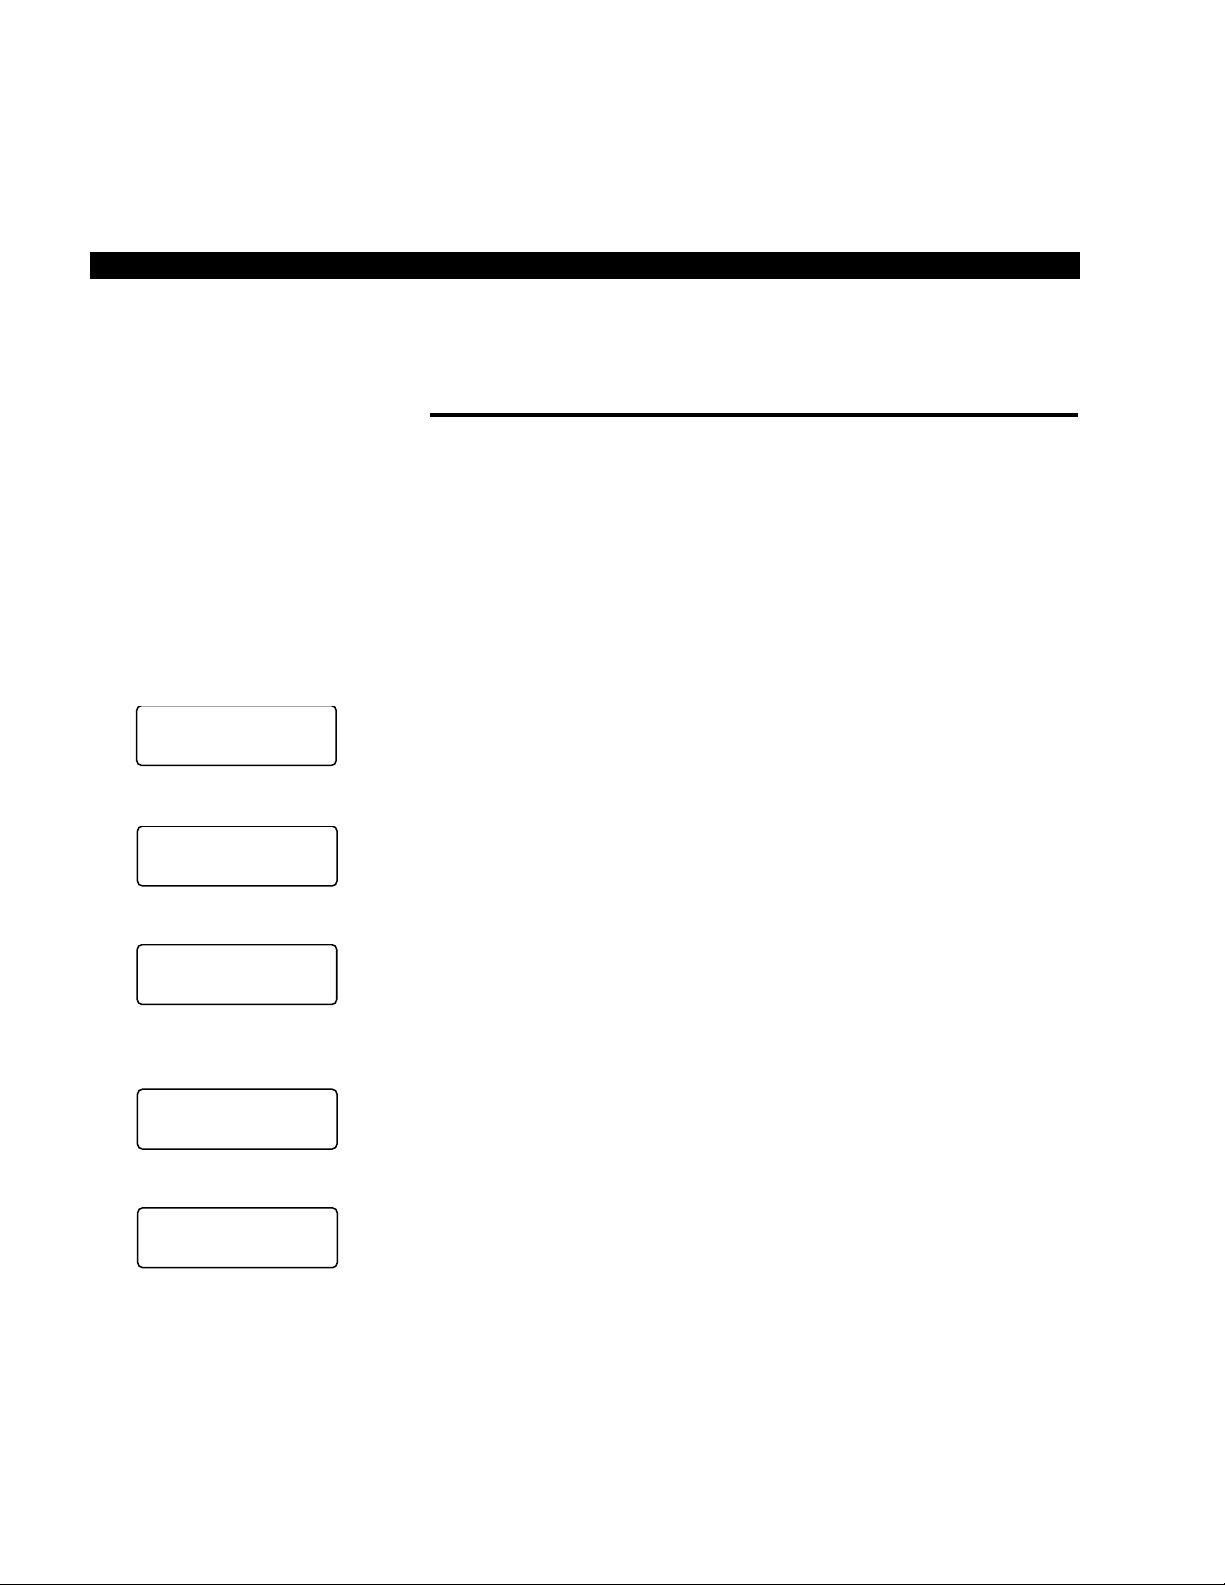
Figure I-1
Sample Page
ACTION TEXT
SPECIFIC INSTRUCTIONS ON HOW TO PERFORM A
PROCEDURE ARE NUMBERED AND ENTERED IN
THE LEFT-HAND COLUMN.
RESULTS OR
DETAILS
EXPLANATIONS
OR DETAILS OF
THE ACTION TEXT.
CHAPTER TITLES
FIRST LEVEL
HEADINGS
NOTES AND
WARNING
MESSAGES
STRATA DK FEATURE OPERATION
NOTES:
1. To cancel call forward, press
call forward button used to set call forward).
2. If call forward is set:
■
Central Office (CO) lines that ring at your station only will
forward (CO lines that ring into more than one station will not
forward).
■
CO line calls transferred to your station will forward.
■
Intercom calls will forward.
■
Call forward redirects the station hunt feature.
Intercom 6 0 1 Spkr
(or press the
To Use Station-to-Station
Message Waiting:
1. Lift the handset.
2. Dial the desired station
number.
3. The called station user
presses the Intercom and
Msg buttons to return the
call.
4. To clear the Msg LED from
the called station, press the
Msg button.
5. To clear the Msg LED from
the calling station, press the
Intercom button, dial the
station number and press the
Msg button twice (or 7 7).
STATION-TO-STATION MESSAGE WAITING
If there is no answer (busy or DND), press the Msg button (or dial 7).
This causes the Msg LED on the called station to flash. The called
station’s LCD displays the calling station’s number.
When the returned call is answered, the flashing Msg LED will turn off.
NOTE:
Up to four message waiting displays may be stored on the LCD. The
station number in the left-most position will be called when the
button is pressed. To rotate the station numbers, press the
button. The fourth message is reserved for the Message Center.
Msg
Scroll
2-3
Page 8
STRATA DK INTRODUCTION
vi
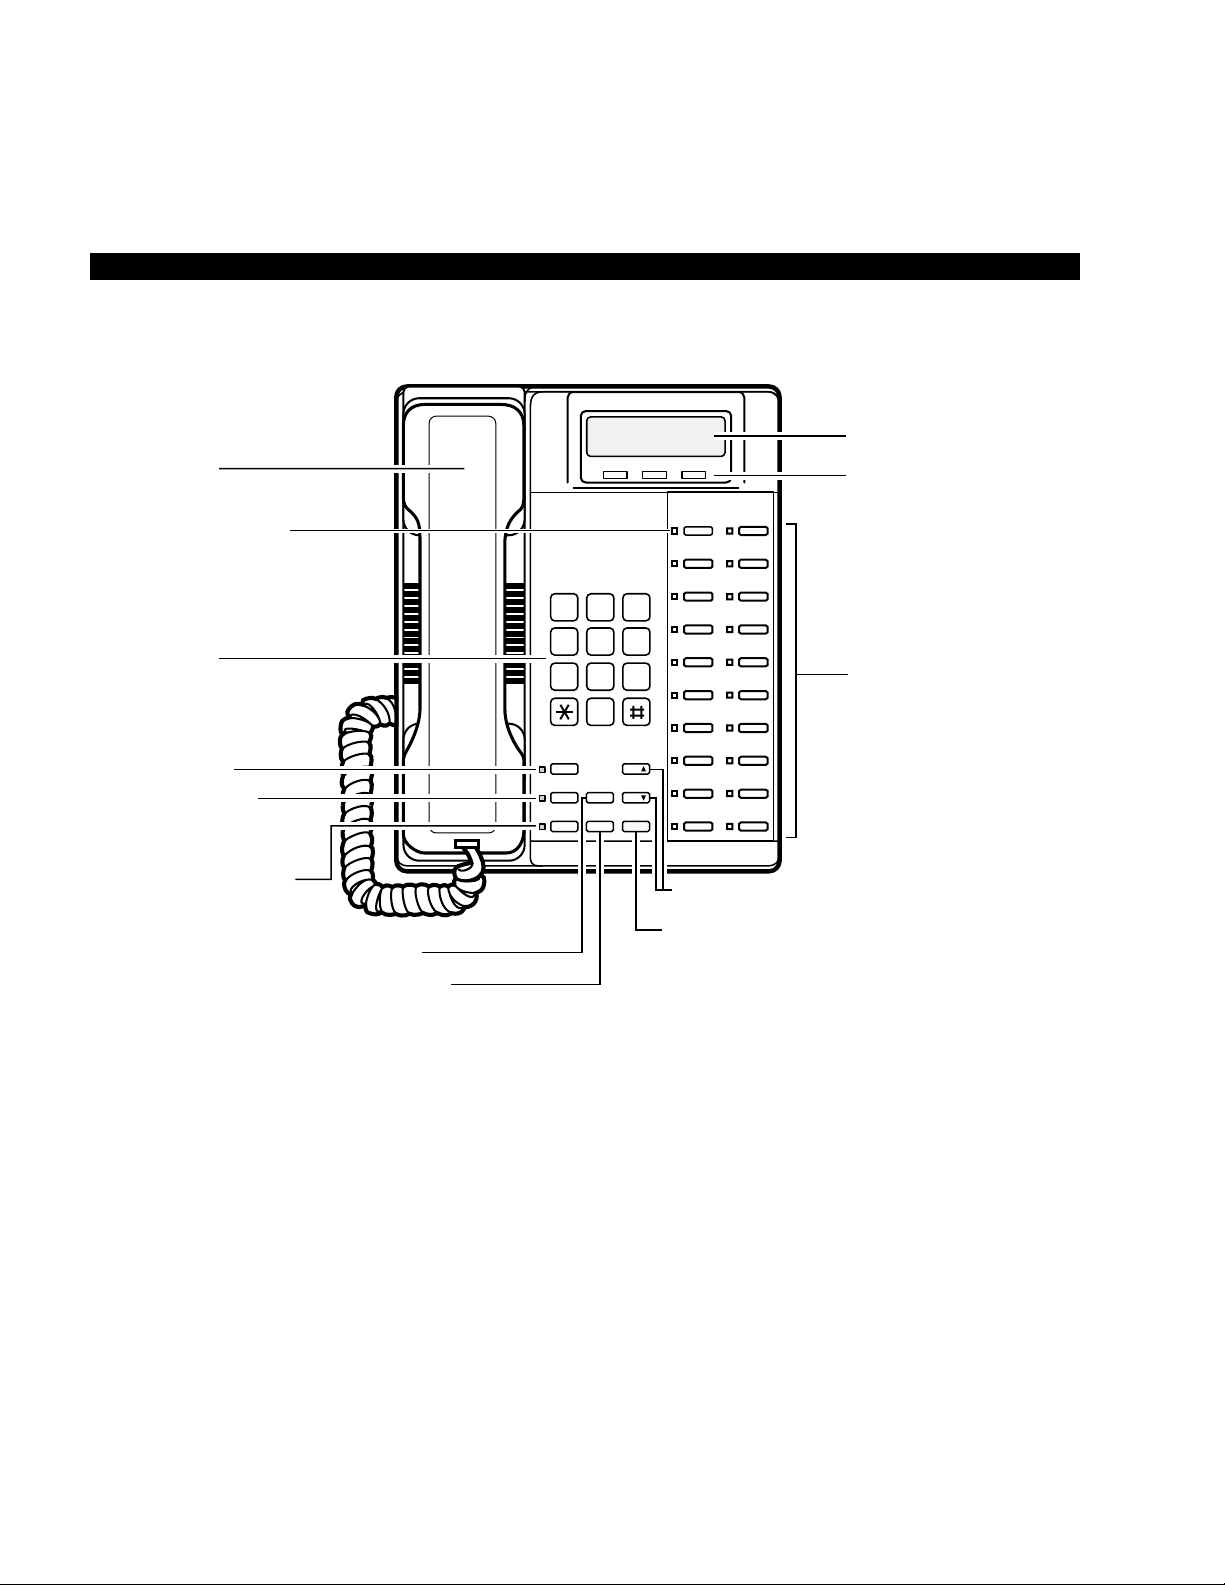
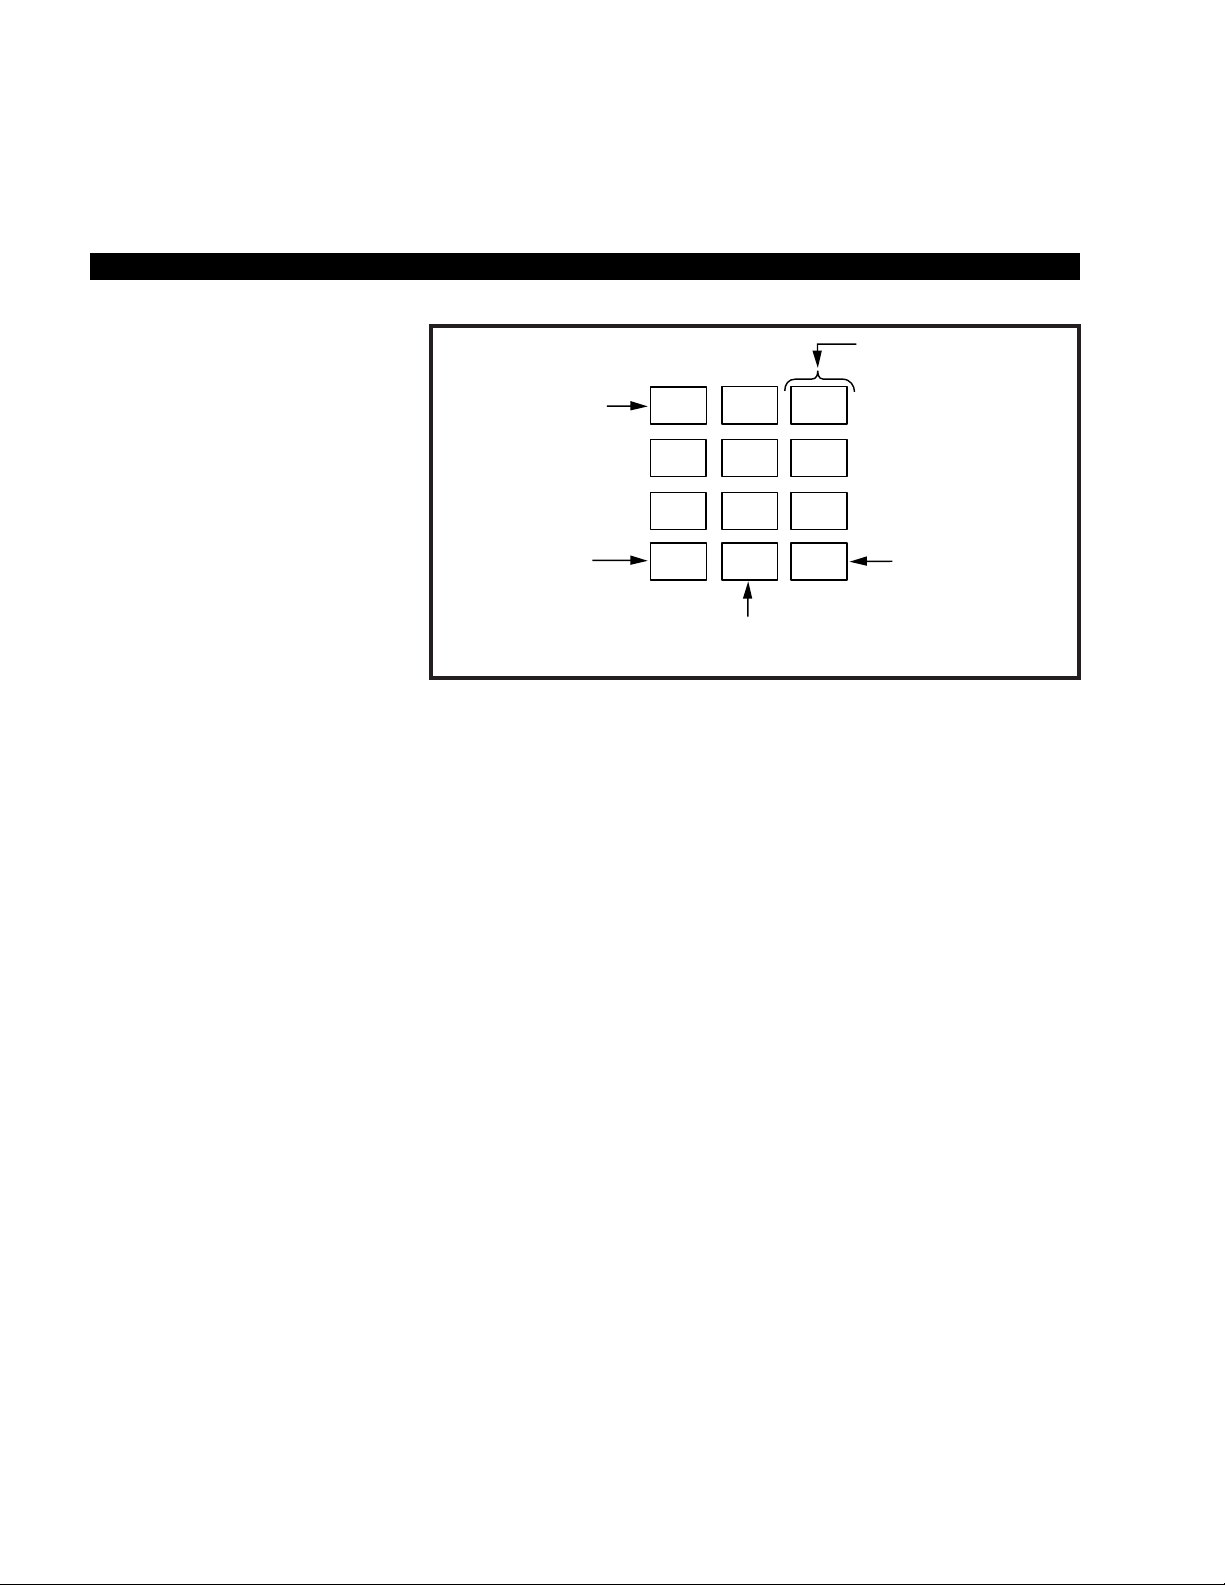
TOSHIBA
LCD DISPLAY
LCD CONTROL
BUTTONS/SOFT KEYS
FLEXIBLE FEATURE
CONTROL BUTTONS
123
456
789
0
GHI
DEFABC
JKL MNO
WXYTUV
OPER
PRS
DIALPAD
MESSAGE WAITING
BUTTON AND LED
INDICATOR
MICROPHONE
ON/OFF BUTTON
AND LED INDICATOR
SPEAKER ON/OFF
BUTTON AND LED
INDICATOR
LAST NUMBER REDIAL BUTTON
CONFERENCE/TRANSFER BUTTON
VOLUME UP/DOWN CONTROL BUTTONS
HOLD BUTTON
HANDSET
Msg
Mic
Spkr
Redial
Cnf/Trn
Hold
Vol
Vol
Mode Page Scroll
RED/GREEN
LED INDICATORS
Figure I-2
20-button Digital Speakerphone with Liquid Crystal Display
Page 9
Chapter 1
LIQUID CRYSTAL DISPLAY
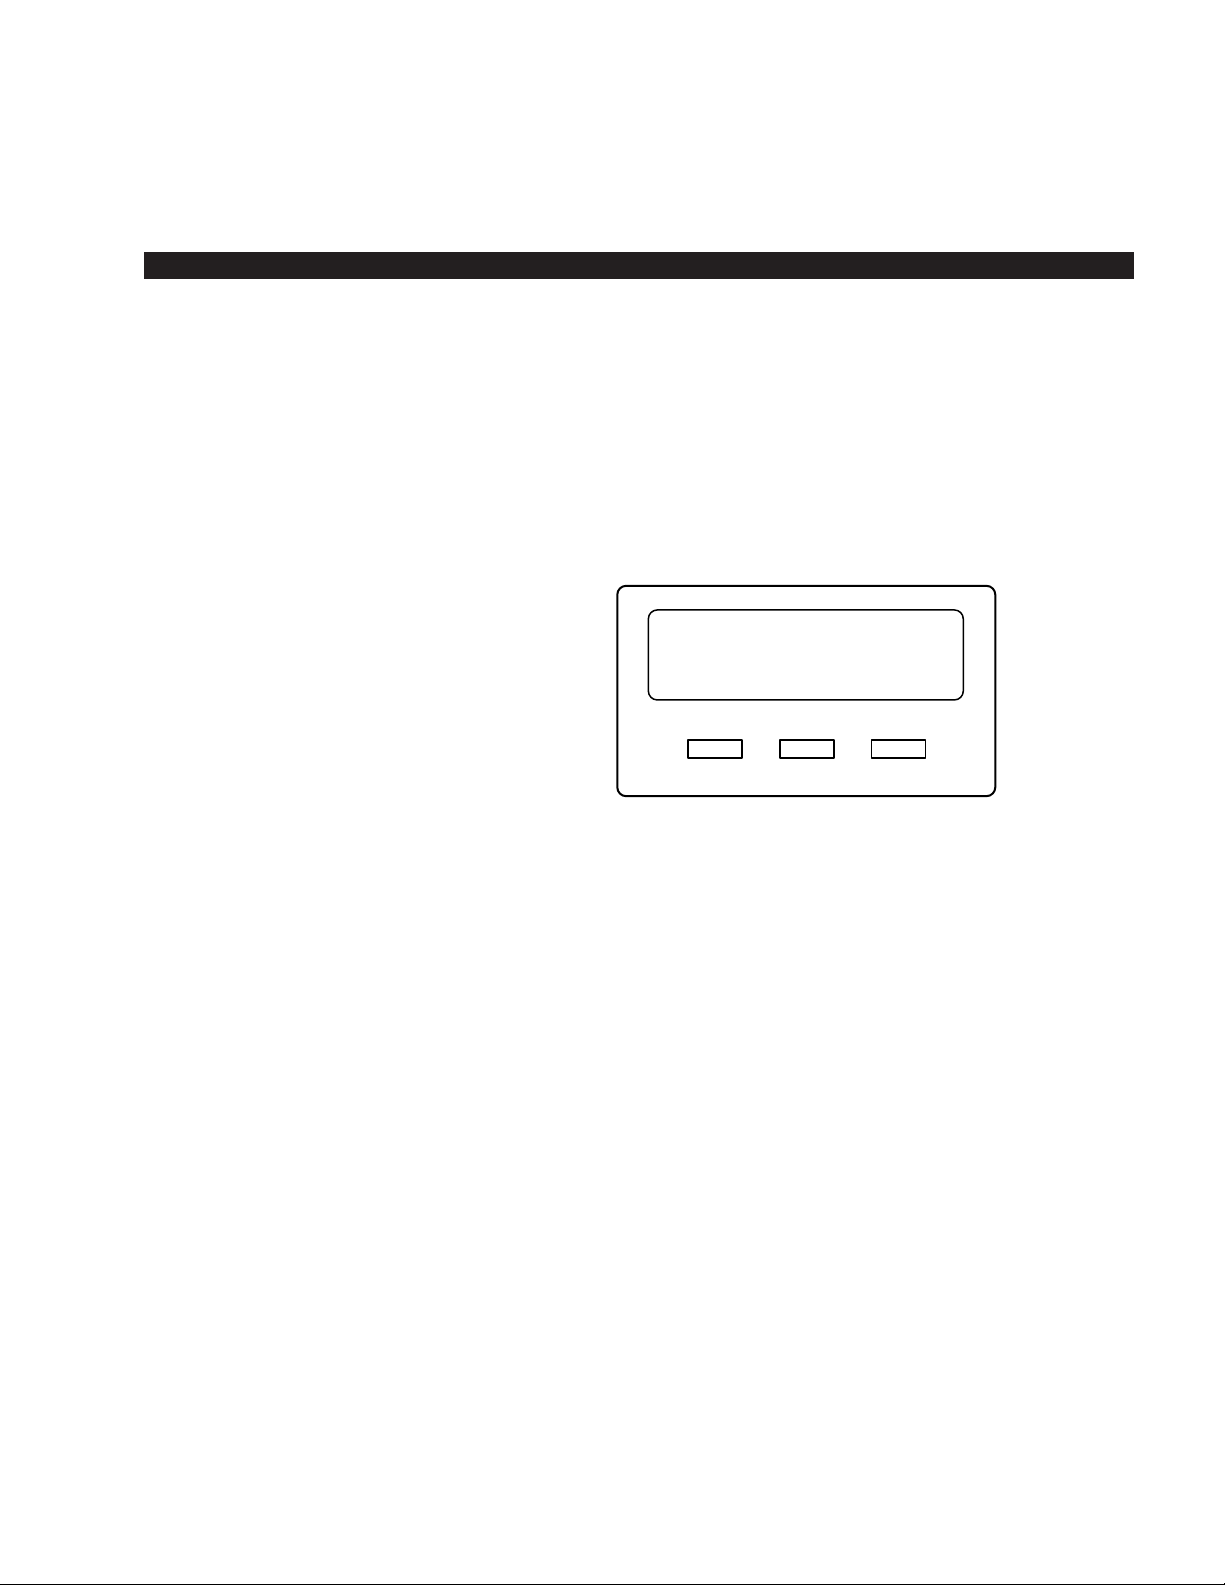
In its idle state, the 32-character Liquid Crystal Display (LCD) feature on
your digital telephone gives you an accurate desk clock and calendar
combination. When you have an outside call in progress, an elapsed time
display gives a constant reminder of the call duration. In addition, a
variety of information displays and feature prompting makes your call
handling more efficient. Alphanumeric messaging capability is also
provided. All display functions occur automatically as call processing
proceeds.
The uses of the three buttons shown above are:
Mode: 1. To enter/exit various mode functions (see “Mode Definitions”
later in this chapter).
2. To cancel the beeping tone when using timed reminders.
Page: 1. Changes Busy Field groups.
2. Used by station 200 to record a user NAME/NUMBER for
another station. Station 200 must be an LCD digital electronic
telephone to record a NAME/NUMBER display for any other
station type.
3. Changes displays (date/time, elapsed time, message, call
forward, dialed number).
4. Scrolls through speed dial numbers when using Mode 8.
Scroll: 1. Scrolls through message waiting numbers.
2. Scrolls through the speed dial digits (if more than 16 digits)
when in Mode 8.
STRATA DK LIQUID CRYSTAL DISPLAY
1-1
Mode Page Scroll
Page 10

STRATA DK LIQUID CRYSTAL DISPLAY
1-2
NOTE:
If your telephone has the Soft Key feature turned on (Mode 71), the
Mode, Page, and Scroll functions are not active when the telephone is
busy on a CO line or Intercom call. Mode, Page, and Scroll are only
used when the telephone is idle.
MODE DEFINITIONS
MODE 0: Used to exit another mode and return to clock/calendar
display.
MODE 1: Busy Field display.
MODE 2: Busy station messaging.
MODE 4: Called station messaging.
MODE 8: Speed dial number check and memo dialing.
MODE 71: Soft key ON (Release 4).
MODE 70: Soft key OFF (Release 4).
MODE 94: Remote called station messaging.
MODE 95: Remote calling station messaging.
Page 11

STRATA DK LIQUID CRYSTAL DISPLAY
1-3
SUMMARY OF LCD FUNCTIONS
When Display Appears
The displays are shown with the Soft Key feature turned OFF (Mode 70).
The displays are basically the same with Soft Keys turned ON (Mode
71), but may vary slightly.
NOTE:
“NNN” in the display, as used here, represents either the called or calling
extension or phone number of the other party. “NN” represents the line in
use.
When you press a Central Office (CO) line that requires a forced (verified
or nonverified) account code; or dial *5 0, or press the Account
Code button to enter a voluntary (verified or nonverified) account code.
When you dial a verified voluntary account code that is not valid.
When you correctly dial a verified voluntary account code that is set in
the system account code memory.
When you dial a verified forced account code that is not valid.
After you dial a verified forced account code that is valid.
After setting auto busy redial, your display prompts you that it has been
set.
When the system dials the call, your display shows the dialed number.
The system inserts a pause (P) before redialing the number.
When the called telephone is ringing, your station’s Central Office (CO)
LED (or Intercom LED) and Spkr LED will flash, and a warning beep will
sound 30 seconds after the call is completed.
LCD-Display Type:
Account Codes:
Auto Busy Redial (ABR):
NO. NNN
CODE NOT VAL ID
NO. NNN
ENTER ACCT CODE
NO. NNN
CODE VERI FI ED
NO. NNN
DIAL RESTRICTED
NO. NNN
DIAL TEL NUMBER
HOLD LI NE NN
ABR SET
NO . NNN
583 3700P
Page 12
STRATA DK LIQUID CRYSTAL DISPLAY
1-4
Automatic Callback (ACB):
Automatic Line Selection:
1. Intercom Line
2. CO Line
3. Dial Access Code
Alphanumeric Messages:
Busy Field:
Your station will display the called number, followed by “LINE NN ACB”,
30 seconds later.
When you set automatic callback at a busy station, its number is
displayed.
When you receive an automatic callback, the station number you called
is displayed.
When you receive an automatic callback for a Central Office (CO) line,
the seized line’s number is displayed.
If your station automatically accesses an intercom line when you go offhook, INT is displayed.
If your station automatically accesses a Central Office (CO) line when
you go off-hook, the number of the seized CO line is displayed.
When you access a Central Office (CO) line by dialing a CO line group
access code, the accessed CO line number is displayed.
Messages of up to 32 characters may be used in alphanumeric
messaging. Messages may either be programmed or set as one-time
messages. (Messages may also be used with a timed reminder.)
The Busy Field display indicates, in groups of 10, the last two digits of
the station numbers that are busy or set for Do Not Disturb (DND). The
top display indicates that stations X00, X05, and X17 are either in use or
in DND mode; the bottom display indicates the same for stations X27,
X32, X34, and X39. If the Page button is pressed, the 00/10 group will
change to 10/20, and the busy/DND states of that group of stations will
be displayed. The station groups will increment each time the Page
button is pressed, thereby eventually displaying all stations.
NO. NNN
INT NNN ACB SET
NO. NNN
NNN ACB
NO. NNN
LINE 10 ACB
NO. NNN
INT
NO. NNN
USI NG LINE 11
BACK AT 2PM-CALL
MEET I NG FOR 3PM
00 0.....5.....
10 ........7...
20 ........7...
30 ..2..4.. ..9
NO. NNN
USI NG LINE 20
NO. NNN
LINE NN ACB
Page 13

When you initiate any type of call forward, the LCD displays “CALL
FORWARD TO”.
After you set call forward, the station number to which your calls will be
forwarded is displayed, along with one of the following abbreviations:
“CF-AC” (Call Forward-All Calls)
“CF-BUSY” (Call Forward-Busy)
“CF-NA” (Call Forward-No Answer)
“CF-B/NA” (Call Forward-Busy/No Answer)
“CF-FIXED” (Call Forward-Fixed)
When your call is forwarded to another station, the station you called is
shown first. It then changes to the station to which your call was
forwarded.
When a call is forwarded to your station, the calling station number is
displayed on the left and the station called is displayed on the right.
When you pick up an intercom call, the calling station’s number is
displayed on the left and the station number called is displayed on the
right.
Your LCD telephone displays information noting that your call to station
NNN was picked up by station NNN.
When you receive an intercom call, the calling station’s number is
displayed.
The Central Office (CO) lines can be programmed to display an
identifying name of up to 16 characters. The name will be displayed on
outgoing and incoming calls.
STRATA DK LIQUID CRYSTAL DISPLAY
1-5
Call Forward:
Call Pickup:
Calling Number-Intercom:
CO Line Identification:
NO . NNN
NNN
NO . NNN
NNN CALL NNN
NO . NNN
200 CALL 201
NO . NNN
NNNPICKUPNNN
NO . NNN
NNN CALL I NG
TOS IBA T LECOMHE
WA T L I NE 3S
ALL FOR AR TODWC
Page 14

Incoming Central Office (CO) call—if your station is programmed for
incoming ringing on that CO line.
Transferred CO call—CO line is transferred to your station in the ringing
state by another station.
Camped-on CO call—CO line was camped-on to your busy station and
rings your station when you hang up.
The display changes to indicate calling status.
You have put a CO line call on hold at your station.
Held call automatically recalls your station after a programmed period of
time.
When you manually select a CO line, it is displayed. This display is
replaced by the dialed number as you dial.
When the CO line queuing feature rings back to your station with an
available CO line, that line number will be displayed.
1. Press the Page button to display date/time when talking on a
Central Office (CO) line (Soft Keys must be off before the call is
started).
2. The date/time is adjusted on a system-wide basis by the station
located in port 00 (usually station 200).
STRATA DK LIQUID CRYSTAL DISPLAY
1-6
CO Line Number:
1. Incoming Call
2. When Call Is Answered
3. Hold
4. Hold Recall
5. Outgoing
6. CO Line Queuing
(Callback)
Date/Time:
NO . NNN
LINE 10 RINGING
HOLD L I NE 1 0
JAN 01 SUN 12:19
NO . NNN
ANSWERED LINE 3
HOLD L I NE NNN
LINE 10 RECALL
N0. NNN
USI NG LINE 6
N0. NNN
LINE 3 ACB
N0. NNN
MAY 24 MON 12:05
Page 15
The digits are displayed as you dial over either a Central Office (CO) line
or the intercom using:
■ Manual dialing
■ Automatic dialing
■ Repeat last number dialed
■ Saved number redial
NOTE:
If you are calling on a CO line, the display will automatically change from
dialed number to elapsed time after a programmed period of time.
When you are called from a door phone, its designating characters are
displayed.
When you call a door phone, its designating characters are displayed.
NOTE:
The door phone designators are NA, NB, and/or NC (N = 1 ~ 4, and
indicate which of the 12 possible door phones is calling or is being
called).
While you are making an outgoing Central Office (CO) line call, the
elapsed time of the call is displayed. Elapsed time automatically replaces
the dialed number on the display after a programmed period of time.
(Timing begins when a LINE button is pressed.)
NOTES:
1. On a CO line call, the display can be alternated between date/time,
elapsed time, and dialed number by pressing the
Page
button
(Soft Keys must be off before the call is started).
2. Elapsed time is displayed for 15 seconds after you hang up, and
then changes automatically to date/time.
To find out what your intercom or extension number is if does not appear
on your display, press Intercom 4 0 1 or CONF 4 0 1 and the
intercom number will be displayed.
STRATA DK LIQUID CRYSTAL DISPLAY
1-7
Dialed Number:
1. CO Line
2. Intercom
Door Phone/Monitor:
Elapsed Time:
Intercom Number Display:
N0. NNN
5551374
N0. NNN
201
N0. NNN
DOOR PHONE 1A
T= NNN
N
I
N0. NNN
00:13:23
N0. NNN
DOOR PHONE 1A
Page 16

A name or title may be set in memory for each station. When an LCD
station is idle, the name displays on the top line of the LCD. When a
station calls an LCD station, the name of the calling station displays on
the bottom line of the called station’s LCD.
When you are making a call via Least Cost Routing (LCR), your display
will prompt you to dial a number by displaying “DIAL TEL NUMBER”.
As you dial the number, it is shown on your display.
When you set message waiting at another station, the number of that
station is displayed.
When you hang up after setting message waiting at another station, a
reminder is shown on the top row of your display.
Your display will show the numbers of up to three stations that have left
messages for you. Four numbers may be stored in message memory
(see Recalling Station).
When a message waiting voice mail is displayed, a “V” will follow the
station number. A “+” indicates that there is a station message in
memory. Press the Scroll button to rotate through more numbers.
When you off-hook call announce to a busy station, your LCD displays
the number of that station.
STRATA DK LIQUID CRYSTAL DISPLAY
1-8
LCD Name/Number
Display:
1. Idle Station
2. Called Station
Least Cost Routing (LCR):
Message Waiting:
Message Waiting/Voice
Mail:
Off-hook Call Announce:
NAME /NUMBER
DATE DAY TIME
N0. NNN
NAME /NUMBER
N0. NNN
DIAL TEL NUMBER
N0. NNN
5833700
N0. NNN
INT NNN MW SET
SENT NNN
JAN 01 SUN 12:19
N0. NNN
CALL 203 201 200
N0. NNN
CALL 200 216V
+
N0. NNN
NNN
Page 17

When another station off-hook call announces to your station, your LCD
displays the number of that station.
When you activate the override feature after calling a busy station, the
station number and the feature are displayed.
Your LCD telephone displays the number of a station initiating override
when you are on the telephone. The number will remain displayed until
override is disconnected.
When you initiate executive override, your LCD telephone displays the
number of the station that is overridden. The station that receives the
override displays your station number. The number will remain displayed
until the call is ended.
The station you have called is in the Do Not Disturb (DND) mode.
When you initiate Do Not Disturb override, the station number you have
overridden is displayed.
When another station overrides Do Not Disturb at your station, its
number is displayed. (The display remains until the end of override.)
When a station presses a busy line button to enter an existing
conversation, the station that initiates the override displays the Central
Office (CO) line identification on the LCD. The overridden station’s LCD
displays the initiating station’s number. (The display remains until the end
of the call.)
STRATA DK LIQUID CRYSTAL DISPLAY
1-9
Overrides:
1. Busy Override
2. Executive Override
3. Do Not Disturb (DND)
Override
4. Privacy Override
N0. NNN
NNN BUSY OVR
N0. NNN
NNN BUSY OVR
N0. NNN
NNN BUSY OVR
N0. NNN
NNN EXEC OVRD
N0. NNN
INT NNN DND
N0. NNN
NNN DND OVR
N0. NNN
NNN DND OVR
N0. NNN
NNN PRV OVRD
Page 18

When a transferred call goes unanswered, it will recall to the station that
transferred it. The display shows the Central Office (CO) line number and
the station number to which it was originally transferred.
When using Speed Dial Memo (Mode 8), the name and number are
displayed.
TOSHIBA is the memo (up to 12 characters).
714 583 3700 is the number (up to 16 digits).
After you access a Central Office (CO) line and press Cnf/Trn 4 7 to
dial a complete toll restriction override or traveling class code, your LCD
display will prompt you to dial a code.
After you establish a two-Central Office (CO) line conference call and
then release. N1and N2identify the connected CO lines.
When you are talking with two external parties on two CO lines. N1and
N2identify the connected CO lines.
STRATA DK LIQUID CRYSTAL DISPLAY
1-10
Recalling Station:
Speed Dial Memo:
Toll Restriction Override
Codes:
Two-CO Line Calls:
1. Tandem
2. Conference
*
11 TOSHIBA
7145833700
N0. NNN
OVERRIDE CODE
TRK-TRK N1 N
2
JAN 10 THU 11:57
NO. NNN
CONF L INE N
1N2
HOLD L I NE 2
LN 2 RECALL NNN
Page 19

Chapter 2
DATE/TIME/DAY ADJUSTMENT
This operation is possible from port 00 only (usually station 200), and
allows you to set the date, time, and day.
Dial year/month/day in the format YYMMDD. Enter a leading 0 for any
single-digit month or day.
You will hear a confirmation tone.
Dial hour/minute/second in the 24-hour clock format HHMMSS. Enter a
leading 0 for any single digit entered.
You will hear a confirmation tone.
1 = Sunday
2 = Monday
3 = Tuesday
4 = Wednesday
5 = Thursday
6 = Friday
7 = Saturday
To Set the Date:
1. Place handset on-hook.
2. Dial Intercom 6 5 1.
3. Dial the date
4. Press the Redial button.
5. Press the Spkr button.
To Set the Time:
1. Place handset on-hook.
2. Dial Intercom 6 5 2.
3. Dial the time
4. Press the Redial button.
5. Press the Spkr button.
To Set the Day:
1. Place handset on-hook.
2. Dial Intercom 6 5 3.
3. Dial the day.
STRATA DK FEATURE OPERATION
2-1
Page 20
2-2
You will hear a confirmation tone.
CALL FORWARD DISPLAY
TO SET CALL FORWARD
When any type of call forward is initiated, the “CALL FORWARD TO”
prompt displays on the lower row of the LCD.
Press Intercom 6 0 1 + N N N + Spkr
(or Call Frwd All Calls + N N N + Call Frwd All Calls).
Press Intercom 6 0 2 + N N N + Spkr
(or Call Frwd Busy + N N N + Call Frwd Busy).
Press Intercom 6 0 3 + N N N + Spkr
(or Call Frwd No Answer + N N N + Call Frwd No Answer).
Press Intercom 6 0 4 + N N N + Spkr
(or Call Frwd Busy NAns + N N N + Call Frwd Busy NAns).
Press the Call Frwd to: button.
4. Press the Redial button.
5. Press the Spkr button.
When your station has call forward
set, the LCD displays as shown
(NNN = the forward-to number).
1. Call Forward–All Calls
2. Call Forward–Busy
3. Call Forward–No Answer
4. Call Forward–Busy/No
Answer
5. Call Forward–Fixed
STRATA DK FEATURE OPERATION
CF- AC TO: NNN
JAN 26 TUE 01:43
CF-BUSY TO: NNN
JAN 26 TUE 01:43
CF- NA T0 : NNN
JAN 26 TUE 01:43
CF-B/NA TO: NNN
JAN 26 TUE 01:43
CF-FIXED TO: NNN
JAN 26 TUE 01:43
Page 21

2-3
NOTES:
1. To cancel call forward, press
Intercom 6 0 1 Spkr
(or press the
call forward button used to set call forward).
2. If call forward is set:
■
Central Office (CO) lines that ring at your station only will
forward (CO lines that ring into more than one station will not
forward).
■
CO line calls transferred to your station will forward.
■
Intercom calls will forward.
■
Call forward redirects the station hunt feature.
STATION-TO-STATION MESSAGE WAITING
If there is no answer (busy or DND), press the Msg button (or dial 7).
This causes the Msg LED on the called station to flash. The called
station’s LCD displays the calling station’s number.
When the returned call is answered, the flashing Msg LED will turn off.
NOTE:
Up to four message waiting displays may be stored on the LCD. The
station number in the left-most position will be called when the
Msg
button is pressed. To rotate the station numbers, press the
Scroll
button. The fourth message is reserved for the Message Center.
To Use Station-to-Station
Message Waiting:
1. Lift the handset.
2. Dial the desired station
number.
3. The called station user
presses the Intercom and
Msg buttons to return the
call.
4. To clear the Msg LED from
the called station, press the
Msg button.
5. To clear the Msg LED from
the calling station, press the
Intercom button, dial the
station number and press the
Msg button twice (or 7 7).
STRATA DK FEATURE OPERATION
Page 22

2-4
VOICE MAIL (VM)
Whenever your station is call forwarded to voice mail, certain digits will
automatically be sent to the voice mail unit to direct the call to your
mailbox. These codes must only be stored one time; they remain in
memory until changed. They do not have to be stored each time you Call
Forward your telephone.
Setting your mailbox # (where calls will go when you forward to the
Toshiba VP voice mail system).
The LCD displays “6 5 6 ID CODE SET”.
The LCD displays the digits and pauses. These digits include special
voice mail codes and your mail box number. For example, for Toshiba VP
Systems dial 91NNN, where NNN is your mail box number.
You will hear a confirmation tone—the LCD displays “DATA
PROGRAMED”.
When you want to retrieve your messages from voice mail, certain digits
will automatically be sent to the voice mail unit to play back your
messages.
The LCD displays “6 5 7 ID CODE SET”.
The LCD displays the data as it is entered. These digits include special
voice mail codes and your mail box number. For example, for Toshiba VP
Systems dial 92NNN, where NNN is your mail box number.
You will hear a confirmation tone—the LCD displays “DATA
PROGRAMED”.
Assigning a mailbox to store
messages:
1. Press the Intercom button.
2. Dial 6 5 6.
3. Dial the digits (up to 16) and
pauses to be sent.
4. Press the Redial button to
store data.
Assigning a mailbox for
message retrieval:
1. Press the Intercom button.
2. Dial 6 5 7.
3. Dial the required digits and
pauses to be sent.
4. Press the Redial button to
store data.
STRATA DK FEATURE OPERATION
656 ID CODE SET
DATA PROGRAMED
Page 23

To Retrieve Messages:
Press the Intercom and Msg
buttons.
To Clear All Digits:
1. Press the Intercom button.
2. Dial 6 5 6 or 6 5 7.
3. Press the Redial button.
To Display Busy Field Status:
1. Press the Mode button.
2. Dial 1. Refer to the figure in
Summary of LCD Functions.
3. Press the Page button to
rotate Busy Field groups.
To Exit Any Mode:
1. Press the Mode button.
2. Dial 0.
2-5
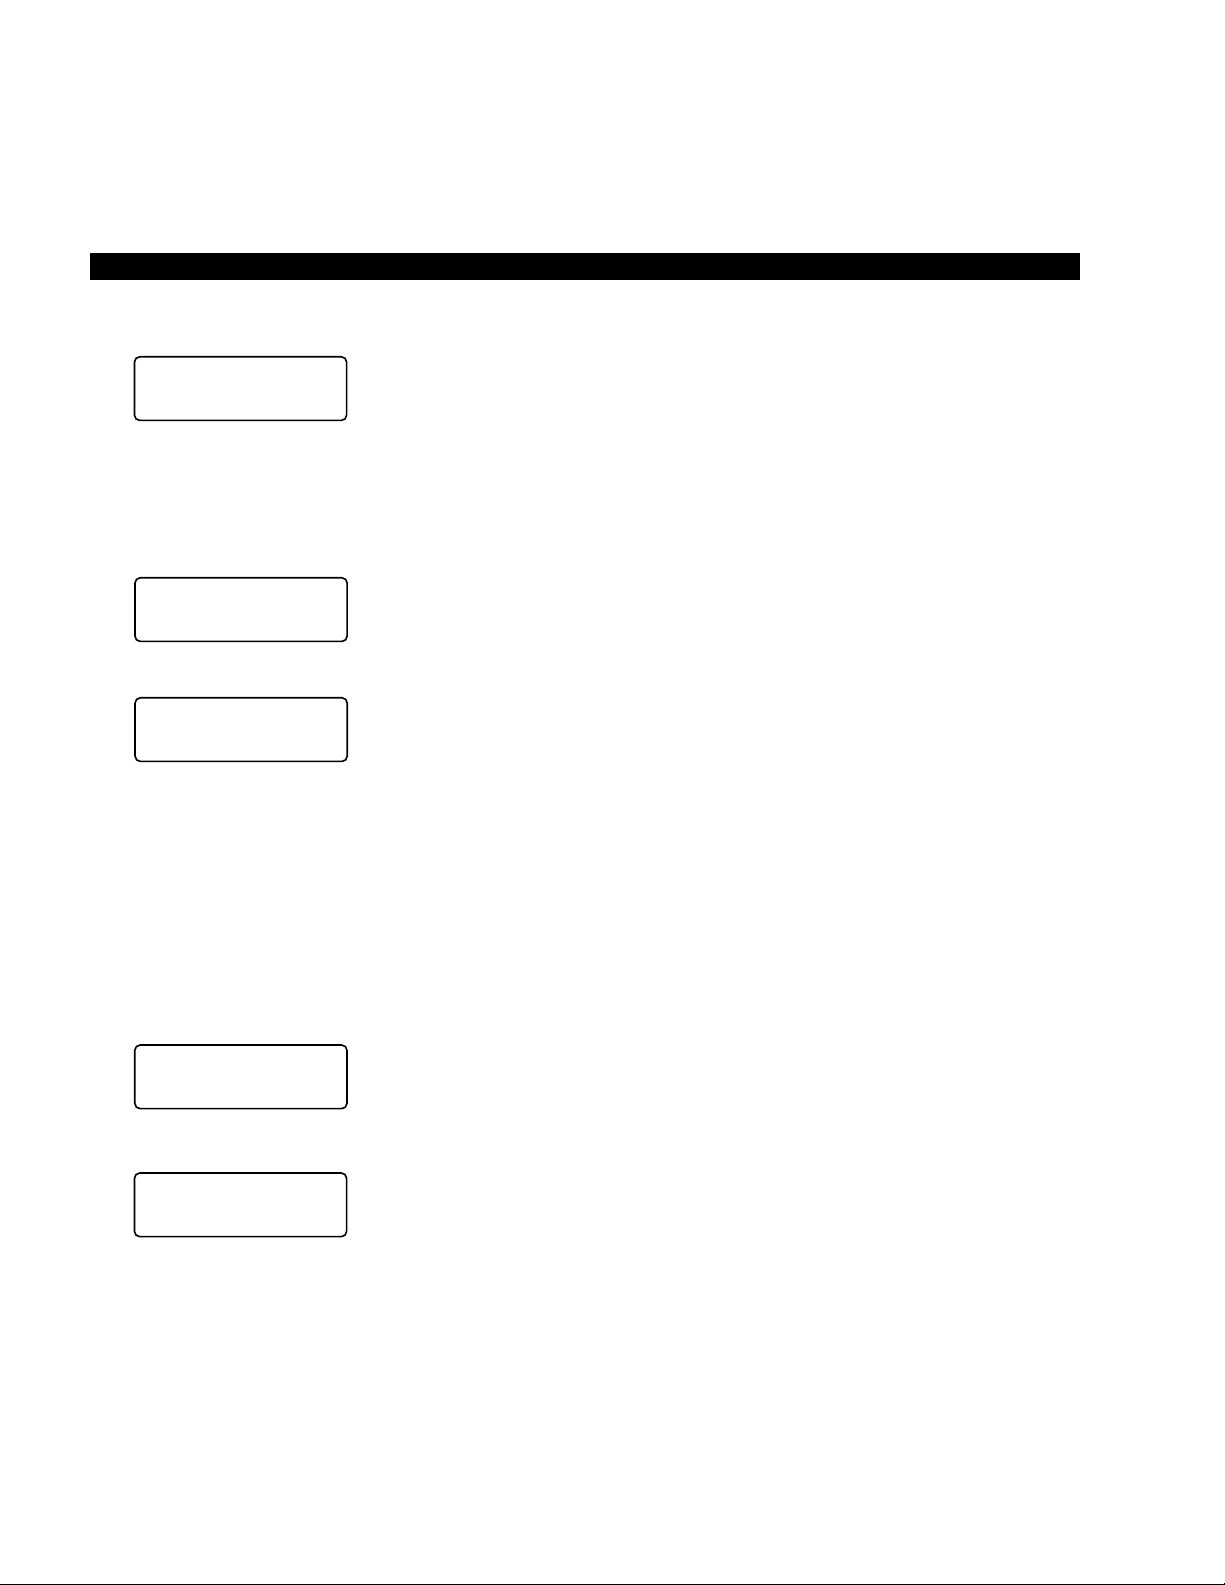
BUSY FIELD DISPLAY
The LCD displays “MODE NO.?” Your telephone must be idle to use the
Mode button when Soft Keys are turned ON.
NOTE:
The Busy Lamp Field (BLF) mode will stop all other displays from
appearing on your telephone LCD.
MODE EXIT
The LCD displays “MODE NO.?” Your telephone must be idle to use the
Mode button when Soft Keys are turned ON.
The LCD displays date/day/time.
DISA SECURITY CODE: ADD/DELETE/CHANGE
Direct Inward System Access (DISA) security codes can be added,
deleted, and changed from designated station(s) only. For security
purposes, the 3-digit access code is not given in this guide. It is available
from your telephone system administrator.
STRATA DK FEATURE OPERATION
MODE NO . ?
Page 24

STRATA DK FEATURE OPERATION
2-6
To Store New DISA Security
Code:
1. Press the Intercom button
and dial the 3-digit access
code.
2. Dial the new DISA security
code.
3. Press the Redial button.
4. To cancel the DISA code,
complete Steps 1 and 3,
skipping Step 2.
To Add, Delete, or Change
Override/Traveling Class Codes:
1. Press Intercom and dial the
three-digit toll restriction
override change access code.
To change or delete the DISA security code, these steps must be
performed from a station that was selected in system programming.
You will hear a confirmation tone.
The DISA security code can be 1 ~ 15 digits.
You will hear a confirmation tone.
If the DISA code is canceled, outgoing access of CO lines on DISA calls
will not require a security code.
TOLL RESTRICTION OVERRIDE/TRAVELING
CLASS CODE CHANGE
From selected stations the Toll Restriction override or Traveling Class
codes can be changed, added, or deleted.
To add, delete, or change override for Traveling Class Code, these steps
must be performed from a station that was selected in system
programming.
You will hear a confirmation tone.
You should hear a dial tone. For security reasons, the change access
code is not provided in this guide. It is available from your telephone
system administrator.
NO. NNN
ENTER OVR CODE
NO. NNN
DATA PROGRAMMED
NO. NNN
❑❑❑ ID CODE SET
Page 25

You will hear a confirmation tone, and the code will be stored in memory.
Press RDL or # if your telephone is not equipped with a Redial button.
VERIFIED ACCOUNT CODE CHANGE
To add, delete, or change a verified account code, these steps must be
performed from a station that was selected in system programming.
For security reasons, the change access code is not provided in this
guide. It is available from your telephone system maintenance provider.
The account code digit length is set in system programming.
2. Dial the four-digit override
code.
3. Press the Redial button to
store the code.
4. Repeat steps 1 ~ 4 to enter
up to four traveling class
codes or two toll restriction
override codes.
To Add, Delete, or Change
Verified Account Codes:
1. Press Intercom and dial the
verified account code change
access code.
2. Dial the three-digit verified
account code number
(000 ~ 299).
3. Dial the verified account code
(4 ~ 15 digits).
STRATA DK FEATURE OPERATION
2-7
NO. NNN
DATA PROGRAMMED
NO. NNN
ENTER OVR CODE ❑❑❑❑
NO. NNN
VERIFY ACC SET
NO. NNN
VERIFY ACC SET ❑❑❑❑
NO . NNN
❑❑❑ ❑❑❑
..........
Page 26

STRATA DK FEATURE OPERATION
2-8
You will hear a confirmation tone.
4. Press the Redial button to
store code.
5. Repeat steps 1 ~ 4 to enter
more verified account codes.
NO. NNN
DATA PROGRAMMED
Page 27

3-1
Chapter 3
GENERAL DESCRIPTION
If you have Release 4, the Soft Key feature provides a quick and easy
way to access frequently-used features. If the Soft Key feature is
activated at your station, abbreviated feature prompts will appear on the
LCD above the Mode, Page, and Scroll keys while you are on a call
(or you are ringing another station or outside telephone number). You
can access the feature represented by the feature prompt just by
pressing the Mode, Page, or Scroll key beneath the prompt.
If the Soft Key feature is activated at your station, you can still access
features with feature buttons (fixed or flexible) or with access codes.
When your telphone is idle, Soft Keys do not display and the Mode,
Page, and Scroll keys function as normal. If your telephone is in use,
Soft Key functions replace the Mode, Page, and Scroll functions.
HOW TO USE SOFT KEYS
This section provides an example of how to use Soft Keys to make a
Conference call by adding a station to an outside call. Other features that
can be accessed with Soft Keys include Transfer, Paging, and more.
USING SOFT KEYS TO MAKE A CONFERENCE CALL
1. While on an outside call with CO line (line 3 for this example) your
LCD will display the following prompts:
NOTE:
Once the Soft Key prompts appear (in this case, the Soft Keys are
TRNS, CONF,
and
PGE
for Transfer, Conference, and Page), the
buttons below them now stand for Transfer, Conference, and Page
instead of
Mode, Page
, and
Scroll
. In the following steps of this
STRATA DK SOFT KEY OPERATION
Mode Page Scroll
TALK ON LINE 3
TRNS CONF PGE
Page 28

example, only the Soft Key displays will be shown since
Mode, Page
,
and
Scroll
no longer apply while Soft Keys are active.
■ If you initiated the call, the “TRNS” prompt will appear 30 seconds
after the first digit of the telephone number is dialed—the “ABR”
prompt for Automatic Busy Redial (ABR) will appear during this first
30 seconds (if it does not appear, then this feature was not assigned
in system programming). If the call is an incoming call, the “TRNS”
prompt will appear immediately when you answer the call.
2. Press the CONF Soft Key to initiate the Conference.
The outside call will be placed on hold and the LCD will appear as
follows after you press the CONF Soft Key in Step 2.
3. To transfer to a station, press the STA. Soft Key.
■ Whenever the RTRN Soft Key appears, you can terminate the
operation and return to the outside call by pressing the RTRN Soft
Key.
4. Dial a station number when the following LCD appears:
STRATA DK SOFT KEY OPERATION
3-2
TALK ON LINE 3
TRNS CONF PGE
LINE OR STATION?
LINE STA. RTRN
DIAL STATION NO.
RTRN
Page 29

5. After you dial the station number (203 in this example), you will see
one of the displays below for about three seconds. The display will
then change to the display in Step 6.
6. After three seconds the user’s name (or number) is replaced with the
following display and you can voice announce to station 203.
■ You could stop the called station voice announce and make station
203 ring by pressing the RING Soft Key.
■ Instead of proceeding with the Conference, you could transfer the
call by pressing the TRNS Soft Key.
■ You could terminate the operation and return to the outside call by
pressing the RTRN Soft Key.
7. The LCD will appear as follows after the called station answers. Your
station is connected to Station 203 and the outside call remains on
hold. Press the JOIN Soft Key to join all parties in a Conference.
■ Instead of proceeding with the Conference, you could transfer the
call by pressing the TRNS Soft Key.
■ You could terminate the operation and return to the outside call by
pressing the RTRN Soft Key.
ANNOUNCE TO 203
TRNS RING RTRN
CALLING
203
CALLING
TOM BROWN 203
STRATA DK SOFT KEY OPERATION
3-3
TALK WITH 203
TRNS JOIN RTRN
or
Called station (203) has “user
name” turned off.
Called station (203) has “user
name” turned on.
Page 30

8. The LCD will appear as follows after you press the JOIN Soft Key in
Step 5 and all parties will be conferenced.
■ “LN 3 + 203” indicates that you are in a Conference with CO line 3
and Station 203.
■ You can exit the Conference and the other parties will remain
connected if you press the EXIT Soft Key.
■ You can add another station or CO line by pressing the CONF Soft
Key.
NOTE:
If the Soft Key feature is activated at your station, incoming call
information will not display on your LCD while your station is busy. To
display this information, you must either disconnect the existing call or
place it on hold.
SOFT KEY PROMPT DEFINITIONS
The following list provides definitions of all of the Soft Key prompts that
could appear on your LCD.
TRNS—Press this Soft Key to initiate or complete a Transfer while on an
outside call. TRNS can cause an immediate or announced transfer,
depending on how the feature is set in system programming.
CONF—Press this Soft Key to initiate or complete a Conference.
PGE—Press this Soft Key to park an outside call and to gain access to a
menu of Page options.
RING—Press this Soft Key to make a called station ring when making a
voice announce call to the station.
TALK—Press this Soft Key to make a voice announcement to a called
station that is ringing.
STRATA DK SOFT KEY OPERATION
3-4
LN3+203
EXIT CONF
Page 31

MESG—Press this Soft Key to set a message waiting indication at a
busy or unanswered station.
OVRD—Press this Soft Key to gain access to override options or to
override a station that is busy or in the Do Not Disturb mode.
BUSY—(Busy Override) Press this Soft Key to send a call-waiting tone
to a busy station.
EXEC—(Executive Override) Press this Soft Key to break into the
conversation of a busy called station.
ACB—Press this Soft Key to activate Automatic Callback after reaching
a busy station, CO line, or CO Line group.
ABR—Press this Soft Key to activate Automatic Busy Redial after dialing
a busy outside telephone number.
RLS—Press this Soft Key to disconnect a call and to return to the idle
state.
RTRN—Press this Soft Key to terminate a feature operation and to return
to a previously displayed state.
LINE—Press this Soft Key to add a CO line to an existing call while in
the Conference mode. The LCD will prompt you to access a CO line after
you press this key.
STA.—Press this Soft Key to add a station to an existing call while in the
Conference mode. The LCD will prompt you to dial a station number after
you press this key.
JOIN—Press this Soft Key while on a conference call to join all parties to
a Conference.
EXIT—Press this Soft Key to exit from a Conference and to leave the
remaining parties connected.
STRATA DK SOFT KEY OPERATION
3-5
Page 32

To activate Soft Keys at your
station:
1. Make sure your telephone is
idle. Do not lift the handset.
2. Press the Mode key below
the LCD.
3. Dial 7 1.
To deactivate Soft Keys at your
station:
1. Make sure your telephone is
idle. Do not lift the handset.
2. Press the Mode key below
the LCD.
3. Dial 7 0.
SOFT KEY ACTIVATION
Your telephone must be idle before you follow the steps on the left to
activate or deactivate the Soft Key feature at your station.
Soft keys are now activated and the appropriate feature prompts will
display when your phone is in use. The Soft Key feature will remain on
until you turn it off. In other words, you can perform numerous telephone
functions and the Soft Keys will not be cancelled unless you deactivate
them.
SOFT KEY DEACTIVATION
Your telephone must be idle before you follow the steps on the left to
activate or deactivate the Soft Key feature at your station.
Once you deactivate the Soft Keys, the feature prompts will no longer
appear on the telephone display.
STRATA DK SOFT KEY OPERATION
3-6
Page 33

Chapter 4
LCD Alphanumeric messages, names, memos
The LCD on your telephone can be used to send or receive messages to
or from other LCD telephone users. The LCD can also display the
names/numbers of the person calling your telephone or the name of the
person you are calling. Names and memos can also be set to display
with speed dial numbers and timed reminders.
STORING A MESSAGE IN MEMORY
The LCD Msg Select LED flashes.
Personal message (10 ~ 19); system message (60 ~ 99 port 00 only).
The current message, if any, will be displayed.
The LCD Msg Select LED lights steadily, and the LCD displays the
message. The message will now be stored in system memory.
The LCD Msg Select LED goes out, and the message will no longer
appear on the LCD, but it will remain in memory.
RECORDING A MESSAGE
recording a message, name, or memo
Use this procedure to enter the characters of a personal message (10 ~
19) or system message (60 ~ 99, Station 200 only), to add to a
preprogrammed message, or to edit and set a new message. After
calling up a message on your display (see Storing a Message in Memory,
Steps 1 and 2 above), perform one of the following procedures:
Figure 4–1
STRATA DK MESSAGES AND MEMOS
4-1
To Store a Message in Memory:
1. Press the LCD Msg Select
(or Intercom 6 8) button.
2. Dial the 2-digit message
number to be stored.
3. Use the Recording a
Message procedure to enter
the message characters.
4. Press the LCD Msg Select
(or Spkr) button.
5. Press the LCD Msg Select
(or Intercom 6 8 Spkr)
button.
MSG NO . ?
Page 34
STRATA DK MESSAGES AND MEMOS
4-2
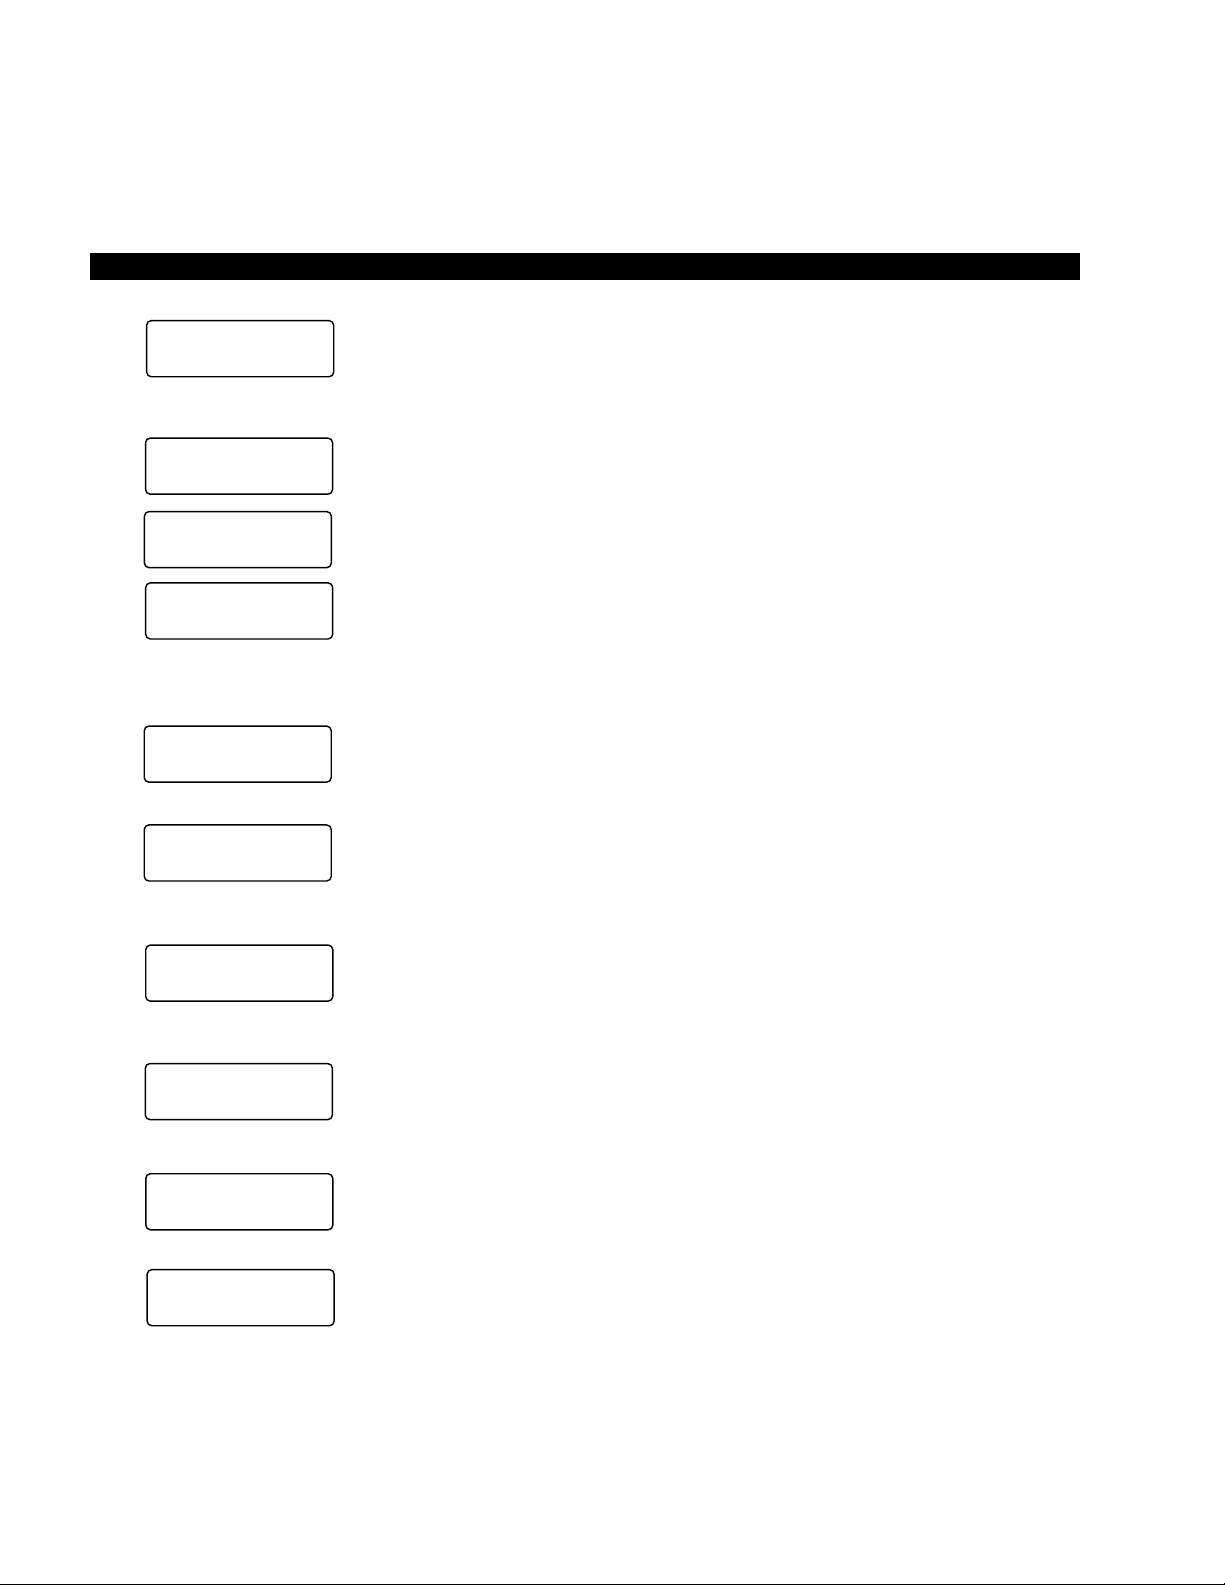
Dialpad Information
If you press 3, a “D” will be displayed. By pressing 0, the “D” is changed
to “E”. By pressing 0 again, the “E” is changed to “F”. Press 0 again and
the “F” changes to “D”.
To enter a space, press 1.
Q, Z, :, -, +, /.
To Record a Message:
1. Press the #button to access
alpha characters. Refer to
Figure 4-1 for an explanation
of the dialpad buttons.
2. Press *or 1 to move the
cursor (–) to the desired
position (the left edge of the
display for a new message, or
two spaces to the right of the
preprogrammed message to
add information).
3. Press the button that has the
letter you want to enter. Use
the 0 button to shift from
letter to letter on the button.
For example:
4. If you want to enter a number,
press the # button to change
to numeric characters.
Numbers are also entered on
the dialpad. Press the #
button again to return to alpha
characters.
5. The following special
characters are set by pressing
1 and then pressing 0 to step
through the available
characters:
# button alternates
between alpha and
numeric characters
Each button has three
letters that are used in
messaging; the 0 button
is used to shift between
the letters
* button moves the
cursor to the left
1
#
*
2
ABC
3
DEF
4
GHI
5
JKL
6
MNO
7
PRS
8
TUV
9
WXY
0
OPER
1 button moves
cursor to the right
(also used to access
special characters
and to enter "blanks"
in the alpha mode)
0 button is used to shift between the three letters on each alpha button (also
used to access special characters)
Page 35

PREPROGRAMMING SYSTEM MESSAGES
System messages can only be programmed or permanently changed at
port 00, station number _____(usually 200). Five preprogrammed
messages are automatically stored in memory when the Alphanumeric
Messaging with LCD feature is initialized.
60) OUT TO LUNCH
61) IN A MEETING
62) CALL __________________________
63) BACK AT ________________________
64) RETURN ON ______________________
You can use these messages and add 35 more messages designed
specifically for your system, or you can overwrite the initialized messages
and program up to 10 of your own. Any messages programmed at port
00 will remain in memory until canceled from port 00 or until the system
is reinitialized. After reinitialization, only the original five messages will be
in memory. System messages are written and stored in memory as
explained in Storing a Message.
ADDING TO PREPROGRAMMED MESSAGES
When you select a message, it appears on your station display. A cursor
(–) also appears immediately to the right of the last letter in the message.
You can now input additional information (up to a total of 32 digits for
each message). Some system messages may expect you to add more
information. For example:
1. CALL _______________________
■ Add a station or outside telephone number.
2. BACK AT __________________________
■ Add the time you will return.
3. RETURN AT _____________________________
■ Add the date you will return.
NOTE: Refer to Recording a Message for adding to a preprogrammed
message.
STRATA DK MESSAGES AND MEMOS
4-3
Page 36

STRATA DK MESSAGES AND MEMOS
4-4
messaging
calling station messaging
You can set a message that will appear on the LCD of telephones that
call your telephone by following the instructions on the left.
The LCD Msg Select LED flashes, and the LCD displays “MSG NO.?”
Personal message (10 ~ 19) and system message (60 ~ 99). The
selected message is displayed. (To add to this message, use the
procedure for "Recording A Message," found earlier in this chapter.)
The LCD Msg Select LED lights steadily, and the selected message will
be set. The message will be sent to LCD telephones that call your
telephone.
cancelling a calling station message
The LCD Msg Select LED goes out.
The Intercom LED lights.
The Intercom LED goes out. A personal message (10 ~ 19) will remain
stored in memory.
To Create an LCD Message for
Phones that Call Yours:
1. Press the LCD Msg Select
button (or Intercom 6 8).
2. Dial the number of the
message you want.
3. Press the LCD Msg Select
(or Spkr) button.
To Cancel a Message that Has
Been Set at Your Station:
Press the LCD Msg Select
button.
To Cancel a Message if You Do
Not Have a LCD Msg Select
Button:
1. Press the Intercom button.
2. Dial 6 8.
3. Press the Spkr button.
MSG NO . ?
Page 37

STRATA DK MESSAGES AND MEMOS
4-5
SETTING/CHANGING CALLING STATION MESSAGES
You can set a completely new, personalized message by overwriting any
of the existing preprogrammed messages. To do this, simply call up one
of the messages as explained previously. When the cursor appears to
the right of the message, shift it to the left margin and write your new
message over the preprogrammed one. The new message will remain on
your station until canceled. It will then be erased and the original
preprogrammed message will be restored.
NOTES:
1. Refer to Recording a Message for leaving a new message at your
station.
2. Messages 60 ~ 99 will be erased. Messages 10 ~ 19 will remain in
memory until changed. The preprogrammed messages are never
erased; only the user-added messages are erased.
storing LCD NAME/NUMBER DISPLAY
This feature allows you to use your telephone to store a title (such as
your name, telephone number, location, etc.) in system memory. This title
(e.g., LOBBY) will display on your station’s LCD while it is idle, and it will
appear at other stations’ LCDs when they are called from your station.
Your NAME will display on other telephone LCDs when they are used to
call your telephone (Soft Keys must be turned on). Name display
information for non-LCD telephones or voice mail/auto attendant devices
may be stored from station 200. When NAME/NUMBER is recorded for
non-LCD telephones or other devices, their NAME/NUMBER is displayed
on LCD telephones when called.
“USER NAME?” will appear on the upper line of the LCD.
Current information will appear on the lower line of the LCD.
Up to 16 characters can be recorded. It is recommended that you enter
the station number along with the user’s name (such as shown in Step
3).
To Enter Name/Number
Information:
1. Press the Intercom button
and dial 6 2 1.
2. Enter the new information via
the dialpad (refer to
Recording a Message for
method).
USER NAME?
Page 38
STRATA DK MESSAGES AND MEMOS
4-6
The new information is stored and will appear on the top line of the
display. For example, if you entered “TOSHIBA EXT. 200,” that will
appear above the date/day/time on the display.
You will hear a confirmation tone, then a busy tone.
NOTES:
1. Your title will appear on the LCD during direct intercom, forwarded,
and hunted calls. On override or OCA calls, the LCD will not display
the title.
2. After a name is cleared, it may be redisplayed at any time by dialing
Intercom 6 2 1
.
3. A name is displaced by message and call forward settings if they
are set.
4. To erase NAME/NUMBER information from memor y, repeat Steps
1 ~ 3 above and enter blanks in Step 2. Blanks are entered by
pressing 1in the alpha mode.
Entering Name/Number information for other stations or devices is only
allowed from Station 200.
“USER NAME?” will appear on the upper line of the LCD.
Current information for station 200 will appear on the lower line of the
LCD.
The LCD displays “DEST. EKT NO.?” In this case, EKT stands for the
intercom number of the digital, electronic or standard telephone.
3. Press the Spkr button.
To Clear Name/Number Display:
Press the Intercom button, dial
6 2 0 and press the Spkr button.
During clear:
After clear:
To Enter Name/Number
Information for Other
Stations/Devices:
1. Turn off Soft Keys by pressing
Mode 7 0, when telephone
is idle.
2. Press the Intercom button
and dial 6 2 1.
3. Press the Page button.
TOSHIBA EXT.200
DATE DAY TIME
NO. NNN
USER NAME RESET
NO. 200
DATE DAY TIME
USER NAME?
DEST EKT NO.?
Page 39
“USER NAME?” will appear on the upper line of the LCD, and current
information for station NNN will appear on the lower line of the LCD.
Up to 16 characters can be recorded. It is recommended that you enter
the station number along with the user’s name.
The new information is stored and appears on the top line of station
NNN’s LCD. Station 200’s LCD returns to the normal idle display.
NOTES:
1. To erase the NAME/NUMBER information of another station from
station 200, repeat Steps 1 ~ 6 above and enter blanks in Step 5.
Blanks are entered by pressing 1 in the alpha mode.
2. Station NNN may set and clear the NAME/NUMBER feature
anytime:
■
Set:
Intercom 6 2 1
.
■
Clear:
Intercom 6 2 0
. “Clear” eliminates the display when
calling, but does not erase it from memory.
SPEED DIAL MEMO
This feature allows an LCD user to program a 12-character name for
each of his/her 40 personal speed dial numbers. The memo pad of
names may be stepped through to select the appropriate party. Memos
may also be added to the 40 system speed dial codes via the station
connected to port 00, station number ______ (usually 200).
STRATA DK MESSAGES AND MEMOS
4-7
4. Dial the intercom number
(N N N) of the station for
which the NAME/NUMBER
information is to be recorded.
5. Press the Page button.
6. Enter the new information via
the dialpad (refer to
Recording a Message for
method).
7. Press the Spkr button.
8. Repeat steps 2 ~ 7 to enter
more names/numbers.
9. To turn Soft Keys on, press
Mode 7 1 when your
telephone is idle.
USER NAME?
_
DEST EKT NO.NNN
Page 40

Press SDS or *if your telephone is not equipped with a Speed Dial
button.
NN = Speed Dial Code. (10~49 station) or (60~99 system station 200
only)
If a name was previously stored on this code, it will display on the top line
of the LCD.
The name will appear on the bottom line of the LCD as you enter it.
The number will appear on the top line of the LCD as you enter it.
The LCD displays “MODE NO.?”
The speed dial number appears with name or memo. Personal speed
dial code numbers are 10 ~ 49, and system numbers, stored from station
200 only, are 60 ~ 99.
STRATA DK MESSAGES AND MEMOS
4-8
To Program Speed Dial Names
and Numbers:
1. Press the Redial button,
then the Speed Dial button.
2. Dial the desired speed dial
code.
3. Press the Mode button.
4. Enter the name or memo
(refer to Recording a
Message for method).
5. Press the Mode button.
6. Enter the desired telephone
number (16 digits maximum).
7. Press the Redial button to
record data in memory.
8. Repeat steps 2–7 to enter
more memos.
To Dial a Speed Dial Number:
1. Press the Mode button
when telephone is idle.
2. Dial 8 NN (NN = 1 0 ~ 4 9
or 6 0 ~ 6 9).
3. Press the Page button to
scan the directory for the
appropriate number/memo.
#*NN SPEED DIAL
*10 NAME
SPEED DIAL
Page 41

NOTE:
A station must be enabled via system programming for LCD message
memory.
Personal speed dial number (10 ~ 49) or system number (60 ~ 99).
If the number is longer than 16 digits, a “+” will appear in the far right
corner of the display. Press the Scroll button to display the remaining
digits.
TIMED REMINDERS WITH MEMO
This feature allows five separate messages to be set at each LCD
station. These messages will be displayed at the times (hour and minute)
set by the station user. They can either be displayed just once or
repeated on a daily basis.
The 3-digit reminder number may be 605 ~ 609.
The message time must be in 24-hour clock format (i.e., HHMM).
STRATA DK MESSAGES AND MEMOS
4-9
4. Press any available CO
button.
5. The number is dialed.
To Check a Speed Dial Number:
1. Press Mode 8 when
telephone is idle.
2. Dial a 2-digit speed dial
number.
3. Press the Page button to
scan the directory for the
appropriate number/memo.
To Set a Timed Reminder with
Memo:
1. Press the Intercom button.
2. Dial a 3-digit reminder
number (6 0 5 ~ 6 0 9).
3. Enter the desired time for the
message to be displayed.
4. Dial 0 if the message is to be
repeated every day, or 1 if it is
a one-time message only.
Page 42

Personal message (10 ~ 19) and system (60 ~ 99). The message does
not display when setting a timed reminder—it displays when the reminder
activates. Messages are set using the Record a Message method.
The LCD displays “DATA PROGRAMED”. You will hear a confirmation
tone. The message will be displayed at the specified time, and a beeping
tone will be heard for 30 seconds (or until it is canceled by pressing the
Mode button and then dialing 0).
MESSAGE SENDING
The Alphanumeric Messaging feature on your LCD digital telephone
enables you to set short text (up to 32 characters) at your station to
ensure that you do not miss important calls. Any station may record a
message; however, only stations with the LCD are able to display
messages. Stations that do not use Soft Keys (Soft Keys Off: Mode 7 0)
may send messages “live” to other LCD station users. To record
messages, see the Recording a Message section in this guide.
Your system has up to 40 preprogrammed messages that may be sent to
other LCD digital or electronic telephones. You can temporarily add to or
change any of these messages, in order to leave a personalized
message at your station (see Note below).
Some stations may record and save up to 10 personal messages to be
used for all types of station messaging. This is a station option that is
enabled in system programming.
CALLED STATION MESSAGING
Your station number and a message indication may be sent to another
LCD station. When that station responds, it will receive the message.
Soft Keys must be off (MODE 70) at the sending station for this feature to
operate.
The LCD displays “MODE?”
STRATA DK MESSAGES AND MEMOS
4-10
5. Enter the desired message
number.
6. Press the Redial button to
record the data in memory.
To Set a Called Station
Message:
1. Dial the station number
(station does not answer or is
busy).
2. Press the Mode button.
Page 43

The LCD displays “MW TO STNNN MSG NO?”
Personal message (10 ~ 19), system message (60 ~ 99). The LCD
displays the message.
“CALL NNNM” is displayed at the called station and the Msg LED
flashes; “SENT NNNM” is displayed at your station. N = Station Number,
M indicates that a message has been sent.
Press these buttons when your telephone MSG LED is flashing
GROUP CALLED STATION MESSAGING
This feature allows a station to set a Called Station Message for a group
of stations.
The LCD displays “MODE?”
The LCD displays “MODE 94 DEST EKT NO.?”
The LCD displays “MODE 94 DEST EKT NO.NN”. Enter 30 for all
stations, or 31 ~ 34 for page groups.
The LCD displays “MODE 94 ORG EKT NO.?”
Your number or another station number. The LCD displays “MODE 94
ORG EKT NO.NN”.
The LCD displays “MSG NO.?”
The LCD displays the message.
The LCD displays “MSG NO.?”
The LCD displays “MODE NO.?”
STRATA DK MESSAGES AND MEMOS
4-11
3. Dial 4.
4. Enter the desired message
number.
5. Press the Msg button.
6. Press the Spkr button to
release.
To Receive a Called Station
Message:
Press the Intercom and Msg
buttons.
To Set a “Called Station”
Message for Other Stations:
1. Press the Mode button
when your telephone is idle.
2. Dial 9 4.
3. Dial the “destination” station’s
number.
4. Press the Page button.
5. Dial the “originating” station’s
number.
6. Press the Page button.
7. Enter the desired message’s
number.
8. Press the Page button.
9. Press the Mode button.
Page 44

The LCD displays date/day/time. The LCD then displays “SENT NNNM”
at originating station, and the originating station number and a message
indication are displayed on the destination station LCD.
remote CALLING STATION MESSAGING
The LCD displays “MODE?”
The LCD displays “MODE 95 DEST EKT NO.?”
The LCD displays “MODE 95 DEST EKT NO.NN”.
The LCD displays “MSG NO.?”
The LCD displays the message.
The LCD displays “MSG NO.?”
NOTE:
Group calling station messaging allows you to set a calling station
message for only one station at a time.
The LCD displays “MODE NO.?”
Your LCD shows the time and date. The message is displayed at the
“destination” station. Any station calling the “destination” station receives
the message.
BUSY STATION MESSAGING
When reaching a busy LCD station, a message can be sent to that
station (an audible tone will be heard). The busy station may also return
a message to the calling station’s LCD. The two stations may continue
this procedure to carry on a “silent” conversation. Soft Keys must be off
(Mode 70) at the sending and receiving stations for this feature to
operate.
STRATA DK MESSAGES AND MEMOS
4-12
10. Dial 0.
To Receive a Called Station
Message:
1. Press the Intercom and
Msg button.
To Set a Calling Station
Message for Another Station:
1. Press the Mode button
when your telephone is idle.
2. Dial 9 5.
3. Dial the “destination” station
number.
4. Press the Page button.
5. Enter the desired message
number.
6. Press the Page button.
7. Press the Mode button.
8. Dial 0.
Page 45

Listen for a busy tone.
The LCD displays “MODE NO.?”
The LCD displays “OVER TO STNN MSG NO?”
Personal message (10 ~ 19) and system message(60 ~ 99). The LCD
displays the message.
The LCD displays “MSG SEND”. The destination station beeps four
times and the message is displayed for 30 seconds, or until the
originating station hangs up.
The LCD displays “MODE NO?”
The LCD displays “OVER TO STNN MSG NO?”
Personal message (10 ~ 19) and system message (60 ~ 99). The LCD
displays the message.
The LCD displays “MSG SEND”.
To Send a Message to a Busy
Station:
1. Call the desired station.
2. Press the Mode button.
3. Dial 2.
4. Enter the desired message
number.
5. Press the Page button.
To Return a Message (within 30
Seconds) from the Busy Station
After Receiving a “Busy
Station” Message:
1. Press the Mode button.
2. Dial 2.
3. Enter the desired message
number.
4. Press the Page button.
STRATA DK MESSAGES AND MEMOS
4-13
Page 46

Page 47

Index
P
Page Button 1-1
Privacy Override Display.
See
Override Displays
Preprogrammed Messages.
See
Messages and Memos
R
Recalling Station Display 1-10
Recording a Message.
See
Messages and Memos
Remote Calling Station
Messaging.
See
Messages and
Memos
S
Scroll Button 1-1
Soft Keys 3-1
Prompt Definitions 3-4
Activation/Deactivation 3-6
Speed Dial
Display 1-10
Use of 4-7
Station to Station Message
Waiting.
See
Message Waiting
Store a Message.
See
Messages
and Memos
System Messages.
See
Messages
and Memos
T
Timed Reminders 4-9
Toll Restriction Override/
Traveling Class Codes
Display 1-10
Setting 2-6
Two-CO Line Call Displays 1-10
V
Verified Account Code 2-7
Voice Mail (VM)
Display 1-8
Use of 2-4
A
Account Code
Calls 1-3
Changes 2-7
Alphanumeric Messages 1-4, 4-1
Auto Busy Redial Display 1-3
Automatic Callback Display 1-4
Automatic Line Selection Display
1-4
B
Busy Field Display 1-4, 2-5
Busy Override Display.
See
Override Displays
Busy Station Messaging 4-12
C
Call Forward
Display 1-5
Setting 2-2
Call Number-Intercom Display 1-5
Call Pickup Display 1-5
Called/Calling Station Messaging.
See
Messages and Memos
Conference Calls 3-1
CO Line Identification Display 1-5
CO Line Number Display 1-6
D
Date/Time/Day
Adjustment 2-1
Display 1-6
Dialed Number Display 1-7
Dialpad Information 4-2
Direct Inward System Access
(DISA) Security Code 2-5
Do Not Disturb Override Display.
See
Override Displays
Door Phone/Monitor Display 1-7
E
Elapsed Time Display 1-7
STRATA DK INDEX
Executive Override Display.
See
Override Displays
G
Group Called Station Messaging.
See
Messages and Memos
I
Intercom Number Display 1-7
L
Liquid Crystal Display
Feature Buttons 1-1
Functions 1-1, 1-3
Name/Number 1-8, 4-5
Least Cost Routing Display 1-8
M
Message Waiting
Display 1-8
Use of 2-3
Messages and Memos 4-1
Called Station Messaging 4-10
Calling Station Messaging 4-4
Group Called Station
Messaging 4-11
Preprogrammed 4-3
Recording 4-1
Remote Calling Station
Messaging 4-12
Sending 4-10
Storing 4-1
System Messages 4-3
Mode
Button 1-1
Definitions 1-2
Exit 2-5
O
Off-hook Call Announce Display
1-8
Override Displays 1-9
Index-1
Page 48

 Loading...