

Page 1

Telecommunication Systems Division
Integrated Wireless Handset
TM
User Guide
May 1999
Page 2

Publication Information
Toshiba America Information Systems, Inc.,
Telecommunication Systems Division, reserves the right,
without prior notice, to revise this information publication for
any reason, includi ng, but not limited to, uti li zation of new
advances in the st ate of technical arts or to simply change th e
design of this documen t.
Further, Toshiba America Information Systems, Inc.,
Telec ommunication Syste ms Division, also reserves the right,
without prior notice, to make such changes in equipment
design or components as engineering or manufacturing
methods may warrant.
DKA-UG-WDTEL-VA
4016152
Version A, May 1999
© Copyright 1999
Toshiba America Information Systems, Inc.
Telecommunication Systems Division
All rights reserved. No part of this manual, covered by th e
copyrights hereon, ma y be reproduced in any form or by any
means—graphic, ele ct roni c, or mechanical, includi ng
recording, taping, photocopying, or information retrieval
systems—without express written permission of the publisher
of this material.
Strata is a registered trade m ark of the Toshiba Corporation
and Strata AirL ink is a trademark of Tosh iba America
Information Systems, Inc.
Trademark s , registered trademarks, and serv ice marks are the
property of their respective owners.
Page 3

Contents
Introduction
Organization...................................................................................................................... vii
Conventions .....................................................................................................................viii
Related Documents..............................................................................................................x
Chapter 1 – The Grand Tour
Handset ................................................................................................................................2
Buttons.................................................................................................................................5
Fixed.................................................................................................................................5
Flexible.............................................................................................................................5
Line...................................................................................................................................5
Directory Number [DN] ...................................................................................................5
Primary Directory Number [PDN]...................................................................................5
Secondary Directory Number [SDN]...............................................................................6
Phantom Directory Number [PhDN]................................................................................6
Liquid Crystal Display .........................................................................................................6
Volume Controls..................................................................................................................6
Charger Base........................................................................................................................7
Battery..................................................................................................................................8
Chapter 2 – Install ation
Step 1: Select Location .............................................................................................. .......11
Step 2: Charge Batteries for First Time............................................................................12
Step 3: Verify Call Ringing Patterns.................................................................................13
Step 4: Verify System/Handset IDs..................................................................................13
Strata AirLink Integrated Wireless Handset 5/99
i
Page 4

Contents
Chapter 3 - Handset Operation
Chapter 3 – Handset Operation
Powering On and Off.........................................................................................................15
Making Calls.................................................................. ......... ......... ......... .........................16
Receiving Calls..................................................................................................................16
Menu Options.....................................................................................................................17
Auto Answer (7 + FCN).................................................................................................18
Change Idle Message (13 + FCN)..................................................................................18
Click Volume (4 + FCN)................................................................................................19
Delete Last Number Dialed (12 + FCN) ........................................................................20
Display Contrast (8 + FCN)............................................................................................20
Display Test Option (9 + FCN)......................................................................................21
Ringer Type (2 + FCN) ..................................................................................................21
Ringer Volume (3 + FCN)..............................................................................................22
Time Format (6 + FCN)..................................................................................................22
Using the Hookswitch........................................................................................................23
Adjusting Volume..............................................................................................................23
Mute...................................................................................................................................24
Lock/Unlock the Dial Pad..................................................................................................24
Speed Dial...................................................................... ............................................... .....25
Chapter 4 – Digital Features
Account Code Calls ...........................................................................................................32
Forced Account Codes....................................................................................................32
Voluntary Account Codes...............................................................................................32
Verified Account Codes .................................................................................................33
Emergency Override of Forced Account Code Dialing .................................................33
Attendant Console Calling.................................................................................................34
Automatic Busy Redial (ABR)..........................................................................................34
Automatic Callback (ACB)................................................................................................35
Automatic Hold..................................................................................................................37
Call Forward (CF)..............................................................................................................38
Call Forward Modes.......................................................................................................38
Using Call Forward Buttons...........................................................................................39
Using Access Codes ................................................... ......... ...........................................39
ii
Strata AirLink Integrated Wireless Handset 5/99
Page 5

Contents
Chapter 4 - Digital Features
Call Forward–All Calls...................................................................................................40
Call Forward–Busy .........................................................................................................40
Call Forward–No Answer...............................................................................................41
Call Forward–Busy/No Answer.....................................................................................43
Call Forward–Fixed........................................................................................................44
Call Forward–External....................................................................................................44
Call Hold............................................................................................................................46
Call Park Orbits..................................................................................................................46
Call Pickup.........................................................................................................................49
Call Waiting.......................................................................................................................52
Caller ID....................................................... ...................................................... ................52
Conference Calls................................................................................................................53
Direct Inward System Access (DISA)...............................................................................53
Do Not Disturb...................................................................................................................55
Door Lock..........................................................................................................................55
Door Phones.......................................................................................................................55
DTMF Tones......................................................................................................................56
ISDN Calling .....................................................................................................................56
Message Waiting................................................................................................................57
Override Calls....................................................................................................................59
Executive Override.........................................................................................................60
Privacy Override.............................................................................................................61
Toll Restriction Override................................................................................................61
Paging Announcements .....................................................................................................62
All Call Page...................................................................................................................62
Release and Answer................................................................ ......... ..................................62
Saved Number Redial........................................................................................................63
Speed Dial...................................................................... ............................................... .....64
Tone/Pulse Dialing.............................................................................................................66
Two CO Line Connection (Tandem).................................................................................66
Transferring Calls ..............................................................................................................69
Transferring with Camp-on............................................................................................69
Strata AirLink Integrated Wireless Handset 5/99
iii
Page 6

Contents
Chapter 5 - Standard Features
Toshiba Voice Mail Integration.........................................................................................70
Voice Mail Identification Code......................................................................................70
Message Retrieval...........................................................................................................71
Call Forward to Voice Systems......................................................................................72
Chapter 5 – Standard Features
Account Code Calls ...........................................................................................................76
Forced Account Codes....................................................................................................76
Voluntary Account Codes...............................................................................................76
Verified Account Codes .................................................................................................77
Emergency Override of Forced Account Code Dialing .................................................77
Attendant Console Calling.................................................................................................78
Automatic Busy Redial......................................................................................................78
Automatic Callback (ACB)................................................................................................79
Call Forward ......................................................................................................................80
Call Forward Modes.......................................................................................................81
Call Forward–All Calls...................................................................................................82
Call Forward–Busy .........................................................................................................82
Call Forward–No Answer...............................................................................................83
Call Forward–Busy/No Answer.....................................................................................84
Call Forward–External....................................................................................................85
Call Hold............................................................................................................................86
Call Park Orbits..................................................................................................................87
Call Pickup.........................................................................................................................89
CO Line Queuing...............................................................................................................91
Conference Calls................................................................................................................92
CO Line Connection (Tandem) .........................................................................................93
Direct Inward System Access (DISA)...............................................................................93
Door Phones.......................................................................................................................96
Emergency Ringdown........................................................................................................96
ISDN Calling .....................................................................................................................97
Message Waiting................................................................................................................97
Override Calls....................................................................................................................98
Executive Override.........................................................................................................99
Paging Announcements ...................................................................................................100
iv
Strata AirLink Integrated Wireless Handset 5/99
Page 7

Chapter 5 - Standard Features
Repeat Last Number Dialed.............................................................................................100
Speed Dial...................................................................... ............................................... ...100
Transferring Calls ............................................................................................................101
Transferring with Camp-on..........................................................................................101
Toshiba Voice Mail Integration.......................................................................................102
Call Forward to Voice Systems....................................................................................102
Voice Mail Identification Code....................................................................................103
Message Retrieval.........................................................................................................104
Appendix
Handset Specifications.....................................................................................................106
Troubleshooting...............................................................................................................107
Access Codes...................................................................................................................109
CO Line Access Codes.................................................................................................109
Feature Codes...............................................................................................................110
Paging Access Codes....................................................................................................112
Contents
Index
Strata AirLink Integrated Wireless Handset 5/99
.....................................................................................................................................113
v
Page 8

Contents
Chapter 5 - Standard Features
vi
Strata AirLink Integrated Wireless Handset 5/99
Page 9

Introduction
This guide describes the features and operation of the Strata AirLink™ Integrated
Wirele ss handse t in S trata DK systems and many non- Toshib a systems. The S trata DK
systems that support the handset are:
♦ DK16e/DK16
♦ DK40i/DK40
♦ DK424/DK280 (Release 3.0 or higher)
If you have a non-Toshiba system, see your System Administrator for more
information.
Organization
♦ Chapter 1 – The Grand Tour describes the featur es associated with the wire les s
handset and includes buttons and icons, Charger Base and its Light Emitting
Diodes (LEDs), and tips for increasing battery li fe.
♦ Chapter 2 – Installation covers selecting the right location for your handset,
charging the batteries, and verifying the IDs of the handset.
♦ Chapter 3 – Handset Operation describes handset features, including changing
the idle message, speed dial calling by number or name, and using feature access
codes.
Strata AirLink Integrated Wireless Handset 5/99 vii
Page 10

Introduction
Conventions
€ Chapter 4 – Digital Features
handset, such as Call Forward, Message Waiting, and Paging.
€ Chapter 5 – Standard Features
your handset in the standard interface wireless system.
€ Appendix
contains handset specifications, troubleshooting techniques, and
feature access codes.
Conventions
Convention Description
Note
Important!
CAUTION!
describes how the system features work with your
describes how the system features work with
Elaborates specific items or references other
information. Within some tables, general notes apply
to the entire table and numbered notes apply to
specific items.
Calls attention to important instructions or
information.
Advises you that hardware, software applications, or
data could be damaged if the instructions are not
followed closely.
viii
W ARNING!
[DN]
[PDN]
[SDN]
Alerts you when the given task could cause personal
injury or death
Represents any Directo ry Nu mber button, also known
as an exten sion or intercom number.
Represents any Primary Direc tory Number button (the
extension number for the telephone).
Represents any Secondary appearance of a PDN. A
PDN which appears on another telephone is
considered an SDN.
Strata AirLink Integrated Wireless Handset 5/99
Page 11

Convention Description
Introduction
Conventions
[PhDN]
Represents any Phantom Di rectory Number button (a n
additional DN).
Represents the pre-programmed digital handset
[B]
buttons 4~9. This is not applicable to the analog
handset.
$ULDO#%ROG
Courier
Represents telephone buttons.
Shows a computer keyboard entry or screen display.
“Type” Indicates entry of a string of text.
“Press”
Indicates entry of a single key. For example: Type
prog
then press
Enter
.
Shows a multiple PC keyboard or phone button entry.
Entries without spaces between them show a
Plus (+)
simultaneous entry. Example:
with spaces between th em show a sequential entry.
+
.
#
5
Tilde (~)
➤
Example:
Means “through.” Example: 350 ~ 640 Hz frequency
range.
Denotes the step in a one-step procedure.
Esc + Enter
. Entries
➤
Denotes a procedure.
Grey words within the printed text denote cross-
See Figure 10
references. In the electronic version of this document
(Strata DK Library CD-ROM or FYI Internet
download), cross-references appear in blue hypertext.
Strata AirLink Integrated Wireless Handset 5/99
ix
Page 12

Introduction
Related Documents
Action/Response Table
1. Actions you perform
appear in this
column. They can
consist of either a
single step or a series
of numbered steps.
2. When the action you
perform results in a
screen, menu, dialog
box, etc., the example
to the right displays.
Related Documents
Some documents listed here may appear in different versions on the CD-ROM, FYI,
or in print. To compare and find the most current version, check the document title
page.
You can find additional information about the Strata AirLink wireless handset and
Strata DK systems in the following documents:
The immediate response to the action performed
appears in this column. Addtional notes and
comments are also included.
2765
♦ Strata AirLink Integrated Wireless Handset Quick Reference Guide
♦ Strata DK Feature Description Manual
♦ Strata DK Installation and Maintenance Manual – Chapter 16 (Strata AirLink
Systems)
For authorized user s, Internet site FYI (http://fyi.tsd.toshiba.com) contains all Strata
DK and Strata AirLink documentation and enables you to view, print, and download
current publications.
x Strata AirLink Integrated Wireless Handset 5/99
Page 13

The Grand Tour
Your Strata AirLink Inte gra ted Wireless handset brings mobi lity and product ivit y to
the office environment. Greater call access cuts down on “telephone tag” delays,
and its compact design makes it easy to take with you.
The wireless handset provides reliability, long life, and outstanding performance. It
has unsurpassed range, clarity, and fully secured communications using proprietary
voice scrambling technology. It operates in the range of 1.9 GHz Unlicensed
Personal Communication Se rvice (UP CS) and r epres ents state -of-t he-ar t des ign an d
engineering.
It has the following features:
€
12 handset volume adjustments (plus silent), 8 ring levels, and a lockable dial
pad
1
€
Access to eight separate telephone systems, enabling movement from building
to building, system to system
€
70 internal Speed Dial (SD) memory locations with maximums of 8 characters
for names and 30 characters for numbers, so that you can SD by name or code
If your wireless system interfaces to a Strata DK system, you can easily access
many system features, such as Call Forwarding, Call Pickup, and Redial by using
)/6+
See Chapter 3 – Handset Operation on Page 15, Chapter 4 – Digital Features on
Page 31, and Chapter 5 – Standard Features on Page 75 for more information.
Strata AirLink Integrated Wireless Handset 5/99
or
)&1
+ pre-programmed buttons 4~9.
1
Page 14
The Grand Tour
Handset
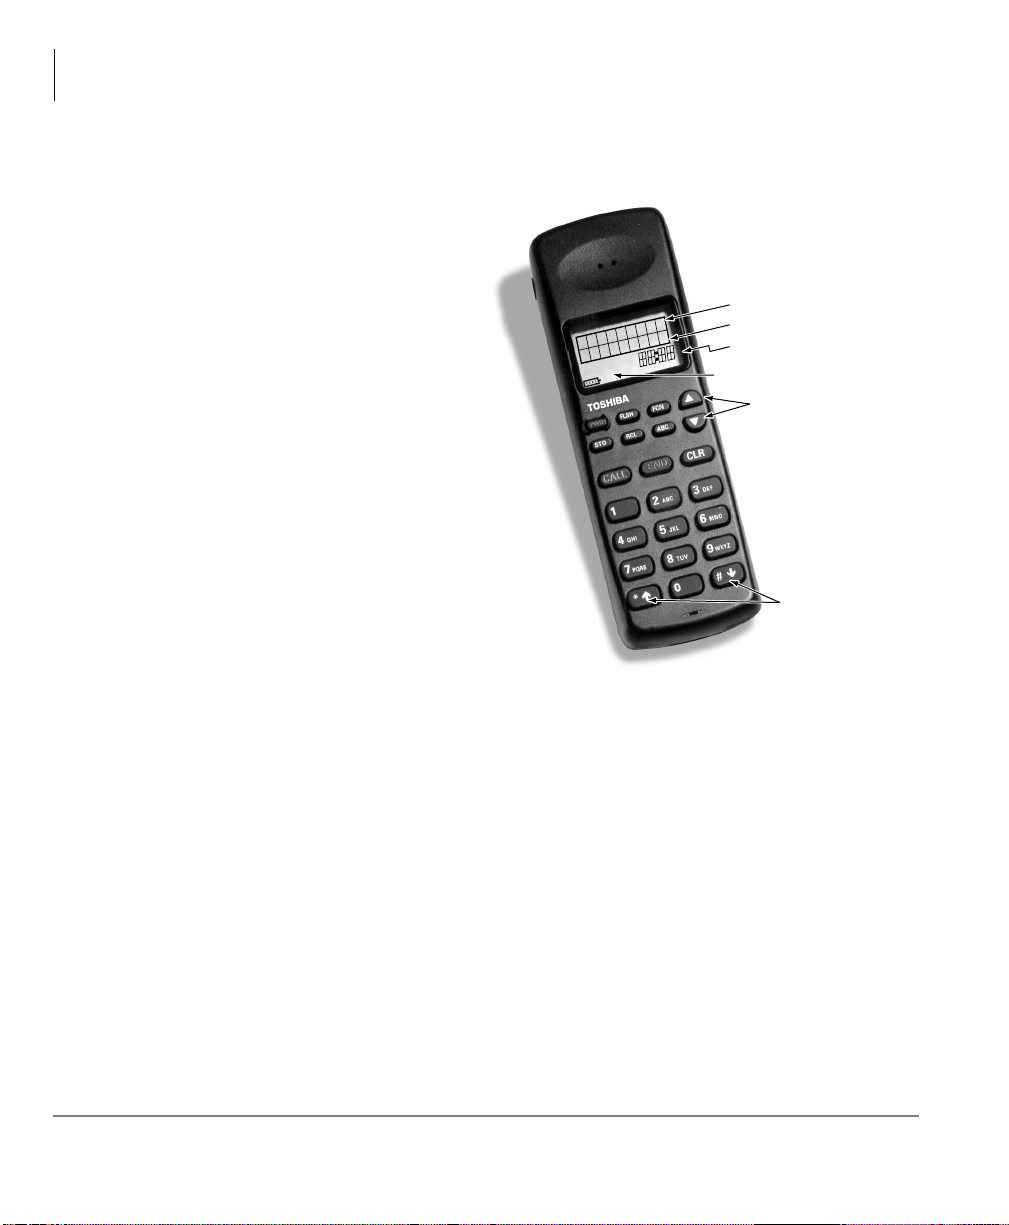
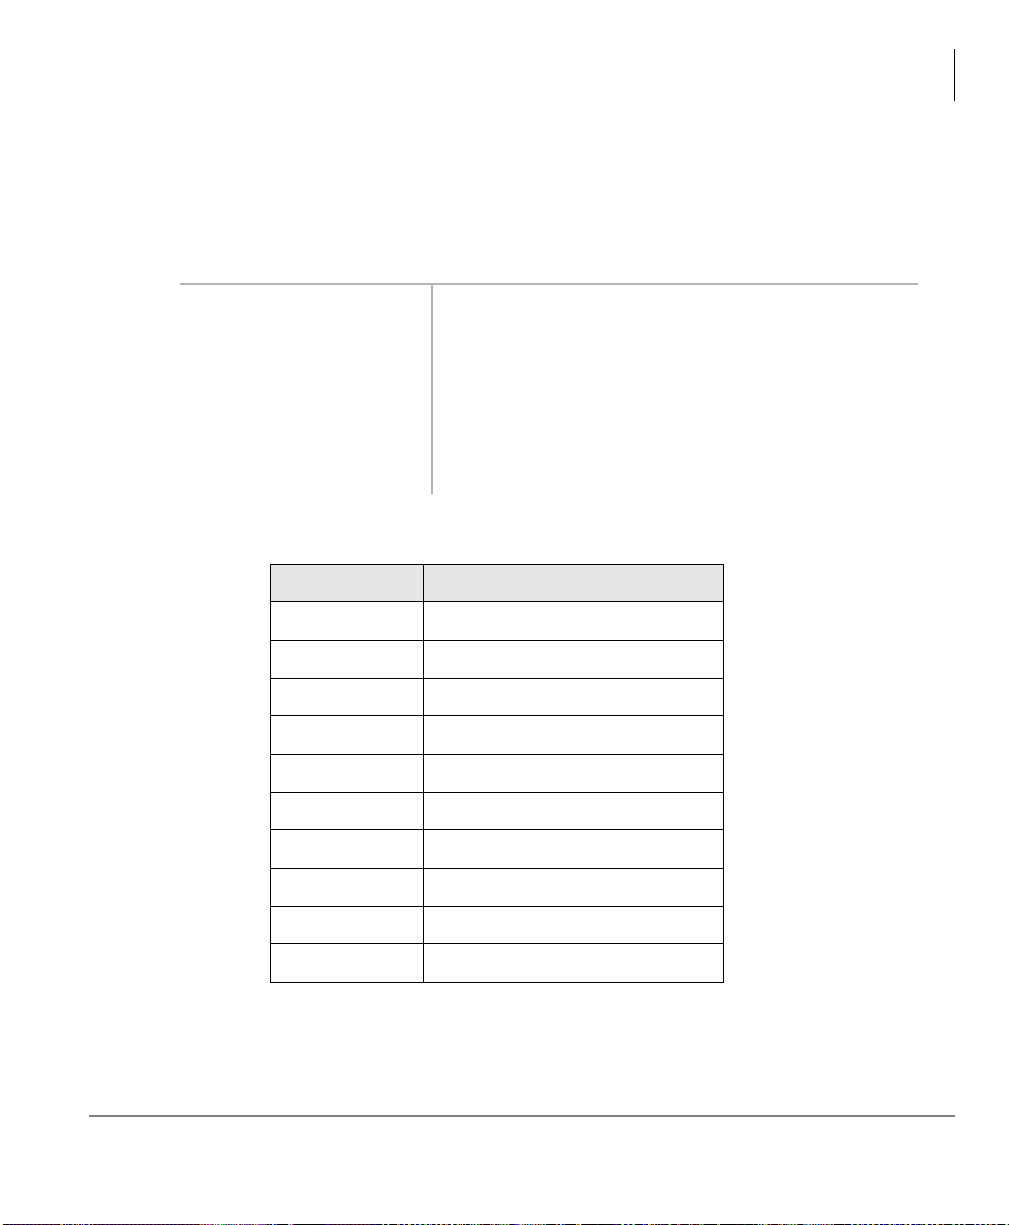
Handset
Your wireless handset (shown
at right) stores up to eight
system and handset IDs tha t are
configured by your System
Administrator.
The handset has a two-line
Liquid Crystal Display (LCD)
that shows alphanumeric
information , including the idle
message, date, call duration,
icons and specific call activity.
Table 1 briefly describes the
functions of the LCD fields,
icons, and the fixed buttons.
Idle Message
Date
Time/Call Duration
Icon Display Area
PWR
END
CALL
Volume/Scroll Buttons
Scroll/Lock Buttons
2
Strata AirLink Integrated Wireless Handset 5/99
Page 15

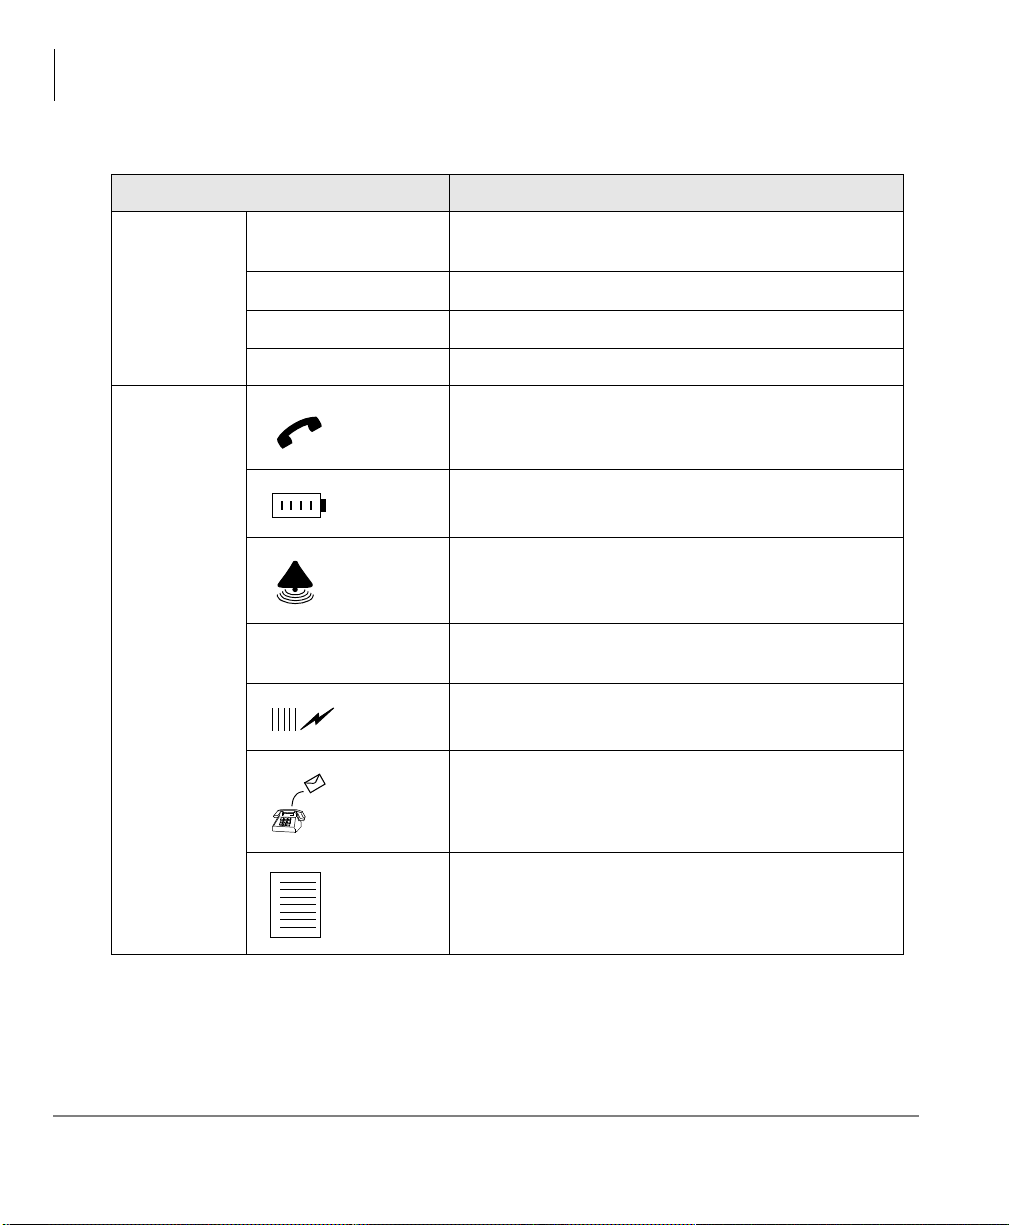
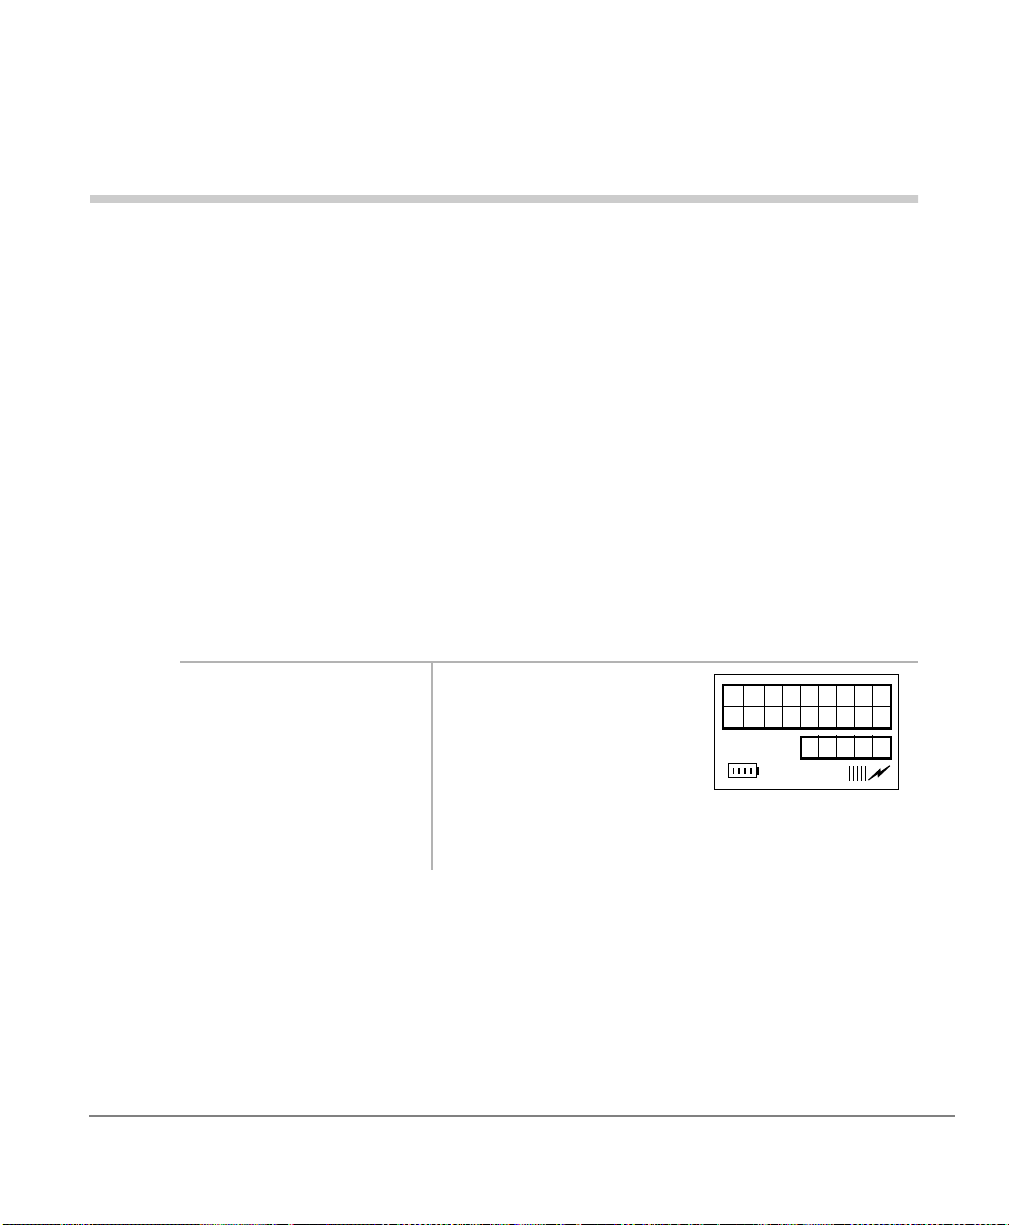
Table 1 LCD Fields, Fixed Buttons, and Icons Descriptions
Handset Description
The Grand Tour
Handset
LCD Fields
Fixed
Buttons
Idle Message Area
Date
Time/Call Duration
Icon Display Area
3:5
)/6+
)&1
▲
▼
672
5&/
$%&
Displays an idle message.
Displays the current date.
Displays the call duration and current time.
Displays icons that represent different battery and
handset conditions.
Turns the power On and Off.
Performs hookflash functions in analog systems only.
Activates the handset menu options and enables
features with the use of other buttons; for example,
Call Forward, Transfer, Speed Dial, and Conference.
Increases list ening v olu me and s crolls fo rward th rough
menu options.
Decreases listening volume and scrolls backward
through menu options.
Stores Speed Dial numbers/names and the idle
message.
Recalls numbers stored in memory.
Toggles handset between alpha and numeric modes.
&$//
(1'
&/5
Å
-
Strata AirLink Integrated Wireless Handset 5/99
Places the handset off-hook to enable calling.
Places the handset on-hook and exits from
)&1, 672
Erases one or more digits in the display.
Scrolls backwards through the Speed Dial list.
, and
$%&
modes.
5&/
,
3
Page 16
The Grand Tour
Handset
Table 1 LCD Fields, Fixed Buttons, and Icons Descriptions
Handset Description
Scrolls forward through the Speed Dial list and locks/
unlocks the dial pad.
Places calls on Hold.
Conferences or transfers calls.
Retrieves messages.
Fixed
Buttons
(continued)
&
Æ
)&1+4
)&1+5
)&1+6
1
1
1
Indicates off-hook or ringing.
Indicates battery strength—one bar is low and four is
high.
Indicates the currently configured ring volume.
Indicates the alpha mode—for entering displayed
letters in memory.
Icons
ABC
Indicates signal strength—one bar is low and four is
high.
(continued)
Indicates a message waiting.
Indicates that your handset is forwarded.
1
1
1. Available in Strata DK systems only.
4
Strata AirLink Integrated Wireless Handset 5/99
Page 17

Buttons
If your handset inter faces to t he Stra ta DK t eleph one syst em using a digit al port, the
handset buttons have special capab ilities as discussed in t he followi ng paragraphs. I f
it does not or you are int erfaced to a non-Toshiba system, the handset does not have
these capa bilities.
Fixed
The handset buttons, 1~3, are fixed as Hold (FCN + 1), Conference/Transfer (FCN
+ 2), and Message Waiting (FCN + 3).
Flexible
The handset buttons, 4~9, are assigned in programming to system features by the
System Administrator. The buttons can also be used as [DNs], [PhDNs], and
[SDNs] or CO lines.
Line
In Strata DK systems, line buttons enable you to directly access outside Central
Office (CO) lines. You can have a handset flexible button (4~9) assigne d as
your handset does not have
access codes listed in Table 9 on Page 109.
The Grand Tour
/LQH
, and you want to access outside CO lines, use the
/LQH
Buttons
. If
Directory Number [DN]
The [DN] buttons consist of [PDNs], [SDNs], and [PhDNs] that are your extension
or intercom number. You can have multiple [DN] buttons on your handset , includi ng
[DNs] belonging to a secondary handset [SDNs].
Primary Directory Number [PDN]
You can have up to four [PDNs] and set the Call Forward and Voice Mail ID
(VMID) code on [PDNs].
Strata AirLink Integrated Wireless Handset 5/99
5
Page 18

The Grand Tour
CF -A201
JAN01 TUE
12:15
Liquid Crystal Display
Secondary Directory Number [SDN]
The [PDN] of another extension that appears on your handset is an [SDN]. You
cannot set Call Forward or a VMID code for [SDNs] on your handset.
Phantom Directory Number [PhDN]
You can have up to four [PhDNs] dedicated to a station or shared by a group of
stations (for example, as a common telephone number for an entire department).
You can only set the Call Forward and VMID code for [PhDNs] that are owned by
your handset. You can have a separate Message Waiting button and mailbox for up
to four [PhDNs] on your handset.
Liquid Crystal Display
The 18-character LCD gives you essential call information,
handset status, and the c urrent time . When you are o n a call ,
it gives you up-to-the-minute call-duration time. All
displays are updated automatically as call processing
proceeds or handset status changes.
Volume Controls
6
Your handset has volume increase (▲) and decrease (▼) buttons for controlling the
ring and button (“key cli ck”) vo lume leve ls. See “Cli ck Volume (4 + FCN)”on Page
19 and “Ringer Volume (3 + FCN)”on Page 22 for more information.
Strata AirLink Integrated Wireless Handset 5/99
Page 19

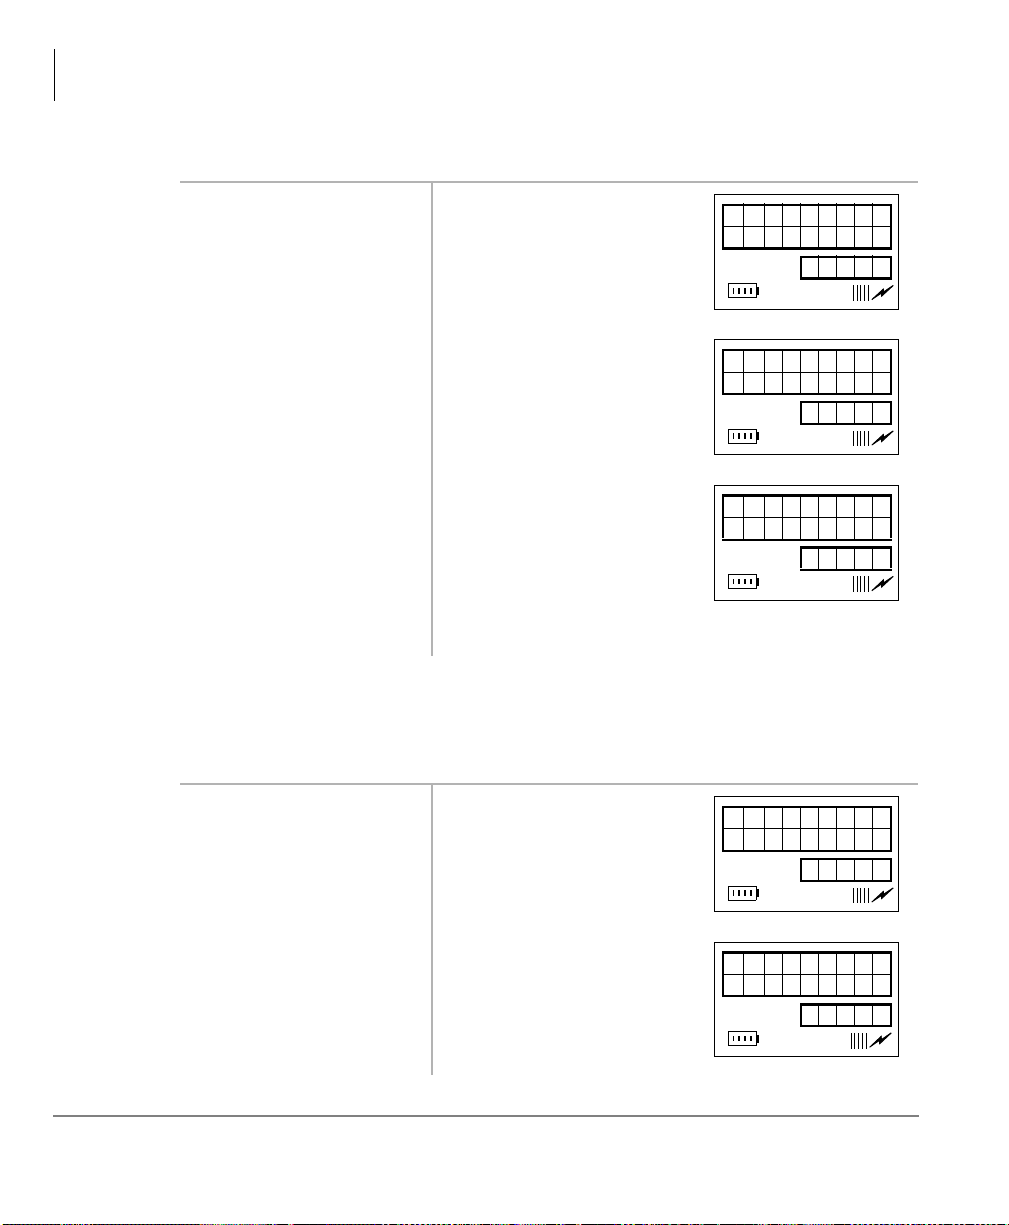
Charger Base
The handset comes with a Charger
Base (shown at right) that has front and
rear slots.
The front slot functions as a cradle for
the handset and a charger for the
handset battery. It provides rapid
charging only.
The rear slot is for a spare battery and
automatically discharges when it
detects that discharging is necessary.
The LEDs indicate battery charging
status. The LEDs flash and use the colo rs red, gree n, and amber to i ndicat e dif fere nt
conditions (shown in Table 2). See “Troubleshooting”on Page 107 for more
information.
Table 2 LED Indicators
The Grand Tour
Charger Base
Battery LED
Handset LED
2959
Color State Description
Steady Rapid charging.
Red
Flashing
Steady Battery is charged.
Green
Flashing Battery is charged, but check standby/talk time.
Steady
Amber
Flashing Short circuit or over-discharged battery.
Amber/Green Alternate Flashing Battery is discharging.
Strata AirLink Integrated Wireless Handset 5/99
Internal battery fault. Try charging the battery again. If
the problem persists, replace it.
Charger is evaluating the battery status or waiting for
the battery to finish charging.
7
Page 20

The Grand Tour
Battery
Battery
The handset uses one Nickel Metal Hydride (NiMH) battery. When fully charged it
provides up to 4 hours of talk and 40 hours of standby time.
➤➤➤➤
To charge the battery
i
Return the handset to the Charger Base.
Important!
➤➤➤➤
To discharge the handset or spare battery
1. Insert the spare
battery in the rear slot
of the Charger Base
...or the handset with
its battery in the front
slot.
2. When the LED
changes to steady
green, remove the
spare battery and
handset from the
Charger Base.
The battery must charge for two continuous hours to operate
properly.
If the LED alternates between green and amber,
leave the battery in the Charger Base to complete
discharging.
After the discharge cycle completes, the LED
changes to steady red which indicates rapid
charging is in progress.
8
Strata AirLink Integrated Wireless Handset 5/99
Page 21
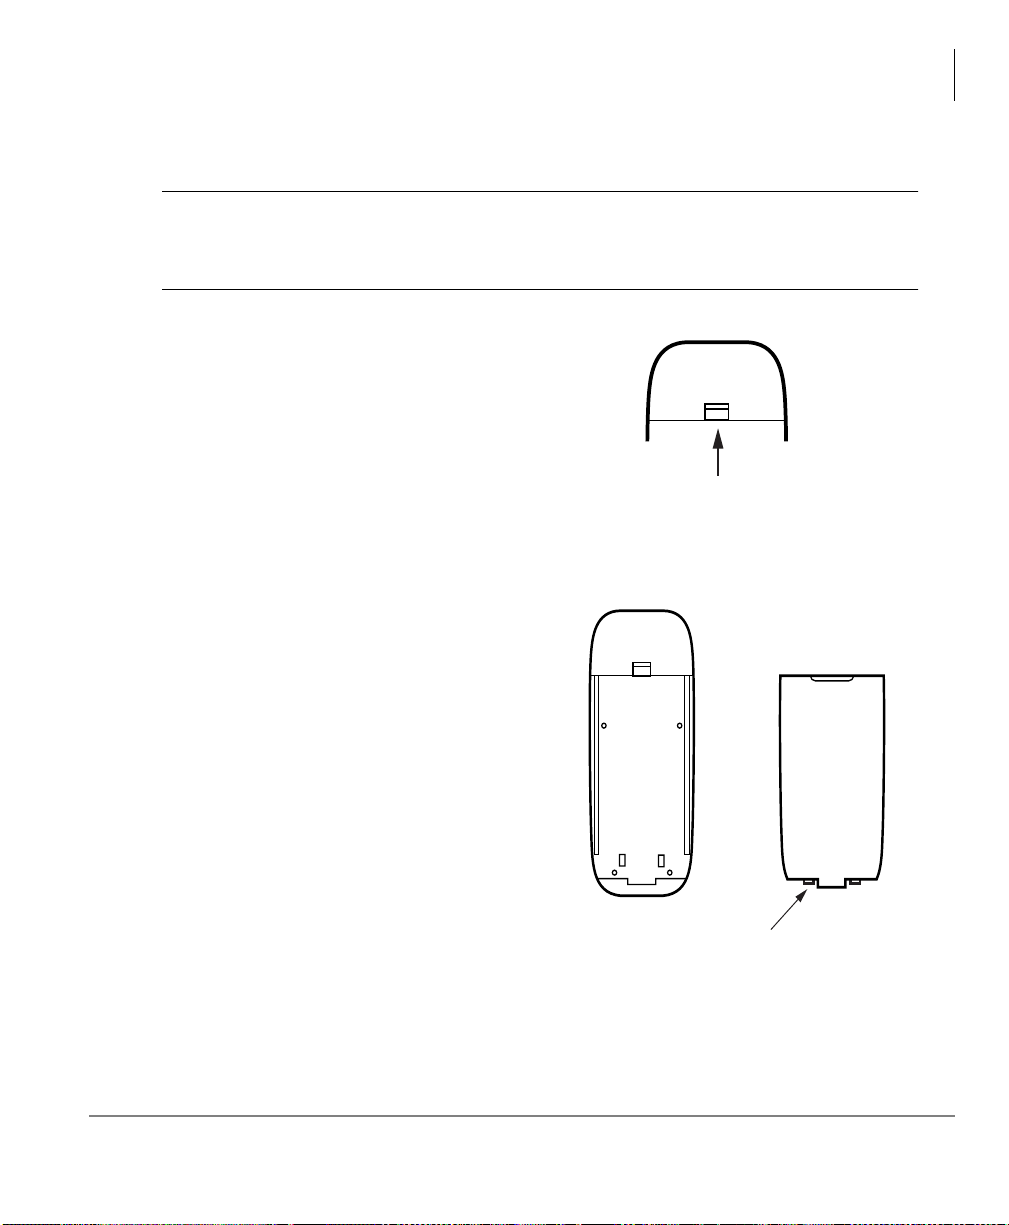
Removing and Re-installing the Battery
3019
Battery Release
The Grand Tour
Battery
CAUTION!
➤➤➤➤
To remove the battery
1. Press the battery release in the direction
of the arrow (shown at right).
2. Lift out the battery.
➤➤➤➤
To re-install the battery
1. Fit the battery notches into the base
of the handset (shown at right).
2. Snap the upper part of the battery int o
the handset.
If you have to remove the battery, turn off the power first. This
saves your menu changes and Speed Dial (SD) additions since the
last time you turned on the power.
Handset without Battery
Handset Battery
X X
Strata AirLink Integrated Wireless Handset 5/99
X X
3020
Notches
9
Page 22

The Grand Tour
Battery
10
Strata AirLink Integrated Wireless Handset 5/99
Page 23

Installation
This chapter describes installation procedures and how to charge the handset
batteries.
2
Important!
The Strata AirLink Wireless Syst em must be programmed before the
handset operates.
Step 1: Select Location
1. Select a location for your handset and Charger Base. Avoid excessive heat or
humidity.
2. Place the handset and charger on a desk or tabletop near a standard 120V AC
outlet.
3. Keep the handset away from sources of electrical noise (motors, fluorescent
lighting, etc.)
Strata AirLink Integrated Wireless Handset 5/99
11
Page 24

Installation
Battery
Step 2: Charge Batteries for First Time
1. Remove the handset carrying case, if it has
one.
2. Make sure the power is off.
3. Insert the handset (bat tery in it) in the front
slot of the charger (shown at upper right).
The Handset LED changes to amber and
then to red, indicating rapid charging.
FCN
FLSH
PWR
ABC
RCL
STO
CLR
END
CALL
DEF
3
ABC
2
1
6
MNO
JKL
5
GHI
4
WXYZ
9
TUV
8
PQRS
7
#
ª
0
*
Note
If you place a fully charged battery in
the charger, it detects the full charge
and cancels rapid charging. The
Handset LED changes to amber, red,
and then green.
4. If you have a spare battery, insert it in the
rear slot of the handset charger (shown at
lower right).
The Battery LED changes to amber wh ile
waiting for the handset to finish charging
or alternates between green and amber,
indicating discharge is in progress.
5. Remove the handset or spare battery wh en
the LEDs change to a steady green.
The steady green LED indicates a fully
charged batte ry. The charger switch es to a
“trickle charge” until you remove the
handset or spare battery.
3911
Handset LED
12
3912
Battery LED
Strata AirLink Integrated Wireless Handset 5/99
Page 25

Installation
Battery
Important!
Do not use the battery before it has completed the rapid charge cycle,
even if the handset battery icon displays full strength. The battery
must charge for two continuous hours. Reduced talk/standby time
result under these conditions.
Step 3: Verify Call Ringing Patterns
Your handset ringing pattern is set in system programming. Some systems use the
internal call ring pattern for incoming outside calls – one second on, three seconds
off. A distinct out side call ring pattern i s available – 0.4 s econds on, 0.2 seconds of f,
0.4 seconds on, three seconds off.
Step 4: Verify System/Handset IDs
Your System Administrator programs one or more system IDs into your handset.
This enables you to roam or handoff calls in one or more telephone systems. See
your System Administrator to program additional system IDs into your handset.
Strata AirLink Integrated Wireless Handset 5/99
13
Page 26

Installation
Battery
14
Strata AirLink Integrated Wireless Handset 5/99
Page 27
Handset Operation
TOSHIBA
_1_DEC_98
12:15
This chapter describes handset operation, including powering on and off, menu
functionality, and SD. Your handset can be configured for digital or standard
operation. See Chapter 4 - Digital Features and Chapter 5 - Standard Features for
features specific to each handset.
Powering On and Off
3
Strata AirLink Integrated Wireless Handset 5/99
i
Press
on or off).
3:5
(toggles
The handset beeps.
Note
Strata DK system time appears shortly after
the handset is first powered on.
15
Page 28

Handset Operation
CALLING
00015
CALL FORW
ARD TO
00025
TALK TO
210
00025
Making Calls
Making Calls
You can make calls outside the telephone sys tem by dialing di rect or using CO Line
Access Codes. See “CO Line Access Codes”on Page 109 for more information.
➤➤➤➤
To make an internal call
i
Enter a telephone
number and press
&$//
If the called number is
forwarded, this displays:
Then, the Call Forward
destination number [
210
displays.
]
Receiving Calls
16
...or press
and the telephone
number.
i
Press
&$//
&$//
first
You hear dial tone and your call is connected.
. The call connects.
Note
Auto Answer mode connects to a call without
pressing
Strata AirLink Integrated Wireless Handset 5/99
&$//
.
Page 29
Menu Options
The handset must be idle to use its own menu. Table 2 describes each option.
➤➤➤➤
To ac cess menu options
Handset Operation
Menu Options
...or
)&1
)&1
)&1
1. Press
2. Press
when the desired
option displays.
Table 3 Menu Options
▲
+
The LCD scrolls backward through menu options
13~1.
+ ▼. It scrolls forward through menu options 1~13 .
again
Important!
You must turn the power of f first or all
menu changes, except to the idle
message, are lost if you remove the
handset battery.
Press Option
5#.#)&1
)&1
)&1)&1
6#.#)&1
)&1
)&1)&1
7#.#)&1
)&1
)&1)&1
9#.#)&1
)&1
)&1)&1
:#.#)&1
)&1
)&1)&1
;#.#)&1
)&1
)&1)&1
<#.#)&1
)&1
)&1)&1
Sets Ringer Type
Sets Ringer Volume
Adjusts Button Beep Volume
Sets Time Format
Turns Auto Answer On/Off
Sets Display Contrast
Tests Icon Display
44#.#)&1
)&1
)&1)&1
45#.#)&1
)&1
)&1)&1
46#.#)&1
)&1
)&1)&1
Strata AirLink Integrated Wireless Handset 5/99
Deletes All SD Numbers
Deletes Last Number Dialed
Changes Idle Messag e
17
Page 30
Handset Operation
AUTO
ANSWER
fn:07
AUTO ANSR
ON
fn:07
AUTO ANSR
OFF
fn:07
CHANGE
IDLE MSG
fn:13
fn:13
ABC
Menu Options
Auto Answer (
1. Press
:
+
)&1
)&1
+ ▼
)
(seven times)
:
...or
2. Press
)&1
+
)&1
.
to toggle
on
...or toggle off.
3. Press
(1'
. Clears the display and saves the last selected value.
Change Idle Message (
46
+
Note
)&1,
When a call comes in,
you only hear a
“click,” simila r to the
click you hear when
you press a button.
18
Important!
1. Press
times)
...or
2. Press
Do not use the full 18 characters because the date displays also.
)&1
+ ▼ (13
46
)&1
+
)&1#
.
again. The handset changes to
alpha mode and displays the
“ABC” icon. The current
message displays.
Strata AirLink Integrated Wireless Handset 5/99
Page 31

Handset Operation
KEY CLICK
VOLUME
fn:04
Menu Options
3. Press the characters
or numbers for a n ew
message.
4. Press
Table 4 Special Characters
672
+
See Table 4 for more informatio n.
(1'
. The new idle message is stored in memory.
Press Result
11
1–
2A
2B
2C
22
7S
77
99
Å
-
&
Æ
*
space
Click Volume (
Strata AirLink Integrated Wireless Handset 5/99
1. Press
times)
...or
7
+
7
)&1,
)&1
)&1
+
+ ▼(four
.
0zero
19
Page 32

Handset Operation
KEY CLICK
SILENT
fn:04
DEL LAST
#DIALED
fn:12
PRESS FCN
TO DELETE
fn:12
DISPLAY
CONTRAST
fn:08
Menu Options
2. Press
3. Press
)&1#
again. You hear levels of beeper
(1'
. Clears the display and saves the last selected value.
Delete Last Number Dialed (
)&1
45
)&1
)&1
+
and ▼
)&1
again.
once
.
1. Press
(12 times)
...or
2. Press
3. Press
more to confirm
volume or this displays:
Note
Your choices are
VOL1~3 and silent.
)&1
)
45
+
If you confirm, the Last Dial ed Number (LDN) is
deleted.
Display Contrast (
20
...or
4. Press
1. Press
(eight times)
...or
(1'
to cancel. Returns you to the idle message.
(1'
. Clears the display and returns you to the idle
message.
;
)&1,
+
▼
+
.
Strata AirLink Integrated Wireless Handset 5/99
)&1
;
+
)&1
Page 33

Handset Operation
CONTRAST
TYPE 3
fn:08
DISP TEST
OPTION
fn:09
PRESS FCN
FOR TEST
fn:09
R I NG TYPE
OPTION
fn:02
Menu Options
2. Press
)&1
until the
contrast that you
want is visible.
3. Press
(1'
. Clears the display and saves the last selected value.
Display Test Option (
)&1
1. Press
times)
...or
2. Press
toggle the test on and
off.
3. Press
+
<
)&1
+
)&1
again to
(1'
. Clears the display and saves the last selected value.
<
▼
.
)&1,
+
(nine
There are seven types of
contrast available.
When the test is off, this
displays:
When the test is on, a ll icons
display and the
alphanumeric area fi ll s with
boxes.
Ringer Type (
Strata AirLink Integrated Wireless Handset 5/99
5
1. Press
(twice)
...or
2. Press
3. Press
)&1,
+
)&1
+ ▼
5
)&1
+
)&1
(1'
.
again. You hear the chosen ringer type (1~8).
. Clears the display and saves the last selected value.
21
Page 34
Handset Operation
RINGER
VOLUME
fn:03
RINGER
SILENT
fn:03
TIME
FORMAT
fn:06
Menu Options
Ringer Volume (
1. Press
(three times)
6
...or
2. Press
3. Press
Time Format (
1. Press
9
times)
...or
9
6
)&1,
+
▼
)&1
)&1
+
)&1
+
.
again. You hear levels of ringer or
this displays:
(1'
. Clears the display and saves the last selected value.
)&1,
+
)&1
+ ▼(six
)&1
+
.
22
2. Press
3. Press
4. Press
)&1
again. Your format or
)&1
again. The values are toggled between
(1'
. Clears the display and saves the last selected value.
12H OR 24H
Strata AirLink Integrated Wireless Handset 5/99
displays.
12H
and
24H
.
Page 35

Using the Hookswitch
Handset Operation
Using the Hookswitch
Note
The ordinary telephone hookswitch is located in the handset cradle of your
telephone. Your handset has a special button that acts as a hookswitch (
➤➤➤➤
To use the hookswitch during a call
➤➤➤➤
To flash a CO line
This feature is only available to handsets that use the BSIA interface to
Strata DK systems.
i
1. Press
2. Press
3. Enter a Centrex or
)/6+
Press
#BBBBBBB
PBX feature access
code or extension
number.
. You hear dial tone.
)/6+
+
&78
.
Adjusting Volume
)/6+
You hear dial tone.
Note
The access code depends on the Centrex or
PBX that you have. Check with your System
Administrator.
See Appendix on Page 105 for more information.
).
You have 12 volume settings that adjust the calling party voice level.
i
Strata AirLink Integrated Wireless Handset 5/99
▲
Press
...or ▼ until you reach the level you want.
23
Page 36

Handset Operation
MUT E
Mute
Mute
There are two types of mute—voic e and ringe r. Voice mute temporarily disconnec ts
the handset microphone and t he othe r part y cannot he ar you. Ri ng mute tempo rari ly
disconnects the ringer during an incoming call without affecting the call.
➤➤➤➤
To mute your voice while in conversation
i
Press and hold ▼ for about one second. This displays:
➤➤➤➤
To mute the ringer of an incoming call
i
➤➤➤➤
To cancel the mute feature
i
&/5
Press
Press ▲.
.
Lock/Unlock the Dial Pad
You can lock/unlock the dial pa d to avoid t he accide ntal pressi ng of the but tons. The
handset must be idle.
24
Note
➤➤➤➤
To lock the dial pad
i
Press and hold
➤➤➤➤
To unlock the key pad
i
Press and hold
...or turn off the power.
You cannot use any buttons except
3:5
when the dial pad is locked. The
dial pad automatically unloc ks whe n you re cei ve an incoming call and then
relocks again when the call ends.
Æ
&
.
Æ
&
Strata AirLink Integrated Wireless Handset 5/99
Page 37
Speed Dial
FULL:00
FREE:70
12:15
STORE AT
ME:10?
12:15
STORED!
12:15
Your handset stores 70 SD numbers internally—10 are dialed by pressing 1 button.
You can also assign SD memory locations or names. If a number or name is longer
than 18 digits, it scrolls to the next LCD line.
Handset Operation
Speed Dial
Important!
Turn the handset power off before removing the battery or all SD
numbers are lost.
➤➤➤➤
To find the available memory locations
Æ
#&
1. Press
+
5&/
.
2. Wait
...or press
➤➤➤➤
To store a SD number
(1'
.
1. Enter a te lephone
number and press
672
.
2. Input the locat ion that
you want.
FULL:
is the number of used
locations, and
FREE:
is the
number of available
locations.
The idle message displays.
A default SD location (
10
displays.
)
Strata AirLink Integrated Wireless Handset 5/99
3. Press
672
again.
25
Page 38

Handset Operation
02
ED: I T
8531212
12:15
Speed Dial
➤➤➤➤
To cancel storing a number
i
Press
➤➤➤➤
To edit stored SD numbers
1. Enter a mem ory
location and press
5&/
...or
&
Æ
for the number.
(1'
5&/
, or
.
+ ▲, ▼,
Å
to search
-
2. Press
&/5
. The number is deleted
3. Enter the new digits
(1'
672
.
.
3~<
. The number stored for that
and press
➤➤➤➤
To cancel the editing process at anytime
i
Press
➤➤➤➤
To SD using buttons 0~9
1. Press and hold
2. Release the button. The call connects.
character by character.
button dials and displays.
26
Strata AirLink Integrated Wireless Handset 5/99
Page 39

➤➤➤➤
8531212
12:15
RECALL
LOCATION
12:15
P
PRGRMMD
12:15
To SD using memory locations 10~69
1. Dial a memory
location (
43~9<
).
Handset Operation
Speed Dial
2. Press
➤➤➤➤
To scroll memory locations for SD numbers
1. Press
5&/
5&/
&$//
+
. The name and the first nine
Note
.
digits of the number
displays.
2. Press ▲ or ▼ to
Each SD number displays.
search
Æ
&
...or
Å
.
-
&$//
. The displayed number rings.
Å
.
-
3. Press
➤➤➤➤
To program a pause
1. Press and hold
...or
Reserve memory locations 0~69 for your
most frequently called numbers.
Strata AirLink Integrated Wireless Handset 5/99
2. Enter
3a<
, -, and &. A one-second pause is programmed.
27
Page 40

Handset Operation
W
12:15
JOHN 01
DELETE?
12:15
Speed Dial
➤➤➤➤
To enter a “wait”
1. Press
2. Press and hold
➤➤➤➤
To delete one stored number
1. Enter a mem ory
location and press
5&/
...or
Æ
&
, or
2. Press
&$//
. You can continue dialing.
Æ
&
.
5&/
+ ▲, ▼,
Å
.
-
&/5
. You are prompted to
The handset searches memory.
confirm the deletion.
28
3. Press
...or
&/5
again The number/name is deleted.
(1'
to cancel.
Strata AirLink Integrated Wireless Handset 5/99
Page 41

➤➤➤➤
DEL ALL
SPEEDDIAL
12:15
PRESS FCN
TO DEL
12:15
SPEEDDIAL
DELETED
12:15
To delete all number s
1. Press
the message at right
displays
...or (in idle mode),
44
+
)&1
)&1
Handset Operation
Speed Dial
+ ▼ until
.
...or
)&1
)&1
(1'
(1'
.
again
to cancel.
again to
All SD numbers/names are
deleted, and this displays:
2. Press
3. Press
4. Press
exit.
T o famil iarize yourself wit h the fea tures of your handse t, you need to know how it is
configured. See you System Administrator for specific information.
If you have the handset configured for digital operation, see C hapter 4 – Digital
Features, beginning on Page 31. If you have the handset configured for standard
operation, see Chapter 5 – Standard Features, beginning on Page 75.
Strata AirLink Integrated Wireless Handset 5/99
29
Page 42

Handset Operation
Speed Dial
30
Strata AirLink Integrated Wireless Handset 5/99
Page 43

Digital Features
This chapter describes Strata AirLink handset features when it is configured to
digital ports in Strata DK16, DK16e, DK40, DK40i, DK280 (Release 3.0 and
higher), and DK424 telephone systems. The handset has many of the same features
as the Digital Telephone (DKT) including Account Codes, Automatic Busy Redial
(ABR), and Call Forward (CF).
Each feature is programmed by your System Administrator to flexible buttons 4~9.
Buttons 1~3 are fixed as Hold (FCN + 1), Conference/Transfer (FCN + 2), and
Message Waiting (FCN + 3).
4
Note
Strata AirLink Integrated Wireless Handset 5/99
Handset buttons 4~9 are represented in this guide as [B].
31
Page 44

Digital Features
Account Code Calls
Account Code Calls
Account Codes are used for billing, call tracking, and line restriction applications.
The codes are recorded and printed in a SMDR report.
Forced Account Codes
Forced Account Codes are set in system prog ramming to re cord outgoi ng calls only.
When they are set at your st ation, you are requir ed to ent er the co de bef ore dia ling a
telephone number.
➤➤➤➤
To use a Forced Account Code
&$//
1. Press
. You hear dial tone.
2. Enter a CO line
Access Code.
3. Enter the Forced
Account Code.
4. Enter the telephone
number.
Voluntary Account Codes
Voluntary Account Codes are entered anytime after accessing a CO line or during a
call. If you enter the code after accessing a CO line, you are reconnected to the
outside caller or you hear dial tone.
If the system is also set for Verified Account Codes, you must enter that code also
after entering the Voluntary Account Code. If the code is not entered, the call is not
validated for the SMDR report.
An exception is the Voluntary Account Code that changes the Toll Restriction
classification of your station. This code accesses telephone numbers outside your
usual dialing area and must be entered
For example, if your station is restricted to local area calls, you can make out-ofstate calls by using a Voluntary Account Code set in system programming.
See Table 9 on Page 109.
You hear dial tone if you have entered a valid
Account Code or busy tone, if invalid.
prior
to dialing the telephone number.
32
Strata AirLink Integrated Wireless Handset 5/99
Page 45

➤➤➤➤
ENTER
ACCOUNT
12:15
To use a Voluntary Account Code
Digital Features
Account Code Calls
1. Press
&$//#
$FFRXQW#&RGH#
)&1
(
+ [B])
)&1
...or
+
+ 5 +
+ Account Code
&79#
You hear dial tone and the CO lin e is pl aced on hold.
Note
Your conversation is not interrupted.
You hear dial tone. You can
hear the caller, but they
cannot hear you or the
Account Code entry.
Verified Account Codes
Some Strata DK systems verify the entere d Forced or Voluntary Codes. These codes
are called Verified Account Codes, an d they a re ent ered wi th the Voluntary Account
Code. See your System Administrator for more information.
Emergency Override of Forced Account Code Dialing
Forced Account Codes are bypassed when emergency numbers, including 911 are
dialed. See your Syst em Administrator for these numbers:
911 2) 3)
1)
Alarm Reset
Strata AirLink Integrated Wireless Handset 5/99
Your Strata DK system can be connected to a facility alarm system. All telephones
produce a startling tone whenever this alarm is activated.
i
Press
&$//
$ODUP#5HVHW#()&1
+
+ [B]).
33
Page 46

Digital Features
NO.202
P555 3700
12:15
Attendant Console Calling
Attendant Console Calling
You can call the Attendant Console using up to three ways, depending upon system
programming.
➤➤➤➤
To call any Attendant Console
i
Press
&$//
+ 3. The call rings any Attendant Console and rotates
between the consoles i f there is more than one consol e
is installed.
➤➤➤➤
To call a particular console
i
➤➤➤➤
To make an emergency call to a console
i
&$//
Press
and dial
the console [DN].
Press
&$//
+
&733
The call rings the console. Your System Administrator
can provide the Attendan t Console’s internal numbers.
. The In-EMGR LED flashes on all consoles.
Automatic Busy Redial (ABR)
When an outside number is busy, you can activate ABR. Strata DK automatically
redials the number at regular intervals. If the number is still busy, ABR resets and
tries again.
Note
ABR is not attempted while your station is busy, but
continues to time-o ut. A
before redialing the number
This feature may not be supported by some or all of the lines in your
system. See your System Administrator for more information.
P
(pause) displa ys (shown at right)
.
34
Strata AirLink Integrated Wireless Handset 5/99
Page 47

➤➤➤➤
AUTO REDI
AL SET
12:15
To activate ABR
Digital Features
Automatic Callback (ACB)
1. Press
5HGLDO
...or
2. Press
$XWR#%XV\#
)&1
(
+ [B])
)&1
+ 5#+
(1'
.
&77
You hear confirmation tone.
.
Note
The system redials, up to 15 times, every 30
or 60 seconds, depending on system
programming.
➤➤➤➤
To answer an ABR call
i
Press
&$//
within
ABR has already connected to the number.
30 seconds when
your handset rings.
Note
If you do not answer within 30 seconds, you
hear a muted ring for a nother 30 s eco nds, t hen
the call disconnects.
➤➤➤➤
To cancel ABR
i
&$//#+ &77
Press
.
Automatic Callback (ACB)
Strata AirLink Integrated Wireless Handset 5/99
When you reach a busy, Do Not Disturb (DND) station, or a busy line group, you
can have the system automatically call you back. If you have Least Cost Routing
(LCR), the system also redials the station or line group for you. If not, you must
enter the station number again.
Note
The access code for ACB depends on system programming. See your
System Administrator for more information.
35
Page 48

Digital Features
AUTO CALL
BACK ON
12:15
S T 15 ACB
12:15
LINE4
ACB
12:15
Automatic Callback (ACB)
➤➤➤➤
To set ACB
i
Press
&DOOEDFN
[B]) +
...or
➤➤➤➤
To answer an ACB call
i
Press
$XWR#
(
(1'
7+ (1'
&$//
You hear two seconds of
)&1
+
dial tone, then busy tone.
.
.
. Your handset rings at a fast
rate. Answer within three
rings or ACB is canceled.
If the ACB was set for a
busy CO Line, the seized
line number displays.
If you hear busy tone after answering, the called
party has alread y received or originate d another ca ll.
ACB is still activated, and you are called again
when the station is available.
➤➤➤➤
To cancel ACB to busy or DND station
36
i
Press
(1'
(1'
(1'(1'
&$//
&$//
&$//&$//
.
+
&76
&76
&76&76
+
Strata AirLink Integrated Wireless Handset 5/99
Page 49

Automatic Hold
You can place your call on hold automatically by pressing an outside line, a [DN], a
[PhDN], or
Strata DK is programmed for this feature. See your System Administrator for more
information.
➤➤➤➤
To use Automatic Hold
i
While on a call, press another line, [DN] or [PhDN] to make or receive the new
call. The first call is put on hold, and you are connected to the incoming call.
➤➤➤➤
To switch between calls
)&1
+ 4. You can also switch between calls if your handset and the
Digital Features
Automatic Hold
1. Press the line, [DN],
or [PhDN] of the
held call.
2. Press the line, [DN],
or [PhDN] of the
second held call.
3. Repeat Steps 1~2 to
switch between the
calls.
➤➤➤➤
To retrieve a held call
i
Press the line, [DN], or [PhDN] +
...or
)&1
You are connected to the first held call.
You are connected to the second cal l and the fir st call
is on hold again.
&75
+ [B].
Strata AirLink Integrated Wireless Handset 5/99
37
Page 50

Digital Features
Call Forward (CF)
Call Forward (CF)
You can assign CF destinat ions for each [ DN] on yo ur handse t (up t o one [PDN] and
four [PhDNs]). Each [DN] can be independent ly set for a different CF feature. CF
must be set before the call is re cei ved and has priority ov er th e Sta tion Hunt feature.
If you set CF from a [PDN] or [PhDN]:
€
You must set the CF from your handset.
€
Your handset must be programmed as the owner of the [PDN] or [PhDN].
Note
If you hear a re-order tone when following any of the CF steps, your
handset is not the owner of the [PDN]/[PhDN].
If CF is set, the following calls to your station forward (except in CF–External
mode):
€
Internal
€
Auto Attendant
€
CO lines calls that ring only at your station
€
Transferred CO line or station
CO lines that ring more than one station do not forward.
Call Forward Modes
You can set your handset [PDNs] or [PhDNs] for these CF modes:
€ CF–All Calls
called).
€ CF–Busy
busy or in the DND mode.
Note
forwards calls immediatel y when your station, [PDN], or [PhDN] is
CF–All Calls, CF–Busy, CF Busy–No Answer, and CF–No Answer can be
set with the touch of one button. See “Feature Access Codes” on Page 110.
forwards all calls immediately (your handset does not ring when
38
Strata AirLink Integrated Wireless Handset 5/99
Page 51

Digital Features
Call Forward (CF)
€ CF–No Answer
forwards all ca lls if y ou fail to a nswer wit hin a desi gnated t ime
(set by you when you enable the feature).
€ CF–Busy/No Answer
forwards all calls immediately whe never you a re busy, in
the DND mode, or after ringing and you do not answer the call within a
designated time (set by you when you enable the feature).
€ CF–Fixed
forwards all internal, private, or DID CO line calls immediately to a
station or voice mail device set in system programming. Your station does not
ring when called a nd must be as signed with
system programming.
€ CF–External
forwards new incoming calls directed to your [PDN] to a
destination outside of the system. [PhDNs] assigned to your handset do not call
forward to external destinations. Internal calls and transferred calls to your
[PDN] also do not forward to external destinatio ns.
Only incoming calls over CO lines dedicated to immediately ring your [PDN],
the private CO
/LQH ()&1
other CF modes can be set for your [PDNs] or [PhDNs] simultaneously with
CF–External.
Using Call Forward Buttons
If your digital handset has been programmed for CF buttons (
set the following CF features for a [PDN]:
%XV\
([WHUQDO
&DOO#)UZG#1R#$QVZHU, &DOO#)UZG#%XV\21$QV, &DOO#)RUZDUG#
,
&DOO#)RUZDUG#WR=#
, and
#&DOO#)RUZDUG#WR= ()&1
+ [B]) in
+[B]), and/or DID line, CF externally. Any of the
)&1
+ [B]), you can
&DOO#)UZG#$OO#&DOOV, &DOO#)UZG#
(CF–Fixed feature).
Using Access Codes
If your handset has not been programmed for CF buttons or you are forwarding a
[PhDN], you must use access codes to set the CF feature.
Strata AirLink Integrated Wireless Handset 5/99
39
Page 52

Digital Features
CALL FORW
ARD TO
12:15
FORWARD
TO 203
12:15
TOSHIBA
24 MAR 99
12:15
NO.210
CF TO
12:15
Call Forward (CF)
Call Forward–All Calls
1. Press
)UZG#$OO#&DOOV#
)&1 +#
(
...or
[PhDN] +
2. Enter the destination
[DN].
3. Press
&DOOV#
(1'#
...or
code used).
➤➤➤➤
To cancel a CF–All Calls
i
Press
&$//
&$//
+
&DOO#
[B])
&$//
+ [PDN]/
&934
.
&DOO#)UZG#$OO#
)&1 +#
(
[B])
(if access
&DOO#)UZG#$OO#&DOOV ()&1
+
You hear confirmation tone.
Calls are forwarded to the
stored [DN], in this case
203
.
+ [B])
Call Forward–Busy
40
&$//
...or
1. Press
&$//
)UZG#%XV\#+ )&1
[B])
+ [PDN] +
&DOO#
+
+
&934
#
+
(1'
.
Strata AirLink Integrated Wireless Handset 5/99
Page 53

&$//
N0 .210
CF TO 203
12:15
TOSHIBA
24 MAR 99
12:15
NO.210
CF TO
12:15
NO.210
CF TO 203
12:15
...or
[PhDN] +
+ [PDN]/
&935
.
2. Enter the destination
[DN].
Digital Features
Call Forward (CF)
You hear confirmation tone.
%XV\#
(1'
...or
&DOO#)UZG#
)&1 +#
(
[B])
(if access
3. Press
code used).
➤➤➤➤
To cancel a Call Forward—Busy
i
&DOO#)UZG#%XV\ ()&1 +#
Press
&$//
...or
+ [PDN] +
Call Forward–No Answer
1. Press
&$//
)UZG#1R#$QVZHU#
)&1 +#
(
&$//
...or
[PhDN] +
2. Enter the destination
[DN].
+
[B])
+ [PDN]/
&936
&DOO#
.
Calls are forwarded to the
stored [DN], in this case,
203
.
(1'
[B]) +
&934
+
(1'
.
You hear confirmation tone.
Strata AirLink Integrated Wireless Handset 5/99
41
Page 54

Digital Features
16 SEC
12:15
TOSHIBA
24 MAR 99
12:15
TOSHIBA
24 MAR 99
12:15
Call Forward (CF)
3. Enter the time delay
Note
3;a93
(
) seconds.
Skip this step if
you do not want to
change the time.
4. Press
&DOO#)UZG#1R#
$QVZHU#
)&1
(
+
[B])
5HGLDO#()&1
...or
[B]), then
(1'#
(if
access code was used
in Step 1).
&
(1'
5. Press
+
. Calls are forwarded to the
The LCD displays the
amount of time ente red (
Calls are forwarded to the
stored [DN], in the case,
203
.
Notes
+
♦
If the DK system is programmed for Announce
Calls, the handset only ri ngs. It does not have a
speaker to announce the call.
♦
Calls do not forward unless the calling party
presses
4
or
handset. It rings first, the forwards.
stored [DN], in the case,
203
.
16
5LQJ ()&1
).
+ [B]) to toggle the
➤➤➤➤
To cancel a CF–No Answer
42
Note
If the DK system is programm ed for
Announce Calls, the handset only rings. It
does not have a speaker to announce the call.
i
&DOO#)UZG#1R#$QVZHU ()&1
Press
...or
&$//
+ [PDN] +
&934
+
+ [B]) +
(1'
.
Strata AirLink Integrated Wireless Handset 5/99
(1'
Page 55

Call Forward–Busy/No Answer
NO.210
CF TO
12:15
NO.210
CF TO 203
12:15
16 SEC
12:15
Digital Features
Call Forward (CF)
1. Press
&$//
)UZG#%XV\21$QV#
)&1
(
+ [B])
&$//
...or
[PhDN] +
&DOO#
+
+ [PDN]/
&937
.
2. Enter the destination
[DN].
3. Enter the time delay
Note
3;a93
(
) seconds.
Skip this step, if
you do not want to
change the time.
4. Press
&DOO#)UZG#
%XV\21$QV#
)&1
(
+ [B])
You hear confirmation tone.
The LCD displays the
16
amount of time ente red (
).
Calls are forwarded to the stored [DN].
➤➤➤➤
To cancel a CF–Busy/No Answer
Strata AirLink Integrated Wireless Handset 5/99
...or
(1'
used in Step 1).
i
Press
...or
5HGLDO
, then
(if access code
&DOO#)UZG#%XV\21$QV ()&1
&$//
+ [PDN] +
&934
+
(1'
+ [B]) +
.
(1'
43
Page 56

Digital Features
Call Forward (CF)
Call Forward–Fixed
&$//
1. Press
)UZG#WR=#
+
)&1
(
[B]).
2. Press
&DOO#)UZG#WR=
a second time.
Call Forward–External
1. Store the destination
number at Station SD
location code 49.
2. To set CF-External,
&DOO#)UZG#
press
([WHUQDO
[B])
...or the [PDN] +
&9:3
)&1 +#
(
.
&DOO#
+
All calls forward to a station [PDN] or voice mail
device set in system programming.
Feature is canceled.
Notes
♦
Only perform Step 1 the first time C F-External
is set or when you change the destination. It is
not necessary to st ore the destination each time;
it remains in sy stem memory.
♦
The LCR access code “9” cannot be used.
Incoming calls forw ard to the destination stored at
Station Speed Dial Location 49.
44
➤➤➤➤
To cancel a CF–External
i
&DOO#)UZG#([WHUQDO#()&1
Press
&$//
...or
+
&9:3
+
(1'
+ [B])
.
Strata AirLink Integrated Wireless Handset 5/99
Page 57

➤➤➤➤
To change a remote forwarding destination number
If Call Forward-External mode is set at your stati on, you can chan ge the for warding
destination from a telephone outside of the system.
Digital Features
Call Forward (CF)
1. Call into the Strata
DK system over a CO
line programmed for
DISA.
2. After you get dial
&9:3
tone, press
+
your [PDN].
3. Enter the Remote
CF–External security
code.
4. Enter the new
destination.
You hear ringback tone signal, then internal dial
tone for 10 second s. Try again if you hear bu sy tone.
Note
See the System Administrator for DISA
telephone numbers.
You hear a confirmation tone.
If a number is not dialed, the system automatically
makes the DISA CO line ring as a normal incoming
call. Then, if the call is not answered within 15
seconds after the ringing starts, it disconnects.
You hear a confirmation tone. See the System
Administrator for the security code that is assigned
to your handset in system programming.
Notes
♦
You can enter an internal number, Voice Mail
number, or a CO line access code + an external
telephone number.
♦
With some systems, you can dial a line group
code instead of a CO line number access code.
(See “CO Line Access Codes”on Page 109 for
access code information.)
&
(1'
5. Press
Strata AirLink Integrated Wireless Handset 5/99
+
. You hear a confirmation tone.
45
Page 58

Digital Features
HOLD NO.
6753
12:15
Call Hold
Call Hold
i
➤➤➤➤
To return to the call o n hold
i
Press
Press
)&1
&$//
+ 4.
+
+ [B] of the [DN],
[PhDN], or CO line
that is on hold.
Call Park Orbits
The Call Park feature holds calls temporarily in an orbit. Anyone can retrieve a call
from the orbit using the same or a dif ferent stati on. There are 20 General Park Orbi ts
for a Strata DK system and 1 Personal Park Orbit for each station.
)1&
Note
Caller ID displays t he
telephone number or
calling party name if
your Strata DK
system has that
capability.
You are reconnected to the held call. If you do not
return to the held call with in a specified time, the
call rings your handset.
If you are busy on anot her call when the held call
recalls your statio n, you hear two tone bursts of two
beeps each, three seconds apart. When you end the
second call, the first call rings your station.
The call remains on hold at your station indefinitely.
46
Once you have parked a call in an orbit, you can:
€
Hang up and retrieve the parked call at a later time
€
Access a voice paging device to announce the parked call for pickup from
another station
If the parked call is not retrieved within a specified time, the call rings back to your
handset. If you are talking when the parked call recalls, you hear two short beeps
(tones), three seconds apart.
Strata AirLink Integrated Wireless Handset 5/99
Page 59

You can answer the parked recall by putting the new call on hold or end the second
ENTER
ORBIT NO.
12:15
6793 PK
ORBIT 900
12:15
L2PK
ORBT900
12:15
call and answer the parked recall by hanging up. The parked call remains camped
onto your handset until you respond.
➤➤➤➤
To park a call in an orbit
Digital Features
Call Park Orbits
1. Press
3DUN#LQ#2UELW
)&1
(
+ [B])
)&1 +#5#
...or
&665
+
2. Enter a General Orbit
Number (
<33~<4<
...or a valid [PDN]
<<<
...or
3. Press
. The system parks the ca ll on
(1'
. Once the call is parked, you can make or receive
You hear dial tone.
Y ou hea r a one second confir mation tone. The call is
)
parked in an orbit, or to an assigned [PDN]. If an
orbit number is busy, enter another number.
the lowest vacant orbit
number and displays it.
other calls.
Note
If the parked call is
not retrieved wit hin a
specified time, the
call rings back to
your handset and
displays on the LCD.
Strata AirLink Integrated Wireless Handset 5/99
47
Page 60

Digital Features
L2PKORBIT
900
12:15
HOLD LN2
ENTERORB#
12:15
Call Park Orbits
➤➤➤➤
To retrie ve a parked call
1. Press
LQ#2UELW
[B])
...or
the orbit number.
➤➤➤➤
To park and page a call
1. Press
3DJH
...or
2. Enter the general
orbit number
<33~<4<
(
...or a valid [PDN]
&$//
+
)&1
(
&665#
and enter
3DUN#DQG#
)&1
(
&$//
+ [B])
+
)
3DUN#
+
&664
You hear dial tone.
You are reconnected to the parked call.
.
The call is parked on the lo west vacan t orbi t number
or [PDN]. After you enter an orbit number, a short
burst of dial tone prompts you to enter the Page
access code.
48
...or
<<<
. The system parks the call on the l owest vac ant orbi t
number and displays it.
Strata AirLink Integrated Wireless Handset 5/99
Page 61

Digital Features
HOLD LN2
999
12:15
HOLD LN2
L2 ORB900
12:15
Call Pickup
3. Enter a [DN] or Page
Group or Zone access
code.
4. Make your
announcement
including the orbit
number.
5. Press
Call Pickup
You can pick up a ca ll t hat is ringing at another statio n o r on hold and other types of
calls with the Call Pickup feature. Table 5 describes the functions of each code.
(1'
After you enter an orbit
number, a s hort b urs t of d ial
tone prompts you to enter
the Page access code.
The LCD shows the held
line and its orbit number.
See Tables 1 1 and 12 on
Page 112.
.
Strata AirLink Integrated Wireless Handset 5/99
Stations are assigned in system programming to Pickup Groups. As many as 20
groups can be enabled to easily pic k up external (ne w or transferr ed) or intern al calls
that are ringing stations in your group or in other groups. You can belong to more
than one group. See the System Administrator for group assignments.
You can pickup internal calls (station-to-station), Group Pages, and All Call Pages.
If these types of c alls o ccur at th e same ti me, th e pickup pri orit y is st ation -to-s ta tion
and then Page calls in the order of occurrence. In some systems this feature can be
applied to pickup All Call Page exclusively.
49
Page 62

Digital Features
NO.204200
CALL 201
12:15
Call Pickup
Table 5 Call Pickup Access Codes and Functions
Code Function
&8#.#;;;
&63
&68
<
&:334~&:533
➤➤➤➤
To use Call Pickup
i
Press
&$//
+ [PDN] or [PhDN].
➤➤➤➤
To use Directed Call Pickup.
1. Press
&$//
'LUHFWHG#3LFNXS
)&1
(
+ [B])
+
+
Picks up calls ringing or on hold at specific [PDNs] or
[PhDNs].
Picks up group pages, internal calls, or door telephones
ringing stations.
Picks up external pages.
Picks up ringing CO lines.
Picks up CO lines (1~200) on hold.
&8&5
The directed [PDN] is the station that has the
ringing or held call to pick up.
50
&$//#+ &8#
...or
+
[DN].
2. Dial the [PDN]. If more than one call is on hold, the call on the
lowest button number is picked up first. Ringing
calls are picked up over held calls as a priority.
Strata AirLink Integrated Wireless Handset 5/99
Page 63

➤➤➤➤
To pick up a ringing CO line in a tenant system
Digital Features
Call Pickup
i
&$//
)&1
+
+ [B])
Press
'LUHFWHG#3LFNXS#
4
~7#(
You are connected to a incoming CO line call for a
Tenant Group (1~4).
Notes
€
In non-tenant systems,
picks up any ringing CO line.
€
This feature does not pickup held lines or
transferred CO lines that are ringing; use
Directed Call Pickup.
&$// +#
...or
&8<
.
➤➤➤➤
To pick up calls that are ringing in your group
i
&$//
Press
*URXS#3LFNXS
*URXS#3LFNXS
*URXS#3LFNXS*URXS#3LFNXS
)&1
)&1
(
+ [B])
)&1)&1
[DN] +
+
...or a [DN] +
&8&67
&8&67
&8&67&8&67
. You are
connected to the call.
➤➤➤➤
To pick up calls that are ringing in another group
'LUHFWHG#3LFNXS4#
1. Press
2. Enter
&$//
+ [DN]. You hear dial tone.
8
#&
+ the group
pickup access code
&653~&66<
(
).
You are connected to the call aft er dialing the group
access code. If the called station belongs to more
than one group, any of the Group Pickup codes
associated with those groups can pick up the call.
Note
Strata AirLink Integrated Wireless Handset 5/99
These group pickup access codes can be
entered into a SD locati on for easier access.
51
Page 64
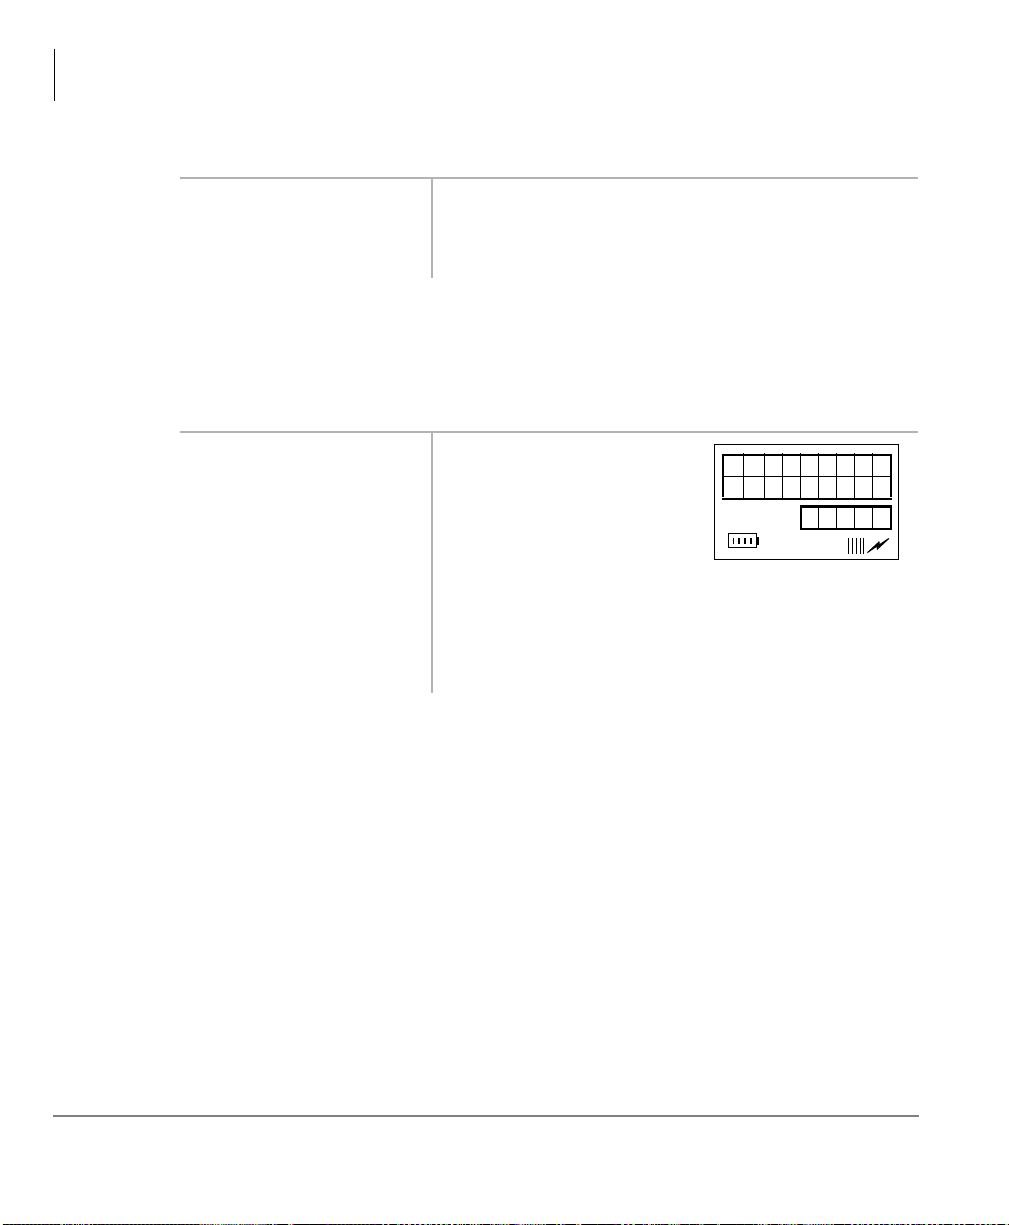
Digital Features
HOLD
6753
12:15
Call Waiting
➤➤➤➤
To pickup a page or internal call
1. Press
&$//
. You hear dial tone.
2. Enter
Call Waiting
When you are talking, incoming calls are camped onto your station. You must end
the conversation or transfer the call to another station to answer the camped on call.
i
Press
...or if your handset
has the Auto Hold
feature, just p ress the
assigned [DN].
Caller ID
Your handset can be programmed to display Caller ID names and numbers if the
local telephone company has the capability. See your System Administrator for
more information.
&8&63
)&1
+
. You are connected to the caller who originated the
internal or page call. The page circuit is released.
4
The existing call is placed
on hold, and the camped-on
line rings your station.
You ar e connected to the transferred call.
Note
See your System Administrator to find out if
you have Auto Hold.
52
You can also toggle between the name and number by pressing
)&1
+ ▲ while the
handset is ringing. Otherwise, the call is put on hold and recalls within the allotted
time.
Strata AirLink Integrated Wireless Handset 5/99
Page 65

Conference Calls
This feature enabl es you t o add other parties to an existing call. You can confer enc e
up to:
€
Two stations and two CO lines
€
Three stations and one CO line
€
Four stations
➤➤➤➤
To make a conference call
Digital Features
Conferenc e Calls
1. While on a call, pre ss
)&1
+ 5.
2. Dial a [DN] or access
a CO line and dial the
telephone number.
3. When the called party
answers, press
5
+
.
)&1
You hear dial tone.
The number is not conferenced unless the user
answers the call. If you receive a busy tone or no
)&1
answer, press
+ 5 to return to the original call.
All parties are conferenced. If the second call was
placed on a [DN] or CO line that appears on your
handset.
4. Repeat the procedure
to add other CO lines
or [DNs], not
exceeding the
maximum number.
Direct Inward System Access (DISA)
Outside callers wit h telephones that send Dual-tone Multi-fr equ enc y (DTMF) tones
(pushbutton dialing) can call into the system on DISA CO lines and dial stations or
outgoing CO lines without going through an attendant or operator.
Strata AirLink Integrated Wireless Handset 5/99
53
Page 66

Digital Features
Direct Inward System Access (DISA)
➤➤➤➤
To make a direct inward station call with DISA
1. From outside the
system, dial the
DISA CO line
telephone number.
2. When you hear dial
tone, dial a [DN].
3. If you receive busy
tone or want to dial
another number while
the station is still
ringing, press
Repeat Step 2.
➤➤➤➤
To make an outgoing call with DISA
.
-
You hear a ringback tone sig nal, then an i nternal d ial
tone for 10 seconds.
If you do not dial within 10 seconds, the system
automatically causes the DISA CO line to ring a
telephone or group of telephones designated in
system programming. Then, if the call is not
answered within 15 seconds after the ringing starts,
it disconnects.
You hear ring tone. When the station answers, you
are connected.
If the call is not answered after 6 rings or 24
seconds, (whichever comes first) you hear busy
tone.
To call another station after completing a DISA
station call, the internal party must transfer you.
Station and System Page cannot be accessed on
DISA calls.
54
1. From outside the
system, press CALL
+ the DISA CO line
telephone number.
2. When you hear dial
tone, enter a CO line
or CO line access
code
You hear a ringback tone sig nal, then an i nternal d ial
tone for 10 seconds.
If you do not dial within 10 seconds, the system
automatically rings the DISA CO line as a normal
incoming call. Then, if the call is not answered
within 15 seconds after the ringing starts, it
disconnects.
You hear dial tone. If you do not hear dial tone, you
must also dial a DISA security code.
Strata AirLink Integrated Wireless Handset 5/99
Page 67

Digital Features
Do Not Disturb
...or enter a CO line
or CO line access
code + the DISA
security code.
Do Not Disturb
If your handset is in DND, CF–Busy, or CF–Busy/No Answer , interna l, external and
transferred calls do not ring on it. Calls are forwarded to Voice Mail or another
station if your [P DN] or [PhDN] ap pears at th ose st atio ns. You can make calls while
in the DND mode.
Important!
➤➤➤➤
To activate DND
i
Press
1RW#'LVWXUE#
+ [B]).
There is no warning tone for incoming Executive or Busy Override.
&$//
Door Lock
+
'R#
)&1
(
You hear dial tone.
Note
See the System Administrator for the DISA
security code number. If the correct code is
not entered, the call disconnects.
If a call is ringing, the ringing stops.
Your handset can have up to five Unlock Door buttons that unlock doors in your
facility.
i
&$//
Press
seconds (set in system programming).
8QORFN#'RRU#()&1
+
Door Phones
You can call a door telephone and monitor the immediate area surrounding it. Only
digital and electronic stations can be called by door telephone users, but you can
pick up these calls when they are incoming.
Strata AirLink Integrated Wireless Handset 5/99
+ [B]). The door unlocks for three or six
55
Page 68

Digital Features
NO.204
DOORPH1A
12:15
DTMF Tones
➤➤➤➤
To call and/or monitor a door telephone
1. Press
2. Enter the door phone
3. If the door phone is
&$//
[DN].
ringing an other
station, press [DN] +
&8&63
DTMF Tones
Some devices or services require DTMF tones (- and &), such as a Voice Mail
device or computer output service. DTMF tones are automatically enabled on
stations with System Speed Dial (SSD) . If you do not have SSD, you must fi rs t di al
, & to enable these tones.
-
This feature disables the SSD during the call, but it is restored when you complete
the call or place it on hold.
i
While on an outside cal l, pre ss
. You hear dial tone.
You are connected to the door phone.
Note
&8&63
.
be turned on for your system.
+ &, then send - and#&, DTMF tones, and 3~<.
-
access is a system option that cannot
ISDN Calling
56
Note
To make outgoing calls using an Integrated Services Digital Network (ISDN)
trunks, you must be an ISDN subscriber and be connected to a Str ata DK424 syste m
with Release 4.0, or higher. ISDN trunks offer f aste r call connec tion s etup a nd more
connection circuit s.
This procedure must be repeated on each call.
Strata AirLink Integrated Wireless Handset 5/99
Page 69

Making an ISDN outgoing call is handled automatically with a timer or by you
CALL
145-105
12:15
NO. 204
CALL 203
12:15
initiating the ISDN “Start ” sequence . The method de pends on syst em programming.
See your Sys tem Administra tor for more information.
➤➤➤➤
To make an outgoing call to an ISDN trunk
&$//
1. Press
+ ISDN
trunk access code
(8xx)
...or dial 9 for LCR.
Digital Features
Message Waiting
2. Press
6WDUW#+)&1
[B]).
Message Waiting
Your handset has a fixed Message Waiting (MW) button
)&1
(
+ 6) to retrieve messages and a special ico n (shown at
right) that displays.
If you call a busy station or it does not answer, you can
leave a message waiting indication at the station. The Msg
LED at the called station flashes and the user can call you
&$//
0VJ
)&1
+
back by pressing
➤➤➤➤
To retrieve messages
1. When you see the
MW icon displayed,
press
+
6
.
+
The dialed digits are not sent until you press
or until the timer expires.
with the flashing LED.
Your message is retrieved.
Note
If the MW icon
continues to display,
you have more
messages—repeat
Step 1 to retrieve
them.
6WDUW
Strata AirLink Integrated Wireless Handset 5/99
...or
&$//
+
&73;
.
57
Page 70

Digital Features
NO.204INT
203 MWSET
12:15
Message Waiting
2. You can bypass the
first message and
listen to the next
This feature is available for Strata DK40, DK280,
Release 3.1 and higher, and DK424 Release 1 and
and higher.
message by repeating
Step 1.
3. After receiving the
message, press
➤➤➤➤
To set a MW indication at another telephone
1. Press
&$//
(1'
+ an
.
Important!
internal number.
)&1
2. Press
(1'
➤➤➤➤
To cancel the MW indication at another telephone
+ 6 +
.
The MW lamp turns on at
station
If you are calling a standard
telephone, it must have a MW lamp.
All Toshiba digital or electronic
telephones have MW lamps.
203
.
➤➤➤➤
To cancel your MW icon
58
i
Press
&$//
called number +
(1'
.
i
Press
(1'
+
&$//
+ the
::
&73<
+
The MW indication on the called station turns OFF.
+
.
Strata AirLink Integrated Wireless Handset 5/99
Page 71

Override Calls
Digital Features
Override Calls
Note
The stations indicated in the sample LCDs (
203, 204, 205
, and
210
examples, not handset defaults.
The available override features are:
€ Busy Override
– sends muted ring tones t o a busy station to indicate that a call
is waiting. The muted ring is programmed for each station as two muted rings
only or continued muted rings until the call is answer ed. The muted ring can be
sent to the telephone speaker or to the telephone handset/headset and speaker.
€ DND Override
– sends a tone to an idle or busy station in the DND mode to
indicate that a call is co ming i n. Your handset can also be programmed to block
DND Override from other telephones.
€ Executive Override
– enters an established conversation. Your handset can
also be programmed to block Executive Override. The Privacy on Line feature
does not block this feature.
€ Privacy Override
– enters an established call on a private common CO Line
button, except common [DNs] that are always private. Up to two stations can
enter an existing CO line-to- statio n call (up t o three st atio ns can be conn ected to
a CO line).
You can also use this feature if the station that is already connected to the CO
line is in the Privacy Release mode. Stations with Privacy Release can enable
calling stations to enter their conversations, even if the station entering the
conversation is not programmed for Privacy Override.
) are
Note
€ Toll Restriction Override
Privacy Override is blocked by DND.
station is enabled or denied specific area and office codes, long distance
information calls, international calls and/or operator-assisted calls. You can
completely override Toll Restriction at selected stations or you can change the
station Toll Restriction class. The st ation resumes its normal class at the
conclusion of the call.
Strata AirLink Integrated Wireless Handset 5/99
– restricts stations from making toll calls. Each
59
Page 72

Digital Features
NO. 203
210BSYOVR
12:15
NO. 203
2 1 0DNDOVR
12:15
NO.203DND
OVR DENY
12:15
NO.204
2 10EXEOVR
12:15
NO.210
2 04EXEOVR
12:15
Override Call s
Busy Override
i
Press
5
. A muted tone is heard at the
Do Not Disturb Override
i
Press
5
. A tone signal is heard at the
Executive Override
i
Press
6
. The called parties hear a
busy station. The station
number (
210
) displays.
DND station, indicating an
incoming call. The
overridden station number
210
(
) displays.
If the station you called
denies DND Override, this
displays:
tone prior to you entering
the conversation.
60
The overridden station
210
[
] displays until the call
ends.
Your number (shown at the
204
right as
) displays until
the override disconnects.
Strata AirLink Integrated Wireless Handset 5/99
Page 73

Privacy Override
NO.204
LN03PROVR
12:15
NO.205
204PRVOVR
12:15
NO.205
OVR CODE
12:15
Digital Features
Override Calls
i
Press
)&1
(
&$//
+ [B]).
+
/LQH#
Toll Restriction Override
1. Access a CO line. You hear dial tone.
)&1
2. Press
&7:
3. Enter the Toll
Restriction Override
code (four digits).
+ 5 +
.
Connected parties hear an
optional tone signal before
you are con nected. The CO
LN03
line [
] displays.
The overridden station LCD
displays the initiating
station number [
204
].
Y ou no long er hear dial tone
and your LCD prompts you
to enter a code.
You hear dial tone. For security reasons, the
override codes are onl y available on a selec ted basis.
See your System Administrator.
Strata AirLink Integrated Wireless Handset 5/99
4. Dial a telephone
number.
61
Page 74

Digital Features
Paging Announcements
Paging Announcements
Telephones are assigned to specific page groups in system programming. You can
page Digital and Electronic telephone speakers and external speakers.
➤➤➤➤
To make a page announcement
&$//
1. Press
paging access code.
+ a
You hear dial tone. See Tables 11 and 12 on Page
112 for the access code.
2. Make your
announcement at a
normal voice level.
(1'
3. Press
.
All Call Page
You can make an All Call Page to Digital and Electronic telephones assigned to the
“All Call Page Group.” Stations are assigned in system programming.
➤➤➤➤
To make an All Call Page
1. Press
2. Make your
3. Press
&$//
&DOO#3DJH
[B])
&$//
...or
announcement
(1'
(
+
.
$OO#
+
)&1
&6<
+
.
Release and Answer
It is recommended that you repeat the
announcement.
All Call Page telephones are paged, but you cannot
access external page speakers.
external speakers, depending on system
programming.
Note
It is recommended that you use your normal
voice level and repeat the page.
&6<
can also Page
62
Release and Answer automatic ally disconne cts or tra nsfers a ca ll and answer s a new
call using a button, instead of
muted, Busy Override, or Camp-on busy tone.
)/6+
. When you receive the new call, you hear a
Strata AirLink Integrated Wireless Handset 5/99
Page 75

➤➤➤➤
To release an active call and answer an incoming call
Digital Features
Saved Number Redial
i
5HOHDVH#DQG#
Press
$QV#
)&1
(
)&1
...or
+ [B])
+ 5 and
dial a “transfer to”
destination. Then
5HOHDVH#DQG#
press
$QV
'66
...or
of a
“transfer to”
destination, then
5HOHDVH#DQG#
press
$QV
.
Saved Number Redial
Saved Number Redial stores a dialed telephone/station number and redials the
number with the touch of a button.
Releases the original call and answers the new
incoming call.
Note
You can press
DQG#$QV
)&1#.#4
before
5HOHDVH#
if you do not wish to release the
original call.
Transfers the original call and answers the new call.
Transfers the original call and answers the new call.
➤➤➤➤
To save a telephone number
i
While on a call (b usy, talking, or r in gin g), press
[B]).
➤➤➤➤
To call a saved telephone number
i
Access a [DN] or CO line, then press
automatically dials the saved number.
Strata AirLink Integrated Wireless Handset 5/99
6DYH#/DVW#1XPEHU#()&1
6DYH#/DVW#1XPEHU
+
. The system
63
Page 76

Digital Features
#605TIMER
SET
12:15
#605TIMER
SET 0800
12:15
#605TIMER
SET 08001
12:15
Speed Dial
Speed Dial
Your wireless handset can store 70 SD numbers in its own memory only. For more
information, see “Speed Dial”on Page 25.
Timed Reminders
You can set five separate re minders at your station, at a time (hour and minute) set
by you. A message displays and your handset beeps. You can set the reminder to
occur once or on a daily basis.
➤➤➤➤
To set a timed reminder
1. Press
&$//
reminder number
&938~&93<
(
+ timed
).
64
2. Enter the reminder
time you want.
3. Press
3
for the
reminder to be
repeated every day,
4
or
for a one-time
reminder only.
Use a 24-hour clock format
(HHMM).
Strata AirLink Integrated Wireless Handset 5/99
Page 77

4. Enter desired LCD
#605TIMER
ST0800111
12:15
DATA
PRGRMD
12:15
message station
number (
43~4<
) or
system number
93~<<
(
...or enter
)
#
33
if you
do not want the
message displayed
when the time
reminder tone
sounds.
Digital Features
Speed Dial
5. Press
5HGLDO#+)&1
+ [B]).
6. To cancel the
beeping/message
prior to 30 seconds,
go off-hook
...or press
➤➤➤➤
To cancel a Timed Reminder
1. Press
&$//
number of the timed
reminder
&938~&93<
(
want to cancel.
2. Press
5HGLDO#()&1
+ [B]).
&$//
+
) you
The time is recorded in
memory and you should
hear a beeping tone (along
with the displayed me ssage)
for 30 seconds at the set
time.
.
You can only cancel one reminder at a time.
The reminder cancels.
Strata AirLink Integrated Wireless Handset 5/99
65
Page 78

Digital Features
Tone/Pulse Dialing
Tone/Pulse Dialing
With some older COs, calls are made on CO lines that are programmed for rotary
dial pulses. This feature enables you, while on these lines, to switch to tone dial in
order to access remote equipment (such as an answering machine) requiring DTMF
tones.
With ISDN call s, when you pre ss
entered after that point are sent with DTMF tones.
➤➤➤➤
To change Tone Dialing
1. Access a CO line. Although the CO line is programmed for rotary dial
2. Dial a telephone
number.
3. While on the call,
press
6HOHFW#+)&1
[B]).
7RQH#'LDO#
+
7RQH#'LDO#6HOHFW ()&1
pulses, access the CO line and dial the telephone
number like any other call described in this user
guide.
You can send DTMF tones with your dial pad. The
feature is cancelled when the call is completed.
Two CO Line Connection (Tandem)
➤➤➤➤
To co nnect two outside lines (using a [DN] button)
1. While talking on an
outside call using a
[DN] button, press
)&1
+ 5.
You hear dial tone and the call is put on hold.
+ [B]), all of the digits
66
2. Dial a CO line access
code and then the
outside telephone
number.
If you receive a busy tone or no answer, press [DN]
to return to the original connection.
See Table 9 on Page 109—CO Line Access Codes
or ask your System Administrator.
Strata AirLink Integrated Wireless Handset 5/99
Page 79

Digital Features
TRK-TRK
N1 N2
12:15
Two CO Line Connection (Tandem)
3. After the called
All parties are conferenced.
number answers,
)&1
press
4. Press
and
)&1
(1'
+ 5.
+ 5 again
.
You hear dial tone before
you hang up, and the two
lines are connected.
N2
identify the connected
CO lines.
If the public telephone company provides auto
disconnect, the connection releases automatically
when the parties hang up.
You can also connect two CO lines, so you can drop out of the conversation. On
some telephone systems, both CO
/LQH
or
appear on your handset to enable Tandem connections.
➤➤➤➤
To connect two outside lines (using a CO Line button)
1. Press CO
/LQH ()&1
You hear dial tone.
+ [B])
3RROHG#/LQH#
...or
)&1
*US
(
+ [B])
and dial a telephone
number.
N1
and
3RROHG#/LQH#*US#()&1
+ [B]) must
Strata AirLink Integrated Wireless Handset 5/99
2. After the party
answers, press
5
+
.
)&1
3. Press another CO
/LQH
3RROHG#/LQH#
...or
*US
and dial a
telephone number.
You hear dial tone.
67
Page 80

Digital Features
TRK-TRK
N1 N2
12:15
Two CO Line Connection (Tandem)
...or on some
systems, you can
)&1
press
+ 5 and
dial a CO line access
code followed by a
telephone number.
4. After the party
answers, press
5
+
.
)&1
5. If you receive a busy
tone or no answer,
return to the original
connection by
pressing the original
Line button.
6. Press
)&1
+ 5 and
hang up.
It is not necessary to have both CO Line buttons on
your telephone.
You hear dial tone and the
two lines are connected.
N2
and
identify the
N1
connected CO lines.
If the public telephone company provides auto
disconnect, the connection releases automatically
when the parties hang up.
68
Strata AirLink Integrated Wireless Handset 5/99
Page 81

Transferring Ca lls
You can transfer calls to an idle or busy station. The station can be the [DN] of a
telephone, a Hunt Group Number, or ACD Group [DN].
➤➤➤➤
To transfer a call
#)&1
1. Press
+ 5. You hear dial tone.
Digital Features
Transf erring Calls
2. Enter the [DN] of the
destination station.
3. Announce the call.
(1'
4. Press
.
Transferring with Camp-on
You can transfer calls to idl e or bus y [DNs] , Hunt Group Numbe rs, and ACD Group
[DNs]. You cannot transfer (or camp-on) to a [PDN] or [PhDn] if the station is
DND, unless the [PDN] or [PhDN] appears on other stations.
1. While on a call, pre ss
)&1
+ 5.
2. Dial the [DN] where
the call will be
transferred.
3. If the sta tion is idle,
announce the call and
hang up
You hear a single tone.
Note
If the destination sta tion does not answer or is
busy , your cal l camps on. You receive a recall
ring (set in system programming) when the
station is available.
You hear internal dial tone.
The called station rings. If you hear a single tone,
you can announce the call over the called telephone
speaker.
...or if the station is
busy or does not
answer, hang up
Strata AirLink Integrated Wireless Handset 5/99
The call camps onto the called s tation and a warning
tone is heard.
69
Page 82

Digital Features
NO.204
CAMP-ON 4
12:15
HOLD LN2
RECALL203
12:15
Toshiba Voice Mail Integration
...or reconnect to the
transferred line
before it is answered
by pressing
5
.
)&1
+
If the call is not answered after a specified recall
time set in system programming, camp-on is
cancelled and the t ransf erred call rings your handset
(if you are not talking). If you are talking, you hear
two tone bursts.
This displ ays (CO line
number and the station
number,
203,
transfer).
Toshiba Voice Mail Integration
of the original
Voice Mail Identification Code
70
This section explains how to use your handset for retri eving messages and se tting up
CF. F or more inform ation, refer to:
€ Stratagy Voice Processing User Guide
€ Toshiba VP User Guide
T o f orward call s to y our mess age mai lbox an d en sure tha t cal lers hear your pe rsonal
greeting, you must stor e a Voice Mail Identificatio n (VMID) c ode. You only have to
store the VMID code once. After storing the code, messages are automatically sent
to the Voice Mail unit and directed to your mailbox. Your [PDN] and up to four
[PhDNs] can be independently forwarded.
Note
Your handset must be programmed as the owner of a [PhDN] before calls to
the [PhDN] can be forwarded to a voice mailbox number.
Strata AirLink Integrated Wireless Handset 5/99
Page 83

➤➤➤➤
656 ID
CODE SET
12:15
91203
12:15
DATA
PRGRMMD
12:15
To assign or change a VMID
Digital Features
Toshiba Voice Mail Integration
Note
1. Press
2. Enter the VMID code
3. Press
➤➤➤➤
To cancel the VMID
i
Press
The station (
&$//
203
) indicated in the LCD is an example, not a handset default.
&989
+
and the voice
mailbox [DN], plus
any required pauses
(up to 16 characters).
5HGLDO#()&1
+ [B])
&$//
+
&989
. You hear confirmation tone.
Note
Once the VMID is
programmed, it
remains in memory
until you change it.
Example: for Toshiba Voice
<4
Mail systems, enter
the mailbox number (
You hear a confirmation
+
203
tone.
5HGLDO ()&1
+
+ [B]).
).
Message Retrieval
Strata AirLink Integrated Wireless Handset 5/99
You can program your handset to automatically retrieve your voice mail messages.
Storing the message retrieval sequence is required only once. It remains in memory
unless cancelled or changed.
71
Page 84

Digital Features
Toshiba Voice Mail Integration
➤➤➤➤
To program the message retrieval sequence
1. Press
&$//
+
&98:
2. Enter the v oice mail
system code and the
voice mailbox [DN],
plus any required
pauses (up to 16
characters).
3. Enter your security
code.
4. Press
➤➤➤➤
To cancel automatic retrieval sequence
i
Press [DN] +
➤➤➤➤
To retrieve multiple messages
i
5HGLDO#()&1#
#>%@
+
).
)&1
Press
&98:
+ 6.
+
. You hear a confirmation tone.
Example: for Toshiba voice mail systems, enter
+ the mailbox number.
By storing your security code, you avoid having to
enter your code every time you access your
mailbox; however, this will also allow anyone to
retrieve your messages from your phone. If a
security code is not desired, do not include it.
You hear confirmation tone. The LCD confirms the
data storage.
5HGLDO ()&1
Note
+ [B]).
If a plus (+) sign displays, you have more
messages. Press
▲
or ▼to rotate through the
messages.
<5
Call Forward to Voice Systems
By setting CF to the Toshiba Voice Mail System, cal lers are aut omatically conne cted
to your voice mailbox.
Note
72
&DOO#)RUZDUG
codes for [PhDNs].
)&1
(
+ [B]) can only be used for [PDNs]. Use access
Strata AirLink Integrated Wireless Handset 5/99
Page 85

➤➤➤➤
To forward calls to Voice Mail
Digital Features
Toshiba Voice Mail Integration
1. Press
)RUZDUG#
[B])
...or
or [PhDN] + the
access code.
2. Call the Voice Mail
system [DN].
3. Press
)&1
(
➤➤➤➤
To cancel Call Forward
i
Press
)RUZDUG#
[B])
&$//
&$//
&DOO#)RUZDUG#
&DOO#
+
)&1
(
+
+ [PDN]
+ [B]).
&$//
+
)&1
(
&DOO#
+
You hear a confirmation tone after entering the
access code.
Call Forward access codes:
CF-All Calls:
CF-Busy:
CF-No Answer:
CF-Busy-No Answer:
&934
&935
&936
&937
See your System Administ rator for the correct Voice
Mail number. After dialing, you hear confirmation
tone.
&$//
...or
or [PhDN] +
(1'
Strata AirLink Integrated Wireless Handset 5/99
+ [PDN]
&934
.
You hear a confirmation tone.
+
73
Page 86

Digital Features
Toshiba Voice Mail Integration
74
Strata AirLink Integrated Wireless Handset 5/99
Page 87

Standard Features
This chapter describes Strata AirLink handset features when it is configured to
standard ports in Strata DK16, DK16e, DK40, DK40i, DK280 (Release 3.0 and
higher), and DK424. The handset features are programmed by your System
Administrator and has m any of the same features as the standard telephone.
If you have a non-Toshiba telephone syst em, see your System Administrator for
available features and their operation.
5
Strata AirLink Integrated Wireless Handset 5/99
75
Page 88

Standard Features
Account Code Calls
Account Code Calls
Account Codes are used for billing, call tracking, and line restriction applications.
The codes are recorded and printed in a SMDR report.
Forced Account Codes
Forced Account Codes are set in system prog ramming to re cord outgoi ng calls only.
When they are set at your st ation, you are requir ed to ent er the co de bef ore dia ling a
telephone number.
➤➤➤➤
To use a Forced Account Code
&$//
1. Press
. You hear dial tone.
2. Enter a CO line
Access Code.
3. Enter the Forced
Account Code.
4. Enter the telephone
number.
Voluntary Account Codes
Voluntary Account Codes are entered anytime after accessing a CO line or during a
call. If you enter the code after accessing a CO line, you are reconnected to the
outside caller or you hear dial tone.
If the system is also set for Verified Account Codes, you must enter that code also
after entering the Voluntary Account Code. If the code is not entered, the call is not
validated for the SMDR report.
An exception is the Voluntary Account Code that changes the Toll Restriction
classification of your station. This code accesses telephone numbers outside your
usual dialing area and must be entered
For example, if your station is restricted to local area calls, you can make out-ofstate calls by using a Voluntary Account Code set in system programming.
See Table 9 on Page 109.
You hear dial tone if you have entered a valid
Account Code or busy tone, if invalid.
prior
to dialing the telephone number.
76
Strata AirLink Integrated Wireless Handset 5/99
Page 89

➤➤➤➤
To use Voluntary Account Code
Standard Features
Account Code Calls
1. Press
&$//
2. Enter the Account
Code + telephone
number if you
entered the code after
+
&79
.
One sound burst confirms the code, if Verified
Account Code is activated. Two sound bursts
confirms an invalid code, if Verified Account Code
is activated. Repeat Steps 1~2.
accessing the CO line
...or resume talking
(1'
...or press
if
you entered the code
during the call.
Verified Account Codes
Some Strata DK systems verify the entere d Forced or Voluntary Codes. These codes
are called Verified Account Codes, an d they a re ent ered wi th the Voluntary Account
Code. See your System Administrator for more information.
Emergency Override of Forced Account Code Dialing
Forced Account Codes are bypassed when emergency numbers, including 911 are
dialed. See your Syst em Administrator for these numbers:
1)
911 2) 3)
Strata AirLink Integrated Wireless Handset 5/99
77
Page 90

Standard Features
Attendant Console Calling
Attendant Console Calling
You can call the Attendant Console using up to three ways, depending upon system
programming.
➤➤➤➤
To call any Attendant Console
i
➤➤➤➤
To call a particular console
i
➤➤➤➤
To make an emergency call to a console
i
&$//
Press
Press
the console [DN].
Press
+ 3. The call rings any Attendant Console and rotates
&$//
and dial
+
&733
&$//
between the consoles if there is more than one
console is installed.
The call rings the console. Your System
Administrator can provide the Attendant Console’s
internal numbers.
. The In-EMGR LED flashes on all consoles.
Au tomatic Busy Redial
When an outside number is busy, you can activate Automatic Busy Redial (ABR).
Strata DK automa ticall y redials the numbe r at regul ar inter vals. If t he number is stil l
busy, ABR resets and tries again.
Note
This feature may not be supported by some or all of the lines in your
system. See your System Administrator for more information.
78
ABR is not attempted while your station is busy, but continues to time-out. A
(pause) displays before redialing the number
.
Strata AirLink Integrated Wireless Handset 5/99
P
Page 91

➤➤➤➤
AUTO REDI
AL SET
12:15
To activate ABR
Standard Features
Automatic Callback (ACB)
1. Press
2. Press
)/6+#+ &77
(1'
.
. You hear confirmation tone.
Note
The system redials, up to 15 times, every 30
or 60 seconds, depending on system
programming.
➤➤➤➤
To answer an ABR call
i
&$//
Press
when your handset rings (ABR has already connected to the
number). If you do not press
&$//
you hear a muted ring for another 30 seconds, then the call disconnects.
➤➤➤➤
To cancel ABR
i
&$//#+ &77
Press
.
Automatic Callback (ACB)
When you reach a busy, DND station, or a busy line grou p, you can h ave the system
automatically call you back. If you have Least Cost Rou ti ng ( LCR), the system also
redials the station or line group for you. If not, you must enter the station number
again.
within 30 seconds after the handset rings,
➤➤➤➤
To set ACB
Strata AirLink Integrated Wireless Handset 5/99
Note
i
The access code for ACB depends on system programming. See your
System Administrator for more information.
7
Press
+
(1'
. You hear a single tone or repetitive ringing and can
make other calls.
79
Page 92

Standard Features
S T 15 ACB
12:15
LINE4
ACB
12:15
Call Forward
➤➤➤➤
To answer an ACB call
i
➤➤➤➤
To cancel ACB to busy or DND station
i
Press
Press
(1'
(1'
(1'(1'
&$//
&$//
&$//
&$//&$//
.
. Your handset rings at a fast
&76
&76
+
&76&76
+
rate. Answer within three
rings or ACB is canceled.
If the ACB was set for a
busy CO Line, the seized
line number displays.
If you hear busy tone after answering, the called
party has alread y received or originate d another ca ll.
ACB is still activated, and you are called again
when the station is available.
Call Forward
80
You can assign CF destinat ions for each [ DN] on yo ur handse t (up t o one [PDN] and
four [PhDNs]). Each [DN] can be independent ly set for a different CF feature. CF
must be set before the call is re cei ved and has priority ov er th e Sta tion Hunt feature.
If you set CF from a [PDN] or [PhDN]:
€
You must set the CF from your handset.
€
Your handset must be programmed as the owner of the [PDN] or [PhDN].
Note
If you hear a re-order tone when following any of the CF steps, your
handset is not the owner of the [PDN]/[PhDN].
Strata AirLink Integrated Wireless Handset 5/99
Page 93

If CF is set, the following calls to your station forward (except in CF–External
mode):
€
Internal
€
Auto Attendant
€
CO lines calls that ring only at your station
€
Transferred CO line or station
CO lines that ring more than one station do not forward.
Call Forward Modes
You can set your handset [PDNs] or [PhDNs] for these CF modes:
Standard Features
Call Forward
€ CF–All Calls
forwards all calls immediately (your handset does not ring when
called).
€ CF–Busy
forwards calls immediatel y when your station, [PDN], or [PhDN] is
busy or in the DND mode.
Note
CF–All Calls, CF–Busy, CF Busy–No Answer, and CF–No Answer can be
set with the touch of one button. See “Feature Access Codes” on Page 110.
€ CF–No Answer
forwards all ca lls if y ou fail to a nswer wit hin a desi gnated t ime
(set by you when you enable the feature).
€ CF–Busy/No Answer
forwards all calls immediately whe never you a re busy, in
the DND mode, or after ringing and you do not answer the call within a
designated time (set by you when you enable the feature).
€ CF–External
forwards new incoming calls directed to your [PDN] to a
destination outside of the system. [PhDNs] assigned to your handset do not call
forward to external destinations. Internal calls and transferred calls to your
[PDN] also do not forward to external destinatio ns.
Only incoming calls over CO lines dedicated to immediately ring your [PDN],
and/or DID lines, CF externally. Any of the other CF modes can be set for your
[PDNs] or [PhDNs] simultaneously with CF–External.
Strata AirLink Integrated Wireless Handset 5/99
81
Page 94

Standard Features
CALL FORW
ARD TO
12:15
FORWARD
TO 203
12:15
TOSHIBA
24 MAR 99
12:15
CALL FORW
TO
12:15
Call Forward
Call Forward–All Calls
1. Press
&$//
2. Enter the destination
[DN].
3. Press
➤➤➤➤
To cancel a CF–All Calls
i
Press
(1'
&$//
Call Forward–Busy
&934
+
You hear confirmation tone.
. Calls are forwarded to the
stored [DN].
+ [PDN] +
&934
+
(1'
.
82
1. Press
&$//#+ &935
2. Enter the destination
[DN].
. You hear confirmation tone.
Strata AirLink Integrated Wireless Handset 5/99
Page 95

Standard Features
TOSHIBA
24 MAR 99
12:15
CALL FORW
TO
12:15
TOSHIBA
24 MAR 99
12:15
Call Forward
3. Press
➤➤➤➤
To cancel a CF–Busy
i
Press
(1'
. Calls are forwarded to the
&$//
+ [PDN] +
Call Forward–No Answer
1. Press
&$//
2. Enter the destination
[DN].
3. Press
delay (08~60
+#the time
-
seconds).
+
&936
stored [DN].
&935
+
(1'
.
. You hear confirmation tone.
Strata AirLink Integrated Wireless Handset 5/99
Note
Skip this step if
you do not want to
change the time.
4. Press
&
+
(1'
. Calls are forwarded to the
stored [DN].
Note
If the DK system is programm ed for
Announce Calls, the handset only rings. It
does not have a speaker to announce the call.
83
Page 96

Standard Features
CALL FORW
TO
12:15
16 SEC
12:15
Call Forward
➤➤➤➤
To cancel a CF–No Answer
i
Press
&$//
+ [PDN] +
Call Forward–Busy/No Answer
&936
+
(1'
.
&$//
1. Press
+
2. Enter the destination
[DN].
3. Press
delay (08~60
+ the time
-
seconds).
Note
Skip this step, if
you do not want to
change the time.
&
(1'
4. Press
➤➤➤➤
To cancel a CF–Busy/No Answer
i
Press
+
&$//
+ [PDN] +
&937
. You hear confirmation tone.
The LCD displays the
amount of time ente red (
16
).
. Calls are forwarded to the stored [DN].
&937
+
(1'
.
84
Strata AirLink Integrated Wireless Handset 5/99
Page 97

Call Forward–External
Standard Features
Call Forward
1. Store the destination
number at Station SD
location code 49.
Notes
♦
Only perform Step 1 the first time C F-External
is set or when you change the destination. It is
not necessary to st ore the destination each time;
it remains in sy stem memory.
♦
The LCR access code “9” cannot be used.
2. Press
&$//
+
&9:3
. Incoming calls forward to the destination stored at
Station Speed Dial Location 49.
➤➤➤➤
To cancel a CF–External
i
➤➤➤➤
To change a remote forwarding destination number
Press
&$//
+
&9:3
+
(1'
.
If Call Forward-External mode is set at your stati on, you can chan ge the for warding
destination from a telephone outside of the system.
1. Call into the Strata
DK system over a CO
You hear ringback tone signal, then internal dial
tone for 10 second s. Try again if you hear bu sy tone.
line programmed for
DISA.
Note
See the System Administrator for DISA
telephone numbers.
2. After you get dial
tone, press
&9:3
your [PDN].
+
You hear a confirmation tone.
If a number is not dialed, the system automatically
makes the DISA CO line ring as a normal incoming
call. Then, if the call is not answered within 15
seconds after the ringing starts, it disconnects.
3. Enter the Remote
CF–External security
code.
Strata AirLink Integrated Wireless Handset 5/99
You hear a confirmation tone. See the System
Administrator for the security code that is assigned
to your handset in system programming.
85
Page 98

Standard Features
Call Hold
4. Enter the new
destination.
&
5. Press
+
Call Hold
i
While on a call, press
➤➤➤➤
To return to the call o n hold
i
Press
#&$//
Notes
♦
You can enter an internal number, Voice Mail
number, or a CO line access code + an external
telephone number.
♦
With some systems, you can dial a line group
code instead of a CO line number access code.
(See “Feature Access Codes”on Page 110 for
access code information.)
(1'
. You hear a confirmation tone.
+
)/6+
&75
. You are reconnected to the held call. If you do not
+
&74
.
return to the held call with in a specified time, the
call rings your handset.
If you are busy on anot her call when the held call
recalls your statio n, you hear two tone bursts of two
beeps each, three seconds apart. When you end the
second call, the first call rings your station.
86
The call remains on hold at your station indefinitely.
Strata AirLink Integrated Wireless Handset 5/99
Page 99

Call Park Orbits
6793 PK
ORBIT 900
12:15
The Call Park feature holds calls temporarily in an orbit. Anyone can retrieve a call
from the orbit using the same or a dif ferent stati on. There are 20 General Park Orbi ts
for a Strata DK system and 1 Personal Park Orbit for each station.
Once you have parked a call in an orbit, you can:
€
Hang up and retrieve the parked call at a later time
€
Access a voice paging device to announce the parked call for pickup from
another station
If the parked call is not retrieved within a specified time, the call rings back to your
handset. If you are talking when the parked call recalls, you hear two short beeps
(tones), three seconds apart.
You can answer the parked recall by putting the new call on hold or end the second
call and answer the parked recall by hanging up. The parked call remains camped
onto your handset until you respond.
➤➤➤➤
To park a call in an orbit
Standard Features
Call Park Orbits
Strata AirLink Integrated Wireless Handset 5/99
1. Press
)/6+
+
&665
2. Enter a General Orbit
Number (
<33~<4<
...or a valid [PDN]
<<<
...or
. The system parks the ca ll on
.
You hear a one-second confirmation tone. The call
)
is parked in an orbit, or to an assigned [PDN]. If an
orbit number is busy, enter another number.
the lowest vacant orbit
number and displays it.
87
Page 100

Standard Features
L2PK
ORBT900
12:15
L2PKORBIT
900
12:15
HOLD LN2
ENTERORB#
12:15
Call Park Orbits
3. Press
➤➤➤➤
To retrie ve a parked call
(1'
. Once the call is parked, you can make or receive
other calls.
Note
If the parked call is
not retrieved wit hin a
specified time, the
call rings back to
your handset and
displays on the LCD.
i
Press
and enter the orbit
number.
➤➤➤➤
To park and page a call
1. Press
2. Enter the general
orbit number
<33~<4<
(
...or a valid [PDN]
...or
&$//
+
&665#
You are reconnected to the
parked call.
&$//
+
&664
.
The call is parked on the lo west vacan t orbi t number
or [PDN]. After you enter an orbit number, a short
)
burst of dial tone prompts you to enter the Page
access code.
<<<
. The system parks the call on the l owest vac ant orbi t
number and displays it.
88
Strata AirLink Integrated Wireless Handset 5/99
 Loading...