

Toshiba DB-EA4D SERIES Owner's Manual
TOSHIBA 2ST LABEL PRINTER
DB-EA4D SERIES
Owner’s Manual
Mode d’emploi
Bedienungsanleitung
Manual de instrucciones
Gebruikershandleiding
Manuale Utente
Manual do Utilizador

TOSHIBA 2ST LABEL PRINTER
DB-EA4D SERIES
'
Safety Summary ENGLISH VERSION
i
Safety Summary
Personal safety in handling or maintaining the equipment is extremely important. Warnings and Cautions
necessary for safe handling are included in this manual. All warnings and cautions contained in this manual
should be read and understood before handling or maintaining the equipment.
Do not attempt to effect repairs or modifications to this equipment. If a fault occurs that cannot be rectified
using the procedures described in this manual, turn off the power, unplug the machine, then contact your
authorized TOSHIBA TEC representative for assistance.
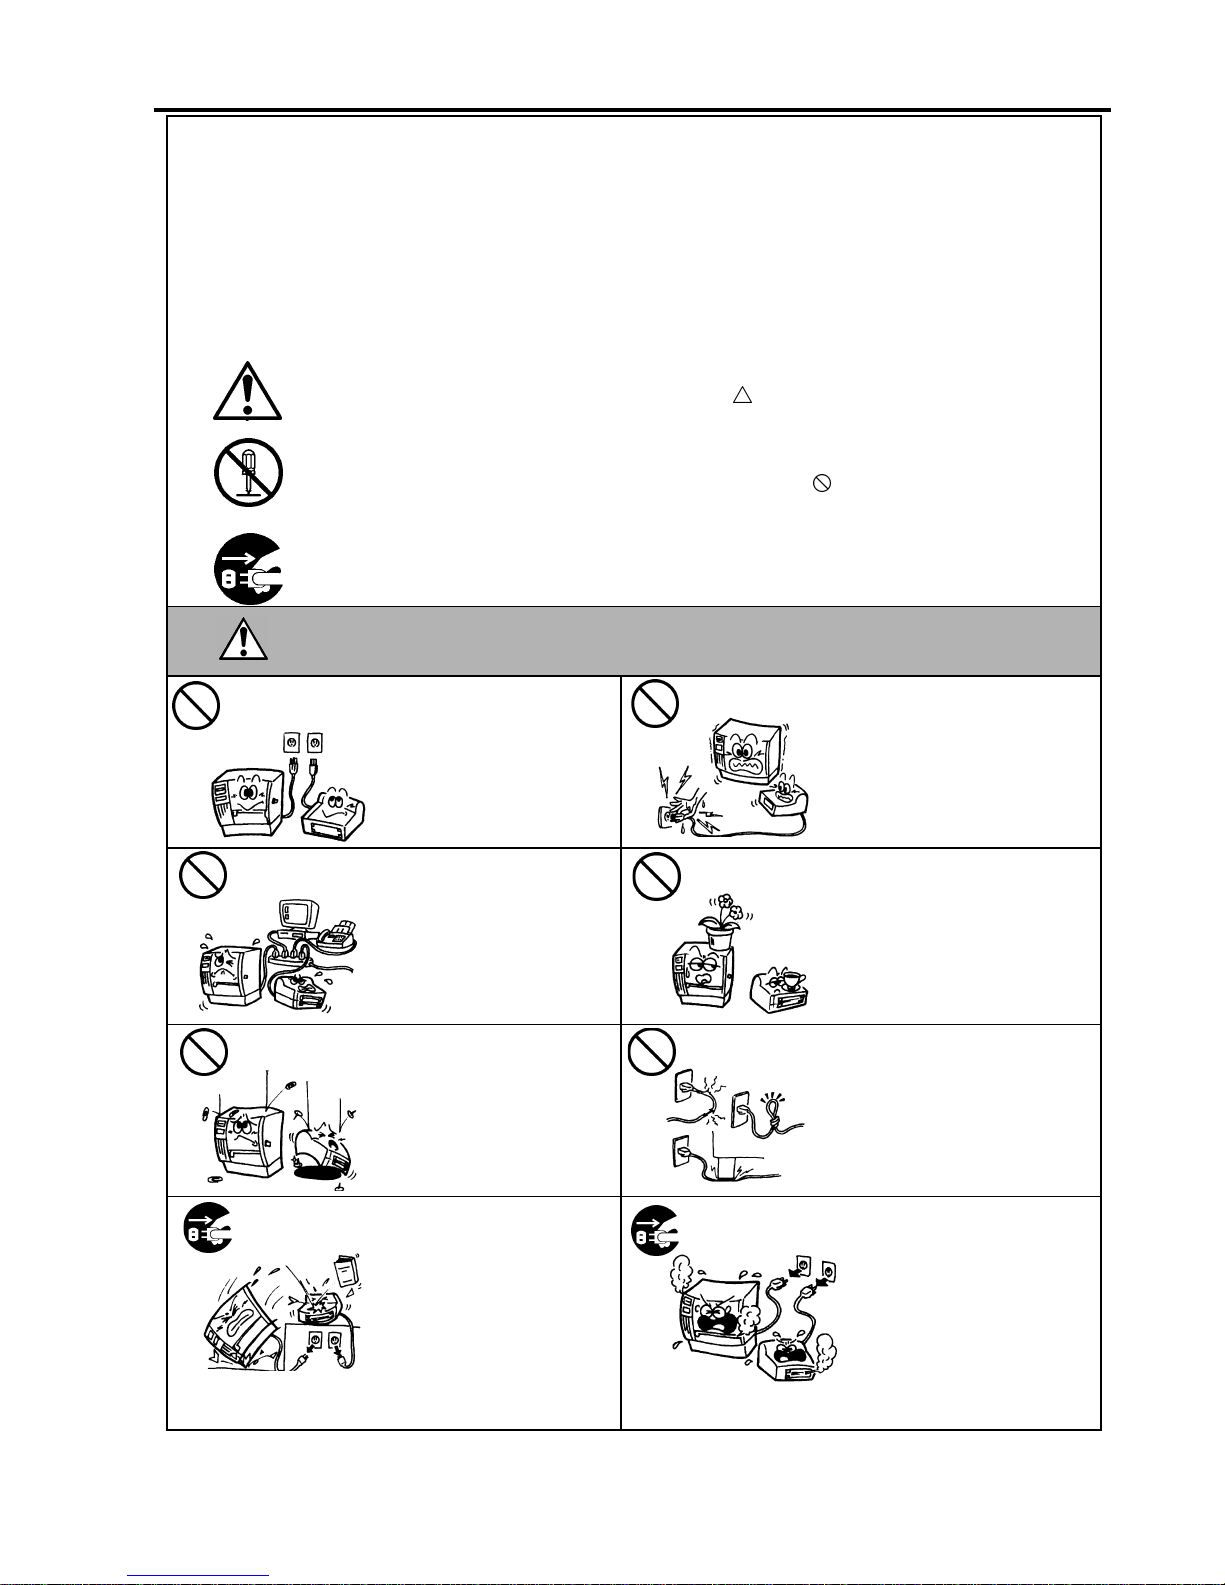
Meanings of Each Symbol
This symbol indicates warning items (including cautions).
Specific warning contents are drawn inside the
symbol.
(The symbol on the left indicates a general caution.)
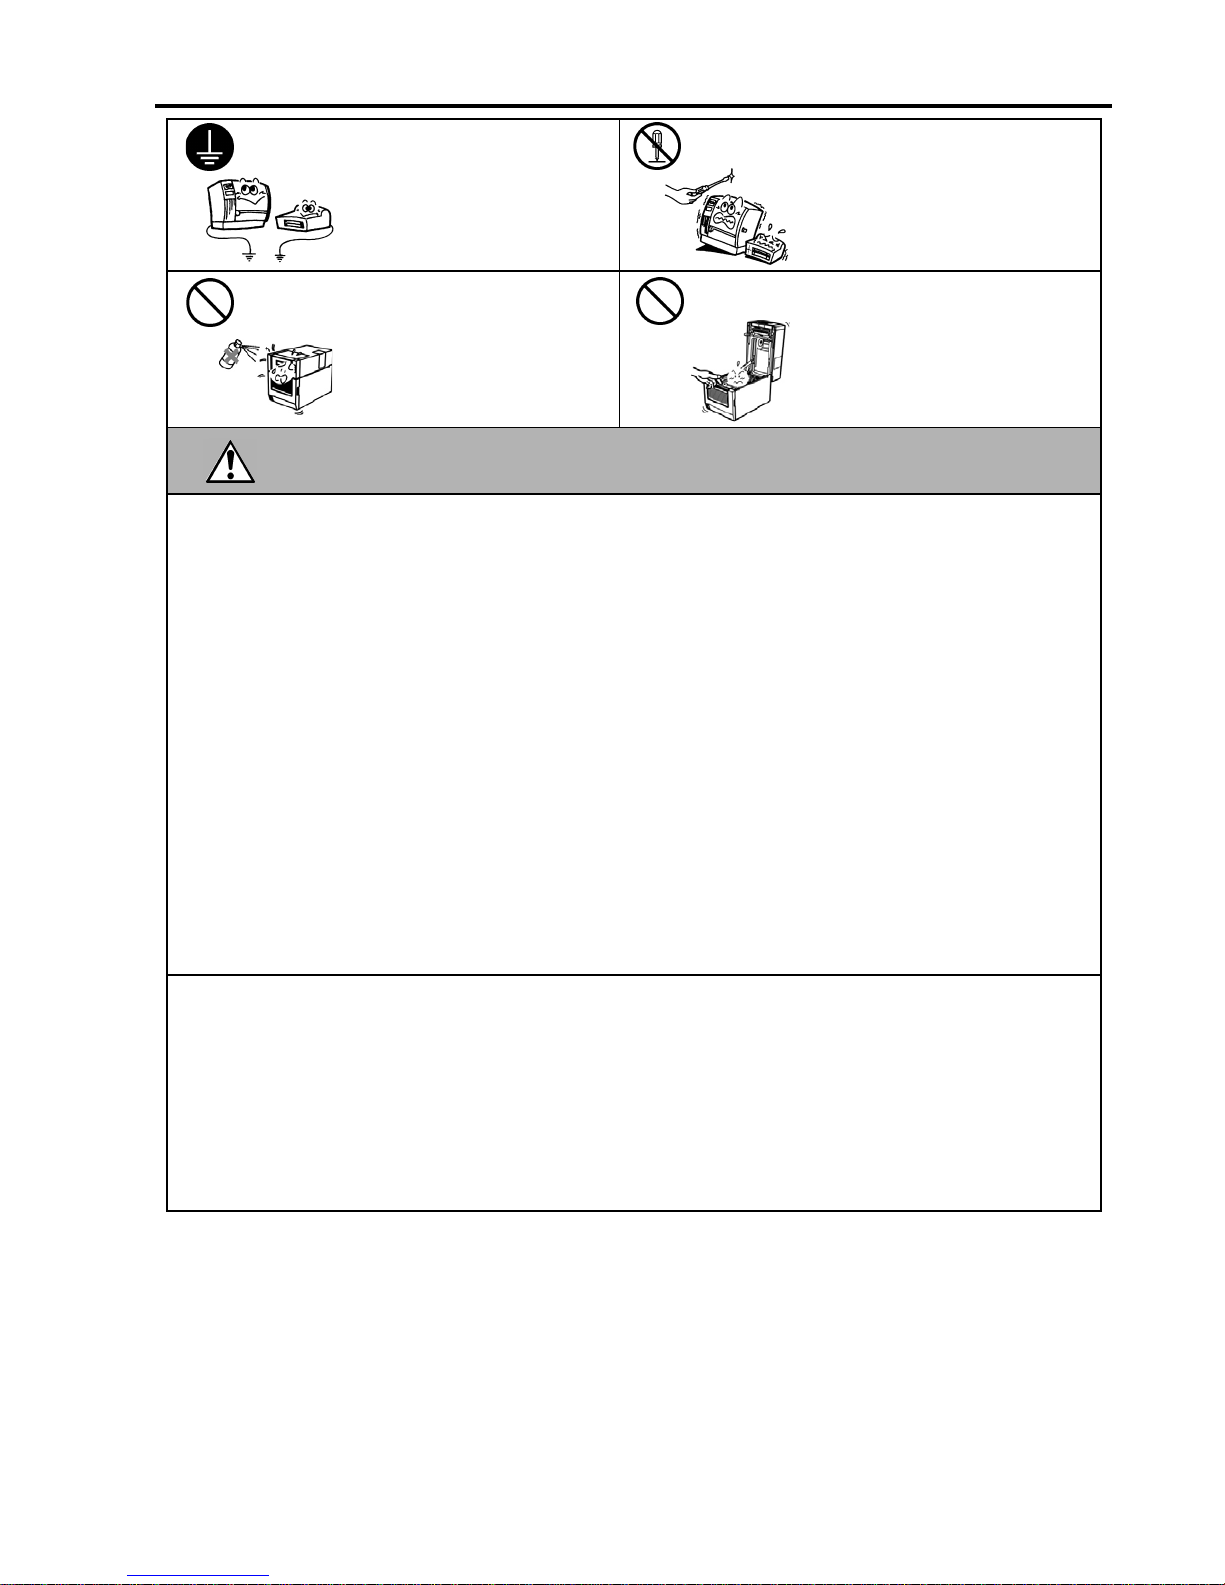
This symbol indicates prohibited actions (prohibited items).
Specific prohibited contents are drawn inside or near the
symbol.
(The symbol on the left indicates “no disassembling”.)
This symbol indicates actions which must be performed.
Specific instructions are drawn inside or near the symbol.
(
The symbol on the left indicates “disconnect the power cord plug from the outlet”.
)
This indicates that there is the risk of death or serious injury if the
machines are improperly handled contrary to this indication.
Do not use voltages other than
the voltage (AC) specified on the
rating plate, as this may cause
fire or electric shock.
Do not plug in or unplug the power
cord plug with wet hands as this
may cause electric shock.
If the machines share the same
outlet with any other electrical
appliances that consume large
amounts of power, the voltage
will fluctuate widely each time
these appliances operate. Be sure
to provide an exclusive outlet for
the machine as this may cause
fire or electric shock.
Do not place metal objects or
water-filled containers such as
flower vases, flower pots or mugs,
etc. on top of the machines. If
metal objects or spilled liquid enter
the machines, this may cause fire
or electric shock.
Do not insert or drop metal,
flammable or other foreign
objects into the machines through
the ventilation slits, as this may
cause fire or electric shock.
Do not scratch, damage or modify
the power cords. Also, do not
place heavy objects on, pull on, or
excessively bend the cords, as this
may cause fire or electrical shock.
If the machines are dropped or
their cabinets damaged, first turn
off the power switches and
disconnect the power cord plugs
from the outlet, and then contact
your authorized TOSHIBA TEC
representative for assistance.
Continued use of the machine in
that condition may cause fire or
electric shock.
Continued use of the machines in
an abnormal condition such as
when the machines are producing
smoke or strange smells may cause
fire or electric shock. In these
cases, immediately turn off the
power switches and disconnect the
power cord plugs from the outlet.
Then, contact your authorized
TOSHIBA TEC representative for
assistance.
W
ARNING
Any other than the
specified AC voltage
is prohibited.
Prohibited
Prohibited
Prohibited
Prohibited
Prohibited
Disconnect
the plug.
Disconnect
the plug.
Safety Summary ENGLISH VERSION
ii
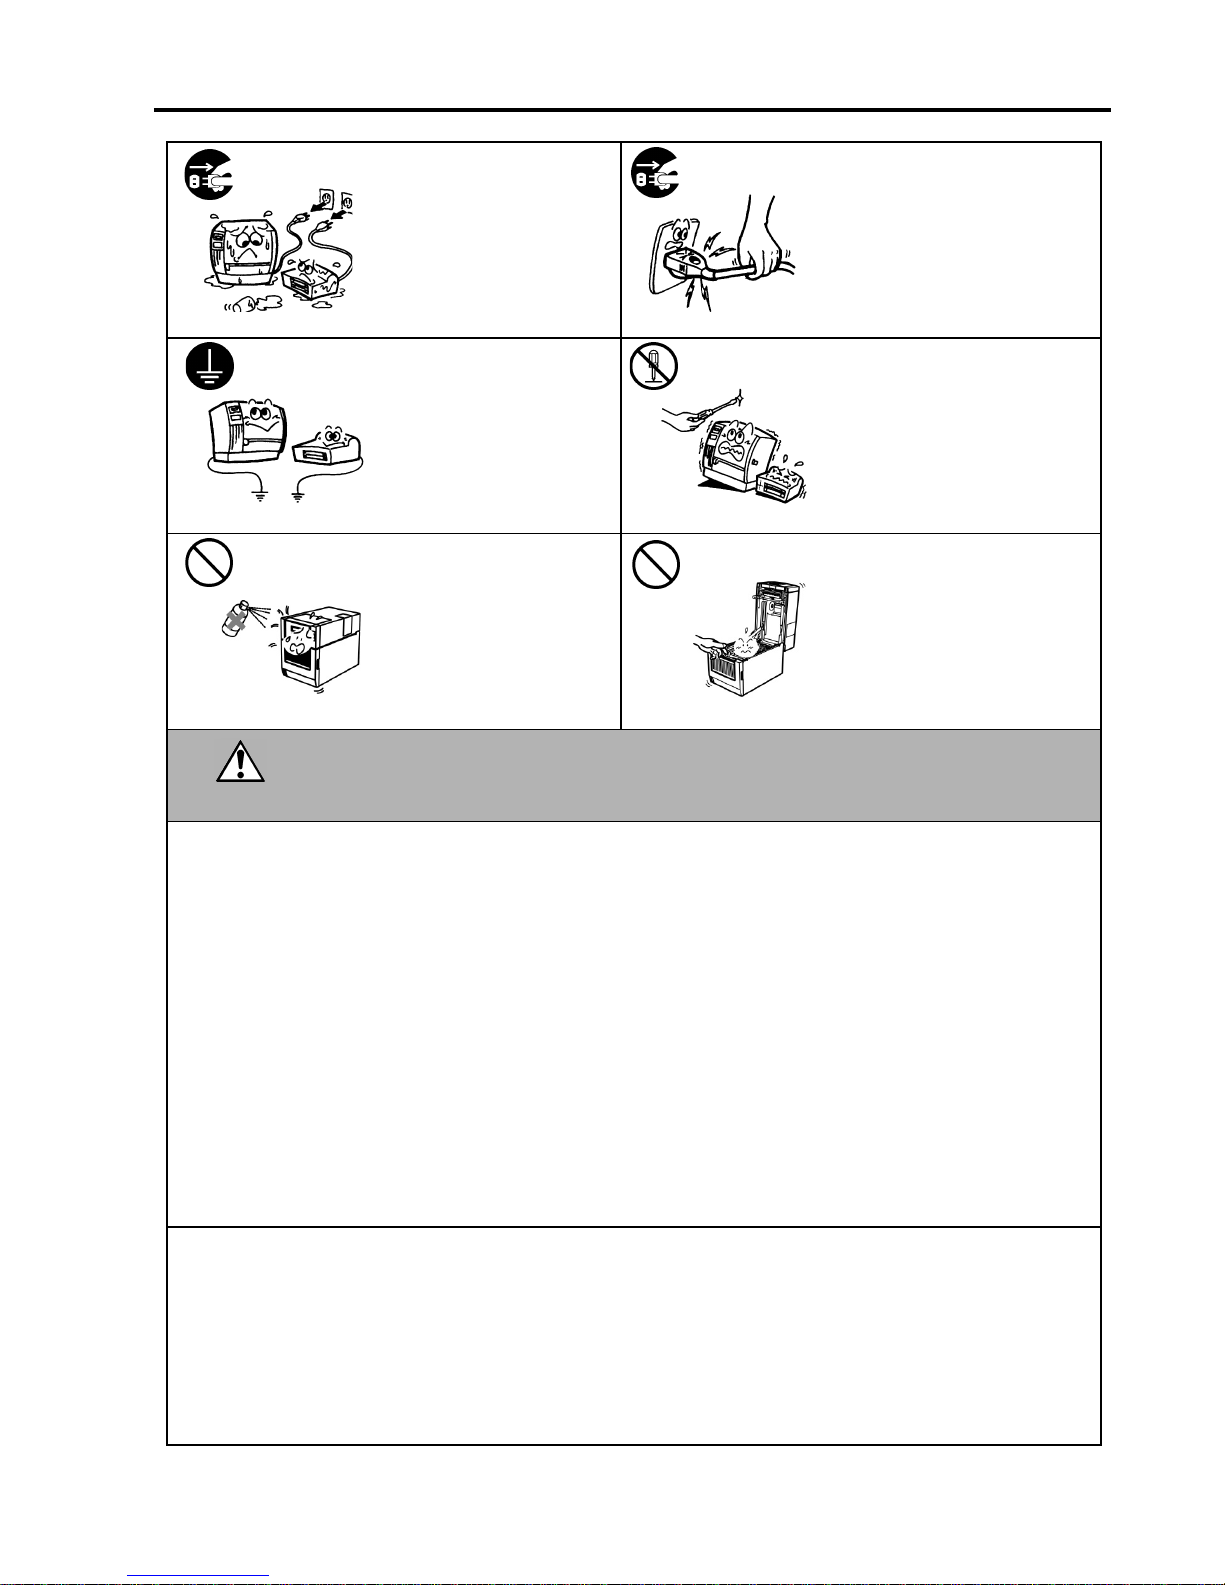
If foreign objects (metal
fragments, water, liquids) enter the
machines, first turn off the power
switches and disconnect the power
cord plugs from the outlet, and
then contact your authorized
TOSHIBA TEC representative for
assistance. Continued use of the
machine in that condition may
cause fire or electric shock.
When unplugging the power cords,
be sure to hold and pull on the plug
portion. Pulling on the cord
portion may cut or expose the
internal wires and cause fire or
electric shock.
Ensure that the equipment is
properly grounded. Extension
cables should also be grounded.
Fire or electric shock could occur
on improperly grounded
equipment.
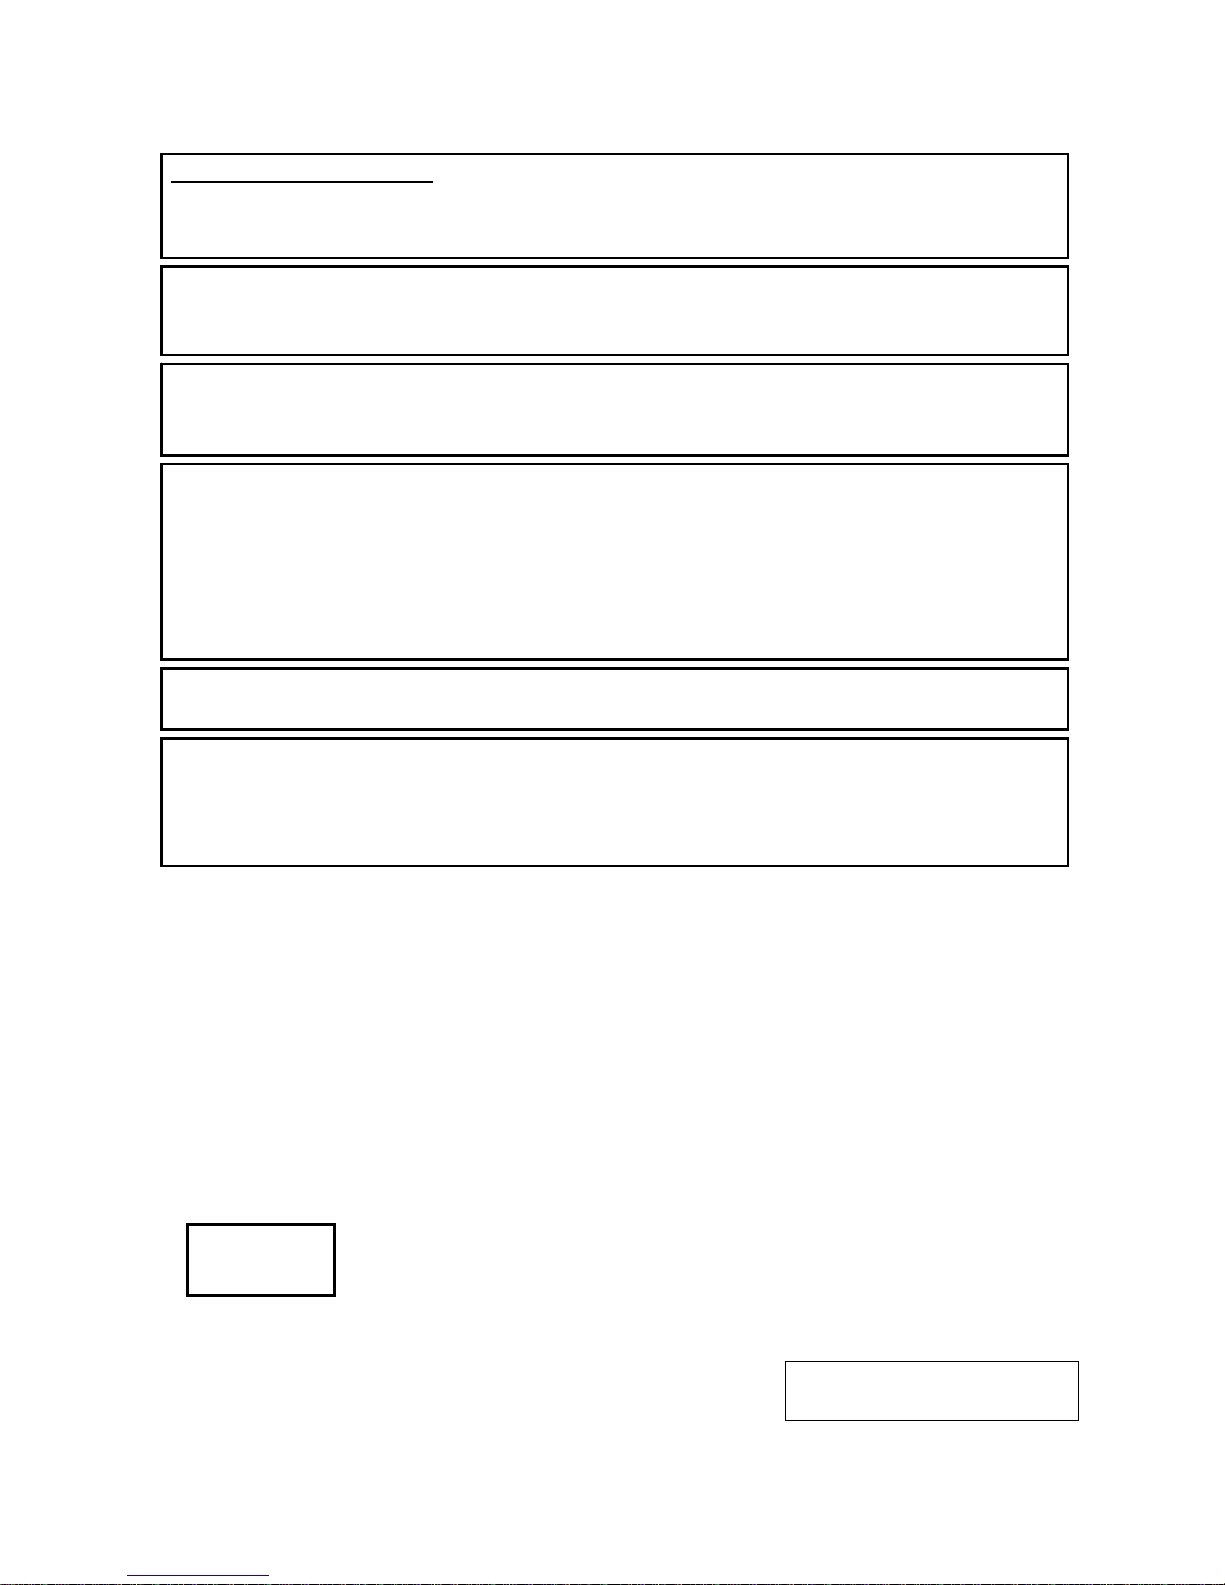
Do not remove covers, repair or
modify the machine by yourself.
You may be injured by high
voltage, very hot parts or sharp
edges inside the machine.
Do not use a spray cleaner
containing flammable gas for
cleaning this product, as this may
cause a fire.
Care must be taken not to injure
yourself with the printer paper
cutter.
This indicates that there is the risk of personal Injury or damage to
objects if the machines are improperly handled contrary to this
indication.
Precautions
The following precautions will help to ensure that this machine will continue to function correctly.
Try to avoid locations that have the following adverse conditions:
* Temperatures out of the specification * Direct sunlight * High humidity
* Shared power source * Excessive vibration * Dust/Gas
The cover should be cleaned by wiping with a dry cloth or a cloth slightly dampened with a mild detergent solution. NEVER
USE THINNER OR ANY OTHER VOLATILE SOLVENT on the plastic covers.
USE ONLY TOSHIBA TEC SPECIFIED paper and ribbons.
DO NOT STORE the paper or ribbons where they might be exposed to direct sunlight, high temperatures, high humidity, dust,
or gas.
Ensure the printer is operated on a level surface.
Any data stored in the memory of the printer could be lost during a printer fault.
Try to avoid using this equipment on the same power supply as high voltage equipment or equipment likely to cause mains
interference.
Unplug the machine whenever you are working inside it or cleaning it.
Keep your work environment static free.
Do not place heavy objects on top of the machines, as these items may become unbalanced and fall causing injury.
Do not block the ventilation slits of the machines, as this will cause heat to build up inside the machines and may cause fire.
Do not lean against the machine. It may fall on you and could cause injury.
Unplug the machine when it is not used for a long period of time.
Place the machine on a stable and level surface.
Request Regarding Maintenance
Utilize our maintenance services.
After purchasing the machine, contact your authorized TOSHIBA TEC representative for assistance once a year to have the
inside of the machine cleaned. Otherwise, dust will build up inside the machines and may cause a fire or a malfunction.
Cleaning is particularly effective before humid rainy seasons.
Our preventive maintenance service performs the periodic checks and other
work required to maintain the quality and performance of the machines, preventing accidents beforehand.
For details, please consult your authorized TOSHIBA TEC representative for assistance.
Using insecticides and other chemicals
Do not expose the machines to insecticides or other volatile solvents. This will cause the cabinet or other parts to deteriorate or
cause the paint to peel.
CAUTION
Disconnect
the plug.
Disconnect
the plug.
Connect a
grounding wire.
No
disassembling.
Prohibited
Prohibited
Résumé des précautions FRENCH VERSION
iii
Résumé des précautions
La sécurité personnelle lors de la manipulation ou de l’entretien du matériel est extrêmement importante.
Les avertissements et précautions nécessaires à la manipulation en toute sécurité du matériel sont inclus dans
ce manuel. Les avertissements et précautions contenus dans ce manuel doivent être lus et assimilés avant
toute manipulation ou entretien.
Ne tentez pas d’effectuer des réparations ou des modifications sur ce matériel. Si une erreur se produit
qui ne peut être résolue en suivant les instructions de ce manuel, coupez le courant, déconnectez le câble
secteur et contactez votre revendeur agréé TOSHIBA TEC pour une assistance technique.
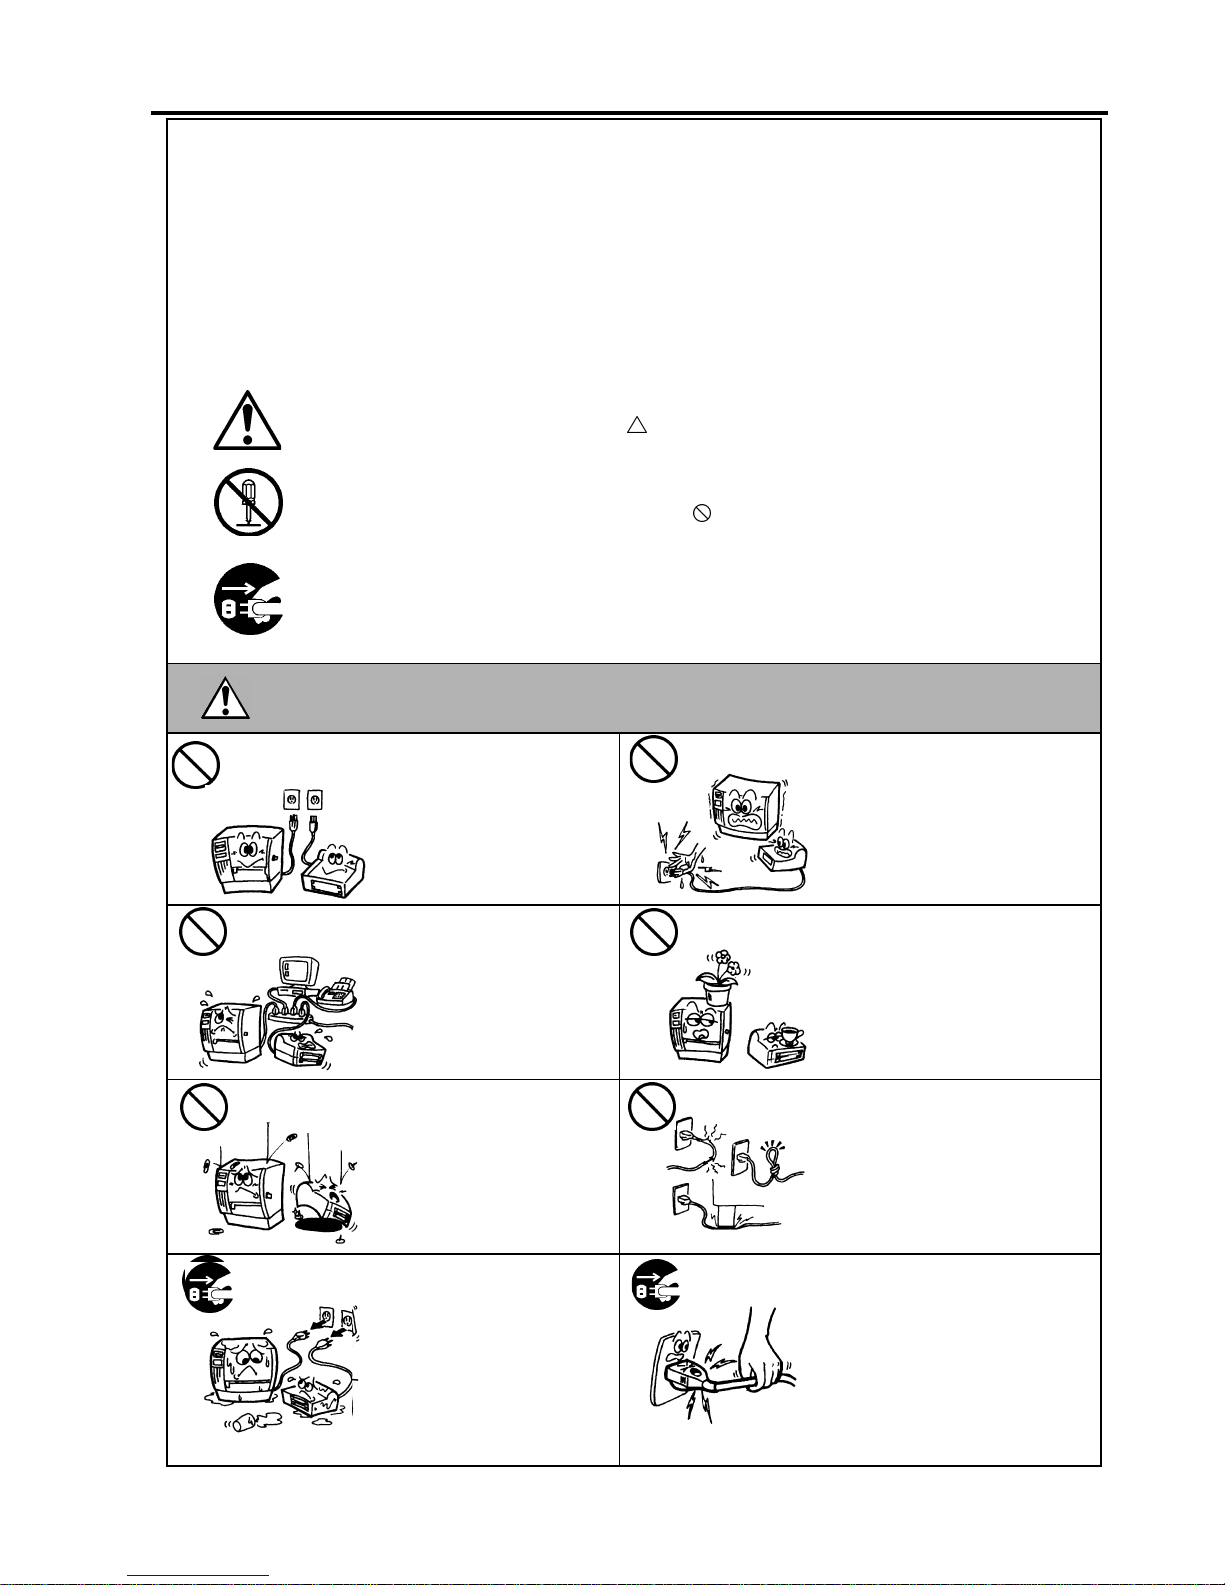
Explication des symboles
Ce symbole signale une mise en garde (ou des précautions).
Le dessin à l’intérieur du symbole
précise quelle est l’action à exécuter.
(Le symbole ci-contre indique une précaution d’ordre général.)
Ce symbole signale une action interdite (interdiction).
Le dessin à l’intérieur ou prés du symbole
précise quelle est l’action interdite.
(Le symbole ci-contre indique “Ne pas démonter”.)
Ce symbole indique une action à effectuer.
Le dessin à l’intérieur du symbole
précise quelle est l’action à exécuter.
(Le symbole ci-contre indique “Retirer la fiche secteur de la prise”.)
Indique un danger de mort ou de blessures graves si
l’équipement est utilisé en négligeant ces instructions.
Ne faites pas fonctionner la
machine avec une tension
électrique différente de celle
indiquée sur la plaquette des
caractéristiques. Ceci pourrait
provoquer un incendie ou une
électrocution.
Ne branchez pas et ne débranchez
pas la fiche secteur avec les mains
mouillées. Vous risqueriez une
électrocution.
Si la machine partage une même
prise avec d’autres appareils
consommant beaucoup d’électricité,
il y aura des fluctuations de tension
importantes lorsque ces appareils
fonctionnent. Pour éviter tout risque
d’incendie ou de choc électrique, ne
branchez pas d’autres appareils à la
même prise que la machine.
Ne placez pas d’objets métalliques
ou de récipients contenant un
liquide (vases, pots de fleurs,
tasses, etc.) sur la machine. Un
objet métallique ou un liquide peut
provoquer un incendie ou une
électrocution s’il pénètre
accidentellement dans la machine.
N’introduisez pas et ne faites pas
tomber de pièces métalliques, de
matières inflammables ou
d’autres objets dans les
ouvertures d’aération de la
machine. Ils pourraient
provoquer un incendie ou une
électrocution.
N’essayez pas de réparer ou de
modifier vous-même la machine.
Ceci pourrait provoquer un
incendie ou une électrocution.
Pour toute question sur les
réparations, adressez-vous à votre
revendeur (ou au service aprèsvente).
Si des corps étrangers (fragments
de métal, eau, liquides) pénètrent
à l’intérieur de la machine,
commencez par positionner le
bouton marche/arrêt sur arrêt et
par déconnecter le câble secteur
de la prise murale. Ensuite,
contactez votre revendeur agréé
TOSHIBA TEC pour une
assistance technique.
Une utilisation prolongée de
l'imprimante dans ces conditions
peut être source d'incendie ou de
choc électri
q
ue.
Pour débrancher le câble
d’alimentation, tirez-le par la prise.
Ne tirez pas directement sur le
câble. Ceci pourrait sectionner et
exposer les fils internes du câble et
causer un incendie ou une
électrocution.
ATTENTION
Interdiction d’utiliser
une tension autre que
celle spécifiée
Interdit
Interdit
Interdit
Interdit
Interdit
Débranchez la
fiche.
Débranchez la
fiche.
Résumé des précautions FRENCH VERSION
iv
Assurez-vous que votre
installation est correctement
reliée à la terre. Une mauvaise
installation peut provoquer un
début d’incendie ou un choc
électrique.
Ne pas retirer les capots, réparer ou
modifier l’imprimante par vousmême. Vous pouvez recevoir un
choc électrique ou vous blessé par
des bords tranchants dans
l’imprimante.
Ne pas utiliser de spray nettoyant
contenant du gaz inflammable
pour nettoyer ce produit, ceci
pourrait provoquer un feu.
Faire attention au couteau de
l'imprimante.
Indique un risque de blessures ou de dommages si l’équipement est
utilisé en négligeant ces instructions.
Précautions
Les précautions suivantes vous permettront d'avoir un fonctionnement correct de l'imprimante.
Evitez les endroits qui présentent les conditions défavorables suivantes:
* Température hors des spécifications * Exposition directe au soleil * Humidité élevée
* Alimentation secteur partagée avec * Vibrations excessives * Poussière/Gaz
d'autres dispositifs.
Nettoyez le couvercle en l'essuyant au moyen d'un chiffon sec ou d'un chiffon imbibé de détergent.
NE JAMAIS UTILISER DE DILUANT NI D'AUTRES SOLVANTS VOLATILES sur les capots en plastique.
Utilisez des étiquettes et des rubans recommandés par TOSHIBA TEC.
N'entreposez pas les films et media à un endroit où ils seraient exposés à la lumière directe du soleil, à des températures
élevées, à une humidité importante, à de la poussière ou à des gaz.
Assurez-vous d'utiliser l'imprimante sur une surface plane.
Toute information mémorisée dans la mémoire de l'imprimante peut être perdue lors d'une erreur d'impression.
Evitez d'utiliser cet équipement sur la même ligne secteur que des appareils de forte puissance ou susceptibles d'émettre des
interférences.
Eteignez l'imprimante lors des interventions à l'intérieur ou lors des nettoyages.
Assurez-vous de garder l'environnement de travail à l'abri de l'électricité statique.
Ne placez pas d'objets lourds sur la machine. Ils pourraient tomber et blesser quelqu'un.
Ne bouchez pas les ouvertures d'aération de la machine. La chaleur s'accumulerait à l'intérieur et pourrait provoquer un
incendie.
Ne vous appuyez pas contre l'imprimante Celle-ci peut tomber et vous pouvez être blessé.
Débranchez l'imprimante lorsqu'elle n'est pas utilisée pendant une longue période.
Placez la machine sur une surface stable.
RISQUE D'EXPLOSION SI LA BATTERIE EST REMPLACÉE PAR UN TYPE INCORRECT. Mettez au rebut les
batteries usagées conformément aux instructions du fabricant.
Au sujet de la maintenance
Faites appel à nos services de maintenance.
Après avoir reçu le matériel, prenez contact avec votre revendeur agréé TOSHIBA TEC pour une visite de maintenance
annuelle, de manière à effectuer un nettoyage complet de l'intérieur de la machine.
Autrement, la poussière qui s’accumule à l’intérieur de la machine peut être source d'incendie ou de mauvais fonctionnement.
Le nettoyage est particulièrement nécessaire avant les saisons humides ou pluvieuses.
Nos services de maintenance effectuent les vérifications périodiques et les autres opérations nécessaires à maintenir la qualité
et la performance des imprimantes. Prévenant de ce fait les problèmes.
Pour tous détails, consultez votre revendeur agréé TOSHIBA TEC.
Utilisations d'insecticides et d'autres produits.
N'exposez pas les machines aux insecticides ou à d'autres solvants volatiles, dans la mesure où cela peut endommager les
capots ou entraîner un écaillage de la peinture.
PRECAUTION
Connectez un
fil de terre.
Démontage
interdit
Interdit
Interdit
This product is designed for commercial usage and is not consumer product.
VORSICHT:
Schallemission: unter 70dB (A) nach DIN 45635 (oder ISO 7779)
Die für das Gerät Vorgesehene Steckdose muß in der Nähe des Gerätes und leicht zugänglich sein.
Centronics is a registered trademark of Centronics Data Computer Corp.
Microsoft is a registered trademark of Microsoft Corporation.
Windows is a trademark of Microsoft Corporation.
This equipment has been tested and found to comply with the limits for a Class A digital device,
pursuant to Part 15 of the FCC Rules. These limits are designed to provide reasonable rotection
against harmful interference when the equipment is operated in a commercial environment. This
equipment generates, uses, and can radiate radio frequency energy and, if not installed and sed in
accordance with the instruction manual, may cause harmful interference to radio communications.
Operations of this equipment in a residential area is likely to cause harmful interference in which case
the user will be required to correct the interference at his own expense.
(for USA only)
Changes or modifications not expressly approved by manufacturer for compliance could void the
user’s authority to operate the equipment.
“This Class A digital apparatus meets all requirements of the Canadian Interference-Causing
Equipment Regulations.”
“Cet appareil numérique de la classe A respecte toutes les exigences du Règlement sur le matériel
brouilleur du Canada.”
(for CANADA only)
IP20
< For EU Only >
TOSHIBA TEC Europe Retail Information Systems S.A.
Rue de la Célidée 33 BE-1080 Brussels
Copyright © 2011
by TOSHIBA TEC CORPORATION
All Rights Reserved
6-78 Minamichou, Mishima-shi, Shizuoka-ken, JAPAN
CE Compliance (for EU only)
This product complies with the requirements of EMC and Low Voltage and R&TTE Directives including their
amendments.

6
Waste Recycling information for users:
Following information is only for EU-member states:
The use of the crossed-out wheeled bin symbol indicates that this product
may not be treated as general household waste.
By ensuring this product is disposed of correctly you will help prevent
potential negative consequences for the environment and human health, which could
otherwise be caused by inappropriate waste handling of this product. For more detailed
information about the take-back and recycling of this product, please contact your supplier
where you purchased the product.

7
TABLE OF CONTENTS
Page
1. INTRODUCTION ....................................................................................................................................................................................... 1
1.1
APPLICABLE MODEL ..................................................................................................................................................................... 1
1.2
ACCESSORIES .................................................................................................................................................................................. 1
2. SPECIFICATIONS ................................................................................................................................................................................... 1
2.1
PRINTERS SPECIFICATIONS ...................................................................................................................................................... 1
2.2
MEDIA SPECIFICATIONS .............................................................................................................................................................. 2
2.2.1 Media Size & Shape ................................................................................................................................................................. 2
2.2.2 Detection Area of the Transmissive Sensor(Label Gap Sensor) .......................................................................... 4
2.2.3 Detection Area of the Reflective Sensor(BM Sensor) .............................................................................................. 5
2.2.4 Effective Print Area of Paper .............................................................................................................................................. 6
2.3
OPTIONS .............................................................................................................................................................................................. 6
3. APPEARANCE .......................................................................................................................................................................................... 1
3.1
DIMENSIONS ...................................................................................................................................................................................... 1
3.2
FRONT VIEW ....................................................................................................................................................................................... 1
3.3
REAR VIEW .......................................................................................................................................................................................... 1
3.4
OPERATION PANEL ........................................................................................................................................................................ 2
3.5
INTERIOR ............................................................................................................................................................................................. 2
4. BASIC FUNCTIONS OF OPERATION PANEL ............................................................................................................................ 1
4.1
LED INDICATION .............................................................................................................................................................................. 1
4.1.1 POWER (ONLINE) LED ........................................................................................................................................................... 1
4.1.2 ERROR LED ................................................................................................................................................................................ 1
4.1.3 INDICATION OF LED AND MEANING ............................................................................................................................. 1
4.2
KEYS ON THE NORMAL MODE .................................................................................................................................................. 1
4.2.1 MENU KEY .................................................................................................................................................................................. 1
4.2.2 PAUSE KEY ................................................................................................................................................................................ 2
4.2.3 FEED KEY .................................................................................................................................................................................... 3
4.3
SPECIAL FUNCTIONS .................................................................................................................................................................... 4
4.3.1 CONFIGURATION PRINT ...................................................................................................................................................... 5
4.3.2 FACTORY DEFAULT .............................................................................................................................................................. 6
4.3.3 Menu Mode .................................................................................................................................................................................. 7
5. PRINTER SETUP ..................................................................................................................................................................................... 1
5.1
INSTALLATION ................................................................................................................................................................................. 2
5.1.1 Installing Roll Paper Holder .................................................................................................................................................. 2
5.1.2 Paper Set ..................................................................................................................................................................................... 3
5.2
CONNECTING THE POWER CORD AND CABLES .............................................................................................................. 4

8
5.3 SETTING THE SENSOR POSITION ........................................................................................................................................... 5
5.3.1 SETTING THE BLACK MARK SENSOR POSITION ................................................................................................... 5
5.3.2 SETTING THE LABEL GAP SENSOR POSITION ....................................................................................................... 6
5.4
MENU MODE ....................................................................................................................................................................................... 3
5.5
INTERFACE SETTING ................................................................................................................................................................... 8
5.5.1 PARALLEL INTERFACE SETTING .................................................................................................................................... 8
5.5.2 ETHERNET INTERFACE SETTING ................................................................................................................................... 9
5.6
PAPER TYPE SETTING ............................................................................................................................................................... 11
5.7
SENSOR CALIBRATION .............................................................................................................................................................. 12
5.7.1 SENSOR CALIBRATION WITH BLACK MARK ........................................................................................................... 13
5.7.2 SENSOR CALIBRATION WITH WHITE PAPER .......................................................................................................... 14
5.7.3 SENSOR CALIBRATION WITH LABEL PAPER ......................................................................................................... 15
5.7.4 SENSOR CALIBRATION WITH PERFORATION PAPER ........................................................................................ 16
5.8
PRINTER DRIVER INSTALLATION .......................................................................................................................................... 17
5.8.1 SYSTEM REQUIREMENT .................................................................................................................................................... 17
5.8.2 DRIVER INSTALLATION GUIDE BY USING USB & PARALLEL ........................................................................ 17
5.8.3 DRIVER INSTALLATION GUIDE BY USING LAN ..................................................................................................... 20
5.9
PARAMETER SETTING IN MENU MODE ............................................................................................................................... 25
5.9.1 CATEGORY “FIRMWARE VERSION, CRC” ................................................................................................................. 25
5.9.2 CATEGORY “COMMUNICATION INTERFACE” ......................................................................................................... 25
5.9.3 CATEGORY “PRINTER CONFIGURATION” ................................................................................................................ 26
5.9.4 CATEGORY “PRINTER ADJUSTMENT” ....................................................................................................................... 29
5.9.5 CATEGORY “PRINTER TEST MODE” ........................................................................................................................... 30
6. CARE/HANDLING OF THE PAPER ................................................................................................................................................. 1
7. GENERAL MAINTENANCE .................................................................................................................................................................. 1
7.1
CLEANING ........................................................................................................................................................................................... 1
7.2
COVERS ............................................................................................................................................................................................... 1
7.3
REMOVING JAMMED PAPER ...................................................................................................................................................... 1
8. TROUBLESHOOTING ............................................................................................................................................................................ 2
8.1
ERROR MESSAGES ......................................................................................................................................................................... 2
8.2
POSSIBLE PROBLEMS .................................................................................................................................................................. 3
APPENDIX I INTERFACE ................................................................................................................................................................... 1
APPENDIX II MENU MODE TREE ..................................................................................................................................................... 3

1. INTRODUCTION ENGLISH VERSION
1.1 Applicable Model
E1-1
1. INTRODUCTION
Thank you for choosing the TEC DB-EA4D Series 2ST 4-inch label printer. This new generation high
performance high quality printer is equipped with the latest hardware including the newly developed
This manual contains general set-up and maintenance information and should be read carefully to help
gain maximum performance and life from your printer. For most queries please refer to this manual and
keep it safe for future reference.
1.1 APPLICABLE MODEL
DB-EA4D-GS10-QM-R
DB-EA4D-GS12-QM-R
Model name description
1.2 ACCESSORIES
When unpacking the printer, please check that the following accessories are supplied with the printer.
Quick Installation Manual (Doc. No: EO1-33092)
Safety Precaution Sheet (Doc. No: EO2-33038)
Power Cord
DB – E A 4 D –G S 1 0 – QM – R
Destination Code
QM : Global
Interface Specification
0 : USB/LAN Interface
2 : USB/LAN/Centronics Interface
Printer Version 1
Issue Mode
S : Standard Type
Resolution
G : 203.2 dpi
Direct Thermal
NOTE:
1. Check for damage or scratches on the printer. However, please note that TOSHIBA TEC shall have
no liability for any damage of any kind sustained during transportation of the product.
2. Keep the cartons and pads for future transportation of the printer.
2. SPECIFICATIONS ENGLISH VERSION
2.1 Printers Specifications
E2-1
2. SPECIFICATIONS
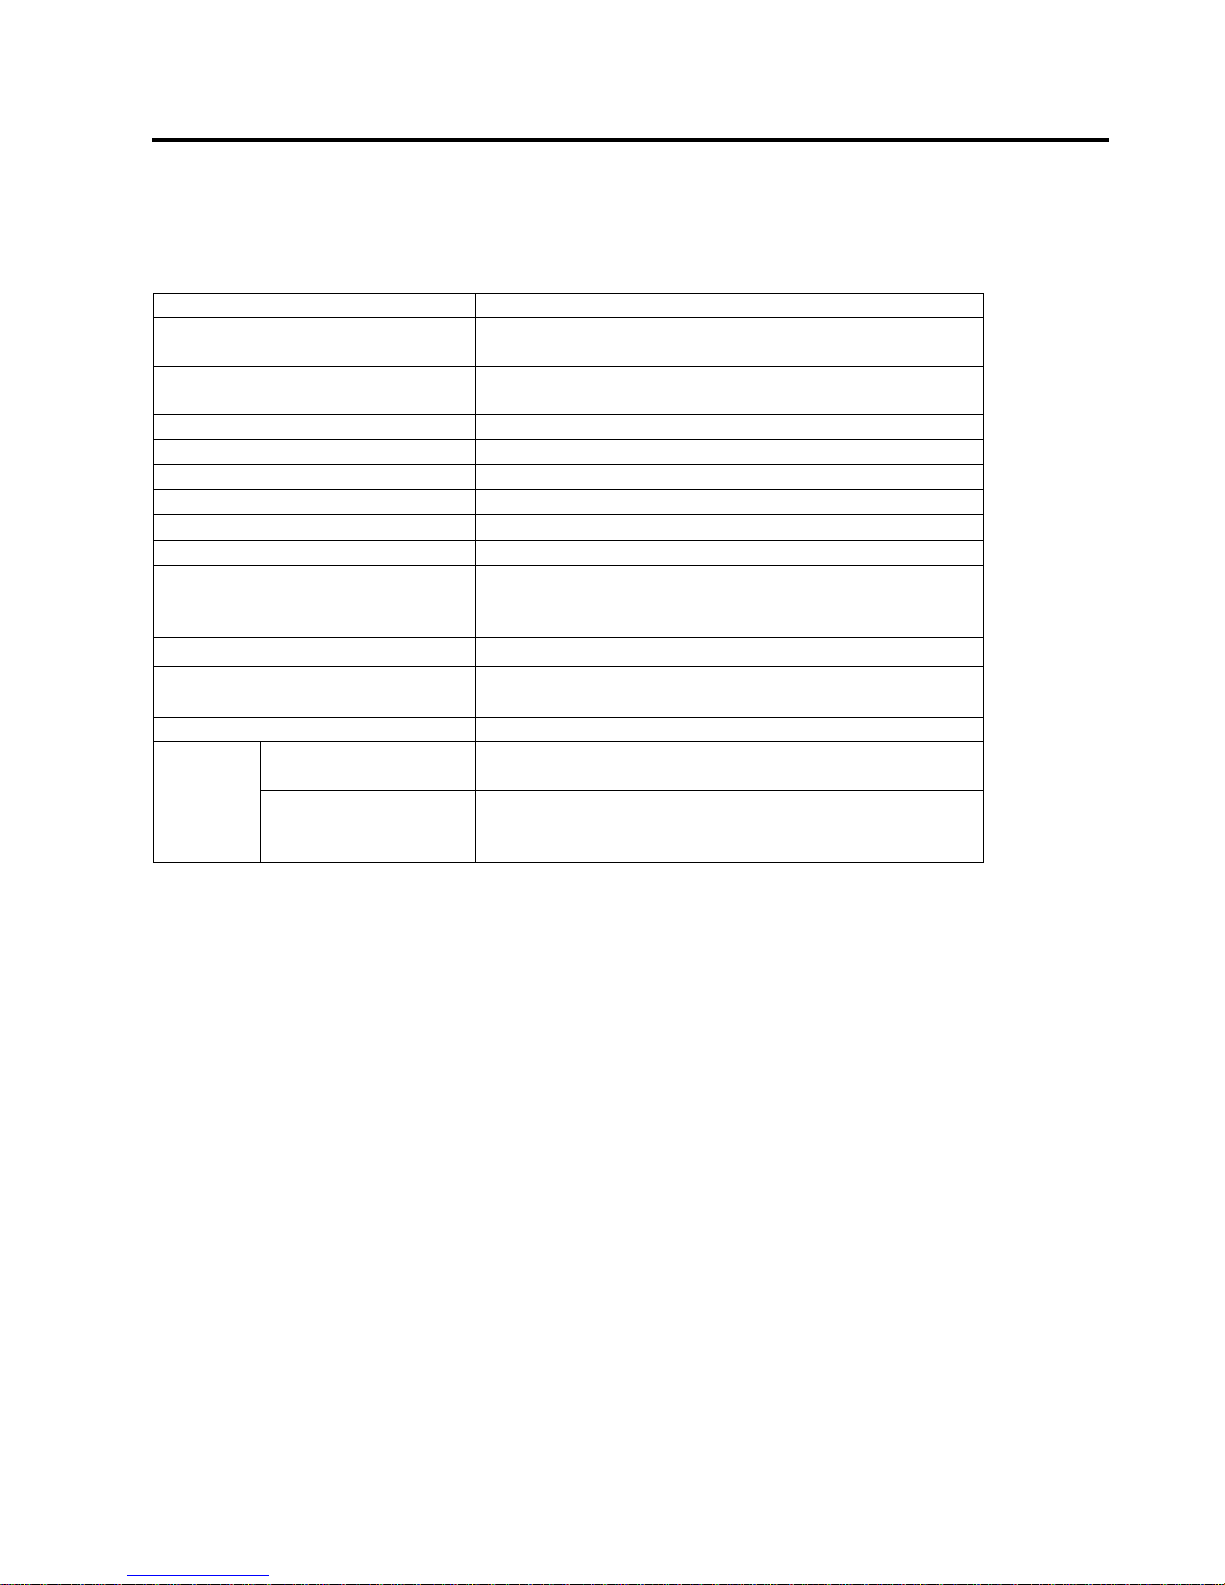
2.1 Printers Specifications
Item
Supply voltage
AC 100 – 120V, 50/60 Hz ± 10%;
AC 220 – 240V, 50 Hz ± 10%
Power consumption
100V – 240V 3.3A – 1.4A (Dual side, Print Ratio 14%
Duty Slant Pattern, 6 inc/sec.)
Operating temperature 0 - 40°C (In case 0°C-5°C: Max Speed: 4 inch/sec.)
Relative humidity 25 - 85% (No condensation)
Print head Line thermal 8 dots per mm (203.2 dots per inch)
Printing methods Line thermal printing (Direct thermal method)
Print speeds Max 6 inch/sec. (Dual side printing mode)
Maximum print width 104mm
Dispensing modes
Batch mode(Continuous)
Cut mode (Available only when cutter module is
installed.)
Message display 16 characters x 2 lines
Dimensions
240 mm (width) x 237 mm (height) x 226 mm (depth),
with Paper hopper 470 mm (depth)
Weight Printer: 7.5kg(without media)
Interfaces
DB-EA4D-GS10-QM-R
USB I/F (V2.0 High Speed)
IEEE802.3 (LAN 10 Base-T/100 Base-TX)
DB-EA4D-GS12-QM-R
USB I/F (V2.0 High Speed)
IEEE802.3 (LAN 10 Base-T/100 Base-TX)
IEEE1284 Interface (SPP, Nibble mode)

2. SPECIFICATIONS ENGLISH VERSION
2.2 Media Specifications
E2-2
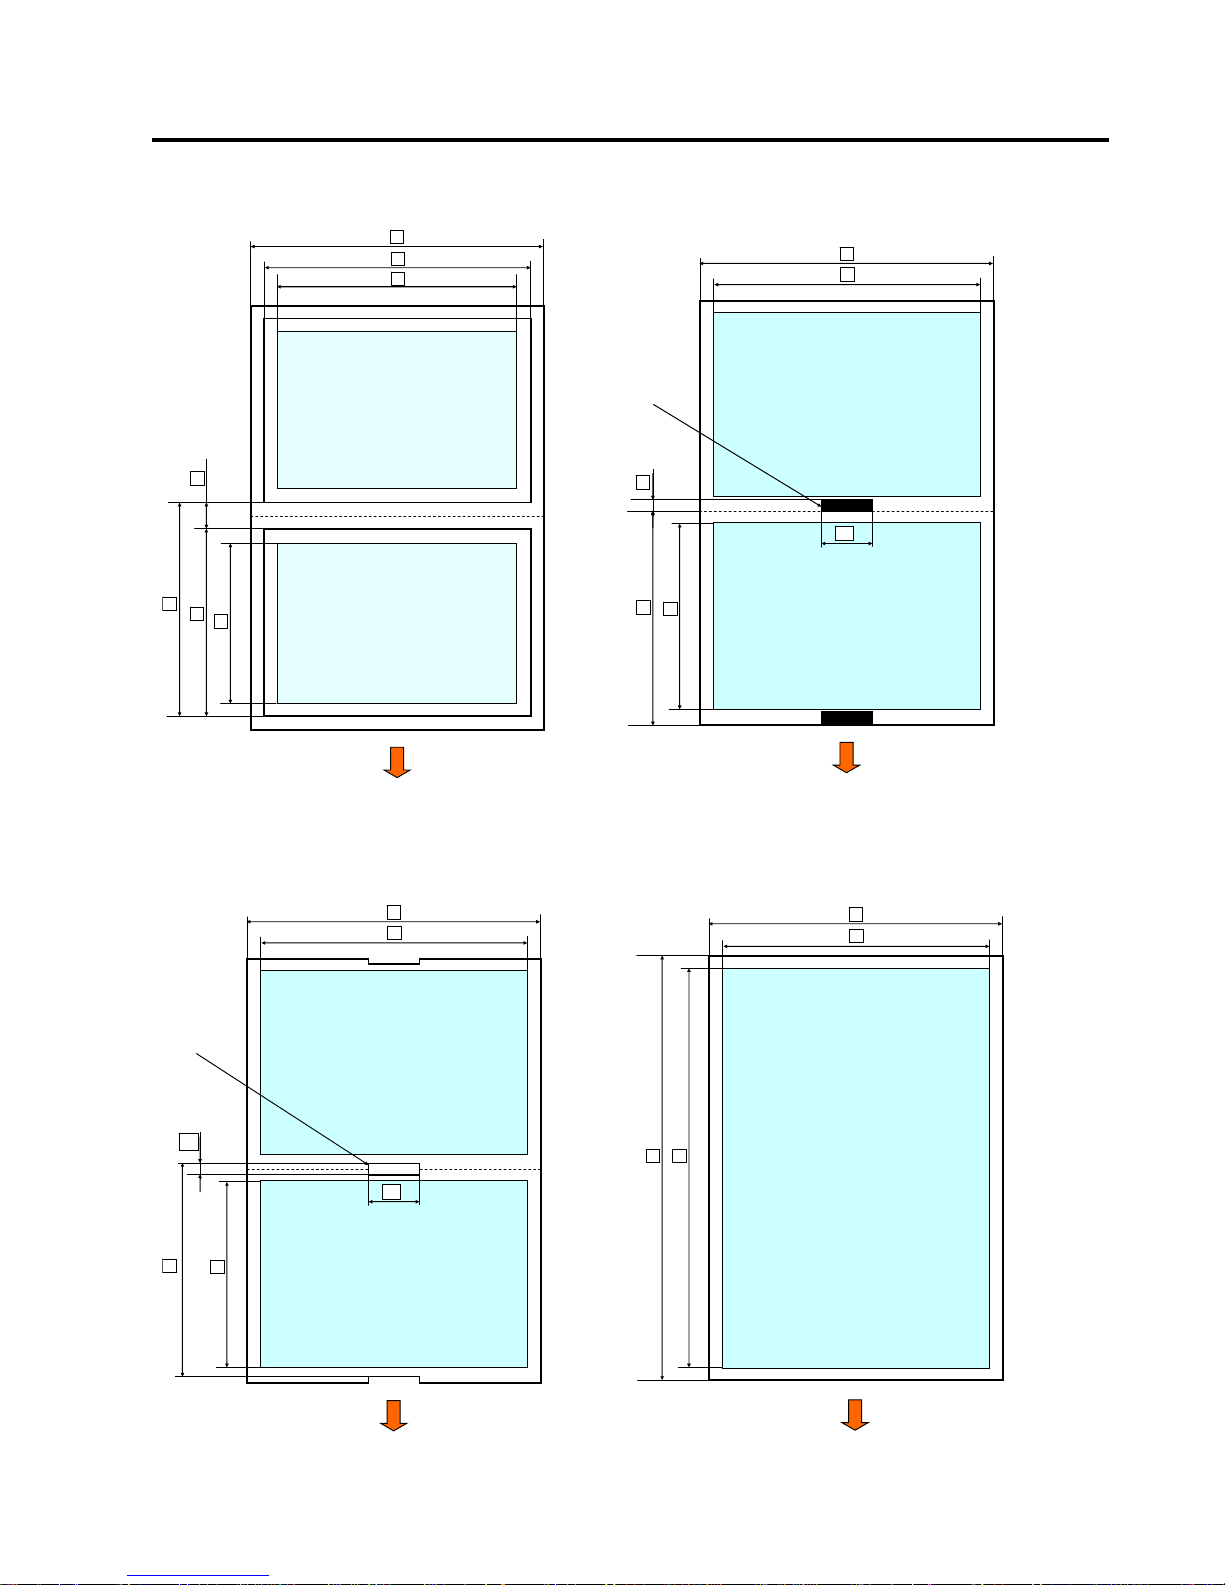
2.2 MEDIA SPECIFICATIONS
2.2.1 Media Size & Shape
[unit: mm]
Batch Mode Cut Mode
1 Media Length
Label
40.0-554.8
Tag
Perforation
Receipt
Cut sheet 120.0-554.8
2 Label Length 37.0-551.8
3
Media Width
(see NOTE 4.)
Label
58.0-130.0 58.0-121.0
Tag
Perforation
Receipt
Cut sheet
4 Label Width 55.0-127.0 55.0-118.0
5 Gap Length 3.0-20.0 6.0-20.0
6 Black Mark Length 2.0-10.0
7 Effective Print Width 104.0+/-0.2
8 Effective Print Length
Label 33.0-547.8
Tag
36.0-547.8
Perforation
Receipt
Cut sheet 116.0-547.8
9 Black Mark Width Min 12.0
10 Hole Length 2.0-10.0
11 Hole Width Min 12.0
Paper Thickness 0.06-0.22
Maximum Effective length for continuous print 547.8
Maximum Outer Roll Diameter Dia 203.2(8")
Roll Direction Outside Label
Inner Core Diameter Dia 38.0, 42.0, 76.2+/-0.3
NOTE:
1. To ensure print quality and print head life, use only TOSHIBA TEC specified media.
2. When marking black marks on the label rolls, they should be marked at the gaps.
3. In the case of using perforation paper with rectangular hole, printer cannot do backfeed.
If send the data to printer one by one, printer skip 2nd page without printing after printing
first data on first page. After that, the printer prints 2nd data on 3rd page.
If send all pages data to printer at one time, the printer can print without skipping a page.
4. Maximum paper width of 128mm is applied when Paper Roll Holder Option installed.
2. SPECIFICATIONS ENGLISH VERSION
2.2 Media Specifications
E2-3
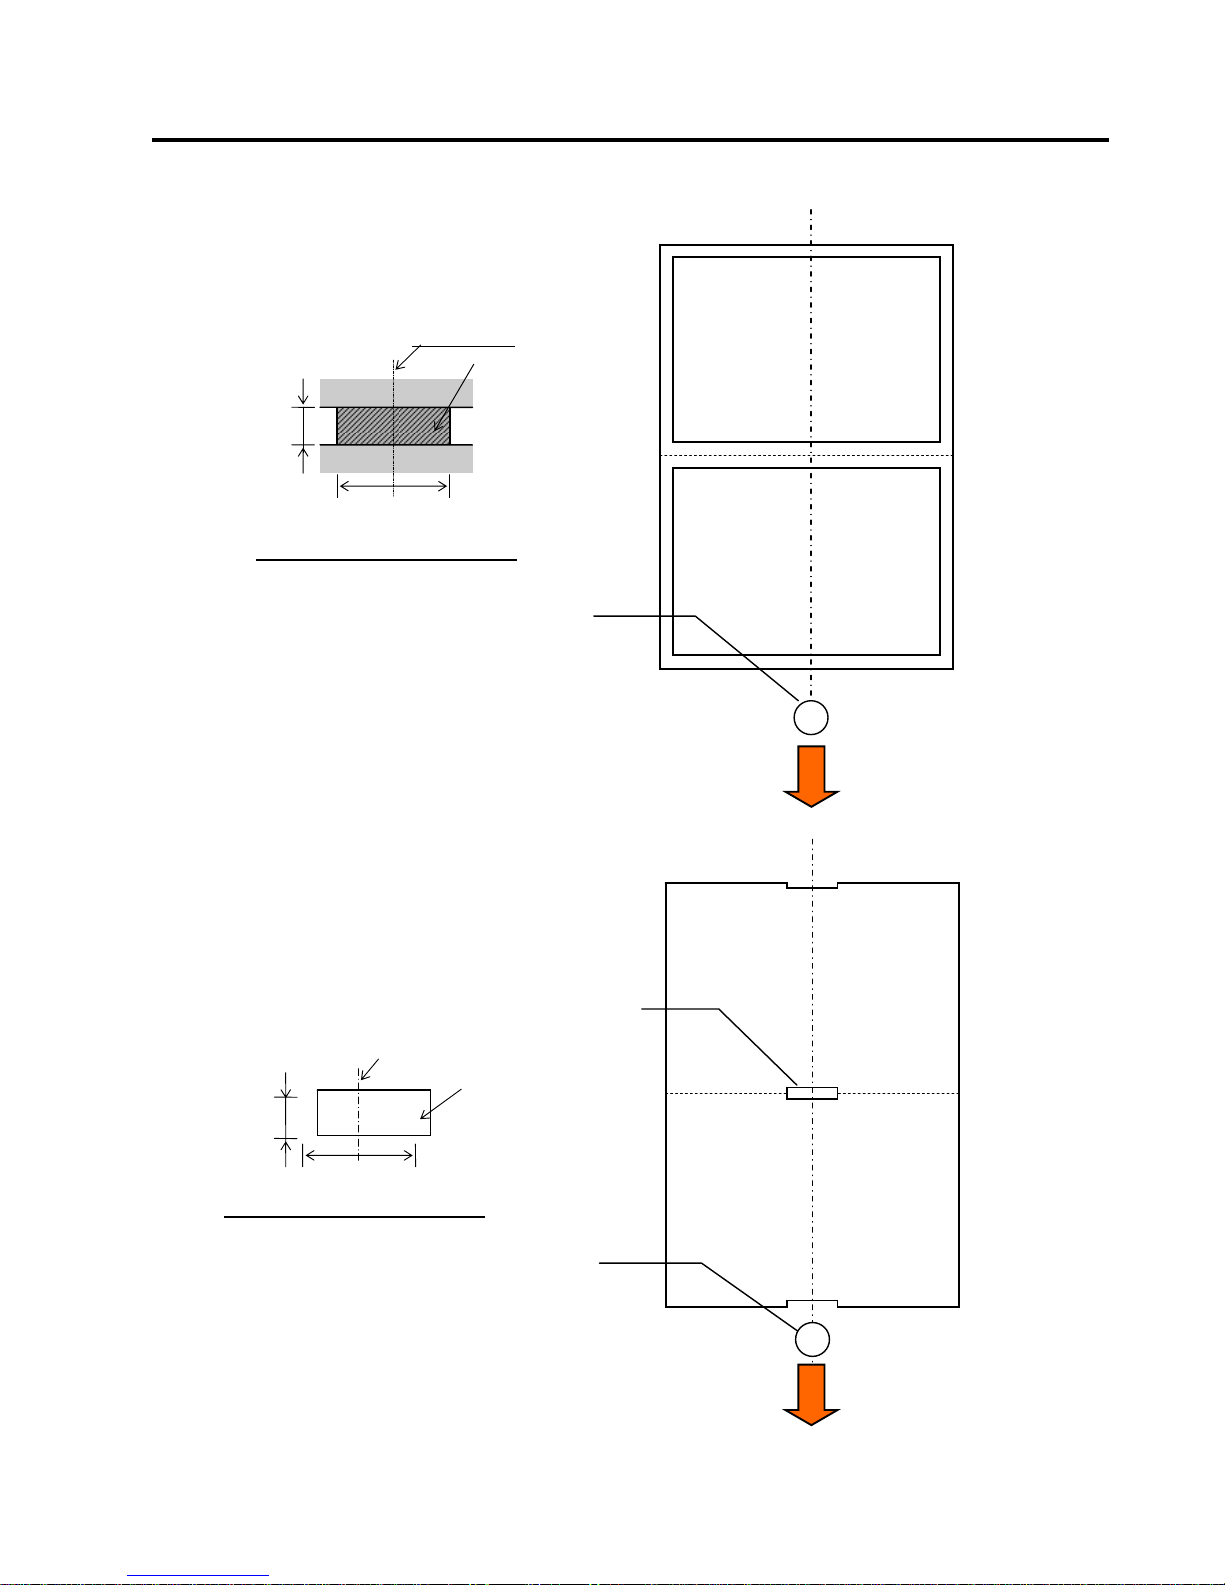
<Label Paper>
<Tag & Receipt Paper with BM>
Effective Printable Area
Effective Printable Area
Media feed dire ction
1
2
3
4
9
8
5
Effective Printable Area
Effective Printable Area
Media feed direc tion
1
8
3
9
11
6
Black Mark
(Perspective
On the back side)
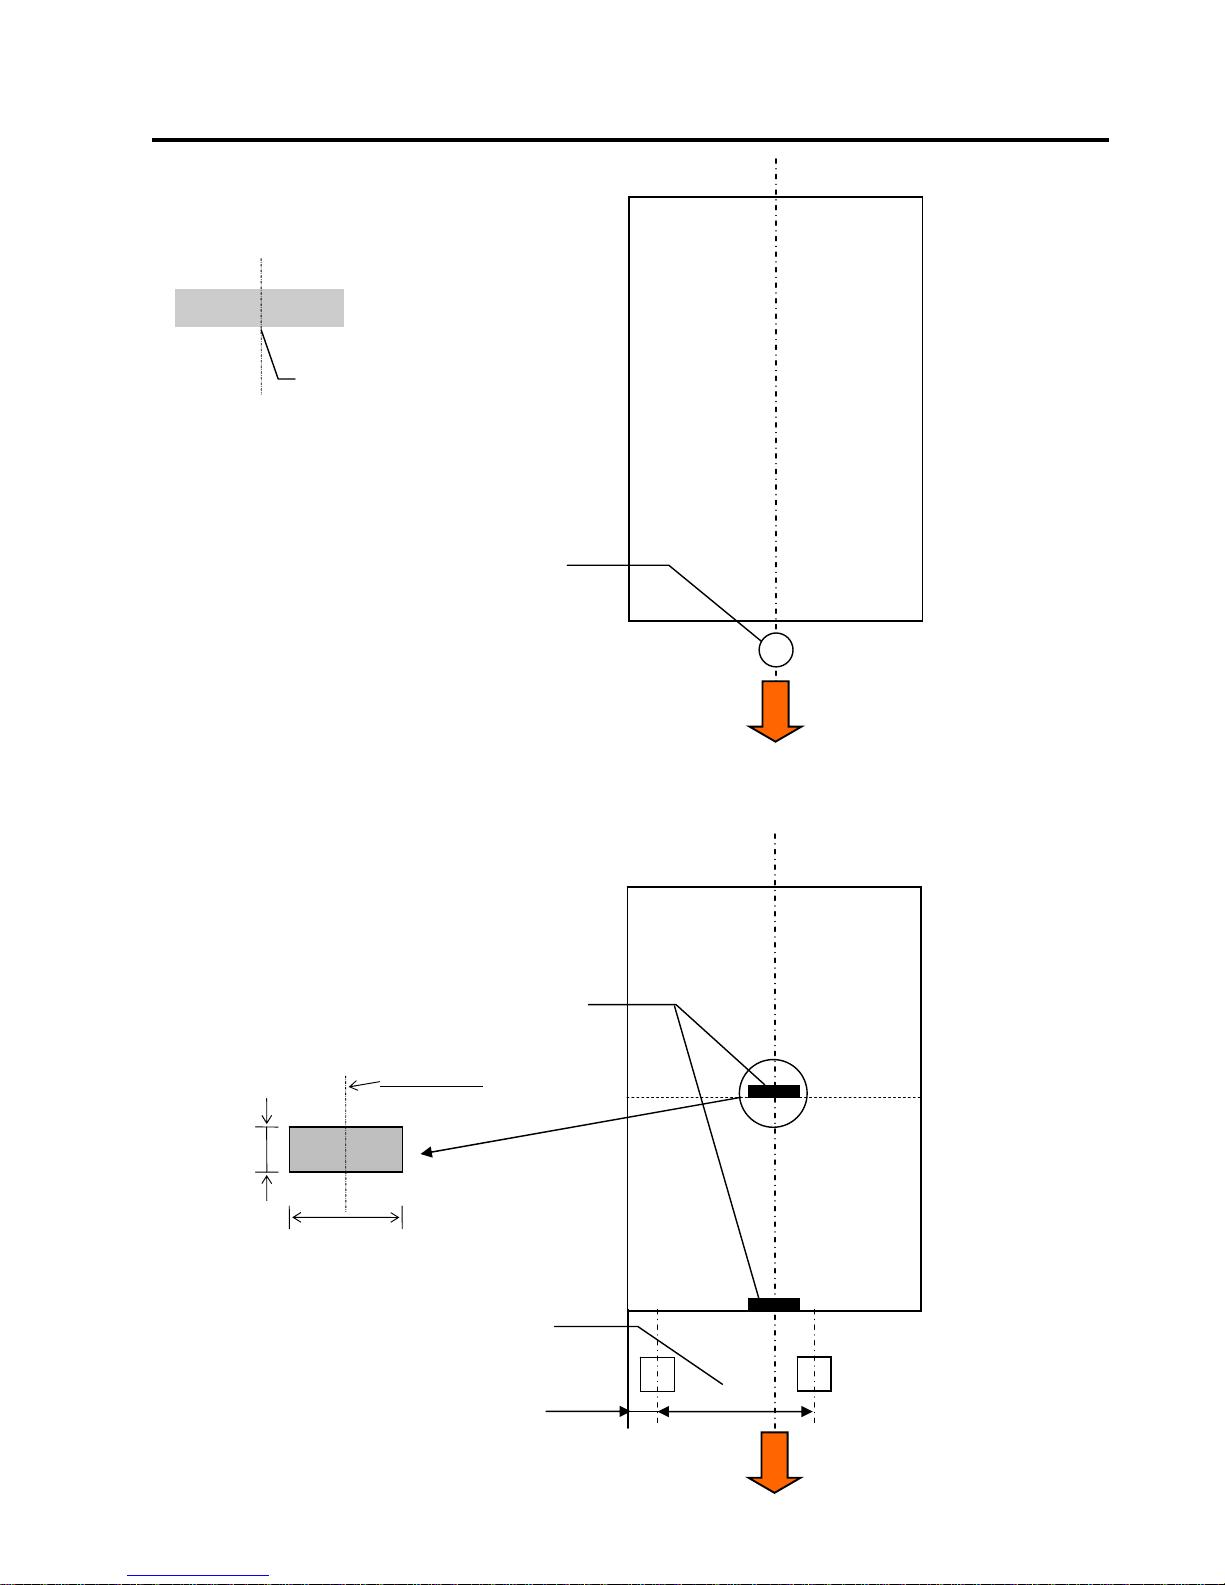
<Perforation Paper with a hole> <Cut Sheet Paper>
Rectangular
Hole
Effective Printable Area
Effective Printable Area
Media feed direc tion
1
8
3
9
10
11
Effective Printable Area
3
9
1 8
Media feed direction
2. SPECIFICATIONS ENGLISH VERSION
2.2 Media Specifications
E2-4
2.2.2 Detection Area of the Transmissive Sensor(Label Gap Sensor)
Label Gap Sensor can be used at center of paper.
<Label Paper>
<Perforation Paper with a hole>
Rectangular
Holes
Label Gap Sensor
Sensor position
Min. 2.0 mm
Min. 12 mm
Magnified view of detection area
Detection of hole
Rectangular hole
(Round holes are
Unacceptable.)
Media feed direction
Label Gap Sensor
Sensor position
Necessary
detection area
Label
Gap
Label
Min. 3.0 mm
Min. 12 mm
Magnified view of detection area
(Min.6.0mm
when the cutter
is used.)
Media feed direction
2. SPECIFICATIONS ENGLISH VERSION
2.2 Media Specifications
E2-5
<Cut Sheet Paper>
2.2.3 Detection Area of the Reflective Sensor(BM Sensor)
BM sensor is movable in the range from 6.0mm to 66.5mm on the left side.
<Tag Paper with black mark>
&
<Receipt Paper with black mark>
Label Gap Sensor
Detect top of form edge
Cut Sheet
Media feed direction
6.0mm
66.5mm
BM sensor is movable within this range
Perspective on the back side
Sensor position
(Center of black mark)
Min. 2.0 mm
Min. 12 mm
Media feed direction
2. SPECIFICATIONS ENGLISH VERSION
2.2 Media Specifications
E2-6
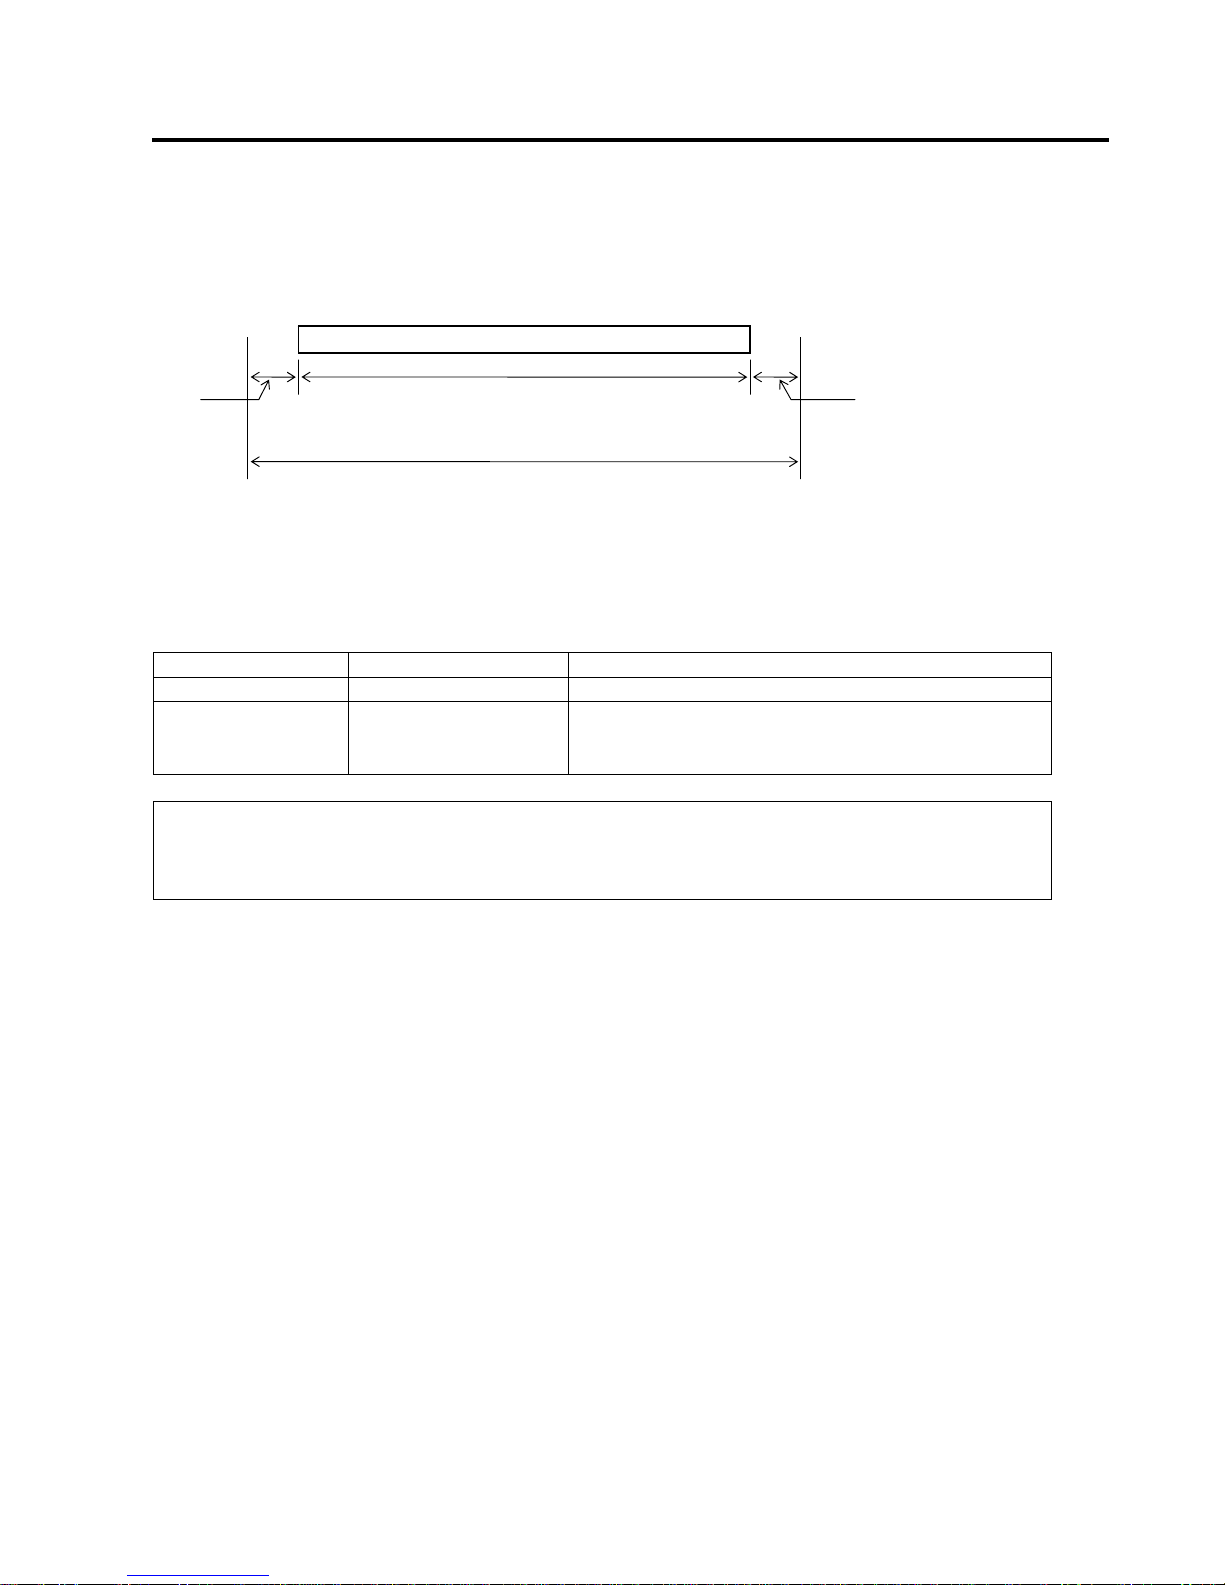
2.2.4 Effective Print Area of Paper
The figure below illustrates the relation between the head effective print width
and media width.
2.3 OPTIONS
Option Name Type Description
Rotary Cutter DB-EA204-RC-QM-R A rotary cutter used to repeatedly cut media
Paper Roll Holder DB-EA904-PH-QM-R A media roll hanger for media roll with an outer roll
diameter up to 203.2mm (8”) and inner core diameter
up to 76.2mm (3”).
NOTE:
To purchase the Optional KIT, please contact your authorized TOSHIBA TEC representative or
TOSHIBA TEC Head Quarter.
13 mm
Outside
printing
area
Outside
printing
area
13 mm
104mm±0.2mm
(Effective print head width)
130mm
(Max. paper width)
3. APPEARANCE ENGLISH VERSION
3.1 Dimensions
E3-1
3. APPEARANCE
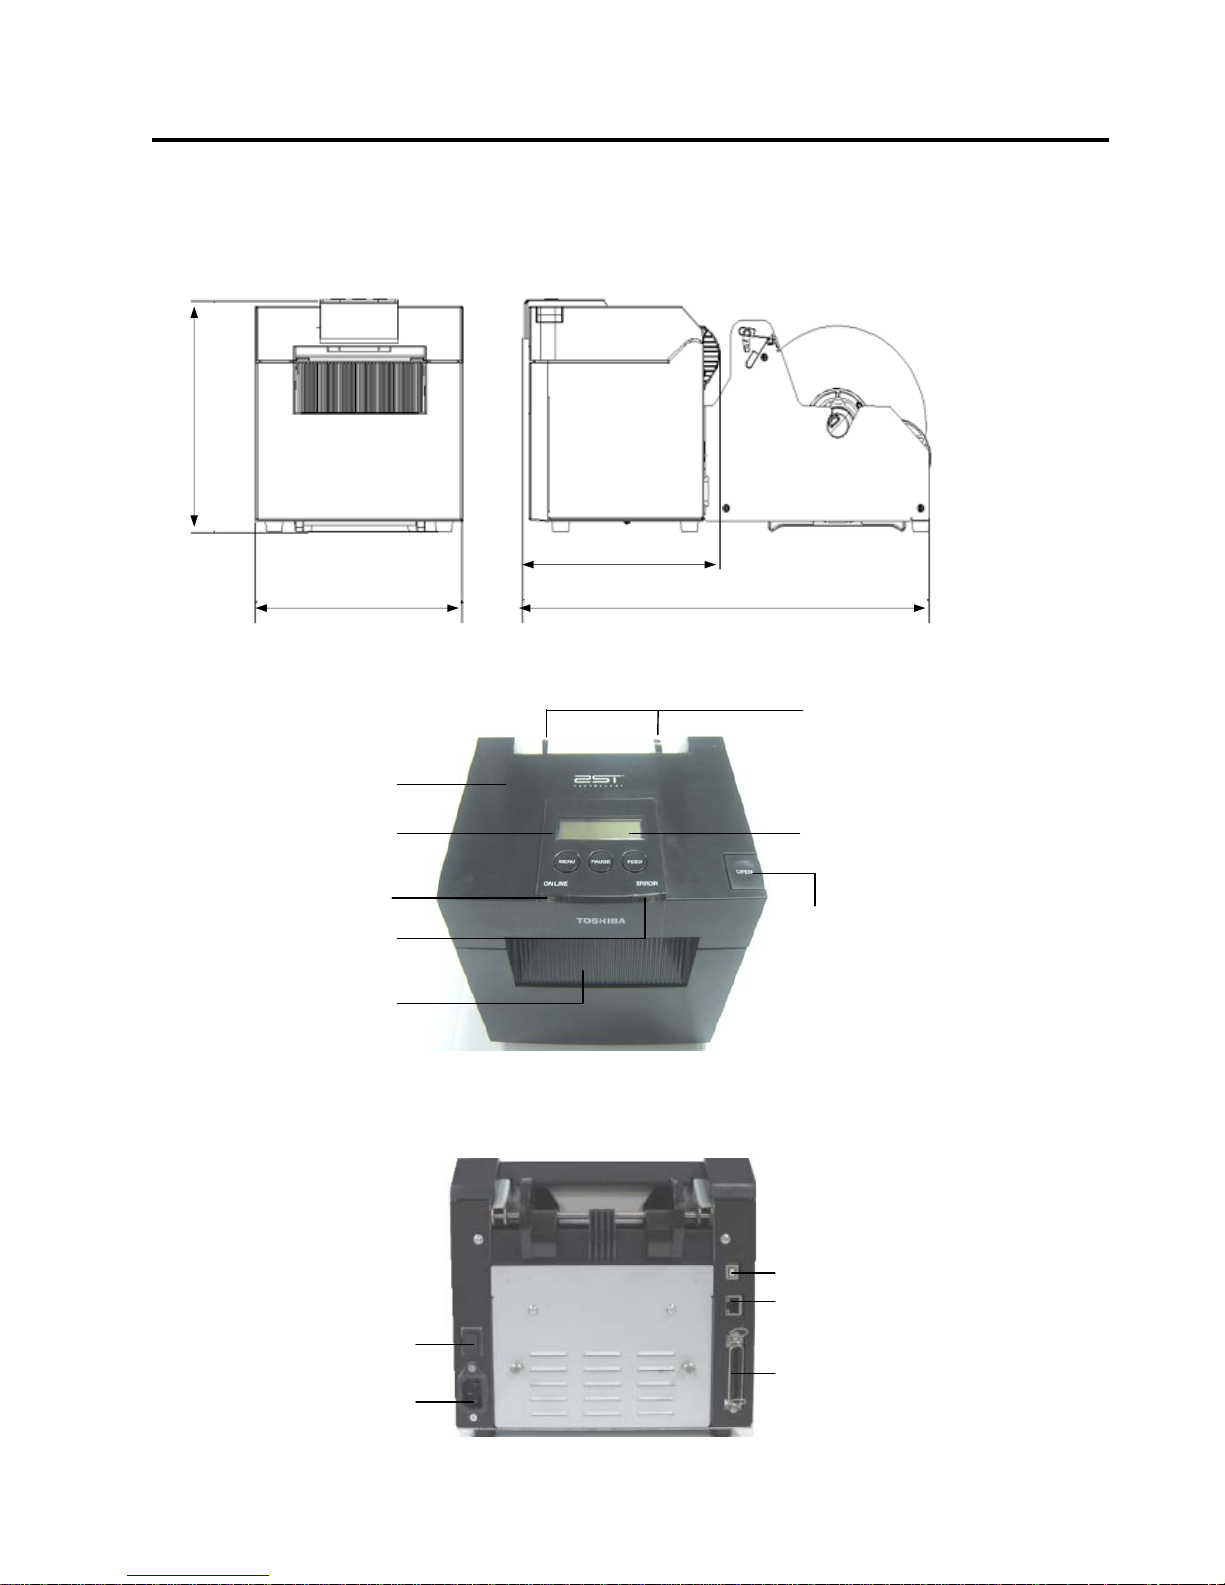
3.1 DIMENSIONS
All dimension in mm
3.2 FRONT VIEW
3.3 REAR VIEW
Power Switch
O: OFF
I: ON
AC Power Inlet
USB Interface
LAN Interface
Parallel Interface
(Centronics)
Top Cover
Release Button
LCD Message Display
Top Cover
Operation
Panel
Online LED
Error LED
Adjustable Paper
Guide (L/R)
Media Outlet
-
3. APPEARANCE ENGLISH VERSION
3.4 Operation Panel
E3-2
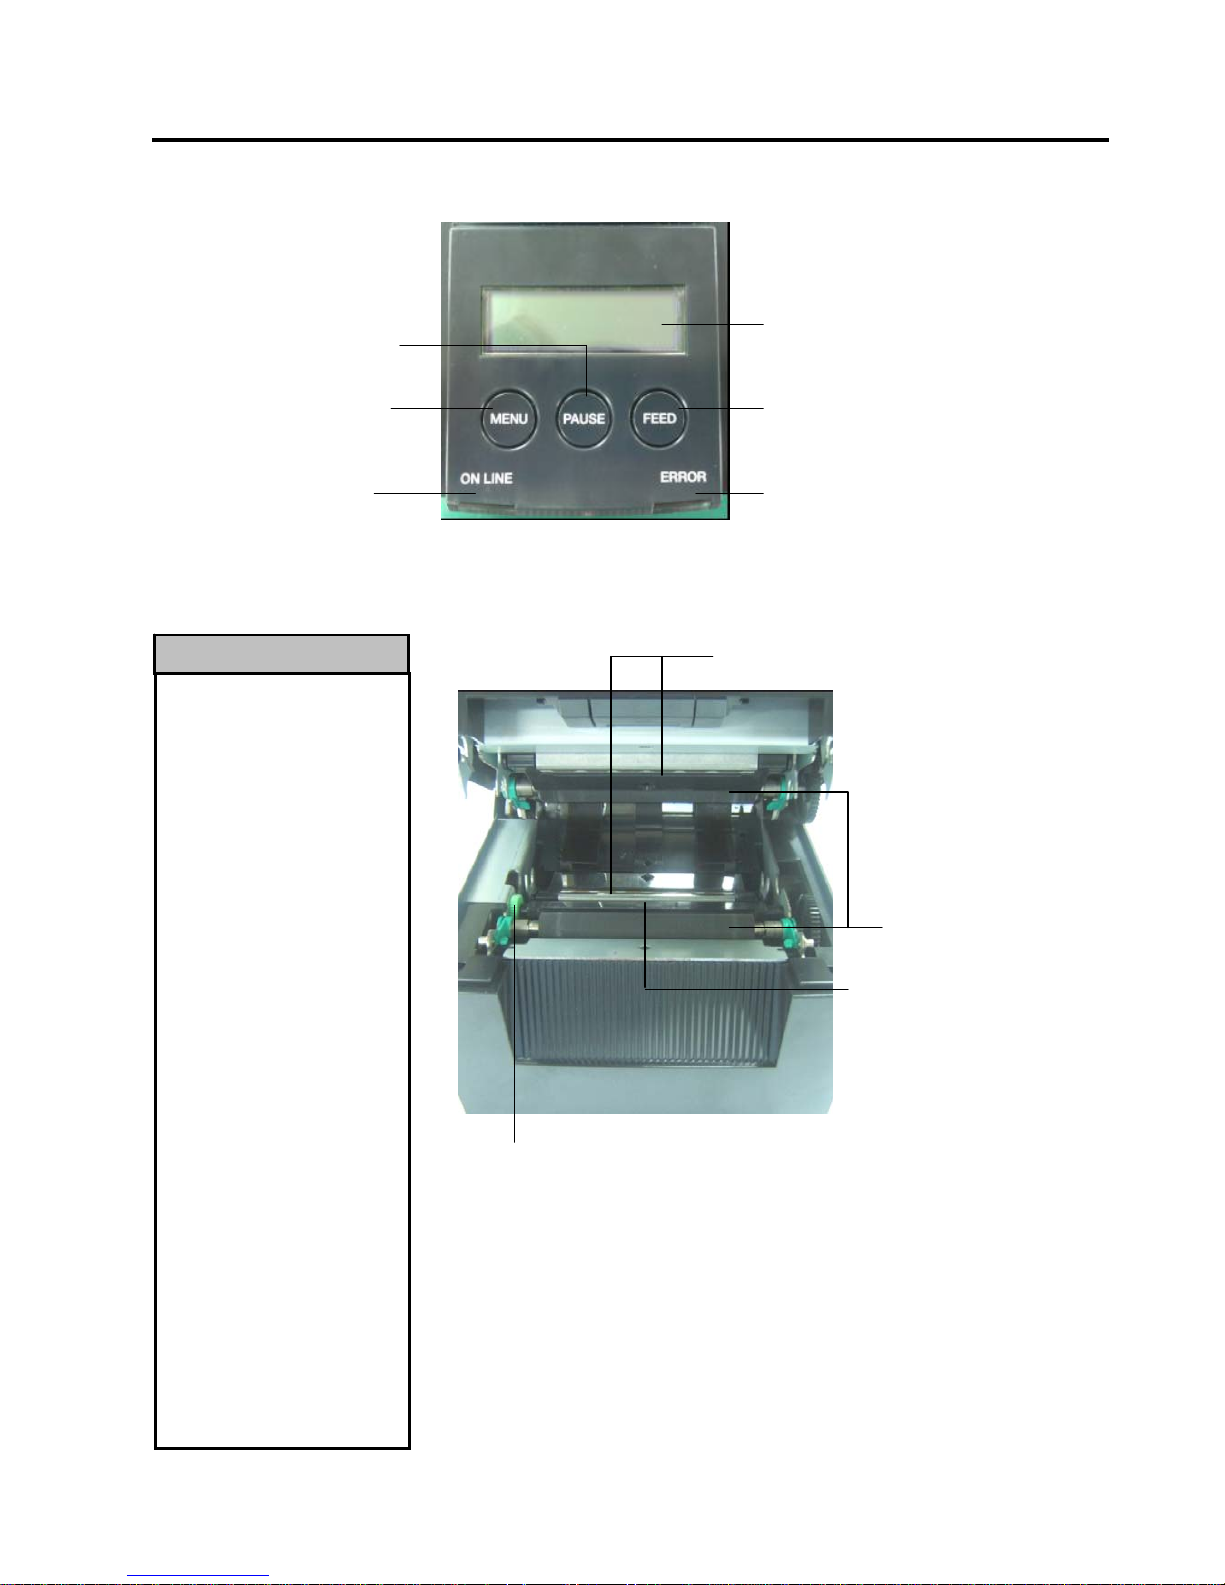
3.4 OPERATION PANEL
(Refer to Section 4 for further information about the Operation Panel.)
3.5 INTERIOR
1. Do not touch the Print Head
or around it just after
printing. You may get
burned as the Print Head
becomes very hot during
printing.
2. Do not touch any moving
parts. To reduce the risk of
fingers, jewellery, clothing,
etc., being drawn into the
printer.
3. To avoid injury, be careful
not to trap your fingers
while opening or closing the
cover.
AVERTISSEMENT
1. Ne touchez pas à la tête
d'impression ou autour juste
après l'impression. Vous
pouvez être brûlé puisque la
tête d'impression devient très
chaude pendant
l'impression..
2.
Ne touchez à aucune pièce
en mouvement. Assurezvous
d’avoir bien arrêté
l’imprimante avant de
charger le média, afin de
réduire le risque d’avoir vos
doigts.
3.
Pour éviter la blessure,
soyez prudent de ne pas
coincer vos doigts pendant
que vous ouvrez ou fermez le
boîtier.
WARNING!
ONLINE LED
(
Blue)
ERROR LED
(
Orange)
LCD Message Display
[FEED] Key
[MENU] Key
[PAUSE] Key
Platen
Label Gap
Sensor & Black
Mark Sensor
Sensor Knob
4. BASIC FUNCTIONS OF OPERATION PANEL ENGLISH VERSION
4.2 Keys On The Normal Mode
E4-1
4. BASIC FUNCTIONS OF OPERATION PANEL
4.1 LED INDICATION
4.1.1 POWER (ONLINE) LED
1. Indicate power on state.
2. Light when the printer power is on.
3. Blink slowly when the printer detects warnings.
4. Blink fast when the printer is in IPL mode.
4.1.2 ERROR LED
1. Indicate error state.
2. Light when the printer detects fatal error.
3. Blink slowly when the printer detects no paper or cover open.
4. Blink fast when the printer detects normal error.
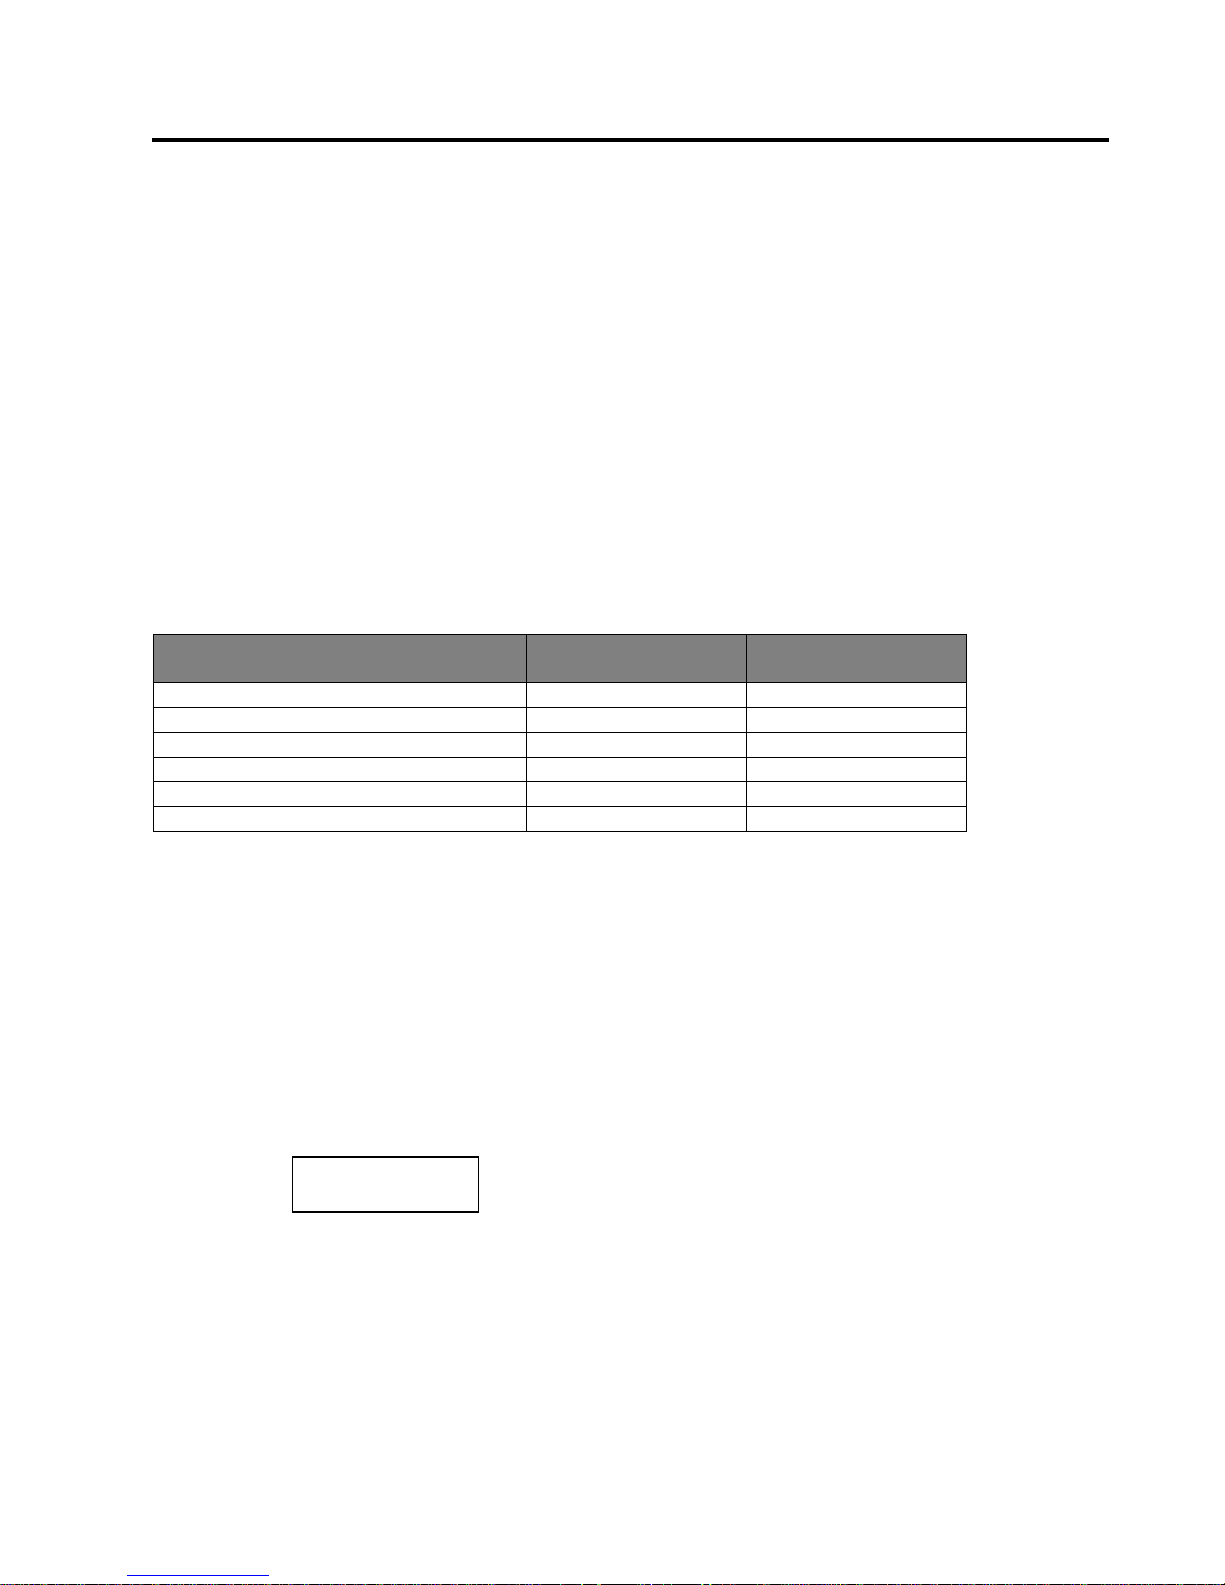
4.1.3 INDICATION OF LED AND MEANING
Printer Status Online LED Error LED
No Error and No Warning ON OFF
Fatal Error ON ON
Paper Empty or Cover Open ON Blinks Slowly
Normal Error ON Blinks Fast
Warning Blinks Slowly OFF
IPL Mode Blinks Fast OFF
4.2 KEYS ON THE NORMAL MODE
4.2.1 MENU KEY
This key enters Menu Mode.
1. Press and hold [MENU] Key for 3 seconds when the printer is in READY or PAUSE state.
This key is not activated during the printer is in ERROR state, processing mechanical activities
or the data is in buffer.
2. To start Menu Mode, a message appears on the LCD, as shown below.
If press [MENU Key during indicates above message, the printer returns to Online Mode.
(Refer to Section 4.3.3 “Menu Mode” in detail explanation of Menu Mode.)
Menu Mode
Press FEED Key

4. BASIC FUNCTIONS OF OPERATION PANEL ENGLISH VERSION
4.2 Keys On The Normal Mode
E4-2
4.2.2 PAUSE KEY
This key switches between READY/PAUSE states when the key is pressed alternately.
USB, Parallel and Ethernet interface are kept ready to host during READY or PAUSE state.
This key is not activated during the printer is in ERROR state.
Press [PAUSE] Key during mechanical activities, the printer stops after printing and feeding the
page of data in buffer and then changes to PAUSE state.
Press [PAUSE] Key in PAUSE state, it changes to READY state.
Ready and Busy
LED
LCD Condition
POWER ERROR
On Off READY
The printer is in READY state and No error.
USB, Parallel and Ethernet interface signal
are ready to host.
Mechanical activities are valid.
On Off PAUSE
The printer is in PAUSE state and No error.
USB, Parallel and Ethernet interface signal
are ready to host.
Stops and pauses mechanical activities.
In “READY” state or three errors condition (LABEL ERROR / BM ERROR / PERFORATION
ERROR), if this key is pressed and hold more than 1 sec, loaded paper will be parked (unloaded) to the
paper parking position.
The message on the LCD is displayed “Parking . . .” during paper parking (unloading).
If paper parking is completed, the message on the LCD is displayed “PARK”.
- In this state, if [FEED] key is pressed, paper is loaded and “READY” is displayed on the LCD.
If paper parking is not completed even if loaded paper is fed in reverse with max. 20”, the same message
as previous is displayed on the LCD. (“READY”)
- In this state, if [FEED] key is pressed, paper is loaded and “READY” is displayed on the LCD.

4. BASIC FUNCTIONS OF OPERATION PANEL ENGLISH VERSION
4.2 Keys On The Normal Mode
E4-3
4.2.3 FEED KEY
This key feeds or loads paper.
This key is not activated during the printer is in an ERROR state and processing mechanical activities.
Press [FEED] Key when Document Length Mode is selected and paper is loaded, the printer
feeds paper.
Press [FEED] Key when Label Mode is selected and paper is loaded,
When Rotary cut is set to “OFF”,
- If paper is present at TOF (stand by) position, Paper is fed to next Label TOF position.
- If paper is present at Manual cut position, Paper is fed to next Manual cut position.
- If paper is present at other position (e.g. just printing is done), Paper is fed to next
Manual cut position.
When Rotary cut is set to not “OFF”,
- Paper is fed to Label TOF position.
Press FEED Key when Black Mark Mode is selected and paper is loaded,
When Rotary cut is set to “OFF”,
- If paper is present at TOF (stand by) position, Paper is fed to next BM TOF position.
- If paper is present at Manual cut position, Paper is fed to next Manual cut position.
- If paper is present at other position (e.g. just printing is done), Paper is fed to next
Manual cut position.
When Rotary cut is set to not “OFF”,
- Paper is fed to BM TOF position.
Press FEED Key when Perforation Mode is selected and paper is loaded,
When Rotary cut is set to “OFF”,
- If paper is present at TOF (stand by) position, Paper is fed to next Perforation TOF
position.
- If paper is present at Manual cut position, Paper is fed to next Manual cut position.
- If paper is present at other position (e.g. just printing is done), Paper is fed to next
Manual cut position.
When Rotary cut is set to not “OFF”,
- Paper is fed to Perforation TOF position.
Press [FEED] Key when Cut Sheet Mode is selected and paper is loaded, the printer feeds paper
to eject.
In case of Paper Load setting is Manual and no paper is set in the printer, press [FEED] Key
after paper is set manually and PE sensor detects paper. Then the printer loads paper to TOF
position in each mode.
Press [FEED] Key when “PARK” is displayed on the LCD, the printer loads paper.

4. BASIC FUNCTIONS OF OPERATION PANEL ENGLISH VERSION
4.3 Special Functions
E4-4
4.3 SPECIAL FUNCTIONS
2ST PRINTER has following Special Functions.
1. Configuration Print
Power On + [FEED] Key
2. Default EEPROM
Power On + [MENU]+ [PAUSE] + [FEED] Key
3. Menu Mode
Power OFF
READY
Power ON
Menu Mode
Pres s and hold [MENU] key
+
turn on the printer
Pres s and hold [ M ENU] key for 3 s ec
Cofiguration Print
Pres s and hold [FE ED] key
+
turn on the printer
Facto ry Default
Pres s and hold [ F EED]+[P A US E] + [FEED] key
+
turn on the printer

4. BASIC FUNCTIONS OF OPERATION PANEL ENGLISH VERSION
4.3 Special Functions
E4-5
4.3.1 CONFIGURATION PRINT
Configuration Print Mode performs list printing of settings in Menu Mode.
It is premised on use of more than 58mm width size paper in this mode.
Sequence:
1. Press and hold [FEED] Key, then turn the printer on.
All I/F are in BUSY state during this mode.
And a message appears on the LCD, as shown below.
2. Press [FEED] Key shortly, it enters Configuration Print Mode and print printer configuration in
the same time.
3. A message appears on the LCD, As shown below
4. Press [FEED] Key shortly or long.
After reset printer, a message appears on the LCD, as shown below.
Print Config.
Press FEED Ke
y
Printer Config.
Printing…
Printer Config.
Completed
NOTE:
1. If Cut Sheet mode is selected as the paper type, can not perform configuration print.
Please change paper type and try again.
2. All keys are invalid during printing printer configuration.
READY
 Loading...