

Page 1

TOSHIBA
Color Television
CZ32T31/CZ36T31
OWNER'S MANUAL
©TOSHIBA CORPORATION, 1999
W
Page 2

Dear Customer
Congratulations! You have purchased one of the finest
Color TV’s on the market!
This manual will help you use the many exciting and
useful features to make your TV viewing more en joyable
than ever before.
Before operating your TV set, please read all these safety
and operating instructions completely and then retain for
future reference.
Safety Precautions
Customer's Record
You will find the model number and serial number on the
back of your TV set.
Record these numbers in the spaces provided below.
Refer to them whenever you call upon your TOSHIBA
dealer regarding this product.
Model Number___________________________________
Serial Number
WARNING:
TO REDUCE THE RISK OF FIRE OR ELECTRIC
SHOCK, DO NOT EXPOSE THIS APPLIANCE TO
RAIN OR MOISTURE.
WARNING
RISK OF ELECTRIC SHOCK
WARNING: TO REDUCE THE RISK OF
ELECTRIC SHOCK, DO NOT REMOVE
COVER (OR BACK). NO USERSERVICEABLE PARTS INSIDE. REFER
SERVICING TO QUALIFIED SERVICE PER
SONNEL
A The lightning symbol in the triangle
DO NOT OPEN
AVIS: RISQUE DE CHOC
ELECTRIQUE-NE PAS OUVRIR
/h\ tells you that the voltage inside this
/ y \ product may be strong enough to cause
an electric shock.
DO NOT TRY TO SERVICE THIS
PRODUCT YOURSELF.
A The exclamation point in the triangle
/|\ tells you that important operating and
• - maintenance instructions follow this
symbol.
I'hi.s TV set may be used only with TOSHIBA stand shown
on page 33. Use with other stands may result in instability
causing possible injury.
CAUTIONS:
TO PREVENT ELECTRIC SHOCK, DO NOT USE
THIS POLARIZED PLUG WITH AN EXTENSION
CORDRECEPTACLEOROTHEROUTLETUNLESS
THE PRONGS CAN BE FULLY INSERTED INTO
THE OUTLET TO PREVENT ANY EXPOSURE OF
THE PRONGS ON THE POLARIZED PLUG.
ATTENTION:
POUR PRÉVENIR LES CHOCS ÉLECTRIQUES,
NE PAS UTILISER CETTE FICHE POLARISÉE
AVEC UN PROLONGATEUR, UNE PRISE DE
COURANT OU UNE AUTRE SORTIE DE
COURANT, SAUF Sf LES LAMES PEUVENT
ÊTRE INSÉRÉS À FOND SANS EN LAISSER
AUCUNE PARTIE À DÉCOUVERT.
Avoid displaying stationary images on your TV screen
for extended periods of time. Stationary patterns generated
by computer displays, video games, stock market reports,
etc. can become permanently engrained on the picture
tube. This damage is not protected by your warranty as it
is the result of misuse. Should you wish to use your
TOSHIBA Television to display still images, it is always
advisable to reduce brightness and contrast settings.
Never leave a computer or video game display unat
tended.
Note to CA TV system installer in the USA:
This reminder is provided to call the CATV system
installer’s attention to Article 820-40 of the NEC that
providc.sguidclincsforpropcrgroundingand. in patlicular.
Specifics that the cable ground shall be connected to the
grounding system of the building, as close to the point of
cable entry as practical.
Page 3

Table of Contents
Set Up...............................................................................................4
Introduction................................................................................ 4
F.xplorijig yoLii* new TV
Selecting ;i location lor the I V'.................................................4
C’oniicctinj^ Your TV
C’onnecling a VCR
Connecting a cable converter box
Connecting a cable converter box and a VCR
Connecting a satellite leeeiver and a VCR
Connecting a DVD (or laserdisc player) and VCR
Connecting two V^CRs........................................................... 7
Preparation.......................................................................................8
Preparing the Remote Control for Use
Installing the Remote Control batteries.................................. X
Location of Controls
Using the Remote with V^CR or Cable TV
Converter............................................................................ 10
Programming the Remote Control............................................11
Controlling other brands of VCR's and
cable TV converters .......................................................... 1 I
Menu function (General Instructions)........................................14
First-Time Operation
Turning the TV set on
Selecting the on-screeii display language
Programming Channel Memory
TV/CABLE function .............................................................. 16
CH PROGRAM function
ADD/ERASE function ........................................................... 17
..........................................................
.................................................................
.................................................................
.........................................
........................
.............................
................
.......................................
........
...........................................................9
................................................................
...........................................................
............................
..............................................
.......................................................
5
15
15
16
16
15
Basic Operation
Watching TV Programs or Video Input..................................... IX
4
5
5
6
6
7
X
Selecting the TV channels
Seieeting the \ ideo input source
Convenient Remote Eimctions
Displaying on-scrcen information......................................... 19
Muting the Sound................................................................. 19
C'hanging quickly between two channels
Adjusting the Picture.................................................................20
Adpisting the picture quality................................................. 20
Seieeting the color temperature
Seieeting the picture preference function.............................21
Adjusting the Sound
Adjusting the sound quality...................................................22
Using the Off-Timer (Sleep Timer)
Setting the off-timer.............................................................. 23
Selecting Stereo/SAP Broadcasts............................................24
Listening to stereo sound..................................................... 24
Activating the surround sound effect
Listening to second language...............................................25
Advanced Operation......................................................................26
Programming Your Favorite Channels
Programming your favorite channels
' Selecting your favorite channels................................................ 26
Operating Closed Caption Feature
Viewing captions or text........................................................27
Using V-CHIP Control
Selecting the V-CHlP CONTROL menu
Adjusting the V-CHIP CONTROL menu
Unblocking programs temporarily
BLOCK CHANNEL function
Reference Section......................................................................... 32
Cleaning and Care
Specifications........................................................................... 33
Before Calling Service Personnel
Limited United States Warranty................................................ 35
............................................................................
...................................................
.........................................
.................................................
............................
...........................................
........
........................................................ 22
..........................................
...................................
.....................................26
...................................
...........................................
.............................................................
...............................
...............................
.........................................
.................................................
..................................................................
............................................
18
18
18
19
19
21
23
24
26
27
28
28
29
3!
31
32
34
Page 4
Introduction
This m;uuml applies nuxicls CZ,i2T.' i aiiJ CZ36T3 I, and lliere ate slight (.hiTeieiKes hetw ecu ihein.
Thc fVonl and rear panel illuslralions in the lc.\t are based on CZ32T3 1. Check the model of yonr TV' before using
this manual,
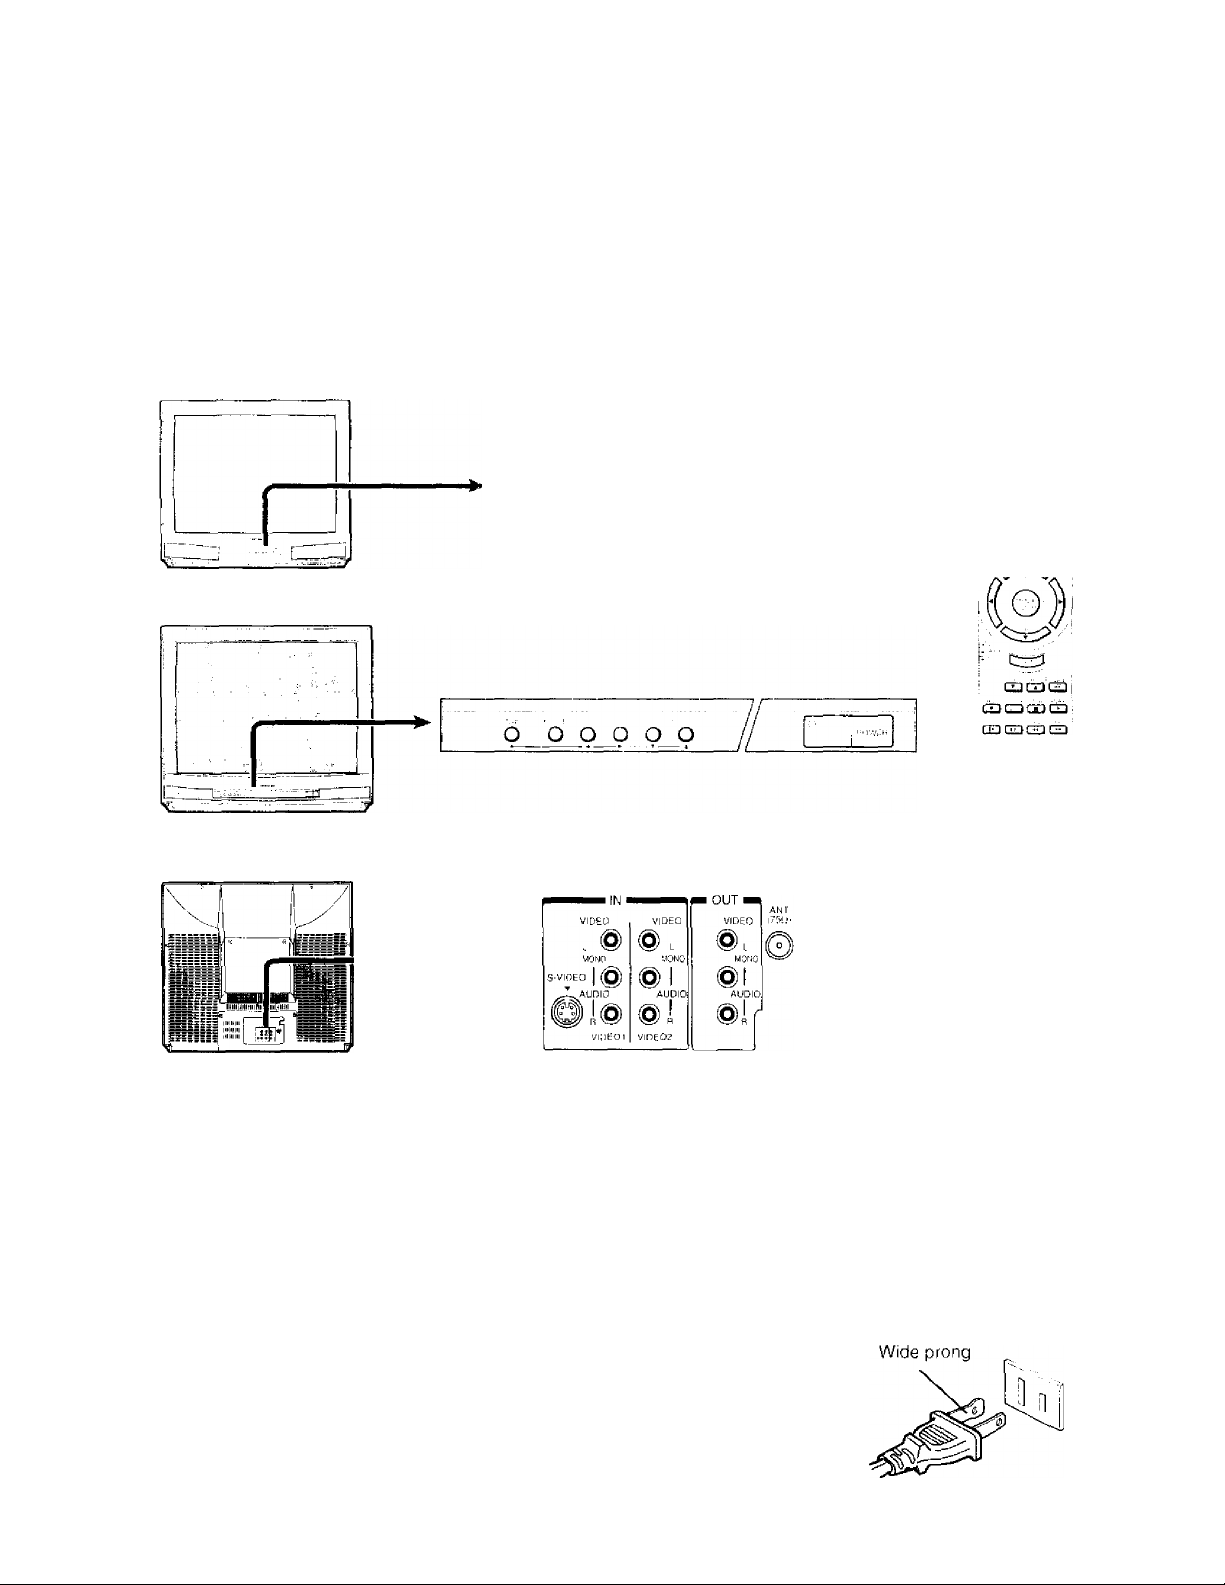
Exploring your new TV
You can operate your TV using the buttons on the frmil panel or the Remote Control.
fhe back panel pro\ ides all the terminal connections you will need to cotinect other equipment to >ottr fV.
CZ32T31
ё © О
О © ©
0 00000
CZ36T31
©о ©
о ® ©
© © ©
Selecting a location for the TV
• F’lace the TV on the floor or on a sturdy platform in a location
where light does not directly hit the screen.
• Place the TV far enough from the walls to allow proper
ventilation. Inadequate ventilation may cause overheating,
which may damage the TV.
WARNING
To itvotti persomii injury:
• Do not slttiid or climb on the fV.
• Do not pLit ;i VCR or any heavy object on top of the TV.
Csution :
riìi' filili’ hiìs ouc jiniiìf’ ivukr ilìiiii thf uihvr
iiiliì iviii fu tiiìlv tinv mn’ ilìUi a sluili/anl
cU-clriruI ornici (120 \ iill. 60 Ihi. f llic
fillio ihìcs noi III imo ihc oiillcl, Irv liiniino il
iironiiil II tlic fìllio Mill (loci noi fi, llic Olitici
/.V fimlnihlc iioii-siitiiiliinl tiihì iiiii.sl he
rc/ilaccil hi' il ifiailllicti clcclrn inii.
liinipcr n ifli thè pilli; or liy lo force il iiilo ii
iioii-ì-liiiidord
Oli
ilei.
Do not
Page 5
Connecting Your TV
11 you haven't connoeted cicclroiiic equipment before, or you hu\ e been fru.stratcd in the past, you may wish to read this
section. {Cables are not supplied.)
• A coaxial cable is the standard cable that comes in from your
antenna or cable converter box, Coa.xial cables use “F"
connectors.
• Audio and video cables are usually color coded according to
use: yellow for video and red and wdiitc for atidio. Tlie red
audio cable is for the stereo right channel, and the white audio
cable is for the stereo (or mono) left channel, if you look at
tlic rear panel ot the 1 V, you vvill see that the terminals are
color coded in the same manner as the cables.
• S-vidco cables provide better picture performance. S-vidco
cables can only be used with S-video compatible components.
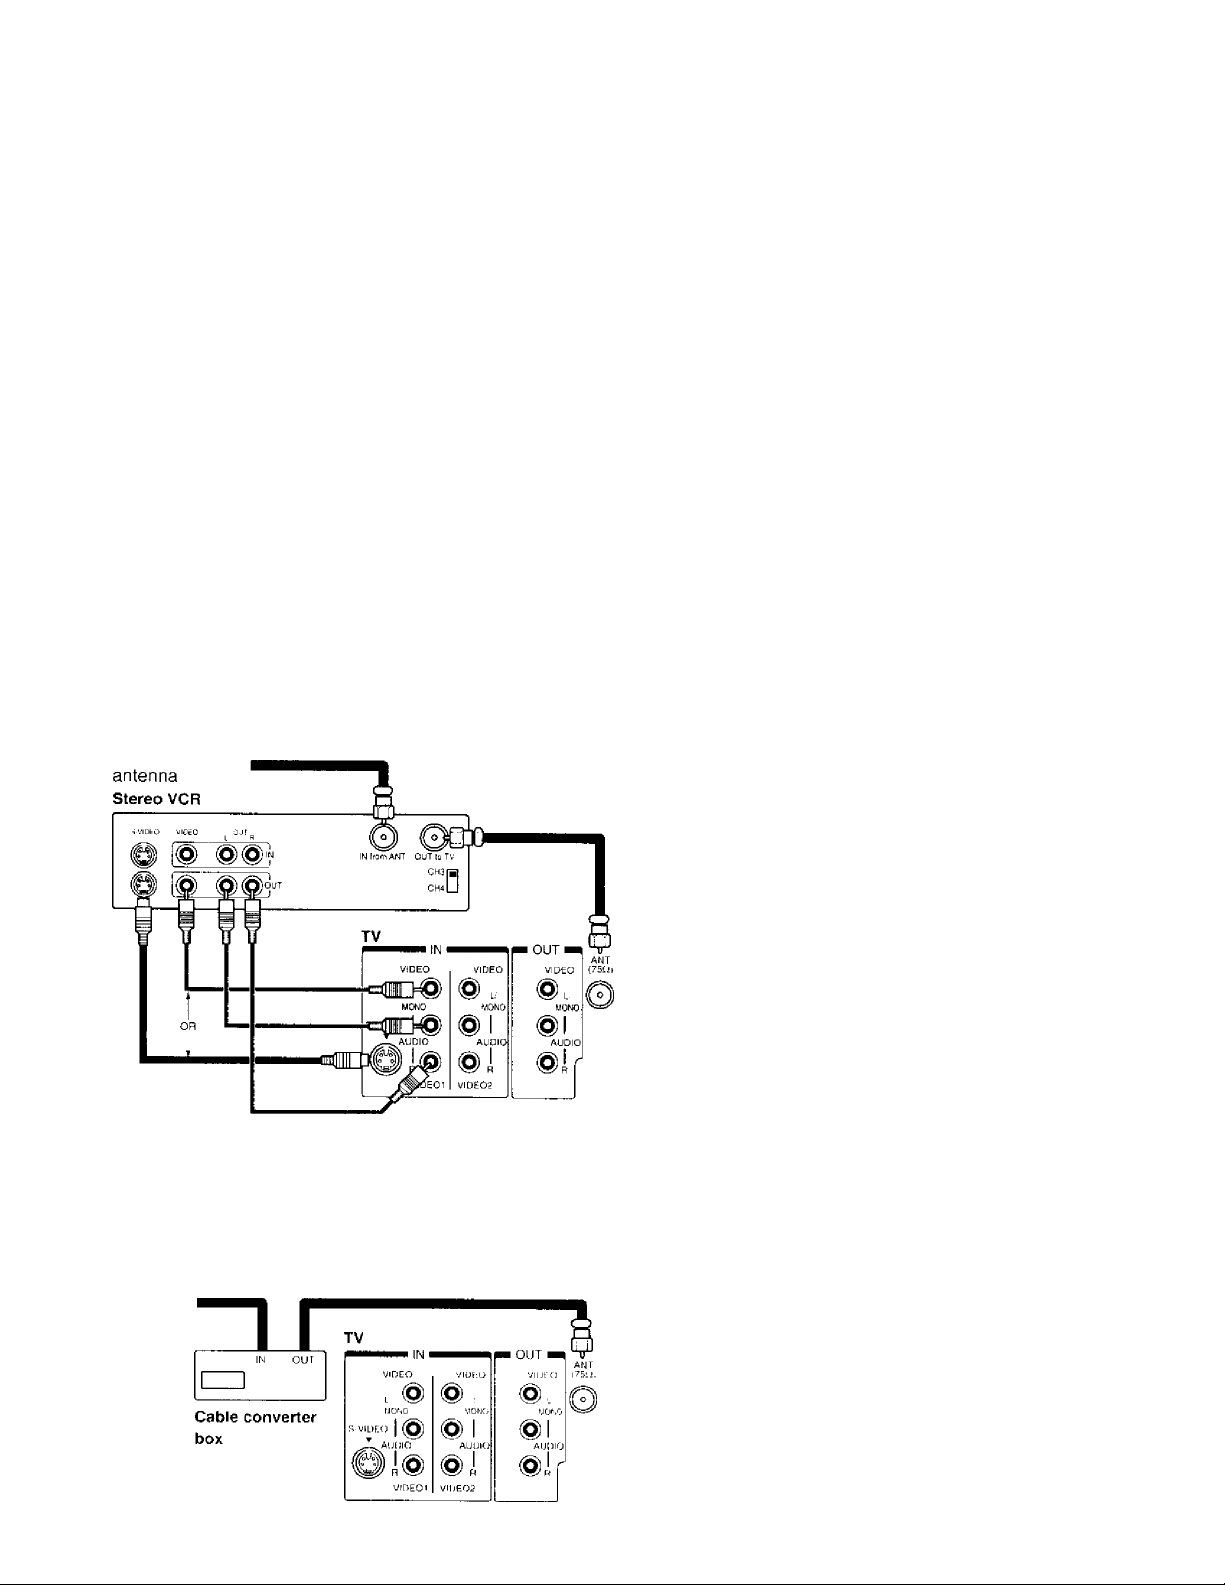
Connecting a VCR
This connection allows you to waitcli local channels and \'idco
programs, play or record on the VCR while watching TV, and to
record from one channel wliilc watching another channel.
CDO
@ =Q|J)=)-
Caution:
Do iiol /'/li.c A(' IT ii: until you haw tiiiishecl
vonui'cliiii: all ojyour equipment.
Antenna Coaxial Cable
AUDIO/VIDEO Cables
S-Video Cable
Connecting a cable converter box
This connection allows you to watch cable ttnd premium channels.
1 Line the TV to channel 3 or 4 (whichever channel is vacant in your
area), then use the converter box to channe channels.
From cable
Caution:
Ifu.tiuit a moiut VCR. conitec! L/Mono to i'CR
Audio our usinty only one audio eahle.
If you hare a .d'HS VCR, u.w the S-video
conueelions and remove the video cable.
Do not eoiwei l the video cable and the S
video cable to VIDEO I simultaneousiv.
Note:
The VIDEO 2 jacks can also he used for
conuecting a second piece of video equipment,
such as a DVD, laser disc player and
camcorder etc n ith audio/video outputs.
See page 7 for one example.
Note:
iUicn u)u u.si-a i ouverter ho.v with \ <>ur TV.
there I’cJcalurcs that vou camino/
program using the Remote Control, such as
block chaunel, andprogrammiug vour
Javorite channels.
Page 6
Connecting Your TV (continued)
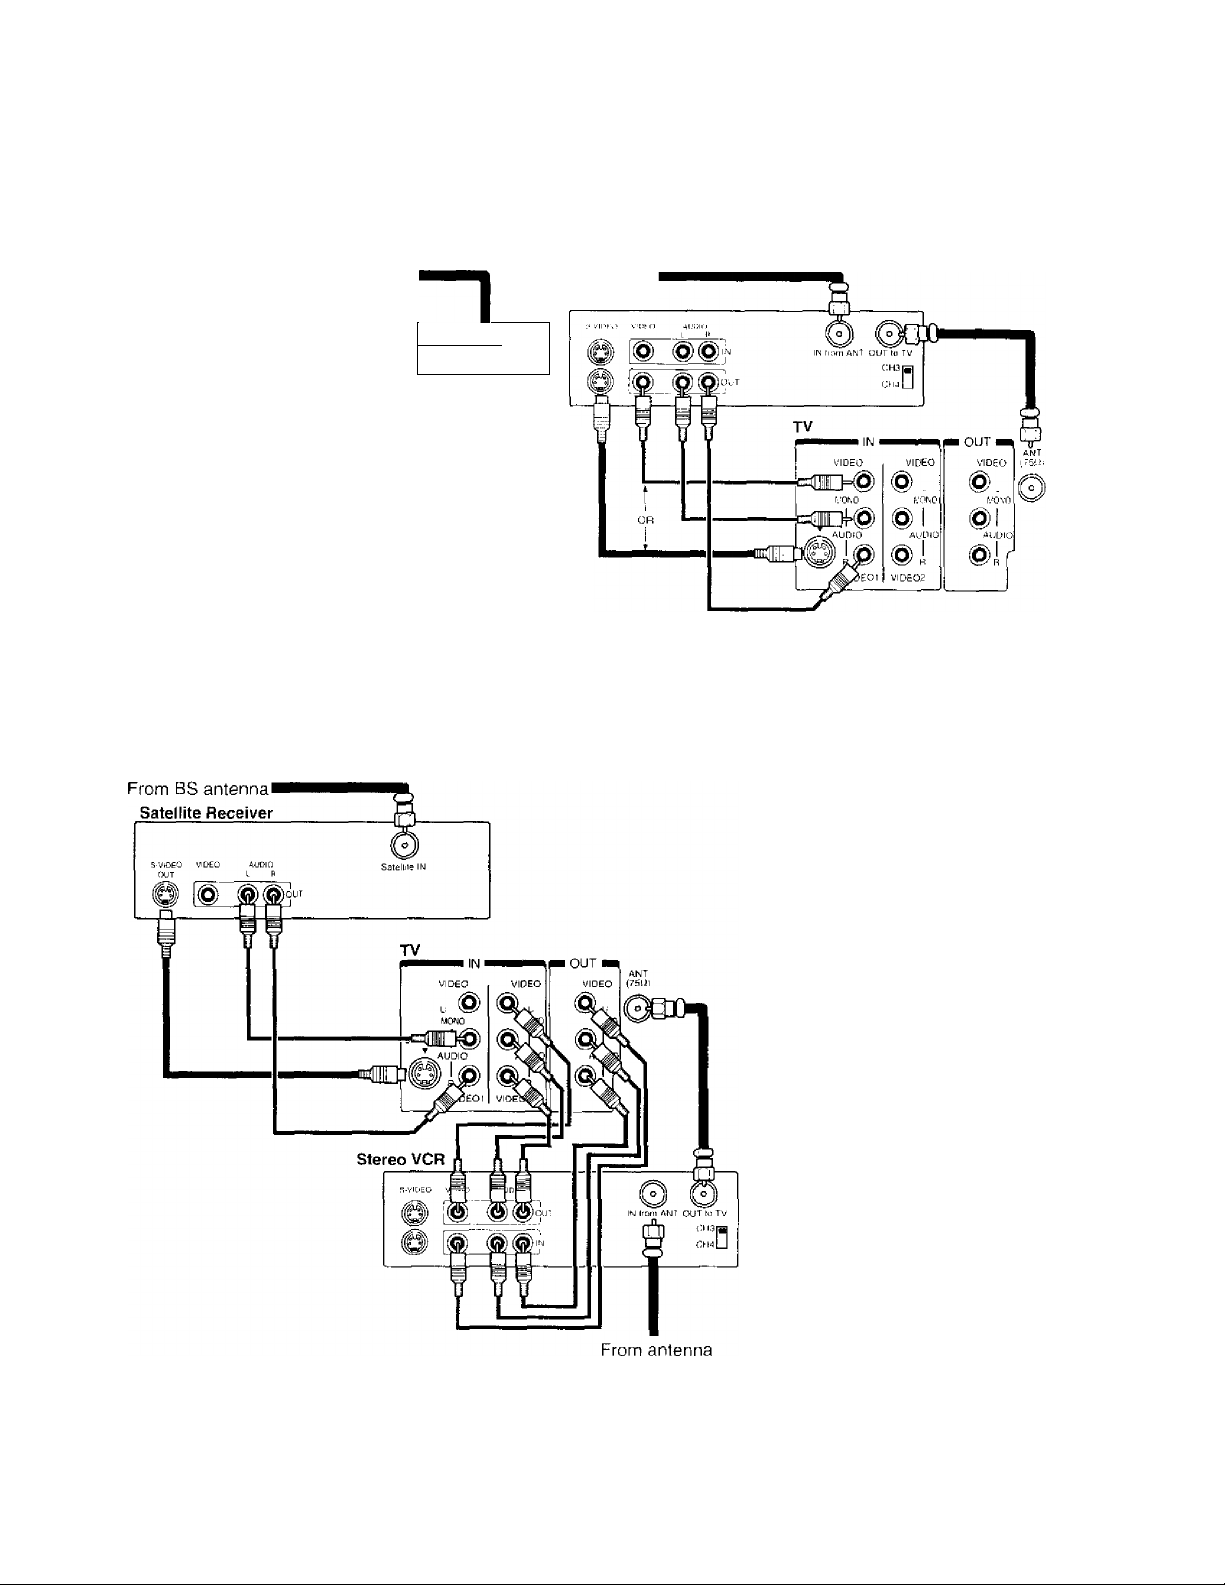
Connecting a cable converter box and a VCR
This connection iillows you to wutdi tind record biisic nnd premium cubic chunneis. us w ell us watch video tapes. Tunc the TV
and VCR chiinnels to d or 4 (whichecer channel is vacant in yotir arett), then use the converter bo.x to change channels.
From Cable
Stereo VCR
t
OUT
IN
1 J
Cable converter box
Caution:
•
!J
vmi hare a iiiwui I 'CR. voiuiecl L/Mono to I'f V’ АшИа
OL'Tiisiiiii /inc auilio aihlc.
l/'voii have a S-l 'IIS I 'CR. use llie S-vnleo l omieí íian: ami
reiiiiive the riilcn ealAi: ai>! emiin'el ihe \ iileo eiihle taul
flic S-\-iiieii ruble Id ¡ IDIIO / shnalhawiuislv.
• li'hen xiu i/.\e a eonrerlcr box u rfh ¡'oar there imtr l>e
features that you viamol program using the remote eoturoi.
such as blocking channels, and programming yoia' faronle
channels.
Connecting a satellite receiver and a VCR
This connection allows yoti to watch satellite, video and TV programsYou can record from the satellite receiver atid TV. as well as record one T\' channel while watehinti another channel.
Caution:
• You cun use a video cable in.slead of the S-video
cable, but the picture (/iialily w ill decrease.
Do not connect the video cable and the S-video
cable to VIDEO / simultaneously.
Notes:
• To watch from the Satellite Receiver, the TV
must select VIDEO I.
• To n atch from the VCR. the TV must sedect
VIDEO 2.
Page 7
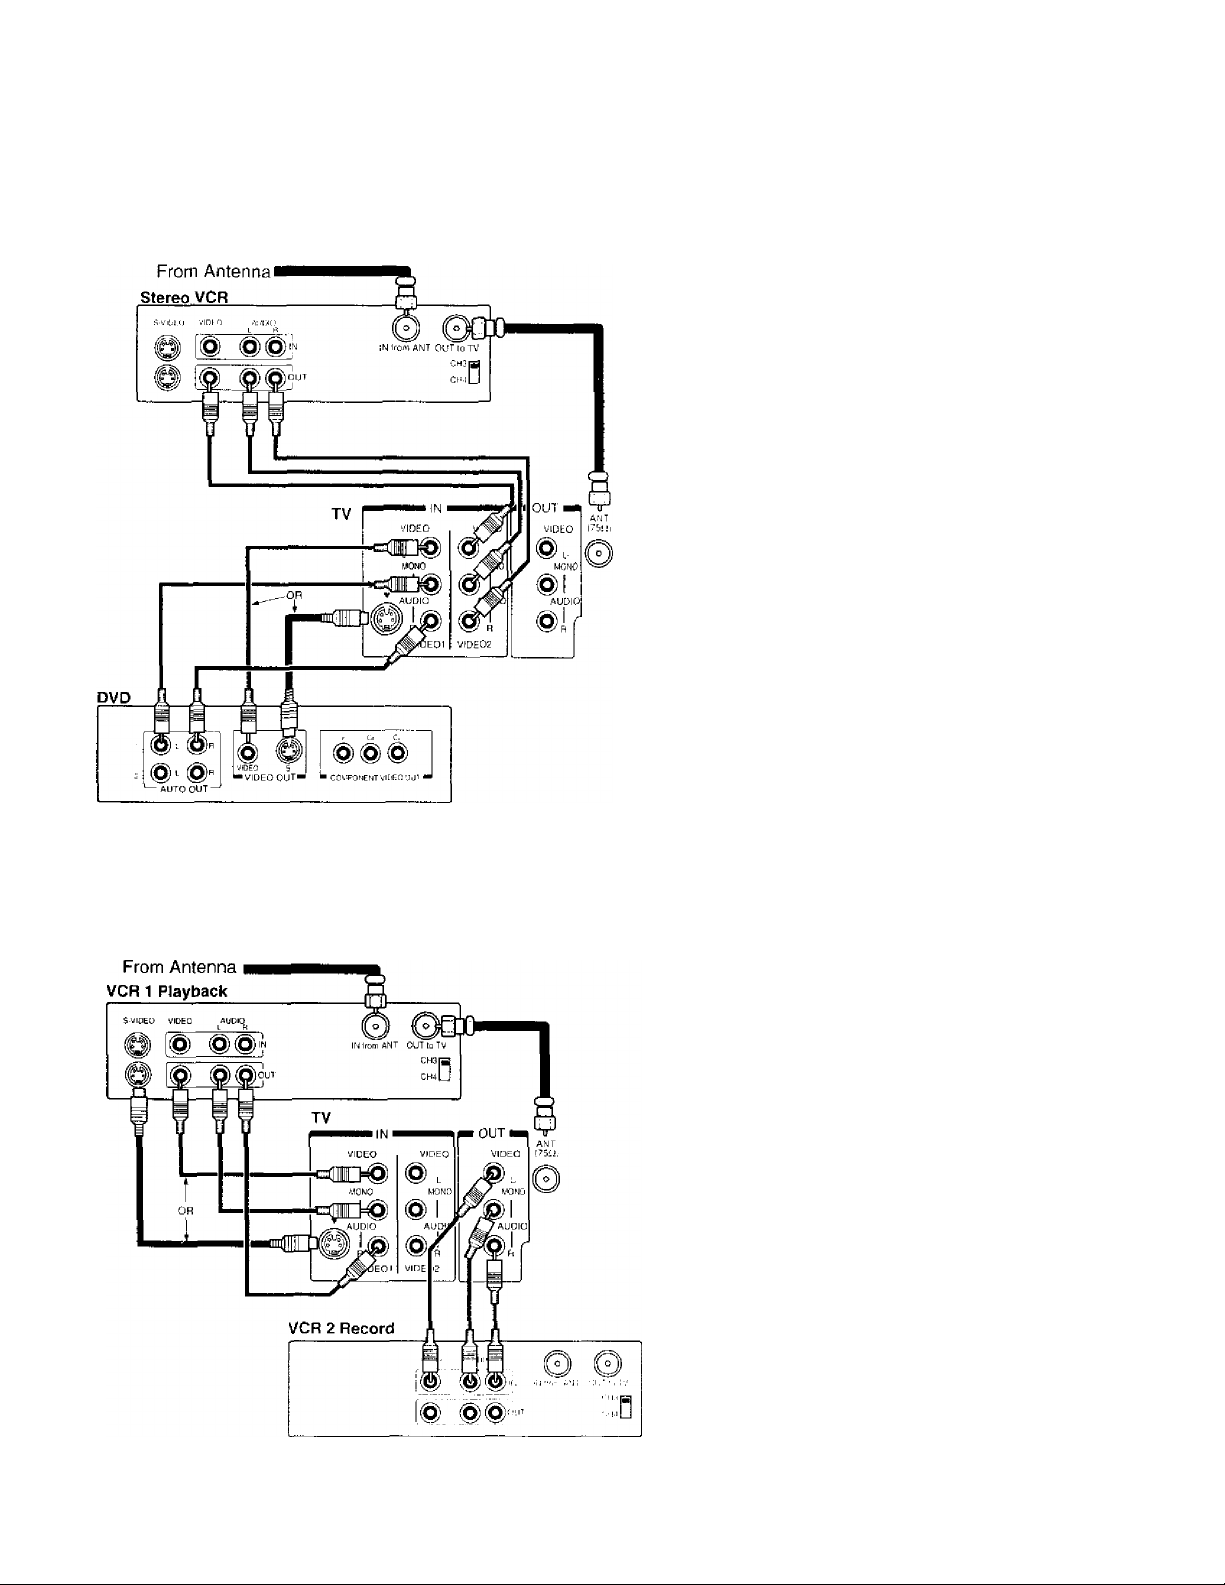
Connecting a DVD (or video disc player) and VCR
Tills connection iillows you to wutcii DVD (or vitlco disc pliiycr), \ ideo or TV prognims and to record TV programs.
C0Ution:
The iii Ki uth nr iz i'd rc for iih i^ of ic/cr/v/D/i
/iroc'oi/ii.v. Itijic s am i uth cr in au T ial s m a \
ni/r ini ;c iij) on ilie p ro ] i 'iii iim i> I t t} i>v rip ,h i l aw s.
Notes:
• hi wiHch Ironi llic I C R. flic TT iiiiisi si'h'rl
I IDEO J
• hi waU'li from Dl 'f). the T\' imisl select I ihl'.O I.
Connecting two VCRs
This connection allows you to record (dub/edit) Trom one VCR to another VCR while watching a video program.
You will also be able to record from one TV channel wdiilc watching another channel.
Caution:
The imaiílhorizetl reeordiiig of íídevtsieiu
/irtigraiiis. video lapes and olher malerUils miiv
infringe lipón íhe provisions o! vopyriglil !aws.
Note:
To iiuindor duhhliig/eddiling. lile l'CK 2 jor
reeording musí seleel LINT! IS'. and the 71 musí
.seleel ¡ IDEO /
Page 8
Preparing the Remote Control for Use
With the Remote Control, you can operate your TV. most VCR models, and cable TV converters together, even if they are
different brand.s. If you will be using your TV with a Toshiba VCR, your Remote Conti'ol is already pi’ogrammed and ready to
use. If you own diffci'ent brands of VCRs and'or convci'ters, you fust have to program your Remote Control.
(Sec "Programtning tlie Remote Control" on page II.)
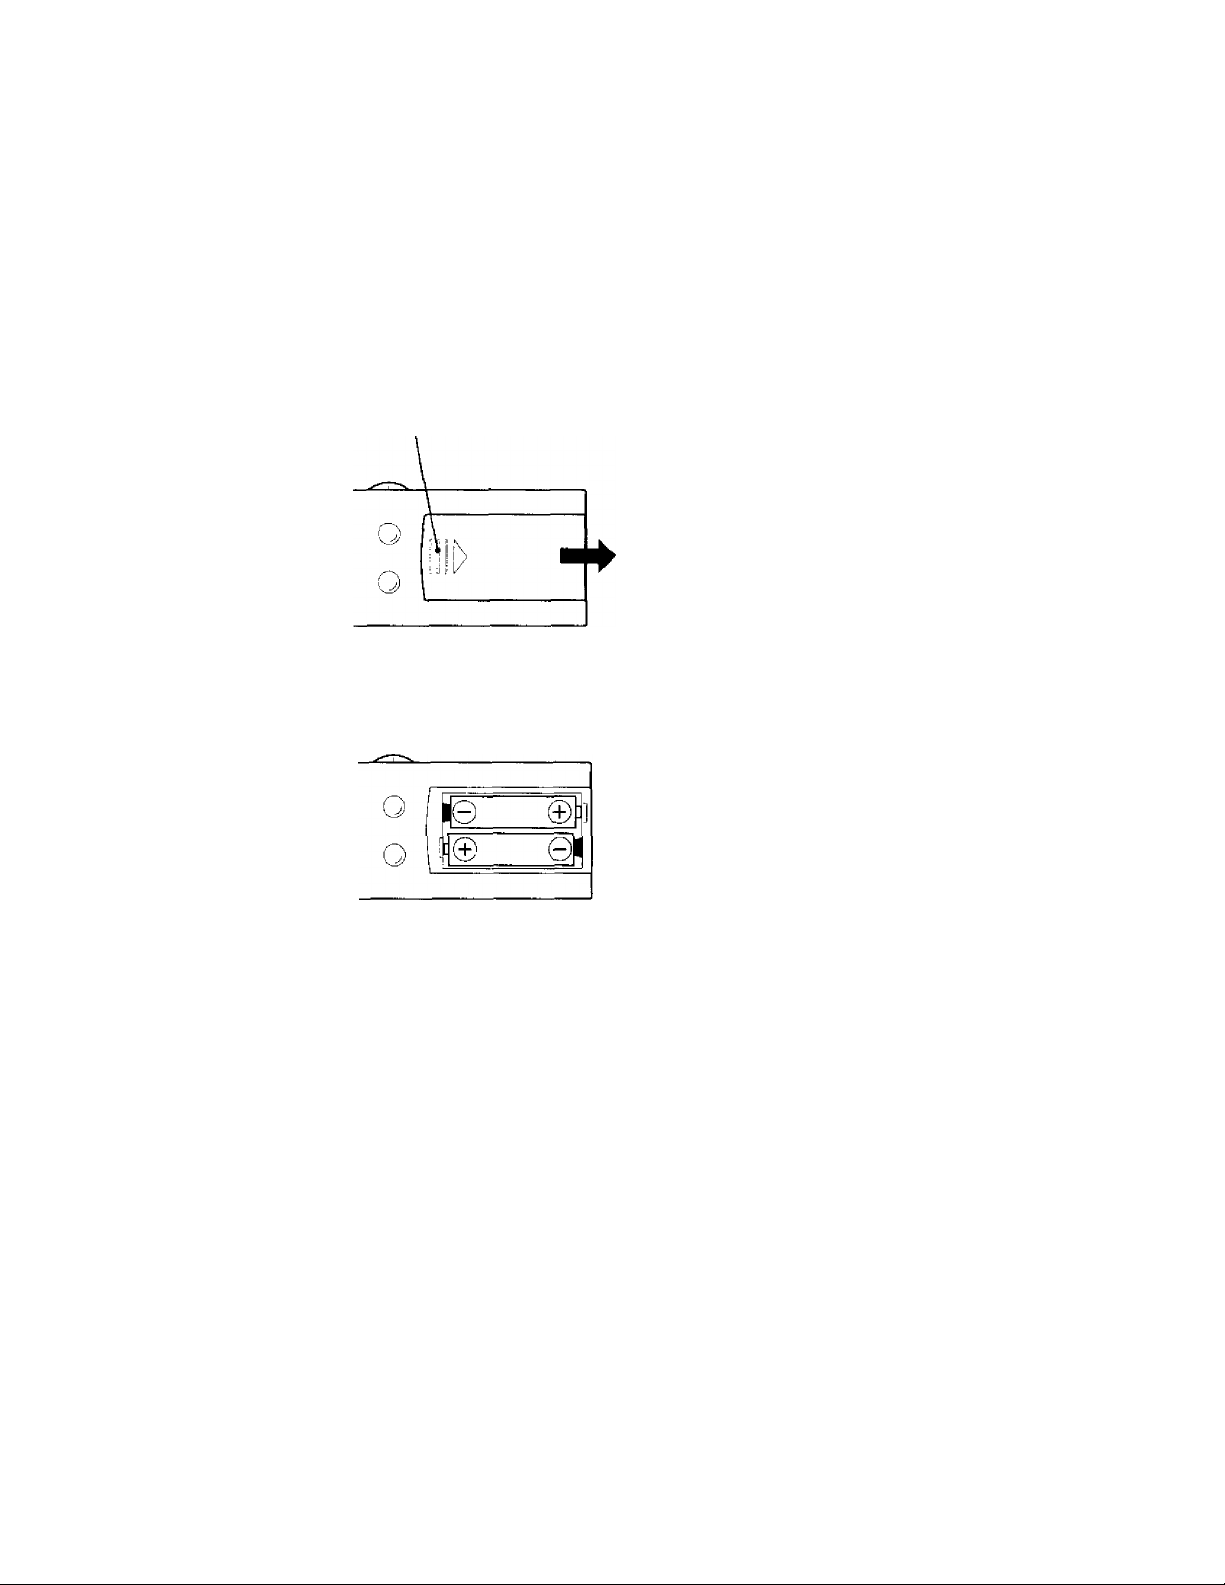
Installing the Remote Control batteries
1 Slide the battery cover off of the baek of the Remote Control.
Press and slide to remove.
2 Install two "AA" .size batteries. Match the + and - signs on the batteries to
the signs on the battery compartment.
Caution:
• Pispow i>f \-oar hiillcric'.s ill a
tiisj’ostil w ctL l)i> Hill lllr(P.v \ onr haUcrii's iuin
ti Jirc.
• Do noi mi.\' hufk’rv ly/k-s or coiiihiiw usai
haik'i irs wuh now ones.
• Rvmovc ik’ail huileries inwiciluitelr lo pi-evcni
haltcrv ikiil trom k'aking iiiio the hatleir
eoittpariitieit!.
• If yiHi do iu)l inleiul to use the remote coiUrol
fill-Cl long lime, remove die hcateries.
Note:
This Remote Control's fiiitetioiis mav or imiy not
operate vour VCR or cable TVcimverlei:
Refer to the owner's manuals supplied with the
c'l/ulpmeilt to see whieh features are available. In
addition, the original controllers may have
features not avaikthie on tiu.s Remote Control. If
vou would like to continue lo use these features,
YOU may wont to use the original remote control.
3 Slide the battery cover back on to the Remote Control until the lock
snaps.
8
Page 9
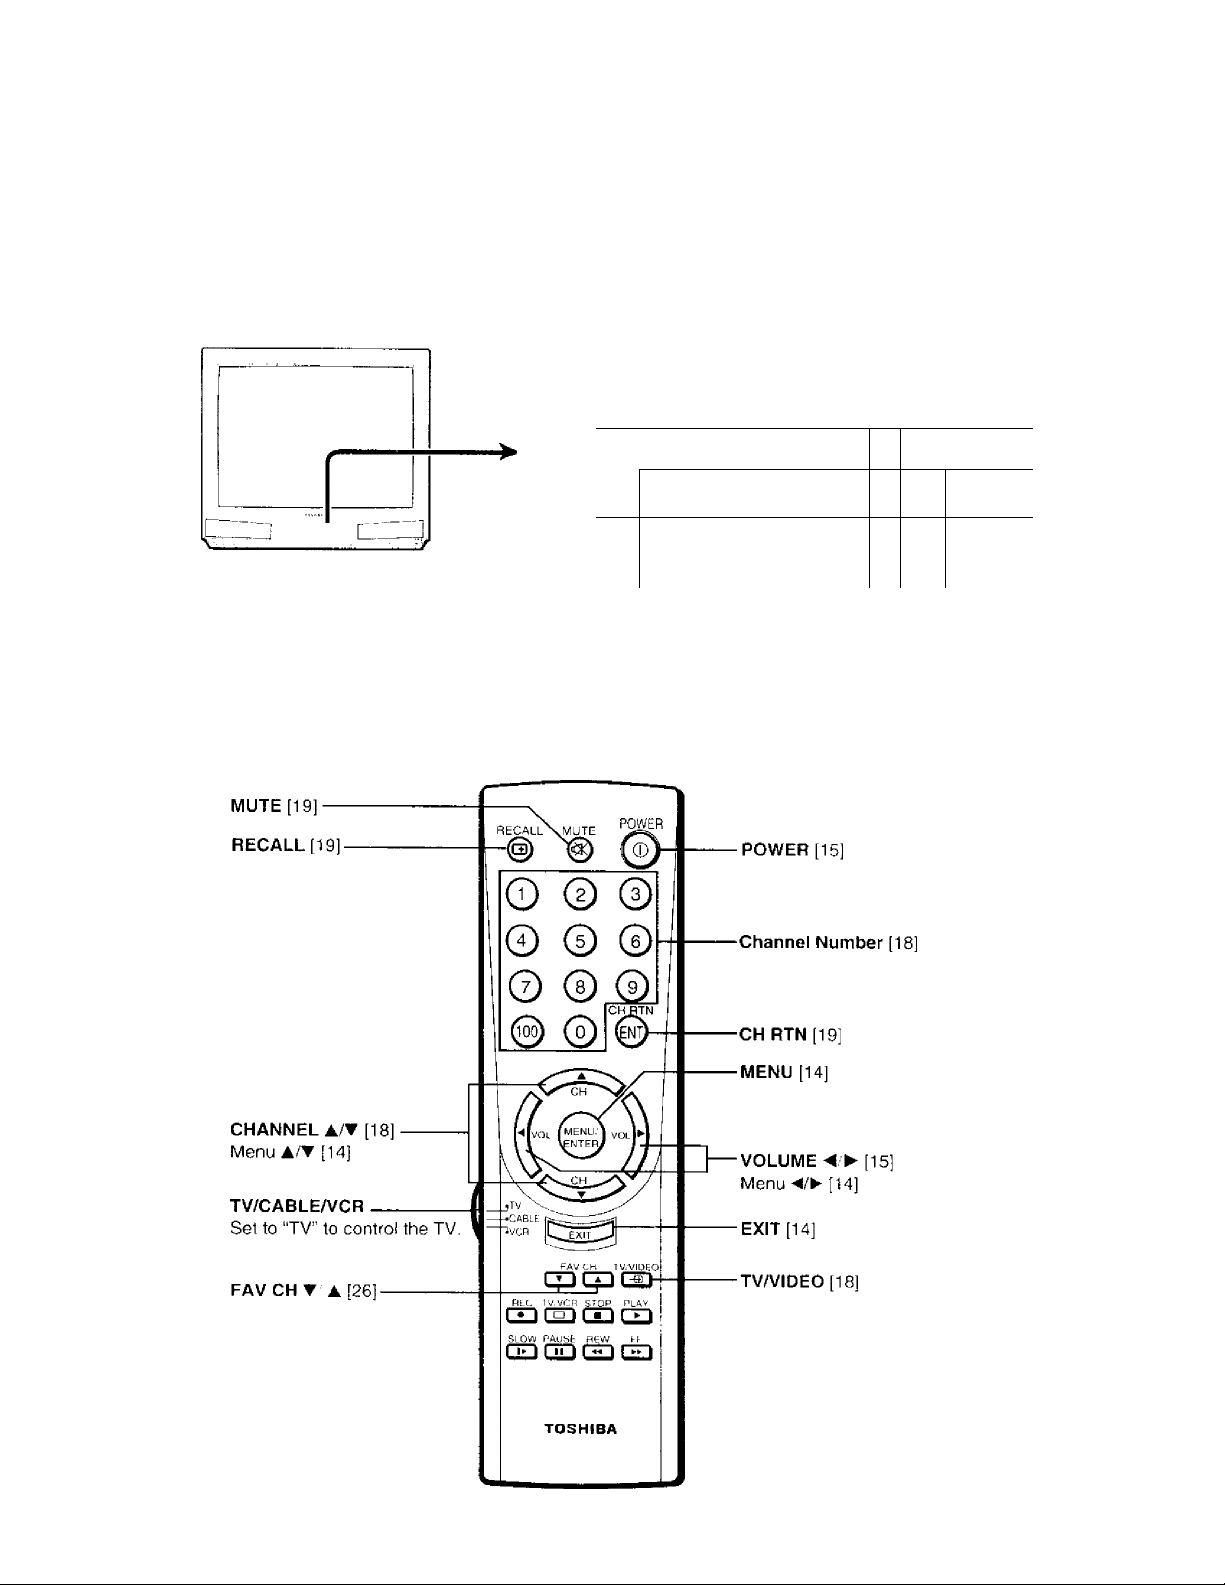
Location of Controls
Only the butUms thaï are nsctl lo operate the TV set arc tIescribcJ hero.
For details on ihe use of each conti ni, rclcr to panes in brackets.
TV front (CZ32T31 represents)
MENU [14]
TVA/IDEO [18]
VOLUME -</► [15]
I CHANNEL T/A [18]
0 00000
1
____
i
◄/►/▼/A [14]
POWER indicator
R
emote
!
i ’
P(
3WER [15]
sensor
Remote Control
Page 10
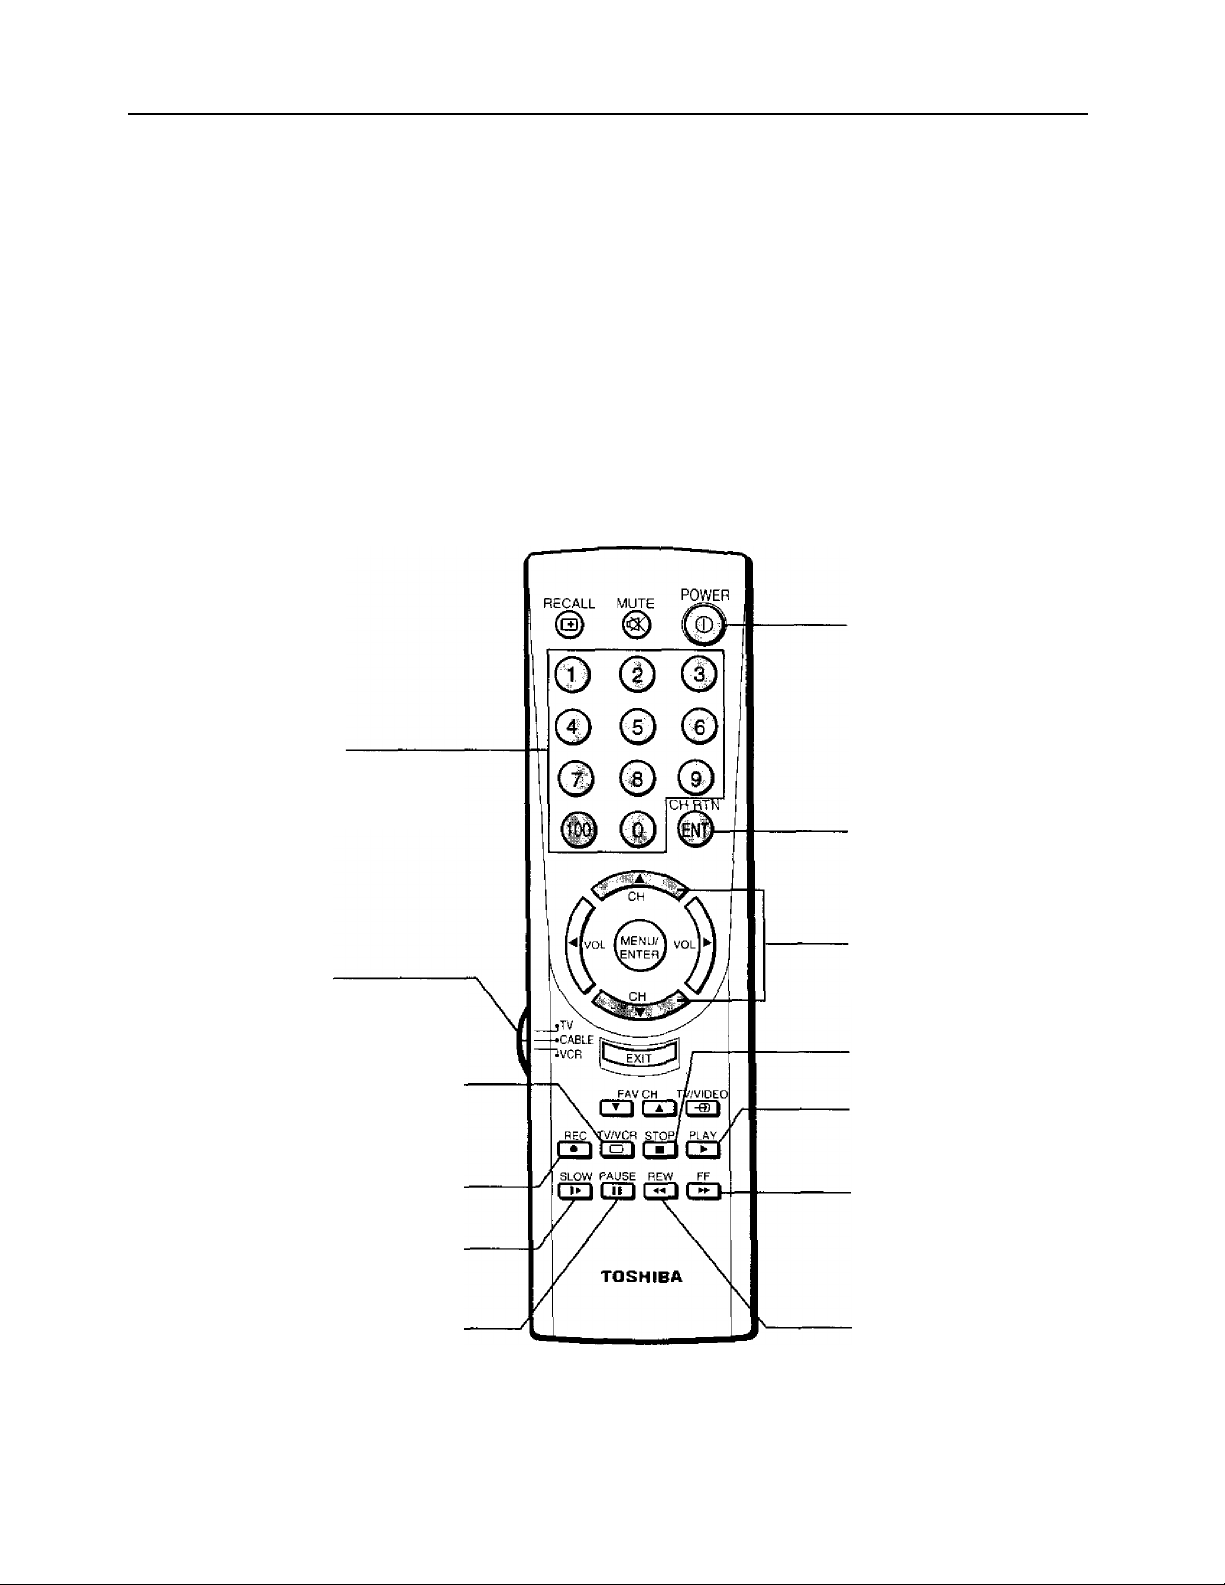
Using the Remote with VCR or Cable TV Converter
• To control a TOSHIBA VCR. first set the TV/CABLE/VCR switch to “VCR” position. The buttons shown
below will then control the VCR. The rest of the buttons operate the TV as usual.
If you have anothei' brand of VCR, you can probably program yonr Remote to conti'ol it.
Detaiis arc on page ! 1.
• To control a cable TV converter, this Remote Conirol must be programmed to recognize the brand of your
converter. See page 1 1.
The shaded buttons can be used to control the cable TV converter.
Set the TV/CABLE/VCR switch to “CABLE” position whenever you control the cable TV converter.
Aim at the VCR or cable TV converter
POWER
Press tlic button to turn tlie VCR
(or converter) on.
Press asiaiii to turn off.
Channel Number
Press the numbers desired
for direct access.
TV/CABLE/VCR
“CABLE”: To control the
cable box
“VCR”: To control the VCR
TV/VCR
Press to select the TV mode to
view one program while
recording another program.
REC (record)
Press to start recording.
SLOW
Press to view a slow-motion
picture in playback mode.
PAUSE
Press to freeze the picture dining
playback or recording.
Press again to release.
ENTER
Some VCR's and Cable TV
converters require “ENT” to
change clianne! number.
CHANNEL A/▼
Press A to select next higher channel.
Press T to select next lower channel.
STOP
Press to stop the tape,
PLAY
Press to begin tape playback.
FF (fast forward)
Press to rapidly advance the tape.
In playback mode, press to view the
picture moving rapidly in forward
direction.
REW (icvvind)
Press to rewind the tape.
In playback mode, press to view
picture ¡not ing rapidly in
reverse.
10
Page 11
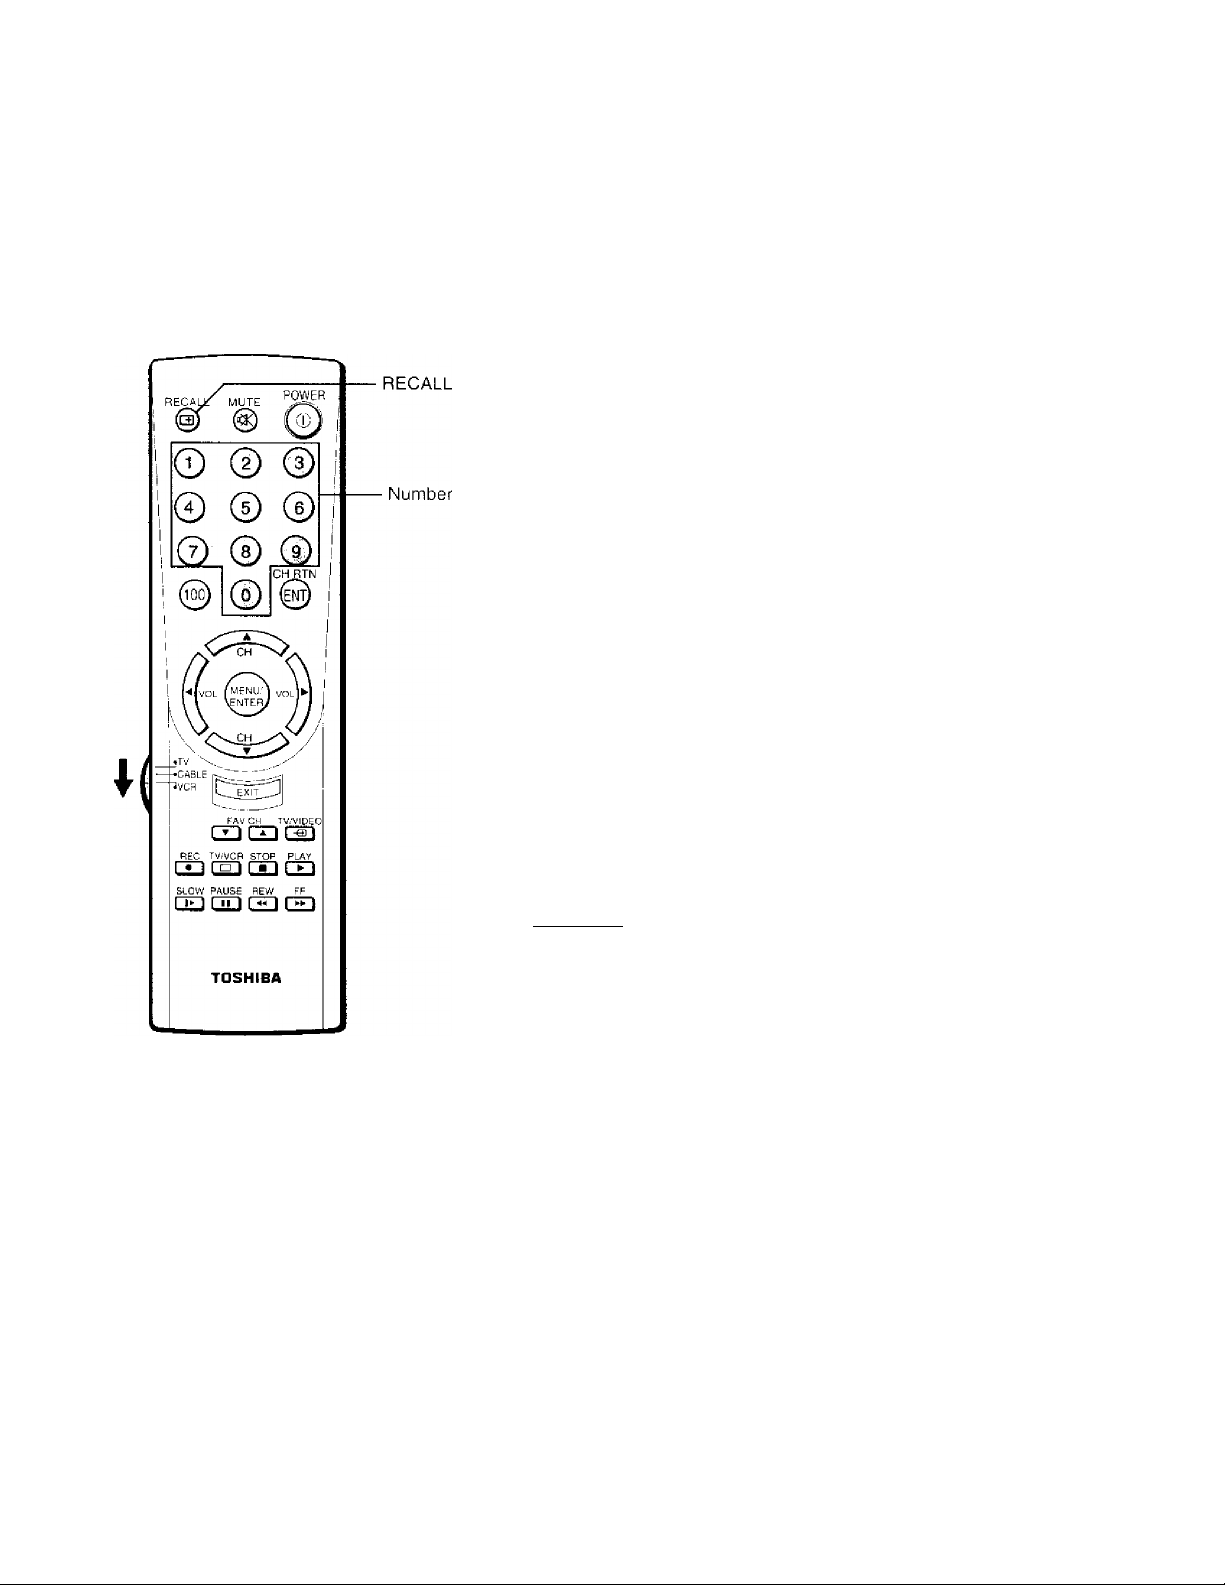
Programming the Remote Control
• This Remote Control is preprogrammed to operate TOSHIBA VCR's.
• To use VCR's other than TOSHIBA models (or cable converter), perform the following procedures before
operating.
Controlling other brands of VCR's and cable TV converters
1 Refer to the "VCR code table" (or "Cable TV converter code
table' ') on pages 12 and I to hnd the code mimher thai corresponds to
the brand name of your Vt R (oi'con\ertei ).
If more thtin one ruimher is listed, try etieli one septirateb' tmtil you find
the one that works,
2 Set tlie TV/CABLEA/CR switch to "V'CR'' (or ■‘C.’\BLh”).
3 I lold down RECALL while pressing the Number buttons for the three
digit code number for your brand of VCR (or converter).
4 I’oint the Remote Control at the VCR (or at the converter) and press
POWER to test the code number.
-If the right Duinher was entered, the VCR (or the converter) should ,
tLirn off. -
-If the VCR {or the converter) does not respond to the Remote
Control, repeat steps 1 to 4 with another code nutnber.
5 Reset the TV/CABLEA/CR switch to ‘TV" to control the TV.
For future reference, write down the code numbers you used:
VCR CODE
CABLE CODE
Notes:
• You have !o reprogrtiiii the Remote Control irlteii von chemge its batteries.
• Some never !'CR s are capable of working on either of two remote codes. These
VCR's have a .switch labeled ''VCR1/VCR2 ".
Ij your VCR ba.\ this kind of .switch, and does not re.spoiid to all the cotie numbers
/or your VCR brand name, set the .switch to another position ("VCRI "or "VCR2")
and reprogram the Remote Control.
_________________________________________
11
Page 12

Programming the Remote Control (Continued)
In some rare eases, you may not be able to operate your noivToshiba equipment with the supplied Remote
Control. Tliis is because your equipment may use a code that is not pro\ ided with this Remote Control. In this
case, please use the equipmetit's own reiinile eoiitrtd.
VCR code table
BRAND NAME
.Acheniiira
,'\iko
/\iwa ..........................
Akai
...................................
...........................
..........................
CODE NUMBER
Opt
2'-)^
OP)
06(I.00;S.0X0.I2.C
BRAND NAME CODE NUMBER
.Icnseii
.....................
,1VC
.........................
Kciiuooti ........................................
KLH
..........................
261 Kodak ...................... . 054,056
American 11 leli
Asha........................................................ 250 L End's
Audio\o.\
Beaumark
...........................................
......................................
Bell & Howell ..........................
054
.......
t)56
250 LXI
12.5
Uo\d
....................................................
.............................................
1 .oeik ................................................ 09!
.........................................................
Maenavo.x
................................
tirandt.................................................... 206 Maenin..............................................
Broksonic
Caiix
.......................................
..........................
Canon........................
Capehart
Ci’arver
...................
......................
140,203.230.314.
3it(l
Marantz...........................................
Marta
..........
056 Matsushita
. 054
MFl........................................................
039 Memorex
. 100
.............
...............................
..................
, 060 Ratin' Shack............
. 027.lt6(l.0Sb Ratli.x .....................
057 (1611,osti
. 091 RCA
OP)
.. 056
.054,058. ion. CAI 68 Runeo
. 259
.. 054,100
.. 056
.. 054
.. 054
.. 019,054,056.058. 229,230,231
065,066,067.! 23.
BRAND NAME
CODE NUMBER
.. 019.056.144
.. 056
Raiulex...................... 056
........................
.. 061,079,084.096,
124,125,168.221
Realistic
..................
,. 019.0.54.056.065.
066,067,081.085.
123.259
Ricoh
..............................................
.............................................
... 053
... 058
Samstmu....................................... 064,259
Sankv ................................................ 058,067
Sansai
Sanvt'
...............................................
Scott
......................
Scais
.....................
........................................
... 060.086
... 065,066,123,259
... 062,064.140.203.
... 0.54,056.061,065.
CCE.......................................................... 091,207 259 066,073,085,123.
Citizen ................................................. 056,297 MCA.................................................... .. 062,080
Colt............................................................
Craie.......................................................
Curtis Mathes
......................
Cybeniex........................................
Daewoo...........................................
Day Iron
Dynatecii
Elcctrohoine
Electrophonie
Emere.K
Emerson
..........................................
.......................................
.............
...........
.........................................
........................................
Fisher..................................................
Fuji...........................................................
Funai....................................................
Gari'anl
.............................................
CiE
...........................
Goldstar....................
(iradieiite
........................................
Haricv Davidson ....
!lami;m.'K.ardon
Harwood
1 Icadquarici'
HI-0
.....................
Hitachi
.....................
...............
......................................
.........................
. 091
. 056,066,091.259
. 054,060,079
. 259 192,233,261
. 039,064.297
. 039
. 019
. 056 NAD
, 056 NEC
. 051
. 019,021,056,062, Noblex............................................. .. 259
080,0S7,140,203, Olympus
227,228,230,231,
297,313,314,380,
498
. 066,073,085.123
. 052,054
. 019,344 061,073,2.59
. 019,344 Pentiix
. ()54,079.(I84,22|
. 037,0.56.057
. 019
.019
. 057,094
, 087.091
., 065 Pulsar.............................................
. 066 Quarter
., 060.061,084,124,
1X5, 254
MGN Technology.
Minolta .......................................... .. 061.124
MitsLibishi.................................
Motorola.......................................
MTC
.......................
Multitcch
....................................
........................
.........................
Nikko..................................................
.......................................
Optimus.........................................
Optoniea
....................................
Orion...................................................
f’anasonic
.................................
Penney .........................................
.....................
Phileo
......................
Philips
.....................
Pilot
...................................................
Pioneer..........................................
Portland ......................................... 039
Protee ............................................
...................
Quarts
...................
Quasar
...................
., 259
.. 062,080,086,094 Shouun........................................
.. 054,067
.. 019,259
.. 019,091
.. 077
... 057,059,()60.<)69.086
.. 056
,. 054
.. 056,067,077.123 Teknika........................................
0X1
.. 498
...054,096,181,244,473
.. 054,056,057.059.
... 061,084.124
054
... 054,08 PI 00.129
... 056
... 077,086
... 091
... 058
065
... 065
... 054,096
Sharp.............................................. ... 067,0X1
Shintom
Singer
....................................
............................................
Sony....................... ... 051,052,053,054
STS....................................................
Svivania
Symphonic
Tatung
.................
.............
..........................................
Teac..................................................
Technics.................................... ... 054,181
Teleftinken.............................
TMK...................................................
Tt'shiba........................................
Totevision
Uniteeh
Vector
...............................
.................
....................
Vector Research,,
Vnico C’onccpts ..
Videoson ic
Wards
XR-IOOO
Yamaha
Zenith
........................
..........................................
..............
................
....................
124
... 091
... 259
... 091
... 061
... 019,054,062,100.
129
... 019,344
... 060
... 019,060
... 019,054,056,071
... 206
... 227,259
... 062,064,085,229.
231,385
... 056,259
.... 2.59
... 064
.... 057,059
.... 059.064,080
.... 259
.... 019,054,061,066,
067.081,091,168.
231,259
.... 019,054,091
.... 057
.... 052,053,058
Page 13

Cable TV converter code table
BRAND NAME
ABC........................ .. 020.022.026.027,
Antronix
Archer
Bdcoi'
Cable Star
Cablctenna
Cablevicw...............
Centui'v
Citizen
Colour Voice
Conitronics
Coulee
Dae Ryung
Eastern
Focus
Garrard
GC Electronics
Gemini
General
Goldstar
Hamlin....................
Hitachi
Hytex......................
Jasco......................
Jcrrold
Macom
Magnavox
Memorex
Movie Time
NSC
Oak
...................
....................
.....................
..............
.............
..................
...................
.........
............
...................
............
..................
....................
..................
...................
Instrument
.......................
.......................
Panasonic
Paragon
Philips
Pioneer
Popular Mediamcs.
Pulsar.....................
RCA
.......................
Reeoton
Regal
.........
.................
....................
....................
...................
.............
................
............
..............
.................
....................
..................
.................
.....................
CODE NUMBER
030.0.72.O.T1.0,76.
066
.. 041
.. 04l.0.Sft.l7^
.. 07.3
.. 07,3
.. 041
.. 041
.. 172
.. 172
.. 044,0.30
.. 059,079
.. 0.7 S
.. 027
.. 021
.. 419
.. 177
.......
.. 075
.. 034,0 S9
.. 030,295
.. 059,163
.. 028,0.39,053,278,
292
.. 030
,. 026
.. 172
.. 022,030,031,033
034,066,295
.. 052
.. 046
., 019
.. 175
,. 089,175
.. 026,038,267
.. 019,040,126
.. 019
044.046,047.048
049,0.30,172
.. 042,163.332
...419
.. 019
.. 040
.. 419
.. 039,278,292
BRAND NAME
Resicnev
Rembrandt
Rtinco
Samsung ................ . 059.163
Scientific Atlanta .. . 023.027.036
Simial
Siijnaliirc..................
SL Marx...................
Sprucer
Stand;) I'd
Starcom
Stargate
Starquest.................
Sylvania
Teleview
Texscan...................
T ocom
Toshiba
Tusa
Unika.......................
United Artists
United Cable
Universal
Viewstar
Zenith
Zentek
.................
.............
.....................
......................
...................
Components
..................
..................
..................
..................
....................
...................
........................
..........
...........
.................
..................
......................
.....................
. (PI
, (130.089
.019
. 034.039
. 030
. 059
. 040
.......
. 174
. 022,034.066
. 034,059
. 034
. 02(1
, 039
, 020
. 03 1,032,078
. 019
. 034
. 041.172
. 026
. 022
. 041,058,075
. 046,079,230
. 019
. 419
CODE NUM
13
Page 14

Menu Function (General Instructions)
We suggest you familiarize yourself with this proccdui e befoi’c using the Menu ftinetion.
To adjust any TV feature, the use of the Mcint function is ivquired. The adjustments that can be made to the TV appear on the
screen.
MENU button (on TV and on Remote)
Htidi time you press MENU, the Pi eture (1,2), .'Vuciio. Setup or Option menu
on-screen display i.s .selected in order.
0 06000
MENU
◄ /►/▼/A
UO'NTilAST
BRIGHTNESS
SHARPNiSS
CCl JR
• !NT
RESET
VOVE|T A] A.
Picture 1
Picture 2
color
TEMRERAfURE : [ COOL 1M£D l IjV iVARM
PICTURE
PReFERENCE. |NORMALjTHEATER
Audio
-A/T
-EXIT
№VE|T AJ 5ELE
UTS'
BASS
TREBLE
balance .■
SURROUN'C 'OK
MCVE» A ?ElC
SrR;S.AR dOHO
.....1...
'.'ER 0 MIN
CABLE T'/[CABLEi
L- PPCGRAM
ACD erase I ApD]erase
FAVORITE C-H
'jcvt^T $ei
Setup
LANGUAGE
[ENQLiSH]FRANCA IS
DEMO:
ESRANOL
STARTISTOP;
C.CAPT.
C1 C2 C3 Ci n
T2 T3 Td[OFF]
hrfOVElT il SCLECTI^ *■ !
Option
▼/A buttons (on TV and on Remote)
Use T or A after you have selected the on-screen menu you want to adjust
with the MENU button.
Each time you press T or A. the function to be adjusted will be selected in
order.
▼ button
A button
.........................
..........................
from top to bottom
from bottom to top
The .selected function will be di.splayed in purple.
Notes:
• The ■ 4/P' hutions will fnncliiw i/.v the
VOLUME
O hiiiu),IS when no menu ili.sphiv
ix on the xci een.
• The A/V hiniinix will Junction as the
CHANNEL ATW
is on the screen.
buttons when no ineiiu ilispla-i
14
buttons (on TV^ and on Remote)
Use ◄ or ► to adjust the function you h;i\c selected with the V/A buttons.
EXIT button (on Remote)
7'lie above four menu displays will automatically disappear from the screen if
no control has been operated for about 15 seconds.
If you want to erase all displays instantly, press EXIT.
_________________________________________
_
Page 15

First-Time Operation
Turning the TV set on
VOLUME ◄/►
-POWER
■A/T
1 Set the TV/CABLE/VCR switch on the
Remote Conti'ol to “TV" position.
2 Press POWER to tnin on the TV.
To turn off the TV. press POWER again.
3 Press VOLUME ◄/► to adjust the \ olumc.
To inci'Oase the volume, press ►.
To decrease tlie \'olumc, press M .
Selecting the on-screen display language
1 Press MENU until the Option menu is
displayed on the screen.
2 Press A or ▼ repeatedly until
"LANGUAGE" is displayed in purple.
VOLUME
TO COMTROL PUSH VOL
LANGUAGE. |ENGL ISHIFPANCAIS
ESPAMÛL
M0VE[T A1 SELECT [A ► ]
J -r
3 Press or ► until your desired language is
VOLUME displayed in purple.
If you .select “FRANÇAIS" for example, the
display language changes to French.
Understanding Auto-Power-Off feature
If a vacant channel is tuned or TV broadcast for a day is finished, the TV will
automatically turn off after about 15 minutes.
This feature does not operate in the VIDEO mode.
Understanding Lust Mode Memory feature
If the power is cut off while you arc viewing the TV and the power is
resupplied, the TV is turned on automatically by the Last Mode Memory
feature. If the power is going to be offer when you leave home for a long
time, remove the power plug from the wall outlet to prevent the TV from
turning on in your absence.
langue■ [FRANÇAIS]
BOUGER[T A] CHOI SIRH ;
15
Page 16

Programming Channel Memory
The channel memory is the list of TV channel ntimbcrs your TV' will stop on wlicn you press the CHANNEL A or ▼ button.
First, use the TVVCABITI and CH PROGRAM fimctinns to preset all active channels in your area.
If necessary, ehtinue the preset channels with the .VDD.'liR ASI'i futielions so that _\ ou can tune ititcr only desiiecl ehannels.
TV/CABLE function
CHANNEL V/A
1 Press MENU imiil the Setup menu is
displayei.1 on the screen.
2 i’res.s A or T until - fV (.'AHLi;'' )S
(iispl.iNctl in purple.
3 Press M or ► initil the motie that corre
sponds to yoLir T\/ signal system is
displayed in purple.
TV: TV' broadcasts signals
(\''IIK ehannels 2 through I.V and UHF
channels 14 through 69)
CABLE: Cahie TV' signals.
(C able ehannels 1 through 12,s)
CH PROGRAM function
1 Press MENU until the Setup menu i.s
dfsphiyed on the screen.
2 Press A or ▼ repeatedly until "CH PRO
GRAM” is displayed in purple.
^^ЭVE IT A I START[-
16
3 Press ◄ or ► to start channel programming.
The TV will automatically cycle through ail
the TV or CABLE channels depending on
the mode selected, and store active channels
in the channel tnctnorv.
CH PROGRAM
CABLE 24
4 When channel programming is complete,
yon will see the message at the right.
CH PROGRAMMING
COMPLETED
CABLE 4
5 Press CHANNEL A or T to make stire the ehtinnel pi-ogramming h;>s
been tlone properly.
Page 17

ADD/ERASE function
.Ai'icr pcrtbi'ining the C'l I PROdRAM I'liiieiioii. ymi e;iii Lidd or ciase speeifie
ehaniiL’ls.
1 Select the channel vtui rvant to erti.se using t he CHANNEL ▲ or T
button, or select the channel yon wtiiii to add using the Channel
Number hnitons.
CABLE channel reference chart
NiimhiTOii
ihh l \
ini: (■ Uil.K
clKtnnoi
1
5
Л-8
51.Л-7)
Number un
this TV
C on'L'spttiiil-
irii-i VIII i;
cbiiniK-l
67
68
67
68
2 Press MENU repeatedly untd the Setup
inetui is displayed on the scivon.
3 Press ▲ oi'T repcaletlly until ■‘ADI)
l•.RASI^” is rlisplased in purple.
4 Press ◄ or ► ;
To erase the channel
Press the button until “Pdi ASI'.” is displtived
in piii'plo indicating that the channel has
been erased from tlic memorv.
To add the channel
Press the button iititil "ADD” is di.splayci.1 in
purple indicating that the channel has been
memorized.
5 Repeat steps 1 to 4 for otlier channels.
WOVE IT A I SELECT[■
6
(ii .Л-6)
14
15 и
16
34
35 V
36 w
Ъ1
38 BB
AA
69
-\
69
92 92
c
и
93
94
95
96 A-4
97
98 A-2
99
100 100
93
94
A-5
A-3
A-1
You have now completed the channel programming.
60
XX 101
61 YY 102
62 ZZ
63 AAA
64
65
66
BBB 124 124
65
66
123 123
125 125
flic above chart is typical of tnany cable
system channel allocations. If In doubt,
consult your cable company.
101
102
17
Page 18

Watching TV Programs or Video input
CHANNEL T/A
RECALL
Channel
Number
Selecting the TV channels
Select a ciiannel in one of llie following two ways.
• To scan the incmori/cd channels in numei ical sequence
Press CHANNEL A select the next higher clKinnel.
Press CHANNEL▼ to select the next lowei' channel.
Press the button again to select the ¡text meinoi i/.ed channels,
• To select a channel directiy
Press the Channel Number buttons and lot)).
1\> select channel 4. press "4" (or pi ess ■■()”. "4").
I'o select channel press '. "S ',
To select channel I 2s, press " 11)0", ’'2", "S" in sequcitcc.
If you cannot select certain eltannels, either PV (off the air) or
CABLE channels
Check if the fV'/CABLE function is properly set. See page 16.
Selecting the video input source
You can use the TV/VIDEO button to view signal coming from other
devices, such as VCRs or video disc players that may be connected to yotir
TV. (See “Connecting Yotir TV" on page 5.)
Note: Tu oyUTo/e v au f /’t ii inl ru lvo c i/ii i/m K 'iil p rnp i’i iy. /1 /tv ti> i hc iii sin iai on :
liini ish ci l \M l h t he \ i ik'n c i/i ii/m ic iU .
MENU
1 Turn the TV and the video equipment ON.
2 Press TV/VIDEO on the Remote Control or
on the TV to select “VIDEO 1" or "VIDEO
2”.
The selected source will be dfsplayed in y, p^Q.,
purple. V I DE02
TO SI^LECT PUSH TV'VIDEO
3 Operate the video equipment normally.
About the Demonstration Mode
When this fiinclion is activated, your TV will automatically display a variety
of its on-screen menus and special features. This function is provided for
demonstration purpose only.
1 Press MENU, then A or T until “DEMO”
in the Option menu is displayed in purple.
ISTART,SrOP
DEMO-
2 Press or ► to select “START".
The on-sereen tlenumstration will slait after
about I .S seconds.
M0VF|T A ! SELEC 1 • ► :
18
fo stop the demonstration
Press EXIT or RECALL on the Remote or select “STOP" in the menu.
Page 19

Convenient Remote Functions
Displaying on-screen information
■ RECALL
-MUTE
■ Channel
Number
■CH RTN
Press RECALL to display the following on
screen information.
• Channel number or VIDEO mode selected
• Stereo or SAP audio status
• V-CHIP rating
Muting the sound
Press MUTE to mute the sound. The word
" M U T h "
will be displayed on the screen as
shown. This is useful during telephone calls or
other interruptions.
To restore the sound, press MUTE again,
\ore:
li'/u’/i ilie
MUTE
huiidii is ¡ircsscil. the Closcd
Ciiplion Jedltii'L' "C! " i.v ui ttviUi'd. ("MUTE"
OH the screi'ii ihspluy n iU disuppear,) To
deuctivute. press the
(This feature only fiitielioiis when the Closed
Caption mode is set to "OFF '.)
MUTE
hiHUnt ¡/guni.
STEREO
SAP
TV-PG
L V
CABLE 4
Changing quickly between two channels
Press CH RTN to return to the last channel viewed.
This is useful should you want to view two channels. This allows you to view
two programs without entering an actual channel number each time.
To operate this function
1 Select the first channel you want to view.
2 Select the other channel with the Channel
Number buttons.
3 Press CH RTN.
The previous channel will return.
Each time you press CH RTN, the TV will
sw'itch back and forth between the two
channels.
19
Page 20

Adjusting the Picture
'i’oLS can adiLisi the pictLirc cjLialily (CONTRAST, RRIGIiTNliSS, SI lARPNi'SS. COLOR ami TIN I) to sLiii yoLiiMa.sic.
Adjusting the picture quality
1 I’fcss MENU repeatedly until the Rietiire
menu is display ed on the scieen.
0 00000
MENU ◄►▼A
2 Press A or T until the item you want to
adjust IS ilis|ilayeil in pta'plc.
3 I’ress ◄ or ► to adjust tlie level.
L\aiTiplc: CON’i PAST adjustment
niodc rlisplay
EsRI'HTNtSP
■■-'r Y A I -'.T 'L ?■ •< I
-A/T
Selection
CONTRAST
BRIGHTNESS
SHARPNESS
COLOR paler deeper
TINT reddish
To reset the Picture and Sound adjustments to the factory-preset status
(inaxiimim CONTRAST and all other adjustments centered)
lower
dtirker lighter
softer
◄
Pressing
►
higher
shaiper
greenish
1 Press MENU until the Picture 1 menu is
displayed on the screen.
2 Press A or ▼ until “RESET" is displayed
in purple.
3 Press ◄ or ►.
20
Page 21

Selecting the color temperature
TIiL’sc scicctions chaiitiL' the appcaiaiicc ofitray and white tunes ofthe
pietiire.
1 Press MENU repeatedly until the Pielure
2 menu is disidayed on the sereen.
2 Press T or ▲ until “COLOR LliMPliRA-
’['DRI''' is displayed in ptirple.
3 Press M or ► itntil the morie \ uu want is
displayed in ptirple.
Mode Picture quality
COOL
MEDIUM
WARM Reddish
Selecting the picture preference function
Bluish
Neutral
Note:
TIu ' R ES ET li inc tin n Lu lju si s ll u' picl iir c
am/ ai iil io /iim 'l iom i.
• ( 'O ST RA ST ..........................................................Ua\ :
• R R /(/H T \E SS
• i O/ A) R........................................................... Ca iil cr
• /'Ey/
• SH A RP SE S S..................................................... i'aule r
• CO i.O R TE M PE RA T CR E ...................................CO O I.
• p/c ri RE ¡‘ RE /T Ai ES i ' E
• //AS S
• /R E// /./ . .......................................................... (a ni er
• /l l/ .AN C E....................................................... Ca iiie r
..................................................
..................................................
..............................
............................................................
Car ne i
Caule!
NO RM A /
{'am er
You can select a desired picture tone from three picture preset modes
(NORMAL, THEATER, MEMORY) instantly.
1 Select “PICTURE PREFERENCET
following the steps 1 atid 2 above.
P ICTLIRE
PREFERENCE |NOWAL| THEATER
UOVE|T A J SELECq-^ ► j
MErjtÛR''^
2 Press or ► until the mode you want is
displayed in purple.
normal theater
fÆMCRVl
N1ÛVE1T A' EELECTH ► i
NORMAL
THEATER
MEMORY
Mode
The picture quality preset at the laetory
Movie-like picture setting
The pielure quality you set (First i'nilow page 21),)
Picture quality
21
Page 22

Adjusting the Sound
You can adjust the sotind quality (BASS, TREBLE and BALANCE) to suit your taste.
Adjusting the sound quality
1 Press MENU until the Atidio menu is
disphiyed on the screen,
0 0 0 0 0 0
MENU
◄ ► ▼ A
2 Press A or T until the item you want to
adjust is displayed in purple.
3 Press or ► to adjust the le\ el.
Example: BASS adjustment morlc dispUiy
MTS
EAS5
TREBii
D.^tLANCE
SURROUND
'.'L'V£'T A
: STfl ] SAP ^O^'0
.............1..............
.............1..............
[ONIOFF
SEl.ECl A ► i
-A/V
Selection
◄ ►
Pressing
BASS weaker stronger
TREBLE weaker
BALANCE
decreases the
right channel
stronger
decreases the
left channel
22
Page 23

Using the Off-Timer (Sleep Timer)
With tlic off-timcr, you can set the TV to turn ofTautomatically after a pre-determined period of time (up to 1 HO minutes in 10
minute units).
Setting the off-timer
1 Pi ess MENU until the Setup menu is
0 0 I 0 0 0
MENU ◄.'►./▼.■A POWER
displayed on the screen.
2 Press A or T until “TIMEK” is displayed in
purple.
TIf.lEfi 0 MIN
TV CABLE ;TV CA9LE
CH ^BOG^AVI
ADC ERASE
V'CKiP CONTROL
= .AvORlT[ CH
IvlOVE^T A' SELECT.»■ I
Time-
№VE W A ! SElECTI-4 ► ;
Q MIN
3 Press < or ► to enter the length of time \ ou
want the TV to stay on.
Each time you press the button, the time
display wilt increase {►)or decrease (◄) by
10 minutes.
...............
To cancel the setting
Press POWER twice, once to turn the TV off and once to turn it on again.
170-*-180 MIN
23
Page 24

Selecting Stereo/SAP Broadcasts
The MTS (Miilti-ch;innel TV Sound) Idiiturc allows you to improve your TV view'ing with high fidelity stereo sound.
This TV' also allows you to activate or deactivate the stereo surround sound effcel.
MTS also provides for an extra chtinuel, SAP (Seeond .Audio Program), used to transmit a second language or other audio
information.
Listening to stereo sound
— ~ - 1 W'hen the TV receives a stereo broadcast,
the word "STF.RF.O" is displayed on the
0 00000
screen \\ henev er the TV is turned on. a
channel is selected, or the RECALL button
IS pressed.
MENU
◄ . ► T'A
2 Press MENU until the Audio menti is
displayed on the screen.
3 Press A or ▼ until "MTS" is displayed in
purple.
If a stereo broadcast is received, “STR" w ill
be displayed in yellow.
4 Press A or ► until "STR" (stereo) is
displayed in purple.
You should leave your TV on "STR" so you
can automatically receive stereo or
monaural sound, depending on the
broadcast type. If the stereo sound is noisy,
select “MONO” to reduce the noise.
Activating the surround sound effect
1 Select the Stereo mode as described above.
2 Press MENU until the Audio menu is
displayed on the screen.
Not e: ":\ nS " ¡ii iu /io ii i v ii nl av oi hih k' w hiU ' in th e
Ì inno made
24
3 Press A or ▼ until “SURROUND” is
displayed in purple.
4 Press ◄ or ► to select “ON”.
In general, you should leave your TV on
SURROUND [ON] so it can ;iutom;itieally
produce suiTOLind stereo or tnontiural sound,
depending mi the broadctist type.
T o deactivate the surround effect
Select “OFF” in step 4 above.
SURROUND ONIOFF]
MOVE If A :■ SELECT]'
Page 25

Listening to second language
1 When the I A' iveeives a SAP broadcast,
lire vvotxi “SAP'' is displayed on the screen.
2 ihess MENU utiti! the Audio nieiui is
displayed on the screen
3 Press ▼ or A until "MTS” is displayed in
purple.
If ;i SAP broadcast is received. "S.AP”
will be displayed in yellow.
4 Press -4 or ► until "SAP” is displayed in
pinple.
You will hear only the second language
from the left and right speakers.
MTi
■ JQVE T A ■ SELECT ^ »- 1
: 1 '.lOijO
25
Page 26

Programming Your Favorite Channels
The Fin oritc Cliannel Programming fealurc allows you lo program up to 12 of your Favorite channels.
Once programmed, you can use the FAV CH T/A buttons on the Remote Control to scan through only your favorite channels,
skipping other channels you do not normally view.
You can use the CHANNEL A/T buttons to scan thi'ough liI! tiic ciiannels you ha\ c programmed in the TV's memory.
Programming your favorite channels
I Select a channel you want to program.
0 0 0 0 0 0
MENU
L
_______^^___________
J
Kvample: channel 2
2 Press MENU until the Setup menu is
displayed on the screen.
3 Press A or T until ‘-FAVORITh; CH" is
displayed in purple.
FAVORI ТЕ CH
MC'VE|T A I STAHTM ► I
-A/T
-FAVCH
T/A
4 Press ◄ or ► to display the FAVORITE CH
program menu.
Each time you press or ►, you are guided
between "SET" and “CLEAR”.
FAVORITE CH
[SETICLEAfl
d 0 0 G
0 0 0 0
0 0 0 0
¡TV CVAN.CABLE:BLUEi
SELSCT[4 ^ ! SET|T A ]
5 To program channels:
Select “SET". Then press A or T until the
channel number to be programmed (“2” in
this example) replaces “0" on the display.
To erase channels:
Select “CLEAR". Then press A or T until
'■()" replaces the channel number to be
erased, “2" for example.
6 Repeat steps I to 5 for other channels.
Selecting your favorite channels
fo select the favorite channels you have programmed, use the FAV CH
T/A buttons on the Remote Control instead of using the CHANNEL A/T
buttons.
FAVORJTE CH
SETICLEAR]
2 0 0 0
0 0 □ 0
0 0 0 0
|TV:CYAN,CABLE.BLUE!
26
Note: '¡'he FAV CHW/A hiiiums cannot /itnclioii i/'yini have no! ¡/ro^rciiiliitct/yoiii
favorite ehimneis.
Page 27

Operating Closed Caption Feature
You lutvc two options with the closed euption teature: captions or text,
.A caption is a printed \'ersion of the dialogue, narration and/or sound effect of a TV progratn.Text is information not related to
the program tliat tippears on the lower half of the screen.
Viewing captions or text
1 Select the desired program.
The captioned programs are tisually noted
0 0 0 0 G 0 C
in your toetd TV listings by service marks
sLiL'h as "CC".
MENU ◄/►/T/A
2 Press MENU until the Option meiui is
displayetl on the screen,
3 Press A or ▼ until "C'.CAPT" is displayed
in purple.
4 Press or ► to select the dosed caption
mode.
• Select Cl, C2.C3, or C4lo
view Ciiptions. Seleci Cl for
traiisiation of the primary
language in your area.
Cl C2 i
T2 T3 TJ OFF '
MOVEiT A' SELECT!
;Ct ;C2 C3 C4 i
T2 T3 T4 OFF
M0V£;T a ] SELECTS ► I
Select T1. T2, T3, or T4 to
view Text
To turn off the closed-captioned feature
Select “OFF” in step 4 above.
Notes:
• A closi'd-fiijtlioned signal /iti/y mil he ilcviidcd in llic foUowin;^ sitiialioiis.
Wlwu n video iape has been duhhed.
When die signal recepliim is weak.
When ihe si^^iuil rece/il/on is luni-suinilard.
• If yon seleel a i losed-cii/iliiined ihwinel and the Te.\l made, die text screen always
appears.
However, text charuvters are not displayed when no signal is aired.
27
Page 28

Using V-CHIP Control
Some 'I'V progniins iincl movies include signals that classify the content of the program (\ iolenec, sex, dialog, Itingutige).
The V-CHIP Control feature in this TV detects the signals and blocks the programs according to your select ions.
To use this feature, perform the following setup.
Selecting the V-CHIP CONTROL menu
1 Press MENU until the Sfi fCP menu is
(.li.spho erl. I hen press ▲ or ▼ repeatedly
iinlil "\ -Cl 111' C ’ONTi\( Jl " is displav cd
in pui'ple.
2 Press or ► ti.i displav the fnii corle
entering niorle.
• ractory reset status
Set your 4 digit code by pressing the
Number buttons (0-h).
'iLOCix I HCi I S ИЕSEI
^’ir.ASr ENTE'i f.EW PIN CO'JE
To return to the normal pietttre
Press EXIT
example; fo enter "111 1)"
Press 1. 1.
1
. and II m order.
• When the pin cttde is alreadv stored
Press the Number buttons (0-d| to
enter the 4-digit pin code used to
block chiinnels.
If a wrong pin code has been entered
The message will appear. Try to enter the
correct code again.
if you can not remember the pin code you
have stored, while in the pin code entering
mode, press the RECALL button four
times vvilbin seconds.
The pin code you have stored w ill be
released, (f’aetory reset status),
3 After about I second, the screen changes
to the V-C4I1P CONTROL momi as
sliown.
BLOCKING IS ACTIVE
PLEASE ENTER Pi\ CCD:
SELECT|0-9j END;EXiT|
INCORRECT PIN CODE
PLEASE ENTER PIN CODE
SELECT ; 0■ a] END|EX IT;
ENARiE SIOCKING T
SET RATING
SE I ill LICK : EG 'TI'T I ONS
NET; I’lT ,01 IF
I'LLll,.-.
28
Continue to set each item following the steps
on the next page.
Page 29

Adjusting the V-CHIP CONTROL menu
V-CHIP CONTROL menu
ENABLE BLOCKING : [Y|N
SET RATING
MOVE[T *] SELECT(4 ►
To select each item
Press Tor ▲.
ENABLE BLOCKING
Press ◄ or^ to select "Y" or "N".
Y: To enable your setting (Block i
N: To release your setting (Unblock)
The Bl.OCK i 7/, l ;\',V7-.7, liuu lion is nut nj/ecicti with this
seleviioii.
SET RATING (Setting the movie or TV' ratings for your choice)
1 Press or ► to display the SET KATINCi menu.
2 Press T for A) to select item.
3 I’ress ► to block (display "X")
Press to unblock (display '■/”)
4 Repeat steps 2 and 3 to set the no.\t item.
1st menu
MPAA RATfWG
>! NC17 R PG13 PG G
YOUTH Tv RATING:
Y7FV Y7 Y
X X ^
ttv rating BACK TO V-CHlP MENU
MOVE;T k ] SELECT[-4 > ]
Press T
Press A
2nd menu
TV RATING MA M PG G
DIALOG: X X
SEX XXX
VIOLENCE: x x x
NO DLSV X V V/ V
M0VE[Y A 1 SELECT[4 ► j
Tlic rating ofllic TV programs you are now
watching can be confirmed by pressing the
RECALL button,
-PG
-V
-L
About Rating
MPAA RATING: Independent rating system for movies
G: General Audience (Appropriate for all ages)
PG: Parental Guidance Suggested (Some material may not be suitable for children)
PG13 : Parents Strongly Cautioned (Some material may be inappropriate
for children under 13)
R: Restricted (Under 17 requires accompanying parent or adult guardian.)
NCI7; Not intended for anyone 17 and under
X: X-rated (For adults only)
TV' RATING: Independent rating system for Broadcasters
YOUTH TV RATING: '
Y: AM Children (This program is designed to be appropriate for all children)
Y7, Y7FV: Directed to Older Children (This program is designed for children
age 7 and above. Note: For those programs where fantasy violence
may be more intense or more combative than other programs in this
category, such programs will be designated TV-Y7-FV.)
G:General Audience (Most paients would find this program suitable for
all ages.)
PG: Parental Guidance Suggested (This program contains material that
parents may find unsuitable for younger children,)
D) Some suggestive dialog L) Infreqiieut coarse languaue
S) Some sexual silualions VI Moderate violence
14: Par cuts Strongly Cautioned ('fhis program contains some material that many
parents would liiid tiiisiinablc for chiklicn under 14 years of auc.)
D) intensely suggestive dialog L) Strong coarse languaue
S) Intense sexual situations V) Intense violence
MA:Mature Audience Only tTliis program is specifically designed to be
viewed by adults and therefore may be unsuitable for children under 17.)
L)
Crude or indecent language S) Lxplicit sexual activity
V) Graphic violence
29
Page 30

Using V-CHIP Control (continued)
Adjusting the V-CHIP CONTROL menu (continued)
V-CHIP CONTROL menu
SET BLOCKING OPTIONS
NEW PIN CODE
BLOCK CHANNEL
MOVE[T к 1 SELECT[-4 ► j
To select each item
Press ▼ or A.
SET BLOCKING OPTIONS
Press M (.)[■ ► lo display the SET BLOCKING OPTIONS nicmi, then
press T or A lo st'lcct ¡(cm.
BLOCK МРЛЛ IJNRM ED
Press ◄ or ► lo select “Y''| Block) or ■‘N'XUnblock) for unrated
programs on МРАЛ rating system.
BI.OCK TV NONE RATING
Press or ► lo select "Y' (Block) or “N '(L'nblock) for programs mteii
NON1-: on TV PARLNTAI. GUIDLLINLS. "
II you seicci “Y”. tlie NOTICE sboun below w ill be displayed since the
eniergciicy information mav also be blocked.
SET BLOCKING OPTION menu
Block mpaa uwrated yin|
BLOCK TV NONE RATINGiV [N|
BACK TO
•CHIP MENU
MOVE[T к SELECT[^ ► 1
If you select ‘’Y" on TV rating
BLOCK .MPAA UNRATED. V|N)
BLOCK TV NONE R.ATING |Y ;N
BACK TO V-CHIP MENU
NOT ICt:ENABLING THIS OPTION
MAY BLOCK EMERGENCY
MESSAGES
MOv'E[T A ! SELECT > \
BACK TO V-CHIP MENL
Press ◄ or ► lo return to the V-Cli(I^ CONTROL, mciuL
NEW PIN CODE (Changing Pin Code)
1 Press ◄ oi-^ to display the NEW PIN
CODE menu.
2 Press the Number buttons (0-9) to enter
a 4-digit code.
The numbers you enter will replace the
dashes in the display.
Example: To enter “I 122"
Press 1. 1,2, and 2 in order.
3 After about I second, the display will
return to the V-CHIP CONTROL menu.
FLcASE EN-TEB NEW PIN COCE
SELECT[0-9j ENDIEXIT
ENABLE 9L0CK'NG i Y 'N
SET RAT ING
SET BLOCKING Ol-l I DNS
NEV; PIN CODE
BLOCK CHYNNFI
L ;t ж , Nt.EOT ► '
30
Page 31

Unblocking programs temporarily
BLOCK CHANNEL function
1 If you iry to watch a TV program that exceeds the rating
limits you set. the TV will enter into the program block
mode.
THIS PflOGRAH HAS BEEN BLOCKED
TV-PG L V
EXCEEDS SET LIMITS
PUSH MUTE TO ENTER PIN
2
If you want to watch the blockctl program temporarily,
press MUTE
Pre.ss the Number
buttons (0-9) to enter the
4-digit code you have
stored.
If the number is correct, the
block mode wdll be
released.
After
1
second, normal
picture Will appear.
All blocking is disabled until the TV is turned off.
It will be enabled when the power is reapplied.
if a wrong pin code is
entered, the message
appears.
Enter the correct code
aeain.
BLOCKING IS ACTIVE
PLEASE ENTEfl PIN CODE
TO temporarily UN-5L0CK
SELECT|0-?' ENDjEXa;
INCORRECT PIN CODE
PLEASE ENTER PIN CODE
TO TEMPORARILY UN-BLOCK
S£LECT|G-9t ENDIEXIT'
With the CH.VNNHL BLOCK function, you can block
speciHc channels. The TV will not be able to tunc these
channels with the CHAIMIMEL A/T buttons or Channel
INiumber buttons, unless you clear tiie setting.
This TV has 8 memory spaces total. 4 for TV mode and 4
for C'ABLL mode.
To block channels
1 Select a channel vou w ant to block.
2 Select -'BLOCK
Cl iANNErL" in the V-CI Ml’
CONTROL meiui by
pressing T or ▲.
5L0CK channel
MOVE ;T a i 3EL£CT|-< ►
3 Press -^or^ to display the
BLOCK CHANNEL meniL
Press ◄ or ► to select
“SET”, then press T or A
until the channel number to
be blocked (“2” in this
example) replaces “0” on
the display.
BLOCK CHANNEL
I
SET;CLEAR
0 '* C
SELECT > ► 1 5ET[T
EKD|Exi T
BLOCK CHANNEL
i SET :CLEAP
0 D 0
SELECTI-A ► : SET[T
END[EXIT]
5 Repeat steps 1 to 4 for other channels.
6 Select another channel before liirning off the TV.
To restore channels
1 Select "CLLAR" Ibllowhig the
abo\'c steps 2 to 4.
2 Press T or A until ”0”
rcplaee.s the ehiiiincl
mimbers.
EXIT U) cra.HC the dlsphiv.
BLOCK CrtANNE L
SET iCcEARI
55 10
SLl iiCr 1 <
r NM by 11;
u 0 0 0
CrSAn'T A 1
6 2
31
Page 32

Cleaning and Care
WARNING; TV sets use High Voltage. Do not try to remove the cabinet back. Refer servicing to qualified service
personnel.
To clean the TV screen:
1. First remove the plug from the power outlet to avoid
possible shock hazard.
2. Use a clean cellulose sponge or chamois ciolh
dampened with a solution of mi Id detergent and
warm water to clean TV screen and trim. Do not use
too much water on the TV screen, Water spills into
the cabinet and may cause damage to the TV.
Avoid e.xcess watci',
.■i. Remove any extra moisture with tlie same cloth or a
drv one.
■ To tnaintain tlic linish and appearance of the cabinet,
polish it from time to time with a quality furniture
polish.
Cauijon;\c\ fr use sfniiiu suh i'iils such us ihiiuici'. I)cnscuc ur
other chemicals on or near t ahiuct. as liter miuht iltiimr^c
the itiush of the cuhinel.
32
Page 33

Specifications
Tok’\'ision system
Cliunncl L'ovci'aue
1Чиеег soli ree
I’ow O' consiimplioii
AiKÌio pow sT
Spcakci' type
/\ii(.lK' \''ideo lei'minals
NTSC standard
VI li-: 2 through 12
CUT: 14 through 6')
Ctihle TV: miti hami (Л-S through A-1, Л through I)
SLijter band (,l through \V)
hyper hand (ЛЛ thi'ough ZZ. AAA. liBH)
ultra btiiid (()5 through V4. 100 througli 125)
120V AC. 01)11/
CZ.'C I .21: lOOW (avL'mge)
C/.^'hl.M; iOlW (axerage)
5\V 5\\
2-.2 S \ 4-.2 '4 indies (tiO \ 120 mm)
S-VlDliO INPUT
Y-INPlJT: IV (p-p). 75 ohm, ncgtitivc sync.
C-INPL'T: 0.286V Ip-]!) (burst signal), 75 ohm
AUDIO VIDEO INPUT
VIDEO: 1 Vtii-pi. 75 ohm, negative syne.
AUDKd: 150niV(rnis) (.lO'.'o modulation cquixiilent. 47k ohm)
AUDIO/VIDEO OU TPU r
VIDEO: I V(p-p), 75 ohm, negative sync.
AUDIO: 150mV(rms) (,20"п modulation etiuivalenl, 4.7k ohm)
Dimentions
Mass
Siipplictl aceessoi'ies
Opiioiuil TV stand
Design anrl spccilictitions arc subject to chtinge willuuit notice.
CZ32T.2I: Width
Height
Depth
CZ36T31: Width
Height
Depth
CZ32T31: 128 lbs (58 kg)
CZ36T31: 172 lbs (78 kg)
Remote Control with 2 size “AA” batteries
CZ.32 ni: S l'3212
CZ.36T31: ST3.512
30-7/16 inches (773mm)
28-1/8 inches (714mm)
22-5/8 inches (574mm)
34-7/8 inches (886mm >
30-3/4 inches (781mm)
24-1/2 inches (622mm)
33
Page 34

Before Calling Service Personnel
Before calling sciA'ice personnel, please check the following chart for a possible cause of the problem you arc experiencing. A
minor adjustment on your part may eliminate the problem and restore your TV reception.
Problem
TV will not turn on
No picture, no sound
No soLind. pietLire OK
Poor sound, picture OK
Poor picture, sound OK
Poor reception of broadcast channels
No UUF, VHP OK
Black box appears on the screen
Cannot .select a certain channel
Multiple images (ghosts)
Poor color or no color
No stereo or SAP sound from an MTS
broadcast
The Remote Control does not operate
Checks and Adjustments
• Make sure the power cord is plugged isi, then press POWER button.
• Check battery in the Remote. (Maybe biitteries are "detuf',)
• Cheek antenna/cable connections.
• Maybe souiul is muted, fry pressing VOLUME ► button.
• 'fry another chtmnel. (Maybe station trotible.)
• Try tmother channel. (Maybe station trouble or local interference
from ttppliance.)
• Check tititenna cable connections.
• Try another chtinnel. (Maybe station trouble or local interference.)
• Adjust Picture menu.
• Try another channel.
• Check antenna connections.
• If using VCR. cheek TV.' VCR button.
• Make sure TV/CABLR function i.s in “TV" mode.
• Captioning may be turtied on
• That channel may be locked out with BLOCK Cl lANNLL llinction. or
erased with the ADD/ERASL function.
• Try another channel. (Maybe station trouble.)
• Use a highly directional outdoor antenna.
• Try another channel. (Maybe station trouble or local interference.)
• Adjust TINT and/or COLOR in the Picture menu.
• If you change the direction of the TV w'hile the TV ts activated, the
picture may suffer from color shading. If so, turn off the TV and allow'
it to cool for about 30 minutes, then turn on the TV again.
The picture should improve.
• Check if MTS function is properly set.
• Check if TV/CABLE/VCR switch is properly set.
• Maybe something was between the Remote and the remote sensor.
• Maybe batteries are dead. Try replacing batteries with new ones.
Page
I.s
b
5
Ls
20
3
10
16
27
.31
17
20
24
9, 10
h
34
Page 35

Limited United States Warranty
Tosliibn Aiiioricii C'onsimicr f'roducts. ino. <“TAC'P‘') and Toshibii Hawaii Inc. CTHI") iiiakc the tbilowing limiicd warniniics. These limited warranties extend
u> the original consumer pureliaser or any person receiving this set as a gilt Iroiii the original consumer purchaser and to no other purchaser or translerec
Limited One (1) Year Warranty
Т.ЛП' and TH! warrant this product and its parts against delects in materials or
workmanship lor a period ot'oiie( I ) year after the dale of original retail purchase
During this period. TACT and TIM will repair or rcpiaee a defective part, at their
option, with a nev\ or ivlurbished pait, willioul elitirge to you. TACP'THl
Aiithori/ed Ser\ lec Station personnel will come to your home when warranty
ser\'icc is rcLjihred. Depending on the type of repair required, the serx iee will
cither be perfoiincd in your home or the set will be taken to the ТЛСТ/ТИ1
Authori/ed Service Station for repaii and i etui ned to your home at no et)si to you.
Limited Two (21 Year Warranty of Picture Tube
Т.ЛГР and TIN furiher warrant the pielure lube in this produel agains! del'cels
111 materials or workmanship fora penodofiwoi2)yearsaiieriheda!eoforigitial
retail purchase. During this period. ТЛСР and Till will repair or replace a
‘.leleelive piciuie luhe. at their tiplion. vx ith n new or relurbislied picture uihe
without charge to you, except that i fa defeelix c picture lube i> replaced a fier one
( I ) yoai' from the date of the original retail purchase, you pay labor charges
involved in the replacement.
Rental Units
The w arraniy for rental units begins with the lirsl rental orthirty (30) days from
the dale of shipment to the rental ilrm, whichever comes fiiM.
Commercial Units
Products sold and used for commercial use have a limited ninety (90) day
warranty for all parts, labor and pielure lube.
How to Obtain Warranty Service
If after following all ofihe operating instructions in this manual and checking the
section "BbbORU CALLING SLRVlCL PLRSONNEL", you find that service
is needed;
Owner's Manual and Demographic Card
^'ou should read this owner's manual thoroughly before operating this product.
^ ou should complete and mat! the enclosed Demographic card within ten days
after you, orthe person w ho has given you this product as a gift, purchased this
product. Tliis is one way to enable TACIVfHl to provide you with better
cLislomer service and improved products, failure lo retui'ii ilie Demographic
card will not affect your rights under this warranty.
Your Responsibility
The above warranties arc subjeet to the following conditions
(11 You must retain your bill of sale or provide other proof ot'purchase.
(2) All warranty serv icing of this product must be made by an .\uthori/ed
I ,\t'PTHl Service Station.
(3) I licse warranties are effective only if the product is purchased and
operated in the U.S.A.or Puerto Rico.
(4) Labor service charges for set installation, sot up, adjustment ofeusloiiier
eonlrois and installation or repair of antenna systems are not co\ ered hy this
warranty. Reception problems caused by inadequate antenna systems are
your responsibility.
(,S) Warranties extend only to defects in materials or workmanship as limited
above and do nut extend to any product or pari.s which have been lost or
discarded by you or to damage to products or parts caused by misuse,
accident, damage caused by Acts of God, such as lightning or lluctuaiions
in electric power, improper installalion. improper maintenance or use in
violation of instructions furnished by ust or to units which have been
modified or had the serial number removed, altered, defaced or rendered
illegible.
In the Continental United States contact:
(1) Call th.j TACT toll free number 1-800-6.11-.1811 after you find a ddcclivo
product or pari to find the nearest TOSHIBA Authorized Service Station.
(2j Please present your bill of sale or other proof lo the Authorized Service
Station.
"TACP/THI Authorized Service Station personnel will come to yourhomc
when waiTanty service is required. Depending on the type of repair required,
the service will either be performed in your home or the set w ill be taken to
the TACP/THl Authorized Service Station for repair and returned lo your
home at no cost to you."
All warranties implied by state law, including the implied warranties of merchantability and fitness for a particular purpose, are expressly limited to the duration
{ilThc limiierl warranties set foril'i above. With the exception of any warranties implied by slate law as hereby limiied, the foregoing warranty is exclusive and in
lieu of all other warranties, guarantees, agreemems and similar obligations of manutacUircr or seller with respect to the repair or replacement of any parts In no
event shall TACÍ’ or Till be hable for eonsequeniial or incidental damages.
No person, agent, distributor, dealer or company is authon/.ed to change, modify or extend the terms of these warranties in any manner whatsoever. 1'he time within
which action must be commenced to enforce any obligation of TACT or THl arising under this warranty or under any statute, or law^ of the United States or any
slate thereof, is hereby limiteil lo 90 days from the dale you discover or should have discovered, the defect. This limitation does not apply to implied warranties
arising under state law'.
■fhis warranty gives you spccillc legal rights and you may also have other rights w hich may vary from state to state. Some stales do not allow limitation on how
long an implied warranty lasts, wlicii an aelion ma) he hroughl, or tlte exclusion or limitation ol incidental or consequential damages, so the above pii)visions may
not apply lo you
ATTENTION CANADIAN CONSUMERS:
Canadian consuméis are requested to complete the special C'atuidian "Warranty Kegislralion I'orm" enclosed, and forward this completed form
with a eopy o I bill ol sale to I OSI11 li A Of- C .AN AD A to "Register and Validate ' their warrants-.
Products purchased in the l .S,A. and used in Canada are not covered hy these warranties.
Products purchased in C'anada and used in the are not covered by these warranties.
Rev. 09-0]-98
1 Toll Free ® J
\ 1-800-631-3811 y
In Hawaii contact:
Toshiba Hawaii, Inc. 327 Kamakcc Street, Honolulu, Hawaii
96SI4(H«8) 521-5377
®
35
Page 36

TOSHIBA AMERICA CONSUMER PROOUCTS, INC.
HEAD OFFlCE/82 TOTOWA ROAD, WAYNE, NEW JERSEY 07470
FACTORY SERVICE CENTER/ 1420B TOSHIBA DRIVE, LEBANON, TENNESSEE 37087
TOSHIBA HAWAII, INC.
HEAD OFFICE/327 KAMAKEE STREET, HONOLULU. HAWAII %814, U.S.A.
TOSHIBA OF CANAOA LTO.
HEAD OFFlCE/191 McNABB STREET, MARKHAM, ONTARIO, L3R 8H2, CANADA TEL: (905) 470-5400
SERVICE CENTERS/TORONTO: I9I McNABB STREET, MARKHAM, ONTARIO, L3R 8H2, CANADA TEL: (905) 470-5400
MONTREAL; 1643, NORTH SERVICE RD„ TRANS-CANADA HIGHWAY, DORVAL QUEBEC, H9P IJl, CANADA
TEL: (514) 856-4100
VANCOUVER: 22171 FRASER WOOD WAY, RICHMOND. B.C., VOW 1.15 TEL: (604) 303-2500
MANUFACTURED BY
TOSHIBA AMERICA CONSUMER PROOUCTS, INC.
PRINTED
(99-04)B
I N
USA
TOSHIBA
23 5 63 57 1
 Loading...