

Page 1

TOSHIBA
Canvio AeroMobile™
Wireless Solid State
Drive User's Manual
English/Español/Français
GMAA00469014
594111-A3
12/15
Page 2

Important notice for security
English
Please be sure to change the default Wi-Fi password and the
default Admin password immediately upon rst usage of the
product. To set your unique password, please refer to this user
manual on your applicable regional support site.
The default password is automatically set upon shipping of the
product. Even if the default password is changed to your unique
password, your unique password may be reset to a default
password in the following situation:
In case the product is reset by depressing the Reset button to
accomplish a reset of the product.
Aviso importante de seguridad
Español
Asegúrese de cambiar la contraseña predeterminada de WiFi y la contraseña predeterminada de administrador de forma
inmediata cuando use el producto por primera vez. Para
congurar la contraseña personal, consulte este manual del
usuario en su correspondiente sitio de soporte regional.
La contraseña predeterminada se congura automáticamente
cuando se envía el producto. Aun si cambia la contraseña
predeterminada a su contraseña personal, su contraseña personal
se puede volver a congurar a la contraseña predeterminada en
la siguiente situación:
Si se reinicia el producto presionando el botón Reiniciar para reiniciar
el producto.
Remarque importante
concernant la sécurité
Français
Veuillez vous assurer de changer le mot de passe Wi-Fi par défaut
et le mot de passe Admin par défaut dès la première utilisation du
produit. Pour dénir votre mot de passe unique, veuillez consulter ce
manuel d’utilisation sur votre site de support régional.
Le mot de passe par défaut est automatiquement déni lors de
l’expédition du produit. Même si vous changé votre mot de passe par
défaut par votre mot de passe unique, celui-ci peut être réinitialisé à
un mot de passe par défaut dans la situation suivante:
Lorsque le produit est réinitialisé en appuyant sur le bouton Reset
pour effectuer une réinitialisation du produit.
Page 3

2
NOTE
NOTE
California Prop 65 Warning
This product contains chemicals, including lead, known to
the State of California to cause cancer and birth defects or
other reproductive harm. Wash hands after handling.
For the state of California only.
Safety information and Rules and
Regulations for wireless LAN
Do not use the Wireless LAN functionality near a microwave
oven or in areas subject to radio interference or magnetic
fields. Interference from a microwave oven or other source
can disrupt Wireless LAN operation.
The transmission speed over the wireless LAN, and the
distance over which the wireless LAN can reach, may vary
depending on surrounding electromagnetic environment,
obstacles, access point design and configuration, client
design and software/hardware configurations. The
transmission rate described is the theoretical maximum
speed as specified under the appropriate standard – the
actual transmission speed will be lower than the theoretical
maximum speed.
Federal Communications Commission
(FCC) Notice (USA)
Complies with FCC RF Exposure requirements.
This equipment has been tested and found to comply with the limits for a
Class B digital device, pursuant to Part 15 of the FCC Rules. These limits are
designed to provide reasonable protection against harmful interference in a
residential installation.
This equipment generates, uses, and can radiate radio frequency energy and,
if not installed and used in accordance with the instructions, may cause
harmful interference to radio communications. However, there is no guarantee
that interference will not occur in a particular installation. If this equipment
does cause harmful interference to radio or television reception, which can be
determined by turning the equipment off and on, the user is encouraged to try
to correct the interference by one or more of the following measures:
❖ Reorient or relocate the receiving antenna.
Page 4

❖ Increase the separation between the equipment and the receiver.
❖ Connect the equipment into an outlet on a circuit different from that
to which the receiver is connected.
❖ Consult the dealer or an experienced radio or television technician
for help.
Changes or modifications to this equipment not expressly approved by
Toshiba or parties authorized by Toshiba could void the user's authority to
operate this equipment.
Declaration of Conformity for Products
Marked with the FCC Logo (USA)
This device complies with Part 15 of the FCC Rules. Operation is subject to
the following two conditions:
1) This device may not cause harmful interference, and
2) This device must accept any interference received, including
interference that may cause undesired operation.
SAR information
This transmitter must not be co-located or operating in conjunction with any
other antenna or transmitter.
Cet émetteur ne doit pas être Co-placé ou ne fonctionnant en même temps
qu’aucune autre antenne ou émetteur.
3
Canadian Notice
This device complies with Industry Canada licence-exempt RSS standard(s).
Operation is subject to the following two conditions: (1) this device may not
cause interference, and (2) this device must accept any interference, including
interference that may cause undesired operation of the device.
Le présent appareil est conforme aux CNR d’Industrie Canada applicables aux
appareils radio exempts de licence.
L’exploitation est autorisée aux deux conditions suivantes: (1) l’appareil ne doit
pas produire de brouillage; (2) l’utilisateur de l’appareil doit accepter tout
brouillage radioélectrique subi, même si le brouillage est susceptible d’en
compromettre le fonctionnement.
Page 5

4
To comply with the Canadian RF exposure compliance
requirements, this device and its antenna must not be colocated or operating in conjunction with any other antenna or
transmitter.
Pour être conforme aux exigences canadiennes en matière
d’exposition aux fréquences radio, l’appareil et son antenne
ne doivent pas être situés au même endroit qu’une autre
antenne ou un autre émetteur ni fonctionner en même
temps.
Copyright
This manual may not be reproduced in any form without the prior written
permission of Toshiba. No liability is assumed with respect to the use of the
information contained herein.
© 2015 by Toshiba America Information Systems, Inc. All rights reserved.
Notice
The information contained in this manual, including but not limited to any
product specifications, is subject to change without notice.
TOSHIBA CORPORATION AND TOSHIBA AMERICA INFORMATION
SYSTEMS, INC. “TOSHIBA” PROVIDE NO WARRANTY WITH REGARD
TO THIS MANUAL OR ANY OTHER INFORMATION CONTAINED
HEREIN AND HEREBY EXPRESSLY DISCLAIMS ANY IMPLIED
WARRANTIES OF MERCHANTABILITY OR FITNESS FOR ANY
PARTICULAR PURPOSE WITH REGARD TO ANY OF THE FOREGOING.
TOSHIBA ASSUMES NO LIABILITY FOR ANY DAMAGES INCURRED
DIRECTLY OR INDIRECTLY FROM ANY TECHNICAL OR
TYPOGRAPHICAL ERRORS OR OMISSIONS CONTAINED HEREIN OR
FOR DISCREPANCIES BETWEEN THE PRODUCT AND THE MANUAL.
IN NO EVENT SHALL TOSHIBA BE LIABLE FOR ANY INCIDENTAL,
CONSEQUENTIAL, SPECIAL, OR EXEMPLARY DAMAGES, WHETHER
BASED ON TORT, CONTRACT OR OTHERWISE, ARISING OUT OF OR
IN CONNECTION WITH THIS MANUAL OR ANY OTHER INFORMATION
CONTAINED HEREIN OR THE USE THEREOF.
Page 6

5
GNU General Public License (“GPL”)
Firmware incorporated into this product may include third party copyrighted
software licensed under the GPL or Lesser General Public License (“LGPL”)
(collectively, “GPL Software”) and not Toshiba's End User License Agreement.
A copy of that license may be obtained at http://www.gnu.org, and http://
support.toshiba.com. You may obtain, for a period of three years after the date
of purchase, the complete Corresponding Source code from us by
downloading at no charge from http://support.toshiba.com or by calling
Toshiba Customer Support. With respect solely to the GPL Software, no
warranty is provided, to the extent permitted by applicable law. Modification of
or tampering with the Software is solely at your own risk and will void the
product warranty. Toshiba is not responsible for any such modification or
tampering. Toshiba will not support any product in which you have or have
attempted to modify the Software supplied by Toshiba.
Third party services and other Internet services are not provided by Toshiba,
may change or be discontinued at any time and may be subject to internet
service provider restrictions. Toshiba makes no warranties, representations, or
assurances about the content, availability, compatibility or functionality of
third-party content or services. Use of third party Internet services may require
the creation of a separate account and payment of one-time and/or recurring
charges.
Protection of stored data
For your important data, please make periodic back-up copies of all the data
stored on the hard disk or other storage devices as a precaution against
possible failures, alteration, or loss of the data.
OR LOST DUE TO ANY TROUBLE, FAILURE OR MALFUNCTION OF
THE STORAGE DEVICES AND THE DATA CANNOT BE RECOVERED,
TOSHIBA SHALL NOT BE LIABLE FOR ANY DAMAGE OR LOSS OF
DATA, OR ANY OTHER DAMAGE RESULTING THEREFROM. WHEN
COPYING OR TRANSFERRING YOUR DATA, PLEASE BE SURE TO
CONFIRM WHETHER THE DATA HAS BEEN SUCCESSFULLY COPIED
OR TRANSFERRED. TOSHIBA DISCLAIMS ANY LIABILITY FOR THE
FAILURE TO COPY OR TRANSFER THE DATA CORRECTLY.
IF YOUR DATA IS ALTERED
Page 7

6
Critical Applications
This product you have purchased is not designed for any “critical
applications.” “Critical applications” means life support systems, medical
applications, connections to implanted medical devices, commercial
transportation, nuclear facilities or systems or any other applications where
product failure could lead to injury to persons or loss of life or catastrophic
property damage.
SUPPLIERS DISCLAIM ANY AND ALL LIABILITY ARISING OUT OF THE
USE OF THE COMPUTER PRODUCTS IN ANY CRITICAL
APPLICATIONS. IF YOU USE THE PRODUCT IN A CRITICAL
APPLICATION, YOU, AND NOT TOSHIBA, ASSUME FULL
RESPONSIBILITY FOR SUCH USE.
Trademarks
Canvio and Canvio AeroMobile are trademarks of Toshiba America Information
Systems, Inc.
Android and Google Play are trademarks of Google Inc.
DLNA is a trademark or a registered trademark of the Digital Living Network
Alliance.
Facebook is a registered trademark of Facebook, Inc.
iOS is a registered trademark or trademark of Cisco Systems, Inc. and/or its
affiliates in the United States and certain other countries.
Mac, Mac OS, iPad, iPhone, OS X, and Time Machine are trademarks of Apple
Inc., registered in the U.S. and other countries. App Store is a service mark of
Apple Inc.
SD, SDHC, and SDXC are trademarks of SD-3C, LLC.
Twitter is a registered trademark of Twitter, Inc.
Wi-Fi® is a registered trademark of the Wi-Fi Alliance®.
Windows is either a registered trademark or trademark of Microsoft
Corporation in the United States and other countries.
All other brand and product names are trademarks or registered trademarks of
their respective companies.
ACCORDINGLY, TOSHIBA, ITS AFFILIATES AND
Page 8

7
NOTE
Safety icons
This manual contains safety instructions that must be observed to
avoid potential hazards that could result in personal injuries, damage
to your equipment, or loss of data. These safety cautions have been
classified according to the seriousness of the risk, and icons
highlight these instructions as follows:
Indicates an imminently hazardous situation which, if
not avoided, will result in death or serious injury.
Indicates a potentially hazardous situation which, if
not avoided, could result in death or serious injury.
Indicates a potentially hazardous situation which, if
not avoided, may result in minor or moderate injury.
Indicates a potentially hazardous situation which, if
not avoided, may result in property damage.
Provides important information.
Safety precautions
Do not immerse the device (with the internal battery
in it) in liquid such as water, beverages, or other
fluids.
The battery (including protection circuit) may catch
on fire, smoke, explode, or cause heat generation
by unexpected electrical load.
Do not use device in a wet location. Do not
connect/disconnect a power plug/cord with wet
hands.
Keep the device (with the internal battery in it) away from
heat and fire. Heat will damage the battery and may
cause it to generate heat, smoke, catch fire, or explode.
Page 9

8
Do not disassemble, modify, tamper with, or repair
your device and/or the internal battery. Disassembly or
modification of the device and/or battery may damage
the protection circuit. This may cause the battery to
generate heat, smoke, catch fire, or explode.
Do not leave parts such as plastic covers, battery,
and electrical plug within the reach of children and
pets. Misuse of the part including, without limitation,
accidental swallowing the part may cause choking
and suffocation resulting in death or serious injury. If
you suspect a part has been swallowed, immediately
take appropriate emergency action and consult a
doctor.
Stop charging if the charging process cannot be finished.
If the battery can not finish the charging process
within the specified time, halt the charging process.
The battery may generate heat, smoke, catch fire, or
explode.
Discard this device in accordance with applicable laws
and regulations. For disposal, reuse or recycling
information, please contact your local government.
Always immediately turn the power off and
disconnect the power cable/cord plug from the plug
socket and stop using the device if you observe any
of the following conditions: Offensive or unusual
odor/Excessive heat/Discoloration/Deformation,
crack, or leaks/Smoke/Other unusual event during
use, such as abnormal sound. Do not turn on the
device’s power again. Continued use could cause a
fire or rupture possibly resulting in serious injury or
drive failure, including but not limited to, the loss of
data.
If the device is leaking or its case is cracked, put on
protective gloves to handle it.
Page 10

9
NOTE
Only operate the device and/or charge the battery in
temperatures between 5 to 35º C (41 to 95º F).
Operating and/or charging the device outside of this
temperature range may result in the loss of data or
damage to the drive. Charging the device outside of
this temperature range may cause the battery to leak,
generate heat, or result in serious damage. It may
also cause the battery's performance and life to
deteriorate.
Actual battery life may vary depending on settings,
application usage, features or tasks selected, network
configuration, operating temperature and many other
factors. Recharge time varies depending on usage. The
battery may not charge while the drive is consuming full
power. After a period of time, the battery will lose its
ability to perform at maximum capacity. This is normal for
all batteries.
Additional Safety Precautions
Failure to observe any of the following instructions may result in risk
of fire, electric shock, serious bodily injury and/or damage to your
device.
Service Provider
Disconnect device from the electrical outlet and
take device to an authorized Toshiba service
provider if:
❖ AC adapter or power cable/cord is damaged.
❖ Liquid has spilled into device or an object (such
as a screw, staple or paper clip) has entered
device.
❖ Device has been dropped, subject to shock or
impact and/or damaged in some way.
❖ Noticeable signs of overheating, smoke,
deformation, cracks, leaks or unusual odor occur.
❖ Service is needed on component inside
compartments requiring opening or removal of
covers.
Page 11

10
❖ Always use power cables/cords and power
sources that comply with the voltage and
frequency specifications and requirements of the
country of use.
❖ Be careful if you use a multiple connector as an
overload of one socket could cause a fire or
electric shock, possibly resulting in serious injury.
❖ Always confirm that the power plug (and
extension cable plug if used) has been fully
inserted into the socket, to ensure a secure
electrical connection.
❖ Always make sure the drive and AC adapter have
adequate ventilation and are protected from
overheating when the AC adapter is connected to
a power outlet. Do not cover the drive during
operation. Inadequate ventilation may cause the
drive and AC adapter to overheat resulting in a
fire or electric shock and serious injury.
❖ If dust gets on the power plug connectors or
connector base, turn the power off and
disconnect the power plug. Then clean the
connector and/or connector base with a dry soft
cloth.
❖ Avoid extended contact between the drive and
your skin. The drive may become hot! Avoid
prolonged contact to prevent skin irritation and/or
heat injury.
❖ Never pull on a power cord/cable to remove a
plug from a socket. Always grasp the plug
directly.
❖ Do not place the drive on a shaky table, uneven,
tilted surface or other unstable location. The drive
may fall, causing damage to the drive or possible
injury.
Page 12

11
❖ Do not disconnect the USB cable or the AC
adapter while operating, as it may result in loss of
data or damage to the drive.
❖ Do not bump, drop or jar the drive, as it may
result in loss of data or damage to the drive.
❖ Do not use the drive during a thunderstorm. If you
see lightning or hear thunder, immediately turn off
the devices to which this drive is connected,
computer and peripherals, and disconnect the
power cord from the outlet, and disconnect the
USB cable from the computer. An electric surge
caused by the lightning may result in loss of data
or damage to the drive.
Page 13

Contents
Introduction.......................................................14
Overview .............................................................. 14
Components .................................................. 14
Hardware specifications ................................ 15
Software specifications.................................. 15
Chapter 1: Getting Started......................................17
Features ............................................................... 17
Charging the Canvio AeroMobile Wireless
Solid State Drive ........................................... 20
Connect to Canvio AeroMobile Wireless
Solid State Drive ............................................ 21
Connect with USB ......................................... 21
Connect wirelessly......................................... 22
Chapter 2: Canvio AeroMobile Wireless Solid
State Drive Software Utility.................23
Wireless SSD for Toshiba System login .............. 23
Connect wirelessly to a PC/Mac.................... 23
Web browser login ......................................... 24
Client login for iPhone or iPad ...................... 24
Client login for Android .................................. 25
Wireless SSD for Toshiba main interface ............ 27
12
Page 14

Contents
Web main interface ........................................ 28
Wireless SSD for Toshiba App main
interface ................................................... 28
Pictures Management interface........................... 30
Picture Viewer interface ................................. 31
Videos Management interface ............................. 32
Video Playback interface
(iPhone, iPad, and Android device
only).......................................................... 34
Music Management interface .............................. 35
Music Player interface
(iPhone, iPad, and Android device
only).......................................................... 37
Documents Management interface...................... 38
Document Viewer interface
(iPhone, iPad, and Android device
only).......................................................... 39
File/Folder Management interface ....................... 40
Transferring files............................................. 42
13
Chapter 3: Backup Management............................44
Using the Backup Management feature .............. 44
Manual backup .............................................. 44
Automatic backup.......................................... 45
Unmount the SD Card ......................................... 46
Chapter 4: Settings Management...........................47
Using the Settings Management ......................... 47
Configurations................................................ 48
DHCP Settings (Web browser only)..................... 57
User image and name management.................... 58
Cache (App only).................................................. 59
Language (App only) ............................................ 59
Logout.................................................................. 59
Contacting Toshiba.............................................. 59
Call Toshiba Customer Support Center......... 59
Index .................................................................60
Page 15

Introduction
Overview
The Toshiba Canvio AeroMobile Wireless Solid State Drive allows
you to wirelessly access your music, videos, pictures, and data,
streaming it to your iPad, iPhone, tablets, smartphones, and
notebooks, no longer requiring you to tangle with cords or cables.
With the internal SSD storage, there is no need to worry about
running out of space on your mobile devices and the built-in USB 3.0
port makes file transfer fast and easy.
Components
The Canvio AeroMobile Wireless Solid State Drive includes the
following components:
❖ AC adapter
❖ USB 3.0 cable
❖ Quick Start guide
❖ Storage pouch
❖ Standard Limited Warranty information
14
Page 16

Introduction
Overview
15
Hardware specifications
Product dimension: 123.5 mm (L) x 63.0 mm (W) x 12.5 mm (H)
[4.9 in (L) x 2.5 in (W) x 0.5 in (H)]
Weight: Approximately 4.23 oz
Battery: 3100mAh Li-ion type
Charging time: 3 hours maximum
Environmental requirements:
Wireless LAN
Standard: 802.11 b/g/n
Frequency: 2.4 GHZ
Speed: 1T1R up to 150 Mbps
Temperature
Operating: 5 to 35º C (41 to 95º F)
Storage: -20 to 60º C (-4 to 140º F)
Humidity
Operating: 20-80%
Storage: 8-90%
Software specifications
Compatible file types:
Videos: mp4, 3gp, m4v, mov, avi
Music: mp3, m4a, aac, wav
Pictures: jpg, bmp, png, gif, tif
Documents: pdf, doc, docx, ppt, pptx, xls, xlsx, txt, rtf
Others: Opens in external software
System requirements:
Operating system
Windows
Mac OS: OS X 10.7, 10.8
Android™, iPhone, or iPad: Android smartphones and tablets, iPhone, and iPads
®
: Windows 7, Windows 8, Windows 8.1, Windows 10
are supported. Visit the “Wireless SSD for Toshiba”
app Web site for the supported versions.
Page 17

16
NOTE
Introduction
Overview
This drive is formatted in NTFS for Windows. When
using this drive with both Windows PC and Mac, you
can read and write data to both Windows PC and
Mac only if the “Tuxera NTFS for Mac” is installed on
the Mac. Under these conditions the Time Machine
function of the OS X is disabled.
Page 18

Chapter 1
Getting Started
Features
❖ Built-in 128 GB SSD with NTFS format.
❖ Access and stream your music, videos, pictures and data
using the free Wireless SSD for Toshiba app available for
iPhone, iPad, and Android.
❖ Four user profiles available to help keep your files organized.
❖ Connect wirelessly or using a USB 3.0 cable.
❖ Enjoy up to 8 hours of continuous battery life in video
streaming condition (actual battery life may differ depending
on user conditions).
❖ Quickly locate and access your files using the Search
function.
❖ Access the Internet via wireless, supporting 802.11 b/g/n.
❖ Supports SD™/SDHC™/SDXC™ memory card, Class 10
compatible.
17
Page 19

Getting Started
SD Card indicator light
Wi-Fi®/SSD indicator light
Battery indicator light
On/Off button
Reset button
USB 3.0 port
SD Card slot
NOTE
18
Features
(Sample Illustration) Canvio AeroMobile Wireless Solid State
Drive features
On/Off button:
❖ Press and hold for 2 seconds, (Wireless LAN mode turns
ON).
❖ Press and hold for 2 seconds again, (Wireless LAN mode
turns OFF).
The Canvio AeroMobile Wireless Solid State Drive cannot
be turned on if the battery is too low. The battery
indicator will blink orange for 6 seconds, and then off.
Reset button:
❖ In Wireless LAN mode, press and hold for 5 seconds. The
system will restore to its factory settings.
USB 3.0 port:
❖ Compatible with USB 3.0 and USB 2.0.
❖ Allows you to transfer data between a computer and the
Canvio AeroMobile Wireless Solid State Drive when
connected.
❖ Allows you to charge the product battery when connected to
the AC adapter.
Page 20

Getting Started
Features
SD Card slot:
❖ Supports SD/SDHC/SDXC memory card, Class 10
compatible. Visit the “Wireless SSD for Toshiba” or the
“Wireless SSD for Toshiba Ver2” app Web site for the SDXC
Card supported versions.
❖ You can access the SD Card in Wireless LAN mode.
Battery indicator light:
❖ Green: There is 30% or more battery power.
❖ Yellow: Between 30%-10% battery power remaining.
❖ Orange (blinking fast): The product is out of battery power or
the operating temperature is too high. The product will shut
down after 30 seconds.
❖ Green or Yellow (blinking slowly): The battery is charging.
❖ Green (not blinking): Finished charging.
❖ Green or Yellow (blinking fast): The product is shutting down
or turning ON.
❖ LED Off: The device is powered OFF.
Wi-Fi/SSD indicator:
❖ Wireless LAN Mode
❖ Blue: Wireless LAN is ON (no data currently transmitting).
❖ Blue (blinking): Wireless LAN is ON (storage access
available).
❖ Blue (turned off): Wireless LAN is OFF.
❖ USB Mode
❖ White: No data currently transmitting.
❖ White (blinking): Data access available.
❖ White (turned off): The device is in Sleep or Standby
mode. It is safe to disconnect the device.
SD Card indicator:
❖ Only glows in Wireless LAN Mode
❖ Violet: No SD Card access.
❖ Violet (blinking): SD Card access available.
❖ Violet (turned off): SD Card enters into Standby.
19
Page 21

Getting Started
USB cable
USB 3.0 port
AC adapter
20
Charging the Canvio AeroMobile Wireless Solid State Drive
Charging the Canvio AeroMobile Wireless
Solid State Drive
To get started using the Canvio AeroMobile Wireless Solid State
Drive, ensure that your device is charged. The Canvio AeroMobile
Wireless Solid State Drive can be charged via the AC adapter and
USB cable.
(Sample Illustration) Canvio AeroMobile Wireless Solid State
Drive charging
To charge the Canvio AeroMobile Wireless Solid State Drive:
1 Attach the USB cable to the AC adapter.
2 Plug the USB cable into the USB 3.0 port on the Canvio
AeroMobile Wireless Solid State Drive.
3 Plug the AC adapter into a live electrical wall outlet.
While charging, the battery indicator light will blink slowly
(interval time is 2 seconds).
Page 22

Getting Started
USB cable
USB 3.0 port
USB port
Connect to Canvio AeroMobile Wireless Solid State Drive
21
Connect to Canvio AeroMobile Wireless
Solid State Drive
You can connect to the Canvio AeroMobile Wireless Solid State
Drive directly with the included USB cable (Direct-Attached Storage
mode) or connect wirelessly (Wireless LAN mode).
Connect with USB
To operate via USB, connect the Canvio AeroMobile Wireless Solid
State Drive to the computer’s USB port using the included USB
cable.
For Mac users:
To write files using the USB, you will need to install the “NTFS driver
for Mac” to your Mac. Refer to the pre-loaded manual stored on the
Canvio AeroMobile Wireless Solid State Drive for more information.
(Sample Illustration) Canvio AeroMobile Wireless Solid State
Drive USB connection
To connect the Canvio AeroMobile Wireless Solid State Drive to your
computer:
1 Make sure the Canvio AeroMobile Wireless Solid State Drive
is powered OFF.
2 Connect the included USB 3.0 cable to the Canvio
AeroMobile Wireless Solid State Drive.
3 Connect the other end of the USB 3.0 cable to your
computer’s USB port.
You can now begin transferring data to and from the product.
Page 23

Getting Started
NOTE
22
Connect to Canvio AeroMobile Wireless Solid State Drive
Connect wirelessly
You can access the Canvio AeroMobile Wireless Solid State Drive
wirelessly from Windows, Mac, iPhone, iPad, Android mobile
devices, and DLNA
app.
®
devices using the Wireless SSD for Toshiba
Visit the “Wireless SSD for Toshiba” or the “Wireless SSD
for Toshiba Ver2” app Web site for the SDXC Card
supported versions.
(Sample Image) Canvio AeroMobile Wireless Solid State Drive
Wireless LAN mode
Press the ON/OFF button to power on the system.
The Canvio AeroMobile Wireless Solid State Drive automatically
functions in Wireless LAN mode once the Wireless SSD for Toshiba
app has been set up, see “Connect wirelessly to a PC/Mac” on
page 23.
Page 24

Chapter 2
Canvio AeroMobile
Wireless Solid State
Drive Software Utility
The software utility for the Canvio AeroMobile Wireless Solid State
Drive is called the Wireless SSD for Toshiba.
Wireless SSD for Toshiba System login
Connect wirelessly to a PC/Mac
1 On the Canvio AeroMobile Wireless Solid State Drive, press
the ON/OFF button to power on the system.
2 Once the Wi-Fi indicator light stops blinking, enable the
Wireless LAN feature on your PC/Mac and open the Wireless
Network connection.
3 Select the
xxxx is a 4-digit number generated by the Canvio
AeroMobile Wireless Solid State Drive), and then enter the
default password
Toshiba wssd xxxx wireless connection (where
12345678.
23
Page 25

Canvio AeroMobile Wireless Solid State Drive
24
Software Utility
Wireless SSD for Toshiba System login
Web browser login
1 Once you have successfully connected to your Canvio
AeroMobile Wireless Solid State Drive, open a Web browser
and enter the “http://wirelessssd” URL.
(Sample Image) Web browser address field
The Toshiba Wireless SSD login page displays.
If an Internet connection is not available, input any URL and
the Web browser will take you to the Toshiba Wireless SSD
login page.
(Sample Image) Login screen
2 Enter your login information in the Login screen, using the
following credentials:
❖
User Name: admin
❖
User Password: Leave the field blank
3 Select the
Log In button to access the main Web Interface.
Client login for iPhone or iPad
Install the app for iPhone and iPad
1 In the App Store, search for and locate the Wireless SSD
for Toshiba
2 Install the Wireless SSD for Toshiba app and follow the
on-screen installation instructions. The
Toshiba
installation process is complete.
app.
Wireless SSD for
icon appears on the Home screen once the
Page 26

Canvio AeroMobile Wireless Solid State Drive
Wireless SSD for Toshiba System login
Connect wirelessly to an iPhone or iPad
1 Press the
Wireless Solid State Drive to power on the system. Wait for
the Wi-Fi indicator light to stop blinking.
2 On your iPad/iPhone, select
3 Select
generated by your Canvio AeroMobile Wireless Solid State
Drive).
4 Enter the default password
App login
1 On your iPhone or iPad, select the
Toshiba icon.
ON/OFF button on the Canvio AeroMobile
Setting, and then Wi-Fi.
Toshiba wssd xxxx (where xxxx is a 4-digit number
12345678.
Software Utility
Wireless SSD for
25
(Sample Image) iPhone or iPad Login screen
2 Enter your login information in the Login screen, using the
following credentials:
❖
User Name: admin
❖
User Password: Leave the field blank
3 Click or touch the
OK button to access the main interface.
Client login for Android
Install the Android app
1 In the Google Play™ store, search for and locate the free
TOSHIBA app called “WirelessSSD for Toshiba.”
2 Install the
on-screen installation instructions.
3 The
Desktop once the installation process is complete.
WirelessSSD for Toshiba app and follow the
WirelessSSD for Toshiba icon appears on the
Page 27

Canvio AeroMobile Wireless Solid State Drive
26
Software Utility
Wireless SSD for Toshiba System login
Connect wirelessly to an Android device
1 Press the ON/OFF button to power on the system.
2 Once the Wi-Fi indicator light stops blinking, go to
and then select the
smart phone.
3 Click or touch
4 Enter the default password
App login
1 On your Android device, select the
Toshiba icon, and then log into the “WirelessSSD for
Toshiba.”
Wireless LAN option in your tablet or
Toshiba wssd xxxx.
12345678.
Wireless SSD for
Setting,
(Sample Image) iPhone or iPad Login screen
2 Enter your login information in the Login screen, using the
following credentials:
❖
User Name: admin
❖
User Password: Leave the field blank
3 Click or touch the
OK button to access the main interface.
Page 28

Canvio AeroMobile Wireless Solid State Drive
Software Utility
Wireless SSD for Toshiba main interface
27
Wireless SSD for Toshiba main interface
When entering the main interface, the Wireless SSD for Toshiba may
notify you that a firmware update is available. The following three
options are available:
❖
OK (this will enable the updating process; recommended)
❖
Cancel (this will cancel the update process)
❖
Do not prompt (this will discontinue future notifications; not
recommended)
(Sample Image) Firmware update screen
If you select
approximately five minutes.
(Sample Image) Firmware update - wait 5 minutes screen
If you select
the next time you log in and enter the Wireless SSD for Toshiba
interface.
If you select
again automatically inform you of a firmware upgrade, however, you
can manually upgrade the firmware on the
“Upgrade Firmware:” on page 56.
OK to update, the system will inform you to wait
Cancel, you may be informed of any available upgrades
Do not prompt, Wireless SSD for Toshiba will never
Setting page, see
Page 29

Canvio AeroMobile Wireless Solid State Drive
Tablets/iPads Smartphones/iPhones
28
Software Utility
Wireless SSD for Toshiba main interface
Web main interface
Below is an example of the Wireless SSD for Toshiba main interface
viewed in a computer’s Web browser.
(Sample Image) Wireless SSD for Toshiba main interface - Web
browser
Wireless SSD for Toshiba App main interface
Below is an example of the Wireless SSD for Toshiba main interface
viewed on an iPhone, iPad, or Android device.
(Sample Image) Wireless SSD for Toshiba main interface - via the
app
Page 30

Canvio AeroMobile Wireless Solid State Drive
Software Utility
29
Wireless SSD for Toshiba main interface
Wireless SSD for Toshiba main interface functionality
At the top of the Wireless SSD for Toshiba interface, a bar of icons is
displayed. These icons provide important information about the
functionality of your Canvio AeroMobile Wireless Solid State Drive.
Below is a description of each icon and its indication or function:
Button/Icon Function
The SD Card is available.
Internet connection is available.
No Internet connection is available.
Displays the current battery level of the Canvio
AeroMobile Wireless Solid State Drive.
Click or touch the
AeroMobile Wireless Solid State Drive system settings.
Click or touch the
internal SSD storage.
Click or touch the
inserted SD Card.
(iPhone, iPad, or Android devices only.) Click or touch the
Local button to switch to the local device.
Settings button to enter the Canvio
SSD Storage icon to switch to the
SD Card button to switch to the
Below is a description of each button and its function within the main
interface:
Button/Icon
Button/Icon
Displays the Pictures Management screen.
Displays the Video Management screen.
Displays the Music Management screen.
Displays the Documents Management screen
Displays the File/Folder Management screen.
Click or touch the
menu, see “Backup Management” on page 44.
(iPhone, iPad, and Android devices only.)
Backup button to access the Back up
Page 31

Canvio AeroMobile Wireless Solid State Drive
NOTE
30
Software Utility
Pictures Management interface
Pictures Management interface
Before using this feature, content should be transferred
to the Canvio AeroMobile Wireless Solid State Drive via
direct connection to your computer, see “Connect with
USB” on page 21.
Click or touch the
Picture button to display the Pictures
Management window.
(Sample Image) Pictures Management interface window
Below is a description of each button/icon and its function within the
Pictures Management interface window:
Button/Icon Button/Icon
Click or touch the Back button to return to the main
window.
When the
are sorted by filename.
When the
are sorted by file date.
Click or touch the icon to toggle between modes.
When the Thumbnail icon is displayed, the pictures are
displayed in thumbnails.
When the
displayed as a list, featuring a smaller thumbnail along
with file information.
Click or touch the icon to toggle between modes.
Enter key letters or numbers in the search box to perform
a search of a specific file or folder.
Click or touch the
by calendar date.
Sort by name icon is displayed, the pictures
Sort by date icon is displayed, the pictures
List icon is displayed, the pictures are
Calendar menu to search for pictures
Page 32

Canvio AeroMobile Wireless Solid State Drive
Software Utility
Pictures Management interface
Button/Icon Button/Icon
Click or touch the SSD Storage icon to switch to the
Canvio AeroMobile Wireless Solid State Drive internal
SSD storage.
Click or touch the
inserted SD Card.
(iPhone, iPad, or Android devices only.) Click or touch the
Local button to switch to the local device.
In the SSD storage mode, you can choose pictures from
one of 4 users. Click or touch the User icon to display
other users. The 4 user default names are: Default,
Owner1, Owner2, and Owner3. To configure these
names, see “User image and name management” on
page 58.
SD Card button to switch to the
Picture Viewer interface
Click or touch a picture file to enter the Picture Viewer interface.
31
(Sample Image) Picture Viewer interface window
Below is a description of each button/icon and its function within the
Pictures Management interface window:
Button/Icon Button/Icon
Click or touch the Back button to return to the Pictures
Management interface window.
Click or touch the Download button to download the
current picture to the local album.
Click or touch the
picture from local to the Canvio AeroMobile Wireless
Solid State Drive.
Upload button to upload the current
Page 33

Canvio AeroMobile Wireless Solid State Drive
NOTE
32
Software Utility
Videos Management interface
Button/Icon Button/Icon
Click or touch the Play/Pause button to start/stop the
photo slide show.
When the
slide show plays in “Loop playback” mode.
When the
show plays in “Sequential” mode.
Click or touch the icon to toggle between modes.
Click or touch the Share button to share the current
picture to Facebook®, Twitter®, or email.
Loop playback icon is displayed, the photo
Sequential icon is displayed, the photo slide
Videos Management interface
Before using this feature, content should be transferred
to the Canvio AeroMobile Wireless Solid State Drive via
direct connection to your computer, see “Connect with
USB” on page 21.
Click or touch the
Videos button to display the Videos Management
window.
(Sample Image) Videos Management interface window
Page 34

Canvio AeroMobile Wireless Solid State Drive
Software Utility
33
Videos Management interface
Below is a description of each button/icon and its function within the
Videos Management interface window:
Button/Icon Button/Icon
Click or touch the Back button to return to the main
window.
When the Sort by name icon is displayed, the videos
are sorted by filename.
When the
sorted by file date.
Click or touch the icon to toggle between modes.
When the Thumbnail icon is displayed, the videos are
displayed in thumbnails.
When the
as a list, featuring a smaller thumbnail along with the file
information.
Click or touch the icon to toggle between modes.
Enter key letters or numbers in the search box to perform
a search of a specific file or folder.
Click or touch the Calendar menu to search for videos
by calendar date.
Click or touch the
Canvio AeroMobile Wireless Solid State Drive internal
SSD storage.
Click or touch the
inserted SD Card.
(iPhone, iPad, or Android devices only.) Click or touch the
Local button to switch to the local device.
In the SSD storage mode, you can choose videos from
one of 4 users. Click or touch the Owner icon to display
other users. The 4 user default names are: Default,
Owner1, Owner2, and Owner3. To configure these
names, see “User image and name management” on
page 58.
Sort by date icon is displayed, the videos are
List icon is displayed, the videos are displayed
SSD Storage icon to switch to the
SD Card button to switch to the
Page 35

Canvio AeroMobile Wireless Solid State Drive
34
Software Utility
Videos Management interface
Video Playback interface
(iPhone, iPad, and Android device only)
Click or touch a video file to enter the Video Playback interface.
(Sample Image) Video Playback interface window
Below is a description of each button/icon and its function within the
Video Playback interface window:
Button/Icon Function
Click or touch the Back button to return to the main
window.
Click or touch the
screen size.
Click or touch the Previous button to switch to the
previous video playback.
Click or touch the
playback.
Click or touch the
a speed of 20 seconds.
Click or touch the Forward button to forward the video
at a speed of 20 seconds.
Click or touch the
currently playing video.
Click or touch the
current video from the Canvio AeroMobile Wireless Solid
State Drive to the local device.
Click or touch the Upload button to upload the current
video from local device to the Canvio AeroMobile
Wireless Solid State Drive.
Zoom button to adjust the playback
Next button to switch to the next video
Rewind button to rewind the video at
Play/Pause button to play/pause the
Download button to download the
Drag the Playback progress bar to navigate to different
positions in the video playback.
Page 36

Canvio AeroMobile Wireless Solid State Drive
NOTE
Software Utility
Music Management interface
Button/Icon Function
Drag the Volume control bar to adjust the volume of the
video.
If the Web browser supports video play back, you can play the video
within a Web browser, otherwise, you will be asked to download the
video to a local device.
35
Music Management interface
Before using this feature, content should be transferred
to the Canvio AeroMobile Wireless Solid State Drive via
direct connection to your computer, see “Connect with
USB” on page 21.
Click or touch the
window.
(Sample Image) Music Management interface window
Music button to display the Music Management
Page 37

Canvio AeroMobile Wireless Solid State Drive
36
Software Utility
Music Management interface
Below is a description of each button/icon and its function within the
Music Management interface window:
Button/Icon Function
Click or touch the Back button to return to the main
window.
When the
displayed in thumbnails.
When the
displayed as a list, featuring a smaller thumbnail along
with file information.
Click or touch the icon to toggle between modes.
Enter key letters or numbers in the search box to perform
a search of a specific file or folder.
Click or touch the
Canvio AeroMobile Wireless Solid State Drive internal
SSD storage.
Click or touch the
inserted SD Card.
(iPhone, iPad, or Android devices only.) Click or touch the
Local button to switch to the local device.
Click or touch the Songs button to view all of the song
files available on the Canvio AeroMobile Wireless Solid
State Drive (default mode).
Click or touch the
albums available on the Canvio AeroMobile Wireless
Solid State Drive.
Click or touch the
available on the Canvio AeroMobile Wireless Solid State
Drive.
Click or touch the
favorite songs. You can add songs to the Favorites screen
by clicking or touching the ( ) button on the
screen, Album screen, or Artist screen. Remove songs
from the Favorites screen by clicking or touching the ( )
button.
Thumbnail icon is displayed, music tracks are
List icon is displayed, music tracks are
SSD Storage icon to switch to the
SD Card button to switch to the
Albums button to view all of the
Artist button to view all of the artists
Favorites button to view all of your
All music
Page 38

Canvio AeroMobile Wireless Solid State Drive
Software Utility
Music Management interface
37
Music Player interface
(iPhone, iPad, and Android device only)
Click or touch a music file to enter the Music Player interface.
(Sample Image) Music Player interface window
Below is a description of each button/icon and its function within the
Music Player interface window:
Button/Icon Function
Click or touch the Back button to return to the Music
Management interface window.
The Favorites icon displays in the Music Player interface
window when playing in Favorites mode.
Click or touch the
previous music playback.
Click or touch the
music playback.
Click or touch the Rewind button to rewind the music at
a speed of 20 seconds.
Click or touch the
at a speed of 20 seconds.
Click or touch the
currently playing music.
Previous button to return to the
Next button to switch to the next
Forward button to forward the music
Play/Pause button to play/pause the
Drag the Playback progress bar, to navigate to different
positions in the music playback.
Page 39

Canvio AeroMobile Wireless Solid State Drive
38
Software Utility
Documents Management interface
Button/Icon Function
Drag the Volume control bar to adjust the volume of the
music.
Click or touch the Music mode button to switch
between the following four musical modes:
Shuffle ( ) (default mode), Loop Playback ( ), Order
Play ( ), and Single Cycle ( ).
Click or touch the Favorites button to add the currently
playing music to your Favorites. To remove a track that
has been added to Favorites, click or touch the
Favorites button.
If the Web browser supports music playback, you can play the music
within a Web browser, otherwise, you will be asked to download the
music file to a local device.
Documents Management interface
Click or touch the Documents button to display the Documents
Management window.
(Sample Image) Documents Management interface window
Page 40

Canvio AeroMobile Wireless Solid State Drive
Software Utility
39
Documents Management interface
Below is a description of each button/icon and its function within the
Documents Management interface window:
Button/Icon Function
Click or touch the Back button to return to the main
window.
When the
are sorted by filename.
When the
documents are sorted by file date.
Click or touch the icon to toggle between modes.
When the Thumbnail icon is displayed, documents are
displayed in thumbnails.
When the
displayed as a list, featuring a smaller thumbnail along
with file information.
Click or touch the icon to toggle between modes.
Enter key letters or numbers in the search box to perform
a search of a specific file or folder.
Click or touch the
document files by calendar date.
Click or touch the
Canvio AeroMobile Wireless Solid State Drive internal
SSD storage.
Click or touch the
inserted SD Card.
(iPhone, iPad, or Android devices only.) Click or touch the
Local button to switch to the local device.
Sort by name icon is displayed, documents
Sort by date icon is displayed, the
List icon is displayed, documents are
Calendar menu to search for
SSD Storage icon to switch to the
SD Card button to switch to the
Document Viewer interface
(iPhone, iPad, and Android device only)
Click or touch a document file to enter the Document Viewer
interface.
Below is a description of each button/icon and its function within the
Document Viewer interface window:
Button/Icon Function
Click or touch the Back button to return to the
Documents Management interface window.
Click or touch the
document to Facebook, Twitter, or email.
Share button to share the current
Page 41

Canvio AeroMobile Wireless Solid State Drive
40
Software Utility
File/Folder Management interface
If the Web browser supports file view, you can display the document
within a Web browser, otherwise, you will be asked to download the
document file to a local device.
File/Folder Management interface
Click or touch the File/Folder button to display the File/Folder
Management window.
(Sample Image) File/Folder Management interface - App window
(Sample Image) File/Folder Management interface - Web
browser window
Below is a description of each button/icon and its function within the
Documents Management interface window:
Button/Icon Function
Click or touch the Back button to return to the main
window.
Page 42

Canvio AeroMobile Wireless Solid State Drive
Application Web browser
Button/Icon Function
When the Thumbnail icon is displayed, files/folders are
displayed in thumbnails.
When the
displayed as a list, featuring a smaller thumbnail along
with file/folder information.
Click or touch the icon to toggle between modes.
Enter key letters or numbers in the search box to perform
a search of a specific file or folder.
Click or touch the
Canvio AeroMobile Wireless Solid State Drive internal
SSD storage.
Click or touch the
inserted SD Card.
(iPhone, iPad, or Android devices only.) Click or touch the
Local button to switch to the local device.
Click or touch the
File/Folder Management interface
Software Utility
List icon is displayed, files/folders are
SSD Storage icon to switch to the
SD Card button to switch to the
Refresh button to refresh the screen.
41
Click or touch the
document to Facebook, Twitter, or email. This feature only
works for photo and video files.
(Within an App only.)
Checkmark icon indicates that the file or folder is
A
selected.
Click or touch the
options:
Click or touch the Transmission button to display the
File transfer status window.
Share button to share the current
Setting button to display the following
Page 43

Canvio AeroMobile Wireless Solid State Drive
NOTE
42
Software Utility
File/Folder Management interface
Transferring files
When an action is taken with a file or folder (copy, cut, upload, or
download), the File transmission dialog box opens. A progress bar of
each transmission is displayed as well as successful and failed
transmissions.
(Sample Image) Queued Files status window
❖ The
❖ The
❖ Click or touch the
❖ The ( ) icon indicates that a file/folder is waiting for
❖ Click or touch the
❖ Click or touch the
Upload ( ) icon indicates an uploading file/folder in
progress.
Download ( ) icon indicates a downloading file/folder
in progress.
Upload/Download icon to pause the
upload/download process. The
displayed.
upload/download. This app allows for individual file/folder
upload/download.
Cancel ( ) icon to cancel all queued
files.
Transfer Complete or Transfe r F a i l ed
buttons to see a list of each transfer result.
Uploads and downloads may complete faster than the
progress bar display. Click or touch the
Complete and/or Transfer Failed buttons to
determine file transfer status.
Pause ( ) icon is
Transfer
Page 44

Canvio AeroMobile Wireless Solid State Drive
NOTE
Software Utility
File/Folder Management interface
(Sample Image) Document Viewer Queued Files window
If a transfer fails and you wish to try again, click or touch the ( )
Re-Transfer button.
To upload/download file(s)/folder(s) within a Web browser:
The Upload ( ) icon indicates an uploading file/folder in progress
from a local system.
(Sample Image) Upload progress bar - Web browser window
43
When a selected local file is uploaded to the Canvio AeroMobile
Wireless Solid State Drive, a progress bar is displayed in the Web
browser window.
The
Download ( ) icon indicates a downloading file/folder in
progress from the Canvio AeroMobile Wireless Solid State Drive.
The downloading method may vary, depending on the
Web browser used.
Page 45

Chapter 3
Backup Management
Using the Backup Management feature
(For iPhone, iPad, and Android devices only.)
You can back up the files on the SD Card or local device to one of
the four user directories: Default, Owner1, Owner2, or Owner3. The
backup is an incremental backup.
You can back up the SD card manually or use the automatic backup
function. Local devices must be backed up manually.
Manual backup
1 To perform a manual backup, click or touch the Backup
button on the main screen.
2 Click or touch
3 Click or touch a desired user directory to the back up the
files to.
4 Click or touch
If the size of the backup files are larger than the available
space on the Canvio AeroMobile SSD internal storage, you
will see a warning message before the backup process
begins.
Backup SD Card or Backup Local Data.
Start Backup.
44
Page 46

Backup Management
Using the Backup Management feature
(Sample Image) SSD insufficient memory window
5 Files from the SD Card or local device will be backed up to
the selected user directory.
The backup progress is displayed at the bottom of the
interface window. Once the backup has finished, you will see
a message indicating backup succeeded.
45
Automatic backup
You can set up Automatic backup for your SD Card by selecting
Auto Copy on the Backup SD Card screen. The next time you insert
the SD Card, all of the videos and pictures on the SD Card will be
automatically backed up to the selected user directory.
(Sample Image) Back up data window
The backup progress bar is displayed in the bottom of the interface
window.
Page 47

Backup Management
46
Unmount the SD Card
Unmount the SD Card
Ensure that all transfers from the SD Card are complete before
removing the card. Failure to do so could result in data corruption.
To unmount the SD Card from an Android device, click or touch the
Go To menu. Then click the Unmount SD Card button.
(Sample Image) Unmount SD Card window
Page 48

Chapter 4
Settings
Management
Using the Settings Management
Click or touch the Setting button on the upper-right corner of the
Main interface window to enter the setting interface window. The
following modules are available:
❖ Configurations
❖ User symbol and name
❖ Cache (App only)
❖ Language (App only)
❖ About
❖ Logout
47
Page 49

Settings Management
48
Using the Settings Management
Configurations
The Canvio AeroMobile Wireless Solid State Drive software offers
several options to configure your SSD. Configuration options for the
app and Web browser vary slightly.
(Sample Image) Settings Configurations - (App) window
(Sample Image) Settings Configurations - (Web browser) window
Page 50

Settings Management
Using the Settings Management
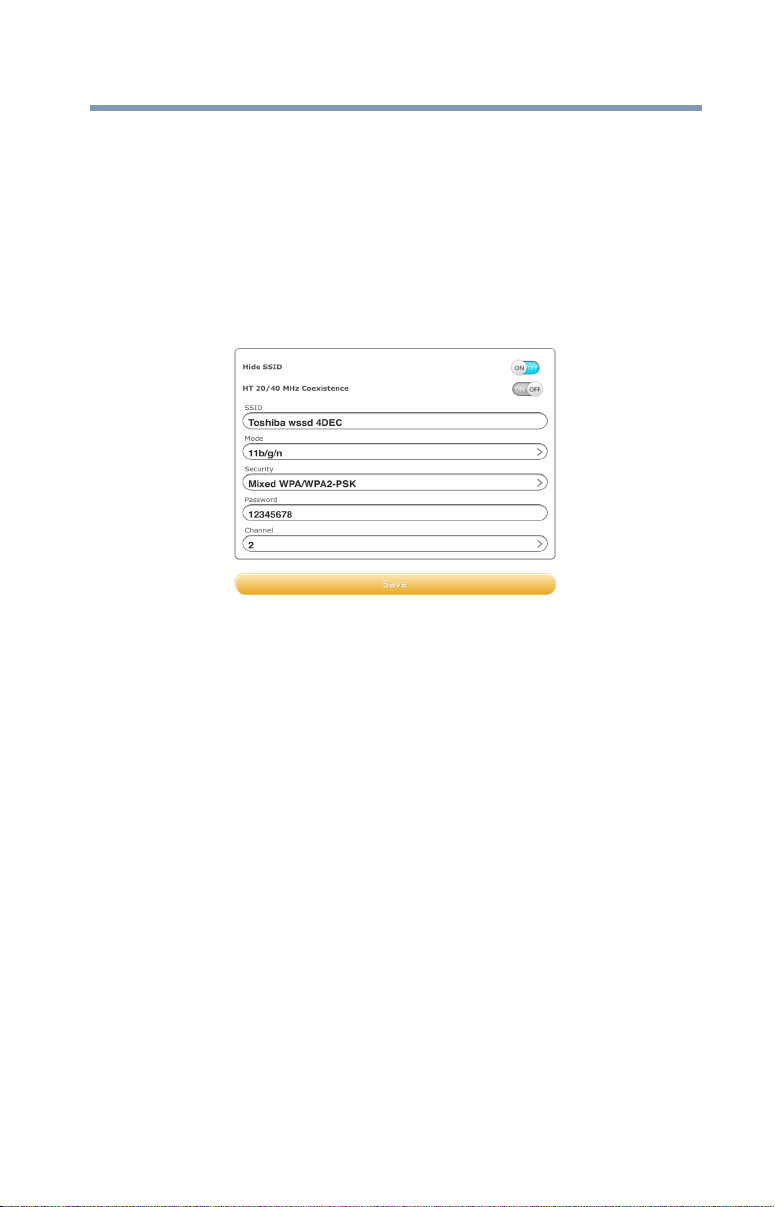
Wi-Fi Settings for the App
Click or touch
window.
(Sample Image) Settings Configurations - Wi-Fi window
The following options are available:
❖ SSID
❖ Channel
❖ Mode
❖ Security
SSID:
1 Click or touch the SSID button to enter the SSID settings
WiFi Setting to enter the Wireless LAN settings
window.
49
(Sample Image) Settings Configurations - SSID settings window
2 Enter your SSID. The default SSID is “Toshiba wssd xxxx.”
3 Click or touch the
Channel:
1 Click or touch the Channel button to enter the Wireless LAN
Channel window.
2 Select the desired Wireless LAN channel, or set it to
3 Click or touch the
Save button.
Save button.
Auto.
Page 51

Settings Management
NOTE
50
Using the Settings Management
Mode:
1 Click or touch the Mode button to enter the Wireless LAN
mode window.
(Sample Image) Settings Configurations - Security window
2 Select the desired Wireless LAN mode.
3 Click or touch the
Security:
1 Click or touch the Security button to enter the Wireless LAN
security window.
(Sample Image) Settings Configurations - Security window
2 Select the desired Wireless LAN security setting.
Password authentication is required if you select
WPA-PSK, WPA2-PSK or Mixed WPA/WPA2PSK
No password is needed if None is selected.
OK button.
. The default password is “12345678.”
3 Enter your password, if requested.
4 Click or touch the
Save button.
Page 52
Settings Management
Using the Settings Management
Wi-Fi Settings for a Web browser
The setting functions within the Web browser version of the Canvio
AeroMobile Wireless Solid State Drive software are similar to the
mobile app settings with minor design differences.
In the Web browser, you can elect to show or hide the SSID settings.
1 To show the SSID settings move the switch in the upper-right
corner of the screen to the
settings move the switch to the
(Sample Image) Settings Configurations - SSID window
ON position. To hide the SSID
OFF position.
51
2 Click or touch the
LAN Settings for the App
1 Click or touch
MAC address: This is for your reference and cannot be
❖
changed.
❖
IP Address: Click or touch the field to modify the IP
address of device.
❖
Subnet Mask: Click or touch the field to modify the
Subnet Mask of device.
2 Click or touch the
Save button.
LAN Setting to enter LAN setting window.
Save button.
Page 53

Settings Management
NOTE
NOTE
52
Using the Settings Management
Internet Settings for the App
Click or touch
You can configure your network connection between the Canvio
AeroMobile Wireless Solid State Drive and Wireless LAN router.
(Sample Image) Settings Configurations - Internet Setting (App)
window
1 Select your router from the Access Points list.
Internet Setting to enter the Internet setting window.
You may be asked to input a password for the
connection.
(Sample Image) Internet Setting - password window
If connected successfully, a checkmark appears next to the
access point.
2 Click or touch
Use caution when connecting to a network in a public
place as others may be able to connect to your device.
OK.
Page 54

Settings Management
Using the Settings Management
Internet Settings for a Web browser
The Internet Settings functions within the Web browser version of the
Canvio AeroMobile Wireless Solid State Drive software are similar to
the mobile app settings with minor design differences.
53
(Sample Image) Settings Configurations - Internet Settings
window (Web browser)
System settings
In the System Settings window, you can modify the admin password,
change the host name, check disk capacity, and upgrade the
firmware. Note that more system settings are available in the Web
browser version.
(Sample Image) System Settings window (Web browser)
Page 55
Settings Management
54
Using the Settings Management
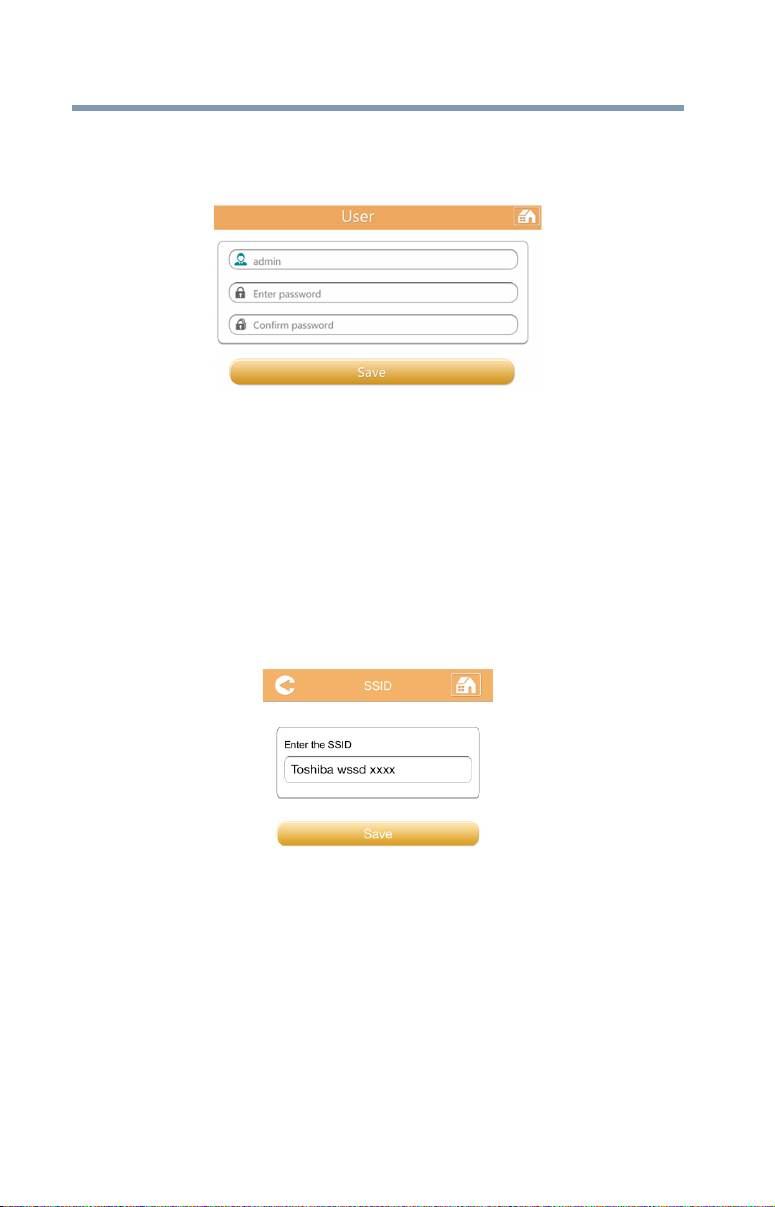
Modify Admin Password:
1 In the System Settings window click or touch Modify Admin
Password
to open the Modify Admin Password window.
(Sample Image) Modify Admin Password window
2 Enter your new login information in the following fields:
❖
User Name
❖ User Password
❖ Confirm Password
3 Click or touch the Save button.
Modify SSID:
1 In the Wi-Fi Settings window, click or touch SSID to open the
SSID window.
(Sample Image) SSID window
2 Enter your new SSID.
3 Click or touch the
Time Settings (Web browser only):
You can manually select the time Zone, date, and time for your
Canvio AeroMobile Wireless Solid State Drive.
OK button.
Page 56

Settings Management
Using the Settings Management
55
You can also set your Canvio AeroMobile Wireless Solid State Drive
to synchronize the date and time with your mobile device or the
Internet.
1 In the System Settings window click or touch
Time Settings
to open the Time Settings window.
(Sample Image) Time Settings window
2 Click or touch the
Time Zone button to choose your desired
location.
3 Move the switch to the
appropriate
Daylight Saving Time setting.
4 Move the switch to the
Automatically synchronize with an internet time
server
5 In the
6 In the
selection.
Date fields, enter the Year, Month, and Day.
Time fields, enter the Hours, Minutes, and Seconds.
7 Click or touch the
Disc Information:
ON/OFF position to choose the
ON/OFF position for the desired
Save button.
In the System Settings window click or touch Disk Information to
open the Disk Information window.
(Sample Image) Disk Information window
Page 57

Settings Management
56
Using the Settings Management
This window shows the amount of available disk space remaining on
your Canvio AeroMobile Wireless Solid State Drive. If an SD Card is
available, its disk information also is displayed.
Reset to Factory Setting (Web browser only):
1 In the System Settings window click or touch Reset
Settings
(Sample Image) Reset Settings window
to open the Reset Settings window.
All information stored on the Canvio AeroMobile
Wireless Solid State Drive will be erased during this
formatting process.
Be sure to save your data to another storage device
before executing this procedure.
2 To restore your Canvio AeroMobile Wireless Solid State Drive
to its original Factory Default settings, move the switch to
the
ON position.
3 Click or touch the
Upgrade Firmware:
1 In the System Settings window click or touch Upgrade
Firmware
2 Click or touch the
If new Firmware is available, the following screen appears.
(Sample Image) Upgrade Firmware window
to open the Upgrade Firmware window.
Save button.
Online Upgrade button.
Page 58

Settings Management
DHCP Settings (Web browser only)
3 Click or touch the OK button.
If no new Firmware is available, a message displays
indicating no firmware is available.
(Sample Image) No detected firmware window
In the Web browser, you can upgrade available firmware
manually.
(Sample Image) Manual Upgrade window
57
4 Click or touch the
The following screen appears.
(Sample Image) Wait 5 minutes window
5 Reconnect your Canvio AeroMobile Wireless Solid State
Drive.
Upgrade button.
DHCP Settings (Web browser only)
You can set up the DHCP server information.
1 Click or touch
2 Click or touch
3 Enter the required information.
You can also check the client list on this screen.
Settings.
Configuration, and then DHCP server.
Page 59
Settings Management
58
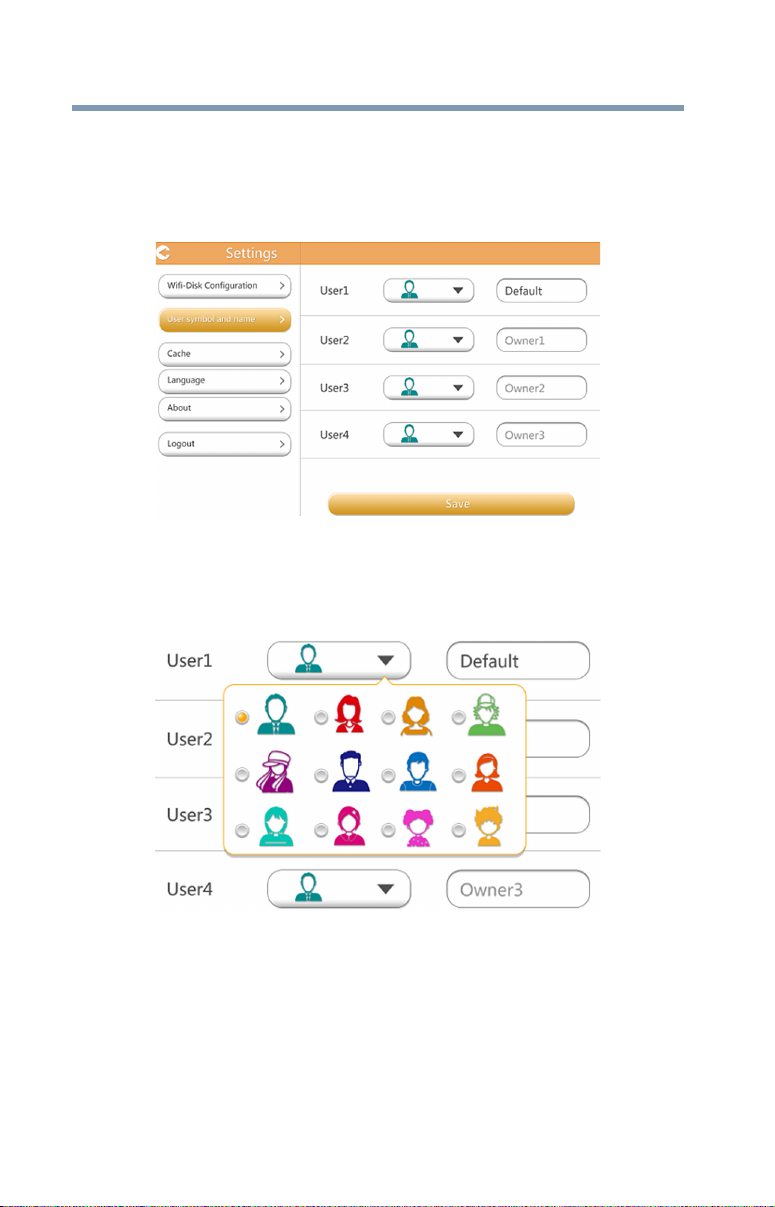
User image and name management
User image and name management
You can set up four different user profiles. These profiles display in
the file management screens as well as the SD Card screen, and
Backup screen.
(Sample Image) User symbol and name management window
1 Click or touch
2 Click or touch a User icon.
(Sample Image) User symbol and name management window
There are a total of 12 icons to choose from.
You can also type a new name for each user, (e.g. “Default”
to “Father”).
Settings.
Page 60
Settings Management
Cache (App only)
59
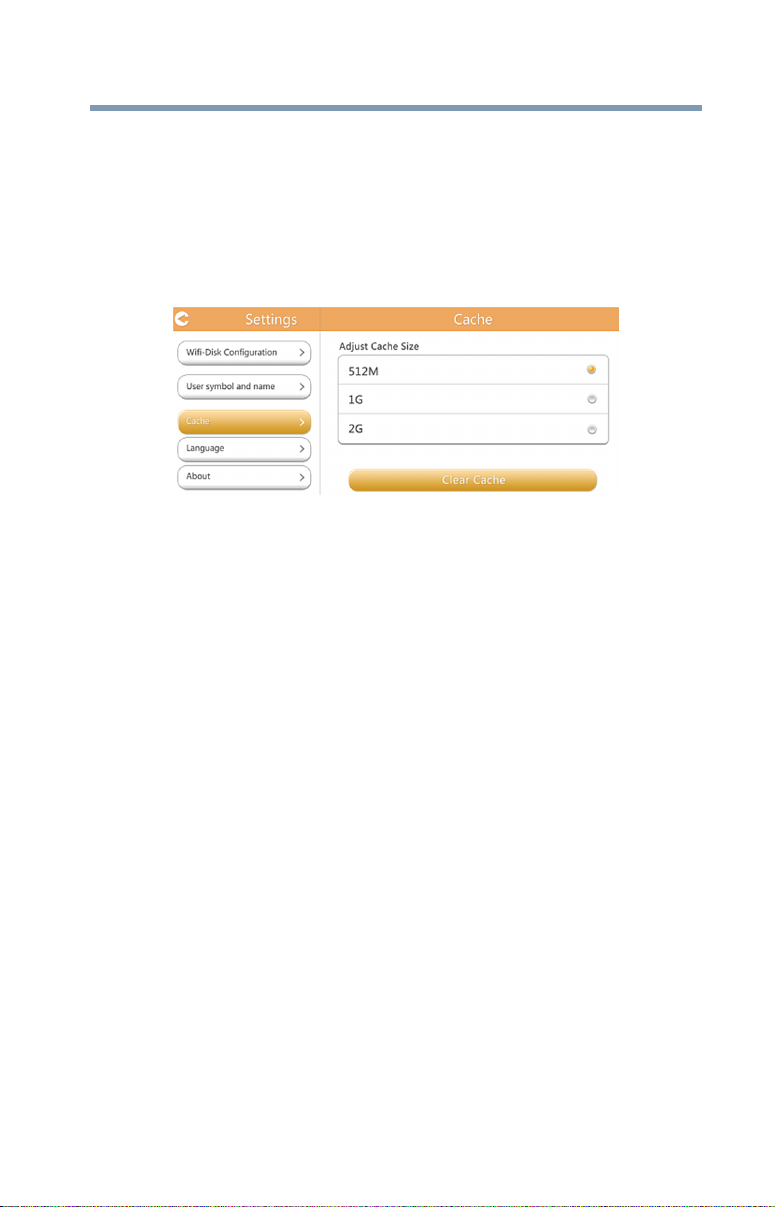
Cache (App only)
Applying caches settings on your local device will improve the
response speed of the Canvio AeroMobile Wireless Solid State Drive.
You can adjust the size of the cache to increase performance.
1 Click or touch
2 Click or touch
Settings.
Cache.
(Sample Image) Cache window
3 Select the desired Cache size.
Language (App only)
You can select the desired language for your Canvio AeroMobile
Wireless Solid State Drive. The default language is English.
Logout
To logout the current user, click or touch Logout from the Settings
window.
For security reasons, if you log out after you set a password, you will
be required to use the password when logging back in.
Contacting Toshiba
For technical support, or to stay current on the most recent software
and hardware options for your computer, and for other product
information, be sure to regularly check the Toshiba Web site at
support.toshiba.com.
Call Toshiba Customer Support Center
Toshiba Customer Support Center is ready to help with personal
service 24 hours a day, 7 days a week.
888-592-0944 (From inside the United States)
949-583-3305 (From outside the United States)
Page 61

Index
A
Android device
install Wireless SSD for Toshiba
app 25
B
Battery indicator light 19
button
On/Off 18
Reset 18
C
Cache (App only) 59
Canvio AeroMobile Wireless Solid
State Drive
charging 20
Components 14
connection 21
features 17
Hardware specifications 15
Overview 14
Canvio AeroMobile Wireless Solid
State Drive, connection
USB 21
wirelessly 22
Contacting Toshiba 59
D
DHCP settings (Web browser) 57
I
icon
safety 7
iPhone and iPad
install Wireless SSD for Toshiba
app 24
iPhone or iPad
Wireless SSD for Toshiba 24
L
Language (App only) 59
light
Battery indicator 19
SD Card indicator 19
Wi-Fi/SSD indicator 19
Logout 59
O
On/Off button 18
P
port
SD Card slot 19
USB 3.0 18
60
Page 62

Index
61
R
Reset button 18
S
safety
icons 7
SD Card
Automatic backup 45
Backup management 44
Manual backup 44
unmount 46
SD Card indicator light 19
SD Card slot 19
Settings
management 47
Settings Management
configurations 48
Internet Settings (App) 52
Internet Settings (Web
browser) 53
LAN (App) 51
System settings 53
Wi-Fi (App) 49
Wi-Fi (Web browser) 51
Software specifications 15
T
Trademarks 6
U
USB 3.0 port 18
user image
management 58
name 58
W
Wi-Fi/SSD indicator light 19
wireless connection
PC/Mac 23
Wireless SSD for Toshiba
Android 25
Document Viewer interface 39
file transfer 42
File/Folder Management
interface 40
main interface 27
Music Management interface
35
Music Player interface 37
Picture Viewer interface 31
Pictures Management
interface 30
system login 23
Video Playback interface 34
Videos Management interface
32
Wireless SSD for Toshiba app login
Android device 26
iPhone/iPad device 25
Wireless SSD for Toshiba app,
Android device
connect wirelessly 26
Wireless SSD for Toshiba app,
iPhone or iPad
connect wirelessly 25
Wireless SSD for Toshiba main
interface
app 28
functionality 29
Web browser 28
Wireless SSD for Toshiba System
login
Web browser login 24
Wireless SSD for
ToshibaDocuments
Management interface 38
Page 63

Canvio AeroMobile™
de TOSHIBA
Manual del usuario de
la unidad inalámbrica
de estado sólido
Page 64

2
N O T A
N O T A
Advertencia de la Proposición 65 de California
ste producto contiene sustancias químicas —plomo, entre
A D V E R T E N C I A
Solo aplica al estado de California.
Información de seguridad y normas y
reglamentos para LAN inalámbrica
E
otras— que el estado de California identifica como
causantes de cáncer, anomalías congénitas u otros
perjuicios reproductivos. Lávese las manos después
de manipular el producto.
No utilice la funcionalidad de LAN inalámbrica cerca
de un horno de microondas o en áreas en las que
haya interferencia de radio o campos magnéticos. La
interferencia de un horno de microondas u otra
fuente puede perturbar el funcionamiento de la LAN
inalámbrica.
La velocidad de transmisión de la LAN inalámbrica y
la distancia que esta puede alcanzar pueden variar
dependiendo del entorno electromagnético, los
obstáculos, el diseño y la configuración del punto de
acceso, el diseño del cliente y la configuración de
software/hardware. La velocidad de transmisión
descrita es la velocidad máxima teórica, según lo
especificado bajo el estándar correspondiente; la
velocidad de transmisión real será menor que la
velocidad máxima teórica.
Aviso de la Comisión Federal de
Comunicaciones (Federal
Communications Commission o FCC)
(EE. UU.)
Cumple con los requisitos de exposición a radiofrecuencia de la FCC.
Este equipo se probó y se comprobó que cumple con los límites para
dispositivos digitales de Clase B, en virtud de la Parte 15 de las normas de la
FCC. Estos límites están diseñados para proporcionar una protección
razonable contra interferencias perjudiciales en una instalación residencial.
Page 65

3
Este equipo genera, utiliza y puede irradiar energía de radiofrecuencia y, si no
se instala y utiliza conforme a las instrucciones, puede interferir con las
comunicaciones por radio. Sin embargo, no se garantiza que no habrá
interferencias en una instalación en particular. Si este equipo provoca
interferencias en la recepción de radio o televisión (lo cual puede determinarse
apagando y encendiendo el equipo), recomendamos al usuario que intente
corregir la interferencia adoptando una o varias de las medidas siguientes:
❖ Cambiar la orientación o la ubicación de la antena receptora.
❖ Aumentar la distancia entre el equipo y el receptor.
❖ Conectar el equipo a un tomacorriente en un circuito diferente al
que está conectado el receptor.
❖ Consultar al distribuidor o a un técnico especializado en radio y
televisión para obtener ayuda.
Los cambios o las modificaciones realizadas a este equipo que no estén
aprobados expresamente por Toshiba, o por terceros autorizados por Toshiba,
pueden invalidar el derecho del usuario a utilizar el equipo.
Declaración de conformidad para los
productos marcados con el logotipo de la
FCC (EE. UU.)
Este dispositivo cumple con la Parte 15 de las normas de la FCC. El
funcionamiento está sujeto a las siguientes dos condiciones:
1) Este dispositivo no debe causar interferencias y
2) Este dispositivo debe aceptar cualquier interferencia recibida, incluidas
aquellas que puedan provocar un funcionamiento indeseado.
Información de SAR (tasa de absorción
específica)
Este transmisor no debe colocarse en el mismo sitio ni funcionar con ninguna
otra antena o transmisor.
This transmitter must not be co-located or operating in conjunction with any
other antenna or transmitter.
Cet émetteur ne doit pas être Co-placé ou ne fonctionnant en même temps
qu’aucune autre antenne ou émetteur.
Aviso para Canadá
Este dispositivo cumple con las especificaciones de los estándares de radio
sin licencias de Industry Canada.
El funcionamiento está sujeto a las siguientes dos condiciones: (1) este
dispositivo no debe causar interferencias y (2) este dispositivo debe aceptar
cualquier interferencia recibida, incluidas aquellas que puedan provocar un
funcionamiento indeseado.
Page 66

4
This device complies with Industry Canada license-exempt RSS standard(s).
Operation is subject to the following two conditions: (1) this device may not
cause interference, and (2) this device must accept any interference, including
interference that may cause undesired operation of the device.
Le présent appareil est conforme aux CNR d’Industrie Canada applicables aux
appareils radio exempts de licence.
L’exploitation est autorisée aux deux conditions suivantes : (1) l’appareil ne doit
pas produire de brouillage, et (2) l’appareil doit accepter tout brouillage
radioélectrique subi, même si le brouillage est susceptible d’en compromettre
le fonctionnement.
Para cumplir con los requisitos canadienses de exposición a
radiofrecuencias, este dispositivo y su antena no deberán
colocarse en el mismo sitio ni funcionar con ninguna otra
antena o transmisor.
To comply with the Canadian RF exposure compliance
requirements, this device and its antenna must not be colocated or operating in conjunction with any other antenna or
transmitter.
Pour être conforme aux exigences canadiennes en matière
d’exposition aux fréquences radio, l’appareil et son antenne
ne doivent pas être situés au même endroit qu’une autre
antenne ou un autre émetteur ni fonctionner en même
temps.
Derechos de autor
Este manual no puede reproducirse en forma alguna sin el permiso previo y
por escrito de Toshiba. Toshiba no asume ninguna responsabilidad respecto al
uso de la información incluida en este manual.
© 2015 Toshiba America Information Systems, Inc. Todos los derechos
reservados.
Aviso
La información contenida en este manual, incluyendo pero sin limitarse a las
especificaciones del producto, está sujeta a modificaciones sin previo aviso.
TOSHIBA CORPORATION Y TOSHIBA AMERICA INFORMATION
SYSTEMS, INC. (TOSHIBA) NO BRINDAN NINGUNA GARANTÍA EN
RELACIÓN CON ESTE MANUAL O CON CUALQUIER INFORMACIÓN
EN ÉL CONTENIDA Y POR ESTE MEDIO SE LIBERAN
EXPRESAMENTE DE TODA RESPONSABILIDAD REFERENTE A
CUALQUIER GARANTÍA IMPLÍCITA DE COMERCIABILIDAD O
ADECUACIÓN PARA UN FIN CONCRETO RELACIONADO CON
CUALQUIERA DE LOS PUNTOS ANTES MENCIONADOS. TOSHIBA NO
ASUME NINGUNA RESPONSABILIDAD POR LOS DAÑOS SUFRIDOS
DIRECTA O INDIRECTAMENTE DEBIDO A ERRORES TÉCNICOS O
Page 67

5
TIPOGRÁFICOS U OMISIONES EN ESTE MANUAL NI POR
DISCREPANCIAS ENTRE EL PRODUCTO Y EL MANUAL. TOSHIBA NO
ASUME BAJO NINGUNA CIRCUNSTANCIA RESPONSABILIDAD POR
DAÑOS INCIDENTALES, EMERGENTES, ESPECIALES O PUNITIVOS,
YA SEA DERIVADOS DE ACTOS CIVILES ILÍCITOS, CONTRATOS U
OTROS, QUE PUDIERAN DESPRENDERSE DE ESTE MANUAL O SE
RELACIONARAN CON EL MISMO O CON CUALQUIER OTRA
INFORMACIÓN EN ÉL CONTENIDA O CON EL USO QUE DE ELLA SE
HICIERA.
Licencia Pública General de GNU (“GPL”)
El firmware incorporado en este producto puede incluir software de terceros
con derechos de autor bajo la licencia GPL o la Licencia Pública General
Reducida (“LGPL”) (colectivamente, “Software GPL”) y no bajo el Acuerdo de
Licencia de Usuario Final de Toshiba. Una copia de esta licencia puede
obtenerse en http://www.gnu.org y en http://support.toshiba.com. Podemos
proporcionarle el código fuente correspondiente completo mediante la
descarga de forma gratuita en http://support.toshiba.com o llamando al
departamento de Servicio al cliente de Toshiba, durante un período de tres
años posterior a la fecha de compra. En lo que respecta únicamente al
Software GPL, no se proporciona ninguna garantía, en la medida permitida
por la ley vigente. La modificación o manipulación del Software se hará
exclusivamente bajo su propio riesgo y anulará la garantía del producto.
Toshiba no se hace responsable de ninguna modificación o manipulación.
Toshiba no respaldará ningún producto en el que se haya modificado o
intentado modificar el Software suministrado por Toshiba.
Los servicios de terceros y otros servicios de Internet no son proporcionados
por Toshiba, y por tanto pueden cambiar o ser cancelados en cualquier
momento. Asimismo, pueden estar sujetos a restricciones del proveedor del
servicio de Internet. Toshiba no garantiza, especifica ni asegura el contenido,
la disponibilidad, la compatibilidad ni la funcionalidad de los contenidos ni de
los servicios de terceros. Para usar los servicios de Internet de terceros es
posible que sea obligatorio crear una cuenta aparte y pagar cargos únicos y/o
recurrentes.
Protección de datos almacenados
En el caso de su información importante, haga copias de respaldo periódicas
de los datos almacenados en el disco duro u otros dispositivos de
almacenamiento como precaución en caso de posibles fallos, alteraciones o
pérdidas.
CUALQUIER PROBLEMA, FALLA O MAL FUNCIONAMIENTO DE LOS
DISPOSITIVOS DE ALMACENAMIENTO Y NO PUDIERAN
RECUPERARSE, TOSHIBA NO SE HARÁ RESPONSABLE DE NINGÚN
DAÑO O PÉRDIDA DE LOS DATOS NI DE NINGÚN OTRO DAÑO QUE
RESULTE DE ELLOS. CUANDO COPIE O TRANSFIERA SUS DATOS,
ASEGÚRESE DE CONFIRMAR QUE SE HAYAN COPIADO O
TRANSFERIDO SATISFACTORIAMENTE. TOSHIBA QUEDA EXENTA DE
SI SUS DATOS SE ALTERARAN O SE PERDIERAN DEBIDO A
Page 68

6
TODA RESPONSABILIDAD EN CASO DE QUE LOS DATOS NO SE
COPIEN O TRANSFIERAN CORRECTAMENTE.
Aplicaciones de importancia vital
Este producto que compró no está diseñado para ninguna “aplicación de
importancia vital”. Las “aplicaciones de importancia vital” son aquellos
sistemas de soporte vital, aplicaciones médicas, conexiones a dispositivos
médicos implantados, usos en transporte comercial, instalaciones o sistemas
nucleares o cualesquiera otras aplicaciones en las que las fallas de los
productos podrían ocasionar lesiones o muerte a personas, o daños
catastróficos a propiedades.
FILIALES Y SUS PROVEEDORES QUEDAN EXENTOS DE TODO TIPO
DE RESPONSABILIDAD QUE SURJA DEL USO DE LOS PRODUCTOS
DE CÓMPUTO EN CUALESQUIERA APLICACIONES DE IMPORTANCIA
VITAL. SI USA LOS PRODUCTOS EN APLICACIONES DE
IMPORTANCIA VITAL, USTED, Y NO TOSHIBA, ASUME TODA
RESPONSABILIDAD POR DICHO USO.
Marcas comerciales
Canvio y Canvio AeroMobile son marcas comerciales de Toshiba America
Information Systems, Inc.
Android y Google Play son marcas comerciales de Google, Inc.
DLNA es una marca comercial o marca registrada de Digital Living Network
Alliance.
Facebook es una marca registrada de Facebook, Inc.
iOS es una marca registrada o marca comercial de Cisco Systems, Inc. o sus
filiales en los Estados Unidos y algunos otros países.
Mac, Mac OS, iPad, iPhone, OS X y Time Machine son marcas comerciales de
Apple Inc., registradas en Estados Unidos y en otros países. App Store es una
marca de servicio de Apple Inc.
SD, SDHC y SDXC son marcas comerciales de SD-3C, LLC.
Twitter es una marca registrada de Twitter, Inc.
®
Wi-Fi
es una marca registrada de Wi-Fi Alliance®.
Windows es una marca registrada o una marca comercial de Microsoft
Corporation en Estados Unidos y en otros países.
Todos los demás nombres de marcas y productos son marcas comerciales o
marcas registradas de sus respectivas compañías.
POR CONSIGUIENTE, TOSHIBA, SUS
Page 69
Iconos de seguridad
P E L I G R O
N O T A
Este manual contiene instrucciones de seguridad que deben
seguirse a fin de evitar posibles peligros que podrían tener como
consecuencia lesiones corporales, daños al equipo o pérdida de
datos. Son advertencias de seguridad que están clasificadas de
acuerdo con la gravedad del peligro y están representadas por
iconos que distinguen cada instrucción como se muestra abajo:
Este icono indica la presencia de una situación
inminentemente peligrosa que, de no evitarse,
ocasionaría la muerte o lesiones graves.
7
A D V E R T E N C I A
Este icono indica la presencia de una situación
potencialmente peligrosa que, de no evitarse, podría
ocasionar la muerte o lesiones graves.
Este icono indica la presencia de una situación
potencialmente peligrosa que, de no evitarse, podría
ocasionar lesiones menores o moderadas.
Este icono indica la presencia de una situación
potencialmente peligrosa que, de no evitarse, podría
ocasionar daños a la propiedad.
Este icono brinda información importante.
Page 70

8
A D V E R T E N C I A
A D V E R T E N C I A
Precauciones de seguridad
No sumerja el dispositivo (con la batería interna
instalada) en líquido, como agua, bebidas u otros
fluidos.
La batería (incluido el circuito de protección) puede
incendiarse, humear, explotar o generar calor
debido a una carga eléctrica inesperada.
No use el dispositivo en contacto con el agua. No
conecte ni desconecte enchufes ni cables con las
manos mojadas.
A D V E R T E N C I A
A D V E R T E N C I A
A D V E R T E N C I A
Mantenga el dispositivo (con la batería interna
instalada) lejos del calor y el fuego. El calor puede
dañar la batería y puede provocar que genere calor,
humo, fuego o una explosión.
No desarme, modifique, manipule ni repare el
dispositivo ni la batería interna. El desarmado o la
modificación del dispositivo y/o la batería pueden
dañar el circuito de protección. Esto puede hacer que
la batería genere calor, humo, fuego o explote.
Mantenga fuera del alcance de niños y mascotas las
piezas como cubiertas de plástico, batería y
enchufes eléctricos. Su uso indebido, como por
ejemplo su ingestión accidental, puede causar asfixia
y sofocación, que pueden ocasionar la muerte o
lesiones graves. Si sospecha que alguien se ha
tragado una pieza, tome las medidas apropiadas de
emergencia inmediatamente y consulte a un médico.
Detenga la carga si el proceso no puede concluirse.
Si la batería no puede terminar el proceso de carga
en el tiempo especificado, deténgalo. La batería
podría generar calor, humo, fuego o una explosión.
Page 71

9
A D V E R T E N C I A
Deseche el dispositivo de acuerdo con las leyes y
regulaciones vigentes. Para obtener información
sobre el tratamiento de residuos, la reutilización o el
reciclaje, comuníquese con las autoridades locales.
A D V E R T E N C I A
A D V E R T E N C I A
Si observa cualquiera de las siguientes condiciones
apague inmediatamente la alimentación, desconecte
el enchufe del cable de alimentación del
tomacorriente y deje de usar la batería: olor
desagradable o inusual, calor excesivo,
decoloración, deformación, rajaduras o filtraciones,
humo u otras anormalidades durante el uso, como
sonidos inusuales. No vuelva a encender el
dispositivo. Si continúa usándolo podría provocar un
incendio o una ruptura, que podría ocasionar
lesiones graves o fallas al dispositivo, incluyendo
entre otras la pérdida de datos.
Si el dispositivo tiene una fuga o su carcasa está
agrietada, use guantes protectores para manipularlo.
Solo utilice el dispositivo y/o cargue la batería a
temperaturas de entre 5 y 35 ºC (41 a 95 ºF). Hacerlo
por fuera de este rango de temperatura puede
ocasionar la pérdida de datos o daños en el
dispositivo. Si carga el dispositivo por fuera de este
rango de temperatura puede hacer que la batería
sufra filtraciones, genere calor o sufra daños graves.
También puede reducir el rendimiento y la vida útil de
la batería.
Page 72

10
N O T A
La duración efectiva de la batería puede variar
dependiendo de las configuraciones, el uso de
aplicaciones, las funciones o tareas seleccionadas, la
configuración de la red, la temperatura de
funcionamiento y muchos otros factores. El tiempo
de carga de la batería varía en función del uso. Es
posible que la batería no se cargue cuando el disco
duro esté utilizando toda su energía. Después de
cierto tiempo, la batería perderá la habilidad de
funcionar al máximo de su capacidad. Esto es común
a todas las baterías.
Precauciones adicionales de seguridad
Si no sigue las instrucciones a continuación existe el riesgo de
incendio, choque eléctrico, lesiones graves y/o daños al dispositivo.
A D V E R T E N C I A
A D V E R T E N C I A
Proveedor de servicio
Desconecte el dispositivo del tomacorriente
eléctrico y llévelo a un proveedor de servicio
Toshiba autorizado si:
❖ el adaptador de CA o el cable están dañados;
❖ se ha derramado líquido sobre el dispositivo o ha
sido penetrado por algún objeto (como un
destornillador, una grapa o un clip);
❖ el dispositivo ha sufrido una caída, se golpeó o
tiene daños de algún tipo;
❖ hay señas claras de sobrecalentamiento, humo,
deformación, rajaduras, filtraciones u olor
inusual;
❖ se debe reparar una pieza que se encuentra
dentro de compartimentos que deben abrirse o
de los que se debe retirar la cubierta.
❖ Use siempre cables y fuentes de energía que
coincidan con las especificaciones de voltaje y
frecuencia, y que cumplan con los requisitos del
país en el que se encuentre.
❖ Tenga cuidado si usa un conector múltiple ya que
la sobrecarga en un tomacorriente podría
ocasionar que se genere un incendio o un
Page 73

11
choque eléctrico, que pueden causar lesiones
graves.
❖ Siempre confirme que el enchufe del cable de
alimentación (y el enchufe del cable de extensión
si se está usando uno) haya quedado totalmente
insertado dentro del tomacorriente para asegurar
la conexión eléctrica.
❖ Asegúrese siempre de que el disco duro y el
adaptador de CA tengan ventilación adecuada y
estén protegidos del sobrecalentamiento cuando
el adaptador esté conectado a una toma
eléctrica. No cubra el disco duro mientras está
funcionando. La ventilación insuficiente puede
causar que tanto el disco duro como el
adaptador de CA se sobrecalienten, lo que puede
ocasionar que se genere un incendio o un
choque eléctrico, así como lesiones graves.
❖ En el caso de que entre polvo en los conectores
del enchufe o en la base del conector,
desconecte la energía y retire el enchufe. Luego
limpie el conector o la base del conector con un
paño suave y seco.
❖ Evite el contacto prolongado de la piel con el
disco duro ya que este podría calentarse. Evite el
contacto prolongado para prevenir la irritación de
la piel, además de quemaduras.
❖ Nunca hale un cable de alimentación para
desconectar un enchufe de un tomacorriente. Si
desea desconectarlo, siempre sostenga
directamente el enchufe.
❖ No coloque el disco duro sobre mesas ni
superficies inestables, desparejas o inclinadas,
ya que podría caerse y dañarse, o causar
lesiones.
Page 74

12
❖ No desconecte el cable USB ni el adaptador de
CA mientras está utilizando el dispositivo, ya que
podría causar pérdida de datos o daños al disco
duro.
❖ No golpee, tire ni sacuda el disco duro, ya que
podría dañarlo o causar la pérdida de datos.
❖ No use el disco duro durante una tormenta. Si ve
relámpagos o escucha truenos, apague
inmediatamente los dispositivos a los que esté
conectado el disco duro, tanto computadoras
como equipos periféricos. Desconecte también el
cable del tomacorriente y el cable USB de la
computadora. Una descarga eléctrica provocada
por los relámpagos podría causar pérdida de
datos o daños al disco duro.
Page 75

Contenido
Introducción......................................................16
Resumen.............................................................. 16
Componentes ................................................ 16
Especificaciones de hardware ....................... 17
Especificaciones de software ........................ 17
Chapter 1: Para comenzar......................................19
Características ..................................................... 19
Cómo cargar la unidad inalámbrica
de estado sólido Canvio AeroMobile............. 22
Cómo conectarse con la unidad inalámbrica
de estado sólido Canvio AeroMobile............. 23
Conexión vía USB.......................................... 23
Conexión inalámbrica .................................... 24
Chapter 2: Utilidad del software de la unidad
inalámbrica de estado sólido Canvio
AeroMobile..........................................25
Ingreso al sistema con Wireless SSD for Toshiba25
Cómo conectarse inalámbricamente
a una PC o Mac ....................................... 25
Inicio de sesión del navegador web............... 26
13
Page 76

14
Contenido
Inicio de sesión de cliente
para iPhone o iPad .................................. 26
Ingreso de cliente en Android ....................... 28
Interfaz principal
de Wireless SSD for Toshiba ......................... 29
Interfaz principal de la web............................ 30
Interfaz principal de la aplicación
Wireless SSD for Toshiba ........................ 30
Interfaz "Pictures Management"
(Gestión de imágenes) ................................... 32
Interfaz "Picture Viewer"
(Visor de imágenes).................................. 33
Interfaz "Video Management"
(Gestión de videos) ........................................ 34
Interfaz "Video Playback"
(Reproducción de videos)
(solo para dispositivos iPhone, iPad y
Android).................................................... 37
Interfaz "Music Management"
(Gestión de música) ....................................... 38
Interfaz "Music Player" (Reproductor de música)
(solo para dispositivos iPhone, iPad y
Android).................................................... 40
Interfaz de "Document Management"
(Gestión de documentos)............................... 42
Interfaz "Document Viewer"
(Visor de documentos)
(solo para dispositivos iPhone, iPad y
Android).................................................... 43
Interfaz "File/Folder Management"
(Gestión de archivos y carpetas) ................... 43
Cómo transferir archivos................................ 46
Chapter 3: Gestión de respaldos ........................... 48
Cómo usar la Gestión de respaldos .................... 48
Respaldo manual ........................................... 48
Respaldo automático..................................... 49
Cómo retirar la tarjeta SD .................................... 50
Chapter 4: Gestión de la configuración.................. 51
Page 77

Contenido
Uso de la Gestión de la configuración................. 51
Ajustes ........................................................... 52
Configuración de DHCP (solo navegador web) ... 62
Gestión de imagen y nombre del usuario............ 63
Caché (solo aplicación)........................................ 64
Idioma (solo aplicación) ....................................... 64
Cerrar sesión........................................................ 64
Cómo comunicarse con Toshiba......................... 64
Llame al Centro de asistencia
al cliente de Toshiba ................................ 65
15
Índice ................................................................66
Page 78

Introducción
Resumen
La unidad inalámbrica de estado sólido Toshiba Canvio AeroMobile
le permite acceder de forma inalámbrica a su música, videos,
imágenes y datos, operando simultáneamente con su iPad, iPhone,
tabletas, teléfonos inteligentes y computadoras portátiles, sin tener
que lidiar con cables enredados. Con el almacenamiento interno
SSD no hay que preocuparse por quedarse sin espacio en sus
dispositivos móviles; además, el puerto integrado USB 3.0 hace que
la transferencia de archivos sea fácil y rápida.
Componentes
La unidad inalámbrica de estado sólido Canvio AeroMobile incluye
los siguientes componentes:
❖ Adaptador de CA
❖ Cable USB 3.0
❖ Guía de inicio rápido
❖ Bolsa para guardar
❖ Información de la garantía limitada estándar
16
Page 79

Introducción
Resumen
Especificaciones de hardware
Dimensiones del
producto:
Peso: Aproximadamente 4,23 oz (120 g)
Batería: Tipo Li-ion de 3100 mAh
Tiempo de carga: máximo de 3 horas
Requisitos de funcionamiento:
LAN inalámbrica
Te m pe r a t ur a
Humedad
123,5 mm (largo) x 63,0 mm (ancho) x 12,5 mm (alto)
[4,9 in (largo) x 2,5 in (ancho) x 0,5 in (alto)]
Estándar: 802.11 b/g/n
Frecuencia: 2,4 GHz
Velocidad: 1T1R hasta 150 Mbps
En funcionamiento: 5 a 35 ºC (41 a 95 ºF)
Almacenamiento: -20 a 60 ºC (-4 a 140 ºF)
En funcionamiento: 20 a 80 %
Almacenamiento: 8 a 90 %
Especificaciones de software
Tipos de archivos compatibles:
Video: mp4, 3gp, m4v, mov, avi
Música: mp3, m4a, aac, wav
Imágenes: jpg, bmp, png, gif, tif
Documentos: pdf, doc, docx, ppt, pptx, xls, xlsx, txt, rtf
Otros: Abre en software externo
Requisitos del sistema:
Sistema operativo
Windows: Windows 7, Windows 8, Windows 8.1, Windows 10
Mac OS: OS X 10.7, 10.8
TM
Android
iPad:
, iPhone o
Compatible con teléfonos inteligentes y tabletas Android,
iPhone y iPads. Visite el sitio web de la aplicación
“Wireless HDD for Toshiba” para consultar las versiones
compatibles.
17
Page 80

18
N O T A
Introducción
Resumen
Esta unidad está formateada en NTFS para
Windows. Cuando esta unidad se usa tanto con
Windows PC como con Mac, puede leer y escribir
datos en ambos sistemas operativos solo si se
instala la aplicación “Tuxera NTFS for Mac” en la
computadora Mac. En estas condiciones, la función
Time Machine para OS X se desactiva.
Page 81

Capítulo 1
Para comenzar
Características
❖ SSD integrado de 128 GB con formato NTFS.
❖ Acceso y transmisión de música, videos, imágenes e
información con la aplicación gratuita Wireless SSD for
Toshiba, disponible para iPhone, iPad y Android.
❖ Cuatro perfiles de usuario para ayudarlo a mantener sus
archivos organizados.
❖ Conexión inalámbrica o con un cable USB 3.0.
❖ Hasta 8 horas de uso continuo de la batería con transmisión
de video (la vida útil real de la batería depende del uso que
se haga).
❖ Función de búsqueda para ubicar y acceder a sus archivos
rápidamente.
❖ Acceso inalámbrico a Internet compatible con 802.11 b/g/n.
❖ Es compatible con tarjetas de memoria SD™, SDHC™ y
SDXC™, Clase 10.
19
Page 82

Para comenzar
Luz indicadora de tarjeta SD
Luz indicadora de -Wi-Fi®/SSD
Luz indicadora de la batería
Botón de encendido
Botón de reinicio
Puerto USB 3.0
Ranura para tarjeta SD
y apagado
N O T A
20
Características
(Ilustración de muestra) Características de la unidad inalámbrica
de estado sólido Canvio AeroMobile
Botón de encendido y apagado:
❖ Presione y mantenga oprimido durante 2 segundos (se
enciende modo de LAN inalámbrica).
❖ Presione y mantenga oprimido durante 2 segundos (el modo
de LAN inalámbrica se apaga).
Botón de reinicio:
❖ En el modo de LAN inalámbrica, presione y mantenga
Puerto USB 3.0:
❖ Compatible con USB 3.0 y USB 2.0.
❖ Permite transferir información entre una computadora y la
❖ Le permite cargar la batería del producto cuando está
La unidad inalámbrica de estado sólido Canvio
AeroMobile no se puede encender si la batería está
demasiado baja. El indicador de batería parpadeará en
naranja durante 6 segundos y después se apagará.
oprimido el botón durante 5 segundos. El sistema se
restablecerá a su configuración de fábrica.
unidad inalámbrica de estado sólido Canvio AeroMobile
cuando están conectados.
conectado al adaptador de CA.
Page 83

Para comenzar
Características
Ranura para tarjeta SD:
❖ Es compatible con tarjetas de memoria SD, SDHC y SDXC,
Clase 10. Visite el sitio web de la aplicación “Wireless SSD
for Toshiba” o “Wireless SSD for Toshiba Ver2” para
consultar las versiones compatibles con la tarjeta SDXC.
❖ Se puede acceder a la tarjeta SD en el modo de LAN
inalámbrica.
Luz indicadora de la batería:
❖ Verde: la energía de la batería está al 30 % o más.
❖ Amarilla: queda entre 30 % y 10 % de energía de la batería.
❖ Naranja (parpadeando rápidamente): el producto ya no tiene
batería o la temperatura de funcionamiento es demasiado
alta. Se apagará después de 30 segundos.
❖ Verde o amarilla (parpadeando lentamente): la batería se
está cargando.
❖ Verde (fija): carga completada.
❖ Verde o amarilla (parpadeando rápidamente): el producto se
está apagando o ENCENDIENDO.
❖ LED apagada: el dispositivo está APAGADO.
Luz indicadora de Wi-Fi/SSD:
❖ Modo LAN inalámbrica
❖ Azul: LAN inalámbrica está ENCENDIDA (no se
transmiten datos actualmente).
❖ Azul (parpadeante): LAN inalámbrica está ENCENDIDA
(con acceso a almacenamiento).
❖ Azul (apagada): LAN inalámbrica está APAGADA.
❖ Modo USB
❖ Blanca: no se transmiten datos actualmente.
❖ Blanca (parpadeante): con acceso a datos.
❖ Blanca (apagada): el dispositivo está en hibernación o en
espera. Puede desconectarlo sin peligro.
Indicador de tarjeta SD:
❖ Solo se enciende en el modo LAN inalámbrica
❖ Violeta: sin acceso a tarjeta SD.
❖ Violeta (parpadeante): con acceso a tarjeta SD.
❖ Violeta (apagada): la tarjeta SD entra en modo de espera.
21
Page 84

Para comenzar
Cable USB
Puerto USB 3.0
Adaptador de CA
22
Cómo cargar la unidad inalámbrica de estado sólido Canvio
AeroMobile
Cómo cargar la unidad inalámbrica de
estado sólido Canvio AeroMobile
Para comenzar a usar la unidad inalámbrica de estado sólido Canvio
AeroMobile, asegúrese de que el dispositivo esté cargado. La
unidad inalámbrica de estado sólido Canvio AeroMobile puede
cargarse con el adaptador de CA y con el cable USB.
(Ilustración de muestra) Cómo cargar la unidad inalámbrica de
estado sólido Canvio AeroMobile
Para cargar la unidad inalámbrica de estado sólido Canvio
AeroMobile:
1 Conecte el cable USB al adaptador de CA.
2 Conecte el cable USB en el puerto USB 3.0 de la unidad
inalámbrica de estado sólido Canvio AeroMobile.
3 Conecte el adaptador de CA a un tomacorriente.
Mientras se carga, la luz del indicador de la batería
parpadeará lentamente (a intervalos de 2 segundos).
Page 85

Para comenzar
Cable USB
Puerto USB 3.0
Puerto USB
Cómo conectarse con la unidad inalámbrica de estado sólido
Canvio AeroMobile
23
Cómo conectarse con la unidad
inalámbrica de estado sólido Canvio
AeroMobile
Puede conectarse con la unidad inalámbrica de estado sólido
Canvio AeroMobile directamente con el cable USB incluido (modo
de conexión directa estándar) o inalámbricamente (modo LAN
inalámbrica).
Conexión vía USB
Para trabajar con una conexión USB, conecte la unidad inalámbrica
de estado sólido Canvio AeroMobile al puerto USB de la
computadora con el cable USB incluido.
Para usuarios de Mac:
Para trabajar con archivos usando USB, deberá instalar el
controlador “NTFS driver for Mac” en su Mac. Consulte el manual
que viene cargado en la unidad inalámbrica de estado sólido Canvio
AeroMobile para obtener más información.
(Ilustración de muestra) Conexión vía USB de la unidad
inalámbrica de estado sólido Canvio AeroMobile
Para conectar la unidad inalámbrica de estado sólido Canvio
AeroMobile a su computadora:
1 Asegúrese de que la unidad inalámbrica de estado sólido
Canvio AeroMobile esté APAGADA.
2 Conecte el cable USB 3.0 incluido a Canvio AeroMobile.
3 Conecte el otro extremo del cable USB 3.0 al puerto USB de
su computadora.
Ahora puede comenzar a transferir información desde y hacia el
producto.
Page 86

Para comenzar
N O T A
Enrutador
24
Cómo conectarse con la unidad inalámbrica de estado sólido
Canvio AeroMobile
Conexión inalámbrica
Puede acceder de forma inalámbrica a la unidad inalámbrica de
estado sólido Canvio AeroMobile desde dispositivos Windows, Mac,
iPhone, iPad, dispositivos móviles Android y dispositivos DLNA
usando la aplicación “Wireless SSD for Toshiba”.
Visite el sitio web de la aplicación “Wireless SSD for
Toshiba” o “Wireless SSD for Toshiba Ver2” para
consultar las versiones compatibles con la tarjeta SDXC.
®
(Imagen de muestra) Modo LAN inalámbrica de la unidad
inalámbrica de estado sólido Canvio AeroMobile
Presione el botón de encendido y apagado para encender el
sistema.
La unidad inalámbrica de estado sólido Canvio AeroMobile funciona
automáticamente en el modo de LAN inalámbrica una vez que se ha
configurado la aplicación Wireless SSD for Toshiba. Consulte “Cómo
conectarse inalámbricamente a una PC o Mac” en la página 25.
Page 87

Capítulo 2
Utilidad del software
de la unidad
inalámbrica de
estado sólido Canvio
AeroMobile
La utilidad del software de la unidad inalámbrica de estado sólido
Canvio AeroMobile es la aplicación llamada Wireless SSD for
To sh i ba .
Ingreso al sistema con Wireless SSD for
Toshiba
Cómo conectarse inalámbricamente a una PC o
Mac
1 En la unidad inalámbrica de estado sólido Canvio
AeroMobile, presione el botón de encendido y apagado para
encender el sistema.
2 Cuando la luz del indicador de Wi-Fi haya dejado de
parpadear, habilite la función de LAN inalámbrica de su PC o
Mac y vea las opciones de conexión a redes inalámbricas.
3 Seleccione la conexión inalámbrica
“xxxx” es el número de 4 dígitos generado por su unidad
inalámbrica de estado sólido Canvio AeroMobile. Luego,
introduzca la contraseña predeterminada:
Toshiba wssd xxxx.
12345678.
25
Page 88

Utilidad del software de la unidad inalámbrica de
26
estado sólido Canvio AeroMobile
Ingreso al sistema con Wireless SSD for Toshiba
Inicio de sesión del navegador web
1 Una vez que se haya conectado a su unidad inalámbrica de
estado sólido Canvio AeroMobile, abra un navegador web e
introduzca la URL “http://wirelessssd”.
(Imagen de muestra) Campo de dirección del navegador web
Se muestra la página de ingreso a la aplicación Wireless
SSD for Toshiba.
Si la conexión a Internet no está disponible, ingrese
cualquier URL y el navegador web le llevará a dicha página
de ingreso.
(Imagen de muestra) Pantalla de inicio de sesión
2 Introduzca sus datos en la pantalla de inicio de sesión
utilizando las siguientes credenciales:
❖
Nombre de usuario: admin
❖
Contraseña de usuario: deje el campo en blanco
3 Seleccione el botón
la interfaz principal de la web.
Log In (Inicio de sesión) para acceder a
Inicio de sesión de cliente para iPhone o iPad
Cómo instalar la aplicación para iPhone y iPad
1 Busque la aplicación
Store.
2 Instale la aplicación
instrucciones de instalación que aparecen en la pantalla.
Cuando el proceso de instalación se haya completado,
Wireless SSD for Toshiba en App
Wireless SSD for Toshiba y siga las
Page 89

Utilidad del software de la unidad inalámbrica de
aparecerá el icono de Wireless SSD for Toshiba en la
pantalla de inicio.
Cómo conectarse de manera inalámbrica a un iPhone
o iPad
1 Presione el botón de
inalámbrica de estado sólido Canvio AeroMobile para
encender el sistema. Espere a que la luz del indicador de WiFi deje de parpadear.
2 En su iPad o iPhone, haga clic o toque
Fi.
3 Seleccione
dígitos generado por su unidad inalámbrica de estado sólido
Canvio AeroMobile).
4 Introduzca la contraseña predeterminada
Inicio de sesión en la aplicación
1 En su iPhone o iPad, seleccione el icono
Toshiba.
estado sólido Canvio AeroMobile
Ingreso al sistema con Wireless SSD for Toshiba
encendido y apagado en la unidad
Ajustes, y luego Wi-
Toshiba wssd xxxx (“xxxx” es el número de 4
12345678.
Wireless SSD for
27
(Imagen de muestra) Pantalla de inicio de sesión en iPhone o
iPad
2 Introduzca sus datos en la pantalla de inicio de sesión
utilizando las siguientes credenciales:
❖
Nombre de usuario: admin
❖ Contraseña de usuario: deje el campo en blanco
3 Haga clic o toque el botón
principal.
OK para acceder a la interfaz
Page 90

Utilidad del software de la unidad inalámbrica de
28
estado sólido Canvio AeroMobile
Ingreso al sistema con Wireless SSD for Toshiba
Ingreso de cliente en Android
Cómo instalar la aplicación para Android
1 Busque la aplicación gratuita de TOSHIBA llamada “Wireless
SSD for Toshiba” en la tienda de aplicaciones Google
Play™.
2 Instale la aplicación
instrucciones de instalación que aparecen en la pantalla.
3 El icono
una vez que el proceso de instalación se ha completado.
Cómo conectarse de manera inalámbrica a un
dispositivo Android
1 Presione el botón de encendido y apagado para encender el
sistema.
2 Una vez que la luz indicadora de Wi-Fi deje de parpadear,
vaya a
LAN (LAN inalámbrica) en su tableta o teléfono inteligente.
3 Haga clic o toque
4 Introduzca la contraseña predeterminada
Wireless SSD for Toshiba aparece en el escritorio
Setting (Configuración) y elija la opción Wireless
Wireless SSD for Toshiba y siga las
Toshiba wssd xxxx.
12345678.
Inicio de sesión en la aplicación
1 En su dispositivo Android, seleccione el icono
SSD for Toshiba, luego inicie sesión en “Wireless SSD for
Toshiba”.
(Imagen de muestra) Pantalla de inicio de sesión en iPhone o
iPad
2 Introduzca sus datos en la pantalla de inicio de sesión
utilizando las siguientes credenciales:
❖
Nombre de usuario: admin
Wireless
Page 91

Utilidad del software de la unidad inalámbrica de
❖ Contraseña de usuario: deje el campo en blanco
3 Haga clic o toque el botón
principal.
estado sólido Canvio AeroMobile
Interfaz principal de Wireless SSD for Toshiba
OK para acceder a la interfaz
29
Interfaz principal de Wireless SSD for
Toshiba
Al ingresar a la interfaz principal, es posible que la aplicación
Wireless SSD for Toshiba le informe que hay una actualización de
firmware disponible. Podrá elegir entre las siguientes 3 opciones:
❖
OK (Habilitará el proceso de actualización, recomendado)
❖
Cancel (Cancelar) (Cancelará el proceso de actualización)
❖
Do not prompt (No avisarme) (Cancelará las notificaciones
futuras, no recomendado)
(Imagen de muestra) Pantalla de actualización de firmware
Si selecciona
debe esperar aproximadamente cinco minutos.
(Imagen de muestra) Pantalla de actualización de firmware, aviso
de 5 minutos de espera
Si selecciona
actualizaciones disponibles la próxima vez que inicie sesión e
ingrese en la interfaz de Wireless SSD for Toshiba.
Si selecciona
Toshiba nunca le informará de nuevo de forma automática acerca de
una actualización de firmware. Sin embargo, puede actualizar
OK para la actualización, el sistema le informará que
Cancel (Cancelar), puede ser informado de todas las
Do not prompt (No avisarme), Wireless SSD for
Page 92
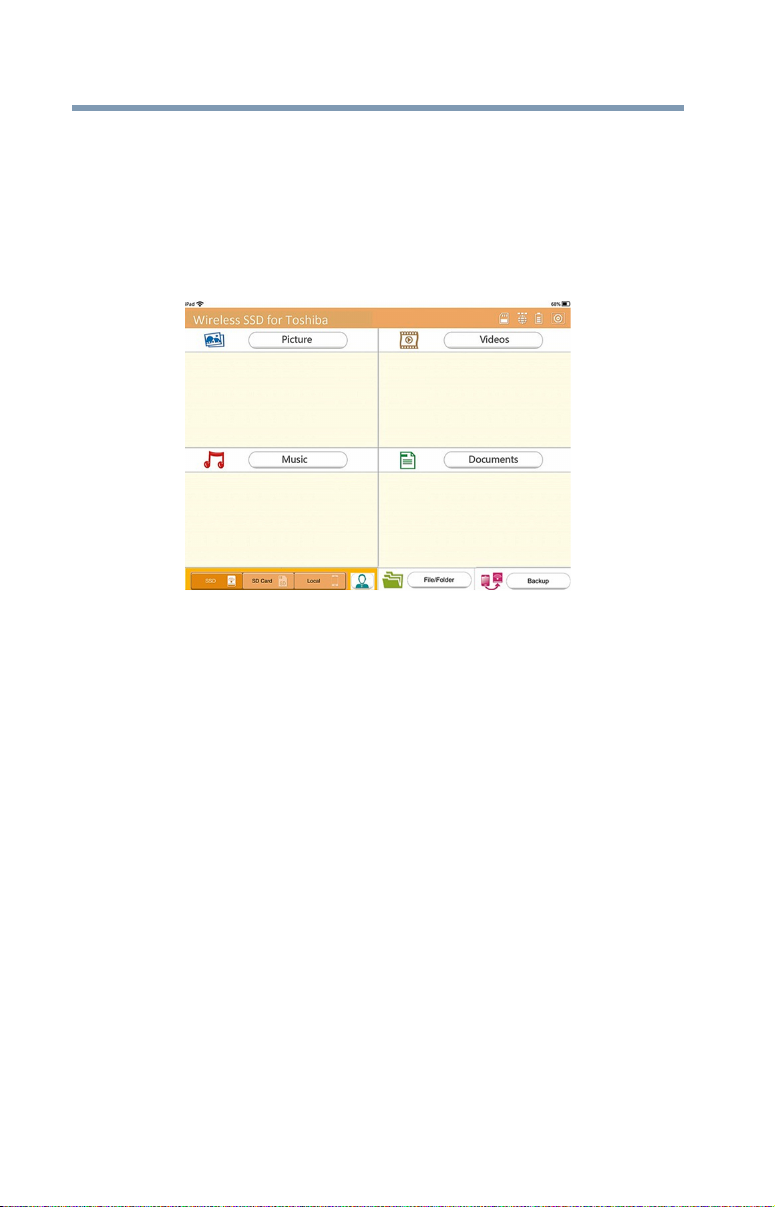
Utilidad del software de la unidad inalámbrica de
30
estado sólido Canvio AeroMobile
Interfaz principal de Wireless SSD for Toshiba
manualmente el firmware en la página Setting (Configuración).
Consulte “Actualización del firmware:” en la página 61.
Interfaz principal de la web
A continuación se muestra un ejemplo de la interfaz principal de
Wireless SSD for Toshiba vista en el navegador web de una
computadora.
(Imagen de muestra) Interfaz principal de Wireless SSD for
Toshiba, navegador web
Page 93

Utilidad del software de la unidad inalámbrica de
Tabletas/iPad Teléfonos inteligentes/iPhone
estado sólido Canvio AeroMobile
Interfaz principal de Wireless SSD for Toshiba
31
Interfaz principal de la aplicación Wireless SSD
for Toshiba
A continuación se muestra un ejemplo de la interfaz principal de
Wireless SSD for Toshiba vista en un dispositivo iPhone, iPad o
Android.
(Imagen de muestra) Interfaz principal de Wireless SSD for
Toshiba en la aplicación
Funcionalidad de la interfaz principal de Wireless SSD
for Toshiba
En la parte superior de la interfaz de Wireless SSD for Toshiba, se
muestra una barra de iconos que proporcionan información
importante sobre la funcionalidad de la unidad inalámbrica de
estado sólido Canvio AeroMobile. A continuación verá una
descripción de cada icono y su indicación o función:
Botón/icono Función
La tarjeta SD está disponible.
Conexión a Internet disponible.
No hay conexión a Internet disponible.
Muestra el nivel actual de la batería de la unidad
inalámbrica de estado sólido Canvio AeroMobile.
Haga clic o toque el botón
para configurar el sistema de la unidad inalámbrica de
estado sólido Canvio AeroMobile.
Settings (Configuración)
Page 94
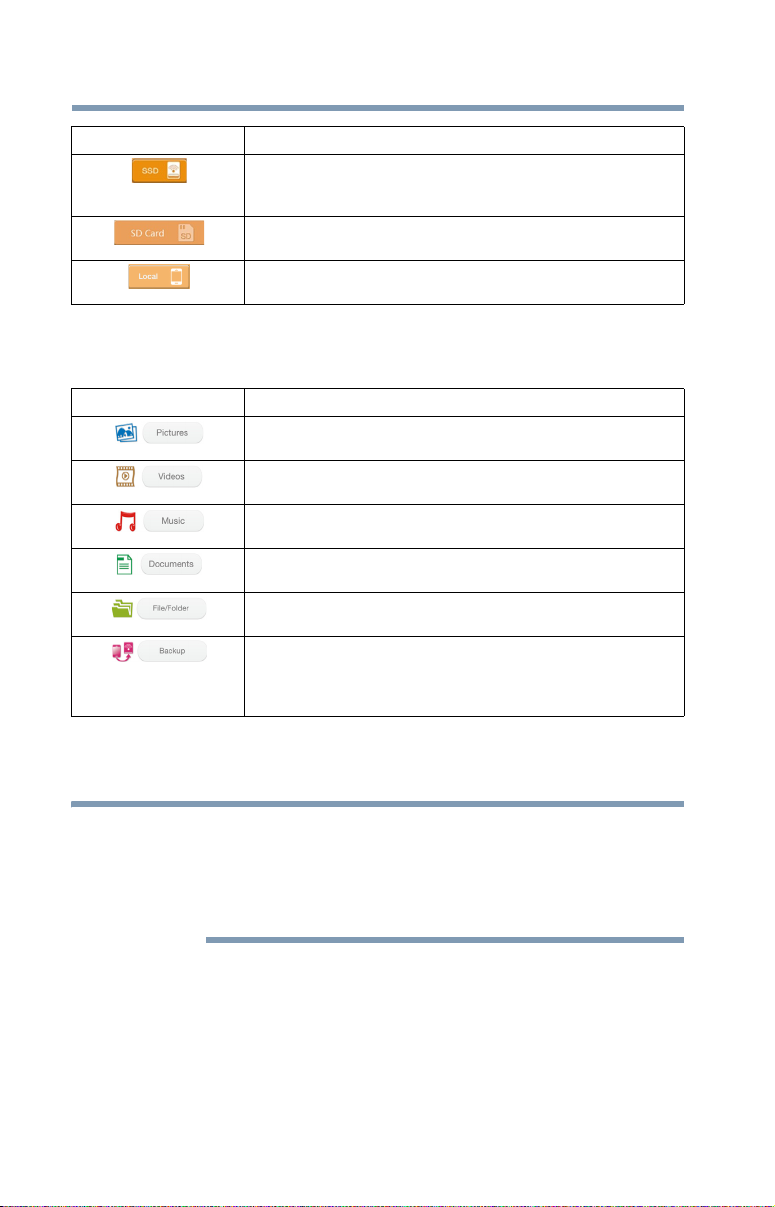
Utilidad del software de la unidad inalámbrica de
N O T A
32
estado sólido Canvio AeroMobile
Interfaz "Pictures Management" (Gestión de imágenes)
Botón/icono Función
Haga clic o toque el icono SSD Storage
(Almacenamiento SSD) para cambiar al almacenamiento
interno SSD.
Haga clic o toque el botón
cambiar a la tarjeta SD.
(Solo para dispositivos iPhone, iPad o Android). Haga clic
o toque el botón Local para cambiar al dispositivo local.
SD Card (Tarjeta SD) para
A continuación verá una descripción de cada botón y su función en
la interfaz principal:
Botón/icono Botón/icono
Muestra la pantalla "Pictures Management" (Gestión de
imágenes).
Muestra la pantalla "Video Management" (Gestión de
videos).
Muestra la pantalla "Music Management" (Gestión de
música).
Muestra la pantalla "Documents Management" (Gestión
de documentos).
Muestra la pantalla "File/Folder Management" (Gestión
de archivos y carpetas).
Haga clic o toque el botón
acceder al menú de Respaldo. Consulte “Gestión de la
configuración” en la página 51.
(Solo para dispositivos iPhone, iPad y Android).
Backup (Respaldo) para
Interfaz "Pictures Management" (Gestión
de imágenes)
Antes de utilizar esta función, el contenido debe ser
transferido a la unidad inalámbrica de estado sólido
Canvio AeroMobile a través de la conexión directa con
su computadora. Consulte “Conexión vía USB” en la
página 23.
Haga clic o toque el botón
pantalla de gestión de imágenes.
Picture (Imagen) para ingresar a la
Page 95

Utilidad del software de la unidad inalámbrica de
estado sólido Canvio AeroMobile
Interfaz "Pictures Management" (Gestión de imágenes)
33
(Imagen de muestra) Ventana de la interfaz de gestión de
imágenes
A continuación verá una descripción de cada botón o icono y su
función en la ventana de la interfaz de gestión de imágenes:
Botón/icono Botón/icono
Haga clic o toque el botón Back (Atrás) para volver a la
ventana principal.
Si aparece el icono Sort by name (Ordenar por
nombre), las imágenes están ordenadas por nombre del
archivo.
Si aparece el icono
las imágenes están ordenadas por fecha del archivo.
Haga clic o toque el icono para alternar los modos.
Si aparece el icono Thumbnail (Miniatura), las
imágenes aparecen como miniaturas.
Si aparece el icono
muestran en una lista con una miniatura más pequeña
además de la información del archivo.
Haga clic o toque el icono para alternar los modos.
Introduzca letras o números clave en el cuadro de
búsqueda para realizar la búsqueda de un archivo o una
carpeta específica.
Haga clic o toque el menú Calender (Calendario) para
buscar imágenes por fecha.
Haga clic o toque el icono
(Almacenamiento SSD) para cambiar al
almacenamiento interno SSD de la unidad inalámbrica de
estado sólido Canvio AeroMobile.
Haga clic o toque el botón
cambiar a la tarjeta SD.
(Solo para dispositivos iPhone, iPad o Android). Haga clic
o toque el botón Local para cambiar al dispositivo local.
Sort by date (Ordenar por fecha),
List (Lista), las imágenes se
SSD Storage
SD Card (Tarjeta SD) para
Page 96

Utilidad del software de la unidad inalámbrica de
34
estado sólido Canvio AeroMobile
Interfaz "Pictures Management" (Gestión de imágenes)
Botón/icono Botón/icono
En el modo de almacenamiento en la unidad de estado
sólido, puede elegir las imágenes de uno de los 4
usuarios. Haga clic o toque el icono User (Usuario) para
ver otros usuarios. Los 4 nombres de usuarios
predeterminados son: “Default” (Predeterminado),
“Owner1” (Usuario 1), “Owner2” (Usuario 2) y “Owner3”
(Usuario 3). Para configurar estos nombres, consulte
“Gestión de imagen y nombre del usuario” en la
página 63.
Interfaz "Picture Viewer" (Visor de imágenes)
Haga clic o toque un archivo de imagen para entrar en la interfaz del
visor de imágenes.
(Imagen de muestra) Ventana de interfaz del visor de imágenes
A continuación verá una descripción de cada botón o icono y su
función en la ventana de la interfaz de gestión de imágenes:
Botón/icono Botón/icono
Haga clic o toque el botón Back (Atrás) para volver a la
ventana de gestión de imágenes.
Haga clic o toque el botón
descargar la imagen actual al álbum local.
Haga clic o toque el botón
la foto actual del álbum local a la unidad inalámbrica de
estado sólido Canvio AeroMobile.
Haga clic o toque el botón Play/Pause
(Reproducir/pausa) para comenzar a ver o pausar la
presentación de imágenes.
Download (Descargar) para
Upload (Cargar) para cargar
Page 97

Utilidad del software de la unidad inalámbrica de
N O T A
Botón/icono Botón/icono
estado sólido Canvio AeroMobile
Interfaz "Video Management" (Gestión de videos)
Cuando se muestra el icono Loop playback
(Reproducción continua), la presentación de
diapositivas se reproduce en el modo “Reproducción
continua”.
Cuando se muestra el icono
la presentación de diapositivas se reproduce en el modo
“Secuencial”.
Haga clic o toque el icono para alternar los modos.
Haga clic o toque el botón Share (Compartir) para
compartir la imagen actual en Facebook®, Twitter® o por
correo electrónico.
Sequential (Secuencial),
35
Interfaz "Video Management" (Gestión de
videos)
Antes de utilizar esta función, el contenido debe ser
transferido a la unidad inalámbrica de estado sólido
Canvio AeroMobile a través de la conexión directa con
su computadora. Consulte “Conexión vía USB” en la
página 23.
Haga clic o toque el botón Videos para ingresar a la pantalla de
gestión de videos.
(Imagen de muestra) Ventana de la interfaz de gestión de videos
Page 98
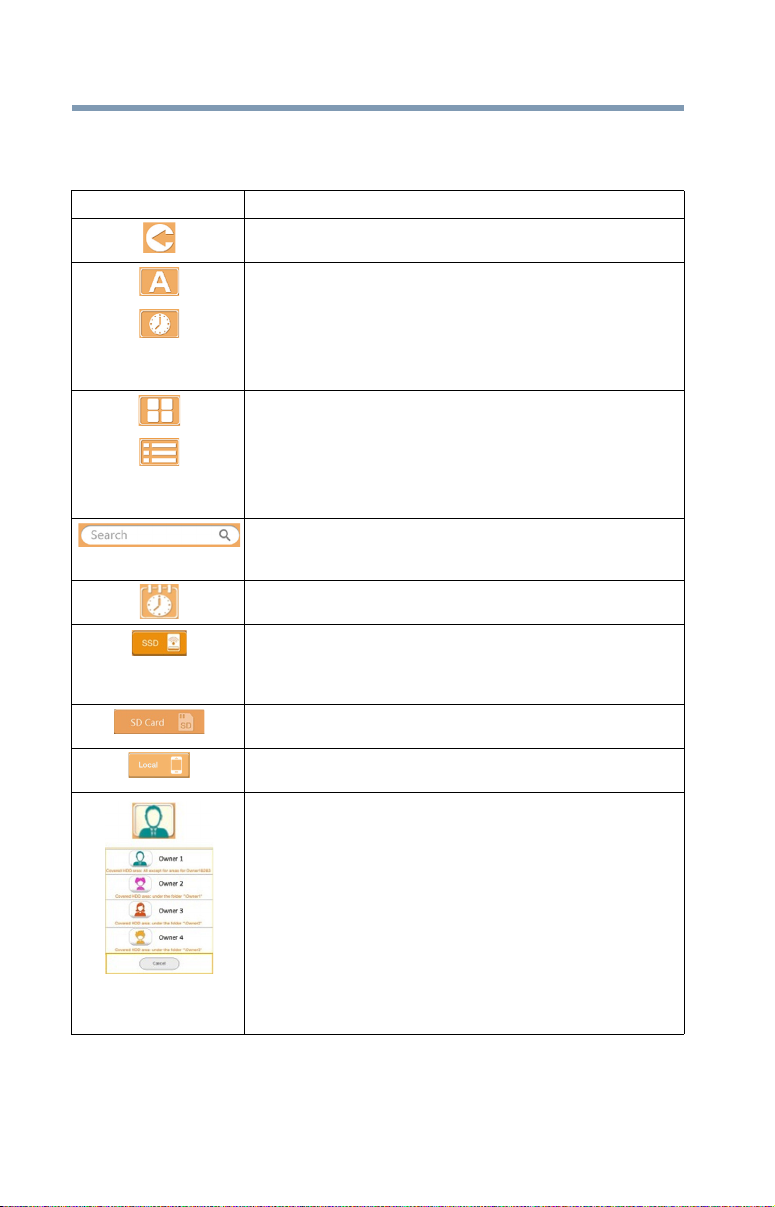
Utilidad del software de la unidad inalámbrica de
36
estado sólido Canvio AeroMobile
Interfaz "Video Management" (Gestión de videos)
A continuación verá una descripción de cada botón o icono y su
función en la ventana de la interfaz de gestión de videos:
Botón/icono Función
Haga clic o toque el botón Back (Atrás) para volver a la
ventana principal.
Si aparece el icono
nombre), los videos están ordenados por nombre del
archivo.
Si aparece el icono
los videos están ordenados por fecha del archivo.
Haga clic o toque el icono para alternar los modos.
Si aparece el icono Thumbnail (Miniatura), los videos
aparecen como miniaturas.
Si aparece el icono
en una lista con una miniatura más pequeña además de
la información del archivo.
Haga clic o toque el icono para alternar los modos.
Introduzca letras o números clave en el cuadro de
búsqueda para realizar la búsqueda de un archivo o una
carpeta específica.
Haga clic o toque el menú Calender (Calendario) para
buscar videos por fecha.
Haga clic o toque el icono
(Almacenamiento SSD) para cambiar al
almacenamiento interno SSD de la unidad inalámbrica de
estado sólido Canvio AeroMobile.
Haga clic o toque el botón
cambiar a la tarjeta SD.
(Solo para dispositivos iPhone, iPad o Android). Haga clic
o toque el botón Local para cambiar al dispositivo local.
En el modo de almacenamiento en la unidad de estado
sólido, puede elegir los videos de uno de los 4 usuarios.
Haga clic o toque el icono
otros usuarios. Los 4 nombres de usuarios
predeterminados son: “Default” (Predeterminado),
“Owner1” (Usuario 1), “Owner2” (Usuario 2) y “Owner3”
(Usuario 3). Para configurar estos nombres, consulte
“Gestión de imagen y nombre del usuario” en la
página 63.
Sort by name (Ordenar por
Sort by date (Ordenar por fecha),
List (Lista), los videos se muestran
SSD Storage
SD Card (Tarjeta SD) para
Owner (Usuario) para ver
Page 99

Utilidad del software de la unidad inalámbrica de
estado sólido Canvio AeroMobile
Interfaz "Video Management" (Gestión de videos)
37
Interfaz "Video Playback" (Reproducción de
videos) (solo para dispositivos iPhone, iPad y
Android).
Haga clic o toque un archivo de video para acceder a la interfaz de
reproducción de videos.
(Imagen de muestra) Ventana de la interfaz de reproducción de
videos
A continuación verá una descripción de cada botón o icono y su
función en la ventana de la interfaz de reproducción de videos:
Botón/icono Función
Haga clic o toque el botón Back (Atrás) para volver a la
ventana principal.
Haga clic o toque el botón
de la pantalla de reproducción.
Haga clic o toque el botón Previous (Anterior) para
reproducir el video anterior.
Haga clic o toque el botón
reproducir el video siguiente.
Haga clic o toque el botón
rebobinar el video 20 segundos.
Haga clic o toque el botón Forward (Adelantar) para
adelantar el video 20 segundos.
Haga clic o toque el botón
(Reproducir/pausa) para reproducir/pausar el video que
se está reproduciendo.
Haga clic o toque el botón
descargar el video actual de la unidad inalámbrica de
estado sólido Canvio AeroMobile al dispositivo local.
Zoom para ajustar el tamaño
Next (Siguiente) para
Rewind (Rebobinar) para
Play/Pause
Download (Descargar) para
Page 100

Utilidad del software de la unidad inalámbrica de
N O T A
38
estado sólido Canvio AeroMobile
Interfaz "Music Management" (Gestión de música)
Botón/icono Función
Haga clic o toque el botón Upload (Cargar) para cargar
el video actual del dispositivo local a la unidad
inalámbrica de estado sólido Canvio AeroMobile.
Arrastre la barra de progreso de reproducción para
navegar a diferentes momentos del video en
reproducción.
Arrastre la barra de control de volumen para ajustar el
volumen del video.
Si el navegador web es compatible con la reproducción de video, se
puede reproducir el video dentro de un navegador web; de lo
contrario, se le pedirá que descargue el video a un dispositivo local.
Interfaz "Music Management" (Gestión de
música)
Antes de utilizar esta función, el contenido debe ser
transferido a la unidad inalámbrica de estado sólido
Canvio AeroMobile a través de la conexión directa con
su computadora. Consulte “Conexión vía USB” en la
página 23.
Haga clic o toque el botón
de gestión de música.
Music (Música) para ingresar a la pantalla
 Loading...