

Toshiba Camileo X-Sports User Manual

User’s Manual
CAMILEO X-SPORTS
EN GR PT
CZ HR RS
DE HU SE
DK IT SK
ES NL SL
FI NO TR
FR PL

CAMILEO X-SPORTS
Table of Contents
Introduction .................................................................................3
Safety Instructions ......................................................................3
About the Battery Pack ..............................................................4
TOSHIBA support .......................................................................5
Regulatory Information ................................................................5
Box Content ................................................................................8
Getting Started ............................................................................9
Inserting and removing battery ...............................................9
Charge the Camcorder and Remote Control..........................9
Inserting and removing a microSD™ card ...........................10
Quick Tour .................................................................................10
Camileo X-Sports Camcorder ..............................................11
Remote Control ....................................................................12
Remote LED Status ..............................................................12
Waterproof Casing ...............................................................13
Power ON, Record a Video, Power OFF ..............................13
MAIN MENU .........................................................................14
About the Electronic Image Stabiliser (EIS) built-in
your X-Sports ............................................................................24
How to use your bundled Mounting Accessories ......................24
Optional Accessory Packs ........................................................29
Connect your Remote Control with the Camcorder ..................29
Start pairing your Remote Control with the Camcorder........29
WI-FI .........................................................................................29
Turn on and off Wi-Fi ............................................................ 29
Toshiba APP “Toshiba WiFi Connect” ...................................29
Viewing Photos or Videos on TV ...............................................30
Connecting to a high-denition 16:9 (wide) TV ....................30
Specications ............................................................................30
Operating Environment Conditions ...........................................32
Firmware upgrade .....................................................................32
EN-2
User’s Manual

Introduction
Welcome and thank you for choosing a TOSHIBA product.
For your convenience, your TOSHIBA product is furnished with two guides:
a) a Quick Start Guide, and
b) this comprehensive PDF User’s Manual.
We recommend to read this manual carefully and keep it with your product
documentation for future reference.
Safety Instructions
1. Do not drop, puncture or disassemble the camcorder / Remote Control;
otherwise the warranty will be voided.
2. Do not expose the camcorder / remote to high temperature or leave it in
direct sunlight. Doing so may damage the camcorder/remote.
3. The camcorder may get warm due to continuous use. If needed, the built-in
overheat protection will automatically turn off the unit for safety purposes.
In case this happens, let the camcorder cool down before attempting to use
it again.
4. Use the camcorder / remote with care. Avoid pressing hard on the
camcorder / remote body.
5. For your own safety, avoid using the camcorder / remote when there is a
storm or lightning.
6. Use only the accessories supplied by the manufacturer.
7. Do not use other AC/DC adapters than the one bundled with your device*,
as otherwise your device may be damaged.
* (Sunny Electronics Corp.; model: SYS1460-0505; INPUT: 100-240 V~, 50-60Hz,
Max. 1,0 A, Class II; OUTPUT: 5,0 Vd.c., 1 A, LPS)
8. Keep the camcorder / remote out of the reach of infants.
CAMILEO X-SPORTS
User’s Manual
Cautions concerning using the camcorder under water –
inside Waterproof Casing
• Please be aware that the camcorder itself is not waterproof at all. It is only
waterproof inside the Waterproof Casing.
• The waterproof properties of the Casing apply to fresh water and saltwater
only; they do not apply to cleaning substances, chemicals or water from
spas, etc. In case of a splash, immediately wipe off any moisture.
• Make sure that the Waterproof Casing door is closed and the door latch is
locked properly.
• Do not immerse in water at a depth deeper than 60 m.
• Do not subject the camcorder to high-pressure water.
• Do not immerse in water for longer than 1.5 hours.
EN-3

CAMILEO X-SPORTS
• Do not open and close the Casing door when the camcorder is wet or while
• Do not open and close the Casing door with wet hands.
• Do not open the Casing door on the beach or at the poolside.
• Do not jolt the camcorder while it is immersed in water. Doing so may
• Do not drop or damage the Casing. This could impact the waterproof ability
• Keep the Waterproof Casing clean and wipe the water off the Casing with a
Cautions concerning using the Remote Control under water
• The waterproof properties (up to 3m) of the Remote Control apply to
• Make sure that the Remote Control micro-USB door is closed and the door
• Do not immerse in water at a depth deeper than 3 m.
• Do not subject the remote to high-pressure water.
• Do not immerse in water for longer than 30 minutes.
• Do not open and close the Remote door when the it is wet or while it is
• Do not open and close the Remote door with wet hands.
• Do not open the Remote door on the beach or at the poolside.
• Do not jolt the Remote while it is immersed in water. Doing so may cause
• Do not drop or damage the Remote. This could impact the waterproof ability
• Keep the Remote Control clean and wipe the water off the Remote with a
• If the Remote Control gets wet, dry it rst before opening the door.
it is immersed in water.
cause the Casing door to open.
of the Casing. Waterproof is only guaranteed with non-damaged Casing.
soft and dry cloth after use.
fresh water and saltwater only; they do not apply to cleaning substances,
chemicals or water from spas, etc. In case of a splash, immediately wipe off
any moisture.
latch is locked properly.
immersed in water.
the Remote door to open.
of the Remote. Waterproof is only guaranteed with non-damaged Remote.
soft and dry cloth after use.
About the Battery Pack
• The battery pack is lithium ion battery, which can explode if not used properly.
• Charge the battery only in an ambient temperature between 5 and 35
degrees Celsius. Otherwise, the electrolyte solution might leak, battery
performance might deteriorate and the battery life might be shortened.
• Charge the battery in accordance with the instructions stated in this
User’s Manual.
CAUTION
EN-4
RISK OF EXPLOSION IF BATTERY IS REPLACED BY AN INCORRECT TYPE.
DISPOSE OF USED BATTERIES ACCORDING TO THE INSTRUCTIONS.
User’s Manual
TOSHIBA support
Need help?
For the latest driver updates, User’s Manuals & FAQs please have a look at
the TOSHIBA options & services support page:
computers.toshiba.eu/options-support
Please see computers.toshiba.eu/options-warranty
for the TOSHIBA hotline numbers.
Regulatory Information
CE compliance
This product is CE marked in accordance with the
requirements of the applicable EU Directives. Responsible for
CE marking is Toshiba Europe GmbH, Hammfelddamm 8,
41460 Neuss, Germany. A copy of the ofcial Declaration of
Conformity can be obtained from following website:
http://epps.toshiba-teg.com.
Working Environment
The Electromagnetic Compliance (EMC) of this product has been veried
typically for this product category for a so called Residential, Commercial &
Light Industry Environment. Any other working environment has not been
veried by Toshiba and the use of this product in these working environments
is maybe restricted or cannot be recommended. Possible consequences of the
use of this product in non-veried working environments can be: Disturbances
of other products or of this product in the nearby surrounding area with
temporarily malfunction or data loss/corruption as result. Example of non-
veried working environments and related advices:
■ Industrial environment (e.g. where 3-phase 380V mains is being used
mainly): Danger of disturbances of this product due to possible strong
electromagnetic elds especially near to big machinery or power units.
■ Medical environment: The compliance to the Medical Product Directive
has not been veried by Toshiba, therefore this product cannot be
used as a medical product without further verication. The use in usual
ofce environments e.g. in hospitals should be no problem if there is no
restriction by the responsible administration.
■ Automotive environment: Please search the owner instructions of the
related vehicle for advices regarding the use of this product (category).
■ Aviation environment: Please follow the instructions of the ight personnel
regarding restrictions of use.
CAMILEO X-SPORTS
User’s Manual
EN-5

CAMILEO X-SPORTS
Additional environments not related to EMC
■ Outdoor use: As a typical home/ofce equipment this product has no special
resistance against ingress of moisture and is not strong shock proofed.
■ Explosive atmosphere: The use of this product in such special working
environment (Ex) is not allowed.
Wireless Devices and your health
Wireless products, like other radio devices, emit radio frequency
electromagnetic energy. The level of energy emitted by Wireless products
however is far much less than the electromagnetic energy emitted by
wireless devices like for example mobile phones. Because Wireless products
operate within the guidelines found in radio frequency safety standards and
recommendations, TOSHIBA believes Wireless products is safe for use by
consumers. These standards and recommendations reect the consensus
of the scientic community and result from deliberations of panels and
committees of scientists who continually review and interpret the extensive
research literature. In some situations or environments, the use of Wireless
products may be restricted by the proprietor of the building or responsible
representatives of the organization. These situations may for example include:
■ Using the Wireless products equipment on board of airplanes, or
■ In any other environment where the risk of interference to other devices
or services is perceived or identied as harmful. If you are uncertain of the
policy that applies on the use of wireless devices in a specic organization
or environment (e.g. airports), you are encouraged to ask for authorization
REACH
EN-6
Following information is only valid for EU-member States:
REACH - Compliance Statement
The new European Union (EU) chemical regulation, REACH (Registration,
Evaluation, Authorization and Restriction of Chemicals), entered into force on
1 June 2007.
Toshiba will meet all REACH requirements and is committed to provide our
customers with information about the chemical substances in our products
according to REACH regulation.
Please consult the following website www.toshiba-europe.com/computers/
info/reach for information about the presence in our articles of substances
included on the candidate list according to article 59(1) of Regulation (EC)
No 1907/2006 (“REACH”) in a concentration above 0.1 % weight by weight.
User’s Manual
CAMILEO X-SPORTS
Following information is only valid for EU-member States:
Disposal of products
The crossed out wheeled dust bin symbol indicates that products
must be collected and disposed of separately from household
waste. Integrated batteries and accumulators can be disposed of
with the product. They will be separated at the recycling centeres.
The black bar indicates that the product was placed on the market
after August 13, 2005.
By participating in separate collection of products and batteries,
you will help to assure the proper disposal of products and batteries
and thus help to prevent potential negative consequences for the
environment and human health.
For more detailed information about the collection and recycling
programs available in your country, please visit our website
(http://eu.computers.toshiba-europe.com) or contact your local city
ofce or the shop where you purchased the product.
Disposal of batteries and/or accumulators
The crossed out wheeled dust bin symbol indicates that batteries
and/or accumulators must be collected and disposed of separately
from household waste.
If the battery or accumulator contains more than the specied
values of lead (Pb), mercury (Hg), and/or cadmium (Cd) dened in
the Battery Directive (2006/66/EC), then the chemical symbols for
lead (Pb), mercury (Hg) and/or cadmium (Cd) will appear below the
crossed out wheeled dust bin symbol.
By participating in separate collection of batteries, you will help to
assure the proper disposal of products and batteries and thus help
to prevent potential negative consequences for the environment
and human health.
For more detailed information about the collection and recycling
programs available in your country, please visit our website
(http://eu.computers.toshiba-europe.com) or contact your local city
ofce or the shop where you purchased the product.
User’s Manual
EN-7
CAMILEO X-SPORTS
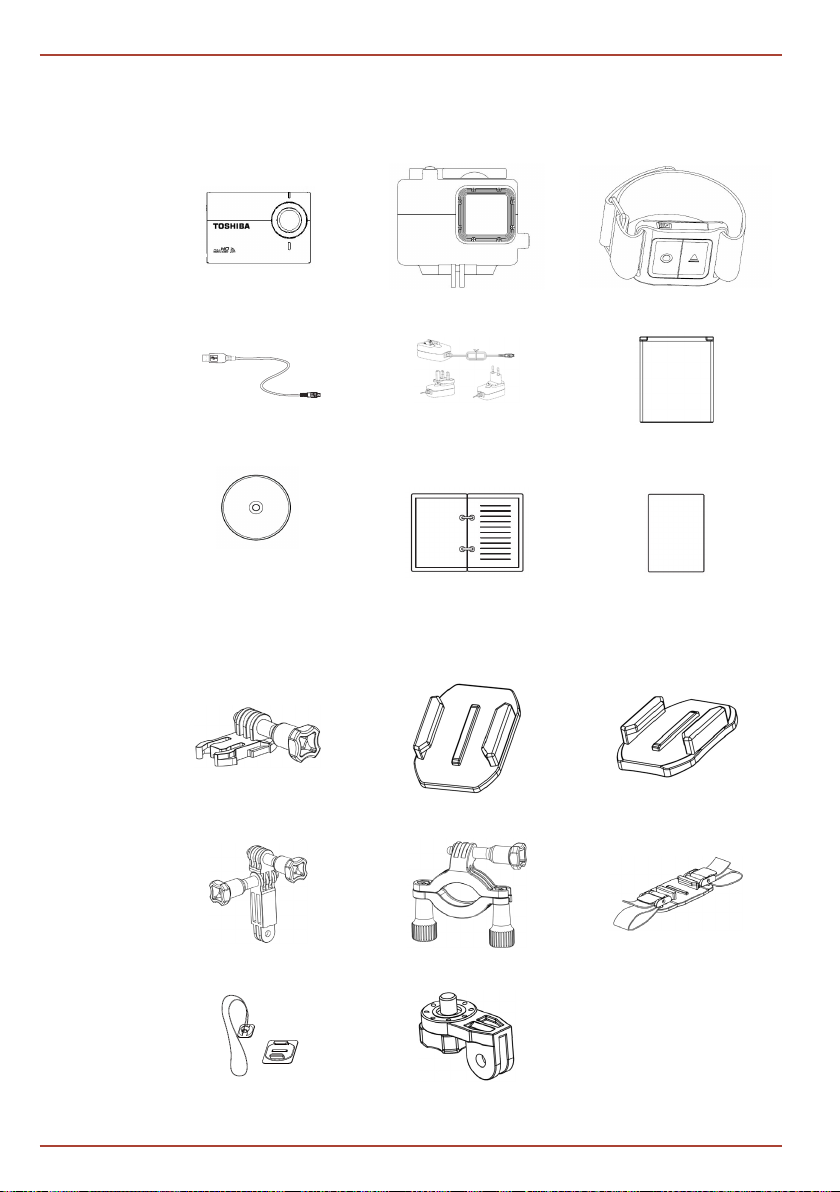
Box Content
Make sure you have all of the following items:
Camileo X-Sports Camcorder
Waterproof Casing
Remote Control
micro-USB cable
DVD (with User’s Manual &
Magix Video Easy HD Trial
Version, Magix Movie Edit Pro
Plus Trial Version)
Flat Clip Mount
Side Mount
AC Adapter (with exchangeable
EU/UK plugs)
Quick Start Guide
Mounting Accessories:
Flat Adhesive Mount
Bike Mount
Li-Ion Battery
Warranty Leaet
Curved Adhesive Mount
Vented Helmet Mount
EN-8
Surfboard Mounts
Tripod Mount
User’s Manual
Getting Started
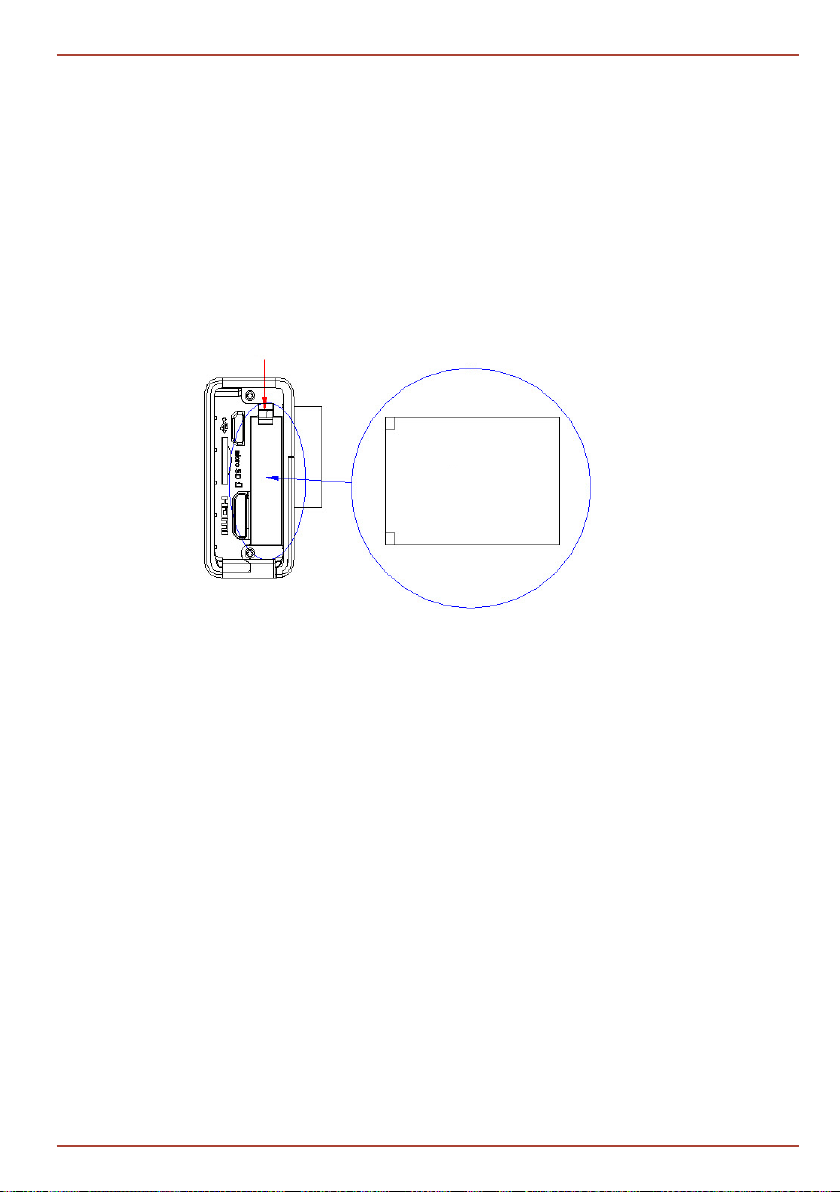
Inserting and removing battery
Your camcorder comes with a battery that needs to be inserted in the
camcorder before usage.
1. Open the ports cover.
2. Insert the battery into the slot until it locks properly.
3. To remove the battery, push the battery lock outward and gently pull
battery out.
4. Close the ports cover.
Battery lock
CAMILEO X-SPORTS
Battery
(Sample Illustration) Inserting / removing battery
Charge the Camcorder and Remote Control
You must use the AC adapter or USB cable to charge your camcorder or
remote before usage. To charge your camcorder or remote through the AC
Adapter (5V/1A) plug the AC adaptor into an AC wall socket and connect
its micro-USB plug into the micro-USB port on the camcorder / remote.
The blinking green light indicates that the battery is currently being charged;
the light glows continuously green once charging is completed. The full
charging time with AC adapter is approximately 2.5 hours. (Actual charging
time will vary, depending on battery condition and charging conditions.)
To charge your camcorder / remote through the supplied USB cable connect
your camcorder’s / remote’s micro-USB port to a USB port on your computer
with the supplied USB cable. The blinking green light indicates that the battery
is currently being charged; the light glows continuously green once charging is
completed. Charging the battery through the USB cable takes approximately
6 hours for camcorder / 2.5 hours for remote. (Actual charging time will vary,
depending on battery condition and charging conditions including power
availability from the computer’s USB port.)
Never charge the battery by a method other than as instructed. Doing so may
cause a re or explosion possibly resulting in serious injury.
User’s Manual
EN-9
CAMILEO X-SPORTS
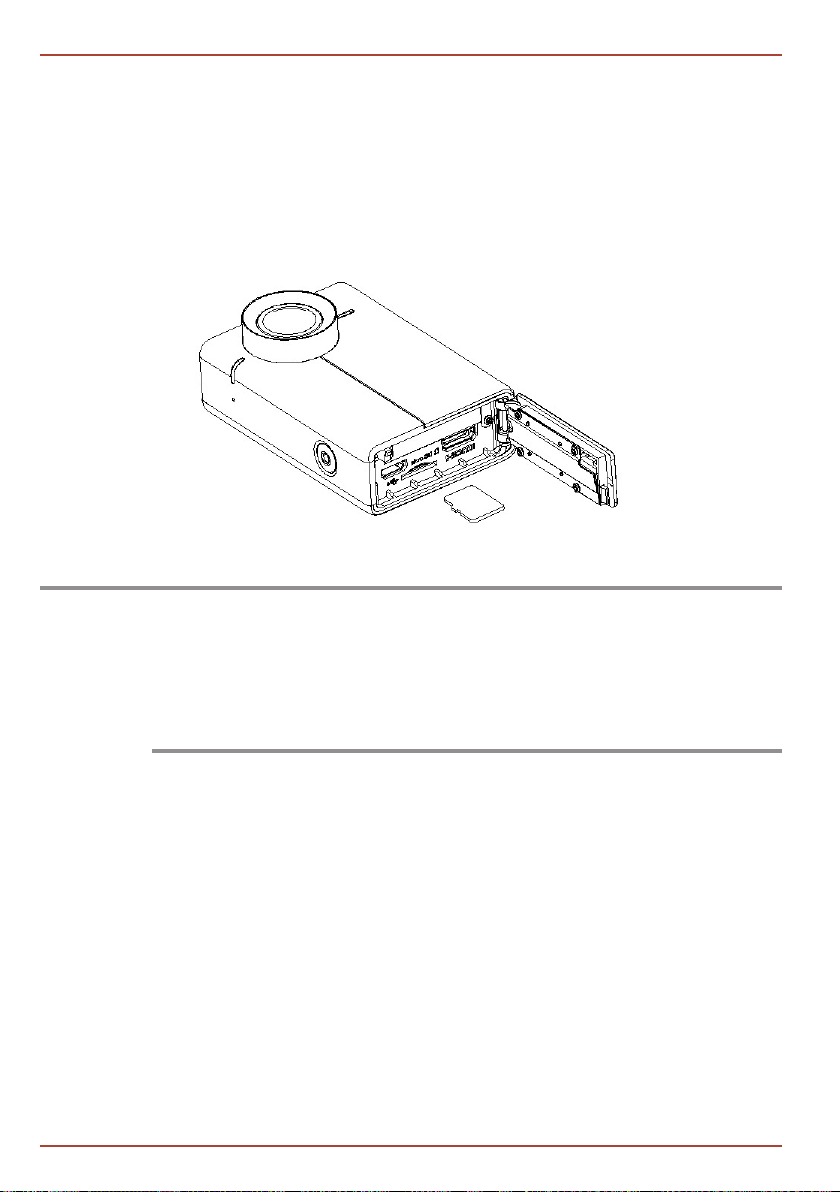
Inserting and removing a microSD™ card
A microSD™ card may need to be purchased separately. Your camcorder
comes with a microSD™ card slot that allows you to expand the camcorder’s
memory capacity with an optional microSD™ up to micro SDXC™ memory card.
1. Open the ports cover.
2. Insert the microSD™ card (optional) into the slot until it locks properly.
3. To remove the microSD™ card press inward to release it and gently pull it out.
4. Close the ports cover.
(Sample Illustration) Inserting / removing a microSD™ card
NOTE
Push in the SD card slowly until it is locked, then release the card slowly. As the SD
card is under minimal tension when it is installed in the card slot, please take care
during removing it.
To remove the microSD™ card, press inwards to release it. When the card pops out,
grasp it and pull it straight out.
To record in higher video resolutions with high frame rates we recommend to use at
least a Class 6 SD card.
Quick Tour
This section identies the various components of your Camileo X-Sports
camcorder.
For a description of each component please refer to the table beneath each
illustration.
EN-10
User’s Manual

Camileo X-Sports Camcorder
CAMILEO X-SPORTS
1: Record/Exit button
2: HDMI® port (Mini-C)
3: microSD™ slot
4: Battery slot
5: micro-USB port
6: Status LED
7: Lens
8: Up/Left/Zoom In button
9: Down/Right/Zoom Out button
10: LCD screen
11: Power button
12: Playback/Conrm button
13: Menu/Back button
14: Tripod hole
Buttons Description
1 Record • Record button to take video or capture photo
• Exit Menu to Live Video/Photo view
8 Up • Zoom In
• Move between menu options
9 Down • Zoom Out
• Move between menu options
11 Power • Turn on Camera
• Turn off Camera
12 Playback • Enter Playback
• Select and Conrm
13 Menu • Enter Menu
• Go back
User’s Manual
EN-11
CAMILEO X-SPORTS
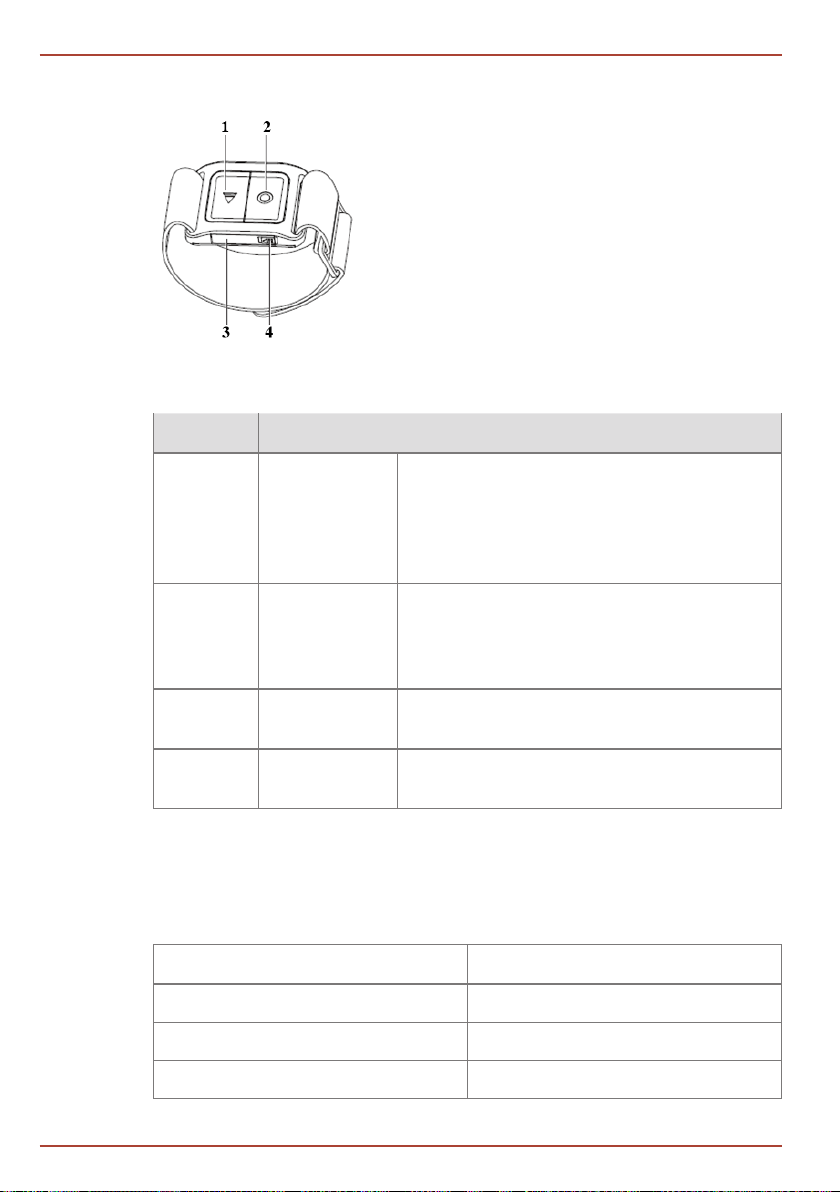
Remote Control
1. Record/Pairing button
2. Stop/Mode button
Buttons Description
1 Record • Press and hold the Record button to power
2 Stop • During recording, press Stop button to
3 USB door • Close the USB door while using
4 Door lock • Slide door lock towards center to open the
*Please read the Remote Control section for further instructions how to pair
your remote with the camcorder.
Remote LED Status
3. USB door
4. Door lock
your remote on and off.
• The LED indicates current camera mode.
• Press the Record button to pair with
your cam.
stop recording.
• In stop mode, press Stop button to
toggle mode.
remote control.
USB door
EN-12
Remote LED status Operation
Blinking Green + Red (alternatively) Less than 15% battery life remains
Blinking Red slowly Video Mode
Blinking Blue slowly Photo Mode
User’s Manual
CAMILEO X-SPORTS
Remote LED status Operation
Blinking Red + Blue (alternatively) Simultaneous Video & Photo Mode
Blinking Red continuously Record a Video/ Simultaneous Video
& Photo
Blinking Blue continuously Taking Photos in Timelapse
Blinking Blue once (1 sec.) Taking a single Photo/ Continuous
Photo/ Photo Burst
Blinking White once
Blinking Green Remote is charging
Stay solid Green Remote is fully charged
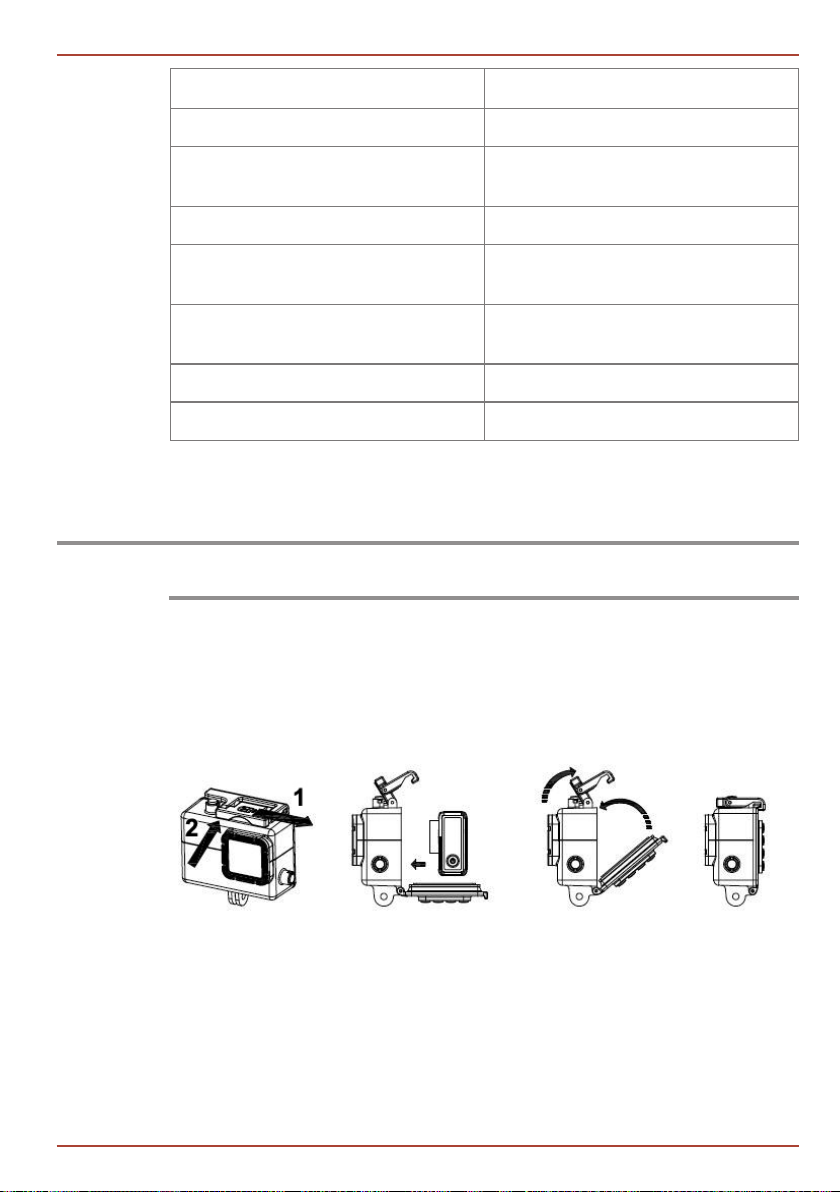
Waterproof Casing
NOTE
Please be aware that the camcorder itself is not waterproof at all. It is only waterproof
inside the waterproof casing.
How to put the camera into the waterproof casing:
1. Slide the open button and lift up the latch. Open the waterproof casing door.
2. Put the camera into the waterproof casing.
3. Close the waterproof casing door and bring the latch into position to hold
the door.
4. Lift down the latch to lock the door.
Camera received operating signal
from Remote
To take out the camera from the waterproof casing:
1. Slide the open button and lift up the latch.
2. Open the door.
3. Take out the camera.
Power ON, Record a Video, Power OFF
1. Press and hold the Power button for 2 seconds to start up the camera.
User’s Manual
EN-13
CAMILEO X-SPORTS
2. The screen will be turned on, this will show the Toshiba welcome display for
3. The camera will enter into the default mode: Video 1080p/60fps live view.
4. Press the Record button to start recording a video. Press the Record button
5. To power off press and hold Power button for 3 seconds.
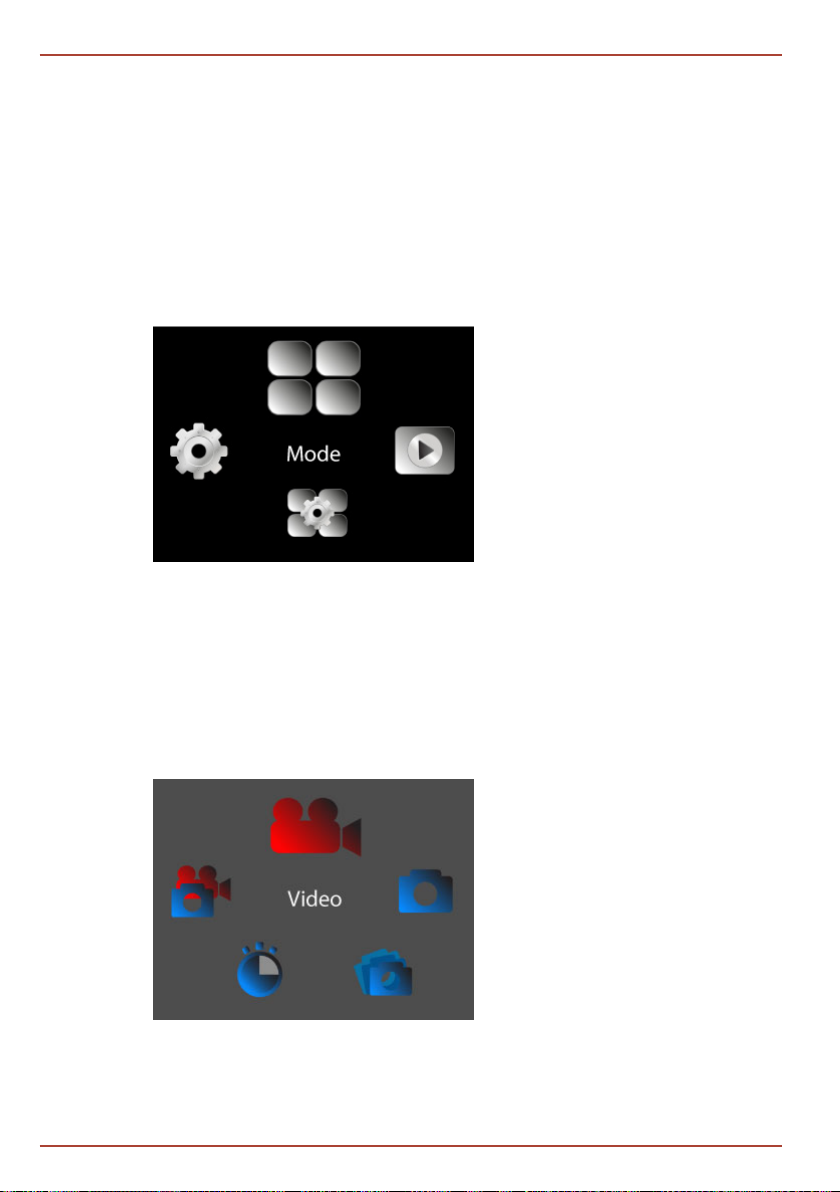
MAIN MENU
From video live view press the Menu button to enter the Main Menu. Four
menu options will be shown: Mode, Playback, Mode Settings, Settings. You
can enter into the next level by choosing a menu option with the Up and Down
buttons and then pressing the Playback button when your preferred menu
option is highlighted on the top of the screen.
2 seconds, then enter into Live view.
Mode is indicated by the icon in the top left of the display, as well as by the
status LED.
again to stop recording the video.
EN-14
Mode Menu
When Mode is highlighted press the Playback button and Mode options will be
shown: Video, Photo, Photo Burst, Timelapse, Simultaneous Video + Photo.
User’s Manual
CAMILEO X-SPORTS
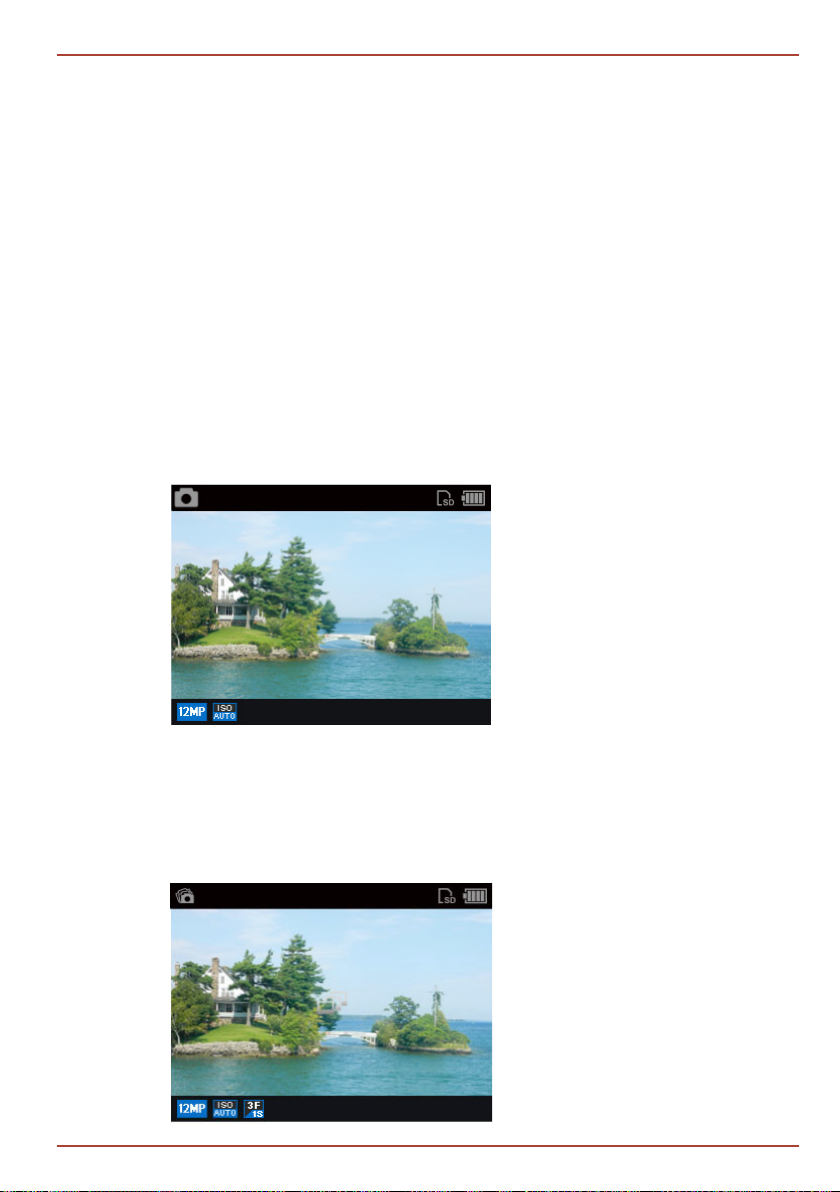
VIDEO MODE
In Video mode the status LED will be slowly blinking red. Once the user
presses the Record button on from either the camera or remote, the camera
will start recording and the LED will start blinking red continuously. Press the
Record button on the camera and it will stop recording and status LED will
resume blinking red slowly. Press the Stop button on the remote and camera
will stop recording and status LED will resume blinking red slowly.
Please note that besides the original recorded video le
(VID00001.mp4) a smaller sized video le (VID00001_thm.mp4) will be created
during video recording. This le will be used for faster video content transfer
with your WiFi APP from the camera to your tablet/smartphone device and
further to upload your videos and photos to social networks with your WiFi APP.*
*Please refer to further information about the WiFi APP to section Toshiba APP
“Toshiba WiFi Connect”.
PHOTO MODE
In Photo mode, the status LED will be blinking blue slowly. Once the user
presses the Record button on either the camera or remote, the camera will
capture a single picture and LED will blink once upon the photo is taken.
User’s Manual
PHOTO BURST MODE
In Photo Burst mode, status LED will be blinking blue slowly. Once the user
presses the Record button on either the camera or remote, the camera will
capture a pre-dened burst of photos within a pre-dened period (please refer
to Photo Burst Settings section) and the LED will blink once upon the burst of
photos is taken.
EN-15
CAMILEO X-SPORTS
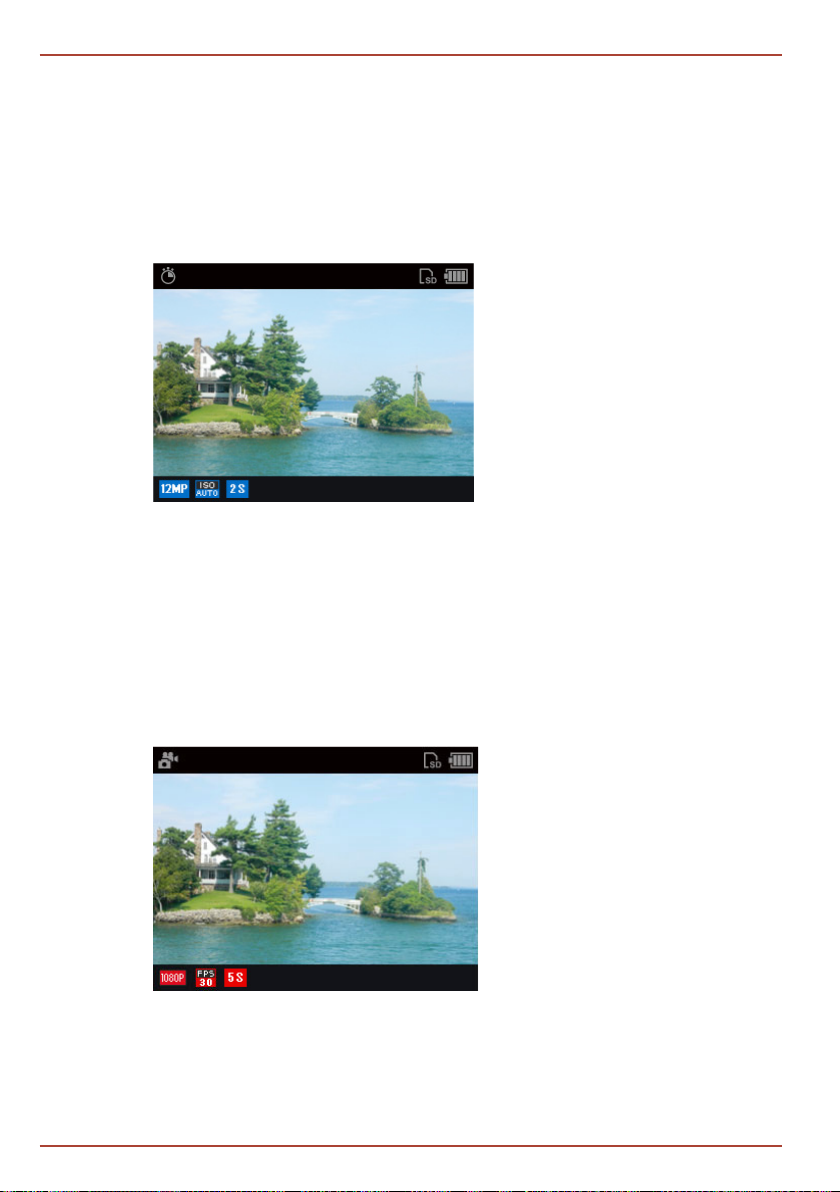
TIMELAPSE MODE
In Timelapse mode status LED will be blinking blue slowly. Once the user
presses the Record button from either camera or remote, the camera will
start to capture photos continuously in a pre-dened interval set by the user
in advance (please refer to Timelapse Settings section) and the LED will start
blinking blue continuously. Press the Record button on the camera and it will
stop capturing photos and status LED will resume blinking blue slowly. Press
the Stop button on the remote and the camera will stop capturing photos and
status LED will resume blinking blue slowly.
Simultaneous Video & Photo MODE
In Simultaneous Video & Photo mode status LED will be blinking red and blue
alternatively. Once user presses the Record button from either camera or
remote, camera will start video recording and capturing photos simultaneously
in a pre-dened interval (please refer to Simultaneous Video & Photo Settings
section) and the LED will start blinking red continuously. Press the Record
button on the camera and it will stop simultaneously video and photo recording
and the status LED will resume blinking red slowly. Press the Stop button on
the remote and the camera will stop simultaneously video and photo recording
and the status LED will resume blinking red slowly.
EN-16
Pressing the Menu button will bring you back to previous navigation level.
Pressing the Record button will bring you back to video or photo live view directly.
User’s Manual
CAMILEO X-SPORTS
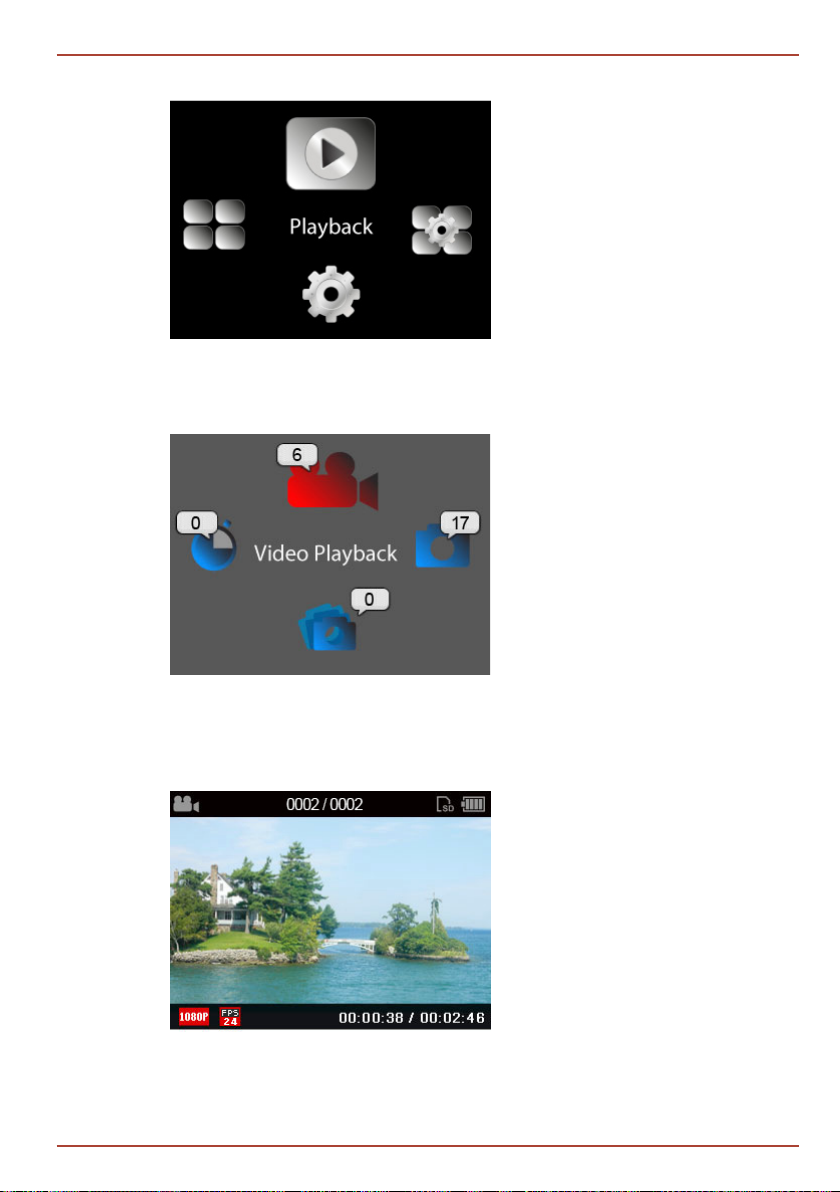
Playback Menu
When Playback Menu is highlighted press Playback button to enter the
playback options in which you can select media les taken in different video
and photo modes: Video Playback, Photo Playback, Timelapse Playback,
Photo Burst Playback.
User’s Manual
The number shown on the top corner of each Playback mode icon is the le
number inside this folder. Selecting a Playback mode and press Record button,
you enter all videos and photos that can be played back. You can navigate
through the les by Up and Down buttons. To playback videos or photos press
the Playback button.
You can also enter the Playback Mode from the live video or photo view
directly when pressing the Playback button.
Pressing the Menu button will bring you back to previous navigation level.
Pressing the Record button will bring you back to video or photo live view directly.
EN-17
CAMILEO X-SPORTS
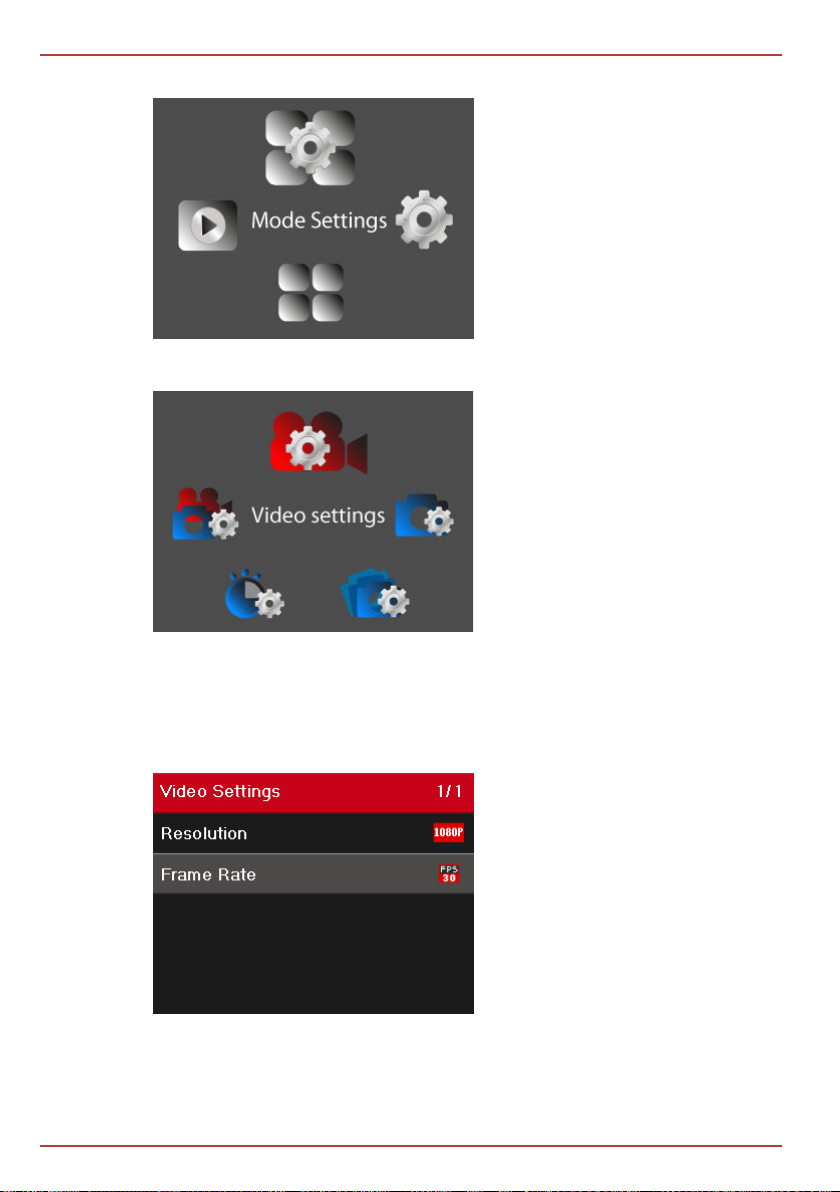
Mode Settings
By entering the Mode Settings menu with the Playback button you can
congure the camera for each 5 camera modes.
EN-18
Video Settings
You can choose Resolution and Frame Rate with the Up and Down buttons.
Use the Playback button to toggle the different options.
Pressing the Menu button will bring you back to previous navigation level.
Pressing the Record button will bring you back to video or photo live view directly.
User’s Manual
CAMILEO X-SPORTS
Video resolution /
Frame rate
FULL HD 1920 x 1080: (60 / 48 / 30 / 24 fps NTSC)
(50 / 48 / 25 / 24 fps PAL)
HD 1280 x 720: (120 / 60 fps NTSC) (100 / 50 fps PAL)
1200P 1600 x 1200: (60 / 30 fps NTSC) (50 / 25 fps PAL)
960P 1280 x 960: (60 / 48 fps NTSC) (50 / 48 fps PAL)
WVGA 848 x 480: (240 fps NTSC) (200 fps PAL)
VGA 640 x 480: (30 fps NTSC)
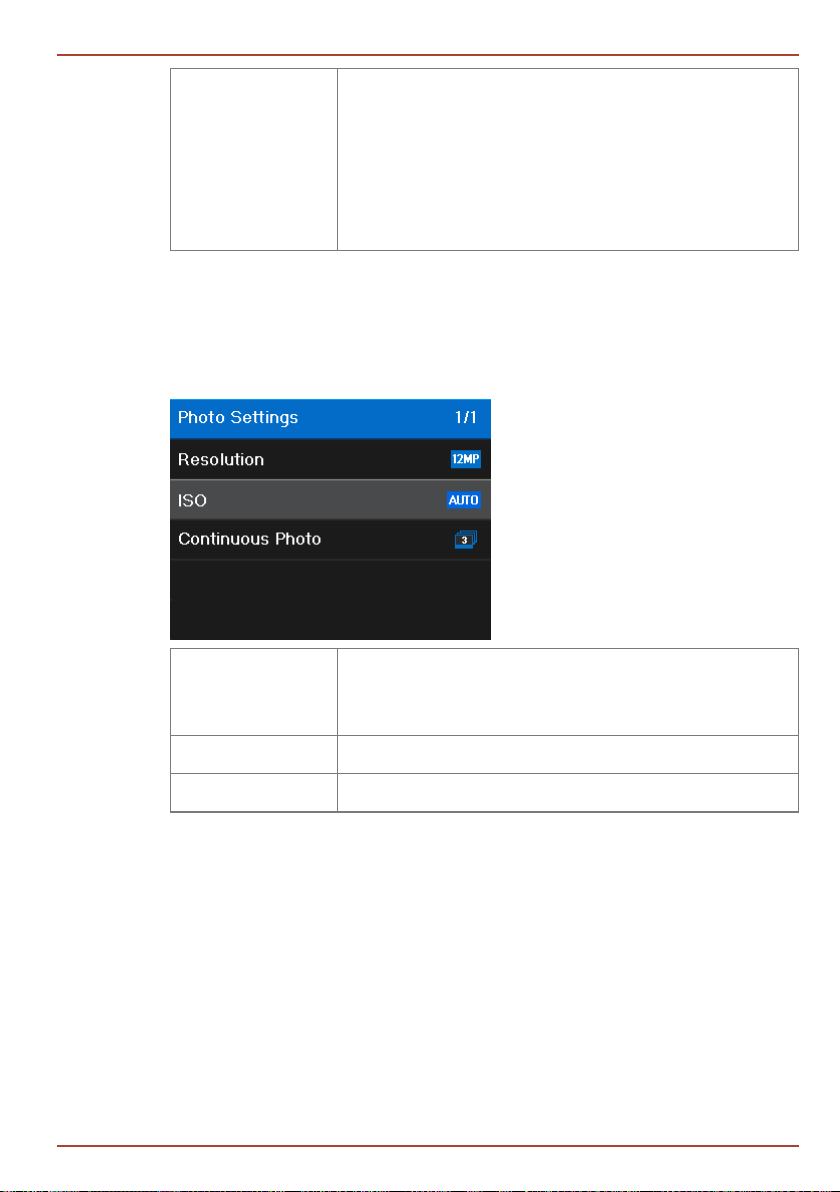
Photo Settings
You can choose Resolution, ISO and Continuous Photo with the Up and Down
buttons. Use the Playback button to toggle the different options.
Pressing the Menu button will bring you back to previous navigation level.
Pressing the Record button will bring you back to video or photo live view directly.
Image resolution 12MP: 12 megapixels, (4000 x 3000)
8MP: 8 megapixels, (3264 x 2448)
5MP: 5 megapixels, (2592 x 1944)
User’s Manual
ISO Auto / 100 / 200 / 400 / 800 / 1600 / 3200 / 6400
Continuous photo OFF / 3 / 5 / 10 per 1 s
ISO setting gives you different options to choose the best light sensitivity for
your photo shooting scene.
Continuous Photo gives you the option to capture a series of photos per
second continuously while holding down the Record button on your camera.
From your remote control you can only press the record button to capture a
series of photos per second only one time - and not continuously.
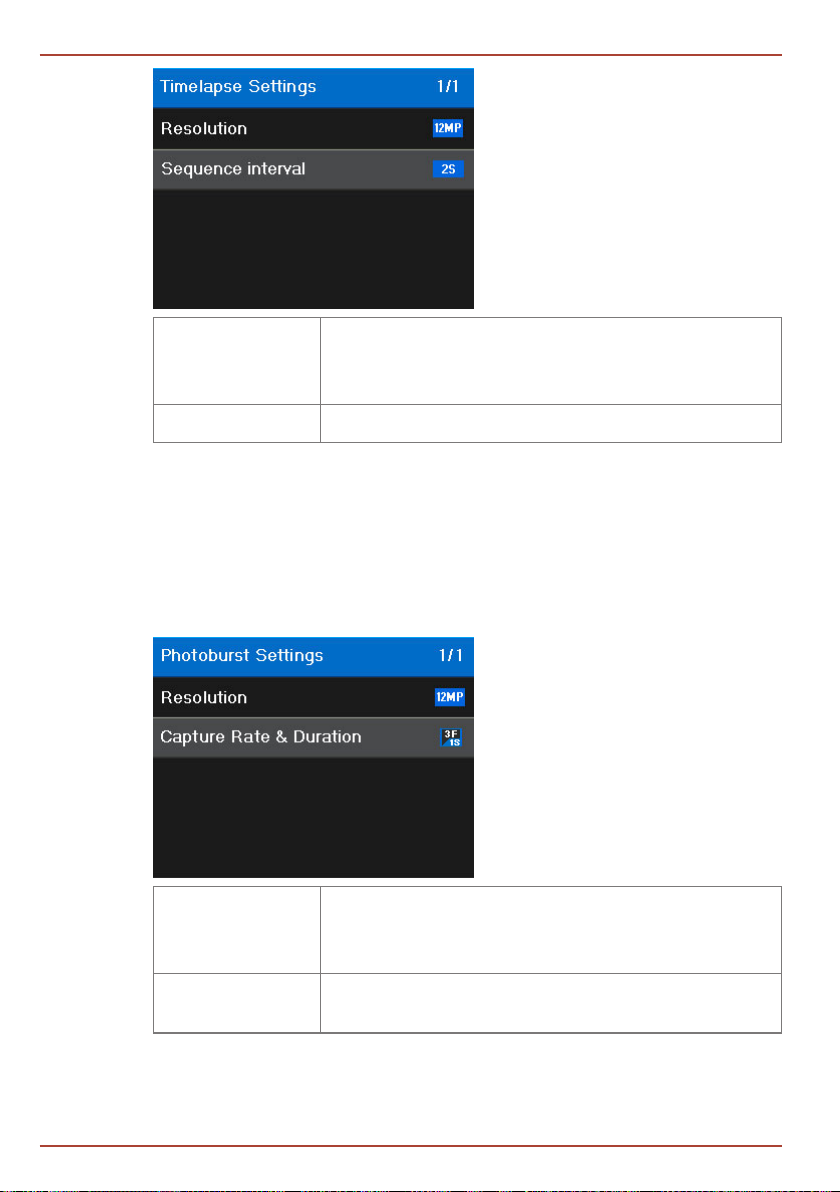
Timelapse Settings
You can choose Resolution and Sequence interval with the Up and Down
buttons. Use the Playback button to toggle the different options.
Pressing the Menu button will bring you back to previous navigation level.
Pressing the Record button will bring you back to video or photo live view directly.
EN-19
CAMILEO X-SPORTS
Image resolution 12MP: 12 megapixels, (4000 x 3000)
Sequence interval 0.5s* / 1 s / 2 s / 5 s / 10 s / 30 s / 60 s
*When using the 0.5 seconds setting, an SD card with a Speed Class 10
Rating is required.
Photoburst Settings
You can choose Resolution and Capture Rate & Duration with the Up and
Down buttons. Use the Playback button to toggle the different options.
Pressing the Menu button will bring you back to previous navigation level.
Pressing the Record button will bring you back to video or photo live view directly.
8MP: 8 megapixels, (3264 x 2448)
5MP: 5 megapixels, (2592 x 1944)
EN-20
Image resolution 12MP: 12 megapixels, (4000 x 3000)
8MP: 8 megapixels, (3264 x 2448)
5MP: 5 megapixels, (2592 x 1944)
Capture rate
3f/1s, 5f / 1s, 10f / 1s, 10f / 2s, 30f / 1s, 30f / 2s, 30f / 3s *
& duration
*30f / 1s, 30f / 2s and 30f / 3s are only supported with up to 5MP image
resolution.
User’s Manual
CAMILEO X-SPORTS
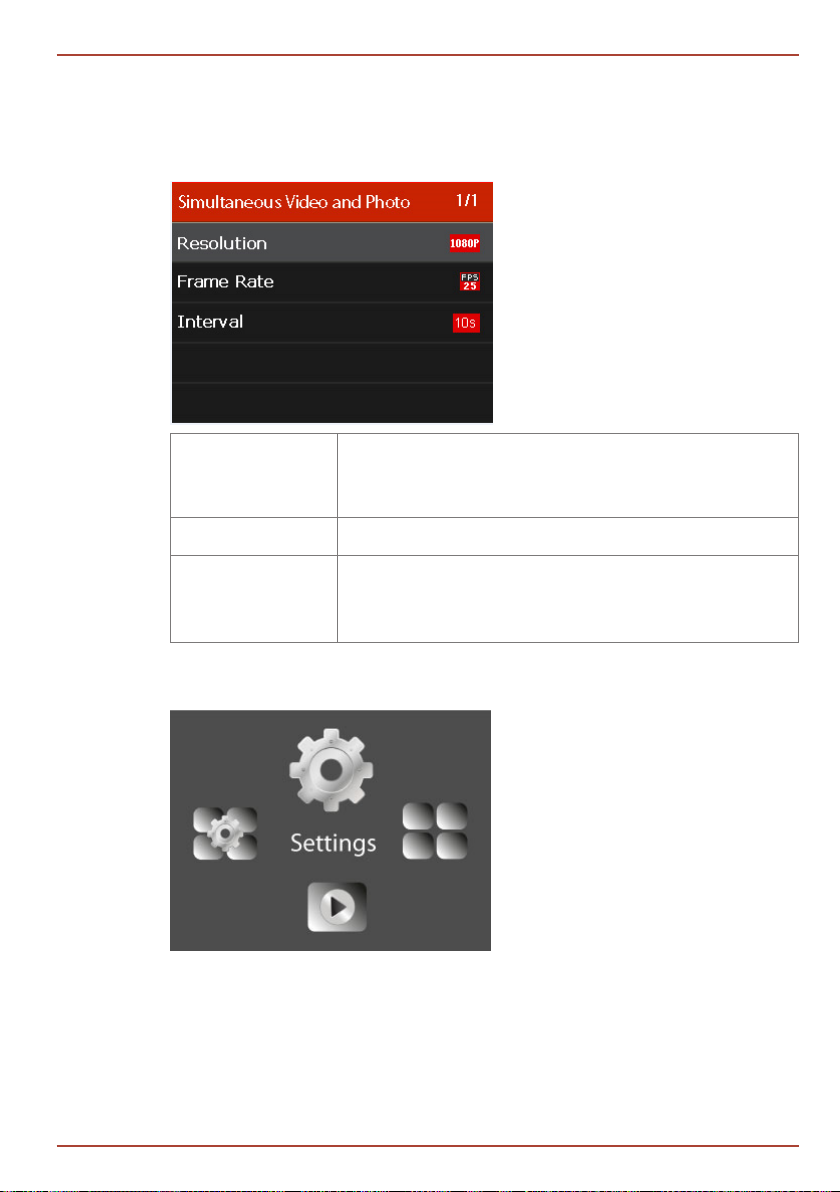
Simultaneous Video and Photo Settings
You can choose Interval with the Up and Down buttons. Use the Playback
button to toggle the different options.
Pressing the Menu button will bring you back to previous navigation level.
Pressing the Record button will bring you back to video or photo live view directly.
Video resolution /
Frame rate
Interval 5s / 10s / 30s / 60s
Photo resolutions 30 fps or below 8MP
FULL HD 1920 x 1080: (30 / 24 fps NTSC)
(25 / 24 fps PAL) + 8MP
HD 1280 x 720: (60 fps NTSC) (50 fps PAL) + 2MP
31 - 60 fps 2MP
61 fps or higher: no photo can be supported
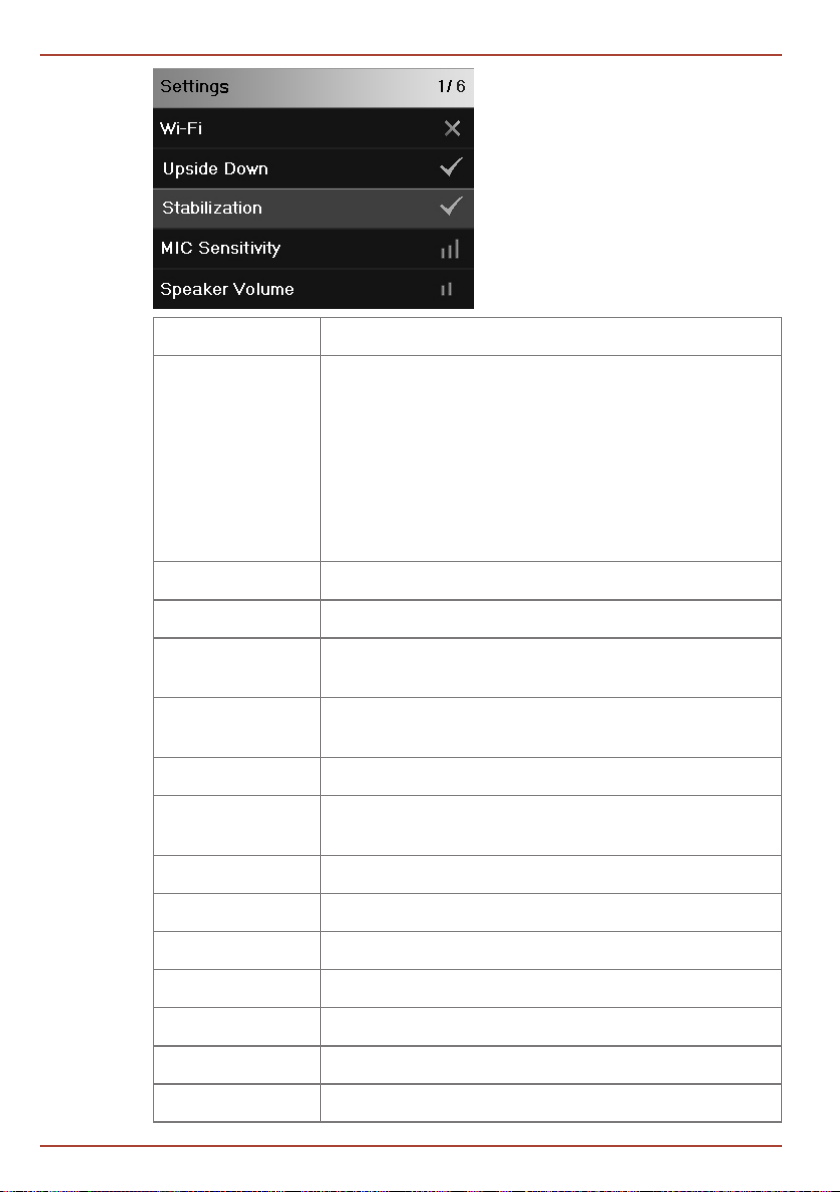
Settings
When Settings is highlighted press the Playback button and you will enter the
general Settings menu. Within this menu you can congure the camera with
basic settings.
You can choose all settings with the Up and Down buttons. Use the Playback
button to toggle the different options.
Pressing the Menu button will bring you back to previous navigation level.
Pressing the Record button will bring you back to video or photo live view directly.
User’s Manual
EN-21
CAMILEO X-SPORTS
WI-FI ON/OFF
UPSIDE DOWN ON/OFF
STABILIZATION ON/OFF
Supported resolutions:
FULL HD 1920 x 1080 (30 / 24 fps NTSC) (25 /
24 fps PAL)
HD 1280 x 720: (60 fps NTSC / 50 fps PAL)
1200P 1600 x 1200: (30 fps NTSC, 25 fps PAL)
960P 1280 x 960: (60 / 48 fps NTSC) (50 / 48 fps PAL)
VGA 640 x 480: (30 fps NTSC)
EN-22
MIC SENSITIVITY OFF/LOW/MED/HIGH
SPEAKER
OFF/LOW/MED/HIGH
VOLUME
LCD
LOW/MED/HIGH
BRIGHTNESS
LCD OFF NEVER/5S/10S/20S/1MIN/5MIN
REMOTE
ON/OFF
CONTROL
REMOTE PAIRING START
REMOTE LED ON/OFF
LED INDICATOR ON/OFF
DIGITAL ZOOM ON/OFF
SELF TIMER OFF/10S
EXPOSURE -2 / -1 / 0 / 1 / 2
FILTER AUTO, BLACK&WHITE, CLASSIC, NEGATIVE
User’s Manual

CAMILEO X-SPORTS
SCENE AUTO, SKIN, NIGHT, BACKLIGHT
WHITE BALANCE AUTO, DAY LIGHT, TUNGSTEN, FLUORESCENT
SPOT METER ON/OFF
LOOPING VIDEO OFF/ MAX/ 5MIN/ 20MIN/ 60MIN/ 120MIN
TV OUTPUT NTSC/PAL
POWERSAVE NEVER/ 1MIN/ 2MIN/ 5MIN
DATA&TIME
PHOTO DATE/
TIMESTAMP
LANGUAGE English, Czech, Danish, Dutch, Finnish, French,
RESTORE
DEFAULT
FORMAT
MEMORY CARD
FIRMWARE
VERSION
YEAR/MONTH/DAY/HOUR/MINUTE
ON/OFF
German, Spanish, Turkish, Greek, Italian, Norwegian,
Polish, Portuguese, Swedish
REFRESH/CANCEL
YES/NO
Shows Firmware version
Spot Meter
Spot Meter allows you pointing the camera into a brighter setting when taking
photos from a dark space, such as taking photos from within a house-window.
Please note that this feature is only supported during photo shooting.
Looping Video
Looping Video features recording a continuously looping video that overwrites
itself until you stop it. Looping Video feature includes:
User’s Manual
OFF Default
Max Depending on the maximum capacity the camera
records a certain number of videos based on 15 minutes
les, then deletes the rst 15 minutes le to continue
recording a new video.
5 Min Camera records 5 x 1 minute le, then deletes the rst
1 minute le to continue recording a new video.
EN-23

CAMILEO X-SPORTS
20 Min Camera records 4 x 5 minutes le, then deletes the rst
5 minutes le to continue recording a new video.
60 Min Camera records 4 x 15 minutes le, then deletes the
rst 15 minutes le to continue recording a new video.
120 Min Camera records 8 x 15 minutes le, then deletes the
rst 15 minutes le to continue recording a new video.
Upside Down
When mounting your X-Sports Upside Down your les will be upright when
viewing or editing. This setting allows you not to ip your video or photos.
The supported video resolutions are as follows:
FULL HD 1920 x 1080 (30 / 24 fps NTSC) (25 / 24 fps PAL)
HD 1280 x 720: (60 fps NTSC / 50 fps PAL)
1200P 1600 x 1200: (30 fps NTSC, 25 fps PAL)
960P 1280 x 960: (60 / 48 fps NTSC) (50 / 48 fps PAL)
VGA 640 x 480: (30 fps NTSC)
About the Electronic Image Stabiliser (EIS) built-in your X-Sports
The Electonic Image Stabiliser (EIS) built-in your X-Sports camcorder helps
to improve your video performance in environments when the camcorder is
subject to movement. Please be aware that in action usage scenarios where
the camcorder is subject to extreme movement, the EIS brings only limited
image stabilisation to your camcorder’s video performance. If EIS is activated,
the view angle will be reduced by approximately 10%.
How to use your bundled Mounting Accessories
Important
EN-24
Apply mounts to clean and smooth surfaces only. Surfaces must be free of dirt, oil and
contaminants to ensure adhesive mount attaches securely and to avoid the mount
detaching during use. Attach mount at room temperature 24 hours prior to use to ensure
optimum adhesion.
User’s Manual
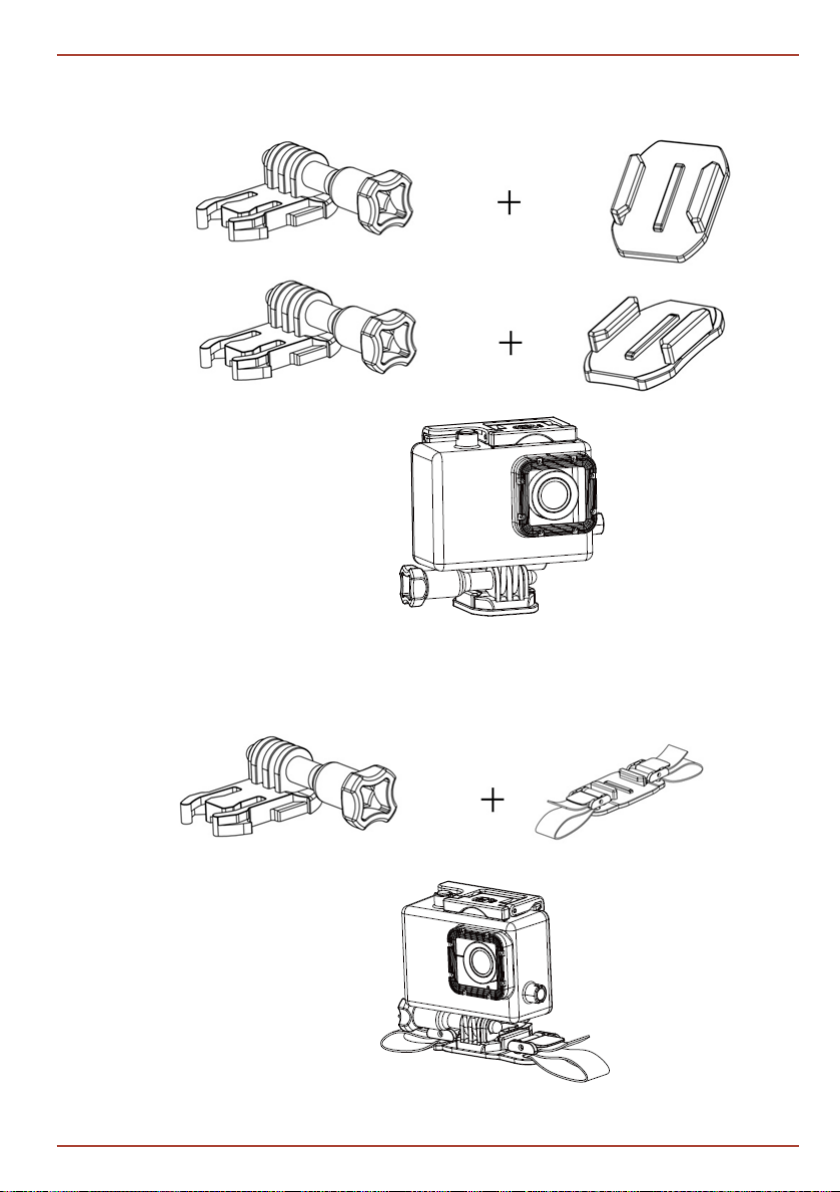
CAMILEO X-SPORTS
You can clip the Flat Clip Mount into the Flat or Curved Adhesive Mount and
screw the Waterproof Casing on the Flat Clip Mount.
=
User’s Manual
You can clip the Flat Clip Mount into the Vented Helmet Mount and screw the
Waterproof Casing on the Flat Clip Mount.
=
EN-25
CAMILEO X-SPORTS
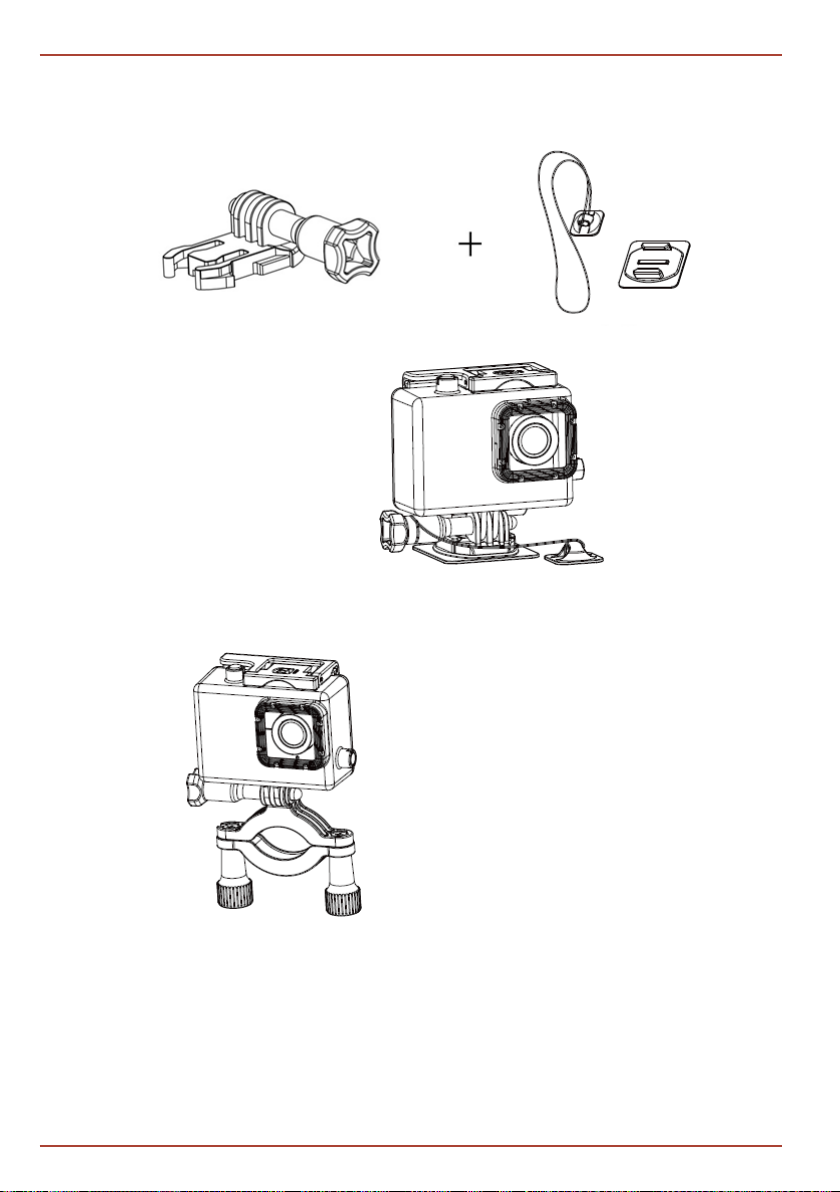
Use the Waterproof Casing screwed on the Flat Clip Mount and clipped into
the Surfboard Mount. You can save your Waterproof Casing with camera by
connecting the safety mount strap to the Flat Clip Mount.
=
EN-26
You can screw the Waterproof Casing on the Bike Mount.
User’s Manual
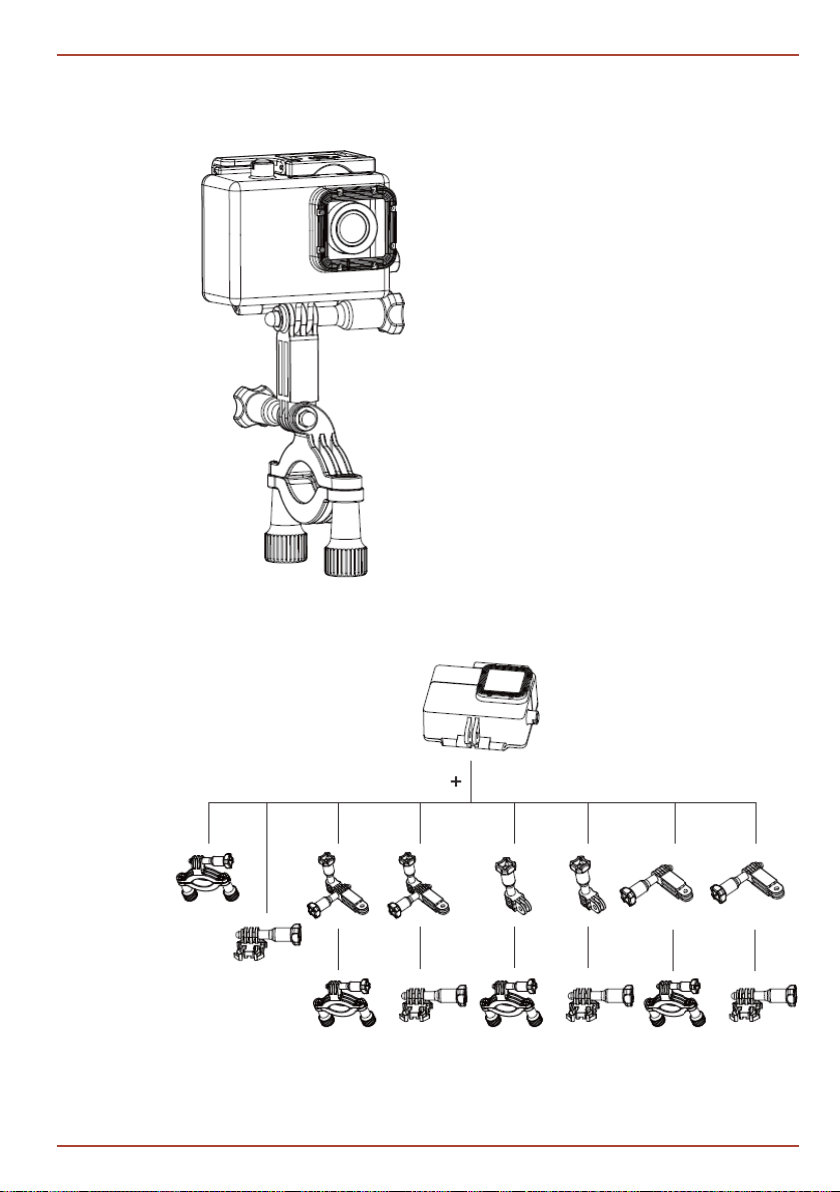
CAMILEO X-SPORTS
For further usage scenarios on your bike you can disassemble the Side Mount
into two parts and use each of these parts to connect the Bike Mount with your
Waterproof Casing.
User’s Manual
Please check below for further usage scenarios with your Waterproof Casing.
Waterproof case And
other Mounts
EN-27
CAMILEO X-SPORTS
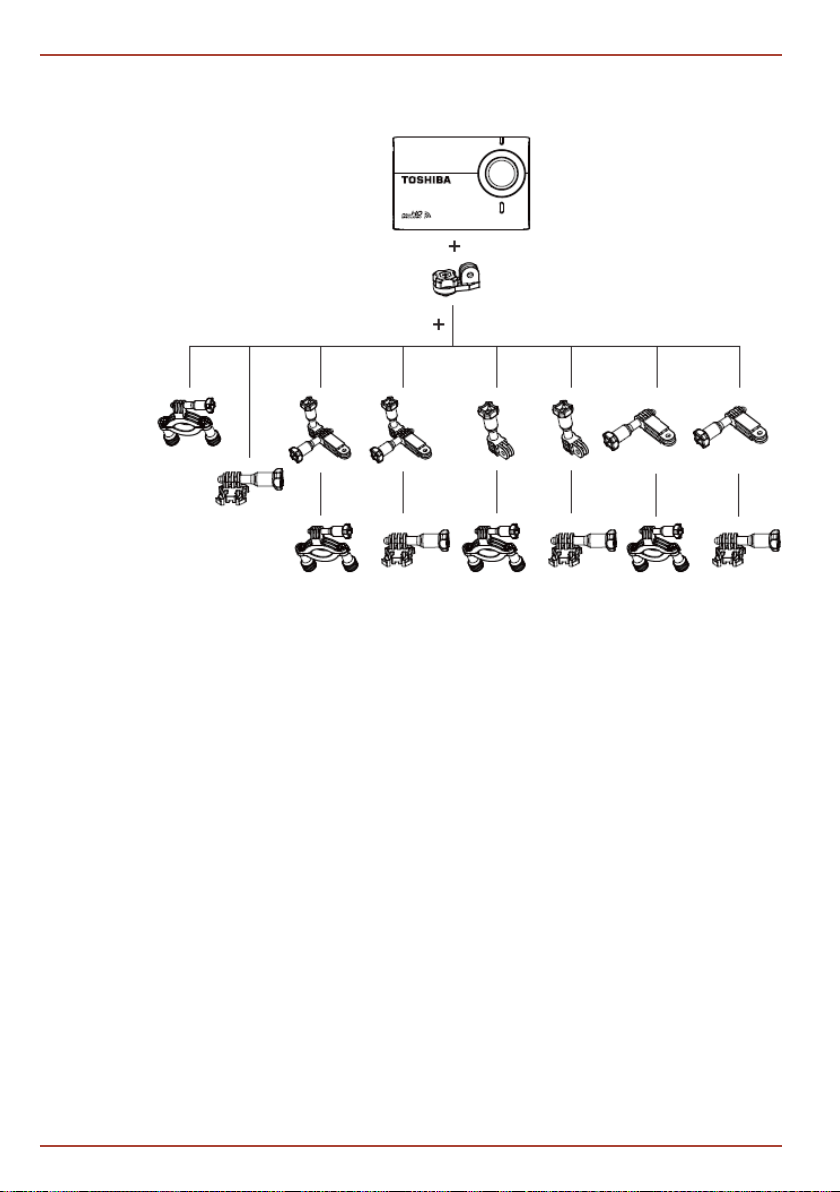
Please check below for further usage scenarios with your Tripod Mount
screwed on your camera without using the Waterproof Casing.
Camera And
other Mounts
EN-28
User’s Manual

CAMILEO X-SPORTS
Optional Accessory Packs
Following Accessory Packs are available separately from Toshiba (availability
depending on region):
1. Head & Chest Pack
2. Clip & Go Pack
3. Waterproof Casing
4. Accessory Pack
5. Battery Pack
Connect your Remote Control with the Camcorder
Start pairing your Remote Control with the Camcorder
In your camcorder’s general Settings make sure the Remote Control option is
activated (ON). Turn on your remote by pressing the Record button on your
remote. Choose Remote Pairing option in your camcorders’ general Settings
with the Up and Down buttons and press the Playback button on your camera
to conrm and start pairing process. LCD screen will show the message
“Please click REC on your remote”. Click the Record button on your remote
and remote will be paired with your camcorder showing solid white LED.
When pairing process nished, LCD will show message “Successful!”. You can
now remote control your camcorder.
WI-FI
Turn on and off Wi-Fi
In the general Settings choose Wi-Fi option with the Up and Down buttons and
press the Playback button to enable Wi-Fi. Then exit to live view screen by
pressing the Record button. LCD will display “Processing…”. Once the Wi-Fi
initializing is done, a Wi-Fi icon will appear on the left top status column which
indicates that Wi-Fi is activated.
Toshiba APP “Toshiba WiFi Connect”
With the APP* “Toshiba WiFi Connect” you can operate your camera wirelessly
from iOS and Android devices, such as smartphones and tablets.
*(available for free on iOS and Google Play stores, compatible with latest iOS
versions 5.x & Android versions 4.x and above)
User’s Manual
EN-29
CAMILEO X-SPORTS
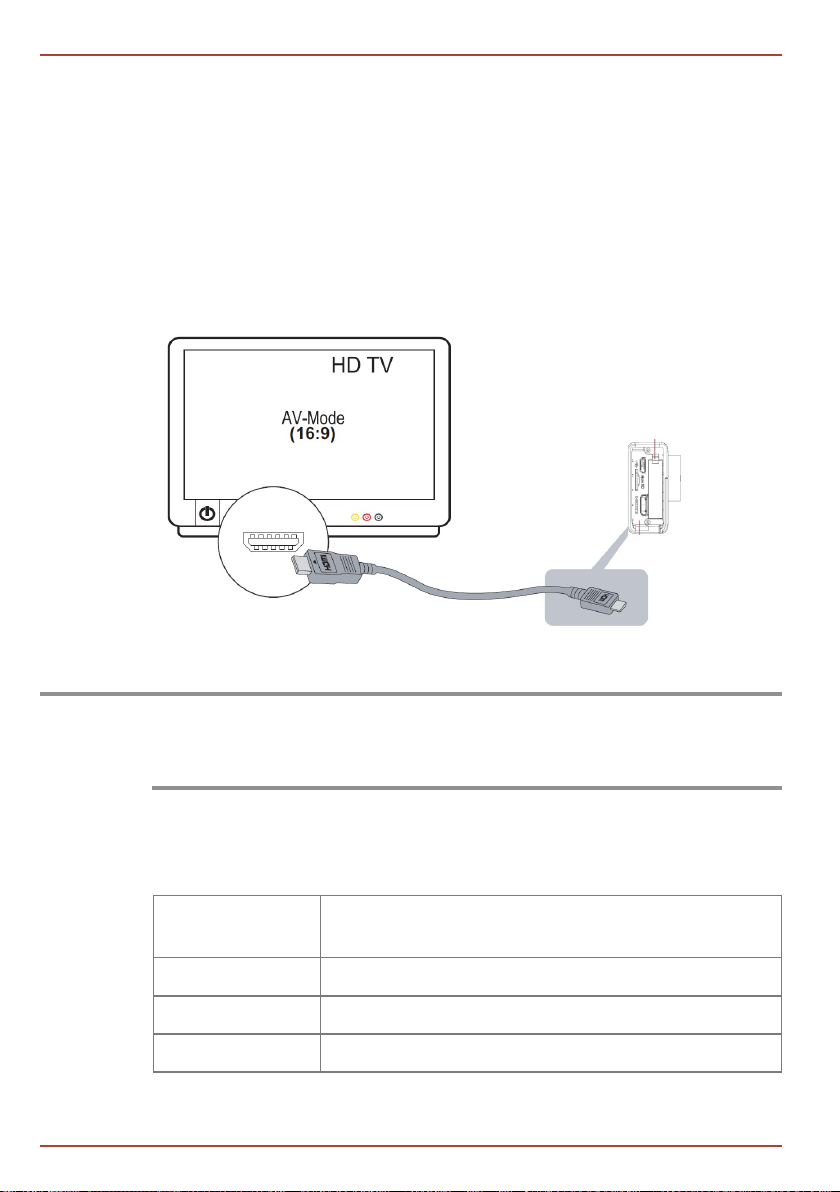
Viewing Photos or Videos on TV
Connecting to a high-denition 16:9 (wide) TV
To view images or videos from your camcorder on an TV:
1. Connect the mini-HDMI® cable (sold separately) to your camcorder’s miniHDMI® Out port.
2. Connect the other end of the cable to an HDTV.
3. Set the video input source of your HDTV to HDMI®.
4. The steps for viewing stored photos and videos on a TV are the same
steps used for viewing them on the LCD screen.
(Sample Illustration) Connecting a high-denition TV
NOTE
Please note that while your camcorder is connected to your TV or an LCD screen via
HDMI, WiFi is automatically turned off to ensure high resolution viewing of your stored
photos and videos. The conguration of WiFi will automatically be restored once the
HDMI connection is removed.
Specications
Part number CAMILEO X-SPORTS: PA5150 series
Image sensor 12MP (megapixels) CMOS sensor
Operation modes Record video, capture photo
Lens Fixed Focus (F 2.97)
EN-30
Remote Controller: RC-A10
User’s Manual
 Loading...