

Page 1
GMAA00217011.book Page 1 Friday, March 26, 2010 10:53 AM
CAMILEO S20
Quick Start Guide
English/Español
Page 2
GMAA00217011.book Page 2 Friday, March 26, 2010 10:53 AM
2
Introduction
Introduction
For more detailed information please refer to the User's Guide on the
included CD.
Safety instructions
1 Do not drop, puncture or disassemble the camcorder; otherwise the
warranty will be voided.
2 Avoid all contact with water, and dry hands before using.
3 Do not expose the camcorder to high temperature or leave it in direct
sunlight. Doing so may damage the camcorder.
4 Use the camcorder with care. Avoid pressing hard on the camcorder
body.
5 For your own safety, avoid using the camcorder when there is a storm
or lightning.
6 Do not use batteries of different specifications. Doing so may lead to
the potential for serious damage.
7 Remove the battery during long periods between usages, as a
deteriorated battery may affect the functionality of the camcorder.
8 Remove the battery if it shows signs of leaking or distortion.
9 Use only the accessories supplied by the manufacturer.
10 Keep the camcorder out of the reach of infants.
11 Risk of explosion if battery is replaced by an incorrect type.
12 Dispose of used batteries according to the instructions.
About the battery pack
❖ Use only batteries recommended by TOSHIBA as replacements. The
battery pack is lithium ion batteries, which can explode if not
replaced, used, handled or disposed of properly. Dispose of the
battery as required by local ordinances or regulations.
❖ Charge the battery pack only in an ambient temperature between 5
and 35 degrees Celsius. Otherwise, the electrolyte solution might
leak, battery pack performance might deteriorate and the battery life
might be shortened.
❖ Never install or remove the battery pack without first turning off the
power and disconnecting the AC adaptor.
❖ Only use the supplied AC adaptor or USB cable, or an optional
Toshiba battery charger to charge the battery pack. Never attempt to
charge the battery pack with any other charger.
Page 3
GMAA00217011.book Page 3 Friday, March 26, 2010 10:53 AM
Safety instructions
Handling the cord on this product will expose you to lead, a chemical
known to the State of California to cause birth defects or other
reproductive harm. Wash hands after handling.
Regulatory Information
TOSHIBA declares that this product conforms to the following Standards:
FCC Conditions
This equipment has been tested and found to comply with Part
15 of the FCC Rules.
Operation is subject to the following two conditions:
(1) This device may not cause harmful interference.
(2) This device must accept any interference received.
Including interference that may cause undesired operation.
Contact
Address: TOSHIBA America Information Systems, Inc.
9740 Irvine Boulevard
Irvine, California 92618-1697
Telephone: (949) 583-3000
Trademarks
Adobe and Photoshop are either registered trademarks or trademarks of
Adobe Systems Incorporated in the United States and/or other countries.
ArcSoft, MediaImpression, and MediaConverter are registered trademarks
of ArcSoft, Inc.
HDMI, the HDMI Logo and High-Definition Multimedia Interface are
trademarks or registered trademarks of HDMI Licensing, LLC.
Secure Digital and SD are trademarks of SD Card Association.
YouTube and the YouTube logo are registered trademarks of Google, Inc.
All other brand and product names are trademarks or registered
trademarks of their respective companies.
3
Page 4
GMAA00217011.book Page 4 Friday, March 26, 2010 10:53 AM
4
Getting Started
Getting Started
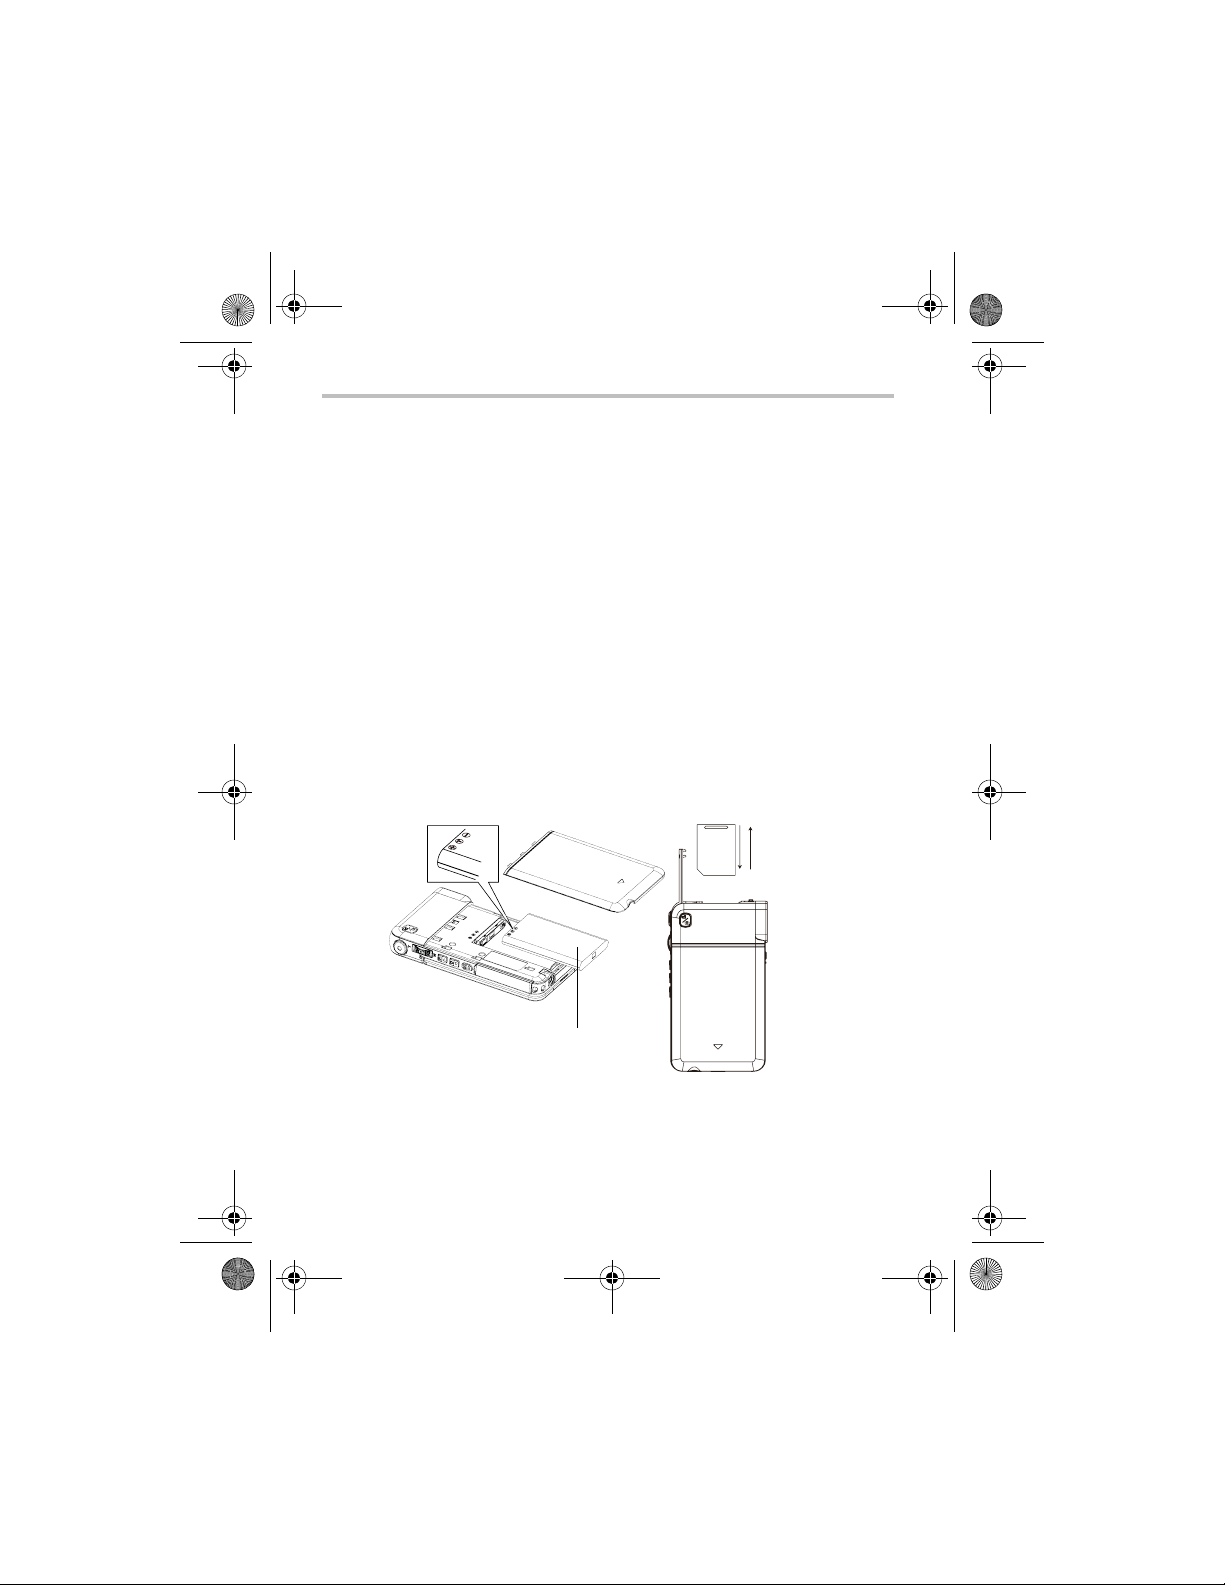
The battery comes pre-installed in the camcorder, however you must
remove the protective film on the battery before use.
To properly connect the battery:
1 Slide the back battery cover off.
2 Remove the battery.
3 Pull the film off.
4 Reinsert the battery, making sure it is lined-up with the correct
polarity marks.
5 Close the battery cover.
To insert the SD™ Card (optional):
1 Flip open the SD™ Card cover.
2 Insert the SD™ Card into the slot until it locks in place.
3 Once inserted, close the SD™ Card cover.
To remove the
SD™ Card, press
inward to release
it. When the card
pops out, grasp
it and pull it
straight out.
Li-ion battery
Page 5
GMAA00217011.book Page 5 Friday, March 26, 2010 10:53 AM
Getting Started
Charge your battery
You must use the supplied AC adaptor or the USB cable to charge your
camcorder before use. Turn off the camcorder. A blinking light will
indicate active charging and a solid light will indicate that charging is
complete. In AC charging mode, the light will turn off automatically after
5 minutes.
5
Page 6
GMAA00217011.book Page 6 Friday, March 26, 2010 10:53 AM
6
Quick Tour
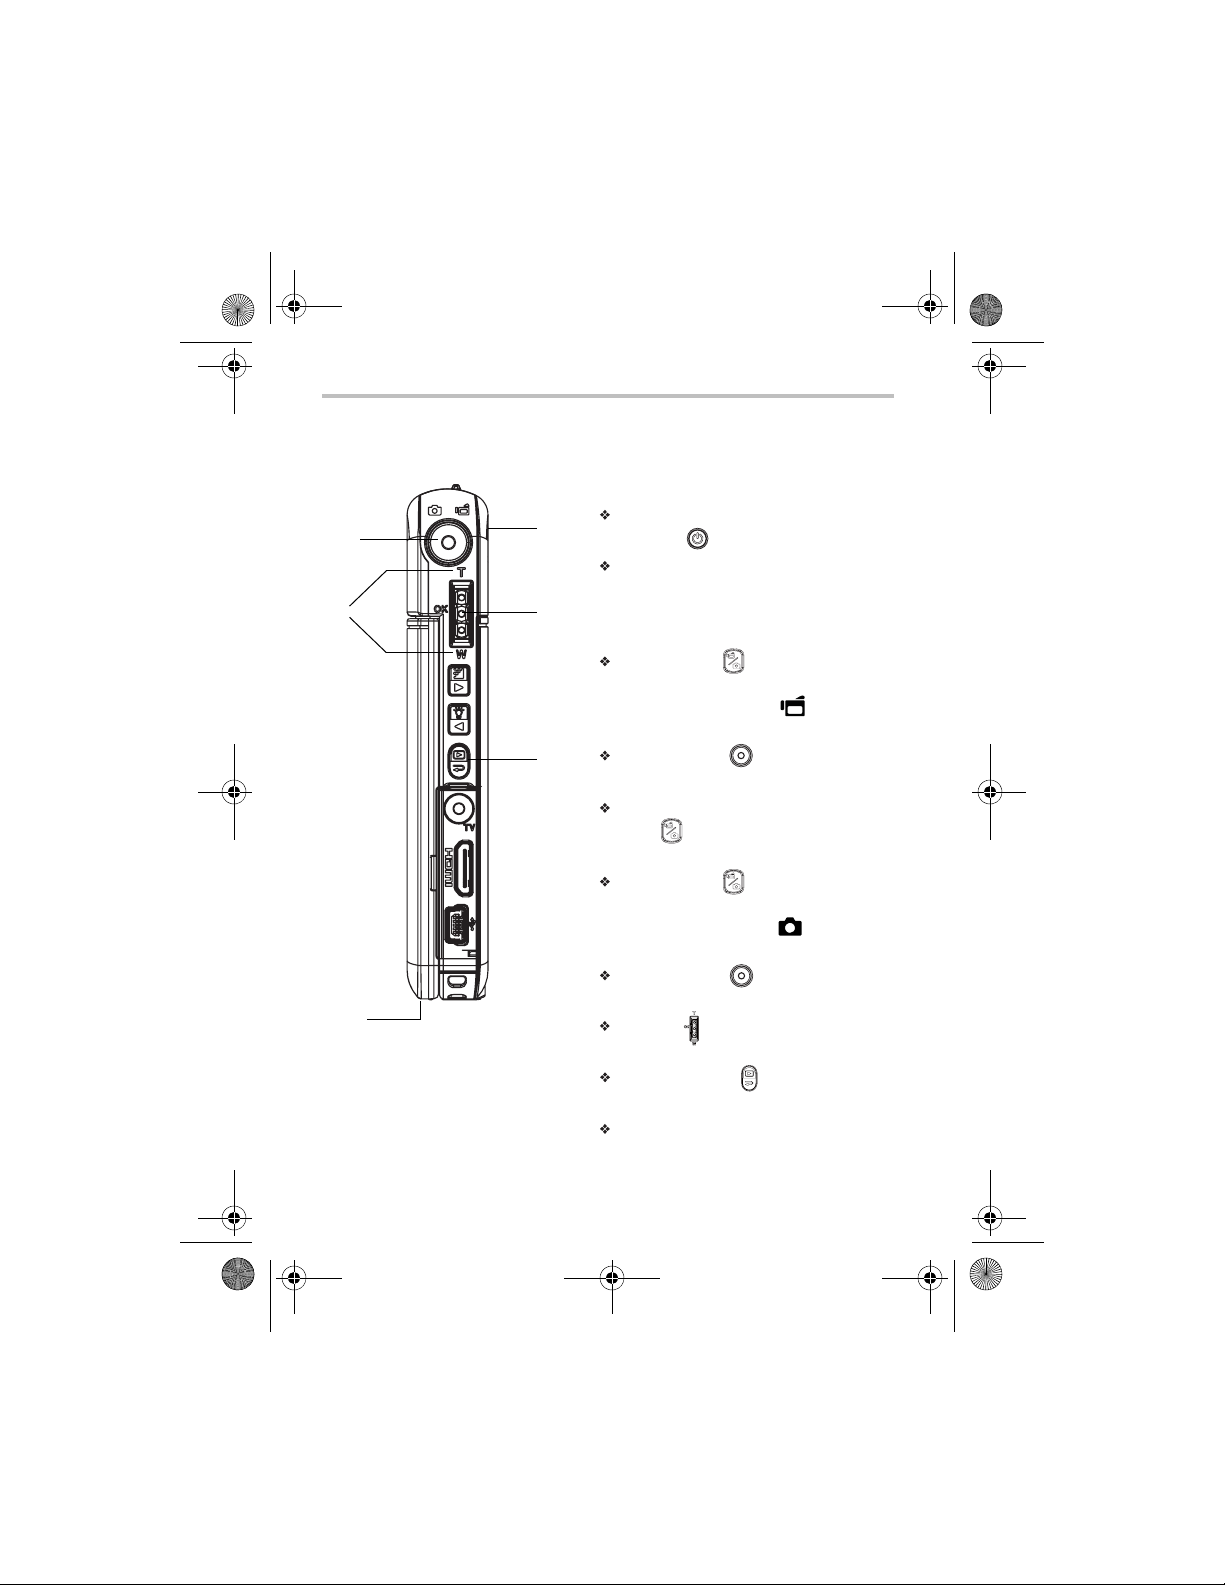
Quick Tour
2 4
5
1
For more detailed operational
instructions, please refer to
the User’s Guide, chapters
3 & 4 on the supplied CD.
Record and Play
1 Flip to power on
3
7
Flip out the LCD screen or hold
the Power (......) button for one second.
To conserve battery power, the
camcorder will turn off automatically
after 3 minutes of non-operation.
2 To start or stop recording
Press the Mode (......) button to switch
to Movie Record mode.
NOTE: The Movie Record (......)
indicator light will glow.
6
Press the Record (......) button.
3 Dual record
When recording a movie, press the
Mode (......) button to capture a still image.
4 To take pictures
Press the Mode (......) button to switch
to Picture Record mode.
NOTE: The Picture mode (......)
indicator light will glow.
Press the Record (......) button.
5 To zoom in and out
Press T/W
6 To review movies/pictures
Press the Playback (....) button.
7 To operate more advanced options
Press the OK button to access the
options menu.
Page 7
GMAA00217011.book Page 7 Friday, March 26, 2010 10:53 AM
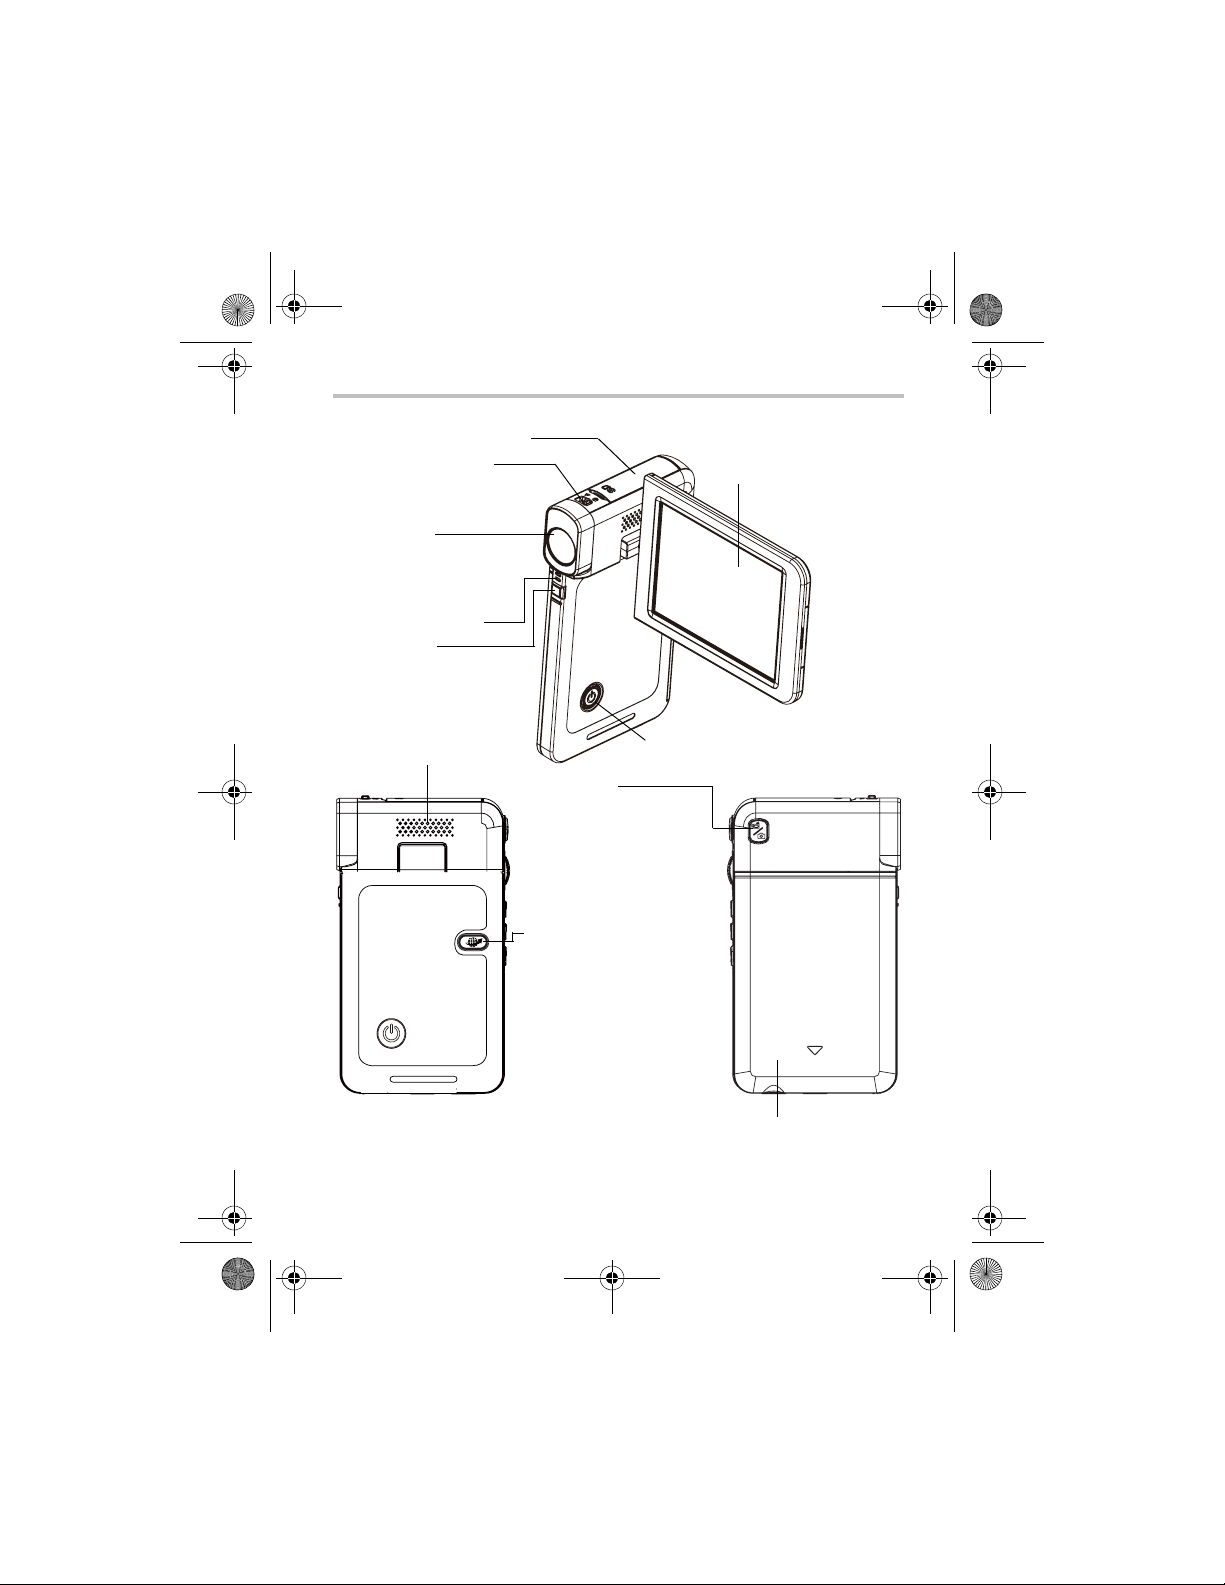
SD™ Card cover
Macro switch
Switch between Macro mode
and Normal mode.
Lens
NOTE: Remove the
protective film from
the lens before use.
Microphone
Light
Speaker
Mode button
When recording movies, press
to capture the image. Switch
between Movie mode and
Picture mode or switch between
Movie Preview Screen and
Picture Preview Screen.
Pre-Record/YouTube™
Direct button
In Record mode, press to activate
the Pre-Record function and the
movie will be recorded 3 seconds
before the Record button is pressed.
In Movie Playback mode, press to
select current movies to upload
to YouTube™.
When the camera is connected to
the computer, press to launch the
YouTube™ Direct application automatically.
Front/Side
LCD screen
Power button
Quick Tour
Battery cover
7
Page 8
e
GMAA00217011.book Page 8 Friday, March 26, 2010 10:53 AM
8
Quick Tour
Picture mode indicator light
Record button
In Movie Record mode, press to
record a movie, press again to stop.
In Picture Record mode, press to take
pictures. During playback, press to view
the movie/picture or play/pause the
movie. In Picture Playback mode, press
to start/stop the slideshow.
Left button
Digital Light ON/OFF. In Record
mode, press to return to the main
menu. During playback, move to the
previous movie/picture or Fast
Rewind a movie.
Playback button
Switch between Record/Playback mode.
For quick review, press after recording.
Mini USB 2.0 port
Strap hook
Rear/Underside
Movie mode indicator light
Tele (Up) button
Move between the option items,
Zoom in, and Volume increase.
OK button
Menu ON or Validate the setting.
During playback, press to delete
movie/picture.
Wide (Down) button
Move between the option items,
Zoom out and Volume decrease.
Right button
Resolution switch (FHD (1080p30)/
WVGA 60) (High (16 MP)/Standard
5 MP). In Record menu, press to
switch to the submenu. During
playback, go to the next movie/pictur
Fast Forward movies.
TV port
HDMI™ port
Tripod socket
Page 9
GMAA00217011.book Page 9 Friday, March 26, 2010 10:53 AM
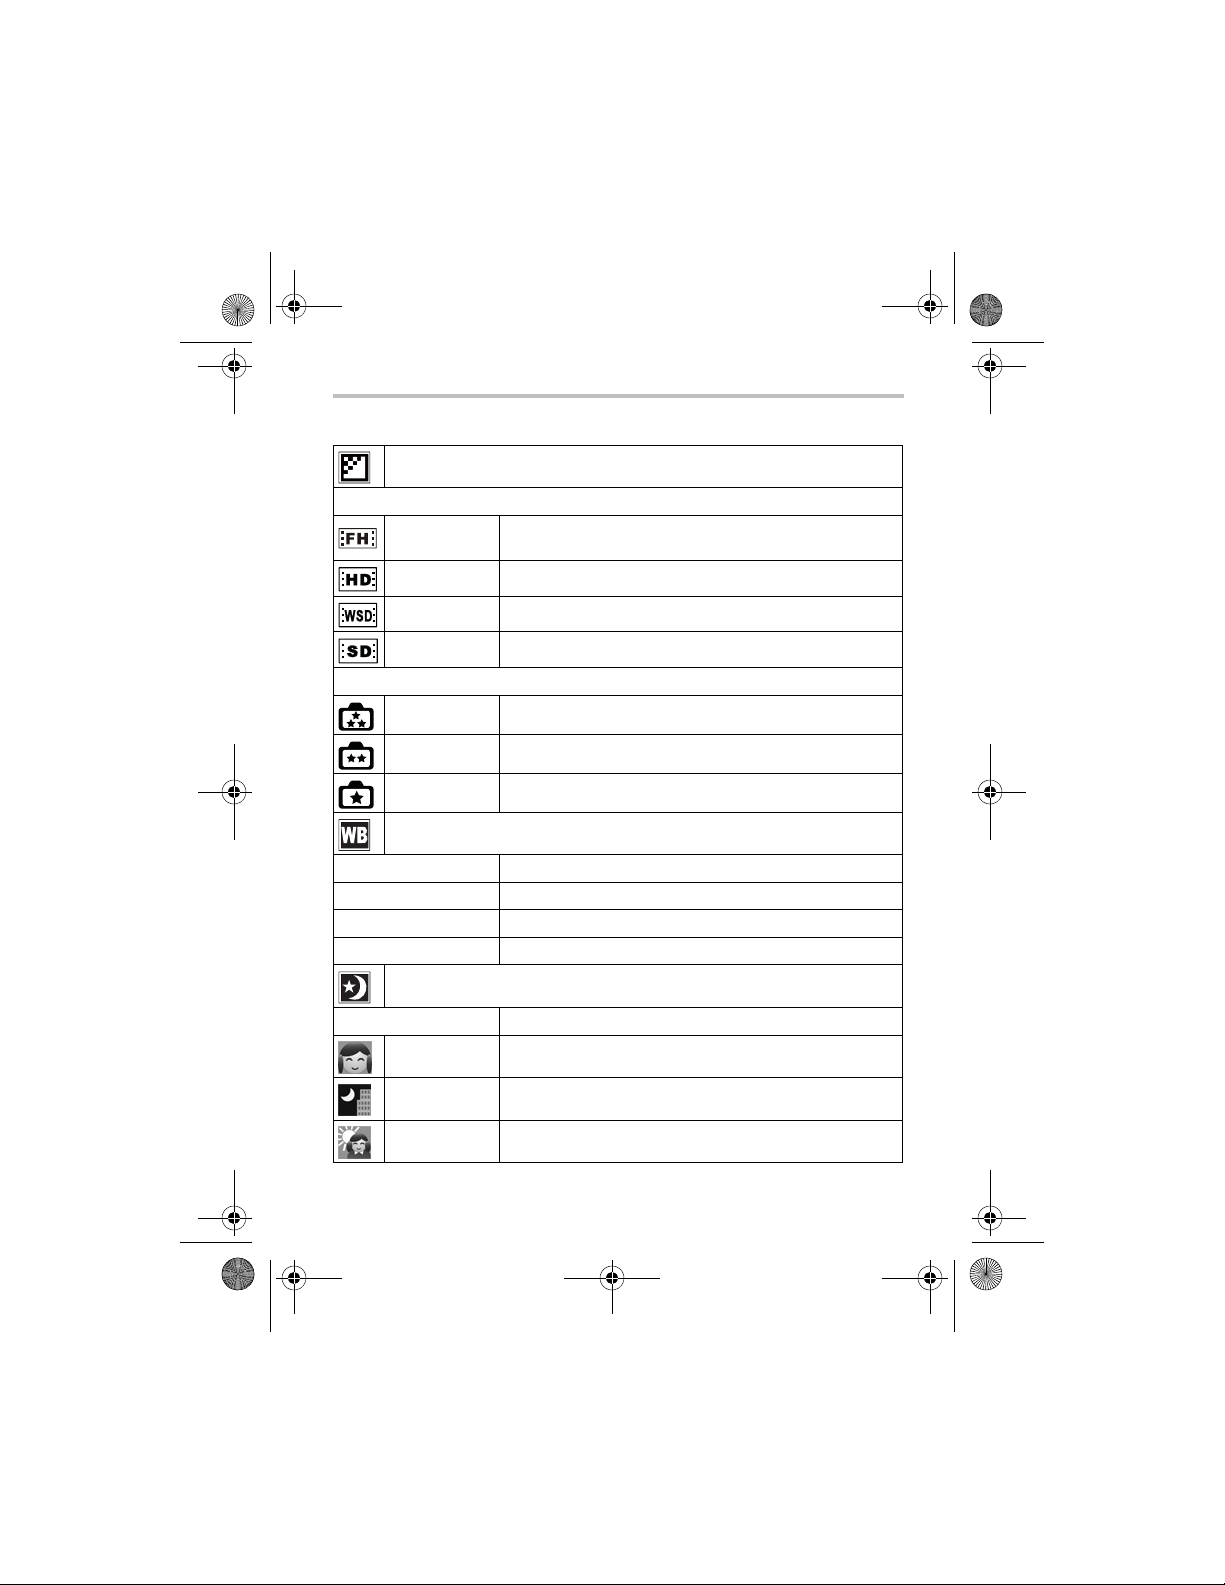
Menu options
Resolution
Movie Resolution
FHD (1080p 30) 1920 x 1080p (30fps)
HD (720p 30) 1280 x 720p (30fps)
WVGA 60 848 x 480 (60fps)
VGA (4:3) 640 x 480
Picture resolution
High (16 MP) 4608 x 3456 (16 M pixels)
Standard (5 MP) 2592 x 1944 (5 M pixels)
Low (3 MP) 2048 x 1536 (3 M pixels)
White Balance
Auto Automatic adjustment
Daylight Use under outside lighting conditions
Fluorescent Use under fluorescent lighting conditions
Tungsten Use under tungsten lighting conditions
Quick Tour
9
Scene
Auto Shoot with no special effect on the image
Skin Makes skin tones appear more natural
Night Use Night mode for night scenes or low light conditions
Backlight Take pictures when bright light is behind the subject
Page 10

GMAA00217011.book Page 10 Friday, March 26, 2010 10:53 AM
10
Quick Tour
Black and white The image is converted to black and white
Classic The image is converted to sepia
Negative The image is converted as the negative of the original
Effect
Movie effect
Stabilization
ON
OFF Disables motion stabilization
ON
Motion Detect
OFF Disables Motion detection
ON
Slow Motion
OFF Disables Slow motion
1 second
3 seconds
Time lapse
5 seconds
OFF Disables Time lapse
Picture Effect
ON
Self-Timer
OFF Disables Self-timer
Enables motion stabilization, giving you smooth,
stable video. Stabilization doesn’t apply on FHD
(1080p 30) and WVGA 60.
Record movies while detecting the movement of
objects.
Record videos with slow motion effect. When the
video is played, the playback time will be longer
than the actual recording time.
Record one frame per second
Record one frame every 3 seconds
Record one frame every 5 seconds
Activates 10-second-delayed Self-timer
Page 11

GMAA00217011.book Page 11 Friday, March 26, 2010 10:53 AM
ISO
Setting
Sound
TV
Language
Format
Time Setting
Default Setting
Quick Tour
Auto
The camcorder adjusts the ISO sensitivity of its
images automatically.
800 The larger the number, the higher the ISO
sensitivity is set to. Select a small number to
shoot a smoother image. Select a large number
1600
to shoot an image in a dark location or to shoot a
subject moving at high speed. Note: The image
may become grainy when the number is large.
ON Enables operation sound
OFF Disables operation sound
NTSC (60 Hz) TV output setting is NTSC standard
PAL (50 Hz) TV output setting is PAL standard
English, Czech, Danish, Dutch, Finnish, French, German, Greek,
Italian, Norwegian, Polish, Portuguese, Russian, Swedish, Spanish,
Tur k is h
Yes Format memory/card
No Do not format memory/card
Set up Date and Time
Yes Restore default factory setting
No Do not restore default factory setting
11
Page 12

GMAA00217011.book Page 12 Friday, March 26, 2010 10:53 AM
12
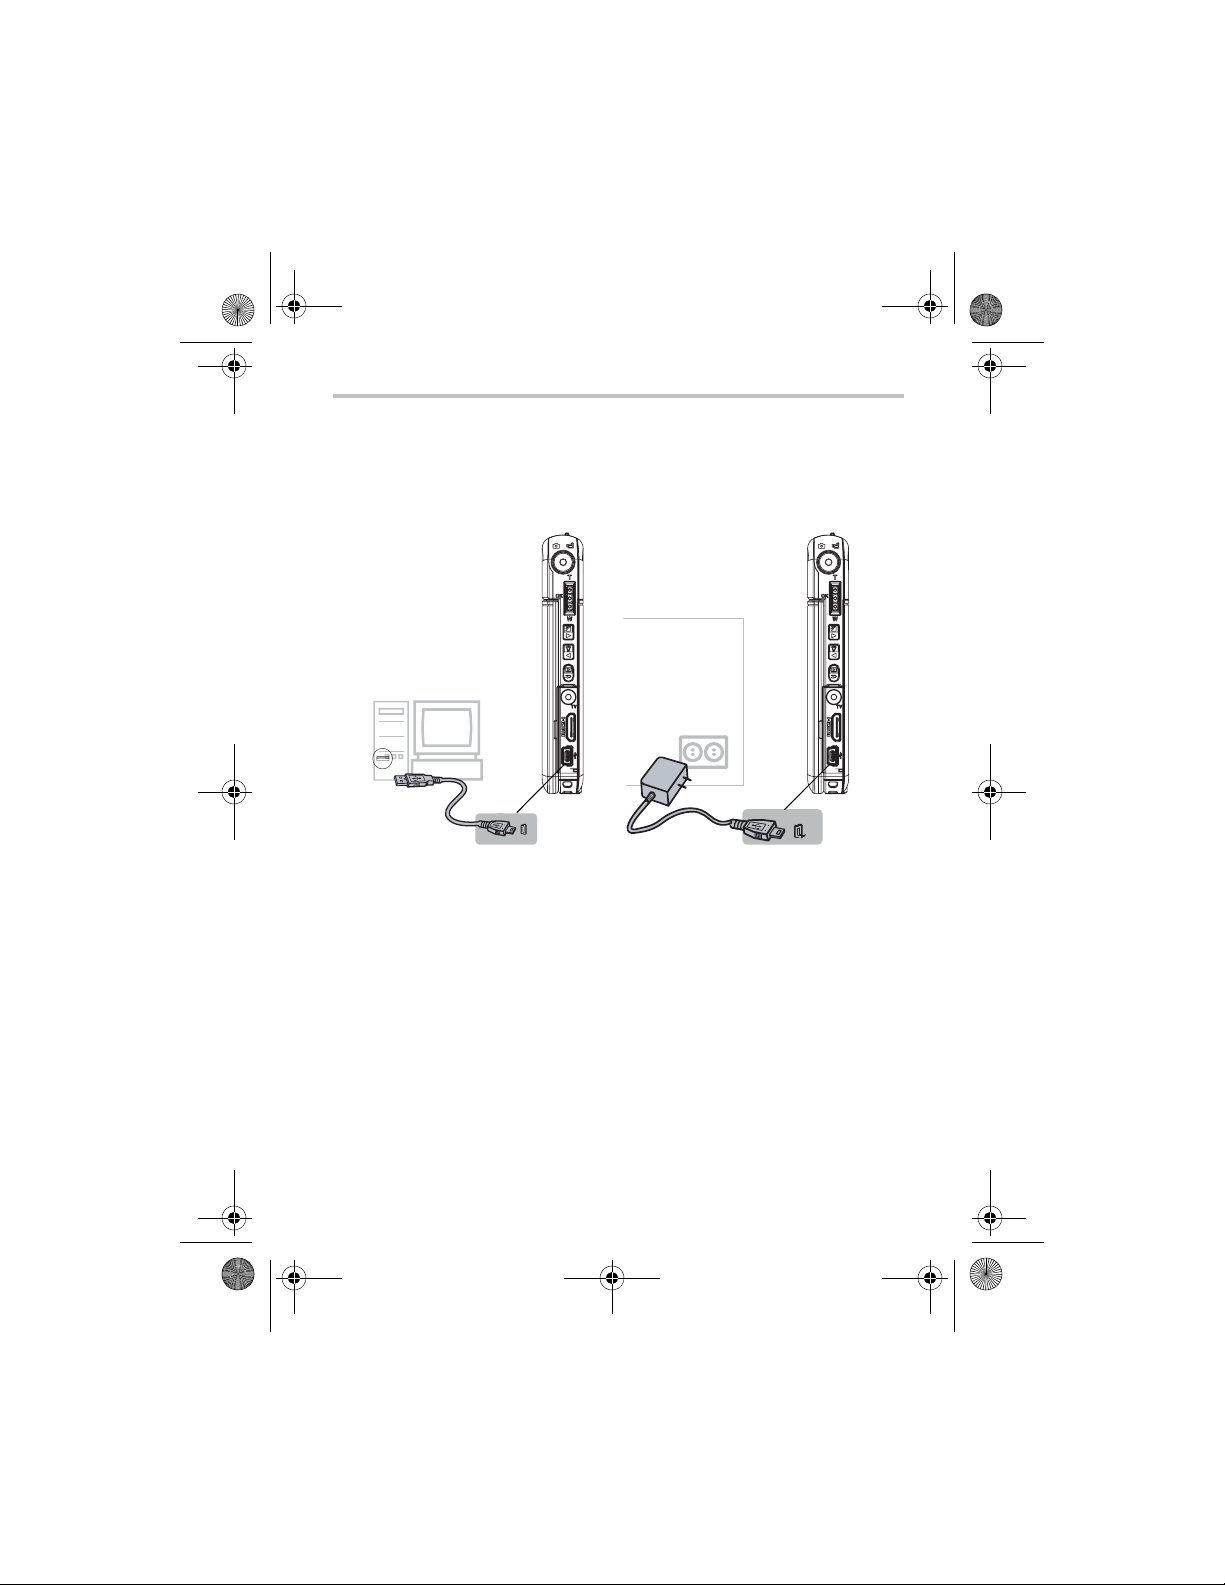
Plug and share
Plug and share
Install the bundled software application, ArcSoft MediaImpression®, for
optimal video playback on your computer.
Connect the computer and camcorder with the supplied mini USB 2.0
cable as shown.
Movies and pictures can be found on your computer at My
Computer\Removable Disk\DCIM\100MEDIA. In this folder, you can
view, delete, move, or copy the desired recorded movies and pictures.
To upload video files to YouTube™:
You can also share recorded movies on the YouTube™ Web site via the
built-in YouTube™ Direct application, which offers you an easy way to
upload your video clips to YouTube™ instantly. For more detailed
instructions, refer to the User’s Guide, chapter 9 on the supplied CD.
To install the bundled Software:
1 Insert the supplied CD into your computer’s CD-ROM drive.
2 The autorun screen appears. Then, click on [Install Application
Software]. Follow the on-screen instructions to complete the
installation.
❖ ArcSoft MediaImpression®—a user-friendly application that helps
in the management of your media; burns a video to DVD, and
uploads videos to YouTube™ easily.
❖ ArcSoft MediaConverter®—a powerful application that can convert
multiple video formats into one format that is compatible with your
camcorder.
Page 13

GMAA00217011.book Page 13 Friday, March 26, 2010 10:53 AM
Toshiba Support
Toshiba Support
If you require help or are having problems operating your product, you
may need to contact Toshiba for additional technical assistance.
Before you call
Since some problems may be related to software, it is important that you
investigate other sources of assistance first. Try the following before
contacting Toshiba:
❖ Review the User’s Guide supplied with your product.
❖ If a problem occurs when you are running software applications,
consult the software documentation for troubleshooting suggestions.
Contact the software company’s technical support department for
assistance.
❖ Consult the reseller or dealer from whom you purchased your
product. They are your best resource for current information and
support.
Contacting Toshiba
Toshiba’s technical support Web site
For technical support, or to stay current on the most recent software and
hardware options for your CAMILEO product and for other product
information, be sure to regularly check the Toshiba Web site at
www.pcsupport.toshiba.com.
Toshiba voice contact
For technical support, call the Toshiba Customer Support Center:
Within the United States at (888) 592-0944
Outside the United States at (949) 583-3305
13
This product comes with a One (1) Year Standard Limited Warranty.
The One (1) Year Standard Limited Warranty for Toshiba Computer
Accessories can be found online at www.warranty.toshiba.com.
Page 14

GMAA00217011.book Page 14 Friday, March 26, 2010 10:53 AM
Page 15

GMAA00217011.book Page 1 Friday, March 26, 2010 11:00 AM
CAMILEO S20
Guía de inicio rápido
Page 16

GMAA00217011.book Page 2 Friday, March 26, 2010 11:00 AM
2
Introducción
Introducción
Para obtener información detallada consulte el Manual del usuario en el
CD que se incluye.
Instrucciones de seguridad
1 No deje caer la videocámara ni la perfore o desarme, de lo contrario
se anula la garantía.
2 Evite el contacto con el agua y séquese las manos antes de usar la
videocámara.
3 No exponga la videocámara a temperaturas elevadas ni la deje en
contacto directo con la luz del sol ya que la videocámara podría
averiarse.
4 Use la videocámara con cuidado. No presione el cuerpo de la
videocámara con fuerza.
5 Para su seguridad personal, no utilice la videocámara durante una
tormenta ni cuando relampaguea.
6 No utilice baterías de especificaciones diferentes, ya que se podrían
causar daños graves.
7 Extraiga la batería cuando no esté utilizando la videocámara durante
un período prolongado, ya que una batería deteriorada puede afectar
el funcionamiento de la videocámara.
8 Extraiga la batería si da muestras de que tiene una fuga o una
deformación.
9 Utilice solamente los accesorios suministrados por el fabricante.
10 Mantenga la videocámara fuera del alcance de los niños.
11 Se corre el riesgo de una explosión cuando se reemplaza la batería
con una de tipo incorrecto.
12 Elimine las baterías usadas de acuerdo con las instrucciones.
Información sobre la batería
❖ Utilice solamente las baterías recomendadas por TOSHIBA como
repuestos. La batería es de iones de litio y puede explotar si no se
reemplaza, utiliza, manipula o elimina en forma correcta. Deseche la
batería según lo requieran la legislación y los reglamentos locales.
❖ Cargue la batería a temperatura ambiente entre 5 y 35 grados
centígrados. De lo contrario, es posible que se fugue la solución
electrolítica, que disminuya el rendimiento de la batería y se acorte
su duración.
❖ Nunca instale o extraiga la batería sin antes apagar la alimentación y
desconectar el adaptador de CA.
Page 17

GMAA00217011.book Page 3 Friday, March 26, 2010 11:00 AM
Instrucciones de seguridad
❖ Para cargar la batería utilice solamente el adaptador de CA o el cable
USB suministrado o un cargador de baterías Toshiba opcional. Nunca
trate de cargar la batería con cualquier otro tipo de cargador.
A D V E R T E N C I A
Al tocar el cable de este producto las personas se exponen al plomo,
una sustancia química que el estado de California sabe que ocasiona
anomalías congénitas u otros daños a la reproducción. Lávese las
manos después de tocar el cable.
Información reglamentaria
TOSHIBA declara que este producto cumple con las siguientes normas:
Requisitos de la FCC
Este equipo se probó y se comprobó que cumple con la
sección 15 de las normativas de la FCC.
Su funcionamiento está sujeto a las siguientes dos condiciones:
(1) Este dispositivo no debe causar interferencias perjudiciales.
(2) Este dispositivo debe aceptar cualquier interferencia,
incluidas aquellas que puedan comprometer su
funcionamiento.
Contacto
Dirección: TOSHIBA America Information Systems, Inc.
9740 Irvine Boulevard
Teléfono: (949) 583-3000
Irvine, California 92618-1697
3
Marcas comerciales
Adobe y Photoshop son marcas registradas o marcas comerciales de
Adobe Systems Incorporated en Estados Unidos y/u otros países.
ArcSoft, MediaImpression, y MediaConverter son marcas registradas de
ArcSoft, Inc.
HDMI, el logotipo de HDMI y High-Definition Multimedia Interface son
marcas comerciales o marcas registradas de HDMI Licensing, LLC.
Secure Digital y SD son marcas comerciales de la SD Card Association.
YouTube y el logotipo de YouTube son marcas registradas de Google, Inc.
Todos los demás nombres de marcas y productos son marcas comerciales
o marcas registradas de sus respectivas compañías.
Page 18

GMAA00217011.book Page 4 Friday, March 26, 2010 11:00 AM
4
Para comenzar
Para comenzar
La batería ya viene instalada en la videocámara, sin embargo, debe retirar
la película protectora de la batería antes de usarla.
Para conectar correctamente la batería:
1 Abra la cubierta de la batería deslizándola.
2 Saque la batería.
3 Retire la película.
4 Inserte de nuevo la batería asegurándose de que esté alineada con las
marcas de polaridad correctas.
5 Cierre la cubierta de la batería.
Para insetar una tarjeta SD™ (opcional):
1 Abra la cubierta de la tarjeta SD™.
2 Inserte la tarjeta SD™ en la ranura hasta que encaje en su lugar.
3 Una vez insertada la tarjeta cierre la cubierta.
Para extraer la
tarjeta SD™,
presiónela
hacia adentro
para liberarla.
Cuando la
tarjeta se
asome, tome la
tarjeta y
Batería de ion-litio
extráigala.
Page 19

GMAA00217011.book Page 5 Friday, March 26, 2010 11:00 AM
Para comenzar
Carga de la batería
Antes de utilizar la videocámara debe cargar la batería usando el
adaptador de CA o el cable USB que se suministran. Apague la
videocámara. Una luz intermitente indica que se está cargando la batería y
una luz sólida indica que se completó la carga. Cuando se utiliza el modo
de carga con CA, la luz se apaga automáticamente después de 5 minutos.
5
Page 20

GMAA00217011.book Page 6 Friday, March 26, 2010 11:00 AM
6
Referencia rápida
Referencia rápida
2 4
5
1
Para obtener instrucciones
más detalladas sobre el
manejo de la videocámara,
consulte los capítulos 3 y 4
del Manual del usuario en el
CD suministrado.
Grabar y reproducir
1 Abrir la pantalla para encender la
videocámara
Abra la pantalla LCD o mantenga presionado el
3
botón de encendido ( ) durante un segundo.
Para conservar energía de la batería la
videocámara se apaga automáticamente
después de 3 minutos de inactividad.
7
2 Para iniciar o detener una grabación
Presione el botón Modo ( ) para cambiar al
modo Grabar películas. NOTA: La luz indicadora
del modo Grabar películas ( ) se ilumina.
Presione el botón Grabar ( ).
3 Grabación Dual
6
Mientras esté grabando una película, presione
el botón Modo ( ) para capturar una
fotografía.
4 Para tomar fotografías
Presione el botón Modo ( ) para cambiar al
modo Fotografía. NOTA: La luz indicadora del
modo Fotografía ( ) se ilumina.
Presione el botón Grabar ( ).
5 Para efectuar acercamiento y
alejamientos
Presione T/W .
6 Para revisar películas/fotografías
Presione el botón Reproducir ( ).
7 Para hacer uso de opciones más
avanzadas
Presione el botón OK (Aceptar) para acceder al
menú de opciones.
Page 21

GMAA00217011.book Page 7 Friday, March 26, 2010 11:00 AM
Lado frontal/lateral
Cubierta de la tarjeta SD™
Interruptor macro
Para alternar entre el
modo Macro y el
modo Normal.
Lente
NOTA: Retire la
película protectora del
lente antes de usarlo.
Micrófono
Luz
Parlante
Botón Modo
Cuando esté grabando una película,
presione este botón para capturar una
fotografía. Utilícelo también para
alternar entre el modo Película y el
modo Fotografía, o para alternar entre
la pantalla de Vista previa de
películas y la de Vista previa de
fotografías.
Botón Pregrabar/YouTube™
Direct
En el modo Grabar, presione este
botón para activar la función de
pregrabado y las películas se
empiezan a grabar 3 segundos
antes de que se presione el botón
Grabar. En el modo Reproducir
películas, presione este botón para
seleccionar la película que desee
subir a YouTube™. Cuando la
cámara está conectada a la
computadora, presione este botón
para ejecutar la aplicación YouTube™
Direct automáticamente.
Referencia rápida
Pantalla LCD
Botón de encendido
Cubierta de la batería
7
Page 22

GMAA00217011.book Page 8 Friday, March 26, 2010 11:00 AM
8
Referencia rápida
Lados Posterior/Inferior
Luz indicadora del modo Fotografía
Botón Grabar
En el modo Grabar películas, presione
este botón para grabar una película.
Presiónelo de nuevo para detener la
grabación. En el modo Grabar
fotografías, presione este botón para
tomar fotografías. Durante la
reproducción, presione este botón
para ver la película/fotografía o para
reproducir/pausar la película. En el
modo Reproducir fotografías, presione
este botón para iniciar/detener la
presentación gráfica.
Botón Izquierda
Luz digital encendida/apagada. En el
modo Grabar, presione este botón para
regresar el menú principal. Durante la
reproducción, presione este botón
para desplazarse a la
película/fotografía previa o para
rebobinar rápidamente una película.
Botón Reproducir
Para alternar entre el modo Grabar y el
modo Reproducir.
Para una revisión rápida presione este
botón después de la grabación.
Mini puerto USB 2.0
Gancho para la correa
Luz indicadora del modo
Película
Botón Tele (Arriba)
Para moverse entre las opciones,
efectuar acercamientos y aumentar
el volumen.
Botón OK (Aceptar)
Menú ACTIVADO o para validar
una configuración. Durante la
reproducción, presione este
botón para eliminar una
película/fotografía.
Botón Gran angular (W) (botón
Abajo)
Para moverse entre las opciones,
efectuar alejamientos y disminuir el
volumen.
Botón Derecha
Interruptor de resolución (FHD
(1080p/30fps)/WVGA 60) (Alta (16
MP)/Estándar (5MP). En el menú
Grabar, presione este botón para
cambiar al submenú. Durante la
reproducción presione este botón
para ir a la siguiente
película/fotografía. Avance rápido
de películas.
Puerto TV
Puerto HDMI
™
Ranura para el trípode
Page 23

GMAA00217011.book Page 9 Friday, March 26, 2010 11:00 AM
Referencia rápida
Opciones del menú
Resolución
Resolución de películas
FHD (1080p 30) 1920 x 1080p (30fps)
HD (720p 30) 1280 x 720p (30fps)
WVGA 60 848 x 480 (60fps)
VGA (4:3) 640 x 480
Resolución de fotografías
Alta (16 MP) 4608 x 3456 (16 megapíxeles)
Estándar (5 MP) 2592 x 1944 (5 megapíxeles)
Baja (3 MP) 2048 x 1536 (3 megapíxeles)
Balance de blancos
Auto Ajuste automático
Luz de día Utilizar bajo condiciones de luz en exteriores
Fluorescente Utilizar bajo condiciones de luz fluorescente
Tungsteno Utilizar bajo condiciones de luz de tungsteno
9
Escena
Auto Filmar sin utilizar efectos especiales en la imagen
Piel Hace que los tonos de la piel parezcan más naturales
Noche
Contraluz Tomar fotografías cuando hay una luz brillante detrás del sujeto
Utilice el modo Noche para escenas nocturnas o en condiciones de
baja iluminación
Page 24

GMAA00217011.book Page 10 Friday, March 26, 2010 11:00 AM
10
Referencia rápida
Blanco y negro La imagen se convierte a blanco y negro
Clásica Le da una apariencia sepia a la imagen
Negativa La imagen se convierte en una versión negativa del original
Efectos
Efectos para las películas
Habilita la estabilización del movimiento,
Estabilización
ACTIVADA
DESACTIVADA Deshabilita la estabilización del movimiento
ACTIVADO
Detección de movimiento
DESACTIVADO Deshabilita la Detección del movimiento
ACTIVADA
Cámara lenta
DESACTIVADA Deshabilita la cámara lenta
1 segundo
3 segundos
Tiempo de espera
5 segundos
DESACTIVADO Deshabilita el tiempo de espera
Efectos para las fotografías
ACTIVADO
Autotemporizador
DESACTIVADO Deshabilita el autotemporizador
brindándole videos estables y uniformes. La
estabilización no se aplica en la FHD (1080p/
30fps) y la WVGA 60.
Graba películas mientras detecta movimiento en
los objetos.
Graba videos en cámara lenta. Cuando se
reproduce el video, el tiempo de reproducción
será más largo que el tiempo real de grabación.
Grabar un fotograma por segundo
Grabar un fotograma cada 3 segundos
Grabar un fotograma cada 5 segundos
Activa un autotemporizador con una demora de
10 segundos
Page 25

GMAA00217011.book Page 11 Friday, March 26, 2010 11:00 AM
ISO
Configuración
Sonido
TV
Idioma
Formato
Ajuste de la hora
Configuración
predeterminada
Referencia rápida
Auto
La videocámara ajusta la sensibilidad ISO de las
imágenes automáticamente.
800 Al un número más grande corresponde una
sensibilidad ISO más alta. Seleccione un número
menor para filmar una imagen más suave.
Seleccione un número mayor para filmar una
1600
imagen en una ubicación oscura o para filmar un
sujeto que se mueve a alta velocidad. Nota:
Cuando el número es alto la imagen se puede
volver granulosa.
ACTIVADO Habilita el sonido de funcionamiento
DESACTIVADO Deshabilita el sonido de funcionamiento
NTSC (60 Hz) El estándar de salida del TV es NTSC
PAL (50 Hz) El estándar de salida del TV es PAL
Inglés, checo, danés, holandés, finlandés, francés, alemán, griego,
italiano, noruego, polaco, portugués, ruso, sueco, español, turco
Sí Formatear memoria/tarjeta
No No formatear memoria/tarjeta
Fijar fecha y hora
Sí
No
Restaurar la configuración predeterminada en
fábrica
No restaurar la configuración predeterminada de
fábrica
11
Page 26

GMAA00217011.book Page 12 Friday, March 26, 2010 11:00 AM
12
Conectar y compartir
Conectar y compartir
Para una reproducción de video óptima en la computadora, instale el
programa de software ArcSoft MediaImpression® incluido.
Conecte la computadora y la videocámara, con el mini cable USB 2.0 que
se suministra, como se muestra a continuación.
Las películas y fotografías se pueden encontrar en la computadora bajo Mi
PC\Disco extraíble\DCIM\100MEDIA. En esta carpeta puede ver,
eliminar, mover o copiar las películas y fotografías que desee.
Para subir archivos de video a YouTube™:
También puede compartir las películas grabadas en el sitio web
YouTube™ utilizando la aplicación integrada YouTube™ Direct, que
brinda una forma sencilla de subir rápidamente videoclips a YouTube™.
Para obtener instrucciones detalladas, consulte el capítulo 9 del Manual
del usuario que se suministra en el CD.
Para instalar el software incluido:
1 Inserte el CD suministrado en la unidad CD-ROM de la
computadora.
2 Aparece la pantalla de ejecución automática. Haga clic en Instalar
software. Para terminar el proceso de instalación siga las
instrucciones que aparecen en la pantalla.
❖ ArcSoft MediaImpression®—es una aplicación fácil de usar que
ayuda a gestionar medios, graba videos en DVD y transfiere videos a
YouTube™ en forma sencilla.
Page 27

GMAA00217011.book Page 13 Friday, March 26, 2010 11:00 AM
Asistencia técnica de Toshiba
❖ ArcSoft MediaConverter®—es una aplicación potente que puede
convertir numerosos formatos de video a un formato que sea
compatible con su videocámara.
Asistencia técnica de Toshiba
Si necesita ayuda o tiene problemas con el funcionamiento de su producto,
podría ser necesario ponerse en contacto con Toshiba para obtener
asistencia técnica adicional.
Antes de contactar a Toshiba
Puesto que algunos problemas pueden estar relacionados con el software,
es conveniente que recurra primero a otras fuentes de asistencia técnica.
Intente lo siguiente antes de comunicarse con Toshiba:
❖ Consulte el Manual del usuario suministrado con el producto.
❖ Si el problema se produce mientras está ejecutando una aplicación de
software, consulte las sugerencias sobre posibles soluciones de
problemas en la documentación del software. Póngase en contacto
con el personal de asistencia técnica del fabricante del software y
solicite su ayuda.
❖ Consulte al revendedor o al distribuidor a quien le compró el
producto, ya que es su mejor fuente de información actualizada y
asistencia.
Contacto con Toshiba
Sitio web de asistencia técnica de Toshiba
Para obtener asistencia técnica o para mantenerse al día acerca de las
opciones más recientes de software y hardware para su producto
CAMILEO, así como para obtener otro tipo de información sobre otros
productos, asegúrese de visitar periódicamente el sitio web de Toshiba en
pcsupport.toshiba.com.
Contacto telefónico con Toshiba
Si desea solicitar asistencia técnica, llame al Centro de asistencia al cliente
de Toshiba:
Al (888) 592-0944 dentro de Estados Unidos
Al (949) 583-3305 desde fuera de Estados Unidos
13
Este producto viene con una Garantía limitada estándar de un (1) año.
La Garantía limitada estándar de un (1) año para los accesorios de
computadoras Toshiba se puede encontrar en línea en el sitio
www.warranty.toshiba.com.
Page 28

GMAA00217011.book Page 14 Friday, March 26, 2010 11:00 AM
GMAA00217011
03/10
 Loading...