

Page 1

CAMILEO® CLIP User’s Guide
English/Español
GMAA00371010
04/12
Page 2

2
Regulatory Information
FCC Information
Product Name: Camcorder
Model number: CAMILEO® CLIP
FCC notice “Declaration of Conformity Information”
This equipment has been tested and found to comply with the limits for a Class B
digital device, pursuant to part 15 of the FCC rules. These limits are designed to
provide reasonable protection against harmful interference in a residential
installation. This equipment generates, uses and can radiate radio frequency
energy and, if not installed and used in accordance with the instructions, may
cause harmful interference to radio communications. However, there is no
guarantee that interference will not occur in a particular installation. If this
equipment does cause harmful interference to radio or television reception, which
can be determined by turning the equipment off and on, the user is encouraged to
try to correct the interference by one or more of the following measures:
❖ Reorient or relocate the receiving antenna.
❖ Increase the separation between the equipment and receiver.
❖ Connect the equipment into an outlet on a circuit different from that to
which the receiver is connected.
❖ Consult the dealer or an experienced radio/TV technician for help.
Changes or modifications made to this equipment, not expressly approved
by TOSHIBA or parties authorized by TOSHIBA could void the user’s
authority to operate the equipment.
Page 3

3
NOTE
FCC Conditions
This equipment has been tested and found to comply with Part 15 of the FCC
Rules. Operation is subject to the following two conditions:
(1) This device may not cause harmful interference.
(2) This device must accept any interference received. Including interference that
may cause undesired operation.
Contact
Address: TOSHIBA America Information Systems, Inc.
Telephone: (949) 583-3000
9740 Irvine Boulevard
Irvine, California 92618-1697
Safety Instructions
1 Do not drop, puncture or disassemble the camcorder; otherwise the
warranty will be voided.
2 Avoid all contact with water, and dry hands before using.
3 Do not expose the camcorder to high temperature or leave it in direct
sunlight. Doing so may damage the camcorder.
4 Use the camcorder with care. Avoid pressing hard on the camcorder body.
5 For your own safety, avoid using the camcorder when there is a storm or
lightning.
6 Use only the accessories supplied by the manufacturer.
7 Keep the camcorder out of the reach of infants.
The camcorder has a built-in battery, which is not user-accessible.
Page 4
4
NOTE
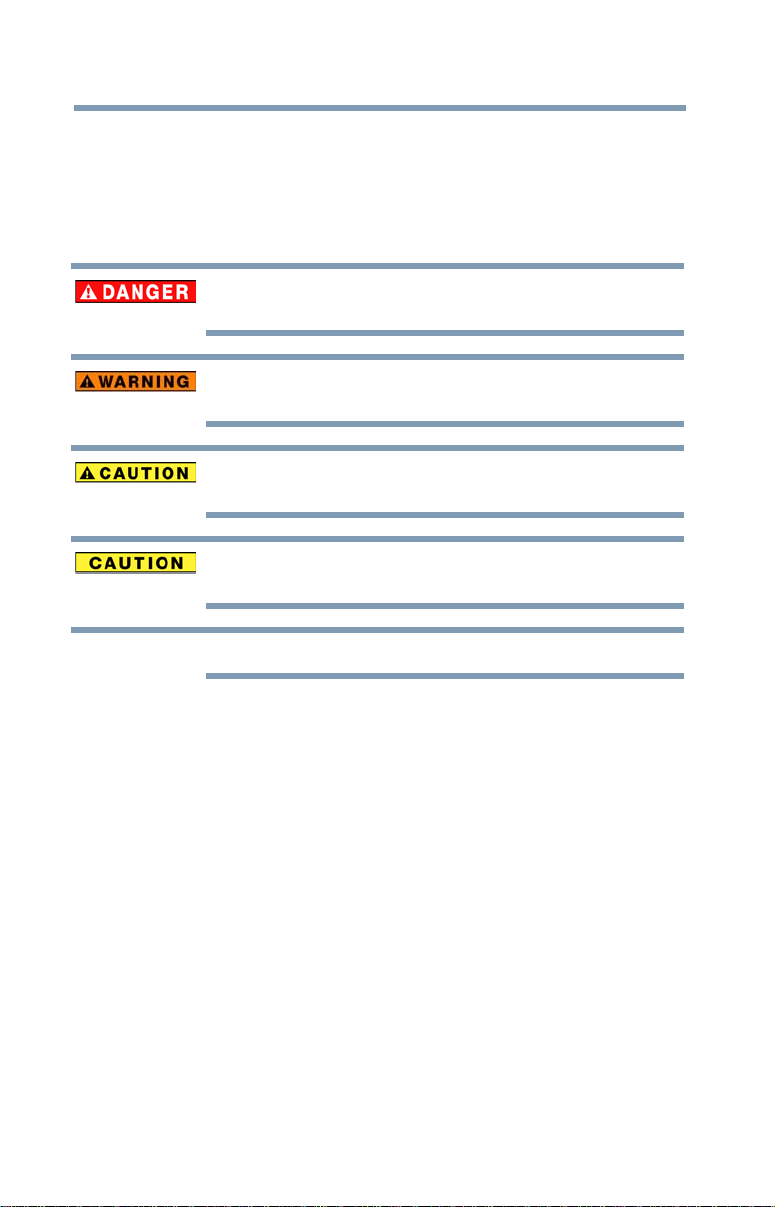
Safety icons
This manual contains safety instructions that must be observed to avoid potential
hazards that could result in personal injuries, damage to your equipment, or loss
of data. These safety cautions have been classified according to the seriousness of
the risk, and icons highlight these instructions as follows:
Indicates an imminently hazardous situation which, if not avoided, will result
in death or serious injury.
Indicates a potentially hazardous situation which, if not avoided, could result
in death or serious injury.
Indicates a potentially hazardous situation which, if not avoided, may result
in minor or moderate injury.
Indicates a potentially hazardous situation which, if not avoided, may result
in property damage.
Provides important information.
Additional Information
© Copyright 2012 TOSHIBA CORPORATION. All rights reserved. TOSHIBA
reserves the right to make technical changes. TOSHIBA assumes no liability for
damages incurred directly or indirectly from errors, omissions or discrepancies
between this product and the documentation.
About the built-in battery
❖ The built-in battery pack is a lithium ion battery, which can
explode if not used properly.
❖ Do not attempt to replace the built-in battery. It is built-in and
not changeable.
❖ Charge the built-in battery only in an ambient temperature
between 41 and 95 degrees Fahrenheit (5 and 35 degrees
Celsius). Otherwise, the electrolyte solution might leak, battery
performance might deteriorate, and the battery life might be
shortened.
Page 5

❖ Charge the battery in accordance with the instructions.
❖ Only use the supplied USB cable or an optional Toshiba
charger to charge the camcorder. Never attempt to charge the
camcorder with any other charger.
Trademarks
CAMILEO is a registered trademark of Toshiba America Information Systems,
Inc. and/or Toshiba Corporation.
Adobe and Adobe Reader are either registered trademarks or trademarks of
Adobe Systems Incorporated in the United States and/or other countries.
ArcSoft, MediaImpression, and MediaConverter are registered trademarks of
ArcSoft, Inc.
Facebook is a registered trademark of Facebook Inc.
HDMI, the HDMI Logo and High-Definition Multimedia Interface are
trademarks or registered trademarks of HDMI Licensing, LLC.
Intel, Intel Core, Celeron, Centrino and Pentium are trademarks or registered
trademarks of Intel Corporation or its subsidiaries in the United States and other
countries.
Mac is a trademark of Apple Inc., registered in the U.S. and other countries.
Microsoft, Windows, and Windows Vista are either registered trademarks or
trademarks of Microsoft Corporation in the United States and/or other countries.
Picasa is a trademark of Google Inc.
Secure Digital and SD are trademarks of SD Card Association.
YouTube and the YouTube logo are registered trademarks of Google, Inc.
All other brand and product names are trademarks or registered trademarks of
their respective companies.
5
Page 6

Contents
Chapter 1: Getting to Know Your Camcorder.............................9
Overview ..................................................................9
Check the components .....................................10
Splash-proof design..........................................11
System requirements........................................11
Front view ........................................................12
Underside view .................................................12
Rear view..........................................................13
Chapter 2: Getting Started......................................................... 15
Charge the Built-in Battery......................................15
Inserting and Removing the Micro SD Card............16
About the Clip .........................................................17
Turning the Camcorder On and Getting Started ......17
Turning on the Camcorder - Standby Mode active..17
Turning the Camcorder Off .....................................18
Menu options..........................................................18
Video Mode Menu.............................................18
Photo Mode Menu ............................................20
6
Page 7

Contents
7
Chapter 3: Preview/Record Mode............................................22
Button Functions.....................................................22
LCD screen information ..........................................23
Video recording ......................................................25
Taking photos .........................................................26
Using Anti-Glare Function.......................................26
Using Digital Zoom .................................................26
Options for Menu....................................................27
Video Mode Menu.............................................27
Photo Mode Menu ............................................28
Video setup.............................................................29
Resolution.........................................................29
Stabilization ......................................................30
Motion detection...............................................30
Face tracking.....................................................31
Slow motion......................................................31
Pre-record.........................................................32
Time lapse ........................................................32
Continuous play................................................33
Photo setup ............................................................34
Resolution.........................................................34
Self-timer..........................................................35
Smile detection .................................................35
Date printing .....................................................36
ISO....................................................................36
Slide show ........................................................37
Settings...................................................................38
Sound ...............................................................38
TV format..........................................................39
Language ..........................................................39
Time..................................................................40
Format ..............................................................40
Restore default..................................................41
Effects.....................................................................42
Scene................................................................43
Filter..................................................................43
Page 8

8
Contents
White balance ...................................................44
Chapter 4: Voice Recording......................................................45
Voice recording.......................................................45
Audio Playback .................................................47
Delete Audio File ...............................................47
Chapter 5: Playback Mode........................................................48
Button functions .....................................................48
LCD screen information ..........................................49
Operations for Playback mode................................50
Video Playback........................................................51
Video Trim ..............................................................51
Photo Playback .......................................................53
Delete File in Playback Mode...................................53
Chapter 6: Viewing Files on the computer............................... 54
Installing bundled software.....................................54
Transferring files to a computer..............................55
Chapter 7: Uploading Files to the Internet................................ 56
CAMILEO® Uploader..............................................56
Set up account information for the web site ...........59
Chapter 8: Webcam Mode........................................................ 60
Chapter 9: Troubleshooting.......................................................61
Chapter 10: Other Information.................................................. 62
Toshiba Support .....................................................62
Before you call ..................................................62
Contacting Toshiba .................................................63
Toshiba’s technical support web site ................63
Toshiba voice contact .......................................63
Warranty.................................................................63
Online Warranty Information.............................63
Warranty Service ..............................................63
Page 9

Chapter 1
Getting to Know Your Camcorder
Thank you for buying the CAMILEO Clip camcorder. This guide introduces
the camcorder's features as well as some basic procedures to operate this
product.
Overview
Your Toshiba camcorder comes equipped with a 5MP sensor that
can record H.264 format movies. This format allows for extended
video recording with less memory.
❖ High-quality images up to 16MP can also be delivered
smoothly.
❖ 5x digital zoom helps you to control over the videos and photos
you take.
❖ The camcorder supports video recording at Full HD resolution
of 1920 x 1080p. You can also connect it to an HDTV via a
mini HDMI
separately), and easily playback the recorded high-definition
videos on the wide screen HDTV.
❖ Electronic Image Stabilization to record smoother videos.
❖ Pause function to record multiple moments in a single file.
❖ This camcorder integrates function of video trimming to edit
the video without the need for a computer.
❖ ISO sensitivity and color balance can either be adjusted
automatically or changed manually.
TM
cable (Mini HDMITM cable must be purchased
9
Page 10
10
NOTE
NOTE
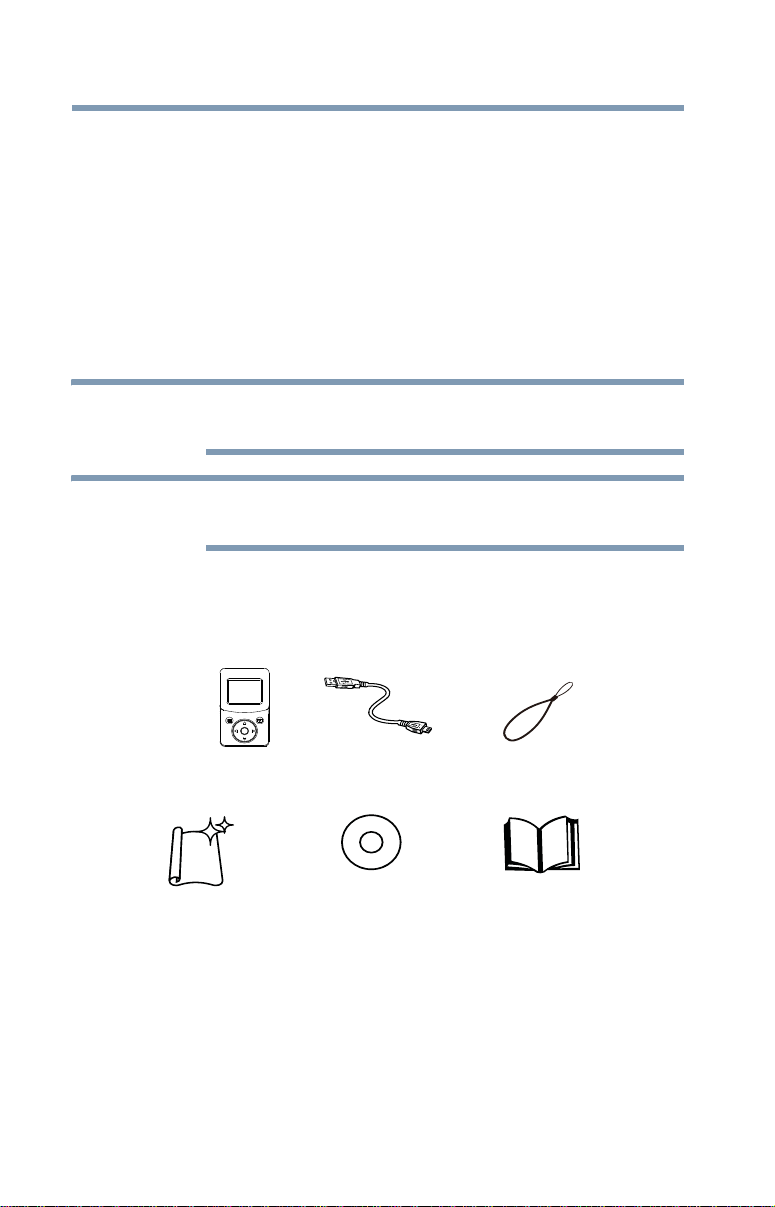
USB Cable
Camcorder
Strap
Cleaning Cloth
CD-ROM
Software, User’s
Guide (this document),
and Warranty information
Quick Start Guide
Overview
❖ Moreover, the camcorder has an advanced uploading feature.
With the exclusive built-in CAMILEO UPLOADER
application, you can upload the videos or photos captured by
the camcorder to the Internet more effortlessly.
❖ Splash resistant and ruggedized finish for outdoor use.
❖ The camcorder can be a voice recorder to record WAV audio
files.
❖ The built-in memory allows you to take limited photos and to
record limited videos without a memory card. The memory
card slot allows users to increase the storage capacity.
Partial memory of the built-in memory is used for the camcorder’s
Firmware code.
Install the bundled software application for viewing the videos
correctly on a computer.
Check the components
Unpack the package and make sure all standard accessories listed
are included:
Getting to Know Your Camcorder
(Sample Illustration) Components
Page 11
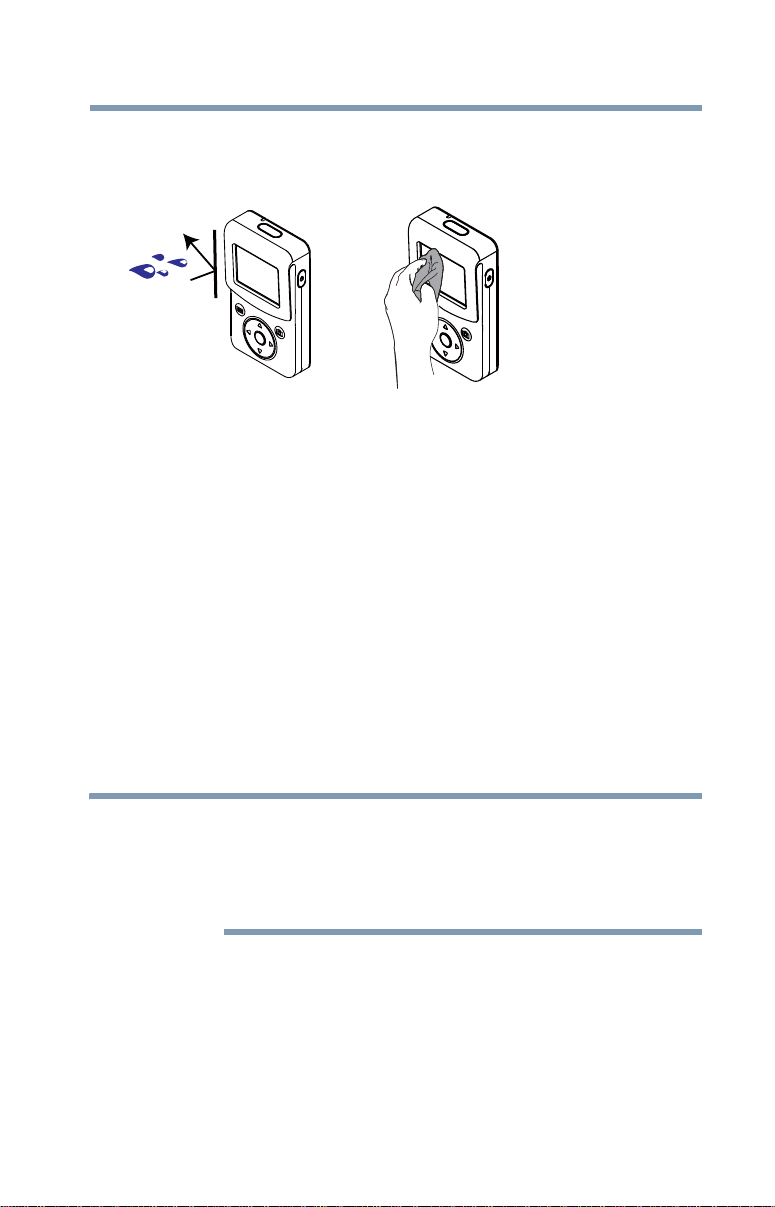
Splash-proof design
NOTE
❖ Splash-proof design protects your camcorder from damage that
accidental splashes can cause.
❖ Always keep the lens clean and wipe the water droplets off the
camcorder with a soft, dry cloth.
❖ The cover for the ports must be firmly closed.
❖ The splash-proof of the ports is not guaranteed in all
environments or conditions.
System requirements
❖ Microsoft® Windows® XP/Windows Vista®/Windows® 7
❖ Intel
❖ 1 GB system memory
❖ 1 GB hard drive space
❖ CD-ROM drive
❖ Available USB port
❖ 16-bit Color Display
®
/ AMD® Dual-Core CPU or above
Getting to Know Your Camcorder
Overview
11
The LCD screen is manufactured using extremely high-precision
technology. However, some tiny black and/or bright dots (white, red,
blue or green) may appear on the LCD screen. These dots are a
normal result of the manufacturing process, and do not affect the
recording.
Page 12
12
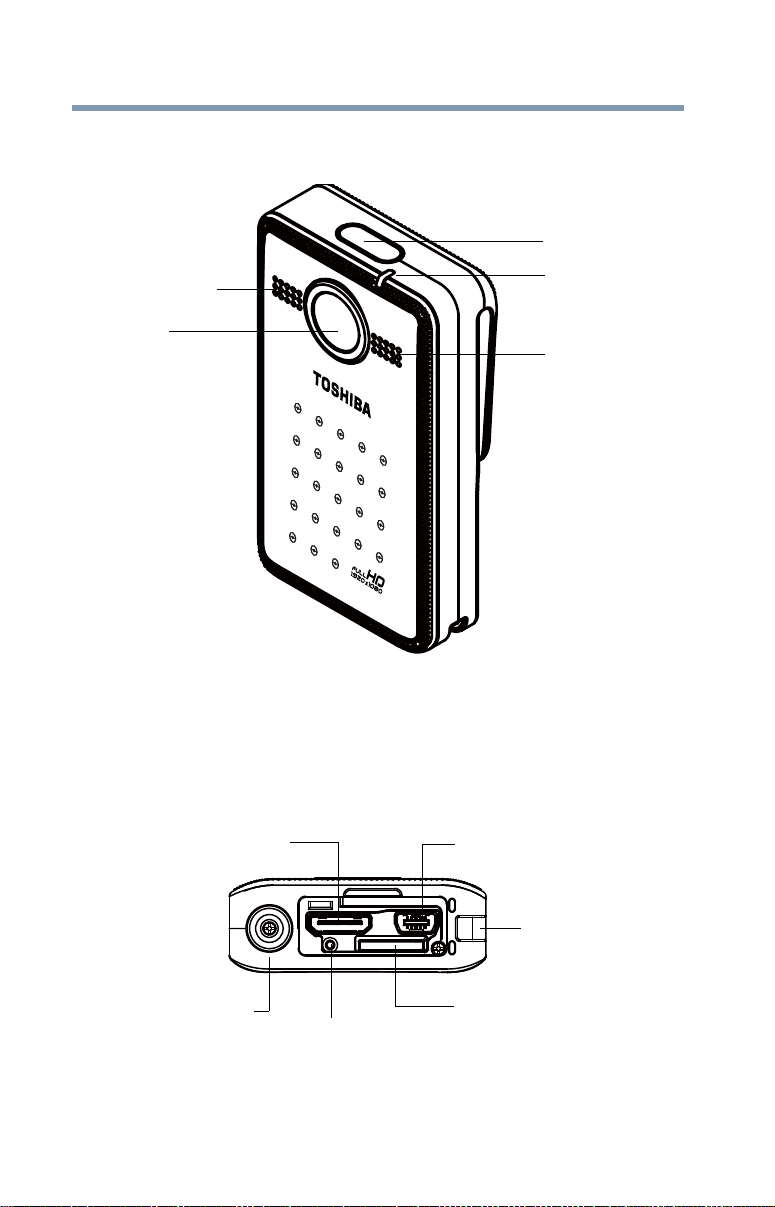
Lens
Microphone
Speaker
LED indicator
Record button
Micro SD™
Tripod socket
Mini USB 2.0 port Mini-HDMI™ port
Strap hook
Card slot
Reset button
Front view
Getting to Know Your Camcorder
Overview
(Sample Illustration) Front view
Underside view
(Sample Illustration) Underside view
Page 13
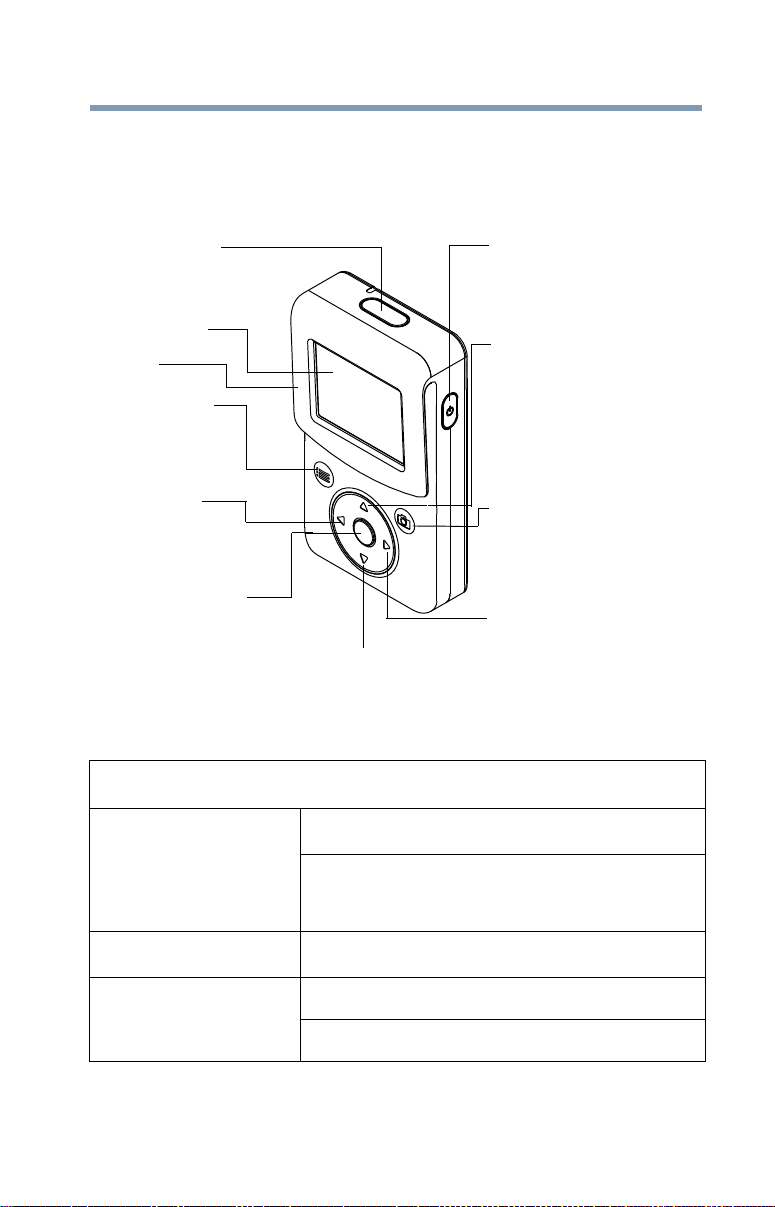
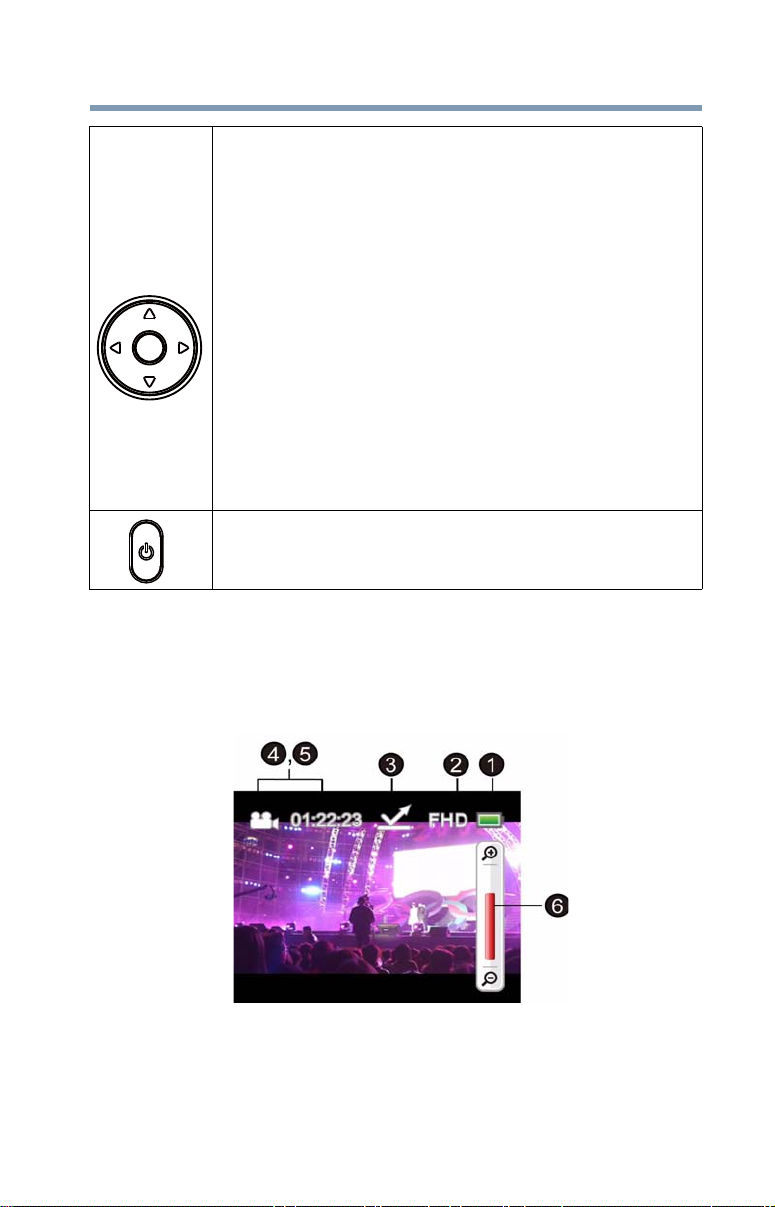
Rear view
Record button
Clip
Menu button
Left button
Down button
LCD screen
Camera mode button
Right button
Power button
Up button
Record/OK button
Getting to Know Your Camcorder
Overview
13
QUICK TOUR
Power button
Camera mode button
Menu button
(Sample Illustration) Rear view
Press the Power button for one second.
If no operation is made in three minutes, the camcorder will
turn itself off automatically to conserve battery power.
Press to toggle Video Mode or Photo Mode
Menu ON.
Exit Menu / Playback Mode.
Page 14

14
Record button
Getting to Know Your Camcorder
Overview
In Video Mode, press to take video. To stop recording, press
it again.
In Photo Mode, press to take photo.
In Video Mode, press to take video. To stop recording, press
it again.
Record / OK button
Up button
Down button
Left button
In Photo Mode, press to take photo.
In VOICE RECORDING, press to record audio. To stop
recording, press it again.
Validate the setting.
Zoom in.
In Playback Mode, go to the Information screen.
When playing videos, press to increase volume.
Zoom out.
When playing video, press to decrease volume.
In Preview Mode, press to go to Playback Mode.
Move between the option items.
In Playback Mode, press to go to the previous video / photo.
In Preview Mode, press to toggle ANTI GLARE ON or ANTI
GLARE OFF.
Right button
While recording video / audio, press to pause the recording.
Press again to resume recording.
Move between the option items.
In Playback Mode, press to go to the next video / photo.
Page 15

Chapter 2
Getting Started
Charge the Built-in Battery
When the USB connection is made to your computer for the first
time, up to three AutoPlay screens will appear on your computer
screen. You must use the supplied USB cable.
1 Connect your camcorder to your computer.
2 Select MASS STORAGE on the camcorder screen.
3 The blinking light indicates that the camcorder is currently
charging, and the light remains on after the charging is
completed.
4 The full charge time is is up to 8.5 hours, using the provided
USB cable. (Actual charging time may vary, depending on the
battery and computer charging conditions.)
15
(Sample Illustration) Charge the built-in battery
Page 16
16
NOTE
NOTE
NOTE
Getting Started
Inserting and Removing the Micro SD Card (optional)
❖ Be sure to remove the protective film on the lens before using.
❖ You may also use the optional USB AC adaptor (Rated at 5V, 2A)
to charge the built-in battery. Approximate charging time is up to
2.5 hours (optional USB AC adaptor may be purchased
separately).
Never charge the battery by a method other than as instructed. Doing
so may cause a fire or explosion possibly resulting in serious injury.
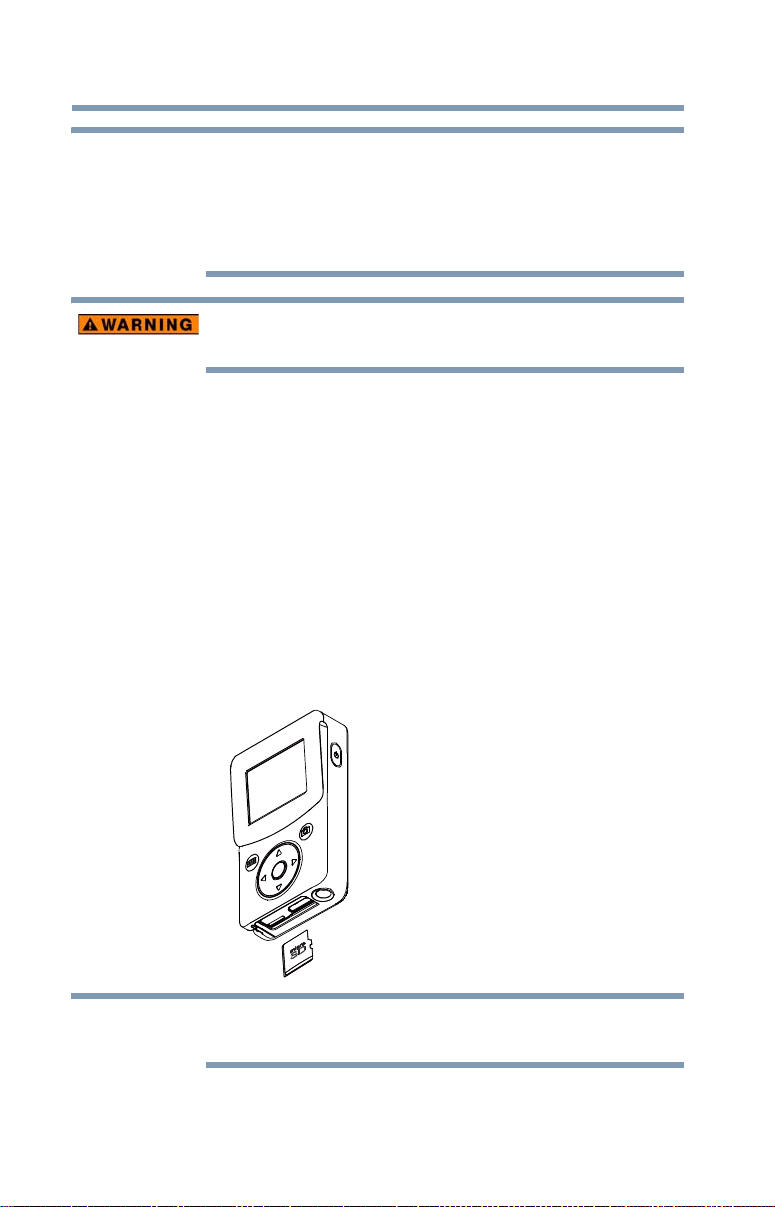
Inserting and Removing the Micro SD Card (optional)
The camcorder comes with a limited internal memory which allows
you to store limited photos and videos. You can expand the memory
capacity by using an optional Micro SD memory card.
1 Open the ports cover.
2 Insert the Micro SD card (Optional) into the slot until it locks
properly.
3 To remove the Micro SD card, press inward to release it and
gently pull it out.
When a memory card is inserted, photos and videos are saved onto
the card rather than the built-in memory.
Page 17
Getting Started
NOTE
NOTE
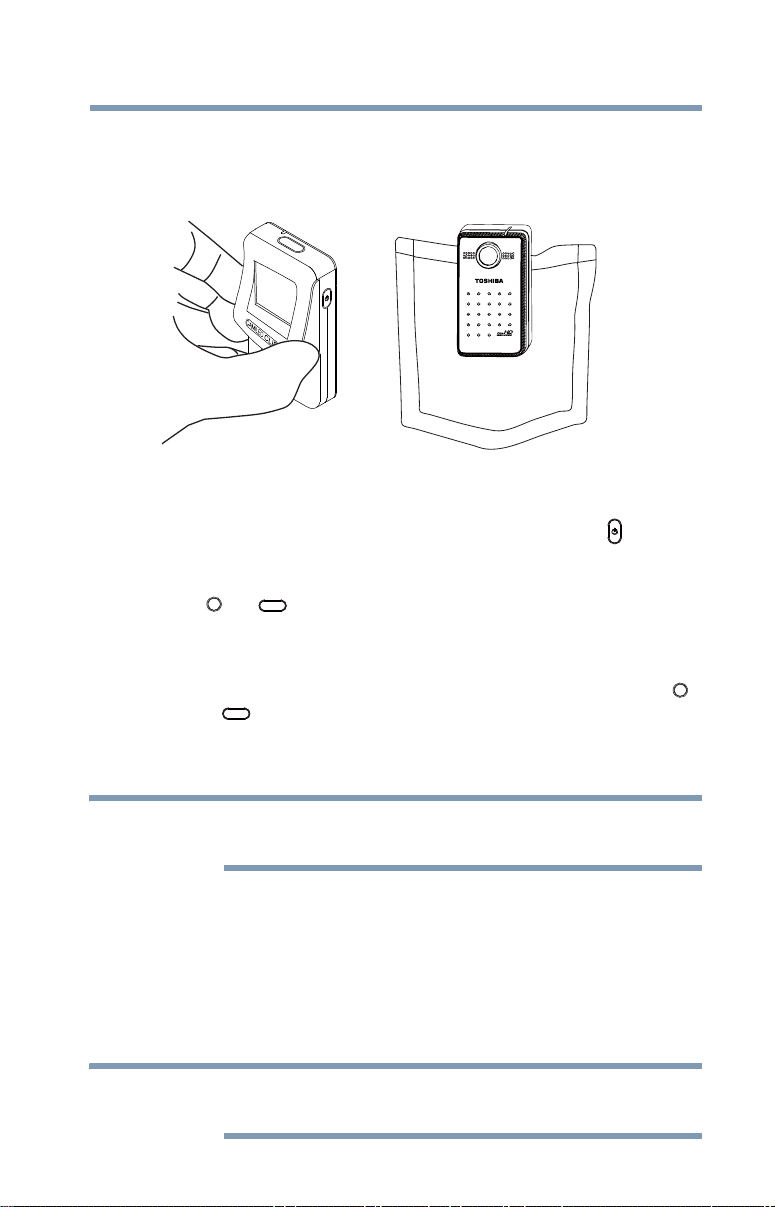
About the Clip
About the Clip
❖ Pull the clip slightly and clip the camcorder onto your clothing
/ belt, etc.
Turning the Camcorder On and Getting Started
❖ To turn on the camcorder, press the Power button ( ) for one
second.
❖ To record video: In Video Mode, press the Record button
( ) / ( ) to record videos. To stop recording, press it again.
❖ To pause recording: Press the Right button to pause recording.
To continue the recording, press it again.
❖ To take a photo: In Photo Mode, press the Record button ( )
/ ( ) to take photo.
❖ To view stored videos and photos: Press the Left button to
switch to the Playback mode.
17
There are two separate record buttons to be utilized, depending on
your mode of use.
Turning on the Camcorder - Standby Mode active
❖ In order to conserve battery power, the LCD will automatically
turn off after idling about one minute to switch to standby
mode.
❖ When standyby mode is active, you can resume to normal
mode by pressing any button.
If no operation is made in three minutes, the camcorder will turn
itself off automatically to conserve battery power.
Page 18
18
Turning the Camcorder Off
Turning the Camcorder Off
Getting Started
❖ To turn off the camcorder, press the Power button ( ) for one
second.
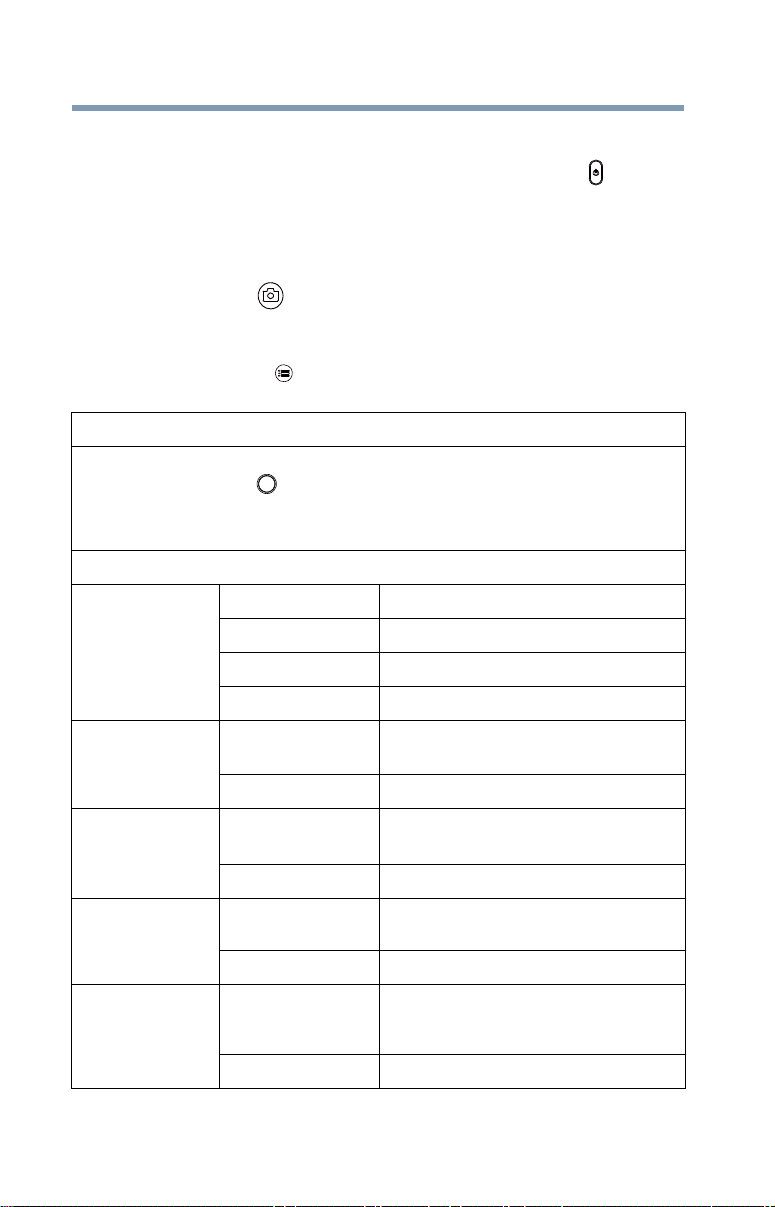
Menu options
There are two camera modes, Video and Photo. Press the Camera
mode button ( ) to toggle between the two modes.
Video Mode Menu
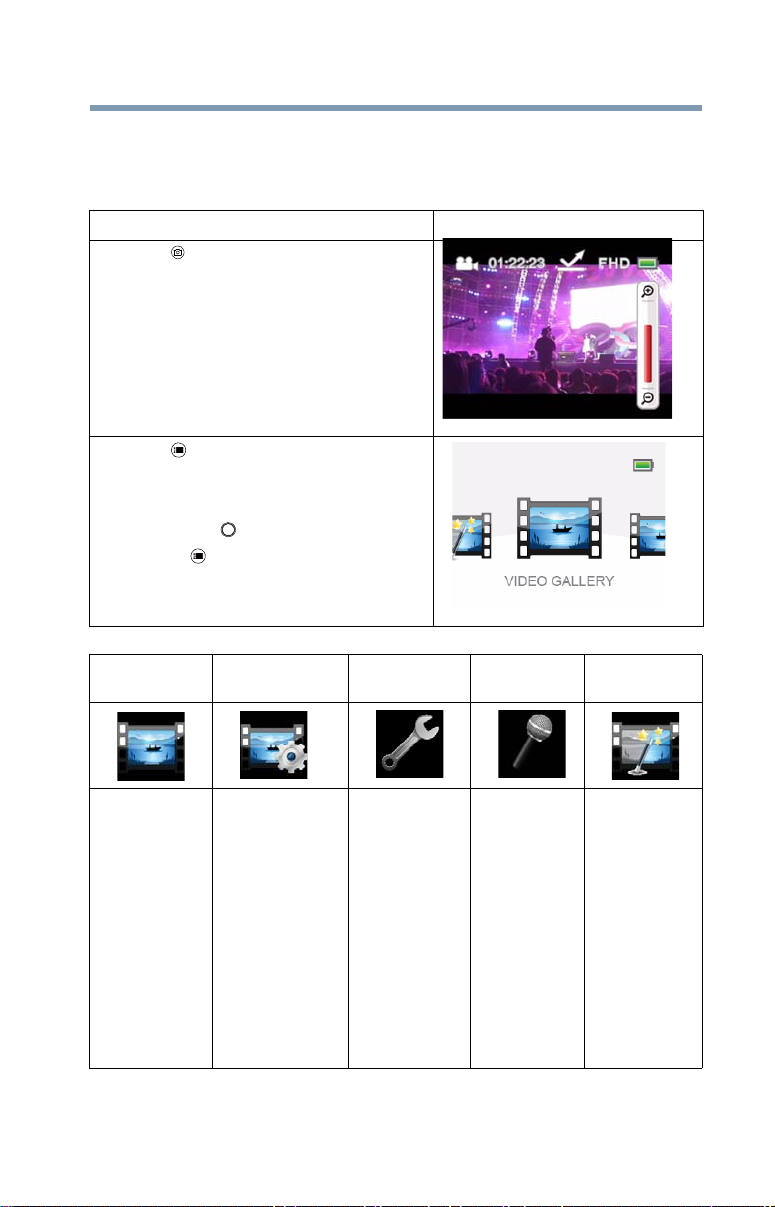
In Video Mode, press ( ) to go to the video mode menu.
IDEO GALLERY
V
Go to the recorded video files carousel. You can check the recorded video files.
Press the Record/OK ( ) button to enter the playback full screen mode.
The information screen will display for 3 seconds, then disappear. You can delete or edit
the recorded video file,
V
IDEO SETUP
Full HD 1080/30 1920 x 1080p (30fps)
Resolution
Stabilization
HD 720/60 1280 x 720p (60fps)
HD 720/30 1280 x 720p (30fps)
VGA 480/30 640 x 480 (30fps)
ON
OFF Disable motion stabilization.
Enable motion stabilization, for smooth and
stable video.
Motion detection
Face tracking
Slow motion
ON
OFF Disable motion detection.
ON
OFF Disable face tracking.
ON
OFF Disable slow motion.
Start video recording while detecting
movements of objects.
The camcorder can detect human face(s) and
focus on the face(s) automatically.
Record videos in slow motion. When the video
is played, the playback time will be longer than
the actual recording time.
Page 19
Getting Started
Menu options
19
Pre-record
Time lapse
Continuous play
ETTINGS
S
Sound
TV format
Languages
Time Set up date and time.
Format
Restore defaults
OICE RECORDING
V
ON
OFF Disable pre-recording.
OFF Disable time lapse.
1 second Record one frame per second.
3 seconds Record one frame every three seconds.
5 seconds Record one frame every five seconds.
ON Playback the video files continuously.
OFF Disable continuous play.
ON Enable operation sound.
OFF Disable operation sound.
NTSC (60Hz) TV output setting is NTSC standard.
PAL (50Hz) TV output setting is PAL standard.
English, Czech, Danish, Dutch, Finnish, French, German, Greek, Italian,
Norwegian, Polish, Portuguese, Russian, Swedish, Spanish, and Turkish.
YES Format memory/ card.
NO Do not format memory/ card.
YES
NO Do not restore default factory settings.
Enable pre-recording. The camcorder records a
few seconds more before the Record button is
pressed.
Restore default factory settings and delete all data
in Wi-Fi profile.
You can start voice recording or check/delete the recorded audio files in the AUDIO GALLERY. Press the
Record/OK ( ) button to start recording.
FFECTS
E
AUTO Automatic adjustment.
Scene
SKIN Select to make skin tones look more natural.
NIGHT Select for night scenes or low-light situations.
BACKLIGHT Select when bright light is behind subject.
Page 20
20
Filter
White balance
Menu options
AUTO Shoot without any special effect on the image.
BLACK & WHITE The image is converted to black and white.
CLASSIC The image is converted to sepia look.
NEGATIVE
AUTO Automatic adjustment.
DAYLIGHT Use under outsides light condition.
FLUORESCENT Use under fluorescent light condition.
TUNGSTEN Use under tungsten light condition.
The image is converted as the negative of the
normal.
Photo Mode Menu
In Photo Mode, press ( ) to go to the photo mode menu.
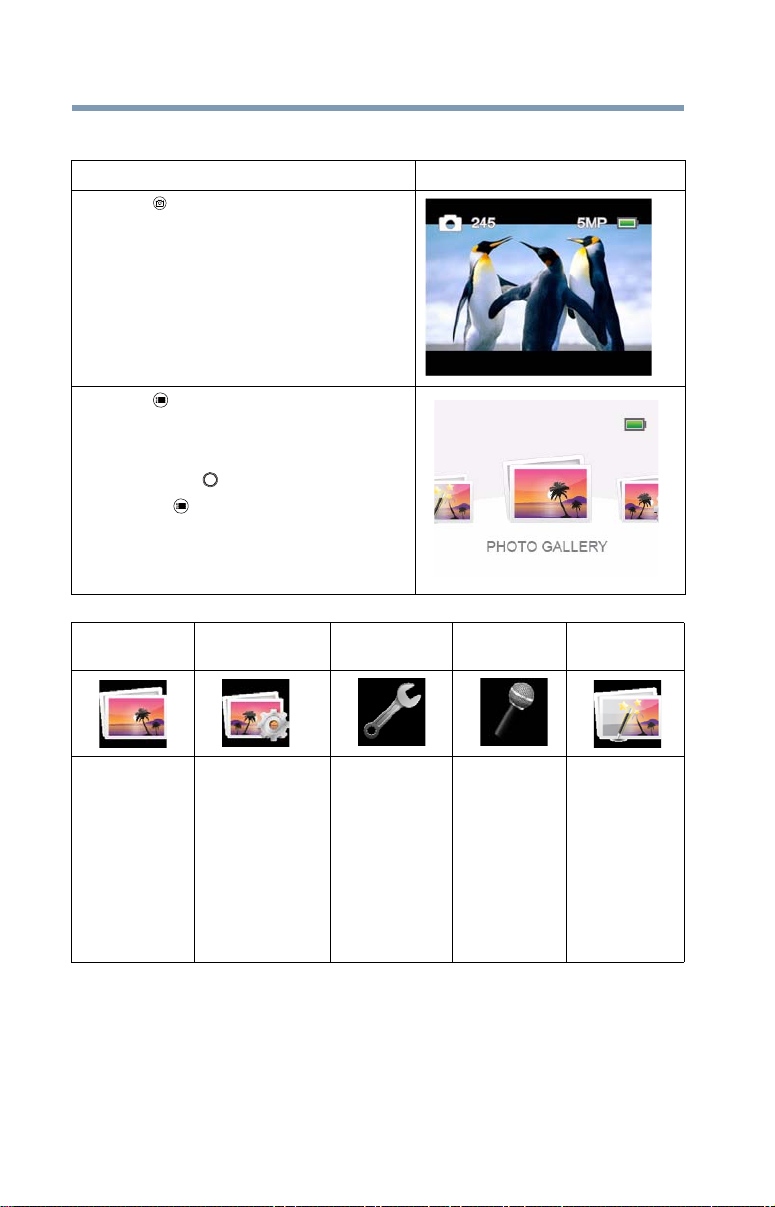
HOTO GALLERY
P
Go to the recorded photo files carousel. You can check the recorded photo files.
Press the Record/OK ( ) button to enter the playback full screen mode.
The information screen will display for 3 seconds, then disappear. You can delete the
recorded photo files.
Getting Started
P
HOTO SETUP
Resolution
Self timer
Smile detection
Date printing
ISO
HIGH - 16MP 4608 x 3456 (16MP)
STANDARD - 5MP 2592 x 1944 (5MP)
LOW - 3MP 2048 x 1536 (3MP)
ON Activate 10-second-delayed self timer.
OFF Disable self timer.
ON The camcorder can capture image
automatically when detecting a smile in photo
mode.
OFF Disable Smile detection.
ON Imprint the date and time on the photo.
OFF Disable date printing.
auto The camcorder adjusts the ISO sensitivity of its
images automatically.
800 Manually sets to ISO 800 for lower light settings
Page 21

Slideshow
ETTINGS
S
EFFECTS
Getting Started
Menu options
2 seconds Display one photo every 2 seconds.
5 seconds Display one photo every 5 seconds.
10 seconds Display one photo every 10 seconds.
OFF Disable slide show.
(Refer to the video mode menu.)VOICE RECORDING
21
Page 22

Chapter 3
Preview/Record Mode
Button Functions
Camera mode button:
1 Press to toggle between Video mode and Photo mode.
Menu button:
1 Menu ON.
2 Exit Menu/Playback mode.
Record button:
1 In Video mode, press to take video. To stop recording, press it
again.
2 In Photo mode, press to take photo.
22
Page 23
Up button:
1 Zoom in.
Down button:
1 Zoom out.
Left button:
1 In preview mode, press to go to Playback mode.
Right button:
1 In preview mode, press to toggle ANTI GLARE ON
or ANTI GLARE OFF.
2 While recording video/audio, press to pause the recording.
Press again to resume recording.
Record/OK button:
1 In Video mode, press to take video.
To stop recording, press it again.
2 In Photo mode, press to take photo.
Power button:
1 Press down for one second to turn on or turn off the camcorder.
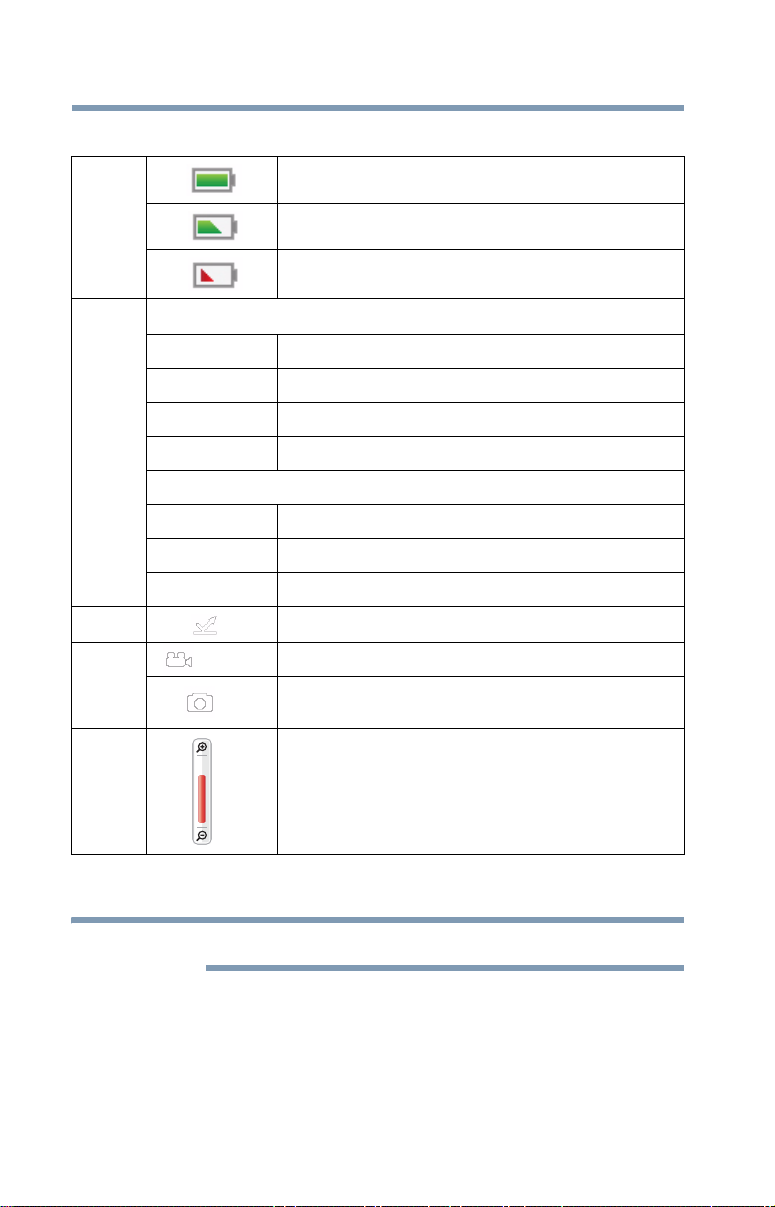
LCD screen information
The indicators shown below may display on LCD when videos and
photos are recorded:
Preview/Record Mode
LCD screen information
23
(Sample Image) LCD screen information
Page 24
24
NOTE
Preview/Record Mode
LCD screen information
Battery: full power
1
2
3
4, 5
6
Battery: medium power
Battery: low power
IDEO RESOLUTION
V
FHD FULL HD 1080/30
HD60 HD 720/60
HD30 HD 720/30
VGA VGA 480/30
PHOTO RESOLUTION
16MP High-16MP
5MP Standard-5MP
3MP Low-3MP
ANTI GLARE ON
01:22:23 Video mode / Remaining recordable time
15
Photo mode / The number of photos that can still be taken
at the current resolution
Zoom meter:
1X~5X (5X Digital zoom) (Available for FULL HD 1080/30
video recording)
1X~10X (10X Digital zoom) (Available for HD 720/60, HD
720/30, and VGA 480/30 video recording)
Some modes cannot be used simultaneously.
Page 25

Video recording
Operation Display Screen
1 In Video mode, press the Record ( ) /
( ) button to start recording.
2 When a video is being recorded, a time
indicator will display on the LCD screen.
3 To stop recording, press the Record ( ) /
( ) button again.
4 To pause recording, press the Right
button. To continue recording, press it
again.
Preview/Record Mode
Video recording
25
Page 26
26
Preview/Record Mode
Taking photos
Taking photos
Operation Display Screen
1 In Photo mode, press the Record ( ) /
( ) button to take photo.
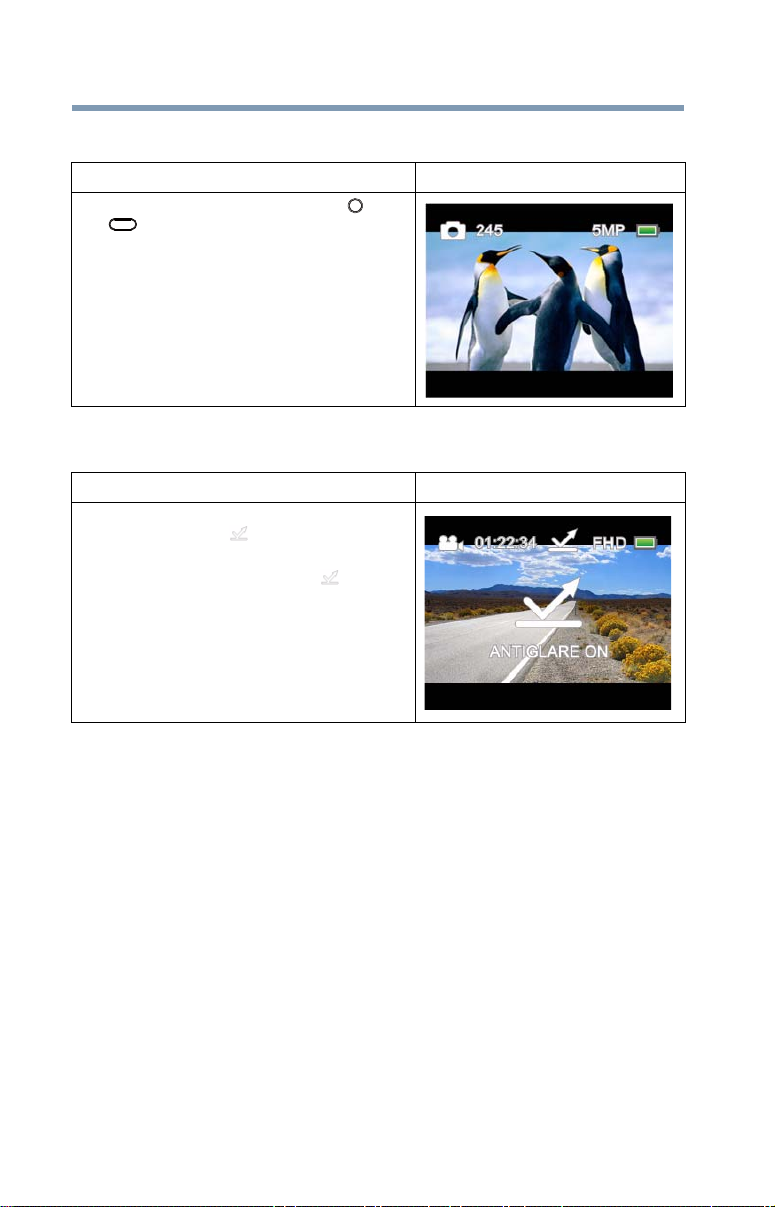
Using Anti-Glare Function
Operation Display Screen
1 Press the Right button in preview mode,
the ANTI GLARE ( ) icon will appear on
the screen.
2 Press again, the ANTI GLARE ( ) icon
will disappear.
Using Digital Zoom
❖ The digital zoom magnifies images when recording video or
taking photos.
❖ The digital zoom can be set to 1X~5X (FULL HD 1080/30), or
1X~10X (HD 720/60, HD 720/30, and VGA 480/30).
Page 27
Options for Menu
Video Mode Menu
Operation Display Screen
1 Press ( ) to switch to Video mode.
2 Press ( ) to access to the Video mode
menu.
3 Use the Right/Left button to select the
desired option on the carousel, and then
press the OK ( ) button to enter its menu.
4 Or press ( ) to exit the Video mode menu.
Preview/Record Mode
Options for Menu
27
VIDEO
GALLERY
(Video files
carousel)
VIDEO SETUP SETTINGS
• RESOLUTION
• STABILIZATION
• MOTION
DETECTION
• FACE
TRACKING
• SLOW MOTION
• PRE-RECORD
• TIME LAPSE
• CONTINUOUS
PLAY
• SOUND
• TV FORMAT
• LANGUAGES
• DATE & TIME
• FORMAT
• RESTORE
DEFAULT
VOICE
RECORDING
• START
RECORDING
• AUDIO
GALLERY
EFFECTS
• SCENE
• FILTER
• WHITE
BALANCE
❖ Please refer to Chapter 4 for the detailed information about VOICE RECORDING.
❖ Please refer to Chapter 5 for the detailed information about VIDEO GALLERY.
Page 28
28
Options for Menu
Photo Mode Menu
Operation Display Screen
1 Press ( ) to switch to Photo mode.
2 Press ( ) to access to the Photo mode
menu.
3 Use the Right/Left button to select the
desired option on the carousel, and then
press the OK ( ) button to enter its menu.
4 Or press ( ) to exit the Photo mode
menu.
Preview/Record Mode
PHOTO
GALLERY
(Photo files
carousel)
PHOTO SETUP SETTINGS
• RESOLUTION
• SELF-TIMER
• SMILE
DETECTION
• DATE
PRINTING
• ISO
• SLIDE SHOW
• SOUND
• TV FORMAT
• LANGUAGES
• DATE & TIME
• FORMAT
• RESTORE
DEFAULT
VOICE
RECORDING
• START
RECORDING
• AUDIO
GALLERY
EFFECTS
• SCENE
• FILTER
• WHITE
BALANCE
❖ Please refer to Chapter 4 for the detailed information about VOICE RECORDING.
❖ Please refer to Chapter 5 for the detailed information about PHOTO GALLERY.
Page 29
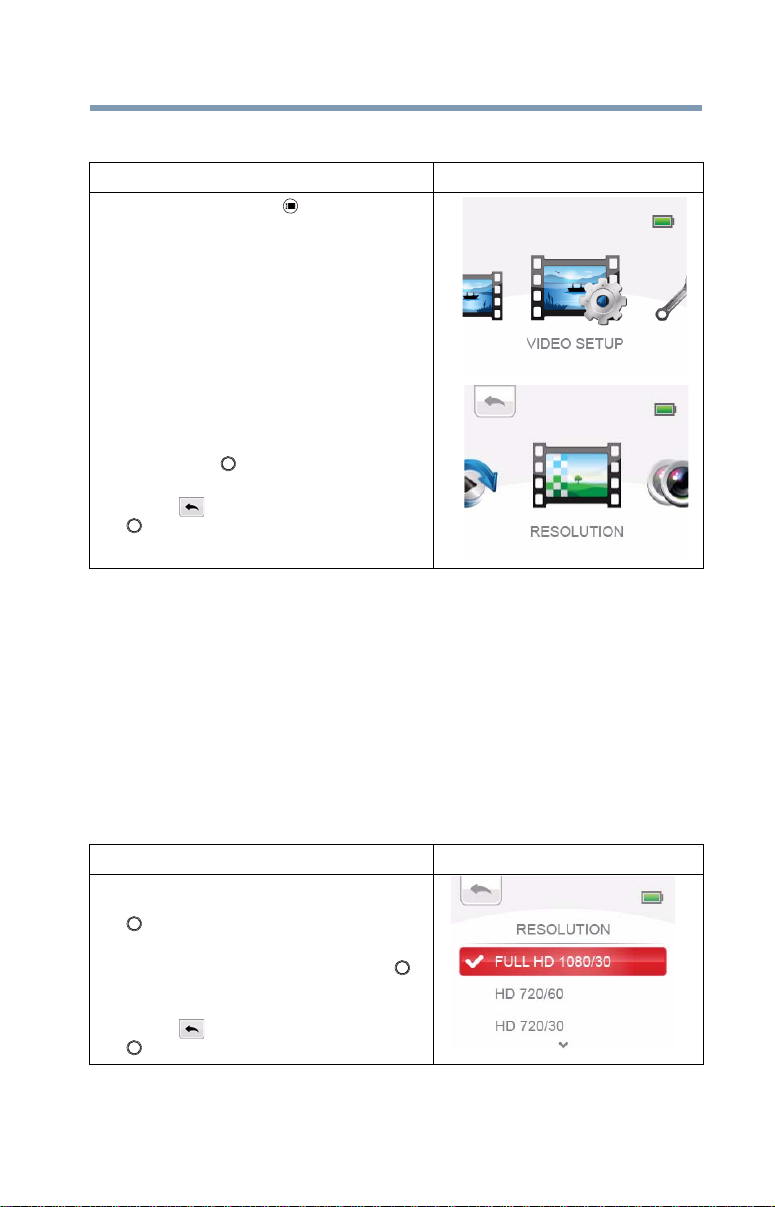
Video setup
Operation Display Screen
1 In Video mode, Press ( ) to go to the
video mode menu.
2 Use the Right/Left button to select VIDEO
SETUP on the carousel, and then press the
OK button to enter its menu.
3 The menu contains eight options:
RESOLUTION, STABILIZATION, MOTION
DETECTION, FACE TRACKING, SLOW
MOTION, PRE-RECORD, TIME LAPSE, and
CONTINUOUS PLAY, for you to adjust the
camcorder settings.
4 Use the Right/Left button to select the
desired option on the carousel, and then
press the OK ( ) button to enter its menu.
5 Or press the Up button to highlight the
Return ( ) icon, and then press the OK
( ) button to exit.
Resolution
Four resolution settings are available.
❖ Full HD: 1080/30: Record videos at 1920x1080p 30 FPS
(frames per second) resolution.
❖ HD 720/60: Record videos at 1280x720p 60 FPS resolution.
❖ HD 720/30: Record videos at 1280x720p 30 FPS resolution.
❖ VGA 480/30: Record videos at 640x480p 30 FPS resolution.
Preview/Record Mode
Video s e tup
29
Operation Display Screen
1 In the Video Setting menu, select the
RESOLUTION icon and then press the OK
( ) button to enter its setting menu.
2 Use the Up/Down button to select the
desired setting, and then press the OK ( )
button to validate the setting.
3 Or press the Up button to highlight the
Return ( ) icon, and then press the OK
( ) button to exit.
Page 30
30
Video s e tup
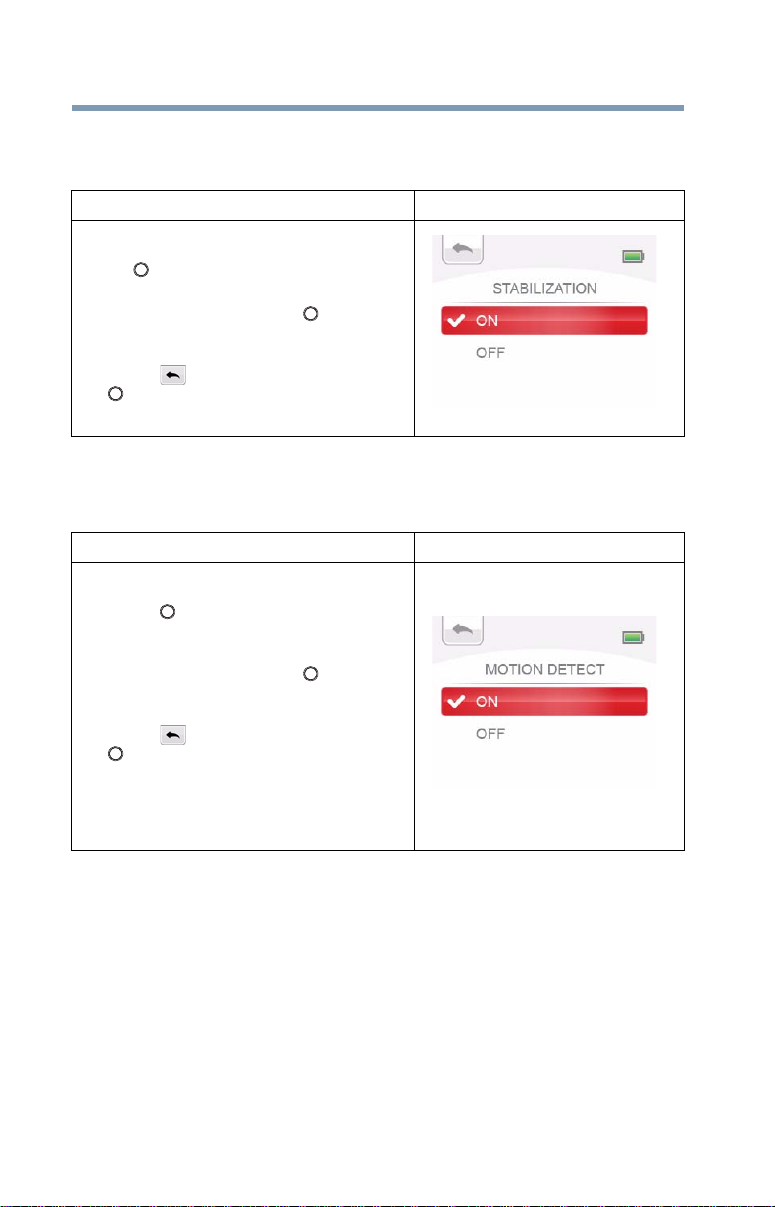
Stabilization
Preview/Record Mode
Record with an effect of reducing the camcorder shake to result in more stable video.
Operation Display Screen
1 In the Video Setting menu, select the
STABILIZATION icon and then press the
OK ( ) button to enter its setting menu.
2 Use the Up/Down button to select ON or
OFF, and then press the OK ( ) button to
validate the setting.
3 Or press the Up button to highlight the
Return ( ) icon, and then press the OK
( ) button to exit.
Motion detection
Record video automatically when the camcorder detects a movement.
Operation Display Screen
1 In the Video Setting menu, select the
MOTION DETECTION icon and then press
the OK ( ) button to enter its setting
menu.
2 Use the Up/Down button to select ON or
OFF, and then press the OK ( ) button to
validate the setting.
3 Or press the Up button to highlight the
Return ( ) icon, and then press the OK
( ) button to exit.
4 The camcorder will start to record video
automatically if it detects a movement, and
will stop recording when it no longer
detects movement.
Page 31

Preview/Record Mode
NOTE
Video s e tup
Face tracking
The camcorder can detect human face(s) and focus on the face(s) automatically (up to
six faces). Use this function for capturing portraits in backlight scenes.
Operation Display Screen
1 In the Video Setting menu, select the FACE
TRACKING icon and then press the OK
( ) button to enter its setting menu.
2 Use the Up/Down button to select ON or
OFF, and then press the OK ( ) button to
validate the setting.
3 Or press the Up button to highlight the
Return ( ) icon, and then press the OK
( ) button to exit.
4 In Record mode, aim the camcorder at the
face(s). The face frame(s) will appear
around the face.
31
Slow motion
Record video with slow motion effect. When the video is played, the playback time
will be longer than the actual recording time. Some occasions you can use this effect,
such as the skill demonstration of athletic activities of all kinds, or a key moment in an
athletic game.
Operation Display Screen
1 In the Video Setting menu, select the
SLOW MOTION icon and then press the
OK ( ) button to enter its setting menu.
2 Use the Up/Down button to select ON or
OFF, and then press the OK ( ) button to
validate the setting.
3 Or press the Up button to highlight the
Return ( ) icon, and then press the OK
( ) button to exit.
❖ The view angle may become smaller when Slow Motion is On.
❖ When Slow Motion is On, the video resolution is 320x240.
Page 32

32
NOTE
Video s e tup
Pre-record
The Pre-record function ensures that you will not miss any critical recording
opportunities. The videos are recorded few seconds more before the Record button is
pressed.
Operation Display Screen
1 In the Video Setting menu, select the Pre-
record icon and then press the OK ( )
button to enter its setting menu.
2 Use the Up/Down button to select ON or
OFF, and then press the OK ( ) button to
validate the setting.
3 Or press the Up button to highlight the
Return ( ) icon, and then press the OK
( ) button to exit.
❖ Be sure to aim the camcorder at the subject and position it
securely before the Record button is pressed.
❖ Once the Pre-record function is activated, it will be disabled
when you set up any other setting.
Preview/Record Mode
Time lapse
Record still images at specific intervals you can set, and play them as one video file.
This effect is good for recording cloudscapes, seeds germinating, and flowers opening.
❖ OFF: Disable Time Lapse.
❖ 1 SECOND: Record one frame per second.
❖ 3 SECONDS: Record one frame every 3 seconds.
❖ 5 SECONDS: Record one frame every 5 seconds.
Operation Display Screen
1 In the Video Setting menu, select the TIME
LAPSE icon and then press the OK ( )
button to enter its setting menu.
2 Use the Up/Down button to select the
desired setting, and then press the OK ( )
button to validate the setting.
3 Or press the Up button to highlight the
Return ( ) icon, and then press the OK
( ) button to exit.
Page 33

Motion Detect, Time Lapse, and Slow Motion functions cannot be
NOTE
used simultaneously.
Continuous play
Playback the video files continuously.
Operation Display Screen
1 In the Video Setting menu, select the
Continuous Play icon and then press the
OK ( ) button to enter its setting menu.
2 Use the Up/Down button to select ON or
OFF, and then press the OK ( ) button to
validate the setting.
3 Or press the Up button to highlight the
Return ( ) icon, and then press the OK
( ) button to exit.
Preview/Record Mode
Video s e tup
33
Page 34

34
Photo setup
Photo setup
Operation Display Screen
1 In Photo mode, Press ( ) to go to the
photo mode menu.
2 Use the Right/Left button to select PHOTO
SETUP on the carousel, and then press the
OK ( ) button to enter its menu.
3 The menu contains six options:
RESOLUTION,SELF-TIMER, SMILE
DETECTION, DATE PRINTING, ISO, and
SLIDE SHOW, for you to adjust the
camcorder settings.
4 Use the Right/Left button to select the
desired option on the carousel, and then
press the OK ( ) button to enter its menu.
5 Or press the Up button to highlight the
Return ( ) icon, and then press the OK
( ) button to exit.
Resolution
Three resolution settings are available.
❖ 16MP: Takes photos at 4608 x 3456, 16 megapixel resolution
(interpolated).
❖ 5MP: Takes photos at 2592 x 1944, 5 megapixel quality.
❖ 3MP: Takes photos at 2048 x 1536, 3 megapixel quality.
Preview/Record Mode
Operation Display Screen
1 In the Photo Setting menu, select the
RESOLUTION icon and then press the OK
( ) button to enter its setting menu.
2 Use the Up/Down button to select the
desired setting, and then press the OK ( )
button to validate the setting.
3 Or press the Up button to highlight the
Return ( ) icon, and then press the OK
( ) button to exit.
Page 35

Preview/Record Mode
Photo setup
Self-timer
The self-timer allows you to take photos with a ten-second time
delay.
Operation Display Screen
1 In the Photo Setting menu, select the
SELF-TIMER icon and then press the OK
( ) button to enter its setting menu.
2 Use the Up/Down button to select ON or
OFF, and then press the OK ( ) button to
validate the setting.
3 Or press the Up button to highlight the
Return ( ) icon, and then press the OK
( ) button to exit.
Smile detection
The camcorder captures the photo automatically when it detects a smile.
Operation Display Screen
1 In the Photo Setting menu, select the
SMILE DETECTION icon and then press
the OK ( ) button to enter its setting
menu.
2 Use the Up/Down button to select ON or
OFF, and then press the OK ( ) button to
validate the setting.
3 Or press the Up button to highlight the
Return ( ) icon, and then press the OK
( ) button to exit.
4 In Record mode, aim the camcorder at the
smiling faces. The face frames will appear
around the face with smile. The camcorder
will focus on the subject, then it will
capture the photo automatically.
35
Page 36

36
NOTE
Photo setup
Date printing
Preview/Record Mode
Imprint the date and time on the photo.
Operation Display Screen
1 In the Photo Setting menu, select the DATE
PRINTING icon and then press the OK ( )
button to enter its setting menu.
2 Use the Up/Down button to select ON or
OFF, and then press the OK ( ) button to
validate the setting.
3 Or press the Up button to highlight the
Return ( ) icon, and then press the OK
( ) button to exit.
4 As the function is activated, the date will
appear on the corner of the photo.
ISO
The camcorder adjusts the ISO sensitivity of the images automatically. A manual ISO
sensitivity setting of 800 is also available. Manually select ISO 800 to shoot an image
in lower light settings.
❖ AUTO: Set the ISO sensitivity automatically.
❖ 800: ISO 800
Operation Display Screen
1 In the Photo Setting menu, select the ISO
icon and then press the OK ( ) button to
enter its setting menu.
2 Use the Up/Down button to select the
desired setting, and then press the OK ( )
button to validate the setting.
3 Or press the Up button to highlight the
Return ( ) icon, and then press the OK
( ) button to exit.
The image may become grainy when the ISO number is large.
Page 37

Slide show
Display photos one after another in turn.
❖ 2 SECONDS: Display one photo every 2 seconds
❖ 5 SECONDS: Display one photo every 5 seconds
❖ 10 SECONDS: Display one photo every 10 seconds
❖ OFF: Disable Slideshow
Operation Display Screen
1 In the Photo Setting menu, select the Slide
show icon and then press the OK ( )
button to enter its setting menu.
2 Use the Up/Down button to select the
desired setting, and then press the OK ( )
button to validate the setting.
3 Or press the Up button to highlight the
Return ( ) icon, and then press the OK
( ) button to exit.
Preview/Record Mode
Photo setup
37
Page 38

38
Settings
Settings
Operation Display Screen
1 Press the Menu ( ) button to go to the
video/photo mode menu.
2 Use the Right/Left button to select
SETTINGS on the carousel, and then press
the OK ( ) button to enter its menu.
3 The SETTINGS menu contains six options
for configuring your camcorder setup:
SOUND (operation sound), TV FORMAT,
LANGUAGES, DATE & TIME, FORMAT, and
RESTORE DEFAULT.
4 Use the Right/Left button to select the
desired option on the carousel, and then
press the OK ( ) button to enter its menu.
5 Or press the Up button to highlight the
Return ( ) icon, and then press the OK
( ) button to exit.
Sound
Enable or disable the keypad tone and the operation sound.
Preview/Record Mode
Operation Display Screen
1 In the Settings menu, select the SOUND
icon and then press the OK ( ) button to
enter its setting menu.
2 Use the Up/Down button to select ON or
OFF, and then press the OK ( ) button to
validate the setting.
3 Or press the Up button to highlight the
Return ( ) icon, and then press the OK
( ) button to exit.
Page 39

Preview/Record Mode
Settings
TV format
Ensure that the appropriate TV standard of your area is selected – either NTSC or PAL
Selecting the incorrect TV format setting may cause image flickering.
❖ NTSC (60Hz): USA, Canada, Japan, South Korea, Taiwan, etc.
❖ PAL (50Hz): UK, Europe, China, Australia, Singapore, Hong
Kong, etc.
Operation Display Screen
1 In the Settings menu, select the TV icon
and then press the OK ( ) button to enter
its setting menu.
2 Use the Up/Down button to select the
desired setting, and then press the OK ( )
button to validate the setting.
3 Or press the Up button to highlight the
Return ( ) icon, and then press the OK
( ) button to exit.
Language
Use this option to select the language of the user interface.
Operation Display Screen
1 In the Settings menu, select the
LANGUAGE icon and then press the OK
( ) button to enter its setting menu.
2 Use the Up/Down button to select the
desired setting, and then press the OK ( )
button to validate the setting.
3 Or press the Up button to highlight the
Return ( ) icon, and then press the OK
( ) button to exit.
39
Page 40

40
Settings
Time
The date and time can be imprinted on the photo (Refer to DA TE PRINTING for
the setting.) Before using the camcorder, be sure to set the correct date and time.
Operation Display Screen
1 In the Settings menu, select the TIME icon
and then press the OK ( ) button.
2 Select Change settings and then press the
OK ( ) button to enter time setting menu.
3 Use the Up/Down button to move between
the lines of Day, Month, Year, Hour and
Minute.
4 Use the Right/Left button to adjust the
numeric value.
5 Press the Up button to highlight the Return
( ) icon, and then press the OK ( )
button to exit.
Preview/Record Mode
Format
Use this option to delete all files in the camcorder's built-in memory, or on
the optionally-installed memory card.
❖ Yes: All files in the built-in memory will be deleted, or all files on the
memory card will be deleted.
❖ No: No files will be deleted from either the built-in memory, or from the
memory card.
Operation Display Screen
1 In the Settings menu, select the FORMAT
icon and then press the OK ( ) button to
enter its setting menu.
2 Use the Up/Down button to select YES or
NO, and then press the OK ( ) button to
validate the setting.
3 Or press the Up button to highlight the
Return ( ) icon, and then press the OK
( ) button to exit.
Page 41

Preview/Record Mode
NOTE
Settings
All the data will be erased if the memory card is formatted. Make sure
that all files are copied to your computer before formatting the card.
Restore default
Use this option to restore the default factory setting.
❖ YES: Restore the default factory setting.
❖ NO: Do not restore the default factory setting.
Operation Display Screen
1 In the Settings menu, select the RESTORE
DEFAULT icon and then press the OK ( )
button to enter its setting menu.
2 Use the Up/Down button to select YES or
NO, and then press the OK ( ) button to
validate the setting.
3 Or press the Up button to highlight the
Return ( ) icon, and then press the OK
( ) button to exit.
The following table indicates the camcorder’s default factory settings.
ETTING DEFAULT FACTORY SETTING
S
RESOLUTION
STABILIZATION On
MOTION DETECTION Off
FACE TRACKING Off
SLOW MOTION Off
PRE-RECORD Off
TIME LAPSE Off
CONTINUOUS PLAY Off
SELF-TIMER Off
SMILE DETECTION Off
DATE PRINTING Off
ISO Auto
SLIDESHOW Off
SCENE Auto
FILTER Auto
Video: Full HD 1080p/30
Photo: STANDARD-5M
41
Page 42

42
NOTE
WHITE BALANCE Auto
SOUND On
TV Depends on shipping area
LANGUAGE Depends on shipping area
VOLUME Level 3
Effects
Please refer to chapter 4 for voice recording instructions.
Effects
Operation Display Screen
1 Press ( ) to go to the video/photo mode
menu.
2 Use the Right/Left button to select
EFFECTS on the carousel, and then press
the OK ( ) button to enter its menu.
3 The menu contains three options: SCENE,
FILTER, and WHITE BALANCE, for you to
adjust the camcorder settings.
4 Use the Right/Left button to select the
desired option on the carousel, and then
press the OK ( ) button to enter its menu.
5 Or press the Up button to highlight the
Return ( ) icon, and then press the OK
( ) button to exit.
Preview/Record Mode
Page 43

Scene
NOTE
You can select the mode according to the scene condition.
❖ AUTO: Automatic adjustment.
❖ SKIN: Shoot with an effect that makes skin tones more natural.
❖ NIGHT: Use Night mode for night scenes or low light conditions.
❖ BACKLIGHT: You can take shots when the bright light is behind the
subject.
Operation Display Screen
1 In the effects menu, select the SCENE icon
and then press the OK ( ) button to enter
its setting menu.
2 Use the Up/Down button to select the
desired setting, and then press the OK ( )
button to validate the setting.
3 Or press the Up button to highlight the
Return ( ) icon, and then press the OK
( ) button to exit.
To avoid blurry photos, place the camcorder on a flat, steady surface,
or use a tripod when taking shots in the NIGHT mode.
Preview/Record Mode
Effects
43
Filter
You can select the special filter effects on the videos or photos.
❖ AUTO: Shoot without any special effect on the image.
❖ BLACK & WHITE: The image is converted to black and white.
❖ CLASSIC: The image is converted to a sepia look.
❖ NEGATIVE: The image is converted as the negative of the normal.
Operation Display Screen
1 In the effects menu, select the FILTER icon
and then press the OK ( ) button to enter
its setting menu.
2 Use the Up/Down button to select the
desired setting, and then press the OK ( )
button to validate the setting.
3 Or press the Up button to highlight the
Return ( ) icon, and then press the OK
( ) button to exit.
Page 44

44
Preview/Record Mode
Effects
White balance
The camcorder adjusts the color balance of images automatically. Three manual white
balance settings are available:
❖ AUTO: The camcorder automatically adjusts white balance.
❖ DAYLIGHT: Under outdoor condition.
❖ FLUORESCENT: Under fluorescent light condition.
❖ TUNGSTEN: Under tungsten light condition.
Operation Display Screen
1 In the effects menu, select the WHITE
BALANCE icon and then press the OK ( )
button to enter its setting menu.
2 Use the Up/Down button to select the
desired setting, and then press the OK ( )
button to validate the setting.
3 Or press the Up button to highlight the
Return ( ) icon, and then press the OK
( ) button to exit.
Page 45

Chapter 4
Voice Recording
Voice recording
The camcorder can be a voice recorder to record WAV audio files.
Operation Display Screen
1 Press to the Menu button ( ) to go to
the video/photo mode menu.
2 Use the Right/Left button to select VOICE
RECORDING on the carousel, and then
press the OK ( ) button to enter its
menu.
45
Page 46

46
3 Select START RECORDING and then press
the OK ( ) button to start voice
recording. To stop recording, press it
again.
4 While recording audio, press the Right
button to pause the recording. Press again
to resume recording.
5 5. Or press the Up button to highlight the
Return icon ( ), and then press the OK
( ) button to exit.
Voice Recording
Voice recording
Operation Display Screen
Page 47

Audio Playback
You can check/delete the recorded audio files through AUDIO GALLERY.
Operation Display Screen
1 In voice recording menu, use the
Right/Left button to select AUDIO
GALLERY, and then press the OK ( )
button to go to the audio thumbnail.
2 Use the Right/Left button to select the
audio file you want to play, and then press
the OK ( ) button to playback it.
3 When playing audio, press the Up button
to increase volume, or press the Down
button to decrease volume.
Voice Recording
Voice recording
47
Delete Audio File
Operation Display Screen
1 Press the Up button to go to the
information screen.
2 Press the Down button to highlight the
Delete icon ( ) to go to the delete
screen.
3 Select Yes to delete it. Select No to cancel
and exit.
Page 48

Chapter 5
Playback Mode
Button functions
The buttons have the following functions in Playback Mode.
Camera mode button:
1 Press to toggle Video mode or Photo mode.
Menu button:
1 Menu ON.
2 Exit menu/playback mode.
Up button:
1 In Playback Mode, go to the information screen.
2 When playing video/audio, press to increase volume.
Down button:
1 When playing video, press to decrease volume.
Left button:
1 Go to the previous video/photo/audio.
Right button:
1 Go to the next video/photo/audio.
Record/OK button:
1 Press to play/pause the video/audio.
48
Power button:
1 Press down for one second to turn on or turn off the camcorder.
Page 49

LCD screen information
Indicators on the LCD screen while in Playback Mode:
(Sample Image) LCD screen information.
Battery: full power
Playback Mode
LCD screen information
49
1
2
3
4
5
6
Video Mode
Photo Mode
22 of 25
Battery: medium power
Battery: low power
Return
Video trimmimg
Slideshow
Number of current video or photo/Total number of videos
or photos
Delete
Press the Record/OK button to switch to thumbnail screen
Page 50

50
NOTE
Playback Mode
Operations for Playback mode
Operations for Playback mode
Operation Display Screen
1 In Video/Photo mode, press the Left
button to switch to the Video Playback
mode.
2 Or select VIDEO GALLERY/PHOTO
GALLERY in the Video/Photo mode menu.
3 Use the Right/Left button to go to the
next/previous video/photo.
4 Press the Up button to go to the
video/photo information screen of videos
and photos.
The 3 indicators ( / / ) will disappear after 5 seconds.
Page 51

Video Playback
Operation Display Screen
1 In the Video Playback Mode, press the OK
( ) button to play or pause the video.
2 While playing video, press the Right/Left
button to fast forward/rewind.
3 Use the Up/Down button to adjust the
volume.
Video Trim
You can trim away the beginnings and ends of the recorded video
and save it as a new video clip.
Operation Display Screen
1 In the information screen, use the Down
button to highlight the edit icon ( ), and
then press the OK ( ) button to start to
trim the video file.
Playback Mode
Video Playback
51
Page 52

52
2 Press the Left/Right buttons to move the
left dividing icon on the bar to specify
the beginning. Press the OK ( ) button to
confirm the position and switch to the
right dividing icon (the arrow becomes
red) to specify the end.
3 Press the Down button to highlight the
preview icon ( ) and then press the OK
( ) button to watch the edited video
preview.
4 Press the Down button and then press the
Right button to highlight the save icon
( ). Press the OK ( ) button to trim
away the white portion and save the red
portion.
5 In confirmation screen, you can select
Overwrite or As New to save the edited
video.
6 Or press the Up button to highlight the
Return ( ) icon, and then press the OK
( ) button to exit.
Video Trim
Operation Display Screen
Playback Mode
Page 53

Photo Playback
Operation Display Screen
1 In the Photo Playback Mode, use the
Right/Left button to go to the next/
previous photo.
2 In the information screen, use the Down
button to highlight the slide show icon
( ), and then press the OK ( ) button
to start the slideshow.
Delete File in Playback Mode
Operation Display Screen
1 In the information screen, use the Down
button and then the Right button to
highlight the delete icon ( ), and then
press the OK ( ) button to go to the
confirmation screen.
2 Select Yes and then press the OK ( )
button to delete the current file.
3 Select No and then press the OK ( )
button to cancel and exit.
Playback Mode
Photo Playback
53
Page 54

Chapter 6
Viewing Files on the computer
Installing bundled software
The CD-ROM supplied with this camcorder contains two pieces of
software.
❖ CAMILEO® Uploader is an application that offers you an
easy way to upload your files to social media web sites
instantly.
❖ ArcSoft MediaImpression® is a user-friendly application that
helps you managing your media, and uploading your files to
the web sites easily.
❖ Adobe® Reader® is a popular program that you need to have
installed to read the User’s Manual. Many computer users will
find they already have this software installed on their computer.
To install the bundled software:
1 Insert the CD-ROM into your computer’s optical disc drive.
The autorun screen appears.
2 Click “Install Application Software”. Follow the onscreen
instructions to complete the installation.
54
Page 55

Viewing Files on the computer
NOTE
Transferring files to a computer
Detailed information can be found in the online help of all the
bundled software. Install the bundled software application,
ArcSoft MediaImpression, for viewing the videos correctly on
a computer.
Transferring files to a computer
You can transfer videos/photos/audios stored on your camera to a
computer and send them in emails to friends or post them on the
web sites.
To do this you should:
1 Connect the computer and camera with the supplied mini USB
2.0 cable.
2 Select MASS STORAGE on the camcorder screen.
3 To access files on your Micro SD card: Video, photo, and audio
files can be found on your computer at My Computer\
SD\DCIM\100MEDIA (path will vary depending on name of
the card).
4 To access files in the camcorder’s internal memory: Video,
photo, and audio files can be found on your computer at My
Computer\DV\DCIM\100MEDIA
5 Under this folder, you can view, delete, move, and copy your
videos, photos, and audio files.
55
Page 56

Chapter 7
Uploading Files to the Internet
The built-in CAMILEO® Uploader application offers you an easy
way to upload your files to social media web sites instantly. It helps
you share them with your family and friends on the web sites.
CAMILEO® Uploader
To upload files to the Internet:
1 Connect the camcorder to your computer by using the supplied
USB cable.
(Sample Illustration) Connecting the camcorder to a computer
56
Page 57

Uploading Files to the Internet
NOTE
CAMILEO® Uploader
2 After making a USB connection, the AutoPlay window will
appear. (It may be different based on OS recognition. If the
AutoPlay window does not appear. Please click My Computer /
DVAP / DVAP.exe to execute the application.)
3 The main screen appears automatically on the desktop.
57
(Sample Image) CAMILEO
®
Uploader main screen
If ArcSoft MediaImpression is not installed, you may be asked
to install the H.264 codec (ffdshow, free under GPL license) for
correctly viewing the videos on CAMILEO Uploader.
4 Choose the web site you wish to upload to.
5 Click on VIDEOS/PHOTOS to go to the videos / photos
thumbnail page. Scroll the bar to change the pages.
Page 58

58
Uploading Files to the Internet
CAMILEO® Uploader
6 Click on the files you want to upload. Click on Select
All/Deselect All to select/deselect all video or photo files
shown on the current page.
(Sample Image) CAMILEO® Uploader main screen
7 Click on Upload to start uploading.
(Sample Image) CAMILEO
videos/photos.
®
Uploader screen - Upload
Page 59

Uploading Files to the Internet
NOTE
Set up account information for the web site
Set up account information for the web site
1 Choose the web site.
2 Click on SETTINGS to go to the setup page.
3 Fill in your account information in the blanks. Then click on
“Save”.
4 You can check Remember Password to save your account
information and password in this CAMILEO Uploader
application. (If it is unchecked, the password request will
appear after clicking on UPLOAD on the thumbnail page.)
59
(Sample Image) CAMILEO
account
Some social web sites may not be accessible in certain regions.
You must have Internet access to upload files to the web site.
®
Uploader screen - Sign up for new
Page 60

Chapter 8
Webcam Mode
Webcam Mode
1 Connect the computer and camcorder with the supplied mini
USB 2.0 cable.
2 Select WEBCAM on the camcorder.
3 In this mode, you can implement live video conference
meetings and multimedia communications.
60
(Sample Illustration) Connecting the camcorder to a computer
Page 61

Chapter 9
Troubleshooting
The files on the memory
card do not display
smoothly when the LCD
shows the “!” marking
Why do some of my
indoor photos look blurry
and dark?
After connecting the USB
cable to the computer...
The camcorder is not
responsive.
Please DO NOT format this disk or delete the application inside;
otherwise, the CAMILEO Uploader application may not function.
The “!” symbol means the SD card is too low of a speed or
contains corrupted files. Solve this condition by formatting
the SD card in the camcorder instead of with a computer
(refer to the detailed format instruction in Chapter 3).
Or change the SD/SDHC/SDXC card to a high speed one.
The camcorder extends photo exposure time under low
light/ indoor condition. Keep the camcorder (and the target
subject) steady for several seconds when taking photos.
The shutter will sound when photos are being taken.
1. The disk “DV” indicates the internal memory of the
camcorder.
2. “Removable Disk” indicates the external memory (if the
SD card is inserted in the camcorder).
3. The disk “DVAP” indicates that the built-in CAMILEO
UPLOADER application is saved to this disk.
Press the reset button, then press the Power button twice.
61
Page 62

Chapter 10
Other Information
Toshiba Support
If you require help or are having problems operating your product,
you may need to contact Toshiba for additional technical assistance.
Before you call
Since some problems may be related to software, it is important that
you investigate other sources of assistance first. Try the following
before contacting Toshiba:
❖ Review the documentation supplied with your product.
❖ If a problem occurs when you are running software
applications, consult the software documentation for
troubleshooting suggestions. Contact the software company’s
technical support department for assistance.
❖ Consult the reseller or dealer from whom you purchased your
product. They are your best resource for current information
and support.
62
Page 63

Contacting Toshiba
Toshiba’s technical support web site
For technical support, or to stay current on the most recent software
and hardware options for your CAMILEO
product information, be sure to regularly check the Toshiba web site
at support.toshiba.com.
Toshiba voice contact
For technical support, call the Toshiba Customer Support Center:
Within the United States at (888) 592-0944
Outside the United States at (949) 583-3305
Warranty
Online Warranty Information
This product is covered by a One (1) Year Standard Limited
Warran ty.
A copy of the warranty is included on the enclosed CD, and can be
viewed online at http://pcsupport.toshiba.com/accessories1yr.
Other Information
Contacting Toshiba
®
product and for other
63
Warranty Service
Customers located in the fifty (50) United States and District of
Columbia may obtain warranty service by visiting the Toshiba
Acclaim Web site at www.acclaim.toshiba.com or by contacting the
telephone support center at 888-592-0944.
Customers located outside the fifty (50) United States and District
of Columbia may obtain warranty service by contacting the
telephone support center at 949-583-3305.
Page 64

CAMILEO® CLIP Manual del usuario
GMAA00371010
04/12
Page 65

2
Información reglamentaria
Información de la Comisión Federal de Comunicaciones de
Estados Unidos (FCC)
Nombre del producto: Videocámara
Número de modelo: CAMILEO® CLIP
Aviso de la FCC “Información sobre la declaración de
conformidad”
Este equipo se probó y se comprobó que cumple con los límites para dispositivos
digitales de Clase B, en virtud de la Parte 15 de las normas de la Comisión
Federal de Comunicaciones de Estados Unidos (Federal Communications
Commission o FCC). Estos límites están diseñados para proporcionar una
protección razonable contra interferencias perjudiciales en una instalación
residencial. Este equipo genera, utiliza y puede irradiar energía de
radiofrecuencia y, si no se instala y utiliza conforme a las instrucciones, puede
provocar interferencias perjudiciales a las comunicaciones por radio. Sin
embargo, no se garantiza que no habrá interferencias en una instalación en
particular. Si este equipo provoca interferencias perjudiciales en la recepción de
radio o televisión, lo que se puede determinar apagando y encendiendo el equipo,
recomendamos al usuario que intente corregir la interferencia adoptando una o
varias de las siguientes medidas:
❖ Cambiar la orientación o la ubicación de la antena receptora.
❖ Aumentar la distancia entre el equipo y el receptor.
❖ Conectar el equipo a un tomacorriente en un circuito diferente al que está
conectado el receptor.
❖ Consultar al distribuidor o a un técnico especializado en radio y televisión
para obtener ayuda.
Los cambios o las modificaciones realizados a este equipo, que no estén
aprobados expresamente por TOSHIBA o por terceros autorizados por
TOSHIBA, pueden invalidar el derecho del usuario a utilizar el equipo.
Page 66

Requisitos de la FCC
NOTA
Este equipo se probó y se comprobó que cumple con la Parte 15 de las
normativas de la FCC. El funcionamiento está sujeto a las siguientes dos
condiciones:
(1) Este dispositivo no debe causar interferencias perjudiciales.
(2) Este dispositivo debe aceptar cualquier interferencia, incluidas aquellas que
puedan comprometer su funcionamiento.
Contacto
Dirección: TOSHIBA America Information Systems, Inc.
9740 Irvine Boulevard
Irvine, California 92618-1697
Teléfono: (949) 583-3000
Instrucciones de seguridad
1 No deje caer la videocámara ni la perfore o desarme, de lo contrario se
anula la garantía.
2 Evite el contacto con el agua y séquese las manos antes de usar la
videocámara.
3 No exponga la videocámara a temperaturas elevadas ni la deje en contacto
directo con la luz del sol ya que la videocámara podría averiarse.
4 Use la videocámara con cuidado. No presione el cuerpo de la videocámara
con fuerza.
5 Para su seguridad personal, no utilice la videocámara durante una tormenta
ni cuando relampaguea.
6 No utilice baterías de especificaciones diferentes, ya que se podrían causar
daños graves.
7 Mantenga la videocámara fuera del alcance de los niños.
3
La videocámara tiene una batería incorporada, a la cual el usuario no
tiene acceso.
Page 67

4
NOTA
Íconos de seguridad
Este manual contiene instrucciones de seguridad que deben seguirse a fin de
evitar posibles peligros que podrían tener como consecuencia lesiones
personales, daños al equipo o pérdida de datos. Son advertencias de seguridad
que están clasificadas de acuerdo con la gravedad del peligro y están
representadas por íconos que distinguen cada instrucción como se
muestra abajo:
Este ícono indica la presencia de una situación inminentemente peligrosa
que, de no evitarse, ocasionaría muerte o lesiones graves.
Este ícono indica la presencia de una situación potencialmente peligrosa
que, de no evitarse, podría ocasionar muerte o lesiones graves.
Este ícono indica la presencia de una situación potencialmente peligrosa
que, de no evitarse, podría ocasionar lesiones menores o moderadas.
Este ícono indica la presencia de una situación potencialmente peligrosa
que, de no evitarse, podría ocasionar daños a la propiedad.
Este ícono brinda información importante.
Información adicional
© Copyright 2012 TOSHIBA CORPORATION. Todos los derechos reservados.
TOSHIBA se reserva el derecho de efectuar cambios técnicos. TOSHIBA no
asume ninguna responsabilidad por daños directos o indirectos incurridos por
errores, omisiones o discrepancias entre este producto y la documentación.
Acerca de la batería incorporada
❖ La batería incorporada es de iones de litio y puede explotar si
no se utiliza de forma correcta.
❖ No intente reemplazar la batería incorporada. Es incorporada y
no se puede cambiar.
Page 68

❖ Cargue la batería incorporada solamente a temperatura
ambiente entre 5 y 35 grados centígrados (41 y 95 grados
Fahrenheit). De lo contrario, es posible que se fugue la
solución electrolítica, que se deteriore el rendimiento de la
batería y que se acorte su duración.
❖ Cargue la batería de acuerdo con las instrucciones.
❖ Para cargar la videocámara utilice solamente el cable USB
suministrado, o un cargador de baterías Toshiba opcional.
Nunca trate de cargar la videocámara con cualquier otro tipo de
cargador.
Marcas comerciales
CAMILEO es una marca registrada de Toshiba America Information Systems,
Inc. y/o Toshiba Corporation.
Adobe y Adobe Reader son marcas registradas o marcas comerciales de Adobe
Systems Incorporated en Estados Unidos y/u otros países.
ArcSoft, MediaImpression y MediaConverter son marcas registradas de
ArcSoft, Inc.
Facebook es una marca registrada de Facebook Inc.
HDMI, el logotipo de HDMI y High-Definition Multimedia Interface son marcas
comerciales o marcas registradas de HDMI Licensing, LLC.
Intel, Intel Core, Celeron, Centrino y Pentium son marcas comerciales o
marcas registradas de Intel Corporation o de sus subsidiarias en Estados
Unidos y otros países.
Mac es una marca comercial de Apple Inc., registrada en Estados Unidos y
otros países.
Microsoft, Windows y Windows Vista son marcas registradas o marcas
comerciales de Microsoft Corporation en Estados Unidos y/u otros países.
Picasa es una marca comercial de Google Inc.
Secure Digital y SD son marcas comerciales de la SD Card Association.
YouTube y el logotipo de YouTube son marcas registradas de Google, Inc.
Todos los demás nombres de marcas y productos son marcas comerciales o
marcas registradas de sus respectivas compañías.
5
Page 69

Contenido
Capítulo 1 Familiarícese con la videocámara..............................9
Vista general ............................................................9
Revise los componentes...................................10
Diseño a prueba de salpicaduras ......................11
Requisitos del sistema......................................11
Vista frontal ......................................................12
Vista inferior .....................................................12
Vista posterior ..................................................13
Capítulo 2 Para comenzar......................................................... 15
Carga de la batería incorporada ..............................15
Inserción y extracción de la micro tarjeta SD
(opcional) .........................................................16
Acerca del clip.........................................................17
Encender la videocámara y empezar a usarla..........17
Encendido de la videocámara -
Modo de suspensión activo ..............................17
Apagado de la videocámara ....................................18
Opciones de menú ..................................................18
Menú de modo de video ...................................18
Menú de modo de fotografía.............................20
6
Page 70

Contenido
7
Capítulo 3 Modo de vista previa/grabación............................. 22
Funciones de los botones .......................................22
Información de la pantalla LCD...............................23
Grabación de videos ...............................................25
Para tomar fotografías ............................................26
Uso de la función anti brillo ....................................26
Uso del zoom digital ...............................................26
Opciones del menú .................................................27
Menú de modo de video ...................................27
Menú de modo de fotografía.............................28
Configuración del video ..........................................29
Resolución........................................................29
Estabilización ....................................................30
Detección de movimiento .................................30
Seguimiento de caras .......................................31
Cámara lenta.....................................................31
Pregrabar..........................................................32
Tiempo de espera .............................................33
Reproducción continua.....................................33
Configuración de la fotografía.................................34
Resolución........................................................34
Temporizador automático .................................35
Detección de sonrisa.........................................35
Impresión de la fecha........................................36
ISO....................................................................36
Presentación de diapositivas.............................37
Configuraciones......................................................38
Sonido ..............................................................38
Formato de TV ..................................................39
Idioma...............................................................39
Hora..................................................................40
Formatear .........................................................40
Restaurar predeterminado ................................41
Efectos....................................................................42
Escena ..............................................................43
Filtro .................................................................43
Balance de blancos ...........................................44
Page 71

8
Contenido
Capítulo 4 Grabación de voz ..................................................... 45
Grabación de voz ....................................................45
Reproducción de audio.....................................47
Eliminar archivo de audio..................................47
Capítulo 5 Modo Reproducir.....................................................48
Funciones de los botones .......................................48
Información de la pantalla LCD...............................49
Operaciones para el modo Reproducir....................50
Reproducción de video ...........................................51
Recorte de video.....................................................51
Reproducción de fotografías...................................53
Eliminar archivo en modo Reproducir.....................53
Capítulo 6 Visualizar archivos en el computador....................54
Instalación del software suministrado.....................54
Cómo transferir archivos a la computadora............55
Capítulo 7 Cómo cargar archivos a internet............................56
CAMILEO® Uploader..............................................56
Información de configuración de la
cuenta para el sitio web ....................................59
Capítulo 8 Modo de cámara web..............................................60
Capítulo 9 Solución de problemas........................................... 61
Capítulo 10 Otra información.................................................... 62
Asistencia técnica de Toshiba .................................62
Antes de contactar a Toshiba............................62
Contacto con Toshiba .............................................63
Sitio web de asistencia técnica de Toshiba .......63
Contacto telefónico con Toshiba.......................63
Garantía ..................................................................63
Información en línea sobre la garantía..............63
Servicio de garantía ..........................................63
Page 72

Capítulo 1
Familiarícese con la videocámara
Gracias por comprar la videocámara CAMILEO Clip. Esta guía presenta las
características de la videocámara, así como algunos procedimientos básicos
para operar este producto.
Vista general
La videocámara Toshiba viene equipada con un sensor de
5 megapixeles que puede grabar videos en formato H.264.
Este formato permite grabar más video con menos memoria.
❖ También se pueden entregar imágenes de alta calidad hasta de
16 megapixeles.
❖ El zoom digital de 5x le ayuda a controlar los videos y
fotografías que toma.
❖ La videocámara admite grabación de video con resolución de
alta definición completa (HD) de 1920 x 1080p. También
puede conectarla a un HDTV mediante un cable mini HDMI
(el cable Mini HDMI
reproducir fácilmente los videos grabados de alta definición en
el HDTV de pantalla amplia.
❖ Estabilización de la imagen electrónica para grabar videos sin
dificultades.
❖ Función Pausa para grabar múltiples momentos en un solo
archivo.
TM
debe comprarse por separado), y
TM
9
Page 73

10
NOTA
NOTA
Cable USB
Videocámara
Correa
Paño de limpieza
CD-ROM de software,
Manual del usuario
(este documento),
e información de garantía
Guía de inicio rápido
Familiarícese con la videocámara
Vista ge n eral
❖ Esta videocámara integra la función de recorte de video para
editar video sin necesidad de una computadora.
❖ El equilibrio de color y la sensibilidad ISO pueden ajustarse
automáticamente o cambiarse manualmente.
❖ Además, la videocámara tiene una función avanzada de carga.
Con la aplicación exclusiva CAMILEO UPLOADER
incorporada, puede subir a Internet los videos o las fotografías
capturadas por la videocámara sin mayor esfuerzo.
❖ Resistente a las salpicaduras y acabado robusto para uso en
exteriores.
❖ La videocámara puede ser una grabadora de voz para grabar
archivos de audio WAV.
❖ La memoria integrada permite tomar fotografías o grabar
videos de forma limitada sin utilizar una tarjeta de memoria.
La ranura para tarjeta de memoria permite a los usuarios
aumentar la capacidad de almacenamiento.
Se utiliza una porción de la memoria integrada para el código de
firmware de la videocámara.
Revise los componentes
Instale la aplicación de software suministrada para visualizar los
videos de manera correcta en una computadora.
Desempaque la caja y asegúrese de que estén incluidos todos los
accesorios estándar enumerados a continuación:
(Ilustración de muestra) Componentes
Page 74

Familiarícese con la videocámara
NOTA
Diseño a prueba de salpicaduras
❖ El diseño a prueba de salpicaduras protege la videocámara de
daños provocados por salpicaduras accidentales.
❖ Siempre mantenga limpio el lente y limpie las gotas de agua de
la videocámara con un paño suave y seco.
❖ La cubierta de los puertos debe estar firmemente cerrada.
❖ La característica a prueba de salpicaduras de los puertos no
está garantizada en todos los entornos o condiciones.
Requisitos del sistema
❖ Microsoft® Windows® XP/Windows Vista®/Windows® 7
❖ CPU Intel
❖ 1 GB de memoria del sistema
❖ 1 GB de espacio libre en el disco duro
❖ Unidad de CD-ROM
❖ Puerto USB disponible
❖ Visualización en colores de 16 bits
®
/ AMD® Dual-Core o superior
Vista ge n eral
11
La pantalla de cristales líquidos (LCD) táctil se fabrica utilizando una
tecnología de altísima precisión. Sin embargo, pueden aparecer en la
pantalla algunos puntos pequeños negros y/o brillantes (blancos,
rojos, azules o verdes). Estos puntos son el resultado normal del
proceso de fabricación y no afectan la grabación.
Page 75

12
Lente
Micrófono
Parlante
Indicador LED
Botón de grabación
Ranura para el trípode
Puerto Mini USB 2.0 Puerto Mini-HDMI™
Gancho para la
Botón de reinicio
correa
Ranura para la tarjeta
Micro SD™
Vista frontal
Familiarícese con la videocámara
Vista ge n eral
(Ilustración de muestra) Vista frontal
Vista inferior
(Ilustración de muestra) Vista inferior
Page 76

Vista posterior
Botón de grabación
Clip
Botón Menú
Botón Izquierdo
Botón Abajo
Pantalla LCD
Botón de modo de cámara
Botón Derecho
Botón de encendido
Botón Arriba
Botón Grabar/Aceptar
Familiarícese con la videocámara
Vista ge n eral
13
(Ilustración de muestra) Vista posterior
GUÍA RÁPIDA
Botón de encendido
Botón de modo de cámara
Botón Menú
Oprima el botón de encendido durante un segundo.
Si no se realiza ninguna operación en tres minutos, la
videocámara se apagará automáticamente para ahorrar batería.
Pulse el botón para alternar entre el modo Video o el modo
Fotografía.
Menú Encendido.
Salir del Menú / Modo Reproducción.
Page 77

14
Botón de grabación
Familiarícese con la videocámara
Vista ge n eral
En el Modo Video, oprima para hacer videos. Para detener la
grabación, oprímalo de nuevo.
En el Modo Fotografía, oprima para tomar fotografías.
En el Modo Video, oprima para hacer videos. Para detener la
grabación, oprímalo de nuevo.
Botón Grabar/Aceptar
Botón Arriba
Botón Abajo
Botón Izquierdo
En el Modo Fotografía, oprima para tomar fotografías.
En GRABACIÓN DE VOZ, oprima para grabar audio. Para
detener la grabación, oprímalo de nuevo.
Validar la configuración.
Acercamiento.
En el Modo Reproducción, vaya a la pantalla Información.
Al reproducir videos, oprima para aumentar el volumen.
Alejamiento.
Al reproducir videos, oprima para disminuir el volumen.
En el Modo Vista previa, oprima para pasar al
Modo Reproducción.
Desplazarse entre los ítems de opción.
En el Modo Reproducción, oprima para pasar al
video/fotografía anterior.
En el Modo Vista previa, oprima para alternar entre ANTI
BRILLO ENCENDIDO o ANTI BRILLO APAGADO.
Botón Derecho
Mientras graba video/audio, oprima para pausar la grabación.
Oprima de nuevo para reanudar la grabación.
Desplazarse entre los ítems de opción.
En el Modo Reproducción, oprima para pasar al siguiente
video/fotografía.
Page 78

Capítulo 2
Para comenzar
Carga de la batería incorporada
Cuando se realiza la conexión USB a la computadora por primera
vez, hasta tres pantallas AutoPlay aparecen en la pantalla de la
computadora. Debe utilizar el cable USB que se suministra.
1 Conecte la videocámara a la computadora.
2 Seleccione Almacenamiento masivo en la pantalla de la
videocámara.
3 Una luz intermitente indica que se está cargando la
videocámara y una luz sólida indica que se completó la carga.
4 El tiempo para la carga completa es de hasta 8.5 horas,
utilizando el cable USB suministrado. El tiempo de carga real
puede variar, dependiendo de la batería y de las condiciones de
carga de la computadora.
15
(Ilustración de muestra) Carga de la batería incorporada
Page 79

16
NOTA
NOTA
Para comenzar
Inserción y extracción de la micro tarjeta SD (opcional)
❖ Asegúrese de quitar la película protectora del lente antes de
utilizarlo.
❖ También puede utilizar el adaptador de CA USB opcional
(capacidad nominal 5V, 2A) para cargar la batería incorporada.
El tiempo de carga aproximado es de 2.5 horas ( el adaptador de
CA USB opcional puede comprarse por separado).
Nunca cargue la batería mediante un método que no esté indicado en
las instrucciones ya que si lo hace puede provocar un incendio o
explosión, que podría ocasionar lesiones graves.
Inserción y extracción de la micro tarjeta SD (opcional)
La videocámara viene con una memoria interna limitada que le
permite guardar una cantidad limitada de fotografías y videos.
puede aumentar la capacidad de la memoria utilizando una tarjeta
de memoria Micro SD opcional.
1 Abra la cubierta de los puertos.
2 Inserte la tarjeta Micro SD™ (opcional) en la ranura hasta que
encaje en su lugar.
3 Para extraer la tarjeta Micro SD™, presiónela hacia adentro
para liberarla y sáquela con suavidad.
Cuando se inserta una tarjeta de memoria, los videos y las
fotografías se guardan en la tarjeta en lugar de la memoria integrada.
Page 80

Para comenzar
NOTA
NOTA
Acerca del clip
Acerca del clip
❖ Hale ligeramente el clip y fije la videocámara en su ropa,
cinturón, etc.
Encender la videocámara y empezar a usarla
❖ Para activar la videocámara, presione el botón de encendido
( ) durante un segundo.
❖ Para grabar video: en el modo Video, oprima el botón Grabar
( ) / ( ) para grabar videos. Para detener la grabación,
oprímalo de nuevo.
❖ Para colocar la grabación en pausa: Oprima el botón
Derecho. Para seguir con la grabación, oprima de nuevo.
❖ Para tomar una fotografía: en el modo Fotografía, oprima el
botón Grabar ( ) / ( ).
❖ Para ver los videos y fotografías guardados: oprima el botón
Izquierdo para pasar al modo de Reproducción.
17
Hay dos botones de grabación independientes para ser utilizados,
dependiendo del modo de uso.
Encendido de la videocámara - Modo de suspensión activo
❖ A fin de ahorrar energía de la batería, la pantalla LCD se apaga
automáticamente después de estar inactiva durante un minuto
aproximadamente para cambiar al modo de espera.
❖ Cuando el modo de espera está activo, se puede reanudar al
modo normal pulsando cualquier botón.
Si no se realiza ninguna operación en tres minutos, la videocámara
se apagará automáticamente para ahorrar batería.
Page 81

18
Apagado de la videocámara
Apagado de la videocámara
Para comenzar
❖ Para apagar la videocámara, presione el botón de encendido
( ) durante un segundo.
Opciones de menú
Hay dos modos de la cámara: Video y Fotografía. Pulse el botón de
modo de cámara ( ) para alternar entre los dos modos.
Menú de modo de video
En el modo de video, oprima ( ) para pasar al menú de modo de video.
ALERÍA DE VIDEOS
G
Vaya al carrusel de archivos de video grabados. Puede revisar los archivos de video
grabados.
Pulse el botón de Grabar/Aceptar ( ) para entrar en el modo de pantalla completa de
reproducción.
La pantalla de información se muestra durante 3 segundos, luego desaparece.
Puede eliminar o editar el archivo de video grabado.
C
ONFIGURACIÓN DEL VIDEO
Full HD 1080/30 1920 x 1080p (30fps)
Resolución
Estabilización
HD 720/60 1280 x 720p (60fps)
HD 720/30 1280 x 720p (30fps)
VGA 480/30 640 x 480 (30fps)
ENCENDIDO
APAGADO Desactiva la estabilización del movimiento.
Permite la estabilización del movimiento, para video
sin sobresaltos y estable.
Detección de
movimiento
Seguimiento de
caras
Cámara lenta
ENCENDIDO
APAGADO Desactiva la detección de movimiento.
ENCENDIDO
APAGADO Desactiva el movimiento de caras.
ENCENDIDO
APAGADO Desactiva la cámara lenta.
Inicia la grabación de video al detectar movimientos
de objetos.
La videocámara puede detectar caras humanas y
centrarse en ellas automáticamente
Graba videos en cámara lenta. Cuando se
reproduce el video, el tiempo de reproducción será
mayor que el tiempo de grabación real.
Page 82

Para comenzar
Opciones de menú
19
Pregrabar
Tiempo de
espera
Reproducción
continua
ONFIGURACIONES:
C
Sonido
Formato de TV
Idiomas
Hora Configuración de fecha y hora
Formatear
Restaurar
predeterminados
RABACIÓN DE VOZ
G
ENCENDIDO
APAGADO Desactiva la pregrabación.
APAGADO Desactiva el tiempo de espera.
1 segundo Graba un cuadro por segundo.
3 segundos Graba un cuadro cada tres segundos.
5 segundos Graba un cuadro cada cinco segundos.
ENCENDIDO Reproduce los archivos de video continuamente.
APAGADO Desactiva la reproducción continua.
ENCENDIDO Activa el sonido de la operación.
APAGADO Desactiva el sonido de la operación.
NTSC (60Hz) La configuración de salida de TV es NTSC estándar.
PAL (50Hz) La configuración de salida de TV es PAL estándar.
Inglés, checo, danés, holandés, finlandés, francés, alemán, griego,
italiano, noruego, polaco, portugués, ruso, sueco, español y turco.
SÍ Formatear memoria/ tarjeta.
NO No formatear memoria/ tarjeta.
SÍ
NO No restaura los valores predeterminados de fábrica.
Activa la pregrabación. La videocámara graba unos
segundos más antes de que se presione el botón Grabar.
Restaura los valores predeterminados de fábrica y borra
todos los datos de perfil de Wi-Fi.
Puede iniciar la grabación de voz o revisar o eliminar los archivos de audio grabados en la GALERÍA DE
. Presione el botón Grabar/Aceptar ( ) para iniciar la grabación.
AUDIO
FECTOS
E
AUTO Ajuste automático.
PIEL
Escena
NOCTURNO
LUZ DE FONDO Seleccione cuando hay luz brillante detrás del sujeto.
Seleccione para hacer que los tonos de la piel tengan un
aspecto más natural.
Seleccione para escenas nocturnas o situaciones de
poca luz.
Page 83

20
Filtro
Para comenzar
Opciones de menú
AUTO Tome fotografías sin ningún efecto especial en la imagen.
BLANCO Y NEGRO La imagen se convierte en blanco y negro.
CLÁSICO La imagen se convierte en apariencia sepia.
NEGATIVO La imagen se convierte en el negativo de la normal.
AUTO Ajuste automático.
Balance de
blancos
LUZ DIURNA Utilice bajo condición de luz externa.
FLUORESCENTE Utilice bajo condición de luz fluorescente.
TUNGSTENO Utilice bajo condición de luz de tungsteno.
Menú de modo de fotografía
En el modo Fotografía, oprima ( ) para pasar al menú de modo de fotografía.
G
ALERÍA DE FOTOGRAFÍAS
Vaya al carrusel de archivos de fotografías grabadas. Puede revisar los archivos de
fotografías grabadas.
Pulse el botón de Grabar/Aceptar ( ) para entrar en el modo de pantalla completa de
reproducción.
La pantalla de información se muestra durante 3 segundos, luego desaparece. Puede
eliminar los archivos de fotografías grabadas.
ONFIGURACIÓN DE LA FOTOGRAFÍA
C
HIGH - 16MP 4608 x 3456 (16MP)
Resolución
Temporizador
automático
Detección de
sonrisa
Impresión de la
fecha
STANDARD - 5MP 2592 x 1944 (5MP)
BAJA - 3MP 2048 x 1536 (3MP)
ENCENDIDO Activa el temporizador automático de 10 segundos de
retardo.
APAGADO Desactiva el temporizador automático.
ENCENDIDO La videocámara puede capturar una imagen
automáticamente cuando detecta una sonrisa en el
modo fotografía.
APAGADO Desactiva la detección de sonrisa.
ENCENDIDO Imprime la fecha y la hora en la fotografía.
APAGADO Desactiva la impresión de fecha.
Page 84

ISO
Presentación de
diapositivas
ONFIGURACIONES:
C
Para comenzar
Opciones de menú
AUTO La videocámara ajusta automáticamente la
sensibilidad ISO de sus imágenes.
800 Ajusta manualmente a ISO 800 para configuraciones de
luz más bajas.
2 segundos Muestra una fotografía cada 2 segundos.
5 segundos Muestra una fotografía cada 5 segundos.
10 segundos Muestra una fotografía cada 10 segundos.
APAGADO Desactiva la presentación de diapositivas.
21
RABACIÓN DE VOZ
EFECTOS
(Consulte el menú de modo de video.)G
Page 85

Capítulo 3
Modo de vista previa/grabación
Funciones de los botones
Botón de modo de cámara
1 Pulse el botón para alternar entre el modo Video o el modo
Fotografía.
Botón Menú:
1 Menú Encendido.
2 Salir del Menú / Modo Reproducción.
Botón de grabación
1 En el Modo Video, oprima para hacer videos. Para detener la
grabación, oprímalo de nuevo.
2 En el Modo Fotografía, oprima para tomar fotografías.
22
Page 86

Modo de vista previa/grabación
Información de la pantalla LCD
Botón Arriba
1 Acercamiento.
Botón Abajo
1 Alejamiento.
Botón Izquierdo
1 En el Modo Vista previa, oprima para pasar al Modo
Reproducción.
Botón Derecho
1 En el Modo Vista previa, oprima para alternar entre ANTI BRILLO
ENCENDIDO o ANTI BRILLO APAGADO.
2 Mientras graba video/audio, oprima para pausar la grabación.
Oprima de nuevo para reanudar la grabación.
Botón Grabar/Aceptar
1 En el Modo Video, oprima para hacer videos.
Para detener la grabación, oprímalo de nuevo.
2 En el Modo Fotografía, oprima para tomar fotografías.
Botón de encendido
1 Presione durante un segundo para encender o apagar la
videocámara.
23
Información de la pantalla LCD
Los indicadores que aparecen en las siguientes imágenes pueden
aparecer en la pantalla LCD cuando se graban fotografías o videos:
(Imagen de muestra) Información de la pantalla LCD
Page 87

24
NOTA
Modo de vista previa/grabación
Información de la pantalla LCD
Batería: Alimentación plena
1
2
3
4, 5
6
Batería: Alimentación media
Batería: Alimentación baja
ESOLUCIÓN DE VIDEO
R
FHD FULL HD 1080/30
HD60 HD 720/60
HD30 HD 720/30
VGA VGA 480/30
RESOLUCIÓN DE FOTOGRAFÍA
16MP Alta-16MP
5MP Estándar-5MP
3MP Baja-3MP
ANTI BRILLO ENCENDIDO
01:22:23 Modo de video / Tiempo de grabación restante
15
Modo de fotografía / Cantidad de fotografías restantes que
se pueden tomar con la configuración de resolución actual
Contador del zoom:
1X~5X (5X zoom digital) (disponible para grabación de
video FULL HD 1080/30)
1X~10X (10X zoom digital) (disponible para grabación de
video HD 720/60, HD 720/30 y VGA 480/30)
Algunos modos no pueden utilizarse simultáneamente.
Page 88

Modo de vista previa/grabación
Grabación de videos
Operación Pantalla de visualización
1 En el modo Video, oprima el botón Grabar
( ) / ( ) para iniciar la grabación.
2 Un indicador de tiempo aparece en la
pantalla LCD mientras se está grabando un
video
3 Oprima de nuevo el botón Grabar ( ) /
( ) para detener la grabación.
4 Para pausar la grabación oprima el botón
Derecho. Para seguir con la grabación,
oprímalo de nuevo.
Grabación de videos
25
Page 89

26
Modo de vista previa/grabación
Para tomar fotografías
Para tomar fotografías
Operación Pantalla de visualización
1 En el modo Fotografía, oprima el botón
Grabar ( ) / ( ) para tomar la
fotografía.
Uso de la función anti brillo
Operación Pantalla de visualización
1 Oprima el botón derecho en el modo de
vista previa, el icono ANTI BRILLO ( )
aparece en la pantalla.
2 Oprima de nuevo y desaparece el icono
ANTI BRILLO ( ).
Uso del zoom digital
❖ El zoom digital amplía las imágenes al grabar videos o
tomar fotografías.
❖ El zoom digital puede ajustarse a 1X~5X (FULL HD 1080/30),
o 1X~10X (HD 720/60, HD 720/30, y VGA 480/30).
Page 90

Modo de vista previa/grabación
Opciones del menú
Menú de modo de video
Operación Pantalla de visualización
1 Oprima ( ) para cambiar al modo Video.
2 Oprima ( ) para tener acceso al menú de
modo Video.
3 Utilice el botón de derecha/izquierda para
seleccionar la opción deseada en el
carrusel y, a continuación, pulse el botón
Aceptar ( ) para entrar en su menú.
4 O presione ( ) para salir del menú de
modo de Video.
Opciones del menú
27
GALERÍA DE
VIDEOS
(Carrusel de
archivos de
video)
CONFIGURA-
CIÓN DEL VIDEO
• RESOLUCIÓN
• ESTABILIZACIÓN
• DETECCIÓN DE
MOVIMIENTO
• SEGUIMIENTO
DE CARAS
• CÁMARA LENTA
• PREGRABAR
• TIEMPO DE
ESPERA
• REPRODUCCIÓN
CONTINUA
CONFIGURA-
CIONES
• SONIDO
• FORMATO DE
TV
• IDIOMAS
• FECHA Y
HORA
• FORMATO
• RESTAURAR
PREDETERMI
NADO
GRABACIÓN DE
VOZ
• INICIAR
GRABACIÓN
• GALERÍA DE
AUDIO
• ESCENA
• FILTRO
• BALANCE DE
BLANCOS
❖ Consulte el Capítulo 4 para obtener la información detallada acerca de la
GRABACIÓN DE VOZ.
❖ Consulte el Capítulo 5 para obtener la información detallada acerca de la
GALERÍA DE VIDEOS.
EFECTOS
Page 91

28
Opciones del menú
Menú de modo de fotografía
Operación Pantalla de visualización
1 Oprima ( ) para cambiar al modo
Fotografía.
2 Oprima ( ) para tener acceso al menú de
modo Fotografía.
3 Utilice el botón de derecha/izquierda para
seleccionar la opción deseada en el
carrusel y, a continuación, pulse el botón
Aceptar ( ) para entrar en su menú.
4 O presione ( ) para salir del menú de
modo Fotografía.
Modo de vista previa/grabación
GALERÍA DE
FOTOGRAFÍAS
(Carrusel de
archivos de
fotografía)
CONFIGURACIÓN
DE LA
FOTOGRAFÍA
• RESOLUCIÓN
• TEMPORIZADOR
AUTOMÁTICO
• DETECCIÓN DE
SONRISA
• IMPRESIÓN DE
FECHA
• ISO
• PRESENTACIÓN
DEDIAPOSITIVAS
CONFIGURACIONES
• SONIDO
• FORMATO
DE TV
• IDIOMAS
• FECHA Y
HORA
• FORMATO
• RESTAURAR
PREDETERMI
NADO
GRABACIÓN
DE VOZ
• INICIAR
GRABACIÓN
• GALERÍA DE
AUDIO
❖ Consulte el Capítulo 4 para obtener la información detallada acerca de la
GRABACIÓN DE VOZ.
❖ Consulte el Capítulo 5 para obtener la información detallada acerca de la
GALERÍA DE FOTOGRAFÍAS.
EFECTOS
• ESCENA
• FILTRO
• BALANCE DE
BLANCOS
Page 92

Modo de vista previa/grabación
Configuración del video
Operación Pantalla de visualización
1 En el modo de video, oprima ( ) para
pasar al menú de modo de video.
2 Utilice el botón de derecha/izquierda para
seleccionar la CONFIGURACIÓN DE VIDEO
en el carrusel y, a continuación, pulse el
botón Aceptar para entrar en su menú.
3 El menú contiene ocho opciones:
RESOLUCIÓN, ESTABIL IZAC IÓN ,
DETECCIÓN DE MOVIMIENTO,
SEGUIMIENTO DE CARAS, CÁMARA LENTA,
PREGRABACIÓN, TIEMPO DE ESPERA Y
REPRODUCCIÓN CONTINUA, para que
ajuste la configuración de la videocámara.
4 Utilice el botón de derecha/izquierda para
seleccionar la opción deseada en el
carrusel y, a continuación, pulse el botón
Aceptar ( ) para entrar en su menú.
5 O presione el botón Arriba para resaltar el
icono Retorno ( ) y, a continuación,
presione el botón Aceptar ( ) para salir.
Resolución
Hay cuatro configuraciones de resolución disponibles.
❖ Full HD: 1080/30: Graba videos con una resolución de
1920x1080p 30 FPS (cuadros por segundo).
❖ HD 720/60: Graba videos con una resolución de 1280x720p 60 FPS.
❖ HD 720/30: Graba videos con una resolución de 1280x720p 30 FPS.
❖ VGA 480/30: Graba videos con una resolución de 640x480p 30 FPS.
Configuración del video
29
Operación Pantalla de visualización
1 En el menú de configuración de video,
seleccione el icono RESOLUCIÓN y,
a continuación, presione el botón
Aceptar ( ) para entrar en su menú de
configuración.
2 Utilice el botón arriba/abajo para
seleccionar el ajuste deseado y, a
continuación, pulse el botón Aceptar ( )
para validar la configuración.
3 O presione el botón Arriba para resaltar el
icono Retorno ( ) y, a continuación,
presione el botón Aceptar ( ) para salir.
Page 93

30
Configuración del video
Estabilización
Modo de vista previa/grabación
Graba con un efecto de reducción de la sacudida de la videocámara para producir un
video más estable.
Operación Pantalla de visualización
1 En el menú de configuración de video,
seleccione el icono ESTABILIZACIÓN y,
a continuación, presione el botón
Aceptar ( ) para entrar en su menú de
configuración.
2 Utilice el botón arriba/abajo para
seleccionar el ajuste deseado y,
a continuación, pulse el botón
Aceptar ( ) para validar la configuración.
3 O presione el botón Arriba para resaltar el
icono Retorno ( ) y, a continuación,
presione el botón Aceptar ( ) para salir.
Detección de movimiento
Graba video automáticamente cuando la videocámara detecta un movimiento.
Operación Pantalla de visualización
1 En el menú de configuración de video,
seleccione el icono DETECCIÓN DE
MOVIMIENTO y, a continuación, presione
el botón Aceptar ( ) para entrar en su
menú de configuración.
2 Utilice el botón arriba/abajo para
seleccionar ENCENDIDO o APAGADO y,
a continuación, pulse el botón
Aceptar ( ) para validar la configuración.
3 O presione el botón Arriba para resaltar el
icono Retorno ( ) y, a continuación,
presione el botón Aceptar ( ) para salir.
4 La videocámara comenzará a grabar video
automáticamente si detecta un
movimiento y se detendrá la grabación
cuando ya no detecta movimiento.
Page 94

Modo de vista previa/grabación
Configuración del video
Seguimiento de caras
La videocámara puede detectar caras humanas y enfocarse en ellas automáticamente
(hasta seis caras). Utilice esta función para capturar retratos en escenas de contraluz.
Operación Pantalla de visualización
1 En el menú de configuración de video,
seleccione el icono SEGUIMIENTO DE
CARAS y, a continuación, presione el
botón Aceptar ( ) para entrar en su menú
de configuración.
2 Utilice el botón arriba/abajo para
seleccionar el ajuste deseado y,
a continuación, pulse el botón
Aceptar ( ) para validar la configuración.
3 O presione el botón Arriba para resaltar el
icono Retorno ( ) y, a continuación,
presione el botón Aceptar ( ) para salir.
4 En el modo Grabar, enfoque la
videocámara en las caras. El marco
aparece alrededor de la cara.
31
Cámara lenta
Graba video con efecto de cámara lenta. Cuando se reproduce el video, el tiempo de
reproducción será mayor que el tiempo de grabación real. En algunas ocasiones se
puede utilizar este efecto, tal como en la demostración de la habilidad de actividades
deportivas de todo tipo, o un momento clave en un juego deportivo.
Operación Pantalla de visualización
1 En el menú de configuración de video,
seleccione el icono CÁMARA LENTA y,
a continuación, presione el botón
Aceptar ( ) para entrar en su menú de
configuración.
2 Utilice el botón arriba/abajo para
seleccionar ENCENDIDO o APAGADO y,
a continuación, pulse el botón
Aceptar ( ) para validar la configuración.
3 O presione el botón Arriba para resaltar el
icono Retorno ( ) y, a continuación,
presione el botón Aceptar ( ) para salir.
Page 95

32
NOTA
NOTA
Configuración del video
❖ El ángulo de visión puede ser menor cuando la Cámara Lenta
está encendida.
❖ Cuando la Cámara Lenta está encendida, la resolución de video
es 320x240.
Pregrabar
La función Pregrabar asegura que usted no se perderá ninguna oportunidad grabación
crítica. Los videos son grabados unos segundos más antes de que se presione el botón
Grabar.
Operación Pantalla de visualización
1 En el menú de configuración de video,
seleccione el icono Pregrabar y,
a continuación, presione el botón
Aceptar ( ) para entrar en su menú de
configuración.
2 Utilice el botón arriba/abajo para
seleccionar ENCENDIDO o APAGADO y,
a continuación, pulse el botón
Aceptar ( ) para validar la configuración.
3 O presione el botón Arriba para resaltar el
icono Retorno ( ) y, a continuación,
presione el botón Aceptar ( ) para salir.
Modo de vista previa/grabación
❖ Asegúrese de apuntar la videocámara al sujeto y ubíquela de
forma segura antes de presionar el botón Grabar.
❖ Una vez activada la función Pregrabar, ésta se desactivará
cuando se ajusta cualquier otra configuración.
Page 96

Modo de vista previa/grabación
NOTA
Configuración del video
Tiempo de espera
Graba imágenes fijas a intervalos específicos que usted puede establecer y las puede
reproducir como un archivo de video. Este efecto permite grabar paisajes de nubes,
semillas germinando y flores abriéndose.
❖ OFF: Desactiva el Tiempo de espera.
❖ 1 SEGUNDO: Graba un cuadro por segundo.
❖ 3 SEGUNDOS: Graba tres cuadros por segundo.
❖ 5 SEGUNDOS: Graba cinco cuadros por segundo.
Operación Pantalla de visualización
1 En el menú de configuración de video,
seleccione el icono TIEMPO DE ESPERA y,
a continuación, presione el botón
Aceptar ( ) para entrar en su menú de
configuración.
2 Utilice el botón arriba/abajo para
seleccionar el ajuste deseado y, a
continuación, pulse el botón Aceptar ( )
para validar la configuración.
3 O presione el botón Arriba para resaltar el
icono Retorno ( ) y, a continuación,
presione el botón Aceptar ( ) para salir.
33
Las funciones detección de movimiento, tiempo de espera y cámara
lenta no pueden utilizarse simultáneamente.
Reproducción continua
Reproduce los archivos de video continuamente.
Operación Pantalla de visualización
1 En el menú de configuración de video,
seleccione el icono Reproducción continua
y, a continuación, presione el botón
Aceptar ( ) para entrar en su menú de
configuración.
2 Utilice el botón arriba/abajo para
seleccionar el ajuste Encendido o Apagado
y, a continuación, pulse el botón
Aceptar ( ) para validar la configuración.
3 O presione el botón Arriba para resaltar el
icono Retorno ( ) y, a continuación,
presione el botón Aceptar ( ) para salir.
Page 97

34
Configuración de la fotografía
Configuración de la fotografía
Operación Pantalla de visualización
1 En el modo Fotografía, oprima ( ) para
pasar al menú de modo de fotografía.
2 Utilice el botón de derecha/izquierda para
seleccionar Configuración de la fotografía
en el carrusel y, a continuación, pulse el
botón Aceptar ( ) para entrar en su
menú.
3 El menú contiene seis opciones:
RESOLUCIÓN, TEMPORIZADOR
AUTOMÁTICO, DETECCIÓN DE
SONRISAS, IMPRESIÓN DE FECHAS,
ISO y PRESENTACIÓN DE DIAPOSITIVAS,
para que ajuste la configuración de la
videocámara.
4 Utilice el botón de derecha/izquierda para
seleccionar la opción deseada en el
carrusel y, a continuación, pulse el botón
Aceptar ( ) para entrar en su menú.
5 O presione el botón Arriba para resaltar el
icono Retorno ( ), a continuación,
presione el botón Aceptar ( ) para salir.
Modo de vista previa/grabación
Resolución
Hay tres configuraciones de resolución disponibles.
❖ 16MP: Toma fotografías con una resolución de
4608 x 3456, 16 megapixeles (interpolados).
❖ 5MP: Toma fotografías con una calidad de
592 x 1944, 5 megapixeles.
❖ 3MP: Toma fotografías con una calidad de
2048 x 1536, 3 megapixeles..
Operación Pantalla de visualización
1 En el menú de configuración de fotografía,
seleccione el icono RESOLUCIÓN y, a
continuación, presione el botón
Aceptar ( ) para entrar en su menú de
configuración.
2 Utilice el botón arriba/abajo para
seleccionar el ajuste deseado y,
a continuación, pulse el botón
Aceptar ( ) para validar la configuración.
3 O presione el botón Arriba para resaltar el
icono Retorno ( ) y, a continuación,
presione el botón Aceptar ( ) para salir.
Page 98

Modo de vista previa/grabación
Configuración de la fotografía
Temporizador automático
El temporizador automático permite tomar fotografías con un
retraso de tiempo de diez segundos.
Operación Pantalla de visualización
1 En el menú de configuración de video,
seleccione el icono TEMPORIZADOR
AUTOMÁTICO y, a continuación,
presione el botón Aceptar ( ) para entrar
en su menú de configuración.
2 Utilice el botón arriba/abajo para
seleccionar Encendido o Apagado y,
a continuación, pulse el botón
Aceptar ( ) para validar la configuración.
3 O presione el botón Arriba para resaltar el
icono Retorno ( ) y, a continuación,
presione el botón Aceptar ( ) para salir.
Detección de sonrisa
La videocámara captura la fotografía automáticamente cuando detecta una sonrisa.
Operación Pantalla de visualización
1 En el menú de configuración de fotografía,
seleccione el icono DETECCIÓN DE
SONRISA y, a continuación, presione el
botón Aceptar ( ) para entrar en su menú
de configuración.
2 Utilice el botón arriba/abajo para
seleccionar Encendido o Apagado y,
a continuación, pulse el botón
Aceptar ( ) para validar la configuración.
3 O presione el botón Arriba para resaltar el
icono Retorno ( ) y, a continuación,
presione el botón Aceptar ( ) para salir.
4 En el modo Grabar, enfoque la
videocámara en las caras sonrientes.
Los marcos aparecen alrededor de las
caras sonrientes. La videocámara se
enfocará en el sujeto y, a continuación,
capturará la fotografía automáticamente.
35
Page 99

36
NOTA
Configuración de la fotografía
Impresión de la fecha
Modo de vista previa/grabación
Imprime la fecha y la hora en la fotografía.
Operación Pantalla de visualización
1 En el menú de configuración de fotografía,
seleccione el icono IMPRESIÓN DE FECHA
y, a continuación, presione el botón
Aceptar ( ) para entrar en su menú de
configuración.
2 Utilice el botón arriba/abajo para
seleccionar Encendido o Apagado y,
a continuación, pulse el botón
Aceptar ( ) para validar la configuración.
3 O presione el botón Arriba para resaltar el
icono Retorno ( ) y, a continuación,
presione el botón Aceptar ( ) para salir.
4 Cuando la función está activada, la fecha
aparece en la esquina de la fotografía.
ISO
La videocámara ajusta automáticamente la sensibilidad ISO de sus imágenes. También
está disponible una configuración manual de sensibilidad ISO de 800. Seleccione
manualmente ISO 800 para tomar una imagen en configuraciones de luz inferiores.
❖ AUTO: Ajusta la sensitibilidad ISO automáticamente.
❖ 800: ISO 800
Operación Pantalla de visualización
1 En el menú de configuración de fotografía,
seleccione el icono ISO y, a continuación,
presione el botón Aceptar ( ) para entrar
en su menú de configuración.
2 Utilice el botón arriba/abajo para
seleccionar el ajuste deseado y, a
continuación, pulse el botón Aceptar ( )
para validar la configuración.
3 O presione el botón Arriba para resaltar el
icono Retorno ( ) y, a continuación,
presione el botón Aceptar ( ) para salir.
La imagen puede volverse granulosa cuando el número ISO es
grande.
Page 100

Modo de vista previa/grabación
Configuración de la fotografía
Presentación de diapositivas
Muestra fotografías una después de otra.
❖ 2 SEGUNDOS: Muestra una fotografía cada 2 segundos.
❖ 5 SEGUNDOS: Muestra una fotografía cada 5 segundos.
❖ 10 SEGUNDOS: Muestra una fotografía cada 10 segundos.
❖ OFF: Desactiva la presentación de diapositivas
Operación Pantalla de visualización
1 En el menú de configuración de fotografía,
seleccione el icono Presentación de
diapositivas y, a continuación, presione el
botón Aceptar ( ) para entrar en su menú
de configuración.
2 Utilice el botón arriba/abajo para
seleccionar el ajuste deseado y,
a continuación, pulse el botón
Aceptar ( ) para validar la configuración.
3 O presione el botón Arriba para resaltar el
icono Retorno ( ) y, a continuación,
presione el botón Aceptar ( ) para salir.
37
 Loading...