

Page 1

CAMILEO® AIR10 User’s Guide
GMAA00363011
02/12
Page 2

2
Regulatory Information
FCC Information FCC Information
Product Name: Camcorder
Model number: CAMILEO
FCC notice “Declaration of Conformity Information”
This equipment has been tested and found to comply with the limits for a Class B
digital device, pursuant to part 15 of the FCC rules. These limits are designed to
provide reasonable protection against harmful interference in a residential
installation. This equipment generates, uses and can radiate radio frequency
energy and, if not installed and used in accordance with the instructions, may
cause harmful interference to radio communications. However, there is no
guarantee that interference will not occur in a particular installation. If this
equipment does cause harmful interference to radio or television reception, which
can be determined by turning the equipment OFF and ON, the user is encouraged
to try to correct the interference by one or more of the following measures:
❖ Reorient or relocate the receiving antenna.
❖ Increase the separation between the equipment and receiver.
❖ Connect the equipment into an outlet on a circuit different from that to
which the receiver is connected.
❖ Consult the dealer or an experienced radio/TV technician for help.
®
AIR10
Changes or modifications made to this equipment, not expressly approved
by TOSHIBA or parties authorized by TOSHIBA could void the user’s
authority to operate the equipment.
FCC Conditions
This equipment has been tested and found to comply with Part 15 of the FCC
Rules. Operation is subject to the following two conditions:
(1) This device may not cause harmful interference.
(2) This device must accept any interference received. Including interference that
may cause undesired operation.
Page 3

Contact
Address: TOSHIBA America Information Systems, Inc.
9740 Irvine Boulevard
Irvine, California 92618-1697
Telephone: (949) 583-3000
Safety Instructions
1 Do not drop, puncture or disassemble the camcorder; otherwise the
warranty will be voided.
2 Avoid all contact with water, and dry hands before using.
3 Do not expose the camcorder to high temperature or leave it in direct
sunlight. Doing so may damage the camcorder.
4 Use the camcorder with care. Avoid pressing hard on the camcorder body.
5 For your own safety, avoid using the camcorder when there is a storm or
lightning.
6 Do not use a battery of different specifications. Doing so may lead to the
potential for serious damage.
7 Remove the battery during long periods between usage, as a deteriorated
battery may affect the functionality of the camcorder.
8 Remove the battery if it shows signs of leaking or distortion.
9 Use only the accessories supplied by the manufacturer.
10 Keep the camcorder out of the reach of infants.
11 Risk of explosion if battery is replaced by an incorrect type.
12 Dispose of used batteries according to the instructions.
3
About the battery
❖ Use only batteries recommended by TOSHIBA as replacements. The
battery is a lithium ion battery, which can explode if not replaced, used,
handled or disposed of properly. Dispose of the battery as required by local
ordinances or regulations.
❖ Charge the battery only in an ambient temperature between 14 and 104
degrees Fahrenheit (-10 and 40 degrees Celsius). Otherwise, the electrolyte
solution might leak, battery performance might deteriorate and the battery
life might be shortened.
❖ Never install or remove the battery without first turning OFF the power and
disconnecting the AC adaptor (AC adaptor may be sold separately) or mini
USB cable (if used for charging).
❖ Only use the supplied Mini USB cable or AC adaptor (AC adaptor sold
separately). Never attempt to charge the battery with any other charger.
Page 4
4
NOTE
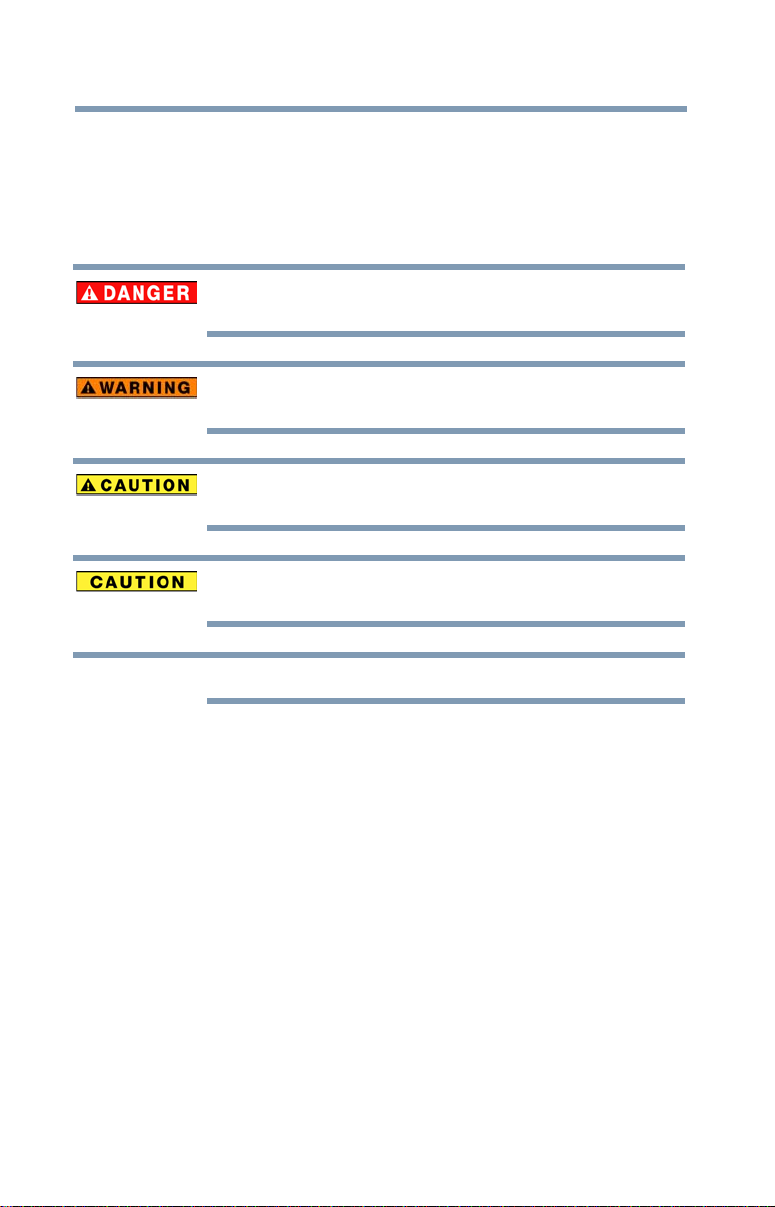
Safety icons
This manual contains safety instructions that must be observed to avoid potential
hazards that could result in personal injuries, damage to your equipment, or loss
of data. These safety cautions have been classified according to the seriousness of
the risk, and icons highlight these instructions as follows:
Indicates an imminently hazardous situation which, if not avoided, will result
in death or serious injury.
Indicates a potentially hazardous situation which, if not avoided, could result
in death or serious injury.
Indicates a potentially hazardous situation which, if not avoided, may result
in minor or moderate injury.
Indicates a potentially hazardous situation which, if not avoided, may result
in property damage.
Provides important information.
Additional Information
© Copyright 2012 TOSHIBA CORPORATION. All rights reserved.
TOSHIBA reserves the right to make technical changes. TOSHIBA assumes no
liability for damages incurred directly or indirectly from errors, omissions or
discrepancies between this product and the documentation.
Page 5

Trademarks
CAMILEO is a registered trademark of Toshiba America Information Systems,
Inc. and/or Toshiba Corporation.
Adobe is either a registered trademark or trademark of Adobe Systems
Incorporated in the United States and/or other countries.
ArcSoft and MediaImpression are registered trademarks of ArcSoft, Inc.
Facebook is a registered trademark of Facebook Inc.
HDMI, the HDMI Logo and High-Definition Multimedia Interface are
trademarks or registered trademarks of HDMI Licensing, LLC.
Intel, Intel Core, Celeron, Centrino and Pentium are trademarks or registered
trademarks of Intel Corporation or its subsidiaries in the United States and other
countries.
Microsoft, Windows, and Windows Vista are either registered trademarks or
trademarks of Microsoft Corporation in the United States and/or other countries.
Picasa is a trademark of Google Inc.
Secure Digital and SD are trademarks of SD Card Association.
Wi-Fi is a registered trademark of the Wi-Fi Alliance.
YouTube and the YouTube logo are registered trademarks of Google, Inc.
All other brand and product names are trademarks or registered trademarks of
their respective companies.
5
Page 6

Contents
Chapter 1: Getting to Know Your Camcorder.............................9
Overview ...................................................................9
Check the Components .....................................10
System Requirements.......................................11
Front view .........................................................12
Underside view .................................................12
Rear view ..........................................................13
Chapter 2: Getting Started......................................................... 14
Charging the battery ...............................................14
Charging the battery .........................................16
Inserting and removing an SD™ Card (optional).....21
Protecting data on an SD™ Card.......................22
Turning the camcorder on and getting started........22
Turning off the camcorder ......................................22
Chapter 3: Record Mode........................................................... 23
Button functions .....................................................23
LCD screen information ..........................................24
Notification icons ..............................................25
Video recording ......................................................26
6
Page 7

Contents
Photo recording ......................................................27
Using Digital zoom..................................................27
Menu options/operations ........................................27
Video Setting options........................................28
Photo setting options........................................31
Effects...............................................................36
7
Chapter 4: Playback Mode........................................................ 39
Button functions .....................................................39
LCD screen information ..........................................40
Notification icons ..............................................41
Playback mode operations......................................42
Video Playback..................................................43
Photo Playback .................................................43
Delete a file in Playback mode ..........................44
Chapter 5: Camcorder Settings ................................................ 45
Setup menu ............................................................45
Menu Sound .....................................................46
TV .....................................................................46
Language ..........................................................47
Time settings ....................................................47
Format ..............................................................48
Default setting...................................................49
Chapter 6: CAMILEO® AIR10 Connect................................... 50
Advanced operations on your computer
(CAMILEO® AIR10 Connect)............................50
Installing CAMILEO® AIR10 Connect .....................50
Using CAMILEO® AIR10 Connect via Wi-Fi®
(Infrastructure mode) .......................................52
Using CAMILEO AIR10 Connect via USB ................55
Chapter 7: Wi-Fi® Functions...................................................... 58
Uploading files to social networking sites...............59
Broadcast live streaming on USTREAM .................63
Page 8

8
Contents
Chapter 8: Viewing Photos and
Videos on TV..................................................... 65
Connecting to a high-definition 16:9 (wide) TV.......65
Installing bundled software.....................................66
Chapter 9: Viewing Photos and
Videos on a Computer...................................... 67
Transferring photos or videos to a computer..........67
Chapter 10: Specifications......................................................... 68
Operating Environment Conditions .........................69
Chapter 11: Troubleshooting..................................................... 70
Chapter 12: Other Information.................................................. 73
Toshiba Support .....................................................73
Before you call ..................................................73
Contacting Toshiba .................................................74
Toshiba’s technical support Web site................74
Toshiba voice contact .......................................74
Warranty .................................................................74
Online Warranty Information.............................74
Warranty Service ..............................................74
Page 9

Chapter 1
Getting to Know Your Camcorder
Overview
Your Toshiba camcorder comes equipped with a 5 Megapixel BSI
CMOS sensor that can record H.264 format videos. This format
allows for extended video recording with less memory.
Other features of your CAMILEO
❖ Built-in CAMILEO
to easily upload or stream videos captured by the camcorder to
the Internet (for Windows
❖ High quality photos up to 16 Megapixels (interpolated)
❖ Color LCD screen for easy viewing of photos and videos
❖ Video recording at full HD resolution of 1920 x1080p
❖ HDTV connectivity via an HDMI
separately)
❖ Easy playback of recorded high-definition videos on wide
screen HDTV
❖ ISO and white balance can be set to automatic or may be
manually adjusted
❖ 5x digital zoom
❖ Webcam for video conferencing
®
AIR10 Connect application, allowing you
®
AIR10 camcorder are:
®
based systems only)
®
cable (HDMI® cable sold
9
Page 10
10
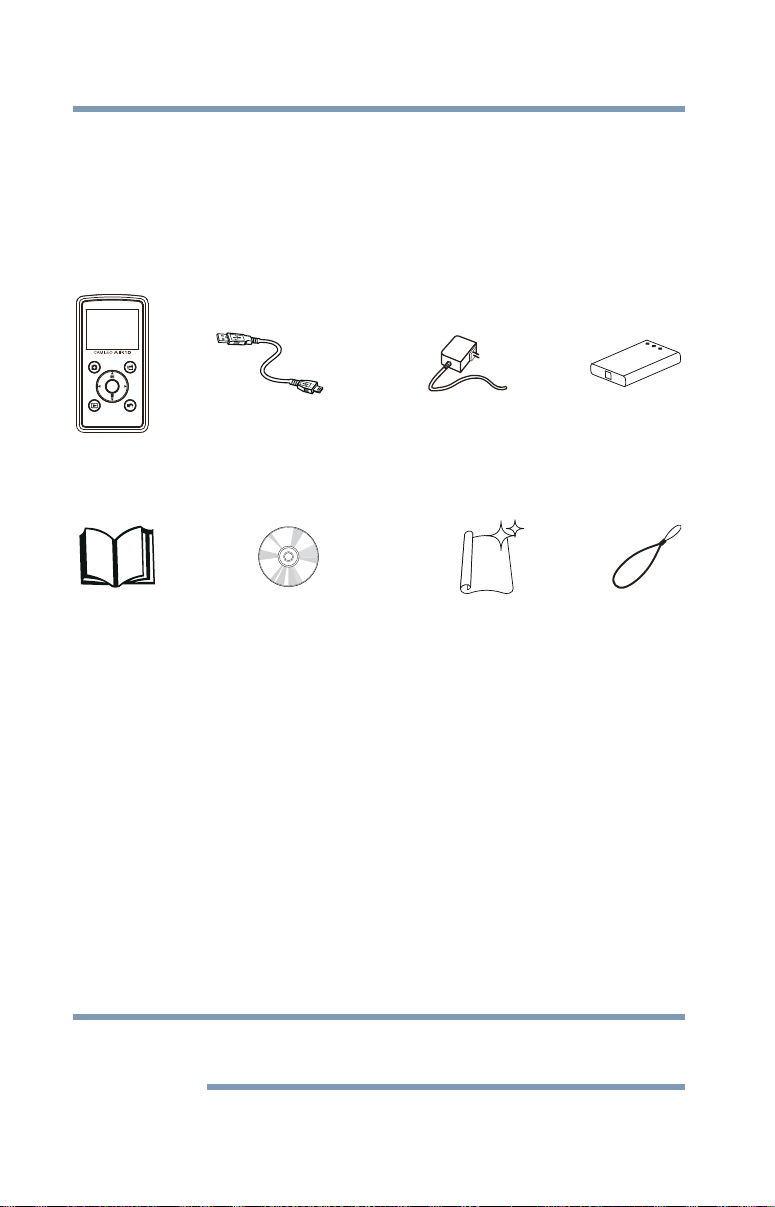
Camcorder Mini USB cable
Quick Start
Guide
Lithium-ion
rechargeable
battery*
AC adaptor (may be
sold separately)
Hand strap Cleaning clothCD-ROM
Software, User’s
Guide (this document),
and Warranty information
NOTE
Getting to Know Your Camcorder
Overview
❖ Limited built-in memory allowing you to take photos and to
record videos without a memory card
❖ Memory card slot allowing users to increase storage capacity
Check the Components
Unpack the box and make sure all listed items below are included:
MENU
OK
(Sample Illustration) Components
The CD-ROM supplied with the camcorder contains these software
applications:
❖
CAMILEO® AIR10 Connect is a PC application that provides a
simple and friendly platform to manage the files in the
camcorder, and control the interaction with your camcorder via
either WiFi or USB connection.
❖ ArcSoft MediaImpression is a user-friendly application that
helps you manage your media, edit and playback video, and
upload your files to websites easily.
*Preinstalled in the camcorder
.
A portion of the built-in memory is used for firmware to operate the
camcorder and is not available for storage.
Page 11

System Requirements
NOTE
❖ Microsoft® Windows® XP/Windows Vista®/Windows® 7
❖ Intel/AMD Dual-Core CPU or above
❖ 1 GB system memory
❖ 2 GB free HDD space
❖ 4x CD-ROM Drive
❖ Available USB 2.0 port
❖ 16-bit color display
❖ Wi-Fi
®
capability
The LCD screen is manufactured using extremely high-precision
technology. However, some tiny black and/or bright dots (white, red,
blue or green) may appear on the LCD screen. These dots are a
normal result of the manufacturing process, and do not affect the
recording.
Getting to Know Your Camcorder
Overview
11
Page 12
12
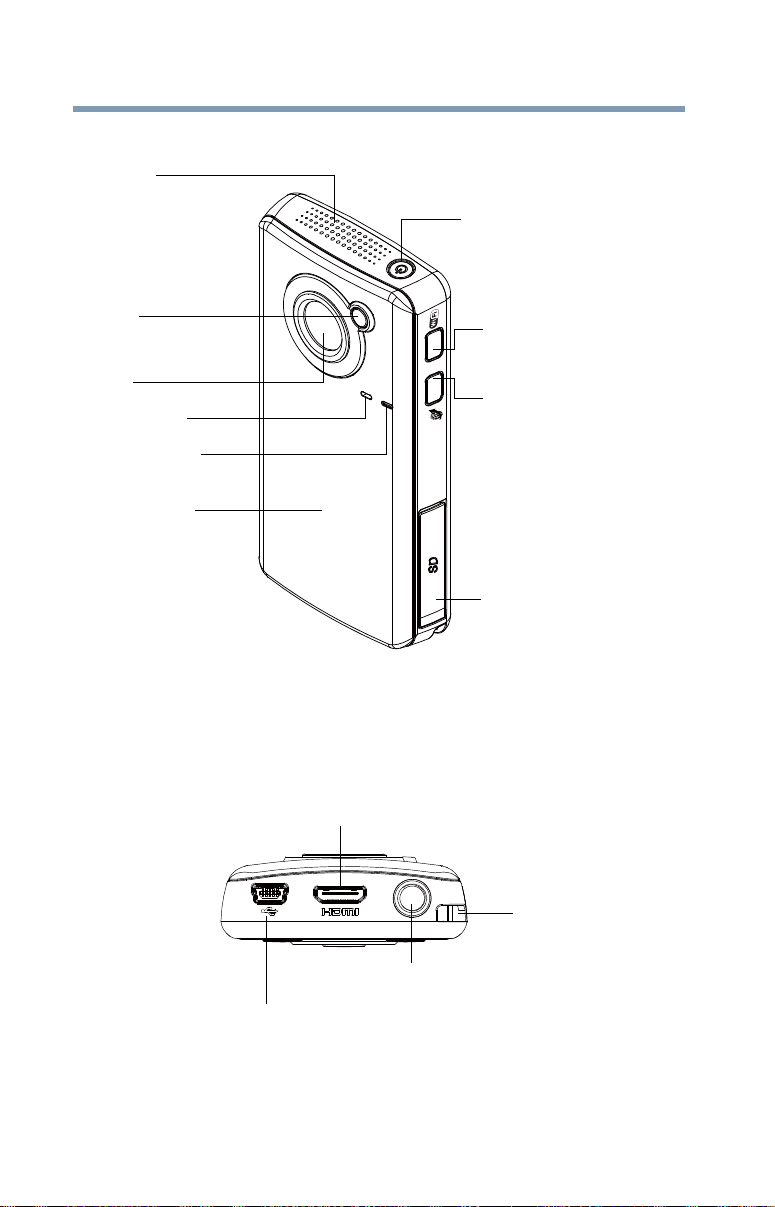
Power button
Wi-Fi button
Press to turn ON/OFF
Internet button
Press to display the
Light
Microphone
Multi-indicator
Battery cover
Speaker
SD™ Card cover
social networking site
Lens
upload menu.
Wi-Fi®.
Strap hook
Tripod socket
Mini HDMI® port
Mini USB 2.0 port
Getting to Know Your Camcorder
Overview
Front view
Underside view
(Sample Illustration) Front view
For more detailed operational instruction, please see “Record
Mode” on page 23 and “Playback mode operations” on page 42.
(Sample Illustration) Underside view
Page 13

Rear view
Menu/OK button
Menu ON.
Validate the setting.
Press to take a photo.
Press to begin recording.
Photo button
LCD screen
Left button
Playback button
Video button
To stop recording, press
it again.
(Down) Zoom out/Delete
button
In Record mode: Zoom out.
In Playback mode: Go to the delete
screen. When playing a video,
press to decrease volume.
Move between option items.
During playback: Go to
previous video/photo.
In Record mode: Zoom in.
In Playback mode: Go to the
video/photo thumbnail
screen. When playing a video,
press to increase volume.
Move between option items.
Right button
In Playback mode: Go to the
next video/photo.
Return/Exit button
Return to the previous screen.
Exit.
Switch to Playback mode.
(Up) Zoom in/Thumbnail
button
Getting to Know Your Camcorder
CAMILEO AIR10
MENU
OK
Overview
13
(Sample Illustration) Rear view
Page 14
Chapter 2
Getting Started
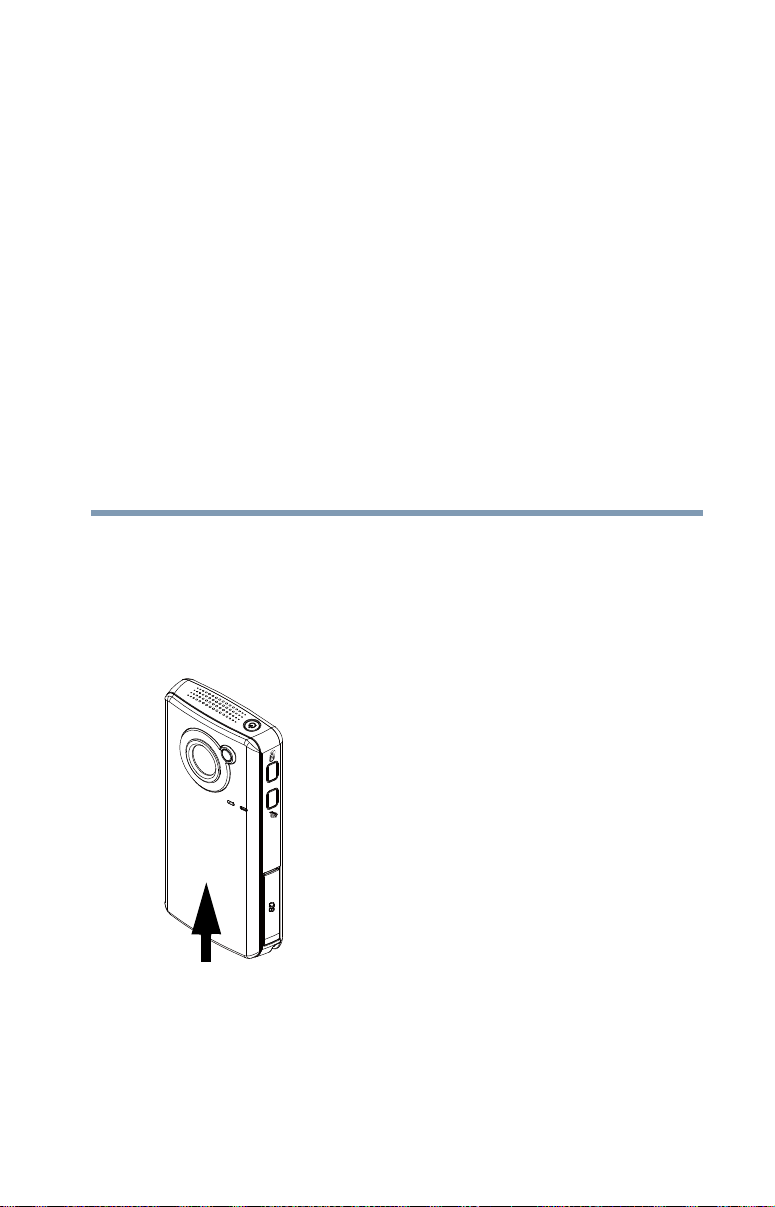
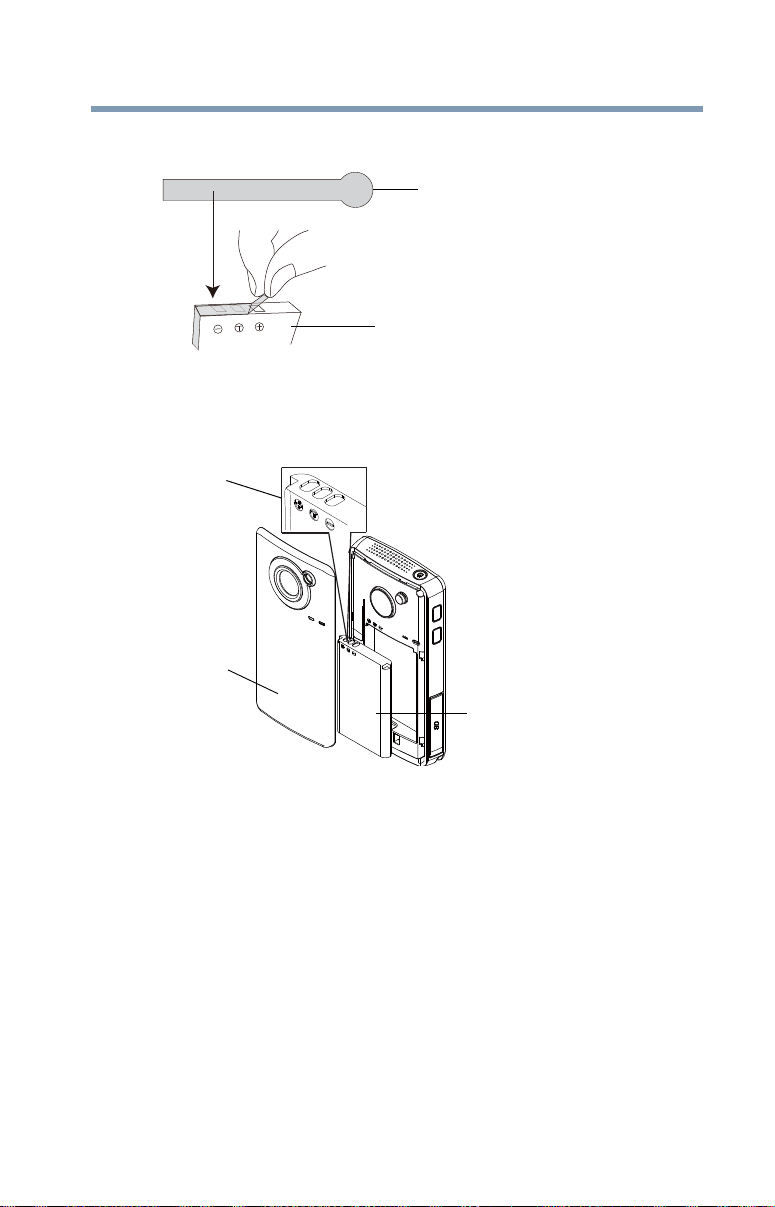
Charging the battery
The battery comes pre-installed in the camcorder, and must be
charged before use, however you must remove the protective film
on the battery.
1 Slide the battery cover off.
14
(Sample Illustration) Front view
2 Remove the battery.
Page 15
Getting Started
Protective film
Li-ion battery
Li-ion battery
Polarity marks
Battery cover
Charging the battery
3 Pull the protective film off.
(Sample Illustration) Removing the protective film
4 Reinsert the battery face up, making sure it is lined-up with the
correct polarity marks.
15
(Sample Illustration) Inserting the battery
5 Reinstall the battery cover.
Page 16
16
NOTE
Getting Started
Charging the battery
Charging the battery
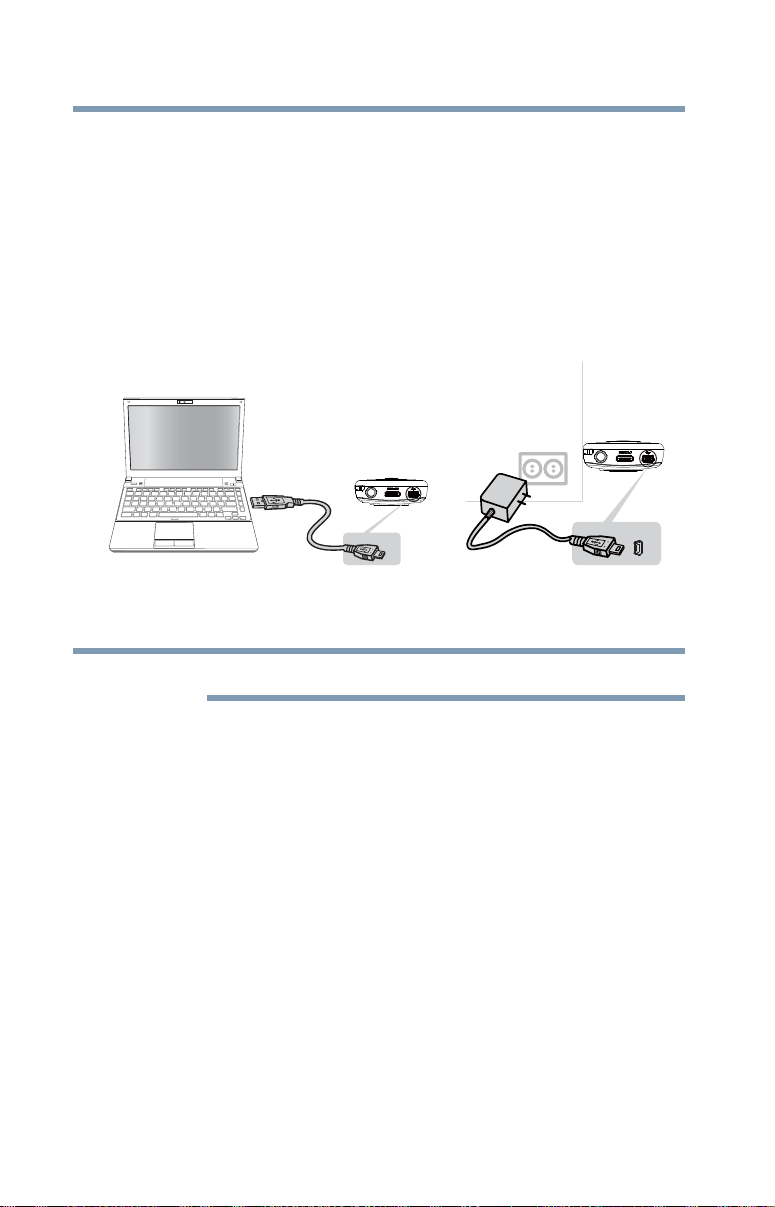
You must use the supplied Mini USB cable or AC adaptor (AC
adaptor may be sold separately) to charge your camcorder before
use. Turn OFF the camcorder before connecting the cable. A
blinking light indicates active charging and a solid light indicates
that charging is complete.
In AC charging mode, the solid light will turn off automatically
after a few minutes. It may take up to 8.5 hours to charge the battery
via USB and up to 4 hours via AC adaptor. (Actual time may vary.)
(Sample Illustration) Charging the battery
Be sure to remove the protective film on the lens before using.
Page 17

Getting Started
Charging the battery
Handling of the battery
❖ Never attempt to dispose of a battery by burning or by throwing
it into a fire, and never allow exposure to a heating apparatus
(e.g., microwave oven). Heat can cause a battery to explode
and/or release caustic liquid, both which may possibly cause
serious injury.
❖ Never attempt to disassemble, tamper with or repair a battery.
The battery could overheat and ignite. Leakage of the caustic
alkaline solution or other electrolytic substances could cause
fire, possibly resulting in death or serious injury.
❖ Never short-circuit the battery by either accidentally or
intentionally bringing the battery terminals in contact with
another conductive object. This could cause serious injury or a
fire, and could also damage the battery and product. Always
wrap the battery in plastic (or place it in a plastic bag) whenever
transporting it, to avoid exposing the terminals to another
conductive object which could result in serious injury. Always
cover the metal terminals with insulating tape when disposing of
the battery, to prevent accidental short-circuiting which could
result in serious injury.
❖ Never drive a nail or any other sharp object into the battery, hit
battery with a hammer or other object or step on it. Doing so
could cause a fire or explosion possibly resulting in serious
injury.
❖ Never charge the battery by a method other than as instructed.
Doing so could cause a fire or explosion possibly resulting in
serious injury.
❖ Never connect the battery to a plug socket or a car cigarette plug
socket. The battery could rupture or ignite causing a fire or
explosion possibly resulting in serious injury.
❖ Never allow a battery to become wet. A wet battery will overheat
or ignite causing rupture or fire, possibly resulting in death or
serious injury.
❖ Never store a battery in an area of high humidity. This could
cause a fire or explosion possibly resulting in serious injury.
17
Page 18

18
Getting Started
Charging the battery
❖ Never expose a battery to abnormal shock, vibration or pressure.
Never use a battery which has been exposed to abnormal shock
even if the appearance is normal. The battery’s internal protective
device could fail, causing it to overheat or ignite resulting in
caustic liquid leakage, or explosion or fire, possibly resulting in
death or serious injury.
❖ Never subject a battery to heat, and never store it or use it near a
heat source. The battery could ignite or explode when heated or
burned, possibly resulting in death or serious injury. Subjecting
a battery to heat could also cause caustic liquid to leak. It can
also cause failure, malfunction, or loss of stored data.
Use of correct battery
❖ Always use the battery supplied. Other batteries have different
voltage and terminal polarities. Use of non-conforming batteries
could generate smoke or cause fire or rupture, possibly resulting
in serious injury.
Battery safety
❖ Never allow caustic electrolyte fluid leaked from the battery to
contact your eyes, body or clothing.
Use appropriate protective gloves when handling a damaged
battery.
If caustic electrolyte fluid from the battery should contact your
eyes, immediately wash your eyes with large amounts of running
water and obtain prompt medical attention, to help prevent
permanent eye damage.
If electrolyte fluid should contact any part of your body,
immediately wash it off under running water to help prevent skin
rashes.
If electrolyte fluid should contact your clothes, promptly remove
them to help prevent the electrolyte fluid from contacting your
body, possibly resulting in serious injury.
Page 19

Getting Started
Charging the battery
Battery warning indicators
❖ Always immediately turn the power OFF and disconnect the
power cable/cord plug from the plug socket and stop using the
battery if you observe any of the following conditions:
❖ Offensive or unusual odor
❖ Excessive heat
❖ Discoloration
❖ Deformation, cracks or leaks
❖ Smoke
❖ Other unusual event during use, such as abnormal sound
In such an event, carefully and immediately remove the battery
from the product. In some instances, you might have to wait for
the product to cool down before removing the battery, in order to
avoid any possible minor injury due to heat exposure. Do not
turn on the product’s power again until an authorized Toshiba
service provider has checked it for safety. Continued use could
cause a fire or rupture possibly resulting in serious injury or
product failure including but not limited to the loss of data.
19
Disposal of used batteries
❖ Always dispose of used batteries in compliance with all
applicable laws and regulations. Put insulating tape, such as
cellophane tape, on the electrode during transportation to avoid
a possible short circuit, fire or electric shock. Failure to do so
could possibly result in serious injury.
❖ Make sure the battery is securely installed in the product before
attempting to charge the battery.
❖ Improper installation could generate smoke or fire, or cause the
battery to rupture.
Page 20

20
NOTE
Getting Started
Charging the battery
❖ The battery is a lithium ion battery, which can explode if not
replaced, used, handled or disposed of properly. Dispose of the
battery as required by local ordinances or regulations. Use only
batteries recommended by TOSHIBA as replacements.
❖ Charge the battery only in an ambient temperature between 14
and 104 degrees Fahrenheit (-10 and 40 degrees Celsius).
Otherwise, the electrolyte solution might leak, battery
performance might deteriorate and the battery life might be
shortened.
❖ Never install or remove the battery without first turning OFF the
power and disconnecting the AC adaptor (AC adaptor may be
sold separately).
Inserting the battery
❖ When installing a battery or before moving the product, always
make sure the battery is inserted correctly and securely. If the
battery falls out, while you are carrying the product, you could
be injured or the battery could be damaged.
Do not use an impaired or exhausted battery
❖ Never continue to use a battery after its recharging capability has
become impaired, or after the warning message indicating that
the battery power is exhausted has been displayed.
Continued use of an exhausted or impaired battery could result
in the loss of data or damage to the product.
Handling of the battery
❖ Never attempt to install batteries in reverse polarity.
Page 21
Getting Started
NOTE
To remove the
SD™ Card, press
inward to release
it. When the card
pops out, grasp
it and pull it
straight out.
NOTE
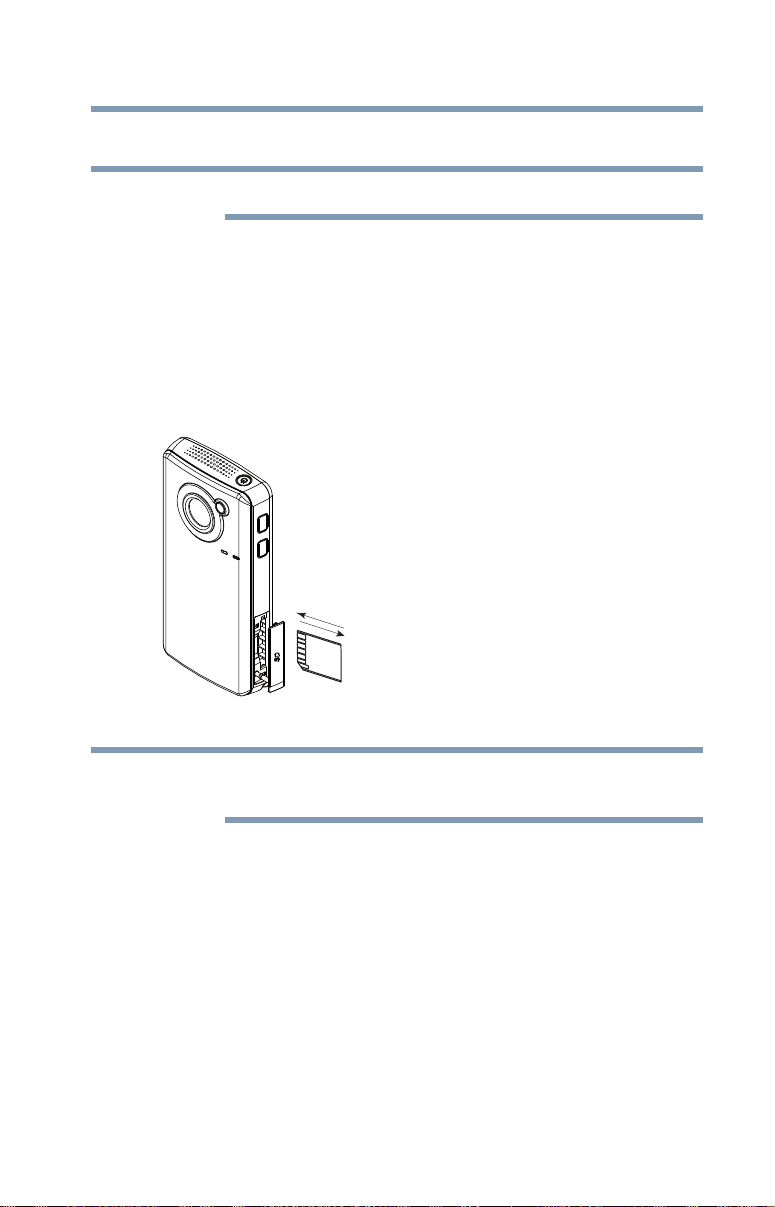
Inserting and removing an SD™ Card (optional)
Inserting and removing an SD™ Card (optional)
An SD™ Card must be purchased separately.
Your camcorder comes with internal memory that allows you to
store limited photos and videos. You can expand the memory
capacity by using an optional SD/SDHC/SDXC memory card.
1 Open the SD™ Card cover.
2 Insert the SD™ Card into the slot until it locks into place, as
shown below.
3 Once inserted, close the SD™ Card cover.
21
(Sample Illustration) Inserting and removing an SD™ Card
When a memory card is inserted, videos and photos are saved to the
card rather than the built-in memory.
Page 22

22
Write-protectedWriteable
position position
Getting Started
Turning the camcorder on and getting started
Protecting data on an SD™ Card
Photos or videos cannot be recorded on an SD™ Card when the
card is locked (read only), however photos and videos can be
viewed.
Make sure the lock is in the writeable position before recording
photos and videos as shown below.
(Sample Illustration) Protecting data on an SD™ Card
Turning the camcorder on and getting started
To turn ON the camcorder, press the Power ( ) button for
approximately one second.
To record videos: In Record mode, press the Video button. Press it
again to stop recording.
To take a photo: In Record mode, press the Photo button.
To view recorded videos/photos: Press the Playback button.
Turning off the camcorder
Press the Power ( ) button for approximately one second to turn
the camcorder OFF.
Page 23
Chapter 3
Record Mode
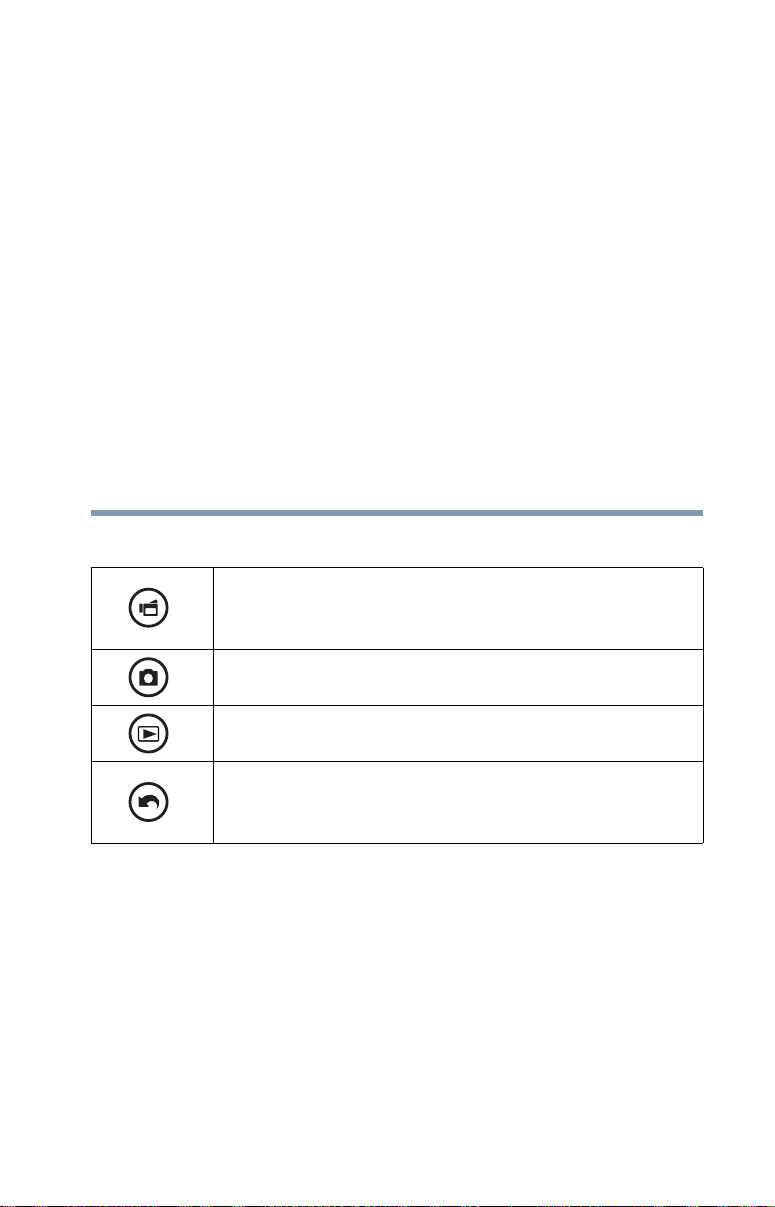
Button functions
Video button:
1 Press to begin recording.
2 Press it again to stop recording.
Photo button:
Press to take a photo.
Playback button:
Switch between Record/Playback mode.
Return/Exit button:
1 Return to the previous screen.
2 Exit.
23
Page 24

24
4 3 2 16
8
7
5
Record Mode
LCD screen information
Zoom in (Up) button:
1 Zoom in.
2 Move between option items.
Zoom out (Down) button:
1 Zoom out.
2 Move between the option items.
Left button:
Move between the option items.
Right button:
Move between the option items.
Menu/OK button:
1 Menu ON.
2 Validate the setting.
Power button:
Press for approximately one second to turn the camcorder ON/OFF.
LCD screen information
The indicators shown on the image below may appear on the LCD
screen when videos and photos are recorded:
(Sample Image) LCD screen indicators
Page 25

Notification icons
LCD screen information
Battery: Full power
Battery: Medium power
Record Mode
25
1
2
3
Battery: Low power
Battery: No power
AC power mode
Video Resolution
Full HD (1080p 30)
HD60 (720p 60)
HD30 (720p 30)
VGA (430p 30)
Photo resolution
High-16MP
Standard-5MP
Low-3MP
Digital light ON
Light ON
Video Record mode
Stabilization ON
4
Photo Record mode
Self-timer ON
5Wi-Fi
®
signal strength
Page 26

26
00:03:12
00:00:12
25
12
NOTE
Record Mode
Video recording
Recording time remaining
Pause Recording
6
NOTE: Maximum number of photos shown is 9999; however, more photos
may be recorded.
7
8
Filter: Black & White/Classic/Negative can be previewed
immediately without the indicator on the LCD screen.
Video recording
In Record mode, press the Video ( ) button to start recording. A
time indicator displays on the LCD screen when a video is being
recorded. Press the Video button again to stop recording.
Press the Playback button to view a recorded video.
The resolution settings available are:
The remaining amount of photos that can be taken at the
current resolution settings
Current number of photos taken
Motion Detection (Video Record mode only)
Zoom meter:
1x~5x (5x Digital zoom)
Video Quality
Full HD 1080/30: 1920 x 1080p 30/fps
HD 720/60: 1280 x 720p 60/fps
HD 720/30: 1280 x 720p 30/fps
VGA 480/30: 640 x 480p 30/fps
Page 27

Record Mode
Photo recording
Photo recording
In Record mode, press the Photo ( ) button to take a photo.
Press the Playback button to view the photo.
The resolution settings available are:
Image Quality
High-16 MP: 4608 x 3456
Standard-5 MP: 2592 x 1944
Low-3 MP: 2048 x 1536
Using Digital zoom
Digital zoom magnifies images when recording videos or while
taking photos.
To zoom in/out, press the (Up) Zoom in/(Down) Zoom out buttons.
The digital zoom ranges from 1x to 5x.
Menu options/operations
Video Setting Photo Setting Effects Setup* Wi-Fi
27
®
Light
Resolution
Stabilization
Motion Detect
Continuous Play
Light
Resolution
Self-Timer
Face Tracking
Date Printing
ISO
Slideshow
Scene
Filter
White Balance
Menu Sound
TV
Language
Time Setting
Format
Default Setting
Available
Networks (List)
*Please see “Camcorder Settings” on page 45 or “Wi-Fi® Functions” on
page 58 for more information about Setup.
Page 28

28
Record Mode
Menu options/operations
Operation Screen
1 In Record mode, Press the MENU/OK
button.
The Menu screen appears.
The options available are: Video Setting,
Photo Setting, Effects, Setup, and Wi-Fi.
2 Use the Directional buttons to select
the desired option, and then press the
OK button to enter the settings menu.
3 Use the Directional buttons to select
the specific option you want to
change.
4 Press the OK button to validate the
new setting.
5 Select the Return/Exit ( ) icon, and
then press the OK button, or press the
Return/Exit button to exit.
Video Setting options
Operation Screen
1 In Record mode, Press the MENU/OK
button.
The Menu screen appears.
2 Use the Directional buttons to select
the Video Setting icon, and then press
the OK button to enter the settings
menu.
3 The Video Setting menu options are:
Light, Resolution, Stabilization, Motion
Detect, and Continuous Play.
Light
In this option select a mode to brighten the shooting area or to
extend the brightness of objects. The Light settings available are:
ON Turns the light ON, providing illumination when recording.
OFF Turns the light OFF.
Digital Light
Extends the dynamic range of high contrast and backlight,
so objects appear brighter and clearer.
Page 29

Operation Screen
1 In the Video Setting menu, select the
Light icon, and then press the OK
button to enter the settings menu.
2 Use the Directional buttons to select
the desired option.
3 Press the OK button to validate the
new setting.
4 Select the Return/Exit ( ) icon, and
then press the OK button, or press the
Return/Exit button to exit.
Resolution
The Resolution settings available are:
Full HD 1080/30 Records videos at 1920 x 1080p 30/fps resolution.
HD 720/60 Records videos at 1280 x 720p 60/fps resolution.
HD 720/30 Records videos at 1280 x 720p 30/fps resolution.
Record Mode
Menu options/operations
29
VGA 480/30 Records videos at 640 x 480p 30/fps resolution.
Operation Screen
1 In the Video Setting menu, select the
Resolution icon, and then press the OK
button to enter the settings menu.
2 Use the Directional buttons to select
the desired option.
3 Press the OK button to validate the
new setting.
4 Select the Return/Exit ( ) icon, and
then press the OK button, or press the
Return/Exit button to exit.
Page 30

30
Record Mode
Menu options/operations
Stabilization
Your camcorder provides a feature that steadies the image to help
reduce blurry photos and create clearer videos.
Operation Screen
1 In the Video Setting menu, select the
Stabilization icon, and then press the
OK button to enter the settings menu.
2 Use the Directional buttons to select
the desired option.
3 Press the OK button to validate the
new setting.
4 Select the Return/Exit ( ) icon, and
then press the OK button, or press
the Return/Exit button to exit.
Motion detection
This option allows the camcorder to automatically record videos
when the camcorder detects movement.
Operation Screen
1 In the Video Setting menu, select the
Motion Detect icon, and then press
the OK button to enter the settings
menu.
2 Use the Directional buttons to select
the desired option.
3 Press the OK button to validate the
new setting.
4 Select the Return/Exit ( ) icon, and
then press the OK button, or press
the Return/Exit button to exit.
The camcorder will begin recording
automatically if movement is detected. It
stops recording when movement stops.
Page 31

Continuous Play
This option allows you to playback files continuously.
Operation Screen
1 In the Video Setting menu, select the
Continuous Play icon, and then press
the OK button to enter the settings
menu.
2 Use the Directional buttons to select
the desired option.
3 Press the OK button to validate the
new setting.
4 Select the Return/Exit ( ) icon, and
then press the OK button, or press
the Return/Exit button to exit.
Photo setting options
Operation Screen
1 In Record mode, press the MENU/OK
button.
The Menu screen appears.
2 Use the Directional buttons to select
the Photo Setting icon, and then press
the OK button to enter the settings
menu.
The Photo Setting menu appears.
3 The Photo Setting menu options are:
Light, Resolution,
Self-Timer, Face Tracking, Date
Printing, ISO, and Slideshow.
Record Mode
Menu options/operations
31
Light
In this option select a mode to brighten the shooting area or to
extend the brightness of objects. The Light settings available are:
ON Turns the light ON, providing illumination when recording.
OFF Turns the light OFF.
Digital Light
Extends the dynamic range of high contrast and backlight,
so objects appear brighter and clearer.
Page 32

32
Record Mode
Menu options/operations
Operation Screen
1 In the Photo Setting menu, select the
Light icon, and then press the OK
button to enter the settings menu.
2 Use the Directional buttons to select
the desired option.
3 Press the OK button to validate the
new setting.
4 Select the Return/Exit ( ) icon, and
then press the OK button, or press the
Return/Exit button to exit.
Resolution
The Resolution settings available are:
High-16M Takes photos at 4608 x 3456, 16 MP quality.
Standard-5M Takes photos at 2592 x 1944, 5 MP quality.
Low-3M Takes photos at 2048 x 1536, 3 MP quality.
Operation Screen
1 In the Photo Setting menu, select the
Resolution icon, and then press the OK
button to enter the settings menu.
2 Use the Directional buttons to select
the desired option.
3 Press the OK button to validate the
new setting.
4 Select the Return/Exit ( ) icon, and
then press the OK button, or press the
Return/Exit button to exit.
Page 33

Self timer
The self-timer allows you to take photos with a ten-second time
delay. The self-timer light on the front of the camcorder blinks to
indicate the feature is activated. The blinking speed increases just
before the photo is taken.
Operation Screen
1 In the Photo Setting menu, select the
Self-Timer icon, and then press the
OK button to enter the settings menu.
2 Use the Directional buttons to select
the desired option.
3 Press the OK button to validate the
new setting.
4 Select the Return/Exit ( ) icon, and
then press the OK button, or press
the Return/Exit button to exit.
Face Tracking
The camcorder detects and focuses on face(s) automatically. This
function works in Photo mode to capture portraits in backlit
conditions.
Record Mode
Menu options/operations
33
Operation Screen
1 In the Photo Setting menu, select the
Face Tracking icon, and then press
the OK button to enter the settings
menu.
2 Use the Directional buttons to select
the desired option.
3 Press the OK button to validate the
new setting.
4 Select the Return/Exit ( ) icon, and
then press the OK, or press the
Return/Exit button to exit.
In Photo mode, when the camcorder is
aimed at face(s), the face frame(s) appear
on the screen.
Page 34

34
Record Mode
Menu options/operations
Date Printing
With this option, you can imprint the date on each photo.
Operation Screen
1 In the Photo Setting menu, select the
Date Printing icon, and then press the
OK button to enter the settings menu.
2 Use the Directional buttons to select
the desired option.
3 Press the OK button to validate the
new setting.
4 Select the Return/Exit ( ) icon, and
then press the OK button, or press
the Return/Exit button to exit.
When this function is activated, the date
appears on the corner of each photo.
ISO
The camcorder automatically adjusts the ISO setting of images.
Two manual ISO sensitivity settings are also available (800 and
1600). Use the higher setting to take a photo in the dark or in a
poorly lit location, or for a subject moving at a high rate of speed.
Auto
800 ISO 800
1600 ISO 1600
Sets the ISO setting automatically according to
conditions.
Page 35

Operation Screen
NOTE
1 In the Photo Setting menu, select the
ISO icon, and then press the OK button
to enter the settings menu.
2 Use the Directional buttons to select
the desired option.
3 Press the OK button to validate the
new setting.
4 Select the Return/Exit ( ) icon, and
then press the OK button, or press the
Return/Exit button to exit.
The image may become grainy with a higher ISO setting.
Slideshow
Photos can be viewed one after another in a slideshow in a chosen
interval of time. The Slideshow settings available are:
2 seconds Displays one photo every two seconds.
Record Mode
Menu options/operations
35
5 seconds Displays one photo every five seconds.
10 seconds Displays one photo every ten seconds.
OFF Disables Slideshow.
Operation Screen
1 In the Photo Setting menu, select the
Slideshow icon, and then press the OK
button to enter the settings menu.
2 Use the Directional buttons to select
the desired option.
3 Press the OK button to validate the
new setting.
4 Select the Return/Exit ( ) icon, and
then press the OK button, or press the
Return/Exit button to exit.
Page 36

36
NOTE
Record Mode
Menu options/operations
Effects
Operation Screen
1 In Record mode, Press the MENU/OK
button.
The Menu screen appears.
2 Use the Directional buttons to select
the Effects icon, and then press the
OK button to enter the settings menu.
The Effects menu appears.
3 The Effects menu options are: Scene,
Filter, and White Balance.
Scene
You can select a mode according to the scene and conditions. The
Scene settings available are:
Auto Automatically adjusts to current conditions.
Skin Adjusts skin tones to appear more natural.
Night Use in low light conditions or at night.
Backlight Use when the subject is brightly lit from behind.
Operation Screen
1 In the Effects Setting menu, select the
Scene icon, and then press the OK
button to enter the settings menu.
2 Use the Directional buttons to select
the desired option.
3 Press the OK button to validate the
new setting.
4 Select the Return/Exit ( ) icon, and
then press the OK button, or press
the Return/Exit button to exit.
To avoid blurry photos when taking photos in Night mode, place the
camcorder on a flat, steady surface, or use a tripod.
Page 37

Filter
NOTE
You can select a special filter effect for videos and photos. The
Filter settings available are:
Auto No filter effects.
Black & White The image is converted to black and white.
Classic The image is converted to sepia.
Negative The image is converted to a negative of the original.
Operation Screen
1 In the Effects Setting menu, select the
Filter icon, and then press the OK
button to enter the settings menu.
2 Use the Directional buttons to select
the desired option.
3 Press the OK button to validate the
new setting.
4 Select the Return/Exit ( ) icon, and
then press the OK button, or press
the Return/Exit button to exit.
Record Mode
Menu options/operations
37
Scene/Filter: B/W / Classic / Negative effect can be previewed
immediately without icons appearing on the LCD screen.
Page 38

38
Record Mode
Menu options/operations
White Balance
The camcorder adjusts the white balance of images automatically.
The White Balance settings available are:
Auto Automatically adjusts white balance.
Daylight Use in outdoor conditions.
Fluorescent Use in Fluorescent lighting.
Tungsten Use in tungsten lighting.
Operation Screen
1 In the Effects Setting menu, select the
White Balance icon, and then press
the OK button to enter the settings
menu.
2 Use the Directional buttons to select
the desired option.
3 Press the OK button to validate the
new setting.
4 Select the Return/Exit ( ) icon, and
then press the OK button, or press
the Return/Exit button to exit.
Page 39

Chapter 4
Playback Mode
Button functions
The buttons have the following functions in Playback mode.
Video button:
Press to switch to Video Playback mode.
Photo Button:
Press to switch to Photo Playback mode.
Playback button:
Switch between Record/Playback mode.
Return/Exit button:
1 Return to the previous screen.
2 Exit.
39
Page 40

40
124
5
3
6
123
Playback Mode
LCD screen information
Up button:
1 View the video/photo thumbnail screen.
2 Press to increase volume during video playback.
Down button:
1 View the Delete screen.
2 Press to decrease volume during video playback.
Left button:
View the previous video/photo.
Right button:
View the next video/photo.
Menu/OK button:
Press to play/pause a video.
LCD screen information
The indicators shown below may appear on the LCD screen while
in Playback mode:
Onscreen notification icons
(Sample Image) Video playback (Sample Image) Photo playback
Page 41

Notification icons
00:03:12
12
25
2/2
LCD screen information
Battery: Full power
Battery: Medium power
Playback Mode
41
1
2
3
Battery: Low power
Battery: No power
AC power mode.
Video Resolution
Full HD (1080p 30)
HD60 (720p 60)
HD30 (720p 30)
VGA (430p 30)
Photo resolution
High-16MP
Standard-5MP
Low-3MP
Wi-Fi® signal strength
Playback time counter.
Current number of photos taken.
4
NOTE: Maximum number of photos shown is 9999; however, more photos
may be recorded.
5
6
The remaining amount of photos that can be taken at the
current resolution settings.
Volume control.
Current number/Total number of videos.
Page 42

42
Playback Mode
Playback mode operations
Playback mode operations
To view and manage videos and photos in the built-in memory or
on an SD™ Card, use the Playback mode.
Operation Screen
1 In Video/Photo Record mode, press
the Playback button to switch to
Video/Photo Playback mode.
2 Press the Up button to view the
video/photo thumbnail screen.
3 Select the video/photo file, and then
press the OK button.
4 Or press the Playback button to exit.
Page 43

Video Playback
Operation Screen
1 In Video Playback mode, press the
OK button to play or pause the video.
2 Use the Right/Left buttons to view the
next/previous video.
3 While playing a video, press the
Right/Left buttons to fast
forward/rewind.
4 Press the OK button to stop.
5 Use the Up/Down buttons to adjust
the volume.
6 Press the Internet button to select
and tag the current video to upload to
the Internet (for Windows® based
systems only).
Photo Playback
Operation Screen
1 In Photo Playback mode, use the
Right/Left buttons to view the
next/previous photo.
2 Press the OK button to pause the
slideshow.
3 Press the Internet button to select the
current photo to upload to the
Internet (for Windows
systems only).
®
based
Playback Mode
Playback mode operations
43
Page 44

44
NOTE
Playback Mode
Playback mode operations
Delete a file in Playback mode
Operation Screen
1 In Playback mode, press the Down
button to view the delete screen.
2 Select the ( ) icon, and then select
the ( ) icon to delete the current
video/photo.
3 Select the Return/Exit ( ) icon, and
then press the OK button, or press
the Return/Exit button to cancel and
exit.
4 Select the ( ) icon, and then select
the ( ) icon to delete all video/photo
files.
5 Select the Return/Exit ( ) icon, and
then press the OK button, or press
the Return/Exit button to cancel and
exit.
❖ When an SD™ Card is installed, only the videos and photos
stored on the card are deleted.
❖ Videos or photos cannot be deleted if the card is write-protected.
Page 45

Chapter 5
Camcorder Settings
Setup menu
Operation Screen
1 In Record mode, press the MENU/OK
button.
The Menu screen appears.
2 Use the Directional buttons to select
the Setup ( ) icon, and then press
the OK button to enter the settings
menu.
3 The Setup Menu options are: Menu
Sound (operation sound), TV,
Language, Time Setting, Format,
Default Setting, and Information
(scroll down to view).
45
Page 46

46
Camcorder Settings
Setup menu
Menu Sound
You can enable or disable tone and operation sounds.
Operation Screen
1 In the Setup menu, select the Menu
Sound icon, and then press the OK
button to enter the settings menu.
2 Use the Directional buttons to select
the desired option.
3 Press the OK button to validate the
new setting.
4 Select the Return/Exit ( ) icon, and
then press the OK button, or press
the Return/Exit button to exit.
TV
Use this function to select the appropriate TV standard for your
area, either NTSC or PAL.
An incorrect TV system setting may cause the image to flicker.
NTSC (60Hz) USA, Canada, Japan, South Korea, Taiwan, etc.
PAL (50Hz) UK, Europe, China, Australia, Singapore, Hong Kong, etc.
Operation Screen
1 In the Setup menu, select the TV
icon, and then press the OK button to
enter the settings menu.
2 Use the Directional buttons to select
the desired option.
3 Press the OK button to validate the
new setting.
4 Select the Return/Exit ( ) icon, and
then press the OK button, or press
the Return/Exit button to exit.
Page 47

Language
Use this option to select the language of the user interface.
Operation Screen
1 In the Setup menu, select the
Language icon, and then press the
OK button to enter the settings menu.
2 Use the Directional buttons to select
the desired option.
3 Press the OK button to validate the
new setting.
4 Select the Return/Exit ( ) icon, and
then press the OK button, or press
the Return/Exit button to exit.
Time settings
Operation Screen
1 In the Setup menu, select the Time
Setting icon, and then press the OK
button to enter the settings menu.
2 Use the Right/Left buttons to select
the Year, Month, Day, Hour, or
Minute.
3 Use the Up/Down buttons to adjust
the numeric value.
4 Select the ( ) icon, and then press
the OK button to validate the setting.
5 Select the Return/Exit ( ) icon, and
then press the OK button, or press
the Return/Exit button to exit.
Camcorder Settings
Setup menu
47
Page 48

48
NOTE
Format
Camcorder Settings
Setup menu
Use this option to delete all data in the built-in memory or on the
SD™ Card.
Yes
No
Operation Screen
1 In the Setup menu, select the Format
icon, and then press the OK button to
enter the settings menu.
2 Use the Directional buttons to select
the desired option.
3 Press the OK button to validate the
new setting.
4 Select the Return/Exit ( ) icon, and
then press the OK button, or press
the Return/Exit button to exit.
Delete all videos and photos in the built-in memory (when
no SD™ Card is installed), or delete all videos and photos
on the installed SD™ Card.
Do not delete all videos and photos in the built-in memory
(when no SD™ Card is installed), or do not delete all
videos and photos on the installed SD™ Card.
All data will be erased if the SD™ Card is formatted. Make sure all
data is copied to your computer or other media before formatting the
SD™ Card.
SD™ Card cannot be formatted if the card is write-protected.
Page 49

Default setting
To restore the default factory setting, select this option.
Yes Restore to default factory setting.
No Do not restore to default factory setting.
Operation Screen
1 In the Setup menu, select the Default
Setting icon, and then press the OK
button to enter the settings menu.
2 Choosing Yes performs the
operation, and No cancels the
operation.
3 Select the Return/Exit ( ) icon, and
then press the OK button, or press
the Return/Exit button to exit.
The following table lists the camcorder’s default settings:
Setting Default Factory Setting
Resolution
Light OFF
Stabilization ON
Motion Detection OFF
Continuous Play OFF
Self-Timer OFF
Face Tracking OFF
Date Printing OFF
ISO Auto
Slideshow OFF
Scene Auto
Filter Auto
White Balance Auto
Menu Sound ON
TV NTSC
Language English
Volume Level 3
Video: Full HD 1080/30
Photo: Standard-5M
Camcorder Settings
Setup menu
49
Page 50

Chapter 6
CAMILEO® AIR10 Connect
Advanced operations on your computer
®
(CAMILEO
AIR10 Connect)
The camcorder can connect to your computer via Wi-Fi® or USB
connection. Once you launch the CAMILEO
application (for Windows
it searches for your camcorder and connects to it. (The camcorder
must be turned ON and connected to the same access point .)
You can then operate more functions on your computer:
❖ Transfer files from the camcorder
❖ Watch live streaming video from the camcorder on your
computer
❖ Use the camcorder as a wireless webcam for online video
chatting
❖ Configure your account information on social networking sites
and save them to the camcorder
❖ Synchronize your Wi-Fi
up a security password to open the CAMILEO
Connect application via Wi-Fi
®
based systems only) on your computer,
®
profile with your camcorder and set
®
connection
®
AIR10 Connect
®
AIR10
Installing CAMILEO
To connect to the camcorder and launch the CAMILEO® AIR10
Connect application via Wi-Fi
50
®
AIR10 Connect
®
correctly, you will need to first
Page 51

CAMILEO® AIR10 Connect
NOTE
Installing CAMILEO® AIR10 Connect
51
install this program. It is a perfect platform to watch live streaming
video from your camcorder and use the camcorder as a webcam for
your online video chatting. The application also facilitates the
configuration of the Wi-Fi
®
profiles and your social networking site
account information.
Follow the steps below to install the CAMILEO
®
AIR10 Connect
application on the computer. The program pack is bundled in the
camera and on the CD as backup.
To install the bundled software from the camcorder:
1 Connect the camcorder to your computer via the included Mini
USB cable.
(Sample Illustration) Connecting to your computer
2 When the USB connection is made to your computer for the
first time, up to three AutoPlay screens will appear on your
computer.
CD Drive (x:) AIR10_Connect -- CAMILEO® AIR10 Connect Application
DV (x:) -- Internal memory of the camcorder
Removable Disk (x:) -- Only shows if an SD card is installed in the camcorder
The AutoPlay screens may load on top of one another. Simply
drag them into view. Check your taskbar if you do not see them.
If the CAMILEO
automatically, click on the CAMILEO® AIR10 Connect application.
Depending on your computer settings during installation, up to three User
Account Control screens (listed below) may pop up during the CAMILEO
AIR10 Connect installation process. Click OK on each one to proceed.
Microsoft Visual C++
Setup.exe
AIR10_Connect.exe
Follow the onscreen instructions to complete the installation.
®
AIR10 Connect application does not start to install
®
Page 52

52
NOTE
CAMILEO® AIR10 Connect
Using CAMILEO® AIR10 Connect via Wi-Fi® (Infrastructure mode)
To Install the bundled software from the included CD:
1 Insert the CD into your computer’s optical disk drive.
The AutoPlay screen appears.
2 Click Install
application.
CAMILEO® AIR10 Connect to install the
❖ If ArcSoft MediaImpression® is not installed, the CAMILEO
AIR10 Connect program will install the H.264 Codec (ffdshow-a
free software under GPL license) to view videos correctly.
❖ In order for video chatting to function properly, you need to log
out/quit the Instant Message (IM) application before the
installation.
❖ During the installation, a warning message may appear. Click
Continue Anyway/Yes to go on the installation.
❖ CAMILEO
®
AIR10 Connect is for Windows
Using CAMILEO® AIR10 Connect via Wi-Fi®
(Infrastructure mode)
Follow the steps below to successfully connect to an available AP.
Operation Screen
On you camcorder:
1 In Record mode, press the MENU/OK
button.
The Menu screen appears.
2 Use the Directional buttons to select
the Wi-Fi ( ) icon, and then press
the OK button to display the available
AP list.
3 Select the available access point
(Network), see “Wi-Fi
page 58.
®
Functions” on
®
®
based systems only.
Page 53

CAMILEO® AIR10 Connect
Using CAMILEO® AIR10 Connect via Wi-Fi® (Infrastructure
Operation Screen
On your computer:
NOTE: Make sure your computer is on the
same wireless network, and that you have
already installed the
Connect application on your computer.
4 Double-click on the shortcut for
CAMILEO® AIR10 Connect on the
Windows® desktop.
The camcorder connects to your
computer and the CAMILEO
Connect main screen displays on your
computer screen.
NOTE: If more than one Wi-Fi
connected to your computer, you may be
asked to select the camcorder.
CAMILEO® AIR10
®
AIR10
®
device is
53
The available options in the CAMILEO
via Wi-Fi
Function Description Screen
Transfer You can remote access the videos
Live Video Watch live streaming from your
®
connection are:
and photos stored in your
camcorder.
You can transfer or delete files on
your computer.
camcorder on your computer.
The video resolution can be
selected.
®
AIR10 Connect application
Page 54

54
CAMILEO® AIR10 Connect
Using CAMILEO® AIR10 Connect via Wi-Fi® (Infrastructure mode)
Function Description Screen
Video Chat Use your camcorder as a wireless
webcam for online video chatting.
NOTE: You must first select this
device as your Webcam in the
camera/audio setting.
You will need to select Virtual
Camera as your webcam and
Virtual Audio Device as your
microphone for online video
chatting.
Page 55

CAMILEO® AIR10 Connect
NOTE
Using CAMILEO AIR10 Connect via USB
55
❖ ACCOUNT SETUP and Wi-Fi SETUP are not available during
❖ For Wi-Fi
®
Wi-Fi
connection.
CAMILEO
®
connectivity to work correctly, make sure the bundled
®
AIR10 Connect (for Windows® based systems only)
is installed and the wireless LAN module on your computer is
activated.
❖ Make sure your computer connects with your access point (AP)
correctly and your camcorder is in the same range as the WLAN.
❖ For more stable video streaming when using LIVE VIDEO or
VIDEO CHAT, make sure the Wi-Fi
( ) or above on the camcorder.
❖ To improve the Wi-Fi
®
signal strength, move the camcorder
closer to your access point.
❖ If the camcorder is located too far away from your computer or
the AP device, it may take longer to connect to the network. (The
signal and the radio frequency may have interference.)
❖ The zoom function is not available while on LIVE VIDEO or
VIDEO CHAT mode
Using CAMILEO AIR10 Connect via USB
1 Connect the camcorder to your computer using the supplied
Mini USB cable.
2 After establishing the USB connection, the main screen
appears, see “Installing CAMILEO® AIR10 Connect” on
page 50.
®
signal strength shows 2 bars
Page 56

56
CAMILEO® AIR10 Connect
Using CAMILEO AIR10 Connect via USB
The available options in the CAMILEO
®
AIR10 Connect
application via USB connection are:
Function Description Screen
Transfer You can remote access the videos and
Account
Setup
photos stored in your camcorder and
transfer files to social networking sites.
Upload:
1 Select the videos/photos tab on the
thumbnail screen.
2 Click Upload.
The networking site options appear.
3 Select the social networking site.
4 Click OK to upload.
Set up your social networking site account
information and save it to your camcorder.
1 Select the social networking site tab
you wish to configure.
2 Enter your Username/email and
password of the specific social
networking site.
3 Click Save to save this account
information to your camcorder.
4 Click Remove to delete the account
information
NOTE: For USTREAM setup, you may
choose the channel.
You must set up your social networking
site account information on the computer
using the CAMILEO
application and save it to the camcorder
before uploading.
®
AIR10 Connect
Page 57

CAMILEO® AIR10 Connect
NOTE
Using CAMILEO AIR10 Connect via USB
Function Description Screen
Wi-Fi®
Setup
Wi-Fi® Profile
Synchronize the Wi-Fi
computer with your camcorder.
1 Click Add to camcorder to add the
®
Wi-Fi
profile on your computer to
your camcorder.
2 Click Up/Down/Remove to sort the
priority of the Wi-Fi
camcorder.
NOTE: Make sure your computer is
equipped with a wireless LAN adapter and
connects with your access point (AP)
correctly, otherwise the SSID field will be
blank.
Camcorder Setting:
Create a name for your camcorder or a
security password to open the Wi-Fi
application.
1 Create a password in the Password
field and type it again to confirm.
2 Check Enable Security to enable it.
Otherwise you will be asked to type
the password before accessing the
CAMILEO® AIR10 Connect
application via Wi-Fi® connection the
next time.
®
profile on your
®
profiles on your
®
57
❖ LIVE VIDEO and VIDEO CHAT are not available during USB
connection.
❖ Some social networking sites may not allow access in certain
regions or networks.
❖ Your computer must have Internet access to upload files to a
networking site.
❖ If you do not have an account, sign up on the networking site
first.
❖ The social networking site update is subject to change without
notice. (e.g,. password validation, create a channel), visit the
Web site first to update your account setting.
Page 58

Chapter 7
Wi-Fi® Functions
CAMILEO® AIR10 allows you to:
❖ Upload files to social networking sites
❖ Broadcast live streaming on USTREAM Web site
On your computer, with the CAMILEO
application (Windows
❖ Download the files from the camcorder to your computer
❖ Watch live streaming video from the camcorder on your
computer
❖ Use the camcorder as a wireless webcam for online video
chatting
®
based systems only), you can:
®
AIR10 Connect
58
Page 59

Uploading files to social networking sites
Uploading files to social networking sites
Follow the steps below to connect to an available AP (access point).
Operation Screen
1 Press the Wi-Fi button.
The camcorder scans for an available AP
device and connects to it automatically.
You can also select the available access
point manual by selecting Wi-Fi while in
Menu mode.
2 If the available AP requires a
password or the profile has not yet
been setup, the AP list screen
appears.
Existing profile—An already saved AP
profile.
Secured network—Requires a
password to gain access to the AP
Signal strength
Down cursor—Indicates more than
four available access points. Press the
Down button to advance to the next
page.
3 Select the desired available AP, and
then press the OK button.
If the selected AP requires password
authentication, the Enter Password
screen appears.
4 Use the directional buttons to select
the text and press the OK button to
confirm.
5 Select the ( ) icon to confirm the
password and connect to the AP.
Or select the Return/Exit ( ) icon to
exit.
Wi-Fi® Functions
59
Page 60

60
NOTE
NOTE
Wi-Fi® Functions
Uploading files to social networking sites
Closed networks or networks that must be accessed through a
webpage login screen are not supported.
Operation Screen
The Connection OK screen appears and
indicates that the connection is
established. The signal strength appears
at the top of the screen.
If a connection cannot be established,
the Connection Failed screen appears.
Please see NOTE section below for
possible reasons of connection failure.
❖ This camcorder only supports the AP (SSID) named in
English/number/symbols (ASCII characters).
❖ The possible reasons for “CONNECTION FAILED” could be (1)
wrong password; (2) you are not in the wireless network area of
the AP; (3) the camcorder does not support the type of
encryption used on the AP. This model only supports
WEP/WPA/WPA2 personal type of encryption, but not up to
enterprise level; (4) your network requires PPPoE
account/password information.
❖ You can only enter text in English, regardless of the OSD
language.
Page 61

Uploading files to social networking sites
NOTE
After the connection to the AP is established, follow the steps to
upload the video/photo to the social networking sites.
Operation Screen
1 Press the Internet button.
The camcorder automatically connects
to the network.
2 Some networks require
authentication from the network’s
service provider (NSP). Follow the
onscreen instructions.
3 Select the Return/Exit ( ) icon, and
then press the OK button, or press
the Return/Exit button to exit.
4 If a successful connection cannot be
made, contact the network service
provider.
Wi-Fi® Functions
61
The camcorder will try to connect to the Internet for one minute
before the Connection Failed notice appears
Page 62

62
NOTE
Wi-Fi® Functions
Uploading files to social networking sites
Operation Screen
The Connection OK screen appears and
indicates that the connection is
established. The signal strength appears
at the top of the screen
If a connection cannot be established,
the Connection Failed screen appears.
Once the connection to the network has
be established, the camcorder
automatically connects to the network
and launches the built-in uploading
application.
5 Select the Web site you wish to
upload to.
You must first set up your social networking
site information with the CAMILEO
Connect application and save it to your
camcorder. For more information, see
“CAMILEO® AIR10 Connect” on page 50.
®
AIR10
6 Select the file you wish to upload, and
then press the OK button to confirm.
Uploading files may take a few minutes depending on the size of
the files and the wireless network signal strength.
Page 63

Broadcast live streaming on USTREAM
NOTE
Operation Screen
The status bar appears during the
upload process.
7 Select the Return/Exit ( ) icon, and
then press the OK button, or press
the Return/Exit button to exit.
8 There is no Internet connection,
please establish an Internet
connection and try again.
The camcorder will try to upload files to the Internet for one
minute before the No Internet Connection notice appears.
Wi-Fi® Functions
63
Broadcast live streaming on USTREAM
Operation Screen
1 Follow steps 1 - 5 in the previous
section.
2 Use the Directional buttons to select
the USTREAM icon on the listed Web
site screen.
3 Select the Return/Exit ( ) icon, and
then press the OK button, or press
the Return/Exit button to terminate
streaming.
Page 64

64
NOTE
Wi-Fi® Functions
Broadcast live streaming on USTREAM
Operation Screen
4 Video streaming is broadcast on the
USTREAM Web site.
Anyone that possesses your
account/channel name can visit the
USTREAM Web site and view live streaming
broadcast from your camcorder through
their various devices.
Visit the USTREAM Web site for
instructions on how to view live streaming.
❖ Some AP routers do not allow you to connect to the network
(e.g. firewall).
❖ You may be charged by the network service provider.
❖ It may take time to scan and connect to the AP/network, or to
upload files. The upload speed is affected by the Internet
connection speed and/or other factors.
❖ Social networking site information is subject to change without
notice (e.g. password validation, create a channel). Visit the
networking site first to update your account setting.
❖ Configuration through the CAMILEO
application on your computer may require Wi-Fi
enable the uploading/streaming features, (e.g., select the
broadcasting channel in YouTube
❖ Avoid transferring confidential files and setting your personal
account information on an open network or in public areas.
❖ Make sure you create the channel on the USTREAM Web site for
your broadcast. For detailed setup procedure, refer to the
USTREAM Web site.
❖ The zoom function is not available while on USTREAM mode.
®
AIR10 Connect
®
/USTREAM).
®
connection to
Page 65

Chapter 8
Viewing Photos and Videos on TV
Connecting to a high-definition 16:9 (wide) TV
To view images or videos from your camcorder on a TV:
1 Connect the mini HDMI
sold separately) to your camcorder’s mini HDMI
2 Connect the other end of the cable to a television.
3 Set the video input source of your TV to HDMI
®
cable (mini HDMI® cable required
®
out port.
®
.
(16:9)
(Sample Image) Connecting a high-definition TV
65
Page 66

66
NOTE
NOTE
NOTE
NOTE
Viewing Photos and Videos on TV
Installing bundled software
4 The steps for viewing stored photos and videos on a TV are the
same steps used for viewing them on the LCD screen.
The camcorder cannot connect to the network while it is connected to
an HDTV via the cable, or vice versa.
The LCD screen does not display when the camcorder is connected
to an HDTV.
Some functions may not be accessible while the camcorder is
connected to an HDTV.
Installing bundled software
The CD-ROM supplied with your camcorder contains two software
applications.
To install the bundled software:
1 Insert the CD-ROM into your computer’s optical disc drive.
The autorun screen appears.
2 Click “Install Application Software”. Follow the onscreen
instructions to complete the installation.
Detailed information can be found in the online help of all the
bundled software.
Page 67

Chapter 9
NOTE
Viewing Photos and Videos on a Computer
It may be necessary to install the bundled software application,
ArcSoft MediaImpression
computer.
®
to view videos properly on your
Transferring photos or videos to a computer
You can transfer photos or videos stored on your camcorder to a
computer and send them via email to friends or post them on the
Internet.
To do this:
1 Connect the computer and camcorder with the supplied mini
USB 2.0 cable.
The multi-indicator light blinks.
2 To access photos and videos on your SD™ Card: Videos and
photos can be found on your computer at
“My Computer\SD\DCIM\100MEDIA (path will vary
depending on name of SD™ Card).”
3 To access photos and videos in the camcorder’s internal
memory: Videos and photos can be found on your computer at
“My Computer\DV\DCIM\100MEDIA"
4 In this folder, you can view, delete, move, or copy any
video/photo you want.
5 Use the bundled ArcSoft MediaImpression
software to edit the videos or photos.
®
application
67
Page 68

Chapter 10
Specifications
Image sensor
Operations modes
Lens
Focus range
Zoom
Shutter
LCD screen
Storage media
Image resolution
Video resolution
5 Megapixel BSI CMOS sensor
Video record, Photo record, Video/Photo upload via Wi-Fi®, Live
streaming via Wi-Fi®, Wireless Webcam
Fixed focus lens (F 2.5)
HD 720/60/HD 720/30: 29.5 in. (75cm) ~ infinity
Photo/Full HD 1080/30: 43.3 in. (110cm) ~ infinity
1x~5x (5x Digital zoom)
Electronic
2 in. (5.08cm) LCD screen
Built-in 128MB memory (partial memory is used for firmware
code),
SD/SDHC/SDXC card slot support (up to 64GB)
High: 4608 x 3456 (16MP) (Interpolated)
Standard: 2592 x 1944 (5MP)
Low: 2048 x 1536 (3MP)
Full HD 1080/30: 1920 x 1080 (30fps)
HD 720/60: 1280 x 720 (60fps)
HD 720/30: 1280 x 720 (30fps)
VGA 480/30: 640 x 480 (30fps)
68
Page 69

Specifications
Operating Environment Conditions
69
White balance
ISO
Self-timer
Light
File format
Image play
PC interface
TV out
®
Wi-Fi
Battery
Dimensions
Weight
Auto/Manual (Daylight, Fluorescent, Tungsten)
Auto/800/1600
10 second delay
Light ON/Light OFF/Digital Light ON
Photo: JPG
Video: MP4 (H.264)
Single image/Slideshow
Mini USB 2.0 port
Mini HDMI
802.11 a/b/g Wi-Fi® CERTIFIED
Lithium-ion rechargeable battery
2.2 (W) x 4.3 (H) x 0.75 in. (D)
56 (W) x 108 (H) x 19mm (D)
3.0 oz. (86g) (without battery), 3.9 oz. (111g) (with battery)
®
Operating Environment Conditions
Operating temperature: 14° to 104° F (-10° to 40° C)
Operating humidity: 20 to 85% (relative humidity)
Page 70

Chapter 11
Troubleshooting
If the camcorder fails to function as expected, check the list of
common problems/solutions below:
Problem Solution(s)
The camcorder does not turn
on. The power turns off
suddenly
The files on the memory card
do not display smoothly, and
the camcorder’s LCD screen
displays the “!” marking
The camcorder does not take
videos/photos
Power is OFF. Press the Power button to turn ON.
The battery is weak or dead. Recharge the battery.
The “!” means the SD™ Card is low speed or contains
corrupted files. To solve this, format the SD™ Card
using the camcorder not a computer, “Format” on
page 48.
The card has some problems and can not be
recognized. Change the card with another one.
Change the SD/SDHC/SDXC card to a high speed card.
The memory is full. Delete some unnecessary
videos/photos or insert a new SD™ Card.
The power is OFF. Press the Power Button to turn ON.
70
Page 71

Problem Solution(s)
How do I charge the battery?
The camcorder is freezing up
The date imprinted on the
photo is incorrect
Why do some of my indoor
photos look blurry and dark?
The color of the video/photo
is not natural
USB connection to the
computer indications:
Troubleshooting
You must use the supplied AC adaptor or the mini USB
cable, see “Charging the battery” on page 16.
The camcorder must be turned OFF.
A blinking light indicates active charging and a solid
light indicates that charging is complete.
In AC charging mode, the full charge time is
approximately up to 4 hours and the light will turn Off
automatically after approximately 3~5 minutes even
though charging continues. (Actual charging time may
vary, depending on the battery’s condition.)
Try turning OFF the camcorder and removing the
battery. Then re-insert the battery and turn the
camcorder ON again.
Set the date and time in the Setup menu, see “Time
settings” on page 47.
The lighting may be poor. Check your surroundings for
a better lit area.
The camcorder extends photo exposure time under
low light/indoor conditions. Keep the camcorder (and
the target subject) steady for several seconds when
taking photos, see “Photo setting options” on page 31.
Place the camcorder on a flat and steady surface, or
use a tripod when taking photos.
Select the proper white balance option to match the
light source, see “White Balance” on page 38.
DV: Indicates the internal memory of the camcorder.
Removable Disk: Indicates the external memory
(SD/SDHC/SDXC card) installed in the camcorder.
AIR10 Connect: Indicates the bundled program. If you
want to install this program, double-click on the icon to
begin the installation automatically, see “Installing
CAMILEO® AIR10 Connect” on page 50.
71
Page 72

72
Troubleshooting
Problem Solution(s)
The camcorder’s LCD screen
displays the message
“CONNECTION FAILED” after
pressing the Internet/Wi-Fi
button
Uploading files takes a long
time
Cannot upload files to the
social networking site
The CAMILEO® AIR10
Connect application does not
install properly
The password configuration does not match the AP
you wish to connect to.
The AP router or the computer is not turned on. Turn
®
the AP router or your computer on.
The camcorder is not in the wireless network service
area or has a weak network signal. Make sure the AP
router is able to access the Internet. Closed networks
or networks that must be accessed through a webpage
login screen are not supported.
The camcorder does not support the type of
encryption used on the AP. This model only supports
WEP/WPA/WPA2 personal type of encryption, but not
up to enterprise level.
Your network requires PPPoE account/password
information.
Some AP routers do not allow you to connect to the
network (e.g. firewall).
For more information, see “Wi-Fi
page 58.
Uploading files may take a few minutes depending on
the size of the files and the wireless network signal
strength. Either reduce the file size, increase the signal
strength or try another wireless network.
There is no Internet connection. Please check your
wireless network connection and try again.
Make sure that your computer’s operation system is
compatible with the CAMILEO® AIR10 Connect
application, see “Advanced operations on your
computer (CAMILEO® AIR10 Connect)” on page 50.
®
Functions” on
Page 73

Chapter 12
Other Information
Toshiba Support
If you require help or are having problems operating your product,
you may need to contact Toshiba for additional technical assistance.
Before you call
Since some problems may be related to software, it is important that
you investigate other sources of assistance first. Try the following
before contacting Toshiba:
❖ Review the documentation supplied with your product.
❖ If a problem occurs when you are running software
applications, consult the software documentation for
troubleshooting suggestions. Contact the software company’s
technical support department for assistance.
❖ Consult the reseller or dealer from whom you purchased your
product. They are your best resource for current information
and support.
73
Page 74

74
Other Information
Contacting Toshiba
Contacting Toshiba
Toshiba’s technical support Web site
For technical support, or to stay current on the most recent software
options for your CAMILEO
information, be sure to regularly check the Toshiba Web site at
support.toshiba.com.
®
Toshiba voice contact
For technical support, call the Toshiba Customer Support Center:
Within the United States at (888) 592-0944
Outside the United States at (949) 583-3305
Warranty
Online Warranty Information
This product is covered by a One (1) Year Standard Limited
Warran ty.
A copy of the warranty is included on the enclosed CD or can be
viewed online at http://pcsupport.toshiba.com/accessories1yr.
product and for other product
Warranty Service
Customers located in the fifty (50) United States and District of
Columbia may obtain warranty service by visiting the Toshiba
Acclaim Web site at acclaim.toshiba.com or by contacting the
telephone support center at (888) 592-0944.
Customers located outside the fifty (50) United States and District
of Columbia may obtain warranty service by contacting the
telephone support center at (949) 583-3305.
 Loading...