

Page 1

CAMILEO® AIR10
Quick Start Guide
Page 2

Introduction
2
Introduction
For detailed information regarding product features, warranty and safety
precautions, please refer to the User’s Guide on the included CD.
Contact
Address: TOSHIBA America Information Systems, Inc.
Telephone: (949) 583-3000
9740 Irvine Boulevard
Irvine, California 92618-1697
Additional Information
© Copyright 2012 TOSHIBA CORPORATION. All rights reserved. TOSHIBA
reserves the right to make technical changes. TOSHIBA assumes no liability for
damages incurred directly or indirectly from errors, omissions or discrepancies
between this product and the documentation.
Trademarks
CAMILEO is a registered trademark of Toshiba America Information Systems, Inc.
and/or Toshiba Corporation.
HDMI, the HDMI Logo and High-Definition Multimedia Interface are trademarks
or registered trademarks of HDMI Licensing, LLC.
Secure Digital and SD are trademarks of SD Card Association.
Wi-Fi is a registered trademark of the Wi-Fi Alliance.
All other brand and product names are trademarks or registered trademarks of their
respective companies.
Page 3
Getting Started
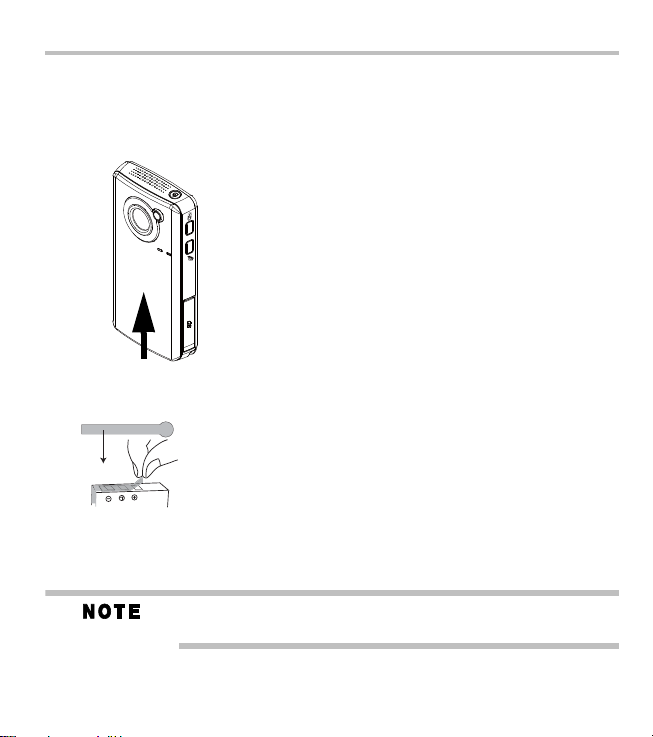
REMOVE
Getting Started
The battery comes pre-installed in the camcorder, however you must
remove the protective film on the battery before use.
1 Slide the front battery cover off.
2 Remove the battery.
3 Pull the film off.
4 Reinsert the battery face up, making sure it is lined-up with the
correct polarity marks.
5 Close the battery cover.
Be sure to remove the protective film from the lens before using the
camcorder.
3
Page 4

Getting Started
To remove the
SD™ Card, press
inward to release
it. When the card
pops out, grasp
it and pull it
straight out.
4
To insert the SD™ Card (optional):
1 Flip open the SD™ Card cover.
2 Insert the SD™ Card into the slot until it locks in place.
3 Once inserted, close the SD™ Card cover.
Charge your battery before use
You must use the supplied Mini USB cable or AC adaptor to charge your
camcorder before use. Turn off the camcorder before connecting the cable.
A blinking light indicates active charging, and a solid light indicates that
charging is complete. In AC charging mode, the solid light will turn off
automatically after a few minutes.
Page 5

Before Using your Camcorder
Before Using your Camcorder
Using Wi-Fi®
Just like your Wi-FI® connection on your computer, you will need a
connection to a wireless network and an internet connection to upload
videos/photos to social networking sites, stream videos, or use your
camcorder as a wireless webcam. The camcorder does not use cellular
communications to connect.
Closed wireless networks or wireless networks that must be
accessed through a webpage login screen are not supported.
For optimal performance and ease of use on setting up Wi-Fi® functions
and sharing, please refer to chapters 6 and 7 in the User's Guide on the
supplied CD. It is recommended to print and/or store the User's Guide on
your computer for easy access.
In order for Wi-Fi® connectivity to work correctly, make sure you have
configured the setting correctly on your computer using the bundled
CAMILEO® Air10 Connect Application (for Windows® based systems
only) and that the camcorder is within an active wireless network area. The
CAMILEO® AIR10 Connect application will be automatically installed to
your computer when the mini USB cabel is connected, or can be installed
from the CD included with the camcorder.
The CD supplied with the camcorder contains these software applications:
❖ CAMILEO® AIR10 Connect is a PC application that provides a
simple and friendly platform to manage the files in the camcorder, and
control the interaction with your camcorder via either Wi-Fi or USB
connection.
5
Page 6

Before Using your Camcorder
6
❖ ArcSoft MediaImpression is a user-friendly application that helps
you manage your media, edit and playback video, and upload your
files to websites easily.
Connecting the camcorder to your computer with the mini USB cable
When the USB connection is made to your computer for the first time, up
to three AutoPlay screens will appear on your computer.
CD Drive (x:) AIR10_Connect -- CAMILEO® AIR10 Connect Application
DV (x:) -- Internal memory of the camcorder
Removable Disk (x:) -- Only shows if an SD card is installed in the camcorder
The AutoPlay screens may load on top of one another.
Simply drag them into view. Check your taskbar if you do
not see them.
If the CAMILEO® AIR10 Connect application does not start to install
automatically, click on the CAMILEO® AIR10 Connect application.
Depending on your computer settings during installation, up to three User
Account Control screens (listed below) may pop up during the
CAMILEO® AIR10 Connect installation process. Click OK on each one
to proceed.
Microsoft Visual C++
Setup.exe
AIR10_Connect.exe
Uploading files may take a few minutes depending on the
size of the files and the wireless network signal strength.
Page 7

Quick Tour
Power button
Wi-Fi
®
button
Press to turn ON/OFF Wi-Fi®.
Internet button
Press to display the social
Front/Underside
Light
Microphone
Indicator light
Battery cover
Strap hook
Speaker
SD™ Card cover
networking site upload
Tripod socket
Lens
menu.
Mini HDMI® port
Mini USB 2.0 port
Quick Tour
7
Page 8

8
Menu/OK button
Menu ON.
Validate the setting.
Rear
Press to take a photo.
Press to begin recording.
Photo button
LCD screen
Left button
Playback button
Video button
To stop recording, press
it again.
(Down) Zoom out/Delete
button
In Record mode: Zoom out.
In Playback mode: Go to the delete
screen. When playing a video,
press to decrease volume.
Move between option items.
During playback: Go to
previous video/photo.
In Record mode: Zoom in.
(Up) Zoom in/
In Playback mode: Go to the
video/photo thumbnail
Thumbnail button
screen. When playing a video,
press to increase volume.
Move between option items.
Right button
In Playback mode: Go to the
next video/photo.
Return/Exit button
Return to the previous screen.
Exit.
Switch to Playback mode.
Quick Tour
CAMILEO AIR10
MENU
OK
Page 9

1 To power on
Press and hold the Power (......) button
for one second.
To conserve battery power, the
camcorder will turn off automatically
after 3 minutes of non-operation.
2 To start or stop recording
Press the Video (.......) button.
3 To take a photo
Press the Photo (......) button.
4 To zoom in and out
Press the Up/Down arrow (....) buttons.
5 To review videos/photos
Press the Playback (.....) button.
6 To operate more advanced options
Press the MENU/OK (.......) button to access
the options menu.
For more detailed operational instructions,
please refer to the User’s Guide, chapters
3 & 4 on the supplied CD.
6
3
2
4
5
1
Record and Play
CAMILEO AIR10
MENU
OK
Quick Tour
9
MENU
OK
Page 10

Toshiba Support
10
Toshiba Support
If you require help or are having problems operating your product, you
may need to contact Toshiba for additional technical assistance.
Before you call
Since some problems may be related to software, it is important that you
investigate other sources of assistance first. Try the following before
contacting Toshiba:
❖ Review the User’s Guide supplied with your product.
❖ If a problem occurs when you are running software applications,
consult the software documentation for troubleshooting suggestions.
Contact the software company’s technical support department for
assistance.
❖ Consult the reseller or dealer from whom you purchased your
product. This is the best resource for current information and support.
Contacting Toshiba
Toshiba’s technical support Web site
For technical support, or to stay current on the most recent software and
hardware options for your CAMILEO® product and for other product
information, be sure to regularly check the Toshiba Web site at
support.toshiba.com.
Toshiba voice contact
For technical support, call the Toshiba Customer Support Center:
Within the United States at (888) 592-0944
Outside the United States at (949) 583-3305
This product is covered by a One (1) Year Standard Limited Warranty. A
copy of the warranty is included on the enclosed CD or can be viewed
online at http://pcsupport.toshiba.com/accessories1yr.
Page 11

Page 12

GMAA00364011
02/12
 Loading...