

Page 1

User’s Guide
If you need assistance:
oshiba’s Support Web site
❖ T
tabletsupport.toshiba.com
❖ Toshiba Customer Support Center
Calling within the United States (800) 457-7777
Calling from outside the United States (949) 859-4273
For more information, see “If Something Goes Wrong” on page 98
in this guide.
GMAD00283010
09/11
Page 2
2
Handling the cord on this product will expose you to lead, a
chemical known to the State of California to cause birth defects or
other reproductive harm. Wash hands after handling.
Model: AT1S0 Series
Regulatory Information
Protection of Stored Data
For your important data, please make periodic back-up copies of all the data
stored on the hard disk or other storage devices as a precaution against possible
failures, alteration, or loss of the data. IF YOUR DATA IS ALTERED OR
LOST DUE TO ANY TROUBLE, FAILURE OR MALFUNCTION OF
THE HARD DISK DRIVE OR OTHER STORAGE DEVICES AND THE
DATA CANNOT BE RECOVERED, TOSHIBA SHALL NOT BE
LIABLE FOR ANY DAMAGE OR LOSS OF DATA, OR ANY OTHER
DAMAGE RESULTING THEREFROM. WHEN COPYING OR
TRANSFERRING YOUR DATA, PLEASE BE SURE TO CONFIRM
WHETHER THE DATA HAS BEEN SUCCESSFULLY COPIED OR
TRANSFERRED. TOSHIBA DISCLAIMS ANY LIABILITY FOR THE
FAILURE TO COPY OR TRANSFER THE DATA CORRECTLY.
Critical Applications
The device you have purchased is not designed for any “critical applications.”
“Critical applications” means life support systems, medical applications,
connections to implanted medical devices, commercial transportation, nuclear
facilities or systems or any other applications where product failure could lead to
injury to persons or loss of life or catastrophic property damage.
ACCORDINGLY, TOSHIBA, ITS AFFILIATES AND SUPPLIERS
DISCLAIM ANY AND ALL LIABILITY ARISING OUT OF THE USE
OF THE DEVICE PRODUCTS IN ANY CRITICAL APPLICATIONS. IF
YOU USE THE DEVICE PRODUCTS IN A CRITICAL APPLICATION,
YOU, AND NOT TOSHIBA, ASSUME FULL RESPONSIBILITY FOR
SUCH USE.
Radio Frequency (RF) Energy Exposure
When the transmitter and receiver on your device is powered ON, RF energy is
received and transmitted. The power level your device transmits at is controlled
by your network access while in communication.
Your device is approved to the radio standard by the country/region listed in the
approved countries table for the module installed in your device.
Page 3

FCC Notice “Declaration of Conformity Information”
NOTE
This equipment has been tested and found to comply with the limits for a Class B
digital device, pursuant to Part 15 of the FCC rules. These limits are designed to
provide reasonable protection against harmful interference in a residential
installation.
This equipment generates, uses and can radiate radio frequency energy and, if not
installed and used in accordance with the instructions, it may cause harmful
interference to radio communications. However, there is no guarantee that
interference will not occur in a particular installation. If this equipment does
cause harmful interference to radio or television reception, which can be
determined by turning the equipment off and on, the user is encouraged to try to
correct the interference by one or more of the following measures:
❖ Reorient or relocate the receiving antenna.
❖ Increase the separation between the equipment and receiver.
❖ Connect the equipment to an outlet on a circuit different from that to which
the receiver is connected.
❖ Consult the dealer or an experienced radio/TV technician for help.
Only Peripherals complying with the FCC Class B limits may be attached to this
equipment. Operation with noncompliant peripherals or peripherals not
recommended by Toshiba is likely to result in interference to radio and TV
reception. Shielded cables must be used between the external devices and the
device's ports. Changes or modifications made to this equipment not expressly
approved by Toshiba or parties authorized by Toshiba could void the user's
authority to operate the equipment.
3
This device complies with Part 15 of the FCC Rules. Operation is subject to the
following two conditions:
❖ This device may not cause harmful interference.
❖ This device must accept any interference received, including interference
that may cause undesired operation.
Contact either:
❖ Toshiba’s Support Web site at tabletsupport.toshiba.com.
❖ Or call the Toshiba Customer Support Center:
Within the United States at (800) 457-7777
Outside the United States at (949) 859-4273
Page 4
4
Industry Canada Requirement
This Class B digital apparatus complies with Canadian ICES-003.
Cet appareil numérique de la classe B est conformé à la norme NMB-003 du
Canada.
Wireless Interoperability
The Toshiba Wireless LAN Card products are designed to be interoperable with
any wireless LAN product that is based on Direct Sequence Spread Spectrum
(DSSS) radio technology, and is compliant to:
❖ The IEEE 802.11 Standard on Wireless LANs (Revision A/B/G), as defined
and approved by the Institute of Electrical and Electronics Engineers.
❖ The Wireless Fidelity (Wi-Fi
Alliance. The “Wi-Fi CERTIFIED” logo is a certification mark of the Wi-Fi
Alliance.
®
) certification as defined by the Wi-Fi
Bluetooth® and Wireless LAN devices operate within the same radio
frequency range and may interfere with one another. If you use Bluetooth
and Wireless LAN devices simultaneously, you may occasionally experience
a less than optimal network performance or even lose your network
connection.
If you should experience any such problem, immediately turn off your
Bluetooth® or Wireless LAN device.
Please contact Toshiba product support on Web site
http://www.toshiba-europe.com/computers/tnt/bluetooth.htm in Europe or
tabletsupport.toshiba.com in the United States for more information.
Wireless LAN and Your Health
Wireless LAN products, like other radio devices, emit radio frequency
electromagnetic energy. The level of energy emitted by Wireless LAN devices
however is far much less than the electromagnetic energy emitted by wireless
devices like for example mobile phones.
Because Wireless LAN products operate within the guidelines found in radio
frequency safety standards and recommendations, Toshiba believes Wireless
LAN is safe for use by consumers. These standards and recommendations reflect
the consensus of the scientific community and result from deliberations of panels
and committees of scientists who continually review and interpret the extensive
research literature.
®
Page 5
In some situations or environments, the use of Wireless LAN may be restricted
by the proprietor of the building or responsible representatives of the
organization. These situations may for example include:
❖ Using the Wireless LAN equipment on board airplanes, or
❖ In any other environment where the risk of interference to other devices or
services is perceived or identified as harmful.
If you are uncertain of the policy that applies on the use of wireless devices in a
specific organization or environment (e.g. airports), you are encouraged to ask for
authorization to use the Wireless LAN device prior to turning on the equipment.
Exposure to Radio Frequency Radiation
The radiated output power of the Toshiba Wireless LAN Card is far below the
FCC radio frequency exposure limits. Nevertheless, the Toshiba Wireless
LAN Card shall be used in such a manner that the potential for human
contact during normal operation is minimized. The antenna(s) used for this
transmitter must not be co-located or operating in conjunction with any
other antenna or transmitter.
Specific Absorption Rate (IEEE)
Your device is designed to be in compliance with Radio Waves exposure
regulations and does not exceed the limits for exposure to radio waves (radio
frequency electromagnetic fields) in accordance with the Federal Trade
Communications Commission (FCC) and Industry Canada (IC). A substantial
safety margin is set to assure the safety of all persons, regardless of health.
A unit of measurement known as the Specific Absorption rate, or SAR is utilized
for the radio wave exposure guidelines. The SAR measurement for devices does
not exceed 1.6W/kg.
The actual SAR values for your device, while in use, are normally well below the
stated values. The operating power of your device is automatically decreased
when full power is not needed for the wireless connection to increase system
efficiency and to minimize interference on the network. The lower the power
output of the device the lower its SAR value.
As stated by the World Health Organization, present scientific information
indicates no special precautions are needed for the use of this device. To further
reduce any exposure, limit your usage.
5
Page 6
6
Turn Wi-Fi®, Bluetooth®, and Wireless WAN
Functionalities off for Cardiac Pacemakers
❖ Turn Wi-Fi
when you are near a person who may have a cardiac pacemaker
implant or other medical electric device. Radio waves may affect
pacemaker or medical device operation, possibly resulting in
serious injury. Follow the instructions of your medical device
when using any Wi-Fi
functionally.
Regulatory Information
This device complies with the following radio frequency and safety standards.
Canada – Industry Canada (IC)
This device complies with RSS 210 of Industry Canada.
The installer of this radio equipment must ensure that the antenna is located
or pointed such that it does not emit RF field in excess of Health Canada
limits for the general population; consult Safety Code 6, obtainable from
Health Canada’s Web site www.hc-sc.gc.ca/rpb. The RF device shall not be
co-located with any other transmitter that has not been tested with this
device.
®
, Bluetooth®, and Wireless WAN functionality off
®
or Bluetooth® or Wireless WAN
Operation is subject to the following two conditions: (1) this device may not
cause interference, and (2) this device must accept any interference, including
interference that may cause undesired operation of this device.
L’ utilisation de ce dispositif est soumis aux deux conditions suivantes: (1) il ne
doit pas produire de brouillage et (2) l’utilisateur du dispositif doit être prêt à
accepter tout brouillage radioélectrique reçu, même s’il est susceptible de
compromettre son fonctionnement.
The term “IC” before the equipment certification number only signifies that the
Industry Canada technical specifications were met.
To prevent radio interference to the licensed service, this device is intended to be
operated indoors and away from windows to provide maximum shielding.
Equipment (or its transmit antenna) that is installed outdoors is subject to
licensing.
Pour empecher que cet appareil cause du brouillage au service faisant l’objet
d’une licence, il doit etre utilize a l’interieur et devrait etre place loin des fenetres
afin de Fournier un ecram de blindage maximal. Si le matriel (ou son antenne
d’emission) est installe a l’exterieur, il doit faire l’objet d’une licence.
Page 7
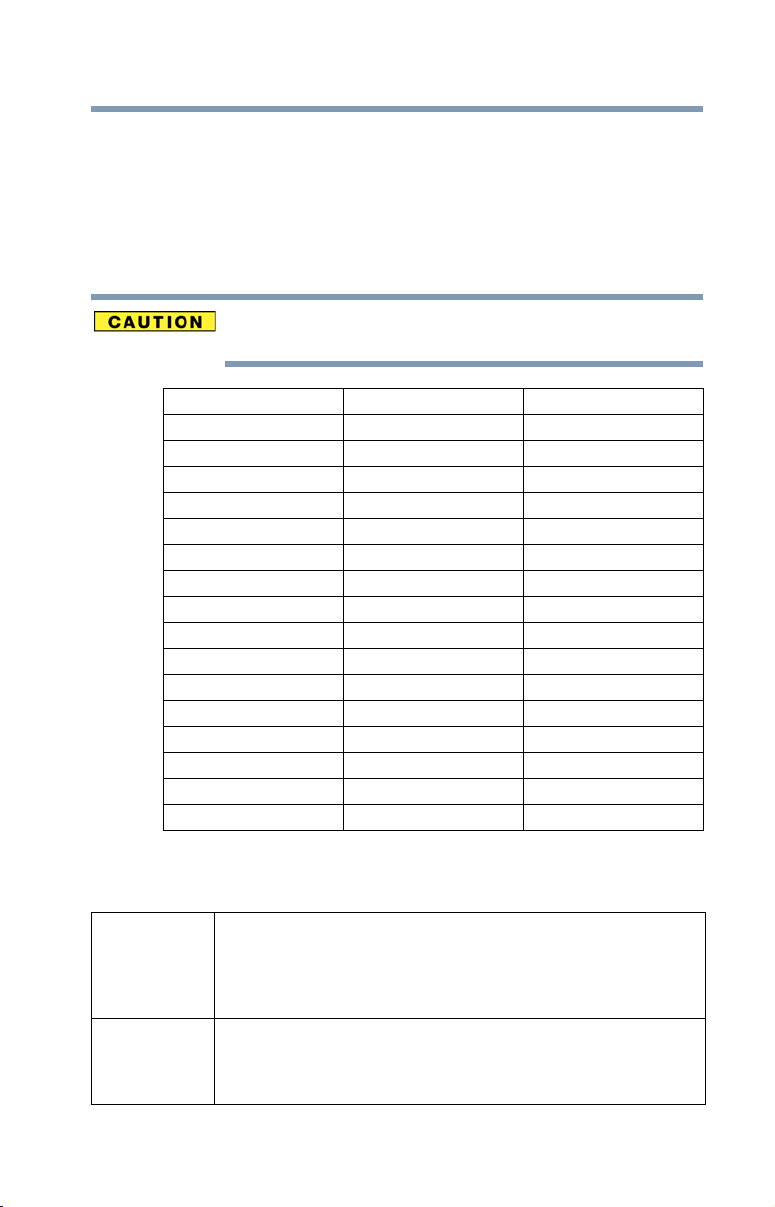
Radio Approvals for Wireless Devices
Approved Countries/Regions for the Broadcom® Wireless
Wi-Fi® AW-NH931 Series
This equipment is approved to the radio standard by the countries/regions in the
following table.
Do not use this equipment except tin the countries/regions in the following
table.
Australia Austria Bangladesh
Belgium Bolivia Bulgaria
Canada Colombia Cyprus
Czech Republic Denmark Dominican Republic
El Salvador Estonia Finland
France Germany Greece
Guatemala Hong Kong Hungary
Iceland Ireland Italy
Japan Latvia Liechtenstein
Lithuania Luxembourg Malta
Monaco Netherlands New Zealand
Norway Panama Poland
Portugal Puerto Rico Romania
Saudi Arabia Slovak Republic Slovenia
Spain Sri Lanka Sweden
Switzerland Taiwan Turkey
United Kingdom USA
7
België/
Belgique:
Europe - Restrictions for use of 2.4 GHz Frequencies in
European Community Countries
For private usage outside buildings across public grounds over less than
300m no special registration with IBPT/BIPT is required. Registration to
IBPT/BIPT is required for private usage outside buildings across public
grounds over more than 300m. For registration and license please
contact IBPT/BIPT.
Voor privé-gebruik buiten gebouw over publieke groud over afstand
kleiner dan 300m geen registratie bij BIPT/IBPT nodig; voor gebruik
over afstand groter dan 300m is wel registratie bij BIPT/IBPT nodig.
Voor registratie of licentie kunt u contact opnemen met BIPT.
Page 8
8
Dans le cas d’une utilisation privée, à l’extérieur d’un bâtiment, audessus d’un espace public, aucun enregistrement n’est nécessaire pour
une distance de moins de 300m. Pour une distance supérieure à 300m un
enregistrement auprès de l’IBPT est requise. Pour les enregistrements et
licences, veuillez contacter l’IBPT.
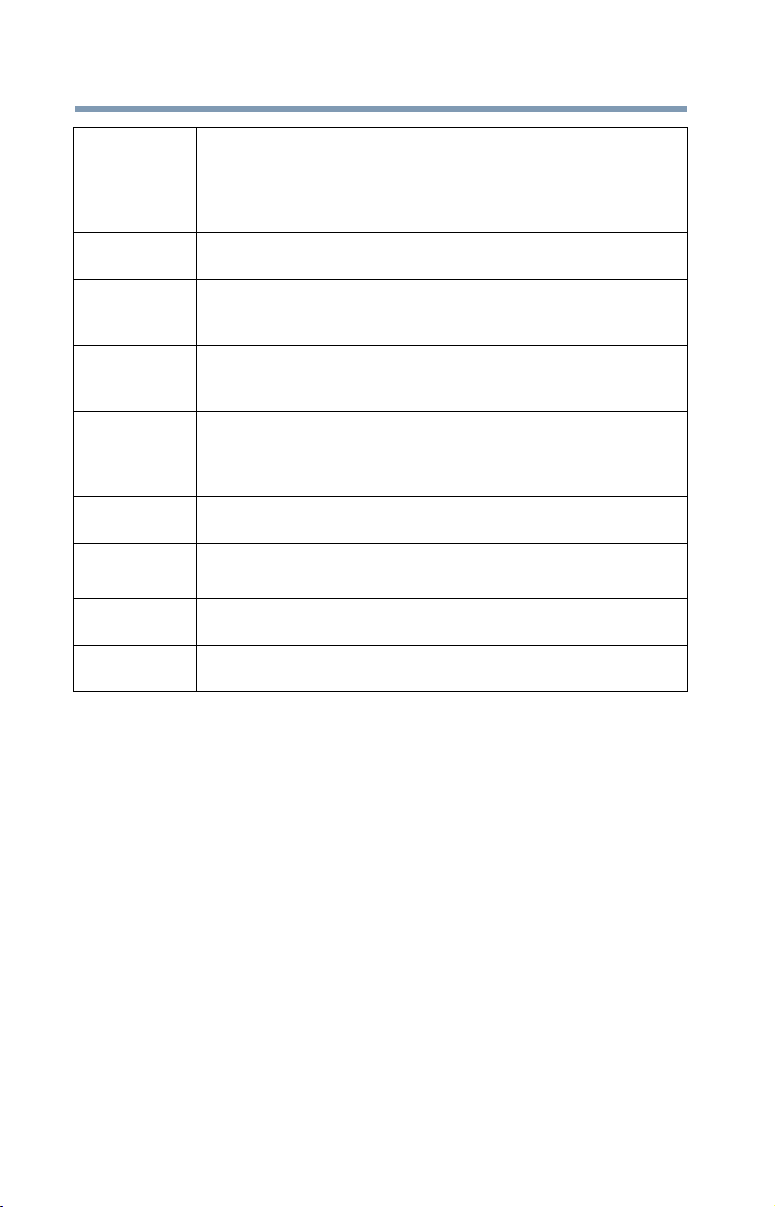
Deutschland: License required for outdoor installations. Check with reseller for
France: Restricted frequency band: only channels 1 to 7 (2400 MHz and 2454
Italia: License required for indoor use. Use with outdoor installations not
Nederland: License required for outdoor installations. Check with reseller for
procedure to follow.
Anmeldung im Outdoor-Bereich notwendig, aber nicht
genehmigungspflichtig. Bitte mit Händler die Vorgehensweise
abstimmen.
MHz respectively) may be used outdoors in France. Please contact
A.R.T. (http://www.art-telecom.fr) for applicable procedures to follow.
Bande de fréquence restreinte: seuls les canaux 1- 7 (2400 et 2454 MHz
respectivement) doivent être utilisés endroits extérieur en France. Vous
pouvez contacter l’Autorité de Régulation des Télécommunications
(http://www.art-telecom.fr) pour la procédure à suivre.
allowed.
È necessaria la concessione ministeriale anche per l’uso interno.
Verificare con i rivenditori la procedura da seguire.
procedure to follow.
Licentie verplicht voor gebruik met buitenantennes. Neem contact op
met verkoper voor juiste procedure.
Bluetooth® Wireless Technology Interoperability
Bluetooth® Cards from Toshiba are designed to be interoperable with any product
with Bluetooth
Spectrum (FHSS) radio technology, and is compliant to:
❖ Bluetooth
Special Interest Group.
❖ Logo certification with Bluetooth
Bluetooth
®
wireless technology that is based on Frequency Hopping Spread
®
Specification as defined and approved by The Bluetooth®
®
®
Special Interest Group.
wireless technology as defined by The
Page 9
9
Always use Bluetooth® cards from Toshiba in order to enable wireless
networks over two or more (up to a total of seven) Toshiba portable
computers using these cards. Please contact Toshiba product support on
Web site http://www.toshiba-europe.com/computers/tnt/bluetooth.htm in
Europe or tabletsupport.toshiba.com in the United States for more
information.
When you use Bluetooth
LAN devices, Bluetooth® transmissions might slow down or cause errors. If
you detect certain interference while you use Bluetooth
always change the frequency, move your device to the area outside of the
interference range of 2.4 GHz Wireless LAN devices (40 meters/43.74 yards
or more) or stop transmitting from your device. Please contact Toshiba
product support on Web site http://www.toshiba-europe.com/computers/tnt/
bluetooth.htm in Europe or tabletsupport.toshiba.com in the United States
for more information.
®
Bluetooth
frequency range and may interfere with one another. If you use Bluetooth
and Wireless LAN devices simultaneously, you may occasionally experience
a less than optimal network performance or even lose your network
connection. If you should experience any such problem, immediately turn off
either one of your Bluetooth® or Wireless LAN. Please contact Toshiba
product support on Web site http://www.toshiba-europe.com/computers/tnt/
bluetooth.htm in Europe or tabletsupport.toshiba.com in the United States
for more information.
and Wireless LAN devices operate within the same radio
®
cards from Toshiba close to 2.4 GHz Wireless
®
cards from Toshiba,
®
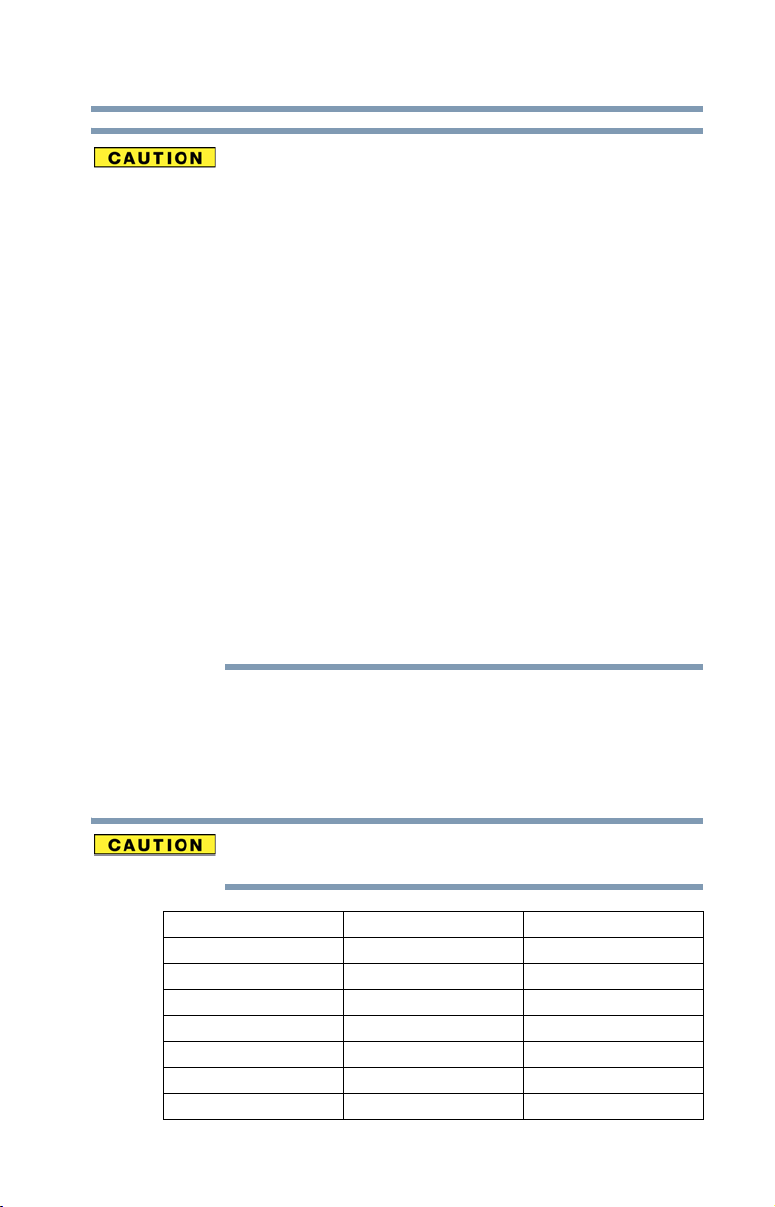
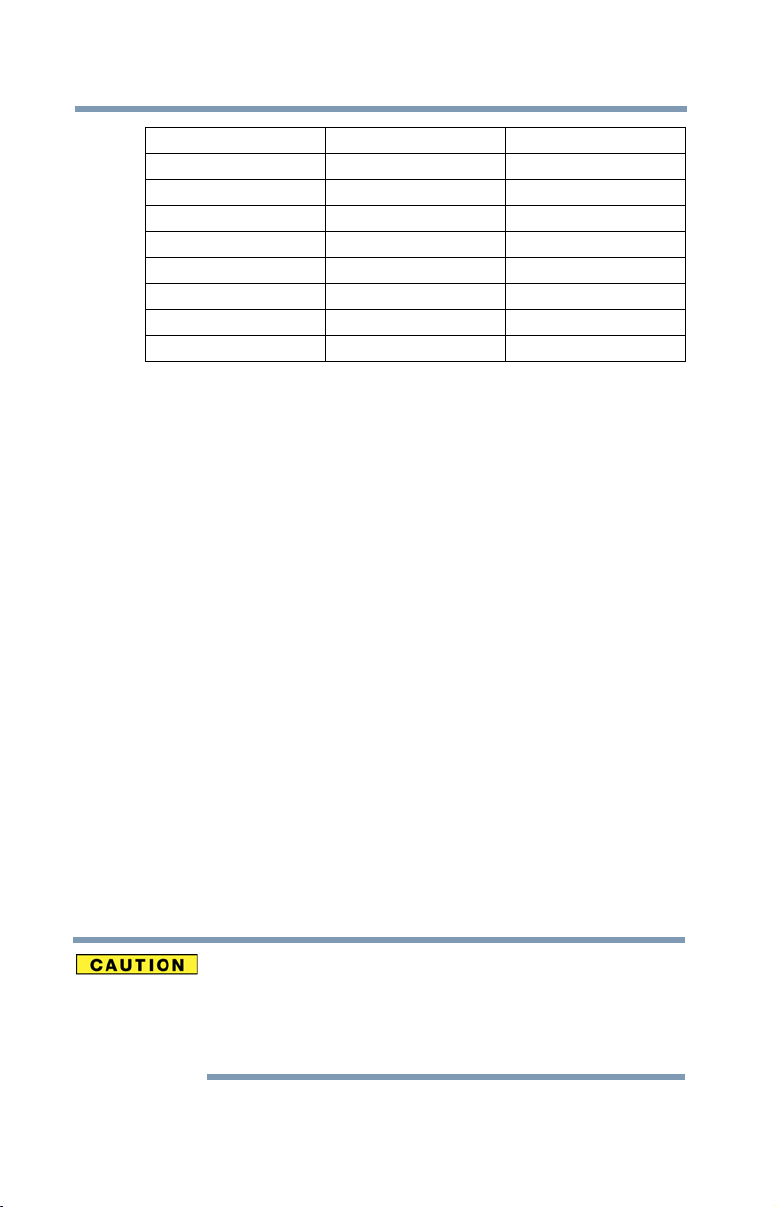
Approved Countries/Regions for use (Bluetooth® wireless
technology)
Bluetooth® Card from Toshiba equipment is approved to the radio standard by the
countries/regions in the following table.
Do not use this equipment except in the countries/regions in the following
table.
Australia Austria Bangladesh
Belgium Bolivia Bulgaria
Canada Colombia Cyprus
Czech Republic Denmark Dominican Republic
El Salvador Estonia Finland
France Germany Greece
Guatemala Hong Kong Hungary
Iceland Ireland Italy
Page 10
10
Japan Latvia Liechtenstein
Lithuania Luxembourg Malta
Monaco Netherlands New Zealand
Norway Panama Poland
Portugal Puerto Rico Romania
Saudi Arabia Slovak Republic Slovenia
Spain Sri Lanka Sweden
Switzerland Taiwan Turkey
United Kingdom USA
Bluetooth® Wireless Technology and Your Health
The products with Bluetooth® wireless technology, like other radio devices, emit
radio frequency electromagnetic energy. The level of energy emitted by devices
with Bluetooth® wireless technology however is much less than the
electromagnetic energy emitted by wireless devices such as mobile phones.
Because products with Bluetooth® wireless technology operate within the
guidelines found in radio frequency safety standards and recommendations,
Toshiba believes Bluetooth
These standards and recommendations reflect the consensus of the scientific
community and result from deliberations of panels and committees of scientists
who continually review and interpret the extensive research literature.
In some situations or environments, the use of Bluetooth
may be restricted by the proprietor of the building or responsible representatives
of the organization. These situations may for example include:
❖ Using the equipment with Bluetooth
airplanes, or
❖ In any other environment where the risk of interference to other devices or
services is perceived or identified as harmful.
If you are uncertain of the policy that applies on the use of wireless devices in a
specific organization or environment (e.g. airports), you are encouraged to ask for
authorization to use the device with Bluetooth
turning on the equipment.
®
wireless technology is safe for use by consumers.
®
wireless technology
®
wireless technology on board
®
wireless technology prior to
Exposure to Radio Frequency Radiation
®
The radiated output power of the Bluetooth
the FCC radio frequency exposure limits. Nevertheless, the Bluetooth
Card from Toshiba is far below
®
Card
from Toshiba shall be used in such a manner that the potential for human
contact during normal operation is minimized.
Page 11

Copyright
This guide is copyrighted by Toshiba America Information Systems, Inc. with all
rights reserved. Under the copyright laws, this guide cannot be reproduced in any
form without the prior written permission of Toshiba. No patent liability is
assumed, however, with respect to the use of the information contained herein.
©2011 by Toshiba America Information Systems, Inc. All rights reserved.
Export Administration Regulation
This product and/or document contains technical data that may be controlled
under the U.S. Export Administration Regulations, and may be subject to the
approval of the U.S. Department of Commerce prior to export. Any export,
directly or indirectly, in contravention of the U.S. Export Administration
Regulations is prohibited.
Notice
While Toshiba has made every effort at the time of publication to
ensure the accuracy of the information provided herein, product
specifications, configurations, prices, system/component/options
availability are all subject to change without notice. For the most
up-to-date product information about your device, or to stay current
with the various product software or hardware options, visit
Toshiba’s Web site at tabletsupport.toshiba.com. Toshiba assumes
no liability for any damages incurred directly or indirectly from any
errors or omissions contained herein. In no event shall Toshiba be
liable for any incidental, consequential, special, or exemplary
damages, whether based on tort, contract or otherwise, arising out
of or in connection with this information or any other information
contained herein or the use thereof.
11
Page 12

12
Trademarks
App Place, Resolution+, and THRiVE are either trademarks or registered
trademarks of Toshiba America Information Systems, Inc. and/or Toshiba
Corporation.
Bluetooth word mark and logos are owned by the Bluetooth SIG, Inc. and any
use of such marks by Toshiba is under license. Other trademarks and trade names
are those of their respective owners.
Broadcom is a registered trademark of Broadcom Corporation and/or its affiliates
in the United States, certain other countries, and/or the EU.
Google, the Google logo, Android, Android Market, Google Maps, Google
eBooks, Gmail, YouTube, and Google Talk are trademarks of Google, Inc.
HDMI, the HDMI Logo and High-Definition Multimedia Interface are
trademarks or registered trademarks of HDMI Licensing, LLC.
Microsoft is a registered trademarks of Microsoft Corporation in the United
States and/or other countries.
Secure Digital and SD are trademarks of SD Card Association.
Wi-Fi is a registered trademark of the Wi-Fi Alliance.
All other brand and product names are trademarks or registered trademarks of
their respective companies.
Product Disposal Information
Discard this device in accordance with applicable laws and regulations.
Disposal of this product may be regulated due to environmental
considerations. For disposal, reuse or recycling information, please contact
your local government.
As part of Toshiba’s commitment to preserving the environment, Toshiba
supports various trade-in and recycling programs. For details, please visit
us.toshiba.com/green.
Licenses
This Product is licensed under the AVC, the VC-1 and the MPEG-4 Part 2 Visual
patent portfolio licenses for the personal and non-commercial use of a consumer
to (i) encode video in compliance with the above standards (“Video Standards”)
and/or (ii) decode AVC, VC-1 and MPEG-4 Part 2 Visual that was encoded by a
consumer engaged in personal and non-commercial activity or was obtained
from a video provider licensed to provide such video. None of the licenses extend
to any other product regardless of whether such product is included with this
product in a single article. No license is granted or shall be implied for any other
use. Additional information may be obtained from MPEG LA, LLC.
See www.mpegla.com.
Page 13

Contents
Introduction................................................................................ 18
This guide ...............................................................19
Safety icons ............................................................19
Other icons used...............................................20
Your device’s features and specifications .........20
Other documentation ..............................................20
Service options .......................................................21
Precautions.......................................................21
File management tips..............................................22
Toshiba’s online resources .....................................22
Chapter 1: Getting Started......................................................... 23
Features and components.......................................23
Front .................................................................24
Back..................................................................25
Right side..........................................................25
Left side ............................................................26
Top ...................................................................27
Bottom..............................................................27
13
Page 14

14
Contents
Connecting to a power source ................................27
Battery Notice .........................................................30
Charging the battery ...............................................30
Taking care of your battery .....................................31
Safety precautions ............................................31
Optimizing battery life .......................................31
Maintaining your battery ...................................32
Disposing of your device ........................................32
Using the device for the first time ...........................33
Turning on the power .......................................33
Setting up your device ......................................34
Setting up your Wi-Fi® connection....................34
Setting location preferences .............................35
Setting the date and time ..................................36
Sign in to your Google™ Account .....................36
Setting up Wi-Fi® and Bluetooth®
connections ...............................................38
Registering your Toshiba device.............................39
Backing up your data ..............................................39
Backing up data using TOSHIBA
File Manager ...............................................39
Backing up data using your Google™
Account.......................................................39
Restoring your data using your Google™
Account.......................................................40
Navigation and features ..........................................41
Home screen.....................................................42
Touch screen navigation ...................................43
Navigating the Home screen .............................44
System bar........................................................44
Securing your tablet..........................................47
Customizing your Home screens ............................49
Adding an item to a Home screen .....................49
Moving an item from the Home screen.............50
Removing an item from a Home screen............50
Changing the wallpaper.....................................50
Page 15

Contents
Turning off the device .............................................51
Options for turning off the device .....................51
Using Shut down mode ....................................51
Using Sleep mode.............................................52
Syncing and managing your accounts ....................53
Add an account .................................................53
Remove an account ..........................................54
Navigation, Maps, Places, and Latitude...................55
Managing downloads..............................................55
Factory data reset ...................................................56
Caring for your device.............................................57
Cleaning the device ...........................................57
15
Chapter 2: Settings .................................................................... 58
Customizing your device’s settings.........................58
Apps and Settings menus .................................58
Wireless and networks settings ........................63
Sound settings..................................................65
Screen settings .................................................65
Multimedia settings ..........................................66
Location and security settings ..........................67
Applications settings.........................................69
Accounts & sync settings .................................70
Privacy settings ................................................71
Storage settings................................................72
Language & input settings ................................72
Date & time settings .........................................74
About tablet .....................................................75
Chapter 3: Working with Apps.................................................. 77
Downloading Toshiba Apps ....................................77
TOSHIBA Media Player .....................................77
Apps .......................................................................78
Downloading from Android Market™................78
Preinstalled Apps on your tablet .......................78
Uninstalling Apps on your tablet .......................79
Page 16

16
Contents
Chapter 4: Exploring the Features on your Device.................. 80
Using the onscreen keyboard..................................80
Type to enter text ..............................................81
Speak to enter text ............................................83
Using the built-in speakers .....................................83
Using external speakers or headphones..................83
Recording sounds.............................................84
Using the cameras ..................................................84
Using a Micro SD™ Card ........................................84
Inserting memory media...................................85
Removing memory media.................................85
Adding optional external devices.............................86
Using an external keyboard...............................86
Using an external mouse ..................................86
Using external devices ......................................87
Connecting an HDMI®-compatible
television or display device .........................87
Using a docking station ..........................................88
Connecting your tablet to a docking
station.........................................................88
Chapter 5: Utilities...................................................................... 90
TOSHIBA Service Station ........................................91
Check for application updates...........................92
Downloading updates .......................................92
Installing updates..............................................93
Downloading and installing System
updates .......................................................93
TOSHIBA File Manager Utility..................................93
File browsing screen .........................................95
Operation of files/folders...................................95
TOSHIBA Adaptive display ......................................97
TOSHIBA Resolution+
®
....................................97
Page 17

Contents
17
Chapter 6: If Something Goes Wrong ..................................... 98
Problems when you turn on the device...................98
The operating system is not working ......................99
Internet problems .............................................99
Power and the batteries ........................................100
Display problems ..................................................101
Sound system problems .......................................101
Wireless networking problems..............................102
If you need further assistance...............................102
Before you contact Toshiba ............................103
Contacting Toshiba .........................................103
Other Toshiba Internet Web sites..........................104
Toshiba’s worldwide offices..................................104
Appendix A: Power Cord/Cable Connectors.......................... 106
Glossary.................................................................................... 107
Index..........................................................................................117
Page 18
Introduction
NOTE
Welcome to the world of powerful, portable, multimedia. With your
Toshiba tablet device, you can watch movies, listen to your favorite
music, read books, play games and do much more.
The product specifications and configuration information are
designed for a product Series. Your particular model may not have
all the features and specifications listed or illustrated. For more
detailed information about the features and specifications on your
particular model, please visit Toshiba’s Web site at
tabletsupport.toshiba.com.
While Toshiba has made every effort at the time of publication to
ensure the accuracy of the information provided herein, product
specifications, configurations, prices, system/component/options
availability are all subject to change without notice. For the most
up-to-date product information about your device, or to stay current
with the various device software or hardware options, visit Toshiba’s
Web site at tabletsupport.toshiba.com.
18
Page 19
This guide
NOTE
This guide introduces the features on your device as well as some
basic procedures needed to perform tasks on your tablet powered by
Android™.
You can:
❖ Read the entire guide from beginning to end.
❖ Skim through and stop when a topic interests you.
❖ Use the table of contents and the index to find specific
Safety icons
All of the Safety instructions contained in this manual must be read
carefully and be fully understood before you attempt to use this
device, in order to avoid potential hazards that could cause bodily
injury, property damage, or damage to the device.
❖ The Safety Instructions contained in this Manual have been
Introduction
This guide
information.
categorized according to the seriousness of the potential
hazards, through the use of the following signal words.
Indicates an imminently hazardous situation which, if not avoided,
will result in death or serious injury.
19
Indicates a potentially hazardous situation which, if not avoided,
could result in death or serious injury.
Indicates a potentially hazardous situation which, if not avoided, may
result in minor or moderate injury.
Indicates a potentially hazardous situation which, if not avoided, may
result in property damage.
Provides important information.
Page 20
20
Introduction
Other documentation
Other icons used
Additional icons highlight other helpful or educational information:
TECHNICAL NOTE: This icon indicates technical information about
the device.
HINT: This icon indicates helpful hints and tips.
DEFINITION: This icon indicates the definition of a term used in the
text.
Your device’s features and specifications
Certain chassis are designed to accommodate all possible
configurations for an entire product Series. Your select model may
not have all the features and specifications corresponding to all of
the icons or switches shown on the chassis, unless you have
selected all those features.
This information applies to all the features and icons described in
this guide.
Below are examples of some of the many possible icons used on
your device:
(Sample Illustration) System icons
Other documentation
Your device comes with the following documentation:
❖ A Legal/Safety/Regulatory document
❖ A Quick Start Card
❖ A standard limited warranty
❖ It may also contain guides for other programs that may come
with your system.
For accessory information, visit Toshiba’s Web site at
accessories.toshiba.com.
Page 21
Service options
Toshiba’s standard limited warranty, extended warranty, and service
upgrade terms and conditions are available at warranty.toshiba.com.
To stay current on the most recent applications, application updates,
and hardware options for your device, as well as other product
information, be sure to regularly check the Toshiba Web site at
tabletsupport.toshiba.com.
If you have a problem or need to contact Toshiba, see “If Something
Goes Wrong” on page 98.
Precautions
Your device is designed to provide optimum safety and ease of use,
and to withstand the rigors of travel. You should observe certain
precautions to further reduce the risk of personal injury or damage
to the device.
Keep this device away from small children. This device is not a toy
and may be hazardous to small children, for example, small
detachable parts may be a choking hazard. Improper use of device
could result in loud volume emitting from the device possibly
causing hearing damage, and improper use and handling of batteries
could result in possible injury.
Introduction
Service options
21
Never place a heavy object on the device and be careful not to drop a
heavy object onto the device. It could damage the device or cause
system failure.
❖ Turning off the device while it is reading from or writing to flash
media may damage the flash media.
❖ Keep the device and disks away from objects that generate
strong magnetic fields, such as large stereo speakers.
❖ Scan all new files for viruses.
This precaution is especially important for files you receive via
email or download from the Internet. Occasionally, even new
programs you buy from a supplier may contain a virus. You
need a special program to check for viruses.
Page 22

22
Introduction
File management tips
File management tips
❖ Back up your files to external media on a regular basis. Label
the backup copies clearly and store them in a safe place.
Your data stays in the device’s temporary memory until you
back it up to external media. If the network you are using goes
down and you must restart your device to reconnect, or your
battery runs out of charge while you are using your device, you
will lose all data since you last backed it up. See “Backing up
your data” on page 39 for further information.
❖ Scan all new files for viruses.
This precaution is especially important for files you receive via
external media, email, or download from the Internet.
❖ Do not turn off the device if a drive indicator light indicates a
drive is active.
Toshiba’s online resources
Toshiba maintains a number of online sites to which you can
connect. These sites provide information about Toshiba products,
give help with technical questions and keep you up to date with
future upgrades. For more information, see “Contacting Toshiba”
on page 103.
Page 23

Chapter 1
Getting Started
This chapter provides tips for using your device effectively,
summarizes how to connect components, and explains what to do
the first time you use your device.
Please read and adhere to all safety information carefully and make
sure you fully understand the instructions before you attempt to use
your device in order to avoid potential hazards that could cause
bodily injury, property damage, or damage the device.
Features and components
For further details on each of the items listed in the following
section, be sure to follow the provided references to sections later in
this document.
23
Page 24
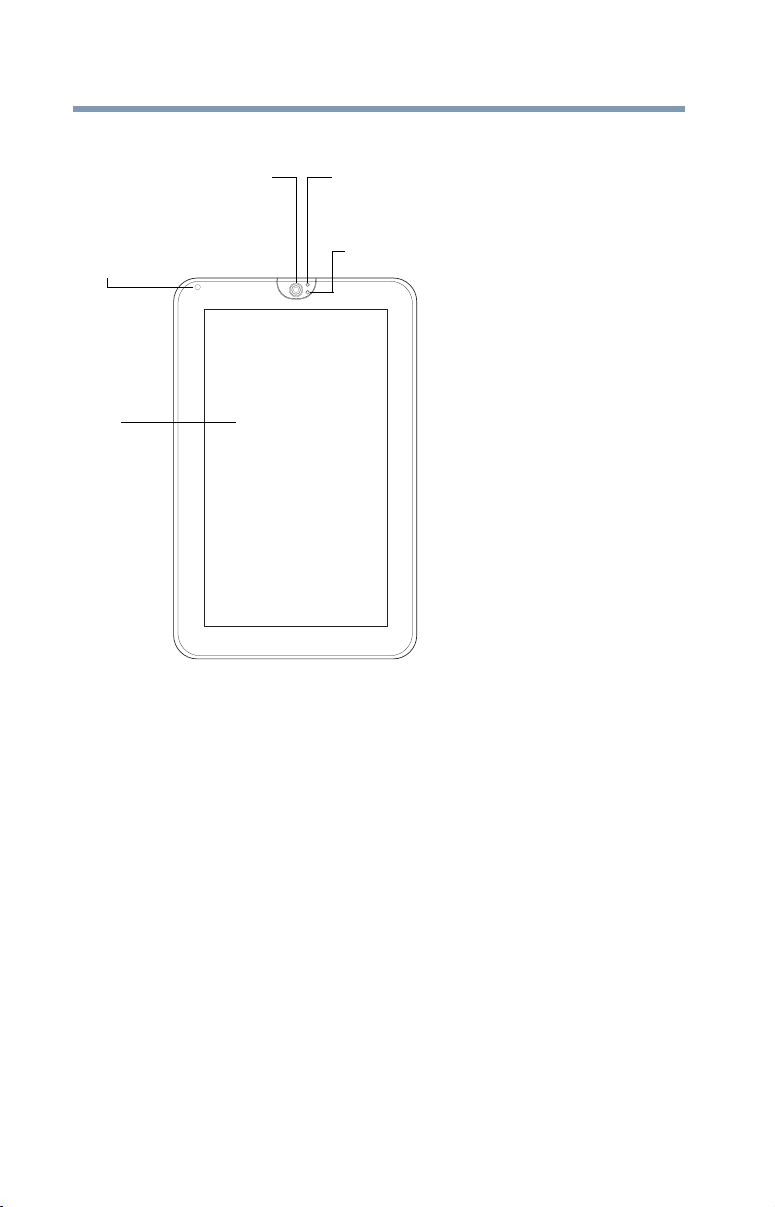
24
Front
Getting Started
Features and components
Camera indicator lightCamera
Power indicator
light
HD
display
(Sample Illustration) Front view
❖ Camera—Allows you to take still photos (includes flash
settings) or record videos.
❖ Camera indicator light—Glows blue when the front Camera
is in operation. For more information, see “Using the cameras”
on page 84.
❖ Internal microphone—Allows you to record sounds for your
application. For more information, see “Recording sounds” on
page 84.
❖ Power light—Glows white when the device is on.
❖ Battery light
❖ Tablet is plugged into AC power: The light glows white
when the battery is fully charged.
❖ Tablet is not plugged into AC power: The light does not
glow. For more information, see page 29.
Internal microphone
Page 25
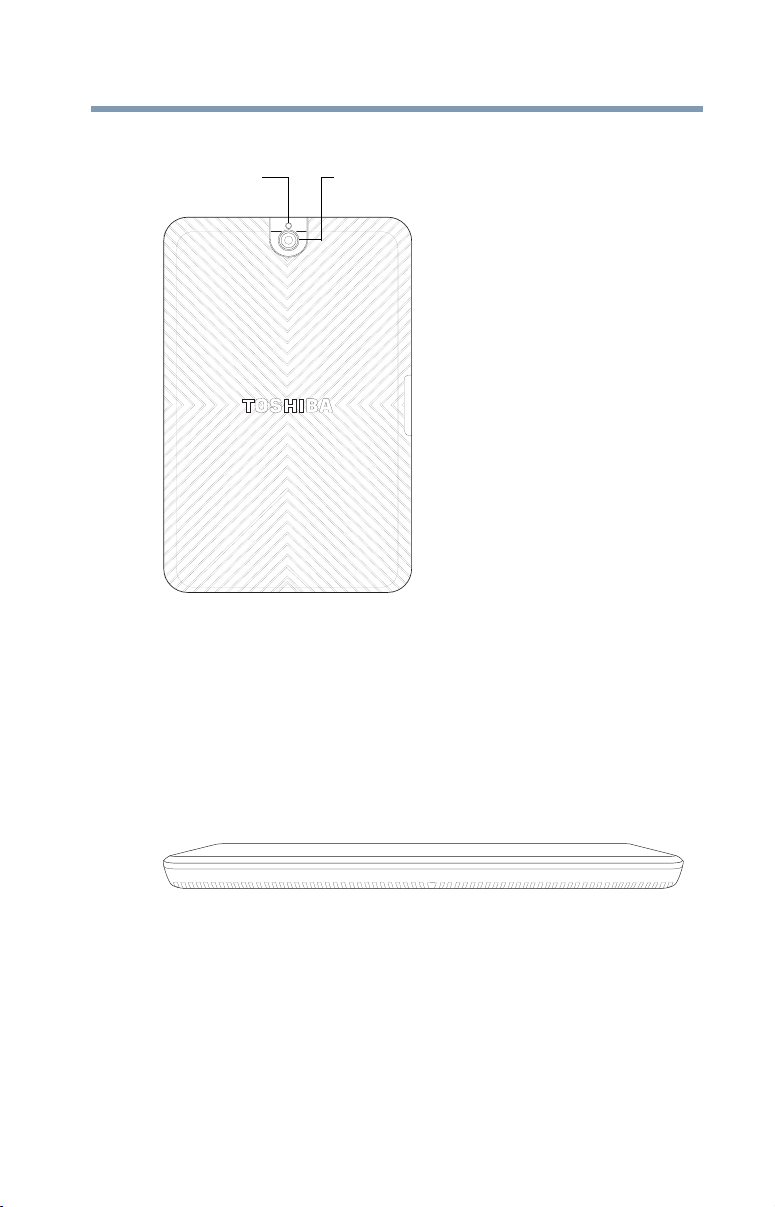
Back
Features and components
CameraCamera light
Getting Started
25
(Sample Illustration) Back view
❖ Camera indicator light—Glows blue when the front Camera
❖ Camera—Allows you to take still photos (includes flash
Right side
(Sample Illustration) Right side view
is in operation. For more information, see “Using the cameras”
on page 84.
settings) and videos. For more information, see “Using the
cameras” on page 84.
Page 26
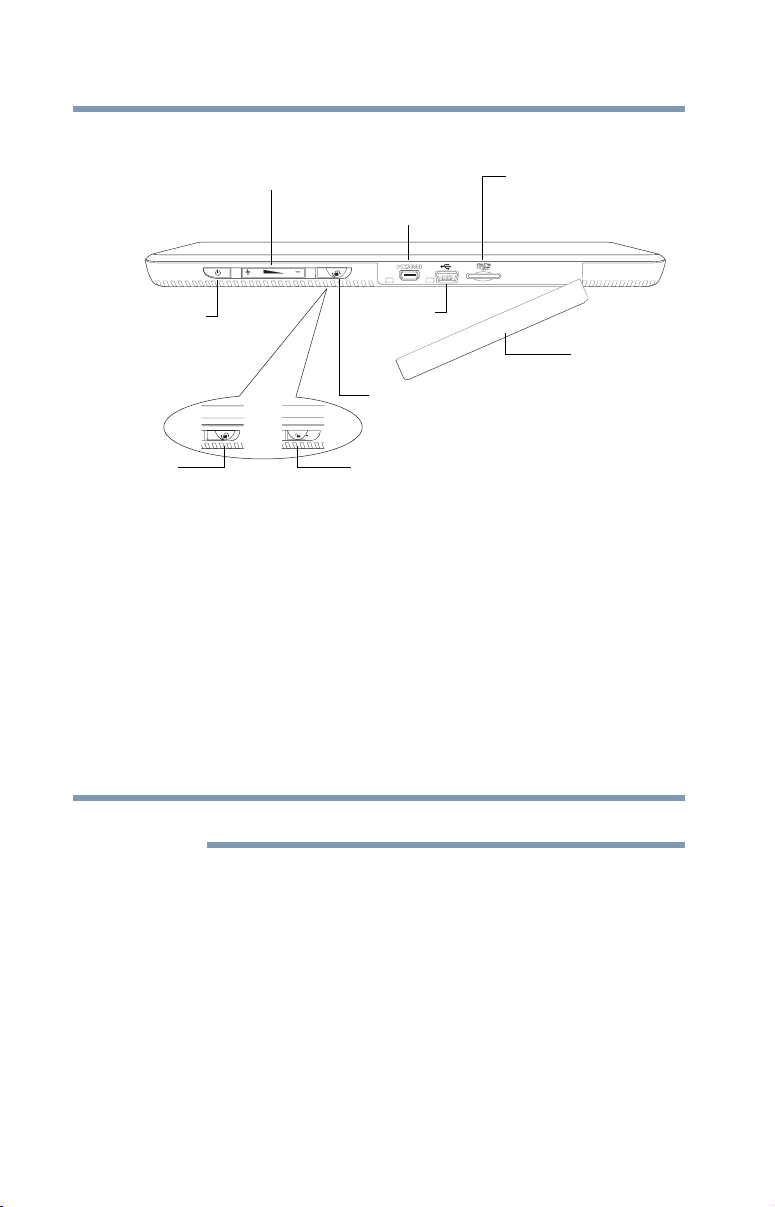
26
NOTE
Left side
Getting Started
Features and components
Micro SD™ Card slotVolume control buttons
Micro HDMI® Out port
Power button
Locked position
(Sample Illustration) Left side view
❖ Power button—Turns the device on and off. Press and hold
❖ Volume control buttons—Allows you to increase/decrease the
❖ Screen rotation lock/unlock switch—Allows you to lock the
❖ Micro HDMI
❖ Mini-USB port—Allows the transfer of data.
❖ Micro SD™ Card slot—Supports the use of Secure Digital™
Mini-USB
port
Screen rotation
lock/unlock switch
Unlocked position
the button for several seconds to turn the device ON/OFF. Press
the button quickly to wake the device from Sleep mode or to
place it into Sleep mode. For more information, see “Options
for turning off the device” on page 51.
volume.
orientation of the display screen so that the current view does
not rotate with movement. For more information, see “Screen
settings” on page 65.
Remove the port cover to access the ports.
®
Out port—Allows for the transfer of video and
audio signals. For more information, see “Using external
devices” on page 87.
(SD™) media. For more information, see “Using a Micro
SD™ Card” on page 84.
Port cover
Page 27
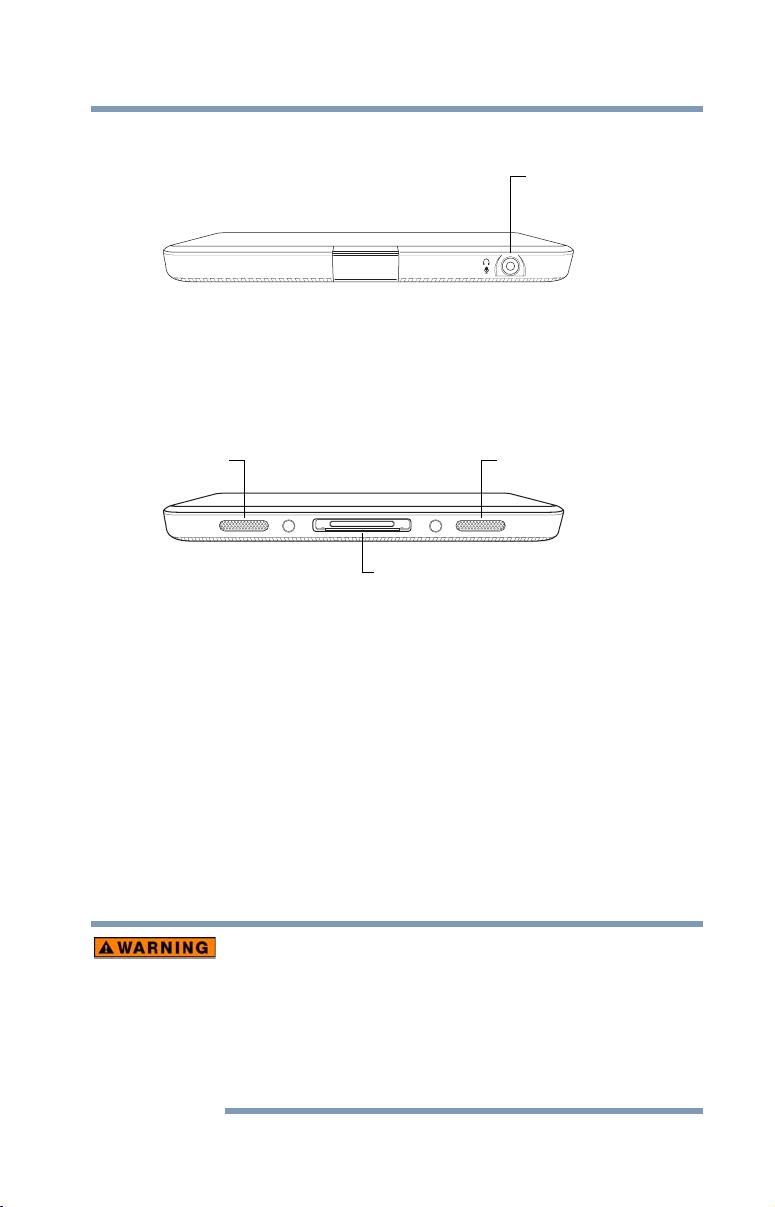
To p
Getting Started
Connecting to a power source
Headphone/Microphone
Line-In jack
27
(Sample Illustration) Top view
❖ Headphone/Microphone Line-In jack—Allows you to listen
to or record sounds onto your device. For more information,
see “Using external speakers or headphones” on page 83.
Bottom
Speaker
(Sample Illustration) Bottom view
❖ Speakers—Allow you to listen to sounds on your device. For
more information, see “Using the built-in speakers” on
page 83.
❖ Power/Docking connector—Allows connection to a USB
power cable or a docking station. Remove the docking
connector cover to access to the docking connector. For more
information, see “Using a docking station” on page 88.
Connecting to a power source
Your device requires power to operate. Use the USB Power cable
and USB/AC adaptor to connect the device to a live electrical
outlet, or to charge the device’s battery.
Speaker
Power/Docking connector
Always confirm that the power plug (and extension cable plug if
used) has been fully inserted into the socket, to ensure a secure
electrical connection. Failure to do so may result in a fire or electric
shock, possibly resulting in serious injury.
Be careful if you use a multiple connector. An overload on one socket
could cause a fire or electric shock, possibly resulting in serious
injury.
Page 28
28
Getting Started
Connecting to a power source
Always use the Toshiba USB/AC adaptor that was provided with your
device, or use USB/AC adaptors specified by Toshiba to avoid any
risk of fire or other damage to the device. Use of an incompatible
USB/AC adaptor could cause fire or damage to the device possibly
resulting in serious injury. Toshiba assumes no liability for any
damage caused by use of an incompatible adaptor.
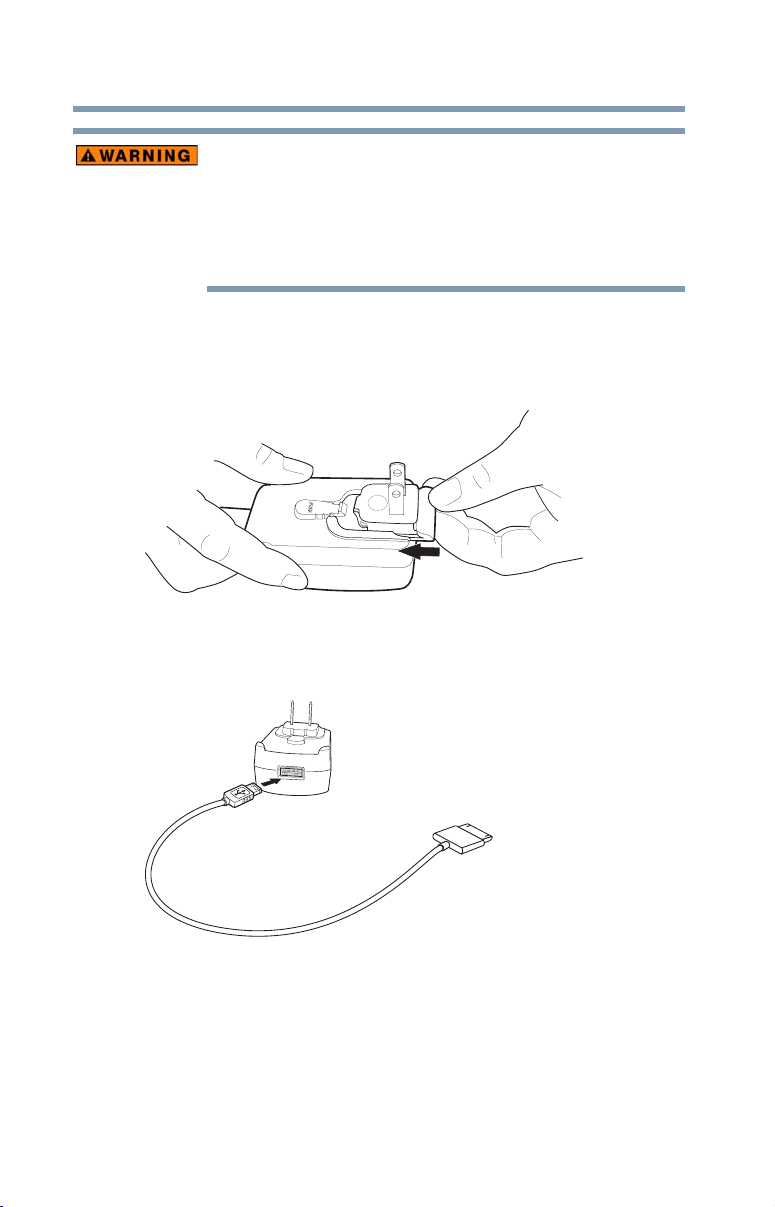
The USB/AC adaptor ships disassembled.
To connect AC power to the device:
1 Connect the outlet plug to the USB/AC adaptor.
(Sample Illustration) Connecting the USB/AC adaptor to the outlet
plug
2 Connect the USB Power cable to the USB/AC adaptor.
(Sample Illustration) Connecting the USB Power cable to the
USB/AC adaptor.
Page 29
Getting Started
_
NOTE
Connecting to a power source
Handling the cord on this product will expose you to lead, a
chemical known to the State of California to cause birth defects or
other reproductive harm. Wash hands after handling.
+
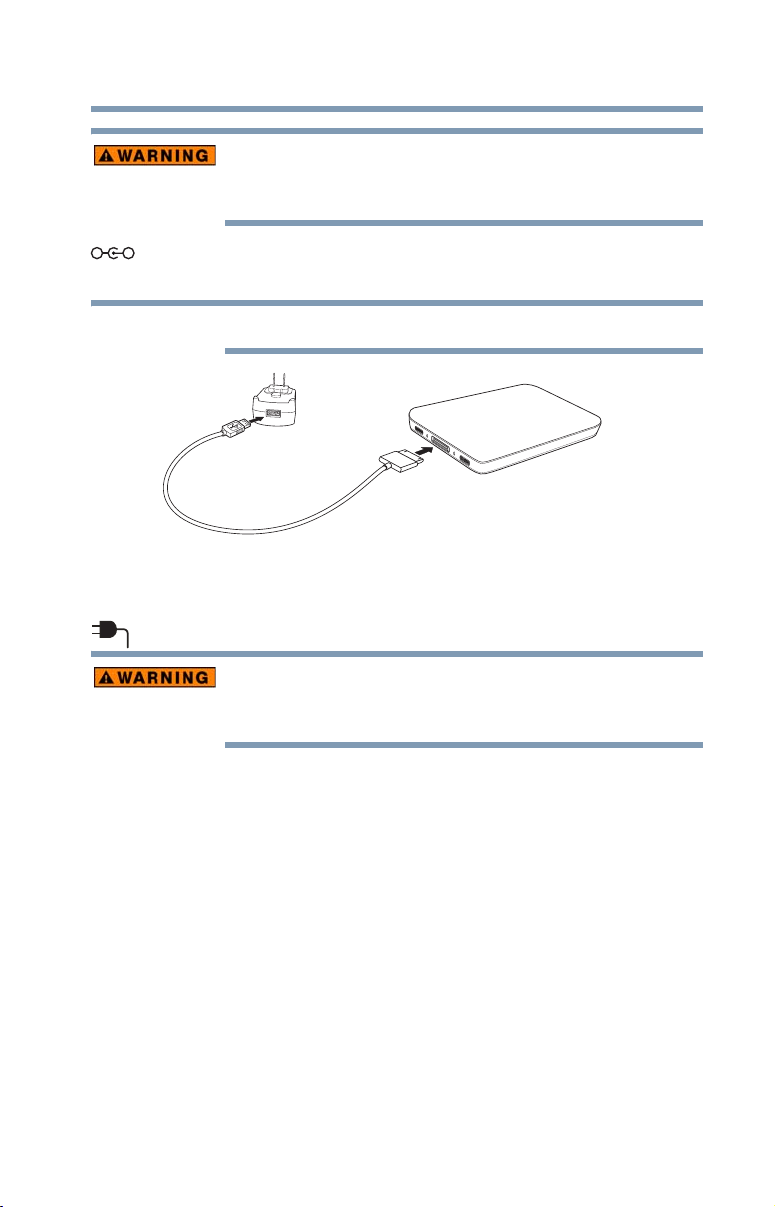
3 Plug the USB Power cord into the Power/Docking connector
on the bottom of the device.
Do not force the plug into device.
(Sample Illustration) Connecting the AC adaptor cord to the device
4 Connect the USB/AC adaptor to a live electrical outlet.
The Power light glows white.
29
Never attempt to connect or disconnect a power plug with wet hands.
Failure to follow this instruction could result in an electric shock,
possibly resulting in serious injury.
The device’s power light gives you an indication of the current
power state:
❖ Glows white while the USB/AC adaptor is connected
❖ Is unlit when the USB/AC adaptor is not plugged into the
device or an AC outlet
❖ Flashes slowly when in Sleep mode
Page 30
30
NOTE
NOTE
Getting Started
Battery Notice
Battery Notice
Actual battery life may vary depending on settings, application
usage, features or tasks selected, network configuration, operating
temperature and many other factors.
The battery life cited in the product specifications is only achieved
on the select models and configurations tested by Toshiba under the
specific test settings at the time of publication and is not an estimate
of a system’s battery life under any conditions other than the
specific test settings.
Recharge time varies depending on usage. The battery may not
charge while the device is consuming full power. After a period of
time, the battery will lose its ability to perform at maximum
capacity and will need to be replaced. This is normal for all
batteries.
Charging the battery
If the device is leaking or its case is cracked, put on protective gloves
to handle it.
Your device contains a rechargeable battery that may need to be
charged prior to use.
To use external power or to charge the battery you must attach the
USB/AC adaptor. See “Connecting to a power source” on page 27.
To charge the device plug it into a power source.
Battery life and charge time may vary depending on the external
conditions, or the applications and features used.
Please handle your device carefully to avoid scratching or damaging
the surface.
Page 31
Taking care of your battery
The following sections offer tips on how to take care of your battery
and prolong its life.
Safety precautions
Device warning indicators
❖ Always immediately turn the power off and disconnect the power
cable/ cord plug from the plug socket and stop using the battery
pack if you observe any of the following conditions:
❖ Offensive or unusual odor
❖ Excessive heat
❖ Discoloration
❖ Deformation, cracks, or leaks
❖ Smoke
❖ Other unusual event during use, such as abnormal sound
Do not turn on the device's power again until an authorized Toshiba
service provider has checked it for safety. Continued use could cause
a fire or rupture possibly resulting in serious injury or device failure
including but not limited to the loss of data.
Getting Started
Taking care of your battery
31
Optimizing battery life
You can extend your battery’s life between charges by turning off
features you don’t need. You can also change and monitor the way
apps and system resources consume battery power.
Below are some of the things you can do:
❖ To turn off Wi-Fi
touch the Apps ( ) icon, the Settings ( ) icon, and then
touch Wireless & networks. For more information, see
“Wireless and networks settings” on page 63 and “Location
and security settings” on page 67.
❖ Turn down the screen brightness and set a shorter screen
time-out. For more information, see “Screen settings” on
page 65.
❖ If you do not need them, turn off automatic syncing for
Gmail™, Calendar, Contact, etc. For more information, see
“Accounts & sync settings” on page 70.
®
or Bluetooth® when you are not using them,
Page 32
32
NOTE
Getting Started
Disposing of your device
❖ If you know you will not be near a Wi-Fi® network for some
time, switch to Airplane mode. For more information, see
“Wireless and networks settings” on page 63.
To check the battery charge level:
1 Touch the Apps () icon.
The Apps menu appears.
2 Touch the Settings ( ) icon.
The Settings menu appears.
3 Touch the About tablet ( ) icon.
The About tablet menu appears.
4 Touch Status.
The battery status (charging/discharging) and level (as a
percentage of fully charged) are displayed.
For more details on your battery use, touch Battery use.
Maintaining your battery
Fully discharging your battery periodically will allow better
accuracy of the battery meter.
To fully discharge your battery, periodically disconnect the device
from a power source and operate it on battery power until the
battery fully discharges.
Disposing of your device
Discard this device in accordance with applicable laws and
regulations.
Disposal of this product may be regulated due to environmental
considerations. For disposal, reuse or recycling information, please
contact your local government.
In addition, Toshiba’s recycling initiatives include recycling
programs, events, and consumer promotions. For details, please
visit us.toshiba.com/green.
Notice regarding CR coin cell batteries, applicable to California,
U.S.A. only:
Perchlorate Material - special handling may apply.
See http://www.dtsc.ca.gov/hazardouswaste/perchlorate/
Page 33
Using the device for the first time
Using the device for the first time
The device is now ready for you to turn it on and begin using it.
Turning on the power
To turn on the device:
1 Make sure any external devices (such as the USB/AC adaptor,
if you plan to use AC power rather than battery power) are
properly connected and ready.
2 Check to ensure that all slots are empty.
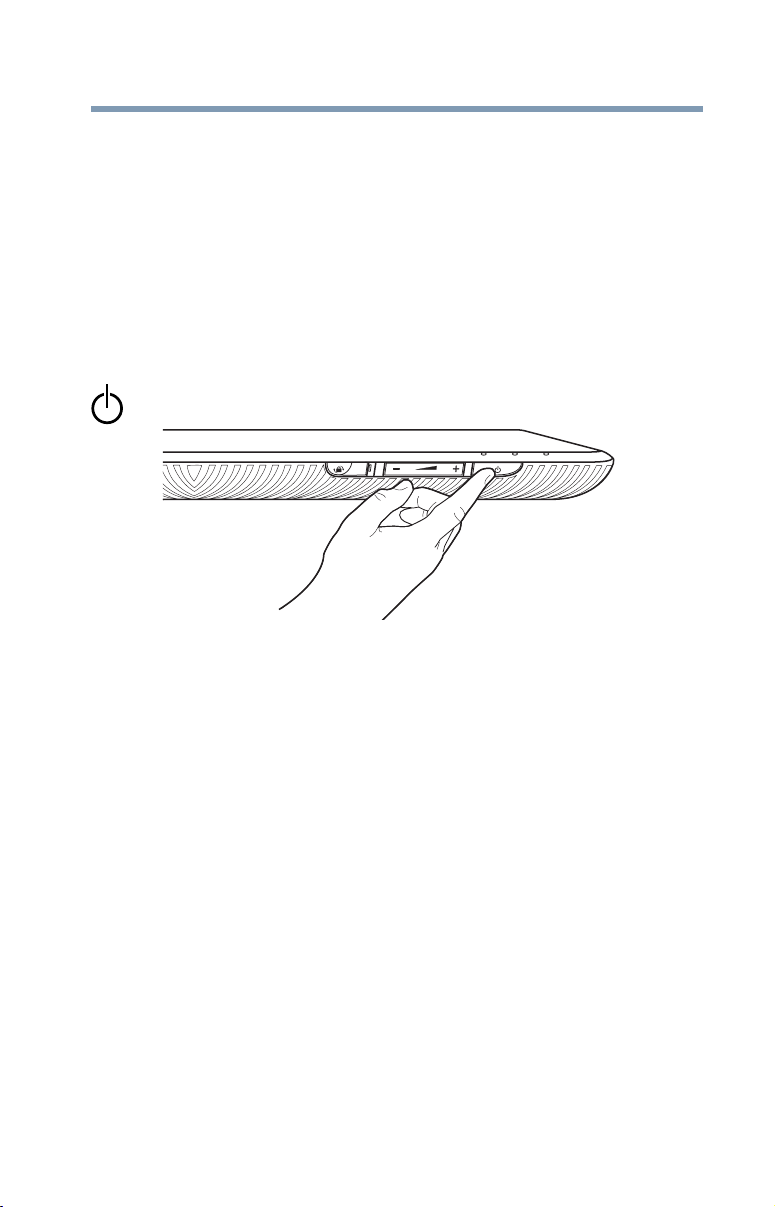
3 Press and hold the Power button for several seconds.
Getting Started
33
(Sample Illustration) Turning on the power
Small bright dots may appear on your screen display when you
turn on your device. Your display contains an extremely large
number of thin-film transistors (TFT) and is manufactured using
high-precision technology. Any small bright dots that may appear
on your display are an intrinsic characteristic of the TFT
manufacturing technology. Over a period of time, and depending on
the usage of the device, the brightness of the screen will deteriorate.
This is also an intrinsic characteristic of the screen technology.
Page 34
34
NOTE
Getting Started
Using the device for the first time
Setting up your device
To take full advantage of features for your device, Toshiba
recommends that you have access to a Wi-Fi
Google™ Account before setting up your device.
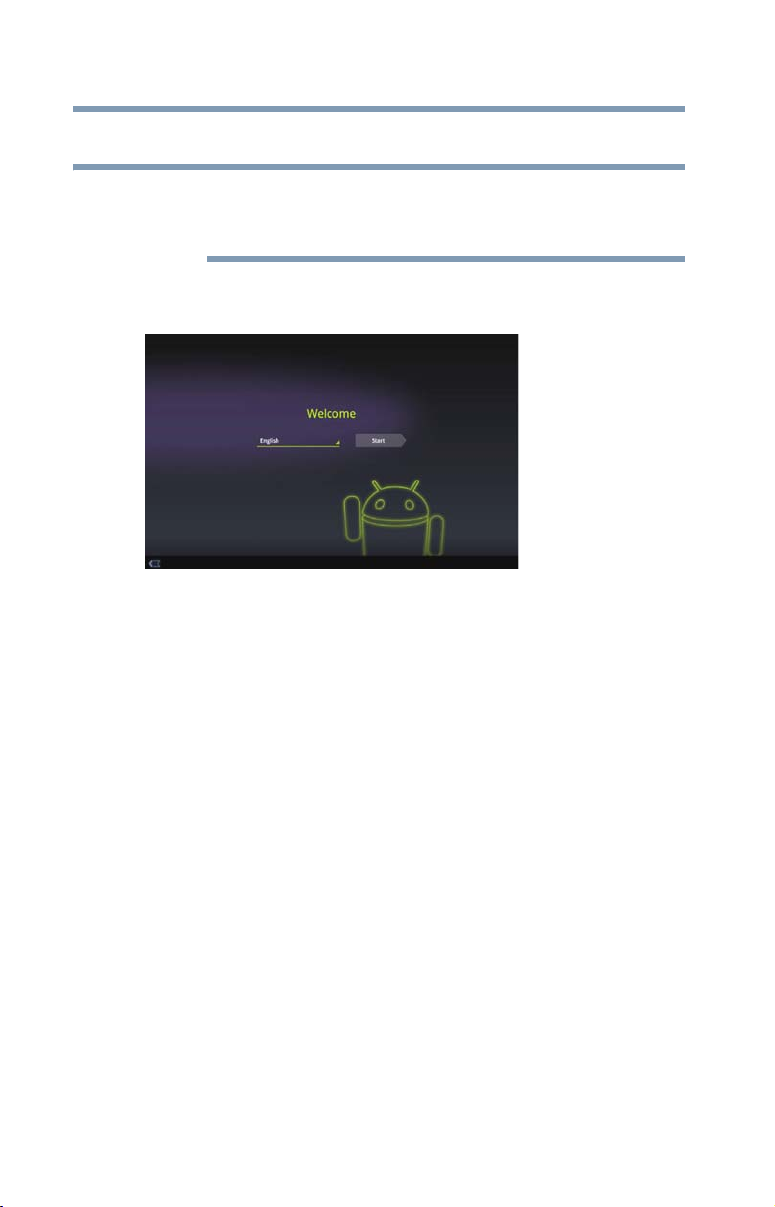
The first time you power on your tablet the Welcome screen appears
and you will be asked to choose a language.
(Sample Image) Welcome screen
❖ If English is your language of choice touch Start.
❖ Touch English to change your language. Choose from the list
of language options and then touch Start.
Your tablet begins the activation process when you touch Start on
the Welcome screen.
®
network and a
Setting up your Wi-Fi® connection
After choosing your language the “Wi-Fi setup” screen appears,
displaying all available Wi-Fi
Touch the name of the network you want to connect to, and then
touch Connect.
®
networks.
Page 35
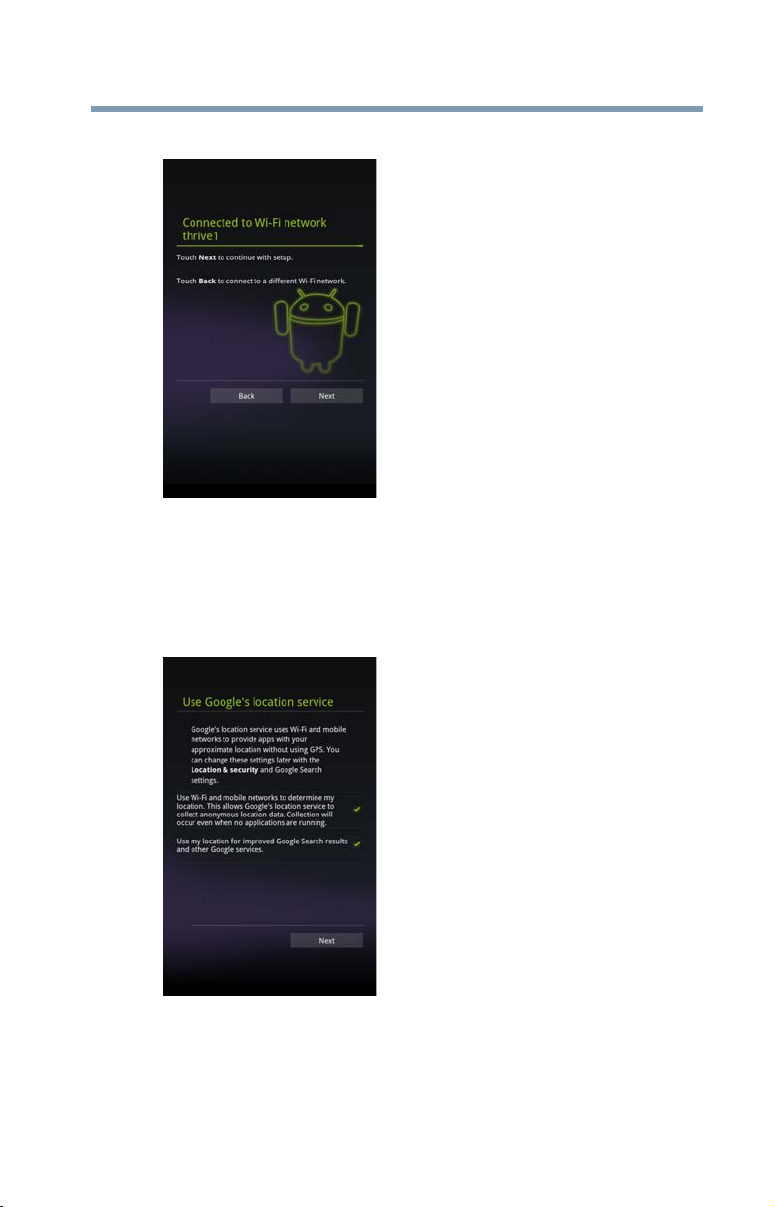
The "Connected to Wi-Fi network" screen appears.
(Sample Image) Wi-Fi setup screen
Setting location preferences
After you have connected to a Wi-Fi® network, the “Use Google
location service” screen appears. Your approximate location is
made available to the apps you use by Google’s location service.
Getting Started
Using the device for the first time
35
(Sample Image) Use Google location service screen
Touch your preferred settings, and then touch Next to continue.
Page 36
36
NOTE
Getting Started
Using the device for the first time
Setting the date and time
When your location preferences have been chosen, the “Set date
and time” screen appears.
There are two options available for setting date and time:
❖ Use network provided time (leave the setting option ON), and
then touch Next.
❖ The option, “Use network provided time” can be set to OFF.
This allows you to manually enter the date/time information.
1 Select the time zone.
2 Set the date and time by touching the date or time option
and then the up/down arrows, and then touch Next to
continue.
Sign in to your Google™ Account
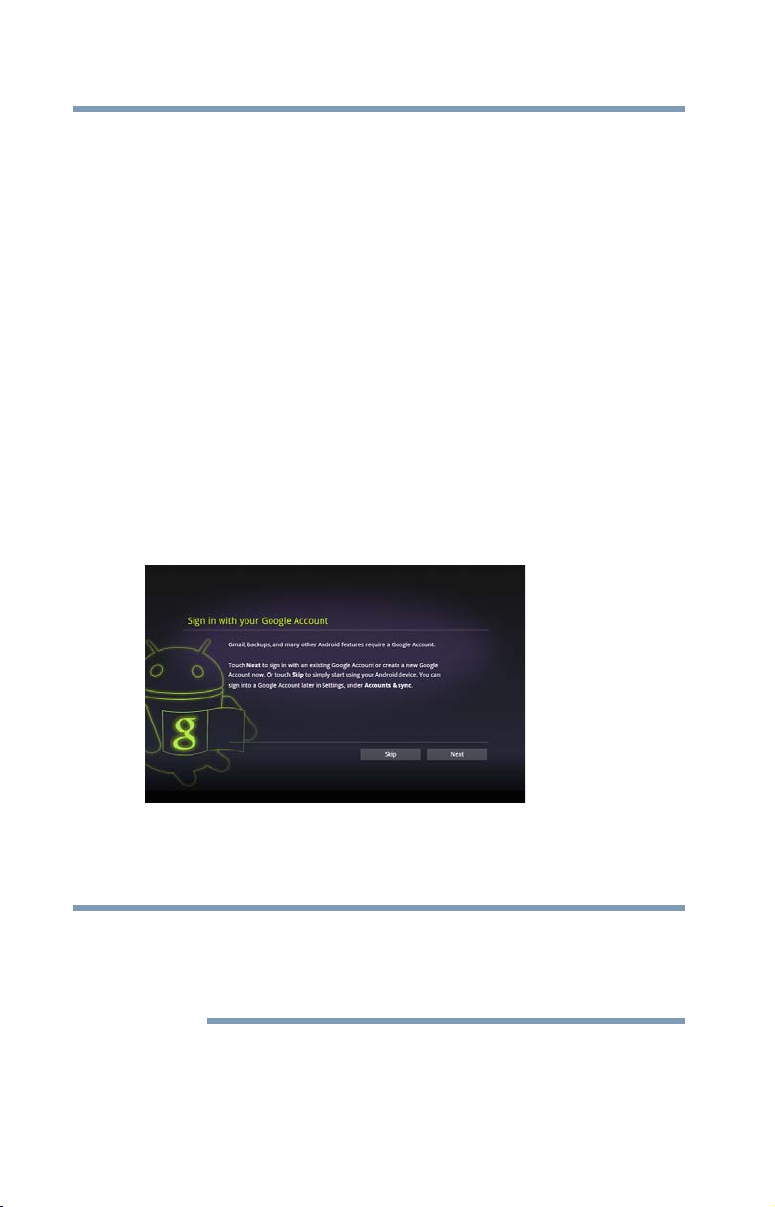
Once the date and time have been set, the “Sign in with your
Google Account” screen appears.
(Sample Image) Sign in with your Google Account screen
A Google Account is required to access many of the powered by
Android
Touch Next to sign in with an existing Google Account or create a
new one now.
TM
features, including GmailTM, backing up your data, etc.
Sign in to your Google Account now to restore settings that have
been previously backed up. If you wait until after setup, you will not
be able to restore your settings. For more information, see “Backing
up your data” on page 39.
Page 37
Getting Started
NOTE
Using the device for the first time
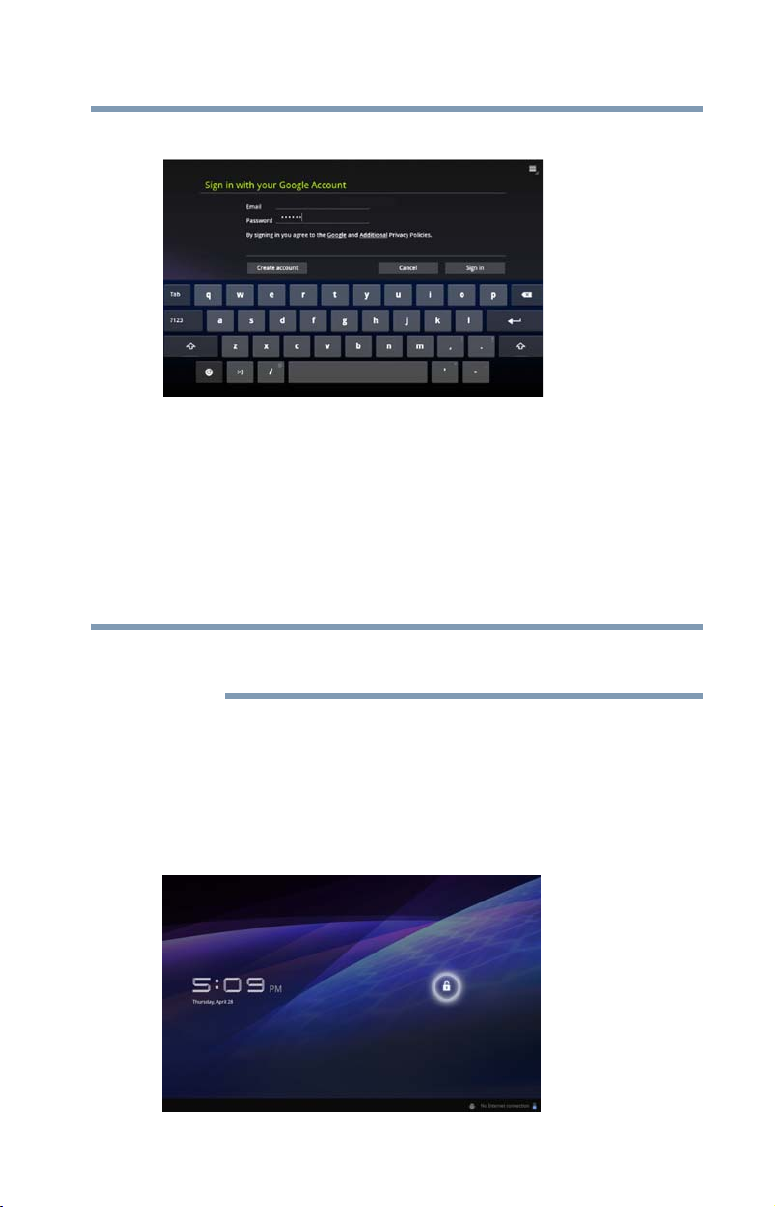
The “Sign in with your Google Account” screen appears.
37
(Sample Image) Sign in with your Google Account screen
❖ Enter your existing Google Account information, and then
touch Sign in.
❖ If you do not already have a Google Account, you can create a
new one by touching Create account.
The “Signing in” screen appears.
Touch Skip to skip the account setup for now. You can sign in to a
Google Account later in Settings, under Accounts & sync.
This may take several minutes. If your screen times-out and goes
blank/dark, press the Power button to turn on the screen again.
Waking the tablet
If the screen times-out:
1 Press the Power button.
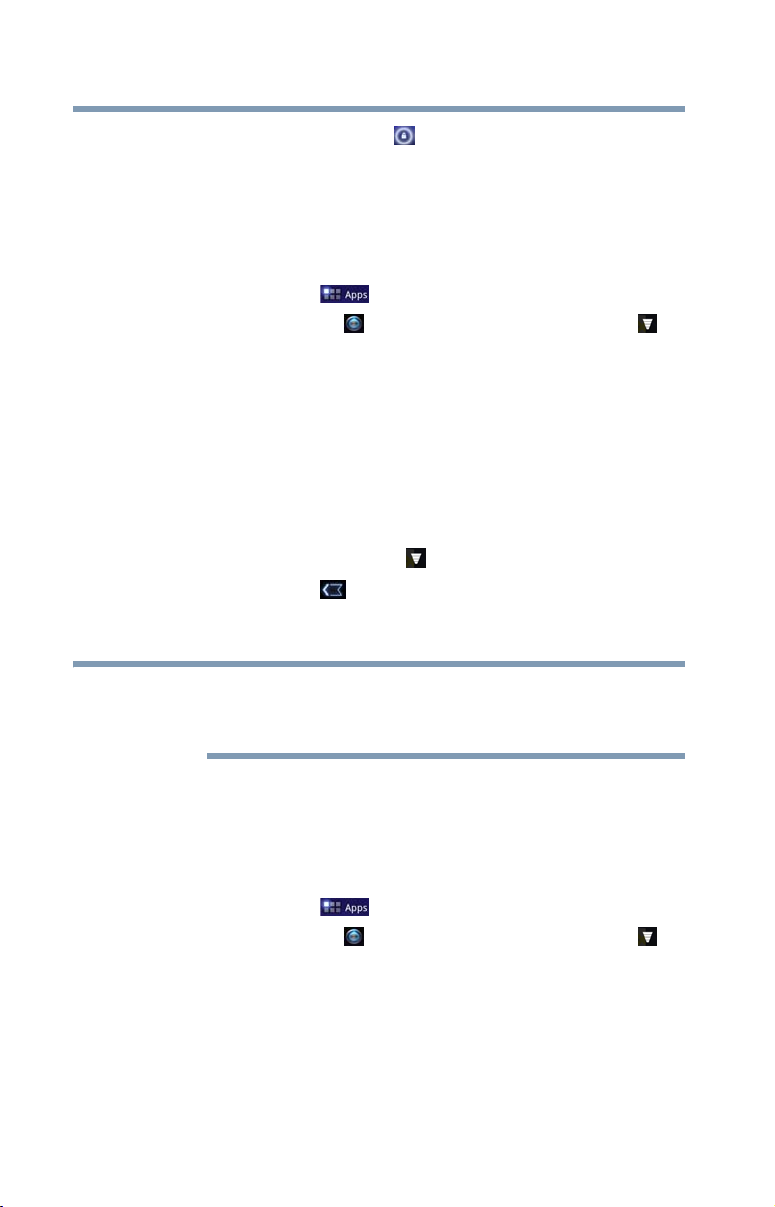
The lock screen appears, unless you have previously
disabled it.
(Sample Image) Lock screen
Page 38
38
NOTE
Getting Started
Using the device for the first time
2 Touch and hold the Lock ( ) icon and drag it to the edge of
the large circle surrounding it.
The last screen viewed appears.
Setting up Wi-Fi® and Bluetooth® connections
Wi-Fi®:
1 Touch the Apps ( ) icon.
2 Touch the Settings ( ) icon, the Wireless & networks ()
icon, Wi-Fi settings, and then select Wi-Fi, if not previously
turned on.
The device scans for and displays all available Wi-Fi
networks.
®
3 Touch the Wi-Fi
If the network is open, you will be asked to confirm the
connection.
4 Touch Connect to confirm.
The Wireless & networks ( ) icon appears in the System bar.
5 Touch the Back ( ) icon to try a different network.
To connect to secure/locked networks, you will be prompted to
enter the appropriate credentials.
network you want to connect to.
®
Wi-Fi® may be enabled by default and the device saves this
information so that you can connect automatically the next time you
come within range of this network.
If you use third-party applications on this device, any information
those applications collect (including location-based information)
may be sent to third parties and merged with other customer
information subject to their respective privacy policies.
Bluetooth
1 Touch the Apps ( ) icon.
2 Touch the Settings ( ) icon, the Wireless & networks ()
3 Touch Bluetooth settings, and then Find nearby devices.
4 Touch the name of the device to pair with and then touch Pair.
®
:
icon, and then Bluetooth (select the check box to enable it).
The device scans/finds nearby devices (i.e. keyboard, mouse).
Page 39
Registering your Toshiba device
NOTE
Registering your Toshiba device
To register online, you must be connected to the Internet.
Product registration is strongly recommended, and allows Toshiba
to send you periodic updates, announcements, and special offers
applicable to your product. Product registration can be completed
by either visiting the Toshiba Web site at
http://www.register.toshiba.com, or by touching the Registration
( ) icon on the Home screen. Failure to complete Product
Registration will not diminish Customer rights under the Standard
Limited Warranty.
Backing up your data
Back up the data you create in case something happens to your
device. You can back up your data to a Micro SD™ Card (see
“Using a Micro SD™ Card” on page 84), or to a network (see
“Backing up data using your Google™ Account” on page 39), if
available.
You can also back up your settings as well as your data using your
Google™ Account. Your data is backed up automatically using this
option. For more information, see “Privacy settings” on page 71. If
you need to replace your device, your data can be restored to your
new one.
Getting Started
39
Backing up data using TOSHIBA File Manager
Using the TOSHIBA File Manager, you can back up your data to a
Micro SD™ Card. For more information, see “TOSHIBA File
Manager Utility” on page 93.
Backing up data using your Google™ Account
You can also back up your settings as well as your data using your
Google™ Account. Your data is backed up automatically using this
option. For more information, see “Sign in to your Google™
Account” on page 36.
Page 40
40
Getting Started
Backing up your data
Restoring your data using your Google™ Account
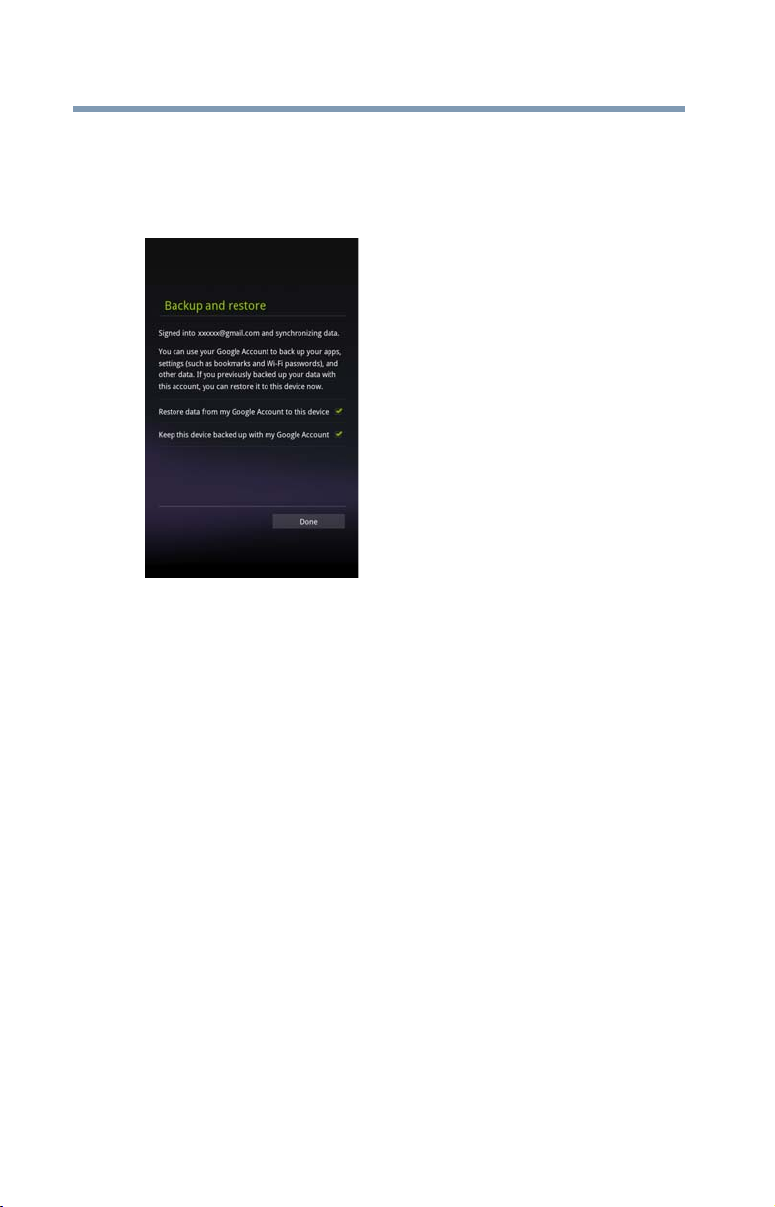
If your data was previously backed up using this service you can
sign in to your Google™ Account and choose to restore your
settings from your Google Account to your device.
(Sample Image) Backup and Restore screen
The data that is backed up may include the following:
❖ Your Wi-Fi
settings
❖ Many Google application settings, such as your Browser
bookmarks
❖ The apps you download from Android Market
®
networks and passwords, user data, and tablet
TM
Page 41
Navigation and features
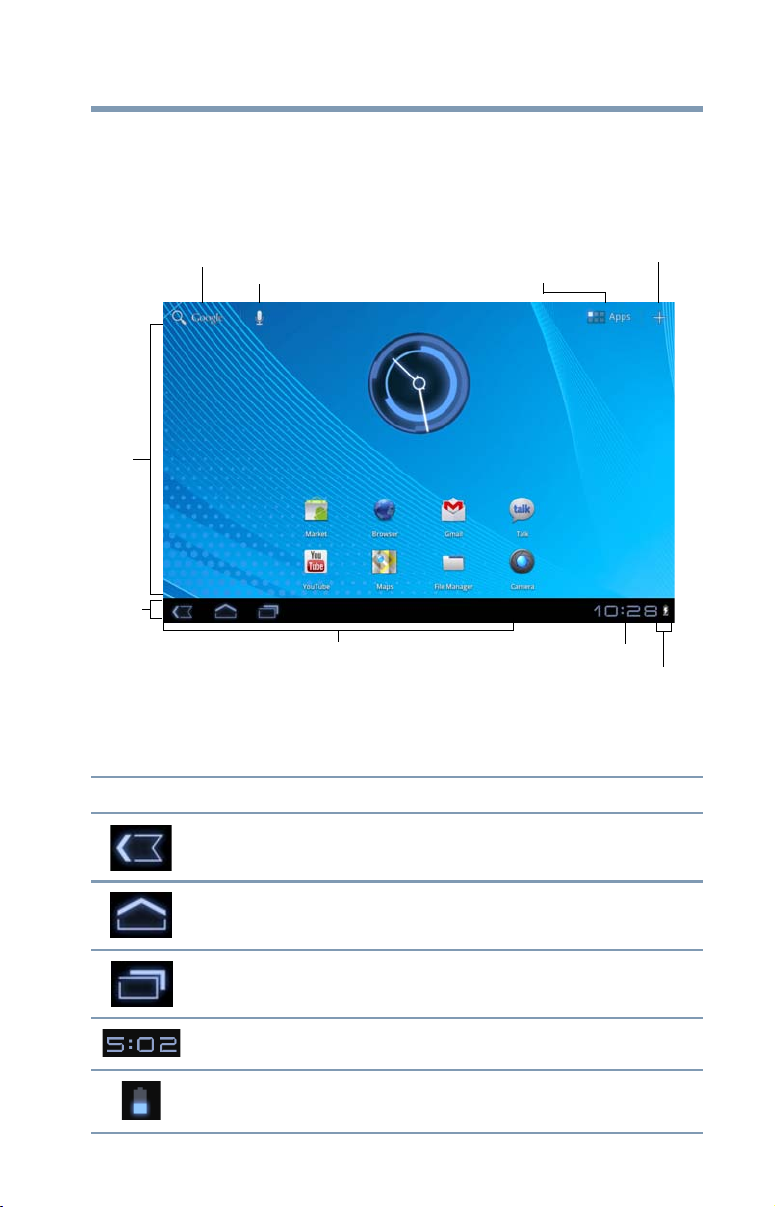
Your device exemplifies the innovative blending of touch-screen
technology and intuitive application design making the most of
your tablet device.
Getting Started
Navigation and features
41
Google™ Search bar
Voice recognition
Home
screens
System
bar
Notification icons
(Sample Image) Central Home screen
Icons and buttons you may find on your display screen.
Icon Name Description
Back button Touch to return to the previously viewed screen.
Apps button
Customize button
Time
Status icons
Home button Touch to return to the Home screen.
Recent Apps button Touch to view the most recently view apps.
Time display Located in the System bar to the left of the Status icons.
Battery status icon Located in the System bar. Displays the status of the
battery charge.
Page 42
42
Icon Name Description
Getting Started
Navigation and features
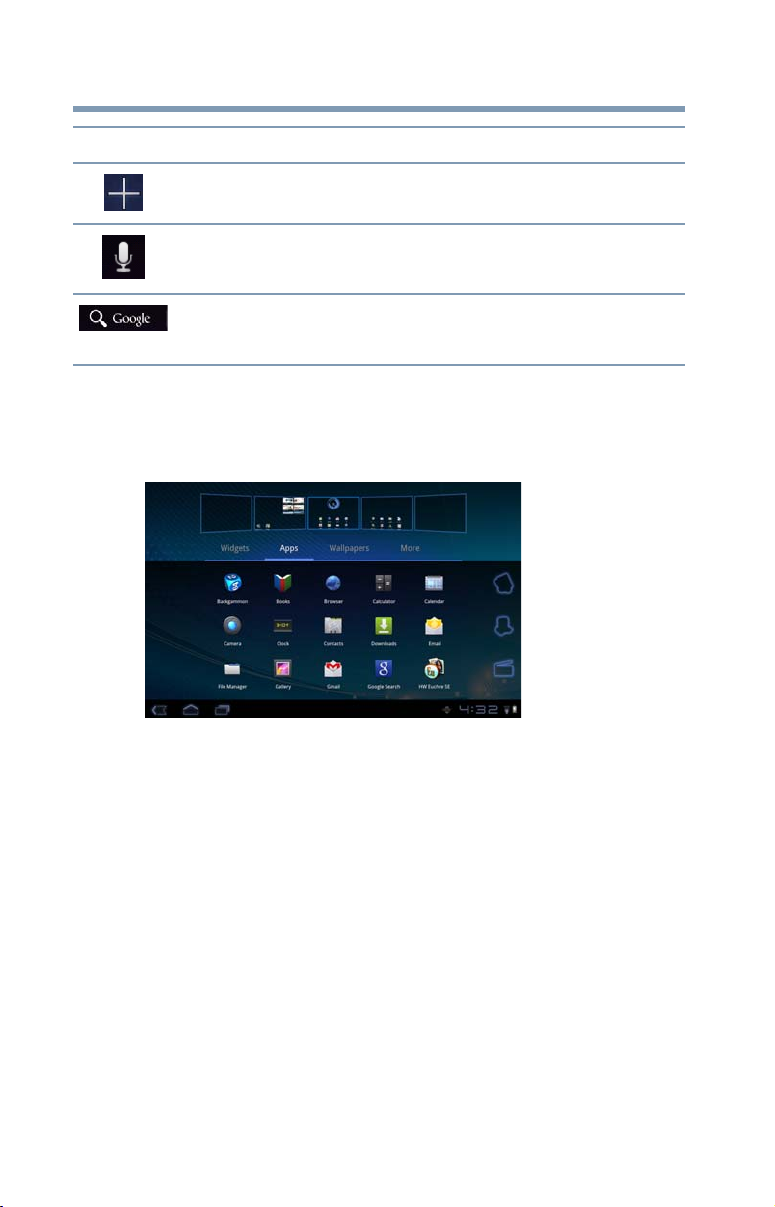
Customize button Touch to Customize your Home screens.
Home screen
The total number of available Home screens is five. Move between
screens by swiping your finger to the left or right.
(Sample Image) 5 available Home screens
Your device’s five home screens have several standard features,
including icons and a customizable background pattern (wallpaper).
The wallpaper image spans the width of all five Home screens.
The middle screen is your Central Home screen and the starting
point after your device has been set up. However, your device will
return to the last home screen viewed each time you wake up your
device from Sleep mode. Touch the Home button to return to the
central Home screen.
Voice recognition
button
Google Search bar Touch to perform a search using the keyboard.
Touch to perform a voice-enabled search.
Page 43
Icons
An icon represents a shortcut of either a widget, application,
bookmark, or game that can be quickly launched by touching the
icon on a Home screen.
Each Home screen may display icons for any of the following:
❖ Widgets
❖ Applications
❖ Bookmarks
❖ Games
❖ Thumbnails
Your Home screen will contain other icons depending on how you
have customized it. See “Customizing your Home screens” on
page 49.
Gmail™ icon—An example of an icon located on a Home screen is
the Gmail icon. This shortcut, when touched, launches your Gmail
webmail account.
Touch screen navigation
Getting Started
Navigation and features
43
Use your finger to manipulate the onscreen icons, buttons, menu
items, onscreen keyboard, and other items on the touchscreen. You
can also change the screen’s orientation.
The screen is made of glass so avoid contact with sharp, rough, or
abrasive objects or substances as screen may break or scratch if not
handled properly. If you see a crack in the glass, discontinue use of
the device to avoid injury.
Tou ch —Touch to activate items displayed on the screen, such as
app and setting icons or onscreen buttons. Touch to type using the
onscreen keyboard.
Touch & hold—Touch and hold an item on the screen by touching
and holding the item in place until an action occurs.
Drag—Touch and hold an item for a moment and then, without
lifting your finger, move the item until you reach the target position.
For example, drag items on the Home screen to reposition them, see
“Customizing your Home screens” on page 49.
Swipe or slide—To swipe or slide, quickly move your finger across
the surface of the screen without pausing. For example, slide the
Home screen left or right to view another Home screen.
Page 44
44
Getting Started
Navigation and features
Double-tap—Tap quickly twice to zoom in. For example, doubletap a section of a Web page to zoom in on that section. Double-tap
again to zoom out.
Pinch—In some apps (such as Maps, Browser, and Gallery), you
can zoom in and out by placing two fingers on the screen at once
and pinching them together (to zoom out) or spreading them apart
(to zoom in).
Rotate the screen—In most apps, the orientation of the screen
rotates with the tablet as you turn it. You can turn this feature on
and off, using the Screen rotation lock switch on the side of your
tablet. This allows you to lock the screen to the currently viewed
screen orientation.
Navigating the Home screen
When the setup process is complete, the Home screen appears. This
is your starting point for all features used on your tablet. You can
use the Customize button to add shortcuts for apps, widgets, and
other features to all five of your Home screens. You can also change
your wallpaper to more customize the look of your device. For
more information, see “Customizing your Home screens” on
page 49.
System bar
The System bar displays icons of tasks or programs that run
continuously in the background and displays notifications, such as
incoming email and the status of your wireless connection. Touch
an icon to learn more about its task.
Navigation buttons
Using the navigation buttons in the System bar is an easy way to
quickly switch between apps.
The System bar displays the Back ( ) button, Home ( ) button,
and Recent Apps ( ) button. Also displayed are the Notification
icons, the time, and Status icons.
Touch the Home button at any time to return to the Home screen.
Swipe your finger right or left to view another Home screen, or
touch and hold anywhere on the Home screen to view the thumbnail
view of all five Home screens. Touch the Home button again to
return to the central Home screen.
Page 45
Getting Started
Navigation and features
In some media apps, the System bar controls are replaced by dim
dots while a movie, slide show, etc. is displayed. This increases the
viewing space on the screen. Touch the dot that corresponds with
the desired control, or touch a blank area of the System bar to
restore the full view.
At the top of the screen you will find the Google™ Search bar
( ), and next to that is the search by voice ( ) button. Also
available at the top of the screen are the Apps ( ) button and
the Customize ( ) button.
45
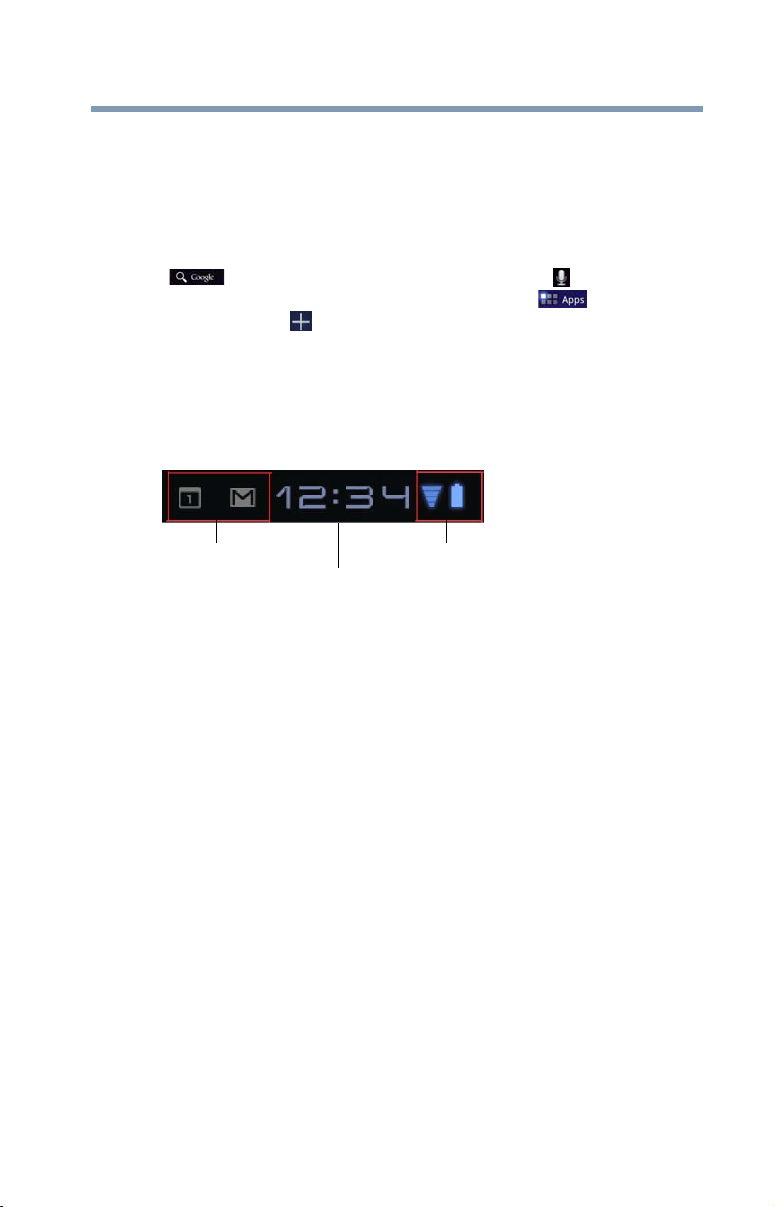
Status icons
Status icons are located on the far right of the System bar. Status
icons display current system status information, such as power
usage and network connectivity status.
Notification icons
Time
(Sample Image) Status icons
Touch the Time display to view the Status Details panel. For more
information, see “Securing your tablet” on page 47.
After your Google™ Account is set up, the Network Status icons
are blue when connected to Google services. This indicates that the
tablet is ready to sync your Gmail™, Calendar, and contacts, and to
back up your settings. When your tablet is not connected to a
Google Account or the wireless connection is disabled, the icons
are gray.
Status icons
Managing Notifications
Notifications report the arrival of new messages, calendar events,
and alarms, and they report the status of your Wi-Fi
Notification icons appear in the System bar, to the left of the time
display, along with a summary that appears briefly.
Depending on your settings you may also hear a notification sound.
Typical notifications are currently running programs and available
updates. To activate a specific task, click the appropriate
Notification bar icon.
®
connection.
Page 46
46
Getting Started
Navigation and features
Most apps that send notifications, such as Gmail™ and the
calendar, have their own settings. These settings can be configured
to send notifications in different ways, with a sound or vibration,
etc. See the documentation for those apps for details.You can open
the Notifications list to view all of your current notifications.
Opening a notification
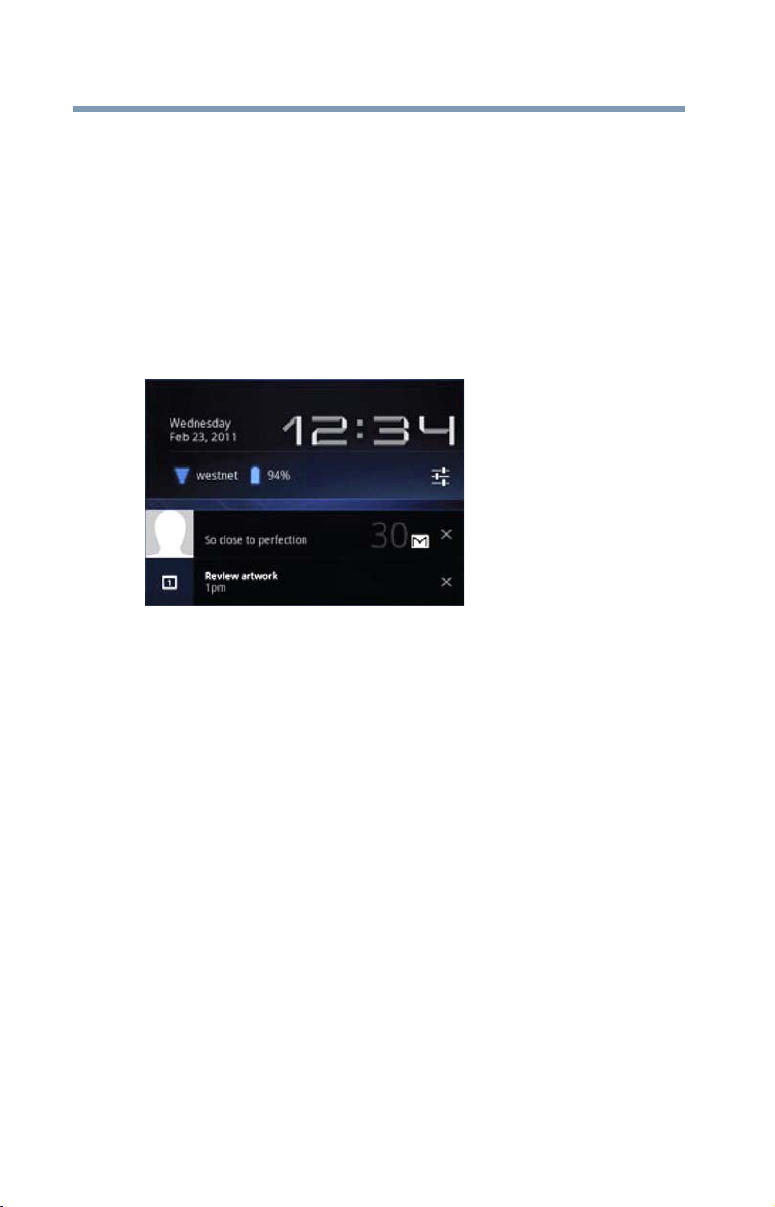
1 Touch the time display in the System bar on the lower right of
your Home screen.
The Notification summary panel opens.
(Sample Image) Notification summary panel screen
2 Touch a notification summary to view it or to respond to it.
Touch the notification’s Close button to remove it from the
Notifications list. Touching a blank area of the screen closes the list
without removing the notification.
Responding to notifications
When the Notification summary panel is open you can respond to a
notification by touching the associated icon.
Notification panels contain a variety of information and controls,
including:
❖ A message summary, with the date and picture of the sender
❖ Media controls to play/pause music or to skip to the next or
previous track
❖ Progress bars that indicate the progress of currently
downloading apps:
1 Touch a notification icon in the System bar.
The notification’s summary panel opens.
Page 47
2 Touch a notification in the Notification summary panel to
open it in its application.
It will then be cleared from the Notification summary
panel.
3 To remove the notification without viewing it, touch its
Close button.
Securing your tablet
If you choose to set a password (with or without encryption), Toshiba
strongly recommends that you write down your password and keep it
in a safe location where you can later access it should you not
remember it.
Toshiba is not responsible for any losses that may occur, as a result
of the inability to access your device.
When you initially turn on or wake the tablet, the lock screen
requires you to drag the Lock ( ) icon to unlock the screen, see
“Waking the tablet” on page 37. Alternatively, you can secure the
lock screen by requiring a pattern or entry of a numeric PIN or
password, so only you can access your data. You may also be
required to secure the lock screen by a policy set by an email
account or other account you add to your tablet. For more
information, see “Location and security settings” on page 67.
You can also encrypt the data on your tablet, so you must enter a
numeric PIN or a password to decrypt it each time you power it on.
1 Touch the Time ( ) display in the System bar, touch
the time in the Status Details panel, and then touch the
Settings ( ) icon at the bottom of the Quick Settings screen.
You can also open Settings by touching the Settings ( ) icon
in the Apps screen or on a Home screen (if you placed a
shortcut to it there).
2 Touch the Location & security () icon.
3 Touch Configure lock screen.
4 Touch Pattern, PIN, or Password.
If you touch Pattern, you’re guided to create a pattern you must
draw to unlock the screen. The first time you do this, a short tutorial
about creating an unlock pattern appears. Then you are prompted to
draw and redraw your own pattern.
Getting Started
Navigation and features
47
Page 48
48
Getting Started
Navigation and features
If you touch PIN or Password, you are prompted to set a numeric
PIN or a password you must enter to unlock your screen.
The next time you turn on your tablet or wake up the screen, you
must draw your unlock pattern or enter your PIN or password to
unlock it.
You can encrypt all the data on your tablet: Google™ Accounts,
application data, music and other media, downloaded information,
etc. If you do, you must enter a numeric PIN or password each time
you power on your tablet.
❖ Encryption is irreversible. The only way to revert to an
unencrypted device is to perform a factory data reset, which will
erase all your data.
❖ You must not interrupt the encryption process or you will lose
some or all of your data. (See “Privacy settings” on page 71 and
“If Something Goes Wrong” on page 98).
1 Before starting the encryption process on your tablet, you
must:
❖ Set a lock screen PIN or password (see “Securing your
tablet” on page 47).
❖ Charge your tablet’s battery.
❖ Plug your tablet to the USB/AC adaptor.
❖ Schedule an hour or more for the encryption process:
2 Touch the Settings ( ) icon, Location & security () icon,
and then Encrypt tablet.
Read the information on the Encrypt Tablet screen carefully.
If you change your mind touch the Back ( ) button to exit
the encryption process.
3 Touch the Encrypt tablet button.
4 Enter your lock screen PIN or password and touch Continue.
5 Touch the Encrypt tablet button again, to confirm you want to
continue.
The encryption process begins and displays the progress.
Encryption can take an hour or more, during which time your tablet
may restart several times.
Page 49

Customizing your Home screens
When encryption is complete, you are prompted to enter your PIN
or password. Subsequently, you must enter your PIN or password
each time you power on your tablet, to decrypt it.
Customizing your Home screens
You can add Apps icons, Widgets, Bookmark shortcuts, and other
items to any available free space on any Home screen. You can also
change the Wallpaper.
For more information on the Home screens, see “Navigation and
features” on page 41.
Adding an item to a Home screen
1 Open the Home screen you want to add the item to. For more
information on using the Home screens, see “Navigation and
features” on page 41.
2 Touch the Customize ( ) button located at the top-right of the
screen or touch & hold an empty area of the Home screen.
3 Touch the category of the item you want to add. If there are no
empty spots on the Home screen, “Add” is dimmed and you
must delete or move an item or switch to another Home screen
before you can add a new item.
4 In the pop-up menu, touch the tab for the category of the item
you want to add.
❖ App shortcuts—Application icons you can place on your
Home screen. Touching them opens the associated apps
without having to first open the Apps screen.
❖ Widgets—Miniature applications. You can place the
associated icons on the Home screen.
❖ Wallpapers—Background images downloaded from the
Web or chosen from the Gallery (pictures taken with your
camera, or still images included with the system). A live
wallpaper is an animated scene or maybe a map that
centers on your location.
❖ More—This category includes Browser bookmark
shortcuts, shortcuts created in the Maps app, and many
more items.
5 Swipe your finger left or right to view additional items in each
category.
6 Touch & hold the item, and then drag it to the location you
wish to place it on the Home screen.
Getting Started
49
Page 50
50
NOTE
Getting Started
Customizing your Home screens
Moving an item from the Home screen
To move an item to a new location on the current Home screen or to
move it to another Home screen, touch & hold the icon, and then
drag and drop it to the new location.
Removing an item from a Home screen
1 Touch & hold the item you wish to remove.
The Remove button appears in the top right corner of the
display.
2 Drag the item to the Remove button.
3 Lift your finger when the icon turns red.
The item has been removed from the Home screen, but not deleted
from the system. To add the item back to your Home screen, see
“Adding an item to a Home screen” on page 49.
Changing the wallpaper
1 Touch the Customize ( ) button located at the top-right of the
screen.
2 Touch Wallpapers.
3 Touch Gallery, Live wallpapers, or Wallpapers.
❖ Gallery—Opens a thumbnail page, displaying the images
you have taken with the tablet’s camera. Pictures can be
cropped before setting them as a wallpaper.
❖ Live wallpapers—Opens a thumbnail page, displaying
the sample live wallpapers that came preinstalled on your
tablet. Touch a thumbnail image to preview it on the
screen.
❖ Wallpapers—Opens a thumbnail page, displaying the
sample wallpaper images that came preinstalled on your
tablet. Touch a thumbnail image to preview it on the
screen.
Additional wallpapers can be downloaded from Android
Market™.
4 Touch the wallpaper you want. The selected wallpaper is set as
the background image on your display screen.
Page 51
Turning off the device
NOTE
It is a good idea to turn off your device when you are not using it for
a while.
If you are using the device for the first time, leave the device
plugged into a power source (even though the device is off) to fully
charge the battery.
Options for turning off the device
You have two options available for turning off the device: Shut
down and Sleep mode. Each option has its advantages.
❖ Use shut down if you will not be using the device for several
days or if you must turn off your device.
TECHNICAL NOTE: Before using the shut down option to turn off
your device, backup your data and make sure all disk activity lights
are off.
If you change your mind and decide to continue working after all,
wait a few seconds before turning the device on again.
Getting Started
Turning off the device
51
If you do not intend to use your device for a long period of time, turn
off the device, disconnect the power plug from the plug socket, and
store your device in a dry dust-free location.
❖ Letting the screen time-out or enter into Sleep mode allows the
device to conserve power. When turning on the device again,
the system automatically returns to the last screen viewed.
To change the screen time-out setting, see “Screen settings” on
page 65.
Using Shut down mode
The Shut down mode completely shuts down the device without
saving your data or the current state of the device. Shut down mode
closes all open apps, shuts down the operating system, and then
turns off your tablet.
Always back up your data and settings before shutting down your
tablet.
Page 52
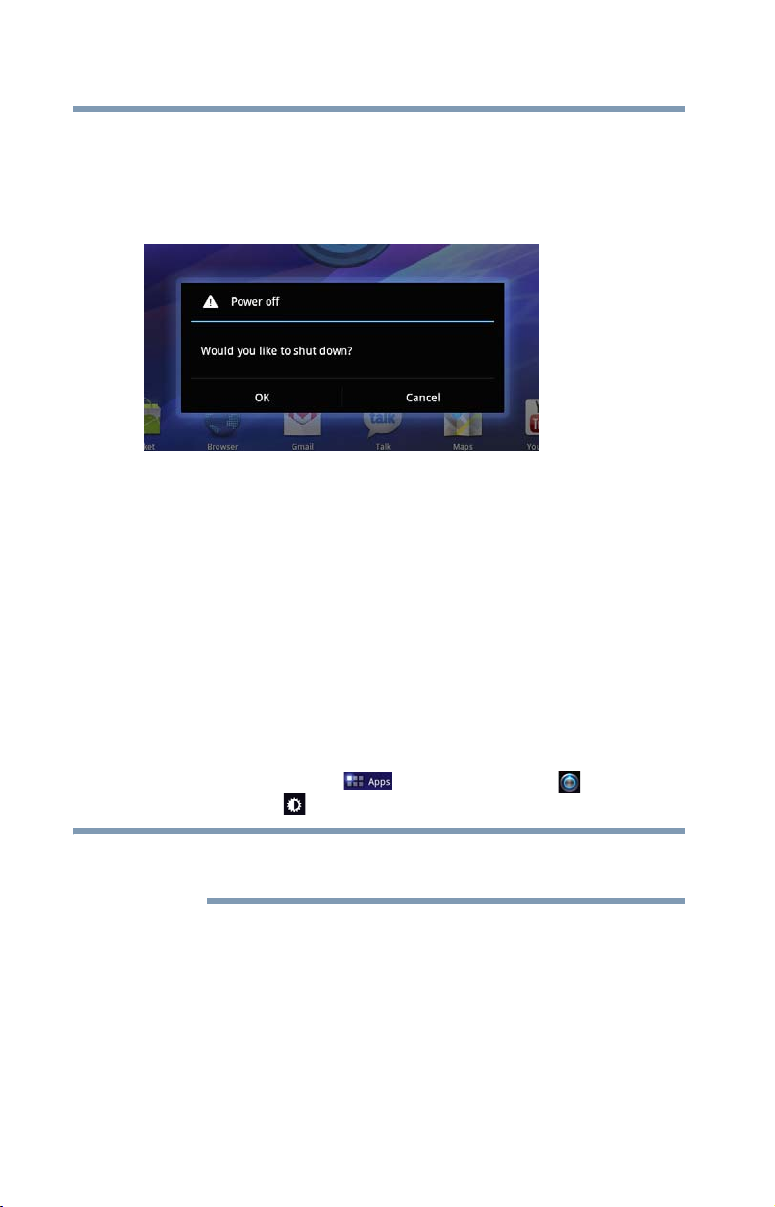
52
NOTE
Getting Started
Turning off the device
To turn off your device using Shut down mode:
1 Press and hold the Power button.
A pop-up screen appears, asking whether you would like to
shut down.
(Sample Image) Shut down pop-up screen
2 In the pop-up window, touch OK to completely shut down the
tablet.
The operating system shuts down and the tablet turns off.
3 Touch Cancel to abort the shut down process.
Using Sleep mode
Your device will automatically time-out after a few minutes of
non-operation, placing it into Sleep mode. The screen dims and
then darkens to conserve battery power. For more information on
waking the tablet from Sleep mode, see “Waking the tablet” on
page 37. To change the amount of time it takes for the display to
darken, touch the Apps ( ) icon, the Settings ( ) icon, and
then the Screen ( ) icon.
Increase battery life between charges by using the shortest available
time-out setting. See “Screen settings” on page 65.
Page 53
Syncing and managing your accounts
You can also place your tablet into Sleep mode by pressing the
Power button quickly.
Factors to consider when choosing Sleep mode:
❖ While in Sleep mode, the device uses some battery power.
❖ Because the state of the system is stored in memory, you will
lose data if the battery discharges completely while the device
is in Sleep mode.
❖ Waking your device from Sleep mode takes less time and
consumes less battery power than restarting after shutting
down the device.
❖ When starting up again, the device returns to the screen last
viewed.
If you place the device in Sleep mode and the battery discharges
fully, your unsaved data will be lost. Be sure to backup your data
first.
Syncing and managing your accounts
Using the Accounts & Sync settings, you can configure the ways in
which your account interacts with the applications on your tablet,
and you can sync contacts, email, calendar events, etc. from your
multiple Google™ Accounts.
Getting Started
53
Add an account
Add multiple Google Accounts and Microsoft® Exchange
ActiveSync accounts to have all your accounts available on your
tablet device. For more information, see “Accounts & sync settings”
on page 70.
1 Touch the Apps () icon.
The Apps menu appears.
2 Touch the Settings ( ) icon.
The Settings menu appears.
Page 54
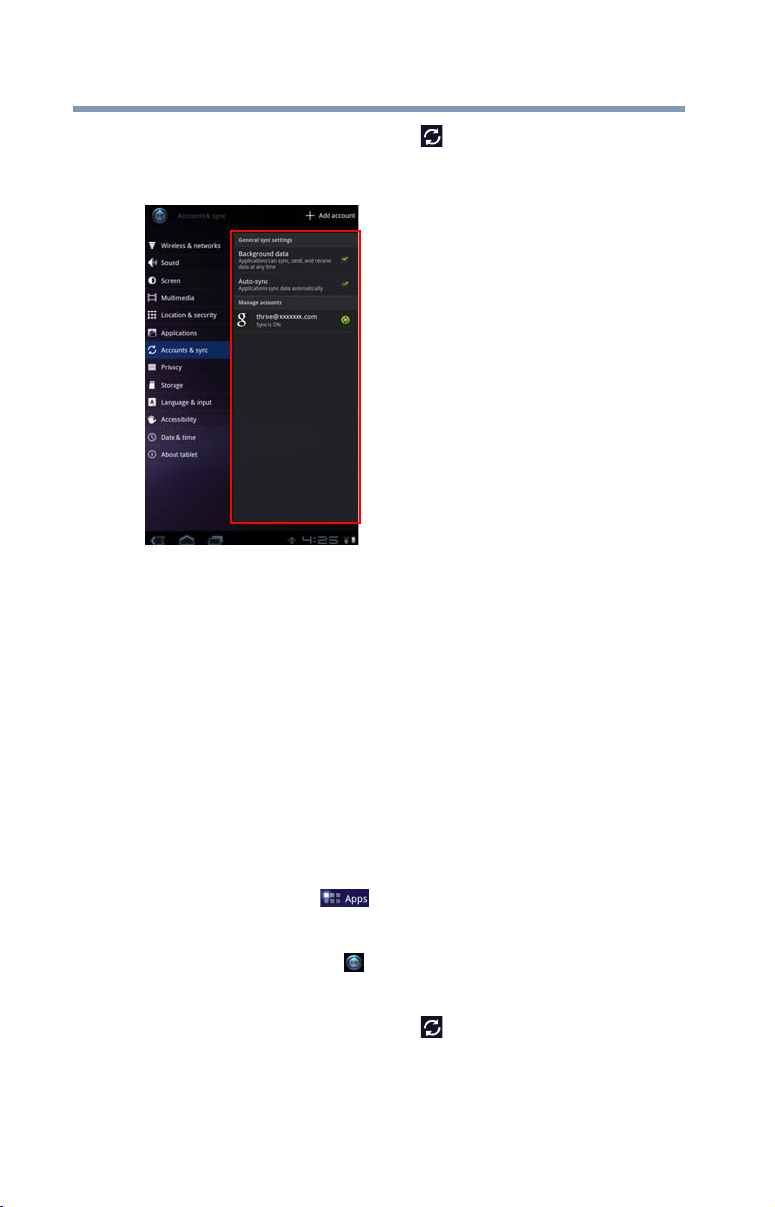
54
Getting Started
Syncing and managing your accounts
3 Touch the Accounts & sync () icon.
The Accounts & sync menu appears displaying the current
sync settings and a list of the current accounts.
(Sample Image) Accounts & sync screen
4 Touch Add account.
5 Follow the onscreen instructions to enter the required account
information.
6 Configure the account settings. For more information, see
“Accounts & sync settings” on page 70.
The account is added to the list in the Accounts & sync
settings.
Remove an account
To remove an account and all the associated information, including
email, contacts, settings, etc.:
1 Touch the Apps () icon.
The Apps menu appears.
2 Touch the Settings ( ) icon.
The Settings menu appears.
3 Touch the Accounts & sync () icon.
The Accounts & sync menu, appears, displaying the current
sync settings and a list of the current accounts.
Page 55
Navigation, Maps, Places, and Latitude
4 Touch the account you wish to delete.
5 Touch Remove account and confirm to continue.
The account and the associated information is removed from
the Accounts & sync settings.
Navigation, Maps, Places, and Latitude
To access Navigation, Maps, Places and Latitude:
1 Touch the Apps () icon.
The Apps menu appears.
2 Touch the Navigation ( ) icon, Maps ( ) icon, Places ()
icon, or the Latitude ( ) icon.
Do not use this device while driving.
Navigation: Access turn-by-turn, spoken driving instructions with
the free Google™ Navigation application (Beta).
Maps: Finds your current location to access real-time traffic
conditions, and obtain detailed directions by foot, public
transportation, or car, using the free Google Maps application
(Beta).
Places: Quickly find local establishments, such as restaurants,
banks, or gas stations, using the free Google Places application.
Latitude: Locate points-of-interest directly on a street map or
satellite image. Some areas support street-level views of businesses
and neighborhoods. View your friends’ locations on your maps and
share your location and other information with them, using Google
Latitude.
To learn more, visit the Google Help Center.
Getting Started
55
Managing downloads
To access downloads:
1 Touch the Apps () icon.
The Apps menu appears.
2 Touch the Applications ( ) icon, and then touch the
Manage applications menu on the right side.
3 Touch the Downloaded () icon.
The Downloaded menu appears.
Page 56
56
Getting Started
Factory data reset
4 Touch an item to open it.
Items can be deleted from your tablet or sorted by file size or file
name for easier viewing.
To sort the items, touch the Sort by size ( ) or Sort by name
( ) menu option on the top right of the screen.
To delete items:
1 Select the items you wish to delete.
2 Touch Uninstall, and then touch OK to confirm the deletion.
Files, apps, and items downloaded from a Web Browser, Gmail,
etc., are stored on your tablet’s internal storage. Use the Downloads
app to view, open, or delete downloaded items.
Factory data reset
This restores the device to the out of box state. All data on the
device is erased, including system/application settings, user
downloaded/installed applications and data such as photos, music,
videos, contacts, etc.
The recovery process deletes all data, restoring the tablet to its
out-of-box state. Be sure to save your data to external media before
executing the recovery), see “Backing up your data” on page 39.)
Before restoring the device to the out of box state, back up all data
to external media. You can use your Google™ account to back up
all data and apps settings.
To perform this process:
1 Touch the Apps () icon.
The Apps menu appears.
2 Touch the Settings ( ) icon.
The Settings menu appears.
3 Touch the Privacy ( ) icon.
The Privacy menu appears.
4 Touch Factory data reset.
Page 57
5 Touch Reset tablet.
NOTE
6 Touch Erase everything.
The Factory data reset process begins.
This process could take several minutes. For more information, see
“Setting up your device” on page 34.
Caring for your device
This section gives tips on cleaning and moving your device. For
information about taking care of your device’s battery, see “Taking
care of your battery” on page 31.
The screen is made of glass so avoid contact with sharp, rough, or
abrasive objects or substances as screen may break or scratch if not
handled properly. If you see a crack in the glass, discontinue use of
the device to avoid injury.
Cleaning the device
Getting Started
Caring for your device
57
Keep liquids, including cleaning fluid, out of the device’s ports,
speakers and other openings. Never spray cleaner directly onto the
device. Never use harsh or caustic chemical products to clean the
device.
To keep your device clean, gently wipe it with a lightly dampened
soft cloth.
Page 58
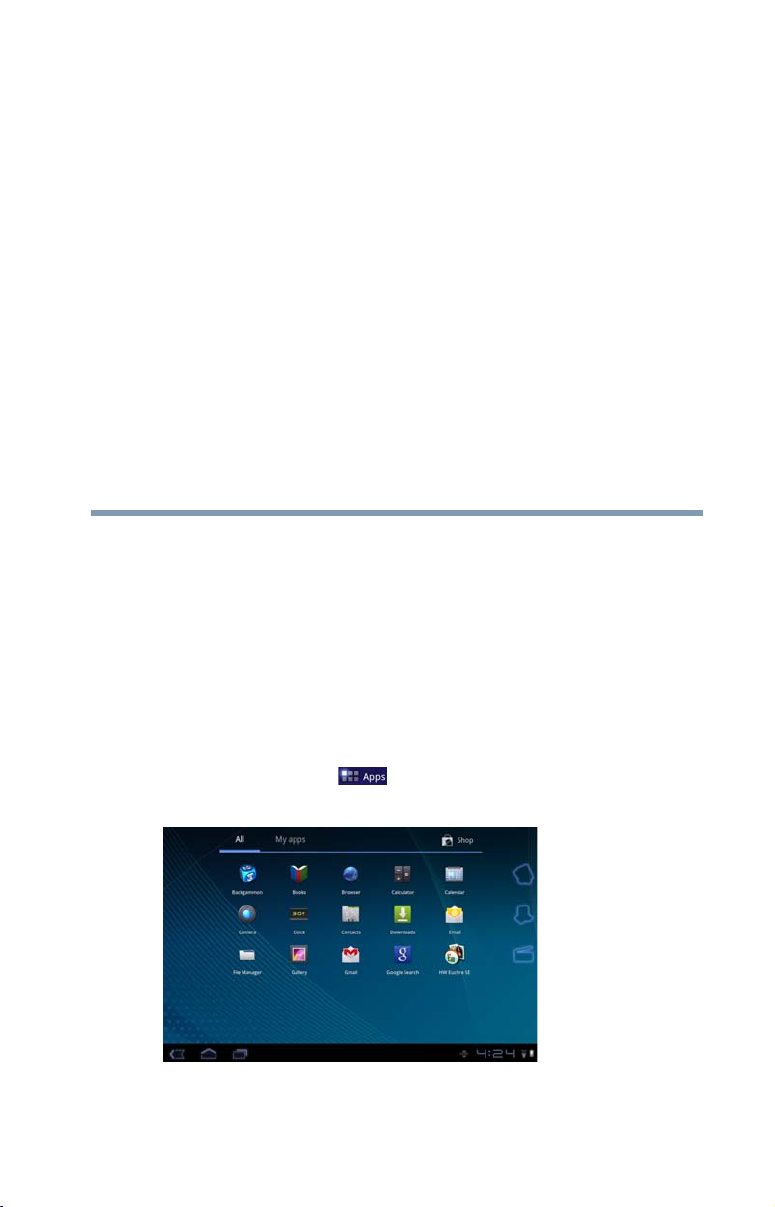
Chapter 2
Settings
Customizing your device’s settings
You can customize the settings for the various functions on your
Toshiba tablet, such as screen orientation, or sound settings.
Apps and Settings menus
This menu contains most of the tools you will need to customize
and configure your tablet.
58
Accessing the Apps and Settings menus
To access the Apps menu:
❖ Touch the Apps () icon.
The Apps menu appears.
(Sample Image) Apps menu screen
Page 59
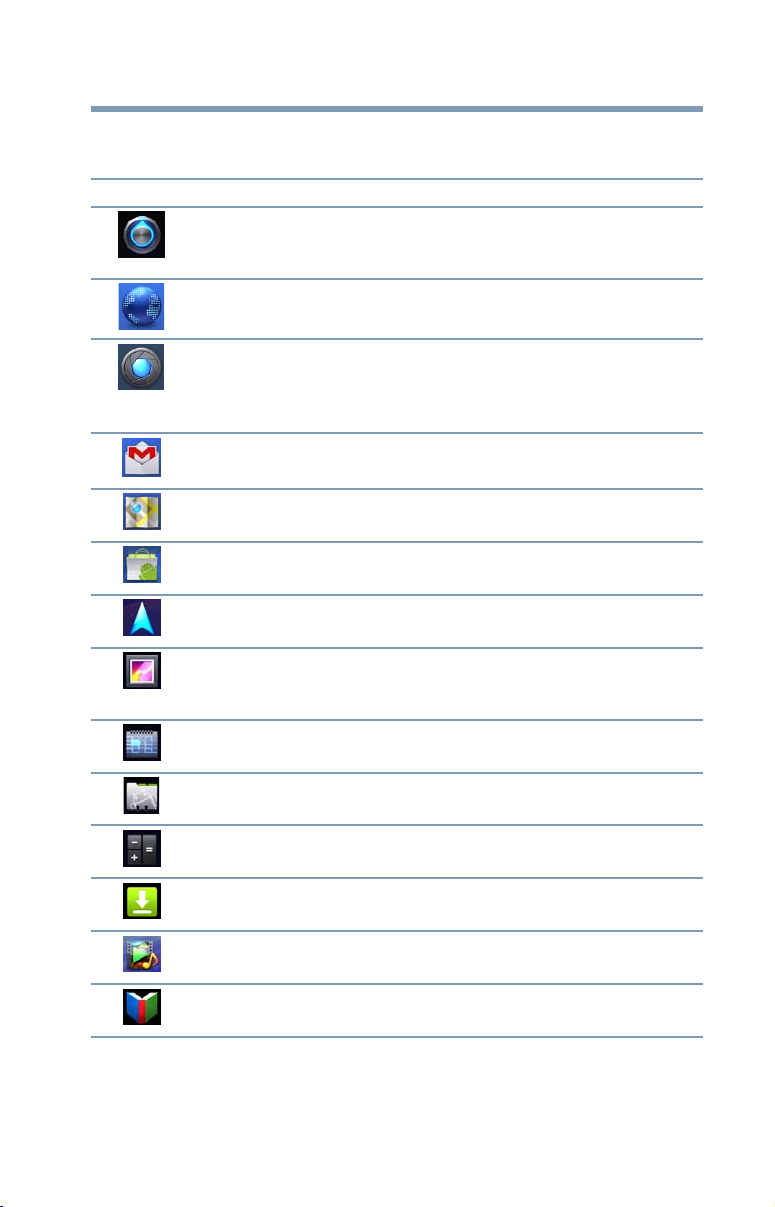
Settings
Customizing your device’s settings
The following are some of the icons you may find in the Apps
menu.
Icon Name Description
Settings Touch to open the Settings menu and change the
settings on your tablet, see “Apps and Settings menus”
on page 58.
Browser Touch to open and view Web sites.
Camera Touch to open the Camera application. Take
photos/videos, using the camera on either the back or
the front of the tablet, see “Using the cameras” on
page 84.
Gmail™ Touch to access your Gmail email account.
Maps Touch to open the Maps app, see “Navigation, Maps,
Places, and Latitude” on page 55.
Android Market™ Touch to open Android Market to view and download
available apps for your tablet.
Navigation Touch to open the Navigation app, see “Navigation,
Maps, Places, and Latitude” on page 55.
Gallery Touch to view the photos/videos you have recorded,
using the camera, or images preinstalled on your tablet,
see “Using the cameras” on page 84.
Calendar Touch to view your Calendar.
59
Contacts Touch to view your Contacts.
Calculator Touch to open the Calculator application.
Downloads Touch to view the Downloads application, see
“Managing downloads” on page 55.
Media Player Touch to open the multimedia player, see “TOSHIBA
Media Player” on page 77.
Books Touch to view the books that have been downloaded to
your tablet.
Page 60
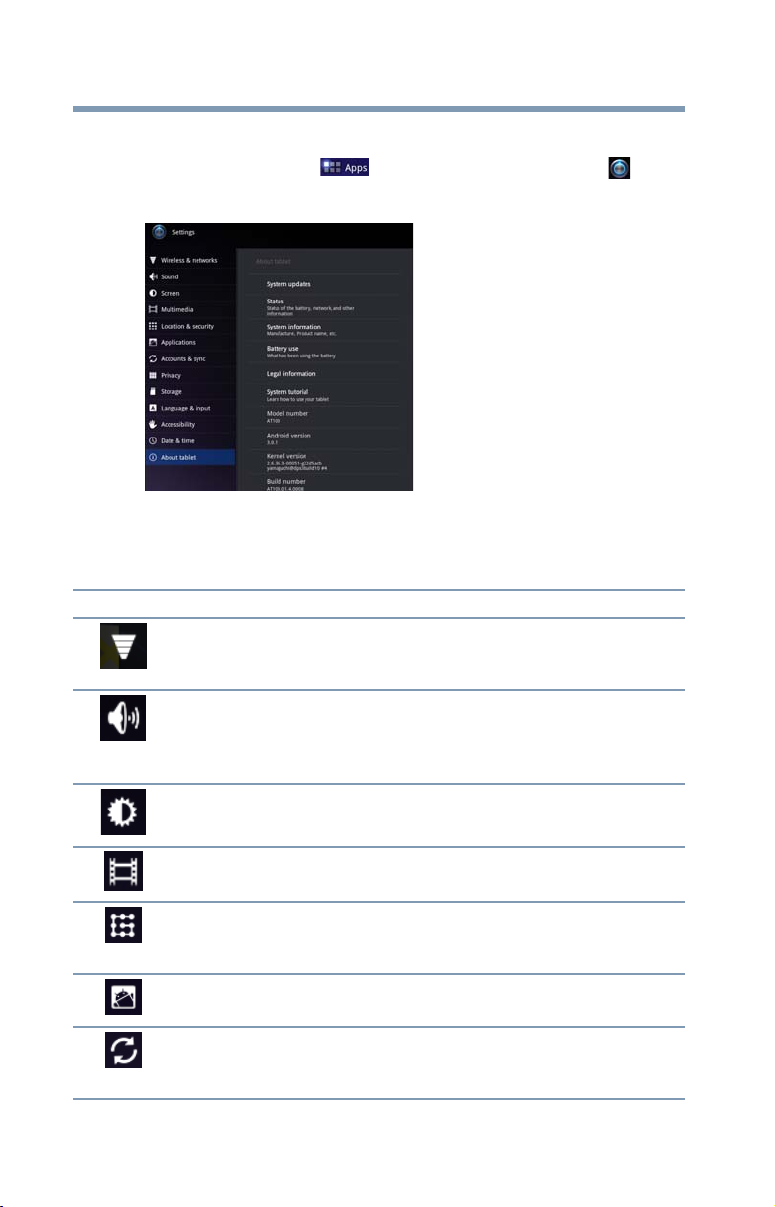
60
Icon Name Description
Settings
Customizing your device’s settings
To access the Settings menu:
❖ Touch the Apps ( ) icon, and then the Settings () icon.
The Settings menu appears.
(Sample Image) Settings menu screen
The following are some of the icons you may find in the Settings
menu.
®
Wi-Fi
Sound Configure the Sound settings to set the audio for media
Screen Configure the screen orientation or use energy saving
Configure and manage connections to networks and
devices via Wi-Fi
networks settings” on page 63.
playback, notifications, and alarms with the your desired
volume level and notification sounds, see “Sound
settings” on page 65.
settings, see “Screen settings” on page 65.
®
, or Bluetooth®, see “Wireless and
Multimedia Touch to adjust the multimedia playback settings, see
“Multimedia settings” on page 66.
Location & security Configure how you want the tablet to determine your
location, see “Location and security settings” on
page 67.
Applications Touch to view and manage the installed applications, see
“Applications settings” on page 69.
Accounts & sync Add, remove, and manage all of your accounts, and sync
accounts to work together, see “Accounts & sync
settings” on page 70.
Page 61
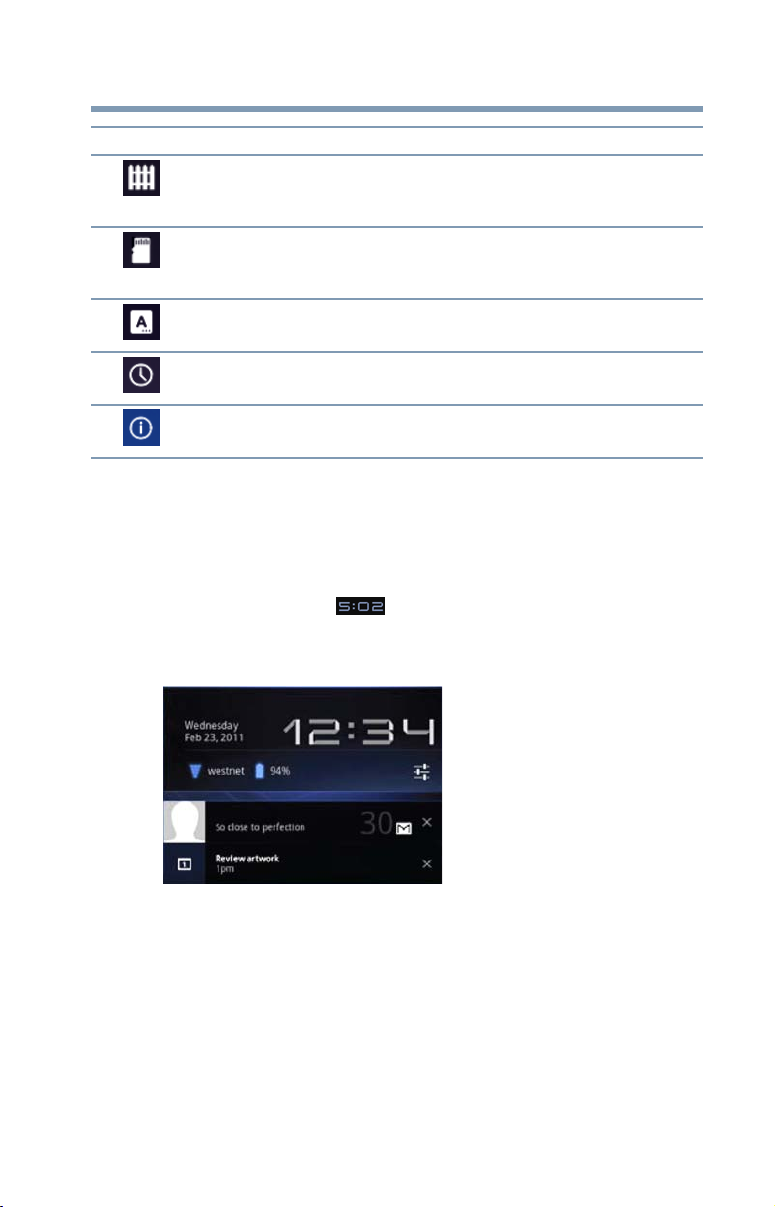
Settings
Customizing your device’s settings
Icon Name Description
Privacy Back up your settings and data to Google™ servers,
using your Google Account, or perform a factory data
reset, see “Privacy settings” on page 71.
Storage Monitor the used and available space on your tablet’s
internal storage and other storage media installed on
your tablet, see “Storage settings” on page 72.
Language & input Configure the various input methods available on your
tablet, see “Language & input settings” on page 72.
Date & time Configure your preferences for the way in which dates
are displayed, see “Date & time settings” on page 74.
About tablet Displays information regarding your operating system
software and hardware, see “About tablet” on page 75.
Access Settings from the Quick Settings menu
You can open the Quick Settings menu to view and control the
tablet settings you most often use, as well as access the Settings
menu.
1 Touch the Time ( ) display in the lower-right corner of the
screen in the System bar.
The Status Details menu displays.
61
(Sample Image) Status Details menu screen
❖ Touch any open area of the display screen to close the
Status Details menu.
Or
❖ Touch anywhere in the Status Details menu to display the
Quick Settings menu.
Page 62
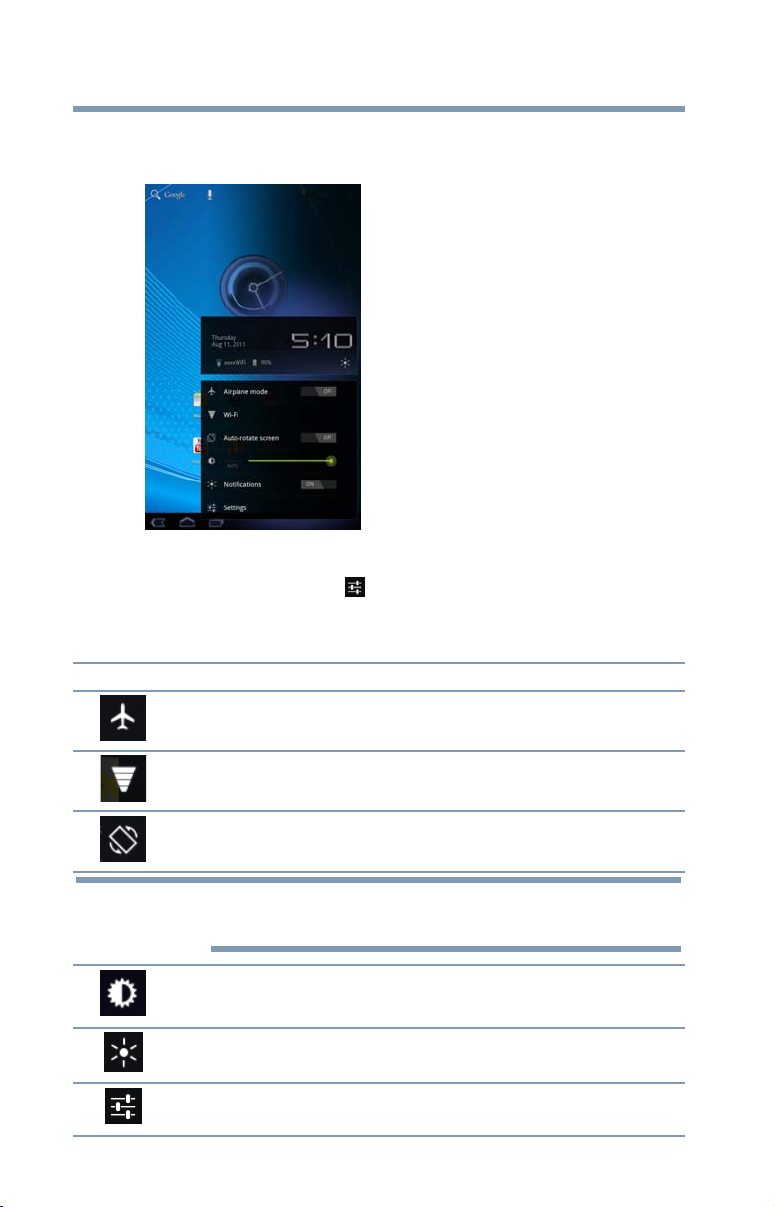
62
NOTE
Settings
Customizing your device’s settings
The Quick Settings menu displays below the Status Details
menu, replacing the list of current notifications.
(Sample Image) Quick Settings menu screen
2 Touch the Settings ( ) icon to open the Settings menu, and
then select the setting you wish to change.
The following are icons you will find in the Quick Settings menu.
Icon Name Description
Airplane mode Touch to turn ON/OFF Airplane mode, see “Wireless and
networks settings” on page 63.
®
Wi-Fi
Lock screen
orientation
This may also be locked/unlocked by using the screen rotation
lock/unlock switch.
Screen brightness Touch to adjust the screen brightness, see “Screen
Notifications Touch to turn ON/OFF Notifications, see “Sound
Settings Touch to select the tablet setting you wish to change, see
Touch to view the current Wi-Fi® connections, see
“Wireless and networks settings” on page 63.
Touch to turn ON/OFF screen rotation, see “Screen
settings” on page 65.
settings” on page 65.
settings” on page 65.
“Apps and Settings menus” on page 58.
Page 63
Settings
Customizing your device’s settings
Wireless and networks settings
Use the Wireless & networks settings to configure and manage
connections to networks and devices via Wi-Fi
more information, see “Setting up Wi-Fi® and Bluetooth®
connections” on page 38. The Wireless & Networks settings can
also be used to configure connections between your tablet and
virtual private networks (VPNs), and to turn off the device’s radios
while in-flight.
To change the Wireless & networks settings:
1 Touch the Apps () icon.
The Apps menu appears.
2 Touch the Settings ( ) icon.
The Settings menu appears.
3 Touch the Wireless & networks ( ) icon.
The Wireless & networks menu appears.
4 Touch the item you wish to change in the Wireless & networks
menu.
Below are some of the categories to choose from:
❖ Airplane mode—Select to turn off the tablet’s radios that
transmit data.
❖ Wi-Fi—Select to turn on Wi-Fi
®
so you can connect to Wi-Fi®
networks.
❖ Wi-Fi settings—See
“Setting up Wi-Fi® and Bluetooth® connections” on page 38.
In addition to the settings described in this section, you can
touch the Menu ( ) button in this screen’s Application bar
and touch Advanced to view the settings in the “Advanced
Wi-Fi settings” screen.
Some of the options available are:
❖ Wi-Fi—Select to turn on Wi-Fi
®
Wi-Fi
networks. The network name is displayed when a
network is connected.
❖ Network notification—If this is selected, you will receive
a notification in the System bar when an open Wi-Fi
network becomes available.
®
, or Bluetooth®. For
®
so you can connect to
®
63
Page 64

64
Settings
Customizing your device’s settings
❖ Wi-Fi® Disconnect policy choices—Choose from the
following selections to set conditions for automatically
turning off the Wi-Fi
When the screen times-out
Never while plugged into AC power
Never (uses more battery power)
❖ Wi-Fi networks—Displays a list of Wi-Fi
you’ve previously configured and those detected when the
tablet last scanned for Wi-Fi
your Wi-Fi® connection” on page 34.
❖ Add Wi-Fi network—Touch to open a dialog box to add
a Wi-Fi
®
network by entering its SSID (the name it
broadcasts), security type, and other properties. See
“Setting up your Wi-Fi® connection” on page 34.
❖ Bluetooth—Select to turn on Bluetooth
Bluetooth
®
devices, such as an external keyboard.
❖ Bluetooth settings—For more information, see “Setting up
Wi-Fi® and Bluetooth® connections” on page 38.
Some of the options available are:
❖ Bluetooth—Select to turn on Bluetooth
connect to Bluetooth
❖ Device name—Touch to open a dialog box to give your
tablet a name that is visible on some Bluetooth
The current name is displayed.
❖ Discoverable—Select to make your tablet discoverable by
other Bluetooth
❖ Bluetooth devices—Displays a list of Bluetooth
that you’ve previously configured and those detected when
the tablet last scanned for Bluetooth
❖ Find nearby devices—Touch to search for and display
information about nearby Bluetooth
®
connection:
®
networks
®
networks. See “Setting up
®
so you can connect to
®
®
devices.
®
devices for a brief period of time.
so you can
®
devices.
®
devices.
®
devices.
®
devices
Page 65
Settings
Customizing your device’s settings
Sound settings
The Sound settings can be configured to set the audio for media
playback, notifications, and alarms with the desired volume level
and notification sounds. You can also set audible feedback when
touching or locking and unlocking the screen.
To change the Sound settings:
1 Touch the Apps () icon.
The Apps menu appears.
2 Touch the Settings ( ) icon.
The Settings menu appears.
3 Touch the Sound () icon.
The Sound menu appears.
4 Touch the item you wish to change in the Sound menu.
Below are some of the categories you can choose from:
❖ Vo lu m e—Select to open a screen containing three sliders, used
to adjust media volume, notification sounds, and alarm sounds.
❖ Notification sounds—Select to open a screen containing a list
of notification sounds. Touch a notification sound to listen to a
sample of it.
❖ Audible selection—Select to hear a sound while touching the
buttons, icons, and other onscreen items.
❖ Screen lock sounds—Select to hear a sound when locking or
unlocking the screen.
65
Screen settings
You can change the Screen settings for various things, such as
orientation of the display or brightness level for energy
conservation.
To change the Screen settings:
1 Touch the Apps () icon.
The Apps menu appears.
2 Touch the Settings ( ) icon.
The Settings menu appears.
Page 66
66
NOTE
Settings
Customizing your device’s settings
3 Touch the Screen ( ) icon.
The Screen menu appears.
4 Touch the item you wish to change in the Screen menu.
Below are some of the categories you can choose from:
The Automatic Brightness selection must be deselected to access the
Brightness control screen.
❖ Brightness—Displays the Brightness control bar screen. To
change the brightness level, deselect the Automatic brightness
option. Then touch and slide the bar left or right to decrease or
increase the screen brightness.
❖ Auto-rotate screen—Select to enable your screen to
auto-rotate the screen in apps, Web pages, and games that
support auto-rotation. This allows the screen to automatically
switch the orientation of the currently viewed screen as you
turn the tablet sideways or upright.
❖ Animation—Displays a list of settings to enable or disable
animation while navigating your tablet in menus, screens, and
apps that support it.
❖ Time-out—Displays a list of time interval settings that
indicate the amount of time it takes for the screen to time-out.
Using the shortest time-out period extends the battery life
between charges.
Multimedia settings
Change the way in which your tablet displays media playback in
videos, music, photos, etc.
1 Touch the Apps () icon.
The Apps menu appears.
2 Touch the Settings ( ) icon.
The Settings menu appears.
3 Touch the Multimedia () icon.
The Multimedia menu appears.
4 Touch the item you wish to change in the Multimedia menu.
Page 67
Settings
Customizing your device’s settings
Location and security settings
Use the Location & security settings to configure how you want the
tablet to determine your location (this affects accuracy), and the
way in which you want to share your location with Google™ and
others. Security settings can also be configured to help secure your
tablet and its data.
Do not use this device while driving.
To change the Location & security settings:
1 Touch the Apps () icon.
The Apps menu appears.
2 Touch the Settings ( ) icon.
The Settings menu appears.
3 Touch the Location & security () icon.
The Location & security menu appears.
4 Touch the item you wish to change in the Location & security
menu.
Below are some of the categories you may choose from:
❖ Use wireless networks—Under My Location, selecting this
option allows your tablet to use information from Wi-Fi
networks to determine your approximate location. This is
important for use in Maps and other geographically aware
applications, etc. You will be asked if you consent to sharing
your location anonymously with Google’s location service, in
order help improve the service.
❖ Use GPS satellites—Under My Location, selecting this
option allows your tablet’s global positioning system (GPS)
receiver to pinpoint your location to within as close as several
meters (street level). Actual GPS accuracy depends on weather
conditions, as well as other factors.
❖ Use location for Google Search—Under My Location, select
this option to include information about your location when
you use Google Search, Voice Search, etc.
❖ Configure lock screen—Under Screen unlock, touch this
option to configure your lock screen with a required pattern,
PIN, or password to unlock the screen. For more information,
see “Securing your tablet” on page 47.
®
and
67
Page 68
68
Settings
Customizing your device’s settings
❖ Owner info—Under Screen unlock, touching this option
displays a screen that allows you to display information about
yourself (such as your contact information) on the lock screen.
You will be prompted to enter the text you wish to display.
❖ Encrypt tablet—Under Screen unlock, touch this option to
encrypt the contents of your tablet in the event that it is
powered off. Configure a required numeric PIN or password to
decrypt your tablet each time you power it on, see “Securing
your tablet” on page 47.
If you choose to set a password (with or without encryption), Toshiba
strongly recommends that you write down your password and keep it
in a safe location where you can later access it should you not
remember it.
Toshiba is not responsible for any losses that may occur, as a result
of the inability to access your device.
❖ Visible passwords—Under Passwords, select this option to
briefly display each character of your passwords as you enter
them into the keyboard.
❖ Device administrators—Under Device administration, touch
open a screen with a list of the applications you have
authorized to be administrators for your tablet. This is typically
an email, calendar, or other enterprise application that you
granted this authority to, when you added an account hosted by
an enterprise service that requires the ability to implement
security policies on any devices that connect to it. Touch an
application in this list to disable its authority to be a device
administrator; if you do, the account you added will typically
lose some functionality in its applications, such as the ability to
sync new email or calendar events, until you restore the
application’s authority as a device administrator. Applications
whose device administration authority you disable in this way,
but that have accounts that require them to be device
administrators, typically notify you how to restore their
authority when you try to use them, unless you delete those
accounts.
❖ Use secure credentials—Under Credential storage, select to
allow applications to access your tablet’s encrypted store of
secure certificates and related passwords as well as other
credentials. Credential storage is used to establish some kinds
of VPN and Wi-Fi
Bluetooth® connections” on page 38. This setting is dimmed if
you do not set a password for credential storage.
®
connections, see “Setting up Wi-Fi® and
Page 69
Settings
Customizing your device’s settings
❖ Install from storage—Under Credential storage, select to
install a secure certificate from your tablet’s storage.
❖ Set password—Under Credential storage, touch to open a
dialog box. Enter the password you wish to use to set or change
an existing password for your secure credential storage. Your
password must have at least 8 characters.
❖ Clear storage—Under Credential storage, select to delete all
secure certificates and related credentials. You will be
prompted to also confirm deletion of the credential storage
password.
Applications settings
You use the Applications settings to view details about the
applications installed on your tablet, to manage their data, to force
them to stop if needed, and to set whether you want to permit
installation of applications that you obtain from Web sites and
email.
To change the Applications settings:
1 Touch the Apps () icon.
The Apps menu appears.
2 Touch the Settings ( ) icon.
The Settings menu appears.
3 Touch the Applications () icon.
The Applications menu appears.
4 Touch item you wish to change in the Applications menu.
Below are some of the categories you can choose from:
❖ Manage applications—Displays a list of the applications and
other software installed on your tablet. The file information is
available for each item.
❖ Running services—Displays a list of applications, processes,
and services currently running.
❖ Storage use—Displays a list of the applications that are
currently using memory resources on your tablet.
❖ Battery use—Displays a list of the applications using battery
power since you last charged your tablet.
69
Page 70
70
NOTE
Settings
Customizing your device’s settings
Accounts & sync settings
You can add, remove, and manage your Google™ Accounts and
other accounts, using the Accounts & sync settings. For more
information, see “Syncing and managing your accounts” on
page 53. Use these settings to also control the ways in which
applications send, receive, and sync data on their own schedules, or
how applications synchronize user data automatically.
Gmail™, Calendar, and other applications may have their own
setting options. For details, refer to the application’s
documentation.
To change the Accounts & sync settings:
1 Touch the Apps () icon.
The Apps menu appears.
2 Touch the Settings ( ) icon.
The Settings menu appears.
3 Touch the Accounts & sync () icon.
The Accounts & sync menu appears.
4 Touch the item you wish to change in the Accounts & sync
menu.
Below are some of the categories you can choose from:
❖ Background data—Select to allow applications to
synchronize data in the background even if the application is
not currently being used. Disabling this setting can save battery
power and data use.
❖ Auto-sync—Select to allow applications to synchronize data
on their own schedule.
If Background data is not selected, automatically synchronizing data
is disabled and data will need to be manually synchronized in each
application that supports it.
❖ Manage accounts—You can manage your Google Accounts
and others you have added to the tablet by touching an account
on this screen.
The account’s screen displays.
Page 71
Settings
NOTE
Customizing your device’s settings
❖ Account screen—The options available on this screen depend
on the account screen you have displayed. You can choose to
turn ON/OFF synchronize for each account, or touch the
Synchronize button at the top right of the Application bar to
synchronize data now. Touch Remove account to remove the
account and all its data. For more information, see “Privacy
settings” on page 71.
Privacy settings
You can use the Privacy settings to back up your settings and data to
Google™ servers, using your Google Account. You can also
perform a factory data reset to erase all data on your tablet. For
more information, see “Backing up your data” on page 39.
To change the Privacy settings:
1 Touch the Apps () icon.
The Apps menu appears.
2 Touch the Settings ( ) icon.
The Settings menu appears.
3 Touch the Privacy ( ) icon.
The Privacy menu appears.
4 Touch the item you wish to change in the Privacy menu.
Below are some of the categories you can choose from:
❖ Back up my data—Select to back up your personal data
®
(Wi-Fi
servers, with your Google Account. Your data can be restored
to a new tablet the first time you sign in with your Google
Account. Some third-party applications may also take
advantage of this feature, allowing you to restore the associated
data of a reinstalled application.
passwords, Browser bookmarks, etc.) to Google
71
If you disable this option, data will no longer be backed up to your
Google Account. All existing backed up data is deleted from Google
servers.
❖ Backup account—Displays the Google Account used to back
up your settings and data. Sign in to this account to restore
your settings and data to a new tablet or other device.
❖ Automatic restore—Select this option to restore the
associated settings and data when reinstalling an application.
Page 72
72
NOTE
❖ Factory data reset—Restores your device to it’s out-of-box
Storage settings
The Storage settings can be used to monitor the used and available
space in your tablet’s internal storage or on a Micro SD™ Card
inserted in your tablet.
To change the Storage settings:
1 Touch the Apps () icon.
2 Touch the Settings ( ) icon.
3 Touch the Storage () icon.
4 Touch the item you wish to change in the Storage menu.
You can also view and manage the amount of storage used by your
applications.
Settings
Customizing your device’s settings
state, see “Factory data reset” on page 56.
The recovery process deletes all data, restoring the tablet to its
out-of-box state. Be sure to save your data to external media before
executing the recovery), see “Backing up your data” on page 39.)
Any system updates already installed are retained on your device.
The Apps menu appears.
The Settings menu appears.
The Storage menu appears.
Language & input settings
You can select the language and configure various input methods,
such as the text-to-speech synthesizer for applications that support
it.
To change the Language & input settings:
1 Touch the Apps () icon.
The Apps menu appears.
2 Touch the Settings ( ) icon.
The Settings menu appears.
Page 73
Settings
Customizing your device’s settings
3 Touch the Language & input ( ) icon.
The Language & input menu appears.
4 Touch the item you wish to change in the Language & input
menu.
Below are some of the categories you can choose from:
❖ Select language—Select to open the Language screen, and
then select your preferred language for use on your tablet.
❖ User dictionary—Select to open a list of the words you’ve
added to the dictionary. Touch a word to edit it, or touch the red
X next to a word to delete it. Touch the Plus button at the
top right of the Application bar to add a word.
❖ Voice recognizer settings—Select to open a screen that allows
you to configure the following settings:
Some of the available options are:
❖ SafeSearch—Set whether you want Google™ SafeSearch
filtering to block some search results when using Google
Voice Search.
❖ Block offensive words—Select to have your Google
voice recognition replace offensive words with hash
symbols (#).
❖ Text-to-speech settings—Select to open a screen that allows
you to configure the following settings:
❖ Listen to an example—Using your current settings, a
brief sample of the speech synthesizer is played.
❖ Always use my settings—Select to use the settings on
your device, rather than an application’s speech
synthesizer settings.
❖ Default engine—If you have more that one text-to-speech
application installed, select to set one of them as the
default application.
❖ Install voice data—If you do not have a speech
synthesizer application installed on your device, this
option connects to Android Market and guides you
through the download process.
❖ Speech rate—Touch to select the speed in which you
would like the synthesizer to speak.
❖ Language—Touch to select the text language you wish
your synthesizer to speak.
73
Page 74
74
NOTE
Settings
Customizing your device’s settings
❖ Engines—Touch to view the text-to-speech applications
installed on your device. Touch one to view or change its
settings.
❖ Current input method—Select to open the screen, and then
select the input method you wish to use, if more than one is
installed. Touch Configure input methods to open the screen,
and then configure the current input method. Alternative
keyboards and other input methods can be downloaded from
Android Market™.
❖ Input method selector—Select to open the screen, and then
choose whether you want the Input Selector button to appear in
the System bar, to the left of the Time display.
❖ Configure input methods—Select to open a screen that
allows you to configure the following settings:
❖ Active input methods—Touch to select the languages
you want available when speaking and typing, using the
onscreen keyboard and voice input. When languages are
specified, the Input Method button appears in the System
bar when the onscreen keyboard is used.
❖ Settings—Touch to select the keyboard settings you
wish to use (Auto-capitalization, Sound on keypress,
Auto-correction, Show correction suggestions).
The correction and capitalization features are supported only in
English.
For more information on using the onscreen keyboard, see “Using
the onscreen keyboard” on page 80.
Date & time settings
Use the Date & time settings to configure your preferences for the
way in which dates are displayed.
To change the Date & time settings:
1 Touch the Apps () icon.
The Apps menu appears.
2 Touch the Settings ( ) icon.
The Settings menu appears.
Page 75
Settings
Customizing your device’s settings
3 Touch the Date & time ( ) icon.
The Date & time menu appears.
4 Touch the item you wish to change in the Date & time menu.
Below are some of the categories you can choose from:
❖ Automatic date & time—Clear the selection to set the date
and time manually.
❖ Automatic time zone—Clear the selection to set the time zone
manually.
❖ Set date—If Automatic date & time is cleared, a screen
opens to set the date manually.
❖ Set time—If Automatic date & time is cleared, a screen
opens to set the time manually.
❖ Select time zone—If Automatic time zone is cleared, a screen
opens to set the time zone manually.
❖ Use 24-hour format—Select to display the time using a
24-hour time format (i.e. 13:00, rather that 1:00).
❖ Select date format—Select to open a screen to select the
displayed date’s format.
75
About tablet
The About tablet menu displays information regarding your
operating system software and hardware.
To view th e About tablet information:
1 Touch the Apps () icon.
The Apps menu appears.
2 Touch the Settings ( ) icon.
The Settings menu appears.
3 Touch the About tablet ( ) icon.
The About tablet menu appears.
4 Touch the item you wish to view in the About tablet menu.
Page 76

76
Settings
Customizing your device’s settings
Below are some of the categories you can choose from:
❖ System updates—Select to open the Toshiba Service Station
that lists the availability of operating system software updates.
❖ Status—Select to open a screen that displays information
about your battery, network connections, etc.
❖ Battery use—Select to open a list of the applications and
operating system components used since you last charged the
tablet.
❖ Legal information—Select to open a screen that displays legal
information about the system software included with your
tablet.
Page 77
Chapter 3
NOTE
NOTE
Working with Apps
Downloading Toshiba Apps
You can download Toshiba apps from the Toshiba App Place™ by
touching the App Place
To download apps, you must be connected to the Internet.
TM
icon.
TOSHIBA Media Player
The TOSHIBA Media Player is a multimedia player that allows
users to experience outstanding multimedia viewing enjoyment.
The TOSHIBA Media Player supports a number of multimedia
content formats. For detailed information regarding supported file
formats, see the detailed specifications for your device at
tabletsupport.toshiba.com.
Toshiba does not guarantee that all audio/video files will play
correctly.
On the Media Player’s main screen, touch the Menu ( ) button to
open the following options:
❖ About—Displays version information, etc.
❖ Capture Photo—Turns on the camera application in photo
mode.
77
Page 78

78
NOTE
Apps
Working with Apps
Apps
❖ Capture Video—Turns on the camera application in video
mode.
❖ Help—For more information, refer to the TOSHIBA Media
Player Help file.
TOSHIBA Resolution+®
Viewing enhancements may vary depending upon content quality
and display device capability/functionality/settings. Depending on
the quality of the content, some video noise may be visible.
This technology upconverts standard-definition video content,
instantly improving sharpness and color, for a higher quality visual
experience. For more information, see “TOSHIBA Resolution+®”
on page 97.
In Android Market™ you will have direct access to more than
100,000 apps. Search for your favorite games, apps, wallpapers,
and more to customize your tablet.
To learn more, visit the Google™ Help Center.
Downloading from Android Market™
On the Home Screen, touch the Market ( ) icon. This opens
Android Market™, allowing you to choose from the available apps,
games, etc.
Preinstalled Apps on your tablet
Android Market™, Browser, Gmail™, Maps, YouTube™,
Calendar, and Contacts apps are preinstalled on your tablet and the
shortcuts for them appear on your Home screen. You can move the
icons for these applications to other Home screens to customize the
look of your tablet, see “Moving an item from the Home screen” on
page 50.
You can install many more apps, widgets, games, etc. by visiting
the Toshiba App Place™ or Android Market.
Page 79
Uninstalling Apps on your tablet
NOTE
To uninstall applications from your tablet.
1 Touch the Apps () icon.
2 Touch & hold the icon that represents the application you want
to delete, and then drag it to Uninstall.
3 Confirm the deletion.
Applications that came preinstalled on your tablet cannot be deleted
from the device.
Working with Apps
Apps
79
Page 80
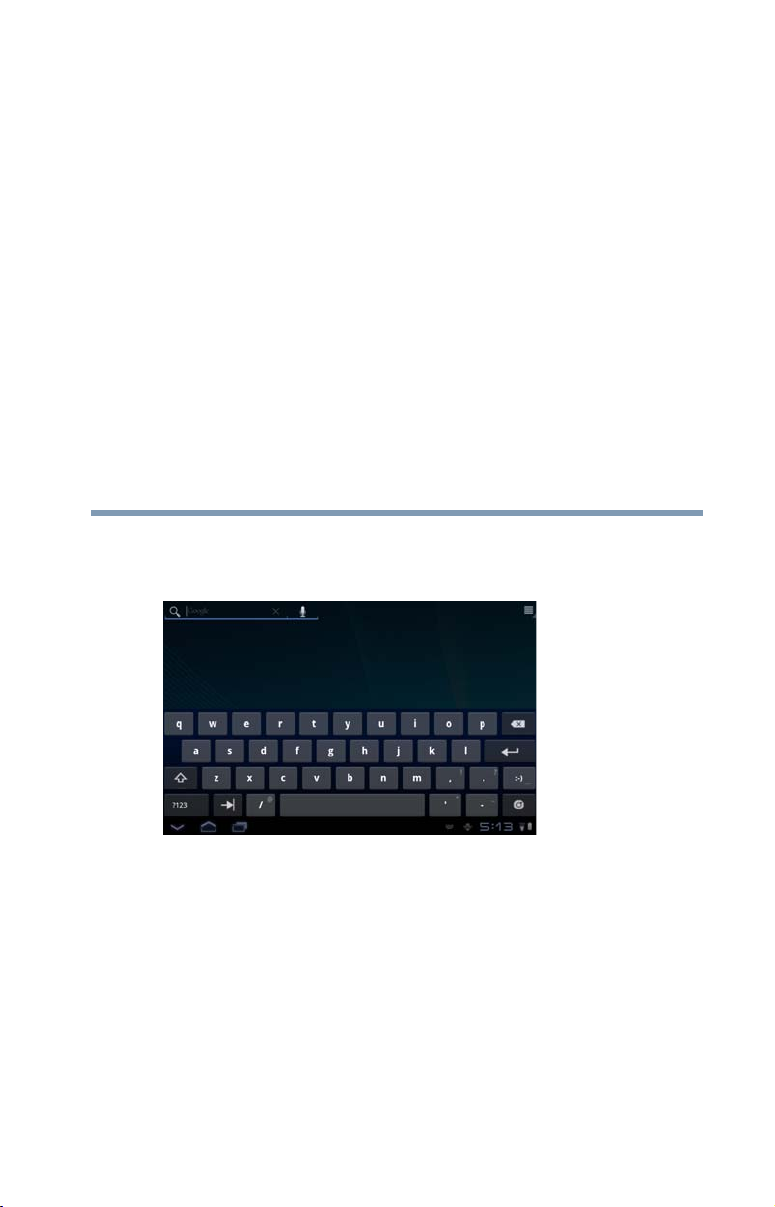
Chapter 4
Exploring the Features on
your Device
Using the onscreen keyboard
Your tablet comes with an onscreen keyboard.
80
(Sample Image) Onscreen keyboard
Enter text using the onscreen keyboard. Some applications open a
text field that when touched, opens the onscreen keyboard allowing
you to enter text. Some apps open the keyboard automatically.
The onscreen keyboard has a number of settings. For more
information, see “Language & input settings” on page 72.
Page 81
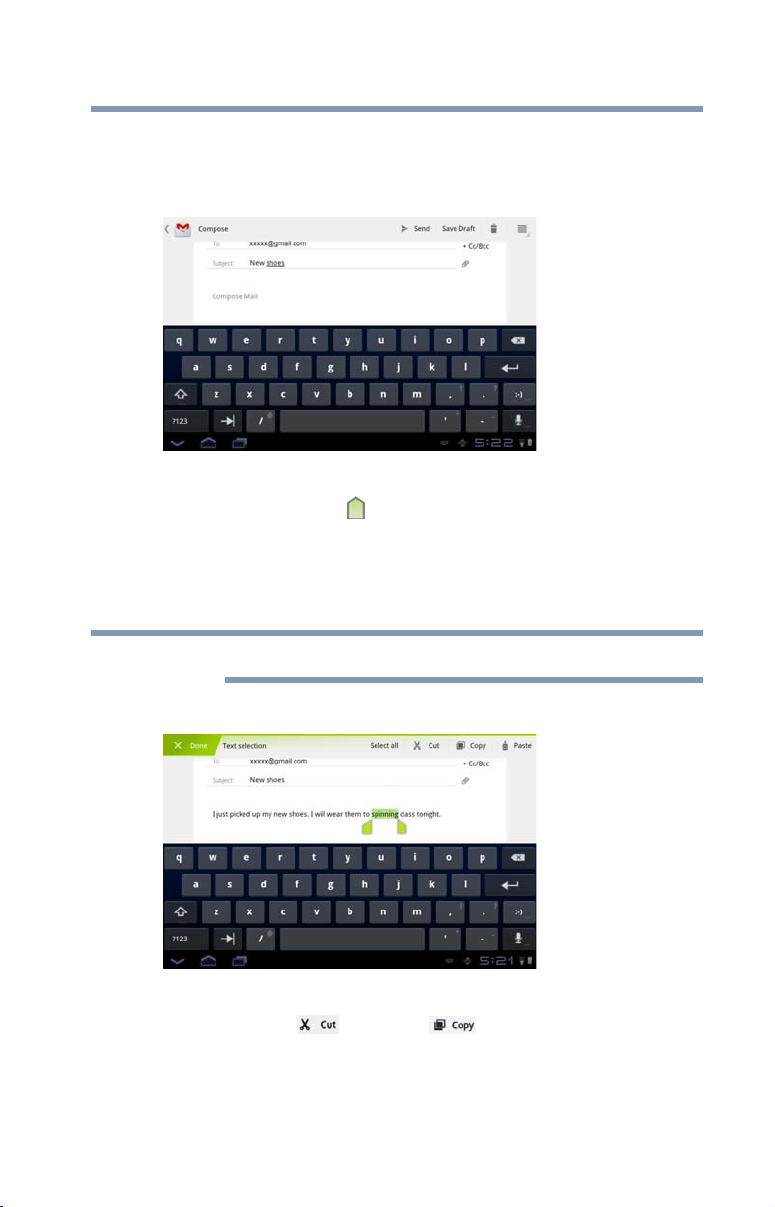
Type to enter text
NOTE
To begin typing, touch the text field in the application you are using
to open the onscreen keyboard.
Exploring the Features on your Device
Using the onscreen keyboard
81
(Sample Image) Touching a text field to type
An insertion point tab ( ) appears where you touch the text field. If
text has been previously entered you can drag the insertion point by
its tab to move it to the location in the text line you wish to begin
typing from.
You may also select one or more words to copy, cut, and paste.
Not all applications support this function.
1 Select the text you wish to cut or copy.
(Sample Image) Touching a text field to type
2 Touch Cut ( ) or Copy ( ) in the Application bar.
Touching Cut removes the selected text from the text field, but
it can be pasted into another text field.
3 Place the cursor in the text field where you want to place the
text.
Page 82
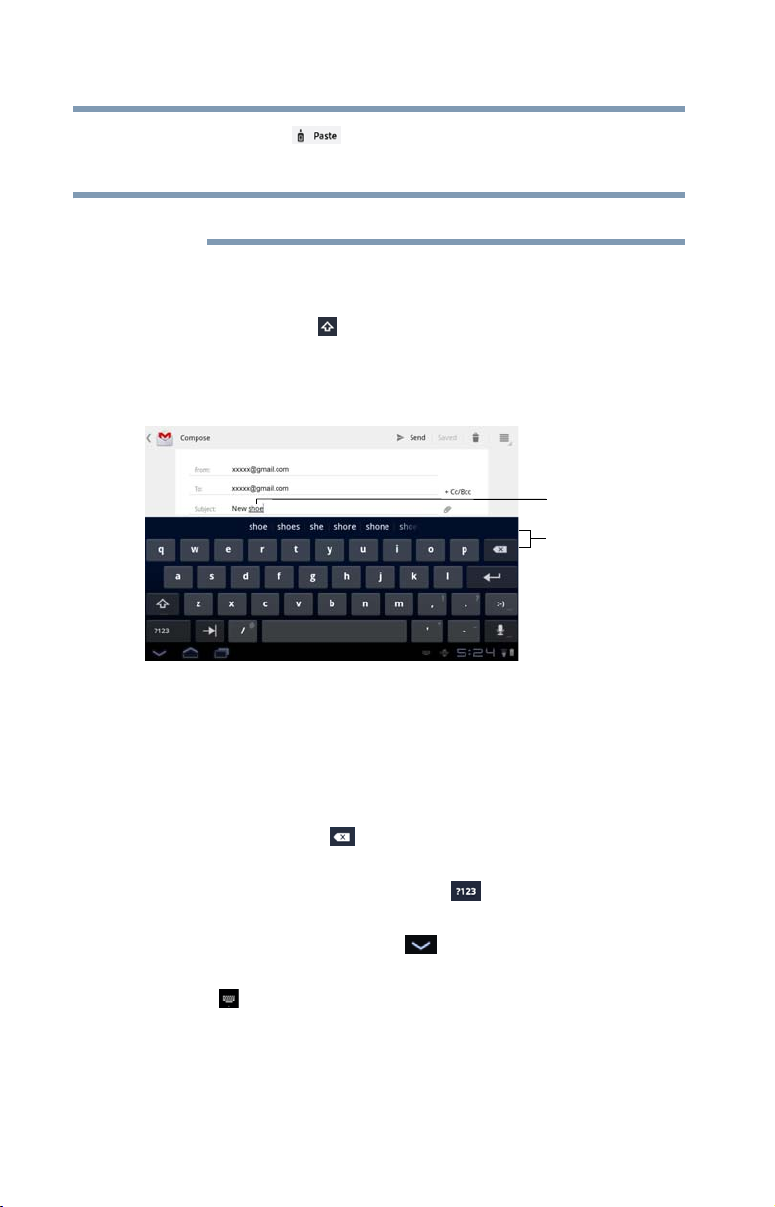
82
NOTE
Exploring the Features on your Device
Using the onscreen keyboard
4 Touch Paste ( ) in the application bar.
The text is inserted into the new text field.
Text can be copied and pasted from one app to another.
❖ Touch the space bar or a punctuation mark to auto complete a
word you are typing.
❖ Touch the Shift ( ) key one time to capitalize the next letter
typed.
❖ Double-tap the Shift key to capitalize all of the letters you
type. Touch the Shift key again to type in lower case.
Underlined word
Word suggestion
(Sample Image) Touching a text field to type
❖ While typing, spelling suggestions and similar word
suggestions appear just above the keyboard. Touch a word
suggestion to use it in place of the underlined word in the text
field. To change the input settings, see “Language & input
settings” on page 72.
❖ Touch the Delete ( ) key to erase characters to the left of the
cursor.
❖ Touch the Number and Symbols ( ) key to type numbers,
symbols, and other special characters.
❖ Touch the Close Keyboard ( ) button when you are finished.
You can change the language you want to use by touching the Input
Method ( ) button, or by going to the Settings menu, see
“Language & input settings” on page 72.
Page 83
Exploring the Features on your Device
Speak to enter text
You can use the speech-recognition feature to input text to the
onscreen keyboard.
1 Touch the text field.
2 Touch the Microphone ( ) key on the keyboard.
3 Speak your text when you are prompted to “Speak now.”
The speech-recognition types the words you say.
4 To enter punctuation, say “comma,” “period,” “exclamation
mark,” etc.
The text you enter by speech is underlined.
5 Touch the Delete ( ) key to erase the underlined text, or the
Send ( ) button to accept the text.
You can change the language you want to use by touching the Input
Method ( ) button, or by going to the Settings menu, see
“Language & input settings” on page 72.
Using the built-in speakers
Your tablet is equipped with internal speakers. To increase or
decrease the volume, use the volume control buttons on the side of
your tablet.
You can silence your tablet, so that your notifications are
announced with a vibration instead of a tone. To place your tablet
into Silent mode, use the volume decrease button to turn the volume
down completely. The lowest setting places your tablet into Silent
mode.
Using the built-in speakers
83
Using external speakers or headphones
Instead of using the internal speakers, you can connect headphones
or a pair of external stereo speakers.
Do not set the volume too high on this device or when using
headphones. Continuous exposure to loud sound can harm your
hearing. Discontinue use and consult a physician if you experience
any hearing discomfort.
TECHNICAL NOTE: When using amplified speakers, use speakers
that require an external power source. Other types of speakers will be
inadequate to produce sound from the device.
Page 84
84
NOTE
Exploring the Features on your Device
Using the cameras
To play back sound files through external speakers or headphones:
1 Locate the headphone jack on the device.
2 Using any necessary adapters, plug the cable from the
headphones or external speakers into the headphone jack.
The headphone jack requires a 16-ohm stereo mini connector.
To adjust the volume:
❖ For external speakers, use the volume controls on each speaker.
❖ For headphones, use the device’s volume control.
Recording sounds
You may record sounds using the internal microphone on the device
or by connecting a headset.
Using the cameras
Your device comes with a built-in camera on the front and one on
the back of the tablet. With these cameras you can do the following:
❖ Take pictures and record videos with your device
❖ Chat with others and have them see you while using instant
messaging (IM) programs
❖ Have video conference calls
To email, instant message or video conference, you must be
connected to the Internet.
The camera indicator light glows when the front camera is active.
You may also adjust the settings to use a flash.
Using a Micro SD™ Card
For detailed information regarding supported media, see the
detailed specifications for your device at tabletsupport.toshiba.com.
The Micro SD™ Card slot supports the use of Secure Digital™
(SD™) media. This media can be used with a variety of digital
products: digital music players, cellular phones, PDAs, digital
cameras, digital video camcorders, etc.
Page 85
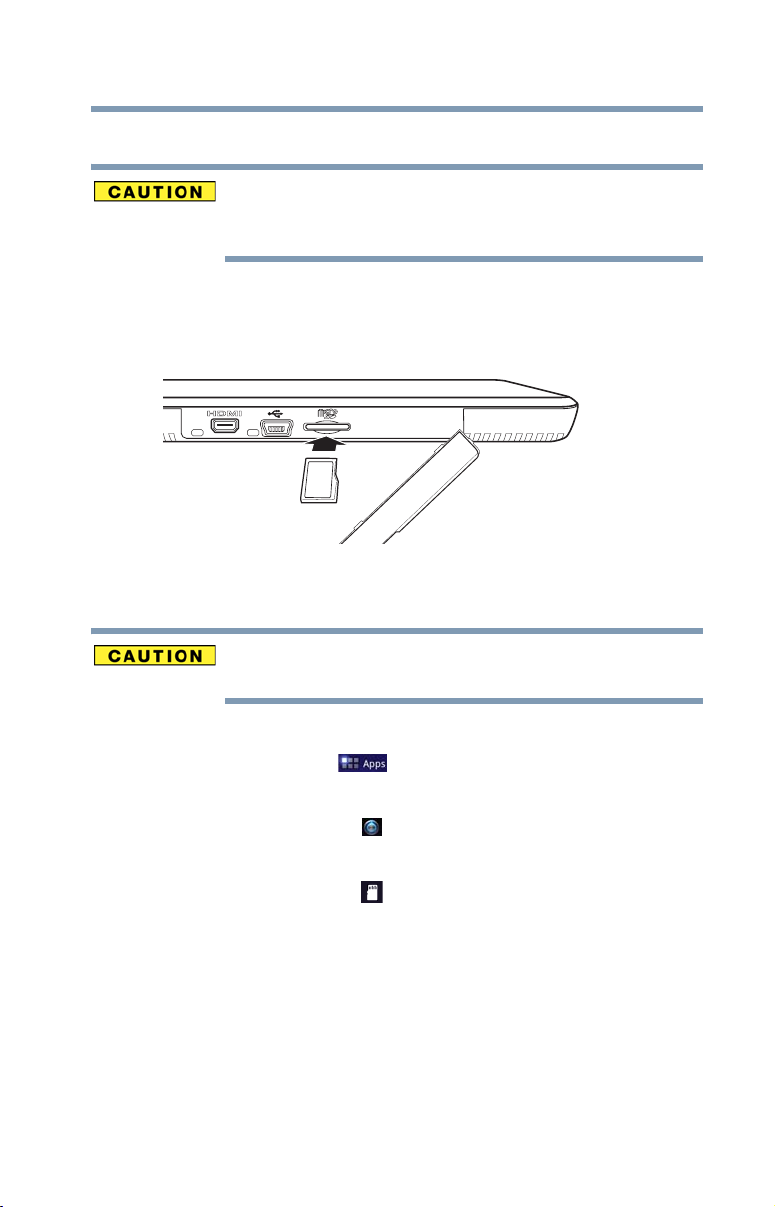
Inserting memory media
When inserting memory media, do not touch the metal contacts. You
could expose the storage area to static electricity, which can destroy
data.
To insert a Micro SD™ Card:
1 Turn the media so that the contacts (metal areas) are face down.
2 Push the media into the adapter until it locks in place.
Exploring the Features on your Device
Using a Micro SD™ Card
85
(Sample Illustration) Inserting memory media
Removing memory media
Do not remove media while data is being written or read, or your data
could be destroyed.
To prepare the card for removal:
1 Touch the Apps () icon.
The Apps menu appears.
2 Touch the Settings ( ) icon.
The Settings menu appears.
3 Touch the Storage () icon.
The Storage menu appears.
4 Touch Unmount SD card.
5 Gently press the card inward to release it.
The card pops out slightly.
Page 86
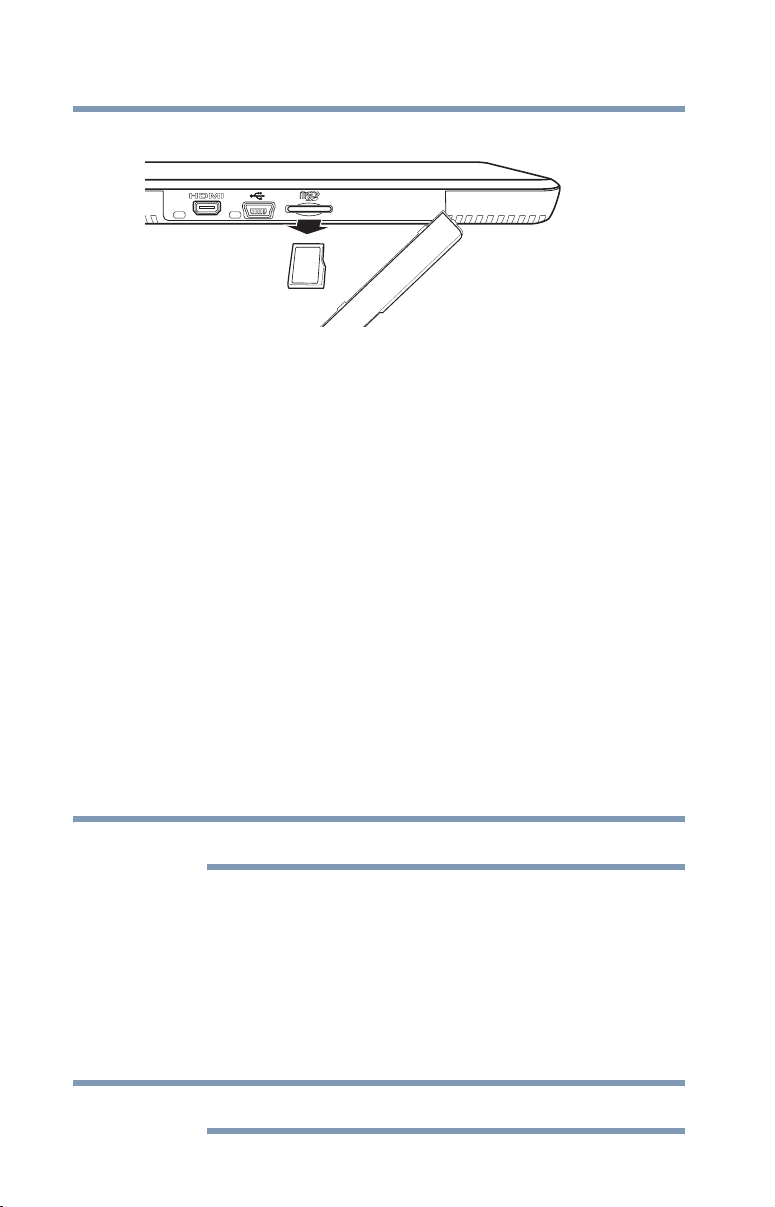
86
NOTE
NOTE
Exploring the Features on your Device
Adding optional external devices
6 Grasp the card and pull it straight out.
(Sample Illustration) Removing memory media
Adding optional external devices
After starting your device for the first time you may want to:
❖ Connect an external keyboard via the available Bluetooth
settings (see “Using an external keyboard” on page 86 or
“Setting up Wi-Fi® and Bluetooth® connections” on page 38)
❖ Connect an external mouse via the available Bluetooth
settings (see “Using an external mouse” on page 86 or “Setting
up Wi-Fi® and Bluetooth® connections” on page 38)
❖ Connect an external monitor via the Micro HDMI
(see “Using external devices” on page 87)
Using an external keyboard
If you prefer to use an external keyboard, you can attach one to
your device by pairing a Bluetooth
available Bluetooth
information, see “Setting up Wi-Fi® and Bluetooth® connections”
on page 38 and “Using external devices” on page 87.
Some keyboard functionality may not be supported.
®
connectivity on your device. For more
®
®
Out port
®
enabled keyboard using the
®
Using an external mouse
You may want to use an external mouse instead of the device’s
touch screen. You can attach one to your device by pairing a
Bluetooth
connectivity on you device. For more information, see “Setting up
Wi-Fi® and Bluetooth® connections” on page 38 and “Using
external devices” on page 87.
®
enabled mouse using the available Bluetooth®
Some mouse functionality may not be supported.
Page 87
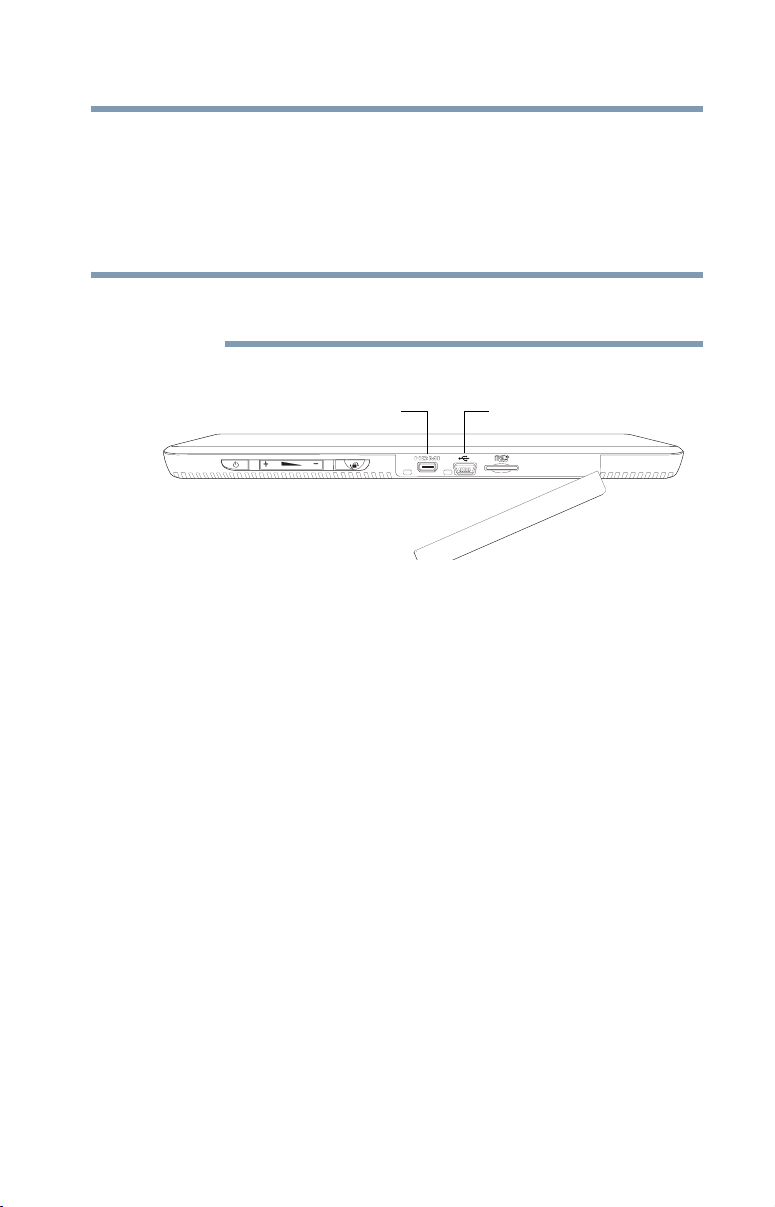
Using external devices
NOTE
You can connect external devices to your device using the following
available ports:
❖ A Micro HDMI
television or display device to your tablet.
To connect a device to the Micro HDMI® Out port, you must
purchase a Micro HDMI® cable.
❖ A Mini-USB port—Supports data transfer.
Micro HDMI® Out port Mini-USB port
(Sample Illustration) External device ports on the bottom of the
tablet
Exploring the Features on your Device
Adding optional external devices
®
Out port—Connect an HDMI®-compatible
87
Connecting an HDMI®-compatible television or display device
To connect an HDMI®-compatible television or display device to
the device:
❖ Connect one end of a Micro HDMI
your device) to the Micro HDMI
device, and then connect the other end of the cable to your
television or display device. Refer to the manual that came
with the television or display device for more information.
Your device will automatically detect the external display
device.
®
cable (not included with
®
Out port on the side of your
Page 88
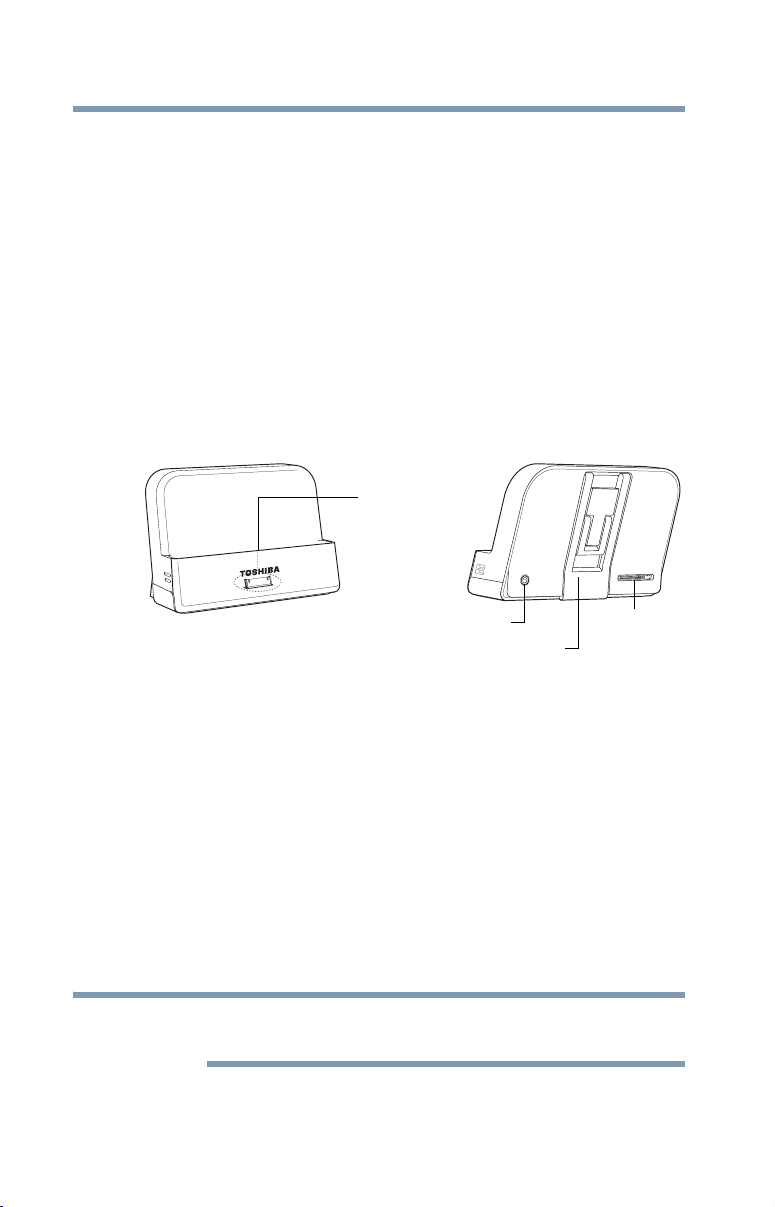
88
NOTE
Exploring the Features on your Device
Using a docking station
Using a docking station
(Sold separately.)
The docking connector, located on the side of your tablet device, is
used to attach your device to a docking station (not shipped with
your system).
You can leave network cables and external devices (such as an
external keyboard, mouse, speakers, and USB devices) connected
to the docking station when the tablet is not connected to it. This
allows you to quickly connect your tablet to the docking station and
have immediate access to all of your network resources and
external devices. This eliminates the time-consuming process of
connecting each external device individually, and saves wear and
tear on the ports and cables.
Docking connector
(inside)
Audio out jack
(Sample Illustration) Docking station
To achieve a proper connection between your tablet and the docking
station, your tablet must be properly aligned with the docking
station. For more information, consult the user’s manual that came
with your docking station, or visit support.toshiba.com.
To find a docking station that is compatible with your tablet device,
please visit accessories.toshiba.com.
Connecting your tablet to a docking station
1 Assemble the AC adaptor (provided with your Toshiba tablet),
see “Connecting to a power source” on page 27.
Additional Toshiba USB/AC adaptors can be purchased separately at
accessories.toshiba.com.
2 Gently pull out the support stand to hold the dock steady.
Power interface
Support stand
BackFront
Page 89
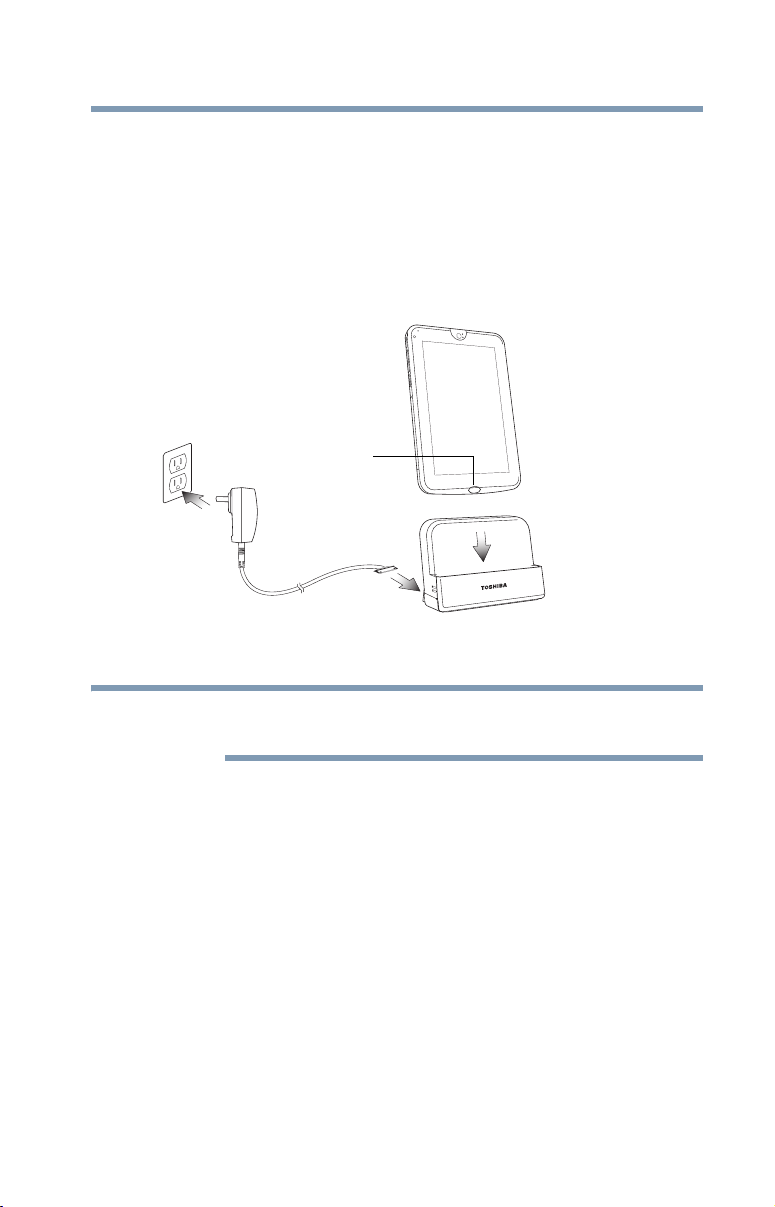
Exploring the Features on your Device
NOTE
Using a docking station
3 Connect the USB/AC adaptor cord to the power interface slot
on the back of the dock.
4 Connect the USB/AC adaptor to a live electrical outlet.
5 Remove the docking connector cover on the bottom of your
tablet.
6 Align the docking interface located on your tablet with the
docking connector on the dock.
Docking interface
(Sample Illustration) Aligning the docking interface with the
docking connector
89
Not all USB devices are compatible. Check with the manufacturer of
the USB device for compatibility.
The tablet multi-function indicator glows white while charging, and
is off when fully charged.
Page 90
Chapter 5
NOTE
Utilities
Your device includes several utilities designed to help you
reconfigure your system to best meet your individual needs.
Together, these allow you to ascertain certain system details, set
additional options, or change default options. These utilities are
described in this chapter.
The utilities described in this chapter, and the icons shown in the
sample images are applicable only if the related utility is available on
your system.
❖ TOSHIBA Service Station
❖ TOSHIBA File Manager Utility
❖ TOSHIBA Adaptive display
❖ TOSHIBA Resolution+®
90
Page 91
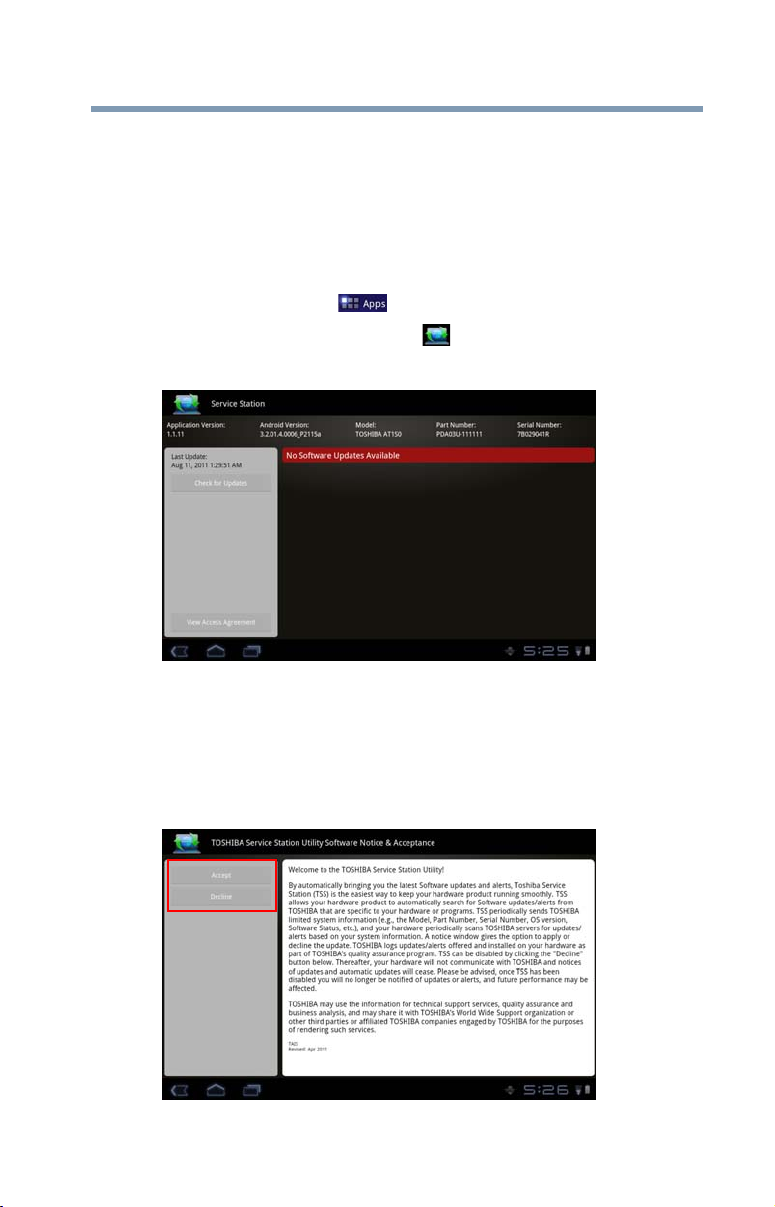
TOSHIBA Service Station
The TOSHIBA Service Station utility provides you with updates for
both application and system software. It notifies you when new
versions of your system software are available, and then prompts
you to download and install them.
To open TOSHIBA Service Station:
1 Touch the Apps () icon.
2 Touch the Service Station ( ) icon.
The TOSHIBA Service Station screen appears.
Utilities
TOSHIBA Service Station
91
(Sample Image) TOSHIBA Service Station screen
The first time TOSHBIA Service Station is run, you will be
prompted to accept the access agreement. This agreement
authorizes the utility to collect certain basic information about your
device and send it to the Toshiba severs as part of the process of
obtaining updates.
(Sample Image) TOSHIBA Service Station Acceptance screen
Page 92
92
NOTE
NOTE
NOTE
Utilities
TOSHIBA Service Station
Touch the Accept button (recommended) to accept the agreement
or touch the Decline button to decline.
The TOSHIBA Service Station utility will not be able to notify you of
new software and application updates if you choose to decline the
agreement.
The main screen of this application includes the following areas:
❖ Header—This section runs along the top of the screen and
contains basic information about your system, such as the
version of the OS, the device part number, and serial number.
❖ Buttons—Buttons are displayed on the screen. Depending on
the actions you have available, the buttons will vary.
❖ Information—The main part of the screen displays
information, such as the list of available updates, or more
detailed information about each specific update.
Check for application updates
During normal operations, the TOSHIBA Service Station will
periodically check for updates to your system. This is done
automatically. You will be notified with the TOSHIBA Service
Station icon in the Status bar when new updates become available.
You can also check for updates manually. Touch the Check for
Updates button. The application will refresh the list of available
updates.
Connect the USB/AC adaptor before updating.
Downloading updates
Toshiba strongly recommends before downloading updates to back
up your data and settings.
Touch the TOSHIBA Service Station ( ) icon in the
Status bar when an update becomes available to display additional
information about that item. To download the update, touch the
Download button. The update begins to download and displays a
progress indicator in the Notification bar.
Page 93
TOSHIBA File Manager Utility
NOTE
Touch the Home () button to allow the download to continue
while you use your tablet. A notification of download completion
appears in the Status bar.
To discontinue the download process, touch the Back ( ) button.
Installing updates
Once an update has been successfully downloaded, it can be
installed.
1 Touch the Download completion notice on the Status bar.
2 Touch the Install button.
The application installer launches.
3 Confirm the installation to continue.
Downloading and installing System updates
TOSHIBA Service Station downloads both application and system
updates. System updates require the device to be rebooted during
the update process.
Installing a system update is similar to an application update,
however you will be reminded that the device will automatically
reboot during the update process. Make sure to close any
applications and save all data prior to installing a system update.
Utilities
93
Do not interrupt or turn off your tablet during a system update once it
has begun. Data loss may occur.
TOSHIBA File Manager Utility
Using the TOSHIBA File Manager, you can back up your data to a
Micro SD™ Card, or network storage.
1 Insert a Micro SD™ Card into the Micro SD™ Card slot on
your tablet. For more information, see “Using a Micro SD™
Card” on page 84.
2 Touch the Apps () icon.
Page 94
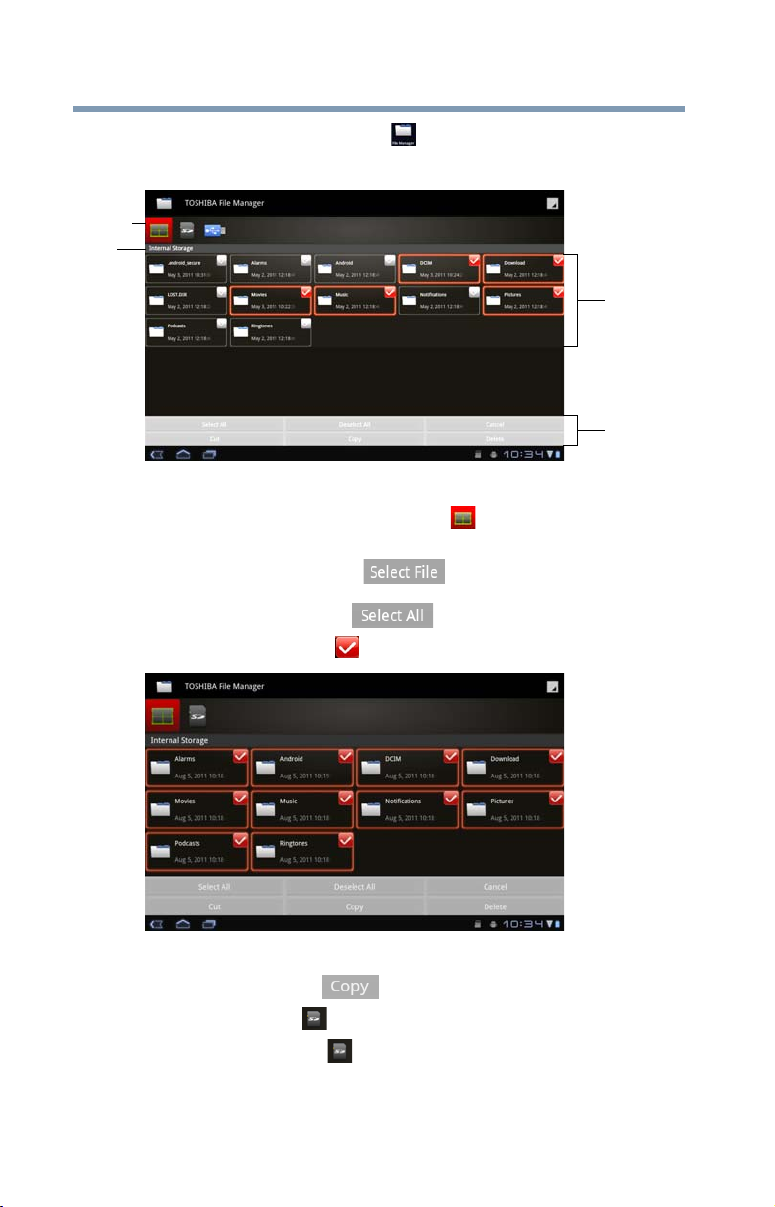
94
Devices
Path
Utilities
TOSHIBA File Manager Utility
3 Touch the File Manager ( ) icon.
The TOSHIBA File Manager screen appears.
Files
Controls
(Sample Image) TOSHIBA File Manager screen
4 Make sure the Internal Storage ( ) icon, at the top left
corner, is selected.
5 Touch the Select File ( ) icon at the bottom of the
screen, and then touch the files/folders you wish to back up, or
touch the Select All ( ) icon.
A red check mark ( ) indicates the selected files/folders.
(Sample Image) TOSHIBA File Manager screen - files checked
6 Touch the Copy ( ) icon at the bottom of the screen.
7 Touch the SD () icon.
Touching the SD ( ) icon displays the file/folder content on
the Micro SD™ Card.
Page 95
8 Select the folder you want to copy the files to, and then touch
the Paste ( ) icon at the bottom of the screen.
The files are copied to the Micro SD™ Card.
File browsing screen
The available options in the File browsing screen are:
❖ Device—Internal storage and Micro SD™ Card are displayed.
❖ Path—The device name is displayed on the left side of the
screen, and the relative path is displayed on the right.
❖ File—Files/folders are listed in multi-columns with thumbnails
showing the file information, such as name, modified
date/time, etc. The selected files/folders are tagged in red.
❖ Control—You can select files, create folders and go to the top
level directory by selecting different options.
Operation of files/folders
Touch Select File to open a screen, enabling you to multi-select,
copy, cut, and delete selected files/folders.
The available options in this screen are:
❖ Select All—Touch to select all of the files/folders in the current
path.
The selected files/folders are tagged in red.
❖ Deselect All—Touch to deselect all the files/folders in the
current path.
❖ Cancel—Touch to cancel file operation and return to the file
browsing screen.
❖ Copy—Touch to copy the selected files/folders to a target path.
After choosing the correct path, touch Paste to copy the
files/folders into the target directory.
❖ Cut—Touch to cut the selected files/folders and paste them to
a target path. After choosing the correct path, touch Paste to
move the files/folders to the target directory.
❖ Delete—Touch to delete the selected files. Confirm the
deletion in the pop-up window. Touch OK or Cancel to
continue.
Touch & hold a file/folder to display a pop-up menu, enabling you
to Cut, Copy, Delete or Rename the selected file/folder.
Utilities
TOSHIBA File Manager Utility
95
Page 96
96
Utilities
TOSHIBA File Manager Utility
Rename files/folders
To rename a file/folder:
1 Touch & hold the selected file/folder.
2 Touch Rename in the pop-up window and create a new name
for the selected file/folder.
3 Touch OK.
Create folders
To create a new folder:
1 Choose the desired top directory in the File browsing screen.
2 Touch Create a folder.
A pop-up window appears.
3 Create a new folder name.
4 Touch OK to continue.
Storage structure
The following describes the function of each of the icons on the
TOSHIBA File Manager screen:
Icon Name Description
Internal storage Displays the file content of the device’s internal storage,
(excluding system files).
Micro SD™ Card Displays the file content of the Micro SD™ Card that is
inserted into the Micro SD™ Card slot.
Page 97
TOSHIBA Adaptive display
NOTE
The Toshiba Adaptive display provides an enhanced visual
experience in varying locations and conditions. It automatically
adjusts the display brightness and gamma based on ambient light. It
also automatically adjusts locally stored pictures and video content
for optimal viewing.
TOSHIBA Resolution+®
This technology upconverts standard-definition video content,
instantly improving sharpness and color, for a visual experience
that looks and feels more like HD.
Viewing enhancements may vary depending upon content quality
and display device capability/functionality/settings. Depending on
the quality of the content, some video noise may be visible.
To enable/disable these features:
1 Touch the Apps () icon.
The Apps menu appears.
2 Touch the Settings ( ) icon.
The Settings menu appears.
3 Touch the Multimedia () icon.
The Multimedia menu appears.
4 Touch Video Enhancement.
Utilities
TOSHIBA Adaptive display
97
Page 98

Chapter 6
If Something Goes Wrong
Some problems you may encounter when using your tablet are
relatively easy to identify and solve.
This chapter aims to help you solve many problems by yourself. It
covers the problems you are most likely to encounter.
If all else fails, contact Toshiba. You will find information on
Toshiba’s support services at the end of this chapter.
Problems when you turn on the device
These problems may occur when you turn on the power.
The device will not start.
Make sure you attached the USB/AC adaptor and power/docking
connector cord properly.
If you are using the USB/AC adaptor, check that the wall outlet is
working by plugging in another device, such as a lamp.
Verify that the device is on by looking at the ON/OFF indicator. If
the indicator is glowing, the device is on. Also, try turning the
device off and then on.
The device starts but when you touch an icon nothing
happens.
Your device may be in Sleep mode and have an application or
resource conflict.
98
Page 99

If Something Goes Wrong
The operating system is not working
The operating system is not working
Once you are familiar with the Home screens and used to the way
the operating system responds, you can easily detect if the it is not
working correctly. For example:
❖ The operating system responds differently from the normal
routine
❖ Screens and apps take a long time to load
❖ The screen does not look right
Unless a hardware device has failed, problems usually occur when
you change the system in some way such as installing a new app or
adding an external device.
If you experience any of these problems, use the About tablet
setting to check for available system updates. For more
information, see “About tablet” on page 75.
Internet problems
My Internet connection is very slow.
Many factors contribute to the speed with which you can surf the
Internet. They include: network speed, network conditions, time of
day (when everyone else is surfing, your access can be slow) and
popularity of the sites you are trying to access. If accessing a
particular site is very slow, try later.
My browser cannot find the URL address I typed in.
Make sure you separated the domain names of the address with the
forward slash (/). Check the spelling of each name and the syntax of
the address carefully. A single incorrect letter or missed character
will make it impossible for your browser to locate the site.
My browser cannot find a site I bookmarked.
The World Wide Web is constantly changing. A site you
bookmarked yesterday may not be available today or its server may
be down for temporary repair. Try again later.
99
Page 100

100
If Something Goes Wrong
Power and the batteries
Power and the batteries
Your device receives its power through the USB/AC adaptor and
power/docking connector cord or from the system battery. Power
problems are interrelated. For example, a faulty USB/AC adaptor or
power/docking connector cord will neither power the device nor
recharge the batteries.
Here are some typical problems and how to solve them:
The Power light does not come on when you plug in the
USB/AC adaptor and power/docking connector cord.
Make sure the USB/AC adaptor and power/docking connector cord
are firmly plugged into both the wall outlet and the device.
If the Power light still does not come on, check that the wall outlet
is working properly by plugging in a lamp or other appliance.
The USB/AC adaptor and power/docking connector cord
work correctly, but the battery will not charge.
The battery does not charge while the device is consuming full
power. Try turning off the device.
The battery may be too hot or too cold to charge properly. If you
think this is the probable cause, let the battery reach room
temperature and try again.
If the battery light does not glow after a few minutes, the battery
may have reached the end of its useful life.
The device does not power on.
Let the battery discharge completely, then try charging it again.
Check the power options. For more information, see “Optimizing
battery life” on page 31. Have you added a device, such as a
memory module, that takes its power from the battery? Is your
software using the internal storage drive more? Is the display power
set to turn off automatically? Was the battery fully charged to begin
with? All these conditions affect how long the charge lasts.
If the device still does not power on, contact your service provider
immediately.
After a period of time, the battery will lose its ability to perform at
maximum capacity and will need to be replaced. This is normal for
all batteries.
For more information on maintaining battery power, see “Charging
the battery” on page 30.
 Loading...