

Page 1
Guidance for
AS/400 Print Solution
Page 2

2 AS/400 Print Solution —
Page 3

Software License Agreement
INSTALLING OR OTHERWISE USING THIS SOFTWARE PRODUCT CONSTITUTES YOUR
ACCEPTANCE OF THE FOLLOWING TERMS AND CONDITIONS (UNLESS A SEPARATE
LICENSE IS PROVIDED BY THE SUPPLIER OF APPLICABLE SOFTWARE IN WHICH CASE
SUCH SEPARATE LICENSE SHALL APPLY). IF YOU DO NOT ACCEPT THESE TERMS, YOU
MAY NOT INSTALL OR USE THIS SOFTWARE, AND YOU MUST PROMPTLY RETURN THE
SOFTWARE TO THE LOCATION WHERE YOU OBTAINED IT.
THE SOFTWARE INSTALLED ON THIS PRODUCT INCLUDES NUMEROUS INDIVIDUAL
SOFTWARE COMPONENTS, EACH HAVING ITS OWN APPLICABLE END USER LICENSE
AGREEMENT (“EULA”). INFORMATION RELATING TO THE EULAS MAY BE FOUND IN AN
ELECTRONIC FILE INCLUDED ON THE USER DOCUMENTATION CD-ROM INCLUDED HEREWITH; HOWEVER, ALL SOFTWARE AND DOCUMENTATION DEVELOPED OR CREATED BY
OR FOR TOSHIBA TEC CORPORATION (“TTEC”) ARE PROPRIETARY PRODUCTS OF TTEC
AND ARE PROTECTED BY COPYRIGHT LAWS, INTERNATIONAL TREATY PROVISIONS,
AND OTHER APPLICABLE LAWS.
Grant of License
This is a legal agreement between you, the end-user (“You”), and TTEC and its suppliers. This
software, fonts (including their typefaces) and related documentation (“Software”) is licensed for
use with the system CPU on which it was installed (“System”) in accordance with the terms contained in this Agreement. This Software is proprietary to TTEC and/or its suppliers.
TTEC and its suppliers disclaim responsibility for the installation and/or use of this Software, and
for the results obtained by using this Software. You may use one copy of the Software as installed
on a single System, and may not copy the Software for any reason except as necessary to use the
Software on a single System. Any copies of the Software shall be subject to the conditions of this
Agreement.
You may not, nor cause or permit any third party to, modify, adapt, merge, translate, reverse compile, reverse assemble, or reverse engineer the Software. You may not use the Software, except in
accordance with this license. No title to the intellectual property in the Software is transferred to
you and full ownership is retained by TTEC or its suppliers. Source code of the Software is not
licensed to you. You will be held legally responsible for any copyright infringement, unauthorized
transfer, reproduction or use of the Software or its documentation.
Term
This license is effective until terminated by TTEC or upon your failure to comply with any term of
this Agreement. Upon termination, you agree to destroy all copies of the Software and its documentation.
You may terminate this license at any time by destroying the Software and its documentation and
all copies.
Disclaimer of Warranty
THIS SOFTWARE IS PROVIDED “AS IS” WITHOUT WARRANTY OF ANY KIND, EITHER
EXPRESS OR IMPLIED, INCLUDING, BUT NOT LIMITED TO, THE IMPLIED WARRANTIES OF
MERCHANTABILITY, FITNESS FOR A PARTICULAR PURPOSE, TITLE, AND NON-INFRINGEMENT. TTEC AND ITS SUPPLIERS DISCLAIM ANY WARRANTY RELATING TO THE QUALITY
AND PERFORMANCE OF THE SOFTWARE. IF THE SOFTWARE PROVES DEFECTIVE, YOU
(AND NOT TTEC OR ITS SUPPLIERS) SHALL BE RESPONSIBLE FOR THE ENTIRE COST OF
ALL NECESSARY SERVICING, REPAIR OR CORRECTION. TTEC AND ITS SUPPLIERS DO
NOT WARRANT THAT THE FUNCTIONS CONTAINED IN THE SOFTWARE WILL MEET YOUR
REQUIREMENTS OR THAT THE OPERATION OF THE SOFTWARE WILL BE UNINTERRUPTED OR ERROR FREE.
ALL INFORMATION CONTAINED HEREIN THAT IS PROVIDED BY TTEC AND ITS AFFILIATES
PURSUANT TO A EULA IS PROVIDED “AS IS” WITHOUT WARRANTY OF ANY KIND, EITHER
EXPRESS OR IMPLIED.
AS/400 Print Solution — Software License Agreement 3
Page 4

Limitation of Liability
IN NO EVENT WILL TTEC OR ITS SUPPLIERS BE LIABLE TO YOU FOR ANY DAMAGES,
WHETHER IN CONTRACT, TORT, OR OTHERWISE (EXCEPT PERSONAL INJURY OR DEATH
RESULTING FROM NEGLIGENCE ON THE PART OF TTEC OR ITS SUPPLIERS), INCLUDING
WITHOUT LIMITATION ANY LOST PROFITS, LOST DATA, LOST SAVINGS OR OTHER INCIDENTAL, SPECIAL OR CONSEQUENTIAL DAMAGES ARISING OUT OF THE USE OR INABILITY TO USE THE SOFTWARE, EVEN IF TTEC OR ITS SUPPLIERS HAVE BEEN ADVISED OF
THE POSSIBILITY OF SUCH DAMAGES, NOR FOR THIRD PARTY CLAIMS.
U.S. Government Restricted Rights
The Software is provided with RESTRICTED RIGHTS. Use, duplication or disclosure by the U.S.
Government is subject to restrictions set forth in subdivision (b) (3) (ii) or (c) (i) (ii) of the Rights in
Technical Data and Computer Software Clause set forth in 252.227-7013, or 52.227-19 (c) (2) of
the DOD FAR, as appropriate. Contractor/Manufacturer is TOSHIBA TEC Corporation, 6-78,
Minami-cho, Mishima City, Shizuoka, 411-8520, Japan.
General
You may not sublicense, lease, rent, assign or transfer this license or the Software. Any attempt to
sublicense, lease, rent, assign or transfer any of the rights, duties or obligations hereunder is void.
You agree that you do not intend to, and will not ship, transmit (directly or indirectly) the Software,
including any copies of the Software, or any technical data contained in the Software or its media,
or any direct product thereof, to any country or destination prohibited by the United States Government. This license shall be governed by the laws of Japan or, at the election of a Supplier of TTEC
concerned with a dispute arising from or relating to this Agreement, the laws of the Country designated from time to time by the relevant Supplier of TTEC. If any provision or portion of this Agreement shall be found to be illegal, invalid or unenforceable, the remaining provisions or portions
shall remain in full force and effect.
YOU ACKNOWLEDGE THAT YOU HAVE READ THIS LICENSE AGREEMENT AND THAT YOU
UNDERSTAND ITS PROVISIONS. YOU AGREE TO BE BOUND BY ITS TERMS AND CONDITIONS. YOU FURTHER AGREE THAT THIS LICENSE AGREEMENT CONTAINS THE COMPLETE AND EXCLUSIVE AGREEMENT BETWEEN YOU AND TTEC AND ITS SUPPLIERS AND
SUPERSEDES ANY PROPOSAL OR PRIOR AGREEMENT, ORAL OR WRITTEN, OR ANY
OTHER COMMUNICATION RELATING TO THE SUBJECT MATTER OF THIS LICENSE
AGREEMENT.
TOSHIBA TEC Corporation, 6-78, Minami-cho, Mishima City, Shizuoka, 411-8520, Japan.
4 AS/400 Print Solution — Software License Agreement
Page 5

Trademarks and Copyright
Trademarks
• Copyright permissions regarding screenshots, pictures and descriptions, included in
this document, can be obtained from AXIS Communications AB.
• AXIS Communications, AXIS 5570e, AXIS 5570e IPDS SNA and design (the AXIS
logo) are either registered trademarks or trademarks of AXIS AB and AXIS Communications AB in Sweden, the European Union, the United States, Japan and other
countries.
All "AXIS 5570e" described henceforth means "AXIS 5570e IPDS SNA".
• AS/400 is a registered trademark of US International Business Machines Corpora-
tion.
• Other company names and product names in this manual are the trademarks of
their respective companies.
Copyright
© 2006 - 2010 TOSHIBA TEC CORPORATION All rights reserved
This manual is protected by copyright laws. No part of this manual shall be duplicated or reproduced without the permission of TOSHIBA TEC CORPORATION. TOSHIBA TEC CORPORATION
shall not be liable in terms of granting patents for any use of information contained in this manual
by third parties.
AS/400 Print Solution — Trademarks and Copyright 5
Page 6

Disclaimer Notice
The following notice sets out the exclusions and limitations of liability of TOSHIBA TEC
CORPORATION (including its employees, agents and sub-contractors) to any purchaser or user (‘User’) of the e-STUDIO520/600/720/850, e-STUDIO281C/351C/451C,
e-STUDIO352/452, e-STUDIO202L/232/282, e-STUDIO2500C/3500C/3510C,
e-STUDIO165/205, e-STUDIO167/207/237, e-STUDIO523/603/723/853,
e-STUDIO353/453, e-STUDIO203L/233/283, e-STUDIO2020C/2330C/2820C/2830C/
3520C/3530C/4520C, e-STUDIO5520C/6520C/6530C, e-STUDIO283C/353C/453C,
e-STUDIO205L/255/305/355/455, e-STUDIO555/655/755/855 and e-STUDIO182/212/
242 including its accessories, options and bundled software (‘Product’).
1. The exclusion and limitations of liability referred to in this notice shall be effective to
the fullest extent permissible at law. For the avoidance of doubt, nothing in this
notice shall be taken to exclude or limit TOSHIBA TEC CORPORATION’s liability for
death or personal injury caused by TOSHIBA TEC CORPORATION’s negligence or
TOSHIBA TEC CORPORATION’s fraudulent misrepresentation.
2. All warranties, conditions and other terms implied by law are, to the fullest extent
permitted by law, excluded and no such implied warranties are given or apply in
relation to the Products.
3. TOSHIBA TEC CORPORATION shall not be liable for any loss, cost, expense,
claim or damage whatsoever caused by any of the following:
- use or handling of the Product otherwise than in accordance with the manuals,
- any cause which prevents the Product from operating or functioning correctly
- additions, modifications, disassembly, transportation, or repairs by any person
- use of paper, supplies or parts other than those recommended by TOSHIBA
including but not limited to Operator’s Manual, User’s Guide, and/or incorrect or
careless handling or use of the Product;
which arises from or is attributable to either acts, omissions, events or accidents
beyond the reasonable control of TOSHIBA TEC CORPORATION including
without limitation acts of God, war, riot, civil commotion, malicious or deliberate
damage, fire, flood, or storm, natural calamity, earthquakes, abnormal voltage or
other disasters;
other than service technicians authorized by TOSHIBA TEC CORPORATION; or
TEC CORPORATION.
4. Subject to paragraph 1, TOSHIBA TEC CORPORATION shall not be liable to Customer for:
- loss of profits; loss of sales or turnover; loss of or damage to reputation; loss of
production; loss of anticipated savings; loss of goodwill or business opportunities; loss of customers; loss of, or loss of use of, any software or data; loss under
or in relation to any contract; or
- any special, incidental, consequential or indirect loss or damage, costs,
expenses, financial loss or claims for consequential compensation;
whatsoever and howsoever caused which arise out of or in connection with the
Product or the use or handling of the Product even if TOSHIBA TEC CORPORATION is advised of the possibility of such damages.
TOSHIBA TEC CORPORATION shall not be liable for any loss, cost, expense,
claim or damage caused by any inability to use (including, but not limited to failure,
malfunction, hang-up, virus infection or other problems) which arises from use of the
Product with hardware, goods or software which TOSHIBA TEC CORPORATION
has not directly or indirectly supplied
6 AS/400 Print Solution — Disclaimer Notice
Page 7

Preface
The e-STUDIO520/600/720/850, e-STUDIO281C/351C/451C, e-STUDIO352/452,
e-STUDIO202L/232/282, e-STUDIO2500C/3500C/3510C, e-STUDIO165/205,
e-STUDIO167/207/237, e-STUDIO523/603/723/853, e-STUDIO353/453,
e-STUDIO203L/233/283, e-STUDIO2020C/2330C/2820C/2830C/3520C/3530C/
4520C, e-STUDIO5520C/6520C/6530C, e-STUDIO283C/353C/453C, e-STUDIO205L/
255/305/355/455, e-STUDIO555/655/755/855 and e-STUDIO182/212/242 provides
powerful network printing capability with many output finishing options. Now a means
exists to use the controller with an IBM AS/400
About this guide
This guide is for network administrators who are familiar with the IBM AS/400 system. It
assumes you are familiar with the software applications used to print documents.
This guide is not designed for digital-copier service technicians or operators. For information on using and maintaining the equipment, refer to the following documents or
contact your dealer for support.
• e-STUDIO520/600/720/850, e-STUDIO281C/351C/451C, e-STUDIO352/452,
• e-STUDIO2020C/2330C/2820C/2830C/3520C/3530C/4520C, e-STUDIO5520C/
• e-STUDIO165/205, e-STUDIO167/207/237 and e-STUDIO182/212/242:
®
system.
e-STUDIO202L/232/282, e-STUDIO2500C/3500C/3510C, e-STUDIO523/603/723/
853, e-STUDIO353/453, e-STUDIO203L/233/283 and e-STUDIO283C/353C/453C:
Operator’s Manual for Basic Functions
6520C/6530C, e-STUDIO205L/255/305/355/455 and e-STUDIO555/655/755/855:
Copying Guide
Operator’s Manual for Copying Functions
Conventions
• The term “equipment” in this manual refers to the following models:
- e-STUDIO520/600/720/850
- e-STUDIO281C/351C/451C
- e-STUDIO352/452
- e-STUDIO202L/232/282
- e-STUDIO2500C/3500C/3510C
- e-STUDIO165/205
- e-STUDIO167/207/237
- e-STUDIO523/603/723/853
- e-STUDIO353/453
- e-STUDIO203L/233/283
- e-STUDIO2020C/2330C/2820C/2830C/3520C/3530C/4520C
- e-STUDIO5520C/6520C/6530C
- e-STUDIO283C/353C/453C
- e-STUDIO205L/255/305/355/455
- e-STUDIO555/655/755/855
- e-STUDIO182/212/242
AS/400 Print Solution — Preface 7
Page 8

8 AS/400 Print Solution — Preface
Page 9

Table of Contents
Software License Agreement ......................................................................... 3
Trademarks and Copyright ............................................................................. 5
Disclaimer Notice............................................................................................6
Preface ........................................................................................................... 7
About this guide ......................................................................................................7
Conventions ......................................................................................................7
Table of Contents ...........................................................................................9
1. AXIS Network Print Server ............................................................................11
Overview.......................................................................................................12
Components .........................................................................................................12
Finishing options and logical printers....................................................................13
Installation ....................................................................................................14
Installation procedure ...........................................................................................14
Configuration ................................................................................................17
Available AXIS firmware version...........................................................................17
Update procedure .................................................................................................17
Copier model ........................................................................................................19
Only PCL available ...............................................................................................20
Available finisher options ......................................................................................21
General settings....................................................................................................28
IPDS emulator ......................................................................................................29
Custom copier driver.............................................................................................31
Problem Solving ........................................................................................... 32
Problems and recommended solutions ................................................................32
Customer service..................................................................................................32
2. WorkStation Customization Object for TOSHIBA e-STUDIO .....................33
Overview.......................................................................................................34
Components .........................................................................................................34
Finishing options and logical printers....................................................................34
Installation ....................................................................................................35
Installation procedure ...........................................................................................35
Uninstallation ................................................................................................ 40
Uninstallation procedure .......................................................................................40
Operation...................................................................................................... 44
Operational procedure ..........................................................................................44
Print file script .......................................................................................................45
Appendix....................................................................................................... 47
Stapling specifications ..........................................................................................47
Printing character size - Reference values ...........................................................48
Glossary..............................................................................................................49
Definitions of Terms...................................................................................... 49
AS/400 Print Solution — Table of Contents 9
Page 10

10 AS/400 Print Solution — Table of Contents
Page 11

1. AXIS Network Print Server
AS/400 Print Solution — 1. AXIS Network Print Server 11
Page 12
Overview
Components
The components of the AS/400® Printing Solution are:
• AS/400 server
• Your equipment
• USB cable to connect the AXIS 5570e Print Server and your equipment
• AXIS 5570e Print Server
• Client PC workstation
• Custom Config file (Config_landscape) TOSHIBA TEC Products
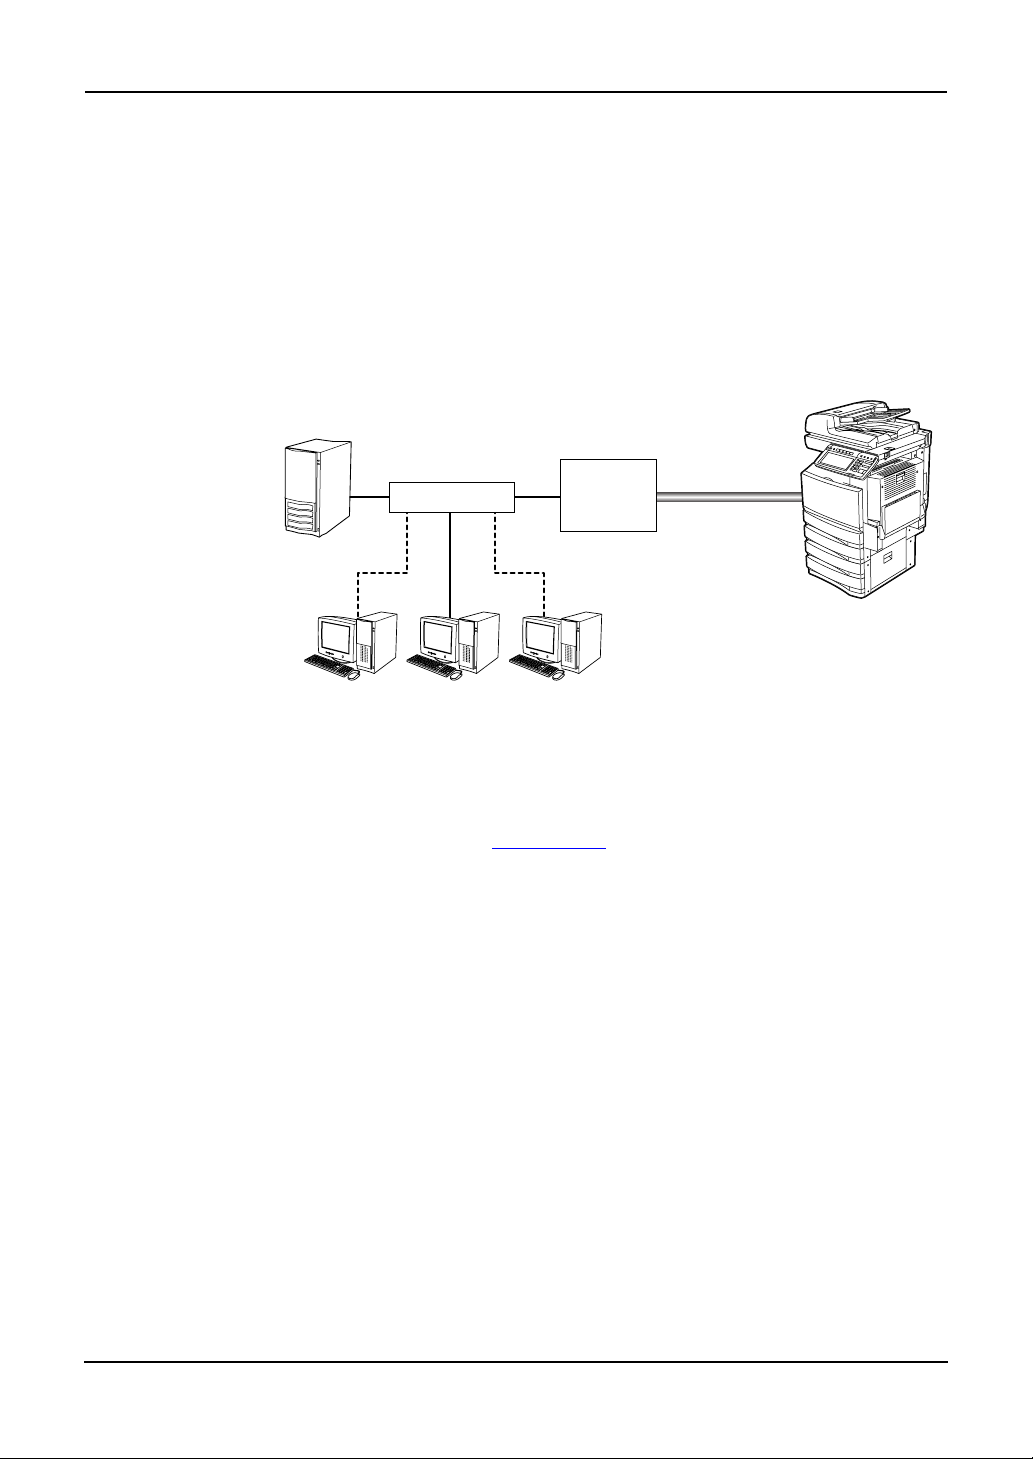
The configuration diagram illustrates the relationship among these components.
USB
Connection
AS/400 Server
Network HUB
AXIS 5570e
Print Server
Client PC Client PC Client PC
AS/400 Printing Solution components
Print output generated by the AS/400 server passes through the AXIS 5570e Print
Server that acts as a converter from IPDS into PCL print commands, which are then
sent to your equipment. For more information about AXIS 5570e Print Server, go to the
AXIS COMMUNICATIONS of www.axis.com
A client PC can also send commands directly to your equipment.
.
12 AS/400 Print Solution — Overview
Page 13

Finishing options and logical printers
TOSHIBA offers several finishing options in addition to standard print commands coming from the AS/400. For example, stapling and hole punching are finishing options.
The finishing options are grouped in several preconfigured sets, which you associate
with up to eight logical printers.
NOTE:
• Any finisher options are not supported in e-STUDIO165/205 and e-STUDIO167/
207/237.
AS/400 Print Solution — Overview 13
Page 14

Installation
Installation procedure
Install the AS/400 printing solution in two steps:
1. Set up the hardware
2. Set up the AS/400 printer
Step 1: Set up the hardware
NOTE: • The controller can be directly connected to the AS/400 network at the same time.
Thus, PCL-based or raw print jobs can be sent to it via the network, bypassing the
AXIS 5570e Print Server device.
1. Following the product installation instructions that came with
the AXIS 5570e Print Server, setup this device.
2. Connect the AXIS 5570e Print Server and your equipment
using the USB cable.
3. Press the TEST button on the AXIS 5570e Print Server to print
a test page to your equipment.
4. Connect the AXIS 5570e Print Server to the network hub.
14 AS/400 Print Solution — Installation
Page 15
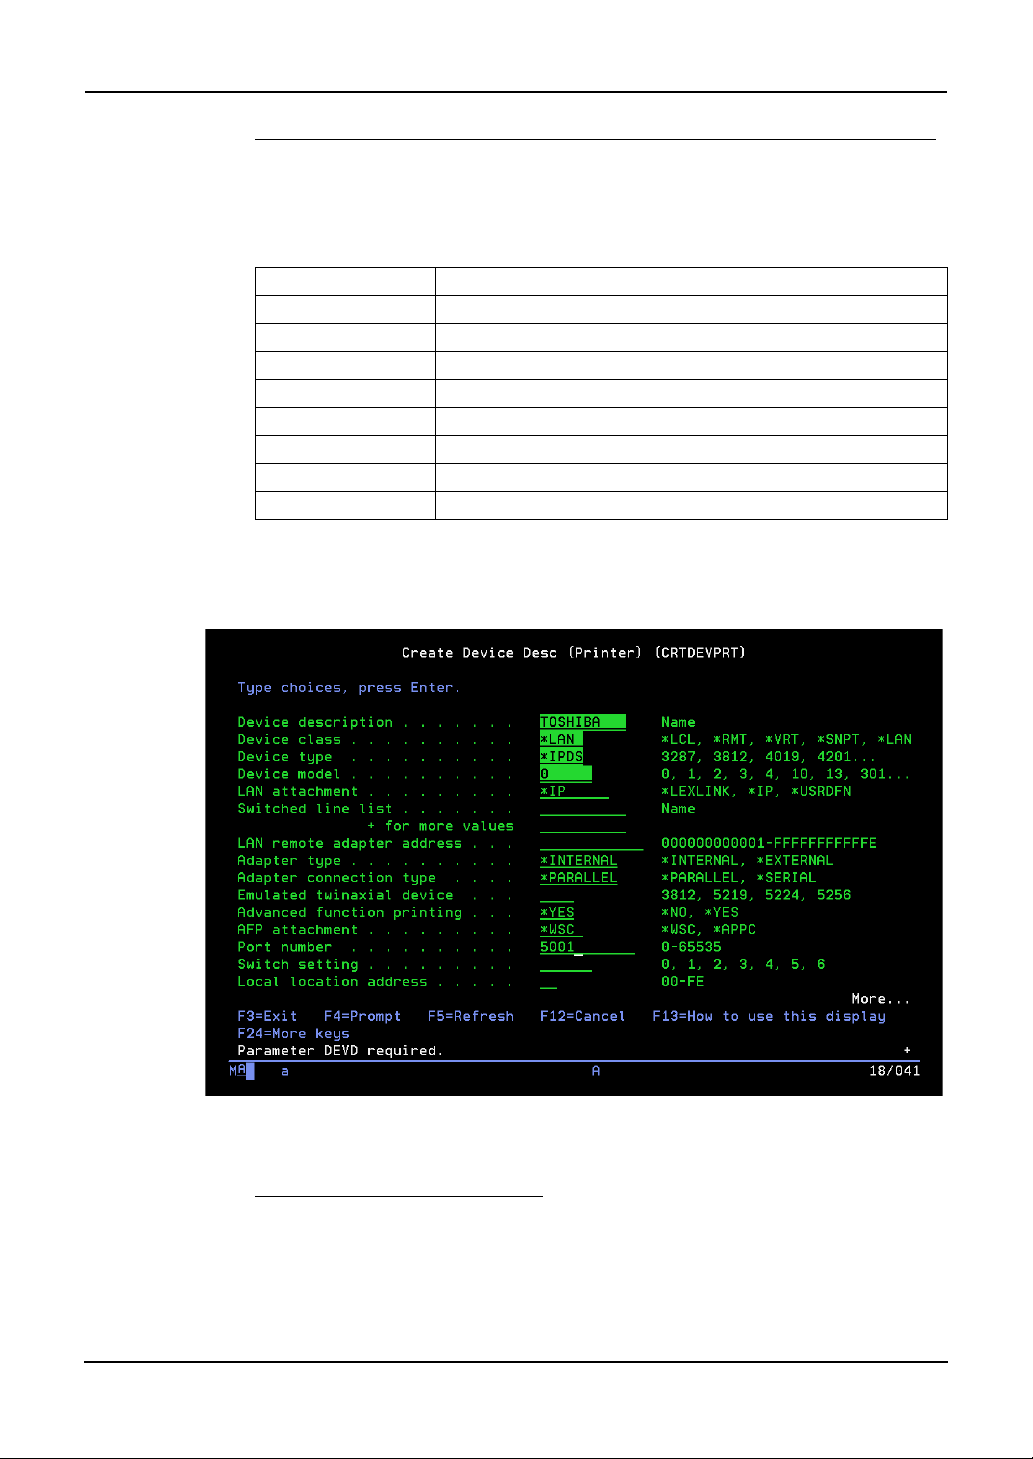
Step 2: Set up the AS/400 printer
On the AS/400, use the CRTDEVPRT command to configure the print settings according to the following table:
AS/400 Print settings
Setting Name Value
Device description Unique description, such as TOSHIBA
Device class *LAN
Device type *IPDS
Device model 0
LAN attachment *IP
Port number e.g. 5001
Font identifier 11
Remote location IP address of AXIS 5570e
All other settings can be left unchanged.
NOTE:
• If you experience any problems, press F1 for help.
Sample AS/400 Printer Setup Screen
Configuring the AXIS 5570e
Follow the instructions below to configure your AXIS 5570e for AS/400 IPDS over PPR/
PPD printing using a standard Web browser:
1. Start a Web browser and enter the IP address or the host
name of the AXIS 5570e in the location field. Press Enter.
The internal Web pages of the AXIS 5570e will appear.
AS/400 Print Solution — Installation 15
Page 16

NOTE: • To protect the admin pages and the Configuration Wizard from unauthorized use,
enter a password (by default set to pass) in the Root Password field under Admin
General Settings.
• Use the same port number when creating the print device (page 15).
Note for IPDS printing:
In the Configuration Wizard, you can choose between PCL or PostScript printing.
Choose PCL for Printer Driver. PostScript is not available.
2. Click the Configuration Wizard for IBM sessions button.
3. Delete the pre-configured PPR/PPD session. Pre-configured
session is not available for TOSHIBA e-STUDIO series.
4. Click the Add Session button. This will start the Configura-
tion Wizard which is a step-by-step guide through the
required configuration settings.
Verifying the communication link (AS/400)
Follow the instructions below to verify the communication to the AXIS 5570e:
1. Type WRKCFGSTS *DEV <Device description Name> on the
AS/400 command line and press Enter. The previously created printer device will be displayed. The status of the printer
device should be VARIED OFF.
2. Vary on the printer device by typing 1 in the Opt field. Press
Enter.
3. Press F5 to refresh the display. The printer device should
now be VARIED ON.
4. Start the printer writer by typing STRPRTWTR <Device
description Name> on the AS/400 command line.
Press Enter.
5. Press F5 to refresh the display. The printer device should
now be ACTIVE/WRITER.
6. Direct a printout to this printer device. A successful printout
verifies the communication link between the AS/400 and the
AXIS 5570e.
NOTE: • If the setup fails, refer to the troubleshooting section in the AXIS 5570e User’s Man-
ual, on www.axis.com
16 AS/400 Print Solution — Installation
Page 17

Configuration
Available AXIS firmware version
Use the production release version or service release version given in the following
table when using TOSHIBA MFP.
All official firmware releases for the AXIS 5570e are available on AXIS website.
TOSHIBA MFP Production release
e-STUDIO520/600/720/850 7.08 or later 7.06.04 or later
e-STUDIO523/603/723/853
e-STUDIO281C/351C/451C
e-STUDIO352/452 7.08 or later 7.08.2 or later
e-STUDIO353/453
e-STUDIO202L/232/282
e-STUDIO203L/233/283
e-STUDIO2500C/3500C/
3510C
e-STUDIO165/205
e-STUDIO167/207/237
e-STUDIO2020C/2330C/
2820C/2830C/3520C/3530C/
4520C
e-STUDIO5520C/6520C/
6530C
e-STUDIO283C/353C/453C
Service release
version
7.10 or later 7.08.2 or later
version
http://www.axis.com/techsup/prtsrv/axis_5570e/firmware.php
Use AXIS 5570e IPDS printing when using TOSHIBA MFP.
Update procedure
Update procedure of the AXIS 5570e firmware using FTP:
1. Open a Windows command prompt.
2. Connect to the print server using ftp: Type ftp <ip address>
3. Enter the user and password: (Default user: root Default
4. Change to binary transfer mode: type bin and press Enter.
5. Type hash and press Enter.
6. Type put <filename> FLASH. A stream of hash marks will
7. The message "Transfer complete. Flash programming fin-
password pass) and press Enter.
appear.
ished OK. " will appear.
AS/400 Print Solution — Configuration 17
Page 18

8. The print server will restart in five seconds running the new
software.
Update procedure of the config file:
1. Get the config file by FTP. Open a Windows command prompt
and enter the following:
ftp <ip address>
default user name root
default password pass
get config
bye
2. Update the custom driver parameters from the config file; the
parameters needed for the custom driver begin with DC General Menu and end with DC PCL Copies.
3. Save the file as, e.g. my_template.
4. Upload 'my_template' to the print server by FTP.
ftp <IP address>
default user name root
default password pass
put my_template CONFIG
bye
18 AS/400 Print Solution — Configuration
Page 19

Copier model
When printing portrait data, select an appropriate copier model, e.g. Toshiba
eSTUDIO520/600/720/850 or Toshiba eSTUDIO281C/351C/451C.
When printing landscape data, select Custom copier driver for Copier model.
P.31 "Custom copier driver"
NOTE: • In using e-STUDIO167/207/237, choose e-STUDIO165/205.
• In using e-STUDIO523/603/723/853, choose e-STUDIO520/600/720/850.
• In using e-STUDIO353/453, choose e-STUDIO352/452.
• In using e-STUDIO2020C/2330C/2820C/2830C/3520C/3530C/4520C, choose
e-TUDIO2500C/3500C/3510C.
• In using e-STUDIO5520C/6520C/6530C, choose e-STUDIO2500C/3500C/3510C.
• In using e-STUDIO283C/353/453C, choose e-STUDIO281C/351C/451C.
AS/400 Print Solution — Configuration 19
Page 20

Only PCL available
In the Configuration Wizard for IBM sessions, select PCL for Printer Driver. PostScript
is not available.
Edit Session:
Only PCL is available for IPDS Printer Driver under Edit Session. PostScript is not
available.
20 AS/400 Print Solution — Configuration
Page 21

Available finisher options
The following options are available for the settings of Logical Printers or Edit Session.
Duplex:
Edit Session:
Long Edge Binding and Short Edge Binding are available for Duplex under Edit Session.
AS/400 Print Solution — Configuration 21
Page 22

Logical Printers:
LONG_EDGE_BINDING and SHORT_EDGE_BINDING are available for Copier
Duplex under Logical Printers.
Staple:
Edit Session:
Top Left Slant, Top Double, Left Double and Top Right are available for Staple under
Edit Session.
Center is not available.
Selecting Center staples at the center of the paper, not in a book format.
22 AS/400 Print Solution — Configuration
Page 23

Logical Printers:
TOP_LEFT_SLANT, TOP_RIGHT, TOP_DOUBLE and LEFT_DOUBLE are available
for Copier Staple under Logical Printers.
TOP_LEFT_HORIZONTAL, TOP_LEFT_VERTICAL, BOTTOM_LEFT,
BOTTOM_RIGHT and CENTER are not available.
Selecting CENTER staples at the center of the paper, not in a book format.
NOTE: • e-STUDIO165/205 and e-STUDIO167/207/237 are not supporting the Staple
Option.
AS/400 Print Solution — Configuration 23
Page 24

Hole Punch:
Edit Session:
Long Edge and Short Edge are available for Hole Punch under Edit Session.
Logical Printers:
LONG_EDGE and SHORT_EDGE are available for Copier Hole Punch under Logical
Printers.
NOTE:
24 AS/400 Print Solution — Configuration
• e-STUDIO165/205 and e-STUDIO167/207/237 are not supporting the Hole Punch
Option.
Page 25

Fold:
Fold option is not available.
Edit Session:
Logical Printers:
HALF_FOLD and Z_FOLD are not available for Copier Fold under Logical Printers.
AS/400 Print Solution — Configuration 25
Page 26

Paper Source:
Default and 1-4 are available for Paper Source.
Default: Auto select
1: Upper Cassette
2: Lower Cassette
3: 1st Pedestal or Large Capacity Feeder
4: 2nd Pedestal
Edit Session:
26 AS/400 Print Solution — Configuration
Page 27

Logical Printers:
5 is not available for Copier Paper Sources under Logical Printers.
Copies:
The Copies option is for selecting the number of copies.
AS/400 Print Solution — Configuration 27
Page 28

General settings
Select DISABLE for Printer Information and Bidirectional control if extra data, which is
specified as "PAGECOUNT", is printed.
28 AS/400 Print Solution — Configuration
Page 29

IPDS emulator
NOTE: • Statement and Hagaki are not supported in e-STUDIO165/205 and e-STUDIO167/
IPDS bin under the IPDS Configuration tab is used for setting the paper size.
Statement, Ledger, Folio, Hagaki, Letter, Legal, A4 and A3 are available.
Executive and Custom are not available.
207/237.
PostScript Page Size, PostScript Page Orientation, PostScript Page Format and PostScript Page Font are not available under Logical Printers.
N-up under the IPDS Configuration tab is not available.
IPDS Configuration:
AS/400 Print Solution — Configuration 29
Page 30

For PCL Bin number, the available value for TOSHIBA MFP is as follows:
1: Upper
2: Bypass
4: Lower
5: Pedestal Upper or Large Capacity Feeder
7: Auto
21: Pedestal Lower
30 AS/400 Print Solution — Configuration
Page 31

Custom copier driver
When you print landscape data with some finisher options enabled, you may need to
use the Custom Copier Driver for correct output. Obtain the information about the Custom copier driver functionality from AXIS COMMUNICATIONS web site. When you use
the Custom Copier Driver, select "config_landscape" for the PCL config setting.
NOTE:
• When you use the Custom copier driver, the printing condition is the same when
only PCL and available finisher options can be selected.
Select Custom copier driver for Copier under Edit Session.
Select Custom_copier_driver for Copier Model under Logical Printer.
AS/400 Print Solution — Configuration 31
Page 32

Problem Solving
Problems and recommended solutions
The following table provides suggestions for resolving printing problems.
Problem Recommended solution
The finishing option needed
for the current job did not
occur.
Document does not print
AXIS 5570e Print Server cannot be discovered
• Check the Custom Config file currently loaded
• Check if the print queue on the AS/400 is config-
ured to use the correct port for the logical printer
with the desired finishing option
• Make sure both the controller and the AXIS 5570e
Print Server are powered on and online
• Check the cable connection. Print a test page by
pressing the TEST button on the AXIS 5570e Print
Server
• Ensure both the controller and the AXIS 5570e
Print Server are configured with the TCP/IP protocol
• Make sure the print queue on the AS/400 is con-
figured to use the current IP address of the AXIS
5570e Print Server. Remember, it is recommended that a static IP address is assigned to the
AXIS 5570e Print Server device
• Restart the controller and/or the AXIS 5570e Print
Server if necessary
• Check configuration according to AXIS 5570e
Print Server guide
• Make sure the AXIS 5570e Print Server is config-
ured with the TCP/IP protocol
Customer service
For help with AXIS 5570e Print Server questions, go to the AXIS COMMUNICATIONS
section of www.axis.com.
32 AS/400 Print Solution — Problem Solving
Page 33

2. WorkStation Customization Object for TOSHIBA e-STUDIO
AS/400 Print Solution — 2. WorkStation Customization Object for TOSHIBA e-STUDIO 33
Page 34

Overview
Components
The components of the AS/400® Printing Solution are:
• AS/400 Server OS version 5.2 or later (The latest PTF is recommended)
• Your equipment (See NOTE below.)
• WorkStation Customization Object for TOSHIBA e-STUDIO
The configuration diagram illustrates the relationship among these components.
Network HUB
AS/400 Server
AS/400 Printing Solution components
Print data generated with AS/400 can be printed out from a TOSHIBA MFP by relating
them with OUTQ which was set up with the WorkStation Customization Object for
TOSHIBA e-STUDIO.
NOTE: • The WorkStation Customization Object for TOSHIBA e-STUDIO does not support
the following models:
- e-STUDIO281C/351C/451C
- e-STUDIO2500C/3500C/3510C
Finishing options and logical printers
TOSHIBA offers several finishing options in addition to standard print commands coming from the AS/400. For example, stapling is a finishing option.
34 AS/400 Print Solution — Overview
Page 35

Installation
Installation procedure
Before installing the WorkStation Customization Object for TOSHIBA e-STUDIO, configure the system environments as follows:
• Set up AS/400 Server under the environment that allows you to use printing func-
tions.
• Set up a TOSHIBA MFP under an environment that allows you to use it in a net-
work.
• Connect the AS/400 Server and the TOSHIBA MFP with a LAN cable.
Step 1: Installing WorkStation Customization Object for TOSHIBA
e-STUDIO
This section describes how to install the WorkStation Customization Object for
TOSHIBA e-STUDIO.
1. Mount a product CD into a CD-ROM drive.
2. Login as a user with QSECOFR authority.
3. Execute a command [LODRUN] + [F4] and then specify the
CD-ROM drive where you mounted the product CD.
AS/400 Print Solution — Installation 35
Page 36

4. The setting screen for OUTQ appears as the installation is
executed. Specify the name of OUTQ (maximum 7 bytes) to
be used, its library, the IP address of the printer and default
tray type*. Then press the execution key.
* default tray type
- e-STUDIO5520C/6520C/6530C
Enter “ I ” (InnerTray) or “S” (SideTray). If you use both of them, enter one, install
“WorkStation Customization Object for TOSHIBA e-STUDIO” and then register
the other when setting it up. For details of the setting up, see the following page:
P.37 "Step 2: Setting up WorkStation Customization Object for TOSHIBA
e-STUDIO"
- Other models
Enter “ I ” (InnerTray).
5. The installation is completed.
• The installation is properly completed unless any error messages appear. You
can go to the following page because in this case the next step "Setting up
WorkStation Customization Object for TOSHIBA e-STUDIO" is also completed:
P.38 "Step 3: Starting up auto assign (resident) program"
• An error message appears when the specified OUTQ name already exists or
OUTQ was not generated because a parameter value is in error.
• If an error message appears or you stopped the command by pressing [F12] or
[F3], go to the following page:
P.37 "Step 2: Setting up WorkStation Customization Object for TOSHIBA
e-STUDIO"
36 AS/400 Print Solution — Installation
Page 37

Step 2: Setting up WorkStation Customization Object for TOSHIBA
e-STUDIO
This section describes how to set up the WorkStation Customization Object for
TOSHIBA e-STUDIO.
1. Login as a user with QSECOFR authority.
2. Execute the command below to add a library "WTEC02" to
the top of the library list.
ADDLIBLE WTEC02
3. Execute a command [TECSETQ] + [F4]. Then specify the
name of OUTQ (maximum 7 bytes) to be used, its library, the
IP address of the printer and default tray type*. Then press
the execution key.
* default tray type
- e-STUDIO5520C/6520C/6530C
Enter “ I ” (InnerTray) or “S” (SideTray). If you use both of them, enter one, set
up “WorkStation Customization Object for TOSHIBA e-STUDIO” and then set it
up again for registering the other.
- Other models
Enter “ I ” (InnerTray).
4. The setup is completed.
• The setup is properly completed unless any error messages appear.
• An error message appears when the specified OUTQ name already exists or
OUTQ was not generated because a parameter value is in error.
• If an error message appears or you stopped a command by pressing [F12] or
[F3], execute the command [TECSETQ] + [F4] again.
AS/400 Print Solution — Installation 37
Page 38

Step 3: Starting up auto assign (resident) program
This section describes how to start up auto assign (resident) program.
NOTE:
• It is recommended to load the auto assign (resident) program into IPL.
1. Login as a user with QSECOFR authority.
2. Execute the command below to add a library "WTEC02" to
the top of the library list.
ADDLIBLE WTEC02
3. Execute a command [STRTECPRT] + [F4]. Then select the
name of OUTQ that you specified at the installation or setup,
a job queue to use and its library. Then press the execution
key.
NOTE: • If you use a job queue and the library at their initial values, this program will run
within QBATCH.
38 AS/400 Print Solution — Installation
Page 39

4. The program is started up.
• Execute a command [WRKACTJOB] to display the list. If the status of this pro-
gram is displayed as "DEQA" in the list, the program is properly started up.
• If the name of OUTQ to be monitored or a job queue to be used is incorrect, the
status of this program is displayed as "MSGW" in the list. In this case, confirm
the message and then execute the command [STRTECPRT] + [F4] again.
AS/400 Print Solution — Installation 39
Page 40

Uninstallation
Uninstallation procedure
Step 1: Uninstalling WorkStation Customization Object for
TOSHIBA e-STUDIO
1. Execute a command [WRKACTJOB] and then select a resi-
dent OUTQ monitoring program. Then enter option "4". Now
the resident program exits.
NOTE: • Turn the power of the printer to be used OFF before starting uninstallation; other-
wise the program will exit in the middle of the uninstallation.
40 AS/400 Print Solution — Uninstallation
Page 41

2. Execute a command [DLTOUTQ OUTQ(library name / OUTQ
*1
name
*1: It shall be the OUTQ name specified at the installation or the setup.
)] to delete the OUTQ specified at the installation.
3. Execute a command [ENDWTR OUTQ name
*1
01*IMMED] to
disconnect the printer.
*1: It shall be the OUTQ name specified at the installation or the setup.
AS/400 Print Solution — Uninstallation 41
Page 42

NOTE: • The part "01" after the OUTQ name shall be changed from "01" through "07" as you
repeat this command seven times.
4. Execute a command [WRKOUTQ OUTQ name
that no spool remains.
*1: It shall be the OUTQ name specified at the installation or the setup.
*1
*] to confirm
42 AS/400 Print Solution — Uninstallation
Page 43

If "Files" is a value other than "0" and also there are remaining spools, select option "5"
to delete the remaining spools.
5. Execute a command [DLTLIB WTEC02] to delete the product
library.
AS/400 Print Solution — Uninstallation 43
Page 44

Operation
Operational procedure
Follow the procedure below to operate the WorkStation Customization Object for
TOSHIBA e-STUDIO.
1. Specify print file script (ORIENTATION, STAPLE, DUPLEX and
DRAWER) for a document to be printed with the MFP.
For the details of file script parameters, see the following page:
P.45 "Print file script"
2. Change a job to alter the OUTQ specified at the installation or
the setup to the one for printing functions.
3. Start up the auto assign (resident) program.
For starting up, see the following page:
P.38 "Step 3: Starting up auto assign (resident) program"
NOTE:
NOTE:
• Start up the resident program every time you execute IPL.
4. Perform routine work.
When you are performing routine work, you do not need to particularly pay attention to this function.
5. Finish a job.
Finish a job in any of the following methods:
• Execute a command [WRKACTJOB]. Then select a job to be finished and select
Option "4". Then press the execution key.
• Execute a command [ENDSBS] and then exit the corresponding sub system.
• Turn the power of the printer to be used OFF before starting the operation; other-
wise the program will exit in the middle of the operation.
44 AS/400 Print Solution — Operation
Page 45

Print file script
Specify print file script below according to the printing style of a document to be printed
with an MFP.
Printing Style Attribute
ORIENTATION Portrait
PAGRTT : *AUTO (Leave it default.)
Or select “0”
Landscape
STAPLE TOP_LEFT
TOP_RIGHT
LEFT_DOUBLE
TOP_DOUBLE
DUPLEX LONG_EDGE
SHORT_EDGE
CORNERSTPL : *TOPLEFT
DUPLEX : *YES
:90
:*TOPRIGHT
: *BOTLEFT
: *BOTRIGHT
:*TUMBLE
Printing directions on the back
sides differ depending on the
orientation. See "Printing
directions on the back side
(DUPLEX)" on the next page.
DRAWER AUTO DRAWER : 1 (Leave it default.)
Example:
The examples of commands for print file script are as follows:
Portrait + DUPLEX SHORT_EDGE + STAPLE TOP_LEFT:
CHGPRTF FILE (library name / spool file name) DUPLEX(*TUMBLE) CORNERSTPL(*TOPLEFT)
Automatic drawer selection
In case of LT/A4, the orientation of the paper is reversed when "TOP_DOUBLE" and
"STAPLE" are selected together. Therefore the drawer in this case shall be selected as
follows:
LT/A4 (Portrait) + STAPLE TOP_DOUBLE:
DRAWER: LT-R/A4-R
LT/A4 (Landscape) + STAPLE TOP_DOUBLE:
DRAWER: LT/A4
Printing directions on the back side (DUPLEX)
The examples of printing directions on the back side of the paper in case of "DUPLEX"
are shown below.
AS/400 Print Solution — Operation 45
Page 46

LONG_EDGE: DUPLEX(*YES)
Portrait
Landscape
SHORT_EDGE: DUPLEX(*TUMBLE)
Portrait
ABCD
EFG
ABCD
EFG
ABCD
EFG
ABCD
E...
ABCD
EFG
ABCD
EFG
Landscape
46 AS/400 Print Solution — Operation
ABCD
EFG
ABCD
E...
Page 47

Appendix
Stapling specifications
Printing Specifications Available Sizes
OUTQ*1
1 xxxxxxx01 Portrait OFF 99999 9 9 9Rotational degrees PAGRTT =
2 xxxxxxx02 Portrait TOP_LEFT 99999 9 9 – Rotational degrees PAGRTT =
3 xxxxxxx03 Portrait TOP_RIGHT 99999 9 9 – Rotational degrees PAGRTT =
4 xxxxxxx04 Portrait TOP_DOUBLE 9
5 xxxxxxx05 Portrait LEFT_DOUBLE 9LT––– 9A4– – – Rotational degrees PAGRTT =
6 xxxxxxx06 Land-
7 xxxxxxx07 Land-
Por-
trait/
Landscape
Landscape
Landscape
Landscape
scape
scape
STAPLE LT LG LD A3 A4 FO COM ST
*AUTO or 0
OFF 99999 9 9 9Rotational degrees PAGRTT = 90
*AUTO or 0
Stapling position CORNERSTPL
= *TOPLEFT
*AUTO or 0
Stapling position CORNERSTPL
= *TOPRIGHT
TOP_LEFT 99999 9 9 – Rotational degrees PAGRTT = 90
999 9
LTR
LEFT_DOUBLE 9
TOP_RIGHT 9999 9 9 9 – Rotational degrees PAGRTT = 90
TOP_DOUBLE 9LT––– 9A4– – – Rotational degrees PAGRTT = 90
999 9
LTR
99– Rotational degrees PAGRTT =
A4R
99– Rotational degrees PAGRTT = 90
A4R
Stapling position CORNERSTPL
= *TOPLEFT
*AUTO or 0
Stapling position CORNERSTPL
= *BOTRIGHT
Stapling position CORNERSTPL
= *BOTLEFT
*AUTO or 0
Stapling position CORNERSTPL
= *BOTLEFT
Stapling position CORNERSTPL
= *TOPRIGHT
Stapling position CORNERSTPL
= *BOTRIGHT
Remarks
*1: OUTQ numbers assigned by resident programs.
AS/400 Print Solution — Appendix 47
Page 48

Printing character size - Reference values
Paper Size CPI Line Char. Remarks
LT CPI(10) 66 80
CPI(15) 66 120
LT-R CPI(10) 51 110
CPI(15) 51 163 Number of characters: 158
LG CPI(10) 84 80
CPI(15) 84 120
LG-R CPI(10) 51 140
CPI(15) 51 210 Number of characters: 204
LD CPI(10) 102 103 PAGRTT(0)
CPI(15) 102 120 PAGRTT(0)
LD-R CPI(10) 66 170
CPI(15) 66 255 Number of characters: 249
A3 CPI(10) 99 105 PAGRTT(0)
CPI(15) 99 157 PAGRTT(0)
A3-R CPI(10) 70 160
CPI(15) 70 240
A4 CPI(10) 70 72
CPI(15) 70 108
A4-R CPI(10) 49 110
CPI(15) 49 165
CO CPI(10) 84 101 PAGRTT(0)
CPI(15) 84 151 PAGRTT(0)
CO-R CPI(10) 61 140
CPI(15) 61 210
FO CPI(10) 77 72
CPI(15) 77 108
FO-R CPI(10) 50 130
CPI(15) 50 195
ST CPI(10) 51 55
CPI(15) 51 82
ST-R CPI(10) 33 85
CPI(15) 33 125
* All paper sizes noted “-R” are rotated in “PAGRTT (90)”.
48 AS/400 Print Solution — Appendix
Page 49

Glossary
Definitions of Terms
Term Definition
DLC Data Link Control, the data link layer protocol.
Duplex The process of printing on both sides of a sheet of paper.
Finishing option A feature provided by TOSHIBA printers and copiers for doing such things as
stapling and hole punching documents.
Gateway address The default address that provides a single point of entry to a network.
IP Address Internet Protocol address of a computer or server attached to a network.
PCL Printer Control Language, developed by Hewlett Packard.
Print stream The information the AS/400 sends to its printer port. This information includes
the text to be printed and various print commands for formatting the text and
graphics.
Subnet mask The method used for splitting IP networks into a series of subnets (subgroups).
AS/400 Print Solution — Glossary 49
Page 50

50 AS/400 Print Solution — Definitions of Terms
Page 51

DP-2090/2520/3000/3570/4570
DP-5550/6550/7550/8550
FC-2020C/2330C/2820C/2830C/3520C/3530C/4520C
FC-5520C/6520C/6530C
DP-1670/2070/2370
FC-2500C/3500C/3510C
DP-1650/2040
FC-281C/351C/451C
DP-5200/6000/7200/8500
DP-3540/4540
DP-2050/2340/2840
DP-1830/2120/2420
OME060055I0
Page 52

Guidance for
AS/400 Print Solution
2-17-2, HIGASHIGOTANDA, SHINAGAWA-KU, TOKYO, 141-8664, JAPAN
2006 - 2010 TOSHIBA TEC CORPORATION All rights reserved
R060120B3909-TTEC
Ver09 2010-07
 Loading...